

Page 1
®
T48G-Skype for Business Edition
www.yealink.com
Quick Start Guide (V8.60)
Applies to firmware version 35.8.0.60 or later.
Page 2
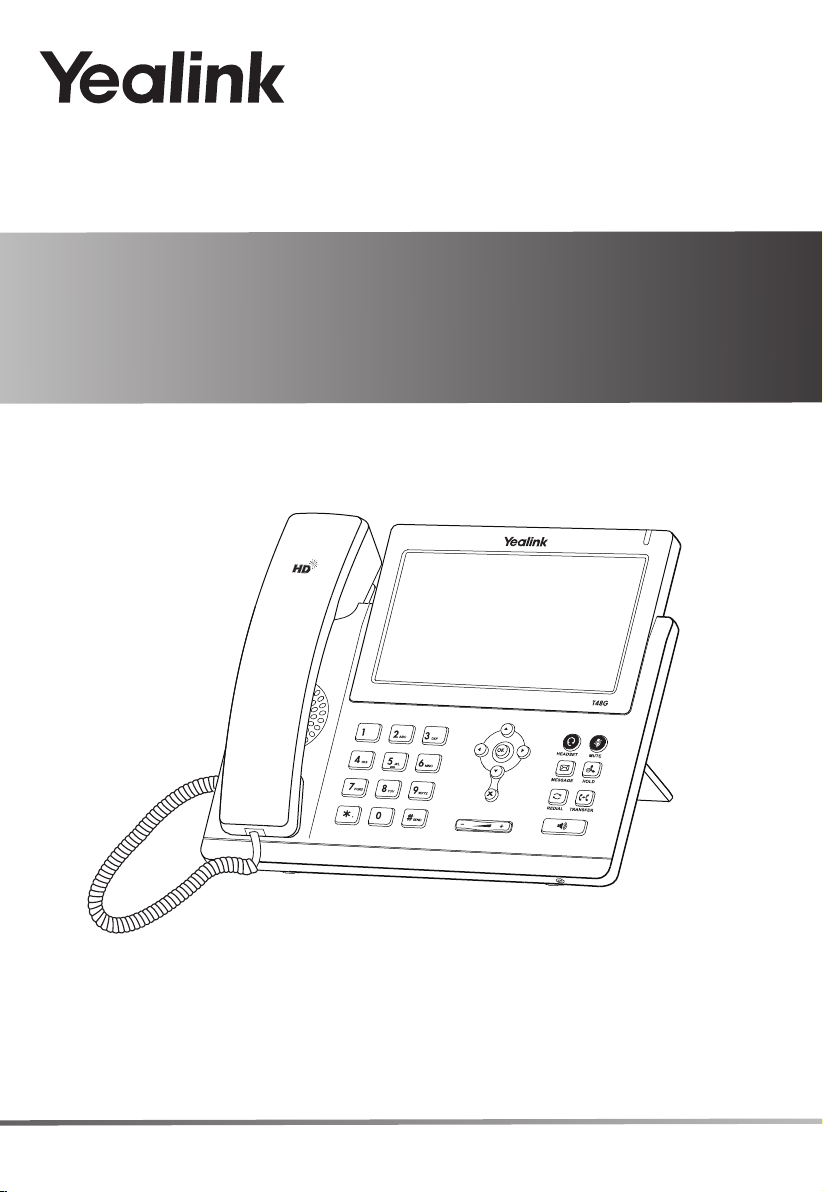
Packaging Contents
Packaging Contents
The following items are included in your package. If you find anything missing, contact your system administrator.
Handset Cord
10
Skype for Business Phone
Note: We recommend that you use the accessories provided or approved by Yealink. The use of unapproved
third-party accessories may result in reduced performance.
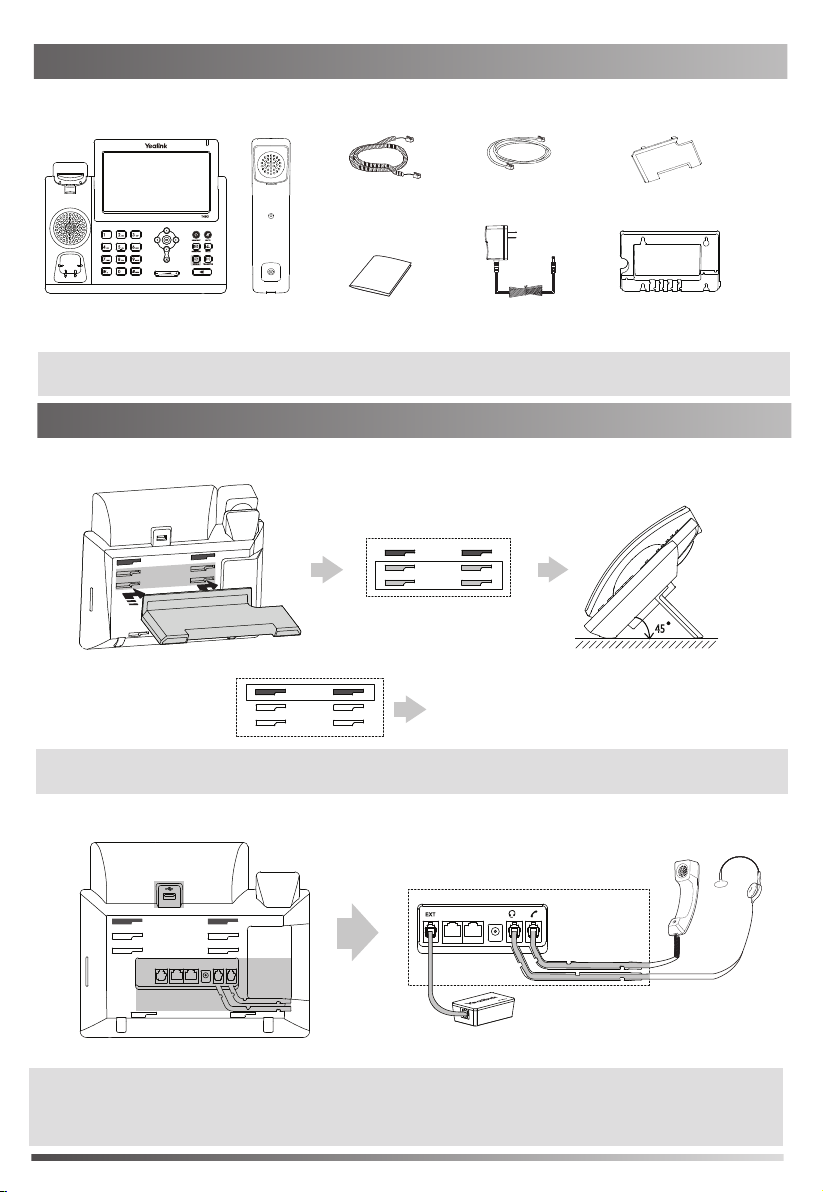
Assembling the Phone
Handset
Quick Start Guide
Ethernet Cable
(2m CAT5E FTP Cable)
(Optional)
Stand
Wall Mount BracketPower Adapter
(Optional)
1. Attach the stand, as shown below:
Desk Mount Method
The two wall mount slots are plugged up by
silica gels. You can pull out the silica gels when
mounting your Skype for Business phone to a wall.
45
Note
: For more information on how to attach the wall mount bracket, refer to Yealink Wall Mount Quick
Installation Guide for SIP-T29 T27 T46 T48 IP Phones.
2. Connect the handset and optional headset, as shown below:
Wireless Headset Adapter EHS36
Note: The headset or wireless headset adapter EHS36 should be purchased separately.
The EXT port can also be used to connect the expansion module EXP40. For more information
on how to use the EHS36 and EXP40, refer to Yealink EHS36 User Guide and Yealink T48G-Skype for
Business Edition User Guide.
1
Page 3
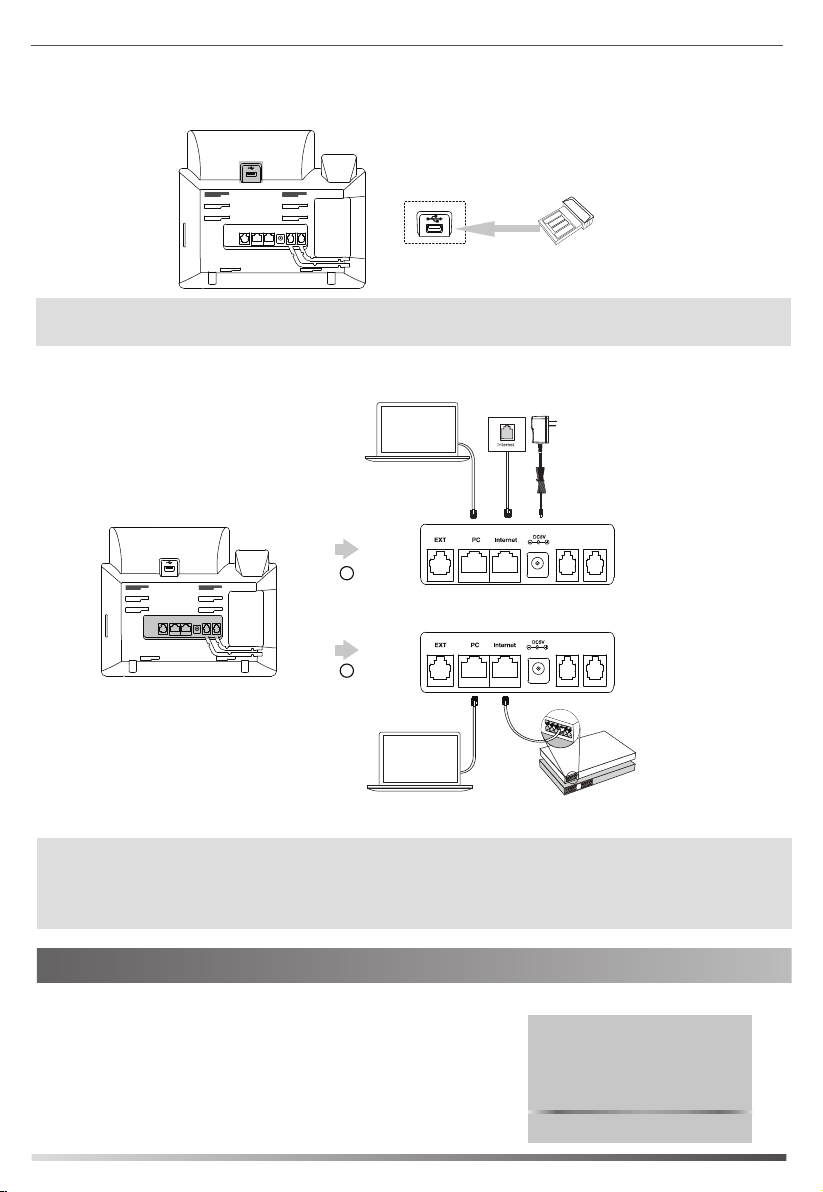
3. Connect the optional Bluetooth USB Dongle, as shown below:
You can connect a Bluetooth USB dongle to your phones for connecting a Bluetooth headset.
Bluetooth USB Dongle BT40
The Bluetooth USB dongle BT40 should be purchased separately.
Note:
For more information on how to use the BT40, refer to Yealink Bluetooth USB Dongle BT40 User Guide.
4. Connect the network and power, as shown below:
You have two option for network and power connections. Your system administrator will advise you which one to use.
Power Adapter
(DC 5V)
A
AC Power Option
PC
PC Connection
(Optional)
B
PoE ( Power over
Ethernet ) Option
PC
PC Connection
(Optional)
IEEE 802.3af compliant
PoE Hub/Switch
Note: The Skype for Business phone should be used with Yealink original power adapter (5V/2A) only. The
use of the third-party power adapter may cause the damage to the phone. If you are connecting a PC
to your phone, we recommend that you use the Ethernet cable provided by Yealink.
If inline power (PoE) is provided, you don’t need to connect the power adaper. Make sure the hub/switch
is PoE-compliant.
Startup
After the Skype for Business phone is connected to the network and
supplied with power, it automatically begins the initialization process.
After startup, the sign-in screen appears on the phone touch screen.
Refer to Sign-in on page 3 to sign into the Skype for Business Server.
Welcome
Initializing... Please wait
2
Page 4

Sign-in
The sign-in screen displays after initializing. You can sign into Skype for Business Server using following method.
1. Select desired sign-in method from the pull-down list of Login Type field.
a. If you select PIN Authentication (Only applicable to Onprem account):
1) Enter the extension and extension PIN in the corresponding field.
2) Tap the Sign in soft key.
b. If you select User Sign-in (Applicable to Onprem account and Online account):
1) Enter the user’s sign-in address, user name and password in the corresponding field.
2) Tap the Sign in soft key.
c. If you select Web Sign-in (Only applicable to Online account):
1) Tap the Sign in soft key, the touch screen will show the pairing code and URL.
2) Enter the URL in the address bar of the web browser on your computer, and then press Enter.
3) Enter your email address to check its validity. If your email address passes validation, enter your Online
account and password, and then enter the pairing code to pair with the phone. The phone will sign
into the Skype for Business Server automatically.
If the Skype for Business Server is configured to forcibly lock the phone. You need to configure an unlock PIN
at the initial sign-in.
Note: Make sure the network connection is correct before login. By default, the phone attempts to contact a
DHCP server in your network to obtain its valid network settings. Contact your system administrator
for more information.
To sign out of the Skype for Business Server:
1. Tap your avatar at the top-right corner of the touch screen.
2. Tap Sign Out from the pull-down list of status.
Update Presence Status
Your presence status displays your availability and activity to your contacts. It is constantly updated by the
Skype for Business Server. You can also update your presence status manually.
1. Tap your avatar at the top-right corner of the touch screen.
2. Tap the desired status from the pull-down list.
You can tap Reset Status to reset the presence status to “Available”.
Presence Status Icons on the Touch Screen:
(Green and white) Available
Note: Contact your system administrator if any error appears during the sign-in process or if a specific
configuration is required.
3
(Red) Busy
(Yellow and white) Be Right Back\Off Work\Away(Grey) Off Line
(Red and white) DND
Page 5

Using Your Phone
Navigating the Touch Screen
To enter the main menu, tap .
To go back to the previous menu, tap .
To select a soft key, tap the soft key.
To select an item, tap the item.
To turn pages, press or , tap or on the touch screen.
To scroll through values in a pull-down list, press or .
Entering and Updating Data
Using the phone keypad to enter data:
1. Tap the field you want to edit.
2. Tap or abc soft key to change the input modes.
3. Enter data using the keypad.
4. Tap .
Using the onscreen keyboard to enter data:
1. Tap the field you want to edit.
2. Tap &123 or to change the input modes.
3. Enter data using the onscreen keyboard.
Basic Call Features
Placing a Call
1. Do one of the following:
If you are using the handset, pick up the handset.
If you are using the speakerphone, with the handset on-hook, press .
If you are using the headset, with the headset connected, press to activate the headset mode.
2. Enter the number, and then press on the phone or tap or on the onscreen keyboard.
Note: During a call, you can alternate between the headset, hands-free speakerphone and handset modes by
pressing the HEADSET key, the Speakerphone key or by picking up the handset. Headset mode requires
a connected headset.
Answering a Call
If you are using the handset, pick up the handset or tap .
If you are using the speakerphone, press or tap .
If you are using the headset, press or tap .
Note: You can reject an incoming call by tapping .
Ending a Call
If you are using the handset, hang up the handset or tap .
If you are using the speakerphone, press or tap .
If you are using the headset, tap .
Redial
Press when the phone is idle to dial out the last dialed number.
4
Page 6

Call Mute and Un-mute
Press to mute the microphone during a call.
Press
again to un-mute the call.
Call Hold and Resume
To place a call on hold:
1. Press or tap during an active call.
To resume the call, do one of the following:
If there is only one call on hold, press or tap .
If there is more than one call on hold, tap the call you want to resume, and then press or tap .
Call Transfer
You can transfer a call in the following ways:
Blind Transfer:
1. Press or tap during an active call. The call is placed on hold.
2. Enter the number or tap the desired contact from the desired group you want to transfer to.
You can also tap the avatar of the desired contact in the Favorites screen.
3. Press or tap .
Consultative Transfer:
1. Tap during an active call. The call is placed on hold.
2. Enter the number or tap the desired contact from the desired group you want to transfer to, then press or
tap .
You can also tap the avatar of the desired contact in the Favorites screen.
3. Press or tap when the second party answers.
Call Forward
To enable call forward:
1. When the phone is idle, tap ->Features->Call Forward, or you can also press to enter the call
forward setting creen.
2. Tap the On radio box of the Call Forward field.
3. Do one of the following:
4. Tap or press .
a. Select Forward to Voice Mail.
b. Select Forward Calls to Number or Contact.
c. Select
Enter a phone number that you want to ring simultaneously, then tap , or enter the first few continuous
characters of the contact name or the contact number, tap the desired entry from the result list, and then
tap or press .
The preset number will ring simultaneously when your phone receives an incoming call.
Incoming calls will be forwarded to voice mail automatically.
Enter a phone number that you want to forward incoming calls to, then tap , or enter the first few
continuous characters of the contact name or the contact number, tap the desired entry from the result
list, and then tap or press .
Incoming calls will be forwarded to the preset number automatically.
.
Simultaneously Ring
.
To disable call forward:
1. When the phone is idle, tap ->Features->Call Forward, or you can also press to enter the call
forward setting screen.
5
Page 7

2. Tap the Off radio box of the Call Forward field.
3. Tap or press .
To forward an incoming call to a number dynamically:
1. Tap when the phone receives an incoming call.
2. Do one of the following:
Enter the number you want to forward the incoming call to, and then tap or tap on the onscreen
keyboard.
Tap the avatar of the desired contact in Favorites screen.
.
To forward an incoming call to the voice mail dynamically:
1. Tap to forward an incoming call to voice mail directly.
Skype for Business Conference
To initiate a Skype for Business conference call from the phone:
1. Tap ->Meet Now to initiate a Skype for Business conference call directly.
2. Tap to invite a new party.
3. Enter the desired number, and then press , or tap .
The new party answers the call to join the conference automatically.
4. Repeat the steps 2-3 to add more parties to the conference.
5. During the Skype for Business conference, you can hold the conference, view the conference participants,
mute or unmute the participants, promote or demote conference participants, remove conference
participants, enable or disable the announcement, lock or unlock the conference and view the dial-in number
and conference ID.
Voice Mail
When receiving a new voice mail, the phone will play a warning tone, and the power LED will slowly flashing red.
A number icon (indicating the number of voice mails you haven’t retrieved) appears on the Message menu.
When you sign into the phone using User Sign-in/Web Sign-in/Sign in via PC method:
1. Tap ->Message.
2. Do one of the following:
Tap to enter the Message Center.
Tap to play the selected voice mail.
Tap the desired voice mail to view the details.
- Tap to redial the one who leaves the voice mail.
- Tap Play Message to play the selected voice mail.
- Tap Mark As Read to mark the unread voice mail as read.
- Tap Delete to delete the voice mail.
When you sign into the phone using PIN Authentication method:
1. Tap ->Message.
2. Follow the voice prompts to listen to the voice mail.
Note: You can follow the voice prompts to listen to the voice mail by pressing .
Customizing Your Phone
Phone Features
Call History
1. Tap when the phone is idle, tap the desired list.
2. Tap the avatar of the desired entry to view detailed information about the entry, you can also do one of the
following:
Tap to place a call.
6
Page 8

Tap Delete to delete the entry.
Directory
The directory list displays Skype for Business directory (e.g., Favorites, Other Contacts) and local directory. You
can only manage Skype for Business directory through the Skype for Business client and manage the local
directory on the phone.
Skype for Business Directory
To add a Skype for Business contact:
1. Open your Skype for Business client, and then enter the number of the desired contact in the Search field.
2. Right-click the avatar of a contact, and then click Add to Contacts List.
3. Click the desired group.
The contact is added to the selected group.
If you want to add the Skype for Business contacts as favorites, do the following:
1. Right-click the avatar of a contact.
2. Click Add to Favorites.
The contact will be added to the phone at the path: ->Favorites.
Local Directory
To add a local contact:
1.
Tap ->Local Directory->All.
2. Tap .
3. Enter a unique contact name in the Name field and other information in the corresponding fields.
4. Tap or press to accept the change.
To edit a local contact:
1.
Tap ->Local Directory->All.
2. Tap the avatar of the desired contact.
3. Tap the Edit soft key.
4. Tap the desired field to edit the contact information.
5. Tap or press to accept the change.
To delete a local contact:
1.
Tap ->Local Directory->All.
2. Tap the avatar of the desired contact.
3. Tap the Delete soft key.
4. Tap OK or press to accept the change.
Local Favorites
Local favorites are the contacts in your local directory that you call most often.
To add a local favorite via phone user interface:
1.
Tap ->Local Directory->Favorites.
2. Tap .
3. Enter a unique contact name in the Name field and other information in the corresponding fields.
4. Select the index number from the pull-down list of Index.
Local favorites display consecutively, according to their index number. The contact with the lowest number
displays first. If you select Null from the pull-down list of Index, the contact displays first. Contacts that have
a favorite index number will display .
5. Tap or press to accept the change.
7
Page 9

To search for contacts:
1. When the phone is idle, tap to enter the search screen.
2. Enter the first few continuous characters of the contact name or the contact number (e.g., press the digit key
5 to search the letter “5, j, k and l”).
The phone will search for the contacts in the local directory, Skype for Business directory and Outlook
directory. Whose name or phone number matches the characters entered will appear on the touch screen.
Volume Adjustment
Press during a call to adjust the receiver volume of the handset/speakerphone/headset.
Press to adjust the ringer volume when the phone is idle or ringing.
Using the Calendar
To use the calendar feature on your phone, you must sign into the phone using User Sign-in, Web Sign-in or
Sign in via PC method. When you set up Skype conferences, appointments, meetings, events, or receive
conferences invitation in Outlook® application, your phone will display all schedules in the Calendar menu.
To view the calendar:
1. Tap ->Calendar.
2. Tap the desired month and day.
3. Tap the desired schedule to view details of the specific schedule.
Schedule Reminder
The phone displays a schedule reminder 15 minutes before a shedule starts.
Tap the Ignore soft key to permanently remove the reminder and stop reminding.
Tap the Snooze soft key to temporarily remove the reminder, until the next schedule reminder. The reminder
will appear every 5 minutes and also appear 1 minute before the schedule starts.
Tap the Detail soft key to view details of the specific schedule.
If you receive a Skype conference reminder, tap the Join soft key to join the Skype conference.
Boss-Admin
The Boss-Admin feature enables a boss to assign delegates to manage boss’s incoming call. A “boss” and a
“delegate” phone will ring simultaneously when a user calls the boss.
To assign delegates in the Skype for Business client:
1. Open Skype for Business client, and then sign into Skype for Business client as the person who wants to
assign a delegate.
2. Click , and then click Call Forwarding Settings.
3. Mark the radio box of Simultaneously ring.
4. Select My Delegates from the pull-down list of Simultaneously ring.
5. In the Delegates dialog box, click Add and select the desired delegates from the Choose a Delegate dialog
box.
To view a list of bosses on your phone:
1. Tap ->Bosses.
To view a list of delegates on your phone:
1. Tap ->Delegates.
The boss answers an incoming call:
1. Press or tap when the boss receive a call, the delegate’s phone stops ringing.
The delegate answers an incoming call for a boss:
1. Press or tap when the boss receives a call, the boss’s phone stops ringing.
The boss places a call on hold on a boss’s phone:
1. During a call, the boss presses or taps to place the call on hold. A red Boss/Admin soft key
appears at the bottom left corner of the delegate’s phone screen.
8
Page 10

The delegate places a call on hold on a delegate’s phone:
1. During a call, the delegate presses or taps to place the call on hold. A red Boss/Admin soft key
appears at the bottom left corner of the boss’s phone screen.
The boss resumes a call held by a delegate:
1. Tap the Boss/Admin soft key to view the calls that are held by the delegate.
2. Tap the avatar of the caller to resume the held call.
The delegate resumes a call held by a boss:
1. Tap the Boss/Admin soft key to view the calls that are held by the boss.
2. Tap the avatar of the caller to resume the held call.
The delegate transfers a delegation call to the boss’s voice mail, do one of the following:
Tap when the phone is ringing.
Tap -> after the delegate answers the call.
The delegates makes a safe transfer to a boss’s line:
1. Tap -> during a call. The call is placed on hold.
Note: If the boss is not available to answer the transferred call or rejects the transferred call, the delegate’s
phone displays as “Transfer Failed” and the delegate can resume the call.
The delegate places a call on behalf of an assigned boss:
Tap ->Bosses. 1.
2. Tap the avatar of the desired boss.
3. Tap the On behalf soft key.
4. Tap the desired contact or enter the desired number.
5. Press or tap .
The call displays as “Calling On behalf of” boss’s line on the delegate and third-party’s phones.
The delegate adds a boss’s line to a Skype for Business conference call:
1. Tap to join an incoming conference call.
2. Tap to invite the boss’s line to the conference.
3. Tap the OK soft key to send the invitation.
When the boss joins the conference call, the delegate can choose to continue or leave the conference.
Common Area Phone
Common area phone is the Skype for Business phone that is not associated with an individual user. It is typically
located in some places where a large number of people are likely to gather. Common area phone supports the
basic call features, including placing a call, answering a call, placing a call on hold, resuming a held call, muting
or unmuting a call and ending a call like a regular phone. Contact your system administrator for the common
area account, and you must sign into the phone using PIN Authentication or Web Sign-in method to use the
common area phone.
To switch a common area account to a Skype for Business account:
1. Tap ->User Sign in when the common area phone is idle.
2. Select the desired sign-in method from the pull-down list of Login Type field.
3. Refer to Sign-in on page 3 to sign into your phone.
No matter whether you sign out of the Skype for Business account, the phone will sign into the last common
area account automatically after a period of time.
To sign out of a common area phone:
1. Tap ->Advanced (admin or the unlock PIN)->CAP Sign Out.
2. Mark the On radio box in the Sign Out field.
9
Page 11

Better Together over Ethernet (BToE)
Better Together over Ethernet (BToE) enables you to place, hold, and answer calls on your phone and Skype for
Business client on your computer. You must download the Yealink BToE Connector application before enabling
BToE. You can find the application on the Yealink Website.
To enable BToE feature via phone user interface:
1. Tap ->Features ->BToE.
2. Select Enabled from the pull-down list of BToE.
3. Select Auto or Manual from the pull-down list of BToE Pairing Mode.
4. Tap or press to accept the change.
Before you can begin using BToE, you must pair your phone and your computer.
To pair your phone with your computer:
1. Sign into your Skype for Business client on your computer.
2. Install and start the Yealink BToE Connector application on your computer.
3. Connect an Ethernet cable from your computer to the PC port on your phone, check the Wired checkbox on
the BToE application so that the IP address of your phone will be filled automatically. If your computer is not
connected to the PC port on the phone, uncheck the Wired checkbox, and then enter the IP address manually.
4. Click Pair on the BToE application.
- If BToE Pairing Mode is Auto, your phone will pair with your computer directly.
- If BToE Pairing Mode is Manual, your phone will generate a pairing code. You should enter the pairing
code in the Pair code field on the BToE application to pair your phone with your computer.
After your phone and computer are paired, you can sign into your phone via PC.
Sign in via PC
- If your phone is not signed in, a dialog box is displayed on your computer asking for your Skype for Business
login credentials. You should enter your login credentials in the dialog box.
- If your phone and Skype for Business client are signed into with different user accounts, right-click in the
System Tray to select Sign in via client(L) , and then enter your login credentials in the dialog box displayed
on your computer.
Now the same user account is signed into the phone and the Skype for Business client, your computer and
phone are paired, and BToE is activated. Your phone is set as primary device in your client automatically.
Using Better Together over Ethernet (BToE)
To place a call, do one of the following:
Hover your cursor over the avatar of the contact, and then click in the Skype for Business client.
Select a contact or enter the phone number, and then tap .
To answer a call, do one of the following:
Click in the Skype for Business client.
Tap on your phone.
To hold a call, do one of the following:
Click , and then click in the Skype for Business client.
Tap or press on your phone.
To resume a call, do one of the following:
Click , and then click in the Skype for Business client.
Tap or press on your phone.
To change the audio device during a call in the Skype for Business client:
1. Click , and then click to change the audio device.
10
Page 12

About us
Founded in 2001, Yealink, a leading provider of VoIP Phone and IP communication solutions, has been focusing on VoIP
products characterized by reliable quality, easy deployment and affordable price for more than a decade. Today, customers from
over 140 countries rely on Yealink as the backbone of global collaboration to extend the value of network communications.
More about Yealink
Since 2001, Yealink has continued to develop state-of-the art, hi-tech VoIP communication terminals that include IP video
phones, IP phones and USB phones. With a worldwide market in more than 140 countries, the company has also established a
first-class international service network.
Our priorities are quality, functionality, ease-of-use, customer support and competitive pricing. To provide new solutions for
the future in this fast-evolving sector, Yealink’s large, talented and highly-experienced VoIP R&D team is totally committed to
the pursuit of excellence.
To date, we have passed more than 80 interoperability tests and meet certification requirements set by leading VoIP system and
platforms. Yealink works in close partnership with T-Mobile, Telefonica, Portugal Telecom and other leading telecommunication
service providers.
YEALINK(XIAMEN) NETWORK TECHNOLOGY CO.,LTD.
Web: www.yealink.com
Addr: 309, 3th Floor, No.16, Yun Ding North Road, Huli District, Xiamen City, Fujian, P.R. China
©2017
8 94 1 8 8 5 1 0 0 3 9
Copyright
YEALINK(XIAMEN) NETWORK TECHNOLOGY CO.,LTD.
All rights reserved.
 Loading...