


Copyright
Copyright © 2013 YEALINK NETWORK TECHNOLOGY CO., LTD.
ght © 2013 Yealink Network Technology CO., LTD. All rights reserved. No parts of this
Copyri
publication may be reproduced or transmitted in any form or by any means, electronic or
mechanical, photocopying, recording, or otherwise, for any purpose, without the express
written permission of Yealink Network Technology CO., LTD. Under the law, reproducing includes
translating into another language or format.
When this publication is made available on media, Yealink Network Technology CO., LTD. gives
its consent to downloading and printing copies of the content provided in this file only for
private use and not for redistribution. No parts of this publication may be subject to alteration,
modification or commercial use. Yealink Network Technology CO., LTD. will not be liable for any
damages arising from use of an illegally modified or altered publication.
Warr
TH
TO CHANGE WITHOUT NOTICE. ALL STATEMENTS, INFORMATION, AND RECOMMENDATIONS IN
THIS GUIDE ARE BELIEVED TO BE ACCURATE BUT ARE PRESENTED WITHOUT WARRANTY OF ANY
KIND, EXPRESS OR IMPLIED. USERS MUST TAKE FULL RESPONSIBILITY FOR THEIR APPLICATION OF
PRODUCTS.
anty
E SPECIFICATIONS AND INFORMATION REGARDING THE PRODUCTS IN THIS GUIDE ARE SUBJECT
YEALINK NETWORK TECHNOLOGY CO., LTD. MAKES NO WARRANTY OF ANY KIND WITH REGARD
TO THIS GUIDE, INCLUDING, BUT NOT LIMITED TO, THE IMPLIED WARRANTIES OF MERCHANTABILITY
AND FITNESS FOR A PARTICULAR PURPOSE. Yealink Network Technology CO., LTD. shall not be
liable for errors contained herein nor for incidental or consequential damages in connection
with the furnishing, performance, or use of this guide.
Any Changes or modifications not expressly approved by the party responsible for compliance
could void the user's authority to operate the equipment.
This device complies with part 15 of the FCC Rules. Operation is subject to the following two
conditions: (1) This device may not cause harmful interference, and (2) this device must
accept any interference received, including interference that may cause undesired
operation.
Note: This equipment has been tested and found to comply with the limits for a Class B digital
device, pursuant to part 15 of the FCC Rules. These limits are designed to provide
reasonable protection against harmful interference in a residential installation. This
equipment generates, uses and can radiate radio frequency energy and, if not installed
and used in accordance with the instructions, may cause harmful interference to radio
communications. However, there is no guarantee that interference will not occur in a
particular installation. If this equipment does cause harmful interference to radio or
television reception, which can be determined by turning the equipment off and on, the

s encouraged to try to correct the interference by one or more of the following
user i
measures:
—R
eorient or relocate the receiving antenna.
—Increase the separation between the equipment and receiver.
—Connect the equipment into an outlet on a circuit different from that to which the receiver is connected.
—Consult the dealer or an experienced radio/TV technician for help.
Declar
ation of Conformity
Hereby
, Yealink Network Technology CO
with the essential requirements and other relevant provisions of the CE, FCC.
.,
LT
D. declares that this phone is in conformity
CE Mark Warning
T
his device is marked with the CE mark in compliance with EC Directives 2006/95/EC and 2004/108/EC.
art 15 FCC Rules
P
T
his device is compliant with Part 15 of the FCC Rules. Operation is subject to the following two conditions:
1. This device may not cause harmful interference.
2. This device must accept any interference received, including interference that may cause undesired
operation.
s B Digital Device or Peripheral
Clas
ote: This device is tested and complies with the limits for a Class B digital device, pursuant to Part 15 of the
N
FCC Rules. These limits are designed to provide reasonable protection against harmful interference in a
residential installation. This equipment generates, uses, and can radiate radio frequency energy and, if not
installed and used in accordance with the instructions, may cause harmful interference to radio
communications. However, there is no guarantee that interference will not occur in a particular installation.
If this equipment does cause harmful interference to radio or television reception, which can be
determined by turning the equipment off and on, the user is encouraged to try to correct the interference
by one or more of the following measures:
1. Reorient or relocate the receiving antenna.
2. Increase the separation between the equipment and receiver.
3. Connect the equipment into an outlet on a circuit different from that to which the receiver is connected.
4. Consult the dealer or an experience radio/TV technician for help.
WEEE Warning
To av
oid the potential effects on the environment and human health as a result of the
presence of hazardous substances in electrical and electronic equipment, end users of

electrical and electronic equipment should understand the meaning of the crossed-out
wheeled bin symbol. Do not dispose of WEEE as unsorted municipal waste and have to
collect such WEEE separately.

GNU GPL INFORMATION
Yealink SIP-T42G firmware contains third-party software under the GNU General Public License (GPL). Yealink
uses software under the specific terms of the GPL. Please refer to the GPL for the exact terms and conditions
of the license.
The original GPL license, source code of components licensed under GPL and used in Yealink products can
be downloaded from Yealink web site:
http://www.yealink.com/GPLOpenSource.aspx?BaseInfoCateId=293&NewsCateId=293&CateId=293.

About This Guide
Thank you for choosing the SIP-T42G IP Phone, an ultra-elegant gigabit IP Phone which is
especially designed for power users in the office environment. This unit provides business
telephony features such as Call Hold, Call Transfer, Busy Lamp Field and 5-way
Conference.
This guide provides everything you need to quickly use your new phone. Be sure to
verify with your system administrator that your network is prepared for configuring your
IP phone. As well, be sure to read the Packaging Contents and Regulatory Notices
sections in this guide before you set up and use the SIP-T42G IP phone.
If this is your first time using the SIP-T42G IP phone, we recommend that you first refer to
the Quick Installation Guide and Quick Reference Guide, which are available at:
http://www.yealink.com/DocumentDownload.aspx?CateId=142&flag=142.
About This Guide
In This Guide
This guide is based on firmware version 71. The topics provided in this guide include:
z Chapter 1 Overview
z Chapter 2 Getting Started
z Chapter 3 Customizing Your Phone
z Chapter 4 Basic Call Features
z Chapter 5 Advanced Phone Features
v

User Guide SIP-T42G IP Phone
Table of Contents
About This Guide .......................................................................... v
In This Guide............................................................................................................................. v
Table of Contents ........................................................................ vi
Overview ....................................................................................... 1
Hardware Component Instructions ..................................................................................... 1
Icon Instructions ...................................................................................................................... 3
LED Instructions ........................................................................................................................ 5
User Interfaces ......................................................................................................................... 5
Phone User Interface .......................................................................................................... 6
Web User Interface ............................................................................................................. 6
Documentations ..................................................................................................................... 8
Getting Started ............................................................................. 9
Packaging Contents .............................................................................................................. 9
Phone Installation ................................................................................................................. 11
Phone Initialization ................................................................................................................ 13
Phone Status .......................................................................................................................... 14
Basic Network Settings ......................................................................................................... 14
Registrati on ............................................................................................................................ 15
Idle Screen ............................................................................................................................. 15
Customizing Your Phone............................................................ 17
General Settings ................................................................................................................... 17
Wallpaper ........................................................................................................................... 17
Backlight ............................................................................................................................. 18
Contrast .............................................................................................................................. 18
Language ........................................................................................................................... 19
Date & Time........................................................................................................................ 19
Administrator Password .................................................................................................... 21
Key as Send ........................................................................................................................ 21
Keypad Lock ...................................................................................................................... 21
Audio Settings ....................................................................................................................... 23
vi

Table of Contents
Volume ................................................................................................................................ 23
Ring Tones ........................................................................................................................... 23
Contact Management ........................................................................................................ 24
Favorites .............................................................................................................................. 24
Local Directory .................................................................................................................. 25
Blacklist ................................................................................................................................ 32
Remote Phonebook ......................................................................................................... 33
Call History Management ................................................................................................... 34
System Customizations ......................................................................................................... 35
Headset Use ....................................................................................................................... 35
DSS Keys .............................................................................................................................. 37
Account Management .................................................................................................... 45
Dial Plan .............................................................................................................................. 46
Emergency Number ......................................................................................................... 49
Live Dialpad ....................................................................................................................... 50
Hotline ................................................................................................................................. 50
Basic Call Features ..................................................................... 51
Placing Calls .......................................................................................................................... 51
Answering Calls ..................................................................................................................... 53
Ending Calls ........................................................................................................................... 54
Redialing Numbers ............................................................................................................... 55
Recent Call In Dialing .......................................................................................................... 55
Auto Answer .......................................................................................................................... 56
Auto Redial ............................................................................................................................ 56
Call Completion.................................................................................................................... 57
Call Return ............................................................................................................................. 57
Call Mute ............................................................................................................................... 58
Call Hold/Resume ................................................................................................................. 58
Do Not Disturb (DND) ........................................................................................................... 59
Call Forward .......................................................................................................................... 61
Call Transfer ........................................................................................................................... 65
Call Waiting ........................................................................................................................... 66
Conference ........................................................................................................................... 66
Local Conference ............................................................................................................. 67
Network Conference ........................................................................................................ 68
Call Park ................................................................................................................................. 69
Call Pickup ............................................................................................................................. 70
Anonymous Call .................................................................................................................... 73
Anonymous Call Rejection .................................................................................................. 73
Advanced Phone Features ....................................................... 75
Busy Lamp Field (BLF) ........................................................................................................... 75
vii

User Guide SIP-T42G IP Phone
Call Recording ...................................................................................................................... 77
Intercom ................................................................................................................................. 79
Outgoing Intercom Calls .................................................................................................. 79
Incoming Intercom Calls .................................................................................................. 80
Multicast Paging ................................................................................................................... 81
Sending RTP Stream .......................................................................................................... 81
Receiving RTP Stream ....................................................................................................... 82
Music on Hold ........................................................................................................................ 83
Messages ............................................................................................................................... 84
Short Message Service (SMS) ........................................................................................... 84
Voice Mail .......................................................................................................................... 85
Message Waiting Indicator (MWI) .................................................................................. 86
Troubleshooting .......................................................................... 88
Regulatory Notices ..................................................................... 92
Service Agreements ............................................................................................................. 92
Limitations of Liability ............................................................................................................ 92
Safety Instructio ns ................................................................................................................. 92
Appendix A - Time Zones .......................................................... 94
Index ................................................................
viii
Overview
This chapter provides the overview of the SIP-T42G IP phone. The topics include:
z Hardware Component Instructions
z Icon Instructions
z LED Instructions
z User Interfaces
z Documentations
If you require additional information or assistance with your new phone, contact your
system administrator.
Overview
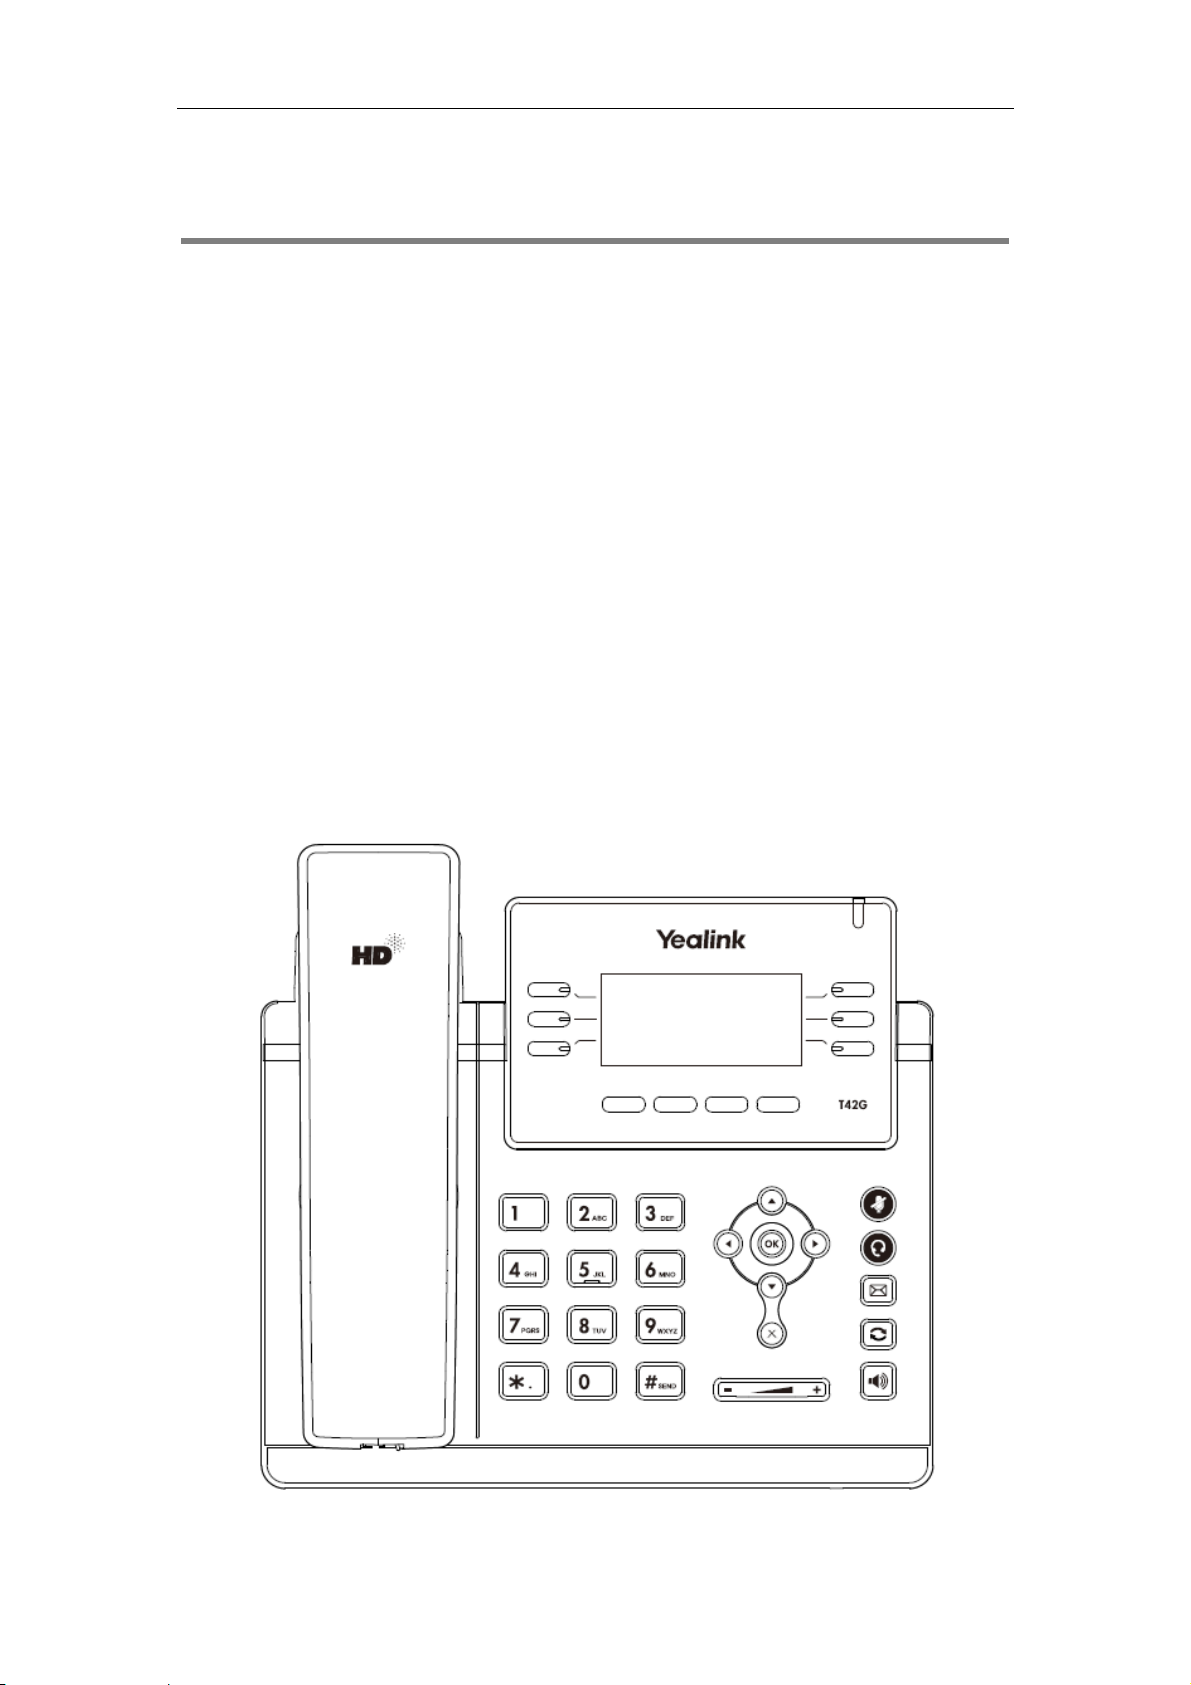
Hardware Component Instructions
The main hardware components of the SIP-T42G IP phone are the LCD screen and the
keypad.
1
User
2
r
C
o
n
E
ORE
p
o
e
o
r
o
e
n
w
e
a
o
s
o
a
c
tToggTogg
i
s
ggAdju
t
e
u
T
o
n
m
s
t
o
c
c
m
h
u
s
o
d
m
t
e
p
a
n
S
s
p
u
m
u
k
n
d
s
n
a
t
n
u
a
o
a
a
e
m
o
)
Guide SIP-T4
G IP Phone
Hardwa
L
①
P
②
Li
③
H
④
M
M
H
⑤
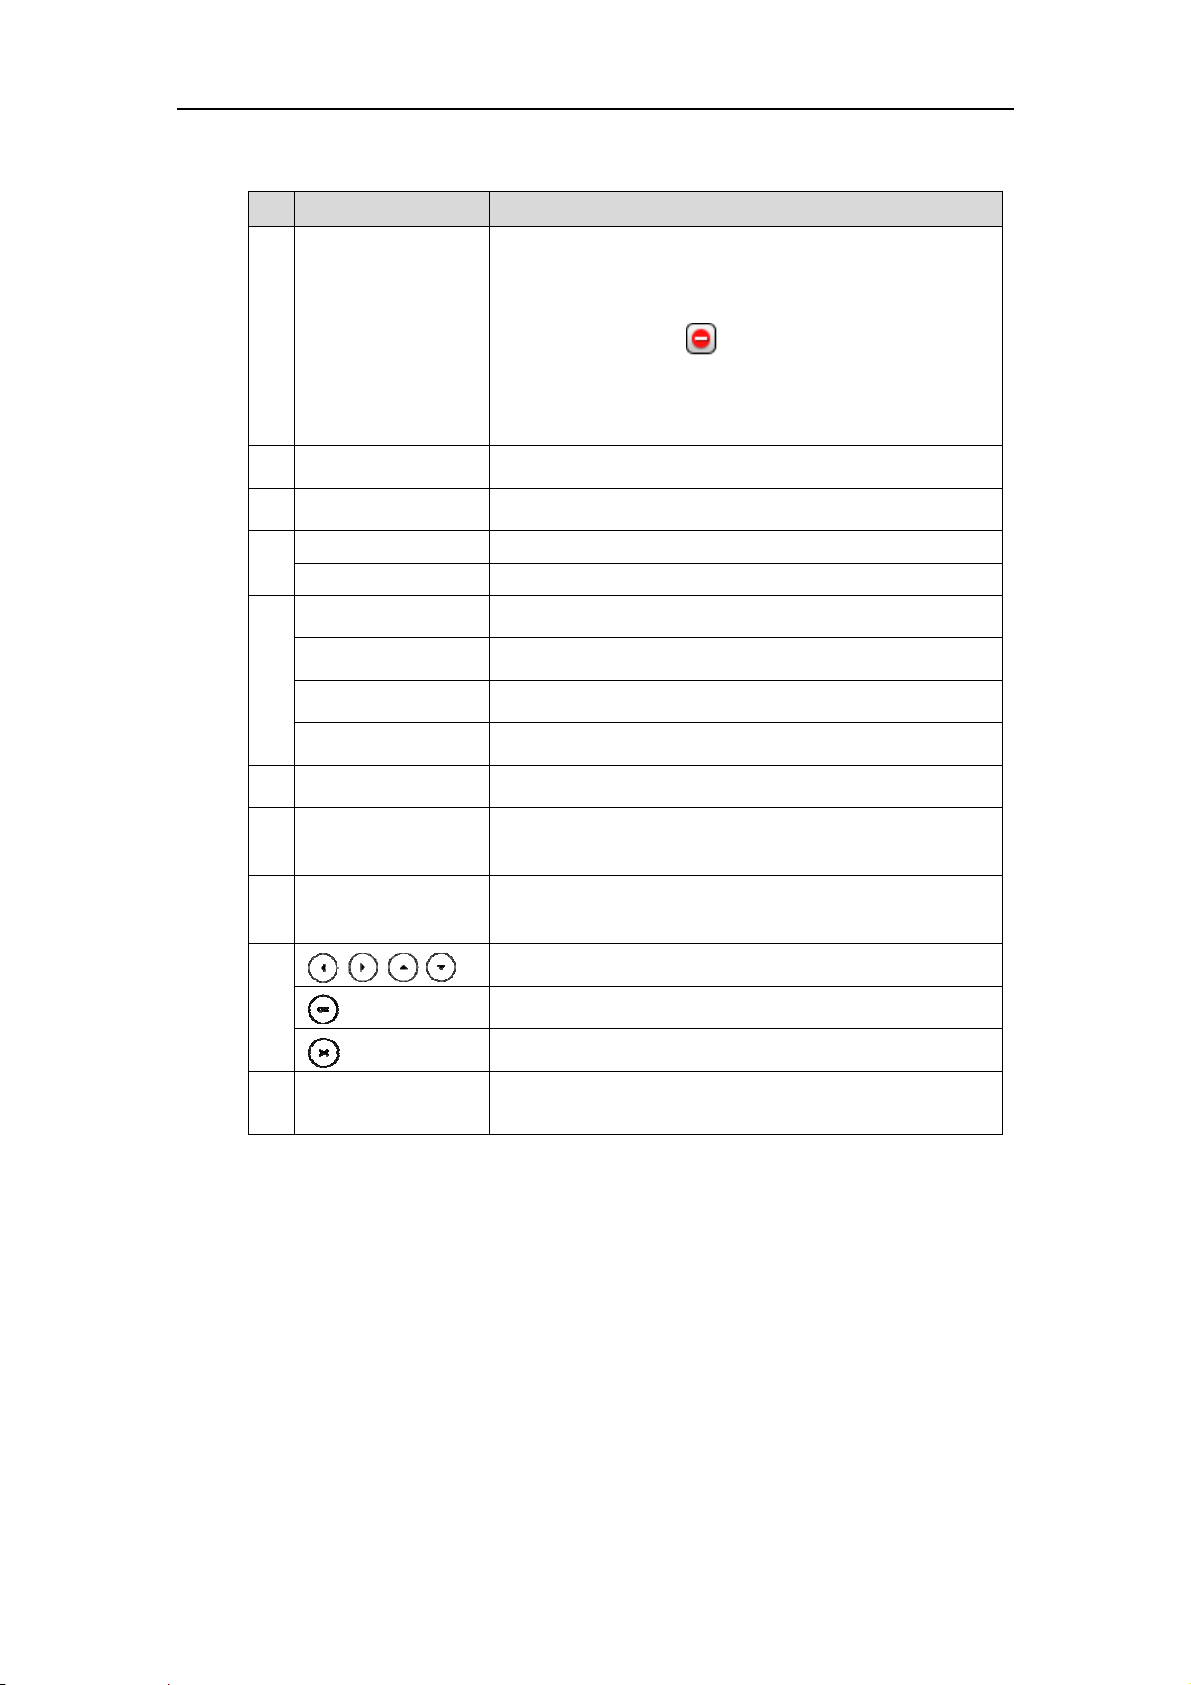
e compone
Item
D Screen
wer Indicat
e Keys
ADSET Key
UTE Key
ESSAGE Key
LD Key
DIAL Key
nt instructio
Sho
dat
• C
• Ic
• Mi
• Pr
• D
LED Indi
Use
Acc
Plac
Red
s of the SIP-
s informati
and other r
ll informatio
ns (for exa
sed call tex
mpt text (fo
te and time
ates phone
hese keys t
les and indi
les and indi
esses voice
es a call on
als a previo
42G IP phon
Descri
n about call
elevant dat
—caller ID,
ple, )
or second i
r example, "
power statu
activate u
ates the he
ates the M
essages.
old or resu
sly dialed n
e are:
tion
s, messages,
:
call duratio
coming cal
aving file…"
.
to six acco
adset mode
te feature o
es a held c
mber.
soft keys, ti
ler informati
nts.
.
n or off.
ll.
e,
n
TR
ANSFER Key
S
⑥
⑦
⑧
⑨
⑩
eakerphon
V
lume Key
K
ypad
S
ft Keys
Key To
Tran
fers a call t
les the han
sts the volu
and
ringer.
Prov
ides the digi
con
ext-sensitive
Scro
ll through th
Con
firms actions
Can
cels actions
Lab
l automatic
feat
res.
another pa
s-free spea
e of the ha
s, letters, an
application
displayed i
or answers
or rejects an
ally to identi
rty.
erphone m
dset, heads
special ch
.
formation.
n incoming
incoming c
y their cont
de.
et, speaker,
racters in
call.
ll.
xt-sensitive
2
u
p
d
uReg
o
o
a
a
e
p
g
e
r
t
p
o
g
m
Ove
r
w
vie
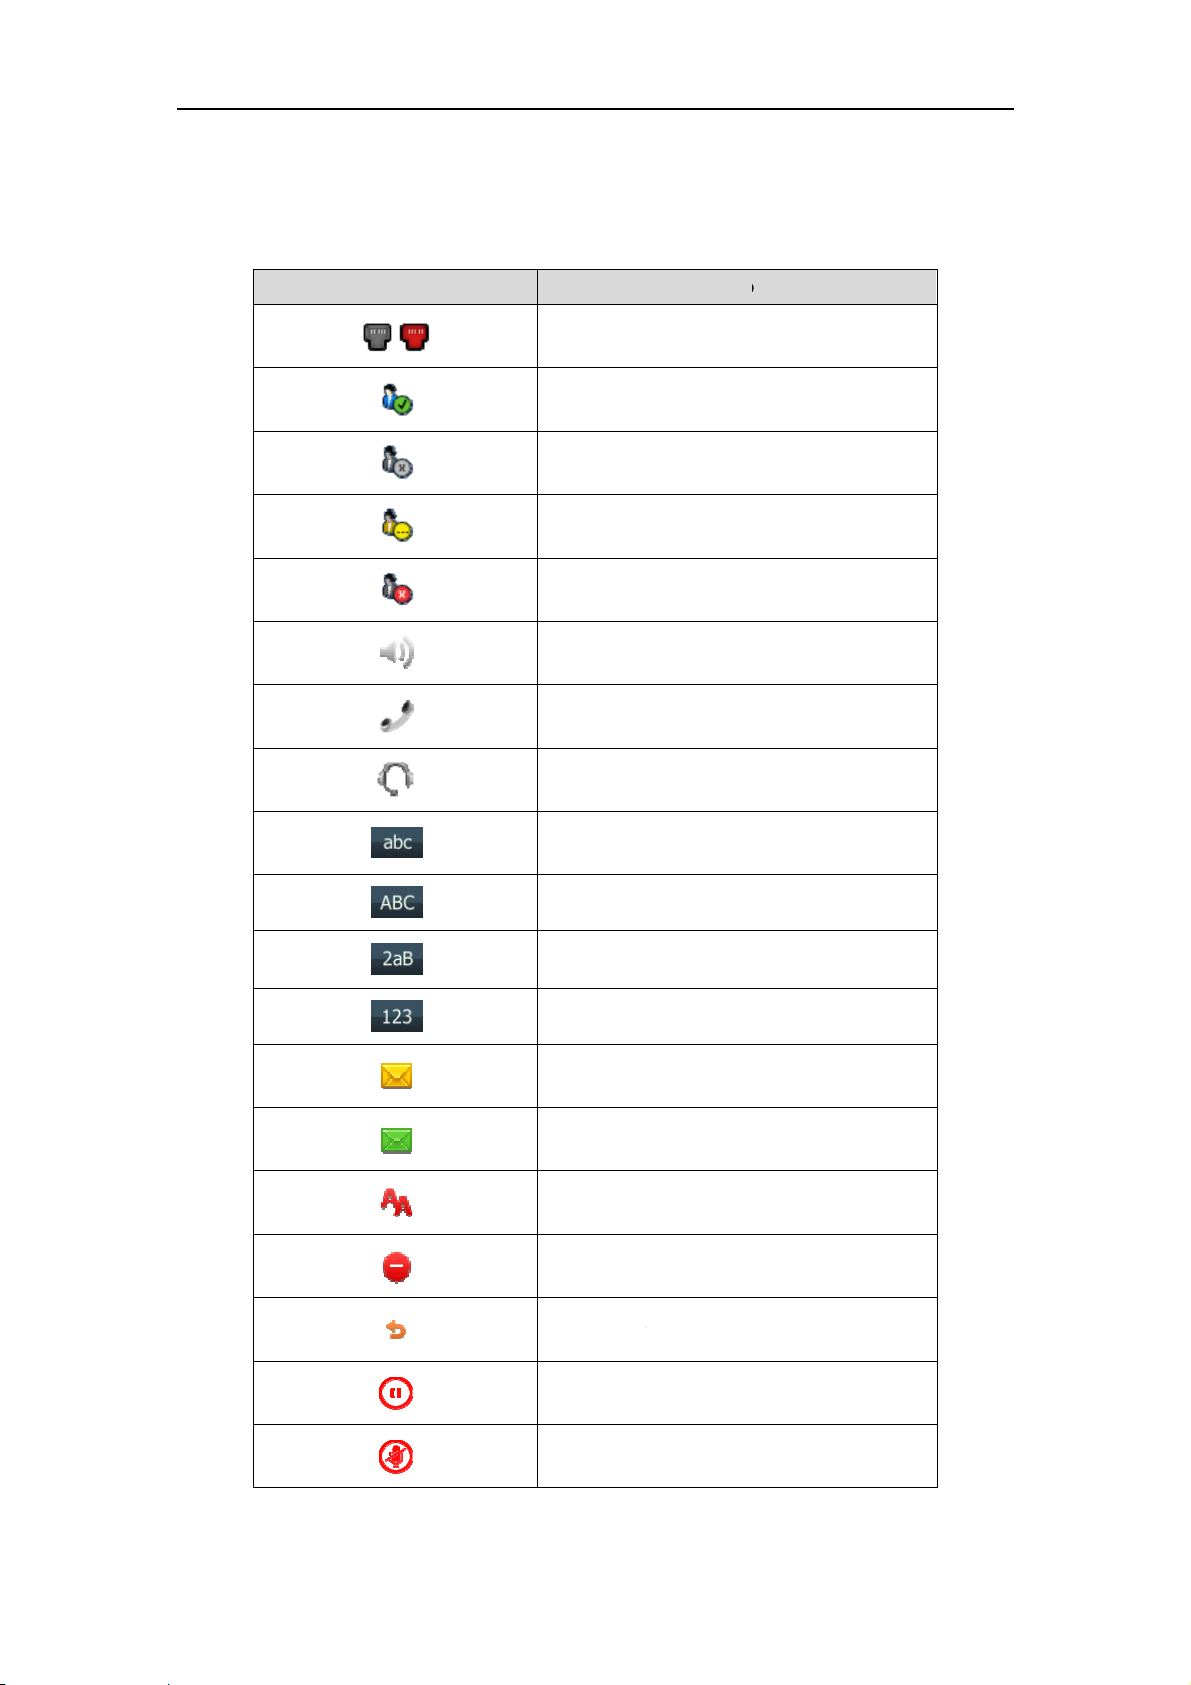
Icon Instr
Icons a
ctions
pear on the
Icons
phone LCD
screen are
Network is
istered
Registered
Registering
No register
Hands-free
Handset m
escribed in
Descri
navailable
successfully
failed
speakerpho
de
he followin
tion
ne mode
table:
Headset m
Multi-lingu
Multi-lingu
Alphanum
Numeric in
Voice Mail
Text Messa
Auto Answ
Do Not Dist
Call Forwa
de
l lowercase
l uppercase
ric input m
ut mode
e
urb
d
letters input
letters input
de
ode
mode
Call Hold
Call Mute
3

User
c
C
s
b
n
s
c
c
e
c
t
p
d
s
t
t
o
Guide SIP-T42G IP Phone
Icons
Descri
Ringer volu
Keypad Lo
me is 0
tion
Missed Call
Received
Dialed Call
Missed Call
Forwarded
Recording
A call can
s
alls
s
Calls
ox is full
ot be recor
ed
Recording
Recording
Recording
Open VPN
Blue Tooth
Conferenc
The conta
The defaul
tarts succes
annot be s
annot be s
t icon
contact ph
fully
arted
opped
to
4

LED Instructions
Power Indicator LED
LED Status Description
Solid red
Fast flashing red The phone is ringing.
Slow flashing red The phone receives a text message or voicemail.
Off The phone is powered off.
Line key LED
LED Status Description
Solid green
Fast flashing green The line receives an incoming call, the phone is ringing.
Slow flashing green The call is placed on hold.
Off The line is inactive.
The phone is initializing.
The phone is powered on.
The line is seized.
The line is in conversation.
Overview
Line key LED (configured as BLF key)
LED Status Description
Solid red The monitored user is busy.
Fast flashing red The monitored user receives an incoming call.
Off
User Interfaces
There are two ways to customize specific configurations on your SIP-T42G IP phone:
z Using the user interface on the IP phone.
z Using the user interface in an internet browser window from your PC.
The hardware components keypad and LCD screen constitute the phone user
interface, which allows the user to execute all call operation tasks and basic
configuration changes directly on the phone. In addition, you can use the web user
interface to access all configuration settings. In many instances, it is possible to use both
the phone user interface and the web user interface to operate the phone and
change settings. However, in some instances, it is only possible to use the phone or the
web user interface.
The monitored user is idle.
The monitored user does not exist.
5

User Guide SIP-T42G IP Phone
Phone User Interface
You can customize your phone by pressing the Menu soft key to access the phone user
interface. The Advanced options are only accessible to an administrator, and the
default administrator password is admin (case-sensitive). For more information on
customizing your phone using the available options from the phone user interface, refer
to Customizing Your Phone on page 17.
Web User Interface
In addition to the phone user interface, you can also customize your phone via web
user interface. In order to access the web user interface, you need to know the IP
address of your new phone. To obtain the IP address, press the OK key on the phone.
Enter the IP address (e.g., http://192.168.0.10 or 192.168.0.10) in the address bar of web
browser on your PC. The default administrator user name and password are both admin
(case-sensitive).
The options you can use to customize the IP phone via phone user interface and/or via
web user interface are listed in the following table:
Options Phone User Interface Web User Interface
Status
--IPv4
--MAC
--Firmware
--Network
--Phone
--Accounts
Basic Call Features
--Auto Answer √
--Auto Redial √
--Call Completion √
--Call Forward √
--Call Waiting √
--Call Park √
--Call Pickup √
--Call Return √
--Conference
--Anonymous Call √
--Anonymous Call Rejection
--DND √
Basic Phone Settings
--Language √
√ √
√
√
√
6

Options Phone User Interface Web User Interface
--Date & Time √
--Administrator Password √
--Ring Tones √
--Contrast √
--Wallpaper √
--Backlight √
--Call Waiting √
--Keypad Lock √
--Phone Volume √
--Call History Management √
--Contact Management
--Local Directory √
--Blacklist √
--Remote Phonebook
--Dial Plan
--DSS Keys √
--Key as Send √
--Hot Line √
--Live Dialpad
--Emergency
Advanced Phone Features
--BLF √
--Intercom √
--Call Recording √
--Multicast Paging
--Music on Hold
--Messages √
SIP Account
--User Options
--Register Status √
--Account Active √
--Label √
--Display Name √
--Register Name √
--User Name √
--Password √
--SIP Server √
--Server Option
--Registrar Port
--Outbound Status √
--Outbound Proxy √
Overview
√
√
7
User Guide SIP-T42G IP Phone
Options Phone User Interface Web User Interface
--NAT Traversal
--STUN Status √
--STUN Server √
Note
The table above lists most of the feature options. Please refer to the relevant sections for
more information.
Documentations
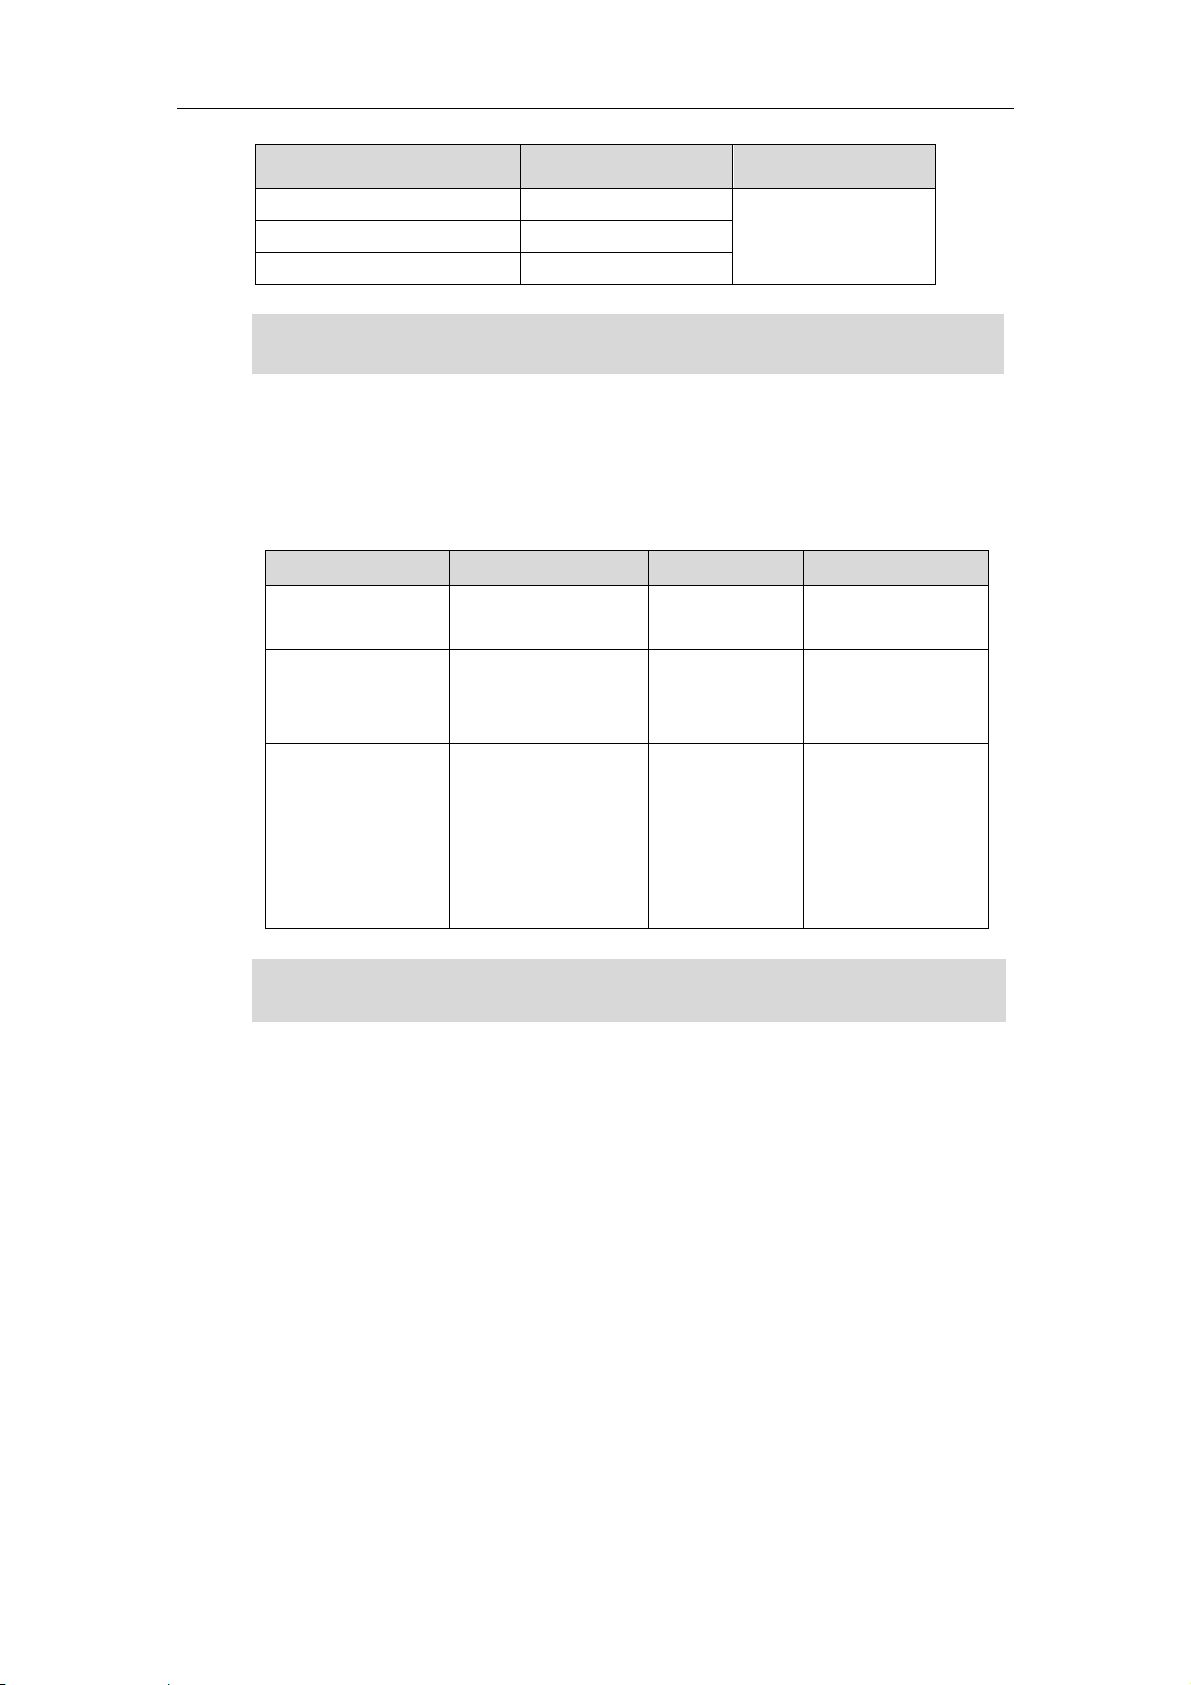
The following table shows documentations available for the SIP-T42G IP phone.
Name Contents Where found Format/ Language
Quick Installation
Guide
Quick Reference
Guide
User Guide
Basic set up of the
phone
Basic call features
and phone
customizations
Phone/Web user
interface settings
Basic call features
and advanced
phone features
In the
package
In the
package
CD attached
in the package
PDF/English
PDF/English
PDF/English
Note
You can also download the latest documentations from website:
http://www.yealink.com/DocumentDownload.aspx?CateId=142&flag=142
.
8
Getting Started
This chapter provides basic installation instructions and information for obtaining the
best performance with the SIP-T42G IP phone. The topics include:
z Packaging Contents
z Phone Installation
z Phone Initialization
z Phone Status
z Basic Network Settings
z Registration
z Idle Screen
Getting Started
If you require additional information or assistance with your new phone, contact your
system administrator.
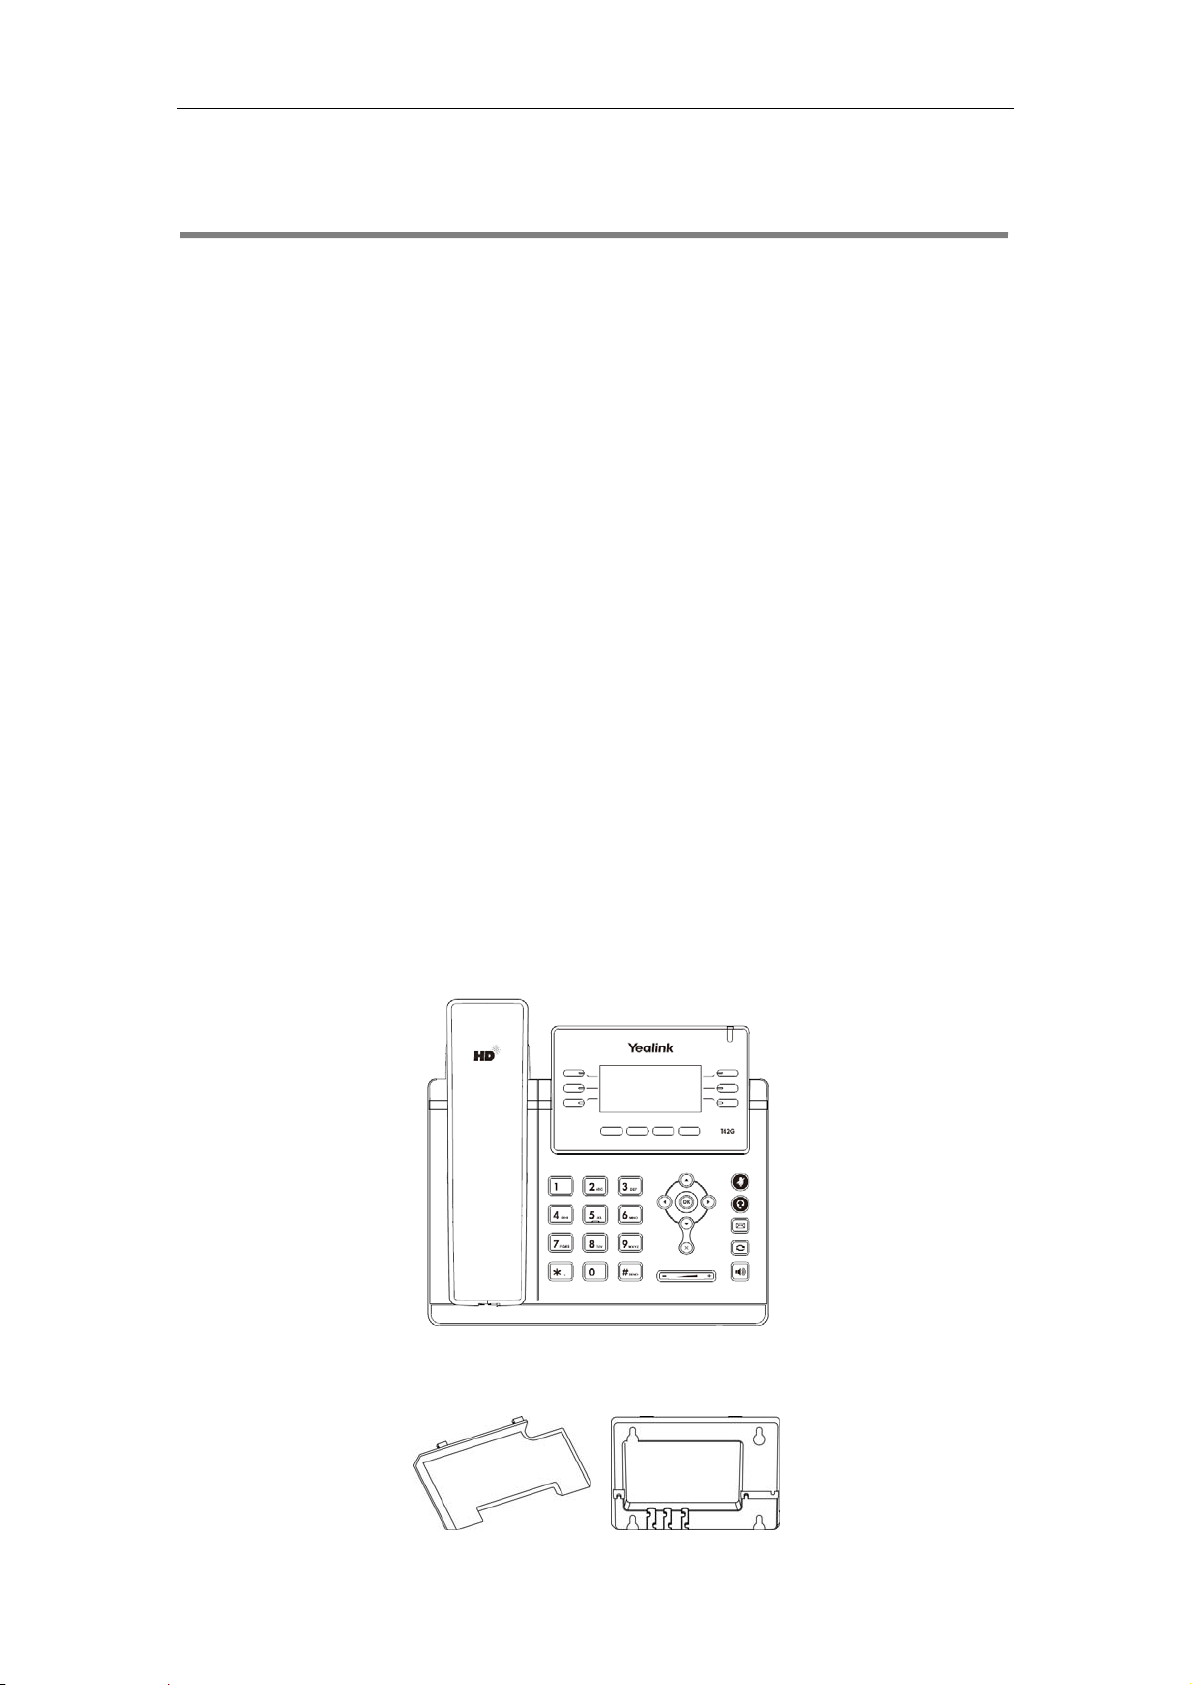
Packaging Contents
The following components are included in your SIP-T42G IP phone package:
z SIP-T42G IP Phone
z Phone Stand
9
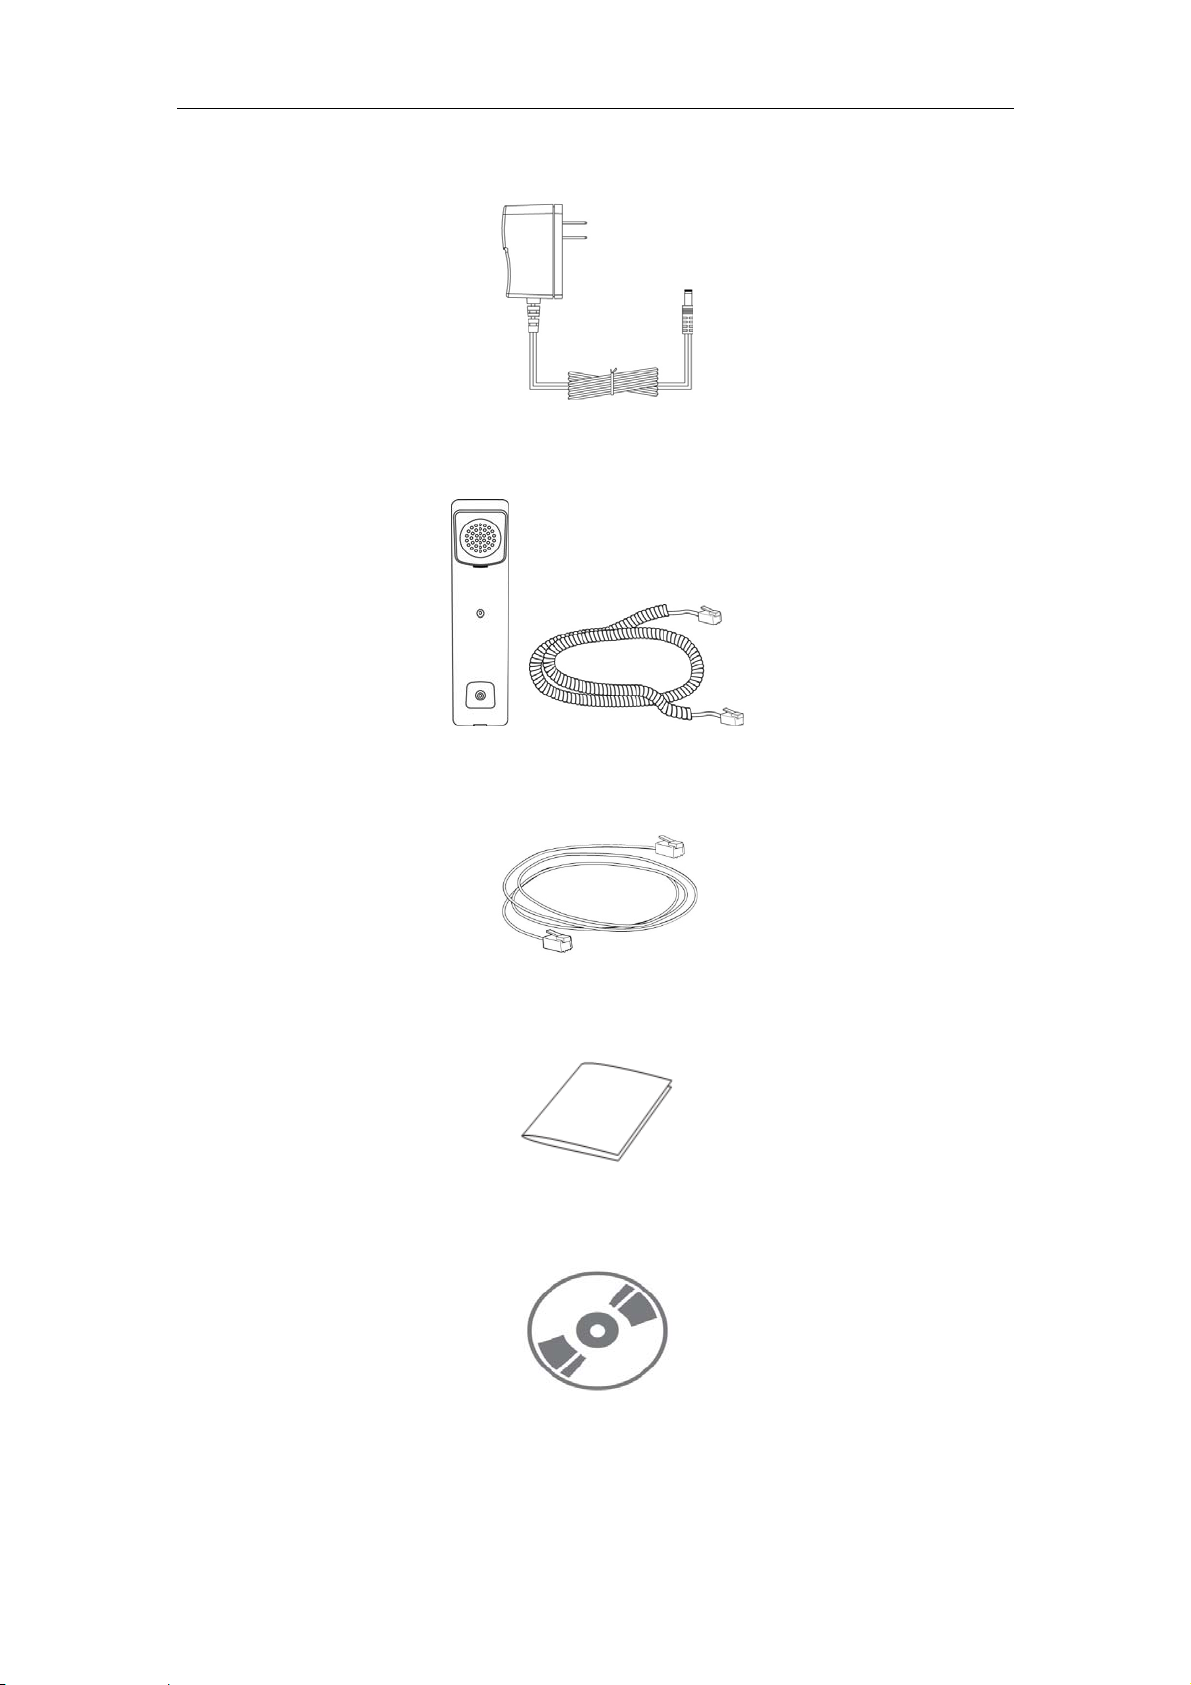
User Guide SIP-T42G IP Phone
z Power Adapter
z Handset & Handset Cord
z Ethernet Cable
z Quick Installation Guide & Quick Reference Guide
z CD-ROM
10
Check the list before installation. If you find anything missing, contact your system
administrator.
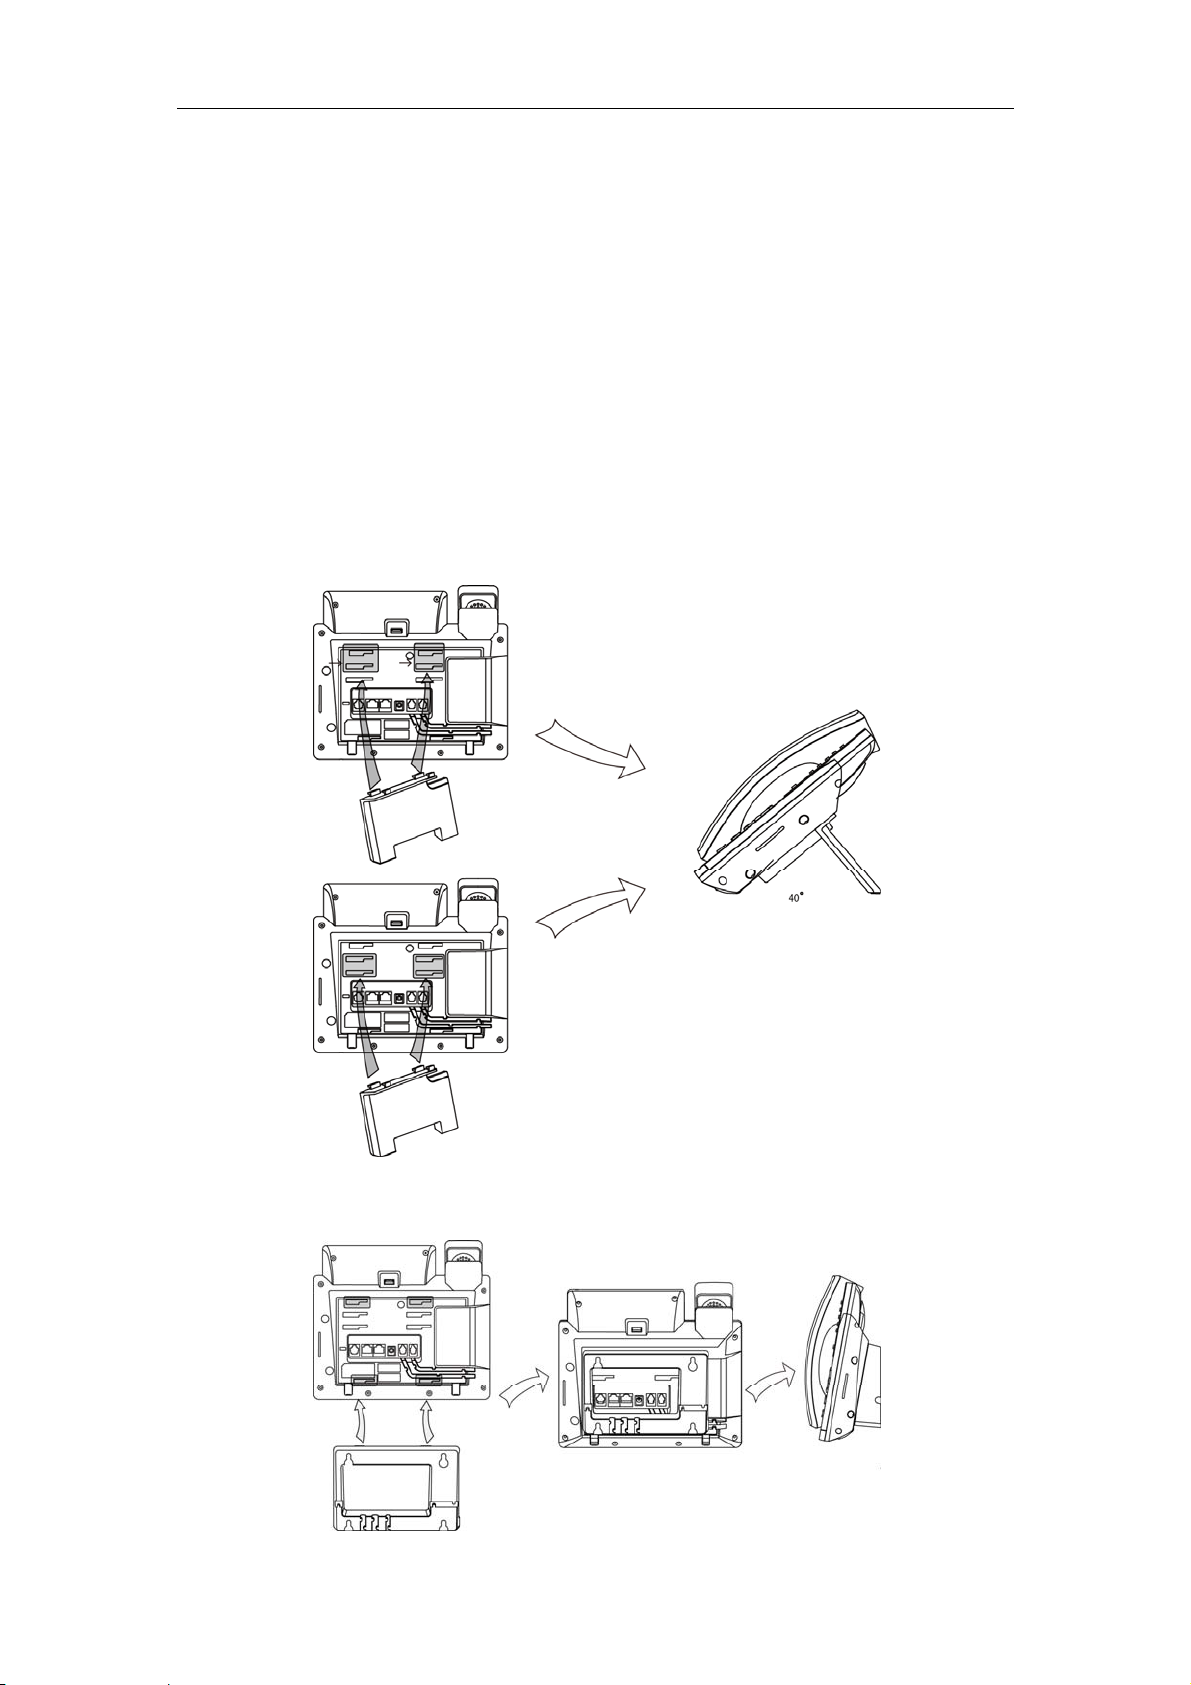
Phone Installation
If your phone is already installed, proceed to Phone Initialization on page 13.
This section introduces how to install the phone with the components in the packaging
contents:
z Attach the stand
z Connect the handset and optional headset
z Connect the network and power
1) Attach the stand
Deskmount Method
Getting Started
Wallmount Method
11
User Guide SIP-T42G IP Phone
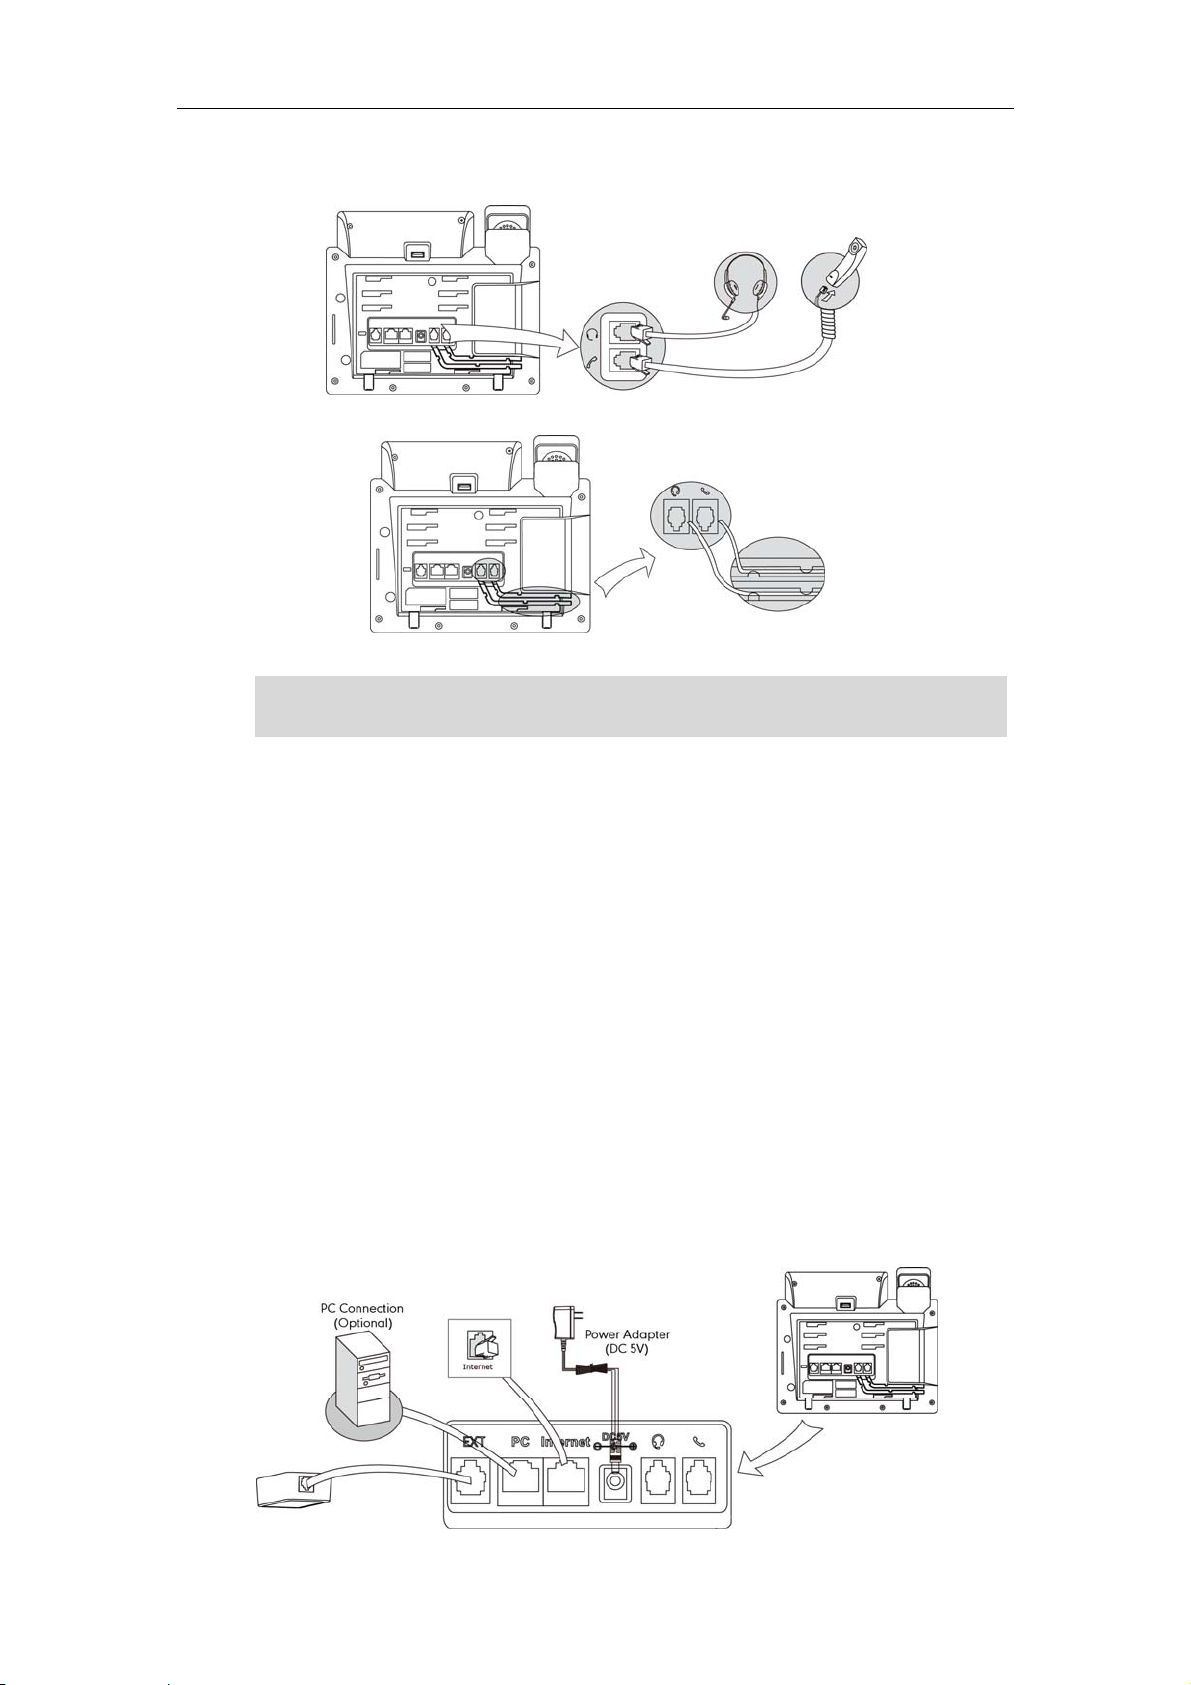
2) Connect the handset and optional headset
Note
A headset is not provided in the packaging contents. Contact your system administrator
for more information.
3) Connect the network and power
You have two options for power and network connections. Your system administrator
will advise you which one to use.
z AC power
z Power over Ethernet (PoE)
AC Power
To connect the AC power:
1. Connect the DC plug on the power adapter to the DC5V port on the phone and
connect the other end of the power adapter into an electrical power outlet.
2. Connect the supplied Ethernet cable between the Internet port on the phone and
the Internet port in your network or switch/hub device port.
12
Getting Started
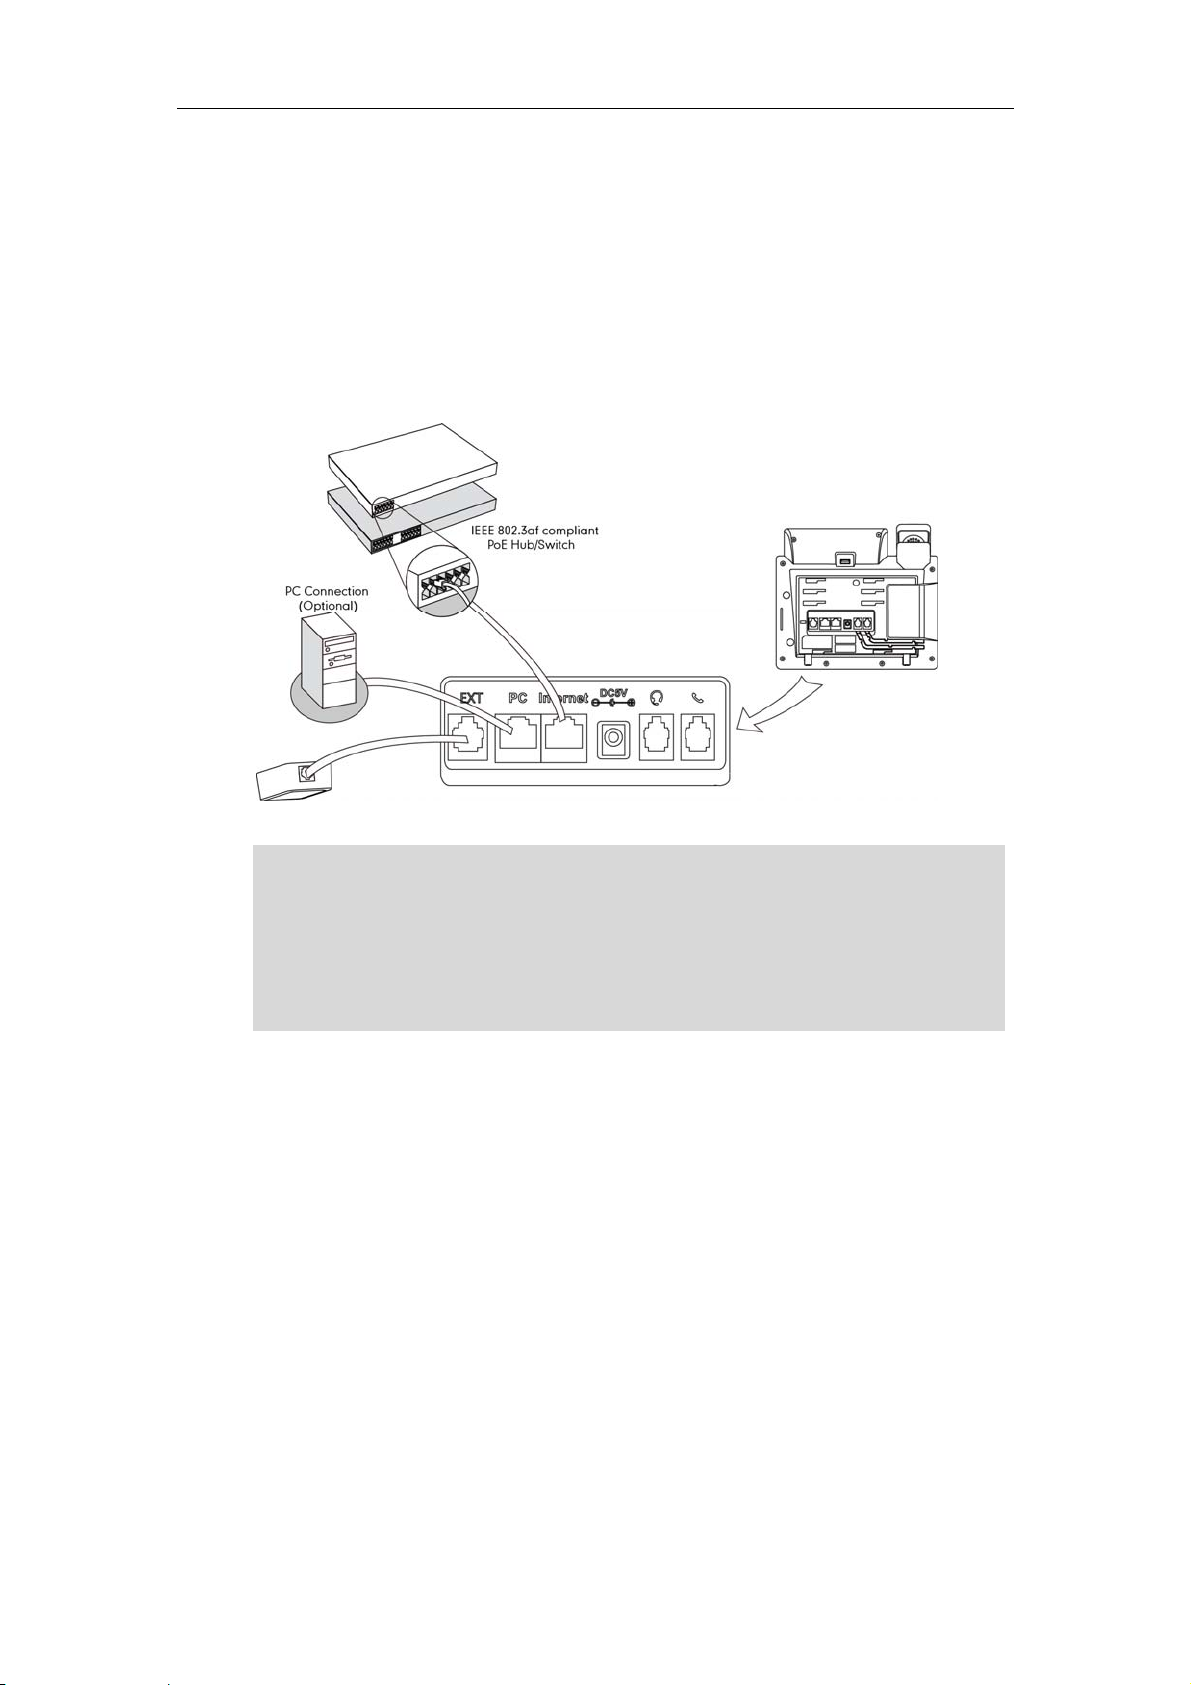
Power over Ethernet
Using a regular Ethernet cable, the SIP-T42G IP phone can be powered from a PoE (IEEE
802.3af) compliant switch or hub.
To connect the PoE:
1. Connect the Ethernet cable between the Internet port on the phone and an
available port on the in-line power switch/hub.
Note
If in-line power is provided, you don’t need to connect the AC adapter. Make sure the
Ethernet cable and switch/hub is PoE compliant.
The phone can also share the network with other network devices such as a PC
(personal computer). It is an optional connection.
Important! Do not unplug or remove power to the phone while it is updating firmware
and configurations.
Phone Initialization
After your phone has been powered on, the system boots up and performs the
following steps:
Automatic Phone Initialization
The phone finishes the initialization process by loading the saved configuration. The
phone LCD screen will display "Initializing…Please wait" during the initialization.
13

User
e
h
a
2
(D
u
h
a
n
e
w
c
t
t
e
e
e
w
g
g
t
e
s
n
n
n
a
e
a
b
r
a
e
n
d
v
o
s
o
o
t
o
t
N
e
n
a
o
b
o
o
)
D
o
v
e
s
v
c
s
C
)
D
e
e
A
m
t
f
a
c
r
r
o
u
v
a
u
o
b
u
r
n
c
e
n
o
e
)
k
mng
B
e
o
o
e
e
a
o
n
a
d
o
>
n
w
r
e
Guide SIP-T4
G IP Phone
Not
P
DHCP
By defa
obtain t
address
If your
one St
You ca
interfac
Availabl
z
Net
z
Pho
z
Ac
ynamic Hos
lt the phon
e valid IPv4
and DNS ad
network doe
tus
view the sy
.
e informatio
ork status i
ne status inc
ount status i
Configurati
attempts t
network set
dress.
not use DH
tem status
of phone s
cluding WA
luding devic
dicating th
n Protocol
contact a
ings, e.g., IP
P, proceed t
f your phon
atus includ
port and L
e model, fir
register sta
HCP server
address, su
Basic Netw
via phone
s:
N port info
ware versio
us of sip ac
in your netw
net mask, d
rk Settings o
ser interfac
mation.
and MAC
ounts.
rk in order t
fault gate
page 14.
or web use
ddress.
ay
r
B
sic Net
To view
1. Pres
2. Pres
To view
1. Op
2. Ent
3. Ent
4. Clic
If your p
network
address
he phone st
s , or pr
s or
he phone st
n the web
r the IP add
r the user n
k Confirm to
ork S
hone canno
settings ma
only or both
tus via pho
ss Menu->St
to scroll thr
tus via we
rowser of y
ess in the br
me (admin
login.
ttings
t contact a
ually. IP ph
IPv4 and IP
e user inter
tus.
ugh the list
user interfa
ur compute
wser’s add
and passw
HCP server
nes support
6 addresses.
ace:
nd view th
e:
.
ess bar, and
rd (admin) i
for any reas
to use the IP
specific inf
then click E
the login p
n, you nee
v4 address
rmation.
te
.
e.
to configur
nly, the IPv6
To confi
1. Pres
2. Pres
3. Pres
To confi
14
ure the IP a
s Menu->Ad
s or
s the Save s
ure a static
dress mod
anced (pas
to select IP
ft key to ac
IPv4 addres
via phone
word: admi
4, IPv6 or IP
ept the ch
via phone
ser interfac
n
->Networ
4 & IPv6 fro
e or the
ser interfac
:
->WAN Port the IP Mod
ack soft key
:
IP Mode.
e field.
to cancel.
e
e
e
o
g
s
s
e
c
s
e
Yneg
t
m
g
e
o
a
yreg
e
r
e
e
h
a
v
d
f
o
d
d
D
a
n
w
v
v
a
o
n
o
c
c
c
s
c
e
t
c
s
s
t
h
c
c
o
r
e
s
c
s
c
p
e
w
s
ge
t
e
w
m
o
,
a
u
t
s
a
n
E
t
o
a
m
e
o
a
d
u
)
k
S
s
B
e
)
k
i
B
h
P
)
k
P
B
e
d
o
e
i
o
-
-
m
y
l
o
>
h
y
o
a
p
Getting St
a
S
e
S
P
P
.
o
s
u
m
e
rted
1. Pres
2. Pres
3. Ent
Sec
4. Pres
To confi
1. Pre
2. Pre
3. Ent
Se
4. Pre
If you ar
mode.
otia
user na
To confi
s Menu->Ad
s or
r the desire
ndary DNS
s the Save s
ure a static
s Menu->A
s or
r the desire
ondary DNS
s the Save s
using an x
ou can set
ion to obtai
e and pass
ure PPPoE
anced (pa
, or the Swit
values in th
ields respec
ft key to ac
IPv6 addres
vanced (pa
, or the Swi
values in t
fields respe
oft key to a
SL modem,
WAN port t
the IP add
ord.
ia phone us
sword: admi
h soft key t
IP Address
ively.
ept the ch
via phone
sword: adm
ch soft key
e IP Addres
tively.
cept the ch
you can co
be a PPPo
ess. Contac
r interface:
n
->Networ
select the
Subnet Ma
nge or the
ser interfac
in
->Networ
o select the
, IPv6 IP Pref
nge or the
nect your p
port. The P
your system
->WAN Port
tatic IP from
k, Gateway,
ack soft key
:
->WAN Port
Static IP fro
x, Gateway,
ack soft ke
one to the I
PoE port wil
administrat
>IPv4.
the Type fie
Primary DN
to cancel.
>IPv6.
the Type fi
Primary DN
to cancel.
nternet via P
perform a
r for the PP
ld.
and
ld.
and
PPoE
PP
oE
Not
R
1. Pres
2. Pres
3. Ent
4. Pres
Using t
also h
param
gistrati
General
system
start up
ister
phone,
s Menu->Ad
s or
r the user n
s the Save s
e wrong net
ve an impa
eters, conta
n
ly, your pho
dministrator
our phone,
d, you may
efer to Acc
anced (pas
, or the Swit
me and pa
ft key to ac
work param
t on your net
t your syste
e will be de
will configur
the phone
have to regi
unt Mana
word: admi
h soft key t
sword in the
ept the ch
ters may res
ork perform
administrato
loyed with
the phone
ill be regist
ter it. For m
ment on p
n
->Networ
select the
correspondi
nge or the
lt in inaccess
ance. For m
r.
ultiple oth
parameters
red and rea
re informati
e 45.
->WAN PortPPoE from t
ng fields.
ack soft key
bility of your
re informatio
r phones. In
beforehand
y to use. If
n on how t
IPv4.
e Type field
to cancel.
hone and
n about thes
this case, y
, so that afte
our phone i
register yo
ay
ur
r you
not
r
Idl
e Scre
If the ph
Idle Scr
n
one has suc
en descripti
essfully star
on:
ed up, the i
le LCD scre
n is shown
s below.
15

User Guide SIP-T42G IP Phone
No. Description
1 This area shows the phone’s time & date.
2
This area shows the phone feature status. For more information
you can refer to Icon Instructions on page 3.
This area shows the line key labels. You can customize the line key
3
as other function. For more information you can refer to Line Keys
on page 37.
4 This area shows three page icons.
5
6
This area shows the soft key labels. The default soft key labels are
“History”, “Favorites”, “DND” and “Menu”.
This area shows the wallpaper. You can customize the wallpaper.
For more information you can refer to Wallpaper on page 17.
16

C
u
e
a
z
n
e
l
n
n
d
n
e
q
a
S
n
w
m
g
n
-
a
o
y
s
gs
g
a
z
o
g
a
m
r
a
s
o
ge
m
d
a
i
e
e
o
>
c
c
a
e
y
t
n
4
a
r
o
a
r
g
e
o
u
e
e
r
dng
B
t
c
m
gh
c
n
e
c
a
d
p
m
e
o
o
g
stomi
ing Y
ur Pho
ne
Custo
izing Your P
hone
G
You ca
ring ton
from ca
ways.
This cha
topics i
z
z
z
z
z
If you re
system
neral
customize
s and so on
l history. You
pter provide
clude:
Ge
eral Settin
Au
io Settings
Co
tact Mana
Call
History Man
Syst
m Customi
uire additi
dministrator
ettings
our SIP-T42G
. You can a
can also ha
basic oper
ement
ement
ations
nal informat
.
IP phone b
d contacts
ndle incomi
ting instruct
on or assista
configurin
o the phon
calls from
ions for cust
nce with yo
the backli
’s local dire
different co
mizing your
r new phon
t, date & ti
tory manua
tacts in diff
phone. The
, contact y
e,
lly or
rent
ur
W
llpaper
You ca
wallpap
custom
must be
require
To chan
1. Pres
2. Pres
3. Pres
You ca
Settings
To uplo
1. Clic
customize t
er ima
.jpg, .png o
ent of the fi
s Menu->Ba
s or
s the Save s
also chan
>Preference
d the custo
k on Settings
e vi
allpaper i
e the wallp
he wallpap
phone user
ages via w
.bmp. Cont
le format.
per via ph
ic->Display-
, or the Swit
ft key to ac
wallpaper
.
ized wallp
->Preferenc
r of the SIP-T
interface or
b user interf
act your syst
ne user inte
Wallpaper
h soft key t
ept the ch
via web use
per via web
.
2G IP phon
web user int
ce. The file
em administ
face:
select the
e or the
interface a
user interfa
. You can c
rface. You
format of w
ator for the
esired wall
ack soft key
the path
e:
hange the
an also upl
llpaper ima
etailed
aper image
to cancel.
ad
e
.
17
User
2
h
a
n
B
s
o
t
n
a
n
a
g
e
c
n
-
n
g
s
a
u
w
h
m
t
h
k
n
c
s
e
e
o
gu
h
s
d
r
d
c
p
h
g
gh
D
e
m
n
>
c
c
c
c
k
o
h
(pas
c
e
d
e
d
c
e
ght
n
e
o
o
o
a
b
s
n
f
o
h
s
g
t
e
n
f
d
d
d
B
c
E
h
)
S
r
r
p
e
t
t
i
e
i
w
e
c
h
r
D
P
u
d
t
t
Guide SIP-T4
G IP Phone
Ba
cklight
2. In t
loc
3. Clic
4. Clic
The
You ca
screen.
phone i
which d
the bac
comple
You ca
z
Alw
z
1mi
for
e Upload W
l system.
k Upload to
k Confirm to
customized
configure t
acklight ti
inactive. Sh
es not give
klight intensi
ely turns off
configure t
ys on: Bac
, 2min, 5mi
pproximate
llpape
pload the fi
accept the
e backlight
e specifies t
orter backli
you enou
y of the LC
the backligh
e backlight
light is on p
, 10min, 30
ly 1min, 2mi
fiel
allpaper a
, click Brows
le.
hange.
pears in th
feature to a
e delay tim
ht time is an
time to rea
screen. Ina
t of the LCD
status on th
rmanently.
in: Backli
, 5min, 10mi
e to select t
pull-down li
ust the bri
to turn off
noying if the
messages.
tive level d
screen after
LCD scree
is turned of
or 30min.
e wallpape
t of Wallpa
htness of th
he backligh
backlight is
Active level
fines wheth
a period of
as the follo
when the p
image from
e
.
phone LC
when the I
urned off q
s used to a
r the IP pho
nactivity.
ing types:
hone is inac
your
ickly
ust
ne
ive
Co
To confi
1. Pres
2. Pres
3. Pres
4. Pres
5. Pres
You ca
Settings
ntrast
You ca
Premise
ure the ba
s Menu->Ba
s or
Lev
l field.
s or
Ina
tive Level fi
s or
Bac
klight Time fi
s the Save s
also confi
>Preference
configure t
is the expan
klight via ph
ic->Display-
, or the Swit
, or the Swit
ld.
, or the Swit
ld.
ft key to ac
re the bac
.
e contrast
ion model
one user int
General.
h soft key t
h soft key t
h soft key t
ept the ch
light via we
f the expan
as been co
rface:
select the
select the
select the
nge or the
user interfa
ion model (
nected to t
esired level
esired valu
esired time
ack soft key
e at the pa
XP40) to a
e phone.
from the Ac
from the
from the
to cancel.
th
omfortable l
ive
evel.
To confi
1. Pre
2. Pres
18
ure the con
s Menu->A
s or
con
trast.
trast via pho
vanced
, or the Swit
ne user inter
sword: adm
h soft key t
ace:
in
->Phone
increase o
etting->Con
decrease t
trast.
e intensity o
f
La
n
e
a
s
g
e
e
g
g
e
e
e
o
n
e
g
a
a
t
o
g
a
u
g
e
gu
s
o
gu
e
t
a
P
s
m
r
r
o
2
c
h
o
u
p
g
e
c
e
w
e
c
r
e
e
o
m
a
i
c
d
o
d
n
a
f
r
u
c
i
n
a
n
e
i
m
a
o
T
o
a
B
r
y
l
a
guag
f
h
o
t
g
m
e
r
gu
d
c
i
n
a
u
a
c
u
r
o
d
e
e
The
3. Pres
guage
default con
s the Save s
rast level is
ft key to ac
.
ept the ch
nge or the
Custo
ack soft key
izing Your P
to cancel.
hone
Not
The def
use the
the lan
interfac
interfac
Not all
langu
admini
To chan
1. Pres
2. Pres
3. Pres
Text
To chan
ult langua
ame langu
uage of yo
will use En
and the w
languages a
ge packs cu
strator for m
e the lan
s Menu->Ba
s or
s the Save s
appears on
e the lan
e of the pho
e as whic
r internet br
lish by defa
b user interf
e available f
rently loade
re informatio
age for the
ic->Langua
to select th
ft key to ac
the LCD scr
age for the
ne user inter
of your inte
wser is not s
lt. You can
ace respect
r selection.
to the IP ph
about the
hone user i
e.
desired lan
ept the ch
en will cha
eb user int
ace is Englis
net browse
pported b
hange the
vely from e
he available
ne. Please c
vailable lan
terface:
e
nge.
e to the se
rface:
h. The phon
for the web
the phone,
anguage fo
ch other.
languages d
ontact your s
uages of yo
lected lan
will detect
user interfa
the web use
the phone
epend on th
ystem
r new phon
age.
nd
e. If
ser
.
Da
te & Tim
1. Clic
2. Sel
3. Clic
Text
The dat
cannot
contact
to obtai
and tim
To confi
1. Pres
2. Pres
are
k on Settings
ct the desir
k Confirm to
displays on
and time d
btain the d
your system
the date a
manually.
ure the SNT
s Menu->Ba
s or
from the Ti
->Preferenc
d language
accept the
he web use
isplay on th
te and tim
administrat
nd time fro
settings vi
ic->Date & T
, or the Swit
e Zone fiel
.
from the pul
hange.
interface w
LCD screen
from the Si
r for more in
the SNTP se
phone user
me->Gener
h soft key t
.
l-down list o
ll change to
when the p
ple Networ
formation. Y
rver automa
interface:
l->SNTP.
select the
Language.
the selecte
one is idle. I
k Time Proto
u can conf
tically, or co
ime zone th
language.
f the phone
ol (SNTP) se
ure the ph
figure the
t applies to
ver,
ne
ate
your
19

User
e
2
e
p
i
g
e
g
e
4
W
n
e
n
-
n
o
e
s
c
o
e
s
d
o
e
s
p
u
D
WDY
DDDWW
gu
e
e
C
P
c
c
m
i
c
o
i
c
c
c
a
b
D
Y
Y
M
e
g)
o
a
p
a
a
o
t
o
o
a
p
t
a
t
e
r
m
B
n
ng
a
d
dng
B
e
D
-
7
7
3
3
b
b
b
T
h
.
W
t
a
e
e
o
a
Guide SIP-T4
G IP Phone
The
default time
zone is "+8
hina(Beijin
".
Not
3. Ent
res
4. Pres
Sav
5. Pres
Please
phone
To confi
1. Pres
2. Ent
3. Pres
The
To confi
1. Pres
r the domai
ectively.
s or,
ng field.
s the Save s
refer to App
.
ure the dat
s Menu->Ba
r the specifi
s the Save s
time that dis
ure the dat
s Menu->Ba
names or I
or the Swit
ft key to ac
ndix A - Tim
and time
ic->Date & T
date and t
ft key to ac
plays on the
and time f
ic->Date & T
addresses i
h soft key t
ept the ch
Zones for th
anually via
me->Gener
ime.
ept the ch
LCD screen
rmat via ph
me->Forma
n the NTP Se
select Auto
nge or the
list of availa
hone user i
l->Manual.
e.
will change
ne user inte
.
ver 1 and N
atic from t
ack soft key
le time zon
terface:
ccordingly
rface:
P Server 2 fi
e Daylight
to cancel.
s on the IP
lds,
2. Pres
Dat
3. Pres
or 2
4. Pres
There ar
MMM","
date, a
The dat
s or
Format fiel
s or
Hour) from
s the Save s
e 7 availabl
WW" repre
d "MMM" re
formats yo
W
, or the Swit
.
, or the Swit
the Time For
ft key to ac
date form
ents the ab
resents the
need to kn
ate Format
W MMM D
D-MMM-YY
YYY-MM-DD
D/MM/YYY
MM/DD/YY
h soft key t
h soft key t
mat field.
ept the ch
ts, for exam
reviation of
first three let
ow:
Ex
select the
select the
e or the
le, the dat
the week, "
ers of the m
mple (2013
Wed Feb 2
27-Feb-13
2013-02-2
27/02/201
02/27/13
esired date
esired time
ack soft key
format "W
D" represen
onth.
2-27)
format from
format (12 H
to cancel.
W DD
s two-digit
the
our
f the
MMM YYY
W DD MM
You ca
Settings
20
also confi
>Time & Dat
re the date
.
and time se
27 Feb 201
Wed 27 Fe
tings via we
user interf
ce at the p
th

A
d
y
y
o
n
y
a
g
e
e
e
n
d
n
s
c
n
h
eFun
w
e
w
n
v
s
a
a
o
o
n
l
e
o
gu
n
y
o
o
d
g
s
(
s
e
c
o
c
c
r
r
m
u
n
n
b
H
e
a
s
a
p
o
s
w
n
a
d
c
o
h
a
u
n
m
n
o
c
d
e
e
Y
e
o
v
e
)
r
r
B
i
ng
B
e
m
e
c
v
u
O
u
a
b
g
g
m
o
a
o
h
t
s
a
t
d
E
o
r
n
A
o
s
G
genc
e
ministrat
r Pass
ord
Custo
izing Your P
hone
Ke
You ca
use. Onl
the adv
To chan
1. Pres
2. Ent
3. Ent
4. Ent
5. Pres
as Sen
You ca
To set th
1. Pres
2. Pres
Sen
change th
the users o
nced settin
e the admi
s Menu->Ad
r the old pa
r the new p
r the new p
s the Save s
d
set the "#"
e key as se
s Menu->Ca
s or
field, or sel
administrat
ning the a
s.
istrator pas
anced
sword in th
ssword in th
ssword aga
ft key to ac
r "*" to perf
d via phone
l Feature->O
, or the Swit
ct Disabled
pas
r password
ministrator
word via ph
word: admi
Current Pas
e New Pass
in in the Co
ept the ch
rm as a sen
user interfa
thers->Gene
h soft key t
to disable t
to protect y
assword ha
ne user int
n
->Passwo
word field.
ord field.
firm Passwo
nge or the
key while d
e:
ral.
select Key
is feature.
ur phone fr
e the permi
rface:
d->Admin P
d field.
ack soft key
aling a call.
# or Key * fr
m unautho
ssion to cha
ssword.
to cancel.
m the Key
ized
e
s
Ke
3. Pres
You ca
Feature
pad Lo
You ca
feature
This feat
s the Save s
also confi
->General I
k
lock the ke
elps you to
ure allows y
M
nu Key:
ction Keys:
All
Keys:
ft key to ac
re key as se
formation.
pad of you
protect you
u to perfor
The Men
the pho
by pressi
cannot
The func
REDIAL,
keys, lin
All keys
number
the Spe
an activ
ept the ch
nd via web
phone whe
phone fro
the followi
soft key is l
e until unlo
the Conn
e configure
tion keys ar
OLD, MUTE,
keys and m
re locked.
, answer inc
kerphone k
e call on hol
e or the
ser interfac
you are te
unauthoriz
:
cked. You
ked. A new
ect soft key,
.
locked. Yo
TRANSFER,
mory keys
ou are only
oming calls
y or pressin
d by pressin
ack soft key
at the pat
porarily no
d use.
annot acce
oice mail c
but the voic
cannot use
K, X, naviga
ntil unlocke
llowed to d
y lifting the
the HEADS
the Hold s
to cancel.
using it. This
s the menu
n be acce
e mail code
the MESSA
ion keys, sof
.
ial emer
handset, pr
T key and p
ft key.
f
sed
E,
t
y
ssing
lace
21

User
e
e
e
2
a
b
k
g
n
e
g
e
c
k
e
c
e
m
n
a
N
v
o
p
h
r
s
d
d
c
s
t
o
d
m
e
t
p
(
s
c
c
c
k
y
n
m
c
A
c
d
h
n
c
h
D
c
m
e
f
n
n
o
o
a
e
o
m
e
e
r
e
o
s
r
c
c
t
)
b
d
e
s
a
e
6
c
ing
a
b
s
c
a
e
e
k
f
o
c
c
c
y
a
g
d
Guide SIP-T4
Not
The e
more i
G IP Phone
ergency nu
formation, r
ber setting, i
fer to Emerg
f desired, mu
ncy Numbe
t be made
on page 49.
efore lock a
tivation. For
To activ
1. Pres
2. Pres
Ena
3. Pres
Loc
4. Pres
5. Lon
The
You ca
long pr
To confi
1. Clic
2. Ent
3. Clic
te the keyp
s Menu->Ad
s or
le field.
s or
Type field.
s the Save s
press
LCD screen
configure t
ssing
ure the inte
k on Feature
r the desire
k Confirm to
ad lock via
anced
pas
, or the Swit
, or the Swit
ft key to ac
to lock the
rompts “Ke
e interval (i
.
val for auto
->Phone Lo
time in the
accept the
hone user i
word: admi
h soft key t
h soft key t
ept the ch
eypad imm
pad Lock!”
seconds) t
atic keypa
k.
uto Lock Ti
hange.
terface:
->Phone S
n
select Ena
select the
nge.
diately wh
and display
automatic
d lock via w
e Out (0~3
ettings->Key
led from th
esired type
n the phon
the icon
lly lock the
b user inter
00s) field.
pad Lock.
Keypad Lo
from the Ke
is idle.
.
eypad inste
ace:
k
pad
d of
Not
Not
The de
only.
You c
To unlo
default
To set th
1. Pres
2. Ent
3. Pres
The PI
To unlo
1. Pres
2. Ent
fault time ou
n configure t
k the keypa
eypad unlo
e keypad lo
s Menu->Ba
r the Curren
s the Save s
code can o
k the keypa
s any locke
r the PIN in t
is 0 seconds,
he time out
, you shoul
ck PIN is null.
k PIN via p
ic->Phone U
PIN, New PI
ft key to ac
nly be 0~9, a
d lock via p
key, the LC
he Unlock PI
that is, you
or automati
know the k
one user int
lock PIN.
N and Confi
ept the sett
d not more
one user int
screen pr
N field.
an long pres
keypad lo
ypad unlo
rface:
m PIN in the
or the B
han 15 char
rface:
mpts “Unloc
to lo
via web us
k PIN of the
correspondi
ck soft key t
cters.
PIN”.
k the keypa
er interface
phone. The
n
fields.
o cancel.
3. Pres
22
s the OK soft
The
icon dis
key to unlo
appears fro
k the keypa
the LCD sc
d.
reen.

Not
e
Au
e
n
b
n
a
t
n
o
e
s
jus
a
g
u
e
a
e
e
v
o
t
n
o
o
p
e
e
tker
o
t
e
s
s
o
d
k
o
i
(
s
c
c
v
o
e
h
e
h
n
s
R
e
c
n
p
e
o
a
p
n
e
)
m
c
l
o
g
a
a
n)
b
w
m
p
d
e
c
B
p
m
e
e
h
e
c
n
g
e
Y
t
h
Custo
You
can long pr
You c
n also unloc
ss to l
the keypad
ck the key
by administr
ad again.
tor password
.
izing Your P
hone
dio Set
Vo
lume
To deac
1. Pres
2. Pres
Ena
3. Pres
You ca
path Fe
You ca
can als
devices
interfac
tivate the k
s Menu->Ad
s or
le field.
s the Save s
also activa
tures->Pho
ings
press the V
press the V
handset, s
or during a
ypad lock v
anced
, or the Swit
ft key to ac
e or deacti
e Lock.
lume key to
lume key t
eakerphon
call.
pas
a phone us
word: admi
h soft key t
ept the ch
ate the key
adjust the ri
adjust the r
or headset
r interface:
->Phone S
select Disa
nge.
ad lock via
er volume
ceiver volu
, when the
ettings->Key
led from th
eb user int
when the p
e of curren
hone is in th
pad Lock.
Keypad Lo
rface at th
one is idle.
tly used aud
dialing
ck
ou
o
Not
Ri
g Tones
To adju
1. Pres
To ad
1. Pres
spe
If ring
Ring ton
distin
ui
from yo
To selec
1. Pres
t the volum
s
t the volum
s
phone
r volume is a
es are used
sh the differ
r neighbor’
t a ring tone
s Menu->Ba
when the p
to adjust th
when the p
o adjust the
r headset).
justed to mi
o indicate i
nt account
.
for the phon
ic->Sound->
one is idle:
ringer volu
one is durin
volume of
imum, the
coming cal
registered
e via phone
ing Tones.
e.
a call:
urrently use
icon will a
s. You can s
n your phon
user interfa
audio devi
pear on the
lect differe
e or to distin
e:
e (handset,
LCD screen.
t ring tones
uish your p
o
one
2. Pres
3. Pres
s or
s the Save s
to select th
ft key to ac
desired rin
ept the ch
tone.
nge or the
ack soft key
to cancel.
23

User Guide SIP-T42G IP Phone
To select a ring tone for the phone via web user interface:
1. Click on Settings->Preference.
2. Select the desired ring tone from the pull-down list of Ring Tone.
3. Click Confirm to accept the change.
To select a ring tone for the account via web user interface:
1. Click on Account.
2. Select the desired account from the pull-down list of Account.
3. Click on Basic
4. Select the desired ring tone from the pull-down list of Ring Tone.
If Common is selected, this account will use the ring tone selected for the phone at
Settings->Preference. Refer to the above instruction.
5. Click Confirm to accept the change.
You can also upload custom ring tones for your phone, contact your system
administrator for more information.
Note
The ring tone for an incoming call on the phone may be different. For example, when
the phone receives an incoming call from a contact stored in the local directory, it will
play the ring tone assigned to the contact in the contact directory (refer to Adding
Contacts
tone assigned to the account. If both the contact ring tone and the account ring tone
are not assigned, then the phone will play the ring tone assigned for the phone.
in the Contact Management section). Otherwise, the phone will play the ring
Contact Management
This section provides the operating instructions for managing contacts. The topics
include:
z Favorites
z Local Directory
z Blacklist
z Remote Phonebook
Favorites
Favorites provide easy access to the lists you use frequently. The lists may contain Local
Directory, History, Remote Phone Book and LDAP.
To configure the favorites via web user interface:
1. Click on Contacts->Setting.
24

e
c
h
k
e
a
e
c
t
t
g
n
d
b
a
l
s
d
o
e
e
s
n
r
k
t
h
o
n
c
a
a
s
y
C
e
v
s
c
e
m
c
o
s
a
y
s
o
n
i
j
d
ing
o
n
o
m
y
Custo
m
m
y
o
e
n
s
a
izing Your P
hone
2. In t
clic
The
3. Rep
4. To r
5. To
The
e Favorite b
.
selected list
eat the step
move the li
djust the or
lists appear
ock, select t
appears in t
2 to add m
t from the E
er of list, clic
n the LCD s
he desired li
e Enabled
re lists to th
abled colu
k or
creen in the
t from the D
olumn.
Enabled co
n, click
.
ad
usted or
sabled colu
lumn.
.
er.
n and
Not
Lo
6. Clic
If you
Phone
You c
To chec
1. Pres
The
If th
dire
al Direc
The buil
can stor
roups i
k Confirm to
on’t configu
oo
, you ca
n configure
k the favorit
s the Favorit
phone LCD
re is only o
tly.
ory
-in phone di
e up to 1000
the local d
accept the
re the remot
nnot see the
he favorites
s via phone
s soft key w
creen displ
e list in the f
ectory store
contacts in
irectory: All
hange.
phonebook
remote phon
ia web user i
user interfa
hen the pho
ys the list(s)
vorite, pres
the names
our phone'
ontacts, C
in advance i
ebook in the
terface onl
e:
ne is idle.
f favorites.
the Fav
nd phone
local direct
mpany, Fa
n the Contac
phone user i
.
rites soft ke
umbers of y
ry. There ar
ily and Frien
ts->Remote
terface.
enters this li
ur contacts
four defau
d. You can
t
. You
lt
dd
25

User
Add
Add
2
o
e
p
a
o
n
e
n
a
n
n
m
m
g
a
o
n
e
e
c
u
d
h
e
t
a
y
s
d
o
h
c
o
s
t
e
t
a
y
e
f
a
d
a
o
l
e
c
c
e
l
g
c
c
e
r
v
u
o
a
o
y
a
r
v
o
r
M
d
e
B
e
w
r
M
e
d
e
e
o
a
c
n
Fing
a
c
r
o
w
c
a
d
r
e
Guide SIP-T4
G IP Phone
new gr
edit, del
from th
ing Grou
To add
1. Pres
The
fav
If Lo
Co
2. Pres
3. Ent
4. Pres
5. Pres
You ca
contact
ups and ad
ete or searc
local direct
s
group to a
s the Favorit
IP phone en
rites by def
cal Director
tacts.
s the Group
the desire
s or
s the Save s
also press t
groups.
new conta
for a cont
ory.
local direct
s soft key.
ers the loca
ult.
is removed
oft key.
group nam
to select th
ft key to ac
e Option sof
cts to differe
ct in the loc
ry:
contacts di
from the fa
e in the Gro
desired gr
ept the ch
t key to edit
nt groups in
al directory.
ectly as the
orites, press
p Name fiel
up ring ton
nge or the
r delete th
the local dir
You can als
e is only Loc
enu->Dire
.
from the Ri
ack soft key
Company,
ctory. You
dial a cont
l Directory i
tory->Local
Tones fiel
to cancel.
amily and F
an
ct
the
.
iend
ing Cont
You ca
z
Ma
z
Fro
z
Fro
Addin
To add
1. Pres
The
fav
If Lo
Co
2. Sel
3. Pres
cts
add conta
ually
call history
remote ph
Contact
contact to
s the Favorit
IP phone en
rites by def
cal Director
tacts.
ct the desir
s the Add so
ts to your lo
nebook
Manually
he local dir
s soft key.
ers the loca
ult.
is removed
d contact
t key.
al director
ctory manu
contacts di
from the fa
roup.
in the follo
lly:
ectly as the
orites, press
ways:
e is only Loc
enu->Dire
l Directory i
tory->Local
the
4. Ent
5. Pres
26
r the name
s or
Ac
ount field.
If A
to is selecte
nd the offi
, or the Swit
, the phon
e, mobile or
h soft key t
will use the
other numb
select the
first availabl
rs in the cor
esired acc
account
esponding f
unt from th
hen placing
ields.
calls

e
to t
h
d
d
g
a
e
g
a
e
e
e
e
e
3
a
a
c
r
o
s
t
c
o
e
s
t
e
e
e
o
a
r
o
n
e
x
c
c
c
e
d
c
d
o
e
o
o
d
v
x
y
p
e
d
o
o
a
h
e
a
h
o
v
e
c
o
c
o
d
dng
B
r
t
h
t
a
r
y
o
e
w
m
o
o
c
e
t
C
h
e
o
o
e
e contact f
om the loca
l directory.
Custo
izing Your P
hone
Not
6. Pres
fiel
7. Pres
fiel
8. Pres
If the
alread
Addin
To add
1. Pres
2. Pres
3. Pres
4. Ent
5. Pres
The
s or
.
s or
.
s the Save s
ontact has e
y existed!”.
Contact
contact to
s the History
s or
s the Option
r the conta
s the Save s
entry is succ
, or the Swit
, or the Swit
ft key to ac
isted in the
from Call
he local dir
soft key.
to highlight
soft key, an
t name.
ft key to ac
ssfully save
h soft key t
h soft key t
ept the ch
irectory, the
History
ctory from t
the desired
then select
ept the ch
in the loca
select the
select the
e or the
LCD screen
e call histo
ntry.
Add to Con
nge.
directory.
esired ring t
esired phot
ack soft key
ill prompt “
y:
acts from th
ne from the
from the P
to cancel.
ontact nam
e prompt list
Ring
oto
.
Edi
ting Cont
Addin
To add
1. Pres
If R
Boo
2. Sel
3. Pres
4. Pres
5. Pres
If th
"Ov
con
For mor
page 3
Contact
contact to
s Menu->Dir
mote Phon
k.
ct the desir
s or
s the Option
s the Save s
contact h
rwrite the o
tact in the l
informatio
.
cts
from rem
he local dir
ctory->Rem
Book is add
d remote gr
to highlight
soft key, an
ft key to sa
s already e
iginal conta
cal director
on remote
te phone
ctory from t
te Phone B
ed to the fa
up.
the desired
then select
e the conta
isted in the l
ct?". Press th
or the Can
honebook
book
e remote p
ok.
orites, press
ntry.
Add to Con
t to the loc
cal directo
e OK soft ke
el soft key t
perating, r
onebook:
Favorites->R
acts from th
l directory.
y, the LCD s
to overwrit
cancel.
fer to Remo
emote Phon
e prompt list
reen will pr
the origina
e Phonebo
.
mpt
l
on
To edit
1. Pres
contact in t
s the Favorit
he local dir
s soft key.
ctory:
27

User
e
2
o
n
e
t
e
o
n
e
n
t
o
a
n
a
t
a
y
e
s
o
f
e
t
a
y
e
p
g
t
s
t
o
e
e
a
l
g
c
a
l
g
d
o
d
s
r
v
c
a
r
v
c
g wa
i
u
c
o
t
r
M
h
B
r
M
g
a
e
s
l
a
c
s
a
c
y
h
e
e
Guide SIP-T4
G IP Phone
The
IP phone en
fav
rites by def
If Lo
cal Director
Co
tacts.
ers the loca
ult.
is removed
contacts di
from the fa
ectly as the
orites, press
e is only Loc
enu->Dire
l Directory i
tory->Local
the
Del
eting Con
2. Sel
3. Pres
4. Pres
5. Pres
6. Pres
To delet
1. Pres
The
fav
If Lo
Co
2. Sel
3. Pres
4. Pres
ct the desir
s or
s theOption
s or
s the Save s
acts
a contact
s the Favorit
IP phone en
rites by def
cal Director
tacts.
ct the desir
s or
s the Option
d contact
to highlight
oft key, and
to highlight
ft key to ac
rom the loc
s soft key.
ers the loca
ult.
is removed
d contact
to highlight
soft key, an
roup.
the desired
then select
the contact
ept the ch
l directory:
contacts di
from the fa
roup.
the desired
then select
ontact.
Detail from t
information
nge or the
ectly as the
orites, press
ontact.
Delete from
e prompt li
and then ed
ack soft key
e is only Loc
enu->Dire
the prompt
t.
it.
to cancel.
l Directory i
tory->Local
list.
the
Not
Upl
oading C
The
5. Pres
You c
All. For
You ca
Contac
To uplo
1. Clic
2. Clic
3. Clic
You ca
LCD screen
s the OK soft
n also delet
more inform
also mana
s->Contacts.
ntact Pho
d a new cu
on Contac
k Browse, an
k Upload Ph
also click D
rompts the
key to confi
all contact
tion, refer to
e the conta
os
tom photo f
s->Contacts
d then selec
to to uploa
lete Photo t
followin
rm the delet
by pressing
the above st
cts via web
r the conta
.
t a photo fr
the photo.
o delete the
rning:
n
or the C
he Option so
eps.
ser interfac
t via web u
m your loca
photo.
ncel soft ke
ft key and th
at the pat
er interface:
computer.
to cancel.
n select Del
te
28

e
g
e
o
e
e
o
n
e
a
t
h
e
w
t
c
o
t
a
y
e
f
p
e
t
n
m
n
n
t
l
g
n
v
o
e
r
r
v
c
p
d
o
o
r
M
r
Custo
m
a
a
n
izing Your P
hone
Not
Pla
cing Calls
The ph
You c
To chan
1. Clic
2. Clic
3. Sel
4. Clic
When y
LCD scr
To plac
1. Pres
The
fav
one only sup
n only delet
e the custo
on Contac
to select t
ct the desir
k Edit to acc
u place a c
en will sho
to Contac
a call to a
s Favorites s
IP phone en
rites by def
orts uploadi
the custom
m photo for
s->Contacts
e desired e
d photo fro
ept the cha
all to the co
the contac
s
ontact from
ft key.
ers the loca
ult.
g the png, j
photos.
he contact
.
try which yo
the pull-d
e.
tact or rec
photo.
the local di
contacts di
g or bmp fo
ia web user
u want to e
wn list of Ph
ive a call fr
ectory:
ectly as the
mat files.
interface:
it.
to.
m the cont
e is only Loc
ct, the pho
l Directory i
e
the
If Lo
cal Director
Co
tacts.
2. Sel
3. Pres
4. Pres
ct the desir
s or
s the Dial so
is removed
d contact
to highlight
t key.
from the fa
roup.
the desired
orite, press
ontact.
enu->Direct
ory->Local
29

User
aSea
2
n
u
r
c
o
n
e
p
c
n
e
g
h
u
e
a
b
h
e
a
r
a
a
e
t
a
y
t
o
h
D
a
a
s
t
u
s
d
t
n
m
l
a
u
r
Y
y
o
h
o
n
o
i
r
v
y
m
w
g
c
e
m
e
a
c
.
r
M
m
s
u
e
e
r
e
p
y
a
c
u
c
t
e
m
j
.
i
r
D
e
Guide SIP-T4
G IP Phone
Se
- If o
key
- If m
soft
rching fo
To sear
1. Pres
The
fav
If Lo
Co
2. Pres
3. Ent
the
ly one num
to dial out t
ltiple numb
key to displ
Press o
Press the Di
Contacts
h for a cont
s the Favorit
IP phone en
rites by def
cal Director
tacts.
s the Search
a few con
contact ph
er of the co
e number.
rs of the co
y a list of nu
to high
l soft key to
ct in the loc
s soft key.
ers the loca
ult
is removed
soft key.
inuous char
ne number
tact is store
ntact are st
bers.
light the des
dial out the
al directory:
contacts di
from the fa
cters of the
sing the ke
d in the loc
red in the lo
red number
number.
ectly as the
orites, press
contact na
pad.
l directory,
al director
e is only Loc
enu->Dire
e or contin
ress the Dial
, press the D
l Directory i
tory->Local
ous numbe
soft
al
the
s of
The
ap
rch Sour
You ca
interfac
To confi
1. Clic
2. In t
col
The
3. Rep
4. To r
5. To
The
contacts w
ear on the L
e List in
search for
. The lists m
ure search
k on Contac
e Search So
mn and clic
selected list
eat the step
move the li
djust the or
search resul
ose name o
CD screen.
ialing
contact in
y contain L
ource list in
s->Setting.
rce List In D
k .
appears in t
2 to add m
t from the E
er of list, clic
s display on
phone nu
ou can dial
our desired
cal Contac
dialing via
ialin
block,
e Enabled
re lists to th
abled colu
k or
the LCD scr
ber matche
from the res
list when th
ts, History, R
eb user inte
select the d
olumn.
Enabled co
n, click
.
en in the ad
the chara
lt list.
phone is in
mote Phon
face:
sired list fro
lumn.
.
usted order
ters entered
he dialing
book and L
the Disabl
will
AP.
d
30

e
p
c
k
enum
t
p
n
y
r
e
a
a
t
e
t
a
o
n
o
x
e
t
s
L
e
s
c
a
e
a
e
d
o
n
i
t
h
i
e
h
o
c
y
w
s
s
a
t
m
e
C
e
e
:
u
Custo
m
h
Y
e
r
r
l
e
r
s
a
e
izing Your P
hone
Not
Im
6. Clic
You c
To sear
1. Pic
2. Ent
The
ma
or
orting/Ex
You ca
can onl
k Confirm to
n configure
h for a cont
up the hand
a few con
ber using th
contacts in
ches the ch
to scroll t
orting Co
manage y
import or e
accept the
earch sourc
ct in the en
set, press th
inuous char
keypad.
he enabled
racters ent
the desire
tact Lists
ur phone’s l
port the co
hange.
list in dialing
bled searc
speakerph
cters of the
search sour
red will app
contact an
cal director
tact list via
via web user
source lists:
ne or press
contact na
e lists whos
ear on the L
d then plac
via phone
eb user int
interface on
he line key.
e or the co
name or p
D screen.
a call to th
or web user i
rface.
y.
ntact phon
one numbe
ou can pres
contact.
nterface. Bu
t you
To impo
1. Clic
2. Clic
3. Clic
4. Clic
t an XML fil
k on Contac
k Browse to
syst
m.
k Import XM
web user int
The
k OK to com
of contact l
s->Contacts
elect a con
to import t
rface prom
plete import
st via web u
.
act list file (fi
e contact li
pts "The origi
ng the cont
er interface
le format m
t.
nal contact
ct list.
st be .xml) f
will be cove
om your loc
ed, continu
l
?".
31

User
a
2
r
e
a
e
r
t
o
c
a
s
s
e
d
c
u
h
d
d
e
s
e
o
t
s
V
h
l
t
L
v
r
o
a
y
t
o
d
r
o
o
>
e
t
t
h
r
n
m
u
s
o
o
c
c
c
e
c
c
c
s
a
g
e
o
b
c
e
r
b
o
o
o
o
a
u
t
m
e
m
n
c
o
k
b
d
e
d
dng
B
o
o
e
h
d
y
o
o
w
o
o
a
n
t
Y
c
c
g
e
h
Guide SIP-T4
G IP Phone
Bl
To impo
1. Clic
2. Clic
3. Clic
4. Clic
To expo
1. Clic
2. Clic
3. Clic
cklist
The buil
can stor
delete
the bla
automa
t a CSV file
k on Contac
k Browse to
syst
m.
k Import CS
You
can then se
list,
nd select t
For
xample, co
Confirm to
t a contact
k on Contac
k Export XM
k Save to sa
-in phone di
e up to 30 c
r search for
klist director
tically.
f contact lis
s->Contacts
elect a con
to import t
lect whethe
e contact i
ntact name,
complete i
ist via web
s->Contacts
(or Export C
e the conta
ectory store
ntacts in y
contact in
, but an inc
via web us
.
act list file (fi
e contact lis
to delete al
formation y
office num
porting the
ser interfac
.
SV).
ct list to you
the names
ur phone’s
the blacklist
ming call fr
r interface:
le format m
t.
l old contac
u want to i
er or mobil
ontact list.
:
local syste
and phone
lacklist dire
directory. Y
m the blac
st be.csv) fr
s while imp
port into th
number.
.
umbers of t
tory. You ca
u can also
list director
m your loc
rting the co
local direc
e blacklist.
n add, edit,
ial a conta
will be reje
l
tact
ory.
ou
t in
ted
To add
1. Pre
2. Pre
3. Ent
fiel
4. Pres
Ac
If A
to t
5. Pres
fiel
6. Pres
fiel
7. Pres
To mov
1. Pre
contact to
s Menu->Dir
s the Add s
r the name
s.
s or
ount field.
to is selecte
e contact f
s or
.
s or
.
s the Save s
a contact t
s Favorites-
he blacklist
ectory->Bla
ft key.
and the offi
, or the Swit
, the phon
om the loca
, or the Swit
, or the Swit
ft key to ac
the Blackli
Local Cont
manually:
klist.
e, mobile o
h soft key t
will use the
l directory.
h soft key t
h soft key t
ept the ch
t:
cts.
r other num
select the
first availabl
select the
select the
e or the
ers in the c
esired acc
account
esired ring t
esired phot
ack soft key
rrespondin
unt from th
hen placing
ne from the
from the P
to cancel.
calls
Ring
oto
2. Sel
32
ct the desir
d contact
roup.

3. Press the Option soft key and then select Add to Blacklist from the prompt list.
The phone user interface prompts "Move selected to Blacklist?"
4. Press the OK soft key to confirm the setting.
Operating instructions of adding blacklists, editing blacklists, deleting blacklists, placing
call to blacklists and searching for contact in the blacklist, refer to the operating
instructions of Local Directory on page 25.
Remote Phonebook
You can access your corporate directory through your phone. You can add local
contacts from the corporate directory. You can also dial a contact from the corporate
directory.
You can configure your new phone to access up to 5 corporate directories. Contact
your system administrator for the access URL of the corporate directory.
To configure an access URL for remote phonebook via web user interface:
Customizing Your Phone
1. Click on Contacts->Remote Phone Book.
2. Enter the access URL in the URL field.
3. Enter the name in the Name field.
4. Click Confirm to accept the change.
To access your corporate directory via phone user interface:
1. Press Menu->Directory->Remote Phone Book.
If Remote Phone Book is added to the favorite, press Favorites->Remote Phone
Book.
2. Select the desired remote group, and then press the Enter soft key.
The phone connects to load the corporate directory, and then displays the
corporate contact list on the LCD screen.
3. Press the Back soft key to back to the previous interface.
To search for a contact in the corporate directory:
1. Press Menu->Directory->Remote Phone Book.
2. Select the desired remote group, and then press the Enter soft key to load the
corporate directory.
3. Press the Search soft key.
4. Enter a few continuous characters of the contact name or continuous numbers of
the contact phone number using the keypad.
The contacts whose name or phone number matches the characters entered will
appear on the LCD screen. You can dial from the result list.
To place a call from the corporate directory:
33

User
a
2
e
p
e
e
e
(sec
r
T
d
h
s
d
a
e
e
t
e
f
w
n
t
r
e
a
d
y
y
l
o
d
r
o
e
o
o
n
p
i
l
P
-
o
o
c
t
c
a
y
u
c
c
C
e
e
d
h
y
o
e
a
e
t
S
s
a
u
e
o
a
t
p
E
.
l
m
S
C
e
a
b
B
C
t
L
r
y
o
e
m
s
e
e
e
s
a
s
o
s
Guide SIP-T4
G IP Phone
C
1. Pres
2. Sel
cor
3. Sel
4. Pres
In additi
corpora
To enab
1. Clic
2. Sel
3. Ent
The
4. Clic
ll Histo
s Menu->Dir
ct the desir
orate direc
ct the desir
s the Dial so
on, you can
te directory
le the prese
k on Contac
ct Enabled f
r the refresh
onds) field.
default valu
k Confirm to
y Man
ctory->Rem
d remote gr
ory.
d contact i
t key.
enable the
hen receiv
tation of ca
s->Remote
om the pull
period of c
is 3600 sec
accept the
gemen
te Phone B
up, and th
the corpor
hone to pr
ng a call.
ler identity s
hone Book.
down list of
rporate dire
nds.
hange.
ok.
n press the
te directory
sent the cal
ored in the r
Remote Na
ctory in the
nte
soft ke
er identity st
emote phon
e.
Remote Na
to load the
red in the
ebook:
e Flash Tim
The SIP-
Calls an
check t
list. You
To enab
1. Pres
2. Pres
fiel
3. Pres
To chec
1. Pres
The
2. Pres
Call
3. Pres
4. Pres
42G IP phon
Forwarde
e call histor
hould enab
le the histor
s Menu->Ca
s or
.
s the Save s
k the call his
s the History
LCD screen
s or
s and Forwa
s or
s the Option
e maintains
Calls. The c
, dial a call,
le the histor
record feat
l Feature->O
, or the Swit
ft key to ac
tory:
soft key.
isplays All
to switch b
ded Calls.
to select th
soft key, an
all history li
ll history list
add a cont
record feat
re via phon
thers->Gene
h soft key t
ept the ch
alls list.
tween All C
desired en
then select
ts of Dialed
supports up
ct or delet
re in advan
user interf
ral.
select Ena
nge or the
alls, Dialed
ry.
Detail from
alls, Receiv
to100 entrie
an entry fro
ce.
ce:
led from th
ack soft key
alls, Receiv
he prompt li
ed Calls, Mis
in all. You c
m the call hi
History Rec
to cancel.
d Calls, Mis
st.
ed
n
tory
rd
ed
The
detailed inf
To dial
1. Pres
34
call from th
s the History
rmation of t
call histor
soft key.
e entry ap
list:
ears on the
CD screen.

y
a
e
e
e
s
e
s
s
l
s
s
s
u
s
e
r
o
r
d
n
o
r
p
k
f
y
a
n
p
o
e
e
e
s
e
e
d
h
e
e
t
m
a
m
,
t
t
d
g
t
e
g
C
?
g
C
C
t
p
C
C
t
c
o
Custo
m
e
e
d
s
e
v
i
o
s
s
o
s
s
izing Your P
hone
2. Pres
Call
3. Pres
4. Pres
To add
1. Pres
2. Pres
Call
3. Pres
4. Pres
the
5. Ent
key.
For mor
To delet
1. Pres
s or
s and Forwa
s or
s the Send s
contact fro
s the History
s or
s and Forwa
s or
s the Option
prompt list.
r the desire
informatio
an entry fr
s the History
to switch b
ded Calls.
to select th
ft key.
m the call hi
soft key.
to switch b
ded Calls.
to select th
soft key, an
values in th
, refer to Co
m the call
soft key.
tween All C
desired en
tory list:
tween All C
desired en
then select
e correspon
ntact Mana
istory list:
alls, Dialed
ry.
alls, Dialed
ry.
Add to Con
ing fields. A
ement on
alls, Receiv
alls, Receiv
acts (or Ad
nd then pre
age 24.
d Calls, Mis
d Calls, Mis
to Blacklist)
s the Save s
ed
ed
from
ft
S
stem C
2. Pres
Call
3. Pres
4. Pres
The
5. Pres
To delet
1. Pre
2. Pre
Ca
3. Pre
4. Pre
The
5. Pre
s or
s and Forwa
s or
s the Delete
LCD screen
the OK soft
all entries
s the Histor
s or
ls and Forw
s the Optio
s the OK sof
LCD screen
s the OK soft
stomiz
to switch b
ded Calls.
to select th
soft key.
rompts "Dele
ey to confir
rom the call
soft key.
to switch b
rded Calls.
soft key, an
t key.
rompts "Cle
key to confir
ations
tween All C
desired en
e the select
the deletin
history list:
etween All
d then selec
r all records
the deletin
alls, Dialed
ry.
d records?".
or the Canc
alls, Dialed
t Clear from
".
or the Can
alls, Receiv
el soft key to
alls, Recei
he prompt l
el soft key t
d Calls, Mis
cancel.
ed Calls, Mi
st.
cancel.
ed
sed
He
adset U
Physical
activat
e
ly connect y
/deactivat
ur headset
it for use.
refer to Pho
ne Installati
n on page 1
1 and
35

User Guide SIP-T42G IP Phone
Headset Activation/Deactivation
To activate the headset mode:
1. Press on the phone.
The HEADSET key LED illuminates solid green when the headset mode is activated.
Press the line key or the Answer soft key to answer a call, the call will connect to
your headset automatically. Enter the desired number and then press the Send soft
key, the phone will place the call by using the headset automatically. For more
information about using the headset to place a call, refer to Placing Calls on page
51.
To deactivate the headset mode:
1. Press again on the phone.
The HEADSET key LED turns off when the headset mode is deactivated.
Headset Prior
You can use headset in priority when enabling the headset prior feature. This feature is
especially useful for permanent or full-time headset users.
To enable headset prior via web user interface:
1. Click on Features->General Information.
2. Select Enabled from the pull-down list of Headset Prior.
3. Click Confirm to accept the change.
To use headset prior, you should activate the headset mode in advance:
1. Physically connect the headset.
2. Press to activate the headset mode.
Note
If the headset prior feature is enabled, the headset mode will not be deactivated until
you press the HEADSET key again.
Dual Headset
36
You can use two headsets when enabling the dual headset feature. To use this feature,
you must physically connect headsets to the headset jack and handset jack
respectively. Once the phone joins in a call, people with the headset connected to the
headset jack has a full-duplex conversation, another people with the headset
connected to the handset jack is only allowed to listen to.
To enable dual headset via web user interface:
1. Click on Features->General Information.

2. Select Enabled from the pull-down list of Dual Headset.
3. Click Confirm to accept the change.
DSS Keys
There are two types of DSS keys: Line Keys and Programmable Keys. The details will be
introduced as following. The SIP-T42G IP phone supports 27 line keys.
Line Keys
You can assign predefined functionalities to the line keys. You can also define a label
for the line key feature which will appear on the LCD screen. Line keys allow you to use
quick access features such as call return and voice mail. The Line keys LED will indicate
the monitoring status when the keys a reassigned specific features, such as BLF and
Shared Line. The default key type of line key 1-6 is Line. The default key type of line key
7-27 is N/A, which indicates that this line key provides no functionality.
Customizing Your Phone
To configure the Line key via phone user interface:
1. Press Menu->Call Feature->DSS Keys.
2. Select the desired Line key, and then press the Enter soft key.
3. Select the desired key type from the Type field.
4. (Optional.) Select the desired key event type from the Key Event field.
5. (Optional.) Select the desired line from the Account ID field.
6. (Optional.) Enter the string that will appear on the LCD screen in the Label field.
7. (Optional.) Enter the corresponding value in the Value field.
8. (Optional.) Enter the corresponding value in the Extension field.
9. Press the Save soft key to accept the change or the Back soft key to cancel.
You can also configure the Line key via web user interface at the path Dsskey->Line
Key.
You can assign functionalities to 27 line keys. When you assign functionality to line keys
located in line key 1-9, the labels of the line key are displayed on the first page of line
keys. The following figure shows an example of the line keys:
When you assign functionality to line key located in line key 10-27, the label of the line
key is displayed on the second or third page of the line keys. Each page can display 9
line key labels at most. The right lowest line key is used to switch pages of the line keys.
The following figure shows an example of the line keys:
The following table lists the page icon status:
Icons Description
37

User
2
e
c
k
u
M
i
a
L
L
A
n
w
n
d
D
u
o
p
e
s
n
s
s
m
e
a
e
e
o
ring
e
n
o
d
f
c
c
ge
c
t
ge
Guide SIP-T4
G IP Phone
The Line
z
Line
z
Spe
z
Voi
z
Pic
2
1
3
1
1
key feature
d Dial
e Mail
Up
Indicate
Indicate
Fast flash
The BLF
non-curr
Solid:
There is
Fast flash
The line r
are explain
the current
the non-cu
:
onitored us
nt page.
parked call
ing:
ceives an i
d in the foll
page of the
rent page o
receives a
on the non-
coming call
wing subch
line keys.
the line key
n incoming
urrent pa
on the non-
apters in de
s.
all on the
.
urrent pa
ail:
.
z
Gro
p Pickup
z
DT
F
z
Pref
x
z
Loc
l Group
z
XM
Group
z
XM
Brower
z
LD
P
z
Co
ference
z
For
ard
z
Tra
sfer
z
Hol
z
DN
SMS
Gro
Zer
p Listening
-Touch
z
z
z
z
URL
z
Key
ad Lock
For mor
informatio
, contact y
ur system a
ministrator.
Line
38

Customizing Your Phone
You can use this key feature to accept the incoming calls, place active calls on hold or
resume a held call. It performs the same as a hard line key.
Dependencies: Type (Line)
Account ID (the account this feature will be applied to)
Value (Default/Lock/Float)
Usage: When receiving an incoming call, the DSS key LED flashes green:
1. Press the DSS key to accept the incoming call.
2. Press the DSS key to place the active call on hold.
3. Press the DSS key again to resume the held call.
If Auto is selected from the Account ID field, press the DSS key when the phone is idle,
you can then dial out using the first available account.
When you select Lock in the Value field, the line keys located in the same position of
the other page will be automatically assigned Line feature with Lock filled in the Value
field. Then you can use this key on every page. This feature is only applicable to line key
1-9.
When you select Float in the Value field, the phone will automatically switch to the
page where the line receives an incoming call.
Speed Dial
You can use this key feature to speed up dialing the numbers often used or hard to
remember.
Dependencies: Type (Speed Dial)
Account ID (the account this feature will be applied to)
Label (key label displayed on the LCD screen)
Value (the number you want to dial out)
Usage: Press the DSS key to dial out the number specified in the Value field, using the
account selected from the Account ID field.
Voice Mail
You can use this key feature to connect voice mail quickly. For more information, refer
to Voice Mail on page 85.
Dependencies: Type (Key Event)
Key Event (Voice Mail)
Account ID (the account this feature will be applied to)
Label (key label displayed on the LCD screen)
Value (the voice mail access code)
Usage: Press the DSS key to dial out the voice mail access code, you can follow the
voice prompt to listen to the voice mails.
Pick Up
39

User Guide SIP-T42G IP Phone
You can use this key feature to answer someone else’s incoming call on the phone.
Dependencies: Type (Key Event)
Key Event (Pick Up)
Account ID (the account this feature will be applied to)
Label (key label displayed on the LCD screen)
Value (the direct pickup code followed by the specific phone number)
Usage: Press the DSS key on your phone when the specific phone number receives an
incoming call. The call is answered on your phone.
Group Pickup
You can use this key feature to answer incoming calls in a group that is associated with
their own group.
Dependencies: Type (Key Event)
Key Event (Group Pickup)
Note
Account ID (the account this feature will be applied to)
Label (key label displayed on the LCD screen)
Value (the group pickup feature code)
Usage: Press the DSS key on your phone when a phone number in the group receives
an incoming call. The call is answered on your phone.
DTMF
You can use this key feature to send the specification of arbitrary key sequences via
DTMF.
Dependencies: Type (Key Event)
Key Event (DTMF)
Label (key label displayed on the LCD screen)
Value (DTMF sequence)
DTMF sequence is allowed to be: "0-9", "*", "#" and "A-D".
Usage: Press the DSS key during an active call to send the key sequence specified in the
Value field.
40
Prefix
You can use this key feature to add a specified prefix number before the dialed
number.
Dependencies: Type (Key Event)
Key Event (Prefix)
Label (key label displayed on the LCD screen)

Customizing Your Phone
Value (the prefix number)
Usage: Press the DSS key when the phone is idle, the phone enters into the dialing
screen and displays the prefix number which you specified in the Value field, enter
other digits and then dial out.
Local Group
You can use this key feature to access the contact group in the local directory quickly.
For more information, refer to Local Directory on page 25.
Dependencies: Type (Key Event)
Key Event (Local Group)
Local Group (the contact group name you want to access)
Label (key label displayed on the LCD screen)
Usage: Press the DSS key to access the contact group specified in the Local Group field.
XML Group
You can use this key feature to access the remote group in your corporate directory
quickly. You should configure the remote phonebook in advance. For more information,
refer to Remote Phonebook on page 33.
Dependencies: Type (Key Event)
Key Event (XML Group)
XML Group (the remote group name you want to access if the remote
phonebook is configured)
Label (key label displayed on the LCD screen)
Usage: Press the DSS key to access the remote group specified in the XML Group field.
XML Browser
You can use this key feature to access the XML browser quickly. The Xml browser allows
you to create custom services which meet your functional requirements on the server.
You can customize practical applications, such as weather report, stock information,
Google search, etc.
Dependencies: Type (Key Event)
Key Event (XML Browser)
Label (key label displayed on the LCD screen)
Value (the access URL for xml browser)
Usage: Press the DSS key to access the Xml browser specified in the Value field.
LDAP
You can use this key feature to access the LDAP search interface quickly.
Dependencies: Type (Key Event)
Key Event (LDAP)
Label (key label displayed on the LCD screen)
41

User Guide SIP-T42G IP Phone
Usage:
1. Press the DSS key to access the LDAP search interface.
2. Enter a few continuous characters of the contact name or continuous numbers of
the contact phone number using the keypad.
The contacts whose name or phone number matches the characters entered will
appear on the LCD screen.
Conference
You can use this key feature to set up a conference call. For more information, refer to
Conference on page 66.
Dependencies: Type (Key Event)
Key Event (Conference)
Label (key label displayed on the LCD screen)
Value (the number you want to add to the conference)
Usage: Press the DSS key during an active call to set up a conference with the number
specified in the Value field.
Note
Note
When leaving the Value field blank, the DSS key performs the same as the Conference
soft key during a call.
Forward
You can use this key feature to forward an incoming call to someone else. For more
information, refer to Call Forward on page 61.
Dependencies: Type (Key Event)
Key Event (Forward)
Label (key label displayed on the LCD screen)
Value (the number you want to forward to)
Usage: Press the DSS key to forward an incoming call to the number specified in the
Value field.
When leaving the Value field blank, the DSS key performs the same as the Forward soft
key when receiving an incoming call.
Transfer
42
You can use this key feature to handle the call differently depending on the transfer
mode on DSS key when there is an active call on the phone.
Dependencies: Type (Key Event)
Key Event (Transfer)
Label (key label displayed on the LCD screen)

Customizing Your Phone
Value (the number you want to transfer to)
Usage:
z When the transfer mode on DSS key is Blind Transfer, press the DSS key to complete
the blind transfer to the number specified in the Value field.
z When the transfer mode on DSS key is Attended Transfer, press the DSS key to dial
out the number specified in the Value field, and then you can perform the
attended or semi-attended transfer.
z When the transfer mode on DSS key is New Call, press the DSS key, the number
specified in the Value field displays on the LCD screen, and then you can perform
the blind, attended or semi-attended transfer.
Note
You can configure the transfer mode on DSS key via web user interface at the path
Features->Transfer. For more information on how to configure the transfer mode on DSS
key, refer to Busy Lamp Field (BLF) on page 75.
When leaving the Value field blank, the DSS key performs the same as the TRANSFER key
or the Transfer soft key during a call. For more information, refer to Call Transfer on page
65.
Hold
You can use this key feature to place an active call on hold or retrieve a held call.
Dependencies: Type (Key Event)
Key Event (Hold)
Label (key label displayed on the LCD screen)
Usage:
1. Press the DSS key during an active call to place the call on hold.
2. Press the DSS key again to retrieve the held call.
DND
Note
You can use this key feature to activate or deactivate the DND mode.
Dependencies: Type (Key Event)
Key Event (DND)
Label (key label displayed on the LCD screen)
Usage:
1. Press the DSS key to activate the DND mode.
2. Press the DSS key again to deactivate the DND mode.
When the DND mode is activated, the incoming calls will be rejected automatically.
43

User Guide SIP-T42G IP Phone
SMS
You can use this key feature to quick access the text message feature. For more
information, refer to Short Message Service (SMS) on page 84.
Dependencies: Type (Key Event)
Key Event (SMS)
Label (key label displayed on the LCD screen)
Usage: Press the DSS key when the phone is idle to access the text message feature.
Group Listening
You can use this key feature to activate the Speakerphone and Handset/Headset
mode at the same time. It is suitable for the group conversation which has more than
one person at one side. You are able to speak and listen through the handset/headset,
meanwhile the others nearby can only listen through the speaker.
Dependencies: Type (Key Event)
Key Event (Group Listening)
Label (key label displayed on the LCD screen)
Usage:
1. During a call, press the DSS key to activate the group listening mode.
You can then speak and listen through the handset/headset, other people at your
side can listen through speaker at the same time.
2. Press the DSS key again to deactivate the group listening mode.
Zero-Touch
You can use this key feature to configure auto provision and network parameters
quickly.
Dependencies: Type (Key Event)
Key Event (Zero-Touch)
Label (key label displayed on the LCD screen)
Usage:
1. Press the DSS key to access the zero-touch screen.
2. Press the OK soft key within a few seconds.
3. Configure the network parameters in the corresponding fields.
44
4. Press the Next soft key.
5. Configure the auto provision parameters in the corresponding fields.
6. Press the OK soft key.
The phone will reboot to update configurations.
URL
You can use this key feature to trigger the phone to send a HTTP GET request contained
a specific URL.

Customizing Your Phone
Dependencies: Type (URL)
Label (key label displayed on the LCD screen)
URL (the URL contained in the HTTP GET request)
Usage: Press the DSS key to trigger the phone to send a HTTP GET request contained the
URL specified in the URL field.
Keypad Lock
You can use this key feature to immediately lock the keypad of your phone instead of
long pressing . For more information, refer to Keypad Lock on page 21.
Dependencies: Type (Key Event)
Key Event (Keypad Lock)
Label (key label displayed on the LCD screen)
Usage: Press the DSS key to immediately lock the keypad of your phone instead of long
pressing .
Programmable Keys
You can customize the soft keys, navigation keys and function keys on the keypad.
To customize the programmable keys via web user interface:
1. Click on Dsskey->Programmable Key.
2. Customize specific features for these keys.
3. Click Confirm to accept the change.
Note
You can configure the programmable keys via web user interface only.
Account Management
You can register one or multiple accounts on the SIP-T42G IP phone. You can also
configure each line key associated with an account or configure multiple line keys
associated with an account.
Account Registration
To register an account via phone user interface:
1. Press Menu->Advanced (password: admin) ->Account.
2. Select the desired account and then press the Enter soft key.
3. Select Enabled from the Account Status field.
4. Enter the desired values in Label, Display Name, Register Name, User Name,
Password and SIP Server1 fields respectively. Contact your system administrator for
45

User Guide SIP-T42G IP Phone
more information.
5. Press the Save soft key to accept the change or the Back soft key to cancel.
6. Repeat steps 2 to 5 until you have registered all accounts.
The following figures show single or multiple accounts registered on the phone:
Single account:
Multiple accounts:
To disable an account via phone user interface:
1. Press Menu->Advanced (password: admin) ->Account.
2. Select the desired account and then press the Enter soft key.
3. Select Disabled from the Account Status field.
4. Press the Save soft key to accept the change or the Back soft key to cancel.
You can also register or disable an account via web user interface at the path
Account->Register.
Multiple Line Keys per Account
You can configure multiple line keys associated with an account. This enhances call
visualization and simplifies call handling.
If this is the case, the LCD screen could resemble the following figure:
Incoming calls to this line will be distributed evenly among the available line keys.
Similarly, outgoing calls will be distributed.
Your phone can be configured to have a combination of lines with a single line key and
lines with multiple line keys.
Dial Plan
Dial plan is a string of characters that governs the way your SIP-T42GIP phone processes
the inputs received from your phone keypad. The SIP-T42G IP phone supports the
following dial plan features:
z Replace Rule
z Dial-now
46
z Area Code
z Block Out
The basic expression syntax you need to know:
Syntax Description
.
The dot "." can be used as a placeholder or multiple placeholders for

Syntax Description
any character. Example:
"12." would match "123", "1234", "12345", "12abc", etc.
x
An "x" can be used as a placeholder for any character. Example:
"12x" would match "121", "122", "123", "12a", etc.
The square brackets "[]" can be used as a placeholder for a single
[]
character which matches any of a set of characters. Example:
"91[5-7]1234" would match "9151234", "9161234", "9171234", etc.
The parentheses "( )" can be used to group together patterns, for
()
instance, to logically combine two or more patterns. Example:
"([1-9])([2-7])3" would match "923", "153", "773",etc.
The “$” should be followed by the sequence number of a parenthesis.
The “$” plus the sequence number means the whole character or
characters placed in the parenthesis. The number directs to the right
$
parenthesis when there are more than one. Example:
A replace rule configuration: Number: "9([5-7])(.)", Replace: "5$2". When
you enter "96123" to dial out on your phone, the number will be
replaced as "5123" and then dialed out. “$2” means the characters in
the second parenthesis, that is, “123”.
Customizing Your Phone
Note
You can configure the dial plan rules via web user interface only.
Replace Rule
You can configure one or more replace rules to remove the specified string and
replace it with another string. You can configure a pattern with wildcards (expression
syntax refer to the table above), so that any string that matches the pattern will be
replaced. This feature is convenient for you to dial out a long number. For example, a
replace rule is configured as "Prefix: 1" and "Replace: 1234567", when you try to dial out
the number “1234567”, you just need to enter “1” on the phone and then press the
Send soft key.
To add a replace rule via web user interface:
1. Click on Settings->Dial Plan->Replace Rule.
2. Enter the string (e.g., 2xx) in the Prefix field.
3. Enter the string (e.g., 12345) in the Replace field.
4. Enter the desired line ID in the Account field or leave it blank.
5. Click Add to add the replace rule.
When you enter the number “234” using the keypad and then dial out, the phone
will dial out “12345” instead.
Note
The valid value of Account field can be one or more digits among 1, 2, 3, 4, 5 and 6.
Each digit must be separated by a “,”. For example: when you enter the value “1, 2” in
the Account field, this replace rule will apply to account1 and account2.
If you leave the Account field blank or enter an invalid value, then the replace rule will
apply to all accounts.
47

User Guide SIP-T42G IP Phone
To edit a replace rule via web user interface:
1. Click on Settings->Dial Plan->Replace Rule.
2. Select the desired replace rule by checking the checkbox.
3. Edit the values in the Prefix and Replace fields.
4. Enter the desired line ID in the Account field or leave it blank.
5. Click Edit to edit the replace rules.
To delete one or more replace rules via web user interface:
1. Click on Settings->Dial Plan->Replace Rule.
2. Select the one or more replace rules by checking the checkbox(es).
3. Click Del to delete the replace rule(s).
Dial-now
You can configure one or more dial-now rules on your phone. When the dialed out
number matches the dial-now string, the number will be dialed out automatically. For
example, a dial-now rule is configured as "2xx", then entering any three-digit string
begins with 2 will be dialed out automatically on the phone.
Note
To add a dial-now rule via web user interface:
1. Click on Settings->Dial Plan->Dial Now.
2. Enter the desired value (e.g., 1234) in the Dial Now Rule field.
3. Enter the desired line ID in the Account field or leave it blank.
4. Click Add to add the dial-now rule.
When you enter the number “1234” using the keypad, the phone will dial out “1234”
automatically without pressing any key.
You can also edit or delete the dial-now rule, refer to Replace Rule on page 47 for more
information.
Time Out for Dial-Now Rule
You can configure the interval for dial-now rules. That is, you can configure your phone
to dial out the phone number automatically, which matches a dial-now rule, after the
specified delay time.
To configure the time out for dial-now rule via web user interface:
48
1. Click on Features->General Information.
2. Enter the time within 1-14 (in seconds) in the Time Out for Dial Now Rule field.
3. Click Confirm to accept the change.

Area Code
Area codes are also known as Numbering Plan Areas (NPAs). They usually indicate
geographical areas in a country. This feature is necessary only when dialing the number
outside the code area. For example, area code is configured as "Code: 011, Minimum
Length: 4, Maximum Length: 11", then when you dial out the number "56789", which has
the digits between 4 to 11, the phone will add the area code and dial out the number
"01156789".
To configure the area code and lengths via web user interface:
1. Click on Settings->Dial Plan->Area Code.
2. Enter the desired values in the Code, Min Length (1-15) and Max Length (1-15)
3. Enter the desired line ID in the Account field or leave it blank.
4. Click Confirm to accept the change.
fields.
Customizing Your Phone
Note
The default values of minimum and maximum length are 1 and 15 respectively.
Block Out
You can block some specific numbers from being dialed on your phone. When you dial
a block out number on your phone, the dialing will fail and the LCD screen will prompt
"Forbidden Number".
To add a block out number via web user interface:
1. Click on Settings->Dial Plan->Block Out.
2. Enter the desired value in the BlockOut Number field.
3. Enter the desired line ID in the Account field or leave it blank.
4. Click Confirm to add the block out number.
Emergency Number
Public telephone networks in countries around the world have a single emergency
telephone number (emergency services number), that allows a caller to contact local
emergency services for assistance when required. The emergency telephone number
may differ from country to country. It is typically a three-digit number so that it can be
easily remembered and dialed quickly. Some countries have a different emergency
number for each of the different emergency services.
Note
You can specify the emergency telephone numbers on the IP phone for contacting
the emergency services in an emergency situation.
Contact your local phone service provider for available emergency numbers in your
.
area
49

User Guide SIP-T42G IP Phone
To specify emergency numbers via web user interface:
1. Click on Features->Phone Lock.
2. Enter the emergency services number in the Emergency field. For multiple numbers,
enter a "," between each emergency number.
The default emergency numbers are 120, 911 and 110.
3. Click Confirm to accept the change.
Live Dialpad
You can enable the live dialpad feature on the SIP-T42G IP phone, which enables the IP
phone to automatically dial out the phone number without pressing any other key. You
can also configure a period of time before automatically dialing out the phone
number.
To enable the live dialpad via web user interface:
1. Click on Settings->Preference.
2. Select Enabled from the pull-down list of Live Dialpad.
3. Enter the desired delay time in the Inter Digit Time (1~14) (seconds) field.
4. Click Confirm to accept the change.
Note
Hotline
You can dial a hotline number immediately once you lift the handset, press the
speakerphone key or press a line key. You can also configure a period of delay time to
dial out the hotline number, the phone will dial out the hotline number automatically
after the specified delay time.
To configure the hotline number via phone user interface:
1. Press Menu->Call Feature->Others->Hotline.
The default delay time of live dialpad feature is 4s.
You can configure live dialpad via web user interface only.
2. Enter the desired number in the Number field.
3. Enter the delay time in the Hotline Delay0-10(s) field.
4. Press the Save soft key to accept the change or the Back soft key to cancel.
You can also configure hotline via web user interface at the path Features->General
Information.
50

Basic Call Features
The SIP-T42G IP phone is designed to be easily used like a regular phone on a public
switched telephone network (PSTN). You can place calls, answer calls, transfer a call to
someone else, or conduct a conference call.
This chapter provides basic operating instructions for the SIP-T42G IP phone. The topics
include:
z Placing Calls
z Answering Calls
z Ending Calls
z Redialing Numbers
Basic Call Features
z Recent Call In Dialing
z Auto Answer
z Auto Redial
z Call Completion
z Call Return
z Call Mute
z Call Hold/Resume
z Do Not Disturb (DND)
z Call Forward
z Call Transfer
z Call Waiting
z Conference
z Call Park
z Call Pickup
z Anonymous Call
z Anonymous Call Rejection
If you require additional information or assistance with your new phone, contact your
system administrator.
Placing Calls
You can place a call in three ways using your SIP-T42G IP phone:
51

User
e
2
g
g
g
n
a
n
l
ge
a
u
e
k
e
u
e
e
h
e
h
e
h
a
h
p
n
e
e
e
e
c
a
a
a
a
”
g
d
d
y
m
g
i
d
g
i
a
y
s
h
6
o
t
h
F
b
e
s
2
t
n
d
d
y
r
r
n
n
o
t
o
R
S
e
c
o
n
e
S
a
k
i
p
a
r
o
r
s
d
w
r
e
i
n
n
r
e
e
u
a
r
t
o
e
r
y
K
a
y
s
t
o
e
o
e
d
o
d
n
Guide SIP-T4
G IP Phone
z
Usin
the hands
z
Usin
the speak
z
Usin
the heads
t
rphone
t
You ca
other p
You ca
and dia
on pa
During
by press
The call
to the n
To plac
1. Pic
2. Ent
3. Pres
By defa
or set n
page 21
also dial th
rty.
search the
from the se
24 and Cal
call, you c
ing the Spe
duration of
mber”1000
a call usin
up the han
r the desire
s ,
lt, the # ke
ither of the
.
number firs
all history, t
rch results.
l History Man
n alternate
kerphone k
ctive calls i
has lasted
the handse
set.
number usi
, or the Sen
is configure
as send ke
, and then
e local con
or more inf
agement o
etween Sp
y, the HEAD
visible on th
0 seconds.
:
the keyp
soft key.
as a send
s. For more
hoose the
tact directo
rmation, ref
page 34.
akerphone,
ET key, or p
e LCD scree
d.
ey. You ca
nformation,
ay you wan
y or the rem
r to Contac
Headset, or
cking up th
. In the figu
set the * ke
efer to the
to speak to
te phoneb
t Managem
Handset m
handset.
e below, th
as the sen
ey as Send
the
ok
nt
de
call
key
n
Not
You c
press t
exam
Your p
more i
To plac
Do one
- Wit
Ent
Pres
- Wit
Pres
To plac
Do one
n also dial u
e OK key. T
le, SIP URI: 3
hone may n
formation.
a call usin
of the follow
the handse
r the desire
s ,
the handse
s ,
a call usin
of the follow
ing the SIP U
e maximum
06@sip.com,
t support dir
the hands-f
ng:
t on-hook, p
number usi
or the Send
t on-hook, e
,
the headse
ng:
I or IP addre
IP URI or IP a
IP: 192.168.1.
ct IP dialing.
ee speaker
ess
the keyp
soft key.
ter the desi
r the Send s
:
s. To obtain t
dress length
15.
Contact you
hone mod
or the line k
d.
ed number
ft key.
he IP addres
is 32 charac
system adm
:
y to obtain
sing the ke
of your pho
ers. For
inistrator for
dial tone.
pad.
e,
- Wit
52
the option
Pres
s the line ke
l headset c
to obtain a
nnected, p
dial tone.
ess to
ctivate the
headset mo
e.

e
An
e
Ent
e
h
e
e
n
a
e
e
n
e
g
o
g
g
g
n
s
y
n
m
d
a
d
l
y
d
e
a
d
e
e
e
e
t
v
o
c
e
n
d
o
n
d
a
t
n
d
e
n
d
r
c
C
p
y
oFor
o
r
d
a
r
a
P
g
d
a
h
a
n
m
r
g
H
a
o
a
n
j
g
Ba
e
l
j
o
o
d
a
d
e
o
r the desire
Pres
s ,
number usi
, or the Sen
the keyp
soft key.
d.
sic Call Fe
tures
Not
- Wit
Ent
Pres
To per
To plac
You ca
during
- Pres
Ent
Pres
- Pres
Pres
Ent
Pres
the option
r the desire
s ,
anently ena
multiple ca
have more
n active cal
s the line ke
r the desire
s ,
s or th
s the New C
r the desire
s ,
l headset c
number usi
, or the Sen
ble your hea
lls:
than one c
, do one of
. The active
number usi
, or the Sen
Hold soft k
ll soft key.
number usi
, or the Sen
nnected, p
the keyp
soft key.
set, refer to
ll on your SI
he followin
call is place
the keyp
soft key.
y to place t
the keyp
soft key.
ess to
d.
eadset Prior
-T42G IP ph
:
on hold.
d.
e original c
d.
ctivate the
on page 36.
ne. To plac
ll on hold.
headset mo
a new call
e.
Not
You ca
key to r
swerin
When y
z
Usin
z
Usin
z
Usin
You ca
soft ke
ring on
You ca
more i
Answeri
press o
trieve the d
Calls
u are not in
the hands
the speak
the heads
n ignore inc
. You can als
your phone.
n forward in
formation, r
When No
to swit
sired call.
another call
t
rphone
t
ming calls b
o activate D
more info
oming calls t
fer to Call Fo
in Another
h between
, you can a
pressing the
Not Disturb
rmation, refe
someone e
ward on pa
all
the calls, an
swer a call i
X key, the Re
ode to igno
to Do Not Di
lse by pressin
e 61.
d then press
three ways
ect soft key
re the incomi
sturb (DND)
the Forwar
the Resume
:
r the Silenc
ng calls with
n page 59.
soft key. For
soft
ut
In all ca
destinat
es, the acti
ion.
e call will a
pear on the
LCD screen
showing cal
duration an
d
53

User
n
e
2
e
k
e
h
h
(
e
h
h
gree
n
a
g
a
a
o
o
o
s
n
d
n
w
n
i
A
e
r
a
c
g ca
i
d
e
-
n
n
e
e
g
v
v
d
k
d
p
u
e
e
s
s
t
t
c
a
a
h
l
a
a
(
n
pig
p
y
y
h
f
n
o
o
o
t
w
k
h
t
r
Guide SIP-T4
G IP Phone
To answ
1. Pic
To answ
Do one
- Pres
- Wit
soft
- Wit
the
To answ
Do one
- Pres
- Wit
- Wit
r a call usi
up the han
r a call usi
of the follo
s .
the handse
key.
the handse
line key LED
r a call usi
of the follow
s .
the headse
the headse
n).
the hands
set.
the hands
ing:
t on-hook a
t on-hook a
flashes gre
the heads
n
:
t mode acti
t mode acti
t:
free speak
d the head
d the head
n).
t:
ated, press
ated, press
rphone mod
et mode de
et mode de
he Answer s
he line key
e:
ctivated, p
ctivated, p
oft key.
the line key
ress the Ans
ress the line
LED flashes
e
ey
E
Answeri
If you h
followin
- Pres
The
- Pres
Pres
The
ding C
To end
Do one
- If y
- If y
When in
ve an activ
:
s the Answe
incoming c
s to ac
s or the
incomin
lls
call:
of the follow
u are using t
u are using t
nother Call
call, and a
soft key.
ll is answere
ess the new
Answer soft
ll is answere
ng:
he handset,
he headset,
n incoming
and the or
call.
ey.
and the or
press the C
press the C
all arrives o
iginal call is
inal call is
ncel soft ke
ncel soft ke
the phone,
laced on h
laced on h
or hang up
.
do one of t
ld.
ld.
the handset
e
.
- If y
Not
54
To end
or pres
u are using t
a call place
the Resume
he speaker
on hold, yo
soft key to r
hone, press
can press t
sume the ca
or t
e Cancel so
l before endi
e Cancel s
t key to end
g it.
ft key.
he call direc
ly,

R
eRe
e
l
a
l
a
n
e
c
e
c
a
r
c
e
s
y
n
a
p
e
t
c
o
s
e
m
e
l
d
n
e
n
e
p
t
r
a
u
d
c
n
n
u
a
s
t
g
a
p
dialing
Numbe
s
B
sic Call Fe
tures
To redia
1. Pres
A c
To redia
1. Pres
2. Pres
cent C
You ca
should
To enab
1. Cli
2. Sel
the last pla
s twic
ll to your la
a previousl
s whe
s or
or the Se
ll In Di
check the
nable the r
le the recen
k on Conta
ct Enabled
ed call fro
.
t placed cal
placed cal
n the phone
to select th
d soft key.
ling
laced calls
cent call in
call in diali
ts->Setting.
from the pull
your phon
l is attempte
l from your
is idle.
desired en
ist when the
ialing featu
feature vi
-down list of
:
d.
hone:
ry from the
phone is in t
e in advan
web user i
Recent Call
ialed calls li
he dialing in
e.
terface:
In Dialin
.
t, and then
erface. You
ress
3. Cli
Not
To chec
You c
k Confirm t
n enable th
k place call
accept the
recent call i
list when th
change.
dialing feat
phone is in
re via web
the dialing i
ser interface
terface:
only.
55

User
Au
e
Au
2
kThe
w
n
t
g
s
e
s
d
s
e
n
t
a
n
e
g
s
s
d
e
e
eThe
s
n
s
u
m
d
p
n
a
e
p
gu
w
d
a
d
e
d
e
gu
n
a
n
a
r
o
A
t
c
e
w
a
n
O
t
0
e
c
p
a
h
e
a
a
r
r
e
t
a
n
d
a
t
v
e
a
s
a
a
c
e
B
c
n
B
u
o
e
y
e
y
c
a
a
r
Guide SIP-T4
G IP Phone
1. Pic
to Ans
You ca
feature
To confi
1. Pre
2. Sel
3. Pre
4. Pre
You ca
Accoun
up the han
phone LCD
er
enable the
o allow the
ure auto a
s Menu->C
ct the desir
s or
fiel
.
s the Save s
Th
icon a
also confi
->Basic.
set, press th
screen displ
auto answe
hone to au
swer via ph
ll Feature->
d line and t
, or the Swi
oft key to a
pears on th
re auto ans
e speakerp
ys the plac
feature for
tomatically
ne user inte
uto Answe
hen press th
ch soft key
cept the ch
LCD scree
er via web
one or press
d calls list.
line. You c
nswer an in
face:
.
Enter soft k
o select Ena
nge or the
.
user interfa
the line key.
n use the a
oming call
y.
bled from th
ack soft ke
e at the pat
to answer
n the line.
Auto Answ
to cancel.
h
e
Not
to Redi
The a
auto
You ca
when th
the tim
To confi
1. Pre
2. Pre
fiel
3. Ent
Th
4. Ent
to answer fe
atically whe
l
enable the
e called par
to wait bet
ure auto re
s Menu->C
s or
.
r the desire
default tim
r the desire
default tim
ture is not a
there is an
auto redial f
ty is busy. Yo
een redial
ial via pho
ll Feature->
, or the Swi
time in the
interval is 1
times in th
s are 10.
plicable to
ctive call on
eature to re
u can also c
ttempts.
e user interf
thers->Auto
ch soft key
Redial Inter
s.
Redial Tim
nswer anoth
the phone.
ial the pho
onfigure the
ce:
Redial.
o select Ena
al field.
s field.
er incoming
e number a
times of the
bled from th
all
utomatically
auto redial
Auto Redi
nd
l
5. Pre
You ca
Feature
To use a
56
s the Save s
also confi
->General I
uto redial:
oft key to a
re auto redi
formation.
cept the ch
al via web u
nge or the
er interface
ack soft ke
at the path
to cancel.

a
e
a
h
n
s
p
n
c
g
s
s
m
s
n
s
h
n
sact
e
s
r
n
g
e
a
y
r
d
a
m
a
d
gu
n
o
r
d
h
e
l
s
e
v
e
p
e
b
O
t
c
p
e
o
a
o
S
c
p
d
n
o
a
C
t
a
w
p
t
e
e
l
o
n
p
o
e
e
B
r
p
e
o
B
a
e
o
p
d
e
y
p
e
a
n
h
m
a
r
n
C
a
sic Call Fe
tures
C
When t
the pho
1. Pre
the
2. Wa
The pho
ll Com
You ca
desired
To confi
1. Pre
2. Pre
Co
3. Pre
e called pa
e:
s the OK sof
LCD screen
it for a perio
ne will retry
letion
use the call
allee when
ure call co
s Menu->C
s or
pletion fiel
s the Save s
ty is busy, th
t key to acti
of the phon
of time or
s many tim
completion
the callee
pletion via
ll Feature->
, or the Swi
.
oft key to a
following
ate auto re
:
ress the OK
s as you co
feature to n
ecomes av
phone user i
thers->Call
ch soft key
cept the ch
rompt will a
ial. The foll
soft key to r
figured until
tify the call
ilable to rec
nterface:
ompletion.
o select Ena
nge or the
pear on th
wing promp
dial the ph
the called
r who faile
eive a call.
bled from th
ack soft ke
LCD screen
t will appea
ne number.
arty is idle.
to reach a
Call
to cancel.
of
on
Not
C
You ca
Feature
To use c
When t
the pho
1. Pre
Wh
scr
2. Pre
The c
your s
ll Retu
also confi
->General I
all completi
e called pa
e:
s the OK sof
ivated.
en the calle
en of the p
s the OK sof
ll completion
stem admini
n
re call com
formation.
n:
ty is busy, th
t key, the ph
party bec
one:
t key to redi
feature is no
trator.
letion via
following
one returns
mes idle, th
l the numb
t available o
eb user inte
rompt will a
o the idle sc
following p
r.
all servers. F
face at the
pear on th
reen and ca
rompt appe
r more infor
ath
LCD screen
ll completio
rs on the L
ation, cont
of
is
D
ct
You ca
To confi
1. Pres
2. Sel
3. Pres
press a call
ure a call r
s Menu->Ca
ct a desired
s or
return key t
turn key via
l Feature->D
DSS key.
, or the Swit
place a ca
phone user
S Keys.
h soft key t
l back to th
interface:
select Key
last incomi
Event from t
call.
e Type field
.
57

User
aCa
e
2
d
(
n
>
n
e
m
R
n
s
c
ge
e
m
l
e
t
r
o
gu
m
g
s
g
g
e
c
o
e
o
e
s
e
d
m
l
p
c
c
u
o
r
c
a
e
a
n
e
e
s
f
o
d
3
o
a
a
w
a
e
h
i
o
D
B
r
e
u
s
h
w
t
t
h
a
e
e
E
e
s
n
d
y
e
a
n
Guide SIP-T4
G IP Phone
C
ll Mute
4. Pres
fiel
5.
Op
6. Pres
You ca
Dsskey-
You ca
then th
To mute
1. Pres
The
illu
To un-m
s or
.
tional.) Ente
s the Save s
also confi
Line key.
mute the
other party
a call:
s durin
phone LCD
inates solid
ute a call:
, or the Swit
the string th
ft key to ac
re a call ret
icrophone
cannot hea
an active
creen indic
reen when
h soft key t
at will appe
ept the ch
rn key via
f the active
you.
all.
tes that the
the call is on
select Call
r on the LC
nge or the
eb user inte
udio devic
call is on m
mute.
Return from
screen in t
ack soft key
face at the
during an
te. The Mut
he Key Eve
e Label fiel
to cancel.
path
ctive call, a
key LED
t
.
nd
Not
1. Pres
ll Hold/
You ca
progres
original
messa
To plac
1. Pres
The
The ph
hold.
To resu
1. Pres
s a
esum
place an a
on your ph
all on hold.
to the oth
a call on h
s or th
phone LCD
one will bee
e a held ca
s or th
a
in to un-mut
tive call on
ne, other c
When placi
r party whil
ld:
Hold soft k
creen show
softly every
ll:
Resume so
the call.
hold. At any
lls can be r
a call on
waiting.
y during a c
the call is o
0 seconds t
t key.
time, at mo
ceived and
old, your IP
all.
n hold and t
remind you
t one activ
made while
PBX might pl
e line key L
hat you still h
call can be
placing the
ay a melod
D flashes gr
ave a call o
in
or
en.
Multiple
If multip
then pr
If more
58
Calls on Hol
e calls are p
ss the Resu
han two cal
:
laced on ho
e soft key t
s are on hol
ld, press
retrieve the
, an indicat
or to s
desired call
on appears
itch betwe
.
on the LCD
n the calls,
creen, for
nd

example "2/4", indicating that this is the second call out of four calls.
If multiple calls are on hold on more than one line keys, you can view the details of the
calls by pressing the corresponding line key, and then press the Resume soft key to
retrieve the call.
Do Not Disturb (DND)
You can use the DND feature to reject the incoming calls automatically on the phone
and the callers can hear a busy signal or a message depending on your server.
You can enable/disable the DND feature for the phone system, or you can customize
the DND feature for each account or all accounts. The following describes the DND
modes:
z Phone (default): DND in phone mode means that the DND feature is effective for
the phone system.
z Custom: DND in custom mode means that you can configure the DND feature for
each account or all accounts.
Basic Call Features
You can also configure the phone to receive incoming calls from some specific
numbers when the DND feature is enabled.
To configure the DND mode via web user interface:
1. Click on Features->Forward & DND.
2. In the DND block, mark the desired radio box in the Mode field.
3. Click Confirm to accept the change.
59

User
e
e
2
a
sThe
o
i
a
sThe
s
s
sThe
o
D
a
sThe
s
s
t
o
i
g
c
e
e
c
o
s
n
s
a
o
n
w
u
u
o
e
o
(
u
o
s
w
u
D
e
e
m
o
e
e
f
e
e
s
h
s
c
g
s
s
c
i
e
&
t
a
y
b
s
c
)
c
s
o
c
a
e
r
u
s
o
a
c
)
m
n
g
y
d
d
e
s
e
N
N
u
u
N
t
ge
m
b
a
e
b
t
s
a
p
s
d
n
t
e
d
r
Guide SIP-T4
Not
You c
G IP Phone
n configure t
he DND mod
e via web us
r interface o
nly.
To activ
1. Pre
Inc
ind
To activ
1. Pre
2. Pre
3. Pre
4. Pre
Inc
Mis
LC
te DND in p
s the DND s
icon o
ming calls
cates the n
te DND in c
s the DND s
LCD screen
s or
s or
s the Save s
specific lin
ming calls
sed Call(s)"
screen.
hone mode:
ft key when
the idle scr
ill be reject
mber of the
stom mode
ft key when
displays a li
to select t
soft key to
oft key to a
icon chan
n the specif
"n" indicate
the phone i
en indicate
d automati
missed calls
for a specifi
the phone i
t of the acc
e desired a
elect On to
cept the ch
es to icon
ic line will b
the numbe
idle.
s that the D
ally and "n
will prompt
account:
idle.
unts on the
count.
activate DN
nge.
.
rejected a
of the misse
D feature is
ew Missed
on the LCD
phone.
D.
tomatically
d calls) will
enabled.
Call(s)" ("n"
creen.
nd "n New
rompt on th
Not
To activ
1. Pre
2. Pre
3. Pre
All
Inc
ind
The pr
The Mi
Accou
The Do
setting
To confi
1. Cli
te DND in c
s the DND s
LCD screen
s the All On
s the Save s
he line icon
ming calls
cates the n
mpt messag
sed Call Log
t->Basic.
Not Disturb f
. For more in
ure the DN
k on Featur
stom mode
ft key when
displays a li
soft key to a
oft key to a
change to
ill be reject
mber of the
displays onl
feature can
ature is loca
ormation, co
authorized
s->Forward
for all acco
the phone i
t of the acc
ctivate DND
cept the ch
con .
d automati
missed calls
if the Misse
e configure
l to the phon
ntact your sy
numbers via
DND.
nts:
idle.
unts on the
for all acco
nge.
ally and "n
will prompt
Call Log fe
via web us
, and may
tem adminis
web user in
phone.
nts.
ew Missed
on the LCD
ture for the li
r interface a
e overridden
rator.
erface:
Call(s)" ("n"
creen.
e is enable
the path
by the serve
.
2. Sel
3. Ent
4. Cli
60
ct Enabled
r the numb
For
multiple nu
k Confirm t
from the pull
s in the Au
bers, enter
accept the
-down list of
horized Nu
"," betwee
chan
e.
DND Emer
bers (com
each num
ncy.
a separate
er.
field.

When the DND feature is enabled on the phone, the phone can still receive the
incoming call from the numbers specified in the Authorized Numbers (comma
separated) field.
Call Forward
You can configure your phone to forward incoming calls to another party by the static
forwarding. You can also forward calls while your phone is ringing, refer to the dynamic
forwarding.
Static Forwarding
You can configure three types of call forward:
z Always Forward: Incoming calls are immediately forwarded.
z Busy Forward: Incoming calls are immediately forwarded if the phone is busy.
z No Answer Forward: Incoming calls are forwarded if not answered after a period of
time.
Basic Call Features
You can enable/disable the call forward feature for the phone system, or you can
customize the call forward feature for each account or all accounts. The following
describes the call forward modes:
z Phone: Call forward in phone mode means that the call forward feature is
effective for the phone system.
z Custom: Call forward in custom mode means that you can configure the call
forward feature for each account or all accounts.
To configure the call forward mode via web user interface:
1. Click on Features->Forward & DND.
2. In the Forward block, mark the desired radio box in the Mode field.
61

User
e
2
p
a
r
l
e
s
a
e
h
t
h
e
s
w
ewhe
t
e
s
w
c
m
h
n
a
d
r
o
o
a
e
r
w
g
c
r
f
f
c
r
e
w
:
c
w
p
o
o
c
o
o
d
d
o
b
i
o
b
i
b
t
e
a
v
a
e
Guide SIP-T4
G IP Phone
Not
3. Clic
You c
To enab
1. Pres
2. Pres
soft
3. De
k Confirm to
n configure t
le call forwa
s Menu->Ca
s or
key.
ending on y
a.) If you s
1) Pres
Alw
2) Ent
in t
3) (Op
in t
accept the
he call forwa
d in phone
l Feature->C
to select t
our selectio
lect Always
or
ys Forward
r the destin
e Target fiel
ional.) Ente
e On Code
han
e.
rd mode via
ode:
all Forward.
e desired fo
:
Forward:
, or the Swit
field.
tion numbe
.
the always
r Off Code
eb user inte
rwarding ty
h soft key t
you want t
orward on
ield.
rface only.
e, and then
select Ena
forward all
ode or off c
press the En
led from th
ncoming c
de respecti
er
lls to
ely
b.) If you s
1) Pres
2) Ent
3) (Op
c.) If you s
1) Pres
62
lect Busy F
or
For
ard field.
r the destin
n the phon
ional.) Ente
the
On Code or
lect No Ans
or
Ans
er Forward
rward:
, or the Swit
tion numbe
is busy in th
the busy for
Off Code fiel
er Forward
, or the Swit
field.
h soft key t
you want t
Target fiel
ard on co
d.
h soft key t
select Ena
forward all
.
e or off cod
select Ena
led from the
ncoming c
e respective
led from th
Busy
lls to
ly in
No

s
s
s
t
p
e
o
s
o
t
p
o
r
a
y
e
s
a
e
h
t
h
n
s2)
s
s
e
s
w
e
e
t
n
a
o
n
t
r
h
c
n
C
h
h
n
a
d
r
o
e
d
s
p
o
a
e
r
e
d
r
ge
c
e
c
w
o
a
c
r
u
c
r
f
f
f
f
o
e
c
c
r
e
w
r
f
o
o
i
o
fng
B
t
e
o
o
c
a
F
e
g
t
o
o
d
d
a
B
a
u
f
c
b
i
o
w
.
b
i
f
w
a
ing
w
k
e
a
v
w
y
a
sic Call Fe
tures
4. Pres
The
To enab
1. Pre
2. Pre
3. Pre
sof
4. De
2) Ent
inc
3) Pres
bef
The
4) (Op
res
s the Save s
icon on the
le call forwa
s Menu->C
s or
s or
key.
ending on
a.) If you s
r the destin
ming calls t
or
re forwardi
default ring
ional.) Ente
ectively in t
ft key to ac
idle screen i
d in custom
ll Feature->
to select t
to select t
our selectio
lect Always
tion numbe
in the Tar
, or the Swit
in the Aft
ime is 12 se
the no ans
e On Code
ept the ch
dicates the
mode:
all Forward.
e desired a
e desired fo
:
Forward, yo
you want t
t field.
h soft key t
r Ring Time f
onds.
er forward
r Off Code
e or the
call forward
count, and
warding typ
can enabl
forward all
select the r
eld.
n code or o
ield.
ack soft key
is enabled.
hen press th
e, and then
it for a spe
unanswered
time to
f code
to cancel.
e Enter soft
press the Ent
ific accoun
ait
ey.
er
t.
1) Pres
Alw
2) Ent
in t
3) (Op
in t
You ca
forward
1) Pres
Pres
The
3) Pres
can
b.) If you s
1) Pres
For
or
ys Forward
r the destin
e Target fiel
ional.) Ente
e On Code
also enabl
was enable
or
the All Line
LCD screen
the OK soft
cel.
lect Busy F
or
ard field.
, or the Swit
field.
tion numbe
.
the always
r Off Code
the always
for a speci
to highlight
soft key.
rompts “C
key to acc
rward, you
, or the Swit
h soft key t
you want t
orward on
ield.
orward for
ic account,
the Always
py to All Lin
pt the chan
an enable i
h soft key t
select Ena
forward all
ode or off c
ll accounts.
do as belo
orward field
s?”.
e or the Ca
for a specifi
select Ena
led from th
ncoming c
de respecti
After the al
:
ncel soft ke
c account.
led from the
lls to
ely
ays
to
Busy
2) Ent
3) (Op
You ca
forward
r the destin
wh
n the phon
ional.) Ente
the
On Code or
also enabl
was enable
tion numbe
is busy in th
the busy for
Off Code fiel
the busy fo
for a speci
you want t
Target fiel
ard on co
d.
ward for all
ic account,
forward all
.
e or off cod
ccounts. A
do as belo
ncoming c
e respective
ter the busy
:
lls to
ly in
63

User
e
2
s
o
n
s
b
a
h
r
a
s2)
s
3)
s
e
s
w
e
o
s
o
t
p
n
f
s2)
s
3)
s
o
gu
i
n
l
t
I
e
d
c
s
p
w
a
o
n
t
r
h
e
s
p
c
t
m
e
e
e
o
e
,
c
r
ge
c
e
c
w
o
w
o
e
a
w
w
g
d
e
w
e
g
o
o
o
i
o
f
c
w
e
g
B
r
e
e
g
e
e
s
b
u
f
n
a
i
y
p
t
e
y
o
e
w
y
t
n
n
Guide SIP-T4
G IP Phone
1) Pres
Pres
The
Pres
can
c.) If you s
1) Pres
Ans
2) Ent
inc
3) Pres
bef
The
4) (Op
res
You ca
answer
or
the All Line
LCD screen
the OK soft
cel.
lect No Ans
or
er Forward
r the destin
ming calls t
or
re forwardi
default ring
ional.) Ente
ectively in t
also enabl
orward was
to highlight
soft key.
rompts “C
key to acc
er Forward
, or the Swit
field.
tion numbe
in the Tar
, or the Swit
in the Aft
ime is 12 se
the no ans
e On Code
the no ans
enabled for
the Busy For
py to All Lin
pt the chan
you can en
h soft key t
you want t
t field.
h soft key t
r Ring Time f
onds.
er forward
r Off Code
er forward f
a specific a
ard field.
s?”.
e or the Ca
able it for a
select Ena
forward all
select the r
eld.
n code or o
ield.
or all accou
count, do
ncel soft ke
pecific acc
led from th
unanswered
ing time to
f code
ts. After the
s below:
to
unt.
No
ait
no
Not
5. Pre
The ass
You ca
Feature
You c
using t
Call fo
Call fo
inform
To disa
1) Pres
Pres
The
Pres
can
s the Save s
ciate line ic
also confi
->Forward &
n also enter
e SIP URL or
ward featur
rward on co
tion, conta
le call forwa
or
the All Line
LCD screen
the OK soft
cel.
oft key to a
n changes
re forward f
DND.
he SIP URL or
P address, re
is local to th
e or off cod
t your system
rd in phone
to highlight
soft key.
rompts “C
key to acc
cept the ch
o .
eature via
IP address in
fer to Placin
phone, an
may be diff
administrato
ode:
the No Ans
py to All Lin
pt the chan
nge or the
eb user inte
the Target fi
Calls on pa
may be ov
rent betwe
r.
er Forward f
s?”.
e or the Ca
ack soft ke
face at the
ld. For more i
e 51.
rridden by th
n servers. For
eld.
ncel soft ke
to cancel.
ath
nformation o
server setti
more
to
gs.
Do one
- Pres
- Pres
64
of the follow
s whe
s Menu->Ca
Pres
s or
ng:
the phone i
l Feature->C
to select th
s idle.
all Forward.
desired for
arding typ
, then press
he Enter sof
key.

a
Pres
w
b
s
s
skey
s
w
s
m
a
e
e
s
n
d
m
e
e
n
e
gb
o
a
d
e
e
p
a
r
a
T
e
a
e
e
e
c
t
e
e
e
c
c
C
h
h
t
c
n
o
d
a
e
d
r
s
t
o
t
o
s
t
o
.
t
o
a
s
o
c
r
t
a
w
e
m
e
n
h
o
a
e
r
a
e
b
o
a
c
e
w
ge
o
a
b
t
s
w
s
n
e
e
a
e
ging
s or
for
ard.
Pres
s the Save s
, or the Swit
ft key to ac
h soft key t
ept the ch
select Disa
nge.
led to disa
B
sic Call Fe
le the call
tures
To disa
1. Pre
2. Pre
3. Pre
4. Pre
for
5. Pre
Dyna
To forw
1. Wh
2. Ent
3. Pres
The
le call forwa
s Menu->C
s or
s or
.
s or
ard.
s the Save s
ic Forwar
rd an incom
n the phon
r the numb
s ,
LCD screen
rd in custom
ll Feature->
to select t
to select t
, or the Swi
oft key to a
ing
ing call to a
is ringing, p
r you want t
, or the Sen
rompts a c
mode for a
all Forward
e desired a
e desired fo
ch soft key
cept the ch
other party:
ress the For
forward th
soft key.
ll forward
pecific acc
press
count, then
warding typ
o select Dis
nge.
ard soft key.
incoming
essage.
unt:
when the
press the En
e, then pres
bled to disa
all to.
phone is idl
er soft key.
the Enter so
ble the call
.
ft
C
ll Tran
You ca
z
Blin
z
Se
z
Att
To perfo
1. Pres
2. Ent
3. Pres
The
To perfo
1. Pres
2. Ent
3. Pres
fer
transfer a c
Transfe
i-Attended
nded Transf
rm a blind tr
s or th
r the numb
s or th
the call is
rm a semi-a
s or th
r the numb
s or
: Tr
ll to anoth
nsfer a call
ransfe
: Tran
: Transfer a
nsfer:
Transfer sof
r you want t
Transfer sof
onnected t
tended tran
Transfer sof
r you want t
to dial out
r party in on
irectly to a
fer a call w
call with pri
key during
transfer th
key to com
the numbe
fer:
key during
transfer th
of the thre
other party
en the tar
r consulting.
call.
call to.
plete the tra
to which y
call.
call to.
ways:
ithout con
t phone is ri
nsfer.
u are transf
ulting.
n
rring.
.
4. Pres
s or th
rin
ack.
Transfer sof
key to com
plete the tra
nsfer when r
ceiving
65

User
aCo
e
2
e
e
n
n
n
i
O
e
t
g
s
s
d
s
(Op
O
s
n
s
c
n
b
a
c
d
e
e
a
n
d
y
o
i
a
e
d
gu
n
o
e
g
e
h
o
e
m
t
o
.
c
a
o
a
e
m
a
n
n
C
t
t
a
c
w
k
o
a
e
e
a
c
u
n
f
g
t
t
a
r
t
e
u
n
b
n
d
e
g
r
eng
B
s
e
r
f
e
r
g
t
e
i
o
e
e
y
y
o
e
i
e
d
o
g
h
w
f
C
c
h
e
w
g
Guide SIP-T4
G IP Phone
C
To perfo
1. Pres
2. Ent
3. Pres
4. Aft
tran
If you ar
You ca
key.
ll Waiti
You ca
feature
phone.
busy m
disable
rm an atten
s or th
r the numb
s or
r the party
sfer.
e using a ha
cancel the
g
enable or
s enabled,
therwise, a
ssage when
he phone t
ed transfer:
Transfer sof
you want t
to dial out
nswers the
dset, the tr
transfer bef
isable the c
ou can rec
nother inco
there is an
play a war
key during
transfer th
all, press
nsfer can b
re the call is
ll waiting fe
ive another
ing call is a
ctive call o
ing tone wh
call.
call to.
or the Tra
complete
connected
ture on the
all when th
tomatically
the phone.
en receivin
sfe
soft key
by hangin
by pressing
phone. If th
re is an act
rejected by
You can als
another cal
to complet
up the han
he Cancel s
call waitin
ve call on t
the phone
enable or
l.
the
set.
ft
e
ith a
To confi
1. Pre
2. Pre
fiel
3. Pre
4.
or
5. Pre
You ca
Feature
nferen
You ca
feature.
by press
parties
you to
ure call wa
s Menu->C
s or
.
s or
tional.) Ent
ff Code fiel
s the Save s
also confi
->General I
e
create a c
You can cr
in
the Conf
y pressing t
dd and rem
ting via pho
ll Feature->
, or the Swi
, or the Swi
r the call w
.
oft key to a
re the call
formation.
nference wi
ate a confe
rence soft
e Manage s
ve specific
e user inter
all Waitin
ch soft key
ch soft key
iting on cod
cept the ch
aiting featu
th other par
rence betw
ey. Then yo
oft key. The
conference
ace:
.
o select Ena
o select Ena
e o
off cod
e or the
e via web u
ies using the
en an activ
can add o
etwork con
parties.
bled from th
bled from th
respectivel
ack soft ke
er interface
phone’s loc
call and s
remove th
erence feat
Call Waitin
Play Tone
in the On
to cancel.
at the path
al conferen
me calls on
conferenc
ure also allo
ield.
ode
e
old
s
Not
The ne
twork confer
conta
66
t your syste
nce feature
administrat
is not availa
r.
le on all serv
rs. For more
nformation,

Lo
c
e
T
a
p
c
e
n
h
e
e
y
h
o
s
f
a
y
,
a
e
a
k
al Conf
rence
B
sic Call Fe
tures
The SIP-
This is c
To set u
1. Pla
2. Pres
3. Ent
42G IP phon
lled Local C
a local co
e a call to t
s the Confer
The
active call is
r the numb
e supports u
onference a
ference call
e first party.
nce soft ke
placed on
r of the sec
p to 5 partie
nd is the de
:
to create
old.
nd party an
(including
ault method
new call.
d press
ourself) in a
of conferen
, or th
conference
ce.
Send soft
call.
ey.
67

User
2
eadd
e
e
m
c
c
n
c
h
s
s
s
s
s
s
s
s
o
n
n
h
e
e
e
g
e
p
o
o
a
a
e
c
e
o
g
u
v
C
a
e
k
l
o
g
a
o
g
n
e
e
w
n
w
s
e
a
o
y
c
e
t
a
o
o
o
o
e
p
m
a
a
s
o
d
c
g
s
p
e
d
n
n
h
m
o
t
e
s
p
e
w
o
n
e
r
u
c
o
a
e
o
h
n
o
n
a
e
w
e
f
e
e
s
e
a
e
d
h
c
f
e
t
a
p
o
a
U
e
e
Guide SIP-T4
G IP Phone
4. Wh
5. Pres
6. Ent
7. Wh
the
8. Rep
To join
1. Pla
pla
2 a
2. Pres
ac
During t
- Pre
- Pre
n the secon
the second
s the Mana
r the numb
n the new
third party t
eat steps 5 t
ultiple calls
e multiple c
e the first c
d so on).
s the Confer
ount 1.
e conferen
s or th
s the Split s
d party ans
party to the
e soft key a
r of the ne
arty answer
the confer
7 until you
(no more th
lls using mu
ll using acc
nce soft ke
e call, you
Hold soft k
ft key to spli
ers the call,
conference
d then pres
party and
the call, pr
nce.
have adde
n 4) in a co
ltiple differe
unt 1, and t
to join the
an do the f
y to place
the confer
press the C
.
the New C
ress ,
ss the Conf
up to 4 inte
ference:
t accounts
en place t
ultiple calls
llowing:
he confere
nce call int
nference so
ll soft key.
, or the S
rence soft k
nded partie
n the phon
e second c
in the conf
ce on hold.
some indivi
t key again
nd soft key.
y again to
.
(for exam
ll using acc
rence on
ual calls.
o
dd
le,
unt
Ne
twork C
- Pre
- Pre
- Pre
- Pre
- Pre
- Pre
You ca
confere
This feat
z
Join
z
Invit
s the Mana
s the Far M
s the Remo
s the New
s to m
s the End C
nferenc
use networ
ce with mu
ure allows y
two calls to
e another p
e soft key,
te soft key t
e soft key t
all soft key t
ute the conf
ll soft key t
conferenc
tiple partici
u to perfor
ether into
rty into an
nd then pre
forbid the
remove th
add a ne
erence call.
drop the c
feature on
ants.
the followi
conferenc
ctive confe
s or
arty speaki
party from t
party.
nference c
the SIP-T42G
:
call.
ence call.
to select t
.
he conferen
ll.
IP phone to
e desired p
ce call.
conduct a
rty.
To use t
advanc
1. Clic
2. Sel
3. Ent
68
is feature, c
, and confi
k on Accou
ct the desir
r the confer
ntact your
ure the ph
t->Advance
d conferen
nce URI (e.
ystem admi
ne via web
.
e type from
., conferen
nistrator for t
ser interfac
the pull-do
e@exampl
he network
:
n list of Con
.com) in th
onference-
erence Typ
Conferenc
RI in
.
URI

a
e
fiel
d
p
c
e
e
o
e
enew
c
t
t
n
Y
a
g
e
e
e
a
n
c
h
e
e
e
e
p
e
o
e
u
r
e
k
s
b
l
e
n
c
c
y
h
o
w
n
y
s
e
o
.
s
p
S
c
c
c
o
a
a
h
e
d
D
n
o
o
o
t
.
,
o
e
d
p
d
o
g
a
r
d
m
u
a
e
f
t
e
r
o
v
o
e
m
h
e
r
o
m
a
k
d
t
e
o
c
h
e
f
o
e
B
sic Call Fe
.
tures
4. Clic
To set u
1. Pla
2. Pres
The
3. Ent
4. Wh
sec
5. Pres
The
6. Ent
7. Wh
8. Rep
The pro
differen
informa
k Confirm to
a network
e a call to t
s the Confer
active call is
r the numb
n the secon
nd party to
s the Confer
conference
r the numb
n the new
party to th
eat steps 5 t
edures to s
from introd
ion.
accept the
onference
e first party.
nce soft ke
placed on
r of the sec
d party ans
the confere
nce soft ke
is placed on
r of the new
arty answer
conferenc
7 until you
t up a netw
ced above
hange.
all:
to create
old.
nd party an
ers the call,
ce.
to create
hold.
party and t
the call, pr
.
have adde
rk conferen
Contact yo
new call.
d press
press the C
new call.
en press
ss the Conf
all intende
ce call for s
ur system ad
, or th
nference so
, , or
rence soft k
parties.
ecific serve
ministrator f
Send soft
t key to ad
he Send sof
y to add th
s may be
r more
ey.
the
key.
C
Not
ll Park
You ca
another
room).
call is p
was par
Call P
more i
To confi
1. Pres
2. Sel
3. Pres
4. Pres
5. Pres
ID fi
use call pa
phone in th
ou can par
rked succe
ked, or a visi
rk feature is
formation.
ure a call p
s Menu->Ca
ct the desir
s or
s or
s or
ld.
k feature to
system (for
an active c
sfully, the re
le indicatio
ot available
ark key via
l Feature->D
d DSS key.
, or the Swit
, or the Swit
, or the Swit
place a call
example, a
all by pressin
ponse is eith
n on the LC
on all servers
hone user i
S Keys.
h soft key t
h soft key t
h soft key t
on hold, an
phone in an
the call p
er a voice p
screen.
Contact yo
terface:
select Key
select Call
select the
then retrie
ther office
rk key on th
ompt confir
r system ad
Event from t
Park from th
esired line f
e the call fr
r conferen
phone. If t
ing that th
inistrator for
e Type field
Key Event
om the Acc
m
e
e
call
.
ield.
unt
6. Ent
r the call pa
rk feature c
de (contac
your syste
administrat
r for it) in th
69

User Guide SIP-T42G IP Phone
Value field.
7. (Optional.) Enter the string that will appear on the LCD screen in the Label field.
8. Press the Save soft key to accept the change or the Back soft key to cancel.
You can also configure a call park key via web user interface at the path Dsskey->Line
Key.
To use the Call Park feature:
1. User on phone A places a call to phone B.
2. User on phone A wants to take the call in a conference room for privacy, then
presses the call park key on phone A.
3. User on phone A walks to an available conference room where the phone is
designated as phone C. The user dials the call park retrieve feature code to
retrieve the parked call.
The system establishes call between phone C and B.
Note
The call park feature code and call park retrieve feature code are predefined on the
system server. Contact your system administrator for more information.
If the parked call is not retrieved within a period of time assigned by the system, the
phone performing call park feature will receive call back.
Call Pickup
You can use call pickup feature to answer someone else’s incoming call on the phone.
The SIP-T42G IP phone supports the directed call pickup and group call pickup features.
Directed call pickup is used for picking up a call that is ringing at a specific phone
number. Group call pickup is used for picking up a call that is ringing at any phone
number in the group. The pickup group should be predefined, contact your system
administrator for more information.
You can configure the phone to pick up an incoming call by using the
DPickup/GPickup soft key. To use the call pickup feature, you need to configure the
call pickup code beforehand on a global or per-line basis via web user interface.
Note
If there are many incoming calls at the same time, pressing the Gpickup soft key on the
phone will pick up the call that rings first.
70
Directed Call Pickup
To enable the directed call pickup via web user interface:
1. Click on Features->Call Pickup.
2. Select Enabled from the pull-down list of Directed Call Pickup.
3. Enter the directed call pickup code in the Directed Call Pickup Code field.

4. Click Confirm to accept the change.
Basic Call Features
Note
The directed pickup code above is configured on a global, which applies to all
To configure the directed call pickup code on a per-line basis via web user interface:
1. Click on Account.
2. Select the desired account from the pull-down list of Account.
3. Click on Advanced.
4. Enter the directed call pickup code in the Directed Call Pickup Code field.
5. Click Confirm to accept the change.
To pick up a call directly:
1. Pick up the handset.
The DPickup soft key appears on the LCD screen.
2. Press the DPickup soft key on your phone when a phone receives an incoming call.
3. Enter the ringing phone’s number.
4. Press the DPickup soft key again.
The call is answered on your phone.
You can also configure a DSS key as a directed pickup key via phone user interface or
web user interface. You can pick up a call by pressing the directed pickup key directly.
Group Call Pickup
To enable the group call pickup via web user interface:
1. Click on Features->Call Pickup.
2. Select Enabled from the pull-down list of Group Call Pickup.
71

User Guide SIP-T42G IP Phone
3. Enter the group call pickup code in the Group Call Pickup Code field.
4. Click Confirm to accept the change.
Note
The group pickup code above is configured on a global, which applies to all accounts.
To configure the group call pickup code on a per-line basis via web user interface:
1. Click on Account.
2. Select the desired account from the pull-down list of Account.
3. Click on Advanced.
4. Enter the group call pickup code in the Group Call Pickup Code field.
5. Click Confirm to accept the change.
To pick up a call in the group:
1. Pick up the handset.
Note
72
The GPickup soft key appears on the LCD screen.
2. Press the GPickup soft key on your phone when a phone in the group receives an
incoming call.
The call is answered on your phone.
You can also configure a DSS key as group pickup key via phone user interface or web
user interface. You can pick up a call by pressing the group pickup key directly.
The directed call pickup code and group call pickup code are predefined on the
system server. Contact your system administrator for more information.
The call pickup code configured on a per-line basis takes precedence over that
configured on a global.

An
e
An
u
n
g
u
r
g
e
d
(
(
n
t
e
g
u
n
A
a
n
g
e
je
(
(
o
s
m
a
h
e
m
l
e
r
r
o
gu
m
c
o
R
m
c
h
a
m
l
e
r
r
w
b
b
n
h
c
m
m
c
o
p
je
r
je
n
h
c
m
m
t
k
l
t
i
e
o
c
c
a
w
a
n
e
a
r
a
e
o
o
je
je
n
o
b
O
O
B
r
o
c
c
e
e
b
d
d
C
e
B
a
n
e
d
d
p
m
g
e
C
C
s
a
m
a
s
m
w
s
sic Call Fe
tures
onymo
Not
You ca
showin
to cons
configu
The an
admini
To confi
1. Pres
2. Sel
3. Pres
fiel
4.
Op
5.
Op
s Call
use anony
up to the c
lt some of t
able on a p
nymous call
trator for the
ure anony
s Menu->Ca
ct the desir
s or
.
tional.) Ente
tional.) Ente
ous call fea
lled party
e services,
-account
feature is no
anonymous
ous call via
l Feature->A
d line and t
, or the Swit
the anony
the anony
ture to bloc
hen you cal
ut you don’
asis.
available o
call on code
phone user
onymous.
en press Ent
h soft key t
ous call on
ous call off
the identity
someone. F
want to be
all servers.
and off cod
nterface:
soft key.
select Ena
ode in the
ode in the
and phone
r example,
harassed. A
ontact your
.
led from th
n Code fiel
ff Code fiel
number fro
you want to
onymous c
ystem
Anonymou
.
.
call
ll is
Call
6. Pres
You ca
Accoun
To plac
1. Usin
The
onymo
You ca
callers.
deliber
rejectio
To confi
1. Pres
2. Sel
s the Save s
also confi
->Basic.
an anony
the specifi
LCD screen
s Call
use anony
nonymous
tely block t
is configur
ure anony
s Menu->Ca
ct the desir
ft key to ac
re anonym
ous call:
line on the
f phone B
ejectio
ous call re
all rejection
eir identities
ble on a pe
ous call re
l Feature->A
d line and t
ept the ch
us call via
phone to pl
rompts an i
n
ction featur
automatic
and numbe
-account b
ction via ph
onymous.
en press Ent
nge or the
eb user inte
ce a call t
coming call
to reject in
lly rejects in
s from showi
sis.
one user int
soft key.
ack soft key
face at the
phone B.
from anony
oming calls
oming calls
n
up. Anon
rface:
to cancel.
ath
ity.
from anony
from callers
ymous call
ous
ho
3. Pres
4. Pres
5.
6.
s or
s or
Re
ct field.
Op
tional.) Ente
Op
tional.) Ente
to scroll to t
, or the Swit
the anony
the anony
he Anonym
h soft key t
ous call re
ous call re
us Reject fi
select Ena
ction on co
ction off co
ld.
led from th
e in the On
e in the Off
Anonymou
Code field.
ode field.
73

User Guide SIP-T42G IP Phone
7. Press the Save soft key to accept the change or the Back soft key to cancel.
You can also configure anonymous call rejection via web user interface at the path
Account->Basic.
74

Ad
u
d
e
y
r
t
s
q
a
n
m
p
t
e
n
s
n
g
f
g
e
e
e
(
n
s
g
o
(
o
D
k
a
i
w
o
e
l
e
,
r
n
(
i
m
a
e
n
u
m
o
y
e
S
c
c
e
o
c
e
o
o
n
c
o
u
a
c
u
s
o
e
o
n
o
i
r
r
e
o
D
Advance
s
e
g
g
y
t
n
e
o
V
h
a
4
o
h
o
E
o
e
o
d
d Phone Fe
tures
vance
B
sy Lam
This cha
IP phon
z
Bus
z
Call
z
Inte
z
Mul
z
Mus
z
Me
If you re
system
Pho
pter provide
. The topics
Lamp Field
Recording
com
icast Pagin
ic on Hold
sages
uire additi
dministrator
p Field
e Feat
operating i
include:
BLF)
nal informat
.
BLF)
ures
structions f
on or assista
r the advan
nce with yo
ed feature
r new phon
of the SIP-T
, contact y
2G
ur
You ca
For exa
friend’s
illumina
For mor
You ca
phone i
phone
pressin
more in
To confi
1. Pres
2. Sel
3. Pres
4. Pres
ID fi
5. Ent
use the BLF
ple, you ca
hone (busy
es solid red
BLF key LE
press a BLF
idle. You c
umber rece
the BLF key
ormation, c
ure a BLF k
s Menu->Ca
ct the desir
s or
s or
ld.
r the phone
feature to
n configure
or idle). Wh
n your pho
indications,
ey to dial o
n receive a
ves an inco
hen the m
ntact your s
y via phon
l Feature->D
d DSS key.
, or the Swit
or the Swit
number or
onitor a spe
BLF key on
n the friend
e to indicat
refer to LED
t the monit
visual alert a
ing call. Yo
nitored ph
stem admi
user interfa
S Keys.
h soft key t
h soft key to
xtension yo
ific user for
the phone f
makes a ca
that the fri
Instructions
red phone
nd an audi
u can also p
ne number
istrator.
e:
select BLF f
select the d
want to m
tatus chan
r monitorin
ll, the BLF ke
nd’s phone
n page 5.
umber whe
alert when
ck up a call
eceives an i
om the Typ
sired line fr
nitor in the
es on the p
the status
(line key) L
is in use and
n the monit
he monitor
directly by
coming cal
field.
m the Acc
alue field.
one.
f a
D
busy.
red
d
l. For
unt
6.
Op
tional.) Ente
the string th
at will appe
r on the LC
screen in t
e Label fiel
.
75

User Guide SIP-T42G IP Phone
7. (Optional.) Enter the pickup code in the Extension field.
8. Press the Save soft key to accept the change or the Back soft key to cancel.
You can also configure the BLF key via web user interface at the path Dsskey->Line
Key.
You can enable audio alert for BLF pickup feature on the phone. This allows the
monitoring phone to play a warning tone, when the monitored phone number receives
an incoming call. You can also enable visual alert for BLF pickup feature on the phone.
This allows the LCD screen of the monitoring phone to display the caller ID, when the
monitored phone number receives an incoming call.
To enable the visual and audio alert feature via web user interface:
1. Click on Features->Call Pickup.
2. Select Enabled from the pull-down list of Visual Alert for BLF Pickup.
3. Select Enabled from the pull-down list of Audio Alert for BLF Pickup.
4. Click Confirm to accept the change.
When the monitored phone number receives an incoming call, the following occurs on
the monitoring phone:
z The phone plays a warning tone (if enabled).
z The BLF key LED flashes red.
z The caller ID appears on the LCD screen (if enabled).
76

Advanced Phone Features
In the following figure, the phone LCD screen shows an incoming call from 3606 on the
monitored line.
Note
If your phone is locked and the type of the keypad lock is set to be Function Keys or All
keys, you cannot use the Pickup, Dial, New Call and Cancel soft keys appear in the
figure above until unlocked.
When there is an active call on the IP phone, you can transfer the active call to the
monitored phone number directly by pressing the BLF key. The phone transfers the
active call differently depending on the transfer mode on DSS key.
To configure the transfer mode on DSS key via web user interface:
1. Click on Features->Transfer.
2. Select the desired transfer mode from the pull-down list of Transfer Mode via
DSSkey. Depending on your selection:
- If you select Blind Transfer, press the BLF key to blind transfer to the monitored
phone number.
- If you select Attended Transfer, press the BLF key to dial out the monitored phone
number and then you can perform the attended or semi-attended transfer.
- If you select New Call, press the BLF key to place a new call to the monitored user.
3. Click Confirm to accept the change.
For more information on performing call transfer, refer to Call Transfer on page 65.
Call Recording
You can record calls by pressing a record key on the SIP-T42G IP phone. There are 2
different ways of configuring call recording and they even work differently:
z Record: The phone sends SIP INFO message containing a specific header “Record:
on/off” to trigger a recording.
z URL Record: The phone sends HTTP URL request to trigger a recording. Contact your
system administrator for the predefined URL.
77

User
e
2
g
e
(
g
e
e
(
n
s
o
e
e
o
e
e
e
c
n
r
l
e
r
o
e
l
e
r
o
gu
e
o
e
o
r
e
e
o
e
o
s
d
o
.
s
h
S
c
c
c
a
S
c
g
c
o
n
u
o
e
d
s
r
o
a
e
e
o
o
a
a
o
n
a
a
c
r
e
o
a
c
a
n
r
o
D
B
R
D
B
a
e
g
o
o
h
h
g
R
h
t
d
e
d
d
e
d
h
e
c
Guide SIP-T4
Not
The re
more i
G IP Phone
ord feature i
formation.
not availabl
on all serve
s. Contact y
ur system a
ministrator fo
r
To confi
1. Pres
2. Sel
3. Pres
4. Pres
5.
Op
6. Pres
To confi
1. Pres
2. Sel
3. Pres
4. Ent
5.
Op
6. Pres
You ca
path Ds
ure a Reco
s Menu->Ca
ct the desir
s or
s or
tional.) Ente
s the Save s
ure a URL R
s Menu->Ca
ct the desir
s or
r the URL (e.
tional.) Ente
s the Save s
also confi
key->Line K
d key via p
l Feature->D
d DSS key.
, or the Swit
, or the Swit
the string th
ft key to ac
cord key vi
l Feature->D
d DSS key.
, or the Swit
., http://10.
the string th
ft key to ac
re the Rec
y.
one user int
S Keys.
h soft key t
h soft key t
at will appe
ept the ch
phone use
S Keys.
h soft key t
1.2.224/pho
at will appe
ept the ch
rd or URL Re
rface:
select Key
select Rec
r on the LC
nge or the
interface:
select URL
erecording.
r on the LC
nge or the
ord keys vi
Event from t
rd from the
screen in t
ack soft key
ecord from
c
i) in the U
screen in t
ack soft key
web user in
e Type field
Key Event fi
e Label fiel
to cancel.
the Type fiel
L Record fil
e Label fiel
to cancel.
terface at t
.
ld.
.
.
d.
.
e
The Rec
z
Duri
z
Wh
z
Duri
z
Duri
z
Wh
The Rec
z
Wh
z
Wh
To recor
1. Pres
If th
and
2. Pres
The
key
rd/URL Rec
ng an activ
n calls are
ng a blind o
ng a confer
n the phon
d/URL Rec
n there are
n you plac
d a call:
s a Record
recording
the Record
s the Recor
recording ic
LED turns off
rd keys co
call
n hold or m
attended tr
nce call
prompts y
rd keys are
no connect
a new call
r URL Recor
tarts succes
or URL Reco
or URL Rec
n disappe
trol the reco
te
ansfe
u to answer
not availabl
d calls on y
key during
fully, there
d key LED fl
rd key agai
rs from the L
rding and ar
an incomin
:
ur phone
call.
ording icon
shes green.
to stop rec
CD screen a
available:
call
appears on
rding.
nd the Reco
he LCD scr
rd or URL Re
en
ord
78

e
t
e
u
n
d
d
d
o
n
e
m
e
n
g
e
e
e
(
n
e
e
n
a
i
n
d
b
b
r
s
e
e
s
e
C
l
e
,
e
e
r
o
gu
m
e
r
e
a
go
S
c
h
c
o
a
g
o
w
c
a
a
a
a
a
u
g
o
m
I
e
a
a
w
s
v
f
L
C
o
o
o
o
e
u
y
t
c
D
B
e
Advance
e
m
c
i
e
e
h
a
a
n
c
d
y
r
y
d Phone Fe
tures
Not
In
ercom
Recordi
A recor
A recor
A recor
The rec
The can
You ca
an acc
The w
system
status ind
Circumsta
ing is starte
ing cannot
ing cannot
rding box is
not be reco
listen to the
ss code to li
y listening to
administrato
cations you
ce
e started
e
full
ded
recordings s
ten to the r
the recordin
for more inf
need to kno
appe
appe
appe
appe
appe
tored on yo
cordin
s may be dif
rmation.
s.
:
I
ons on the
s on the L
rs for 1 sec
rs for 1 sec
rs for 1 sec
rs for 1 sec
r server syst
erent on diff
CD screen
D screen
nd
nd, then go
nd
nd
m. For exa
rent servers.
s back
ple, you ca
Contact you
dial
Not
O
Interco
operato
with a r
automa
The int
more i
tgoing I
To confi
1. Pres
2. Sel
3. Pres
4. Sel
5. Ent
6.
Op
is a useful f
r or the secr
mote exten
tically answ
rcom featur
formation.
tercom
ure an inter
s Menu->Ca
ct the desir
s or
ct the desir
r the remot
tional.) Ente
ature in an
tary. You c
ion for out
r the incomi
is not avail
alls
com key via
l Feature->D
d DSS key.
or the Swit
d line from t
extension n
the string th
office envir
n press the i
ing interco
ng intercom
ble on all ser
phone user
S Keys.
h soft key to
e Account
umber in th
at will appe
nment to q
ntercom ke
calls, and
calls.
ers. Contact
interface:
select Inter
D field.
Value field.
r on the LC
ickly conne
to automat
he remote
your system
om from th
screen in t
t with the
cally conne
xtension will
dministrator
Type field.
e Label fiel
t
for
.
7. Pres
You ca
To plac
1. Pres
s the Save s
also confi
an interco
s the interco
ft key to ac
re an interc
call:
m key when
ept the ch
m key via
the phone i
nge or the
eb user inte
idle.
ack soft key
rface at the
to cancel.
path DSS Ke
.
79

User Guide SIP-T42G IP Phone
The phone is automatically connected to the extension specified in the Value field.
2. Press the intercom key again or the Cancel soft key to end the intercom call.
Incoming Intercom Calls
By default, the SIP-T42G IP phone supports to answer an incoming intercom call
automatically. The phone automatically plays a warning tone when it receives an
incoming intercom call. In addition, you can enable the phone to mute the
microphone when it automatically answers an incoming intercom call. You can also
enable the phone to automatically answer an incoming intercom call while there is
already an active call on the phone, the active call is placed on hold.
Intercom features you need to know:
Intercom features Description
Accept Intercom
Intercom Mute
Warning Tone
Intercom Barge
Allows you to enable or disable the IP phone to
automatically answer an incoming intercom call.
Allows you to enable or disable the microphone on
the IP phone for Intercom calls.
Allows you to enable or disable the IP phone to play
a warning tone when the IP phone receives an
incoming intercom call.
Allows you to enable or disable the IP phone to
automatically answer an incoming intercom call
while there is already an active call on the phone.
Note
To configure intercom features via phone user interface:
1. Press Menu->Call Feature->Intercom.
2. Make the desired changes.
3. Press the Save soft key to accept the change or the Back soft key to cancel.
You can also configure these specific parameters via web user interface at the path
Features->Intercom.
Accept Intercom
You can enable or disable the phone to automatically answer an incoming intercom
call. If Accept Intercom is enabled, the phone automatically answers an incoming
intercom call. If Accept Intercom is disabled, the phone rejects incoming intercom calls
and sends a busy signal to the caller. Accept Intercom is enabled by default.
Your administrator can set a time period delay before the phone automatically answers.
Contact your system administrator for more information.
Intercom Mute
80

u
n
o
d
g
n
m
a
m
n
e
a
m
e
P
n
c
s
l
g
f
u
T
g
e
(
e
d
n
-
i
d
d
n
e
e
d
e
y
s
y
m
o
t
m
c
a
e
r
a
a
o
gu
c
s
m
h
e
o
h
v
e
p
b
w
n
c
g
g
k
K
c
c
s
s
c
a
n
h
g
o
o
e
a
e
l
m
)
n
o
o
a
u
a
e
f
n
o
s
a
n
n
e
n
r
.
e
d
e
o
a
D
2
B
s
Advance
f
g
c
t
h
n
o
g
e
t
o
i
o
gn
h
g
K
h
0
5
a
o
d
o
d
a
r
g
e
d
V
y
d Phone Fe
tures
You ca
automa
If Interc
Mute is
Warnin
You ca
interco
before
automa
default.
Interco
You ca
call whil
phone
Interco
call. Int
mute or un
tically. If Inte
m Mute is d
isabled by
Tone
enable or
call. If War
nswering th
tically answ
Barge
enable or
there is alr
utomaticall
Barge is di
rcom Barge
mute the mi
rcom Mute i
sabled, the
efault.
isable the p
ing Tone is
intercom c
rs the interc
isable the p
ady an acti
answers th
abled, the
is disabled
rophone o
enabled, t
icrophone
one to play
nabled, the
all. If Warnin
m call with
one to aut
e call on th
intercom c
hone handl
y default.
the phone
e micropho
is un-muted
a warning t
phone play
Tone is dis
ut warning.
matically a
phone. If I
ll and plac
s an incomi
or intercom
e is muted
for incomin
ne when re
a warning
bled, the p
Warning To
swer an inc
tercom Bar
s the activ
intercom
calls
or intercom
calls. Interc
eiving an
one to alert
one
e is enable
ming interc
e is enable
call on hold
call like a w
calls.
m
ou
by
m
, the
. If
iting
M
lticast
Se
nding R
You ca
announ
multica
Protoco
signalin
pre-con
specify
To confi
1. Pres
2. Sel
3. Pres
4. Pres
aging
use multica
ements out
t paging ke
(RTP) strea
. You can c
igured multi
p to 10 mul
P Strea
ure a multi
s Menu->Fe
ct the desir
s or
s or
st paging to
to people
on the pho
to the pre-
nfigure the
cast listenin
icast listenin
ast paging
tures->DSS
d DSS key.
, or the Swit
, or the Swit
quickly and
ithin the mu
e, which all
onfigured
phone to all
address(es
addresses.
ey via pho
eys.
h soft key t
h soft key t
easily forwa
ticast group
ows you to s
ulticast ad
ow it to rec
without inv
e user interf
select Key
select Pagi
d time sensi
You can c
nd a Real T
ress(es) with
ive an RTP st
lving SIP si
ce:
Event from t
n
from the
ive
nfigure a
me Transpo
ut involvin
ream from
aling. You c
e Type field
ey Event fi
t
SIP
an
.
ld.
5.
Op
tional.) Ente
6. Ent
7. Pres
You ca
r the multic
fiel
.
valid multic
The
s the Save s
also confi
the string th
st IP addres
st IP addres
ft key to ac
re a multic
at will appe
and port n
es range fro
ept the ch
st paging k
r on the LC
mber (e.g.,
m 224.0.0.0 t
nge or the
y via web u
screen in t
24.5.6.20:1
o 239.255.25
ack soft key
er interface
e Label fiel
008) in the
.255.
to cancel.
at the path
.
alue
81

User
e
e
2
>
n
v
g
e
o
R
n
e
u
n
c
B
n
w
2
t
a
n
gu
u
s
e
e
a
s
r
e
g
gu
o
a
a
h
gu
t
ge
f
g
g
c
d
e
w
a
I
c
e
e
s
e
ging
D
m
c
s
s
i
g
ning
e
t
a
s
m
e
o
p
o
s
P
n
m
e
s
p
e
e
i
g
e
e
.
h
c
ging
b
u
n
h
R
s
v
s
n
u
t
d
s
e
g
c
e
rfig
t
n
n
o
g
e
n
e
c
u
e
e
P
s
n
c
g
c
o
o
Guide SIP-T4
G IP Phone
Not
Dsskey-
You ca
stream
To confi
1. Clic
2. Sel
The
3. Clic
If G72
indica
To send
1. Pres
The
the
Port
inv
Line Key.
also confi
ia web user
ure a defa
k on Feature
ct the desir
default cod
k Confirm to
codec is us
e that is prov
RTP stream:
s the multic
phone send
local netwo
. For both s
lved.
re the phon
interface.
lt codec for
->General
d codec fro
c is G722.
accept the
d for multica
iding high de
st paging k
RTP to a pr
k then listen
nding and r
e to use a d
multicast pa
nformation.
m the pull-d
hange.
t paging, th
finition voice
y when the
configured
to the RTP
ceiving of t
fault code
via we
wn list of M
phone LCD
hone is idle
multicast ad
n the preco
he multicast
for sendin
user interfa
lticast Cod
creen displa
.
dress (IP: Po
ured mul
RTP there is
Multicast RT
e:
c.
ys icon t
t). Any phon
icast addre
o sip signali
e in
s (IP:
Not
Re
ceiving
The
The
2. Pres
3. Pres
Multic
outgoi
You ca
from th
specify
You ca
paging
parame
Paging
multicast pa
followin
s the Hold s
s the End C
st RTP is one
g RTP multic
fi
TP Stre
configure t
pre-confi
p to 10 mul
also chan
alls by con
ters are: Pa
arge
key LE
re shows a
ft key to pla
ll soft key to
ay only fro
sts, all other
m
e phone to
red multica
icast addre
the behav
iguring spec
ing Bar
e a
illuminates
ulticast RT
e the curre
cancel the
sender to t
existing calls
receive a R
t address (e
ses that the
or of how th
ific paramet
d Paging Pr
olid green.
session on t
t multicast
ulticast RTP
e multicast a
on the phon
al Time Tran
without in
hone listen
phone ha
rs via web
ority Active.
e phone:
TP session o
session.
ddress (es) (r
will be plac
port Protoc
olving SIP si
to on the n
dles incomi
ser interfac
hold.
ceiver). For
d on hold.
l (RTP) strea
naling. You
twork.
multicast
. The specifi
m
an
c
You ca
If the pri
then it
82
use the pa
ority of an in
ill be ignore
barge f
oming mul
automatic
ature to def
icast pagin
lly. If Disabl
ne the priori
call is lower
d is selecte
y of the voi
than that of
from the p
e call in pro
the active
ll-down list
ress.
all,
f

Advanced Phone Features
Paging Barge, the voice call in progress shall take precedence over all incoming
multicast paging calls. The valid values in the Paging Barge field are:
z 1 to 10: Define the priority of the active call, 1 is the highest priority, 10 is the lowest
priority.
z Disabled: The voice call in progress shall take precedence over all incoming
paging calls.
Paging Priority Active
You can enable or disable this feature to decide how the phone handles the incoming
multicast paging calls, when there is already a multicast paging call on the phone. If
enabled, the phone will ignore the incoming multicast paging call with a lower priority,
otherwise, the phone will play the incoming multicast RTP and place the previous
multicast paging call on hold. If disabled, the phone will automatically ignore all
incoming multicast paging calls.
To configure multicast listening addresses via web user interface:
1. Click on Contacts->Multicast Paging.
2. Select the desired value from the pull-down list of Paging Barge.
3. Select the desired value from the pull-down list of Paging Priority Active.
4. Enter the multicast IP address (es) and port number (e.g., 224.5.6.20:10008) which
the phone listens for incoming RTP multicast in the Listening Address field.
5. Enter the label in the Label field. Label will appear on the LCD screen when
receiving the RTP multicast.
6. Click Confirm to accept the change.
Note
The multicast IP addresses range from 224.0.0.0 to 239.255.255.255.
The priorities of listening addresses are predefined: 1 with the highest priority, 10 with the
lowest priority.
Both the multicast paging sender and the receiver will play a warning tone when
pressing the multicast paging key.
Music on Hold
Music on hold (MoH) is the business practice of playing recorded music to fill the silence
that would be heard by the callers who have been placed on hold. To use this feature,
you should specify a SIP URI pointing to a Music on Hold Server account, when placing
a call on hold, the phone will invite this SIP URI to the Music on Hold Server account. The
Music on Hold account automatically answers to the SIP INVITE messages and
immediately plays audio from some source located anywhere (LAN, Internet) to the
held party. Contact your system administrator for the SIP URI.
To configure music on hold server via web user interface:
83

User
e
e
e
e
2
e
e
e
s
n
ge
ge
o
e
m
u
(
m
e
M
n
p
d
o
n
e
c
v
e
d
e
m
a
a
s
e
a
s
e
o
e
e
o
t
e
c
r
c
a
S
m
h
a
M
a
M
a
o
o
e
t
h
n
y
r
w
n
e
c
m
a
A
y
2
y
w
e
ge
n
r
n
v
e
e
a
ge)
i
o
i
h
c
w
u
e
Guide SIP-T4
G IP Phone
Not
M
ssage
Sh
ort Mess
1. Clic
2. Sel
3. Clic
4. Ent
5. Clic
Wh
All inv
You ca
messa
messa
number
indicat
k on Accou
ct the desir
k on Advan
r the SIP URI
k Confirm to
n you have
lved parties
age Ser
send and r
s can be in
, the phon
of waiting
r LED slow fl
t.
d account f
ed.
(e.g., sip:mo
accept the
placed a c
annot use e
ice (SM
ceive text
icated bot
LCD screen
essages (ex
shes red.
om the pull-
h@sip.com)
hange.
ll on hold, t
ncrypted RTP
)
essages usi
acousticall
will prompt
mple: 3 Ne
down list of
n the Music
e held part
(SRTP).
the SIP-T4
and visuall
eceiving ne
Text Messa
ccount.
on Hold Ser
can then h
G IP phone.
. When rec
text mess
and an
er field.
ar the musi
New text
iving a new
es with the
con. The po
.
text
er
Not
Not
The S
more i
To read
1. Pres
2. Sel
If the
to rea
To send
1. Pres
2. Co
inp
3. Pres
S feature is n
formation.
a text mess
s Menu->Me
ct the desir
hone promp
the new m
a text mess
s Menu->Me
pose the n
t mode.
s the Send s
t available
e:
sage->Text
d message
s receiving n
ssages direc
e:
sage->Text
w text mess
ft key.
n all servers.
essage->I
nd press th
w text mess
ly.
essage->N
e. You ca
ontact you
box.
View soft k
ges, you ca
ew Messa
n press the a
system adm
y.
also press t
.
bc soft key t
nistrator for
e View soft k
change th
y
e
4.
Op
tional.) Press
fro
the From fi
5. Ent
84
r the numb
or
ld.
r you want t
, or the Swit
send the
h soft key to
essage to i
select the d
the To field.
esired acco
nt

Advanced Phone Features
6. Press the Send soft key to send the message or the Back soft key to cancel.
You can also send a text message via web user interface at the path Features->SMS.
To reply a text message:
1. Press Menu->Message->Text Message->Inbox.
2. Select the desired message and press the Reply soft key.
3. Compose the new text message. You can press the abc soft key to change the
input mode.
4. Press the Send soft key after completing the content.
To delete a text message:
1. Press Menu->Message->Text Message->Inbox (Sent Box, Outbox or Draftbox).
2. Select the desired message and then press the Option soft key.
3. Select Delete to delete the desired message.
The LCD screen prompts "Delete the selected message?".
4. Press the OK soft key to delete this message or the Cancel soft key to cancel.
Note
You can also delete all text messages by pressing the Option soft key and then select
Delete All. For more information, refer to the above steps.
You can also delete a specific message after retrieving by pressing the Delete soft key.
Voice Mail
You can leave voice mails for someone else on the SIP-T42G IP phone. You can also
listen to the voice mails stored in a centralized location. When receiving a new voice
mail, the phone will play a warning tone. The power indicator LED will slow flash red.
The phone LCD screen will prompt receiving a new voice mail and an icon.
Note
Voice Mail feature is not available on all servers, contact your system administrator for
more information.
To leave a voice mail:
You can leave a voice mail for someone else when he/she is busy or inconvenient to
answer the call. Follow the voice prompt from the system server to leave the voice mail,
and then hang up after completing the voice mail.
To configure voice mail access codes via phone user interface:
1. Press Menu->Message->Voice Mail->Set Voicemail.
2. Press the navigation keys to highlight the account which you want to set.
85

User Guide SIP-T42G IP Phone
3. Press the 123 soft key to select the proper input mode and then enter the voice
mail access code (e.g., *97).
4. Press the Save soft key to accept the change or the Back soft key to cancel.
Note
Note
Voice mail access code must be predefined on the system server. Contact your system
administrator for the more information.
To listen to the voice mails:
1. When the phone user interface prompts receiving new voice mails and the power
indicator LED slow flashes red, press or the Connect soft key to dial out the
access voice mail code.
2. Follow the voice prompt to listen to the voice mails.
Before listening to the voicemails, make sure the voice mail access code has been
configured.
When all new voice mails are retrieved, the power indicator LED will stop flashing.
To view the voicemail via phone user interface:
1. Press Menu->Message->Voice Mail->View Voicemail.
The phone LCD screen displays the amount of the voice mails that includes new or
old voice mails.
2. Select an account and then press the Connect soft key to listen to the voice mails.
Message Waiting Indicator (MWI)
The SIP-T42G IP phone supports MWI feature when receiving a new voice message. If
someone leaves you a voicemail, you will receive a message waiting indicator. MWI will
be indicated in three ways: a warning tone, the power indicator LED illuminates slow
flashing red and an indicator message (including a voice mail icon) appears on the
LCD screen. This is cleared only when you retrieve all voicemails or delete them.
For some particular servers, the MWI service is unsolicited. So the SIP-T42G IP phone just
need to handle the MWI messages sent from the server. But for some servers, the MWI
service is solicited. In this case, the SIP-T42G IP phone must enable the MWI Subscription
for MWI messages.
Note
MWI service is not available on all servers. Contact your system administrator for more
information
The MWI Subscription parameters you need to know:
.
86

Options Description
Advanced Phone Features
Note
Subscribe for MWI
Enable or disable a subscription for MWI service.
Period of MWI subscription. The IP phone sends
MWI Subscription Period
refresh SUBSCRIBE request before initial SUBSCRIBE
expiration
Enable or disable a subscription to the voice mail
number for MWI service.
Subscribe MWI to VM
To use this feature, you should also configure the
voice mail number.
Whether the phone subscribes the MWI messages to the account or the voice number
depends on the server. Contact your system administrator for more information
.
To enable MWI subscription via web user interface:
1. Click on Account.
2. Select the desired account from the pull-down list of Account.
3. Click on Advanced.
4. Select Enabled from the pull-down list of Subscribe for MWI.
5. Enter the period time in the MWI Subscription Period (seconds) field.
6. Click Confirm to accept the change.
The IP phone will subscribe to the account number for MWI service by default.
To enable the Subscribe MWI to VM feature via web user interface:
1. Click on Account.
2. Select the desired account from the pull-down list of Account.
3. Click on Advanced.
4. Select Enabled from the pull-down list of Subscribe MWI to VM.
5. Click on Basic.
6. Enter the desired voice number in the Voice Mail field.
7. Click Confirm to accept the change.
The IP phone will subscribe to the voice mail number for MWI service using
Subscribe MWI to WM feature.
87

User Guide SIP-T42G IP Phone
Troubleshooting
This chapter provides general troubleshooting information to help you solve the
problems you might encounter when using your SIP-T42G IP phone.
If you require additional information or assistance with your new phone, contact your
system administrator.
Why is the phone LCD screen blank?
z Ensure your phone is properly plugged into a functional AC outlet.
z Ensure that the phone isn’t plugged into a plug controlled by a switch that is off.
z If the phone is plugged into a power strip, try plugging it directly into a wall outlet
instead.
z If your phone is powered from PoE, ensure you use a PoE compliant switch or hub,
or contact your system administrator for more information.
z Check that the power LED is on to ensure the phone is powered on.
Why does the phone display "Network Unavailable"?
z Ensure that the Ethernet cable is plugged into the Internet port on the phone and
the Ethernet cable is not loose.
z Ensure that the switch or hub in your network is operational.
z Contact your system administrator for more information.
Why can’t I get a dial tone?
Check for any loose connections and that the phone has been installed properly. For
the installation instructions, refer to Phone Installation on page 11.
Check whether dial tone is present on one of the audio modes.
z Switch between the Handset, Headset (if present) or Hands-Free Speakerphone to
check whether dial tone is present for one of the audio modes.
z If the dial tone exists on another audio mode, connect a different handset or
headset to isolate the problem.
88
Why doesn’t the phone ring?
Check the ringer volume on your phone. To adjust the ringer volume setting, press the
Volume key when the phone is on-hook and idle. For more information, refer to Volume
on page 23.

Troubleshooting
Why can’t I receive calls?
z Check the SIP registration with your system administrator.
z Check DND (Do Not Disturb) mode is turned off on your phone. Refer to Do Not
Disturb (DND) on page 59.
z Check call forward feature is disabled on the phone. Refer to Call Forward on
page 61.
z Check whether the caller number is stored in the blacklist directory. Refer to
Blacklist on page 32.
Why is my handset not working?
Check to ensure that the handset cord is fully connected to both the handset jack on
the phone and handset. Refer to Phone Installation on page 11.
Why is my headset not working?
z Check to ensure that the headset cord is fully connected to the headset jack on
the phone. Refer to Phone Installation on page 11.
z Check to ensure that the headset mode is activated. Refer to Headset Use on
page 35.
z Check to ensure that the headset volume is adjusted to an appropriate level. Refer
to Volume on page 23.
How to change the user password?
You can change the user password via web user interface:
1. Click on Security->Password.
2. Enter the current user password in the Current Password field.
3. Enter the new user password in the New Password field and Confirm Password field.
4. Click Confirm to accept the change.
You can also contact your system administrator for help.
Note
How to reboot the phone?
To reboot the IP phone via web user interface:
1. Click on Settings->Upgrade.
2. Click Reboot to reboot the IP phone.
Any reboot of your phone may take a few minutes.
89

User
e
2
r
o
e
m
i
E
y
r
e
E
y
r
e
e
o
r
h
a
y
v
v
e
p
T
o
a
g
r
d
m
o
o
e
e
t
a
o
m
a
s
(
s
c
P
u
g
c
w
S
u
t
i
c
e
h
w
g
r
o
e
e
c
o
o
e
w
o
s
o
s
w
b
)
d
y
z
a
y
d
r
s
b
e
r.
e
b
eng
y
a
a
Guide SIP-T4
G IP Phone
Not
How to
Reset y
You ne
recom
To reset
1. Pres
2. Pres
Opt
3. Pres
The
4. Pres
Reset o
How to
We ma
eset your ph
ur phone w
d to note th
end asking
your phone
s Menu->Ad
s or
on field.
s Save soft k
LCD screen
s the OK soft
f your phone
xport PCAP
need you t
one?
en other Tr
t all custo
our system
ia phone u
anced
pas
, or the Swit
y.
rompts the
key.
may take a f
race?
provide a
ubleshootin
ized settings
dministrato
er interface:
word: admi
h soft key t
following m
ew minutes.
CAP Trace t
suggestion
will be over
for advice
->Reset &
n
select the
ssage:
o help anal
do not corr
ritten after
efore resetti
Reboot->Re
esired type
ze your pro
ect the pro
esetting. W
your pho
et to Factor
from Reset
lem.
lem.
ne.
.
To expo
1. Clic
2. Clic
3. Rec
4. Clic
5. Clic
syst
How to
We ma
To expo
1. Clic
2. Sel
3. Clic
The
t a PCAP Tr
k on Settings
k Start to be
reate the er
k Stop to en
k Export to o
m.
xport Syste
need you t
t a System L
k on Settings
ct 6 from th
k Confirm to
web user int
ce via web
->Upgrade.
in recordin
or to be do
recording.
pen file do
Log?
provide a
via web
->Configura
pull-down l
accept the
rface prom
ser interfac
signal traffi
umented in
nload wind
ystem Log t
ser interfac
ion.
st of Systoml
hange.
pts “Do you
:
.
the trace.
, and then
help analy
:
og Level.
ant to rest
save the fil
e your probl
rt your mac
to your loc
em.
hine?”.
l
4. Clic
5. Ma
6. Clic
k OK to rebo
Aft
r rebooting
foll
wing steps.
k the Local r
k Export to o
ot the phon
he phone, y
dio box in t
pen file do
.
ou can exp
e Export Sy
nload wind
rt a 6 level s
tem Log fiel
, and then
stem log th
save the fil
ough the
to your loc
l
90

Troubleshooting
system.
You can also export the system log to a Syslog Server, contact your system administrator
for more information.
How to Export/Import phone configurations?
We may need you to provide your phone configurations to help analyze your problem.
In some instance, you may need to import configurations to your phone.
To export your phone configurations via web user interface:
1. Click on Settings->Configuration.
2. Click Export to open file download window, and then save the file to your local
system.
To import phone configurations via web user interface:
1. Click on Settings->Configuration.
2. Click Browse to select a configuration file from your local system.
Note
Note
3. Click Import to import the configuration file.
The file format of configuration file must be “.bin”.
How to make a call using SRTP?
You can enable SRTP to encrypt the audio stream(s) of phone calls. The parties
participating in the call should enable SRTP. You can enable SRTP on per-account basis.
To enable SRTP via web user interface:
1. Click on Account.
2. Select the desired account from the pull-down list of Account.
3. Click on Advanced.
4. Select the desired type from the pull-down list of Basicencryption (SRTP).
5. Click Confirm to accept the change.
The SRTP feature is not available on all servers. Contact your system administrator for
more information
.
91

User Guide SIP-T42G IP Phone
Regulatory Notices
Service Agreements
Contact your Yealink Authorized Reseller for information about service agreements
applicable to your product.
Limitations of Liability
TO THE FULL EXTENT ALLOWED BY LAW, YEALINK EXCLUDES FOR ITSELFAND ITS SUPPLIERS
ANY LIABILITY, WHETHER BASED IN CONTRACT OR TORT (INCLUDINGNEGLIGENCE), FOR
INCIDENTAL, CONSEQUENTIAL, INDIRECT, SPECIAL, OR PUNITIVE DAMAGES OFANY KIND,
OR FOR LOSS OF REVENUE OR PROFITS, LOSS OF BUSINESS, LOSS OF INFORMATION
ORDATA, OR OTHER FINANCIAL LOSS ARISING OUT OF OR IN CONNECTION WITH THE
SALE,INSTALLATION, MAINTENANCE, USE, PERFORMANCE, FAILURE, OR INTERRUPTION OF
ITS PRODUCTS,EVEN IF YEALINK OR ITS AUTHORIZED RESELLER HAS BEEN ADVISED OF THE
POSSIBILITY OF SUCHAMAGES, AND LIMITS ITS LIABILITY TO REPAIR, REPLACEMENT, OR
REFUND OF THE PURCHASERICE PAID, AT YEALINK’S OPTION. THIS DISCLAIMER OF
LIABILITY FOR DAMAGES WILL NOT BEAFFECTED IF ANY REMEDY PROVIDED HEREIN SHALL
FAIL OF ITS ESSENTIAL PURPOSE.
Safety Instructions
Save these instructions. Read these safety instructions before use!
The following basic safety precautions should always be followed to reduce risk of fire,
electrical shock, and other personal injury.
General Requirements
z
Before you install and use the device, read the safety instructions carefully
and observe the situation during operation.
z
During the process of storage, transportation, and operation, please always
keep the device dry and clean.
z
During the process of storage, transportation, and operation, please avoid
collision and crash of the device.
z
Please attempt not to dismantle the device by yourself. In case of any
discrepancy, please contact the appointed maintenance center for repair.
z
Without prior written consent, no organization or individual is permitted to
make any change to the structure or the safety design of the device.
Yealink is under no circumstance liable to consequences or legal issues
caused by such changes.
z
Please refer to the relevant laws and statutes while using the device. Legal
rights of others should be respected as well.
92
Environmental Requirements
z
Place the device at a well-ventilated place. Do not expose the device
under direct sunlight.
z
Keep the device dry and free of dusts.
 Loading...