

Page 1
Table of Contents
i
Page 2

Page 3

Table of Contents
Table of Contents ...................................................................... iii
Summary of Changes.............................................................. vii
Changes for Release 73, Guide Version 73.40 ................................................................. vii
Changes for Release 73, Guide Version 73.16 ................................................................. vii
Changes for Release 72, Guide Version 72.30 ................................................................. vii
Changes for Release 72, Guide Version 72.2 .................................................................. viii
Changes for Release 72, Guide Version 72.1 .................................................................. viii
Changes for Release 71, Guide Version 71.165 .............................................................. viii
Changes for Release 71, Guide Version 71.140 ................................................................ix
Changes for Release 71, Guide Version 71.125 ................................................................ix
Changes for Release 71, Guide Version 71.120 ................................................................ix
Changes for Release 71, Guide Version 71.110 ................................................................ix
Changes for Release 70, Guide Version 1.3 ...................................................................... x
Introduction ............................................................................... 1
Getting Started ......................................................................... 3
Obtaining Configuration Information ................................................................................ 3
Obtaining Configuration Files ......................................................................................... 3
Obtaining Phone Information .......................................................................................... 5
Managing Configuration Files ............................................................................................ 5
Editing Common CFG File ................................................................................................ 5
Editing MAC-Oriented CFG File...................................................................................... 9
Managing MAC-local CFG File..................................................................................... 11
Encrypting Configuration Files ...................................................................................... 14
Customizing Resource Files ............................................................................................ 15
Configuring a TFTP Server ...................................................... 35
Preparing a Root Directory ................................................................................................ 35
Configuring a TFTP Server ................................................................................................. 36
Obtaining the Provisioning Server Address .......................... 37
Zero Touch ........................................................................................................................... 37
iii
Page 4

Yealink IP Phones Auto Provisioning Guide
Plug and Play (PnP) Server ............................................................................................... 39
DHCP Options ..................................................................................................................... 40
Phone Flash ......................................................................................................................... 42
Configuring Wildcard of the Provisioning Server URL.................................................... 43
Configuring the Update Mode .............................................. 45
Power On ............................................................................................................................. 45
Repeatedly.......................................................................................................................... 46
Weekly ................................................................................................................................. 47
Auto Provision Now ............................................................................................................ 48
Multi-mode Mixed ............................................................................................................. 49
SIP NOTIFY Message ......................................................................................................... 49
Auto Provisioning via Activation Code ............................................................................ 50
Downloading and Verifying Configurations .......................... 53
Downloading Configuration Files ..................................................................................... 53
Resolving and Updating Configurations ......................................................................... 53
Downloading and Updating <MAC>-local.cfg File...................................................... 54
Verifying Configurations .................................................................................................... 54
Specific Scenarios-Protect Personalized Settings ........................................................... 56
Configuration Parameters .............................................................................................. 56
Scenario A Protect personalized settings .................................................................... 57
Scenario B Clear personalized configuration settings ............................................... 61
Scenario C Protect personalized settings after factory reset .................................... 62
Scenario D Import or export the local configuration file ............................................ 64
Troubleshooting ...................................................................... 67
Glossary .................................................................................. 69
Appendix ................................................................................ 71
Configuring an FTP Server ................................................................................................ 71
Preparing a Root Directory ............................................................................................ 71
Configuring an FTP Server ............................................................................................. 72
Configuring an HTTP Server .............................................................................................. 75
Preparing a Root Directory ............................................................................................ 75
Configuring an HTTP Server .......................................................................................... 76
Configuring a DHCP Server .............................................................................................. 79
iv
Page 5

Table of Contents
Customizing a Ring Tone Using Cool Edit Pro ................................................................. 85
Customizing a Logo File Using PictureExDemo .............................................................. 87
Configurations Defined Never be Saved to <MAC>-local.cfg file ............................. 88
Auto Provisioning Flowchart (Protect personalized configuration settings)................ 96
Description of Configuration Parameters in CFG Files .................................................. 97
Programmable Keys ........................................................................................................ 383
Time Zones ........................................................................................................................ 385
BLF LED Mode ................................................................................................................... 388
v
Page 6

Yealink IP Phones Auto Provisioning Guide
vi
Page 7
Summary of Changes
This section describes the changes to this guide for each release and guide version.
This version is updated to remove SIP-T21P and SIP-T19P IP phones. The following section
is new for this version:
Configurations Defined Never be Saved to <MAC>-local.cfg file on page 88
Major updates have occurred to the following sections:
Managing MAC-local CFG File on page 11
Customizing Resource Files on page 15
Specific Scenarios on page 56
Description of Configuration Parameters in CFG Files on page 97
Programmable Keys on page 383
Time Zones on page 385
The following sections are new for this version:
Configuring Wildcard of the Provisioning Server URL on page 43
Auto Provisioning via Activation Code on page 50
Downloading and Updating <MAC>-local.cfg File on page 54
Major updates have occurred to the following sections:
Managing MAC-local CFG File on page 11
Specific Scenarios on page 56
Description of Configuration Parameters in CFG Files on page 97
This version is updated to remove SIP-T4X, SIP-T21P and SIP-T19P IP phones. The following
sections are new for this version:
Managing MAC-local CFG File on page 11
Specific Scenarios on page 56
vii
Page 8
Yealink IP Phones Auto Provisioning Guide
Auto Provisioning Flowchart (Protect personalized configuration settings) on page
96
Major updates have occurred to the following sections:
Obtaining Configuration Files on page 3
Downloading Configuration Files on page 53
Resolving and Updating Configurations on page 53
Description of Configuration Parameters in CFG Files on page 97
This version is updated to incorporate SIP-T48G IP phones. The following sections are
new for this version:
Customizing a Directory Template on page 30
Customizing a Super Search Template on page 31
Major updates have occurred to the following sections:
Editing Common CFG File on page 5
Editing MAC-Oriented CFG File on page 9
Customizing Resource Files on page 15
Description of Configuration Parameters in CFG Files on page 97
BLF LED Mode on page 388
This version is updated to incorporate SIP-T46G, SIP-T42G and SIP-T41P IP phones. The
following sections are new for this version:
Time Zones on page 385
BLF LED Mode on page 388
Major updates have occurred to the following sections:
Editing Common CFG File on page 5
viii
Editing MAC-Oriented CFG File on page 9
Customizing Resource Files on page 15
Description of Configuration Parameters in CFG Files on page 97
Documentations of the newly released SIP-T21P and SIP-T19P IP phones have also been
Page 9
Summary of Changes
added.
Major updates have occurred to the following sections:
Editing Common CFG File on page 5
Editing MAC-Oriented CFG File on page 9
Encrypting Configuration Files on page 14
Customizing a Language on page 16
Customizing a Local Contact File on page 24
Description of Configuration Parameters in CFG Files on page 97
Major updates have occurred to the following section:
Customizing a Language on page 16
Major updates have occurred to the following section:
Description of Configuration Parameters in CFG Files on page 97
The following sections are new for this version:
Encrypting Configuration Files on page 14
SIP NOTIFY Message on page 49
Resolving and Updating Configurations on page 53
Description of Configuration Parameters in CFG Files on page 97
Major updates have occurred to the following sections:
Customizing a Local Contact File on page 24
Customizing a Replace Rule File on page 28
Customizing a Dial-now File on page 29
ix
Page 10

Yealink IP Phones Auto Provisioning Guide
The following sections are new for this version:
Customizing a Replace Rule File on page 28
Customizing a Dial-now File on page 29
Major updates have occurred to the following sections:
Customizing a Local Contact File on page 24
Upgrading Firmware on page 33
x
Page 11

Introduction
The auto provisioning process outlined in this guide applies to Yealink
SIP-T28P/T26P/T22P/T20P/T4X IP phones running firmware version X.73.0.1 or later. We
recommend that IP phones running the latest firmware CANNOT be downgraded to an
earlier firmware version. The new firmware is compatible with old configuration
parameters, but not vice versa.
Yealink IP phones are full-featured telephones that can be plugged directly into an IP
network and can be used easily without manual configuration.
This guide provides instructions on how to provision Yealink IP phones with the minimum
settings required. Yealink IP phones support FTP, TFTP, HTTP, and HTTPS protocols for auto
provisioning and are configured by default to use the TFTP protocol.
The purpose of this guide is to serve as a basic guidance for provisioning Yealink IP
phones, including:
Yealink SIP-T28P
Yealink SIP-T26P
Yealink SIP-T22P
Yealink SIP-T20P
Yealink SIP-T48G
Yealink SIP-T46G
Yealink SIP-T42G
Yealink SIP-T41P
1
Page 12

Yealink IP Phones Auto Provisioning Guide
2
Page 13
Getting Started
Phone Model
Common CFG File
SIP-T28P
y000000000000.cfg
SIP-T26P
y000000000004.cfg
SIP-T22P
y000000000005.cfg
SIP-T20P
y000000000007.cfg
SIP-T48G
y000000000035.cfg
This section provides instructions on how to get ready for auto provisioning. The auto
provisioning process discussed in this guide uses the TFTP server as the provisioning
server.
To begin the auto provisioning process, the following steps are required:
Obtaining Configuration Information
Managing Configuration Files
Before beginning provisioning, you need to obtain configuration files. There are two
configuration files both of which are CFG-formatted. We call these two files Common
CFG file and MAC-Oriented CFG file. The IP phone tries to download these CFG files
from the server during auto provisioning.
IP phones also support a local configuration file named as <MAC>-local.cfg. When a
user modifies configurations via web user interface or phone user interface, the
configurations will be automatically saved to the MAC-local CFG file on the IP phone.
The MAC-Oriented and MAC-local CFG files are only effectual for the specific phone.
They use the 12-digit MAC address of the IP phone as the file name. For example, if the
MAC address of the IP phone is 0015651130f9, the MAC-Oriented CFG and MAC-local
CFG files have to be named as 0015651130f9.cfg and 0015651130f9-local.cfg
respectively. However, the Common CFG file is effectual for all phones of the same
model. It uses a fixed name “y0000000000XX.cfg” or “y00000000000X.cfg” as the file
name, where "XX" or “X” equals to the first two digits or the first digit (except 0 for
SIP-T28P) of the hardware version of the IP phone model.
The names of the Common CFG file for each phone model are:
3
Page 14
Yealink IP Phones Auto Provisioning Guide
Phone Model
Common CFG File
SIP-T46G
y000000000028.cfg
SIP-T42G
y000000000029.cfg
SIP-T41P
y000000000036.cfg
The IP phones running firmware version 71 or later can only recognize configuration files
using UTF-8 or ANSI encoding.
The <MAC>-local.cfg can be exported/imported via web user interface. For more
information on how to export/import the <MAC>-local.cfg file, refer to Scenario D
Import or export the local configuration file on page 64.
You can ask the distributor or Yealink FAE for Common CFG and MAC-Oriented files. You
can also obtain the Common CFG file and MAC-Oriented file online:
http://www.yealink.com/DocumentDownload.aspx?CateId=142&flag=142
To download Common CFG and MAC-Oriented files:
1. Go to Yealink Document Download Page and select the desired phone model under
the Documents and Download tab.
2. Download and uncompress the combined configuration files to your local system.
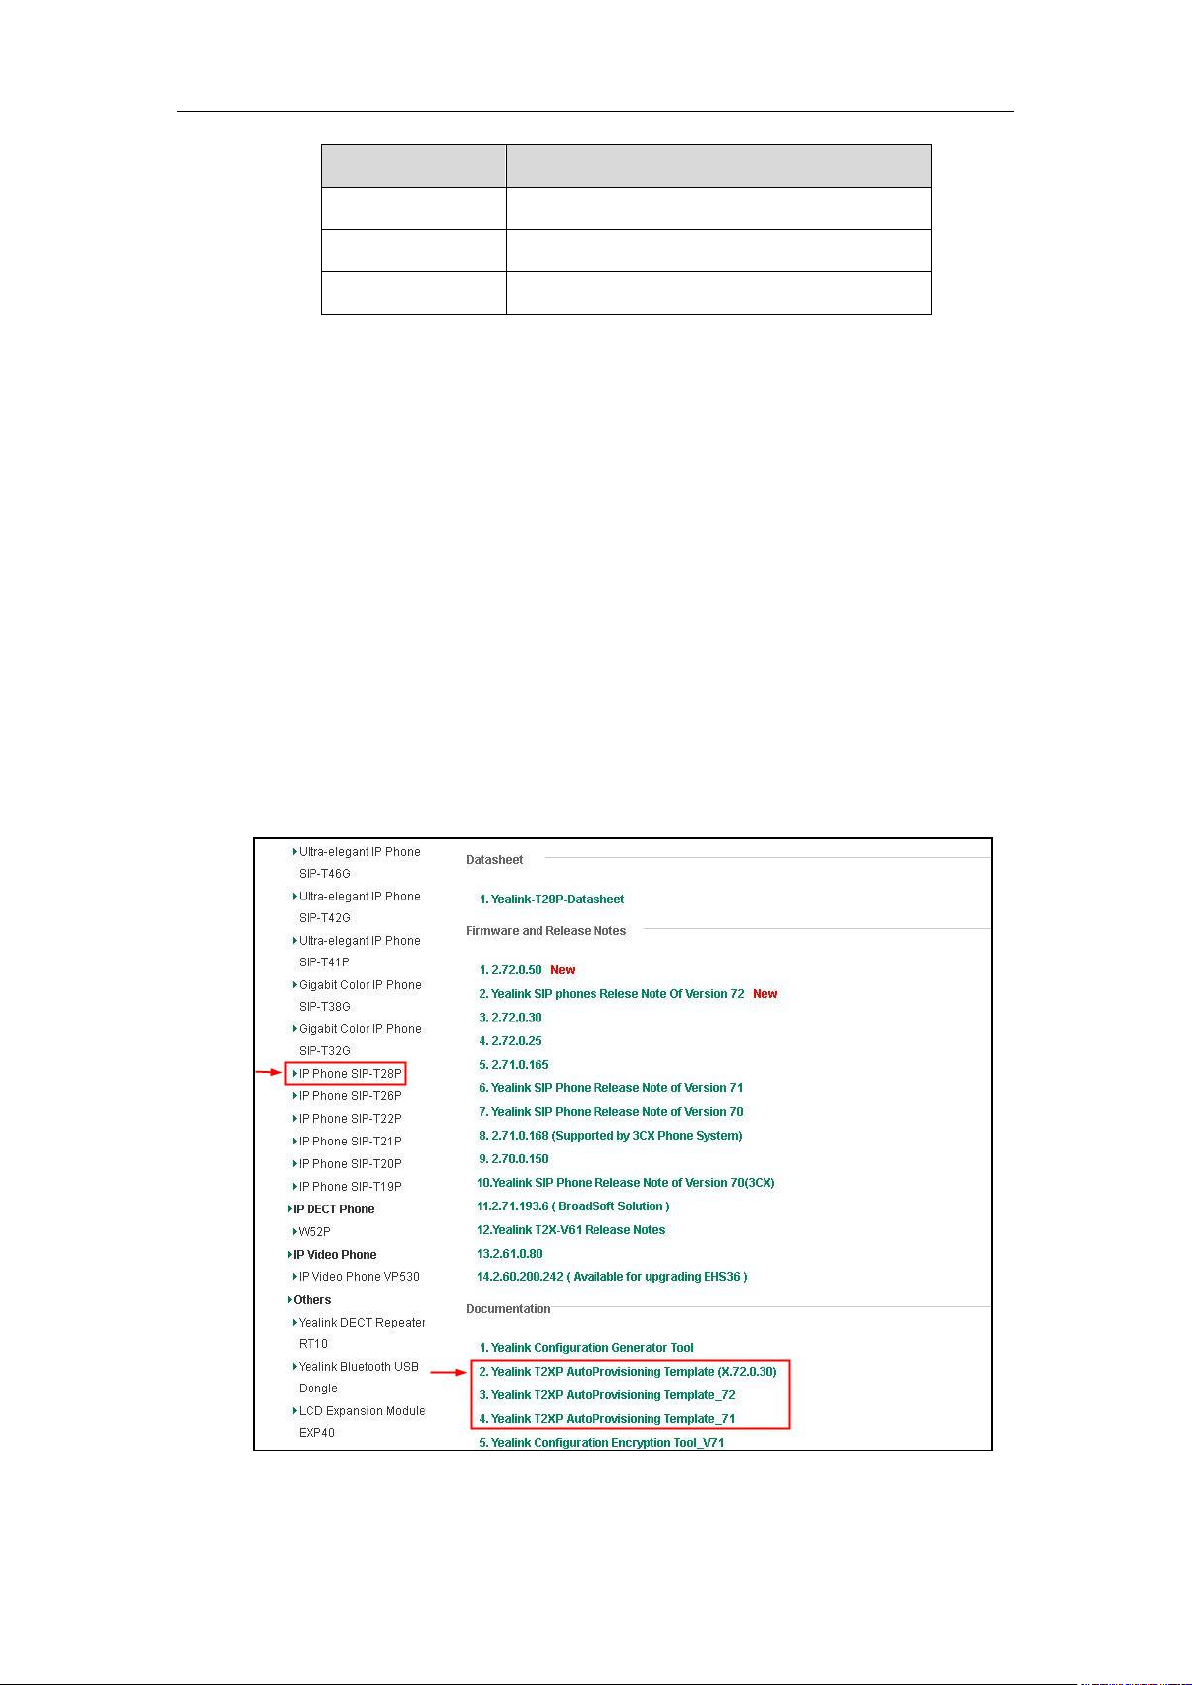
For example, the following illustration shows the template files available for SIP-T2xP
IP phones running different firmware versions.
4
Page 15
Getting Started
3. Open the folder you uncompressed to and identify the files you will edit according
to the table introduced above.
Before beginning provisioning, you also need the IP phone information. For example,
MAC address and the SIP account information of the IP phone.
MAC Address: The unique 12-digit serial number of the IP phone. You can obtain it from
the bar code on the back of the IP phone.
SIP Account Information: This may include SIP credentials such as user name, password
and IP address of the SIP server. Ask your system administrator for SIP account
information.
Auto provisioning enables Yealink IP phones to update themselves automatically via
downloading Common CFG and MAC-Oriented CFG files. Before beginning
provisioning, you may need to edit and customize your configuration files. Open each
configuration file with a text editor such as UltraEdit. For more information on
configuration parameters in configuration files, refer to Description of Configuration
Parameters in CFG Files on page 97
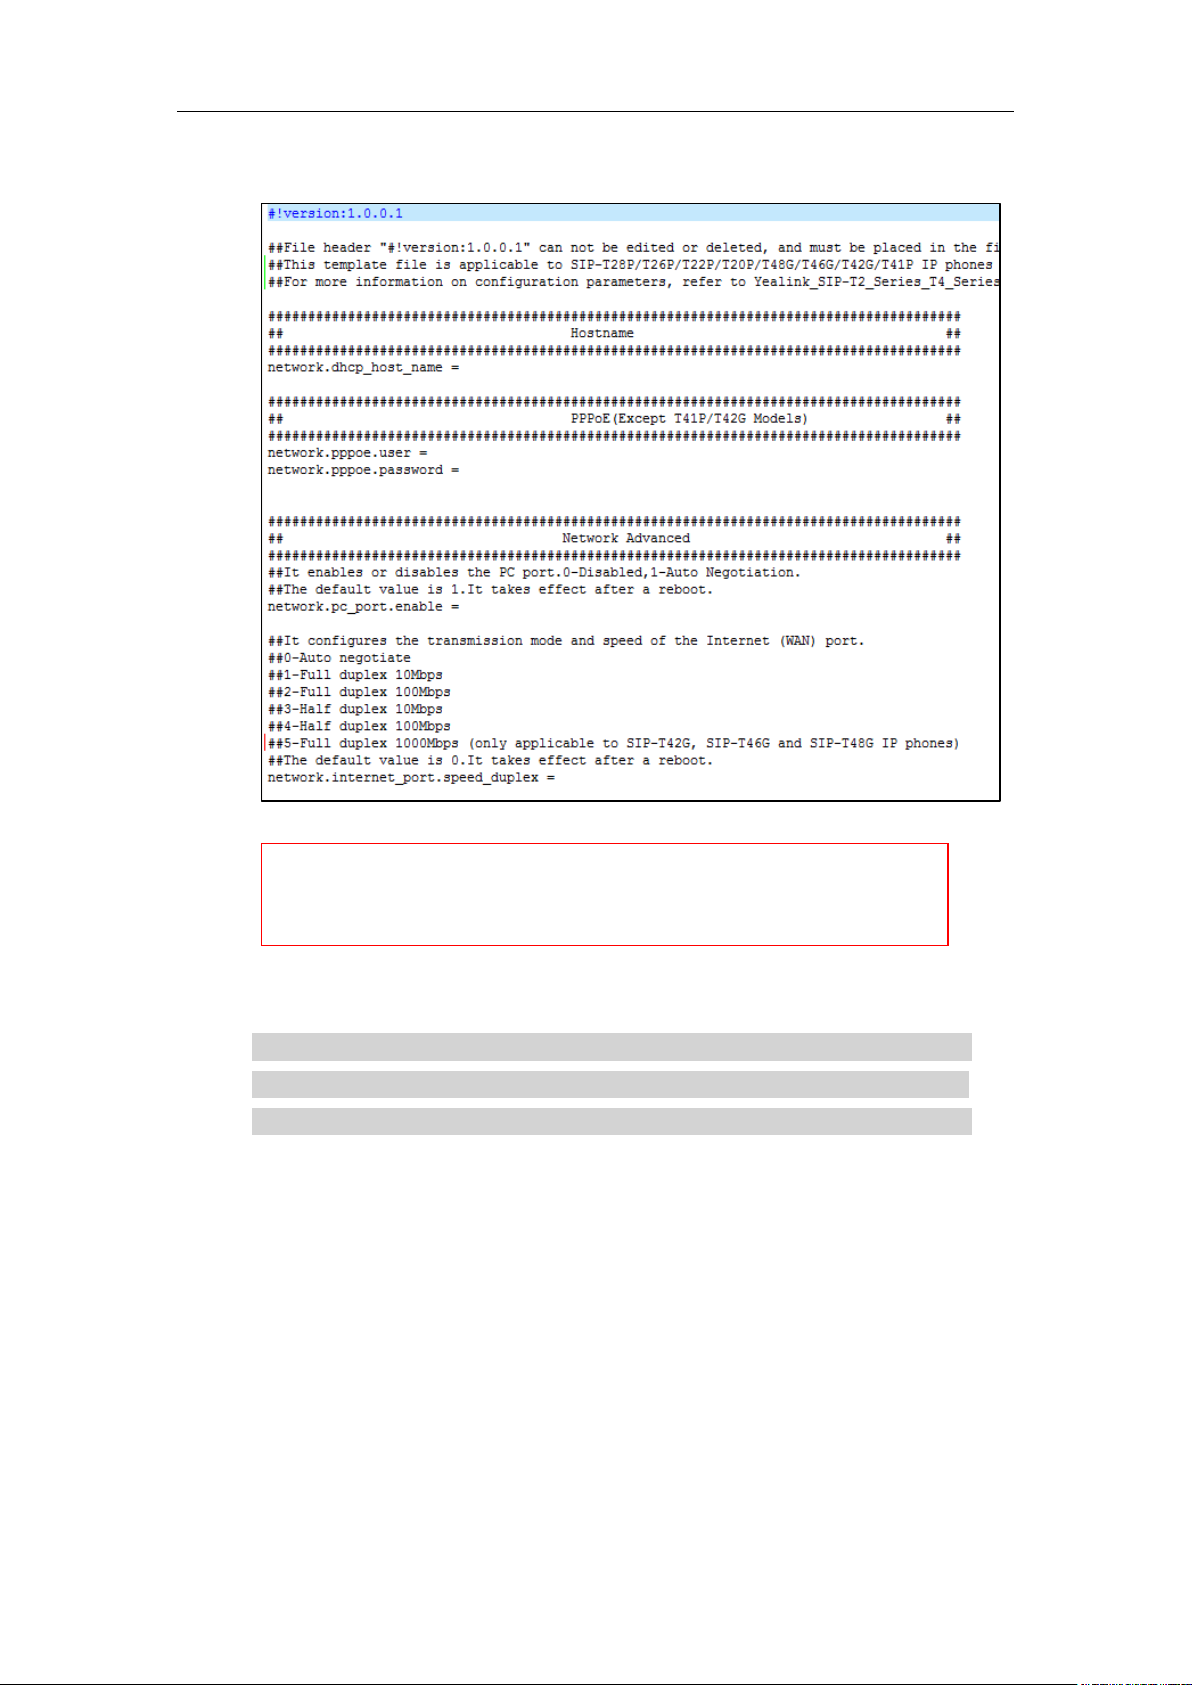
Common CFG file contains configuration parameters which apply to phones with the
same model, such as language and volume.
5
Page 16
Yealink IP Phones Auto Provisioning Guide
The line beginning with “#” is considered to be a comment.
The file header “#!version:1.0.0.1” is not a comment and must be placed in the
first line. It cannot be edited or deleted.
The following figure shows a portion of the common CFG file:
The partial parameters in the Common CFG file are described as follows:
####################################################
## Common CFG File ##
####################################################
#!version:1.0.0.1
##File header "#!version:1.0.0.1" can not be edited or deleted, and must be placed in
the first line.##
##This template file is applicable to SIP-T28P/T26P/T22P/T20P/T48G/T46G/T42G/T41P IP
phones running firmware version 73 or later.##
##For more information on configuration parameters, refer to
Yealink_SIP-T2_Series_T4_Series_IP_Phones_Auto_Provisioning_Guide.##
######################################################
## Hostname ##
######################################################
network.dhcp_host_name =
6
Page 17

Getting Started
######################################################
## PPPoE(Except T41P/T42G Models) ##
######################################################n
etwork.pppoe.user =
network.pppoe.password =
######################################################
## Network Advanced ##
######################################################
##It enables or disables the PC port.0-Disabled,1-Auto Negotiation.
##The default value is 1.It takes effect after a reboot.
network.pc_port.enable =
##It configures the transmission mode and speed of the Internet (WAN) port.
##0-Auto negotiate
##1-Full duplex 10Mbps
##2-Full duplex 100Mbps
##3-Half duplex 10Mbps
##4-Half duplex 100Mbps
##5-Full duplex 1000Mbps (only applicable to SIP-T42G, SIP-T46G and SIP-T48G IP
phones)
##The default value is 0.It takes effect after a reboot.
network.internet_port.speed_duplex =
##It configures the transmission mode and speed of the PC (LAN) port.
##0-Auto negotiate
##1-Full duplex 10Mbps
##2-Full duplex 100Mbps
##3-Half duplex 10Mbps
##4-Half duplex 100Mbps
##5-Full duplex 1000Mbps (only applicable to SIP-T42G, SIP-T46G and SIP-T48G IP
phones)
##The default value is 0.It takes effect after a reboot.
network.pc_port.speed_duplex =
##It enables or disables the phone to use manually configured static IPv4 DNS when
Internet (WAN) port type for IPv4 is configured as DHCP.
##0-Disabled (use the IPv4 DNS obtained by DHCP) 1-Enabled
##The default value is 0.It takes effect after a reboot.
network.static_dns_enable =
network.ipv6_static_dns_enable =
###Only T41P/T42G/T46G Models support this parameter
network.vlan.pc_port_mode =
##It enable or disable to use A record of TTL
##The defalue value is 1;0-Disable 1-Enable
network.dns.ttl_enable =
7
Page 18

Yealink IP Phones Auto Provisioning Guide
##It configures the LAN MTU
##The default value is 1500,.Integer from 128 to 1500.It takes effect after a reboot.
network.mtu_value =
######################################################
## VLAN ##
######################################################
network.vlan.internet_port_enable =
network.vlan.internet_port_vid =
network.vlan.internet_port_priority =
network.vlan.pc_port_enable =
network.vlan.pc_port_vid =
network.vlan.pc_port_priority =
network.vlan.dhcp_enable =
network.vlan.dhcp_option =
##It configures LLDP or manually VLAN can't obtain IP, whether to switch to other
methods of VLAN or closed VLAN to get IP
##0-Disable 1-Enable
network.vlan.vlan_change.enable =
######################################################
## WEB Port ##
######################################################
##It configures the HTTP port for web server access.
##The default value is 80.It takes effect after a reboot.
network.port.http =
##It configures the HTTPS port for web server access.
##The default value is 443.It takes effect after a reboot.
network.port.https =
wui.https_enable =
wui.http_enable =
######################################################
## QoS ##
######################################################
##It configures the voice QoS.
##The default value is 46.It takes effect after a reboot.Integer from 0 to 63
network.qos.rtptos =
##It configures the SIP QoS.
##The default value is 26.It takes effect after a reboot.Integer from 0 to 63
network.qos.signaltos =
8
Page 19
Getting Started
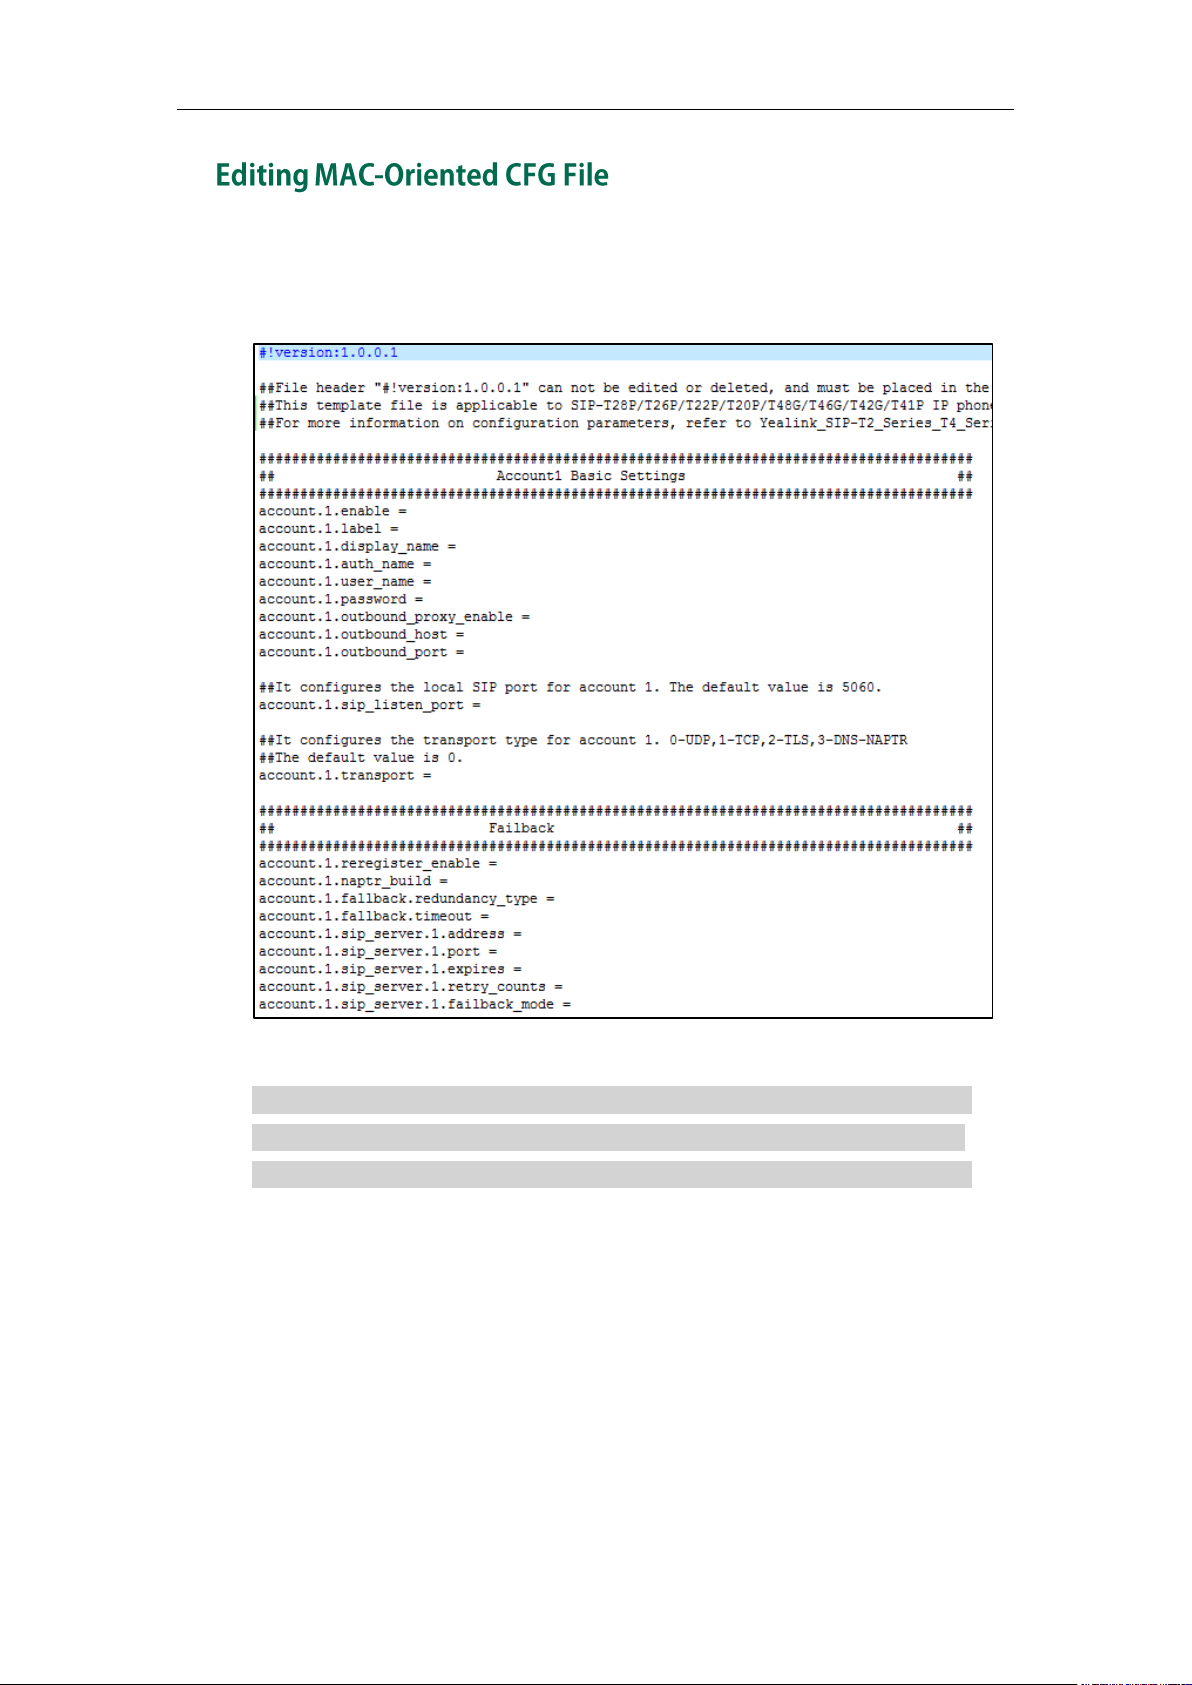
MAC-Oriented CFG file contains configuration parameters which are expected to be
updated per phone, such as the registration information.
The following figure shows a portion of the MAC-Oriented CFG file:
The partial parameters in the MAC-Oriented CFG file are described as follows:
####################################################
## MAC-Oriented CFG File ##
####################################################
#!version:1.0.0.1
##File header "#!version:1.0.0.1" can not be edited or deleted, and must be placed in
the first line.##
##This template file is applicable to SIP-T28P/T26P/T22P/T20P/T48G/T46G/T42G/T41P IP
phones running firmware version 73 or later.##
##For more information on configuration parameters, refer to
Yealink_SIP-T2_Series_T4_Series_IP_Phones_Auto_Provisioning_Guide.##
9
Page 20

Yealink IP Phones Auto Provisioning Guide
######################################################
## Account1 Basic Settings ##
######################################################
account.1.enable =
account.1.label =
account.1.display_name =
account.1.auth_name =
account.1.user_name =
account.1.password =
account.1.outbound_proxy_enable =
account.1.outbound_host =
account.1.outbound_port =
##It configures the local SIP port for account 1. The default value is 5060.
account.1.sip_listen_port =
##It configures the transport type for account 1. 0-UDP,1-TCP,2-TLS,3-DNS-NAPTR
##The default value is 0.
account.1.transport =
######################################################
## Failback ##
######################################################
#################################
account.1.reregister_enable =
account.1.naptr_build =
account.1.fallback.redundancy_type =
account.1.fallback.timeout =
account.1.sip_server.1.address =
account.1.sip_server.1.port =
account.1.sip_server.1.expires =
10
account.1.sip_server.1.retry_counts =
account.1.sip_server.1.failback_mode =
account.1.sip_server.1.failback_timeout =
account.1.sip_server.1.register_on_enable =
account.1.sip_server.2.address =
account.1.sip_server.2.port =
account.1.sip_server.2.expires =
Page 21
Getting Started
SIP-T48G/T46G IP phones support 16 accounts, SIP-T42G IP phones support 12 accounts,
SIP-T41P/T28P IP phones support 6 accounts, SIP-T26P/T22P IP phones support 3 accounts,
and SIP-T20P IP phones support 2 accounts
account.1.sip_server.2.retry_counts =
account.1.sip_server.2.failback_mode =
account.1.sip_server.2.failback_timeout =
account.1.sip_server.2.register_on_enable =
MAC-local CFG file is automatically filled with configurations modified via web user
interface or phone user interface. The file is stored locally on the IP phone and can also
be uploaded to the provisioning server.
If your IP phone’s current firmware version doesn’t support generating a
<MAC>-local.cfg file, the IP phone will automatically generate a MAC-local CFG file
after it is upgraded to the latest firmware.
Uploading and downloading the <MAC>-local.cfg file
You can configure whether the IP phone periodically uploads the <MAC>-local.cfg file
to the provisioning server to back up this file, and downloads the <MAC>-local.cfg file
from the provisioning server during auto provisioning to override the one stored on the
phone. This process is controlled by the value of the parameter
“auto_provision.custom.sync”. When the value of the parameter
“auto_provision.custom.sync” is set to 1, the IP phone will periodically upload the
configuration files to the provisioning server, and download the configuration files from
the provisioning server during auto provisioning.
For more information on how to configure this parameter, refer to Configuration
Parameters on page 56.
Updating the <MAC>-local.cfg file
You can configure whether the IP phone updates configurations in the <MAC>-local.cfg
file during auto provisioning. This process is controlled by the value of the parameter
“auto_provision.custom.protect”. When the value of the parameter
“auto_provision.custom.protect” is set to 1, the IP phone will update the configurations in
the <MAC>-local.cfg file during auto provisioning. The configurations in the
<MAC>-local.cfg file take precedence over the ones in the downloaded Common CFG
file or <MAC>.cfg file. As a result, the personalized settings of the phone configured via
the phone or web user interface can be remained after auto provisioning.
For more information on how to configure this parameter, refer to Configuration
Parameters on page 56.
11
Page 22

Yealink IP Phones Auto Provisioning Guide
Note: The following configurations are defined never to be saved to the
<MAC>-local.cfg file, even if a user modifies the configurations via web user interface
or phone user interface. For more information on the configurations, refer to
Configurations Defined Never be Saved to <MAC>-local.cfg file on page 88.
Configurations associated with the password.
For example,
#Configure the password for PPPoE connection.
network.pppoe.password =
For more information on the specific configurations which associated with the
password, refer to Description of Configuration Parameters in CFG Files on page
97.
Configurations requiring a reboot during auto provisioning.
For example,
#Configure the IP address mode.
network.ip_address_mode=
For more information on the specific configurations which require a reboot during
auto provisioning, refer to Description of Configuration Parameters in CFG Files on
page 97.
The following configuration parameters.
#Configure always forward feature.
forward.always.enable =
forward.always.target =
forward.always.on_code =
forward.always.off_code =
#Configure busy forward feature.
forward.busy.enable =
forward.busy.target =
forward.busy.on_code =
forward.busy.off_code =
#Configure no answer forward feature.
forward.no_answer.enable =
12
forward.no_answer.target =
forward.no_answer.timeout =
forward.no_answer.on_code =
forward.no_answer.off_code =
#Configure DND feature.
features.dnd.enable =
features.dnd.on_code =
Page 23

Getting Started
features.dnd.off_code =
#Configure always forward feature for account X. (X stands for the serial number
of account)
account.X.always_fwd.enable =
account.X.always_fwd.target =
account.X.always_fwd.on_code =
account.X.always_fwd.off_code =
#Configure busy forward feature for account X. (X stands for the serial number of
account)
account.X.busy_fwd.enable =
account.X.busy_fwd.target =
account.X.busy_fwd.on_code =
account.X.busy_fwd.off_code =
#Configure no answer forward feature for account X. (X stands for the serial
number of account)
account.X.timeout_fwd.enable =
account.X.timeout_fwd.target =
account.X.timeout_fwd.timeout =
account.X.timeout_fwd.on_code =
account.X.timeout_fwd.off_code =
#Configure DND feature for account X. (X stands for the serial number of account)
account.X.dnd.enable =
account.X.dnd.on_code =
account.X.dnd.off_code =
#Configure the access URL of the firmware file.
firmware.url =
#Configure the access URL of configuration files.
auto_provision.server.url=
Note: The following configurations are defined to be bundled together. If a user modifies
one of the configurations in a bundled group via web user interface or phone user
interface, the other configurations in this group can also be saved to the
<MAC>-local.cfg file (if the parameter isn't configured, the value of this parameter will
be written by “%NULL%”) in addition to the modified configuration.
#Group1: Configure memory key. (Memory key is only applicable to the SIP-T28P,
SIP-T26P IP phones. X stands for the serial number of line key)
memorykey.X.line =
memorykey.X.value =
memorykey.X.pickup_value =
13
Page 24
Yealink IP Phones Auto Provisioning Guide
We recommend you do not edit the MAC-local CFG file. If you really want to edit
MAC-local CFG file, you can export and then edit it. For more information on how to
export this file, refer to Scenario D Import or export the local configuration file on
page 64. For more information on how to edit this file, refer to Editing Common CFG
File on page 5 and Editing MAC-Oriented CFG File on page 9.
memorykey.X.type =
memorykey.X.xml_phonebook =
#Group2: Configure line key. (X stands for the serial number of line key)
linekey.X.line =
linekey.X.value =
linekey.X.pickup_value =
linekey.X.type =
linekey.X.xml_phonebook =
linekey.X.label =
#Group3: Configure programable key. (X stands for the serial number of programable
key)
programablekey.X.type =
programablekey.X.line =
programablekey.X.value =
programablekey.X.xml_phonebook =
programablekey.X.history_type =
programablekey.X.label =
#Group4: Configure expansion module key. (Expansion module key is only applicable
to the SIP-T48G, SIP-T46G, SIP-T28P, SIP-T26P IP phones. X stands for the serial number of
expansion module, Y stands for the serial number of expansion key)
expansion_module.X.key.Y.type =
expansion_module.X.key.Y.line =
expansion_module.X.key.Y.value =
expansion_module.X.key.Y.pickup_value =
expansion_module.X.key.Y.label =
expansion_module.X.key.Y.xml_phonebook =
To protect against unauthorized access and tampering of sensitive information (e.g.,
login password, registration information), you can encrypt configuration files using
Yealink Configuration Encryption Tool. AES keys must be 16 characters and the
supported characters contain: 0 ~ 9, A ~ Z, a ~ z and the following special characters
14
Page 25
Getting Started
Server
HTTP/HTTPS
TFTP/FTP
Windows
Support: ~ ` ! @ $ ^ ( )
_ - , . ' ; [ ] { } (including
space)
Not Support: | < > : "
/ \ * ? # % & = +
Support: ~ ` ! @ $ ^ ( )
_ - , . ' ; [ ] { } % & = +
(including space)
Not Support: | < > : "
/ \ * ? #
Linux
Support: ~ ` ! @ $ ^ ( )
_ - , . ' ; [ ] { } | < > : "
(including space)
Not Support: / \ * ? #
% & = +
Support: ~ ` ! @ $ ^ ( )
_ - , . ' ; [ ] { } | < > : " %
& = + (including
space)
Not Support: / \ * ? #
Phone Model
File Format
Single File Size
Total Files Size
SIP-T28P/T26P/T22P/T20P
.wav
<=100KB
<=100KB
SIP-T48G/T46G
.wav
<=8MB
<=20MB
SIP-T42G/T41P
.wav
<=100KB
<=100KB
The ring tone file must be PCMU audio format, mono channel, 8K sample rate and 16 bit
resolution.
Platform
are also supported: # $ % * + , - . : = ? @ [ ] ^ _ { } ~. For more information on how to
encrypt configuration files, refer to
Yealink Configuration Encryption Tool User Guide
.
When configuring some particular features, you may need to upload resource files to IP
phones, such as personalized ring tone file, language package file and logo file. Yealink
supplies some resource file templates for the particular features. Ask the distributor or
Yealink FAE for resource file templates. The following provides information on how to
customize resource files and specify the access URL for the resource files.
For some features, you can customize the filename as required. The following table lists
the special characters supported by Yealink IP phones:
Yealink IP phones have built-in system ring tones. You can change the ring type, or
customize a ring tone and upload it to the IP phone via auto provisioning.
The ring tone file must meet the following:
15
Page 26
Yealink IP Phones Auto Provisioning Guide
Available Language
Associated Language File
for SIP-T28P/T26P/T22P/T20P
Associated Language
File for
SIP-T42G/T41P/T48G/T46G
English
000.GUI.English.lang
000.GUI.English.lang
Chinese Simplified
/
001.GUI.Chinese_S.lang
For more information on customizing a ring tone file, refer to Customizing a Ring Tone
Using Cool Edit Pro on page 85.
####################################################
## Configure the custom ring tone ##
####################################################
#Specify the access URL of the custom ring tone.
ringtone.url =
For example, enter “tftp://192.168.1.100/Customring.wav” in the “ringtone.url =” field.
During the auto provisioning process, the IP phone connects to the provisioning server
“192.168.1.100”, and downloads the ring tone file “Customring.wav”.
To use the custom ring tone for the IP phone, you also need to configure the following
parameter:
#Configure the custom ring tone (e.g., Customring.wav) for the IP phone.
phone_setting.ring_type = Customring.wav
To use the custom ring tone for the desired account, you also need to configure the
following parameter:
#Configure the custom ring tone (e.g., Customring.wav) for account 1.
account.1.ringtone.ring_type = Customring.wav
#Delete all custom ring tones.
ringtone.delete = http://localhost/all
For more information on these parameters, refer to Description of Configuration
Parameters in CFG Files on page 97.
You can modify the existing language translation for phone and web user interface. You
can also add a new language (not included in the available language list) to IP phones.
The following table lists available languages and the associated language files for
phone user interface:
16
Page 27

Getting Started
Available Language
Associated Language File
for SIP-T28P/T26P/T22P/T20P
Associated Language
File for
SIP-T42G/T41P/T48G/T46G
Chinese Traditional
/
002.GUI.Chinese_T.lang
French
001.GUI.French.lang
003.GUI.French.lang
German
002.GUI.German.lang
004.GUI.German.lang
Italian
003.GUI.Italian.lang
005.GUI.Italian.lang
Polish
004.GUI.Polish.lang
006.GUI.Polish.lang
Portuguese
005.GUI.Portuguese.lang
007.GUI.Portuguese.lang
Spanish
006.GUI.Spanish.lang
008.GUI.Spanish.lang
Turkish
007.GUI.Turkish.lang
009.GUI.Turkish.lang
Russian
008.GUI.Russian.lang
010.GUI.Russian.lang
To customize a language file:
1. Open the desired language template file (e.g., 000.GUI.English.lang) using an
ASCII editor.
2. Modify the characters within the double quotation marks on the right of the equal
sign.
Don’t modify the translation item on the left of the equal sign.
17
Page 28
Yealink IP Phones Auto Provisioning Guide
The following figure shows a portion of a lang formatted English language file (Take
SIP-T28P IP phones for example):
####################################################
## Configure the custom LCD language file ##
####################################################
#Specify the access URL of the custom LCD language file.
gui_lang.url =
If you want to modify the existing language translation for the IP phone user interface,
edit the language translation and then configure the parameter “gui_lang.url =” in the
configuration file, for example:
gui_lang.url = tftp://192.168.1.100/000.GUI.English.lang
During the auto provisioning process, the IP phone connects to the provisioning server
“192.168.1.100”, and downloads the language file “000.GUI.English.lang”. The
language translation will be changed accordingly.
If you want to add a new language “wuilan” to SIP-T28P IP phones, prepare the
language file named as 009.GUI.wuilan.lang for downloading and configure the
parameter “gui_lang.url =” in the configuration file, for example:
gui_lang.url = tftp://192.168.1.100/009.GUI.wuilan.lang
18
Page 29
Getting Started
Available Language
Associated Language Pack
Associated Note Language
Pack
English
1.English.js
1.English_note.xml
Chinese Simplified
2.Chinese_S.js
2.Chinese_S_note.xml
Chinese Traditional
3.Chinese_T.js
3.Chinese_T_note.xml
French
4.French.js
4.French_note.xml
German
5.German.js
5.German_note.xml
Italian
6.Italian.js
6.Italian_note.xml
Polish
7.Polish.js
7.Polish_note.xml
Portuguese
8.Portuguese.js
8.Portuguese_note.xml
Spanish
9.Spanish.js
9.Spanish_note.xml
For existing language files, “X” ranges from 000 to 010. For custom language files, X must
start from 009 or 011 due to phone models. “Y” means the language name.
Available languages may vary between different firmware versions.
To modify translation of an existing language, do not rename the language file.
During the auto provisioning process, the SIP-T28P IP phone connects to the provisioning
server “192.168.1.100”, and downloads the language file “009.GUI.wuilan.lang”. After
update, you will find a new language selection “wuilan” on the IP phone user interface:
Menu->Settings->Basic Settings->Language.
To use the custom language for the IP phone, you also need to configure the following
parameter:
#Configure the custom language (e.g., English) for the phone user interface.
lang.gui = English
#Delete all custom languages.
gui_lang.delete = http://localhost/all
For more information on these parameters, refer to Description of Configuration
Parameters in CFG Files on page 97.
The note information is integrated in the icon of the web user interface. When you
add a new language for the web user interface, you also need to add the note
language.
The following table lists available languages and the associated language files for web
user interface:
19
Page 30
Yealink IP Phones Auto Provisioning Guide
Available Language
Associated Language Pack
Associated Note Language
Pack
Turkish
10.Turkish.js
10.Turkish_note.xml
Russian
11.Russian.js
11.Russian_note.xml
To customize a language file:
1. Open the desired language template file (e.g., 1.English.js) using an ASCII editor.
2. Modify the characters within the double quotation marks on the right of the colon.
Don’t modify the translation item on the left of the colon.
The following figure shows a portion of a js formatted English language file:
20
Page 31

Getting Started
To customize a note language file:
1. Open the desired note language template file (e.g., 1.English_note.xml) using an
ASCII editor.
2. Modify the text of the note field.
Don't modify the name of the note field.
The following figure shows a portion of an xml formatted English note language file:
####################################################
## Configure the custom web and note language files ##
####################################################
#Specify the access URL of the custom web language file.
wui_lang.url =
#Specify the access URL of the custom note language file.
wui_lang_note.url =
If you want to modify the existing language translation for the web user interface, edit
the language translation and then configure the parameter “wui_lang.url =” in the
configuration file, for example:
wui_lang.url = tftp://192.168.1.100/1.English.js
During the auto provisioning process, the IP phone connects to the provisioning server
“192.168.1.100”, and downloads the language file “1.English.js”. The language
translation will be changed accordingly.
If you want to add a new language “wuilan” to IP phones, prepare the language file
named as 12.wuilan.js and 12.wuilan_note.xml for downloading and configure the
parameter “gui_lang.url =” and “wui_lang_note.url” in the configuration files, for
example:
wui_lang.url = tftp://192.168.1.100/12.wuilan.js
21
Page 32

Yealink IP Phones Auto Provisioning Guide
Phone Model
Logo File Format
Resolution
SIP-T28P
.dob
<=236*82 2 gray scale
SIP-T26P/T22P
.dob
<=132*64 2 gray scale
SIP-T42G/T41P
.dob
<=192*64 2 gray scale
For existing language files, “X” ranges from 1 to 11. For custom language files, X must
start from 12 “Y” means the language name.
To modify translation of an existing language, do not rename the language file.
wui_lang_note.url = tftp://192.168.1.100/12.wuilan_note.xml
During the auto provisioning process, the IP phone connects to the provisioning server
“192.168.1.100”, and downloads the language files “12.wuilan.js” and
“12.wuilan_note.xml”. After update, you will find a new language selection “wuilan” on
the web user interface: Setting->Preference->Language, and new note information is
integrated in the icon when the new language is selected.
To use the custom language for the IP phone, you also need to configure the following
parameter:
#Configure the custom language (e.g., English) for the web user interface.
lang.wui = English
#Delete all custom languages.
wui_lang.delete = http://localhost/all
Yealink IP phones allow you to customize the logo displayed on the LCD screen. SIP-T20P
IP phones only support a text logo. Logo is not applicable to SIP-T48G/T46G IP phones.
These two IP phone models use the wallpaper instead.
The following table lists the supported logo file format and resolution for each phone
model:
For more information on customizing a logo file, refer to Customizing a Logo File Using
PictureExDemo on page 87.
You can customize a *.dob logo file, upload the logo file to the provisioning server and
then specify the access URL in configuration files:
####################################################
## Configure the custom Logo File ##
####################################################
#Specify the access URL of the custom Logo File (not applicable to SIP-T20P IP phones).
lcd_logo.url =
For example, enter “tftp://192.168.1.100/logo.dob” in the “lcd_logo.url =” field. During
22
Page 33

Getting Started
Phone Model
Format
Resolution
Single File Size
Total Files Size
SIP-T46G
.jpg/.png/.bmp
<=480*272
<=5MB
<=20MB
SIP-T48G
.jpg/.png/.bmp
<=800*480
<=5MB
<=20MB
the auto provisioning process, the IP phone connects to the provisioning server
“192.168.1.100”, and downloads the logo file “logo.dob”.
To use the custom logo, you also need to configure the following parameter:
#Configure the logo mode (not applicable to SIP-T20P IP phones).
#0-Disabled (Except for SIP-T28P IP phones), 1-System logo, 2-Custom logo
phone_setting.lcd_logo.mode = 2
For SIP-T20 IP phones, you can only configure a text log.
#Enable or disable a text logo (only applicable to SIP-T20P IP phones).
#0-Disabled, 1-Enabled
phone_setting.lcd_logo.mode = 1
#Configure a text logo (only applicable to SIP-T20P IP phones).
phone_setting.lcd_logo.text =Yealink
After auto provisioning, you will find that the custom logo or text logo appears on the
LCD screen.
#Delete all custom logo files (not applicable to SIP-T20P IP phones).
lcd_logo.delete = http://localhost/all
For more information on these parameters, refer to Description of Configuration
Parameters in CFG Files on page 97.
Yealink SIP-T48G and SIP-T46G IP phones allow you to customize the wallpaper
displayed on the LCD screen.
The following table lists the supported wallpaper image format and resolution for
SIP-T48G and SIP-T46G IP phones:
Upload the wallpaper image to the provisioning server and then specify the access URL
in configuration files:
####################################################
## Configure the custom wallpaper ##
####################################################
#Specify the access URL of the custom wallpaper.
wallpaper_upload.url =
For example, enter “tftp://192.168.1.100/wallpaper.jpg” in the “wallpaper_upload.url =”
field. During the auto provisioning process, the IP phone connects to the provisioning
server “192.168.1.100”, and downloads the wallpaper image “wallpaper.jpg”.
23
Page 34

Yealink IP Phones Auto Provisioning Guide
Phone Model
Values
Description
SIP-T20P
0~2
0 stands for Auto (the first registered line)
1~2 stand for line1~line2
SIP-T22P/T26P
0~3
0 stands for Auto (the first registered line)
1~3 stand for line1~line3
SIP-T28P
0~6
0 stands for Auto (the first registered line)
1~6 stand for line1~line6
SIP-T41P
-1~5
-1 stands for Auto (the first registered line)
0~5 stand for line1~line6
SIP-T42G
-1~11
-1 stands for Auto (the first registered line)
0~11 stand for line1~line12
To use the custom wallpaper, you also need to configure the following parameter:
#Configure the custom image (e.g., wallpaper.jpg) as phone wallpaper.
phone_setting.backgrounds = Config:wallpaper.jpg
For more information on these parameters, refer to Description of Configuration
Parameters in CFG Files on page 97.
Yealink IP phones allow you to upload contact data in batch via auto provisioning. You
can create multiple contacts using the supplied local contact template file. The existing
local contacts on the IP phones will be overwritten by the downloaded local contacts.
Yealink IP phones support *.xml format.
When editing the local contact template file, learn the following:
Add groups between <root_group> and </root_group>.
At most 5 groups (including the default groups) can be stored on SIP-T2xP IP
phones.
At most 48 groups (including the default groups) can be stored on SIP-T4X IP
phones.
Add local contacts between <root_contact> and </root_contact>.
At most 1000 local contacts can be added to IP phones.
When specifying a desired line for a contact, valid values are -1~15. Multiple line
IDs are separated by commas.
The following table lists valid values for each phone model.
24
Page 35

Getting Started
Phone Model
Values
Description
SIP-T46G/T48G
-1~15
-1 stands for Auto (the first registered line)
0~15 stand for line1~line16
When specifying a ring tone for a contact, valid values are Auto,
Resource:Silent.wav, Resource:Splash.wav or Resource: RingN.wav (system ring
tone, integer N ranges from 1 to 5 for SIP-T2xP IP phones and from 1 to 8 for SIP-T4X
IP phones) and Custom:Name.wav (custom ring tone). To specify a custom ring
tone for a contact, you need to upload the ring tone in advance. For more
information on customizing a ring tone, refer to Customizing a Ring Tone on page
15.
When specifying a group for a contact, valid values are the group names (built-in
or custom groups).
When specifying an avatar for a contact, valid values are “Resource: avatar name”
(for the built-in avatar) and “Config: avatar name” (for the custom avatar). This is
only applicable to SIP-T48G/T46G IP phones. To specify a custom avatar for a
contact, you need to upload the avatar in advance.
To customize a local contact file:
1. Open the template file using an ASCII editor.
2. For each group that you wish to add, add the following string to the file. Each starts
on a separate line:
<group display_name=”” ring=””/>
Where:
display_name=”” specifies the name of the group.
ring=”” specifies the ring tone for this group.
3. For each contact that you wish to add, add the following string to the file. Each
starts on a separate line:
<contact display_name=”” office_number=”” mobile_number=”” other_number=””
line=”” ring=”” group_id_name=””/>
Where:
display_name=”” specifies the name of the contact (This value cannot be blank or
duplicated).
office_number=”” specifies the office number of the contact.
mobile_number=”” specifies the mobile number of the contact.
other_number=”” specifies the other number of the contact.
line=”” specifies the line for the contact.
ring=”” specifies the ring tone for the contact.
group_id_name=”” specifies the group you want to add the contact to.
default_photo=”” specifies the avatar for the contact (for SIP-T48G/T46G IP phones).
25
Page 36

Yealink IP Phones Auto Provisioning Guide
4. Specify the values within double quotes.
5. Save the change.
After editing the local contact template file, upload it to the provisioning server and
then specify the access URL in configuration files.
The following shows an example of a local contact file used for SIP-T2xP IP phones:
<root_group>
<group display_name="All Contacts" ring=""/>
<group display_name="Family" ring="Resource: Ring1.wav"/>
<group display_name="Friend" ring="Auto"/>
</root_group>
<root_contact>
<contact display_name="Mary" office_number="123" mobile_number="456"
other_number="2201" line="0" ring="Auto" group_id_name="Family"/>
<contact display_name="Damy" office_number="124" mobile_number="789"
other_number="2202" line="1" ring="Resource: Ring2.wav" group_id_name=""/>
<contact display_name="Jack" office_number="125" mobile_number="234"
other_number="2203" line="2" ring="Custom:lin.wav" group_id_name="Family"/>
<contact display_name="Ada" office_number="8800" mobile_number="1234"
other_number="0000" line="0" ring="" group_id_name=""/>
</root_contact>
26
Page 37

Getting Started
The following shows an example of a local contact file used for SIP-T48G/T46G IP
phones:
<root_group>
<group display_name="All Contacts" ring=""/>
<group display_name="Family" ring="Resource: Ring1.wav"/>
<group display_name="Friend" ring="Auto"/>
</root_group>
<root_contact>
<contact display_name="Mary" office_number="123" mobile_number="456"
other_number="2201" line="0" ring="Auto" group_id_name="All Contacts"
default_photo="Resource:default_contact_image.png"/>
<contact display_name="Damy" office_number="124" mobile_number="789"
other_number="2202" line="1" ring="Resource: Ring2.wav" group_id_name="Family"
default_photo="Resource:icon_family_b.png"/>
<contact display_name="Jack" office_number="125" mobile_number="234"
other_number="2203" line="2" ring="Custom:lin.wav" group_id_name="Family"
default_photo="Resource:icon_family_b.png"/>
<contact display_name="Ada" office_number="8800" mobile_number="1234"
other_number="0000" line="0" ring="" group_id_name="Friend"
default_photo="Config:custom.png"/>
</root_contact>
####################################################
## Configure the custom local contact file ##
####################################################
# Specify the access URL of the custom local contact file.
local_contact.data.url =
For example, enter “tftp://192.168.1.100/contact.xml” in the “local_contact.data.url =”
field. During the auto provisioning process, the IP phone connects to the provisioning
server “192.168.1.100”, and downloads the contact file “contact.xml”.
If you want to upload custom avatars for contacts, compress avatars as a tar formatted
file named as photo.tar (case-sensitive) and specify the access URL of the TAR file.
#Do not rename the filename (applicable to SIP-T46G and SIP-T48G IP phones)
local_contact.image.url =
#Specify the access URL of a TAR contact icon file. (only applicable to SIP-T48G IP
phones)
local_contact.icon.url =
For example, enter “tftp://192.168.1.100/photo.tar” in the
“local_contact.data_photo_tar.url =” field. During the auto provisioning process, the IP
27
Page 38

Yealink IP Phones Auto Provisioning Guide
phone connects to the provisioning server “192.168.1.100”, and downloads the avatar
file “photo.tar”.
If the contact XML file named as ContactData.xml (case-sensitive) and the compressed
avatar TAR file named as photo.tar (case-sensitive) are compressed as a tar formatted
file (e.g., Contact.tar), you can only configure the following parameter to upload
contacts and avatars:
#Specify the access URL of the compressed TAR file (only applicable to SIP-T46G IP
phones)
local_contact.data_photo_tar.url =
For example: enter “tftp://192.168.1.100/Contact.tar” in the
“local_contact.data_photo_tar.url =” field. During the auto provisioning process, the IP
phone connects to the provisioning server “192.168.1.100”, and downloads the file
“Contact.tar”.
For more information on these parameters, refer to Description of Configuration
Parameters in CFG Files on page 97.
You can create replace rules directly in configuration files, or create multiple replace
rules using the supplied replace rule template file. The existing replace rules on the IP
phones will be overwritten by the downloaded replace rules.
When editing the replace rule template file, learn the following:
<DialRule> indicates the start of the template file and </DialRule> indicates the
end of the template file.
Create replace rules between <DialRule> and </DialRule>.
When specifying the desired line(s) to apply the replace rule, valid values are 0
and line ID. The digit 0 stands for all lines. Multiple line IDs are separated by
commas.
At most 100 replace rules can be added to the IP phone.
For the basic expression syntax of the replace rule, refer to
Yealink phone-specific
user guide.
To customize a replace rule file:
1. Open the template file using an ASCII editor.
2. For each replace rule you wish to add, add the following string to the file. Each
starts on a separate line:
28
<Data Prefix=”” Replace=”” LineID=””/>
Where:
Prefix=”” specifies the numbers to be replaced.
Replace=”” specifies the alternate string.
Page 39

Getting Started
LineID=”” specifies the desired line(s) for this rule. When you leave it blank or enter
0, this replace rule will apply to all lines.
3. Specify the values within double quotes.
4. Save the change.
The following shows an example of a replace rule file:
<DialRule>
<Data Prefix="1" Replace="05928665234" LineID=""/>
<Data Prefix="2(xx)" Replace="002$1" LineID="0"/>
</DialRule>
#Specify the access URL of the custom replace rule file.
dialplan_replace_rule.url =
For example, enter “tftp://192.168.1.100/DialPlan.xml” in the “dialplan_replace_rule.url =”
field. During the auto provisioning process, the IP phone connects to the provisioning
server “192.168.1.100”, and downloads the replace rule file “DialPlan.xml”.
For more information on the parameter, refer to Description of Configuration Parameters
in CFG Files on page 97.
You can create dial-now rules directly in configuration files, or create multiple dial-now
rules using the supplied dial-now rule template file. The existing dial-now rules on the IP
phones will be overwritten by the downloaded dial-now rules.
When editing a dial-now file, learn the following:
<DialNow> indicates the start of the template file and </DialNow> indicates the
end of the template file.
Create dial-now rules between <DialNow> and </DialNow>.
When specifying the desired line(s) for the dial-now rule, valid values are 0 and
line ID. The digit 0 stands for all lines. Multiple line IDs are separated by commas.
At most 100 dial-now rules can be added to the IP phone.
For the basic expression syntax of the dial-now rule,
refer to Yealink phone-specific
user guide.
To customize a dial-now file:
1. Open the template file using an ASCII editor.
2. For each dial-now rule you wish to add, add the following string to the file. Each
starts on a separate line:
<Data DialNowRule=”” LineID=""/>
Where:
DialNowRule=””/ rule=”” specifies the dial-now rule.
29
Page 40

Yealink IP Phones Auto Provisioning Guide
LineID=””/ lines=”” specifies the desired line(s) for this rule. When you leave it
blank or enter 0, this dial-now rule will apply to all lines.
3. Specify the values within double quotes.
4. Save the change.
The following shows an example of a dial-now file:
<DialNow>
<Data DialNowRule="1234" LineID="1"/>
<Data DialNowRule="52[0-6]" LineID="1"/>
<Data DialNowRule="xxxxxx" LineID=""/>
</DialNow>
#Specify the access URL of the custom dial-now file.
dialplan_dialnow.url =
For example, enter “tftp://192.168.1.100/DialNow.xml” in the “dialplan_dialnow.url =”
field. During the auto provisioning process, the IP phone connects to the provisioning
server “192.168.1.100”, and downloads the dial-now file “DialNow.xml”.
For more information on the parameter, refer to Description of Configuration Parameters
in CFG Files on page 97.
Directory provides easy access to frequently used lists. You can access lists by pressing
the Directory soft key when the IP phone is idle. The lists may contain Local Directory,
History, Remote Phone Book, LDAP and Network Directory. You can add the desired list(s)
to Directory using the supplied directory template (favorite_setting.xml). After setup,
place the directory template to the provisioning server and specify the access URL in
the configuration files. Directory is not applicable to SIP-T20P IP phones.
When editing a directory template, learn the following:
Do not rename the directory template.
<root_favorite_set> indicates the start of a template and </root_favorite_set>
indicates the end of a template.
The default display names of directory lists are Local Directory, History, Remote
Phone Book, LDAP and Network Directory.
When specifying the display priority of the directory list, the valid values are 1, 2, 3,
4 and 5. 1 is the highest priority, 5 is the lowest.
30
When enabling or disabling the desired directory list for Directory, the valid values
are 0 and 1. 0 stands for Disabled, 1 stands for Enabled.
To customize a directory template:
1. Open the template file using an ASCII editor.
Page 41

Getting Started
2. For each directory list that you want to configure, edit the corresponding string in
the file. For example, you want to configure the local directory list, edit the
following strings:
<item id_name="localdirectory" display_name="Local Directory" priority="1"
enable="1" />
Where:
id_name="" specifies the directory list (id_name = “localdirectory” specifies the
local directory list). Do not edit this field.
display_name="" specifies the display name of the directory list. We recommend
you do not edit this field.
priority="" specifies the display priority of the directory list.
enable="" enables or disables the directory list for Directory.
3. Edit the values within double quotes.
4. Place this file to the provisioning server.
The following shows an example of a directory template:
<root_favorite_set>
<item id_name="localdirectory" display_name="Local Directory"
priority="1" enable="1" />
<item id_name="history" display_name="History" priority="2"
enable="0" />
<item id_name="remotedirectory" display_name="Remote Phone Book"
priority="3" enable="0" />
<item id_name="ldap" display_name="LDAP" priority="4" enable="0" />
<item id_name=”networkdirectory” display_name=”Network Directories”
priority=”5” enable=”0” />
</root_avorite_set>
## Specify the access URL of the custom directory template.
directory_setting.url =
For example, enter “tftp://192.168.1.100/favorite_setting.xml” in the “directory_setting.url
=” field. During the auto provisioning process, the IP phone connects to the provisioning
server “192.168.1.100”, and downloads the contact file “favorite_setting.xml”.
For more information on the parameter, refer to Description of Configuration Parameters
in CFG Files on page 97.
Search source list in dialing allows the IP phone to search for entries from the desired
lists when the IP phone is in the dialing screen, and then the user can select the desired
entry to dial out quickly. The lists may contain Local Directory, History, Remote Phone
31
Page 42

Yealink IP Phones Auto Provisioning Guide
Book, LDAP and Network Directory. You can configure the search source list in dialing
using the supplied super search template (super_search.xml). After setup, place the
super search template to the provisioning server and specify the access URL in the
configuration files. Search source list in dialing is not applicable to SIP-T20P IP phones.
When editing a super search template, learn the following:
Do not rename the super search template.
<root_super_search> indicates the start of a template and </root_super_search>
indicates the end of a template.
The default display names of directory lists are Local Directory, History, Remote
Phone Book, LDAP and Network Directory.
When specifying the priority of search results, the valid values are 1, 2, 3, 4 and 5. 1
is the highest priority, 5 is the lowest.
When enabling or disabling the IP phone to search the desired directory list, the
valid values are 0 and 1. 0 stands for Disabled, 1 stands for Enabled.
To customize a super search template:
1. Open the template file using an ASCII editor.
2. For each directory list that you want to configure, edit the corresponding string in
the file. For example, you want to configure the local directory list, edit the
following strings:
<item id_name="local_directory_search" display_name="Local Directory"
priority="1" enable="1" />
Where:
id_name="" specifies the directory list (id_name = “local_directory_search”
specifies the local directory list). Do not edit this field.
display_name="" specifies the display name of the directory list. We recommend
you do not edit this field.
priority="" specifies the priority of search results.
enable="" enables or disables the IP phone to search the directory list.
3. Edit the values within double quotes.
4. Place this file to the provisioning server.
32
Page 43

Getting Started
Phone Model
Firmware Name
SIP-T28P
2.x.x.x.rom
SIP-T26P
6.x.x.x.rom
SIP-T22P
7.x.x.x.rom
SIP-T20P
9.x.x.x.rom
SIP-T48G
35.x.x.x.rom
SIP-T46G
28.x.x.x.rom
SIP-T42G
29.x.x.x.rom
The following shows an example of a super search template:
<root_super_search>
<item id_name="local_directory_search" display_name="Local
Directory" priority="1" enable="1" />
<item id_name="calllog_search" display_name="History" priority="2"
enable="1" />
<item id_name="remote_directory_search" display_name="Remote Phone
Book" priority="3" enable="0" />
<item id_name="ldap_search" display_name="LDAP" priority="4"
enable="0" />
<item id_name=”Network_directory_search” display_name=”Network
Directories” priority=”5” enable=”0” />
</root_super_search>
##Specify the access URL of the custom super search template.
super_search.url =
For example, enter “tftp://192.168.1.100/super_search.xml” in the “super_search.url =”
field. During the auto provisioning process, the IP phone connects to the provisioning
server “192.168.1.100”, and downloads the contact file “super_search.xml”.
For more information on the parameter, refer to Description of Configuration Parameters
in CFG Files on page 97.
Yealink IP phones allow you to upgrade firmware manually via web user interface, or
upgrade firmware in batch via auto provisioning.
The following table lists the firmware name for each phone model (X is replaced by the
actual firmware version):
33
Page 44

Yealink IP Phones Auto Provisioning Guide
Phone Model
Firmware Name
SIP-T41P
36.x.x.x.rom
To upgrade the IP phones’ firmware in batch via auto provisioning, ask the distributor for
the firmware file, upload it to the provisioning server, and then specify the access URL in
configuration files.
##Specify the access URL of the firmware file.
firmware.url =
For example, enter “tftp://admin:password@192.168.1.100/2.73.0.40.rom” (“admin” is
replaced by the authentication user name and “password” is replaced by the
authentication password) in the “firmware.url =” field. During the auto provisioning
process, the IP phone connects to the provisioning server “192.168.1.100”, and
downloads the firmware file “2.73.0.40.rom”.
For more information on the parameter, refer to Description of Configuration Parameters
in CFG Files on page 97.
34
Page 45

Configuring a TFTP Server
Yealink IP phones support using FTP, TFTP, HTTP and HTTPS protocols to download
configuration files. You can use one of these protocols for provisioning. The TFTP protocol
is used by default. The following section provides instructions on how to configure a TFTP
server.
We recommend that you use 3CDaemon or TFTPD32 as a TFTP server. 3CDaemo and
TFTPD32 are free applications for Windows. You can download 3CDaemon online:
http://www.oldversion.com/3Com-Daemon.html and TFTPD32 online:
http://tftpd32.jounin.net/.
For more information on how to configure FTP and HTTP servers, refer to Configuring an
FTP Server on page 71 and Configuring an HTTP Server on page 75.
To prepare a root directory:
1. Create a TFTP root directory on the local system.
2. Place configuration files to this root directory.
3. Set security permissions for the TFTP directory folder.
You need to define a user or a group name, and set the permissions: read, write or
modify. Security permissions vary by organizations.
An example of configuration on the Windows platform is shown as below:
35
Page 46

Yealink IP Phones Auto Provisioning Guide
If you have a 3CDaemon application installed on your local system, use it directly.
Otherwise, download and install it.
To configure a TFTP server:
1. Double click 3CDaemon.exe to start the application. A configuration page is shown
as below:
2. Select Configure TFTP Server. Click the button to locate the TFTP root directory
from your local system:
3. Click the Confirm button to finish configuring the TFTP server.
The server URL “tftp://IP/” (Here “IP” means the IP address of the provisioning server, for
example, ”tftp://192.168.1.100/”) is where the IP phone downloads configuration files
from.
36
Page 47

Obtaining the Address of Provisioning Server
Yealink IP phones support obtaining the provisioning server address in the following
ways:
Zero Touch
Plug and Play (PnP) Server
DHCP Options
Phone Flash
Configuring Wildcard of the Provisioning Server URL
The priority of obtaining the provisioning server address is as follows: Zero Touch-->PnP
Server-->DHCP Options (Custom option-->option 66-->option 43) -->Phone Flash.
The following sections detail the process of each way (take the SIP-T28P IP phone as an
example).
Zero Touch allows you to configure the network parameters and provisioning server
address via phone user interface during startup. This feature is helpful when there is a
system failure on the IP phone. To use Zero Touch, make sure this feature is enabled.
To configure Zero Touch via web user interface:
1. Click on Settings->Auto Provision.
2. Select Enabled from the pull-down list of Zero Active.
3. Configure the wait time in the Wait Time (1~100s) field.
37
Page 48

Yealink IP Phones Auto Provisioning Guide
The default value is 10.
4. Click Confirm to accept the change.
When Zero Touch is enabled, there will be a configuration wizard during startup:
Press the OK soft key.
The network parameters are configurable via phone user interface:
38
Page 49

Obtaining the Address of Provisioning Server
Press the Next soft key after finishing network settings.
Configure the provisioning server address, authentication user name (optional) and
password (optional) in the Auto Provision screen.
An example of screenshot is shown as below:
Yealink IP phones support obtaining the provisioning server address from the PnP server.
The IP phone broadcasts the PnP SUBSCRIBE message to obtain the provisioning server
address during startup. To use Plug and Play, make sure this feature is enabled.
To configure PnP via web user interface:
1. Click on Settings->Auto Provision.
2. Mark the On radio box in the PNP Active field.
39
Page 50

Yealink IP Phones Auto Provisioning Guide
3. Click Confirm to accept the change.
Any PnP server activated in the network responses with a SIP NOTIFY message, and an
address of the provisioning server is contained in the message body. Then the IP phone
can connect to the provisioning server and perform the auto provisioning process.
Yealink IP phones support obtaining the provisioning server address by detecting DHCP
options.
The phone will automatically detect the option 66 and option 43 for obtaining the
provisioning server address. DHCP option 66 is used to identify the TFTP server. DHCP
option 43 is a vendor-specific option, which is used to transfer the vendor-specific
information. You can configure the phone to obtain the provisioning server address via
a custom DHCP option. To obtain the provisioning server address via a custom DHCP
option, make sure the DHCP option is properly configured on the phone.
The custom DHCP option must be in accordance with the one defined in the DHCP
server. For more information on how to configure a DHCP server, refer to Configuring a
DHCP Server on page 79.
To configure the DHCP option via web user interface:
1. Click on Settings->Auto Provision.
2. Mark the On radio box in the DHCP Active field.
40
Page 51

Obtaining the Address of Provisioning Server
3. Enter the desired value in the Custom Option (128~254) field.
4. Click Confirm to accept the change.
The phone will broadcast DHCP request with DHCP options for obtaining the
provisioning server address. The provisioning server address will be found in the
received DHCP response message.
41
Page 52

Yealink IP Phones Auto Provisioning Guide
The following figure shows the example messages of obtaining the TFTP server address
from a custom DHCP option:
Right click the root node of the custom option (e.g., option 128) shown on the above
figure, and select Copy->Bytes->Printable Text Only. Paste the copied text in your
favorite text editor to check the address, for example, tftp://192.168.1.100/.
Yealink IP phones support obtaining the provisioning server address from the IP phone
flash. To obtain the provisioning server address by reading the IP phone flash, make
sure the configuration is set properly.
To configure the IP phone Flash via web user interface:
1. Click on Settings->Auto Provision.
42
Page 53

Obtaining the Address of Provisioning Server
2. Enter the URL, user name and password of the provisioning server in the Server
URL, User Name and Password fields (the user name and password are optional).
3. Click Confirm to accept the change.
Normally, many phone models may be deployed in your environment. To deploy many
phone models using a unified provisioning server, it is convenient for the administrator
to configure a unified provisioning server URL for different phone models. On the
provisioning server, many directories need to be configured for different phone models,
each with a unique directory name. Yealink IP phones support the following wildcards in
the provisioning server URL:
$PN: it is used to identify the directory name of the provisioning server directory
where the corresponding configuration files are located
$MAC: it is used to identify the MAC address of the IP phone.
The parameter “auto_provision.url_wildcard.pn” is used to configure the directory name
the configuration files located. For more information on the parameter, refer to
Description of Configuration Parameters in CFG Files on page 97.
When the IP phone obtains a provisioning server URL containing the wildcard $PN, it
automatically replaces the character $PN with the value of the parameter
43
Page 54

Yealink IP Phones Auto Provisioning Guide
The value of the parameter “auto_provision.url_wildcard.pn” must be configured in
accordance with the directory name of the provisioning server directory where the
configuration files of the IP phones are located.
“auto_provision.url_wildcard.pn” configured on the IP phone. When the IP phone is
triggered to perform auto provisioning, it will request to download the configuration files
from the identified directory on the provisioning server.
The following example assists in explaining the wildcard feature:
You want to deploy SIP-T28P and SIP-T46G IP phones simultaneously in your environment.
IP phones are configured to obtain the provisioning server address via DHCP options.
The following details how to deploy the SIP-T28P and SIP-T46G IP phones using wildcard
feature.
1. Create two directories on the root directory of provisioning server.
2. Configure the directory name of these two directories to be “T28P” and “T46G”
respectively.
3. Place the associated configuration files to the directories created above.
4. Configure the provisioning server URL on the DHCP server as:
tftp://192.168.1.100/$PN.
5. Configure the value of the parameter “auto_provision.url_wildcard.pn”.
The default value of the parameter “auto_provision.url_wildcard.pn” is “T28P” for the
SIP-T28P IP phones and ‘’T46G’’ for the SIP-T46G IP phones. If the default value is different
from the directory name, you need to configure the value of this parameter to be the
directory name on the IP phones in advance.
During startup, IP phones obtain the provisioning server URL “tftp://192.168.1.100/$PN”
via DHCP option, and then replace the character “$PN” in the URL with “T28P” for the
SIP-T28P IP phones and “T46G” for the SIP-T46G IP phones. When performing auto
provisioning, the SIP-T28P IP phones and the SIP-T46G IP phones request to download
configuration files (y000000000000.cfg for the SIP-T28P IP phones, y000000000028.cfg for
the SIP-T46G IP phones and <MAC>.cfg files ) from the provisioning server address
“tftp://192.168.1.100/T28P” and “tftp://192.168.1.100/T46G” respectively.
If the URL is configured as “tftp://192.168.1.100/$PN/$MAC.cfg” on the DHCP server, the
SIP-T28P IP phones and the SIP-T46G IP phones will replace the characters “$PN” with
“T28P” and “T46G” respectively, and replace the characters “$MAC” with their MAC
addresses. For example, the MAC address of one SIP-T28P IP phone is 001565147fd7.
When performing auto provisioning, the IP phone will only request to download the
001565147fd7.cfg file from the provisioning server address “tftp://192.168.1.100/T28P”.
44
Page 55

Configuring the Update Mode
When there is an active call on the IP phone during auto provisioning, the auto
provisioning process will detect the call status every 30 seconds. If the call is released
within 2 hours, the auto provisioning process will be performed normally. Otherwise, the
process will end, due to timeout.
The update mode is used to set the desired time to trigger the IP phone to perform the
auto provisioning process. This chapter introduces the following update modes in detail:
Power On
Repeatedly
Weekly
Auto Provision Now
Multi-mode Mixed
SIP NOTIFY Message
Auto Provisioning via Activation Code
The IP phone performs the auto provisioning process when the IP phone is powered on.
To activate the Power On mode via a web user interface:
1. Click on Settings->Auto Provision.
45
Page 56

Yealink IP Phones Auto Provisioning Guide
2. Mark the On radio box in the Power On field.
3. Click Confirm to accept the change.
The IP phone performs the auto provisioning process at regular intervals. You can
configure the interval for the Repeatedly mode. The default interval is 1440 minutes.
To activate the Repeatedly mode via web user interface:
1. Click on Settings->Auto Provision.
2. Mark the On radio box in the Repeatedly field.
46
Page 57

Configuring the Update Mode
3. Enter the interval time (in minutes) in the Interval (Minutes) field.
4. Click Confirm to accept the change.
The IP phone performs the auto provisioning process at the fixed time every week. You
can configure what time of the day and which day of the week to trigger the IP phone to
perform the auto provisioning process. For example, you can configure the IP phone to
check and update new configuration between 2 to 3 o’clock every Friday and Sunday.
To activate the Weekly mode via web user interface:
1. Click on Settings->Auto Provision.
2. Mark the On radio box in the Weekly field.
3. Enter the desired time in the Time field.
47
Page 58

Yealink IP Phones Auto Provisioning Guide
4. Mark one or more checkboxes in the Day of Week field.
5. Click Confirm to accept the change.
You can use Auto Provision Now mode to manually trigger the IP phone to perform the
auto provisioning process immediately.
To use the Auto Provision Now mode via web user interface:
1. Click on Settings->Auto Provision.
48
Page 59

2. Click Autoprovision Now.
Configuring the Update Mode
The IP phone will perform the auto provisioning process immediately.
You can activate more than one update mode for auto provisioning. For example, you
can activate the “Power On” and “Repeatedly” modes simultaneously. The IP phone
will perform the auto provisioning process when it is powered on and at a specified
interval.
The IP phone will perform the auto provisioning process when receiving a SIP NOTIFY
message which contains the header “Event: check-sync”. If the header of the SIP
NOTIFY message contains an additional string “reboot=true”, the IP phone will reboot
immediately and then perform the auto provisioning process. This update mode
requires server support.
49
Page 60

Yealink IP Phones Auto Provisioning Guide
The following figure shows the message flow:
In addition to the updating modes introduced above, users can trigger IP phones to
perform auto provisioning by dialing an activation code. To use this method, the
activation code and the provisioning server address need to be pre-configured on the
IP phones. This method is normally used for IP phones distributed by retail sales. It has
the advantage that the IP phones do not need to be handled (e.g., registering account)
before sending them to end-users.
50
Page 61

Configuring the Update Mode
The following lists the processes for triggering auto provisioning via activation code:
1. Create multiple directories (e.g., two directories) on the provisioning server.
2. Store a common CFG file and multiple <MAC>.cfg files to each directory on the
provisioning server.
3. Configure a user name and password for each directory.
The user name and password provides a means of conveniently partitioning the
configuration files for different IP phones. To access the specified directory, you
need to provide the correct user name and password configured for the directory.
4. Configure unique activation codes and the provisioning server URLs on IP phones.
The activation code can be numeric string and special characters “* #” with a
maximum of 32 characters.
The following are example configurations in the configuration file for IP phones:
autoprovision.1.code = *123
autoprovision.1.url = tftp://192.168.1.30/T28P_1/
autoprovision.2.code = *456
autoprovision.2.url = tftp://192.168.1.30/T28P_2/
5. Send the IP phone, specified activation code and associated user name and
password to each end-user.
6. Set up the IP phone, and then input the activation code after the phone startup.
The LCD screen will prompt the following dialog box:
7. Press the OK soft key to trigger the IP phone to perform auto provisioning.
The LCD screen will prompt the following input box:
8. Enter the user name and password in the User Name and Password field
51
Page 62

Yealink IP Phones Auto Provisioning Guide
The entered user name and password will be saved to the IP phone for next auto
provisioning via activation code and auto provisioning via update modes.
The LCD screen will not prompt for user name and password if the provisioning server
does not require authentication, or the user name and password are already saved on
the IP phone.
respectively.
The entered user name and password must correspond to the directory where the
configuration files of the IP phone are located. If you enter invalid user name or
password, the LCD screen will prompt the message “Wrong user name or
password!”. The prompt message will disappear in two seconds, and the LCD
screen will return to the idle screen. You need to input the activation code again to
trigger the auto provisioning process.
The IP phone downloads the Common CFG file and the corresponding <MAC>.cfg
files from the provisioning server to complete phone configurations.
The following parameters are used to configure the auto provisioning via activation
code method (X ranges from 1 to 50):
#Configure the auto provisioning name.
autoprovision.X.name
#Configure the activation code.
autoprovision.X.code
#Configure the URL of the provisioning server.
autoprovision.X.url
#Configure the username and password for downloading configuration files.
autoprovision.X.user
autoprovision.X.password
52
Page 63

Downloading and Verifying Configurations
The latest values to be applied to the IP phone are the values that take effect.
The phone only reboots when there is at least a specific configuration requiring a reboot
after auto provisioning. If you want to force the IP phone to perform a reboot after auto
provisioning, you can configure “auto_provision.reboot_force.enable = 1” in the
configuration file.
For more information on the specific configurations which require a reboot during auto
provisioning and the parameter “auto_provision.reboot_force.enable”, refer to
Description of Configuration Parameters in CFG Files on page 97.
After obtaining the provisioning server address in one of the ways introduced above,
the phone will request to download the configuration files from the provisioning server
when it is triggered to perform auto provisioning. During the auto provisioning process,
the IP phone will try to download the Common CFG file firstly, and then try to download
the MAC-Oriented CFG file from the provisioning server. If the access URLs of the
resource files have been specified in the configuration files, the phone will try to
download the resource files.
After downloading, the phone resolves the configuration files and resource files (if
specified in the configuration files), and then updates the configurations and resource
files to the phone flash. Generally, updated configurations will automatically take effect
after the auto provisioning process is completed. For update of some specific
configurations which require a reboot before taking effect, for example, network
configurations, the IP phone will reboot to make the configurations effective after the
auto provisioning process is completed.
The IP phone calculates the MD5 values of the downloaded files before updating them.
If the MD5 values of the Common and MAC-Oriented configuration files are the same
as those of the last downloaded configuration files, this means these two configuration
files on the provisioning server are not changed. The IP phone will complete the auto
provisioning without repeated update. This is used to avoid unnecessary restart and
impact of phone use. On the contrary, the IP phone will update configurations.
If configuration files have been AES encrypted, the IP phone will uses the Common AES
key to decrypt the Common CFG file and the MAC-Oriented AES key to decrypt the
<MAC>.cfg file after downloading the configuration files. For more information on how
the IP phone decrypts configuration files, refer to
User Guide
.
Yealink Configuration Encryption Tool
53
Page 64

Yealink IP Phones Auto Provisioning Guide
You can configure the IP phone whether to download the <MAC>-local.cfg file from the
provisioning server, and update configurations in the <MAC>-local.cfg file to protect
personalized settings after auto provisioning.
If the IP phone is configured to download the <MAC>-local.cfg file from the
provisioning server, it will download the <MAC>-local.cfg file after downloading the
Common CFG file and the MAC-Oriented CFG file.
If the IP phone is configured to protect personalized settings, it will update
configurations in the <MAC>-local.cfg file. The IP Phone updates configuration files
during auto provisioning in sequence: Common>MAC-Oriented>MAC-local. So when
configuration items in the <MAC>-local.cfg file are duplicated with the ones in the
downloaded Common CFG file or the MAC-Oriented CFG file, the settings in the
<MAC>-local.cfg file will take effect.
For more information on how to configure the IP phone, refer to Scenario A Protect
personalized settings on page 57.
After auto provisioning, you can then verify the update via phone user interface or web
user interface of the phone. For more information, refer to Yealink phone-specific user
guide.
During the auto provisioning process, you can monitor the downloading requests and
response messages by a WinPcap tool. The following shows some examples.
Example1: Yealink SIP-T28P IP phone downloads configuration files from the TFTP server.
54
Page 65

Downloading and Verifying Configurations
Example 2: Yealink SIP-T28P IP phone downloads configuration files from the FTP server.
Example 3: Yealink SIP-T28P IP phone downloads configuration files from the HTTP server.
55
Page 66

Yealink IP Phones Auto Provisioning Guide
Parameters
Permitted Values
Default
auto_provision.custom.protect
0 or 1
0
Description:
Enables or disables the IP phone to protect personalized settings after auto provisioning.
0-Disabled
1-Enabled
If it is set to 1 (Enabled), personalized settings configured via web or phone user
interface will be protected and remained after auto provisioning.
auto_provision.custom.sync
0 or 1
0
Description:
Enables or disables the IP phone to periodically (every 5 minutes) upload the
<MAC>-local.cfg file to the provisioning server, and download the <MAC>-local.cfg file
from the provisioning server during auto provisioning.
0-Disabled
1-Enabled
Yealink IP phones support FTP, TFTP, HTTP and HTTPS protocols for uploading the
MAC-local CFG file. This section takes the TFTP protocol as an example. Before
performing the following, make sure the provisioning server supports uploading.
If you are using the HTTP(S) server, you can specify the way the IP phone uploads the
MAC-local CFG file to the provisioning server. It is determined by the value of the
parameter “auto_provision.custom.upload_method”. For more information on
description of this parameter, refer to Description of Configuration Parameters in CFG
Files on page 97.
Generally, the administrator deploys phones in batch via auto provisioning, yet some
users would like to remain the personalized settings (e.g., ringtones, dial plan and DSS
keys), after auto provisioning. These specific scenarios are applicable to
SIP-T20P/T22P/T26P/T28P/T4X IP phones running firmware version X.73.0.1 or later. The
following demonstrated specific scenarios are taking SIP-T28P IP phones as example for
reference.
The following table lists the configuration parameters used to determine the phone
behavior for protecting personalized settings:
56
Page 67

Downloading and Verifying Configurations
Parameters
Permitted Values
Default
If it is set to 1 (Enabled), the IP phone will periodically upload the <MAC>-local.cfg file to
the provisioning server to back up this file. During auto provisioning, the IP phone will
download the <MAC>-local.cfg file from the provisioning server to override the one
stored on the phone.
If it is set to 0 (Disabled), the IP phone will not upload the <MAC>-local.cfg file to the
provisioning server. During auto provisioning, the IP phone will not download the
<MAC>-local.cfg file from the provisioning server.
auto_provision.custom.upload_method
0 or 1
0
Description:
Configures the way the IP phone uploads the <MAC>-local.cfg file to the provisioning
server (for HTTP/HTTPS server only).
0-PUT
1-POST
Note: It works only if the value of the parameter “auto_provision.custom.sync” is set to 1
(Enabled).
For more information on how to configure these parameters in different scenarios, refer
to the following introduced scenarios.
The administrator wishes to upgrade firmware from the old version to the latest version.
Meanwhile, protect personalized settings after auto provisioning and upgrade.
Scenario Conditions:
The current firmware version of the SIP-T28P IP phone is 2.71.0.165. This firmware
version does not support protecting personalized settings and generating a
<MAC>-local.cfg file.
The target firmware version of the SIP-T28P IP phone is 2.73.0.1. This firmware
version supports protecting personalized settings after auto provisioning or
upgrade.
The MAC address of the SIP-T28P IP phone: 001565221229
Provisioning server URL: tftp://192.168.1.211
Place the target firmware to the root directory of the provisioning server.
57
Page 68

Yealink IP Phones Auto Provisioning Guide
If your IP phone is running firmware version prior to 61, the IP phone can only recognize
the old (M1) configuration file for auto provisioning, so the blank configuration file
created above uses the M1 template.
Create a new directory "ProvisioningDir_new" under the root directory of the
provisioning server.
The IP phone with old firmware does not support protecting personalized settings after
auto provisioning and upgrade. You can configure the value of the parameter
“auto_provision.custom.protect” to 1 in the configuration file to protect personalized
settings after auto provisioning and upgrade.
Do the following operations:
1. Place the configuration files (y000000000000.cfg and 001565221229.cfg) that you
want the IP phone to download to the new directory “ProvisioningDir_new” of the
provisioning server.
2. Add/Edit the following parameter in the y000000000000.cfg file or 001565221229.cfg
file you want the IP phone to download:
auto_provision.custom.protect=1
3. Create a blank configuration file “y000000000000.cfg” on the root directory of the
provisioning server and add the following parameters to this file.
#Configure the access URL of the firmware file.
firmware.url = tftp://192.168.1.211/2.73.0.1.rom
#Configure the access URL of configuration files.
auto_provision.server.url = tftp://192.168.1.211/ProvisioningDir_new
4. Trigger the IP phone to perform the auto provisioning process. For more information
on how to trigger auto provisioning process, refer to Configuring the Update Mode
on Page 45.
During auto provisioning, the IP phone first downloads the y000000000000.cfg file, and
then downloads firmware from the root directory of the provisioning server.
The IP phone reboots to complete firmware upgrade, and then starts auto provisioning
process again which is triggered by phone reboot (the power on mode is enabled by
default). It downloads the y000000000000.cfg and 001565221229.cfg files in sequence
from the new directory “ProvisioningDir_new” of the provisioning server. As no
001565221229-local.cfg file exists on the IP phone, the IP phone automatically generates
a 001565221229-local.cfg file which saves the personalized settings of the old firmware.
58
Page 69

Downloading and Verifying Configurations
If a configuration item is both in the downloaded MAC-local.cfg file and Common CFG
file/ MAC-Oriented CFG file, setting of the configuration item in the MAC-local CFG file
will be written and saved to the IP phone system.
The IP phone updates configurations in the downloaded configuration files orderly to
the IP phone system. As the value of the parameter “auto_provision.custom.protect” is
set to 1, the phone also updates the configurations stored in the 001565221229-local.cfg
file on the phone. As a result, the personalized settings of the old firmware are
remained after upgrade and auto provisioning.
The administrator wishes to upgrade firmware from the old version to the latest version.
Meanwhile, protect personalized settings after auto provisioning and upgrade.
Scenario Conditions:
SIP-T28P IP phone current firmware version: 2.72.0.30. This firmware version supports
protecting personalized settings and generating a <MAC>-local.cfg file.
SIP-T28P IP phone target firmware version: 2.73.0.1. This firmware supports support
protecting personalized settings and generating a <MAC>-local.cfg file.
SIP-T28P IP phone MAC: 001565221229
Provisioning server URL: tftp://192.168.1.211
Place the target firmware to the root directory of the provisioning server.
The old firmware version supports protecting personalized settings and generating a
<MAC>-local.cfg file. To protect personalized settings after auto provisioning and
upgrade, you need to configure the value of the parameter
“auto_provision.custom.protect” to 1 in the configuration file.
Do one of the following operations:
Scenario Operations I:
1. Add/Edit the following parameters in the y000000000000.cfg file or
001565221229.cfg file you want the IP phone to download:
auto_provision.custom.protect=1
auto_provision.custom.sync=1
#Configure the access URL of the firmware file.
firmware.url = tftp://192.168.1.211/2.73.0.1.rom
2. Trigger the IP phone to perform the auto provisioning process. For more information
on how to trigger auto provisioning process, refer to on Page 45.
59
Page 70

Yealink IP Phones Auto Provisioning Guide
If a configuration item is both in the downloaded MAC-local.cfg file and Common CFG
file/ MAC-Oriented CFG file, setting of the configuration item in the MAC-local CFG file
will be written and saved to the IP phone system.
During auto provisioning, the IP phone first downloads the y000000000000.cfg file, and
then downloads firmware from the root directory of the provisioning server.
The IP phone reboots to complete firmware upgrade, and then starts auto provisioning
process again which is triggered by phone reboot (the power on mode is enabled by
default). It downloads the y000000000000.cfg, 001565221229.cfg and the
001565221229-local.cfg file in sequence from the provisioning server, and then updates
configurations in these downloaded configuration files orderly to the IP phone system.
The IP phone starts up successfully, and the personalized settings in the
001565221229-local.cfg file are remained after auto provisioning.
When a user customizes feature configurations via web/phone user interface, the IP
phone will save the personalized configuration settings to the 001565221229-local.cfg
file on the IP phone, and then periodically (every 5 minutes) upload this file to the
provisioning server.
Scenario Operations II:
1. Add/Edit the following parameters in the y000000000000.cfg file or
001565221229.cfg file you want the IP phone to download:
auto_provision.custom.protect=1
auto_provision.custom.sync=0
#Configure the access URL of the firmware file.
firmware.url = tftp://192.168.1.211/2.73.0.1.rom
2. Trigger the IP phone to perform the auto provisioning process. For more information
on how to trigger auto provisioning process, refer to on Page 45.
During auto provisioning, the IP phone first downloads the y000000000000.cfg file, and
then downloads firmware from the root directory of the provisioning server.
The IP phone reboots to complete firmware upgrade, and then starts auto provisioning
process again which is triggered by phone reboot (the power on mode is enabled by
default). It downloads the y000000000000.cfg and 001565221229.cfg files in sequence,
and then updates configurations in the downloaded configuration files orderly to the IP
phone system. As the value of the parameter “auto_provision.custom.protect” is set to 1,
configurations in the 001565221229-local.cfg file saved on the IP phone are also
updated.
60
Page 71

Downloading and Verifying Configurations
If a configuration is modified via both web user interface and phone user interface, the
later modification will prevail.
For more information on the flowchart of protect personalized configuration settings,
refer to Auto Provisioning Flowchart (Protect personalized configuration settings) on
page 96.
In this scenario, the IP phone will not upload the MAC-local.cfg file to provisioning server
and request to download the MAC-local.cfg file from provisioning server during auto
provisioning.
If a configuration item is both in the MAC-local.cfg file on the IP phone and Common CFG
file/ MAC-Oriented CFG file downloaded from auto provisioning server, setting of the
configuration item in the MAC-local CFG file will be written and saved to the IP phone
system.
The Reset Local Configuration option on the web/phone user interface is available only if
the value of the parameter “auto_provision.custom.protect” was set to 1.
If the value of the parameter “auto_provision.custom.sync” was set to 1, the
configurations in the 001565221229-local.cfg file on the provisioning server will be also
cleared after resetting personalized settings of the phone.
The IP phone starts up successfully, and personalized settings are remained after auto
provisioning. When a user customizes feature configurations via web/phone user
interface, the IP phone will save the personalized settings to the 001565221229-local.cfg
file on the IP phone only.
If value of the parameter “auto_provision.custom.protect” is set to 0, the personalized
settings may be overridden after auto provisioning, no matter what the value of the
parameter “auto_provision.custom.sync” is.
The administrator or user wishes to clear personalized configuration settings via phone
user interface.
Scenario Conditions:
SIP-T28P IP phone MAC: 001565221229
The current firmware of the phone is 2.73.0.1 or later.
Provisioning server URL: tftp://192.168.1.211
auto_provision.custom.protect = 1
Scenario Operations:
You can clear the personalized settings of the phone via the phone or web user
interface.
61
Page 72

Yealink IP Phones Auto Provisioning Guide
To clear personalized configuration settings via phone user interface:
1. Press Menu->Settings->Advanced Settings (password: admin).
2. Select Reset Local Configuration.
The LCD screen prompts “Delete Default Setting?”.
3. Press the OK soft key.
The LCD screen prompts “Delete default…Please Wait!”.
To clear personalized configuration settings via web user interface:
1. Click on Settings->Upgrade.
2. Click Reset Local Config.
The web user interface prompts “Are you sure to reset the local configuration?”.
3. Click OK.
Configurations in the 001565221229-local.cfg file saved on the phone will be cleared. If
the IP phone is triggered to perform auto provisioning after resetting local configuration
file, it will download the configuration files from the provisioning server and update the
configurations to the phone system. As there is no configuration in the
001565221229-local.cfg file, configurations in the y000000000000.cfg/<MAC>.cfg file will
take effect.
62
The IP phone requires factory reset when it has a breakdown, but the user wishes to
remain personalized settings of the phone after factory reset.
Page 73

Downloading and Verifying Configurations
As the parameter “auto_provision.custom.sync” was set to 1, the 001565221229-local.cfg
file on the IP phone will be uploaded to the provisioning server at tftp://192.168.1.211.
Scenario Conditions:
SIP-T28P IP phone MAC: 001565221229
Provisioning server URL: tftp://192.168.1.211
auto_provision.custom.sync = 1
auto_provision.custom.protect=1
Scenario Operations:
You can protect the personalized settings of the phone after factory reset via phone or
web user interface.
To reset the phone to factory via phone user interface:
1. Press Menu->Settings->Advanced Settings (password: admin).
2. Select Reset to Factory.
The LCD screen prompts “Reset to factory settings?”.
3. Press the OK soft key.
The LCD screen prompts “Resetting…Please Wait!”.
The LCD screen prompts “Welcome Initializing…Please Wait”.
To reset the phone to factory via web user interface:
1. Click on Settings->Upgrade.
2. Click Reset to Factory Setting to reset the phone.
63
Page 74

Yealink IP Phones Auto Provisioning Guide
The web user interface prompts “Do you want to reset to factory?”.
3. Click OK.
After startup, all configurations of the phone will be reset to factory defaults.
Configurations in the 001565221229-local.cfg file saved on the IP phone will also be
cleared. But configurations in the 001565221229-local.cfg file stored on the provisioning
server (tftp://192.168.1.211) will not be cleared after reset.
To retrieve personalized settings of the phone after factory reset:
1. Set the values of the parameters “auto_provision.custom.sync” and
“auto_provision.custom.protect” to be 1 in the configuration file (y000000000000.cfg
or 001565221229.cfg).
2. Trigger the phone to perform the auto provisioning process.
The IP phone will download the 001565221229-local.cfg file from the provisioning server,
and then update configurations in it during auto provisioning. As a result, the
personalized settings of the phone are retrieved after factory reset.
The administrator or user can export the local configuration file to check the
personalized settings of the phone configured by the user, or import the local
configuration file to configure or change settings of the phone.
Scenario Conditions:
SIP-T28P IP phone MAC: 001565221229
64
The current firmware of the phone is 2.73.0.1 or later.
Page 75

Downloading and Verifying Configurations
As the personalized settings of the base station cannot be changed via auto provisioning
when the value of the parameter “auto_provision.custom.protect” is set to 1, it is cautious
to change the settings in the <MAC>-local.cfg file before importing it.
Provisioning server URL: tftp://192.168.1.211
Scenario Operations:
To export local configuration file via web user interface:
1. Click on Settings->Configuration.
2. Select Local Configuration from the pull down list of Export CFG Configuration File
field, and then click Export to open file download window, and then save the
001565221229-local.cfg file to the local system.
The administrator or user can edit the 001565221229-local.cfg file after exporting.
To import local configuration file via web user interface:
1. Click on Settings->Configuration.
65
Page 76

Yealink IP Phones Auto Provisioning Guide
If the value of the parameter “auto_provision.custom.sync” is set to 1, and the
001565221229-local.cfg file is successfully imported, the new 001565221229-local.cfg file
will be uploaded to the provisioning server and overrides the existing one on the server.
2. In the Import CFG Configuration File field, click Browse to locate the
001565221229-local.cfg file from your local system and select Local Configuration
from the pull down list.
3. Click Import.
The configurations in the imported 001565221229-local.cfg file will override the one in
the existing local configuration file. The configurations only in the existing local
configuration file will not be cleared. The configurations in the new
001565221229-local.cfg file will be saved to the phone flash and take effect.
66
Page 77

Troubleshooting
This chapter provides general troubleshooting information to help you solve problems
you might encounter when deploying phones.
If you require additional information or assistance with the deployment, contact your
system administrator.
Why does the IP phone fail to download configuration files?
Ensure that auto provisioning feature is configured properly.
Ensure that the provisioning server and network are reachable.
Ensure that authentication credentials configured on the IP phone are correct.
Ensure that configuration files exist on the provisioning server.
Why does the provisioning server return HTTP 404?
Ensure that the provisioning server is properly set up.
Ensure that the access URL is correct.
Ensure that the requested files exist on the provisioning server.
Why does the IP phone display "Network Unavailable"?
Ensure that the Ethernet cable is plugged into the Internet port on the IP phone and
the Ethernet cable is not loose.
Ensure that the switch or hub in your network is operational.
Ensure that the configurations of network are properly set in the configuration files.
Why is the permission denied when uploading files to the root directory of the FTP
server?
Ensure that the complete path to the root directory of the FTP server is authorized.
Check security permissions on the root directory of the FTP server, if necessary,
change the permissions.
Why doesn’t the IP phone obtain the IP address from the DHCP server?
Ensure that settings are correct on the DHCP server.
Ensure that the IP phone is configured to obtain the IP address from the DHCP
server.
67
Page 78

Yealink IP Phones Auto Provisioning Guide
Why doesn’t the IP phone download the ring tone?
Ensure that the file format of the ring tone is *.wav.
Ensure that the size of the ring tone file is no larger than that the IP phone supports.
Ensure that the properties of the ring tone for the IP phone are correct.
Ensure that the network is available and the root directory is right for downloading.
Ensure that the ring tone file exists on the provisioning server.
Why doesn’t the IP phone update configurations?
Ensure that the configuration files are different from the last ones.
Ensure that the IP phone has downloaded the configuration files.
Ensure that the parameters are correctly set in the configuration files.
68
Page 79

Glossary
MAC Address: A Media Access Control address (MAC address) is a unique identifier
assigned to network interfaces for communications on the physical network segment.
MD5: The MD5 Message-Digest Algorithm is a widely used cryptographic hash function
that produces a 128-bit (16-byte) hash value.
DHCP: Dynamic Host Configuration Protocol (DHCP) is a network configuration protocol
for hosts on Internet Protocol (IP) networks. Computers that are connected to IP networks
must be configured before they can communicate with other hosts.
FTP: File Transfer Protocol (FTP) is a standard network protocol used to transfer files from
one host to another host over a TCP-based network, such as the Internet. It is often used
to upload web pages and other documents from a private development machine to a
public web-hosting server.
HTTP: The Hypertext Transfer Protocol (HTTP) is an application protocol for distributed,
collaborative, hypermedia information systems. HTTP is the foundation of data
communication for the World Wide Web.
HTTPS: Hypertext Transfer Protocol Secure (HTTPS) is a combination of Hypertext
Transfer Protocol (HTTP) with SSL/TLS protocol. It provides encrypted communication
and secure identification of a network web server.
TFTP: Trivial File Transfer Protocol (TFTP) is a simple protocol to transfer files. It has been
implemented on top of the User Datagram Protocol (UDP) using port number 69.
AES: Advanced Encryption Standard (AES) is a specification for the encryption of
electronic data.
URL: A uniform resource locator or universal resource locator (URL) is a specific
character string that constitutes a reference to an Internet resource.
XML: Extensible Markup Language (XML) is a markup language that defines a set of
rules for encoding documents in a format that is both human-readable and
machine-readable.
69
Page 80

Yealink IP Phones Auto Provisioning Guide
70
Page 81

Appendix
We recommend that you use vsftpd as an FTP server for Linux platform if
required.
Wftpd and FileZilla are free FTP application softwares for Windows. This section mainly
provides instructions on how to configure an FTP server using wftpd for Windows. You
can download wftpd online: http://www.wftpd.com/products/products.html or FileZilla
online: https://filezilla-project.org.
To prepare a root directory:
1. Create an FTP root directory on the local system.
2. Place the configuration files to this root directory.
3. Set the security permissions for the FTP directory folder.
You need to define a user or group name, and set the permissions: read, write, and
modify. Security permissions vary by organizations.
An example of configuration on the Windows platform is shown as below:
71
Page 82

Yealink IP Phones Auto Provisioning Guide
To configure a wftpd server:
1. Download the compressed file of the wftpd application to your local directory and
extract it.
2. Double click the WFTPD.EXE.
The dialogue box of how to register is shown as below:
3. Check the check box and click OK in the pop-up dialogue box.
The log file of the wftpd application is shown as below:
72
Page 83

4. Click Security->Users/rights.
5. Click New User.
Appendix
6. Enter a user name (e.g., test1) in the User Name field and then click OK.
73
Page 84

Yealink IP Phones Auto Provisioning Guide
7. Enter the password of the user (e.g., test1) created above in the New Password
and Verify Password fields respectively, and then click OK.
8. Click Browse to locate the FTP root directory from your local system.
9. Click Rights>> and assign the desired permission for the user (e.g., test1) created
above.
10. Check the check boxes of Read, Create Files/Dirs, List Directories and
Overwrite/Delete to make sure the FTP user has the read and write permission.
74
11. Click Done to save the settings and finish the configurations.
The server URL “ftp://username:password@IP/” (Here “IP” means the IP address of the
provisioning server, “username” and “password” are the authentication for FTP
download. For example, “ftp://test1:123456@10.3.6.234/”) is where the IP phone
Page 85

Appendix
Before configuring a wftpd server, ensure that no other FTP servers exist in your local
system.
downloads configuration files from.
This section provides instructions on how to configure an HTTP server using HFS tool. You
can download the HFS software online: http://www.snapfiles.com/get/hfs.html.
To prepare a root directory:
1. Create an HTTP root directory on the local system.
2. Place configuration files to this root directory.
3. Set the security permissions for the HTTP directory folder.
You need to define a user or group name and set the permissions: read, write, and
modify. Security permissions vary by organizations.
An example of configuration on the Windows platform is shown as below:
75
Page 86

Yealink IP Phones Auto Provisioning Guide
HFS tool is an executable application, so you don’t need to install it.
To configure an HTTP server:
1. Download the application file to your local directory, double click the hfs.exe.
The main configuration page is shown as below:
76
Page 87

Appendix
2. Click Menu in the main page and select the IP address of the PC from IP address.
The default HTTP port is 8080. You can also reset the HTTP port (make sure there is no
port conflict).
77
Page 88

Yealink IP Phones Auto Provisioning Guide
3. Right click the icon on the left of the main page, select Add folder from disk to
add the HTTP Server root directory.
4. Locate the root directory from your local system.
5. Check the server URL (e.g., http:// 10.2.11.101:8088/ProvisioningDir) by clicking
“Open in browser”.
78
Yealink IP phones also support the Hypertext Transfer Protocol with SSL/TLS (HTTPS)
protocol for auto provisioning. HTTPS protocol provides the encrypted communication and
secure identification. For more information on installing and configuring an Apache HTTPS
Server, refer t the network resource.
Page 89

Appendix
This section provides instructions on how to configure a DHCP server for Windows using
DHCP Turbo. You can download this software online:
http://www.tucows.com/preview/265297 and install it following the setup wizard.
Before configuring the DHCP Turbo, make sure:
The firewall on the PC is disabled.
There is no DHCP server in your local system.
To configure the DHCP Turbo:
1. To start the DHCP Turbo application, double click localhost.
2. Click the Login button (the login password is blank) to log in.
3. Right click Scopes and select New Scope.
4. Configure the DHCP server name, the DHCP IP range and the subnet mask.
79
Page 90

Yealink IP Phones Auto Provisioning Guide
5. Click OK to accept the change.
6. You can add a custom option via DHCP Turbo. Select Option Types, right click one
of the options on the right of the main page, and then select New Option Type.
80
Page 91

Appendix
7. Set the custom DHCP option (custom DHCP option tag number ranges from 128 to
254) and select the option type (Yealink supports String and IP Address option
types only). Click the OK button to finish setting the option properties. Click to
save the change.
8. Click Named Policies-->Global, right click the blank area on the right of the main
page and then select New Option.
81
Page 92

Yealink IP Phones Auto Provisioning Guide
9. Scroll down and double click the custom option 128.
10. Fill the provisioning server address in the input field.
11. Click the OK button to finish setting a custom option.
12. Click to save the change.
82
Page 93

Appendix
You can add the option 66 via DHCP Turbo. The following shows the detailed processes.
1. Click Named Policies-->Global, right click the blank area on the right of the main
page and then select New Option.
2. Select TFTP Options from the pull-down list of Filter.
3. Scroll down and double click MS option 66.
83
Page 94

Yealink IP Phones Auto Provisioning Guide
4. Fill the provisioning server address in the input field.
5. Click the OK button to finish setting a custom option.
6. Click to save the change.
You can also add the option 43. The following shows the detailed processes.
1. Click Named Policies-->Global, right click the blank area on the right of the main
page and then select New Option.
2. Select the Standard Options from the pull-down list of Filter.
3. Scroll down and double click 43.
84
Page 95

4. Fill the provisioning server address in the input field.
Appendix
5. Click the OK button to finish setting a custom option.
6. Click to save the change.
If you have installed the Cool Edit application, double click to open it. Otherwise, you
can download the installation package online:
http://www.toggle.com/lv/group/view/kl36218/Cool_Edit_Pro.htm and install it.
To customize a ring tone using Cool Edit Pro:
1. Open the Cool Edit Pro application.
2. Click File to open an audio file.
3. Locate the ring tone file, click Open, the file is uploaded as follows.
85
Page 96

Yealink IP Phones Auto Provisioning Guide
A sample audio file loaded is shown as below:
4. Select and copy the audio waveform.
5. Select File->New to create a new file, set the channels as Mono, the sample rate as
8000 and the resolution as 16-bit.
6. Paste the audio waveform to the new file.
7. Select File->Save as to save the new audio file. On the Save waveform page,
select the file format as A/mu-law wave.
86
Page 97

Appendix
The original picture format must be *.bmp or *.gif. We recommend placing all files and
the PictureExDemo application to the root directory of the PC. You can ask the distributor
or Yealink FAE for the PictureExDemo application.
1. Double click the PictureExDemo.exe.
2. Click Add button to open a *.bmp or *.gif file.
You can repeat the second step to add multiple original picture files.
3. Click the Convert button.
Then you can find the DOB logo files in the adv directory.
87
Page 98

Yealink IP Phones Auto Provisioning Guide
Item
Configurations
Server Type
account.X.sip_server_type
account.X.xsi.server_type
Network
network.dhcp_host_name
network.pppoe.user
network.pppoe.password
network.pc_port.enable
network.internet_port.speed_duplex
network.pc_port.speed_duplex
network.static_dns_enable
network.ipv6_static_dns_enable
network.vlan.pc_port_mode
network.dns.ttl_enable
network.mtu_value
network.vlan.internet_port_enable
network.vlan.internet_port_vid
network.vlan.internet_port_priority
network.vlan.pc_port_enable
network.vlan.pc_port_vid
network.vlan.pc_port_priority
network.vlan.dhcp_enable
network.vlan.dhcp_option
network.vlan.vlan_change.enable
network.port.http
network.port.https
network.qos.rtptos
network.qos.signaltos
The following tables list all the configurations defined never be saved to <MAC>-local.cfg
file.
88
Page 99

Appendix
Item
Configurations
network.802_1x.mode
network.802_1x.identity
network.802_1x.md5_password
network.802_1x.root_cert_url
network.802_1x.client_cert_url
network.802_1x.proxy_eap_logoff.enable
network.vpn_enable
network.lldp.enable
network.lldp.packet_interval
network.span_to_pc_port
network.port.max_rtpport
network.port.min_rtpport
network.ipv6_prefix
network.ipv6_internet_port.type
network.ipv6_internet_port.ip
network.ipv6_internet_port.gateway
network.ipv6_primary_dns
network.ipv6_secondary_dns
network.ipv6_icmp_v6.enable
network.internet_port.type
network.internet_port.ip
network.internet_port.mask
network.internet_port.gateway
network.primary_dns
network.secondary_dns
Openvpn
openvpn.url
Security
security.user_name.user
security.user_name.admin
security.user_name.var
security.user_password
security.trust_certificates
89
Page 100

Yealink IP Phones Auto Provisioning Guide
Item
Configurations
security.ca_cert
security.dev_cert
security.cn_validation
security.var_enable
trusted_certificates.url
trusted_certificates.delete
server_certificates.url
server_certificates.delete
wui.https_enable
wui.http_enable
Log
syslog.mode
syslog.server
syslog.log_level
Autoprovision
auto_provision.custom.sync
auto_provision.custom.protect
auto_provision.custom.upload_method
auto_provision.power_on
auto_provision.pnp_enable
auto_provision.dhcp_option.enable
auto_provision.dhcp_option.list_user_options
auto_provision.repeat.enable
auto_provision.repeat.minutes
auto_provision.weekly.enable
auto_provision.weekly.dayofweek
auto_provision.weekly.begin_time
auto_provision.weekly.end_time
auto_provision.server.url
auto_provision.server.username
auto_provision.server.password
auto_provision.aes_key_16.com
auto_provision.aes_key_16.mac
90
 Loading...