

Yealink Full HD Video Conferencing Syste User Manual

Contents
About This Guide...................................................................................... 10
Related Documents...........................................................................................................................10
Summary of Changes....................................................................................................................... 11
Changes for Release 44 SP1, Guide Version 44.25..............................................................11
Changes for Release 43, Guide Version 43.32......................................................................12
Changes for Release 43, Guide Version 43.31......................................................................12
Changes for Release 43, Guide Version 43.30......................................................................12
Changes for Release 43, Guide Version 43.10......................................................................12
Getting Started...........................................................................................13
Hardware Overview........................................................................................................................... 13
Hardware of MeetingEye 600.................................................................................................13
Hardware of MeetingEye 400.................................................................................................15
Hardware of VC880 Codec.................................................................................................... 16
Hardware of PVT980 Codec.................................................................................................. 17
Hardware of VC800 Codec.................................................................................................... 18
Hardware of VC500/PVT950 Codec...................................................................................... 20
Hardware of VC200 Codec.................................................................................................... 22
Hardware of VP59 Codec...................................................................................................... 24
VCR20 Remote Control..........................................................................................................25
VCR11 Remote Control..........................................................................................................27
VCC22 video conferencing camera........................................................................................28
Hardware of VCH50 Video Conferencing Hub.......................................................................30
Hardware of VCH51 Video Conferencing Hub.......................................................................31
CP960 Conference Phone......................................................................................................32
CTP20 Touch Panel................................................................................................................34
WPP20 wireless presentation pod......................................................................................... 34
Hardware of CPE90 Wired Expansion Microphones............................................................. 35
Hardware of CPW90-BT Bluetooth Wireless Microphone......................................................36
VCM38.................................................................................................................................... 36
VCM34.................................................................................................................................... 37
Hardware of MSpeaker...........................................................................................................38
Hardware of MSpeaker II....................................................................................................... 39
CP900/CP700 Ultra-Compact Speakerphone........................................................................ 40
LED Instructions................................................................................................................................ 41
MeetingEye 600/MeetingEye 400/VC880/VC800/VC500/VC200/PVT980/ PVT950 LED
Indicator............................................................................................................................. 41
Power Indicator LED of VP59................................................................................................ 41
Camera Indicator LED of VP59..............................................................................................41
LED Instructions of VCC22 Video Conferencing Camera......................................................42
LED Instructions of CTP20.....................................................................................................42
Mute Indicator LED of CP960 Conference Phone................................................................. 42
Mute Indicator LED of CPE90 Wired Expansion Microphones.............................................. 43
LED Instructions of CPW90-BT Bluetooth Wireless Microphones......................................... 43
LED Instructions of WPP20 Wireless Presentation Pod........................................................ 44
Powering on and off.......................................................................................................................... 44
Powering on MeetingEye 600/MeetingEye 400/VC880/VC800/VC500/VC200/PVT980/
PVT950.............................................................................................................................. 44
| Contents | ii

| Contents | iii
Powering off MeetingEye 600/MeetingEye 400/VC880/VC800/VC500/VC200/PVT980/
PVT950.............................................................................................................................. 45
Powering on or Powering off VP59........................................................................................ 45
Initialization Process Overview............................................................................................... 45
Running the Setup Wizard........................................................................45
Configuration Methods............................................................................. 46
Using Web User Interface.................................................................................................................46
Logging into the Web User Interface..................................................................................... 46
Configuring the Web Server Type..........................................................................................47
User and Administrator Account Login...................................................................................48
Using CTP20 Touch Panel................................................................................................................49
Using the Remote Control.................................................................................................................50
Using the Virtual Remote Control.......................................................................................... 50
Customizing the Key Type......................................................................................................50
Disabling Remote Control Keys..............................................................................................51
Remote Controller...................................................................................................................51
Use CP960 Conference Phone.........................................................................................................51
Device Type Licenses and Multipoint Licenses..................................... 51
Licenses.............................................................................................................................................51
Multipoint Licenses............................................................................................................................ 52
Importing Device Type License/Multipoint License........................................................................... 52
Traditional Deployment Methods............................................................. 53
Public IP Configuration......................................................................................................................53
Intranet Deployment.......................................................................................................................... 53
NAT..........................................................................................................................................53
STUN...................................................................................................................................... 57
H.460.......................................................................................................................................59
Intelligent Traversal.................................................................................................................60
VPN.........................................................................................................................................61
Cloud Deployment Method....................................................................... 63
Configuring Network Settings.................................................................. 63
Configuring IPv4 or IPv6................................................................................................................... 63
Configuring IP Addressing Mode........................................................................................... 64
Configuring IPv4..................................................................................................................... 64
Configuring IPv6..................................................................................................................... 66
Setting the Wireless Network............................................................................................................68
Connecting to the Wireless Network......................................................................................68
Viewing the Wireless Network Status.................................................................................... 70
Forgetting a Wi-Fi................................................................................................................... 70
Disabling the Wi-Fi................................................................................................................. 70
Wireless Access Point.......................................................................................................................71
Enabling the Wireless Access Point.......................................................................................71
Configuring Wireless Access Point........................................................................................ 71
Viewing the Connected Devices.............................................................................................73

| Contents | iv
Adding Connected Devices to the Blocklist............................................................................74
Removing Devices from the Blocklist.....................................................................................74
Disabling the Wireless Access Point......................................................................................75
Configuring DNS Server....................................................................................................................75
DHCP Options................................................................................................................................... 76
Supported DHCP Option of IPv4........................................................................................... 76
DHCP Option 42, Option 2.................................................................................................... 77
DHCP Option 12.....................................................................................................................77
Configuring LLDP.............................................................................................................................. 77
Configuring LLDP................................................................................................................... 78
Configuring VLAN Manually.............................................................................................................. 79
Configuring DHCP VLAN.................................................................................................................. 80
802.1x Authentication........................................................................................................................ 80
Configuring the 802.1x Authentication................................................................................... 81
Enabling/Disabling the PC Port.........................................................................................................82
Network Speed and Duplex Mode.................................................................................................... 83
Supported Transmission Methods.......................................................................................... 83
Configuring Transmission Methods........................................................................................ 83
Restricting Reserved Ports................................................................................................................84
Quality of Service (QoS)...................................................................................................................85
Configuring QoS..................................................................................................................... 86
Configuring MTU............................................................................................................................... 87
Configuring SNMP............................................................................................................................. 88
Configuring Account Settings..................................................................89
Setting SIP Account/SIP IP Call....................................................................................................... 89
Configuring SIP Accounts...................................................................................................... 89
Configuring SIP IP Call.......................................................................................................... 91
Setting H. 323 Account/H.323 IP Call.............................................................................................. 93
Configuring H.323 Accounts...................................................................................................93
H.323 Tunneling......................................................................................................................96
Configuring the PSTN account......................................................................................................... 97
Configuring the Video Conference Platform Account....................................................................... 98
Registering a Yealink Cloud Account..................................................................................... 98
Registering a YMS Account................................................................................................. 100
Logging into Zoom Cloud Platform...................................................................................... 101
Registering a Pexip Account................................................................................................ 102
Logging into the BlueJeans Cloud Platform.........................................................................105
Logging into Videxio Platform...............................................................................................106
Registering a Custom Account.............................................................................................107
Configuring Quick Switch Platform..................................................................................................109
Logging out of the Video Conference Platform...............................................................................110
Basic Settings.......................................................................................... 110
Configuring the Site Name..............................................................................................................111
Setting the Language...................................................................................................................... 112
Configuring Key Tone...................................................................................................................... 112
Configure the Time and Date......................................................................................................... 112
Time Zone.............................................................................................................................113
Configuring NTP Server....................................................................................................... 115
Configuring the DST.............................................................................................................116
Manually Configuring the Time and Date.............................................................................118
Customizing the Time and Date Format.............................................................................. 119
Setting the Time Reminder.................................................................................................. 119

| Contents | v
Setting Screen Saver for VP59....................................................................................................... 120
Setting Wallpaper for VP59.............................................................................................................120
Enabling/Disabling the Clock for the VP59..................................................................................... 121
Setting the Ring Tone for the VP59................................................................................................ 121
Configuring Automatic Sleep Time..................................................................................................122
Configuring the Display to Wake up the Sleeping Endpoint........................................................... 122
Allowing Website Snapshot.............................................................................................................123
Setting the Screen Saver Wait Time...............................................................................................123
Customizing the Local Interface for the System............................................................................. 123
Hide the IP Address on the Status Bar............................................................................... 124
Hiding the Time and the Date on the Status Bar.................................................................124
Hiding the User Interface in Idle Screen.............................................................................. 125
Showing or Hiding Icons in a Call........................................................................................125
Muting the Microphone....................................................................................................................129
Configuring Microphone Mute Mode...............................................................................................129
Configuring the Keyboard Input Method......................................................................................... 130
Configuring USB Storage................................................................................................................131
Configuring Local Storage...............................................................................................................131
Configuring the Screenshot.............................................................................................................132
Configuring to Automatically Upload Screenshots to the YMS....................................................... 132
Configuring Video Recording.......................................................................................................... 133
Basic Settings for CP960 Conference Phone................................................................................. 134
Adjusting Backlight of the CP960 Conference Phone..........................................................135
Setting the Screen Saver for CP960 Conference Phone..................................................... 135
Configuring * Key for Default Input................................................................................................. 135
Configuring Whiteboard Tools.........................................................................................................136
Configuring the Presentation Tools.................................................................................................137
Configuring the Audio Settings............................................................. 137
Audio Output....................................................................................................................................138
Audio Output Type................................................................................................................138
Specifying an Available Audio Output.................................................................................. 139
Audio Input.......................................................................................................................................140
Audio Input Type...................................................................................................................140
Specifying an Available Audio Input..................................................................................... 142
Media Audio Input........................................................................................................................... 144
Configuring Media Audio Input............................................................................................. 144
EQ Self Adaption.............................................................................................................................145
Configuring the EQ Self-adaption........................................................................................ 145
Configuring the Noise Suppression................................................................................................ 146
Tones................................................................................................................................................147
Supported Tones...................................................................................................................147
Custom Tones Formats........................................................................................................ 147
Customizing Tones................................................................................................................147
Codecs.............................................................................................................................................148
Audio Codec......................................................................................................................... 148
Video Codecs....................................................................................................................... 150
DTMF............................................................................................................................................... 152
DTMF Keypad.......................................................................................................................152
Transmission Ways of DTMF................................................................................................152
Setting DTMF Transmission Method for SIP Protocol.......................................................... 153
Configuring DTMF for H.323 Protocol..................................................................................154
Configuring Video Settings.................................................................... 154

| Contents | vi
Display Layout Settings...................................................................................................................155
Setting the Default Layout for a Single Screen.................................................................... 155
Setting the Default Layout for Dual Single Screen...............................................................156
Configuring Change Layout by Content Sharing..................................................................157
Configuring Auto Zoom In Content for a Single Screen.......................................................158
Hiding Local Video Image in Equal Layout..........................................................................159
Configuring Hide Local Video When PIP............................................................................. 159
Configuring Multi-Camera Default Layout.............................................................................160
Configuring Voice Activation................................................................................................. 161
Configuring the View Switching............................................................................................161
Configuring Preview Local....................................................................................................163
Changing the Video Input Source...................................................................................................163
Configuring HDMI Extended Display by VP59................................................................................164
Specifying Content to the Secondary Screen................................................................................. 164
Adjusting the Monitor Display Proportion........................................................................................166
Selecting Video Frame Rate and Resolution.................................................................................. 166
Configuring the Monitor Resolution.................................................................................................168
Configuring VC200 Experimental Access (Auto Framing).............................................................. 169
Showing the Site Name to Remote Parties.................................................................................... 170
Configuring Content Sharing................................................................. 172
Configuring Dual-Stream Protocol...................................................................................................172
Configuring the H.239 Protocol............................................................................................ 172
Configuring BFCP (Binary Floor Control dual Protocol).......................................................173
Configuring Mix-Sending................................................................................................................. 173
Configure Content Sharing..............................................................................................................173
Configuring Camera Settings.................................................................175
Selecting and Setting Cameras...................................................................................................... 176
Viewing Camera Status...................................................................................................................176
Specifying the Camera Control Mode for MeetingEye 600/MeetingEye 400.................................. 177
Enabling People Counting...............................................................................................................178
Controlling the Camera................................................................................................................... 179
Adjusting the White Balance........................................................................................................... 179
Adjusting the Exposure................................................................................................................... 180
Configuring Auto Exposure Mode........................................................................................ 181
Configuring Manual Exposure Mode.................................................................................... 182
Configuring the Mode of Shutter Priority..............................................................................183
Configuring Aperture Priority................................................................................................185
Configuring the Mode of Brightness Priority........................................................................ 186
Configuring the Mode of WDR-Auto.....................................................................................187
Configuring WDR-Manual..................................................................................................... 188
Displaying Camera Name When Multi-Camera Connected............................................................189
Adjusting the Display Image of the Camera................................................................................... 189
Adjusting Hangup Mode and Camera Pan Direction...................................................................... 191
Configuring Continuous Auto Focus................................................................................................192
Setting the Camera Presets............................................................................................................192
Configuring Preset Synchronize With Active Camera.....................................................................193
Allowing the Remote System to Control Your Camera................................................................... 193
Camera Control Protocol...................................................................................................... 193
Configuring the Far Site to Control the Near Camera..........................................................195
Configuring Multi-Camera Default Layout....................................................................................... 195
Resetting the Camera..................................................................................................................... 196

| Contents | vii
Configuring Virtual Meeting Room........................................................ 196
Setting the Endpoint as a Regular Mode Conference Room..........................................................197
Setting the Endpoint as VMR Mode Conference Rooms................................................................197
Joining the VMR..............................................................................................................................199
Configuring the Third-party Virtual Meeting Room......................................................................... 200
Configuring Call Settings....................................................................... 201
Selecting a Call Protocol.................................................................................................................201
Specifying the Video Call Rate....................................................................................................... 202
Configuring Call Rate Adaptation....................................................................................................203
Account Polling................................................................................................................................ 203
Priority of Call Types............................................................................................................ 204
Configuring the Account Polling........................................................................................... 204
Selecting the CTP20 Conference Call Preferences........................................................................204
Setting the CTP20 Contact Display Label...................................................................................... 205
Configuring Additional Audio Call....................................................................................................206
Selecting the Multi-Party Resources............................................................................................... 207
Configuring Call Match....................................................................................................................208
Dial Plan.......................................................................................................................................... 208
Adding a Dial Plan............................................................................................................... 209
Search Source List in Dialing......................................................................................................... 209
Configuring Search Source List in Dialing........................................................................... 209
Configuring SIP IP Call by Proxy....................................................................................................210
Configuring Ringback Timeout........................................................................................................ 210
Configuring the Auto Refuse Timeout.............................................................................................211
Auto Answer.................................................................................................................................... 211
Answering a Call Automatically When not in a Call............................................................. 211
Answering Multiple Calls Automatically................................................................................212
Muting Auto-Answered Calls........................................................................................................... 212
Muting Auto-Dialed Calls.................................................................................................................213
DND (Do Not Disturb)..................................................................................................................... 213
Enabling DND When Not in a Call.......................................................................................213
Enabling DND during an Active Call.................................................................................... 213
Enabling Fast Audio Call for CP960............................................................................................... 214
Managing the Directory...........................................................................214
Local Directory.................................................................................................................................214
Adding Local Contacts and Conference Contacts............................................................... 214
Importing a Local Contact List............................................................................................. 216
Exporting Local Contact List................................................................................................ 217
Editing Local Contacts..........................................................................................................217
Deleting Local Contacts........................................................................................................217
Yealink Cloud Contacts................................................................................................................... 218
Enterprise Directory.........................................................................................................................218
LDAP................................................................................................................................................219
LDAP Attributes.................................................................................................................... 219
Configuring LDAP................................................................................................................. 220
Meeting Whitelist............................................................................................................................. 222
Adding Meeting Whitelist......................................................................................................223
Deleting the Meeting Allowlist.............................................................................................. 223
Meeting Blacklist..............................................................................................................................223
Adding Meeting Blacklist...................................................................................................... 223

| Contents | viii
Deleting the Meeting Blacklist.............................................................................................. 223
Managing the Call History...................................................................... 224
Saving History Record.................................................................................................................... 224
Adding a History Record to the Local Directory............................................................................. 224
Deleting Call Records..................................................................................................................... 225
Deleting a Call Record......................................................................................................... 225
Deleting Multiple History Records........................................................................................ 225
Deleting All History Records................................................................................................ 225
Placing Calls from Call History....................................................................................................... 225
Placing a Call........................................................................................... 226
Placing a Call by Entering a Number............................................................................................. 226
Editing Numbers Before Placing a Call.......................................................................................... 227
Configuring the Security Features........................................................ 227
Collaboration Data Security Control................................................................................................227
Configuring the Auto Logout Time..................................................................................................228
Transport Layer Security (TLS)....................................................................................................... 228
Supported Cipher Suites...................................................................................................... 229
TLS Transport Protocol.........................................................................................................230
Managing the Trusted Certificates List.................................................................................231
Managing the Server Certificates.........................................................................................238
Secure Real-Time Transport Protocol (SRTP)..................................................................... 238
H.235 Encryption.................................................................................................................. 240
Defending against Attacks....................................................................................................241
System Integrated with Control Systems........................................................................................ 243
Connection Methods of Control Systems.............................................................................243
Connection Settings for Control Systems.............................................................................243
CEC Monitor Controls............................................................................. 245
Configuring CEC Monitor Controls..................................................................................................245
Accessories with Your System.............................................................. 246
Using WPP20 Wireless Presentation Pod...................................................................................... 246
Using the CPN10 PSTN Box.......................................................................................................... 246
Using the VCC22 Video Conferencing Cameras............................................................................ 246
Controlling VCC22 Camera.................................................................................................. 247
Adjusting the Multi-Camera Layout During a Call................................................................ 247
Using the CPW90-BT Bluetooth Wireless Microphones with VCS................................................. 247
Registering CPW90-BT with VCS........................................................................................ 248
Deregistering CPW90 from VCS..........................................................................................248
Viewing the Information of Bluetooth Wireless Microphones............................................... 249
Finding the Registered CPW90-BT...................................................................................... 249
Using CTP20................................................................................................................................... 249
Wired Connection to CTP20................................................................................................ 249
Wireless Connection to CTP20............................................................................................ 250
Using Multiple CTP20s for Collaboration............................................................................. 250
Using VCM34.................................................................................................................................. 250
Using VCM38.................................................................................................................................. 251
Using the Soundbar/MSpeaker II.................................................................................................... 251

| Contents | ix
Using CP900/CP700 Ultra-Compact Speakerphone.......................................................................251
System Maintenance............................................................................... 251
Exporting or Importing Configuration Files..................................................................................... 251
Exporting BIN Files from the System...................................................................................251
Importing BIN Files to the System....................................................................................... 252
Rebooting the System.....................................................................................................................252
Resetting the SD card of MeetingEye 600/MeetingEye 400/VC200/VP59..................................... 252
Resetting the System...................................................................................................................... 253
Resetting the System via Configuration Methods................................................................ 253
Resetting the System by using Reset Button...................................................................... 253
Resetting VP59 by REDIAL key...........................................................................................253
Exporting Log Files......................................................................................................................... 254
Setting the Severity Level of the Local log...........................................................................254
Setting Severity Level of the Module log..............................................................................254
Exporting the Log Files to a Local PC.................................................................................255
Exporting the Log Files to a USB Flash Drive.....................................................................256
Exporting the Log Files to a Syslog Server......................................................................... 256
Capturing Packets........................................................................................................................... 257
Capturing the Packets via Web User Interface.................................................................... 257
Capturing the Packets via Remote Control.......................................................................... 260
Capturing the Packets via Ethernet Software...................................................................... 260
System Firmware.............................................................................................................................260
Upgrading the Firmware.......................................................................................................262
Viewing Multipoint License Status...................................................................................................262
Viewing the Device Type.................................................................................................................263
Troubleshooting....................................................................................... 263
General Issues................................................................................................................................ 264
Call Issues....................................................................................................................................... 265
Audio Issues.................................................................................................................................... 266
Video Issues.................................................................................................................................... 267
Placing a Test Call.......................................................................................................................... 268
System Diagnostics......................................................................................................................... 268
Diagnosing the Audio........................................................................................................... 269
Diagnosing the Camera........................................................................................................269
Diagnosing the Network....................................................................................................... 269
System Status................................................................................................................................. 270
System Status List................................................................................................................270
Viewing System Status.........................................................................................................273
Viewing Call Statistics..................................................................................................................... 273

About This Guide
Yealink administrator guide provides general guidance on configuring, customizing, managing, and
troubleshooting video conferencing systems. This guide is not intended for an administrator who is
experienced in system administration.
This guide is applicable to the following models:
• MeetingEye 600 video conferencing system
• MeetingEye 400 video conferencing system
• VC880 video conferencing system
• VC800 video conferencing system
• VC500 Pro video conferencing system
• VC500 video conferencing system
• VC200 video conferencing system
• PVT980 video conferencing system
• PVT950 video conferencing system
• VP59 video conferencing system (conference phone)
| About This Guide | 10
The differences between VC500 and VC500 Pro models are as follow:
Features VC500 VC500 Pro
Work with CP960 conference
phone
H.265 video codec ×
60 frame rate ×
Attention:
Notes for upgrading firmware versions:
• For VC800, VC500, VCC22, and PVT950 using new hardware, their hardware versions are
63.0.98.0.2.1.17, 71.0.50.0.2.0.16, 82.0.1.0.2.0.17, and 1137.0.2.0.2.0.16 respectively. After
upgrading their firmware to version X.44.0.25, you cannot degrade them to version X.43.0.30 or
earlier versions. Please upgrade with caution.
• After upgrading VP59 to version 44 (91.344.0.10), you cannot degrade it to versions earlier than
44. Please upgrade with caution.
Note:
If you purchase VC500, but you want to use the features supported by the VC500 Pro model, you
can contact Yealink technical support for help.
• Related Documents
• Summary of Changes
×
√
√
√
Related Documents
The following related documents are available:
• Video Conferencing System Quick Start Guide, which describes how to assemble the system and
configure the meeting room and the network.

| About This Guide | 11
• Video Conferencing System User Guide, which describes how to configure and use basic features
available on the systems.
• Video Conferencing System Network Deployment Guide, which describes how to deploy VCS.
• Video Conferencing System Network Deployment Solution, which describes how to deploy the network
for your systems.
• Yealink VCR11 Remote Control Quick Reference Guide, which describes how to use the VCR11
Remote Control.
• Yealink CP960 HD IP Conference Phone Quick Reference Guide, which describes how to use CP960
conference phone.
• Yealink CPW90-BT Bluetooth Wireless Microphones Quick Start Guide, which describes how to use
CPW90-BT.
• Yealink Wi-Fi USB Dongle WF50 User Guide, which describes how to connect the wireless network to
the VCS codec and provide wireless AP via WF50.
• Yealink WPP20 Wireless Presentation Pod User Guide, which describes how to use WPP20 wireless
presentation pod.
• Yealink PSTN Box CPN10 Quick Start Guide, which describes how to connect VCS codec to PSTN.
• Yealink VCC22 Video Conferencing Camera Quick Start Guide, which describes how to connect the
VCC22 video conferencing cameras to the VCS codec.
• Yealink CTP20 Quick Start Guide, which describes how to connect CTP20 to the VCS codec.
• Yealink VCM34 Quick Start Guide, which describes how to connect VCM34 to the VCS codec.
• Yealink VCH51 Quick Start Guide, which describes how to connect VCH51 to the VCS codec.
• Yealink Soundbar Quick Start Guide, which describes how to connect Soundbar to the VCS codec.
• Yealink MSpeaker II Quick Start Guide, which describes how to connect MSpeaker II to the VCS codec.
You can download these documentations online:
http://support.yealink.com/documentFront/forwardToDocumentFrontDisplayPage.
For support or service, please contact your Yealink reseller or go to Yealink Technical Support online:
http://support.yealink.com/.
Summary of Changes
• Changes for Release 44 SP1, Guide Version 44.25
• Changes for Release 43, Guide Version 43.32
• Changes for Release 43, Guide Version 43.31
• Changes for Release 43, Guide Version 43.30
• Changes for Release 43, Guide Version 43.10
Changes for Release 44 SP1, Guide Version 44.25
In this version, we change the design of user interface.
The following sections are new for this version:
VCM38
Using VCM38
CP900/CP700 Ultra-Compact Speakerphone
Configuring Whiteboard Tools
Configuring the Presentation Tools
Using CP900/CP700 Ultra-Compact Speakerphone
Major updates have occurred to the following sections:

Hardware of CPW90-BT Bluetooth Wireless Microphone
Selecting a Call Protocol
Specifying the Video Call Rate
Adding a Dial Plan
Using the CPW90-BT Bluetooth Wireless Microphones with VCS
Changes for Release 43, Guide Version 43.32
This guide is also available to MeetingEye 600 video conferencing system which is newly issued.
The following sections are new for this version:
• Hardware of MeetingEye 600
• Setting the Default Layout for Dual Single Screen
Changes for Release 43, Guide Version 43.31
This guide is also available to MeetingEye 400 video conferencing system which is newly issued.
The following sections are new for this version:
| About This Guide | 12
• Hardware of MeetingEye 400
• VCR20 Remote Control
• Specifying the Camera Control Mode for MeetingEye 600/MeetingEye 400
• Enabling People Counting
Changes for Release 43, Guide Version 43.30
The following sections are new for this version:
• Enabling/Disabling the PC Port
• Setting Screen Saver for VP59
• Setting Wallpaper for VP59
• Configuring the Display to Wake up the Sleeping Endpoint
• Configuring * Key for Default Input
• Dial Plan
• Configuring Auto Zoom In Content for a Single Screen
• Showing the Site Name to Remote Parties
• Hardware of MSpeaker II
Major updates have occurred to the following sections:
• Configuring Change Layout by Content Sharing
• Specifying Content to the Secondary Screen
• Configuring Call Rate Adaptation
• Using the Soundbar/MSpeaker II
• System Firmware
Changes for Release 43, Guide Version 43.10
The following sections are new for this version:
• Configuring Quick Switch Platform
• Configuring to Automatically Upload Screenshots to the YMS
• Configuring Call Rate Adaptation

• Displaying Camera Name When Multi-Camera Connected
• Configuring SNMP
Major updates have occurred to the following sections:
• Configuring Video Recording
• Configuring Virtual Meeting Room
• Setting the Camera Presets
• Using WPP20 Wireless Presentation Pod
• Call Issues
Getting Started
This chapter introduces the basic operation of VCS endpoints.
• Hardware Overview
• LED Instructions
• Powering on and off
| Getting Started | 13
Hardware Overview
• Hardware of MeetingEye 600
• Hardware of MeetingEye 400
• Hardware of VC880 Codec
• Hardware of PVT980 Codec
• Hardware of VC800 Codec
• Hardware of VC500/PVT950 Codec
• Hardware of VC200 Codec
• Hardware of VP59 Codec
• VCR20 Remote Control
• VCR11 Remote Control
• VCC22 video conferencing camera
• Hardware of VCH50 Video Conferencing Hub
• Hardware of VCH51 Video Conferencing Hub
• CP960 Conference Phone
• CTP20 Touch Panel
• WPP20 wireless presentation pod
• Hardware of CPE90 Wired Expansion Microphones
• Hardware of CPW90-BT Bluetooth Wireless Microphone
• VCM38
• VCM34
• Hardware of MSpeaker
• Hardware of MSpeaker II
• CP900/CP700 Ultra-Compact Speakerphone
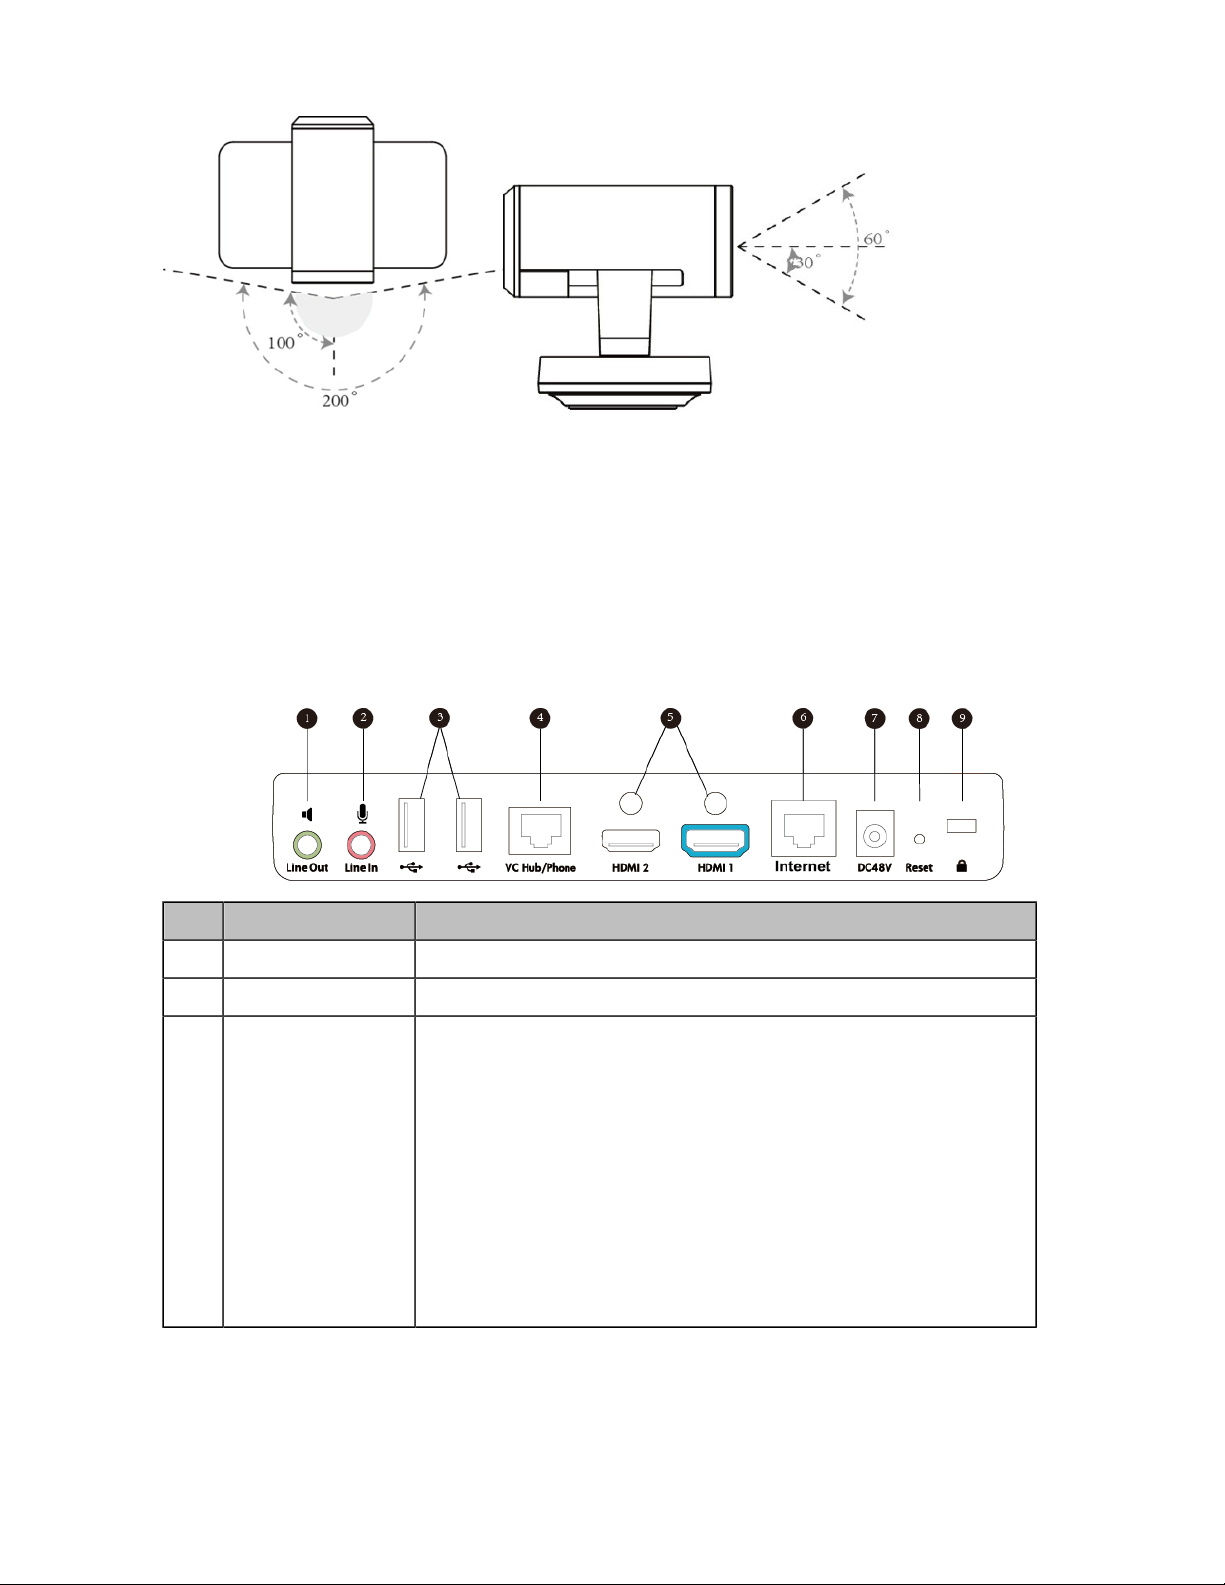
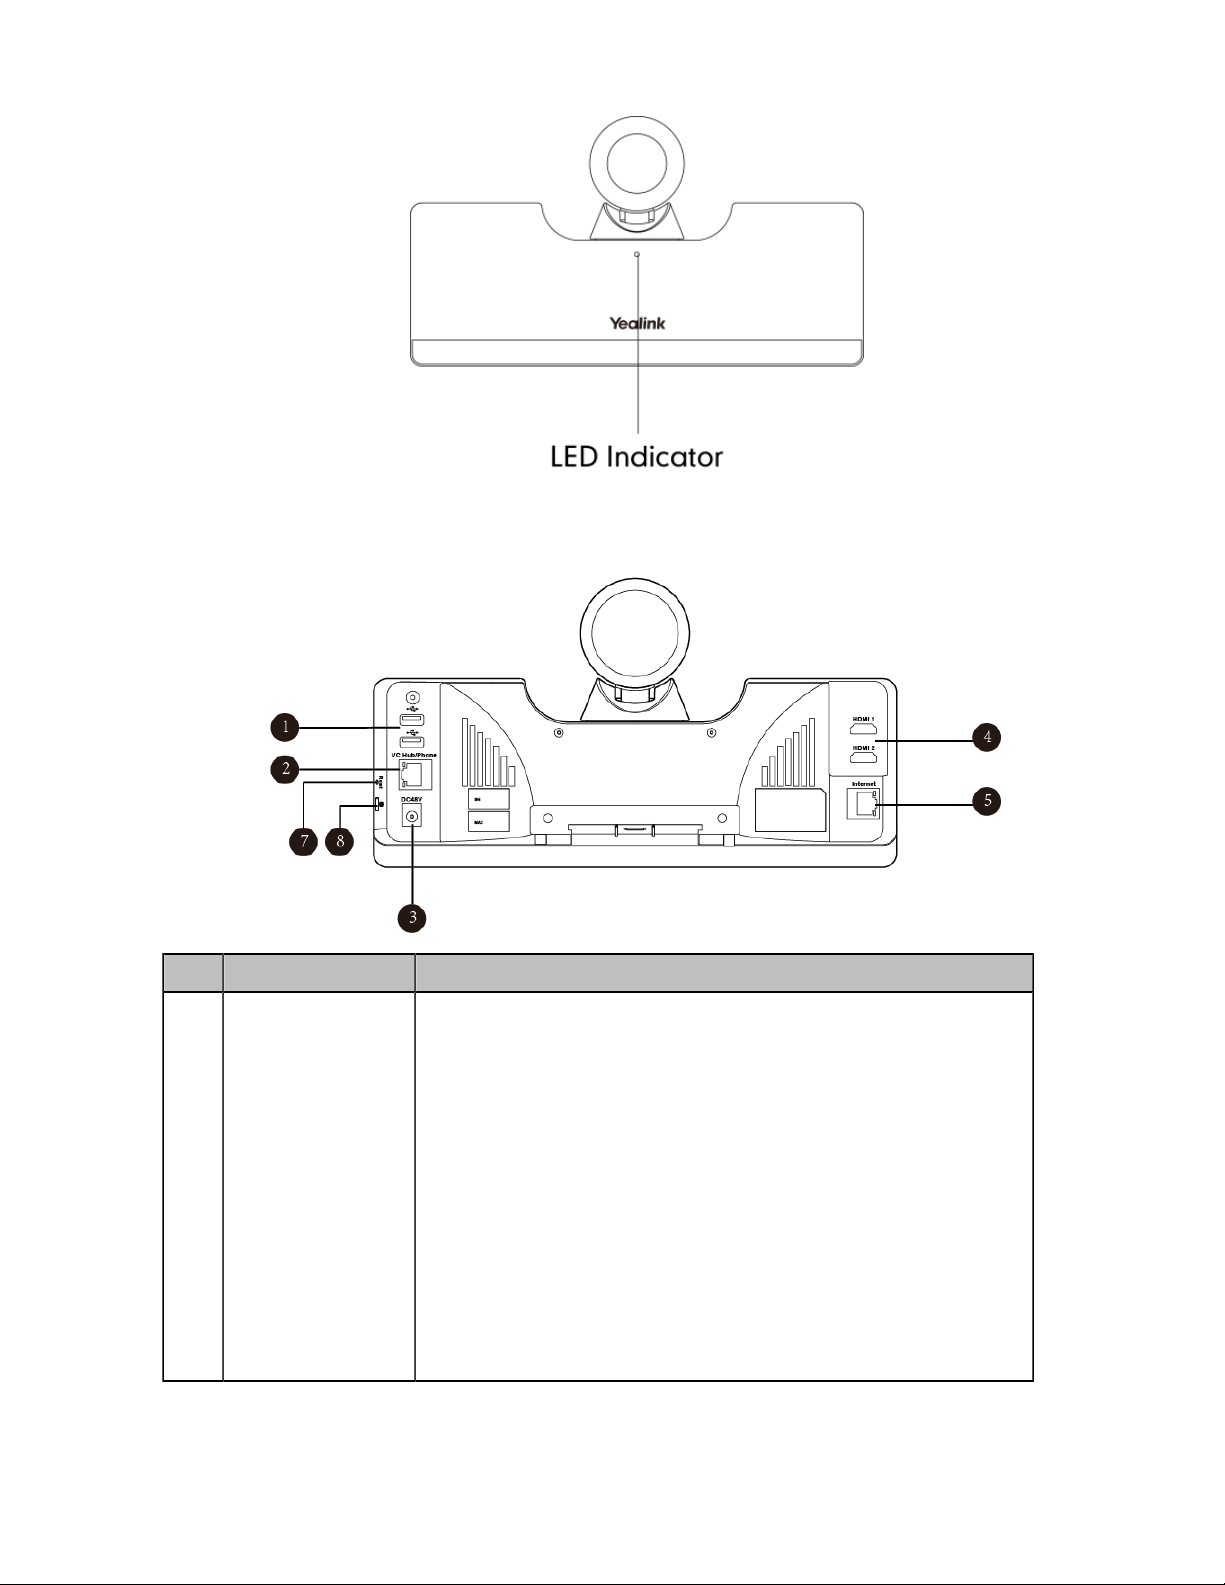
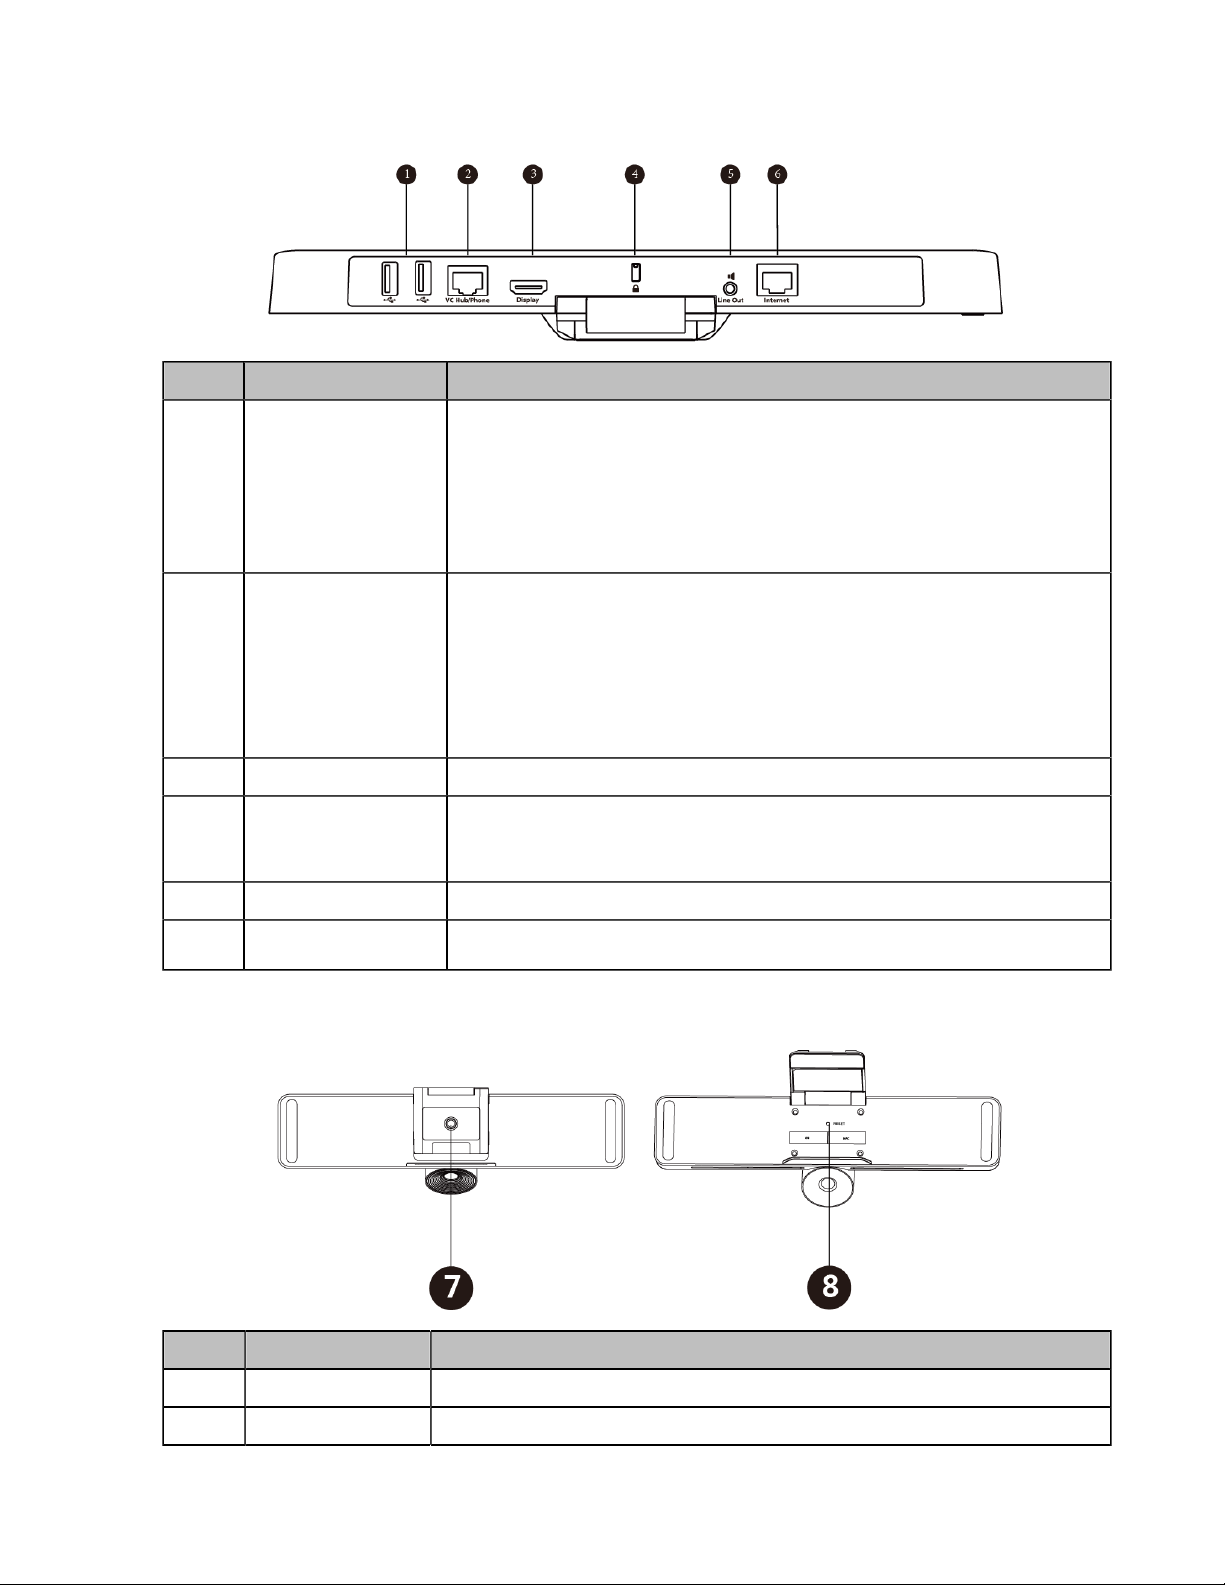
Hardware of MeetingEye 600
Yealink MeetingEye 600 is the smart video conferencing endpoint, designed for medium meeting rooms. It
adopts 20MP super-wide angle lens and 10x Hybrid Zoom, providing excellent video quality with delicate

| Getting Started | 14
details. Its dual UHD 4K video conference, AI technologies, and the auto privacy shutter allow users to
experience a smarter and safer video conference.
Port Name Description
1 Reset Key
2 DC48V Connect to the power source via a power adapter.
3 VC Hub/Phone
4 Line In Connect to an audio input device via an audio cable (3.5mm).
5 Line Out Connect to an audio output device via an audio cable (3.5mm).
6 HDMI Connect to a monitor for displaying video images.
7 Internet Connect to the network device.
8 Security Slot Allow you to connect a universal security cable to the VCS endpoint,
9 USB
Reset the VCS endpoint to factory defaults.
• If you want to use wired sharing to present, connect this port to the
PoE port on the VCH51 video conferencing hub.
• Connect to CTP20.
• If you need an audio device, connect this port to the Internet port on
the CP960 Conference phone.
• Connect to MSpeaker II.
• Connect to VCM34.
so you can lock the VCS endpoint down. The VCS endpoint cannot be
removed when locked.
• Connect to a USB flash drive for storing screenshots, recording
videos or capturing packets. If you insert multiple USB flash drives to
the VCS endpoint simultaneously, only the last USB flash drives you
insert can be identified by the endpoint.
• Insert a PSTN box CPN10 for connecting to the PSTN (Public
Switched Telephone Network).
• Pair with WPP20.
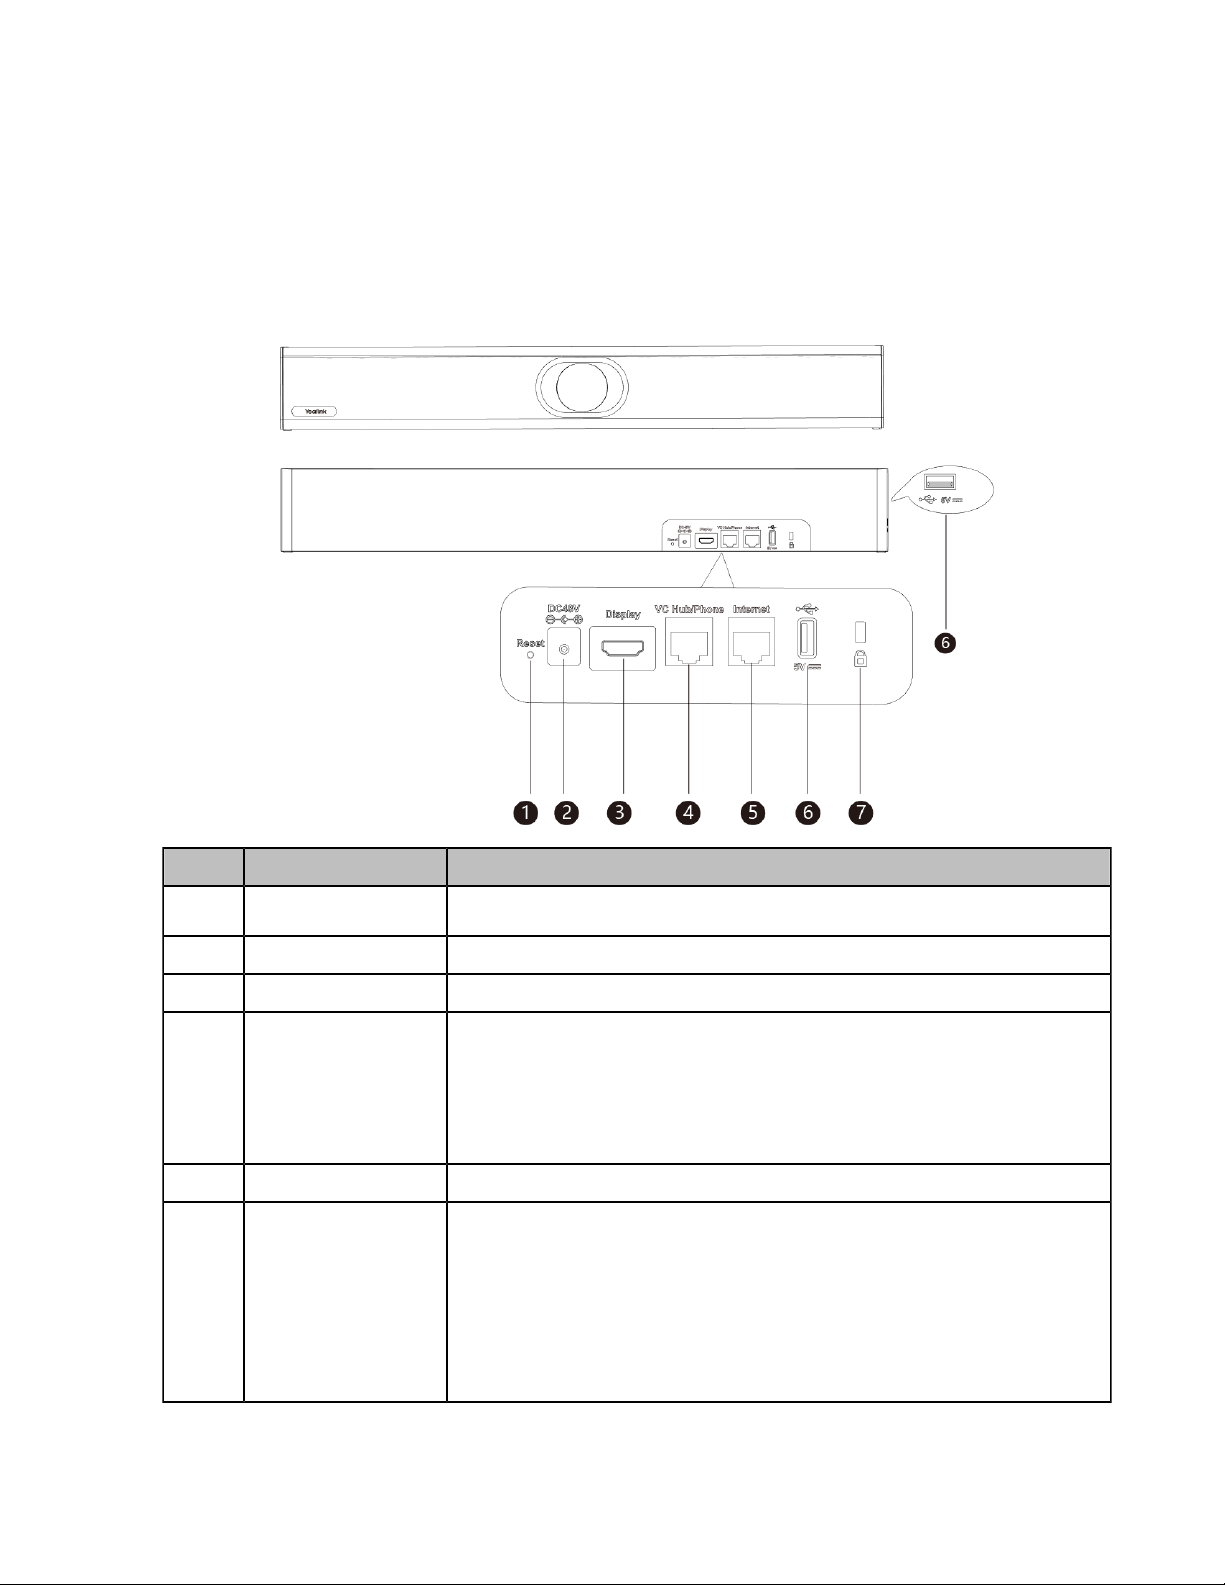
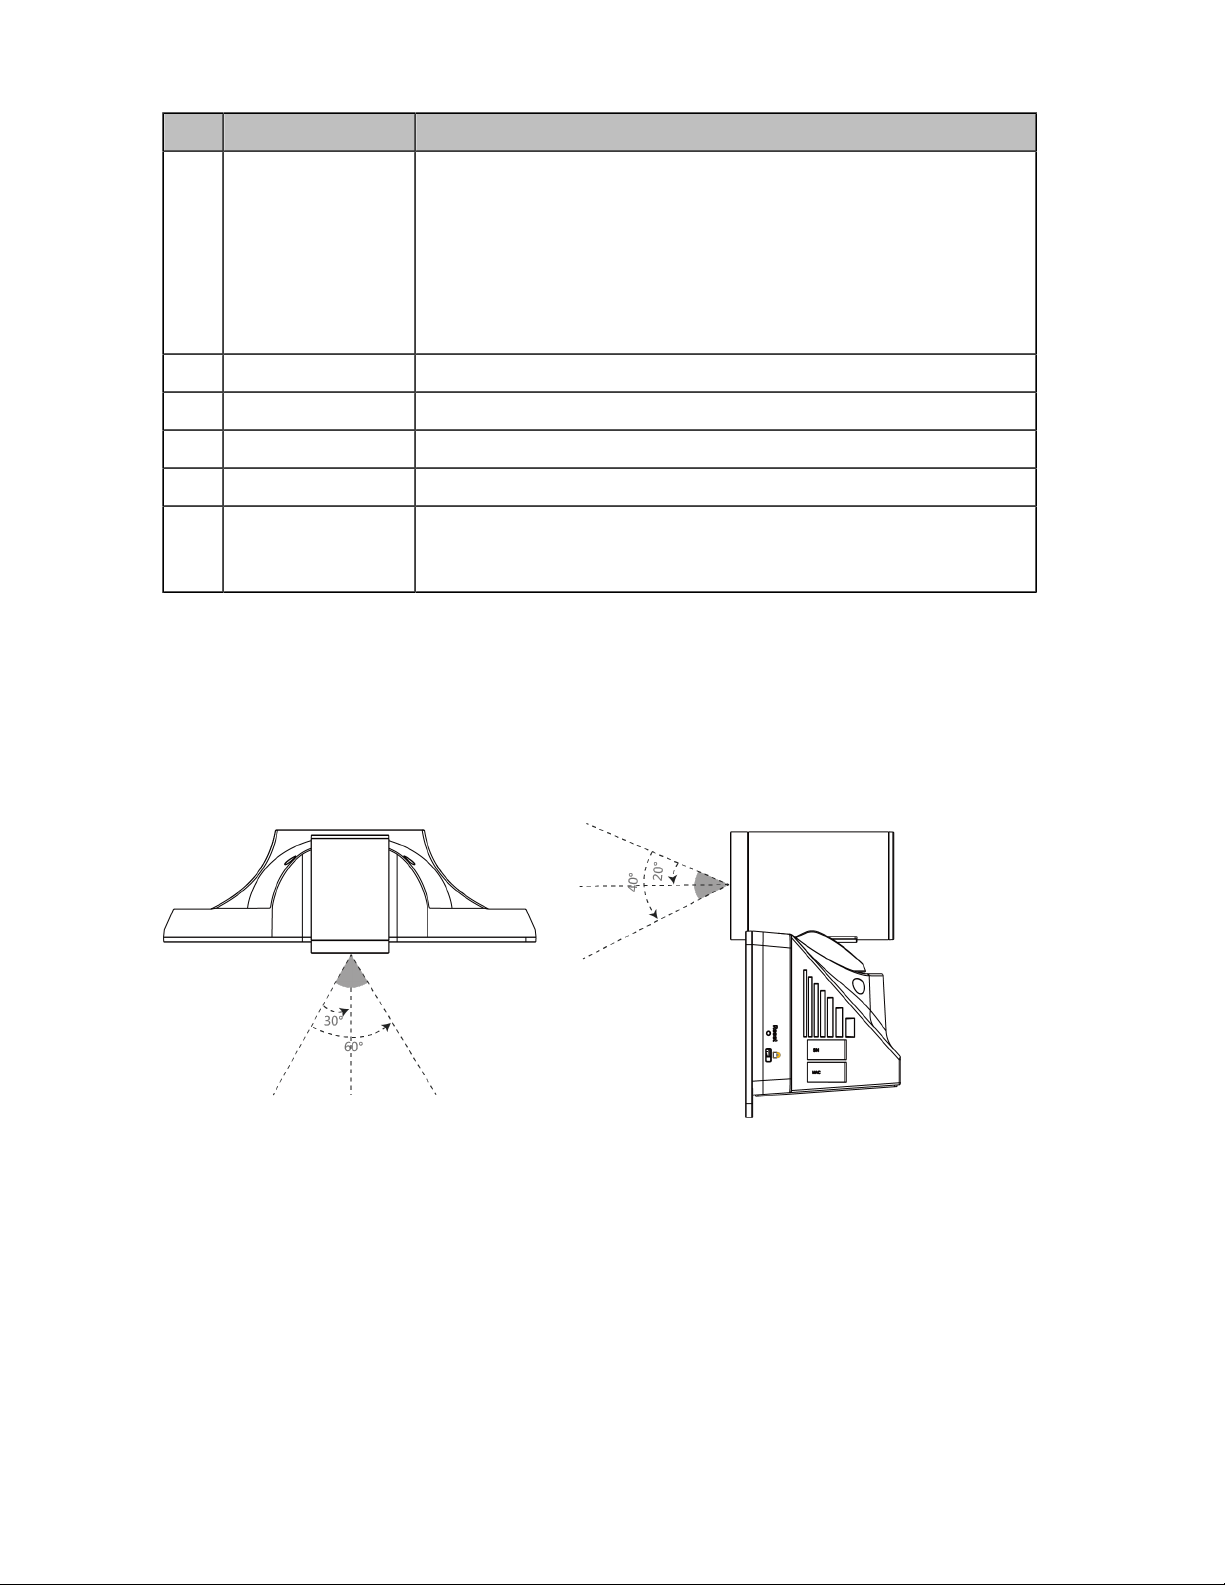
Hardware of MeetingEye 400
Yealink MeetingEye 400 is the smart video conferencing endpoint, designed for small meeting rooms.
Supporting dual 4K video conference, 20MP camera, and 133 ° super-wide-angle lens, MeetingEye
400 delivers outstanding video quality. Its AI technologies and built-in auto privacy shutter allow users to
experience a smarter and safer video conference. With 8 MEMS microphone arrays and Yealink new audio
algorithms, MeetingEye 400 brings excellent audio experience in small rooms even in full-duplex mode and
ensures that everyone can be heard as well as seen.
| Getting Started | 15
Port Name Description
1 Reset Key
2 DC48V Connect to the power source via a power adapter.
3 Display Connect to a monitor for displaying video images.
4 VC Hub/Phone
5 Internet Connect to the network device.
6 USB
Reset the VCS endpoint to factory defaults.
• If you want to use wired sharing to present, connect this port to the
PoE port on the VCH51 video conferencing hub.
• Connect to CTP20.
• If you need an audio device, connect this port to the Internet port on
the CP960 Conference phone.
• Connect to a USB flash drive for storing screenshots, recording
videos or capturing packets. If you insert multiple USB flash drives to
the VCS endpoint simultaneously, only the last USB flash drives you
insert can be identified by the endpoint.
• Insert a PSTN box CPN10 for connecting to the PSTN (Public
Switched Telephone Network).
• Pair with WPP20.
| Getting Started | 16
Port Name Description
7 Security Slot Allow you to connect a universal security cable to the VCS endpoint,
so you can lock the VCS endpoint down. The VCS endpoint cannot be
removed when locked.
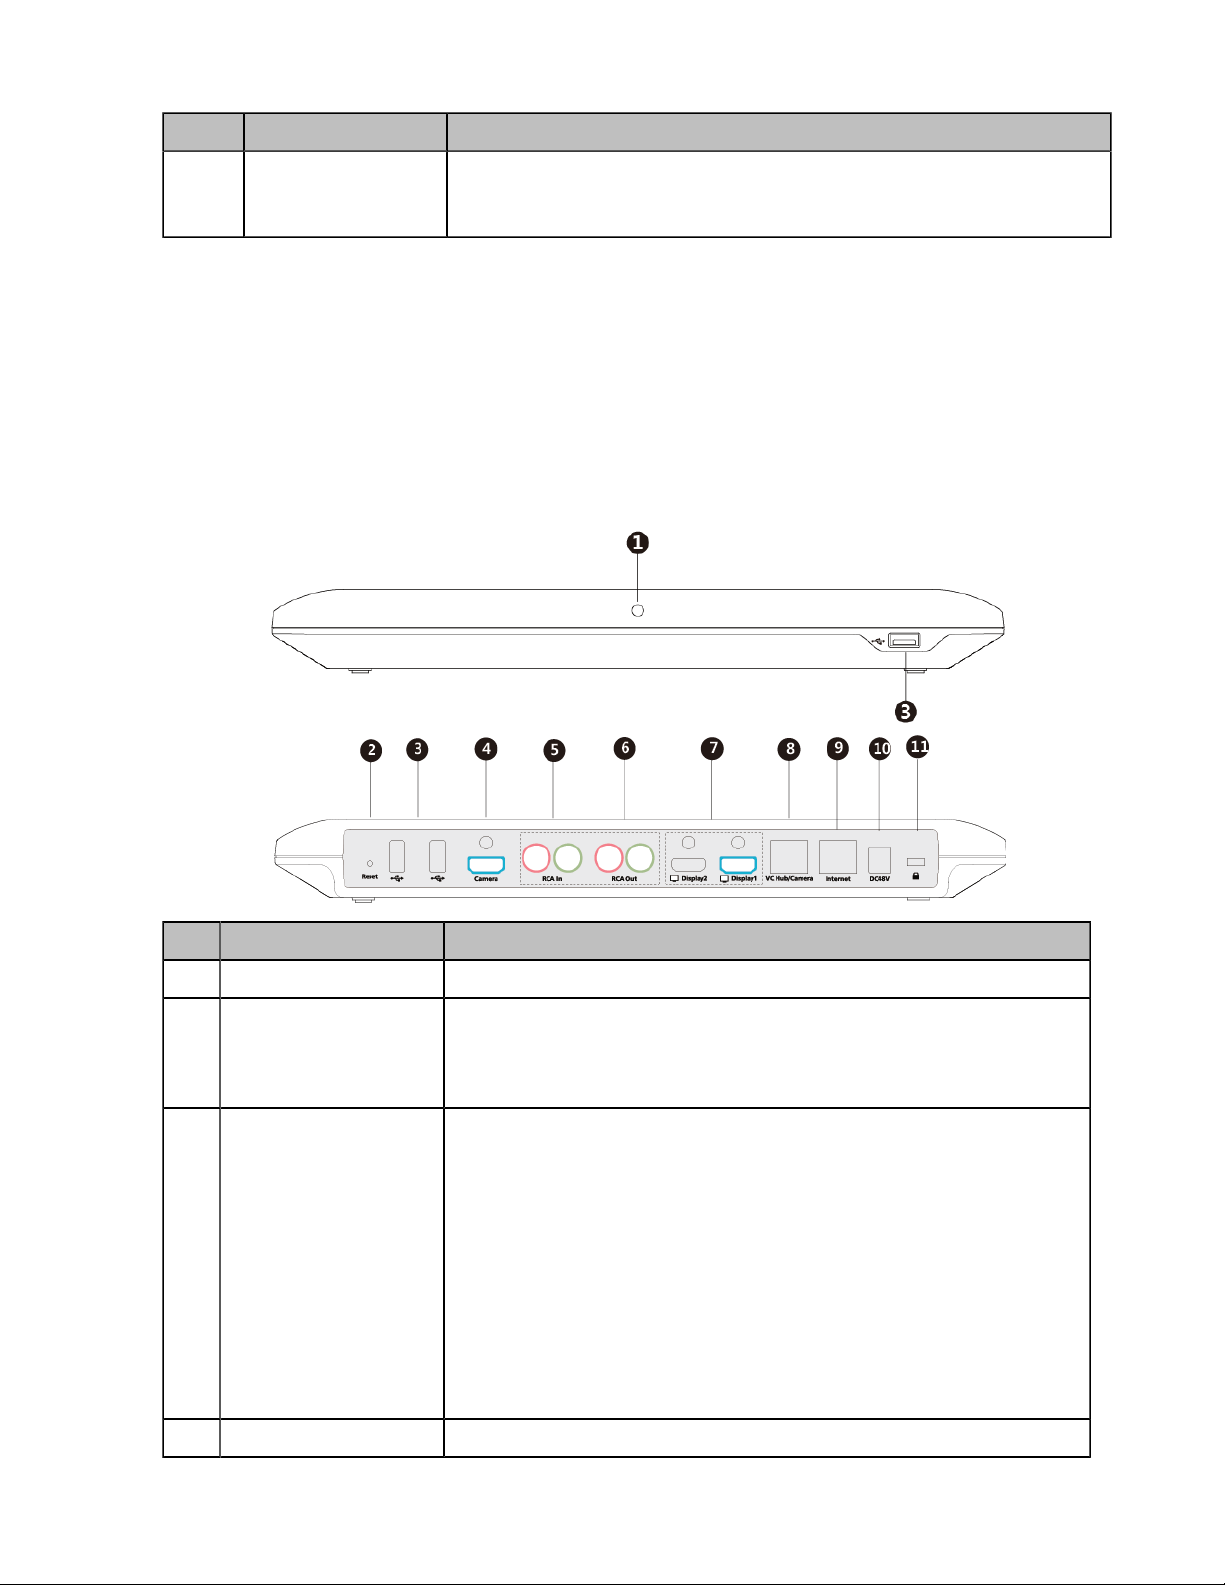
Hardware of VC880 C odec
With rich physical interfaces for audio and video connection, VC880 can be connected to the 3rd-party
camera or access to the video matrix. Possessing rich physical interfaces for audio and video connection,
the system can be connected to the 3rd-party camera or access to the video matrix. In addition, it comes
with the professional RCA-in/out interface that integrates the mixer with the gooseneck microphone. Its
spilt-type structure can meet the deployment requirement of the control room which separates from a large
conference room.
can adapt to the monitors automatically.
The following introduces the corresponding ports on VC880.
Supporting 16:9 and 4:3 aspect ratios, it is compatible with different audio devices, and
Port Name Description
1 LED Indicator Indicate different status of the system.
2 Reset Key
3 USB
4 Camera Port Connect to a third-party camera.
Reset the VCS endpoint to factory defaults.
· Insert a USB flash drive.
USB flash drive can be used for storing screenshots, recorded
videos or captured packets. If you insert multiple USB flash drives to
the VCS endpoint simultaneously, only the last USB flash drives you
insert can be identified by the endpoint.
· Insert a WF50 Wi-Fi USB Dongle for connecting to Wi-Fi or
providing wireless AP.
· Insert a BT42 Bluetooth USB Dongle for connecting to the CPW90BT Bluetooth wireless microphones.
· Insert a PSTN box CPN10 for connecting to the PSTN (Public
Switched Telephone Network).
Port Name Description
5 RCA In Connect to an audio input device via an RCA cable.
6 RCA Out Connect to an audio output device via an RCA cable.
7 Display Connect to a monitor for displaying video images.
| Getting Started | 17
8 VC Hub/Camera
9 Internet Connect to the network device.
10 DC48V Connect to the power source via a power adapter.
11 Security Slot Allow you to connect a universal security cable to the VCS endpoint,
• If you want to use wired sharing to present, connect this port to the
Codec port on the VCH50 video conferencing hub/to the PoE port
on the VCH51 video conferencing hub.
• Connect to CTP20.
• Connect this port to the Camera port on the VCC22 video
conferencing camera.
• If you need an audio device, connect this port to the Internet port on
the CP960 Conference phone.
• Connect to VCM34.
so you can lock the VCS endpoint down. The VCS endpoint cannot be
removed when locked.
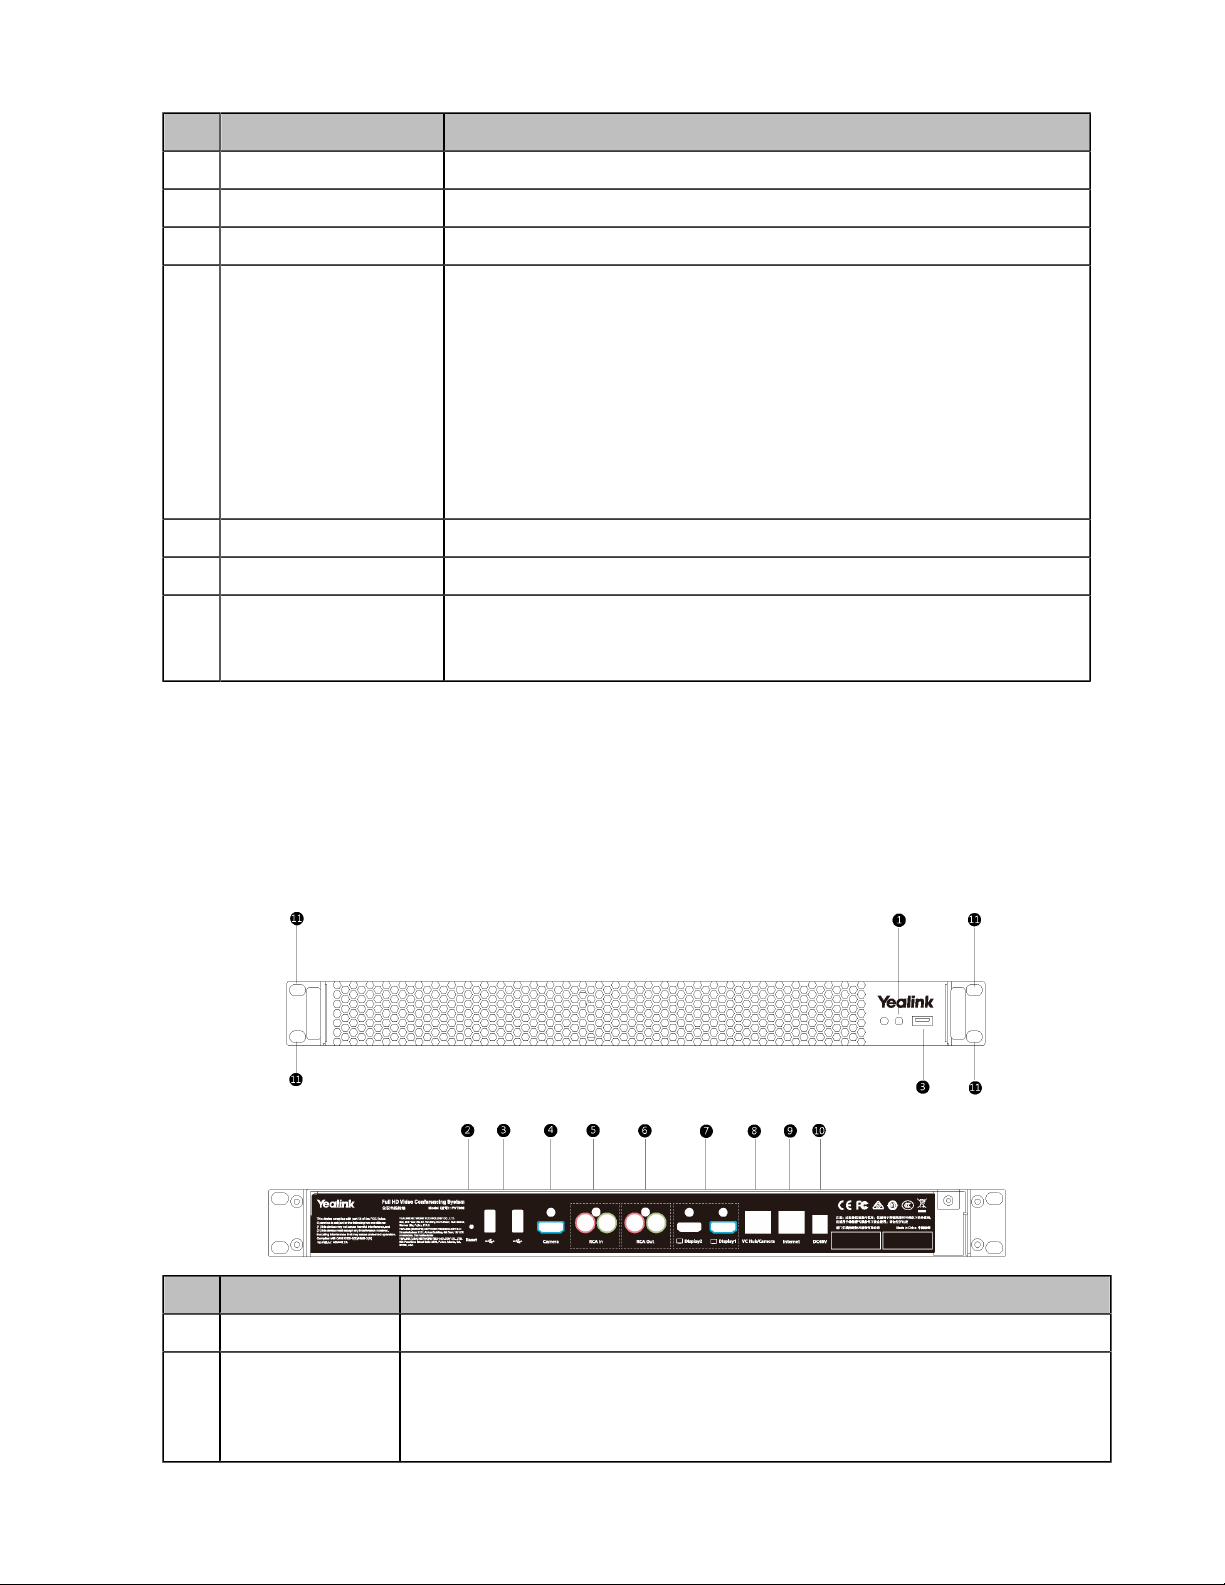
Hardware of PVT980 Codec
PVT980, targeted at large meeting room, is applicable to the meeting room with a rack or the lecture hall.
Possessing rich physical interfaces for audio and video connection, the system can be connected to the
3rd-party camera or access to the video matrix. In addition, it comes with the professional RCA-in/out
interface that integrates the mixer with the gooseneck microphone.
The following introduces the corresponding ports on PVT980.
Port Name Description
1 LED Indicator Indicate different status of the system.
2 Reset Key
Reset the VCS endpoint to factory defaults.

Port Name Description
| Getting Started | 18
3 USB
4 Camera Port Connect to a third-party camera.
5 RCA In Connect to an audio input device via an RCA cable.
6 RCA Out Connect to an audio output device via an RCA cable.
7 Display Connect to a monitor for displaying video images.
8 VC Hub/Camera
• Insert a USB flash drive.
USB flash drive can be used for storing screenshots, recorded videos
or captured packets. If you insert multiple USB flash drives to the VCS
endpoint simultaneously, only the last USB flash drives you insert can be
identified by the endpoint.
• Insert a WF50 Wi-Fi USB Dongle for connecting to Wi-Fi or providing
wireless AP.
• Insert a BT42 Bluetooth USB Dongle for connecting to the CPW90-BT
Bluetooth wireless microphones.
• Insert a PSTN box CPN10 for connecting to the PSTN (Public Switched
Telephone Network).
• If you want to use wired sharing to present, connect this port to the Codec
port on the VCH50 video conferencing hub/to the PoE port on the VCH51
video conferencing hub.
• Connect this port to the Camera port on the VCC22 video conferencing
camera.
• If you need an audio device, connect this port to the Internet port on the
CP960 Conference phone.
• Connect to VCM38.
9 Internet Connect to the network device.
10 DC48V Connect to the power source via a power adapter.
11 Slot Hole Use the screws to lock the PVT980 system to the rack.
Hardware of VC800 Codec
VC800 codec compresses the outgoing video and audio data, transmits the data to the far site, and
decompresses the incoming data.
Supporting 16:9 and 4:3 aspect ratios, it is compatible with different audio devices, and can adapt to the
monitors automatically. The VC800 camera can be panned (± 100 degrees range), tilted (± 30 degrees
range) and supports 12 x optical zoom, white balance, automatic gain and so on.
• Front Panel of VC800 Codec
• Rear Panel of VC800 Codec
Front Panel of VC800 Codec
The LED indicator in front of the camera indicates different camera status.
Related information
MeetingEye 600/MeetingEye 400/VC880/VC800/VC500/VC200/PVT980/ PVT950 LED Indicator
| Getting Started | 19
Rear Panel of VC800 Codec
Port Name Description
1 Line Out Connect to an audio output device via an audio cable (3.5mm).
2 Line In Connect to an audio input device via an audio cable (3.5mm).
3 USB
• Insert a USB flash drive.
USB flash drive can be used for storing screenshots, recorded
videos or captured packets. If you insert multiple USB flash
drives to the VCS endpoint simultaneously, only the last USB
flash drives you insert can be identified by the endpoint.
• Insert a WF50 Wi-Fi USB Dongle for connecting to Wi-Fi or
providing wireless AP.
• Insert a BT42 Bluetooth USB Dongle for connecting to the
CPW90-BT Bluetooth wireless microphones.
• Insert a PSTN box CPN10 for connecting to the PSTN (Public
Switched Telephone Network).
Port Name Description
| Getting Started | 20
4 VC Hub/Phone
5 HDMI Connect to a monitor for displaying video images.
6 Internet Connect to the network device.
7 DC48V Connect to the power source via a power adapter.
8 Reset Key Reset the VCS endpoint to factory defaults.
9 Security Slot Allow you to connect a universal security cable to the VCS endpoint,
• If you want to use wired sharing to present, connect this port to
the Codec port on the VCH50 video conferencing hub/to the PoE
port on the VCH51 video conferencing hub.
• Connect to CTP20.
• If you need an audio device, connect this port to the Internet port
on the CP960 Conference phone.
• Connect to VCM38/VCM34.
so you can lock the VCS endpoint down. The VCS endpoint cannot
be removed when locked.
Hardware of VC500/PVT950 Codec
VC500/PVT950 codec compresses outgoing video and audio data, transmits this information to the far site,
and decompresses incoming data.
VC500/PVT950 codec, compatible with different audio devices, supports 16:9 and 4:3 aspect ratios and
can adapt to the monitors automatically. The VC500/PVT950 camera can be panned (± 60 degrees range),
tilted (± 40 degrees range) and support 5 x optical zoom, white balance and automatic gain.
• Front Panel of VC500/PVT950 Codec
• Rear Panel of VC500 Codec
Front Panel of VC500/PVT950 Codec
The LED indicator in front of the camera indicates different camera status.
Related information
MeetingEye 600/MeetingEye 400/VC880/VC800/VC500/VC200/PVT980/ PVT950 LED Indicator
Rear Panel of VC500 Codec
| Getting Started | 21
Port Name Description
1 USB
• Insert a USB flash drive.
USB flash drive can be used for storing screenshots, recorded
videos or captured packets. If you insert multiple USB flash
drives to the VCS endpoint simultaneously, only the last USB
flash drives you insert can be identified by the endpoint.
• Connect to an audio input device via a USB to line input adapter.
• Connect to an audio output device via a USB to line input
adapter.
• Insert a WF50 Wi-Fi USB Dongle for connecting to Wi-Fi or
providing wireless AP.
• Insert a BT42 Bluetooth USB Dongle for connecting to the
CPW90-BT Bluetooth wireless microphones.
• Insert a PSTN box CPN10 for connecting to the PSTN (Public
Switched Telephone Network).
Port Name Description
| Getting Started | 22
2 VC Hub/Phone
3 DC48V Connect to the power source via a power adapter.
4 HDMI Connect to a monitor for displaying video images.
5 Internet Connect to the network device.
6 Reset Key Reset the VCS endpoint to factory defaults.
7 Security Slot Allow you to connect a universal security cable to the VCS endpoint,
• If you want to use wired sharing to present, connect this port to
the Codec port on the VCH50 video conferencing hub/to the PoE
port on the VCH51 video conferencing hub.
• Connect to CTP20.
• If you need an audio device, connect this port to the Internet port
on the CP960 Conference phone.
• Connect to VCM34. (It is not applicable to PVT950)
• Connect to VCM38. (It is not applicable to VC500)
so you can lock the VCS endpoint down. The VCS endpoint cannot
be removed when locked.
Hardware of VC200 Codec
Yealink VC200 is an entry-level smart video conferencing endpoint designed for small and huddle room.
Supporting 16:9 and 4:3 aspect ratios, it is compatible with different audio devices, and can adapt to the
monitors automatically. VC200 possesses many features, ultra HD 4K, 4 x digital zoom camera, 103°
super-wide angle lens, white balance automatic gain and others. With 6 beamforming microphone arrays
for direct voice pickup and Yealink Noise Proof Technology, VC200 brings excellent audio effect in small
rooms and ensures that everyone can be heard clearly.
• Front Panel of VC200 Codec
• Rear Panel of VC200 Codec
• Bottom of VC200 Codec
Front Panel of VC200 Codec
The LED indicator on the camera indicates different camera status.
Related information
MeetingEye 600/MeetingEye 400/VC880/VC800/VC500/VC200/PVT980/ PVT950 LED Indicator
Rear Panel of VC200 Codec
Port Name Description
| Getting Started | 23
1 USB
2 VC Hub/Phone
3 Display Connect to a monitor for displaying video images.
4 Security Slot Allow you to connect a universal security cable to the VCS endpoint,
5 Line Out Connect to an audio output device via an audio cable (3.5mm).
6 Internet
• Connect to a USB flash drive for storing screenshots, recording
videos or capturing packets. If you insert multiple USB flash drives to
the VCS endpoint simultaneously, only the last USB flash drives you
insert can be identified by the endpoint.
• Insert a PSTN box CPN10 for connecting to the PSTN (Public
Switched Telephone Network).
• If you want to use wired sharing to present, connect this port to the
Codec port on the VCH50 video conferencing hub/to the PoE port on
the VCH51 video conferencing hub.
• If you need an audio device, connect this port to the Internet port on
the CP960 Conference phone.
• Connect to VCM34.
so you can lock the VCS endpoint down. The VCS endpoint cannot be
removed when locked.
Connect to the PoE via the network cable.
Bottom of VC200 Codec
Port Name Description
7 VESA Fix VC200 to the TV stand or a tripod via a 1/4”-20 UNC screw.
8 Reset Key Reset the VCS endpoint to factory defaults.
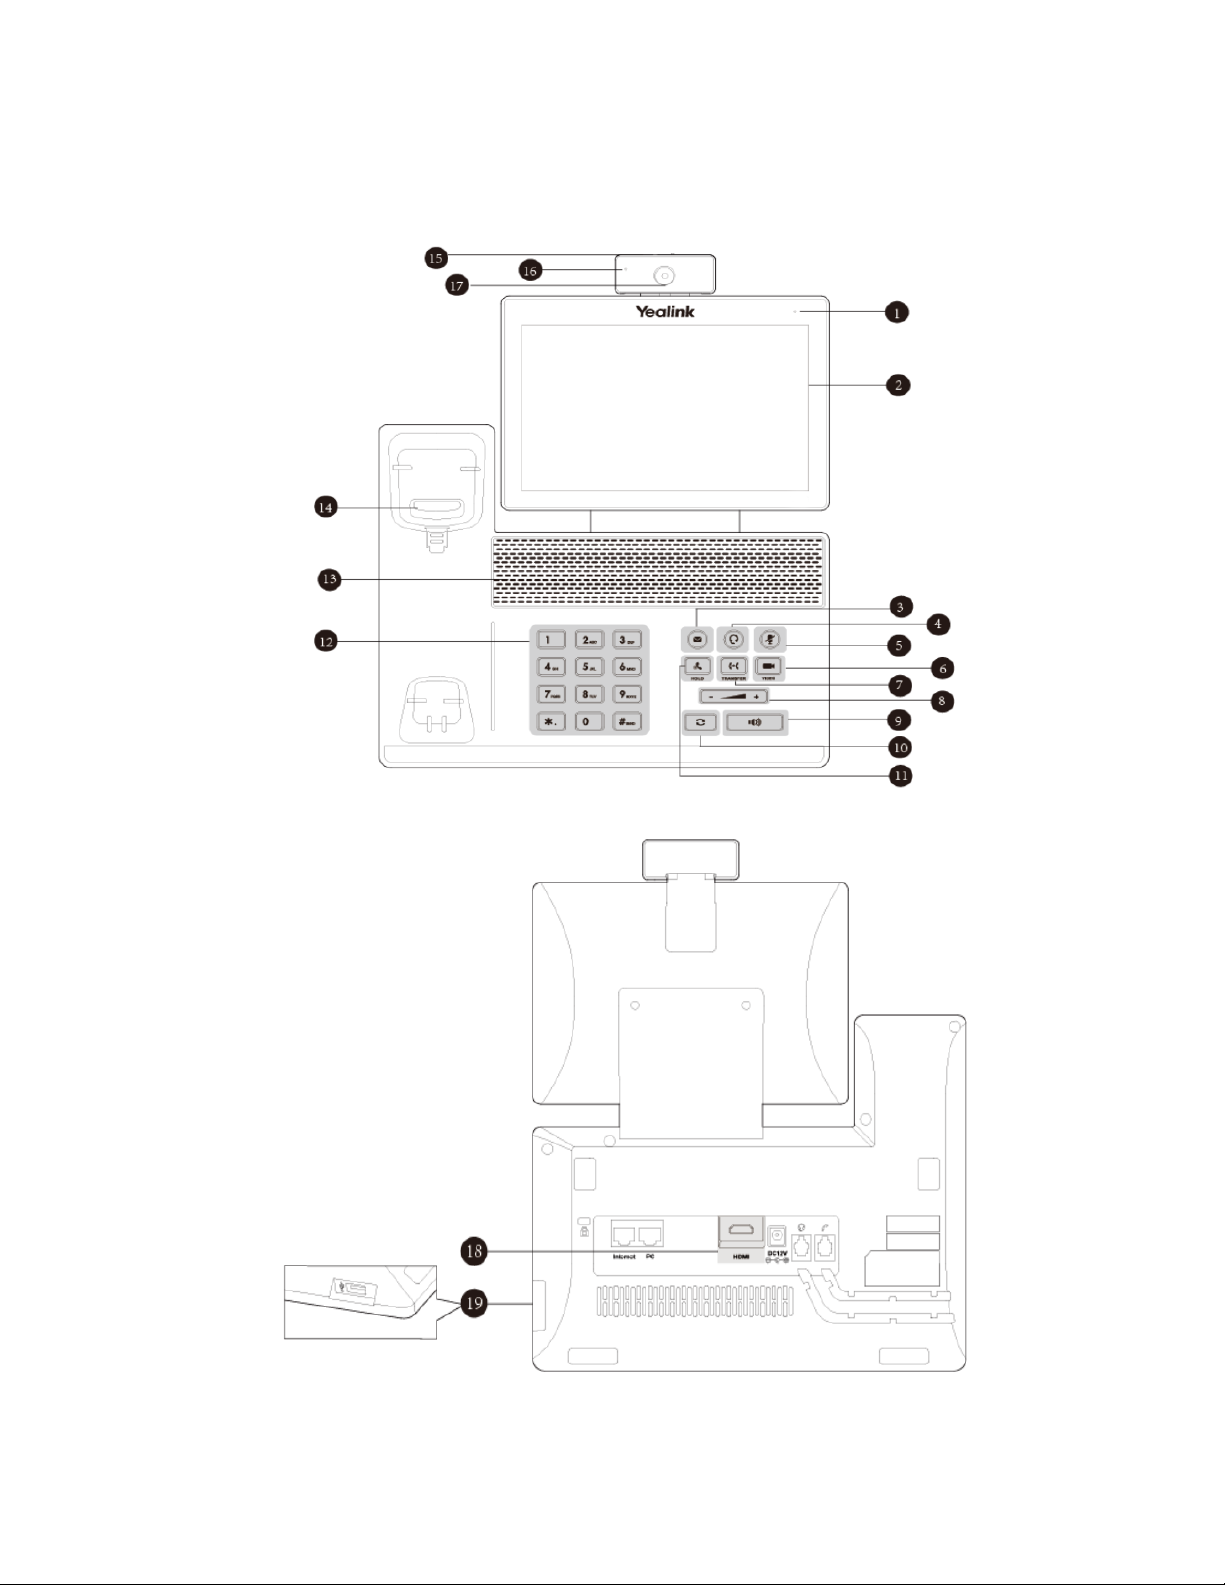
Hardware of VP59 Codec
You can use VP59 as a video phone on your desktop, you can also use it as a video conferencing device in
a small meeting room (20-30 square meters).
| Getting Started | 24

Name Description
| Getting Started | 25
1 Power Indicator
LED
2 Touch Screen Tap the screen and select the desired menu. Displays the time, the date, the
3 MESSAGE Key Not available.
4 HEADSET Key Toggles and indicates the headset mode. The key LED glows green when
5 Mute Key Toggles and indicates the mute feature. The key LED glows red when the call is
6 VIDEO Key
7 TRANSFER Key Not available.
8 Volume Key Adjusts the volume of the handset, the speakerphone, the earphone, ringer or
9 Speakerphone
Key
10 REDIAL Key Redials a previously dialed number.
11 HOLD Key Not available.
Indicates the call status and the system status.
call and other related information.
headset mode is activated.
muted.
• Allows you to preview local-site video when the phone is idle.
• Controls the transmission of video images during calls and conferences.
the media.
Toggles and indicates the hands-free (speakerphone) mode. When the handsfree (speakerphone) mode is activated: the key LED glows green
12 Keypad Use it to type in digits, letters and special characters.
13 Speaker Provides hands-free (speakerphone) audio output.
14 Hookswitch
15 Shutter Switch Covers or uncovers the camera. When the camera is switched off, the video
16 Camera
Indicator LED
17 Camera Lens Two mega-pixel camera. The optimal object distance should be from 0.35m (1
18 HDMI Connect to a monitor for displaying video images.
19 USB 2.0 Port Connect to a USB flash drive/WPP20/CPN10/USB to Line output.
• Picking up the handset from the handset cradle, the hookswitch bounces
and the phone connects to the line.
• Laying down the handset on the handset cradle, the phone disconnects from
the line.
image turns to be black.
Indicates the status of video call and camera:
• Receives a video call: flashing green
• The camera is inserted and detected successfully on the phone: green
foot) to 2m (6 feet).
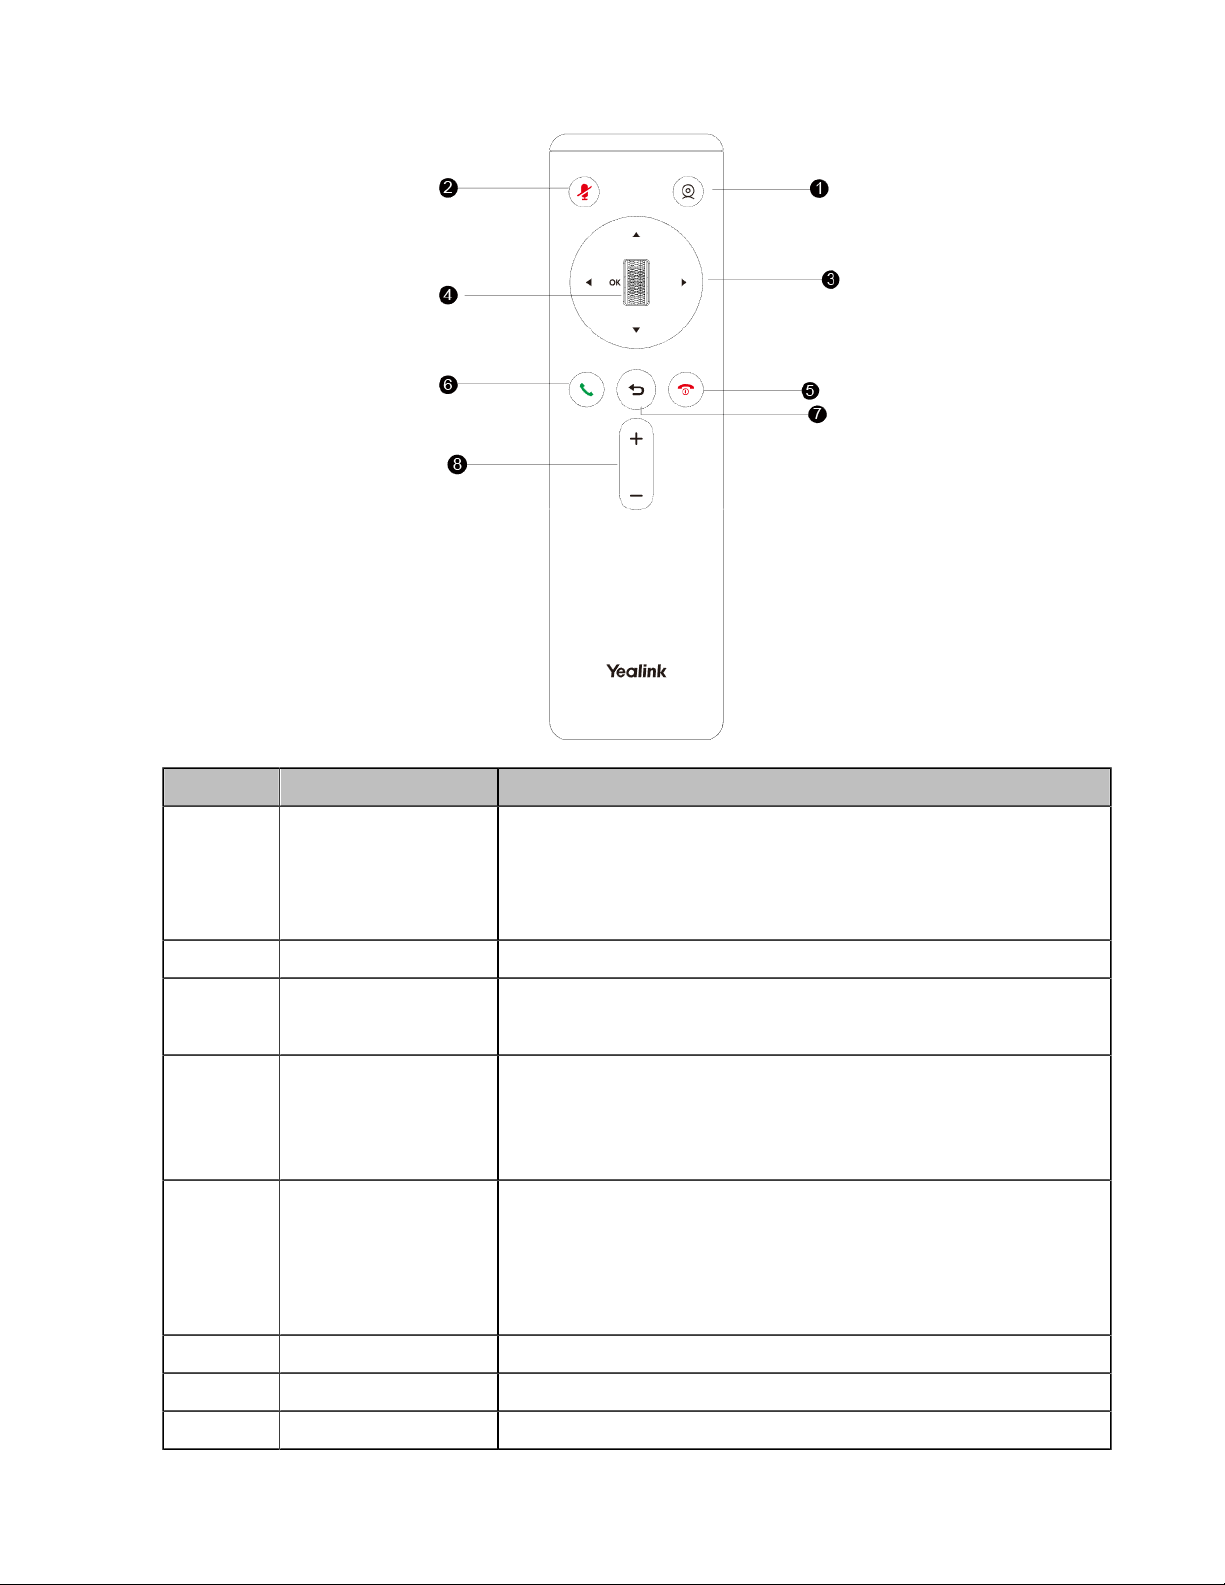
VCR20 Remote Control
The VCR20 remote control allows you to operate a video conferencing system, including placing calls,
adjusting EQ volume, controlling the camera, navigating screens, and more. The following table introduces
the keys on the remote control.
| Getting Started | 26
①
②
③
④
⑤
⑥
Name Description
Custom Key
Mute Key Mute or unmute the microphone
Navigation Key
Scroll Wheel (OK Key)
Hang up key
Answer key Go to the Pre-dialing screen, place a call or answer a call.
Customize the key function.
You can configure this key as the Presentation key (default), the
Tracking mode key, the ScreenShot key, the Mute Speaker key, or
Cameral Control key.
• Navigate through menu items.
• Pan and tilt the camera to adjust the viewing angle.
• Scroll up or down to the desired menu item. Press the key to go
to the sub-menu or confirm actions.
• Adjust the focal length of the camera: After selecting the video,
scroll up or down to zoom in/out the video image.
• End a call or exit the current conference.
• Return to the idle screen.
• Long press to shut down the system or put the system to sleep.
• Press it to power on the endpoint when the endpoint is shut
down but not powered off.
⑦
⑧
Back Key Return to the previous menu.
Volume Key Turn up/down the volume.
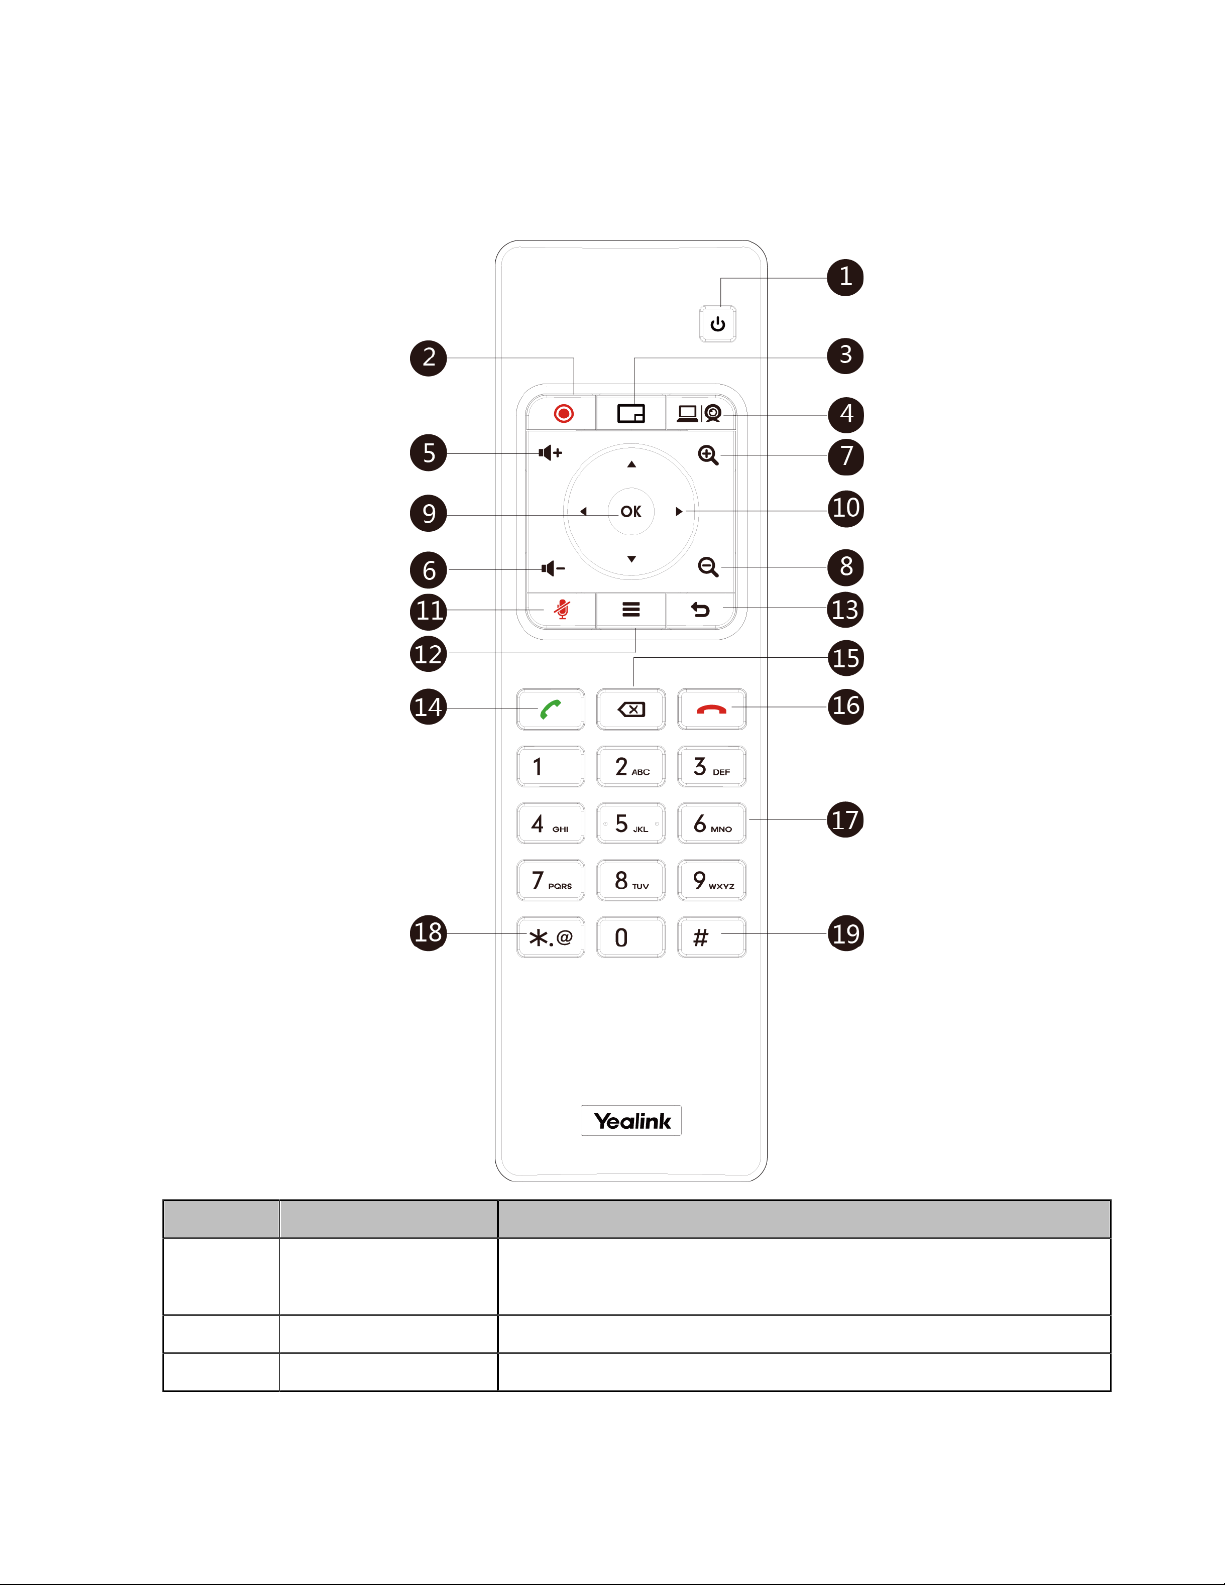
VCR11 Remote Control
The VCR11 remote control allows you to operate a video conferencing system, including placing calls,
adjusting EQ volume, controlling the camera, navigating screens, and more. The following table introduces
the keys on the remote control.
| Getting Started | 27
No. Name Description
1 Power Key
2 Video Recording Key Start or stop recording the video and audio.
3 Layout Key Adjust the layout during a video call.
• Power on or power off the endpoint.
• Put the endpoint to sleep or wake up the endpoint.

No. Name Description
| Getting Started | 28
4 Custom Key
5 Volume up key Increase the speaker volume.
6 Volume down key Turn down the speaker volume.
7 Zoom in key
8 Zoom out key
9 OK key Go the sub-menu, confirm actions or answer incoming calls.
10 Navigation Key
11 Mute Key Mute or unmute the microphone
12 Home key
Customize the key function.
You can configure this key as the Presentation key (default), the
Input key, the ScreenShot key, Mute Speaker key, or Preset key.
• Zoom the camera in.
• Zoom in the screenshot.
• Turn the page up.
• Zoom the camera out.
• Zoom out the screenshot.
• Turn the page down.
• Navigate through menu items.
• Pan and tilt the camera to adjust the viewing angle.
• Return to the idle screen when the endpoint is not in a call.
• Open the Talk Menu during a call.
13 Back key Return to the previous menu.
14 Off-hook Key Go to the Pre-dialing screen, place a call or answer a call.
15 Delete Key
16 On-hook Key
17 Keypad
18 Character Key Enter the special characters: .@*.
19 Pound key Enter the pound key (#).
Related information
Using the Remote Control
• Delete the text. Delete one character at a time. Long press to
delete all characters in the input field.
• One press to capture packets. When the device is connected
to the USB flash drive, long press it for 2 seconds to start
capturing packets and long press it for 2 seconds again to stop
capturing packets.
• End a call or exit the current conference.
• Return to the idle screen.
• Enter digits.
• Go to the pre-dialing screen.
VCC22 video conferencing camera
VCC22 is a video conferencing camera for VC880/VC800/PVT980. It adopts 12x optical zoom lens,
supports 1080P/60 frame full HD video, has OSMO and PTZ function, and possesses professional video
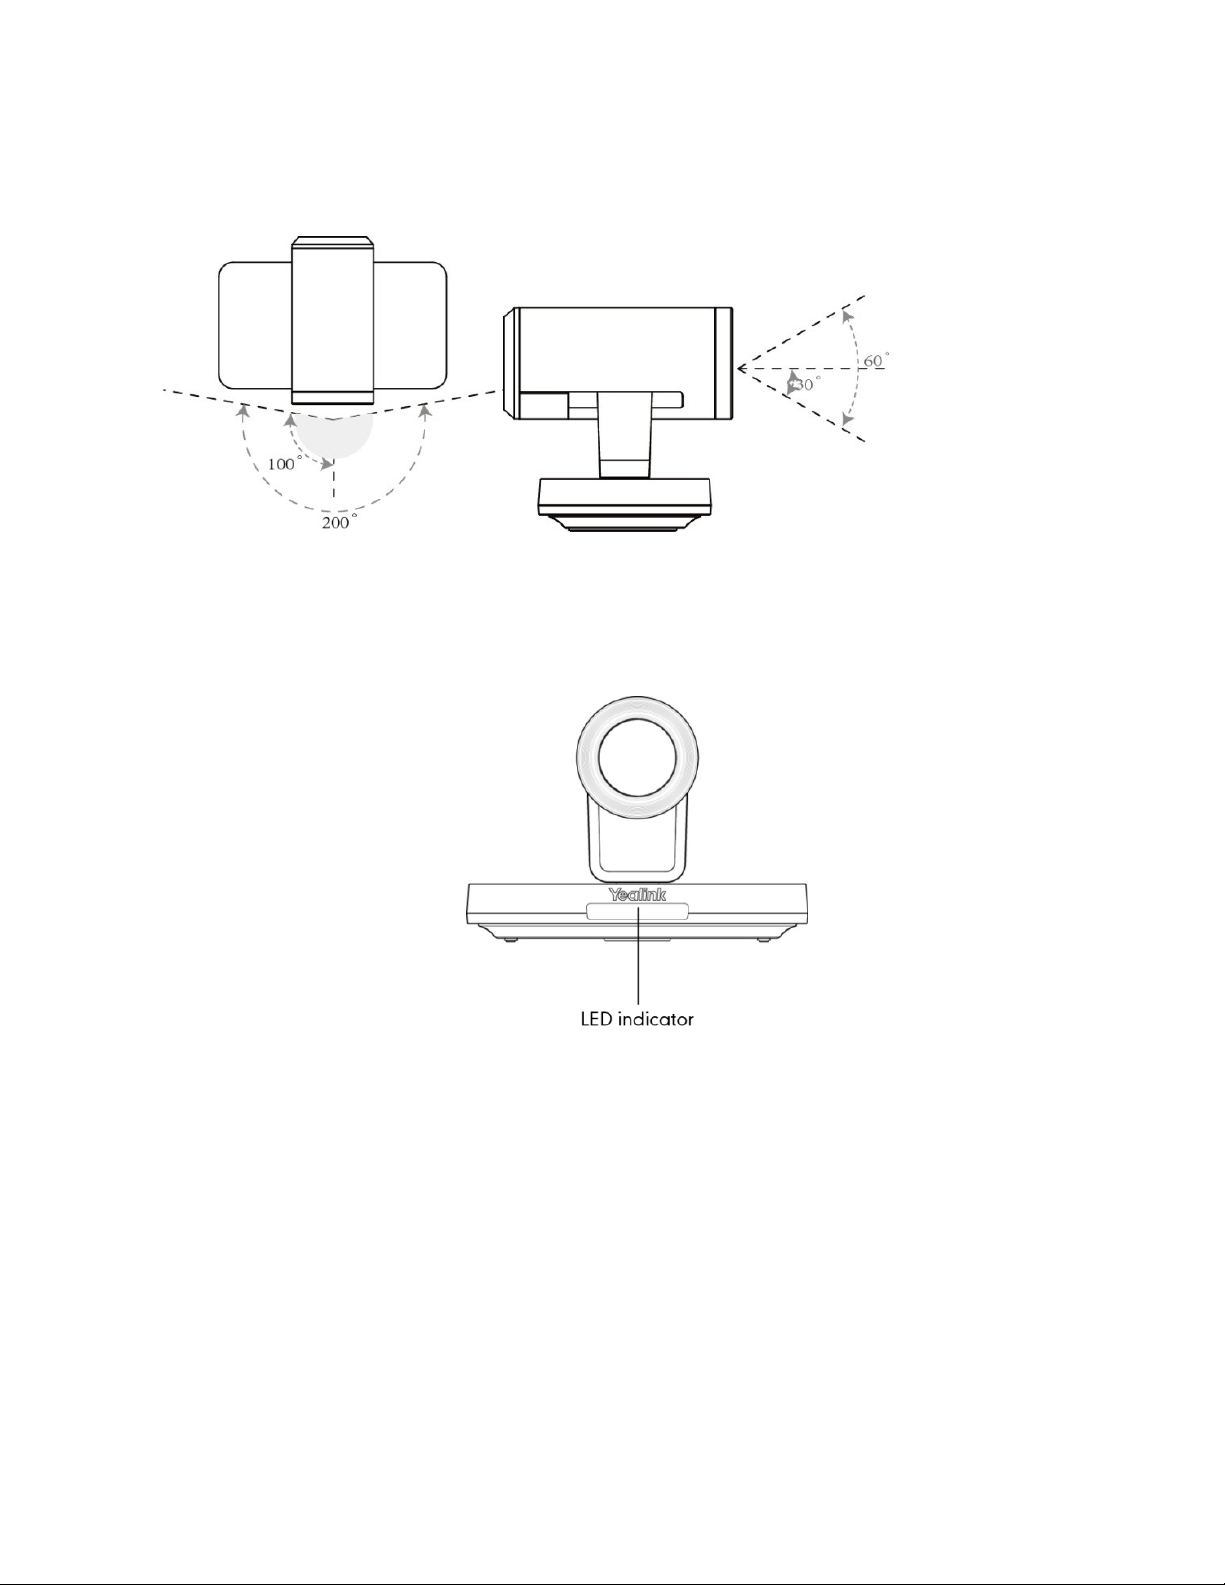
| Getting Started | 29
quality and environmental adaptability. You can connect up to 9 VCC22 video conferencing cameras to the
VC880/PVT980 video conferencing system, and 8 to VC800 video conferencing system.
The VCC22 camera can be panned (± 100 degrees range), tilted (± 30 degrees range) and supports 12 x
optical zoom, white balance and automatic gain.
• Front Panel of VCC22 Video Conferencing Camera
• Rear Panel of VCC22 Video Conferencing Camera
Front Panel of VCC22 Video Conferencing Camera
The LED indicator in front of the camera indicates different camera status.
Related information
LED Instructions of VCC22 Video Conferencing Camera
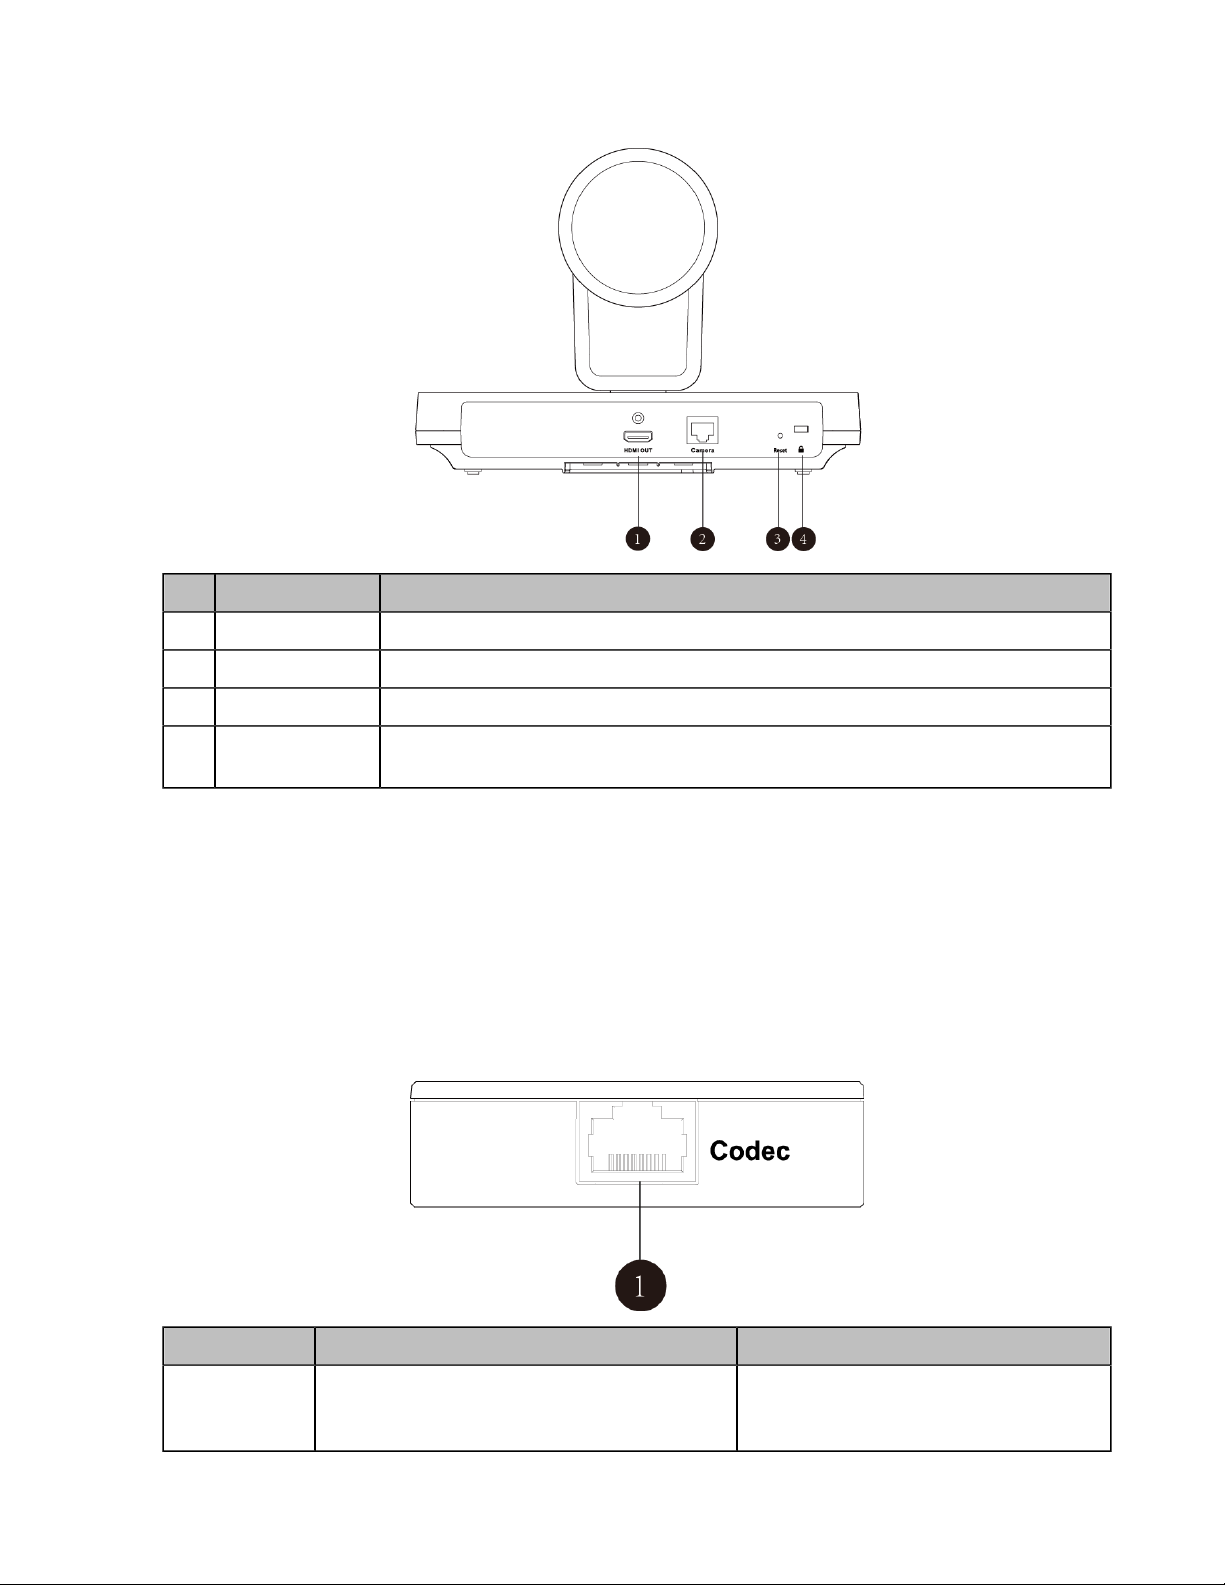
Rear Panel of VCC22 Video Conferencing Camera
Port Name Description
| Getting Started | 30
1 HDMI Out Connect to a monitor for displaying shared content.
2 Camera Port Connect to a PoE switch.
3 Reset Key Reset the camera to factory defaults.
4 Security Slot Allow you to connect a universal security cable to VCC22, so you can lock it
down. The camera cannot be removed when locked.
Hardware of VCH50 Video Conferencing Hub
You can connect VCH50 to the computer for presenting. If you want to connect a PC to your system using
Ethernet cable, you need to connect the VCH50 video conferencing hub to your system. Connecting
VCH50 to the computer for presenting is not applicable to VP59.
• Left Side of VCH50 Cable Hub
• Right Side of VCH50 Cable Hub
• Rear Panel of VCH50 Cable Hub
Left Side of VCH50 Cable Hub
Port Name Description
1 Codec Connect to the video conferencing
system via the provided 7.5m network
cable.
 Loading...