

Page 1

PERSONAL ELECTRONIC PIANO
YPP-15
Owner's Manual
Page 2

FCC INFORMATION
7. IMPORTANT NOTICE: DO NOT MODIFY THIS UNIT!
This product, when installed as indicated in the instructions
contained in this manual, meets FCC requirements.
Modifications not expressly approved by Yamaha may void your
authority, granted by the FCC, to use the product
2. IMPORTANT: When connecting this product to accessories and/
or another product use only high quality shielded cables. Cable/s
supplied with this product MUST be used. Follow all installation
instructions. Failure to follow instructions could void your FCC
authorization to use this product in the USA.
3. NOTE: This product has been tested and found to comply with
the requirements listed in FCC Regulations, Part 15 for Class “B”
digital devices. Compliance with these requirements provides a
reasonable level of assurance that your use of this product in a
residential environment will not result in harmful interference with
other electronic devices. This equipment generates/uses radio
frequencies and, if not installed and used according to the
instructions found in the users manual, may cause interference
harmful to the operation of other electronic devices. Compliance
with FCC regulations does not guarantee that interference will
not occur in all installations. If this product is found to be the
source of interference, which can be determined by turning the
unit “OFF” and “ON”, please try to eliminate the problem by using
one of the following measures:
Relocate either this product or the device that is being affected by
the interference.
Utilize power outlets that are on different branch (circuit breaker or
fuse) circuits or install AC line filter/s.
In the case of radio or TV interference, relocate/reorient the antenna.
If the antenna lead-in is 300 ohm ribbon lead, change the lead-in to
co-axial type cable.
If these corrective measures do not produce satisfactory results,
please contact the local retailer authorized to distribute this type of
product. If you can not locate the appropriate retailer, please contact
Yamaha Corporation of America, Electronic Service Division, 6600
Orangethorpe Ave, Buena Park, CA 90620.
The above statements apply ONLY to those products distributed by
Yamaha Corporation of America or its subsidiaries.
Wichtiger Hinweis für die Benutzung in der Bundesrepublik
Deutschland.
Bescheinigung des Importeurs
Hiermit wird bescheinigt, daß der/die/das
Typ: YPP-15
(Gerät, Typ, Bezeichnung)
in Übereinstimmung mit den Bestimmungen der
VERFÜGUNG 1046/84
(Amtsblattverfügung)
funk-entstört ist.
Der Deutschen Bundespost wurde das Inverkehrbringen dieses
Gerätes angezeigt und die Berechtigung zur Überprüfung der Serie
auf Einhaltung der Bestimmungen eingeräumt.
Yamaha Europa GmbH
Name des Importeurs
This applies only to products distributed by YAMAHA Europe GmbH.
Dies bezieht sich nur auf die von der YAMAHA EUROPA GmbH vertriebenen Produkte,
Ceci ne s’applique qu'aux produits distributbs Yamaha Europe GmbH.
Esto se apitca solamente a productos distribuidos por Yamaha Europa GmbH,
CANADA
This digital apparatus does not exceed the “CLASS B” limits for radio
noise emissions from digital apparatus set out in the radio
interference regulation of the Canadian Department of
Communications.
Le present appareil numérique n’émet pas de bruits radioélectriques
dépassant les limites applicables aux appareils numériques de la
“CLASS B” prescrites dans le règlement sur le brouillage
radioélectrique édicte par le ministère des communications du
Canada.
This applies only to products distributed by Yamaha Corporation of America,
Dies bezieht sich nur auf die von der YAMAHA CORPORATiON OF AMERiCA vetriebenen
Produkte.
Ceci ne s'applique qu’aux produits distributés par Yamaha Corporation of America.
Esta se apiica solamente a productos distribuidos por Yamaha Corporation of America.
* This applies only to products distributed by YAMAHA Canada Music Ltd.
* Dies bezieht sich nur auf die von der YAMAHA Canada Music Ltd. vertriebenen Produkte.
* Ceci ne s'applique qu’aux produits distributes par Yamaha Canada Music Ltd.
* Esto se apiica solamente a productos distribuidos por Yamaha Canada Music Ltd,
Page 3

Congratulations, and thank you for buying the YAMAHA YPP-15. We are sure you will be
pleased with the natural sound and easy operation of this keyboard. Features include AWM
technology (for a clear, realistic sound), five different voices, touch-sensitive keys and much
more. Please read this manual to learn how to best use and enjoy your new instrument. We
wish you many years of musical pleasure with your YPP-15.
CONTENTS
1. BEFORE PLAYING
A. Power Supply.....................................................................................2
B. Setting the Music Stand
C. Using the Foot Switch
D. Using Headphones.............................................................................3
E. Connecting YPP-15 to another Audio System
...................................................................
.....................................................................
........................................................................
...................................
2. PLAYING.....................................................................................4
A. Basic Playing Operation.....................................................................4
B. Demonstration Play............................................................................5
3. PLAYING TIPS & FEATURES
A. Touch Sensitivity
B. Using the Metronome.........................................................................6
C. Transposition......................................................................................6
D. Fine Tuning........................................................................................7
................................................................................
................................................
4. MIDI..............................................................................................8
A. What is MIDI?.....................................................................................8
B. Types of MIDI Information..................................................................8
C. MIDI Channel
D. Applications......................................................................................10
...................................................................................
10
2
2
2
3
6
6
MAINTENANCE...........................................................................14
TROUBLESHOOTING.................................................................14
SPECIFICATIONS........................................................................15
MIDI IMPLEMENTATION CHART
.........................................
16
Page 4
1. BEFORE PLAYING
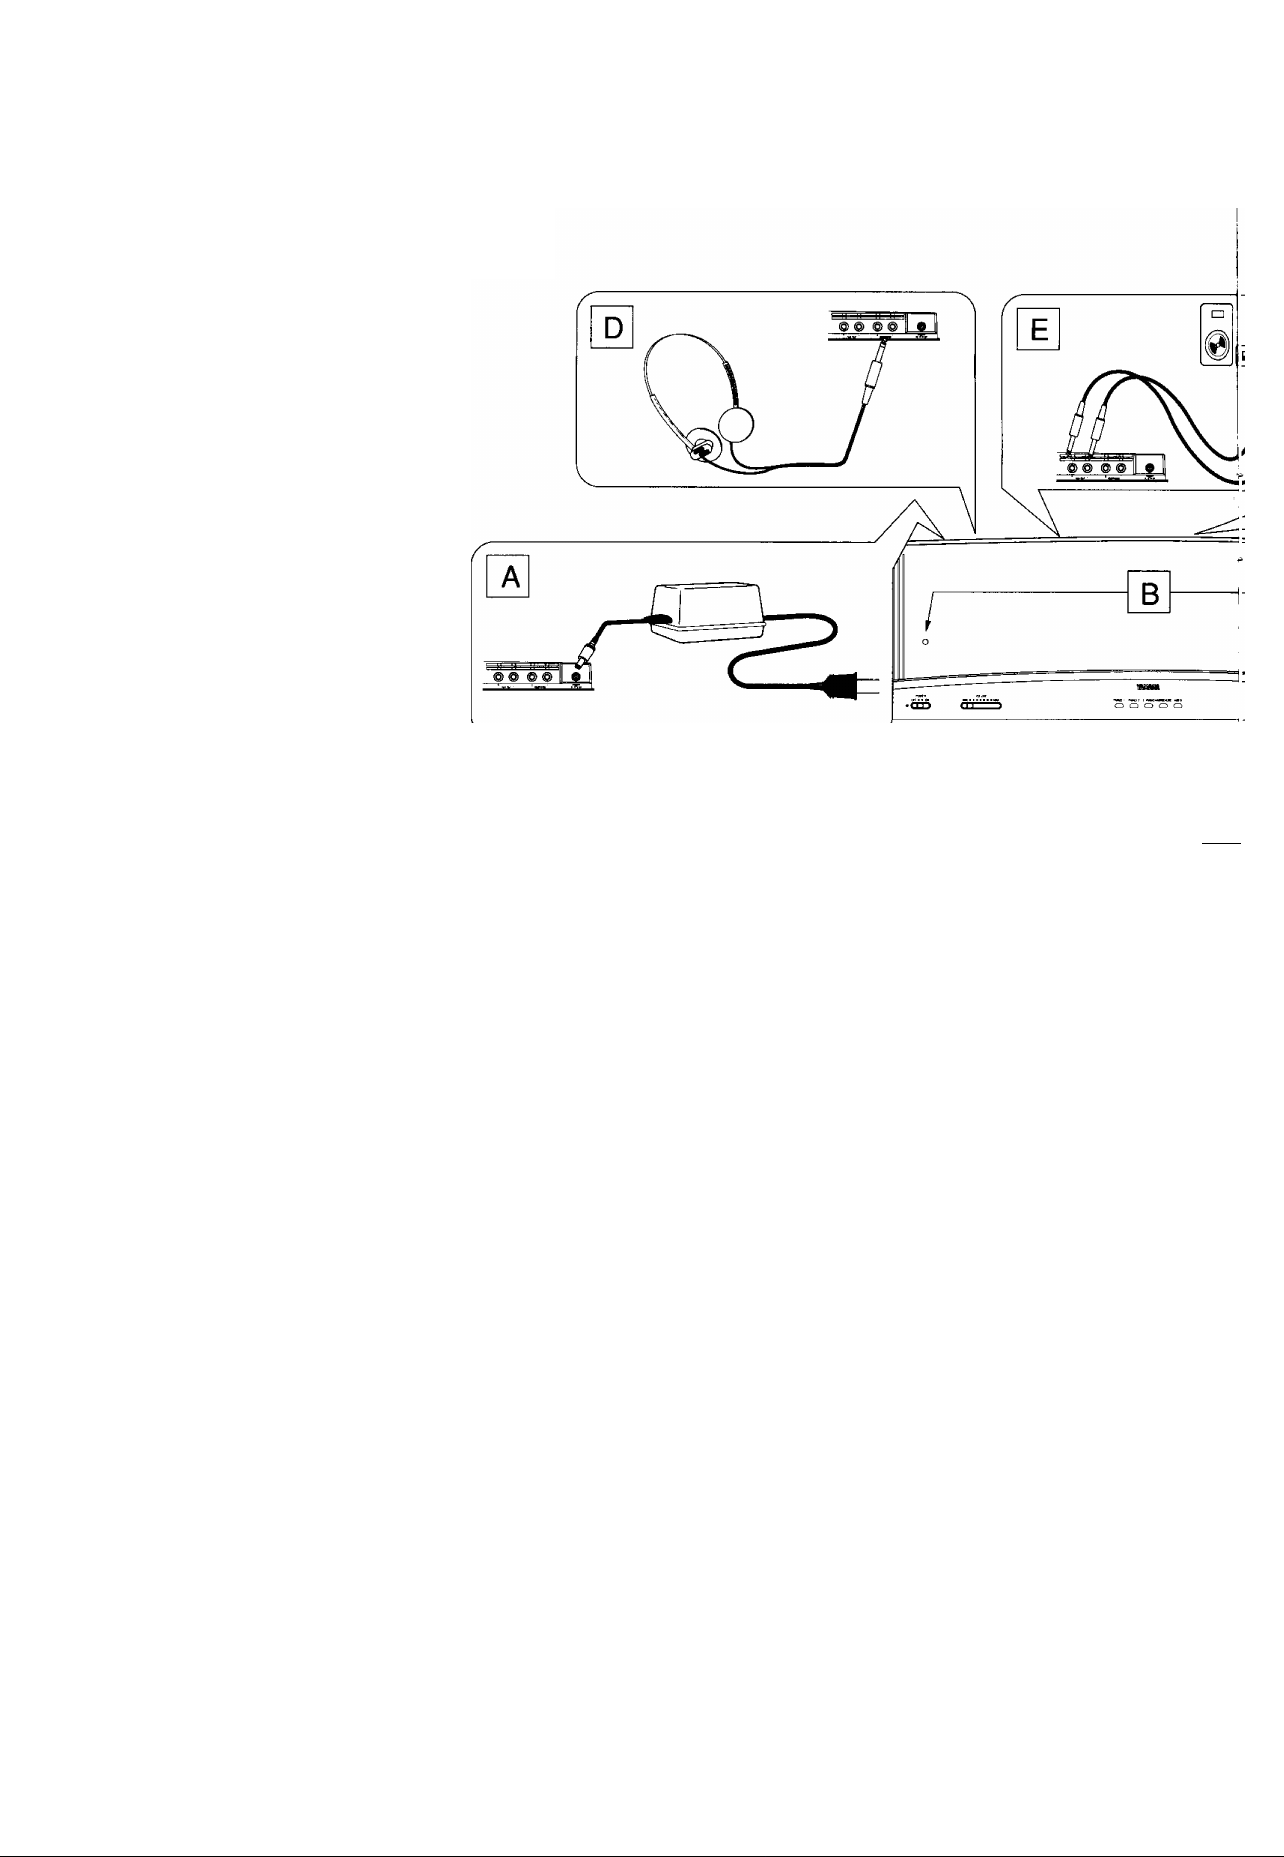
A. Power Supply
The YPP-15 can be used with batteries or a
power adaptor connected to AC current.
1) Using Batteries
Remove the Battery Compartment Cover
on the underside of the keyboard. Insert 6
batteries (1.5V SUM-1, D-cells, or R20) into
the compartment, making sure their direc
tion (+/-) is correct. Replace the cover.
* Change all batteries at the same time.
* Use only the batteries listed above. Do not
use Ni-Cd or other kinds of batteries.
* Remove the batteries if the YPP-15 is not
going to be used for a long time.
2) Using AC Power
You will need a supplied YAMAHA PA-3
power adaptor. Make sure the YPP-15 is
turned off. Connect the adaptor to the DC
IN 10-12V jack on the rear panel. Please
note that YAMAHA will not be held re
sponsible for any problems caused by us
ing other, unauthorized adaptors.
mmm
B. Setting the Music Stand
Insert both ends of the supplied Music Stand
into the 2 hoies iocated on the front panei
next to the speakers.
C. Using the Foot Switch
Connect the supplied foot switch to the
DAMPER jack on the rear panel. If you
depress the Foot Switch while playing, you
can sustain the sound.
Page 5
CD
0
J
E. Connecting YPP-15 to
D. Using Headphones
There are 2 HEADPHONES jacks on the
rear panel of the YPP-15. Connecting your
headphones to the HEADPHONES jack(s)
turns off the speakers, so 1 or 2 people can
practise and listen without disturbing any
body else.
another Audio System
If you want more volume, connect the L/R
AUX. OUT jacks of the YPP-15, using
suitable cables, to the inputs of a stereo,
keyboard amplifiers or a similar device. If
the device is monoaural, use the Left (L)
AUX. OUT jack of the YPP-15.
Page 6

2. PLAYING
OQ
e
f
niMHnil
A. Basic Playing Operation
1) Power
When all the necessary connections have
been made, turn on the POWER switch (1).
2) Volume
Adjust the volume with the VOLUME slider
(2). This slider controls the speakers’ and
headphones’ volume, as well as the output
level of the AUX. OUT Jacks.
3) Selecting Voices
Select the sound you wish to play by pressing
one of the 5 Voice Select buttons (3).
When the YPP-15 is first turned on, PIAN01
is automatically selected.
4) Playing
Normally you can play up to 16 notes si
multaneously except for PIANO 2 which
can be played up to 14 notes at a time.
While depressing the foot switch connected
to the DAMPER jack, you can play up to 28
notes with any voice.
The tone of some voices may change slightly
at one or more points on the Keyboard. This
is due to the way in which the voice wave
forms were initially sampled and is normal.
Page 7

o o o o o
B. Demonstration Play
1) Listening to the Demonstration
The YPP-15 has a demonstration song for
each voice. Press the yellow DEMON
STRATION button (4), and the demonstra
tion song for each voice will be played in
order from PIANO 1 to VIBES. This se
quence is repeated indefinitely.
* During demonstration piay, the Metronome
function wiii not be avaiiabie.
* The demonstration songs are not output as
MIDi performance messages (See section 4,
MiDi).
2) Stopping the Demonstration
To stop the performance, press the DEM
ONSTRATION button again.
3) Playing Individual Demonstration
Songs
If you wish to play the Demonstration Songs
individually, first press the DEMONSTRA
TION button. While holding it down, press
one of the Voice Select buttons. The song
corresponding to the selected voice will be
played once. If you wish to stop the per
formance, press the DEMONSTRATION
button again.
Page 8

3. PLAYING TIPS & FEATURES
A. Touch Sensitivity
The YPP-15 is Touch Sensitive, which
means that the sound changes according
to the player’s touch. If you play harder, the
attack (initial phase of the sound) changes,
and the notes sound louder. There are 3
levels of touch resopnse, soft, medium and
loud. To adjust the sensitivity range, press
and hold the B5 and C6 keys, then press one
of Voice Select buttons PIAN01 (Range 1),
PIANO 2 (Range 2), E. PIANO (Range 3).
* When the YPP-15 is turned on, the sensitivity
range 2 is automaticaliy selected.
We recommend that you practise fine-tuning
your touch on the YPP-15, so as to achieve
maximum dynamic control and musical ex
pression.
B. Using the Metronome
To activate the metronome, press the M ET-
RONOME button (5). The initial tempo,
after the instrument has been turned on, is
always 120 beats per minute. The two
TEMPO buttons (6) are used to adjust the
tempo. To increase the tempo, press the
TEMPO A button, and hold it down until the
desired speed is reached. To decrease the
tempo, follow the same procedure with the
TEMPO T button. Pressing both TEMPO
buttons at the same time brings the tempo
back to 120. The range of the Metronome
is from 40 to 280 beats per minute. To turn
off the metronome, press the METRONOME
button again.
You can use the metronome to tighten your
playing, rhythmically, orto practise a musical
selection at different speeds.
C. TVansposition
The overall pitch of the YPP-15 can be
transposed up or down as far as 6 semitones.
Transposition occurs in 100 cent (1
semitone) steps.
You can use the Transposition function to
play a passage of music in several different
keys, without actually changing the notes
you play. Similarly, if you have to do some
playing (for instance, accompanying or
improvising) in a difficult key, you can
transpose the YPP-15 to that key, so that
the played C major scale (i.e. the white
notes) will sound like a scale in that key.
1) Raising the Pitch
To raise the overall pitch of the YPP-15,
press the MIDI/TRANSPOSE button (7).
While holding it down press one of the C*5
to F*5 keys (shown in the Front Panel Dia
gram).
PRESSED KEY
TRANSPOSED KEY
(i.e. actual pitch
of played C)
ds D5 D#5 E5 F5
d D d E F F#
Page 9

0 ©o
2) Lowering the Pitch
To lower the overall pitch of the YPP-15,
press the MIDI/TRANSPOSE button. While
holding it down, press one of the F*4 to B4
keys (Shown in the Front Panel Diagram).
PRESSED KEY
TRANSPOSED KEY
(i.e. actual pitch
of played C)
3) Returning to the Standard Pitch
To bring the YPP-15 back to the standard
pitch (Key of C), press the MIDI/TRANS
POSE button, and while holding it down,
press the C5 key. Or, you can turn off the
POWER switch, then turn it on again after a
few seconds.
F»4
F«
G4
G
Gk
G«
A4
D. Fine Tuning
This function is very useful if you are playing
in a band or other ensemble. It allows you
to tune your instrument with the others. The
YPP-15 can be fine-tuned up or down up to
a quarter tone (+/-50 cents). You can also
use the Fine Tuning function in conjunction
with the Transposition function, in either
order.
1) Raising the Pitch
While holding down both the Cl and D1
keys, press any one of the C3 to B3 keys.
Each time a key is pressed, the pitch will be
raised, up to a maximum of 50 cents.
2) Lowering the Pitch
While holding down both the Cl and C*1
Ak
A
A^
B4
B
keys, press any one of the C3 to B3 keys.
Each time a key is pressed, the pitch will be
lowered, up to a maximum of 50 cents.
3) Returning to the Standard Pitch
While holding down the Cl, C*1 andDI keys
simultaneously, press any one of the C3 to
B3 keys. Or, you can turn off the POWER
switch, then turn it on again after a few
seconds.
Page 10

4. MIDI
A. What is MIDI?
The YPP-15 is MIDI-equipped keyboard. MIDI
(Musical Instrument Digital Interface) is a worldwide
standard for communicating performance informa
tion between electronic musical instruments. With
MIDI, the YPP-15 can control, and be controlled by,
other MIDI-equipped instruments, such as synthe
sizers, sequencers and drum machines.
Note: If you connect more than two instruments, the
third instrument becomes the second Slave. To do
this, make an additional One-Way connection from
the MIDI-THRU jack of the first Slave to the MIDI-IN
jack of the second Slave:
DIAGRAM
In asimple MIDI setup between two instruments, the
instrument which is controlling is called the Master,
and the instrument being controlled is called the
Slave (Diagram A). You can also set up the two
instruments so that they control each other, i.e. both
machines are simultaneously Masters and Slaves
(Diagram B). To connect the YPP-15 to another
MIDI-equipped instrument, use the MIDI-IN or MIDIOUT jacks on the rear panel, and join the instruments
as shown in Diagram A or B.
DIAGRAM
A
DIAGRAM
B
Diagram A depicts a “One-Way” connection, and
Diagram B depicts a “Hand-Shaking” connection.
All the following MIDI explanations will relate to
these terms, as well as to the terms Master and
Slave. So please be clear about all of these concepts
before proceeding.
At this time, the first Slave simply transmits, from its
MIDI-THRU jack, the information received at its
MIDI-IN jack. In this way, a Master can control two
Slaves simultaneously.
Note: that some MIDI instruments, such as the
YPP-15, are not equipped with a MIDI-THRU jack,
so are best used as the final Slave in a MIDI chain.
* Although MIDI Is a uniform standard, different instru
ments may have different specifications. Making the
MIDI connection Is not enough. The MIDI instruments or
devices must also have the same MIDI functions. If you
wish to know about the MIDI functions of a device, refer
to its MIDI Implementation Chart. The MIDI Implemen
tation Chart for the YPP-15 is on the last page of this
manual.
. Types of MIDI Informa
tion
What kind of information is communicated by MIDI?
The most universal is information about the notes
being performed (or played back) from the Master.
This is called “Note On” message, which includes
information about the key being depressed (trans
mitted as MIDI note number), and, in the case of
touch sensitive instruments such as the YPP-15, the
velocity (speed) of depression (transmitted as ve
locity data). For instance, when the YPP-15 is set up
as a Master, playing something on it will activate the
sound module of the Slave, and you will hear,
simultaneously, the voices of both instruments as
you play. If your Slave instrument is equipped to
receive the velocity data, the volume, timbre of its
voice will also vary according to your performance.
In addition to Note On information, the YPP-15 is
also equipped to deal with Program Change and
Control Change messages.
Page 11

1) Program Change Message
Program Change message is used to change voices
on a Slave instrument. For instance, with the YPP-
15 set up as a Master, if you select one of its voices,
a Program Change message (including MIDI Pro
gram Number) will be transmitted to the Slave. If the
Slave has the MIDI capabilities to receive this
message, its own voice will be changed according to
the MIDI Program Number it has received. Con
versely, when the YPP-15 is the Slave, it can receive
the message and will automatically select its voice
according to the MIDI Program Number from the
Master.
The following chart shows the relation between
YPP-15 voices and MIDI Program Numbers.
MIDI Program
Number
OOH
01H
02H
03H
04H
YPP-15 Voice/Volce
Select Button
PIANO 1
PIANO 2
E. PIANO
HARPSICHORD
VIBES
YPP-15 Control Change Message Reception Capabilities
MIDI Control
Number
64
122
123
124 Omni Off (*3) 0
125
(*1) Local On/Off: Upon reception of a Local Off
message, the YPP-15’s keyboard will be separated
from its internal sound module. See “Example 3” on
page 11 for details.
(*2) All Notes Off: As soon as the YPP-15 receives
this instruction, all of its notes sounding at that time
will be muted.
(*3) Omni Off/On: See the following section, “MIDI
Channels”, for details.
Name Value
Damper
Local On/Off (*1)
0-63:Off, 64-127:On
0: Off, 1-127: On
All Notes Off (*2)
Omni On (*3)
0
0
* This relation appiies to both transmission and reception.
MIDI program numbers other than those in the chart
cannot be transmitted or received.
Cancelling Program Change Message
Program Change message is automatically avail
able when the YPP-15 is turned on. Though it is a
very useful feature, you may sometimes run into a
situation where you wish to cancel it. To cancel
Program Change message, while holding down the
MIDI/TRANSPOSE button, press the Voice Select
button PIANO 2. To reactivate this message, repeat
the same procedure.
2) Control Change Message
Control Change message deals with various as
pects of the played sound. For instance, when
you’re using the YPP-15 as a Master and depress
the foot switch, a Control Change message (includ
ing MIDI Control Number and a Damper value) will
be transmitted to the Slave, so that the the Slave’s
sound will also be sustained (unless it cannot receive
the message). If the VPP-^5 is the Slave, it will
receive Control Change message instructions from
the Master.
Cancelling Control Change Message
Normally, Control Change message is automati
cally available when the YPP-15 is turned on. But
you may wish to create a situation where, for example,
the Slave YPP-15 sounds are not sustained in
tandem with the Master sounds. To cancel the
Control Change message, while holding down the
MIDI/TRANSPOSE button, press the Voice Select
button E. PIANO. To reactivate this message,
repeat the same procedure.
The above-described Note On, Program Change,
and Control Change messages are known as MIDI
channel information. That is, these messages are
communicated through MIDI channels. Sowhatare
MIDI channels? The next section addresses this
question.
The YPP-15, as a Master, can transmit only Damper
information (MIDI Control Number 64 in the follow
ing chart) As a Slave, however, it can receive a lot
more information, as shown in the chart above:
Page 12

C. MIDI Channels
There are 16 MIDI channels (1-16). Unless MIDI
instruments are set to the same MIDI channel, they
cannot communicate MIDI channel information (Note
On, Program Change, Control Change, etc.), even
if the cables are connected properly. MIDI channels
can be likened to television channels, i.e. information
from several TV stations is transmitted through the
air, so to receive the desired program, you have to
select one channel on your TV set.
When the YPP-15 is turned on, both its transmitting
and receiving MIDI channels are setto 1. If required,
these channels can be reset.
1) Setting a MIDI Transmitting Channei
While holding down the MIDI/TRANSPOSE button,
press one of 16 keys from Cl to D^*2 according to the
table below.
Key
Cl C't
D'i F 1
Channel
2) Setting a MiDI Receiving Channel
While holding down the MIDI/TRANSPOSE button,
press one of 16 keys from C3 to D^*4 according to the
table below.
A’i
10
12Ca13
c'=
D2150*2
16
>. Applications
The following three examples show how several of
the YPP-15’s MIDI functions can be applied in
specific setups. In order to make best use of MIDI,
it is important to determine which instruments are
most effective as Masters or as Slaves. This will
depend on the individual situation. Consulting the
MIDI implementation chart of each instrument in
your setup will help you to decide in each case. If
one instrument has more transmission capabilities
than the other(s), it will generally be better suited as
the Master. Conversely, instruments with more
recognition capabilities will be better Slaves.
Example 1: Using the YPP-15 with another key
board or sound module
If you are a MIDI rookie, first, make a Hand-Shaking
connection between the two MIDI keyboards. After
matching the transmitting and receiving MIDI
channels (in both directions), you can use either
instrumentas Master or Slave. Whichever keyboard
you play, you will hear the sounds of both instruments.
In addition, the Slave will duplicate the Master’s
sustain, etc., as long as it is equipped to receive MIDI
messages such as Program Change, Control
Change, and so on.
* Practising with a Hand-Shaking connection is a good
way to learn which instrument will make the better
Master or Slave in a One-Way connection.
Key
Channel
C3
c'a Da D'a Ea Fa
12345 678
F'j G3 gS A3
g 10
A’s Ba C4
11
C'4 D4 D'4
12 13 14 15 16
3) Omni On Mode
If required, the YPP-15 can be set to receive infor
mation on all MIDI channels (1-16). This mode is
called “Omni On”. To set the YPP-15 to this mode,
while holding down the MIDI/TRANSPOSE button,
press the E4 key. To get out of this mode, either
select a specific receiving channel, or turn off the
YPP-15, then turn it on again after a few seconds.
Note: If you have several Slaves, all set to OMNI
Mode, they will all receive the same instructions, and
therefore play the same music. To achieve individual
control of the Slaves, that is, to get each one to
respond to different instructions and play its own
part in an ensemble, you must set the Slaves’ MIDI
receiving channels individually. When a specific
channel is selected, it means the instrument is in
OMNI OFF Mode.
* If you’re connecting the YPP-15 to a MIDI sound module,
the latter is best used as a Slave in a One-Way connec
tion.
DIAGRAMS
OUT
\ IN
OUT
i
IN
JiL III
p
!l!ll!l!!l
llinilillillli
YPP-15
YPP-15
10
Page 13

Example 2:
chine
Using the YPP-15 with a drum ma-
Examples: Using the YPP-15 with a sequencer
(and other keyboards)
If you have a MIDI-compatible rhythm/drum ma
chine, use It as a Slave of the YPP-15. After
matching MIDI channels, play the YPP-15 key
board. Now you can have various percussion sounds
at your fingertips. Playing a key on the YPP-15 will
transmit a specific MIDI Note Number to the drum
machine, which reproduces the percussion sound
corresponding to it.
Here’s another idea: If your drum machine includes
a melody instrument such as bass or vibraphone,
you can access this sound from the YPP-15. First,
look up the MIDI receiving channel assigned for
controlling the sound. Then, set both instruments to
this channel. You can now play the drum machine’s
melody instrument sound from the YPP-15. If you
wish, you can accompany your performance with a
rhythmic pattern (start/stopped locally on the drum
machine). Yourentire performance can be input into
the drum machine as rhythm data.
DIAGRAM
Knowing how to use the YPP-15 effectively with a
sequencer makes you a MIDI pro!
After you’ve recorded all the parts of your perfor
mance on the sequencer, you’ll want to play back
your ensemble, with each part matched (via MIDI
channels) to the appropriate instrument or sound
module. Say you’ve recorded a two-part ensemble,
cello and flute, on MIDI channels 1 and 2, each
channel matched to a separate instrument or sound
module in your MIDI system (instruments A and B in
the Diagram below). When you play back the
ensemble, you may wish to experiment with the
sounds. Here’s one thing you can try: put the YPP-
15 (one of the Slaves in your setup) in OMNI ON
Mode, and select the voice you wish, say PIANO 1.
Thus, the YPP-15 will receive performance data in
both of MIDI channels 1 and 2, and so will play back
both parts in PIAN01 voice, as a complement to the
cello and flute sounds from instruments A and B.
Another use of OMNI ON Mode is for checking the
contents of an unlabelled performance data disk whose
MIDI channels are unspecified. After loading the data
into the sequencer, transmit it from the sequencer to the
YPP-15 in OMNI ON Mode. Regardless of the MIDI
channels to which the data was assigned, the YPP-15 In
OMNI ON Mode will play it back.
YPP-15
E QHH HQ
Q Q Q B Q Q
DIAGRAM
YPP-15
11
Page 14

If you set up a Hand-Shaking connection between
the YPP-15 and the sequencer, there are two things
to be noted:
If the sequencer is set to transmit the same MIDI infor
mation as received at its MIDI IN jack (This is called
“Echo On”, “Soft Thru On”, etc., depending on the
make), set the YPP-15 to “Local Control Off If you
fail to do this, pressing a single key will sound twice as
many notes as in normal play. As a result, it will reduce
the polyphonic notes you can play at a time.
Conversely, when the sequencer is set to “Echo Off”
(“Soft Thru Off”, etc.), you cannot play directly from the
keyboard If it is in “Local Control Off”, because the
sequencer doesn’t retransmit any received MIDI data. In
this case, you have to set the YPP-35 to “Local Control
On”, which enables you to control the sound module
from either the keyboard or the sequencer.
DIAGRAMS
OUT IN
--------------------►
□ □
n T_:r:i
;iN
Echo On
OUT IN
n □
I
c=i I=l
□□□
Echo Off
(*1) Local Control On/Off: Normally, the YPP-15’s
keyboard is connected to its internal sound module,
which means that when you play, a sound is output
from the instrument, and when you select a different
voice, the sound changes. This state is called “Local
Control On”. However, if desired, the YPP-15 can
be set to “Local Control Off.” In this state, the
keyboard is disconnected from the sound module,
which means that if you play something, a sound will
not be produced from the instrument itself, but your
performance can be transmitted via MIDI to an
external instrument.
◄
--------------------
IN OUT
OUT
or
YPP-15
■
Local Off
YPP-15
!
Local On
- Setting to Local Control Off
While holding down the MIDI/TRANSPOSE button,
press Voice Select button PIANO 1. To return the
YPP-15 to Local Control On, repeat the same pro
cedure.
One of the most exciting features of the YPP-15 is
that it is capable of playing all of its five voices at the
same time. This feature is called Multi-timbre, and
is most useful when using the YPP-15 as a Slave
from a sequencer.
The YPP-15 has two play modes: Normal and Multi
timbre. When the instrument is turned on, it is
always in Normal mode, that is, you play a single
voice on the keyboard. When in Multi-timbre mode,
however, the YPP-15 will act as ten independent
sound modules, with all 5 preset voices available for
use in an ensemble performance.
- Entering Multi-timbre mode
While holding down the MIDI/TRANSPOSE button,
press the HARPSICHORD Voice Select button. To
exit from Multi-timbre mode, repeat the same op
eration once again.
Now, try using the YPP-15 in Multi-timbfe mode with
a sequencer(*).
* To best use the YPP-15 in Multi-timbre mode, you will
need a Master device which can control other devices
with different MIDI channels at the same time. This could
be a sequencer, MIDI-equipped personal computer, or
MIDI master keyboard.
The following diagram relates to a Hand-Shaking
connection between a YPP-15 and a sequencer.
Try going quickly through the following steps, to
become familiar with the use of Multi-timbre mode.
The object is to record an ensemble performance of
several parts onto the sequencer, then play it back
with each part sounding in a different YPP-15 voice.
DIAGRAM
IN
r
..
□ □
▼
OUT
IN 1
OUT
12
YPP-15
Page 15

Step 1: Set the YPP-15 in Multi-timbre mode.
Step 2: Ensure the YPP-15 is set to Local Control
On and the sequencer to Echo Off, or the YPP-15 to
Local Control Off and the sequencer to Echo On.
Remember the notes on page 12.
Step 3: Select a MIDI transmitting channel from 1 -
10(*) on the YPP-15, then select the voice you
desire. You should set the transmitting channel
before playing, so that the sequencer will receive all
the information, via MIDI channel message, regarding
voice, touch, sustain, etc.
* In Multi-timbre mode, the YPP-15’s sound module can
receive MiDI messages In channels 1 -10. MIDI messages
in channels 11-16 cannot control the YPP-15’s sound
module. Additionally, when you enter Multi-timbre mode,
preset voices are automatically assigned to MIDI chan
nels, as shown in the following chart:
Step 4: Play one of the ensemble parts on the
keyboard, pedalling as needed, and record it onto
one of the tracks of the sequencer. You may, of
course, change voices during play.
Step 5: Repeat Steps 3 and 4 as needed. In each
case, selectthe appropriate MIDI channel (according
to the voice desired for that part) before Step 3, and
in Step 4, record onto a new track or overdub onto
previously recorded tracks.
Step 6: Play back the completed ensemble per
formance from the sequencer. You will hear the
different voices, corresponding to the different parts
of the ensemble, played out simultaneously.
Channel 1
Channel 2
Channel 3 E. PIANO
Channel 4 HARPSICHORD
Channel 5
Channel 6
Channel 7
Channel 8 E. PIANO
Channel 9 HARPSICHORD
Channel 10:
PIANO 1
PIANO 2
VIBES
PIANO 1
PIANO 2
VIBES
13
Page 16

MAINTENANCE
• Every once in a while, wipe the cabinet clean with a soft cloth slightly moistened with a diluted soap solution,
then wipe it with a dry cloth. Don’t use chemically treated cloths or other chemicals like oil, solvents or
insecticides.
• Do not expose the unit to direct sunlight, moisture or extremes in temperature. This includes not placing the
unit on top of amplifiers, receivers or other heat sources, especially those with temperatures higher than 60°C
(140°F).
• Place the unit on a firm, level, vibration-free surface. Do not put anything on top of it.
• Keep the unit away from sources of strong magnetism, and from highly dusty or humid areas.
• Using an unauthorized AC power adaptor may damage the unit.
• Do not remove the unit’s cover, as this can cause electric shock. All repairs should be referred to YAMAHA
personnel.
YAMAHA IS NOT RESPONSIBLE FOR DAMAGE CAUSED BY IMPROPER USE.
TROUBLESHOOTING
Many “problems” can be solved quite easily. Before calling your YAMAHA dealer, please refer to the following
table.
PROBLEM
• Power does not come on.
• Volume is too low, sounds cannot be sus
tained (held).
• No sound.
• Distorted sound.
• MIDI information is not being transmitted or
received.
• Load batteries correctly.
• Replace batteries if dead.
• If using an AC adaptor, make sure it is firmly
connected at both ends.
• Replace batteries.
• Remove headphones if plugged in.
• Replace batteries if dead.
• Reset keyboard to “Local Control On” if not in
this mode.
• Lower the volume.
• Check MIDI channels of transmitting and re
ceiving instruments.
POSSIBLE SOLUTION
14
Page 17

SPECIFICATIONS
Keyboard
Voice Technology
Effects
Metronome
Controls
Jacks
Amplifier
Speakers
Power Source
Power Consumption
Dimensions
Weight
Accessories
Optional Items
61 keys (C1-C6) with 3-level Touch sensitivity
AWM
PIANO 1, PIANO 2, E. PIANO, HARPSICHORD, VIBES
DAMPER (foot) switch
METRONOME button, TEMPO buttons
POWER switch, VOLUME slider, MIDI/TRANSPOSE button, DEMONSTRATION
button
MIDI IN, MIDI OUT, DAMPER, AUX. OUT L/R, HEADPHONES 1,2, DC IN 10-12V
5.0 Wx 1
12.0 cm (8 a)X2
DC 9V (6 batteries, 1.5V SUM-1, R20 or D-cells)
AC Power Adaptor PA-3, PA-4 or PA-40
13 W (when using the AC Power Adaptor PA-3 )
15 W (when using the AC Power Adaptor PA-4 or PA-40 )
7 W (when using the batteries)
970 mm x 123 mm x 381 mm (WxHxD)
7.5 kg
Music Stand, Foot Switch, AC Power Adaptor PA-3
Keyboard Stand LW-10
(Some optional items may not be available in every region)
* YAMAHA reserves the right to make design and specification changes in the interests of product improvement without prior
notice.
15
Page 18

YAMAHA
Model YPP-15
MIDI Implementation Chart
Date : 9/17 1991
Version : 1.0
Function Transmitted
Basic
Channel
Mode
Note 36-96
Number :
Velocity
After
Touch
Pitch Bender
Control
Change
Default
Changed
Default
Messages
True Voice
Note On
Note Off
Key's
Ch's
64
1
1-16
3
X OMNI ON/OFF
******
0 9nH,v-l-127
X 9nH,v=0
X
X
X
0
Recognized
1
1-16
3
X
21-108
21-108
0 v=l-127
X
X
X
X
0
Remarks
DAMPER
Program 0 0-4
Change
System Exclusive
System : Song Pos
Common
System
Real Time : Commands
Aux Local ON/OFF
Messages : Active Sense
Notes :
Mode 1 : OMNI ON, POLY
Mode 3 : OMNI OFF, POLY
: True #
; Song Sel
: Tune
: Clock
:
All Notes OFF
:
Reset
MODE 2 : OMNI ON, MONO
Mode 4 : OMNI OFF, MONO
********
0 0-4
0-4
0
X
X
X
X
X
X
X 0 (122-125)
0
X
0
X
X
X
X
X
0
0
X
O : YES
X : NO
16
Page 19

For details of products, please contact your nearest Yamaha
or the authorized distributor listed below.
Die Einzelheiten zu Produkten sind bei Ihrer unten aufge
führten Niederlassung und bei Yamaha Vertragshändlern in
den jeweiligen Bestimmungsländern erhältlich.
Pour plus de détails sur les produits, veuillez-vous adresser
à Yamaha ou au distributeur le plus proche de vous figurant
dans la liste suivante.
NORTH AMERICA
CANADA
Yamaha Canada Music Ltd.
135 Milner Avenue, Scarborough, Ontario,
MIS 3R1, Canada
Tel: 416-298-1311
U.S.A.
Yamaha Corporation of America
6600 Orangethorpe Ave., Buena Park, Calif. 90620,
U.S.A.
Tel: 714-522-9011
MIDDLE & SOUTH AMERICA
MEXICO
Yamaha De Mexico S.A. De C.V.,
Departamento de ventas
Javier Rojo Gomez No. 1149, Col. Gpe Del
Moral, Deleg. Iztapalapa, 09300 Mexico, D.F.
Tel: 686-00-33
BRASIL
Yamaha Musical Do Brasil LTDA.
Ave. Reboucas 2636, Sao Paulo, Brasil
Tel: 55-1 1 853-1377
PANAMA
Yamaha De Panama S.A.
Edificio Interseco, Calle Elvira Mendez no. 10, Piso
3, Oficina #105, Ciudad de Panama, Panama
Tel: 507-69-5311
OTHER LATIN AMERICAN COUNTRIES
AND CARIBBEAN COUNTRIES
Yamaha Music Latin America Corp.
6101 Blue Lagoon Drive, Miami, Florida 33126,
U.S.A.
Tel: 305-261-4111
EUROPE
THE UNITED KINGDOM/IRELAND
Yamaha-Kemble Mu$ic(U.K.) Ltd.
Sherbourne Drive, Tilbrook, Milton Keynes,
MK7 8BL England
Tel: 0908-366700
GERMANY/SWITZERLAND
Yamaha Europa GmbH.
SiemensstraBe 22-34, D-2084 Rellingen, F.R. of
Germany
Tel: 04101-3030
AUSTRIA/HUNGARY
Yamaha Music Austria GmbH.
Schleiergasse 20, A-IlOO Wien Austria
Tel; 0222-60203900
THE NETHERLANDS
Yamaha Music Benelux B.V.,
Verkoop Administratie
Kanaalweg 18G, 3526 KL Utrecht, The Netherlands
Tel: 030-828411
BELGIUM/LUXEMBOURG
Yamaha Music Benelux B.V.,
Brussels-office
Keiberg Imperiastraat 8, 1930 Zaventem, Belgium
Tel: 02-7258220
FRANCE
Yamaha Musique France, Division Claviers
BP 70-77312 Marne-la-Valée Cedex 2, France
Tel: 01-64-61-4000
ITALY
Yamaha Musica Italia S.P.A.,
Home Keyboard Division
Viale Italia 88, 20020 Lainate(Milano), Italy
Tel: 02-937-4081
SPAIN
Yamaha-Hazen Electronica Musical, S.A,
Jorge Juan 30, 28001, Madrid, Spain
Tel: 91-577-7270
PORTUGAL
Valentim de Carvalho Cl SA
Estrada de Porto Salvo, Paço de Arcos 2780 Oeiras,
Portugal
Tel: 01-443-3398/4030/1823
GREECE
Philippe Nakas S.A.
Navarinou Street 13, P.Code 10680, Athens, Greece
Tel: 01-364-7111
SWEDEN
Yamaha Scandinavia AB
J. A. Wettergrens gata 1, Box 30053, 400 43
Göteborg, Sweden
Tel: 031-496090
DENMARK
Yamaha Scandinavia Filial Danmark
Finsensvej 86, DK-2000 Frederiksberg, Denmark
Tel: 31-87 30 88
FINLAND
Fazer Music Inc.
Länsituulentie lA, SF-02100 Espoo, Finland
Tel: 90-435 011
NORWAY
Narud Yamaha AS
0sterndalen 29, 1345 0sterâs
Tel: 02-24 47 90
ICELAND
Pall H. Palsson
P.O. Box 85, Reykjavik, Iceland
Tel: 01-19440
EAST EUROPEAN COUNTRIES
(Except HUNGARY)
Yamaha Europa GmbH.
Siemensstraße 22-34, D-2084 Rellingen, F.R. of
Germany
Tel: 04101-3030
Yamaha Corporation,
International Marketing Division
Nakazawa-cho 10-1, Hamamatsu, Japan 430
Tel: 053-460-2311
MIDDLE EAST ASIA
ISRAEL
R.B.X. International Co., Ltd.
P.O. Box 11136, Tel-Aviv 61111, Israel
Tel: 3-298-251
TURKEY/CYPRUS
Yamaha Musique France, Division Export
BP70-77312 Marne-la-Valée Cedex 2, France
Tel: 01-64-61-4000
Para detalles sobre productos, contacte su tienda Yamaha más
cercana o el distribuidor autorizado que se lista debajo.
AFRICA
OTHER COUNTRIES
Yamaha Corporation,
International Marketing Division
Nakazawa-cho 10-1, Hamamatsu, Japan 430
Tel: 053-460-2311
ASIA
HONG KONG
Tom Lee Music Co., Ltd.
15/F., World Shipping Centre, Harbour City,
7 Canton Road, Kowloon, Hong Kong
Tel: 3-722-1098
INDONESIA
PT. Yamaha Music Indonesia (Distributor)
PT. Nusantik
Gedung Yamaha Music Center, Jalan Jend. Gatot
Subroto Kav. 4, Jakarta 12930, Indonesia
Tel: 21-520-2577
MALAYSIA
Yamaha Music Malaysia Sdn., Bhd.
16-28, Jalan SS 2/72, Petaling Jaya, Selangor,
Malaysia
Tel: 3-717-8977
PHILIPPINES
Yupangco Music Corporation
339 Gil J. Puyat Avenue, Makati, Metro Manila
1200, Philippines
Tel: 2-85-7070
SINGAPORE
Yamaha Music Asia Pte., Ltd.
80 Tannery Lane, Singapore 1334, Singapore
Tel: 747-4374
TAIWAN
Kung Hsue She Trading Co., Ltd.
KHS Fu Hsing Building, 322, Section 1, Fu-Hsing
S. Road, Taipei 10640, Taiwan. R.O.C.
Tel: 2-709-1266
THAILAND
Siam Music Yamaha Co., Ltd.
933/1-7 Rama I Road, Patumwan, Bangkok,
Thailand
Tel: 2-215-0030
THE PEOPLE’S REPUBLIC OF CHINA
AND OTHER ASIAN COUNTRIES
Yamaha Corporation,
International Marketing Division
Nakazawa-cho 10-1, Hamamatsu, Japan 430
Tel: 053-460-2311
OCEANIA
AUSTRALIA
Yamaha Music Australia Pty. Ltd.
17-33 Market Street, South Melbourne, Vic. 3205,
Australia
Tel: 3-699-2388
NEW ZEALAND
Music Houses of N.Z. Ltd.
146/148 Captain Springs Road, Te Papapa,
Auckland, New Zealand
Tel: 9-640-099
COUNTRIES AND TRUST
TERRITORIES IN PACIFIC OCEAN
Yamaha Corporation,
International Marketing Division
Nakazawa-cho 10-1, Hamamatsu, Japan 430
Tel: 053-460-2311
HEAD OFFICE Yamaha Corporation, Electronic Musical Instrument Division
Nakazawa-cho 10-1, Hamamatsu, Japan 430
Tel: 053-460-3273
Page 20

YAM AHA
IMPORTANT
PLEASE RECOnO THE SERIAL NUMBER OF YOUR UNIT IN THE
SPACE BELOW
MOOiL YPP-16
SERIAL NO:
THE MRIAI NUMSIR IS iOCATIO ON THI SOITOM OE THE UNit
AftAiN TH($ OWNERS MANUAL IN A SA^E PLACE POP PVTURE
RfPERENCE
___
__________________________
YAMAHA CORPORATION
AOBoi lHmvr«tau.McMr>
VVM10 KP Pr«M N i«P*A
 Loading...