


Yamaha YFZ450RB, YFZ450RSEB User Manual
 READ THIS MANUAL CAREFULLY! It contains important safety information.
 LIRE ATTENTIVEMENT CE MANUEL!
Il comprend d’importantes informations de sécurité.  ¡LEA ESTE MANUAL ATENTAMENTE!
Contiene indicaciones importantes acerca de la seguridad.
OWNER’S MANUAL MANUEL DU PROPRIÉTAIRE MANUAL DEL PROPIETARIO
YFZ450RB
YFZ450RSEB
18P-28199-66

PRINTED ON RECYCLED PAPER IMPRIMÉ SUR PAPIER RECYCLÉ IMPRESO EN PAPEL RECICLADO
PRINTED IN JAPAN 2011.05-0.3×1 CR
(E,F,S)
 READ THIS MANUAL CAREFULLY! It contains important safety information.
OWNER’S MANUAL
YFZ450RB
YFZ450RSEB
18P-28199-66-E0

EBU29133

 Read this manual carefully before operating this vehicle. This manual should stay with this vehicle if it is sold.
EC Declaration of Conformity
conforming to Directive 2006/42/EC
We,YAMAHA MOTOR CO., LTD. 2500 Shingai, Iwata, Japan, declare in sole responsibility, that the product
YFZ450R (YFZ450R) |
(JY4AJ42W0B0002630–) |
(YFZ450RSE) |
|
(Make, model)
to which this declaration applies, conforms to the essential health and safety requirements of Directive 2006/42/EC
(If applicable)
and to the other relevant Directives of EEC
2004/108/EC
(Title and/or number and date of issue of the other Directives of EEC)
(If applicable)
To effect correct application of the essential health and safety requirements stated in the Directives of EEC, the following-standards and/or technical specifications were consulted:
ANSI/SVIA 1-2010
(Title and/or number and date of issue of standards and/or specifications)
Authorized Representative
YAMAHA MOTOR EUROPE N.V.
Koolhovenlaan 101, 1119 NC Schiphol-Rijk, The Netherlands
Signature
Shinya Shimada
General Manager
RV Engineering Division
Recreational Vehicle Business Unit
Motorcycle Business Operations
YAMAHA MOTOR CO., LTD.
Date of Issue |
1 February, 2011 |
EBU17170
INTRODUCTION
EBU17322
Congratulations on your purchase of the Yamaha YFZ450RB/YFZ450RSEB. This ATV represents the result of many years of Yamaha experience in the production of fine sporting, touring, and pacesetting racing machines. With the purchase of this Yamaha, you can now appreciate the high degree of craftsmanship and reliability that have made Yamaha a leader in these fields.
This manual will provide you with a good basic understanding of the features and operation of this ATV.
This manual includes important safety information. It provides information about special techniques and skills necessary to ride the ATV. It also includes basic maintenance and inspection procedures. If you have any questions regarding the operation or maintenance of your ATV, please consult a Yamaha dealer.
AN IMPORTANT SAFETY MESSAGE:
●Read this manual completely before operating your ATV. Make sure you understand all instructions.
●Pay close attention to the warning and notice labels on the ATV.
●This ATV should not be ridden by anyone under 16 years of age.
●This ATV is a high-performance ATV for off-road use only, for sport-type recreational and competitive use by experienced operators.

EBU17330
IMPORTANT MANUAL INFORMATION
EBU17342
FAILURE TO FOLLOW THE WARNINGS CONTAINED IN THIS MANUAL CAN RESULT IN SERIOUS INJURY OR DEATH.
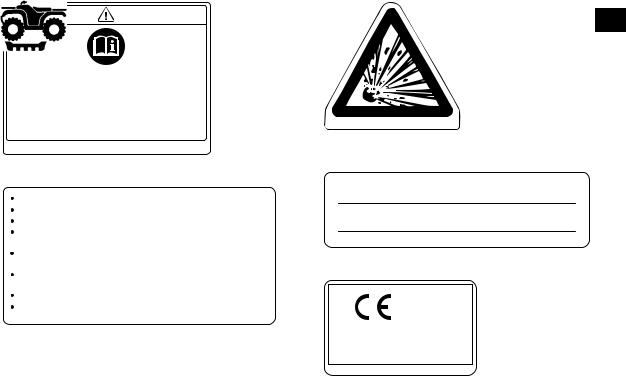
Particularly important information is distinguished in this manual by the following notations:
|
|
|
|
This is the safety alert symbol. It is used to alert you to potential per- |
|
|
|
|
sonal injury hazards. Obey all safety messages that follow this sym- |
|
|
|
|
bol to avoid possible injury or death. |
|
|
|
|
|
|
|
|
|
|
|
|
|
|
A WARNING indicates a hazardous situation which, if not avoided, |
|
WARNING |
|
||
|
|
could result in death or serious injury. |
||
|
|
|
|
|
|
|
|
|
|
|
|
|
|
|
|
|
|
|
A NOTICE indicates special precautions that must be taken to avoid |
|
NOTICE |
|
|
|
|
|
damage to the vehicle or other property. |
||
|
|
|
|
|
|
|
|
|
|
TIP |
A TIP provides key information to make procedures easier or clearer. |
|
|
* Product and specifications are subject to change without notice.

EBU17350
IMPORTANT NOTICE
EBU17372
This ATV is designed and manufactured for use on unpaved surfaces only. It is unsafe to operate this ATV on any paved surface, paved street, paved road or motorway.
Please check your local riding laws and regulations before operating this ATV.
EBU17390
YFZ450RB/YFZ450RSEB
OWNER’S MANUAL ©2011 by Yamaha Motor Co., Ltd.
1st edition, April 2011 All rights reserved.
Any reprinting or unauthorized use without the written permission of Yamaha Motor Co., Ltd.
is expressly prohibited. Printed in Japan.
EBU17420
TABLE OF CONTENTS
LOCATION OF THE WARNING AND |
|
SPECIFICATION LABELS ............................ |
1-1 |
SAFETY INFORMATION .............................. |
2-1 |
DESCRIPTION .............................................. |
3-1 |
Left view ...................................................... |
3-1 |
Right view.................................................... |
3-1 |
Controls and instruments ............................ |
3-2 |
INSTRUMENT AND CONTROL |
|
FUNCTIONS .................................................. |
4-1 |
Main switch ................................................ |
4-1 |
Indicator light and warning lights ................ |
4-2 |
Handlebar switches .................................... |
4-3 |
Throttle lever .............................................. |
4-4 |
Speed limiter .............................................. |
4-5 |
Clutch lever ................................................ |
4-5 |
Brake lever ................................................. |
4-6 |
Brake pedal ................................................ |
4-6 |
Parking brake lever .................................... |
4-7 |
Shift pedal .................................................. |
4-8 |
Fuel tank cap .............................................. |
4-8 |
Fuel ............................................................ |
4-9 |
Seat .......................................................... |
4-10 |
Adjusting the front shock absorber |
|
assemblies .............................................. |
4-11 |
Adjusting the rear shock absorber |
|
assembly ................................................. |
4-16 |
Handlebar position .................................... |
4-24 |
PRE-OPERATION CHECKS .......................... |
5-1 |
Fuel ............................................................. |
5-4 |
Engine oil .................................................... |
5-4 |
Coolant ....................................................... |
5-4 |
Front and rear brakes ................................. |
5-4 |
Throttle lever ............................................... |
5-5 |
Drive chain .................................................. |
5-5 |
Tires ............................................................ |
5-5 |
Chassis fasteners ....................................... |
5-7 |
Instruments, lights and switches ................. |
5-7 |
OPERATION................................................... |
6-1 |
Starting the engine ...................................... |
6-1 |
Shifting ........................................................ |
6-2 |
Engine break-in ........................................... |
6-4 |
Parking ........................................................ |
6-4 |
Parking on a slope ...................................... |
6-5 |
Accessories and loading ............................ |
6-6 |
RIDING YOUR ATV ...................................... |
7-1 |
GETTING TO KNOW YOUR ATV............... |
7-2 |
RIDE WITH CARE AND GOOD |
|
JUDGMENT .............................................. |
7-2 |
BE CAREFUL WHERE YOU RIDE............. |
7-9 |
TURNING YOUR ATV .............................. |
7-12 |
CLIMBING UPHILL ................................... |
7-13 |
RIDING DOWNHILL.................................. |
7-16 |
CROSSING A SLOPE............................... |
7-18 |
CROSSING THROUGH SHALLOW |
|
WATER ................................................... |
7-19 |
RIDING OVER ROUGH TERRAIN ........... |
7-20 |
SLIDING AND SKIDDING......................... |
7-21 |
WHAT TO DO IF... .................................... |
7-22 |
WHAT TO DO... ........................................ |
7-22 |
PERIODIC MAINTENANCE AND |
|
ADJUSTMENT ............................................... |
8-1 |
Owner’s manual and tool kit ....................... |
8-2 |
Periodic maintenance chart for the |
|
emission control system ........................... |
8-3 |
General maintenance and lubrication |
|
chart ......................................................... |
8-5 |
Removing and installing the cowling and |
|
panels ....................................................... |
8-9 |
Checking the spark plug ........................... |
8-15 |
Engine oil and oil filter element ................. |
8-16 |
Coolant ..................................................... |
8-22 |
Cleaning the air filter element ................... |
8-23 |
Cleaning the spark arrester ...................... |
8-27 |
Adjusting the throttle lever free play ......... |
8-29 |
Valve clearance ........................................ |
8-30 |
Brakes ....................................................... |
8-30 |
Checking the front and rear brake pads |
...8-30 |
Checking the brake fluid level ................... |
8-32 |
Changing the brake fluid ........................... |
8-33 |
Checking the front brake lever free play ... |
8-33 |
Checking the brake pedal height .............. |
8-34 |
Adjusting the parking brake free play ....... |
8-34 |
Brake light switches .................................. |
8-36 |
Adjusting the clutch lever free play ........... |
8-36 |
Drive chain slack ....................................... |
8-38 |
Lubricating the drive chain ........................ |
8-40 |
Checking and lubricating the cables ......... |
8-40 |
Checking and lubricating the brake and |
|
clutch levers ............................................ |
8-41 |
Checking the shift pedal ........................... |
8-42 |
Checking and lubricating the brake |
|
pedal ....................................................... |
8-42 |
Checking the wheel hub bearings ............. |
8-42 |
Lubricating the swingarm pivots ............... |
8-43 |
Lubricating the upper and lower arm |
|
pivots ...................................................... |
8-43 |
Lubricating the steering shaft ................... |
8-44 |
Battery ...................................................... |
8-45 |
Replacing the fuse ................................... |
8-47 |
Replacing a headlight bulb ....................... |
8-48 |
Adjusting a headlight beam ...................... |
8-50 |
Tail/brake light .......................................... |
8-50 |
Removing a wheel .................................... |
8-50 |
Installing a wheel ...................................... |
8-51 |
Troubleshooting ....................................... |
8-52 |
Troubleshooting charts ............................. |
8-53 |
CLEANING AND STORAGE.......................... |
9-1 |
Cleaning ..................................................... |
9-1 |
Storage ....................................................... |
9-2 |
SPECIFICATIONS ...................................... |
10-1 |
CONSUMER INFORMATION ...................... |
11-1 |
Identification numbers .............................. |
11-1 |
EBU29680
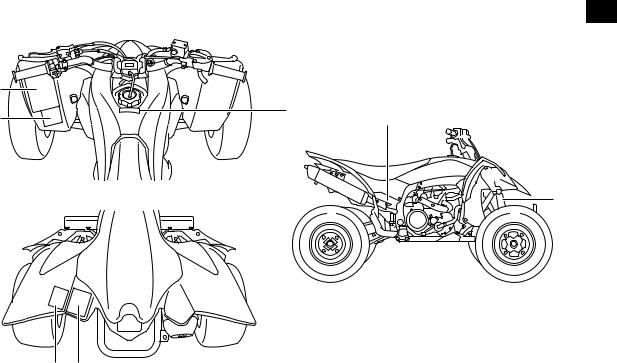
LOCATION OF THE WARNING AND SPECIFICATION LABELS
1
EBU29991
Read and understand all of the labels on your ATV. These labels contain important information for safe and proper operation.
Never remove any labels from your ATV. If a label becomes difficult to read or comes off, request a replacement label from your Yamaha dealer.
For Europe
1 |
6 |
2 |
5 |
6
3 |
|
|
4 |
8 |
7 |
|
1-1

1 |
2 |
1
4D3-2816L-20
3
1AS-2816P-00
43P-2816R-01
1-2
4
27.5 kPa |
30.0 kPa |
0.275 kgf/cm² |
0.30 kgf/cm² |
4.0 psi |
4.4 psi |
5D3-2816M-M0 |
|
5 |
|
|
|
|
|
Use PREMIUM unleaded gasoline with |
min. 97 octane (RON). |
||
|
Nur Super Bleifrei mit Mindestoktanzahl |
97 (ROZ) tanken. |
||
|
Utilice gasolina sin plomo que |
tenga como |
mínimo 97 octanos (RON). |
|
|
Utiliser une essence SUPER |
sans plomb |
d'un indice |
|
|
d'octane (RON) de min. 97. |
|
|
|
|
Utilizzare benzina PREMIUM super senza piombo con almeno 97 |
|||
|
ottani(RON). |
|
|
|
|
Gebruik loodvrije SUPERBENZINE met een octaangetal (RON) van |
|||
|
minstens 97. |
|
|
|
|
Utilize gasolina sem chumbo com índice de octano mínimo de 97 (RON). |
|||
|
Använd blyfri PREMIUMBENSIN av 97 |
oktan (RON) eller mer. |
||
|
|
|
|
5TG-2415E-00 |
6
1
4AA-22259-40
7
YFZ450R
29.4 kW 184 kg
18P-2156A-10
8
2011
YAMAHA MOTOR CO., LTD. 2500 SHINGAI, IWATA, JAPAN
8AC-2817L-00
1-3
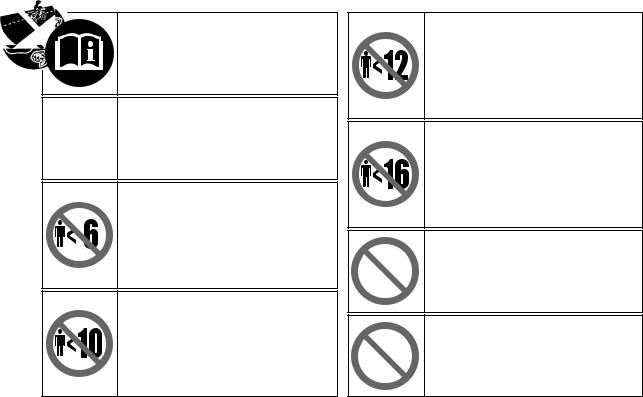
Familiarize yourself with the following pictograms and read the explanatory text, then make sure to check the pictograms that apply to your model.
1
Read the Owner’s manual.
ALWAYS use an approved helmet and protective gear.
NEVER permit children under age 6 to operate this ATV.
Operation of this ATV by children under the age of 6 increases the risk of severe injury or death.
Adult supervision required for children under age 16.
NEVER permit children under age 10 to operate this ATV.
Operation of this ATV by children under the age of 10 increases the risk of severe injury or death.
Adult supervision required for children under age 16.
NEVER permit children under age 12 to operate this ATV.
Operation of this ATV by children under the age of 12 increases the risk of severe injury or death.
Adult supervision required for children under age 16.
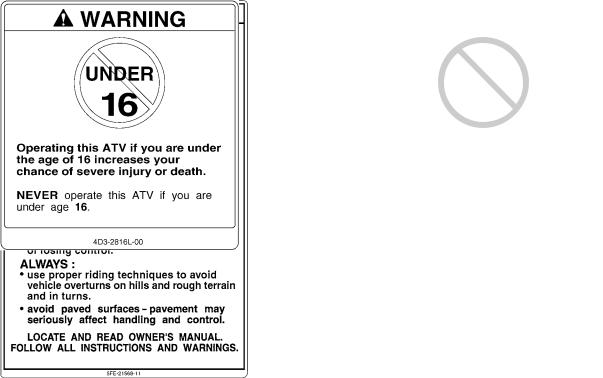
NEVER operate this ATV if you are under age 16.
Operating this ATV if you are under the age of 16 increases your chance of severe injury or death.
NEVER use on paved roads.
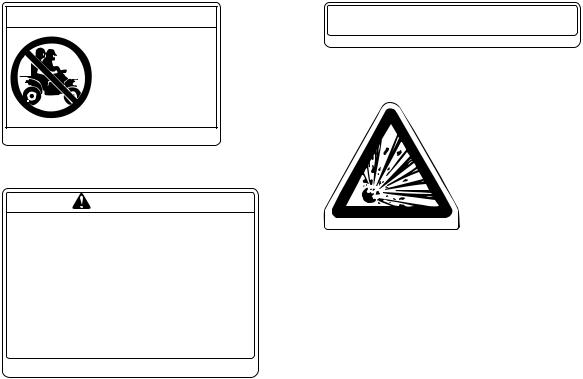
NEVER carry passengers.
1-4
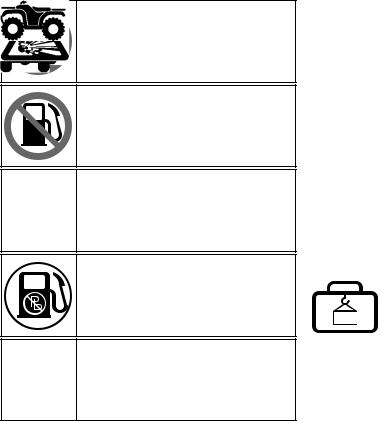
NEVER use with drugs or alcohol.
NEVER store fuel or flammable liquids.
This unit contains high-pressure nitrogen gas.
Mishandling can cause an explosion. Do not incinerate, puncture or open.
Use unleaded gasoline only.
Measure the tire pressure when the tires are cold.
|
|
Adjust the tire pressure. |
|
|
|
|
|
|
|
Improper tire pressure can cause loss of |
|
|
|
|
|
|
|
1 |
|
||||
|
|
control. |
|
|
|
|
|
|
|
Loss of control can result in severe injury or |
|
|
|
|
|
**.* kPa |
**.* kPa |
death. |
|
|
|
|
|
|
|
|
|
|
|
||
*.** kgf/cm² *.** kgf/cm² |
|
|
|
|
|
|
|
*.* psi |
*.* psi |
|
|
|
|
|
|
|
|
|
|
|
|||
|
|
|
|
||||
|
|
Turning the ATV in |
4WD-LOCK |
|
|
|
|
|
|
(“DIFF.LOCK”) takes more effort. |
|
||||
|
|
Operate at a slow speed and allow extra |
|
||||
|
|
time and distance for maneuvers to avoid |
|
||||
|
|
loss of control. |
|
|
|
|
|
|
|
|
|
||||
|
|
|
|||||
|
|
This pictogram shows the loading limits |
|
|
|
|
|
|
|
and/or maximum load capacity for this ATV. |
|
||||
|
|
Follow all load limits and other loading |
|
||||
|
|
guidelines in this manual. |
|
|
|
|
|
|
|
Load may include the driver, passenger, |
|
||||
|
|
human protective gear, accessories, goods, |
|
||||
|
|
luggage, and all other load related items. |
|
||||
|
|
Make sure you do not exceed the load limits. |
|
||||
|
|
Overloading can cause loss of control. |
|
||||
|
|
Loss of control can result in severe injury or |
|
||||
|
|
death. |
|
|
|
|
|
|
|
|
|
|
|
|
|
1-5
|
|
|
|
|
|
|
This pictogram shows trailer Hitch Tow |
|
|
|
|
|
|
|
weight limit. (Combined weight of the trailer |
|
1 |
|
|
|
|
|
|
|
|
|
|
|
|
and all cargo in the trailer.) |
|
|
|
|
|
|
|
|
Overloading can cause loss of control. |
|
|
|
|
|
|
|
Loss of control can result in severe injury or |
|
|
|
|
|
|
|
death. |
|
|
|
|
|
|
|
|
|
|
|
|
|
|
|
|
|
|
|
|
|
|
|
This pictogram shows trailer Hitch Tongue |
|
|
|
|
|
|
|
weight limit. (Weight on the trailer tongue.) |
|
|
|
|
|
|
|
Overloading can cause loss of control. |
|
|
|
|
|
|
|
Loss of control can result in severe injury or |
|
|
|
|
|
|
|
death. |
|
|
|
|
|
|
|
|
|
|
|
|
|
|
|
|
|
|
|
|
|
1 |
|
1 Model Name |
|
|
|
|
|
|
|
|
|
|
|
|
|
****** |
2 Max. Power |
|
|
|
|
|
*** kW *** kg |
|||
|
|
|
|
2 |
3 |
3 Mass In Running Order |
|
|
|
||||||
|
|
|
|
|
|
|
|
|
|
|
|
|
|
|
|
|
|
|
|
|
1 |
|
|
|
|
|
|
|
|
|
|
|
|
|
|
|
**** |
1 Year of construction |
|
|
|
|
|
YAMAHA MOTOR CO., LTD. |
|
||
|
|
|
|
2500 SHINGAI, IWATA, JAPAN |
|
||
|
|
|
|
|
|
|
|
1-6
For Oceania
1
1 |
|
|
2 |
5 |
6 |
|
6
3 4
1-7
1 |
2 |
1
1-8
3 |
5 |
 WARNING
NEVER ride as a passenger.
Use PREMIUM unleaded gasoline with min. |
|
1 |
|
97 octane (RON). |
|
|
|
|
|
|
|
5TG-2415E-10 |
|
|
|
Passengers can cause a loss of control,
resulting in SEVERE |
6 |
INJURY or DEATH. |
|
5FE-2151H-01
4
WARNING
Improper tire pressure or overloading can cause
loss of control. 4AA-22259-40 Loss of control can result in severe injury or
death.
OPERATING TIRE PRESSURE: Set with tires cold
• Recommended : Front |
: 27.5 kPa ( 4.0 psi ) |
||
• Minimum |
Rear |
: 30.0 kPa ( 4.4 psi |
) |
: Front |
: 24.5 kPa ( 3.6 psi |
) |
|
|
Rear |
: 27.0 kPa ( 4.0 psi ) |
|
•Never set tire pressure below minimum.
It could cause the tire to dislodge from the rim.
LOADING
•Maximum weight capacity : 100 kg (220 lbs.) Includes weight of operator, cargo and accessories.
5D3-2816M-00
1-9

EBU17431
 SAFETY INFORMATION
2 EBU29372
AN ATV IS NOT A TOY AND CAN BE HAZARDOUS TO OPERATE.
An ATV handles differently from other vehicles, including motorcycles and cars. A collision or rollover can occur quickly, even during routine maneuvers such as turning and riding on hills or over obstacles, if you fail to take proper precautions.
SEVERE INJURY OR DEATH can result if you do not follow these instructions:
●Read this manual and all labels carefully and follow the operating procedures described.
●Never operate an ATV without proper training or instruction.
●Always follow the age recommendation:
– A child under 16 years old should never operate an ATV with engine size greater than 90 cc.
●Never allow a child under age 16 to operate an ATV without adult supervision, and never allow continued use of an ATV by a child if he or she does not have the abilities to operate it safely.
2-1
●Never carry a passenger on an ATV.
●Always avoid operating an ATV on any paved surfaces, including sidewalks, driveways, parking lots and paved streets.
●Never operate an ATV on any paved street, paved road or motorway.
●Watch carefully for other vehicles when operating on unpaved public streets or roads. Make sure you know your country’s laws and regulations before you ride on unpaved public streets or roads.
●Never operate an ATV without wearing an approved motorcycle helmet that fits properly. You should also wear eye protection (goggles or face shield), gloves, boots, a long-sleeved shirt or a jacket, and long pants.
●Never consume alcohol or drugs before or while operating this ATV.
●Never operate at speeds too fast for your skills or the riding conditions. Always go at a speed that is proper for the terrain, visibility, operating conditions, and your experience.
●Never attempt wheelies, jumps, or other stunts.
●Always inspect your ATV each time you use it to make sure it is in safe operating condition. Always follow the inspection and maintenance procedures and schedules described in this manual.
●Always keep both hands on the handlebars and both feet on the footrests of the ATV during operation.
●Always go slowly and be extra careful when operating on unfamiliar terrain. Always be alert to changing terrain conditions when operating the ATV.
●Never operate on excessively rough, slippery or loose terrain until you have learned and practiced the skills necessary to control the ATV on such terrain. Always be especially cautious on these kinds of terrain.
●Always follow proper procedures for turning as described in this manual. Practice turning at low speeds before attempting to turn at faster speeds and never turn at excessive speeds.
●Never operate the ATV on hills too steep for the ATV or for your abilities. Practice on smaller hills before attempting larger hills.
●Always follow proper procedures for climbing hills as described in this manual. Check the terrain carefully before you start up any hill. Never climb hills with excessively slippery or loose sur-
faces. Shift your weight forward. Never open the 2 throttle suddenly or make sudden gear changes. Never go over the top of a hill at high speed.
●Always follow proper procedures for going down hills and for braking on hills as described in this manual. Check the terrain carefully before you start down any hill. Shift your weight backward. Never go down a hill at high speed. Avoid going down a hill at an angle that would cause the vehicle to lean sharply to one side. Go straight down the hill where possible.
●Always follow proper procedures for crossing the side of a hill as described in this manual. Avoid hills with excessively slippery or loose surfaces. Shift your weight to the uphill side of the ATV. Never attempt to turn the ATV around on any hill until you have mastered the turning technique described in this manual on level ground. Avoid crossing the side of a steep hill if possible.
●Always use proper procedures if you stall or roll backwards when climbing a hill. To avoid stalling, use the proper gear and maintain a steady
2-2

speed when climbing a hill. If you stall or roll backwards, follow the special procedure for braking described in this manual. Dismount on the uphill side or to a side if pointed straight up-
2hill. Turn the ATV around and remount, following the procedure described in this manual.
●Always check for obstacles before operating in a new area.
●Never attempt to operate over large obstacles, such as large rocks or fallen trees. Always follow proper procedures when operating over obstacles as described in this manual.
●Always be careful when skidding or sliding. Learn to safely control skidding or sliding by practicing at low speeds and on level, smooth terrain. On extremely slippery surfaces, such as ice, go slowly and be very cautious in order to reduce the chance of skidding or sliding out of control.
●Never operate an ATV in fast flowing water or in water deeper than that recommended in this manual. Remember that wet brakes may have reduced stopping ability. Test your brakes after leaving water. If necessary, apply them several times to let friction dry out the linings.
●Always use the size and type of tires specified in this manual.
●Always maintain proper tire pressure as described in this manual.
●Never modify an ATV through improper installation or use of accessories.
●Never exceed the stated load capacity for an ATV. Cargo should be properly distributed and securely attached. Reduce speed and follow instructions in this manual for carrying cargo or pulling a trailer. Allow greater distance for brak-
ing.
EWB00072
 WARNING
Avoid Carbon Monoxide Poisoning
All engine exhaust contains carbon monoxide, a deadly gas. Breathing carbon monoxide can cause headaches, dizziness, drowsiness, nausea, confusion, and eventually death.
Carbon Monoxide is a colorless, odorless, tasteless gas which may be present even if you do not see or smell any engine exhaust. Deadly levels of carbon monoxide can collect rapidly and you can quickly be overcome and unable to save yourself. Also, deadly levels of carbon monoxide can linger for hours or days in en-
2-3

closed or poorly ventilated areas. If you experience any symptoms of carbon monoxide poisoning, leave the area immediately, get fresh air, and SEEK MEDICAL TREATMENT.
● Do not run engine indoors. Even if you try to 2 ventilate engine exhaust with fans or open
windows and doors, carbon monoxide can rapidly reach dangerous levels.
●Do not run engine in poorly ventilated or partially enclosed areas such as barns, garages, or carports.
●Do not run engine outdoors where engine exhaust can be drawn into a building through openings such as windows and doors.
2-4
EBU17680
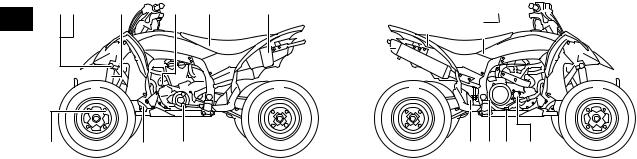
|
DESCRIPTION |
EBU17690 |
EBU17700 |
Left view |
Right view |
1 2 |
3 |
4 |
5 |
6 |
3 |
|
|
|
|
9 |
8 |
7 |
|
1. |
Front shock absorber assembly compression damping |
||
|
force adjusting bolt (for fast compression damping) |
||
2. |
Front shock absorber assembly compression damping |
||
|
force adjusting screw (for slow compression damping) |
||
3. |
Front shock absorber assembly spring preload adjusting |
||
|
nut |
|
|
4. |
Engine oil tank filler cap |
|
|
5. |
Rear brake fluid reservoir |
|
|
6. |
Battery |
|
|
7. |
Shift pedal |
|
|
8. |
Coolant reservoir |
|
|
9. |
Front shock absorber assembly rebound damping force |
||
|
adjusting screw |
|
|
1 |
2 |
3 4 5 |
||||
|
|
|
|
|
|
|
|
|
|
|
|
|
|
|
|
|
|
|
|
|
9 8 7 6
1.Spark arrester
2.Fuse
3.Rear shock absorber assembly spring preload adjusting nut
4.Rear shock absorber assembly compression damping force adjusting bolt (for fast compression damping)
5.Rear shock absorber assembly compression damping force adjusting screw (for slow compression damping)
6.Oil filter element
7.Brake pedal
8.Rear brake light switch
9.Rear shock absorber assembly rebound damping force adjusting screw
3-1

EBU17712
Controls and instruments
1 2 |
3 |
4 |
5 |
6 |
7 |
8 |
3
1.Clutch lever
2.Parking brake lever
3.Handlebar switches
4.Fuel tank cap
5.Main switch
6.Front brake fluid reservoir
7.Throttle lever
8.Brake lever
TIP
The ATV you have purchased may differ slightly from the figures shown in this manual.
3-2
EBU17733
INSTRUMENT AND CONTROL FUNCTIONS
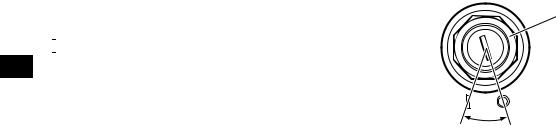
EBU29911
Main switch
The positions of the main switch are as follows:
“ 
 ” (on)
4All electrical systems are supplied with power. The headlights and taillight come on when the light switch is on, and the engine can be started. The key cannot be removed.
“  ” (off)
All electrical systems are off. The key can be removed.
1
ON OFF
1. Main switch
4-1
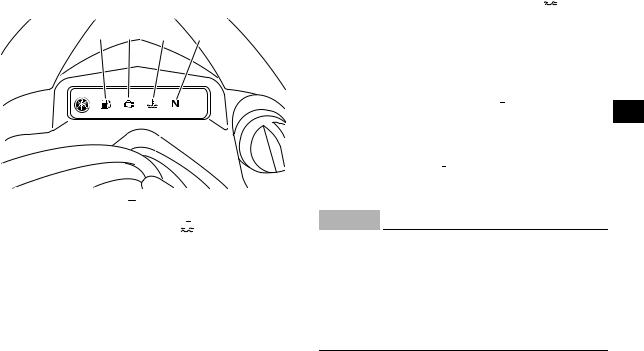
EBU29382
Indicator light and warning lights
1 2 3 4
1.Fuel level warning light “  ”
”
2.Engine trouble warning light “  ”
”
3.Coolant temperature warning light “  ”
”
4.Neutral indicator light “N”
EBU17860
Neutral indicator light “ ”
”
This indicator light comes on when the transmission is in the neutral position.
EBU29921
Coolant temperature warning light “  ”
”
This warning light comes on when the engine overheats. When this occurs during operation, stop the engine as soon as it is safe to do so and allow it to cool down for about 10 minutes.
The electrical circuit of the warning light can be checked by turning the key to “ 
 ” (on). The warn-
ing light should come on for a few seconds, and 4 then go off.
If the warning light does not come on initially when the key is turned to “ 
 ” (on), or if the warning light remains on, have a Yamaha dealer check the electrical circuit.
ECB00010
NOTICE
●The engine may overheat if the ATV is overloaded. In this case, reduce the load to specification.
●Start the engine after making sure that the warning light is out. Continuous use while the warning light is on may cause damage to the engine.
4-2
EBU29931
Fuel level warning light “ ”
”
This warning light comes on when the fuel level drops below approximately 3.4 L (0.90 US gal, 0.75 Imp.gal). When this occurs, refuel as soon as possible.
The electrical circuit of the warning light can be checked by setting the engine stop switch to “  ”
”
4and turning the key to “ 
 ” (on). The warning light should come on for a few seconds, and then go off. If the warning light does not come on initially when
the key is turned to “ 
 ” (on), or if the warning light remains on, have a Yamaha dealer check the electrical circuit.
EBU29942
Engine trouble warning light “  ”
”
This warning light comes on or flashes when an electrical circuit monitoring the engine is not working correctly. When this occurs, have a Yamaha dealer check the self-diagnosis system.
The electrical circuit of the warning light can be checked by turning the key to “ 
 ” (on). The warning light should come on for a few seconds, and then go off.
If the warning light does not come on initially when the key is turned to “ 
 ” (on), or if the warning light remains on, have a Yamaha dealer check the electrical circuit.
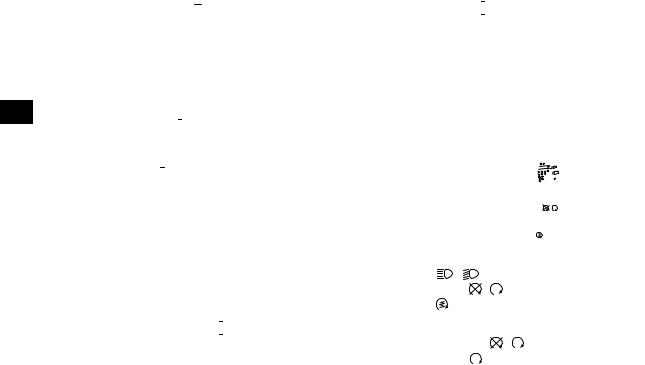
EBU18061
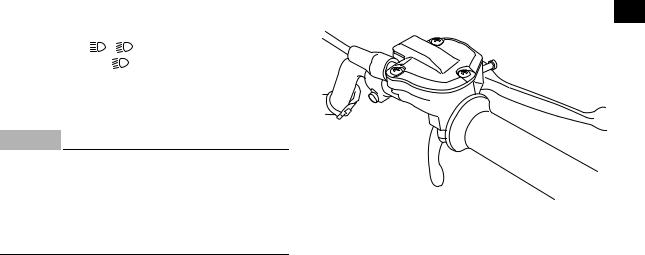
Handlebar switches
1
2
3
1. |
Light switch “ |
/ |
/OFF” |
|
2. |
Engine stop switch “ |
/ |
” |
|
3. |
Start switch “ |
” |
|
|
EBU18080 |
|
|
|
|
Engine stop switch “ |
/ ” |
|||
Set this switch to “ |
” before starting the engine. |
|||
The engine stop switch controls the ignition and stops the engine when it is running. Use this switch
4-3
to stop the engine in an emergency situation. The engine will not start or run when this switch is set to “ ”.
”.
EBU18101
Start switch “ ”
”
Push this switch to crank the engine with the starter. See the starting instructions on page 6-1 prior to starting the engine.
EBU18154 |
|
Light switch “ / |
/OFF” |
Set this switch to “ |
” to turn on the low beams |
and the taillight. Set the switch to “  ” to turn on the high beams and the taillight. Set the switch to “OFF” to turn off all the lights.
ECB00043
NOTICE
Do not use the headlights with the engine turned off for an extended period of time, otherwise the battery may discharge to the point that the starter motor will not operate properly. If this should happen, remove the battery and recharge it. (See page 8-45.)
EBU18282
Throttle lever
Once the engine is running, pushing the throttle le- |
|
ver will increase the engine speed. |
|
Regulate the speed of the ATV by varying the |
|
throttle position. Because the throttle is spring- |
|
loaded, the ATV will decelerate, and the engine will |
|
return to an idle any time the throttle lever is re- |
4 |
leased. |
 1
1
1. Throttle lever
Before starting the engine, check the throttle to be sure it is operating smoothly. Make sure it returns to the idle position as soon as the lever is released.
4-4
EBU18323
Speed limiter
Your ATV is equipped with an adjustable speed limiter. The speed limiter keeps the throttle from fully opening, even when the throttle lever is pushed to the maximum.
1.Loosen the locknut.
2.To increase the maximum engine power avail-
4able and the maximum speed of the ATV, turn the adjusting screw in direction (a). To decrease the maximum engine power available and the maximum speed of the ATV, turn the adjusting screw in direction (b). Do not turn the adjusting screw out more than 12 mm (0.47 in) or the throttle cable could be damaged. Always make sure the throttle lever free play is adjusted to 2.0–4.0 mm (0.08–0.16 in). (See page 8-29.) WARNING! Improper adjustment of the speed limiter and throttle could cause throttle cable damage or improper throttle operation. You could lose control, resulting in an accident. [EWB00241]
3
1
2
(b)
(a)
1.Locknut
2.Adjusting screw
3.No more than 12 mm (0.47 in)
3.Tighten the locknut.
EBU18382
Clutch lever
The clutch lever is located on the left handlebar and the ignition circuit cut-off system is incorporated in the clutch lever holder. To disengage the clutch, pull the clutch lever toward the handlebar grip. To engage the clutch, release the clutch lever. The clutch lever should be pulled rapidly and re-
4-5
 Loading...