

Yamaha YAS-306 User Manual
Front Surround System
EN
Owner’s Manual
Read the supplied booklet “Quick Start Guide” before using the unit.
English
Contents
PREPARATION
Supplied items .......................................................................3
Features..................................................................................4
Frequently asked questions..................................................5
Part names and functions .....................................................6
Installation .............................................................................8
Connecting the unit............................................................ 10
Connecting the unit to a TV ........................................................................... 10
Connecting the unit to other devices......................................................... 11
PLAYBACK
Operations........................................................................... 12
Listening to the sound from a Bluetooth device.............. 16
Using wireless headphones to listen to audio.................. 17
NETWORKS
Networks ............................................................................. 18
Network functions and the MusicCast CONTROLLER app.................. 18
Connecting to a network ................................................................................ 18
Playing back music stored on media servers (PCs/NAS)......................22
Listening to Internet radio .............................................................................. 23
Playing back music with AirPlay ................................................................... 24
Playing back music stored on mobile devices ........................................ 25
SETTINGS
Settings................................................................................ 26
Using the TV’s remote control to adjust the unit’s volume ................ 26
Using an external subwoofer......................................................................... 29
Enabling/disabling the auto power standby function ......................... 29
Enabling/disabling the network standby function................................ 30
Enabling/disabling a wireless (Wi-Fi) connection .................................. 30
Enabling/disabling the Bluetooth function.............................................. 31
Updating the unit’s firmware ........................................................................ 31
Initializing the unit............................................................................................. 32
APPENDIX
Troubleshooting ................................................................. 33
Specifications ...................................................................... 38
About this manual
NOTE
This indicates precautions for use of the product and its feature limitations.
HINT
This indicates supplementary explanations for better use.
En 2

PREPARATION
The unit
Remote control Batteries x 2
(AAA, R03, UM4)
Optical digital audio cable*
(1.5 m [4.9 ft])
Mounting template
Use when mounting the unit on a wall
Spacers × 2
Use when mounting
the unit on a wall
Quick Start Guide
Cover (for the TV remote repeater)
MusicCast
Setup Guide
Owner’s Manual
CD-ROM
* The China model comes with a coaxial digital audio cable rather than an optical
digital audio cable.
Remote control sensor
Within 6 m (20 ft)
Supplied items
Make sure you have received all of the following items.
Preparing the remote control
Peel off the protection sheet before use.
Operating range of the remote control
Operate the remote control within the range as shown below. When the unit is mounted
on a wall, point the remote control at the remote control sensor on the top panel (p.9).
PREPARATION ➤ Supplied items En 3
Features
This front surround system is easily installed and has a built-in subwoofer for enjoying powerful and realistic sound with connection to a TV or other
devices.
• AIR SURROUND XTREME
Enjoy 7.1 channel surround sound, which creates a wide and deep soundstage, as if speakers are positioned not only in front of, but also to the left, right, and behind the listener.
• Bass extension
Enjoy powerful bass with Yamaha’s exclusive bass boosting technology, Advanced Bass Extension Processing (p.14).
• Unrestricted playback of music over a network using MusicCast CONTROLLER
The free app for mobile devices*, MusicCast CONTROLLER, allows you to listen to music stored on mobile devices such smartphones, or on servers, or to listen to Internet radio
stations and many kinds of major streaming services (p.18).
This app also allows you to distribute content to other MusicCast-enabled devices for synchronized playback.
The MusicCast CONTROLLER app can also be used to perform such tasks as selecting the input source and adjusting volume.
See the “MusicCast Setup Guide”, or visit the Yamaha website for details.
Search for “MusicCast CONTROLLER” on the App Store or Google Play.
• A function that learns from the TV’s remote control
Use the TV’s remote control to turn on and off the unit or adjusting the volume (p. 26).
•Clear voice
This feature makes speech, such as dialog and narration, clearer (p.14).
* In this manual, iOS and Android mobile devices are collectively referred to as “mobile devices”. The specific type of mobile device is noted in explanations as needed.
PREPARATION ➤ Features En 4

Frequently asked questions
The following section covers popular functions and frequently asked questions about the unit.
Q1
Switching between remote controls is inconvenient. Can I use the TV’s
remote control to operate the unit?
A1
Yes. You can use the unit’s learning function to “teach” it to respond to
commands from the TV’s remote control, allowing you to operate the unit
using the TV’s remote control (p.26).
This function is available only for the IR (infrared) remote control. Check your
TV’s remote control type.
Q2
Can I improve the clarity of dialogue?
A2
Yes. Dialogue in movies, TV news, sports programs, etc., can be made
clearer using the “clear voice” function (p.14).
Q3
Can I operate the unit using a smartphone?
A3
Yes. The unit can be operated with a smartphone or other mobile device
using the free mobile device app, MusicCast CONTROLLER, installed on the
device (p.18).
The MusicCast CONTROLLER app allows you to perform such tasks as
turning the unit on or off, selecting the input source, and adjusting the volume.
Q4
Can headphones be used?
A4
Yes. Bluetooth wireless headphones can be used (p.17).
Q5
Can sound playing via the unit be played on another audio device at the
same time, or vice versa?
A5
Yes. Sound from one MusicCast-enabled audio device can be played on
another MusicCast-enabled audio device at the same time. Note that all
devices must support MusicCast.
Tap in the MusicCast CONTROLLER app’s Rooms screen, and follow
the on-screen instructions to set up the master room (the source device) and
to link other rooms (devices to which audio is distributed) with the master
room. Refer to the supplied MusicCast Setup Guide, or visit Yamaha’s
website for details.
Q6
How can music content stored on a smartphone be played via the unit?
A6
Choose one of the following methods.
Connecting via Bluetooth (p.16)
This method is useful for playing music content stored on a smartphone or
other mobile device without connecting to a network.
Playing music with AirPlay (p.24)
This method is useful for those using an iPhone or other iOS device.
Playing music with the MusicCast CONTROLLER app (p.25)
This method is useful for playing music content stored on a smartphone or
other mobile device on which the MusicCast CONTROLLER app is installed.
Q7
Can Internet radio be played?
A7
Yes. Use the MusicCast CONTROLLER app’s Net Radio feature (p. 23).
PREPARATION ➤ Frequently asked questions En 5
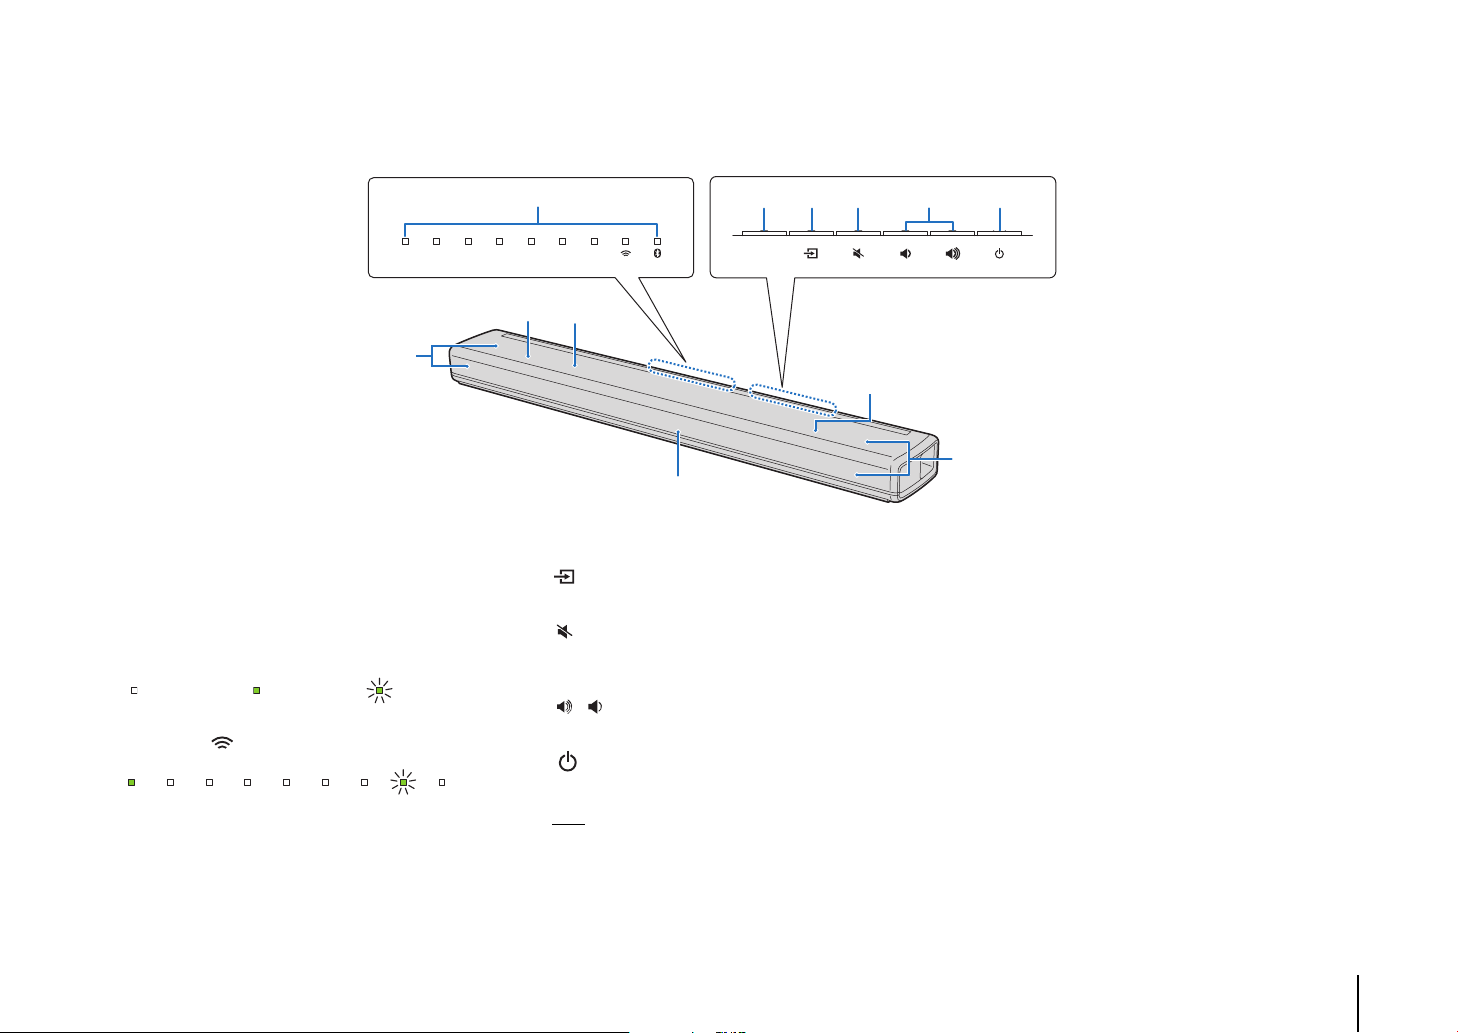
Part names and functions
9
8
7
7
8
9
STATUS TV BD/DVD ANALOG NET SURROUNDBLUETOOTH
CONNECT
1
234 5 6
Keys are located in the rear
part of the unit.
The unit (front panel/top panel)
1 Indicators
The indicators on the top panel flash or glow, to show
the operation and setting status.
In this manual, illustrations of the nine in-line
indicators are used for explanation as necessary.
: Off : Glows : Flashes
Example: When the STATUS indicator glows, and
the indicator flashes
2 CONNECT key
Use to connect the unit to a network using the
MusicCast CONTROLLER app (p.19).
3 (input) key
Select an input source to be played back (p.12).
4 (mute) key
Mute the audio output. Press the key again to unmute
(p.13).
5 / (volume +/-) keys
Adjust the volume (p.13).
6 (power) key
Turn on or off the unit (p.12).
HINT
• The unit may automatically turn off when the auto power
standby function is enabled (p.29).
7 Remote control sensors
Receive infrared signals from the remote control of
the unit (p.3) or TV’s remote control (p.8).
The remote control sensors are located on the front
panel and on the top panel of the unit (p.8, 9).
8 Dual built-in subwoofers
The built-in subwoofers are located in the top part of
the unit.
9 Speakers
PREPARATION ➤ Part names and functions En 6
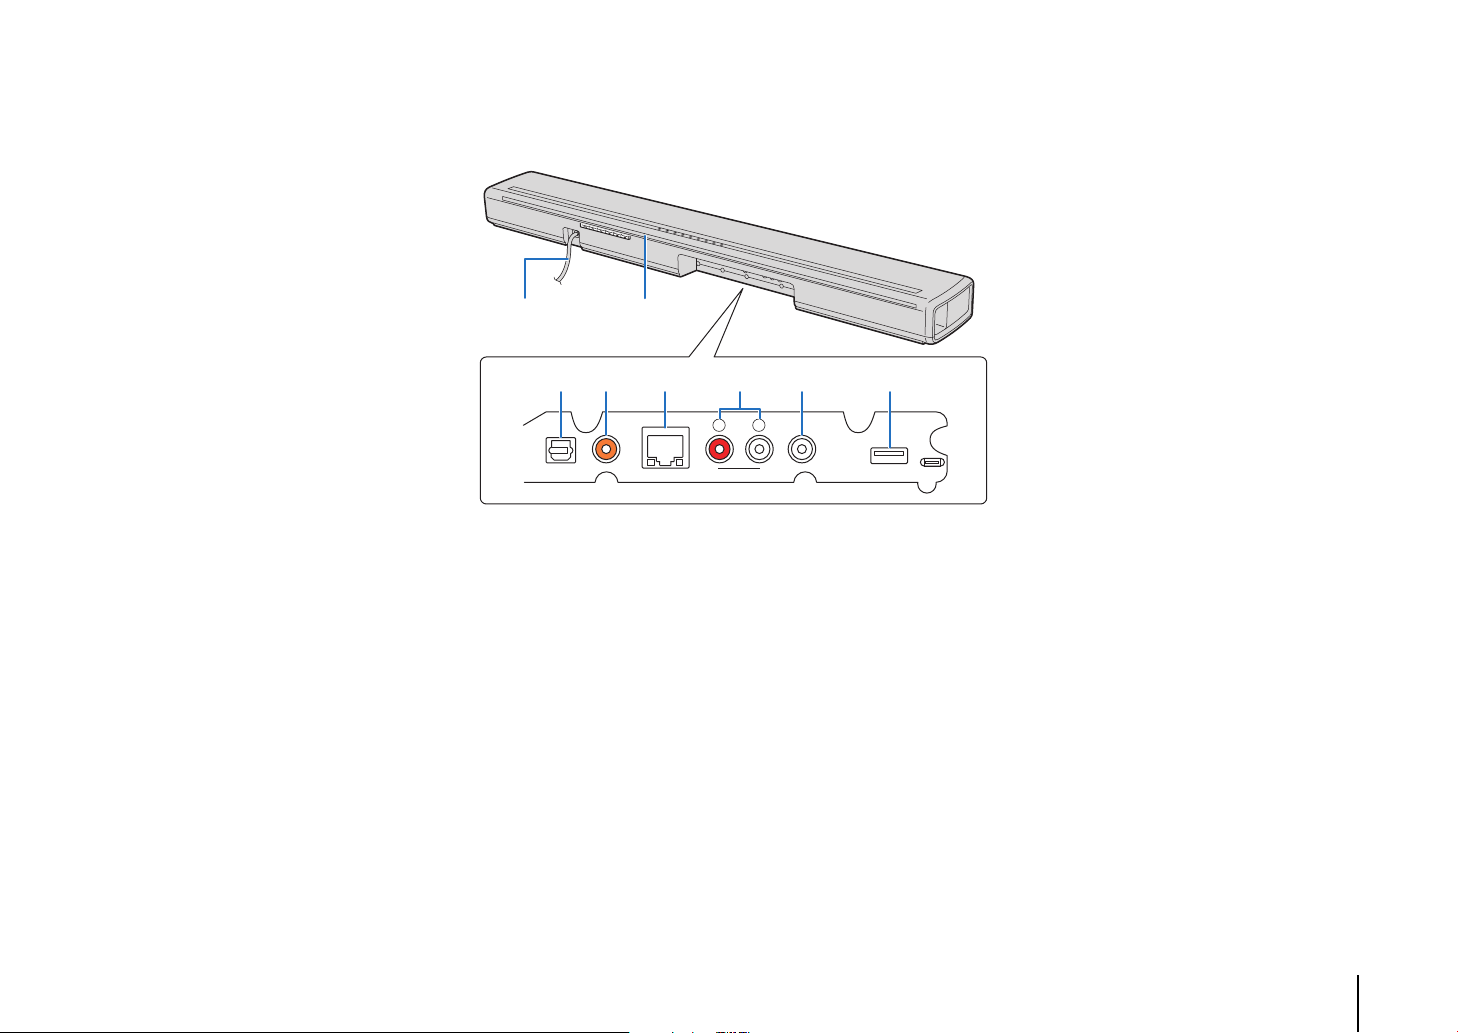
The unit (rear panel)
TV BD/DVD
NETWORK ANALOG
R
SUBWOOFER OUT
SERVICE ONLY
L
34 5 6 7 8
21
1 Power cable
For connecting to an AC wall outlet (p.10).
2 TV remote repeater
Used to transmit signals from the TV’s remote
control, received by the unit’s remote control sensor,
to the TV (p.8).
3 TV input jack
For connecting to a TV with an optical digital audio
cable (p.10).
4 BD/DVD input jack
For connecting to a playback device, such as a Bluray Disc (BD) player, with a coaxial digital audio
cable (p.11).
5 NETWORK jack
For connecting to a network with a network cable
(p.18).
6 ANALOG input jacks
For connecting to an external device with a stereo
cable (p.10, 11).
7 SUBWOOFER OUT jack
For connecting to an external subwoofer with an RCA
mono cable (p.29).
8 SERVICE ONLY jack
Used only for after-sales servicing. This jack is not
normally used.
PREPARATION ➤ Part names and functions En 7
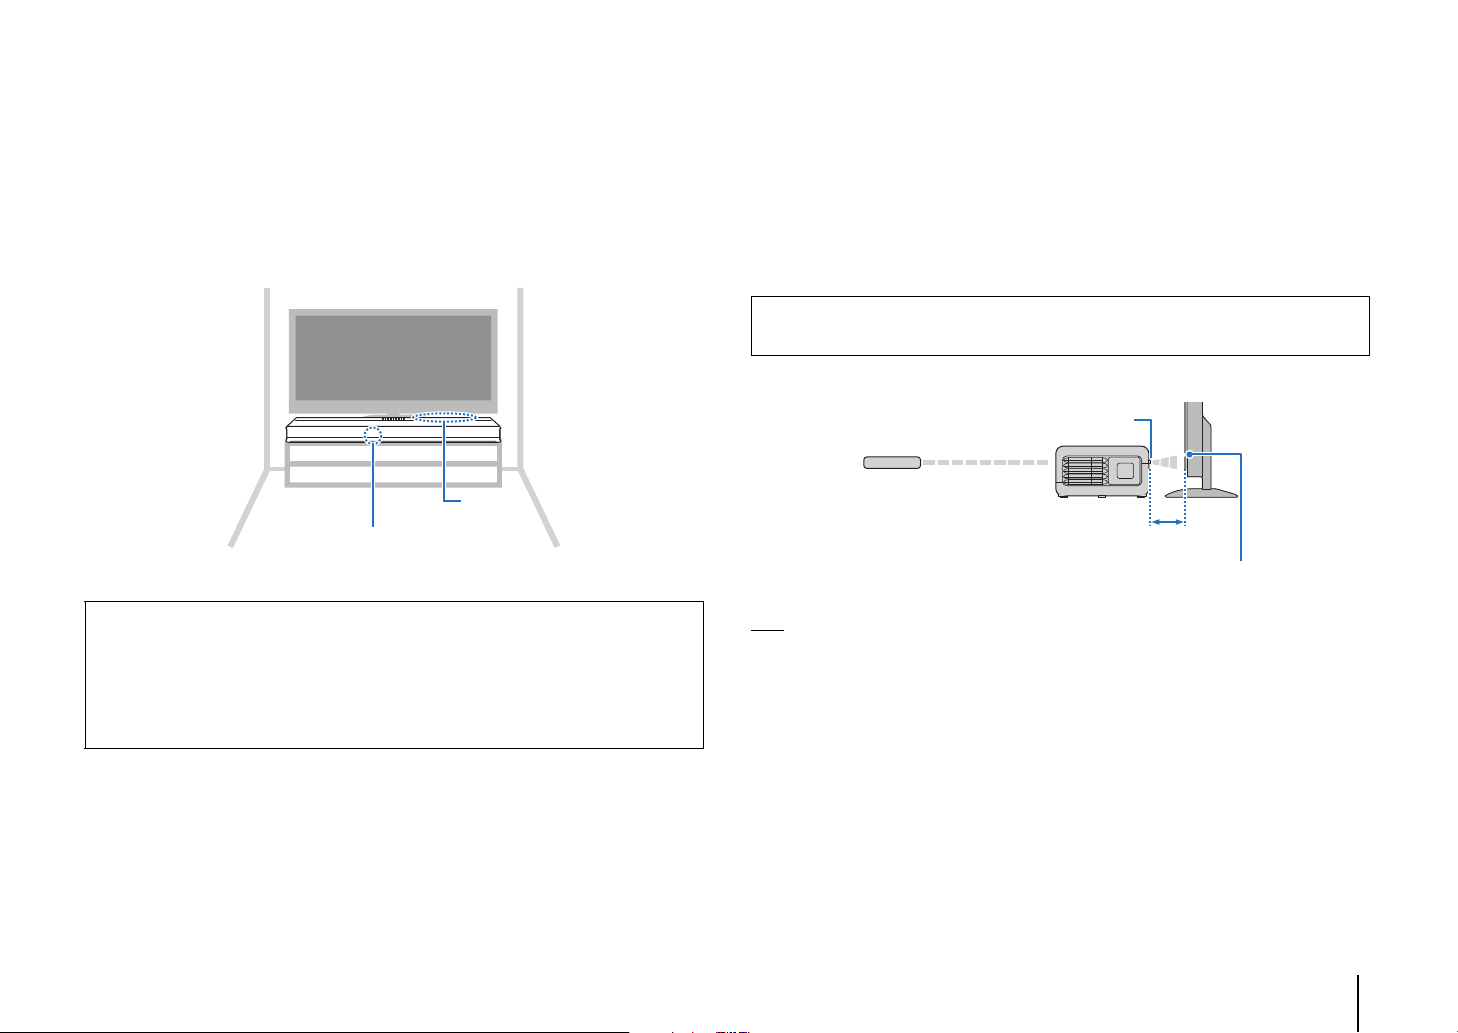
Installation
Remote control sensor (front panel)
Keys
TV remote repeater
TV’s remote control
More than 5 cm (2 in)
TV remote control sensor
The unit can be installed on a TV stand or mounted on a wall (p.9).
It is equipped with remote control sensors positioned to support installation on a TV stand or mounting on a wall.
Installing the unit on a TV stand, etc.
Position the unit so that the keys are on the far side of the unit.
Cautions
• Do not stack the unit and a BD player or other device directly on each other. Doing so may cause a
malfunction due to vibrations.
• Do not hold the speaker portion (fabric parts) on the front and the top of the unit.
• The unit contains non-magnetic shielding speakers. Do not place magnetically sensitive items (hard
disk drive, etc.) near the unit.
• Depending on your installation environment, it may be better to connect the unit and external devices
before installing the unit.
About the TV remote repeater
The unit receives signals from the TV’s remote control via the remote control sensor
located on the front panel. It then transmits these signals from the TV remote repeater
located on the rear panel.
Caution
Position the unit more than 5 cm (2 in) away from the TV to ensure proper transmission of signals from
the remote control to the remote control sensor on the TV.
HINT
• This function is available only when the TV’s remote control uses infrared signals.
• The TV’s remote control can be used even when the unit is turned off as long as the unit’s power cable is
plugged into an AC wall outlet.
PREPARATION ➤ Installation En 8
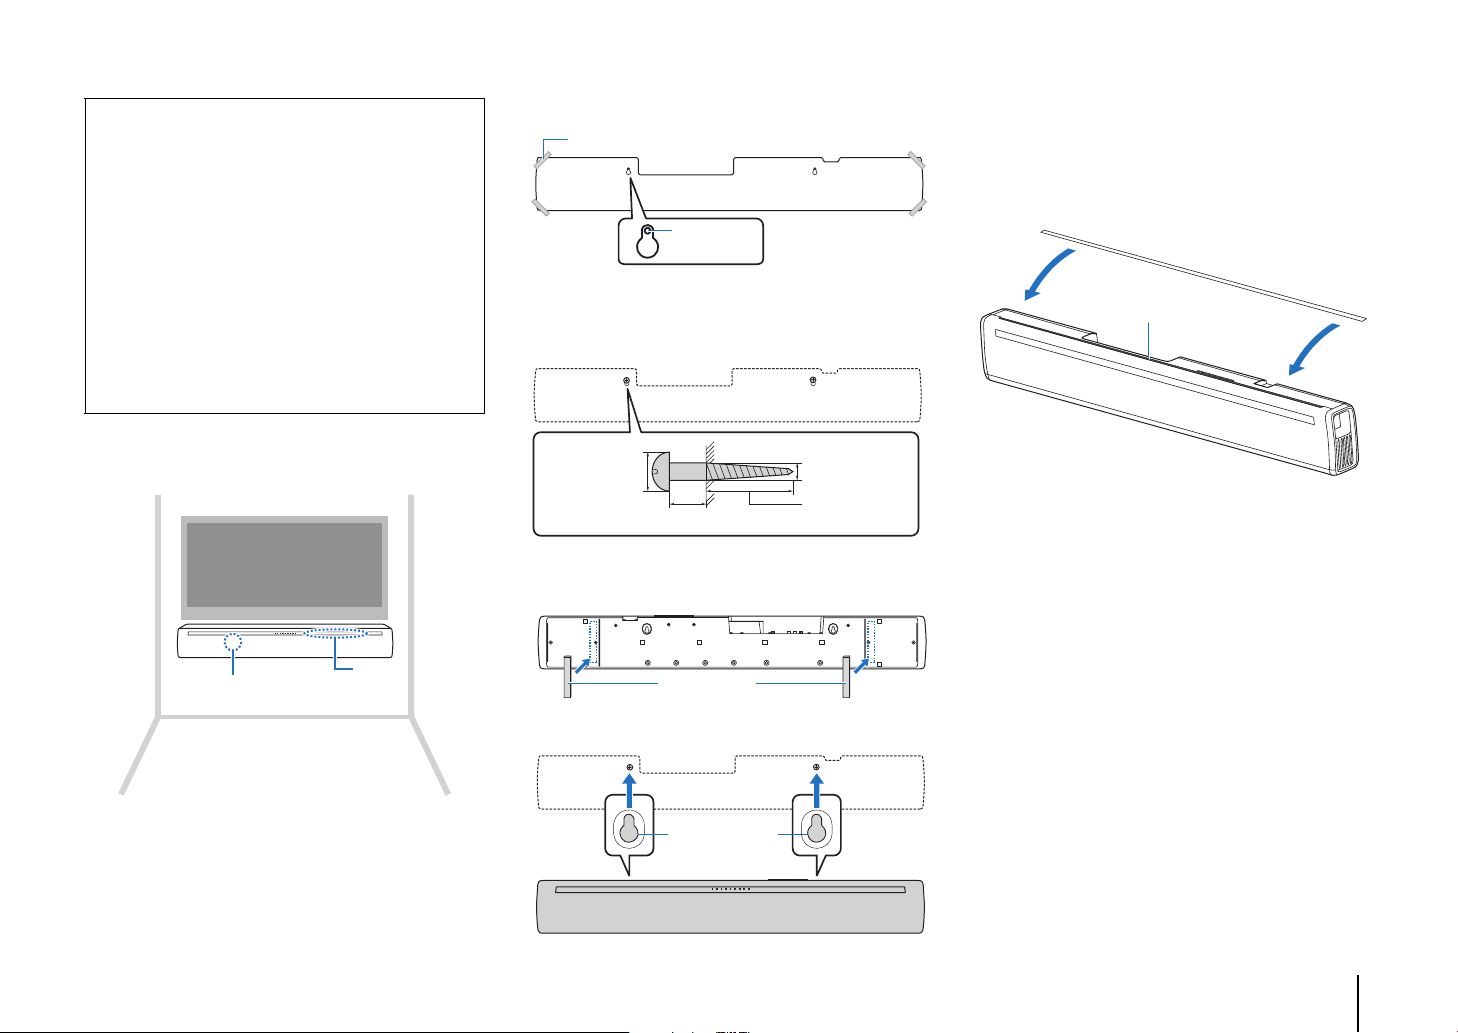
Mounting the unit on a wall
Keys
Remote control sensor
(top panel)
Tapes or thumbtacks
Mounting template (supplied)
Screw
holes
7 to 9 mm
(1/4" to 3/8")
13 to 15 mm (1/2" to 5/8")
4 mm (#8)
20 mm (3/4")
or more
Spacers
Mounting holes
on bottom of the
unit
Cover (for the TV remote repeater)
Peel off the backing and attach
the sticky sheet.
TV remote repeater
Cautions
• When mounting the unit on a wall, all installation work must be
performed by a qualified contractor or dealer. The customer must
never attempt to perform this installation work. Improper or
inadequate installation could cause the unit to fall, resulting in
personal injury.
• To avoid falling the unit, attach the unit to a dry wall.
• Make sure you use commercially available screws that can
support the weight of the installation (specified in Step 2 on the
right). Using clamps other than specified screws, such as short
screws, nails, and two-sided tape, may cause the unit to fall.
• Fix the cables in place where they will not become loose. If your
foot or hand accidentally gets caught on a loose cable, the unit
may fall.
• Do not lean on the unit or apply excessive force to the top of the
unit. Doing so may cause the unit to fall.
• Check that the unit is fixed securely after the installation. Yamaha
will bear no responsibility for any accidents caused by improper
installations.
Mount the unit on the wall so that the keys face
upwards.
How to mount the unit on the wall
1 Attach the mounting template on a wall and mark
for the screw holes.
2 Remove the mounting template from the wall,
then install commercially available screws (as
illustrated below) at the points marked on the
wall.
3 Peel off the backing paper from the spacers and
attach the adhesive face to the unit as illustrated
below.
Using the supplied cover (for the TV remote
repeater)
When the unit is mounted on a wall, the TV remote
repeater may appear white. If this presents a distraction
while watching TV, attach the supplied cover to the TV
remote repeater.
4 Hang the unit on the screws.
PREPARATION ➤ Installation En 9
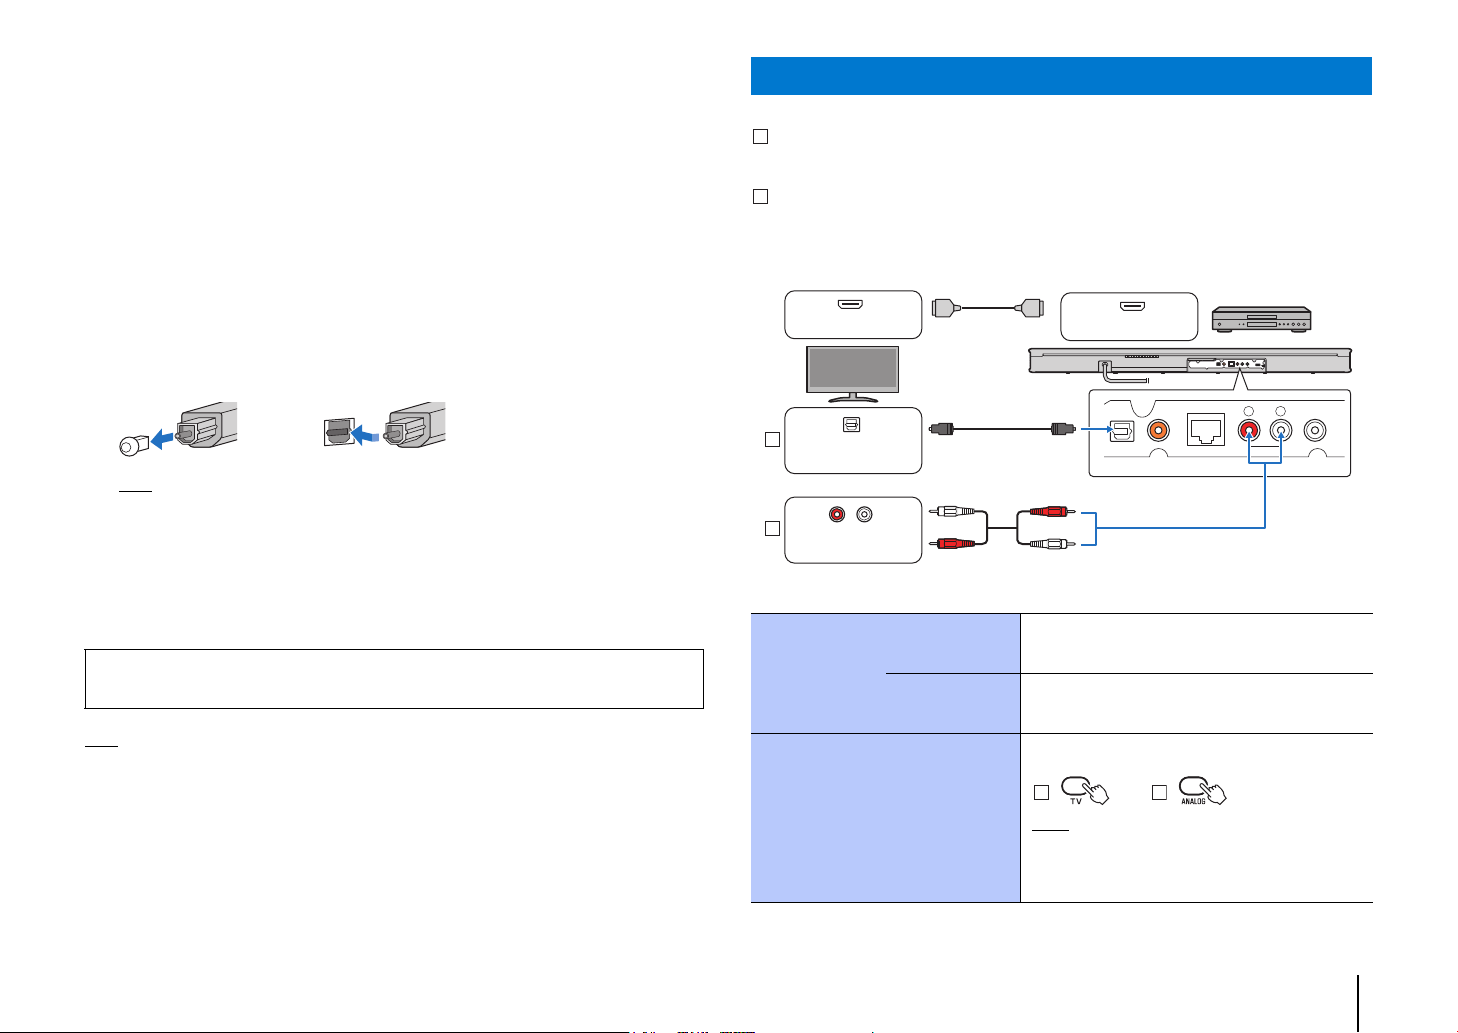
Connecting the unit
A
B
A
B
TV
Optical digital audio
output
or
Analog audio output
(supplied)
HDMI input HDMI output
Playback device
(such as a BD/DVD player)
B
The way in which the unit is connected will vary depending upon the type of jacks with
which the TV or playback devices (BD/DVD player, etc.) are equipped, and how the TV
and playback devices are connected. Refer to the connection examples on pages 10
and 11 to connect the unit.
1 Be sure that the unit’s power cable is not plugged into an AC wall
outlet.
2 Refer to the connection examples on pages 10 and 11 to connect the
unit to a TV and playback devices.
To connect the unit using the supplied optical digital audio cable, remove the cap,
confirm orientation, and then plug it firmly into the TV input jack.
Connecting the unit to a TV
Connection method 1: Connect the unit to a TV
If the TV has an optical audio output jack
Connect one end of the supplied optical digital audio cable to the unit’s TV input jack,
and the other to the optical digital audio output jack on the TV.
If the TV has no optical audio output jack
Use an optional stereo cable to connect the unit’s ANALOG input jacks to the analog
audio output jacks on the TV.
R
L
HINT
• Connect the supplied optical digital audio cable to the TV input jack, a coaxial digital audio cable to
the BD/DVD input jack, and a stereo cable to the ANALOG input jacks.
3 Plug the unit’s power cable into an AC wall outlet.
4 Set TV volume as low as possible, or disable output from the TV’s
built-in speaker(s).
Caution
Do not use excessive force when inserting the cable plug. Doing so may damage the cable plug or
terminal.
HINT
• If a setting to disable the speaker output is not available on your TV in step 4, you may disable it by
connecting headphones to the headphones jack on the TV. For details, refer to the manuals of the TV.
• The TV and BD/DVD input jacks support the following audio signals.
− PCM (2 channel)
− Dolby Digital (up to 5.1 channel)
− DTS Digital Surround (up to 5.1 channel)
To watch TV or play content from other devices
When watching
Change the
TV's input
source
Select the unit’s input source
TV
When playing
content from a
device
Switch to the input source for watching TV (select
the same input source used before the unit was
connected to the TV).
Switch to the input source for the BD/DVD player
or other device.
Press the input keys on the unit's remote control
to change the unit’s input source.
: :
A
NOTE
• When sound from the TV cannot be output in a digital
audio format (Dolby Digital or DTS Digital Surround), be
sure that the TV’s digital audio output is set to PCM
(2ch).
PREPARATION ➤ Connecting the unit En 10
TV BD/DVD
NETWORK ANALOG
SUBWOOFER OUT
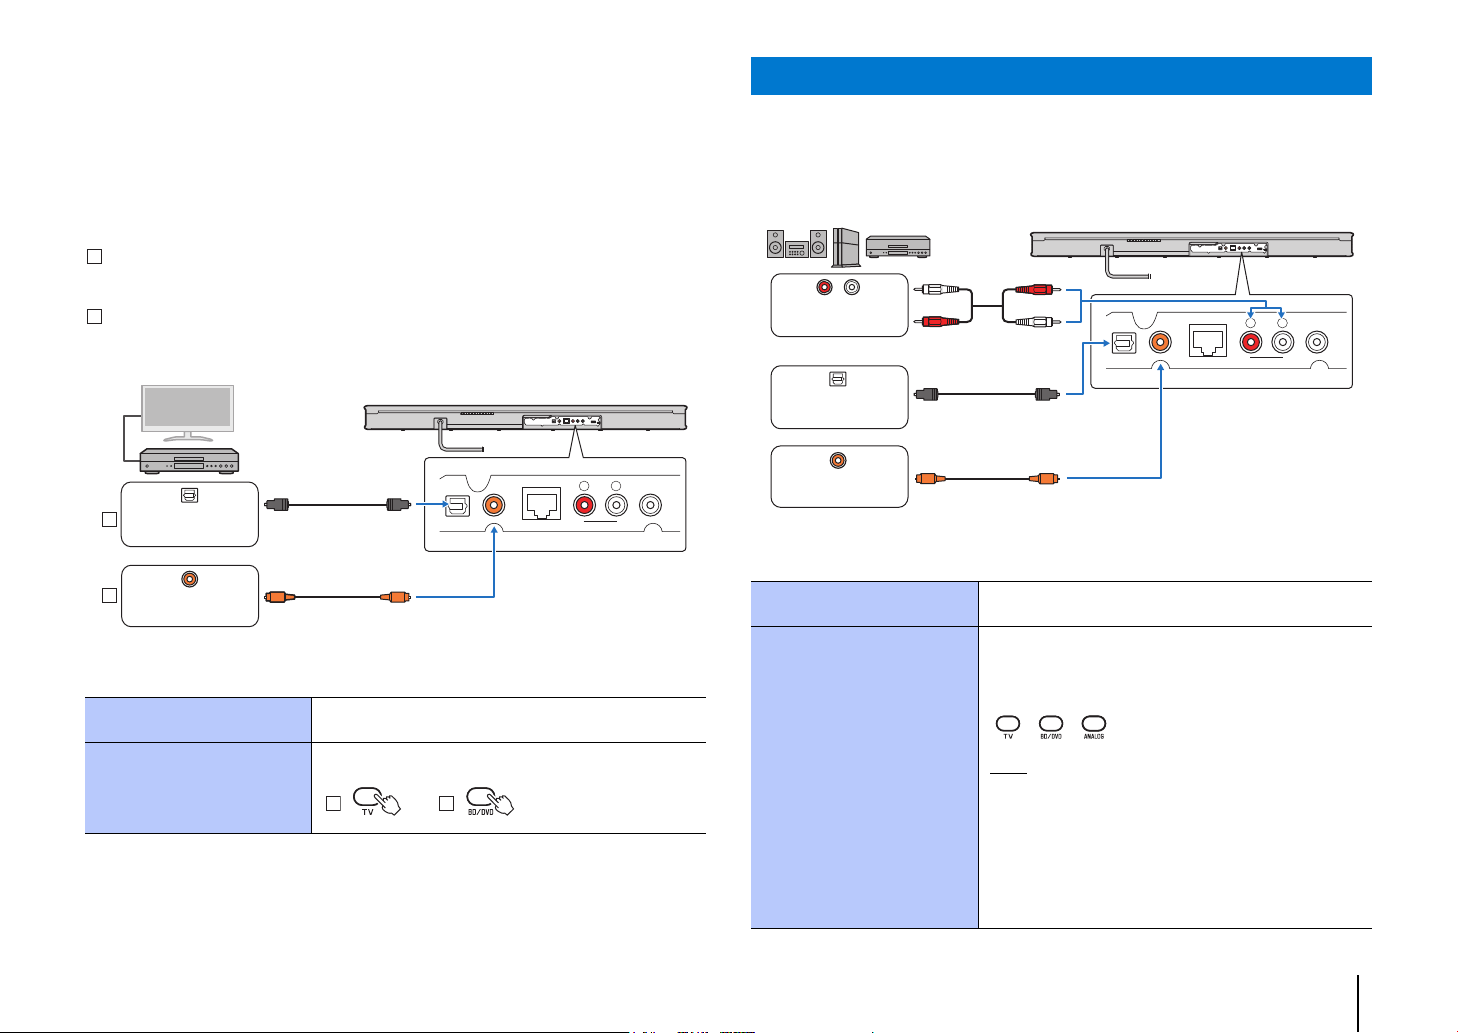
Connection method 2: Connect the unit to a playback device
A
B
A
B
Playback device
(such as a BD/DVD player)
Optical digital audio
output
or
Coaxial digital audio
output
(supplied)
B
CD/DVD player, game console, etc.
Optical digital audio
output
Coaxial digital audio
output
Analog audio output
(BD/DVD player, etc.)
Use this method to connect the unit to a playback device when it cannot be connected to
the TV as explained with method 1 because the TV has no optical digital audio output
jack or analog audio output jacks.
This method can also be used to connect the unit to a playback device, after it has been
connected to the TV, when sound from a BD/DVD player or other device connected to
the TV is not output as surround sound.
If the playback device has an optical digital audio output jack
Connect one end of the supplied optical digital audio cable to the unit’s TV input jack,
and the other to the optical digital audio output jack on the playback device.
If the playback device has no optical digital audio output jack
Connect one end of an optional coaxial digital audio cable to the unit’s BD/DVD input
jack, and the other to the coaxial digital audio output jack on the playback device.
L
R
Connecting the unit to other devices
Connect devices such as CD/DVD players or game consoles to the unit for dynamic
sound playback. Use an optical digital audio cable, coaxial digital audio cable, or stereo
cable to connect audio output jack(s) on each playback device to input jack(s) on the
unit.
R
L
TV BD/DVD
NETWORK ANALOG
SUBWOOFER OUT
To watch video from a playback device connected to the TV
Change the TV's input
source
Select the unit’s input
source
TV BD/DVD
NETWORK ANALOG
SUBWOOFER OUT
Switch to the input source for the BD/DVD player or
other playback device connected to the TV.
Press the input keys on the unit's remote control to
change the unit’s input source.
: :
A
To watch video from an external device
Change the TV's input
source
Select the unit’s input
source
Switch to the input source for the external device.
To play sound from an external device, press the input
key (ANALOG, TV, or BD/DVD) that corresponds to the
jack(s) on the unit to which the external device is
connected.
NOTE
• When sound from the external device cannot be output in a
digital audio format (Dolby Digital or DTS Digital Surround), be
sure that the device’s digital audio output is not set to PCM
(2ch).
• If volume can be adjusted using the device connected to the
unit’s ANALOG input jacks, set that device's volume to the
same level as that of other devices connected to the unit’s TV
and BD/DVD input jacks to prevent volume from being louder
than expected.
PREPARATION ➤ Connecting the unit En 11
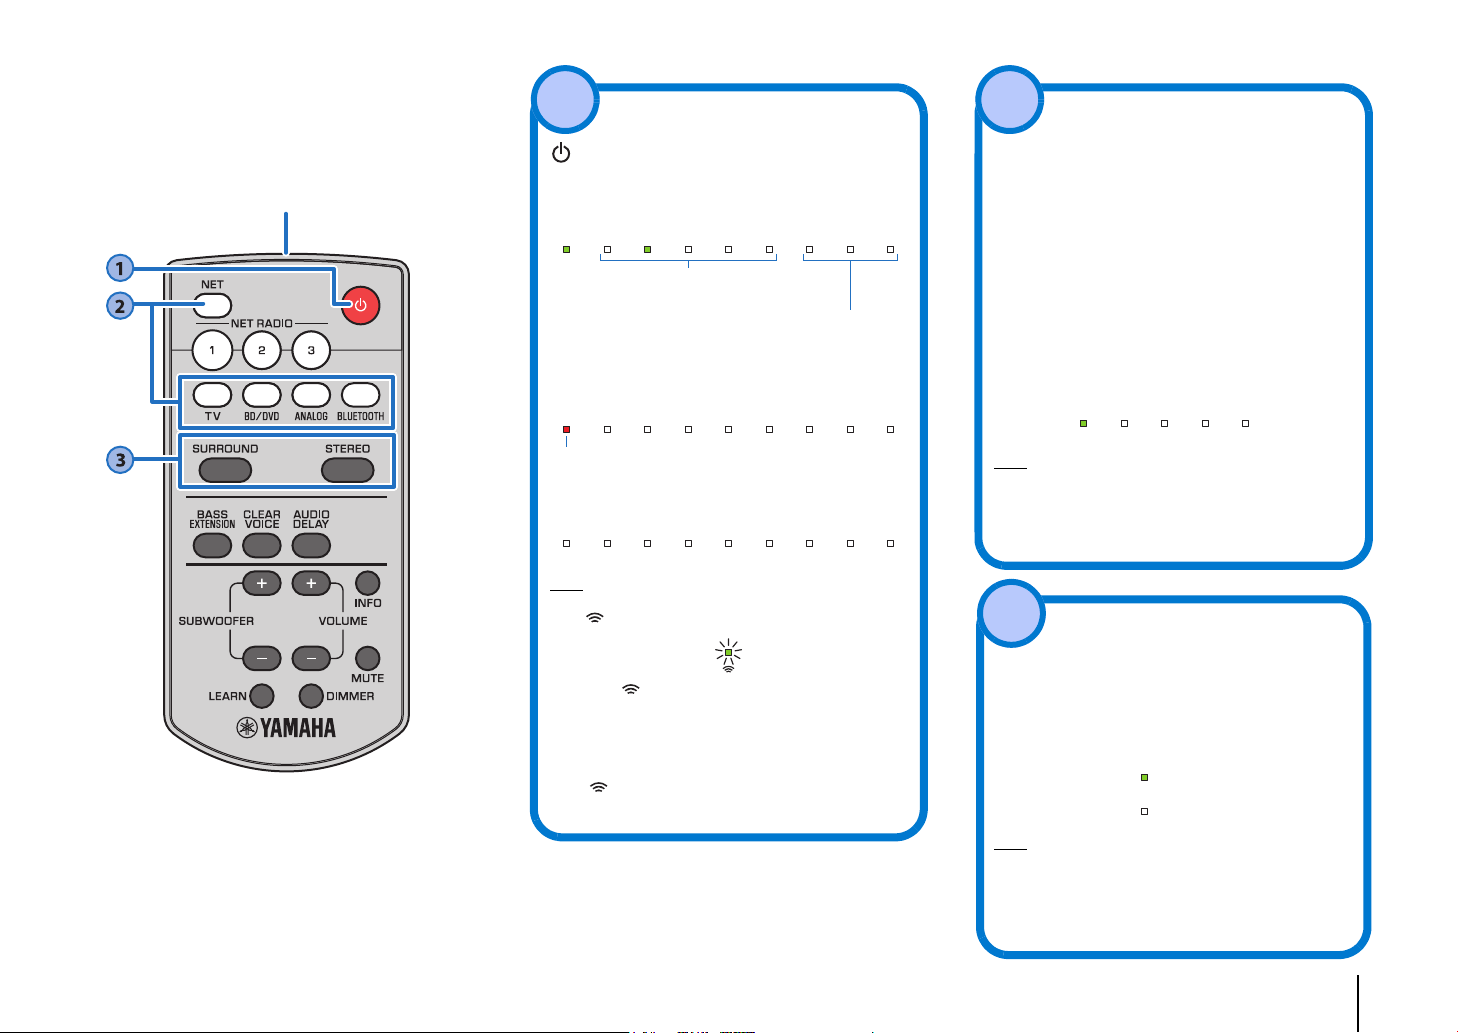
PLAYBACK
Remote control signal transmitter
Transmits infrared signals.
(power) key
Turns on or off the unit.
Turned on
Turned off (network standby function enabled,
p.30)
Turned off
HINT
• When the unit is turned on for the first time after purchase,
the indicator flashes slowly.
While the indicator is flashing, network settings from
your iOS device (an iPhone, etc.) can be applied to the unit
to connect the unit to a wireless network. For details on
settings, see “Playing back music with AirPlay” (p.24). Press
any key on the remote control to cancel this function if it will
not be used.
The indicator does not flash if the unit’s NETWORK jack
is connected to a router using a cable (wired connection).
The indicator for the last input
source selected glows green.
Indicates the surround setting, and network
(p.18) or Bluetooth (p. 16) connection status.
Glows (red)
1
Input keys
Select an input source to be played back.
TV......................TV audio or sound from a device
connected to the unit’s TV input jack
BD/DVD.............Sound from a device connected to
the BD/DVD input jack
ANALOG...........Sound from a device connected to
the ANALOG input jacks
BLUETOOTH .... Sound from a Bluetooth connected
device
NET ...................Audio acquired via a network
The last audio source listened to is
selected when the NET key is
pressed.
The indicator for the selected input source glows.
(Example: when TV is selected)
HINT
• To play sound from the device connected to the TV or to
watch video from the device, set the TV’s input source to the
playback device.
• For playback from a Bluetooth device, refer to page 16. For
audio playback via a network, refer to pages 22 to 25.
TV BD/DVD ANALOG NETBLUETOOTH
SURROUND and STEREO keys
Switch between surround and stereo (2 channels)
playback. When surround playback is selected, you
can enjoy a realistic sound effect using Yamaha’s
exclusive AIR SURROUND XTREME.
SURROUND........ Glows (surround playback)
STEREO.............. Off (stereo playback)
HINT
• Dolby Pro Logic II is used when 2-channel stereo signal is
played in surround.
• The TV PROGRAM, MOVIE, MUSIC, SPORTS, or GAME
surround mode can be selected using the MusicCast
CONTROLLER app (p.19) installed on a mobile device.
SURROUND
SURROUND
2
3
Operations
PLAYBACK ➤ Operations En 12
 Loading...