

Page 1

The Yamaha XG Editor
By
G.Gregson
XGedit95 User Manual Page 1
Page 2

Contents
1. INTRODUCTION ................................................................................................................................... 4
2. GETTING STARTED.............................................................................................................................6
2.1 System Requirements.................................................................................................................... 6
2.2 Installation......................................................................................................................................6
2.3 Configuration..................................................................................................................................6
3. THE MAIN SCREEN .............................................................................................................................7
3.1 Controls.......................................................................................................................................... 7
4. MASTER MODULE.............................................................................................................................10
4.1 Midi File Edit Parameter Contents LEDs.......................................................................................10
4.2 Midi File Format LEDs..................................................................................................................10
4.3 Number of Parts LED....................................................................................................................11
4.4 Thru LED......................................................................................................................................11
4.5 Transport Buttons .........................................................................................................................11
4.6 PPQ Dial.......................................................................................................................................11
4.7 Knob Controls...............................................................................................................................12
5. EQUALISER MODULE.......................................................................................................................13
5.1 Equalisation Program List-box......................................................................................................13
5.2 Equaliser Controls........................................................................................................................13
6. DISPLAY PANEL ................................................................................................................................14
6.1 Volume Panel Mode..................................................................................................................... 14
6.2 Pan Panel Mode...........................................................................................................................14
6.3 Amplitude Envelope Generator (AMP EG) Panel Mode................................................................14
6.4 Pitch Envelope Generator (PITCH EG) Panel Mode.....................................................................14
6.5 Reverb Panel Mode ......................................................................................................................14
6.6 Chorus Panel Mode ......................................................................................................................14
6.7 Variation Panel Mode ...................................................................................................................14
7. A TO D CONVERTERS.......................................................................................................................15
7.1 AD Controls..................................................................................................................................15
7.2 AD Message Enables...................................................................................................................15
7.3 General ........................................................................................................................................15
8. EFFECTS & CONTROLLERS MODULE.............................................................................................16
8.1 Understanding The Effects Unit.................................................................................................... 16
8.2 Effects Unit...................................................................................................................................17
8.3 Effect Parameters Module............................................................................................................19
8.4 Controllers....................................................................................................................................24
9. PART & DRUM MODULE ...................................................................................................................26
9.1 Part Edit Mode..............................................................................................................................26
XGedit95 User Manual Page 2
Page 3

9.2 Drum Edit Mode............................................................................................................................28
10. ENABLES MODULE........................................................................................................................... 29
10.1 Message Enables.........................................................................................................................29
11. KEYBOARD........................................................................................................................................30
11.1 Selecting Key Ranges...................................................................................................................30
11.2 Auditioning Sounds.......................................................................................................................30
11.3 Velocity Limit................................................................................................................................30
12. VOICE BOX........................................................................................................................................ 31
12.1 Part Selection...............................................................................................................................31
12.2 Midi Channel Selection................................................................................................................. 31
12.3 Element Reserves........................................................................................................................31
12.4 Selecting Voices...........................................................................................................................31
13. MENUS...............................................................................................................................................34
13.1 File Menu......................................................................................................................................34
13.2 Setup Menu..................................................................................................................................35
13.3 Utils Menu....................................................................................................................................37
13.4 Help Menu....................................................................................................................................37
14. SW MIXER..........................................................................................................................................38
15. WORKING WITH MIDI FILES.............................................................................................................40
15.1 Introduction...................................................................................................................................40
15.2 Setting Up Your Midi System........................................................................................................40
15.3 The Authoring Process.................................................................................................................45
15.4 Merging Midi Data ........................................................................................................................49
15.5 Saving Midi Data ..........................................................................................................................52
15.6 Using Native Save Formats..........................................................................................................53
16. CREATE YOUR OWN SYSTEM EXCLUSIVE MESSAGES................................................................54
16.1 Hexadecimal Notation and MIDI ...................................................................................................54
16.2 Check This Out First.....................................................................................................................55
16.3 XG Sysex.....................................................................................................................................57
16.4 Constructing XG Parameter Change Sysex..................................................................................58
16.5 Other Useful Sysex Information....................................................................................................60
XGedit95 User Manual Page 3
Page 4

1. Introduction
Legal Stuff - License/ War r ant y/ Di scl aimer
XGedit is distributed as Shareware. You may make as many backups of the program as you need, however
you may not run the registered version on m or e t han one PC at a time.
You may not distribute XGedit for pr ofit except by arrangement with the aut hor .
You may not disclose registration keys to non-registered users.
The contents of this user manual are the copyr ight of G ar y Gregson. Copying, reproduction or distribution of
this manual (by electronic means or otherwise) are f or bidden without the written consent of the author .
XGEDIT IS PROVIDED ON THE UNDERSTANDING THAT THE USER ACCEPTS ALL RESPONSIBI LITY
FOR USE OF THE PROGRAM . THE AUTHO R WILL NO T BE LIABLE FO R ANY DAMAG ES O R LOSS O F
DATA INCURRED BY USE OF THE PROGRAM. THE AUTHOR DOES NOT GUARANTEE THE
PROGRAM IS FIT FOR PURPOSE OR PROVIDE ANY O T HER G UARANTEES OF MERCHANTABILITY.
XGedit is off i cially endorsed by Yamaha UK and supporte d by Yam aha Japan
With the exception of the above the mention of any Trademarks, product names etc. are for identificat ion
purposes only and do not constitute an endorsement of any kind.
If you find this program useful and wish to cont inue using it beyond the 21 day evaluation period, you are
obliged to register your copy with the author (See the help f ile section
Registration
for details).
XGedit95 User Manual Page 4
Page 5

What Is XGedit?
XGedit is a Windows based editor/librarian for the Yamaha XG series of synt hesiser modules. The editor
may also be used in GM mode to edit the paramet er s of other synth modules and sound cards.
The main features of the program ar e as follows:-
Access to all XG parameters in real-time using simple mouse actions.
A single dialog window designed to represent a conventional rack based synth front panel.
Parameters separated into logical groups:-
Master Module
Part/Drum Module
Effects and Controller Module
Effects Parameters M odule
Enables Module
Keyboard
Voice Selection
Analogue To Digital Converters
LCD panels providing overviews across parts for the main system parameters and Mini Mixer
functionality
All edits may be performed as System Exclusive messages, with a limited subset being
provided as controller messages (GM Mode).
Soft midi thru wit h r e- c hannellisat ion to current edit part
.
Support for the SW60XG On boar d m ixer and SW1000XG Audio part s
On Screen control wheel for continuous controllers
Instant auditioning of parts fr om on- scr een keyboar d.
Full Save/Load facilities (
sets.
Saving of parameters to type 0/1 Midi files for impor t into sequencer software (with choice of
message content Sysex/Controllers).
Merging of Editor Setup data to impor t ed m idi files
Midi file playback for simultaneous editing
XG level 1 Edit mode for m axim um file compatibility across XG synths
Full program description and on-line help
in registered version
) for complete module, individual parts and drum
(XGedit provides only limited midi file sequencer functionality - this is only provided for auditioning of editor
setups with imported midi files……true sequencer funct ionality is best left to dedicat ed software. To this end
XGedit may be used in parallel with your favourite sequencer to perf or m r eal t ime edits ) .
If you have any modifications you would like to see incorporated (or bugs you would like removed) please
contact the author. However suppor t will only be provided to registered users.
XGedit95 User Manual Page 5
Page 6

2. Getting Started
2.1 System Requirements
The program is designed to operate on machines with the following specification
A 486 PC (or faster) running Microsoft Windows 95 or NT4.0
•
8M Byt es RAM
•
1. 5M byt es Disk space
•
M ult imedia Drivers f or use with at t ached XG Synthesiser
•
Mouse
•
It is recommended that t he program be used at a minimum Windows display resolution of 800 x 600 with
256 colours. However to allow use on display resolutions below this, the dialog window boundary is sizeable
and may be scrolled.
2.2 Installation
Unpack t he XG EDIT. ZI P ar chive t o a t em por ar y direct or y.
•
Fr om Windows, RUN the install program SETUP.EXE
•
Fr om t he inst allation dialog, follow prompt s unt il the installation is complete.
•
You m ay now delete t he t em por ar y dir ect or y
•
Ret ur n t o Pr ogr am M anager / Deskt op and click on the XG edit icon t o st ar t the program.
•
2.3 Configuration
From the
required input/output dr ivers for your attached XG synth (these will nor mally be listed as SB16 In/ Out for
Daughter boards or SW60 for internal cards. External modules may be attached to any valid midi por t with
external connections).
Setup Menu
select the
Setup Midi
option to bring up the Midi Port Setup dialog. Select the
It is strongly recommended that a dr iver capable of accept ing m ultiple connections for M idi Out is used. This
will enable the editor to be used in parallel with your favourite sequencer (such a driver is the SW60XG
Driver, the Twelve Tone MPU driver, Herman Seibs Multimid driver, the MidiOx Midi Yoke drivers or t he
Hubis Loopback drivers).
Contrary to popular belief Multimid is compatible with most Win95 midi drivers (if you are using
SB16 drivers ensure you have version 4.13 or above).
Multi Client drivers may be obtained by following the links from the Utils page of the aut hor s web
site http://www.cybertheque.fr /galerie/GGregson
To test if the XG synth module is in communication with t he program, right click on the display keyboard. If
you hear the notes being played then everything is OK. If not : -
Conf irm t he cor r ect dr iver s ar e installed by using an alternat e pr ogr am t o dr ive t he synt h f r om
•
Windows.
Check all midi leads are correctly connected.
•
Once you can hear notes being played from the keyboard, try moving the volume knob within the Part
module. If the sound level from the synth changes accordingly then everything is OK. If not: -
Select t he XG Reset but t on t o ensur e the attached synth is in XG mode.
•
Check t he UNIT Number displayed in the Mast er M odule mat c hes t hat of the Attached synth (if in
•
doubt Press the GM button and try the Part volume knob again. If the knob now works, then you
have probably changed the default setting ( 16) f or the XG UNIT number. Click on the GM button
again to return to Sysex mode and adjust the UNIT num ber dial until the volume knob works.
You’re now ready to start editing…I hope you enjoy the program and support future versions by
registering
.
XGedit95 User Manual Page 6
Page 7
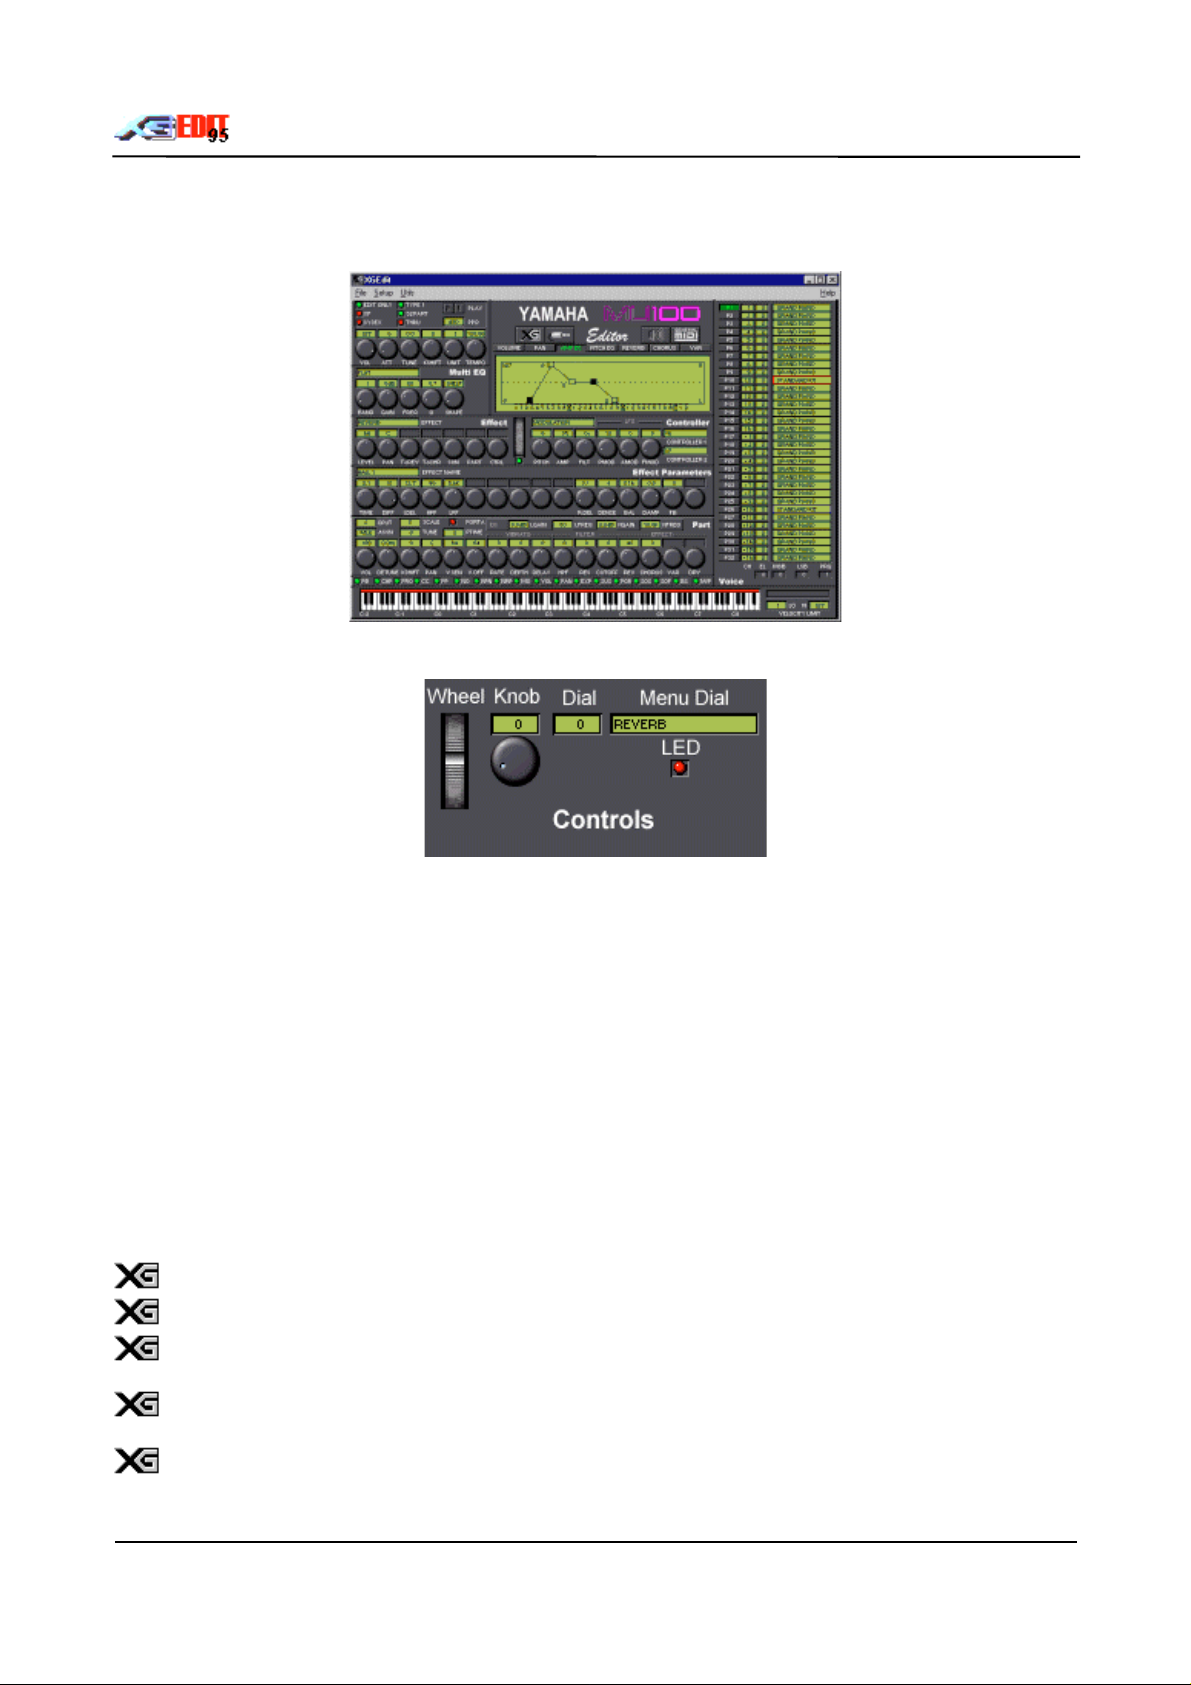
3. The Main Screen
The main screen consists of a single dialog window from which all XG parameters may be accessed.
3.1 Controls
You can use the Standard Windows keys to move around the main screen cont r ols: -
TAB - m oves bet ween gr oups of cont r ols
•
Curs or Ar r ow Keys - m ove bet ween cont r ols within a group.
•
The currently selected control is always highlighted.
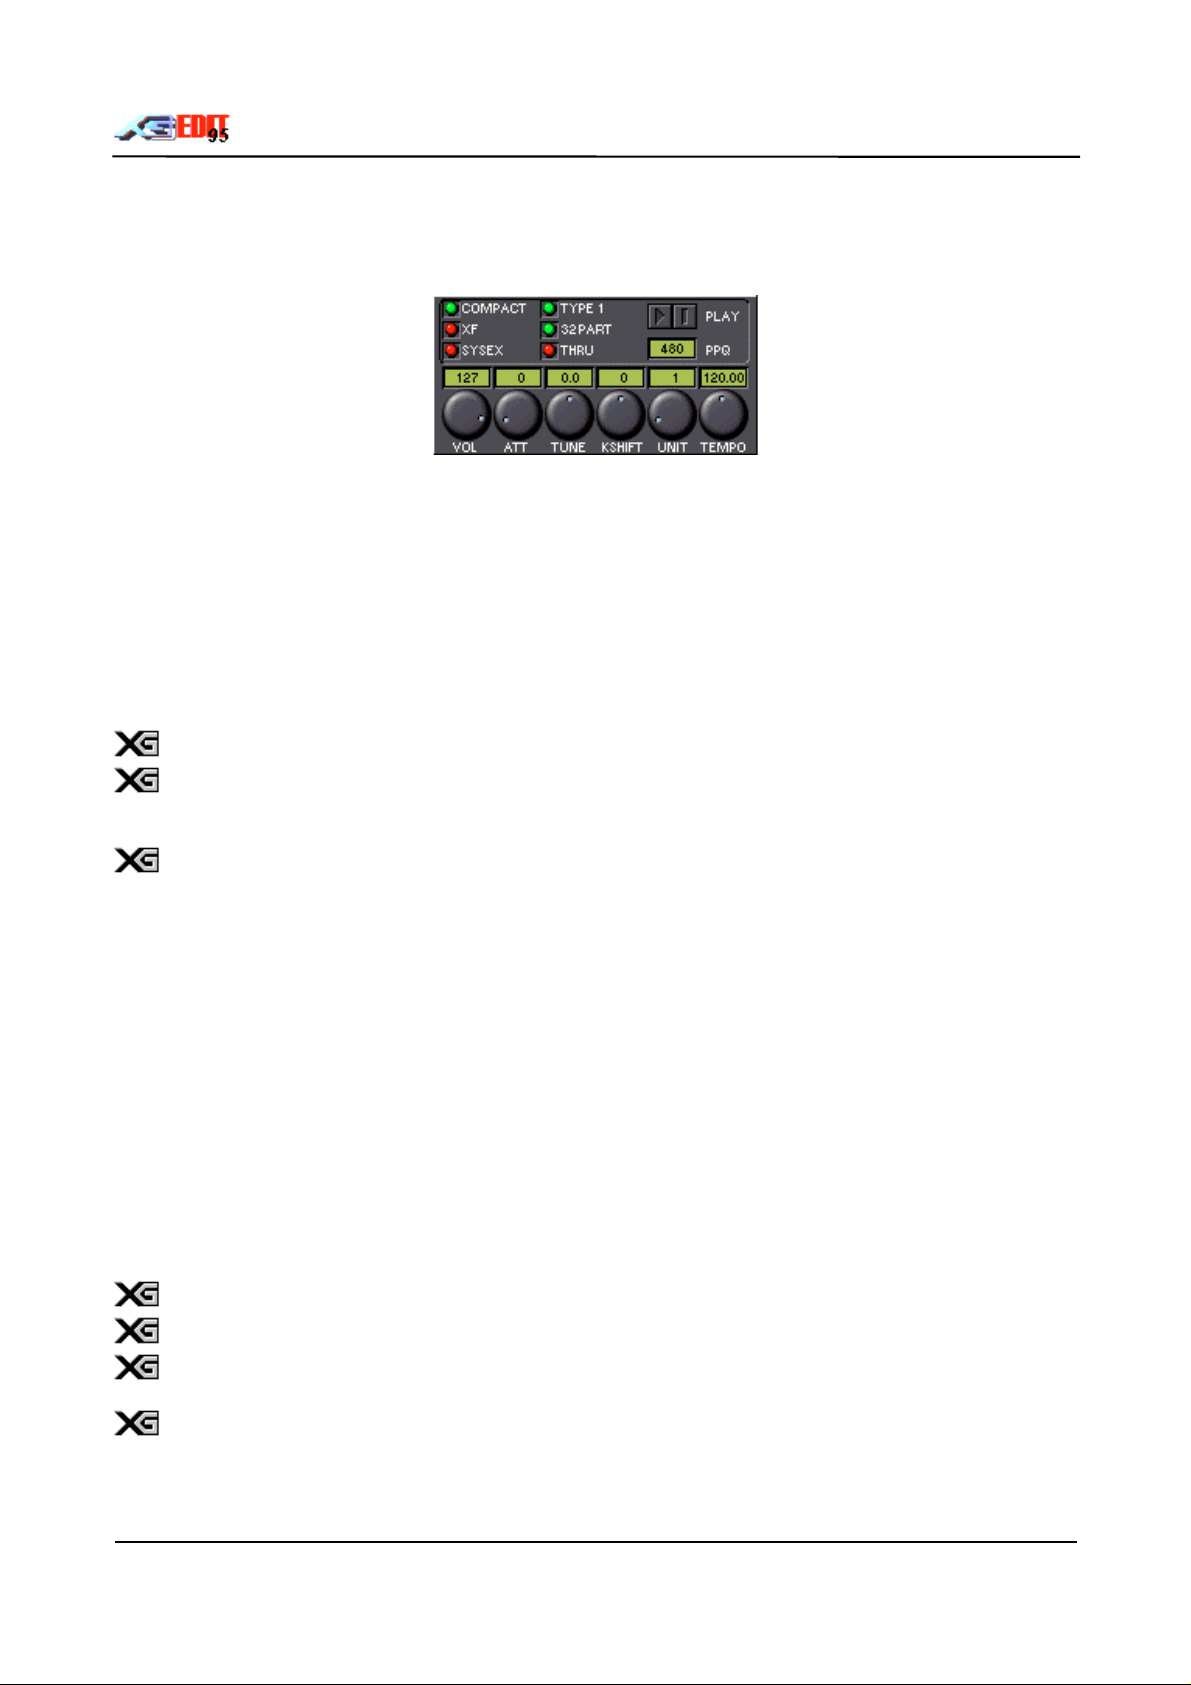
3.1.1 Knobs
Activated by pressing and holding down the left mouse button over t he knob face (t he dial above the knob
illuminates to provide a digital readout). Moving the mouse with the button down will cause the knob to
rotate
Up / Left anti-clockwise
Down / Right Clockwise
Releasing the mouse deactivates the knob. The knob will turn Yellow when the control is in its non-def ault
position.
Controls can be reset to their default posit ion by clicking with the right mouse but ton.
Holding down both the left and right mouse buttons allows fine adjustments t o be m ade.
Note that the mouse does NOT have to rem ain over the knob face. So long as t he left mouse
button is down, the mouse may be moved lar ge distance and still operate the control
The PC Keyboard +/- keys will increment/decrement the highlighted knobs value (useful for
adjusting values while simultaneously auditioning the sound from the on screen keyboard)
The Setup Menu "Reverse Dial Action" option may be used to reverse the direction of the knobs
with respect to vertical mouse movement (such t hat behave m or e like sliders i.e. Up for increase)
XGedit95 User Manual Page 7
Page 8

3.1.2 Dials
are digital readout controls with no associated knob. To adjust the value press and hold the left mouse
button do wn o v e r the dial. M o v in g the mouse wit h the button d o wn will in c rement t he d ia l.
Up / Left decrease
Down / Right Increase
Releasing the mouse deactivates the dial
PC keyboard +/- keys may also be used to adjust dial readouts when highlighted.
The Setup Menu "Reverse Dial Action" option will cause the vertical mouse movement response to be
reversed.
3.1.3 LED’s
LEDs are toggle controls, activated by single clicking with the left mouse button or pressing the space bar
whilst highlighted.
Green Enabled
Dark Green Enabled but cannot be modified in current mode
Red Disabled
Dark Red Disabled and cannot be modified in current mode
3.1.4 Wheel
The wheel represents a synth controller wheel. Pressing and holding the left m ouse button over the wheel
allows the controller value to be altered. The LED below the wheel determines if wheel messages are
automatically sent after contr oller param eter edits.
The PC keyboard +/- keys may also be used to adjust the wheel value when highlighted.
3.1.5 List/Combo Boxes
Used to select values from a pre-defined list. Operate as st andar d Windows Combo boxes.
3.1.6 Buttons
Buttons are activated by clicking with the left mouse butt on or by pr essing t he space bar when highlighted.
Silence Button
A standard push-button - Resets all notes and controllers. Press to silence hung notes. Caution
- this will also reset the cont r o ller wheel posit ions.
XG Button
A standard push-button - Resets t he attached synth module to XG mode. Caution - all current
edits will be lost.
AD Button
A standard push-button – Opens the AD/Audio panel for editing of Analogue To digital
Converter and Aux part parameter s.
XGedit95 User Manual Page 8
Page 9

GM Button
A two state push button. If the but ton is up the program will use System Exclusive messages t o
communicate with the synth m odule. If the button is down the program will use only General
Midi controller messages.
Note that only a small subset of the XG parameters may be altered by controller messages
(Controls update to show which are available).
Most GM synths respond to the cont r ols available in GM m ode. However, some Non Registered
(NRPN) Midi Control Messages may be mapped to different f unctions.
If XGedit is to be recorded by a sequencer, the user should be aware of the advantages and
disadvantages associated with each mode:-
Sysex Messages Controller Messages
Allow individual parts to be edited
even if they share a common midi
channel.
Can cause unpredictable or undesirable
effects if two parts share the sam e m idi
channel
Difficult to selective ly filter Easily select iv ely filtered
Encompasses all available edit
parameters
May only be used for those parameters
which have equivalent controller, RPN
or NRPN message..
More compact for large dumps and
therefore faster to transmit. Better
for global setups at the start of a
More compact for smaller edits and
hence best suited for use within the
body of a song.
song
XGedit95 User Manual Page 9
Page 10
4. Master Module
The Master module controls the global settings for both the XGedit program and the attached XG synth
module.
4.1 Midi File Edit Parameter Contents LEDs
These LEDs determine the cont ent of saved midi fi les as follows:-
Compact
messages are only used where no equivalent controller based message is available).
- The midi file is structured in accordance with Yamaha’s XG authoring gui delines. The content is similar
XF
to Compact but also contains import ant par am et er s which may be at their default setting.
Sysex
messages.
- The midi file contains a GM/XG reset plus those parameters which have been edit ed (Sysex
- The midi fi le contains is sim ilar to Compact but all parameters are expressed as System Exclusive
XGedit guarantees correct m idi timing for saved event s as stated in the XG specification.
If the editor setup contains mult i part layers (i.e. several synth parts assigned to the same midi
channel), then the user must utilise the Sysex midi save format to ensur e correct interpretation
within a sequencer. I.e. Sysex messages are midi channel independent.
The status o f the Content option will be sa ve d in XGEDIT.INI for use in future session s
4.2 Midi File Format LEDs
The Type LED determines the f or m at of saved midi files.
Type 0 files (LED red) contain a single track incorporating all midi channels. All sequencers should be
capable of reading this format
Type 1 files (LED green) contain multiple tracks and are more com m only used by modern sequencers.
Saved Type 1 midi files contain multiple tracks as follows:-
Syst em - A shor t track providing the GM/XGReset m essages for module initialisation plus the global
•
synth parameters (master s/ ef f ect s/ equalisation)
O ne Tr ack per par t. - tracks contain midi controller and Sysex messages f or t he par ts parameter edits.
•
Each track will be named with its corr esponding inst r u m ent assignm ent. (e.g. P1 - Harpsichor d
…..indicating the track is used by synth part 1 and is set to t he Harpsichord voice).
A To D t r ack - cont ains Sysex messages for A to D parameter edits.
•
Tracks assigned to drum parts will also include any associated drum edits
Merging a Midi file will automat ically updat e t he Midi Setup dialog with the midi files parameters.
Merged Type 1 files may be converted to Type 0 files by using the Format checkboxes. However
Type 0 files cannot be converted to Type 1 files.
The SW60XG mixer unit parameters ar e saved within the editor setup files but are never saved to
midi files.
XGedit95 User Manual Page 10
Page 11

4.3 Number of Parts LED
This LED determines the number of synth part s saved t o t he m idi file.
Normally the saved file will only include tracks f or System data, A to Ds and 16 synth parts . On mult i port
synths the user may choose to save all 32 synth parts. However, since there is no way to represent port
number within a midi file, the user will have to perform this assignm ent later within a sequencer.
The status o f the Parts o ption will be saved in XGEDIT.INI for use in future sessions ..
4.4 Thru LED
This LED selects whether midi thru is enabled. If enabled; midi messages (with the exception of system
exclusive) appearing at the input device will automatically be transfer red to the output. If the current part is
set to a specific midi channel 1 - 16 then all m essages will be re-channellised to this channel. If the current
part is set to ‘NO’ (i. e. the part is disabled), then no re- c hannellisat ion occur s .
For multi-port use, r e- c hannellisat ion occur s t oget her with automatic port selection.
The LED’s stat e will b e s a v ed in XGEDIT.INI for use in fu ture sessions .
4.5 Transport Buttons
These buttons control Midi Fi le Playback
When a midi file is loaded the transport butt ons ar e enabled and allow the file to be auditioned.
The current midi file play capabilities of XGedit are limi ted i.e. the editor only allows playback from the start
to end of a file. As such, the playback functionality is only designed t o allow auditioning of a m er ged midi f i le
and for experimenti ng with edi t s. In general the program is better used i n par allel with a sequencer.
Performing any file operations will automatically stop file playback.
Note that the merge operation also strips non XG data from t he setup bars of a m idi fi le. Consequently non
XG data files may not play properly after merging.
4.6 PPQ Dial
This determines the resolution of t he saved m idi file e.g. a v alue of 120 implies that there ar e 120 midi ti cks
per quarter note.
The higher the resolution, the greater the accuracy of playback timing. However slower PCs may have
problems playing back files at very high resolution.
In general a value of 384 is recommended for 486 based machines and a values of 480 for Pentiums
The Time base setting will be saved in XG EDIT.INI f o r u s e in future ses s ion s ..
XGedit95 User Manual Page 11
Page 12
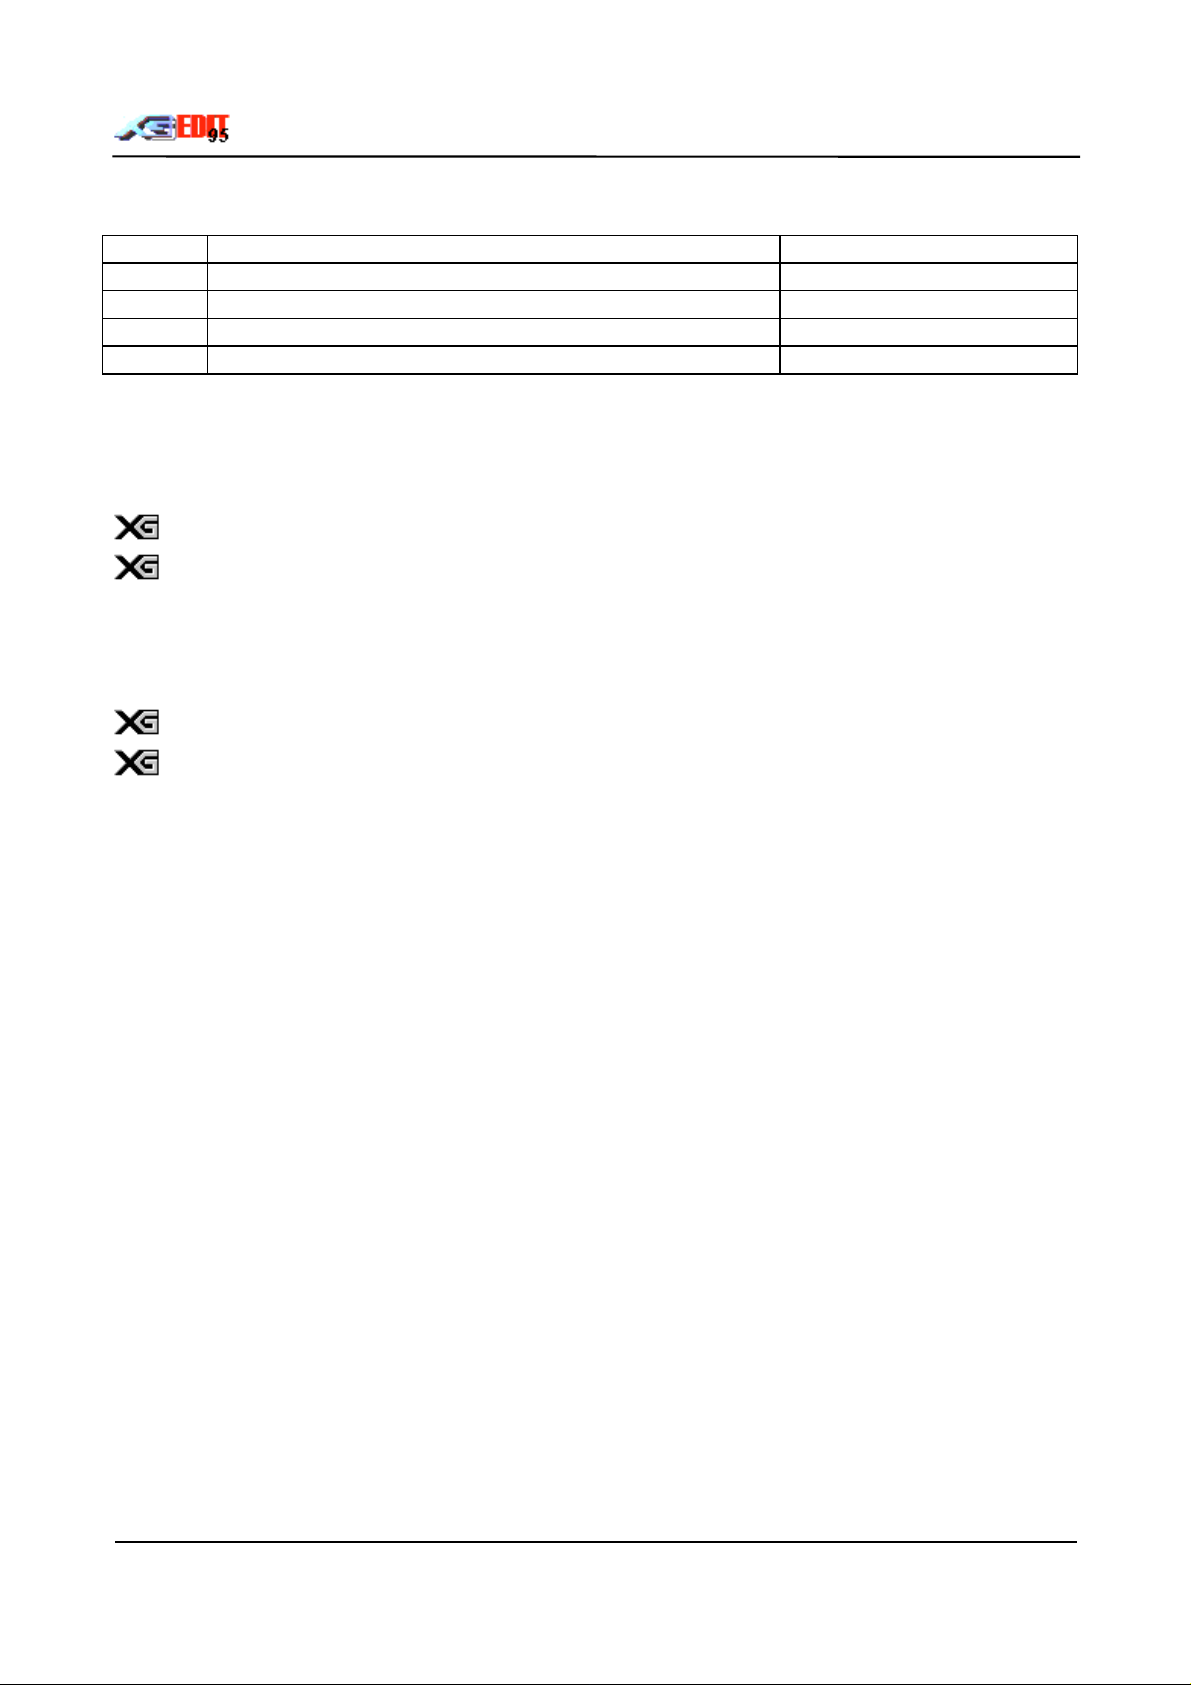
4.7 Knob Controls
These controls adjust the synths global parameters: -
VOL Master volume level 0 - 127
ATT Master volume attenuation level 0 - 127
TUNE Master tuning control -102.4 - +102.3 cent
KSHIFT Master Key Shift control -24 - +24 semitones
UNIT Module Unit Number (see below) 1 - 16
4.7.1 Unit Number Knob
This knob selects the address of the XG module (in most cases the default value will be correct). If you
have multiple external modules attached to your PC, then you may wish to alter this value to select the
desired module.
modules are factory configured to r eceive dat a on all device numbers
The knobs state will be saved in XGEDIT.I NI for use in future sessions.
4.7.2 Tempo Knob
This Knob controls the default tempo saved to m idi files. The knob may also be used in real-time to adjust
midi file playback tempo.
The XG Authoring guidelines recommend Tempo values between 32 - 250 bpm
The dials stat e will b e s av e d in XGEDIT.INI f o r use in futu r e s es s io ns .
XGedit95 User Manual Page 12
Page 13

5. Equaliser Module
The Equaliser module provides editing of the built in sound output equalisation unit.
This function is only available on the higher range devices. For other XG synths use the
equalisation parameters built into the Variation eff ect s
5.1 Equalisation Program List-box
The list-box provides convenient access to the built in Equalisation macros. Selecting a macro will
automatically update all equalisation controls to the appropriate values.
5.2 Equaliser Controls
BAND Selects the band currently being edited 1 - 5
GAIN Adjusts the gain applied to the current band filter -12dB - +12dB
FREQ Selects the frequency of the current band filter 32Hz - 16kHz as appropriate to band
Q Adjusts the current filter Q value 0.1 - 12.0
SHAPE Adjusts the filter shape SHELF/PEAK
XGedit95 User Manual Page 13
Page 14

6. Display Panel
The display panel provides a graphical representation of the system parameters. The panel has seven
modes, which are selected by left clicking on the appropriate button above the display. Note that the
standard Windows keyboard navigation keys may be used to select different modes, however the envelope
parameters may only be edited using the mouse.
6.1 Volume Panel Mode
This mode provides a graphical representation of the Volume settings for each part. Each bar corresponds
to a given part as indicated on the X axis. The bar labelled
volume of a giv e n p art will provide a v is ua l represent a tion of the r e la tive volume lev e l.
The Y axis indicates the range of values. To adjust a parts volume left click on the cor responding bar and
drag up or down like a conventional slider. Right clicking on a bar will r eset its value to the default sett ing.
6.2 Pan Panel Mode
This mode provides a graphical representation of the Pan sett ings for each part. Operation is identical to
that of the Volume mode. ( The Y axis indicates the r ight/left position).
6.3 Amplitude Envelope Generator (AMP EG) Panel Mode
This mode provides a graphical representation of the ADSR envelope of the current part. The highlight
markers are used to change the envelope shape.
To change a marker left click and hold the mouse button down over the marker. Moving the mouse left and
right will decrease/increase the envelope parameter correspondingly. A digital readout adjacent to the
marker provides the value for the cur r ent position ( all marker s m ay be set over the range -63 - 0 - +63).
represents the master set ting. Adjusting the
S
Right clicking o n a marker will r e s et its value t o the default setting.
If the Part module is in Drum Edit mode, then the AMP envelope corr esponds to the cur rent dr um
key amplitude envelope
6.4 Pitch Envelope Generator (PITCH EG) Panel Mode
This mode provides a graphical representation of the Pitch envelope of the current part. The highlight
markers are used to change the envelope shape.
To change a marker left click and hold the mouse button down over the marker. Moving the mouse left and
right will decrease/increase the envelope time param eter correspondingly. M oving the mouse up and down
will increase/decrease the envelope pitch off set parameter correspondingly. A digital readout adjacent to
the marker provides the value for t he cur r ent posit ion (all mark er s m ay be set over t he r ange - 63 - 0 - + 63).
6.5 Reverb Panel Mode
This mode provides a graphical representation of the Reverb sett ings for each par t. O peration is identical to
that of the Volume mode.
6.6 Chorus Panel Mode
This mode provides a graphical representation of the Chorus sett ings for each par t. O peration is identical to
that of the Volume mode.
6.7 Variation Panel Mode
This mode provides a graphical representation of the Variation settings for each part . Operation is identical
to that of the Volume mode.
XGedit95 User Manual Page 14
Page 15
7. A To D Converters
This module provides control over the A to D convert ers of the MU10/MU80/MU100/SW1000 and SW60
synths.
7.1 AD Controls
Stereo Select AD converter stereo mode of
operation (Ads are grouped in pairs and
controlled from a single set of parameter s)
GAIN Selects input gain level for external module
AD inputs
OP Selects Output routing for SW1000XG Aux
parts
VOLUME
FADER
PAN AD Pan position 63L - C - 63R
REV AD send level to Reverb unit 0 - 127
CHOR AD send level to Chorus unit 0 - 127
VAR AD send level to Variation effect unit . 0 - 127
DRY AD dry level 0 - 127
MIDI AD midi channel number (allows control
CC1/CC2 AD Continuous controller assignments 0 - 95
AD volume level 0 - 127
using Midi controllers in place of System
Exclusive)
Note :
The MU10s ADs are always linked as a stereo
pair
MIC/LINE (not available on the SW60XG)
Only Available on the SW1000XG
1 - 16
7.2 AD Message Enables
When the AD channel is assigned to a midi channel using the MIDI dial, the following messages may be
enabled/disabled:-
PRO Program change messages
CC General controller change messages not
include above
VOL Volume controller messages
PAN Pan controller messages
EXP Expression pedal messages
BS Bank Select
7.3 General
The following general AD properties should be noted:-
XGedit does not provide a specific capability to select the AD programs available in some XG
synths. Incorporation of this feature would greatly increase the complexity of the application and
confusion of the user (as such program changes have global affects on the synths setup i.e.
cause changes to multiple AD parameters and the system wide effects unit). If the user really
must have this function .....then assign the AD to a midi channel and use the program changes
within the voice box for the corresponding channel!
The SW60XG AD operation is affected by the mixer panel set tings. In particular the use of the
KARAOKE LOCK feature will disable AD edits (and Variation effect edits). The Mixer STEREO
button also enables AD1 to be used as a stereo AD.
The Master channel of the AD panel provides a convenient repeat display of the global Volume,
Reverb, Chorus and Variation controls
XGedit95 User Manual Page 15
Page 16
8. Effects & Controllers Module
The Effects module consists of controls relating to both the global effects settings and the part based
continuous controller settings.
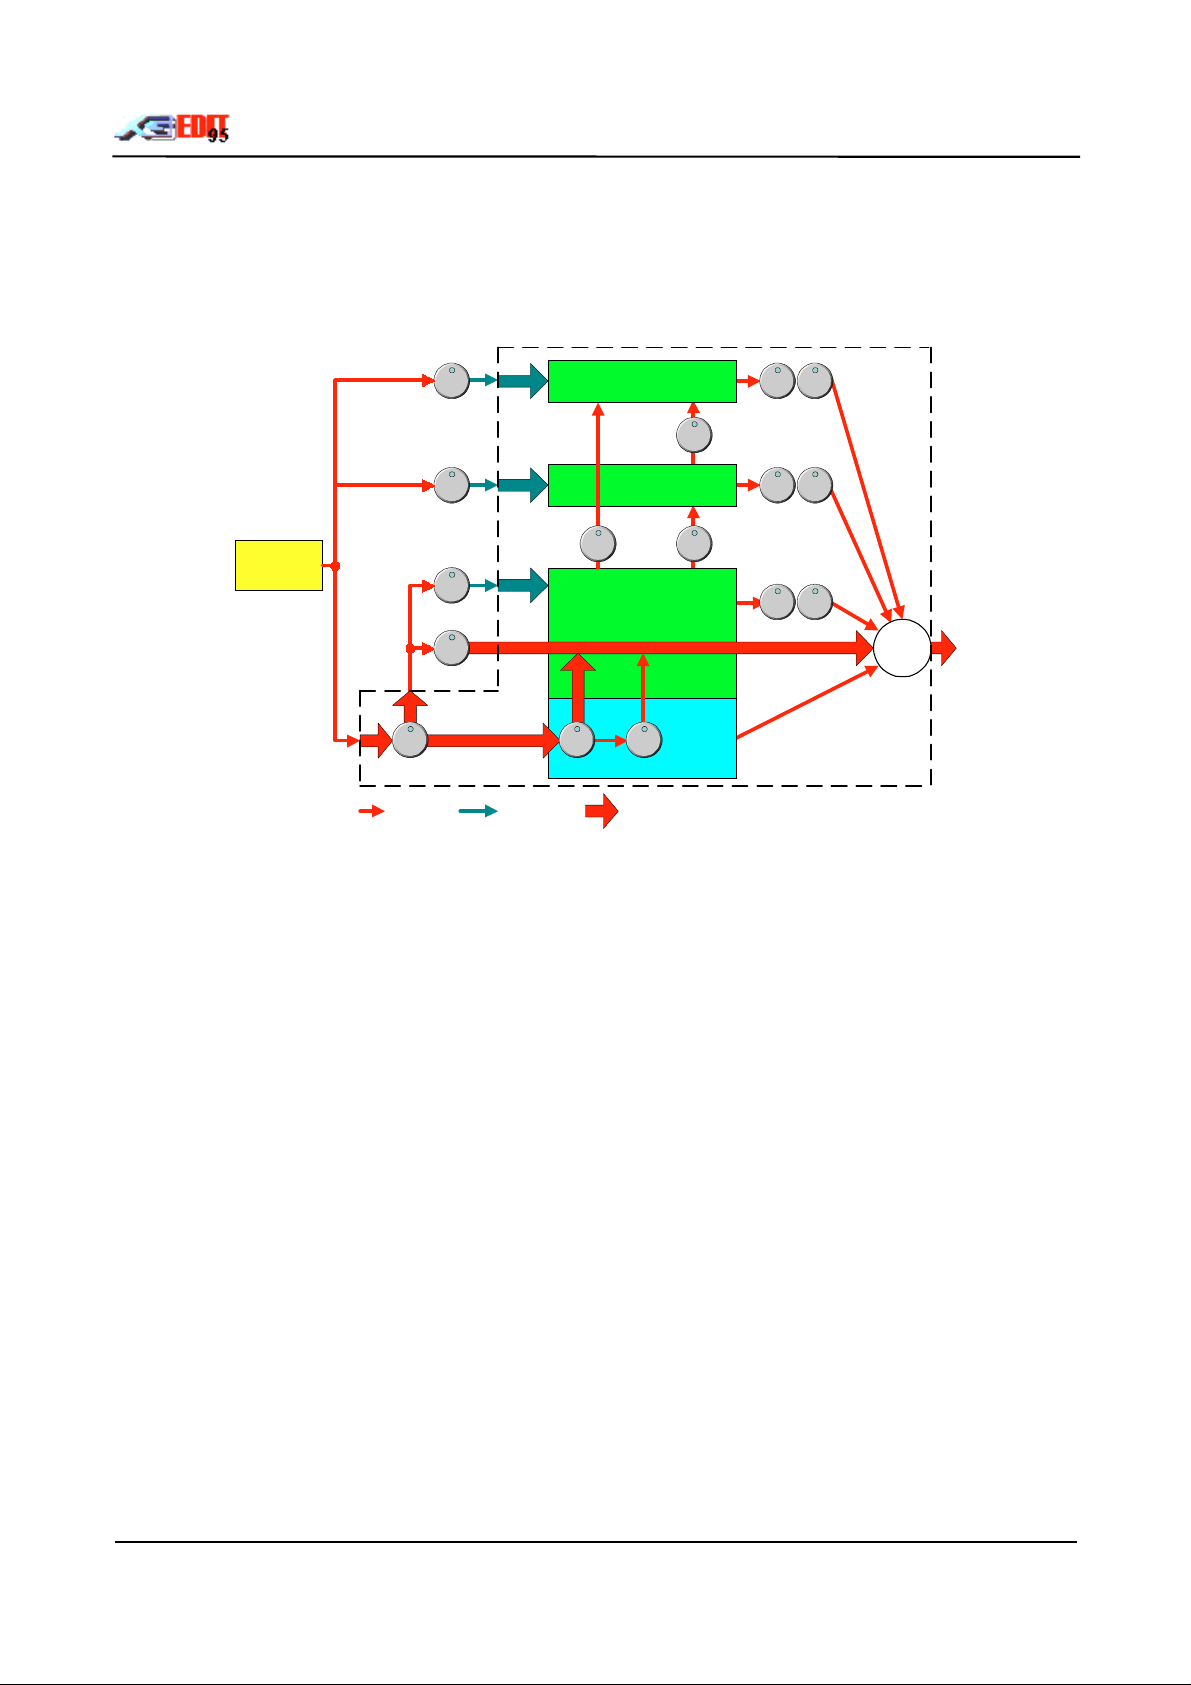
8.1 Understanding The Effects Unit
REVERB
LEVEL PAN
ToREV
LEVEL PAN
LEVEL PAN
SYNTH
PART
REV
PART BASED
CHOR
VAR
CHORUS
ToREV ToCHOR
VARIATION
+
DRY
SYS
INS
CON PART D/W
STEREO MONO
MULTI
PART
SYSTEM GLOBAL
8.1.1 Three Effects Units
Basically there are three effects modules within t he XG synt h, nam ely REVERB, CHO RUS and VARIATIO N
(the MU80/MU100/SW1000 have additional effect unit s that only operate by Insertion). The t hree modules
are System Global, i.e. changing the setup of a module affects ALL parts using that module. Consequently
you may only have three different eff ect s active at one time (four on the MU80, five on the MU100/SW1000,
six on the MU100R or SW1000 if the Virtual Harmony plugin card is fitted). Furthermore each effect unit
provides its own output level control LEVEL ( Effect Return), and panning contr ol PAN. Consequently you
may independently control the amount and panning position of each effect as applied to the final sound
output.
8.1.2 Individual Part Send Controls
The signals from each synth part are routed to the three effects units in proportion to their effect send
controls (labelled REV,CHOR and VAR within the XGedit Part Module). Hence you may simultaneously
apply full Reverb to part 1 by setting its REV knob t o maximum whilst disabling Reverb on part 2 by set tings
its REV knob to zero. In this way you can contr ol the amount of effect applied to each part as best suits
your songs mix. It should be noted that t he signal routed to the effects modules are monophonic, since the
effects modules provide their own panning controls
8.1.3 Variation Connections
The Variation unit is special in that it has two modes of operation, namely System (SYS) and Insertion
(INS). The desired mode is controlled using the CON knob within the XG edit Effects module (note t hat this
control is system global and that the EFFECT listbox must first be set to Variation before t he CON knob can
be adjusted). If we study the rout ing schematic above, then we can see how these two modes alter the
behaviour of the effects unit.
In System mode each synth part signal is routed via its Var iation send control (VAR) , wh ich ac ts in a simila r
XGedit95 User Manual Page 16
Page 17

manner to the Reverb and Chorus send controls. Hence, in this mode the Variation module is system
global. It should be noted that in this mode each synth part signal is also routed via a DRY knob. This
controls the amount of dry (pure signal) that bypasses the eff ects units and is routed directly to the out put.
This is useful if you do not wish to fully effect a sound.
e.g. you want a fully dry signal from the left speaker and a f ully eff ected signal from the r ight speaker. In t his
case you would set the part pan to left with the dry knob to maximum and the effect m odule pan to right with
the effect send level to maximum.
If we look at the Insertion mode rout ing (CO N set to INS) then things become somewhat more complex.. In
this mode each parts signal is fed via the system global PART control. This control is used to select one
part for Variation processing; all others ar e fed directly to the output as dry signals ( hence the Part DRY
knob is disabled, but Reverb and Chorus effects may be applied in the normal m anner). The part signal
selected for processing is routed via the Effect Param eters Dry/Wet contr ol (D/W) to determine the am ount
of effect applied (i.e. similar to the combination of the part VAR and DRY control in SYS mode). The
proportion selected for processing is then fed via the Var iation module and then to the output (note in this
mode the Variation module Level and Pan controls are bypassed as these are controlled by the part
settings).
Interestingly, inspecting the range of t he PART control, reveals t hat up to 64 synth parts (P1 - P64) and 63
analogue parts (AD1 - AD63) are catered f or within the XG f ormat . Current ly, the SW1000 pr ovide 32 synth
parts and 14 Analogue parts......hence we can only assume that Yamaha have been very generous with the
XG specs future expansion capability!
So what’s the point of Insertion if it still only provides a single simultaneous effect?………. Well t he benefit of
this mode is that certain paramet ers of t he effect s unit may be cont rolled by an external midi contr oller ( foot
pedals, wheels, breath etc.). e.g. The Rotary Speaker effect provides for external control of the rotation
speed (please refer to the XG effect tables for which parameters are controllable in this manner). Using
XGedit, the assigned external controller and amount of control can be setup using a combination of the
CTRL knob and CONTROLLER listbox.
8.2 Effects Unit
The synths effects unit is edited using the eff ect s cont r ols and Ef f ect Par am eters Module
8.2.1 Effect List Box
The Effect list box selects the effect type; Reverb, Chorus, Variation, Inser tion 1 & 2 and Plug Harmony
Insertion is only available on higher range XG devices.
Plug Harmony is only available on the MU100R and SW1000XG when the VH Plugin board is
fitted and VH is enabled via the Setup Plugins menu
8.2.2 Effect Controls
LEVEL Overall effect return level 0 - 127
(-∝dB-0-+6dB)
PAN Overall effect pan position L63 - 0 - R63
ToREV Amount of effect sent to Reverb unit 0 - 127
ToCHR Amount of effect sent to Chorus unit 0 - 127
CON Connection setting for Variation and Insertion, either Insertion to a single part
or global to System
PART Selects the Par t num ber when CON is set t o INS P1 - P63,
CTRL Effect sensitivity to midi controller messages. Note the sensitivity setting
applies to the currently selected controller in the CONTROLLER listbox.
INS/SYS
AD1 - AD63
OFF
0 - 127
XGedit95 User Manual Page 17
Page 18

HCH Selects Plug Harmony ef fect – Harmony MIDI control channel 1 – 16,OFF
MCH Selects Plug Harmony effect – Melody MIDI control channel 1 – 16,OFF
XGedit95 User Manual Page 18
Page 19

8.3 Effect Parameters Module
This module provides editing of the currently selected effect s par am eters.
8.3.1 Effect Name List- box
Effect types may be quickly selected using the Effect Name Listbox. Each name corresponds to one of t he
built in effect macros
Reverb
NO EFFECT Effect turned off.
HALL1 Reverb simulating the resonance of a hall.
HALL2 Reverb simulating the resonance of a hall.
ROOM1 Reverb simulating the resonance of a r oom .
ROOM2 Reverb simulating the resonance of a r oom .
ROOM3 Reverb simulating the resonance of a r oom .
STAGE1 Reverb appropriat e for a solo instrument.
STAGE2 Reverb appropriat e for a solo instrument.
PLATE Rever b simulating a metal plate reverb unit.
WHITE RO O M A unique short rever b with a bi t of initia l delay.
TUNNEL Simulation of a tunnel space expanding to left and right.
BASEMENT A bit of init ial delay followed by reverb with a unique resonance
CANYON Long cavernous r everb (MU80/MU100/SW1000 Only)
Chorus
NO EFFECT Effect turned off.
CHORUS1 Convent ional chorus program that adds natural spaciousness
CHORUS2 Convent ional chorus program that adds natural spaciousness
CHORUS3 Convent ional chorus program that adds natural spaciousness
CHORUS4 Chorus with stereo input . The pan setting specified f or the Part will also apply to the
effect sound. (Not avai lable on MU80)
CELESTE1 A 3-phase LFO adds modulation and spaciousness to the sound
CELESTE2 A 3-phase LFO adds modulation and spaciousness to the sound
CELESTE3 A 3-phase LFO adds modulation and spaciousness to the sound
CELESTE4 Celeste with stereo input. The pan setti ng specified for the Part will also apply to the
effect sound. (Not avai lable on MU80)
FLANGER1 Adds a jet-aer oplane effect t o the sound.
FLANGER2 Adds a jet-aer oplane effect t o the sound.
FLANGER3 Adds a jet-aer oplane effect t o the sound. (Not available on MU80)
SYMPHONIC Exceptionally rich & deep chorusing
ENSEMBLE
DETUNE
PHASER Pronounce metallic modulation with periodic phase change (MU80 Only)
Chorus effect without modulation, created by adding a slightly pitch shifted sound
(MU100/SW1000 Only)
Variation
NO EFFECT Effect turned off.
HALL1 Reverb simulating the resonance of a hall.
HALL2 Reverb simulating the resonance of a hall.
ROOM1 Reverb simulating the resonance of a r oom .
XGedit95 User Manual Page 19
Page 20

ROOM2 Reverb simulating the resonance of a r oom .
ROOM3 Reverb simulating the resonance of a r oom .
STAGE1 Reverb appropriat e for a solo instrument.
STAGE2 Reverb appropriat e for a solo instrument.
PLATE Rever b simulating a metal plate reverb unit.
WHITE RO O M A unique short rever b with a bi t of initia l delay. (MU100/SW1000 Only)
TUNNEL Simulation of a tunnel space expanding to left and right. (MU100/ SW 1000 Only)
BASEMENT A bit of initial delay followed by reverb with a unique resonance (MU100/ SW1000
Only)
CANYON Long cavernous r everb (MU100/ SW1000 Only)
DELAY L,C,R A progr am t hat cr eat es three delay sounds; L, R, and C (centre).
DELAY L,R A program that creates two delay sounds; L and R. Two feedback delays are provided
ECHO Two delays (L and R) and independent feedback delays for L and R.
CROSS DELAY A program that cr osses the feedback of two delays.
EARLY REF1 An ef f ect that produces only the early reflection component of reverb
EARLY REF2 An ef f ect that produces only the early reflection component of reverb.
GATE REVERB A si m u lation of gated reverb.
REVERSE GATE A program that sim u lates gated r everb played backwards.
KARAOKE 1 A delay with feedback of the same types as used for Kar aoke r everb.
KARAOKE 2 A delay with feedback of the same types as used for Kar aoke r everb.
KARAOKE 3 A delay with feedback of the same types as used for Kar aoke r everb.
CHORUS1 Convent ional chorus program that adds natural spaciousness.
CHORUS2 Convent ional chorus program that adds natural spaciousness
CHORUS3 Convent ional chorus program that adds natural spaciousness
CHORUS4 Chorus with ster eo i nput . (Not available on MU80)
CELESTE1 A 3-phase LFO adds modulation and spaciousness to the sound
CELESTE2 A 3-phase LFO adds modulation and spaciousness to the sound
CELESTE3 A 3-phase LFO adds modulation and spaciousness to the sound
CELESTE4 Celeste with stereo input. (Not available on MU80)
FLANGER1 Adds a jet-aer oplane effect t o the sound.
FLANGER2 Adds a jet-aer oplane effect t o the sound.
FLANGER3 Adds a jet-aer oplane effect t o the sound. (Not available on MU80)
SYMPHONIC A multi-phase version of CELESTE.
ENSEMBLE
DETUNE
Chorus effect without modulation, created by adding a slightly pitch shifted sound
(MU100/ SW1000 Only)
AMBIENCE An effect which adds spatial depth by blurring the sound (MU100/ SW1000 Only)
ROTARY
SPEAKER
2 WAY ROTARY
SPEAKER
A simulation of a rotary speaker. You can use AC1 (assignable controller) etc. to
control the speed of rotation
A simulation of a rotary speaker. You can use AC1 (assignable controller) etc. to
control the speed of rotation (M U100/ SW1000 Only)
TREMOLO An effect that cyclically modulates the volume.
AUTO PAN A program that cyclically moves that sound image to left and right, f r ont and back
PHASER1 Cyclically changes the phase to add modulation to the sound
PHASER2 Phaser with ster eo input. (Not available on MU80)
DISTORTION Adds a sharp-edged distorti on t o the sound.
COMP+ Since a compressor is included in the input stage, distor tion can be provided evenly,
XGedit95 User Manual Page 20
Page 21

DISTORTION
OVERDRIVE Adds mild distorti on t o the sound.
AMP
SIMULATOR
3BAND
EQ(MONO)
2BAND
EQ(STEREO)
AUTO
WAH(LFO)
AUTO
WAH+DIST
AUTO
WAH+ODRV
TOUCH WAH 1 W ah effect that vari es filter sweep according to input level; also serves as pedal wah
TOUCH WAH 2 W ah effect that vari es filter sweep according to input level; also serves as pedal wah
TOUCH
WAH+DIST
TOUCH
WAH+ODRV
PITCH CHANGE1Increases or decreases the pitch of incoming signals (MU80/MU100/ SW1000 &
PITCH CHANGE2Increases or decreases the pitch of incoming signals (MU80/MU100/ SW1000 &
AURAL EXCITER Enhances the sound by giving greater def ini ti on, presence and clarity (MU80/MU100/
COMPRESSOR Affects the dynamics of the sound by smoothing out high volume peaks and low
NOISE GATE Elimi nates Noise or Hum in the signal (MU80/M U100/ SW1000 only)
VOICE CANCEL Attenuates t he vocal part from sources such as CDs (MU100/ SW1000 & SW60 only)
TALKING
MODULATO R
LO-FI Degrades the quality of the input (MU100/ SW1000 Only)
DIST + DELAY Distortion and delay connected in series (M U100/ SW1000 Only)
ODRIVE+DELAY Overdrive and delay connected in series (MU100/ SW1000 Only)
COMP+DIST +
DELAY
COMP+ODRIVE
+
DELAY
WAH+DIST+
DELAY
WAH+ODRIVE+
DELAY
THRU Bypass without applying an effect.
INSERTION1
& 2
regardless of the input level (MU100/ SW1000 Only)
A simulation of a guitar amp.
A mono EQ with adjustable LOW, MID, and HIGH equalising.
A stereo EQ with adjustable LOW and HIGH. Ideal for drum Parts
Cyclically modulates the centre frequency of a wah filter. Wi th an AC1 etc. this can
function as a pedal wah.
Applies distortion to the output of Auto Wah. W ith an AC1 etc. t his can function as a
pedal wah. (MU100/ SW1000 Only)
Applies overdive to t he output of Auto W ah. W ith an AC1 etc. this can function as a
pedal wah. (MU100/ SW1000 Only)
with AC1 (MU80/MU100/ SW1000 only)
with AC1 (MU100/ SW 1000 only)
Applies distortion to the output of Touch Wah; also serves as pedal wah with AC1
(MU100/ SW1000 only)
Applies distortion to the output of Touch Wah; also serves as pedal wah with AC1
(MU100/ SW1000 only)
SW60 only)
SW60 only)
SW1000 only)
volume dips (MU80/MU100/ SW1000 only)
Adds a vowel sound to the input (MU100/ SW1000 Only)
Compression, distort ion and delay connected in series(MU100/ SW1000 Only)
Compression, overdr i ve and delay connected in series (MU100/ SW1000 Only)
Wah, di st or tion and delay connected in series (MU100/ SW1000 Only)
Wah, overdrive and delay connected in series (M U100/ SW1000 Only)
(Insertion1 effect only available on MU80, Insertion 1 and 2 only available on MU100/
SW1000)
XGedit95 User Manual Page 21
Page 22

THRU Bypass without applying an effect.
HALL1 Reverb simulating the resonance of a hall. (MU100/SW1000 Only)
HALL2 Reverb simulating the resonance of a hall. (MU100/SW1000 Only)
ROOM1 Reverb simulating the resonance of a r oom . ( M U100/ SW1000 Only)
ROOM2 Reverb simulating the resonance of a r oom . ( M U100/ SW1000 Only)
ROOM3 Reverb simulating the resonance of a r oom . ( M U100/ SW1000 Only)
STAGE1 Reverb appropriat e for a solo instrument. (M U100/ SW1000 Only)
STAGE2 Reverb appropriat e for a solo instrument. (M U100/ SW1000 Only)
PLATE Rever b simulating a metal plate reverb unit. (MU100/ SW1000 Only)
DELAY L,C,R A program that creates three delay sounds; L, R, and C (centre). (MU100/SW 1000
Only)
DELAY L,R A program that creates two delay sounds; L and R. Two feedback delays are
provided(MU100/SW1000 Only)
ECHO Two delays (L and R) and independent feedback delays for L and R. (MU100/SW1000
Only)
CROSS DELAY A program that cr osses the feedback of two delays. (MU100/SW1000 Only)
KARAOKE 1 A delay with feedback of the same types as used for Karaoke reverb.
(MU100/SW1000 Only)
KARAOKE 2 A delay with feedback of the same types as used for Karaoke reverb.
(MU100/SW1000 Only)
KARAOKE 3 A delay with feedback of the same types as used for Karaoke reverb.
(MU100/SW1000 Only)
CHORUS1 Convent ional chorus program that adds natural spaciousness. (M U100/ SW1000 Only)
CHORUS2 Convent ional chorus program that adds natural spaciousness (MU100/SW1000 Only)
CHORUS3 Convent ional chorus program that adds natural spaciousness (MU100/SW1000 Only)
CHORUS4 Chorus with ster eo i nput . (MU100/SW1000 Only)
CELESTE1 A 3-phase LFO adds modulation and spaciousness to the sound (MU100/SW 1000
Only)
CELESTE2 A 3-phase LFO adds modulation and spaciousness to the sound (MU100/SW 1000
Only)
CELESTE3 A 3-phase LFO adds modulation and spaciousness to the sound (MU100/SW 1000
Only)
CELESTE4 Celeste with stereo input. (MU100/ SW1000 Only)
FLANGER1 Adds a jet-aer oplane effect t o the sound. (MU100/SW1000 Only)
FLANGER2 Adds a jet-aer oplane effect t o the sound. (MU100/SW1000 Only)
FLANGER3 Adds a jet-aer oplane effect t o the sound. (MU100/SW1000 Only)
SYMPHONIC A multi-phase version of CELESTE. (MU100/SW1000 Only)
ENSEMBLE
DETUNE
ROTARY
SPEAKER
Chorus effect without modulation, created by adding a slightly pitch shifted sound
(MU100/SW1000 Only)
A simulation of a rotary speaker. You can use AC1 (assignable controller) etc. to
control the speed of rotation (M U100/SW1000 only)
TREMOLO An effect that cyclically modulates the volume. (MU100/SW1000 only)
AUTO PAN A program that cyclically moves that sound image to left and right, front and back
(MU100/SW1000 only)
PHASER1 Cyclically changes the phase to add modulation to the sound (MU100/SW1000 only)
DISTORTION Adds a sharp-edged distorti on t o the sound. (MU100/SW1000 only)
OVERDRIVE Adds mild distorti on t o the sound.
XGedit95 User Manual Page 22
Page 23

AMP
SIMULATOR
3BAND
EQ(MONO)
2BAND
EQ(STEREO)
AUTO
WAH(LFO)
TOUCH WAH 1 W ah effect that vari es filter sweep according to input level; also serves as pedal wah
TOUCH WAH 2 W ah effect that vari es filter sweep according to input level; also serves as pedal wah
AURAL EXCITER Enhances the sound by giving greater definition, presence and clarity
COMPRESSOR Affects the dynamics of the sound by smoothing out high volume peaks and low
NOISE GATE Elimi nates Noise or Hum in the signal (MU100/ SW1000 only)
Harmony
VOCODER
CHORDAL
DETUNE
CHROMATIC
A simulation of a guitar amp.
A mono EQ with adjustable LOW, MID, and HIGH equalising.
A stereo EQ with adjustable LOW and HIGH. Ideal for drum Parts (MU100/SW 1000
only)
Cyclically modulates the centre frequency of a wah filter. Wi th an AC1 etc. this can
function as a pedal wah. (MU100/SW1000 only)
with AC1 (MU100/SW 1000 only)
with AC1 (MU100/SW 1000 only)
(MU100/SW1000 only)
volume dips (MU100/SW1000 only)
(MU100/SW1000 only through Harmony Plugin effect)
8.3.2 Effect Parameter Controls
Each effect may be fine tuned using the effect parameter knobs.
For each macro, the contr ols will be updated to show their current assignment and value. Unused controls
will be disabled (g rey with no name)
Please refer to the XG midi data book f or a com plete list of effect parameters and ranges.
XGedit95 User Manual Page 23
Page 24

8.4 Controllers
The parts response to continuous controller messages is edited using t he controller section of the Ef fects
Module
8.4.1 Controller Selection
Controller selection is achieved using the controller list-box
For standard controllers, select the required item from the list-box (Modulation, Pitchbend, Channel
Aftertouch or Polyphonic Aftert ouch) .
For non standard controllers, first set Controller1 or Cont roller2 to the required controller value, t hen select
Controller1 or Controller2 from the cont r oller list-box.
The XG module will respond to all continuous controller messages from 0 to 95. However, only those
controllers listed in the implementation chart have a ‘built in’ effect. All other contr ollers may only be used in
combination with the Controller 1/2 module settings.
If a voice is allocated to VL use on the MU100R/ SW1000XG, then the cont roller section will also display the
VL controllers available for editing in accordance with the XG specification.
8.4.2 Controller Wheel
When altering the controller parameters, the module does not use the new value until it receives a message
from the appropriate controller. This can be annoying, as the relevant controller must continually be
adjusted in order to hear the affect of the edit. To overcome this, a controller wheel has been provided
within the Control module.
The Control Wheel may be adjusted with the mouse to set the requir ed controller position (note the wheel
sends controller midi messages as per a standard synth based contr ol wheel). I f the LED below the wheel is
ON, then any edits performed within the control module, will automatically re-transmit the current wheel
position via a continuous controller midi message. In this way, all edits appear to be immediate and will
affect the module sound in real time.
The wheel position may be different for each type of cont roller within the control list-box and for each part.
However the wheel position is not saved to disk.
When selecting pitch bend the wheel behaves as a normal spring loaded self centring pitch wheel.
The wheel may be used for recording purposes, to send contr ollers not available on your keyboard.
8.4.3 General Controller Parameters
PITCH adjusts how the controller affects the pit ch of the current part -24 - 0 - +24
except Pitchbend
0 - 24 semitones
AMP adjusts how the controller affects the am plitude of t he cur r ent part -100 - 0 - +100%
TVF Adjusts how the controller affects the Time Varying Filter of the
current part
8.4.4 Low Frequency Oscillator Parameters
The LFO settings work in combination with the current par t s VIBRATO settings.
PMOD Adjusts the depth of the pitch modulation induced by the LFO 0 - 127
AMOD Adjusts the depth of the Time Varying Amplitude modulation
induced by the LFO
-9600 - 0 +9600 cents
0 - 127
FMOD Adjusts the dept h of the Time Varying Filter modulation induced by
the LFO
XGedit95 User Manual Page 24
0 - 127
Page 25

8.4.5
VL Specific Parameters (MU100R/SW1000XG O nly)
VL
ASSIGN
Assigns a controller to the VL function 0 - 95, Aftertouch,
Velocity and Pitch Bend
DEPTH Adjusts the depth of effect pr oduced by t he cont r oller -64 - 0 - + 64
XGedit95 User Manual Page 25
Page 26

9. Part & Drum Module
This module allows editing of the current part paramet ers or current drum edit buffer parameters. (Note t he
current part and drum edit buf fer are selected using the VoiceBox )
9.1 Part Edit Mode
9.1.1 General
The following general part parameters may be adjusted:-
VOLUME Sets the volume of the current part in proportion to the units
master volume
DETUNE Allows tuning of the current part relative to the master tuning
setting
KSHIFT Key shifts the current part relative to the master KSHIFT setting -24 - 0 - +24
PAN Allows panning of the current part. Moving the knob fully anti-
clockwise enables random (RND) panning each time a note is
played
SCALE
TUNE
ASSIGN Changes the same note play assignment for the part 0 = single
PORTA Portamento time adjustment. Note this is only active when the
9.1.2 Keyboard Velocity
The part response to key velocity is controlled as follows:-
SENS Velocity sensitivity, scales r eceived value 0 - 64 - 127
OFFSET Velocity Offset, offsets the received value 0 - 64 -127
Note: a value of 64 is equivalent to normal response.
Allows microtuning of the part with respect to t he chosen scale C,C#,D,D#,E,F,F#,G,
adjacent LED is green
0 - 127
-12.8 - 0 - +12.7Hz
RND,-63L - 0 - 64R
G#,A,A#,B
-64 - 0 - +63 cents
1 = multi
2 = (Inst )Full multi
0 - 127
9.1.3 Vibrato
The part vibrato parameters m ay be adjust ed as f ollows:-
RATE Adjust vibrato (LFO) rate -63 - 0 - +63
DEPTH Adjusts vibrato (LFO) depth -63 - 0 - +63
DELAY Adjust time delay before vibrat o ( LFO ) -63 - 0 - +63
9.1.4 Time Varying Fil t er
Adjusts the time varying filter characteristics applied to the part.
RES Amount of resonance induced by filter -63 - 0 - +63
CUTOFF Cut off frequency of filter -63 - 0 - +63
HPF High Pass Filter Cut-off (M U100 Only) -63 - 0 - +63
9.1.5 Effect Controls
REV Adjusts the part Reverb send level 0 - 127
CHORUS Adjust the par t chorus send level 0 - 127
VAR Adjust the part variation send level 0 - 127
DRY Adjust the part dr y send level 0 - 127
XGedit95 User Manual Page 26
Page 27

9.1.6 Part EQ (MU100/SW1000 Onl y)
Adjusts the EQ character i st ics applied to the part.
LGAIN Bass frequency gain -12dB - + 12 dB
LFREQ Bass centre frequency 32Hz - 2.0Khz
HGAIN Treble frequency gain -12dB - + 12 dB
HFREQ Treble centre frequency 500Hz - 16.0KHz
9.1.7 Output (MU100/SW1000XG O nly)
OPUT Selects the output jack routing of the part Stereo, Indiv 1 + 2,
Indiv 1, Indiv 2
9.1.8 VL Specific Controls (M U100R/SW1000XG with VL board fit ted Only)
If a part is allocated to VL use then the following additional controls are available.
BPL Bend Pitch Low Control -24 - + 24 semitones
FEGDP Filter EG Depth -63 - 0 - + 64
XGedit95 User Manual Page 27
Page 28

9.2 Drum Edit Mode
In this mode the Part Module allows editing of individual drum tone paramet er s
Drum editing is only available for parts set up for editable Rhythm use. Nor mally only part 10, is used for
rhythm, although any part or num ber of parts may be used. However it is important t o r ealise t hat ,
how many parts are selected for rhythm use, there can only be two (four on MU80/MU100/SW1000)
editable drum kits ac tive ( DRUMS1.. .DRUMS3) .
kit using the Voice Box. Selecting a drum kit other than those already in use, will cause all parts using the
corresponding drum buffer to change.
Furtherm o r e a ll ed iting will be lost fo r that drum b uffer.
Care should be taken when selecting a new editable drum
Rhythm parts set t o STD DRUM ar e non editable.
9.2.1 Enabling Drum Editing
To enable drum editing :-
1. Using the Voice Box, switch to a part configured for rhythm use. If no parts ar e currently configured for
rhythm, use the VoiceBox to change a part to voice bank DRUMS1.. .DRUMS3. The Drum Key name
should then become enabled
no matter
2. Single click with the left mouse button on the Drum Key Name (the control that reads
3. The Part edit controls will now change to Drum edit contr ols and the Keyboard will change to highlight a
single key. Additionally, the LCD Panel display AMP EG mode will now show the appropriate drum tone
amplitude envelope
4. I f a drum tone is m apped to the curr ent key, its nam e will be highlighted in the Drum Key Name cont rol.
Otherwise the contr o l will s ho w
5. To change drum tones press and hold the left mouse butt on down on the Keyboard . Moving the m ouse
left/right will highlight the key under the mouse. The dr um edit contr ols will automatically updat e to show
the corresponding key parameters. Alternatively you may use an att ached midi instrument to select the
drum key for editing by playing the appropriate note.
NO DRUM KEY
NO DRUM KEY
)
Drum tones can be auditioned from the on screen Keyboar d using the right mouse button as per
normal voice play.
9.2.2 Drum Parameters
The part module provides similar editing of drum parameters to those in part edit mode The following
additional parameters are also available:-
ALTGRP Selects the exclusive group to which the tone belongs.
Playing a note within an exclusive group automatically turns
off sounds from any other members of the group. Normally
used for cymbal effects.
K.ON Enables drum key response to note on messages. Disabling
this effectively removes the drum tone f r om the kit.
K.OFF Enables drum key response to not e off messages. Disabling
this allows the drum to sound and decay naturally after the
key is released
0 = no group, 1 - 127
Enable/Disable (0 -1)
Enable/Disable (0 - 1)
VPTCH Controls Pitch response to Velocity (MU100/SW100 Only) -16 – 0 - + 16
VLPF Control Filter Low Pass Filter response to velocity
(MU100/SW1000 Only)
XGedit95 User Manual Page 28
-16 – 0 - +16
Page 29

10. Enables Module
This module provides a group of LED’s to select the midi messages received by the current part.
To enable or disable a message left click on the appropriate LED or press the space bar whilst the LED is
highlighted.
Green Enabled
Dark Green Enabled but cannot be modified in current mode
Red Disabled
Dark Red Disabled and cannot be modified in current mode
10.1 Message Enables
The messages affected are:-
PB Pitch Bend cont r oller m essages
CHP Channel pressure controller messages ( CAf )
PRO Program change messages
CC General controller change messages not include above
PP Polyphonic pressure contr oller messages ( PAf)
NO Note On/Off messages
RPN Registered Par amet er Number messages. Note if disabled SYSEX m ode must be selected for
editing the part.
NRPN XG Non Registered Parameter Number messages. Note if disabled SYSEX mode must be
selected for editing the part.
MOD Modulation controller messages.
VOL Volume controller m essages
PAN Pan controller messages
EXP Expression pedal messages
SUS Sustain pedal
PORT Portamento controller messages
SOS Sostenuto pedal messages
SOFT Soft pedal messages
BS Bank Select
M/P Monophonic/Polyphonic mode selection messages (enabled = Poly)
The NO(te) enable may be used to mute a par t .
XGedit95 User Manual Page 29
Page 30

11. Keyboard
The Keyboard is primarily used to define the input key range for a par t. This is useful if you wish t o produce
a performance setting incorporat ing multiple layers. The keyboard is also used for auditioning sounds and
selecting drum tones in Drum Edit mode (see Part M odule )
Performance - a setup used when playing live. Avoid having to play multiple keyboards by splitting one
keyboard between several sounds. e.g. bottom octave of keyboard configured for bass on midi channel 1,
mid range configured for Piano on channel 1 and top range configured f or st r ings on channel 1.
11.1 Selecting Key Ranges
The keyboard indicates graphically the full range over which the synth can respond. M iddle C is mar ked by
a green dot. To select the playable range for the cur rent part, left click on the keyboard. Whilst holding the
left button down move the mouse to highlight the key r ange you r equir e.
If you click near the left hand side, the lower boundar y will be updated, Clicking near the right will
change the upper boundary.
11.2 Auditioning Sounds
If a midi out device is enabled the keyboard may be used to play notes on the cur rent part. To play a note
click on the keyboard. Holding the right button down and dragging across the keyboard will play a
right
glissando of notes.
If a layered performance setup has been created the keyboard provides an excellent way of
auditioning the splits.
11.3 Velocity Limit
These two dials set the high and low cut-off values for the curr ent par t s key velocity r esponse.
The value set for the velocity high cut-off is used f or the note velocity of all sounds played from
the on screen keyboard.
XGedit95 User Manual Page 30
Page 31

12. Voice Box
The Voice box is used to select the current active part and pr ovide an overview of t he Synth setup.
12.1 Part Selection
Part selection is achieved using the
assigned voice in the list box.
To select a part for editing left click on the associa ted button. The select ed parts LED will be illuminated
(Green) and the part s assigned voice will be highlighted.
The spacebar may be used to select the currently highlighted part but ton.
radio button
12.2 Midi Channel Selection
The first column of dials to the right of t he part butt ons allow the parts assigned midi channel to be altered.
To change a parts midi channel, left click and hold the left mouse butt on down on the appropriat e CH dial.
Moving the mouse will increment/ decr em ent the channel.
Channels 1 t hrough 16 may be selected. A value of NO indicates that no channel is assigned to that part
(effectively disabling the part). If operating in multi port mode (MU80/MU100/ SW1000), a ‘+’ in front of the
channel number indicates the part is assigned to port B.
You may change the midi channel, and element reserve assignment of any part (not just the
currently selected part)
Changing a parts midi channel will cause all thru data t o be re-channellised to that channel. (a
value of NO, indicates that no r e- c hannellisat ion will be per f o r m ed)
array on the left of the Voice Box or clicking on the parts
Multiple parts may be assigned to the same channel. However, if GM mode is used, the changes
will affect all parts on the same channel.
12.3 Element Reserves
The number of elements reserved for a par t is shown in the dial to the right of the midi channel.
The number of elements indicates the number of tone generators r eserved for t he part. During a complex
multi part piece the synth may run out of available tone generators. However assigning an element r eserve
to a part, guarantees that the part will always receive that number of tone generators. If t he part does not
require the number of generator s assigned, t hey ar e r eleased back to the pool for use by other parts.
Be aware that the number of elements is not equivalent to the number of notes that can be simultaneously
played, as some sounds require more than one tone generat or per note ( Refer to the XG Voice List for the
number of elements required by a voice).
The total number of elements remaining to be assigned is indicated at the bottom of the element dial
column. (a value of 0 indicates that all generators have been assigned).
To change the number of elements assigned to a part oper at e t he dial as described for the midi channel dial
above.
The dials will never allow you to assign more than 32 (64 MU80/MU100/SW1000) elements in
total.
12.4 Selecting Voices
The voice selection assigned to each part is shown in the list box. In addition, the bank allocation for the
current edit part is shown at the bot t om of t he list.
To change the voice allocated to a part left click on the corresponding part s voice within the list. The voice
selection dialog box will appear allowing you to select the desired voice.
XGedit95 User Manual Page 31
Page 32

Voices
The Voice List provides a three level grouping of patches to allow for easy selection of the requir ed sounds.
The first column groups v oi c es accor di ng t o their type:-
MELODY Normal melo d ic v o ic es
SFX Sound Effect voices
MU100 Exclusive Special voices only available on the MU100/SW1000
SFX Kit Sound Effect drum kits (i.e. where each key plays a diff er ent sound)
Drum Kit Drum Kits where each key play a different drum sound
VL1 VL sounds with no fallbacks (only available where the Plug VL card is fitted)
VL2 VL sounds with fallback to capital tones (only available where the Plug VL card is
fitted)
DX1 DX sounds with no fallbacks (only available where the Plug DX card is fitted)
DX2 DX sounds with fallback to capital tones (only available where the Plug DX card is
fitted)
DX3 DX SFX Effect sounds
The second column groups voices according to their instrument family (Pianos, Organs, G uitar s et c)
The third column lists the actual voices.
Clicking on a voice selection will automatically update the M ain Voice box list and transm it the program to
the synth for auditioning. (note that the voice selection dialog may be left open whilst other edits are
performed).
Drum Kits
Drum kits are selected in a similar manner to normal voices. However t he user may choose to allocate a kit
to one of the synths editable drum buffers DRUMS1…DRUMS2 (DRUMS1…DRUMS4 on the
MU80/MU100/SW1000). This will allow each drum sound to be independently edit ed using XGedits’ Drum
Edit mode.
To allocate a kit to an edit buffer:-
First select the Drum Kits or SFX kits from the first Voice List column.
•
Then select the required buffer (note that the second column will update to show the curr ent content s of
•
the edit buffer).
Finally select the required kit. (note all parts using the selected buffer will be affected by the new
•
program change)
NOTE: In general if you do not need to edit a kit t hen you should not allocate it to an buffer.
XGedit95 User Manual Page 32
Page 33

Voice Selection Ti ps
Only those banks and voices currently defined in the XG data book ar e available for select ion.
Some midi files may contain voice selections where a bank does not provide a voice for a given
program number. In t his case the corresponding capital (or fallback) tone is shown. Such voices
may be used, but the user should be aware that future XG modules may assign variation tones to
these programs.
The voice list indicates the level of the XG specification each voice was added by means of a
small colour coded box preceding the voice name. Selecting a voice from a higher level of the
specification than your synth will norm a lly r esult in the corresponding Capital tone being used.
XGedit does not support the Q S300 user voices of the MU10/SW60/DB50. Such voices will be
stripped from merged Midi files unless they occur af t er the first note on event of t he f ile.
Selecting a VL/DX voice will automatically update t he synth VL/ DX part allocation paramet er. Any
other part currently allocated to VL/DX will fallback to using the XG capital tone ( for VL/DX2) or
will switch to s ile nc e (VL/DX1).
NOTE: The author has chosen not to filter the Main Window voice list dependent on synth type.
The reason being that an increasing number of XG files are using the higher level voices and it is
informative for the user t o be able to identify which voices are being correctly produced on their
machines. However these voices are not displayed in the Voice selection list unless the cor rect
synth type is used.
XGedit95 User Manual Page 33
Page 34

13. Menus
The following Menu commands are available:-
13.1 File Menu
13.1.1 New
This menu item allows the contents of the editor to be reset to its def ault state (note all edits and merged
midi song data will be lost)
13.1.2 Save Setup (XGE)
Registered Version Only
This menu item allows quick saving of an XGEdit setup (.XGE) to disk. The menu item is disabled unless
the setup has been previously loaded from disk or has already been saved under an appropriat e f ilename.
13.1.3 Save Setup As..
Registered Version Only
This item brings up the standard save file dialog to allow saving of files to disk.
The information saved depends on the file type selected from the standard File Type listbox of the File Save
dialog:-
*.XGE All edit parameter s ( def ault )
*.XGP Current Par t par am et er s only
*.XGD Current Part and Drum Edit Buffer parameters. Note if t he current part is not assigned to an
editable drum buffer ( DRUM S1 - DRUMS3) then the save operation will be abor t e d
*.XGF Current Effect Unit Parameters
*.MID All edits and any merged Midi song data are saved to a standard Midi File. The content s of
the file depend on the settings of the Mast er M odule
*.SYX The current setup is saved as a MIDIEX file. These files may be loaded as Sysex banks
directly into popular sequencers such as Cakewalk.
13.1.4 Open File
Retrieves a previously saved editor file or midi file from disk and transmits the edit information to the
attached XG module (informat ion is only transm it t ed if the Setup menu "Refresh on Load" item is checked).
*. XGE All edit parameters retrieved
*. XGP A single parts parameters are ret r ieved to t he cur r ent Part
*. XGD A single rhythm part and associated Drum Edit Buf fer par ameter s are ret rieved to the current
part
*.XGF Effect unit parameters are retrieved
*.MID A midi file is loaded for auditioning. Any setup bar parameters will be interpreted and
displayed (note if you wish to merge a midi file into a current setup you should use the
MERGE menu option)
13.1.5 Merge Midi
Allows a standard midi file to be merged into the XGedit setup, for playback auditioning and saving with the
current setup. See the Section 15. 4 - M er ging Midi Data.
13.1.6 Clear Midi
Clears any merged midi song data from the editor.
13.1.7 Exit
Quits th e p rogram - if there are any un-sa v e d e d its you will be pro mpted to s av e , discard or c a n c e l the exit.
XGedit95 User Manual Page 34
Page 35

13.2 Setup Menu
13.2.1 Setup Midi
Opens the Midi Port Setup dialog allowing the user to select the midi dr ivers used to comm unicate with t he
attached XG synth module.
Device Driver Lists
The three list boxes select the device drivers used for midi in/out m essages.
The top list box shows the midi input device and the bottom two list boxes show t he midi output devices.
Each list box displays the devices available on your system (r efer to Windows help for installing Multimedia
devices drivers). Note if using multiple midi output devices (with an MU80/MU100/ SW1000), the Midi Out A
port should be connected to the A port of t he synt h ( SW1000 #1 Synt hesiser on t he SW1000XG ) .
The settings will b e s tored in XGEDI T.INI for u se in future sess io ns ..
13.2.2 Reverse Dial Action
If checked, the response of knobs and dials to vertical mouse movem ent will be reversed. This option is
provided for users who prefer displayed values to increase with vertical movement .
The state will be s av e d in XGEDIT.INI for use in future sessions .
13.2.3 Refresh On Load
If checked, the editor will aut omat ically re-t ransmit its st ate to t he synth on any midi f ile load oper ation. This
ensures that the attached synth is always in the same state as t he editor. Users may prefer to disable this
option if they merely wish to view the contents of saved files.
The state will be s av e d in XGEDIT.INI for use in future sessions .
13.2.4 Change LCD Colour
Produces a standard W indows Colour selection dialog box, allowi ng the colour of the background colour of
controls to be altered.
The chosen custom colours will be s av e d in XGEDIT.INI for use in future session s.
The first custom colour always reverts to the original XGedit colour, allowing the user to retur n to
XGedit defaults if desired..
13.2.5 Select Synth
Allows the editor to be swapped between the SW1000, MU100,MU80, MU10, MU50, DB50XG, SW60XG
and XGLevel 1modes of operation.
This action will also perform an XG r eset of the attached synth.
The state will be s av e d in XGEDIT.INI for use in future sessions .
13.2.6 Plugins
Allows you to configure XGedit for your i nst alled Plugin boards on the MU100R and SW 1000XG.
Placing a check mark next to the installed plugin board will enable the features of that board within XGedits
voice, effects and cont r oller lists
The state of each Plugin will be sav e d in XGEDIT.INI for use in future sessions .
XGedit95 User Manual Page 35
Page 36

13.2.7 Register
If you like this program and continue to use it you are obliged to register it (See the Registr ation section of
the Help file for details )
XGedit95 User Manual Page 36
Page 37

13.3 Utils Menu
13.3.1 SW Mixer
Provides access to the SW Mixer panel when XGedit is operating in SW60XG mode.
13.3.2 Clear Midi Song Data
Clears any merged midi song data from the edi tors memory. Useful if you wish to extract a setup header
from an existing m i di file and save back as just the setup data.
13.3.3 Refresh Synth
This option will re-transmit the current parameters contained within the editor. This may be useful if a
sequenced midi file has changed the contents of the Synth.
13.3.4 Reset All
This option will perform a global re set of t he att ached synth m odule. Not e all edits will be lost . Not e t hat this
message should be sent with caution and should NEVER be embedded in an XG Midi file. The message
behaves much the same as a normal XG r eset, however it will also reset the SW60XG Mixer and all user
Performance memories of t he XG synth (i.e. user Perform ance m ode voices in the M U80 etc)
13.4 Help Menu
13.4.1 XGedit Help
Provides access to the XGedit help file
13.4.2 About
Provides access to the About dialog containing Version details and Registration status.
XGedit95 User Manual Page 37
Page 38

14. SW Mixer
(13)
(12)
(11)
(10)
(8)
(9)
(7)
(1)
(6)
(5)
(4)
(3)
(2)
This mixer screen provides control over the SW card built in mixer.
There is no way to read back the current stat us of the mixer. Hence to ensure, t he panel correctly
reflects the current set up you m ay wish to use t he Ref r esh Synt h m enu opt ion
The mixer setup is saved into XGedit .XGE save files. However to avoid corrupting other users
setups, the status of the mixer is NEVER sav ed t o midi files.
(1) XG Synth Input
Indicates the mixer routing for the left/right channels of the on-board XG synth.
(2) Microphone Input
Indicates the mixer routing for the left/right channel contributions from the microphone socket.
(3) Line/CD Input
Indicates the mixer routing for the left/right channels of the Line/CD input.
(4) XG Synth Input Level
Controls the stereo input level from the on- boar d XG synth
(5) Mic Input Level
Controls left/right input level from the microphone
Note that although the microphone socket is monaural, the two knobs allow the overall volume and balance
between left and right mixer channels to be adjusted.
Note the small LED adjacent to the knobs determines whether the left/right controls are locked
together or may be adjusted independently.
(6) Line/CD Input Level
Controls left/right input level from the Line In/CD
The two knobs allow the overall volume and balance between left and right mixer channels to be adjusted
for the Line/CD input.
Note the small LED adjacent to the knobs determines whether the left/right controls are locked
together or may be adjusted independently.
XGedit95 User Manual Page 38
Page 39

(7) Left To Right/Right To Left Control s
Allows the left audio signal to be overlaid on the right audio channel and vice versa.
These controls are useful when balancing the right and left channels for voice cancellation, or for switching
left and right inputs of an attached audio device.
Note the small LED adjacent to the knobs determines whether the left/right controls are locked
together or may be adjusted independently.
(8) Voice Cancellation
Enables/disables the voice cancellation DSP function
This function may be used to remove a voice from a CD recor ding.
Normally the vocal track is centre panned (i.e. has an equal level within the left and right channels). The
voice cancellation function basically subtracts the two channels and thus removes the vocal.
If the voice you wish to remove is not centre panned, then adjusting the Line/CD left right input
levels and left to right/right to left levels may produce bett er r esults.
(9) Left/Right Enables
Enable/disable routing of the LINE IN/CD audio channels to the A to Ds and audio outputs.
These controls are useful if you wish to disable either audio channel e.g. to allow microphone
input exclusive control over one channel
(10) Bypass
Enables/disables audio bypass of the mixer for the Line/CD input
(11) Output Level
Controls the left/right output level to the A to Ds and analogue outputs
The two knobs allow the overall volume and balance between left and right mixer channels to be adjusted.
Note the small LED adjacent to the knobs determines whether the left/right controls are locked
together or may be adjusted independently.
(12) A To D Enables
These controls enable/disable certain A to D related functions
- enables/disables the Karaoke Lock function.
Lock
When enabled all A to D and Variation effect edits are disabled. This prevents midi files from inadvertently
changing the mixer effect settings during Kar aoke sessions.
Note the main editor screen will update to show the affected cont r ols.
Stereo
When enabled the AD1 behaves as a stereo A to D converter, with the pan control acting as overall
balance. In this mode any effect applied to AD1 is applied to both the lef t and r ight channels simultaneously.
When disabled the two A to Ds may be adjusted and effected independently (similar to an external MU80
module)
(13) A To D
Enables/disables the Analogue to Digital converters.
When enabled the digitised audio signals may be routed via the XG effects unit to provide special effects
processing.
- enables/disables AD1 stereo operation.
Note that effects processing requires two elements of polyphony from the XG synth.
Consequently, in AD enable mode the XG synth will decr ease in polyphony t o 30 elem ents.
Furthermore this requires t hat the XG synth be reinitialised. To overcome losing all edits whilst
this operation is performed, the editor prompts whether you want to optionally resend edits after
the AD ON/OFF action.
XGedit95 User Manual Page 39
Page 40

15. Working With Midi Files
15.1 Introduction
Your XG synth is a superb instrument, designed to offer a large variety of high quality tonal sounds,
supplemented by multiple drum kits, special effects banks and a versatile effects unit. However the real
benefit of the XG format is the expressive control that can be applied to these elements……off ering the sort
of performance that was unt il now only available on machines far beyond the budget of m ost m usicians.
Unfortunately in order to access this wealth of functionality and expression requires the use of complicated
controller and system exclusive commands.
XGedit is designed to hide this complex midi notation from the user and in place provide an intuitive
analogue control interface which it is hoped the musician will find significantly more friendly and thus
productive.
Furthermore, the most important factor considered when producing the editor, was to deliver this
functionality in real-time i.e. when you perform edits, they are applied in real-time (much t he same as they
would be from a control wheel or knob on a real synth front panel). Unfortunately standard Windows
controls don't work this way......they only send a value when the control is released. Hence if you move a
slider on a conventional editor it only sends the final position value (and not t he values in between). What
this means, is that if you use a conventional editor then you won't get smooth transitional effect s and may
have to make do with non optimal settings.
XGedit has been written to overcome these pr oblems, allowing you to hear the transitional changes as the
controls are moved, and thus allowing you to get exactly the effect you're af ter. Furthermore, if the control
edits are recorded in real-time they can be used as dynamic effects throughout the body of a song
(whooshing filters, wha..wha, LFO ramps)
However all of this functionality is of lit tle use if the user cannot utilise the r esults in their midi projects.
To this end the following sections describes how best to utilise the editor during t he aut hor ing pr ocess
15.2 Setting Up Your Midi System
Most Windows Midi port drivers are single client. i.e. only one program on the system can use the port at
any given time. This causes problems when you need an to work in parallel with your sequencer, such that
you can audition edits while the track is playing.
However there are multi client drivers available which allow multiple programs to output to the dr iver (but
only one program to input) Such a driver is the
requiring separate installation from the Windows Control Panel/Drivers applet) .
More useful though, is Herman Seibs MULTIMID driver, Hubi LoopBack and Hubi Midi Cable drivers or the
MidiOX - MidiYoke drivers. These can transform any single client drivers into a multi client drivers f or BOTH
input and output. Additionally they provide software rout ing of data from a drivers out put to another drivers
input! This allows you to record XGedit output directly into a sequencer while your midi file plays in real-time
(without the need for an external midi cabling)
You can obtain Multimid, LoopBack and MidiOX from the links on my Web Page.
http://www.cybertheque.fr/galerie/GGregson
The following sections describe some recommended midi setups.
Twelve Tone MPU401 driver
(shipped with Cakewalk, but
XGedit95 User Manual Page 40
Page 41

15.2.1 Stand Alone Mode
This is the normal mode of operation if you are using XGedit on its own and you want XGedit t o provide
software thru from an external keyboard
The table below shows the correct driver settings (note you should substitut e your drivers name
for the word
Driver
e.g. if you are using the SB16 MIDI port driver, Xgedit in should read SB16
MIDI IN)
The SW60XG driver has no Input port. Hence for midi IN you should use the input driver of an
alternate midi interface such as your sound card
Program IN OUT THRU Comment
Multimid Multimid not required
XGedit
Driver
IN
Driver
Out ON XGedit pr ovides sof t t hr u
Sequencer Sequencer not loaded
XGedit95 User Manual Page 41
Page 42

15.2.2 Dual Mode
This is the normal mode of operation if you are using XGedit in parallel with your sequencer and thus need
both programs to access the midi out por t .
The table below shows the correct driver settings (note you should substitut e your drivers name
for the word
Driver
e.g. if you are using the SB16 MIDI port driver, Sequencer in should read
SB16 MIDI IN)
The SW60XG driver has no Input port. Hence for midi IN you should use the input driver of an
alternate midi interface such as your sound card
If you are using a Multi Port synth (s uch as the MU100R) then you m ay wish to over lay multiple
midi port drivers using Multimid.
Program IN OUT THRU Comment
Multimid Overlay
XGedit NONE MULTI
Sequencer
Driver
IN MULTI
Driver
Driver
Driver
OUT Multi Client Output
OUT OFF XGedit input is unused
OUT ON Sequencer provides soft thru
XGedit95 User Manual Page 42
Page 43

15.2.3 Dual Mode With Record
This is the normal mode of operation if you are using XGedit in parallel with your sequencer and wish to
record XGedits output in real-tim e
The table below shows the correct driver settings (note you should substitut e your drivers name
for the word
Driver
e.g. if you are using the SB16 MIDI port driver, Sequencer in should read
MULTI SB16 MIDI IN)
The SW60XG driver has no Input port. Hence for midi IN you should use the input driver of an
alternate midi interface such as your sound card
If you are using a Multi Port synth (s uch as the MU100R) then you m ay wish to over lay multiple
midi port drivers using Multimid.
Program IN OUT THRU Comment
Multimid Overlay
XGedit NONE PIPE
Sequencer MULTI
Driver
Driver
IN Overlay
IN MULTI
Driver
Driver
Driver
OUT Multi Client Input and Output
IN OFF XGedit Outputs t o sequencer
OUT ON Sequencer provides soft thr u
XGedit95 User Manual Page 43
Page 44

15.2.4 Trouble Shooting
The following provides a list of possible problems and solutions related to midi setups:-
I get the message ‘Device Already In Use’ when I try to run bot h XG edit and m y Sequencer .
You are using a Single Client Midi Driver . Please install Multimid or an alternate Multi Client Driver.
I have installed Multimid but I still get the same message or it doesn’t appear to work.
Please check you have setup the driver routi ngs as described i n Setting Up Your Midi System . If
everything looks to be correctly configured, then it may be that Multimi d cannot overlay your Midi
Port driver ( possibly because you are using Win95 with an older 32bit driver). You should try Hubi’s
LoopBack driver in place of Multimid or install the latest midi port dri ver for your interface (if you
are using Win95 SB16 drivers please ensure you are using v er s i on 4. 13 or above)
I can get the dual program mode to work but cannot get the recor d m ode t o work.
Check that your Sequencer can record real-time System Exclusive (Many budget Sequencers
cannot) and that you have not disabled Sysex recording in your sequencers r ecord filter. If your
sequencer cannot record real-time Sysex then press the General Midi button down on XGedit. Thi s
will force the editor to output Midi cont roller messages in place of Sysex. If you find that recording
now works, I’m afraid you will be limited to recording only those parameters that can be edited i n
GM mode.
I’ve tried GM mode but I still cannot get the sequencer to record XGedit output
Check that your sequencer is not configured to directly access the midi input port. If t hi s i s the case
the Multimid/LoopBack driv er will be overridden and cease to function. Configure your sequencer
to only access the midi port via t he MULTI driver input (this is parti cularly important with Cubase,
which attempts to access all Midi ports….use the Cubase SetupM ME program to select only the
MULTI ports)
I seem to be losing notes/polyphony from the synth in Dual program mode.
Check that only one program is providing soft t hru. If bot h program s hav e their input s set to M ULTI
Driver IN and both are prov iding soft t hru, then every note tr ansmitted fr om the external keyboard
will be played twice on the synth.
I seem to be losing notes and/or getting not i ceable delays.
This may be due to Windows:-
Ensure you always have plenty of PHYSICAL memory available. This prevents Windows from
paging VIRTUAL memory to disc and thus tying up the CPU with disc transacti ons (which are dealt
with at high priorit y! )
Avoid running any un-needed applications (screen savers, clocks etc...). They may appear to be
dormant.....but are in fact consuming background timers (CPU) and memory.
Always use a true MPU401 Midi port. The MPU supports processi ng of midi events in hardware,
whereas the others (including MPU emulators) often use soft ware.
If all else fails……Upgrade your machine to use a faster CPU!!!
My SW60XG car d will not allow me to edit Variation or AD param et er s
This is due to the SW Mixer Karaoke Lock functi on (which Effect Gear II and other pr ograms have
a nasty habit of setting). To clear the Lock either use the SWMixer panel or send a Reset ALL from
the Utils menu.
XGedit95 User Manual Page 44
Page 45

15.3 The Authoring Process
XGedit is designed to be used throughout the authoring of a Midi project. However it must be realised that it
is a specialised editing tool; it does not provides capabilities for note entry, recording, arranging etc and
therefore is not designed to replace your existing sequencing soft ware.
Consequently the midi author should be prepared to operate both XGedit and their sequencer in parallel. To
this end it is recommended that a large PC monitor is used and that Windows is configured to run at a
screen resolution of 800 x 600 (or above) utilising at least 256 colours.
The midi author should also be familiar with how Windows operates; particularly with respect to running
multiple programs and switching rapidly between them. (this is best achieved using the ALT - TAB keyboard
shortcut combination or the Win95 task bar).
For information on setting up your system f or m ult iple midi applications see
Suggest Authoring Steps are outlined in the following sections:-
15.3.1 Compose Your Midi Fil e
XGedit does
use of a separate sequencer program such as Cubase or Cakewalk. However for optimum flexibility the
user should configure their system to allow both XGedit and a sequencer to run simultaneously. (see
for information on configuring your system for dual program mode)
Mode
The above configuration allows a first pass at instrument voicing to be performed during the song
composition. This has the advantage that all voice editing information is held separately in XGedit where it
may be quickly modified, rather than embedded within the musical data of your sequencer .
provide facilities for note editing or arranging. Hence midi file composition will r equire the
not
Dual Mode
Dual
(Of course you may wish to rely solely on your sequencers capabilities at this stage. If so please ensure
that any patch/controller information inserted by your sequencer can be correctly exported to a st andard
midi file for later interpretation by XGedit)
Before starting your composition, take some time to think carefully about its structure and your target
audience. The following points may prove helpful when planning your songs layout:-
XG compat ibility - XG is designed as an ext ensible format, consequent ly you will find that not all
XG synths provide all XG features. However ther e is a defined level 1 format of XG feat ures that
are guaranteed to be present in all XG synths. I f you intend your composition t o be performed
correctly on all XG instruments then you should restrict yourself to this subset of feat ures. This is
best achieved by configuring XGedit for XG Level 1 use (see the
Select Synth
menu item).
Polyphony - basic XG synths provide 32 note polyphony shared across 16 midi channels. The
polyphony refers to the number of simultaneous tone generators (or elements) available. The
user should be aware that this does not imply an equivalent number of simultaneous not es, as
some sounds require more than one element (refer to the XG m anual for t he number of elements
required by each sounds). The user should bear this in mind when creating a complex song; if too
many simultaneous notes are used the listener may perceive “dropped” or “clipped” notes.
However, the XG format pr ovides an element assign prioritisation scheme (see
make the most of this feature, the user should structure their song such that the most important
notes are given the highest priority i.e. by assigning the most import ant t racks to t he lower synths
parts (if the default midi channel assignment of each synth part is left unaltered t hen synth parts
correspond to midi channels). The suggested allocations are given below. Additionally, the user
may wish to adjust the element reserves of particular par ts to guarantee t hat they always receive
the required number of elements.
XGedit95 User Manual Page 45
Voice Box
). To
Page 46

Resolution - the author should be aware that the order of some events is important (particularly
controller changes such as Bank select, Program Change, Continuous Controllers and
RPN/NRPN). If such events are placed at the same ‘midi tick’ within a song, their ordering may
not be guaranteed when replayed on different sequencers. To ensure that t his does not cause
problems the author should make sure that such events are correctly ordered and separated by
at least an interval of 1/480 (i.e. one high resolut ion midi tick). Continuous controller data should
also be thinned to intervals of 5/ 480 t o avoid tempo instabilities.
Tempo - tempo should be kept within the range 32 - 250 bpm
Setup Bars - You should leave a couple of bars before the fir st note event of a song, t o allow for
the insertion of setup data (See
Setup Bar
). If you intend to process t he file via XGedit, these
bars are not necessary as XGedit will insert them for you. However it is always good practice to
start with as you may wish to enter some initialisation data within your sequencer.
Voice changes - In the final song the setup bar will contain all the parameters necessary to
configure the synth (including any specially edited voices). If you wish to change the voice
assignment of a musical track during the body of a song (e.g. switch the melody line fr om a guitar
to flute) it is best to do this by assigning the new voice to a separat e synth part. In this way t he
new voice may be configured in the initialisation setup bar, rather than sending a mass of data
during the body of song (which could cause timing problems and/or lost notes) .
Track MIDI Channel Comment
Rhythm 10 Dedicated Rhythm part
Melody 1 Main melody line
Sub Melody/ solo/ accomp 2 solo part or important backing
Bass 3 Bass part
Pad 4 backing part with mostly sustained notes
Riff 5 rhythmic backing
Once you have planned your song you may wish to switch to XGedit and assign the initial voices to each
track. To do this make a note of the track to midi channel allocations within the sequencer. Then within
XGedit assign the required voices to the synth part s on the corresponding midi channels. At t his stage only
worry about getting the basic sounds correct (f urther refinement of the voice character and overall mix can
be performed later when you have some music to work with) .
Having completed the voice assignment you may now start recording midi data using the featur es of your
sequencer.
After recording each track you may wish to set the song playing in a loop and switch back to XGedit to
perform some voice refinement .
REMEMBER TO SAVE YOUR W ORK REGULARLY FROM BOTH XGEDIT AND YOUR SEQUENCER.
15.3.2 Edit The Sounds
Once you have recorded one or more tr acks of your song you will want to per form some more t horough
voice editing. The best way to do this is using the dual program configuration (see
Dual Mode
) with the
song playing from the sequencer in an endless loop.
Alternatively you may wish to use t he built in midi file play capability of XGedit ( although this is likely to be
much less flexible than your sequencers capabilities)
With the song playing you should adjust the XGedit controls such that you hear all edits in real time. This
provides greater feedback of how the edits affect the sounds within an overall mix context and is much
better than attempting to edit an individual voice played solo.
If you do wish to mute certain voices, then use the NOte enable LED within the Enables module. Always
remember to re-enable any voices mut ed in this m anner bef or e r et ur ning t o your sequencer .
XGedit95 User Manual Page 46
Page 47

The following is my preferred procedure for editing an overall voice mix:-
Start by assigning basic (GM) voices to each tr ack/ par t
Where the basic voice is unsatisfactory, try voices from t he cor responding pat ch number in the
higher XG banks.
Where a voic e is s till unsatisf a c tory perf o rm some editing:-
Using the Part Filter parameters RES and CUTOFF have the greatest impact on voice
character
Using Part AMP EG par am et er s together with V.SEN and V.OFF have the greatest effect
on voice dynamics.
Only use other Part paramet er s where special voice effects are required e.g. vibrato or
detuning.
Adjust part volume levels to balance the overall mix (this is best achieved using the overview bars
of the central display panel)
Adjust the Part pan positions to give the song a feeling of space (again this is best per formed
from the central display panel).
Adjust the Reverb and Chorus effect unit sett ings in combination with the Par t REV and CHOR
controls to give the song a feeling of ambience. Note you should first det er m ine t he basic effect
required and then perform fine t uning using the ef f ect par am et er s)
Use Variation effect settings to fur ther alter ambience or add special effects to par t icular par t s
(note you should use Variation is SYStem mode unless you later wish to perform r eal t ime
changes to the effect character using cont roller messages - see
Understanding The Effect Unit
Note you can always return a parameter highlighted in yellow to its default sett ing by right clicking
on the control
REMEMBER TO SAVE YOUR WORK REGULARLY FROM XGEDI T AS A .XGE FILE
15.3.3 Add Dynamics
Once you have recorded your song tracks and edited the sounds t o your liking, you may consider adding
some real-time dynamic edits. e.g. filter sweeps, cr escendos, dr um t unings et c.
There are several possible ways to add such effects:-
Sequencer
Use the facilities of your sequencer to add the relevant cont roller/ Sysex messages. This can be t edious and
depends greatly on the capabilities of your sequencer . Hence this will not be discussed further here.
External Controllers
Use XGedit to set up external midi controllers such that you can record dynamics using your external
equipment (e.g. Mod/Pitch Wheels, Br eat h Contr oller, Foot Pedals) . See
Controllers
Record XGedit output di r ectly to your Sequencer
Record the Output of XGedit in r eal-time to your sequencer. This can be achieved by setting up your midi
system as described in
Dual Mode With Record
Using Dual Mode with Record can be very powerful, but care should be taken to follow the guidelines
described below:-
XGedit95 User Manual Page 47
Page 48

Where possible use XGedit in Controller Output mode (G ener al Midi butt on down).
XGedit normally transmits edits as a series of Syst em Exclusive Param et er Change messages.
These are capable of editing every parameter within the XG synt h, but their format is relat ively
bulky and not all Sequencers can handle them in real-time. Consequently wherever possible midi
controller messages should be used. These are much shorter t o t r ansm it and ar e guar ant eed t o
work with almost all sequencers.
Avoid excessive amounts of data
Whether you choose to use XGedit in Sysex or Controller mode, you should avoid recording
excessive amounts of edit data to the body of your song. If too much data is present the
sequence may suffer from t iming inst abilit ies dur ing playback ( par t icular ly on slower m achines) .
Consequently after recording it is always good practice to utilise your sequencers editing
capabilities to remove duplicates and thin out the number of messages. ( Not e the XG
specification recommends a spacing of at least 5/480 between each cont r oller event )
Check for multiple events on the same midi channel and midi tick
When using dynamic controller events you should always check that each midi event occurs on a
separate midi tick (this is particularly true where RPN/NRPN controllers are used). The or der ing
of events on the same midi tick value cannot be guaranteed across all sequencers. Hence to
ensure correct ordering you should separate each event onto a different tick (the XG specificat ion
recommends a minimum separation of 1/ 480)
Avoid using Macro parameters
Macro parameters are t hose edits which effect multiple parameters within the synth as f ollows:Effect Program changes
Voice/Bank program changes
Equalisation program changes
These parameters alter several sett ings within the synth and consequently take a significant
amount of time to process. If normal note events arrive at the same time, the synth may not
process them, resulting in lost notes, or unpr edictable behaviour.
If you must use these paramet er s, either position them within the setup bar (where no not e
events are present) or utilise t hen dur ing gaps in t he m usic i.e. think ahead.
Record Dynamics to a separate track within your sequencer
In order to assist later editing (and t hinning of cont r oller data) you should r ecor d all dynamics to a
separate track within your sequencer. However please ensure that t he tracks midi channel is
assigned to the same value as the Part you are editing. Although t his is not impor t ant for Sysex
commands, it is import ant for controller messages as they m ay be r e - channellised by your
sequencer. .
15.3.4 Save The Setup Bar To The Midi Fil e
Up until now you have been working with the majority of voice edits being held within XGedit and the
dynamic song data being held within your sequencer. Before you can distribute your midi f ile you must first
combine the two.
There are two ways to perform t his operation; either merge the data within your sequencer or merge the
data within XGedit. However before you decide on which operation to per form, you should f irst decide on
what format the XGedit set up data should be stored (see
Saving Midi Data
)
Merging Within a Sequencer
This method involves saving the XGedit setup data in a format that can be im ported by your sequencer and
then manually splicing this into the song data. This method can be a little tricky but provides the user with
the greatest control over where t he dat a is placed. Please refer to your sequencer user guide for performing
midi merge/cut/paste operat ions.
Note XGedit saves setup bar data with the correct t iming intervals between events. Wherever possible this
XGedit95 User Manual Page 48
Page 49

timing should not be altered by the merge process. I n addition the XG specification states that a per iod of
200ms should be left between the setup data and the f irst note on event of a song.
Merging Within XGedit
This is a simple operation and should provide the best results. The operation is described in
. The user should pay particular attent ion to which midi events will be stripped from the f ile in case
Data
they need to be replaced later. In addition the user should always make a back up of the file prior to
merging or save the final merged output t o a dif f er ent f ilename
(XGedit is not infallible and the Aut hor cannot be held responsible for t he loss of your masterpiece should
XGedit decide to eat it).
Note it is always advisable to keep separate copies of the midi song data in your sequencers native f ile
format and the XGedit setup data in .XGE format. This way, should you wish to perform some further
refinements at a later date, the two programs can be reloaded and the editing session continued from
where you left off.
Merging Midi
15.4 Merging Midi Data
The XGedit Midi Merge feature is NOT a simple midi file load operation, but a true
designed primarily for splicing together edit data held within XGedit and song data fr om your sequencer.
During file load, all midi events contained within the files
the file. This allows XGedit to merge and display the file based edits together with those already resident in
the editor. The combined Setup Bar of t he file and editor based event s is then for matt ed with respect t o t he
midi song data and used for later Midi File save operations.
Setup Bar
In order for a synthesiser to correctly play back a midi song, the file must contain both synth setup data
(Reset commands, voice selections, parameter edits) and midi note/controller data. In general the synth
setup data requires larger midi packets than normal note events and thus takes longer to transmit and
process. Consequently it is customary to store such events at the start of a song prior to any not e events
such that any timing instabilities or mode changes associated with the data do not present audible problems
within the song. This collection of initialisation data at the start of t he song is known as the Set up Bar
Setup Bar
are interpreted and/or discarded f rom
merge
operation. It is
For the purposes of processing within XGedit the Setup Bar is def ined as containing all events fr om t he st ar t
of the file up to but excluding the first not e on/ of f event.
XGedit95 User Manual Page 49
Page 50

The File | Merge Midi menu item performs the following:-
Provides Midi Input File Selection
A standard file select dialog box is opened allowing the user to select the Midi input file. The file
must have the .MID extension and must cont ain either a t y pe 0 or t ype 1 header with associated
midi track data.
Data Loading and Setup Bar interpretation
On closing the file select dialog, the midi file data is loaded into XGedit for processing. The
processing consists of interpreting all setup bar data cont ained within the f ile. For the purposes of
this processing, Setup Bar data is considered to consist of all midi events prior to the first note on
event of the song.
XGedit interprets the data listed below. Wher e r elevant an event s m idi channel is used to
determine which synth part(s) to updat e.
Since there is no way of determining midi port from a
standard midi file, XGedit cannot update parts 17 to 32 of multi port modules unless they are also
assigned to the first midi port
Header information (used to determ ine output midi save format)
•
Tempo/Time base (used to determine playback/event st or age timing and saved to output
•
.
files)
Time Signature/Key Signature/SMTE offset (saved to output file and used to realign midi
•
data after appending setup bar)
Copyright notice (preserved and saved to output f ile)
•
System Exclusive Bulk Dumps (interpreted and used to update display)
•
System Exclusive Parameter Change (interpret ed and used to update display)
•
Patch Change/Bank Select (interpreted and used t o updat e display)
•
Relevant Continuous Controller messages including RPN/NRPN (interpreted and used to
•
update display)
Note On/off (first event used to signify end of setup bar)
•
Setup Bar stripping
The data interpreted above is stripped from t he m idi file and stored for use when saving out files.
Any other data that lies within the setup bar and is not interpreted is discarded; this includes t ext
events, markers, pitch bend, modulation and aftertouch controller data, any unr ecognised Sysex
(including SW60XG mixer) and all channel mode messages)
Any tracks left empty after set up dat a st r ipping are discarded
All data after and including the first note on/of f event is preserved and used for saving out midi
files.
XGedit will not recognise sysex for the QS300 user voices available on the MU10/SW60/DB50
and will therefore strip them from an imported midi file. To prevent this ensure any such voice
sysex is placed after the first note on event (a dummy note on event with a velocity of zero m ay
be used if desired)
Display Update and Synth Refresh
The interpreted data is used to update the status of the editor and refresh the attached synth
(such that the editor and synth remain consistent). Any parameters contained within the mer ged
midi file override existing parameters in the editor; all other editor par am eters remain intact
Midi File save/play preparation
The loaded midi song data is prepared for playing using XGedits midi play feature and processed
XGedit95 User Manual Page 50
Page 51

ready for output to midi file
XGedit95 User Manual Page 51
Page 52

Problem Files
It should be noted that under cer tain circumstances XGedit will not show all setup dat a contained within a
loaded file and/or may not correctly play a midi file. This is usually an indication that t he file deviates from
the XG Midi File Authoring Guidelines. Some common errors ar e descr ibed below:-
1) The file is badly structured
If the file contains setup data interspersed with note events XGedit will stop reading dat a after the
first note event. Hence the major ity of edits may not be visible.
2) The file is not XG
Many midi files will have been written fo r the GS format and cont ain a GS reset command. In this
case the XG synth would normally switch to TG300B mode before playing the file. XGedit does not
interpret GS commands and will therefore discard GS related event s from the file, thus preventing
the synth from switching t o TG300B mode. Any r emaining GM/ XG events will be inter preted but t his
will not provide optimal playback of the file (in particular GS bank selections are dif ferent t o XG and
therefore correct voicing is unlikely)
3) The XG file was written for a different XG synth
Some XG synths provide additional features, voices and eff ects. If XGedit is in a synth mode which
does not support these features, then their associated edits m ay not be correctly displayed ( XGedit
will attempt to mimic the fallback features of the selected synth).
It should also be noted that the default setup of all XG synths is NOT the same. ( In particular the
MU80 defaults for Element Reserves, Effect Parameters and Drum kits are slightly different to those
of the MU50/MU10/DB50/SW60. Consequently if you load a midi file containing an MU80 bulk dump
into XGedit in MU50 mode, you will not ice a larger number of edits than shown for XGedit in MU80
mode).
4) Ambiguous Controller Events
If the file contains multiple Controller events positioned on the same midi tick, their ordering cannot
be guaranteed across all sequencers. Additionally XGedit may misinterpret their assignments
(particularly with respect to RPN/NRPN controllers and Data Entry). All controller events should be
spaced at 1/480.
If the author utilises controller events which assume prior init ialisat ion, then XGedit may not int er pr et
the events correctly (e.g. O m it t ing Bank Select M SB/ LSB pr ior t o a Pr ogr am change m essage) . All
such controller events should therefor be expressed implicitly and in the corr ect time order.
15.5 Saving Midi Data
The
registered
files (.M ID) in associa tion with normal editor Na tive saves
MIDIEX files contain raw system exclusive bulks dumps and may be imported into popular sequencers such
as Cakewalk. To save .SYX files the user should select the .SYX format from the st andar d File Save Dialog.
(note that SYX format saves the com plete state of the synt h. Hence they should only be used where there
are a large number of edits or layered part s which require sysex. For all ot her purposes Midi files should be
used)
Standard Midi files are more useful and can be read by almost all sequencers. To save . MID files the user
should select the .MID format from the standard File Save Dialog.
The contents of the saved midi file are determined by the controls in the Master Module (Refer to the
Master Module section for a description of each control)
15.5.1 Saving Merged Midi Data
If the user has merged a m idi file into XGedit, then the saved midi file will also contain the merged song
data. The setup data will be saved to the f irst few bars and assigned t o the appropr iate song tracks ( based
on midi channel number). The song data will be repositioned with respect to the setup data such that a gap
of at least 200ms is left between end of setup and the first note on event (as recommended in the XG
authoring guidelines).
XGedit95 User Manual Page 52
version of XGedit allows edited data to be saved to MIDIEX files (.SYX) or standard M idi
Page 53

The user should refer to
file.
If the user does not wish to include the merged m idi file data, then the Utils | Clear Midi Song Data menu
item should be clicked prior to saving. This will er ase any merged m idi song data fr om the edit or but will not
affect any extracted setup dat a.
Merging Midi Data
for which events will have been stripped fr om the merged m idi
15.6 Using Native Save Formats
15.6.1 Save Formats and Extensions
XGedit provides four native save formats as follows:
XGE Saves the entire cont ent s of the editor
XGP Saves the parameters associated with the current edit part
XGD Saves the parameters associated with the current edit dr um par t
XGF Saves the parameters associated with the global effects unit
Versions of XGedit prior to V2.0 utilised t he extensions .ALL, . PRT and .DRM. However , to avoid
confusion with files generated by Cubase, these file types have now been renamed to those
shown above: XGedit V2.0 is fully backward com patible with older file save fo rmats and will load
files with the old extensions correctly
File saving is achieved using the File | Save Setup As.. m enu item. This brings up a standard file select
dialog box where the user may enter the desired file name. It should be noted that the type of save
operation is determined from the user provided extension as defined above. (That is the user must ensure
that the filename provided has the correct extension for the desired save/load operation)
15.6.2 Useful Operations
Since so much of a voices character is governed by the global effect unit settings, there is little point in
constructing a library of individual part (.XGP) settings. Consequently, the user is encouraged t o
use the global XGE format when saving the editor setup.
However there are circumstances where the alter nat ive f or m at s can pr ove usef ul.
always
Part Copy
The XGP format is useful if the users wishes to copy one parts setup to another . To do this t he user selects
the desired source part (using the VoiceBox part buttons) and performs an XGP save. The user then
selects the desired destination part and perfor ms an XGP load. Note that the XG P file contains the source
parts midi channel. Hence the user may wish to adjust the midi channel of the copied part after loading.
Drum Kits
Performing drum kit edits can be very t im e consum ing hence it is always worth saving edited kits using the
.DRM format. Note that DRM saves also store the associated .PRT data and therefor e m ay be used f or
copying kits as described for parts above.
XGedit95 User Manual Page 53
Page 54

16. Create Your Own System Exclusive Messages
There are times when you may want to enter just a single System Exclusive message int o your midi file
(e.g. to change an effect m i d way through the song). Where possi ble such activity should be avoided as it is
generally better to plan your midi file so that all setups are performed at the start of the song. However i n
some cases it may be unavoidable.
To insert the required sysex message you may use XGedit in dual mode with record and attempt to
synchronise moving a control at just the right point during record/ playback from your sequencer. However
this may prove difficult.
Hence a better alternative may be to ut ilise the feat ures of your sequencer (part icularly List Edit if av ailable)
for inserting i ndividual Sysex messages.
This section describes how to construct an XG sysex message and highlights some of the special cases
and problems you may encounter.
16.1 Hexadecimal Notation and MIDI
All midi messages are transmitted in hexadecimal notation (i. e. As si ngle bytes encoded in base 16 format) .
Your sequencer may or may not perform the conversion f rom normal decimal numbers for you. If it does
not, use the Windows calculator or the following table to look up the appropriate value:-
D
HDHDHDHDHDHD HD H
000 16 10 32 20 48 30 64 40 80 50 96 60 112 70
1 01 17 11 33 21 49 31 65 41 81 51 97 61 113 71
2 02 18 12 34 22 50 32 66 42 82 52 98 62 114 72
3 03 19 13 35 23 51 33 67 43 83 53 99 63 115 73
4 04 20 14 36 24 52 34 68 44 84 54 100 64 116 74
5 05 21 15 37 25 53 35 69 45 85 55 101 65 117 75
6 06 22 16 38 26 54 36 70 46 86 56 102 66 118 76
7 07 23 17 39 27 55 37 71 47 87 57 103 67 119 77
8 08 24 18 40 28 56 38 71 48 88 58 104 68 120 78
9 09 25 19 41 29 57 39 73 49 89 59 105 69 121 79
10 0A 26 1A 42 2A 58 3A 74 4A 90 5A 106 6A 122 7A
11 0B 27 1B 43 2B 59 3B 75 4B 91 5B 107 6B 123 7B
12 0C 28 1C 44 2C 60 3C 76 4C 92 5C 108 6C 124 7C
13 0D 29 1D 45 2D 61 3D 77 4D 93 5D 109 6D 125 7D
14 0E 30 1E 46 2E 62 3E 78 4E 94 5E 110 6E 126 7E
15 0F 31 1F 47 2F 63 3F 79 4F 95 5F 111 6F 127 7F
Figure 1 Decimal To Hexadecim al
Note that all data values within midi messages, must be less than 128 (decim al). Any bytes with values of
128 (decimal) or more are treat ed as M idi commands.
XGedit95 User Manual Page 54
Page 55

16.2 Check This Out First
Before you attempt to create the sysex message, please take the time to check the XG manual section
concerning Controllers and NRPN. It may be that the message you require can be input as a simple
controller message (which is both faster to transmit and easier to construct).
16.2.1 Standard Controllers
In particular the following parameters can be sent as standard midi cont r ollers:-
Parameter Controller Comment
Program Change Cn,xx Should be preceded by Bank Select MSB/LSB
Bank Select MSB Bn,00,xx 0:Normal,64:SFX,126/7 Drum
Bank Select LSB Bn,20,xx Bank select does not take aff ect unt il Program Change is received
Modulation Bn,01, xx
Portamento Tim e Bn,05,xx
Volume Bn,07,xx
Pan Bn,0A,xx
Expression Bn,0B,xx Should be used in place of Volume for crescendos etc
Sustain Bn,40, xx
Portamento Bn,41,xx
Sostenuto Bn,42,xx
Soft Bn,43,xx
Filter Resonance Bn,47,xx Harmonic Content
AmpEG Release Bn,48,xx
AmpEG Attack Bn,49,xx
Filter Cutoff Bn,4A, xx Br ightness
Portamento Control Bn,54,xx
Part Reverb Bn,5B, x x Effect Depth 1
Part Chorus Bn,5D,xx Effect Depth 2
Part Variation Bn,5E,xx Eff ect Depth 3
Note:
n=Midi channel number in Hex 0 - F (1 - 16)
xx = Data value in Hex
XGedit95 User Manual Page 55
Page 56

16.2.2 RPN/NRPN Contr ollers
If the parameter you want does not have an equivalent standard controller message, then it may have a
register or non registered parameter controller number (RPN/NRPN):-
Parameter Controller Messages
Vibrato Rate Bn,63,01,Bn,62,08,Bn,06,xx
Vibrato Depth Bn,63,01,Bn,62, 09, Bn, 06,xx
Vibrato Delay Bn,63,01,Bn,62,0A,Bn,06, xx
Filter EG Depth (MU100/SW1000 VL Only) Bn,63, 01, Bn,62,22,Bn,06,xx
High Pass Filter Cutoff (MU100/SW1000 Only) Bn,63, 01, Bn, 62,24,Bn,06,xx
EQ Bass Gain (MU100/SW1000 Only) Bn,63,01,Bn, 62, 30,Bn,06,xx
EQ Treble Gain (MU100/SW1000 Only) Bn,63,01, Bn, 62, 31, Bn,06,xx
EQ Bass Frequency (MU100/SW1000 Only) Bn,63,01,Bn, 62, 34, Bn,06,xx
EQ Bass Frequency(MU100/SW1000 Only) Bn,63,01,Bn,62,35,Bn,06, xx
AmpEG Decay Bn,63,01,Bn,62,64,Bn,06,xx
Drum Filter Cutoff Bn,63,14,Bn, 62,rr,Bn,06,xx
Drum Filter Resonance Bn,63,15,Bn,62,rr, Bn, 06,xx
Drum EG Attack Bn,63,16,Bn,62,rr ,Bn,06,xx
Drum EG Decay Bn,63,17,Bn,62,rr, Bn, 06,xx
Drum Pitch Coarse Bn,63,18, Bn, 62, r r , Bn,06,xx
Drum Pitch Fine Bn, 63, 19, Bn,62,rr,Bn,06,xx
Drum Volume Bn,63,1A,Bn,62,rr,Bn,06,xx
Drum Pan Bn,63,1C,Bn,62,rr,Bn,06,xx
Drum Reverb Bn,63, 1D,Bn, 62, r r , Bn,06,xx
Drum Chorus Bn,63, 1E, Bn, 62, r r , Bn, 06,xx
Drum Variation Bn,63,1F,Bn,62,rr,Bn,06,xx
Drum High Pass Filter (MU100/SW1000) Bn,63,24, Bn, 62,rr,Bn,06,xx
Drum EQ Bass Gain (M U100/SW1000) Bn,63,30,Bn, 62, rr,Bn,06,xx
Drum EQ Treble Gain (M U100/ SW1000) Bn,63,31,Bn,62,rr,Bn,06,xx
Drum EQ Bass Frequency (MU100/SW1000) Bn,63,34,Bn,62,rr , Bn,06,xx
Drum EQ Treble Frequency(MU100/SW1000) Bn,63,35,Bn,62, r r , Bn,06,xx
Note
n= Midi channel number in Hex 0 - F (1 - 16)
rr= drum key number
xx = Data value in Hex
If you still cannot find the parameter you are looking for, then Sysex may be the only way to change its
value.
XGedit95 User Manual Page 56
Page 57

16.3 XG Sysex
All XG parameters can be altered using XG Sysex messages. Note that Sysex is specific to each
manufacturer and is i ndependent of m idi channel (i.e. you can send sysex on any channel and i t will always
affect the correct par t. This is because Sysex addresses the i nt er nal memory of t he synth)
There are two types of Sysex messages:-
Bulk Dump
However they are normally very long and slow to transmit. In addition they contai n a checksum (which is
used to check the integrit y of t he t r ansm i tted informati on) .
Parameter Change
transmit. As t hey are short , t hey contai n no m echanism for checking the int egr ity of their contents.
Bulk dump messages are relatively difficult to construct (due t o their length and checksum). However they
are only really required where large sections of the synth status needs to be updated or r ecorded (such as
from a synth editor/librarian). Hence we will not deal wi th these messages any further (although the same
general principals described below apply).
- These messages can send or retri eve large numbers of parameters in a single messages.
- these messages can send or retri eve i ndiv i dual parameters and are r elatively short t o
XGedit95 User Manual Page 57
Page 58

16.4 Constructing XG Parameter Change Sysex
The general format for an XG Par am et er Change m essage i s shown below.
F0 43 1n 4C ah am al xx F7
F0 The Midi command byte for a system exclusive message
43 The Yamaha manufacturer ID
n Device number (normally an XG synth will receive on all device numbers unless you have
deliberately altered the Device number). Hence in general a value of 10 should be used.
4C Model ID for an XG synth
ah Parameter High address (look up from sysex parameter data t ables)
am Parameter Mid address (look up from sysex parameter dat a t ables)
al Paramet er Low address (look up from sysex parameter data tables)
xx Data Value you wish to set
F7 The Midi command byte to termi nate a sysex message
Note if you wish to send a Parameter Requests then change 1n t o 3n and om i t the data byte.
Parameter Request ask the synth to send you the current value of the paramet er. Normally only external
modules will respond to this message
16.4.1 Example Parameter Change Sysex:
Assume we want to change the Variation effect so t hat it inserts the effect into Part 5.
First we need to set the VARIATION CONNECTION to Insertion mode. To construct the message:-
1) Look up the VARIATION CONNECTION parameter address; thi s i s shown as 02 01 5A. So in our sysex
message ah = 02, am=01 and al=5A.
2) Now look up the data value; this shows that INSERTION mode is 0. So t he data value we need t o send
for our message is xx=00
3) Hence the final message is
Now we need to set the VARIATION PART parameter to Part 5. T o const r uct t he m essage:-
4) Look up the VARIATION PART parameter address; this is shown as 02 01 5B. So in our sysex
message ah = 02, am=01 and al=5B.
5) Now determine the data value; Part values are actually transmitted with a value one less than their part
number. So the data value we need to send for Part 5 in our message is xx=04
6) Hence the final message is
16.4.2 Example Multi Byte Paramet er Change Sysex:
Assume we now want to change the VARIATION TYPE to DELAY LR. If we look in the XG Sysex tables we
find that VARIATION TYPE consists of two parameters (an MSB and an LSB). How do we send both
parameters in one message?
The answer is that Parameter Change messages can actually contain multiple data bytes. In fact if you look
at the XG sysex tables you will notice that there is a column labelled 'Size' (for VARIATION TYPE this
shows '2' indicating that two data bytes are requi r ed) Hence to construct the VARIATION TYPE message:-
1) Look up the VARIATION TYPE parameter addr ess; t his is shown as 02 01 40. So in our sysex message
ah = 02, am=01 and al=40.
F0 43 10 4C 02 01 5A 00 F7
F0 43 10 4C 02 01 5B 04 F7
2) Now look up the DELAY LR program number; thi s is shown as MSB=06, LSB=00. You will also notice
that the XG Sysex tables lists the VARIATION TYPE MSB bef ore the LSB. So the data value we need
to send for our message is 06 00.
3) Hence the final message is
XGedit95 User Manual Page 58
F0 43 10 4C 02 01 40 06 00 F7
Page 59

If we were really ambitious we could extend this multi byte Parameter Change message to change all
Variation paramet er s i n a single message!
However certain restricti ons apply as follows:a) You must send messages with number of data values defined in the Sysex tables.
b) If you send more than one parameter in a given message then you must always send the complete
parameter block. You will notice that the tables are split into blocks and that each block has a total size.
Hence if we wanted to change VARIATION RETURN and VARIATION PAN, then we must ei ther send each
parameter as a separate message or we must send the whole block (i.e. from address 02 01 40 with 21 hex
(33 decimal) data bytes!
Consequently unless you really want to change every parameter in a block you are best sticking to
individual Parameter Change m essages per par am et er .
16.4.3 Numbers That Are Too Big For Singl e Bytes
Lets assume we now want to set the Lch Delay of the DELAY LR effect to it s m axim um v alue. If we inspect
the Effect Parameter List tables we find that a setting of 715. 0m s cor r esponds t o a value of 7150 decimal.
Also we find that VARIATION PARAMETER 1 requires two data bytes.
The first approach m ight be to convert 7150 t o a hexadecimal number i.e. 1BEE and to send this as the two
data bytes i.e. xx= 1B EE.
Unfortunately this will not work. The reason being that the second byte is greater t han 127 decimal (7Fhex)
and will therefore be treated as a Midi command byte (in this case i t corresponds to t he command for Pi tch
Bend on midi channel 15).
The answer to this problem is to send the dat a as 7bit bytes (i.e. bytes whose values have a maxi mum
value of 127dec)
In this format the upper bit of t he LSB becomes the lower bit of the MSB. So for example 130 decimal (82
hex) is send as 01 02.
A simple way of calculating data in this way using the Windows calculator is as follows:-
1) Convert the number t o hex.
2) Divide by 80 hex to yield the MSB value (i.e. t hi s i s the original value modulus 128 decimal)
3) Multiply the MSB value by 80 hex and subtract from the original hex value (i.e. this is the rem ainder of
the original number modulus 128 decimal).
So in our example we have a value of 7150 to transmit.
7150 decimal = 1BEE hex
MSB = 1BEE / 80 = 37 hex
LSB = 1BEE - (37 x 80) = 1BEE - 1B80 = 6E
So our data value xx = 37 6E
Therefore to construct our message we take the VARIATION PARAMETER 1 address of 02 01 42 and the
data value of 37 6E to produce a sysex message of
F0 43 10 4C 02 01 42 37 6E F7
XGedit95 User Manual Page 59
Page 60

16.5 Other Useful Sysex Informatio n
This section highlights some ot her useful sysex strings and sysex related facts you should be awar e of .
16.5.1 Reset Messages
All XG synths will respond to the following three sysex messages:-
GM Reset - F0 7E 7F 09 01 F7
This sysex string forces the synth to resets all parameters to their General Midi defaults. Since XG is a
superset of GM, the string should be included at the head of all XG song files to ensure non XG synths can
at least make a reasonable attempt at playing the file.
XG Reset - F0 43 10 4C 00 00 7E,00 F7
This string forces t he synth to switch to XG mode and reset all parameters to thei r XG defaults. The st ring
should be included in all XG files after the GM r eset .
XG Reset All- F0 43 10 4C 00 00 7F 00 F7
This string f or ces t he synth t o switch t o XG m ode and r eset all parameters to t heir XG defaults. In addi t ion it
forces any synth system parameters to be reset t o their factory defaults (t his includes the SW 60XG m iser
and any User Performance memories). Since this stri ng per f or m s such a catastrophic reset it should only be
used where absolutely necessary and NEVER EMBEDDED IN A MIDI FILE.
GS Reset - F0 41 10 42 12 40 00 7F 00 41 F7
This string f orces the synth to switch to TG300B mode and reset all parameters t o their GS def aults (XG
synths TG300B mode is an emulation of t he Roland GS format). T he string should be included in all GS
files after the GM reset.
16.5.2 Sysex Timing
Sysex messages generally require more processing by the synth than standard midi controller and note
event messages. Consequently, inter message t imi ng constr aints m ust be applied to allow the synth time to
respond.
For simple single Parameter Change messages a period of one mi di clock should be allowed between each
message.
For GM reset a period of 200m s should be allowed before subsequent messages are sent.
For XG and GS resets a period 50m s should be allowed before subsequent messages are sent.
If you do not allow these intervals between messages then you may find the synths midi buffer overr uns
and/or the synth does not behave as expected.
If you use midi files saved from XGedit, the programme guarantees that all required Reset messages are
inserted to the head of t he f ile and that all inter message timing is correct .
XGedit95 User Manual Page 60
Page 61

A
About, 3 6
ALTGR P, 27
AMOD, 23
AMP, 14, 23, 27, 46
Amplitude Envelope Generator, 14, 27, 46
Analogue To Digital Converters, 15, 38, 43
Assign, 25
Att enuation, 1 2
Auditioning Sounds, 29
B
Band, 13
Bank, 25, 30
Bank Select, 15, 28
Bass Centre Frequency
Bass Frequency Gain
Bypass, 38
, 26
, 26
C
Index
Envelope, 14
Equaliser, 13
Exit
, 33
Expression, 15, 28
F
File, 10, 11, 33, 44, 47, 48, 49, 50, 51
Filter Cutoff, 25, 46
Frequency, 13
Frequency Modulation, 23
G
Gain, 13
GAIN, 15
General Midi, 5, 6, 9, 10, 30, 43, 46, 50, 58
GS, 50, 58
H
Help, 35, 36
High Pass Filter
, 25
CD, 37, 38
Change LCD Colour
Channel Pr e ssure , 28
Channels, 30
Chorus, 15, 16, 46
Clear Midi
Configuration, 6
Continuous Controllers, 15, 28
Controller, 5, 9, 23, 46, 47, 49, 50, 53, 54
CTRL, 17
, 33, 36, 51
, 34
D
Delay, 25, 56, 57
Depth, 25
DETUNE
Dials, 8
Display Pan el, 14
Distortion, 17
Drum Edit Mode, 27
Drum Filter Velocity Response
Drum Parameters, 27
Drum Pitch Velocity Response
Dry, 15, 17, 25
, 25
, 27
, 27
E
I
Insertion, 16, 17, 56
Installation, 6
Introduction, 4, 39
K
Karaoke Lock, 38, 43
Key Off, 27
Key On, 2 7
Key Range, 29
Keyboard, 5, 7, 25, 27, 29
Knobs, 7, 17
KSHIFT, 12, 25
L
LED, 8, 10, 11, 23, 25, 28, 30, 37, 38, 45
LEVEL, 16, 17
Line, 37, 38
Load, 5, 33, 34
Low Frequency Oscillato r, 23, 2 5, 39
M
Edits Only, 1 0
Effect List Box, 17
Effect Name, 18
Effect Parameters, 17, 18, 50
Elements Reserves, 30, 50
Enables, 5, 15, 27, 28, 38, 45
XGedit95 User Manual Page 61
Master Module, 5, 6, 10, 33, 50
Merge
, 33, 48, 49
Mic, 37
MIDI, 15, 40, 41, 42, 45, 52, 58
Midi Thru, 11
Page 62

MOD, 28
Mode, 5, 14, 25, 27, 40, 41, 42, 44, 45, 46
Mono/Poly, 28
Multimid , 6 , 39, 40, 41, 42, 43
N
New, 33
NRPN, 9, 28, 44, 47, 49, 50, 53, 54
O
OFFSET , 25
OP
, 15
Output Select
, 26
S
Save, 5, 33, 47, 50, 51
SCALE, 25
Select Synth, 34, 44
Setup, 5, 6, 7, 8, 10, 33, 34, 45, 47, 48, 49, 51
SHAPE, 13
Sile n ce, 8
SOFT, 28
SOS, 28
Stereo
, 15, 38
SUS, 28
SWMixer, 43
System Exclusive, 5, 6, 9, 10, 33, 43, 46, 47, 49, 52, 54, 55,
56, 57, 58
P
PAN, 15, 16, 17, 25, 28, 57
PART, 17, 56
Part Copy, 51
Part Edit, 25
Part Module, 16, 27, 29
Part Volume
Performance, 29, 36, 58
PITCH, 14, 23
Pitch B e nd, 28
Pitch Envelope Gener ator, 1 4
Pitch Modulation, 23
Plugins
Port Setup, 6, 34
Portamento, 28
Portamento Time, 25
PPQ, 11
PRO, 15, 28
, 25
, 34
Q
Q, 13
R
RATE, 25
Refresh, 33, 34, 36, 37, 49
Register, 35
Registered Parameter Number, 9, 28, 44, 47, 49, 50, 54
Reset, 6, 36, 43, 48, 58
Reset All, 36, 58
Resonance, 25, 46
Reverb, 15, 16, 25, 46
Reverse Dial Action, 7, 8, 34
Time Varying Filter, 23
Tone, 39
Transport, 11
Treble Frequency
Treble Frequency Gain
TUNE, 12, 25
Unit Number, 6, 12
Variation, 15, 16, 17, 25
Variation Connection, 1 6, 17
Velocity, 25, 29
Veloc ity Limit, 29
Velocity Offset, 46
Veloc ity Sensitiv ity, 25, 46
VL Assign
VL Bend Pitch Low
VL Depth
VL Filter EG Depth
Voice Box, 27, 30, 44
Volume, 12, 15, 28
Wheel, 8, 23
XF, 10
, 24
, 24
, 26
, 26
, 26
, 26
T
U
V
W
X
XGedit95 User Manual Page 62
 Loading...