

Page 1

®
YAMAHA
AUTHORIZED
PRODUCT MANUAL
WIND MIDI CONTROLLER
Page 2

YAMAHA
WIND MIDI CONTROLLER
OWNER’S MANUAL
Page 3

INTRODUCTION
Congratulations and thank you for purchasing the Yamaha WX7 Wind MIDI Controller.
Since 1887, Yamaha has been producing quality musical instruments, both acoustic and electronic. Now in its 100th
year, Yamaha is proud to present an extraordinarily expressive
and technically sophisticated MIDI musical instrument, the
WX7 Wind MIDI Processor. The WX7 combines Yamaha
state-of-the-art technology with its traditional craftsmanship
to bring the professional saxophone player into the expressive
world of electronic music.
With its light, sleek design and its advanced features, the
WX7 is destined to be one of the most used and influential
MIDI controllers for many years to come. MIDI (Musical Instrument Digital Interface) is a computer “language” adapted
for music, to allow electronic instruments to “talk” to each
other. Through the power of MIDI, the WX7 can play synthesizers and tone generators, enter music directly onto
computers and sequencers for noise-free multitrack recording, change programmed settings on MIDI-compatible
equalizers, digital delay devices, and reverb units, and perform a host of other modern musical feats.
Yet, the WX7 is extremely easy to operate, even for the
saxophone player with a limited experience of electronic
music devices. It uses the standard Bohm fingering and, in
normal operation, can be played in two octaves. A special
Octave Transpose key lets you extend the total range of the
instrument to over 7 octaves. The WX7 allows you to bend
pitch by lip pressure as well as by a conveniently located Pitch
Bend Wheel. And you can control the volume, vibrato, and
tone of the connected MIDI sound source by the way you
blow (breath pressure).
The WX7’s Key Hold and Dual Play capabilities are highly
impressive and useful features. With Key Hold, you can hold
a selected note while playing other notes. The held note can
remain at one pitch, or follow the melody at a selected interval. The Dual Play feature improves upon the Key Hold
by sending the lead line and held note on independent MIDI
channels, giving your playing an unprecedented fullness by
letting you play two separate MIDI devices, producing two
different digital instrument sounds.
The more your expertise at the use of MIDI grows (in particular,
the more you become familiar with the use of the MIDI devices that you will control with your WX7), the more powerful
and versatile the WX7 becomes. Its possibilities are endless!
CONTENTS
HOW TO USE THIS MANUAL
PRECAUTIONS
GUIDE TO THE CONTROLS
ACCESSORIES AND
QUICK GUIDE.....................................................
SETTING UP.......................................................
PLAYINGTHEWX7
THE
DIPSWITCHES
...................................................
MAINTENANCE.................
.............................................
.........................................
............................
................................
11
2
3
3
5
7
8
9
ADJUSTING THE PLAYING
RESPONSE
MIDI AND APPLICATIONS
GLOSSARY
SPECIFICATIONS
MIDI DATA FORMAT
FCCINFORMATION
MIDI IMPLEMENTATION
FINGERING CHARTS (the last page of this manual)
....................................................... 13
...............................
....................................................... 17
..............................................
.......................................
......................................... 20
..................................
15
19
20
21
1
Page 4

HOW TO USE THIS MANUAL
We recommend that you read this manual carefully in order
to get the most out of your WX7.
l Read the PRECAUTIONS (p.3) first, to familiarize
yourself with ways in which the WX7 can be damaged
or misused. A thorough knowledge of this section will
enable you to get the optimum performance out of your
WX7 for many years to come.
l
The
GUIDE TO THE CONTROLS
clear, easy-to-follow introduction the the controls built
in to the WX7. Although sophisticated, the WX7’s controls are laid out in a neat, orderly manner allowing you
to make full use of its features with a minimum of effort.
l
The
ACCESSORIES AND MAINTENANCE
tion describes the complete range of accessories supplied
with the WX7, and gives tips on how to keep the WX7
in perfect working order, for years of trouble-free playing.
l The QUICK GUIDE (p.7) gives you an opportunity to
start playing the WX7, without having to read the rest
of the manual. It gives a very brief and concise guide to
connecting and playing the WX7. You should then go
on to succeeding sections of the manual, for full explanations on the use of the WX7.
(p.3) section gives a
(p.5) sec-
l
A special section on
MIDI AND APPLICATIONS
(p. 15)
is provided as a simplified crash course in MIDI technology. This will give you a brief introduction to MIDI
plus some system examples, to suggest just a few of the
virtually unlimited number of ways to use the WX7 with
a MIDI digital music system. For further reference on
MIDI, consult the manual of your MIDI synthesizer or
tone generator, as well as the variety of publications and
magazines now available on the subject of this fast-growing
technology.
l A GLOSSARY (p.17) has been included, which clearly
explains the terminology used in this manual, partcularly
for the benefit of the WX7 owner with a limited knowledge
of digital music and MIDI.
l Following the technical SPECIFICATIONS (p.19), the
MIDI IMPLEMENTATION
(p.23) section gives full details of the MIDI technology used in the WX7, for users
seriously interested in MIDI and computer applications
of this advanced unit.
l The all-important FINGERING CHARTS (the last page
of this manual) indicates in musical score form the
available fingerings on the WX7. All the standard fingering
positions are provided, plus additional fingering positions
for fast, easy octave transposing.
l SETTING UP (p.8), as the title indicates, describes the
simple connection procedure of the WX7 plus its
MIDI/Power pack. Once you understand this procedure,
you’ll be able to set up your WX7 and be ready to play
in minutes.
l PLAYING THE WX7 (p.9) gets you right into playing,
and in a remarkably concise and easy-to-understand section, tells you all you need to know about its performance
features.
l THE DIP SWITCHES (p.11) details the setting of the
concealed switches on the WX7, which are used to select
a variety of impressive functions.
l ADJUSTING THE PLAYING RESPONSE (p.13) tells
you how to alter the WX7’s response to both lip pressure
and breath pressure, so you can “customize” the WX7 to
suit your individual playing style.
2
Page 5
PRECAUTIONS
l Avoid placing your WX7 in direct sunlight or close to a
source of heat. Also, avoid locations where the instrument
is likely to be subjected to vibration, excessive dust, cold
or moisture. All of these conditions could have a detrimental effect on both the mechanisms and the circuitry
incorporated into the WX7.
l Avoid applying excessive force to the switches and keys.
Use the mouthpiece and keys with as much care as you
would with any other top quality wind instrument. Also
avoid dropping the instrument or otherwise subjecting it
to impact. While the internal circuitry is of reliable integrated circuit design, the WX7 should be treated with
care.
l When not in use, even for short periods of time, always
keep the WX7 in the supplied carrying case.
l When unplugging cords (MIDI, audio, power, etc.) from
the WX7, never unplug by pulling on the cords; this can
result in damage to the WX7 or the cords.
All computer circuitry, including that of the WX7, is
sensitive to power surges or voltage spikes, such as those
caused by lightning. For this reason, the MIDI/Power
Pack of the WX7 should be turned off and unplugged from
the wall socket (if using it with AC power rather than the
internal batteries) in the event of an electrical storm.
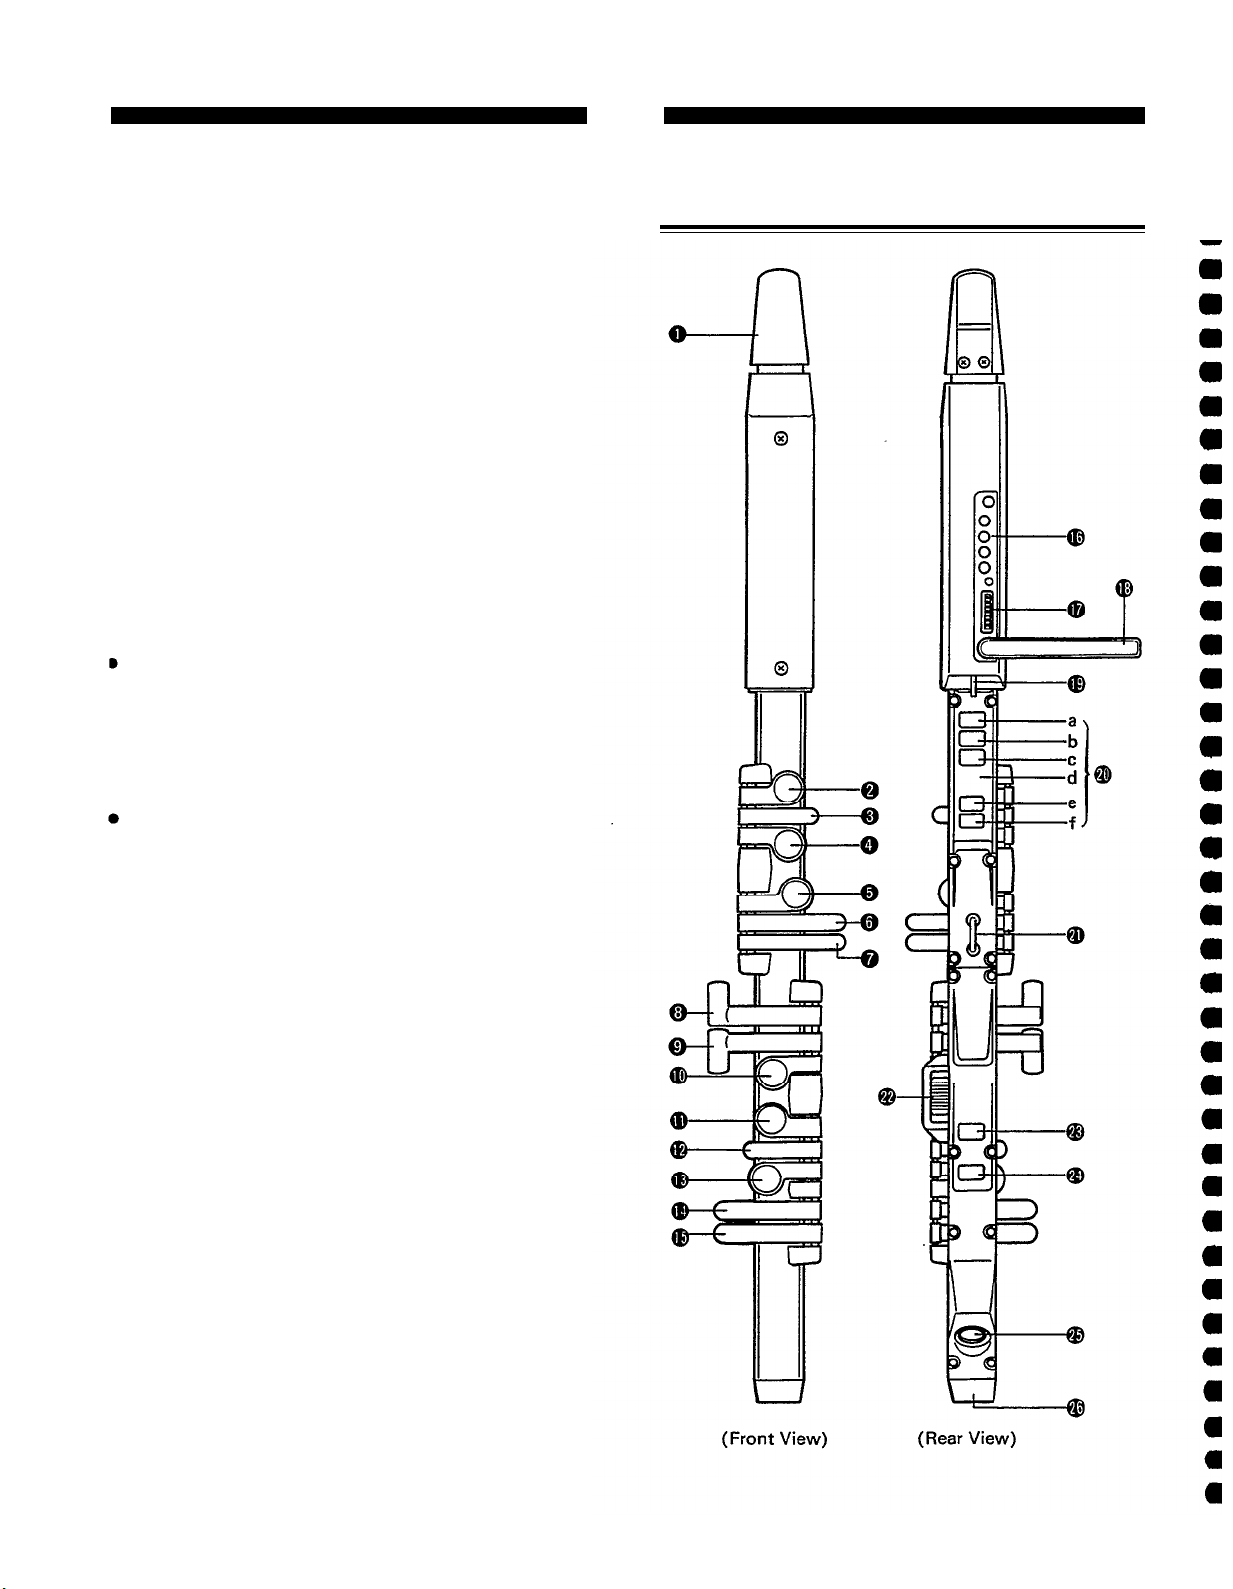
GUIDE TO THE CONTROLS
Front View/Rear View
Computer circuitry is also sensitive to electromagnetic
radiation, such as is generated by television sets.
Use your
WX7 at a suitable distance from such equipment to avoid
malfunctions in the WX7 or any other connected equipment.
l
When making connections, carefully follow the in-
structions detailed in the SETTING UP section (both in
the WX7 manual and that of the MIDI device which it
is controlling) so as to avoid damage to any of your
equipment.
l When cleaning the WX7, use a slightly damp cloth, with
a mild detergent if necessary, and dry with the soft cloth
provided. Never use solvents (such as benzine or thinner)
since they can melt or discolor the finish. Also, never use
aerosol sprays near the WX7 as they can get into the
circuitry and prevent accurate transmission of data
l Your WX7 and the MIDI/Power Pack contain no user
serviceable parts. Opening them or tampering with them
can lead to electrical shock as well as damage.
Refer all
servicing to qualified Yamaha personnel.
3
Page 6

Mouthpiece (detachable).
Bkey
key
A
A
key
Gkey
key
G
Playing strap ring
Attach the playing strap to this ring to hang the WX7
from your body while playing.
Pitch Bend Wheel.
Operated by the right thumb, this allows you to bend
the pitch of notes, by an amount corresponding to the
pitch bend range setting on the connected MIDI sound
source.
Low B key
Whole tone up key
Semitone up key
Fkey
Ekey
key
F
Dkey
key
D
Ckey
Lip/Wind controls (four rotary pots, under cover).
Refer to the ADJUSTING THE PLAYING RE-
SPONSE section for details.
DIP switches (eight, under cover).
Refer to THE DIP SWITCHES section for details.
Lip and Wind Sensors/Dip Switches Cover
A soft rubber cover protects the adjustment controls and
switches from damage or accidental changes. To get
at the controls, pull the top part of the cover away from
the instrument, but do not take it completely off. A small
knob at the bottom allows you to pivot the cover and
use the controls, yet still keeps it safely attached to the
WX7.
Hold Key.
Allows one note to be held while other notes are played.
Refer to the PLAYING THE WX7 section for details.
Program Change key.
Permits selection of programs (on the connected MIDI
sound source) from the WX7. To change programs, hold
down the Program Change key and press an Octave
Transpose key. The top Octave Transpose key (a) corresponds to program number 1 on your tone generator,
the next Octave Transpose key (b) corresponds to pro-
gram 2, and so on down to the bottom Octave Transpose
key (0, which corresponds to program 5.
MIDI/DC connector.
For connection of the WX7 to its MIDI/Power Pack.
This connector has two functions: to supply DC power
to the WX7, and to transmit MIDI data from the WX7.
Drain Hole.
For drainage of condensation from the WX7.
WX7/Power Pack ring
Connect this ring to the hook on the MIDI/Power Pack
to keep it and the WX7 together when not playmg.
Octave Transpose keys.
Normally played with the left thumb, these keys allow
transpositon of the played note, in the following order
(reading from top to bottom): three octaves up (a); two
octaves up (b); one octave up (c); a zero notch (d) in
which to rest the thumb for playing in concert pitch; one
octave down (e); two octaves down (f).
4
Page 7
ACCESSORIES AND
MAINTENANCE
The WX7 comes fully equipped with everything you need
to connect it to your MIDI synthesizer or tone generator
and begin playing. This section lists all the supplied accessories, explains their usage, and gives tips on how to maintain
your WX7, for years of trouble-free use.
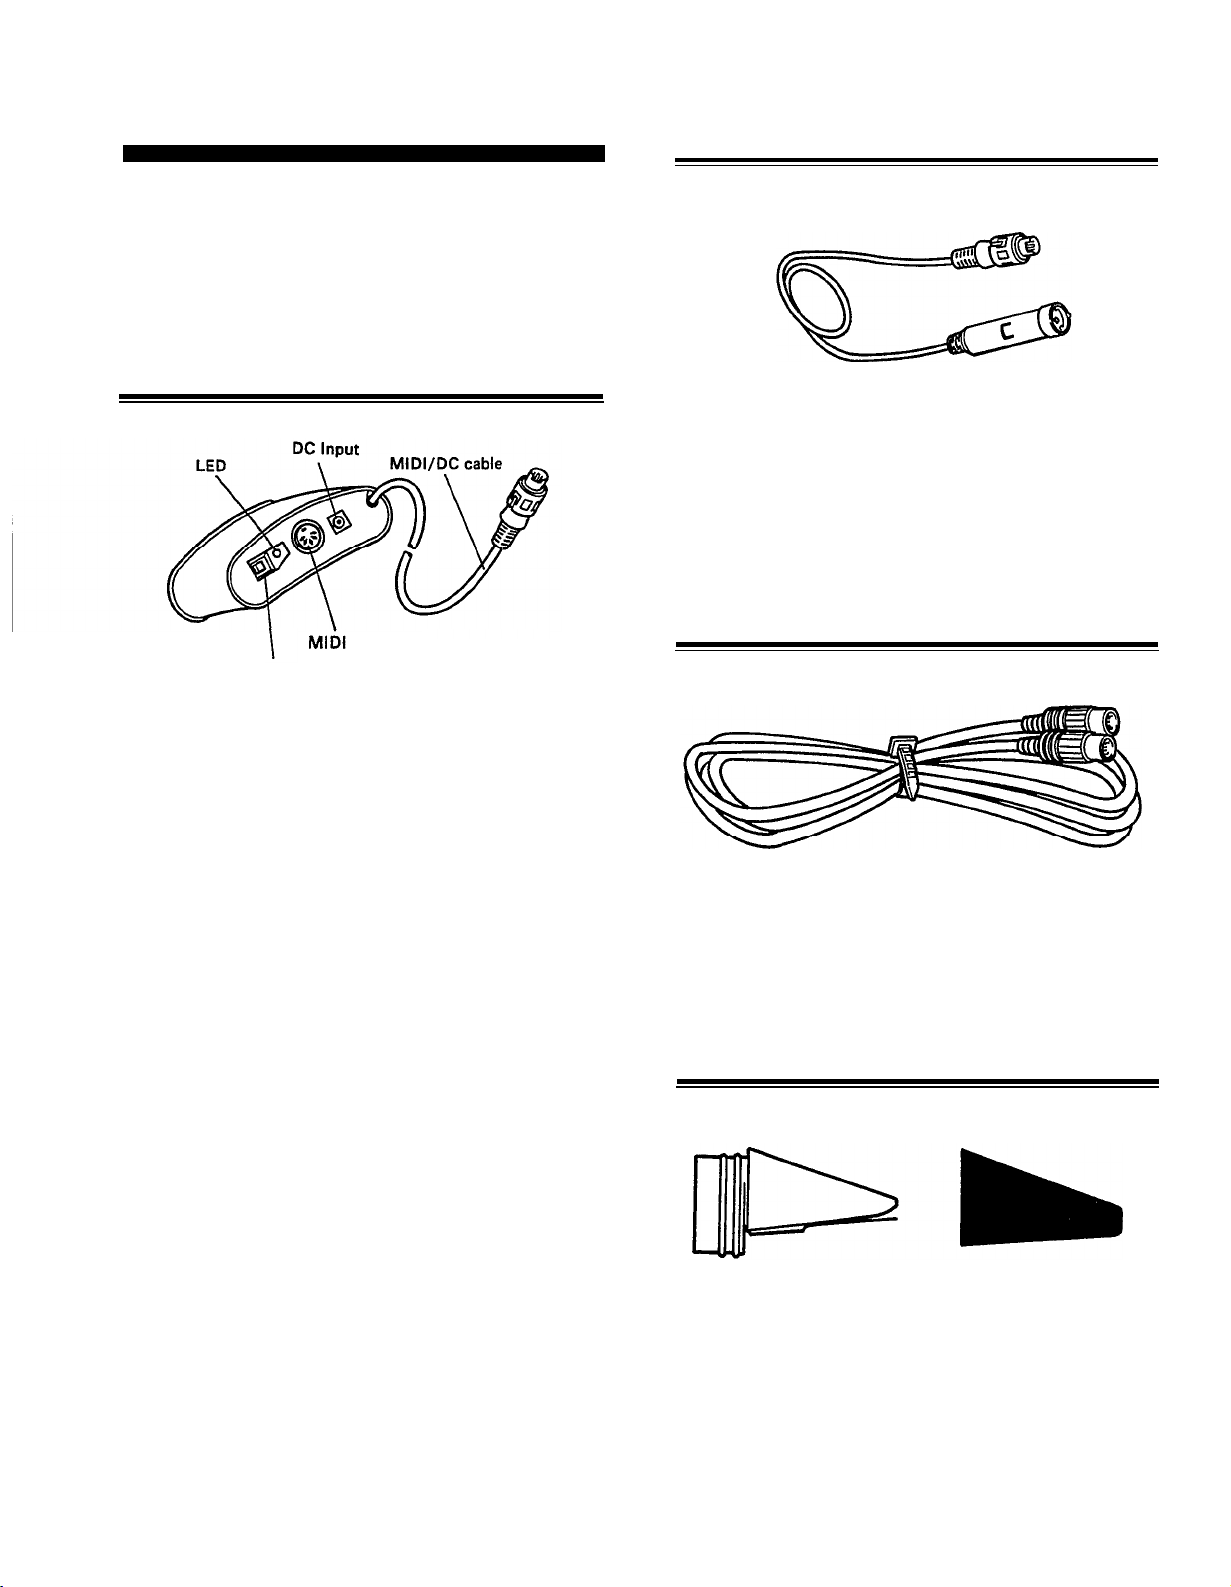
MIDI/POWER PACK
OUT Jack
On/Off Switch
MIDI/DC EXTENSION CORD
This cord allows you to increase the length of the MIDI/DC
cord connecting the MIDI/Power pack to the WX7. Like the
MIDI/DC cord, it has the dual function of supplying the
WX7 with power and transmitting its MIDI data to the
MIDI/Power pack. This cord has a length of 5 meters (15
feet). Extra cords can be purchased and used (up to a suggested maximum of three.
MIDI CABLE
The MIDI/Power Pack supplies the required power (9 volts
DC) to the WX7 and sends the WX7’s MIDI data out to
your MIDI synthesizer or tone generator. The MIDI/Power
Pack normally runs on 6 “AA”-size batteries. You can also
use an optional 12-volt AC adaptor (Yamaha PA-1).
possibility is to use rechargeable batteries. In this case we
suggest that you always keep a spare set of fully-recharged
batteries handy.
When battery voltage becomes low, the LED on the
MIDI/Power Pack will flash, signalling that replacement of
the batteries is necessary.
The MIDI/Power Pack is connected to the WX7 by means
of a 1.5 meter (4 l/2 feet) MIDI/DC cable, which attaches
to the compact, specially-constructed MIDI/DC terminal on
both units.
The MIDI/Power pack has an on/off switch with an accompanying LED to indicate when the power is on, a DC
input jack for the PA-l adaptor, and a MIDI OUT terminal
to which you connect a standard MIDI cable (the other end
of which is connected to the MIDI IN terminal of your MIDI
synthesizer or tone generator).
Also included is a soft case which has slots in the back for
attaching the MIDI/Power Pack to your belt.
Six “AA”-size batteries are supplied. Insert the batteries into
the MIDI/Power Pack in the configuration printed on the
inside case of the battery compartment. During regular use,
keep a spare set of batteries in the carrying case. When not
using the WX7 for long periods, remove the batteries and
store them in the carrying case.
A third
The MIDI cable supplied with your WX7 is a standard 3meter (9 feet) cable. To avoid any degradation of the MIDI
signal use only this cable, or a similar high-quality MIDI
cable, to connect the WX7 to your MIDI synthesizer or tone
generator.
MOUTHPIECE AND MOUTHPIECE COVER
Mouthpiece
Made of durable, scratch-resistant plastic, the WX7’s
mouthpiece has a permanently attached plastic reed and a
special cover to protect the mouthpiece when not in use.
Two mouthpieces are supplied; the second can be kept as a
spare, or used by a second player. Keep the mouthpiece
attached to the WX7 when not in use or when storing in the
hard case.
damage.
The mouthpiece protects the lip sensor from
Cover
5
Page 8
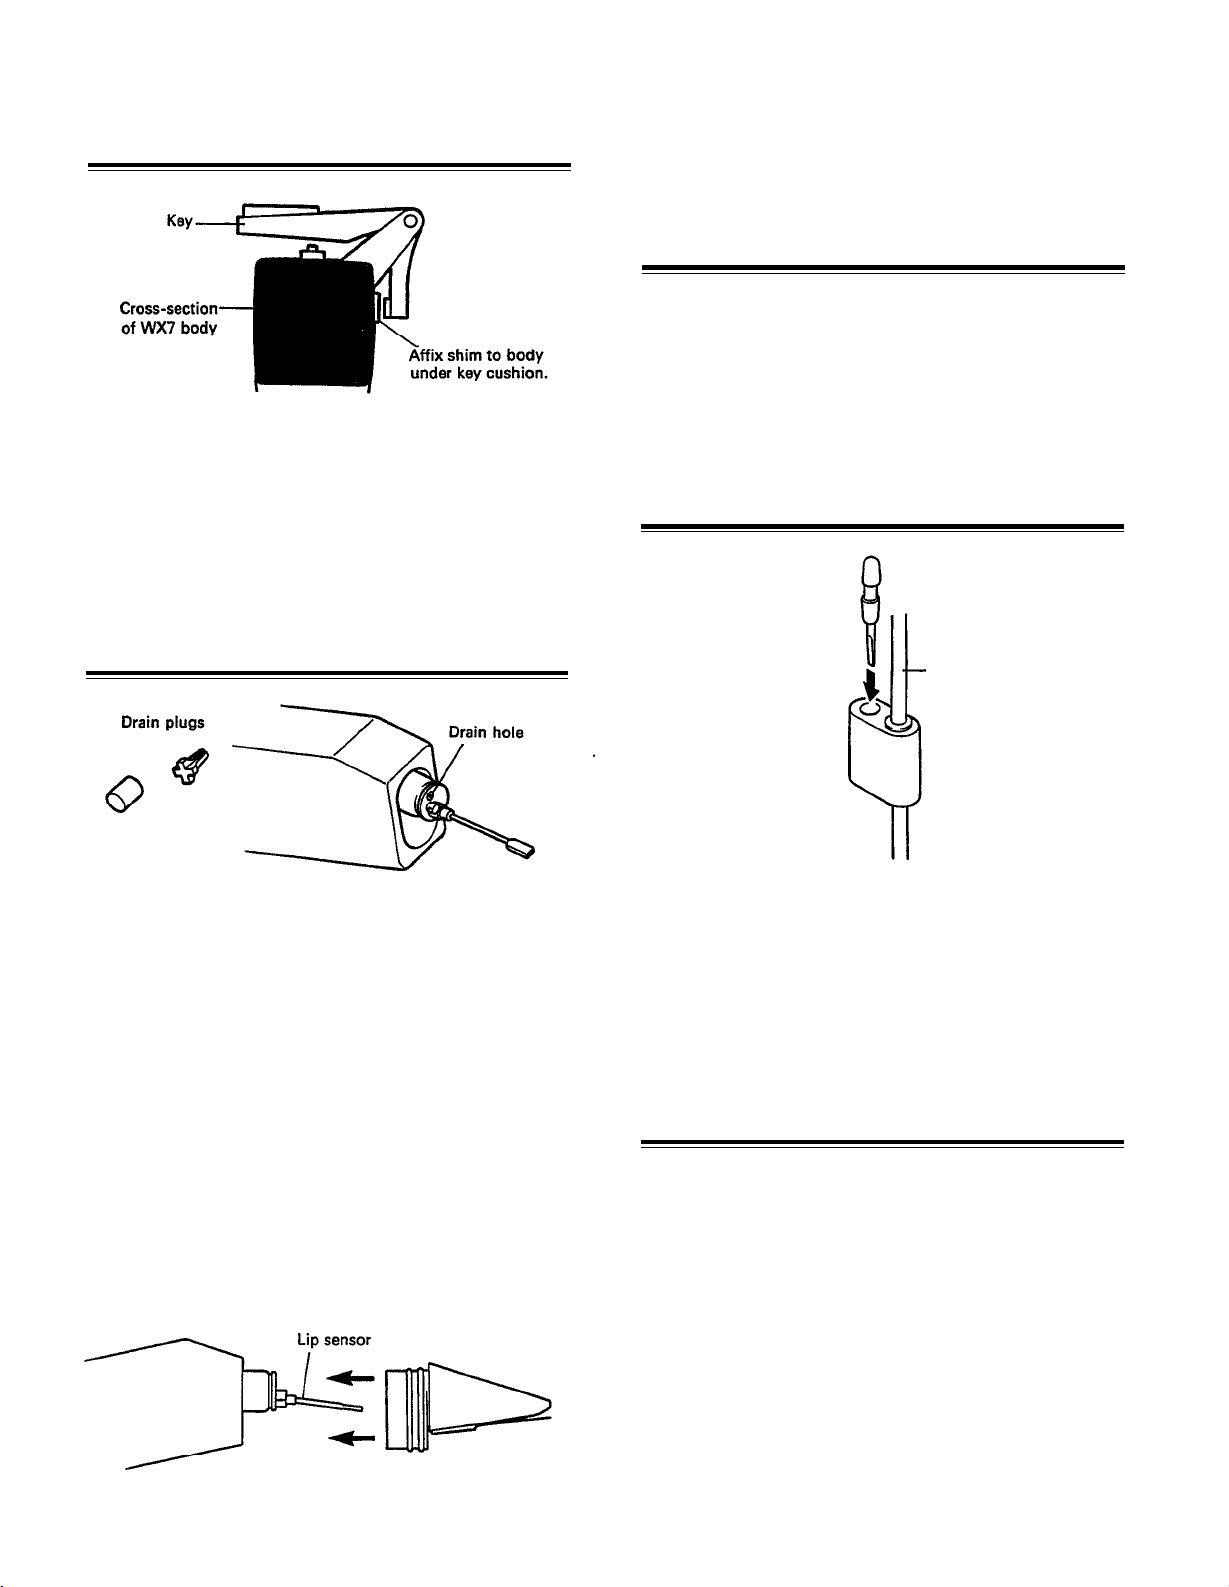
KEY ADJUSTMENT SHIMS
Two sets of 14 key adjustment shims allow you to make minute
adjustments of each key’s playing height. 0.2 mm and 0.5
mm thick shims are provided, enabling you to set each key
to one of three playing heights, to exactly suit your playing
style. The shims are self-adhesive. Simply remove the plastic
covering from the shim, and stick it firmly on the body of
the WX7 just under the pad opposite the key you want to
adjust, as shown in the above diagram.
Make sure to push the plug as far in as it will comfortably
go without forcing. Keep the drain plugs in their compartment
in the carrying case when not in use.
INFORMATION BOOKLET AND CASSETTE TAPE
An informative booklet, Expressive FM Applications, and
an accompanying cassette tape have been included. The
booklet provides important playing and editing tips for most
effectively using your tone generator with the WX7, and the
cassette tape includes recorded performances of the WX7
as well as specially programmed TX8lZ and DX7II voice
data.
SCREWDRIVER
DRAIN PLUGS
Two types of Drain Plugs are included: one that fully blocks
the Drain Hole (with a circular cross-section), and one that
partially blocks it (with a cross-shaped cross-section). In
normal use (without plugs) the WX7 behaves like a regular
saxophone: the air passes down the body of the instrument
and out of the lower drain hole. Partially closing the upper
drain hole creates a tighter blowing feel. Completely closing
the drain hole creates an even tighter feel, suitable for saxophone players who tend to blow hard. Experiment with these
options and select the one that suits you.
The plugs are inserted into the drain hole while the mouthpiece is detached. The mouthpiece is detached by gently and
firmly sliding it out from the top of the WX7.
TAKE CARE NOT TO TOUCH THE THIN LIP SENSOR
EXTENDING FROM THE INSTRUMENT. This device
(which measures subtle variations in lip pressure) is delicate
and can easily be bent or damaged.
MIDI/DC
Extension Cord
The screwdriver is located on a plastic holder attached to the
MIDI/DC extension cord.
The screwdriver is used to adjust the four rotary pots (which
control the lip pressure and breath pressure: refer to the
ADJUSTING THE PLAYING RESPONSE section) and to
change the positions of the DIP switches (see THE DIP
SWITCHES section). Always keep the screwdriver in the
plastic holder on the MIDI/DC extension cord.
PLAYING STRAP
A playing strap is included to hold the WX7 while playing.
Connect the strap to the ring on the back of the instrument
as shown in the rear view illustration in the GUIDE TO THE
CONTROLS section.
6
Page 9

CARRYING CASE
The WX7 carrying case is a light and durable case designed
to hold the WX7 plus all accessories, so you can easily carry
everything you need to your concert or recording session.
When not using the WX7, always store it in the carrying case
to protect it from damage from dust and impact. Use the
special compartments in the carrying case to store the accessories. We recommend that the inside of the carrying case
be cleaned at regular intervals, using the supplied polishing
cloth (a slightly damp cloth may be used to remove stains).
POLISHING CLOTH
Use this special anti-static soft polishing cloth to clean all
parts of your WX7, before and after every performance or
session. Difficult stains may be removed with a slightly damp
cloth, then dried with this polishing cloth. If the polishing
cloth becomes soiled, it can be washed by hand in lukewarm
water.
QUICK GUIDE
This section gets you playing the WX7 in minutes, without
having to study the detailed information in the rest of this
manual. Refer to the GUIDE TO THE CONTROLS and
ACCESSORIES AND MAINTENANCE sections for explanations of the equipment mentioned in this Quick Guide.
1.
Remove the WX7 from its carrying case and carefully
but firmly attach the mouthpiece by sliding it into position.
2.
Insert the six batteries into the MIDI/Power Pack, in
the direction indicated in the battery compartment.
3.
Use the MIDI/DC cable to connect the WX7 to the
MIDI/Power Pack. The cable connections can be locked
by turning the outer sleeve of the connectors in a
clockwise direction.
4.
Use the MIDI cable to connect the MIDI OUT terminal
of the MIDI/Power Pack to the MIDI IN terminal of
your MIDI synthesizer or tone generator.
5.
Check the following conditions on your MIDI synthesizer or tone generator:
(i)
It is set to receive MIDI data on MIDI channel 1,
or on all 16 MIDI channels (Omni mode).
(ii) It is connected to a sound system.
(iii) A voice (program) has been selected which responds
to Breath Control.
6.
Turn on the power on the WX7’s MIDI/Power Pack (its
LED will light) then turn on your MIDI synthesizer or
tone generator, and sound system.
7.
You can now play your WX7. Experiment with varying
lip pressure, breath pressure, the Octave Transpose keys,
Pitch Bend Wheel, and the Hold Key. While holding
down the Program Change key, press the Octave
Transpose key to change the voice (program) on your
MIDI synthesizer or tone generator.
8. After you have satisfactorily produced a variety of
performances from your WX7, go on to read the rest
of this manual in detail, so as to get a full understanding
of this versatile and powerful MIDI instrument.
7
Page 10

SETTlNG UP
SETTING THE MIDI SOUND SOURCE
In this section you will learn how to prepare the WX7 for
playing, and connect it up to your MIDI synthesizer or tone
generator. Information will also be given on how to set up
your MIDI sound source to be controlled by the WX7.
CONNECTION OF THE MIDI/POWER PACK
Plug the MIDI/DC cord coming from the MIDI/DC Power
Pack into the MIDI/DC jack of the WX7. In both cases,
the connection can be locked by turning the outer sleeve of
the connecting plug.
A strap on the case of the MIDI/Power Pack lets you attach
it to your belt. You can also use the 5-meter (15-foot)
MIDI/DC extension cord which allows you to put the
MIDI/Power Pack in any convenient location. Extra
MIDI/DC extension cords may be purchased, but it is not
recommended that you use more than three extension cords,
as MIDI signals may deteriorate if the cable length is more
than 15 meters (45 feet).
CONNECTION TO THE MIDI SOUND SOURCE
Use the supplied MIDI cable or any standard MIDI cable
to connect the MIDI OUT jack of the MIDI/Power Pack to
the MIDI IN jack of your MIDI synthesizer or tone generator.
The diagram below shows how the WX7 can be connected
for controlling a TX81Z tone generator, but a virtually limitless number of other configurations using many different
kinds of MIDI devices are also possible. Please refer to the
MIDI AND APPLICATIONS section for more information
on how to use the WX7 with a MIDI system.
Three vital points must be remembered when setting up your
MIDI Synthesizer or tone generator to be controlled by the
WX7:
(1)
MIDI data can actually be sent on any of 16 “MIDI
channels”,
allowing instruments within a complex
MIDI system to communicate independently. When
two MIDI instruments communicate, they should be
set to the same MIDI channel. The WX7 normally
TRANSMITS MIDI data on MIDI channel 1, so your
MIDI sound source should be set to RECEIVE MIDI
data on MIDI channel 1 (or it can be set to OMNI,
a MIDI mode which allows it to receive MIDI data
on all 16 MIDI channels).
In the Dual Play mode, the WX7 can be used to transmit
MIDI data on two separate MIDI channels. You can also
change the MIDI Transmit channel of the WX7. Refer to
THE DIP SWITCHES section (DIP Switches #5 and #6) for
more information.
(2)
The MIDI sound source should normally be set to
receive MIDI Breath Control data. On the Yamaha
DX7II synthesizer, for example, this is known as “BC”
and can be independently set for each voice. Four
parameters (functions) can be controlled by BC, as
follows:
l Pitch Modulation (vibrato level)
l Amplitude Modulation (tremolo level)
l EG Bias (volume and/or timbre)
l
Pitch Bias (Pitch)
Each parameter can be individually set, over a wide range.
The setting of BC parameters directly affects the way breath
pressure from the WX7 will control the selected voice.
(3)
The maximum amount of Pitch Bend that can be created
by lip pressure or by use of the Pitch bend Wheel on
the WX7 is set by adjusting the Pitch Bend parameter
on your MIDI sound source. For example, on the
DX7II synthesizer, Pitch Bend can be adjusted over a
range of 1 thru 12 half-steps (semitones). Each of the
DX7II’s 64 voices can be set to a different Pitch Bend
level, to suit both the timbre of the voice, and your
playing style.
USE OF NON-BC COMPATIBLE MIDI DEVICES
If your MIDI sound source cannot receive BC data, but can
receive After Touch and MIDI Volume data, the WX7 can
be switched to transmit these types of MIDI data. Refer to
DIP Switches #l and #2 in THE DIP SWITCHES section.
In this case, you should set the After Touch and MIDI Volume
parameters for each voice on your MIDI sound source.
8
Page 11

PLAYING THE WX7
LIP PRESSURE
After you have made all the connections between the WX7,
the MIDI/Power Pack, your MIDI tone generator, and your
sound system, you are ready to play your WX7.
POWER ON
Turn on the power to your connected MIDI synthesizer or
tone generator, and to your sound system. Then turn on the
power to the WX7, using the power switch on the
MIDI/Power pack.
If the LED next to the switch does not light or is flashing,
this indicates that the batteries are dead, or, inserted incorrectly. If you’re using a PA-1 AC Convertor, check to see
that it is properly connected to the wall socket. Turn the
WX7 power off, replace the batteries (or check that the PA-1
AC Convertor is correctly connected to the MIDI/Power
pack and to the wall socket) then turn the WX7 power on.
BASIC PLAY OPERATION
Producing notes with the WX7 depends on three conditions:
(1)
Your connected MIDI synthesizer or tone generator.
is set to a program that will produce a sound via your
sound system. This program MUST be one that is set
to respond to MIDI Breath Control or After Touch
data (refer to the SETTING UP section for more information on setting up your MIDI sound source).
(2) You are blowing into the mouthpiece with breath
pressure that is higher than the Wind Zero point (a
breath threshold point that you can set by following
the instructions in the ADJUSTlNG THE PLAYING
RESPONSE section).
(3)
You are fingering the keys correctly so as to produce
a note (the WX7 uses the standard Böhm fingering
system plus some special fingering positions: refer to
the FINGERING CHARTS).
The WX7’s Lip Sensor lets you bend pitch up or down by
biting the reed.
It can be set for one of two modes: Tight
Lip or Loose Lip. (See THE DIP SWITCH section, DIP
Switch #8 for information on how to select Lip Modes.)
(1) TIGHT LIP MODE.
In the Tight Lip mode, the WX7 changes pitch much
like a normal saxophone does. For normal playing
at concert pitch, a regular embouchure may be used
(i.e. a certain amount of bite is applied to the reed).
Relaxing pressure on the reed will lower the pitch and
increasing pressure will raise the pitch.
The reed is bitten against the flat area of the
mouthpiece. When bite is relaxed, the reed
bends down flattening pitch. when bite is
increased, the reed bends up against the curved
area of the mouthpiece, raising pitch.
There is a narrow “dead” zone in the center where small
changes of bite don’t alter the pitch. This “dead” zone makes
it easy to remain at concert pitch.
LIP ZERO sets the position
of the central “data” zone. You can adjust the amount by
which the reed responds to lip pressure (the Lip Gain parameter). Refer to the ADJUSTING THE PLAYING RESPONSE section for details on how to adjust both these
parameters.
(2)
LOOSE LIP MODE.
In the Loose Lip mode, the lower lip is loose, and for
normal concert-pitch playing, no bite is applied to the
reed. Pitch is bent by increasing the bite on the reed,
and in this mode, pitch can only be bent upward.
However, the range of pitch bend is greater than that
in the Tight Lip mode. In this mode, the Lip Zero
parameter lets you set the pitch from which lip pressure
will create a pitch bend.
No sound will be produced unless all three conditions are
fulfilled.
In short, when you blow AND finger the keys correctly, a
note will be heard. When you stop blowing OR fingering,
the note will end. The note that you hear will respond to both
lip pressure and breath pressure, as described in the following
paragraphs.
The reed normally stays in its lowest position.
Any lip pressure bends the reed up, raising
pitch.
Again, refer to the ADJUSTING THE PLAYING RESPONSE section for details on how to adjust the pitch bend
response.
9
Page 12

BREATH PRESSURE
The WX7’s Wind Sensor allows you to use breath pressure
to control volume, tone, vibrato and tremolo. Refer to the
SETTING UP section, and consult the owner’s manual
supplied with your MIDI synthesizer or tone generator, for
information about which parameters may be affected by
Breath Control (BC) data.
The Program Change key can also be used as an easy (and
silent) way to find out if you have correctly made all MIDI
connections and MIDI channel settings. By holding down
the Program Change key and pressing one of the Octave
Transpose keys on the WX7 you should see the attached tone
generator change its internal programs.
OCTAVE TRANSPOSE KEYS
When first trying out your WX7, set the parameter values
on your MIDI sound source so that the results of a change
in breath pressure will be obvious. For example, if you are
using a Yamaha TX8lZ FM Tone Generator, set the Pitch
Modulation Depth to at least 70 and the LFO Speed to about
40.
Increasing the breath pressure on your WX7 will create
a pronounced vibrato effect on the TX81Z.
As with the Lip Sensor, the WX7’s Wind Sensor has two
response parameters which may be adjusted. The Wind Zero
parameter lets you set the minimum amount of breath
pressure needed to make a note speak. The Wind gain parameter lets you select the amount by which the WX7 will
respond to a change in breath pressure. See the ADJUSTING
THE PLAYING RESPONSE section for details.
PITCH BEND WHEEL
Pitch can be controlled by moving the Pitch Bend Wheel
conveniently located under your right thumb. The Pitch Bend
range must be set on your MIDI sound source (usually ± 1
to 12 semitones). The WX7’s Pitch bend Wheel then operates
in exactly the same way as the Pitch Bend Wheel on a synthesizer such as the Yamaha DX7II (i.e., when you push the
wheel past the “dead zone” in the center position, pitch is
bent; on releasing the wheel, it returns automatically to the
center position).
NOTE: When the Pitch Bend Wheel is at its maximum or
minimum setting, the Lip Sensor will not bend the
pitch any higher or lower than that setting.
PROGRAM CHANGE KEY
Use the Program Change key (with the Octave Transpose
keys) to change the voice programs on your MIDI sound
source. Holding down the Program Change key alters the
function of the Octave Transpose keys. With the Program
Change key held down, the top Octave Transpose key is used
to select program number 1, the Octave Transpose key below
that is used to select program number 2, and so on down to
the last Octave Transpose key, which is used to select program
number 5. Normally the right thumb is used to hold down
the Program Change key (see the GUIDE TO THE CONTROLS section).
While playing the WX7, you can instantly transpose the instrument to other octaves by pressing the Octave Transpose
keys. Pitch can be lowered by one or two octaves or raised
by one, two or three octaves. The Octave Transpose keys
are located on the rear of the WX7 and can be pressed singly
or in succession by rolling or sliding the left thumb across
them (see the GUIDE TO THE CONTROLS section). With
this feature, you can create very rapid octave changes while
you play. The Octave Transpose function increases the total
range of the WX7 to over 7 octaves.
WHOLE TONE/SEMITONE UP KEYS
The WX7 has whole tone/semitone up keys which can be
used either for execution of trills or for alternative fingering
of notes. These are conveniently located in a central position
(see the GUIDE TO THE CONTROLS section). Unlike
on a normal saxophone, the same keys are used regardless
of the pitch of the note that is being trilled (yet another of
the advantages of MIDI!).
Two trill keys are provided: the lower key raises the pitch
of the note by a semitone; the upper trill key raises the pitch
by a whole tone.
HOLD KEY
The Hold key lets you sustain a selected note for use in the
Key Hold and Dual Play modes. This note will be sustained
until you press the Hold key a second time. Other special
effects such as parallel harmony and breath-controlled sustain
can be used. Refer to THE DIP SWITCHES section, DIP
switches #5 and #6 for more information about the Key Hold
and the Dual Play modes. The Hold key is normally played
by the right thumb (see the GUIDE TO THE CONTROLS
section).
NOTE:
No sound can be produced when changing programs.
10
Page 13

THE DIP SWITCHES
DIP SWITCH #2 — MIDI Volume
The DIP switches are eight tiny switches (similar to those
found on computers) located under a cover on the upper back
of the WX7, just above the Octave Transpose keys.
OFF ON
Use the WX7’s screwdriver to move these switches. Be sure
to replace the screwdriver in its holder after use. For each
DIP switch, set the switch to the left for the OFF position;
to the right for the ON position.
The DIP switches control the type of data sent out, transpose
to pitches other than concert pitch, set the Dual Play type,
select how the WX7 will respond to breath (Wind Curve),
and select the Lip Sensor mode. Each of these functions is
described in more detail below.
DIP SWITCH #1 —
You can use the WX7 not only to play notes from your MIDI
device but also alter the tonal character, volume and pitch
by breath pressure. The WX7 monitors changes in breath
pressure and sends them out as MIDI Breath Control data.
Yamaha MIDI instruments such as the DX7II Digital Programmable Algorithm Synthesizer or the TX8lZ and TX802
FM Tone Generator respond to Breath Control data.
However, if your tone generator doesn’t respond to Breath
Control data, this switch will let the WX7 send breath pressure
changes as After Touch data.
Set DIP Switch #1 to one of the following positions:
OFF: the WX7 sends Breath Control data.
ON: the WX7 sends After Touch data.
Breath Control/After Touch
You can use breath pressure to control the volume of your
tone generator while simultaneously controlling another parameter (such as pitch or tone). This feature allows you to
still take advantage of the dynamically expressive control
of MIDI for those voices that don’t respond to Breath Control
or After Touch data. Voices that do respond to Breath
Control or After Touch data will also respond to MIDI
Volume data when this switch is turned on.
Set DIP Switch #2 to one of the following positions:
OFF: the WX7 does not send MIDI Volume data.
ON:
the WX7 sends MIDI Volume data.
DIP SWITCHES #3 AND #4 — Transpose
The normal playing key of the WX7 is C (corresponding to
that of a flute or oboe). Using DIP Switches #3 and #4, you
can transpose UP to E flat (corresponding to soprano, alto
and baritone saxophones), DOWN to B flat (corresponding
to soprano, tenor and bass saxophones, and clarinet) or UP
by an octave.
Set DIP Switches #3 and #4 to the following positions:
DIP SWITCH #3 DIP SWITCH #4
OFF OFF
ON OFF
OFF
ON
ON
ON C (octave up)
KEY
C
B flat
E flat
DIP SWITCHES #5 AND #6: Key Hold Modes
The Key Hold facility is a unique and exciting feature of the
WX7. With it you can have a note memorized for as long
as you like while you play other notes together with it. To
use the feature, press and release the Hold key while playing
a note.According to the settings of DIP switches #5 and
#6, the held note will be played every time you play another
note until you press and release the Hold key a second time.
Pitch bending, by Lip Sensor and Pitch Bend wheel, affect
both notes simultaneously.
NOTE:
Key Hold has four modes: NORMAL, FOLLOW, DUAL
(NO BREATH) and DUAL (USE BREATH). The following
chart shows the functions of these four modes, with full explanations in the subsequent text.
11
this function will NOT work if the connected MIDI
sound source is set to MONO (monophonic play).
Page 14

KEY HOLD MODE FUNCTIONS
MODE
NORMAL
FOLLOW
DUAL PLAY
(NO BREATH)
DUAL PLAY
(USE BREATH)
PITCH OF
HELD NOTE
Fixed at
selected pitch.
FOLLOWS LEAD
LINE
INTERVAL.
FIXED AT
SELECTED PITCH.
FIXED AT
SELECTED PITCH
CHARACTER OF
HELD NOTE
Affected
pressure.
AT SELECTED
Affected
pressure
Sustained continu-
ously; not affected
by breath pressure.
Affected by breath
pressure
by
by
NUMBER OF
MIDI TRANS-
MIT CHANNELS
breath
One
breath
One
Two
Two
NORMAL MODE: In the Normal Mode, the WX7 holds
only that note that was played when the Key Hold button
was pressed. For example, if you press the Hold key while
playing middle C, all succeeding notes will be accompanied
by a middle C until the Hold key is pressed a second time.
[NORMAL MODE]
etc...
FOLLOW MODE: In the Follow Mode, the WX7 re-
members the first note that you play, plus the interval between
that note and your second note, the held note will then follow
all subsequent notes at that interval.
press the Hold key while playing middle C, then play a G
above middle C, this sets the FOLLOW interval at a major
fifth. All notes played after that will be accompanied by a
harmony note a fifth above the note played until the Key
Hold button is pressed a second time. Once you get familiar
with this mode, you’ll be able to change the FOLLOW interval
by judicious use of the Hold key, to create complex and expressive harmony passages.
[FOLLOW MODE]
For example, if you
DUAL PLAY (NO BREATH) MODE:
Normal Mode except that the WX7 transmits data for the
lead line and the held note on two separate MIDI channels
(see MIDI TRANSMIT CHANNEL SELECTION later in
this section) allowing you to play two separate MIDI synthesizers or tone generators. Also, the held note is continuously sustained under the lead line, and is unaffected by
breath pressure. For example, you could use this mode to
sustain a string note, while playing a lead line using a flute
voice. The sustained note ends only when you press the Hold
key a second time.
[DUAL PLAY (NO BREATH) MODE]
DUAL PLAY (USE BREATH) MODE:
NORMAL Mode, except that the MIDI data is sent on two
separate MIDI channels, allowing you to create harmony
passages using two separate instrument sounds. The tonal
qualities and volumes of the tone generators being controlled
over both MIDI channels in this and the NORMAL Mode
will change according to breath pressure; for example, notes
that are slurred will sustain and notes played in staccato
fashion will be interrupted for both the held note and the
played note.
Set DIP Switches #5 and #6 to the following positions:
DIP SWITCH #5 DIP SWITCH #6
OFF
ON
OFF ON DUAL (NO BREATH)
ON
l MIDI TRANSMIT CHANNEL SELECTION:
In both the DUAL PLAY modes, the lead line is transmitted
on MIDI channel 1 and the held note on MIDI channel 2.
However, the WX7 can be set to transmit on MIDI channels
3 and 4 instead, in the following manner:
OFF
OFF FOLLOW
ON
DUAL (USE BREATH)
The same as the
Identical to the
KEY HOLD MODE
NORMAL
Turn the WX7’s power off. Then, while simultaneously
holding down the Hold and Program Change keys, turn the
power on.The WX7 will now transmit the lead line (and
normal monophonic play) on MIDI channel 3, and held notes
on MIDI channel 4. To return to MIDI channels 1 and 2,
repeat the above operation. This operation may also be used
to switch the MIDI channel for normal monophonic play
between MIDI channels 1 and 3.
12
Page 15

ADJUSTING THE PLAYING
DIP SWITCH #7 —
This feature allows you to select one of two breath response
settings. These are curves that determine the continuous
sensitivity of the response of the WX7 to breath pressure.
DIP Switch #7 allows you to change the shape, not the range,
of the Wind Curve. The actual range of the Wind Curve is
set using the WIND GAIN parameters (see the ADJUSTING
THE PLAYING RESPONSE section).
WIND CURVE
Wind Curve Select
RESPONSE
The sensitivity of the Wind and Lip Sensors can be finely
adjusted to perfectly suit your style of playing. Four rotary
pots, located under a cover on the upper back of the WX7
(next to the DIP switches), control the playing response for
the sensors.
Set DIP Switch #7 to one of the following positions:
OFF: Linear response
ON:
Exponential response
DIP SWITCH #8 — Loose Lip/Tight Lip
This switch lets you select the Loose Lip mode or Tight Lip
mode, offering two different techniques for creating pitch
bends by lip pressure on the WX7’s mouthpiece. (See the
PLAYING THE WX7 section for more information on these
modes.) The range settings of these modes are explained in
the ADJUSTING THE PLAYING RESPONSE section.
Set DIP Switch #8 to one of the following positions:
ON: Loose Lip Mode
OFF: Tight Lip Mode
For each pot, turning the pot clockwise increases the parameter value; turning the pot counter-clockwise decreases
the parameter value. Use the WX7’s screwdriver to adjust
these pots (be sure to replace the screwdriver in its holder
after use).
ADJUSTING THE WIND SENSOR
The following graph indicates the effect of the Wind Zero
and Wind Gain pot adjustments on the Wind Sensor response:
13
Page 16

WIND ZERO:
This is the point at which breath pressure causes a note to
speak (i.e., a MIDI Note On signal is sent to the connected
MIDI synthesizer or tone generator). Set at the minimum
level, the instrument will sound with no breath pressure.
Set at the maximum level, considerable breath pressure is
required to start a note. Begin by setting the Wind Zero
somewhere in the middle range, for the most comfortable
breath threshold.
The Wind Zero pot sets the breath threshold.
WIND GAIN: The Wind Gain pot controls the amount of
effect that changes in breath pressure will produce. Begin
by setting the Wind Gain to a mid-range value, then adjust
it for the most natural response to changes in breath pressure.
While adjusting Wind Gain, be sure to select a voice (on your
MIDI sound source) that responds well to BC (Breath
Control) data. If your synthesizer or tone generator’s BC
parameters are set to their minimum values, no amount of
Wind Gain will produce any BC modulation effect. Conversely, if the Wind Gain setting is at its lowest, even the
highest BC parameter settings on your synthesizer or tone
generator will produce no modulation.
NOTE:. The Wind Gain response of the WX7 can be set to
two different “Wind Curves”. See THE DIP
SWITCHES section, DIP switch #7, for more information.
For the Tight Lip mode, the pots function as follows:
LIP ZERO:
bends will be made. With the use of a tuner to accurately set
concert pitch, rotate the LIP ZERO pot clockwise to lower
the pitch and counterclockwise to raise the pitch. If holding
to the central pitch is difficult (in other words, if the “dead”
zone is too narrow), rotate the LIP GAIN pot counterclockwise to make it easier to keep to the central pitch, or
lower the pitch bend range of the tone generator.
Lip Zero sets the central pitch from which pitch
LIP GAIN: The Lip Gain pot controls the amount of pitch
bend that changes in lip pressure will produce. Turing the
pot in a clockwise direction increases the amount of pitch
bend. At the maximum setting, pitch will be affected even
by very slight changes in lip pressure. Begin by setting the
Lip Gain to a mid-range value, then adjust it for the most
natural response to changes in lip pressure. While adjusting
Lip Gain, be sure to select a voice (on your MIDI sound
source) that responds well to PB (Pitch Bend) data. If your
synthesizer or tone generator’s PB range is set to the minimum
value, no amount of Lip Gain will produce any PB effect.
NOTE: The LIP ZERO and LIP GAIN parameters are in-
teractive, so it is necessary to them one after the
other.
ADJUSTING THE LIP SENSOR
The following graphs indicate the effect of the Lip Zero and
Lip Gain pot adjustments on the Lip Sensor response, for
each of the two playing modes (Tight Lip and Loose Lip
modes). These modes are explained in the PLAYING THE
WX7 section, and are selected using DIP switch #8 (see THE
DIP SWITCHES section for details).
<Tight>
-MAX
For the Loose Lip mode, the pots function as follows:
LIP ZERO:
This is the point at which an increase in lip pressure causes
the pitch of a note to rise. Set at the minimum level, the
slightest amount of lip pressure will cause an increase in pitch.
Set at the maximum level, considerable lip pressure is required
to raise the pitch of a note. Begin by setting the Lip Zero
somewhere in the middle range, for the most comfortable lip
pressure threshold.
The Lip Zero pot sets the lip pressure threshold.
LIP GAIN: See the comments about Lip Gain setting for
the Tight lip mode.
14
Page 17

MIDI AND APPLICATIONS
The Musical Instrument Digital Interface (MIDI), first
brought out in 1982, has proved to be one of the most important developments in electronic music. Using the power
of MIDI, a single musician can carry out an unlimited number
of previously impossible performance operations, including
the following:
l Play several synthesizers at one time from a single key-
board controller.
l Control performance functions such as pitch bend and
modulation on the remote synthesizers as expressively as
if they were being played directly.
lChange voices on remote synthesizers and tone generators,
for impressive and effortless sound changes in real time.
l
Connect synthesizers with sequencers or MIDI-compatible
computers, for flawless, noise-free recording and playback
of both music data and program change data, with automatic timing correction (quantizing) and enormously
flexible editing facilities.
lControl digital drum machines for a perfectly synchronized
performance.
l Set effects devices such as digital delay and digital rever-
beration units to change their effects programs along with
voice program changes, to add just the right processing
to each voice program.
per second, and simply transmits a number corresponding
to the current position of the control (together with a message
indicating which control is currently being altered).
You should know how the MIDI messages transmitted by
the WX7 affect the sound of the slave (i.e., your MIDI
synthesizer or tone generator) and how you can program your
MIDI instrument to respond to these messages. For that
information, please consult the owner’s manuals of your
MIDI instruments.
In essence, MIDI is extremely simple: it simply reduces all
musical data to numbers, which can easily be sent from one
instrument to another (hence the term “Digital Interface”).
In practice, MIDI is unbelievably versatile, which is as it
should be, for it is designed to fulfill the demands of professional musicians. Indeed, new uses of MIDI are being
discovered at an extraordinary rate, both by MIDI engineers,
and by musicians like yourself, experimenting and refining
the art of digital music on stages and in studios around the
world.
A short explanation of some of the possibilities of MIDI
will perhaps be helpful in triggering some ideas on how best
to use your WX7. In the following system setups, the WX7
is used to change voice programs on tone generators and
synthesizers and, at the same time, call up custom effect
settings like chorusing, repeat delays, and reverb on digital
effect units (for example, the REX 50, the SPX90II, and the
REV 5).
Use a Tape Sync signal recorded onto one channel of a
multitrack tape deck, to perfectly synchronize MIDI se-
quencers and drum machines with a vocal or acoustic
performance recorded on tape. In this way, the seemingly
opposed worlds of traditional acoustic music and state-
of-the-art digital music can be blended and merged, pro-
viding enormous creative potential.
As you can see, MIDI is a very powerful musical tool.
However, you won’t need a course in computer science to
use your WX7 effectively with other MIDI instruments.
All you need to know is what MIDI devices can do, and how
you can control them with your WX7. After that, MIDI does
all the work for you.
In every MIDI setup there is a master and a slave. The master
can be a keyboard, sequencer, computer — or a WX7 — and
the slave (a sound-generating instrument) is played by it.
The master transmits MIDI messages to the slave in the form
of computer type signals. The messages depend on how the
instrument is being played, which keys are pushed, etc. In
the case of the WX7, Note On and Note Off messages are
sent at the start and end of each breath respectively, indicating
to the slave the start and end of each note. A Program Change
message is sent every time you press the Program Change
and Octave Transpose keys. When a continuous message
needs to be sent (such as when you are moving the Pitch bend
Wheel, or gradually changing breath pressure) MIDI technology “slices” the continuous change into thousands of slices
15
Page 18

1. WX7 PLUS TX81Z MULTI-TIMBRAL FM TONE
GENERATOR.
In this basic yet versatile arrangement, the WX7 is used to
control the Yamaha TX81Z FM Tone Generator, which can
create up to eight superb FM voices simultaneously. The eight
voices could be set to different octaves for a full, powerful
sound.
Programming each voice to occupy a separate register of the
WX7’s 7-octave pitch. range also allows you to experiment
with various split and layer combinations. For example,
program a bass sound for F0 to C2, piano and cello sounds
layered together in the C#2 to C4 range, 4 different string
sounds between C#4 and F5, and a clarinet sound at the top.
Depending on which register you play in, you can get four
distinct sounds. Voices can also be set to overlap, for added
tonal interest.
You could also transpose four of the TXS1Z’s voices to form
a chord. Assign these chordal voices to MIDI channel 2, and
the other four voices to MIDI channel 1. With the WX7 in
the Dual Play mode, you could then add chordal harmonies
your rich 4-voice lead line.
to play a flute sound on MIDI channel 1 and a cello voice
on channel 2. Press the Hold Key to create a cello drone,
while playing a flute melody above it.
Also, the DX7II has an innovative Pitch Bias feature, allowing
you to use Breath Control to affect pitch as well as other
parameters (vibrato, tremolo, etc). In this way, pitch control
can be executed from the WX7 using breath pressure as well
as lip pressure and Pitch bend Wheel, for expanded expressivity.
3. WX7 PLUS TX802 FM TONE GENERATOR SYSTEM
TX802
OUTPUT
I I
MIDI OUT
MIDI
MIDI FOOT CONTROLLER
MFCl
Like the TXS1Z, the TX802 FM Tone Generator can create
eight FM voices, but with even greater richness and tonal
possibilities. For example, you could use the TX802 to create
an eight-sound drum or percussion set. Assign each drum
sound to a different note (perhaps to a convenient eight-note
scale). With the WX7’s Breath Control ability, you can “hit”
each instrument of the drum set with different strengths,
creating amazingly realistic dynamic changes.
2. WX7 PLUS DX7II SYNTHESIZER
DX7II
The world-famous Yamaha DX7II Digital Programmable
Algorithm Synthesizer has a feature that makes it an ideal
match for the WX7: reception of music data on two separate
MIDI channels, for independent control of two voices. For
example, use the WX7 in the Dual Play (No Breath) mode
Also, the TX8023 unique Alternative Assign feature means
that every time you play a note, a different voice is selected.
For example, you could use eight slightly different string
voices, so that when you play a string melody, the sound
changes in a subtle, vibrant fashion, enhancing the effect of
a live string orchestra.
MP.
16
Page 19

GLOSSARY
after touch:
applied to the key after it has reached and is resting on the
keybed is sensed. This, depending on what function settings
have been programmed into a synthesizer, is used to change
parameters of the sound (such as volume, pitch, or timbre).
Also applies to a category of MIDI messages. The WX7 can
be set to transmit after touch data instead of breath control
data.
algorithm:
breath control: A type of MIDI message which is used to
control function parameters of a synthesizer’s sound (usually
vibrato depth, tremolo depth, volume and tone). Breath
Control data is created by breath pressure, and can be sent
by blowing into a breath controller (such as the BC1 or BC2
Breath Controllers, designed for use with the Yamaha
DX7II synthesizer). In normal use, the WX7 sends Breath
Control data.
breath controller: A MIDI controller device with a mouth-
piece that can be blown into, producing a control signal.
Normally, a breath controller sends only Breath Control data,
but the WX7 can also send Note On and Note Off data, and
can also be set to transmit After Touch data.
carrier:
channel: In MIDI, 16 channels are available for data
transmission/reception. As on a TV set, a MIDI device can
be set to receive (or send) only messages of the selected
channel. In this way, one MIDI controller such as a QX5
Digital Sequence Recorder (on which stored MIDI data can
be assigned to a number of different MIDI channels) can
be used to independently control up to sixteen MIDI devices.
DIP switch: Dual In-line Package (a common integrated
circuit) switch. In computer usage, a two-position switch
which lets the user set current paths on or off. DIP switches
are usually of compact proportions, requiring a screwdriver
for setting, and as they are normally not requiring frequent,
are access concealed under a detachable cover. In the WX7,
eight DIP switches are incorporated, for selecting a variety
of performance modes and functions.
FM: Stands for Frequency Modulation. This is a unique and
versatile tone-generating system featured on Yamaha’s DX
series Synthesizers and TX series Tone Generators, and is
based on the technology used in FM radio broadcasting.
Voices are created by modulating the frequency of one
“operator” by another “operator”. Operators are high-frequency sine-wave oscillators. The ratio between the frequency
of the operators determines the harmonic structure and tone
of the resulting sound. The operator which is being modulated
is called a “carrier”
operator which is modulating the carrier is called a
“modulator”.
lower-priced DX series synthesizers, four operators are
available for each voice, allowing complex timbral possibilities. The operators can be grouped in various configurations
A type of touch sensitivity in which the pressure
See FM.
See
FM.
— it actually creates the sound. The
In the TX8lZ Tone Generator, and
called “algorithms” (for example, one carrier modulated by
three modulators, or two carrier/modulator pairs). The
TX802 and TX816 Tone Generators, and professional range
DX series synthesizers feature six operators, for added
richness. The level and pitch of each operator can be modified
in a wide variety of ways, enabling recreation of the complex
and random harmonic changes over time that occur in
acoustic instruments.
function parameter:
is usually changed while the sound is being played, for musical
expression. Examples of these include pitch, volume, tone
(EG Bias), and vibrato (pitch modulation).
An aspect of a synthesizer’s sound that
initialize: To reset the parameters of a device to zero or to
a predetermined basic setting.
LFO: Low-frequency oscillator. A waveform controller that
oscillates at a “low” (usually sub-audio) frequency and is used
mainly to produce vibrato, tremolo, and trills. On a DX7II
synthesizer, you can adjust the speed and depth of the LFO,
its waveform (sine, sawtooth, square, etc.) as well as the
“delay” (the time it takes for the LFO to reach its full intensity,
allowing vibrato, for example, to be gradually applied, for
an extremely natural effect).
master: Any device (such as a keyboard, sequencer, or the
WX7) that controls another device (the slave). The WX7,
therefore, always functions as a master, by sending MIDI
signals to a connected MIDI synthesizer or tone generator.
message: Any group of MIDI data that is sent or received
within a MIDI system to initiate a selected function or to
achieve a particular effect (e.g., pitch bend, program change,
modulation, etc.).
MIDI: Musical Instrument Digital Interface. A worldwide
standard digital “language” permitting digital information
to be transmitted from one synthesizer to another, or between
synthesizers, sequencers, drum machines, computers, etc.
MIDI IN: A MIDI terminal on a MIDI device, that receives
MIDI data transmitted from an external MIDI device. For
example, the TX81Z FM tone generator has a MIDI IN
terminal to which you can connect the WX7, allowing you
to use the WX7 to play the tone generators in the TX8lZ.
MIDI OUT: A MIDI terminal on a MIDI device that
transmits MIDI data. The WX7’s MIDI/Power Pack has a
MIDI OUT terminal, through which MIDI data is transmitted to a connected MIDI sound source.
MIDI THRU: A MIDI terminal on a MIDI device that
relays, unchanged, the data received at its MIDI IN terminal.
This enables you to connect several MIDI devices together
in a “daisy chain” configuration, permitting a number of
MIDI devices to be controlled by one master MIDI device
such as the WX7.
17
Page 20

mode: The manner in which a device is currently operating. polyphonic: Also called poly. Capable of producing more
In MIDI operation there are four modes, which describe how than one note at a time. The DX7II is a typical MIDI poldevices respond to data, are omni on/poly, omni on/mono,
omni off/poly, and omni off/mono. When omni is on, the simultaneously. Although, for obvious reasons, only ten notes
device responds to MIDI data arriving on any channel. When
omni is off, it only responds to data arriving on the set channel.
When poly is on, the device will play the maximum number
of simultaneous notes (usually 16).
will play only one note at a. time. Mode can also be used to as the QX5 Digital Sequence Recorder to play the DX7II,
describe other manners of operation, such as the Tight Lip up to 16 independent melody lines could be transmitted,
Mode on the WX7. enabling performance of 16-part orchestral arrangements.
When mono is on, it 10 simultaneous notes. Also, when using a sequencer such
yphonic instrument in that it can produce up to 16 notes
can be played at any one time, other notes may be required
to sustain at the same time (for example, when using the
sustain pedal on a piano voice), hence the need for more than
modulation: The process of modifying the sound of a syn-
thesizer. Some examples of modulation include pitch modulation (vibrato), amplitude modulation (tremolo), and
brightness (called EG Bias on Yamaha DX series synthesizers
and TX series tone generators).
modulation
of most keyboards. It sends a MIDI message to modulate
the sound of a synthesizer, for vibrato or tremolo effects.
wheel:
A wheel controller located on the left side
modulator: See FM.
monophonic:
one note at a time. Normally the WX7 is a monophonic instrument (when not set to the Dual Play mode).
Also called mono. Capable of producing only
note off: A MIDI message indicating the end of a note. This
message is sent whenever a key is released on a MIDI keyboard.
ceases to be applied to the mouthpiece. If the MIDI sound
source has been programmed with a long “release” time, the
note will continue and fade out, after the note off message
is received. Also known as key off.
On the WX7, a Note Off message is sent when breath
note on: A MIDI message indicating the start of a note. This
message is sent whenever a key is pressed on a MIDI key-
board. On the WX7, a Note On message is sent when a note
is fingered and breath is applied to the mouthpiece. If the
MIDI sound source has been programmed with a long
“attack” time, the note may take some time to fade in after
receiving a note on message. Also known as key on.
program:
values in a MIDI instrument, in order to create a voice, select
MIDI receive/transmit settings, etc. [2] (noun) see “voice”.
setting: The number or value to which a parameter has been
programmed.
[1] (verb) A general term meaning to set parameter
slave: Any device (tone generator, drum machine, etc.) that
is being controlled by another device called a master. The
TX802 FM Tone Generator is a typical example of a slave
–– it has no keyboard or other playing device, and is basically
a “black box” containing tone generators which produce FM
voices which can be played by an external master-type device
such as the WX7.
voice: [1] A synthesizer sound, preset, or patch program. [2]
The basic sound generating portion of a synthesizer. For
example, a monophonic synthesizer is a one-voice instrument,
whereas the polyphonic DX7II has 16 voices.
operator: See FM.
parameter: An aspect of a synthesizer’s sound that can be
changed. Some parameters (called function parameters) can
be changed while playing, whereas others (called voice pa-
rameters) can only be programmed to be a permanent part
of the sound.Some examples of parameters include “LFO
speed,” “keytranspose,” and “portamento time.”
pitch bend wheel: A controller on a MIDI instrument that
is used to bend pitch up or down on a note as it is being played.
The wheel is usually spring-loaded, so that it automatically
returns to a central (concert pitch) position when released.
In addition, there is usually a central “dead zone” so that
very small changes in the position of the wheel will not affect
pitch. On a DX7II synthesizer, the pitch bend range is variable
between ± 1 to 12 semitones. The WX7 has a pitch bend
wheel.
18
Page 21

SPECIFICATIONS
WX7 MAIN UNIT
l
SENSORS
Wind Sensor (Breath Pressure); Lip Sensor (Lip
Pressure)
l
CONTROLS
Keys x 14; Pitch Bend Wheel; Key Hold; Program
Change; Octave Transpose (-2 to +3 octaves)
l TERMINALS
DC In/MIDI Out (single connector)
l MIDI TRANSMIT CHANNELS
1 or 3 [Normal Mode];
1 + 2 or 3 + 4 [Dual Play Mode]
l DIP SWITCHES
After Touch; MIDI Volume; Transpose to B flat;
Transpose to E flat; Key Hold Normal/Follow;
Dual Play No Breath/Use Breath;
Wind Curve Select; Loose Lip/Tight Lip
l ADJUSTABLE POTS
Lip Zero; Lip Gain; Wind Zero; Wind Gain
WX7 MIDI/POWER PACK
l TERMINALS
DC Out/MIDI In (single connector); MIDI OUT;
AC IN
l
SWITCH
Power On/Off
l
POWER SOURCE
EITHER: “AA” batteries (1.5 V) X 6
OR: 12V DC, using optional Yamaha PA-1 12V
Voltage convertor connected to one of the following power supplies:
120V, 50/60 Hz [U.S., Canada]
220V, 50/60 Hz [General]
240V, 50/60 Hz [Britain]
l DIMENSIONS (W x D x H)
111x34x95mm
(4-3/8” x 1-3/8” x 3-3/4”)
l
WEIGHT
300 grams
(11 oz.)
l DIMENSIONS (W x D x H)
57 x 64 x 538 mm
(2-1/4” x 2-1/2” x 21-1/4”)
l
WEIGHT
380 grams
(13 - 1/2 oz.)
ACCESSORIES
MIDI/Power pack w/soft case (1 ea.)
AA battery (6)
MIDI/DC extension cord (1)
MIDI cable (1)
Mouthpiece (1), attached
Extra mouthpiece (1)
Mouthpiece cover (1)
Adjustment shim (0.2 mm t x 14,0.5 mm t x 14)
Drain plug (2)
Screw driver w/holder (1 ea.)
Polishing cloth (1)
Carrying case (1)
Playing strap (1)
Information booklet w/cassette tape (1 ea.)
19
Page 22

MIDI Data Format
System Exclusive
Condition Acknowledge
MIDI CHANNEL
MIDI channel output is basically done through channel
1, however, channel 2 is used when DIP Switch #6 is ON
(DUAL NO/USE BREATH).
Furthermore, channel 3 is used when power is turned on
while the keyhold switch and the program change switch
are held. Channel 4 is used when DIP Switch #6 is ON,
provided that channel 3 is used as a basic channel.
DETAILS OF OUTPUT MESSAGE
Note ON, OFF
100100
0nnnnnnn $nn ;note no. 20 – 122
0vvvvvvv $vv
Control Change
101100
0ccccccc $cc
0ddddddd $dd ;data 0 – 127
When SW1 is OFF, WIND data is output as breath control.
When SW2 is ON, WIND data is output with master volume.
Program Change
110000
00000ddd $dd ;program no. 0 – 4
After Touch
110100
0ddddddd $dd ;data 0 – 127
When SW1 is ON, WIND data is output as after touch.
Pitch Bend
111000
0 llllll $LL ;data LSB
0mmmmmmm $mm
$90, 91 ;note on/off
($92, 93)
– 127 velocity
;1
0 = note off
$b0, b1 ;control change
($b2, b3)
;control no.
2=breath control
7=master volume
$c0, c1 ;program change
($c2, c3)
$d0, d1 ;after touch
($d2, d3)
$e0, e1 ;pitch bend
($e2, e3)
;data MSB (resolution 7 bit)
11110000 $f0 ;system exclusive
01000011 $43 ;YAMAHA ID
00000000 $00 ;bulk dump
01111101 $7d ;condition acknowledge
00001100 $0c ;data bytes LSB
00000000 $00
01001100
01001101
00100000
00111000
00111001
00110111
‘L’
‘M’
‘ ’
‘8’
‘9’
‘7’
;data bytes MSB
;message
FCC INFORMATION
While the following statements are provided to comply with FCC
Regulations in the United States, the corrective measures listed
below are applicable worldwide.
This series of Yamaha professional music equipment uses fre-
quencies that appear in the radio frequency range and if installed
in the immediate proximity of some types of audio or video devices
(within three meters), interference may occur. This series of Yamaha
combo equipment have been type tested and found to comply with
the specifications set for a class B computing device in accordance
with those specifications listed in subpart J of part 15 of the FCC
rules. These rules are designed to provide a reasonable measure
of protection against such interference. However, this does not.
guarantee that interference will not occur. If your professional music
equipment should be suspected of causing interference with other
electronic devices, verification can be made by turning your combo
equipment off and on. If the interference continues when your
equipment is off, the equipment is not the source of interference.
If your equipment does appear to be the source of the interference,
you should try to correct the situation by using one or more of the
following measures:
Relocate either the equipment or the electronic device that is being
affected by the interference. Utilize power outlets for the professional music equipment and the device being affected that are on
different branch (circuit breaker or fuse) circuits, or install AC line
filters.
In the case of radio or TV interference, relocate the antenna or, if
the antenna lead-in is 300 ohm ribbon lead, change the lead-in the
co-axial type cable.
If these. corrective measures do not produce satisfactory results,
please contact your authorized Yamaha professional products dealer
for suggestions and/or corrective measures.
If you cannot locate a franchised Yamaha professional products
dealer in your general area contact the professional products Service
Department, Yamaha Music Corporation, 6600 Orangethorpe Ave.,
Buena Park, CA 90620, U.S.A.
If for any reason, you should need additional information relating
to radio or TV interference, you may find a booklet prepared by the
Federal Communications Commission helpful:
“How to Identify and Resolve Radio -- TV Interference Problems”.
This booklet is available from the U.S. Government Printing Office,
Washington D.C. 20402 -- Stock No. 004-000-00345-4.
20
Page 23

[ Wind MIDI Controller ] Date : 4/7, 1987
Model WX7 MIDI Implementation Chart Version : 1.0
Function ...
Basic Default
Channel Changed
Default
Mode Messages
Altered
Note
Number : True voice
Velocity Note ON
Note OFF
After Key's
Touch Ch's
Pitch Bender
2
7
Control
Transmitted
1
1
& 2 , 3 &
X
X
4
***************
20 - 122
*************
o 9nH,v=1~127
x 9nH,v=0
x
0
0
o
*1
o
*1
Remarks
*1
*1
7 bit resolution
Breath control
Volume
Change
Prog
o 0~4
Change : True # ***************
System Exclusive
System : Song Pos
: Song Sel
Common : Tune
System :Clock
Real Time :Commands
Aux :Local ON/OFF
:All Notes OFF
Mes- :Active Sense
sages:Reset
X
X
X
X
X
X
X
X
0
X
Notes
Mode 1
Mode 3 :
*1 = Select by DIP SW
OMNI ON, POLY Mode 2 : OMNI ON, MONO
:
OMNI OFF, POLY Mode 4 : OMNI OFF, MONO
o : Yes
x : No
Page 24

WX7 FINGERING CHART (NORMAL PITCH)
TABLE DE DOIGTE WX7 (HAUTEUR NORMALE)
FINGERING-TABELLE FÜR WX7 (NORMALE TONLAGE)
WX7 FlNGERlNG CHART (OCTAVE TRANSPOSE)
Shaded keys are fingered.
Octave changes (from two octaves below concert pitch to three octaves above)
can also be made using the Octave Transpose keys. Octave changes made with
these keys are in addition to those made using the fingerings shown in the charts.
Refer to the rear view illustration in the Guide to the Controls section for more
about the Octave Transpose keys.
*In this Iine. these keys
have been released to
transpose up by one
octave.
*Dans cette ligne. ces
touches ont été relâchées
pour transposer d’une
octave vcrs le haut.
TABLE DE DOIGTE WX7 (TRANSPOSITION A L’OCTAVE)
Les touches en ombré sont jouées.
Les changements d’octave (de 2 octaves au dessous du diapason de concert à 3
octaves au dessus) peuvent également être effectués en utilisant les touches de
transposition d’octave. Les changements d’octave réalisés avec les touches
s’ajoutent à ceux effectués par des doigtés indiqués dans les tables. Reportez-vous
à l’illustration de la vue arriére dans la section GUIDE DES COMMANDES pour
plus de détails sur la touche de transposition d-octave.
FINGERING-TABELLE FÜR WX7 (OKTAVEN-TRANSPONIERUNG)
Die schraffierten Tasten sind auf Fingered gestellt.
Änderungen der Oktavlage (von zwei Oktaven unter dem Kammerton bis zu
drei Oktaven darüber) sind auch mit Hiffe der Oktaven-Transponiertasten
möglich. Auf diese Weise vorgenommene Änderungen der Oktavlage erfolgen
zusätzlich zu den Änderungen, die über die in der Grifftabelle gezeigten Griffe
ausgeführt werden. Weitere Einzelheiten zu den Oktaven-Transponiertasten
finden Sie in der Rückansicht des WX7 im Kapitel “BESCHREIBUNG DER
BEDIENELEMENTE”.
*In dieser Linie wurden
diese Tasten losgelassen urr um eine Oktave
höher zu transponieren
Page 25

FINGERING CHARTS
The WX7’s playing keys are arranged according to the
standard Böhm fingering system. The fingering positions
are shown in the following charts. The first chart gives
TABLES DE DOIGTES
Les touches du WX7 son organisées en accord avec le système
de doigté standard Böhm. Les positions de doigtés sont
présentées dans les tables suivantes. La première table donne
GRIFFTABELLEN
Die Anordnung der Fingertasten des WX7 entspricht dem
Standard der Böhm-Grifftechnik. Die Griffpositionen
werden in den folgenden Grifftabellen gezeigt. Die erste
the positions for normally-pitched playing. The second
chart offers four convenient methods of playing one octave
above normal pitch.
les positions pour jouer sur une octave normale. Le deuxième
table offre quatre méthodes commodes pour jouer une octave
au dessus de Ia hauteur normale.
Tabelle enthält die Griffe für normales Spielen, die zweite
zeigt lhnen vier praktische Methoden, um eine Oktave über
der normalen Tonhühe zu spielen.
YAMAHA
YAMAHA CORPORATION
P.O.Box 1. Hamamatsu, Japan
VD8916O 88 04 ´ 2 R5 CR Printed in JAPAN
Page 26

®
YAMAHA
Yamaha Corporation of America
6600 Orangethorpe Avenue, P.O. Box 6600, Buena Park, CA 90622-6600
3/10/99 19C0172
 Loading...