

Yamaha WX-030 User Manual
En Fr De
Sv It Es
OWNER'S MANUAL
MODE D'EMPLOI
BEDIENUNGSANLEITUNG
BRUKSANVISNING
MANUALE DI ISTRUZIONI
MANUAL DE INSTRUCCIONES
GEBRUIKSAANWIJZING
ИНСТРУКЦИЯ ПО ЭКСПЛУАТАЦИИ
Nl
Ru
G
CAUTION: READ THIS BEFORE OPERATING YOUR UNIT.
En
1 To assure the finest performance, please read this
manual carefully. Keep it in a safe place for future
reference.
2 Install this unit in a well ventilated, cool, dry, clean
place – away from direct sunlight, heat sources,
vibration, dust, moisture and cold. For proper
ventilation, allow the following minimum clearances.
Top: 5 cm (2 in)
Rear: 5 cm (2 in)
Sides: 5 cm (2 in)
3 Locate this unit away from other electrical
appliances, motors, or transformers to avoid
humming sounds.
4 Do not expose this unit to sudden temperature
changes from cold to hot (or vice versa), and do not
locate this unit in an environment with high humidity
(i.e., a room with a humidifier) to prevent
condensation inside this unit, which may cause an
electrical shock, fire, damage to this unit, and/or
personal injury.
5 Avoid installing this unit where foreign object may
fall onto this unit and/or this unit may be exposed to
liquid dripping or splashing. On the top of this unit,
do not place:
– Other components, as they may cause damage
and/or discoloration on the surface of this unit.
– Burning objects (i.e., candles), as they may cause
fire, damage to this unit, and/or personal injury.
– Containers with liquid in them, as they may fall
and liquid may cause electrical shock to the user
and/or damage to this unit.
6 Do not cover this unit with a newspaper, tablecloth,
curtain, etc. in order not to obstruct heat radiation. If
the temperature inside this unit rises, it may cause
fire, damage to this unit, and/or personal injury.
7 Do not plug in this unit to a wall outlet until all
connections are complete.
8 Do not operate this unit upside-down. It may
overheat, possibly causing damage.
9 Do not use force on switches, knobs and/or cords.
10 When disconnecting the power cable from the wall
outlet, grasp the plug; do not pull the cable.
11 Do not clean this unit with chemical solvents; this
might damage the finish. Use a clean, dry cloth.
12 Only voltage specified on this unit must be used.
Using this unit with a higher voltage than specified is
dangerous and may cause fire, damage to this unit,
and/or personal injury. Yamaha will not be held
responsible for any damage resulting from use of this
unit with a voltage other than specified.
13 To prevent damage by lightning, keep the power
cable and outdoor antennas disconnected from a wall
outlet or this unit during a lightning storm.
14 Do not attempt to modify or fix this unit. Contact
qualified Yamaha service personnel when any
service is needed. The cabinet should never be
opened for any reasons.
15 When not planning to use this unit for long periods of
time (i.e., vacation), disconnect the AC power plug
from the wall outlet.
16 Be sure to read the “TROUBLESHOOTING” section
on common operating errors before concluding that
this unit is faulty.
17 Before moving this unit, press to set the unit to
off, and disconnect the AC power plug from the wall
outlet.
18 Condensation will form when the surrounding
temperature changes suddenly. Disconnect the power
cable from the outlet, then leave this unit alone.
19 When using this unit for a long time, this unit may
become warm. Turn the unit off, then leave this unit
alone for cooling.
20 Install this unit near the wall outlet and where the AC
power plug can be reached easily.
21 Be sure to use the power cable supplied with this
unit. Using a power cable other than the one provided
may cause fire or damage to this unit.
This unit is not disconnected from the AC power source
as long as it is connected to the wall outlet, even if this
unit itself is turned off by . In this state, this unit is
designed to consume a very small quantity of power.
WARNING
TO REDUCE THE RISK OF FIRE OR ELECTRIC
SHOCK, DO NOT EXPOSE THIS UNIT TO RAIN OR
MOISTURE.
• This unit’s speakers use magnets. Do not place items
that are sensitive to magnetism, such as CRT-type TVs,
clocks, credit cards, floppy disks, etc., on or beside this
unit.
• There is a chance that placing this unit too close to a
CRT-based (Braun tube) TV set might impair picture
color. Should this happen, move this unit away from the
TV set.
◆ For U.K. customers
If the socket outlets in the home are not suitable for the
plug supplied with this appliance, it should be cut off and
an appropriate 3 pin plug fitted. For details, refer to the
instructions described below.
The plug severed from the mains lead must be destroyed, as a
plug with bared flexible cord is hazardous if engaged in a live
socket outlet.
i En
◆ Special Instructions for U.K.
Note
y
☞
Model
IMPORTANT
THE WIRES IN MAINS LEAD ARE
COLOURED IN ACCORDANCE WITH THE
FOLLOWING CODE:
Blue: NEUTRAL
Brown: LIVE
As the colours of the wires in the mains lead of this
apparatus may not correspond with the coloured
markings identifying the terminals in your plug,
proceed as follows:
The wire which is coloured BLUE must be
connected to the terminal which is marked with the
letter N or coloured BLACK. The wire which is
coloured BROWN must be connected to the
terminal which is marked with the letter L or
coloured RED.
Make sure that neither core is connected to the
earth terminal of the three pin plug.
Information for Users on Collection
and Disposal of Old Equipment
This symbol on the products, packaging,
and/or accompanying documents means
that used electrical and electronic products
should not be mixed with general
household waste.
For proper treatment, recovery and
recycling of old products, please take them
to applicable collection points, in
accordance with your national legislation
and the Directives 2002/96/EC.
By disposing of these products correctly,
you will help to save valuable resources
and prevent any potential negative effects
on human health and the environment
which could otherwise arise from
inappropriate waste handling.
For more information about collection and
recycling of old products, please contact
your local municipality, your waste
disposal service or the point of sale where
you purchased the items.
[Information on Disposal in other
Countries outside the European
Union]
This symbol is only valid in the European
Union. If you wish to discard these items,
please contact your local authorities or
dealer and ask for the correct method of
disposal.
If there should be color blotching or noise when
used near a TV, move this unit away from the TV
when using it.
Do not use this unit within 22 cm (9 inches) of
persons with a heart pacemaker implant or
defibrillator implant.
Radio waves may affect electro-medical devices.
Do not use this unit near medical devices or inside
medical facilities.
The user shall not reverse engineer, decompile,
alter, translate or disassemble the software used in
this unit, whether in part or in whole. For
corporate users, employees of the corporation
itself as well as its business partners shall observe
the contractual bans stipulated within this clause.
If the stipulations of this clause and this contract
cannot be observed, the user shall immediately
discontinue using the software.
About this manual
• “iPod” described in this manual may also refer to “iPhone”
or “iPad.”
• Illustrations may differ from actual item depicted.
• Symbols:
Indicates precautions for use of the unit and its
feature limitations.
Indicates supplementary explanations for better
use.
Indicates the corresponding reference page(s).
ii En
WX-030
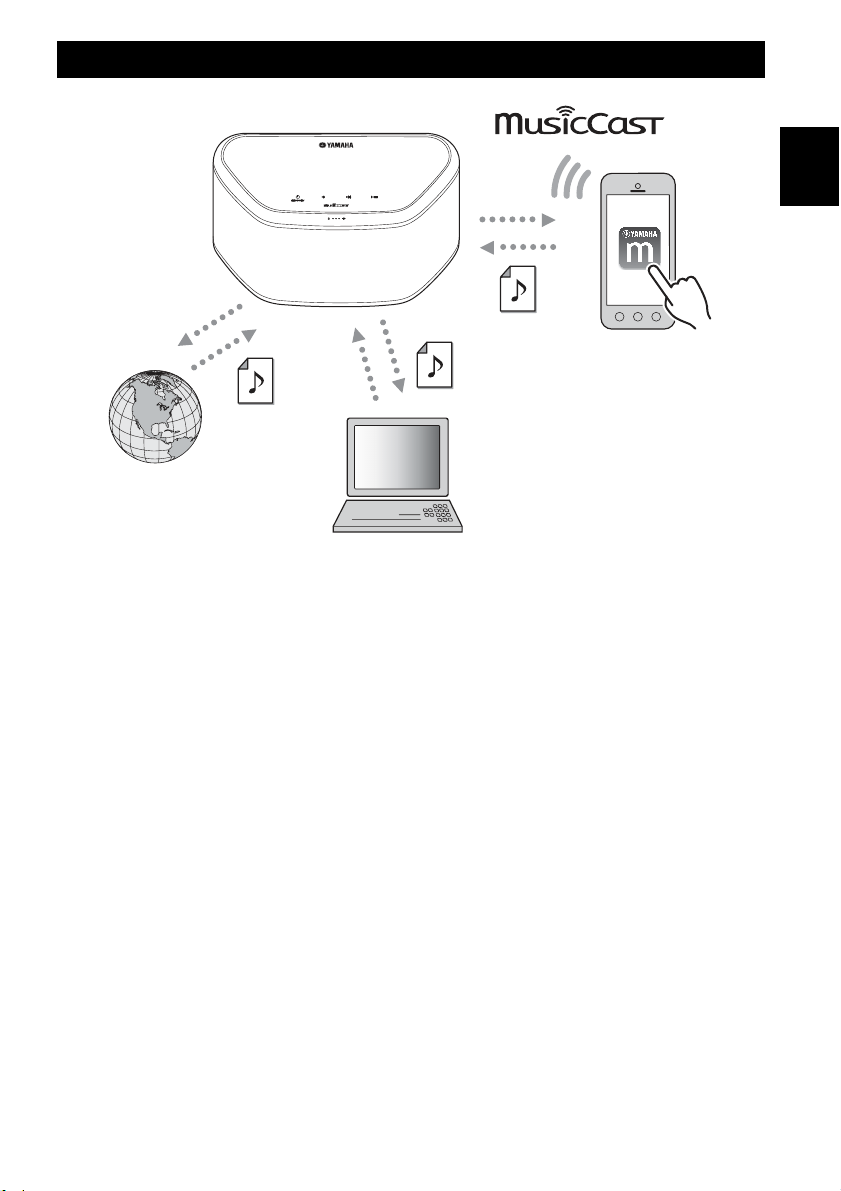
FEATURES
Plays music files in smartphones
via a network (using MusicCast
CONTROLLER app, DLNA servers,
Spotify), AirPlay (iPod), and
Bluetooth (Bluetooth device). Also
you can use your smartphone as a
remote controller.
En
Plays music from
Internet radio and online streaming content.
Plays music files
in PCs and DLNA
servers.
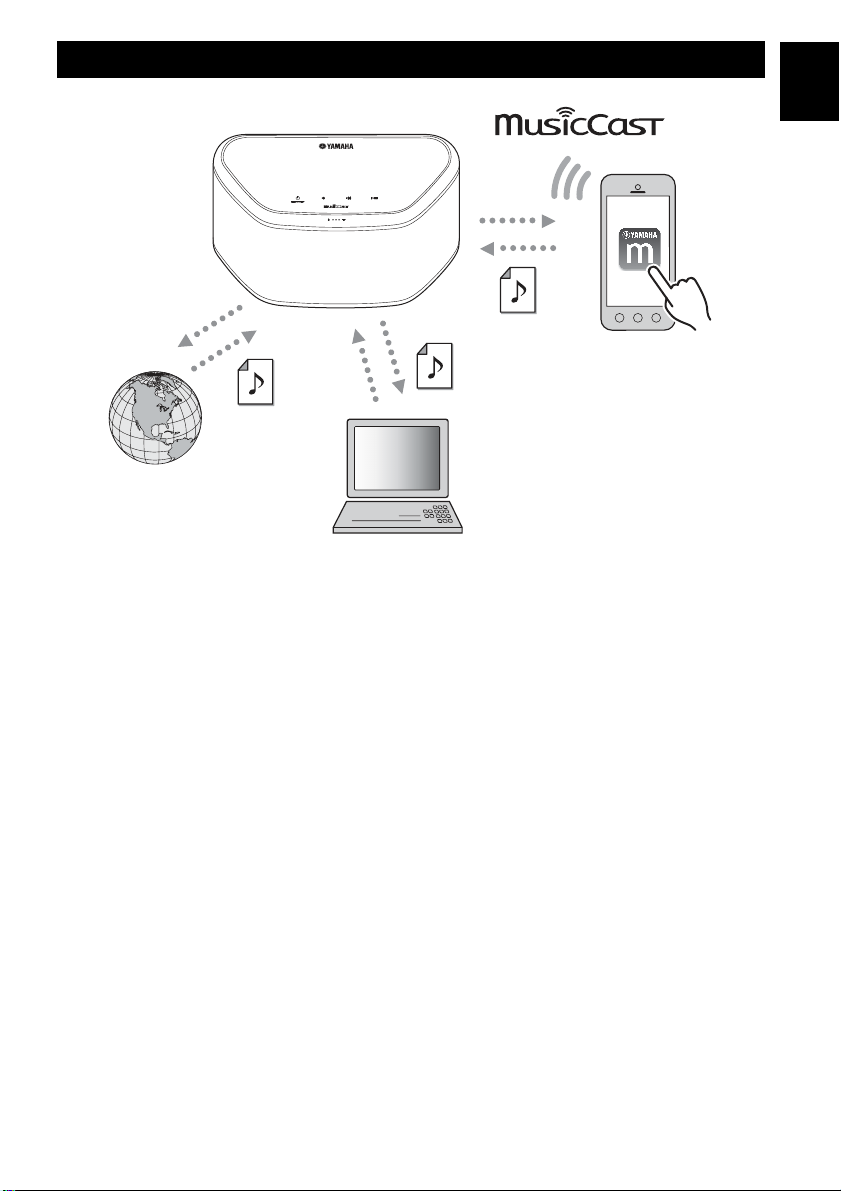
Smooth operation and wireless music playback using iPhone/AndroidTM devices
• By installing the free dedicated app “MusicCast CONTROLLER” on your iPhone/iPad/iPod touch or Android device, you
will be able to set up a network, make various settings, and select songs to play back. You can also use these devices as a
remote controller (☞ P.7).
• Equipped with Wi-Fi, which allows the unit to connect to the wireless router (access point) without any cables.
Plays various supported content with high quality sound
• Plays music from DLNA servers (☞ P.15), Internet radio, AirPlay and Bluetooth.
• Rich sound provided by the two-way speaker, large passive radiator, and DSP (Digital Signal Processor) developed by
Ya ma h a.
• Enhanced treble and thick mid/bass sound, even when playing a compressed audio source, such as MP3. (Music Enhancer)
Supports streaming services
• You can enjoy music from a variety streaming services. (Supported music streaming services vary by the country or region of
use.)
Stereo Pair function
• You can enjoy stereo reproduction using two WX-030 units.
1 En

INTRODUCTION
CONTENTS
INTRODUCTION
SUPPLIED ACCESSORIES ..................................2
PART NAME ..........................................................3
OTHER FUNCTIONS AND
INFORMATION
STEREO PAIR .....................................................12
PREPARATION
INSTALLATION .....................................................4
Mounting the unit on a wall ................................ 4
TURNING ON THE POWER ..................................5
CONNECTING TO THE NETWORK...................... 6
HOME AUDIO NETWORK WITH MusicCast .......7
Connecting to the network using MusicCast
CONTROLLER ..............................................7
UPDATING THE FIRMWARE..............................14
OPTION SETTINGS............................................. 14
ADDITIONAL INFORMATION ............................. 15
TRADEMARKS....................................................15
TROUBLESHOOTING .........................................16
LISTENING TO THE MUSIC
LISTENING TO THE INTERNET RADIO............... 9
LISTENING TO THE SONGS IN THE COMPUTER
AND NAS ...............................................................9
Setting the media sharing of music files............. 9
PLAYING BACK MUSIC WITH AirPlay ..............10
Playback of iTunes/iPod music contents..........10
Clearing AirPlay ...............................................10
LISTENING TO MUSIC FROM YOUR
DEVICE ................................................................11
Pairing this unit with your
Connecting an already-paired device via
Bluetooth ...................................................... 11
Disconnecting a
Bluetooth device...... 11
Bluetooth connection .............11
Bluetooth
SUPPORTED DEVICES/MEDIA AND FILE
FORMATS............................................................ 19
SPECIFICATIONS ............................................... 20
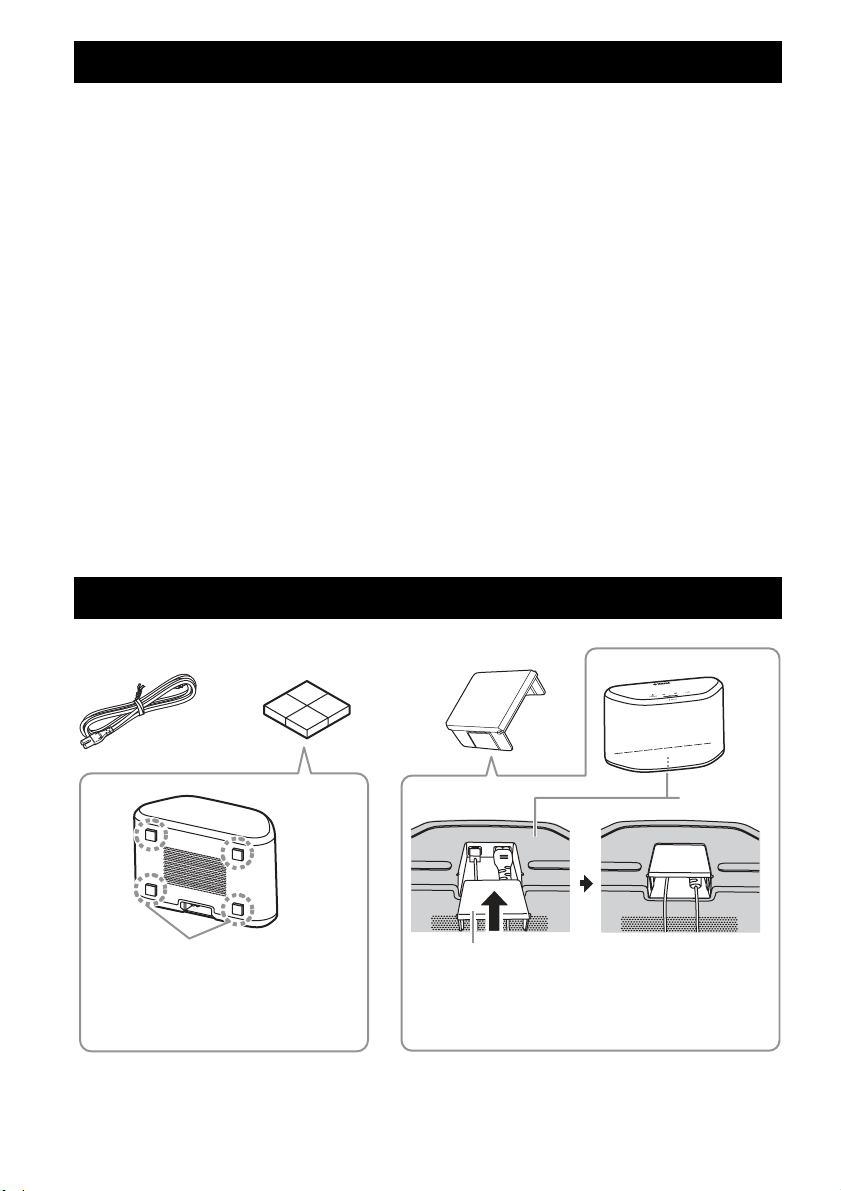
SUPPLIED ACCESSORIES
Power cable Cushion Cable cover
Setting/Playing back music .............................. 12
Canceling Stereo Pair ...................................... 13
General ............................................................ 16
MusicCast ........................................................ 16
Network ............................................................ 16
Bluetoot h .......................................................... 18
Cussion
y
To prevent the vibration from the sound from
reaching the wall, attach the cushions on the
four corners of the rear panel.
2 En
Bottom
Cable cover
y
You can hide the cables by installing the cable cover.
Install as above.
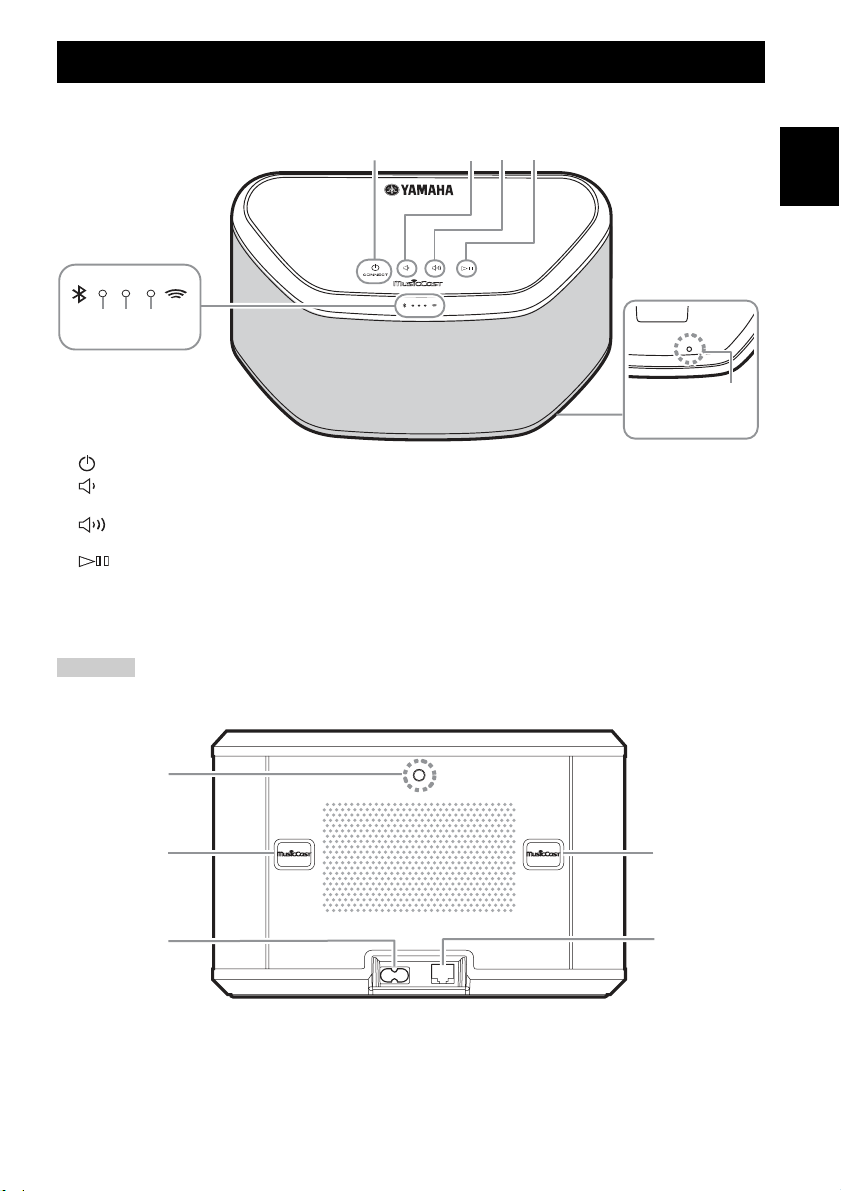
■ Top panel
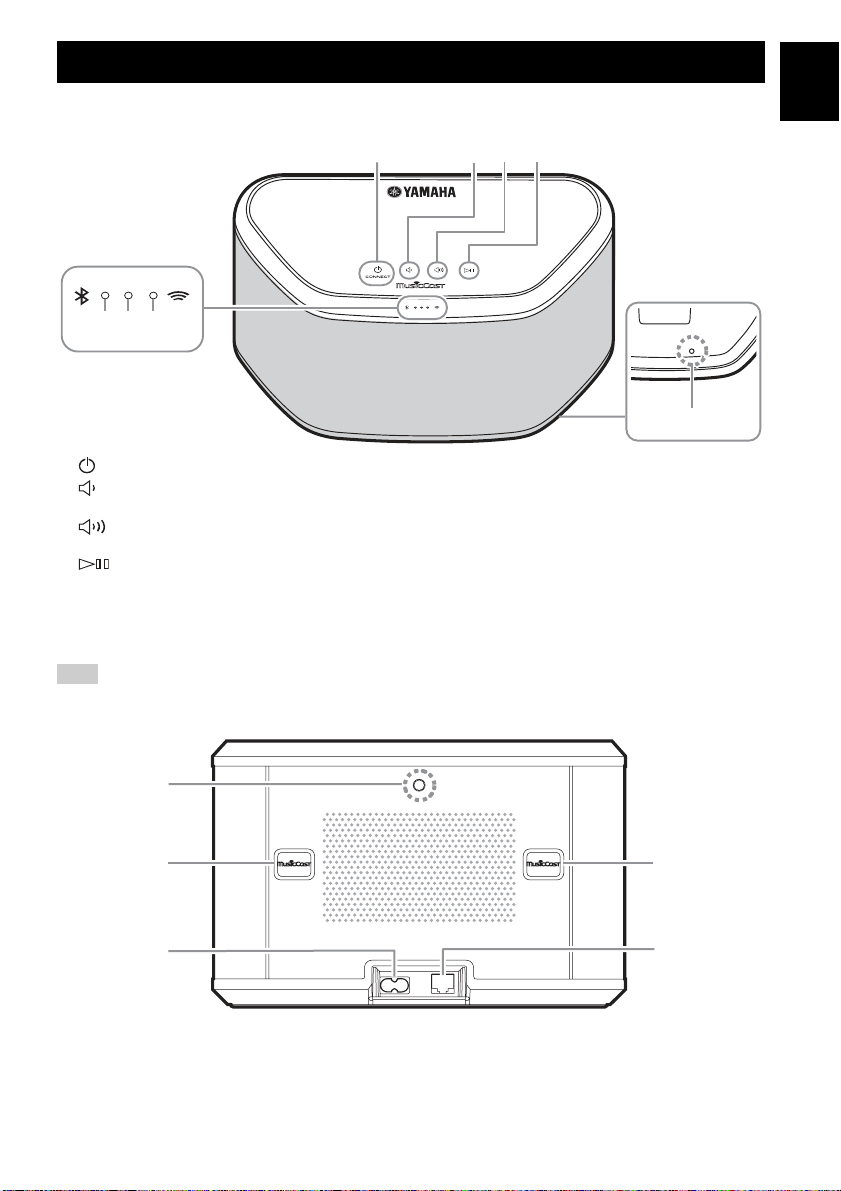
PART NAME
En
1
23
576
E
A (power)/CONNECT (☞ P.5)
B
Turns down the volume.
C
Turns up the volume.
D
Plays/pauses.
y
, B, C, D are touch sensors. They react when you touch them with your finger.
A
Note
If the volume reaches the maximum/minimum value, these three indicators (
■ Rear panel
Bluetooth indicator
Lights during Bluetooth connection.
F Power indicator
Lights while the unit is turned on.
G Network indicator
Lights while the unit is connected to the wired or wireless
(Wi-Fi) network.
H Reset button (☞ P.16)
Press to restart the unit.
E, F, G) flash twice at the same time.
4
Bottom
8
1
2
34
A Wall mount hanger hole
Use to mount the unit to a wall mount hanger (☞ P.5).
B Key hole slot/key hole slot cover (☞ P.4)
If you lift up the key hole slot covers, you will find the
key hole slots for mounting the unit to a wall.
C Power connector (☞ P.5)
2
D Network terminal (☞ P.6)
Use a LAN cable (commercially available) to connect to
the network.
y
If you use the unit with Wi-Fi, a LAN cable is not necessary
to connect to the unit.
3 En

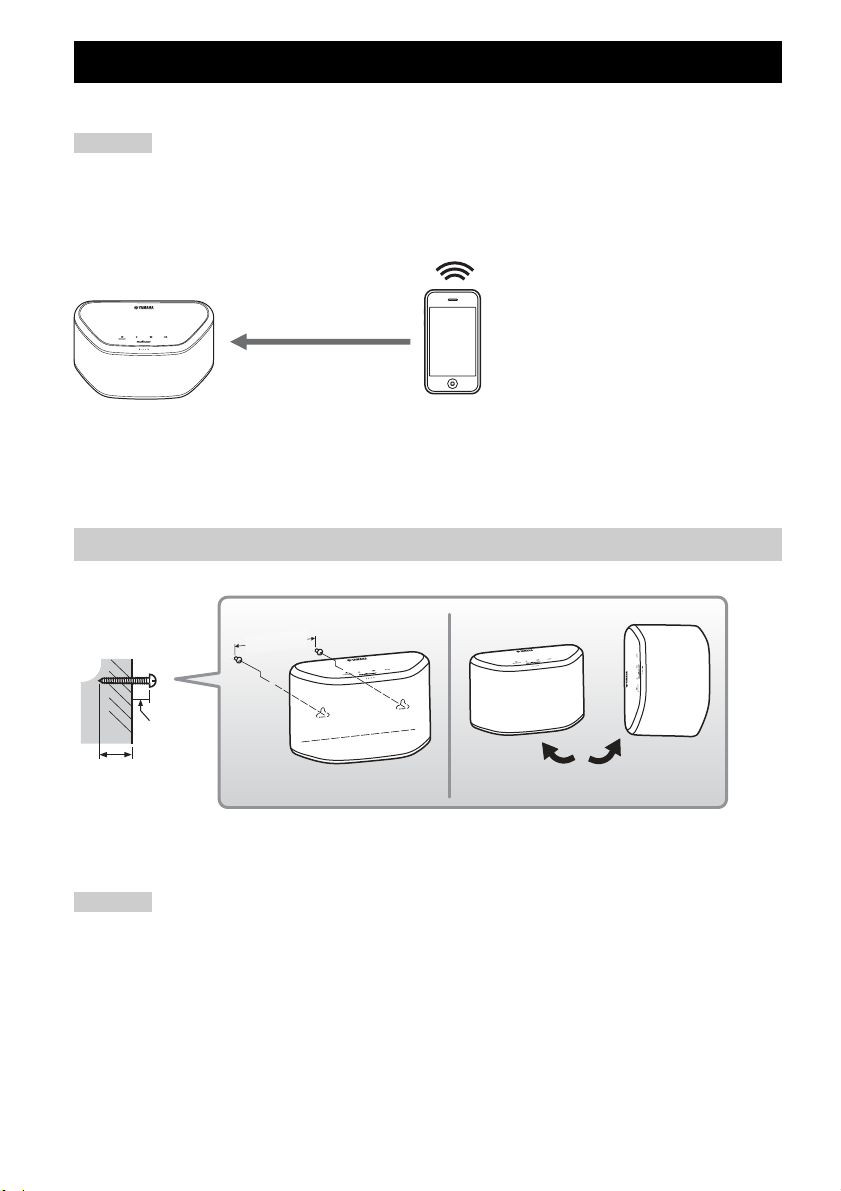
PREPARATION
INSTALLATION
Plug the power cable into the wall outlet after connecting all the other cables.
Note
Placing the unit too close to a CRT TV may impair the picture color or cause a buzzing noise. In this case, move the unit at least
20 cm (8") away from the TV. This is not an issue with LCD and plasma TVs.
Install in a stable place, being careful of
For
Bluetooth device users
Within 10 m (33 ft)
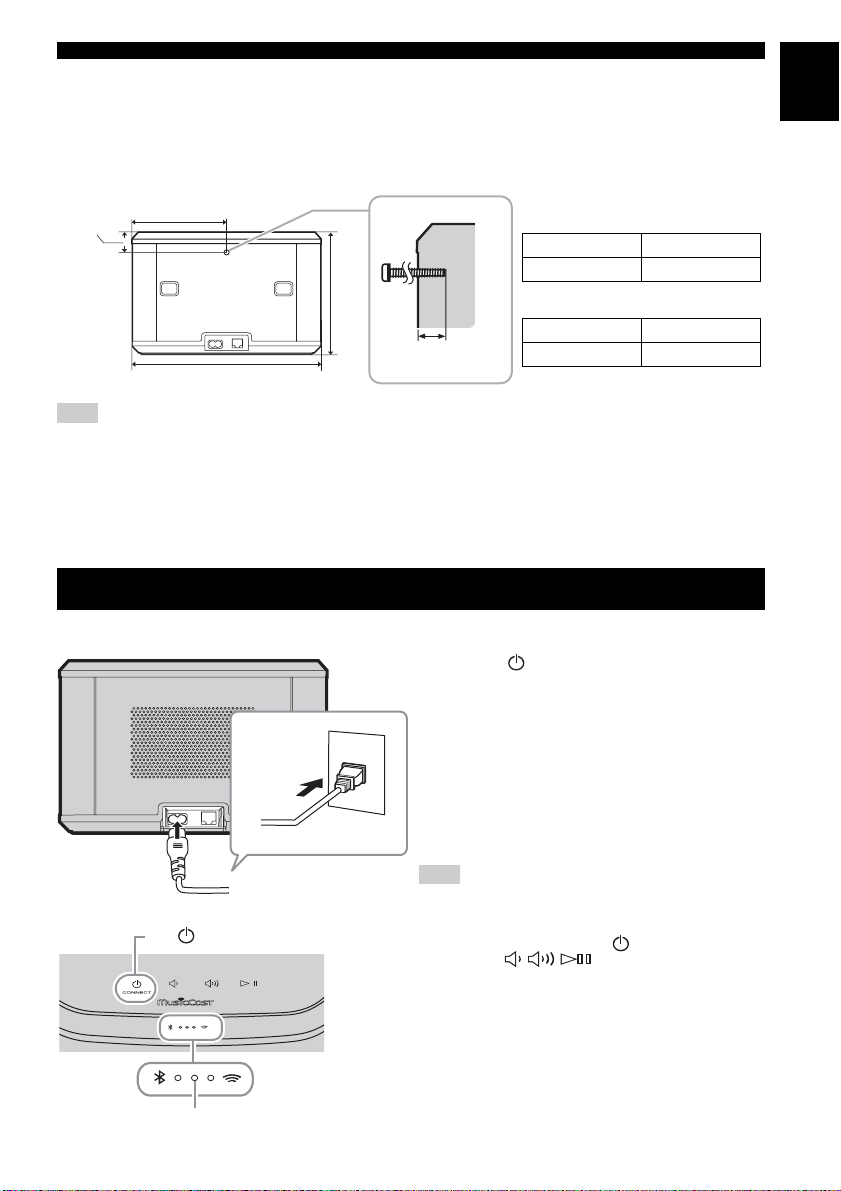
Mounting the unit on a wall
You can mount the unit on the wall as follows.
12
Wall/wall
support
147 mm
(5-3/4")
the following points:
• Do not place on top of steel or other
metal plates.
• Do not cover with a cloth, etc.
For
Bluetooth device users
• Install in the same room as the device
with which signals are to be exchanged
(Bluetooth profile A2DP compatible
smartphone, digital audio player, etc.)
within a direct line-of-sight distance of
10 m (33 ft).
• Make sure there are no obstacles
between this unit and the Bluetooth
device.
6 mm
(1/4")
Minimum
20 mm (3/4")
A Install screws (commercially available) into a solid wall or wall support as shown in the illustration. Use 3.5 to 4 mm (1/8")
diameter self-tapping screws.
B Hang the unit by its keyhole slots onto the protruding screws.
Note
• Make sure the shaft of the screw is seated in the narrow part of the keyhole slot. Otherwise, the unit may fall.
• Do not mount the unit on thin plywood or on a wall with a soft surface material. Otherwise, the screws may pull out of the
surface and the unit may fall, possibly damaging the unit or causing personal injury.
• Do not affix the unit to a wall using nails, adhesives, or unstable hardware. Long-term use and vibration may cause the unit to
fall.
• To avoid accidents resulting from tripping over loose cables (such as a power cable), affix the cables to the wall.
• When using the brackets to mount the unit on a wall / ceiling, please use safety wire (not included) between the unit and the
bracket to prevent the unit from falling.
• If you are not sure of a safe way to install the unit, consult a professional installer or a building contractor.
• To prevent the vibration from the sound from reaching the wall, attach the cushions on the four corners of the rear panel
(☞ P.2).
WX-030
2.2 kg (4.9 lbs.)
y
The unit can be installed vertically and
horizontally.
4 En
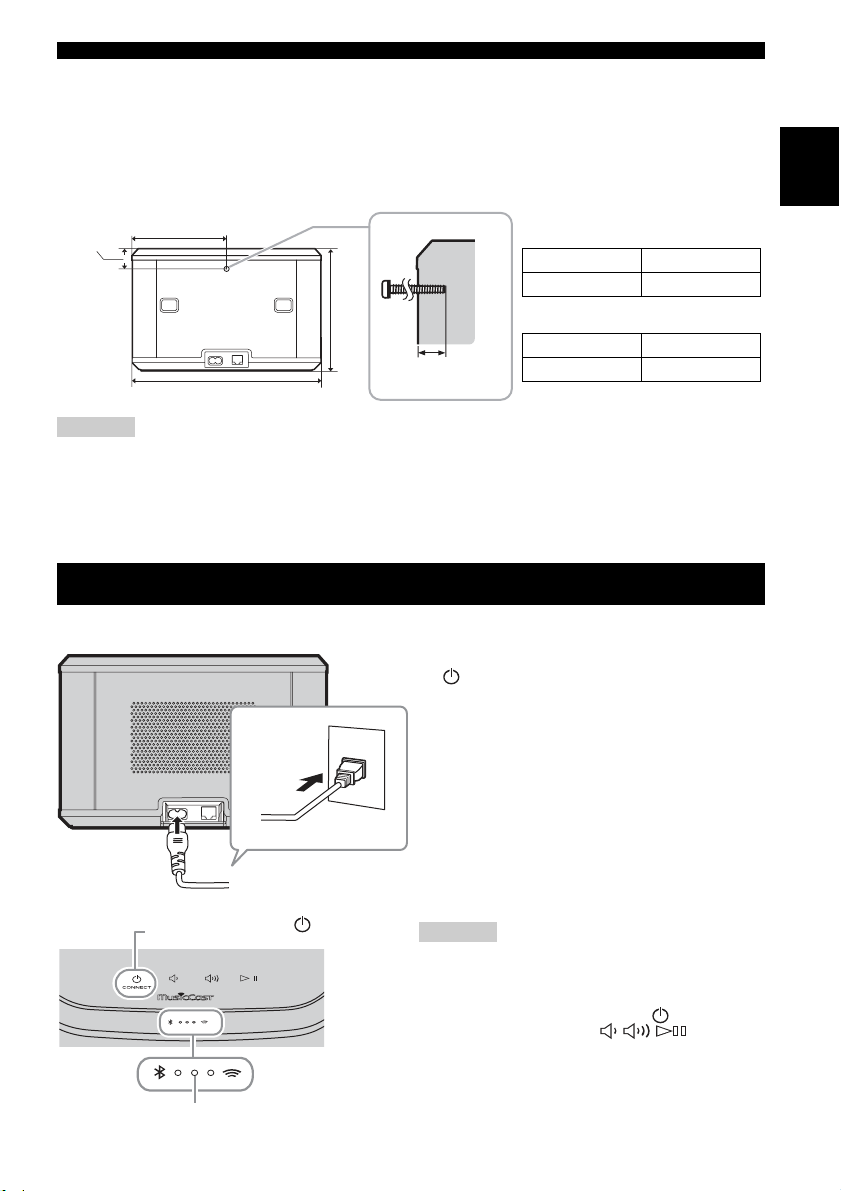
TURNING ON THE POWER
■ To mount the unit to a wall mount hanger
The unit can be mounted to the wall using a commerciallyavailable wall mount hanger. Use the wall mount hanger hole on the
rear panel to mount.
y
Use a wall mount hanger that is compatible for a unified coarse screw, such as those used for the tripod stand of a camera.
Rear panel
26 mm
(1")
WX-030
2.2 kg (4.9 lbs.)
• If using a wall mount hanger, use the one compatible for this unit.
• Use the wall mount hanger whose withstand load capacity is over 4.5 kg (10 lbs.).
• Follow the instructions in the owner’s manual of the wall mount hanger and mount the unit correctly.
• If you mount the unit incorrectly or use a wall mount hanger that is not compatible for the unit, the unit may fall and cause
• Check the safety after mounting the unit. Yamaha is not responsible for any accidents which may be caused due to an
121.5 mm (4-3/4")
156.5 mm (6-1/8")
243 mm (9-5/8")
Note
injury.
incorrect installation position or incorrect installation methods, or for any malfunction of the wall mount hanger. If you are
worried about the safety, ask a professional to install.
WX-030
Minimum
5 mm (1/4")
Specification of mounting screw:
UNC 1/4-20
Diameter 6.35 mm (1/4")
Screw thread 20 (per 1")
Specifications of the screw hole
Diameter 6.35 mm (1/4")
Depth 9 mm (3/8")
TURNING ON THE POWER
En
Rear pannel
Top pannel
Power indicator
Power cable
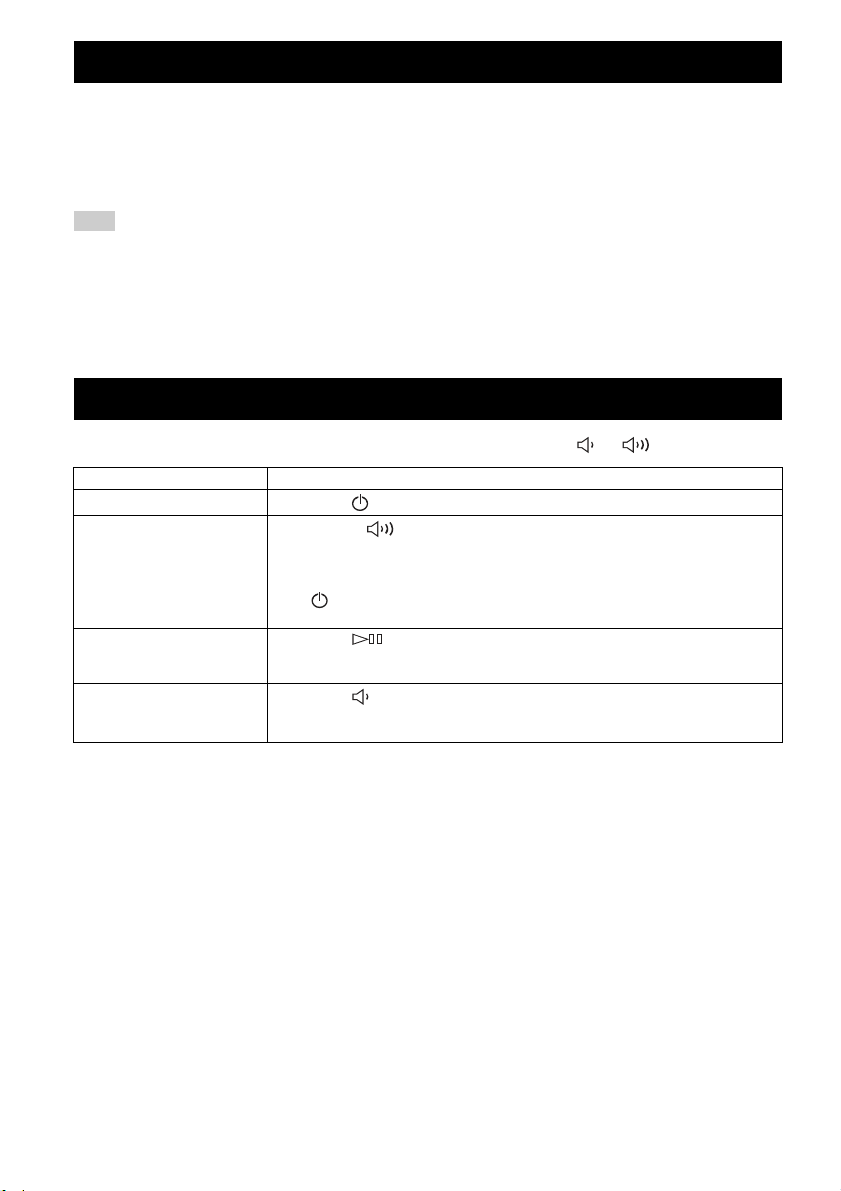
Tap (power)/CONNECT.
A Plug the power cable into the wall outlet
and tap (power)/CONNECT.
The unit turns on and the power indicator lights. If
you tap again, the unit turns off (standby mode)
and the power indicator turns off.
y Auto Standby
Auto Standby is a mode in which the unit
automatically enters standby mode if about
20 minutes have elapsed with no playback and no
operation. You can enable/disable this mode with
the MusicCast CONTROLLER app (
Note
• After the power plug is inserted to the wall outlet, it takes
about 10 seconds for the unit to start up internally. The
unit cannot play back during this time.
• Do not touch the touch sensors ( (power)/
CONNECT// / ) for about 10 seconds after
the unit starts up, since the unit is adjusting sensor
sensitivity. If your finger touches the touch sensors during
this time, they may not function properly after the unit
starts up.
☞
P.7).
5 En
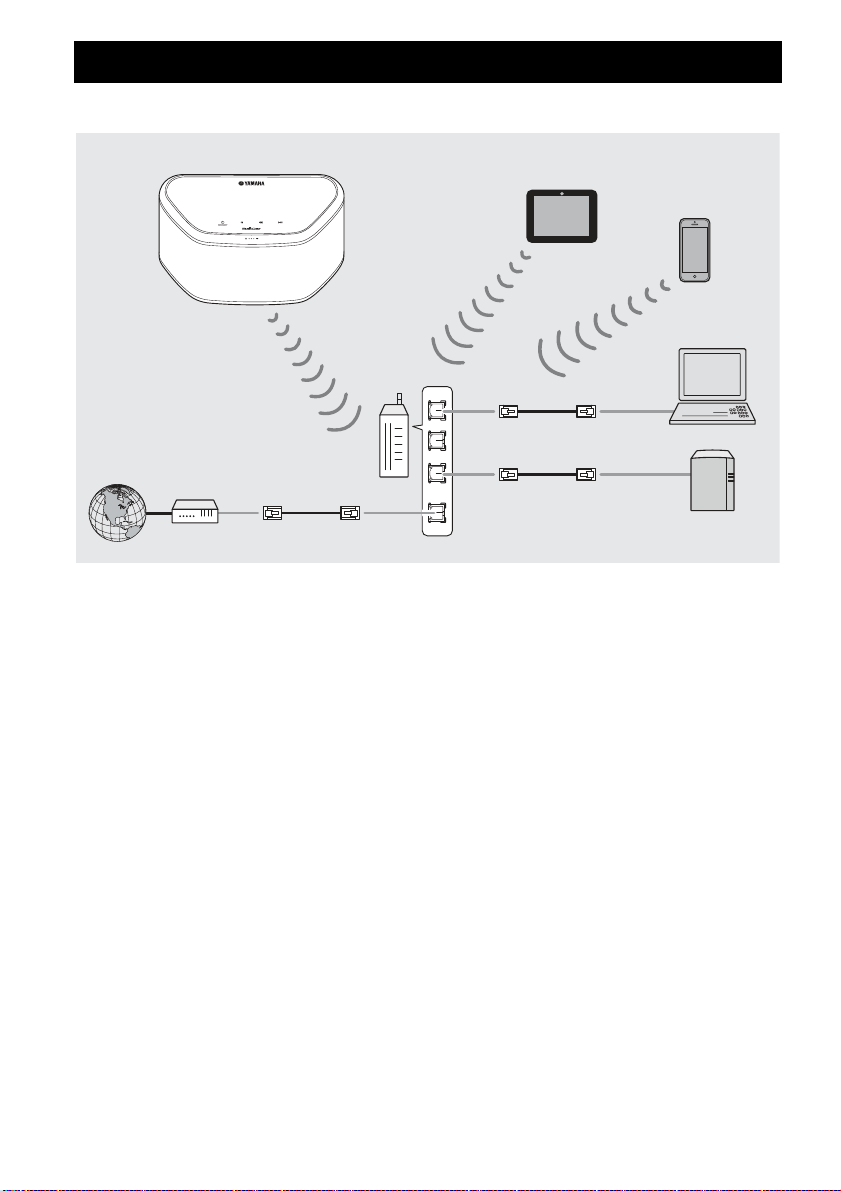
CONNECTING TO THE NETWORK
Connect the unit to the network as shown below.
Tablet
Network cable
Mobile device
PC
Network attached
storage (NAS)
Internet
Modem
Broadband
router
This unit
LAN
WAN
y
• For details on Internet connection, refer to the owner’s manuals of your connecting devices.
• Some security software installed on your PC or the firewall settings of connecting devices (such as a router) may block the
access of the unit to the connecting devices or the Internet. In this case, change the setting of the security software or
connecting devices.
• If you connect the unit to the network with a LAN cable, connect with a commercially available STP (shielded twisted pair)
network cable (straight, CAT-5 or higher).
• Using the MusicCast CONTROLLER app, make sure that the unit and other connecting devices are connected to the same
router.
6 En
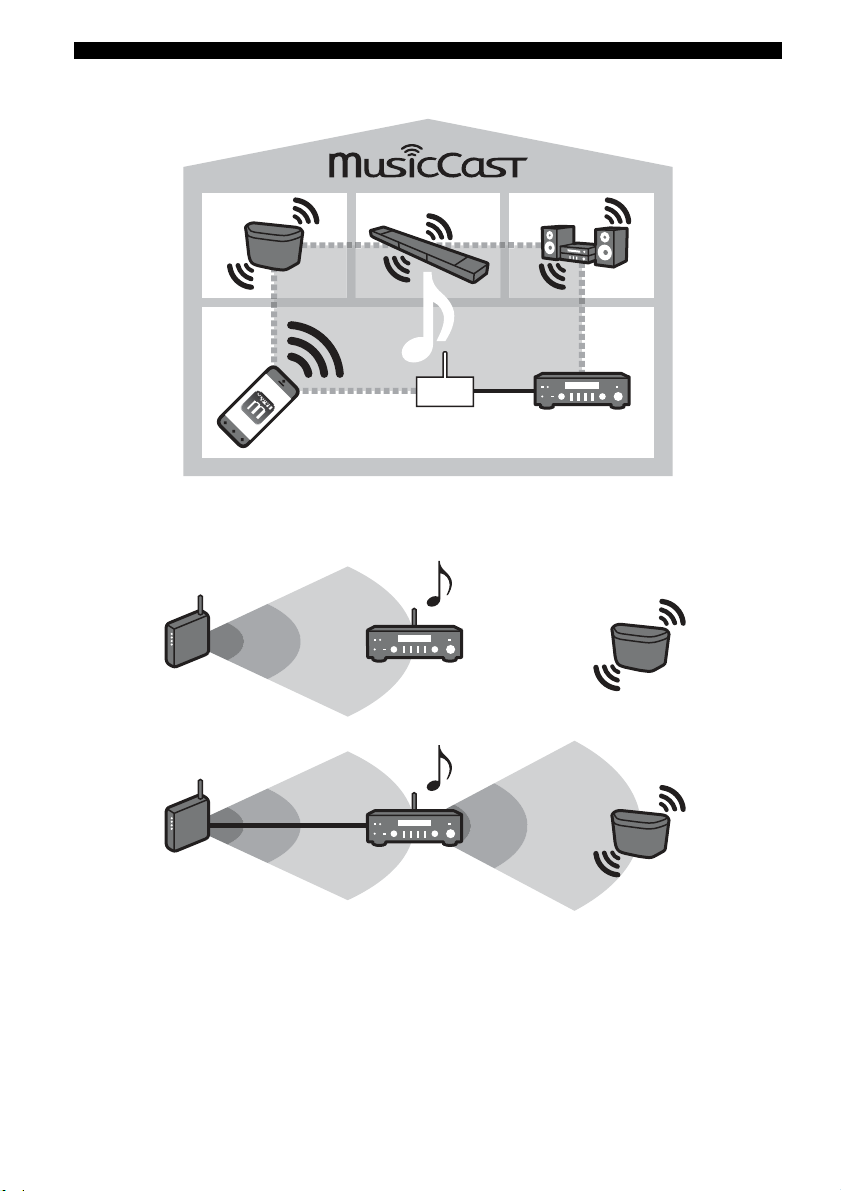
HOME AUDIO NETWORK WITH MusicCast
MusicCast is a brand new wireless musical solution from Yamaha, allowing you to share music among all of your rooms with a
variety of devices. You can enjoy music from your smartphone, PC, NAS drive and music streaming service anywhere in your
house with one easy-to-use app. For more details and a lineup of MusicCast compatible products, visit our website.
http://www.yamaha.com/musiccast/
■ MusicCast CONTROLLER
• Main functions
- Basic operations such as turning the unit on/off and, volume adjustment.
- Select/play/pause the music.
- Play music in the devices.
- Equalizer setting
- Sleep timer
• System requirements
- For details, search App Store or Google Play
• The application supports iPhone/iPad/iPod touch and Android mobile devices.
- WLAN environment.
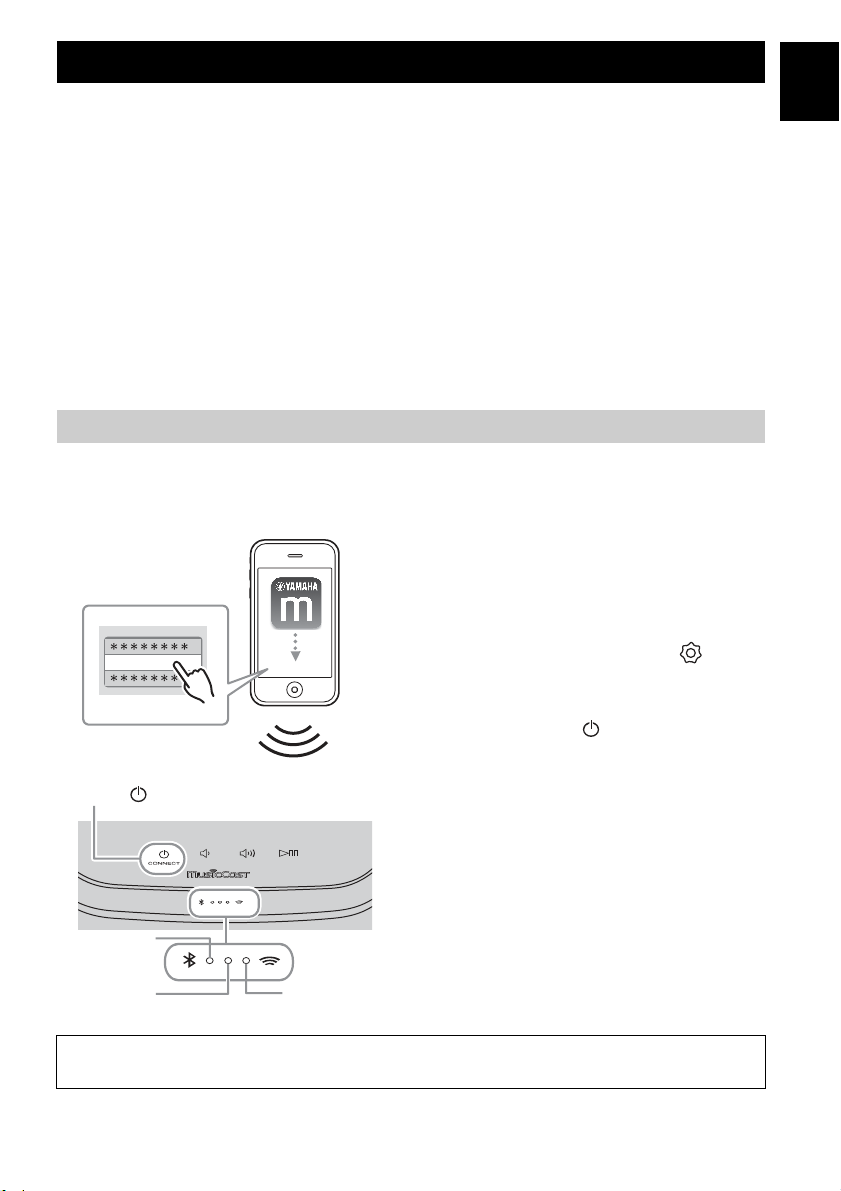
Connecting to the network using MusicCast CONTROLLER
■ Mobile device (smartphone, etc.)
To use the unit, you need the dedicated app “MusicCast CONTROLLER” for the operation. Search for the free app “MusicCast
CONTROLLER” on App Store (for iOS devices) or Google Play (for Android devices) and install it to your device.
For details, refer to the instructions for this app in each store.
1
2
Setup
34
,
(power)/CONNECT
TM
for “MusicCast CONTROLLER.”
A Install the MusicCast CONTROLLER app to
the mobile device.
B Start the app.
After the app starts, select “Setup.”
y
If you have already connected a MusicCast
compatible device to the network, tap
(Settings) and then “Add New Device.”
C Turn on the unit.
The power indicator lights.
D Touch and hold the (power)/CONNECT
on the unit for 3 seconds.
The Network and the Bluetooth indicators flash quickly.
E Set the network.
Connect your audio device to the network.
Follow the guidance displayed in the app to set.
F Follow the instructions in the MusicCast
CONTROLLER app to play music.
En
Bluetooth
indicator
Power
indicator
If your router supports multiple SSID’s (network names), connect the mobile device to the first access point (“SSID 1”,
etc.)
4
3
4
Network
indicator
7 En
HOME AUDIO NETWORK WITH MusicCast
■ Setting of the devices and playback
Create the following network (MusicCast Network) using the MusicCast CONTROLLER app.
WX-030
wireless router
y
If you want to install a MusicCast compatible device to a location that is out of range of the wireless router, connect another
MusicCast support device to the router with a network cable to extend the range (Extend mode).
Standard Mode
WX-030
Extend Mode
WX-030
Depending on where it is placed, the MusicCast compatible device may not be able to play back a high-resolution audio source.
In this case, connect the device directly to the router with a network cable.
8 En
LISTENING TO THE MUSIC
LISTENING TO THE INTERNET RADIO
You can listen to world-wide radio stations via Internet. After connecting the unit to the network, use the MusicCast
CONTROLLER app (☞ P.7) to play the radio.
y
You can use the advanced feature of vTuner (such as adding a new station to the list) by accessing the following website with
the web browser on your PC.
http://yradio.vtuner.com/
- Before registering the Internet radio station, play any Internet radio station with this unit.
- To create a necessary account for registration, you need the vTuner ID of this unit and your e-mail address. You can check the
vTuner ID on “Information” in the MusicCast CONTROLLER app. (☞ P.7)
Select (Settings), then “ Room name*/Information,” and check the vTuner ID.
*You can register any name for the Room name.
LISTENING TO THE SONGS IN THE COMPUTER AND NAS
This unit allows you to play back music files such as MP3, WMA, or FLAC (lossless audio data compression format) files
stored in the computer (server) connected to the network or NAS.
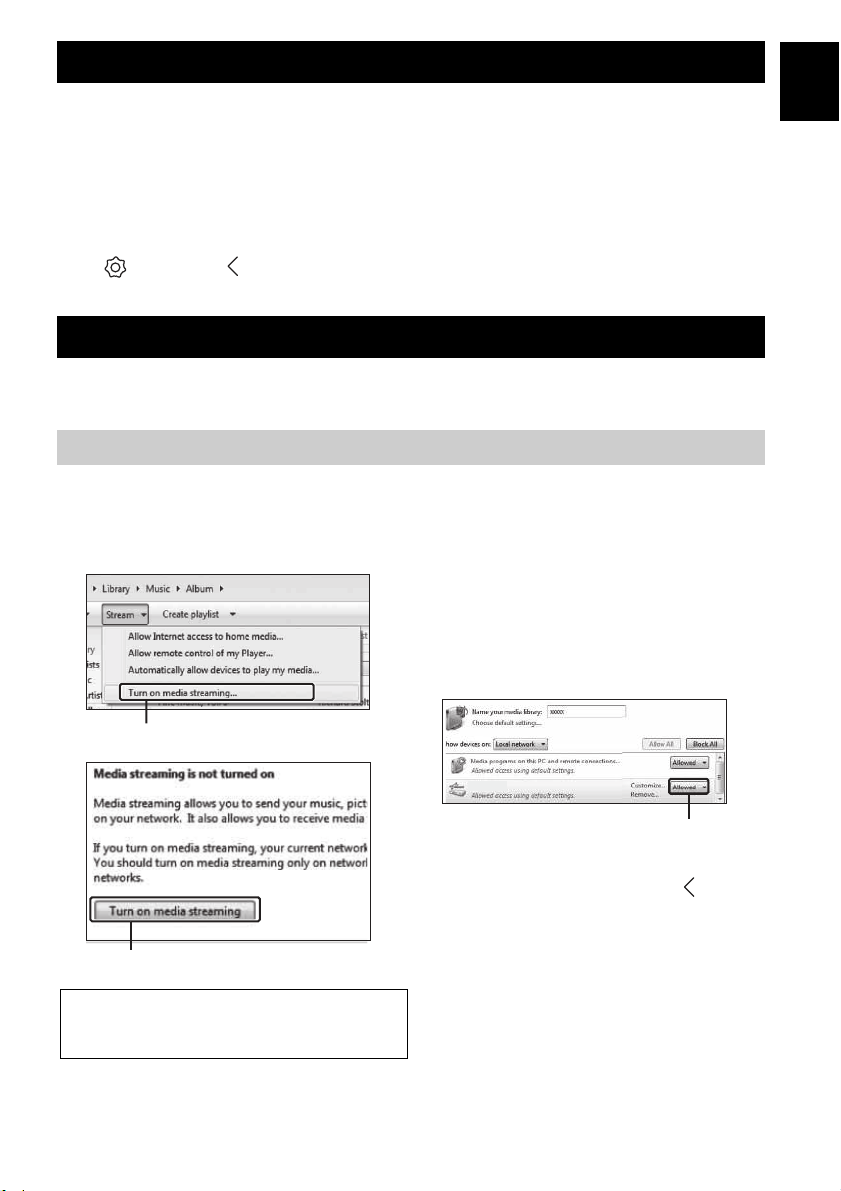
Setting the media sharing of music files
To play back music files in your computer with this unit, you need to make the media sharing setting between the unit and
computer (Windows Media Player 11 or later). The following instructions use Windows Media Player 12 in Windows 7 as an
example.
■ For Windows Media Player 12
A Start Windows Media Player 12 on your PC.
B Select “Stream”, then “Turn on media
streaming.”
The control panel window of your PC is shown.
C Click “Turn on media streaming.”
D Select “Allowed” from the drop-down list
next to “WX-030.”
En
Turn on media streaming...
2
Turn on media streaming
3
Only setting the media sharing is explained in this section.
After setting, operate Windows Media Player with your
PC as usual to play back.
WX-030
Allowed
4
y
The names on the list are device names (Room
names). You can set Room names on “ Room
name/Information” in the MusicCast
CONTROLLER app (
☞
P.7). If the Room name
is not set, the Room name is “WX-030 ***.” (***
is an arbitrary number.)
E Click “OK” to exit.
y
For details on media sharing settings, refer to Windows
Media Player help.
9 En
PLAYING BACK MUSIC WITH AirPlay
◆ For Windows Media Player 11
A Start the Windows Media Player 11 on your PC.
B Select “Library” then “Media Sharing.”
C Check the “Share my media to” box, select the “WX-030” icon, and click “Allow.”
y
The names on the list are device names (Room names). You can set Room names on “ Room name/Information” in the
MusicCast CONTROLLER app (
arbitrary number.)
D Click “OK” to exit.
◆ For a PC or a NAS with other DLNA server software installed
Refer to the owner’s manual of your device or software and configure the media sharing settings.
☞
P.7). If the Room name is not set, the Room name is “WX-030 ***.” (*** is an
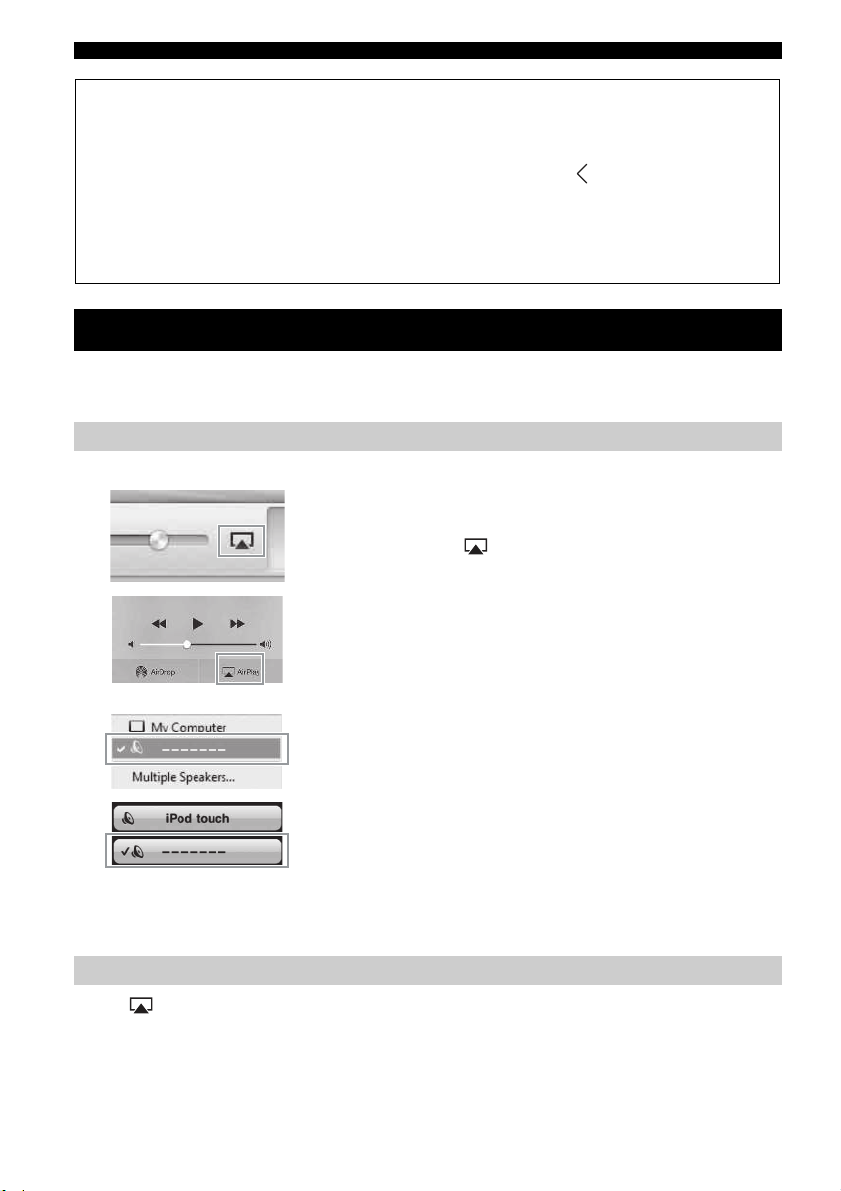
PLAYING BACK MUSIC WITH AirPlay
Playing abundant supported contents with high quality sound from AirPlay.
The AirPlay function allows you to play back iTunes/iPod music on the unit wirelessly via a network.
Playback of iTunes/iPod music contents
Follow the procedure below to play back iTunes/iPod music contents on the unit.
1
iTunes
(example)
iPod iOS7/iOS8
(example)
A Turn on the unit, and start iTunes on the PC
or display the playback screen on the iPod.
If the iTunes/iPod recognizes the unit, the AirPlay icon
( ) appears.
B On the iTunes/iPod, click (tap) the AirPlay
icon and select the unit (room name of the
unit) as the audio output device.
The source automatically switches to [AirPlay] and
playback starts (except in the eco standby mode).
C Select a song and start playback.
2
The unit’s room name is
displayed where “-------” is
indicated above.
iTunes
(example)
iPod
(example)
Clearing AirPlay
Tap/click on the iPod/iTunes screen and select a device other than WX-030 from the speaker list. Or, change the source to
other than AirPlay, using “MusicCast CONTROLLER.”
10 En
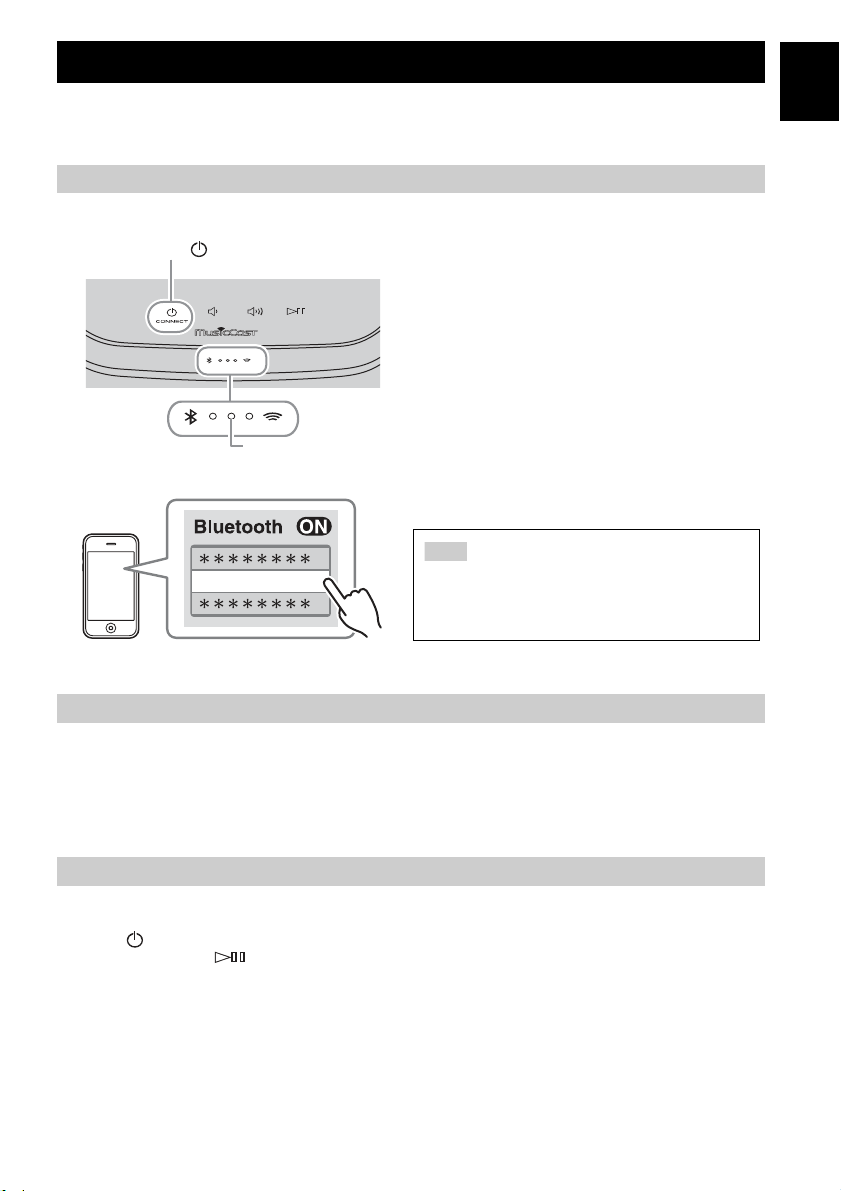
LISTENING TO MUSIC FROM YOUR Bluetooth DEVICE
This unit provides Bluetooth functionality. You can enjoy wireless music playback from your Bluetooth device
(smartphone, digital audio player, etc.). Please also refer to the owner’s manual of your Bluetooth device.
Pairing this unit with your Bluetooth device
■ Pairing (Registration)
A
(power)/CONNECT
1
Power indicator
1
4
-------
The unit’s Room name is displayed where
“-------” is indicated above.
Turn on the unit.
The power indicator lights.
B On your connecting device (mobile device),
Bluetooth to on.
set
C Perform Bluetooth pairing on the connecting
device.
For details, refer to the owner’s manual of the connecting
device.
D From the
connecting device, choose this unit (the
Room name of this unit ☞ P.9).
Bluetooth connection list of the
y
• Finish the operation from turning on the unit to completing
pairing in 5 minutes.
• If you are asked to enter a password, enter the numerals “0000.”
Note
Check that the pairing process on the connecting device
has been completed. If the pairing process fails, start over
from step B. For details, see the connecting device’s
owner's manual.
En
Connecting an already-paired device via Bluetooth
■ Connecting from the connecting device
A In the
Bluetooth settings of the connecting device, turn Bluetooth on.
B From the Bluetooth connection list of the connecting device, choose this unit (the
Room name of this unit ☞ P.9).
The Bluetooth connection will be established, and the Bluetooth indicator will light.
Disconnecting a Bluetooth connection
If any of the following operations are performed while a Bluetooth connection is established, the Bluetooth
connection will be disconnected.
• Tapping (power)/CONNECT to enter standby mode.
• Touching and holding for 3 seconds.
• Disconnecting the Bluetoot h connection from the connecting device.
11 En
OTHER FUNCTIONS AND INFORMATION
STEREO PAIR
You can use two WX-030 units to reproduce stereo sound by setting each speaker as the right
or left speaker. Set the left and right speakers separately by following the steps below.
Note
Left
speaker
WX-030
WX-030
Right
speaker
Setting/Playing back music
A Connect each WX-030 to the same network by using the dedicated app “MusicCast
CONTROLLER.”
If the WX-030 is linked to another MusicCast unit, first disconnect the link by using the dedicated app “MusicCast
CONTROLLER.”
B Tap (power)/CONNECT of each unit to set them to standby mode.
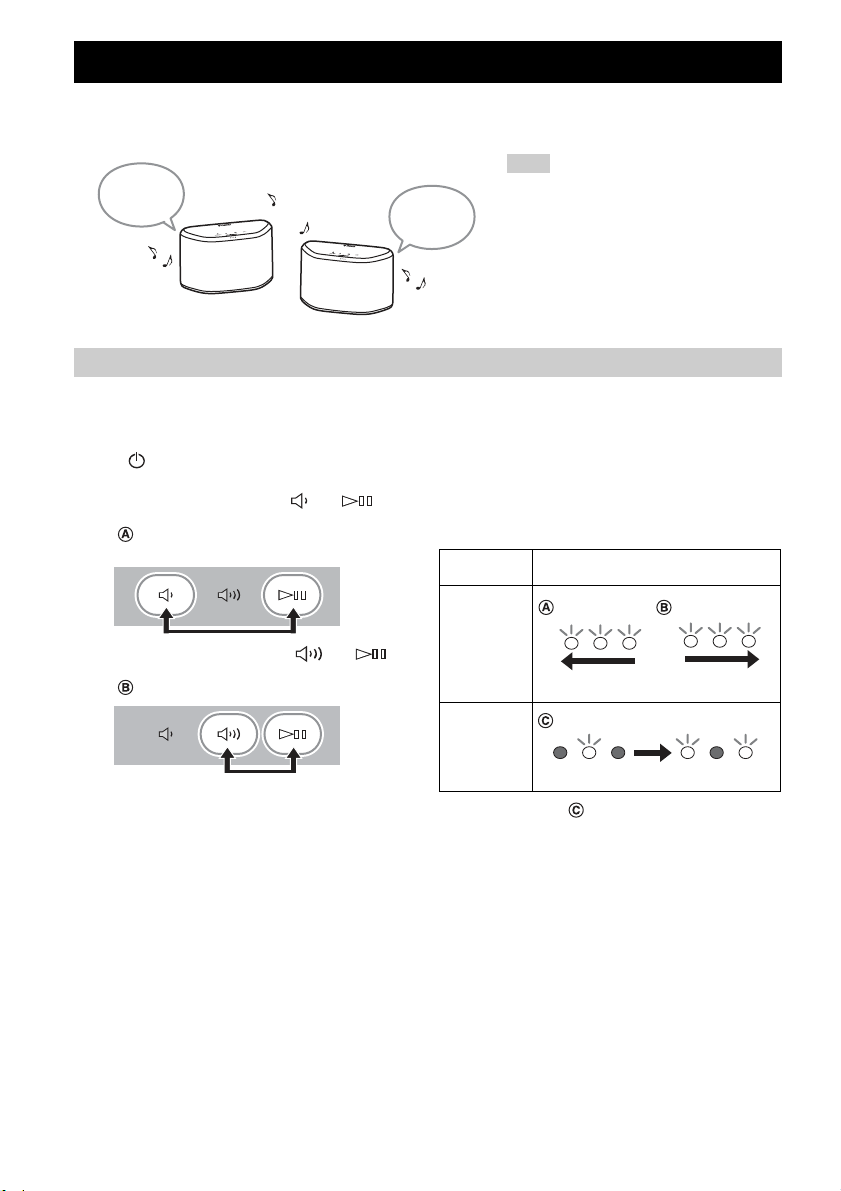
C Tap and hold the following together for 3 seconds to set the left/right speakers.
1 For setting the left speaker: and
Indicators light from right to left repeatedly (refer to
of the table), and the unit enters pairing standby
mode.
For setting the right speaker: and
2
Indicators light from left to right repeatedly (refer to
of the table), and the units start pairing.
Indicator display during the Stereo Pair
Start Pairing/
Checking the
Left and Right
Speaker
Pairing
Completed
• To use the Stereo Pair function, you need two
WX-030.
• Before setting the Stereo Pair, update the
dedicated app “MusicCast CONTROLLER”
and the firmware of both units to the latest
version (☞ P.7).
• Stereo Pair function does not support AirPlay.
• Stereo Pair is available only when the
Network Standby mode of the unit is enabled.
Stereo Pair
status
Indicator display
Left speaker
Right-to-Left Left-to-Right
Right speaker
Center to both sides
After paring is completed, the indicators light from the center to both sides (refer to of the table), and all indicators
return to the normal status.
12 En
STEREO PAIR
D Use the dedicated app “MusicCast CONTROLLER” to play back.
y
• You can check which speaker is the left or right speaker with the dedicated app “MusicCast CONTROLLER” (Indicators
light as
or of the table).
• In Stereo Pair mode, you can operate one speaker to simultaneously turn off both speakers or adjust the volume of both
speakers.
• If about five minutes passes while the unit cannot find the other speaker to connect to, the pairing standby mode will be
cancelled automatically.
• When in Stereo Pair mode, the option settings other than “Initialize the network setting.” (☞ P.14) cannot be set.
Note
The Stereo Pair setting remains even if the speakers enter standby mode or the power cable is unplugged and plugged again.
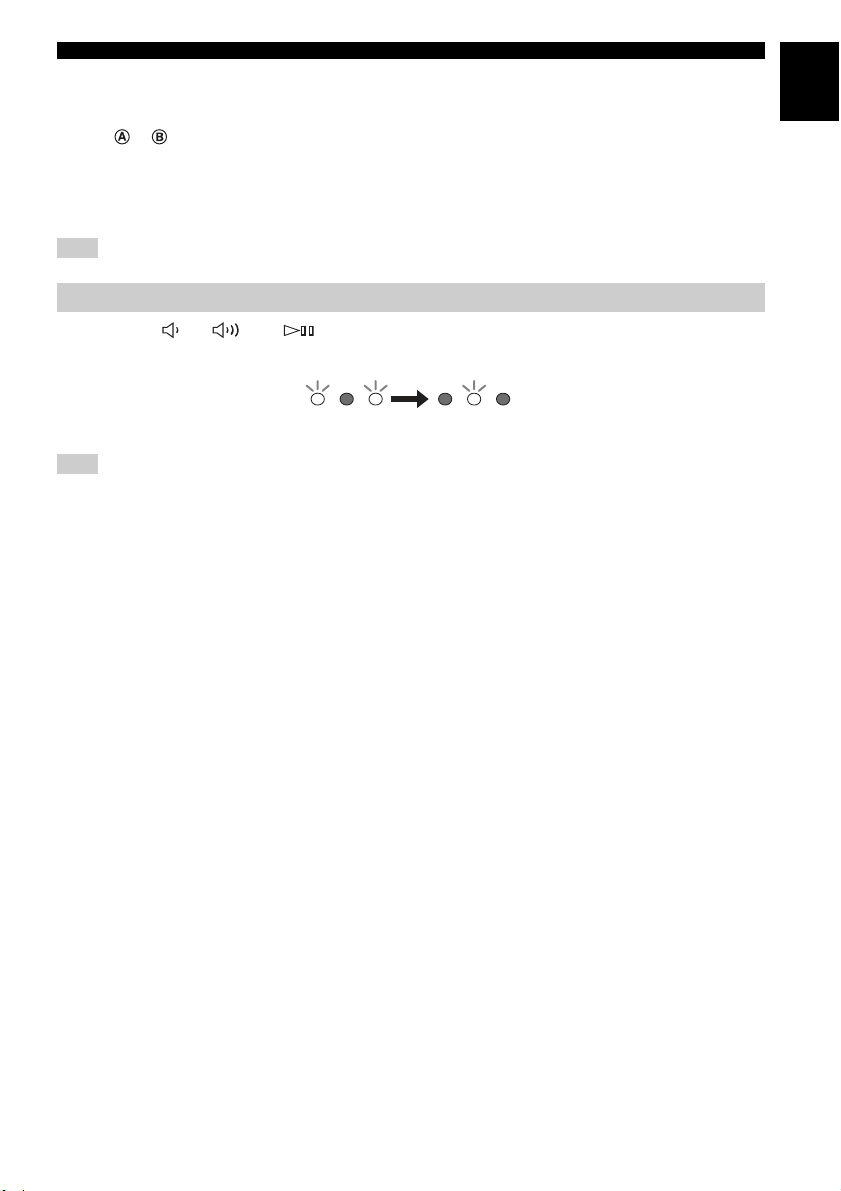
Canceling Stereo Pair
Tap and hold (or ) and on either speaker together for 3 seconds.
Indicators light from both sides to the center and Stereo Pair will be canceled.
Indicator display
Both sides to center
Note
• The Stereo Pair can be canceled only during standby mode.
• If you cancel Stereo Pair with one of the two speakers, the other one will be canceled automatically.
• If one of the two speakers is disconnected from the network when canceling the Stereo Pair, cancel Stereo Pair on each
speaker.
En
13 En
OTHER FUNCTIONS AND INFORMATION
UPDATING THE FIRMWARE
You can update the firmware only when the unit is connected to the Internet (☞ P.6).
Follow the instructions in the MusicCast CONTROLLER app to update.
The power indicator flashes quickly while the firmware is being updated.
Updating completed: The unit restarts.
Updating failed: All the indicators flash. Unplug the power cable from the wall outlet and plug it in after 30 seconds or more,
then update the firmware again.
Note
• Do not operate the unit or disconnect the power cable or network cables while updating.
• Do not turn off the unit (enter standby mode) while updating the firmware.
y
• The update of the firmware will be informed in the app.
• When Internet speed is not fast enough or the unit is connected to the wireless network via a wireless network adapter,
network update may not be possible depending on the condition of the wireless connection.
OPTION SETTINGS
To set the following option settings, set this unit to the standby mode, and touch and hold and for 5 seconds.
Items Operations
Initialize the network setting.
Enable/disable Network Standby
*2
mode.
Enable/disable Wi-Fi.
Enable/Disable
Bluetooth.
Touch and hold (power)/CONNECT for 3 seconds (☞ P.3).
A Touch and hold for 3 seconds. Network Standby will be disabled. To enable it, perform the same
operation.
Enable: The power indicator flashes twice and remains lit.
Disable: The power indicator flashes twice and turns off.
B Tap (power)/CONNECT once to turn on the unit.
The setting is complete.
Touch and hold for 3 seconds. Wi-Fi will be disabled. To enable it, perform the same operation.
Enable: The network indicator flashes twice and remains lit.
Disable: The network indicator flashes twice and turns off.
Touch and hold for 3 seconds. Bluetooth will be disabled. To enable it, perform the same operation.
Enable: The Bluetooth indicator flashes twice and remains lit.
Disable: The Bluetooth indicator flashes twice and turns off.
*1: If you do not tap any button during these 5 seconds, the unit will cancel the option setting mode.
*2: Network Standby is a standby mode which enables the unit to connect to the network by operating another device.
Eco Standby
y
You can only enable/disable Network Standby mode in the option settings as long as the unit is in Eco Standby mode.
If you disable Network Standby, the unit enters Eco Standby mode, which keeps the standby power consumption to a
minimum. However, you cannot start up the unit with the MusicCast CONTROLLER app during Eco Standby mode.
*1
14 En
ADDITIONAL INFORMATION
En
■ DLNA
What types of servers can I use to browse or
play back music files with DLNA?
Use a DLNA-compatible server, such as one of the following
devices.
PC compatible with Windows Media Player 12 or
Windows Media Player 11
To browse folders (directories) on your PC from this unit, you
need to change the media sharing setting of Windows Media
Player 12 or Windows Media Player 11 to make those folders
accessible from this unit. For details on Windows Media
Player, please ask Microsoft Corporation.
■ iTunes
Can I play back music in the iTunes library on
WX-030?
Use AirPlay (☞ P.10).
TRADEMARKS
MusicCast is a trademark or registered trademark of Yamaha
Corporation.
The Bluetooth® word mark and logos are registered
trademarks owned by Bluetooth SIG, Inc. and any use of such
marks by Yamaha Corporation is under license.
■ Internet radio
Can I add other Internet radio stations to the
list?
On the “vTuner Internet Radio” website, you can add Internet
radio stations which do not exist on the list manually.
To use this feature, access the following URL to get a new
account.
http://yradio.vtuner.com/
To create a necessary account for registration, you need the
vTuner ID of this unit and your e-mail address (☞ P.9).
Can I delete Internet radio stations that I do
not listen to from the list?
You cannot delete the vTuner list itself.
You can delete radio stations that you added by accessing the
“vTuner Internet Radio” website.
Android™ Google Play™
Android and Google Play are trademarks of Google Inc.
The Wi-Fi CERTIFIED Logo is a certification mark of the Wi-Fi
Alliance.
The Wi-Fi Protected Setup Identifier Mark is a mark of the Wi-Fi
Alliance.
Bluetooth protocol stack (Blue SDK)
Copyright 1999-2014 OpenSynergy GmbH
All rights reserved. All unpublished rights reserved.
DLNA™ and DLNA CERTIFIED™ are trademarks or registered
trademarks of Digital Living Network Alliance. All rights
reserved. Unauthorized use is strictly prohibited.
Windows™
Windows is a registered trademark of Microsoft Corporation in
the United States and other countries.
Internet Explorer, Windows Media Audio and Windows Media
Player are either registered trademarks or trademarks of Microsoft
Corporation in the United States and/or other countries.
Explanations regarding GPL
This product utilizes GPL/LGPL open-source software
in some sections. You have the right to obtain,
duplicate, modify, and redistribute this open-source
code only. For information on GPL/LGPL open source
software, how to obtain it, and the GPL/LGPL license,
refer to the Yamaha Corporation website
(http://download.yamaha.com/sourcecodes/musiccast/).
iTunes, AirPlay, iPhone, iPod, iPod nano, iPod touch, and Safari
are trademarks of Apple Inc., registered in the U.S. and other
countries.
App Store is a service mark of Apple Inc.
15 En
TROUBLESHOOTING
Refer to the table below when the unit does not function properly. If your problem is not listed below or if the
instruction below does not help, turn off the unit, disconnect the power cable, and contact the nearest
authorized Yamaha dealer or service center.
General
Problem Cause Solution
The unit is not turned on, or the
touch sensors do not react.
The unit is turned off as soon as
the unitis turned on.
The unit does not operate
properly.
This unit cannot be operated. The intern al microcomputer has frozen, due to an
No sound. No appropriate source has been selected. Select the music source that you want to play using
There is noise interference from
digital or high-frequency
equipment.
MusicCast
Your finger was touching the touch sensor on the
top while the unit was starting up (the unit is
adjusting the touch sensor sensitivity while the
unit is starting up for about 10 seconds after you
plugged the power cable into the wall outlet).
The power cable is not properly connected. Connect the power cable firmly.
external electric shock (such as lightning or
excessive static electricity) or to a drop in the
power supply voltage.
The volume is minimum or mute. Turn up the volume.
This unit is too close to the digital or highfrequency equipment.
While the unit is starting up, wait and avoid touching
the sensors until the unit has completely started up.
Tap (power)/CONNECT after the unit has
completely started up (☞ P.3).
Press the reset button on the bottom of the unit
(☞ P.3) using a fine-tipped stick and restart the unit.
(If the problem persists, unplug the power cable from
the wall outlet and plug it again after 30 seconds or
more.)
the MusicCast CONTROLLER app (☞ P.7).
Place this unit farther away from such equipment.
Problem Cause Solution
Cannot make the connection
settings on the MusicCast
CONTROLLER app.
Network
Problem Cause Solution
This unit is not detected with the
MusicCast CONTROLLER app on
your mobile device.
16 En
The mobile device is not connected to the
wireless router at your home.
The unit is turned off. Turn on the unit.
The unit and mobile devices are not in the same
network.
Your mobile device is connected to the secondary
SSID of a router supporting multi SSID.
Multiple routers are connected between your
connecting devices (double router).
Connect the mobile device to the wireless router and
start the MusicCast CONTROLLER app.
Disable the cellular data transmission.
Check the network connections and your router
settings, and then connect the unit and mobile device
to the same network.
When your mobile device is connected to the
secondary SSID, access to the device connecting to
the primary SSID or LAN is restricted (only Internet
access is available). Connect your mobile device to
the primary SSID.
Disconnect Internet temporarily, check the local
network, and connect the connecting device you wish
to use to the same router.
Problem Cause Solution
The network feature does not
function.
Playback stops (songs cannot be
played back continuously).
A PC is not detected with the
MusicCast CONTROLLER app on
your mobile device.
The Internet radio cannot be
played.
Update of the firmware via
network failed.
The unit cannot connect to the
Internet via a wireless router
(access point).
A wireless network is not
detected with MusicCast
CONTROLLER app on your
mobile device.
The iPod does not recognize the
unit when using AirPlay.
TROUBLESHOOTING
The network parameters (IP address) have not
been obtained properly.
The unit is starting up. (The unit becomes
operative about 10 seconds after plugging the
power cable into the wall outlet.)
There are unsupported files in the server. Remove the files (including image files or hidden
The media sharing setting is not correct. Configure the sharing setting and select the unit as a
Some security software installed on your PC is
blocking the access of the unit to your PC.
The unit and PC are not in the same network. Check the network connections and your router
Your PC is connected to the secondary SSID of a
router supporting multi SSID.
Multiple routers are connected between your
connecting devices (double router).
The selected Internet radio station is currently
not available.
The selected Internet radio station is currently
broadcasting silence.
Access to the network is r estricted by the firewall
settings of your connecting devices (such as the
router).
The network connection is unstable. Try updating again after a while.
The wireless router (access point) is turned off. Turn on the wireless router.
The unit and the wireless router (access point)
are too far apart.
There is an obstacle between the unit and the
wireless router (access point).
Microwave ovens or other wireless devices in
your neighborhood might disturb the wireless
communication.
Access to the network is r estricted by the firewall
settings of the wireless router (access point).
The unit is connected to a multiple SSID router. Access to the unit might be restricted by the network
Enable the DHCP server function on the router.
Use the network function after the unit has
completely started up.
files) which the unit does not support, from the folder
being played back.
device to which music contents are shared (☞ P.9).
Check the settings of security software installed on
your PC.
settings, and then connect the unit and the PC to the
same network.
When your PC is connected to the secondary SSID,
access to the device connecting to the primary SSID
or LAN is restricted (only Internet access is
available). Connect your PC to the primary SSID.
Disconnect Internet temporarily, check the local
network, and connect the connecting devices you
wish to use to the same router.
There may be a network problem at the radio station,
or the service may have been stopped. Try the station
later or select another station.
Some Internet radio stations broadcast silence at
certain of times of the day. Try the station later or
select another station.
Check the firewall settings of your connecting
devices. The Internet radio can be played only when it
passes through the port designated by each radio
station. The port number varies depending on the
radio station.
Place the unit and the wireless router (access point)
closer to each other (☞ P.6).
Move the unit and the wireless router (access point) in
a location where there are no obstacles between them
(☞ P.6).
Turn off these devices.
Check the firewall setting of the wireless router
(access point).
separation function on the router. Connect the iPod to
the SSID which can access the unit.
En
17 En

TROUBLESHOOTING
Bluetooth
Cannot make this unit
Problem Cause Solution
paired with the connecting
device.
Cannot establish a
Bluetooth connection.
No sound is produced or
the sound is interrupted
during playback.
The connecting device does not support
A2DP.
The passkey of the devices, such as a
Bluetooth adaptor, that you want to pair
with this unit is other than “0000.”
This unit and the connecting device are
too far apart.
There is a device (microwave oven,
wireless LAN, etc.) that outputs signals in
the 2.4 GHz frequency band nearby.
The unit is in standby mode.
Another Bluetooth device is connected. Terminate current Bluetooth connection, and
This unit is not registered on the connecting
device’s Bluetooth connection list.
The unit is in Eco Standby mode. Turn the unit on, then establish a Bluetooth
Another Bluetooth device is connected. Terminate current Bluetooth connection, then
The Bluetooth function of the device is
turned off.
The pairing information has been deleted. Perform pairing again (☞ P.11).
The Bluetooth connection of this unit with
the connecting device is disconnected.
This unit and the connecting device are
too far apart.
There is a device (microwave oven,
wireless LAN, etc.) that outputs signals in
the 2.4 GHz frequency band nearby.
The connecting device’s Bluetooth
function is off.
The connecting device is not set to send
Bluetooth audio signals to this unit.
The pairing setting of the connecting
device is not set to this unit.
The connecting device’s volume is set to
the minimum.
The connecting device is connected to
more than two Bluetooth devices and this
unit (WX-030) is not selected as a
playback device.
Perform pairing operations with a device
which supports A2DP.
Use a connecting device with a passkey
“0000.”
Move the connecting device closer to this
unit.
Move this unit away from the device that is
emitting radio-frequency signals.
Turn the unit on and perform pairing (☞ P.11).
perform pairing with the new device.
Perform pairing operations again (☞ P.11).
connection (☞ P.11).
establish a Bluetooth connection with that
device again.
Turn on the Bluetooth function of the device.
This unit can be paired with up to 20 devices.
(Depending on the conditions of use, the
maximum number of devices the unit can
connect decreases.). If pairing with the 21st
device is performed, the pairing information
with the oldest connection date will be
deleted.
Delete any pairing history of WX-030 on the
iPhone/iPad/iPod touch, then pair with the
WX-030 again (☞ P.11).
Perform Bluetooth connection operations
again (☞ P.11).
Move the connecting device closer to this
unit.
Move this unit away from the device that is
emitting radio-frequency signals.
Turn on the Bluetooth function of the
connecting device.
Check that the Bluetooth function of the
connecting device is set properly.
Set the pairing setting of the connecting
device to this unit.
Increase the volume level.
Select this unit as a playback device for the
connecting device.
18 En
SUPPORTED DEVICES/MEDIA AND FILE FORMATS
■ File format
This unit supports the following formats.
File
WAV
(PCM format only)
MP3 32/44.1/48 — ~320kbps 2 —
WMA 32/44.1/48 — ~320kbps 2 —
MPEG-4 AAC 32/44.1/48 — ~320kbps 2 —
FLAC 32/44.1/48/88.2/96/
ALAC 32/44.1/48/88.2/96 16/24 — 2 ✔
AIFF 32/44.1/48/88.2/96/
• To play back FLAC files, you need to install server software that supports sharing of FLAC files via DLNA on your PC or
use a NAS that supports FLAC files.
• Digital Rights Management (DRM) contents cannot be played back.
Sampling
frequency
(kHz)
32/44.1/48/88.2/96/
176.4/192
176.4/192
176.4/192
■ PC
A PC with the following software installed.
• Windows Media Player 11/Windows Media Player 12
■ NAS
NAS that is compatible with DLNA version 1.5.
■ AirPlay
AirPlay works with iPhone, iPad, and iPod touch with iOS 4.3.3 or later, Mac with OS X Mountain Lion or later, and Mac and
PC with iTunes 10.2.2 or later. (as of April 2015)
Quantization
bitrate (bit)
16/24 — 2 ✔
16/24 — 2 ✔
16/24 — 2 ✔
Bitrate
The number
of channels
Gapless playback
En
Bluetooth
Bluetooth is a technology for wireless communication
employing the 2.4 GHz frequency band, which can be used
without a license.
Handling
• The 2.4 GHz band used by Bluetooth compatible devices
• The speed of signal transfer and the distance at which
• Yamaha does not guarantee all wireless connections
Bluetooth communications
is a radio band shared by many types of equipment. While
Bluetooth compatible devices use a technology
minimizing the influence of other components using the
same radio band, such influence may reduce the speed or
distance of communications and in some cases interrupt
communications.
communications is possible differs according to the
distance between the communicating devices, the
presence of obstacles, radio wave conditions and type of
equipment.
between the sound bar and devices compatible with
Bluetooth function.
19 En

SPECIFICATIONS
■ PLAYER
Network
• Ethernet interface....................................100Base-TX/10Base-T
• Internet radio........................................vTuner service supported
• PC client function....DLNA Ver. 1.5 (DMR function) supported
• Supported file format
............................................ WAV, FLAC, AIFF (192KHz/24bit)
.................................................................. ALAC (96KHz/24bit)
......................................MP3, WMA, MPEG-4 AAC (48KHz/-)
• AirPlay............................................................AirPlay supported
Wi-Fi
• Wireless LAN Standards ............................... IEEE 802.11 b/g/n
• Radio frequency.............................................................. 2.4GHz
• Available security method
......................................WEP, WPA2-PSK (AES), Mixed Mode
■
Bluetooth
• Bluetooth version................................................... Ver.2.1+EDR
• Supported protocols.............................................A2DP, AVRCP
• Compatible CODEC
...........................................................................Sink:SBC, AAC
................................................................................. Source:SBC
• Operation mode ................................................... Sink or Source
• Wireless output................................................ Bluetooth Class 2
• Maximum communication distance
............................................. 10 m (33 ft) (without obstructions)
■ AUDIO
• Frequency response............................................. 60Hz to 20kHz
■ GENERAL
• Power Supply....................................AC 100 to 240 V 50/60 Hz
• Power consumption............................................................. 10 W
• Standby power consumption
Network Standby off/Bluetooth standby off: 0.5W
Network Standby on/Bluetooth standby off
.......................................................................... a) Wired: 1.9 W
..........................................................b) Wireless (Wi-Fi): 2.0 W
Network Standby on/Bluetooth standby on
........................................................................... a) Wired: 2.0 W
..........................................................b) Wireless (Wi-Fi): 2.1 W
• Weight ................................................................ 2.2 kg (4.9 lbs.)
• Dimensions (W × H × D).............243 mm × 157 mm × 113 mm
Specifications are subject to change without notice.
(9-5/8 inch × 6-1/8 inch × 4-1/2 inch)
20 En
ATTENTION : VEUILLEZ LIRE CE QUI SUIT AVANT D’UTILISER
L’APPAREIL.
1 Pour utiliser l’appareil au mieux de ses possibilités,
lisez attentivement ce mode d’emploi. Conservez-le
soigneusement pour référence.
2 Installez cet appareil dans un endroit frais, bien aéré,
sec et propre - à l’abri de la lumière du soleil, des
sources de chaleur, des vibrations, des poussières, de
l’humidité et du froid. Pour une aération correcte,
tenez compte des distances minimales suivantes.
Au-dessus : 5 cm
À l’arrière : 5 cm
Sur les côtés : 5 cm
3 Placez l’appareil loin des équipements, moteurs et
transformateurs électriques, pour éviter les
ronflements parasites.
4 N’exposez pas l’appareil à des variations brutales de
température, ne le placez pas dans un environnement très
humide (par exemple dans une pièce contenant un
humidificateur) car cela peut entraîner la condensation
d’humidité à l’intérieur de l’appareil qui elle-même peut
être responsable de décharge électrique, d’incendie, de
dommage à l’appareil ou de blessure corporelle.
5 Evitez d’installer l’appareil dans un endroit où des
objets peuvent tomber, ainsi que là où l’appareil
pourrait être exposé à des éclaboussures ou des gouttes
d’eau. Sur le dessus de l’appareil, ne placez pas :
– d’autres appareils qui peuvent endommager la
surface de l’appareil ou provoquer sa décoloration.
– des objets se consumant (par exemple, une bougie)
qui peuvent être responsables d’incendie, de
dommage à l’appareil ou de blessure corporelle.
– des récipients contenant des liquides qui peuvent
être à l’origine de décharge électrique ou de
dommage à l’appareil.
6 Ne couvrez pas l’appareil d’un journal, d’une nappe,
d’un rideau, etc. car cela empêcherait l’évacuation de la
chaleur. Toute augmentation de la température intérieure
de l’appareil peut être responsable d’incendie, de
dommage à l’appareil ou de blessure corporelle.
7 Ne branchez pas la fiche du câble d’alimentation de
l’appareil sur une prise secteur aussi longtemps que
tous les raccordements n’ont pas été effectués.
8 Ne pas faire fonctionner l’appareil à l’envers. Il
risquerait de chauffer et d’être endommagé.
9 N’exercez aucune force excessive sur les
commutateurs, les boutons et les cordons.
10 Pour débrancher la fiche du câble d’alimentation au
niveau de la prise secteur, saisissez la fiche et ne tirez
pas sur le cordon.
11 Ne nettoyez pas l’appareil au moyen d’un solvant
chimique, ce qui pourrait endommager la finition.
Utilisez un chiffon sec et propre.
12 N’alimentez l’appareil qu’à partir de la tension prescrite.
Alimenter l’appareil sous une tension plus élevée est
dangereux et peut être responsable d’incendie, de dommage à
l’appareil ou de blessure corporelle. Yamaha ne saurait être
tenue responsable des dommages résultant de l’alimentation
de l’appareil sous une tension autre que celle prescrite.
13 Pour empêcher tout dommage causé par les éclairs,
déconnectez la câble d’alimentation et toute antenne
extérieure de la prise murale pendant un orage.
14 Ne tentez pas de modifier ni de réparer l’appareil.
Consultez le service Yamaha compétent pour toute
réparation qui serait requise. Le coffret de l’appareil
ne doit jamais être ouvert, quelle que soit la raison.
15 Si vous envisagez de ne pas vous servir de l’appareil
pendant une longue période (par exemple, pendant
les vacances), débranchez la fiche du câble
d’alimentation au niveau de la prise secteur.
16 Lisez la section intitulée « GUIDE DE
DÉPANNAGE » où figurent une liste d’erreurs de
manipulation communes avant de conclure que
l’appareil présente une anomalie de fonctionnement.
17 Avant de déplacer cet appareil, appuyez sur pour
le mettre hors tension, puis débranchez la fiche du
câble d’alimentation au niveau de la prise secteur.
18 La condensation se forme lorsque la température
ambiante change brusquement. En ce cas, débranchez
la fiche du câble d’alimentation et laissez l’appareil
reposer.
19 La température de l’appareil peut augmenter en
raison d’une utilisation prolongée. Coupez
l’alimentation de cet appareil et laissez-le au repos
pour qu’il refroidisse.
20 Installez cet appareil à proximité de la prise secteur et
à un emplacement où la fiche du câble d’alimentation
est facilement accessible.
21 Utilisez le câble d’alimentation fourni avec cet
appareil. L’emploi d’un câble d’alimentation
différent de celui fourni peut provoquer un incendie
ou endommager l’appareil.
Cet appareil n’est pas déconnecté du secteur tant qu’il reste
branché à la prise de courant, même si l’appareil en soi est
éteint par la touche . Dans cet état, l’appareil consomme
une très faible quantité de courant.
AVERTISSEMENT
POUR RÉDUIRE LES RISQUES D’INCENDIE OU DE
DÉCHARGE ÉLECTRIQUE, N’EXPOSEZ PAS CET
APPAREIL À LA PLUIE OU À L’HUMIDITÉ.
• Les haut-parleurs de cet appareil utilisent des aimants.
Ne placez pas d’objets sensibles au magnétisme comme
un téléviseur à écran cathodique, une horloge, des cartes
de crédit, des disquettes etc. au-dessus ou près de cet
appareil.
• Il y a un risque possible de création d’interférences,
visibles sur les images en couleurs si cet appareil est
placé à côté d’un téléviseur à tube cathodique (tube de
Braun). Dans ce cas, éloigner l’unité du téléviseur.
Fr
i Fr
Information concernant la Collecte et
Remarque
y
☞
le Traitement des déchets
d’équipements électriques et
électroniques
Le symbole sur les produits, l’emballage
et/ou les documents joints signifie que les
produits électriques ou électroniques
usagés ne doivent pas être mélangés avec
les déchets domestiques habituels.
Pour un traitement, une récupération et un
recyclage appropriés des déchets
d’équipements électriques et
électroniques, veuillez les déposer aux
points de collecte prévus à cet effet,
conformément à la réglementation
nationale et aux Directives 2002/96/EC.
En vous débarrassant correctement des
déchets d’équipements électriques et
électroniques, vous contribuerez à la
sauvegarde de précieuses ressources et à
la prévention de potentiels effets négatifs
sur la santé humaine qui pourraient
advenir lors d’un traitement inapproprié
des déchets.
Pour plus d’informations à propos de la
collecte et du recyclage des déchets
d’équipements électriques et
électroniques, veuillez contacter votre
municipalité, votre service de traitement
des déchets ou le point de vente où vous
avez acheté les produits.
[Information sur le traitement dans
d’autres pays en dehors de l’Union
Européenne]
Ce symbole est seulement valables dans
l’Union Européenne. Si vous souhaitez
vous débarrasser de déchets d’équipements
électriques et électroniques, veuillez
contacter les autorités locales ou votre
fournisseur et demander la méthode de
traitement appropriée.
L’utilisateur n’est pas autorisé à rétro-concevoir,
décompiler, modifier, traduire ou désassembler le
logiciel utilisé dans cet appareil, aussi bien dans
ses parties que dans sa totalité. En ce qui concerne
les utilisateurs en entreprise, les employés de
l’entreprise proprement dite ainsi que ses
partenaires commerciaux doivent respecter les
interdictions figurant dans cette clause. Si les
termes de cette clause et de ce contrat ne peuvent
pas être respectés, l’utilisateur devra
immédiatement cesser d’utiliser le logiciel.
Quelques mots sur ce mode d’emploi
• L’« iPod », décrit dans ce manuel peut également faire
référence à un « iPhone » ou à un « iPad ».
• Les illustrations peuvent varier du véritable article
représenté.
•Symboles:
Signale les précautions à prendre concernant
l’utilisation de l’appareil et les limites de ses
fonctions.
Donne des explications supplémentaires
permettant une meilleure utilisation.
Indique la ou les pages de référence
correspondantes.
En cas de déformation des couleurs ou de bruit
lorsque cet appareil est utilisé près d’un
téléviseur, éloignez l’appareil du téléviseur.
Ne pas utiliser cet appareil à moins de 22 cm de
personnes ayant un stimulateur cardiaque ou un
défibrillateur.
Les ondes radio peuvent avoir une incidence sur
les équipements électroniques médicaux.
N’utilisez pas cet appareil à proximité
d’équipements médicaux ou à l’intérieur
d’institutions médicales.
ii Fr
WX-030
Écoute de la musique
diffusée sur les radios
Internet et du contenu de
diffusion en ligne.
FONCTIONNALITÉS
Lecture des fichiers
musicaux enregistrés sur
des ordinateurs et des
serveurs DLNA.
Lecture des fichiers musicaux
enregistrés sur un smartphone via un
réseau (à l’aide de l’application
MusicCast CONTROLLER, de serveurs
DLNA, de Spotify), via AirPlay (iPod) et
Bluetooth (dispositif Bluetooth). Il est
via
également possible d’utiliser le
smartphone comme télécommande.
Fr
Utilisation et lecture de musique sans fil à l’aide de périphériques iPhone/Android
• Installez l’application dédiée gratuite « MusicCast CONTROLLER » sur votre iPhone/iPad/iPod touch ou votre périphérique
Android pour configurer un réseau, effectuer divers réglages et sélectionner des morceaux en vue de les lire. Vous pouvez
également utiliser ces périphériques comme télécommande (☞ P.7).
• La fonction Wi-Fi intégrée permet de connecter l’appareil au routeur sans fil (point d’accès), sans aucun câble.
TM
Prise en charge de divers supports avec un son haute qualité
• Cet appareil permet d’écouter de la musique des serveurs DLNA (☞ P.15), de la radio Internet, d’AirPlay et des dispositifs
Bluetooth.
• Il permet d’obtenir une qualité sonore exceptionnelle grâce à un haut-parleur à deux voies, à un récupérateur passif intégré et
à un processeur de signaux numériques (DSP - Digital Signal Processor) développé par Yamaha.
• Cet appareil produit en outre des aigus améliorés et des médiums/graves denses, même lors de la lecture d’une source audio
compressée, comme un MP3 (Music Enhancer).
Prise en charge de services de diffusion en streaming
• Vous pouvez écouter la musique d’une variété de services de diffusion en streaming. (Les services de diffusion en streaming
pris en charge varient selon le pays ou la région d’utilisation.)
Fonction Paire Stéréo
• Vous pouvez profiter d’un son stéréo à l’aie de deux appareils WX-030.
1 Fr
INTRODUCTION
TABLE DES MATIÈRES
INTRODUCTION
ACCESSOIRES FOURNIS .................................... 2
NOM DES PIÈCES.................................................3
PRÉPARATION
INSTALLATION .....................................................4
Installation de l’appareil sur un mur ................... 4
MISE SOUS TENSION...........................................5
CONNEXION AU RÉSEAU.................................... 6
RÉSEAU AUDIO À DOMICILE GRÂCE À
MusicCast.............................................................. 7
Connexion au réseau via l’application
MusicCast CONTROLLER ............................ 7
ÉCOUTE DE MUSIQUE
ÉCOUTE DE LA RADIO INTERNET ..................... 9
ÉCOUTE DES MORCEAUX ENREGISTRÉS
SUR L’ORDINATEUR ET LE PÉRIPHÉRIQUE
NAS ........................................................................ 9
Réglage du partage des fichiers multimédias
pour les fichiers musicaux .............................9
LECTURE DE MUSIQUE VIA AirPlay ................10
Lecture de contenus musicaux d’iTunes ou
d’un iPod ......................................................10
Supprimer AirPlay ............................................ 10
ÉCOUTE DE MUSIQUE À PARTIR DE VOTRE
DISPOSITIF
Jumelage de cet appareil à votre dispositif
Bluetoot h...................................................... 11
Connexion d’un dispositif déjà jumelé via
Bluetoot h...................................................... 11
Désactivation d’une connexion
AUTRES FONCTIONS ET
INFORMATIONS
PAIRE STÉRÉO.................................................. 12
Réglage/Lecture de la musique ....................... 12
Annulation de la Paire Stéréo .......................... 13
MISE À JOUR DU MICROPROGRAMME........... 14
RÉGLAGE DES OPTIONS .................................. 14
INFORMATIONS COMPLÉMENTAIRES ............ 15
MARQUES DE COMMERCE............................... 15
GUIDE DE DÉPANNAGE .................................... 16
Généralités....................................................... 16
MusicCast ........................................................ 16
Réseau............................................................. 16
Bluetoot h .......................................................... 18
APPAREILS/SUPPORTS ET FORMATS DE
FICHIER PRIS EN CHARGE ............................... 19
CARACTÉRISTIQUES TECHNIQUES ................20
ACCESSOIRES FOURNIS
Câble d’alimentation Coussinet Protège-câbles
Bluetooth........................................11
Bluetooth ........ 11
Coussinet
y
Pour éviter que les vibrations provoquées par le
son n’atteignent le mur, installez les coussinets
aux quatre coins du panneau arrière.
2 Fr
Dessous
Protège-câbles
y
Vous pouvez dissimuler les câbles en installant le protègecâbles. Installez comme décrit ci-dessus.
■ Panneau supérieur
NOM DES PIÈCES
1
23
4
576
A (alimentation)/CONNECT (☞ P.5)
B
Appuyez pour augmenter le volume.
C
Appuyez pour réduire le volume.
D
Lecture/pause.
E Voyant
y
A
Remarque
Si le volume atteint la valeur maximale/minimale, ces trois voyants (
Bluetooth
, B, C, D sont des touches tactiles. Elles réagissent lorsque vous appuyez dessus avec votre doigt.
■ Panneau arrière
S’allume lors de la connexion Bluetooth.
F Voyant d’alimentation
S’allume lorsque l’appareil est sous tension.
G Voyant réseau
S’allume lorsque l’appareil est connecté au réseau filaire
ou sans fil (Wi-Fi).
H Bouton de réinitialisation (☞ P.16)
Appuyez sur ce bouton pour redémarrer l’appareil.
E, F, G) clignotent deux fois en même temps.
Dessous
Fr
8
1
2
34
A Trou pour support de montage mural
Utilisez ce trou pour installer l’appareil sur un support de
montage mural (☞ P.5).
B Orifices/cache des orifices (☞ P.4)
Soulevez le cache des orifices pour faire apparaître les
orifices de montage mural.
C Connecteur d’alimentation (☞ P.5)
2
D Prise réseau (☞ P.6)
Utilisez un câble LAN (vendu dans le commerce) pour
raccorder l’appareil au réseau.
y
Si vous utilisez l’appareil en Wi-Fi, aucun câble LAN n’est
nécessaire.
3 Fr
PRÉPARATION
INSTALLATION
Branchez le câble d’alimentation sur la prise murale après avoir raccordé tous les autres câbles.
Remarque
Si vous placez l’appareil trop près d’un téléviseur CRT, les couleurs de l’image risquent de se dégrader ou un grésillement
risque de se produire. Dans ce cas, placez l’appareil à au moins 20 cm du téléviseur. Il ne s’agit pas d’un dysfonctionnement du
téléviseur LCD ou plasma.
Installez cet appareil à un emplacement
Utilisateurs de dispositifs
Bluetooth
10 m au maximum
Installation de l’appareil sur un mur
Vous pouvez monter l’appareil sur un mur en procédant comme suit.
12
Mur/support
mural
147 mm
stable, en vérifiant les points suivants :
• Ne posez pas cet appareil sur de l’acier
ou d’autres plaques métalliques.
• Ne recouvrez pas cet appareil d’un
tissu, etc.
Utilisateurs de dispositifs Bluetooth
• Installez cet appareil dans la même
pièce que le dispositif avec lequel les
signaux doivent être échangés
(smartphone, lecteur audio portable
compatibles avec le profil Bluetooth
A2DP, etc.), à une distance directe de
10 m maximum.
• Assurez-vous qu’aucun obstacle ne se
trouve entre cet appareil et le dispositif
Bluetooth.
6mm
Minimum
20 mm
A Installez les vis (disponibles dans le commerce) sur un mur ou un support mural solide, comme indiqué dans l’illustration.
Utilisez des vis autotaraudeuses de 3,5 à 4 mm de diamètre.
B Accrochez l’appareil en insérant ses orifices dans les vis protubérantes.
Remarque
• Vérifiez que la tige de la vis s’insère bien dans la section étroite de l’orifice, faute de quoi l’enceinte risque de tomber.
• Ne montez pas l’appareil sur du contre-plaqué fin ou sur un mur composé d’un matériau non résistant. Les vis pourraient en
effet ressortir de la surface et l’appareil pourrait tomber, ce qui risquerait d’endommager l’appareil ou d’entraîner des
blessures corporelles.
• Ne fixez pas l’appareil au mur avec des clous, des fixations adhésives ou tout autre matériel précaire. Avec le temps et les
vibrations, l’appareil risque de tomber.
• Pour éviter de trébucher sur des câbles lâches (notamment sur le câble d’alimentation) et prévenir tout accident, fixez les
câbles le long du mur.
• Lorsque vous utilisez les supports pour monter l’appareil au mur ou au plafond, utilisez un câble de sécurité (non fourni)
entre l’appareil et le support afin d’éviter que l’appareil ne tombe.
• Si vous n’êtes pas certain de savoir installer l’appareil de façon sécurisée, faites appel à un installateur professionnel ou à un
entrepreneur en bâtiment.
• Pour éviter que les vibrations provoquées par le son n’atteignent le mur, installez les coussinets aux quatre coins du panneau
arrière (☞ P.2).
WX-030
2,2 kg
y
Vous pouvez installer l’appareil
verticalement ou horizontalement.
4 Fr
MISE SOUS TENSION
■ Pour installer l’appareil sur un support de montage mural
Vous pouvez installer l’appareil sur un mur à l’aide d’un support de montage mural vendu dans le commerce. Utilisez pour cela
le trou pour support de montage mural à l’arrière de l’appareil.
y
Utilisez un support de montage mural compatible avec des vis à gros filetage unifié, similaires à celles utilisées pour le trépied
d’un appareil photo.
Panneau arrière
26 mm
WX-030
2,2 kg
Remarque
• Si vous utilisez un support de montage mural, il doit être compatible avec cet appareil.
• Utilisez un support de montage mural capable de supporter une charge de plus de 4,5 kg.
• Suivez les instructions du mode d’emploi du support de montage mural pour installer correctement l’appareil.
• Si vous installez l’appareil de façon incorrecte ou utilisez un support de montage mural non compatible, l’appareil risque de
tomber et vous pourriez vous blesser.
• Vérifiez la sécurité une fois le montage terminé. Yamaha décline toute responsabilité en cas d’accidents dus à une position
d’installation incorrecte ou à des méthodes d’installation non conformes, ou en cas de défectuosité du support de montage
mural. Si vous pensez que l’installation n’est pas sécurisée, faites appel à un installateur professionnel.
121,5 mm
156,5 mm
243 mm
WX-030
Minimum
5mm
Spécification de la vis de montage :
UNC 1/4-20
Diamètre 6,35 mm
Filetages 20 (par 1")
Spécifications du trou de vis
Diamètre 6,35 mm
Profondeur 9 mm
MISE SOUS TENSION
Fr
Panneau arrière
Panneau supérieur
Appuyez sur la touche
(alimentation)/CONNECT.
Voyant d’alimentation
Câble d’alimentation
A Branchez le câble d’alimentation à la
prise murale et appuyez sur la touche
(alimentation)/CONNECT.
L’appareil se met sous tension et le voyant
d’alimentation s’allume. Si vous appuyez à
nouveau sur cette touche, l’appareil se met hors
tension (mode de veille) et le voyant
d’alimentation s’éteint.
y Veille automatique
Le mode Veille automatique permet de mettre
automatiquement l’appareil en mode veille si la
fonction de lecture n’est pas activée ou si aucune
opération n’est effectuée pendant 20 minutes.
Vous pouvez activer/désactiver ce mode avec
l’application MusicCast CONTROLLER (
Remarque
• Lorsque vous branchez le câble d’alimentation à la prise
murale, le démarrage interne de l’appareil prend
10 secondes. Les fonctions de lecture de l’appareil ne sont
pas disponibles pendant ce laps de temps.
• N’appuyez pas sur les touches tactiles (
(alimentation)/CONNECT/ / / ) pendant
environ 10 secondes après le démarrage de l’appareil, car
l’appareil règle leur sensibilité. Si vous appuyez sur les
touches tactiles pendant ce laps de temps, celles-ci
risquent de ne pas fonctionner correctement après le
démarrage de l’appareil.
☞
P.7).
5 Fr
 Loading...