

Page 1

YAM A HA [R f fl i ai l im á
Digital voice sampling keyboard/ Digitale Instrumentalstimmen-Tastatur
Clavier numérique à échantiibnnage Teclado digital para memorias de sonidos
Owners Manual
Bedienungsanleitung
Mode demploi
Manual de instrucciones
DIGITAL VOICE SAMPLER
Page 2

Introduction
Einleitung
Introduction
Introducción
Thank you for purchasing a YAMAHA
Digital Voice Sampier VSS-100.
The VSS-100 is a revolutionary new type
of keyboard resulting from a combination
YAMAHA’S rich experience as a manufac
turer of quality musical instruments and
advanced digitai technoiogy.
Using the VSS-IOO’s epoch-making new
Voice Sampler function, you’ll have hours
of fun playing its wide-range, 49-key
keyboard using all kinds of sounds from
the world around you as a sound source.
Or, you can use the VSS-100’s built-in
FM tone generation system which offers
21 different instrumental voices and twelve
distinctive rhythm patterns.
The VSS-100 also features the Auto Bass
Chord function whereby you can activate
automatic bass, chord and rhythm accom
paniment with a single finger, as well as a
“Fingered” mode which allows you to play
the chords yourself once you’ve learned
how to form them.
This manual contains important instruc
tions on how to properly handle and play
your new VSS-100. In order to be able to
use its features to the fullest and obtain
maximum playing satisfaction, we suggest
you follow the steps in this manual with
the VSS-100 in front of you as you famil
iarize yourself with it.
Herzlichen Glückwunsch zum Kauf des
YAMAHA Digital Voice Sampling Keyboards
VSS-100. Das VSS-100 ist ein revolutionärer
neuer Keyboard-Typ, der aus einer einer
Kombination der umfangreichen Erfahrung
von Yamaha als Hersteller von Qualitäts
musikinstrumenten und fortschrittlicher
digitaler Technologie entstanden ist. Durch
Einsatz der epochemachenden neuen VoiceSampler-Funktion können Sie stundenlang
dieses Breitbereich-Keyboard mit 49 Tasten
genieBen und züle Arten von Klängen aus
der Umgebung als Tonquelle verwenden.
Oder Sie können dcis eingebaute Tonerzeu
gungssystem des VSS-100 benutzen, das 21
verschiedene Instrumentenstimmen und
zwölf charakteristische Rhythmusmuster
bietet.
Das VSS-100 bietet außerdem Auto-BaBakkord-Funktion, mit der Sie automatische
BaBbegleitung in Single-Finger- oder
Fingered-Betriebsart dazu verwenden
können, die Akkorde selber zu spielen, wenn
Sie sie erst einmal gelernt haben. Diese
Bedienungsanleitung enhält wichtige Anwei
sungen zur richtigen Behandlung und Ver
wendung Ihres neuen VSS-100. Um die
Merkmale voll ausnutzen zu können und
maximale Spielfreude zu erhalten, raten
wir an, die Schritte dieser Bedienungsanlei
tung mit dem VSS-100 vor Ihnen gleich
auszuprobieren, während Sie sich mit dem
Instrument vertraut machen.
Nous vous remercions de votre achat
du Clavier numérique à échantillonnage
YAMAHA VSS-100, un type de clavier
révolutionnaire qui est le fruit de la riche
expérience de Yamaha comme fabricant
d’instruments de musique de qualité,
alliée aux plus récents progrès des tech
nologies numériques.
A l’aide de l’exceptionnelle fonction
d’échantillonnage du VSS-100, vous
passerez de longues heures à jouer sur
le large clavier à 49 touches et vous
utiliserez toutes sortes de sons qui vous
entourent comme sources sonores.
Vous pourrez également faire appel au
système incorporé de génération FM du
VSS-100 qui vous offre 21 voix instru
mentales différentes et 12 types de
rythmes distincts.
Le VSS-100 dispose aussi de la fonction
Accord basse automatique qui permet
l’actualisation d’un accompagnement
automatique à basse, accord et rythme
avec un seul doigt, ainsi qu’en mode à
“plusieurs doigts”, de manière à jouer
vous-même les accords après avoir appris
à les composer.
Ce manuel renferme des explications im
portantes sur l’utilisation et la façon de
jouer du VSS-100. Pour être à même de
tirer parti au maximum de ses possibilités
et d’en obtenir pleine satisfaction, nous
vous invitons à lire les étapes succes
sives de cette brochure en plaçant le
VSS-100 devant vous, afin de vous famili
ariser progressivement à son utilisation.
Gracias por haber adquirido el Teclado
digital para memorias de sonidos VSS-100
YAMAHA. El VSS-100 es un nuevo y revolu
cionario tipo de teclado, producto de la
combinación de la rica experiencia de
YAMAHA como fabricante de instrumentos
musicales de calidad y avanzada tecnología
digital.
Con la nueva y revolucionaria función de
muestren vocal del VSS-100, podrá disfrutar
durante muchas horas con su teclado de
amplia gama de 49 notas, empleando como
friente sonora cualquiera de los sonidos que
se produzcan a su alrededor. O, podrá
utilizar el sistema generador de tonos de FM
incorporado del VSS-100, que ofrece 21
voces instrumentales diferentes y 12 patrones
rítmicos distinitos.
El VSS-100 se caracteriza también por su
función de bajos y acordes automáticos,
con la que podrá activar un acompañamiento
automático de bajos, acordes, y ritmos con
un solo dedo. También dispone de un modo
de “todos los dedos” que le permitirá tocar
los acordes que desee después de haber
aprendido a formarlos.
Este manual contiene instrucciones im
portantes sobre cómo manejar y tocar
adecuadamente su nuevo VSS-100. A fin de
lograr emplear al máximo sus funciones y
obtener la mayor satisfacción tocando
música, le sugerimos que siga los pasos de
este manual con el VSS-100 frente a usted
para familiarizarse con él.
Page 3

Before playing
Vor dem Spielen
Avant la mise en service
Antes de comenzar a tocar
Inserting batteries
Remove the battery compartment cover
on the bottom of the instrument and insert
six 1.5V SUM-2. “C” size, R-14 or equivalent
alkaline batteries (sold separately), making
sure that the polarities are placed as
directed inside the compartment. Replace
the cover, ensuring that it is locked
securely in place.
Optional power adaptors
Household current: YAMAHA power ad
aptor PA-1 is available for household
current. No other adaptor is recommended.
So when you purchase a power adaptor
please be sure that it is model PA-1.
Car battery: Car Battery Adaptor CA-1
allows you to plug your VSS-100 into a car
cigarette lighter socket.
Hnlegen der Batterien
Nehmen Sie den Batteriefachdeckel am
Boden des Instrumentes ab, und legen Sie
sechs 1,5-V-Monozellen des Typs SUM-2,
Größe “C”, R-14 oder entsprechende
Alkali-Batterien (nicht mitgeliefert) ein,
wobei Sie die im Inneren des Batteriefachs
angegebene Polarität beachten. Setzen Sie
dann den Deckel wieder auf, und achten
Sie darauf daß er richtig einrastet.
Ala Sonderzubehör erhältliche Adapter
Für Netzstrom: Das Netzteil Yamaha PA-1
steht für Netzstrombetrieb zur Verfügung.
Von der Verwendung anderer Netzteile wird
abgeraten.
Autobatterie: Der Autobatterie-Adapter
CA-1 erlaubt es Ihnen, das VSS-100 in
den Zigarettenanzünder Ihres Wagens
einzustecken.
Mise en place des piles
Déposez le couvercle du logement des
piles sur le fond de l’instrument et
installez-y six piles SUM-2 de 1,5 V et de
taille “C” (R-14) ou six piles alcalines
équivalentes (vendues séparément).
Veillez à respecter les polarités des piles,
comme illustré dans le logement. Replacez
le couvercle et assurez-vous qu’il est bien
remis en place.
Adaptateurs de courant en option
Secteur L’adaptateur secteur YAMAHA
PA-1 est disponible pour une alimentation
sur le secteur. Comme aucun autre
adaptateur ne convient, veuillez vous
assurer, à l’achat, qu’il s’agit bien du
modèle PA-1 de Yamaha.
Batterie de voiture: L’adaptateur pour
batterie de voiture CA-1 permet d’alimenter
le VSS-100 via la douille de l’allumecigare d’un véhicule automobile.
Inserción de las pilas
Extraiga la tapa del compartimiento de las
pilas de la parte inferior del instrumento e
inserte seis pilas de 1,5V SUM-2, tamaño
“C”, R-14, o pilas alcalinas equivalentes
(no suministradas), asegurándose de que los
polos de las mismas queden como se indica
en el interior del compartimiento. Coloque
la tapa y compruebe que quede bien encajada
en su lugar.
Adaptadores de alimentación
opcionales
Tensión de la red: Adaptador de alimen
tación PA-1 YAMAHA.
No se recomienda ningún otro adaptador.
Batería de automóvil: El adaptador de
baterá de automóvil CA-1 YAMAHA le
permitirá tocar su VSS-100 conectado a la
toma del encendedor de cigarrillos de su
automóvil.
Contents
Before Playing ..............................................1
Nomenclature
Starting to Play
VOICE SAMPLER
ORCHESTRA
ACCOMPANIMENT ....................................14
■ RHYTHM Section ....................................14
■Auto Bass Chord Section
External Jacks and Optional Items
Taking care of your PortaSound
...............................................
..............................................
.........................................
.............................................
.........................
............
..................
13
15
17
19
Inhalt
Vor dem Spielen
2
Bezeichnung der Bedienungselemente
4
Spielbeginn
5
VOICE SAMPLER.............................................5
ORCHESTER ..................................................13
BEGLEITUNG.................................................14
■ RHYTHMUS-TEIL .....................................14
■Auto-Baßakkord-Bereich
Anshlußbuchsen ud Sonderzubehör
Pflege Ihres VSS-100
.................................................
.........................................................
.............................
......................................
..............
................
Table des matières
1
Avant la mise en service
2
Nomenclature des organes
4
Mise en service
ECHANTILLONNAGE
ORCHESTRE .............................................13
ACCOMPAGNEMENT
15
17
19
■Section RYTHME .....................................14
■Section Accord basse automatique
Prises extérieures et équipements
en option..................................................17
Entretien du PortaSound
..............................
...........................
.............................................
..................................
...............................
.........
............................
14
15
19
Indice
1
Antes de comenzar a tocar
2
Nomenclatura
4
Comenzando a tocar
5
MUESTREADOR VOCAL
ORQUESTA.....................................................13
ACCOMPANAMIENTO
■Sección de ritmos (RHITHM)
■Sección de bajos y acordes automáticos
(AUTO BASS CHORD)
Tomas externas e ítems opcionales..................17
Cuidado de su VSS-100
.....................................................
.................................
..........................................
..............................
.................................
..............................
.................................
......................
1
2
4
5
14
14
15
19
Page 4

Nomenclature
Bezeichnung der Bedienungselemente
Nomenclature des organes
Nomenclatura
VOICE SAMPLER
PLAY BACK
PITCH * ^
-KEYBOARD
E
SVNa«0 START
С0П
STMÏT/STtJP
1=©3
MASTER VOLUfc«
YAMAHA RnrtìSnnKd]
VSS-100
LEVEL
С DEF G A BCvD EF)
ilii
PtAVBAOt VOUWE
ACCOMPANIMENT
ACCOMPANIMENT
AUTO BASS CHORD
™get«d
SIMGl£ FINGER
OFF
POPS REGGAE
synchho STAFU'
STAPfT
STOP
C#=l .
FILL IN
DISCO BIG BAND
16 BEAT SLOW ROCK
ROCK N RCU. MARCH POLKA
COlWTRY WALTZ
co>=i II
I—=1
sossAævA
ORCHESTRA
JAZZ ORGAN SAXOPHONE KOTO
PtPE ORGAN OBOE аЕСТИС GUiTAR
CLARl^T accordion VIBES
WOLIN MLISIC BO К COSMIC
elute piano popsvnth
TRUMPET electric PIANO EUWSVNTH
HORN HARPSICHORD SLAPSYl^fTH
Ф
¡DIGITAL voies SAMRLGR
Page 5

® POWER switch
® MASTER VOLUME control
VOICE SAMPLER
® SAMPLING LEVEL control
® PITCH control
® SAMPLING selector (FULLorPART)
® SYNCHRO START
@ START/STOP
® PLAYBACK selector
(KEYBOARD or BASS)
® PLAYBACK VOLUME control
ACCOMPANIMENT
® TEMPO control
® SYNCHRO START
® START
® STOP
® FILL IN
® AUTO BASS CHORD selector
{FINGERED. SINGLE FINGER. OFF)
® ACCOMPANIMENT VOLUME control
® RHYTHM selectors
ORCHESTRA
(S> VIBRATO
® ORCHESTRA VOLUME control
(§) SUSTAIN
(ID ORCHESTRA voice selectors
@ Microphone
® DEMONSTRATION START/STOP
® Ein-Schalter (POWER)
® Hauptlautstärkeregler
(MASTER VOLUME)
VOICE SAMPLER
® Sampling-Pegelregler
(SAMPLING LEVEL)
® Tonhöhenregler (PITCH)
® Wahlschalter fur ganzes/teilweises
Sampling (SAMPLING FULL oder
PART)
® SYNCHRO START-Schalter
@ Start/Stopp-Schaltcr (START/STOP)
® Wiedergabeschalter für Tastatur oder
Baß (PLAYBACK KEYBOARD oder
BASS)
® Wiedergabelautstärkeregler
(PLAYBACK VOLUME)
BEGLEITUNG
@ Temporegler (TEMPO)
® SYNCHRO START-Schalter
® START-Schalter
® STOP-Schalter
@ Einfüg-Schalter (FILL IN)
® Baßakkord-Automatik-Schalter
(AUTO BASS CHORD)
(FINGERED, SINGLE FINGER, OFF)
® Begleitlautstärkeregler
(ACCOMPANIMENT VOLUME)
® Rhythmuswähler (RHYTHM)
® Interrupteur d’alimentation (POWER)
@ Réglage de volume principal
(MASTER VOLUME)
Echantillonnage
® Réglage de niveau d’échantillonnage
(SAMPLING LEVEL)
® Réglage de hauteur du son (PITCH)
® Sélecteur d’échantillonnage
(SAMPLING) < FULL ou PART>
® Mise en marche synchronisée
(SYNCHRO START)
® Marche/arrêt (START/STOP)
® Sélecteur de lecture (PLAYBACK)
< KEYBOARD ou BASS>
® Réglage de volume de lecture
(PLAYBACK VOLUME)
Accompagnement
® Réglage de tempo (TEMPO)
® Mise en marche synchronisée
(SYNCHRO START)
® Marche (START)
® Arrêt (STOP)
® Remplissage (FULL IN)
® Sélecteur d’accord basse automatique
(AUTO BASS CHORD)
(FINGERED, SINGLE FINGER, OFF)
® Réglage de volume d’accompagne
ment (ACCOMPANIMENT VOLUME)
® Sélecteurs de rythme (RHYTHM)
® Interruptor de alimentación (POWER)
® Control general de volumen
(MASTER VOLUME)
MUESTREADOR VOCAL
® Control de nivel de muestren
(SAMPLING LEVEL)
® Control de diapasón (PITCH)
® Selector de muestren (completo o partes)
(SAMPUNG < FULL o PART>)
® Inicio sincronizado (SYNCHRO START)
® Inicio/paro (START/STOP)
® Selector de reproducción (teclado o bajos)
(PLAYBACK < KEYBOARD o BASS >)
® Control de volumen de reproducción
(PLAYBACK VOLUME)
ACOMPAÑAMIENTO
® Control de tempo (TEMPO)
® Inicio sincronizado (SYNCHRO START)
® Inicio (START)
® Paro (STOP)
® ReUeno (RLL IN)
® Selector de bajos y acordes automáticos
(todos los dedos, un solo dedo,
desactivación) (AUTO BASS CHORD
< FINGERED, SINGLE FINGER,
OFF>)
@ Control de volumen del acompañamiento
(ACCOMPANIMENT VOLUME)
® Selectores de ritmos (RHYTM)
@ Lower Keybord section
ORCHESTER
® VIBRATO-Regler
® Orchesterlautstärke-Regler
(ORCHESTRA VOLUME)
® Hallregler (SUSTAIN)
® Orchester-Stimmenwahlschalter
(ORCHESTRA)
® Mikrofon
(® Vorführschalter
(DEMONSTRATION START/STOP)
(|i Unterer Tastaturbereich
Orchestre
® Vibrato (VIBRATO)
® Réglage de volume orchestre
(ORCHESTRA VOLUME)
® Soutien (SUSTAIN)
@ Sélecteurs de voix orchestre
(ORCHESTRA)
(g) Microphone
(g) Marche/arrêt de démonstration
(DEMONSTRATION START/STOP)
(g Section clavier inférieur
ORQUESTA
® Vibrato (VIBRATO)
® Control de volumen de orquesta
ORCHESTRA VOLUME)
@) Sostenido (SUSTAIN)
@ Selectores de voces de orquesta
(ORCHESTRA)
@ Micrófono
(g Inicio/paro de demostración
(DEMONSTRARON START/STOP)
@ Sección del teclado inferior
Page 6

starting to Play
Spielbeginn
Mise en service
Comenzando a tocar
POWER
-ON
II
KAASTER VOLUME
DEMOMSTRATtON
START/STC»’
1. Turning the Power ON
Turn the POWER switch © ON and the
power on light will light up. If the power on
light should begin to get dim while
operating the instrument on batteries,
this is a signal that the batteries are
getting weak; please replace all of them
as soon as possible.
2. Adjusting the MASTER VOLUME Control Use the MASTER VOLUME control ® to adjust the overall volume.
• Listening to the VSS-100’s
Demonstration Performance
You can listen to a demonstration per
formance of any or all of the VSS-100’s
21 voices and twelve rhythm patterns
by simply pressing the DEMONSTRA
TION START/STOP button (g) ; pressing
it a second time will stop the automatic
performance.
You can set the tempo of the demonstra
tion performance by using the TEMPO
control buttons ® as well as indicate
which voice or rhythm you would like
to hear by pressing the appropriate
ORCH ESTRA voice selector @ and
RHYTHM selector ® buttons after press
ing the DEMONSTRATION START/STOP
button.
1. Einschalten des Geräts
Schieben Sie den Ein-Schalter (POWER) ©
auf Ein (ON), und das Ein-Lämpchen
(POWER ON) leuchtet auf. Wenn das
Lämpchen beim Betrieb des Instrumentes
schwächer leuchtet, sind die Batterien
schwach geworden und müssen so schneit
wie möglich ersetzt werden.
2. Hnstellen des HaupHautstäihereglers
Stellen Sie den Hauptlautstärkeregler
(MASTER VOLUME) @ auf die gewünschte
Gesamtlautstärke ein.
• Hören der Vorföhmummer des
VSS-100
Sie können eine automatische Vorführung
hören, bei der eine oder alle der 21 Instru
mentenstimmen und Rhythmusmuster
eingesetzt werden, indem Sie einfach den
Vorführschalter (DEMONSTRATION
START/STOP) (g) drücken; durch ein
weiteres Drücken wird die automatische
Vorführung gestoppt.
Sie können das Tempo,der Vorführung mit
dem Temporegler ® einstellen und
eingeben, welche Instrumentenstimme oder
welchen Rhythmus Sie hören wollen, indem
Sie den richtigen Stimmenwahlschalter
(g) und Rhythmuswahlschalter ®
drücken, nachdem Sie den Vorfuhrschalter
gedrückt haben.
1. Allumer (ON) l’interrupteur POWER.
Allumer l’interrupteur POWER ©, ce qui
fait s’allumer le témoin d’alimentation.
Si le témoin semble terne pendant une
alimentation de l’appareil sur piles, c’est
le signe que les piles sont presque
équisées; dans ce cas, les remplacer le
plus tôt possible.
2. Ajuster le réglage MASTER VOLUME. Se servir du réglage MASTER VOLUME @
pour ajuster le niveau général du volume.
• Ecoute de la performance de démons
tration du VSS-100
Il est possible d’écouter une des perfor
mances de démonstration d’une ou de
toutes les 21 voix du VSS-100 et des
douze types de rythmes par simple
poussée sur la touche START/STOP @ ;
une seconde poussée sur cette touche
arrêtera la performance automatique.
Il est possible d’ajuster le tempo de la
performance de démonstration à l’aide
des réglages TEMPO ®; on peut aussi
indiquer quelle voix ou rythme on désire
entendre en appuyant sur le sélecteur
de voix ORCHESTRA @ et le sélecteur
RHYTHM ® appropriés après avoir
appuyé sur la touche DEMONSTRATION
START/STOP.
1. Conexión de la alimentación
Ponga el interruptor POWER © en ON, y
se iluminará la lámpara indicadora de ali
mentación. Si, al emplear el instrumento
con pilas, la lámpara se üumina débilmente,
signiñcará que las pilas están a punto de
agotarse; reempláceleis todas lo antes
posible por otras nuevas.
2. Ajuste del control MASTER VOUIME
Emplee el control MASTER VOLUME @
para ajustar el nivel global.
• Escucha de la ejecución de
demostración del VSS-100
Simplemente presionando el botón DE
MONSTRATION START/STOP (g ,
podrá escuchar la ejecución de demostra
ción de cualquiera o de las 21 voces del
VSS-100 y 12 patrones rítmicos; si lo
presiona por segunda vez, la ejecución
automática cesará.
Usted podrá ajustar el tempo de la ejecución
de demostración con los botones del con
trol TEMPO ® , así como indicar la voz
o el ritmo que desee escuchar presionando
los botones selectores de voces ORCHESTRA
® y los selectores RHYTHM ® apro
piados después de haber presionado el
botón DEMONSTRATION START/STOP.
Page 7

VOICE SAMPLER
VOICE SAMPLER
ECHANTILLONNAGE
MUESTREADOR VOCAL
VOICE
SAMPLER
What the Voice Sampler is
(1) The VOICE SAMPLER lets you take a
‘sample’ of just about any sound you
wish with VSS-100’s microphone, in
cluding everything from natural instru
ments to people’s or animals’ voices
and the sounds of motor vehicles,
etc., and then use that sample as a
sound source for a monophonic key
board performance.
(2) Besides using the accessory micro
phone for ‘sampling’, you can also take
your sound source from a radio, record
or tape player, or other similar device
by using the unit’s LINE IN jack.
(3) ‘Sampling’ time is a maximum of 8
seconds.
(4) You can combine your ‘sampled’ sound
with other orchestra voices and enjoy
playing them together on your keyboard.
(5) You can also use your ‘sampled’ sound
as the bass voice during Auto Bass
Chord automatic accompaniment. You
can even use it as the bass voice
during the demonstration performance
initiated with the DEMONSTRATION
START/STOP switch ®.
(6) You are not limited to only one
‘sampled’ sound over the whole 49-key
range of the VSS-100’s keyboard; you
can divide the keyboard into four parts
and then assign a different ‘sampled’
sound to each one of them!
Was ist ein Voice Sampler?
(1) Der Voice Sampler erlaubt es Ihnen, ein
“Muster” (englisch; sample) von praktisch
jedem in Ihrer Umgebung vorhandenen
Klang mit dem Mikrofon des VSS-100
aubunehmen. Jedes Geräusch ist
dabei eingeschlossen, von natürlichen
Instrumenten zu Tier- oder Menschen
stimmen oder Motorgeräuschen usw.,
und Sie können dieses Muster dann als
Klangquelle für monophones KeyboardSpiel einsetzen.
(2) Neben dem als Zubehör mitgelieferten
Mikrofon zum “Sampling” von Stimmen,
können Sie auch Ihr Radio, ihr Tonband
gerät oder andere Geräte mittels der
LINE IN-Eingangsbuchse einsetzen.
(3) Die “Sampling”-Zeit beträgt maximal
8 Sekunden.
(4) Sie können Ihren mit “Sampling” einge
fangenen Klang mit anderen Orchester
stimmen zusammen einsetzen und das
gemeinsame Spiel auf Ihrem Keyboard
genießen.
(5) Sie können Ihren mit “Sampling”
eingefangenen Klang als Baßstimme
beim Spiel mit Automatik-BaßakkordBegleitung einsetzen. Sie können ihn
sogar als Baßstimme beim Vorführungs
spiel verwenden, das mit dem Vorfuhrschalter (DEMONSTRATION
START/STOP) ® eingeleitet wird,
(6) Sie sind nicht bloß auf eine “Sampling”-
Stimme auf der 46-Tasten-Tastatur des
VSS-100 beschränkt: Sie können die
Tastatur in vier Teile unterteilen und
jedem eine andere Stimme zuordnen!
En quoi consiste réchantilionnage?
(1) L’échantillonneur vous permet de
prendre un “échantillon” de pratique
ment n’importe quel son par le micro
phone du VSS-100, que ce soit le son
d’instruments de musique, de voix
humaines, de cris d’animaux ou de
bruits de véhicules, par exemple. Cet
échantillonnage peut ensuite être utilisé
comme source sonore pour une inter
prétation monophonique du clavier.
(2) Outre l’emploi du microphone, fourni
comme accessoire, pour l’échantillon
nage, rien n’empêche de capter des
sons d’une radio, d’un magnétophone,
d’une platine-disque ou d’un autre
appareil similaire, en se servant de la
prise LINE IN de l’appareil.
(3) La durée d’un “échantillonnage” est de
8 secondes au maximum.
(4) Il est possible de combiner des sons
“échantillonnés” avec d’autres voix
orchestre et de les jouer ensemble
sur le clavier.
(5) Il est également possible de se servir
d’un son “échantilloné” comme voix
basse pendant un accompagnement à
accord basse automatique. On pourra
même l’utiliser comme voix basse
pendant l’interprétation d’une démon
stration, lancée par la touche DEMONS
TRATION START/STOP @.
(6) On ne sera pas limité à un seul son
“échantillonné” sur toute la plage des
49 touches du clavier du VSS-1CX); en
effet, on pourra diviser le clavier en
quatre parties et assigner alors un son
“échantillonné” différent à chacune
de celles-ci.
1 ¿ Qué es el muestreador vocal?
(1) El muestreador vocal (VOICE
SAMPLER) le permitirá tomar con el
micrófono del VSS-100 una “muestra”
de cualquier sonido que desee, desde
instrumentos naturales a voces de
personas o animales, sonidos de auto
móviles, etc., y después emplear tal
muestra con fuente sonora para una
ejecución monofònica con el teclado.
(2) Además de emplear el micrófono ac
cesorio para “muestrear”, podrá tomar
también su fuente sonora de una radio,
un giradiscos, un magnetófono, o
cualquier otro dispositivo similar
empleando la toma LINE IN de la unidad.
(3) El tiempo de “muestreo” es de 8 segundos
como máximo,
(4) Usted podrá combinar su sonido
“maestreado” con otras voces de orquesta
y disfrutar tocándolas juntas en su
teclado.
(5) También podrá utilizar el sonido
“muestreado” como voz de bajo durante
el acompañamiento de bajos y acordes
automáticos. Además podrá emplear
este sonido como la voz de bajo durante
la ejecución de demostración iniciada
con el botón DEMONSTRATION
START/STOP ® .
(6) Usted no estará limitado solamente al
sonido “muestreado” en toda la gama de
las 49 teclas del teclado del VSS-100:
¡podrá dividir el teclado en cuatro partes
y después asignar un sonido“muestreado”
diferente a cada una de ellas!
Page 8

Two Methods of Sampling: Microphone
and Line-in
(A)Sampling by Microphone
Use the accessory microphone @ when
you want to sample the sound of some
thing in your immediate surroundings;
it can be the voice of a person or
animal, like the twittering of a bird, the
sound of you tapping against a pane of
glass, or even the sound of a car or
truck, whatever you like.
• How to Take out the Microphone
To take the microphone out of its com
partment, press lightly on the spot
labelled “PUSH” as shown in the Illust
ration below and lift it out.
When replacing the microphone after
use, first neatly place the microphone
cord into the compartment and then
place the microphone inside.
Zwei Methoden des Sampling:
Mikrofon und Line-in
(A) Sampling mit Mikrofon
Verwenden Sie das als Zubehör mitgelieferte
Mikrofon (||) wenn Sie einen Klang aus
Ihrer Umgebung einfangen wollen; es kann
die Stimme einer Person oder eines Tieres
sein, wie das Zwitschern von Vögeln, Ihr
Antippen von Gläsern oder Scheiben, oder
sogar das Geräusch von Autos oder
Lastwagen, ganz wie Sie wollen.
• Entnehmen des Mikrofons
Um das Mikrofon aus seinem Fach
zu nehmen, drücken Sie leicht die mit
“PUSH” markierte Stelle und heben Sie
es heraus, wie in der Abbildung unten
dargestellt. Wenn Sie das Mikrofon nach
Gebrauch wieder einlegen, plazieren Sie
zuerst das Mikrofonkabel sauber im
Fach und legen dann das Mikrofon
darauf.
Deux méthodes d'échantillonnage:
Microphone et Entrée de ligne
(A) Enchantillonnage par microphone
Se servir du microphone ® , fourni comme
accessoire, quand on désire capter le
son d’une source proche de soi; ce peut
être la voix d’une personne ou le cri d’un
animal, le gazouillis d’un oiseau, un doigt
tapotant sur une fenêtre ou encore le
bruit d’une voiture ou d’un camion, peu
importe.
• Sortie du microphone
Pour sortir le microphone de son loge
ment, appuyer légèrement sur l’endroit
marqué “PUSH” et soulever comme
indiqué sur l’illustration ci-après.
Pour remettre le microphone en place
après utilisation, glisser tout d’abord
convenablement le cordon du micro
phone dans le logement; puis, placer
le microphone dans l’ouverture.
Dos métodos de muestreo:
Micrófono p entrada de línea
(A) Muestreo con el micrófono
Emplee el micrófono incorporado ®
cuando desee maestrear el sonido de algo
que esté en su inmediato alrededor; podrá
ser la voz de una persona o un animal,
como el trino de un pájaro, el sonido del
golpeteo de los dedos contra un cristal, o
incluso el ruido de un coche o un camión,
es decir el sonido que más le guste.
• Extracción del micrófono
Para extraer el micrófono de su com
partimiento, presione ligeramente la
parte con la inscripción “PUSH” y
levántelo como se muestra en la ilus
tración siguiente.
Para guardar el micrófono después de
haberlo empleado, primeramente intro
duzca con cuidado el cordón del mismo
en el compartimiento y después inserte
el micrófono en su abertura.
(B) Sampling by the Line-In Method
Use this method when you want to
“Sample” the sound of a person’s voice
from your television set or radio, or the
sound of music from a record or tape
player, etc.
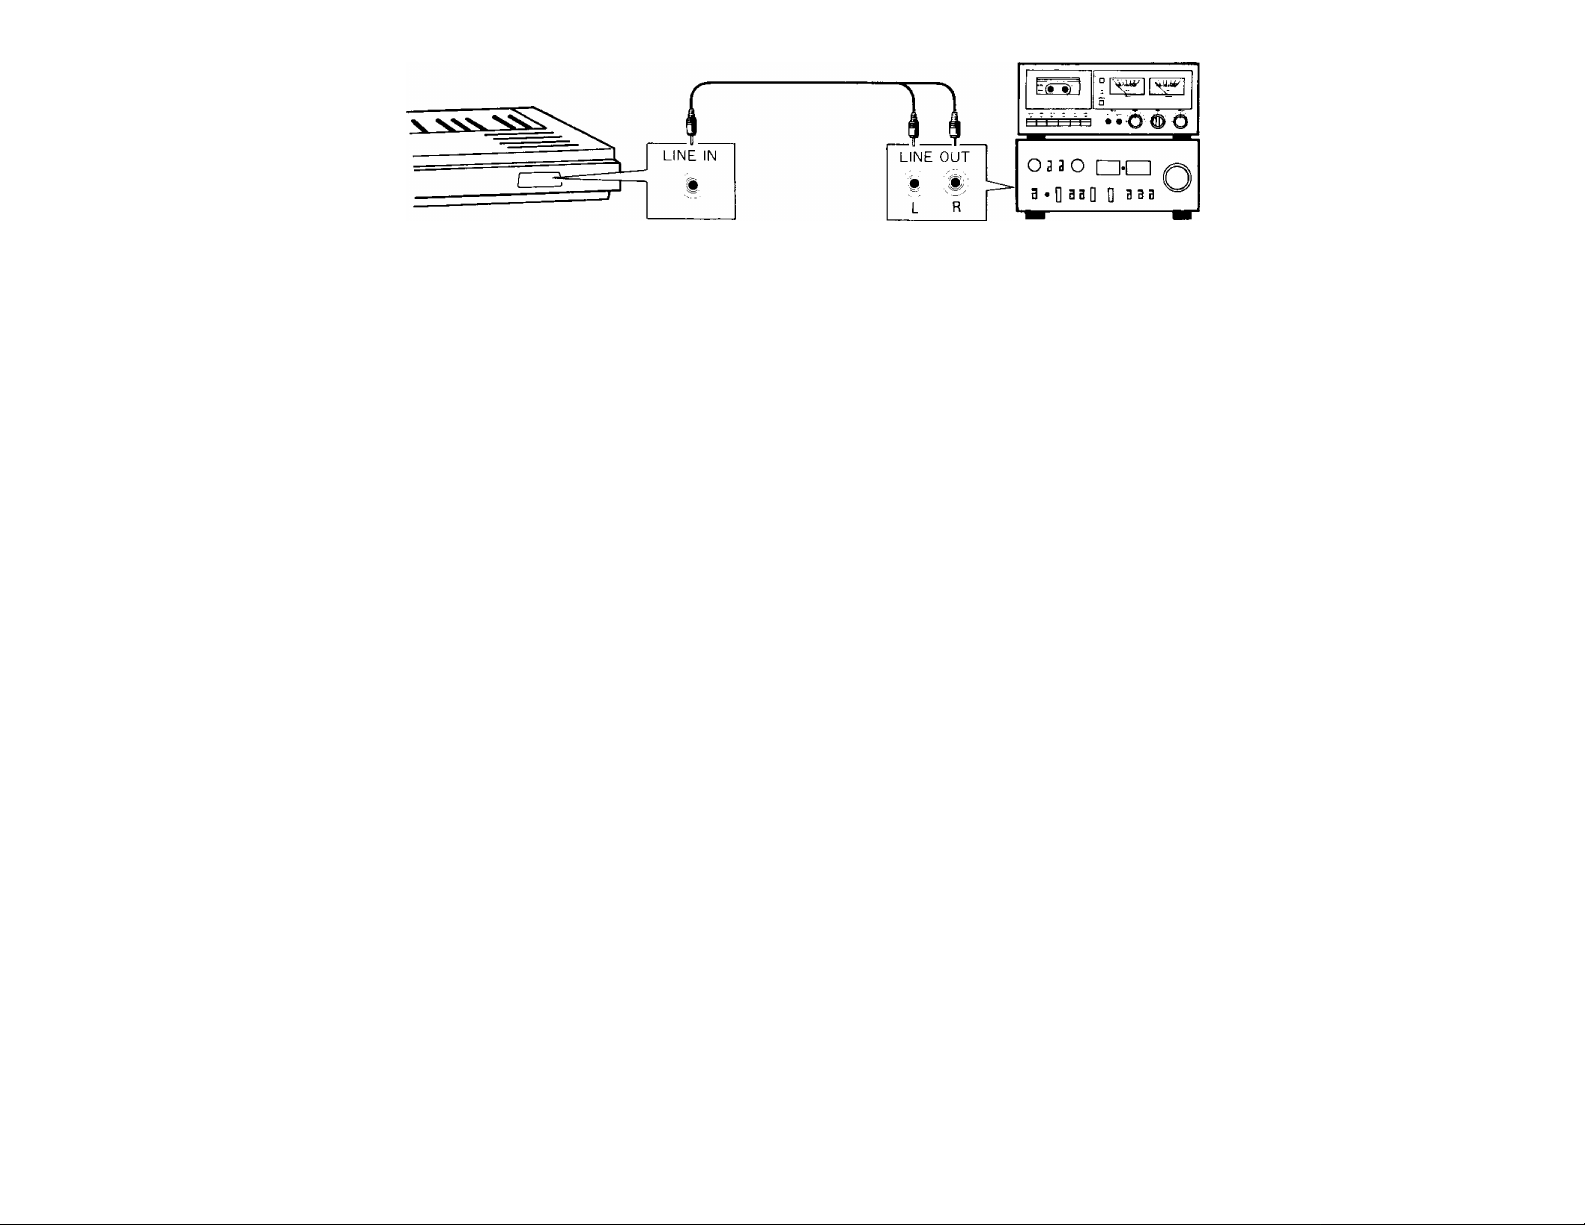
• How to Hook Up the VS&100 to
Source Unit
How to connect the VSS-100 for Direct
Sampling. By plugging a connector cable
(optional) into the LINE IN jack on the
VSS-100 and the LINE OUT jack on the
external source (record or tape player,
etc.), you can sample directly without
outside noises. If your external source
unit has left and right channel output
jacks, use the optional PC-2 connector
cable.
(B) Sampling mit Line*ln-Verfahren
Verwenden Sie diese Methode, wenn Sie den
Ton eines Fernsehers, Radios, Platten
spielers, Tonbandgeräts o.ä. einfangen wollen.
• Anschluß des V$$-100 an die
Tonquelle
Wenn Sie das Anschlußkabel (Sonder
zubehör) in die Buchse LINE IN am
VSS-100 und die Buchse UNE OUT an der
Tonquelle (Plattenspieler, Tonbandgerät
usw.) einstecken, können Sie direkt ohne
Eindringen von Umgebungsgeräuschen die
Tonsignale überspielen. Wenn die Tonquel
le getrennte Ausgangsbuchsen für einen
linken und rechten Kanal hat, verwenden
Sie das Anschlußkabel PC-2 (Sonder
zubehör).
(B) Echantillonnage par l’entrée de ligne
Se servir de cette méthode quand on
désire “échantillonner” le son de la voix
d’une personne, parlant à la radio ou à la
télévision, ou le son d’une bande, d’un
disque, etc.
• Branchement du VSS-100 sur l’unité
de source
En branchant le câble de connexion
(en option) sur la prise LINE IN du
VSS-100 et sur la prise LINE OUT de la
source externe (magnétophone, platinedisque, etc.), il est possible de procéder
à un échantillonnage direct, sans para
sites extérieurs. Si l’unité de source
externe est munie de prises de sortie
pour canaux gauche et droit, on fera
appel au câble de connexion PC-2, dis
ponible en option.
(B) Muestreo con el método de entrada
de linea
Emplee este método cuando desee “maes
trear” el sonido de una persona hablando
por la televisión o la radio, o el sonido de
la mùsica de un disco, un casete, etc.
• Conexión del VSS-100 a una unidad
fuente de sonido
Conexión del VSS-100 para muestreo
directo
Enchufando un cable conector (opcional)
a la toma UNE IN del VSS-100 y a
la toma LINE OUT de una fuente
externa (giradiscos, magnetófono, etc.),
podrá muestrear directamente sin
ruidos exteriores. Si su unidad fuente de
sonido externa tiene tomas de salida de
canal izquierdo y derecho, emplee el
cable conector opcional PC-2.
Page 9
Now that everything is set up, you’re
ready to go ahead and begin ‘sannpling.’
First, try sampling your own voice with
the microphone as described below in
Step 1. Then, use the Line In method to
sample a sound from the pre-recorded
accessory tape, as described below in
Step 2. Finally, you can also try out
sampling in parts as explained in the
“Advanced Sampling”section.
Wenn alle Verbindungen hergestellt sind,
können Sie mit dem “Sampling” beginnen.
Fangen Sie zuerst Ihre eigene Stimme mit
dem Mikrofon ein, wie unten in Schritt 1
beschrieben. Dann verwenden Sie die LineIn-Methode, um einen Ton vom mitgelieferten
Beispielband einzufangen, wie unten in
Schritt 2 beschrieben. Schließlich können
Sie andere Parts einfangen, wie im Abschnitt
“Fortgeschrittenes Sampling” beschrieben.
Une fois tes préparatifs terminés, on
pourra procéder à l’échantillonnage.
Commencer par sa propre voix avec le
microphone, comme expliqué ci-après à
la démarche 1. Utiliser ensuite la méthode
par Entrée de ligne en utilisant le son
d’une bande pré-enregistrée, comme
expliqué à la démarche 2 ci-aprés. Enfin,
on procédera aux essais expliqués dans
la section “Echantillonnage évolué”.
Una vez efectuadas las conexiones, podrá
comenzar a “muestrear”. En primer lugar
pruebe a muestrear su propia voz con el
micrófono como se describe en el PASO 1
siguiente. Desqués emplee el método de
entrada de línea, como se describe en el
PASO 2, para muestrear el sonido de la
cinta grabada suministrada. Finalmente
podrá intentar muestrear en partes como se
explica en la sección “Muestreo avanzado”.
STEP 7, Using the Microphone to
Sampie your own Voice.
Sampling
1. Remove the microphone from its
compartment.
2. Press the FULL button in the
SAMPLING selector section.
Pressing the FULL button puts the VSS-100
in the Full Keyboard Sampling Mode,
which means that the sampled sound
will be available on the entire keyboard.
For dividing the keyboard into different
parts, see the “Advanced Sampling”
section on page 11.
• Indicating the Sampling Key
When in the FULL mode, you may press
a key (use a keyboard key representing
a note closest tonally to the sound being
sampled) in the range of C3-C4. The
further the key is to the right, the shorter
the sampling time will be. C3 gives you
the maximum sampling time of eight
seconds, while C4, the minimum of four
seconds. When you wish to indicate a
specific duration, press the appropriate
key. When no key is pressed, C3 {eight
second sampling time) will be auto
matically selected.
SCHRITT 1. Fangen Sie Ihre eigene
Stimme mit dem Mikrofon ein
Sampling
1. Nehmen Sie das Mikrofon aus dem
Fach.
2. Drücken Sie den Schalter FULL in
der Sampling-Schaltergnippe.
Durch Drücken des Schalters FULL wird
das VSS-100 in die Betriebsart “Full
Keyboard Sampling” gestellt. Das bedeutet,
daß der eingefangene Klang auf der ganzen
Tastatur zur Verfügung steht. Zur Aufteilung
der Tastatur in verschiedene Teile sehen Sie
“Fortgeschrittenes Sampling” auf Seite 11 .
• Einsatz des Sampling-Schalters
In der Betriebsart FULL drücken Sie eine
Taste (nehmen Sie eine Notentaste, die eine
Note repräsentiert, welche in der Tonlage
dem eingefangenen Klang ähnelt) im Bereich
C3 bis C4, Die Sampling-Zeit wird um so
kürzer, je weiter rechts die Taste liegt. C3
gibt Ihnen die maximale Sampling-Zeit
von acht Sekunden, während C4 die mini
male von vier Sekunden gibt. Wenn Sie
eine bestimmte Zeitdauer angeben wollen,
drücken Sie die entsprechende Taste. Wenn
keine Taste gedrückt wird, wird automa
tisch C3 (acht Sekunden Sampling-Zeit)
eingestellt.
DEMARCHE 1. Utilisation du
microphone pour Téchantillonnage de
sa propre voix
Echantillonnage
1. Retirer le microphone de son logement.
2. Appuyer sur la touche FULL dans la
section séiecteur SAMPLiNG.
Une poussée sur la touche FULL place le
VSS-100 en mode d’échantillonnage par
clavier complet, ce qui signifie que le
son échantillonné sera disponible sur l’en
semble du clavier. Pour diviser le clavier
en diverses parties, voir la section
“Echantiiionnage évolué” en page 11.
• Indication de touche d’échantillonnage
Quand on se trouve en mode FULL, on
pourra appuyer une touche dans la plage
C3-C4(utiliser une touche du clavier repré
sentant la note la plus proche du son en
cours d’échantillonnage). Plus la touche
est sur la droite, plus courte sera la durée
de l’échantillonnage. C3 fournit la durée
d’échantillonnage maximale de huit
secondes, tandis que C4 fournit la plus
courte: quatre secondes. Si l’on désire
déterminer une durée particulière, appuyer
sur la touche adhoc. Si aucune touche
n’est actionnée, C3 (durée d’échantil ionnage de huit secondes) sera automatique
ment choisie.
PASO 1. Empleo del micrófono para
muestrear su propia voz
Muestreo
1. Extraiga el micrófono de su
compartimiento.
2. Presione el botón FÜLL de la sección
del selector SAMPLING.
Al presionar el botón FÜLL, el VSS-100
pasará al modo de muestreo de teclado
completo, lo que significa que el sonido
muestreado estará disponible en todo el
teclado. Para dividir el teclado en partes
diferentes, consulte la sección “Muestreo
avanzado” de la página 11.
• Indicación de la clave de muestreo
En el modo FÜLL usted podrá pulsar una
tecla (emplee una tecla del teclado que
represente una nota lo más cercana en
clave tonal al sonido que esté muestreando)
en la gama de C3-C4. Cuanto más a la
derecha se encuentre la tecla pulsada, más
corto será el tiempo de muestreo. C3
ofrecerá el tiempo máximo de muestreo de
ocho segundos, mientras que con C4 se
obtendrá el mínimo de cuatro segundos.
Cuando desee indicar una duración espe
cífica, pulse la tecla apropiada. Si no pulsa
ninguna tecla, se seleccionará automática
mente C3 (tiempo de muestreo de ocho
segundos).
Page 10

NOTE:
The reproduced tone of the sampled sound varies
depending on how long a sampling time you select. When
sampling the same sound for each part in the PART mode,
use as high a key as you can within each octave range so
as to obtain the best possible tone quality. The higher the
key, the better the tone achieved.
3. Adjusting the SAMPLING LEVEL
While speaking into the microphone,
adjust the sampling level. The lights will
indicate the current level.
The standard sampling level is normally
about “4”. Be sure to adjust the sampl
ing level accordingly as a too-high level
can cause sound distortion during play
back, and a too-low level often gives
rise to a lot of unwanted noise.
4. How to Initiate Sampling; there are two
ways to activate the sampling feature,
each of which is described below.
SYNCHRO START®: By pressing this
button, the VSS-100 enters the Sampling
“standby” mode as indicated by the
SAMPLING light flashing. Actual sampling
is immediately started when this button is
pressed: by pressing this same button
once again, it will be stopped.
START/STOP®: Sampling is immediately
started when this button is pressed: by
pressing this same button once again, it
will be stopped.
5. Now, face the microphone and say
something.
When the sampling time is up, the
SAMPLING light will automatically go out.
With that, the sampling procedure is
complete!
NOTE:
*When you wish to sample a new sound, you should
completely erase the previous sound first. Otherwise,
parts of the first sound will be left over if the sampling
time of the new sound is shorter than that of the
previous one. In order to completely erase a previously
sampled sound, first set the SAfyiPLING LEVEL ® To
MIN., press the FILL button in the SAMPLING SELECTOR
section ®.
*You can also erase all sampled sounds completely by
turning the POWER switch off.
ANMERKUNG:
Der reproduzierte Ton des Sampling-Klatigs verändert
sich je nach der gewählten Sampling-Zeit. Wenn Sie den
gleichen Ton für jeden Part in der Betriebsart PART
einfangen, verwenden Sie eine Taste, die so hoch wie
möglich in der jeweiligen Oktave liegt, um die beste
Tonqualität zu erzielen. Je höher die Taste, um so besser
der erzielte Ton.
3. Einstellen des Sampling-Pegels
Während Sie in das Mikrofon sprechen,
stellen Sie den Sampling-Pegel (Sampling
Level) ein. Die Lämpchen zeigen den
momentanen Pegel an.
Der normale Sampling-Pegel liegt etwa bei
“4”. Stellen Sie immer den Sampling-Pegel
richtig ein, da ein zu hoher Wert Verzer
rung bei der Wiedergabe und ein zu niedriger
Wert unerwünschtes Rauschen bewirken kann.
4. Einleiten des Sampling: Es gibt zwei
Arten der Einleitung des Sampling-Merkmals,
die im folgenden beschrieben werden.
SYNCHRO START®; Durch Drücken
dieses Schalters wird das VSS-100 in die
Sampling-Bereitschafts-Betriebsart gestellt,
was durch Flackern des SAMPLINGLämpchens angezeigt wird. Der SamplingVorgang beginnt sofort beim Drücken
dieses Schalters; durch erneutes Drücken
wird er wieder aufgehoben.
START/STOP @ : Der Sampling Vorgang
beginnt sofort beim Drücken dieses
Schalters; durch erneutes Drücken wird er
wieder aufgehoben.
5. Jetzt sprechen Sie in das Mikrofon.
Wenn die Sampling-Zeit abgelaufen ist,
erlischt das Sampling-Lämpchen automa
tisch. Damit ist der Sampling-Vorgang
abgeschlossen!
ANMERKUNG:
’Wenn Sie einen neuen Klang einfangen wollen, müssen
Sie den bestehenden erst einmal löschen. Andernfalls
bleiben Teile des ersten Klangs bestehen, wenn die
Sampling-Zeit des neuen Klangs kürzer als die des alten
ist. Um einen bestehenden Sampling-Klang vollständig
zu löschen, stellen Sie den Sampling-Pegel-Regler
{SAMPLING LEVEL) auf MIN und drücken den FILL-
Schalter in der Schaltergruppe SAMPUNG SELECTOR ®.
'Sie formen alle eingefangenen Klänge vollständig durch
Ausschalten des Geräts mit dem Ein/Ausschalter Zöschen.
REMARQUE:
La tonalité reproduite du son échantillonné varie en
fonction de la durée choisie. Lors don échantillonnage
du même son pour chaque partie en mode PART, utiliser
une touche aussi élevée que possible dans chaque ocfave
de manière à obtenir ta meilleure qualité possible. Plus
haute sera la touche, meilleure sera la tonalité obtenue.
3. Réglage du niveau d’échantillonnage
En parlant devant le microphone, ajuster
le niveau d’échantillonnage. Les témoins
indiquent le niveau actuel. Le niveau
standard s’obtient normalement à “4”
environ. Veiller à ajuster convenablement
le niveau car s’il est trop élevé, il se
produira une distorsion à la lecture;
en revanche, s’il est trop bas, il y a
risque d’une production de parasites
désagréables.
4. Initiation de l’échantillonnage; les
deux méthodes disponibles sont expli
quées ci-après.
Départ synchronisé (SYNCHRO START)
®: Par une poussée sur cette touche,
le VSS-100 se place en mode d’attente
comme l’indique le clignotement du
témoin SAMPLING. L’échantillonnage
réel commence dès que cette touche
est actionnée et il s’arrête par une
nouvelle poussée sur cette même touche.
Marche/arrêt (START/STOP)®: L’échan
tillonnage commence dès que cette
touche est actionnée et il est arrêté
par une nouvelle poussée sur cette même
touche.
5. A présent, parler devant le microphone. Lorsque la durée d’échantillonnage s’est
écoulée, le témoin SAMPLING s’éteint
et la procédure est ainsi terminée.
Remarque:
* Avant d'échantillonner un nouveau son, il sera
nécessaire, au préalable, d’effacer complètement le
précédent, sinon, certaines parties du premier son
subsisteront si la durée d’échantiitonnage du nouveau
son est plus courte que celle de ta précédente. Pour
effacer complètement le son échantillonné précédent,
régler tout d’abord le réglage SAMPLING LEVEL ® sur
MIN et appuyer sur la touche FILL de la section
sélecteur déchantillonnage (SAMPUNG SELECTOR) ® .
*On pourra également effacer complètement tous les
sons échantillonnés en coupant l’interrupteur POWER.
NOTA:
El tono reproducido del sonido maestreado varía de
acuerdo con el tiempo de maestreo seleccionado. Para
maestrear el mismo sonido para cada parte en el modo
PART, emplee la clave más alta que pueda dentro de la
gama de cada octava a fin de obtener la mejor calidad
tona! poábie. Cuanto m«5s alta sea Za clave, mejor será el
tono obtenido.
3. Ajuste del nivel de muestren
(SAMPLING LEVEL)
Hablando ante el micrófono, ajuste el nivel
de muestreo. Las lámparas indicarán el
nivel actual.
El nivel de muestreo estándar es normal
mente alrededor de “4”. Asegúrese de
ajustar el nivel de muestreo adecuadamente
ya que un nivel demasiado alto puede
causar distorsión del sonido durante la
reproducción, y un nivel demasiado bajo
produce a menudo el aumento de gran
cantidad de ruido molesto.
4. Inicio del muestreo; hay dos formas de
activar la kinción de muestreo, las cuales
se explican a continuación.
Inicio sincronizado: Al presionar el botón
SYNCHRO START ®, el VSS-100 pasará
al modo de muestreo “en pausa” como indi
cará el parpadeo de la lámpara SAMPLING.
El muestreo real se iniciará inmediatamente
cuando presione este botón; si vuelve a
presionarlo, el muestreo se parará.
Inicio / paro: Al presionar el botón START /
STOP ®, el muestreo se iniciará inmediata
mente; si vuelve a presionarlo, el muestreo
se parará.
5. Ahora, póngase ante el micrófono
y diga algo.
Cuando haya fínalizado el tiempo de
muestreo, la lámpara SAMPLING dejará
de iluminarse automáticamente. De esta
forma habrá finalizado el procedimiento
de muestreo.
NOTAS:
’Cuando desee maestrear un nuevo sonido, primero
tendrá que borrar completamente el sonido anterior. Si
no lo hace así, si el tiempo de muestreo del nuevo
sonido es más corto que el del anterior, quedarán partes
de este último. Para borrar completamente un sonido
previamente muestreado, ponga el control SAMPLING
LEVEL C?) en MIN., y después presione el botón FULL
de la sección del selector SAMPLING ® ,
'Usted tembién podrá borrar completamente todos los
sonidos maestreados poniendo el interruptor POWER
en OFF.
Page 11

Playback
1. Set the PLAYBACK Selector ® to the
KEYBOARD position.
2. Set the PLAYBACK VOLUME ® as
desired; don’t put it in the MIN. position,
otherwise no sound will be reproduced
on playback. Do, however, put the
ORCHESTRA VOLUME in the MIN.
position in order to hear only your
sampled sound.
3. Press any key on the keyboard: see?
You should be able to hear your voice
reproduced! Try playing a melody or
tune with It!
NOTE:
*Voice Sampler playback is monophonic, which means
only one note can be played/heard at a time.
*Because the playback band is limited, the reproduced
sound may deviate somewhat from the originally
sampled sound.
*You can play sampled voices together v\/ith an Orchestra
Voice by turning the ORCHESTRA VOLUME control
@ up.
*lf the Auto Bass Chord selector © is not turned off,
Voice Sampler sounds will not be reproduced by the
keys In the Lower Keyboard Section @ .
• Playing back your Sampled Voice as
a Bass Note
1. Set the PLAYBACK selector ® to the
BASS position and turn the PLAYBACK
VOLUME up somewhat.
2. Set the Auto Bass Chord selector ® to
the SINGLE FINGER position.
3. Press the SYNCHRO START switch (Q)
in the ACCOMPANIMENT section.
4. Press any one of the keys in the Lower
Keyboard Section.
The sampled sound will be reproduced as
automatic bass accompaniment, and will
be synchronized with the rhythm pattern.
At this time, an Auto Bass Chord will not
be rendered. For instructions on how to
play a sampled sound back as an Auto
Bass Chord, please see the instructions
on page 15.
• Adjusting the PITCH
When performing sampled voices together
with orchestra voices, or using them as a
sound source for automatic bass accom
paniment, or when playing in ensemble
with other instruments, you may want to
adjust the pitch of the sampled sound
slightly in order to tune it to the other
instruments.
We suggest using the PITCH controls ®
for this purpose. By pressing the up (A)
button once, you can raise the pitch by
about 7 cents, and by pressing the down
(T) button, you will lower it by about the
Wiedergabe
1. Drücken Sie den Wiedergabeschalter ®
in Stellung KEYBOARD.
2. Stellen Sie die Wiedergabelautstärke
(PLAYBACK VOLUME) @ ein ; steUen
Sie nicht den Minimalwert ein, sonst
wird bei der Wiedergabe kein Ton erzeugt.
Stellen Sie aber die Orchesterlautstärke
(ORCHESTRA VOLUME) ® auf
Minimalwert, damit nur der eingefangene
Klang gehört wird.
3. Drücken Sie eine beliebige Taste auf der
Tastatur; Jetzt sollten Sie die reprodu
zierte Stimme hören! Versuchen Sie, eine
Melodie damit zu spielen.
ANMERKUNGEN:
‘Der Voice Sampler arbeitet monophon; er kann nur eine
Note zur Zeit aufnehmen/wiedergeben.
"Da das Wiedergabeband begrenzt ist, kann der repro
duzierte Klang leicht vom ursprünglich eingefangenen
Klang abweichen.
‘Sie icönnen eingefangene Klänge zusammen mit einer
Orchesterstimme spielen, indem Sie den Orcíiesíer/auí-
stärkeregler (ORCHESTRA VOLUME) © aufdrehen.
‘Wenn der Baßakkord-Automatik-Schalter (AUTO BASS
CHORD) © nicht ausgeschaltet wird, werden Voice
Sampler Klänge nicht durch die Tasten im unteren
Tasiaiurbereic/i reproduziert.
• Wiedergabe der eingefangenen
Stimme als Baßnote.
1. Stellen Sie den Wiedergabeschalter
(PLAYBACK) ® auf BASS und drehen
die Wiedergabelautstärke leicht auf.
2. Stellen Sie den Baßakkord-AutomatikSchalter (AUTO BASS CHORD) auf
Stellung SINGLE FINGER.
3. Stellen Sie SYNCHRO START-Schalter
® auf Stellung ACCOMPANIMENT.
4. Drücken Sie eine der Tasten im unteren
Tastaturbereich.
Der eingefangene Klang wird als automa
tische Baßbegleitung reproduziert und wird
mit dem Rhythmus synchronisiert. Zu
diesem Zeitpunkt wird kein automatischer
Baßakkord abgegeben. Anleitungen zur
Wiedergabe eines eingefangenen Klanges als
Auto-Baßakkordbegleitung können Sie aus
Seite 15 ersehen.
• Gnstellen der Tonhöhe
Beim Spielen mit Sampling-Stimmen zusam
men mit Orchesterstimmen oder bei deren
Verwendung als Klangquelle für automa
tische Baßakkordbegleitung oder auch beim
Spielen als Ensemble mit anderen Instru
menten wollen Sie sicher manchmal die
Tonhöhe des Sampling-Tons leichtnachstellen,
um auf andere Instrumente einzustimmen.
Wir schlagen vor, die Tonhöhenregler
(PITCH) ® zu diesem Zweck einzusetzen.
LscturG
1. Régler le sélecteur PLAYBACK ® à la
position KEYBOARD.
2. Amener le réglage PLAYBACK VOLUME
® à la position souhaitée, mais pas
sur MIN car, dans ce cas, aucun son ne
serait audible à la lecturé. Cependant,
placer le réglage ORCHESTRA VOLUME
à la position MIN pour écouter unique
ment le son échantillonné.
3. Appuyer sur une touche quelconque du
clavier et l’on entendra la reproduction
de sa propre voix. Essayer de jouer une
mélodie en même temps!
Remarque:
*La lecture de Téchantillonneur est monophonique, ce
qui signifie qu'une seule note pourra être jouée/
entendue à la fois.
*Du fait que la bande de lecture est limitée, il se peut que
te son reproduit dévie quelque peu du son original
échantillonné.
*11 est possible de jouer les voix échantillonnées avec
une voix Orchestre simplement en élevant te réglage
ORCHESTRA VOLUME @ ,
*Si le sélecteur d'accord basse automatique © n’est
pas coupé, ies sons d'échantillonnage ne seront pas
reproduits par les touches de la section clavier
inférieur @ .
• Lecture de sa voix échantillonnée
comme note basse
1. Régler le sélecteur PLAYBACK ® à la
position BASS et élever légèrement le
réglage PLAYBACK VOLUME.
2. Régler le sélecteur AUTO BASS CHORD
® à la position SINGLE FINGER.
3. Appuyer sur la touche SYNCHRO
START ® dans la section ACCOM
PANIMENT.
4. Appuyer sur une quelconque des
touches de la section clavier inférieur.
Le son échantillonné sera reproduit comme
accompagnement basse automatique et
il sera synchronisé avec le type de rythme.
A ce moment, un accord basse automa
tique ne sera pas obtenu. En ce qui con
cerne la façon de reproduire un son
échantillonné comme un accord basse
automatique, voir les instructions en
page 15.
• Réglage de la hauteur du son
Lorsqu’on interprète plusieurs voix
échantillonnées avec des voix orchestre,
ou qu’on les utilise comme source sonore
pour l’accompagnement basse automa
tique ou qu’on les joue avec d’autres
instruments, on souhaitera parfois ajuster
légèrement la hauteur du son échantil
lonné pour le syntoniser aux autres instru
ments. Nous conseillons d’utiliser les
Reproducción
1. Ponga el selector PLAYBACK ® en la
posición KEYBOARD.
2. Ajuste el control PLAYBACK VOLUME
® a su gusto; no lo ponga en la posición
MIN., ya que no podrá reproducir ni
tocar ningún sonido. Sin embargo, ponga
el control VOLUME ORCHESTRA en
MIN. a fin de oír solamente el sonido
muestreado.
3. Pulse cualquier tecla del teclado: ¿Ha
visto? ¡Se ha reproducido su voz! ¡Pruebe
a tocar una melodía o armonizar con
eUa!
NOTAS:
‘La reproducción con maestreo vocal es monofònica, lo
que significa que solamente podrá tocar una nota al mismo
tiempo.
‘Como la banda de reproducción es limitada, el sonido
reproducido puede desviarse un poco del originalmente
muestreado.
'Usíed podrá reproducir voces maestreadas junto con una
voz de orquesta aumentando el nivel del control
ORCHESTRA VOLUME ® ,
*Si el selector de bajos y acordes auíomáíicos © no
está en OFF, los sonidos de maestreo vocal no se re
producirán mediante las teclas de la sección del teclado
inferior @ .
• Reproducción de su voz muestreada
como una nota de bigo
1. Ponga el selector PLAYBACK ® en
la posición BASS y aumente ligeramente
el nivel del control PLAYBACK
VOLUME ®.
2. Ponga el selector AUTO BASS CHORD
® en la posición SINGLE FINGER.
3. Presione el botón SYNCHRO START ®
de la sección de acompañamiento
(ACCOMPANIMENT).
4. Pulse una de las teclas de la sección
del teclado inferior.
El sonido muestreado se reproducirá como
acompañamiento de bajo automático, y se
sincronizará con el patrón rítmico. En este
momento no podrá activar la función de
bajos y acordes automáticos. Con respecto
a la instrucciones sobre cómo reproducir un
sonido muestreado como bajos y acordes
automáticos, consulte la página 15 ,
• Д]ив1е del diapasón (PITCH)
Cuando emplee voces maestreadas junto con
voces de orquesta, cuando emplee éstas con
una fuente sonora para el acompañamiento
de bajo automático, o cuando toque en
conjunto con otros instrumentos, es posible
que desee ajustar ligeramente el diapasón del
sonido muestreado a fin de sintonizarlo con
los demás instrumentos. Para ello, le
sugerimos que emplee los controles PITCH
Page 12

same amount. By continuously holding
either one of these controls down, the pitch
wilt change by 7 cents, while pressing
both simultaneously will return the pitch
to its original value.
Durch einmziliges Drücken des Aufwärts
schalters (A) können Sie die Tonhöhe um
etwa 7 Halbtonhundertstel anheben, und
durch Drücken des Abwärtsschalters (▼)
um den gleichen Betrag senken. Durch
kontinuierliches Gedrückthalten eines
dieser Schalters ändert sich die Tonhöhe
um 7 Halbton hundertstel, während durch
gleichzeitiges Gedrückthalten beider die
Tonhöhe auf den Ausgangswert zurückgestellt wird.
réglages PITCH ® à cet effet. Une seule
poussée sur la touche (A) permet d’élever
le son d’environ 7 centièmes, tandis
qu’une poussée sur la touche (▼) rabais
sera d’une valeur identique. Une poussée
continue sur une de ces touches fera
changer la hauteur du son de 7 centièmes,
tandis qu’une poussée simultanée sur les
deux fera revenir à la valeur originale.
®. Presionando una vez el botón de
aumento (A) podrá aumentar el diapasón
aproximadamente 7 centésimas de semitono,
y si presiona el de disminución (▼), lo
reducirá aproximadamente la misma
cantidad. Si mantiene presionado cualquiera
de estos botones, el diapasón cambiará
continuamente 7 centésimas de semitono; si
mantiene simultáneamente presionados los
dos, el diapasón volverá a su valor original.
STEP 2. Sampling from the Accessory
Cassette Tape with the Line in Method
Human voices and animal sounds as well
as a few other sounds appearing in
nature have been pre-recorded on the
accessory cassette tape. First, try sampl
ing the sound of breaking glass (No.57on
the cassette tape).
Sampling
1. Connect the VSS-100 to a tape deck by
plugging an optional connector cable
into the LINE IN jack on the keyboard
unit and the LINE OUT jack on the tape
10
player.
2. Place the cassette into the deck and
fast-forward it to the beginnig of No.57.
3. Press the FULL switch in the SAMPL
ING selector section ®. If you wish to,
indicate a sampling key by pressing
an appropriate key.
4. Adjust the SAMPLING LEVEL by using
the SAMPLING LEVEL control (fi after
starting playback of the cassette tape.
Once the level has been set as desired,
rewind the tape to the beginning of the
desired section.
5. Now, play back the tape. After entering
the No. 57 section, a signal tone will
sound in rhythm three times, then drop
out on the fourth beat. Press the
SYNCHRO START button ® on the
silent fourth beat; the sound of the
breaking glass will begin on the fifth
beat.
SCHRITT 2. Sampling vom
mitge/ieferten Cassettenband mit
dem Line-In-Veifahren
Menschliche Stimmen und Tiergeräusche
ebenso wie einige andere in der Natur
auftretenden Klänge sind auf dem mitgeliefer
ten Cassettenband aufgezeichnet. Versuchen
Sie zuerst, den Klang von Glasbruch
einzufangen (Nr, 57 auf dem Cassettenband),
Sampling
1. Schließen Sie das VSS-100 an ein Cassettendeck an, indem Sie das Verbindungskabel (Sonderzubehör) in die LINE
IN-Buchsc am Keyboard und die LINE
OUT-Buchse am Deck einstecken.
2. Legen Sie eine Cassette in das Deck
ein und spulen Sic bis zum Anfang von
Nr. 57 vor.
3. Drücken Sie den FULL-Schalter in der
Schaltergruppe SAMPLING (5) .
Wenn Sie wollen, können Sie eine
Sampling-Taste durch Drücken des
entsprechenden Schalters bestimmen.
4. Stellen Sie den Sampling-Pegel unter
Einsatz des SampUng-Pegelreglers
(SAMPLING LEVEL) (J) ein, wenn die
Wiedergabe des Cassettenbandes be
gonnen hat. Wenn der gewünschte Pegel
erreicht ist, spulen Sie das Band zum
Anfang des gewünschten Teils zurück.
5. Jetzt spielen Sie das Band ab. Nach
Eingabe des Teils Nr. 57 ertönt drei
Taktschläge lang ein Signalton und setzt
beim vierten Taktschlag aus, Drücken
Sie den SYNCHRO START-Schalter ®
beim stummen letzten Taktschlag: der
Klang von Glasbruch beginnt beim
fünften Taktschlag.
DEMARCHE2. Echantillonnage depuis
la cassette fournie par la méthode
d*entrée de ligne
Des voix humaines, des cris d’animaux
ainsi que quelques autres sons, provenant
de la nature, ont été pré-enregistrés sur
la cassette fournie comme accessoire.
Essayer tout d’abord l’échantillonnage du
son du bris de verre (№ 57 sur la cassette).
Echantillonnage
1. Raccorder le VSS-KX) au magnétophone
en branchant le câble de connexion
en option dans la prise UNE IN du
clavier et dans la prise LINE OUT du
magnétophone.
2. Installer la cassette dans la platine et la
faire avancer jusqu’au début du N®57.
3. Appuyer sur la touche FULL dans la
section sélecteur SAMPLING®. Si on
le désire, indiquer une touche d’échantil
lonnage en appuyant sur une touche
adéquate.
4. Ajuster le niveau d’échantillonnage à
l’aide du réglage SAMPLING LEVEL ®
après avoir lancé la lecture de la
cassette. Une fois que le niveau a été
réglé selon ses préférences, rebobiner
la bande jusqu’au début de la section
souhaitée.
5. Reproduire alors la bande. Après être
arrivé à la section N®57, une tonalité se
fera entendre trois fois, puis elle dis
paraîtra à la quatrième mesure. Appuyer
sur la touche SYNCHRO START ® à la
quatrième mesure silencieuse: le son
du bris de verre commencera à la
cinquième mesure.
PASO 2, Maestreo empleando el
casete suministrado con el método
de entrada de línea
En el casete suministrado se han grabado
voces humanas y sonidos de animales, así
como algunos otros sonidos que aparecen
en la naturaleza. En primer lugar, pruebe a
maestrear el sonido de rotura de cristal
(n.° 57 del casete).
Maestreo
1. Conecte el VSS-100 a un magnetófono
enchufando un cable conector opcional
a la toma LINE IN del primero y a la
toma LINE OUT del segundo.
2. Introduzca el casete en el magnetófono
y avance rápidamente la cinta hasta el
comienzo del n,°57,
3. Presione el botón FULL de la sección del
selector SAMPLING ®. Si lo desea,
indique una clave de muestreo pulsando
la tecla apropiada.
4. Ajuste el nivel de muestreo empleando el
control SAMPLING LEVEL i® después
de haber puesto el casete en reproduc
ción. Una vez ajustado el nivel al valor
deseado, rebobine la cinta hasta el
comienzo de la sección deseada.
5. A continuación, ponga el casete en
reproducción. Una vez que haya entrado
en la sección n.® 57, sonará tres veces
un tono rítmico de señal, y después
desaparecerá en el cuarto compás.
Presione el botón SYNCHRO START
® en el silencio del cuarto compás; el
sonido de rotura de cristal comenzará
en el quinto compás.
Page 13

Playback
Now, let’s play the sampled sound back
as the bass note in the demonstration
mode:
6. Set the PLAYBACK selector (8) to the
BASS position.
7. Press the DEMONSTRATION START/
STOP button (g).
8. Adjust, the PLAYBACK VOLUME (9),
ACCOMPANIMENT VOLUME and
ORCHESTRA VOLUME ® controls to
achieve your preferred balance between
the three sections. If the reproduced
note should sound flat or sharp, use
the PITCH controls ® to tune it.
Wiedergabe
Lassen Sie uns jetzt den eingefangenen
Klang als Baßnote in Vorführ-Betriebsart
wiedergeben:
6. Drücken Sie den Wiedergabeschalter (8)
in Stellung BASS.
7. Drücken Sie den Vorftihrschalter
(DEMONSTRATION START/STOP)@.
8. Stellen Sie die Wiedergabelautstärke
(PLAYBACK VOLUME) g) , den Be
gleitlautstärkepegel (ACCOMPANIMENT
VOLUME) ® , und die Orchesterlaut
stärke (ORCHESTRA VOLUME) ®
auf die beste Balance zwischen den drei
Teilen ein. Wenn der wiedergegebene
Ton flach oder scharf klingt, stellen Sie
die Tonhöhe mit den Tonhöhenreglern
(PITCH) ® ein.
Lecture
Reproduire à présent le son échantil
lonné comme note basse en mode
démonstration:
6. Régler le sélecteur PLAYBACK (D à la
position BASS.
7. Appuyer sur la touche DEMONSTRA
TION START/STOP (g).
8. Ajuster les réglages PLAYBACK
VOLUME (D , ACCOMPANIMENT
VOLUME (® et ORCHESTRA VOLUME
(g) pour obtenir un équilibre adéquat
entre les trois sections. Si la note repro
duite semble une bémol ou une dièze,
se servir des réglages PITCH ® pour
syntoniser.
Reproducción
Ahora, reproduzcamos el sonido maest
reado como nota de bajo en el modo de
demostración:
6. Ponga el selector PLAYBACK (8) en la
posición BASS.
7. Presione el botón DEMONSTRATION
START/STOP (g .
8. Ajuste los controles PLAYBACK
VOLUME ® , ACCOMPANIMENT
VOLUME ®,y ORCHESTRA VOLUME
® hasta lograr el equilibrio deseado
entre las tres secciones. Si la nota
reproducida suena bemol o sostenido,
emplee los controles PITCH ® para
afinarla.
Advanced Sampling
Sampling in Parts
• By dividing the keyboard into four parts,
each one spanning an octave, you can
‘sample’ a different sound source for
each part.
• When you’ve sampled the sound of an
acoustic instrument in the FULL mode,
playback tone will differ from that of
the original instrument when playing
keys in the upper and lower note regions.
The PART mode is convenient in these
cases because it allows you, for ex
ample, to sample a different note as the
sound-source for each octave to achieve
greater accuracy throughout the key
board range.
• The sampling time while in the PART
mode is from a 2 seconds maximum
(lowest key in the part range), to a 1
second minimum (highest key in the
range).
Fortgeschrittenes Sampling
Sampling von Parts
• Durch die Einteilung der Tastatur in vier
Teile, von denen jeder eine Oktave
umfaßt, können Sie eine andere Klang
quelle für jeden Teil einfangen,
• Wenn Sie den Klang eines akustischen
Instruments in FULL-Betriebsart einge
fangen haben, unterscheidet sich der
Wiedergabeton vom Originalinstrument,
wenn Tasten im oberen und unteren
Notenbereich gespielt werden. Die
PART-Betriebsart ist in diesen Fällen
praktisch, weil sie es Ihnen zum Beispiel
erlaubt, eine andere Note als Klangquelle
für jede Oktave zu nehmen, um größere
Genauigkeit im ganzen Tastaturbereich
zu erzielen.
• Die Sampling-Zeit in der PART-Be
triebsart beträgt zwischen maximal 2
Sekunden (niedrigste Taste im PartBereich) bis minimal 1 Sekunde (höchste
Taste im Part-Bereich).
Echantillonnage évolué
Echantillonnage en parties
• En divisant le clavier en quatre parties,
couvrant chacune une octave, il sera
possible d’échantillonner une source
sonore différente pour chaque partie.
• Quand on a échantillonné le son d’un
instrument acoustique en mode FULL,
la tonalité de lecture sera différente de
celle de l’instrument original quand on
jouera les touches des régions supé
rieure et inférieure. Le mode PART
s’avère pratique dans ces cas, car il
permet, par exemple, d’échantillonner
une note différente comme source
sonore pour chaque octave, afin
d’atteindre une plus grande précision
sur toute la plage du clavier.
• En mode PART, la durée d’échantillon
nage va d’un maximum de 2 secondes
(la note la plus basse dans la partie)
jusqu’à un minimum de 1 seconde (la
note la plus haute dans la partie).
Maestreo avanzado
Muestren en partes
• Dividiendo el teclado en cuatro partes,
cada una ocupando una octava, podrá
“muestrear” un sonido diferente para
cada parte.
• Si ha muestreado el sonido de un instru
mento acústico en el modo FULL, el
tono reproducido será diferente al del
instrumento original cuando toque teclas
de las regiones de notas altas y bajas.
El modo PART será muy útil en estos
casos porque le permitirá, por ejemplo,
muestrear una nota diiferente como
fuente de sonido para cada octava a
fin de lograr una mayor precisión en
toda la gama del teclado.
• El tiempo de muestreo en el modo
PART es de 2 segundos como máximo
(tecla inferior de la gama de la parte) a 1
segundo como mínimo (tecla superior
de la gama).
Part 1
CWC2
Part 2
СЙ2-СЗ
Part 3-
C»3~C4
-Part 4-
CM--C5
Page 14

1. Set the microphone or connect your
VSS-100 to a sound source (radio, TV,
tape recorder, etc.) as described in the
previous section.
2. Press the PART button in the SAMPLING
selector section ® and adjust the
sampling level with the SAMPLING
LEVEL control ®.
3. To sample Part 1, indicate the desired
sampling key by pressing the appro
priate C1-C2 key (if no specific key
has been pressed at this time, C1 will
be automatically selected) and begin
sampling by pressing either the
SYNCHRO START ® or the START @
button.
4. To sample Part 2, press the PART
button once again and indicate a
sampling key by pressing one of the
keys within the C#2-C3 range. Sampl
ing is initiated by pressing either the
SYNCHRO START or the START button
in the same way as for Part 1.
Sampling for Part 3 and Part 4 is
exactly the same as for Part 2, except
that the keys for indicating the sampl
ing key shift up one octave for each
successive part (see figure).
5. Set the PLAYBACK selector ® to the
KEYBOARD position and you’re ready
to begin playback of the sampled
sounds on the keyboard.
NOTE:
*When playing back sounds sampled in the PART mode
as Bass, the sound sampled for Part 1 will be reproduced
first. If the Bass note is played continuously for a period
of time longer than the Part 1 sampling time, the source
sound for the Bass note will change to the sounds
sampled for Part 2, then Part 3, and Part 4, one after
another.
*After completing the SAMPLING process in the PART
mode, the sampled sound can be played back individuaT
ly over the whole keyboard range by pressing the FULL
button In the SAMPLING selector section © twice, then
holding a keyboard key down; the source sound will
alternate from the sound sampled for Part 1 to the one
for Part 2, then Part 3, and Part 4, respectively. Each
time, the source sound currently being reproduced will
become valid for the whole keyboard.
To return to the PART mode, where the sound sources
sampled tor each part will be valid only for their res
pective octaves, just press the PART button twice.
1. Schließen Sie das Mikrofon an oder
schließen Sie Ihr VSS-100 an eine
Tonquelle an (Radio, Fernseher,
Tonbandgerät etc.), wie im vorherigen
Kapitel beschrieben.
2. Drücken Sie den PART-Schalter in der
SAMPLING-Schaltergruppe ® und stel
len Sie den Sampling-Pegel mit dem
Sampling-Pegelregler (SAMPLING
LEVEL) ® ein.
3. Um Part 1 einzufangen, geben Sie die
gewünschte Taste durch Drücken der
entsprechenden Taste CI bis C3 ein
(wenn zu diesem Zeitpunkt keine be
stimmte Taste gedrückt worden ist, wird
automatisch CI gewählt), und beginnen
Sie den Sampling-Vorgang durch
Drücken entweder des SYNCHRO
START-Schalters ® oder des STARTSchalters. ®.
4. Um Part 2 einzufangen, drücken Sie den
PART-Schalter erneut und geben eine
Sampling-Taste durch Drücken einer der
Tasten im Bereich C2 bis C3 an. Sam
pling wird durch Drücken entweder des
Schalters SYNCHRO START oder
START auf gleiche Weise wie bei Part 1
eingeleitet.
Sampling für Part 3 und Part 4 geschieht
auf genau gleiche Weise wie für Part 2,
mit der Ausnahme, daß die Tasten zur
Anzeige des Sampling sich für jeden
folgenden Part um eine Oktave nach
oben bewegen (siehe Abbildung).
5. Stellen Sie den Wiedergabeschalter
(PLAYBACK)®auf KEYBOARD, und
Sie sind zur Wiedergabe der einge
fangenen Klänge bereit.
ANMERKUNG:
‘Wenn in PART-Betriebsart eingefangene Klänge als Baß
wiedergegeben werden, ujerden die für Part 1 eingefangenen
Klänge zuerst reproduziert. Wenn die Baß note kontinuier
lich über einen längeren als den Sompling-Zeitraum für
Part 1 gespielt wird, wechselt der Quellenklang für die
Baß note auf die Klänge um, die für Part 2 eingefangen
wurden, und onsc/i/ie^end entsprechend auf Part 3 und
Part 4.
’Nach der Durchführung des SAMPUNC-Vorgangs in der
PART-Betriebsart kann der eingefangene Klang einzeln
über den gesamten Tastaturbereich durch zweimaliges
Drücken des FULL-Schalters in der SAMPLINGSchaltergruppe © und ansch//ej3endes Gedrückthalten
einer Notentas^ gespielt werden; der QueÜenton
wechselt zwischen dem eingefangenen Klang für Part 1
und dem für Part 2, Part 3 und anschließend Part 4 um.
Jedesmai wird der momentan reproduzierte Quellenklang
für den gesamten Tastaturbereich gültig.
Um zur PAiRT-Betriebsart zurückzukehren, wo die für
jeden Part eingefangenen K/ongque/Zen nur für die
jeweiligen Oktaven gelten, drücken Sie einfach den
PART-Schalter zweimal.
1. Préparer le microphone ou raccorder le
VSS-100 à une source sonore (radio,
téléviseur, magnétophone, etc.) comme
expliqué à la section précédente.
2. Appuyer sur la touche PART dans la
section sélecteur SAMPLING ® et
ajuster le niveau d’échantillonnage
par le réglage SAMPLING LEVEL @.
3. Pour échantillonner la Partie 1, indiquer
la touche d’échantillonnage souhaitée
en appuyant sur la touche C1-C2
adéquate (si aucune touche n’est action
née à ce stade, Cl sera automa
tiquement choisi) et commencer
l’échantillonnage en appuyant sur la
touche SYNCHRO START ® ou sur la
touche START @.
4. Pour échantillonner la Partie 2, appuyer
à nouveau sur la touche PART et
indiquer une touche d’échantillonnage
en appuyant sur une des touches dans
la plage C^^2-C3. L’échantillonnage
est lancé en appuyant sur la touche
SYNCHRO START ou sur la touche
START, de la même façon que pour
la Partie 1.
L’échantillonnage pour la Partie 3 et la
Partie 4 s’accomplit exactement de la
même façon que pour la Partie 2, sauf
que les touches pour indiquer l’échantil
lonnage sont déplacées d’une octave
vers le haut pour chaque partie succes
sive (voir la figure).
5. Régler le sélecteur PLAYBACK ® à la
position KEYBOARD et l’on sera prêt
pour commencer la reproduction des
sons échantillonnés sur le clavier.
RemarQues:
*A la lecture de son, échantillonné ep mode PART
comme Basse, le son échantillonné pour la Partie 1
sera d'abord reproduit Si la note Basse est jouée de
façon continue pendant une durée supérieure à la
durée d’échantillonnage de la Partie 1, la source
sonore pour la note Basse fera place aux sons
échantillonnés pour ta Partie 2, puis la Partie 3 et la
Partie 4 successivement
* Après avoir terminé te processus d’échantillonnage
pour le mode PART, le son échantillonné peut être
reproduit Individuellement sur tout le clavier en
appuyant deux fois sur !a touche FULL dans ta section
sélecteur SAMPLING © et en maintenant ensuite
enfoncée une touche du clavier. Le son de la source
alternera entre te son échantillonné pour la Partie 1 et
celui pour la Partie 2, ensuite pour la Partie 3 et
ia Partie 4 respectivement Chaque fols, le son de la
source actuellement reproduit deviendra valide pour ia
totalité du clavier.
Pour repasser au mode PART, ou les sources sonores
échantillonnées pour chaque partie sont valides pour
leurs octaves respectives, il suffira de pousser deux
fols sur ta touche PART.
1. Emplee el micrófono о conecte su
VSS-100 a una fuente sonora (radio,
TV, magnetòfono, etc.) como se ha
descrito en la sección anterior.
2. Presione el botón PART de la sección
del selector SAMPLING ® y ajuste
el nivel de muestren con el control
SAMPLING LEVEL ®
3. Para muestrear la parte 1 indique la
clave de muestren deseada pulsando la
tecla C1-C2 apropiada (si en este
momento no pulsa ninguna tecla, se
seleccionará automáticamente Cl), y
el muestreo se iniciará cuando presione
el botón SYNCHRO START ® o
START®.
4. Para muestrear en la parte 2, presione
de nuevo el botón PART e indique la
clave de muestreo pulsando una de las
teclas de la gama C2-C3. El muestreo se
iniciará, al igual que en el caso de la
parte 1, cuando presione el botón
SYNCHRO START о START.
El muestreo para las partes 3 y 4 es
exactamente igual al de la parte 2,
excepto que las teclas para indicar la
clave de muestreo se desplazan una
octava en la parte siguiente (consulte
la figura).
5. Ponga el selector PLAYBACK ® en la
posición KEYBOARD y, de esta forma,
estará listo para tocar los sonidos
muestreados con el teclado.
NOTAS:
’Guarido toque los sonidos muestreados en el modo
PART como bajos, el sonido maestreado para la parte 1 se
reproducirá en primer lugar. Si la nota de bajo se toca
continuamente durante un período de tiempo más largo
que el de muestreo de la parte 1, la fuente sonora para la
nota de bajo cambiará a los sonidos muestreados para
la parte 2, después la parte 3, y por último la parte 4,
uno iras otro.
’Una vez finalizado el prrxeso de muestreo en el modo
PART, el sonido maestreado podrá reproducirse individual
mente en toda la gama del teclado presionando dos
veces el botón FULL de la sección del selector SAMPLING
(5y , V después manteniendo pulsada uno tecla; el sonido
fuente cambiará del maestreado para la parte 1 al de la
parte 2, después al de ¡a parte 3, y por último al de la
parte 4. respecfíuameníe.
Codo vez, la fuente sonora actualmente en reproducción
será uáfido para todo el teclado.
Para volver al modo PART en el que las fuentes sonoras
muestreados de cada parte sean válidas solamente paro
sus octavas respectivas, presione simplemente dos ueces
el botón PART.
Page 15

ORCHESTRA
ORCHESTER
ORCHESTRE
ORQUESTA
ORCHESTRA
VIBRATO SUSTAIN QaZZ ORGAN SAXOPHONE KOTO
-ON
1
Orchestra Section
By pressing any of the 21 voice selectors
available in the Orchestra Section, your
VSS-100 will let you play melodies using
the authentic sound of the selected instru
ment as reproduced by its FM sound
source.
1. Select the instrument you want to ‘play’
by pressing the corresponding Orchestra
Voice selector button (g).
2. Use the ORCHESTRA VOLUME control
@ to adjust the volume of the selected
instrument voice. Don’t turn the
ORCHESTRA VOLUME all the way
down to MIN., otherwise the selected
instrument voice will not be heard.
Do, however, set the Voice Sampler’s
PLAYBACK VOLUME (9) to the MIN.
position in order to hear only the
orchestra voices.
3. Now try playing a melody on the key
board; and try some of the other voices
in the Orchestra section to experience
the versatility of the VSS-100.
NOTE:
*Your VSS-100 can produce up to 9 notes at any one
time. However, when the rhythm function has been
activated, this number is reduced to six. If the Auto
Bass Chord function is also in use, the maximum
number of notes which can be played is two.
Orchesterteil
Durch Drücken eines der 21 Stimmen
wahlschalters des Orchesterbereichs
erlaubt Ihr VSS-100 es Ihnen, Melodien mit
dem authentischen Klang des gewählten
Instruments zu spielen, die von dessen FMKlangquelle reproduziert werden.
1. Wählen Sie das Instrument, das Sie
“spielen” wollen, indem Sie den entspre
chenden Orchester-Stimmenwahlschal
ter (ORCHESTRA)
® drücken.
2. Verwenden Sie den Orchesterlautstärke
regler (ORCHESTRA VOLUME) ® ,
um die Lautstärke des gewählten Instru
ments einzustellen. Drehen Sie die
Orchesterlautstärke nicht ganz auf MIN,
weil sonst die gewählte Instrumenten
stimme nicht gehört wird. Stellen Sie
aber die Wiedergabe mit dem Wiederg abelautstärkeregler (PLAYBACK
VOLUME) (9) auf MIN, um nur die
Orchesterstimmen zu hören.
3. Versuchen Sie nun, eine Melodie auf
dem Keyboard zu spielen; und probieren
Sie einige der anderen Stimmen im
Orchesterteil aus, um die Vielseitigkeit
des VSS-100 auszuprobieren.
ANMERKUNG:
Ihr VSS-100 fcann bis zu 9 Noten zur Zeit produzieren. Wenn
aber die Rhythmusfunktion aktiviert worden ist, ist diese
Zahl auf sechs reduziert. Wenn die Auto-Baß akkordBegleitungsfunktion ebenfalls eingesetzt wird, können nur
maximal zwei Nofen gespielt werden.
Section orchestre
En appuyant sur un des 21 sélecteurs
de voix, disponibles dans la Section
ORCHESTRA, le VSS-100 permettra de
jouer des mélodies en utilisant le son
authentique de l’instrument choisi qui
sera reproduit par sa propre source FM.
1. Choisir l’instrument que l’on désire
“jouer” en appuyant sur le sélecteur
de voix orchestre ® correspondant.
2. Se servir du réglage ORCHESTRA
VOLUME ® pour ajuster le volume de
la voix de l’instrument choisi. Ne pas
tourner le réglage ORCHESTRA
VOLUME à fond vers MIN, car l’instru
ment choisi serait alors inaudible.
Cependant, amener le réglage PLAYBACK VOLUME (D de l’échantillonneur
sur MIN afin de pouvoir entendre seule
ment les voix d’orchestre.
3. Essayer alors de jouer une mélodie sur
le clavier; se livrer à un essai d’autres
voix dans la section Orchestre pour
avoir un aperçu de la polyvalence du
VSS-100.
Remarque:
Le VSS-100 peut produire jusqu'à 9 notes à tout moment.
Cependant, quand la fonction Rythme a été mise en
service, ce nombre est réduit à 6. St la fonction Accord
basse automatique est utilisée également, le nombre
maximum de notes qu 'il est possible de jouer est 2.
Sección de orquesta (ORCHESTRA)
Presionando uno cualquiera de los selec
tores de las 21 voces de la sección de
orquesta, su VSS-100 le permitirá tocar
melodías empleando el sonido auténtico
del instrumento seleccionado reproducido
mediante su fuente sonora de FM,
1. Seleccione el instrumento que desee
“tocar” presionando el selector de voces
ORCHESTRA ® .
2. Emplee el control ORCHESTRA
VOLUME (j|) para a justar el volumen
de la voz instrumental seleccionada.
No gire este control completamente
hasta MIN., yaque si no no podrá oír
la voz instrumental seleccionada. Sin
embargo, ponga el control PLAYBACK
VOLUME CD en MIN. A fin de oír
solamente las voces de orquesta.
3. Pruebe a tocar una melodía con el
teclado, y utilice algunas de las demás
voces de la sección ORCHESTRA a fin
de comprobar la versatilidad del VSS-100.
NOTA:
Su VSS-100 puede producir hasta 9 notas al mismo tiempo.
Sin embargo, cuando haya activado la función de ritmo,
este número se reducirá a seis. Si también está empleando
la función de bajos y acordes automáticos, el número
máximo de notas que podrán tocarse será dos.
Page 16

ACCOMPANIMENT
BEGLEITUNG
ACCOMPAGNEMENT
ACCOMPANAMIENTO
ACCOMRANIMENT
TEMPO * Ф
I
-------
SYNCHRO START
фс
AUTO BASS CHORD
1-
II
Ф
FINGERED
aNGLE FINGER
OFF
il 1 1
1 DISCO
■MAÌ|
.1 1 1 1
1 16 BEAT
II 1
, ROCK’N’ ROa MARCH/POLI
:i 1
1 COUNTRY WALTZ
BOSSANOVA
I
--------
----------------
BIG BAND
SLOW ROCK
L 1
r 1
1 1
1
1
Ф
LJ
RHYTHM Section
Now try playing a melody with rhythm
accompaniment.
1. First, select the type of rhythm best
suited for the song you’re going to play
from among the twelve selectors in the
ACCOMPANIMENT section. Press the
corresponding button ® for your
desired rhythm.
2. By pressing the START button ® , the
selected rhythm will begin immediately.
• SYNCHRO START
The SYNCHRO START button is con
venient when you wish to begin your
melody and the rhythm simultaneously.
Pressing the SYNCHRO START button
® puts the VSS-100 in the Rhythm
“Standby” mode. To start the rhythm,
press any key in the Lower Keyboard
Section @ .
3. Use the TEMPO control buttons (® to
adjust the rhythm speed to suit the
melody you wish to play.
• TEMPO LIGHT
The TEMPO LIGHT will illuminate on the
first beat of each measure to indicate the
speed of the rhythm. Use the TEMPO
LIGHT as a guide for determining the
tempo while adjusting it to your desired
speed. When your VSS-100 rhythm has
been put into the “Standby” mode by
pressing the SYNCHRO START button
@ , the TEMPO LIGHT will flash on
each beat.
RHYTHMUS-TEIL
Versuchen Sie jetzt, eine Melodie mit
Rhythmusbegleitung zu spielen.
1. Wählen Sie den Rhythmus, der am besten
zu Ihrer Musik paßt, durch Drücken
eines der zwölf Schalter im BegleitungsBereich. Drücken Sie den entsprechenden
Schalter ® für den gewünschten
Rhythmus.
2. Durch Drücken des START-Schälters
® beginnt der gewählte Rhythmus
sofort.
• SYNCHRO START
Der SYNCHRO START-Sc halter ® ist
praktisch, wenn Sie Ihre Melodie und den
Rhythmus gleichzeitig beginnen wollen.
Durch Drücken des SYNCHRO STARTSchalters ® wird das VSS-100 in die
Rhythmus-Bereitschafts-Betriebsart gestellt.
Zum Start des Rhythmus drücken Sie jede
Taste im unteren Tastaturbereich @1 ,
3. Stellen Sie das Rhythmustempo mit den
Temposchaltern (TEMPO) ® ein, um
es der gewählten Melodie anzupassen.
• Tempolämpchen
Das Tempolämpchen (TEMPO LIGHT)
leuchtet beim ersten Taktschlag jedes
Taktes auf, um das Tempo des Rhythmus
anzuzeigen. Verwenden Sie es als Richtmaß
zur Bestimmung des Tempos, während Sie
es nach Wunsch einstellen. Wenn Ihr
VSS-100 durch Drücken des SYNCHRO
START-Schalters ® in BereitschaftsBetriebsart gestellt wurde, leuchtet das
Tempolämpchen bei jedem Taktschlag auf.
Section RYTHME
Essayer à présent de jouer une mélodie
avec accompagnement rythmique.
1. Parmi les douze sélecteurs de la sec
tion ACCOMPANIMENT, choisir tout
d’abord le type de rythme qui convient
le mieux à la chanson que l’on envisage
d’interpréter. Appuyer sur la touche ®
correspondant au rythme souhaité.
2. Le rythme choisi commence immédiate
ment par une poussée sur la touche
START @ .
• MISE EN MARCHE SYNCHRONISEE
La touche SYNCHRO START s’avère pra
tique quand on désire faire commencer
simultanément la mélodie et le rythme.
Une poussée sur la touche SYNCHRO
START ® place le VSS-100 en mode
“Attente” rythme. Pour lancer le rythme,
appuyer sur une touche quelconque de la
section clavier inférieur @ .
3. Se servir des réglages TEMPO ® pour
ajuster la vitesse du rythme de manière
qu’elle convienne à la mélodie à jouer.
• Témoin de TEMPO
La lampe TEMPO s’allumera au premier
temps de chaque mesure afin d’indiquer
la vitesse du rythme. On observera ce
témoin TEMPO qui servira de guide pour
déterminer le tempo lors du réglage de la
vitesse. Lorsque le VSS-iœ a été placé
en mode “Attente” par une poussée sur
la touche SYNCHRO START ® ,1e témoin
TEMPO clignote à chaque temps.
Sección de ritmos (RHITHM)
Ahora, pruebe a tocar una melodía con
acompañamiento rítmico.
1. En primer lugar, elija el tipo de ritmo que
mejor se adecúe a la canción que vaya
a tocar con uno de los doce selectores de
la sección ACCOMPANIMENT. Presione
el botón RHITHM ® correspondiente
al ritmo deseado.
2. Al presionar el botón START ® ,
el ritmo seleccionado se iniciará
inmediatamente.
• INICIO SINCRONIZADO
El botón SYNCHRO START ® le será
muy útil cuando desee iniciar simultánea
mente su melodía y el ritmo. Al presionar
este botón, el VSS-100 plisará al modo de
ritmo “en espera”. Para iniciar el ritmo,
pulse cualquier tecla de la sección del
teclado inferior (§) .
3. Emplee los botones de control TEMPO
® para ajustar la velocidad del ritmo
de acuerdo con la melodía que desee
tocar.
• Lámpara indicadora de tempo
TEMPO LIGHT
La lámpara TEMPO LIGHT se iluminará en
el primer tiempo de cada compás pcira indicar
la velocidad del ritmo. Empléela como
guía pcura determinar el tempo mientras lo
ajuste a la velocidad deseada. Cuando haya
puesto el ritmo de su VSS-100 en el modo
de “espera” presionando el botón SYNCHRO
START ® , la lámpara TEMPO parpa
deará en cada tiempo.
Page 17

4. The loudness of the rhythm accompani
ment can be adjusted as desired by
sliding theACCOMPANlMENTVOLUME
control ® up or down. We recommend
using the ACCOMPANIMENT VOLUME
and the ORCHESTRA VOLUME controls
to set and maintain a good balance
between the accompaniment and
melody sounds.
• FILL IN
Pressing the FILL IN button ® will allow
a rhythmic FILL IN pattern to be inserted
into the measure during which the button
was pressed. FILL IN patterns differ
according to the selected rhythm.
4. Die Lautstärke der Rhythmusbegleitung
kann nach Wunsch eingestellt werden»
indem der Begleitlautstärkeregler
(ACCOMPANIMENT VOLUME) ®
nach oben oder unten geschoben wird.
Wir empfehlen die Verwendung der
Regler für Begleitlautstärke ACCOM
PANIMENT VOLUME ® und Orches
terlautstärke (ORCHESTER VOLUME),
um eine gute Balance zwischen Beglei
tung und Melodie einzustellen.
• HLL IN
Drücken Sie den Schalter FILL IN ® , um
ein automatisches FILL IN-Muster zu
erhalten, das in den Takt eingefügt wird,
dessen Schalter gedrückt wurde. FILL INMuster unterscheiden sich je nach gewähltem
Rhythmus.
4. L’intensité de raccompagnement
rythmé peut se régler à volonté en
déplaçant leréglageACCOMPANIMENT
VOLUME ® vers le haut ou vers le
bas. Nous conseillons de se servir
des réglages ACCOMPANIMENT
VOLUME et ORCHESTRA VOLUME
pour maintenir un bon équilibre entre
l’accompagnement et la mélodie.
• FILL IN
Appuyer sur la touche FILL IN ® pour
permettre l’insertion d’un type rythmique
FILL IN dans la mesure pendant laquelle
la touche est actionnée. Les types FILL IN
diffèrent en fonction du rythme choisi.
4. La sonoridad del acompañamiento
rítmico podrá ajustarse como se desee
deslizando el control ACCOMPANIMENT
VOLUME ® hacia arriba o hacia abajo.
Recomendamos emplear los controles
ACCOMPANIMENT VOLUME y
ORCHESTRA VOLUME para ajustar y
mantener un buen equilibrio entre los
sonidos del acompañamiento y de la
melodía.
• RELLENO (FILL IN)
Presionando el botón FILL IN @ podrá
inserteur un patrón rítmico de relleno (FILL IN)
en el compás durante el que presionó el
botón. Los patrones FILL IN difieren de
acuerdo con el ritmo seleccionado.
Auto Bass Chord section
The Auto Bass Chord function is an auto
matic accompaniment feature; please turn
it off when you do not wish to use it by
setting the slide switch ® to the OFF
position.
A. Single Finger Operation
By putting the Auto Bass Chord feature
in the SINGLE FINGER mode, you can play
chords and bass with a single finger by
pressing any key in the Lower Keyboard
Section @. The accompaniment will
automatically be synchronized with the
selected rhythm.
1. Put the VSS-100 into SINGLE FINGER
Mode
Set the AUTO BASS CHORD selector
switch ® to the SINGLE FINGER
position.
2. Select a Rhythm Pattern
Select the desired rhythm pattern with
the Rhythm Select switch ® , then set
the rhythm speed with the TEMPO
control ® and adjust the ACCOM
PANIMENT TEMPO ® as desired.
3. Press the SYNCHRO START button.
4. Press any Key
Pressing any key in the Lower Keyboard
Section (g) will automatically provide
a chord and bass note accompaniment
to compliment the selected rhythm.
5. Play a Melody with Accompaniment
Try playing a melody with the Single
Finger accompaniment.
Auto-Bcdiakkord-Bereich
Die Auto-Baßakkord-Funktion ist ein
automatisches Begleitmerkmal: Schalten
Sie sie aus, wenn Sic sie nicht einsetzen
wollen, indem Sie den Schieberegler ® auf
Aus-Stellung (OFF) schieben.
A. Single-Hnger-Betriebsaii
Indem Sie den Auto-Baß-Akkord auf
Single-Finger-Betrieb stellen, können Sie
Akkorde und Baßrhythmen mit einem
einzigen Finger spielen, indem Sie eine
Taste im unteren Tastaturbereich (g)
drücken.
1. Stellen Sie Ihr VSS-100 auf SingleFinger-Betrieb.
Stellen Sieden Auto-Baßakkord-Schalter
® auf Single- Finger-Begleitung.
2. Wählen Sie einen Rhythmus.
Wählen Sie den gewünschten Rhythmus
mit dem Rhythm uswahlschalter
(RHYTHM) ® und stellen Sie den
Temporegler @ und den Begleittem
poregler (ACCOMPANIMENT TEMPO)
® nach Wunsch ein.
3. Drücken Sie den SYNCHRO STARTSchalter.
4. Drücken Sie eine beliebige Taste.
Drücken Sie jede beliebige Taste im
unteren Tastaturbereich (g , und Sie
erhalten automatisch einen Akkord und
Baßbegleitung zur Ergänzung des
gewählten Rhythmus.
5. Spielen Sie eine Melodie mit Begleitung.
Versuchen Sic, eine Melodie mit der
Singlc-Finger-Begleitung zu spielen.
Section Accord basse automatique
La Section Accord basse automatique est
un dispositif d’accompagnement automa
tique. Prière de la couper quand elle
n’est pas requise en amenant le curseur
® à la position OFF.
A. Opération à un seul doigt
En plaçant le dispositif Accord basse
automatique en mode SINGLE FINGER,
on pourra jouer les accords et les basses
avec un seul doigt en appuyant sur une
quelconque des touches de la section
clavier inférieur g . L’accompagnement
sera automatiquement synchronisé au
rythme choisi.
1. Placer le VSS-100 en mode SINGLE
FINGER.
Régler le sélecteur AUTO BASS CHORD
® à la position SINGLE FINGER.
2. Choisir le type de rythme
Choisir le type de rythme souhaité par
le sélecteur de rythme ® ; puis, régler
la vitesse du rythme par le réglage
TEMPO ® et ajuster le réglage
ACCOMPANIMENT TEMPO ® selon
les besoins.
3. Appuyer sur la touche SYNCHRO START.
4. Appuyer sur une touche quelconque.
Une poussée sur une des touches de
la Section clavier inférieur g produira
automatiquement un accord et une
note basse d’accompagnement pour
convenir au rythme choisi.
5. Jouer la mélodie avec accompagnement.
Essayer de jouer une mélodie avec
accompagnement à un seul doigt.
Sección de bajos y acordes
automáticos (AUTO BASS CHORD)
Ésta es una función de acompañamiento
automático; cuando no vaya a utilizarla,
desactívela poniendo el selector AUTO
BASS CHORD ® en OFF.
A. Operación con un solo dedo
Poniendo la función de bajos y acordes
automáticos en el modo de un solo dedo
(SINGLE FINGER), podrá tocar acordes y
bajos con un solo dedo pulsando cualquier
tecla de la sección del teclado inferior g .
El acompañamiento se sincronizará auto
máticamente con el ritmo seleccionado.
1. Ponga el VSS-100 en el modo de un solo
dedo.
Ponga el selector AUTO BASS CHORD
® en la posición SINGLE FINGER.
2. Seleccione un patrón rítmico.
Elija el patrón rítmico deseado con el
selector RHYTHM ® , después ajuste la
velocidad del ritmo con el control TEMPO
® y, el volumen del acompañamiento
con el control ACCOMPANIMENT
VOLUME ® en la forma deseada.
3. Presione el botón SYNCHRO START.
4. Pulse cualquier tecla.
Al pulsar cualquier tecla de la sección
del teclado inferior g obtendrá auto
máticamente un acompañamiento de
notas de acordes y bajos que se
añadirán al ritmo seleccionado.
5. Toque una melodía con acompañamiento.
Pruebe a tocar una melodía con el
acompañamiento de un solo dedo.
Page 18

• How to Play Chords in the Single
Finger Mode
Major Chords: To play major chords, you
only need to press the key in the Lower
Keyboard Section (g) corresponding to
the chord's root note.
Minor Chords: To piay a minor chord,
press the key corresponding to the root
note in the Lower Keyboard Section @
together with the black key to its left.
Seventh Chords: To play a seventh chord,
press key in the Lower Keyboard Section
@) of the major chord together with the
white key to its left.
Minor Seventh Chords: To play a minor
seventh chord, press the key in the Lower
Keyboard Section @ corresponding to
the root note of the major chord together
with the white and the black keys to its left.
• Spielen von Akkorden in SingleHnger-Einstellung
Dur-Akkorde: Zum Spielen von Dur-
Akkorden brauchen Sie nur die Taste im
unteren Tastaturbereich (g) zu drücken, die
der Grundnote des Akkords entspricht.
Moll-Akkorde: Zum Spielen von MollAkkorden brauchen Sie nur die Taste im
unteren Tastaturbereich ® zu drücken, die
der Grundnote des Akkords entspricht,
zusammen mit der schwarzen Taste links
davon.
Septimenakkorde; Zum Spielen von
Septimen-Akkorden brauchen Sie nur die
Taste im unteren Tastaturbereich ® zu
drücken, die der Grundnote des Akkords
entspricht, zusammen mit der weißen Taste
links davon.
Moll-Septimenakkorde: Zum Spielen von
Moll-Septimen-Akkorden brauchen Sie nur
die Taste im unteren Tastaturbereich (g)
zu drücken, die der Grundnote des Akkords
entspricht, zusammen mit den schwarzen
und weißen Tasten links davon.
• Pour Jouer les accords en mode à un
seul doigt
Accords majeurs: Pour jouer les accords
majeurs, it suffit d’appuyer sur la touche
de la Section clavier inférieur g), corres
pondant à la note de base de l’accord.
Accords mineurs: Pour jouer un accord
mineur, appuyer sur la touche correspon
dant à la note de base dans la Section
clavier inférieur (g) en même temps que
sur la touche noire à sa gauche.
Septième: Pour jouer un accord septième,
appuyer sur la touche correspondant à la
note de base dans la Section clavier
inférieur g en même temps que sur la
touche blanche à sa gauche.
Accords mineurs septième: Pour jouer un
accord mineur septième, appuyer sur la
touche de la Section clavier inférieur g
correspondant à la note de base de
l’accord majeur en même temps que sur
les touches blanche et noire à sa gauche.
• Cómo tocar acordes en el modo de
un solo dedo
Acordes mayores: Para tocar acordes
mayores, solamente tendrá que pulsar una
tecla de la sección del teclado inferior g
correspondiente a la nota raíz del acorde.
Acordes menores:
Para tocar un acorde
menor, pulse la tecla correspondiente a la
nota raíz de la sección del teclado inferior
g junto con la tecla negra situada a su
izquierda.
Acordes de séptima; Para tocar un acorde
de séptima, pulse una tecla de acorde mayor
de la sección del teclado inferior g junto
con la tecla blanca situada a su izquierda.
Acordes menores séptima : Para tocar
un acorde de séptima menor, pulse la tecla
correspondiente a la nota raíz del acorde
mayor de la sección del teclado inferior g
junto con las teclas blanca y negra situadas
a su izquierda.
16
(major chord)
(Dur-Akkord)
(accord majeur)
(acorde mayor)
B. Fingered Mode
The FINGERED mode permits you to
play your own chords (3 or 4 notes). A bass
note will automatically be added and
the resulting accompaniment will be
synchronized with the selected rhythm.
This mode allows you to play more than
the “basic” chords generated in the
Single Finger mode.
1. Set the Auto Bass Chord selector switch
g to the FINGERED position.
2. Select the desired rhythm pattern with
the Rhythm Selector switch ® , set
the tempo with the TEMPO control ®
and adjust the ACCOMPANIMENT
VOLUME control g as desired.
iminor chord) (Moll-Akkord)
accord mineur) (acorde menor)
Î
seventh chord) (Septimenakkord)
accord septième) (acorde de séptima)
B. Hngered -Betriebsart
Die Fingered-Betriebsart erlaubt es Ihnen,
Ihre eigenen Akkorde (drei oder vier Noten)
zu spielen. Eine Baßnote wird automatisch
hinzugefügt, und die resultierende Beglei
tung wird mit dem gewählten Rhythmus
synchronisiert. Diese Betriebsart erlaubt es
Ihnen, mehr als die “grundlegenden”
Akkorde zu spielen, die in der FingeredBetriebsart erzeugt werden.
1. Stellen Sie den Baßakkord-AutomatikSchalter (AUTO BASS CHORD) g
auf Stellung FINGERED.
2. Wählen Sie den gewünschten Rhythmus
mit dem Rhythmuswähler (RHYTHM)
g , stellen Sie das Tempo mit dem
Temporegler g ein und stellen Sie die
Begleitlautstärke mit dem Begleitlaut
stärkeregler (ACCOMPANIMENT
VOLUME) g nach Wunsch ein.
Cm?
(minor seventh chord)
(Moll- Septimen-Akkord)
(accord mineur septième)
(acorde menor séptima)
B. Mode plusieurs doigts (FINGERED)
Le mode FINGERED permet de jouer ses
propres accords (3 ou 4 notes). Une note
de basse sera automatiquement ajoutée
et l’accompagnement qui en résultera
sera synchronisé au rythme choisi. Ce
mode permet de jouer plus que les accords
“de base”, produit en mode à un seul doigt.
1. Régler le sélecteur d’accord basse auto
matique g à la position FINGERED.
2. Choisir le type de rythme souhaité avec
le sélecteur de rytyme ® , déterminer
le tempo par le réglage TEMPO g Et
ajuster le réglage ACCOMPANIMENT
VOLUME g selon les besoins.
B. Modo con todos los dedos
El mcwlo con todos los dedos (FINGERED)
le permitirá tocar sus propios acordes (3 o
4 notas). Se añadirá automáticamente una
nota de bajo y el acompañamiento resultante
se sincronizará con el ritmo seleccionado.
Este modo le permitirá tocar más acordes
que los “básicos” generados en el modo de
un solo dedo.
1. Ponga el selector AUTO BASS CHORD
g en la posición FINGERED.
2. Elija el patrón rítmico deseado con el
selector RHYTHM g , después ajuste
la velocidad del ritmo con el control
TEMPO g , y el volumen del acom
pañamiento con el control ACCOMPANI
MENT VOLUME g en la forma deseada.
Page 19

3. Press the SYNCHRO START button ® .
4. Play a chord with your left hand. When
a chord is fingered in the Lower Key
board Section @), it will be auto
matically rendered with bass, as
accompaniment. Try playing a melody
while fingering the accompaniment
in this manner.
3. Drücken Sie den SYNCHRO STARTSchalter ® .
4. Spielen Sic einen Akkord mit der linken
Hand. Wenn ein Akkord im unteren
Tastaturbereich @) gespielt wird, wird
er automatisch mit Baßbegleitung
gehört. Versuchen Sie, eine Melodie mit
dieser Fingerbegleitung zu spielen.
3. Appuyer sur la touche SYNCHRO
START ® .
4. Jouer un accord de la main gauche.
Lorsque l’accord est exécuté dans la
Section clavier inférieur @ , il sera
automatiquement rendu avec basse et
accompagnement.
Essayer de jouer une mélodie en
jouant l’accompagnement de cette
façon.
3. Presioné el botón SYNCHROSTART ® .
4. Toque un acorde con la mano izquierda.
Cuando toque un acorde con la sección
del teclado inferior @ , éste se oirá
automáticamente con un bajo de acom
pañamiento. Pruebe una melodía tocando
el acompañamiento de esta forma.
NOTE:
* Whether playing the accompaniment in the Single
Finger or the Fingered mode, play of the chord and
bass notes set when a key or keys in the Lower
Keyboard Section was/were pressed initially wili
automatically continue. Therefore, you only need to
press a key or keys when you wish to change chords
or bass notes.
*The tone of the Auto Bass Chord remains the same
regardless of the Instrument voice selected in the
Orchestra section.
ANMERKUNG:
’’Wenn die Begleitung in Single-Finger- oder Fingered-
Betriebsart gespielt wird, werden die Baßnoten oder die
Fingered-Akkorde automatisch fortgesetzt, bis Sie eine neue
Single-Fmger-Baß note oder einen Fingered-Akkord spielen.
*Der Ton der Auto-Baß-Begleitung verbleibt gleich,
ungeachtet der im Orchesterstimmen-Register gewählten
Instrumentenstimme.
External Jacks and Optional Items
Anschlußbuchsen und Sonderzubehör
Prises extérieures et équipements en option
Tomas externas e items opcionales
A. LINE IN Jack
This jack is used when connecting the
VSS-100 to a radio, television, tape deck
or other similar audio equipment when
sampling a sound for the Voice Sampler.
An optional connecting cable is needed
and one end should be plugged into the
LINE OUT jack on the external equipment.
A. LINE IN-Buchse
Diese Buchse dient zum Anschluß des
VSS-100 an einen Fernseher, ein Radio
oder ein Tonbandgerät, wenn Sie Töne
von diesen Geräten zum Sampling verwenden
wollen. Verwenden Sie ein PC-2-Verbindungskabel (getrennt erhältlich), wenn Sie
diese Buchse zum Anschluß an LINE OUTßuchsen anderer Geräte verwenden.
Remarques:
*Que l’on joue l’accompagnement en mode à un seul
doigt ou à plusieurs doigts, le jeu de l'accord et des
notes basses continuera automatiquement quand la
(ou les) touche(s) de la Section clavier inférieur a (ont)
été actionnée(s) initialement. Par conséquent il suffit
d’actionner une (ou des) touche(s) quand on désire
changer les accords ou les notes basses.
*Le ton de l’Accord basse automatique reste le même,
quelle que soit la voix instrumentale choisie dans la
section Orchestre.
A. Prise d’entrée de ligne (LINE IN)
Cette prise s’emploie pour raccorder le
VSS-100 à une radio, un téléviseur, un
magnétophone ou un autre appareil audio
en vue de l’échantillonnage d’un son. Un
câble de raccordement, disponible en
option, est nécessaire dont une extrémité
doit se brancher sur la prise LINE OUT
de l’équipement externe.
NOTAS:
* Cuando toque el acompañamiento en el modo de un so/o
dedo o de todos los dedos, la reproducción de ios noíos
de acorde y bajo establecidas, cuando pulsó inicialmente
una o uoríos teclas de la sección del teclado inferior, con
tinuará automáticamente. Por lo tanto, cuando desee
cambiar las notas de acordes o bajos, solamente necesitará
pulsar una o varias tedas.
*£/ tono del acompañamiento de bajos y acordes ouío-
móficos permanecerá igual independientemente de la
voz instrumental elegida de la sección de orquesta.
A. Toma de entrada de finea (UNE IN)
Empléela para conectar el VSS-100 a una
radio, TV, magnetófono, u otro equipo de
audio similar a fin de maestrear un sonido
para el muestreador vocal. Para ello nece
sitará un cable conector opcional, uno de
cuyos extremos deberá enchufarse en la
toma UNE OUT del equipo externo.
Page 20

B. AUX. OUT Jack
This jack is used when you wish to con
nect your VSS-100 into an amplifier or
tape recorder when performing before an
audience or when you wish to record
your performance. Please use a PC-2
Connector Cable (sold separately) when
using this jack to connect into other audio
equipment.
• Impedance: 40
• Output level; +2dBm
C. HEADPHONES Jack
Connect a set of headphones to this jack
and you can enjoy your performance
without disturbing others.
D. External power source jack
DC 9-12V IN
•AC Power
Connect the AC Power Adaptor PA-1
to the DC 9-12V IN jack.
• Car battery
The Car Battery Adaptor CA-1 plugs into
the DC 9-12V IN jack and a cigarette
lighter socket.
Optional Items
• AC Power Adaptor (PA-1)
Transforms AC voltage to DC voltage.
• Car Battery Adaptor (CA-1)
Enables you to provide power to the
instrument from a car battery using the
cigarette lighter socket.
• Soft Carrying Case (SCC-15)
For convenient transportation.
• Headphones series)
Specially designed lightweight dynamic
headphones with extra-soft ear pads.
• Connecting cord (PC-2)
For connecting the keyboard to a stereo
hi-fi system.
B. AUX/OUT-Buchse
Diese Buchse dient zum Anschluß des
VSS-100 an einen Verstärker oder ein
Tonbandgerät, wenn Sie vor Zuhörern
spielen oder Ihre Vorführung au^eichnen
wollen. Verwenden Sie ein PC-2-Verbin d-
ungskabel (getrennt erhältlich), wenn Sie
diese Buchse zum Anschluß an andere
Audiogeräte verwenden.
• Impedanz: 4 Ohm
• Ausgangspegel: -»-ZdBm
C. Kopfhörerbuchsen (HEADPHONES)
Schließen Sie hier Kopfhörer an, und Sie
können Ihr Spiel genießen, ohne andere zu
stören.
D. Fremdstrombuchse DC 9-12V IN
• Netzstrom
Schließen Sie das Netzteil PA-1 an die
Fremdstrombuchse DC 9-12V IN an.
• Autobatterie
Schließen Sie den Autobatterieadapter
CA-1 an die Fremdstrombuchse DC
9-12V IN und an den Zigarettenanzünder
Ihres Wagens an.
Sonderzubehör
• Netzteil (PA-1)
Wandelt Netzstrom in Gleichstrom um.
• Autobatterieadapter (CA-1)
Ermöglicht es Ihnen, das Instrument mit
Strom aus der Autobatterie durch den
Zigarettenanzünder Ihres Wagens zu
betreiben.
• Weiche Tragetasche (SCC-15)
Zum bequemen Tragen des Instrumentes.
• Kopfhörer (YH-Serie)
Speziell leicht ausgelegte, dynamische
Kopfhörer mit extraweichen Ohmiuscheln.
• Verbindungskabel (PC-1)
Zum Anschluß des Instrumentes an ein
HiFi-Stereosystem.
B. Prise de sortie auxiliaire (AUX OUp
Cette prise s’emploie quand on désire
raccorder le VSS-100 à un amplificateur ou
un magnétophone pour une interprétation
devant un public ou pour enregistrer
l’interprétation. Se servir du câble de
raccordement PC-2 (vendu séparément)
quand on se sert de cette prise pour
raccorder le VSS-100 à un autre appareil
audio.
• Impédance; 4 ohms
• Niveau de sortie: +2 dBm
C. Prise de casque (HEADPHONES)
Brancher un casque d’écoute sur cette
prise pour écouter une interprétation sans
déranger les autres,
D. Prise de source électrique externe
DC 9-12V IN
• Secteur
Brancher l’adaptateur d’alimentation
secteur PA-1 sur la prise DC 9-12V IN.
• Batterie de voiture
L’adaptateur de batterie de voiture CA-1
se branche sur la prise DC 9-12V IN
et sur la douille de l’atlume-cigare.
Equipements en option
• Adaptateur d’alimentation secteur (PA-1)
Transforme le cburant alternatif en
courant continu.
• Adaptateur de batterie de voiture (CA-1)
Permet d’alimenter l’instrument sur
une batterie de voiture via la douille de
l’allume-cigare du véhicule.
• Etui souple de transport (SCC-15)
Pratique pour le transport de l’instrument.
• Casque d’écoute (Série YH)
Casque léger et dynamique de concep
tion spéciale, muni de pavillons d’oreille
extra-doux.
•Cordon de raccordement (PC-2)
Pour le raccordement du clavier à une
chaîne hi-fi stéréo.
B. Toma de salida exterior (AUX. OUT)
Empléela para conectar el VSS-100 a un
amplificador o un magnetófono a fin de
tocar ante auditorio, o para grabar sus
ejecuciones.
Para conectar esta toma a otro equipo de
audio, emplee el cable conector PC-2
(opcional).
• Impedancia: 4 ohmios
• Nivel de salida: +2 dBm
C. Toma de auriculares (HEADPHONES)
Conéctele un juego de auriculares para dis
frutar de sus ejecuciones sin molestar a los
demás.
D. Toma de alimentación exterior
(DC IN 9-12V)
• Tensión de la red Conecte a esta toma
el adaptador de alimentación de PA-1.
• Batería de automóvil
Enchufe el adaptador de batería de
automóvil CA-1 a la toma DC IN 9-12V
del VSS-100 y a la toma del encendedor
de cigarrillos de su automóvil.
ítmes opmonales
• Adaptador de alimentación de CA (PA-1)
Transforma la tensión de CA en CC.
• Adaptador de batería de automóvil
(CA-1)
Le permitirá alimentar el PSS-260 con la
batería de su automóvil empleando la
toma del encendedor de cigarrillos del
mismo.
• Funda de transporte (SCC-15)
Para facilitar el transporte.
• Auriculares (serie YH)
Auriculares dinámicos dinámicos y
ligeros, especialmente diseñados, con
almohadillas auriculares extrablandas.
• Cable conector (PC-2)
Para conectar el teclado a un sistema
estéreo de alta fidelidad.
Page 21

Taking care of your PortaSound
Pflege Ihres VSS-lOO
Entretien du PortaSound
Cuidado de su VSS*100
Your PortaSound will remain in excellent play
ing condition if care is taken concerning the
following.
1-When battery power becomes low, the
instrument’s sound quality may become
unstable. If this occurs, be sure to replace
all the batteries with new ones.
2. When you use AC power be sure to use the
optional PA-1adaptor. Before use, read the
adaptor instructions carefully.
3. The optional car battery adaptor CA-1 is only
for use with a negative ground 12V battery.
Ensure that this is the case before connect
ing the adaptor.
4. Connections made between the PortaSound
and any other device should be made with
both units turned off.
5. Do not set the MASTER VOLUME at MAX
when you connect the PortaSound to a
stereo system. Use the stereo system’s
volume control to adjust the sound level.
6. Avoid placing the instrument in excessively
humid areas.
7. Do not subject the unit to physical shock,
and avoid placing anything heavy on it.
8. The PortaSound should not be placed in
direct sunlight for a long time.
9. Do not place the instrument near any heating
appliance, or leave it inside a car in direct
sunlight for any length of time. Direct
sunshine can raise the interior temperature
of a car with closed doors and windows to
as high as 80°C (176“F). Temperatures in
excess of 60“C (140°F) can cause physical
and/or electrical damage not covered by
warranty.
10. Use a dry or damp cloth for cleaning.
11. Because the orchestra, accompaniment,
and playback volume controls are phasecontrolled they may not render the desired
volume if the power switch is turned on
with them left at an intermediate setting;
if this should happen, simply move the
offending volume control a little bit in either
direction and its function will return to
normal.
Ihr VSS-100 ist immer in erstklassigem Spielzu
stand, wenn Sie die folgenden Punkte beachten:
1. Wenn die Batterien schwach werden, läßt die
Klangqualität des Instrumentes nach. Wenn
dieser Fall eintritt, entfernen Sie alle altefi
Batterien und ersetzen sie so schnell wie
möglich durch neue.
2. Wenn Sie das VSS-100 mit Netzstrom
betreiben, verwenden Sie immer das Netzteil
PA-1. Vor dem Einsatz lesen Sie die Bedienungs
anleitung des Netzteils sorgfältig durch.
3. Der als Sonderzubehör erhältliche Autobat
terie-Adapter CA-1 ist nur zur Verwendung mit
einer 12-Volt-Autobatterie mit negativer Masse
gedacht. Verwenden Sie ihn nur, wenn die
elektrische Anlage Ihres Fahrzeugs diesen
Angaben entspricht.
4. Verbindungen, die zwischen dem VSS-100 und
anderen Geräten hergestellt werden, müssen
bei ausgeschalteten Geräten vorgenommen
werden.
5. Stellen Sie nicht die Hauptlautstärke
(MASTER VOLUME) auf Maximum, wenn Sie
das VSS-100 an eine Stereoanlage anschlie
ßen. Verwenden Sie die Lautstärkeregelung
der Stereoanlage zum Einstellen des Laut
stärkepegels.
6. Stellen Sie das Instrument nicht an Orten mit
hoher Luftfeuchtigkeit auf.
7. Schützen Sie das VSS-100 vor starken Stößen
und stellen Sie keine schweren Gegenstände
darauf.
8. Das VSS-100 darf nicht längere Zeit im prallen
Sonnenlicht aufgestellt werden.
9. Stellen Sie das Instrument nicht in der Nähe
von Heizkörpern auf und lassen Sie es nicht im
in der Sonne geparkten Auto stehen. Direkte
Sonnenbestrahlung bei geschlossenen Türen
und Fenstern kann die Innentemperatur in
einem geparkten Wagen auf solch hohe
Temperaturen wie 80°C ansteigen lassen.
Temperaturen von über 60*^0 können Schäden
im Material und in der Elektronik verursachen,
die nicht von der Garantie gedeckt werden.
10. Verwenden Sie ein weiches trockenes oder
leicht angefeuchtetes Tuch zur Reiningung.
11. Weil die Regler für Orchester, Begleitung
und Wiedergabe-Lautstärke phasengesteuert
sind, kann es sein, das die gewünschte
Lautstärke nicht erzielt wird, wenn das Gerät
bei in Mittenstellung stehenden Reglern einge
schaltet wird; wenn dieser Fall eintritt,
schieben Sie einfach die störende Laut
stärkeregelung ein wenig in eine beliebige
Richtung, und die Funktion normalisiert sich.
Votre instrument restera en parfait état si vous
prenez les précautions suivantes.
1. Quand les piles s’épuisent, la qualité sonore
de l’instrument se détériore. Dans ce cas,
remplacer toutes les piles par des neuves.
2. Pour une alimentation sur secteur, utiliser
uniquement l’adaptateur PA-1 en option et
lire attentivement les explications qui l’ac
compagnent avant son utilisation.
3. L’adaptateur de batterie de voiture CA-1 en
option est réservé à une utilisation avec une
batterie de 12V à masse négative. Confirmer
ce point avant de brancher l’adaptateur.
4. Couper l’alimentation électrique du Porta
Sound et de tout autre appareil avant d’ef
fectuer des connexions entre eux.
5. Ne pas amener le réglage MASTER VOLUME
sur MAX avant de brancher le PortaSound
sur une chaîne stéréo. Se servir du réglage
de volume de la chaîne pour ajuster le niveau
sonore.
6. Eviter de placer l’instrument dans un local
très humide.
7. Ne pas soumettre l’appareil à des chocs
violents et ne rien y déposer de lourd.
8. Ne pas laisser le PortaSound pendant long
temps en plein soleil.
9. Ne pas placer l’instrument près d’un ap
pareil de chauffage ni le laisser pendant
longtemps en plein soleil. La température à
l’intérieur d’un véhicule fermé et laissé en
plein soleil peut atteindre 80"C (176°F). Or,
toute température supérieure à 60“C(140‘’F)
peut entraîner des dégâts physiques et/ou
électriques, non couverts par la garantie.
10. Se servir d’un linge sec ou légèrement
humide pour le nettoyage.
11. Comme les réglages de volume d’orchestre,
d’accompagnement et de lecture sont
contrôlés en phase, il se peut qu’ils ne
rendent pas le volume souhaité si l’alimen
tation est fournie alors qu’ils se trouvent
à une position intermédiaire. Si le cas se
présente, déplacer simplement le réglage de
volume incriminé dans une direction ou une
autre et sa fonction redeviendra normale.
Su VSS-100 estará siempre en condiciones
excelentes si tiene en cuenta los puntos siguientes.
1. Cuando las pilas estén a punto de agotarse, al
calidad del sonido del instrumento será ines
table. Cuando suceda esto, extraiga todas
las pilas y reemplácelas por otras nuevas lo
antes posible.
2. Emplee solamente el adaptador de alimenta
ción PA-1 opcional. Antes de utilizarlo, lea
cuidadosamente su manual de instrucciones.
3. El adaptador de batería de automóvil CA-1
opcional es solamente para emplearse con
baterías de 12V y negativo a la carrocería.
Antes de utilizarlo, asegúrese de que éste es
el caso de su automóvil.
4. Las conexiones entre el VSS-100 y cualquier
otro dispositivo deberán realizarse con la ali
mentación de ambas unidades desconectada.
5. Cuando conecte el VSS-100 a un sistema
estéreo, no ponga el control MASTER
VOLUME en MAX. Para ajustar el nivel del
sonido, emplee el control de volumen de dicho
sistema estéreo.
6. Evite colocar el instrumento en lugares ex
cesivamente húmedos.
7. No exponga el instrumento a choques, y evite
colocar objetos pesados sobre el mismo.
8. El VSS-100 No deberá colocarse a la luz solar
directa durante mucho tiempo.
9. No coloque el instrumento cerca de aparatos
de calefacción, ni lo deje dentro de un auto
móvil expuesto a la luz solar. El sol puede
aumentar la temperatura interior de un auto
móvil con puertas y ventanas cerradas hasta
80°C. Las temperaturas superiores a 60°C
pueden causar daños físicos y/o eléctricos no
cubiertos por la garantía.
10. Para la limpieza, emplee un paño seco o ligera
mente humedecido.
11. Como los controles de volumen de orquesta,
acompañamiento, y reproducción están con
trolados por fose, es posible que no ofrezcan
el volumen deseado si se conecta la alimenta
ción con tales controles en un punto inter
medio. Cuando suceda esto, simplemente
mueva el control de volumen en cuestión
ligeramente en cualquier sentido y su función
volverá a la normalidad.
19
Page 22

Specifications
Technische Daten
Fiche technique
Especificaciones
• Keyboard
49 Keys (C1-C5)
• Orchestra Voices
Jazz Organ, Pipe Organ, Clarinet, Violin, Flute,
Trumpet, Horn, Saxophone, Oboe, Accordion,
Music Box, Piano, Electric Piano, Harp
sichord, Koto, Electric Guitar, Vibes, Cosmic,
Popsynth, Funksynth, Slapsynth, Orchestra,
Volume
• Effects
Vibrato, Sustain
• Accompaniment Section
Rhythm (Pops, Disco, 16 Beat, Rock’n'Roll,
Country, Samba, Bossanova, Reggae, Big
Band, Slow Rock, March/Polka, Waltz), Auto
Bass Chord {Fingered, Single Finger, Off)
Synchro Start, Start, Stop, Fill In, Tempo
Control
(A, T), Accompaniment Volume
20
• Voice Sampler
Sampling (Full, Part), Synchro Start, Start/
Stop, Sampling Level, Pitch Control, Playback
(Keyboard, Bass), Playback Volume,
Microphone
• Other Controls
Power Switch, Pilot Light, Master Volume,
Demonstration Start/Stop
• Auxiliary Jacks
Line in, Aux. out. Headphones, DC 9-12V in
• Amplifier
2.0W
• Speaker
9cm (4iJ) X1
• Rated Voltage
DC 9V (six 1.5V SUM-2, “C” size, R-14 or
equivalent batteries), AC Power Adaptor(PA-l)
or Car Battery Adaptor (CA-1)
• Dimensions (W x H x D)
628.5x229x56.6 (mm)
{24\"x9"x2y^" mm)
• Weight
2.4kg (5.3 lbs.)
• Tastatur
49 Tasten (C1-C5)
• Orchesterstìmmen
Jazz-Orgel, klassische Orgel, Klarinette,
Violine, Flöte, Trompete, Horn, Saxophon,
Oboe, Akkordeon, Music Box, Piano,
elektrisches Piano, Cembalo, Koto, elektrische
Gitarre, Vibes, Cosmic, Popsynth, Funksynth,
Slapsynth, Orchesterlautstärke
• Effekte
Vibrato, Sustain
• Begleitunssbereich
Rhythmus(Pop, Disco, 16-Beat, Rock’n Roll,
Country, Samba, Bossanova, Reggae, Big
Band, Slow Rock, Marsch-Polka, Walzer)
Auto-Baßakkord (Fingered, Single-Finger,
Aus) Synchro Start, Start, Stopp, Fill-in,
Tempo (A, ▼), Begleitungslautstärke
• Voice Sampler
Sampling (voll, teilweise), Synchro-Start,
Start/Stopp, Sampling-Pegel, Tonhöhenrege-
lung,Wiedergabe (Keyboard, Baß),
Wiedergabelautstärke, Mikrofon
• Andere Regler
Netzschalter, Leitlämpchen, Hauptlautstärke,
Vorführung Start/Stopp
• Anschlußbuchsen
Line-ln, Aux-Out, Kopfhörer, Fremdstrom
(9-12 V) (DC IN)
• VerstaÀer
2,0 W
• Lautsprecher
9 cm (4 Ohm)xl
• Nennspannung
Gleichstrom 9 V (sechs 1,5 V SUM-2
“C”-Format, R-14 oder entsprechende
Batterien), Netzteil (PA-1) oder Autobatterie
adapter (CA-1)
• Abmessungen (Bx HxT)
628,5 X 229 X 56,6 (mm)
• Gewicht
2.4 kg
• Clavier
49 touches (C1-C5)
• Voix Orcherstre
Orgue de jazz, Grandes orgues, Clarinette,
Violon, Flûte, Trompette, Cor, Saxophone,
Hautbois, Accordéon, Boîte à musique,
Piano, Piano électrique, Clavecin, Koto,
Guitare électrique. Vibes, Cosmic,
Popsynth, Funksynth, Slapsynth, Volume
orchestre
• Effets
Vibrato, Soutien
• Section accompagnement
Rythmes (Pops, Disco, 16 beats, Rockn’Roll,
Country, Samba, Bossanova, Reggae,
Big Band, Rock lent, Marche/Polka,
Valse) Accord basse automatique
(plusieurs doigts, un seul doigt, coupé)
Mise en marche synchronisée, Marche,
Arrêt, FMI in. Réglage tempo (A, ▼),
Volume accompagnement
• Echantillonneur
Echantillonnage (FULL, PART), Mise en
marche synchronisée, Marche/Arrêt,
Niveau d’échantillonnage, Réglage de
hauteur de son. Lecture (Clavier, Basse),
Volume de lecture, Microphone
• Autres réglages
Interrupteur d’alimentation. Lampe témoin.
Volume principal, Mise en marche/arrêt
démonstration
• Prises auxiliaires
Entrée de ligne, Sortie auxiliaire. Casque,
Entrée cc 9-12V
• Amplificateur
2,0W
• Haut-parleur
9cm (4 ohms) X1
• Tension nominale
cc 9V (six piles SUM-2 de 1,5V, taille
“C”, R-14 ou équivalentes). Adaptateur
d’alimentation secteur (PA-1), Adaptateur de
batterie de voiture (CA-1)
• Dimensions (l/p/h)
628,5 X 229 X 56,6mm
(243/4x9x2V^ pouces)
• Poids
2,4kg (5,3 livres)
• Teclado
49 teclas (C1-C5)
• Voces de orquesta
Órgano de jazz. Órgano de tubos. Clarinete,
Violín, Flauta, Trompeta, Trompa, Saxofón,
Oboe, Acordeón, Caja musical. Piano,
Piano eléctrico. Clavicordio, Koto, Guitarra
eléctrica. Vibrafono, Cósmica, Sintetizador Pop,
Sintetizador Funk, y Sintetizador Slap
Volumen de orquesta
• Efectos
Vibrato, y sostenido
• Sección de acompañamiento
Ritmos (Pops, Disco, 16 Beat, Rockn’Roll,
Country, Samba, Bossanova, Reggae, Big
Band, Rock lento, Marcha/Polka, y Vals)
Bajos y acordes automáticos (Todos los
dedos. Un solo dedo, y Desactivación)
Inicio sincronizado. Inicio, Paro, Relleno,
Control de tempo (A, ▼), y Volumen de
acompañamiento.
• Muestreador
Mucstreo (Completo y Partes), Inicio
sincronizado, Inicio/Paro, Nivel de muestreo,
Control de diapasón. Reproducción (Teclado
y Bajos), Volumen de reproducción, y
Micrófono
• Otros controles
Interruptor de alimentación. Lámpara
piloto. Control de volumen global, e Inicio/
paro de demostración
• Tomas auxiliares
Entrada de línea. Salida auxiliar. Auriculares,
y Toma de alimentación exterior
• Amplificador
2,0W
• Altavoz
9cm (4 ohmios) x 1
• Tensión nominal
9V CC (seis pilas de 1,5V SUM-2, tamaño
“C”, R-14, o pilas alcalinas equivalentes).
Adaptador de alimentación de la red (PA-1),
o Adaptador de batería de automóvil (CA-1)
• Dimensiones (An x Al x Prf )
628,5 X 229 X 56,6 (mm)
• Peso
2,4kg
'Specifications are subject to change without
notice.
‘Änderungen bei Design und technischen Daten
ohne Vorankündigung Vorbehalten.
‘Spécifications sous réserve de changement
sans préavis.
‘Las especificaciones están sujetas a cambio sin
previo aviso.
Page 23

Attention users in the U.S.A.
PortaSound VSS-100 prepared in accordance
The PortaSound VSS-100 uses frequencies that appear
in the radio frequency range, and if installed in the
immediate proximity (within three meters) of some types
of audio or video devices interference may occur.
The PortaSound VSS-100 has been type tested and
found to comply with the specifications set for a Class
B computing device in accordance with those specifi
cations listed in Subpart J of Part 15 of the FCC rules.
These rules are designed to provide a reasonable
measure of protection against such interference.
However, this does not guarantee that interference will
not occur. If your PortaSound should be suspected of
causing interference with other electronic devices,
verification can be made by turning your PortaSound
VSS-1(X) off and on. If the interference continues when
your PortaSound VSS-100 is off, the PortaSound VSS-100
is not the source of the interference. If your PortaSound
VSS-100 does appear to be the source of the inter
ference, you should try to correct the situation by
using one or more of the following measures:
Relocate either the PortaSound VSS-100 or the elec
tronic device that is being affected by the interference.
21
with FCC ruies.
utilize power outlets for the PortaSound VSS-100
and the device being affected that are on different
branch (circuit breaker or fuse) circuits, or install A/C
line filters.
In the case of radio-TV interference, relocate the
antenna or, if the antenna lead-in is a 300 ohm ribbon
lead, change the lead-in to a co-axial type cable.
If these corrective measures do not produce satis
factory results, please contact your Authorized
Yamaha Specialty Products dealer for suggestions
and/or corrective measures. If you cannot locate an
Authorized Yamaha Specialty Products dealer in your
general area, contact the Specialty Products Service
Center, Yamaha International, 6600 Orangethorpe Ave.,
Buena Park, CA 90620.
If for any reason you should need additional
information relating to radio or TV interference, you
may find a booklet prepared by the Federal Communi
cations Commission helpful: “How to identify and
Resolve Radio-TV Interference Problems”. This booklet
is available from the U.S. Government Printing Office,
Washington D.C. 20402—Stock #004-000-345-4.
Page 24

SIICËI^
rsHFmM BAmtm,, tm hamamatsu.oapan
The serial number of this product may be
found on the bottom of the unit. You should
note this serial number in the space provided
below and retain this manual as a permanent
record of your purchase to aid identification
in the event of theft.
Model No. VSS-100
Serial No. Serien-Nr.
Die Seriennumnier befindet sich an der Unterseite
des Instruments. Wir empfehlen, diese Nummer
sicherheitshalber an der unten vorgesehenen
Stelle einzutragen, um sie auch im Falle eines
Diebstahls jederzeit zur Hand zu haben.
Modell-Nr. VSS-100
Concerning Warranty
This product was made for international dis
tribution, and since the warranty for this type
of product varies from marketing area to
marketing area, please contact the selling
agency for information concerning the appli
cable warranty and /or service policies.
Dieses Produkt wird international vertrieben, und
die Garantiebedingungen sind von Vertriebsland
zu Vetriebsland verschieden. Ihr Händler gibt
Ihnen gerne genauere Informationen zu den in
Ihrem Land gültigen Garantie- und/oder
Servicebedingungen.
Hinweis zur Garantie
Le numéro de série de ce produit figure sur
le socle de l’appareil. Il conviendra de noter
ce numéro de série dans l’espace réservé cidessous et de conserver ce manuel: celui-ci
constitue le document permanent de votre
achat et permet l’identification en cas de vol.
Modèle No. VSS-100
No. de série.
Remarque relative à la garantie
Ce modèle est destiné à être distribué à
l’échelle internationale. Etant donné que tes
conditions de garantie pour ce type de produit
varient en fonction des zones de commer
cialisation, prière de prendre contact avec
l’agence chargée des ventes pour tous
renseignements relatifs aux conditions de
garantie et de service après-vente.
E1 número de serie de este producto se encuentra
en la parte inferior de la unidad. Sírvase anotar
este número de serie en el espacio proporcionado
debajo y guarde este manual como comprobante
de compra para ayudar a la identificación en
caso de robo.
N° de modelo VSS-100
№. de serie
Concerniente a la garantía
Este producto ha sido fabricado para ser dis
tribuido internacionalmente y, como la garantía
para este tipo de producto varía en relación a
su área de comercialización, sírvase consultar
con el agente de ventas sobre la información en
torno a la garantía aplicable y/o políticas
de servicio.
® ^601 Printed in Japan
 Loading...