

Page 1

トロンボーン
取扱説明書
Trombone
Owner’s Manual
Posaune
Bedienungsanleitung
Trombone
Mode d’emploi
Trombón
Manual de instrucciones
长号
使用手册
日本語
ENGLISHDEUTSCHFRANÇAISESPAÑOL
中文
Тромбон
Руководство пользователя
트롬본
사용설명서
Русский
한국어
Page 2

ごあいさつ
1
(6)
1
5
5
3
3
3
3
3
3
3
3
1
1
1
1
2
2
4
4
2
2
4
4
3
3
1
(4)
1
1
(4)
1
2
2
2
2
2
2
このたびは、ヤマハ管楽器をお買い上げいただき、まことにありがとうございます。
楽器を正しく組み立て性能をフルに発揮させるため、また永く良い状態で楽器を
お使いいただくために、この取扱説明書をよくお読みください。
Congratulations!
You are now the owner of a high quality musical instrument. Thank you for choosing
Yamaha. For instructions on the proper assembly of the instrument, and how to keep the
instrument in optimum condition for as long as possible, we urge you to read this Owner’s
Manual thoroughly.
Wir beglückwünschen Sie!
Sie sind nun der stolze Besitzer eines hochwertigen Musikinstruments. Vielen Dank, dass Sie sich für
ein Instrument der Marke Yamaha entschiedenen haben. Um mit den Handgriffen zum Zusammen
setzen und Zerlegen des Instruments vertraut zu werden und dieses über Jahre hinweg in optimalem
Zustand halten zu können, raten wir Ihnen, diese Anleitung aufmerksam durchzulesen.
-
Félicitations!
Vous êtes dès à présent le propriétaire d’un instrument de musique de haute qualité. Nous vous
remercions d’avoir choisi Yamaha. En ce qui concerne les instructions relatives à un assemblage adé
quat de l’instrument et sur la façon de garder l’instrument dans des conditions optimales aussi long
temps que possible, nous vous conseillons vivement de lire entièrement le présent Mode d’emploi.
¡Enhorabuena!
Usted es ahora propietario de un instrumento musical de alta calidad. Le agradecemos su elección
de un instrumento Yamaha. Le aconsejamos que lea todo este manual de instrucciones para ver las
instrucciones para el montaje correcto del instrumento y para aprender a conservar el instrumento
en óptimas condiciones durante tanto tiempo como sea posible.
-
-
恭喜恭喜 !
现在您已经是高品质乐器的主人了 ! 在此 , 我们衷心感谢您选择雅马哈乐器 , 同时也恳请您完整阅
读该使用手册 , 从而可以充分了解有关乐器正确组装及如何使您的乐器尽可能长久地处于最佳状
况的使用说明。
P.3
P.17
P.31
P.45
P.59
P.73
Поздравляем!
Вы стали обладателем высококачественного музыкального инструмента. Благодарим Вас
за выбор продукции Yamaha. Для получения инструкций по правильной сборке данного
инструмента и его длительном хранении в оптимальных условиях мы нас тоятельно
рекомендуем Вам внимательно прочитать настоящее руководство.
인사말 !
야마하 악기를 구입해 주셔서 감사합니다 . 악기의 알맞은 조립 방법 및 보관을 위해 본 사용설명서를
반드시 읽어주시기 바랍니다 .
2
P.87
P.101
Page 3

Trombone
Owner’s Manual
Precautions Please read before using
The precautions given below concern the proper and safe use of the instrument, and are to
protect you and others from any damage or injuries. Please follow and obey these precautions.
If children are using the instrument, a guardian should clearly explain these precautions to the child and make sure they
are fully understood and obeyed. After reading this manual, please keep it in a safe place for future reference.
■ About the Icons
: This icon indicates points which should be paid attention to. : This icon indicates actions that are prohibited.
Caution
Do not throw or swing the instrument when others
are close by.
The mouthpiece or other parts may fall off hitting other
people. Always treat the instrument gently.
Keep the oil, polish, etc., out of children’s mouths.
Keep the oil, polish, etc., out of children’s reach and do
maintenance when children are not present.
Be aware of climatic conditions such as temperature, humidity, etc.
Keep the instrument away from heat sources such as
heaters, etc. Also, do not use or store the instrument in
any extreme conditions of temperature or humidity. Doing so may result in damage to key balance, linkage, or
pads, resulting in problems during performance.
In regards to brass instruments with a plate finish, the color of the finish may change over time however, it should be
of no concern in regards to the instrument’s performance. Discoloration in its early stage can easily be removed with
maintenance. (As discoloration progresses, it may be difficult to remove.)
*
Please use the accessories that are specified for use with the particular type of finish found on the instrument. Also, metal polishes
remove a thin layer of the finish’s top coat which will make the finish thinner. Please be aware of this before using polish.
Disobeying the points indicated with this mark may
lead to damage or injury.
Never use benzene or thinner for maintenance on
instruments with a lacquer finish.
Doing so may result in damage to the finish’s top coat.
Take care not to disfigure the instrument.
Placing the instrument where it is unstable may cause
the instrument to fall or drop resulting in disfigurement.
Take care as to where and how you place the instrument.
Do not modify the instrument.
Besides voiding the warranty, modification of the instrument may make repairs impossible.
17
Page 4
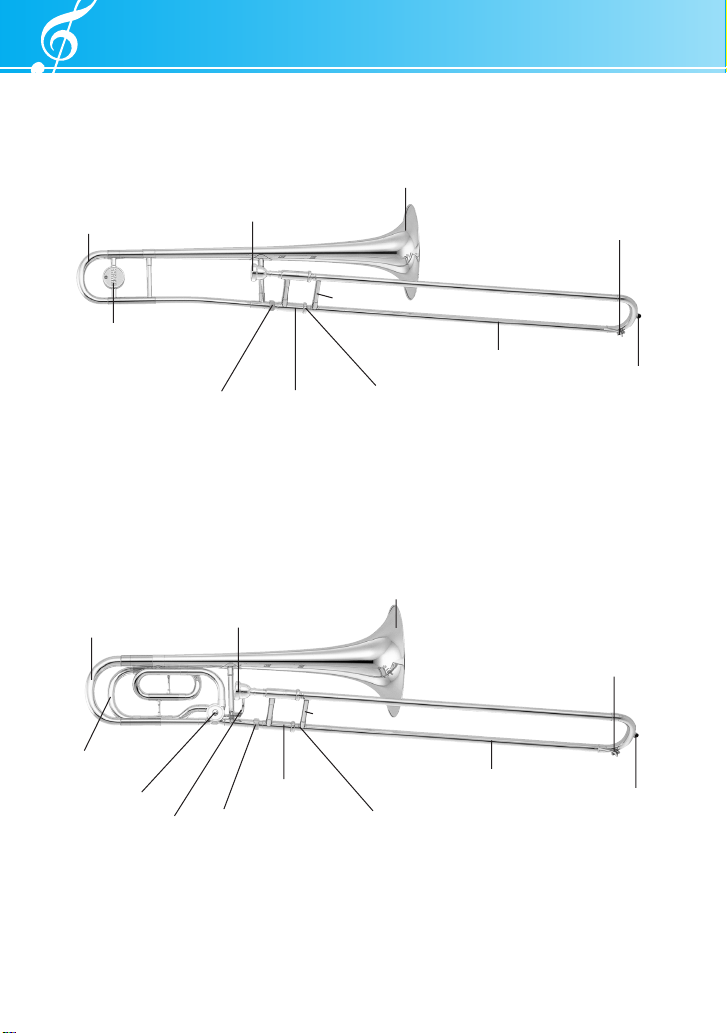
Nomenclature
■ Tenor Trombone
Tuning Slide
Balancer
■ Tenor Bass Trombone
Tuning Slide
Mouthpiece
Slide Receiver
Mouthpiece
Slide Stopper
Bell
Slide Brace
Slide Lock Ring
Bell
Slide
Water Key
Bumper
F Attachment
Tuning Slide
18
Rotary Valve
Rotary Valve Lever
Slide Stopper
Slide Receiver
Water Key
Slide Brace
Slide
Bumper
Slide Lock Ring
Page 5
Nomenclature
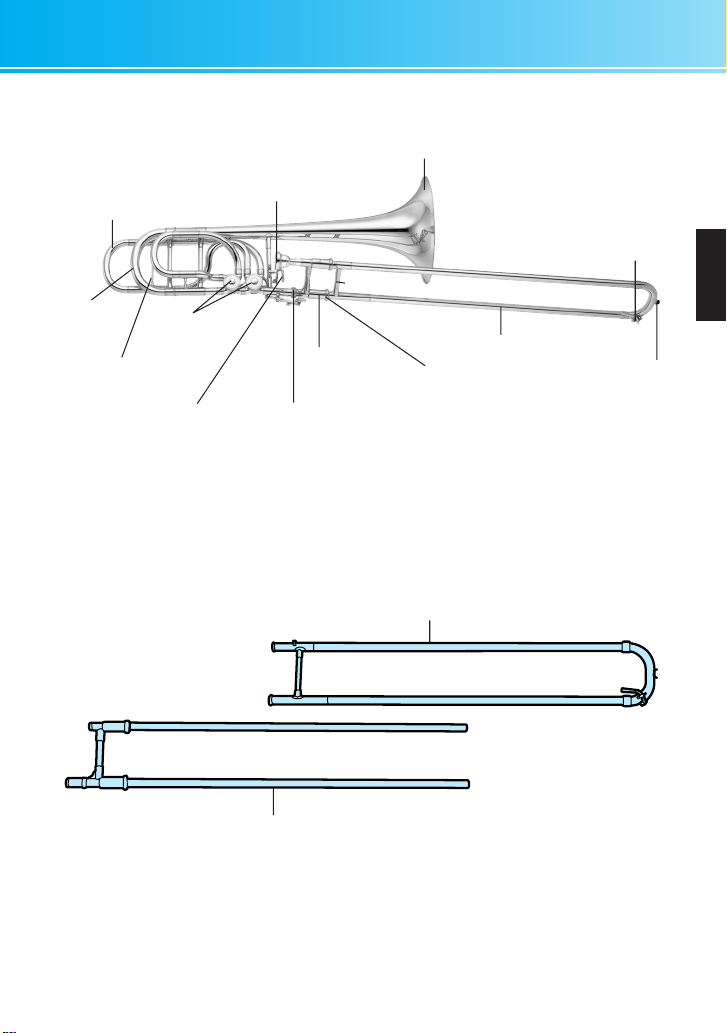
■ Bass Trombone
F Attachment
Tuning Slide
Tuning Slide
G Attachment
Tuning Slide
Rotary Valves
Rotary Valve Lever
■ Slide
Mouthpiece
Slide Receiver
Slide
Stopper
Slide Brace
Slide Lock Ring
Outer Slide
Bell
Water Key
Slide
Bumper
Inner Slide
* Due to improvements, specifications and appearance may change without notice.
19
Page 6
Before Playing
Handling the Instrument
The instrument is made with very thin metal so please handle it with care. Do not apply
any excessive force, or bump it in a manner that will dent or damage the instrument.
■ Removing the Instrument
From Its Case
1. Holding the instrument with both hands,
gently remove the instrument from its case.
* Holding only the main section of the
instrument can result in damage to the
bell, so please hold on to both the bell and
the main part of the instrument when
removing it from the case.
2. When removing the slide from the case,
hold the slide with both hands hooking a
finger on the slide brace to keep the slide
from moving, and gently lift the slide out
of the case.
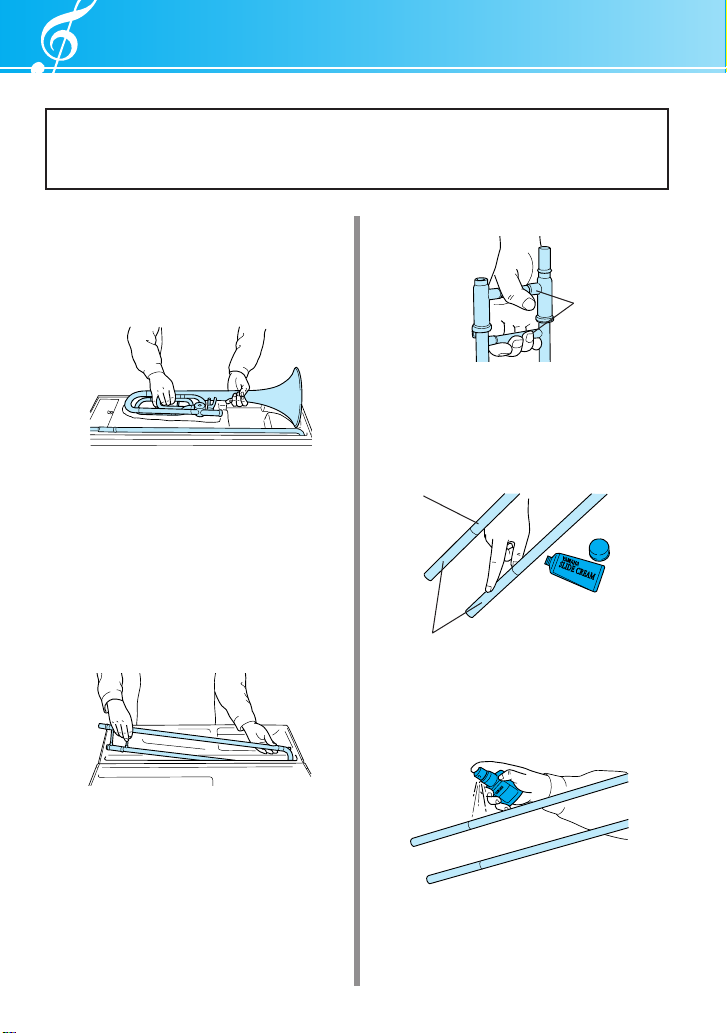
■ Preparing the Slide
1. Remove dirt from inside of the inner slide
then apply a bit of slide cream on the
slightly thicker end sections of the slide.
Inner slide
Apply slide cream to these parts
* Do not use slide grease on these parts.
Slide Braces
* Always hold the slide with both hands.
Holding it with only one hand may result
in damage to the slide.
* When carrying only the slide, make sure
that both of the slide braces are held
together to prevent either section of the
slide from dropping.
20
2. After applying slide cream, use a water
spray bottle to moisten the slide sufficiently.
Page 7

Before Playing
3. Put the outer slide on the inner slide and
slide the two sections back and forth several times to distribute the cream evenly.
* The amount of slide cream applied to the
slide has an effect on how smooth the
slide moves. Experiment with different
amounts of cream to determine the
optimum amount necessary.
* If the slide becomes sluggish while
playing, moisten the slide with the water
spray bottle.
CAUTION!
Preventing the Slide From Coming Off
The slide consists of outer and inner slide
sections. Make sure that the slide lock ring
is securely locked to keep the outer slide
from accidentally coming off when assembling the instrument, etc.
■ Oiling the Rotary Valve
On tenor bass trombones and bass trombones,
apply rotor oil directly to the rotary valve
through the slide receiver.
Bell
Receiver
* Rotor oil adhering to the inside of the
receiver can attract dirt and dust to the
rotary valve resulting in poor function.
Please use caution.
Slide Stopper
Outer Slide
Slide Lock Ring
When Locked
21
Page 8

Before Playing
■ Assembling the Instrument
1. After confirming that the slide lock is locked,
hold the slide by the slide brace and rest
the bumper on the floor.
2. Use your other hand to hold on to the bell
section.
* Make sure you hold on to the bell section
close to the slide receiver. If you hold on to
the tuning slide, the tuning slide may come
off or poor stability may result in the
instrument being bumped.
3. Attach the slide section to the main bell
section. Attach the slide so that it is at a
suitable angle when you play.
4. After attaching, tighten the slide receiver to
secure the slide in place.
Receiver
Slide
Receiver
Slide
Stopper
* After assembly is complete, make sure that
the slide brace is used to hold the
instrument. Also, handle the instrument
with care, being careful not to bump or
damage it.
■ Attaching the Mouthpiece
Insert the mouthpiece until it just fits snugly in
the mouthpiece receiver and is no longer loose.
* Never insert the mouthpiece with force or
unnecessary strength. The mouthpiece
may become stuck in the receiver.
22
Page 9

Before Playing
■ Tuning the Instrument
Slide the main tuning slide in or out to tune
the instrument. Since temperatures have an effect on the instrument’s pitch, blow some warm
air through the instrument to warm it up before tuning.
Adjust the length of the main tuning slide until
you achieve the desired pitch.
Main Tuning Slide
About the rotary valve
On trombones with a single rotary valve, engaging the valve with the lever will change
the pitch from Bb to F.
Bb
F
Rotary Valve Rotary Valve Lever
On trombones with double rotary valves, the
levers can be used to change the pitch from
Bb-F, Bb-G, or Gb (when a D attachment is
used), Bb-Eb (when a D attachment is used).
First Lever
Second
Rotary Valve
First Lever Second Lever Pitch
XXBb -
OXF XOGGb
OOEb D
O ... When the lever is engaged
X .... When the lever is disengaged
First
Rotary Valve
Second Lever
Using D
Attachment
Offset rotary valves
First Lever
Second
Rotary Valve
First Lever Second Lever Pitch
XXBb -
OXF XO(Bb)-
OOEb D
O ... When the lever is engaged
X .... When the lever is disengaged
First
Rotary Valve
Second Lever
Using D
Attachment
23
Page 10

Caring for the Instrument
■ After Playing
After playing the instrument, make sure that moisture or dirt is removed from the
instrument using the procedure described below.
● Cleaning the Slide
1. Open the water key to remove moisture
from inside the slide section.
* The outer slide section is made using
materials that are excellent at resisting
corrosion however, corrosion may appear
if moisture is left in the instrument for an
extended period of time. Please use
caution.
Water Key
2. Use a gauze cloth to clean off the slide
cream and moisture on the inner slide.
3. Wrap a cleaning rod with gauze so there is
no bare metal exposed.
Cleaning Rod
4. Clean the slide’s interior.
* Firmly hold on to the gauze to prevent the
gauze from coming off the cleaning rod.
* Hold on to the slide brace as shown in the
illustration while cleaning.
Take Care When Cleaning
A leadpipe is fitted inside the slide stopper so take care not to let the gauze become stuck in the leadpipe.
Slide Stopper
Leadpipe
Gauze
* Exposed metal can damage the interior of
the slide.
24
Page 11

Caring for the Instrument
● Cleaning the exterior
Gently wipe the surface of the instrument with
a polishing cloth. If dirt or tarnish is obvious,
use one of the following accessories listed below.
For lacquer finishes
Polishing cloth + lacquer polish
For silver plate
Silver cloth + silver polish
■ Once or Twice a Month Maintenance
● Cleaning the Tuning Slide
1. Use a gauze cloth to remove dirt from the
inner tuning slide’s surfaces.
Inner tuning
slide surface
2. Wrap a cleaning rod with gauze and remove
dirt from the interior of the inner and outer
tuning slide.
Outer tuning slide
* Hold the gauze securely to prevent it from
coming off of the cleaning rod.
3. Apply a small amount of slide grease to
the surface of the inner tuning slide.
* Never use slide grease on the slide. This
grease is for use on tuning slides only.
25
Page 12

Caring for the Instrument
4. Slide the tuning slides back and forth sev-
eral times to distribute the grease evenly.
Tuning Slide
● Rotary Valve Maintenance
1. Apply some rotor oil to the rotary valve
through the slide receiver end.
2. Remove the rotary valve cap and apply a
small amount of rotor spindle oil to the
center of the rotary valve and the area supporting the shaft.
3. Also apply small amounts of rotor spindle
oil to the rotor rotation shaft and its receiver. After applying oil, close the valve
cap and move the lever a few times to distribute the oil evenly.
Apply
oil here
* The rotary valve is a precision crafted part.
Attempting to remove the valve in an
improper manner will cause damage.
Rotary
4. Apply some lever oil to the lever mecha-
nism.
Lever
26
rotary valve cap
Page 13

Caring for the Instrument
Oil the water key
Neglecting to oil the water key can result
in poor function of the water key.
Use a fine gauze cloth to clean in tight places.
● Stringing the Rotary Valve
Wrap the string as shown in the illustration
below then fasten the string in place with the
small string screw. After the string is secured,
use the small screw A to adjust the lever position.
String screw B
Lever linkage
Rotor stem
screw
■ Twice Yearly Maintenance
● Cleaning the instrument
1. Prepare a brass soap water solution.
Mix 1 part brass soap with between 10 and
15 parts warm water (30° C to 40° C). Remove the tuning slide and slide sections
before placing the instrument in the soap
water solution.
* Contact your dealer when the rotary valve
needs cleaning.
2. Apply some brass soap solution to a flex-
ible cleaner and use the cleaner to clean
the inside of the instrument.
Outer Slide
* Use a cleaning rod wrapped with gauze to
clean out the inside of the inner slide.
3. After cleaning the instrument, use clean
water to thoroughly rinse out the brass soap
water solution. After that, apply some slide
grease to the tuning slide and reassemble.
Tuning slide
String screw A
27
Page 14

Caring for the Instrument
● Cleaning the mouthpiece
Dip the mouthpiece brush in a brass soap water solution and use the brush to clean the
mouthpiece’s throat. Rinse the mouthpiece
thoroughly with clean water.
Mouthpiece brush
Always place the instrument in its case when
you are finished playing. Also, keep the instrument in its case during breaks.
28
Page 15

Troubleshooting
Tone is not clear and pitch is poor.
• A large amount of dirt has accumulated inside the pipe.
➞ Wash out the pipes.
• There is a large dent in the pipe and
air is leaking from a pipe seam.
• The mouthpiece is loose and air is
leaking from around the mouthpiece.
• The holes in the rotary valve and valve
casing are not aligned.
➞ Contact the dealer from whom you
purchased the instrument.
The slide does not move smoothly.
• Dirt has accumulated between the
inner and outer slides.
➞ Wash the inside of the slide.
• The slide is bent.
• There is a dent in the slide.
➞ Never use the instrument with a
damaged slide. Contact the dealer from
whom you purchased the instrument.
The tuning slide is stuck can not
be removed. The slide is sluggish.
• Dirt or dust between the tuning slide
and pipe has scratched the tuning
slide.
➞ Thoroughly remove dirt and apply
some slide grease that matches the
type of slide.
• Dropping or hitting the slide has
caused a dent, or the slide was bent
while cleaning.
➞ Contact the dealer from whom you
purchased the instrument.
The screw is too tight and cannot
be removed.
• The screw is corroded.
• Hitting the instrument has damaged
the screw.
➞ Contact the dealer from whom you
purchased the instrument.
The rotary valve is sluggish.
• Dirt has accumulated between the
rotary valve and valve casing.
• The rotary valve lever linkage is bent.
➞ Contact the dealer from whom you
purchased the instrument.
• The string is loose.
➞ Re-attach the string.
The mouthpiece cannot be removed.
• The instrument was dropped or hit
with the mouthpiece attached. Or, the
mouthpiece was inserted with too
much force.
• The instrument has been left for a
long period of time with the mouthpiece inserted in the instrument.
➞ Contact the dealer from whom you
purchased the instrument.
The instrument makes an abnormal sound when played.
• Solder on the instrument has come
loose, or a foreign object is in the
pipe.
➞ Contact the dealer from whom you
purchased the instrument.
The rotary valve lever makes a
metallic sound when moved.
• The lever comes into contact with the
pipes.
➞ Re-attach the string and adjust the
lever’s position.
• Screws are loose.
➞ Firmly tighten the screws.
• The rotary valve and valve casing have
come loose.
➞ Contact the dealer from whom you
purchased the instrument.
29
Page 16

ポジション表
L6 L47L26L144
2
2
7
L26L144
2
2
1 L5 L
3
5
5
3
3
5
5
3
3
1
L3
() は替えポジションです。
★
テナーバスのレバー (L) を押すと、F 管になります。
★
Positions in parenthesis ( ) denote alternate positions.
★
Changes to F when the lever (L) on a tenor bass
★
trombone is pressed
/Position Chart/Positionstabelle/Tableau des positions/
Alternative Positionen stehen in Klammern ( ).
★
Ändert sich bei einer Tenorbassposaune beim
★
Drücken des Hebels (L) in F.
Les positions entre parenthèse ( ) dénote les
★
position alternatives.
Passe en Fa quand la palette (L) du trombone ténor
★
complet est actionnée
■テナートロンボーン
/
次中音长号
/ Tenor Trombone / Tenorposaune / Trombone ténor / Trombón tenor
Теноровый тромбон
/
테너 트롬본
/
1
2
3 4 5 6 7
114
Page 17

Tableau des positions/Cuadro de posiciones/
1
(6)
1
5
5
3
3
3
3
3
3
3
3
1
1
1
1
2
2
4
4
2
2
4
4
3
3
1
(4)
1
1
(4)
1
2
2
2
2
2
2
Las posiciones entre paréntesis ( ) indican
★
posiciones alternativas.
Cambia a F cuando se presiona la palanca (L) de
★
un trombón tenor bajo.
括号 () 中的为交替把位
★
按下次中低音长号上的连杆时 , 音调变为 F 调
★
★
★
★
★
/
把位图
П оз и ци и в кр уг л ых ск об к ах ( ) я в ля ю тс я
дополнительными.
Строй F при нажатом квартветиле (L).
괄호 ( ) 안의 위치는 대체 위치입니다 .
테너 베이스 트롬본의 레버 (L) 를 누르면 F 로 바
뀝니다 .
Таблица позиций
포지션 차트
/
■
テナーバストロンボーン
/ Trombón tenor bajo /
/ Tenor Bass Trombone / Tenorbassposaune/ Trombone ténor complet
次中低音长号
Теноровый бас-тромбон
/
L1
L2
1 2
3 4 5 6 7
L3 L4 L5 L6
/
테너 베이스 트롬본
115
Page 18

This document is printed on chlorine free (ECF) paper with soy ink.
Auf Umweltpapier mit Sojatinte gedruckt.
Ce document a été imprimé sur du papier non blanchi au chlore avec de l’encre d’huile de soja.
Este documento se ha impreso en papel sin cloro alguno, con tinta de soja.
此说明书纸张为无氯漂染纸 (ECF), 使用大豆油墨印制。
Документ отпечатан на не содержащей хлора (ECF) бумаге соевыми чернилами.
본 사용설명서 무염소 (ECF) 용지에 소이 잉크로 인쇄한 것입니다 .
この取扱説明書はエコパルプ(ECF: 無塩素系漂白パルプ)を使用しています。
この取扱説明書は大豆インクで印刷しています。
xxxxxxx
2434850 0708PONK-A0
Printed in Japan
 Loading...