

Yamaha S5 User Manual

EN
FR
ES
RU
ZH
CEILING SPEAKER
S5
OWNER’S MANUAL
MODE D’EMPLOI
MANUAL DE INSTRUCCIONES
English
Precautions
When choosing a power amplifier
to use with your speakers, make
sure that its power output matches
the speakers’ power capacity (refer
to the Specifications). Even if the
amplifier’s power output is lower
than the speakers’ power capacity,
the speakers may be damaged
when clipping of a high input signal occurs. The following may
cause damage to speakers:
• Feedback caused when using a
microphone.
• Continuous high sound pressure
level produced by electronic
instruments.
• Continuous high-power output of
distorted signals.
• Popping noises caused by turning
on equipment, or by connecting
or disconnecting system components while the amplifier is
turned on.
Précautions d’usage
Lors de la sélection de l’amplificateur à utiliser avec les haut-parleurs,
vérifiez que sa puissance de sortie
correspond à la capacité de puissance
des haut-parleurs (voir la fiche technique). Même si la puissance de sortie de l’amplificateur est inférieure à
la capacité de puissance des hautparleurs, ces derniers risquent d'être
endommagés lors de l’écrêtage d’un
signal d’entrée élevé. Les phénomènes suivants risquent d’endommager
les enceintes :
• Effet Larsen provoqué lors de l’utilisation d’un microphone.
• Haut niveau de pression sonore
continu engendré par des instruments électroniques.
• Signaux déformés par une puissance de sortie élevée continue.
• Brusques émissions de son puissant
provoquées par la mise sous tension des appareils ou le branchement/débranchement des
composants du système lorsque
l’amplificateur est sous tension.
Precauciones
Al elegir un amplificador de potencia para usar con los altavoces, asegúrese de que la salida de potencia
coincide con la capacidad de potencia de los altavoces (consulte las
Especificaciones). Aunque la salida de potencia del amplificador sea
inferior a la capacidad de los altavoces, los altavoces podrían sufrir
daños al cortarse una señal de entrada alta. Los altavoces podrían
sufrir daños por:
• Realimentación provocada por el
uso de un micrófono.
• Continuo nivel de presión acústica alto producido por instrumentos electrónicos.
• Continua salida de potencia alta
de las señales distorsionadas.
• Chasquidos al encender el equipo
o al conectar o desconectar componentes mientras el amplificador está encendido.
Предостережения
При выборе усилителя мощности
для использования с потолочным
динамиком проследите за тем, чтобы выходная мощность усилителя
соответствовала номинальной
мощности динамика (см. «Технические характеристики»). При ограничении амплитуды высокого
входного сигнала риск повреждения потолочного динамика существует даже в том случае, когда
выходная мощность усилителя
меньше номинальной мощности
динамика. Повреждения потолочного динамика могут быть обусловлены следующими факторами:
• обратной связью при использовании микрофона;
• продолжительным высоким звуковым давлением, создаваемым электронными инструментами;
• продолжительным формированием искаженных сигналов высокой
выходной мощности;
• посторонними шумами, генерируемыми при включении оборудования либо в процессе
подсоединения или отсоединения
компонентов системы при включенном усилителе.
注意事项
选择与音箱一起使用的功放
时,请确保功放的功率输出
与音箱的功率容量 ( 请参考
技术规格 ) 相匹配。即使功
放的功率输出小于音箱的功
率容量,当高输入信号被夹
住时,仍然可能损坏音箱。
以下情况可能损坏音箱:
•使用麦克风时引起的反馈。
•电子仪器所产生的持续高声
压级。
•失真信号的持续高功率输
出。
•接通设备电源或者在功放打
开时连接或断开系统组件所
引起的噪音。
Français
Español
Русский
中文
Thank you for choosing Yamaha
S5 Ceiling Speaker.
The S5 is an in-ceiling type speaker system designed to meet versatile indoor acoustic facilities.
Nous vous remercions d’avoir
choisi le haut-parleur pour plafond
S5 de Yamaha.
Il s’agit d’un système de hautparleur de type plafonnier conçu
pour les équipements acoustiques
intérieurs polyvalents.
Gracias por elegir el altavoz de techo Yamaha S5.
El S5 es un sistema de altavoz
para techo diseñado para adaptarse a las distintas instalaciones
acústicas de interior.
Благодарим вас за выбор потолочный громкоговоритель Yamaha S5.
S5 представляет собой встраиваемую в потолок акустическую
систему, предназначенную для
эксплуатации в различных акустических условиях помещений.
感谢您购买 Yamaha S5 吸顶音
箱。
S5 是一种顶棚内陷式音箱系统,
为室内多用途扩声设备。
■ Installation location
Cutout size (diameter) 150 mm
Minimum / Maximum
ceiling thickness
• First, make sure that the material of
the ceiling into which you are installing the speaker is sturdy enough to
support the weight of the product. If
it is not strong enough, reinforce the
strength of the ceiling board with appropriate hardware.
• Yamaha will not be responsible for
any accidents caused by a speaker
that falls due to weak ceilings or inappropriate installation methods.
5 mm/
65 mm
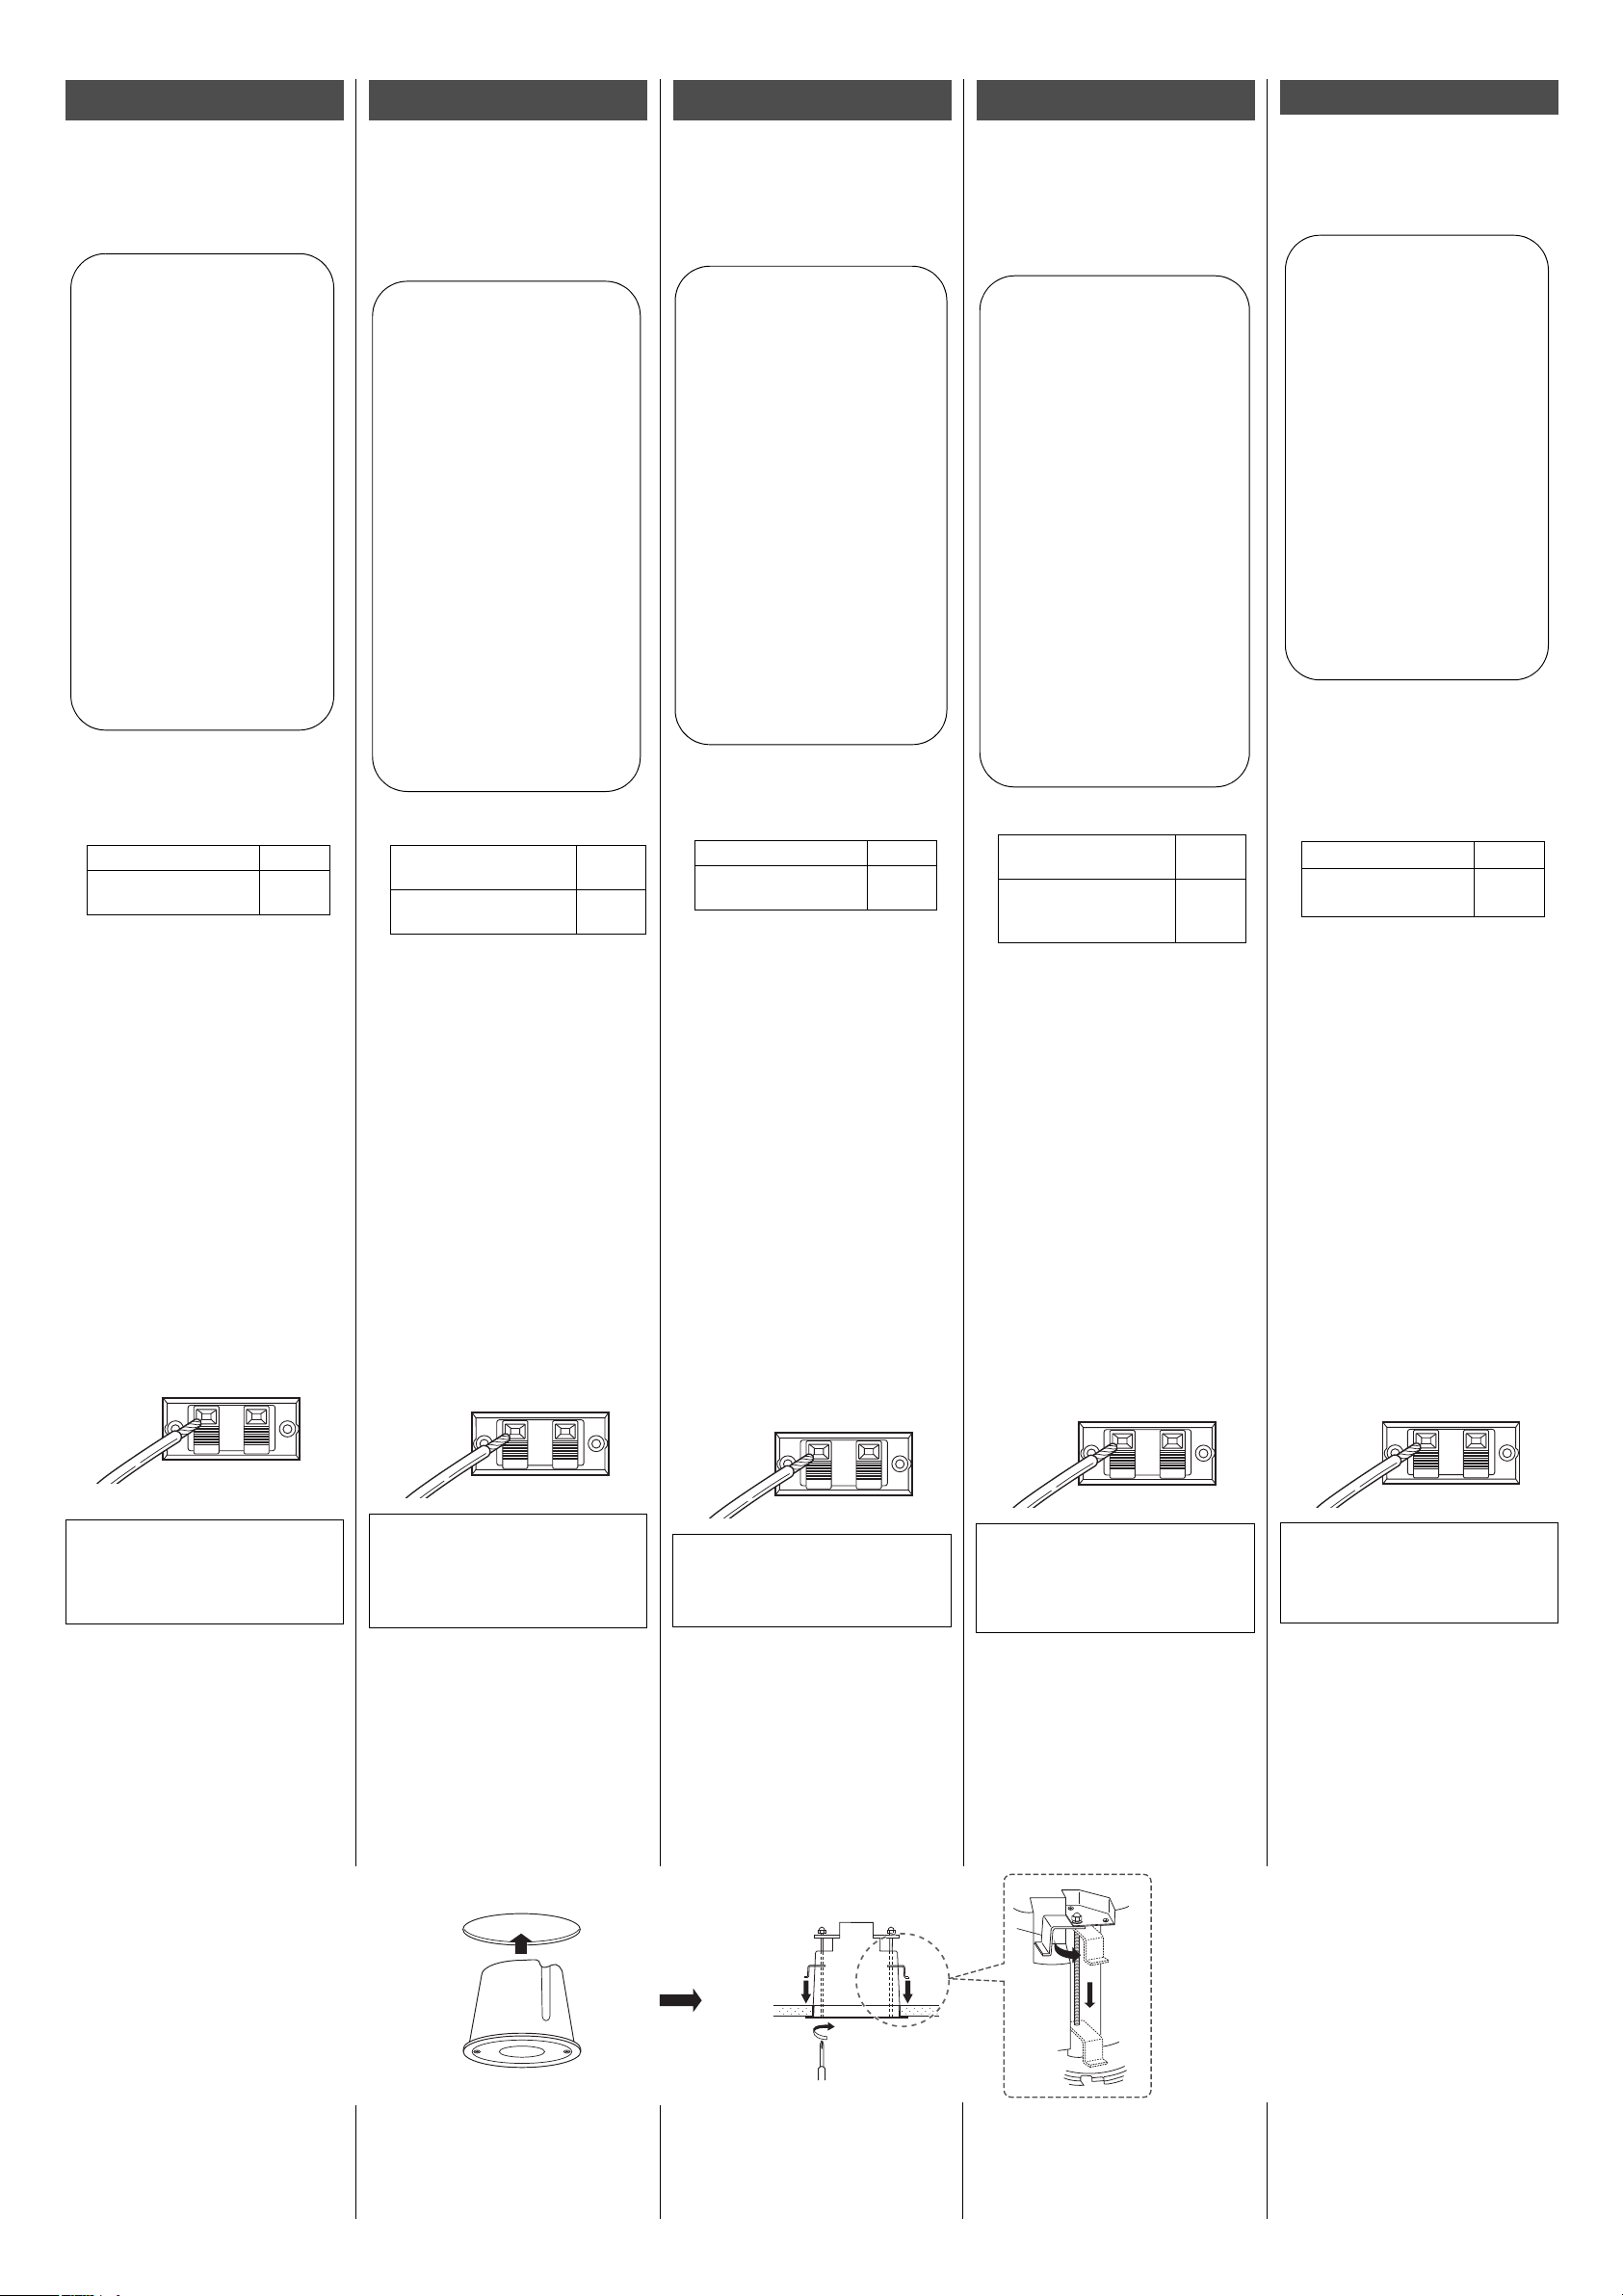
■ Installation procedure
1.Use the supplied cutout template to
cut an opening in the ceiling.
2.Connect the speaker cable to the ter-
minals on the rear of the speaker.
Red is (+) and black is (–). Pay
attention to the polarity, especially
when installing multiple speakers.
■
Emplacement d’installation
Taille de découpe
(diamètre)
Épaisseur minimale/maximale du plafond
• Vérifiez au préalable que la matière
du plafond sur lequel le haut-parleur
est fixé est suffisamment robuste
pour supporter le poids du produit. Si
ce n’est pas le cas, renforcez la solidité du support pour plafond à l’aide
de matériel approprié.
• Yamaha ne sera pas tenu responsable
d’éventuels accidents causés par la
chute d’un haut-parleur en raison
d’un plafond non résistant ou de méthodes d’installation inappropriées.
■
Procédure d’installation
150 mm
5 mm/
65 mm
1.Utilisez le modèle de découpe fourni
pour exécuter une ouverture dans le
plafond.
2.
Reliez le câble du haut-parleur aux
bornes situées à l’arrière du hautparleur. Le câble rouge correspond au
signe (+) et le noir au signe (–). Soyez
attentif à la polarité, en particulier si
vous installez plusieurs haut-parleurs..
■
Ubicación de la instalación
Tamaño (diámetro) 150 mm
Espesor mínimo/máxi-
mo del techo
• En primer lugar, asegúrese de que el
material del techo donde vaya a instalar el altavoz sea lo bastante robusto como para soportar el peso del
producto. Si no es lo bastante resistente, refuerce el panel del techo con
los elementos de fijación adecuados.
• Yamaha no será responsable de ningún accidente provocado por la caída
de un altavoz debido a la debilidad
del techo o a unos métodos de instalación inadecuados.
5 mm/
65 mm
■ Procedimiento de instalación
1.Utilice la plantilla de corte suminis-
trada para realizar una abertura en el
techo.
2.Conecte el cable del altavoz a los
terminales de la parte posterior del
altavoz. El cable rojo es (+) y el
negro es (–). Preste atención a la
polaridad, especialmente si instala
varios altavoces.
■ Место установки
Размер (диаметр)
выемки
Минимальная / максимальная толщина
потолка
• Вначале удостоверьтесь в достаточной прочности материала потолка,
в котором устанавливается динамик, и его способности выдержать
вес продукта. Если потолок недостаточно прочен, усильте потолочную плиту подходящей арматурой.
• Компания Yamaha не несет ответственность за несчастные случаи,
возникающие вследствие выпадения динамика из недостаточно прочного потолка или вследствие
неправильной установки.
150 mm
5 mm/
65 mm
■ Установка
1.Сделайте отверстие в потолке с
помощью шаблона под выемку
из комплекта поставки.
2.Подсоедините кабель динамика к
выводам в его задней части.
Красным цветом обозначен
положительный вывод, черным
— отрицательный. Следите за
распределением выводов по
полюсам, особенно при установке нескольких динамиков.
■ 安装位置
挖开尺寸 (直径) 150 mm
最小 / 最大顶棚厚度
5 mm/
65 mm
• 首先,确保你安装音箱所在天
花板的材料强度足以承受本产
品的重量。如果强度不足,请
用适当的硬件加固天花板。
• Yamaha 公司对任何因天花板
强度不足或安装方法不当导致
音箱坠落所造成的意外事故不
承担任何责任。
■ 安装步骤
1.用附赠的天花板开洞模板在顶
棚上切割出一个洞口。
2.将音箱信号线连接到音箱背板
上的连接端口。红色为 ( + )
黑色为 ( - )。请注意连接的
正负极性,特别是安装多个音
箱时。
Note: Before connecting or disconnecting the speaker system from the
amplifier, turn the amplifier off. Otherwise, the speaker may be damaged.
3.Remove the grille from the speaker,
insert the speaker into the ceiling
opening, then while pressing the
speaker to the ceiling by the front
baffle rim, turn two screws on the
baffle clockwise. Be sure to tighten
the screws securely until the mounting clamps press down on the ceiling
board. Do not overtighten.
4.Attach the grille to the speaker by
aligning the grille with the baffle
and turning it clockwise until it
securely locks in.
Remarque :
débrancher le système de haut-parleur
de l’amplificateur, mettez ce dernier
hors tension. Sinon, vous pourriez endommager le haut-parleur.
avant de brancher ou de
3.Retirez la grille du haut-parleur,
insérez ce dernier dans l’ouverture
du plafond, puis, tout en enfonçant
le haut-parleur dans le plafond par le
bord de l’enceinte acoustique avant,
tournez les deux vis sur l’enceinte
dans le sens des aiguilles d’une
montre. Veillez à serrer les vis correctement jusqu’à ce que les attaches
de fixation s’appuient sur le support
pour plafond. Ne serrez pas trop.
4.Fixez la grille sur le haut-parleur en
l’alignant sur l’enceinte acoustique
et en la tournant dans le sens des
aiguilles d’une montre jusqu’à ce
qu’elle soit verrouillée.
Nota:
Antes de conectar o desconectar
el sistema de altavoz del amplificador,
apague este último. De lo contrario, el
altavoz podría sufrir daños.
3.Extraiga la rejilla del altavoz, inserte
el altavoz en la abertura del techo y,
mientras presiona el altavoz contra
el techo por el reborde del bafle
frontal, apriete dos tornillos del
bafle en el sentido de las agujas del
reloj. Asegúrese de apretar los tornillos de forma segura hasta que las
abrazaderas de montaje se fijen al
panel del techo. No apriete demasiado.
4.Monte la rejilla en el altavoz ali-
neándola con el bafle y girando en el
sentido de las agujas del reloj hasta
que encaje de forma segura.
Примечание.
тель перед подсоединением или отсоединением динамика.
Невыполнение этого условия может
привести к повреждению динамика.
Отключите усили-
3.Снимите сетку с динамика,
вставьте динамик в отверстие в
потолке, а затем, надавливая на
передний ободок звукоотражателя и прижимая динамик к потолку, поверните два винта на
звукоотражателе по часовой
стрелке. Проследите за тем, чтобы винты были плотно затянуты,
а монтажные зажимы — прижаты к потолочной плите. Не перетягивайте винты.
4.Прикрепите сетку к динамику.
Для этого совместите сетку со
звукоотражателем и зафиксируйте ее на месте поворотом по часовой стрелке.
注:将音箱从功放断开或将音
箱连接到功放时,首先应关闭
功放。否则可能造成音箱的损
坏。
3.去掉音箱上的外框,将音箱插
入天花板上挖开的洞口,然后
将音箱的前边缘贴紧在天花板
上并按住,同时小心地顺时针
旋转音箱前缘上的两个螺丝,
直到音箱上的安装钩爪紧卡在
天花板内侧。不要过度拧紧螺
丝。
4.将外框对准音箱的边缘并安装
到音箱上,然后顺时针旋转螺
丝直到安全锁紧。
 Loading...