

Page 1
Owner’s Manual
Page 2

SPECIAL MESSAGE SECTION
This product utilizes batteries or an external power
supply (adapter). DO NOT connect this product to any
power supply or adapter other than one described in
the manual, on the name plate, or specifically recommended by Yamaha.
WARNING:
where anyone could walk on, trip over ,or roll anything
over power or connecting cords of any kind. The use of
an extension cord is not recommended! IF you must
use an extension cord, the minimum wire size for a 25'
cord (or less ) is 18 AWG. NOTE: The smaller the AWG
number ,the larger the current handling capacity. For
longer extension cords, consult a local electrician.
This product should be used only with the components
supplied or; a cart, rack, or stand that is recommended
by Yamaha. If a cart, etc., is used, please observe all
safety markings and instructions that accompany the
accessory product.
Do not place this product in a position
SPECIFICATIONS SUBJECT TO CHANGE:
The information contained in this manual is believed to
be correct at the time of printing. However, Yamaha
reserves the right to change or modify any of the specifications without notice or obligation to update existing
units.
This product, either alone or in combination with an
amplifier and headphones or speaker/s, may be capable of producing sound levels that could cause permanent hearing loss. DO NOT operate for long periods of
time at a high volume level or at a level that is uncomfortable. If y ou experience any hearing loss or ringing in
the ears, you should consult an audiologist.
IMPORTANT: The louder the sound, the shorter the
time period before damage occurs.
Some Yamaha products may have benches and / or
accessory mounting fixtures that are either supplied
with the product or as optional accessories. Some of
these items are designed to be dealer assembled or
installed. Please make sure that benches are stable
and any optional fixtures (where applicable) are well
secured BEFORE using.
Benches supplied by Yamaha are designed for seating
only. No other uses are recommended.
NOTICE:
Service charges incurred due to a lack of knowledge
relating to how a function or effect works (when the unit
is operating as designed) are not covered by the manufacturer’s warranty, and are therefore the owners
responsibility. Please study this manual carefully and
consult your dealer before requesting service.
ENVIRONMENTAL ISSUES:
Yamaha strives to produce products that are both user
safe and environmentally friendly. We sincerely believe
that our products and the production methods used to
produce them, meet these goals. In keeping with both
the letter and the spirit of the law, we want you to be
aware of the following:
Battery Notice:
This product MAY contain a small non-rechargeable
battery which (if applicable) is soldered in place. The
average life span of this type of battery is approximately five years. When replacement becomes necessary, contact a qualified service representative to
perform the replacement.
This product may also use “household” type batteries.
Some of these may be rechargeable. Make sure that
the battery being charged is a rechargeable type and
that the charger is intended for the battery being
charged.
When installing batteries, do not mix batteries with
new, or with batteries of a different type. Batteries
MUST be installed correctly. Mismatches or incorrect
installation may result in overheating and battery case
rupture.
Warning:
Do not attempt to disassemble, or incinerate any battery. Keep all batteries away from children. Dispose of
used batteries promptly and as regulated by the laws in
your area. Note: Check with any retailer of household
type batteries in your area for battery disposal information.
Disposal Notice:
Should this product become damaged beyond repair,
or for some reason its useful life is considered to be at
an end, please observe all local, state, and federal regulations that relate to the disposal of products that contain lead, batteries, plastics, etc. If your dealer is
unable to assist you, please contact Yamaha directly.
NAME PLATE LOCATION:
The name plate is located on the bottom of the product.
The model number, serial number, power requirements, etc., are located on this plate. Y ou should record
the model number, serial number, and the date of purchase in the spaces provided below and retain this
manual as a permanent record of your purchase.
Model
Serial No.
2
92-BP
Purchase Date
PLEASE KEEP THIS MANUAL
(bottom)
Page 3
PRECAUTIONS
PLEASE READ CAREFULLY BEFORE PROCEEDING
* Please keep these precautions in a safe place for future reference.
WARNING
Always follow the basic precautions listed below to avoid the possibility of serious injury or
even death from electrical shock, short-circuiting, damages, fire or other hazards. These
precautions include, but are not limited to, the following:
• Do not open the instrument or attempt to disassemble
the internal parts or modify them in any way. The instrument contains no user-serviceable parts. If it should
appear to be malfunctioning, discontinue use immediately and have it inspected by qualified Yamaha service
personnel.
• Do not expose the instrument to rain, use it near water
or in damp or wet conditions, or place containers on it
containing liquids which might spill into any openings.
• If the AC adaptor cord or plug becomes frayed or damaged, or if there is a sudden loss of sound during use of
the instrument, or if any unusual smells or smoke
CAUTION
Always follow the basic precautions listed below to avoid the possibility of physical injury to
you or others, or damage to the instrument or other property. These precautions include, but
are not limited to, the following:
• Do not place the AC adaptor cord near heat sources
such as heaters or radiators, and do not excessively
bend or otherwise damage the cord, place heavy
objects on it, or place it in a position where anyone
could walk on, trip over, or roll anything over it.
• When removing the electric plug from the instrument or
an outlet, always hold the plug itself and not the cord.
• Do not connect the instrument to an electrical outlet
using a multiple-connector. Doing so can result in
lower sound quality, or possibly cause overheating in
the outlet.
• Unplug the AC power adaptor when not using the
instrument, or during electrical storms.
• Always make sure all batteries are inserted in conformity with the +/- polarity markings. Failure to do so
might result in overheating, fire, or battery fluid leakage.
should appear to be caused by it, immediately turn off
the power switch, disconnect the adaptor plug from the
outlet, and have the instrument inspected by qualified
Yamaha service personnel.
• Use the specified adaptor (PA-3B or an equivalent recommended by Yamaha) only. Using the wrong adaptor
can result in damage to the instrument or overheating.
• Before cleaning the instrument, always remove the
electric plug from the outlet. Never insert or remove an
electric plug with wet hands.
• Check the electric plug periodically and remove any dirt
or dust which may have accumulated on it.
• Always replace all batteries at the same time. Do not
use new batteries together with old ones. Also, do not
mix battery types, such as alkaline batteries with manganese batteries, or batteries from different makers, or
different types of batteries from the same maker, since
this can cause overheating, fire, or battery fluid leakage.
• Do not dispose of batteries in fire.
• Do not attempt to recharge batteries that are not
intended to be charged.
• When the batteries run out, or if the instrument is not to
be used for a long time, remove the batteries from the
instrument to prevent possible leakage of the battery
fluid.
• Keep batteries away from children.
(4)-7
3
Page 4
PRECAUTIONS
PLEASE READ CAREFULLY BEFORE PROCEEDING
* Please keep these precautions in a safe place for future reference.
CAUTION
Always follow the basic precautions listed below to avoid the possibility of physical injury to
you or others, or damage to the instrument or other property. These precautions include, but
are not limited to, the following:
• If the batteries do leak, avoid contact with the leaked
fluid. If the battery fluid should come in contact with
your eyes, mouth, or skin, wash immediately with water
and consult a doctor. Battery fluid is corrosive and may
possibly cause loss of sight or chemical burns.
• Before connecting the instrument to other electronic
components, turn off the power for all components.
Before turning the power on or off for all components,
set all volume levels to minimum. Also, be sure to set
the volumes of all components at their minimum levels
and gradually raise the volume controls while playing
the instrument to set the desired listening level.
• Do not expose the instrument to excessive dust or
vibrations, or extreme cold or heat (such as in direct
sunlight, near a heater, or in a car during the day) to
prevent the possibility of panel disfiguration or damage
to the internal components.
• Do not use the instrument near other electrical products
such as televisions, radios, or speakers, since this
might cause interference which can affect proper operation of the other products.
• Do not place the instrument in an unstable position
where it might accidentally fall over.
• Before moving the instrument, remove all connected
adaptor and other cables.
• When cleaning the instrument, use a soft, dry cloth. Do
not use paint thinners, solvents, cleaning fluids, or
chemical-impregnated wiping cloths. Also, do not
place vinyl, plastic or rubber objects on the instrument,
since this might discolor the panel or keyboard.
• Do not rest your weight on, or place heavy objects on
the instrument, and do not use excessive force on the
buttons, switches or connectors.
• Do not operate the instrument for a long period of time
at a high or uncomfortable volume level, since this can
cause permanent hearing loss. If you experience any
hearing loss or ringing in the ears, consult a physician.
■
REPLACING THE BACKUP BATTERY
• This instrument contains a non rechargeable internal
backup battery which permits internal data to remain
stored even when the power is off. When the backup
battery needs replacing, the message "Backup
Batt.Low" will display in the LCD display. When this
happens, immediately back up your data, then have
qualified Yamaha service personnel replace the backup
battery.
• Do not attempt to replace the backup battery yourself, in
order to prevent the possible serious hazards. Always
have qualified Yamaha service personnel replace the
backup battery.
• Never place the backup battery in a location that a child
can reach, since a child might accidentally swallow the
battery. If this should happen, consult a physician
immediately.
■
SAVING USER DATA
• Always save data to a Memory Card (SmartMedia) frequently, in order to help prevent the loss of important
data due to a malfunction or user operating error.
Yamaha cannot be held responsible for damage
caused by improper use or modifications to the
instrument, or data that is lost or destroyed.
Always turn the power off when the instrument is not in
use.
Make sure to discard used batteries according to local
regulations.
(4)-7
4
Page 5
Contents
Meet the QY100.................................. 7
Power & Connections ........................ 8
Power Supply..........................................8
Using a Power Adaptor ....................8
Using Batteries.................................9
When to Replace the Batteries ......10
Setting Up.............................................11
The Connectors ..............................11
Audio Connections .........................14
MIDI Connections ..........................15
Connecting to a Personal
Computer .......................................16
The Controls...................................... 19
QY100 System Overview:
What It Is and What It Does............. 29
The Sequencer ...............................29
Tone Generator ..............................31
Effects ............................................32
Controller........................................32
Amp Simulator................................32
Guided Tour
Listen To the Demo.......................... 33
For Guitarists: Outstanding Amp
Simulation & Effects ........................ 36
Connection & Gain Adjustment ............36
Try Out the Preset Guitar Setups..........38
Customizing the Setups via the Amp
Simulator Parameters ...........................39
For Singers: Cool Vocal Processing 45
Connection & Gain Adjustment ............45
Try Out the Preset Microphone Setups 47
Customizing the Setups via the
Microphone Effect Parameters.............48
Instant Accompaniment .................. 53
But First … So You’ll Know What
We’re Talking About .............................53
Check Out the Preset Styles.................55
Add Chords & Play Along! ....................59
Record Your Own Chord
Progression & Pattern Changes...... 61
Fingered Chords .............................69
Tempo Changes, too … .................70
If You Make Mistakes …................70
Add Some Details to Complete the
Accompaniment ............................... 71
Voice Assignments ...............................71
Realtime Recording on the Sequencer
Tracks ...................................................73
About the “MULTI” Recording............. 80
Step Accompaniment Recording... 81
“Pt” — Step Record Pattern Changes .84
“Cd” — Step Record Chord Changes ..87
Step Sequencer Track Recording ... 91
Creating Original
Accompaniment Patterns................ 98
The Preset Phrases...............................98
Combining Phrases In the Pattern
Mode ..................................................100
Recording Original Phrases.................105
Realtime Phrase Recording ..........105
Step Phrase Recording................. 111
Pattern Voice mode ............................ 112
The Effect Send Display .....................113
Voice Editing .......................................115
Play Effects.........................................116
Reference Section
Playback Control ............................ 118
Play Effects.........................................124
Swing ...........................................126
Drum Table Remapping................128
The Song Voice Mode.................... 131
The Effect Send Display .....................136
Voice Editing .......................................138
Drum Edit ..................................... 142
The Song Jobs................................ 145
00 : Undo/Redo................................... 147
01 : Quantize.......................................148
02 : Modify Velocity ............................151
03 : Modify Gate Time ........................153
5
Page 6

Contents
04 : Crescendo....................................155
05 : Transpose ....................................157
06 : Shift Clock....................................158
07 : Chord Sort....................................160
08 : Chord Separate ............................161
09 : Copy Event ..................................162
10 : Erase Event..................................164
11 : Extract Event................................165
12 : Create Continuous .......................167
13 : Thin Out .......................................169
14 : Time Stretch ................................170
15 : Create Measure ...........................171
16 : Delete Measure ...........................172
17 : Copy Track ...................................173
18 : Mix Track .....................................174
19 : Clear Track ...................................175
20 : Expand Backing ...........................176
21 : Normalize.....................................177
22 : Copy Song ...................................178
23 : Clear Song ...................................179
24 : Song Name ..................................180
The Pattern Jobs ............................181
00 : Undo/Redo...................................183
01 : Quantize.......................................184
02 : Modify Velocity ............................187
03 : Modify Gate Time ........................189
04 : Crescendo....................................191
05 : Transpose ....................................193
06 : Shift Clock....................................194
07 : Chord Sort....................................196
08 : Chord Separate ............................197
09 : Copy Event ..................................198
10 : Erase Event..................................200
11 : Extract Event................................201
12 : Create Continuous .......................203
13 : Thin Out .......................................205
14 : Time Stretch ................................206
15 : Copy Phrase.................................207
16 : Get Phrase ...................................208
17: Put Phrase ....................................209
18 : Copy Track ...................................210
19 : Mix Track .....................................211
20 : Clear Track ...................................212
21 : Copy Pattern ................................213
22 : Clear Pattern ................................214
23 : Style Name .................................. 215
Editing Songs & Patterns .............. 216
Engaging the SONG or PATTERN
Edit Mode..................................... 216
Moving Around............................. 219
Change Mode Editing................... 220
Insert Mode Editing...................... 221
XG View ..............................................232
View Filter...........................................233
Phrase Table (Pattern Edit Only) .........234
Effects & Effect Editing .................. 236
Accessing & Editing the Effect
Parameters .........................................236
Effect Editing ......................................240
Utility Functions ............................. 242
Accessing the Utility Mode .......... 242
System Parameters......................244
MIDI Parameters ..........................247
Bulk Dump....................................250
Fingered Zone ..............................252
Memory Card Functions ................ 254
About SmartMedia™ Memory Cards .254
Compatible Memory Cards ..........255
Memory Card Capacity................. 255
Inserting and Removing Memory
Cards ............................................ 255
Format New Memory Cards
Before Use!.................................. 256
Handling Precautions....................256
Write-Protecting Memory Cards ..257
Back Up Your Data ....................... 257
Save ....................................................258
Load ....................................................262
Mk Dir (Make Directory) .....................265
Format ................................................268
Appendix ......................................... 270
Specifications......................................270
Troubleshooting ..................................272
Error Messages ..................................274
Glossary ..............................................277
Index ...................................................284
6
Page 7

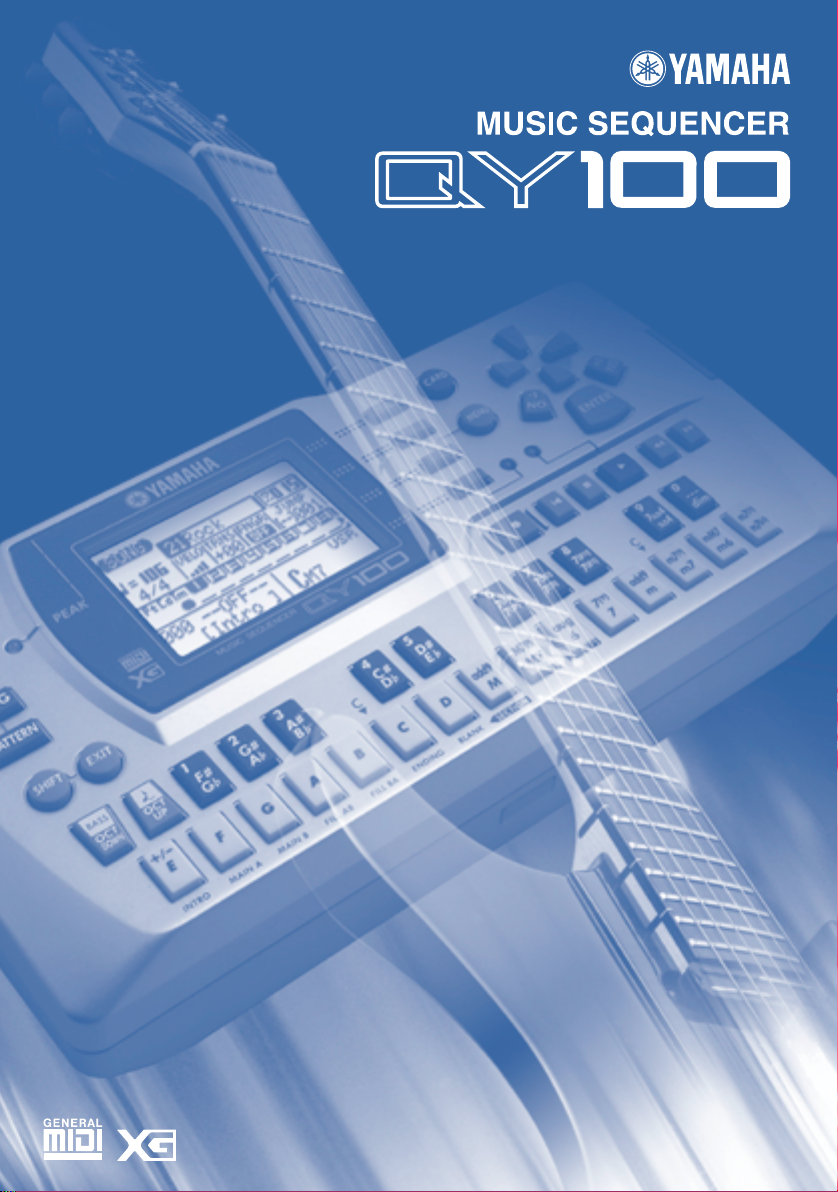
Meet the QY100
16-track sequencer, 525-voice tone module, unmatched automatic accompaniment features and more all rolled into one! The
QY100 is a complete mini-studio for accompaniment and electronic
music production that you can use just about anywhere — at home
or on the road.
Guitarists! The practice and accompaniment tool you’ve been wait-
ing for is here! Use the QY100 as your private “band” to refine and
display your talents to the max.
Singers! Think of it as a fully programmable, very versatile accompa-
niment and “karaoke” machine complete with a range of superb
vocal effects.
Keyboard Players, Composers, & All Electronic Musicians! It’s all
here: the sequencer, the tone module, the advanced accompaniment
features. Everything you need to create even the most complex electronic music.
The screen displays as illustrated in this owner’s manual are for
instructional purposes, and may appear somewhat different
from the screens which appear on your instrument.
7
Page 8
Power & Connections
Power & Connections
Power Supply
Although the QY100 will run either from an optional AC adaptor or
batteries, Yamaha recommends use of an AC adaptor whenever possible.
Moreover, an AC adaptor is more environmentally friendly than batteries
and does not deplete resources.
Using a Power Adaptor
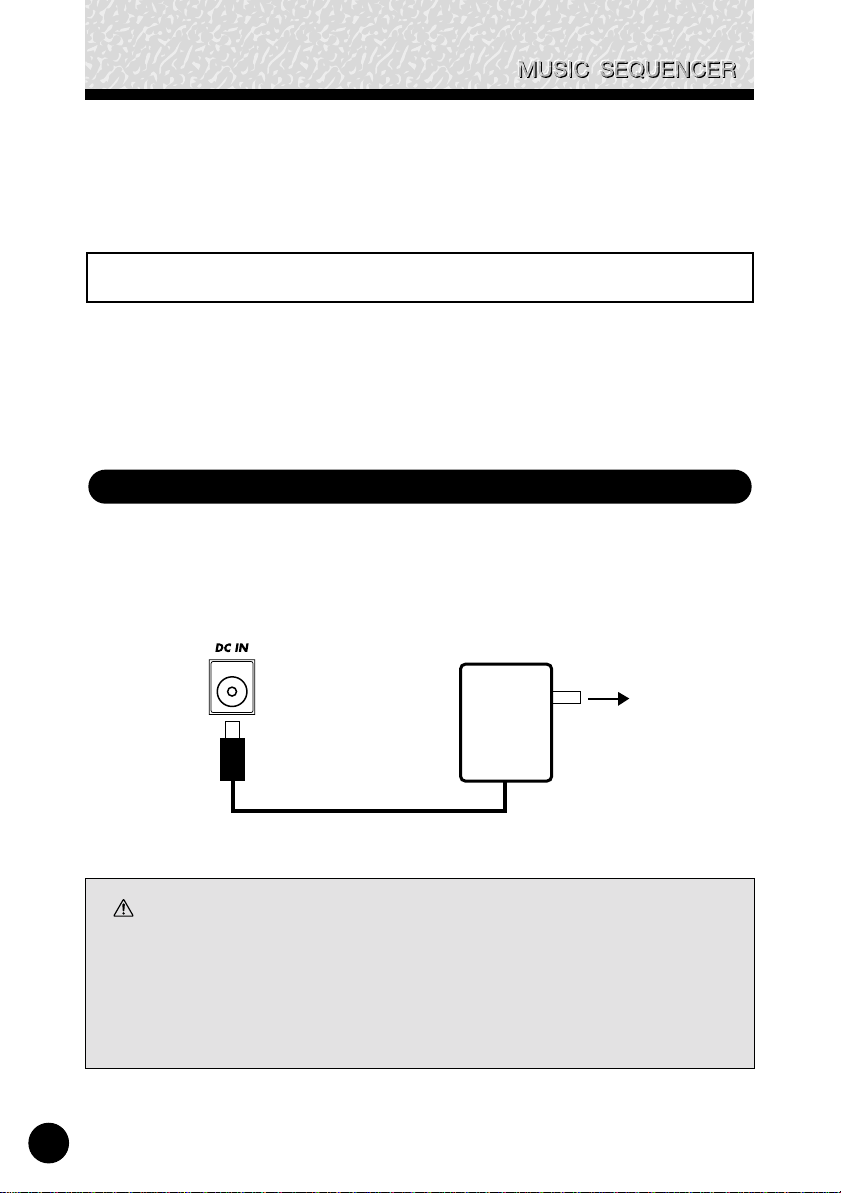
Plug the DC output cable from a Yamaha PA-3B AC Adaptor (available
from your Yamaha dealer) into the DC IN jack on the rear panel, then plug
the adaptor into a convenient wall AC power socket.
AC power
PA-3B
CAUTION
• Do not attempt to use an AC adaptor other than the specified unit or an appropriate
replacement provided by your Yamaha dealer to power the QY100. The use of an
incompatible adaptor may cause irreparable damage to the QY100, and might pose a
serious shock hazard!
• Unplug the AC power adaptor when not using the instrument, or during electrical
storms.
8
socket.
Page 9
Power & Connections
Using Batteries
Six 1.5V AA size (LR6) or equivalent batteries must first be installed
in the battery compartment. Alkaline batteries are recommended for longer
life.
Never mix battery types, such as alkaline batteries with manganese batteries or batteries from different makers.
z
Open Battery Compartment Cover
Open the battery compartment cover — located on the
instrument’s bottom panel — by pressing down on the grooved
section of the cover and sliding in the direction of the arrow, as
shown in the illustration.
x
Insert Batteries
Insert the six batteries, being careful to follow the polarity
markings on the bottom panel.
c
Replace Cover
Replace the compartment cover, making sure that it locks
firmly in place.
9
Page 10

Power & Connections
When to Replace the Batteries
When the batteries run down, the following display will appear:
When the batteries run down more seriously, “Power Batt.End”
message will appear. In this case, memory card functions are no longer
accessible.
When this display appears, replace the batteries with a complete set
of six new batteries. NEVER mix old and new batteries!
10
CAUTION
• To prevent possible damage due to battery leakage, remove the batteries from the
instrument if it is not to be used for an extended period of time.
• If keeping the batteries and memory card inserted, a small current flows through the
instrument. When the memory card is not used, remove the memory card from the
CARD slot.
Page 11
Power & Connections
Setting Up
What you will connect the QY100 to, and what you will connect to
the QY100, will depend entirely on your individual requirements, and it
would be impossible to cover all possibilities here. A few examples are provided below to help you get started.
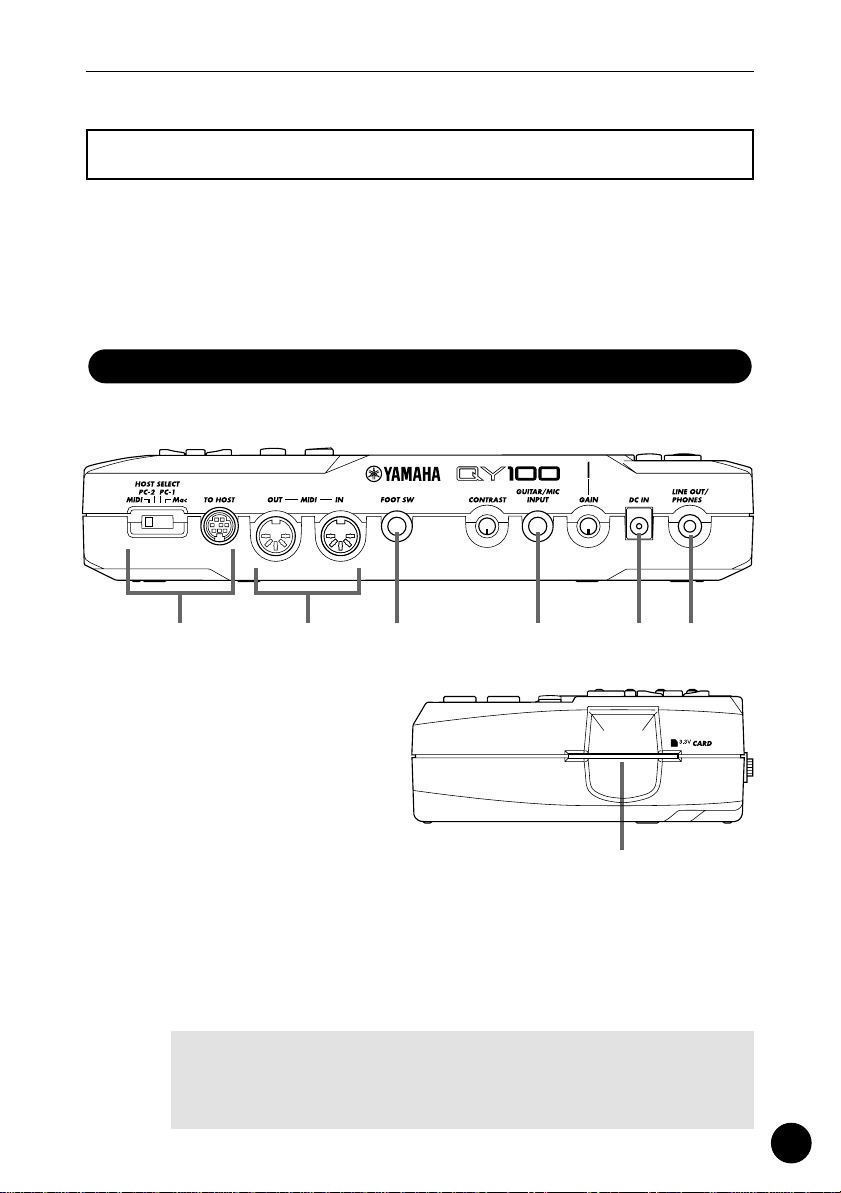
The Connectors
Rear Panel
wr qyt e
Right Side Panel
u
q
DC IN Jack
This jack is only used when you are powering the QY100
from an optional AC adaptor instead of batteries. The DC output
cable from an optional Yamaha PA-3B AC Power Adaptor is
plugged in here.
■
NOTE
• The batteries are automatically disconnected when a plug is inserted
into the DC IN jack.
(→ page 8)
11
Page 12

Power & Connections
MIDI IN & OUT Connectors
w
If you plan to use a MIDI keyboard or other instrument to
play and program the QY100, it should be connected to QY100
MIDI IN connector (see “MIDI Connections,” on page 15). The
MIDI OUT connector can be connected to an external tone generator if you want to drive external voices from the QY100
sequencer, or a MIDI data recorder such as the Yamaha MDF3 if
you want to store your songs and patterns to floppy disk.
LINE OUT/PHONES Jack
e
This miniature stereo phone jack can be used to connect
the output of the QY100 to a stereo sound system, or a pair of
stereo headphones with a miniature stereo phone plug can be
plugged in here for convenient monitoring (see “Audio Connections,” on page 14). The output level is adjusted via the VOLUME
control on the left side panel.
r
TO HOST Connector & HOST SELECT Switch
(→ pages 15, 16)
This jack and selector switch allow direct connection to a
personal computer without the need for a separate MIDI interface. See “Connecting To a Personal Computer” on page 16 for
details.
(→ pages 15, 16)
(→ page 14)
12
FOOT SW Jack
t
An optional FC-4 or FC-5 foot switch can be connected
here to perform a number of switching functions. The footswitch
function is selected via the UTILITY functions described on page
245.
Song and Pattern Playback:
start and stop song or pattern playback.
Section Switching:
QY100’s various style “sections” (e.g. INTRO, MAIN A, FILL
AB, etc.) during song or pattern playback.
(→ page 245)
The footswitch can be used to
The footswitch can be used to select the
Page 13

Power & Connections
Amp Simulator Switching:
The footswitch can be used to
switch the specified sections of the QY100 amp simulator in
or out. The foot switch can be used to bypass the preamp section only (delay when a microphone setup is selected), the
reverb effect only, the chorus effect only, or all three simultaneously (pages 44 and 52).
y
GUITAR/MIC INPUT Jack
(→ pages 36, 45)
Connect your guitar or microphone here to use the
QY100’s superlative guitar and vocal effects. The GAIN control
next to the GUITAR/MIC input jack allows matching with a wide
range of guitars and microphones.
CAUTION
• When connecting a microphone to the QY100 GUITAR/MIC input, be
sure that a microphone amp simulator setup is selected first (page 48).
Loud feedback may occur if one of the guitar setups is selected.
CARD Slot
u
(→ page 254)
The QY100 CARD slot accepts standard memory cards for
convenient storage of settings and sequences. Card access and
operations are described on page 254.
13
Page 14

Power & Connections
Audio Connections
The simplest way to monitor the QY100 sound is via a pair of stereo
headphones (miniature stereo phone plug type) plugged into the LINE OUT/
PHONES jack. If you want to use an external stereo sound system, however, use the supplied “Y” cable (miniature stereo phone plug to dual RCA
pin plugs) to connect the LINE OUT/PHONES jack to the inputs of a stereo
sound system. The white RCA pin plug goes to the left-channel input of
your stereo sound system and the red plug goes to the right-channel input.
14
LR
Stereo Sound System
CAUTION
• Make sure that both the QY100 and your sound system are turned OFF (STANDBY)
when making connections.
Page 15
Power & Connections
MIDI Connections
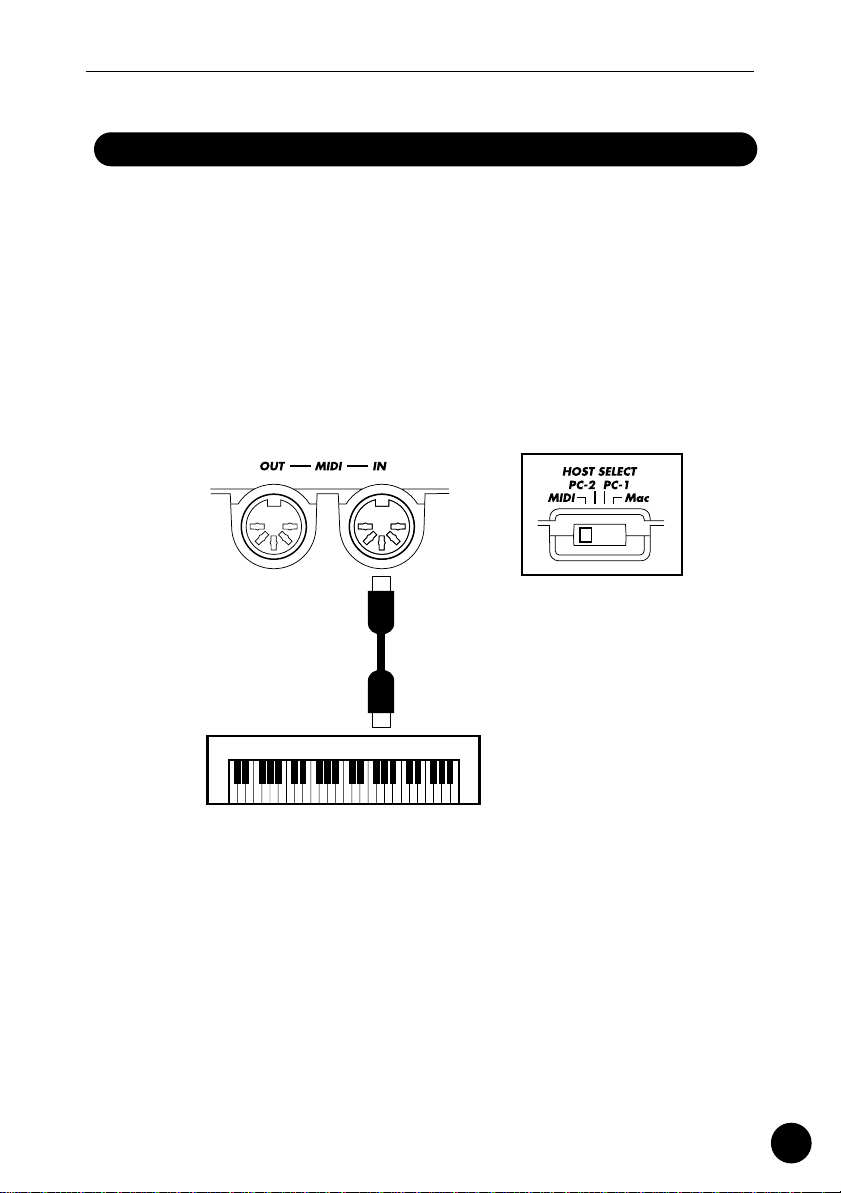
Although the QY100 can be played and programmed from the builtin micro-keyboard, an external MIDI keyboard connected to the MIDI IN
connector provides the added advantages of standard keyboard size and
key velocity sensivity (if your keyboard has a velocity-sensitive keyboard).
Connect the MIDI OUT connector of the keyboard to the MIDI IN connector of the QY100, and make sure that the QY100 HOST SELECT switch is
set to MIDI. The connected MIDI keyboard will play the voice assigned to
the currently selected sequencer track. See page 71 for instructions on
how to assign different voices to the sequencer tracks.
(HOST SELECT switch
is set to MIDI)
External MIDI Keyboard
MIDI OUT
15
Page 16

Power & Connections
Connecting to a Personal Computer
Although the QY100 can be connected to a personal computer via
the MIDI IN/OUT connectors and a MIDI interface, the TO HOST connector
and selector switch allow direct connection to Apple Macintosh, or IBM-PC/
AT series personal computers for sequencing and other music applications
without the need for a separate MIDI interface.
■
IMPORTANT!
• If the QY100 is to be connected to a computer via the TO HOST connector and a
MIDI controller via the MIDI IN connector, the “echo back”(or “MIDI Thru” etc) function of the music software or sequencer you are using must be turned “on” so that
the MIDI note data from the controller is returned to the QY100 and any subsequent
devices connected to the QY100 MIDI OUT connector.
Tone Generator
MIDI Controller
(MIDI Keyboard etc)
MIDI IN
MIDI OUT
MIDI
IN
QY100
MIDI
OUT
Personal Computer
echo back = ON
TO HOST
16
Page 17
Power & Connections
●
Connecting to an Apple Macintosh Series Computer
Connect the TO HOST connector of the QY100 to the
modem or printer port on your Macintosh, depending on which
port your MIDI software is using for MIDI data communication,
using a standard Macintosh 8-pin system peripheral cable. Set the
HOST SELECT switch to the “Mac” position.
You may also have to make other MIDI interface settings
on the computer side, depending on the type of software you use
(refer to your software owner’s manual). In any case the clock
speed should be set to 1 MHz.
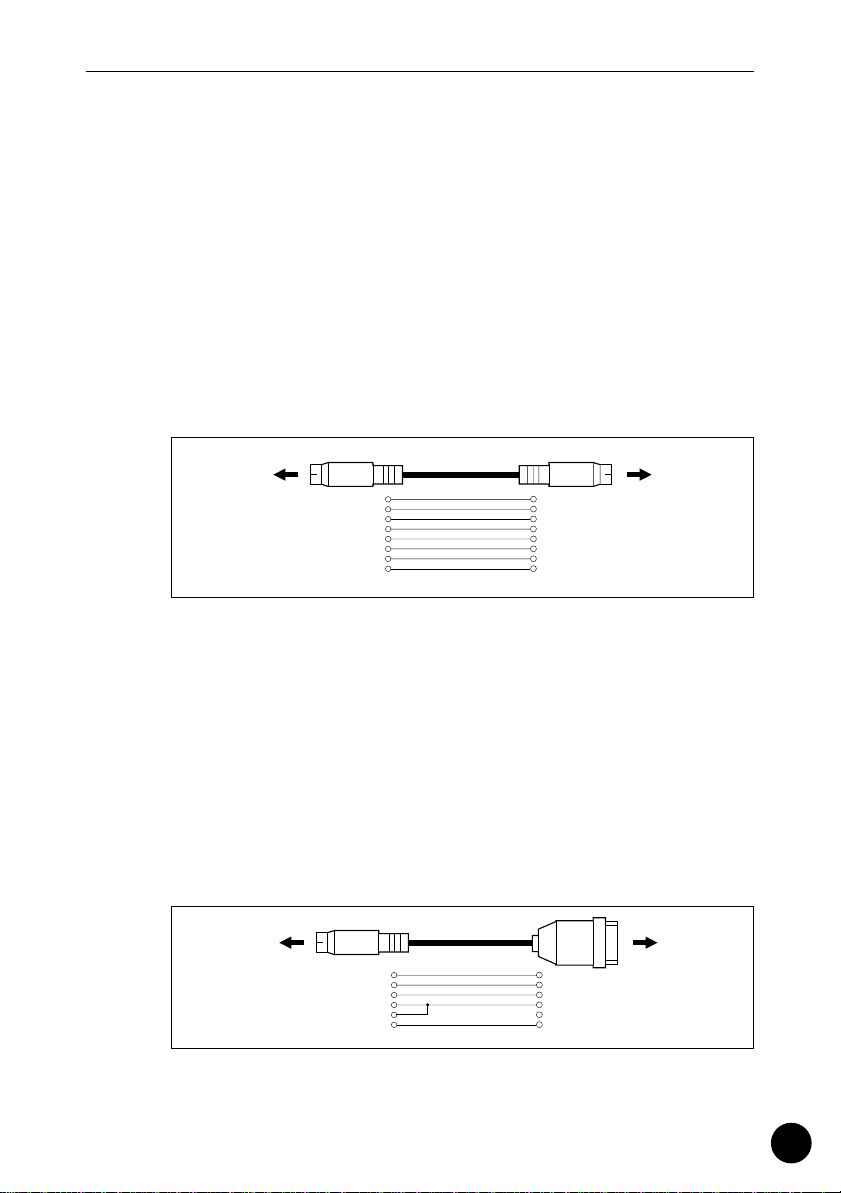
“Mac” Cable Connections
TO HOST
connector
MINI DIN
8-PIN
2 (HSK i)1
MINI DIN
1 (HSK 0)2
8-PIN
5 (RxD-)3
4 GND4
3 (TxD-)5
8 (RxD+)6
7 (GP i)7
6 (TxD+)8
Modem or
printer port
• 8-pin system peripheral cable.
• Data transfer rate: 31,250 bps.
●
Connecting to an IBM-PC/AT Series Computer
Connect the TO HOST connector of the QY100 to the RS232C port on your IBM computer, using a standard 8-pin MINI
DIN → 9-pin D-SUB cross cable. Set the HOST SELECT switch to
the “PC-2” position.
Refer to your software owner’s manual for information on
any settings you might have to make on the computer side.
“PC-2” Cable Connections
TO HOST
connector
MINI DIN
8-PIN
8 (CTS)1
7 (RST)2
4 5 (GND)
8
2 (RxD)3
3 (TxD) 5
D-SUB
9-PIN
RS-232C
port
• 8-pin mini DIN → 9-pin D-SUB cable.
• Data transfer rate: 38,400 bps.
17
Page 18
Power & Connections
●
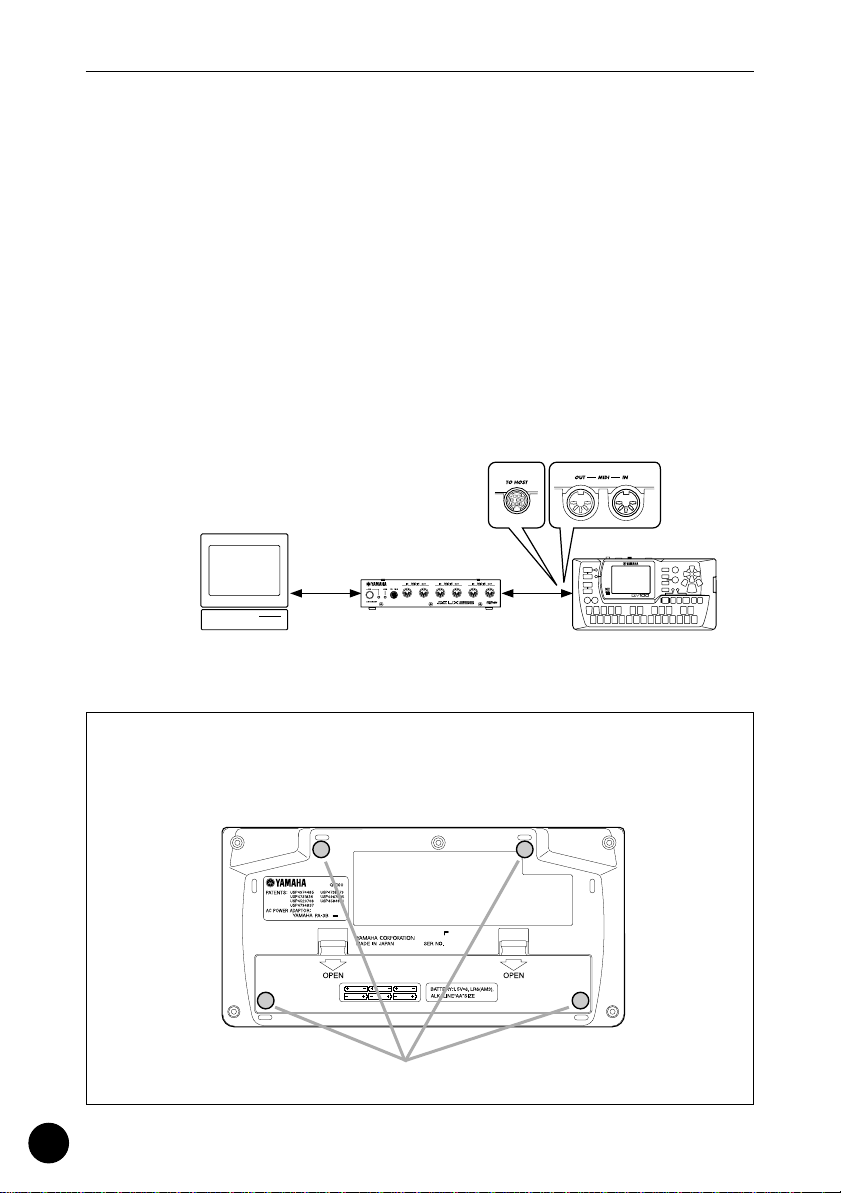
Connecting to a USB interface
(such as the Yamaha UX256)
If your computer does not have an RS-232C port or
modem/printer port, the QY100 can be connected via a separate
USB interface such as the Yamaha UX256.
Connect the USB port of your UX256 or other USB interface to the USB port on your computer using a USB cable. Install
the appropriate driver software on your computer (the driver software should be supplied with the USB interface. Connect the TO
HOST connector or MIDI IN/OUT connector of the QY100 to your
USB interface. For detailed information, refer to the owner’s man-
ual that came with your USB interface.
Computer
(sequencer software)
18
USB cable
UX256
QY100
If necessary, attach the included rubber feet to the bottom of the
QY100 as shown in the following illustration.
MODEL
Rubber feet
Page 19
The Controls
The Controls
The QY100 has fairly simple, consistent control interface that,
once understood, makes operation fast and easy, no matter what
operation you are performing. If you read through this section carefully, and try out the procedures in the ”TRY THIS” sections, you
should have no problem accessing and operating the QY100’s many
advanced features.
Left Side Panel
q !4
Rear Panel
w !5
19
Page 20
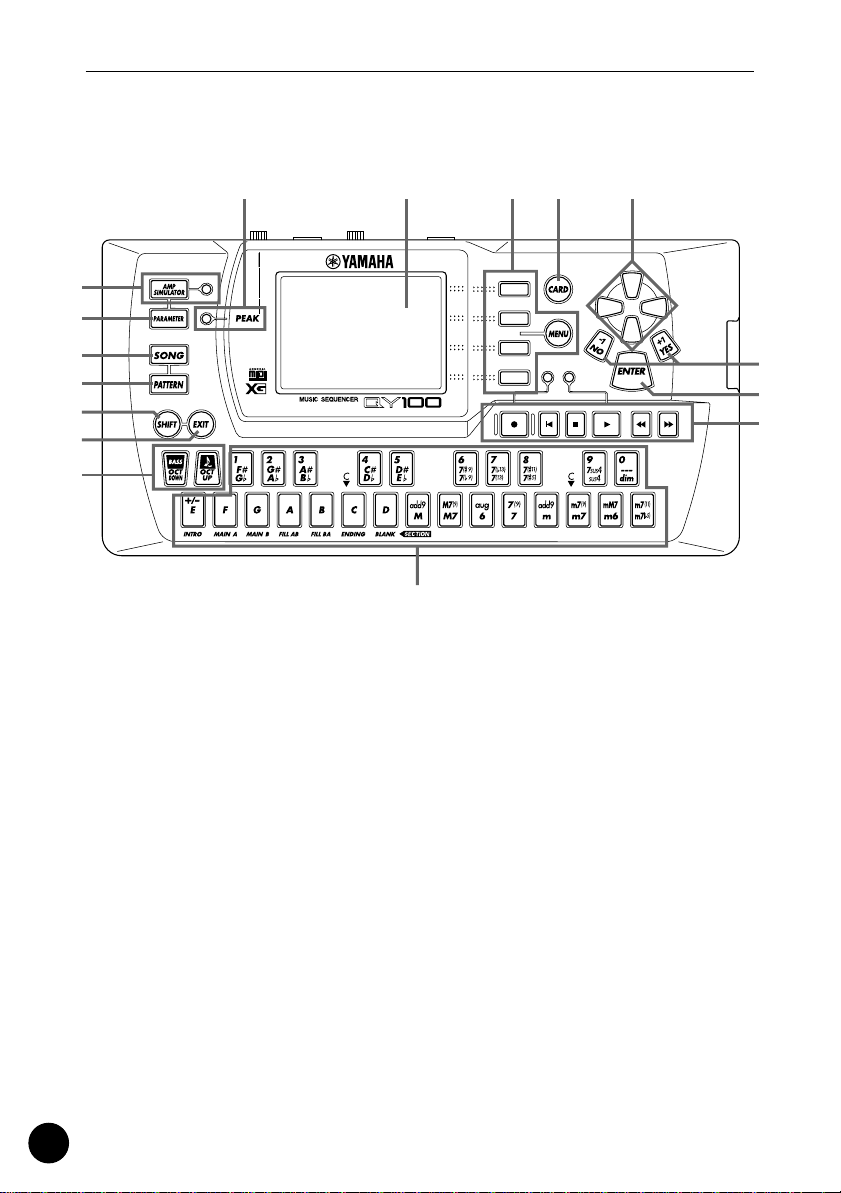
Front Panel
!7
!8
The Controls
w!5 o !6 u
e
r
t
y
!3
!2
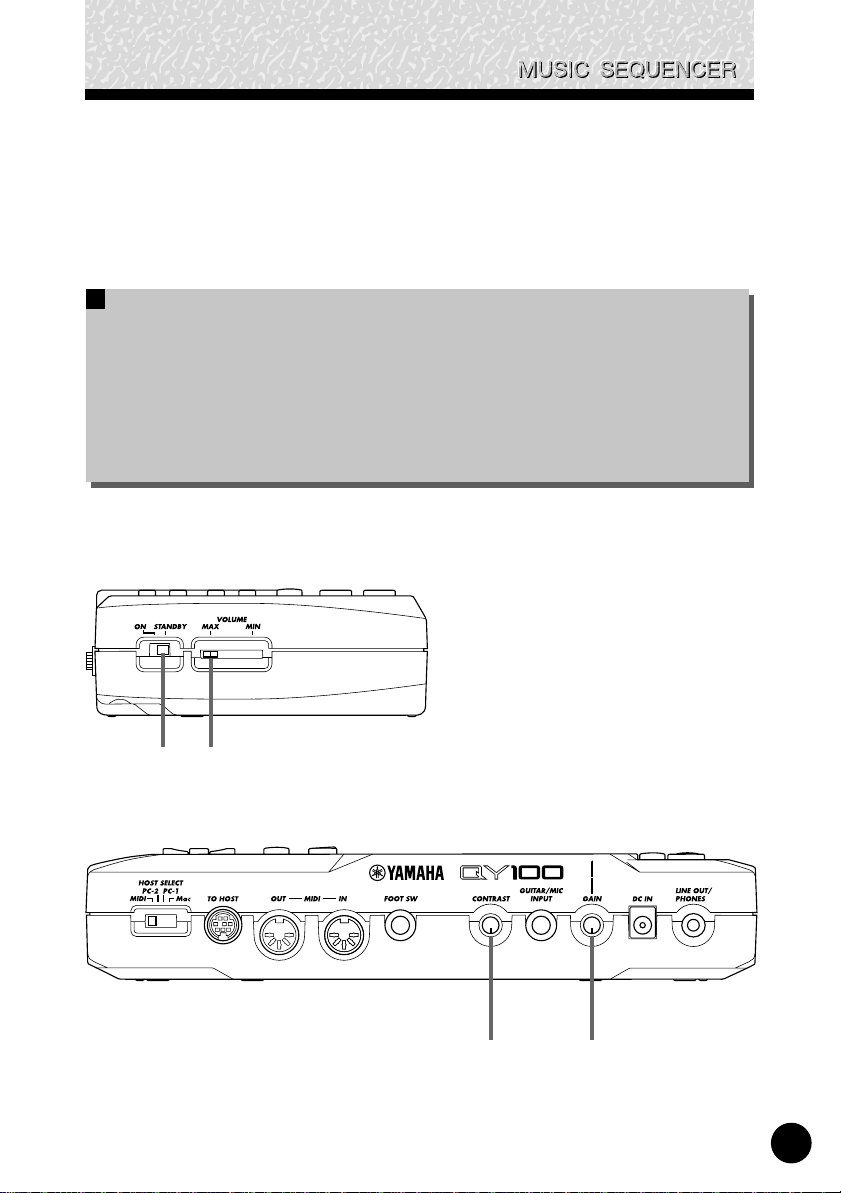
POWER Switch
q
Slide to the “ON” position to turn the QY100 on, or to the
“STANDBY” position to turn it off.
w
LCD Display & CONTRAST Control
This large multi-function liquid crystal display panel shows
all parameters and prompts you need to operate the QY100 with
optimum ease and efficiency.
Use the CONTRAST control on the rear panel to achieve
the best display visibility (LCD visibility varies greatly with viewing
angle and lighting).
i
!0
!1
20
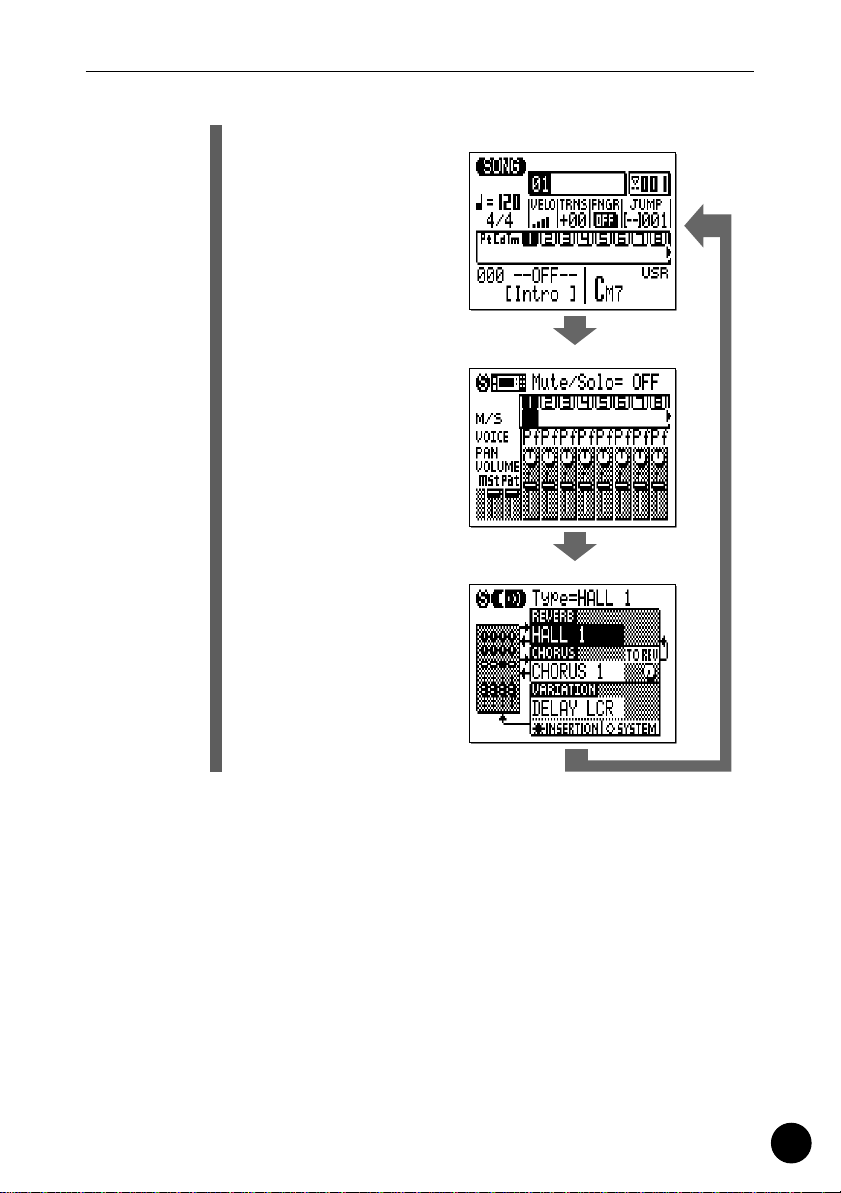
[SONG] Button
e
Use this button to select the QY100 SONG mode from any
other mode, and to switch between the SONG, SONG VOICE,
and SONG EFFECT displays.
Page 21
The Controls
TRY THIS:
Turn your QY100 on
(the power switch is on
the left side), then
press the [SONG] but-
ton a few times and
watch how the display
changes. The [SONG]
button calls the SONG,
SONG VOICE, and
SONG EFFECT displays
in sequence. The order
in which the displays is
selected is reversed if
you press the [SONG]
button while holding the
[SHIFT] button.
SONG display
SONG VOICE display
SONG EFFECT display
r [PATTERN] Button
The [PATTERN] button selects the QY100 PATTERN mode
from any other mode, and switches between the PATTERN, PATTERN VOICE, and PATTERN EFFECT displays.
t [SHIFT] Button
The [SHIFT] button modifies the function of certain other
buttons in certain situations (e.g. it reverses the order in which
the [SONG] or [PATTERN] displays are selected, as described
above). It also allows direct numeric entry via the black micro-keyboard keys (numbered 1 through 0). Situations in which the
[SHIFT] button can be used will be described where appropriate in
the manual.
21
Page 22

The Controls
y [EXIT] Button
No matter where you are in the QY100 display hierarchy,
the [EXIT] button will take to the next highest level (effectively
“backing up” one step — unless you’re already at the top display).
u Cursor Buttons
These 4 buttons move the “cursor” around the display
screen, highlighting the various parameters that are available for
editing (the QY100 cursor appears as a dark block with inverse
characters).
TRY THIS:
Select the SONG mode display (use the [SONG] button, as
described above), then try using the cursor buttons to
move the cursor around the screen.
i [-1/NO] and [+1/YES] Buttons
These buttons are used to edit (change the value of) the
parameter at which the cursor is currently located. The [-1/NO]
button decrements (decreases stepwise) the value of the
selected parameter, while the [+1/YES] button increments
(increases stepwise) the parameter. Press either button briefly to
decrement or increment the parameter by one, or hold the button
for continous decrementing of incrememnting in the specified
direction.
The [-1/NO] and [+1/YES] buttons are also used to respond
to “Are you sure?” prompts when they appear. Press [+1/YES] to
go ahead with the operation, or [-1/NO] to cancel.
22
■
NOTE
• For even faster decrementing or incrementing, press the opposite increment/decrement button while holding the button corresponding to the
direction you want to increment/decrement in.
TRY THIS:
Select the SONG mode display (use the [SONG] button, as
described above), use the cursor buttons to select the
transpose parameter (“TRNS” on the display), then try
using the [-1/NO] and [+1/YES] buttons to change its value.
Set it back to “+00” before continuing.
Page 23
The Controls
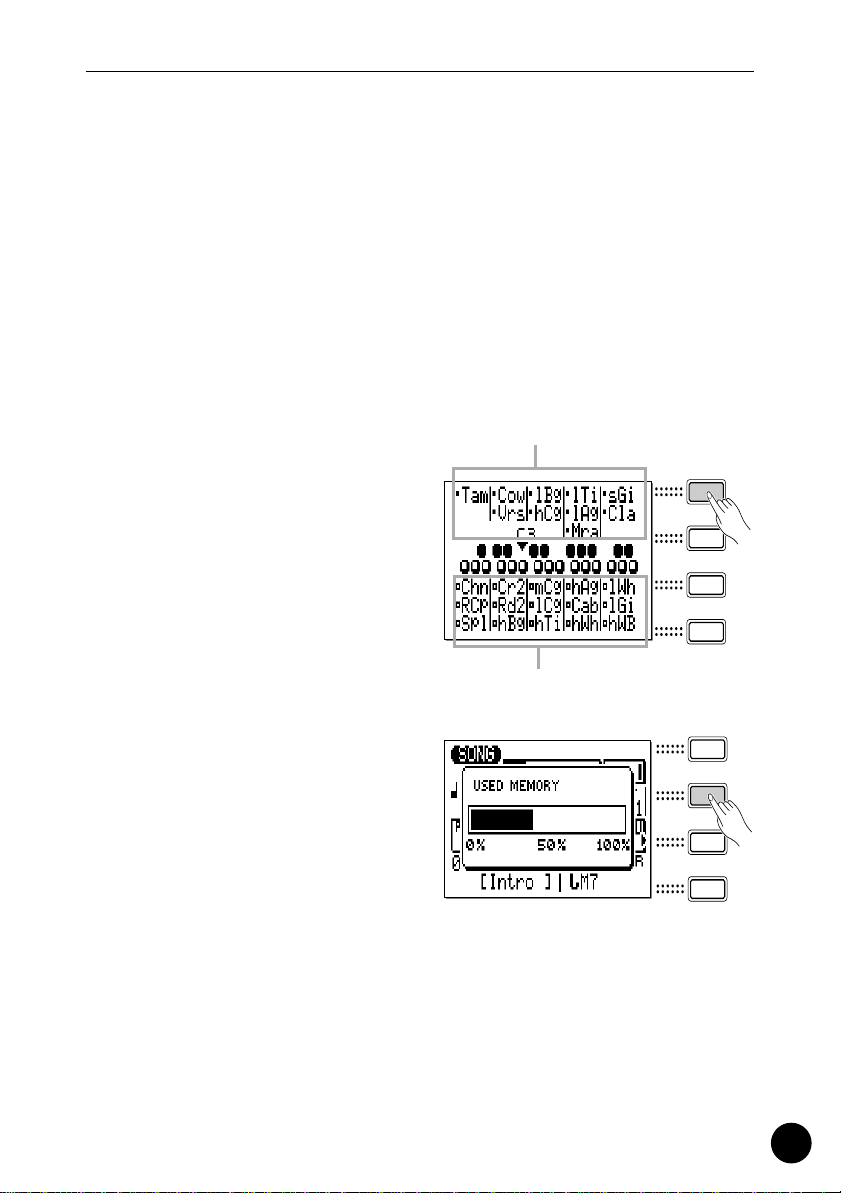
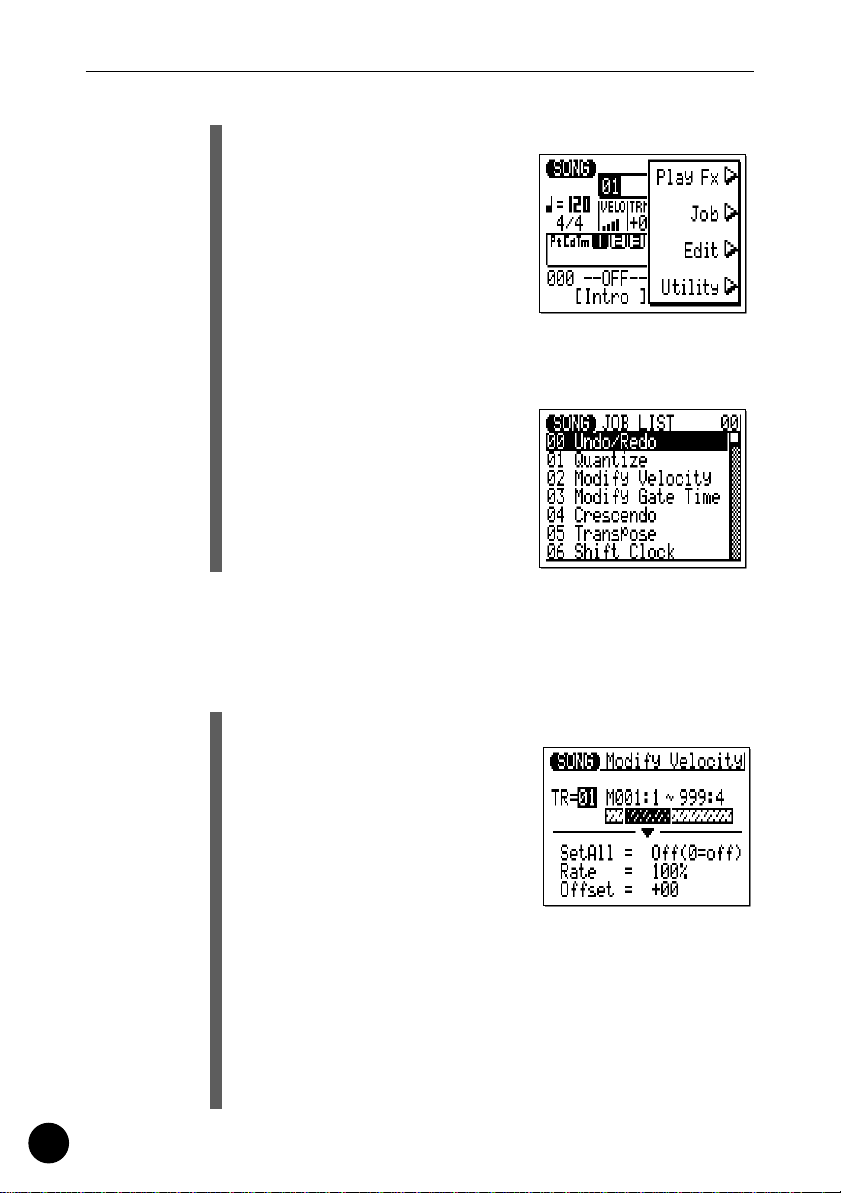
o [MENU] and Function Buttons
The [MENU] button calls a menu of functions or sub-modes
that can be accessed from the current QY100 mode, and the
function buttons (the four small buttons to the right of the display)
select the corresponding item from the menu that appears on the
display.
The function buttons can also be used, as shown below,
with the [SHIFT] button, instead of calling a menu with the
[MENU] button.
• Pressing the top function
button while holding the
Assignment to black keys
[SHIFT] button calls a display showing drum
instrument assignments
to each micro keyboard
key at the current octave
setting.
Assignment to white keys
• Pressing the second
function button while
holding the [SHIFT] button calls the Used Memory display.
• Pressing the bottom function button while holding the [SHIFT]
button executes the Undo/Redo job for immediately previous
edit. (Refer to “Undo/Redo” on page 147).
23
Page 24
The Controls
TRY THIS:
Select the SONG mode display
(use the [SONG] button, as
described above), then press the
[MENU] button. You should see
the menu shown on the right:
Next press the second function
button (the one immediately to
the right of “Job” on the menu)
to call the SONG mode Job List:
You can now use the cursor but-
tons (up and down only) to select
the various items in the Job List.
Leave the display as it is for now,
and read about the [ENTER] but-
ton, below.
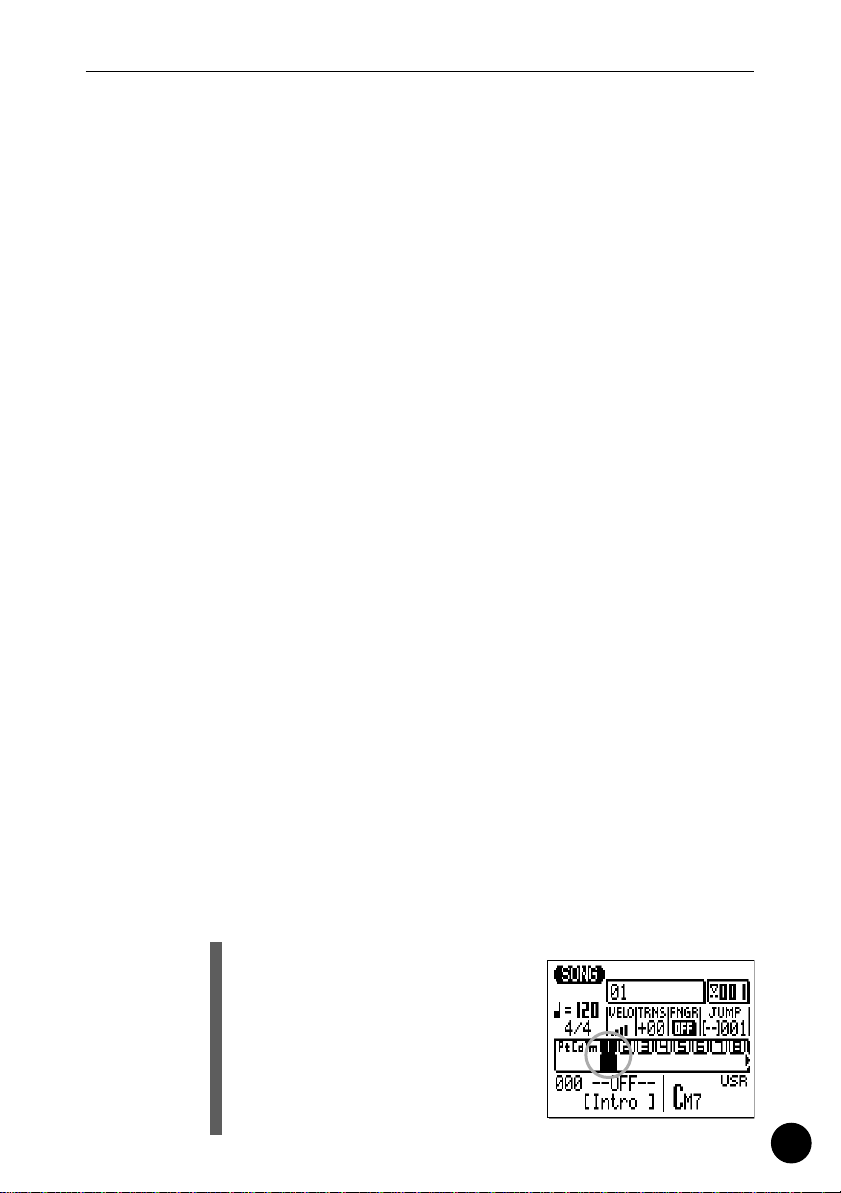
!0 [ENTER] Button
In addition to “entering” chords in the SONG and PATTERN
modes (which we’ll learn about later), the [ENTER] button is used
to “enter” a selected menu function.
TRY THIS:
Assuming that you’ve gone
through the “TRY THIS:” proce-
dure for the [MENU] and Func-
tion buttons, above, you should
now have the SONG mode Job
List on your QY100 screen. Use
the cursor buttons (up and down
only) to select job number 02
“Modify Velocity”. Now press the [ENTER] button to actu-
ally engage the Modify Velocity job — the display should
look like this:
Since we don’t really want to use the Modify Velocity job,
press the [EXIT] button twice (or the [SONG] button once)
to go back to the SONG mode.
24
Page 25
The Controls
!1 Sequencer Buttons
The sequencer buttons control recording and playback in
the SONG and PATTERN modes, and allow you to locate a specific measure within a song or pattern. Their layout and functions
are similar to the transport controls on a tape recorder.
[●] RECORD READY: Press this button to engage the
record ready mode. You have to press the START
button to actually start recording.
[■] STOP: Press to stop recording or playback.
[>] START: Press to start recording or playback.
[p] GO TO TOP: This button takes you directly to the
first measure (the “top”) of the current song or pattern.
[r] MOVE BACK: Press briefly to move back one mea-
sure, or hold for continuous scrolling.
[f] MOVE FORWARD: Press briefly to move forward
one measure, or hold for continuous scrolling.
!2 Micro Keyboard
This tiny 2-octave keyboard makes it possible to program
the QY100 anywhere, anytime, without having to connect an
external MIDI keyboard. It’s even polyphonic, so you can directly
enter chords as well as single notes. The only thing it lacks is
velocity sensitivity. The QY100 does, however, accept velocity
information from an external MIDI keyboard.
When programming accompaniment tracks the micro-keyboard is also used to specify the chord roots and types to be
entered.
TRY THIS:
In the SONG mode, use the cur-
sor buttons to place the cursor at
the track 1 position (“1” on the
display).
25
Page 26
The Controls
Now play the micro keyboard. You should hear the voice
that is currently assigned to sequencer track 1.
In the SONG mode, the micro keyboard plays the voice
assigned to the currently selected track (unless you’re
recording the chord track, in which case it is used to spec-
ify chords).
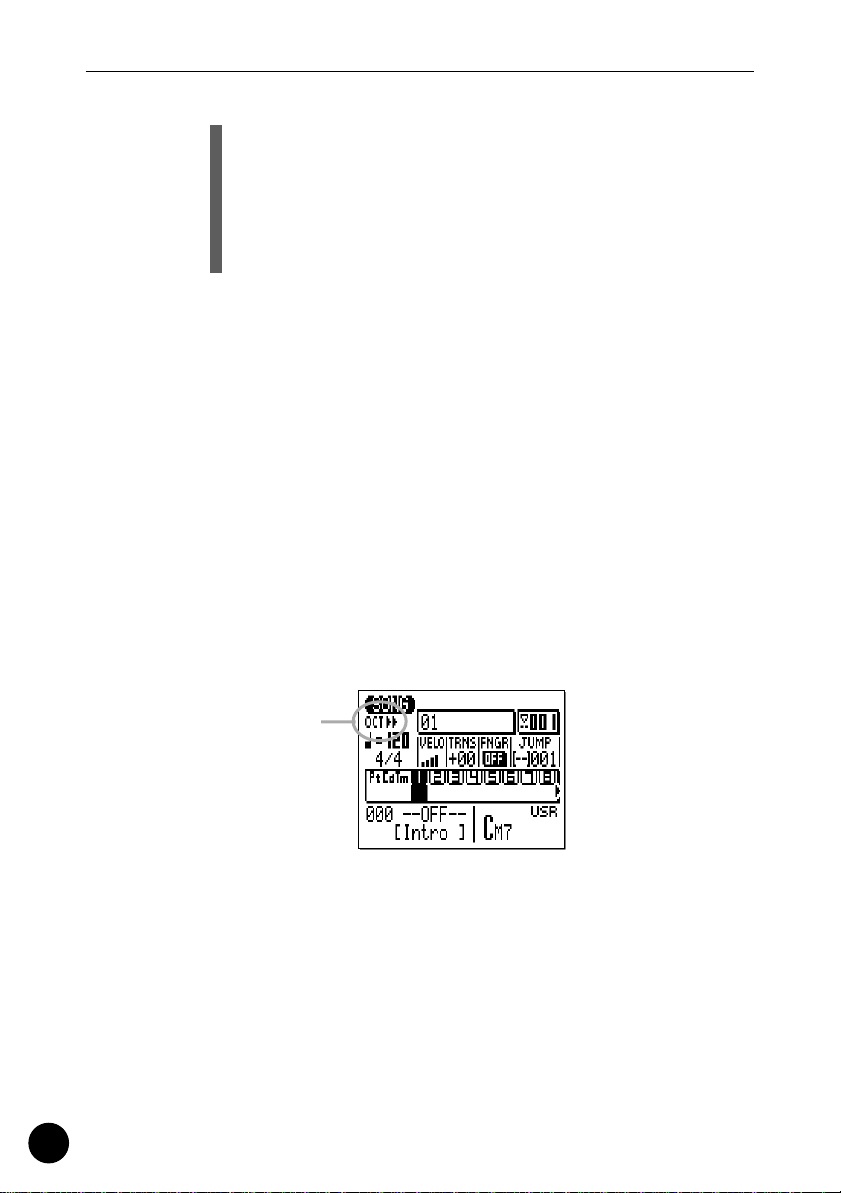
!3 Octave Buttons
Since the 2-octave range of the micro-keyboard is not
enough for serious music programming, the [OCT DOWN] and
[OCT UP] buttons allow the pitch of the keyboard to be shifted up
or down in octave steps, over a range of 8 octaves. Each time the
[OCT DOWN] button is pressed the pitch of the keyboard is
shifted down by one octave, until the lower limit is reached. The
[OCT UP] button shifts the pitch of the keyboard up in the same
way. The number of octaves the pitch of the micro-keyboard has
been shifted down or up is shown by the octave indicator in the
upper left corner of the display — the number of arrows indicates
the number of octaves shifted in the corresponding direction.
Pressing the [OCT DOWN] and [OCT UP] buttons simultaneously shifts the pitch to ±0.
26
Octave indicator
When recording the accompaniment chord tracks in the
step mode, the [OCT DOWN] button is used to specify the bass
note for chords, while the [OCT UP] button is used to enter syncopated chords.
While playing a note on the micro-keyboard, the [OCT
DOWN] button will shift the pitch of the note up while held, and
the [OCT UP] button will apply modulation while held.
Page 27
The Controls
!4 VOLUME Control
The VOLUME control adjusts the volume of the sound
delivered via the LINE OUT/PHONES jack. Slide the control
toward “MAX.” to increase the volume or toward “MIN.” to
decrease the volume.
CAUTION
• Set the VOLUME control to “MIN.” when connecting the QY100 to a
sound system for the first time, then gradually raise the volume level
until the required listening level is reached. This simple precaution can
prevent unexpectedly high volume levels from damaging your speaker
system (and maybe even your ears!).
!5 GAIN Control & PEAK Indicator (
→
pages 36, 45)
Use the GAIN control on the rear panel to adjust the QY100
input gain to match your guitar or microphone. If the PEAK indicator LED next to the [PARAMETER] button light more than just
occasionally as you play or sing, the GAIN setting is too high. The
PEAK indicator should flash only briefly on the highest transient
peaks.
!6 [CARD] Button (
→
page 254)
Accesses the QY100’s memory card functions: Save, Load,
Make Directory, and Format. Settings and sequences can be
saved to and loaded from standard memory cards for convenient,
high-volume storage and portability. The CARD functions are only
available when an appropriate memory card is installed in the
CARD slot on the right side panel. See page 254 for details on the
types of memory cards that can be used and the QY100’s card
functions.
!7 [AMP SIMULATOR] Button & Indicator (
→
pages 44, 52)
Turns the specified section(s) of the QY100 amp simulator
stage on or off. The [AMP SIMULATOR] button alternately turns
the amp simulator preamp section (delay effect when a microphone setup is selected), the reverb effect, the chorus effect, or
all three on and off depending on the setting of the “On/Off”
parameter described on pages 44 and 52. The button’s indicator
27
Page 28

The Controls
goes out when the selected sections are bypassed. The same
function can be assigned to an optional FC-4 or FC-5 footswitch
connected to the rear panel FOOT SW jack (page 12).
!8 [PARAMETER] Button (
→
pages 38, 47)
Accesses the QY100 amp simulator setups and parameters
for guitar and microphone input. See pages 38 and 47 for details.
28
Page 29

QY100 System Overview: What It Is and What It Does
QY100 System Overview:
What It Is and What It Does
This section offers a broad look at the overall QY100 system
and how the various features work together … but if you’d rather
jump right in start playing, skip ahead. Come back and read this section when you’re ready.
QY100
LINE OUT/
Sequencer
• 16 sequencer tracks
• 8 accompaniment
tracks
MIDI
Tone Generator Effects
messages
• 525 voices
• 22 drum kits
Audio
signals
Effects
• reverb, delay,
• reverb, delay,
modulation,
modulation,
distortion, etc
distortion, etc
Audio
signals
LINE OUT/
PHONES
PHONES
Audio signals
MIDI messages MIDI messages
Controller
• built-in micro keyboard
Amp Simulator
• 18 guitar setups
• 5 microphone
setups
GUITAR/MIC
INPUT
The Sequencer
16 Sequencer Tracks
You can individually assign any of the QY100’s 525 normal voices or
22 drum kits to the sequencer tracks and record anything you like via the
micro-keyboard or a MIDI keyboard or other type of MIDI controller connected to the MIDI IN connector. Think of each sequencer track as a “part”
of your composition: the piano part, the bass part, etc. You can separately
record up to 16 parts which can be played back simultaneously to create
29
Page 30

QY100 System Overview: What It Is and What It Does
complex musical structures and rich textures. Of course you can also use
just two or three tracks for simpler arrangements. If you’re a guitar player,
for example, you might only need to create a drum and bass track to play
along with.
The sequencer tracks can be recorded in real time using the
“replace” or “overdub” recording mode. When you use the “replace”
mode anything you use will replace (overwrite) any material that was previously on the same section of the track being recorded. The “overdub”
mode, on the other hand, lets you add new material to a previouslyrecorded track without erasing the previous data. This lets you build up a
track bit by bit without having to play the entire part all at once. Another
option is the “step” record mode in which you can enter notes one at a
time to create extremely fast or complex passages that would be difficult to
record in real time. The “step” mode is also useful for adding finishing
touches to tracks recorded in real time. Finally, there’s a “multi” record
mode in which all 16 sequencer tracks tracks can be recorded simultaneously — a great feature for transferring MIDI data to the QY100 from
another sequencer.
8 Accompaniment Tracks
The QY100 accompaniment tracks are what make it a versatile but
surprisingly easy-to-use accompaniment machine. Rather than recording
individual notes or chords as on the “sequencer” tracks described above,
accompaniments are produced by specifying a sequence of “patterns” to
be played (we will take a brief look at patterns — in the “Instant Accompaniment” section on page 53). In addition to 128 preset accompaniment
“styles”, each with 6 variation “patterns” (for details about styles and patterns, see page 53), the QY100 provides memory for up to 64 original
styles that you can record yourself. Chord changes are programmed simply
by entering the name of the chord (you can do this via the micro-keyboard
simply by pressing the appropriate key), and you can specify the bass note
for the chord as well as syncopated chord timing for maximum versatility in
creating accompaniments for any type of music. The entire accompaniment
is automatically re-harmonized to match the chords you specify. What all
this means is that you can put together great-sounding accompaniments in
a fraction of the time it would take using a conventional sequencer, so you
spend less time programming and more time creating and playing.
30
Page 31

QY100 System Overview: What It Is and What It Does
Tone Generator
The QY100 tone generator is a high-performance sound module in its
own right, complete with 525 voices and 22 drum and percussion kits. In
fact, the tone generator block is fully GM and XG compatible (see explanations, below) so you can actually use it as an independent sound module
driven from an external sequencer or computer-based MIDI music system.
The QY100 even provides a range of editing controls for the voices and
drum kits so you can customize the sound to suit your music. A complete
list of the QY100 voices is provided in the separate Data List booklet.
GM(General MIDI) System Level 1
“GM System Level 1” is a standard specification that defines
the arrangement of voices in a tone generator and its MIDI
functionality, ensuring that data can be played back with substantially the same sounds on any GM-compatible tone generator, regardless of its manufacturer or model.
Tone generators and song data that meet the “GM System Level 1” bear this
GM logo.
XG
“XG” is a tone generator format that expands the voice
arrangement of the “GM System Level 1” specification to
meet the ever-increasing demands of today’s computer
peripheral environment, providing richer expressive power
while maintaining upward compatibility of data. “XG” greatly expands “GM
System Level 1” by defining the ways in which voices are expanded or
edited and structure and type of effects.
When commercially available song data bearing the XG logo is played back
on a tone generator which bears the XG logo, you will enjoy a full musical
experience that includes unlimited expansion voices and effect functions.
31
Page 32

QY100 System Overview: What It Is and What It Does
Effects
Yamaha is famous for the quality of its reverb and other effects, and
the QY100 is no exception. The built-in effect system provides top-quality
reverb, chorus, and variation effects (including modulation and distortion)
that you can use to refine and polish your sound. Each sequencer track has
individual send controls for the reverb, chorus, and variation effect stages,
so you can apply effects separately to each track as required. A complete
list of the QY100 effects is provided in the separate Data List booklet.
Controller
With the QY100’s own micro keyboard you can create sequences
anywhere. But you can connect just about any type of the MIDI controller
— keyboard, MIDI wind controller, MIDI guitar, etc. — to the QY100 to give
you the type of control that best suits your style and talents.
Amp Simulator
As the name suggests, the QY100 “Amp Simulator” simulates the
characteristics of amplifiers — specifically guitar amplifiers and microphone
preamplifiers. Although the requirements for a good microphone preamplifier are pretty straightforward — high gain with flat frequency response as
well as low noise and distortion — guitar amplifiers are a little more complex. Each guitar amp has its own unique sound, and the emphasis is generally on musicality rather than accuracy. The QY100 Amp Simulator
performs both functions quite well, and it offers a range of top-quality
effects for use with guitar and microphone. The guitar setups feature overdrive/distortion, modulation and reverb. The microphone setups offer delay,
modulation and reverb. The QY100 has 18 guitar setups and 5 microphone
setups that you can customize to create the perfect sound for your music.
32
Page 33

Listen To the Demo
Guided Tour
— Your Step-by-Step Guide
to the QY100’s Basic Features and Functions
OK, here we go. Get comfortable with the QY100, the manual, and a
good cup of whatever strikes your fancy and we’ll get right down to making
the QY100 do what it does best — make music.
Listen To the Demo
“If you’d rather make your own music, skip ahead.”
Before you begin actually using the QY100 to create great
music, perhaps you’d like to hear a few examples of what it can do.
The QY100 includes 3 pre-programmed demo songs that will give you
a rough idea of the types of sound it can produce as well as some of
the capabilities of its sequencer functions.
Guided Tour
Guided Tour
z Select the SONG Mode
The demo songs are available in the SONG mode. If the
SONG mode isn’t already selected, press the [SONG] button to
select it. “SONG” should appear in the upper left corner of the
display.
x Select a Demo Song
The demo songs are songs 21, 22, 23 (songs 01 through 20
are available for your own recording). Use the cursor buttons to
move the cursor to the song number on the display (the song
33
Page 34

Listen To the Demo
number should appear in inverse characters — i.e. light characters
on a dark background), then use the [-1] and [+1] buttons to select
song number 21, 22, or 23.
Song number
The SHIFT-Number Data Entry Method:
You can also use the SHIFT-Number method to enter song
numbers or other data values. Use the numbered black
keys on the micro-keyboard to enter the required number
while holding the [SHIFT] button, then press the [ENTER]
button.
Ex. To enter the number “16”
34
Page 35

Listen To the Demo
c Start Playback
Once you’ve selected a song, you can start playback simply
by pressing the sequencer [>] button. Use the VOLUME control
on the left side of the QY100 to set the most comfortable listening level.
When the current song is finished, the next song will start
automatically. But you can stop playback at any time by pressing
the [■] button. You can’t select a different song while one is
already playing, so to select and play a different demo song you’ll
have to stop playback, select the next song, and then start playback again.
■
NOTE
• For full details on controlling sequence playback, see the “Playback Control” section on page 118.
35
Guided Tour
Guided Tour
Page 36

For Guitarists: Outstanding Amp Simulation & Effects
For Guitarists:
Outstanding Amp Simulation
& Effects
“If you’re not a guitarist, feel free to skip this section.”
Whether you want a better way to practice, top-quality accompaniment for live performances, or a convenient means to create fullblown compositions, the QY100 is an ideal musical tool for the guitarist who wants to get ahead. In addition to its sophisticated pattern and
song sequencer features, the QY100 also offers a complete guitar
amp simulator and effects system so you won’t need lots of extra
equipment to integrate your guitar sound with the QY100.
Connection & Gain Adjustment
Simple! In addition to the basic setup instructions provided on page
8, all you need to do is plug your guitar into the GUITAR/MIC INPUT on the
rear panel and adjust the GAIN control for optimum level matching.
z Plug your guitar into the GUITAR/MIC INPUT on the
rear panel.
36
Page 37

For Guitarists: Outstanding Amp Simulation & Effects
x Adjust the input gain.
Use the GAIN control on the rear panel to adjust the QY100
input gain to match your guitar. If the PEAK indicator LED next to
the [PARAMETER] button light more than just occasionally as you
play, the GAIN setting is too high. The PEAK indicator should flash
only briefly on the highest transient peaks.
37
Guided Tour
Guided Tour
Page 38

For Guitarists: Outstanding Amp Simulation & Effects
Try Out the Preset Guitar Setups
The QY100 has 18 amp simulator setups designed specifically for
guitar (see the separate Data List booklet). You can select the setups and
adjust individual parameters via the “GTR/MIC EDIT” display accessed by
pressing the [PARAMETER] button.
z Press the [PARAMETER] Button
The “GTR/MIC EDIT” display will appear.
Setup nameSetup number
38
x Highlight the Setup Number/Name
Use the cursor buttons to move the cursor to the setup
number/name at the top of the display.
c Select and Try Out the Setups
Use the [-1] and [+1] buttons to select the desired setup
(G01 through G18). Go ahead and try out the setups as they are.
You can make adjustments later. Make sure that the QY100 VOLUME control is set to an appropriate level, and adjust the rearpanel GAIN control as necessary to optimize the overall level and
sound quality.
Page 39

For Guitarists: Outstanding Amp Simulation & Effects
Customizing the Setups via the Amp Simulator Parameters
Although the QY100 guitar amp simulator setups sound good as they
are, you’ll undoubtedly want to “tweak” them a bit to create your own
sound. Here’s how:
The QY100 guitar amp simulator section is made up of three main
blocks: the Preamp block, the Chorus block, and the Reverb block, as
shown in the diagram.
GUITAR/MIC
INPUT
GAIN
Preamp
block
Chorus
block
Reverb
block
LINE OUT/
PHONES
All of the available parameters for each setup are located below the
setup number and name in the GTR/MIC EDIT display. The preamp parameters are located near the top of the parameter list, and are indicated by an
inverse “A” before the parameter name. The chorus block parameters are
next, and are indicated by an inverse “C” before the parameter name. The
reverb block has only one parameter, indicated by — you guessed it — an
inverse “R”. The parameter list also includes a “Volume” parameter and an
“On/Off” parameter which are described below.
Parameter page 1
Volume parameter
Preamp block
parameters
Parameter value
Guided Tour
Guided Tour
Parameter name
Graphic parameter
value indicator
39
Page 40

For Guitarists: Outstanding Amp Simulation & Effects
Parameter page 2
Chorus block
parameters
Reverb block
parameter
On/Off parameter
To edit a parameter:
z Move the Cursor to the Parameter You Want to Edit
Use the cursor buttons to highlight the desired parameter
value. Since not all of the parameters fit on one display page,
you’ll have to scroll down below the bottom of the first page to
see the parameters in the second page.
x Adjust the Parameter Value
Use the [-1] and [+1] buttons or the SHIFT-Number entry
method (see page 34. However, this method is not available for
some parameters.) to adjust as necessary. In addition to the
numeric parameter value, each parameter also has a graphic level
control located between the parameter name and value which
provides a convenient visual reference to relative parameter setting.
40
■
NOTE
• Any changes you make to the parameters will be retained for each setup
even if you select a different preset or turn the QY100 off. You can individually restore the initial settings for each setup by using the “INITIALIZE” function: After selecting the setup you want to initialize, press the
[MENU] button and then the function button next to “Initialize” on the
display. Then when the “Initialize” display appears press the [ENTER]
button to initialize all parameters of the selected setup. When initialization is complete press the [EXIT] button to return to the Amp Simulator
display.
Page 41

For Guitarists: Outstanding Amp Simulation & Effects
● The Volume Parameter
A “Volume” parameter which affects the overall volume of
the setup is located at the top of the parameter list. This parameter is most useful for matching the levels of the setups to suit
your musical needs. You might, for example, want all of your guitar setups to have about the same level, or you might want certain effects you’ve set up for solos to have a higher level than the
rest. Parameters such as preamp drive and EQ also affect the
subjective level of the guitar sound, and the Volume parameter is
a convenient way to compensate for such variations.
Volume parameter
● The Preamp Block
Depending on the selected setup, you’ll see one or three
preamp parameters below the “Volume” parameter. In some setups only the “Drive” parameter will be available, while in others
you will have “Drive”, “EQ LowGain” and “EQ Hi Gain”. Here’s
what the preamp parameters do:
Preamp block
parameters
Drive In guitarist-friendly terms, this parameter is similar to
the “gain” or “pre-gain” control on an amplifier that
has both gain and master volume controls. Higher
“Drive” values (range: 000 … 127) produce more overdrive (distortion).
41
Guided Tour
Guided Tour
Page 42

For Guitarists: Outstanding Amp Simulation & Effects
EQ LowGain Boosts or cuts the bass frequencies (range: -12dB …
+00dB … +12dB). Minus settings lower the bass
response, giving you a “thinner” sound. Positive settings boost the bass response for a “fuller” sound.
EQ Hi Gain Boosts or cuts the high frequencies (range: -12dB … 0
… +12dB). Minus settings lower the treble response,
giving you a “rounder”, more mellow tone. Positive
settings boost the treble response for a brighter
sound.
● The Chorus Block
The Chorus effect can give your guitar sound added life and
sparkle. The Chorus block is not engaged on all setups. If you
select a setup which does not use the Chorus block the Chorus
parameter values will all appear as dashed lines. When the Chorus block is engaged, the parameters work as follows:
Chorus block
parameters
42
Mod Speed Adjusts the modulation speed of the chorus effect (the
speed at which the tone varies). The value range is
from 0.0 Hz through 39.7 Hz. The higher the value, the
faster the modulation.
Mod Depth Modulation depth (range: 000 through 127). The higher
the value the deeper the modulation and, thus, the
“stronger” the effect.
FB Level Adjusts the amount of feedback applied to the chorus
block (range: -63 … +00 … +63). Negative values
apply reverse-phase feedback.
Page 43

For Guitarists: Outstanding Amp Simulation & Effects
● The Reverb Block
The Reverb block has only one parameter — “Reverb Lvl”
— which adjusts the depth of the reverb sound. The Reverb Lvl
range is from “000” to “127”, with higher values producing
deeper reverb. If you select a setup which does not use the
Reverb block, the “Reverb Lvl” parameter value will appear as
dashed line.
Reverb block
parameter
43
Guided Tour
Guided Tour
Page 44

For Guitarists: Outstanding Amp Simulation & Effects
● The “On/Off” Parameter
At the very bottom of the parameter list is the “On/Off”
parameter. This parameter allows you to select a specific block to
be turned on and off by the [AMP SIMULATOR] button on the top
panel, or a footswitch connected to the rear-panel FOOT SW jack
(when the footswitch is assigned to amp simulator section
switching via the UTILITY parameter described on page 245).
There’s also an “ALL” setting which allows all blocks to be turned
on or off. When the selected block(s) are bypassed (off), the indicator to the right of the [AMP SIMULATOR] button will go out).
On/Off parameter
44
The settings are:
AMP The footswitch or [AMP SIMULATOR] button turns
only the Preamp block on and off.
CHO The footswitch or [AMP SIMULATOR] button turns
only the Chorus block on and off.
REV The footswitch or [AMP SIMULATOR] button turns
only the Reverb block on and off.
ALL The footswitch or [AMP SIMULATOR] button turns all
three blocks —Preamp, Chorus, and Reverb — on and
off.
Page 45

For Singers: Cool Vocal Processing
For Singers:
Cool Vocal Processing
“If you’re not a vocalist, feel free to skip this section.”
The QY100 is an outstanding accompaniment tool for singers,
too. It features a GUITAR/MIC input that will directly accept the signal
from your vocal microphone and apply essential vocal effects such as
delay and reverb. There’s even a chorus effect that you can use to cre-
ate extra thick sounds.
Connection & Gain Adjustment
Simple! In addition to the basic setup instructions provided on page
8, all you need to do is plug your microphone into the GUITAR/MIC INPUT
on the rear panel and adjust the GAIN control for optimum level matching.
z Plug your microphone into the GUITAR/MIC INPUT on
the rear panel.
Guided Tour
Guided Tour
CAUTION
• When connecting a microphone to the QY100 GUITAR/MIC input, be
sure that a microphone amp simulator setup is selected first (page 48).
Loud feedback may occur if one of the guitar setups is selected.
45
Page 46

For Singers: Cool Vocal Processing
x Adjust the input gain.
Use the GAIN control on the rear panel to adjust the QY100
input gain to match your microphone. If the PEAK indicator LED
next to the [PARAMETER] button light more than just occasionally
as you sing, the GAIN setting is too high. The PEAK indicator
should flash only briefly on the highest transient peaks.
46
Page 47

For Singers: Cool Vocal Processing
Try Out the Preset Microphone Setups
The QY100 has 5 amp simulator setups designed specifically for use
with microphone (see the separate Data List booklet). You can select the
setups and adjust individual parameters via the “GTR/MIC EDIT” display
accessed by pressing the [PARAMETER] button.
z Press the [PARAMETER] Button
The “GTR/MIC EDIT” display will appear.
Setup nameSetup number
x Highlight the Setup Number/Name
Use the cursor buttons to move the cursor to the setup
number/name at the top of the display.
c Select and Try Out the Setups
Use the [-1] and [+1] buttons to select the desired microphone setup (M01 through M05 — you might have to skip past
guitar setups G01 through G18 to reach the microphone setups ).
Go ahead and try out the setups as they are. You can make adjustments later. Make sure that the QY100 VOLUME control is set to
an appropriate level, and adjust the rear-panel GAIN control as
necessary to optimize the overall level and sound quality.
47
Guided Tour
Guided Tour
Page 48

For Singers: Cool Vocal Processing
Customizing the Setups via the Microphone Effect Parameters
The QY100 microphone amp simulator section is has three main
effect blocks: the Delay block, the Chorus block, and the Reverb block, as
shown in the diagram.
GUITAR/MIC
INPUT
GAIN
Delay
block
Chorus
block
Reverb
block
LINE OUT/
PHONES
All of the available parameters for each setup are located below the
setup number and name in the GTR/MIC EDIT display. The delay parameters are located near the top of the parameter list, and are indicated by an
inverse “D” before the parameter name. The chorus block parameters are
next, and are indicated by an inverse “C” before the parameter name. The
reverb block has only one parameter, indicated by — you guessed it — an
inverse “R”. The parameter list also includes a “Volume” parameter and an
“On/Off” parameter which are described below.
Parameter page 1
Volume parameter
Delay block
parameters
Parameter value
48
Parameter name
Graphic parameter
value indicator
Page 49

For Singers: Cool Vocal Processing
Parameter page 2
Chorus block
parameters
Reverb block
parameter
On/Off parameter
To edit a parameter:
z Move the Cursor to the Parameter You Want to Edit
Use the cursor buttons to highlight the desired parameter
value. Since not all of the parameters fit on one display page,
you’ll have to scroll down below the bottom of the first page to
see the parameters in the second page.
x Adjust the Parameter Value
Use the [-1] and [+1] buttons or the SHIFT-Number entry
method (see page 34. However, this method is not available for
some parameters.) to adjust as necessary. In addition to the
numeric parameter value, each parameter also has a graphic level
control located between the parameter name and value which
provides a convenient visual reference to relative parameter setting.
Guided Tour
Guided Tour
■
NOTE
• Any changes you make to the parameters will be retained for each setup
even if you select a different preset or turn the QY100 off. You can individually restore the initial settings for each setup by using the “INITIALIZE” function: After selecting the setup you want to initialize, press the
[MENU] button and then the function button next to “Initialize” on the
display. Then when the “Initialize” display appears press the [ENTER]
button to initialize all parameters of the selected setup. When initialization is complete press the [EXIT] button to return to the Amp Simulator
display.
49
Page 50

For Singers: Cool Vocal Processing
● The Volume Parameter
A “Volume” parameter which affects the overall volume of
the setup is located at the top of the parameter list. This parameter is most useful for matching the levels of the setups to suit
your musical needs. You might, want all of your setups to have
about the same level, or you might want certain effects to have a
higher level than the rest.
Volume parameter
● The Delay Block
The stereo delay block has the following five parameters:
50
Delay block
parameters
Lch Delay Sets the initial delay time of the left-channel delay
from 0.1 through 715.0 milliseconds.
Rch Delay Sets the initial delay time of the right-channel delay
from 0.1 through 715.0 milliseconds.
FB Delay1 Sets the feedback delay time of the left-channel delay
from 0.1 through 715.0 milliseconds (this sets the
delay time for delays following the main initial delay).
FB Delay2 Sets the feedback delay time of the right-channel
delay from 0.1 through 715.0 milliseconds (this sets
the delay time for delays following the main initial
delay).
FB Dly Lvl Feedback Delay Level determines how the later delays
fade out after the initial delay.
Page 51

For Singers: Cool Vocal Processing
● The Chorus Block
The Chorus effect can give your vocal sound added life and
sparkle. The Chorus block is not engaged on all setups. If you
select a setup which does not use the Chorus block the Chorus
parameter values will all appear as dashed lines. When the Chorus block is engaged, the parameters work as follows:
Chorus block
parameters
Mod Speed Adjusts the modulation speed of the chorus effect (the
speed at which the tone varies). The value range is
from 0.0 Hz through 39.7 Hz. The higher the value, the
faster the modulation.
Mod Depth Modulation depth (range: 000 through 127). The higher
the value the deeper the modulation and, thus, the
“stronger” the effect.
FB Level Adjusts the amount of feedback applied to the chorus
block (range: -63 … +00 … +63). Negative values
apply reverse-phase feedback.
Guided Tour
Guided Tour
● The Reverb Block
The Reverb block has only one parameter — “Reverb Lvl”
— which adjusts the depth of the reverb sound. The Reverb Lvl
range is from “000” to “127”, with higher values producing
deeper reverb. If you select a setup which does not use the
Reverb block, the “Reverb Lvl” parameter value will appear as
dashed line.
51
Page 52

For Singers: Cool Vocal Processing
Reverb block
parameter
● The “On/Off” Parameter
At the very bottom of the parameter list is the “On/Off”
parameter. This parameter allows you to select a specific block to
be turned on and off by the [AMP SIMULATOR] button on the top
panel, or a footswitch connected to the rear-panel FOOT SW jack
(when the footswitch is assigned to amp simulator section
switching via the UTILITY parameter described on page 245).
There’s also an “ALL” setting which allows all blocks to be turned
on or off. When the selected block(s) are bypassed (off), the indicator to the right of the [AMP SIMULATOR] button will go out).
52
On/Off parameter
The settings are:
DLY The footswitch or [AMP SIMULATOR] button turns
only the Delay block on and off.
CHO The footswitch or [AMP SIMULATOR] button turns
only the Chorus block on and off.
REV The footswitch or [AMP SIMULATOR] button turns
only the Reverb block on and off.
ALL The footswitch or [AMP SIMULATOR] button turns all
three blocks — Delay, Chorus, and Reverb — on and
off.
Page 53

Instant Accompaniment
Instant Accompaniment
In this section we’ll learn how to use the QY100 to create a vast
range of accompaniments without having to do any programming at
all. By combining the 768 preset patterns provided (128 styles x 6 sections) with 99 preset chord templates we can create … let’s see, um
… a whole lot of accompaniment variations.
But First … So You’ll Know What We’re Talking About
Before we discover how easy it is to create accompaniments with
the QY100, let’s straighten out some of this confusing terminology: just
what exactly are “patterns”, “styles”, “sections”, and “chord templates”?
● Styles
A “style” is, well, a musical style! Like “blues” or “reggae” or “hip-hop”. The QY100’s 128 styles are like mini-arrange-
ments in different musical styles, including drums/percussion,
bass, chords, counter-lines, etc., depending on the requirements
of the style. Each style is further sub-divided into “sections”.
● Sections
Each style has a number of “sections”, as listed below.
INTRO As the name implies, this section will normally func-
tion as the introduction to a song.
MAIN A The MAIN A section is the one you’d normally use as
the verse of a song.
MAIN B This is a variation of the MAIN A section which can be
used as the chorus or “bridge” section of a song.
FILL AB A break or “fill” that connects the MAIN A section to
the MAIN B section.
53
Guided Tour
Guided Tour
Page 54

Instant Accompaniment
FILL BA A fill that connects the MAIN B section to the MAIN A
section.
ENDING An ending pattern which finishes the song. Playback
stops automatically when the ending pattern finishes
playing.
BLANK When you select the “BLANK” section no sound is
produced by the QY100 until you select another section, but the QY100 keeps counting time so that when
you do select another section that section will come in
with the proper timing.
● Patterns
Quite simply, each “section” of each “style” is a pattern.
The INTRO section of the “FunkRock” style is a pattern, as is the
MAIN B section of the “BritPop” style. Thus, with 128 styles,
each having 6 sections (we don’t count the BLANK section, for
obvious reasons), you have a total of 768 individual patterns.
● Chord Templates
If you simply select and play a section of a style, the style
will play but without any “harmonic motion”. Which is simply a
fancy way of saying “without chord changes”. The style will play
with the currently selected chord until you enter a new chord
manually or program an original chord progression. But we’ll leave
manual chord entry and chord progression programming for a
later chapter, because the QY100 actually provides 99 preset
chord progressions that you can simply select and play! These
“chord templates” include a wide range of “standard” progressions — some you might recognize from your favorite songs —
commonly used in a wide range of musical genres.
54
Page 55

Instant Accompaniment
Check Out the Preset Styles
The QY100’s preset styles can be selected and played in the SONG
mode.
z Select the SONG mode & an Empty Song
Press the [SONG] button to select the SONG mode then, if
necessary, make sure the cursor is located at the song number at
the top of the display and use the [+1] and [-1] buttons to select
an “empty” song.
Song number
The SHIFT-Number Data Entry Method:
You can also use the SHIFT-Number method to enter song
numbers or other data values. Use the numbered black
keys on the micro-keyboard to enter the required number
while holding the [SHIFT] button, then press the [ENTER]
button.
■
NOTE
• If for some reason all 20 songs contain data, use the “Clear Song” job
described on page 179 to clear a song for recording.
x Highlight the Style Number
The bottom left-hand area of the QY100 display is the style
and section selection area.
55
Guided Tour
Guided Tour
Page 56

Instant Accompaniment
Style
number
Section name
To select a style, first move the cursor to the style number
on the display.
c Select a Style
Use the [-1] and [+1] buttons or the SHIFT-Number entry
method (page 34) to select the style you want to play (refer to the
“Style List” of the separate Data List booklet for details about
each individual style).
56
v Start Playback
Press the sequencer [>] button to begin playback of the
selected style, and the [■] button to stop playback, as required.
Start Playback
Measure
number
Stop Playback
Page 57

Instant Accompaniment
● Two Methods To Select Sections
There are two ways to select the section you want to play:
Method 1: Move the cursor to the section name at the bottom
of the display and use the [-1] and [+1] buttons or SHIFT-Number entry method (page 34) to select a section.
Method 2: Simply press the key on the mini-keyboard corresponding to the section you want to select (note that the 7
left-most white keys on the mini keyboard have the names of
the sections printed below them). The mini-keyboard method
will only work while the cursor is located within the style and
section selection area of the display.
Either method you choose, when a different section is selected
while the style is playing, the newly selected section will begin
playing from the top of the next measure. “NEXT” will appear
before the newly-selected section name until it actually begins
playing.
“NEXT”
When the INTRO, FILL AB or FILL BA section is selected while
the style is playing, it will play through once and then playback will
automatically return to the MAIN A or MAIN B section; INTRO is
57
Guided Tour
Guided Tour
Page 58

Instant Accompaniment
followed by MAIN A, FILL AB is followed by MAIN B, and FILL BA
is followed by MAIN A. If you selected the ENDING section, playback will stop automatically once the ENDING section has played
all the way through.
• Any Section (or no section) → INTRO → MAIN A
• Any Section → FILL AB → MAIN B
• Any Section → FILL BA → MAIN A
• Any section → ENDING → Playback Stops
58
Page 59

Instant Accompaniment
Add Chords & Play Along!
Now that you have the pattern of your choice grooving along on your
QY100 (if you don’t, select and play one now), Let’s hear how it sounds
with some of the preset chord templates.
z Highlight the Chord Template Parameter
The bottom right-hand area of the display is the chord and
chord template selection area. Move the cursor to the upper right
corner of this area.
Chord template
number
Chord name
x Select a Preset Chord Template
Use the [-1] and [+1] buttons to select and listen to some of
the preset chord templates (numbered P01 through P99). When
the cursor is located at the chord template number, the name of
the selected chord template appears below the chord template
number. If you move the cursor away from the chord template
number the name of each individual chord is displayed in the
same location as the accompaniment plays back.
■
NOTE
• The fact that the QY100 displays the chord names as it plays can be a
great learning tool! Watching the chord names as the progressions plays
— you can play along, too — allows you to associate the chords with the
overall sound they produce in each progression. With a little time and
effort you should be able to recognize chord progressions by ear.
• All chord templates are originally in the key of C. To change the key use
the TRNS (Transpose) parameter to transpose the entire song to the
desired key (page 123).
59
Guided Tour
Guided Tour
Page 60

Instant Accompaniment
Some of the chord templates are standard progressions —
such as the basic I – VI – II – V7 progression of the POPSM01 template (P01). Others may be a little more unusual,
but none the less interesting or useful. See the “Chord
Template List” of the separate Data List booklet for a complete listing of the 99 available chord templates and their
chord progressions. Spend some time combining various
styles with chord templates and see what you can come up
with! Don’t forget to try selecting the various sections of
each style to hear how they sound with the selected chord
template(s).
60
Page 61

Record Your Own Chord Progression & Pattern Changes
Record Your Own Chord
Progression & Pattern Changes
Now that you’re familiar with the QY100’s styles, patterns, and
preset chord templates, let’s try recording a short accompaniment
with pattern changes and an original chord progression.
As an example that can be programmed quickly and easy let’s use
the HipHop2 style (style number 035) with the following arrangement:
INTRO (4 measures) → MAIN A (7 measures) →
FILL AB (1 measure) → MAIN B (7 Measures) →
FILL BA (1 measure) → MAIN A (8 measures) →
ENDING
■
NOTE
• The reason that the first two occurrences of MAIN A and MAIN B are 7 measures
long instead of 8 (a more normal “unit”) is that the fills — FILL AB and FILL BA —
function as the last measure of the 8-measure units.
The chord changes are oh-so-simple. The entire accompaniment
(11)
(11)
(11)
(11)
(11)
and Fm7
)
uses only two chords — Cm7
INTRO
(11)
*
Cm7
MAIN A FILL AB
(11)
Cm7
MAIN B FILL BA
(11)
Cm7
MAIN A
(11)
Cm7
ENDING
(11)
*
Cm7
* The INTRO and ENDING sections have their own chord progressions — you only need to
specify the starting chord (Cm7
Fm7
Fm7
Fm7
Cm7
Cm7
Cm7
(11)
— as follows:
(11)
(11)
(11)
Fm7
Fm7
Fm7
(11)
(11)
(11)
61
Guided Tour
Guided Tour
Page 62

Record Your Own Chord Progression & Pattern Changes
z Select the SONG mode & an Empty Song
Press the [SONG] button to select the SONG mode then, if
necessary, make sure the cursor is located at the song number at
the top of the display and use the [+1] and [-1] buttons to select
an “empty” song.
The SHIFT-Number Data Entry Method:
You can also use the SHIFT-Number method to enter song
numbers or other data values. Use the numbered black
keys on the micro-keyboard to enter the required number
while holding the [SHIFT] button, then press the [ENTER]
button.
■
NOTE
• If for some reason all 20 songs contain data, use the “Clear Song” job
described on page 179 to clear a song for recording.
62
x Select the “Pt” Track to Record the Pattern Changes
Move the cursor to the track area of the display, then move
the cursor sideways to select the “Pt” (Pattern) track. Once the
“Pt” track has been selected, move the cursor vertically to acess
other areas of the screen (moving it sideways will select a different track). The selected track will remain highlighted even after
moving the cursor to other areas of the screen.
“Pt” track
Page 63

Record Your Own Chord Progression & Pattern Changes
c Engage the Record Ready Mode
Press the [●] button to engage the record ready mode. The
red LED above the [●] button will light. The record mode selec-
tors will apear in the central area of the display, and the name of
the current record mode will appear at the top of the display.
Record mode
selector
v Select the Realtime Replace Record Mode
If the realtime replace record mode isn’t already selected,
move the cursor to the “REPL” button in the record mode area of
the display and press the [ENTER] button. An inverse “R”
appears in the selected record mode button.
Selected record
mode button
63
Guided Tour
Guided Tour
Page 64

Record Your Own Chord Progression & Pattern Changes
b Select the Starting Pattern, Chord, and Tempo
Move the cursor to the style number, section, chord, and
tempo parameters and set as required (these will be the starting
values for your accompaniment).
■
NOTE
• Just for the purpose of recording, you can set the tempo parameter at a
slower value than the actual playback tempo you will use, so you have
plenty of time to enter pattern and chord changes.
n Record the Pattern Changes
Press the [>] button to begin recording the pattern
changes to the QY100’s pattern track. The metronome will sound
and you’ll be given a one-measure count-in before recording actually begins (the number of count-in measures can be changed via
the Utility mode — page 245). The count-in is also indicated by
negative numbers in the measure-number area of the display.
With the default count-in setting of one measure, “-01” will
appear during the count-in, then recording will begin from measure “001”.
64
Count-in
Entering Pattern Changes
The cursor will automatically move to the style number
when you start recording on the pattern track. You can
record style number changes by using the [+1] and [-1] but-
Page 65

Record Your Own Chord Progression & Pattern Changes
tons or the SHIFT-Number entry method (page 34) to select
the desired styles. For our example, however, you’ll only be
selecting sections with the HipHop2 style, so there’s no
need to change style numbers. The easiest way to enter
section changes is to simply press the appropriate microkeyboard keys at the appropriate times during recording.
Remember that all pattern changes occur at the top of the
next measure after they have been entered. Also keep in
mind the fact that some sections automatically switch to
another section once they have played through: INTRO to
MAIN A; FILL AB to MAIN B; FILL BA to MAIN B. You
should finish your accompaniment track with the ENDING
pattern, otherwise your accompaniment will play back
indefinitely.
The pattern changes you’ll want to record are as follows:
INTRO (measures 1 … 4): This is the starting pattern (you
should have already selected the INTRO pattern in step 5,
above).
MAIN A (measures 5 … 11): The MAIN A pattern will
automatically be selected after the INTRO finishes, so you
don’t have to manually select the MAIN A pattern.
FILL AB (measure 12): Press the [FILL AB] key on the
micro-keyboard during measure 11, that way the FILL AB
pattern will start playing from the top of measure 12.
MAIN B (measures 13 … 19): The MAIN B pattern will
automatically be selected after the FILL AB pattern plays
through once, so you don’t need to select it manually.
FILL BA (measure 20): Press the [FILL BA] key on the
micro-keyboard during measure 19, that way the FILL BA
pattern will start playing from the top of measure 20.
MAIN A (measures 21 … 28): The MAIN A pattern will
automatically be selected after the FILL BA pattern plays
through once, so you don’t need to select it manually.
65
Guided Tour
Guided Tour
Page 66

Record Your Own Chord Progression & Pattern Changes
ENDING (measures 29 … 32): “- -END- -“ will appear in
place of the style name when the ENDING pattern has finished playing.
■
NOTE
• The ENDING pattern repeats the playback in the realtime record mode.
But it will finish the song automatically when playing back the song in
step 11.
m Stop Recording
Press the [■] button to stop recording and return to the
SONG mode.
, Engage Record Ready Again and Select the “Cd Track
Press the [●] button to engage the record ready mode
again (the “REPL” record mode will still be selected), then move
the cursor to the track area of the display and select the “Cd”
(Chord) track.
66
“Cd” track
Page 67

Record Your Own Chord Progression & Pattern Changes
. Record the Chord Changes
When you press the [>] button to begin recording to the
chord track, the metronome will sound and you’ll be given a
count-in in the same was as described in step 6, above. Once
recording begins (the cursor will automatically move to the chord
name area of the display), you can enter the required chord
changes at the appropriate points in the accompaniment as follows:
Entering Chord Changes
Chords are entered via the QY100 micro-keyboard. Note
that the lower octave of the keyboard has chord root
names “E” through “D#/Eb” marked on the keys, and the
upper octave keys are marked with a variety of chord types.
To enter a chord, press the key corresponding to the
desired chord root, then the key for the desired chord type
(the chord type keys alternately select the upper and lower
chord types marked on them … watch the display), and
then press the [ENTER] button (refer to the “Chord Type
List” of the separate Data List booklet for a list of the available chord types). If a chord is to be followed by a different
chord of the same type, you don’t have to re-enter the
chord type.
Guided Tour
Guided Tour
CHORD ROOT → CHORD TYPE (if necessary) → [ENTER]
● Example: Enter a G7 Chord
67
Page 68

Record Your Own Chord Progression & Pattern Changes
The chord is actually entered only when the [ENTER] button is pressed (until then, the chord root and type will flash
on the display). Note that chord changes actually occur on
quarter-note divisions, so try to press the [ENTER] button to
record each chord change either precisely on the beat or
just slightly before the beat on which you want the change
to occur. Syncopated chord changes can be programmed in
the STEP record mode (page 89).
You can also enter the chord changes by playing the micro
keyboard (page 69).
Record the chord changes as follows:
INTRO (Cm7
(11)
): The preset INTRO patterns have their
own chord progressions. Although you can specify the
chord root (key), chord types such as “M” or “m6” will be
ignored. Since “Cm7
(11)
” has already been selected as the
starting chord (step 5, above), there’s no need to enter any
chords for the INTRO at this point.
MAIN A (Cm7
(11)
nates between the Cm7
measures: Cm7
(11)
(11)
/Fm7
): The progression simply alter-
(11)
and Fm7
(11)
chords every two
for measures 5 and 6, Fm7
sures 7 and 8, and so on.
FILL AB (Fm7
FILL AB pattern, the Fm7
(11)
): There’s no need to enter a chord for the
(11)
chord carries through until the
MAIN B pattern begins.
MAIN B (Cm7
ing Cm7
(11)
and Fm7
FILL BA (Fm7
(11)
(11)
(11)
/Fm7
): The Fm7
): The same 2-measure alternat-
(11)
progression continues.
(11)
chord carries through until
the MAIN A pattern begins.
MAIN A (Cm7
ing Cm7
(11)
and Fm7
ENDING (Cm7
(11)
(11)
(11)
/Fm7
): The same 2-measure alternat-
(11)
progression continues.
): Like the INTRO patterns, the preset
ENDING patterns have their own chord progressions.
(11)
for mea-
68
Page 69

Record Your Own Chord Progression & Pattern Changes
Although you can specify the chord root (key), chord types
will be ignored.
Stop Recording
Press the [■] button to stop recording and return to the
SONG mode.
Play Your Accompaniment
Press the [>] to play back your accompaniment.
Fingered Chords
The QY100 also has a “Fingered Chord” mode which allows chords
to played as required on the micro-keyboard, rather than by specifying the
chord root and type as described above. To turn this function on move the
cursor to the “FNGR” parameter in the SONG mode display before recording, and press the [ENTER] button to select “ON”. When you record using
the Fingered Chord mode, you do not have to press [ENTER] after playing
each chord … the chords are entered as they are played.
Guided Tour
Guided Tour
Fingered chord
function
69
Page 70

Record Your Own Chord Progression & Pattern Changes
Tempo Changes, too …
Tempo changes can be recorded to the QY100 “Tm” (Tempo) track
in much the same way that pattern changes are recorded to the pattern
track and chord changes to the chord track.
After recording your pattern and chord tracks select the “Tm” tempo
track, press the [●] button to engage the record ready mode (only realtime
replace recording can be selected for the tempo track), press [>] to start
recording (the cursor will automatically move to the tempo parameter), then
use the [+1] and [-1] buttons or the SHIFT-Number entry method (page 34)
to specify the required tempo changes at the appropriate times during
recording. Press [■] to stop recording. Tempo changes can be edited in
detail as described on page 216.
Tempo
“Tm” track
■
NOTE
• If you do record tempo changes to your accompaniment, be sure to
record the starting tempo at the beginning of the sequence as well.
If You Make Mistakes …
Don’t worry. A few mistakes made in the realtime record can usually
be corrected quite easily in the STEP record mode described on page 81
70
Page 71

Add Some Details to Complete the Accompaniment
Add Some Details to Complete
the Accompaniment
“Be sure to complete the preceding section
before beginning this one.”
Although you could use the basic accompaniment we created in
the previous section as backing for some inspired improvisation, in
this section we’ll add some simple embellishments that give the track
a little more personality. You can easily take the procedures we cover
in this section and apply them to creating complete songs on the
QY100.
Voice Assignments
Before actually beginning to record the sequencer tracks, switch to
the SONG VOICE mode and assign the voices you plan to use to the appropriate SONG MODE sequencer tracks. You can make or change voice
assignments later if you like, but it’s a good idea to record with the voices
you actually intend to use in the song.
z Select the SONG VOICE Mode
From the main SONG mode display, press the [SONG] but-
ton once so that the SONG VOICE mode display appears.
71
Guided Tour
Guided Tour
Page 72

Add Some Details to Complete the Accompaniment
x Select the Voices
Move the cursor to the voice selector for track 1, and use
the [+1/YES] and [-1/NO] buttons or the SHIFT-Number entry
method (page 34) to select “Ld 081 SquareLd” (the full voice
name appears at the top of the display).
Next, Move the cursor to the track-2 voice selector, and select
“En 056+Bass Hit”.
c Return to the Main SONG Mode Display
From the SONG VOICE display press the [SONG] button
twice to bypass the SONG EFFECT display and return to the main
SONG mode display.
72
Press twice
Page 73

Add Some Details to Complete the Accompaniment
Realtime Recording on the Sequencer Tracks
Here’s the score for the parts we’ll record on tracks 1 and 2. The
upper (treble) staff goes on track 1 and the lower (bass) staff goes on track
2. If you don’t read music or simply couldn’t be bothered, just record whatever sounds good to you. Making music should never be a chore.
=120
081
SquareLD
056+
Bass Hit
081
056+
081
056+
081
056+
73
Guided Tour
Guided Tour
Page 74

081
056+
081
056+
081
056+
Add Some Details to Complete the Accompaniment
74
081
056+
Page 75

Add Some Details to Complete the Accompaniment
z Select a Track to Record
Move the cursor to the track area of the display, and then
move the cursor sideways to select the track you want to record
— 1 through 16. In this case you’ll probably want to record the
first part on track 1. Note that although the display only shows 8
of the available 16 tracks at a time, you can simply use the cursor
buttons to scroll left or right to access the remaining tracks (an
arrow appears to either the left or right of the track numbers to
indicate that that more tracks can be accessed by scrolling in the
corresponding direction). Once you’ve selected the track to
record on, move the cursor vertically to access other areas of the
display (the selected track will remain highlighted).
Track
■
NOTE
• If you will be recording via the
QY100’s own micro-keyboard, you
can set the keyboard velocity via
the “VELO” parameter. The velocity can be set in 10 levels — the
more bars the higher the velocity.
There are also four “random
velocity” settings which produce
different degrees of random
velocity for each note played, simulating the velocity variations produced by a “human” player. The
“R1” random setting produces
the smallest variation and “R4”
produces the greatest variation.
“VELO” parameter
75
Guided Tour
Guided Tour
Page 76

Add Some Details to Complete the Accompaniment
x Engage the Record Ready Mode
Press the [●] button to engage the record ready mode. The
red LED above the [●] button will light. The record mode selec-
tors will appear in the central area of the display, and the name of
the current record mode will appear at the top of the display.
Record mode
selector
76
c Select the Realtime Replace or Overdub Record Mode
Normally, when recording a new track from scratch you’ll
want to use the realtime replace record mode. To select it (if it
isn’t already selected) move the cursor to the “REPL” button in
the record mode area of the display and press the [ENTER] button. An inverse “R” appears in the selected record mode button.
If you’ve already recorded some material on a track and
want to record additional notes without erasing the existing material, select the realtime overdub record mode (“OVER” on the display) instead of the “REPL” mode.
“REPL” button
Page 77

Add Some Details to Complete the Accompaniment
■
NOTE
• There are other record modes other than “REPL” and “OVER”. For
details about “STEP”, see page 91. For details about “MULTI”, see
page 80.
v Set the Tempo and Time Signature
For this example we’ll use the default tempo of 120 beats
per minute and the default 4/4 time signature, so you shouldn’t
need to make any changes. But when you do want to record with
a different tempo or time signature, simply move the cursor to
the tempo and time signature parameters and set them as
required via the [+1/YES] and [-1/NO] buttons.
Tempo and
time signature
parameters
■
NOTE
• As with pattern and chord recording, you can set the tempo parameter
at a slower value than the actual playback tempo you will use, so you
have plenty of time to enter the parts.
77
Guided Tour
Guided Tour
Page 78

Add Some Details to Complete the Accompaniment
b Record the First Track
Press the [>] button to begin recording. The metronome
and count-in work the same way as they do for pattern and chord
recording: the metronome will sound and you’ll be given a onemeasure count-in before recording actually begins (the number of
count-in measures can be changed via the Utility mode — page
245). The count-in is also indicated by negative numbers in the
measure-number area of the display. With the default count-in
setting of one measure, “-01” will appear during the count-in,
then recording will begin from measure “001”.
Once recording begins, play the part on the QY100 micro-keyboard or on an external MIDI keyboard or other controller.
78
Count-in
■
NOTE
• If you have trouble playing a part in real time (or you’d simply rather
enter the notes with scientific precision), use the step recording mode
described on page 91 to enter the notes one at a time, with complete
control over note timing and duration.
• If you make a mistake (or two, or three …) while recording, you can
always go back and record the entire track again. But if only a few minor
adjustments are needed, you might prefer to use the QY100 EDIT mode
(page 216) to edit the track as required.
Page 79

Add Some Details to Complete the Accompaniment
n Stop Recording
Press the [■] button to stop recording and return to the
SONG mode. Note than when you return to the SONG play mode
a bar will appear below each track that contains data. This is the
lowest segment of a “velocity meter” which will indicate velocity
levels in the track during playback.
Recorded
track
m Record the Next Track
Press the [●] button to engage the record ready mode
again (the “REPL” or “OVER” record mode will still be selected
— leave this setting as is or change as necessary), then move the
cursor to the track area of the display and select the next track to
record (in this case, track 2).
Press the [>] button to begin recording, and record the
next track in the same as the first track described above.
■
NOTE
• To extend this process to record a complete song on the QY100
sequencer tracks, simply assign the voices for your tracks and record as
many as your song needs (up to 16, of course) one after the other.
• Use the SONG JOBS (page 145) to make further adjustments to your
recorded tracks, as necessary. If your timing is a little off, for example,
use the “Quantize” job to pull everything into line. Take a look at the
SONG JOB LIST on page 146 for an idea of the types of jobs that are
available.
79
Guided Tour
Guided Tour
Page 80

Add Some Details to Complete the Accompaniment
, Stop Recording
Press the [■] button to stop recording and return to the
SONG mode.
. Play Your Accompaniment
Press the [>] to play back your accompaniment complete
with sequencer-track additions.
80
About the “MULTI” Recording
If you select the “MULTI” mode in step c on page 76, the
QY100 will simultaneously record data received over MIDI channels 1
to 16 onto the corresponding sequencer tracks (1 to 16). This is useful
when you want to record a multipart recording from a computer or
another sequencer in real time, or when you want to record from a
MIDI insrtrument (such as a MIDI guitar) that outputs over multiple
channels.
Before starting the multipart recording, be sure to set the MIDI
Sync to “External” (page 247), MIDI Control to “In” or “In/Out” (page
247), Rec Count to “OFF” (page 245). Then engage the record ready
mode (page 76) and select “MULTI” record mode. When you start
the external computer or sequencer, the QY100 will start multipart
recording automatically.
Page 81

Step Accompaniment Recording
Step Accompaniment Recording
The STEP record mode can be used with the “Pt” (Pattern) and
“Cd” (Chord) tracks, making it easy to individually enter or delete pat-
tern and chord changes at precisely the required locations.
z Select a Song to Record
Select an empty song if you want to record a new song in
the step record mode, or select a song that already contains data
if you want to make changes or additions.
x Engage the Record Ready Mode
Press the [●] button to engage the record ready mode. The
red LED above the [●] button will light.
c Select the “Pt” or “Cd” Track
Move the cursor to the track area of the display, and then
shift the cursor sideways to select “Pt” or “Cd”. Once selected,
move the cursor vertically if you want to move to other areas of
the screen. The selected track will remain highlighted no matter
where you move the cursor.
“Pt” or
“Cd” track
81
Page 82

Step Accompaniment Recording
v Select the Step Record Mode
Move the cursor to the record mode selector area of the
display (the area with the “REPL”, “OVER”, “STEP”, and
“MULTI” buttons), and move it to the “STEP” button, then press
the [+1/YES] button to select the step record mode. An inverse
“R” will appear in the selected record mode button.
“STEP” button
b Start Recording
Press the [>] button to call the selected step record display.
82
“Pt” step record
“Cd” step record
Page 83

Step Accompaniment Recording
n Enter the Required Pattern and/or Chord Data
Refer to the following sections for details on how to use
each of the step-record mode data-entry displays.
You can switch directly between the pattern and chord
data-entry displays while the step record mode is engaged simply
pressing the [MENU] button to call the menu shown below, and
then the function button corresponding to the display you want to
go to.
m Stop Recording
Press the [■] button to exit from the step record mode and
return to the normal SONG play mode.
83
Page 84

Step Accompaniment Recording
“Pt” — Step Record Pattern Changes
Here’s how the STEP record pattern display will look if you’ve
selected an empty song (the appropriate pattern data will appear if the
selected song contains data).
Measure number
Time signature
Style number area
Section area
1st measure
2nd measure
Subsequent measures
follow
● Moving Around & Entering Data
As usual, the cursor buttons are used to move the cursor to
the location at which you want to enter data, and the [-1] and [+1]
buttons are used to actually enter or change data.
The cursor buttons also move you forward or backward
through the song: moving the cursor past the bottom of the
screen accesses subsequent measures, while moving it above
the top of the screen accesses the preceding measures (if there
are any). In the pattern display moving sideways takes you to the
time signature, style number, and section parameters.
In all of the STEP record displays the sequencer buttons
can also be used to move forward or backward through the song.
84
[p] Go to first measure.
[r] Scroll up (see lower measure numbers)
[f] Scroll down (see higher measure numbers)
Page 85

Step Accompaniment Recording
● Style Number and Section
Any preset style number from 001 through 128, the “end
pattern” (number 129), or any user style number from U1 through
U64 can be entered for each measure. The style name appears to
the right of the style number. Only one style & pattern (section)
can be entered per measure, and that pattern will begin playing
from the beginning of the measure at which it is entered.
A pattern entered once will continue to play until a different
pattern is entered. If you want to change sections without changing the style number, only the section need be entered. Playback
will stop automatically when an “end pattern” (style number 129)
or an ending section is encountered.
In the example display below the intro pattern (section) of
style 001 plays for the first measure, then the main A pattern
(section) of the same style is selected in measure 2.
Style number/name
Section
85
Page 86

Step Accompaniment Recording
● Time Signature
Although the default time signature for the selected song is
automatically selected, the time signature value for each measure
can be changed as required. The available time signatures are:
1/16 … 16/16
1/8 … 16/8
1/4 … 8/4
If a time signature is selected that results in shorter measures than the pattern default, the pattern will be truncated (cut
short) accordingly. If the selected time signature results in longer
measures than the pattern default, the pattern will be repeated to
fill the specified measure length.
● Erasing Pattern Changes
The function button immediately to the right of “ers” on
the display can be used to erase style number or section data at
which the cursor is located.
86
Press to erase
style or section at
cursor location.
Page 87

Step Accompaniment Recording
“Cd” — Step Record Chord Changes
Here’s how the STEP record chord display will look if you’ve selected
an empty song (the appropriate chord data will appear if the selected song
contains data).
Measure number
1st measure
Time signature
2nd measure
Place cursor at beat on
which chord is to be
entered
One beat
Subsequent measures
follow
● Chords
One chord can be entered per quarter note. Place the cursor at the required quarter-note division on the display and enter
the chord by specifying the root and type via the micro-keyboard
(see page 67). In the example display below, an A major chord is
entered on the first beat of the first measure, a B minor seventh
on the third beat of the first measure, and a D major on the first
beat of the second measure.
Chord
You can also enter a chord by playing the chord as it is on
the micro keyboard or an external keyboard if the Fingered Chord
function(FNGR) is previously set to “ON”.
87
Page 88

Step Accompaniment Recording
● Specifying the Bass Note For a Chord
You can specify the bass note to be used with any chord by
using the [OCT DOWN] button (note the “BASS” marking above
the button). Enter the chord by specifying the root and type, then
press the key on the micro-keyboard corresponding to the desired
bass note while holding the [OCT DOWN/BASS] button. The bass
note will appear to the right of a slash below the chord name.
Example: Bm7 with E bass
88
Page 89

Step Accompaniment Recording
■
NOTE
• You can add bass notes to existing chords without having to re-enter the
entire chord by simply moving the cursor to the chord and using the
[OCT DOWN/BASS] button to specify the bass note. A bass note can be
removed from a chord by placing the cursor at the chord and re-entering
the chord.
If FNGR is set to “ON”, a bass note can be entered by
pressing a key for a bass note on the left part of the micro keyboard or an external keyboard while holding the chord. (The “left
part” range for entering a bass note can be specified in the Utility
mode on page 252.)
● Syncopated Chords
Chords can be syncopated (i.e. the chord actually begins an
eighth or sixteenth note before the beat on which it is entered) by
using the [OCT UP] button (note the “” marking above the but-
ton). Enter the chord, then press the [OCT UP] button once for
eigth-note syncopation, or twice for sixteenth-note syncopation
(the appropriate syncopation symbol will appear below the chord
name).
Example: D chord syncopated (8th note)
89
Page 90

Step Accompaniment Recording
■
NOTE
• You can add syncopation to existing chords without having to re-enter
the entire chord by simply moving the cursor to the chord and pressing
the [OCT UP] button. Syncopation can be removed from a chord by placing the cursor at the chord and pressing the [OCT UP] once or twice so
that the syncopation symbol disappears.
● Erasing Chords
The function button immediately to the right of “ers” on
the display can be used to erase the chord at which the cursor is
located.
Press to erase
chord at cursor
location.
90
● Sound On/Off
You can hear the sound of entered chord in step recording.
If you don’t want to hear the sound, press the [MENU] button and
then the function button next to “Sound” to call the Sound on/off
display.
Press [-1/NO] button to turn the sound off, [+1/YES] button
to turn on.
Page 91

Step Sequencer Track Recording
Step Sequencer Track Recording
The step record mode lets you enter each track note-by-note,
with precise control over the timing, length, and loudness of each
note. You can record entire tracks using the step mode, or use it to
brush-up and add data to an existing track.
z Select the SONG Mode & the Song To Be Recorded
Use the [SONG] button to select the main SONG mode display and, with the cursor located over the song number at the top
of the display, use the [-1] and [+1] buttons or the SHIFT-Number
entry method (page 34) to select the song you intend to record.
Song number
x Select a Track to Record
Move the cursor to the track area of the display, and then
shift the cursor sideways to select the track you want to record: 1
through 16. The SONG display shows 8 of the 16 available tracks
at a time. Use the cursor buttons to scroll left or right to the
remaining tracks (an arrow appears at either the left or right of the
track numbers to indicate that more tracks can be accessed by
scrolling in the corresponding direction). Move the cursor verti-
91
Page 92

Step Sequencer Track Recording
cally to move to other areas of the screen. The selected track will
remain highlighted.
Track
c Engage the Record Ready Mode
Press the [●] button to engage the record ready mode. The
red LED above the [●] button will light.
92
Record mode
selector
v Select the Step Record Mode
Move the cursor to the record mode selector area of the
display (the area with the “REPL”, “OVER”, “STEP”, and
“MULTI” buttons), and move it to the “STEP” button, then press
the [+1/YES] button to select the step record mode (if it isn’t
already selected). An inverse “R” will appear in the selected
record mode button.
Page 93

Step Sequencer Track Recording
b Engage the Record Mode
Press the [>] button to engage the step record mode. The
step record display shown below will appear.
Current record track
Measure/beat/clock display
Time signature
“STEP” button
Note parameters
Note display
n Set the Note Parameters as Required
Move the cursor to the note, velocity, and gate time parameters and set as required using the [-1] and [+1] buttons for the
first (or next) note to be entered.
93
Page 94

Step Sequencer Track Recording
STEP (Note length)
32nd, 16th, 16th triplet, 8th, 8th
triplet, quarter, quarter triplet, half, whole.
VELO (Velocity)
More bars = higher velocity, adjustable in 10
steps (ppp, pp, p, mp, normal, mf, f, ff, fff, ffff).
~ produces random velocity.
GATE (Gate time)
= staccato (50%).
= normal (90%).
= slur (99%).
m Enter a Note
Once the note parameter have been specified, the note can
be entered simply by playing the appropriate key on the microkeyboard (or on your external MIDI keyboard). A dot appears on
the note display and the note pointer advances to the next note
position. Chords are also indicated by a dot. Here’s how the dis-
play will look after two 8th notes have been entered.
94
■
NOTE
• If you use an external MIDI keyboard for step recording, the QY100
always accepts velocity from the external keyboard regardless of the
“VELO” setting.
Page 95

Step Sequencer Track Recording
The Note Display
The note display shows up to four 1/4-notes worth of data
at once (that’s one measure in 4/4 time). If the selected
time signature results in more than four 1/4 notes per measure, then the display will scroll to show the extra notes.
1st beat 2nd beat
Note
pointer
4th beat3rd beat
Each dash represents a
32nd note (60 clocks).
Moving Around In the Note Display
You can move the cursor down to the note display (the note
pointer will appear filled) and move the note pointer to any
position at which you want to enter a note, or to any note
that you want to delete. You will actually hear the appropriate note or chord when the note pointer is moved to an
existing note. When you move the note pointer past the
end of the note display, the next measure will appear.
Cursor moved to note pointer (pointer filled).
Note that the pointer points up to notes in the
upper row and down to notes in the lower row.
95
Page 96

Step Sequencer Track Recording
The Step Mode Function buttons
The four function buttons immediately to the right of the
display provide acces to a number of handy functions in the
step record mode. The “del” (delete) button deletes the
note or chord at the note pointer. The “Bdl” (back delete)
button moves the note pointer backward by the currently
selected note length and deletes the note at that position.
The “rst” (rest) button enters a rest of the currently
selected note length at the note pointer position. And the
“tie” button lengthens the previously entered note by
“tying” another note of the same length (specified by the
STEP parameter) and pitch to it. The “tie” button only
works immediately after entering a note.
96
The Measure/Beat/Clock Display
The “Meas” area of the step record display shows the current position of the note pointer in measures, beats, and
clocks (there are 480 clocks per 1/4 note). If you’re not sure
what measure you’re seeing on the note display while
recording, check the measure/beat/clock display.
You can move the note pointer to any measure by moving
the cursor to the measure number and entering the value
with the [-1] and [+1] buttons or the SHIFT-Number entry
method (page 34).
Page 97

Step Sequencer Track Recording
Measure number
(001 ... 999)
Clock
(480 clocks per 1/4 note).
Beat
(01, 02, 03, 04 if 4/4 time).
, Complete the Song
Repeat steps n and m until the current track is complete,
then press [■] to stop recording and select the next track for
recording, as necessary.
■
NOTE
• See the “Editing Songs & Patterns” section , page 216, for information
on how to edit recorded song data.
97
Page 98

Creating Original Accompaniment Patterns
Creating Original
Accompaniment Patterns
QY100 accompaniment patterns are created by combining
“phrases” — either preset or original — in the PATTERN mode. A
phrase is simply an individual “part” of a pattern — e.g. a drum
phrase, a bass phrase, a keyboard phrase, etc. — using a single voice.
The QY100 has 4,285 preset phrases, and 384 memory locations for
original patterns (i.e., 64 user styles, each with independent INTRO,
MAIN A, MAIN B, FILL AB, FILL BA, and ENDING sections).
You can also see phrase components of the preset patterns in
the PATTERN mode.
The Preset Phrases
The QY100 has a total of 4,285 preset phrases that can be combined
to create a virtually endless variety of accompaniment patterns. The preset
phrase numbers have three sections, as shown below. The cursor can be
placed at any of these three sections to select as required.
Number
Beat
Category
98
Page 99

Creating Original Accompaniment Patterns
Category
Da Drum-a (Pop&Rock)
Db Drum-b (Specific)
Fa Drum Fill-a (Pop&Rock)
Fb Drum Fill-b (Specific)
PC Percussion
Ba Bass-a (Pop&Rock)
Bb Bass-b (Specific)
Ga Guitar Chord-a (Pop&Rock)
Gb Guitar Chord-b (Specific)
GR Guitar Riff
KC Keyboard Chord
KR Keyboard Riff
PD Pad
BR Brass
SE Sound Effects
■
NOTE
• For details on the phrase category, beat and number, refer to the Preset
Phrase List of the separate Data List booklet.
Beat
16 Beat
8 Beat
3/4 Beat
Number
Differs depending on the category
99
Page 100

Creating Original Accompaniment Patterns
Combining Phrases In the Pattern Mode
The phrases are combined to create patterns which can be used in
accompaniments in the PATTERN mode.
z Select the PATTERN Mode, a User Style, & a Section
Press the [PATTERN] button to select the PATTERN mode
then, with the cursor located at the style number, select a “user”
style: “U00” through “U64”. Also move the cursor to the section
name and select the section you want to create.
Style number
Section
100
x Set the Pattern Length, Time Signature & Tempo as
Required
If you’re starting with an empty pattern, move the cursor to
the pattern length parameter and set the desired pattern length
from 1 to 8 measures. If necessary, also move the cursor to the
time signature parameter and set as required (1/16 … 16/16, 1/8
… 16/8, 1/4 … 8/4). The default tempo is 120, but you can move
the cursor to the tempo parameter and set any other tempo that
is suitable for your pattern.
Pattern length
Tempo
Time signature
 Loading...