

Page 1

Page 2
Table of Contents
About the Included Software ................................................. 3
• For Windows users ...................................................... 3
• For Macintosh users .................................................... 4
Installing the QY100 Data Filer .............................................. 5
• For Windows users ...................................................... 5
• For Macintosh users .................................................... 6
What is the QY100 Data Filer? ............................................... 8
How to start the QY100 Data Filer ...................................... 10
• The Data Filer Menu display....................................... 12
• About the Device Setup ............................................. 13
For Windows Users ................................................ 13
For Macintosh Users .............................................. 14
MIDI Manager (For Macintosh Users) ..................................... 16
●
SPECIAL NOTICES
• The software and this owner’s manual are exclusive copyrights of Yamaha
Corporation.
• Use of the software and this manual is governed by the license agreement which
the purchaser fully agrees to upon breaking the seal of the software packaging.
(Please read carefully the Software Licensing Agreement at the end of this manual
before installing the application.)
• Copying of the software or reproduction of this manual in whole or in part by any
means is expressly forbidden without the written consent of the manufacturer.
• Yamaha makes no representations or warranties with regard to the use of the
software and documentation and cannot be held responsible for the results of the
use of this manual and the software.
• This disk is a CD-ROM. Do not attempt to play the disk on an audio CD player.
Doing so may result in irreparable damage to your audio CD player.
• Copying of the commercially available music sequence data and/or digital audio files
is strictly prohibited except for your personal use.
• The company names and product names in this Owner’s Manual are the trademarks or registered trademarks of their respective companies.
• The screen displays as illustrated in this Owner’s Manual are for instructional
purposes, and may appear somewhat different from the screens which appear on
your computer.
• Future upgrades of application and system software and any changes in specifications and functions will be announced separately.
2
Page 3

About the Included Software
The included CD-ROM (Windows/Macintosh hybrid CD) con-
tains the following software.
For Windows Users
QY100 Data Filer
This software is a file manager that allows you take data created by the
QY100 and save it in your computer.
For more information on using the QY100 Data Filer, refer to the “QY100
Data Filer Manual” PDF file after the installation. This file is located at [Start
| Programs | YAMAHA QY100 Data Filer].
YAMAHA CBX Driver
This is a MIDI driver that is required when you connect the TO HOST
terminal of the QY100 directly to the serial port on your computer.
Acrobat Reader
This software allows you to view the electronic Owner’s Manual saved in
PDF format.
To start the installation, open the “English” folder in the “Acroread” folder,
then dobule-click the “rs405eng.exe”. Follow the directions that appear on
your computer’s display to complete the installation procedure.
3
Page 4

About the Included Software
For Macintosh Users
QY100 Data Filer
This software is a file manager that allows you take data created by the
QY100 and save it in your computer.
For more information on using the QY100 Data Filer, refer to the “QY100
Data Filer E.pdf” included in the CD-ROM.
MIDI Manager
This is a MIDI driver that is required when you connect the TO HOST
terminal of the QY100 directly to the modem or printer port on your
computer. You can choose between MIDI Manager and OMS for the driver
you will use.
OMS
This is a MIDI driver that is required when you connect the TO HOST
terminal of the QY100 directly to the modem or printer port on your
computer. You can choose between MIDI Manager and OMS for the driver
you will use.
Acrobat Reader
This software allows you to view the electronic Owner’s Manual saved in
PDF format.
To start the installation, open the “English” folder in the “Acrobat” folder,
then double-click “Reader Installer”. Follow the directions that appear on
your computer’s display to complete the installation procedure.
4
Page 5
Installing
the QY100 Data Filer
For Windows Users
To use the QY100 Data Filer, follow the instructions below to install
the Data Filer software in your computer using the supplied CD-ROM.
To install the QY100 Data Filer for Windows, the following
system is reguired:
Operating System Windows 95/98/NT4.0/2000/Me
CPU 80486 sx/33MHz or faster
Memory 8MB or more
Hard Disk 3MB or more
Display 640 x 480 dots, 256 or more colors
ZInsert the supplied CD-ROM disc into your computer's CD-
ROM drive.
XOpen the CD-ROM icon in the “My Computer” folder with a
double click, then open the “QY100_” folder.
CDouble click the “setup.exe” icon.
The installer will start up.
Follow the directions that appear on your computer's
display to complete the installation procedure.
■
NOTE
• In addition to the software installation, you need to install the appropriate “MIDI driver” to use the QY100 Data Filer. Refer to the following
explanation to install the MIDI driver.
5
Page 6

Installing the QY100 Data Filer
●
Installing the YAMAHA CBX Driver (for Windows95/98/NT4.0/2000/Me)
ZInsert the supplied CD-ROM disc into your computer's CD-
ROM drive.
XOpen the CD-ROM icon in the “My Computer” with a double
click.
COpen the “MIDIdrv_” folder.
VDouble click the “setup.exe” icon and the installer will start up.
Follow the directions that appear on your computer's
display to complete the installation procedure.
For Macintosh Users
To use the QY100 Data Filer, follow the instructions below to install
the Data Filer software from the CD-ROM to your computer. It is also
necessary to install MIDI Manager or OMS (MIDI Driver) as well as installing the QY100 Data Filer itself. It is also possible to install both of them and
switch the valid MIDI driver (page 14).
To install the QY100 Data Filer for Macintosh, the following
system is required:
Operating System Mac OS System 7.5 or later
CPU 68030 or faster
Memory 3MB or more
Hard Disk 4MB or more
Display 256 or more colors
ZInsert the supplied CD-ROM disc into your computer's CD-
ROM drive.
XAfter the icon for the CD-ROM disc appears on your monitor,
open the CD-ROM icon with a double click. Open the “QY100”
folder in the “International” folder with double-clicks.
CDrag the “QY100 Data Filer” to the hard disk to copy the file.
6
Page 7

If you use MIDI Manager
VOpen the “MIDI Manager 2.0.2” with a double click, then drag
the entire contents of the “MIDI Manager 2.0.2” folder onto
the Macintosh “System Folder” icon.
The files dragged to the system folder will automatically be
copied into the proper folders. If a dialog box appears asking
for confirmation, click “OK”.
If it is required to start up Patch Bay by selecting it from Apple
Menu, drag the “Patch Bay” file from the “System Folder” to
the “Apple Menu Items” folder.
BRestart your Macintosh computer.
This completes installation of the QY100 Data Filer.
■
NOTE
• About the “MIDI Manager”, refer to the QY100 Data Filer Owner's
Manual page 16.
Installing the QY100 Data Filer
If you use OMS (Open Music System)
VOpen the “OMS” folder with a double click, then drag the
“OMS Setup for QY100” folder to the hard disk to copy the
files.
BDouble click the “Install OMS 2.3.6” icon and the installer will
start up. After setting “Install Location” (if required), click the
“Install” to start the installation.
NWhen the installation process has finished, “Installation was
successful” message appears. Click “Restart” to reboot your
computer.
This completes installation of the QY100 Data Filer.
■
NOTE
• To use OMS, it is also necessary to set up OMS (page 14).
For more information about OMS, refer to the “OMS_2.3_Mac.pdf” file
in the supplied CD-ROM.
7
Page 8
What is
the QY100 Data Filer?
The QY100 Data Filer is a file manager that allows you take
data created by the QY100 and save it in your computer. Before you
can use the QY100 Data Filer, you must install the software, and
connect the QY100 to your computer (refer to the “QY100 Owner’s
Manual”).
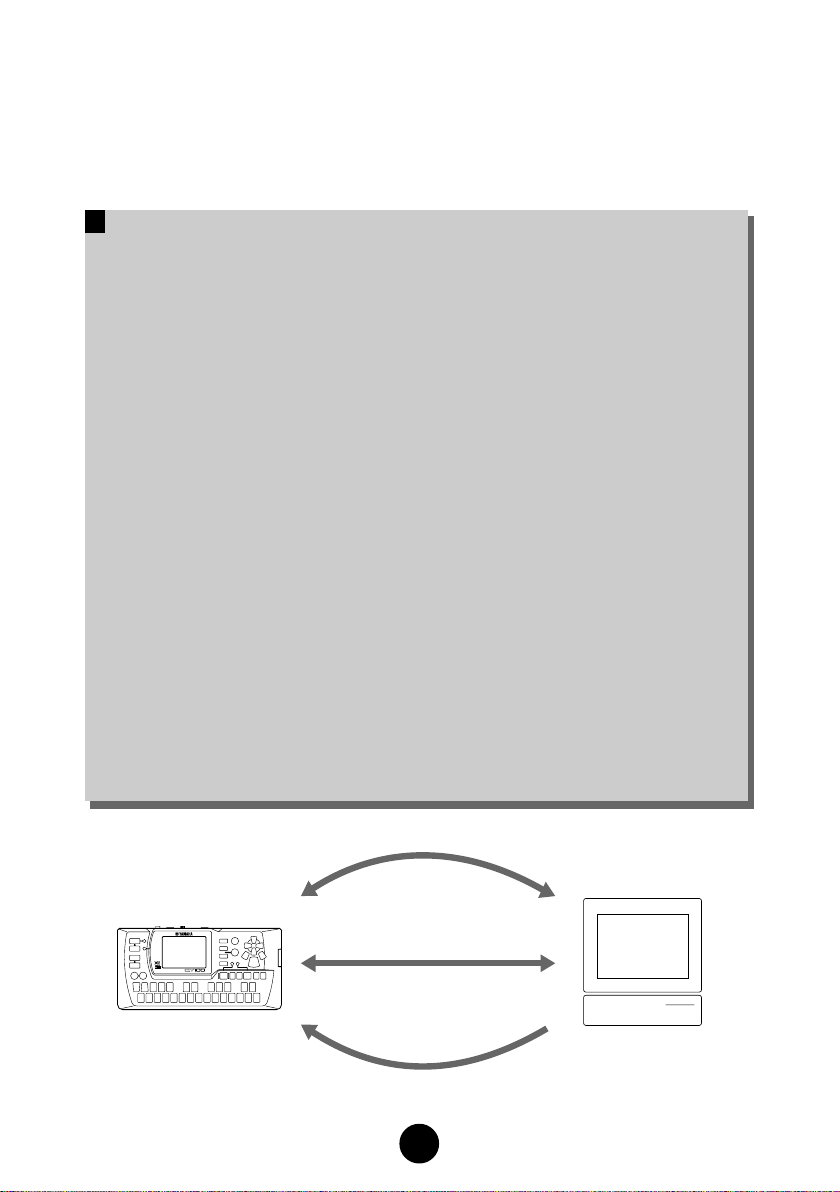
The QY100 Data Filer can perform the following three functions
depending upon how you use it:
1. Data created by the QY100 can be saved to your computer
as QY bulk data. Also, QY bulk data saved in your computer
can be transmitted to the QY100.
2. SMF song data files such as XG or GM song data can be
transmitted from the computer to your QY100 to be played
back on the QY100. Also, data created by the QY100 can be
saved to your computer as an SMF song.
3. Song/Style data in the QY100 can be cleared via the computer.
■
NOTE
• The QY100 Data Filer is an application designed specifically for the QY100. It
cannot be used with any other devices.
• SMF song data files that exceed the QY100 Data Filer’s memory capacity
(approximately 32,000 notes) are not compatible with the QY100.
e
c
e
i
v
r
e
d
n
a
t
i
m
s
n
a
r
T
.
1
2. Transmit and receive SMF data
3
.
C
l
e
a
r
Q
Y
b
u
l
k
d
a
t
a
a
t
a
d
0
0
1
Q
Y
8
Page 9
What is the QY100 Data Filer?
1. Transmit and receive QY bulk data
QY100 ➔ Computer
• All of the data in the QY100 can be saved to the computer as
a bulk file.
Computer ➔ QY100
• A bulk file saved in the computer can be transmitted to the
QY100.
• Single Song data within a bulk file saved in the computer can
be transmitted to the QY100.
• Single User Style data within a bulk file saved in the computer
can be transmitted to the QY100.
2. Transmit and receive SMF data
QY100 ➔ Computer
• Song data in the QY100 can be converted to SMF (Standard
MIDI File) data and saved to the computer.
Computer ➔ QY100
• SMF (Standard MIDI File) data saved in the computer can be
transmitted to the QY100.
3. Clear QY100 data
Computer ➔ QY100
• The QY100’s Song name list can be viewed on the computer
display, single or all Songs in the list can be cleared with the
computer.
• The QY100’s User Style name list can be viewed on the
computer display, single or all User Styles in the list can be
cleared with the computer.
9
Page 10

How to start
the QY100 Data Filer
Z Start the QY100 Data Filer.
After installation (refer to page 5) and connection (refer to the
“QY100 Owner’s Manual”) are completed, follow the instructions below to
start up the QY100 Data Filer.
• If you are using Window95/98/NT4.0/2000/Me
Click the “START” button, then click “QY100 Data Filer”, which is
located in the “YAMAHA QY100 Data Filer” under the Programs
menu.
• If you are using a Macintosh
Double click the “QY100 Data Filer” icon.
■
NOTE
• If you use the QY100 Data Filer on a Macintosh System, open the “Chooser” in the
“Apple Menu” and turn off “Apple Talk”.
■
CAUTION
• If the MIDI Driver cannot be used with your computer, the following message will
be displayed.
“The selected MIDI device is in use. Quit any applications using the device.”
→
Click “OK”, then quit all other MIDI applications (sequencer software, etc.) that
use the MIDI driver, and start the QY100 Data Filer once again.
“Can’t find the MIDI device. Confirm the MIDI device settings.”
→
The MIDI driver is not properly installed. Refer to page 6/7.
■
CAUTION
• If the QY100 is not properly connected to your computer, “Data transfer failed.
Confirm QY100 connections (HOST SELECT switch, etc.)” dialog box will be
displayed. Properly connect the QY100, confirm the HOST SELECT switch position,
and start the software again.
10
Page 11
How to start the QY100 Data Filer
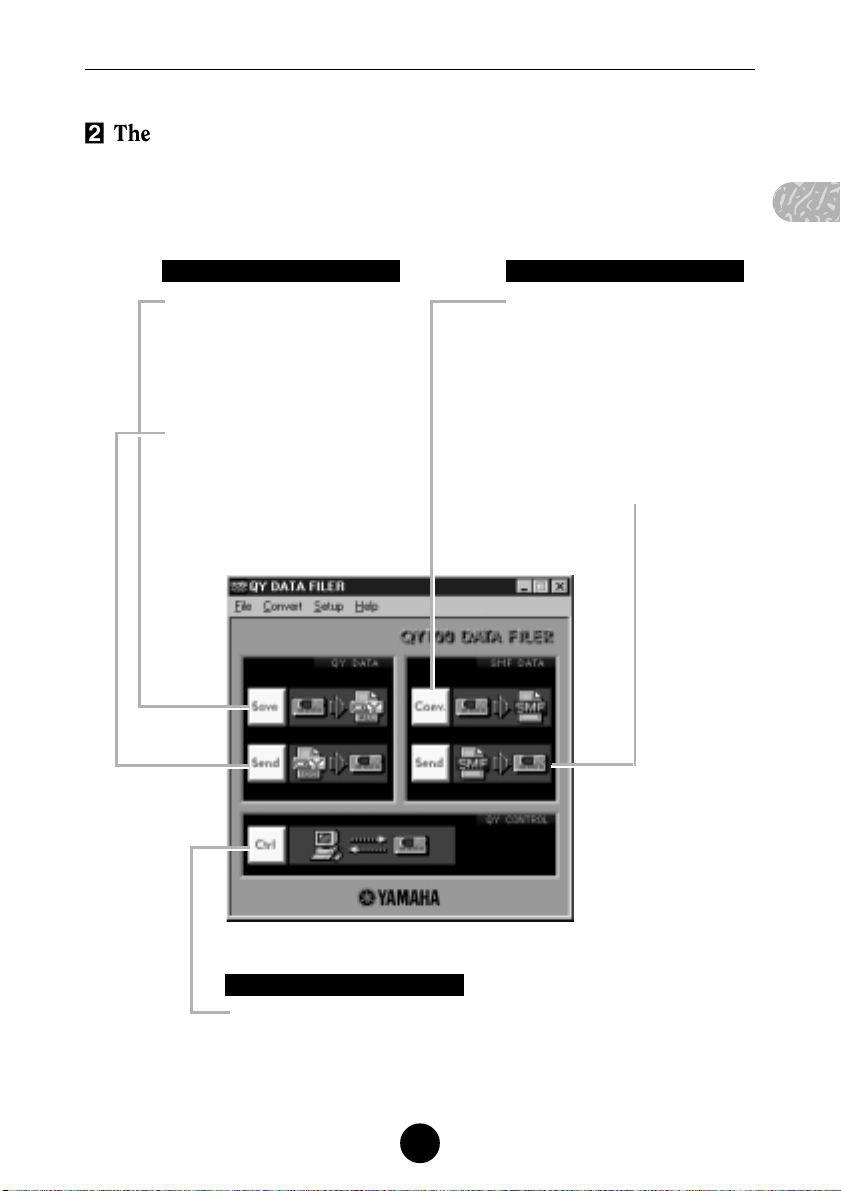
X The top display.
When you start the QY100 Data Filer, the following display will
appear. This is referred to as the “top display”.
QY DATA SMF DATA
“Save”
All of the data in the QY100 can
be saved to the computer as a
bulk file.
“Conv.”
Single Song data in the QY100
can be converted to SMF data
and saved in the computer.
“Send”
A bulk file as well as its single
Song and Style files saved in
the computer can be transmitted to the QY100.
QY CONTROL
“Ctrl”
The QY100’s Song/User Style
name list can be viewed on the
computer display, single or all
Songs/User Styles in the list can
be cleared.
“Send”
Single SMF data saved in the
computer can be transmitted to
the QY100.
11
Page 12
How to start the QY100 Data Filer
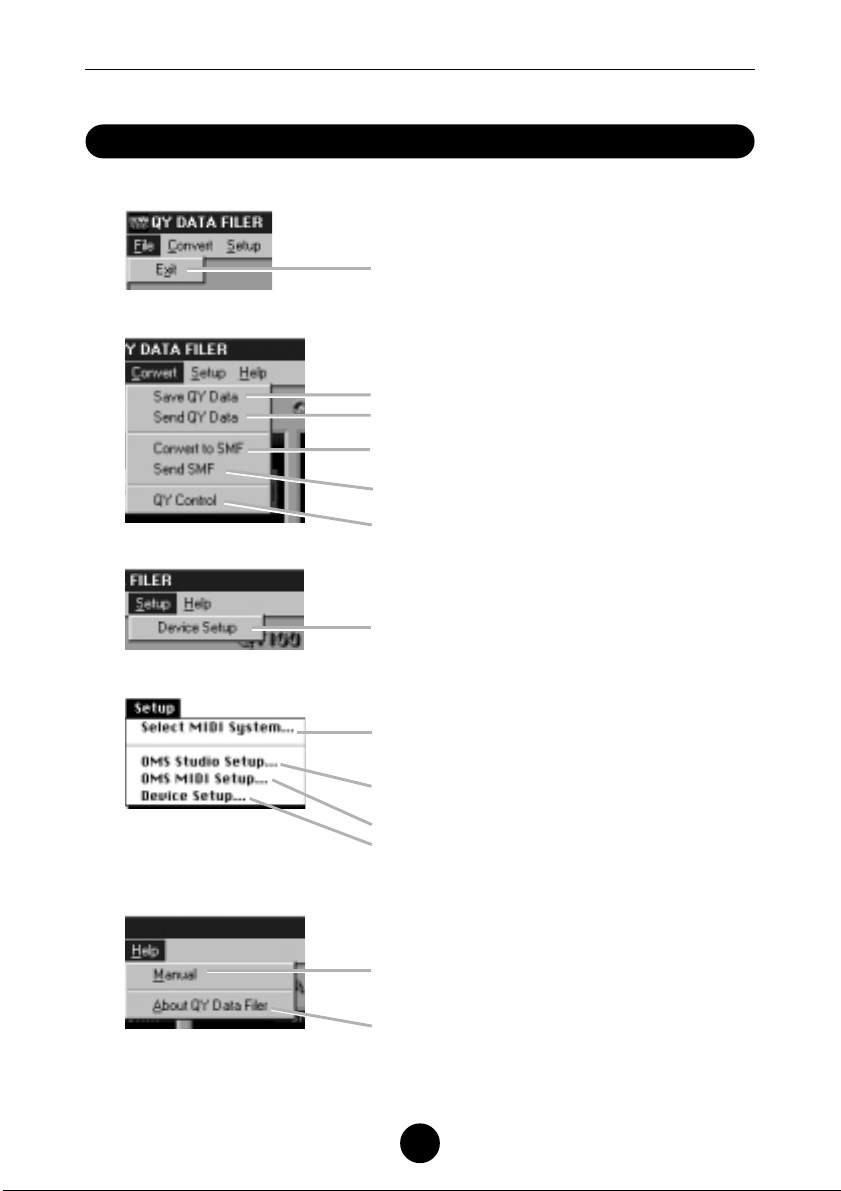
The Data Filer Menu display
Quits the QY100 Data Filer application.
Same as the “Save” for QY data on the top display.
Same as the “Send” for QY data on the top display.
Same as the “Conv.” for SMF data on the top
display.
Same as the “Send” for SMF data on the top
display.
Same as the “Ctrl” on the top display.
Windows:
Selects the MIDI driver that is required to exchange
data (Bulk Dump) between the QY100 and the
computer.
Macintosh:
Selects the MIDI Driver (“MIDI Manager” or
“OMS”). If you select “OMS” here, the following
settings is also necessary.
Starts up “OMS Setup”, then selects the OMS
setup file.
Selects the external port.
Selects the devices.
Windows:
Opens the PDF manual file.
Displays the QY100 Data Filer’s version information,
etc.
12
Page 13
How to start the QY100 Data Filer
About the Device Setup
This procedure lets you select the required MIDI driver that is
necessary in order for the QY100 Data Filer to exchange MIDI data (Bulk
Dump) between the QY100 and the computer.
For Windows Users
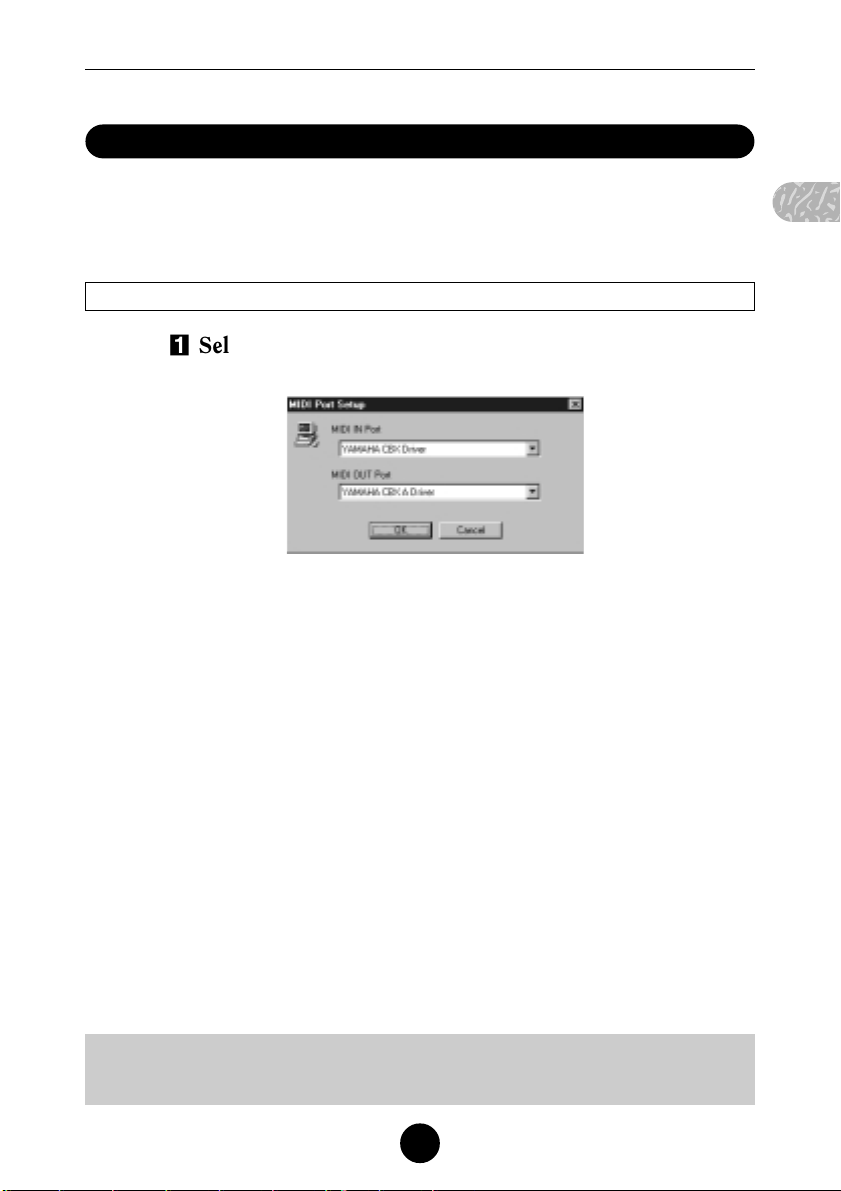
Z Select “Device Setup” from the “Setup” Menu.
The “MIDI Port Setup” dialog box is displayed.
X Select the MIDI Driver.
Click on each of the “▼” buttons for the “MIDI IN Port” or
“MIDI OUT Port”, select the MIDI driver from the drop-down list
that is displayed.
• If the QY100’s TO HOST connector is connected directly to
the computer’s serial port.
Select the “YAMAHA CBX Driver” for the “MIDI IN Port”, and
the “YAMAHA CBX A Driver” for the “MIDI OUT Port”.
• If the QY100’s MIDI ports are connected to the computer
via a MIDI interface.
For both the “MIDI IN Port” and “MIDI OUT Port”, select the
MIDI driver that is compatible with the MIDI interface you are
using.
C Click “OK”.
■
NOTE
• To select the MIDI driver, the required MIDI driver needs be previously installed.
13
Page 14

How to start the QY100 Data Filer
For Macintosh Users
Z Select “Select MIDI System...” from the “Setup” Menu.
The “Select MIDI System” dialog box is displayed.
X Check the appropriate radio button to select required
MIDI driver, MIDI Manager or OMS.
C Click “OK”.
To use OMS, it is necessary to set up OMS (see directly below).
V Select “OMS Studio Setup...” from the “Setup” Menu
and OMS Setup will start up.
If OMS Setup does not start up automatically, a dialog box
will appear. Select the “OMS Setup” in the “OMS Applications”
folder.
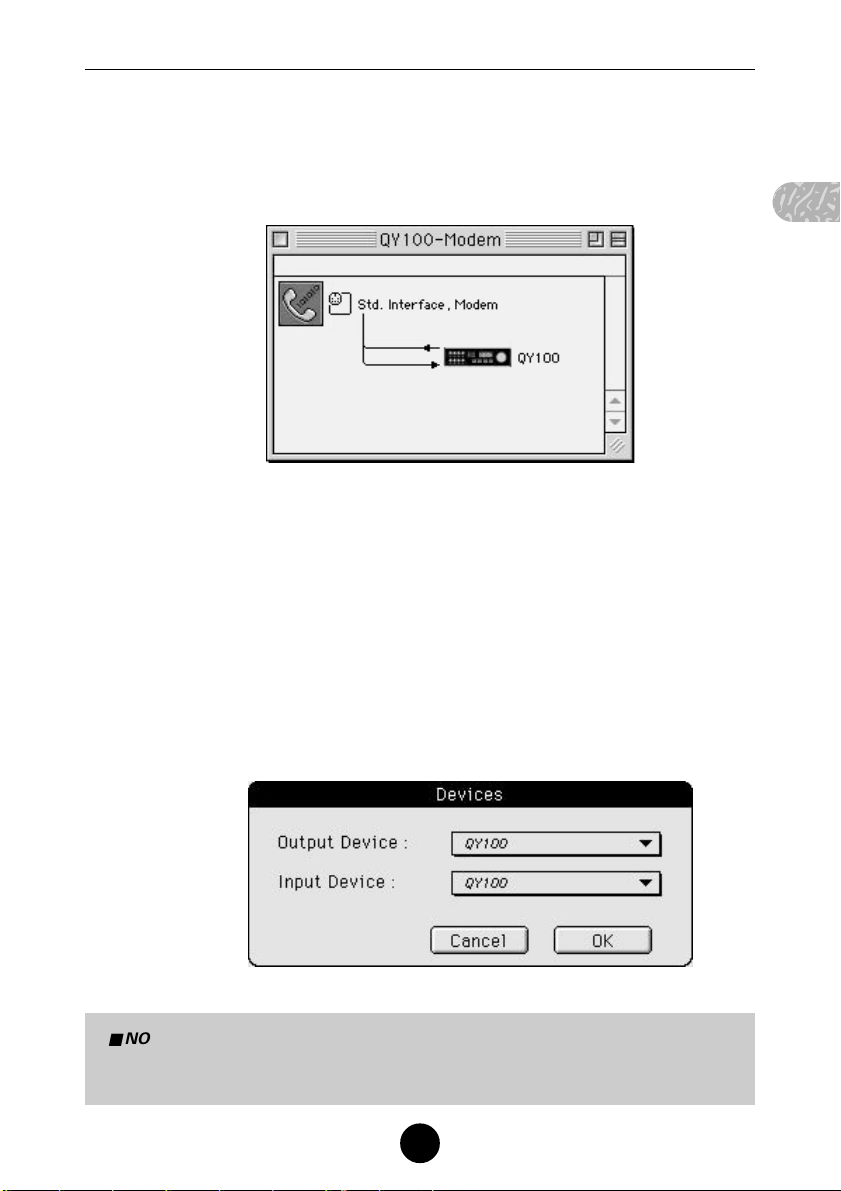
B Select “Open” from the “File” Menu in OMS Setup and
the dialog box appears. Open the “QY100-Modem” file in
the “OMS Setup for QY100” folder. If the Modem port is
unavailable, open the “QY100-Printer” file.
14
Page 15
How to start the QY100 Data Filer
N Select “Make Current” from the “File” Menu in OMS
Setup. The setup for your QY100 is now saved as the
current studio setup.
M After making the screen of QY100 Data Filer active,
select “OMS MIDI Setup...” from the “Setup” Menu,
and the “OMS MIDI Setup” dialog box is displayed.
Check the external ports to use and “Run MIDI in
background”, then click “OK”.
< Select “Device Setup...” from the “Setup” Menu, and the
“Devices” dialog box appears. Select “QY100” as “Output Device” and “Input Device” by clicking twice each
box , then click “OK”.
■
NOTE
• When you select “QY100” from the boxes, click just above the “QY100” display
after clicking the boxes to display the pop-up menu.
15
Page 16
MIDI Manager
MIDI Manager (For Macintosh Users)
MIDI Manager is an Apple system extension file which
handles MIDI information. With it, you can determine the serial port
for the exchange of music data in real-time with various MIDI
software. PatchBay lets you determine how MIDI Manager is
configured for the Apple MIDI driver and the MIDI software.
Normally the Apple MIDI driver will automatically load as part
of the QY100 Data Filer start up process, which means you won’t
need to perform any specific operation unless you plan to change
the serial port connection. To change the serial port connection,
please refer to the steps as outlined below.
● Setting the Serial Port
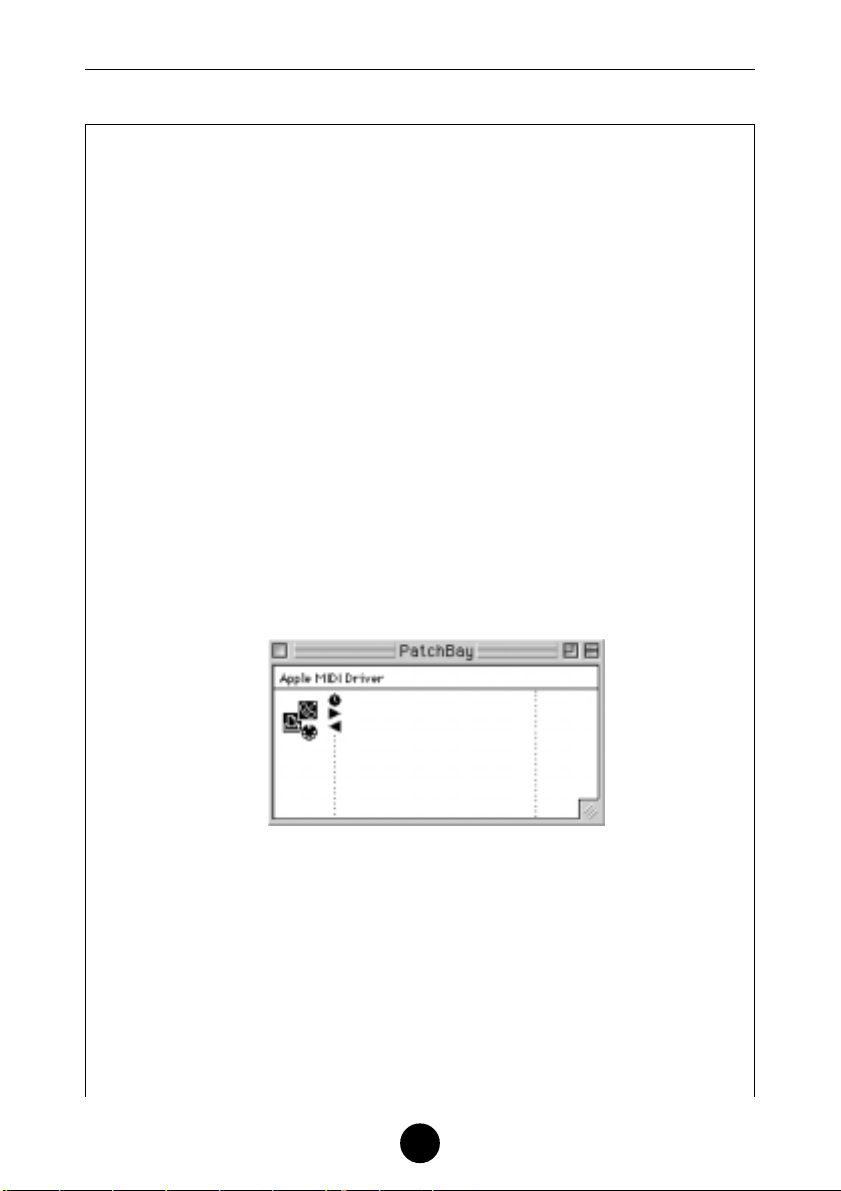
ZFrom the Apple pull-down menu, select “PatchBay”.
A window will appear indicating which interfaces are
connected in relation to the MIDI Manager.
XDouble-click on the Apple MIDI Driver icon. Then select
which port you want to use and set the Interface Type. (In
most cases 1MHz will be appropriate.)
16
Page 17

MIDI Manager
CAfter starting up QY100 Data Filer, you can open the
PatchBay window to confirm how QY100 Data Filer is
configured with the Apple MIDI Driver.
You can also configure another sequencer program with
QY100 Data Filer or determine various other settings.
* When you want to use the QY100 Data Filer, open the “Chooser” in
the Apple menu and turn off Apple Talk.
* To access information about PatchBay, from the Apple menu, select
“About PatchBay”.
* To run QY100 Data Filer on a Macintosh IIfx or certain Quadra models
requires that the “Serial Switch” be in the Control Panels folder, since
the serial port configuration for these computers is different from other
Macintosh models.
17
Page 18

MIDI Manager
When you copy the entire contents of the “MIDI Manager 2.0.2”
folder in the supplied CD-ROM to the Macintosh System folder (as
described on page 6), the “Serial Switch” will be installed automatically into the Control Panels folder.
* If you are using a Performa series computer with an internal
modem installed, select the printer port in step X of the above
procedure. In this particular computer, even if the Modem port is
selected in the window, the QY100 Data Filer cannot transfer data
via the Modem port.
■
NOTE
•“Cache Switch” is necessary for configuring the systems of some
Quadra models. You will find “Cache Switch” in the System disk
called “Tidbits”. Copy it into the System Folder. After copying it into
the System Folder, pull down the Apple menu and select “Control
Panels”. Set the serial port of the “IIfx Serial Switch” to “Compatible”. If you are using a Quadra with the different serial port
configuration, set the “Cache Switch” to “More Compatible”.
When using such a Quadra and the screen message “Cannot use
with this Macintosh” appears, the above settings will not be
required.
18
Page 19

SOFTWARE LICENSING AGREEMENT
The following is a legal agreement between you, the end user, and Yamaha Corporation
(“Yamaha”). The enclosed Yamaha software program is licensed by Yamaha to the original
purchaser for use only on the terms set forth herein. Please read this licensing agreement with
care. Opening this package indicates that you accept all terms outlined herein. If you do not agree
to the terms, return this package unopened to Yamaha for a full refund.
1. GRANT OF LICENSE AND COPYRIGHT
Yamaha grants you, the original purchaser, the right to use one copy of the enclosed software
program and data (“SOFTWARE”) on a single-user computer system. You may not use it on more
than one computer or computer terminal. The SOFTWARE is owned by Yamaha and is protected
by Japanese copyright laws and all applicable international treaty provisions. You are entitled to
claim ownership of the media in which the SOFTWARE is included. Therefore, you must treat the
SOFTWARE like any other copyrighted materials.
2. RESTRICTIONS
The SOFTWARE program is copyrighted. You may not engage in reverse engineer-ing or
reproduction of the SOFTWARE by other conceivable methods. You may not reproduce, modify,
change, rent, lease, resell, or distribute the SOFTWARE in whole or in part, or create derivative
works from the SOFTWARE. You may not transmit or network the SOFTWARE with other
computers. You may transfer ownership of the SOFTWARE and the accompanying written
materials on a permanent basis provided that you retain no copies and the recipient agrees to the
terms of the licensing agreement.
3. TERMINATION
The licensing condition of the software program becomes effective on the day that you receive the
SOFTWARE. If any one of the copyright laws or clauses of the licensing conditions is violated,
the licensing agreement shall be terminated automatically without notice from Yamaha. In this
case, you must destroy the licensed SOFTWARE and its copies immediately.
4. PRODUCT WARRANTY
Yamaha warrants to the original purchaser that if the SOFTWARE, when used in normal
conditions, will not perform the functions described in the manual provided by Yamaha, the sole
remedy will be that Yamaha will replace any media which proves defective in materials or
workmanship on an exchange basis without charge. Except as expressly set forth above, the
SOFTWARE is provided “as is,” and no other war-ranties, either expressed or implied, are made
with respect to this software, including, without limitation the implied warranties of merchantability and fitness for a particular purpose.
5. LIMITED LIABILITY
Your sole remedies and Yamaha’s entire liability are as set forth above. In no event will Yamaha
be liable to you or any other person for any damages, including without limitation any incidental
or consequential damages, expenses, lost profits, lost savings or other damages arising out of the
use or inability to use such SOFTWARE even if Yamaha or an authorized dealer has been advised
of the possibility of such damages, or for any claim by any other party.
6. GENERAL
This license agreement shall be interpreted according to and governed by Japanese laws.
19
Page 20

Inhalt
Anmerkungen zu der mitgelieferten Software ............................... 3
• Windows ................................................................................ 3
• Macintosh .............................................................................. 4
Installation des QY100 Data Filers ................................................... 5
• Windows ................................................................................ 5
• Macintosh .............................................................................. 6
Arbeitsweise und Aufgaben des QY100 Data Filers ....................... 8
Starten des QY100 Data Filers ........................................................ 10
• Die Data Filer Menüanzeige ................................................. 12
• Device Setup........................................................................ 13
Windows .......................................................................... 13
Macintosh ........................................................................ 14
MIDI Manager (für Macintosh) ........................................................... 16
●
Wichtige Hinweise
• Die Software und diese Bedienungsanleitung sind gemäß der gültigen Copyright-Gesetze
das Eigentum von Yamaha Corporation.
• Die Benutzung der Software und dieser Anleitung unterliegt der Lizenzvereinbarung, mit
der sich der Erwerber durch Öffnen des Siegels der Softwareverpackung
uneingeschränkt einverstanden erklärt. (Bitte lesen Sie die Software-Lizenzvereinbarung
am Ende dieser Anleitung vor der Installation der Anwendung sorgfältig durch.)
• Kopieren der Software und Vervielfältigen dieser Anleitung, auch auszugsweise, ist
untersagt und darf nur nach Einholen einer ausdrücklichen schriftlichen Genehmigung
des Herstellers erfolgen.
• Yamaha gibt bezüglich der Software und der begleitenden Dokumentation keine
Garantien und kann nicht für Schäden haftbar gemacht werden, die durch den Gebrauch
der Software und der Anleitung entstehen.
• Die beigelegte Disk ist eine CD-ROM. Versuchen Sie nicht, diese Disk auf einem AudioCD-Player abzuspielen. Dies kann den CD-Player irreparabel beschädigen.
• Kopieren von käuflichen Musik-Sequenzdateien ist strengstens untersagt, sofern dies
nicht ausschließlich für privaten Gebrauch erfolgt.
• Die in dieser Anleitung angeführten Fimennamen und Produktbezeichnungen sind die
Handelszeichen bzw. eingetragenen Warenzeichen der jeweiligen Firma.
• Die Bildschirmanzeigen in dieser Anleitung sind lediglich zur Orientierungshilfe beigefügt
und können von den tatsächlichen Anzeigen Ihres Computersystems abweichen.
• Künftige Upgrades der Anwendungs- und Systemsoftware sowie Änderungen an
Spezifikationen und Funktionen werden separat angekündigt.
2
Page 21

Anmerkungen zu
der mitgelieferten Software
Die beigelegte CD-ROM (Hybrid-CD für Windows/Macintosh) enthält
die folgende Software.
Windows
QY100 Data Filer
Diese Software ist ein Datei-Manager, der es Ihnen ermöglicht, auf dem QY100
erstellte Daten zur Sicherstellung auf Ihren Computer zu übertragen.
Weitergehende Informationen zum Gebrauch des QY100 Data Filers finden Sie
nach der Installation in der PDF-Datei “QY100 Data Filer Manual”. Diese Datei ist
bei [Start | Programme | YAMAHA QY100 Data Filer] gespeichert.
YAMAHA CBX Treiber
Dies ist ein MIDI-Treiber, den Sie benötigen, wenn Sie die TO HOST-Buchse des
QY100 direkt mit dem seriellen Port Ihres Computers verbinden.
Acrobat Reader
Diese Software ermöglicht es Ihnen, die im PDF-Format gespeicherte OnlineBedienungsanleitung am Bildschirm zu lesen.
Zum Installieren des Programms öffnen Sie im “Acroread”-Ordner den “German”-
Ordner und doppelklicken dann auf “rs405deu.exe”. Folgen Sie danach den
Anweisungen auf dem Bildschirm, um die Installation zu beenden.
3
Page 22

Anmerkungen zu der mitgelieferten Software
Macintosh
QY100 Data Filer
Diese Software ist ein Datei-Manager, der es Ihnen ermöglicht, auf dem QY100
erstellte Daten zur Sicherstellung auf Ihren Computer zu übertragen.
Weitergehende Informationen zum Gebrauch des QY100 Data Filers finden Sie in
der Datei “QY100 Data Filer G.pdf” auf der CD-ROM.
MIDI-Manager
Dies ist ein MIDI-Treiber, den Sie benötigen, wenn Sie die TO HOST-Buchse des
QY100 direkt mit dem Modem- oder Druckerport Ihres Computers verbinden. Sie
können als Treiber wahlweise den MIDI-Manager oder OMS wählen.
OMS
OMS ist ein MIDI-Treiber, den Sie benötigen, wenn Sie die TO HOST-Buchse des
QY100 direkt mit dem Modem- oder Druckerport Ihres Computers verbinden. Sie
können als Treiber wahlweise den MIDI-Manager oder OMS wählen.
Acrobat Reader
Diese Software ermöglicht es Ihnen, die im PDF-Format gespeicherte OnlineBedienungsanleitung am Bildschirm zu lesen.
Zum Installieren des Programms öffnen Sie im “Acrobat”-Ordner den “German”-
Ordner und doppelklicken dann auf “German Reader Installer”. Folgen Sie danach
den Anweisungen auf dem Bildschirm, um die Installation zu beenden.
4
Page 23

Installation
des QY100 Data Filers
Windows
Um den QY100 Data Filer benutzen zu können, müssen Sie die Data Filer-
Software mit der mitgelieferten CD-ROM zunächst in Ihrem Computer installieren.
Zur Installation des QY100 Data Filers für Windows muß das
System folgende Anforderungen erfüllen:
Betriebssystem Windows 95/98/NT4.0/2000/Me
CPU 80486 sx/33 MHz oder schneller
Arbeitsspeicher mindestens 8 MB
Freier Festplattenspeicher mindestens 3 MB
Bildschirm 640 x 480 Punkte, mindestens 256 Farben
Z Legen Sie die mitgelieferte CD-ROM in das CD-ROM-Laufwerk Ihres
Computers ein.
X Öffnen Sie das CD-ROM-Icon im Ordner “My Computer” (Arbeits-
platz) durch einen Doppelklick, und öffnen Sie dann den Ordner
“QY100_”.
C Doppelklicken Sie auf das Icon “setup.exe”.
Das Installationsprogramm läuft an.
Folgen Sie nun bis zum Ende der Installation den Anweisungen
auf dem Bildschirm Ihres Computers.
■
NOTIZ
• Neben dem QY100 Data Filer selbst müssen Sie zusätzlich auch den
entsprechenden MIDI-Treiber installieren, damit das Programm laufen kann.
Wie Sie den MIDI-Treiber installieren, erfahren Sie im folgenden Abschnitt.
5
Page 24

Installation des QY100 Data Filers
●
Installation des YAMAHA CBX Treibers (für Windows 95/98/NT4.0/2000/Me)
Z Legen Sie die mitgelieferte CD-ROM in das CD-ROM-Laufwerk Ihres
Computers ein.
X Öffnen Sie das CD-ROM-Icon im Ordner “My Computer” (Arbeits-
platz) durch einen Doppelklick.
C Öffnen Sie dann den Ordner “MIDIdrv_”.
V Doppelklicken Sie auf das Icon “setup.exe”. Das Installations-
programm läuft an.
Folgen Sie nun bis zum Ende der Installation den Anweisungen
auf dem Bildschirm Ihres Computers.
Macintosh
Um den QY100 Data Filer benutzen zu können, müssen Sie die Data FilerSoftware mit der mitgelieferten CD-ROM zunächst in Ihrem Computer installieren.
Neben dem QY100 Data Filer selbst müssen Sie zusätzlich auch den MIDI-Manager
oder OMS (MIDI-Treiber) installieren. Sie können auch beides installieren, um dann
bei Bedarf zwischen beiden Treibern zu wechseln (Seite 14).
Zur Installation des QY100 Data Filers für Windows muß das
System folgende Anforderungen erfüllen:
Betriebssystem Mac OS System 7.5 oder neuer
CPU 68030 oder schneller
Arbeitsspeicher mindestens 3 MB
Freier Festplattenspeicher mindestens 4 MB
Bildschirm mindestens 256 Farben
Z Legen Sie die mitgelieferte CD-ROM in das CD-ROM-Laufwerk Ihres
Computers ein.
X Sobald das Icon der CD-ROM auf dem Bildschirm erscheint, öffnen
Sie es mit einem Doppelklick. Doppelklicken Sie auf den “Internatio-
nal”-Ordner und dann den erscheinenden “QY100”-Ordner.
C Ziehen Sie “QY100 Data Filer“ auf das Festplatten-Icon, um das
Programm zu kopieren.
6
Page 25

Installation des QY100 Data Filers
Wenn Sie mit MIDI Manager arbeiten
V Öffnen Sie den Ordner “MIDI Manager 2.0.2” durch einen
Doppelklick, und ziehen Sie dann den kompletten Inhalt des Ordners
“MIDI Manager 2.0.2” auf das Icon des “System Folder” (Systemordner).
Die auf den System-Ordner gezogenen Dateien werden automatisch
in die entsprechenden Ordner kopiert. Wenn eine Dialogbox zur
Bestätigung auffordert, klicken Sie auf “OK”.
Wenn Sie Patch Bay über das Apfel-Menü starten möchten, ziehen
Sie die Datei “Patch Bay” im “System Folder” (Systemordner) auf
den Ordner für das “Apple Menu Items” (Apple-Menü).
B Lassen Sie Ihren Mac wieder hochfahren.
Die Installation des QY100 Data Filers ist damit beendet.
■
NOTIZ
• Mehr Information über den MIDI Manager finden Sie in der QY100 Data
Filer Bedienungsanleitung auf Seite 16.
Wenn Sie mit OMS (Open Music System) arbeiten
V Öffnen Sie den Ordner “OMS” durch einen Doppelklick, und ziehen
Sie dann den Ordner “OMS Setup for QY100” auf die Festplatte, um
die Dateien zu kopieren.
B Doppelklicken Sie auf das Icon “Install OMS 2.3.6”, um das
Installationsprogramm zu starten. Nach Vorgeben von “Install
Location” (Installationsort; sofern erforderlich) klicken Sie auf “Install”
um die Installation zu starten.
N Nach beendeter Installation erscheint die Meldung “Installation was
successful” (Installation erfolgreich) auf dem Bildschirm. Klicken Sie
auf “Restart” (Neu starten), um den Computer erneut hochzufahren.
Die Installation des QY100 Data Filers ist damit beendet.
■
NOTIZ
• Bevor Sie mit OMS arbeiten können, müssen Sie OMS zunächst einrichten
(Seite 14).
Weitere Informationen zu OMS finden Sie in der Datei “OMS_2.3_Mac.pdf”
auf der mitgelieferten CD-ROM.
7
Page 26

Arbeitsweise und Aufgaben
des QY100 Data Filers
Der QY100 Data Filer ist ein Datei-Manager, der es Ihnen ermöglicht,
auf dem QY100 erstellte Daten zur Sicherstellung auf Ihren Computer zu
übertragen. Bevor Sie den QY100 Data Filer jedoch benutzen können,
müssen Sie zunächst die Software installieren und den QY100 an den
Computer anschließen (siehe “QY100-Bedienungsanleitung”).
Der QY100 Data Filer kann je nach Bedarf die drei folgenden Funktionen ausführen:
1. Auf dem QY100 erstellte Daten können zur Sicherstellung in Form
von QY Bulk-Daten auf den Computer übertragen werden. Sichergestellte QY Bulk-Daten können bei Bedarf wieder in den QY100
zurückgeladen werden.
2. SMF-Songdateien wie XG- oder GM-Songs können vom Computer
auf den QY100 übertragen und auf diesem abgespielt werden. Auf
dem QY100 erstellte Daten können darüber hinaus in das SMFFormat konvertiert auf dem Computer sichergestellt werden.
3. Der Computer kann zum Löschen von Song/Style-Dateien im
QY100 eingesetzt werden.
■
NOTIZ
• Der QY100 Data Filer ist eine speziell für den QY100 konzipierte Applikation. Das
Programm kann für andere Geräte nicht verwendet werden.
• SMF-Songdateien, die größer sind als die Speicherkapazität des QY100 (ca.
32.000 Noten), sind nicht mit dem QY100 kompatibel.
r
t
e
r
a
b
g
Ü
e
d
n
u
n
r
e
h
c
i
e
p
S
.
1
2. Speichern und Übertragen von SMF-Daten
3
.
L
ö
s
c
h
e
n
v
n
v
o
n
Q
Y
-
D
a
t
e
n
n
e
t
a
D
-
0
0
1
Y
o
Q
n
8
Page 27

Arbeitsweise und Aufgaben des QY100 Data Filers
1. Speichern und Übertragen von QY-Daten
QY100 ➔ Computer
• Alle Daten im QY100 können als Bulk-Datei im Computer gespeichert
werden.
Computer ➔ QY100
• Eine im Computer gespeicherte Bulk-Datei kann bei Bedarf wieder
auf den QY100 übertragen werden.
• Einzelne Song-Dateien, die als Teil einer Bulk-Datei im Computer
gespeichert sind, können auf den QY100 übertragen werden.
• Einzelne User-Style-Dateien, die als Teil einer Bulk-Datei im Computer
gespeichert sind, können auf den QY100 übertragen werden.
2. Speichern und Übertragen von SMF-Daten
QY100 ➔ Computer
• Songdaten im QY100 können in SMF-Daten (Standard MIDI File)
umgewandelt und im Computer gespeichert werden.
Computer ➔ QY100
• Im Computer gespeicherte SMF-Daten (Standard MIDI File) können
auf den QY100 übertragen werden.
3. Löschen von QY100-Daten
Computer ➔ QY100
• Die Liste der Songs im QY100 kann direkt auf dem Bildschirm des
Computers angezeigt werden, und einzelne oder alle Songs in dieser
Liste können vom Computer aus gelöscht werden.
• Die Liste der User-Styles im QY100 kann direkt auf dem Bildschirm
des Computers angezeigt werden, und einzelne oder alle User-Styles
in dieser Liste können vom Computer aus gelöscht werden.
9
Page 28

Starten des
QY100 Data Filers
Z Den QY100 Data Filer starten.
Nach der Installation der Software (siehe Seite 5) und dem Anschluß der
Geräte (siehe “QY100-Bedienungsanleitung”) können Sie den QY100 Data Filer
starten, wie im folgenden beschrieben.
• Bei Gebrauch von Windows95/98/NT4.0/2000/Me
Klicken Sie auf die START-Schaltfläche, und klicken Sie dann auf “QY100
Data Filer” im “YAMAHA QY100 Data Filer” unter dem Programme-Menü.
• Bei Gebrauch eines Macintosh
Doppelklicken Sie auf das “QY100 Data Filer”-Icon.
■
NOTIZ
• Wenn Sie den QY100 Data Filer auf einem Macintosh-System laufen lassen, öffnen Sie
den “Chooser” (Wählfeld) im Apfel-Menü und schalten dort “Apple Talk” aus.
■
VORSICHT
• Wenn der MIDI-Treiber mit Ihrem Computer nicht verwendet werden kann, wird die
folgende Meldung angezeigt:
“The selected MIDI device is in use. Quit any applications using the device.” (Der
gewählte MIDI-Treiber ist in Gebrauch. Beenden Sie alle Anwendungen, die diesen
MIDI-Treiber nutzen.)
→
Klicken Sie auf “OK”, und beenden Sie danach alle anderen MIDI-Anwendungen
(Sequenzer-Software u. dgl.), die den MIDI-Treiber belegen. Starten Sie den QY100 Data
Filer noch einmal.
“Can’t find the MIDI device. Confirm the MIDI device settings.” (MIDI-Treiber nicht
auffindbar. Überprüfen Sie die MIDI-Treibereinstellungen.)
→
Der MIDI-Treiber ist nicht richtig installiert. Installieren Sie den MIDI-Treiber, wie auf
Seite 6 beschrieben.
■
VORSICHT
• Wenn der QY100 nicht richtig am Computer angeschlossen ist, wird die Dialogbox “Data
transfer failed. Confirm QY100 connections (HOST SELECT switch, etc.)” angezeigt.
Schließen Sie den QY100 in diesem Fall richtig an, und überprüfen Sie die Einstellung
des HOST SELECT-Schalters, um die Software dann erneut zu starten.
10
Page 29

Starten des QY100 Data Filers
X Die Anfangsanzeige.
Beim Starten des QY100 Data Filers erscheint zunächst die folgende
Anzeige, die wir in dieser Anleitung “Anfangsanzeige” nennen.
QY Data (QY-Daten) SMF Data (SMF-Daten)
“Save” (Sichern)
Alle Daten im QY100 können in
einem Durchgang als BulkDatei im Computer sichergestellt werden.
“Conv.” (Konvertieren)
Einzelne Song-Dateien im
QY100 können in SMF-Daten
umgewandelt und im Computer
gespeichert werden.
“Send” (Übertragen)
Eine im Computer sichergestellte Bulk-Datei oder einzelne
Song- und Style-Dateien
derselben können wieder in
den QY100 geladen werden.
QY Control (QY-Steuerung)
“Ctrl” (Steuerung)
Die Liste der Songs/User-Styles im
QY100 kann auf dem Bildschirm
des Computers dargestellt und zum
Löschen einzelner oder aller Songs/
User-Styles verwendet werden.
“Send” (Übertragen)
Einzelne, im Computer
gespeicherte SMF-Dateien
können auf den QY100
übertragen werden.
11
Page 30

Starten des QY100 Data Filers
Die Data Filer Menüanzeige
Beendet das QY100 Data Filer-Programm.
Wie “Save” für QY-Daten auf der Anfangsanzeige.
Wie “Send” für QY-Daten auf der Anfangsanzeige.
Wie “Conv.” für SMF-Daten auf der Anfangsanzeige.
Wie “Send” für SMF-Daten auf der Anfangsanzeige.
Wie “Ctrl” für SMF-Daten auf der Anfangsanzeige.
Windows:
Zum Wählen des MIDI-Treibers, der zum Austauch
von Daten (Bulk Dump) zwischen dem QY100 und
dem Computer benötigt wird.
Macintosh:
Zum Auswählen des MIDI-Treibers (“MIDI-Manager”
oder “OMS”). Wenn Sie hier “OMS” wählen,
werden die folgenden Einstellungen erforderlich.
Startet das “OMS Setup” und wählt dann die OMS
Setup-Datei.
Zum Auswählen des externen Ports.
Zur Geräteeinrichtung.
Windows:
Öffnet die PDF-Bedienungsanleitungsdatei.
Zeigt Information über den QY100 Data Filer an
(Version usw.).
12
Page 31

Starten des QY100 Data Filers
Device Setup
Über diesen Menüpunkt wählen Sie den MIDI-Treiber, der zum Austauschen
von Daten (Bulk Dump) zwischen dem QY100 und dem Computer benötigt wird.
Windows
Z “Device Setup” im “Setup”-Menü wählen.
Die Dialogbox “MIDI Port Setup” wird eingeblendet.
X Den MIDI-Treiber wählen.
Klicken Sie auf die “▼”-Schaltflächen für den “MIDI IN Port” und
den “MIDI OUT Port”, und wählen Sie den MIDI-Treiber aus der eingeblendeten Liste aus.
• Wenn der QY100 über die TO HOST-Buchse direkt mit dem
Computer verbunden ist.
Wählen Sie den “YAMAHA CBX Driver” für den “MIDI IN Port” und
den “YAMAHA CBX A Driver” für den “MIDI OUT Port”.
• Wenn der QY100 über die MIDI-Buchsen und eine separate MIDISchnittstelle mit dem Computer verbunden ist.
Wählen Sie für den “MIDI IN Port” und den “MIDI OUT Port” den
MIDI-Treiber, der mit der verwendeten MIDI-Schnittstelle kompatibel
ist.
C Abschließend auf “OK” klicken.
■
NOTIZ
• Der MIDI-Treiber kann nur gewählt werden, wenn er zuvor installiert wurde.
13
Page 32

Starten des QY100 Data Filers
Macintosh
Z Wählen Sie “Select MIDI System...” im “Setup”-Menü.
Die Dialogbox “Select MIDI System” wird angezeigt.
X Markieren Sie die Optionsschaltfläche des gewünschten MIDI-
Treibers (MIDI Manager oder OMS).
C Klicken Sie auf “OK”.
Bevor Sie mit OMS arbeiten können, müssen Sie OMS zunächst einrichten
(Siehe folgenden Abschnitt).
V Wählen Sie “OMS Studio Setup...” im “Setup”-Menü, um das
OMS Setup zu starten.
Wenn OMS Setup nicht automatisch gestartet werden kann,
erscheint eine Dialogbox. Wählen Sie “OMS Setup” im Ordner “OMS
Applications”.
B Wählen Sie “Open” im “File”-Menü von OMS Setup. Eine
Dialogbox wird angezeigt. Öffnen Sie die Datei “QY100Modem” im Ordner “OMS Setup for QY100”. Wenn der
Modem-Port bereits belegt ist, öffnen Sie die Datei “QY100Printer” für den Drucker-Port.
14
Page 33

Starten des QY100 Data Filers
N Wählen Sie “Make Current” (Aktualisieren) im “File”-Menü
von OMS Setup. Das Setup für Ihren QY100 ist nun als
aktuelles Studio-Setup gespeichert.
M Gehen Sie zur Anzeige des QY100 Data Filers zurück, und
wählen Sie dort “OMS MIDI Setup...” im “Setup”-Menü. Die
Dialogbox “OMS MIDI Setup” wird nun angezeigt.
Markieren Sie die zu verwendenden externen Ports und “Run
MIDI in background” (MIDI im Hintergrund laufen lassen),
und klicken Sie dann auf “OK”.
< Wählen Sie “Device Setup...” im “Setup”-Menü. Die Dialog-
box “Devices” (Geräte) erscheint. Wählen Sie “QY100” als
sowohl “Output Device” (Ausgabegerät) als auch “Input
Device” (Eingabegerät), indem Sie zweimal in das jeweilige
Feld klicken, und klicken Sie abschließend auf “OK”.
■
NOTIZ
• Beim Auswählen von “QY100” klicken Sie nach Anklicken des jeweiligen Felds direkt
oberhalb von “QY100”, um das Balkenmenü zu öffnen.
15
Page 34

MIDI Manager
MIDI Manager (für Macintosh)
Der MIDI Manager ist eine Apple-Systemerweiterung zur Verwaltung
von MIDI-Information. Mit dieser Erweiterung können Sie den seriellen Port
bei bestimmten MIDI-Programmen für den Austausch von Musikdaten in
Echtzeit konfigurieren. PatchBay ermöglicht es Ihnen, den MIDI Manager für
den Apple MIDI-Treiber und die MIDI-Software zu konfigurieren.
Der Apple MIDI-Treiber wird normalerweise als Teil des QY100 Data
Filer-Programmstarts automatisch geladen, so daß keine besonderen
Einstellungen erforderlich sind, solange Sie den seriellen Port nicht ändern.
Wenn der andere serielle Port beschaltet werden soll, führen Sie bitte die
folgenden Schritte aus.
● Einstellen des seriellen Ports
Z Wählen Sie “PatchBay” im Apfel-Pulldown-Menü.
Ein Fenster öffnet sich dabei, in dem angezeigt wird, welche den
MIDI Manager betreffenden Schnittstellen angeschlossen sind.
X Doppelklicken Sie auf das Apple MIDI Driver-Icon. Wählen Sie
dann den Port, den Sie verwenden möchten, und stellen Sie den
Schnittstellentyp ein. (In den meisten Fällen ist 1 MHz die
geeignete Einstellung.)
16
Page 35

MIDI Manager
C Nach Starten des QY100 Data Filers können Sie das PatchBay-
Fenster öffnen, um zu prüfen, wie der QY100 Data Filer mit dem
Apple MIDI Driver konfiguriert ist.
Sie können auch andere Sequenzerprogramme mit dem QY100
Data Filer konfigurieren und verschiedene andere Einstellungen
vornehmen.
* Wenn Sie mit dem QY100 Data Filer arbeiten möchten, öffnen Sie den
“Chooser” (Wählfeld) im Apfel-Menü und schalten Apple Talk aus.
* Um mehr über PatchBay zu erfahren, wählen Sie “About PatchBay” im
Apfel-Menü.
* Zur Verwendung des QY100 Data Filers auf einem Macintosh IIfx oder
bestimmten Quadra-Modellen, benötigen Sie einen “Serial Switch” im
Ordner “Control Panels” (Kontrollfelder), da die Portkonfiguration dieser
Computer von der anderer Macintosh-Modelle abweicht.
17
Page 36

MIDI Manager
Wenn Sie den gesamten Inhalt des “MIDI Manager 2.0.2”-Ordners von
der mitgelieferten CD-ROM auf den System-Ordner des Macintosh
kopieren (wie auf Seite 6 beschrieben), wird der “Serial Switch”
automatisch im Kontrollfelder-Ordner abgelegt.
* Wenn Sie mit einem Performa mit internem Modem arbeiten, müssen
Sie in Schritt X des obigen Vorgangs den Druckerport wählen. Bei
solchen Computern können über den Modemport auch dann keine
Daten übertragen werden, wenn dieser im Fenster für den QY100 Data
Filer gewählt wurde.
■
NOTIZ
• Bei gewissen Quadra-Modellen wird zur Konfigurierung des Systems
ein “Cache Switch” benötigt. Sie finden dieses Programm in der
System-Diskette mit dem Namen “Tidbits”. Kopieren Sie den “Cache
Switch” auf den System-Ordner. Nachdem Sie das Programm kopiert
haben, öffnen Sie das Apple-Menü und wählen “Control Panels”
(Kontrollfelder). Stellen Sie den seriellen Port des “IIfx Serial Switch”
auf “Compatible” ein. Wenn Sie einen Quadra mit einer anderen
Portkonfiguration verwenden, stellen Sie den “Cache Switch” auf
“More Compatible”. Wenn bei einem solchen Quadra die Meldung
“Cannot use with this Macintosh” (Kann mit diesem Macintosh nicht
verwendet werden) auf dem Bildschirm angezeigt wird, sind die obigen
Einstellungen nicht erforderlich.
18
Page 37

SOFTWARE-LIZENZVEREINBARUNG
Die folgende Vereinbarung ist eine rechtsgültige Vereinbarung zwischen Ihnen, dem Endanwender, und
der Yamaha Corporation (“Yamaha”). Yamaha erteilt dem ursprünglichen Käufer für das beiliegende
Yamaha-Softwareprogramm ausschließlich zu den hier ausgeführten Bedingungen eine Lizenz zur
Verwendung. Bitte lesen Sie diese Lizenzvereinbarung sorgfältig. Durch das Öffnen dieser Packung
bringen Sie zum Ausdruck, daß Sie alle darin enthaltenen Bedingungen akzeptieren. Wenn Sie nicht mit
den Bedingungen einverstanden sind, können Sie die Packung ungeöffnet an Yamaha zurückgeben; der
Kaufpreis wird in voller Höhe zurückerstattet.
1. ERETILUNG VON LIZENZ UND COPYRIGHT
Yamaha erteilt Ihnen, dem ursprünglichen Käufer, das Recht, ein Exemplar des beiliegenden Softwareprogramms und der darin enthaltenen Daten (“SOFTWARE”) als Einzelperson auf jeweils einem
Computer zu verwenden. Sie dürfen sie nicht auf mehr als einem Computer bzw. einer Computerstation
verwenden. Die SOFTWARE bleibt im Besitz von Yamaha und ist durch japanische Copyrightgesetze
sowie alle anwendbaren internationalen Vertragsbestimmungen geschützt. Sie haben ein Anspruchsrecht
auf das Eigentum an den Medien, denen die SOFTWARE beiliegt. Daher müssen Sie die SOFTWARE
wie alle anderen durch Copyright geschützten Materialien behandeln.
2. EINSCHRÄNKUNGEN
Die SOFTWARE ist durch Copyright geschützt. Sie dürfen Sie weder analysieren noch durch
anderweitige Methoden reproduzieren. Sie dürfen die SOFTWARE weder ganz noch teilweise
reproduzieren, modifizieren, verändern, gegen Entgelt oder unentgeltlich verleihen, verkaufen oder
vertreiben, und Sie dürfen auf der Grundlage der SOFTWARE keine Ableitungen erstellen. Sie dürfen
die SOFTWARE nicht an andere Computer senden oder in Netzwerke einspeisen. Sie dürfen das
Eigentum an der SOFTWARE und den schriftlichen Begleitmaterialien auf unbefristeter Basis unter den
Voraussetzungen übertragen, daß Sie keine Kopien zurückbehalten und sich der Empfänger mit den
Bedingungen der Lizenzvereinbarung einverstanden erklärt.
3. BEENDIGUNG
Die Lizenzbedingung des Softwareprogramms wird am Tag, an dem Sie die SOFTWARE erhalten,
wirksam. Falls ein Copyrightgesetz oder eine Bestimmung der Lizenzbedingungen verletzt wird, wird
automatisch und ohne Benachrichtigung durch Yamaha die Lizenzvereinbarung beendet. In diesem Fall
müssen Sie die lizensierte SOFTWARE und ihre Kopien unverzüglich vernichten.
4. PRODUKTGARANTIE
Yamaha garantiert dem ursprünglichen Käufer, daß, falls die SOFTWARE bei Verwendung unter
normalen Bedingungen nicht die in der von Yamaha bereitgestellten Anleitung beschriebenen Funktionen erfüllt, die einzige Abhilfe darin bestehen wird, daß Yamaha auf Austauschbasis kostenlos jedes
Medium ersetzen wird, das Material- oder Verarbeitungsfehler aufweist. Abgesehen von dem oben
Ausgeführten wird die SOFTWARE “wie die Ware liegt und steht” geliefert, und es werden keine
anderen ausdrücklichen oder stillschweigenden Garantien hinsichtlich dieser Software übernommen,
einschließlich, aber nicht beschränkt auf, die stillschweigenden Garantien für handelsübliche Qualität
und Eignung für einen bestimmten Einsatzzweck.
5. BESCHRÄNKTE HAFTUNG
Ihre einzige Abhilfe und die gesamte Haftung Yamahas bestehen in dem oben Ausgeführten. Keinesfalls
haftet Yamaha Ihnen oder einer anderen Person gegenüber für etwaige Schäden, einschließlich, aber
nicht beschränkt auf, zufällige Schäden oder Folgeschäden, Kosten, Verdienstausfall, verlorene
Ersparnisse oder andere Schadenersatzansprüche, die aus der Verwendung der SOFTWARE oder aus
der Tatsache hervorgehen, daß diese SOFTWARE nicht verwendet werden konnte, selbst wenn Yamaha
oder ein autorisierter Händler über die Möglichkeit derartiger Schadenersatzansprüche informiert
wurde, oder für etwaige andere Ansprüche einer anderen Partei.
6. ALLGEMEINES
Diese Lizenzvereinbarung soll gemäß und in Übereinstimmung mit den japanischen Gesetzen ausgelegt
werden.
19
Page 38

Table des matières
;
À propos du logiciel fourni ................................................................ 3
• Pour les utilisateurs de Windows .......................................... 3
• Pour les utilisateurs de Macintosh ......................................... 4
Installation du QY100 Data Filer ....................................................... 5
• Pour les utilisateurs de Windows .......................................... 5
• Pour les utilisateurs de Macintosh ......................................... 6
Qu’est-ce que le QY100 Data Filer ? ................................................. 8
Comment démarrer le QY100 Data Filer ........................................ 10
• L’afficheur de menu Data Filer ............................................. 12
• A propos de l’installation de l’appareil .................................. 13
Pour les utilisateurs de Windows .................................... 13
Pour les utilisateurs de Macintosh ................................... 14
MIDI Manager (Gestionnaire MIDI)
(Pour les utilisateurs de Macintosh) ................................................... 16
●
Remarques spéciales
• Le logiciel et ce mode d’emploi sont des copyrights exclusifs de Yamaha.
• L’utilisation de ce logiciel et de ce manuel est défini par l’accord de licence auquel
l’acheteur déclare souscrire sans réserve quand il coupe le sceau de fermeture de
l’emballage du logiciel. (Veuillez lire attentivement l’accord de licence du logiciel qui se
trouve à la fin de ce manuel avant d’installer ce programme d’application.)
• La copie du logiciel ou la reproduction de ce mode d’emploi dans sa totalité ou même
partielle par quelque moyen que ce soit est expressément interdite sans le consentement écrit du fabricant.
• Yamaha ne fait aucune représentation ou garantie en ce qui concerne l’utilisation de ce
logiciel et de la documentation et ne pourra être tenu responsable des résultats de
l’utilisation de ce mode d’emploi et de ce logiciel.
• Ce disque est un disque CD-ROM. N’essayez pas de le lire dans un lecteur de disque
compact CD audio. En effet, cela risque d’endommager gravement votre lecteur de
disque compact CD audio.
• Copier des données de séquences de musique disponibles dans le commerce est
strictement interdit sauf pour un usage personnel.
• Les noms de sociétés et les noms de produits de ce mode d’emploi sont des marques
commerciales ou des marques déposées de leurs sociétés respectives.
• Les affichages d’écran illustrés dans ce mode d’emploi servent à des intentions
d’instructions et peuvent parfois apparaître un peu différents des écrans qui apparaissent
sur votre ordinateur.
• Les nouvelles mises à jour des programmes d’application et du système d’exploitation
ainsi que toutes les modifications ultérieures dans les caractéristiques techniques et les
fonctions seront annoncées séparément.
2
Page 39

À propos du logiciel fourni
Ce disque CD-ROM fourni (CD hybride Windows / Macintosh) contient
le logiciel suivant.
Pour les utilisateurs de Windows
QY100 Data Filer
Ce logiciel est un gestionnaire de fichier qui vous permet d’extraire les données
créées par le QY100 pour les sauvegarder dans votre ordinateur.
Pour obtenir de plus amples détails au sujet du QY100 Data Filer, veuillez vous
référer au fichier PDF intitulé “QY100 Data Filer Manual” après avoir fait l’installation. Ce fichier peut être trouvé à [Démarrer / Programmes / YAMAHA QY100 Data
Filer].
Pilote Yamaha CBX
Il s’agit d’un pilote MIDI nécessaire lorsqu’un raccordement de la borne TO HOST
du QY100 est effectué directement au port sériel de votre ordinateur.
Acrobat Reader
Ce logiciel vous permet de visionner le mode d’emploi électronique sauvegardé
sous le format PDF.
Pour lancer l’installation, ouvrez le dossier intitulé “French” dans le dossier
“Acroread”, double-cliquez sur “rs405fra.exe”. Suivez les instructions qui apparaissent sur l’écran de votre ordinateur pour exécuter la procédure d’installation.
3
Page 40

À propos du logiciel fourni
Pour les utilisateurs de Macintosh
QY100 Data Filer
Ce logiciel est un gestionnaire de fichier qui vous permet d’extraire les données
créées par le QY100 pour les sauvegarder dans votre ordinateur.
Pour obtenir de plus amples détails au sujet du QY100 Data Filer, veuillez vous
référer au fichier PDF intitulé “QY100 Data Filer F.pdf “ qui se trouve sur ce disque
CD-ROM.
MIDI Manager
Il s’agit d’un pilote MIDI nécessaire lorsqu’un raccordement de la borne TO HOST
du QY100 est effectué directement au modem ou au port d’imprimante de votre
ordinateur. Vous pouvez choisir entre MIDI Manager et OMS suivant le pilote que
vous devez utiliser.
OMS
Il s’agit d’un pilote MIDI nécessaire lorsqu’un raccordement de la borne TO HOST
du QY100 est effectué directement au modem ou au port d’imprimante de votre
ordinateur. Vous pouvez choisir entre MIDI Manager et OMS suivant le pilote que
vous devez utiliser.
Acrobat Reader
Ce logiciel vous permet de visionner le mode d’emploi électronique sauvegardé
sous le format PDF.
Pour lancer l’installation, ouvrez le dossier intitulé “French” dans le dossier
“Acrobat”, double-cliquez sur “French Reader Installer”. Suivez les instructions qui
apparaissent sur l’écran de votre ordinateur pour exécuter la procédure d’installa-
tion.
4
Page 41

Installation
du QY100 Data Filer
Pour les utilisateurs de Windows
Pour utiliser le QY100 Data Filer, suivez les instructions mentionnées cidessous pour installer le logiciel Data Filer dans votre ordinateur à partir du disque
CD-ROM fourni.
Pour installer le QY100 Data Filer pour Windows, il vous faut le
système suivant :
Système d’exploitation Windows 95/98/NT4.0/2000/Me
Unité centrale 80486 sx/33 MHz ou plus rapide
Mémoire 8 MB ou plus
Disque dur 3 MB ou plus
Visuel 640 x 480 points, 256 couleurs ou plus
Z Insérez le disque CD-ROM fourni dans le lecteur de CD-ROM de
votre ordinateur.
X Ouvrez l’icône de lecteur de CD-ROM du dossier “My Computer”
(Poste de travail) et pour ce faire, double-cliquez dessus, puis ouvrez
le dossier “QY100_”.
C Double-cliquez sur l’icône “setup.exe”.
Le programme d’installation démarrera.
Suivez les directives qui apparaissent sur l’écran de votre
ordinateur de manière à exécuter intégralement la procédure d’installa-
tion.
■
NOTE
• En marge de l’installation du logiciel, vous devez également installer le pilote
MIDI approprié pour être à même d’utiliser QY100 Data Filer. Référez-vous
aux explications suivantes pour installer le pilote MIDI.
5
Page 42

Installation du QY100 Data Filer
●
Installation du pilote Yamaha CBX Driver (pour Windows 95/98/NT4.0/2000/Me)
Z Insérez le disque CD-ROM fourni dans le lecteur de CD-ROM de
votre ordinateur.
X Ouvrez l’icône de lecteur de CD-ROM du dossier “My Computer”
(Poste de travail) et pour ce faire, double-cliquez dessus.
C Ouvrez le dossier “MIDIdrv_”.
V Double-cliquez sur l’icône “setup.exe” pour que le programme
d’installation démarre.
Suivez les directives qui apparaissent sur l’écran de votre
ordinateur de manière à exécuter intégralement la procédure d’installa-
tion.
Pour les utilisateurs de Macintosh
Pour utiliser le QY100 Data Filer, suivez les instructions mentionnées cidessous pour installer le logiciel Data Filer dans votre ordinateur à partir du disque
CD-ROM fourni. En marge de l’installation de QY100 Data Filer, vous devez
également installer le gestionnaire MIDI Manager ou le pilote OMS (pilote MIDI).
Vous pouvez aussi installer les deux programmes et commuter sur le pilote MIDI
valide (page 14).
Pour installer le QY100 Data Filer pour Macintosh, il vous faut le
système suivant :
Système d’exploitation Mac OS System 7.5 ou après
Unité centrale 68030 ou plus rapide
Mémoire 3 MB ou plus
Disque dur 4 MB ou plus
Visuel 256 couleurs ou plus
Z Insérez le disque CD-ROM fourni dans le lecteur de CD-ROM de
votre ordinateur.
X Après que l’icône de disque CD-ROM soit apparue sur l’écran, double-
cliquez sur l’icône de disque CD-ROM pour ouvrir. Double-cliquez sur
“QY100” du dossier “International” pour l’ouvrir.
C Glissez “QY100 Data Filer” sur le disque dur pour copier le fichier.
6
Page 43

Installation du QY100 Data Filer
Si vous utilisez MIDI Manager
V Double-cliquez sur le dossier “MIDI Manager 2.0.2” pour l’ouvrir, puis
glissez le contenu entier du dossier “MIDI Manager 2.0.2” sur l’icône
“System Folder” (Dossier Système) de Macintosh. Les fichiers
glissés sur le dossier de système sont automatiquement copiés dans
leurs dossiers respectifs. Si une boîte de dialogue apparaît et pour
vous demander une confirmation, cliquez “OK” (Accepter).
S’il est nécessaire de démarrer Patch Bay en sélectionnant Apple
Menu, glissez le fichier “Patch Bay” du “System Folder” (Dossier
Système) sur le dossier “Apple Menu Items” (Dossier Menu Pomme).
B Redémarrez votre ordinateur Macintosh.
Ceci conclue l’installation de QY100 Data Filer.
■
NOTE
• En ce qui concerne le gestionnaire MIDI Manager, référez-vous au mode
d’emploi de QY100 Data Filer, page 16.
Si vous utilisez le pilote OMS (Open Music System)
V Double-cliquez sur le dossier “OMS” pour l’ouvrir, puis glissez le
dossier “OMS Setup for QY100” sur le disque dur pour copier les
fichiers.
B Double-cliquez sur l’icône “Install OMS 2.3.6” pour que le programme
d’installation démarre. Après avoir le choix de l’emplacement “Install
Location” (Emplacement d’installation) (si nécessaire), cliquez
“Install” pour commencer l’installation.
N Dès que l’installation est complètement terminée, le message
“Installation was successful” (l’installation s’est déroulée avec
succès) apparaît sur l’écran. Cliquez “Restart” (Redémarrer) pour
réamorcer votre ordinateur.
Ceci conclue l’installation de QY100 Data Filer.
■
NOTE
• Pour être à même d’utiliser OMS, vous devez également configurer OMS
(page 14).
Pour obtenir de plus amples renseignements sur OMS, veuillez vous référer
au fichier PDF intitulé “OMS_2_.3_Mac.pdf” qui se trouve sur le disque CDROM fourni.
7
Page 44

Qu’est-ce que le
QY100 Data Filer ?
Le QY100 Data Filer est un gestionnaire de fichiers qui vous permet
de prendre des données créées par le QY100 et de les enregistrer dans votre
ordinateur. Avant de pouvoir utiliser le QY100 Data Filer, vous devez installer
le logiciel et raccorder le QY100 à votre ordinateur (reportez-vous au “Mode
d’emploi du QY100”).
Le QY100 Data Filer peut exécuter ces fonctions selon la manière dont
vous l’utilisez:
1. Les données créées par le QY100 peuvent être enregistrées dans
votre ordinateur en tant que données en bloc QY. Et les donnés en
bloc sauvegardées sur votre ordinateur peuvent être transmises au
QY100.
2. Les fichiers de données de morceaux SMF, tels que les données
de morceaux XG ou GM, peuvent être transmis de l’ordinateur à
votre QY100 pour être reproduits sur le QY100. De plus, les
données créées par le QY100 peuvent être sauvegardées sur votre
ordinateur en tant que morceaux SMF.
3. Vous pouvez utiliser l’ordinateur pour effacer les données Song/
Style dans le QY100.
■
NOTE
• Le QY100 Data Filer est une application conçue spécialement pour le QY100.
Vous ne pouvez pas l’utiliser avec un autre appareil.
• Les fichiers de données musicales qui dépassent la capacité de mémoire du
QY100 Data Filer (environ 32000 notes) ne sont pas compatibles avec les QY100.
n
d
o
i
e
t
s
p
e
c
é
r
t
e
n
o
i
s
s
i
m
s
n
a
r
T
.
1
2. Transmission et réception des données SMF
3
.
E
f
f
a
c
e
m
e
n
t
d
o
n
n
é
e
s
e
n
b
l
o
c
Q
Y
0
0
1
Y
Q
s
e
é
n
n
o
d
d
e
s
8
Page 45

Qu’est-ce que le QY100 Data Filer ?
1. Transmission et réception des données en bloc QY
QY100 ➔ Ordinateur
• Toutes les données dans le QY100 peuvent être enregistrées dans
l’ordinateur comme fichier de grande capacité, (en bloc).
Ordinateur ➔ QY100
• Un fichier en bloc enregistré dans l’ordinateur peut être transmis au
QY100.
• Les fichiers de données de morceau unique dans un fichier en bloc
enregistré dans l’ordinateur peuvent être transmis au QY100.
• Les fichiers de données de style utilisateur unique dans un fichier en
blocs sauvegardé dans l’ordinateur peuvent être transmis au QY100.
2. Transmission et réception des données SMF
QY100 ➔ Ordinateur
• Les données de morceaux dans le QY100 peuvent être convertis en
données SMF (Fichier MIDI Standard) et enregistrées sur l’ordinateur.
Ordinateur ➔ QY100
• Les données SMF (Fichier MIDI Standard) enregistrées dans l’ordinateur peuvent être transmises au QY100.
3. Effacement des données QY100
Ordinateur ➔ QY100
• Vous pouvez voir la liste de noms de morceaux du QY100 sur l’écran
de l’ordinateur et un morceau unique ou effacer tous les morceaux
de la liste avec l’ordinateur.
• Vous pouvez voir la liste de noms de style utilisateur du QY100 sur
l’écran de l’ordinateur et un style utilisateur unique ou effacer tous
les styles utilisateur de la liste avec l’ordinateur.
9
Page 46

Comment démarrer le
QY100 Data Filer
Z Démarrer le QY100 Data Filer.
Une fois que l’installation (voir page 5) et la connexion (Reportez-vous au
“mode d’emploi du QY100”) sont terminées, suivez les instructions ci-dessous
pour démarrer le QY100 Data Filer.
• Si vous utilisez Windows 95/98/NT4.0/2000/Me
Cliquez sur le bouton START (démarrer), puis cliquez sur “QY100 Data
Filer”, qui se trouve dans “YAMAHA QY100 Data Filer” sous le menu de
programmes.
• Si vous utilisez un Macintosh
Cliquez deux fois sur l’icône “QY100 Data Filer”.
■
NOTE
• Si vous utilisez le QY100 Data Filer sur un système Macintosh, ouvrez “Chooser” dans
“Apple Menu” et désactivez “Apple Talk”.
■
PRECAUTION
• Si vous ne pouvez pas utiliser le pilote MIDI avec votre ordinateur, le message suivant
sera affiché.
“The selected MIDI device is in use. Quit any applications using the device.” (L’appareil
MIDI sélectionné est en cours d’utilisation. Quittez toutes les applications qui utilisent
l’appareil.)
→
Cliquez sur “OK”, puis quittez toutes les autres applications MIDI (logiciel de
séquenceur, etc.) qui utilisent le pilote MIDI et démarrez de nouveau le QY100 Data Filer.
“Can’t find the MIDI device. Confirm the MIDI device settings.” (Impossible de trouver
l’appareil MIDI. Confirmez les réglages de l’appareil MIDI.)
→
Le pilote MIDI n’est pas correctement installé. Reportez-vous aux pages 6/7 et
installez le pilote MIDI.
■
PRECAUTION
• Si le QY100 n’est pas raccordé à votre ordinateur, la boîte de dialogue “Data transfer
failed. Confirm QY100 connections (HOST SELECT switch, etc.)” (La transmission des
données a échoué. Vérifiez les connexions du QY100, (Sélecteur HOST SELECT, etc.))
sera affichée. Raccordez correctement le QY100 et démarrez de nouveau le logiciel.
10
Page 47

Comment démarrer le QY100 Data Filer
X L’afficheur de début.
Lorsque vous démarrez le QY100 Data Filer, l’afficheur suivant apparaît.
Nous l’appellerons le “premier afficheur”.
Données QY Données SMF
“Save” (enregistrement)
Toutes les données du QY100
peuvent être enregistrées dans
l’ordinateur comme fichier en
bloc.
“Conv.” (conversion)
Les données d’un morceau
unique dans le QY100 peuvent
être converties en données
SMF et enregistrées dans
l’ordinateur.
“Send” (transmission)
Un fichier en bloc, de même
que les fichiers de morceau et
de style uniques peut être
transmis au QY100.
Commande QY
“Ctrl” (commande)
Vous pouvez voir la liste de noms de
morceaux/styles utilisateur du QY100
et des styles uniques ou tous les
morceaux/styles utilisateur de la liste
peuvent être effacés.
“Send” (transmission)
Les données SMF uniques
enregistrées dans l’ordinateur
peuvent être transmises au
QY100.
11
Page 48

Comment démarrer le QY100 Data Filer
L’afficheur de menu Data Filer
Sort de l’application QY100 Data Filer.
Identique à “Save” (enregistrement) pour les
données QY dans le premier afficheur.
Identique à “Send” (transmission) pour les données
QY dans le premier afficheur.
Identique à “Conv.” (conversion) pour les données
SMF dans le premier afficheur.
Identique à “Send” (transmission) pour les données
SMF dans l’afficheur supérieur.
Identique à “Ctrl” (commande) dans le premier
afficheur.
Windows:
Sélectionne le pilote MIDI qui est requis pour
échanger les données (Bulk Dump) entre le QY100
et l’ordinateur
Macintosh:
Sélectionnez le pilote MIDI (“MIDI Manager” ou
“OMS”). Si vous sélectionnez “OMS” ici, les
paramétrages suivants sont également nécessaires.
Lancez “OMS Setup”, puis le fichier de configuration
OMS.
Sélectionnez le port extérieur.
Sélectionnez les appareils.
Windows:
Ouvrez le fichier de manuel PDF.
Affiche les informations sur la version, etc., QY100
Data Filer.
12
Page 49

Comment démarrer le QY100 Data Filer
A propos de l’installation de l’appareil
Cette procédure vous permet de sélectionner le pilote MIDI qui est néces-
saire pour permettre au QY100 Data Filer d’échanger les données MIDI (Bulk
Dump) entre le QY100 et l’ordinateur.
Pour les utilisateurs de Windows
Z Sélectionnez “Device Setup” dans le menu “Setup”.
La boîte de dialogue “MIDI Port Setup” (Définir le port MIDI) est
affichée.
X Sélectionnez le pilote MIDI.
Cliquez sur chacun des boutons “▼” de “MIDI IN Port” (port
d’entrée MIDI) ou de “MIDI OUT Port” (port de sortie MIDI), sélectionnez le pilote MIDI à partir de la liste déroulante qui est affichée.
• Quand la prise TO HOST du QY100 est raccordée directement au
port série de l’ordinateur.
Sélectionnez le pilote “YAMAHA CBX Driver” pour le port d’entrée
“MIDI IN Port” et le pilote “YAMAHA CBX A Driver” pour le port de
sortie “MIDI OUT Port”.
• Si les ports MIDI du QY100 sont connectés à l’ordinateur via une
interface MIDI.
Sélectionnez le pilote MIDI qui est compatible avec l’interface MIDI
que vous utilisez, pour les deux ports “MIDI IN Port” et “MIDI OUT
Port”.
C Cliquez sur [OK].
■
NOTE
• Il est nécessaire d’installer le pilote MIDI requis avant, pour pouvoir le sélectionner.
13
Page 50

Comment démarrer le QY100 Data Filer
Pour les utilisateurs de Macintosh
Z Sélectionnez “Select MIDI System...” dans le menu “Setup”.
La boîte de dialogue “Select MIDI System” (sélectionnez le
système MIDI) apparaît.
X Cochez le bouton radio approprié pour choisir le pilote MIDI,
le gestionnaire MIDI Manager ou le pilote OMS.
C Cliquez “OK” (Accepter) .
Pour être à même d’utiliser OMS, vous devez configurer OMS (voir ci-
dessous).
V Sélectionnez “OMS Studio Setup...” dans le menu “Setup”
pour que le programme de configuration OMS Setup démarre.
Si toutefois le programme de configuration OMS Setup ne
démarre pas automatiquement, une boîte de dialogue apparaît. Sélectionnez “OMS Setup” du dossier “OMS Applications”.
B Sélectionnez “Open” dans le menu “File”de la configuration
OMS Setup pour qu’une boîte de dialogue apparaisse. Ouvrez
le fichier “QY100-Modem” de “OMS Setup for QY100”. Si le
port de modem n’est pas disponible, ouvrez le fichier “QY100Printer”.
14
Page 51

Comment démarrer le QY100 Data Filer
N Sélectionnez “Make Current” (rendre courant) dans le menu
“File” de configuration OMS Setup. Ceci fait que la configuration pour votre QY100 est dès à présent sauvegardée dans la
configuration studio courante.
M Après avoir rendu active la page-écran de QY100 Data Filer,
sélectionnez “OMS MIDI Setup...” dans le menu “Setup”
pour que la boîte de dialogue “OMS MIDI Setup” (configuration OMS MIDI) apparaisse.
Cochez les ports extérieurs à utiliser et “Run MIDI in
background” (faire tourner MIDI en arrière-plan), puis cliquez
“OK” (accepter).
< Sélectionnez “Device Setup...” dans le menu “Setup” pour
que la boîte de dialogue “Devices” (modules de gestion)
apparaisse. Double-cliquez “QY100” dans chaque boîte pour le
sélectionner en tant que “Output Device” (module de gestion
de sortie) et “Input Device” (module de gestion d’entrée), puis
cliquez “OK” (Accepter).
■
NOTE
• Dès que vous avez sélectionné “QY100” dans les boîtes, cliquez juste au-dessus de
l’affichage “QY100” après avoir cliqué les boîtes de manière à faire apparaître les menus
déroulants.
15
Page 52

MIDI Manager (Gestionnaire MIDI)
MIDI Manager (Gestionnaire MIDI)
: Pour les utilisateurs de Macintosh
Le Gestionnaire MIDI est un fichier d’extension de système Apple
qui traite les informations MIDI. Avec lui, vous pouvez déterminer le port
série d’échange des données musicales en temps réel avec divers logiciels
MIDI. Le tableau de connexions PatchBay vous laisse décider de la configuration du gestionnaire MIDI pour le pilote MIDI et le logiciel MIDI Apple.
Normalement, le pilote MIDI Apple se charge automatiquement en
tant que partie du processus de démarrage du QY100 Data Filer, ce qui
signifie que vous n’avez pas besoin de réaliser des opérations spécifiques à
moins que vous n’envisagiez de changer la connexion du port série. Pour
changer la connexion du port série, veuillez vous reporter aux étapes
mentionnées ci-dessous.
● Réglage du port série
Z A partir du menu déroulant Apple, sélectionnez “PatchBay”
(tableau de connexions).
Une fenêtre apparaît indiquant quelles sont les interfaces raccor-
dées en relation avec le gestionnaire MIDI.
X Cliquez deux fois sur l’icône de pilote MIDI Apple. Puis, sélection-
nez le port que vous voulez utiliser et spécifiez le type d’interface.
(Dans la plupart des cas, 1 MHz est approprié).
16
Page 53

MIDI Manager (Gestionnaire MIDI)
C Après avoir lancé le QY100 Data Filer, vous pouvez ouvrir la
fenêtre du tableau de connexions PatchBay pour confirmer la
manière dont le QY100 Data Filer est configuré avec le pilote MIDI
Apple.
Vous pouvez aussi configurer un autre programme de séquenceur
avec le QY100 Data Filer ou spécifier d’autres réglages.
* Quand vous utilisez le QY100 Data Filer, ouvrez “Chooser” dans le menu
Apple et désactivez Apple Talk.
* Pour accéder aux informations concernant le tableau de connexions
PatchBay, à partir du menu Apple, sélectionnez “About Patchbay” (A propos
du Tableau de connexions).
*L’exécution du QY100 Data Filer, sur un Macintosh llfx ou certains modèles
Quadra, demande que le “Serial switch” (Sélecteur série) soit dans le
dossier des panneaux de configuration, puisque la configuration du port
série de ces ordinateurs diffère des autres modèles Macintosh.
17
Page 54

MIDI Manager (Gestionnaire MIDI)
Si vous copiez la totalité du contenu du dossier intitulé “MIDI Manager
2.0.2” qui se trouve sur le disque CD-ROM fourni dans le dossier de
système Macintosh (comme décrit à la page 6), “Serial Switch” sera
installé automatiquement dans le dossier des panneaux de configuration.
* Si vous utilisez un ordinateur de la série Performa avec modem interne,
sélectionnez le port d’imprimante à l’étape X de la procédure
mentionnée ci-dessus. Pour ce modèle particulier, même si le port de
modem est sélectionné dans la fenêtre, le QY100 Data Filer ne peut pas
transférer les données via le port de modem.
■
NOTE
•“Cache Switch” est nécessaire pour configurer le système de certains
modèles Quadra. Vous trouverez le “Cache Switch” dans le System
Disk appelé “Tidbits”. Copiez-le dans le System Folder (dossier de
système). Après l’avoir copié dans le System Folder, déroulez le menu
Apple et sélectionnez “Control Panels” (panneaux de configuration).
Spécifiez le port série de “llfx Serial Switch” sur “Compatible”. Si vous
utilisez un Quadra avec la configuration de port série différente,
spécifiez le “Cache Switch” sur “More Compatible”. Lorsque vous
utilisez ce type de modèle Quadra, et que le message “Cannot use with
this Macintosh” (Impossible d’utiliser avec ce Macintosh) apparaît sur
l’écran, les réglages mentionnés ci-dessus ne sont pas nécessaires.
18
Page 55

CONTRAT DE LICENCE DE LOGICIEL
Ceci est un contrat entre vous-même, l’utilisateur final, et Yamaha Corporation (« Yamaha »). Le
logiciel Yamaha ci-inclus est concédé sous licence par Yamaha à l’acheteur original et ne peut être
utilisé que dans les conditions prévues aux présentes. Veuillez lire attentivement ce contrat de licence.
Le fait d’ouvrir ce coffret indique que vous acceptez l’ensemble des termes du contrat. Si vous
n’acceptez pas lesdits termes, renvoyez le coffret non ouvert à Yamaha pour en obtenir le remboursement intégral.
1. CONCESSION DE LICENCE ET DROITS D’AUTEUR
Yamaha vous concède le droit d’utiliser, en tant qu’acheteur original, un exemplaire du logiciel et des
données afférentes à celui-ci (« LOGICIEL ») sur un ordinateur pour utilisateur unique. Vous n’êtes pas
autorisé à utiliser ces éléments sur plus d’un ordinateur ou terminal d’ordinateur. Le LOGICIEL est la
propriété de Yamaha. Il est protégé par les dispositions relatives au droit d’auteur contenues dans la
législation japonaise et les traités internationaux. Vous êtes en droit de revendiquer l’appartenance du
support du LOGICIEL. A ce titre, vous devez traiter le LOGICIEL comme tout autre élément protégé
par le droit d’auteur.
2. RESTRICTIONS
Le LOGICIEL est protégé par le droit d’auteur. Vous n’êtes pas autorisé à reconstituer la logique du
LOGICIEL ou à reproduire ce dernier par quelque autre moyen que ce soit. Vous n’êtes pas en droit de
reproduire, modifier, prêter, louer, revendre ou distribuer le LOGICIEL en tout ou partie, ou d’utiliser le
LOGICIEL à des fins de création dérivée. Vous n’êtes pas autorisé à transmettre le LOGICIEL à
d’autres ordinateurs ou à l’utiliser en réseau. Vous êtes en droit de céder, à titre permanent, le LOGICIEL et la documentation imprimée qui l’accompagne, sous réserve que vous n’en conserviez aucun
exemplaire et que le bénéficiaire accepte les termes du présent contrat.
3. RESILIATION
Les conditions énoncées dans le présent contrat de licence prennent effet à compter du jour où le
LOGICIEL vous est remis. Si l’une quelconque des dispositions relatives au droit d’auteur ou des
clauses du contrat ne sont pas respectées, le contrat de licence sera résilié de plein droit par Yamaha, ce
sans préavis. Dans ce cas, vous devrez immédiatement détruire le LOGICIEL concédé sous licence ainsi
que les copies réalisées.
4. GARANTIE PRODUIT
Si, dans des conditions normales d’utilisation, le LOGICIEL ne remplit pas les fonctions décrites dans
le manuel fourni, Yamaha s’engage vis-à-vis de l’acheteur original à remplacer gratuitement, sur la base
d’un échange, tout support reconnu défectueux par suite d’un défaut de matière première ou d’un vice
de fabrication. Ceci constitue le seul recours opposable à Yamaha. Hormis dans les cas expressément
énoncés plus haut, le LOGICIEL est livré « en l’état » et toute autre garantie expresse ou implicite le
concernant, y compris, de manière non limitative, toute garantie implicite de qualité marchande et
d’adéquation à un usage particulier, est exclue.
5. RESPONSABILITE LIMITEE
Votre unique recours et la seule responsabilité de Yamaha sont tels qu’énoncés précédemment. En aucun
cas Yamaha ne pourra être tenu responsable, par vous-même ou une autre personne, de quelques
dommages que ce soit, notamment et de manière non limitative, de dommages indirects, frais, pertes de
bénéfices, pertes de fonds ou d’autres dommages résultant de l’utilisation ou de l’impossibilité d’utiliser
le LOGICIEL, même si Yamaha ou un distributeur agréé ont été prévenus de l’éventualité de tels
dommages, ou de quelque autre revendication formulée par une tierce partie.
6. REMARQUE GENERALE
Le présent contrat de licence est régi par le droit japonais, à la lumière duquel il doit être interprété.
19
Page 56

This document is printed on chlorine free (ECF) paper with soy ink.
Auf Umweltpapier mit Sojatinte gedruckt.
Ce document a été imprimé sur du papier non blanchi au chlore avec de l’encre d’huile de soja.
Yamaha Web Site (English only)
http://www.yamahasynth.com
Yamaha Manual Library
http://www2.yamaha.co.jp/manual/english/
U.R.G., Pro Audio & Digital Musical Instrument Division, Yamaha Corporation
© 2000 Yamaha Corporation
V675850 311POCP2.3-03B0 Printed in Japan
 Loading...