

Page 1

YAMAHA
Owner’s Guide
Spielanleüung
Mode (Pemploi
Manual del Propietario
® YAMAHA
Page 2

Congratulations
Herzlichen
Glückwunsch
Félicitations!
¡Enhorabuena!
Thank you for purchasing a Yamaha
PortaSound PSS-120. This PortaSound
is an ultra-modern keyboard with
a design based on the latest elec
tronics technology. To be sure you
get maximum satisfaction, we suggest
you follow the steps in this manual
carefully while actually playing
the instrument.
Wir gratulieren Ihnen zu Ihrem neuen
Yamaha PortaSound PSS-120. Dieses
ultramoderne Keyboard ist nach neuesten
technologischen Erkenntnissen aufgebaut.
Um alle Möglichkeiten voll ausschöpfen
zu können, empfehlen wir, diese Anlei
tung sorgfältig durchzulesen und mög
lichst gleich alles direkt am Keyboard
auszuprobieren.
Nous tenons à vous remercier d’avoir
porté votre choix sur le Yamaha Porta
Sound PSS-120. Ce clavier PortaSound
est un instrument ultra-moderne, basé
sur les découvertes les plus récentes
dans le domaine de l’électronique.
Pour obtenir un maximum de satisfac
tions de cet appareil, nous vous invi
tons à lire attentivement ce mode
d’emploi tout en vous exerçant à jouer
de l’instrument.
Gracias por haber adquirido un Porta
Sound PSS-120 de Yamaha. Este
PortaSound es un teclado ultramoderno
con un diseño basado en lo último de
la tecnología electrónica. Para obtener
de él la máxima satisfacción, le sugerimos
que siga atentamente los pasos de este
manual mientras toca el instrumento.
Contents
1. Nomenclature ...............................2
2. Playing Back the Demonstration
Music ............................................3
3. How to Use the Orchestra and
Rhythm Sections ..........................4
4. How to Use the Melody Memory ..5
5. Making Use of the DC IN Jack
6. Optional Accessories
7. Taking Care of Your PortaSound .. 8
8.Specifications
...........................
...................
.......
7
....9
Inhalt
1. Bezeichnung der Teile
2. Wiedergabe des fest einprogram
mierten Musikstücks...........................3
3. Verwendung des Orchester- und
Rhythmus-Teils
4. Verwendung des Melodiespeichers . .5
7
5. Anschlußmöglichkeiten......................7
6. Sonderzubehör ...................................7
7. Pflege des PortaSound
8. Technische Daten
.........................
.................................
......................
..............................
Table des matières
2
1. Nomenclature ................................2
2. Reproduction de la Musique
de démonstration
3. Utilisation des Sections
4
8
9
Orchestre et Rythme
4. Utilisation de la Mémoire
musicale
5. Utilisation de la prise
auxiliaire
6. Accessoires en option
7. Entretien du PortaSound
8. Fiche technique
...
.......................................
..........................
.....................
....................................
................
...........................
.............
Indice
1. Nomenclatura
2. Reproduciendo la música de
3
4
5
7
7
3
9
demostración.......................................3
3. Cómo utilizar las secciones de
Orquesta y Ritmo
4. Cómo utilizar la memoria de
melodia
5. Utilización de los contactos
6. Accesorios opcionales
7. Cuidados de su PortaSound ...............8
8. Especificaciones..................................9
.....................................
...............................
..............................................
.......................
...............
2
4
5
7
7
Page 3
Before Playing
Vorbereitui^
Avant de jouer
Antes de comenzar
a tocar
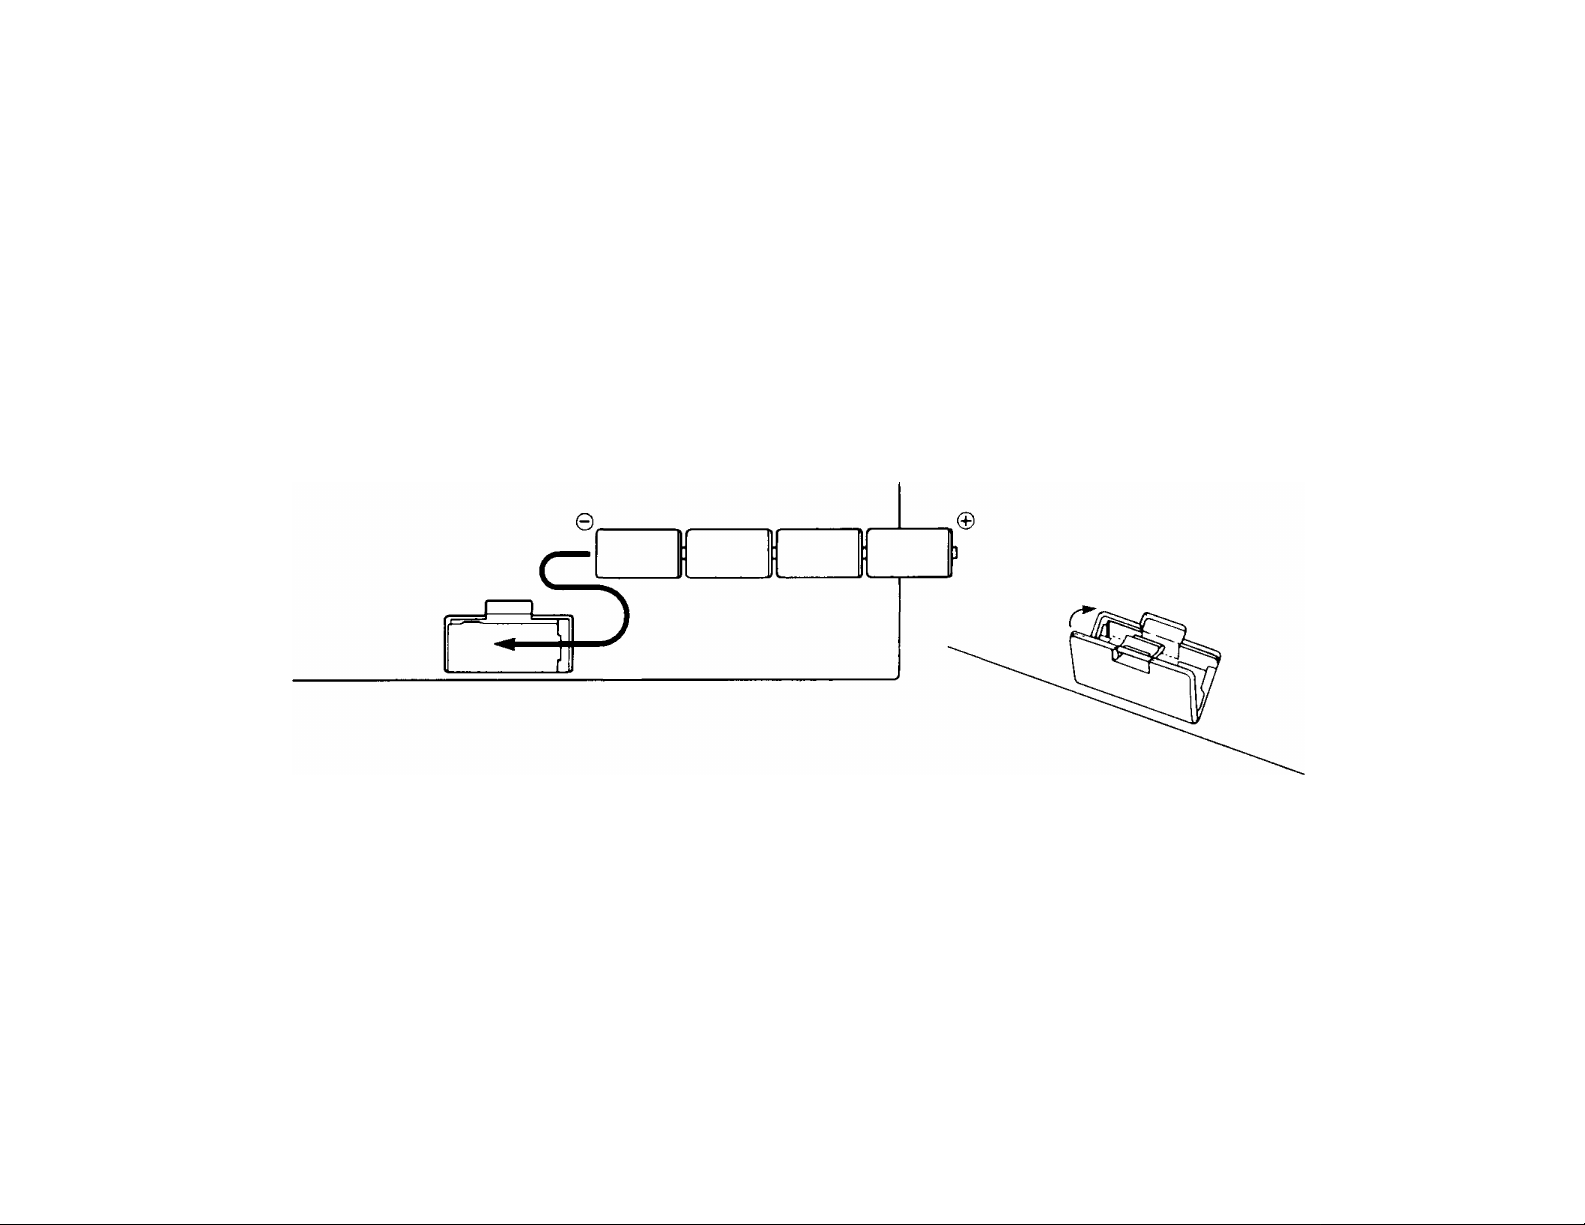
Inserting batteries
Remove the battery compartment
cover on the bottom of the instrument
and insert four 1.5V SUM-2, “C” size,
or equivalent alkaline batteries (sold
separately), making sure that the
polarities are placed as directed inside
the compartment. Replace the cover,
ensuring that it locks securely In place.
Einlegen der Batterien
Nehmen Sie den Batteriefachdeckel an
der Unterseite des Instrumentes ab und
legen Sie vier 1,5-V-AlkaIi-Babyzellen
(nicht mitgeliefert) unter Beachtung
der im Batteriefach angegebenen
Polarität ein. Danach schließen Sie den
Deckel wieder.
Mise en place des piles
Enlever le couvercle du logement des
piles, situé sur le fond de l’instrument
et installer quatre piles SUM-2 de
1,5V, de format “C”, ou des piles
alcalines équivalentes. Prendre soin
de respecter les polarités, indiquées
dans le logement. Replacer le couvercle
en s’assurant qu’il se verrouille bien
en place.
Inserción de las pilas
Extraiga la cubierta del compartimiento
de las pilas de la parte inferior del
instrumento e inserte cuatro pilas
alcalinas de 1,5V SUM-2, tamaño “C”
o equivalentes (vendidas por separado),
asegurándose de que las polaridades
se coloquen como se indica dentro del
compartimiento. Vuelva a colocar la
cubierta, asegurándose de que cierre
correctamente.
Optional power adaptors
Household current: Power adaptor
PA-1 or PA-4 is available for house
hold current. No other adaptor is
usable, so when you purchase a power
adaptor please ensure that it is
model PA-1 or PA-4.
Car Battery: Car Battery Adaptor CA-1
plugs intoacar cigarette lighter socket.
Als Sonderzubehör erhältliche Adapter
Für Netzbetrieb: Verwenden Sie stets
nur den im Handel erhältlichen Netz
adapter PA-1 oder PA-4.
Betrieb an Autobatterie: Hierzu ist der
Batterieadapter CA-1 erforderlich. Er
kann direkt an die Zigarettenanzün
derbuchse des Wagens angeschlossen
werden.
Adaptateurs d’alimentation disponibles en option
Courant secteur: Employer un adap
tateur d’alimentation secteur PA-1
ou PA-4. Comme il n’est pas possible
d’utiliser un autre type d’adaptateur,
prière de s’assurer, au moment de
l’achat, qu’il s’agit bien d’un modèle
PA-1 ou PA-4.
Batterie de voiture: La fiche de
l’adaptateur de batterie de voiture se
branche dans la douille de l’allumecigare du véhicule.
Adaptadores de potencia opcionales
Corriente doméstica: están disponibles
los Adaptadores de Potencia PA-1 o
PA-4 para corriente doméstica. No
puede utilizarse ningún otro adaptador,
de manera que cuando adquiera un
adaptador de potencia, asegúrese de que
sea del modelo PA-1 o PA-4.
Batería del automóvil: el Adaptador para
Batería del Automóvil CA-1 se conecta
a la clavija del encendedor de cigarrillos
del automóvil.
Page 4

1
Nomenclature
Bezeichnung der Teile I Nomenclature Nomenclatura
® Power Switch
® Volume Controls
RHYTHM SECTION
@ Tempo Controls
® Rhythm Selectors
® Rhythm Stop
ORCHESTRA SECTION
(6) Voice Selectors
MELODY MEMORY SECTION
@ Record/Stop
® Playback/Stop
DEMONSTRATION MUSIC SECTION
® Start/Stop
® Ein/Aus-Schalter
® Lautstärkeschalter
RHYTHMUS-TEIL
@ Temposchalter
® Rhythmus-Register
® Rhythmus-Stopp-Schalter
ORCHESTER-TEIL
(6) Orchesterstimmen-Register
MELODIESPEICHER-TEIL
@ Aufnahme/Stopp-Schalter
® Wiedergabe/Stopp-Schalter
VORFÜHRMUSIKSTÜCK-TEIL
(9) Start/Stopp-Schalter
® Interrupteur d’alimentation ® Interruptor de Conexión
® Réglages du volume
SECTION RYTHME
® Réglages du tempo
® Sélecteurs de rythme
® Arrêt du rythme
SECTION ORCHESTRE
(6) Sélecteurs de voix ® Selectores de Voces
SECTION MEMOIRE DE MELODIE
©Touche d’enregistrement/arrêt MELODIA
® Touche de lecture/arrêt @ Grabación/Parada
SECTION MUSIQUE DE ® Reproducción/Parada
DEMONSTRATION
@ Marche/arrêt
@ Controles de Volumen
SECCION DE RITMO
@ Controles del Tempo
® Selectores de Ritmo
© Parada del Ritmo
SECCION DE ORQUESTA
SECCION DE MEMORIA DE
SECCION DE MUSICA DE
DEMOSTRACION
@ Inicio/Parada
Page 5

Playing Back the
Wiedergabe des fest
Reproduction de la
Reproducción de
Demonstration Music
The PSS-120 is programmed with
a demonstration music piece, “Yankee
Doodle”. To hear this music, do the
following.
1. Switch On
Slide the POWER ON/OFF switch ®
to the “ON” position. The power-on
light will illuminate.
• If you forget to turn off the power
when you’ve finished using the key
board, a switch-off alarm warns
you after about two minutes, thus
preventing battery wastage.
2. Adjust the Volume
When the power is turned on, the
volume is set at maximum. To adjust
the level, use the VOLUME control ®,
which allows you to select four
volume levels. Press the control with
the < symbol to lower the volume. At
the lowest setting, the keyboard
sound is still audible.
einprograminierten
Musikstücks
Auf Wunsch spielt das PSS-120 jederzeit
das Stück “Yankee Doodle“ vor.
Die folgenden Schritte sind hierzu
auszuführen.
1. Einschalten
Schieben Sie den POWER ON/OFF-
Schalter ® auf ON. Die Einschalt-
Anzeige leuchtet dann auf.
• Wenn vergessen wurde, das Keyboard
nach der Verwendung auszuschalten,
ertönt nach ca. zwei Minuten ein
Warnsignal. Auf diese Weise wird
ein versehentliches Entladen der
Batterien verhindert.
OFF I
2. Die Lautstärke einstellen
Nach Einschalten ist die Lautstärke auf
Maximum eingestellt. Durch Drücken der
< -Seite des VOLUME-Schalters (2) wird
die Lautstärke verringert. Insgesamt
können vier Lautstärkepegel eingestellt
werden. Auch in der Minimaleinstellung
ist der Ton noch zu hören.
Musique de
démonstration
Un morceau de musique, intitulé
“Yankee Doodle”, est programmé dans
le PSS-120. Pour écouter ce morceau,
procéder comme suit.
1. Mise sous tension
Glisser l’interrupteur POWER ON/OFF
Ф à la position “ON”, ce qui allume
le témoin d’alimentation.
• Si, après utilisation, l’on oublie de
mettre le PortaSound hors tension,
un signal retentit après deux minutes
environ, évitant par conséquent
toute décharge inutile des piles.
2. Réglage du volume
Lorsque l’alimentation est fournie,
le volume est réglé au maximum.
Appuyer une ou deux fois-sur le
réglage VOLUME®, portant
le symbole>, afin d’ajuster le niveau
d’intensité sonore. Ce réglage per
met de choisir entre quatre niveaux
de volume. Une poussée sur le
réglage portant le symbole < permet
de réduire le volume. A la position
la plus réduite, le son du clavier
reste légèrement audible.
la Música de
Demostración
El PSS-120 está programado con una
pieza musical de demostración llamada
“Yankee Doodle“. Para escuchar esta
música, haga lo siguiente,
1. Conecte el instrumento
Deslice el interruptor de conexión
POWER ® a la posición de “ON“.
Se encenderá la luz de conexión,
• Si se olvida de desconectar el
instrumento cuando termíne de utilizar
el teclado, una alarma de desconexión
le avisa pasados unos dos minutos,
evitando así el desgaste innecesario de
las pilas.
2, Ajuste el volumen
Al conectar el instrumento, el volumen
se fija al máximo. Para ajustar el nivel,
utilice el control VOLUME que le
permite escoger cuatro niveles de
volumen. Pulse el control con el
símbolo < para disminuir el volumen.
En su posición más baja, todavía podrá
oirse el sonido del teclado.
3. Press the DEMONSTRATION START/STOP selector
“Yankee Doodle” will start to play as
soon as you press this selector
3. Die Wiedergabe des Musikstücks starten
Drücken Sie den DEMONSTRATION
START/STOP-Schalter ®. Das
Vorführstück “Yankee Doodle“ beginnt
nun.
3. Appuyer sur le sélecteur DEMONSTRATION START/STOP
La reproduction de la musique
“Yankee Doodle” commence dès que
ce sélecteur ® a été actionné.
3. Pulse el selector de DEMONSTRATION START/STOP
Comenzará a sonar “Yankee Doodle“
tan pronto como pulse este selector ®.
Page 6

DEMONSTRATION
START/
STOP
• The music witi be played automati
cally and repeatedly.
• To stop the music, press the
START/STOP selector again.
• You can change the programmed
rhythm and tempo—but not the
voice—as you like. However, you
shouldn’t switch from a 4-beat to
a 3-beat rhythm, or vice versa,
since the beats do not match.
• You can enjoy playing along with
a different voice while the Demon
stration Music is being played.
How to Use the
Orchestra and
Rhythm Sections
W Orchestra Section
Select an instrument voice
You can choose any of eight voices
using the feather-touch voice selectors
(6) in the ORCHESTRA section. Adjust
the volume using the VOLUME control
• Das Musikstück wird fortlaufend
automatisch wiederholt.
• Zum Abschalten des Musikstücks
drücken Sie den START/STOPSchalter erneut.
• Rhythmus und Tempo des Vor
führstücks — nicht jedoch die
Stimme — können beliebig geändert
werden. Es sollte aber nicht von Vierauf Drei-Takt-Rhythmus umgeschaltet
werden (oder umgekehrt), da diese
Rhythmen nicht harmonieren.
• Wenn Sie wollen, können Sie auch
bei der Wiedergabe des Musikstücks
mit einer anderen Stimme mitspielen.
Verwendung des
Orchester- und
Rhythmus-Teils
A) Orchester-Teil
Wahl der Orchesterstimme
Durch Antippen eines ORCHESTRASchalters (6) im Orchester-Teil kann eine
von insgesamt 8 Stimmen ausgewählt
werden. Die Lautstärkeeinstellung
erfolgt am VOLUME-Schalter (2).
ORCHESTRA
• La musique est reproduite de façon
automatique et répétée.
• Pour arrêter la reproduction, ap
puyer une nouvelle fois sur le
sélecteur START/STOP.
• Il est possible de changer à volonté
le rythme et le tempo, mais pas
la voix proprement dite. Toutefois,
on évitera de passer d’un rythme
4 temps à un 3 temps ou vice
versa car la mesure ne correspondra
plus à la musique.
• Il est possible de jouer avec une
autre voix en même temps que la
Musique de démonstration est en
cours de reproduction.
f........................................................................
Utilisation des
sections Orchestre et
Rythme
(A) Section Orchestre
Choisir une voix instrumentale
Il est possible de choisir une des
huit voix à l’aide des sélecteurs de
voix (6) à effleurement de la section
ORCHESTRA. Ajuster l’intensité
sonore à l’aide du réglage VOLUME®.
• La música se tocará automática
y repetidamente,
• Para detener la música, pulse de
nuevo el selector START/STOP.
• Ud, puede cambiar como lo desee,
el tempo y el ritmo pero no la
voz programada. Sin embargo, no
deberá cambiar de un ritmo de
4 tiempos a uno de 3 tiempos,
o viceversa, ya que los tiempos no
concuerdan.
• Puede disfrutar tocando a la vez
con una voz diferente mientras se
reproduce la Música de Demostración.
Cómo utilizar las
secciones de Orquesta
y Ritmo
A) Sección de Orquesta
Seleccione una voz instrumental
Ud. puede escoger cualquiera de las ocho
voces utilizando los selectores de voces
® de la sección de Orquesta.
Ajuste el volumen utilizando el control
VOLUME
• Up to two notes can be played at
the same time.
• Vibrato is built-in for the Violin and
Electric Guitar voices.
• Bis zu zwei Töne können polyphon
gespielt werden.
• Für Violine und Elektrogitarre ist ein
verzögertes Vibrato eingebaut.
• II est possible de jouer deux notes
simultanément.
• La fonction de Vibrato retardé est
incorporée pour les voix Guitare
électrique et Violon.
• Pueden tocarse hasta dos notas al
mismo tiempo.
• El vibrato retardado está incorporado
en las voces de Violin y Guitarra
Eléctrica.
Page 7

(B) Rhythm Section
1. Choose a rhythm
Pick the rhythm that best suits the
music you’re going to play by pressing
the appropriate RHYTHM selector®.
B) Rhythmus-Teil
1. Wahl des Rhythmus
Wählen Sie an den RHYTHM-Schaltern
® einen zu Ihrer Musik passenden
Rhythmus.
(B) Section Rythme
1. Choisir un rythme
Sélectionner le rythme qui convient le
mieux à la musique à jouer en appuyant
sur le sélecteur RHYTHM ® approprié.
RHYTHM
B) Sección de Ritmo
1. Escoja un ritmo
Seleccione el ritmo más apropiado a la
música que va a tocar y pulse el selector
RHYTHM ® adecuado.
2. Start the rhythm
Press any key and the rhythm will
start automatically.
3. Tempo adjustment
Use the TEMPO controls (|) to adjust
the speed of the rhythm. can
increase the tempo in 8 steps
( J = 230) with the control, and
reduce it in 7 steps {J = 40) with
the control.
When you press both controls together
the tempo will return to the preset
setting (J = 110 ).
4. Stopping the rhythm
• Press the STOP selector ® to stop
the rhythm.
How to Use the Melody Memory
2. Starten des Rhythmus
Der Rhythmus setzt automatisch ein,
sobald eine beliebige Taste angeschlagen
wird.
3. Einstellen des Tempos
Die Rhythmus-Geschwindigkeit kann mit
dem TEMPO-Schalter @ eingestellt
werden. Durch Drücken der -Seite
wird das Tempo in acht Stufen (J = 230)
erhöht und durch Drücken der
in sieben Stufen (J = 40) verringert.
Durch gleichzeitiges Drücken beider
Schalter wird das Tempo auf den
Normalwert zurückgestellt (J = 110).
4. Stoppen des Rhythmus
• Zum Stoppen des Rhythmus drücken
Sie den STOP-Schalter ®.
Verwendung des
Melodiespeichers
2. Lancer le rythme
Appuyer sur une des touches du
clavier et le rythme commencera
automatiquement.
3. Ajuster le tempo
Se servir des réglages TEMPO @
pour ajuster la vitesse du rythme. Il
est possible d’ajuster le tempo de
8 paliers vers le haut ( J = 230) à l’aide
du réglage et de 7 paliers vers
le bas ( J = 40) à l’aide du réglage s^ow
Une poussée simultanée sur les deux
réglages ramène le tempo à la valeur
préréglée (J = 110).
4. Arrêter le rythme
• Appuyer sur le sélecteur STOP ®
pour arrêter le rythme.
4
Utilisation de la Mémoire musicale
2. Inicie el ritmo
Pulse cualquier tecla y el ritmo comenzará
automáticamente.
3. Ajuste del Tempo
Utilice los controles de TEMPO @ para
ajustar la velocidad del ritmo. Puede
ajustar el tempo en 8 etapas hacia arriba
(J = 230) con el control y en 7 etapas
hacia abajo ( J = 40) con el control
Cuando pulse ambos selectores a la
vez, el tempo volverá a la posición
preseleccionada (J = 110).
4. Detención del ritmo
• Pulse el selector STOP ® para detener
el ritmo.
Cómo utilizar la
Memoria de Melodía
You’ll get a lot of fun out of your
PortaSound with the Melody Memory
feature, which functions like a mini
recording studio.
Mit dem Melodiespeicher des PortaSound haben Sie ein richtiges kleines
Aufnahmestudio zur Hand, das faszi
nierende neue Möglichkeiten eröffnet.
Vous éprouverez beaucoup de satis
factions de votre PortaSound en
faisant appel à sa fonction de Mémoi re
musicale qui agit comme un studio
d’enregistrement en miniature.
Su PortaSound le resultará mucho más
divertido si utiliza su función de
Memoria de Melodía, que funciona
como un mini-estudio de grabación.
Page 8

1. Recording your melody
To record a melody, first press the
RECORD/STOP selector @ in the
MELODY MEMORY section. Adjust
the tempo as you wish, then play
the music. When you’ve finished,
press the RECORD/STOP selector
again.
1. Aufnahme Ihrer Melodie
Zum Aufnehmen der Melodie drücken
Sie zuerst den RECORD/STOP-Schalter
@ im MELODY MEMORY-Teil, stellen
Sie dann das Tempo wunschgemäß ein,
und beginnen Sie schließlich zu spielen.
Am Ende drücken Sie den RECORD/
STOP-Schalter erneut.
MELODY MEMORY
1. Enregistrement de sa propre
mélodie
Pour enregister une mélodie person
nelle, appuyer tout d’abord sur le
sélecteur RECORD/STOP @ de la
section MELODY MEMORY. Ajuster
ensuite le tempo selon ses préférences
et jouer la musique. Quand on a terminé
l’interprétation, appuyer à nouveau
sur le sélecteur RECORD/STOP.
1. Grabando su melodía
Para grabar una melodía, pulse
primeramente el selector RECORD/
STOP @ de la sección MELODY
MEMORY.
Ajuste el tempo como desee y luego toque
la música. Cuando haya terminado, pulse
de nuevo el selector RECORD/STOP.
2. Playback of your recording
Press the MELODY MEMORY section’s
PLAYBACK/STOP selector®, and the
melody will automatically be played
back. To stop playback at any time,
press the PLAYBACK/STOP selector
once more.
• You can not change to any other
instrument voice during playback.
• Up to 110 notes can be memorized
at one time.
• In playback mode, try playing
a counter-melody along with your
recorded music using any voice
you like—you’ll get an interesting
effect.
• The Melody Memory is cancelled
when the power is turned off.
• When you press the RECORD/STOP
selector, any recorded music will
remain stored in the memory until
you play one of the keys, at which
time it will be erased.
• Your PortaSound’s digital tech
nology enables the keyboard to
respond to two “commands”
2. Wiedergabe der Aufzeichnung
Zur Wiedergabe der Melodie drücken
Sie den PLAYBACK/STOP-Schalter
® im MELODY MEMORY-Teil. Durch
erneutes Drücken dieses Schalters kann
die Wiedergabe jederzeit abgebrochen
werden.
MELODY MEMORY
• Während der Wiedergabe kann nicht
auf eine andere Instrumentenstimme
umgeschaltet werden.
• Max. 110 Töne können gespeichert
werden.
• Einen faszinierenden Effekt erhält
man, wenn man bei der Wiedergabe
der eigenen Darbietung gleichzeitig
mit einer anderen Stimme eine
Gegenmelodie spielt.
• Beim Ausschalten des Keyboards wird
der Melodiespeicher gelöscht.
• Nach dem Drücken des RECORD/
STOP-Schalters ist die vorhergehende
Aufzeichnung zunächst noch im
Speicher vorhanden. Sobald man
jedoch die erste Taste anschlägt, wird
der Speicherinhalt gelöscht.
• Die elektronischen Digital-Schaltkreise
2. Reproduction de son
enregistrement
Appuyer sur le sélecteur PLAYBACK/
STOP ® de la section MELODY
MEMORY et la mélodie enregistrée
sera automatiquement reproduite.
Pour arrêter cette lecture, appuyer
à nouveau sur le sélecteur PLAYBACK/
STOP au moment voulu.
• Pendant la reproduction, il n’est
pas possible de passer à une autre
voix instrumentale.
• Il est possible de mémoriser jusqu’à
110 notes en une fois.
• En mode de reproduction, essayer
de jouer en mesure avec la mélodie
enregistrée en utilisant une autre
voix instrumentale de son choix.
L’effet obtenu sera saisissant!
• La mise hors tension de l’instru
ment a pour effet d’annuler le
contenu de la Mémoire musicale.
• Quand on appuie sur le sélecteur
RECORD/STOP, toute musique
enregistrée reste en mémoire
jusqu’à ce qu’une des touches soit
jouée; à ce moment précis, la
musique sera effacée.
2. Reproducción de su grabación
Pulse el selector PLAYBACK/STOP®
de la sección de MELODY MEMORY
y la melodia se reproducirá automática
mente. Para detener la reproducción
en cualquier momento, pulse una vez
más el selector PLAYBACK/STOP.
• Durante la reproducción, no
podrá cambiar a ninguna otra voz
instrumental.
• Pueden memorizarse hasta 110 Notas
cada vez,
• En la modalidad de reproducción,
pruebe a tocar una contramelodia
junto con la música grabada usando
cualquier voz que desee—obtendrá un
efecto muy interesante.
• La Memoria de Melodía se cancela
cuando se desconecta el instrumento.
• Cuando pulse el selector RECORD/
STOP, cualquier música grabada
permanecerá almacenada en la'
memoria hasta que toque una de las
teclas, momento en el cual quedará
borrada.
• La tecnología digital de su PortaSound
Page 9

simultaneously. This means, for
example, that you cannot change
to a different voice while you’re
pressing two of the keys, or you
can’t play a note while pressing
two function selectors.
des PortaSound können nur jeweils
zwei “Befehle” gleichzeitig aufneh
men. Beispielsweise ist es nicht
möglich, auf eine andere Stimme
umzuschalten, während zwei Tasten
gleichzeitig angeschlagen werden.
Aus dem gleichen Grund ist es auch
nicht möglich auf dem PortaSound
zu spielen, während zwei Funktions
schalter gedrückt werden.
• La technologie numérique du
PortaSound permet au clavier de
répondre simultanément à deux
“commandes”; c’est-à-dire que, par
exemple, il n’est pas possible de
changer à une différente voix tout en
appuyant sur deux des touches, ou
de jouer une note tout en appuyant
sur deux sélecteurs de fonction.
permite al teclado responder simul
táneamente a dos “órdenes”. Esto
significa, por ejemplo, que Ud. no
puede cambiar a una voz diferente
mientras pulsa dos teclas, o no puede
tocar una nota mientras pulsa dos
selectores de función.
Making Use of the DC
IN Jack
You’ll find a jack on the left side of
the instrument. This jack is for con
necting an external power source.
DC 9—12V IN JACK
• AC power
Connect the optional AC Power
Adaptor PA-1 or PA-4 to the
DC 9—12V IN jack.
• Car battery
The Car Battery Adaptor CA-1 plugs
into the DC 9—12V IN jack and
a car cigarette lighter socket.
Optional Accessories
• AC Power Adaptor (PA-1/PA-4)
Transforms AC voltage to DC
voltage.
• Car Battery Adaptor (CA-1)
Enables you to provide power to the
instrument from a car battery using
the cigarette lighter socket.
• Soft Carrying Case (SCC-13)
For convenient transportation.
AllscЫllßmöglìchkeìten
An der linken Seite des Keyboards
befindet sich eine Anschlußbuchse für
externe Stromversorgung.
DC 9—12V IN-Buchse
• Netzbetrieb
Der Netzadapter PA-1 oder PA-4 kann
angeschlossen werden.
• Autobatterieadapter
Über den Autobatterieadapter CA-1
kann das Keyboard an die Zigaret
tenanzünderbuchse eines Wagens
angeschlossen werden.
Sonderzubehör
• Netzadapter (PA-l/PA-4)
Zum Betrieb am Netz.
• Autobatterieadapter (CA-1)
Zur Stromversorgung von einer
Autobatterie. Mit dem Adapter
kann das Keyboard direkt an die
Zigarettenanzünderbuchse des
Wagens angeschlossen werden.
• Weiche Tragetasche (SCC-13)
Zum bequemen Tragen des Keyboards.
Utilisation de la prise auxiliaire
Sur le flanc gauche de l’instrument,
on remarquera une prise, destinée au
branchement d’une source de courant
extérieure.
Prise d’entrée de courant continu DC 9—12V
• Alimentation secteur
Brancher l’adaptateur d’alimenta
tion secteur PA-1 ou PA-4 sur la
prise DC IN 9—12V.
• Batterie de voiture
Brancher les fiches de l’adaptateur
de batterie de voiture CA-1 dans la
prise DC IN 9—12V et dans la douille
de l’allume-cigare du véhicule.
£
Accessoires en option
• Adaptateur d’alimentation secteur
(PA-l/PA-4)
Il transforme le courant alternatif
en courant continu.
• Adaptateur de batterie de voiture
(CA-1)
Il permet d’alimenter l’instrument
sur la batterie d’un véhicule auto
mobile, via la douille de l’allumecigare.
• Etui de transport souple (SCC-13)
Pratique pour le transport de
l’instrument.
Utilización del contacto
deCCIN
Ud. encontrará un contacto en el lateral
izquierdo del instrumento. Este contacto
es para conectar una fuente de alimen
tación opcional.
CONTACTO CC 9—12V IN
• Potencia CA
Conecte el Adaptador de Potencia
CA PA-1 o PA-4 al contacto CC
9—12V IN.
• Batería del automóvil
El Adaptador para Batería del
Automóvil CA-i se conecta al contacto
CC 9—12 V In y a la clavija del encende
dor de cigarrillos.
Accesorios Opcionales
• Adaptador de Potencia CA
(PA-l/PA-4)
Transforma la tensión CA en tension
CC.
• Adaptador para Batería del Automóvil
(CA-1)
Le permite suministrar potencia al
instrumento desde la batería del
automóvil, utilizando la clavija del
encendedor de cigarrillos.
• Estuche blando de transporte (SCC-3)
Para mayor conveniencia de transporte.
• El libro “PortaSound Playtime” para
Page 10

7
Taking Care of Your
PortaSound
Your PortaSound will remain in excel
lent playing condition if care is taken
concerning the following.
1) When you use AC power or a car
battery, be sure to use the optional
PortaSound adaptors. Before use,
read the adaptor instructions
carefully.
2) The optional car battery adaptor is
only for use with a negative ground
12V battery. Ensure that this is the
case before connecting the adaptor.
3) Avoid placing the instrument in
excessively humid areas.
4) Do not subject the unit to physical
shock, and avoid placing anything
heavy on it.
5) The PortaSound should not be
placed in direct sunlight for a long
time.
6) Do not place the instrument near
any heating appliance, or leave it
inside a car in direct sunlight for
any length of time. Direct sunshine
can raise the interior temperature
of a car with closed doors and
windows to as high as80°C(176°F).
Temperatures in excess of 60° C
(140°f^ can cause physical and/or
electrical damage not covered by
warranty.
7) Use a dry or damp cloth for
cleaning.
Pflege des PortaSound
Für lange, uneingeschränkte Freude an
Ihrem PortaSound beachten Sie die
folgenden Punkte:
1) Verwenden Sie für Netz- und Auto
batteriebetrieb ausschließlich die als
Sonderzubehör lieferbaren PortaSound-Adapter und lesen Sie vor der
Verwendung die Bedienungsanleitung
durch.
2) Der als Sonderzubehör erhältliche
Autobatterieadapter ist nur für eine
negativ geerdete 12-V-Autobatterie
geeignet. Vergewissern Sie sich, daß
dies bei Ihrem Wagen der Fall ist,
3) Halten Sie das Instrument von extrem
feuchten Plätzen fern.
4) Schützen Sie das Instrument vor
Stößen und stellen Sie keine schweren
Gegenstände darauf.
5) Setzen Sie das PortaSound nicht
längere Zeit direktem Sonnenlicht aus.
6) Halten Sie das PortaSound von
Heizungen fern und lassen Sie es
nicht in einem Auto, das direkt in
der Sonne geparkt ist. In einem mit
geschlossenen Türen und Fenstern in
der prallen Sonne geparkten Wagen
kann die Temperatur bis auf 80°C
ansteigen. Temperaturen über 60°C
können mechanische und/oder elek
trische Schäden verursachen, die
nicht durch die Garantie abgedeckt
werden.
7) Zur Reinigung verwenden Sie ein
trockenes oder angefeuchtetes Tuch.
Entretien du PortaSound
Le PortaSound restera en parfait
état à condition de tenir compte des
précautions suivantes.
1) En cas d’alimentation sur secteur
ou sur batterie de voiture, veiller
à utiliser les adaptateurs en option,
prescrits pour le PortaSound. De
plus, lire attentivement leur mode
d’emploi respectif.
2) L’adaptateur de batterie de voiture,
disponible en option, doit être
utilisé uniquement sur une batterie
de 12 Volts. Confirmer ce point
avant de brancher l’adaptateur.
3) Eviter de placer et d’utiliser l’instru
ment dans un endroit très humide.
4) Ne pas soumettre l’instrument à
des chocs et ne rien y déposer
de pesant.
5) Ne pas laisser le PortaSound
pendant longtemps en plein soleil.
6) Ne pas placer l’instrument à
proximité d’appareil de chauffage,
ni le laisser dans un véhicule,
exposé pendant longtemps en plein
soleil, où la température de l’habita
cle peut atteindre 80°C (176°F) si
les portes et les fentetres sont
fermées. Toute température,
dépassant 60°C (140° F) peut
entraîner des dégâts physiques et/
ou électriques, non couverts par
la garantie.
7) Se servir d’un linge sec ou humide
pour le nettoyage des parties
externes.
Cuidados de su
PortaSound
Su PortaSound permanecerá en excelente
condición si se toman las siguientes
precauciones.
1) Cuando utilice potencia CA o batería
de automóvil, asegúrese de utilizar
los adaptadores opcionales Porta
Sound. Antes de utilizarlos, lea
cuidadosamente las instrucciones.
2) El adaptador opcional para batería del
automóvil es para utilizarse única
mente con batería de tierra negativa
de 12V. Asegúrese de que este sea
el caso antes de conectar el adaptador.
3) Evite dejar el instrumento en áreas
excesivamente húmedas.
4) Evite los impactos físicos a la unidad
y no coloque nada pesado sobre ella.
5) El PortaSound no deberá dejarse
durante largo tiempo bajo la acción
directa de la luz solar,
6) No coloque el instrumento cerca de
fuentes de calor ni lo deje dentro de
un automóvil al sol. La luz solar
directa puede elevar la temperatura
interior de un automóvil con las
puertas y ventanas cerradas hasta
80°C (176°F). Las temperaturas
superiores a 60°C (140°F) pueden
causar daños físicos y/o eléctricos
que no quedarán cubiertos por la
garantía.
7) Utilice un paño seco o humedecido
con agua para limpiarlo.
Page 11

fl
Specifications
Keyboard
32 keys (F2—C5)
Orchestra Voices
Clarinet, Oboe, Violin, Xylophone,
Piano, Banjo, Harpsichord, Electric
Guitar
Rhythm Section
Pops, Disco, 16 Beat, Latin, Swing,
Slow Rock, March/Polka, Waltz
Controls: Tempo (Slow, Fast), Stop
Other Controls And Indicators
Power Switch, Power-on Light,
Master Volume, Demonstration
Start/Stop
Melody Memory
Record/Stop, Playback/Stop
Auxiliary Jacks
DC 9-12V In
Main Amplifier
0.8W (RMS)
Speaker
8 cm (3-1/8"), 6 ohms
Rated Voltage
DC 6V (Four SUM-2, “C” size, R-14
or equivalent batteries), AC Power
Adaptor (PA-1/PA-4) or Car Battery
Adaptor (CA-1)
Dimensions
507mm (W)x183mm (D)x49mm (H)
(20" X 7-1/4" X1-7/8")
Weight
1.2kg (2 .6 lbs.) excluding batteries
Specifications subject to change without notice.
Technische Daten
Tastatur
32 Tasten (F2—C5)
Orchester-Teil
Klarinette, Oboe, Violine, Xylophon,
Piano, Banjo, Cembalo, Elektrogitarre
Rhythmus-Teil
Pop, Disco, 16 Beat, Lateinameri
kanische Rhythmen, Swing, Langsa
mer Rock, Marsch/Polka, Walzer
Bedienungselemente: Tempo (SLOW/
FAST), Stopp
Weitere Bedienungselement und
Anzeigen
Ein/Aus-Schalter, Einschalt-Anzeige,
Lautstärke, Start/Stopp für Vorführ
musikstück
Melodiespeicher
Aufnahme/Stopp, Wiedergabe/Stopp
Anschlußmöglichkeiten
9—12 V Gleichspannungseingang
(DC 9—12V IN)
Verstärker
0,8 W (RMS)
Lautsprecher
8 cm, 6 Ohm
Betriebsspannung
6 V Gleichspannung (6 Babyzellen),
Netzadapter (PA-l/PA-4) oder
Autpbatterieadapter (CA-1)
Abmessungen
507 mm(B)xl83 mm(T)x49 mm (H)
Gewicht
1,2 kg einschl, Batterien
Änderungen bleiben Vorbehalten.
Fiche technique
Clavier
32 touches (F2—C5)
Voix orchestrales
Clarinette, Hautbois, Violon,
Xylophone, Piano, Banjo, Clavecin,
Guitare électrique
Section Rythme
Pops,Disco,16 mesures. Latin,Swing,
Rock Lent, Marche/Polka, Valse
Réglages:Tempo (SLOW,FAST), Arrêt
Autres réglages et témoins
Interrupteur d’alimentation. Témoin
d’alimentation, Volume principal.
Mise en marche/Arrêt de la
Démonstration
Mémoire musicale
Enregistrement/Arrêt, Reproduction/Arrêt
Prise auxiliaire
Prise d’entrée de courant continu
DC IN 9—12V
Amplificateur principal
0,8W (RMS)
Haut-parleur
8 cm, 6 ohms
Tension nominale
Courant continu de 6 Volts (quatre
piles SUM-2, de taille “C”, R-14
ou équivalentes). Adaptateur
secteur (PA-l/PA-4) ou adaptateur
de batterie de voiture (CA-1)
Dimensions
507mm (L)x 183mm (P)x49mm (H)
Poids
1,2kg sans les piles
Spécifications sujettes à changements sans préavis.
Especificaciones
Teclado
32 teclas (F2—C5)
Voces de Orquesta
Clarinete, Oboe, Violin, Xilofón,
Piano, Banjo, Clavicordio, Guitarra
Eléctrica
Sección de Ritmo
Pops, Disco, 16 Beat, Latino, Swing,
Rock Lento, Marcha/Polka, Vals
Controles: Tempo (SLOW, FAST),
Parada
Otros controles e indicadores
Interruptor de Conexión, Luz de
Conexión, Volumen Principal,
Inicio/Parada de Demostración
Memoria de Melodía
Grabación/Parada, Reproducción/
Parada
Contactos auxiliares
CC 9—12V In
Amplificador principal
0,8W (RMS)
Altavoz
8 cm, 6 ohmios
Tensión nominal
CC 6V (cuatro pilas SUM-2, tamaño
“C”, R-14 o equivalentes). Adaptador
de Potencia CA (PA-l/PA-4)
o Adaptador para Batería del
Automóvil (CA-1)
Dimensiones
507mm (An) x 183mm (Fondo) x
49mm (Al)
Peso
l,2kg excluyendo las pilas
Especificaciones sujetas a cambio sin previo aviso
Attention users in the U.S.A.
PortaSound PSS*i20 is prepared in accordance
with FCC rules.
The PortaSound PSS-120 uses frequencies that appear in the
radio frequency range, and if installed in the immediate
proximity (within three meters) of some types of audio or
video devices interference may occur.
The PortaSound PSS-120 has been type tested and found
to comply with the specifications set for a Class B
computing device in accordance with those specifications
listed in Subpart J of Part 15 of the FCC rules. These rules
are designed to provide a reasonable measure of protection
against such interference. However, this does not guarantee
that interference wUt not occur. If-your PortaSound PSS-120
should be suspected of causing Interference with other
electronic devices, verification can be made by turning your
PortaSound PSS-120 off and on. If the interference continues
when your PortaSound PSS-120 is off, PortaSound PSS-120
is not the source of the interference, if your PortaSound
PSS-120 does appear to be the source of the interference, you
should try to correct the situation by using one or more of
the following measures:
Relocate either the PortaSound PSS-120 or the electronic
device that is being affected by the /Pfer/erence.
Utilize power outlets for the PortaSound PSS-120 and the
device being affected that are on different branch (circuit
breaker or fuse) circuits, or install A/C line filters.
In the case of radio-TV interference, relocate the antenna
or, if the antenna lead-in is a 300 ohm ribbon lead, change
the lead-in to a co-axial type cable.
If these corrective measures do not produce satisfactory
results, please contact your Authorized Yamaha Specialty
Products dealer for suggestions and/or corrective measures,
if you cannot locate an Authorized Yamaha Specialty
Products dealer in your general area, contact the
Specialty Products Service Center, Yamaha International,
6600 Orangethorpe Ave, Buena Park, CA 90620.
If for any reason you should need additional information
relating to radio or TV interference, you may find a booklet
prepared by the Federal Communications Commission
helpful: "Flow to Identify and Resolve Radio-TV Interference
Problems". This booklet is available from the U.S.
Government Printing Office, Washington D.C. 20402—Stock
#044-000-345-4.
Page 12

“ ” ^ YAMAHA
NIPPON GAKKI CO., LTD. HAMAMATSU, JAPAN
The serial number of this product may be
found on the bottom of the unit. You
should note this serial number in the space
provided below and retain this manual
as a permanent record of your purchase to
aid identification in the event of theft.
Model No. PSS-120
Serial No.
Concerning Warranty
This product was made for international
distribution, and since the warranty for this
type of product varies from marketing
area to marketing area, please contact the
selling agency for information concerning
the applicable warranty and/or service
policies.
Die Seriennummer befindet sich an der
Unterseite des Instrumentes. Wir empfehlen,
diese Nummer sicherheitshalber an der unten
vorgesehenen Stelle einzutragen, um sie auch
im Falle eines Diebstahls jederzeit zur Hand
zu haben.
Modell-Nr. PSS-120
Serien-Nr. de serie
Hinweis zur Garantie
Dieses Produkt wird international vertrieben,
und die Garantiebedingungen sind von
Vertriebsland zu Vertriebsland verschieden.
Ihr Händler gibt Ihnen gerne genauere
Informationen zu den in Ihrem Land gültigen
Garantie- und/oder Servicebedingungen.
Le numéro de série de ce produit figure
au bas du bloc. Il conviendra de noter ce
numéro de série dans l’espace réservé
au-dessous et de consen/er ce manuel:
celui-ci constitue le document permanent
de votre achat et permet l’identification en
cas de vol.
Modèle No. PSS-120
No. desérie:
Remarque relative à la garantie
Ce modèle est destiné à être distribué à
l’échelle internationale. Etant donné que
les conditions de garantie pour ce type de
produit varient en fonction des zones
de commercialisation, prière de prendre
contact avec l’agence chargée des ventes
pour tous renseignements relatifs aux
conditions de garantie et de service
après-vente.
E1 número de serie de este producto se
encuentra en la parte inferior de la unidad.
Sirvase anotar este número de serie en el
espacio proporcionado debajo y guarde este
manual como comprobante de compra, para
ayudar a la identificación en caso de robo.
№ de modelo PSS-120
Concerniente a la garantía
Este producto ha sido fabricado para ser
distribuido internacionalmente y, como la
garantía para este tipo de producto varia en
relación a su área de comercialización, sirvase
consultar con el agente de ventas sobre la
información en torno a la garantía aplicable
y/o políticas de servicio.
2 (P ÏÏÎ 603 Printed in Japan
 Loading...