

Page 1

D I G I T A L P I A N O
P
Owner’s Manual
-
4 5
Before using the instrument, be sure to read “PRECAUTIONS” on pages 5 – 6.
EN
Page 2

P-45 Owner’s Manual
2
Page 3

OBSERVERA!
Apparaten kopplas inte ur växelströmskällan (nätet) så länge
som den ar ansluten till vägguttaget, även om själva apparaten
har stängts av.
ADVARSEL:
afbrudt, sålænge netledningen sidder i en stikkontakt, som er
tændt — også selvom der er slukket på apparatets afbryder.
VAROITUS:
koko laitetta verkosta.
Netspændingen til dette apparat er IKKE
Laitteen toisiopiiriin kytketty käyttökytkin ei irroita
(standby)
P-45 Owner’s Manual
3
Page 4
Information for Users on Collection and Disposal of Old Equipment
This symbol on the products, packaging, and/or accompanying documents means that used electrical and electronic
products should not be mixed with general household waste.
For proper treatment, recovery and recycling of old products, please take them to applicable collection points, in
accordance with your national legislation and the Directives 2002/96/EC.
By disposing of these products correctly, you will help to save valuable resources and prevent any potential negative
effects on human health and the environment which could otherwise arise from inappropriate waste handling.
For more information about collection and recycling of old products, please contact your local municipality, your waste
disposal service or the point of sale where you purchased the items.
[For business users in the European Union]
If you wish to discard electrical and electronic equipment, please contact your dealer or supplier for further information.
[Information on Disposal in other Countries outside the European Union]
This symbol is only valid in the European Union. If you wish to discard these items, please contact your local authorities
or dealer and ask for the correct method of disposal.
The model number, serial number, power requirements, etc., may be found on or near the name plate,
which is at the bottom of the unit. You should note this
serial number in the space provided below and retain
this manual as a permanent record of your purchase
to aid identification in the event of theft.
Model No.
Serial No.
(bottom_en_01)
(weee_eu_en_01)
P-45 Owner’s Manual
4
Page 5
PRECAUTIONS
Power supply/AC adaptor
Do not open
Water warning
Fire warning
If you notice any abnormality
PLEASE READ CAREFULLY BEFORE PROCEEDING
Please keep this manual in a safe and handy place for future reference.
For AC adaptor
WARNING
• This AC adaptor is designed for use with only Yamaha electronic instruments. Do
not use for any other purpose.
• Indoor use only. Do not use in any wet environments.
CAUTION
• When setting up, make sure that the AC outlet is easily accessible. If some
trouble or malfunction occurs, immediately turn off the power switch of the
instrument and disconnect the AC adaptor from the outlet. When the AC adaptor
is connected to the AC outlet, keep in mind that electricity is flowing at the
minimum level, even if the power switch is turned off. When you are not using
the instrument for a long time, make sure to unplug the power cord from the wall
AC outlet.
For P-45
WARNING
Always follow the basic precautions listed below to avoid the possibility of serious injury or even death from electrical
shock, short-circuiting, damages, fire or other hazards. These precautions include, but are not limited to, the
following:
• Do not place the power cord near heat sources such as heaters or radiators. Also,
do not excessively bend or otherwise damage the cord, or place heavy objects on
it.
• Only use the voltage specified as correct for the instrument. The required voltage
is printed on the name plate of the instrument.
• Use the specified adaptor (page 20) only. Using the wrong adaptor can result in
damage to the instrument or overheating.
• Check the electric plug periodically and remove any dirt or dust which may have
accumulated on it.
• This instrument contains no user-serviceable parts. Do not open the instrument
or attempt to disassemble or modify the internal components in any way. If it
should appear to be malfunctioning, discontinue use immediately and have it
inspected by qualified Yamaha service personnel.
• Do not put burning items, such as candles, on the unit. A burning item may fall
over and cause a fire.
• When one of the following problems occur, immediately turn off the power switch
and disconnect the electric plug from the outlet. Then have the device inspected
by Yamaha service personnel.
- The power cord or plug becomes frayed or damaged.
- It emits unusual smells or smoke.
- Some object has been dropped into the instrument.
- There is a sudden loss of sound during use of the instrument.
• Do not expose the instrument to rain, use it near water or in damp or wet
conditions, or place on it any containers (such as vases, bottles or glasses)
containing liquids which might spill into any openings. If any liquid such as
water seeps into the instrument, turn off the power immediately and unplug the
power cord from the AC outlet. Then have the instrument inspected by qualified
Yamaha service personnel.
• Never insert or remove an electric plug with wet hands.
DMI-5 1/2
P-45 Owner’s Manual
5
Page 6
CAUTION
Power supply/AC adaptor
Location
Connections
Handling caution
Always follow the basic precautions listed below to avoid the possibility of physical injury to you or others, or damage
to the instrument or other property. These precautions include, but are not limited to, the following:
• Do not connect the instrument to an electrical outlet using a multiple-connector.
Doing so can result in lower sound quality, or possibly cause overheating in the
outlet.
• When removing the electric plug from the instrument or an outlet, always hold
the plug itself and not the cord. Pulling by the cord can damage it.
• Remove the electric plug from the outlet when the instrument is not to be used for
extended periods of time, or during electrical storms.
• Do not place the instrument in an unstable position where it might accidentally
fall over.
• Before moving the instrument, remove all connected cables, to prevent damage
to the cables or injury to anyone who might trip over them.
• When setting up the product, make sure that the AC outlet you are using is easily
accessible. If some trouble or malfunction occurs, immediately turn off the power
switch and disconnect the plug from the outlet. Even when the power switch is
turned off, electricity is still flowing to the product at the minimum level. When
you are not using the product for a long time, make sure to unplug the power
cord from the wall AC outlet.
• Use only the stand specified for the instrument. When attaching it, use the
provided screws only. Failure to do so could cause damage to the internal
components or result in the instrument falling over.
Yamaha cannot be held responsible for damage caused by improper use or modifications to the instrument, or data that is lost or destroyed.
Always turn the power off when the instrument is not in use.
Even when the [ ] (Standby/On) switch is in standby status (power lamp is off), electricity is still flowing to the instrument at the minimum level.
When you are not using the instrument for a long time, make sure you unplug the power cord from the wall AC outlet.
• Before connecting the instrument to other electronic components, turn off the
power for all components. Before turning the power on or off for all components,
set all volume levels to minimum.
• Be sure to set the volumes of all components at their minimum levels and
gradually raise the volume controls while playing the instrument to set the
desired listening level.
• Do not insert a finger or hand in any gaps on the instrument.
• Never insert or drop paper, metallic, or other objects into the gaps on the panel or
keyboard. This could cause physical injury to you or others, damage to the
instrument or other property, or operational failure.
• Do not rest your weight on, or place heavy objects on the instrument, and do not
use excessive force on the buttons, switches or connectors.
• Do not use the instrument/device or headphones for a long period of time at a
high or uncomfortable volume level, since this can cause permanent hearing
loss. If you experience any hearing loss or ringing in the ears, consult a
physician.
NOTICE
To avoid the possibility of malfunction/ damage to the product,
damage to data, or damage to other property, follow the notices
below.
Handling
• Do not use the instrument in the vicinity of a TV, radio, stereo equipment, mobile
phone, or other electric devices. Otherwise, the instrument, TV, or radio may
generate noise. When you use the instrument along with an application on your
iPad, iPhone or iPod touch, we recommend that you set “Airplane Mode” to “ON”
on that device in order to avoid noise caused by communication.
• Do not expose the instrument to excessive dust or vibrations, or extreme cold or
heat (such as in direct sunlight, near a heater, or in a car during the day) to
prevent the possibility of panel disfiguration, damage to the internal components
or unstable operation. (Verified operating temperature range: 5° – 40°C, or 41° –
104°F.)
• Do not place vinyl, plastic or rubber objects on the instrument, since this might
discolor the panel or keyboard.
Maintenance
• When cleaning the instrument, use a soft cloth. Do not use paint thinners,
alcohol, solvents, cleaning fluids, or chemical-impregnated wiping cloths.
Saving data
• Some types of data (page 19) will be stored in internal memory, and maintained
even if the power is turned off. However, the data could be lost due to malfunction
or incorrect operation.
P-45 Owner’s Manual
6
DMI-5 2/2
Information
About copyrights
• Copying of the commercially available musical data including but not limited to
MIDI data and/or audio data is strictly prohibited except for your personal use.
• This product incorporates and bundles computer programs and contents in which
Yamaha owns copyrights or with respect to which it has license to use others'
copyrights. Such copyrighted materials include, without limitation, all computer
software, style files, MIDI files, WAVE data, musical scores and sound recordings.
Any unauthorized use of such programs and contents outside of personal use is
not permitted under relevant laws. Any violation of copyright has legal
consequences. DON’T MAKE, DISTRIBUTE OR USE ILLEGAL COPIES.
About functions/data bundled with the instrument
• Some of the preset songs have been edited for length or arrangement, and may
not be exactly the same as the original.
About this manual
• The illustrations as shown in this manual are for instructional purposes only, and
may appear somewhat different from those on your instrument.
• iPad, iPhone and iPod touch are trademarks of Apple Inc., registered in the U.S.
and other countries.
• The company names and product names in this manual are the trademarks or
registered trademarks of their respective companies.
Tuni ng
• Unlike an acoustic piano, this instrument does not need to be tuned by an expert
(although the pitch can be user-adjusted to match other instruments). This is
because the pitch of digital instruments is always maintained perfectly.
Page 7
Contents
PRECAUTIONS ...................................................... 5
With this instrument, you can:................................. 7
About the Manuals .................................................. 8
Accessories............................................................. 8
Introduction
Panel Controls and Terminals 9
Setting Up 10
Power Requirements ............................................ 10
Turning the Power On/Off ..................................... 10
Auto Power Off Function ....................................... 10
Setting the Volume................................................ 11
Setting the Operation Confirmation Sounds ......... 11
Using Headphones ............................................... 11
Using a Footswitch................................................ 11
Reference
Selecting & Playing Voices 12
Selecting a Voice .................................................. 12
Layering Two Voices (Dual) .................................. 12
Playing Duo........................................................... 13
Adding Variations to the Sound – Reverb............. 13
Setting the Touch Sensitivity................................. 14
Transposing the Pitch in Semitones ..................... 14
Fine-tuning the Pitch ............................................. 15
Playing Back Songs 16
Listening to the Voice Demo Songs ......................16
Listening to the Piano Songs (Preset Songs)........16
Using the Metronome 17
Selecting a Beat .................................................... 17
Adjusting the Tempo..............................................17
Adjusting the Volume of the Metronome ............... 17
Connecting Other Equipment 18
Connecting an iPad or iPhone...............................18
Connecting to a computer .....................................18
MIDI Settings ......................................................... 18
Data Backup and Initializing 19
Appendix
Troubleshooting 20
Specifications 20
Index 21
Quick Operation Guide 22
With this instrument, you can:
Enjoy the feel of an authentic piano action with the Graded Hammer Standard (GHS) keyboard.
Listen to the ten Piano Preset Songs as background music (page 16).
Enjoy easy operation by holding down the [GRAND PIANO/FUNCTION] button and pressing the
corresponding key on the keyboard to set up the instrument as desired. For more information on
keyboard assignments, see page 22.
P-45 Owner’s Manual
7
Page 8
Thank you for purchasing this Yamaha Digital Piano!
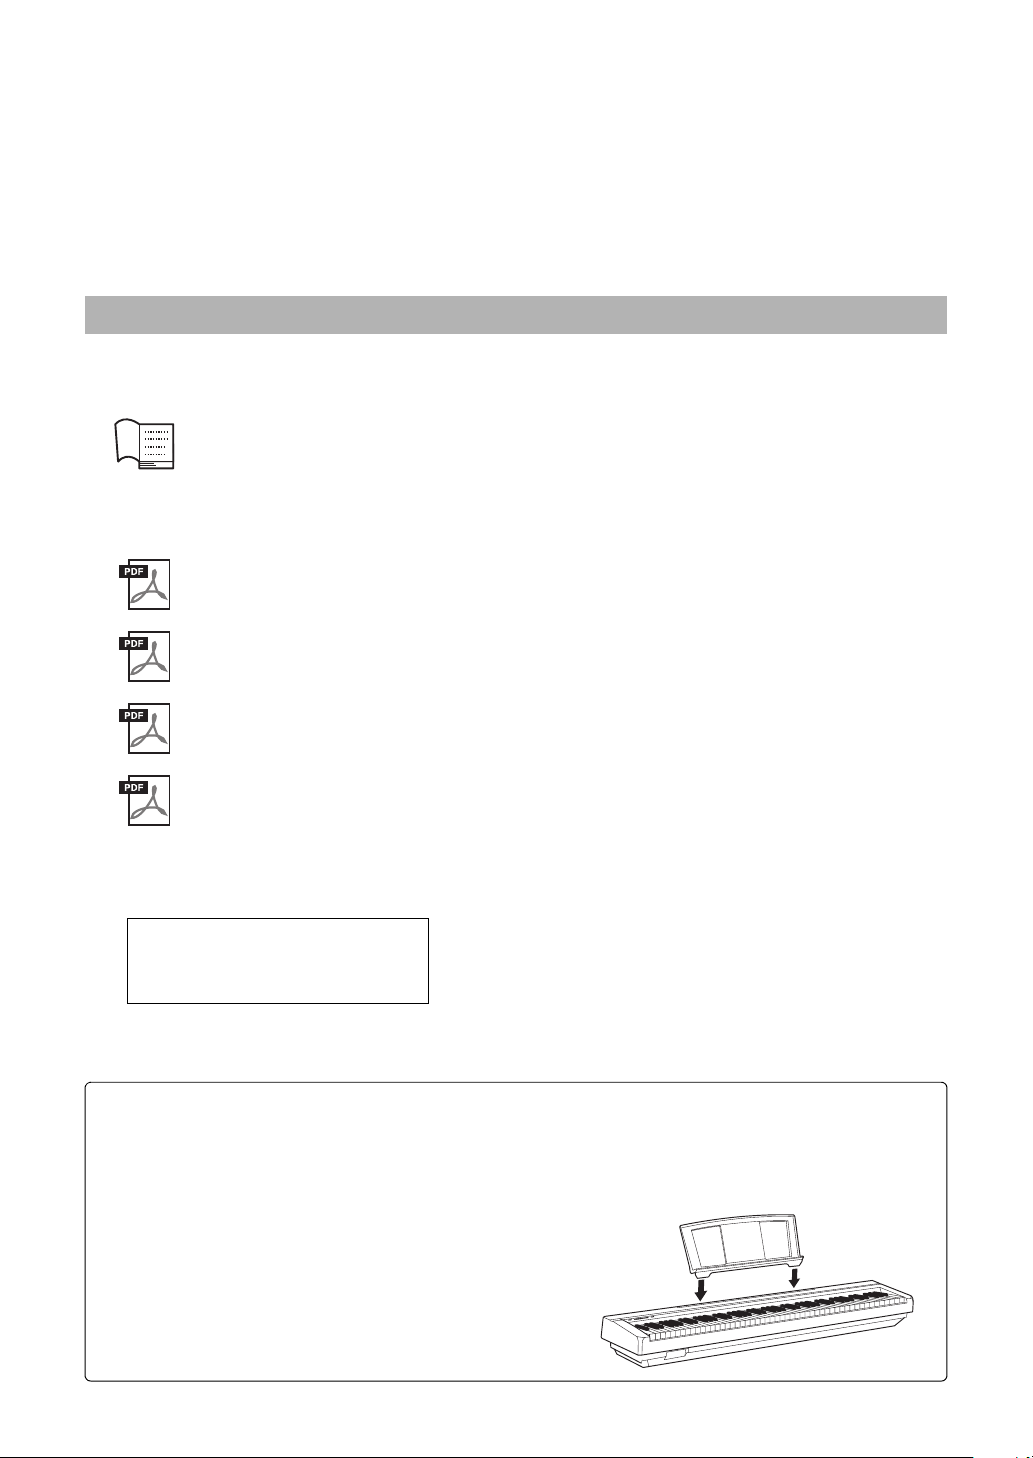
Insert into the slot
We recommend that you read this manual carefully so that you can fully take advantage of the
advanced and convenient functions of the instrument.
We also recommend that you keep this manual in a safe and handy place for future reference.
About the Manuals
This instrument has the following documents and instructional materials.
Included Documents
Owner’s Manual (this book)
Quick Operation Guide (page 22)
Shows in chart form the functions assigned to the buttons and the keyboard for quick understanding.
Online Materials (PDF)
iPhone/iPad Connection Manual
Explains how to connect the instrument to smart devices, such iPhone, iPad, etc.
Computer-related Operations
Contains instructions about computer-related functions.
MIDI Reference
Contains MIDI-related information.
MIDI Basics (only in English, French, German and Spanish)
Contains basic explanations about what MIDI is and can do.
To obtain these manuals, access the Yamaha Downloads website. Select your country, enter “P-45” in the Model
Name box, then click [Search].
Yamaha Downloads
http://download.yamaha.com/
Accessories
• Owner’s Manual
•AC Adaptor*
• Warranty*
• Online Member Product Registration**
• Footswitch
* May not be included depending on your particular area. Please check with
your Yamaha dealer.
** The PRODUCT ID on the sheet will be needed when you fill out the User
Registration form.
•Music Rest
P-45 Owner’s Manual
8
Page 9

Panel Controls and Terminals
qwe
ty ur
C0 C1 C2 C3 C4 C5 C6 C7
A-1
Shows the jacks and terminals as seen when viewed
from the rear of the instrument.
Speakers are built into the instrument at the bottom.
Though you can enjoy playing the instrument even when
putting it on a desk or table, we recommend that you use
an optional keyboard stand for better sound.
Optional Keyboard Stand
Introduction
q [ ] (Standby/On) switch......................page 10
For turning the power on or setting to standby.
w [MASTER VOLUME] slider....................page 11
For adjusting the volume of the entire sound.
e [GRAND PIANO/FUNCTION] button.....page 12
For instantly calling up the Grand Piano 1 Voice.
FUNCTION
You can set various parameters by pressing a note
on the keyboard while holding this button.
r [USB TO HOST] terminal ......................page 18
For connecting to an iPhone, iPad, or computer.
t [SUSTAIN] jack ......................................page 11
For connecting the included footswitch, an
optional footswitch or foot pedal.
y [PHONES] jack ......................................page 11
For connecting a set of standard stereo headphones.
u DC IN jack ..............................................page 10
For connecting the power adaptor.
P-45 Owner’s Manual
9
Page 10

Setting Up
AC Adaptor
AC Outlet
DC IN jack
(page 9)
* The shape of the plug and outlet differs depending on locale.
q
w
WARN ING
CAUTION
Plug
Slide the plug as
indicated
* The shape of the plug differs depending on locale.
WARN ING
q
w
CAUTION
A-1
A-1
Power Requirements
Connect the AC adaptor plugs in the following order.
• Use the specified adaptor (page 20) only. Using the
wrong adaptor can result in damage to the instrument
or overheating.
• When setting up the product, make sure that the AC
outlet you are using is easily accessible. If some trouble or malfunction occurs, immediately turn off the
power switch and disconnect the plug from the outlet.
NOTE
• To disconnect the power adaptor, press the [ ] (Standby/On) switch and
carry out the above procedure in reverse order.
For the Power Adaptor with a Removable Plug
Do not remove the plug from the power adaptor. If the
plug is removed accidentally, slide the plug into place
without touching the metallic parts, and then push the
plug in completely until it clicks.
Turning the Power On/Off
q Set the volume to the minimum.
w Press the [ ] (Standby/On) button to turn on the
power.
When the power is supplied to the instrument, the
power lamp located on the left of the power switch
is turned on. While playing the keyboard, adjust
the volume level by using the [MASTER VOLUME] slider. To turn off the power, press the [ ]
(Standby/On) switch again for a second.
• Even when the power switch is turned off, electricity is
still flowing to the product at the minimum level. When
you are not using the product for a long time, make
sure to unplug the power cord from the wall AC outlet.
Auto Power Off Function
To prevent unnecessary power consumption, this
function automatically turns the power off if no buttons or keys are operated for approximately 30 minutes. If desired, you can disable or enable this
function.
To disable the Auto Power Off function:
When the instrument is turned off:
While holding down the lowest key (A-1), press the
[ ] (Standby/On) switch to turn on the power so that
the power indicator flashes three times, after which
the Auto Power Off function is disabled.
• Make sure to keep the plug attached to the AC adaptor.
Using the plug alone can cause electric shock or fire.
• Never touch the metallic section when attaching the
plug. To avoid electric shock, short circuit or damage,
also be careful that there is no dust between the AC
adaptor and plug.
P-45 Owner’s Manual
10
When the instrument is turned on:
While holding down [GRAND PIANO/FUNCTION],
press the lowest key (A-1).
Page 11

Setting Up
A#-1
LouderSofter
C7
Standard stereo
phone plug
CAUTION
To enable the Auto Power Off function:
While holding down [GRAND PIANO/FUNCTION],
press the A#-1 key.
Setting the Volume
When you start playing, use the [MASTER VOLUME] slider to adjust the volume of the entire keyboard sound.
Setting the Operation Confirmation Sounds
Because of the simple, piano-like design of this instrument, there are a minimum of panel controls, and
most settings are made using the keys of the keyboard.
When you turn a function on or off, or change a setting, the instrument produces a sound to confirm the
change. There are three types of sounds used: an
ascending sound for on, a descending sound for off,
and clicks for other settings. For the list of functions
assigned to the buttons and keys, see “Quick Operation Guide” on page 22.
Setting the Operation Confirmation Sounds
On or Off
You can enable or disable the Operation Confirmation
Sounds as desired.
While holding down [GRAND PIANO/FUNCTION],
press the C7 key. Every time you press the C7 key, the
setting is switched on or off.
Default setting: on
Using Headphones
Any pair of stereo headphones with a 1/4” stereo
phone plug can be plugged in here for convenient
monitoring. The speakers are automatically shut off
when a plug is inserted into this jack.
• To protect your hearing, avoid listening with the headphones at a high volume level for long periods of time.
Using a Footswitch
The [SUSTAIN] jack is for connecting the included
footswitch, which works in the same way as a damper
pedal on an acoustic piano. Also an optional FC3A
foot pedal or FC4A or FC5 footswitch can be connected to this jack. The FC3A lets you use the Half
Pedal function.
Half Pedal function
If you are playing the piano with sustain and want a
clearer, less muddled sound (especially in the bass
register), let up on your foot from the pedal to half
position or higher.
NOTE
• Do not press the footswitch when turning the power on. Doing this changes
the recognized polarity of the footswitch, resulting in reversed footswitch
operation.
• Make sure that power is OFF when connecting or disconnecting the footswitch or pedal.
P-45 Owner’s Manual
11
Page 12

Selecting & Playing Voices
A0С0
A0С0
Voi ce 2Voi ce 1
F5 A#5
C6 (0)B5 (-1)
C#6 (+1)
Reference
Selecting a Voice
Layering Two Voices (Dual)
To select the Grand Piano Voice:
Simply press [GRAND PIANO/FUNCTION] to
instantly call up the Grand Piano 1 Voice — no matter
what other Voice is called up or other settings are made.
To select another Voice:
While holding [GRAND PIANO/FUNCTION], press
one of the C0 – A0 keys.
Voice List
Voice
Key
C0
C#0
D0
D#0
E0
F0
F#0
G0
G#0
A0
Name
GRAND
PIANO 1
GRAND
PIANO 2
E. PIANO 1
E. PIANO 2
PIPE
ORGAN 1
PIPE
ORGAN 2
STRINGS
HARPSICHORD 1
HARPSICHORD 2
VIBRAPHONE
Recorded samples from a full concert grand
piano. Perfect for classical compositions as
well as any other style that requires acoustic
piano.
Bright piano sound. Clear tone helps the
sound to “cut through” when playing in an
ensemble.
Vintage electric piano sound of hammerstruck metallic “tines.” Soft tone when played
lightly, and an aggressive tone when played
hard.
An electronic piano sound created by FM
synthesis. Good for standard popular music.
A typical pipe organ sound (8 feet + 4 feet +
2 feet). Good for sacred music from the
Baroque period.
This is the organ’s full coupler sound, often
associated with Bach’s “Toccata and Fugue.”
Spacious and large-scale string ensemble.
Try combining this Voice with piano in DUAL.
The definitive instrument for baroque music.
Authentic harpsichord sound, with plucked
strings, no touch response.
Mixes the same Voice an octave higher for a
more brilliant, dynamic tone.
Played with relatively soft mallets.
Description
You can play Voices simultaneously across the entire
range of the keyboard.
Engage Dual.
1
While holding down [GRAND PIANO/FUNCTION], simultaneously press any two desired keys
from C0 –A0.
The Voice assigned to the left side key is Voice 1,
while the Voice assigned to the right side key is
Voice 2.
To exit from Dual, simply press [GRAND
2
PIANO/FUNCTION].
To shift the Octave for each Voice:
While holding down [GRAND PIANO/FUNCTION],
press one of the F5 – A#5 keys.
Voice 1
F5 -1
F#50 A5 0
G5 +1 A#5+1
Voice 2
G#5-1
To adjust the Balance between two Voices:
While holding down [GRAND PIANO/FUNCTION],
press the B5 key to decrease by one, C#6 to increase
by one, or C6 to set to 0 (equal balance). The setting
range is from -6 to +6. Settings above “0” increase the
volume of Voice1, and vice versa.
After selecting the desired Voice, play the
keyboard.
NOTE
• To familiarize yourself with the characteristics of the Voices, listen to the Demo
Songs for each Voice (page 16).
• You can shift the Octave as described in the next column (see “Voice 1”).
P-45 Owner’s Manual
12
Page 13

Selecting & Playing Voices
D3
Split Point (E3)
Left Voice (Voice 2) Right Voice (Voice 1)
Equivalent to C3
(Center)
Equivalent to C3
(Center)
D3
NOTE
E5C5
B4 (+1)A4
(-1)
A#4 (Default)
Playing Duo
This function allows two different players to play the
instrument, one on the left and the other on the right,
over the same octave range.
While holding down [GRAND PIANO/
1
FUNCTION], press the D3 key to engage
Duo.
The keyboard is divided into the two sections with
the E3 key as the Split Point.
• The Split Point cannot be changed from E3.
• If the keyboard is in Dual, engaging Duo will exit from Dual. The Voice 1
is used as the Voice of the entire keyboard.
• Changing the Voice will exit from Duo.
One person can play the left section of
2
the keyboard while the other plays the
right.
Sounds played with the left voice are played from
the left speaker, and sounds played with the right
voice are played from the right speaker.
To exit from Duo, press the D3 key while
3
holding [GRAND PIANO/FUNCTION]
again.
To shift the Octave for each Voice:
Same as in Dual (page 12).
Pedal function in Duo
The Footswitch connected to the [SUSTAIN] jack
affects both Right and Left sections.
Adding Variations to the Sound – Reverb
This instrument features several Reverb Types that
add extra depth and expression to the sound to create a
realistic acoustic ambience. Although the appropriate
Reverb Type is called up automatically when you
select each of the Voices, you can change the Reverb
Type as desired.
To select a Reverb Type:
While holding down [GRAND PIANO/FUNCTION],
press one of the C5 – E5 keys.
Reverb Type List
Key
C#5 Hall1
D#5Stage
NOTE
• In Dual, the Reverb Type for Voice 1 is called up by default. If “OFF” is assigned
To adjust Reverb Depth:
While holding down [GRAND PIANO/FUNCTION],
press the A4 key to decrease by one, B4 to increase by
one, or A#4 to reset to the default value (most suitable
value for the current Voice). The higher the value, the
deeper the effect.
Reverb
Typ e
C5 Room
D5 Hall2
E5 Off No effect is applied.
to Voice 1, the Reverb Type for the Voice 2 is called up.
Default setting: the setting best suited for the current
Vo i c e
Setting range: 0 (no effect) – 10 (maximum depth)
Adds a continuous reverb effect to the
sound, similar to the acoustic reverberation you would hear in a room.
For a bigger reverb sound. This effect
simulates the natural reverberation of a
small-size concert hall.
For a truly spacious reverb sound. This
effect simulates the natural reverberation
of a large concert hall.
Simulates the reverb of a stage environment.
Description
P-45 Owner’s Manual
13
Page 14

Selecting & Playing Voices
A2
C3A2
G6 (+1)F6 (-1)
F#6 (Original pitch)
Setting the Touch Sensitivity
You can specify the Touch Sensitivity (how the sound
responds to your playing strength).
While holding down [GRAND PIANO/FUNCTION],
press one of the A2 – C3 keys.
Touch Sensitivity
Key
A#2Soft
Touch
Sensitivity
A2 Fixed
B2 Medium
C3 Hard
Description
The volume level does not change at all
regardless of whether you play the keyboard soft or hard.
The volume level does not change much
when you play the keyboard soft or hard.
This is the standard piano touch response
(default setting).
The volume level changes very widely
from pianissimo to fortissimo to facilitate
dynamic and dramatic expression. You
have to hit the keys hard to produce a
loud sound.
Transposing the Pitch in Semitones
You can shift the pitch of the entire keyboard up or
down in semitone in order to facilitate playing in difficult key signatures, or to easily match the pitch of the
keyboard to the range of a singer or other instruments.
For example, if “+5” is selected, playing key C produces pitch F, letting you play a song of F major as
though it were in C major.
Setting range: -6 – 0 – +6
To transpose the pitch down:
While holding down [GRAND PIANO/FUNCTION],
press the F6 key to decrease by 1 semitone.
To transpose the pitch up:
While holding down [GRAND PIANO/FUNCTION],
press the G6 key to increase by 1 semitone.
To restore the original pitch:
While holding down [GRAND PIANO/FUNCTION],
press the F#6 key.
NOTE
• The Touch Sensitivity settings may have little or no effect with the PIPE ORGAN
and HARPSICHORD Voices, since these instruments are not normally responsive to keyboard dynamics.
P-45 Owner’s Manual
14
Page 15

Fine-tuning the Pitch
B6 (440.0 Hz)A6 (+0.2 Hz)
A#6 (442.0 Hz)G#6 (-0.2 Hz)
You can fine tune the pitch of the entire instrument in
approximately 0.2 Hz increments. This lets you match
the keyboard pitch finely to that of other instruments
or CD music.
Setting range: 414.8 – 440.0 – 466.8 Hz
To lower the pitch:
While holding down [GRAND PIANO/FUNCTION],
press the G#6 key repeatedly to lower the pitch in
approximately 0.2 Hz increments.
To raise the pitch:
While holding down [GRAND PIANO/FUNCTION],
press the A6 key repeatedly to raise the pitch in
approximately 0.2 Hz increments.
To set the pitch to A3 = 442.0 Hz:
While holding down [GRAND PIANO/FUNCTION],
press the A#6 key.
Selecting & Playing Voices
To reset the pitch to the default (A3 = 440.0 Hz):
While holding down [GRAND PIANO/FUNCTION],
press the B6 key.
P-45 Owner’s Manual
15
Page 16

Playing Back Songs
A1C1
NOTE
G2
G2
A#1
Listening to the Voice Demo Songs
Demo Songs are provided for each of the Voices such
as Piano and Organ.
While holding down [GRAND PIANO/
1
FUNCTION], press one of the C1 – A1
keys to start playback.
This operation starts playback of the Demo Song
of the Voice assigned to the pressed key. Starting
with the selected Song, playback will continue in
sequence.
• The keyboard Voice is automatically set to correspond to that of the current Demo Song. If you select another Voice during playback, the Demo
Song will automatically change to that corresponding to the selected new
Voice.
Demo Song List
Key Voic e N a me Title Composer
GRAND PIANO 1
C1
C#1
GRAND PIANO 2
D1 E. PIANO 1 Original Original
D#1 E. PIANO 2 Original Original
E1 PIPE ORGAN 1 Original Original
F1 PIPE ORGAN 2 Original Original
F#1 STRINGS Original Original
HARPSICHORD 1
G1
HARPSICHORD 2
G#1
A1 VIBRAPHONE Original Original
The demonstration pieces listed above are short rearranged excerpts of the original compositions. All other songs are original (© 2014 Yamaha Corporation).
Original Original
Original Original
Gavotte J.S. Bach
Invention No. 1 J.S. Bach
Listening to the Piano Songs (Preset Songs)
In addition to the Demo Songs, Preset Songs are provided for your listening pleasure.
While holding down [GRAND PIANO/
1
FUNCTION], press one of the A#1 – G2
keys to start playback.
Starting with the selected Song, playback will
continue in sequence.
Preset Song List
Key No. Title Composer
A#11
B1 2 Turkish March W.A. Mozart
C2 3 Für Elise L.v. Beethoven
C#2 4 Valse op.64-1 “Petit chien” F.F. Chopin
D2 5 Träumerei R. Schumann
D#26
E2 7 Arabesque J.F. Burgmüller
F2 8 Humoresque A. Dvořák
F#2 9 The Entertainer S. Joplin
G2 10 La Fille aux Cheveux de Lin C.A. Debussy
Press [GRAND PIANO/FUNCTION] again
2
to stop playback.
Menuett G dur
BWV.Anh.114
Dolly’s Dreaming and
Awakening
J.S. Bach
T. Oe st e n
Press [GRAND PIANO/FUNCTION] again
2
to stop playback.
To adjust the playback tempo:
The operation is same as that of the Metronome
Tempo (page 17).
P-45 Owner’s Manual
16
To adjust the playback tempo:
The operation is same as that of Metronome Tempo
(page 17).
Page 17

Using the Metronome
E3
NOTE
F4E4
F3 D#4
F#4G#4
The metronome is convenient for practicing with an accurate tempo.
While holding down [GRAND PIANO/
1
FUNCTION], press the E3 key to start the
Metronome.
Execute the same operation again to
2
stop the Metronome.
• Pressing only [GRAND PIANO/FUNCTION] also stops the Metronome,
but it also resets to the Grand Piano Voice.
Adjusting the Tempo
While holding down [GRAND PIANO/FUNCTION],
press the F3 – D4 keys (to which numbers 0 – 9 are
assigned individually) to specify the three-digit value
as a Tempo of the Metronome and Song. To specify
“95,” for example, press the F3 (0), D4 (9) and A#3
(5) keys in order while holding down [GRAND
PIANO/FUNCTION].
Default setting (Metronome): 120
Setting range: 32 – 280
Selecting a Beat
While holding down [GRAND PIANO/FUNCTION],
press the E4 key to decrease the value, or the F4 key to
increase the value. The default value is “no beat.”
When a value other than “no beat” is selected, the first
beat is accented with a bell sound.
To restore the default value:
While holding down [GRAND PIANO/FUNCTION],
press the D#4 key.
Adjusting the Volume of the Metronome
While holding down [GRAND PIANO/FUNCTION],
press the F#4 key to decrease the volume of the Metronome, the G#4 key to increase the volume, or the
G4 to restore the default volume (10).
Setting range: 1 – 20
P-45 Owner’s Manual
17
Page 18

Connecting Other Equipment
CAUTION
[USB TO HOST] terminal
Instrument
USB cable
Computer
E6 (+1)D6 (-1)
D#6 (Default)
• Before connecting the instrument to other electronic components, turn off the power to all the components. Before turning the
power on or off to all components, set all volume levels to minimum (0). Otherwise, electrical shock or damage to the components may result.
Connecting an iPad or iPhone
With an iPad or iPhone connected to your digital
piano, you can use a wide range of apps to expand the
functionality of your instrument in exciting new ways.
For details on how to connect the devices, refer to the
“iPhone/iPad Connection Manual,” which you can
download for free from the Yamaha web site.
Connecting to a computer
By connecting a computer to the [USB TO HOST]
terminal, you can take advantage of various music
software with your computer and the instrument.
For details on using a computer with this instrument,
refer to the “Computer-related Operations” on the
website.
NOTE
• Use an AB type USB cable. When connecting a USB cable, make sure that the
length is less than 3 meters.
MIDI Settings
Setting the MIDI Transmit Channels
In any MIDI control setup, the MIDI channels of the
transmitting and receiving devices must be matched
for proper data transfer. You can specify the channel
on which this instrument transmits MIDI data. To do
this, while holding down [GRAND PIANO/FUNCTION], press one of the D6 – E6 keys. The D6 key
decreases the value by 1, the E6 key increases the
value by 1, and the D#6 key restores the default value
(channel 1).
Setting range: 1 – 16
Default value: 1
NOTE
• In Dual, the keyboard performance via Voice 1 is transmitted on the specified
MIDI Transmit Channel and the keyboard performance via Voice 2 is transmitted
on the next channel number in sequence (specified channel + 1).
• No MIDI messages are output during playback of the Demo Song or Preset
Song.
Other MIDI Settings
The MIDI settings other than the Transmit Channel
are set as listed below, and cannot be changed.
P-45 Owner’s Manual
18
MIDI Receive Channels:
....................................... All channels (1 – 16)
Local Control: ............................................On
Program Change Transmit/Receive:........Yes
Control Change Transmit/Receive: .........Yes
Page 19

Data Backup and Initializing
C7
NOTICE
The following data will automatically be maintained
as backup data even if you turn off the power.
Backup data
Metronome Volume, Metronome Beat, Touch
Sensitivity, Tuning, Auto Power Off, Operation
Confirmation Sounds on/off
To initialize the backup data:
While holding down the C7 key (right-most key), turn
the power on to initialize the backup data to the factory initial settings.
The power lamp flashes, indicating that the initialization is being executed.
• Never turn off the power while the initialization is being
executed.
NOTE
• If this instrument somehow malfunctions or fails to operate properly, try executing the initialization.
P-45 Owner’s Manual
19
Page 20

Troubleshooting
Appendix
The instrument does not turn on.
The instrument is automatically turned off even if
no operation is done.
Noise is heard from the speakers or headphones.
Noise can be heard coming from the digital
piano’s built-in speakers and/or headphones
when using it with an iPhone/iPad/iPod touch
app.
The overall volume is low, or no sound is heard.
The pedal has no effect.
The footswitch (for sustain) seems to produce
the opposite effect. For example, pressing the
footswitch cuts off the sound and releasing it
sustains the sounds.
Problem Possible Cause and Solution
The instrument has not been plugged in properly. Securely insert the female plug into
the jack on the instrument, and the male plug into a proper AC outlet (page 10).
This is normal. This occurs due to the Auto Power Off function (page 10).
The noise may be due to interference caused by the use of a mobile phone in close
proximity to the instrument. Turn off the mobile phone, or use it further away from the
instrument.
In order to eliminate the risk of noise from other communication when using the instrument with an iPhone, iPad, or iPod touch, we recommend turning on the device’s Airplane Mode.
The Master Volume is set too low; set it to an appropriate level using the [MASTER
VOLUME] slider (page 11).
Make sure a pair of headphones or conversion adaptor is not connected to the headphones jack (page 11).
The pedal cable/plug may not be properly connected. Make sure to securely insert the
pedal plug into the [SUSTAIN] jack (page 11).
The polarity of the footswitch is reversed because the footswitch was pressed when the
power was turned on. Turn off the power and turn it on again to reset the function. Make
sure to not press the footswitch when turning the power on.
Specifications
Dimensions (W x D X H)
• 1,326 x 295 x 154 mm (52-3/16” x 11-5/8” x 6-1/16”)
Weight
• 11.5 kg (25 lbs. 6 oz.)
Keyboards
• 88 keys (A-1 – C7)
• GHS (Graded Hammer Standard) keyboard with matte black
keytops
• Touch Sensitivity (Hard, Medium, Soft, Fixed)
Tone Generation / Voice
• AWM Stereo Sampling
• 10 Preset Voices
• Polyphony: 64
Effects/Functions
• 4 Reverb types
• Dual
• Duo
Song Playback
• 10 Voice Demo Songs + 10 Piano Preset Songs
Overall Controls
• Metronome
• Tempo: 32 – 280
• Transpose: -6 – 0 – +6
• Fine Tuning: 414.8 – 440.0 – 466.8 Hz
Connectivity
• DC IN (12V), PHONES, SUSTAIN, USB TO HOST
Amplifiers
• 6 W + 6 W
Speakers
•12 cm x 2
Power Supply
• AC Adaptor PA-150 or an equivalent recommended by Yamaha
• Power Consumption: 6 W (When using PA-150 adaptor)
• Auto Power Off Function
Included Accessories
• Owner’s Manual, Music Rest, AC Adaptor PA-150 or an equivalent recommended by Yamaha*, Online Member Product Registration**, Footswitch
* May not be included depending on your particular area.
Please check with your Yamaha dealer.
** The PRODUCT ID on the sheet will be needed when you fill
out the User Registration form.
Separately Sold Accessories
• Keyboard Stand L-85, Foot Pedal FC3A, Footswitch FC4A/FC5,
Headphones (HPE-30/HPE-150), USB MIDI Interface for
iPhone/iPod touch/iPad (i-UX1), AC Adaptor (Users within U.S or
Europe: PA-150 or an equivalent recommended by Yamaha, Others: PA-5D, PA-150 or an equivalent)
* The contents of this manual apply to the latest specifications as
of the printing date. Since Yamaha makes continuous improvements to the product, this manual may not apply to the specifications of your particular product. To obtain the latest manual,
access the Yamaha website then download the manual file.
Since specifications, equipment or separately sold accessories
may not be the same in every locale, please check with your
Yamaha dealer.
P-45 Owner’s Manual
20
Page 21

Index
A
Accessories ...................................................................8
Adjusting the Tempo ............................................16–17
Auto Power Off Function ..........................................10
C
Connecting an iPad or iPhone ...................................18
Connecting to a computer .......................................... 18
D
Data Backup ................................................................19
Demo Song List .......................................................... 16
Dual .............................................................................12
Duo .............................................................................. 13
F
Footswitch ...................................................................11
H
Half Pedal function .................................................... 11
Headphones .................................................................11
S
Selecting a Beat .......................................................... 17
Specifications ............................................................. 20
T
Touch Sensitivity ........................................................ 14
Transposing ................................................................. 14
Troubleshooting .......................................................... 20
Tuning ......................................................................... 15
Turning the Power On/Off ......................................... 10
V
Vo i c e ............................................................................ 12
Voice Demo Songs ..................................................... 16
Vo i c e L ist .................................................................... 12
Vo l u m e ........................................................................ 11
I
Initializing ...................................................................19
M
Metronome ..................................................................17
MIDI Settings .............................................................18
Music Rest ....................................................................8
O
Online Materials (PDF) ............................................... 8
Operation Confirmation Sounds ...............................11
Optional Keyboard Stand .............................................9
Owner’s Manual ........................................................... 8
P
Piano Songs .................................................................16
Power Adaptor ............................................................ 10
Preset Song List .......................................................... 16
Preset Songs ................................................................16
Q
Quick Operation Guide .............................................. 22
R
Reverb .......................................................................... 13
Reverb Type List .........................................................13
P-45 Owner’s Manual
21
Page 22

A-1
B-1 C0
D0 E0 F0 G0 A0 B0
C1
D1 E1 F1
G1
A1
B1
C2 D2
E2
F2 G2 A2 B2
C3
D3 E3
F3 G3 A3 B3
C4 D4
E4 F4 G4 A4
B4
C5
D5 E5
F5 G5 A5
B5
C6
D6
E6 F6
G6
A6 B6
C7
A#-1 C#0 D#0 F#0 G#0 A#0 C#1 D#1 F#1
G#1
A#1 C#2
D#2
F#2 G#2
A#2
C#3 D#3 F#3 G#3
A#3 C#4 D#4
F#4
G#4
A#4 C#5 D#5 F#5 G#5
A#5 C#6 D#6 F#6 G#6 A#6
Number key
1
Number key
3
Number key
5
Number key
8
Default Tempo
Decrease Volume by one step
Number key
4
Number key
2
Number key
6
Number key
7
Number key
9
Decrease Beat by one step
Increase Beat by one step
Increase by one step
GRAND PIANO 2
E. PIANO 2
Auto Power Off Enable
Auto Power Off Disable
GRAND PIANO 1
E. PIANO 1
A3 = 442.0 Hz
Increase by approx. 0.2 Hz
A3 = 440.0 Hz
Operation Conrmation Sounds ON/OFF
HARPSICHORD 2
STRINGS
GRAND PIANO 2
E. PIANO 2
STRINGS
HARPSICHORD 2
PIPE ORGAN 1
PIPE ORGAN 2
HARPSICHORD 1
VIBRAPHONE
GRAND PIANO 1
E. PIANO 1
PIPE ORGAN 1
PIPE ORGAN 2
HARPSICHORD 1
VIBRAPHONE
Song
6
Song
4
Song
1
Song
9
Soft
Song
2
Song
3
Song
5
Song
7
Song
8
Song
10
Fixed
Medium
Hard
Duo ON/OFF
METRONOME ON/OFF
Number key
0
Default
Decrease by one step
Increase by one step
Hall 1
Stage
0 (Voice 1)
-1 (Voice 2)
+1 (Voice 2)
Increase Volume by one step
0 (Default)
Decrease by approx. 0.2 Hz
Increase Depth by one step
Default Depth
Room
Default Volume
Decrease Depth by one step
Hall 2
OFF
-1 (Voice 1)
+1 (Voice 1)
0 (Voice 2)
Decrease Volume by one step
0 (equal balance)
Decrease by one step
Increase Volume by one step
Voice Voice Demo
Touch
Sensitivity
Preset Song
Metronome
Reverb
Depth
Reverb
Typ e
Octave
Setting
Tempo Tuni ng
Transpose
While holding down the [GRAND PIANO/FUNCTION] button, press the highlighted keys shown below to select preset songs, etc. or set parameters.
(Refer to diagram below.)
Quick Operation Guide
Balance between
Voice 1 and Voice 2
MIDI Transmit
Channel
Quick Operation Guide
P-45 Owner’s Manual
22
Page 23

For details of products, please contact your nearest Yamaha representative or the authorized distributor listed below.
NORTH AMERICA
CANADA
Yamaha Canada Music Ltd.
135 Milner Avenue, Toronto, Ontario,
M1S 3R1, Canada
Tel: 416-298-1311
U.S.A.
Yamaha Corporation of America
6600 Orangethorpe Avenue, Buena Park, CA 90620,
U.S.A.
Tel: 714-522-9011
CENTRAL & SOUTH AMERICA
MEXICO
Yamaha de México, S.A. de C.V.
Av. Insurgentes Sur 1647 “Prisma Insurgentes”,
Col. San Jose Insurgentes, Del. Benito Juarez,
03900, Mexico, D.F.
Tel: 55-5804-0600
BRAZIL
Yamaha Musical do Brasil Ltda.
Rua Joaquim Floriano, 913 - 4º andar, Itaim Bibi,
CEP 04534-013 São Paulo, SP. BRAZIL
Tel: 011-3704-1377
ARGENTINA
Yamaha Music Latin America, S.A.,
Sucursal Argentina
Olga Cossettini 1553, Piso 4 Norte,
Madero Este-C1107CEK
Buenos Aires, Argentina
Tel: 54-11-4119-7000
VENEZUELA
Yamaha Music Latin America, S.A.,
Sucursal Venezuela
C.C. Manzanares Plaza P4
Ofic. 0401- Manzanares-Baruta
Caracas Venezuela
Tel: 58-212-943-1877
PANAMA AND OTHER LATIN
AMERICAN COUNTRIES/
CARIBBEAN COUNTRIES
Yamaha Music Latin America, S.A.
Torre Banco General, Piso No.7, Marbella,
Calle 47 y Aquilino de la Guardia,
Ciudad de Panamá, República de Panamá
Tel: +507-269-5311
EUROPE
THE UNITED KINGDOM/IRELAND
Yamaha Music Europe GmbH (UK)
Sherbourne Drive, Tilbrook, Milton Keynes,
MK7 8BL, U.K.
Tel: 01908-366700
GERMANY
Yamaha Music Europe GmbH
Siemensstraße 22-34, 25462 Rellingen, Germany
Tel: 04101-3030
SWITZERLAND/LIECHTENSTEIN
Yamaha Music Europe GmbH
Branch Switzerland in Zürich
Seefeldstrasse 94, 8008 Zürich, Switzerland
Tel: 044-387-8080
AUSTRIA
Yamaha Music Europe GmbH Branch Austria
Schleiergasse 20, A-1100 Wien, Austria
Tel: 01-60203900
CZECH REPUBLIC/HUNGARY/
ROMANIA/SLOVAKIA/SLOVENIA
Yamaha Music Europe GmbH
Branch Austria (Central Eastern Europe Office)
Schleiergasse 20, A-1100 Wien, Austria
Tel: 01-60203900
POLAND/LITHUANIA/LATVIA/
ESTONIA
Yamaha Music Europe GmbH
Branch Poland Office
ul. Wrotkowa 14 02-553 Warsaw, Poland
Tel: 022-500-2925
BULGARIA
Dinacord Bulgaria LTD.
Bul.Iskarsko Schose 7 Targowski Zentar Ewropa
1528 Sofia, Bulgaria
Tel: 02-978-20-25
DMI8
MALTA
Olimpus Music Ltd.
The Emporium, Level 3, St. Louis Street Msida
MSD06
Tel: 02133-2144
NETHERLANDS/BELGIUM/
LUXEMBOURG
Yamaha Music Europe Branch Benelux
Clarissenhof 5-b, 4133 AB Vianen, Netherlands
Tel: 0347-358 040
FRANCE
Yamaha Music Europe
7 rue Ambroise Croizat, Zone d'activites Pariest,
77183 Croissy-Beaubourg, France
Tel: 01-64-61-4000
ITALY
Yamaha Music Europe GmbH, Branch Italy
Viale Italia 88, 20020 Lainate (Milano), Italy
Tel: 02-935-771
SPAIN/PORTUGAL
Yamaha Music Europe GmbH Ibérica, Sucursal
en España
Ctra. de la Coruna km. 17,200, 28231
Las Rozas (Madrid), Spain
Tel: +34-91-639-88-88
GREECE
Philippos Nakas S.A. The Music House
147 Skiathou Street, 112-55 Athens, Greece
Tel: 01-228 2160
SWEDEN
Yamaha Music Europe GmbH Germany filial
Scandinavia
J. A. Wettergrensgata 1, Box 30053
S-400 43 Göteborg, Sweden
Tel: +46 31 89 34 00
DENMARK
Yamaha Music Europe GmbH, Tyskland – filial
Denmark
Generatorvej 6A, DK-2730 Herlev, Denmark
Tel: 44 92 49 00
FINLAND
F-Musiikki Oy
Kluuvikatu 6, P.O. Box 260,
SF-00101 Helsinki, Finland
Tel: 09 618511
NORWAY
Yamaha Music Europe GmbH Germany Norwegian Branch
Grini Næringspark 1, N-1361 Østerås, Norway
Tel: 67 16 78 00
ICELAND
Skifan HF
Skeifan 17 P.O. Box 8120, IS-128 Reykjavik,
Iceland
Tel: 525 5000
RUSSIA
Yamaha Music (Russia) LLC.
Room 37, bld. 7, Kievskaya street, Moscow,
121059, Russia
Tel: 495 626 5005
TURKEY/CYPRUS
Yamaha Music Europe GmbH
Merkezi Almanya Türkiye İstanbul Şubesi
Maslak Meydan Sokak No:5 Spring Giz Plaza
Bağımsız Böl. No:3, 34398 Şişli, İstanbul
Tel: +90-212-999-8010
OTHER EUROPEAN COUNTRIES
Yamaha Music Europe GmbH
Siemensstraße 22-34, 25462 Rellingen, Germany
Tel: +49-4101-3030
AFRICA/MIDDLE EAST
SOUTH AFRICA
Global Music Instruments
World of Yamaha
19 Eastern Service Road, Eastgate Ext.6, Sandton,
South Africa
Tel: +27-11-259-7700
OTHER COUNTRIES
Yamaha Music Gulf FZE
LOB 16-513, P.O.Box 17328, Jebel Ali,
Dubai, United Arab Emirates
Tel: +971-4-881-5868
THE PEOPLE’S REPUBLIC OF CHINA
Yamaha Music & Electronics (China) Co.,Ltd.
2F, Yunhedasha, 1818 Xinzha-lu, Jingan-qu,
Shanghai, China
Tel: 400-051-7700
HONG KONG
Tom Lee Music Co., Ltd.
11/F., Silvercord Tower 1, 30 Canton Road,
Tsimshatsui, Kowloon, Hong Kong
Tel: 2737-7688
INDIA
Yamaha Music India Pvt. Ltd.
Spazedge building, Ground Floor, Tower A, Sector
47, Gurgaon- Sohna Road, Gurgaon, Haryana, India
Tel: 0124-485-3300
INDONESIA
PT. Yamaha Musik Indonesia (Distributor)
Yamaha Music Center Bldg. Jalan Jend. Gatot
Subroto Kav. 4, Jakarta 12930, Indonesia
Tel: 021-520-2577
KOREA
Yamaha Music Korea Ltd.
8F, 9F, Dongsung Bldg. 158-9 Samsung-Dong,
Kangnam-Gu, Seoul, Korea
Tel: 02-3467-3300
MALAYSIA
Yamaha Music (Malaysia) Sdn., Bhd.
No.8, Jalan Perbandaran, Kelana Jaya, 47301
Petaling Jaya, Selangor, Malaysia
Tel: 03-78030900
SINGAPORE
Yamaha Music (Asia) Private Limited
Block 202 Hougang Street 21, #02-00,
Singapore 530202, Singapore
Tel: 65-6747-4374
TAI WAN
Yamaha Music & Electronics Taiwan Co.,Ltd.
3F, No.6, Section 2 Nan-Jing East Road, Taipei,
Taiwan R.O.C.
Tel: 02-2511-8688
THAILAND
Siam Music Yamaha Co., Ltd.
3, 4, 15 and 16th floor, Siam Motors Building,
891/1 Rama 1 Road, Wangmai,
Pathumwan, Bangkok 10330, Thailand
Tel: 02-215-2622
VIETNAM
Yamaha Music Vietnam Company Limited
15th Floor, Nam A Bank Tower, 201-203 Cach
Mang Thang Tam St., Ward 4, Dist.3,
Ho Chi Minh City, Vietnam
Tel: +84-8-3818-1122
OTHER ASIAN COUNTRIES
http://asia.yamaha.com
AUSTRALIA
Yamaha Music Australia Pty. Ltd.
Level 1, 99 Queensbridge Street, Southbank,
Victoria 3006, Australia
Tel: 3-9693-5111
NEW ZEALAND
Music Works LTD
P.O.BOX 6246 Wellesley, Auckland 4680,
New Zealand
Tel: 9-634-0099
COUNTRIES AND TRUST
TERRITORIES IN PACIFIC OCEAN
http://asia.yamaha.com
ASIA
OCEANIA
HEAD OFFICE: Yamaha Corporation Nakazawa-cho 10-1, Naka-ku, Hamamatsu, Japan 430-8650
Page 24

Yamaha Global Site
http://www.yamaha.com/
Yamaha Downloads
http://download.yamaha.com/
C.S.G., DMI Development Division
© 2014 Yamaha Corporation
Published 12/2014 PO##*.*- **A0
Printed in China
ZN84080
 Loading...