

Yamaha P-250 Owner's Manual
ELECTRONIC PIANO
ELECTRONIC PIANO
MONO
/
L
R
PUT
IN
ONO
M
L/
0
5
2
P-
IANO
GH
I
H
D
I
M
-
I
H
D
I
M
D
I
M
-
AC INLET
G
ETTIN
S
I
D
I
M
ETTIN
S
HER
ANCE
M
OT
OR
F
ER
ILE
P
. F
S
M
U
R
O
OR
1
N
STAI
SU
2
OSUTENUTO
S
PEDAL
T
3
FT
O
S
NABLE FOO
G
I
SS
A
4
IN AUX
DI
I
UOUT
R
TH
I
MID
PC-2
ELECT M
ac
S
M
B
HOST
US
TO HOST
SB
U
R
OUTPUT
A
ANEL LOCK
P
UT
I O
MID
G FILE
ON
S
S
SONG SETTING
EX.TRACK
REC
TRACK2
TART/STOP
S
TRACK1
TOP
TART
RO S
SONG
NCH
SY
ELECT
S
ONG
S
W SONG
NE
C
UP
DOWN
MPO
TE
T
S
CONTRA
IT
X
E
B
S
E
Y
NO
D
2
IANO
P
.
E
1
IANO
P
.
E
2
S
3
G
IANO
P
TRIN
.
S
G
2
1
2
AN
G
IANO
P
.
OR
G
1
0
1
AN
G
OR
9
S
E
B
I
V
.
I
S
P
AR
H
.
7
I
SS
A
B
CLAV
3
6
ITAR
IANO
P
.
GU
E
D
A
4
P
1
51
.
NC
NTH
Y
S
ORMA
F
3
1
4
PER
/
HOIR
E
C
C
I
O
V
2
1
11
H
F
C
ER
P
B
IT
D
ER
V
E
Q
RE
TER E
S
A
M
LIT
P
S
DIT
E
OICE
TION
V
ARIA
V
B
A
8
G
X
6
1
5
1
E
LO
W
LO
G
ER
LIZ
EQUA
ER
MAST
P
ELECTRONIC
BOARD
Y
KE
E
NC
BALA
SONG
G
N
O
S
MAX
LUME
O
V
ER
MIN
MAST
R
POWE
ON OFF
Owner's Manual
MODULATION
H
PITC
SPECIAL MESSAGE SECTION
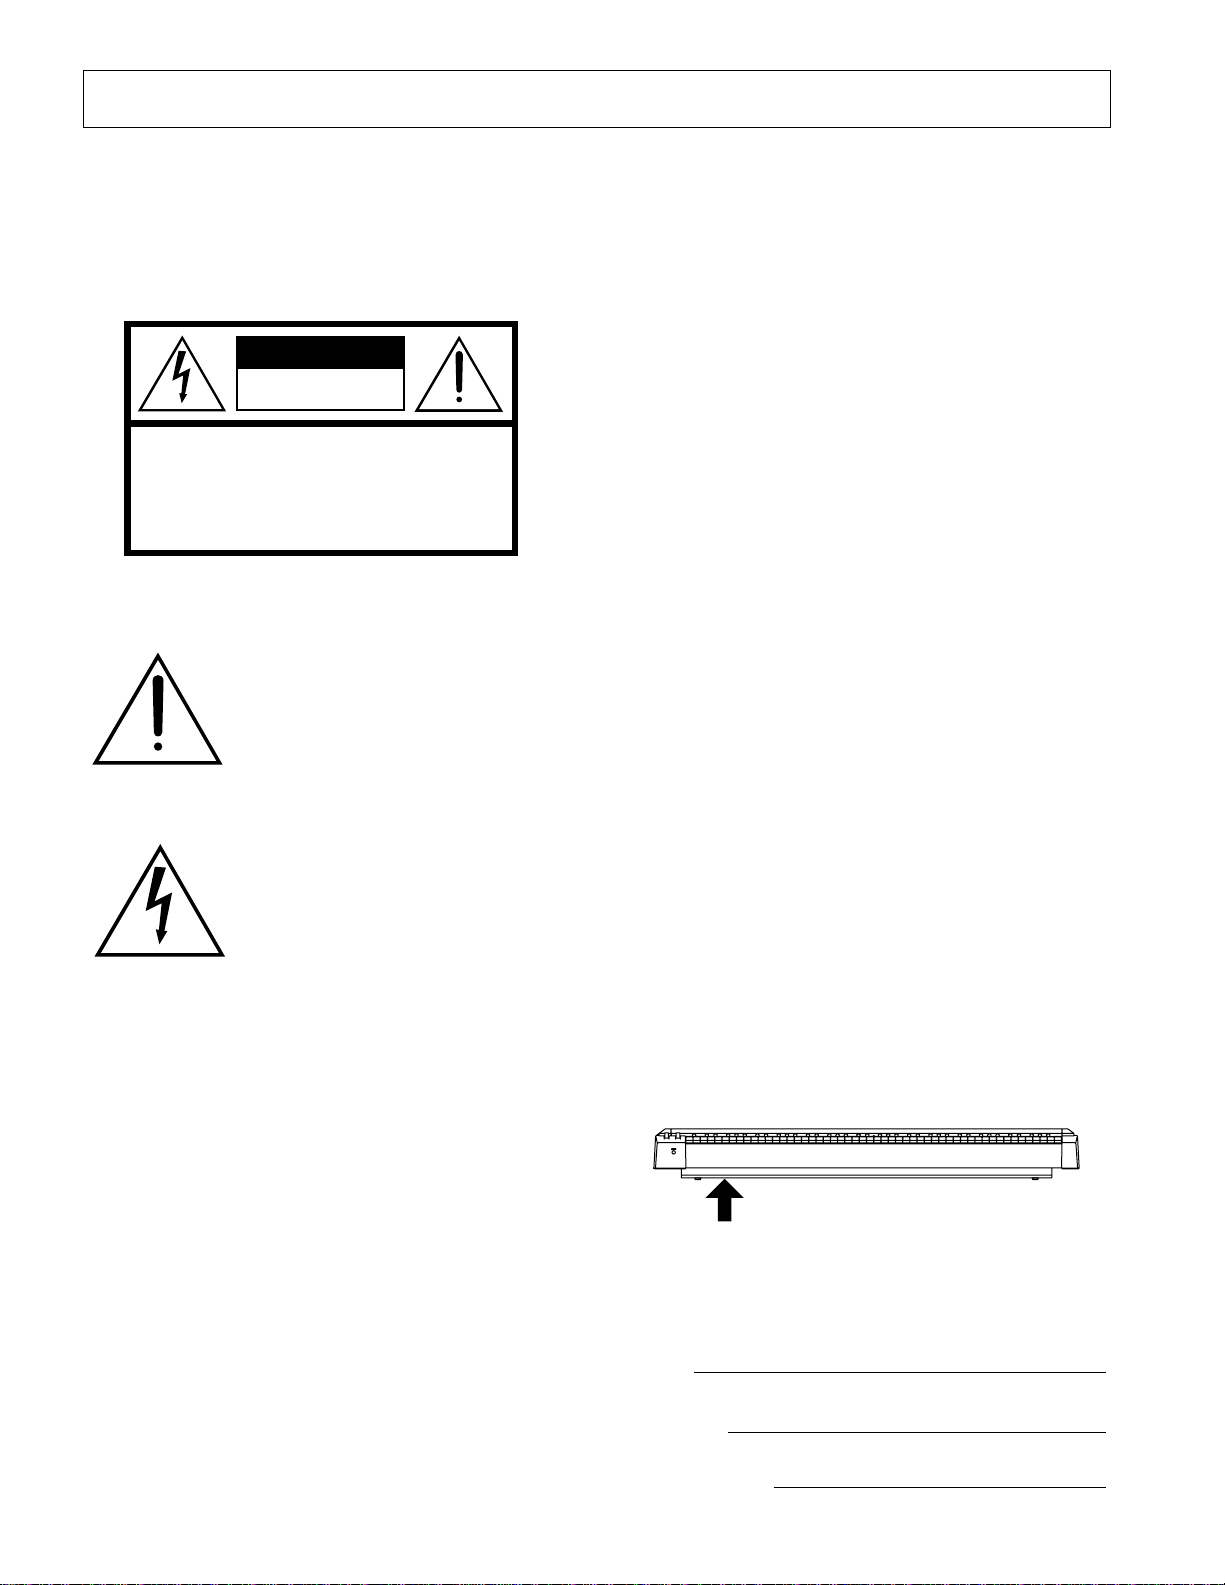
PRODUCT SAFETY MARKINGS:
products may have labels similar to the graphics shown
below or molded/stamped facsimiles of these graphics on
the enclosure. An explanation of these graphics appears
on this page. Please observe all cautions listed on this
page and those listed in the safety instructions section.
Yamaha electronic
CAUTION
RISK OF ELECTRIC SHOCK
DO NOT OPEN
CAUTION: TO REDUCE THE RISK OF ELECTRIC SHOCK.
DO NOT REMOVE COVER (OR BACK).
NO USER-SERVICEABLE PARTS INSIDE.
REFER SERVICING TO QUALIFIED SERVICE PERSONNEL.
See the bottom of the keyboard enclosure for graphic symbol
markings.
The exclamation point within an equilateral triangle is intended to alert the
user to the presence of important
operating and maintenance (servicing) instructions in the literature
accompanying the product.
The lightning flash with arrowhead
symbol, within an equilateral triangle,
is intended to alert the user to the
presence of uninsulated “dangerous
voltage” within the product’s enclosure that may be of sufficient magnitude to constitute a risk of electrical
shock.
IMPORTANT NOTICE:
are tested and approved by an independent safety testing
laboratory so you may be sure that when the product is
properly installed and used in its normal and customary
manner, all foreseeable risks have been eliminated. DO
NOT modify this unit or commission others to do so
unless specifically authorized by Yamaha. Product performance and/or safety standards may be diminished.
Claims filed under the expressed warranty may be denied
if the unit is/has been modified. Implied warranties may
also be affected.
SPECIFICATIONS SUBJECT T O CHANGE:
mation contained in this manual is believed to be correct
at the time of printing. However, Yamaha reserves the
right to change or modify any of the specifications without notice or obligation.
ENVIRONMENTAL ISSUES:
products that are both safe and environmentally friendly.
All Yamaha electronic products
The infor-
Yamaha strives to produce
We sincerely believe that our products and the production
methods used to produce them meet these goals. In keeping with both the letter and the spirit of the law, we want
you to be aware of the following:
Battery Notice:
rechargeable battery which (if applicable) is soldered in
place. The average life span of this type of battery is
approximately five years. When replacement becomes
necessary, contact a qualified service representative to
perform the replacement.
Warning:
incinerate this type of battery. Keep all batteries away
from children. Dispose of used batteries promptly and as
regulated by applicable laws. Note: In some areas, the
servicer is required by law to return defective parts. However, you do have the option of having the servicer dispose of these parts for you.
Disposal Notice:
beyond repair, or for some reason its useful life is considered to be at an end, please observe all local, state, and
federal regulations that relate to the disposal of products
that contain lead, batteries, plastics, etc.
NOTICE:
edge relating to how a function or effect works (when the
unit is operating as designed) are not covered by the manufacturer’ s warranty, and are therefore the owners responsibility. Please study this manual carefully and consult
your dealer before requesting service.
NAME PLATE LOCATION:
cates the location of the name plate. The model number,
serial number, power requirements, etc., are located on
this plate. You should record the model number, serial
number, and the date of purchase in the spaces provided
below and retain this manual as a permanent record of
your purchase.
On P-250 units distributed in countries other than the
U.S. and Canada, the name plate location may be different than that shown in the illustration above.
Model
Serial No.
Purchase Date
This product MAY contain a small non-
Do not attempt to recharge, disassemble, or
Should this product become damaged
Service charges incurred due to lack of knowl-
The graphic below indi-
P-250
2
P-250
92-469
1
(bottom)
Power supply/Power cord
Do not open
Water warning
Fire warning
If you notice any abnormality
Power supply/Power cord
Location
PRECAUTIONS
PLEASE READ CAREFULLY BEFORE PROCEEDING
* Please keep this manual in a safe place for future reference.
WARNING
Always follow the basic precautions listed below to avoid the possibility of serious injury or even death from electrical
shock, short-circuiting, damages, fire or other hazards. These precautions include, but are not limited to, the following:
• Use only the voltage specified for the instrument. The required voltage is
printed on the name plate of the instrument.
• Check the electric plug periodically and remove any dirt or dust which may
have accumulated on it.
• Use only the supplied power cord/plug.
• Do not place the power cord near heat sources such as heaters or radiators, and
do not excessively bend or otherwise damage the cord, place heavy objects on
it, or place it in a position where anyone could walk on, trip over, or roll
anything over it.
• Do not open the instrument or attempt to disassemble the internal parts or
modify them in any way. The instrument contains no user-serviceable parts. If it
should appear to be malfunctioning, discontinue use immediately and have the
instrument inspected by qualified Yamaha service personnel.
• Do not expose the instrument to rain, use it near water or in damp or wet
conditions, or place containers of liquid on it that might spill into any openings.
• Never insert or remove an electric plug with wet hands.
• Do not put burning items, such as candles, on the unit.
Burning items may fall over and cause a fire.
• If the power cord or plug becomes frayed or damaged, or if there is a sudden
loss of sound during use of the instrument, or if any unusual smells or smoke
should appear to be caused by it, immediately turn off the power switch,
disconnect the electric plug from the outlet, and have the instrument inspected
by qualified Yamaha service personnel.
CAUTION
Always follow the basic precautions listed below to avoid the possibility of physical injury to yourself or others, or
damage to the instrument or other property. These precautions include, but are not limited to, the following:
• When removing the electric plug from the instrument or an outlet, always hold
the plug itself and not the cord. Pulling on the cord can damage it.
• Remove the electric plug from the outlet when the instrument is not to be used
for extended periods of time, and during electrical storms.
• Do not connect the instrument to an electrical outlet using a multiple-connector.
Doing so can result in lower sound quality, or possibly cause overheating in the
outlet.
(1)-7
1/2
• Do not expose the instrument to excessive dust or vibration, or extreme cold or
heat (such as in direct sunlight, near a heater, or in a car during the day) to
prevent the possibility of panel disfiguration or damage to the internal
components.
• Do not use the instrument in the vicinity of a TV, radio, stereo equipment,
mobile phone, or other electric devices. Otherwise, the instrument, TV, or radio
may generate noise.
• Do not place the instrument in an unstable position from which it might
accidentally fall over.
• Do not place objects in front of the instrument's air vent, since this may prevent
adequate ventilation of the internal components, and possibly result in the
instrument overheating.
• Before moving the instrument, remove all connected cables.
• Use only the stand specified for the instrument. When attaching the stand or
rack, use the provided screws only. Failure to do so could cause damage to
internal components or result in the instrument falling over.
P-250
3

Connections
Maintenance
Handling precaution
Saving data
• Before connecting the instrument to other electronic components, turn off the
power for all components. Before turning the power on or off for all
components, set all volume levels to minimum. Also, be sure to set the
volumes of all components at their minimum levels and gradually raise the
volume controls while playing the instrument to set the desired listening level.
• When cleaning the instrument, use a soft, dry cloth. Do not use paint thinners,
solvents, cleaning fluids, or chemical-impregnated wiping cloths.
• Do not insert a finger or hand in any gaps on the instrument.
• Never insert or drop paper, metallic, or other objects into the gaps on the panel
or keyboard. If this happens, turn off the power immediately and unplug the
power cord from the AC outlet. Then, have the instrument inspected by qualified
Yamaha service personnel.
• Do not place vinyl, plastic or rubber objects on the instrument since they might
discolor the panel or keyboard.
• Do not rest your weight, or place heavy objects on the instrument. Do not use
excessive force on the buttons, switches or connectors.
• Do not operate the instrument for a long period of time at a high or
uncomfortable volume level, since this may cause permanent hearing loss. If
you experience any hearing loss or ringing in the ears, consult a physician.
Saving and backing up your data
For instruments with DRAM (RAM that does not retain data)
• Current memory data (see page 33) is lost when you turn off the power to the
instrument. Save the data to the storage memory (see pages 44 and 54).
Yamaha is not responsible for damage caused by improper use or modifications to the instrument, or data that is lost or destroyed.
Always turn the power off when the instrument is not in use.
4
P-250
(1)-7
2/2

Introduction
Thank you for purchasing the P-250 Electronic Piano.
The P-250 is a product of Yamaha’s extensive experience in creating fine musical instruments. Its beautiful sound and versatile editing functions enable you to use the P-250 in virtually any situation, ranging
from live performance to recording.
In order to take maximum advantage of the many advanced features and capabilities offered by the
P-250, we urge you to read this manual carefully, and keep it in a safe, accessible location for future reference.
How to Use this Manual
This manual consists of three main sections: Basic
Operation , Edit Operation , and Appendix .
Begin by reading the Basic Operation section to learn
about the basic functions of the P-250. Then, proceed
to the Edit Operation and Appendix sections for information about a particular function or to master an
advanced technique. Page references will help you
locate specific information.
Basic Operation
how to connect and set up your P-250 and use its
basic functions. It also describes the concept and
structure of the P-250 in plain language.
Edit Operation
tings for convenient and advanced techniques.
Appendix
presets, reference materials, a
and an
Index
includes a quick guide that explains
explains detailed functions and set-
includes a list of voice and performance
Troubleshooting
.
section
P-250
5

Introduction
Accessories and Options
Supplied Accessories
AC power cord
FC3 foot pedal
Music rest
Owner’s manual
Data List
CD-ROM (TOOLS for P-250)
TOOLS for P-250 Installation Guide
Options
Yamaha FC3 foot pedal
Yamaha FC4/FC5 foot switch
Yamaha FC7 foot controller
Yamaha LP-3/LG-100 keyboard stand
Yamaha HPE-170/RH headphones
* The illustrations and LCD screens in this owner’s manual are intended for instructional purposes only, and may appear some-
what different from those on your instrument.
COPYRIGHT NOTICE
This product incorporates and bundles computer programs and contents in which Yamaha owns copyrights or with respect to
which it has license to use others' copyrights. Such copyrighted materials include, without limitation, all computer software,
styles files, MIDI files, WAVE data and sound recordings. Any unauthorized use of such programs and contents outside of personal use is not permitted under relevant laws. Any violation of copyright has legal consequences. DON'T MAKE, DISTRIBUTE OR USE ILLEGAL COPIES.
• Unauthorized copying of copyrighted software for purposes other than the purchaser’s personal use is prohibited. If you wish to
use such data for certain occasions, consult a copyright expert.
• Apple and Macintosh are trademarks of Apple Computer, Inc., registered in the U.S. and other countries.
• Windows is a registered trademark of Microsoft Corporation.
• All other trademarks and registered trademarks are the property of their respective holders.
■
Features
• High-quality piano presets that sound virtually identical to an acoustic piano, due to three-stage dynamic sampling,
damper pedal tonal control, and subtle voicing nuances that are generated upon key release.
• An 88-key graded-hammer keyboard that replicates piano-like strokes
• Maximum 128-voice polyphony, 45 original voices by AWM tone generation, plus 480 standard voices and 12 drum kits
that are XG-compatible
• Simple and easy operation via a back-lit LCD and user-friendly control panel
•Various effects that add richness, depth and breadth to the sound
•Versatile MIDI functions
•A master equalizer that enables you to adjust the tone easily from the panel
•A foot control function, as well as pitch bend and modulation wheels, that serve as convenient and powerful tools f or live
performance
•A performance function that stores various parameters and settings, and recalls them quickly
•A 16-track sequencer function that records and plays performance data
6
P-250

Table of Contents
PRECAUTIONS . . . . . . . . . . . . . . . . . . . . . . . . . . . . . . . . . . . . . . . 3
Introduction . . . . . . . . . . . . . . . . . . . . . . . . . . . . . . . . . . . . . . . . . . . . . . . . . . . . . . . . . . . . . . . . . 5
How to Use this Manual . . . . . . . . . . . . . . . . . . . . . . . . . . . . . . . . . . . . . . . . . . . . . . . . . . . . 5
Accessories and Options . . . . . . . . . . . . . . . . . . . . . . . . . . . . . . . . . . . . . . . . . . . . . . . . . . . . 6
Features . . . . . . . . . . . . . . . . . . . . . . . . . . . . . . . . . . . . . . . . . . . . . . . . . . . . . . . . . . . . . . . . . . 6
Basic Operation . . . . . . . . . . . . . . . . . . . . . . . . . . . . . . . . . . . . . 13
Names and Functions. . . . . . . . . . . . . . . . . . . . . . . . . . . . . . . . . . . . . . . . . . . . . . . . . . . . . . . . . 14
Top Panel. . . . . . . . . . . . . . . . . . . . . . . . . . . . . . . . . . . . . . . . . . . . . . . . . . . . . . . . . . . . . . . . 14
Rear Panel Controls . . . . . . . . . . . . . . . . . . . . . . . . . . . . . . . . . . . . . . . . . . . . . . . . . . . . . . . . 15
Basic OperationEdit OperationAppendix
Setting Up . . . . . . . . . . . . . . . . . . . . . . . . . . . . . . . . . . . . . . . . . . . . . . . . . . . . . . . . . . . . . . . . . 16
Installing the Accessories . . . . . . . . . . . . . . . . . . . . . . . . . . . . . . . . . . . . . . . . . . . . . . . . . . . 16
Music rest . . . . . . . . . . . . . . . . . . . . . . . . . . . . . . . . . . . . . . . . . . . . . . . . . . . . . . . . . . . . . . 16
Pedal . . . . . . . . . . . . . . . . . . . . . . . . . . . . . . . . . . . . . . . . . . . . . . . . . . . . . . . . . . . . . . . . . 16
Before Powering Up . . . . . . . . . . . . . . . . . . . . . . . . . . . . . . . . . . . . . . . . . . . . . . . . . . . . . . . 16
Powering Up . . . . . . . . . . . . . . . . . . . . . . . . . . . . . . . . . . . . . . . . . . . . . . . . . . . . . . . . . . . . . 16
Connecting to External Devices . . . . . . . . . . . . . . . . . . . . . . . . . . . . . . . . . . . . . . . . . . . . . . . . 17
Connecting to External Audio Equipment . . . . . . . . . . . . . . . . . . . . . . . . . . . . . . . . . . . . . . 17
Connecting stereo powered speakers . . . . . . . . . . . . . . . . . . . . . . . . . . . . . . . . . . . . . . . . . 17
Connecting to a external instrument. . . . . . . . . . . . . . . . . . . . . . . . . . . . . . . . . . . . . . . . . . 17
Connecting to a mixer . . . . . . . . . . . . . . . . . . . . . . . . . . . . . . . . . . . . . . . . . . . . . . . . . . . . 17
Connecting External MIDI Equipment . . . . . . . . . . . . . . . . . . . . . . . . . . . . . . . . . . . . . . . . . 18
Controlling an external device from the P-250 . . . . . . . . . . . . . . . . . . . . . . . . . . . . . . . . . . 18
Controlling the P-250 from an external device . . . . . . . . . . . . . . . . . . . . . . . . . . . . . . . . . . 18
Recording your performance on the P-250 to an external MIDI sequencer (such as the QY
series), or playing the P-250 (as a tone generator) from an external MIDI sequencer . . . . . 18
Controlling another MIDI device via the MIDI [THRU] connector . . . . . . . . . . . . . . . . . . . . 18
Connecting to a Personal Computer . . . . . . . . . . . . . . . . . . . . . . . . . . . . . . . . . . . . . . . . . . 19
1 USB connection (the computer’s USB port to the P-250 [USB] connector) . . . . . . . . . . . . 19
2 Serial connection (computer’s serial port to P-250 [TO HOST] connector) . . . . . . . . . . . . 20
3 MIDI connection (the computer’s MIDI interface
or external MIDI interface to the P-250 MIDI IN and OUT connectors) . . . . . . . . . . . . . . . . 22
Connecting Pedals. . . . . . . . . . . . . . . . . . . . . . . . . . . . . . . . . . . . . . . . . . . . . . . . . . . . . . . . . 23
Connecting headphones . . . . . . . . . . . . . . . . . . . . . . . . . . . . . . . . . . . . . . . . . . . . . . . . . . . . 23
P-250 Quick Guide . . . . . . . . . . . . . . . . . . . . . . . . . . . . . . . . . . . . . . . . . . . . . . . . . . . . . . . . . . . 24
Listening to Demo and Preset Songs . . . . . . . . . . . . . . . . . . . . . . . . . . . . . . . . . . . . . . . . . . 24
Listening to the demo songs. . . . . . . . . . . . . . . . . . . . . . . . . . . . . . . . . . . . . . . . . . . . . . . . 24
Listening to the preset songs . . . . . . . . . . . . . . . . . . . . . . . . . . . . . . . . . . . . . . . . . . . . . . . 25
Selecting, Editing, and Storing a Voice . . . . . . . . . . . . . . . . . . . . . . . . . . . . . . . . . . . . . . . . 26
Selecting, Editing, and Storing a Performance . . . . . . . . . . . . . . . . . . . . . . . . . . . . . . . . . . 27
P-250
7

Table of Contents
Basic OperationEdit OperationAppendix
Editing a Voice and Storing It as a Performance . . . . . . . . . . . . . . . . . . . . . . . . . . . . . . . . . 27
P-250 Design. . . . . . . . . . . . . . . . . . . . . . . . . . . . . . . . . . . . . . . . . . . . . . . . . . . . . . . . . . . . . . . . 28
Voice. . . . . . . . . . . . . . . . . . . . . . . . . . . . . . . . . . . . . . . . . . . . . . . . . . . . . . . . . . . . . . . . . . . . 28
Performances . . . . . . . . . . . . . . . . . . . . . . . . . . . . . . . . . . . . . . . . . . . . . . . . . . . . . . . . . . . . . 30
Performance parameters . . . . . . . . . . . . . . . . . . . . . . . . . . . . . . . . . . . . . . . . . . . . . . . . . . . 30
Performance file . . . . . . . . . . . . . . . . . . . . . . . . . . . . . . . . . . . . . . . . . . . . . . . . . . . . . . . . . 32
Songs . . . . . . . . . . . . . . . . . . . . . . . . . . . . . . . . . . . . . . . . . . . . . . . . . . . . . . . . . . . . . . . . . . . 33
Song file . . . . . . . . . . . . . . . . . . . . . . . . . . . . . . . . . . . . . . . . . . . . . . . . . . . . . . . . . . . . . . . 33
About P-250 Memory. . . . . . . . . . . . . . . . . . . . . . . . . . . . . . . . . . . . . . . . . . . . . . . . . . . . . . . 33
Storage memory . . . . . . . . . . . . . . . . . . . . . . . . . . . . . . . . . . . . . . . . . . . . . . . . . . . . . . . . . 33
Current memory . . . . . . . . . . . . . . . . . . . . . . . . . . . . . . . . . . . . . . . . . . . . . . . . . . . . . . . . . 33
Basic Operation . . . . . . . . . . . . . . . . . . . . . . . . . . . . . . . . . . . . . . . . . . . . . . . . . . . . . . . . . . . . . 34
Selecting a Voice . . . . . . . . . . . . . . . . . . . . . . . . . . . . . . . . . . . . . . . . . . . . . . . . . . . . . . . . . . 34
Playing in Dual Mode. . . . . . . . . . . . . . . . . . . . . . . . . . . . . . . . . . . . . . . . . . . . . . . . . . . . . . .35
Dual mode using voices in different voice groups . . . . . . . . . . . . . . . . . . . . . . . . . . . . . . . . 35
Dual mode using voices in the same voice group . . . . . . . . . . . . . . . . . . . . . . . . . . . . . . . . 35
Playing in Split Mode. . . . . . . . . . . . . . . . . . . . . . . . . . . . . . . . . . . . . . . . . . . . . . . . . . . . . . . 36
Effect Structure . . . . . . . . . . . . . . . . . . . . . . . . . . . . . . . . . . . . . . . . . . . . . . . . . . . . . . . . . . . 37
System effects . . . . . . . . . . . . . . . . . . . . . . . . . . . . . . . . . . . . . . . . . . . . . . . . . . . . . . . . . . . 37
Insertion effects. . . . . . . . . . . . . . . . . . . . . . . . . . . . . . . . . . . . . . . . . . . . . . . . . . . . . . . . . . 37
Using the Effects . . . . . . . . . . . . . . . . . . . . . . . . . . . . . . . . . . . . . . . . . . . . . . . . . . . . . . . . . . 37
Reverb. . . . . . . . . . . . . . . . . . . . . . . . . . . . . . . . . . . . . . . . . . . . . . . . . . . . . . . . . . . . . . . . . 37
Chorus . . . . . . . . . . . . . . . . . . . . . . . . . . . . . . . . . . . . . . . . . . . . . . . . . . . . . . . . . . . . . . . . 37
Using the Master Equalizer . . . . . . . . . . . . . . . . . . . . . . . . . . . . . . . . . . . . . . . . . . . . . . . . . . 38
Using the Pitch Bend and Modulation Wheels . . . . . . . . . . . . . . . . . . . . . . . . . . . . . . . . . . . 38
Pitch bend wheel . . . . . . . . . . . . . . . . . . . . . . . . . . . . . . . . . . . . . . . . . . . . . . . . . . . . . . . .38
Modulation wheel . . . . . . . . . . . . . . . . . . . . . . . . . . . . . . . . . . . . . . . . . . . . . . . . . . . . . . . . 38
Using Pedals. . . . . . . . . . . . . . . . . . . . . . . . . . . . . . . . . . . . . . . . . . . . . . . . . . . . . . . . . . . . . . 39
Applying the sustain effect . . . . . . . . . . . . . . . . . . . . . . . . . . . . . . . . . . . . . . . . . . . . . . . . . 39
Applying the sostenuto effect . . . . . . . . . . . . . . . . . . . . . . . . . . . . . . . . . . . . . . . . . . . . . . . 39
Applying the soft effect . . . . . . . . . . . . . . . . . . . . . . . . . . . . . . . . . . . . . . . . . . . . . . . . . . . . 39
Applying the expression effect. . . . . . . . . . . . . . . . . . . . . . . . . . . . . . . . . . . . . . . . . . . . . . . 39
Using Panel Lock . . . . . . . . . . . . . . . . . . . . . . . . . . . . . . . . . . . . . . . . . . . . . . . . . . . . . . . . . . 39
Toggling MIDI Transmission On/Off. . . . . . . . . . . . . . . . . . . . . . . . . . . . . . . . . . . . . . . . . . . 40
Transmitting MIDI Panic Signals . . . . . . . . . . . . . . . . . . . . . . . . . . . . . . . . . . . . . . . . . . . . . . 40
Performance Operation . . . . . . . . . . . . . . . . . . . . . . . . . . . . . . . . . . . . . . . . . . . . . . . . . . . . . . . 41
Selecting a Performance . . . . . . . . . . . . . . . . . . . . . . . . . . . . . . . . . . . . . . . . . . . . . . . . . . . . 41
Handling Performance Files [PERFORM.FILE] . . . . . . . . . . . . . . . . . . . . . . . . . . . . . . . . . . . . . . 42
Basic Operation for the Performance File . . . . . . . . . . . . . . . . . . . . . . . . . . . . . . . . . . . . . . . 42
Storing a Performance [Performance] . . . . . . . . . . . . . . . . . . . . . . . . . . . . . . . . . . . . . . . . . 43
Renaming a Performance [Perf.Name] . . . . . . . . . . . . . . . . . . . . . . . . . . . . . . . . . . . . . . . . . 43
Saving a Performance File to Storage Memory [SaveToMemory] . . . . . . . . . . . . . . . . . . . . 44
Loading a Performance File from Storage Memory [LoadFromMem.] . . . . . . . . . . . . . . . . 44
Deleting a Performance File [DeleteFile]. . . . . . . . . . . . . . . . . . . . . . . . . . . . . . . . . . . . . . . . 45
Renaming a Performance File [RenameFile] . . . . . . . . . . . . . . . . . . . . . . . . . . . . . . . . . . . . . 45
8
P-250

Table of Contents
Song Operation . . . . . . . . . . . . . . . . . . . . . . . . . . . . . . . . . . . . . . . . . . . . . . . . . . . . . . . . . . . . . 46
Recording Songs . . . . . . . . . . . . . . . . . . . . . . . . . . . . . . . . . . . . . . . . . . . . . . . . . . . . . . . . . . 46
Recording a New Song . . . . . . . . . . . . . . . . . . . . . . . . . . . . . . . . . . . . . . . . . . . . . . . . . . . . . 47
Recording . . . . . . . . . . . . . . . . . . . . . . . . . . . . . . . . . . . . . . . . . . . . . . . . . . . . . . . . . . . . . . 47
Re-recording part of a song . . . . . . . . . . . . . . . . . . . . . . . . . . . . . . . . . . . . . . . . . . . . . . . . 48
Other Recording Techniques . . . . . . . . . . . . . . . . . . . . . . . . . . . . . . . . . . . . . . . . . . . . . . . . 49
Adding data to or recording over an existing song . . . . . . . . . . . . . . . . . . . . . . . . . . . . . . . 49
Changing the voice or tempo after recording . . . . . . . . . . . . . . . . . . . . . . . . . . . . . . . . . . . 49
Adjusting the volume balance between playback and the sound
of your playing by using the [SONG BALANCE] slider . . . . . . . . . . . . . . . . . . . . . . . . . . . . . 49
Recording in Dual or Split mode . . . . . . . . . . . . . . . . . . . . . . . . . . . . . . . . . . . . . . . . . . . . . 50
Song Playback . . . . . . . . . . . . . . . . . . . . . . . . . . . . . . . . . . . . . . . . . . . . . . . . . . . . . . . . . . . . . . 51
Playback. . . . . . . . . . . . . . . . . . . . . . . . . . . . . . . . . . . . . . . . . . . . . . . . . . . . . . . . . . . . . . . . . 51
Handling Song Files [SONG FILE] . . . . . . . . . . . . . . . . . . . . . . . . . . . . . . . . . . . . . . . . . . . . . . . 53
Basic Song File Operation . . . . . . . . . . . . . . . . . . . . . . . . . . . . . . . . . . . . . . . . . . . . . . . . . . . 53
Saving a Song File in Storage Memory [SaveToMemory] . . . . . . . . . . . . . . . . . . . . . . . . . . 54
Deleting a Song File from Storage Memory [DeleteSong] . . . . . . . . . . . . . . . . . . . . . . . . . 54
Renaming a Song (Song File) [RenameSong]. . . . . . . . . . . . . . . . . . . . . . . . . . . . . . . . . . . . 55
Changing the On-Screen Character Type [CharacterCode]. . . . . . . . . . . . . . . . . . . . . . . . . 55
Basic OperationEdit OperationAppendix
Edit Operation. . . . . . . . . . . . . . . . . . . . . . . . . . . . . . . . . . . . . . 57
Editing . . . . . . . . . . . . . . . . . . . . . . . . . . . . . . . . . . . . . . . . . . . . . . . . . . . . . . . . . . . . . . . . . . . . 58
Parameter List . . . . . . . . . . . . . . . . . . . . . . . . . . . . . . . . . . . . . . . . . . . . . . . . . . . . . . . . . . . . 58
Basic Editing Flow . . . . . . . . . . . . . . . . . . . . . . . . . . . . . . . . . . . . . . . . . . . . . . . . . . . . . . . . . 61
Settings for Song Recording and Playback [SONG SETTING] . . . . . . . . . . . . . . . . . . . . . . . . . 62
Correcting note timing [Quantize] . . . . . . . . . . . . . . . . . . . . . . . . . . . . . . . . . . . . . . . . . . . . . . . . . . . . . . . . 62
Specifying whether playback starts immediately along with the first voicing
[QuickPlay] . . . . . . . . . . . . . . . . . . . . . . . . . . . . . . . . . . . . . . . . . . . . . . . . . . . . . . . . . . . . . . . . . . . . . . . . . . . 62
Auditioning channel [ChannelListen]. . . . . . . . . . . . . . . . . . . . . . . . . . . . . . . . . . . . . . . . . . . . . . . . . . . . . . 63
Deleting data from a channel [ChannelClear] . . . . . . . . . . . . . . . . . . . . . . . . . . . . . . . . . . . . . . . . . . . . . . . 63
Specifying the range and playing back repeatedly [FromToRepeat] . . . . . . . . . . . . . . . . . . . . . . . . . . . . . 63
Specifying a phrase for playback by phrase number [PhraseMark] . . . . . . . . . . . . . . . . . . . . . . . . . . . . . . 63
Playing back a song repeatedly [SongRepeat]. . . . . . . . . . . . . . . . . . . . . . . . . . . . . . . . . . . . . . . . . . . . . . . . 64
Setting the click time signature [TimeSignature]. . . . . . . . . . . . . . . . . . . . . . . . . . . . . . . . . . . . . . . . . . . . . 64
Setting the click volume [ClickVolume] . . . . . . . . . . . . . . . . . . . . . . . . . . . . . . . . . . . . . . . . . . . . . . . . . . . . 64
Turning the click on/off [ClickOnOff] . . . . . . . . . . . . . . . . . . . . . . . . . . . . . . . . . . . . . . . . . . . . . . . . . . . . . 64
Editing a Voice in Detail [VOICE EDIT] . . . . . . . . . . . . . . . . . . . . . . . . . . . . . . . . . . . . . . . . . . . 65
Basic voice editing using [VOICE EDIT] . . . . . . . . . . . . . . . . . . . . . . . . . . . . . . . . . . . . . . . . 65
Setting the octave* [Octave]. . . . . . . . . . . . . . . . . . . . . . . . . . . . . . . . . . . . . . . . . . . . . . . . . . . . . . . . . . . . . . 65
Setting the volume level* [Volume] . . . . . . . . . . . . . . . . . . . . . . . . . . . . . . . . . . . . . . . . . . . . . . . . . . . . . . . 65
Setting the position of the right and left channels* [Pan] . . . . . . . . . . . . . . . . . . . . . . . . . . . . . . . . . . . . . . 66
Adjusting fine pitch offset between two voices in Dual mode [Detune] . . . . . . . . . . . . . . . . . . . . . . . . . . 66
Selecting the reverb type [ReverbType]. . . . . . . . . . . . . . . . . . . . . . . . . . . . . . . . . . . . . . . . . . . . . . . . . . . . . 66
P-250
9

Table of Contents
Basic OperationEdit OperationAppendix
Setting the reverb depth* [ReverbSend] . . . . . . . . . . . . . . . . . . . . . . . . . . . . . . . . . . . . . . . . . . . . . . . . . . . . 66
Setting the chorus type [ChorusType] . . . . . . . . . . . . . . . . . . . . . . . . . . . . . . . . . . . . . . . . . . . . . . . . . . . . . 66
Setting the chorus depth* [ChorusSend] . . . . . . . . . . . . . . . . . . . . . . . . . . . . . . . . . . . . . . . . . . . . . . . . . . . 67
Turning the chorus on/off [ChorusOnOff] . . . . . . . . . . . . . . . . . . . . . . . . . . . . . . . . . . . . . . . . . . . . . . . . . 67
Selecting the insertion effect type* [Ins.Type(Ins)]. . . . . . . . . . . . . . . . . . . . . . . . . . . . . . . . . . . . . . . . . . . 67
Setting the speed of the vibraphone vibrato effect* [VibeRotorSpeed(RotorSpeed)] . . . . . . . . . . . . . . . 67
Turning the Vibraphone vibrato on/off* [VibeRotorOnOff (RotorOnOff)] . . . . . . . . . . . . . . . . . . . . . . 67
Adjusting the speed of the rotary speaker* [RotarySpeed (Rot.Speed)] . . . . . . . . . . . . . . . . . . . . . . . . . . 67
Adjusting the insertion effect depth*
[Dry/WetBalance(Dry/Wet)]. . . . . . . . . . . . . . . . . . . . . . . . . . . . . . . . . . . . . . . . . . . . . . . . . . . . . . . . . . . . . 68
Adjusting the brightness of the sound* [Brightness]. . . . . . . . . . . . . . . . . . . . . . . . . . . . . . . . . . . . . . . . . . 68
Adjusting the resonance effect* [HarmonicContent (Harmonic)] . . . . . . . . . . . . . . . . . . . . . . . . . . . . . . 68
Adjusting the low-range frequency of the part EQ* [EQ LowFreq.(EQ L.Freq)]. . . . . . . . . . . . . . . . . . . 68
Adjusting the high-range frequency of the part EQ* [EQ HighFreq.(EQ H.Freq)] . . . . . . . . . . . . . . . . . 68
Adjusting the low-range gain (amount of boost/cut) of the part EQ* [EQLowGain] . . . . . . . . . . . . . . . 68
Adjusting the high-range gain (amount of boost/cut) of the part EQ* [EQHighGain]. . . . . . . . . . . . . . 68
Setting the touch sensitivity* [TouchSense]. . . . . . . . . . . . . . . . . . . . . . . . . . . . . . . . . . . . . . . . . . . . . . . . . 68
Assigning the Pedal 1 function [Pedal 1] . . . . . . . . . . . . . . . . . . . . . . . . . . . . . . . . . . . . . . . . . . . . . . . . . . . 69
Assigning the Pedal 2 function [Pedal 2] . . . . . . . . . . . . . . . . . . . . . . . . . . . . . . . . . . . . . . . . . . . . . . . . . . . 69
Assigning the Pedal 3 function [Pedal 3] . . . . . . . . . . . . . . . . . . . . . . . . . . . . . . . . . . . . . . . . . . . . . . . . . . . 69
Assigning the Pedal 4 function [Pedal 4] . . . . . . . . . . . . . . . . . . . . . . . . . . . . . . . . . . . . . . . . . . . . . . . . . . . 69
Assigning the modulation wheel function [Modulation] . . . . . . . . . . . . . . . . . . . . . . . . . . . . . . . . . . . . . . 69
Setting the MSB of the Send Bank Select message* [SendBankMSB(SendMSB)] . . . . . . . . . . . . . . . . . . 70
Setting the LSB of the Send Bank Select message* [SendBankLSB(SendLSB)]. . . . . . . . . . . . . . . . . . . . . 70
Setting the Program Change message* [SendPG#] . . . . . . . . . . . . . . . . . . . . . . . . . . . . . . . . . . . . . . . . . . . 70
Turning the Internal tone generator on/off* [InternalTG] . . . . . . . . . . . . . . . . . . . . . . . . . . . . . . . . . . . . 70
Adjusting the Master Equalizer [MASTER EQ EDIT] . . . . . . . . . . . . . . . . . . . . . . . . . . . . . . . . . 71
Setting the Master Equalizer type . . . . . . . . . . . . . . . . . . . . . . . . . . . . . . . . . . . . . . . . . . . . . . . . . . . . . . . . . 71
Adjusting the low range gain of the Master Equalizer [LowGain] . . . . . . . . . . . . . . . . . . . . . . . . . . . . . . . 71
Adjusting the low-middle range gain of the Master Equalizer [LowMidGain] . . . . . . . . . . . . . . . . . . . . 71
Adjusting the middle range gain of the Master Equalizer [MidGain] . . . . . . . . . . . . . . . . . . . . . . . . . . . . 71
Adjusting the high-middle range gain of the Master Equalizer [HighMidGain] . . . . . . . . . . . . . . . . . . . 71
Adjusting the high range gain of the Master Equalizer [HighGain] . . . . . . . . . . . . . . . . . . . . . . . . . . . . . 71
Adjusting the low frequency of the Master Equalizer [LowFreq.] . . . . . . . . . . . . . . . . . . . . . . . . . . . . . . . 71
Adjusting the low-middle frequency of the Master Equalizer [LowMidFreq.]. . . . . . . . . . . . . . . . . . . . . 71
Adjusting the middle frequency of the Master Equalizer [MidFreq.] . . . . . . . . . . . . . . . . . . . . . . . . . . . . 71
Adjusting the high-middle frequency of the Master Equalizer [HighMidFreq.] . . . . . . . . . . . . . . . . . . . 71
Adjusting the high frequency of the Master Equalizer [HighFreq.]. . . . . . . . . . . . . . . . . . . . . . . . . . . . . . 71
Adjusting the low range resonance of the Master Equalizer [LowQ] . . . . . . . . . . . . . . . . . . . . . . . . . . . . 72
Adjusting the low-middle range resonance of the Master Equalizer [LowMidQ] . . . . . . . . . . . . . . . . . . 72
Adjusting the middle range resonance of the Master Equalizer [MidQ]. . . . . . . . . . . . . . . . . . . . . . . . . . 72
Adjusting the high-middle range resonance of the Master Equalizer [HighMidQ]. . . . . . . . . . . . . . . . . 72
Adjusting the high range resonance of the Master Equalizer [HighQ] . . . . . . . . . . . . . . . . . . . . . . . . . . . 72
MIDI [MIDI SETTING] . . . . . . . . . . . . . . . . . . . . . . . . . . . . . . . . . . . . . . . . . . . . . . . . . . . . . . . . . 73
10
P-250

Table of Contents
About MIDI . . . . . . . . . . . . . . . . . . . . . . . . . . . . . . . . . . . . . . . . . . . . . . . . . . . . . . . . . . . . . . 73
[MIDI] connector . . . . . . . . . . . . . . . . . . . . . . . . . . . . . . . . . . . . . . . . . . . . . . . . . . . . . . . . 73
[TO HOST] connector . . . . . . . . . . . . . . . . . . . . . . . . . . . . . . . . . . . . . . . . . . . . . . . . . . . . . 73
[USB] connector . . . . . . . . . . . . . . . . . . . . . . . . . . . . . . . . . . . . . . . . . . . . . . . . . . . . . . . . . 73
Setting the MIDI transmit channel [MidiOutChannel] . . . . . . . . . . . . . . . . . . . . . . . . . . . . . . . . . . . . . . . 74
Setting the MIDI receive channel [MidiInChannel] . . . . . . . . . . . . . . . . . . . . . . . . . . . . . . . . . . . . . . . . . . 74
Turning the Local Control On/Off [LocalControl] . . . . . . . . . . . . . . . . . . . . . . . . . . . . . . . . . . . . . . . . . . . 74
Specifying keyboard performance or song data to be transmitted via MIDI [MidiOutSelect] . . . . . . . . 74
Specifying the type of data received via MIDI [ReceiveParameter] . . . . . . . . . . . . . . . . . . . . . . . . . . . . . . 75
Specifying the type of data transmitted via MIDI [TransmitParameter]. . . . . . . . . . . . . . . . . . . . . . . . . . 75
Transmitting the initial settings on the panel [InitialSetup]. . . . . . . . . . . . . . . . . . . . . . . . . . . . . . . . . . . . 75
Executing Voice Data Bulk Dump [VoiceBulkDump] . . . . . . . . . . . . . . . . . . . . . . . . . . . . . . . . . . . . . . . . 75
Other Settings [OTHER SETTING] . . . . . . . . . . . . . . . . . . . . . . . . . . . . . . . . . . . . . . . . . . . . . . . 76
Selecting a touch response [TouchResponse]. . . . . . . . . . . . . . . . . . . . . . . . . . . . . . . . . . . . . . . . . . . . . . . . 76
Fine-tuning the pitch [Tune] . . . . . . . . . . . . . . . . . . . . . . . . . . . . . . . . . . . . . . . . . . . . . . . . . . . . . . . . . . . . . 76
Selecting a tuning curve for a piano voice [PianoTuningCurve] . . . . . . . . . . . . . . . . . . . . . . . . . . . . . . . . 76
Selecting a scale [Scale] . . . . . . . . . . . . . . . . . . . . . . . . . . . . . . . . . . . . . . . . . . . . . . . . . . . . . . . . . . . . . . . . . . 77
Setting the split point [SplitPoint]. . . . . . . . . . . . . . . . . . . . . . . . . . . . . . . . . . . . . . . . . . . . . . . . . . . . . . . . . 77
Setting the key [Transpose] . . . . . . . . . . . . . . . . . . . . . . . . . . . . . . . . . . . . . . . . . . . . . . . . . . . . . . . . . . . . . . 77
Specifying the depth of the soft pedal [SoftPedalDepth]. . . . . . . . . . . . . . . . . . . . . . . . . . . . . . . . . . . . . . . 77
Specifying the depth of string resonance [StringResonanceDepth] . . . . . . . . . . . . . . . . . . . . . . . . . . . . . . 77
Specifying the depth of sustain sampling for the damper pedal [SustainSamplingDepth]
Specifying the volume of the key-off sound [KeyOffSamplingDepth]. . . . . . . . . . . . . . . . . . . . . . . . . . . . 78
Selecting a pedal function for vibraphone [VibraphonePedalMode]. . . . . . . . . . . . . . . . . . . . . . . . . . . . . 78
Assigning the START/STOP function to a pedal [PedalStart/Stop]. . . . . . . . . . . . . . . . . . . . . . . . . . . . . . 78
Selecting a type of pedal [Pedal Type]. . . . . . . . . . . . . . . . . . . . . . . . . . . . . . . . . . . . . . . . . . . . . . . . . . . . . . 78
Setting the point at which the pedal starts to affect the sound [HalfPedalPoint] . . . . . . . . . . . . . . . . . . . 78
Setting the pitch bend range [PitchBendRange] . . . . . . . . . . . . . . . . . . . . . . . . . . . . . . . . . . . . . . . . . . . . . 79
Assigning a function to the [SONG BALANCE] slider [SongBalanceAssign]. . . . . . . . . . . . . . . . . . . . . . 79
Switching the speaker on/off [Speaker]. . . . . . . . . . . . . . . . . . . . . . . . . . . . . . . . . . . . . . . . . . . . . . . . . . . . . 79
Locking the Master Equalizer settings [EqualizerLock]. . . . . . . . . . . . . . . . . . . . . . . . . . . . . . . . . . . . . . . . 79
Selecting items saved at shutdown [MemoryBackUp] . . . . . . . . . . . . . . . . . . . . . . . . . . . . . . . . . . . . . . . . 79
Restoring the normal (default) settings [FactorySet]. . . . . . . . . . . . . . . . . . . . . . . . . . . . . . . . . . . . . . . . . . 79
. . . . . . . . . . . . . . . 78
Basic OperationEdit OperationAppendix
Appendix . . . . . . . . . . . . . . . . . . . . . . . . . . . . . . . . . . . . . . . . . . 81
Message List. . . . . . . . . . . . . . . . . . . . . . . . . . . . . . . . . . . . . . . . . . . . . . . . . . . . . . . . . . . . . . . . 82
Troubleshooting . . . . . . . . . . . . . . . . . . . . . . . . . . . . . . . . . . . . . . . . . . . . . . . . . . . . . . . . . . . . 86
Midi Data Compatibility . . . . . . . . . . . . . . . . . . . . . . . . . . . . . . . . . . . . . . . . . . . . . . . . . . . . . . 88
Preset Voice List . . . . . . . . . . . . . . . . . . . . . . . . . . . . . . . . . . . . . . . . . . . . . . . . . . . . . . . . . . . . . 90
Preset Performance List . . . . . . . . . . . . . . . . . . . . . . . . . . . . . . . . . . . . . . . . . . . . . . . . . . . . . . . 92
Application Index. . . . . . . . . . . . . . . . . . . . . . . . . . . . . . . . . . . . . . . . . . . . . . . . . . . . . . . . . . . . 94
P-250
11

Table of Contents
Basic OperationEdit OperationAppendix
Listening and playing . . . . . . . . . . . . . . . . . . . . . . . . . . . . . . . . . . . . . . . . . . . . . . . . . . . . . .94
Using the controllers . . . . . . . . . . . . . . . . . . . . . . . . . . . . . . . . . . . . . . . . . . . . . . . . . . . . . . . 94
Changing the sound . . . . . . . . . . . . . . . . . . . . . . . . . . . . . . . . . . . . . . . . . . . . . . . . . . . . . . .94
Changing the pitch . . . . . . . . . . . . . . . . . . . . . . . . . . . . . . . . . . . . . . . . . . . . . . . . . . . . . . . . 94
Adjusting the volume Level . . . . . . . . . . . . . . . . . . . . . . . . . . . . . . . . . . . . . . . . . . . . . . . . . . 95
Recording, playing, and saving a song . . . . . . . . . . . . . . . . . . . . . . . . . . . . . . . . . . . . . . . . . 95
Using, editing, and saving a performance . . . . . . . . . . . . . . . . . . . . . . . . . . . . . . . . . . . . . . 95
Connecting the P-250 to other devices. . . . . . . . . . . . . . . . . . . . . . . . . . . . . . . . . . . . . . . . . 95
If you . . . . . . . . . . . . . . . . . . . . . . . . . . . . . . . . . . . . . . . . . . . . . . . . . . . . . . . . . . . . . . . . . . . 95
Index. . . . . . . . . . . . . . . . . . . . . . . . . . . . . . . . . . . . . . . . . . . . . . . . . . . . . . . . . . . . . . . . . . . . . . 96
12
P-250

Basic Operation
Basic Operation includes a quick guide that explains ho w to connect and set up your P-250 and use its basic
functions. It also describes the concept and structure of the P-250 in plain language.
Names and Functions . . . . . . . . . . . . . . . . . . . . . . . . . . . . . . . . . . . . . . . . . . . .14
Setting Up. . . . . . . . . . . . . . . . . . . . . . . . . . . . . . . . . . . . . . . . . . . . . . . . . . . . .16
Connecting to External Devices . . . . . . . . . . . . . . . . . . . . . . . . . . . . . . . . . . . .17
P-250 Quick Guide . . . . . . . . . . . . . . . . . . . . . . . . . . . . . . . . . . . . . . . . . . . . . .24
P-250 Design. . . . . . . . . . . . . . . . . . . . . . . . . . . . . . . . . . . . . . . . . . . . . . . . . . .28
Basic Operation. . . . . . . . . . . . . . . . . . . . . . . . . . . . . . . . . . . . . . . . . . . . . . . . .34
Performance Operation . . . . . . . . . . . . . . . . . . . . . . . . . . . . . . . . . . . . . . . . . .41
Handling Performance Files [PERFORM.FILE] . . . . . . . . . . . . . . . . . . . . . . . . .42
Song Operation . . . . . . . . . . . . . . . . . . . . . . . . . . . . . . . . . . . . . . . . . . . . . . . .46
Song Playback. . . . . . . . . . . . . . . . . . . . . . . . . . . . . . . . . . . . . . . . . . . . . . . . . .51
Basic Operation
Handling Song Files [SONG FILE]. . . . . . . . . . . . . . . . . . . . . . . . . . . . . . . . . . .53
P-250
13
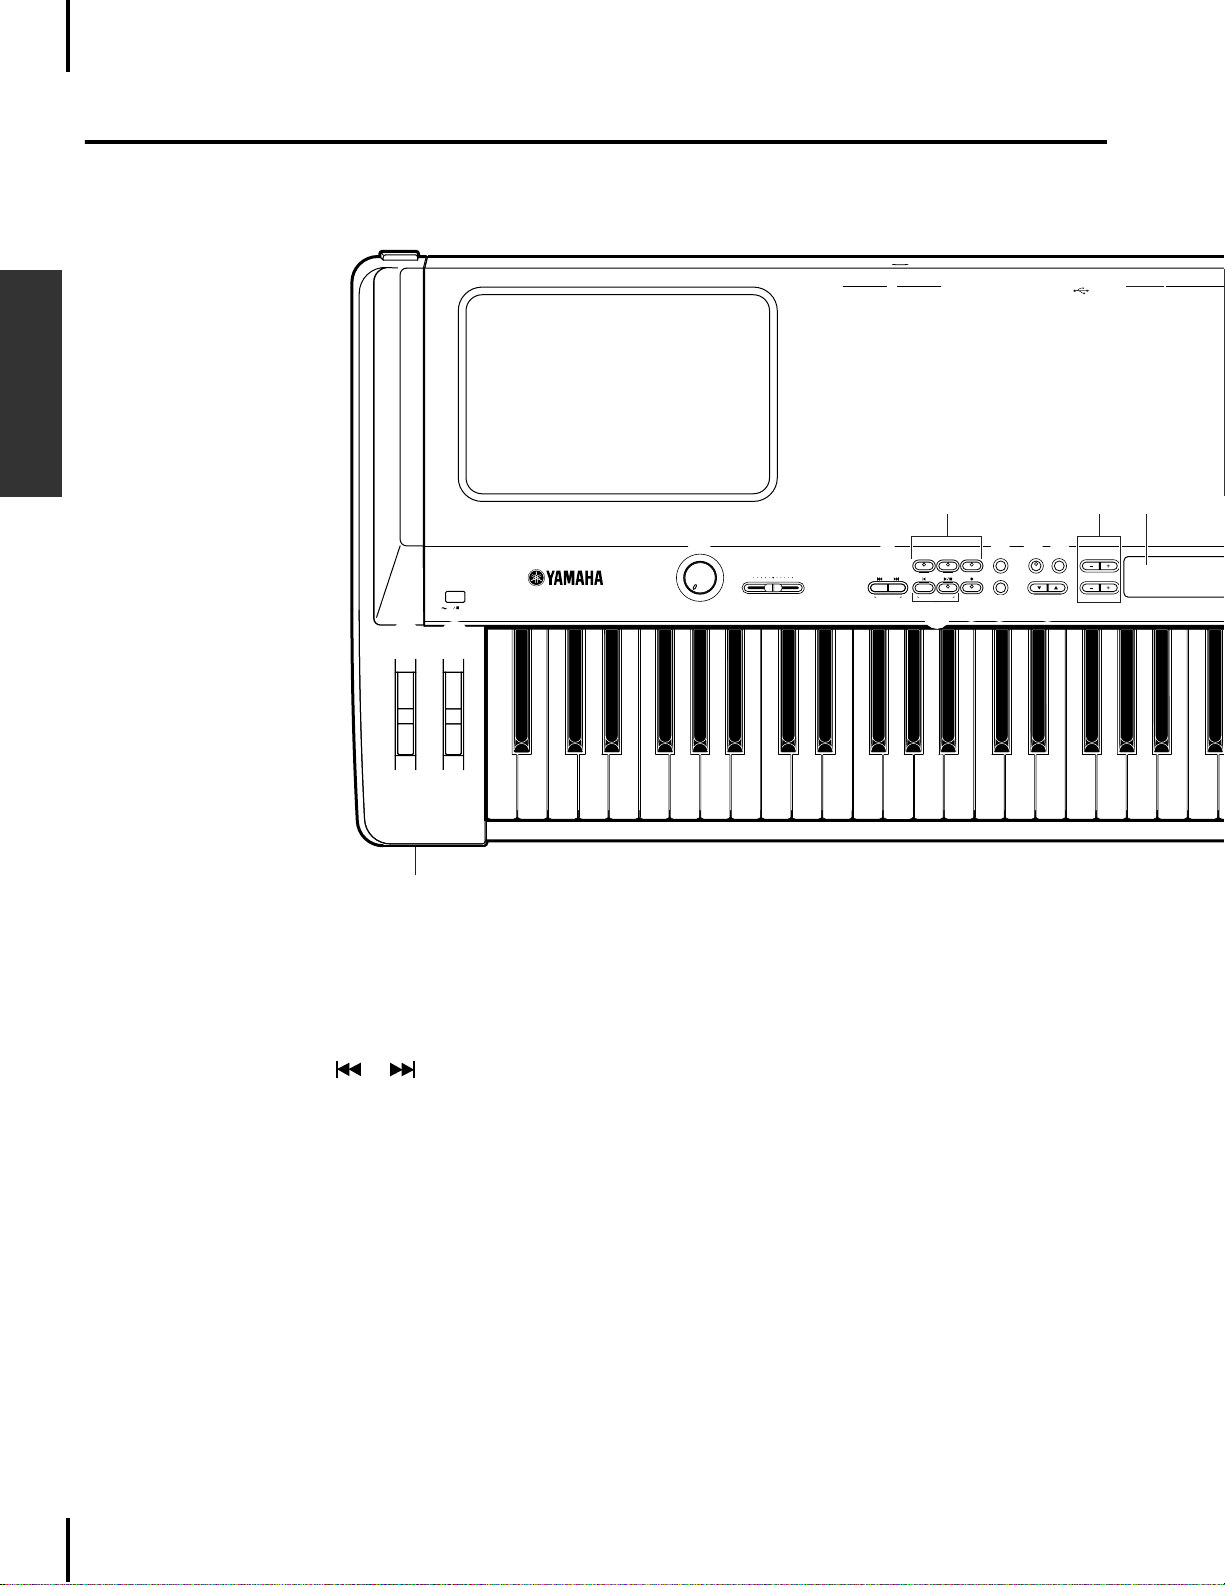
Names and Functions
Names and Functions
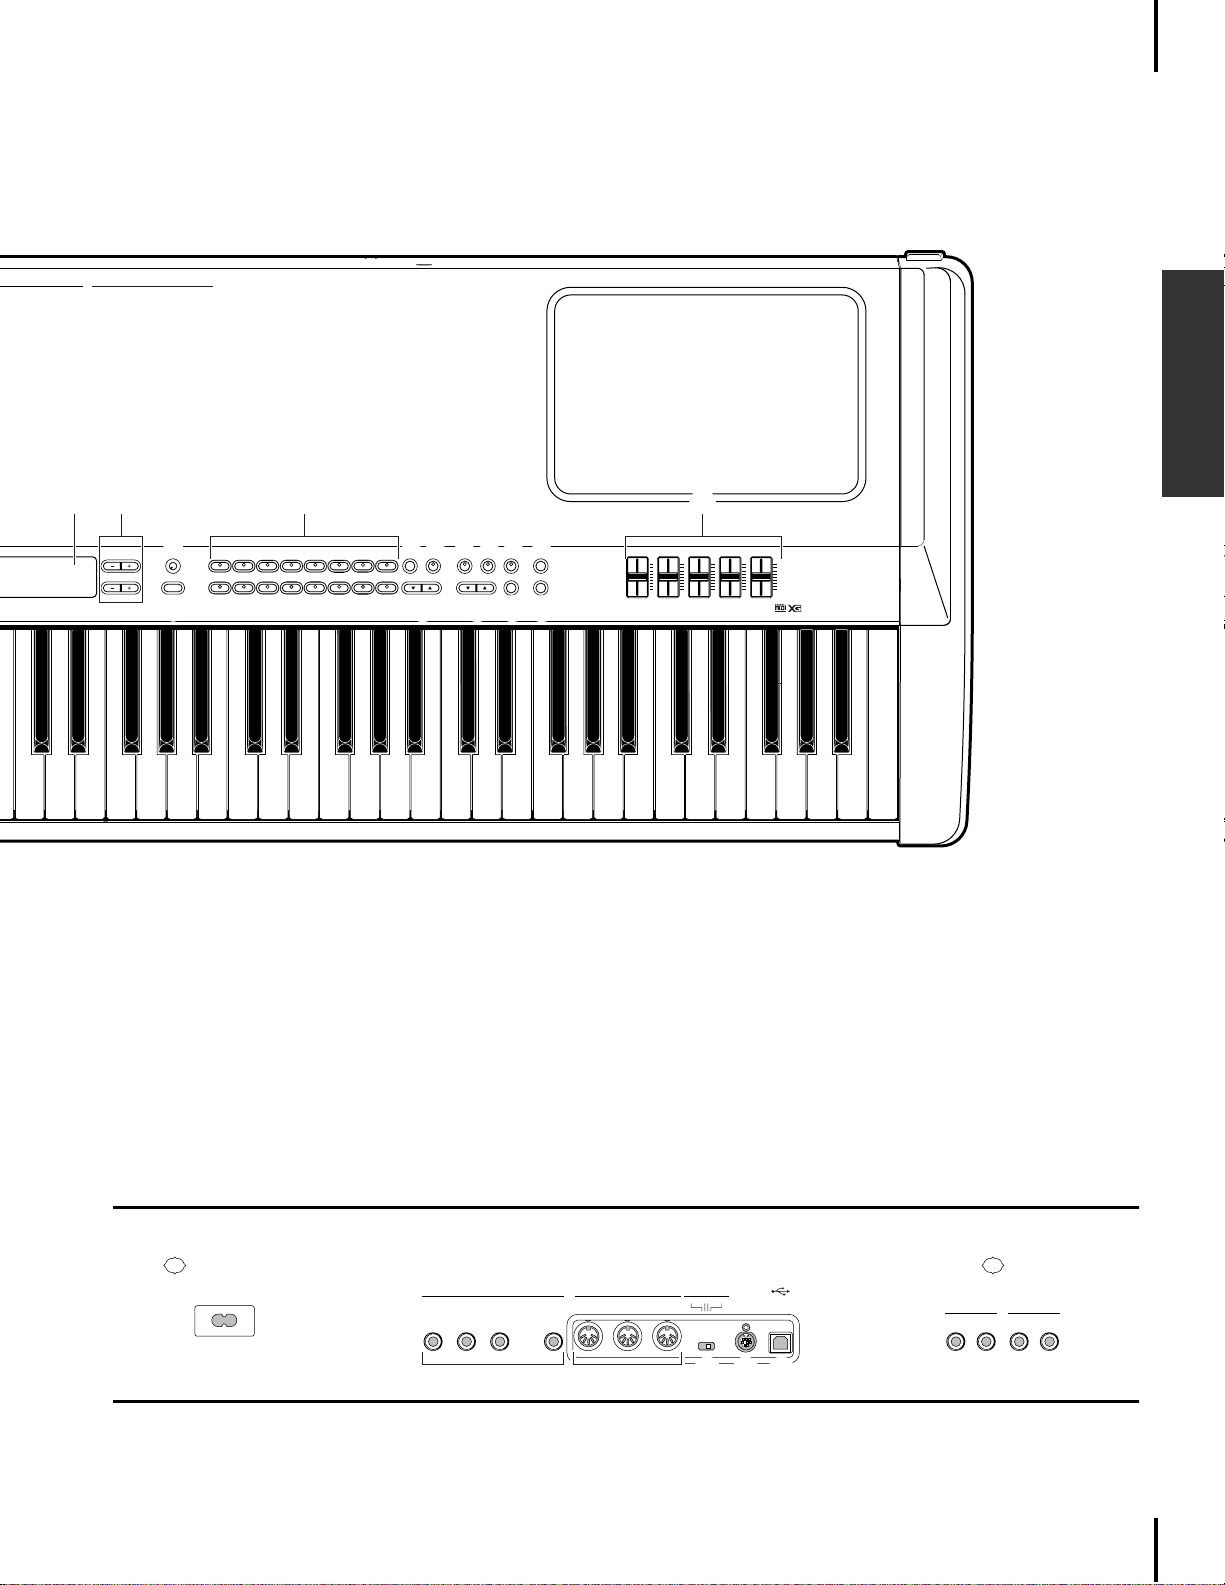
■ Top Panel
Basic Operation
1
PITCH
3
POWER
ON OFF
2
MODULATION
4
MIN
MASTER VOLUME
RL/MONO
OUTPUT
RL/MONO
INPUT
USB
TO HOST
USB Mac
HOST SELECT MIDI
MIDI THRUOUTPC-2
7 E F
0 BC
EX.TRACKS SONG FILE
TRACK1
5
KEYBOARDSONG
MAX
6
TRACK2
TOPSONG SELECT
SYNCHRO STARTNEW SONG
9 A D
8
RECSTART/STOP
MIDI OUT
DOWNSONG SETTING UP
TEMPOSONGSONG BALANCE
PANEL LOCK
A
C
V
1 [PITCH] ....................................page 38
2
[MODULATION] .........................page 38
3
[POWER] .....................................page 16
4
[MASTER VOLUME].....................page 16
5
[SONG BALANCE]...................... page 49
6
SONG SELECT [ ]/[ ] ......page 47,51
7
[TRACK1][TRACK2]
[EX.TRACKS] ........................ page 47—50
8
[TOP]
/ SONG[START/STOP]............page 47,51
9
[REC]............................................page 47
0
[SONG FILE] ................................page 53
A
[SONG SETTING] ........................page 62
B
[MIDI OUT].................................page 40
C
[PANEL LOCK] .............................page 39
D
TEMPO[DOWN][UP].................. page 51
E
LCD buttons A[–]/[+]/ B[–(NO)]/
[+(YES)]/C[–]/[+]/D[–]/[+] ........page 16
F
LCD
...........................................page 16
G
[CONTRAST]
H
[EXIT]............................. ............
I
VOICE
..............................page 16
page 16
/PERFORMANCE buttons ............page 34
J
[VOICE EDIT] ..............................page 65
K [SPLIT] ..................................... page 36
L [REVERB] ................................. page 37
M [CHORUS] ............................... page 37
N
[PERFORMANCE] ........................page 41
O
[MIDI SETTING] ..........................page 74
P VARIATION [†]/[π] ............... page 34
Q
MASTER EQ EDIT [†]/[π]..........page 71
R
[PERFORM. FILE] ................. page 41—42
S
[OTHER SETTING].......................page 76
T
[MASTER EQUALIZER].................page 38
U
Panel logos...................................page 89
V
[PHONES]....................................page 17
14 P-250
Names and Functions
T
HRU OUT IN AUX
MIDI ASSIGNABLE FOOT PEDAL
4
SOFT
3
SOSUTENUTO2SUSTAIN
1
AC INLET
Basic Operation
E I TF
G
G.PIANO 1
B
YESNO
EXIT
D
H
G.PIANO 2
1
2
ORGAN 1
ORGAN 2
9 BA
10
E.PIANO1
STRINGS
3
11
E.PIANO2
4
CHOIR
12
E.PIANO3 HARPSI.
CLAVI.
6
5
GUITAR
SYNTH.PAD
14
13
JK LMN O
VOICE EDITVIBES
8
7
VARIATION
BASS
XG
16
15
P Q R S
REVERBSPLITCONTRAST
MASTER EQ EDIT
CHORUS
PERFORMANCE
PERFORM. FILE
MIDI SETTING
OTHER SETTING
LOW
LO-MID MID
MASTER EQUALIZERVOICE/PERFORMANCE
HIGHHI-MID
U
P-250
ELECTRONIC PIANO
W
[AC INLET]................................. page 16
X
ASSIGNABLE FOOT PEDAL
[1 (SUSTAIN)][2 (SOSTENUTO)]
[3 (SOFT)][4 (AUX)].................... page 23
Y
MIDI[IN][OUT][THRU] ..page 18—20,22
Z
[HOST SELECT]............... page 18—20,22
[
[TO HOST].................................. page 20
\
[USB] ...........................................page 19
]
OUTPUT [R][L/MONO]...............page 17
_
INPUT [R][L/MONO] ..................page 17
■ Rear Panel Controls
AC INLET
W
1
2
SUSTAIN
SOSUTENUTO3SOFT
X Y
IN THRUOUT
MIDIASSIGNABLE FOOT PEDAL
4
AUX
HOST SELECT
TO HOST
MIDI PC-2 USBMac
Z [ \
USB
OUTPUT
RL/MONO
INPUT
RL/MONO
] _
P-250 15
Setting Up
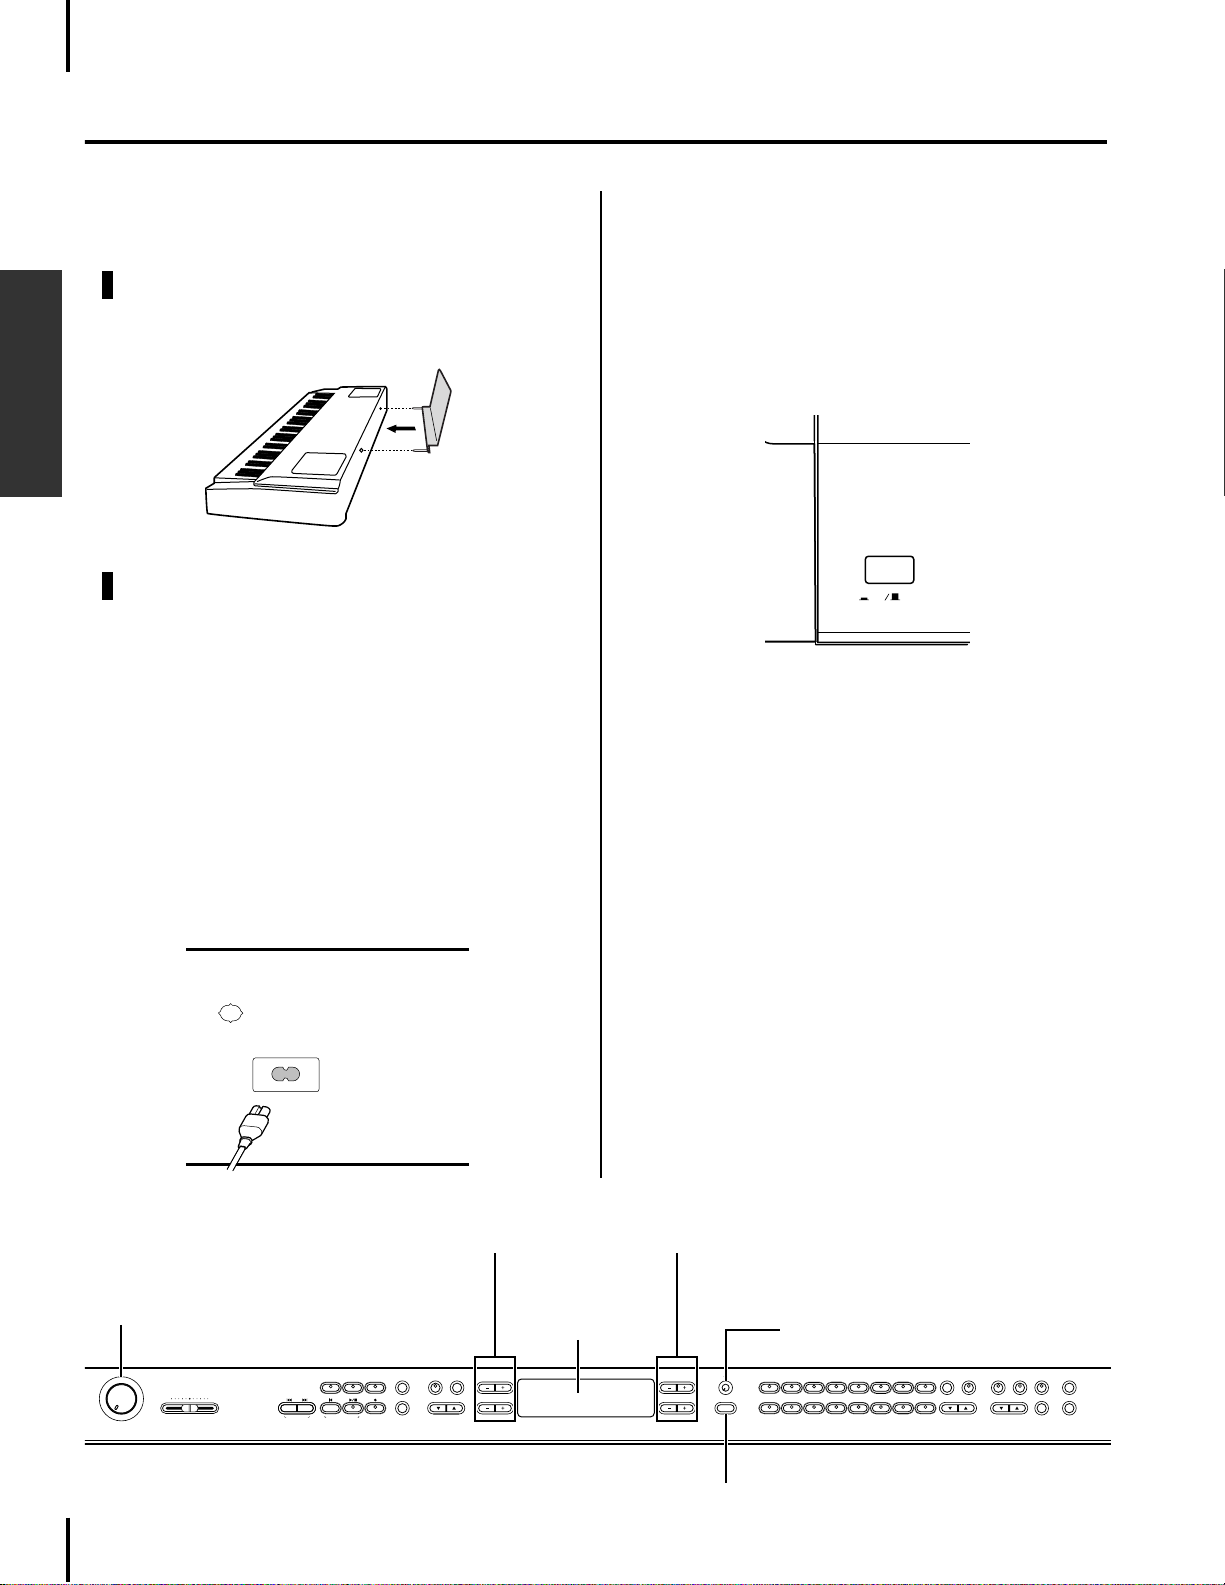
■ Installing the Accessories
Music rest
To attach the music rest, insert its pins into the holes on
the P-250’s rear panel, as shown in the diagram below.
Basic Operation
Pedal
Connect the included pedal (FC3) to the [1(SUSTAIN)], [2(SOSTENUTO)], or [3(SOFT)] jack on the
rear panel. In most situations, you will likely connect
the pedal to the [1(SUSTAIN)] jack for use as a sustain
pedal (page 23).
3 Plug the other end of the power cable into an
AC outlet.
■ Powering Up
Turn the power ON by pressing the [POWER]
1
switch.
POWER
ON OFF
2 Rotate the [CONTRAST] knob to adjust the
brightness of the LCD.
■ Before Powering Up
1
Make sure the [POWER] switch is OFF.
2 Plug the appropriate end of the included
power cable into the [AC INLET].
AC INLET
LCD control buttons
[MASTER VOLUME]
LCD
3
Adjust the [MASTER VOLUME] control to a comfortable listening level while playing the keyboard or playing back the demonstration songs.
LCD and LCD control buttons
You can use the LCD control buttons (A, B, C, and D)
to select and set the items displayed on the LCD. Verify the operation by checking the LCD. When you
press the [EXIT] button, the unit displays the initial
power-on screen.
LCD control buttons
[CONTRAST]
MIN MAX
MASTER VOLUME
16 P-250
G.PIANO 2
E.PIANO1
E.PIANO2
EX.TRACKS SONG FILE
TRACK1
TRACK2
TOPSONG SELECT
KEYBOARDSONG
RECSTART/STOP
SYNCHRO STARTNEW SONG
MIDI OUT
DOWNSONG SETTING UP
PANEL LOCK
A
C
B
YESNO
D
G.PIANO 1
1
ORGAN 2
ORGAN 1
EXIT
10
9 BA
E.PIANO3 HARPSI.
2
3
STRINGS
11
CLAVI.
4
5
CHOIR
GUITAR
SYNTH.PAD
12
13
VOICE/PERFORMANCETEMPOSONGSONG BALANCE
VOICE EDITVIBES
VARIATION
REVERBSPLITCONTRAST
MASTER EQ EDIT
7
8
6
BASS
XG
15
16
14
MIDI SETTING
CHORUS
PERFORMANCE
PERFORM. FILE
OTHER SETTING
[EXIT]
Connecting to External Devices
CAUTION
Before you connect the P-250 to other electronic components, first set all v olume le v els to minimum (0), then turn off the power to all components.
As a standard practice, before you turn the power on or off to any component, set all volume levels to minimum (0). Otherwise, electrical
shock or damage to the components may result.
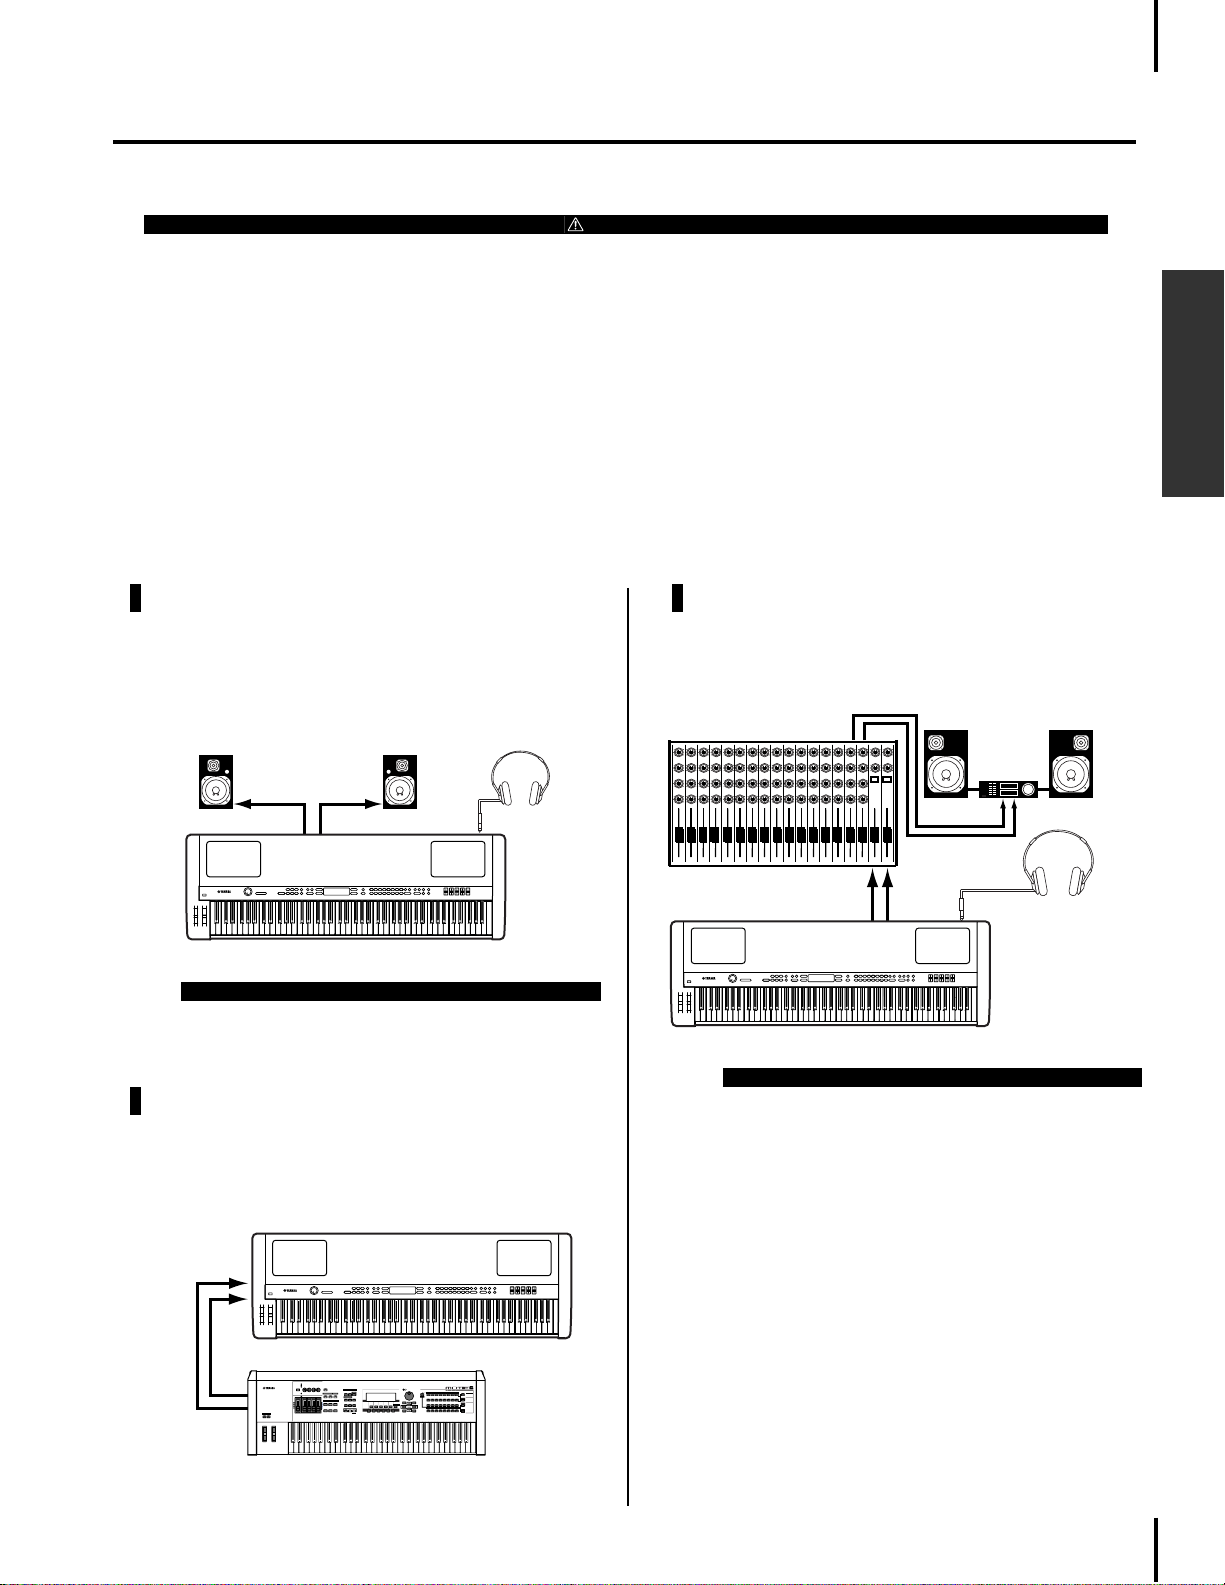
■ Connecting to External Audio Equipment
Although the P-250 has built-in speakers, you can connect an external stereo system or powered speakers as a monitor. You can also connect a set of headphones (page 23).
There are several ways to connect the P-250 to external audio equipment, as described in the following
illustrations. Refer to the illustration most similar to your intended setup.
Basic Operation
Connecting stereo powered speakers
A pair of powered speakers can accurately produce
the instrument's rich sounds as well as the pan and
effect settings. Connect your powered speakers to the
OUTPUT [L/MONO] and [R] jacks on the rear panel.
Powered speaker
(Left)
OUTPUT [L /MONO]
Powered speaker
INPUTINPUT
OUTPUT [R]
P-250
(Right)
Stereo headphones
[PHONES]
TIP
To use a single powered speaker, connect it to the OUTPUT [L/MONO] jack on the rear panel.
Connecting to a external instrument
The stereo outputs from another instrument can be
connected to the INPUT [L/MONO] and [R] jacks,
allowing the sound of an external instrument to be
reproduced via the P-250's speakers.
Connecting to a mixer
A mixer is often used for recording and live performance, enabling you to play the P-250 through a
large-scale sound system.
L
Mixer
12345678910111213141516LR
OUTPUT L
OUTPUT
[
L/MONO]
R
OUTPUT
[R
]
P-250
TIP
Connecting a pair of headphones does not affect audio output from the OUTPUT [L/MONO] and [R] jacks. You can
monitor the output via headphones or at the OUTPUT
jacks.
Speakers
Amplifier
Stereo headphones
[PHONES]
R
INPUT [L/MONO]
[R]
[R]
OUTPUT [L]
P-250
External synthesizer
or tone generator
MUSIC
SYNTHESIZER
PRODUCTION
Sequencer
Sampling
Integrated
Real-timeExternalControl
Surface
Modular
SynthesisPlug-in
System
P-250 17
Connecting to External Devices
MIDI [OUT]
MIDI [OUT]
External
MIDI seqencer
P-250
MIDI [IN]
MIDI [IN]
HOST SELECT
MIDI PC-2 USBMac
MIDI [IN]
MIDI [THRU]
MIDI [OUT]
MIDI [IN]
External
MIDI sequencer
External
MIDI synthesizer
External MIDI synthesizer
MIDI [OUT]
MIDI [IN]
P-250
MUSIC
PRODUCTION
SYNTHESIZER
Integrated
Sampling
Sequencer
Real-timeExternalControl
Surface
Modular
SynthesisPlug-in
System
HOST SELECT
MIDI PC-2 USBMac
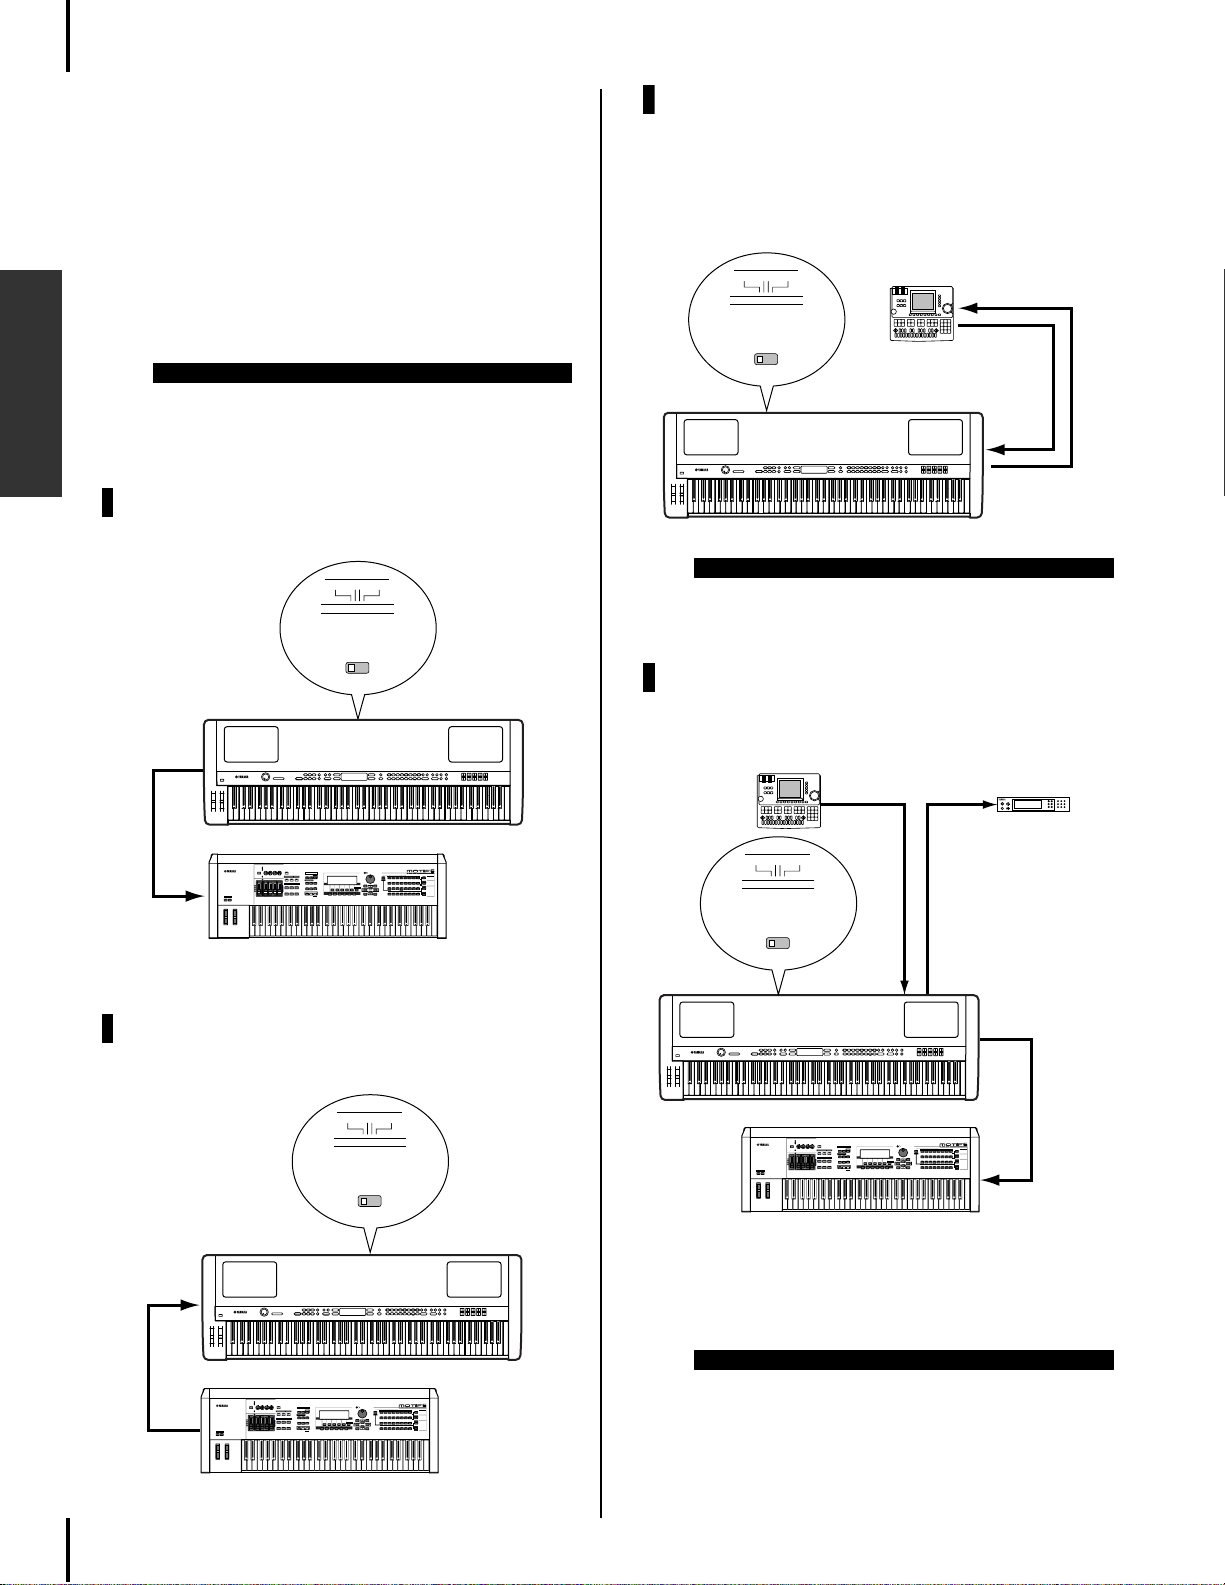
■ Connecting External MIDI
Equipment
Using a standard MIDI cable (available separately), you can connect an external MIDI
device, and control it from the P-250. You can
also use an external MIDI keyboard or
sequencer to control the P-250’s internal
sounds. Several different MIDI connection
examples are illustrated below:
TIP
The HOST SELECT switch should be set to “MIDI.” Otherwise, MIDI information will not be transmitted from the P250’s MIDI OUT connector.
Basic Operation
Controlling an external device from the P-250
HOST SELECT
MIDI PC-2 USBMac
Recording your performance on the
P-250 to an external MIDI sequencer
(such as the QY series), or playing
the P-250 (as a tone generator) from
an external MIDI sequencer
NOTE
The P-250 does not receive or transmit MIDI Start (FAh),
Continue (FBh), or Stop (FCh) messages.
MIDI [OUT]
P-250
MUSIC
SYNTHESIZER
PRODUCTION
Sequencer
Sampling
Integrated
Real-timeExternalControl
Surface
Modular
SynthesisPlug-in
System
MIDI [IN]
External MIDI keyboard
or synthesizer
Controlling the P-250 from an external device
MIDI [IN]
MIDI [OUT]
18 P-250
External MIDI keyboard
or synthesizer
HOST SELECT
MIDI PC-2 USBMac
P-250
MUSIC
SYNTHESIZER
PRODUCTION
Sequencer
Sampling
Integrated
Real-timeExternalControl
Surface
Modular
SynthesisPlug-in
System
Controlling another MIDI device via the MIDI [THRU] connector
In this example, P-250 performance data is transmitted from the MIDI [OUT] connector.
MIDI data input from an external MIDI sequencer is output as is from the MIDI [THRU] connector.
TIP
The MIDI cable should be shorter than 15 meters, and
there should be no more than three devices in a MIDI chain
(chained in series via each unit's MIDI [THRU] connector).
To connect more units, use a MIDI thru box for parallel connections. You may encounter errors if the MIDI cables are
too long or if too many devices are chained together via
their MIDI [THRU] connectors.

Connecting to External Devices
[USB] connector
USB cable
Computer
P-250
HOST SELECT
MIDI PC-2 USBMac
NOTE
The P-250 does not receive or transmit MIDI Start (FAh),
Continue (FBh), or Stop (FCh) messages.
■ Connecting to a Personal
Computer
When a computer is connected, it can be used
to control the P-250 or transfer P-250 data to or
from the computer via MIDI. For example, you
can edit the P-250's voices or store the P-250's
voice data in the computer.
There are three ways in which to connect your
P-250 to a computer:
1 USB connection (the computer’s USB port
to the P-250 [USB] connector)
2 Serial connection (the computer’ s serial port
to the P-250 [TO HOST] connector)
3 MIDI connection (the computer’s MIDI inter-
face or external MIDI interface to the P-250
MIDI [IN] and [OUT] connectors)
TIP
After you connect the P-250 to the computer, make sure
that Local On/Off (pages 22 and 74) is set correctly according to the system environment.
TIP
You will need MIDI application software (sequencer, editor,
etc.) compatible with your computer platform. (Refer to the
separate Installation Guide.)
NOTE
When you connect the P-250 to a personal computer, first
turn off the power to both the P-250 and the computer before
you connect any cables and set the HOST SELECT switch.
After you make connections and set the switch, turn on the
power to the computer first, then to the P-250.
NOTE
If you are not using the connection between the P-250 and
your computer, y ou must disconnect the cab le from the [TO
HOST] or [USB] connector. If the cable is connected, the P250 may not function properly.
The connectors that can be used depend on the setting
of the [HOST SELECT] switch.
[HOST SELECT] Switch Setting
MIDI MIDI [IN], [OUT], [THRU]
PC-2, Mac [TO HOST]
USB [USB]
Different computers require different connections, as follows.
Setting the [HOST SELECT] switch
Set the [HOST SELECT] switch according to the type
of connected computer:
• Macintosh:
“Mac” (data transfer rate: 31,250bps, 1MHz clock)
•Windows:
“PC-2” (data transfer rate: 38,400bps)
Usable connectors
connectors
NOTE
If your system does not work properly with the connections and
settings listed above , check your softw are operation man ual and
set the HOST SELECT switch to the proper data transfer rate .
1 USB connection (the computer’s USB port to the P-250 [USB] connector)
Basic Operation
TIP
About the USB driver:
You must install the specified USB driver (YAMAHA USB
MIDI Driver) in your computer before you can transfer data
between the computer and the P-250.
The YAMAHA USB MIDI Driver can be installed from the
included “TOOLS for P-250” CD-ROM.
The YAMAHA USB MIDI Driver supports the following OS
versions:
Windows 98, Windows 98SE, Windo ws Me, Windows 2000,
Windows XP
Mac OS 8.6 through 9.2.1
TIP
You will need MIDI application software (sequencer, editor,
etc.) compatible with your computer platform.
CAUTION
If you want to use a USB cable to connect the P-250 to your
computer, you must connect the USB cab le before you turn
on the power to the P-250.
Also, do not turn the power of the P-250 on or off while
application software that uses USB MIDI is running.
TIP
The P-250 will begin transmission soon after the USB connection is made.
NOTE
When using a USB cable to connect the P-250 to your computer, make the connection directly without passing through
a USB hub.
CAUTION
Depending on the state of your computer, the operations of
the P-250 may become unstable. Do not use your computer
in a way that causes it to become unstable.
CAUTION
If you turn the power of the P-250 on or off, or connect or
disconnect the USB cable in the following states, problems
will occur in the computer system, possibly causing it to
freeze (hang up), or causing the P-250 to stop functioning:
• While installing the driver
• While starting or shutting down the operating system
• While the computer is in Save Energy (Sleep) mode
• While a MIDI application program is starting up.
P-250 19
Connecting to External Devices
MIDI [OUT]
MIDI [IN]
Windows
Macintosh
MIDI
OUT
MIDI
OUT
MIDI
IN
MIDI
IN
MIDI interface
MIDI interface
MIDI
IN THRUOUT
HOST SELECT
MIDI PC-2 USBMac
• Using an external MIDI interface
CAUTION
Performing the following actions may cause your computer
to hang up or cause the P-250 to stop functioning:
•Turning the power on or off, or connecting or disconnecting the cable too often
• Shifting to power-conservation (sleep) mode while MIDI
data is being transferred, or returning from sleep mode
• Disconnecting or connecting the cable while the P-250 is
on
•Turning the power to the P-250 on or off, starting up your
computer, or installing the driver while a large amount of
data is being transferred
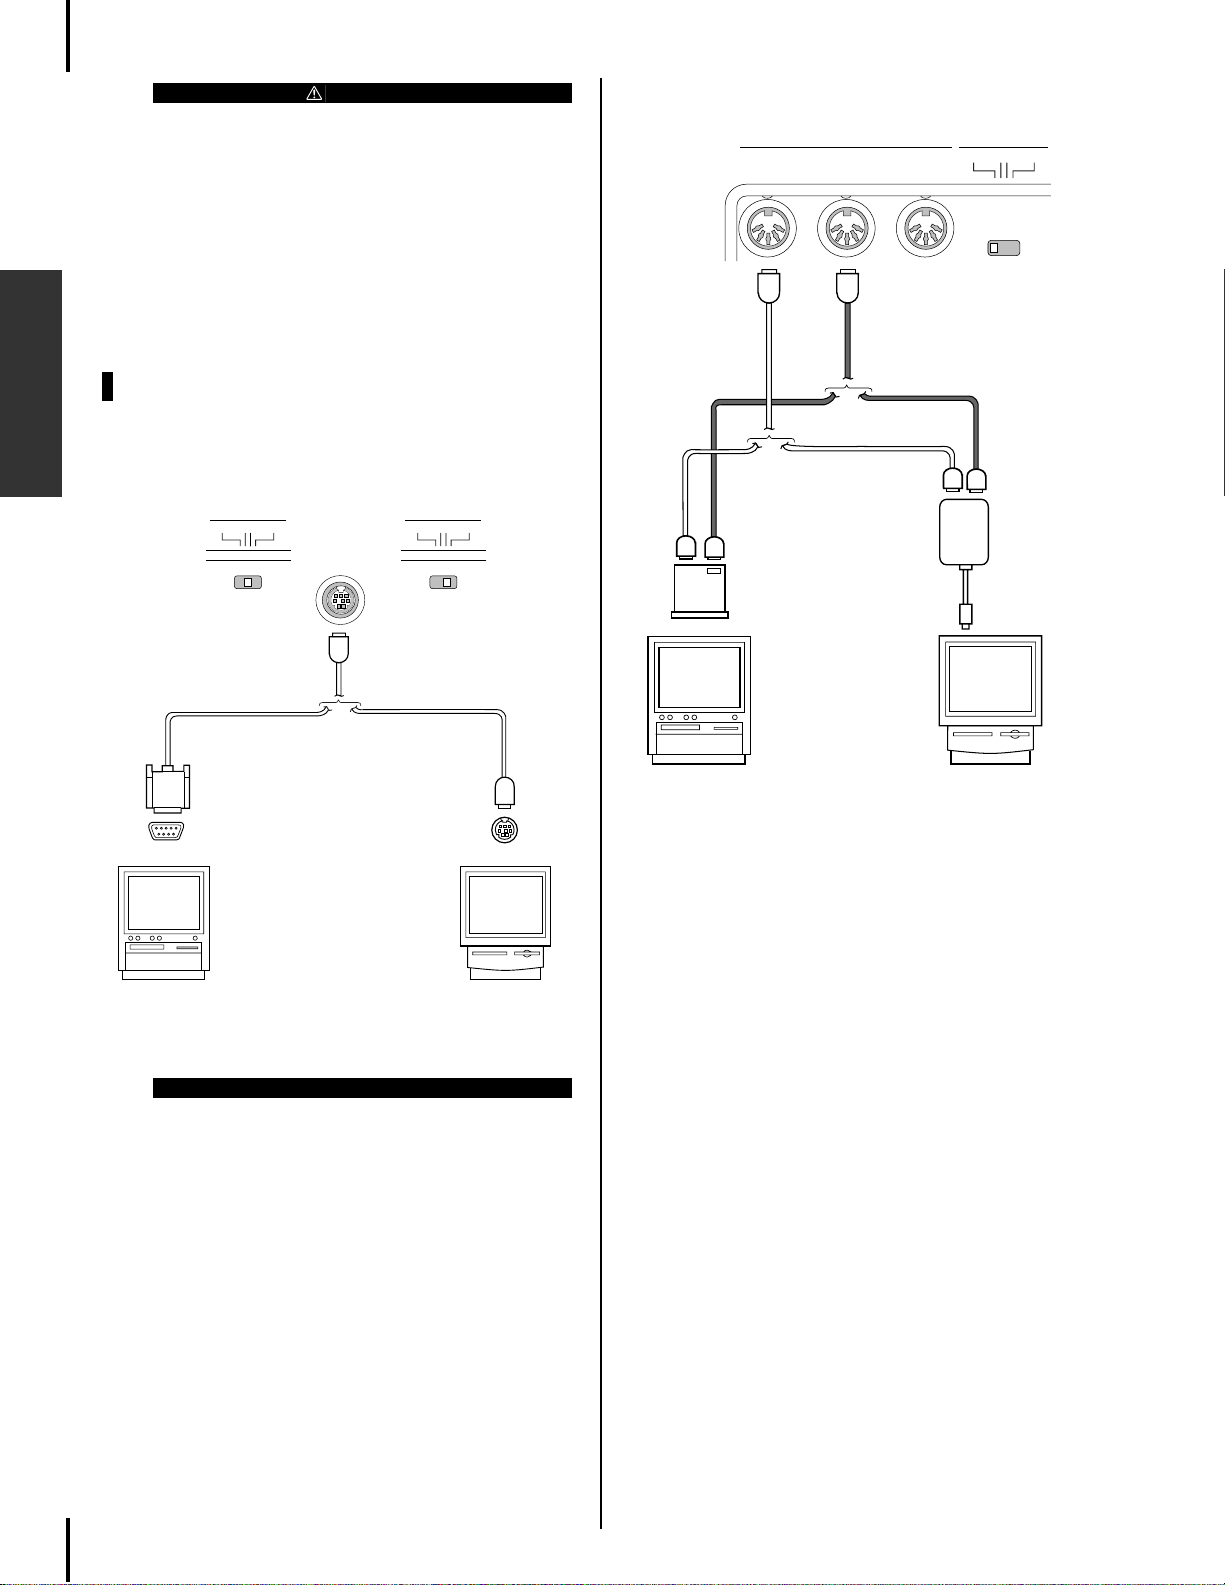
2 Serial connection (computer’s serial
port to P-250 [TO HOST] connector)
Basic Operation
• Using the computer’s MIDI interface
HOST SELECT
MIDI PC-2 USBMac
Windows Macintosh
[TO HOST]
HOST SELECT
MIDI PC-2 USBMac
(Macintosh)(Windows)
Modem portRS-232C (D-sub 9-pin)
20 P-250
TIP
Note for Windows users regarding the MIDI driver:
To transfer data via the computer’s serial port and the
P-250 [TO HOST] connector , y ou need to install a specified
MIDI driver (Yamaha CBX driver for Windows).
You can download this driver from the XG Library on the
Yamaha Web site (http://www.yamaha-xg.com/) or install it
from the included “TOOLS for P-250” CD-ROM.
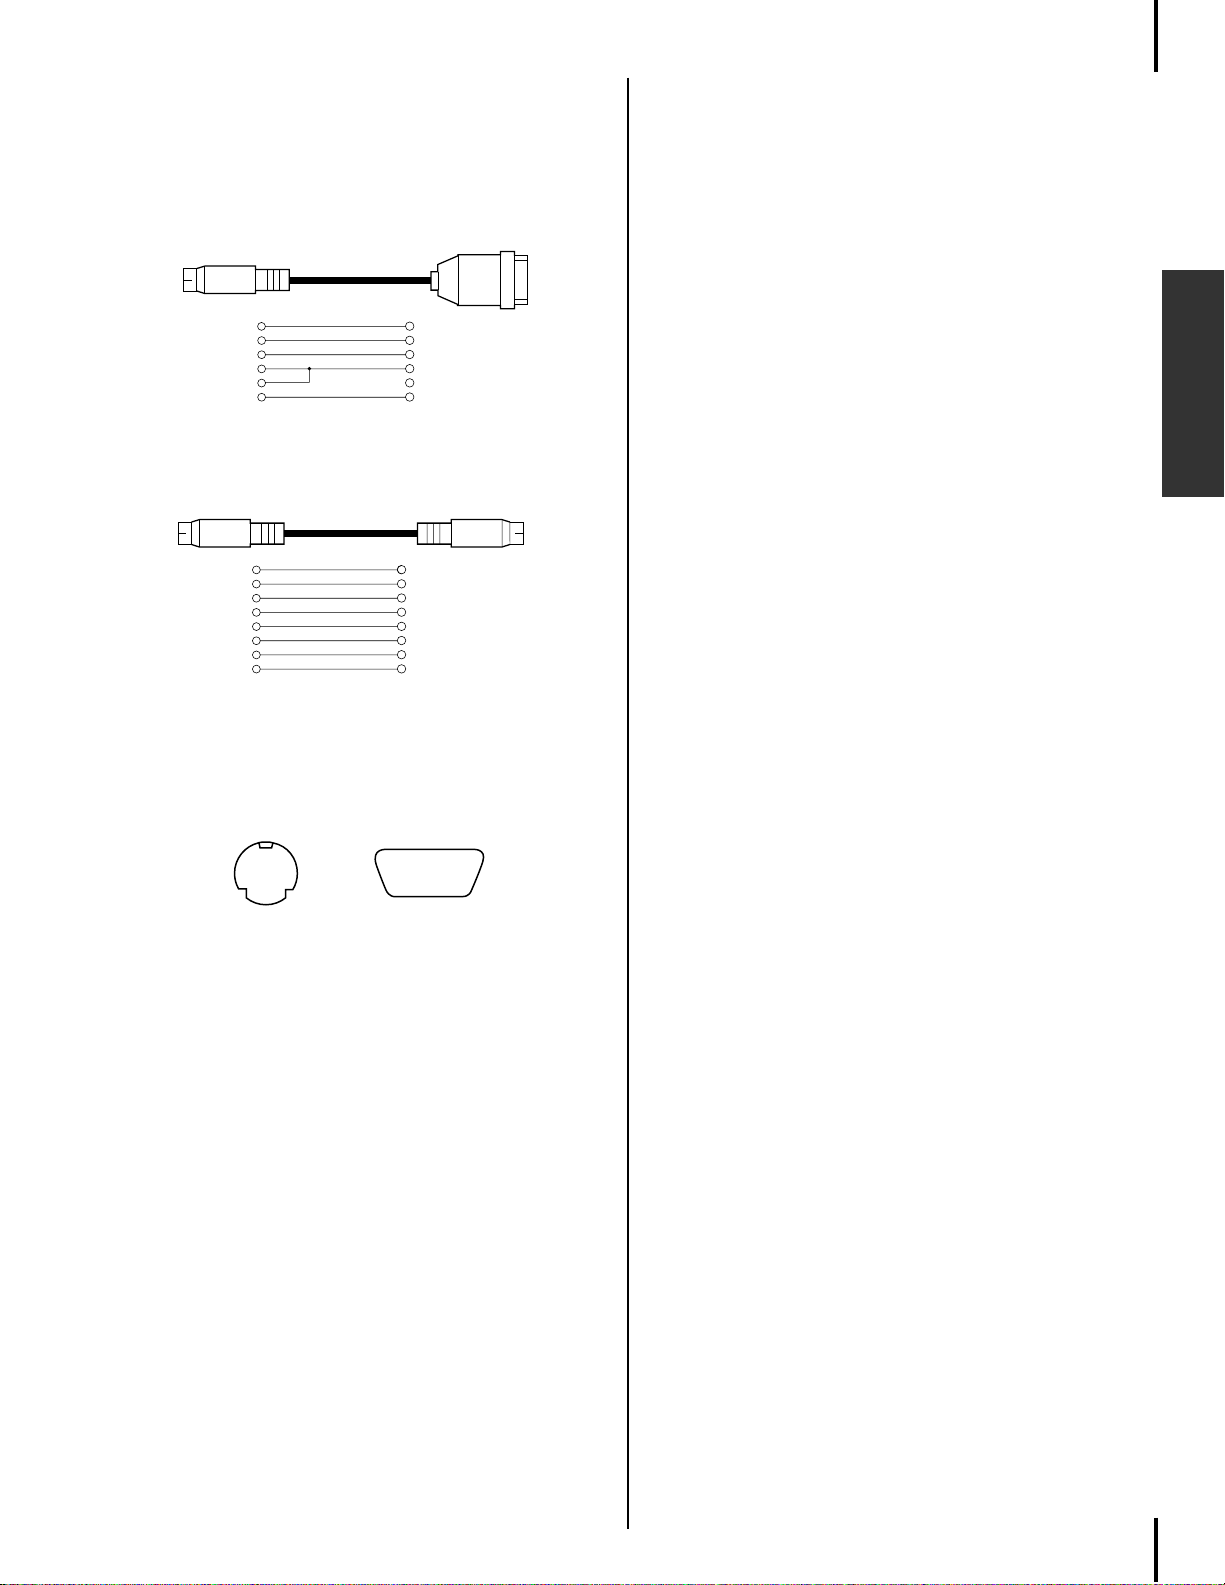
Type of serial cables and pin assignments
Depending on the type of computer you connect, use
one of the following serial cables:
Windows (with a 9-pin D-sub serial port)
8-pin mini DIN plug → D-sub 9-pin plug
(Yamaha CCJ-PC2 or equivalent)
Connecting to External Devices
mini DIN
8-pin
1
2
3
4
8
5
8 (CTS)
7 (RTS)
2 (RxD)
5 (GND)
3 (TxD)
D-sub
9-pin
Macintosh
System peripheral plug → 8-pin plug
(Yamaha CCJ-MAC or equivalent)
mini DIN
8-pin
1
2
3
4
5
6
7
8
2 (HSK i)
1 (HSK O)
5 (RxD-)
4 (GND)
3 (TxD-)
8 (RxD+)
7 (GP-)
6 (TxD+)
mini DIN
8-pin
Pin assignment
The following diagram shows the pin assignments for
each cable.
Pin numbers (view from front)
mini DIN 8-pin
67
8
34
5
1
2
D-sub 9-pin
45321
9876
Basic Operation
P-250 21
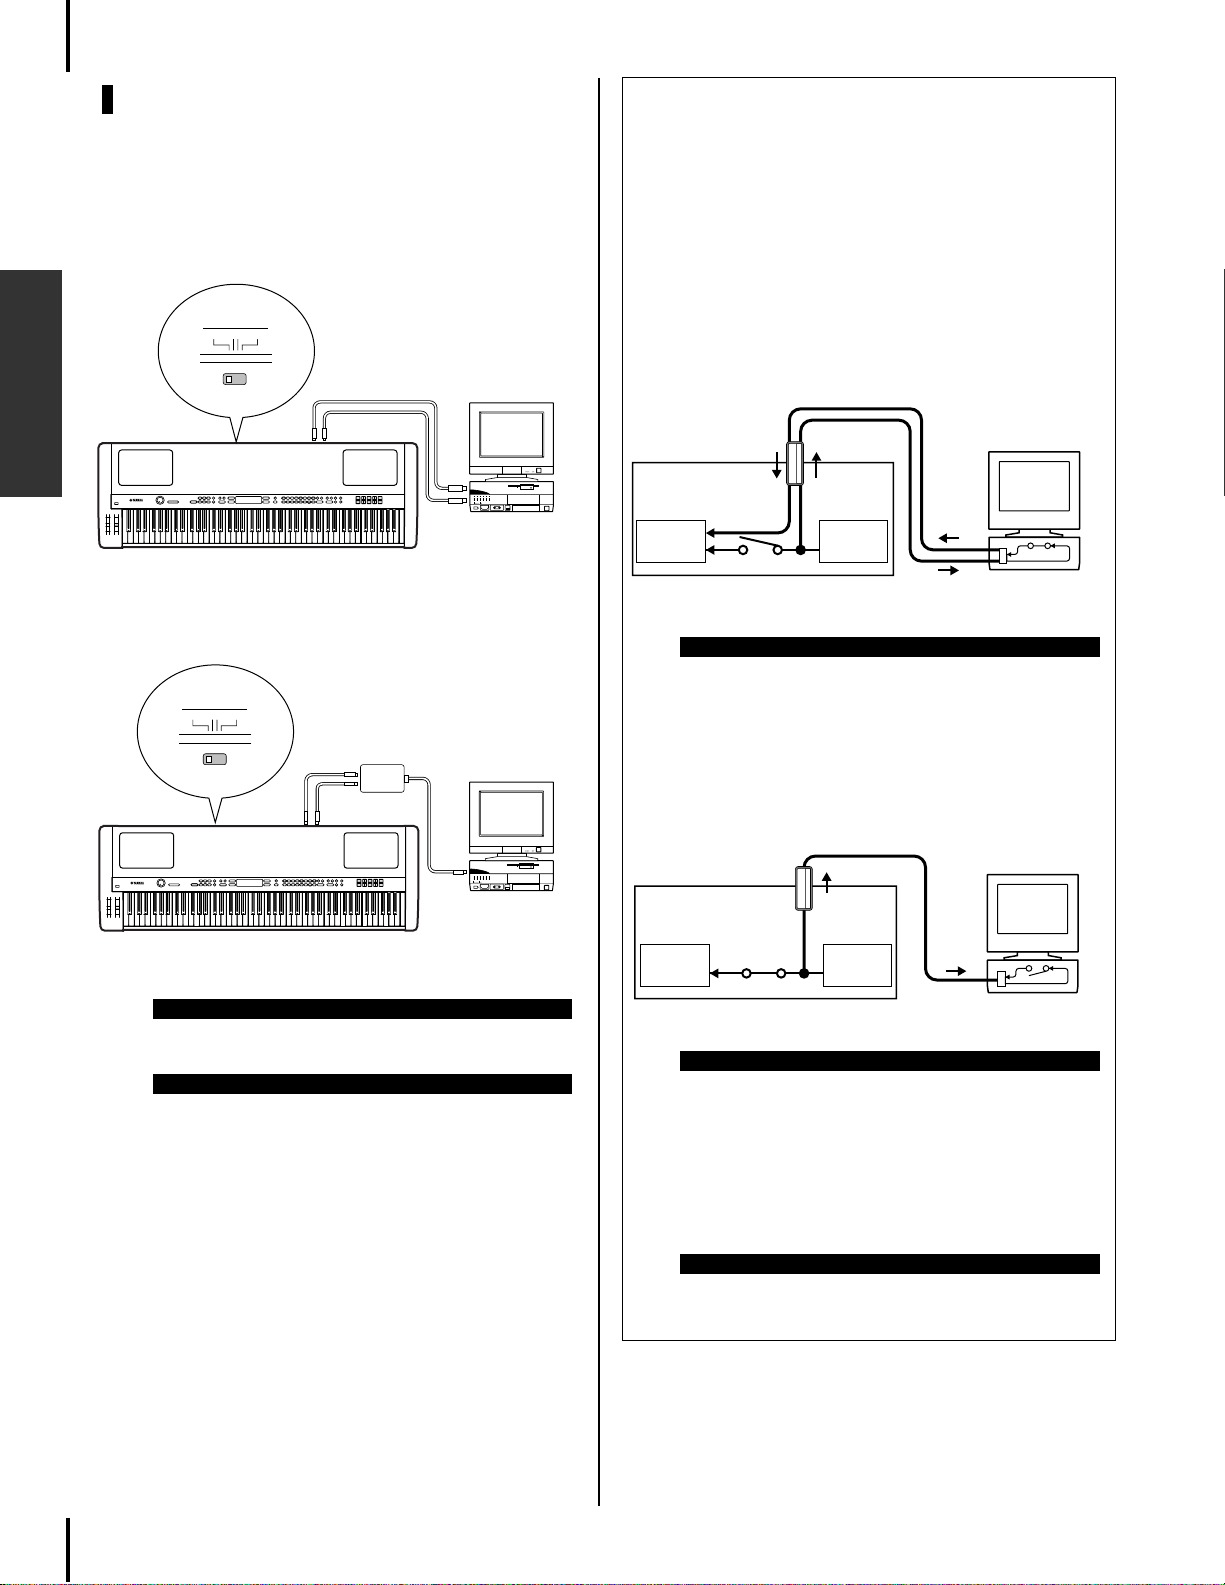
Connecting to External Devices
Echo Back On
Local Off
Computer with
application software
Tone
Generator
Keyboard
MIDI setting “LocalControl” : off
IN OUT
USB
OUT
IN
P-250
Echo Back Off
Local On
Computer with
application software
Tone
Generator
Keyboard
MIDI setting “LocalControl” : on
OUT
IN
USB
P-250
3 MIDI connection (the computer’s
MIDI interface or external MIDI interface to the P-250 MIDI IN and OUT
connectors)
• Using the computer’s MIDI interface
HOST SELECT
MIDI PC-2 USBMac
Basic Operation
• Using an external MIDI interface
HOST SELECT
MIDI PC-2 USBMac
MIDI [IN] MIDI [OUT]
P-250
MIDI [IN] MIDI [OUT]
MIDI OUT
MIDI IN
MIDI Interface
MIDI
OUT
MIDI
IN
Computer with
MIDI interface
Computer
Local On/Off when a computer is connected
If the P-250 is connected to a computer, keyboard performance data is generally sent to the computer, then returned
from the computer to trigger the P-250 internal tone generator. If the Local Switch is set to “on,” the P-250 will play the
song in unison, since the internal tone generator is receiving
performance data from both the keyboard and the computer.
Use the following setting as a guideline; specific instructions may differ depending on your computer and the software used.
MIDI “Echo” is enabled on the software/computer
TIP
To transmit or receive System Exclusive data (page 75,
page 31 of the separate “Data List”) such as with the Bulk
Dump function, use the setting example below , making sure
that MIDI “Echo” on the computer software is set to “off.”
MIDI “Echo” is disabled on the software/
computer
Serial port
(modem or printer port),
or USB port
P-250
TIP
Please use the appropriate MIDI interface for your computer.
TIP
If you are using a computer that features a USB interface,
connect the computer and the P-250 with a USB cable.
TIP
The P-250 receives and responds to MIDI data from the
computer application (sequencer), regardless of the Local
On/Off setting on the P-250.
MIDI “Echo” is a function that takes any data
received via MIDI IN and “echoes” it (or transmits it
as is) through MIDI OUT. In some software applications, this function is also called “MIDI Thru.”
TIP
Refer to the owner’s manual for your software for specific
instructions.
22 P-250
Connecting to External Devices
PHONES
[PHONES]
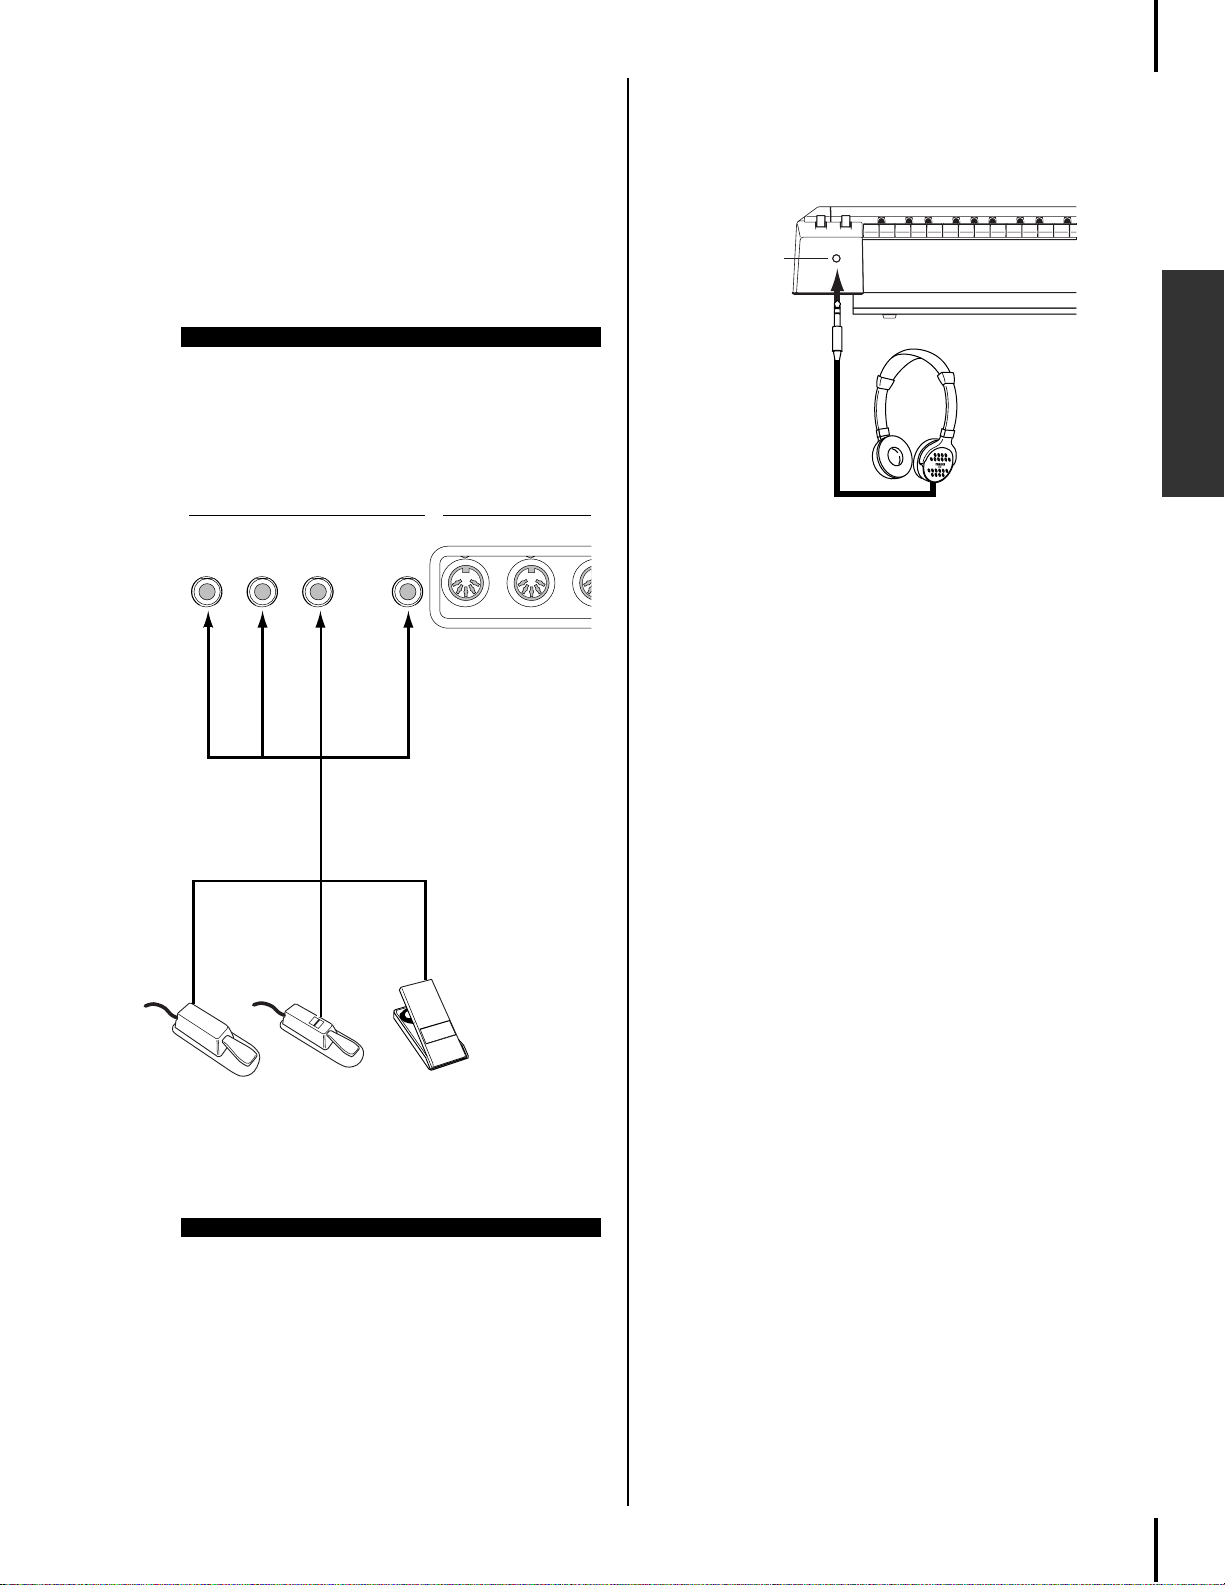
■ Connecting Pedals
You can connect an optional foot switch (FC4,
FC5), foot pedal (FC3), or foot controller (FC7)
(instead of the included FC3 foot pedal) to the
ASSIGNABLE FOOT PEDAL [1 (SUSTAIN)], [2
(SOSTENUTO)], [3 (SOFT)], [4 (AUX)] jacks on
the rear panel to control various parameters
(page 69).
TIP
For more information on basic operation of the pedals and
assigning the functions to them, refer to pages 39 and 69
respectively.
Rear panel
1
SUSTAIN2SOSUTENUTO3SOFT
4
AUX
IN TOUT
■ Connecting headphones
You can connect headphones to the [PHONES] jack
located on the front panel.
Basic Operation
MIDIASSIGNABLE FOOT PEDAL
foot pedal
FC3
Optional pedals:
Yamaha FC3 foot pedal
Yamaha FC7 foot controller
Yamaha FC4 foot switch
Yamaha FC5 foot switch
foot s witch
FC4 or FC5
foot contr oller
FC7
TIP
P-250 23
P-250 Quick Guide
■ Listening to Demo and Preset Songs
For each voice group, the P-250 contains one demo song and one preset song that shows off the characteristics of the voices. This section explains how to listen to demo and preset songs for the voice
groups.
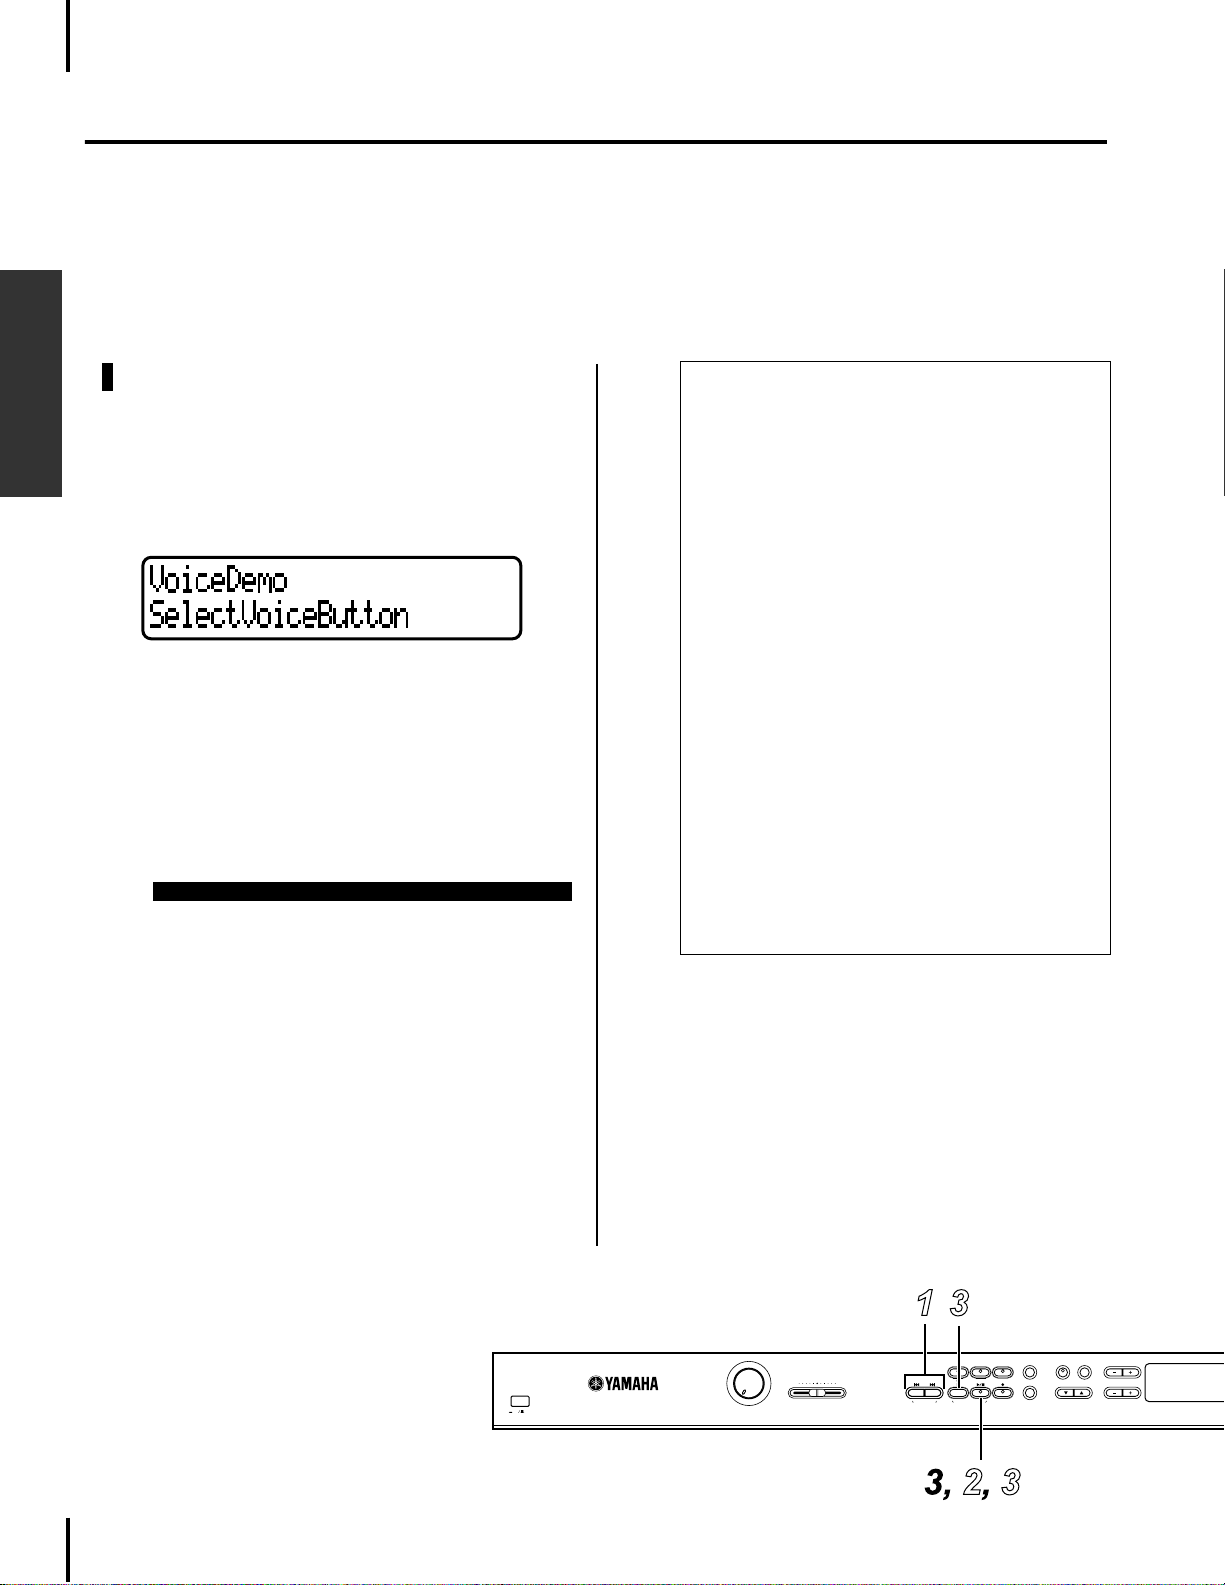
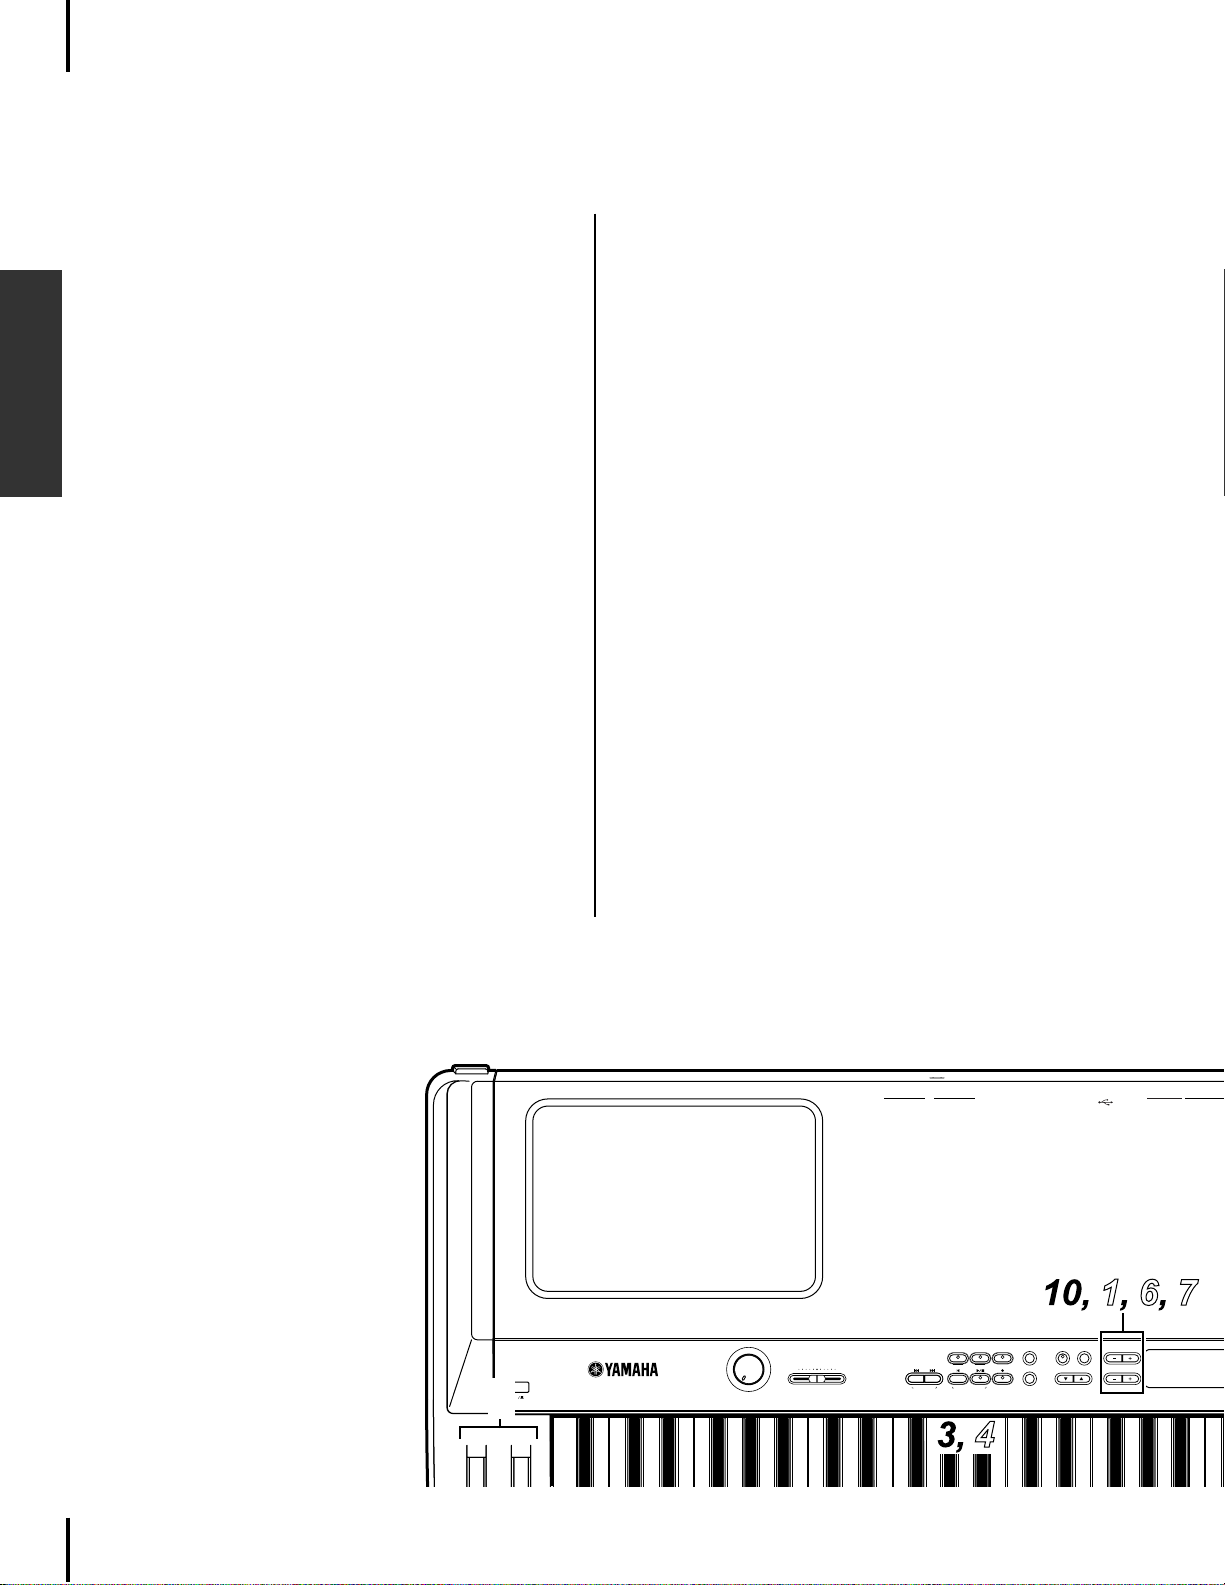
Listening to the demo songs
1 Engage Demo Song mode.
Simultaneously press the [MIDI SETTING] button
Basic Operation
and the [OTHER SETTING] button.
The VOICE/PERFORMANCE button indicators flash in
succession.
2 Select a song and start playback.
Press the VOICE/PERFORMANCE button for the
demo song that you want to hear.
The corresponding VOICE/PERFORMANCE button
indicator lights up and playback starts.
Demo songs will play back consecutively from the
upper-left VOICE/PERFORMANCE button until you
stop playback.
To adjust the volume level
To adjust the volume level of the demo songs, use the
[MASTER VOLUME] dial.
To adjust the volume balance between song playback
and keyboard, use the [SONG BALANCE] slider.
(page 49)
TIP
By pressing the [MIDI SETTING] and the [OTHER
SETTING] buttons simultaneously, then press the A[–]
or [+] button to get the [Piano Demo] display, you
can hear the piano demo. The piano demo lets you
compare the result of enabling/disabling each sampling technology.
GRANDPIANO1 .... Stereo Piano (stereo sampling)
GRANDPIANO2 .... Mono Piano (mono sampling)
E.PIANO1............... mezzo piano (dynamic sam-
pling, mezzopiano)
E.PIANO2............... mezzo forte (dynamic sam-
pling, mezzoforte)
E.PIANO3............... forte (dynamic sampling, forte)
CLAVI. ................... with Sustain (with sustain sam-
pling)
HARPSICHORD .....no Sustain (without sustain
sampling)
VIBRAPHON.......... with KeyOff (with key-off sam-
pling)
ORGAN1 ............... no KeyOff (without key-off
sampling)
ORGAN2 ............... with StringRes (with string res-
onance)
STRINGS ................ no StringRes (without string
resonance)
3 Stop playback.
Press the VOICE/PERFORMANCE button for the
current demo song or press the SONG [START/
STOP] button.
4 Exit Demo Song mode.
Press the [EXIT] button.
24 P-250
POWER
ON OFF
MIN
MASTER VOLUME
EX.TRACKS SONG FILE
TRACK1
TRACK2
TOPSONG SELECT
KEYBOARDSONG
MAX
RECSTART/STOP
SYNCHRO STARTNEW SONG
MIDI OUT
DOWNSONG SETTING UP
TEMPOSONGSONG BALANCE
PANEL LOCK
A
C
P-250 Quick Guide
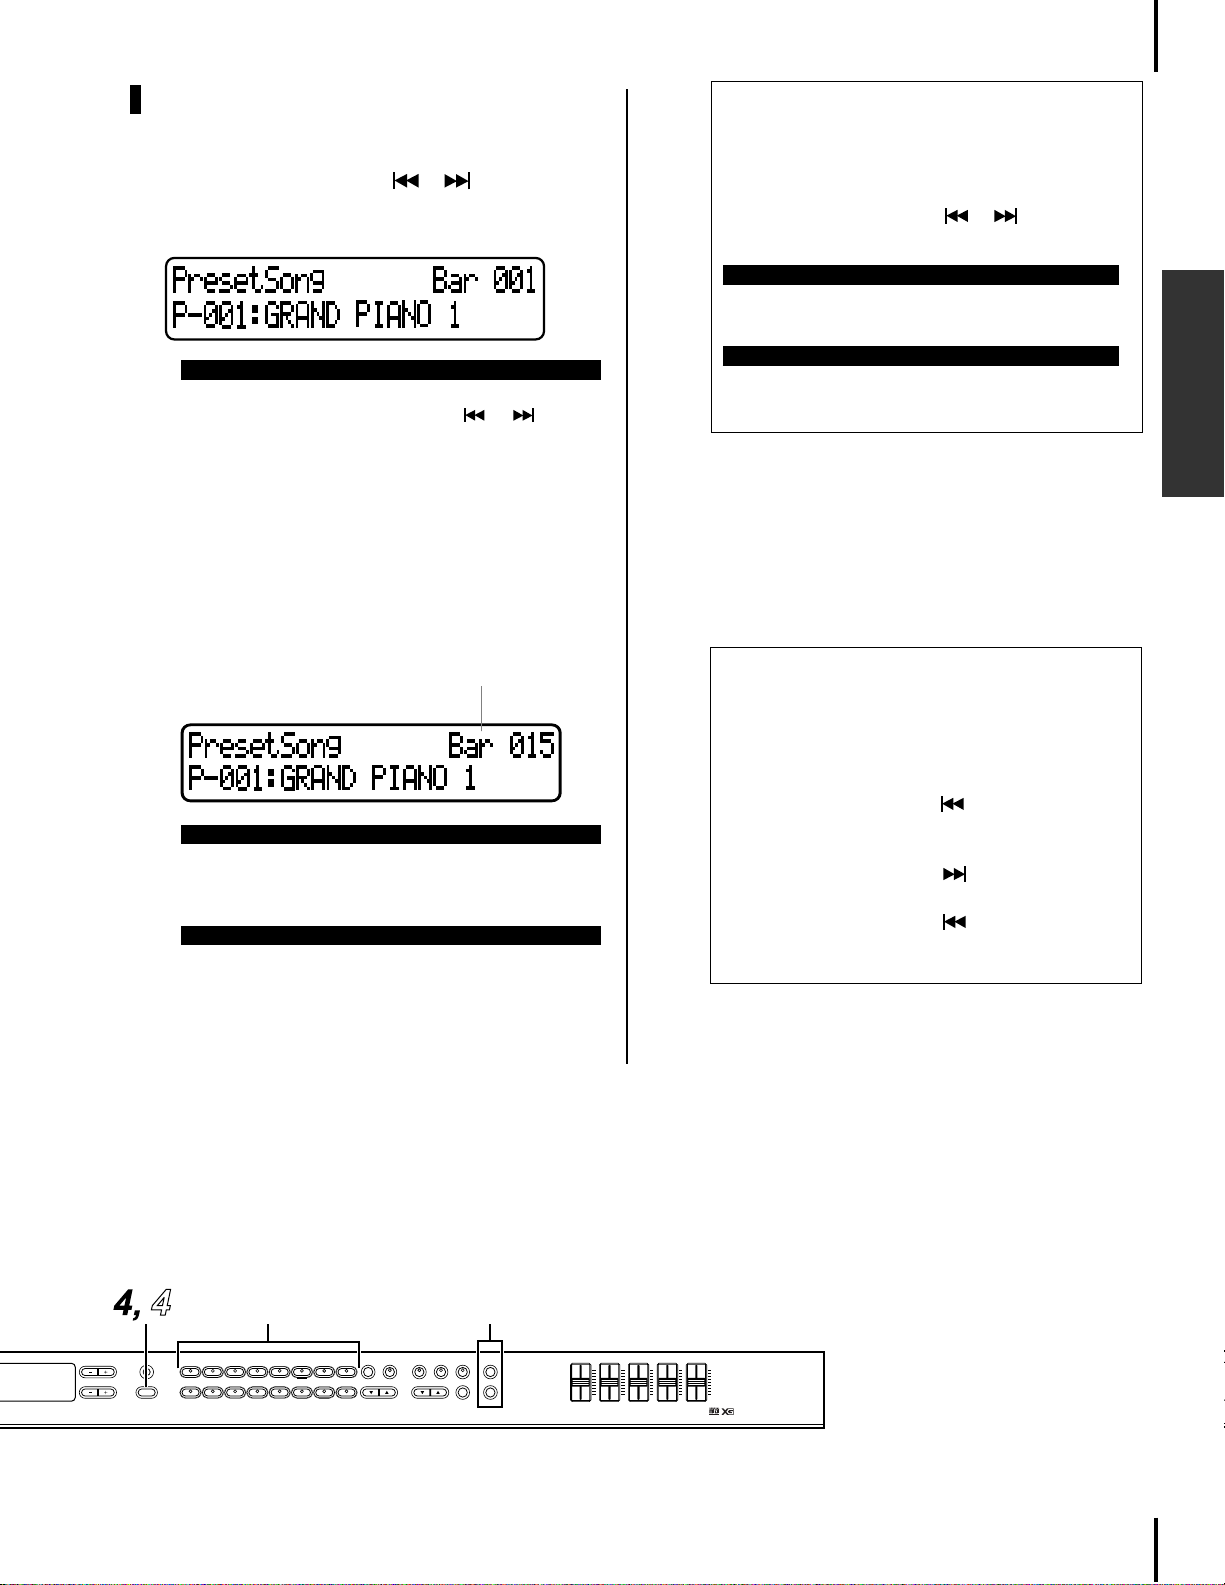
Listening to the preset songs
1 Select the desired song.
Press the SONG SELECT [ ]/[ ] buttons to
select the number of the tune you want to hear.
The song number is displayed as [P-***].
TIP
•You can also use the C [–]/[+] buttons to select a song
after you press the SONG SELECT [ ]/[ ] buttons.
• “P-000: NewSong” is a blank song provided so you can
record your playing. (page 47)
• Use the “SongRepeat” parameter in the [SONG SETTING] menu to select repeat playback of all songs or
repeat playback of a single song. (page 64)
2 Start playback.
Press the SONG[START/STOP] button to start
playback.
the bar number
NOTE
In songs recorded at a free tempo, the actual number of
bars occasionally may not match the number of bars indicated on screen.
NOTE
Some preset songs contain song data recorded at a free
tempo.
Adjusting the tempo
You can use the TEMPO [DOWN]/[UP] buttons to
adjust the playback tempo as required. The default
tempo (the song’s original tempo) is set when you
press the [DOWN] and [UP] buttons simultaneously.
Press either SONG SELECT [ ]/[ ] button to
return to the song selection screen.
TIP
You can also use the D[–]/[+] buttons to change the
tempo.
TIP
Whenever you select a new preset song, the tempo is
automatically reset to the song’s original value.
3 Stop playback.
When playback is complete, the P-250 automatically stops and locates the top of the song. To stop
playback in the middle of a song and locate the
top of the song, press the [TOP] button. You can
also pause playback by pressing the [START/
STOP] button.
Fast forward and rewind
You can perform the following operations while the
song selection screen is displayed:
• Use the B [–]/[+] buttons to move back and forth
(rewind and fast forward) through the song while
the song is played or stopped.
• Press the SONG SELECT [ ] or C [–] button during playback to restart playback from the top of
the song.
• Press the SONG SELECT
ing playback to start playback from the next song.
• Press the SONG SELECT
while playback is paused in a song to locate the
top of the song.
[] or C[+] button dur-
[] or C [–] button
Basic Operation
4 Return to the main screen.
Press the [EXIT] button.
12, 3
LOW
G.PIANO 1
B
YESNO
EXIT
D
G.PIANO 2
1
ORGAN 1
ORGAN 2
9 BA
10
E.PIANO3 HARPSI.
E.PIANO1
E.PIANO2
CLAVI.
STRINGS
5
3
4
GUITAR
SYNTH.PAD
CHOIR
13
11
12
2
VOICE EDITVIBES
7
8
6
14
VARIATION
BASS
XG
15
16
REVERBSPLITCONTRAST
MASTER EQ EDIT
CHORUS
MIDI SETTING
PERFORMANCE
PERFORM. FILE
OTHER SETTING
LO-MID MID
MASTER EQUALIZERVOICE/PERFORMANCE
HIGHHI-MID
P-250
ELECTRONIC PIANO
P-250 25
P-250 Quick Guide
M
■ Selecting, Editing, and Storing a Voice
The P-250 features a large number of high grade piano, organ, and other voices. Follow the steps below
to play your favorite voices, change the parameters, and store the edited voices.
1 Make sure the Performance mode is turned
off.
If it’s on, press the [PERFORMANCE] button to
turn off the button indicator.
2 Select a voice.
Press one of the VOICE/PERFORMANCE buttons
(from [GRAND PIANO 1] through [XG]) to select
your favorite voice. You can also switch between
voices in the same group by pressing one of the
Basic Operation
VARIATION buttons [†]/[π] or A [–]/[+] buttons
repeatedly.
3 Play the keyboard.
4 Change the voice.
You can change a voice in another group by
pressing a VOICE/PERFORMANCE button. You
can also play voices in Dual or Split mode. For
more information, see pages 35 and 36.
5 Apply the reverb effect.
Press the [REVERB] button repeatedly to toggle
the reverb on and off. When the button indicator
is off, the reverb is off. (See page 37.)
6 Apply the chorus effect.
Press the [CHORUS] button repeatedly to toggle
the chorus on or off. When the LED is off, the chorus is off. (See page 37.)
7 Use the Master Equalizer.
By moving the MASTER EQUALIZER [LOW],
[LO-MID], [MID], [HI-MID], [HIGH] controls,
you can adjust the tonal quality. (See page 38.)
8 Use the pitch bend and modulation wheels.
Moving either wheel up or down creates expressive playing effects, pitch bend, modulation, etc.
(See page 38.)
9 Use the pedal.
When the FC3 foot pedal is connected to a jack
on the rear panel, such as the [1 (SUSTAIN)] jack,
it can be used to create expressive playing effects.
(See page 39.)
10 Use the Edit function.
Press the [VOICE EDIT] button, then press the A [–]/
[+] buttons to select an item to edit, then press the
C [–]/[+] and D [–]/[+] buttons to edit tonal color.
11 Store the edits.
Press the B [+(YES)] button to store the edited
voice.
26 P-250
MIDI OUT
DOWNSONG SETTING UP
TEMPOSONGSONG BALANCE
PANEL LOCK
USB
MIDI THRUOPC-2
TO HOST
USB Mac
HOST SELECT
A
C
RL/MONO
OUT PUT
TRACK1
RL/MONO
EX.TRACKS SONG FILE
TRACK2
TOPSONG SELECT
RECSTART/STOP
SYNCHRO STARTNEW SONG
INPUT
POWER
ON OFF
8
PITCH
MODULATION
MIN
MASTER VOLUME
MAX
KEYBOARDSONG
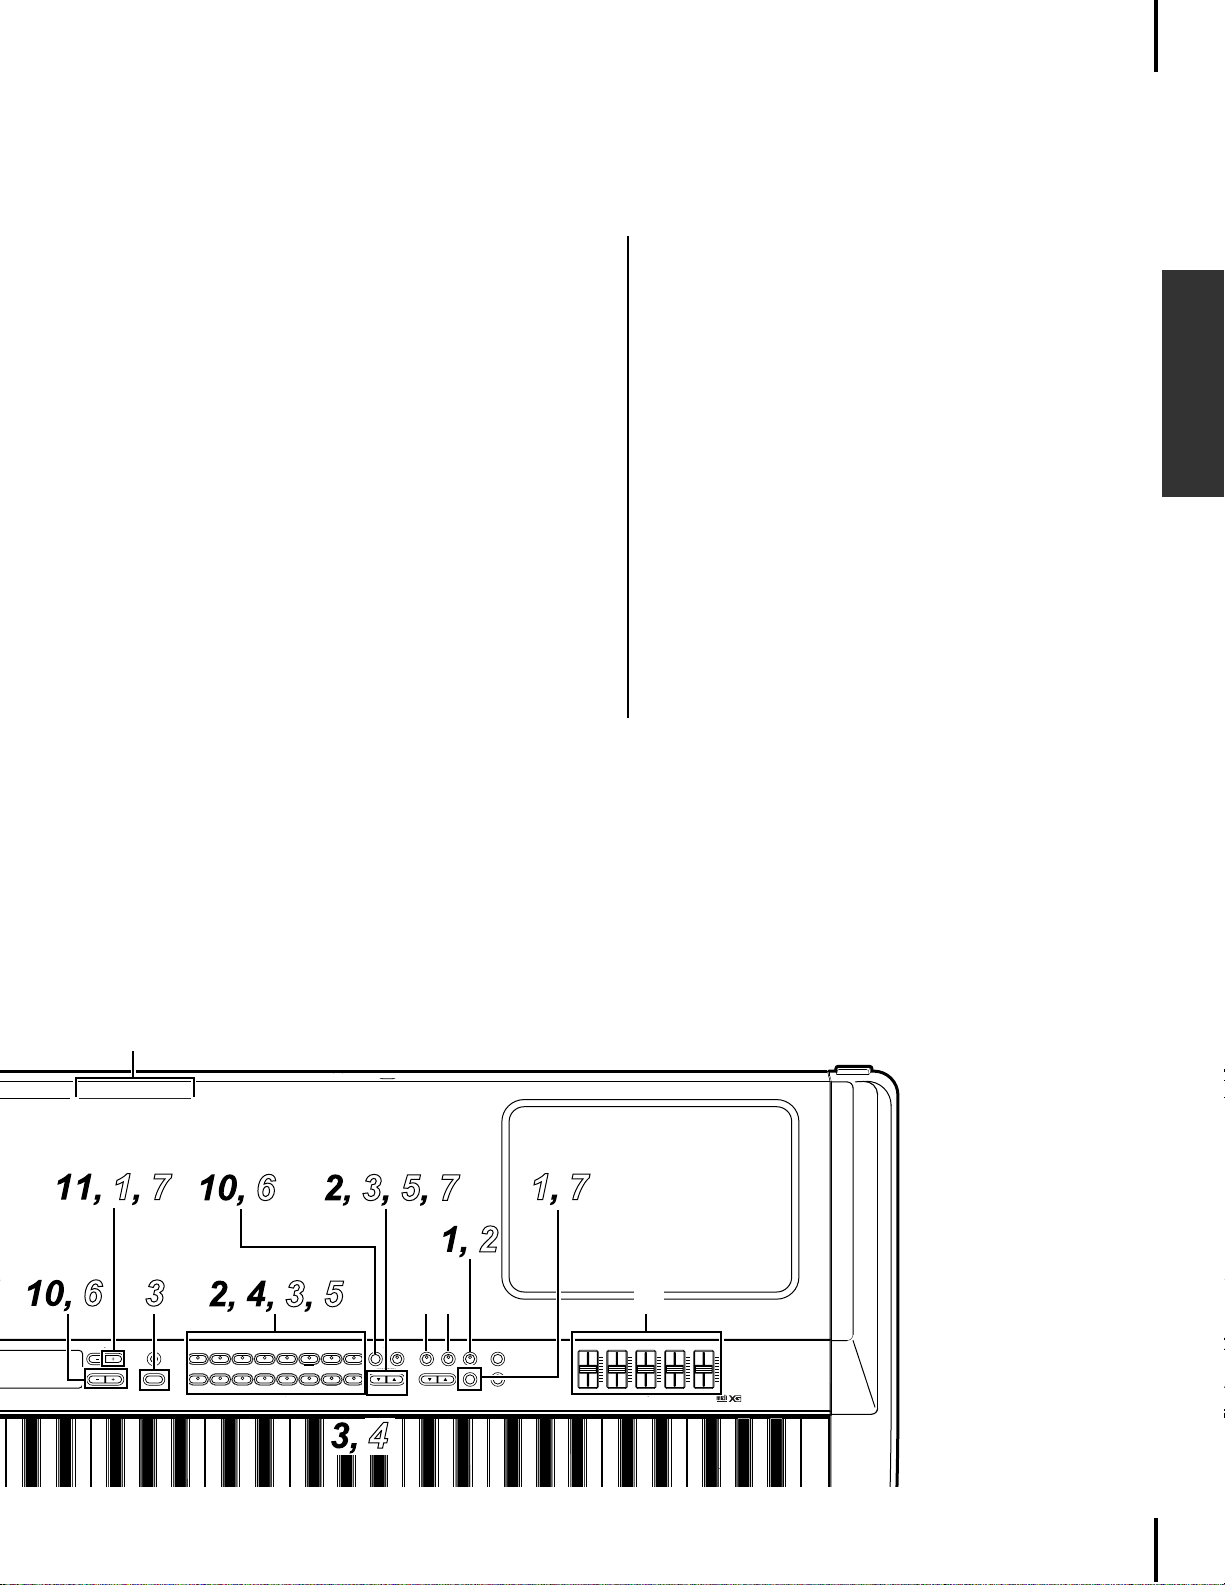
P-250 Quick Guide
U
■ Selecting, Editing, and Storing a Performance
A performance is a group of stored settings regarding the tone generator, MIDI, and so on. The P-250 features 32 preset performances. You can select and play any of these performances. You can also change
the parameters, and store the edits as a new performance.
1 Load a preset performance.
Press the [PERFORM. FILE] button, then press the
A [–]/[+] button to select “LoadFromMem.” Press
the C [–]/[+] button to select “000:PresetPerformance,” then press the B [+(YES)] button. When
the unit displays “Sure?-->,” press the B[+(YES)]
5 Change the performance.
Yo u can change a performance by pressing another
VOICE/PERFORMANCE button. To select a performance in another bank, press the VARIATION [†]/
[π] buttons to flash the [PERFORMANCE] indicator,
then press the desired VOICE/PERFORMANCE button.
button again.
6 Use the Edit function.
2
Make sure the Performance mode is turned
on.
If it’s off, press the [PERFORMANCE] button. The
Press the [VOICE EDIT] button, then press the A [–]/
[+] buttons to select an item to edit, then press the C
[–]/[+] and D [–]/[+] buttons to customize the voice.
button indicator blinks.
7 Store a performance.
3 Select the desired performance.
Press the [EXIT] button, then press the VARIATION [†]/[π] buttons to switch between Banks
A and B (page 30), then press any of the VOICE/
PERFORMANCE [1] — [16] buttons to select the
desired performance.
You can store an edited voice as a performance
(page 30).
Press the [PERFORM. FILE] button, then press the
A [–]/[+] buttons to select “Performance,” and
press the C [–]/[+] or VARIATION [†]/[π] buttons to select a location to store the performance.
Finally, press the B [+(YES)] button.
4 Play the keyboard.
■ Editing a Voice and Storing It as a Performance
Basic Operation
OUT IN AUX
MIDI ASSIGNABLE FOOT PEDAL
4
When you are editing the parameters of a selected v oice, y ou ma y occasionall y want to store the current
settings of the P-250 as a performance. In this case, follow the steps below:
Edit the desired voice following the Steps 1-10 described in the “Selecting, Editing, and Storing a Voice”
section. Then, proceed to Step 7 in the “Selecting, Editing, and Storing a Performance” section to store
the settings the entire keyboard as a performance.
9
1
3
SOSUTENUTO2SUSTAIN
SOFT
E.PIANO1
STRINGS
3
11
E.PIANO2
4
SYNTH.PAD
CHOIR
12
E.PIANO3 HARPSI.
G.PIANO 1
B
YESNO
EXIT
D
G.PIANO 2
1
2
ORGAN 1
ORGAN 2
9 BA
10
AC INLET
65
VOICE EDITVIBES
VARIATION
REVERBSPLITCONTRAST
MASTER EQ EDIT
CLAVI.
8
7
6
5
BASS
XG
GUITAR
16
15
14
13
MIDI SETTING
CHORUS
PERFORMANCE
PERFORM. FILE
OTHER SETTING
7
LOW
LO-MID MID
MASTER EQUALIZERVOICE/PERFORMANCE
HIGHHI-MID
P-250
ELECTRONIC PIANO
P-250 27
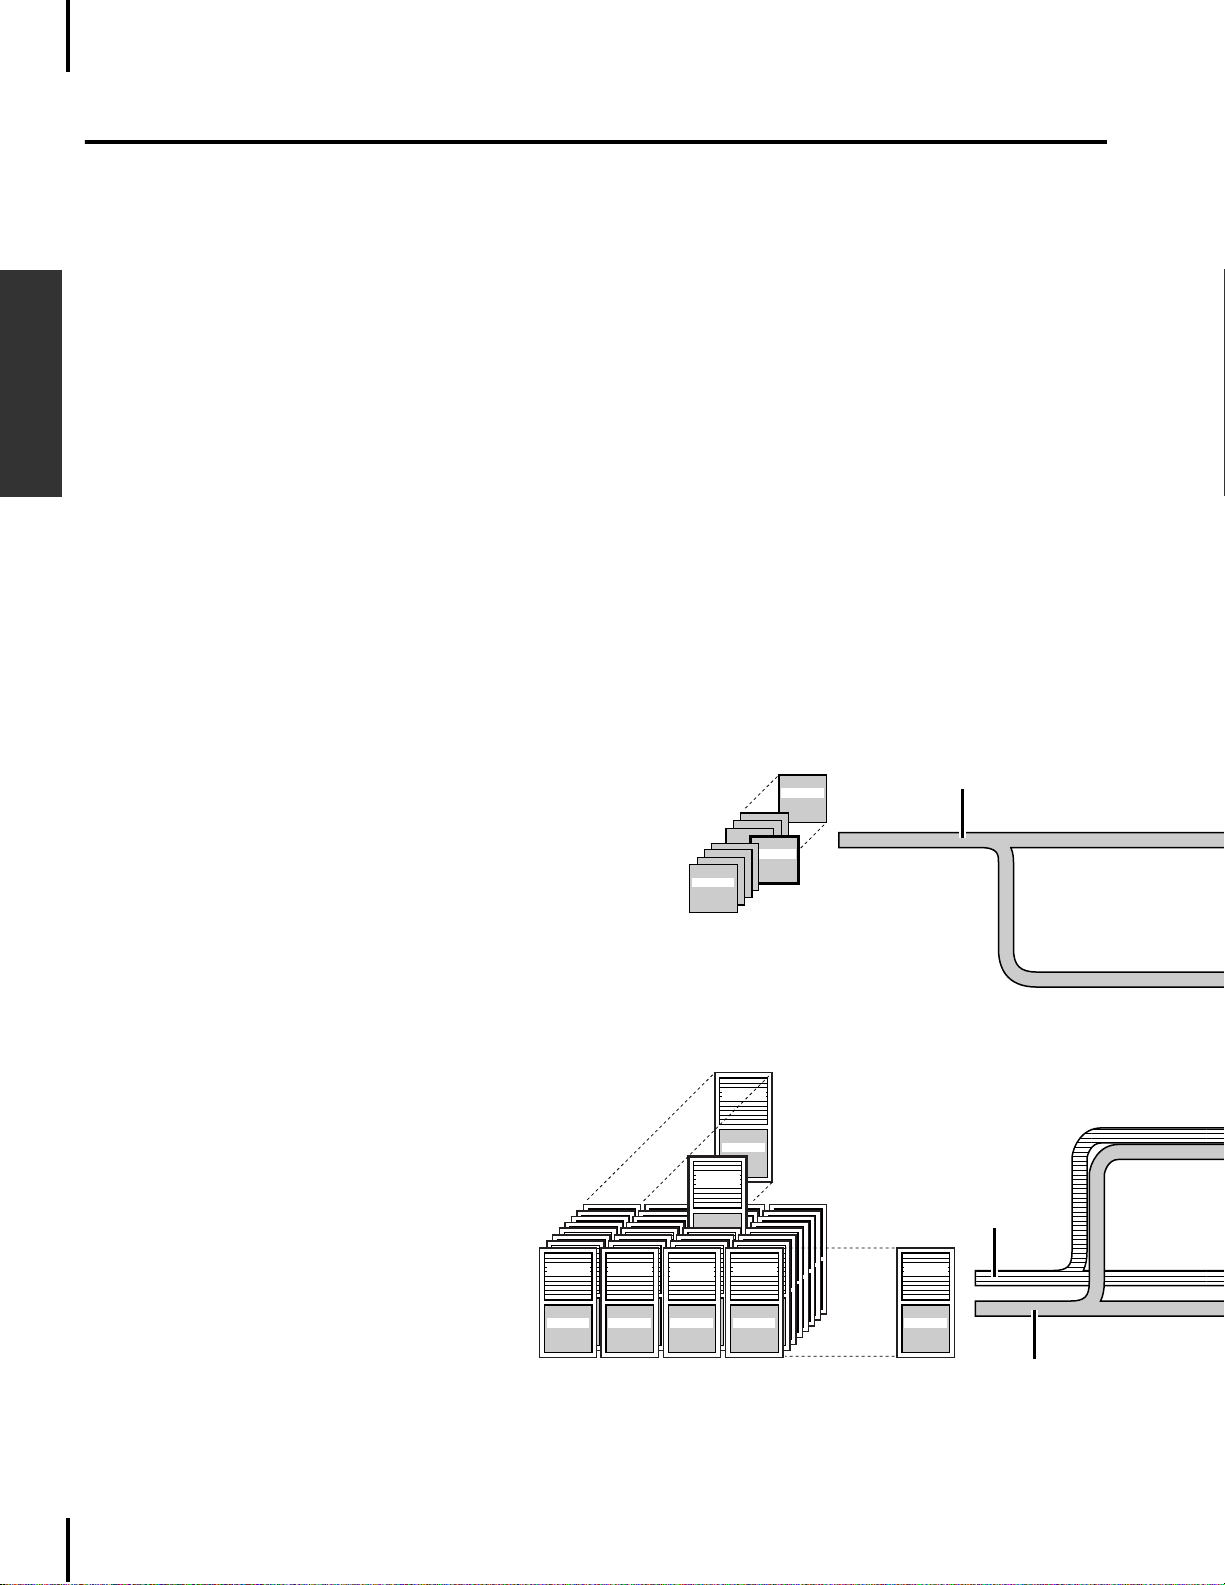
P-250 Design
This chapter explains the terms “Voice,” “Performance,” “Song,” and “Memory.”
■ Voice
The P-250 features 45 preset voices and an XG v oice set (equivalent to a single voice). You can combine
any of these voices in Dual or Split mode and play them simultaneously on the keyboard. The diagram
below illustrates voices in Dual and Split modes.
You can set the effects and various controls for each voice. These settings are automatically recalled
when you select a voice. In Dual or Split mode, you can set the parameters for each combination of
voices. For example, the same voice used in different voice combinations can have different parameter
Basic Operation
settings for each combination.
For a list of parameters, see page 58. For information on editing the parameters, see “Editing” on
page 61 and “Voice Edit” on page 65.
XG
Grand Piano 2
Grand Piano 1
Each voice (45 presets and an XG voice set)
has parameters that you can access via the
[VOICE EDIT] button.
These voices are used for the Left part.
XG
Fretless Bass
Phaser E.Piano
1
Mellow Piano 1
Grand Piano 1
Rock Piano
Grand Piano 1
Honky Tonk
Piano
Grand Piano 1
Grand Piano 2
Grand Piano 1
Left part
LeftLayer part
XG
Grand Piano 1
28 P-250
Each combination of voices (45 preset voices
and XG voices) has unique parameter settings
in the [VOICE EDIT] menu.
These combined voices are used for the Left
part and the LeftLayer part.
Left part
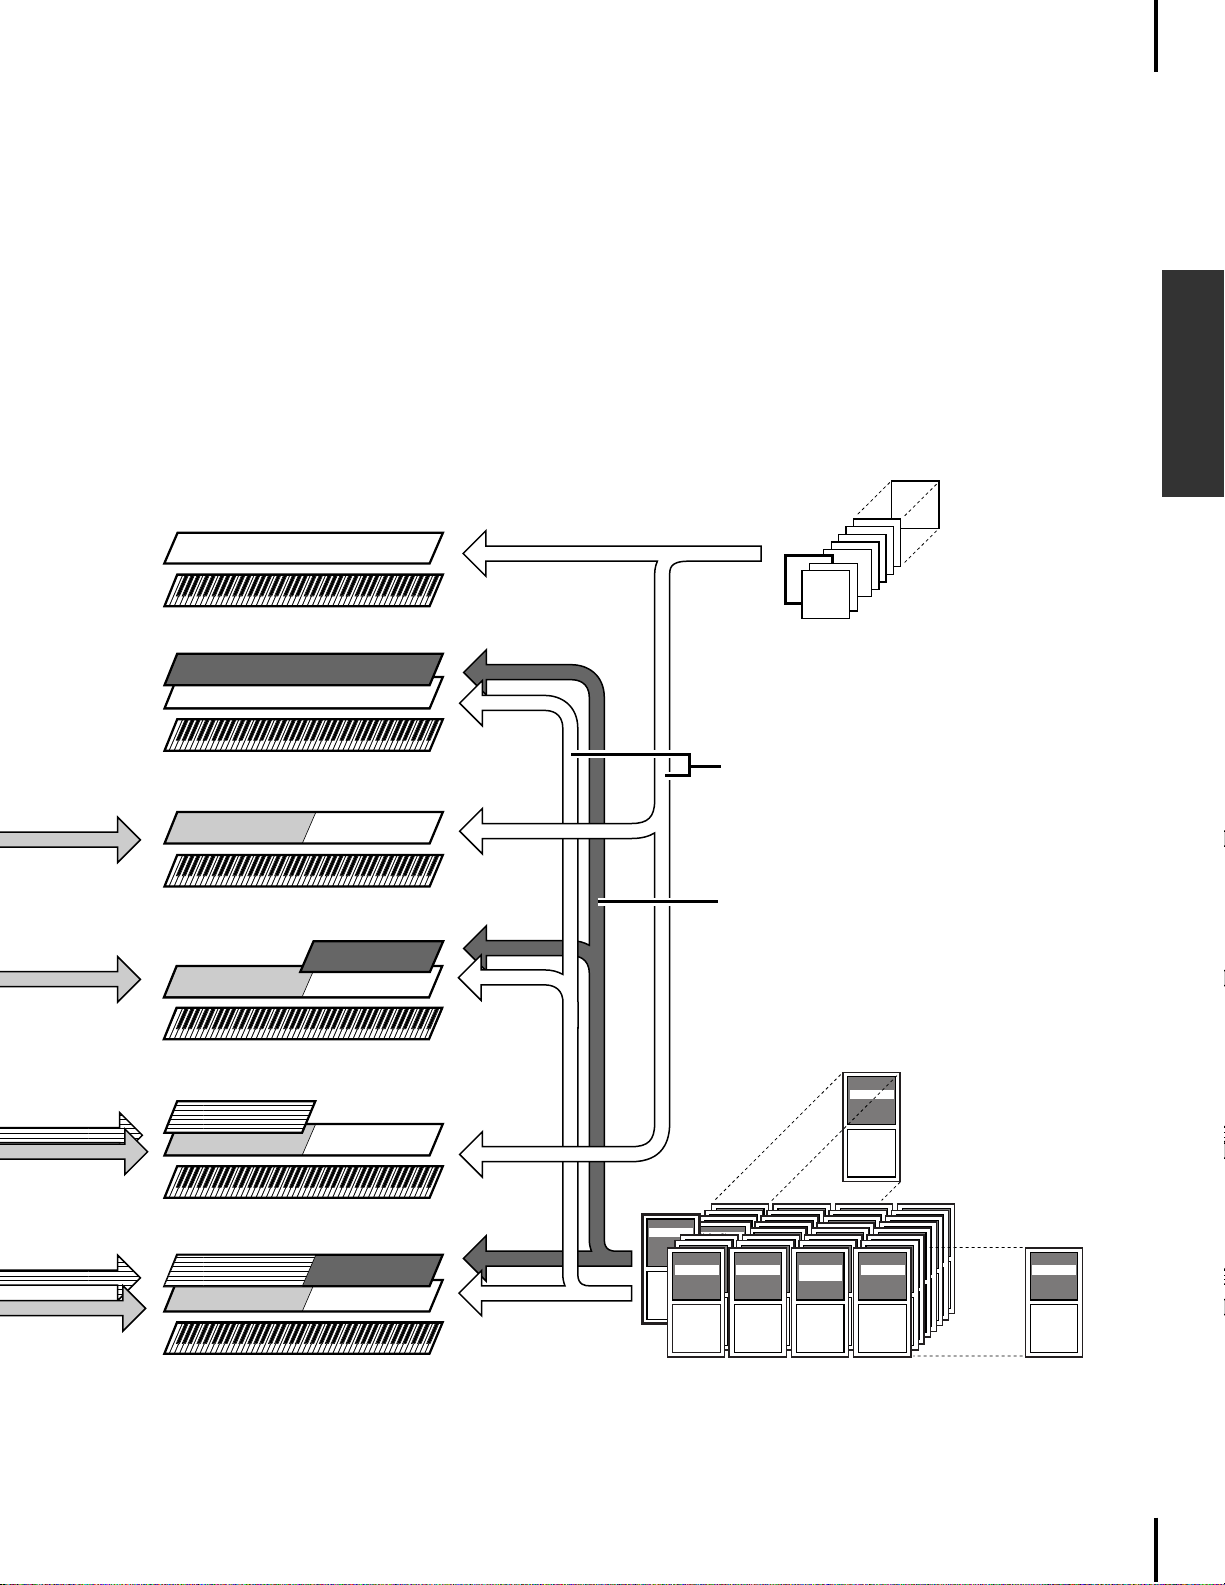
P-250 Design
• Non-Dual and non-Split mode
Main
• Dual
mainpart
LayerLayer
Main
• Split
LeftLeft Main
• The right-handed area in Split mode is
set to Dual.
Left
Left Main
Layer
Layer
XG
Rock Piano
Grand Piano 1
Each voice in a voice combination has
its own parameter settings.
These voices are used for the Main part.
Main part
Layer part
Basic Operation
• The left-handed area in Split mode is
set to Dual.
LeftLayerLeftLayer
Left
Left Main
• Split Dual
LeftLayer
LeftLayer
Left
Left Main
Layer
Layer
XG
Fretless Bass
Grand Piano 2
Mellow Piano 2
Honkky Tonk
Piano
Mellow Piano 1
Grand Piano 1
Rock Piano
Grand Piano 1
Honky Tonk
Piano
Grand Piano 1
Grand Piano 2
Grand Piano 1
XG
Grand Piano 1
Each combination of voices (45 preset voices and XG voices)
has unique parameter settings in the [VOICE EDIT] menu.
These combined voices are used for the Main part and the
Layer part.
P-250 29
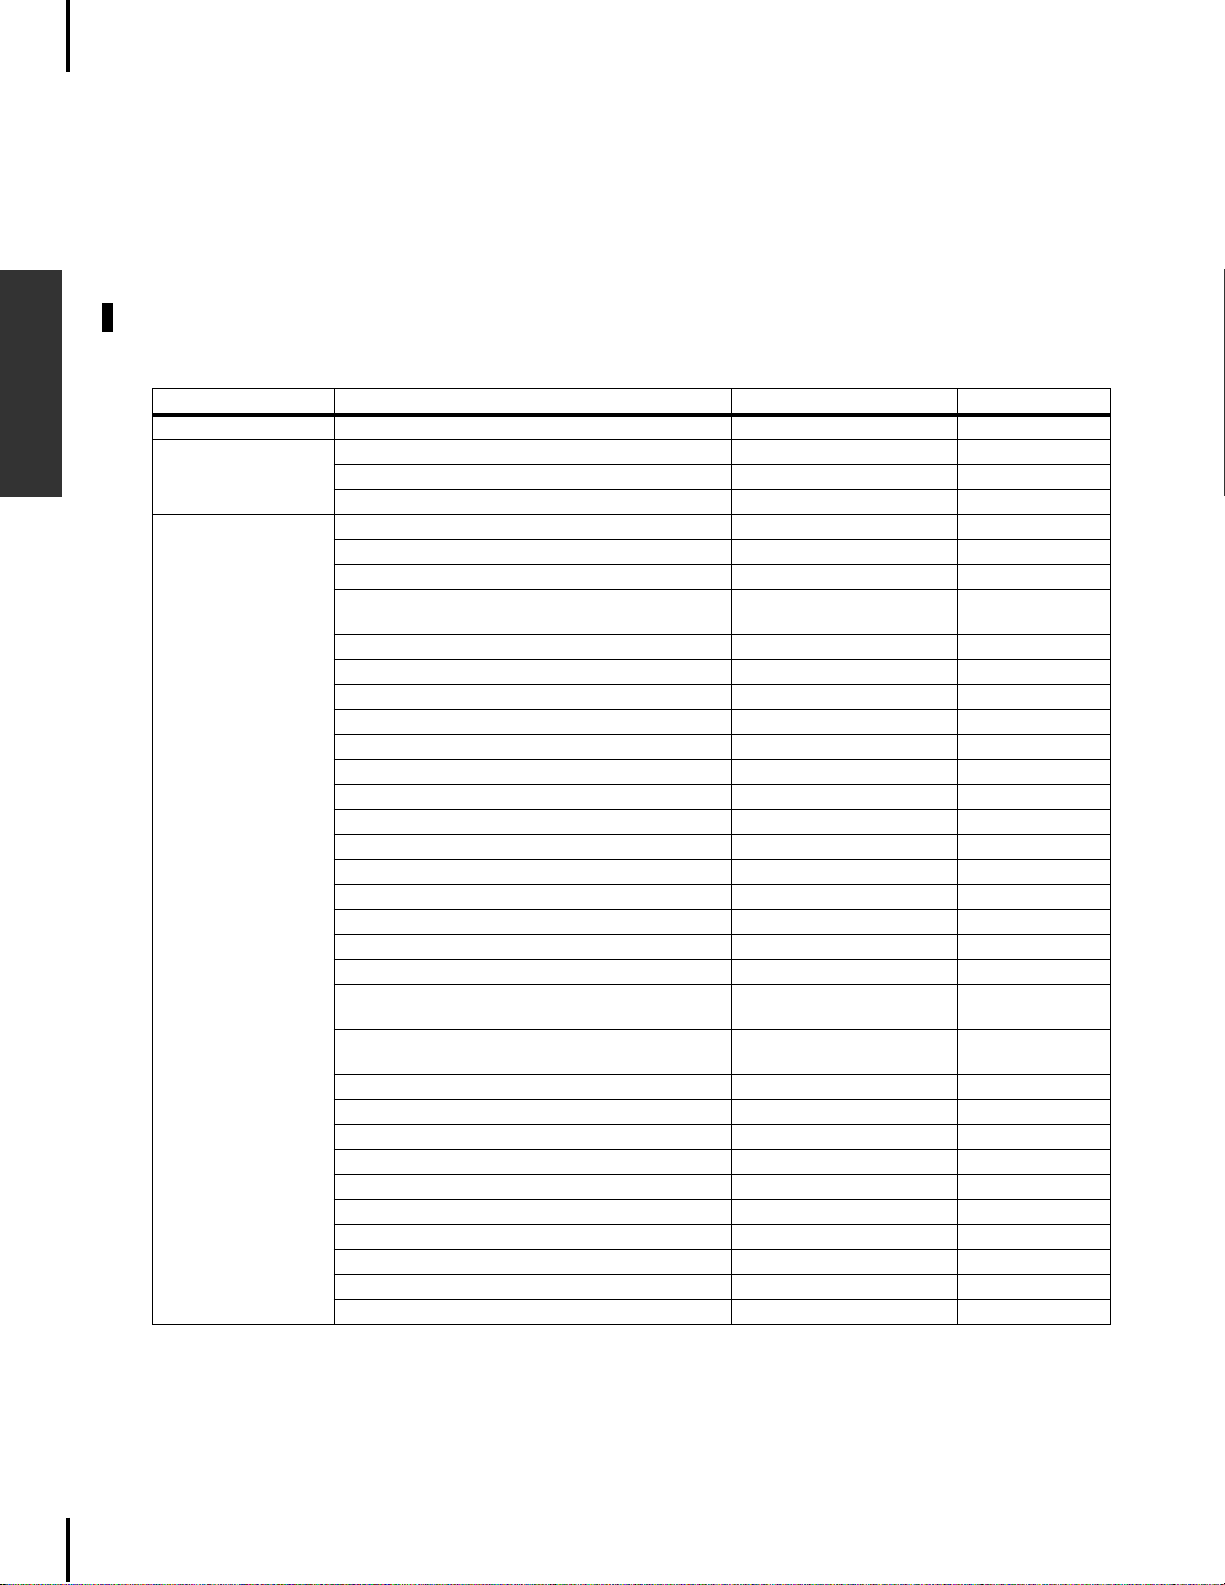
P-250 Design
■ Performances
On the P-250, a “performance” refers to a group of settings that control the tone generator, MIDI, and so
on. You can recall any of 32 performances from the panel by pressing just one button.
The performances are divided into two banks (A and B). P erformances in Bank A are called A01-A16, and
performances in Bank B are called B01-B16.
Refer to “Performance Operation” (page 41) for more information on recalling performances.
Performance parameters
Performance parameters are stored in a performance. You can edit these parameters and store them as a new performance.
Parameter menu Parameter function
Name Naming a performance (Performance name) 43
Voice Turning the reverb on/off N/A 37
Basic Operation
[VOICE EDIT] Setting the octave
Parameter name on screen Reference page
Setting Dual or Split mode N/A 35—36
Selecting a voice
Setting the volume level
Setting the position of left and right channels
Adjusting fine pitch offset between two voices in Dual
*2
mode
*1
*1
*1
*1
N/A 34
Octave 65
Volume 65
Pan 66
Detune 66
Selecting the reverb type ReverbType 66
Setting the reverb depth
*1
ReverbSend 66
Setting the chorus type ChorusType 66
Setting the chorus depth
Turning the chorus on/off
Selecting the insertion effect type
*1
*2
*1
ChorusSend 67
ChorusOnOff 67
Ins.Type 67
Setting the speed of the vibraphone vibrato effect *1 VibeRotorSpeed 67
Turning the vibraphone vibrato on/off
Adjusting the speed of the rotary speaker
Adjusting the insertion effect depth
Adjusting the brightness of the sound
Adjusting the resonance effect
Adjusting the low-range frequency of the part EQ
*1
*1
*1
*1
*1
VibeRotorOnOff 67
RotarySpeed 67
Dry/WetBalance 68
Brightness 68
HarmonicContent 68
*1
EQ LowFreq. 68
Adjusting the high-range frequency of the part EQ *1EQ HighFreq. 68
Adjusting the low-range gain (amount of boost/cut) of
the part EQ
Adjusting the high-range gain (amount of boost/cut) of
the part EQ
Setting the touch sensitivity
Assigening the Pedal 1 function
Assigening the Pedal 2 function
Assigening the Pedal 3 function
Assigening the Pedal 4 function
Assigening the modulation wheel function
*1
*1
*1
*2
*2
*2
*2
*2
EQ LowGain 68
EQ HighGain 68
TouchSense 68
Pedal 1 69
Pedal 2 69
Pedal 3 69
Pedal 4 69
Modulation 69
Setting the MSB of the Send Bank Select message *1SendBankMSB 70
Setting the LSB of the Send Bank Select message
Setting the Program Change message
Turning the Internal tone generator on/off
*1
*1
*1
SendBankLSB 70
SendPG# 70
InternalTG 70
30 P-250
 Loading...