

Yamaha HTR-4063BL, HTR-5064 Easy Setup Manual
INFO
MEMORY
PRESET
FM
AM
TUNING
VOLUME
VIDEOHDMI IN L AUDIO R
STRAIGHT
TONE CONTROL
BD
DVD
TV
CD RADIO
SILENT CINEMA
SCENE
NATURAL SOUND AV RECEIVER HTR-5064
INFO
MEMORY
PRESET
FM
AM
TUNING
VOLUME
VIDEOHDMI IN L AUDIO R
STRAIGHT
TONE CONTROL
BD
DVD
TV
CD RADIO
SILENT CINEMA iPod/iPhone
SCENE
DIRECT
PHONES
USB
PROGRAM
INPUT
YPAO MIC
VIDEO AUX
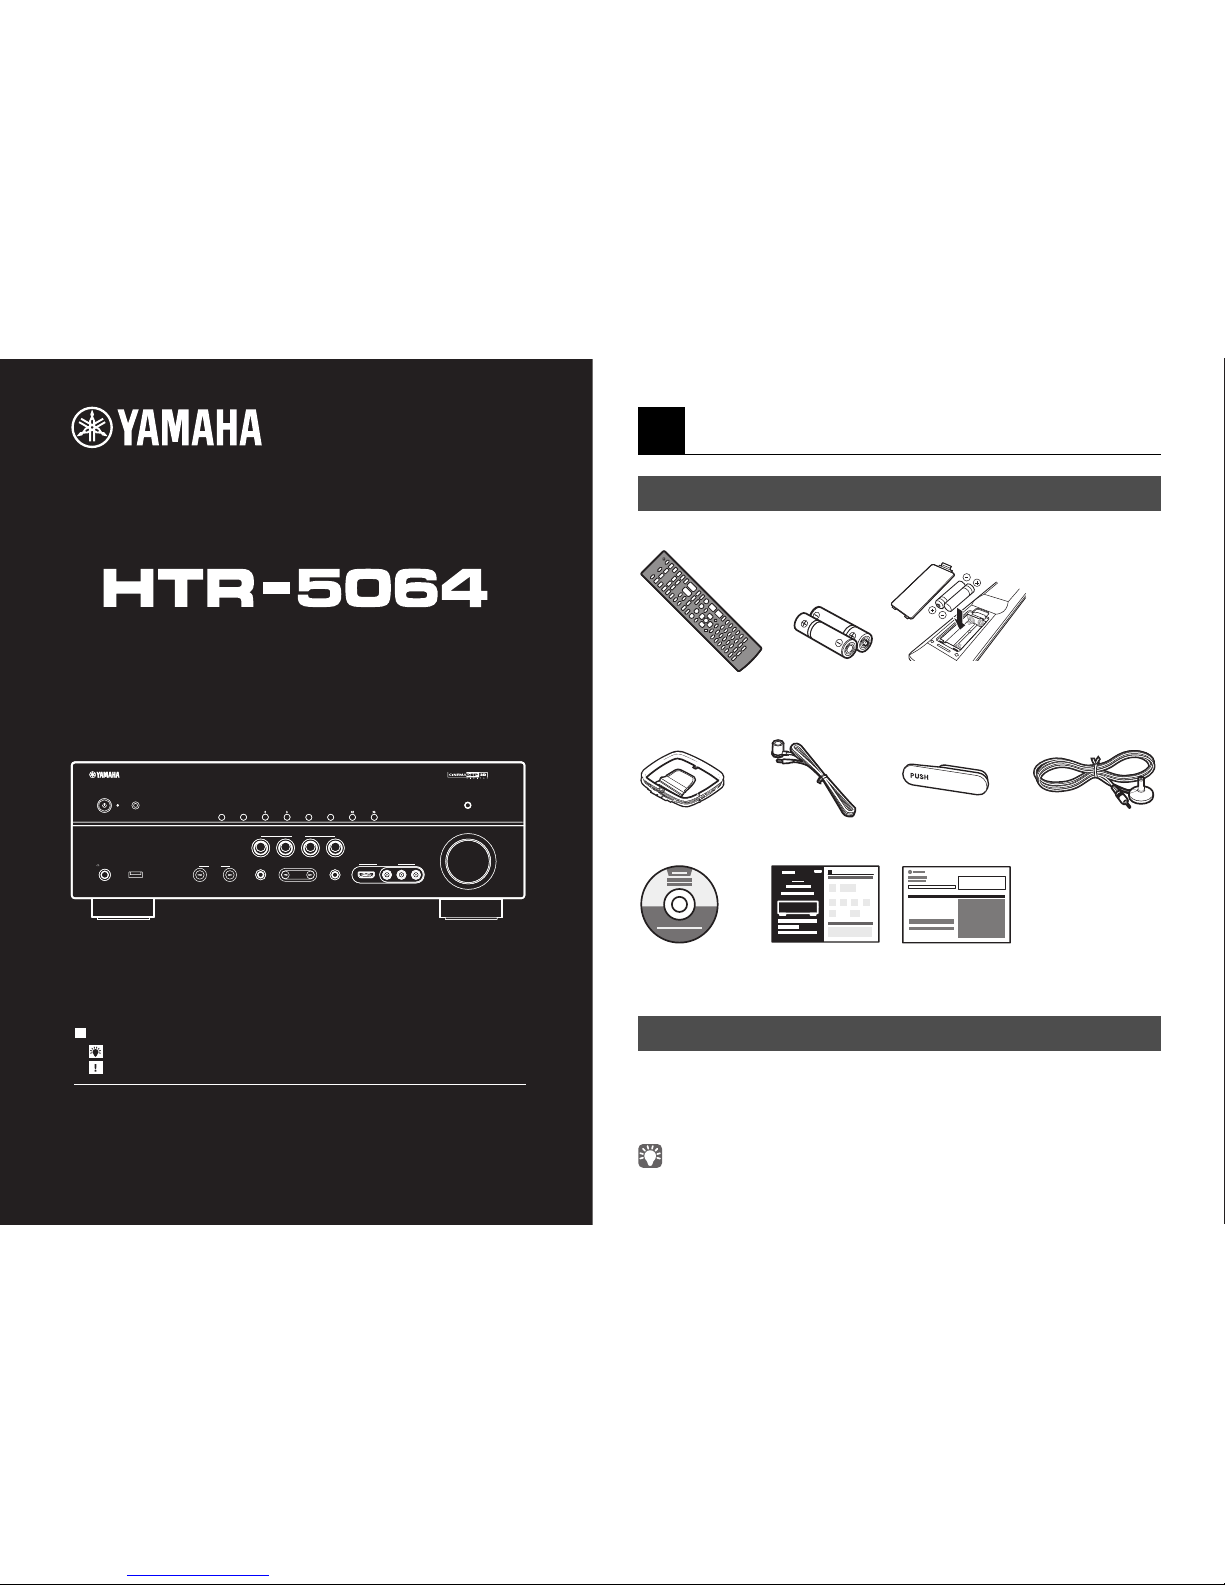
Check that the following accessories are supplied with the unit.
* The supplied FM antenna will differ depending on your country or region.
Prepare the following cables (not supplied) for connection according to the instructions
in this guide.
• A digital optical cable is not required when your TV supports the Audio Return Channel (ARC)
function.
1 Preparation
Accessories
Remote control Batteries (AAA, R03, UM-4) x 2
Insert the batteries into the battery case in correct directions
(+ and -).
AM antenna FM antenna* VIDEO AUX input
cover
YPAO microphone
CD-ROM
(Owner’s Manual)
Easy Setup Guide
(this manual)
Safety Brochure
Preparing cables
Speaker cable (for each speaker) HDMI cable x 2
Monaural pin cable x 1 Digital optical cable x 1
AV Receiver
Easy Setup Guide
The Easy Setup Guide explains the general procedures for setting up the 5.1 or
7.1-channel system and how to produce surround sounds from BD/DVD.
For more details, please refer to the “Owner’s Manual” contained in the CD-ROM.
About the symbols in this manual.
• “ ” indicates the explanations for better use.
• “ ” indicates the cautions concerning operations or setup of the unit.
A PDF format of this guide and the “Owner’s Manual” can be downloaded from
the following website.
http://download.yamaha.com/
Some features are not available in certain regions.
English
2
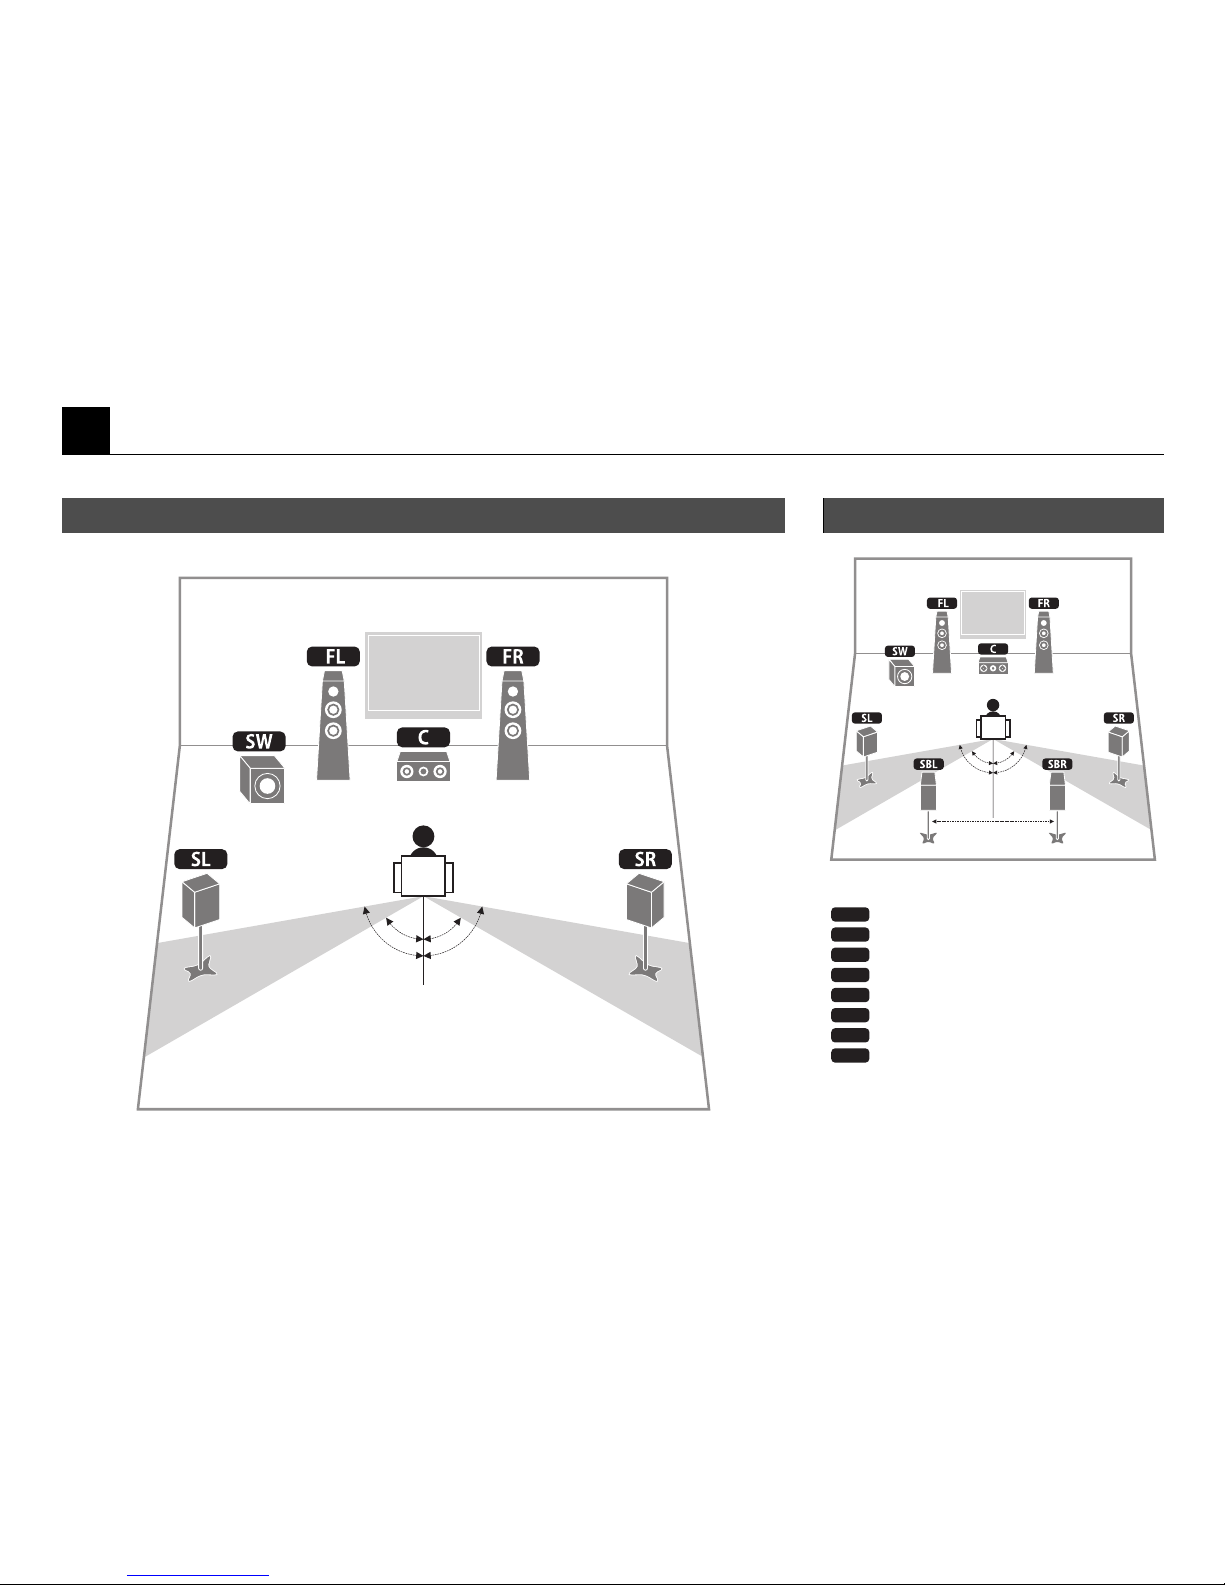
Place the speakers in as shown below. Other layouts (except for 5.1-channel speaker layout and 7.1-channel speaker layout) are shown in the “Owner’s Manual.”
2 Placing speakers
5.1-channel system 7.1-channel system
60° 60°
80° 80°
60° 60°
80° 80°
FL
FR
C
SL
SR
SBL
SBR
SW
Front speaker (L)
Front speaker (R)
Center speaker
Surround speaker (L)
Surround speaker (R)
Surround back speaker (L)
Surround back speaker (R)
Subwoofer
30 cm (1 ft.) or more
3
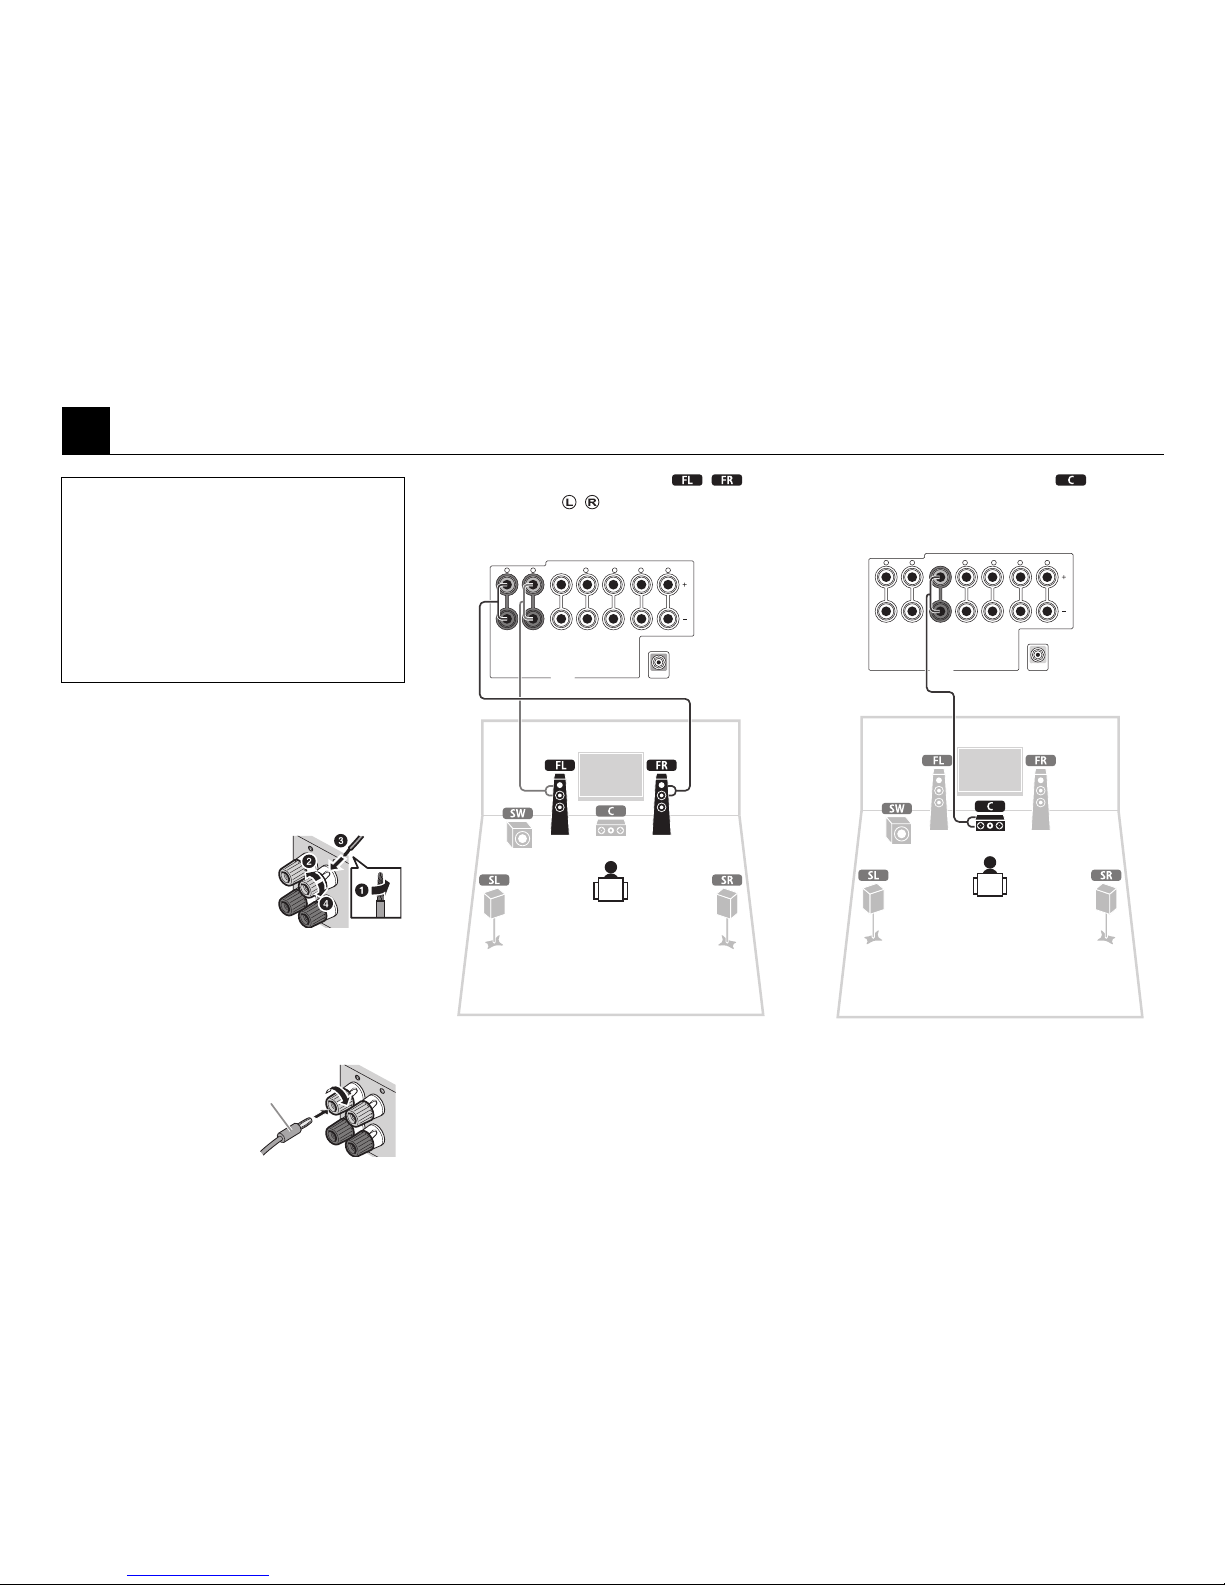
Connecting speaker cables
Speaker cables have two wires. One is for connecting the
negative (-) terminal of the unit and the speaker, and the
other is for the positive (+) terminal. If the wires are colorcoded to prevent confusion, you should connect the black
side to the negative terminal and the other wire to the
positive terminal.
1 Remove approximately
10 mm (0.4 in.) of insulation
from the end of the speaker
cable and twist the bare wire
firmly.
2 Loosen the speaker terminal.
3 Insert the bare wire into the
gap on the side of the terminal.
When it is difficult to insert the wire into the gap on the
side, insert it into the gap downside of terminal.
4 Tighten the terminal.
Connecting banana plugs
(Except U.K., Europe, Asia and Korea models)
Tighten the knob, and then
insert the banana plug into the
end of the terminal.
1 Connect the front speakers ( / ) to
the FRONT ( / ) terminals.
2 Connect the center speaker ( ) to the
CENTER terminal.
3 Connecting speakers
• (U.S.A. and Canada models only) The unit is configured to
8Ω speakers as the factory setting. 6Ω speakers can be also
connected.
• (Except for U.S.A. and Canada models) Use the speakers
with an impedance of at least 6Ω.
• Use a subwoofer with a built-in amplifier.
• Disconnect the power plug before connecting the speakers.
• Be careful that the core of the speaker cable does not touch
anything or come into contact with the metal areas of the unit.
If this happens, it may damage the unit or the speakers. If the
speaker cables short circuit, “CHECK SP WIRES!” will appear
on the front panel display when the unit is switched on.
F
R
O
N
T
+ (Red)
- (Black)
F
RONT
Banana plug
FRONT CENTER SURROUND
SINGLE
SUBWOOFER
R L R RL L
SURROUND BACK/
BI-AMP
SPEAKERS
The unit (rear)
FRONT CENTER SURROUND
SINGLE
SUBWOOFER
R L R RL L
SURROUND BACK/
BI-AMP
SPEAKERS
The unit (rear)
 Loading...