

HALTECH HEAD OFFICE: PH: +612 9729 0999
FAX: +612 9729 0900
EMAIL: sales@haltech.com
HALTECH US OFFICE: EMAIL: usa@haltech.com
See the Haltech Website for your local authorised dealer.
www.haltech.com
Version 1
YAMAHA PWC
HT-140980
QUICK START GUIDE

LIMITED WARRANTY
Lockin Pty Ltd trading as Haltech warrants the Haltech
TM
Programmable Fuel Injection System to be
free from defects in material or workmanship for a period of 12 months from the date of purchase.
Proof of purchase, in the form of a bill of sale or receipted invoice, which indicates that the product is
within the warranty period, must be presented to obtain warranty service. Lockin Pty Ltd trading as
Haltech suggests that the purcha ser retain the dealer’s dated bill of sale as evidence of the date of
retail purchase.
If the HaltechTM Programmable Fuel I njection System is found to be defective as mentioned above, it
will be replaced or repaired if returned prepaid along with proof of purchase. This shall constitute the
sole liability of Lockin Pty Ltd trading as Haltech.
To the extent permitted by law, the foregoing is e xclusive and in lieu of all other warranties or
representations, either expressed or implied, including any implied warranty of merchantability or
fitness. In no event shall Lockin Pty Ltd trading as Haltech, be liable for special or consequential
damages.
IGNITION WIRING WARNING
This system is capable of controlling either Auto-Dwell (also known as intelligent or smart ignitors)
which have in-built dwell control or ECU Dwell ignitors (also known as dumb igniters or Constant
Charge Ignitors), which contain no such control. This allows standard ignitors to be used in many cases.
Auto-dwell ignitors are commonly found on early EFI engines with electronic ignition.
ECU-dwell ignitors are commonly found in modern ECU controlled ignition systems.
Most standard ignitors are ECU Dwell.
It is very important to set the system up to match the type of ignitor used!.
In the ignition set-up page the setting should be:
To control Auto-dwell ignitors set up as “Constant Duty”
To control ECU-dwell ignitors set up as “Constant Charge”
If the wrong setting is applied, damage to the ignition system may occur.
Burning out ignitors due to wrong set-up will not be regarded as Warranty!
Please ensure all power supplies are disconnected before commencing any wiring.
Failure to follow all the warnings and precautions in this manual can lead to damage to
engine components and may possibly void your warranty. Incorrect setup of the ECU can
also lead to damaged engine components.
Damaged components due to incorrect setup will not be regarded as warranty repairs.
GENERAL INSTALLATION WARNING
Avoid open sparks, flames or operation of electrical devices near flammable substances.
Always disconnect the battery cables when doing electrical work on your vehicle.
Do not charge the battery with a 24 Volt truck charger or reverse the polarity of the battery
or any charging unit. Do not charge the battery with the engine running as this could
expose the ECU to an unregulated power supply that could destroy the ECU and other
electrical equipment.
All fuel system components and wiring should be mounted away from heat sources,
shielded if necessary and well ventilated. Disconnect the Haltech ECU from the electrical
system whenever doing any arc welding on the vehicle by unplugging the wiring harness
connector from the ECU.
After completing the installation, make sure that there are no fuel leaks, and no wiring
left un-insulated in case a spark or short-circuit occurs and causes a fire. Also make sure
that you follow all proper workshop safety procedures. If you're working underneath
a jacked-up car, always use safety stands!
CAN Connector
The Main CAN connector is used to connect other Haltech devices via CAN.
Connect the optional Haltech CAN Wideband to this connection via the supplied cable.
Terminations are outlined below.
Main CAN Connector
Main CAN Connector Wiring
Program / Setup Connector
The Program / Setup connector is used to power up the ECU upon initial
installation and setup.
Connect the supplied opposing program/setup loop connector to this to
power up the ECU for the first time to load the base map.
Ensure the opposing program/setup loop connector is removed once
the PWC is setup and running to avoid flattening the battery of the PWC.
Program / Setup Connector
Program / Setup loop connector
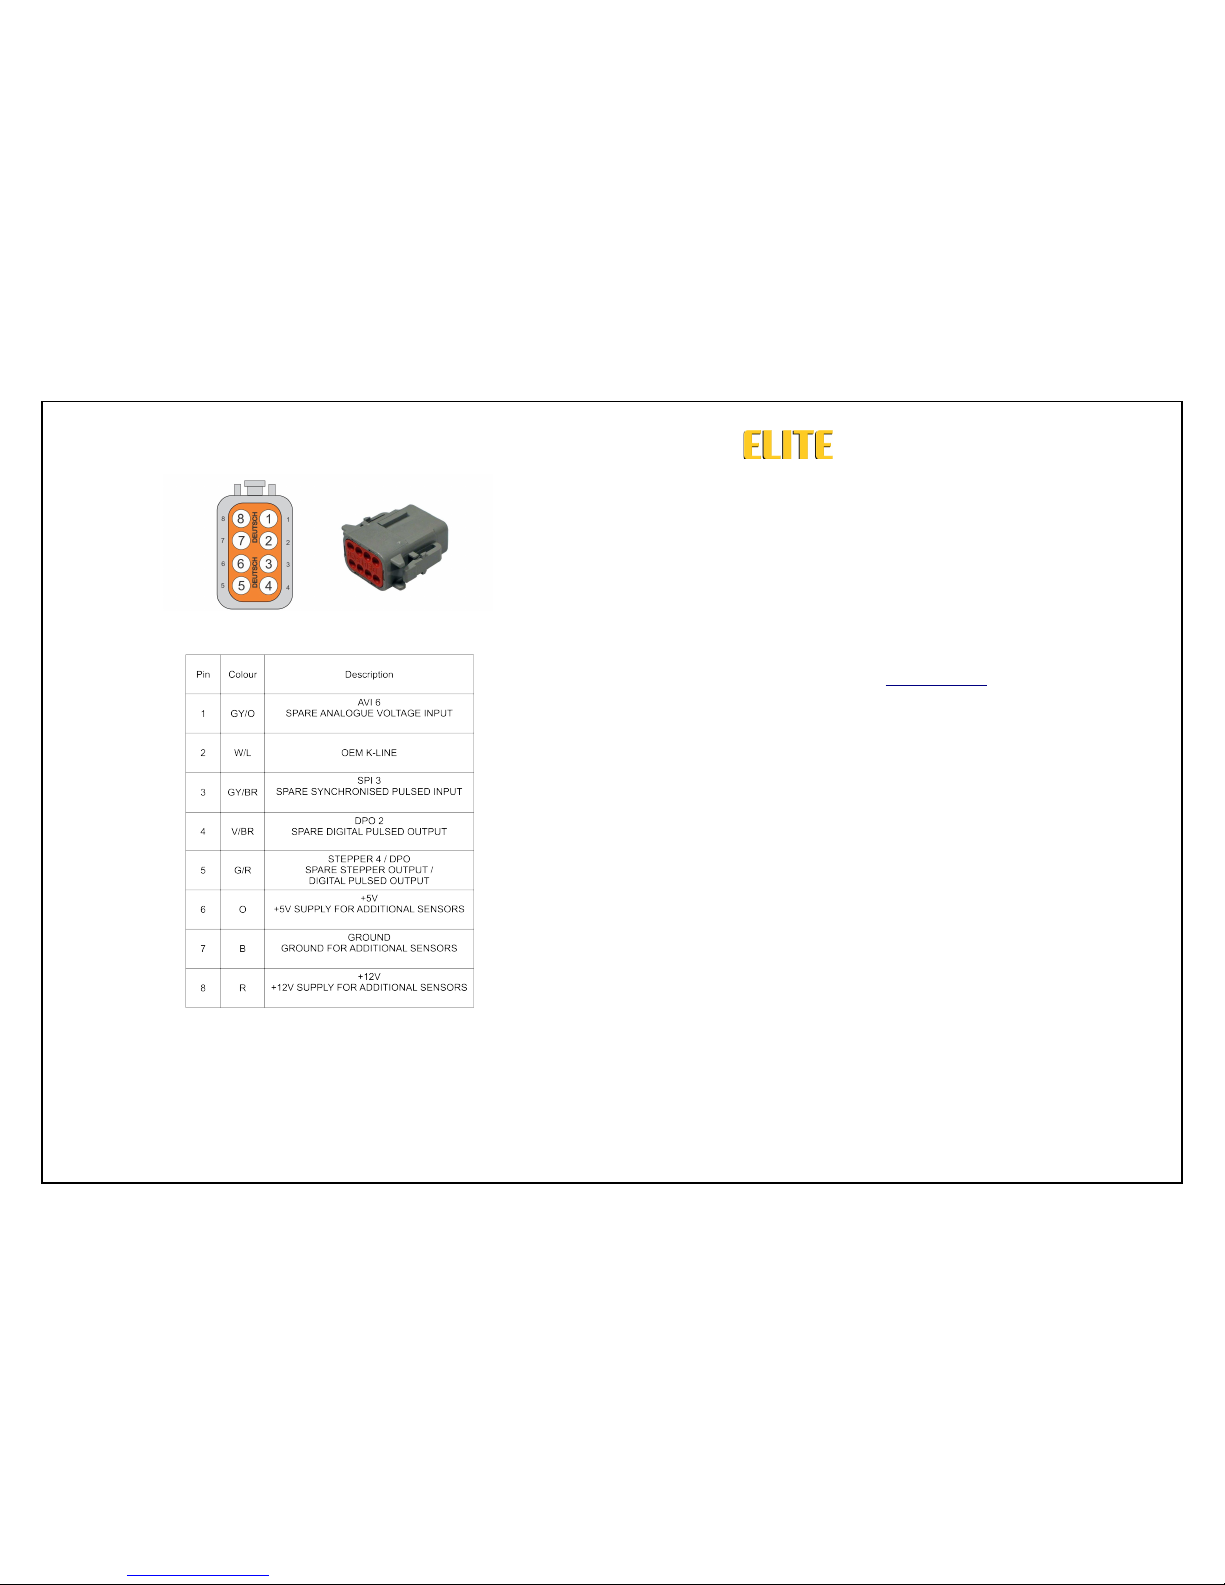
Auxiliary Connector
The Auxiliary connector is used to connect additional inputs and outputs to the
installation. Terminations are outlined below.
Auxiliary Connector
Legend- Wire Colours
B=Black BR=Brown G=Green GY=Grey L=Blue
O=Orange P=Pink R=Red V=Violet Y=Yellow
W=White
When two Colours are used in a wire by the alphabetical code, the first letter
indicates the basic wire colour, the second colour indicates the colour of the
stripe.
YAMAHA PWC
Quick Startup Guide
Congratulations on purchasing a Haltech Engine Management System.
This fully programmable product opens the door to virtually limitless performance
modification and tuning of your vehicle. Programmable systems allow you to extract
all the performance from your engine by delivering precisely the required amount
of fuel and ignition timing that your engine requires for maximum output under all
operating conditions.
This quick startup guide will walk you through installation of a Haltech ECU into a
PWC. This guide is accompanied by the full service manual located on the
software USB provided with the ECU that you or your tuner will need to refer to
before completing your installation and configuration. The Manual can also be
downloaded from the Haltech website www.haltech.com
Compatibility
The Haltech Elite Yamaha PWC Kit is compatible with the following
Yamaha Waverunner series manufactured after 2008 using the
1.8L High Output Yamaha Marine Engine.
• FX
• FZS
• FZR
Supported ECU's
• Elite 1500
• Elite 2500
Included in Haltech Elite Yamaha PWC Kit ( HT-140980)
• Elite PWC Mounting Bracket and associated installation hardware
• Plug & Play Patch Harness
• Auxiliary Connector,Pins,Sealing plugs
• IP67 USB Extension Cable
• Screw on USB A Sealing Cap
Optional Accessories ( Sold Separately )
• Haltech CAN Wideband controller 1 PWC Kit without digital display gauge (HT-010730)
• Haltech CAN Wideband controller 1 PWC Kit with digital display gauge (HT-010731)
 Loading...