

Yamaha GP1200R Installation
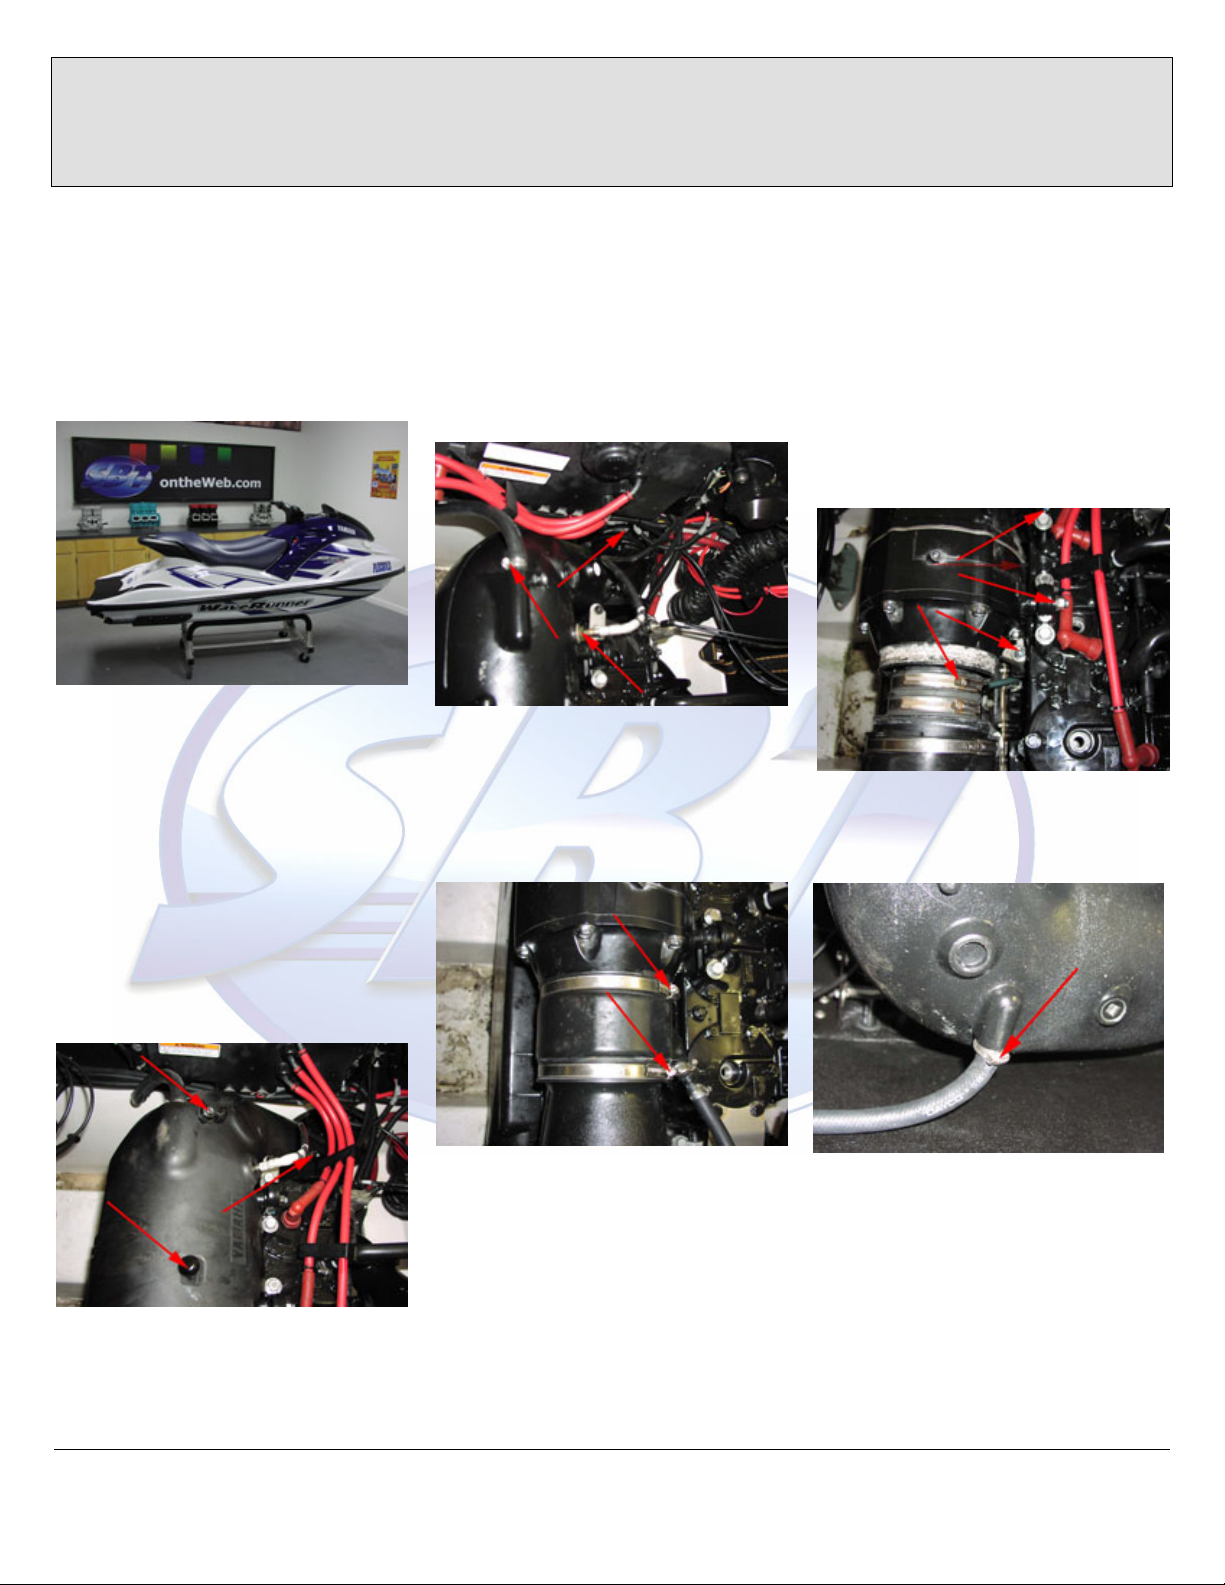
Engine Removal / Installation
Yamaha 1200 pv
Step 1
Battery Removal
1.1 (Above) Remove the two retaining
straps, disconnect the battery and remove it
from the hull. Disconnect the negative
(black) cable first, then the positive (red).
Step 2
2.2 (Below) Loosen the band clamps
around the stinger bypass water line and
through-hull exhaust coupling. Remove the
water line and using a 14mm wrench,
remove the water sensor.
2.3 (Below) Loosen the band clamps
securing the exhaust coupler jacket to the
pipe and slide it all the way forward to clear
the joint.
2.4 (Below) Loosen the rear band clamp
securing the pipes together. Remove the
four 12mm bolts and nuts securing the rear
pipe section to the block. Remove the rear
most bracket 12mm bolt securing the pipe
to the bracket (not pictured). Remove the
rear pipe section from the hull.
2.5 (Below) Remove the front exhaust
water line.
Exhaust Removal
2.1 (Below) Pop open the three bolt
covers on the exhaust heat shield and
remove the three 10mm bolts.
v 1.0 © 2001 Short Block Technologies
1
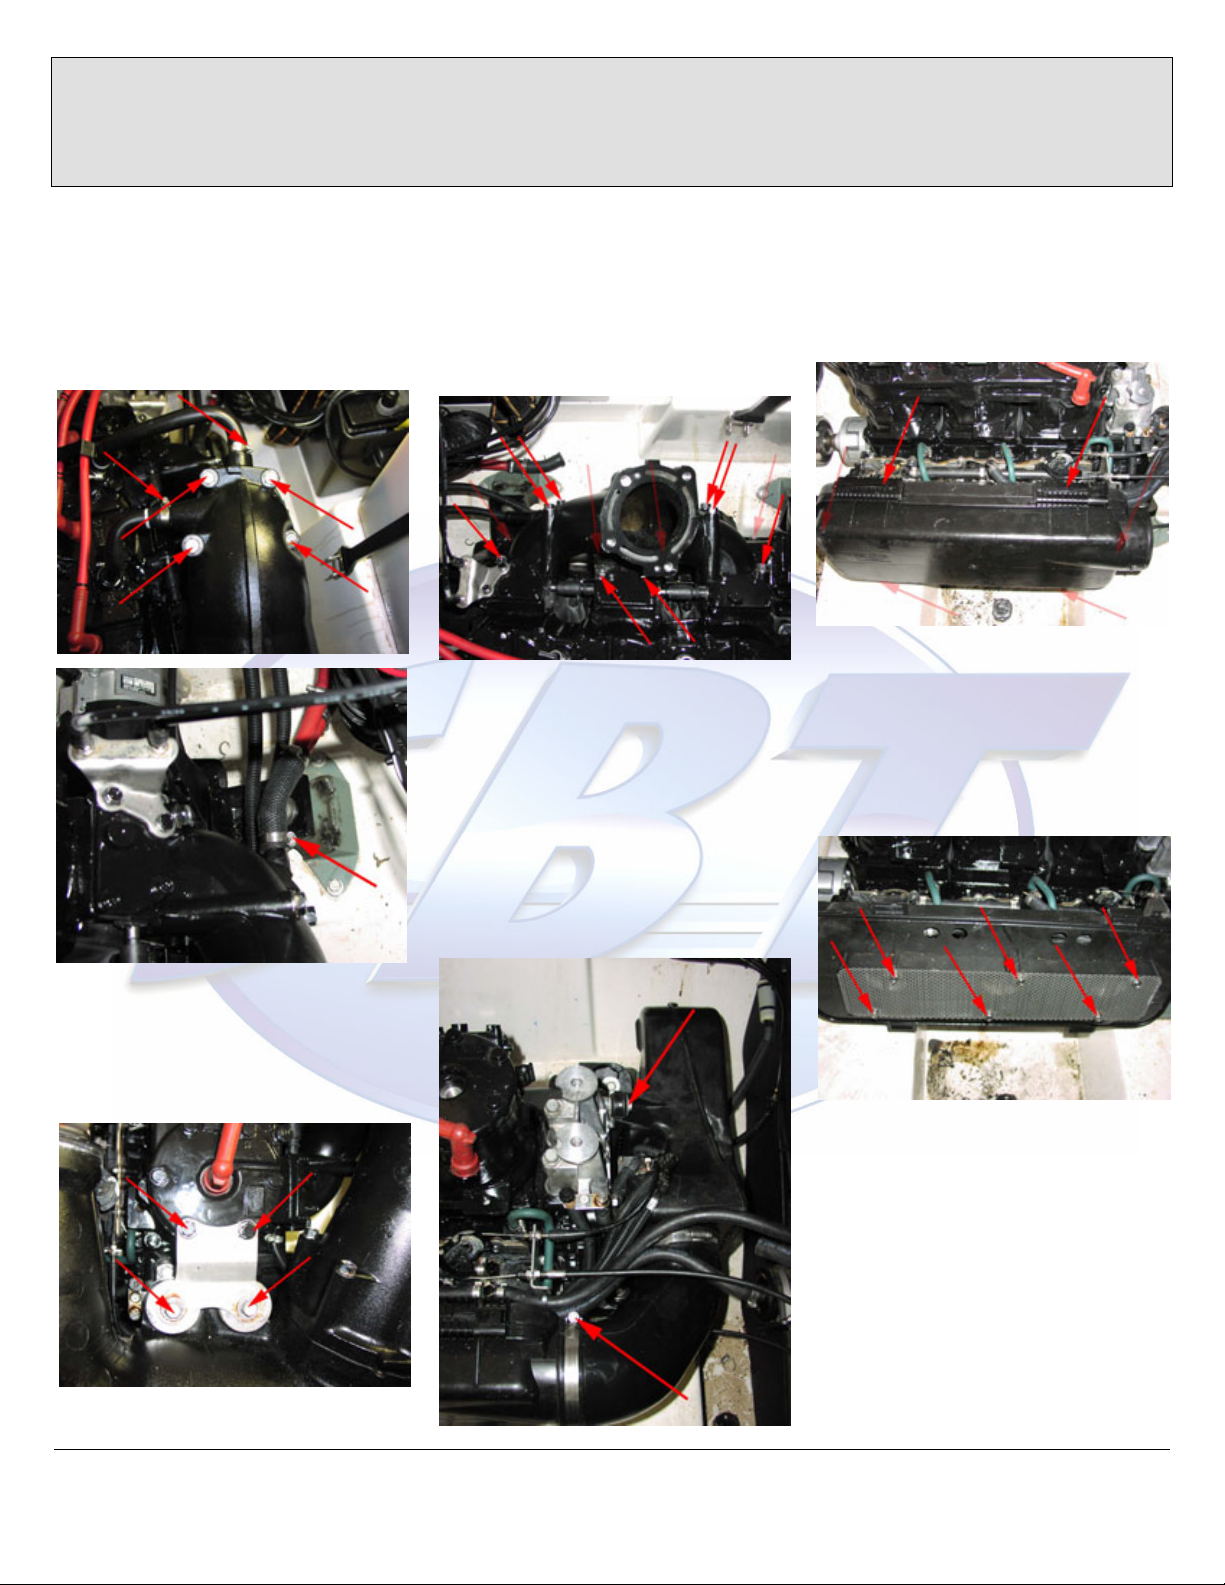
Engine Removal / Installation
Yamaha 1200 pv
2.6 (Below) Remove the three exhaust
header waterlines, and the four 12mm bolts
securing it to the exhaust manifold.
2.8 (Below) Remove the twelve 12mm
bolts from the exhaust manifold and
remove it from the hull.
Step 3
Intake Removal
3.1 (Below) Remove the front air intake
10mm bolt and loosen the band clamp
securing it to the airbox. Remove the
intake.
3.2 (Below) Slide the six airbox cover
retainers open and remove the cover.
3.3 (Below) Remove the six 10mm bolts
securing the flame arrestor element to the
carbs. Remove the flame arrestor assembly
from the hull.
2.7 (Below) Remove the four 12mm bolts
securing the front exhaust bracket to the
pipe and block. Remove the bracket, then
remove the pipe from the hull.
v 1.0 © 2001 Short Block Technologies
2
Engine Removal / Installation
Yamaha 1200 pv
3.4 (Below) Loosen the gas tank cap to
relieve pressure. Be sure the fuel switch is
turned to the “OFF” position, and be aware
of any fuel that may spill from the hoses.
Make sure the hull is clear of any gasoline
fumes before continuing work, especially
with power tools. Disconnect the fuel in
and fuel out lines from the carbs. Using a
10mm wrench loosen and remove the oil
injection linkage from the carbs and brace.
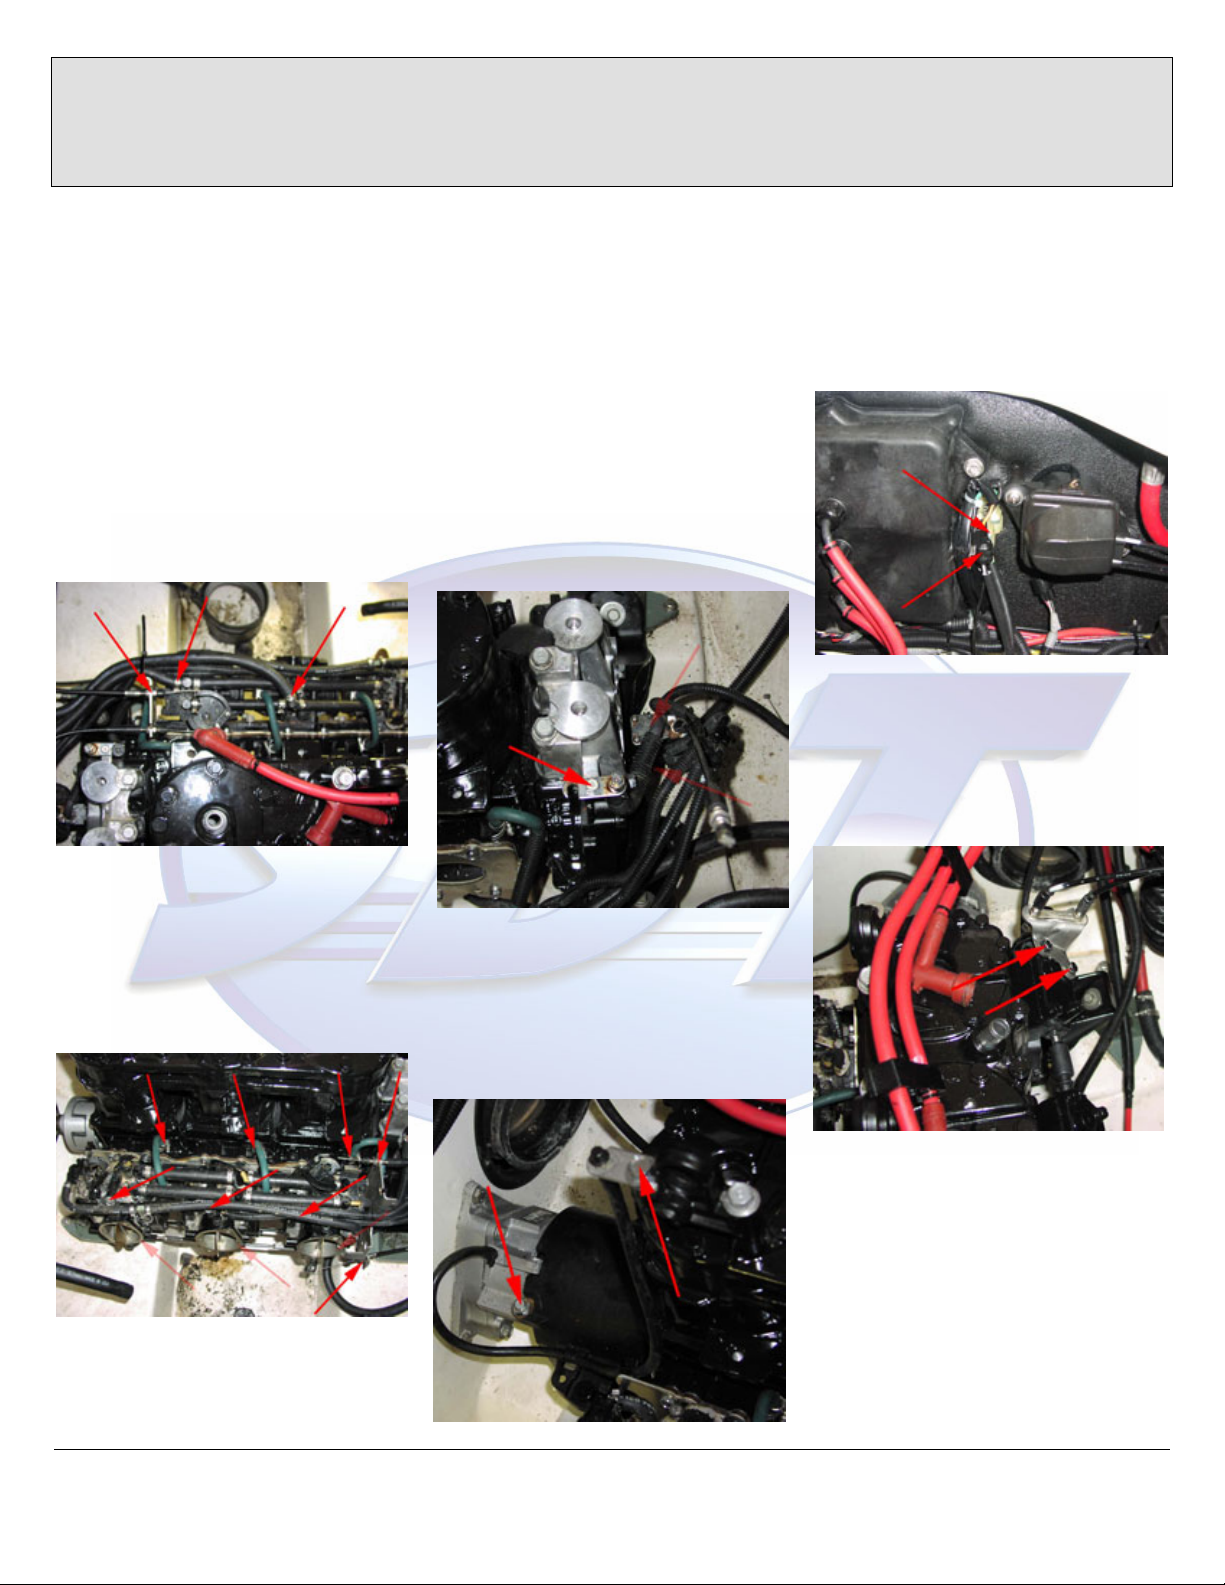
Step 4
Engine Removal
4.1 (Below) Remove the 10mm oil bleed
screw bracket bolt, and the two 10mm bolts
securing the oil pump to the flywheel
cover. Remove the pump and set it aside in
the hull.
4.3 (Below) Undo the three electrical
harnesses going to the flywheel and
exhaust system.
4.4 (Below) Remove the two 10mm bolts
from the end of the rear power valve cover
and remove the power valve actuator
bracket and cables from the cam.
3.5 (Below) Remove the six 10mm bolts
securing the carbs to the intake manifold.
Loosen and remove the pulse lines, choke
and throttle cables from the carbs. Remove
the carbs from the hull.
4.2 (Below) Remove the rear-most 14mm
bolt from the exhaust bracket and set aside
the pump shaft grease fitting bracket.
Remove the 10mm bolt securing the PTO
cover and remove the cover.
v 1.0 © 2001 Short Block Technologies
3
 Loading...