

Page 1

Before using the instrument, be sure to read
“PRECAUTIONS” on pages 5-7.
EZ-300
1
Page 2

EZ-300
2
Page 3

1. IMPORTANT NOTICE: DO NOT MODIFY THIS UNIT!
FCC INFORMATION (U.S.A.)
This product, when installed as indicated in the instructions
contained in this manual, meets FCC requirements. Modifications not expressly approved by Yamaha may void your authority, granted by the FCC, to use the product.
2. IMPORTANT: When connecting this product to accessories
and/or another product use only high quality shielded cables.
Cable/s supplied with this product MUST be used. Follow all
installation instructions. Failure to follow instructions could void
your FCC authorization to use this product in the USA.
3. NOTE: This product has been tested and found to comply
with the requirements listed in FCC Regulations, Part 15 for
Class “B” digital devices. Compliance with these requirements
provides a reasonable level of assurance that your use of this
product in a residential environment will not result in harmful
interference with other electronic devices. This equipment generates/uses radio frequencies and, if not installed and used
according to the instructions found in the users manual, may
cause interference harmful to the operation of other electronic
devices. Compliance with FCC regulations does not guarantee
* This applies only to products distributed by Yamaha Corporation of America.
COMPLIANCE INFORMATION STATEMENT
(Supplier’s declaration of conformity procedure)
Responsible Party : Yamaha Corporation of America
Address : 6600 Orangethorpe Ave., Buena Park, Calif. 90620
Telephone : 714-522-9011
Type of Equipment : Digital Keyboard
Model Name : EZ-300
This device complies with Part 15 of the FCC Rules.
Operation is subject to the following two conditions:
1) this device may not cause harmful interference, and
2) this device must accept any interference received including interference that may
cause undesired operation.
* This applies only to products distributed by Yamaha Corporation of America. (FCC SDoC)
that interference will not occur in all installations. If this product
is found to be the source of interference, which can be determined by turning the unit “OFF” and “ON”, please try to eliminate the problem by using one of the following measures:
Relocate either this product or the device that is being affected
by the interference.
Utilize power outlets that are on different branch (circuit
breaker or fuse) circuits or install AC line filter/s.
In the case of radio or TV interference, relocate/reorient the
antenna. If the antenna lead-in is 300 ohm ribbon lead, change
the lead-in to co-axial type cable.
If these corrective measures do not produce satisfactory
results, please contact the local retailer authorized to distribute
this type of product. If you can not locate the appropriate
retailer, please contact Yamaha Corporation of America, Electronic Service Division, 6600 Orangethorpe Ave, Buena Park,
CA90620
The above statements apply ONLY to those products distributed by Yamaha Corporation of America or its subsidiaries.
(class B)
EZ-300
3
Page 4
For the AC adaptor
CAUTION: TO REDUCE THE RISK OF
ELECTRIC SHOCK, DO NOT REMOVE
COVER (OR BACK). NO USER-SERVICEABLE
PARTS INSIDE. REFER SERVICING TO
QUALIFIED SERVICE PERSONNEL.
CAUTION
RISK OF ELECTRIC SHOCK
DO NOT OPEN
The model number, serial number, power requirements, etc., may be found on or near the name
plate, which is at the bottom of the unit. You should
note this serial number in the space provided below
and retain this manual as a permanent record of
your purchase to aid identification in the event of
theft.
Model No.
Serial No.
(bottom_en_01)
Explanation of Graphical Symbols
The lightning flash with arrowhead symbol
within an equilateral triangle is intended to
alert the user to the presence of uninsulated
“dangerous voltage” within the product’s
enclosure that may be of sufficient magnitude to constitute a risk of electric shock to
persons.
The exclamation point within an equilateral
triangle is intended to alert the user to the
presence of important operating and maintenance (servicing) instructions in the literature accompanying the product.
IMPORTANT SAFETY INSTRUCTIONS
1 Read these instructions.
2 Keep these instructions.
3 Heed all warnings.
4 Follow all instructions.
5 Do not use this apparatus near water.
6 Clean only with dry cloth.
7 Do not block any ventilation openings. Install in accor-
dance with the manufacturer’s instructions.
8 Do not install near any heat sources such as radiators,
heat registers, stoves, or other apparatus (including
amplifiers) that produce heat.
9 Do not defeat the safety purpose of the polarized or
grounding-type plug. A polarized plug has two blades
with one wider than the other. A grounding type plug
has two blades and a third grounding prong. The wide
blade or the third prong are provided for your safety. If
the provided plug does not fit into your outlet, consult
an electrician for replacement of the obsolete outlet.
10 Protect the power cord from being walked on or
pinched particularly at plugs, convenience receptacles, and the point where they exit from the apparatus.
11 Only use attachments/accessories specified by the
manufacturer.
12 Use only with the cart, stand, tri-
pod, bracket, or table specified
by the manufacturer, or sold with
the apparatus. When a cart is
used, use caution when moving
the cart/apparatus combination
to avoid injury from tip-over.
13 Unplug this apparatus during
lightning storms or when unused for long periods of
time.
14 Refer all servicing to qualified service personnel. Ser-
vicing is required when the apparatus has been damaged in any way, such as power-supply cord or plug is
damaged, liquid has been spilled or objects have
fallen into the apparatus, the apparatus has been
exposed to rain or moisture, does not operate normally, or has been dropped.
WARNING
TO REDUCE THE RISK OF FIRE OR ELECTRIC SHOCK, DO NOT EXPOSE THIS APPARATUS TO RAIN OR MOISTURE.
EZ-300 Owner’s Manual
4
(UL60065_03)
Page 5
PRECAUTIONS
Power supply/AC adaptor
Do not open
Water warning
Fire warning
Battery
PLEASE READ CAREFULLY BEFORE PROCEEDING
Please keep this manual in a safe and handy place for future reference.
For the AC adaptor
WARNING
• This AC adaptor is designed for use with only Yamaha electronic
instruments. Do not use for any other purpose.
• Indoor use only. Do not use in any wet environments.
CAUTION
• When setting up, make sure that the AC outlet is easily
accessible. If some trouble or malfunction occurs, immediately
turn off the power switch of the instrument and disconnect the AC
adaptor from the outlet. When the AC adaptor is connected to the
AC outlet, keep in mind that electricity is flowing at the minimum
level, even if the power switch is turned off. When you are not
using the instrument for a long time, make sure to unplug the
power cord from the wall AC outlet.
For the instrument
WARNING
Always follow the basic precautions listed below to avoid the possibility of serious injury or
even death from electrical shock, short-circuiting, damages, fire or other hazards. These
precautions include, but are not limited to, the following:
• Do not place the power cord near heat sources such as heaters or
radiators. Also, do not excessively bend or otherwise damage the
cord, or place heavy objects on it.
• Only use the voltage specified as correct for the instrument. The
required voltage is printed on the name plate of the instrument.
• Use the specified adaptor (page 94) only. Using the wrong
adaptor can result in damage to the instrument or overheating.
• Check the electric plug periodically and remove any dirt or dust
which may have accumulated on it.
• Do not expose the instrument to rain, use it near water or in damp
or wet conditions, or place on it any containers (such as vases,
bottles or glasses) containing liquids which might spill into any
openings. If any liquid such as water seeps into the instrument,
turn off the power immediately and unplug the power cord from
the AC outlet. Then have the instrument inspected by qualified
Yamaha service personnel.
• Never insert or remove an electric plug with wet hands.
• This instrument contains no user-serviceable parts. Do not open
the instrument or attempt to disassemble or modify the internal
components in any way. If it should appear to be malfunctioning,
discontinue use immediately and have it inspected by qualified
Yamaha service personnel.
• Do not put burning items, such as candles, on the unit. A burning
item may fall over and cause a fire.
• Follow the precautions below. Failure to do so might result in
explosion, fire, overheating or battery fluid leakage.
- Do not tamper with or disassemble batteries.
- Do not dispose of batteries in fire.
DMI-7 1/3
EZ-300 Owner’s Manual
5
Page 6
- Do not attempt to recharge batteries that are not designed to be
If you notice any abnormality
Power supply/AC adaptor
Location
Connections
Handling caution
charged.
- Keep the batteries separate from metallic objects such as
necklaces, hairpins, coins, and keys.
- Use the specified battery type (page 94) only.
- Use new batteries, all of which are the same type, same model,
and made by the same manufacturer.
- Always make sure all batteries are inserted in conformity with
the +/- polarity markings.
- When the batteries run out, or if the instrument is not to be
used for a long time, remove the batteries from the instrument.
- When using Ni-MH batteries, follow the instructions that came
with the batteries. Use only the specified charger device when
charging.
• Keep batteries away from small children who might accidentally
swallow them.
• If the batteries do leak, avoid contact with the leaked fluid. If the
battery fluid should come in contact with your eyes, mouth, or
skin, wash immediately with water and consult a doctor. Battery
fluid is corrosive and may possibly cause loss of sight or
chemical burns.
• When one of the following problems occur, immediately turn off
the power switch and disconnect the electric plug from the outlet.
(If you are using batteries, remove all batteries from the
instrument.) Then have the device inspected by Yamaha service
personnel.
- The power cord or plug becomes frayed or damaged.
- It emits unusual smells or smoke.
- Some object has been dropped into the instrument.
- There is a sudden loss of sound during use of the instrument.
- If any cracks or breakages exist on the instrument.
CAUTION
Always follow the basic precautions listed below to avoid the possibility of physical injury to you
or others, or damage to the instrument or other property. These precautions include, but are not
limited to, the following:
• Use only the stand specified for the instrument. When attaching it,
use the provided screws only. Failure to do so could cause
• Do not connect the instrument to an electrical outlet using a
multiple-connector. Doing so can result in lower sound quality, or
possibly cause overheating in the outlet.
• When removing the electric plug from the instrument or an outlet,
always hold the plug itself and not the cord. Pulling by the cord
can damage it.
• Remove the electric plug from the outlet when the instrument is
not to be used for extended periods of time, or during electrical
storms.
damage to the internal components or result in the instrument
falling over.
• Before connecting the instrument to other electronic components,
turn off the power for all components. Before turning the power on
or off for all components, set all volume levels to minimum.
• Be sure to set the volumes of all components at their minimum
levels and gradually raise the volume controls while playing the
instrument to set the desired listening level.
• Do not place the instrument in an unstable position where it might
accidentally fall over.
• Before moving the instrument, remove all connected cables, to
prevent damage to the cables or injury to anyone who might trip
over them.
• When setting up the product, make sure that the AC outlet you are
using is easily accessible. If some trouble or malfunction occurs,
immediately turn off the power switch and disconnect the plug
from the outlet. Even when the power switch is turned off,
electricity is still flowing to the product at the minimum level.
When you are not using the product for a long time, make sure to
unplug the power cord from the wall AC outlet.
EZ-300 Owner’s Manual
6
• Do not insert a finger or hand in any gaps on the instrument.
• Never insert or drop paper, metallic, or other objects into the gaps
on the panel. This could cause physical injury to you or others,
damage to the instrument or other property, or operational failure.
• Do not rest your weight on, or place heavy objects on the
instrument, and do not use excessive force on the buttons,
switches or connectors.
• Do not use the instrument/d evice or headphones for a long period
of time at a high or uncomfortable volume level, since this can
cause permanent hearing loss. If you experience any hearing loss
or ringing in the ears, consult a physician.
DMI-7 2/3
Page 7

Yamaha cannot be held responsible for damage caused by improper use or modifications to the instrument, or data that is lost or destroyed.
Always turn the power off when the instrument is not in use.
Even when the [ ] (Standby/On) switch is in standby status (display is off), electricity is still flowing to the instrument at the minimum level.
When you are not using the instrument for a long time, make sure you unplug the power cord from the wall AC outlet.
Make sure to discard used batteries according to local regulations.
NOTICE
To avoid the possibility of malfunction/ damage
to the product, damage to data, or damage to
other property, follow the notices below.
Handling
• Do not use the instrument in the vicinity of a TV, radio,
stereo equipment, mobile phone, or other electric
devices. Otherwise, the instrument, TV, or radio may
generate noise. When you use the instrument along with
an application on your smart device such as a
smartphone or tablet, we recommend that you set
“Airplane Mode” to on on that device in order to avoid
noise caused by communication.
• Depending on the condition of surrounding radio waves,
the instrument may possibly malfunction.
• Do not expose the instrument to excessive dust or
vibrations, or extreme cold or heat (such as in direct
sunlight, near a heater, or in a car during the day) to
prevent the possibility of panel disfiguration, damage to
the internal components or unstable operation. (Verified
operating temperature range: 5° – 40°C, or 41° – 104°F.)
• Do not place vinyl, plastic or rubber objects on the
instrument, since this might discolor the panel or
keyboard.
• Do not press the LCD screen with your finger because it
is a sensitive, precision-made part. Doing so might cause
an appearance abnormality, such as a stripe on the LCD,
although this abnormality should disappear again within
a short time.
Maintenance
• When cleaning the instrument, use a soft cloth. Do not
use paint thinners, solvents, alcohol, cleaning fluids, or
chemical-impregnated wiping cloths.
Saving data
• Some of the data of this instrument (page 59) are retained
when the power is turned off. However, the saved data
may be lost due to some failure, an operation mistake,
etc. Save your important data onto an external device
such as a computer (page 57).
Information
About copyrights
• Copying of the commercially available musical data
including but not limited to MIDI data and/or audio data
is strictly prohibited except for your personal use.
• This product incorporates and bundles contents in which
Yamaha owns copyrights or with respect to which
Yamaha has license to use others' copyrights. Due to
copyright laws and other relevant laws, you are NOT
allowed to distribute media in which these contents are
saved or recorded and remain virtually the same or very
similar to those in the product.
* The contents described above include a computer
program, Accompaniment Style data, MIDI data, WAVE
data, voice recording data, a score, score data, etc.
* You are allowed to distribute medium in which your
performance or music production using these contents
is recorded, and the permission of Yamaha Corporation
is not required in such cases.
About functions/data bundled with the
instrument
• Some of the preset songs have been edited for length or
arrangement, and may not be exactly the same as the
original.
• The bitmap fonts used in this instrument have been
provided by and are the property of Ricoh Co., Ltd.
About this manual
• The illustrations and LCD screens as shown in this
manual are for instructional purposes only, and may
appear somewhat different from those on your
instrument.
• Windows is a registered trademark of Microsoft®
Corporation in the United States and other countries.
• The company names and product names in this manual
are the trademarks or registered trademarks of their
respective companies.
DMI-7 3/3
EZ-300 Owner’s Manual
7
Page 8

Thank you for purchasing this Yamaha Digital Keyboard!
NOTE
This instrument features a convenient lighting keyboard which makes it easy for beginners to play the
keyboard. It also features a wide variety of built-in preset Songs, including pop and classical music, for
your playing pleasure.
We recommend that you read this manual carefully so that you can fully take advantage of the
advanced and convenient functions of the instrument.
We also recommend that you keep this manual in a safe and handy place for future reference.
About the Manuals
In addition to this Owner’s Manual, the following Online materials (PDF files) are available.
Included Document
Owner ’s Manual
• Setting Up: This section explains how to set up and start using this instrument.
• Quick Guide: This section explains briefly how to use the basic functions.
• Reference: This section explains in detail how to use various functions.
• Appendix: This section includes specifications, Voice List, etc.
Online Materials (PDF)
Drum Kit List
This contains detailed information of the Drum Kit Voices (Voice No. 242-263; page 78). When you
select these Voices, various drum, percussion and SFX sounds listed here are assigned to each
key.
MIDI Reference
This contains MIDI-related information, such as the MIDI Implementation Chart.
Computer-related Operations
This contains instructions about computer-related functions.
Smart Device Connection Manual
This explains how to connect the instrument to smart devices, such as smartphones, tablet
devices, etc.
To obtain these manuals, access the Yamaha Downloads, and then enter the model name for searching
the desired files.
Yamaha Downloads https://download.yamaha.com/
• For a general overview of MIDI and how you can effectively use it, search for “MIDI Basics” (only in English, German, French and Spanish) on the website above.
Song Book (only in English, French, German and Spanish)
This contains music scores for the preset Songs (excepting for a Demo Song and some Songs due
to copyright issues) of this instrument.
To obtain this Song Book, access the Yamaha website and download it from the product web page.
Yamaha Global Site https://www.yamaha.com
EZ-300 Owner’s Manual
8
Page 9
Included Accessories
• Owner’s Manual (this book)
• Music rest
• Online Member Product Registration
Formats and functions
• AC adaptor
* May not be included depending on your particular locale. Check
*
with your Yamaha dealer.
GM System Level 1
“GM System Level 1” is an addition to the MIDI
standard which ensures that any GM-compatible music data can be accurately played by any
GM-compatible tone generator, regardless of
manufacturer. The GM mark is affixed to all
software and hardware products that support
GM System Level.
XGlite
As its name implies, “XGlite” is a simplified version of Yamaha’s high-quality XG tone generation format. Naturally, you can play back any
XG song data using an XGlite tone generator.
However, keep in mind that some songs may
play back differently compared to the original
data, due to the reduced set of control parameters and effects.
Style File Format (SFF)
The Style File Format combines all of
Yamaha’s auto accompaniment know-how
into a single unified format.
USB
USB is an abbreviation for Universal Serial
Bus. It is a serial interface for connecting a
computer with peripheral devices. It allows
“hot swapping” (connecting peripheral
devices while the power to the computer is
on).
Touch Response
The exceptionally natural Touch Response
feature gives you maximum expressive control over the level of the Voices.
EZ-300 Owner’s Manual
9
Page 10

Contents
PRECAUTIONS ................................................... 5
NOTICE ............................................................... 7
Information ........................................................... 7
About the Manuals............................................... 8
Included Accessories ...........................................9
Formats and functions ......................................... 9
Setting Up
Panel Controls and Terminals 12
Setting Up 14
Power Requirements ......................................... 14
Turning the Power On ........................................ 15
Setting the Auto Power Off function ................... 15
Adjusting the Master Volume ............................. 16
Connecting Headphones or External Speaker...16
Using a Pedal (Footswitch)................................ 16
Using the Music Rest ......................................... 16
Display Items 17
Quick Guide
Basic Operations ...............................18
Transfer Your Favorite MIDI Song from
the Computer to the Instrument.....19
Practice Playing a Song Using
Lesson Functions .....................20
Play with Rhythm and
Accompaniment (Styles)............. 21
Record Your Performance.....................22
Use the Metronome ............................23
Make Detailed Settings
(Function Settings) ...................23
Reference
Playing a Variety of Instrument Voices 24
Selecting a Main Voice....................................... 24
Playing the “Grand Piano”..................................24
Using the Metronome ......................................... 24
Adding a Layer – Dual Voice.............................. 25
Playing Different Voices with Your Left and
Right Hands (Split) ........................................ 25
Changing the Touch Response of
the Keyboard ................................................. 26
Applying Effects to the Sound............................26
Adding Harmony or Arpeggio.............................28
Playing the keyboard with two persons
(Duo mode) 30
Playing Songs 31
Selecting and Playing Back a Song ................... 32
Playing Songs Repeatedly (BGM function)........33
Song Fast Forward, Fast Reverse, and Pause.. 33
Changing the Song Melody Voice...................... 33
A-B Repeat......................................................... 34
Turning Each Part On/Off................................... 34
Transferring Songs from a
Computer to this Instrument .......................... 34
Using the Song Lesson Feature 35
Lighting Keyboard (Light Guide Function)..........36
Keys to Success................................................. 36
Phrase Repeat ................................................... 38
Listening, Timing and Waiting ............................ 39
Learning How to Use “Touch” Control
(Touch Tutor) 41
Hearing and Experiencing the Sound of
the Chords (Chord Study) 42
Hear and experience a sound of a single chord
Hear and experience basic chord progressions
.. 42
.. 42
EZ-300 Owner’s Manual
10
Playing Chords along with Chord
Progressions of a Song 43
Play the chords in combination with
“Waiting” of the Lesson function .................... 43
Page 11

Playing with Rhythm and Accompaniment
(Styles) 44
Setting the Fingering Type ................................. 44
Setting the Smart Chord Key ............................. 44
Playing Styles .................................................... 45
Style Variations .................................................. 46
Chord Types for Style Playback ......................... 47
Chords Heard When Smart Chord is Selected ..48
Looking Up Chords Using the Chord Dictionary
Using the Music Database ................................. 50
Registering a Style File ...................................... 50
.. 49
Recording Your Performance 51
Track Structure of a Song .................................. 51
Quick Recording ................................................ 51
Recording to a Specified Track.......................... 52
Clearing a User Song......................................... 52
Memorizing Your Favorite Panel Settings 53
Recalling Panel Settings from
the Registration Memory ............................... 53
Memorizing Panel Settings to
the Registration Memory ............................... 54
Deleting the Registration Memory...................... 54
Disabling Recall of Specific Items (Freeze) ....... 54
Selecting an EQ Setting for
your Favorite Sound 55
Appendix
Troubleshooting .......................................... 64
Song Book Sample...................................... 66
Voice List .....................................................76
Standard Kit 1 List....................................... 82
Song List ...................................................... 83
Style List ......................................................85
Music Database List.................................... 87
Effect Type List............................................ 89
Specifications .............................................. 93
Index............................................................. 95
Connecting to Other Devices 56
Playing an External Audio Device with
the Built-in Speakers ..................................... 56
Connecting to a Computer .................................57
Connecting a Smart Device ............................... 58
Lowering the volume of a melody part
(Melody Suppressor function) ....................... 58
Backup and Initialization 59
Backup Parameters ........................................... 59
Initialization ........................................................ 59
The Functions 60
EZ-300 Owner’s Manual
11
Page 12
Setting Up
Setting Up
q
w
e
r
u
i
o
t
y
!1 !2 !3 !4 !5
!0
!6
!7
!8
@1 @2 @3
!9
@5
@6
@7
@8
@9
036
(C1)
048
(C2)
060
(C3)
072
(C4)
084
(C5)
096
(C6)
@4
@0
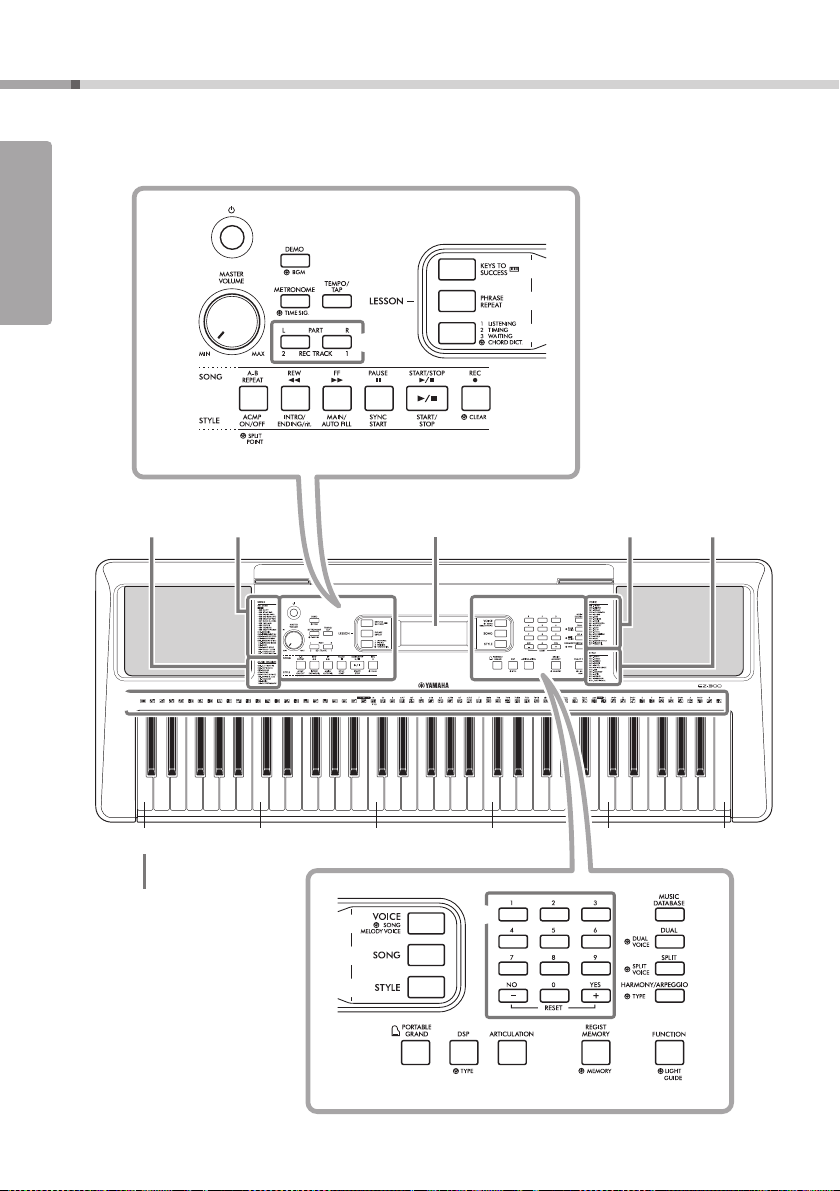
Panel Controls and Terminals
Front Panel
Music
Database List
(page 87)
As illustrated, each note of the keyboard
has a specific note number and name (e.g.,
036/C1), which is used in making various
settings, such as Split Point (page 45).
Song List
(page 83)
Display
(page 17)
Voice List
(page 76)
Style List
(page 85)
EZ-300 Owner’s Manual
12
Page 13
Panel Controls and Terminals
Setting Up
#1 #2 #3
#4
#0
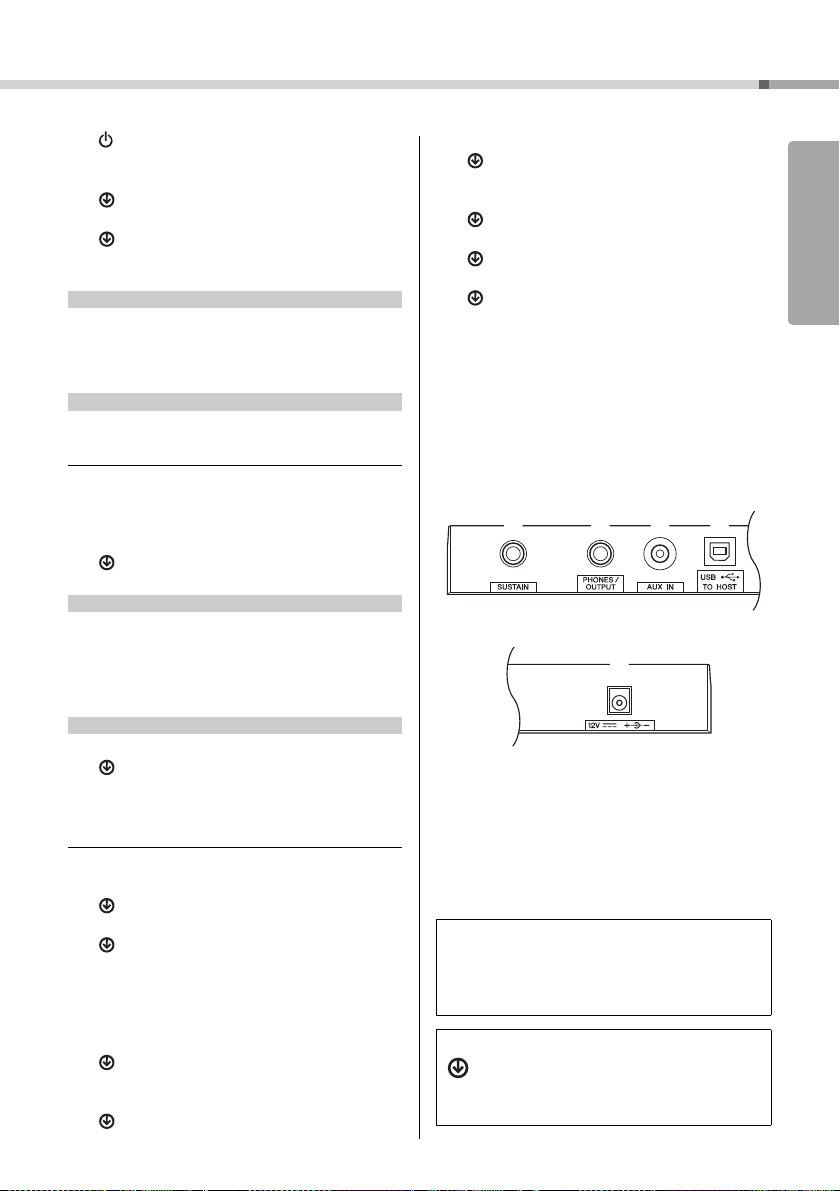
Rear Panel
q [ ] (Standby/On) switch .................... page 15
w [MASTER VOLUME] dial ...................... page 16
e [DEMO] button......................................page 33
BGM................................................page 33
r [METRONOME] button.........................page 24
TIME SIG. ......................................page 24
t [TEMPO/TAP] button ............................page 32
In the Lesson mode
y PA RT
[L] button ..............................................page 39
[R] button ..............................................page 39
In the Recording mode
y [REC TRACK 2] button.........................page 52
[REC TRACK 1] button.........................page 52
u [KEYS TO SUCCESS] button............... page 36
i [PHRASE REPEAT] button...................page 38
o [1 LISTENING 2 TIMING 3 WAITING] button
...............................................................page 39
CHORD DICT. ................................page 49
In the Song mode
!0 [A-B REPEAT] button ...........................page 34
!1 [REW] button ........................................page 33
!2 [FF] button ............................................page 33
!3 [PAUSE] button.....................................page 33
@4 [FUNCTION] button ..............................page 60
LIGHT GUIDE .................................page 36
@5 [MUSIC DATABASE] button.................page 50
@6 [DUAL] button.......................................page 25
DUAL VOICE ..................................page 25
@7 [SPLIT] button.......................................page 25
SPLIT VOICE..................................page 25
@8 [HARMONY/ARPEGGIO] button..........page 28
TYPE...............................................page 28
@9 Drum illustrations for the Drum Kit ....page 24
Each of these indicates the drum or percussion instrument
assigned to the corresponding key for “Standard Kit 1.”
In the Style mode
!0 [ACMP ON/OFF] button........................page 45
!1 [INTRO/ENDING/rit.] button.................page 46
!2 [MAIN/AUTO FILL] button ....................page 46
!3 [SYNC START] button ..........................page 45
!4 [START/STOP] button...........................page 32
!5 [REC] button.........................................page 51
!6 [VOICE] button......................................page 24
!7 [SONG] button......................................page 32
!8 [STYLE] button .....................................page 45
!9
@0 [PORTABLE GRAND] button............... page 24
@1 [DSP] button .........................................page 26
@2 [ARTICULATION] button......................page 27
@3 [REGIST MEMORY] button .................. page 53
SPLIT POINT..................................page 60
CLEAR............................................page 52
SONG MELODY VOICE .................page 33
Number buttons [0]–[9], [+/YES], [-/NO]
TYPE...............................................page 26
MEMORY........................................page 53
....page 18
#0 [SUSTAIN] jack .....................................page 16
#1 [PHONES/OUTPUT] jack...................... page 16
#2 [AUX IN] jack.........................................page 56
#3 [USB TO HOST] terminal .....................page 57
#4 DC IN jack .............................................page 14
Panel Setup (Panel Settings)
By using the controls on the panel, you can make various
settings as described here. These settings of the instrument are together referred to as “panel setup” or “panel
settings” in this manual.
The “Press and hold” Symbol
Buttons having this indication can be used to call
up an alternate function when the relevant button
is pressed and held. Hold down this button until
the function is called up.
EZ-300 Owner’s Manual
13
Page 14
Setting Up
Setting Up
2
1
DC IN jack
(page 13)
AC outle t
AC
adaptor
WARN ING
WARN ING
Plug
The shape of the plug differs depending on
your area.
Slide the plug as
indicated.
CAUTION
NOTE
WARN ING
NOTICE
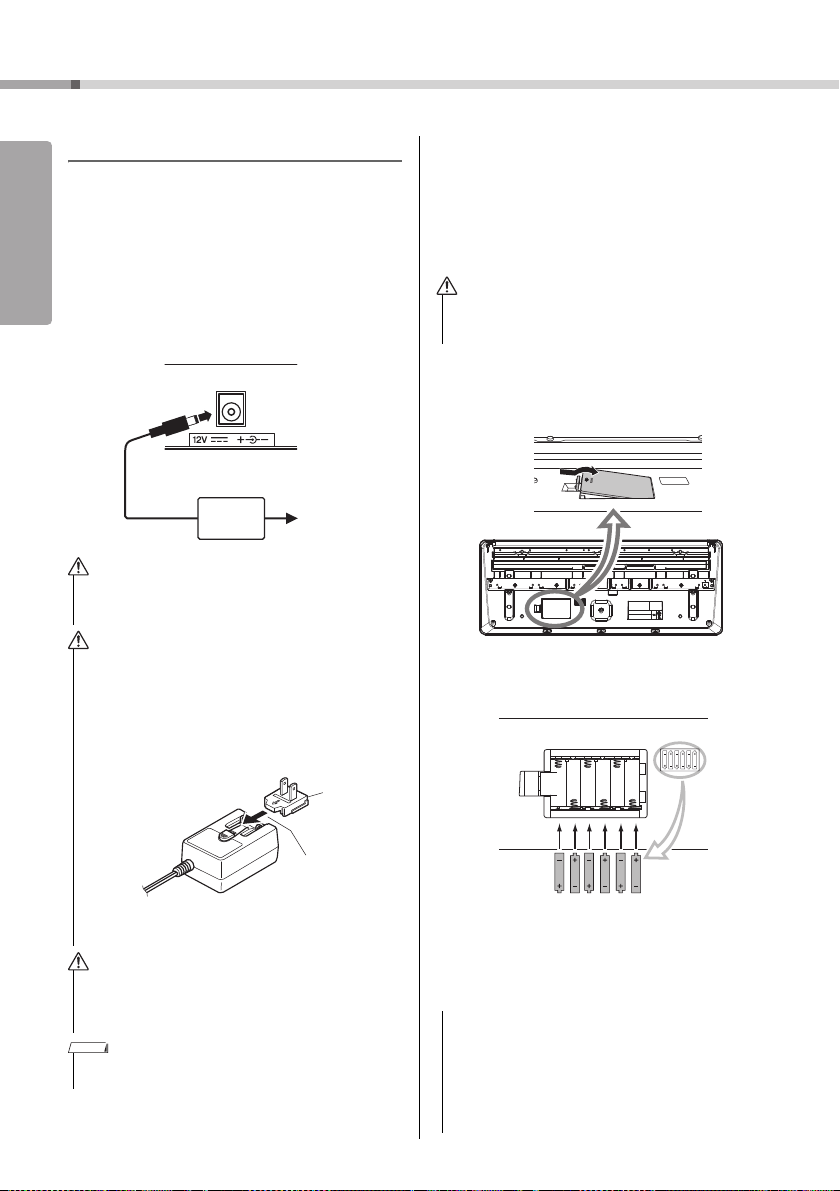
Power Requirements
Although the instrument will run either from an AC
adaptor or batteries, Yamaha recommends use of an
AC adaptor whenever possible. An AC adaptor is
more environmentally friendly than batteries and
does not deplete resources.
Using an AC Adaptor
Connect the AC adaptor in the order shown in the
illustration.
• Use the specified AC adaptor (page 94) only. Using the
wrong AC adaptor can result in damage to the instrument
or overheating.
• When using the AC adaptor with a removable plug, make
sure to keep the plug attached to the AC adaptor. Using the
plug alone can cause electric shock or fire.
• If the plug is accidentally removed from the AC adaptor,
slide it back in until it clicks into place, t aking care to
avoid touching any internal metal parts. To avoid electric
shock, short circuit or damage, also be careful that there
is no dust between the AC adaptor and plug.
Using Batteries
This instrument requires six “AA” size, Alkaline (LR6)/
Manganese (R6) batteries, or rechargeable nickelmetal hydride batteries (rechargeable Ni-MH batteries). The Alkaline batteries or rechargeable Ni-MH
batteries are recommended for this instrument, since
other types may result in poorer battery performance.
• When the batteries run out, or if the instrument is not to be
used for a long time, remove the batteries from the instrument.
1 Make sure that the power of the instrument is off.
2 Open the battery compartment cover located on
the instrument’s bottom panel.
3 Insert the six new batteries, being careful to follow
the polarity markings on the inside of the compartment.
• When setting up the product, make sure that the AC outlet
you are using is easily accessible. If some trouble or malfunction occurs, immediately turn the power off and disconnect the plug from the outlet.
• Follow the order shown above in reverse when disconnecting
the AC adaptor.
EZ-300 Owner’s Manual
14
4 Replace the compartment cover, making sure that
it locks firmly in place.
Make sure to set the battery type correctly (page 15).
• Connecting or disconnecting the AC adaptor with batteries installed may turn the power off, resulting in loss of
data being recorded or transferred at the time.
• When battery power becomes too low for proper operation, the volume may be reduced, the sound may be distorted, and other problems may occur. When this happens,
make sure to replace all batteries with new ones or already
recharged ones.
Page 15
Setting Up
Setting Up
NOTE
NOTICE
CAUTION
NOTICE
The lowest key
NOTICE
NOTE
• This instrument cannot charge the batteries. Use only the
specified charger device when charging.
• Power will be automatically drawn from the AC adaptor if an
AC adaptor is connected while batteries are installed in the
instrument.
Setting the battery type
Depending on the battery type to be used, you need
to change the battery type setting on this instrument.
Alkaline (and manganese) batteries are chosen by
default. After installing new batteries and turning the
power on, make sure to set the Battery Type appropriately (rechargeable or not) via Function number
064 (page 63).
• Failure to set the battery type may shorten the amount of
the battery life. Make sure to set the battery type correctly.
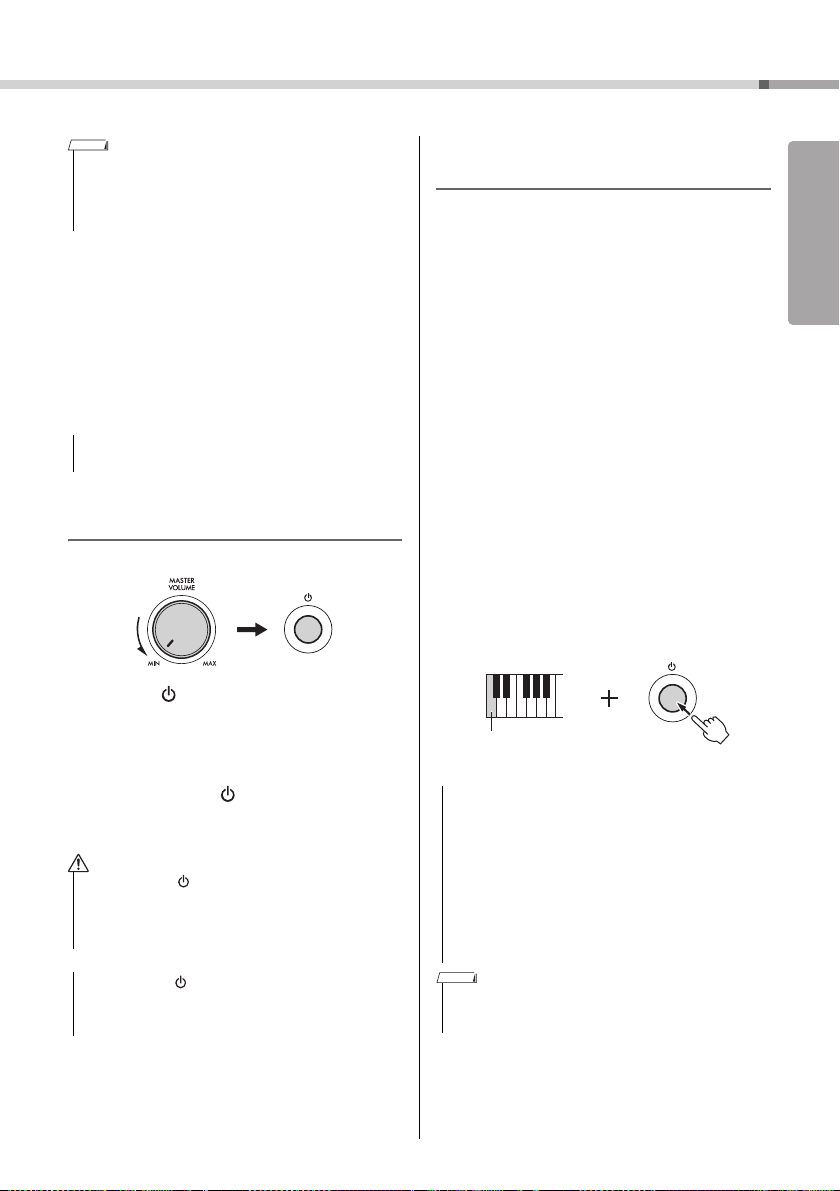
Turning the Power On
1 Turn down the [MASTER VOLUME] dial to “MIN.”
2 Press the [ ] (Standby/On) switch to turn the
power on.
The Voice name appears on the display. Adjust
the volume as desired while playing the keyboard.
3 Press and hold the [ ] (Standby/On) switch for
about a second to set the instrument to standby
mode.
• Even when the [ ] (Standby/On) switch is in standby status, electricity is still flowing to the product at the minimum level. Remove the electric plug from the outlet when
the instrument is not to be used for extended periods of
time, or during electrical storms.
• Press only the [ ] (Standby/On) switch when turning the
power on. Any other operations such as pressing the pedal
are not allowed. Doing so may cause the instrument to
malfunction.
Setting the Auto Power Off function
To prevent unnecessary power consumption, this
instrument features an Auto Power Off function that
automatically turns the power off if the instrument is
not operated for a specified period of time. The
amount of time that elapses before the power is
automatically turned off is 30 minutes by default;
however, you can change the setting.
To set the time that elapses before
Auto Power Off is executed:
Press the [FUNCTION] button several times until
“AutoOff” (Function 063; page 63) appears, then use
the [+/YES] or [-/NO] button to select the desired
value.
Settings: oFF, 5, 10, 15, 30, 60, 120 (minutes)
Default value: 30 (minutes)
To disable the Auto Power Off function:
Turn the power on while holding down the lowest key
on the keyboard. A message “oFF AutoOff” appears
briefly, then the instrument starts up with the Auto
Power Off function disabled. The Auto Power Off
function also can be disabled by selecting Off in
Function number 063 (page 63).
• Depending on the instrument status, the power may not
turn off automatically, even after the elapse of the specified
period of time. Always turn off the power manually when
the instrument is not in use.
• When the instrument is not operated for a specified period
of time while connected to an external device such as an
amplifier, speaker or computer, make sure to follow the
instructions in the Owner’s Manual to turn off the power to
the instrument and the connected devices, in order to protect the devices from damage. If you do not want the
power to turn off automatically when a device is connected, disable Auto Power Off.
• Generally, the data and settings are maintained even when
the power is turned off with the Auto Power Off function. For
details, see page 59.
EZ-300 Owner’s Manual
15
Page 16
Setting Up
Setting Up
CAUTION
Standard stereo
phone plug
CAUTION
NOTICE
NOTE
NOTE
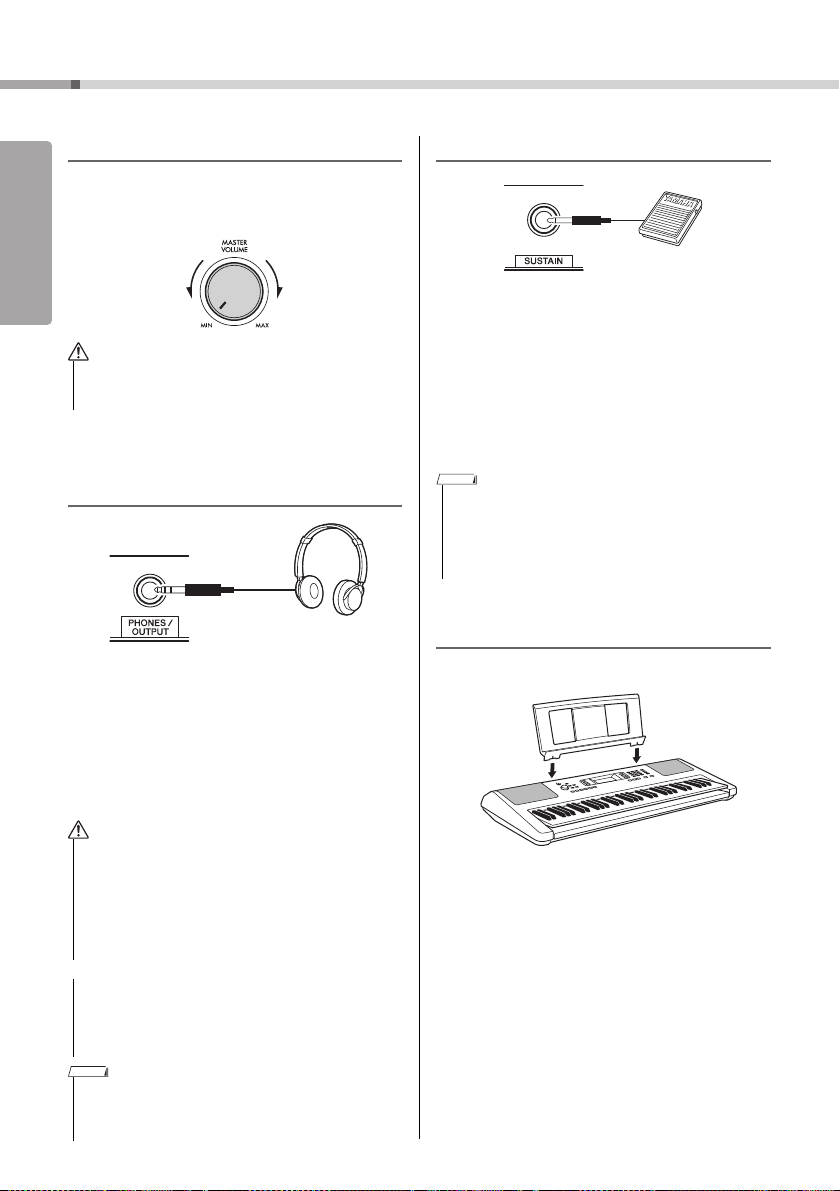
Adjusting the Master Volume
To adjust the volume of the entire keyboard sound,
use the [MASTER VOLUME] dial while playing the
keyboard.
• Do not use the instrument for a long period of time at a
high or uncomfortable volume level, since this can cause
permanent hearing loss.
Connecting Headphones or External Speaker
Connect a pair of headphones to the [PHONES/
OUTPUT] jack. This jack also functions as an external output. By connecting to a computer, keyboard
amplifier, recorder, or other audio device, you can
output the audio signal of this instrument to that
external device. The speakers of this instrument are
automatically shut off when a plug is inserted into
this jack.
Using a Pedal (Footswitch)
You can control three functions: Sustain, Articulation
(page 27), and Arpeggio (page 29) as you play by
pressing a footswitch (FC5 or FC4A; sold separately)
plugged into the [SUSTAIN] jack. By default, Sustain
is assigned, so that the sound can be heard for a
long time even if you take your finger off the keyboard
while pressing the footswitch, like a damper pedal on
a piano. To use a function other than Sustain, use
the function settings (Function 029; page 61).
• Plug or unplug the footswitch while the power is off. Also, do
not press the footswitch when turning the power on. Doing so
changes the polarity of the footswitch, resulting in reversed
operation.
• The Sustain function does not affect Split Voices (page 25) or
the Styles (Auto Accompaniment; page 44).
Using the Music Rest
Insert the music rest into the slots as shown.
• Do not use the instrument or headphones for a long period
of time at a high or uncomfortable volume level, since this
can cause permanent hearing loss.
• Before connecting the instrument to other electronic components, turn off the power of all the components. Also,
before turning any components on or off, make sure to set
all volume levels to minimum. Otherwise, damage to the
components or electrical shock may occur.
• To avoid possible damage to the external device, first turn
on the power to the instrument, then to the external
device. When turning off the power, do so in reverse order:
first turn off the power to the external device, then to the
instrument.
• When connecting the headphones or external speaker to the
instrument, set the Master EQ (page 55) to “2 Headphone.”
The Master EQ can be set in Function settings (page 61;
Function 025).
EZ-300 Owner’s Manual
16
Page 17
Setting Up
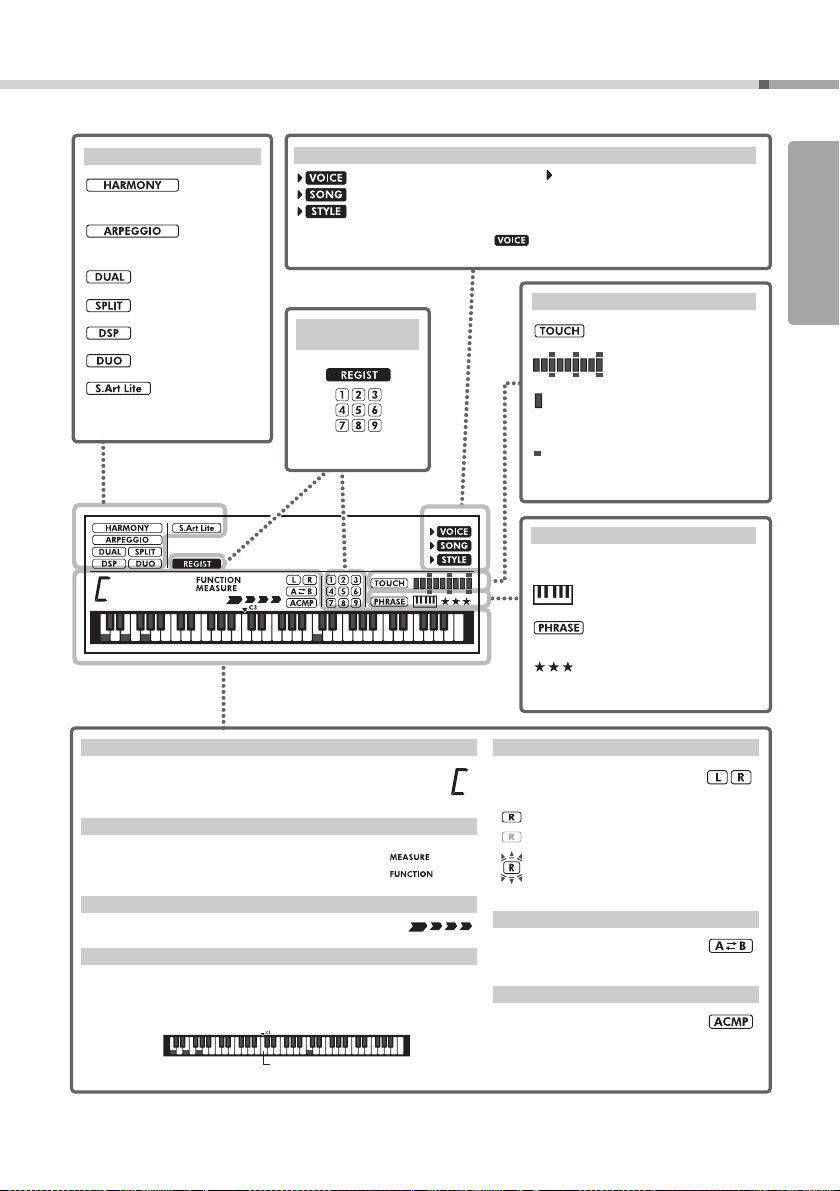
Display Items
CncertGP
003
001
Voice/Song/Style
This area indicates the Lesson related status
is on.
Keys to Success (page 36)
Phrase Repeat (page 38)
Chord Progression (page 43)
Indicates the Passing Status
(page 37) of the Keys to Success
Lesson.
Lesson Indication
Harmony (page 28)
Arpeggio (page 28)
Dual (page 25)
Split (page 25)
DSP (page 26)
Duo (page 30)
Articulation (page 27)
Function status
Indicates the chord which is played on the Auto Accompaniment range (page 45) of the keyboard, or specified via
Song playback.
Normally indicates the current measure number of the current Style or Song. When the [FUNCTION] button (page 60)
is in use, this indicates the Function number.
Indicates the current beat of playback.
Indicates notes currently being played (same as the lighting keyboard). Indicates the melody and chord notes of a Song when the Song Lesson function is
in use. Also indicates the notes of a chord—either when playing a chord or
when using the Dictionary function.
Chord
Measure or Function
Beat
Keyboard Display
02
003
C3
Indicates the on/off status of Song
playback or target Track of Song
recording (pages 34, 52).
Lit: Track contains data
Unlit: Track is muted or contains no data
Flashing: Track is selected as recording track
Appears when the A-B Repeat function is active. (page 34)
Appears when the Auto Accompaniment function is on. (page 45)
Song Track status
A-B Repeat
Auto Accompaniment
(page 53)
Registration
Memory
Touch Response (page 26)
Strength Meter
is a meter that lights up according to the
strength with which you play the keyboard.
(pages 26, 41)
represents the target strength when practicing with Songs in the “Touch Tutor” category. (page 41)
Touch Indication
Voice selection mode
Song mode
Style mode
* The mark next to the mode name indicates which
mode is activate and whose contents can be
selected with the number buttons or [+/YES]/[-/NO]
buttons.
* is always shown, even when in the Song or
Style mode.
7
EZ-300 Owner’s Manual
17
Page 18
Quick Guide
Quick Guide
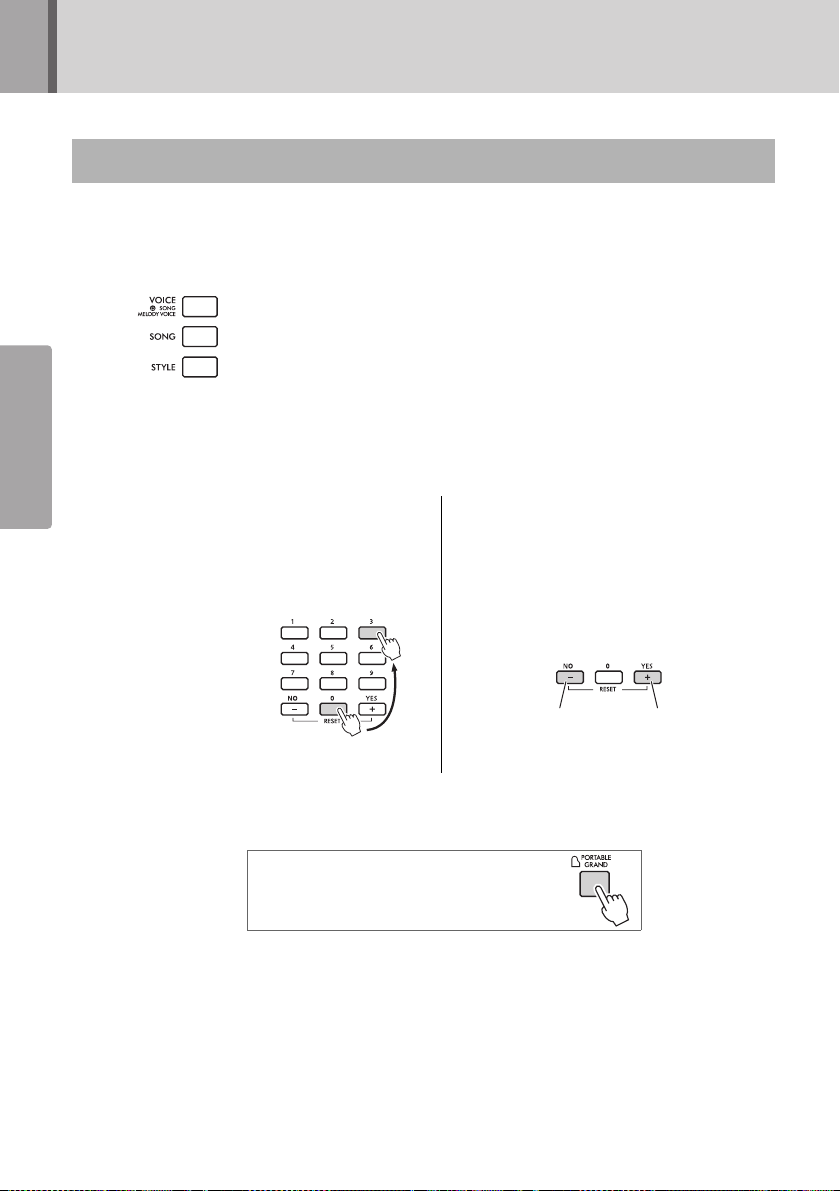
..................... Keyboard Voice
..................... Song
..................... Style
Number buttons [0]–[9]
The Number buttons can be used to directly enter
a Voice, Song, or Style number or parameter
value.
Press number buttons [0], [0], [3] or
simply press [3].
Example: Selecting Voice 003, Bright Piano
[+/YES], [-/NO] buttons
Press the [+/YES] button briefly to increase the
value by 1, or press the [-/NO] button briefly to
decrease the value by 1. Press and hold either button to continuously increase or decrease the value
in the corresponding direction. Pressing both buttons simultaneously lets you reset a parameter to
the default value.
Press briefly to
increase.
Press briefly to
decrease.
Pressing the [PORTABLE GRAND] button will reset
the Voice settings to the Grand Piano Voice (Voice
No.001 Live!ConcertGrandPiano).
Quick Guide
Basic Operations
This instrument features three basic functions: Voice, Song, and Style. This section shows you how
to use these three functions and how to use the number buttons and [+/YES], [-/NO] buttons which
are useful for various functions.
Press one of the following buttons to select a basic function.
1
The above operation calls up the name and number of the current Voice, Song, or Style, and shows it in
the display.
Select a Voice, Song, or Style by using the number buttons [0]–[9], [+/YES], [-/NO].
2
Start playing the Voice, Song or Style that you selected.
3
Voi ce .....................Play the keyboard.
18
Song..................... Press the [START/STOP] button to start Song playback.
Style ..................... Press the [START/STOP] button to start only the rhythm part.
For instructions on playing the chord accompaniment part etc., refer to page 45.
EZ-300 Owner’s Manual
Page 19
Quick Guide
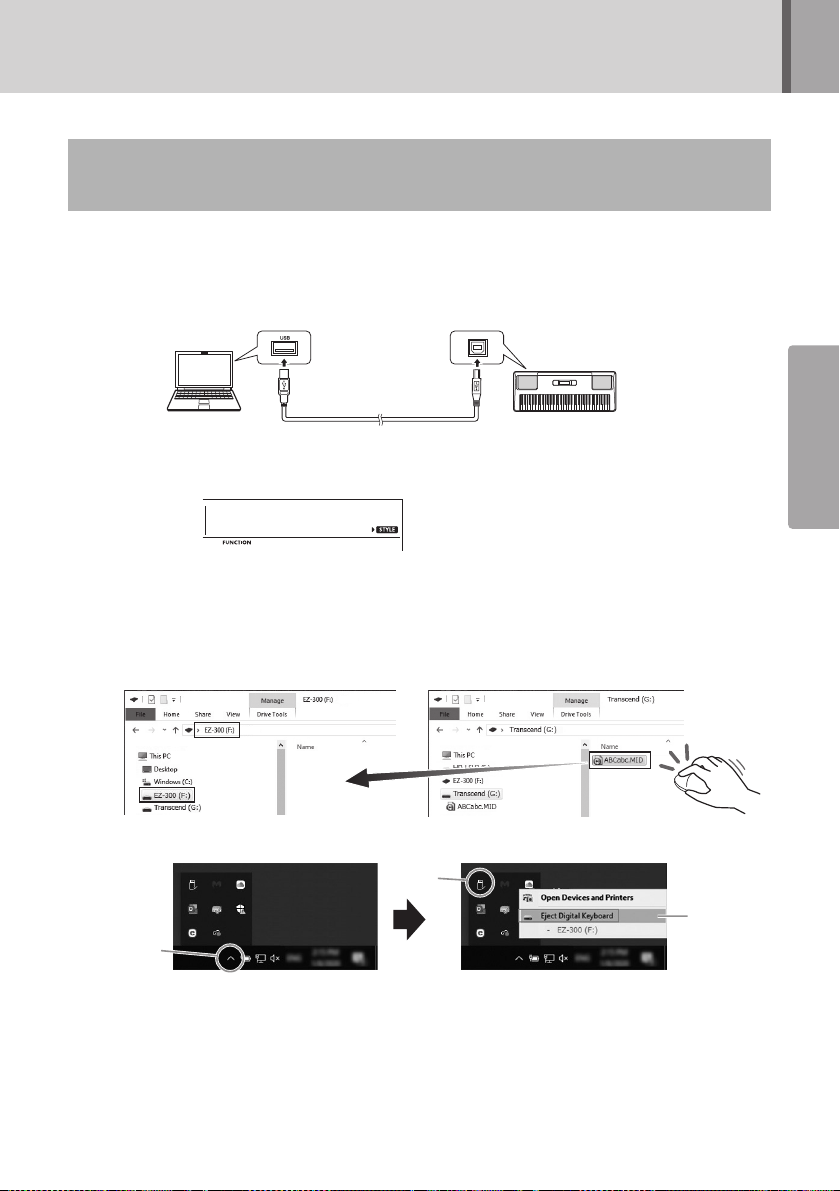
Transfer Your Favorite MIDI Song from the Computer
Computer
USB cable
Instrument
USB terminal [USB TO HOST] terminal
Storage
on
059
Instrument drive
Folder containing song files
1
2
3
to the Instrument
Windows10 is used for the examples in this manual.
Connect the [USB TO HOST] terminal (page 13) on rear panel of this instrument and
1
the computer via a USB cable.
Press the [+/YES] button in the function settings (Storage; Function 059; page 63) to
2
turn the “Storage Mode” on.
Copy your favorite song file from the computer to the instrument folder on the com-
3
puter display.
For other important information about copying files, refer to “Computer-related Operations” on the website
(page 8).
Quick Guide
Page 57
After copying is completed, remove the instrument drive from the computer.
4
Disconnect the USB cable connecting the instrument to the computer.
5
Press the [-/NO] button in the same function settings as in step 2 to turn the “Storage
6
Mode” off.
Start playback of the transferred Song (Song No. 208 –).
7
For instructions on playing back a Song, refer to page 32.
EZ-300 Owner’s Manual
19
Page 20
Quick Guide
Quick Guide
Select the
Song you want
to learn.
Practice step 1.
Practice
Steps 2, 3, 4...
and so on.
Practice the
last Step.
Yo u’ re
done!
Passe d
★
Passed
★★
Pass ed
★★★
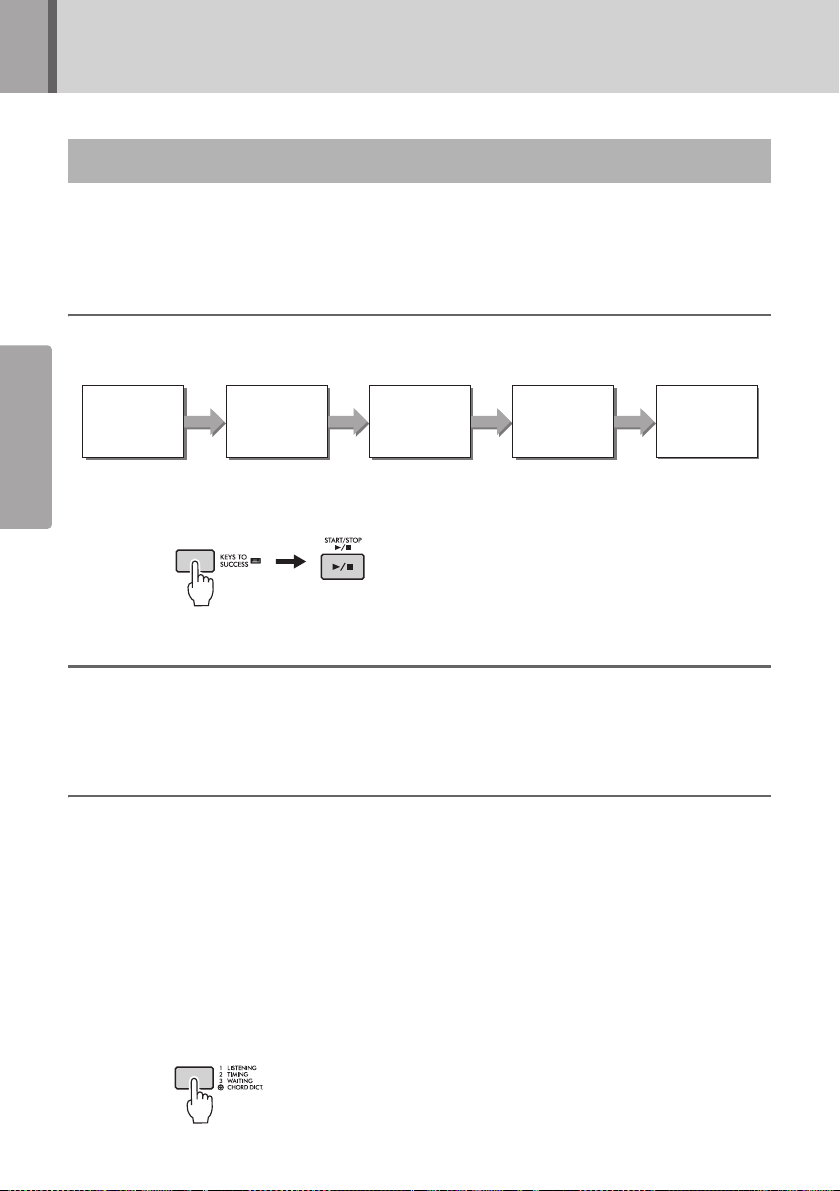
Practice Playing a Song Using Lesson Functions
Page 35
This instrument features the following Lesson functions. Select and practice your favorite preset
Songs, and improve your playing skills with the Song Book, which includes the music scores of the preset Songs, or important points for “Keys to Success,” etc.
Keys to Success
You can select just the key phrases of the Song - the ones you like most or need to work on - and practice them one by one. Enjoy this Lesson by passing and completing each step.
Select the Song you want to learn, and then press the [KEYS TO SUCCESS] and [START/
STOP] buttons to start Lesson.
Phrase Repeat
This lets you practice difficult phrases repeatedly. It’s ideal for use as a final practice before you go on
to the last Step to try to pass in the Keys to Success mode, or when you just want to practice a difficult
phrase repeatedly.
Listening, Timing and Waiting
You can practice the preset Songs in the following three steps, independently for the right or left hand,
or both hands.
These three lessons can be used with Keys to Success or Phrase Repeat. If you feel it difficult to play
the specific phrase in Keys to Success, use the Waiting lesson to have the phrase pause until you play
the correct note (page 39).
Lesson 1 (Listening) ......Listen to the model melody/chords of the part you selected carefully and remem-
Lesson 2 (Timing) .......... Play the notes with the correct timing.
Lesson 3 (Waiting) ......... Play the correct notes.
Select the Song you want to learn, and then press the [1 LISTENING 2 TIMING 3 WAITING]
button to start your desired Lesson.
EZ-300 Owner’s Manual
20
ber it well.
Page 21
Quick Guide
Quick Guide
Split Point
Auto Accompaniment range
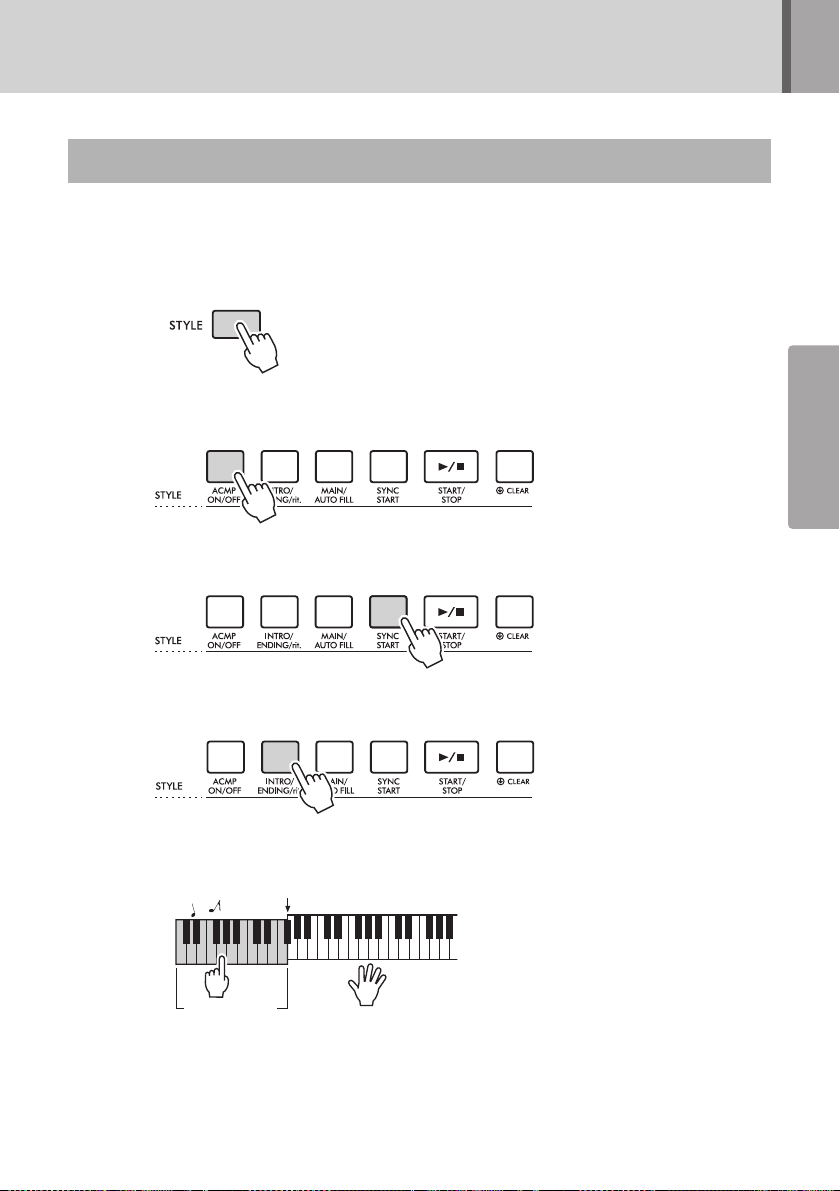
Play with Rhythm and Accompaniment (Styles)
This instrument includes an Auto Accompaniment feature that automatically plays appropriate “Styles”
(rhythm + bass + chord accompaniment), controlled simply by playing only the root note of a chord.
These Styles give you automatic, fingertip control of a full backing band.
Press the [STYLE] button.
1
Use the number buttons [0]–[9], [+/YES], [-/NO] buttons to select the desired Style.
2
Press the [ACMP ON/OFF] button to turn on the Auto Accompaniment.
3
Press the [SYNC START] button to turn Synchro Start on.
4
This puts the Style playback in “standby” and Style starts playing back when you play the keyboard.
Press the [INTRO/ENDING/rit.] button.
5
An Intro part is added before starting Style playback.
Page 44
Play the root note of a chord with your left hand in the Auto Accompaniment range to
6
start Style playback.
Play the root note of a chord with your left hand and the melody part with your right
7
hand.
Press the [INTRO/ENDING/rit.] button to stop Style playback.
8
The Ending part is added before stopping Style playback.
EZ-300 Owner’s Manual
21
Page 22
Quick Guide
Quick Guide
001
User 1
EC
User Song Number
Flashes
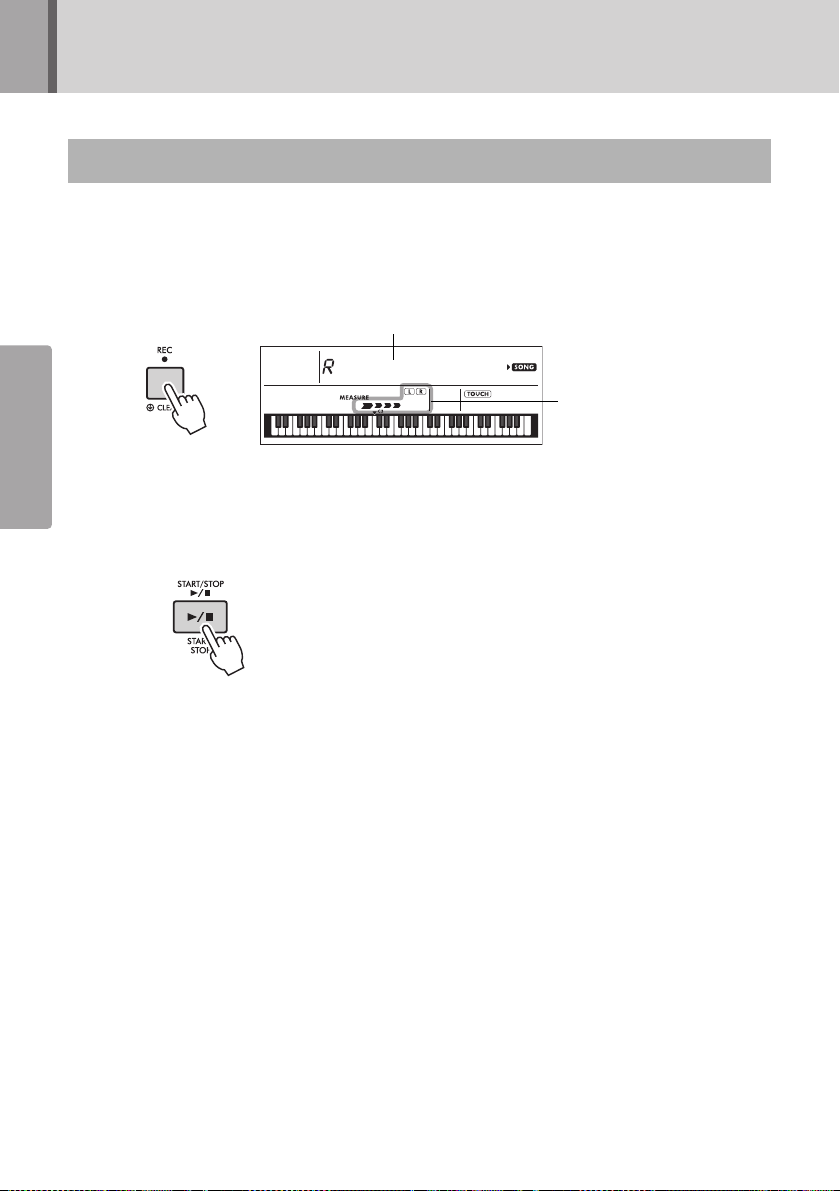
Record Your Performance
You can record your performance.
Make the necessary settings, such as Voice selection, etc.
1
Press the [REC] button to enter the Record Ready mode.
2
Press the [REC] button to exit from the Record Ready mode.
Play the keyboard to start recording.
3
Press the [START/STOP] button to stop recording.
4
To play back the recorded Song, press the [START/STOP] button.
5
Page 51
22
EZ-300 Owner’s Manual
Page 23
Quick Guide
Quick Guide
Lighting Keyboard (Light Guide function)
This instrument features the Light Guide function which makes the keys you press or those specified by Song
data light. Although this function is turned on by default, you can turn the function off by holding down the
[FUNCTION] button for longer than a second.
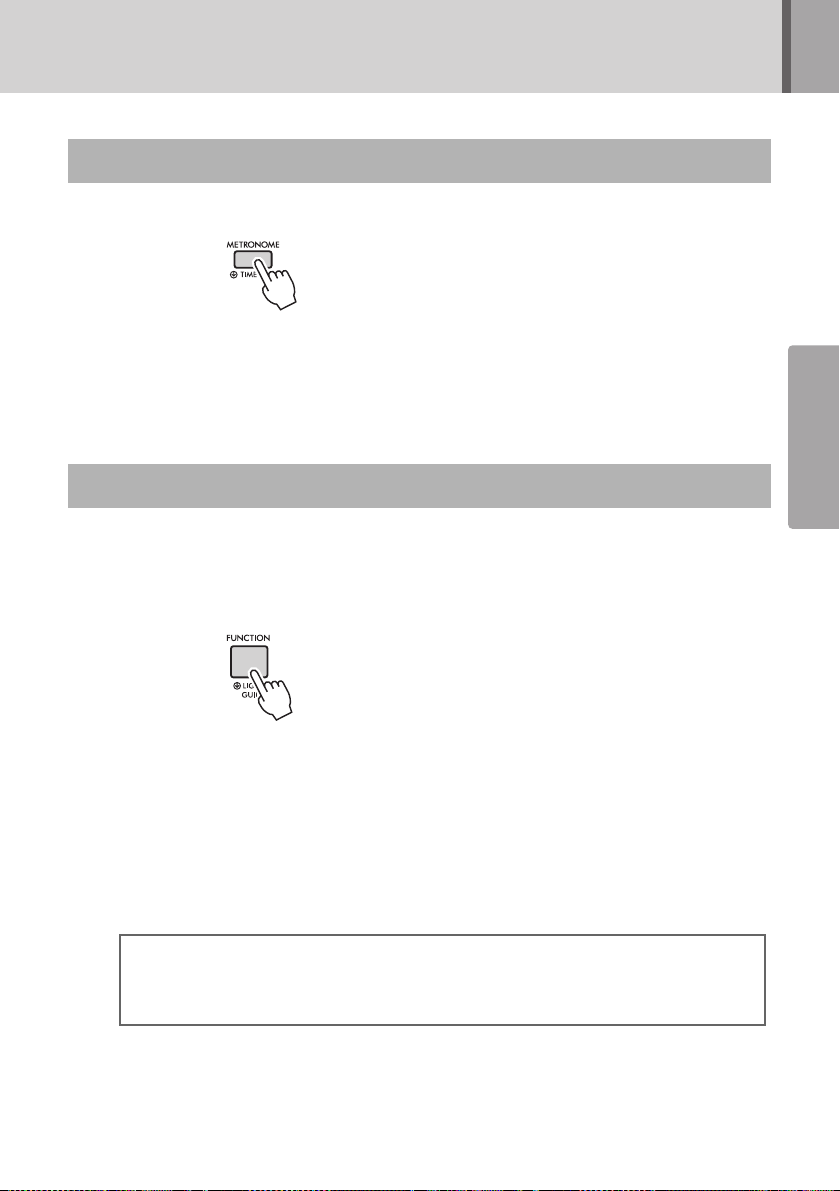
Use the Metronome
Press the [METRONOME] button to start the Metronome.
1
Press the [METRONOME] button again to stop the Metronome.
2
Pressing the [TEMPO/TAP] button enables you to adjust the Metronome tempo.
Make Detailed Settings (Function Settings)
After learning how to use this instrument, use the [FUNCTION] button to set various parameters.
This instrument contains 64 settings. Each time you press the [FUNCTION] button, the setting item
is selected in sequence, and the value of the selected item can be changed by using the number
buttons [0]–[9], and [+/YES], [-/NO] buttons.
Page 24
Page 60
You can select the setting items by simultaneously holding down the [FUNCTION] button and pressing the [+/YES] or [-/NO] button.
When the Function settings display does not appear, press one of the [VOICE], [SONG] or [STYLE]
buttons, and then press the [FUNCTION] button again.
Pressing one of the [VOICE], [SONG] or [STYLE] buttons also lets you exit from the Function settings.
EZ-300 Owner’s Manual
23
Page 24
Reference
Playing a Variety of Instrument Voices
CncertGP
001
Voi ce n am e
The Voice shown here
becomes the Main Voice
for the instrument.
Voice number
appears
when the Voice
selection mode
is active.
NOTE
Flute
134
Select the Voice you want to play
Tempo
090
Current Tempo value
Referenc e
In addition to piano, organ, and other “standard” keyboard instruments, this instrument
has a large range of Voices that includes guitar, bass, strings, sax, trumpet, drums and
percussion, and even sound effects—giving you a wide variety of musical sounds.
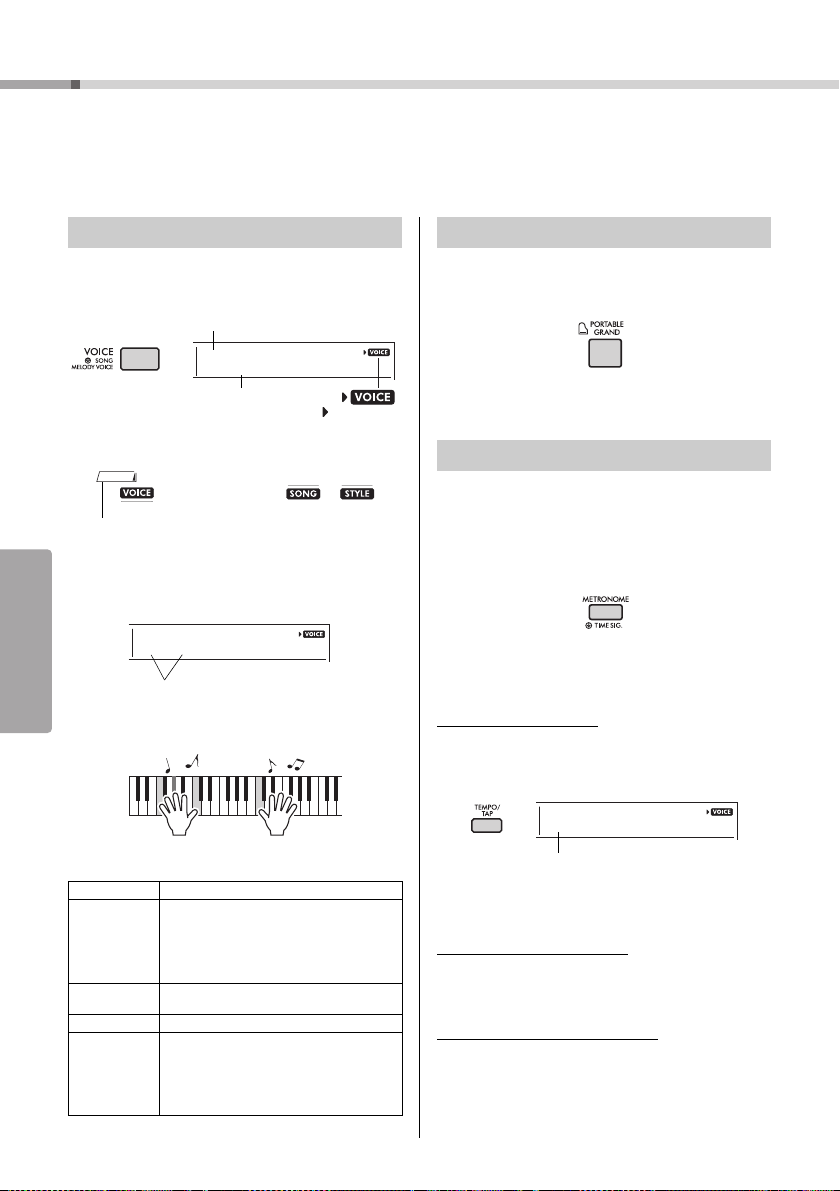
Selecting a Main Voice
Press the [VOICE] button.
1
The Voice number and name will be shown.
• is always displayed with or . For
details, refer to page 17.
Use the number buttons [0]–[9], [+/YES],
2
[-/NO] buttons to select the desired
Vo ic e.
Refer to the Voice List on page 76.
Play the keyboard.
3
Playing the “Grand Piano”
When you want to reset various settings to default
and simply play a Piano sound, press the [PORTABLE GRAND] button.
The Voice “001 Live!ConcertGrandPiano” will automatically be selected as the Main Voice.
Using the Metronome
The instrument features a built-in Metronome (a
device that keeps an accurate tempo), convenient for
practicing.
Press the [METRONOME] button to start
1
the Metronome.
Press the [METRONOME] button again to
2
stop the Metronome.
To change the Tempo:
Press the [TEMPO/TAP] button to call up the Tempo
value, then use the number buttons [0]–[9], [+/YES],
[-/NO].
Preset Voice Types
001–241 Instrument Voices (including sound effects).
242–263
(Drum Kit)
264–283
284–622 XGlite Voices (page 79)
000
EZ-300 Owner’s Manual
24
Various drum and percussion sounds are
assigned to individual keys, from which they can
be played. Details on the instrume nts and key
assignments of each Drum Kit can be found in
the Standard Kit 1 List on page 82 and “Drum
Kit List” on the website (page 8).
Arpeggios are automatically reproduced by
simply playing the keyboard (page 28).
One Touch Setting
The One Touch Setting feature automatically
selects the most suitable Voice when you
select a Style or Song (excepting the Song
inputted from other devices). Simply select
Voice number “000” to activate this feature.
Press the [+/YES] and [-/NO] buttons simultaneously
to instantly reset the value to the default tempo.
To set the Time Signature:
Press and hold the [METRONOME] button to call up
“TimeSigN” (Function 030; page 62), then use the
number buttons, [+/YES] and [-/NO] buttons.
To set the Metronome Volume:
This can be set via Function number 032 (page 62).
Page 25
Reference
Playing a Variety of Instrument Voices
CncertGP
001
Appears when the
layer is on
NOTE
Two Voices will
sound at the same
time.
Split Voice
Main Voice and Dual Voice
Split Point ... default setting: 054 (F#2)
036
(C1)
048
(C2)
060
(C3)
072
(C4)
084
(C5)
096
(C6)
Left hand area
Right hand area
CncertGP
001
Appears when Split
is on
NOTE
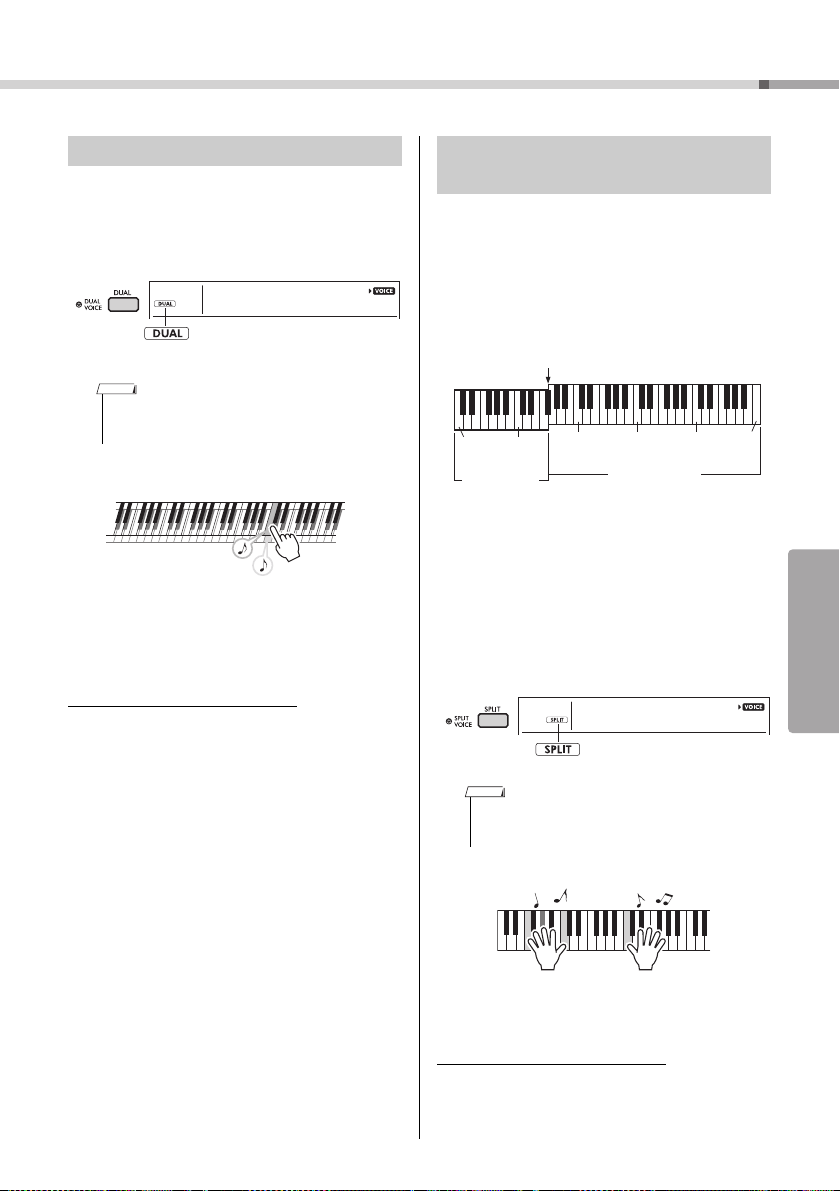
Adding a Layer – Dual Voice
In addition to the Main Voice, you can layer a different Voice over the entire keyboard as a “Dual Voice.”
Press the [DUAL] button to turn on the
1
layer.
• Pressing and holding the [DUAL] button for longer than
a second calls up “D. Voice,” allowing you to select a different Dual Voice.
Play the keyboard.
2
To exit from the layer, press the [DUAL]
3
button again.
To select a different Dual Voice:
Although turning on Dual will select a Dual Voice
suitable for the current Main Voice, you can easily
select a different Dual Voice by pressing and holding
the [DUAL] button to call up “D.Voice” (Function 008;
page 61), then using the number buttons [0]–[9],
[+/YES], [-/NO].
Playing Different Voices with Your Left and Right Hands (Split)
By dividing the keyboard into the two separate areas,
you can play one Voice with your left hand and a different Voice with your right.
Furthermore, you can play both a Main Voice and
Dual Voice in the right-hand area of the keyboard
while playing a different Voice (called “Split Voice”) in
the left-hand area.
The highest key for the left-hand area is referred to
as the “Split Point” (Function 003;
can be changed from the default F#2 key.
Press the [SPLIT] button to turn on the
1
Split function.
The keyboard is divided into the left- and righthand areas.
• Pressing and holding the [SPLIT] button for longer than
a second calls up “S. Voice,” allowing you to select a different Split Voice.
Play the keyboard.
2
page 60
) which
To exit from the Split function, press the
3
[SPLIT] button again.
To select a different Split Voice:
Press and hold the [SPLIT] button to call up “S.Voice”
(Function 012; page 61), then use the number buttons [0]–[9], [+/YES], [-/NO].
EZ-300 Owner’s Manual
25
Page 26

Playing a Variety of Instrument Voices
Reference
TouchRes
004
Medium
2
004
Appears when the Touch
Response is not “Fixed.”
When you play softly.
When you play at
medium strength.
When you play strongly.
NOTE
CncertGP
001
Appears when
the DSP is on.
NOTE
DSPType
023
EnsDet
32
023
Current DSP type
Hold for longer
than a second.
Lesson
Changing the Touch Response of the Keyboard
The keyboard of this instrument is equipped with a
Touch Response feature that lets you dynamically
and expressively control the level of the Voices
according to your playing strength.
Press the [FUNCTION] button several
1
times until “TouchRes” (Function 004;
page 60) appears.
After a few seconds, the current Touch Response
appears.
Applying Effects to the Sound
This instrument can apply various Effects as listed
below to the instrument’s sound.
DSP
The DSP (digital signal processor) is an effect in
which digital signal processing is applied to the
sound to change it.
There are various types of DSP. When the DSP is
turned on, the most suitable type will be selected for
the current Main Voice. If you want to select a specific type, use operation steps 2 and 3 below.
For details on DSP types, refer to page 91.
1 Check whether the DSP is ON or not.
If the “DSP” icon is not shown on the display,
press the [DSP] button.
Use the number buttons [1]–[4], [+/YES],
2
[-/NO] buttons to select a Touch
Response setting between 1 and 4.
Touch Response
Play the keyboard.
3
The strength meter will light according to the
strength with which you play the keyboard.
EZ-300 Owner’s Manual
26
Produces relatively high volume even with
1Soft
2Medium
3Hard
4Fixed
• When the Touch Response is "Fixed," the strength meter
light playing strength. Best for players with a
light touch who want to maintain a consistent, relatively loud volume.
Produces a fairly “standard” keyboard
response.
The keys must be played very strongly to
generate loud volume. This setting is best
for a wide dynamic range and optimum
expressive control of the sound, from pianissimo to forti ssimo.
All notes are produced at the same volume
no matter how hard the keyboard is played.
is at fixed medium strength.
Depending on the selected Voice, the DSP may
automatically be turned on.
• The DSP is only applied to the Main Voice. It is not
applied to the Dual Voice (page 25) or Split Voice (page
25).
• The DSP cannot be turned on during Lessons.
2 Hold down the [DSP] button for longer than a sec-
ond to call up “DSPType” (Function 023; page
91). After a few seconds, the current DSP type
appears.
3 Use the number buttons [0]–[9], [+/YES], [-/NO]
buttons to select the desired type.
4 Play the keyboard.
5 Press the [DSP] button again to turn off the DSP.
Page 27
Reference
Playing a Variety of Instrument Voices
NylnGtrH
044
Appears when the
S.Art Lite Voice is selected
NOTE
NOTE
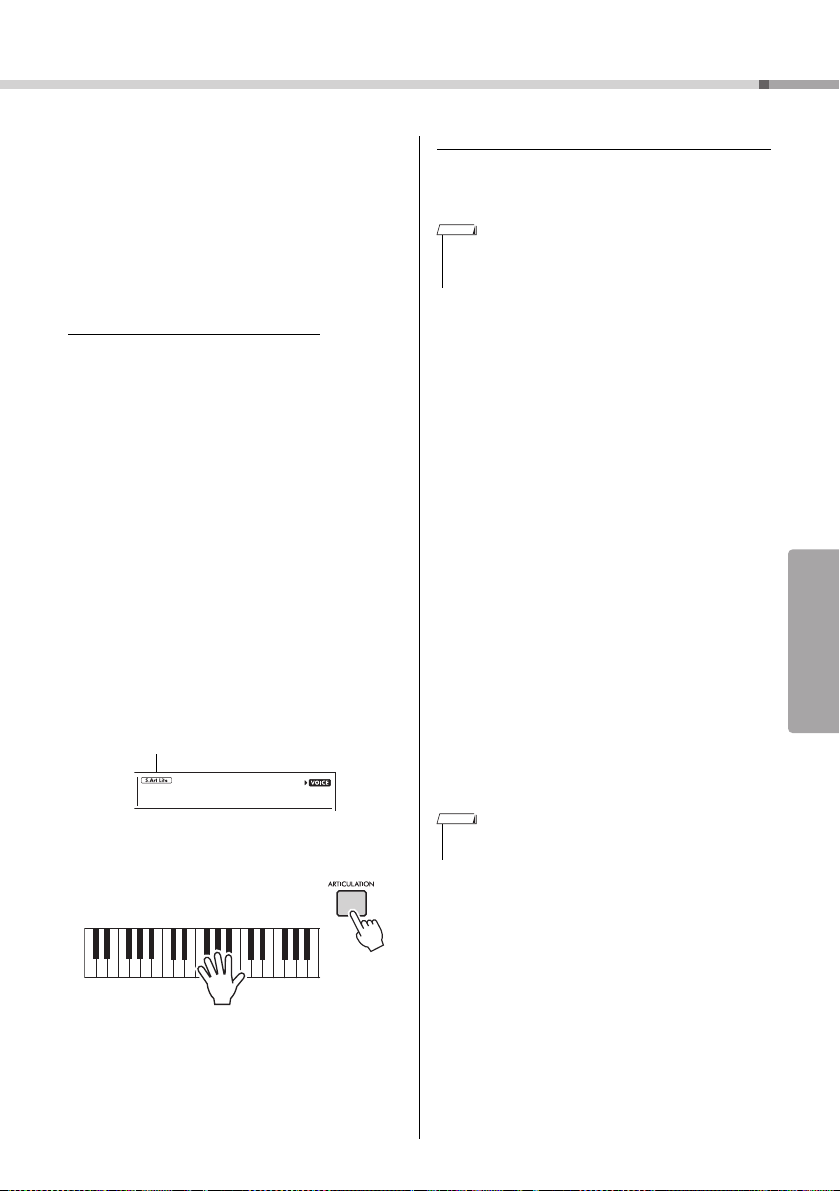
Articulation
Articulation is an effect that reproduces the playing
methods that are unique to specific instruments. The
Articulation effect is applied to notes you play only
while holding down the [ARTICULATION] button.
The Voice to which the Articulation effect is applied is
called “S. Art Lite Voice” (Super Articulation Lite
Voice). The S. Art Lite Voices have the added indication “***” in the Voice List (page 76).
Examples of the Articulation effect
If you select a guitar Voice, you can realistically
reproduce the following guitar-specific playing techniques.
Example: Voice number 044 “S.Art Lite Nylon
Guitar Harmonics”
Playing the keyboard while holding down the
[ARTICULATION] button produces harmonics
sounds.
Example: Voice number 048 “S.Art Lite Distortion
Guitar”
Pressing the [ARTICULATION] button produces a
scratching noise.
Only when an S. Art Voice is selected, the most suitable Ar ticulation effect is automatically applied to the
Voi ce .
When other Voices are selected, the modulation
effect is applied to the Voices.
1 Select the desired S. Art Lite Voice.
Adding the Articulation effect by using the pedal
If you assign the Articulation function to the pedal
(footswitch) with “PdlFunc” (Function 029; page 61),
you can apply the effect by pressing the pedal.
• The Articulation effect is applied only to a Main Voice.
• S.Art Lite Voices sound differently depending on the velocity,
etc.
Reverb
Adds the ambience of a club or concert hall to the
sound. Although the best-suited Reverb type is
called up by selecting a Song or Style, you can
select another one via Function number 020 (page
61). When you select “oFF,” the Reverb effect is
turned off. And you can also set the Reverb level via
Function number 021 (page 61).
Chorus
Makes the Voice sound richer, warmer and more
spacious. Although the best-suited Chorus type is
called up by selecting a Song or Style, you can
select another one via Function number 022 (page
61). When you select “oFF,” the Chorus effect is
turned off. You can also set the Chorus depth for
Voices via Function numbers 007 (page 60), 011, 015
(page 61).
The Chorus depth cannot be applied to the Styles or
Songs.
Sustain
By turning on the Sustain parameter of Function
number 024 (page 61), you can add a fixed, automatic sustain to the Main/Dual Voices played on the
keyboard. Or, you can produce a natural sustain as
desired with the footswitch (sold separately; page
16).
2 Press the [ARTICULATION] button while playing
the keyboard.
Release the [ARTICULATION] button to turn
Articulation off.
• Even if you turn on Sustain, there are some Voices to which
sustain is not applied.
EZ-300 Owner’s Manual
27
Page 28

Playing a Variety of Instrument Voices
Reference
NylnGtrH
044
CncertGP
001
Appears when the Harmony is turned on.
Appears when the
Arpeggio is turned on.
or
NOTE
Harm/Arp
026
Trio
002
026
Current type
Hold for longer
than a second.
NOTE
Adding Harmony or Arpeggio
You can add harmony or arpeggio notes to the Voice
played on the keyboard.
By specifying the Harmony Type, you can apply harmony parts, such as duet or trio, or add tremolo or
echo effects to the played sound of the Main Voice.
Also, when the Arpeggio Type is selected, arpeggios
(broken chords) are automatically played back when
you simply play the appropriate notes on the keyboard. For example, you could play the notes of a
triad—the root, third, and fifth—and the Arpeggio
function will automatically create a variety of interesting phrases.
Press the [HARMONY/ARPEGGIO] but-
1
ton to turn on the Harmony or Arpeggio
function.
When the Harmony or the Arpeggio is turned on,
the most suitable one will be selected for the current Main Voice.
If you want to select a specific type, select it by
the operation steps 2 and 3 at right.
• The Harmony effect can be added to only the Main Voice.
• When selecting a Voice number between 264 and 283,
the Arpeggio function will automatically be turned on.
• When selecting a Harmony Type between 001 and 005,
the harmony effect will only be added to your right-hand
melody play if you turn on the Style (page 45) and press
chords in the auto accompaniment range of the keyboard.
Hold down the [HARMONY/ARPEGGIO]
2
button for longer than a second so that
“Harm/Arp” (Function 026; page 61)
appears on the display.
After “Harm/Arp” is shown for a few seconds, the
current type appears.
Use the number buttons [0]–[9], [+/YES],
3
[-/NO] buttons to select the desired type.
When you want to specify a Harmony Type, refer
to the Harmony Type list on page 89; to specify
an Arpeggio Type, refer to the Arpeggio Type list
on page 90.
• When playing one of the Arpeggio Types 143 to 176,
select the corresponding Voice below as the Main Voice.
143–173: Drum Kit Voices (Voice No. 242–252)
174 (China): StdKit1 + Chinese Perc. (Voice No.253)
175 (Indian): Indian Kit 1 (Voice No.254) or Indian Kit 2
(Voice No. 255)
176 (Arabic): Arabic Kit (Voice No. 259)
Press a note or notes on the keyboard to
4
trigger the Harmony or Arpeggio.
When a Harmony Type is selected, a harmony
part (for example, duet or trio) or an effect (for
example, tremolo or echo) can be added to the
played sound of the Main Voice.
Also, when an Arpeggio Type is selected, arpeggios (broken chords) are automatically played
back when you simply play the appropriate notes
on the keyboard. The particular arpeggio phrase
differs depending on the number of pressed
notes and the area of the keyboard.
28
EZ-300 Owner’s Manual
To turn the Harmony or Arpeggio off,
5
press the [HARMONY/ARPEGGIO] button again.
Page 29
Reference
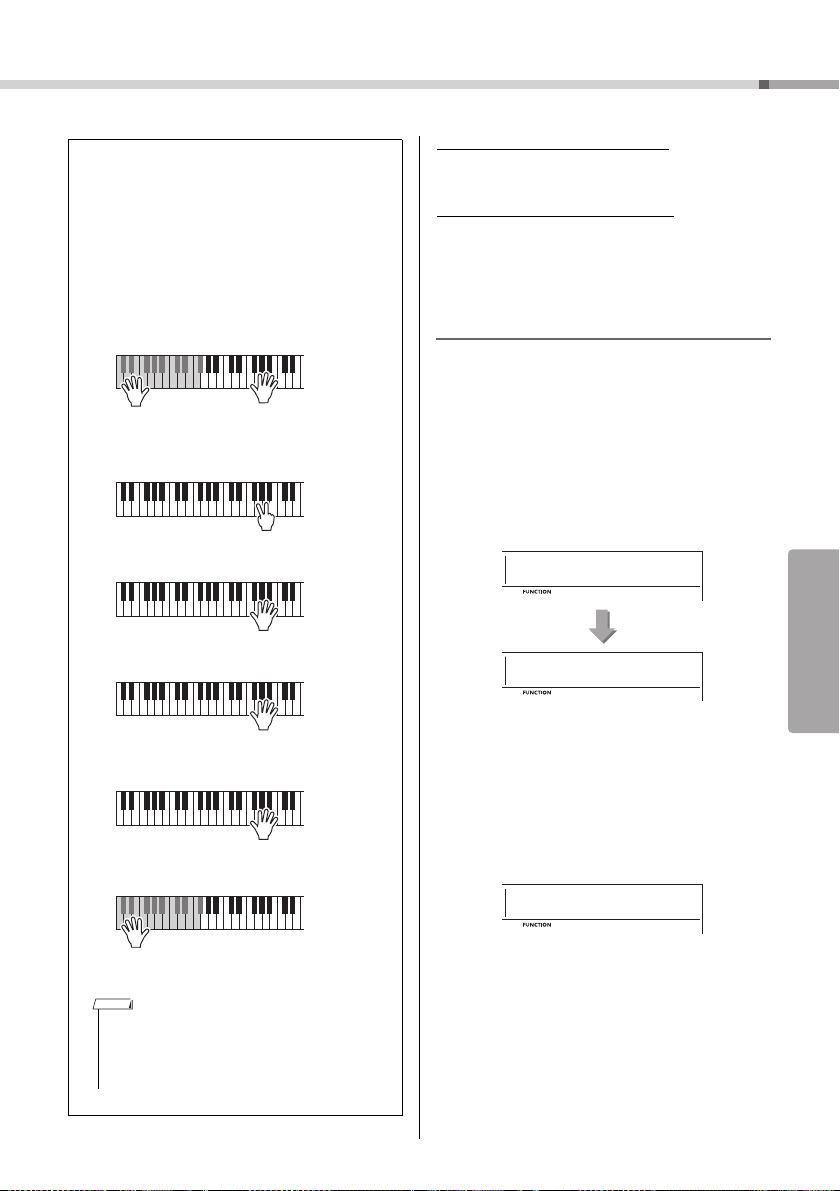
How to play the various Types
• Harmony Type 001 to 005
Press the right-hand keys while playing chords in the
auto accompaniment range of the keyboard when
Auto Accompaniment is on (page 45).
• Harmony Type 006 to 012 (Trill)
Hold down two keys.
• Harmony Type 013 to 019 (Tremolo)
Keep holding
down the keys.
• Harmony Type 020 to 026 (Echo)
Play the keys.
• Arpeggio Type 027 to 176
Arpeggio function applies to the Main Voice
and the Dual Voice.
Arpeggio function applies only to the split
Voi ce.
When Split is off:
When Split is on:
• Arpeggio cannot be applied to the Split and Main/
Dual Voices simultaneously.
• Selecting a Voice number between 274 and 283 as
the Main Voice will turn on Arpeggio and Split automatically.
The method of sounding the Harmony effect (01–26)
differs depending on the selected type. For Types
01–05, turn the Auto Accompaniment on and play it by
pressing a chord in the auto accompaniment section of
the keyboard, then play some keys in the right-hand
side to produce the Harmony effect. For Types 06–26,
turning auto accompaniment on or off has no effect.
However, it is necessary to play two notes simultaneously for Types 06–12.
PdlFunc
029
Sustain
1
029
Arp Hold
2
029
Playing a Variety of Instrument Voices
To adjust the Harmony Volume:
This can be adjusted via Function number 027 (page
61).
To adjust the Arpeggio Velocity:
This can be adjusted via Function number 028 (page
61).
Holding the Arpeggio Playback via the
Pedal (Footswitch) (Hold)
You can set the instrument so that Arpeggio playback continues even after the note has been
released, by pressing the pedal connected to the
[SUSTAIN] jack.
Press a [FUNCTION] button a number of
1
times until the “PdlFunc” (Function 029;
page 61) item appears on the display.
After “PdlFunc” is shown for a few seconds, the
current setting is shown.
NOTE
Select the desired function by using the
2
number buttons [1]–[3] or [+/YES], [-/NO]
buttons. (In this case, number button [2]
to select “Arp Hold.”)
If you want to restore the pedal function to sustain, select “Sustain.” If you want to use both hold
and sustain functions, select “Sus+ArpH.”
Try playing the keyboard with Arpeggio
3
playback using the pedal.
Even if you release the notes, Arpeggio playback
will continue. To stop Arpeggio playback, release
the footswitch.
EZ-300 Owner’s Manual
29
Page 30
Reference
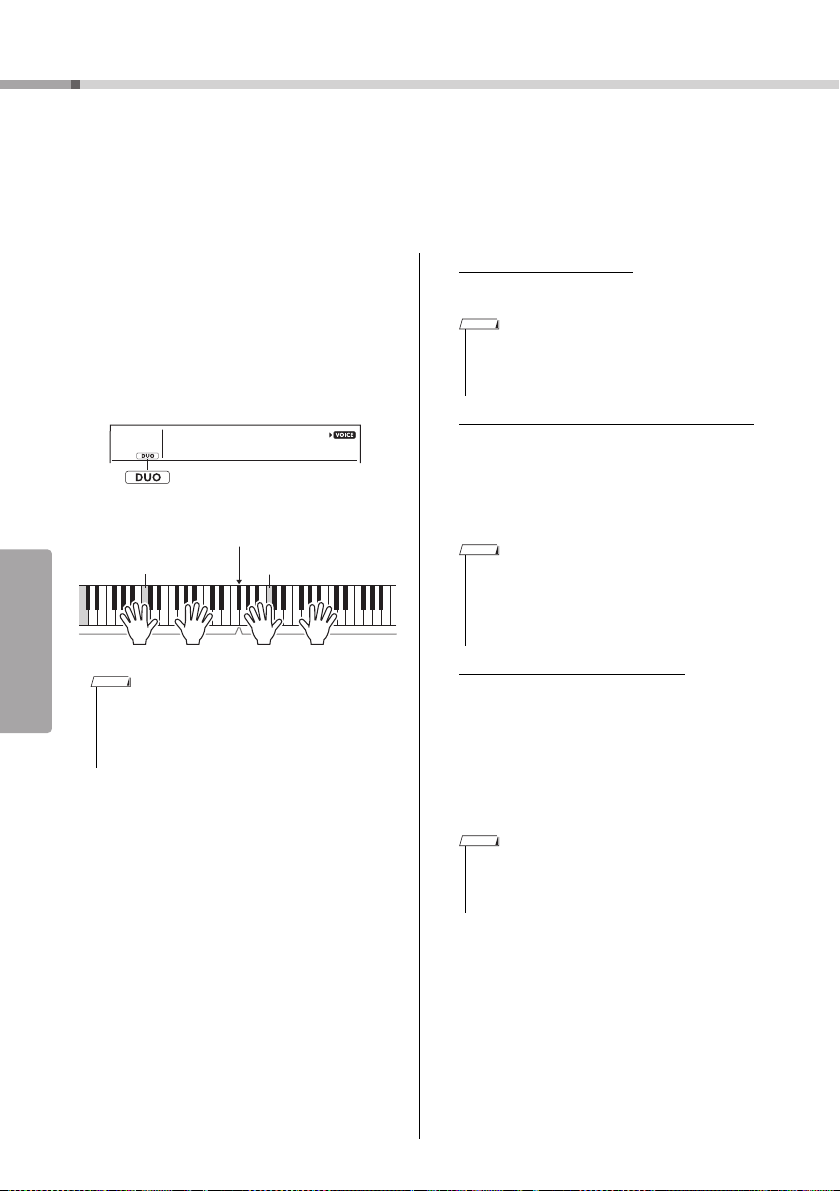
Playing the keyboard with two persons (Duo mode)
DuoMode
on
Appears when the
Duo is turned on.
Equivalent to C3
Duo Split Point
default setting: 066 (F#3)
Left Voice
Equivalent to C3
Right Voice
NOTE
NOTE
NOTE
NOTE
When the Duo mode is activated on this instrument, two different players can play the
instrument simultaneously, with the same sound, over the same octave range—one person on the left and the other on the right. This is useful for learning applications, in
which one person (a teacher, for example) plays a model performance and the other
person watches and practices while sitting at the first person’s side.
Press a [FUNCTION] button several
1
times until “DuoMode” (Function 051;
page 63) appears on the display.
Use the [+/YES] button to select “on.”
2
The F#3 key becomes the Duo Split Point and the
keyboard is divided into two sections: one for the
left Voice and one for the right Voice.
• The right Voice section and the left Voice section of the
keyboard are both set to the same Voice (Main Voice).
• The Duo Split Point can be changed via Function number
053 (page 63) by holding down the [ACMP ON/OFF] button for longer than a second.
One person can play the left Voice sec-
3
tion of the keyboard while the other
plays the right Voice section.
To exit from Duo mode, select “oFF” via
4
“DuoMode” (Function 051; page 63) by
executing steps 1.
Changing the Left Voice
Only the left Voice can be changed via “DuoLVc”
(Function 052; page 63).
• When playing different Voices between the left and right,
the right Voice name is shown in the display.
• Certain functions such as Lesson, Harmony/Arpeggio
and Dual cannot be used in the Duo mode.
How sounds are output in the Duo mode
The performance sound of the left Voice will
sound from the left speaker, and the performance
sound of the right Voice will sound from the right
speaker, in the initial Duo mode setting (“Separate”). This output setting can be changed from
the “DuoType” setting (Function 058; page 63).
• In the Duo mode, the pan, volume and tonal characteristics of the stereo sound may differ from those in the normal mode, due to the setting of DuoType = “Separate”
(page 63). Particularly with Drum Kits, the difference may
be more obvious, since each key of a Drum Kit features a
different stereo pan position.
Using sustain in the Duo mode
Sustain can be applied to the left and right Voice
sections in Duo mode just as it normally is by
using one of the following methods in the Duo
mode like the usual mode.
• Press the footswitch (page 16) connected to the
[SUSTAIN] jack.
• Set “Sustain” (Function 024; page 61) to on.
Sustain is applied to all notes.
• Sustain cannot be applied independently to the left Voice
section and the right Voice section.
• While Sustain is set to on via Function 024, the setting of
hold is maintained even when the power is turned off.
EZ-300 Owner’s Manual
30
Page 31

Reference
Playing Songs
You can simply enjoy listening to the internal Songs, or use them with just about any of
the functions, such as Lesson.
Song Category
The Songs are organized by category as listed below.
Song No. Song Category Descriptions
001 DEMO
002–011 POP
012–042 FAVORITE
043–051 INSTRUMENT MASTER
052–074 PIANO REPERTOIRE
075–090 LEARN TO PLAY
091–110 FAVORITE WITH STYLE
111–116 JAPANESE SONG
117–129 DUET
130– 140 PIANO SOLO
141–150 TOUCH TUTOR
151–162 CHORD STUDY
163–202 CHORD PROGRESSION
203–207 USER SONG Songs (User Songs) you record yourself.
208– FLASH MEMORY
This demonstration Song showcases the various sounds of the
instrument.
This category features a collection of hit songs. Have fun playing
your favorite song.
We’ve collected various folk songs from around the world which
have been handed down from through the generations, as well as
famous classical pieces. Try playing the melodies of these Songs.
These Songs feature solo instruments other than piano—letting you
enjoy playing other instrumental voices along with orchestral
accompaniment.
These include famous pieces from around the world along with wellknown piano pieces. Enjoy the beautiful, resonant piano sound as
you play solo or along with orchestral backing.
Each of these Songs has two variations: a simple one which even
beginners can practice with ease, and another more challenging
version.
Enjoy performing a piece with Style accompaniment (automatic
accompaniment data). (Keys to Success (page 36) is designed so
that you master playing the melody with your right hand first, and
then learn the roots of the chords with your left hand.)
This category features a collection of songs that are well-known in
Japan and have been enjoyed for generations. Experience these
traditional melodies for yourself.
Get together with a friend or family member and make great music
together. (The Songs have been arranged so that it is also possible
to perform them alone.)
This category features a collection of well-known classical piano
compositions. Enjoy the beautiful sounds of the piano.
Learn how to use expressive “touch” control while playing the keyboard according to the strength level displayed in the LCD.
Hear and experience the sound of chords and easy chord progressions while playing the lighting keyboard.
Learn how to play chords with Songs featuring simple, fundamental
chord progressions.
Songs transferred from a computer. For instructions on how to
transfer, refer to page 19 or “Computer-related Operations” on the
website (page 8).
EZ-300 Owner’s Manual
31
Page 32

Playing Songs
Reference
Fur Elis
075
Song name
Song number
Appears when
Song mode is
active.
090
Tempo
Current Tempo value
Selecting and Playing Back a Song
Press the [SONG] button, and then use
1
the number buttons [0]–[9], [+/YES],
[-/NO] to select the desired Song.
Refer to the Song List (page 83).
Press the [START/STOP] button to start
2
playback.
To stop playback, press the [START/STOP] button again.
Changing the Tempo
Press the [TEMPO/TAP] button to call up the Tempo
value, then use the number buttons, [-/NO] and
[+/YES] buttons to adjust the Tempo value.
Adjusting the Song Volume
To adjust the volume balance between Song playback and keyboard, you can adjust the Song Volume.
This can be set via Function number 019 (page 61).
Press the [+/YES] and [-/NO] buttons simultaneously
to reset the value to the default tempo of the current
Song or Style (page 44).
Using the Tap function:
While a Song or Style is playing back, press the
[TEMPO/TAP] button just twice at the desired tempo
to change the tempo. While Song or Style playback
is stopped, tap the [TEMPO/TAP] button several
times to start playback at the tapped tempo—four
times for a 4-beat Song or Style or three times for a
3-beat Song or Style.
EZ-300 Owner’s Manual
32
Page 33

Reference
Playing Songs
Hold for longer than
a second.
NOTE
Fast Reverse
During playback, press
this button to rapidly
return to an earlier point
in the Song.
Fast Forward
During playback, press this
button to rapidly skip ahead to
a later point in the Song.
Pause
During playback, press
this button to pause playback, and press again to
start from that point.
NOTE
NOTE
Playing Songs Repeatedly (BGM function)
With the default setting, pressing the [DEMO] button
will play back only 11 Songs (Song No. 001–011)
repeatedly. This setting can be changed so that, for
example, all internal Songs automatically play back,
letting you use the instrument as a background
music source.
Hold down the [DEMO] button for longer
1
than a second.
“DemoGrp” (Function 061; page 63) is shown in
the display for a few seconds, followed by the current repeat playback target.
Use the [+/YES] or [-/NO] button to select
2
a playback group.
1 Demo Preset Songs (001–011)
2 Preset All preset Songs (001–140)
3 User All User Songs (203–207)
4 Download
• When User Songs and Download Songs data do not
exist, Demo Songs are played back.
Press the [DEMO] button to start play-
3
back.
To stop playback, press the [DEMO] button again
or press the [START/STOP] button.
Random Song Playback
When the Demo Group (above) is set to something
other than “Demo,” the playback order via the
[DEMO] button can be changed between numerical
order and random order. To do this, press the
[FUNCTION] button several times until “PlayMode”
(Function 062; page 63) is called up, then select
“Normal” or “Random.”
All Songs transferred from a computer
(208–)
Song Fast Forward, Fast Reverse, and Pause
Like the transport controls on an audio player, this
instrument lets you fast forward (FF), rewind (REW)
and pause (PAUSE) playback of the Song.
• When the A-B repeat (page 34) is specified, the Fast Reverse
and Fast Forward will only work within the range between A
and B.
• [REW], [FF] and [PAUSE] button cannot be used during Song
playback by using the [DEMO] button.
Changing the Song Melody Voice
You can change a Song’s melody Voice to any other
desired Voice.
Select and play back a Song.
1
Select the desired Voice.
2
Press and hold the [VOICE] button for
3
longer than a second.
“SONG MELODY VOICE” appears in the display
for a few seconds, and the selected Voice
replaces the Song’s original melody Voice.
• You can change the melody Voice even when the Song
playback is stopped.
• Selecting another Song will cancel the changed Melody
Voice.
• You cannot change the melody Voice of a User Song.
EZ-300 Owner’s Manual
33
Page 34

Playing Songs
Reference
AB
Repeat playback of this section
Appears when the
[A-B REPEAT] button is
pressed again in step 3.
NOTE
NOTE
NOTE
A-B Repeat
You can play back only a specific section of a Song
repeatedly by setting the A point (start point) and B
point (end point) in one-measure increments.
Start playback of the Song (page 32).
1
When playback reaches to the point you
2
want to specify as the start point, press
the [A-B REPEAT] button to set the A
point.
When playback reaches to the point you
3
want to specify as the end point, press
the [A-B REPEAT] button again to set the
B point.
The specified A-B section of the Song will now
play repeatedly.
• You can also set the A-B Repeat function when the Song is
stopped. Simply use the [REW] and [FF] buttons to select
the desired measures, pressing the [A-B REPEAT] button
for each point, then start playback.
• If you want to set the start point “A” at the top of the Song,
press the [A-B REPEAT] button before starting playback.
Turning Each Part On/Off
As indicated above the panel buttons (shown below),
Songs other than Song numbers 163–202 consist of
two parts; L and R, which can be turned on or off
individually by pressing the corresponding button, L
or R.
002
Happy
010
When a User Song (number 203-207; page
51) is selected
The L and R indicators light when the tracks contain
data, and are unlit when a track is muted or contains
no data.
When Songs other than a User Song is
selected
The L and R indicators always light regardless of
whether a track contains data or not.
By turning the left- and right-hand parts on or off during playback, you can listen to the Part (that is turned
on), or practice the other part (that is turned off) on
the keyboard.
• Selecting another Song will cancel the on/off status of the
Part s.
To cancel repeat playback, press the
4
[A-B REPEAT] button.
To stop playback, press the [START/STOP] button.
• The A-B Repeat function will be canceled when you select
another Song.
EZ-300 Owner’s Manual
34
Transferring Songs from a Computer to this Instrument
By using a USB cable to connect the [USB TO
HOST] terminal of this instrument to a computer, you
can transfer song files from the computer.
For details, refer to the “Connecting to a Computer”
on page 57.
Page 35

Reference
Using the Song Lesson Feature
Keys to Success (Page 36)
Select the
Song you want
to learn.
Practice step 1.
Practice
Steps 2, 3, 4...
and so on.
Practice the
last Step.
You’re
done!
Passe d
★★★
Passe d
★
Passe d
★★
Phrase Repeat (Page 38)
Phrase mark
Repeat playback of this section
Listening, Timing and Waiting (Page 39)
Select the Song you
want to learn.
Select the part you
want to work on (right
hand, left hand, both
hands).
Select lesson
1, 2, or 3.
Start the
lesson!
Use these convenient features to practice the preset Songs and improve your playing
skills. The Lessons are arranged for optimum, enjoyable learning, so select the one
suitable for you and take your keyboard skills higher, step by step.
You can refer to the music score in the Song Book (free downloadable scores). To obtain the Song Book,
access the Yamaha website and download it from the product web page.
https://www.yamaha.com
You can select just the key phrases of the Song—the ones you like most or need to work on—and practice them
one by one. This lesson is ideal for beginning players.
Each Song consists of several Steps. Each time you play all the way through the current Step, your performance
will be evaluated. A score of “60” or more indicates that you passed this Step and you should try the next Step,
which begins automatically.
The passing status
retry the Step later.
★ is saved, but you can go on to next Step even when you didn’t pass the Step, or you can
You can practice two or more phrases at once repeatedly by specifying them, as desired. This is ideal as a finishing practice before
you try a last (finishing) Step to pass in the Keys to Success mode,
or when you just want to practice the difficult phrase(s) repeatedly.
You can practice the preset Songs in three steps, independently for the right or left hand, or both hands
together. This is ideal when you want to practice all the way through the Song with the selected part.
Lesson 1 (Listening) ....... Listen to the playback part you will play. Remember it as best as you can.
Lesson 2 (Timing) ........... Learn to play the notes with the correct timing. Even if you play wrong notes,
the correct notes will sound.
Lesson 3 (Waiting) .......... Learn to play the correct notes. The Song pauses until you play the right note.
You can combine the Keys to Success lesson (page 36) and Phrase Repeat lesson (page 38) with the Listening,
Timing or Waiting lesson (page 40). If you feel it difficult to play the specific phrase in the Keys to Success lesson, use Listening, Timing or Waiting lesson to listen to the phrase, to practice only the timing to play, or to let
the phrase pause until you play the correct notes.
EZ-300 Owner’s Manual
35
Page 36

Using the Song Lesson Feature
Reference
NOTE
NOTE
Fur Elis
075
Step01
Appears when Keys
to Success is on
Lesson part
: Right-hand lesson
: Left-hand lesson
: Both-hands lesson
Current Step number
001
Step01
NOTE
In addition, various learning functions are provided for your enjoyable playing experience as follows:
Touch Tutor (page 41)
Chord Study (page 42)
Chord Progressions (page 43)
Press the [SONG] button, then select a
Lighting Keyboard (Light Guide Function)
When using the Song Lesson function, keys that you
should press next will light in succession. The lighting keyboard can help you play the keyboard easily,
even if you have limited music reading skills.
2
Song for your lesson.
Here, select Song “Für Elise (Basic)” from the
“LEARN TO PLAY” category, then open the corresponding page of the Song Book.
When you do not want the keyboard to light:
Hold down the [FUNCTION] button for longer than a
second to call up “Light” (Function 037; page 62) and
press the [-/NO] button to turn the Light Guide function off.
In addition to the Song Lesson, the keys you press or
those specified by Song data light.
Compatible Song data includes not only the preset
Songs but also Songs transferred from the computer
to the instrument or played on the computer.
• The keys light only when playing the MIDI Songs. They do not
light when playing the Audio Songs.
• When playing the MIDI Song data on a computer, you can
determine the channel which lights the keyboard. For details,
refer to the “Light Part 1 Setting” (Function 038) or “Light Part
2 Setting” (Function 039) on page 62.
Keys to Success
In this lesson, you can practice individual phrases in
the Song (with each Step) to effectively master the
entire Song.
Prepare the Song Book.
1
Download the Song Book from the Yamaha website (page 8), or you can refer to the scores of
some Songs at the end of this manual.
The amount of Steps and lesson parts (which are
pre-programmed) will differ depending on the
Song. For details, refer to the Song Book.
EZ-300 Owner’s Manual
36
• All preset Songs 002 to 202 other than 001 can be used
with this mode, especially the “LEARN TO PLAY” category Songs.
Press the [KEYS TO SUCCESS] button to
3
engage this lesson.
The keyboard icon, “Step01” and lesson part (“R”
or “L” or “LR”) appears on the display, indicating
that you are to start this lesson from scratch. If
you have already passed several Steps, the next
Step number appears on the display.
Press the [START/STOP] button to start
4
Lesson.
After the lead-in, playback of the current Step
starts.
• For your practice enjoyment, a special arrangement is
applied to each Song. This is why playback tempo may
be slower than original.
Practice the phrase in the current Step.
5
Referring to the notation in the Song Book, play
the lighting keyboard.
Page 37

Reference
Using the Song Lesson Feature
Excellen
068
Displayed when you’ve
passed the Step.
NOTE
NOTE
001
Step01
★ : Passed
No indication: Not yet passed
★✩✩ : There are one or more Steps not yet
passed in addition to the last Step
★✩★ : Only last Step passed
★★✩ : All Steps passed other than last Step
★★★ : All Steps passed
NOTE
Confirm the evaluation in the current
6
Step.
When the current Step reaches the end, your performance will be evaluated and your score (from
0–100) is shown in the display.
A score between “0”–“59” indicates that you did
not pass this Step and you should try the same
Step again, which begins automatically. A score
of “60”–“100” indicates that you passed this Step
and you should try the next Step, which begins
automatically.
• If the specified part is both hands, you cannot pass the
Step until you play both hands, even if you play one of the
hands well. Only a message such as “Left Part is correct!” appears in the display.
Execute Step 02, 03, 04, and so on.
7
In the last Step of each Song, you will practice all
the way through the Song. When you pass all
Steps, the Keys to Success mode will automatically be turned off and playback stops.
• Even during lesson, you can select another Step by using
the [+/YES]/[-/NO] buttons.
Confirming the Passing Status
You can confirm the passing status of each Song
simply by selecting a Song and each Step.
When Step is selected
When Song is selected
075
Fur Elis
001
Clearing the Passing Status
You can clear existing passing status entries for the
entire Song or a specific Step of the Song.
To stop this Lesson, press the [KEYS TO
8
SUCCESS] button.
To clear the passing status entries of all Steps:
Select the desired Song then hold down the [KEYS
TO SUCCESS] button for longer than three seconds,
with the Keys to Success mode disabled. A “Cleared”
message will appear on the display.
To clear the passing status entry for a specific
Step:
Select the desired Song, enable Keys to Success,
select the desired Step, then hold down the [KEYS
TO SUCCESS] button for longer than three seconds.
A “Cleared” message will appear on the display.
• This operation cannot be executed during playback.
EZ-300 Owner’s Manual
37
Page 38

Using the Song Lesson Feature
Reference
NOTE
Phrase mark
Repeat playback of this
section
REPEAT
P03
Appears when the Phrase
Repeat function is on
Phrase number
NOTE
Phrase Repeat
You can practice a difficult phrase repeatedly by
selecting a specific number of the Phrase Marks preprogrammed in the Preset Songs (excepting the
Song numbers 001 and 141–202). You can confirm
the Phrase Mark location in the Song Book (page 8).
• Phrase Mark is a pre-programmed marker in certain Song
data, which indicates a specific location in the Song.
• Depending on the selected Song, some phrases include only
one note.
Practicing only a single Phrase
During Song playback, press the [PHRASE REPEAT]
button at the phrase you want to practice. The corresponding Phrase number will appear in the display
and, after a lead-in, repeat playback will start. Turn
off the L or R part (page 34), then practice the
phrase which is turned off repeatedly until you are
satisfied.
Practicing two or more Phrases
By setting Phrase A (as the start point) and Phrase B
(as the end point), you can practice two or more
Phrases repeatedly. During Phrase Repeat playback,
press the [A-B REPEAT] button to assign the current
Phrase to Phrase A. When playback reaches to the
desired Phrase, press the [A-B REPEAT] button
again to assign Phrase B. “A-B Rep” appears on the
display, and Repeat playback between Phrases A
and B starts. To cancel this setting, press the [A-B
REPEAT] button again.
• You can set Phrases A and B also when playback is stopped
by selecting the Phrase number via the [+/YES] and [-/NO]
buttons.
• Specifying only Point A results in repeat playback between
Point A and the end of the Song.
Even during repeat playback, you can select any
other phrase number via the [+/YES] or [-/NO] button, and you can return to normal playback by pressing the [PHRASE REPEAT] button again.
EZ-300 Owner’s Manual
38
Page 39

Reference
Using the Song Lesson Feature
NOTE
NOTE
NOTE
RightLeft
BothHand
Left-hand
lesson
Right-hand
lesson
Both-hands
lesson
NOTE
NOTE
~~~~~~~~
~~~~~~
~~~~
~~
Excellent!
Very Good!
Good
OK
Listening, Timing and Waiting
Lesson 1—Listening
In this Lesson, you need not play the keyboard. The
model melody/chords of the part you selected will
sound. Listen to it carefully and remember it well.
When the Light Guide (Function 037; page 62) is on,
the keys which are sounding will light.
Lesson 2—Timing
In this Lesson, simply concentrate on playing the
notes with the correct timing. Play the keyboard at
the time the keys light. Even if you play wrong notes,
the correct notes will sound.
Lesson 3—Waiting
In this Lesson, try playing the lit notes on the lighting
keyboard. These correct notes are also shown on the
display. The Song pauses until you play the right
note, and playback tempo will change to match the
speed at which you are playing at.
• If you want to keep a steady playback tempo maintained during Lesson 3: Waiting, set the Your Tempo parameter to OFF
via the Function number 035 (page 62).
• Drum sounds are not played in the Waiting Lesson.
Press the [SONG] button then select a
1
Song for your lesson.
• The Song Lesson can be applied also to the Songs transferred from a computer (page 57), but cannot be applied
to the User Songs.
• If “No LPart” appears on the display by pressing the [L]
button, the current Song does not contain a left-hand
part.
Press the [1 LISTENING 2 TIMING
3
3 WAITING] button until the desired lesson is shown on the display and start it.
Pressing this button repeatedly will change the
Lesson number from 1: LISTENING 2: TIMING
3: WAITING off 1…. .
• During playback, you can change the Lesson mode by
pressing this button, and you can stop the Lesson at any
time by pressing the [START/STOP] button.
• When you play the Lesson Song, the Main Voice automatically changes to “000” (One Touch Setting; page 24). The
Dual or Split Voice cannot be used during the Lesson.
• When the melody Voice of the Song is changed, the key
position shown in the display may be shifted (in octave
units), depending on the selected Voice.
When Lesson playback reaches to the
4
end, check your evaluation Grade on the
display.
“2 Timing” and “3 Waiting” will evaluate your performance in four levels.
Press either or both the [R] and [L] but-
2
tons to select the part you want to practice.
• Songs 163 to 202 are not compatible with the Listening,
Timing and Waiting Lessons.
After the evaluation display has appeared, the
lesson will start again from the beginning.
Press the [START/STOP] button to stop
5
the Lesson mode.
EZ-300 Owner’s Manual
39
Page 40

Using the Song Lesson Feature
Reference
Guide
036
NOTE
NOTE
Turning the Guide Note off
When the “Guide” function is on, you can hear the
Guide note while you are practicing with Lesson 3
(Waiting), and this is ideal when you are not sure of
which keys to play next. The Guide note will sound
slightly behind the timing to indicate the correct note,
when you fail to play the correct note with the correct
timing. When you play the correct note with the correct timing, the Guide note will not sound and the
playback continues.
If you don’t want to hear the Guide note, turn the
function to off in the following steps.
Press the [FUNCTION] button several
1
times until “Guide” (Function 036; page
62) appears.
Use the [+/YES] and [-/NO] buttons to
2
select the value “oFF.”
The default value of this function is “on” (Guide
note will sound.)
• The Guide setting cannot be changed during the Lesson
mode.
The Guide function can be used for all preset Songs,
except Songs in categories “FAVORITE WITH
STYLE” (left-hand part) and “CHORD PROGRESSION,” and No.51.
Keys to Success with Listening, Timing
or Waiting
You can combine the Keys to Success lesson (page
36) with the Listening, Timing or Waiting lesson
(page 39).
Enable the Keys to Success lesson.
1
Refer to Steps 1–3 on page 36.
Select the desired Step via the [+/YES]/
2
[-/NO] buttons, then press the
[1 LISTENING 2 TIMING 3 WAITING] button
repeatedly to select the desired lesson.
The selected lesson playback starts under the
Keys to Success mode. Practice the phrase of
the current Step via the selected Lesson. As evaluation for each Step, just “Timing is correct!” or
“Your playing is correct!” appears, and the passing status is not available.
To return to only the Keys to Success
3
mode, press the [1 LISTENING 2 TIMING
3 WAITING] button repeatedly until
“StepXX” (XX: number) appears in the
display.
To exit from the Lesson mode, press the
4
[KEYS TO SUCCESS] button.
Phrase Repeat with Listening, Timing
or Waiting
With Phrase Repeat set to On, press the [1 LISTENING 2 TIMING 3 WAITING] button once, twice or
three times to start and use Lesson playback with
Phrase Repeat. Pressing the same button again several times to exit from the Lesson mode stops playback and allows use of just the Phrase Repeat
mode.
EZ-300 Owner’s Manual
40
• In this status, the evaluation function is not available.
Page 41

Reference
Learning How to Use “Touch” Control
NOTE
TTutor01
141
Strength level (Target value)
: Soft
: Medium
: Hard
The notes to play are also indicated in the
graphic keyboard in the display.
: Soft
: Medium
: Hard
Target value: medium
Your touch: hard
Target value: medium
Your touch: medium
Target value: medium
Your touch: soft
NOTE
(Touch Tutor)
This learning feature lets you practice how hard or soft to play the keys for musical
expression, referred to as “Touch” in this chapter, by playing back Song numbers 141 to
150 (in the “Touch Tutor” category). Playing back Songs from this category shows indications for the appropriate playing strength. Try playing according to the level displayed in the LCD as the Song progresses.
• Be sure to set the Touch Response parameter (page 26) to a
value other than “Fixed.” When set to “Fixed,” t he Tou c h Tut o r
function is inactive.
Select a Song from Song numbers 141 to
1
150 in the “Touch Tutor” category by
executing Step 1 in “Selecting and Playing Back a Song” on page 32.
To play with the same Voice that is used in a performance data, select Voice number “000” (OTS;
page 24). After this operation, please make sure
to go back to the Touch Tutor display by pressing
the [SONG] button.
Press the [START/STOP] button to play
2
back the selected Song.
When the following display appears, play
3
the lighting keyboard at the strength level
displayed in the LCD.
Play while the strength level is shown.
Strength targets are indicated by “ ”.
Your actual playing “Touch” is indicated by “ .”
Try playing so that the following indications
appear (as target values) while you play.
141
TTutor01
003
The positions of “ ” and “ ” are displayed with
a gap when your touch is softer or harder than
the target value.
Your touch is harder than the target value
(Target value: medium, your touch: hard)
Your touch is same as the target value
(Target value: medium, your touch: medium)
Your touch is softer than the target value
(Target value: medium, your touch: soft)
When your touch is accurate, the instrument evaluates the accuracy of the touch (velocity) and indicates the following evaluation results on the
display. If you continue to play the keys with your
“touch” to match the target value on the display,
your grade will gradually increase. If you continue
to play the keys inaccurately, your grade will gradually decrease.
Great! > VeryGood > Good > OK
To stop the playback, press the [START/
4
STOP] button.
To exit from the Touch Tutor mode, select a Song
from any other category, except “Touch Tutor.”
• This function cannot be used with Keys to Success.
EZ-300 Owner’s Manual
41
Page 42

Reference
Hearing and Experiencing the Sound of
001
ChdStd01
151
the Chords (Chord Study)
You can hear and experience the sound of the chords used in a typical performance by
playing back Song numbers 151 to 162 (in the “Chord Study” category). Song numbers
151 to 157 are very simple Songs consisting of a single chord (C, Dm, Em, F, G, Am, Bm;
respectively) played in various positions, letting you listen to and master the chords
one by one. On the other hand, Song numbers 158 to 162 consist of several chords
strung together in a pattern, for experiencing and understanding basic chord progressions. Hear and experience the sound of simple chords and progressions by playing
back these Songs, and play the lighting keyboard.
Hear and experience a sound of a single chord
Select a Song from Song numbers 151 to
1
157 in the “CHORD STUDY” category by
executing Step 1 in “Selecting and Playing Back a Song” on page 32.
Press the [START/STOP] button to play
2
back the selected Song.
Play the lighting keyboard.
3
If you feel it difficult to play the notes, use the
Waiting function (page 39) to have the Song
automatically pause until you play the correct
notes. Press the [1 LISTENING 2 TIMING 3
WAITING] button repeatedly until “WAITING”
appears in the display. To exit from the Waiting
function, press the same button again.
To stop the playback, press the [START/
4
STOP] button.
Hear and experience basic chord progressions
Select a Song from Song numbers 158 to
1
162 by pressing the [+/YES]/[-/NO] buttons.
Press the [START/STOP] button to play
2
back the selected Song.
Play the lighting keyboard.
3
Listen to the basic chord progression, and play
along with the Song repeatedly until you can
smoothly perform and play along with the chord
changes.
If you feel it difficult to play the notes, use the
Waiting function (page 39) to have the Song
automatically pause until you play the correct
notes. Press the [1 LISTENING 2 TIMING 3
WAITING] button repeatedly until “WAITING”
appears in the display. To exit from the Waiting
function, press the same button again.
To stop the playback, press the [START/
4
STOP] button.
42
EZ-300 Owner’s Manual
Page 43

Reference
Playing Chords along with Chord Progressions of a Song
C 1Note
CP9
The tonic pitch of the selected Song: C
The number of the keys
to press : 1
Appears when Chord
Progression is on.
NOTE
C 2Notes
CP9
NOTE
001
C 1Note
CP9
NOTE
C
D
bEbF#AbBb
DEFGAB
Root range
NOTE
NOTE
Song numbers 163 to 202 in the “Chord Progression” category are constructed from typical chord progressions. You can listen to and get a feel for the chord progressions by
playing back the Song and playing the lighting keyboard. The number of keys that are
indicated for you to play progress in sequence—from a single root note, to two notes,
then three and four—getting you to gradually and naturally memorize the chords. Also,
you can change the key of the Song, allowing you to practice the progressions in all keys
for full mastery of the chords.
1
2
3
4
5
6
Select a Song from Song numbers 163 to
202 in the “Chord Progression” category
by executing Step 1 in “Selecting and
Playing Back a Song” on page 32.
Press the [PHRASE REPEAT] button.
After “CHORD PROGRESSION” scrolls across the
display, the tonic pitch of the selected Song and
the number of the keys to be pressed are shown.
• The initial key setting is C major or A minor.
Press the [+/YES]/[-/NO] buttons to select
the number of the keys to be played.
Each time the [+/YES] button is pressed, the
number of the keys to press is increased from just
one root note (1Note) to two notes (2Notes),
three notes (3Notes) and four notes (All).
• The number of the keys to press can a lso be set by using
the number buttons [1]–[4].
Press the [START/STOP] button to play
back the selected Song.
Play the lighting keyboard.
• When you play the keyboard within the range of C5–B5,
the notes will not sound.
Press the [PHRASE REPEAT] button again
to turn the Chord Progression function off.
To change the key of a Song:
When Chord Progression is on, press one of the
keys in the top octave (C5–B5; indicated to the right
of “ ” on the panel, just above the keys) to
change the tonic pitch of the Song.
For example, if you press the key D5 in the Song
of C major, the key changes to D major.
• The key of a Song cannot be changed during playback.
The number of the keys to be played
Only one root note (1Note)
Press only the root note of the chord.
Two notes (2Notes)
Pres s t he 3
note, and understand the difference between major
chords and minor chords.
Three notes (3Notes)
Pres s t he 5
note and the 3
Four notes (All)
Press all the notes that make up the chord. Very
often, chords are played with just three notes; however, another interval (such as a 7th) is sometimes
added. Keep in mind that depending on the chord,
there may be no 4
rd
interval of a chord along with the root
th
interval of a chord along with the root
rd
.
th
note.
Play the chords in combination with “Waiting” of the Lesson function
You can practice the playing the chords in combination with “Waiting” (page 39) of the Lesson function
by simply pressing the [1 LISTENING 2 TIMING
3 WAITING] button once.
• Even if you play notes in octaves outside of the notes of the lighting keyboard (excluding the range of C5
change the key of a Song), as well as different inversions of the
chords, the playback will progress.
–
B5, which are used to
EZ-300 Owner’s Manual
43
Page 44

Reference
Playing with Rhythm and Accompaniment (Styles)
FingType
017
SmartChd
1
017
S.ChdKey
SP0
018
This instrument includes an Auto Accompaniment feature that automatically plays
appropriate “Styles” (rhythm + bass + chord accompaniment), controlled simply by
playing only root note or all notes of a chord with your left hand.
You can select how you want to play the chords from two ways: “Smart Chord,” which
lets you play chords by playing a key with only one finger, and “Multi Finger,” which lets
you play them normally, with all the constituent notes.
Setting the Fingering Type
How you play the chords when playing Styles is
called “Fingering Type,” which can be specified via
Function number 017 (page 61). With this instrument,
you can choose from two Fingering Types.
Smart Chord (Default setting)
You can play the Style by playing only the root
note of a chord.
Multi Finger
This is a way to play the Style by playing all notes
of a chord. However, major, minor, seventh, and
minor sevenths can also be easily played by
pressing one to three keys.
For information about chords, refer to “Chord Types
for Style Playback” (page 47) or use the Chord Dictionary function (page 49).
Press the [FUNCTION] button several
1
times until “FingType” (Function 017;
page 61) appears.
“FingType” is shown in the display for a few seconds, followed by the current Fingering Type.
Setting the Smart Chord Key
If the Fingering Type is set to “SmartChd,” you need to
set the keys of the Songs you want to play in advance.
The specified key is called the Smart Chord Key.
Press the [FUNCTION] button until
1
“S.ChdKey” (Function 018; page 61)
appears.
The current Smart Chord Key appears.
Press the [+/YES] and [-/NO] buttons to
2
select the Smart Chord Key that
matches the score.
For example, when you want to play the music
score below, you need to set the Smart Chord
Key to “FL2” (2 flats) (page 48).
Press the [STYLE] button to exit from the
3
Smart Chord Key settings.
Use the number buttons [0]-[9] or
2
[+/YES] and [-/NO] buttons to select
“SmartChd” or “Multi.”
Press the [STYLE] button to exit from the
3
Fingering Type settings.
EZ-300 Owner’s Manual
44
Page 45

Reference
Playing with Rhythm and Accompaniment (Styles)
BritRock
001
Style Name
Style Number
Appears when
Style mode is
active.
16Beat
022
This icon appears when automatic
accompaniment is on.
Split Point ... default setting: 054 (F#2)
Auto
Accompaniment
range
036
(C1)
048
(C2)
060
(C3)
072
(C4)
084
(C5)
096
(C6)
NOTE
Flashes when sync start is on.
Split Point
• Since the Pianist category Styles (197–205) have no
rhythm parts, no sound will be produced if you start
rhythm-only playback. When playing these Styles, make
sure to carry out Steps 2–4 on this page.
Playing Styles
Press the [STYLE] button, then use the
1
number buttons [0]–[9], [+/YES], [-/NO]
to select the desired Style.
The Style List is provided on the front panel, or in
the Style List (page 85).
Press the [ACMP ON/OFF] button to turn
2
on the Auto Accompaniment.
With this operation, the area of the keyboard to
the left of the Split Point (054: F#2) becomes the
“Auto Accompaniment range” and is used only for
specifying the chords.
022
16Beat
Play a key in the Auto Accompaniment
4
range to start playback.
If the Fingering Type is set to “SmartChd,” play
only the root note of a chord with your left hand. If
the Fingering Type is “Multi,” play all notes of a
chord referring to page 47. Play a melody with the
right hand and chords with the left hand.
Press the [START/STOP] button to stop
5
playback.
You can add intro, ending and rhythm variations
to Style playback by using “Sections.” For details,
refer to page 46.
To play back the rhythm part only
If you press the [START/STOP] button (without pressing
the [ACMP ON/OFF] button in step 2), only the rhythm
part can be played back, and you can play a melody
performance using the entire keyboard range.
NOTE
You can change the Split Point via Function number 003 (page 60) by holding down the [ACMP
ON/OFF] button for longer than a second.
• The strength meter (page 17) does not respond to playing in the Auto Accompaniment range.
Press the [SYNC START] button to turn
3
Synchro Start on.
This puts the Style playback in “standby” and
Style starts playing back when you play the keyboard.
Changing the Tempo
Refer to “Changing the Tempo” on page 32.
Adjusting the Style Volume
To adjust the volume balance between Style playback and keyboard, you can adjust the Style Volume.
This can be set via Function number 016 (page 61).
EZ-300 Owner’s Manual
45
Page 46

Playing with Rhythm and Accompaniment (Styles)
Reference
MAIN A
Current Section
INTRO≥A
Split Point ... default setting: 054 (F#2)
Auto Ac com pa-
niment range
Style Variations
Each Style consists of "Sections" that allow you to
vary the arrangement of the accompaniment to
match the song you are playing.
INTRO
This is used for the beginning of the Song. When the
Intro finishes, Style playback shifts to the Main section. The length of the Intro (in measures) differs
depending on the selected Style.
MAIN
This is used for playing the main part of the Song.
Playback of the Main section repeats indefinitely until
another Section’s button is pressed. There are two
variations (A and B), and the Style playback sound
changes harmonically in response on the chords you
play with your left hand.
AUTO FILL
This is automatically added before changing to Main
A or B.
ENDING
This is used for the ending of the Song. When the
Ending finishes, the Style playback stops automatically. The length of the Ending (in measures) differs
depending on the selected Style.
1–3
Same as Steps 1–3 in page 45.
Press the [MAIN/AUTO FILL] button to
4
select Main A or Main B.
Play a chord with your left hand to start
6
playback of the Intro.
For example, play a C major chord.
For information on how to enter chords, refer to
page 47.
After the Intro finishes, play the key-
7
board according to the progression of
the Song you are playing.
Play chords with your left hand while playing melodies with your right hand, and press the [MAIN/
AUTO FILL] button as necessary. The Section will
change to Fill-in then Main A or B.
FILL A≥B
Press the [INTRO/ENDING/rit.] button.
8
ENDING
The Section switches to the Ending. When the
Ending is finished, Style playback stops automatically. You can have the Ending gradually slow
down (ritardando) by pressing the [INTRO/ENDING/rit.] button again while the Ending is playing
back.
5
46
Press the [INTRO/ENDING/rit.] button.
Now, you’re ready to start Style playback from the
Intro section.
EZ-300 Owner’s Manual
Page 47

Reference
Playing with Rhythm and Accompaniment (Styles)
C
Cm
7
CM
7
D
Dm
7
DM
7
E
7
E
Em
7
EM
7
F
Fm
7
FM
7
G
Gm
7
GM
7
A
Am
Am
7
AM
7
B
Bm7B
C
Cm
C7Cm
7
Chord Types for Style Playback
For users who are new to chords, this chart conveniently shows how to play common chords in the Auto Accompaniment range of the keyboard. You can also use the Chord Dictionary function (page 49) to find out how to
play the chords. Since there are many useful chords and many different ways to use them musically, refer to
commercially available chord books for further details.
When the Fingering Type is “Multi,” play the notes that make up the chord in the Auto Accompaniment range.
When the Fingering Type is “SmartChd,” play the root note “” in the Auto Accompaniment range.
indicates the root note.
Major Minor Seventh Minor Seventh Major Seventh
Cm
C
7
Dm
D
7
Em
Fm
Gm
• Inversions can be used as well as in “root” position—with the following exceptions:
m7, m7
b
• Inversions of the 7sus4 chords are not recognized if the notes are omitted.
• When playing a chord which cannot be recognized by this instrument, nothing is shown on the display. In such a case, only a specific
5, m7(11), 6, m6, sus4, aug, dim7, 7b5, 6(9), sus2
part, such as the rhythm, will be played.
When “Multi” is selected, major, minor, seventh, and minor sevenths can also be easily played by pressing one to three keys.
Easy Chords for root “C”
F
7
G
7
A
7
Bm
7
BM
7
To play a major chord
Press the root note ()
of the chord.
To play a minor chord
Press the root note
together with the nearest
black key to the left of it.
To play a seventh chord
Press the root note
together with the nearest
white key to the left of it.
To play a minor seventh chord
Press the root note together with the
nearest white and black keys to the
left of it (three keys altogether).
EZ-300 Owner’s Manual
47
Page 48

Playing with Rhythm and Accompaniment (Styles)
Reference
NOTE
Chords Heard When Smart Chord is Selected
When the Fingering Type is “SmartChd,” if you set Smart Chord Key based on the composition of the score
(page 44), play the root note in the Auto Accompaniment range. This lets you hear the respective chords below.
Key
Signature on
the music
score
No key signature
Smart
Chord Key
(Display)
FL7 C dim
FL6 C dim
FL5
FL4 C 1+5
FL3 C m
FL2 C m
FL1 C 7
SP0
(Default)
SP1 C
SP2 C
SP3
SP4 C
SP5 C dim
SP6 C dim
SP7
Db Eb F# G# Bb
CDEFG AB
D
dim7
Eb
1+5
Db m
Db 7DEb mE
C m7
Db D dim Eb m
b5
dim7
Db D dim Eb 7EF mF#
D m7
C
C
dim7
Db
Db
dim7
Db D m Eb
Db
dim
Db
dim
Db m7
b5
Db
1+5
Db mD
Db m
Eb E dim F m
b5
Eb E dim F 7 F# G m G#
D 1+5
E m7
Eb
D m
D 7
D
D
D
dim7
E 1+5 F
dim7
Eb E m F
Eb
E m
dim
Eb
E 7 F
dim
Eb m7
b5
Eb
1+5
Db 7DEb mE
C m7
Db D dim Eb m
b5
dim7
• The “1+5” chord indication on the instrument’s display is the same as that of a major chord.
Root Note
A
dim7
A m7
b5
A 1+5
A m
A 7
A
A
A
dim7
Bb m7
dim7
Bb m7
EF dim
E
b5
EF dim
EF dim
E
F# 7GG# mA
F m7
F# G dim G# m
b5
F 1+5
F# G dim G# 7ABb mB
G m7
G# A dim Bb m
b5
F
F
dim7
F#
dim7
F#
dim
F#
dim
F# m7
b5
F#
1+5
F# mG
F# m
G# A dim Bb 7B
G 1+5
G#
G m
dim7
G# A m Bb
G 7
G#
G
dim
G#
G
dim
G# m7
b5
G
G#
dim7
1+5
F# 7GG# mA
F m7
F# G dim G# m
b5
F 1+5 F# G dim G# 7ABb mB
b5
Bb
1+5
dim7
Bb B dim
Bb B dim
B m7
Bb
B 1+5
Bb B m
Bb
B m
dim
Bb
B 7
dim
b5
Bb
1+5
B
B
B
b5
B
B
EZ-300 Owner’s Manual
48
Page 49

Reference
Looking Up Chords Using the
Dict.
Hold for longer
than a second.
Chord Type range Root range Keyboa rd
playing range
001
Dict.
Chord name (root and type)
Individual notes of chord
(keyboard)
NOTE
Chord Dictionary
The Dictionary function is useful when you know the
name of a certain chord and want to quickly learn
how to play it.
Press and hold the [1 LISTENING
1
2 TIMING 3 WAITING] button for longer
than a second to call up “Dict.”
“Dict.” will appear in the display.
This operation will divide the entire keyboard into
the three ranges as illustrated below.
• The range to the right of “ ”:
• The range between “ ” and
• The range to the left of “ ”:
As an example, learn how to play a GM7
2
(G major seventh) chord.
2-1.
Lets you specify the Chord Root, but produces
no sound.
“”:
Lets you specify the Chord Type, but produces
no sound.
Lets you play and confirm the Chord specified
in the above two ranges.
Press the “G” key in the section to the right
of “ ” so that the “G” is shown as the
root note.
Playing with Rhythm and Accompaniment (Styles)
Press the key labeled “M7” in the section
2-2.
between “ ” and “ .”
The notes you should play for the specified
chord are lit. They are also shown in the
keyboard display.
Dict.
001
To call up possible inversions of the chord, press
the [+/YES]/[-/NO] buttons.
• About major chords: Simple major chords are usually
indicated only by the root note. For example, “C” refers to
C major. However, when specifying major chords here,
make sure to select “M” (major) after pressing the root
note.
• These chords are not shown in the Chord Dictionary function: 6(9), M7(9), M7(
mM7(9), mM7
Following the notation and keyboard dia-
3
gram in the display, try playing a chord
in the range to the left of “ .”
When you’ve played the chord properly, a bell
sound signals your success and the chord name
in the display flashes.
To exit from the Chord Dictionary mode,
4
press one of these buttons; [VOICE],
[SONG] or [STYLE].
b
5, 7b
#
11) , b
5, M7b
5, sus2
5, M7aug, m7(11),
EZ-300 Owner’s Manual
49
Page 50

Playing with Rhythm and Accompaniment (Styles)
Reference
001
Jude Hey
StyleReg
060
NOTICE
Using the Music Database
If you have difficulty finding and selecting the desired
Style and Voice, use this feature. From the Music
Database, just selecting the favorite music genre
calls up the ideal settings.
Press the [MUSIC DATABASE] button.
1
Both the Auto Accompaniment and Synchro Start
are automatically turned on.
Use the number buttons [0]–[9], [+/YES],
2
[-/NO] to select the desired Music Database.
This operation calls up the panel settings such as
Voice and Style that are registered to the
selected Music Database. The category name of
Music Database List is provided on the front
panel, or in the Music Database List (page 87).
Play the keyboard as described in Steps
3
4–5 on page 45.
Registering a Style File
Style data created on another instrument or computer can be registered (loaded) to Style numbers
206–215, and you can play them just the same as
the internal preset Styles.
If some Style files have already been
3
transferred to the instrument, select the
desired Style by using the [+/YES] or
[-/NO] button.
Press the [0] button.
4
As the Load destination, “***Load To?” (***:
206–215) appears on the display. If desired,
select a different number using the [+/YES] or
[-/NO] button.
Press the [0] button.
5
A confirmation message will appear. To cancel
the operation, press the [-/NO] button.
Press the [+/YES] button to actually load
6
the file.
After a while, a message indicating completion of
the operation appears.
• The load operation cannot be cancelled during execution. Never turn off the power during the operation.
Doing so may result in data loss.
Press the [STYLE] button, use the [+/YES]
7
or [-/NO] button to select a Style from
206–215, and then try playing it back.
For instructions on playing the Style, refer to
page 45.
1
2
50
Transfer the Style file (***.STY) from a
computer to this instrument by connecting this instrument and the computer.
For instructions, refer to “Computer-related Operations” on the website (page 8).
Press the [FUNCTION] button several
times until “StyleReg” (Function 060;
page 63) appears.
After about two seconds, a registerable Style file
name will appear in the display.
EZ-300 Owner’s Manual
Page 51

Reference
Recording Your Performance
001
User 1
EC
User Song Number
Flashes
NOTICE
NOTE
36 48
7260
Split Point ... default setting: 054 (F#2)
Auto Accompani-
ment range
NOTICE
You can record up to 5 of your performances as User Songs (User 1–5: Song numbers
203–207). The recorded User Songs can be played back on the instrument. The
recorded User Song can be played back in the same way as the preset Songs.
Track Structure of a Song
You can record your performance to the following two
tracks of a User Song individually or simultaneously.
Track 1:
Your melody performance is recorded to this track.
Track 2:
Your melody performance, or Style playback (Chord
changes and Section changes), is recorded to this
track.
Recording Data Capacity:
A total of approximately 10,000 notes can be
recorded to the five User Songs.
Quick Recording
The operation is convenient for recording a new
Song without having to specify a track.
Make the desired settings such as Voice
1
and Style settings.
If you want to record only the melody performance, turn ACMP off (page 45). If you want to
record Style playback or Rhythm playback as well
as melody performance, turn ACMP on (page 45).
Press the [REC] button to enter the
2
Record Ready mode.
This operation selects the lowest-numbered unrecorded User Song (“User 1”–“User 5”) as the
recording target, if a User Song has not been specified in advance or if Record Ready mode has been
entered from the Style mode. If you want to select
another Song, use the [+/YES] and [-/NO] buttons.
To exit from the Record Ready mode, press the
[REC] button again to stop flashing on the display.
• If all User Songs contain recorded data, “User 1 (Song
Number 203)” will automatically be selected. In this
case, since you will record over and erase any previous data in “User 1,” we recommend that you save
your important data to a computer (see page 59).
• ACMP cannot be turned on or off in this status while you
can select another Style in this status by using the
[STYLE] and Number bu ttons.
Play the keyboard to start recording.
3
If ACMP is turned on, you can independently
record just the rhythm sound of Style playback by
pressing the [START/STOP] button then changing the Section (page 46).
Press the [START/STOP] button to stop
4
recording.
When using a Style, you can stop recording also
by pressing the [INTRO/ENDING/rit.] button then
waiting until playback ends.
• After Recording stops, a “Writing!” message is shown
on the display for a while. Never attempt to turn the
power off while this is shown in the display. Doing so
can damage the internal memory and result in a loss
of data.
To play back the recorded Song, press
5
the [START/STOP] button.
Limitations while Recording
• You cannot record the Reverb Level, Metronome
click, or the Transpose and Tuning settings.
• The following settings and buttons are not available,
or if operated, the new settings cannot be recorded:
ACMP ON/OFF, Split Point, Reverb Type, Chorus
Type, Harmony/Arpeggio Type, [FUNCTION] button, [PORTABLE GRAND] button.
• When you play the keyboard while turning the DSP
on and record your performance, make sure to record
it to track 1.
EZ-300 Owner’s Manual
51
Page 52

Recording Your Performance
Reference
User Song
Flashing: Track is selected as a recording target.
Lit: Track contains data.
Unlit: Track contains no data or is muted.
ClrUser1
YES
Hold for longer
than a second.
Sure?
YES
Recording to a Specified Track
Make the desired settings, such as those
1
of Voice or Style.
If you want to record the melody performance,
turn ACMP off (page 45). If you want to record
Style playback, turn ACMP on (page 45).
While holding down the [REC] button,
2
press the desired Track button 1 or 2 to
engage the Record mode.
If you want to record Style playback, make sure to
select the Track 2. If you want to record melody
performance, select either Track 1 or Track 2 as
desired. The illustration below is the example
when selecting Track 2.
The User Song appears on the display.
EC
User 1
001
Clearing a User Song
Press the [SONG] button then select the
1
desired User Song by using the Number
buttons.
Press and hold the [REC] button for lon-
2
ger than a second.
A confirmation message appears.
To cancel the operation, press the [-/NO] button.
Press the [+/YES] button.
3
A confirmation message appears again.
To cancel the operation, press the [-/NO] button.
Press the [+/YES] button to clear the
4
Song.
A “Writing!” message appears while the Song is
being cleared.
You can record your performance while playing
back or muting the recorded track. To play back
or mute the track, press the [REC TRACK 1] or
[REC TRACK 2] button. Each time the corresponding button is pressed, playback/mute is
switched.
Press the [+/YES], [-/NO] buttons to
3
select the User Song you want to record.
Same as in Steps 3 to 5 (page 51) in
4
“Quick Recording.”
When playing back the recorded Song, pressing
[REC TRACK 1] or [REC TRACK 2] button allows
you to mute Track 1 or Track 2. Each time the button
is pressed, playback/mute is switched.
EZ-300 Owner’s Manual
52
Page 53

Reference
Memorizing Your Favorite Panel Settings
Appears after [REGIST MEMORY]
button is pressed.
NylnGtrH
01
Voice Name in MemoryRegistration Memory
Number
This instrument has a Registration Memory feature that lets you memorize your favorite
settings for easy recall whenever they’re needed. Up to nine complete setups can be
memorized and assigned to each number button 1–9. (Factory settings are recorded to
1-9 .)
Recalling Panel Settings from the Registration Memory
Press the [REGIST MEMORY] button.
1
“LoadNo.?” appears on the display.
LoadNo.?
Press one of the [1]–[9] buttons to call
2
up the panel settings you memorized.
The recalled Registration Memory number and
the Voice Name in the Memory appear on the
display.
Factory settings
Registration Memory
Number
R01 S.Art Lite Nylon Guitar Harmonics
R02 S.Art Lite Steel Guitar Harmonics
R03 S.Art Lite Distortion Guitar
R04 S.Art Lite Slap Bass
R05 S.Art Lite Strings
R06 S.Art Lite Gospel Choir
R07 S.Art Lite Tenor Sax
R08 S.Art Lite Brass Section
R09 S.Art Lite Flute
Parameters that are memorized to Registration
Memory
Style settings*
Style number, ACMP on/off, Style volume, Tempo,
Main A/B, Fingering Type, Smar t Chord Key
Voice settings
Main Voice settings: Voice number and all settings
of the related Functions
Dual Voice settings: Dual on/off and all settings of
the related Functions
Split Voice settings: Split on/off and all settings of
the related Functions
Effect settings:
Ty pe
, DSP on/off, DSP Type, Sustain on/off
Harmony/Arpeggio settings: Harmony/Arpeggio
on/off and all settings of the related Functions
Other settings:
the Function “DUO”, Pedal Function
* When a Song is selected, the Style settings cannot be
recorded or called up.
Voice Name in Memory
Reverb Type, Reverb level, Chorus
Tra n sp os e
, Split Point, All settings for
The Registration Memory number can be
changed by pressing one of the other [1]–[9] buttons. To exit from Registration Memory, press the
[REGIST MEMORY] button.
EZ-300 Owner’s Manual
53
Page 54

Memorizing Your Favorite Panel Settings
Reference
MemNo.?
Hold for
longer than
a second.
Flashes after the [REGIST MEMORY]
button is pressed and held for longer
than a second.
NOTICE
Hold for
longer than
a second.
Flashes after the [REGIST MEMORY]
button is pressed and held for longer
than a second.
Hold for longer
than a second.
Memorizing Panel Settings to the Registration Memory
Make the desired settings such as those
1
for Voice and Style.
Press and hold down the [REGIST MEM-
2
ORY] button for longer than a second.
“MemNo.?” appears on the display.
Press one of the [1]–[9] buttons to mem-
3
orize the current panel settings.
If you select a Registration Memory number that
already contains data, an “Overwr?” message
appears in the display. To overwrite, press the
[+/YES] button; to cancel, press [-/NO].
When memorizing is completed, “Mem OK” is
displayed.
• If you select a Registration Memory number that
already contains data, the previous data is deleted and
overwritten by the new data.
• To restore all Registration Memories to the factory settings, execute Backup Clear operation (page 59).
• Do not turn off the power while memorizing settings to
the Registration Memory, otherwise the data may be
damaged or lost.
EZ-300 Owner’s Manual
54
Deleting the Registration Memory
Hold down the [REGIST MEMORY] but-
1
ton for longer than a second.
“MemNo.?” is shown in the display.
MemNo.?
Hold down the [1]–[9] buttons corre-
2
sponding to the Registration Memory
number you want to delete for longer
than a second.
“ClrRegX?” (“X” represents the Registration
Memory number) is shown in the display.
Press the [+/YES] button to delete the
3
Registration Memory.
Press the [-/NO] button to cancel deleting the Registration
Memory. When deleted, the
Registration Memory number
on the display disappears.
Disabling Recall of Specific Items (Freeze)
Registration Memory lets you recall all the panel setups you made with a single button press. However,
depending on the situation when you perform, there
may be some settings you do not want to recall.
When you want to switch the Voice settings but still
maintain the Style settings, for example, you can
“freeze” only the Style settings and have those Style
settings remain, even when you select another Registration Memory number.
Select the items you want to freeze via Function
numbers 048, 049, and 050 (page 63).
Page 55

Reference
Selecting an EQ Setting for your Favorite Sound
MasterEQ
025
Speaker
1
025
Current Master
EQ type
Six different master equalizer (EQ) settings let you create the optimum sound when listening through different reproduction systems—the instrument’s internal speakers,
headphones, or an external speaker system.
Press the [FUNCTION] button several
1
times until the “MasterEQ” (Function
025; page 61) item appears on the display.
“MasterEQ” is shown in the display for a few seconds, and the current Master EQ type appears.
Use the [+/YES] or [-/NO] button to select
2
the desired Master EQ type.
Master EQ types
1 Speaker
2 Headphone
3 Boost Features more powerful sound.
4 Piano Optimum for piano solo performance.
5 Bright
6 Mild
Optimum for listening via the instrument’s built-in speakers.
Optimum for headphones, or for listening via external speakers.
Lowers the mid range for a brighter
sound.
Lowers the high range for a softer
sound.
EZ-300 Owner’s Manual
55
Page 56

Reference
Connecting to Other Devices
CAUTION
NOTICE
NOTE
Audio device
(Smartphone. etc.)
Stereo-mini
plug
NOTE
• Before connecting, turn off the power of both this instrument and the external audio device. Also, before turning the power on or
off, make sure to set all volume levels to minimum (0). Otherwise, damage to the devices, electrical shock, or even permanent
hearing loss may occur.
Playing an External Audio Device with the Built-in Speakers
You can output the sound of an audio device, such
as a smartphone, with the built-in speakers of this
instrument by connecting it via a cable. This lets you
play the keyboard along with playback of your music
player.
• To avoid damage to the external audio device and this
instrument, first turn on the power to the external device,
and then to the instrument. When turning off the power,
first turn off the power to the instrument, and then to the
external device.
• If you are using a computer or a smart device such as a
smartphone or tablet, you can also connect it to the [USB TO
HOST] terminal (see “Connecting to a Computer” on page
57).
Turn off the power for both the external
1
audio device and this instrument.
Connect the audio device to the instru-
2
ment’s [AUX IN] jack.
Use the cable (no resistance) which has the stereo-mini plug at one side for connecting to this
instrument and the plug matching the output jack
of the external audio device at the other side.
Play back the connected external audio
4
device.
The sound of the audio device is output through
the speakers of this instrument.
Adjust the volume balance between the
5
external audio device and this instrument.
Adjust the audio playback volume on the audio
device, then adjust the entire volume by rotating
the [MASTER VOLUME] control of the instrument.
• You can adjust the level of the input from the external
audio device by calling up “AuxInVol” via Function number 043 (page 62) and using the [0]–[9], [+/YES], [-/NO]
buttons. If you increase the volume to more than 50, the
audio device sound may be distorted.
Play the keyboard along with the sound
6
of the audio device.
You can cancel or lower the volume of the melody
part of audio playback. For details, refer to page
58.
After finishing the performance, stop
7
playback of the audio device.
Turn on the external audio device, then
3
this instrument.
EZ-300 Owner’s Manual
56
Page 57

Reference
Connecting to a Computer
USB cable
USB
terminal
instrumentcomputer
[USB TO HOST]
terminal
NOTE
• Files up to a total of about 1.4 MB can be transferred to
this instrument.
• If you transfer a Style file to this instrument, you need to
register it before using it on the instrument. For details,
refer to “Registering a Style File” (page 50).
• Files transferred to the instrument are listed in the instrument in the order of symbol, number and alphabet.
NOTE
NOTE
NOTE
By connecting the [USB TO HOST] terminal of this
instrument to a computer via a USB cable, you can
perform the following convenient functions.
• Use an AB type USB cable of less than 3 meters.
• USB 3.0 cables cannot be used.
Transferring MIDI Files, such as Song
or Style Files
You can play Song files transferred from a computer
to the instrument (page 19), or take User Songs
(page 51) recorded on the instrument and transfer
them to the computer for further editing and/or saving.
You need to turn the function settings “Storage
Mode” (Function 059; page 63) on before making the
file transfer. For details, refer to “Computer-related
Operations” on the website (page 8).
Files that can be transferred
• Song files (Extension: .MID)
Song files created on other instruments or computers
can be transferred to this instrument. Note that user
Songs created with this instrument cannot be transferred to a computer as a single file.
• Style files (Extension: .STY)
This instrument does not have a function for creating
Style files, but you can import a style file created on
another device. The maximum capacity per file is
50KB. Files that exceed the limit will not be recognized
on this instrument.
• Backup files (Extension: .BUP)
* You can transfer the data of “Parameters backed up as
needed” (excluding “Passing Status of Keys to Success”) and “Parameters backed up when the power is
turned off” on page 59 to the computer and save the
data as a single backup file.
Connecting to Other Devices
• While Storage Mode is set to on, you cannot play the instrument, nor can you transmit/receive MIDI or Audio data. Set
Storage Mode to on only when transferring files.
Transmitting/Receiving MIDI Data
The USB cable connection to a computer lets you listen to MIDI Songs played back on the computer or
record your performance on the instrument as MIDI
data to the computer.
Transmitting/Receiving Audio Data
(USB Audio Interface)
The USB cable connection to a computer also lets
you play the audio data on the computer with high
sound quality on the instrument or record your performance on the instrument as an Audio data to the
computer.
A dedicated driver must be installed for transmitting/
receiving Audio data. For details, refer to “Computerrelated Operations” on the website (page 8).
• The volume can be adjusted both on the computer and by
using the instrument's [MASTER VOLUME] dial.You can also
adjust the level of the audio input sound via [USB TO HOST]
terminal by calling up “USBINVol” via Function number 044
(page 62) and using the [0]–[9], [+/YES], [-/NO] buttons.
• When outputting the audio playback from the instrument to the
computer—for example, when recording the audio input
sound from the [USB TO HOST] terminal with the performance played on the instrument—you cannot adjust the level
of the audio data with the [MASTER VOLUME] dial.
• If you are using the instrument with a music production application, such as a DAW (Digital Audio Workstation), set “Loopback” (Function 045; page 62) to off. If this is instead set to
on, a mix of the audio data and the sound of the instrument is
sent to DAW, which may cause howling and unexpected loud
sounds.
EZ-300 Owner’s Manual
57
Page 58

Connecting to Other Devices
Reference
NOTE
046
MelodySP
on
Appears when Melody
Suppressor is on
Hold for longer
than a second.
NOTE
SupprPan
C
047
L63 – C – R63
(Left – Center – Right)
NOTE
Connecting a Smart Device
By connecting a smart device such as a smartphone
or tablet to the instrument, you can take advantage of
various functions. For details on connections, refer to
“Smart Device Connection Manual” on the website
(page 8). For information about the compatible smart
devices and apps, access the following page:
https://www.yamaha.com/kbdapps/
• If you are using the instrument with a music production application such as a DAW (Digital Audio Workstation), set “Loopback” (Function 045; page 62) to off. If it is set to on, a mix of
the audio data and the sound of the instrument is sent to DAW,
which may cause howling and unexpected loud sounds.
• Use an AB type USB cable of less than 3 meters.
• USB 3.0 cables cannot be used.
• You can adjust the level of the audio input sound via [USB TO
HOST] terminal by function settings “USBINVol” (Function
044; page 62).
Lowering the volume of a melody part (Melody Suppressor function)
When you output the audio sound of an external
audio device or a computer connected to the [AUX
IN] jack or the [USB TO HOST] terminal through this
instrument, you can cancel or lower the volume of
the melody part of audio playback. You can use the
function to practice the melody part along with the
audio playback.
Play back audio on the connected exter-
1
nal device.
To cancel the Melody Suppressor func-
4
tion, press the [-/NO] button to select
“oFF.”
When the melody or vocal sound may not
be canceled (or lowered) as expected
Press the [FUNCTION] button several
1
times to call up “SupprPan” (Function
047; page 62) while the Melody Suppressor function is turned on.
Adjust the pan position of the sound to
2
be cancelled (lowered) by using the
[+/YES], [-/NO] buttons.
• Depending on the particular music content, the melody
or vocal sound may not be canceled as expected even if
the Melody Suppressor is turned on.
Press the [FUNCTION] button several
2
times to call up “MelodySP” (Function
046; page 62).
Press the [+/YES] button to select “on.”
3
• When the instrument is connected to the [USB TO HOST]
terminal, and Audio Loop Back (Function 045; page 62)
is set to OFF, the Melody Suppressor function cannot be
used.
EZ-300 Owner’s Manual
58
Page 59

Reference
Backup and Initialization
NOTICE
NOTE
The highest white key
The highest white key
and the three highest
black keys
NOTICE
Backup Parameters
The following Backup parameters will be maintained
even if the power is turned off.
Parameters backed up as needed
• User Songs (page 51)
• Style Number 206–215 (page 50)
Parameters backed up when the power is turned off
• Registration Memory (page 53)
• Passing Status of Keys to Success (page 37)
• Function Settings: (page 60)
Tuning, Split Point, Touch Response, Style Volume,
Song Volume, Metronome Volume, Your Tempo,
Demo Group, Demo Play Mode, Master EQ type,
Sustain, Auto Power Off, Battery Type, Guide,
Audio Loop Back, Fingering Type, [AUX IN] Audio
Volume, [USB TO HOST] Audio Volume, Style
Freeze, Transpose Freeze, Voice Freeze
In addition to the Backup parameters above, all the
data (including Style data that have not been loaded)
transferred from the connected computer will be
maintained even if you turn off the power.
Backup parameters other than “Passing Status of
Keys to Success” can be transferred and saved to a
computer as a single Backup file (with the extension:
.BUP). This backup file can be loaded to the instrument for future.
For details on using a computer with this instrument,
refer to “Computer-related Operations” on the website (page 8).
• Backup is executed automatically when the power is
turned off. When the power is turned off in the following
cases, backup is not executed.
- Disconnected AC adaptor
- Power failure
- Low or no battery power
If you do not save a backup file on the computer,
there is no problem if an error message is displayed,
and you can ignore the message.
• The size of a backup file varies depending on the amount of
data stored on the instrument. The maximum capacity is
about 620KB.
• Even if a backup file for transferring to a computer is not created, the backup data is retained in the instrument.
Initialization
You can initialize your original data via the following
two methods.
Backup Clear
This operation initializes the backup parameters and
the Registration Memories.
While holding down the highest white key, press the
[ ] (Standby/On) switch to turn the power on.
Flash Clear
This operation deletes all the Songs and Styles that
have been transferred from a computer. Note that
Style data registered to Style numbers 206–215 will
be maintained. While simultaneously holding the
highest white key and the three highest black keys,
press the [ ] (Standby/On) switch to turn the power
on.
Error during Backup Operation
When connecting to a computer with Storage Mode
(Function 059; page 63) set to on, the memory space
on the instrument may be insufficient for creating a
backup file for transferring to the computer. In this situation, the error message “Not enough storage for
backup” scrolls on the display. If you want to save a
backup file to the computer, delete unnecessary
Song files or Style files on this instrument to ensure
sufficient memory space, and then set Storage Mode
to off and back to on again. A backup file will be created.
• Keep in mind that Backup Clear and Flash Clear also
delete the data you have purchased. Be sure to save the
important data to a computer.
EZ-300 Owner’s Manual
59
Page 60

Reference
The Functions
Transpos
00
001
Current value
Function number
Function name
Press several
times as
necessary
NOTE
Direct
numeric entry.
•Increment
value by 1.
•Yes
•On
Press simultaneously
to recall the default
setting.
• Decrement
value by 1.
•No
•Off
The Functions settings provide access to a range of detailed instrument parameters
such as Tuning, Split Point, Voices and Effects.
Press the [FUNCTION] button several
1
times until the desired item appears.
Each time the [FUNCTION] button is pressed, the
Function number increases one by one. To
decrease the Function number by one, simultaneously hold down the [FUNCTION] button and
press the [-/NO] button briefly. Simply pressing
only the [+/YES] or [-/NO] button does not
change the Function number.
After a few seconds, the Function name may be
replaced with the setting value depending on the
selected Function.
• When the Function settings display does not appear,
press one of the [VOICE], [SONG] or [STYLE] buttons,
and then press the [FUNCTION] button again.
• The Function number does not appear in the display during Song, Style or Metronome playback. The beat value
appears instead.
Set the value by using the number but-
2
tons [0]–[9], [+/YES], [-/NO].
To exit from the Function settings, press
3
one of these buttons; [VOICE], [SONG]
or [STYLE].
Function List
Function
Number
Overall
001 Transpose Transpos -12–12 00 Determines the pitch of the instrument in semitone increments.
002 Tuning Tuning 427.0Hz–453.0Hz 440.0Hz
003 Split Point SplitPnt 036–096
004 Touch Response TouchRes
Main Voice (page 24)
005 Volume M.Volume 000–127 *
006 Octave M.Octave -2 – +2 * Determines the octave range for the Main Voice.
007 Chorus Depth M.Chorus 000–127 *
EZ-300 Owner’s Manual
60
Function name Display Range/Settings
(C1–C6)
1 (Soft),
2 (Medium),
3 (Hard),
4 (Fixed)
Default
Valu e
Determines the fine tuning of the pitch of the entire instrument in
approx. 0.2Hz increments.
Determines the highest key for the Split Voice and sets the Split
“point”—in other words, the key that separates the Split (lower)
54 (F#2)
and Main (upper) Voices. This setting is applied to the Accompaniment Split Point setting (page 45).
2 (Medium) Refer to page 26.
Determines the volume of the keyboard performance when performing along with a Song or a Style.
Determines how much of the Main Voice’s signal is sent to the
Chorus effect.
Descriptions
Page 61

Reference
The Functions
Function
Function name Display Range/Settings
Number
Dual Voice (page 25)
008 Dual Voice D.Voice 001–622 * Determines the Dual Voice.
009 Volume D.Volume 000–127 * Determines the volume of the Dual Voice.
010 Octave D.Octave -2 – +2 * Determines the octave range for the Dual Voice.
011 Chorus Depth D.Chorus 000–127 *
Split Voice (page 25)
012 Spl it Voi ce S.Voice 001–622 * Determines the Split Voice.
013 Volu me S.Volume 000–127 * Determines the volume of the Split Voice.
014 Octave S.Octave -2 – +2 * Determines the octave range for the Split Voice.
015 Chorus Depth S.Chorus 000–127 *
Style (page 44)
016 Style Volume StyleVol 000–127 100
017 Fingering Type FingType
018 Smart Chord Key S.ChdKey
Song (page 31)
019 Song Volume SongVol 000–127 100
Effects
020 Reverb Type Reverb
021 Reverb Level RevLevel 000–127 064
022 Chorus Type Chorus
023 DSP Type DSPType 01–38 * Determines the DSP Type (page 91).
024 Sustain Sustain ON/OFF OFF
025 Master EQ Type MasterEQ
Harmony/Arpeggio (page 28)
Harmony/
026
Arpeggio Type
027 Harmony Volume HarmVol 000–127 * Determines the volume of the Har mony effect.
028 Arpeggio Velocity ArpVelo
Pedal (pages 27, 29)
029 Pedal Function PdlFunc
Harm/Arp
1 (SmartChd)
2 (Multi)
FL7 (7 Flats b) – SP0
(No Key Signature) –
SP7 (7 Sharps #)
1–4 (Hall 1–4)
5 (Cathedral)
6–8 (Room 1–3)
9–10 (Stage 1–2)
11–12 (Plate 1–2)
13 (O ff)
1 (Chorus1)
2 (Chorus2)
3 (Chorus3)
4 (Flanger1)
5 (Flanger2)
6 (Off)
1 (Speaker)
2 (Headphone)
3 (Boost)
4 (Piano)
5 (Bright)
6 (Mild)
001–026 (Harmony)
027–176 (Arpeggio)
1 (Original)
2 (Key)
1 (Sustain)
2 (Arp Hold)
3 (Sus+ArpH)
4 (Articulation)
Default
Valu e
Determines how much of the Dual Voice’s signal is sent to the
Chorus effect.
Determines how much of the Split Voice’s signal is s ent to the
Chorus effect.
Determines the volume of the Style while a Style is selected
(page 45).
1
(SmartChd)
SP0 (No Key
Signature)
1 (Speaker)
1 (Sustain)
Determines the method of chord detection in the Accompaniment
Section when playing with a Style.
Determines the Key Signature when the Fingering Type is set to
“SmartChd.” For example, if there are 2 sharps (#) in your music
score, press the [+/YES]/[-/NO] buttons until “SP2” appears on
the display.
Determines the volume of the Song when a Song is selected
(page 32).
** Determines the Reverb type, including Off (page 91).
Determines how much of the Voice’s signal is sent to the Reverb
effect.
** Determines the Chorus t ype, including Off (page 91).
Determines whether the Sustain function is on or off
(page 27).
Determines what type of equalization is applied to the speaker
output or headphone output for optimum sound in different listening situations (page 55).
* Determines the Harmony type or Arpeggio type.
Determines the Arpeggio velocity. If “Key” is selected, arpeggios
will be played back at a volume matching the strength at which
**
you play the keyboard. If “Original” is selected, arpeggios will be
played back at their original volume regardless of your playing
strength.
Sustain: Sustain will be produced while the pedal is held down.
Arp Hold: Arpeggio playback will continue while the pedal is held
down.
Sus + ArpH: Sustain will be produced and Arpeggio playback will
continue while the pedal is held down.
Articulation: Articulation effect will be produced while the pedal is
held down.
Descriptions
EZ-300 Owner’s Manual
61
Page 62

The Functions
Reference
Function
Function name Display Range/Settings
Number
Metronome (page 24)
Time Signature
030
Numerator
Time Signature
031
Denominator
Metronome
032
Vol ume
Lesson (page 35)
033 Lesson Track (R) R-Part 01–16 01
034 Lesson Track (L) L-Part 01–16 02
035 Your Tempo YourTemp ON/OFF ON
036 Guide Guide ON/OFF ON
Light Guide (Lighting Keyboard)
037 Light Guide Light ON/OFF ON Turns the Light Guide function (page 36) on/off.
Light Part 1
038
Setting
Light Part 2
039
Setting
MIDI
040 Local Control Local ON/OFF ON
041 External Clock ExtClock ON/OFF OFF
042 Initial Send InitSend YES/NO –
Audio (pages 56, 57, 58)
[AUX IN] Audio
043
Vol um e
[USB TO HOST]
044
Audio Volume
045 Audio Loop Back
TimeSigN 00–60 ** Determines the time signature of the Metronome.
TimeSigD
MetroVol 000–127 100 Determines the volume of the Metronome.
LightPt1 01–16 01
LightPt2 01–16 02
AuxInVol 000–127
USBINVol 000–127
Loopback
Half note, Quarter
note, Eighth note,
Sixteenth note
ON/OFF ON
046 Melody Suppressor
047 Suppressor Pan
MelodySP
SupprPan L63–C–R63
ON/OFF OFF
Default
Valu e
** Determines the lengt h of each Metronome beat.
Determines the track number for your right hand lesson. The setting is only effective for Songs in SMF format 0 transferred from a
computer.
Select a Song you want to use for the lessons, select the “R-Part,”
and then use the number buttons [0]–[9], [+/YES] and [-/NO] to
select the channel you want to play back as the speci fied righthand part. We recommend that you select chann el 1 for the righthand part.
Determines the track number for your left hand lesson. The setting is only effective for Songs in SMF format 0 transferred from a
computer.
Select a Song you want to use for the lessons, select the “L-Part,”
and then use the number buttons [0]–[9], [+/YES] and [-/NO] to
select the channel you want to play back as the specified lefthand part. We recommend that you select channel 2 for the left
part.
This parameter is for Lesson 3 “Waiting.” When this is set to ON,
playback tempo will change for matching the speed you are playing at. When this is set to OFF, playback tempo will be maintained
regardless of the speed you are playing at.
Determines whether the Guide note sounds (ON) or not (OFF)
during the “Waiting” lesson.
Determines the 1st part (channel) which lights the keyboard
when playing a MIDI Song contained on the computer with this
instrument.
Determines the 2nd part (channel) which lights the keyboard
when playing a MIDI Song contained on the computer with this
instrument.
Determines whether the instrument’s keyboard controls the internal tone generator (ON) or not (OFF). When you are recording
your keyboard performance to the application software on the
computer via MIDI, set this parameter to OFF.
Determines whether the instrument synchronizes to the internal
clock (OFF) or an external clock (ON). When you are recording
your keyboard performance to the application software on the
computer via MIDI, set this parameter to ON.
Allows you to send the data of the panel settings to a computer.
Press [+/YES] to send, or press [-/NO] to cancel.
Determines the volume of audio playback, input from the [AUX
050
IN] jack (page 56).
Determines the volume of audio playback, input from the [USB
100
TO HOST] terminal (page 57).
Determines whether Audio sound input from the [USB TO HOST]
terminal is returned to the computer or not with the performance
played on the instrument. If you want to output only the sound
played on this instrument to the computer, set this parameter to
OFF.
When you output the audio sound of an external audio device or
a computer connected to the [AUX IN] jack or the [USB TO
HOST] terminal through this instrument, select “ON” to cancel or
lower the volume of the melody part of audio playback (page 58).
Determines the position of the playback sound of the external
C
audio device to be canceled or lowered (page 58).
Descriptions
EZ-300 Owner’s Manual
62
Page 63

Reference
The Functions
Function
Function name Display Range/Settings
Number
Regist Freeze (page 54)
048 Style Freeze StyleFrz
049 Transpose Freeze TransFrz
050 Voice Freeze VoiceFrz
Duo (page 30)
051 Duo Mode DuoMode
052 Duo L Voice DuoLVc 001–622 * Determines the voice in the left section.
053 Duo Split Point DuoPnt
054 Duo R Volume DuoRVol 000–127 * Determines the volume of the right section.
055 Duo L Volume DuoLVol 000–127 * Determines the volume of the left section.
056 Duo R Octave DuoROct -3 – +3 * Determines the pitch of the right section in octave units.
057 Duo L Octave DuoLOct -3 – +3 * Determines the pitch of the left section in octave units.
058 Duo Type DuoType
Storage
059 Storage Mode Storage
Style File
060 Style Register StyleReg 001–nnn –
Demo (page 33)
061 Demo Group DemoGrp
062 Demo Play Mode PlayMode
Auto Power Off (page 15)
Auto Power Off
063
Time
Battery (page 14)
064 Battery Type Battery
* The appropriate value is automatically set for each Voice combination.
** The appropriate value is automatically set for each Song, Style or Arpeggio.
AutoOff
ON/OFF OFF
ON/OFF OFF
ON/OFF OFF
ON/OFF OFF
036–096 (C1–C6)
1 (Balance)
2 (Separate)
ON/OFF OFF
1 (Demo)
2 (Preset)
3 (User)
4 (Download)
1 (Normal)
2 (Random)
OFF, 5/10/15/30/60/
120 (minutes)
1 (Alkaline)
2 (Ni-MH)
Default
Valu e
When you want to call up the Registration Memory without overwriting the current Style setting, select “ON.”
When you want to call up the Registration Memory without overwriting the current Transpose setting, select “ON.”
When you want to call up the Registration Memory without overwriting the current Voice setting, select “ON.”
Turns the Duo mode (page 30) on/off.
Sets the key that divides the keyboard range into the left section
066 (F#3)
and right section.
This function is effective in Duo Mode (page 30).
Balance: The performance sounds of the left section and the right
2 (Separate)
1 (Normal) Determines the repeat playback mode.
30 minutes
1 (Alkaline)
section will sound from both the left and right speakers.
Separate: The performance sound of the left section will sound
from the left speaker, and the performance sound of the right section will sound from the right speaker.
When transferring Song or Style files between the instrument and
the computer, set the Storage Mode to ON. While the Storage
Mode is ON, you cannot play the instrument.
Select and register a Style file from flash files that are loaded
from computer (page 50).
1 (Demo) Determines the repeat playback group.
Specifies the time that will elapse before the instrument’s power
is automatically turned off.
Selects the type of batteries you have installed to this instrument.
Alkaline: Alkaline battery/manganese battery
Ni-MH: Rechargeable battery
Descriptions
EZ-300 Owner’s Manual
63
Page 64

Appendix
Troubleshooting
Appendix
Problem Possible Cause and Solution
When the instrument is turned on or off, a popping
sound is temporarily produced.
When using a mobile phone, noise is produced. Using a mobile phone in close proximity to the instrument may produce
Noise is heard from the instrument’s speakers or
headphones when using the instrument with an
application on a smart device.
There is no sound even when the keyboard is
played or when a Song or Style is being played
back.
The instrument does not respond when the instrument is operated.
Playing keys in the right hand area of the keyboard
does not produce any sound.
Not all of the voices seem to sound, or the sound
seems to be cut off.
The harmony doesn’t sound. The method of sounding the Harmony effect (001–026) differs depend-
The Style or Song does not play back when the
[START/STOP] button is pressed.
The ACMP ON indicator does not appear when the
[ACMP ON/OFF] button is pressed.
The Style does not sound properly. Make sure that the Style Volume (page 61 Function 016) is set to an
The Style does not sound as you play a chord. If the Fingering Type (Function 017; page 61) is set to Multi, the following
The footswitch (for sustain) seems to produce the
opposite effect. For example, pressing the footswitch cuts off the sound and releasing it sustains
the sounds.
The sound of the voice changes from note to note. This is normal. The AWM tone generation method uses multiple record-
This is normal and indicates that the instr ument is receiving electrical
power.
interference. To prevent this, turn off the mobile phone or use it further
away from the instrument.
When you use the instrument along with the application on your smart
device, we recommend that you set “Airplane Mode” to “ON” on your
smart device in order to avoid noise caused by communication.
Check that nothing is connected to the [PHONES/OUTPUT] jack on the
rear panel. When a set of headphones is plugged into this jack, no
sound is output.
Check the Local Control on/off setting. (See page 62 Function 040.)
Make sure Local Control is set to ON.
Is Storage Mode set to ON? Make sure Storage Mode is set to OFF;
refer to “Storage” on page 63 (Function 059).
When using the Dictionary function (page 49), the keys in the right hand
area are used only for entering the chord root and type.
The instrument is polyphonic up to a maximum of 48 notes—including
Dual voice, Split Voice, Style, Song, and Metronome.
Notes exceeding this limit will not sound.
ing on the selected type. For Types 001–005, tur n the Auto Accompaniment on and play it by pressing a chord in the auto accompaniment
section of the keyboard, then play some keys in the right-hand side to
produce the Harmony effect. You can play the types 006–026 without
turning Auto Accompaniment on. However, it is necessary to play two
notes simultaneously for Types 006–012.
Is External Clock set to ON? Make sure External Clock is set to OFF;
refer to the function settings on page 62 (Function 041).
• Always press the [STYLE] button first when you are going to use any
Style-related function.
• The ACMP ON indicator does not appear when the Duo mode is on.
appropriate level.
Is the Split Point set to an appropriate key for the chords you are playing? Set the Split Point to an appropriate key (page 60 Function 003).
Is the “ACMP” indicator showing in the display? If it is not showing, press
the [ACMP ON/OFF] button so that it does show.
conditions will occur.
• The auto accompaniment will sometimes not change when related
chords are played in sequence (e.g., some minor chords followed by
the minor seventh).
• Two-note fingerings will produce a chord based on the previously
played chord.
• Playing two same root keys in the adjacent octaves produces accompaniment based only on the root.
The polarity of the footswitch is reversed. Make sure that the footswitch
plug is properly connected to the [SUSTAIN] jack before turning on the
power.
ings (samples) of an instrument across the range of the keyboard; thus,
the actual sound of the voice may be slightly different from note to note.
EZ-300 Owner’s Manual
64
Page 65

Troubleshooting
Appendix
Problem Possible Cause and Solution
• The volume is too soft.
• The sound quality is poor.
• The rhythm stops unexpectedly or will not play.
• The recorded data of the Song, etc. does not
play correctly.
• The LCD display suddenly goes dark, and all
panel settings are reset.
Power suddenly and unexpectedly turns off. This is normal and the Auto Power Off function may have been activated
When the instrument is turned on, power is turned
off suddenly and unexpectedly.
The application on your smart device doesn’t recognize the instrument.
The batteries are low or dead. Replace all six batteries with completely
new ones, or use the included AC adaptor.
(page 15). If you need to disable the Auto Power Off function, select
“Off” in the Function settings (Function 063; page 63).
The protection circuit has been activated due to over current. This may
occur when an AC adaptor other than the one specified is used, or an
AC adaptor is damaged. Use the specified adaptor (page 94) only. If it
should appear to be malfunctioning, discontinue use immediately and
have it inspected by qualified Yamaha service personnel.
Is Storage Mode set to ON? Make sure that Storage Mode is set to
OFF; refer to the function settings on page 63 (Function 059).
EZ-300 Owner’s Manual
65
Page 66

Appendix
Song Book Sample
Für Elise
Für Elise is an all-time classical favorite.
The beautiful, well-known melody is repeated a number of times.
In each step you won’t be practicing alone. You have a wonderful orchestra to back you up!
First, listen to the example a few times. It won’t be long before you’ll want to start playing it yourself!
Für Elise With Step Map
.......................................................................68
Song No.075
Basic
Warm-up Exercise - “The Semitone Mystery” .................................... 70
Diligent Practice Time ................................................................71
Warm-up Exercise - “Basic Accompaniment” ..................................... 72
Diligent Practice Time ................................................................72
First Half Review ...................................................................... 73
Diligent Practice Time ................................................................73
Warm-up Exercise - “The Jump Competition” ....................................74
“EEEEE!” ................................................................................ 74
“Left! Right! Left! Right!” ............................................................ 75
Second Half Review ...................................................................75
Play the Whole Song! .................................................................75
L. v. Beethoven
This score is provided with the part of the Song Book (free downloadable scores).
The Song Book contains not only the scores for all internal songs (excepting for a Demo Song and some Songs due to
copyright issues) but also music terms and important points for your practice. To obtain this Song Book, access the Yamaha
website and download it from the product web page.
Yamaha Global Site https://www.yamaha.com
* The Song Book is provided in English, French, German and Spanish.
This example introduces part of the English Song Book.
EZ-300 Owner’s Manual
66
Page 67

Song Book Sample
Appendix
Before Playing...
Sit Correctly Finger Numbering
Sit near the middle of the keyboard.
Reading the Score
The Keyboard, Staff Lines, and Clef
Treble clef
Bass clef
Time Signatures and Counting Time
4/4 time 2/2 time 2/4 time
3/4 time 6/8 time 9/8 time
1 octave
2 black keys 3 black keys
Accidentals
(Sharp) Raise a semitone
B
(Flat) Lower a semitone
N
(Natural) Return to normal pitch
Key signature
Clef
Time signature
Notes and Rests
BDEFGACBDEFGA BDCEFGAC BDEFGACBDEFGACC
M
i
d
d
l
e
Whole note
Dotted half note
Half note
Dotted quarter note
Quarter note
Eighth note
Sixteenth note
5
3
2
4
1
1
Left Right
1234
Whole note rest
Dotted half note rest
Half note rest
Dotted quarter note rest
Quarter note rest
Eighth note rest
Sixteenth note rest
3
2
4
5
EZ-300 Owner’s Manual
67
Page 68

Song Book Sample
Appendix
Play with both hands as if gently telling a story. It might help to sing or hum the melody as you play.
Similar melody lines and rhythms are repeated in this song, so there aren’t as many sections to practice as
you might think. Enjoy learning each section as you build proficiency.
Für Elise
Song No.004
Basic
With Step Map
From here...
Song No.075
EZ-300 Owner’s Manual
68
Page 69

Appendix
...to here From here...
...to here
Für Elise
Song No.004
Basic
Song Book Sample
Song No.075 Für Elise Basic
EZ-300 Owner’s Manual
69
Page 70

Song Book Sample
Appendix
Für Elise
Song No.004
Basic
Warm-up Exercise - “The Semitone Mystery”
Let’s start with a warm-up exercise using three fingers of the right hand.
We’ll start by ascending and descending the white and black keys. Check out the
illustrations until you understand how the fingers are supposed to move, then get
started!
You’ll find it easier to play if you bend your fingers slightly.
Right
Go back to the beginning and play it again.
Song No.075 Für Elise Basic
r
o
f
t
h
d
i
e
s
s
e
u
s
r
e
g
n
i
F
x
e
r
c
i
s
e
M
i
d
d
l
e
C
E
M
i
d
d
l
e
C
M
i
d
d
l
e
C
A E
ABCD
Tip-toe
EZ-300 Owner’s Manual
70
Page 71

Appendix
Für Elise
Song No.004
Basic
Diligent Practice Time
Right! Now that we’re warmed up let’s try playing along with the orchestra in 3/4 time.
The melody will be built up little by little.
Compare each line... notice that many of the shapes formed by the notes are very similar.
Short break
Almost done
E
Song Book Sample
Song No.075 Für Elise Basic
EZ-300 Owner’s Manual
71
Page 72

Song Book Sample
Appendix
Für Elise
Song No.004
Basic
Warm-up Exercise - “Basic Accompaniment”
And now a warm-up exercise for the left hand.
It’s important to spread your fingers widely from the start.
Don’t play the black keys too strongly.
Diligent Practice Time
Connect the notes smoothly, as if the left hand were passing them to the right hand. You’ll be able to play
smoothly if you move the left hand into position for the next phrase as soon as it finishes playing the first
phrase.
Song No.075 Für Elise Basic
Left hand
M
i
d
d
l
e
AEAE
C
EZ-300 Owner’s Manual
72
Page 73

Appendix
Song No.075 Für Elise Basic
Für Elise
Song No.004
Basic
Diligent Practice Time
OK, let’s begin the second half!
You’ll be able to play the melody nicely if you lift your fingers from the keyboard between the slurs.
It might be easier to grasp the key release timing if you sing along with the melody.
Don’t panic and play too strongly where the left hand has to play short notes.
First Half Review
You’ve reached the halfway step! Have you learned all the material provided in the preceding steps?
Now let’s go back and play through all the first-half exercises. If you find that you’re having trouble
playing any of the material, go back and review the steps using the Step Map as a guide.
Always have left-hand finger 5 ready to play the next note!
Song Book Sample
EZ-300 Owner’s Manual
73
Page 74

Song Book Sample
Appendix
Für Elise
Song No.004
Basic
Warm-up Exercise - “The Jump Competition”
The first note has a staccato dot.
Spread your fingers wide and jump quickly to the next note!
“EEEEE!”
The only note in this step is E!
Make the connection between the left and right hands as smooth as possible.
Song No.075 Für Elise Basic
Left hand
h
t
i
o
n
w
l
y
s
i
h
t
y
a
l
p
n
a
c
u
o
Y
t
h
e
s
e
f
i
n
g
e
r
s
!
Jump to the
next E!
And again!
M
i
d
d
l
e
EEE
C
EZ-300 Owner’s Manual
74
Page 75

Appendix
Left
Right
Für Elise
Song No.004
Basic
“Left! Right! Left! Right!”
Play “D E” repeatedly, alternating the left and right hands.
Have the next hand ready in position to play D so you won’t have to rush.
Second Half Review
Try playing all the way through the second half.
As we did after the first half, if there are places you can’t play with confidence go back and review the steps.
Play the Whole Song!
This is the finishing step!
Don’t be afraid of making mistakes. Just concentrate on playing the entire song from start to finish.
Practice this with the lessons learned in each step in mind, and gradually you’ll master the whole song.
Song Book Sample
Song No.075 Für Elise Basic
EZ-300 Owner’s Manual
75
Page 76

Appendix
Voice List
Maximum Polyphony
The instrument has 48-note maximum polyphony. This means
that it can play a maximum of up to 48 notes at once,
regardless of what functions are used. Auto accompaniment
uses a number of the available notes, so when auto
accompaniment is used the total number of available notes for
playing on the keyboard is correspondingly reduced. The same
applies to the Split Voice and Song functions. If the maximum
polyphony is exceeded, earlier played notes will be cut off and
the most recent notes have priority (last note priority).
NOTE
• The Voice List includes MIDI program change numbers for each
voice. Use these program change numbers when playing the
instrument via MIDI from an external device.
• Program change numbers are often specified as numbers “0–127.
For these cases, it is necessary to subtract 1 from the intended program change number to select the appropriate sound, because this
list uses a “1–128” numbering system. For example, to select program change number 38 in the list below, transmit program change
number 37.
• Some voices may sound continuously or have a long decay after
the notes have been released while the sustain pedal (footswitch) is
held.
”
Panel Voice List
Bank Select
Voice
MSB
No.
(0–127)
1 0 115 1 Live! Concert Grand Piano
2 0 112 1 Grand Piano
3 0 112 2 Bright Piano
4 0 112 7 Harpsichord
5 0 112 4 Honky Tonk Piano
6 0 112 3 MIDI Grand Piano
701133CP80
8 0 118 5 Cool! SuitcaseEP
9 0 118 6 JazzChorusEP
10 0 120 5 PhaseEP
11 0 119 5 Cool! TremoloEP
12 0 121 5 Cool! ElectricPiano
13 0 117 5 StageEP
14 0 114 5 Cool! Galaxy Electric Piano
15 0 113 6 Hyper Tines
16 0 112 5 Funky Electric Piano
17 0 112 6 DX Modern Electric Piano
18 0 114 6 Venus Electric Piano
19 0 112 8 Clavi
20 0 113 8 WahClavi
21 0 118 19 Cool! Organ
22 0 117 19 Cool! Rotor Organ
23 0 112 17 Jazz Organ 1
24 104 49 17 Jazz Organ 1+RotaryFast
25 0 113 17 Jazz Organ 2
26 104 50 17 Jazz Organ 2+RotaryFast
27 0 112 19 Rock Organ
28 0 120 19 Octave Shift Organ
29 0 114 19 Purple Organ
30 0 112 18 Click Organ
31 0 116 17 Bright Organ
32 0 127 19 Theater Organ
33 0 121 20 16'+2' Organ
34 0 120 20 16'+4' Organ
35 0 113 20 Chapel Organ
36 0 112 20 Pipe Organ
37 0 112 21 Reed Organ
38 0 112 22 Musette Accordion
39 0 113 22 Traditional Accordion
40 0 113 24 Bandoneon
41 0 113 23 Moder n Harp
42 0 114 23 Blues Har p
43 0 115 23 Har monica
EZ-300 Owner’s Manual
76
LSB
(0–127)
MIDI
Program
Change#
(1–128)
PIANO
E.PIANO
ORGAN
ACCORDION
Voice Name
Bank Select
Voice
MSB
No.
(0–127)
44 8 96 1
45 8 96 2
46 8 97 1
47 8 97 2 S.Art Lite Steel Guitar Slide ***
48 8 96 6 S.Art Lite Distortion Guitar ***
49 0 116 25 Dynamic Nylon Guitar
50 0 118 30 Dynamic Overdriven
51 0 121 31 Dynamic Distortion Guitar
52 0 122 25 Nylon Guitar
53 0 112 25 Classical Guitar
54 104 25 26 Steel Guitar
55 0 112 26 Folk Guitar
56 0 112 27 Jazz Guitar
57 0 117 28 60s Clean Guitar
58 0 113 26 12Strings Guitar
59 0 112 28 Clean Guitar
60 0 127 28 Wah Guitar
61 0 113 27 Octave Guitar
62 0 112 29 Muted Guitar
63 0 112 30 Overdriven Guitar
64 0 112 31 Distortion Guitar
65 0 127 31 Wah Distortion Guitar
66 8 96 18 S.Art Lite Slap Bass ***
67 0 116 34 Dynamic Electric Bass
68 0 112 34 Finger Bass
69 0 112 33 Acoustic Bass
70 0 112 35 Pick Bass
71 0 112 36 Fretless Bass
72 0 112 37 Slap Bass
73 0 121 40 Funk Bass
74 0 112 39 Synth Bass
75 0 113 39 Hi-Q Bass
76 0 113 40 Dance Bass
77 8 96 50 S.Art Lite Strings ***
78 0 117 50 Live! Strings
79 104 23 49 Studio Strings
80 0 112 49 Strings
81 0 112 50 Chamb er Strings
82 0 115 50 Marcato Strings
83 0 113 50 Slow Strings
84 0 112 45 Tremolo Strings
85 0 112 51 Synth Strings
LSB
(0–127)
MIDI
Program
Change#
(1–128)
GUITAR
S.Art L ite
Nylon Guitar Harmonics ***
S.Art L ite
Steel Guitar Harmonics ***
S.Art L ite
Nylon Guitar Slide ***
BASS
STRINGS
Voice Name
Page 77

Voice List
Appendix
Bank Select
Voice
MSB
No.
(0–127)
86 0 112 46 Pizzicato Strings
87 0 116 46 Orchestra Pizzicato Strings
88 0 113 41 Sweet! Violin
89 0 112 41 Violin
90 0 112 43 Cello
91 0 112 44 Contrabass
92 0 112 47 Har p
93 0 112 56 Orchestra Hit
94 8 96 55 S.Art Lite Gospel Choir ***
95 0 112 53 Choir
96 104 12 54 Gospel Hmm
97 104 13 54 Gospel Wow
98 0 113 53 Vocal Ensemble
99 0 112 55 Air Choir
100 0 112 54 Vo x H uma na
101 8 96 83 S.Art Lite Tenor Sax ***
102 0 122 67 Sax Section
103 0 117 67 Sweet! Tenor Sax
104 0 112 67 Tenor Sax
105 0 112 66 A lto Sa x
106 0 112 65 Soprano Sax
107 0 112 68 Baritone Sax
108 0 114 67 Breathy Tenor Sax
109 0 116 66 Small Sax Section
110 0 112 72 Clarinet
111 0 112 69 Oboe
112 0 112 70 English Horn
113011271Bassoon
114 0 112 57 Trumpet
115 0 127 57 Distortion Trumpet
116 0 112 58 Trombone
117 0 113 58 Trombone Section
118 0 112 60 Muted Trumpet
119 0 112 61 French Horn
120 0 112 59 Tuba
121 8 96 57 S.Art Lite Brass Section ***
122 0 117 63 Live! Brass
123 0 112 62 Brass Section
124 0 113 62 Big Band Brass
125 0 116 62 Octave Brass
126 0 113 63 80s Brass
127 0 119 62 Mellow Horns
128 0 115 63 Funky Brass
129 0 114 63 Techno Brass
130 0 112 63 Synth Brass
131 8 96 74 S.Art Lite Flute ***
132 0 114 74 Sweet! Flute
133 0 115 74 Sweet! Classical Flute
134 0 112 74 Fl ute
135 0 112 73 Piccolo
136 0 112 76 Pan Flute
137 0 112 75 Recorder
138 0 112 80 Oc arina
139 104 20 91 Gemini
140 104 21 91 Hands Up!
141 0 112 81 Square Lead
LSB
(0–127)
MIDI
Program
Change#
(1–128)
CHOIR
SAXOPHONE
TRUMPET
BRASS
FLUTE
SYNT H
Voice Name
Bank Select
Voice
MSB
No.
(0–127)
142 0 112 82 Sawtooth Lead
143 0 108 82 RS Tech Saw
144 0 112 88 Under Heim
145 0 112 85 Portatone
146 0 115 82 Analogon 1
147 0 119 82 Fargo 1
148 104 53 82 Analogon 2
149 104 54 82 Fargo 2
150 0 112 86 Voice Lead
151 0 121 82 Funky Lead
152 0 118 89 Sweet Heaven
153 0 121 89 Dream Heaven
154 0 113 89 Symbiont
155 0 112 99 Stardust
156 0 112 101 Brightness
157 0 112 92 Xenon Pad
158 0 112 95 Equinox
159 0 112 89 Fantasia
160 0 113 90 Dark Moon
161 0 113 101 B ell Pad
162 0 126 90 RS Analog Pad
163 0 116 91 RS Short Resonance
164 0 112 12 Vibraphone
165 0 113 12 Jazz Vibes
166 0 112 13 Marimba
167 0 112 14 Xylophone
168 0 112 115 Steel Drums
169 0 112 9 Celesta
170 0 112 11 Mu sic Box
171 0 112 15 Tubular Bells
172 0 112 48 Timpani
173 0 112 106 Banjo
174 0 0 111 F id d le
175 0 0 110 Bagpipe
176 0 0 16 Dulc imer 1
177 0 35 16 Dulcimer 2
178 0 96 16 Cimbalom
179 0 121 16 Santur
180 0 97 108 Kanoon
181 0 98 106 Oud
182 0 96 106 Rabab
1830 0109Kalimba
184 0 113 21 Harmonium 1 (Single Reed)
185 0 114 21 Harmonium 2 (Double Reed)
186 0 115 21 Harmonium 3 (Triple Reed)
187 0 114 105 Tanpura
188 0 96 112 Pungi
189 0 117 74 Bansuri
1900 0105Sitar 1
191 0 32 105 Detuned Sitar
192 0 35 105 Sitar 2
193 0 0 112 Shehnai
194 0 97 106 Gopichant
195 0 116 117 Tabl a
19 6 0 11 5 111 Er Hu
197 0 118 74 Di Z i
198 0 116 106 P i Pa
199 0 113 108 Gu Zheng
200 0 40 47 Yang Qin
201 0 120 111 Morin Khuur
LSB
(0–127)
MIDI
Program
Change#
(1–128)
PERCUSSION
WORLD
Voice Name
EZ-300 Owner’s Manual
77
Page 78

Voice List
Appendix
Bank Select
Voice
MSB
No.
(0–127)
202 0 124 74 Suling
203 0 0 107 S hamisen
204 0 0 108 Koto
205 0 96 108 Taisho-kin
206 – – – Octave Piano
207 – – – Piano & Strings
208 – – – Piano Pad
209 – – – Octave Harpsichord
210 – – – Tiny Electric Piano
211 – – – Electric Piano Pad
212–––Full Organ
213 – – – Octave Jazz Guitar
214 – – – Octave Strings
215 – – – Orchestra Section
216 – – – Octave Pizzicato Strings
217 – – – Strings Session
218 – – – Brass Tutti
219 – – – Orchestra Tutti
220 – – – Octave French Horns
221 – – – Octave Harp
222 – – – Orchestra Hit & Timpani
223 – – – Octave Choir
224 – – – Jazz Brass Section
225 – – – Jazz Section
226 – – – Ballroom Sax Ensemble
227 – – – Ballroom Brass
228 – – – Flute & Clarinet
229 – – – Trumpet & Trombone
230 – – – Fat Synth Brass
231 – – – Octave Lead
232 – – – Super 5th Lead
233 0 0 121 Fret Noise
234 0 0 122 Breath Noise
235 0 0 123 S eashore
236 0 0 124 Bird Tweet
237 0 0 125 Telephone Ring
238 0 0 126 Helicopter
239 0 0 127 Applause
240 0 113 116 Hand Clap
241 0 0 128 G unshot
242 127 0 88 Power Kit
243 127 0 1 Standard Kit 1
244 127 0 2 Standard Kit 2
245 127 0 9 Room Kit
246 127 0 17 Rock Kit
247 127 0 25 Electronic Kit
248 127 0 26 Analog Kit
249 127 0 113 Dance Kit
250 127 0 33 Jazz Kit
251 127 0 41 Brush Kit
252 127 0 49 Symphony Kit
253 126 0 128 StdKit 1 + Chinese Perc.
254 126 0 40 Indian Kit 1
255 126 0 115 Indian Kit 2
256 126 0 55 StdKit 1 + Indonesian Perc. 1
257 126 0 56 StdKit 1 + Indonesian Perc. 2
258 126 0 57 StdKit 1 + Indonesian Perc. 3
259 126 0 37 Arabic Kit
260 126 0 41 Cuban Kit
LSB
(0–127)
SOUND EFFECTS
MIDI
Program
Change#
(1–128)
DUAL*
DRUM KITS
Voice Name
Bank Select
Voice
MSB
No.
(0–127)
261 126 0 1 SFX Kit 1
262 126 0 2 SFX Kit 2
263 126 0 113 Sound Effect Kit
264 – – – Concerto
265 – – – Latin Rock
266 – – – Brass Section
267 – – – Piano Ballad
268 – – – Synth Sequence
269 – – – Guitarist
270 – – – Pickin'
271 – – – Spanish
272 – – – Funky Clavi
273 – – – Harpeggio
274 – – – Finger Bass Left
275 – – – Combo Jazz Left
276 – – – Paul's Bass Left
277 – – – Trance Bass Left
278 – – – Acid Bass Left
279 – – – Piano Ballad Left
280 – – – Salsa Piano Left
281 – – – Piano Arpeggio Left
282 – – – Guitar Arpeggio Left
283 – – – Strum Left
* When you select a Voice of the DUAL category, two voices
sound at the same time.
** Selecting a Voice number between 264 and 283 will turn
on Arpeggio.
*** S.Art Lite voice (page 27)
LSB
(0–127)
MIDI
Program
Change#
(1–128)
ARPEGGIO**
Voice Name
EZ-300 Owner’s Manual
78
Page 79

Voice List
Appendix
XGlite Voice List
Bank Select
Voice
MSB
No.
(0–127)
284 0 0 1 Grand Piano
285 0 1 1 Grand Piano KSP
286 0 40 1 Piano Strings
287 0 41 1 Dream
288 0 0 2 Bright Piano
289 0 1 2 Bright Piano KSP
290 0 0 3 Electric Grand Piano
291 0 1 3 Electric Grand Piano KSP
292 0 32 3 Detuned CP80
293 0 0 4 Honky Tonk Piano
294 0 1 4 Honky Tonk Piano KSP
295 0 0 5 Electric Piano 1
296 0 1 5 Electric Piano 1 KSP
297 0 32 5 Chorus Electric Piano 1
298 0 0 6 Electric Piano 2
299 0 1 6 Electric Piano 2 KSP
300 0 32 6 Chorus Electric Piano 2
301 0 41 6 DX + Analog Electric Piano
302 0 0 7 Harpsichord 1
303 0 1 7 Harpsichord KSP
304 0 35 7 Harpsichord 2
305 0 0 8 Clavi
306 0 1 8 Clavi KSP
307 0 0 9 Celes ta
308 0 0 10 Glockenspiel
309 0 0 11 Music Box 1
310 0 64 11 Music Box 2
311 0 0 12 Vibraphone
312 0 1 12 Vibraphone KSP
313 0 0 13 Marimba
314 0 1 13 Marimba KSP
315 0 64 13 Sine Marimba
316 0 97 13 Balimba
317 0 98 13 Log Drums
318 0 0 14 Xylophone
319 0 0 15 Tubular Bells
320 0 96 15 Church Bells
321 0 97 15 Carillon
322 0 0 17 Drawbar Organ 1
323 0 32 17 Detuned Drawbar Organ
324 0 33 17 60s Drawbar Organ 1
325 0 34 17 60s Drawbar Organ 2
326 0 35 17 70s Drawbar Organ 1
327 0 37 17 60s Drawbar Organ 3
328 0 40 17 16+2'2/3 Organ
329 0 64 17 Organ Bass
330 0 65 17 70s Drawbar Organ 2
331 0 66 17 Cheezy Organ
332 0 67 17 Drawbar Organ 2
333 0 0 18 Percussive Organ 1
334 0 24 18 70s Percussive Organ
335 0 32 18 Detuned Percussive Organ
336 0 33 18 Light Organ
337 0 37 18 Percussive Organ 2
338 0 0 19 Rock Organ
339 0 64 19 Rotary Organ
340 0 65 19 Slow Rotary Organ
341 0 66 19 Fast Rotary Organ
LSB
(0–127)
MIDI
Program
Change#
(1–128)
XG PIANO
XG CHROMATIC
XG ORGAN
Voice Name
Bank Select
Voice
MSB
No.
(0–127)
342 0 0 20 Church Organ 1
343 0 32 20 Church Organ 3
344 0 35 20 Church Organ 2
345 0 40 20 Notre Dame
346 0 64 20 Organ Flute
347 0 65 20 Tremolo Organ Flute
348 0 0 21 Reed Organ
349 0 40 21 Puff Organ
350 0 0 22 Accordion
351 0 0 23 Harmonica 1
352 0 32 23 Harmonica 2
353 0 0 24 Tango Accordion 1
354 0 64 24 Tango Accordion 2
355 0 0 25 Nylon Guitar 1
356 0 25 25 Nylon Guitar 3
357 0 43 25 Velocity Guitar Harmonics
358 0 96 25 Ukulele
359 0 0 26 Steel Guitar
360 0 35 26 12-string Guitar
361 0 40 26 Nylon & Steel Guitar
362 0 41 26 Steel Guitar with Body Sound
363 0 96 26 Mandolin
364 0 0 27 Jazz Guitar
365 0 32 27 Jazz Amp
366 0 0 28 Clean Guitar
367 0 32 28 Chorus Guitar
368 0 0 29 Muted Guitar
369 0 40 29 Funk Guitar
370 0 41 29 Muted Steel Guitar
371 0 45 29 Jazz Man
372 0 0 30 Overdriven Guitar
373 0 43 30 Guitar Pinch
374 0 0 31 Distor tion Guitar
375 0 40 31 Feedback Guitar 1
376 0 41 31 Feedback Guitar 2
377 0 0 32 Guitar Harmonics 1
378 0 65 32 Guitar Feedback
379 0 66 32 Guitar Harmonics 2
380 0 0 33 Acoustic Bass
381 0 40 33 Jazz Rhythm
382 0 45 33 Velocity Crossfade Upright Bass
383 0 0 34 Finger Bass 1
384 0 18 34 Finger Bass Dark
385 0 40 34 Bass & Distorted Electric Guitar
386 0 43 34 Finger Slap Bass
387 0 45 34 Finger Bass 2
388 0 65 34 Modulated Bass
389 0 0 35 Pick Bass
390 0 28 35 Muted Pick Bass
391 0 0 36 Fretless Bass 1
392 0 32 36 Fretless Bass 2
393 0 33 36 Fretless Bass 3
394 0 34 36 Fretless Bass 4
395 0 0 37 Slap Bass 1
396 0 32 37 Punch Thumb Bass
397 0 0 38 Slap Bass 2
398 0 43 38 Velocity Switch Slap
399 0 0 39 Synth Bass 1
400 0 40 39 Techno Synth Bass
LSB
(0–127)
MIDI
Program
Change#
(1–128)
XG GUITAR
XG BASS
Voice Name
EZ-300 Owner’s Manual
79
Page 80

Voice List
Appendix
Bank Select
Voice
MSB
No.
(0–127)
401 0 0 40 Synth Bass 2
402 0 6 40 Mellow Synth Bass
403 0 12 40 Sequenced Bass
404 0 18 40 Click Synth Bass
405 0 19 40 Synth Bass 2 Dark
406 0 40 40 Modular Synth Bass
407 0 41 40 DX Bass
408 0 0 41 Violin
409 0 8 41 Slow Violin
410 0 0 42 Viola
411 0 0 43 Cello
412 0 0 44 Contrabass
413 0 0 45 Tremolo Strings
414 0 8 45 Slow Tremolo Strings
415 0 40 45 Suspense Strings
416 0 0 46 Pizzicato Strings
417 0 0 47 Orchestral Harp
418 0 0 48 Timpani
419 0 0 49 Strings 1
420 0 3 49 Stereo Strings
421 0 8 49 Slow Strings
422 0 35 49 60s Strings
423 0 40 49 Orchestra 1
424 0 41 49 Orchestra 2
425 0 42 49 Tremolo Orchestra
426 0 45 49 Velocity Strings
427 0 0 50 Strings 2
428 0 3 50 Stereo Slow Strings
429 0 8 50 Legato Strings
430 0 40 50 Warm Strings
431 0 41 50 Kingdom
432 0 0 51 Synth Strings 1
433 0 64 51 Synth Strings 4
434 0 0 52 Synth Strings 2
435 0 0 53 Choir Aahs
436 0 3 53 Stereo Choir
437 0 32 53 Mellow Choir
438 0 40 53 Choir Strings
439 0 0 54 Voice Oohs
440 0 0 55 Synth Voice 1
441 0 40 55 Synth Voice 2
442 0 41 55 Choral
443 0 64 55 Analog Voice
444 0 0 56 Orchestra Hit 1
445 0 35 56 Orchestra Hit 2
446 0 64 56 Impact
447 0 0 57 Trumpet
448 0 32 57 Warm Trumpet
449 0 0 58 Trombone 1
450 0 18 58 Trombone 2
451 0 0 59 Tuba
452 0 0 60 Muted Trumpet
453 0 0 61 French Horn 1
454 0 6 61 French Horn Solo
455 0 32 61 French Horn 2
456 0 37 61 Horn Orchestra
457 0 0 62 Brass Section
458 0 35 62 Trumpet & Trombone Section
459 0 0 63 Synth Brass 1
LSB
(0–127)
MIDI
Program
Change#
(1–128)
XG STRINGS
XG ENSEMBLE
XG BRASS
Voice Name
Bank Select
Voice
MSB
No.
(0–127)
460 0 20 63 Resonant Synth Brass
461 0 0 64 Synth Brass 2
462 0 18 64 Soft Brass
463 0 41 64 Choir Brass
464 0 0 65 Soprano Sax
465 0 0 66 Alto Sax
466 0 40 66 Sax Section
467 0 0 67 Tenor Sax
468 0 40 67 Breathy Tenor Sax
469 0 0 68 Baritone Sax
470 0 0 69 Oboe
471 0 0 70 English Horn
472 0 0 71 Bassoon
473 0 0 72 Clarinet
474 0 0 73 Piccolo
475 0 0 74 Flute
476 0 0 75 Recorder
477 0 0 76 Pan Flute
478 0 0 77 Blown Bottle
479 0 0 79 Whistle
480 0 0 80 Ocarina
481 0 0 81 Square Lead 1
482 0 6 81 Square Lead 2
483 0 8 81 LM Square
484 0 18 81 Hollow
485 0 19 81 Shroud
486 0 64 81 Mellow
487 0 65 81 Solo Sine
488 0 66 81 Sine Lead
489 0 0 82 Sawtooth Lead 1
490 0 6 82 Sawtooth Lead 2
491 0 8 82 Thick Sawtooth
492 0 18 82 Dynamic Sawtooth
493 0 19 82 Digital Sawtooth
494 0 20 82 Big Lead
495 0 24 82 Heavy Synth
496 0 96 82 Sequenced Analog
497 0 0 83 Calliope Lead
498 0 65 83 Pure Lead
499 0 0 84 Chiff Lead
500 0 0 85 Charang Lead
501 0 64 85 Distorted Lead
502 0 0 86 Voice Lead
503 0 0 87 Fifths Lead
504 0 35 87 Big Five
505 0 0 88 Bass & Lead
506 0 16 88 Big & Low
507 0 64 88 Fat & Perky
508 0 65 88 Soft Whirl
509 0 0 89 New Age Pad
510 0 64 89 Fantasy
511 0 0 90 Warm Pad
512 0 0 91 Poly Synth Pad
513 0 0 92 Choir Pad
514 0 66 92 Itopia
515 0 0 93 Bowed Pad
516 0 0 94 Metallic Pad
517 0 0 95 Halo Pad
LSB
(0–127)
XG SYNTH LEAD
MIDI
Program
Change#
(1–128)
XG REED
XG PIPE
XG SYNTH PAD
Voice Name
EZ-300 Owner’s Manual
80
Page 81

Voice List
Appendix
Bank Select
Voice
MSB
No.
(0–127)
518 0 0 96 Sweep Pad
519 0 0 97 Rain
520 0 64 97 Harmo Rain
521 0 65 97 African Wind
522 0 66 97 Carib
523 0 0 98 Sound Track
524 0 27 98 Prologue
525 0 0 99 Crystal
526 0 12 99 Synth Drum Comp
527 0 14 99 Popcorn
528 0 18 99 Tiny Bells
529 0 35 99 Round Glockenspiel
530 0 40 99 Glockenspiel Chimes
531 0 41 99 Clear Bells
532 0 42 99 Chorus Bells
533 0 65 99 Soft Crystal
534 0 70 99 Air Bells
535 0 71 99 Bell Harp
536 0 72 99 Gamelimba
537 0 0 100 A tmosphere
538 0 18 100 Warm Atmosphere
539 0 19 100 Hollow Release
540 0 40 100 Nylon Electric Piano
541 0 64 100 Nylon Harp
542 0 65 100 Harp Vox
543 0 66 100 Atmosphere Pad
544 0 0 101 B rightness
545 0 0 102 Goblins
546 0 64 102 Goblins Synth
547 0 65 102 Creeper
548 0 67 102 Ritual
549 0 68 102 To Heaven
550 0 70 102 Night
551 0 71 102 Glisten
552 0 96 102 Bell Choir
553 0 0 103 E choes
554 0 65 103 Big Pan
555 0 0 104 Sci-Fi
556 0 0 78 Shakuhachi
557 0 97 105 Tamboura
558 0 0 106 Banjo
559 0 28 106 Muted Banjo
560 0 0 113 Tinkle Bell
561 0 96 113 Bonang
562 0 97 113 Altair
563 0 98 113 Gamelan Gongs
564 0 99 113 Stereo Gamelan Gongs
565 0 100 113 Rama Cymbal
566 0 0 114 Agogo
567 0 0 115 Steel Drums
568 0 97 115 Glass Percussion
569 0 98 115 Thai Bells
570 0 0 116 Woodblock
571 0 96 116 Castanets
572 0 0 117 Taiko Drum
573 0 96 117 Gran Cassa
574 0 0 118 Melodic Tom 1
575 0 64 118 Melodic Tom 2
576 0 65 118 Real Tom
MIDI
Program
LSB
Change#
(0–127)
(1–128)
XG SYNTH EFFECTS
XG WORLD
XG PERCUSSIVE
Voice Name
Bank Select
Voice
MSB
No.
(0–127)
577 0 66 118 Rock Tom
578 0 0 119 Synth Drum
579 0 64 119 Analog Tom
580 0 65 119 Electronic Percussion
581 0 0 120 Reverse Cymbal
582 64 0 1 Cutting Noise 1
583 64 0 2 Cutting Noise 2
584 64 0 4 String Slap
585 64 0 17 Flute Key Click
586 64 0 33 Shower
587 64 0 34 Thunder
588 64 0 35 Wind
589 64 0 36 Stream
590 64 0 37 Bubble
591 64 0 38 Feed
592 64 0 49 Dog
593 64 0 50 Horse
594 64 0 51 Bird Tweet 2
595 64 0 56 Maou
596 64 0 65 Phone Call
597 64 0 66 Door Squeak
598 64 0 67 Door Slam
599 64 0 68 Scratch Cut
600 64 0 69 Scratch Split
601 64 0 70 Wind Chime
602 64 0 71 Telephone Ring 2
603 64 0 81 Car Engine Ignition
604 64 0 82 Car Tires Squeal
605 64 0 83 Car Passing
606 64 0 84 Car Crash
607 64 0 85 Siren
608 64 0 86 Train
609 64 0 87 Jet Plane
610 64 0 88 Starship
611 64 0 89 Burst
612 64 0 90 Roller Coaster
613 64 0 91 Submarine
614 64 0 97 Laugh
615 64 0 98 Scream
616 64 0 99 Punch
617 64 0 100 Heartbeat
618 64 0 101 Footsteps
619 64 0 113 Machine Gun
620 64 0 114 Laser Gun
621 64 0 115 Explosion
622 64 0 116 Firework
MIDI
Program
LSB
Change#
(0–127)
(1–128)
XG SOUND EFFECTS
Voice Name
EZ-300 Owner’s Manual
81
Page 82

Appendix
Standard Kit 1 List
A1
B1
C2
D2
E2
C#1
D#1
C1
D1
E1
F1
G1
G#1
F#1
A#1
C#2
D#2
F2
G2
A2
B2
F#2
G#2
A#2
C#3
D#3
C3
D3
E3
• For drum kits other than Standard Kit 1, refer to “Drum Kit List” on the website (page 8).
The lowest key
Voice No. 243
Standard Kit 1
C
C#
D
D#
E
F
F#
G 1 Snare Soft
G# 1Sticks
A 1 Bass Drum Soft
A# 1 Open Rim Shot
B 1 Bass Drum Hard
C 2 Bass Drum
C# 2 Side Stick
D 2 Snare
D# 2 Hand Clap
E 2 Snare Tight
F 2 Floor Tom L
F# 2 Hi-Hat Closed
G 2 Floor Tom H
G# 2 Hi-Hat Pedal
A2 Low Tom
A# 2 Hi-Hat Open
B 2 Mid Tom L
C 3 Mid Tom H
C# 3 Crash Cymbal 1
D 3 High Tom
D# 3 Ride Cymbal 1
E 3 Chinese Cymbal
1
1
1
1
1
1
1
Seq Click H
Brush Tap
Brush Swirl
Brush Slap
Brush Tap Swirl
Snare Roll
Castanet
F3
G3
A3
B3
C4
D4
E4
F4
G4
A4
B4
C5
D5
E5
F5
G5
A5
B5
C6
Voice No. 243
Standard Kit 1
F 3 Ride Cymbal Cup
F# 3 Tambourine
F#3
G 3 Splash Cymbal
G# 3Cowbell
G#3
A 3 Crash Cymbal 2
A# 3Vibraslap
A#3
B 3 Ride Cymbal 2
C 4 Bongo H
C# 4 Bongo L
C#4
D4 Conga H Mute
D# 4 Conga H Open
D#4
E4 Conga L
F4 Timbale H
F# 4 Timbale L
F#4
G 4 Agogo H
G# 4 Agogo L
G#4
A 4 Cabasa
A# 4 Maracas
A#4
B 4 Samba Whistle H
C 5 Samba Whistle L
C# 5Guiro Short
C#5
D 5 Guiro Long
D# 5 Claves
D#5
E 5 Wood Block H
F 5 Wood Block L
F# 5Cuica Mute
F#5
G 5 Cuica Open
G# 5 Triangle Mute
G#5
A 5 Triangle Open
A# 5Shaker
A#5
B 5 Jingle Bells
C6 Bell Tree
EZ-300 Owner’s Manual
82
Page 83

Appendix
Song List
Song
No.
001 Demo (Yamaha Original)
002 Happy (Pharrell Williams)
It's My Life
003
(Jon Bon Jovi/Martin Sandberg/Richie Sambora)
Viva La Vida
004
(Guy Berryman/Jon Buckland/Will Champion/Chris Martin)
005 Bad Romance (Stefani Germanotta/Nadir Khayat)
Shape Of You
006
Tameka Cottle/Steve Mac/Johnny McDaid)
Duele El Corazon
(Enrique Iglesias/M. Hasibur Rahman/Francisco Sal-
007
dana/Juan Luis Morera/Servando Moriche Primera Mussett/Patrick Ingunza/Silverio Ramon Lozada Schwarck)
Titanium
008
(David Guetta/Sia Furler/Giorgio Tuinfort/Nick Van De Wall)
009 Per fect (Ed Sheeran)
Treasure (Bruno Mars/Ari Levine/Philip Lawrence/Fre-
010
drick Brown/Thibaut Berland/Christopher Acito)
Something Just Like This (Andrew Taggart/Chris Mar-
011
tin/Guy Berryman/Jonny Buckland/Will Champion)
012 Frère Jacques (Traditional)
013 Der Froschgesang (Traditional)
014 Aura Lee (Traditional)
015 London Bridge (Traditional)
016 Sur le pont d'Avignon (Traditional)
017 Old MacDonald Had a Farm (Traditional)
018 Nedelka (Traditional)
019 Aloha Oe (Q. Liliuokalani)
020 Sippin' Cider Through a Straw (Traditional)
021 Old Folks at Home (S. C. Foster)
022 Bury Me Not on the Lone Prairie (Traditional)
023 Santa Lucia (A. Longo)
024 If You're Happy and You Know It (Traditional)
025 Beautiful Dreamer (S. C. Foster)
026 Greensleeves (Traditional)
027 Kalinka (Traditional)
028 Holdilia Cook (Traditional)
029 Ring de Banjo (S. C. Foster)
030 La Cucaracha (Traditional)
031 Funiculi Funicula (L. Denza)
032 Largo (from the New World) (A. Dvořák)
033 Brahms' Lullaby (J. Brahms)
034 Liebesträume Nr.3 (F. Liszt)
035 Pomp and Circumstance (E. Elgar)
036 Chanson du Toreador (G. Bizet)
037 Jupiter, the Bringer of Jollity (G. Holst)
Song Name
Demo
POP
(Ed Sheeran/Kevin Briggs/Kandi Burruss/
FAVOR IT E
Song
No.
038 The Polovetsian Dances (A. Borodin)
039 Die Moldau (B. Smetana)
040 Salut d'Amour op.12 (E. Elgar)
041 Humoresques (A. Dvořák)
Symphony No.9 (from the New World - 4th movement)
042
(A. Dvořák)
043 Sicilienne/Fauré (G. Fauré)
044 Swan Lake (P. I. Tchaikovsky)
045 Grand March (Aida) (G. Verdi)
Serenade for Strings in C major, op.48
046
(P. I. Tchaikovsky)
047 Pizzicato Polka (J. Strauss II)
048 Romance de Amor (Traditional)
049 Menuett BWV Anh.114 (J. S. Bach)
050 Ave Verum Corpus (W. A. Mozart)
051 Radetzky Marsch (J. Strauss I)
052 Wenn ich ein Vöglein wär (Traditional)
053 Die Lorelei (F. Silcher)
054 Home Sweet Home (H. R. Bishop)
055 Scarborough Fair (Traditional)
056 My Old Kentucky Home (Traditional)
057 Loch Lomond (Traditional)
058 Silent Night (F. Gruber)
059 Deck the Halls (Traditional)
060 O Christmas Tree (Traditional)
Sonata Pathétique 2nd Adagio Cantabile
061
(L. v. Beethoven)
Ave Maria/J. S. Bach - Gounod
062
(J. S. Bach/C. F. Gounod)
063 Jesus bleibet meine Freude (J. S. Bach)
064 Prelude op.28-15 “Raindrop” (F. Chopin)
065 Nocturne op.9-2 (F. Chopin)
066 Etude op.10-3 “Chanson de L'adieu” (F. Chopin)
067 Romanze (Serenade K.525) (W. A. Mozart)
068 Arabesque (J. F. Burgmüller)
069 La Chevaleresque (J. F. Burgmülle r)
070 Für Elise (L. v. Beethoven)
071 Turkish March (W. A. Mozart)
072 24 Preludes op.28-7 (F. Chopin)
073 Annie Laurie (Traditional)
074 Jeanie with the Light Brown Hair (S. C. Foster)
075 Für Elise (Basic) (L. v. Beethoven)
076 Für Elise (Advanced) (L. v. Beethoven)
077 Twinkle Twinkle Little Star (Basic) (Traditional)
078 Twinkle Twinkle Little Star (Advanced) (Traditional)
Song Name
INSTRUMENT MASTER
PIANO REPERTOIRE
LEARN TO PLAY
EZ-300 Owner’s Manual
83
Page 84

Song List
Appendix
Song
No.
079 Turkish March (Basic) (W. A. Mozart)
080 Turkish March (Advanced) (W. A. Mozar t)
081 Ode to Joy (Basic) (L. v. Beethoven)
082 Ode to Joy (Advanced) (L. v. Beethoven)
083 The Entertainer (Basic) (S. Joplin)
084 The Entertainer (Advanced) (S. Joplin)
085 Londonderry Air (Basic) (Traditional)
086 Londonderry Air (Advanced) (Traditional)
087 The Last Rose of Summer (Basic) (Traditional)
088 The Last Rose of Summer (Advanced) (Traditional)
089 Amazing Grace (Basic) (Traditional)
090 Amazing Grace (Advanced) (Traditional)
091 O du lieber Augustin (Traditional)
092 Mary Had a Little Lamb (Traditional)
093 When Irish Eyes Are Smiling (E. R. Ball)
094 Little Brown Jug (Traditional)
095 Ten Little Indians (Traditional)
096 On Top of Old Smoky (Traditional)
097 My Darling Clementine (P. Montrose)
098 Oh! Susanna (S. C. Foster)
099 Red River Valley (Traditional)
100 Turkey in the Straw (Traditional)
101 Muffin Man (R. A. King)
102 Pop Goes the Weasel (Traditional)
103 Grandfather’s Clock (H. C. Work)
104 Camptown Races (S. C. Foster)
105 When the Saints Go Marching In (Traditional)
106 Yankee Doodle (Traditional)
107 Battle Hymn of the Republic (Traditional)
108 I’ve Been Working on the Railroad (Traditional)
109 American Patrol (F. W. Meacham)
110 Down by the Riverside (Traditional)
111 Furus ato (T. Okano)
112 Momiji (T. Okano)
113 Aogeba Totoshi (Traditional)
114 Haruga Kita (T. Okano)
115 Soushunfu (A. Nakada)
116 Akatonbo (K. Yamada)
117 O Christmas Tree (Traditional)
118 We Wish You a Merry Christmas (Traditional)
119 Im Mai (Traditional)
120 Mary Had a Little Lamb (Traditional)
121 Yankee Doodle (Traditional)
122 Ten Little Indians (Traditional)
EZ-300 Owner’s Manual
84
Song Name
FAVORI TE W ITH STY LE
JAPANESE SONG
DUET
Song
No.
123 Scarborough Fair (Traditi onal)
124 Three Blind Mice (Traditional)
125 Battle Hymn of the Republic (Traditional)
126 My Darling Clementine (P. Montrose)
127 The Cuckoo (Traditional)
128 London Bridge (Traditional)
Close Your Hands, Open Your Hands
129
(J. J. Rousseau)
130 Valse op.64-1 “Petit Chien” (F. Chopin)
131 Menuett/Beethoven (L. v. Beethoven)
132 Andante grazioso (Sonate K.331) (W. A. Mozart)
133 Melodie (Album für die Jugend) (R. Schumann)
Fröhlicher Landmann (Album für die Jugend)
134
(R. Schumann)
Von fremden Ländern und Menschen
135
(Kinderszenen) (R. Schumann)
136 Thema (Impromptus D.935-3) (F. Schubert)
137 Invention Nr.1 (J. S. Bach)
138 Gavotte/J. S. Bach (J. S. Bach)
139 Arietta/Grieg (E. Grieg)
140 To a Wild Rose (E. A. MacDowell)
Song No. SPECIAL APPENDIX
141–150 Touch Tutor 01–Touch Tutor 10
151–162 Chord Study 01–Chord Study 12
163–202 Maj1234–min1736
• Some Songs have been edited for length or for ease in learning, and
may not be exactly the same as the original.
• A Song Book (free downloadable scores) is available that includes
scores for internal Songs (excepting for a Demo Song and some Songs
due to copyright issues). To obtain this Song Book, access the Yamaha
website and download it from the product web page.
https://www.yamaha.com
Song Name
PIANO SOLO
TOUC H TU TOR
CHORD STUDY
CHORD PROGRESSION
Page 85

Appendix
Style List
Style
No.
1 BritPopRock
2 8BeatModern
3 Cool8Beat
4 Happy8Beat
5 Shake8Beat
6 BoyBandPop
7SweetPop
8 ContemporaryRock
9 StadiumRock
10 70sRock
11 H ar d R o c k 1
12 60sGuitarPop
13 8BeatAdria
14 60s8Beat
15 8Beat
16 OffBeat
17 Folkrock
18 60sRock
19 HardRock 2
20 RockShuffle
21 8BeatRock
22 16Beat
23 DancehallPop
24 CinematicPop
25 PopShuffle
26 GuitarPop
27 16BeatUptempo
28 KoolShuffle
29 HipHopLight
30 70sGlamPiano
31 EpicDivaBallad
32 OrchestraRockBallad
33 PianoBallad
34 LoveSong
35 6/8ModernEP
36 6/8SlowRock
37 OrganBallad
38 PopBallad
39 16BeatBallad
40 ClubBeat
41 SkyPop
42 AgagBeat
43 Electronica
44 FunkyHouse
45 RetroClub
46 USHipHop
47 MellowHipHop
48 Chillout
Style Name
8BEAT
16BE AT
BALLAD
DANCE
Style
No.
49 EuroTrance
50 Ibiza
51 SwingHouse
52 Clubdance
53 ClubLatin
54 Garage 1
55 Garage 2
56 TechnoParty
57 UKPop
58 HipHopGroove
59 HipShuffle
60 HipHopPop
61 ModernDisco
62 70sDisco
63 LatinDisco
64 SaturdayNight
65 DiscoHands
66 BigBandFast
67 BigBandBallad
68 AcousticJazz
69 AcidJazz
70 JazzClub
71 Swing 1
72 Swing 2
73 Five/Four
74 Dixieland
75 Ragtime
76 BluesRock
77 UK Soul
78 JustR&B
79 WorshipAcoustic1
80 WorshipAcoustic2
81 WorshipRockBallad
82 Soul
83 DetroitPop
84 60sRock&Roll
85 6/8Soul
86 CrocoTwist
87 Rock&Roll
88 ComboBoogie
89 6/8Blues
90 CountryPop
91 CountrySwing
92 Country2/4
93 Bluegrass
94 BrazilianSamba
95 BrazilianBossa
Style Name
DISCO
SWING&JAZZ
R&B
COUNTRY
LATIN
Style
No.
96 Bachata
97 CubanSon
98 Guajira
99 BossaNova
100 Forro
101 Sertanejo 1
102 Sertanejo 2
103 Baião
104 TangoArgentino
105 CumbiaPeruana
106 CumbiaColombiana
107 Vallenato
108 Joropo
109 Parranda
110 Merengue
111 ReggaetonPop
112 Reggaeton
113 Tijuana
114 PasoDuranguense
115 CumbiaGrupera
116 BaladaBanda
117 MexicanMambo
118 M a mb o
119 S a ls a
120 Beguine
121 Reggae
122 Hawaiian
123 CelticDance
124 ScottishReel
125 4/4Standart
126 Rumba2/4
127 Saeidy
128 WehdaSaghira
129 IranianElec
130 Emarat i
131 AfricanGospelReggae
132 HighLife1
133 AfricanGospel
134 Makossa
135 ModernAfrobeat
136 HighLife2
137 OrganHighLife
138 IgboHighLife
139 SocaCalypso
140 Azon to
141 IndianPop
142 Bhangra
143 Bhajan
144 BollyM ix
145 Tamil
146 Keral a
Style Name
WORLD
EZ-300 Owner’s Manual
85
Page 86

Style List
Appendix
Style
No.
147 GoanPop
148 Rajasthan
149 Dandiya
150 Q awwali
151 FolkHills
152 ModernDangdut1
153 Keroncong
154 ModernDangdut2
155 DangdutUmum
156 DangdutSlowLegend
157 Dangdut3/4
158 KoploRampak
159 LanggamModern
160 DangdutJawa
161 Congdut
162 VietnamesePopBallad
163 Vietnamese6/8Ballad
164 XiQingLuoGu
165 YiZuMinGe
166 JingJuJieZou
167 VienneseWaltz
168 EnglishWaltz
169 Slowfox
170 Foxtrot
171 Q uicks tep
172 Tango
173 Pasodoble
174 Samba
175 ChaChaCha
176 Rumba
177 J ive
178 U S M arch
179 6 /8 March
180 GermanMarch
181 Po lka Pop
182 OberkrainerPolka
183 Tarantella
184 Showtune
185 ChristmasSwing
186 ChristmasWaltz
187 ItalianWaltz
188 SwingWaltz
189 JazzWaltz
190 ValsMexicano
191 CountryWaltz
192 OberkrainerWalzer
193 Musette
194 Learning2/4
EZ-300 Owner’s Manual
86
Style Name
BALLROOM
TRADITIONAL
WALTZ
CHILDREN
Style
No.
195 Learning4/4
196 Learning6/8
197 S tride
198 PianoSwing
199 PianoBoogie
200 Arpeggio
201 Habanera
202 SlowRock
203 8BeatPianoBallad
204 6/8PianoMarch
205 PianoWaltz
Style Name
PIANIST
Page 87

Appendix
Music Database List
MDB No. MDB Name
1 Jude Hey
2 Jumping
3 WrldRock
4 All OK
5YourTune
6USA Surf
7 JustCall
8Get Home
9 GtrWheel
10 IW asBo rn
11 Sailing
12 BluJeans
13 Holiday
14 Ima gine
15 Marriage
16 WiteShde
17 NowNever
18 Hard Day
19 USA Pie
20 Norway
21 YesterBd
22 A Magic
23 UR Shape
24 Love Me
25 Ideal
26 SweetPop
27 Just Way
28 Speed
29 Cheerful
30 SwftShke
31 Watches
32 PrtTmLvr
33 S Party
34 MoonShdw
35 NikitSng
36 GirlsMne
37 Radio
38 Attempt
39 OnAStrng
40 WhatWant
41 ThankFor
42 Tmbourin
43 RubyGirl
44 TopWorld
45 TeachSng
46 Each Min
47 ShakenUp
48 CrocRock
49 HurryLov
50 Champion
51 Jailhous
ALL TIME HITS
POP & ROCK
MDB No. MDB Name
52 Rock&Rll
53 HonkyTnk
54 JustU&Me
55 LveSmile
56 Wish I
BALLA D
57 StayWith
58 DontMiss
59 HiBallad
60 Red Lady
61 IvoryAnd
62 TheWorld
63 Paradise
64 Whisper
65 Woman
66 CndleWnd
67 Fly Away
68 Love You
69 SavingAl
70 InTheDrk
71 Say You
72 Way Were
73 Inspirng
OLDIES
74 Diana's
75 Tonight
76 SandLter
77 No Rain
78 Ghetto
79 PrettyWm
80 Sherry
81 Sally's
DANCE & DISCO
82 SkyStars
83 Bad Love
84 PokerPop
85 FevrNite
86 StyAlive
87 Westerly
88 Run Free
89 DISCO
90 JoelLife
91 Coupled
92 SingBack
93 Janeiro
94 BoomRoom
95 DontHide
96 RewCraig
97 LondonRU
98 WerUBeen
99 MkeMusic
100 10, 2 S un
101 Tru st
MDB No. MDB Name
102 Mar ieCl b
SWING & JAZZ
103 Moon Of
104 Pat rol
105 Rhy thm
106 Cat Swing
107 Misbehav
108 Saf ari
109 SoWhatIs
110 TimeGone
111 Ta s t eH n y
112 Two F o o t
113 Bl k &W h te
114 En t er R ag
115 TakeFour
116 Birdland
117 Mi s t yF l n
COUNTRY
118 OnTheRd
119 BlueSong
120 InMyMind
121 RoadHome
122 G reenG rs
123 E verNe ed
124 Lucille
125 Tennesse
LATIN
126 L oveAmo r
127 Brasil
128 Chr yPink
129 MyShadow
130 B osaWave
131 D ntWorry
132 I 'm Pol a
133 Mambo Jm
134 O ne Not e
135 PasoCani
136 Beguine
137 Tijuana
138 Pu ntual i
139 Cielito
140 The Liar
141 U nfrgi vn
ENTERTAINMENT
142 Raindrop
143 Califrag
144 C atMem ry
145 MyPrince
146 Showbiz
147 J inglB el
148 S ilent Nt
149 C hrist ms
150 Fa vorite
EZ-300 Owner’s Manual
87
Page 88

Music Database List
Appendix
MDB No. MDB Name
151 RedRdolf
152 Moon Wlz
153 AroundWd
WALTZ & TRAD
154 DadClock
155 RockBaby
156 SomeLara
157 Doodah!
158 Dreamer
159 Birthda y
160 Sunshine
161 Tex Ros e
162 ThePol ka
163 Yankee 's
164 DanubeWz
165 D'amo r
166 Reine de
167 MnchHaus
168 Comrades
169 Van Maas
170 ClariPka
EZ-300 Owner’s Manual
88
Page 89

Appendix
Effect Type List
Harmony Types
No. Harmony Type Description
001 Duet
002 Trio
003 Block
004 Country
005 Octave
006 Trill 1/4 note
007 Trill 1/6 note
008 Trill 1/8 note
009 Trill 1/12 note
010 Trill 1/16 note
011 Trill 1/24 note
012 Trill 1/32 note
013 Tremolo 1/4 note
014 Tremolo 1/6 note
015 Tremolo 1/8 note
016 Trem o lo 1/12 not e
017 Trem o lo 1/16 not e
018 Tremolo 1/24 note
019 Tremolo 1/32 note
020 Echo 1/4 note
021 Echo 1/6 note
022 Echo 1/8 note
023 Echo 1/12 note
024 Echo 1/16 note
025 Echo 1/24 note
026 Echo 1/32 note
If you want to sound one of the harmony types 01–05, play keys to the right side of the Split Point
while playing chords in the left side of the keyboard after turning Auto Accompaniment on. One, two
or three notes of harmony are automatically added to the note you play. When playing back a Song
that includes chord data, harmony is applied whichever keys are played.
If you keep holding down two different notes, the notes alternate (in a trill)
continuously.
(The trill speed differs depending on the selected type.)
If you keep holding down a note, the note is repeated continuously.
(The repeat speed differs depending on the selected type.)
If you play a note, echo is applied to the note played.
(The echo speed differs depending on the selected type.)
EZ-300 Owner’s Manual
89
Page 90

Effect Type List
Appendix
Arpeggio Types
Arpeggio No. Arpeggio Name
027 UpOct
028 DownOct
029 UpDwnOct
030 SynArp1
031 SynArp2
032 SynArp3
033 SynArp4
034 SyncEcho
035 PulsLine
036 StepLine
037 Random
038 Down&Up
039 SuperArp
040 AcidLine
041 TekEcho
042 VelGruv
043 Planet
044 Trance1
045 Trance2
046 Trance3
047 ChordAlt
048 SynChrd1
049 SynChrd2
050 Syncopa
051 Hybrid1
052 Hybrid2
053 Hybrid3
054 Hybrid4
055 Hybrid5
056 PfArp1
057 PfArp2
058 PfArp3
059 PfArp4
060 PfClub1
061 PfClub2
062 PfBallad
063 PfChd8th
064 EPArp
065 PfShufle
066 PfRock
067 Clavi1
068 Clavi2
069 RocknPf
070 70RockPf
071 SlowflPf
072 SoulPf
073 ChordUp
074 ChdDance
075 LatinRck
076 Salsa1
077 Salsa2
078 Reggae1
079 Reggae2
080 Reggae3
081 6/8R&B
082 Gospel
083 BalladEP
084 Strum1
085 Strum2
086 Strum3
087 Strum4
088 Pickin1
089 Pickin2
090 Funky
Arpeggio No. Arpeggio Name
091 GtrChrd1
092 GtrChrd2
093 GtrChrd3
094 GtrAr p
095 FngrPck1
096 FngrPck2
097 CleanG tr
098 Slowfl
099 Samba1
100 Samba2
101 Spanish1
102 Spanish2
103 Harp1
104 Harp2
105 Fn grBas 1
106 Fn grBas 2
107 Fn grBas 3
108 CoolFunk
109 SlapBass
110 AcidBas1
111 AcidBas2
112 FunkyBas
113 Cm b Ja z B1
114 Cm b Ja z B2
115 Cm b Ja z B3
116 NewR&BBs
117 HipHopBs
118 Sm o ot h Bs
119 Dr e am B as
120 TranceB s
121 LatinBas
122 Stri ngs1
123 Stri ngs2
124 Stri ngs3
125 Stri ngs4
126 Str ngDwn
127 Str ngUp
128 OrcheStr
129 Jupiter
130 Pizz 1
131 Pizz 2
132 Bras Sec1
133 Bras Sec2
134 Bras Sec3
135 FunkBras
136 Soul Reed
137 Disc oLd
138 Smoo thPd
139 PercA rp
140 Ethnic
141 Cresendo
142 Disc oCP
143 Perc1
144 Perc2
145 R&B
146 Funk1
147 Funk2
148 Funk3
149 Soul
150 ClscHip
151 Smoo th
152 NewG ospl
153 Cmb Jazz1
154 Cmb Jazz2
Arpeggio No. Arpeggio Name
155 Bebop
156 JazzHop
157 FolkRock
158 Unpluggd
159 Hip Hop
160 Trance
161 Drea m
162 2 Ste p
163 ClubHs1
164 ClubHs2
165 EuroTek
166 House
167 Ibi za1
168 Ibi za2
169 Ibi za3
170 Garage
171 Samba
172 Afri can
173 Lati n
174 China
175 Indi an
176 Arab ic
• When playing one of the Arpeggio Types 143
to 176, select the corresponding Voice below
as the Main Voice.
143–173: Select a Drum Kit (Vo ice
No.242–252).
174 (China): Select “StdKit1 + Chinese
Perc.” (Voice No.253).
175 (Indian): Select “Indian Kit 1” (Voice
No.254) or “Indian Kit 2” (Voice No.255).
176 (Arabic): Select “Arabic Kit” (Voice
No.259).
EZ-300 Owner’s Manual
90
Page 91

Appendix
Reverb Types
No. Reverb Type Description
01–04 Hall 1–4 Concert hall reverb.
05 Cathedral Rich reverb simulating the acoustics of a cathedral. Good for pipe organ sounds.
06–08 Room 1–3 Small room reverb.
09–10 Stage 1–2 Reverb for solo instruments.
11–12 Plate 1–2 Simulated steel plate reverb.
13 Off No effe ct.
Chorus Types
No. Chorus Type Description
1–3 Chorus 1–3 Conventional chorus program with rich, warm chorusing.
4–5 Flanger 1–2 This produces a rich, animated wavering effect in the sound.
6 Off No effe ct.
NOTE
• Some Styles/Songs may have types that are not listed above.
• The Reverb/Chorus Type is reset when you select another Style/Song.
DSP Types
No. DSP Type Description
01 Dual Rotary Speaker Bright Slow
02 Dual Rotary Speaker Bright Fast
03 Rotary Speaker Slow
04 Rotary Speaker Fast
05 Smal l Stereo Distortion Stereo distortion for guitar. Setting for distortion sound.
06 Small Stereo Overdrive Stereo distortion for guitar. Setting for overdrive sound.
07 Small Stereo Vintage Amp Stereo distortion for guitar. Setting for vintage sound.
08 British Combo Classic British combo amp simulator. Setting for classic sound.
09 British Combo Top Boost British combo amp simulator. Setting for "TOP BOOST" sound.
10 British Combo Heavy British combo amp simulator. Setting for heavy sound.
11 British Legend Blues British stack amp simulator. Setting for blues sound.
12 British Legend Heavy British stack amp simulator. Setting for heavy sound.
13 British Legend Clean British stack amp simulator. Setting for clean sound.
14 Stereo Amp Sim Crunch
15 Stereo Amp Sim Blues
16 Chorus 1
17 Chorus 3
18 Chorus 4
19 Chorus 5
20 Celeste 2 A 3-phase LFO adds modulation and spaciousness to the sound.
21 Symphonic Adds more stages to the modulation of Celeste.
22 Flanger1 Creates a sound similar to that of a jet airplane.
23 Vintage Phaser Stereo
24 Phaser Cyclically modulates the phase to add modulation to the sound.
25 E-Pi ano Phaser Cyclically modulates the phase to add modulation to the sound. For electric piano.
26 Auto Wah Cyclically modulates the center frequency of a wah filter.
27 Auto Wah + Distortion Distortion can be applied to the output of Auto Wah.
28 Clavi Touch Wah Clavinet Touch Wah
29 Tremolo
31 Guitar Tremolo
32 Ensemble Detune Chorus effect without modulation, created by adding a slightly pitch-shifted sound.
Simulates a rotary speaker.
Stereo amp simulator.
Conventional chorus program with rich, warm chorusing.
This simulates an analog phaser, giving a strong vintage flavor to the sound. It is
effective in stereo.
Rich Tremolo effect with both volume and pitch modulation.30 E-Piano Tremolo
Effect Type List
EZ-300 Owner’s Manual
91
Page 92

Effect Type List
Appendix
No. DSP Type Description
33 Tempo Auto Pan Tempo-synchronized auto pan.
34 Echo Two delayed sounds (L and R), and independent feedback delays for L and R.
35 Cross Delay The feedback of the two delayed sounds is crossed.
36 Compressor Medium Compressor with medium setting.
37 3Band EQ A mono EQ with adjustable LOW, MID, and HIGH equalization.
38 Harmonic Enhancer Adds new harmonics to the input signal to make the sound stand out.
EZ-300 Owner’s Manual
92
Page 93

Appendix
Specifications
Product Name Digital Keyboard
Size/Weight
Control Interface
Voi c es
Effects
Accompaniment
Styles
Songs (MIDI)
Functions
Storage and
Connectivity
Sound System
Dimensions (W x D x H )
Weight
Keyboard
Display Type LCD
Panel Language English
Tone Generation
Polyphony (max.) 48
Preset Number of Voices
Compatibility GM/XGlite
Types
Functions
Preset
External Styles 10
Other Features
Compatibility Style File Format (SFF)
Preset Number of Preset Songs
Recording
Form at
Lesson
USB Audio (USB TO HOST) 44.1 kHz, 16 bit, stereo
Registration
Memory
Overall Controls
Miscellaneous PIANO Button Yes ([PORTABLE GRAND] Button)
Storage Internal Memory Approx. 1.4 MB
Connectivity
Amplifiers 2.5 W + 2.5 W
Speakers 12 cm x 2
Number of Keys 61
Touch Response Soft, Medium, Hard, Fixed
Light Guide Yes
Backlight Yes
Language English
Tone Generation
Technology
(241 Panel Voices + 22 Drum/SFX kits + 20 Arpeggio +
DSP 38 types
Reverb 12 types
Chorus 5 types
Master EQ 6 types
Dual Yes
Split Yes
Sustain Yes
Harmony 26 types
Arpeggio 150 types
Melody Suppressor Yes
Articulation Yes (11 Super Articulation Lite Voices)
Number of Styles 205
Fingering Smart Chord, Multi finger
Style Control
Music Database 170
One Touch Setting
(OTS)
Number of Songs 5
Number of Tracks 2
Data Capacity Approx. 10,000 notes
Playback SMF Formats 0 & 1
Recording Original File Format
Number of Buttons 9
Metronome Yes
Tempo Range 11–280
Transpose -12 to 0, 0 to +12
Tuning 427.0–440.0–453.0 Hz (approx. 0.2 Hz increments)
Duo Yes
DC IN 12 V
Headphones/Output Standard stereo phone jack (PHONES/OUTPUT)
Sustain Sustain, Articulation, Arpeggio
AUX I N Yes (Ster eo mi ni jac k)
USB TO HOST Yes
ACMP ON/OFF, SYNC START, START/STOP, INTRO/ENDING/rit.,
(including Touch Tutor: 10, Chord Study: 12, Chord Progression: 40)
Keys to Success, Lesson 1–3 (Listening, Timing, Waiting),
Phrase Repeat, A-B Repeat, Chord Dictionary, Touch Tutor,
Chord Study, Chord Progression
EZ-300
945 mm x 369 mm x 118 mm
(37-3/16” x 14-1/2” x 4-5/8”)
4.8 kg (10 lb 9 oz)
(not including batteries)
AWM Stereo Sampling
622
339 XGlite Voices)
MAIN/AUTO FILL
Ye s
202
EZ-300 Owner’s Manual
93
Page 94

Specifications
Appendix
Power Supply
Included Accessories
Separately Sold Accessories
(May not be available depending on your area.)
* The contents of this manual apply to the latest specifications as of the publishing date. To obtain the latest manual, access the Yamaha
website then download the manual file. Since specifications, equipment or separately sold accessories may not be the same in every locale,
please check with your Yamaha dealer.
Power Supply
Power Consumption 5 W (When using PA-130 AC adaptor)
Auto Power Off Yes (Time can be set)
AC Adaptor
Batteries
Users within U.S or Europe: PA-130 or an equivalent recommended
by Yamaha
Others: PA-3C,PA-130 or an equivalent recommended by Yamaha
Six 1.5 V “AA” size alkaline (LR6), manganese (R6) or
six 1.2 V “AA” size Ni-MH rechargeable batteries (HR6)
• Owner’s Manual
• Music Rest
• AC adaptor * (PA-130 or an equivalent recommended by Yamaha)
• Online Member Product Registration
* May not be included depending on your particular area. Please check with
your Yamaha dealer.
• AC adaptor:
Users within U.S. or Europe: PA-130 or an equivalent recommended by
Yamaha
Others: PA-3C, PA-130 or an equivalent recommended by Yamaha
• Keyboard stand: L-2C
• Headphones: HPH-50/HPH-100/HPH-150
• Footswitch: FC4A/FC5
EZ-300 Owner’s Manual
94
Page 95

Appendix
Index
A
A-B Repeat ..............................34
AC Adaptor ..............................14
Arpeggio ............................ 16, 28
Arpeggio Type ...................29, 90
Arpeggio Velocity..................... 61
Articulation......................... 16, 27
Audio Device ...........................56
Auto Accompaniment.........21, 45
Auto Accompaniment Range...45
AUTO FILL...............................46
Auto Power Off................... 15, 63
AUX IN.....................................56
B
Backup.....................................59
Backup Clear ...........................59
Battery ..................................... 14
Battery Type ....................... 15, 63
Beat ......................................... 17
BGM ........................................33
C
Chord..................................17, 47
Chord Dictionary......................49
Chord Progressions .................43
Chord Study............................. 42
Chorus .....................................27
Chorus Type ......................61, 91
Clear (User Song) ................... 52
Computer........................... 19, 57
Computer-related Operations ....8
Copyright ................................. 97
D
DEMO......................................33
Display..................................... 17
Drum Kit List..............................8
DSP ......................................... 26
DSP Type........................... 61, 91
Dual ......................................... 25
Dual Voice .........................25, 61
Duo..........................................30
Duo Split Point...................30, 63
E
Effect........................................26
Effect Type List ........................ 89
ENDING .................................. 46
External Clock .........................62
F
Fast Forward ........................... 33
Fast Reverse ........................... 33
Fingering Type ......................... 44
Flash Clear.............................. 59
Footswitch ......................... 16, 29
Freeze ..................................... 54
Function List............................ 60
Functions........................... 23, 60
G
GM System Level 1 ................... 9
Guide....................................... 40
H
Harmony ................................. 28
Harmony Type................... 29, 89
Headphones............................ 16
I
Initial Send .............................. 62
Initialization ............................. 59
INTRO ..................................... 46
K
Key Transpose .................... 60
Keyboard Display .................... 17
Keys To Success ...............20, 36
L
Layer ....................................... 25
Lesson............................... 20, 35
Light Guide........................ 23, 36
Listening............................ 20, 39
Local Control ........................... 62
M
MAIN ....................................... 46
Master EQ ............................... 55
Master EQ types ..................... 55
Master Volume ........................ 16
Measure .................................. 17
Melody Suppressor ................. 58
Metronome ........................ 23, 24
Metronome Volume........... 24, 62
MIDI Basics ............................... 8
MIDI Reference ......................... 8
Multi Finger ............................. 44
Music Database ...................... 50
Music Database List................ 87
Music Rest .............................. 16
O
One Touch Setting .................. 24
P
Part ......................................... 34
Passing Status........................ 37
Pause...................................... 33
Pedal..................................16, 29
Phrase Repeat.................. 20, 38
Pitch Transpose .................. 60
Pitch Tuning ........................ 60
PORTABLE GRAND ..........18, 24
Power.......................................14
R
Random Playback................... 33
Recording.......................... 22, 51
Registration Memory............... 53
Reverb .................................... 27
Reverb Type ...................... 61, 91
Rhythm ................................... 45
rit. (ritardando) ........................ 46
S
Sections .................................. 46
Smart Chord ..................... 44, 48
Smart Chord Key .................... 44
Smart Device .......................... 58
Smart Device Connection
Manual................................... 8
Song ..................................18, 31
Song Book .......................... 8, 36
Song Book Sample ................. 66
Song Category........................ 31
Song List................................. 83
Song Melody Voice................. 33
Song Volume .................... 32, 61
Specifications.......................... 93
Split......................................... 25
Split Point.......................... 25, 45
Split Voice......................... 25, 61
Standard Kit 1 List .................. 82
Storage Mode ....................19, 57
Style.............................18, 21, 44
Style File ............................. 9, 50
Style List ................................. 85
Style Volume..................... 45, 61
Sustain...............................16, 27
Synchro Start .......................... 45
T
Tap function ............................ 32
Tempo ............................... 24, 32
EZ-300 Owner’s Manual
95
Page 96

Index
Appendix
Time Signature ........................24
Timing................................20, 39
Touch Response......................26
Touch Tutor ..............................41
Track ..................................51, 52
Transpose ................................60
Troubleshooting .......................64
Tuning......................................60
U
USB Audio Interface ................ 57
USB TO HOST ........................57
User Song ............................... 51
V
Voice.................................. 18, 24
Voice List .................................76
Volume (AUX IN) .....................62
Volume (Dual Voice) ................61
Volume (Harmony)...................61
Volume (Main Voice) ................ 60
Volume (Metronome).........24, 62
Volume (Split Voice) ................61
Volume (USB TO HOST) ......... 62
W
Waiting......................... 20, 39, 43
X
XGlite......................................... 9
EZ-300 Owner’s Manual
96
Page 97

Credits and Copyrights for the preset Songs
Bad Romance
Words and Music by Stefani Germanotta and Nadir Khayat
Copyright (c) 2009 Sony/ATV Music Publishing LLC and House Of Gaga Publishing Inc.
All Rights Administered by Sony/ATV Music Publishing LLC, 424 Church Street, Suite 1200, Nashville, TN 37219
International Copyright Secured All Rights Reserved
Duele El Corazon
Words and Music by Enrique Iglesias, M. Hasibur Rahman, Francisco Saldana, Juan Luis Morera, Servando Moriche Primera Mussett,
Patrick Ingunza and Silverio Ramon Lozada Schwarck
Copyright (c) 2016 Kobalt Music Copyrights SARL, Xuanlu Music Inc., EMI Blackwood Music Inc., Blue Kraft Music Publishing,
Sony/ATV Music Publishing LLC, Yele Publishing, Sony/ATV Bailar, Warner-Tamerlane Publishing Corp., Patrick Ingunza Music,
WB Music Corp. and Azul Siete Music
All Rights for Kobalt Music Copyrights SARL and Xuanlu Music Inc. Administered Worldwide by Kobalt Music Group Ltd.
All Rights for EMI Blackwood Music Inc., Blue Kraft Music Publishing, Sony/ATV Music
Publishing LLC, Yele Publishing and Sony/ATV Bailar Administered by Sony/ATV Music
Publishing LLC, 424 Church Street, Suite 1200, Nashville, TN 37219
All Rights for Patrick Ingunza Music Administered by Warner-Tamerlane Publishing Corp.
All Rights for Azul Siete Music Administered by WB Music Corp.
All Rights Reserved Used by Permission
Happy
from DESPICABLE ME 2
Words and Music by Pharrell Williams
Copyright (c) 2013 EMI April Music Inc., More Water From Nazareth and Universal Pictures Global Music
All Rights on behalf of EMI April Music Inc. and More Water From Nazareth Administered by Sony/ATV Music Publishing LLC, 424
Church Street, Suite 1200, Nashville, TN 37219
All Rights on behalf of Universal Pictures Global Music Controlled and Administered by Universal Music Works
International Copyright Secured All Rights Reserved
It's My Life
Words and Music by Jon Bon Jovi, Martin Sandberg and Richie Sambora
Copyright (c) 2000 Universal Music Publishing International Ltd., Bon Jovi Publishing, GV-MXM, Sony/ATV Music Publishing LLC
and Aggressive Music
All Rights for Universal Music Publishing International Ltd. and Bon Jovi Publishing Administered by Universal Music Works
All Rights for GV-MXM Administered Worldwide by Kobalt Songs Music Publishing
All Rights for Sony/ATV Music Publishing LLC and Aggressive Music Administered by Sony/ATV Music Publishing LLC, 424 Church
Street, Suite 1200, Nashville, TN 37219
All Rights Reserved Used by Permission
Perfect
Words and Music by Ed Sheeran
Copyright (c) 2017 Sony/AT V Music Publishing (UK) Limited
All Rights Administered by Sony/ATV Music Publishing LLC, 424 Church Street, Suite 1200, Nashville, TN 37219
International Copyright Secured All Rights Reserved
Shape Of You
Words and Music by Ed Sheeran, Kevin Briggs, Kandi Burruss, Tameka Cottle, Steve Mac and Johnny McDaid
Copyright (c) 2017 Sony/ATV Music Publishing (UK) Limited, EMI April Music Inc., Air Control Music, Kandacy Music, Tiny Tam
Music, Shek'em Down Music, Pepper Drive Music, Tony Mercedes Music, Rokstone Music and Spirit B-Unique Polar Patrol
All Rights on behalf of Sony/ATV Music Publishing (UK) Limited, EMI April Music Inc., Air Control Music, Kandacy Music and Tiny
Tam Music Administered by Sony/ATV Music Publishing LLC, 424 Church Street, Suite 1200, Nashville, TN 37219
All Rights on behalf of Shek'em Down Music Administered by Songs Of Windswept Pacific and Hitco Music
All Rights on behalf of Songs Of Windswept Pacific and Hitco Music Administered by BMG Rights Management (US) LLC
All Rights on behalf of Pepper Drive Music Administered by Warner-Tamerlane Publishing Corp.
All Rights on behalf of Tony Mercedes Music Administered by WB Music Corp.
All Rights on behalf of Rokstone Music in the United States and Canada Administered by Universal - PolyGram International Publish-
ing, Inc.
All Rights on behalf of Spirit B-Unique Polar Patrol Controlled and Administered by Spirit B-Unique Polar Patrol Songs
International Copyright Secured All Rights Reserved
- contains samples of "No Scrubs" by Kevin Briggs, Kandi Burruss and Tameka Cottle (c) 1999 EMI April Music Inc., Air Control
Music, Kandacy Music, Tiny Tam Music, Shek'em Down Music, Pepper Drive Music and Tony Mercedes Music
EZ-300 Owner’s Manual
97
Page 98

Something Just Like This
Words and Music by Andrew Taggart, Chris Martin, Guy Berryman, Jonny Buckland and Will Champion
Copyright (c) 2017 Sony/ATV Music Publishing LLC, EMI April Music Inc., Nice Hair Publishing and Universal Music Publishing
MGB Ltd.
All Rights on behalf of Sony/ATV Music Publishing LLC, EMI April Music Inc. and Nice Hair Publishing Administered by Sony/ATV
Music Publishing LLC, 424 Church Street, Suite 1200, Nashville, TN 37219
All Rights on behalf of Universal Music Publishing MGB Ltd. Administered in the United States and Canada by Universal Music -
MGB Songs
International Copyright Secured All Rights Reserved
Titanium
Words and Music by David Guetta, Sia Furler, Giorgio Tuinfort and Nick Van De Wall
Copyright (c) 2011 What A Publishing Ltd., KMR Music Royalties II SCSp, EMI Music Publishing Ltd., Sony/ATV Music Publishing
LLC and Afrojack Publishing
All Rights for What A Publishing Ltd. and KMR Music Royalties II SCSp Administered Worldwide by Kobalt Songs Music Publishing
All Rights for EMI Music Publishing Ltd. and Sony/ATV Music Publishing LLC Administered by Sony/ATV Music Publishing LLC,
424 Church Street, Suite 1200, Nashville, TN 37219
All Rights for Afrojack Publishing Administered by BMG Rights Management (US) LLC
All Rights Reserved Used by Permission
Tre asu re
Words and Music by Bruno Mars, Ari Levine, Philip Lawrence, Fredrick Brown, Thibaut Berland and Christopher Acito
(c) 2012 BMG GOLD SONGS, MARS FORCE MUSIC, UNIVERSAL MUSIC CORP., TOY PLANE MUSIC, NORTHSIDE INDE-
PENDENT MUSIC PUBLISHING LLC, WB MUSIC CORP., ROC NATION MUSIC, MUSIC FAMAMANEM and SONGS
MUSIC PUBLISHING, LLC o/b/o BECAUSE EDITIONS LTD.
All Rights for BMG GOLD SONGS and MARS FORCE MUSIC Administered by BMG RIGHTS MANAGEMENT (US) LLC
All Rights for TOY PLANE MUSIC Controlled and Administered by UNIVERSAL MUSIC CORP.
All Rights for ROC NATION MUSIC and MUSIC FAMAMANEM Administered by WB MUSIC CORP.
All Rights Reserved Used by Permission
Viva La Vida
Words and Music by Guy Berryman, Jon Buckland, Will Champion and Chris Martin
Copyright (c) 2008 by Universal Music Publishing MGB Ltd.
All Rights in the United States and Canada Administered by Universal Music - MGB Songs
International Copyright Secured All Rights Reserved
EZ-300 Owner’s Manual
98
Page 99

Information for users on collection and disposal of old equipment and used batteries:
These symbols on the products, packaging, and/or accompa nying documents mean that u sed electrical and electronic products and batteries
should not be mixed with general household waste.
For proper treatment, recover y and recycling of old products and used batteries, pleas e take them to applicable co llection points, in
accordance with your national legislation.
By disposing of these products and batteries correctly, you will help to save valuable resources and prevent any potential negative effects on
human health and the environment which could otherwise arise from inappropriate waste handling.
For more information about collection and recycling of old products and batteries, please contact your local municipality, your waste disposal
service or the point of sale where you purchased the items.
For business users in the European Union:
If you wish to discard electrical and electronic equipment, please contact your dealer or supplier for fur ther information.
Information on Disposal in other Countries outside the European Union:
These symbols are only valid in the European Union. If you wish to discard these items, please conta ct your local authorities or dealer and ask
for the correct method of disposal.
Note for the battery symbol (bottom two symbol examples):
This symbol might be used in combination with a chemical symbol. In this c ase it complies with the requirement set by the EU Batte ry
Directive for the chemical involved.
(weee_battery_eu_en_02)
Page 100

Memo
 Loading...