

Yamaha ELB-02 Owner's Manual
Owner’s Manual
ELB-02
EN
Before using the instrument, be sure to read “PRECAUTIONS” on pages 4-5.
For information on assembling the instrument, refer to the instructions at the end of this manual.

ELB-02 Owner’s Manual
2

ELB-02 Owner’s Manual
3
PRECAUTIONS
Power supply/Power cord
Do not open
Water warning
Fire warning
If you notice any abnormality
Power supply/Power cord
Assembly
Location
PLEASE READ CAREFULLY BEFORE PROCEEDING
Please keep this manual in a safe and handy place for future reference.
WARNING
Always follow the basic precautions listed below to avoid the possibility of serious injury or even death from electrical
shock, short-circuiting, damages, fire or other hazards. These precautions include, but are not limited to, the
following:
• Do not place the power cord near heat sources such as heaters or radiators.
Also, do not excessively bend or otherwise damage the cord, or place heavy
objects on it.
• Only use the voltage specified as correct for the instrument. The required
voltage is printed on the name plate of the instrument.
• Use only the supplied power cord/plug.
• Check the electric plug periodically and remove any dirt or dust which may have
accumulated on it.
• This instrument contains no user-serviceable parts. Do not open the instrument
or attempt to disassemble or modify the internal components in any way. If it
should appear to be malfunctioning, discontinue use immediately and have it
inspected by qualified Yamaha service personnel.
• Do not expose the instrument to rain, use it near water or in damp or wet
conditions, or place on it any containers (such as vases, bottles or glasses)
containing liquids which might spill into any openings. If any liquid such as
water seeps into the instrument, turn off the power immediately and unplug the
power cord from the AC outlet. Then have the instrument inspected by qualified
Yamaha service personnel.
• Never insert or remove an electric plug with wet hands.
• Do not put burning items, such as candles, on the unit. A burning item may fall
over and cause a fire.
• When one of the following problems occur, immediately turn off the power
switch and disconnect the electric plug from the outlet. Then have the device
inspected by Yamaha service personnel.
- The power cord or plug becomes frayed or damaged.
- It emits unusual smells or smoke.
- Some object has been dropped into the instrument.
- There is a sudden loss of sound during use of the instrument.
CAUTION
Always follow the basic precautions listed below to avoid the possibility of physical injury to you or others, or damage
to the instrument or other property. These precautions include, but are not limited to, the following:
• Do not connect the instrument to an electrical outlet using a multiple-connector.
Doing so can result in lower sound quality, or possibly cause overheating in the
outlet.
• When removing the electric plug from the instrument or an outlet, always hold
the plug itself and not the cord. Pulling by the cord can damage it.
• Remove the electric plug from the outlet when the instrument is not to be used
for extended periods of time, or during electrical storms.
• Read carefully the attached documentation explaining the assembly process.
Failure to assemble the instrument in the proper sequence might result in
damage to the instrument or even injury.
ELB-02 Owner’s Manual
4
• Do not place the instrument in an unstable position where it might accidentally
fall over.
• When transporting or moving the instrument, always use two or more people.
Attempting to lift the instrument by yourself may damage your back, result in
other injury, or cause damage to the instrument itself.
• Before moving the instrument, remove all connected cables, to prevent damage
to the cables or injury to anyone who might trip over them.
• When setting up the product, make sure that the AC outlet you are using is
easily accessible. If some trouble or malfunction occurs, immediately turn off
the power switch and disconnect the plug from the outlet. Even when the power
switch is turned off, electricity is still flowing to the product at the minimum
level. When you are not using the product for a long time, make sure to unplug
the power cord from the wall AC outlet.
DMI-5 1/2
• Before connecting the instrument to other electronic components, turn off the
Connections
Handling caution
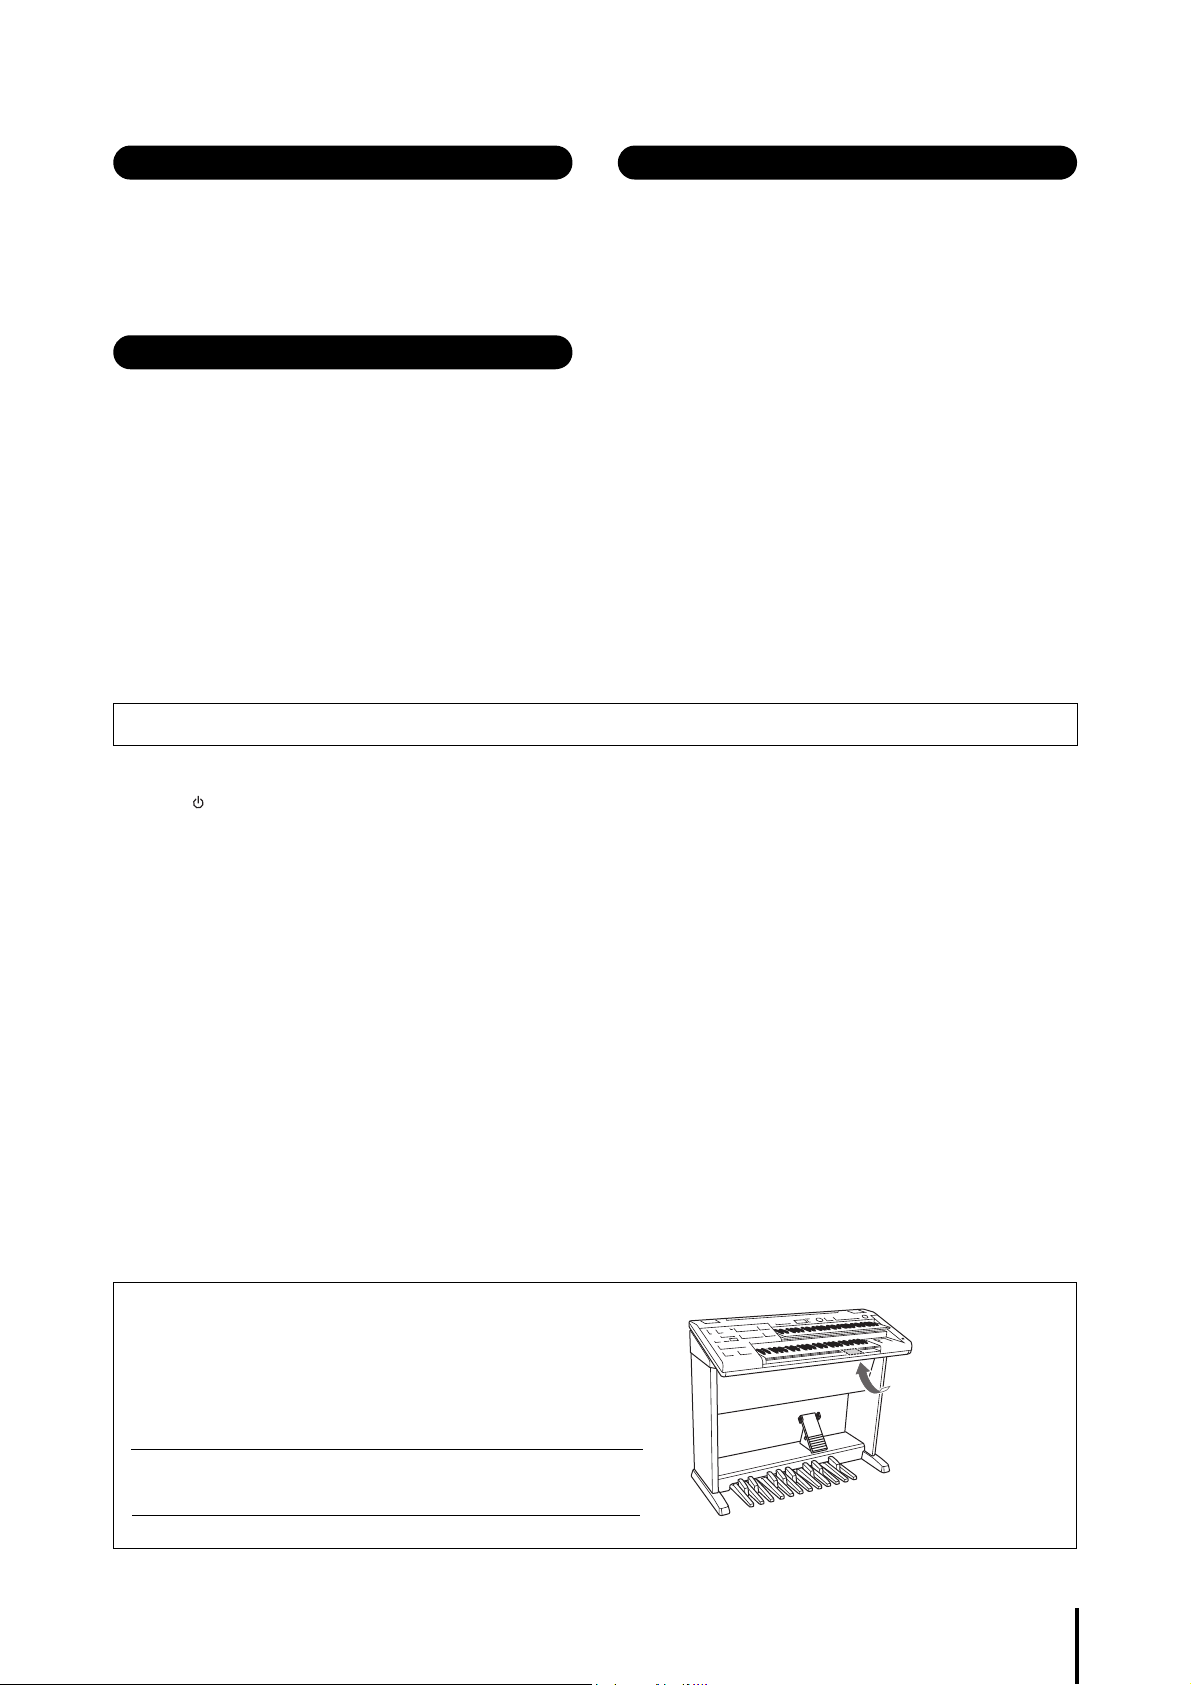
Using the bench (If included)
The model number, serial number, power requirements, etc., may be
found on or near the name plate, which is at the bottom of the unit. You
should note this serial number in the space provided below and retain
this manual as a permanent record of your purchase to aid identification
in the event of theft.
Model No.
Serial No.
The name plate is
located on the bottom
of the unit.
power for all components. Before turning the power on or off for all components,
set all volume levels to minimum.
• Be sure to set the volumes of all components at their minimum levels and
gradually raise the volume controls while playing the instrument to set the
desired listening level.
• Do not insert a finger or hand in any gaps on the instrument.
• Never insert or drop paper, metallic, or other objects into the gaps on the panel
or keyboard. This could cause physical injury to you or others, damage to the
instrument or other property, or operational failure.
• Do not rest your weight on, or place heavy objects on the instrument, and do not
use excessive force on the buttons, switches or connectors.
• Do not use the instrument/device or headphones for a long period of time at a
high or uncomfortable volume level, since this can cause permanent hearing
loss. If you experience any hearing loss or ringing in the ears, consult a
physician.
• Do not rest your legs or feet on the Expression Pedal or Pedal Box from the back
of the instrument, or climb on the instrument, or put excessive weight on it.
Yamaha cannot be held responsible for damage caused by improper use or modifications to the instrument, or data that is lost or destroyed.
• Do not place the bench in an unstable position where it might accidentally fall
over.
• Do not play carelessly with or stand on the bench. Using it as a tool or
stepladder or for any other purpose might result in accident or injury.
• Only one person should sit on the bench at a time, in order to prevent the
possibility of accident or injury.
• If the bench screws become loose due to extensive long-term use, tighten them
periodically using the specified tool in order to prevent the possibility of
accident or injury.
• Keep special watch over any small children so that they don’t fall off the rear of
the bench. Since the bench does not have a backrest, unsupervised use may
result in accident or injury.
Always turn the power off when the instrument is not in use.
Even when the [ ] (Standby/On) switch is in standby status (display is off), electricity is still flowing to the instrument at the minimum level.
When you are not using the instrument for a long time, make sure you unplug the power cord from the wall AC outlet.
DMI-5 2/2
(bottom_en_01)
ELB-02 Owner’s Manual
5

NOTICE
To avoid the possibility of malfunction/ damage to the product, damage to data, or damage to other property,
follow the notices below.
Handling
• Do not use the instrument in the vicinity of a TV, radio, stereo equipment, mobile phone, or other electric devices.
Otherwise, the instrument, TV, or radio may generate noise. When you use the instrument along with an application on
your iPad, iPhone or iPod touch, we recommend that you set “Airplane Mode” to “ON” on that device in order to avoid
noise caused by communication.
• Do not expose the instrument to excessive dust or vibrations, or extreme cold or heat (such as in direct sunlight, near a
heater, or in a car during the day) to prevent the possibility of panel disfiguration, damage to the internal components or
unstable operation. (Verified operating temperature range: 5° – 40°C, or 41° – 104°F.)
• Do not place vinyl, plastic or rubber objects on the instrument, since this might discolor the panel or keyboard.
Maintenance
• When cleaning the instrument, use a soft cloth. Do not use paint thinners, solvents, alcohol, cleaning fluids, or
chemical-impregnated wiping cloths.
• During extreme changes in temperature or humidity, condensation may occur and water may collect on the surface of
the instrument. If water is left, the wooden parts may absorb the water and be damaged. Make sure to wipe any water off
immediately with a soft cloth.
Saving data
• Save your important Registration data onto the USB flash drive (page 116) since the Registration data memorized to the
instrument will be overwritten by certain operations, such as Song playback, etc. Before using a USB flash drive, make
sure to refer to page 132.
•A “” mark appears at the top left of the display indicating that the Registration data is currently being saved. Do not
turn the power off while the Registration is being saved, otherwise the data will be lost.
The Registration Shift settings and Keyboard Percussion settings will be automatically saved to the Registration data
when you switch to another display. While data is being saved, “” appears at the top left of the display indicating that
the Registration data is currently being saved. Do not turn the power off without switching to another display or while
“” is shown in the display, otherwise the data will be lost.
• To protect against data loss through USB flash drive damage, we recommend that you save your important data onto a
spare USB flash drive as backup data.
Information
About copyrights
• Copying of the commercially available musical data including but not limited to MIDI data and/or audio data is strictly
prohibited except for your personal use.
• This product incorporates and bundles contents in which Yamaha owns copyrights or with respect to which Yamaha has
license to use others' copyrights. Due to copyright laws and other relevant laws, you are NOT allowed to distribute
media in which these contents are saved or recorded and remain virtually the same or very similar to those in the
product.
* The contents described above include a computer program, Accompaniment Style data, MIDI data, WAVE data, voice recording data, a score,
score data, etc.
* You are allowed to distribute medium in which your performance or music production using these contents is recorded, and the permission of
Yamaha Corporation is not required in such cases.
ELB-02 Owner’s Manual
6
About functions/data bundled with the instrument
• This device is capable of using various types/formats of music data by optimizing them to the proper format music data
for use with the device in advance. As a result, this device may not play them back precisely as their producers or
composers originally intended.
• The bitmap fonts used in this instrument have been provided by and are the property of Ricoh Co., Ltd.
About this manual
• The illustrations and LCD screens as shown in this manual are for instructional purposes only, and may appear
somewhat different from those on your instrument.
• iPhone, iPad and iPod touch are trademarks of Apple Inc., registered in the U.S. and other countries.
• Electone and STAGEA are the trademarks of Yamaha Corporation.
• The company names and product names in this manual are the trademarks or registered trademarks of their respective
companies.
Compatible Format
“GM (General MIDI)” is one of the most common Voice allocation formats. “GM System Level 2” is a standard
specification that enhances the original “GM” and improves Song data compatibility. It provides for increased
polyphony, greater Voice selection, expanded Voice parameters, and integrated effect processing.
XG is a major enhancement of the GM System Level 1 format, and was developed by Yamaha specifically
to provide more Voices and variations, as well as greater expressive control over Voices and effects, and
to ensure compatibility of data well into the future.
GS was developed by the Roland Corporation. In the same way as Yamaha XG, GS is a major
enhancement of the GM specifically to provide more Voices and Drum kits and their variations, as well
as greater expressive control over Voices and effects.
ELB-02 Owner’s Manual
7
Congratulations!
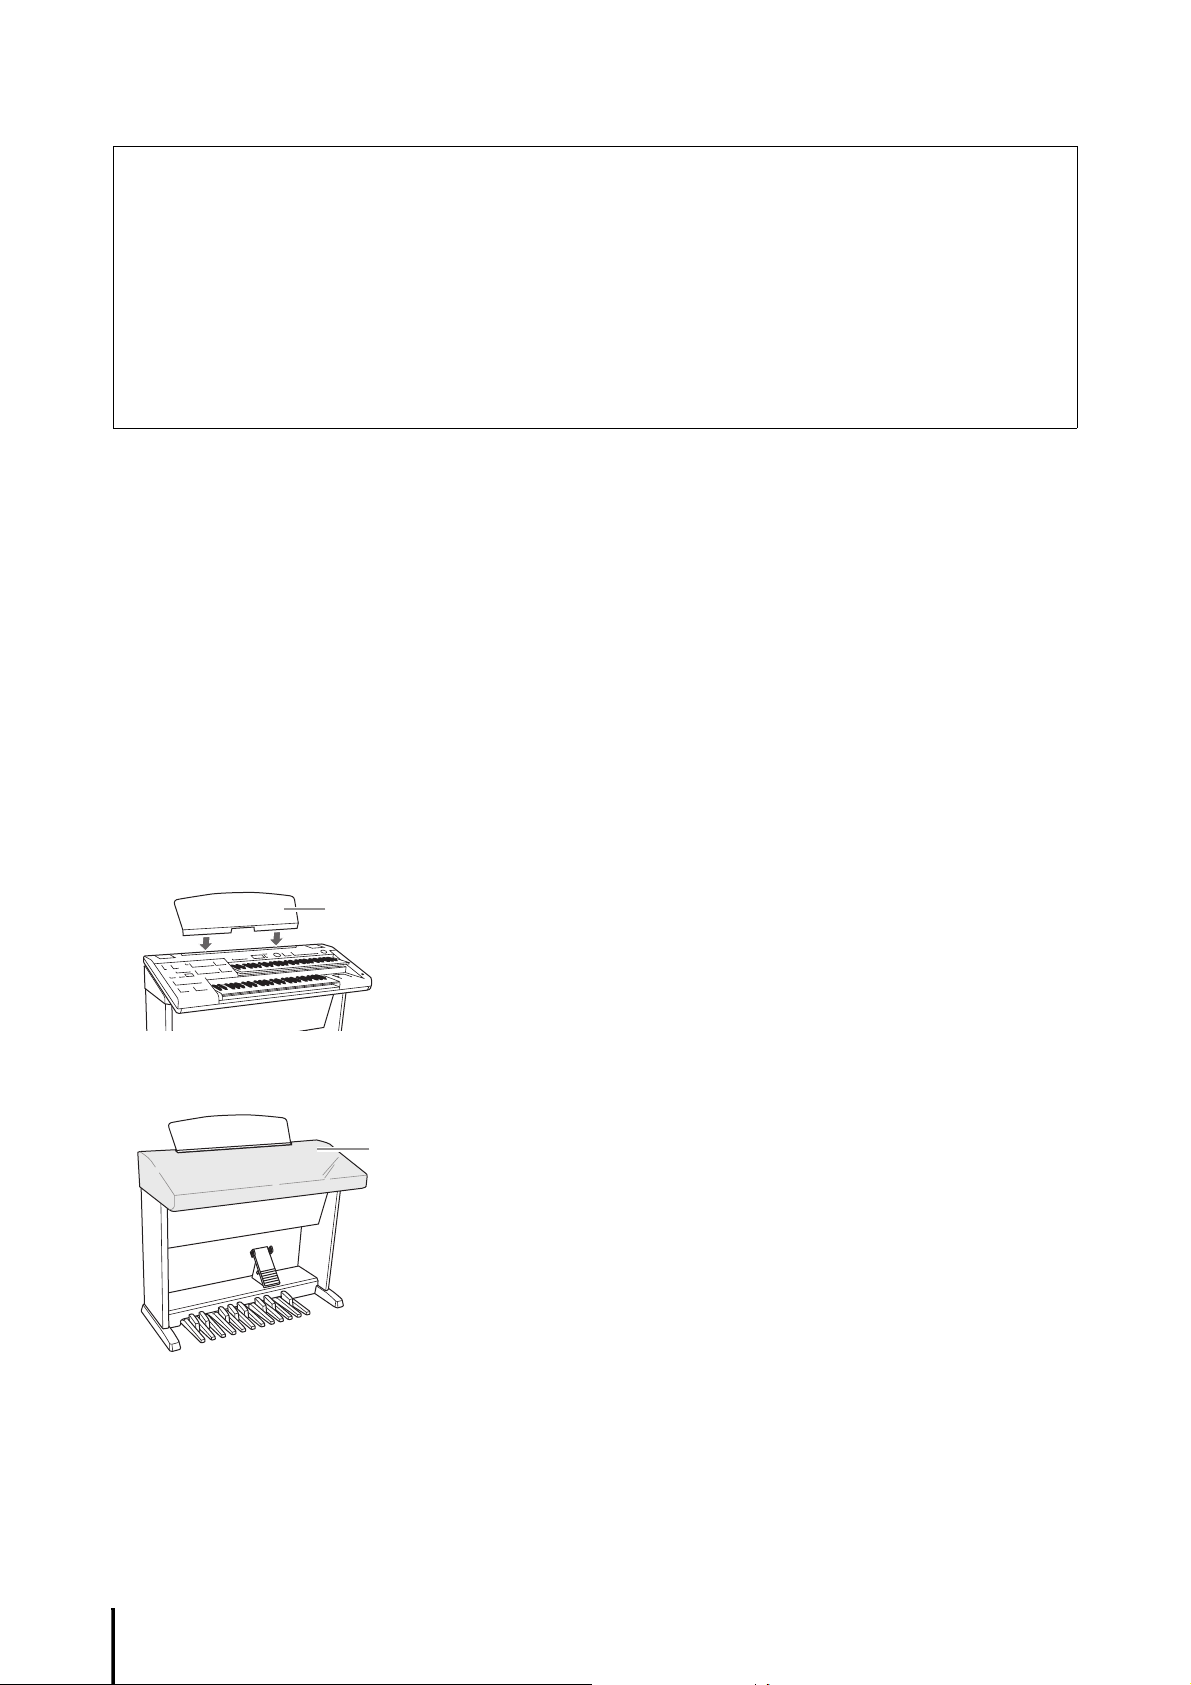
Insert the music rest into the slots as shown.
Dust Cover
Thank you for purchasing this Yamaha Electone!
We recommend that you read this manual carefully so that you can fully take advantage
of the advanced and convenient functions of the instrument. We also recommend that
you keep this manual in a safe and handy place for future reference.
Included Accessories
Owner’s Manual (this book)
Playing the ELB-02 — Tutorial Guidebook
Online Member Product Registration
The “PRODUCT ID” on the sheet will be needed when you fill out the User Registration form.
Music Rest
Dust Cover
Power Cord
Bench
ELB-02 Owner’s Manual
8
About the Manuals
This instrument has the following documents and instructional materials.
Included Documents
Owner’s Manual (this book)
Provides overall explanations of the Electone functions.
Playing the ELB-02 — Tutorial Guidebook
This useful book helps you familiarize yourself with the Electone, giving you basic information on
playing the instrument, including the proper playing posture, and providing helpful music scores
which get you started playing the Electone using the preset Registration menu. This book also includes
information on how to record your performance to the USB flash drive, and listen back to your
recorded performances.
Online Materials (PDF)
iPhone/iPad Connection Manual
Explains how to connect this instrument to the iPhone/iPad.
MIDI Reference
Contains MIDI related information such as MIDI Data Format and the MIDI Implementation Chart.
To obtain these manuals, access the Yamaha Downloads website, select your country, enter “ELB-02” in the
Model Name box, then click [Search].
Yamaha Downloads
http://download.yamaha.com/
ELB-02 Owner’s Manual
9

Contents
PRECAUTIONS.................................................................... 4
NOTICE ................................................................................ 6
Information............................................................................ 6
Congratulations! ................................................................... 8
Included Accessories............................................................ 8
About the Manuals................................................................ 9
Main Features..................................................................... 12
Panel Controls and Terminals 13
Overview............................................................................. 13
Front Panel ......................................................................... 14
Quick Introductory Guide 16
Power Supply ..................................................................... 16
Turning On/Off the Power ................................................... 16
Adjusting the Volume ......................................................... 17
Adjusting the Contrast of the Display................................. 18
Using Headphones ............................................................ 19
1 Basic Operation 20
Registration Menu .............................................................. 20
Selecting Registrations from the Registration Menu.. 20
Registration Menu List ............................................... 22
Using the LCD display ....................................................... 25
Selecting from a list in the display ............................. 25
Selecting an item and changing its value.................. 25
Changing the Display Page ....................................... 26
Basic Operation.................................................................. 27
Selecting the Display Language................................ 27
Factory Set (Initializing the Electone)......................... 27
Confirming the Version of Your Electone ................... 28
2 Voices 29
Voices for Each Keyboard.................................................. 29
Voice Display...................................................................... 31
Selecting Voices with the Voice buttons ............................ 33
Selecting Voices for Voice section 1.......................... 33
Adjusting the Voice volume ....................................... 34
Selecting a Voice for Voice section 2 ................................. 36
Switching between Voice section 1 and Voice
section 2 .................................................................. 36
Selecting Voices for Voice Section 2 ......................... 37
Selecting Voices from the User buttons ............................. 39
Voice List ............................................................................ 42
3 Voice Controls and Effects 52
Selecting from the Voice Condition display ....................... 53
Rotary Speaker .......................................................... 60
Selecting from the panel .................................................... 61
Reverb........................................................................ 61
Sustain ....................................................................... 63
Effect List............................................................................ 64
4 Rhythm/Keyboard Percussion 68
Selecting rhythms with the Rhythm buttons ...................... 68
To select and play a rhythm...................................... 68
Operating the rhythm from the panel........................ 71
Adjusting the tempo .................................................. 73
Changing the rhythm volume/reverb......................... 74
Selecting rhythms from the User buttons .......................... 75
Rhythm List ........................................................................ 77
Accompaniment ................................................................ 79
Automatic Accompaniment—Auto Bass Chord (A.B.C.) .. 82
Melody On Chord (M.O.C.) ............................................... 85
Keyboard Percussion ........................................................ 88
Using the Preset Keyboard Percussion .................... 88
Preset Keyboard Percussion List .............................. 90
Assigning sounds to the User Keyboard Percussion
.............................................................................. 101
Recalling the User Keyboard Percussion ............... 104
Kit Assign List.......................................................... 105
5 Registration Memory 111
Storing Registrations ....................................................... 111
Selecting Registrations .................................................... 113
Storing Registrations to Another Bank............................. 116
Deleting Banks ................................................................ 117
Saving the Registration Data to USB Flash Drive............ 118
Initializing Registration Memory....................................... 120
Registration Shift.............................................................. 121
6 Music Data Recorder (MDR) 127
Calling Up the MDR Display ............................................ 127
Using the MDR Display ................................................... 128
Song icons .............................................................. 130
Connecting a USB Device............................................... 132
Precautions when using the [USB TO DEVICE]
terminal ................................................................. 132
Using USB Flash Drives .......................................... 132
Formatting a USB Flash Drive ......................................... 133
Selecting a Song ............................................................. 134
Recording ........................................................................ 138
Recording................................................................ 138
Re-recording (Retry) ............................................... 140
Recording Each Part Separately............................. 140
Punch-in Recording ................................................ 143
Changing the Song/Folder Name.................................... 144
Saving Registrations ........................................................ 147
Saving Two or More Registration Units to One Song
.............................................................................. 149
Overwriting Registration data to a Unit ................... 151
Deleting Registrations ............................................. 152
Next Unit Settings (using more than 80 Registrations
in one performance) ............................................. 153
Recalling Recorded Registrations................................... 154
Loading Registrations ............................................. 154
Playing Back a Song ....................................................... 155
Playing Back Selected Parts ................................... 157
Rewind, Fast Forward and Pause ........................... 157
ELB-02 Owner’s Manual
10
Changing the Tempo ............................................... 158
1
2
3
4
5
6
7
8
9
10
11
Repeat Playback...................................................... 159
Playing Back XG Songs ........................................... 160
Other Operations — Copy, Delete, etc. ........................... 161
Copy......................................................................... 161
Song Delete/Folder Delete....................................... 164
Creating folders ....................................................... 165
Converting to XG format .......................................... 166
Checking the Remaining Memory............................ 168
7 Audio 169
Quick Introductory
Guide
Basic Operation
Recording Your Performance as Audio............................ 169
Playing Back Audio Files .................................................. 172
Rewind, Fast Forward and Pause ............................ 173
Changing the Volume, Tempo and Pitch ................. 174
Deleting the File / Changing the File Name............. 176
8 Footswitches 177
Right Footswitch ............................................................... 177
Left Footswitch ................................................................. 177
9 Transpose and Pitch Controls 181
10 Connections 182
Accessory Jacks and Controls......................................... 182
Connection Examples — External Devices...................... 184
Playing the Sounds of the Electone Through
an External Audio System...................................... 184
Outputting the sound of an external device through
the built-in speakers of the Electone ..................... 184
Controlling External MIDI Devices from the Electone
............................................................................... 185
Controlling the Electone from an External Device ... 185
Connection with Computer............................................... 186
Using the [USB TO HOST] terminal ......................... 186
MIDI .................................................................................. 187
What is MIDI? ........................................................... 187
MIDI Messages of the Electone ............................... 188
MIDI Channels ......................................................... 189
MIDI Control ..................................................................... 190
Connecting to an iPhone/iPad.......................................... 192
Wireless LAN settings .............................................. 192
Wireless LAN Detailed Settings ............................... 198
Initialize the wireless LAN settings........................... 200
Glossary of Terms .................................................... 201
Voices
Voice Controls
and Effects
Rhythm/Keyboard
Percussion
Registration
Memory
Music Data
Recorder (MDR)
Audio
Footswitches
Transpose and
Pitch Controls
11 Appendix 202
Assembly Instructions ...................................................... 202
Troubleshooting................................................................ 206
Specifications ................................................................... 209
Index................................................................................. 211
Connections
Appendix
ELB-02 Owner’s Manual
11

Main Features
Wide Variety of Registration Menus
The Registration Menu buttons feature a total of 601 Registrations, allowing you to instantly set up the
Electone for playing your favorite type of music. The Registrations in Registration Menu are divided into six
basic categories for ease of selection. Moreover, you can edit any of the Registrations and customize them to fit
your own performance needs.
Richly textured, AWM Voices, Touch functions and High Quality
page 20
pages 29, 52
Digital Effects
The ELB-02 contains a huge amount of exceptionally high-quality Voices—540 altogether—created with the
AWM (Advanced Wave Memory) tone generation system, including special Super Articulation Voices, which
realistically recreate characteristic instrument sounds. With highly playable keyboards featuring authentic
touch response—with Initial Touch and After Touch functions—you can play these Voices with all the
expressiveness and control of an actual acoustic instrument. What’s more, there is a wide variety of effect types
that you can apply to each Voice section—letting you enhance and even completely change the character of the
Vo ic e s .
Dynamic, Contemporary Rhythms and Auto Accompaniment
The exceptionally wide selection of various rhythms lets you choose exactly the rhythm you need in your
performance. Each rhythm contains 15 variations (sections) —such as Main, Fill In, Intro, Ending, and
Break—that you can easily switch while you play, to make your performance even more dynamic and
professional. Each rhythm has its own matching accompaniment divided into five instrument parts, providing
basic backing as well as embellishments.
page 68
Keyboard Percussion
This powerful feature allows you to play drum and percussion sounds from the keyboard. A wide range of
sounds and drum/percussion kits are available, for performing rhythms in real time. Each sound is assigned to
its own key, and the sounds include everything from conventional kicks and snares to a wide variety of ethnic
and Latin instruments, as well as special sound effects, such as thunder, laughing, animal cries and more.
Versatile Functions of the Music Data Recorder
The Electone also features a Music Data Recorder (MDR) for recording your Registrations and performances
to a USB flash drive, and playing back those performances using the sounds of the Electone. In addition, the
MDR allows you to copy a Song from one USB flash drive to another, letting you archive your important
recordings and Registration data.
Audio Recording
You can record your performances as audio data (.WAV) to a USB flash drive. Since the data is saved in stereo
WAV format of normal CD quality resolution (44.1kHz/16bit), it can be transmitted to and played on portable
music players by using a computer, allowing you to share your recordings with your friends, and make your
own CDs to enjoy as well.
page 88
page 127
page 169
ELB-02 Owner’s Manual
12
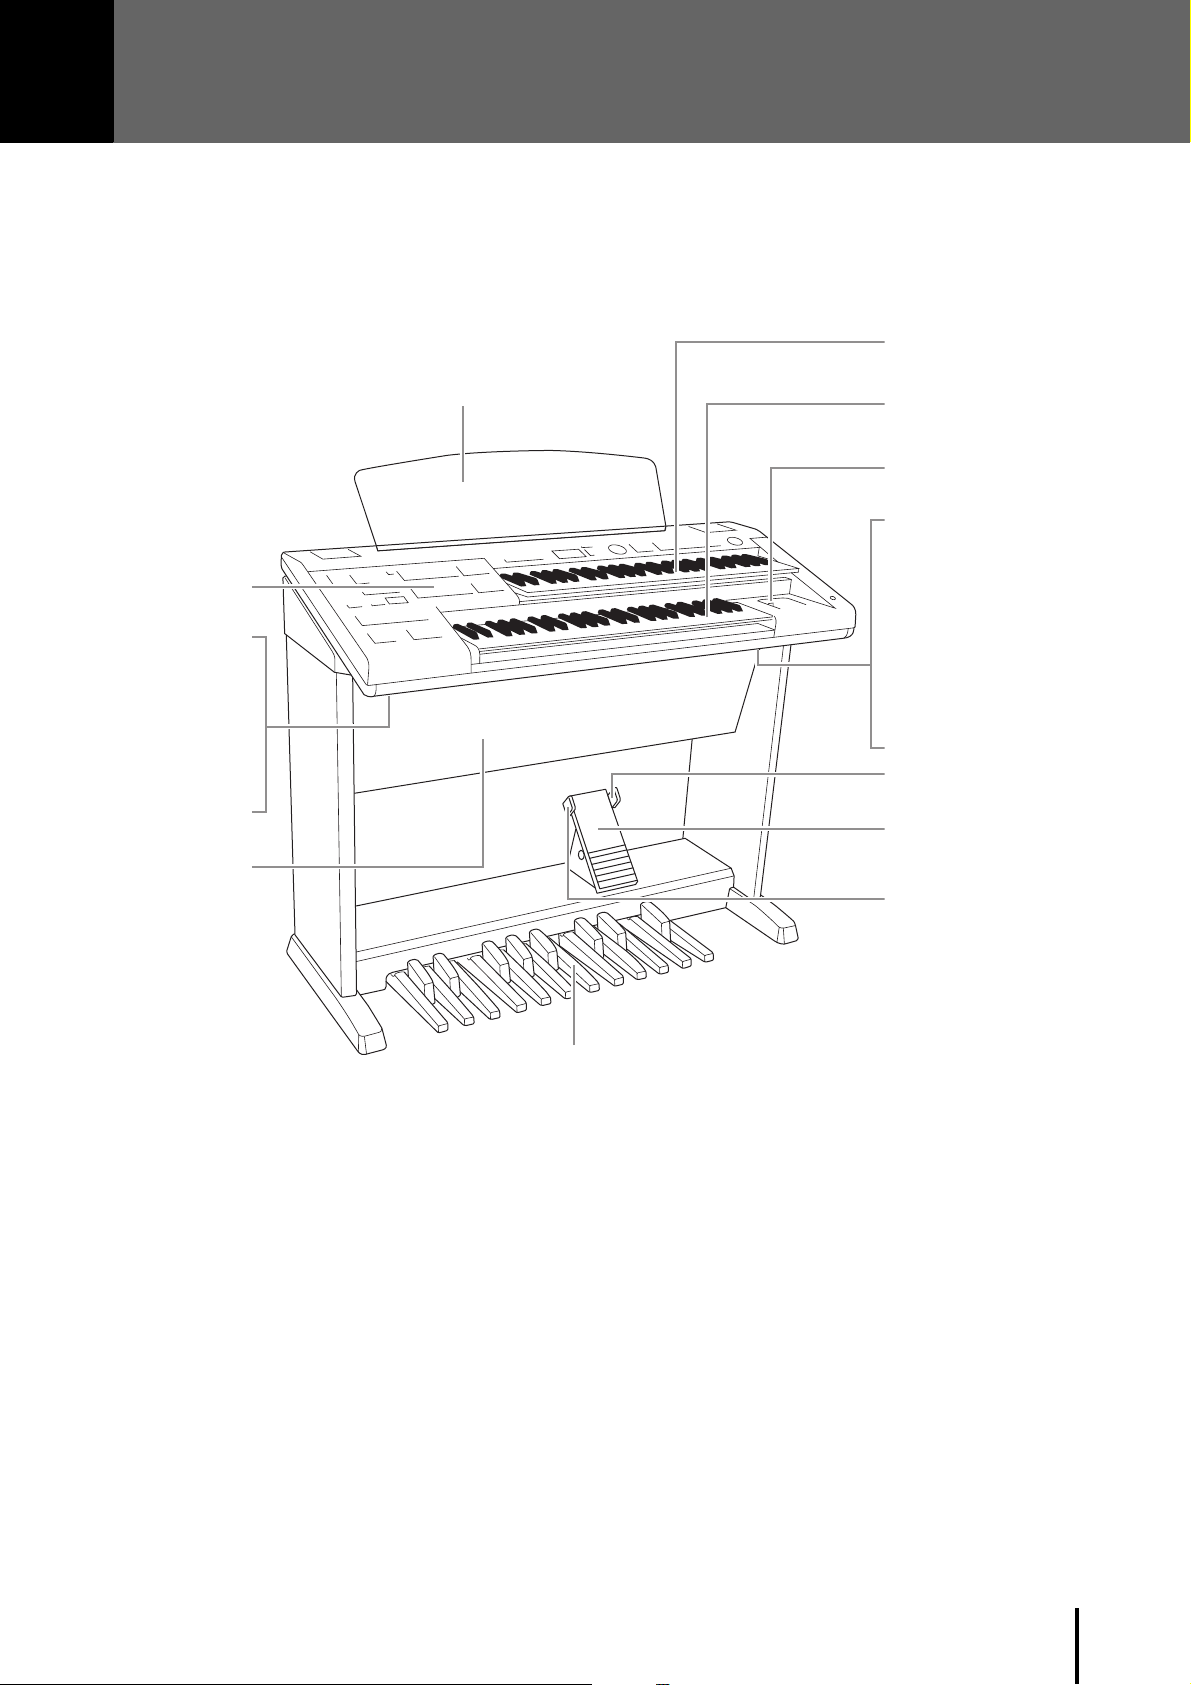
Panel Controls and Terminals
Overview
Upper Keyboard
Music Rest
page 8
Front Panel
[AUX IN] jack
page 182
AUX OUT [L/L+R]/
[R] jack
page 182
[PHONES] jack
page 182
Speaker
page 29
Lower Keyboard
page 29
[USB TO DEVICE] terminal
page 183
MIDI terminals
page 183
[USB TO DEVICE] terminal
page 183
[USB TO HOST] terminal
page 183
[AC IN] jack
For connecting a power
cord. page 16
Right Footswitch
page 121
Expression Pedal
page 17
Left Footswitch
page 177
Pedalboard
page 29
ELB-02 Owner’s Manual
13
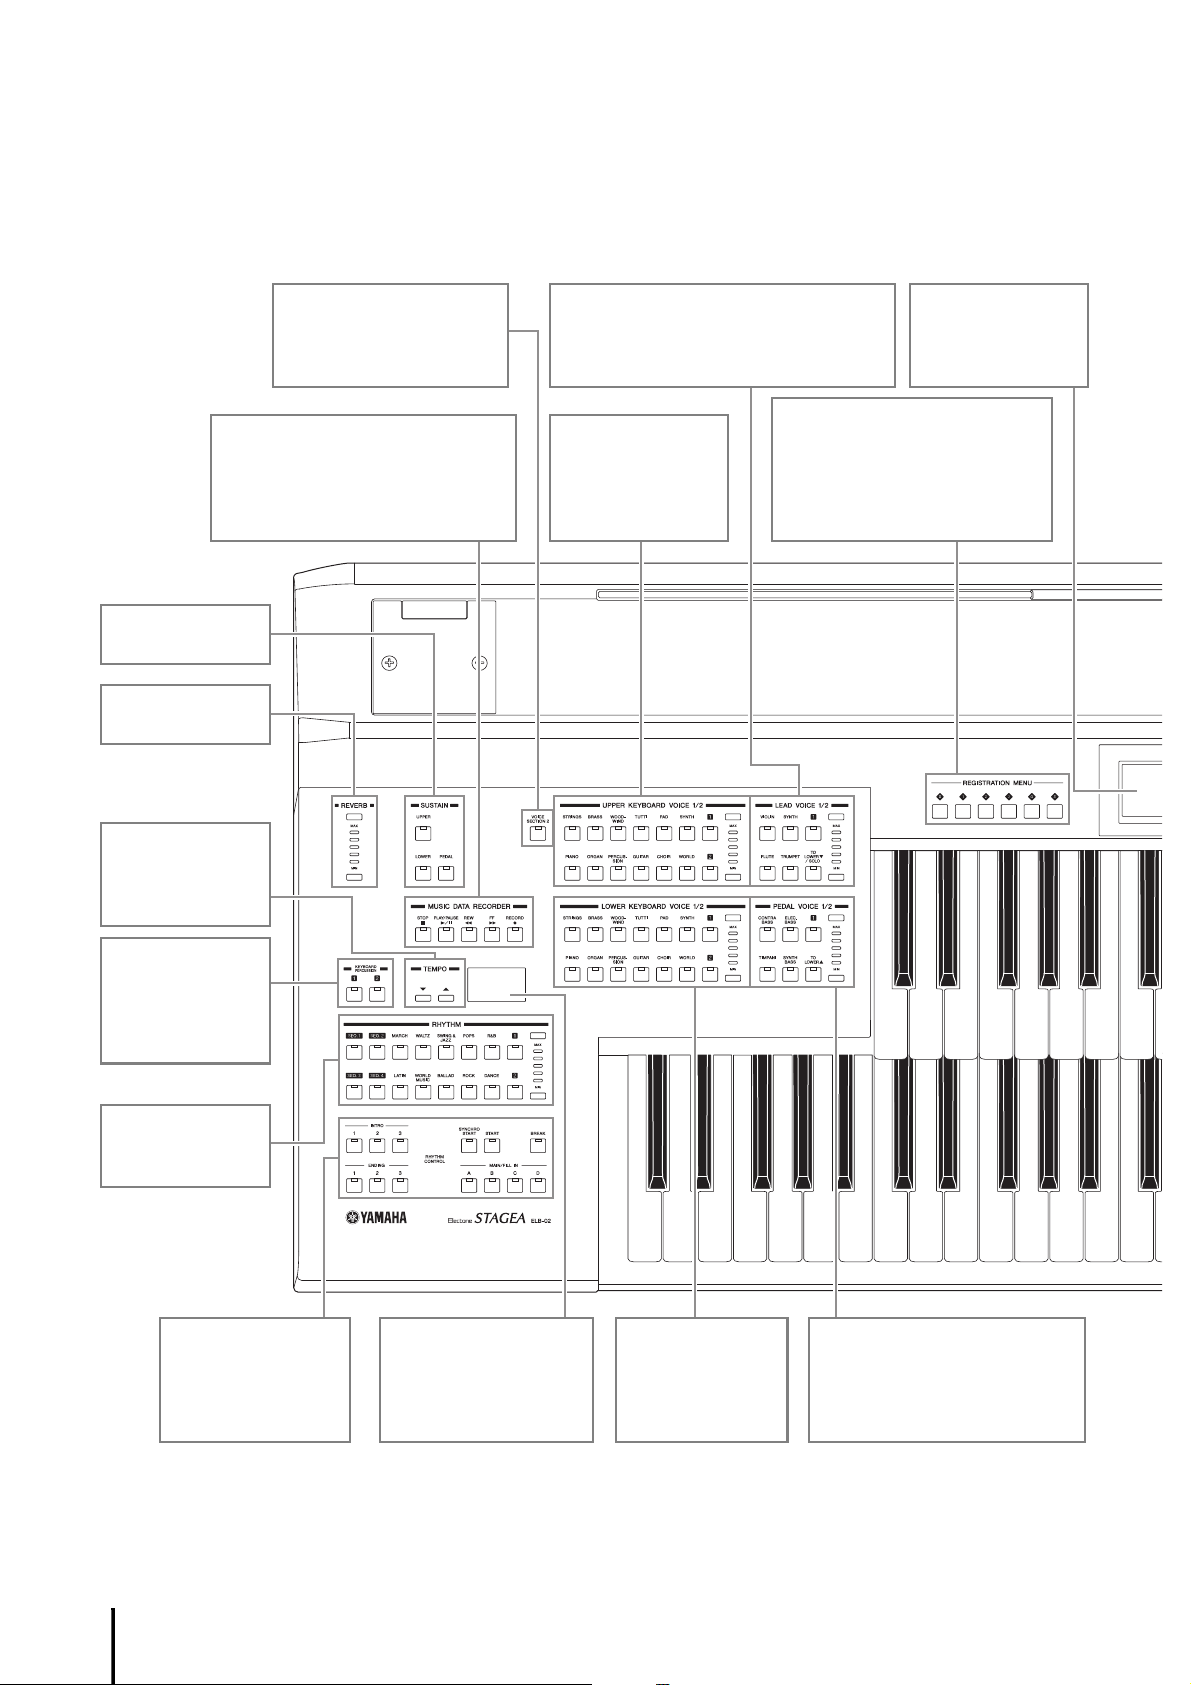
Front Panel
C1 D1 E1 F1 G1 A1 B1 C2 D2 E2 F2 G2 A2 B2 C3
C2 D2 E2 F2 G2 A2 B2 C3
MUSIC DATA RECORDER (MDR)
Allows recording and playback of
your keyboard performances, and
lets you store Registration data for
future recall (page 127).
[VOICE SECTION 2]
button
Switches between Voice
sections 1 and 2 (page 33).
UPPER KEYBOARD
VOICE
Selects the Voices
for Upper Keyboard
(page 29).
LEAD VOICE
Selects the Lead Voices for Upper Keyboard
(page 29). Also available on the Lower
Keyboard while “To Lower” function is on.
REGISTRATION MENU
Selects convenient Registrations,
which let you instantly reconfigure
all relevant settings, allowing you
to start playing with all appropriate
sounds pre-selected (page 20).
LCD display
Shows the current
settings of the
Electone (page 25).
SUSTAIN buttons
(page 63)
REVERB buttons
(page 61)
TEMPO buttons
Adjusts the speed
of the rhythm
(page 73).
KEYBOARD
PERCUSSION
Turns Keyboard
Percussion On or
Off (page 88).
RHYTHM
Sets the rhythm
(page 68).
RHYTHM CONTROL
Starts and stops the
rhythm, and adds
changes to the
rhythm (page 71).
Tempo, Bar/Beat
display
Shows the current
tempo or position in the
measure (page 73).
LOWER
KEYBOARD VOICE
Selects the Voices
for Lower Keyboard
(page 30).
PEDAL VOICE
Selects the Voices for Pedalboard
(page 30). Also available on the
Lower Keyboard while “To Lower”
function is on.
Panel Setup (Panel Settings)
By using the controls on the panel, you can make various settings such as selecting a Voice or Style, tuning the pitch, and so on. These settings
of the instrument are together referred to as “panel setup” or “panel settings” in this manual.
ELB-02 Owner’s Manual
14
D3 E3 F3 G3 A3 B3 C4 D4 E4 F4 G4 A4 B4 C5
D3 E3 F3 G3 A3 B3 C4 D4 E4 F4 G4 A4 B4 C5 D5 E5 F5 G5 A5 B5 C6
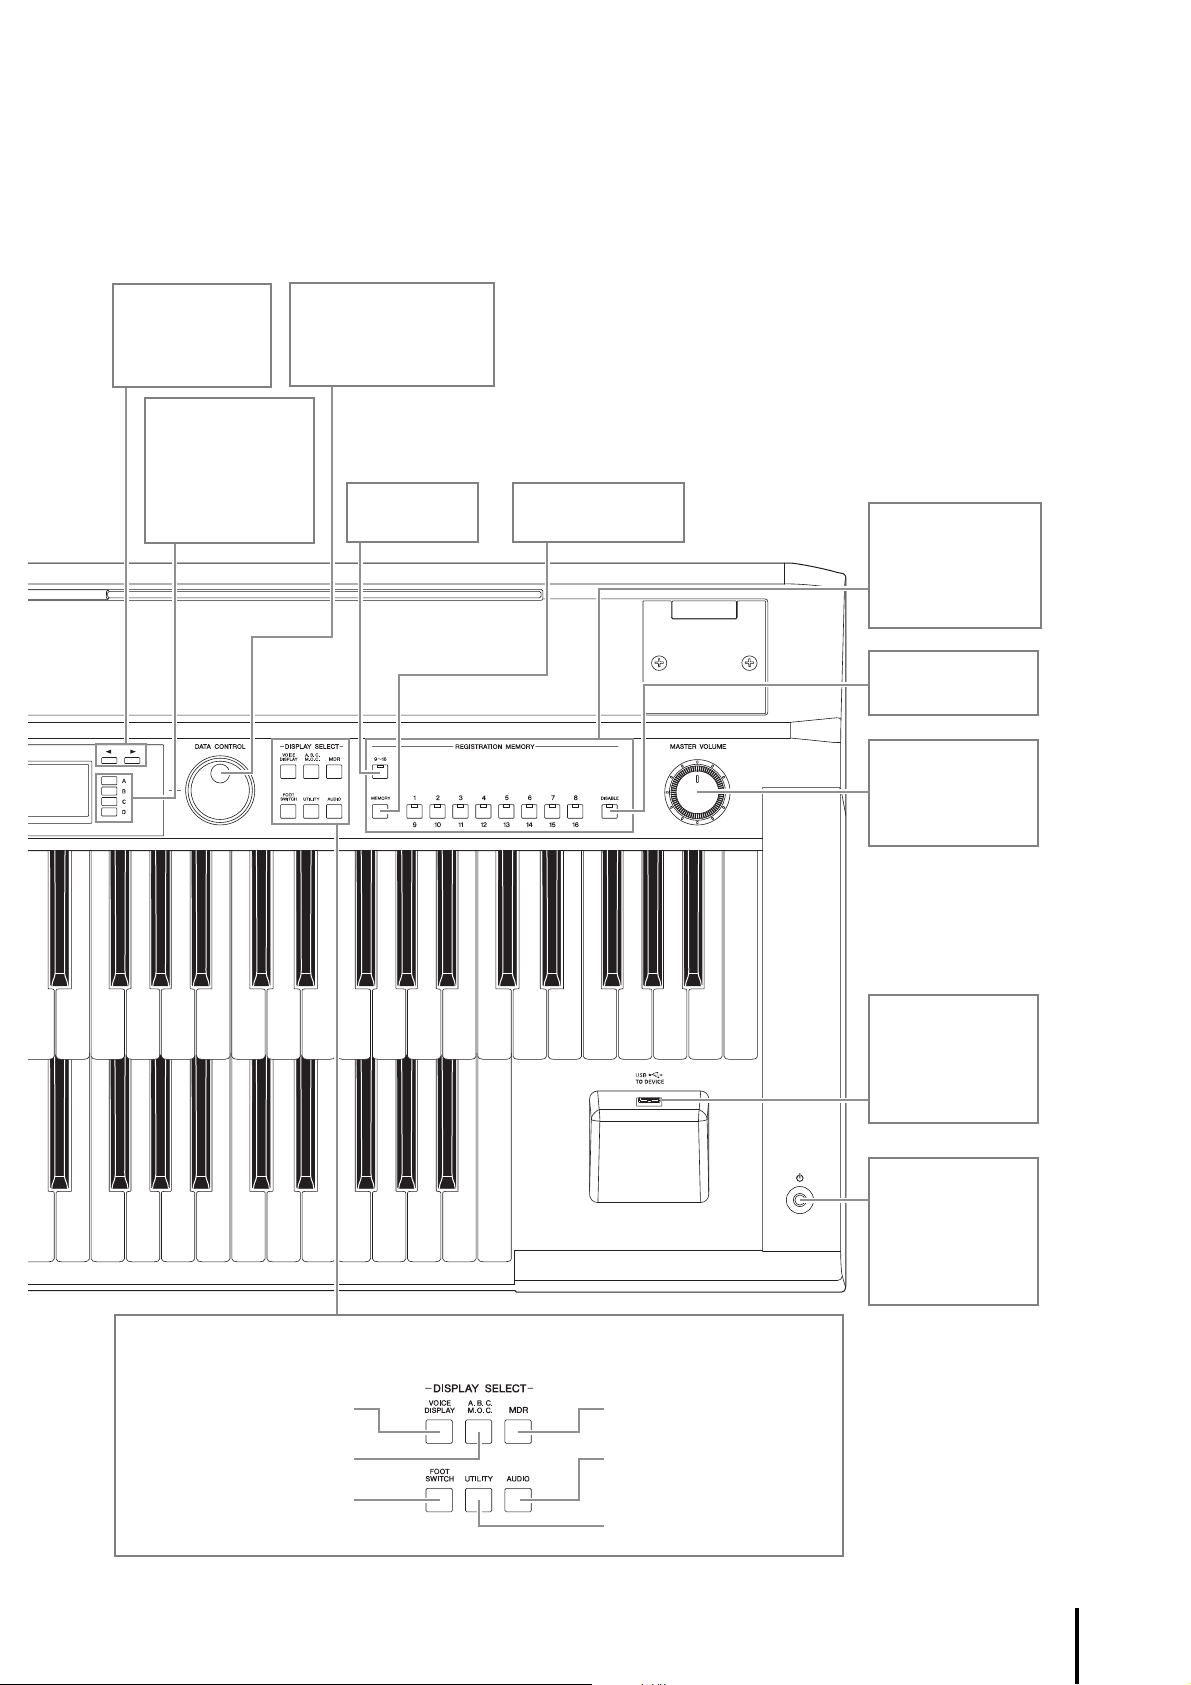
Display Select
[VOICE DISPLAY] button
(page 31)
[A.B.C./M.O.C.] button
(page 82)
[FOOTSWITCH] button
(page 177)
[MDR] button (page 127)
[AUDIO] button
(page 169)
[UTILITY] button
(page 27)
Page buttons
Selects the Page
of the display
(page 26).
DATA CONTROL dial
Selects the setting or
value in the display
(page 25).
Data Control [A] –
[D] buttons
Selects items and
changes the values/
settings in the
display (page 25).
[9-16] button
(page 112)
[MEMORY] button
(page 111)
REGISTRATION
MEMORY buttons
For registering and
recalling panel
setups (page 111).
[DISABLE] button
(page 114)
MASTER VOLUME
dial
Adjusts the overall
volume (page 17).
[USB TO DEVICE]
terminal
For connecting a
USB flash drive
(page 183).
[P] (Standby/On)
switch
Turns the
instrument’s power
on or sets it to
standby (page 16).
ELB-02 Owner’s Manual
15
Quick Introductory Guide
1
2
[AC IN] jack
(page 13)
AC Outlet
The shape of the
plug and outlet
differs depending
on your locale.
WARNING
Use only the supplied
power cord.
CAUTION
When setting up the
product, make sure that
the AC outlet you are using
is easily accessible. If
some trouble or
malfunction occurs,
immediately turn off the
power switch and
disconnect the plug from
the outlet.
NOTE
When disconnecting the
power cord, first turn off the
power, then follow this
procedure in reverse order.
NOTICE
Do not press any keys or
buttons while turning the
power on. Doing so may
cause the Electone to
malfunction or data loss.
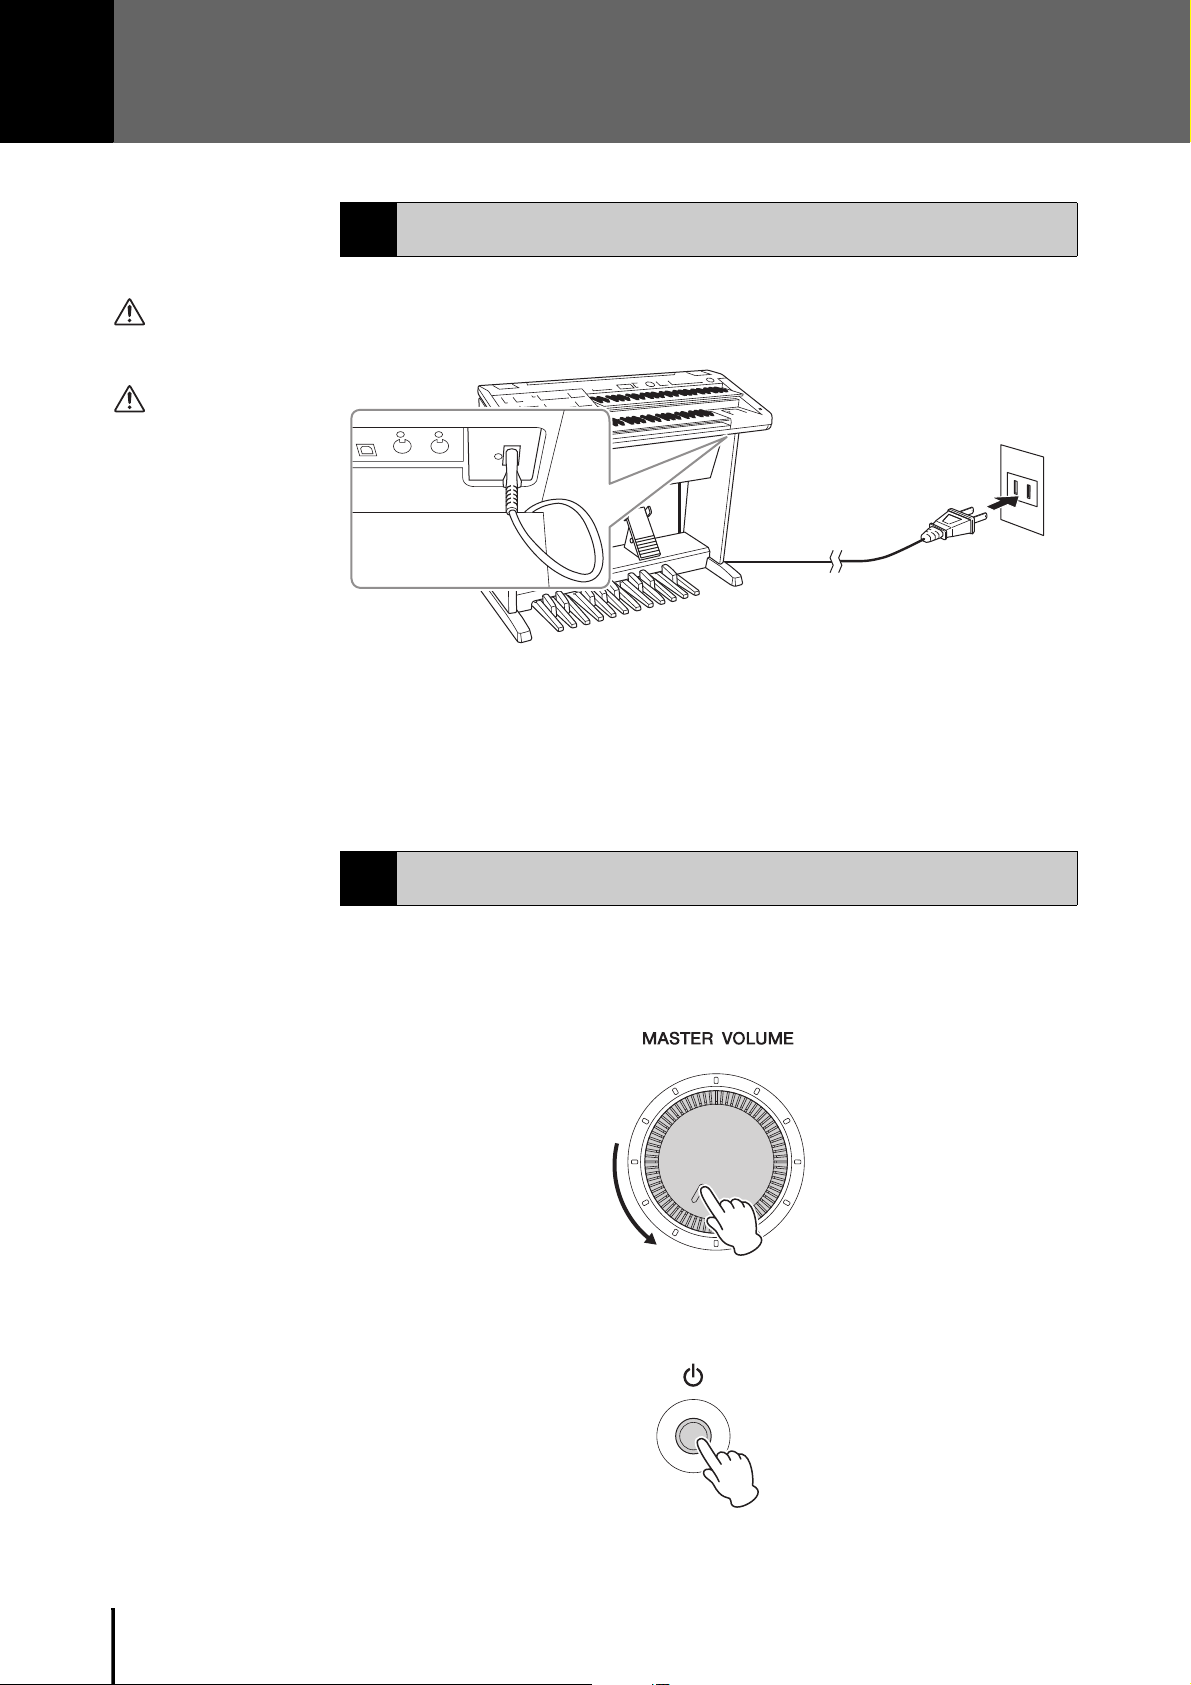
Power Supply
1
Connect the plugs of the power cord in the order shown in the illustration.
ELB-02 Owner’s Manual
16
Turning On/Off the Power
2
1
Turn down the [MASTER VOLUME] dial counter-clockwise.
2 Press the [P] (Standby/On) switch to turn the power on.

When you turn on the Electone, the following displays will appear one after the
CAUTION
Even when the [P]
(Standby/On) switch is in
standby status, electricity
is still flowing to the
instrument at the minimum
level. Remove the electric
plug from the outlet when
the instrument is not to be
used for extended periods
of time, or during electrical
storms.
CAUTION
Do not use the instrument
for a long period of time at
a high or uncomfortable
volume level, since this
can cause permanent
hearing loss.
Decreases the volume Increases the volume
Maximum volume Minimum volume
other on the LCD display:
This last display, Voice Display, shows you the currently assigned voice settings
for each Voice section (page 31).
3 Press and hold the [P] (Standby/On) switch for about a second to
turn the power off.
Adjusting the Volume
3
1
Set the MASTER VOLUME control.
The MASTER VOLUME control is an overall control that affects the volume of
the entire instrument.
Quick Introductory Guide
2 Press the Expression pedal down with your foot.
Once you have set the MASTER VOLUME control to a suitable level, you can
use the Expression pedal to change the volume with your foot as you play.
ELB-02 Owner’s Manual
17
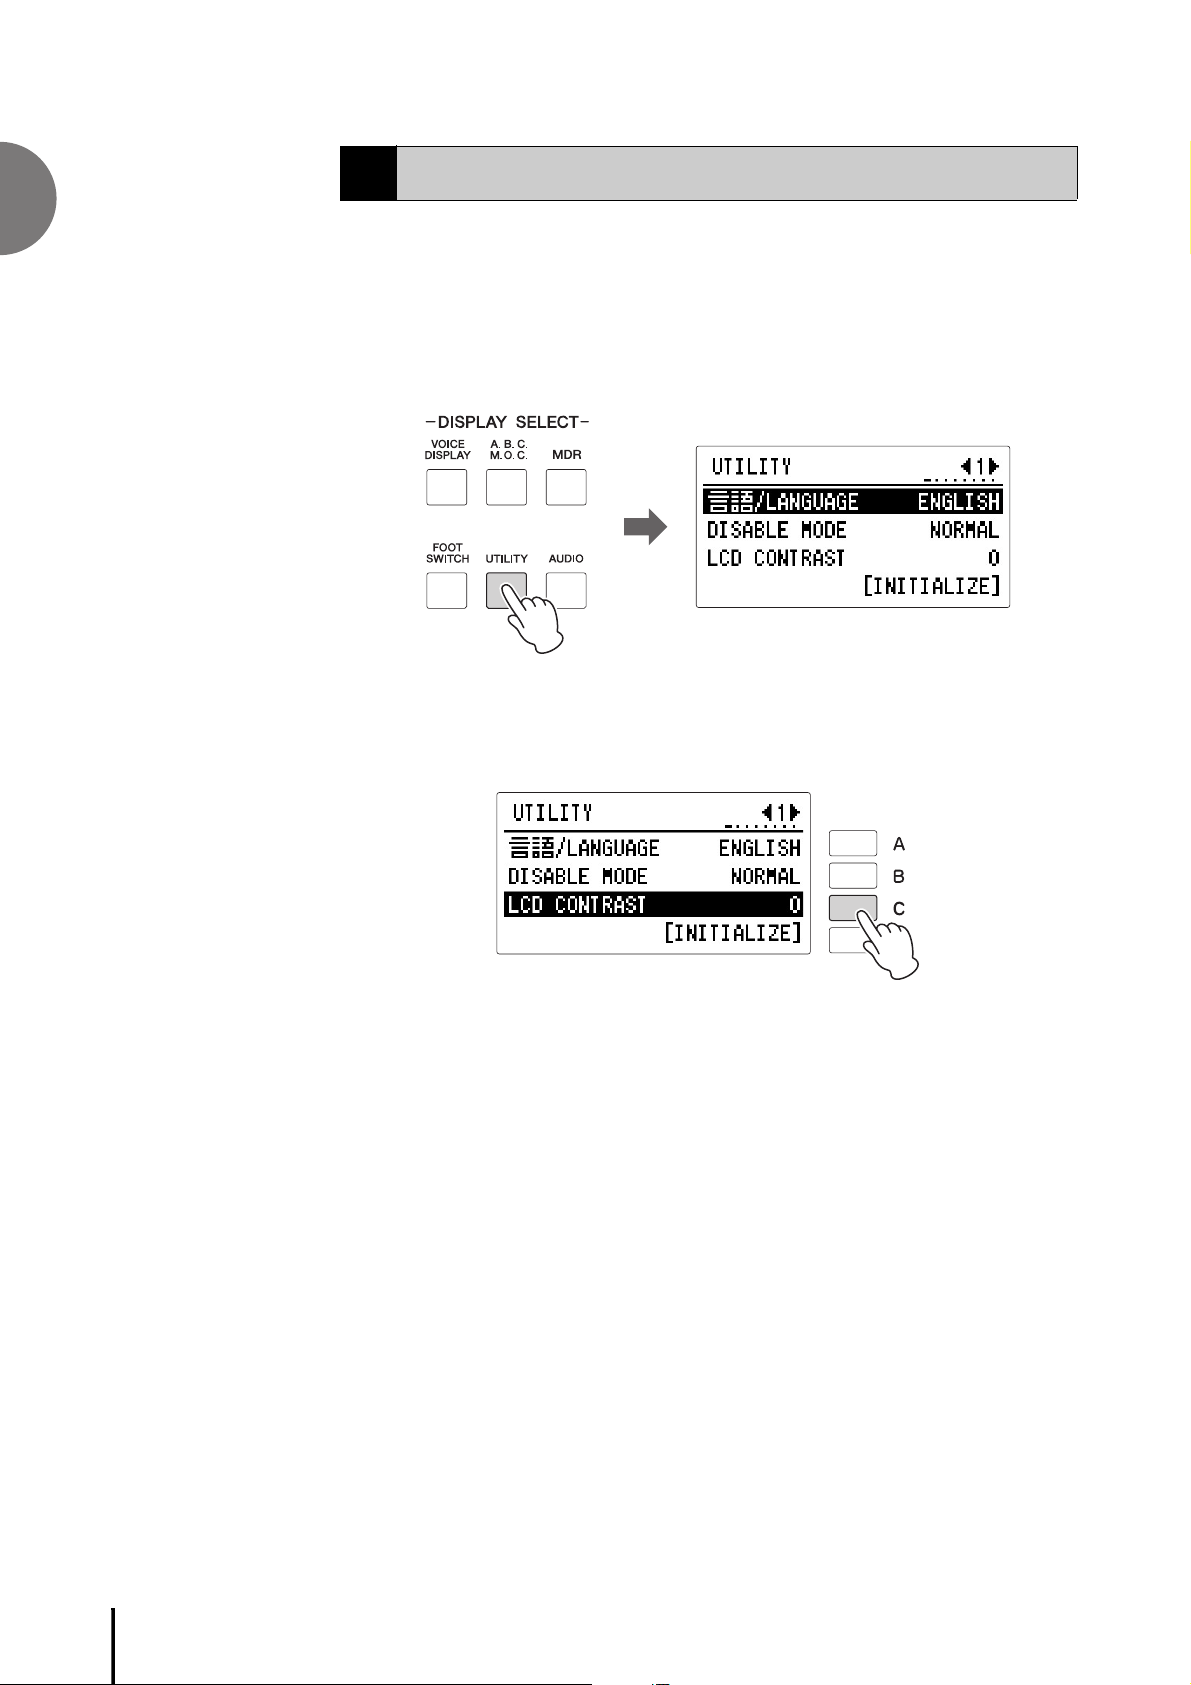
Adjusting the Contrast of the Display
NOTICE
The LCD contrast setting is
automatically saved when
another display is called
up. Make sure to switch to
another display before
turning the power off.
4
Quick Introductory Guide
You can adjust the contrast of the display.
1
Press the [UTILITY] button on the panel to call up the Utility display.
Since the contrast setting is set in Utility display Page 1, select Page 1 with the
page buttons if another page is shown.
2 Press the [C] button corresponding to “LCD CONTRAST.”
“LCD CONTRAST” is selected and highlighted.
ELB-02 Owner’s Manual
18
3 Adjust the LCD contrast with the DATA CONTROL dial or by
successively pressing the corresponding button.
You can set the value between -5 – +5.
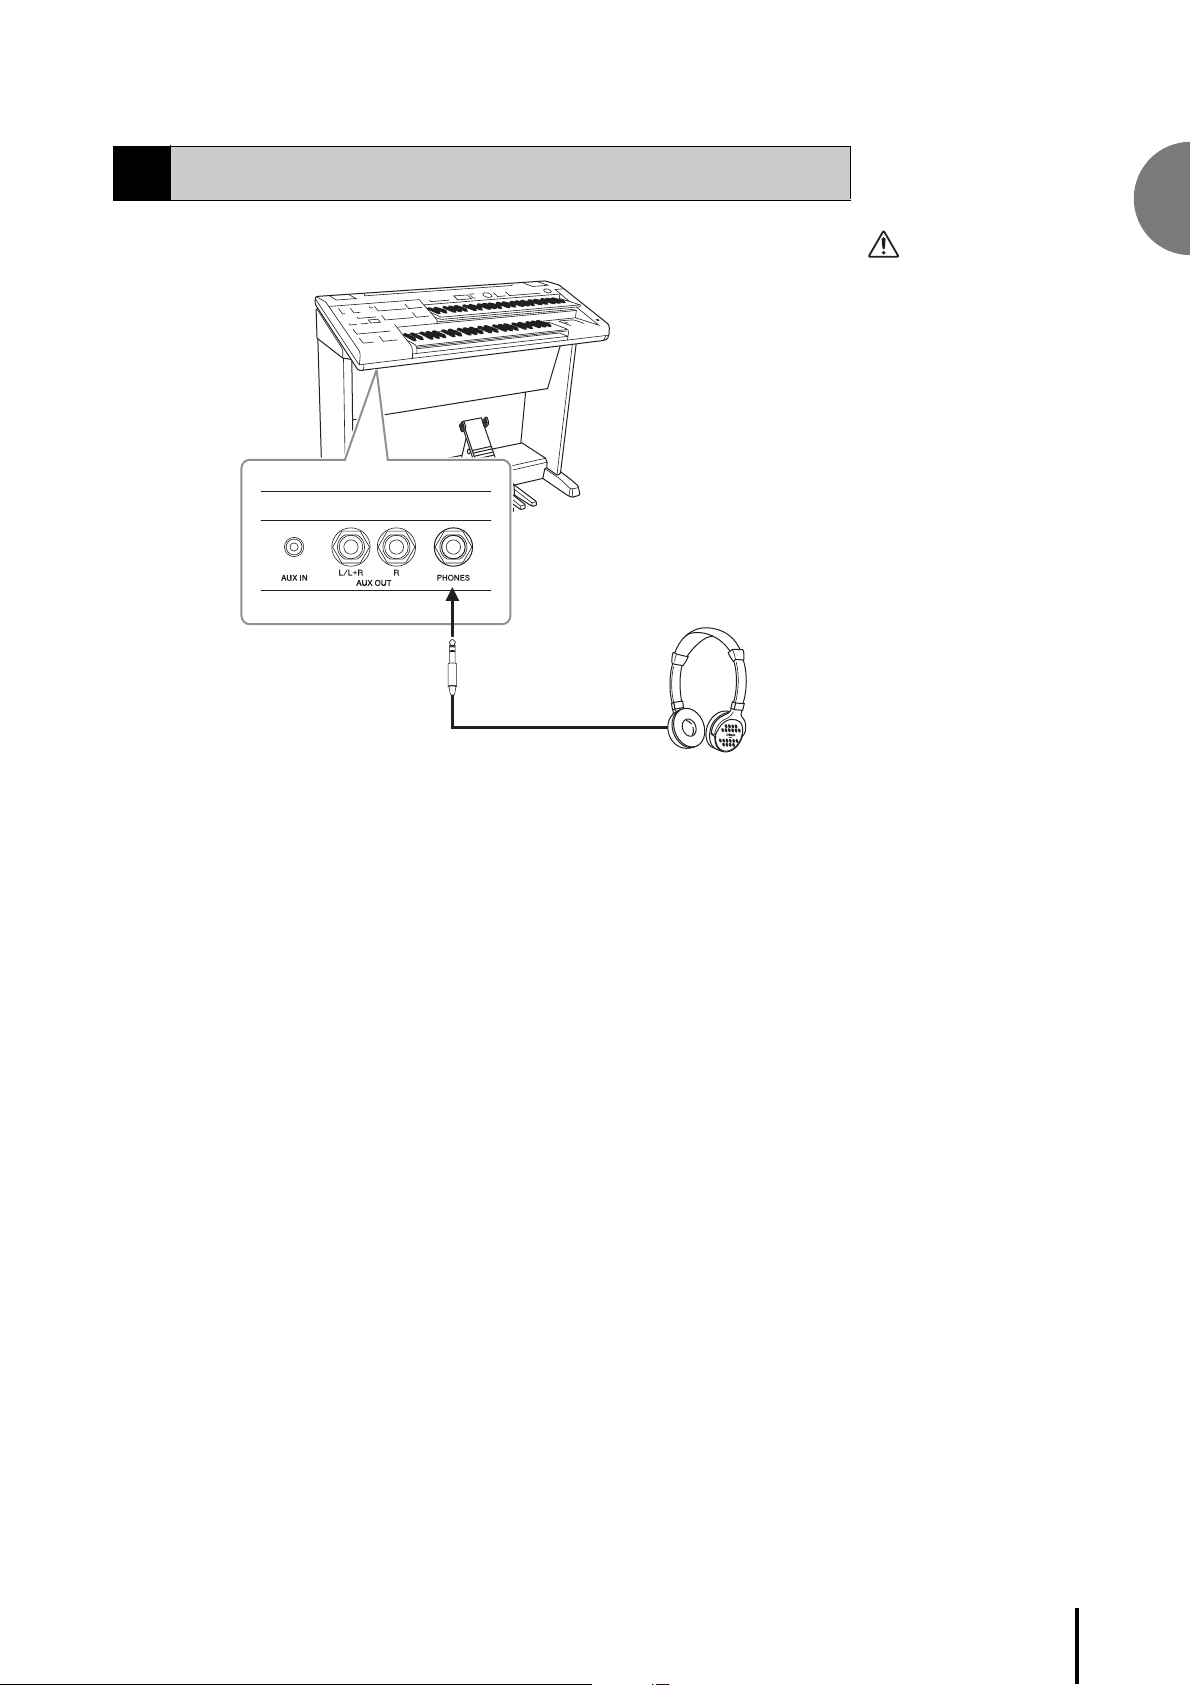
Using Headphones
CAUTION
Do not use the
headphones for a long
period of time at a high or
uncomfortable volume
level, since this can cause
permanent hearing loss.
Standard stereo phone plug
5
To use headphones, connect them to the PHONES jack (standard stereo phone jack).
Quick Introductory Guide
ELB-02 Owner’s Manual
19
NOTE
Additional basic
Registrations are preset on
the Registration Memory
locations from 1 to 16. See
page 116 for details.
1
Basic Operation
Registration Menu
1
The Registration Menu is a simple, highly convenient way to instantly change all the
Electone settings for playing in specific music styles. A Registration consists of panel
settings including the selected Upper Keyboard Voices, Lower Keyboard Voices,
Pedal Voices, the assigned rhythm and so on. Registration Menu button [0] includes
a variety of basic Registrations, especially for practicing, and the other buttons [1] –
[5] include Registrations in various music genres for playing your favorite types of
music. These give you a wide palette of Registrations to choose from, both for
practice purposes and for freely playing in virtually any music style or genre.
Selecting Registrations from the Registration Menu
1 Press one of the REGISTRATION MENU buttons.
Each button has different Registrations for different music genres. For example,
if you want to play Jazz, press the [4] button. For details on the Registration
Menu, see page 22.
Basic
Page 01 Kids
Page 02 Simple
Pages 01, 02 Pops & Rock
Pages 01, 02 Dance & Ballad
Pages 01, 02 Jazz & Latin
Pages 01, 02 Symphony & World
2 From this main category, select the specific Registration you want
to use.
Each Registration Menu button actually contains many Registrations. Select the
desired Registrations in sequence by turning the DATA CONTROL dial. You
can also select Registration by using the [A] and [D] buttons located at the
immediate right side of the LCD.
ELB-02 Owner’s Manual
20
1
Changing Pages
Page buttons
REGISTRATION MENU buttons [1] – [5] contain two display pages: “01” and
“02,” each of which contain two different sets of Registrations. Page 01 features the
same Registration Menu as that of the ELB-01, while Page 02 features new
Registration Menus for the ELB-02. From each of the 01 and 02 pages, select the
desired Registration.
3 Play your favorite song with the selected Registration.
Basic Operation
ELB-02 Owner’s Manual
21
1
Registration Menu List
[ 0 ] BASIC
01
02
03
Basic Operation
04
05
06
07
08
09
10
11
12
13
14
15
16
17
18
19
20
21
22
23
24
25
26
27
28
29
30
31
32
33
34
35
36
37
38
39
40
41
42
43
44
45
46
47
48
49
50
51
52
53
54
55
Simple 1 St/St
Simple 2 St/Hr
Simple 3 Cl/St
Simple 4 Cl/Hr
Simple 5 Tp/St
Simple 6 Tp/Hr
Simple 7 Ob/St
Simple 8 Ob/Bsn
Simple 9 Fl/St
Simple 10 Fl/Cl
Simple 11 Cl/Cl
Simple 12 Pf/Pf
Simple 13 Cl/Bsn
Sound Effect 1
Sound Effect 2
Sound Effect 3
Sound Effect 4
Sound Effect 5
Sound Effect 6
Sound Effect 7
Sound Effect 8
Sound Effect 9
Sound Effect 10
Sound Effect 11
Sound Effect 12
Sound Effect 13
Sound Effect 14
Sound Effect 15
Sound Effect 16
StCombi 1 St/St
StCombi 2 St/Hr
StCombi 3 St/Br
StCombi 4 St/CB
StCombi 5 Oct Hi
StCombi 6 Oct Lo
StCombi 7 Soft
StCombi 8 SftOct
StCombi 9 Hard
StCombi 10HrdOct
StCombi 11 St+WW
StCombi 12 St+Br
StCombi 13 Pizz
StCombi 14 Trem
StCombi 15 Vn/Vc
StCombi 16 Vn/Pz
BrCombi 1 Tp/St
BrCombi 2 Tp/Hr
BrCombi 3 Tp/Tb
BrCombi 4 Br/Hr
BrCombi 5 Br/Br
BrCombi 6 Oct
BrCombi 7 Br/CB
BrCombi 8Br/Timp
BrCombi 9 Br+Xyl
WWCombi 1 Fl/St
WWCombi 2 Fl/Cl
56
WWCombi 3 Fl/Hp
57
WWCombi 4 Ob/St
58
WWCombi 5 Ob/Bsn
59
WWCombi 6 Ob/Piz
60
WWCombi 7 Cl/St
61
WWCombi 8 Cl/Hr
62
WWCombi 9 Cl/Piz
63
WWCombi 10Sax/Pf
64
Woodwind Ens 1
65
Woodwind Ens 2
66
Woodwind Ens 3
67
Woodwind Ens 4
68
Woodwind Ens 5
69
Woodwind Ens 6
70
Woodwind Ens 7
71
Decay 1 Piano
72
Decay 2 Harpsi
73
Decay 3 E.Piano
74
Decay 4 Guitar
75
Decay 5 E.Guitar
76
Decay 6 Xylophne
77
Decay 7 Glocken
78
Decay 8 Harp
79
Hold 1 PipeOrgan
80
Hold 2 JazzOrgan
81
Hold 3 Accordion
82
Hold 4 Recorder
83
Synth 1
84
Synth 2
85
Synth 3
86
Synth 4
87
Synth 5
88
Comping Rock
89
Comping Jazz 1
90
Comping Jazz 2
91
Comping Classic1
92
Comping Classic2
93
Comping Classic3
94
Comping Classic4
95
[ 1 ] KIDS, SIMPLE
Page 01 KIDS
Simple 8Beat 1
01
Simple 8Beat 2
02
Light Step
03
Sunny Pop
04
Kids March 1
05
Kids March 2
06
Kids March 3
07
Synth Rock
08
SymphonicMarch 1
09
SymphonicMarch 2
10
Bluegrass
11
Sea Carnival
12
Basic Waltz
13
Brass Ensemble
14
Pure Waltz
15
Rococo Ensemble
16
Pop Cha Cha
17
Comical Rumba
18
Comical Samba
19
Toy Orchestra
20
Charleston
21
Winter Swing
22
Snow Waltz 1
23
Snow Waltz 2
24
Alpine Polka *A
25
Alpine Polka *B
26
Alpine Polka *C
27
Alpine Polka *D
28
Dream Ballad *A
29
Dream Ballad *B
30
Dream Ballad *C
31
Dream Ballad *D
32
Pops Orchestra*A
33
Pops Orchestra*B
34
Pops Orchestra*C
35
Pops Orchestra*D
36
Kids On Stage *A
37
Kids On Stage *B
38
Kids On Stage *C
39
Kids On Stage *D
40
Galaxy March *A
41
Galaxy March *B
42
Galaxy March *C
43
Galaxy March *D
44
SE *A
45
SE *B
46
SE *C
47
SE *D
48
Page 02 SIMPLE
SimpleReg Strs 1
01
SimpleReg Strs 2
02
SimpleReg Orch 1
03
SimpleReg Orch 2
04
SimpleReg Orch 3
05
SimpleReg Pops 1
06
SimpleReg Pops 2
07
SimpleReg Latin
08
SimpleReg Jazz 1
09
SimpleReg Jazz 2
10
SimpleReg Jazz 3
11
SimpleReg Organ
12
BrassBandMarch*A
13
BrassBandMarch*B
14
Orchestra March
15
6/8 MarchingBand
16
6/8 MarchingKids
17
Light Waltz
18
OrchestraWaltz*A
19
OrchestraWaltz*B
20
OrchestraWaltz*C
21
OrchestraWaltz*D
22
8Beat Synth Pop
23
8Beat Pop
24
Pop Shuffle
25
R&B Shuffle
26
Rock
27
Rock Shuffle
28
Rock Pop Ballad
29
Funk
30
Dance Pop
31
Disco Pop
32
R&B E.Piano Bld
33
R&B Piano Ballad
34
8Beat Ballad
35
8Beat OrchBallad
36
3/4 Pop Ballad
37
6/8 Pop Ballad
38
Big Band King *A
39
Big Band King *B
40
Big Band King *C
41
Big Band Swing
42
Jazz Session
43
Fusion Samba
44
Pop Samba
45
Simple BossaNova
46
Mambo
47
Rumba
48
Cls Organ Chapel
49
Cls Organ Hall
50
RockOrgan Ballad
51
R&B Rock Organ
52
Organ Combo
53
6/8 Organ Ballad
54
Soul Jazz Organ
55
Pop Organ 60s
56
Toy O r ga n
57
Theatre Organ NY
58
Nostalgic Organ
59
ELB-02 Owner’s Manual
22
1
[ 2 ] POPS&ROCK
Page 01
Dynamic 8Beat
01
NY Ballad
02
British Pop
03
8Beat Modern
04
Rock Band
05
Detroit Pop
06
Techno Pop
07
Sheriff Reggae
08
Rock & Roll
09
Power Rock
10
60s Guitar Rock
11
Unplugged
12
Motor City
13
Lovely Shuffle
14
Gospel Shuffle
15
Joyful Gospel
16
Frankly Soul
17
Soul
18
Gospel
19
6/8 Soul
20
Hit Pop
21
New Country
22
Eternal Pop
23
Ground Beat
24
Bounce Pop *A
25
Bounce Pop *B
26
Bounce Pop *C
27
Bounce Pop *D
28
Blues Jam *A
29
Blues Jam *B
30
Blues Jam *C
31
Blues Jam *D
32
EvergreenWaltz*A
33
EvergreenWaltz*B
34
EvergreenWaltz*C
35
EvergreenWaltz*D
36
16Beat Pop *A
37
16Beat Pop *B
38
16Beat Pop *C
39
16Beat Pop *D
40
Top Gear Rock *A
41
Top Gear Rock *B
42
Top Gear Rock *C
43
Top Gear Rock *D
44
Southern Pop *A
45
Southern Pop *B
46
Southern Pop *C
47
Southern Pop *D
48
Page 02
70s Easy Pop
01
BoysGuitarBallad
02
Soul Pop
03
70s Top Duo
04
Daydream Shuffle
05
Oldies Pop
06
EuroPop Folklore
07
Discotheque Rock
08
Slow Hand Ballad
09
Sweet AC Ballad
10
70s PrimeTime TV
11
Crossover Funk
12
Joyful Gospel #2
13
Gospel Groove
14
Worship Shuffle
15
Worship 16beat
16
Soulful Wonder
17
Lovely & Soulful
18
Danceable Funk
19
Bright Pop Rock
20
AmericanHardRock
21
Power Rock 80s
22
USA RockStandard
23
Seaside Rock
24
70s Folk Rock
25
Alternative Rock
26
Alternative6/8Rk
27
Highway Rock
28
Funky Rock&Roll
29
Synth Pop Rock
30
Power Synth Rock
31
RockGuitarBallad
32
Pop Rock & Roll
33
Back To The 60s
34
Dancing Boogie
35
6/8 Shuffle Rock
36
Shuffle BoysRock
37
Shuffle Pop Rock
38
Shfl Rock Ballad
39
Pop Rock Band
40
Shuffle PopPiano
41
Contemp Country
42
Smooth Country
43
Xmas Shuffle
44
Snowy Christmas
45
Pretty Rock
46
Ultra Rock
47
Rock Graffiti
48
Casual Rock
49
Rookie Rock
50
Happy Rock
51
J-Pop Idol Rock
52
J-Pop Band Rock
53
Spirit Pop
54
Sweet Love Pop
55
Summer Pop
56
Shaky Dance
57
J-Pop Piano Band
58
J-Pop Boys
59
J-PopShuffleBeat
60
J-Pop BandBallad
61
Breezy Ballad
62
HeroRanger Theme
63
Sunset Pop
64
Funky Punch *A
65
Funky Punch *B
66
GlxyBattleship*A
67
GlxyBattleship*B
68
J-Pop Anime *A
69
J-Pop Anime *B
70
70s Honey
71
70s Hero
72
DBZ *A
73
DBZ *B
74
DBZ *C
75
DBZ *D
76
[ 3 ]
DANCE&BALLAD
Page 01
Organ Ballad
01
Dramatic Ballad
02
Love Ballad
03
Smooth Lead
04
Pop Ballad
05
Guitar Ballad
06
Acoustic Ballad
07
Healing Guitar
08
Chillout
09
Sweetheart 1
10
Sweetheart 2
11
Slow & Easy
12
Euro Trance
13
6/8 Trance
14
Cool Hip Hop
15
Latin House
16
Dance Beat
17
Euro Dance Pop
18
UK Pop
19
Jive
20
Disco Queen
21
Disco Soul
22
Pop Disco
23
Hot Disco
24
Ibiza *A
25
Ibiza *B
26
Ibiza *C
27
Ibiza *D
28
Power House *A
29
Power House *B
30
Power House *C
31
Power House *D
32
Dance Latino *A
33
Dance Latino *B
34
Dance Latino *C
35
Dance Latino *D
36
Twilight Disco*A
37
Twilight Disco*B
38
Twilight Disco*C
39
Twilight Disco*D
40
Love Song *A
41
Love Song *B
42
Love Song *C
43
Love Song *D
44
Movie Ballad *A
45
Movie Ballad *B
46
Movie Ballad *C
47
Movie Ballad *D
48
Page 02
R&B Pop Ballad
01
R&B Soul Ballad
02
R&B Cool Ballad
03
Cool AC
04
Sweet Chart Hits
05
Sweet SlowBallad
06
YourPiano Ballad
07
Sweet EP Ballad
08
J-Pop EasyBallad
09
Sweet Sax Ballad
10
Sweet R&B Ballad
11
Lovers R&B
12
Sentimental Bld
13
Tears Ballad
14
Glory Ballad
15
Unplugged Ballad
16
SentimentalMovie
17
BeautyCinema Bld
18
CinemaSympho Bld
19
Enka Ballad
20
6/8 Enka Shuffle
21
Christmas Ballad
22
Disco Hits 70s
23
70s Disco Night
24
Euro Pop Disco
25
Synth Disco
26
Ballroom Disco
27
Syn DancePop 80s
28
Dirty Dance Beat
29
Fortune Disco
30
Girls Pop 48 *A
31
Girls Pop 48 *B
32
Shiny Girls Pop
33
Share The Peace
34
DanceAndRhythm*A
35
DanceAndRhythm*B
36
DanceAndRhythm*C
37
DanceAndRhythm*D
38
Girls Techno
39
Candy Pop Techno
40
Dancing Platform
41
Dance Beat EX.
42
Club Beat
43
Electronica Beat
44
Kool Garage
45
Electronic Dance
46
New Age Chillout
47
Eurobeat Party
48
Ibiza Trance
49
Casual Trance
50
Trance Party
51
WonderTranceShfl
52
Basic Operation
ELB-02 Owner’s Manual
23
1
[ 4 ] JAZZ&LATIN
Page 01
01
02
03
04
05
06
Basic Operation
07
08
09
10
11
12
13
14
15
16
17
18
19
20
21
22
23
24
25
26
27
28
29
30
31
32
33
34
35
36
37
38
39
40
41
42
43
44
45
46
47
48
Page 02
01
02
03
04
05
06
07
Blow On Sax
Sax Ensemble
Moonlight
Big Band
Clarinet Swing
Jazz Combo
Medium Jazz
Organ Session
Guitar Combo
Tender Ballad
Jazz Waltz
Five-Four
Big Band Samba
Mambo Brass
Mambo Tenor
Montuno
Bossa Nova
Pop Bossa
Sweet Rumba
Beguine
Cha Cha Cha
Mellow Groove
Modern R&B
Dixieland Jazz
Jungle Drum *A
Jungle Drum *B
Jungle Drum *C
Jungle Drum *D
Jazz Club *A
Jazz Club *B
Jazz Club *C
Jazz Club *D
Afro Session *A
Afro Session *B
Afro Session *C
Afro Session *D
ChaCha Grandee*A
ChaCha Grandee*B
ChaCha Grandee*C
ChaCha Grandee*D
3/4 Fast Jazz *A
3/4 Fast Jazz *B
3/4 Fast Jazz *C
3/4 Fast Jazz *D
Twilight Sax *A
Twilight Sax *B
Twilight Sax *C
Twilight Sax *D
Big Band Tutti
Alto Sax Combo
Jazz Combo Fast
Jazz Combo 66
The Big Band *A
The Big Band *B
Guitar JazzCombo
The Swing Jazz
08
New Orleans Jazz
09
Ragtime Band
10
Funky Cat Groove
11
Afro Cuban Jazz
12
Guitar JazzWaltz
13
Sax Jazz Waltz
14
Swing Steps
15
Swing Chorus
16
Relax Swing
17
Urban Lounge
18
Broadway Tap
19
Brazilian Bossa
20
Lounge BossaNova
21
8Beat Bossa Nova
22
Pop Bossa Nova
23
Tiny Bossa Nova
24
Cafe Samba
25
BitterSweetLatin
26
Latin Rock
27
DanceBeatLatin*A
28
DanceBeatLatin*B
29
Pop Accordion
30
Sweet Bomba
31
Orquesta Salsa
32
New Flamenco
33
Jummin' Reggae
34
RumbaAndTheCity
35
French Caribbean
36
Caribbean Sea
37
[ 5 ]
SYMPHONY&WORLD
Page 01
Fanfare
01
String Orchestra
02
Romantic Violin
03
Baroque
04
Flute & Harp
05
Serenade
06
Fast March
07
Wild West
08
Vienna Waltz
09
Polka
10
Chanson Club
11
Theatre Organ
12
Flamenco
13
Pop Flamenco
14
Mexican Dance
15
Mariachi
16
Celtic Dance
17
Folk Step
18
Italiano
19
Musette
20
Country
21
Hawaiian
22
Chinese Nocturne
23
Japanese Sound
24
OrchestraMarch*A
25
OrchestraMarch*B
26
OrchestraMarch*C
27
OrchestraMarch*D
28
Pasodoble *A
29
Pasodoble *B
30
Pasodoble *C
31
Pasodoble *D
32
Tango *A
33
Tango *B
34
Tango *C
35
Tango *D
36
Show Time *A
37
Show Time *B
38
Show Time *C
39
Show Time *D
40
Majestic Sound*A
41
Majestic Sound*B
42
Majestic Sound*C
43
Majestic Sound*D
44
OrchestraSwing*A
45
OrchestraSwing*B
46
OrchestraSwing*C
47
OrchestraSwing*D
48
Page 02
Orch Full Unit
01
String Classic
02
Sweet Pizzicato
03
Baroque Symphony
04
Nostalgic Green
05
New Year March
06
Wind Orchestra
07
BrassBand Parade
08
Choral No.9
09
Angel Voices
10
Beat Classic
11
Can Can Pop
12
Elegant Waltz
13
Chorus Waltz
14
Love Waltz
15
Fantasy World
16
Movie Pirates
17
Chorus Symphony
18
Hollywood Sound
19
Super Showtune
20
TV DramaTrack *A
21
TV DramaTrack *B
22
Movie Symphonic
23
Movie Soundtrack
24
Yoo-Hoo Polka
25
Pop Polka
26
Funny Polka
27
Casual Polka
28
Country Town
29
Tango Band
30
Turki s h P o p s
31
Oriental Dance
32
Celtic Beat
33
Celtic Waltz
34
Trad Irish Pipe
35
Irish Ballad
36
ChinaSweetBallad
37
ChinaRomanticBld
38
China Dance Beat
39
China Kung Fu
40
China Trad Song
41
China Trad Dance
42
ELB-02 Owner’s Manual
24
1
Using the LCD display
Scroll bar
1. Select the item 2. Change the value/setting
2
Many of the Electone’s operations are done from the LCD display. Pressing a button
on the panel automatically calls up the relevant function for the corresponding
button in the display. Depending on the display that appears, you can conveniently
perform various functions and change values/settings by using the [A] – [D] buttons
(located at the immediate right side of the LCD) and the DATA CONTROL dial (at
the right of the [A] – [D] buttons).
Selecting from a list in the display
In general (for example, for Voices and Rhythms), there are too many selectable
items and menus to all be shown in the display. In such a list display, scroll bar will
be shown at the right side of the display. When the scroll bar is shown in the display,
you can scroll through the display vertically by rotating the DATA CONTROL dial
and select the desired menu.
When the marks [U] and [D] are shown at the right side of the scroll bar in the
display, you can scroll the display and select the desired one by using the [A] or [D]
buttons.
Basic Operation
Selecting an item and changing its value
In many displays (other than lists), items or parameters, such as Volume and Reverb,
are shown in vertical order, with the corresponding values/settings at the immediate
right of the items. In this type of display, you can select (highlight) the item by
pressing the corresponding [A] – [D] button (in the example above, the [B] button,
which corresponding to the Reverb setting), letting you change the value/setting
with the DATA CONTROL dial or by successively pressing the corresponding
button (in this case, the [B] button).
ELB-02 Owner’s Manual
25
1
Basic Operation
Display name Page
Page buttons
Shows the number of pages and the current
page. The current page is shown with a long
bar (_), while other available pages are shown
as dots (.).
Page 1 Page 2 Page 3
Changing the Display Page
Page buttons are used to select the various ‘pages’ of the display (when available),
with the currently selected page number appearing at the top right of the LCD. Use
the [R] button to select the next page, and [L] to select the previous page.
Simultaneously pressing both buttons selects Page 1.
ELB-02 Owner’s Manual
26
1
Basic Operation
NOTICE
The language setting is
automatically saved when
another display is called
up. Make sure to switch to
another display before
turning the power off.
Reference Page
Saving the Registration Data
to USB Flash Drive
(page 118)
Reference Page
Initializing Registration
Memory (page 120)
3
Selecting the Display Language
The LCD display can be shown in two languages, English and Japanese. The default
setting is English.
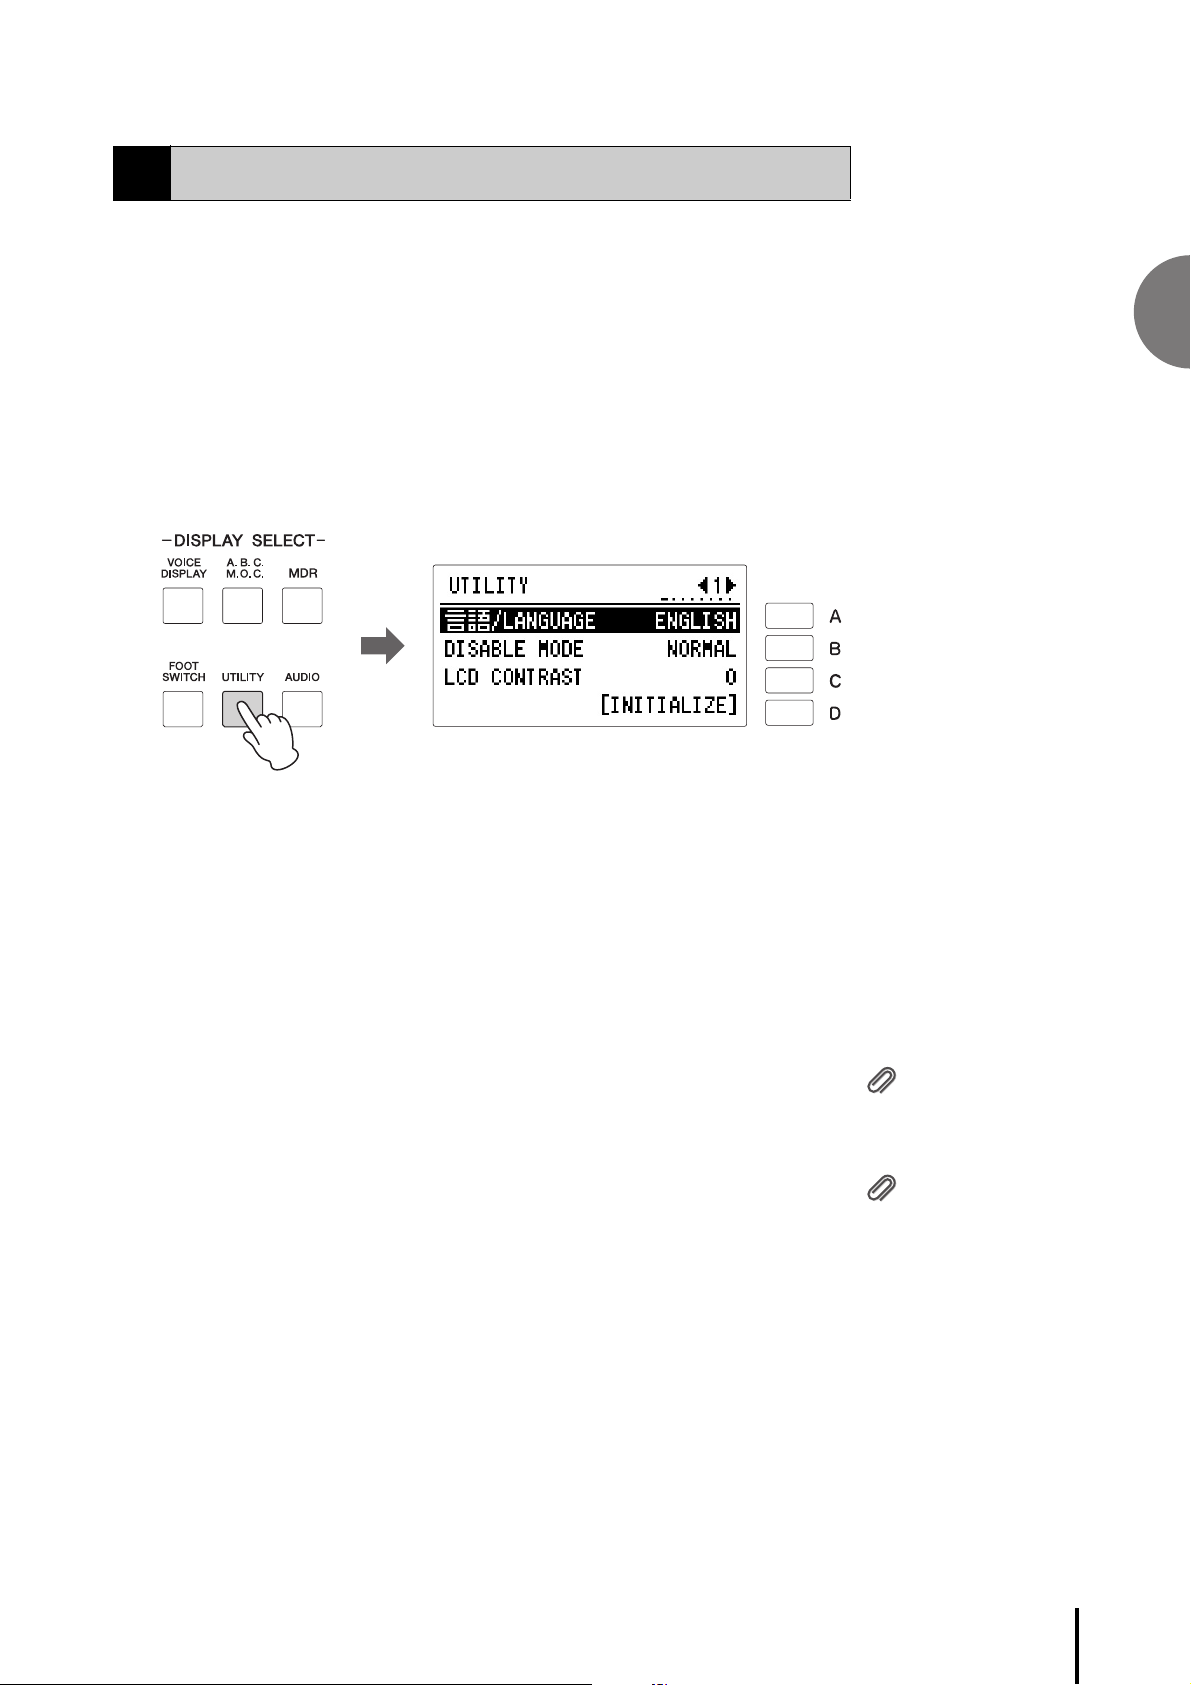
1 Press the [UTILITY] button on the panel.
The Utility display appears. Since the language is set in Utility display Page 1,
select Page 1 with the page buttons if another page is shown.
Basic Operation
2 Press the [A] button to select the corresponding language then
successively press the same button to switch the value between
Japanese and English.
Factory Set (Initializing the Electone)
All current settings including Registration Memory (in all banks), Display language
and display contrast settings can be deleted at once by the following procedure. Be
careful when executing Factory Set, since it erases all your existing data. Always save
your important data to a USB flash drive.
Note that the operation here does not affect the settings of the wireless LAN settings,
which can be initialized on page 200.
1 Turn off the power.
ELB-02 Owner’s Manual
27
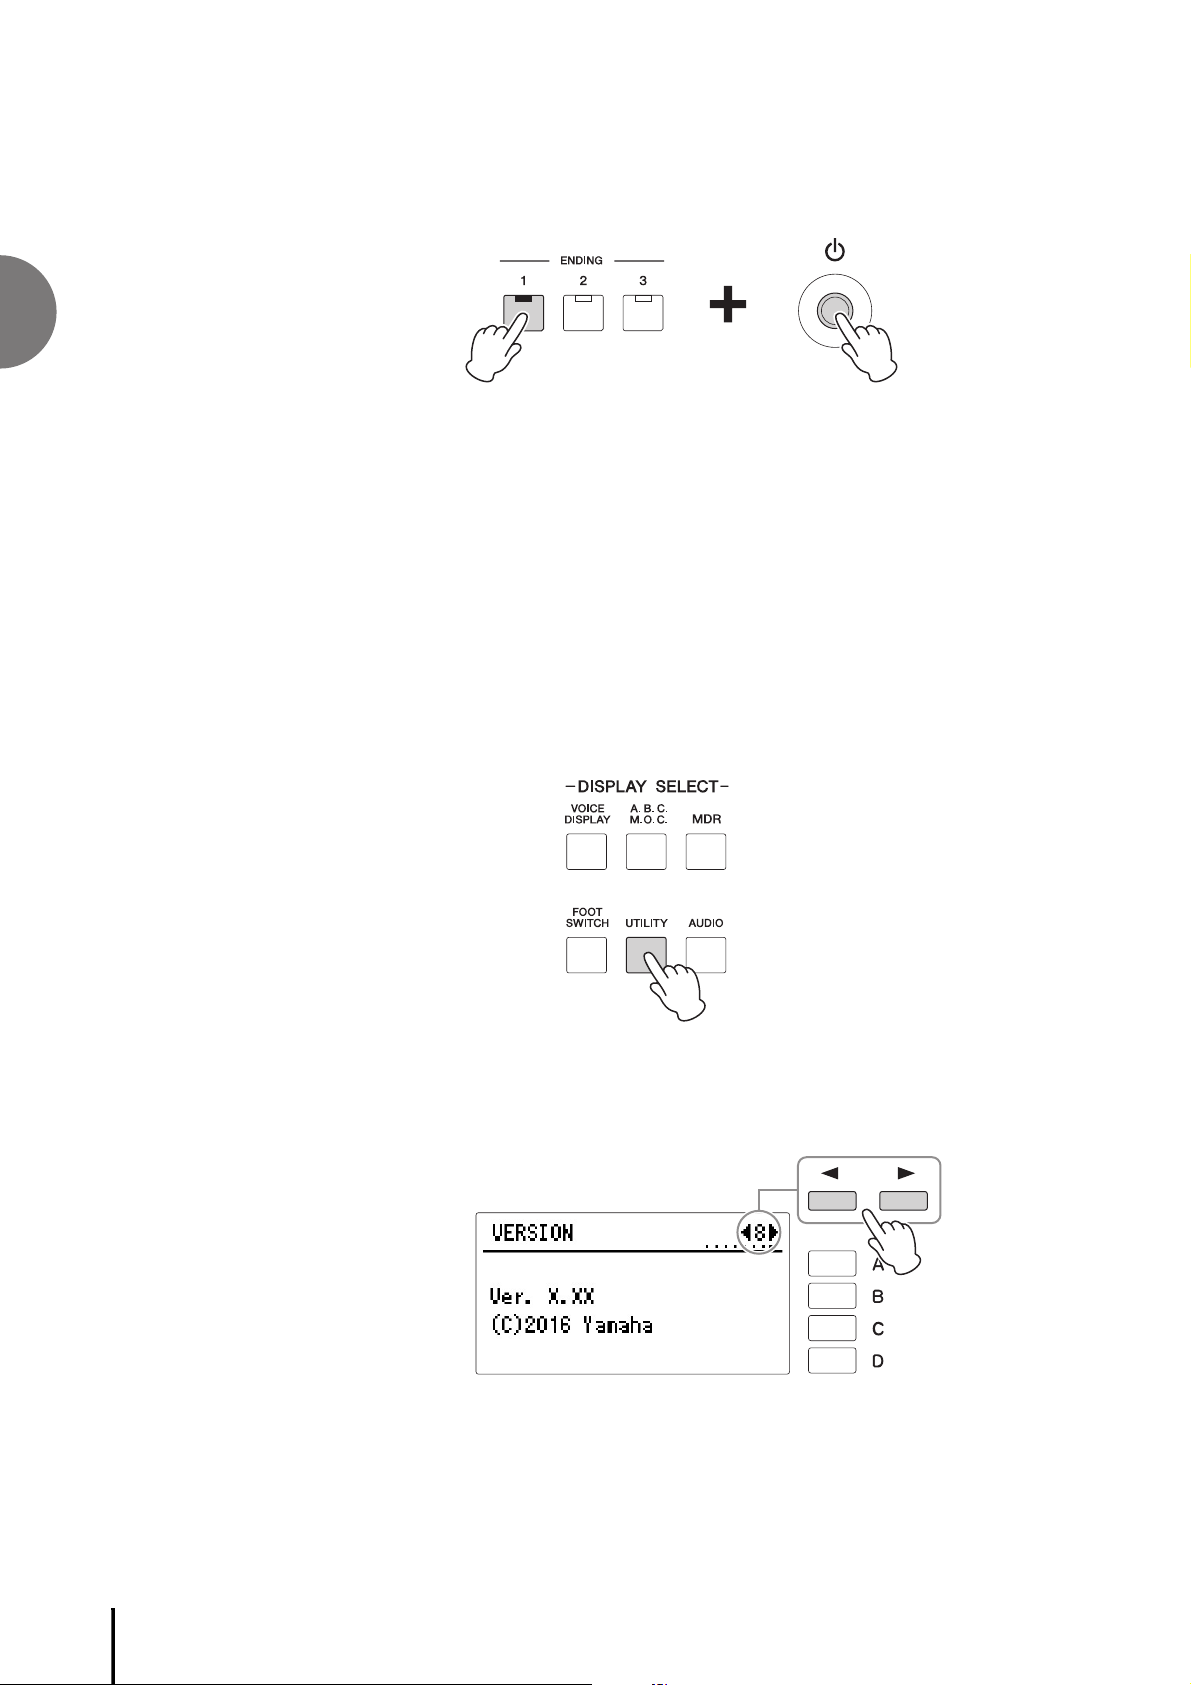
1
Basic Operation
2 While holding down the ENDING [1] button, turn the power back
on.
3 Release the ENDING [1] button after the Voice Display appears.
Confirming the Version of Your Electone
You can confirm the version of your Electone by the following procedure.
1 Press the [UTILITY] button.
The Utility display appears.
2 Select Page 8 by using the Page buttons.
The Version appears in the display.
ELB-02 Owner’s Manual
28
Voices for the Upper
Keyboard
Voices for the Lower
Keyboard
Voi c es fo r
Pedalboard
Reference Page
• Switching between Voice
section 1 and Voice section
2 (page 36)
• User buttons (page 39)
•[TO LOWERD/SOLO]
button (pages 38, 39)
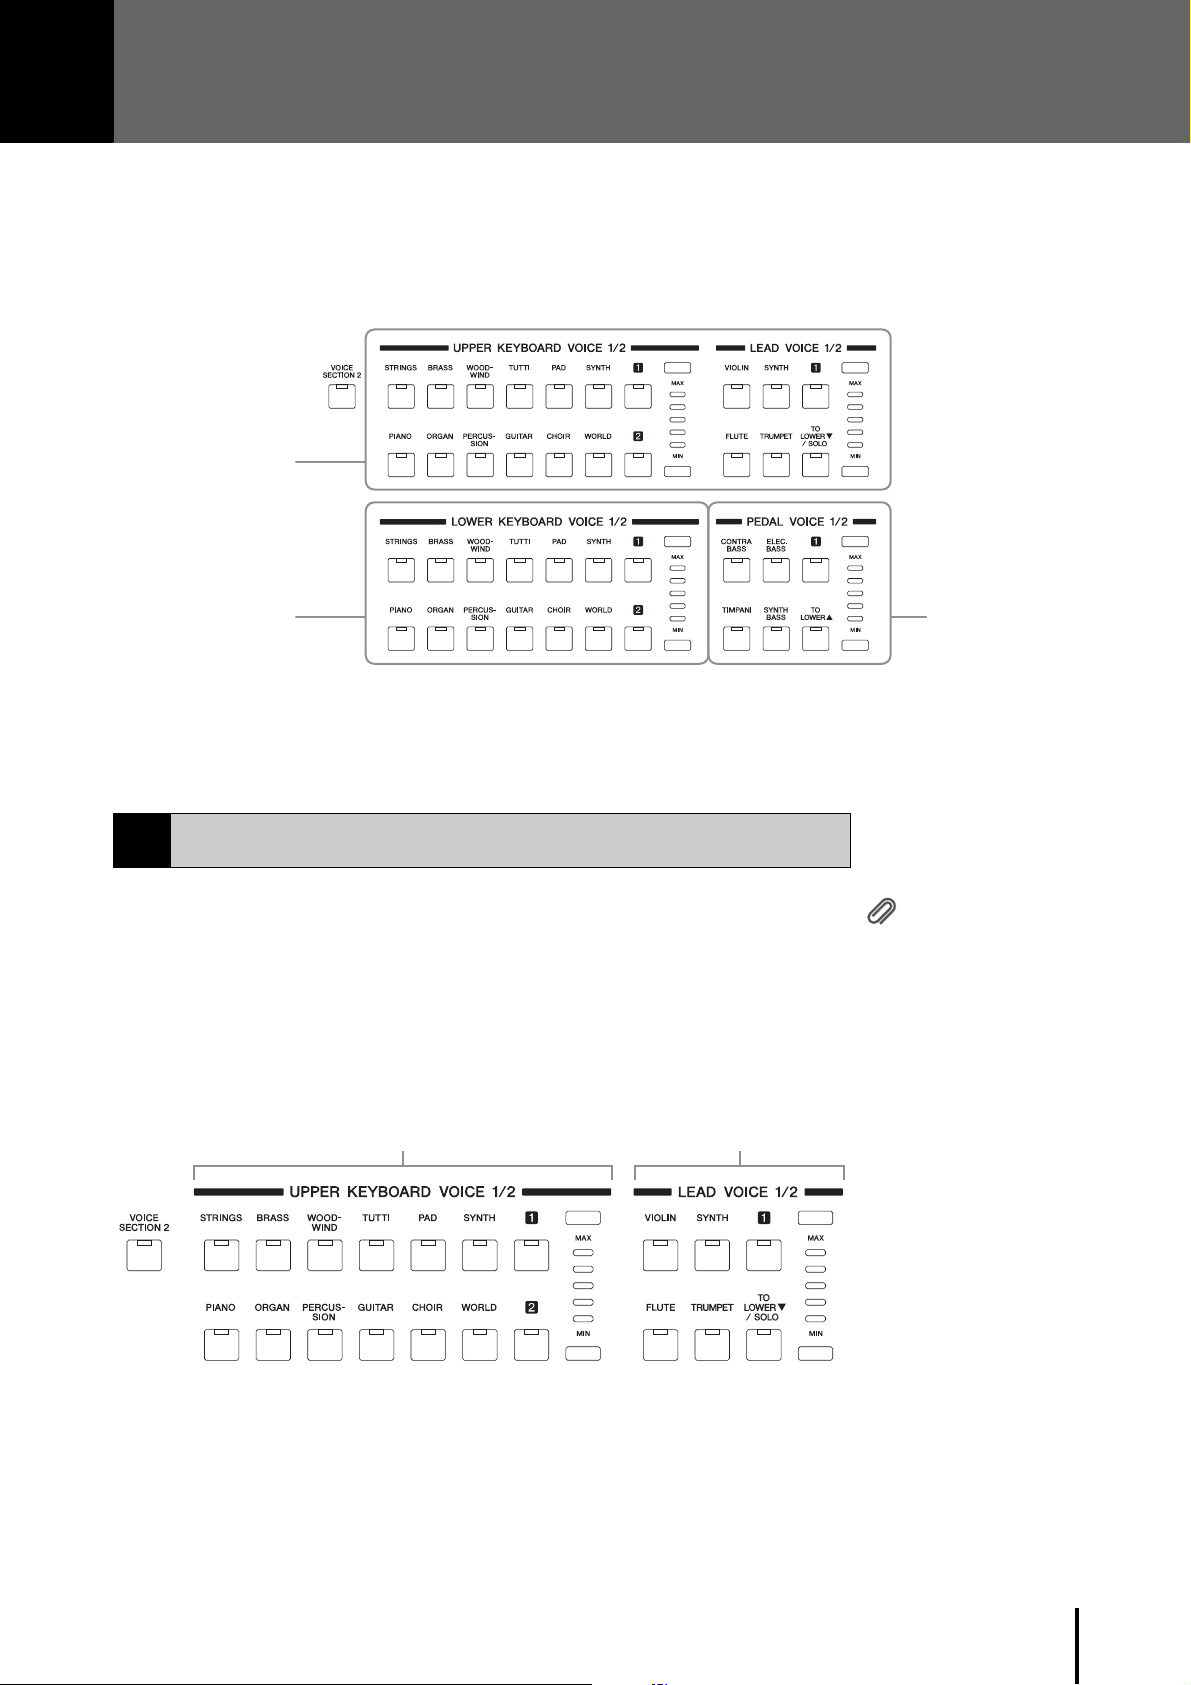
Voices for the Upper Keyboard 1 and Upper
Keyboard 2
Voices for the Lead Voice 1
and Lead Voice 2
2
Voices
This Electone features hundreds of high quality Voices. Any of these Voices can be used on the
Upper Keyboard, Lower Keyboard and Pedalboard. Up to four Voice sections are available on the
Upper Keyboard for playing together in a layer, while the Lower Keyboard and Pedalboard each
have two Voice sections.
1
Voices for the Upper Keyboard
Up to four different Voice sections are available on the Upper Keyboard for playing
to g et he r: Up p er Ke y boa rd Vo ic e 1 , Up pe r K ey bo ar d Voi ce 2, Lea d Vo ic e 1 , a nd Lea d
Voic e 2 . Up per Ke y bo ar d Vo ic e 1 an d Up pe r Key boa rd Voi ce 2 c an be s el ect ed from
the panel’s “UPPER KEYBOARD VOICE 1/2” section, while the Lead Voice 1 and
Lead Voice 2 can be selected from the “LEAD VOICE 1/2” section.
The Lead Voice sounds only the highest note (or last note played) if two or more
keys are played together. This makes the Lead Voices ideal for solo instruments such
as Trumpet and Saxophone—instruments that play the “leading” or most prominent
part in an orchestra or band.
As the default, only the Upper Keyboard Voice 1 sounds when you play the Upper
Keyboard.
Voices for Each Keyboard
ELB-02 Owner’s Manual
29
2
Voices
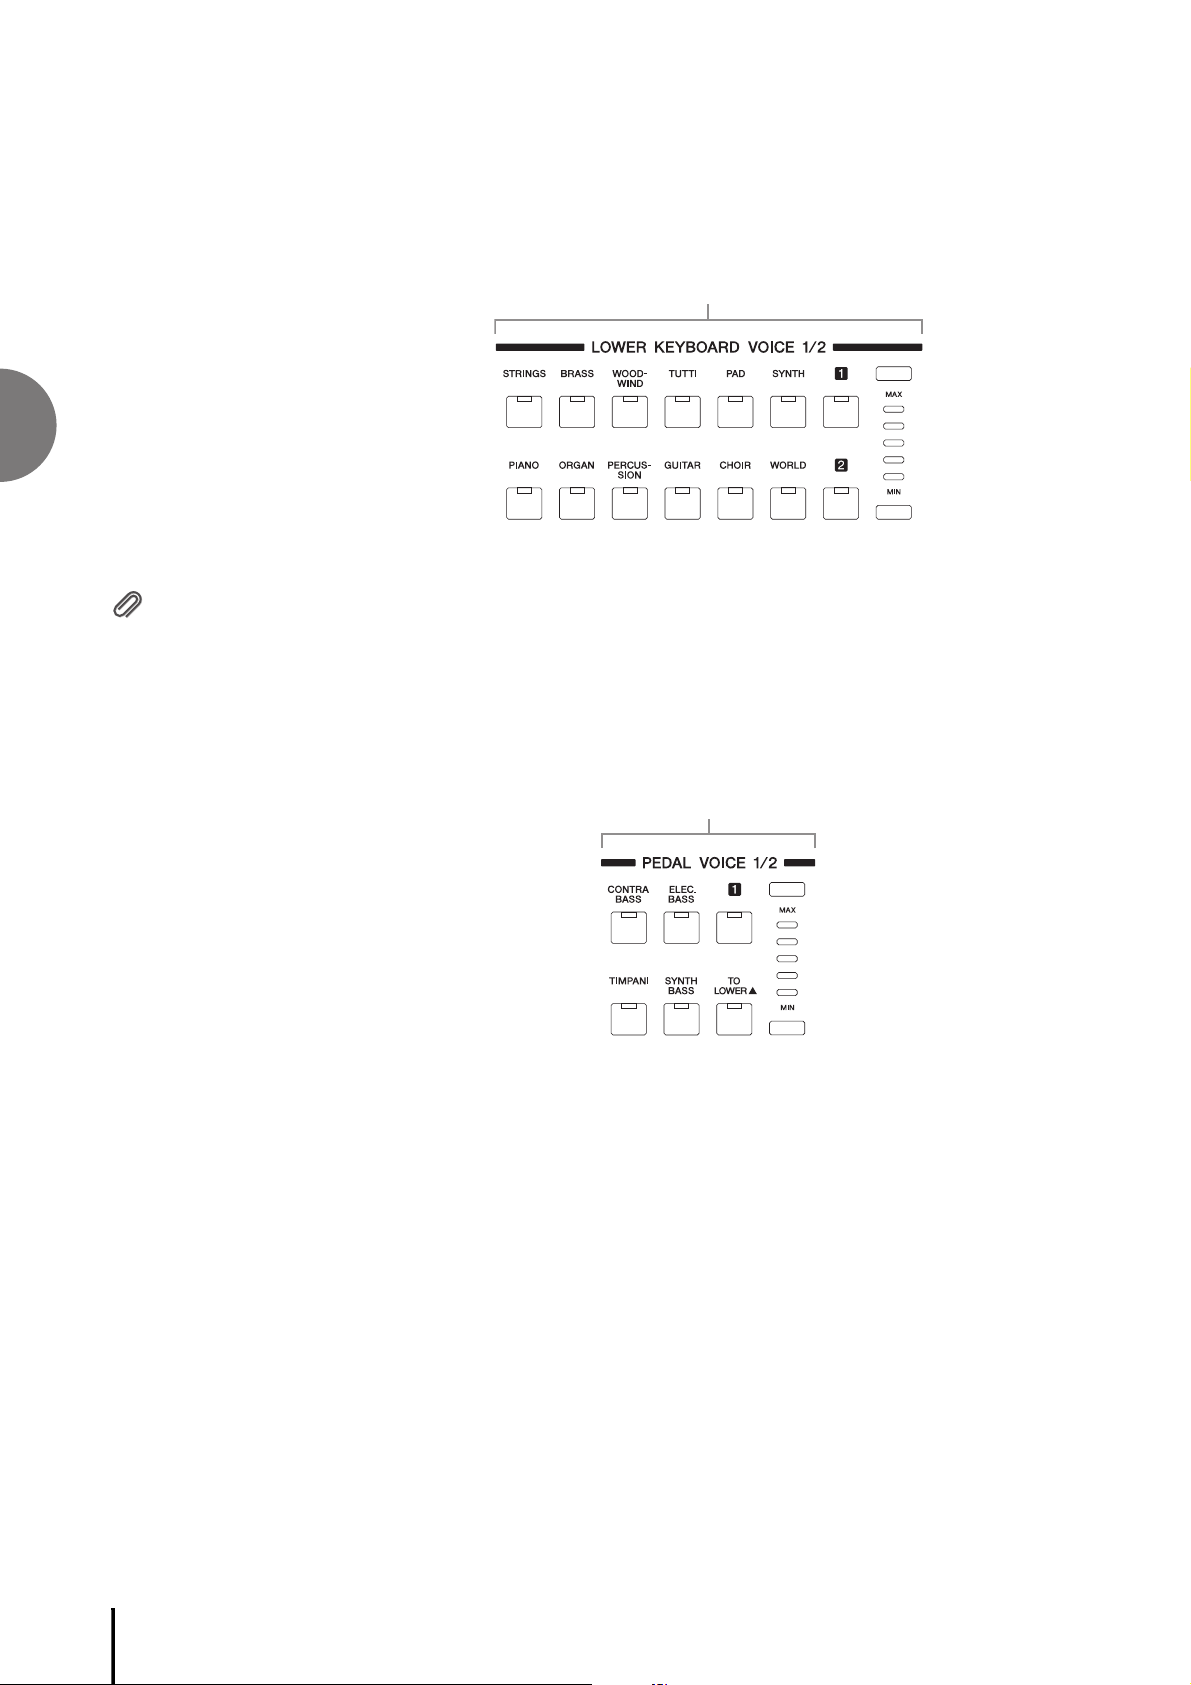
Voices for the Lower Keyboard 1 and Lower Keyboard 2
Reference Page
[TO LOWERU] button
(page 38)
Voices for the Pedal Voice 1 and Pedal Voice 2
Voices for the Lower Keyboard
Up to two different Voice sections are available on the Lower Keyboard for playing
together: Lower Keyboard Voice 1 and Lower Keyboard Voice 2. Voices for each
section can be selected from the panel’s “LOWER KEYBOARD VOICE 1/2” section.
Voices for Pedalboard
Up to two different Voice sections are available on the Pedalboard for playing
together: Pedal Voice 1 and Pedal Voice 2. Voices for each section can be selected
from the panel’s “PEDAL VOICE 1/2” section. The Pedal Voice sounds one note at a
time; when you simultaneously press two or more keys, only the highest note will
sound.
ELB-02 Owner’s Manual
30
 Loading...