


SPECIAL MESSAGE SECTION
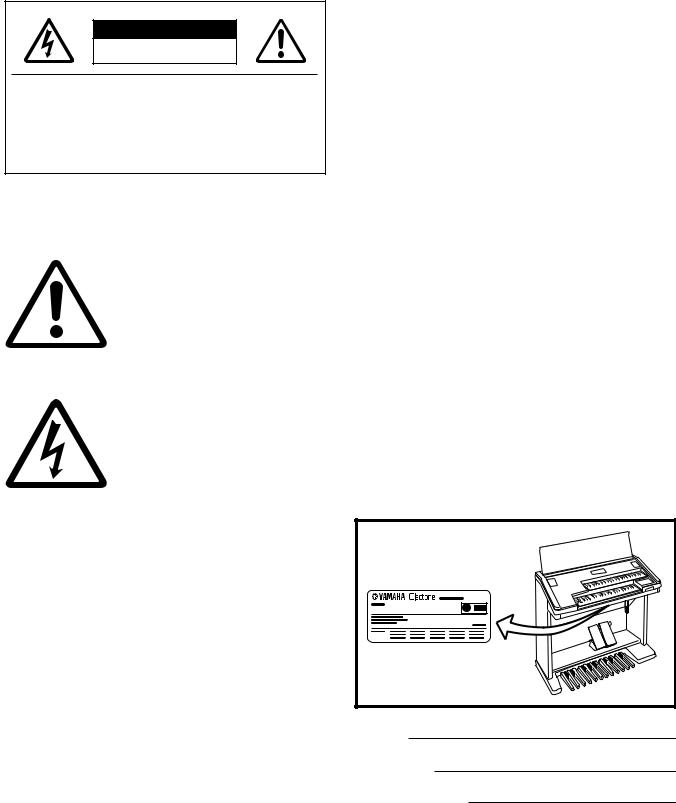
PRODUCT SAFETY MARKINGS: Yamaha electronic products may have either labels similar to the graphics shown below or molded / stamped facsimiles of these graphics on the enclosure. The explanation of these graphics appears on this page.
Please observe all cautions indicated on this page and those indicated in the safety instruction section.
CAUTION |
RISK OF ELECTRIC SHOCK. |
DO NOT OPEN |
CAUTION: TO REDUCE THE RISK OF |
ELECTRIC SHOCK, DO NOT REMOVE |
COVER (OR BACK). NO USER-SERVICEABLE |
PARTS INSIDE. REFER SERVICING TO |
QUALIFIED SERVICE PERSONNEL. |
See the name plate for graphic symbol markings.
The exclamation point within the equilateral triangle is intended to alert the user to the present of important o p e r a t i n g a n d m a i n t e n a n c e (servicing) instructions in the literature accompanying the product.
The lightning flash with arrowhead symbol within the equilateral triangle is intended to alert the user to the presence of uninsulated "dangerous v o l t a g e " w i t h i n t h e p r o d u c t ' s enclosure that may be of sufficient magnitude to constitute a risk of electrical shock.
IMPORTANT NOTICE: All Yamaha electronic products are tested and approved by an independent safety testing laboratory in order that you may be sure that when it is properly installed and used in its normal and customary manner, all foreseeable risks have been eliminated. DO NOT modify this unit or commission others to do so unless specifically authorized by Yamaha.
Product performance and/or safety standards may be diminished. Claims filed under the expressed warranty may be denied if the unit is/has been modified. Implied warranties may also be affected.
SPECIFICATIONS SUBJECT TO CHANGE: The information contained in this manual is believed to be correct at the time of printing. However, Yamaha reserves the right to change or modify any of the specifications without notice or obligation to update existing units.
ENVIRONMENTAL ISSUES: Yamaha strives to produce products that are both user safe and environmentally friendly.
We sincerely believe that our products and the production methods used to produce them, meet these goals. In keeping with both the letter and the spirit of the law, we want you to be aware of the following:
BATTERY NOTICE: This product MAY contain a small nonrechargeable battery which (if applicable) is soldered in place. The average life span of this type of battery is approximately five years. When replacement becomes necessary, contact a qualified service representative to perform the replacement.
WARNING: Do not attempt to recharge, disassemble, or incinerate this type of battery. Keep all batteries away from children. Dispose of used batteries promptly and as regulated by applicable laws. Note: In some areas, the servicer is required by law to return the defective parts. However, you do have the option of having the servicer dispose of these parts for you.
DISPOSAL NOTICE: Should this product become damaged beyond repair, or for some reason its useful life is considered to be at an end, please observe all local, state, and federal regulations that relate to the disposal of products that contain lead, batteries, plastics, etc.
NOTICE: Service charges incurred due to lack of knowledge relating to how a function or effect works (when the unit is operating as designed) are not covered by the manufacture's warranty, and are therefore the owner's responsibility.
Please study this manual carefully and consult your dealer before requesting service.
NAME PLATE LOCATION: The graphic below indicates the location of the name plate. The model number, serial number, power requirements, etc., are located on this plate. You should record the model number, serial number, and the date of purchase in the spaces provided below and retain this manual as a permanent record of your purchase.
Model |
Serial No.
Purchase Date
92-469-
PRECAUTIONS
PLEASE READ CAREFULLY BEFORE PROCEEDING
* Please keep these precautions in a safe place for future reference.
WARNING
Always follow the basic precautions listed below to avoid the possibility of serious injury or even death from electrical shock, short-circuiting, damages, fire or other hazards. These precautions include, but are not limited to, the following:
•Do not open the instrument or attempt to disassemble the internal parts or modify them in any way. The instrument contains no user-serviceable parts. If it should appear to be malfunctioning, discontinue use immediately and have it inspected by qualified Yamaha service personnel.
•Do not expose the instrument to rain, use it near water or in damp or wet conditions, or place containers on it containing liquids which might spill into any openings.
•If the power cord or plug becomes frayed or damaged, or if there is a sudden loss of sound during use of the instrument, or if any unusual smells or smoke should appear to be caused by it, immediately turn off the power
switch, disconnect the electric plug from the outlet, and have the instrument inspected by qualified Yamaha service personnel.
•Only use the voltage specified as correct for the instrument. The required voltage is printed on the name plate of the instrument.
•Before cleaning the instrument, always remove the electric plug from the outlet. Never insert or remove an electric plug with wet hands.
•Check the electric plug periodically and remove any dirt or dust which may have accumulated on it.
CAUTION
Always follow the basic precautions listed below to avoid the possibility of physical injury to you or others, or damage to the instrument or other property. These precautions include, but are not limited to, the following:
•Do not place the power cord near heat sources such as heaters or radiators, and do not excessively bend or otherwise damage the cord, place heavy objects on it, or place it in a position where anyone could walk on, trip over, or roll anything over it.
•When removing the electric plug from the instrument or an outlet, always hold the plug itself and not the cord. Pulling by the cord can damage it.
•Do not connect the instrument to an electrical outlet using a multipleconnector. Doing so can result in lower sound quality, or possibly cause overheating in the outlet.
•Remove the electric plug from the outlet when the instrument is not to be used for extended periods of time, or during electrical storms.
•Before connecting the instrument to other electronic components, turn off the power for all components. Before turning the power on or off for all components, set all volume levels to minimum. Also, be sure to set the volumes of all components at their minimum levels and gradually raise the volume controls while playing the instrument to set the desired listening level.
•Do not expose the instrument to excessive dust or vibrations, or extreme cold or heat (such as in direct sunlight, near a heater, or in a car during the day) to prevent the possibility of panel disfiguration or damage to the internal components.
•Do not use the instrument near other electrical products such as televisions, radios, or speakers, since this might cause interference which can affect proper operation of the other products.
•Do not place the instrument in an unstable position where it might accidentally fall over.
•Before moving the instrument, remove all connected cables.
•When cleaning the instrument, use a soft, dry cloth. Do not use paint thinners, solvents, cleaning fluids, or chemical-impregnated wiping cloths. Also, do not place vinyl, plastic or rubber objects on the instrument, since this might discolor the panel or keyboard.
•Do not rest your weight on, or place heavy objects on the instrument, and do not use excessive force on the buttons, switches or connectors.
•Take care that the key cover does not pinch your fingers, and do not insert a finger or hand in the key cover gap.
•Never insert or drop paper or metallic or other objects between the slits of the key cover and the keyboard. If this happens, immediately turn off the power and remove the electric plug from the outlet and have the instrument inspected by qualified Yamaha service personnel.
•Do not place the instrument against a wall (allow at least 3 cm/one-inch from the wall), since this can cause inadequate air circulation, and possibly result in the instrument overheating.
•Do not operate the instrument for a long period of time at a high or uncomfortable volume level, since this can cause permanent hearing loss. If you experience any hearing loss or ringing in the ears, consult a physician.
■USING THE BENCH
•Do not play carelessly with or stand on the bench. Using it as a tool or stepladder or for any other purpose might result in accident or injury.
•Only one person should sit on the bench at a time, in order to prevent the possibility of accident or injury.
•If the bench screws become loose due to extensive long-term use, tighten them periodically using the included tool.
■SAVING USER DATA
•Always save data to a floppy disk frequently, in order to help prevent the loss of important data due to a malfunction or user operating error.
Yamaha cannot be held responsible for damage caused by improper use or modifications to the instrument, or data that is lost or destroyed.
Always turn the power off when the instrument is not in use.
(1)B-5
Congratulations!
You are the proud owner of a fine electronic organ, Electone EL-900. The Yamaha EL-900 Electone combines the most advanced AWM tone generation technology with state-of-the-art digital electronics and
features to give you stunning sound quality with maximum musical enjoyment. A large Liquid Crystal Display and sophisticated yet easy-to-use interface also greatly enhance the operability of this advanced instrument.
In order to make the most of the Electone and extensive performance potential, we urge you to read the manual thoroughly while trying out
the various features described.
Keep the manual in a safe place for later reference.
Included Items
Registration Menu Disk
3.5" 2HD Floppy Disk
Owner sManual
Turning the Electone off erases all panel settings you have made. When the Electone is turned on, Basic Registration 1 is automatically selected. If you have made panel settings you wish to keep, save them to Registration Memory before turning the Electone off.
GM (General MIDI System Level 1) is an addition to the MIDI standard which ensures that any GM-compatible music data can be accurately played by any GM-compatible tone generator, regardless of maker. The GM mark is affixed to all software and hardware products that support the General MIDI standard.
XG is a new MIDI format created by Yamaha which significantly improves and expands upon the General MIDI standard by providing a greater variety of high-quality voices plus considerably enhanced effect operation while being fully compatible with GM.
ProductsbearingtheSONDIUS-XGlogoarelicensedunderpatentsofStanfordUniversityandYamahaas listed on the internet web site, <http://www.sondius-xg.com>.
The screen displays and illustrations as shown in this owner s manual are for instructional purposes only, and may appear somewhat different from those on your instrument.
Copying of the commercially available music sequence data is strictly prohibited except for your personal use.
4
Table of Contents
Panel Layout .............................................. |
6 |
||
Main Features ............................................ |
9 |
||
1 |
Quick Introductory Guide.................. |
10 |
|
1 |
Getting Started .................................................... |
10 |
|
2 |
Basic Registrations .............................................. |
11 |
|
3 |
Registration Menu Disk ...................................... |
12 |
|
4 |
Basic Operation................................................... |
19 |
|
5 |
Using the LCD Display ....................................... |
20 |
|
6 |
Voice List ............................................................ |
24 |
|
2 |
Voice Sections ..................................... |
26 |
|
1 |
Selecting Voices from the Panel ......................... |
26 |
|
2 |
Selecting Voices from the Dotted Buttons.......... |
30 |
|
3 |
Voice Menus ....................................................... |
32 |
|
3 |
Flute Voices (Organ Sounds) ............. |
40 |
|
1 |
Creating Flute Voices ......................................... |
40 |
|
2 |
Save to User Flute Voice ..................................... |
42 |
|
3 |
Using Preset and User Voices ............................. |
43 |
|
4 |
Voice Controls and Effects ................. |
44 |
|
1 |
Selecting from Voice Condition Pages ............... |
45 |
|
|
[PAGE 1] ............................................................ |
37 |
|
|
1) |
Touch Tone ................................................... |
45 |
|
2) |
Pitch............................................................... |
46 |
|
3) |
Feet ................................................................ |
46 |
|
4) |
Pan ................................................................. |
46 |
|
5) |
Reverb ............................................................ |
46 |
|
6) |
Volume .......................................................... |
46 |
|
[PAGE 2] ............................................................ |
46 |
|
|
1) |
Effect (On/Off) .............................................. |
46 |
|
2) |
Brilliance ........................................................ |
47 |
|
[PAGE 3] ............................................................ |
47 |
|
|
1) |
Vibrato ........................................................... |
47 |
|
2) |
Touch Vibrato ............................................... |
48 |
|
3) |
Slide (Lead Voice Only) ................................ |
48 |
|
4) |
Tune (Lead Voice Only)................................ |
48 |
2 |
Selecting from Effect Set Pages ........................... |
48 |
|
|
1) |
Tremolo/Chorus ............................................ |
49 |
|
2) |
Symphonic/Celeste ........................................ |
49 |
|
3) |
Delay .............................................................. |
49 |
|
4) |
Flanger ........................................................... |
50 |
|
5) |
Distortion ...................................................... |
51 |
3 |
Selecting from the Panel ..................................... |
52 |
|
|
1) Reverb .................................................................. |
52 |
|
|
2) Sustain.................................................................. |
55 |
|
|
3) Tremolo/Chorus .................................................. |
56 |
|
5 |
Rhythm and Accompaniment ............ |
59 |
|
1 |
Selecting Rhythms from the Panel ..................... |
59 |
|
2 |
Rhythm Condition Page ..................................... |
62 |
|
3 |
Dotted Buttons and User Rhythms..................... |
64 |
|
4 |
Rhythm Menus ................................................... |
66 |
|
5 |
Automatic Accompaniment-Auto Bass Chord |
|
|
|
(A.B.C.) ............................................................... |
68 |
|
6 |
Accompaniment Controls .................................. |
70 |
|
7 |
Preset/User Keyboard Percussion....................... |
71 |
|
8 |
Melody On Chord (M.O.C.)............................... |
79 |
|
6 |
Registration Memory ......................... |
80 |
|
1 |
Storing Registrations........................................... |
80 |
|
2 |
Selecting Registrations ........................................ |
80 |
|
3 |
Saving the Registration Data to Disk .................. |
81 |
|
4 |
Registration Shift ................................................ |
82 |
|
7 |
Music Disk Recorder........................... |
87 |
1 |
Precautions ......................................................... |
87 |
2 |
Formatting a Disk ............................................... |
89 |
3 |
Recording Punch In Recording ..................... |
90 |
4 |
Recording Registrations (and Bulk Data)........... |
96 |
5 |
Recalling Recorded Registrations (and Bulk Data) .... |
97 |
6 |
Replacing Registrations ...................................... |
97 |
7 |
Playback About XG Songs ............................. |
98 |
8 |
Other Functions ............................................... |
102 |
8 |
Voice Edit ........................................... |
110 |
1 |
Editing a Voice.................................................. |
110 |
2 |
Saving Your New Voice .................................... |
115 |
3 |
Quitting Voice Edit........................................... |
117 |
4 |
Recalling an Edited Voice ................................. |
117 |
5 |
Selecting Voices from a Voice Disk (Optional) .... |
118 |
6 |
Voice Editing Basics.......................................... |
119 |
9 |
Rhythm Pattern Program and |
|
||
|
Rhythm Sequence Program .............. |
125 |
||
Outline of the Rhythm Programming Operation . 125 |
||||
1 |
Rhythm Pattern Program.................................. |
126 |
||
|
1) |
Entering Rhythm Pattern Program ............. |
126 |
|
|
2) |
Percussion Sounds Used for |
|
|
|
|
|
Rhythm Pattern Program ............................ |
128 |
|
3) |
Step Write and Real Time Write ................. |
130 |
|
|
4) |
Selecting Step Write or |
|
|
|
|
|
Real Time Write Operation ......................... |
130 |
|
5) |
Setting the Beat/Quantize Values ................ |
130 |
|
|
6) |
Entering Percussion Sounds to |
|
|
|
|
|
a Rhythm Pattern ........................................ |
131 |
|
7) |
Editing with Step Write............................... |
132 |
|
|
8) |
Editing with Real Time Write ..................... |
136 |
|
|
9) |
Selecting Accompaniment Patterns |
|
|
|
|
|
Lower Rhythmic .......................................... |
137 |
|
10) Saving Rhythm Patterns............................. |
140 |
||
|
11) Quitting Rhythm Pattern Program ............ |
141 |
||
|
12) Recalling User Rhythm Patterns ................ |
142 |
||
|
13) Selecting Patterns from a Pattern Disk |
|
||
|
|
|
(Optional) .................................................. |
143 |
2 |
Rhythm Sequence Program .............................. |
144 |
||
|
1) |
Selecting a Sequence.................................... |
144 |
|
|
2) |
Programming a Sequence............................ |
145 |
|
|
3) |
Quitting Rhythm Sequence Program .......... |
148 |
|
|
4) |
Playing Rhythm Sequences ......................... |
148 |
|
|
5) |
Playing All Sequences in Order................... |
149 |
|
10 Footswitches, Knee Lever and |
|
|||
|
|
|
Expression Pedals........................... |
151 |
1 |
Footswitch ........................................................ |
151 |
||
2 |
Knee Lever ........................................................ |
153 |
||
3 |
Expression Pedals ............................................. |
155 |
||
11 |
Transpose And Pitch Controls ....... |
157 |
||
12 MIDI ................................................ |
158 |
|||
13 |
Accessory Jacks and Controls ........ |
160 |
||
14 |
Appendix ......................................... |
161 |
||
MIDI |
...................................................................... |
161 |
||
MIDI Data Format ................................................. |
167 |
|||
MIDI Implementation Chart ................................. |
178 |
|||
Troubleshooting .................................................... |
181 |
|||
Specifications......................................................... |
184 |
|||
Index...................................................................... |
186 |
|||
1 |
Quick Introductory Guide |
2 |
Voice Sections |
3 |
Flute Voices |
(Organ Sounds) |
|
|
|
4 |
Voice Controls |
|
|
|
and Effects |
5 |
Rhythm and |
Accompaniment |
|
6 |
Registration Memory |
7 |
Music Disk Recorder |
8 |
Voice Edit |
|
Rhythm Pattern |
|
Program and |
9 |
Rhythm Sequence |
|
Program |
||
|
||
|
Footswitches, Knee Lever |
|
10 and Expression Pedals |
||
11 |
Transpose and |
|
Pitch Controls |
||
|
||
12 MIDI |
||
13 |
Accessory Jacks |
|
and Controls |
||
|
||
14 Appendix |
||
5

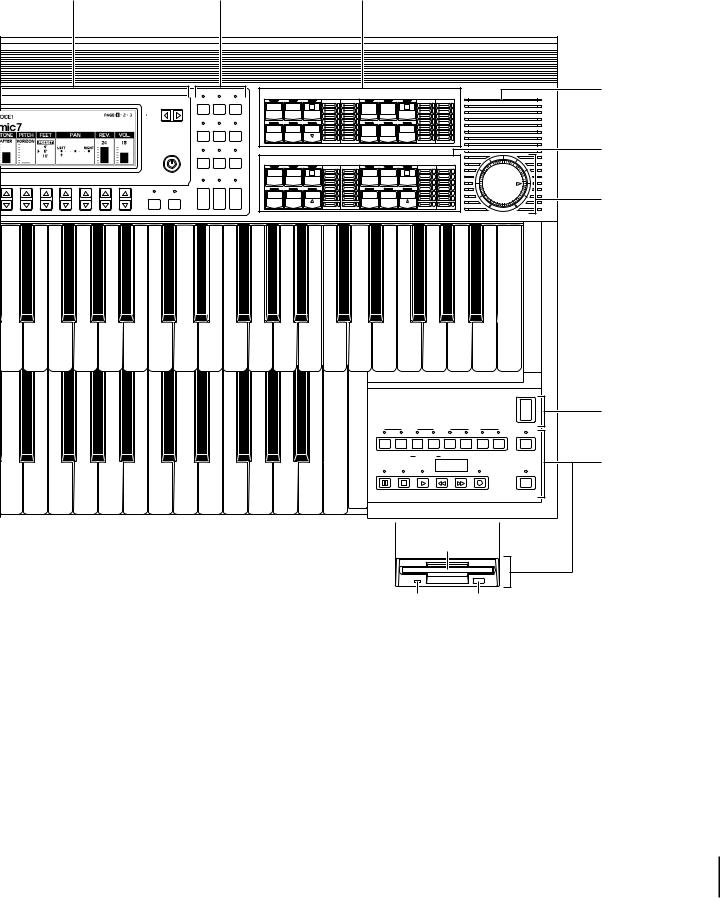
Panel Layout
Front Panel
LOWER KEYBOARD VOICE 1, 2 |
UPPER KEYBOARD VOICE 1, 2 |
(page 26) |
(page 26) |
Monitor Speaker
|
REVERB |
|
|
|
UPPER KEYBOARD VOICE 1 |
BRILLIANCE |
VOLUME |
|
|
|
UPPER KEYBOARD VOICE 2 |
BRILLIANCE |
VOLUME |
||||
|
MAX |
|
|
|
|
|
|
BRILLIANT |
MAX |
|
|
|
|
|
|
BRILLIANT |
MAX |
|
|
STRINGS |
BRASS |
CLARI- |
SAXO- |
CHORUS |
HARMO- |
1 |
|
STRINGS |
BRASS |
CLARI- |
SAXO- |
CHORUS |
HARMO- |
1 |
|
REVERB |
|
|
|
NET |
PHONE |
|
NICA |
|
|
|
NET |
PHONE |
|
NICA |
|
||
|
|
|
|
|
|
|
|
|
|
|
|||||||
|
|
|
|
|
|
|
|
|
|
|
|
|
|
|
|
|
|
(page 52) |
|
ORGAN |
PIANO |
GUITAR |
VIBRA- |
COSMIC |
TUTTI |
2 |
|
ORGAN |
PIANO |
GUITAR |
VIBRA- |
COSMIC |
TUTTI |
2 |
|
|
|
|
|
|
PHONE |
|
|
|
|
|
|
PHONE |
|
|
|
||
|
|
|
|
|
|
|
|
|
|
|
|
|
|
|
|
||
|
MIN |
|
|
|
|
|
|
MELLOW |
MIN |
|
|
|
|
|
|
MELLOW |
MIN |
|
SUSTAIN |
|
|
|
LOWER KEYBOARD VOICE 1 |
BRILLIANCE |
VOLUME |
|
|
|
LOWER KEYBOARD VOICE 2 |
BRILLIANCE |
VOLUME |
||||
|
|
|
|
|
|
|
|
BRILLIANT |
MAX |
|
|
|
|
|
|
BRILLIANT |
MAX |
|
UPPER |
STRINGS |
BRASS |
CLARI- |
SAXO- |
CHORUS |
HORN |
1 |
|
STRINGS |
BRASS |
CLARI- |
SAXO- |
CHORUS |
HORN |
1 |
|
SUSTAIN |
(KNEE) |
|
|
NET |
PHONE |
|
|
|
|
|
NET |
PHONE |
|
|
|
||
|
|
|
|
|
|
|
|
|
|
|
|
||||||
|
|
|
|
|
|
|
|
|
|
|
|
|
|
|
|
|
|
(page 55) |
LOWER PEDAL |
ORGAN |
PIANO |
GUITAR |
VIBRA- |
COSMIC |
TUTTI |
2 |
|
ORGAN |
PIANO |
GUITAR |
VIBRA- |
COSMIC |
TUTTI |
2 |
|
|
(KNEE) |
|
|
|
PHONE |
|
|
|
|
|
|
PHONE |
|
|
|
||
|
|
|
|
|
|
|
|
|
|
|
|
|
|
|
|||
|
|
|
|
|
|
|
|
|
MELLOW |
MIN |
MELLOW |
MIN |
KEYBOARD |
|
|
|
|
RHYTHM |
|
|
|
BASIC |
|
|
|
PERCUSSION |
|
|
|
|
|
|
VOLUME |
REGIST. |
|
|
|
|
|
|
|
|
|
|
|
|
MAX |
|
|
|
|
LOWER |
SEQ. |
SEQ. |
MARCH |
WALTZ |
SWING |
BOUNCE |
SLOW |
1 |
1 |
|
|
|
|
1 |
2 |
|
|
|
|
ROCK |
|
|
|
|
|
1 |
|
|
USER 1 |
USER 2 |
USER 3 |
USER 4 |
A |
B |
|
|
|
|
|
|
|
|
|
|
|
|
|
|
|
|
|
PEDAL |
SEQ. |
SEQ. |
TANGO |
LATIN 1 |
LATIN 2 |
8 BEAT |
16 BEAT |
2 |
2 |
|
|
|
|
3 |
4 |
|
|
|
|
|
|
|
|
|
|
2 |
|
|
USER 5 |
USER 6 |
USER 7 |
USER 8 |
C |
D |
|
|
|
|
|
|
|
|
|
|
|
|
|
|
|
|
|
|
|
|
|
|
|
|
|
MIN |
|
|
|
|
|
|
|
|
|
|
|
|
|
3 |
|
|
|
|
|
TEMPO |
|
|
|
|
|
|
|
|
|
|
|
|
|
|
|
|
|
|
|
4 |
|
|
|
|
|
|
|
|
|
|
BAR/BEAT |
|
|
|
|
|
Rhythm Section |
|
|
|
|
|
|
|
|
|
|
|
|
(page 59) |
|
|
|
|
|
|
|
|
5 |
|
|
|
|
|
|
|
|
|
TEMPO |
|
|
|
|
|
|
INTRO. |
SYNCHRO |
START |
|
|
|
|
|
|
|
|
|
|
ENDING |
START |
|
|
|
|
|
|
|
|
|
|
|
|
|
FILL IN |
|
|
|
|
|
|
|
|
|
|
KEYBOARD PERCUSSION |
|
|
BASIC REGIST. |
|
|
|
|
|
|||||
(page 71) |
|
|
(page 11) |
|
|
|
|
|
|
||||
|
|
|
|
|
|
|
|
|
|
|
|
|
|
|
|
|
|
|
|
|
|
|
|
|
|
|
|
|
|
M. |
|
13 |
14 |
15 |
16 |
1 |
2 |
3 |
4 |
||
|
|
/TO DISK |
|
||||||||||
|
|
|
|
|
|
|
|
|
|
|
|
|
|
|
|
|
|
|
|
|
|
||||||
M./TO DISK Button |
|
|
|
|
Registration Memory Buttons |
||||||||
|
(page 80) |
|
|
|
|
|
|
(page 62) |
|
||||
6
LCD Display |
DISPLAY SELECT |
LEAD VOICE 1, 2 |
(page 20) |
(page 8) |
(page 26) |
PAGE
CONTRAST
COARSE HOLD
DATA CONTROL
VOICE |
EFFECT |
A. B. C. |
DISPLAY |
SET |
M. O. C. |
FOOT |
REGIST. |
EXP. |
SW. |
SHIFT |
PITCH/MIDI |
|
RHYTHM |
|
VOICE |
PROGRAM |
|
EDIT |
PATTERNSEQUENCE |
|
U. FLUTE |
L. FLUTE TREMOLO |
|
VOICE |
VOICE |
(FAST) |
DISPLAY SELECT
|
LEAD VOICE 1 |
BRILLIANCE |
VOLUME |
LEAD VOICE 2 |
BRILLIANCE |
VOLUME |
|
|
|
BRILLIANT |
MAX |
|
|
BRILLIANT |
MAX |
VIOLIN |
FLUTE |
1 |
|
VA |
VA |
1 |
|
|
|
|
ACOUS- |
VIRTUAL |
|
||
|
|
|
|
TIC |
|
|
|
OBOE |
TRUM- |
TO |
|
VA |
VA |
SOLO |
|
|
PET |
LOWER |
|
ELEC- |
CUSTOM |
(KNEE) |
|
|
|
|
|
TRONIC |
|
|
|
|
|
MELLOW |
MIN |
|
|
MELLOW |
MIN |
PEDAL VOICE 1 |
BRILLIANCE |
VOLUME |
PEDAL VOICE 2 |
BRILLIANCE |
VOLUME |
||
|
|
BRILLIANT |
MAX |
|
|
BRILLIANT |
MAX |
CONTRA |
ELEC. |
1 |
|
CONTRA |
ELEC. |
1 |
|
BASS |
BASS |
|
BASS |
BASS |
|
||
ORGAN |
TUBA |
TO |
|
ORGAN |
TUBA |
TO |
|
BASS |
LOWER |
|
BASS |
LOWER |
|
||
MELLOW |
MIN |
MELLOW |
MIN |
MASTER VOLUME
Monitor Speaker
PEDAL VOICE 1, 2 (page 26)
MASTER VOLUME (page 11)
|
RECORD |
|
|
|
PLAY |
POWER |
|
|
|
|
|
|
|||
UPPER |
LOWER |
PEDAL CONTROL |
UPPER LOWER PEDAL CONTROL |
SHIFT |
|||
SONG |
|
FROM |
TO |
|
|
SONG DEL. |
|
REPEAT |
|
SONG COPY |
|
|
|
|
|
PAUSE |
STOP |
PLAY |
|
SONG SELECT |
RECORD |
CUSTOM PLAY |
|
MUSIC DISK RECORDER |
– |
TEMPO + |
FORMAT |
|
|||
|
|
|
|
||||
POWER (page 10)
MUSIC DISK RECORDER (page 87)
Floppy Disk Slot
LED (Lamp in-use) Eject Button
|
|
|
|
|
|
|
|
|
|
|
|
|
|
|
|
|
|
|
|
|
5 |
|
6 |
|
7 |
|
8 |
|
9 |
|
10 |
|
11 |
|
12 |
|
D. |
|
|
|
|
|
|
|
|
|
|
|
|
|
|
|
|
|
|
|
|
|
|
|
|
|
|
|
|
|
|
|
|
|
|
|
|
|
|
|
|
|
|
|
|
|
|
|
|
|
|
|
|
|
|
|
|
|
|
|
|
|
|
D. (Disable) Button
(page 80)
7
LCD/Display Select
LCD Display (page 20)
VOICE |
EFFECT |
A. B. C. |
DISPLAY |
SET |
M. O. C. |
PAGE |
|
|
FOOT |
REGIST. |
EXP. |
SW. |
SHIFT |
PITCH/MIDI |
|
|
RHYTHM |
CONTRAST |
VOICE |
PROGRAM |
EDIT PATTERN SEQUENCE |
||
Page Buttons (page 28)
VOICE DISPLAY Button (page 28) EFFECT SET Button (page 48) A. B. C. /M. O. C. Button (page 69) FOOT SW. Button (page 151) REGIST SHIFT Button (page 82)
EXP./PITCH/MIDI Button (page 155) VOICE EDIT Button (page 110)
RHYTHM PATTERN PROGRAM Button (page 126) RHYTHM SEQUENCE Button (page 144)
DATA CONTROL
DATA CONTROL Buttons (page 21)
U. FLUTE |
L. FLUTE |
TREMOLO |
VOICE |
VOICE |
(FAST) |
COARSE HOLD
 TREMOLO (FAST) Button (page 58)
DISPLAY SELECT
 L. FLUTE VOICE Button (page 40)
 U. FLUTE VOICE Button (page 40)
HOLD Button (page 23)
COARSE Button (page 23)
Contrast Dial (page 23)
Others
|
Keyboard Cover/Music Stand |
Monitor Speakers |
|
|
Front Panel (page 6) |
|
Upper Keyboard |
|
Lower Keyboard |
|
MIDI Jacks (page 160) |
|
Knee Lever (page 153) |
Jacks (page 180) |
Right-Footswitch (page 82) |
|
|
|
Left-Footswitch (page 151) |
Speaker Unit |
Expression Pedal (page 11) |
|
|
|
Second Expression Pedal (page155) |
|
Pedalboard |
8

Main Features
Your Yamaha Electone is packed with many sophisticated functions. Yet is amazingly easy to use. The main features are briefly described here so that you can quickly understand the capabilities of your Electone.
Included among the main features are:
1 Astoundingly True-to-life Sounds
The new AWM (Advanced Wave Memory), FM (Frequency Modulation) and VA (Virtual Acoustic Synthesis) tone generation technologies combined with authentic touch response, completed by adding breathtaking Horizontal-touch feature, for individual instrument voices, make this Electone a truly expressive musical instrument.
You can enjoy playing a total of 207 voices (173 AWM/FM voices and 34 VA voices) using the touch response and solo mode functions. (page 26)
2 Limitless Variety of Organ Sounds
The Electone also has separate voice sections that feature classic organ sounds-from jazz and pop to church and theater-and lets you easily create your own organ sounds by adjusting the volumes of the various flute footages. (page 40)
3 Original Voice Creation
The Electone also provides easy-to-use voice editing tools for manipulating the sophisticated AWM and FM tone generation technologies, allowing you to create your own original Electone voices (except for VA voices). (page 110)
4 Dynamic and Programmable Rhythm Patterns
The Rhythm section of the Electone features authentic drum and percussion sounds, used by expert rhythm programmers in creating a total of 66 rhythm patterns, ranging across all styles of music. (page 59)
Along with the Keyboard Percussion function (page 71), which lets you play 120 different percussion sounds from the keyboard, the Rhythm Pattern Program and Rhythm Sequence Program functions let you record your own rhythm patterns and connect them to make songs. (page 125)
5 Wide Variety of Effects
Electone voices can also be enhanced with a full range of high-quality digital effects, ranging from Tremolo and Reverb to Flanger, Delay and Distortion. Pan and Reverb can be applied to each voice and each percussion sound independently. (page 44)
6 Versatile Functions of the Music Disk Recorder
The Electone also features a Music Disk Recorder (MDR) for recording your registrations and performances to a floppy disk. In addition, the MDR allows you to copy a song from a disk to another, duplicate a disk, and play and save commercially available XG song data. (page 87)
7 Large LCD for Systematic, Intuitive Operation
The large (480 x 160 full dot) LCD display provides comprehensive and easy-to-understand control over virtually all of the operations of the Electone.
9
11
Guide Introductory Quick
Quick Introductory Guide
Whether you are an advanced Electone performer or have never touched an electronic keyboard in your life, we recommend that you take the time to go through this basic section. It shows you in the simplest possible manner how to start playing your Electone. The basic operations and functions that you learn in this section will also be important when you later use the Electone s more advanced features.
Only use the voltage specified as correct for the Electone. The required voltage is printed on the name plate of the Electone. Yamaha products are manufactured specifically for the supply voltage in the area where they are to be sold. If you should move, or if any doubt exists about the supply voltage, please consult with a qualified technician.
1  Getting Started
1 |
Plug the power cord in to an appropriate electrical outlet. |
2 |
Turn on the Electone by pressing the POWER switch. |
POWER
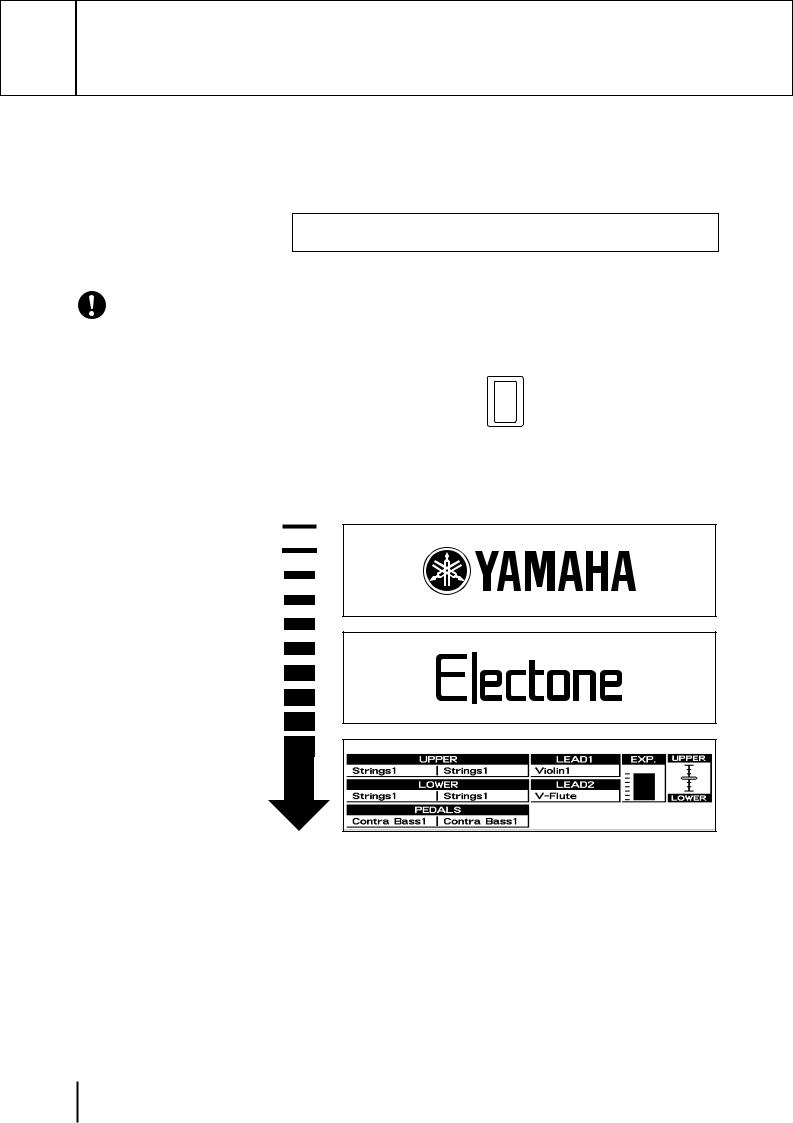
When you turn on the Electone, the following displays will appear one after the other on the LCD display:
®
This last display shows the currently assigned voice settings for each voice section, as well as the overall balance between the Upper and Lower voices.
When the Electone is turned on, Basic Registration 1 is automatically selected.
10
3 SettheMASTERVOLUMEcontrol.
The MASTER VOLUME control is an overall control which affects the volume of the entire instrument.
MASTER VOLUME
4 Press the Expression pedal down with your foot.
Once you have set the MASTER VOLUME control to a suitable level, you can use the Expression pedal to change the volume with your foot as you play.
1
Guide Introductory Quick
Maximum volume |
Minimum volume |
2  Basic Registrations
The Basic Registration section has five factory preset registrations, each with a different set of voices for the Upper/Lower keyboards and Pedalboard and each specially suited for playing in a different music style.
To select Basic Registrations:
When you turn the power on, the Electone automatically selects Basic Registration 1. Press the BASIC REGIST. buttons to select each Basic Registration.
The chart below lists the voices that have been set for the Upper/Lower keyboards and Pedalboard in each of the five Basic Registrations.
|
Basic |
Basic |
Basic |
Basic |
Basic |
|
|
Registration 1 |
Registration 2 |
Registration 3 |
Registration 4 |
Registration 5 |
|
|
|
|
|
|
|
|
Upper Keyboard |
Strings 1 |
Brass 1 |
Flute 1 |
Cosmic 1 |
Synth. Brass 1 |
|
Voice 1 |
||||||
|
|
|
|
|
||
|
|
|
|
|
|
|
Lower Keyboard |
Strings 1 |
Horn1 |
Piano 1 |
Cosmic 2 |
Cosmic 3 |
|
Voice 1 |
||||||
|
|
|
|
|
||
|
|
|
|
|
|
|
Pedal Voice 1 |
Contra Bass1 |
Tuba |
Contra Bass 1 |
Cosmic 2 |
Synth. Bass 1 |
|
|
|
|
|
|
|
Ifyouhavemadepanelsettingsyouwishtokeep,savethemtoRegistration Memory (page 80) before turning the Electone off. You can, however, restore the panel settings that were made before the Electone was last turned off. See page 86 for more information.
BASIC
REGIST.
1
2
3
4
5
Turning the Electone off erases all panel settings you have made. When the Electone is turned on, Basic Registration 1 is automatically selected.
11
1
Guide Introductory Quick
NOTE:
See page 87 for more information on the Music Disk Recorder.
NOTE:
See page 14 for the complete list of the Registration Menus.
NOTE:
While you are in the Voice Edit mode or Rhythm Pattern/Sequence Program mode, the Registration Menus cannot be displayed on the LCD.
3 
 Registration Menu Disk
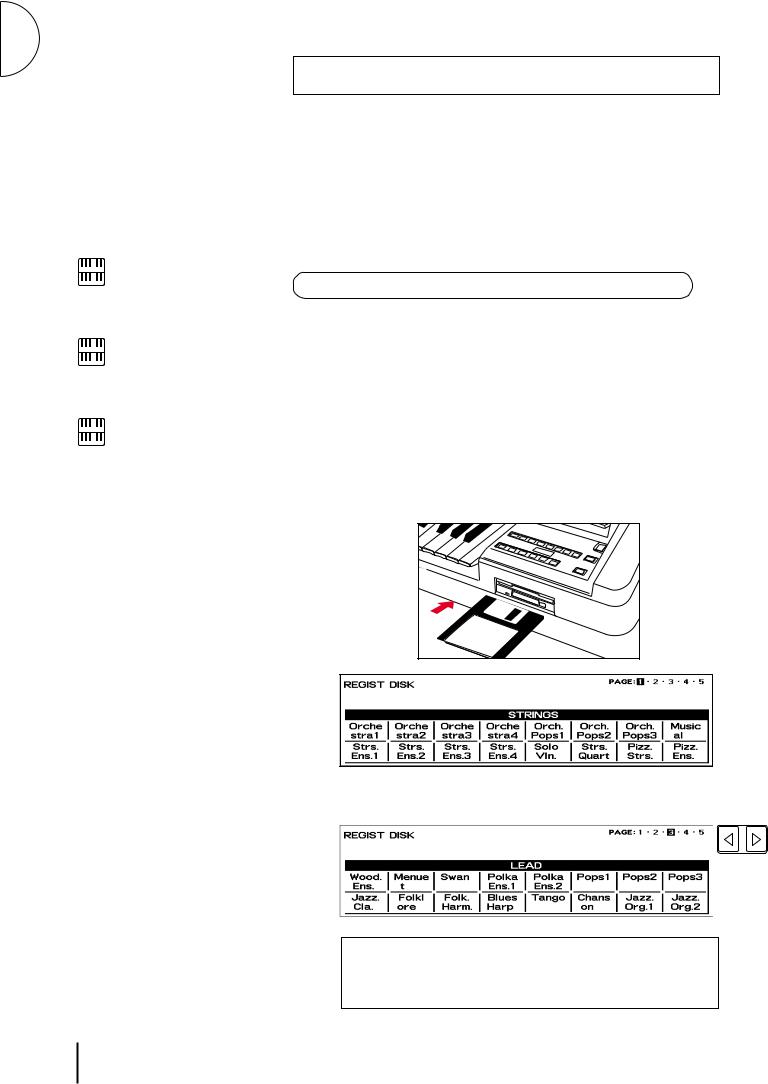
The Electone includes convenient Registrations that let you completely and instantly change the voices and other settings for all of the keyboards, even as you play. Each registration is pre-programmed to be used for a specific music style or instrumental combination.
Included with your Electone is a Registration Menu Disk. The disk is packed with 80 different types of registrations, including voice and rhythm selections. Each registration is pre-programmed to be used for a specific music style or instrumental combination.
To select registrations from the Registration Menu Disk:
1 Put the included Registration Menu Disk (with the label of the disk facing upward and the sliding shutter facing forward) into the Disk slot, located just under the Music Disk Recorder at the right side of the Electone.
Once you ve securely inserted the disk into the slot, the LCD Display on the panel will automatically change to show the available Registration Menus.
There are dozens of registrations on a disk, but up to 16 can only be shown in the LCD Display at a time.
The page numbers 1 through 5 shown at the top right corner of the LCD indicate this Registration Menu Disk contains five pages.
|
Press the Page button to select the various menu pages of |
|
|
2 registrations available on the disk. |
PAGE |
||
|
|
|
|
When the page numbers are displayed at the top right corner, you can select the pages by pressing the Page buttons, [s] to select next page and [w] to select previous page.
12
3 Select one of the registrations shown on the LCD by pressing the appropriate Data Control button.
Up to 16 registration selections are shown on the LCD, and the 16
Data Control buttons correspond to those selections.
The Data Control buttons are used to select voices, rhythms and various functions. They are also used to raise or lower volumes and levels, as well as move the cursor up and down, right and left.
NOTE:
Inadvertently pressing another button on the panel may change the content of the LCD during the Registration Menu operation. In this case press PLAY button on the Music Disk Recorder section, to retrieve the Registration Menu display.
1
Guide Introductory Quick
13
1
Guide Introductory Quick
Registration Menu List
Page 1: Strings
Orchestra1 |
1 Strings 1 |
|
2 Strings 2 |
|
Violin 4 |
4 |
|
|
|
|
|
|
|
|
|
|
5 Horn 3 |
|
6 Strings 1 |
|
7 Contrabass 1 |
8 |
|
|
|
|
|
|
|
|
|
Orchestra2 |
1 Horn 3 |
|
2 Horn 1 |
|
|
4 |
|
|
|
|
|
|
|
|
|
|
5 Tremolo Strings |
|
6 Strings 2 |
|
7 Contrabass 1 |
8 |
|
|
|
|
|
|
|
|
|
Orchestra3 |
1 |
|
2 |
|
English Horn |
4 |
|
|
|
|
|
|
|
|
|
|
5 Strings 2 |
|
6 |
|
7 |
8 Contrabass 1 |
|
|
|
|
|
|
|
|
|
Orchestra4 |
1 Strings 1 |
|
2 Brass 1 |
|
Piccolo |
4 |
|
|
|
|
|
|
|
|
|
|
5 Strings 1 |
|
6 Brass 2 |
|
7 Timpani |
8 |
|
|
|
|
|
|
|
|
|
Orch.Pops1 |
1 Strings 2 |
|
2 Chorus 2 |
|
Whistle |
4 Slow Rock 2 |
|
|
|
|
|
|
|
|
|
|
5 Strings 2 |
|
6 Chorus 2 |
|
7 Upright Bass |
8 |
|
|
|
|
|
|
|
|
|
Orch.Pops2 |
1 Cosmic 1 |
|
2 Celesta |
|
|
4 Slow Rock 1 |
|
|
|
|
|
|
|
|
|
|
5 Strings 2 |
|
6 Chorus 2 |
|
7 Upright Bass |
8 |
|
|
|
|
|
|
|
|
|
Orch.Pops3 |
1 Strings 2 |
|
2 Harpsichord |
|
Violin 4 |
4 |
8 Beat 1 |
|
|
|
|
|
|
|
|
|
5 Strings 1 |
|
6 Horn 3 |
|
7 Elec. Bass 1 |
8 |
|
|
|
|
|
|
|
|
|
Musical |
1 Tutti 1 |
|
2 Strings 2 |
|
Piccolo |
4 Polka 1 |
|
|
|
|
|
|
|
|
|
|
5 Horn 1 |
|
6 Strings 1 |
|
7 Contrabass 1 |
8 |
|
|
|
|
|
|
|
|
|
Strs.Ens.1 |
1 Strings 3 |
|
2 Strings 2 |
|
Violin 4 |
4 |
|
|
|
|
|
|
|
|
|
|
5 Strings 3 |
|
6 Strings 2 |
|
7 Contrabass 1 |
8 |
|
|
|
|
|
|
|
|
|
Strs.Ens.2 |
1 Strings 2 |
|
2 Synth. Strings 1 |
|
|
4 |
|
|
|
|
|
|
|
|
|
|
5 Strings 2 |
|
6 |
|
7 Contrabass 1 |
8 |
|
|
|
|
|
|
|
|
|
Strs.Ens.3 |
1 Strings 1 |
|
2 Strings 2 |
|
Strings 5 |
4 |
|
|
|
|
|
|
|
|
|
|
5 Strings 1 |
|
6 |
|
7 Contrabass 1 |
8 |
|
|
|
|
|
|
|
|
|
Strs.Ens.4 |
1 Strings 2 |
|
2 Strings 2 (16') |
|
|
4 |
|
|
|
|
|
|
|
|
|
|
5 Strings 2 |
|
6 |
|
7 Contrabass 1 |
8 |
|
|
|
|
|
|
|
|
|
SoloVln. |
1 Violin 4 |
|
2 |
|
Violin 1 |
4 |
|
|
|
|
|
|
|
|
|
|
5 Strings 2 |
|
6 |
|
7 Contrabass 1 |
8 |
|
|
|
|
|
|
|
|
|
Strs.Quart |
1 Violin 1 |
|
2 |
|
|
4 |
|
|
|
|
|
|
|
|
|
|
5 Violin 3 |
|
6 |
|
7 Cello |
8 |
|
|
|
|
|
|
|
|
|
Pizz.Strs. |
1 Pizzicato Strings |
|
2 |
|
|
4 |
|
|
|
|
|
|
|
|
|
|
5 Pizzicato Strings |
|
6 Pizzicato Strings |
|
7 Pizzicato Strings |
8 |
|
|
|
|
|
|
|
|
|
Pizz.Ens. |
1 Pizzicato Strings |
|
2 Pizzicato Strings (16') |
|
|
4 |
|
|
|
|
|
|
|
|
|
|
5 Pizzicato Strings |
|
6 Pizzicato Strings |
|
7 Pizzicato Strings |
8 |
|
|
|
|
|
|
|
|
|
The numbers in the parentheses indicate that the “feet” settings for the assigned voice are different from the default. |
|
|
|
||||
|
1 :UPPER KEYBOARD VOICE 1 |
2 :UPPER KEYBOARD VOICE 2 |
:LEAD VOICE 1 |
4 |
:RHYTHM |
||
|
5 :LOWER KEYBOARD VOICE 1 |
6 :LOWER KEYBOARD VOICE 2 7 :PEDAL VOICE 1 |
8 |
:PEDAL VOICE 2 |
|||
14
Page 2: Brass
MarchingBand1 |
1 Brass 1 (16') |
|
2 Brass 1 (8') |
|
|
4 March 1 |
|||
|
|
|
|
|
|
|
|
|
|
|
5 Brass 1 |
|
6 |
|
|
7 Tuba |
8 |
|
|
|
|
|
|
|
|
|
|
||
MarchingBand2 |
1 Glockenspiel |
|
2 |
|
|
Piccolo |
4 March 2 |
||
|
|
|
|
|
|
|
|
|
|
|
5 Brass 1 |
|
6 |
|
|
7 Tuba |
8 |
|
|
|
|
|
|
|
|
|
|
||
BigBand1 |
1 Tutti 3 |
|
2 |
|
|
Trumpet 1 |
4 Swing 3 |
||
|
|
|
|
|
|
|
|
|
|
|
5 Trombone 2 |
|
6 |
|
|
7 Upright Bass |
8 |
|
|
|
|
|
|
|
|
|
|
||
BigBand2 |
1 Tutti 3 |
|
2 |
|
|
Trumpet 3 |
4 Swing 2 |
||
|
|
|
|
|
|
|
|
|
|
|
5 Guitar 2 |
|
6 |
|
|
7 Upright Bass |
8 |
|
|
|
|
|
|
|
|
|
|
||
BigBand3 |
1 Trombone 2 |
|
2 |
|
|
Trombone 2 |
4 Swing 3 |
||
|
|
|
|
|
|
|
|
|
|
|
5 Sax Ensemble 1 |
|
6 |
|
|
7 Upright Bass |
8 |
|
|
|
|
|
|
|
|
|
|
||
BigBand4 |
1 Muted Trombone |
|
2 |
|
|
Muted Trombone |
4 Swing 2 |
||
|
|
|
|
|
|
|
|
|
|
|
5 Piano 1 |
|
6 |
|
|
7 Upright Bass |
8 |
|
|
|
|
|
|
|
|
|
|
||
BigBand5 |
1 Saxphone 2 |
|
2 |
|
|
Saxphone 2 |
4 Swing 1 |
||
|
|
|
|
|
|
|
|
|
|
|
5 Brass 4 |
|
6 |
|
|
7 Upright Bass |
8 |
|
|
|
|
|
|
|
|
|
|
||
BigBand6 |
1 Sax Ensemble 1 |
|
2 |
|
|
Sax Ensemble 1 |
4 Swing 1 |
||
|
|
|
|
|
|
|
|
|
|
|
5 Muted Trombone |
|
6 |
|
|
7 Upright Bass |
8 |
|
|
|
|
|
|
|
|
|
|
|
|
Fanfare |
1 Brass 2 |
|
2 |
|
|
Trumpet 1 |
4 |
|
|
|
|
|
|
|
|
|
|
|
|
|
5 Brass 4 |
|
6 |
|
|
7 Tuba |
8 |
|
|
|
|
|
|
|
|
|
|
|
|
Horn.Ens. |
1 Horn 3 |
|
2 |
|
|
|
4 |
|
|
|
|
|
|
|
|
|
|
|
|
|
5 Trombone 1 |
|
6 |
|
|
7 Tuba |
8 |
|
|
|
|
|
|
|
|
|
|
|
|
Afrocuban |
1 |
|
|
2 |
|
|
Trumpet 3 |
4 Swing 6 |
|
|
|
|
|
|
|
|
|
|
|
|
5 Piano 2 |
|
6 |
|
|
7 Upright Bass |
8 |
|
|
|
|
|
|
|
|
|
|
|
|
JazzBallad |
1 |
|
|
2 |
|
|
Flugelhorn |
4 Jazz Ballad |
|
|
|
|
|
|
|
|
|
|
|
|
5 Piano 1 |
|
6 |
|
|
7 Upright Bass |
8 |
|
|
|
|
|
|
|
|
|
|
||
Dixie1 |
1 Clarinet 2 |
|
2 |
|
|
|
4 Dixieland 2 |
||
|
|
|
|
|
|
|
|
|
|
|
5 Banjo |
|
6 |
|
|
7 Upright Bass |
8 |
|
|
|
|
|
|
|
|
|
|
|
|
Dixie2 |
1 |
|
|
2 |
|
|
Trombone 1 |
4 Dixieland 1 |
|
|
|
|
|
|
|
|
|
|
|
|
5 Honky Tonk Piano |
|
6 |
|
|
7 Upright Bass |
8 |
|
|
|
|
|
|
|
|
|
|
|
|
SaxFusion1 |
1 |
|
|
2 |
|
|
Saxphone 2 |
4 |
16 Beat 3 |
|
|
|
|
|
|
|
|
|
|
|
5 Elec. Piano 2 |
|
6 |
|
|
7 Elec. Bass 1 |
8 |
|
|
|
|
|
|
|
|
|
|
|
|
SaxFusion2 |
1 |
|
|
2 |
|
|
Saxphone 2 (8') |
4 Bounce 3 |
|
|
|
|
|
|
|
|
|
||
|
5 Synth. Strings 2 |
|
6 Elec. Piano 1 |
|
7 Elec. Bass 2 |
8 |
|
||
|
|
|
|
|
|
|
|
|
|
|
1 |
:UPPER KEYBOARD VOICE 1 |
2 |
:UPPER KEYBOARD VOICE 2 |
:LEAD VOICE 1 |
4 |
:RHYTHM |
||
|
5 |
:LOWER KEYBOARD VOICE 1 6 |
:LOWER KEYBOARD VOICE 2 7 :PEDAL VOICE 1 |
8 |
:PEDAL VOICE 2 |
||||
1
Guide Introductory Quick
15
1
Guide Introductory Quick
Page 3: Lead
Wood.Ens. |
1 Clarinet 1 |
|
2 |
|
|
Flute 1 |
4 |
|
|
|
|
|
|
|
|
|
|
|
|
|
5 Bassoon 2 |
|
6 |
|
|
7 Contrabass 1 |
8 |
|
|
|
|
|
|
|
|
|
|
|
|
Menuet |
1 |
|
|
2 |
|
|
Flute 1 |
4 |
|
|
|
|
|
|
|
|
|
|
|
|
5 Harp |
|
6 |
|
|
7 Contrabass 1 |
8 |
|
|
|
|
|
|
|
|
|
|
|
|
Swan |
1 |
|
|
2 |
|
|
Oboe 1 |
4 |
|
|
|
|
|
|
|
|
|
|
|
|
5 Tremolo Strings |
|
6 |
|
|
7 Contrabass 2 |
8 |
|
|
|
|
|
|
|
|
|
|
|
|
PolkaEns.1 |
1 |
|
|
2 |
|
|
Clarinet 1 |
4 Polka 1 |
|
|
|
|
|
|
|
|
|
|
|
|
5 Horn 3 |
|
6 |
|
|
7 Pizzicato Bass |
8 |
|
|
|
|
|
|
|
|
|
|
||
PolkaEns.2 |
1 |
|
|
2 Glockenspiel |
|
Piccolo |
4 Polka 1 |
||
|
|
|
|
|
|
|
|
|
|
|
5 English Horn |
|
6 |
|
|
7 Pizzicato Bass |
8 |
|
|
|
|
|
|
|
|
|
|
|
|
Pops1 |
1 |
|
|
2 |
|
|
Flute 2 |
4 Slow Rock 1 |
|
|
|
|
|
|
|
|
|
|
|
|
5 Elec. Piano 1 |
|
6 |
|
|
7 Elec. Bass 3 |
8 |
|
|
|
|
|
|
|
|
|
|
|
|
Pops2 |
1 |
|
|
2 |
|
|
Oboe 2 |
4 |
8 Beat 5 |
|
|
|
|
|
|
|
|
|
|
|
5 Pizzicato Strings |
|
6 |
|
|
7 Pizzicato Bass |
8 |
|
|
|
|
|
|
|
|
|
|
|
|
Pops3 |
1 |
|
|
2 |
|
|
Whistle |
4 |
8 Beat 1 |
|
|
|
|
|
|
|
|
|
|
|
5 Elec. Piano 1 |
|
6 |
|
|
7 Elec. Bass 1 |
8 |
|
|
|
|
|
|
|
|
|
|
|
|
Jazz.Cla. |
1 |
|
|
2 |
|
|
Clarinet 2 |
4 Jazz Ballad |
|
|
|
|
|
|
|
|
|
|
|
|
5 Strings 2 |
|
6 |
|
|
7 Upright Bass |
8 |
|
|
|
|
|
|
|
|
|
|
|
|
Folklore |
1 |
|
|
2 |
|
|
Pan Flute |
4 Country 2 |
|
|
|
|
|
|
|
|
|
|
|
|
5 Guitar 1 |
|
6 |
|
|
7 Pizzicato Bass |
8 |
|
|
|
|
|
|
|
|
|
|
|
|
Folk.Harm. |
1 |
|
|
2 |
|
|
Harmonica 1 |
4 |
|
|
|
|
|
|
|
|
|
|
|
|
5 Strings 2 |
|
6 |
|
|
7 Contrabass 1 |
8 |
|
|
|
|
|
|
|
|
|
|
|
|
BluesHarp |
1 |
|
|
2 |
|
|
Harmonica 2 |
4 Slow Rock 3 |
|
|
|
|
|
|
|
|
|
|
|
|
5 Guitar 2 |
|
6 |
|
|
7 Upright Bass |
8 |
|
|
|
|
|
|
|
|
|
|||
Tango |
1 Harmonica 2 |
|
2 Bandoneon (4') |
|
Violin 1 |
4 Tango 2 |
|||
|
|
|
|
|
|
|
|
||
|
5 Piano 1 |
|
6 Strings 2 |
|
7 Pizzicato Bass |
8 |
|
||
|
|
|
|
|
|
|
|
||
Chanson |
1 Accordion |
|
2 |
|
|
Harmonica 2 |
4 Waltz 1 |
||
|
|
|
|
|
|
|
|
|
|
|
5 Accordion |
|
6 |
|
|
7 Pizzicato Bass |
8 |
|
|
|
|
|
|
|
|
|
|||
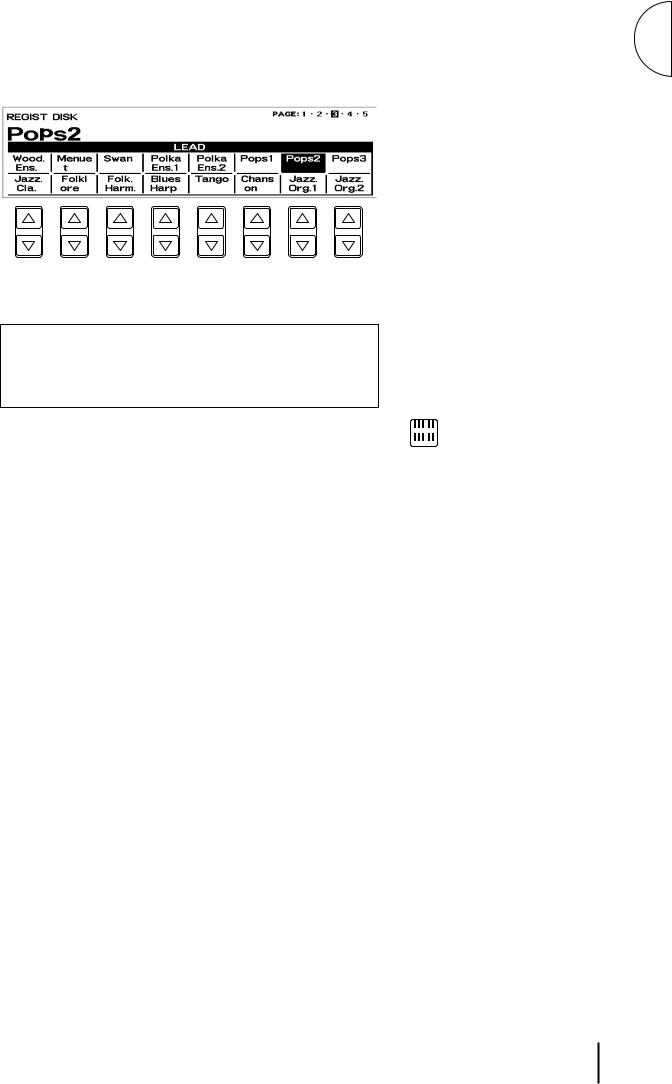
Jazz.Org.1 |
1 Jazz Organ 2 |
|
2 Jazz Organ 2 (4') |
|
|
4 Bossanova 2 |
|||
|
|
|
|
|
|
|
|
|
|
|
5 Pop Organ 1 |
|
6 |
|
|
7 Organ Bass 1 |
8 |
|
|
|
|
|
|
|
|
|
|||
Jazz.Org.2 |
1 Pop Organ 2 |
|
2 Jazz Organ 1 |
|
Jazz Organ 3 |
4 Swing 2 |
|||
|
|
|
|
|
|
|
|
|
|
|
5 Pop Organ 1 |
|
6 |
|
|
7 Organ Bass 1 |
8 |
|
|
|
|
|
|
|
|
|
|
|
|
|
1 |
:UPPER KEYBOARD VOICE 1 |
2 |
:UPPER KEYBOARD VOICE 2 |
:LEAD VOICE 1 |
4 |
:RHYTHM |
||
|
5 |
:LOWER KEYBOARD VOICE 1 6 |
:LOWER KEYBOARD VOICE 2 7 :PEDAL VOICE 1 |
8 |
:PEDAL VOICE 2 |
||||
16

Page 4: Decay
Piano1 |
1 Piano 1 |
|
2 |
|
|
|
4 |
|
|
|
|
|
|
|
|
|
|
|
5 Piano 1 |
|
6 |
|
|
7 Pizzicato Bass |
8 |
|
|
|
|
|
|
|
|
|
|
Piano2 |
1 Piano 2 |
|
2 |
|
|
|
4 |
8 Beat 5 |
|
|
|
|
|
|
|
|
|
|
5 Piano 2 |
|
6 Strings 2 |
|
7 Elec. Bass 1 |
8 |
|
|
|
|
|
|
|
|
|
|
|
E.Piano1 |
1 Elec. Piano 1 |
|
2 |
|
|
|
4 |
16 Beat 3 |
|
|
|
|
|
|
|
|
|
|
5 Elec. Piano 1 |
|
6 |
|
|
7 Elec. Bass 3 |
8 |
|
|
|
|
|
|
|
|
|
|
E.Piano2 |
1 Elec. Piano 2 |
|
2 |
|
|
|
4 |
8 Beat 1 |
|
|
|
|
|
|
|
|
|
|
5 Elec. Piano 2 |
|
6 |
|
|
7 Elec. Bass 3 |
8 |
|
|
|
|
|
|
|
|
|
|
HonkyTonk |
1 Honky Tonk Piano |
|
2 |
|
|
|
4 Dixieland 1 |
|
|
|
|
|
|
|
|
|
|
|
5 Honky Tonk Piano |
|
6 |
|
|
7 Upright Bass |
8 |
|
|
|
|
|
|
|
|
|
|
Country |
1 |
|
2 |
|
|
Whistle |
4 Country 1 |
|
|
|
|
|
|
|
|
|
|
|
5 Guitar 1 |
|
6 |
|
|
7 Upright Bass |
8 |
|
|
|
|
|
|
|
|
|
|
BossaGuit. |
1 |
|
2 |
|
|
Guitar 2 |
4 Bossanova 1 |
|
|
|
|
|
|
|
|
|
|
|
5 Elec. Piano 1 |
|
6 Strings 2 |
|
7 Upright Bass |
8 |
|
|
|
|
|
|
|
|
|
|
|
SambaGuit. |
1 Guitar 3 |
|
2 |
|
|
|
4 Samba 2 |
|
|
|
|
|
|
|
|
|
|
|
5 Guitar 1 |
|
6 |
|
|
7 Upright Bass |
8 |
|
|
|
|
|
|
|
|
|
|
Samba |
1 Marimba |
|
2 |
|
|
|
4Samba 1 |
|
|
|
|
|
|
|
|
|
|
|
5 Piano 1 |
|
6 |
|
|
7 Upright Bass |
8 |
|
|
|
|
|
|
|
|
||
Canzone |
1 Mandolin |
|
2 Chorus 3 |
|
Violin 3 |
4 Tango 1 |
||
|
|
|
|
|
|
|
|
|
|
5 Strings 4 |
|
6 |
|
|
7 Pizzicato Bass |
8 |
|
|
|
|
|
|
|
|
|
|
Reggae |
1 Steel Drum |
|
2 |
|
|
|
4 Reggae 2 |
|
|
|
|
|
|
|
|
|
|
|
5 Pop Organ 1 |
|
6 |
|
|
7 Elec. Bass 1 |
8 |
|
|
|
|
|
|
|
|
|
|
Japan |
1 |
|
2 |
|
|
Shakuhachi |
4 |
|
|
|
|
|
|
|
|
|
|
|
5 Koto |
|
6 |
|
|
7 Koto |
8 |
|
|
|
|
|
|
|
|
|
|
MusicBox |
1 Music Box |
|
2 |
|
|
Whistle |
4 Slow Rock 1 |
|
|
|
|
|
|
|
|
|
|
|
5 Chorus 2 |
|
6 Strings 2 |
|
7 Pizzicato Bass |
8 |
|
|
|
|
|
|
|
|
|
||
X'masChime |
1 Synth. Chime |
|
2 Chime |
|
Glockenspiel |
4 Polka 1 |
||
|
|
|
|
|
|
|
|
|
|
5 Theatre Organ 1 |
|
6 Chorus 2 |
|
7 Organ Bass 2 |
8 |
|
|
|
|
|
|
|
|
|
|
|
Oldies |
1 Elec. Guitar 2 |
|
2 |
|
|
|
4 |
8 Beat 3 |
|
|
|
|
|
|
|
|
|
|
5 Elec. Guitar 1 |
|
6 |
|
|
7 Elec. Bass 3 |
8 |
|
|
|
|
|
|
|
|
|
|
HeavyMetal |
1 Distorted Guitar |
|
2 |
|
|
Distorted Guitar |
4 Bounce 3 |
|
|
|
|
|
|
|
|
|
|
|
5 Elec. Guitar 1 |
|
6 |
|
|
7 Elec. Bass 2 |
8 |
|
|
|
|
|
|
|
|
|
|
|
1 :UPPER KEYBOARD VOICE 1 |
2 |
:UPPER KEYBOARD VOICE 2 |
:LEAD VOICE 1 |
4 |
:RHYTHM |
||
|
5 :LOWER KEYBOARD VOICE 1 6 |
:LOWER KEYBOARD VOICE 2 7 :PEDAL VOICE 1 |
8 |
:PEDAL VOICE 2 |
||||
1
Guide Introductory Quick
17
1
Guide Introductory Quick
Page 5: Synth
Fusion1 |
1 |
|
|
2 |
|
Soprano Sax |
4 |
8 Beat 4 |
|
|
|
|
|
|
|
|
|
|
5 Elec. Guitar 2 |
|
6 |
|
7 Elec. Bass 3 |
8 |
|
|
|
|
|
|
|
|
|
|
|
Fusion2 |
1 Elec. Guitar 1 |
|
2 |
|
Elec. Guitar 2 |
4 |
16 Beat Funk 1 |
|
|
|
|
|
|
|
|
|
|
|
5 Elec. Piano 1 |
|
6 Strings 2 |
|
7 Elec. Bass 2 |
8 |
|
|
|
|
|
|
|
|
|
||
Dance1 |
1 Synth. Brass 2 |
|
2 |
|
Synth. Brass 2 |
4 Dance Pop 2 |
||
|
|
|
|
|
|
|
|
|
|
5 Elec. Guitar 1 |
|
6 |
|
7 Elec. Bass 2 |
8 |
|
|
|
|
|
|
|
|
|
||
Dance2 |
1 Brass 3 |
|
2 Brass 3 (16') |
|
Trumpet 4 |
4 Dance Pop 4 |
||
|
|
|
|
|
|
|
|
|
|
5 Elec. Guitar 1 |
|
6 |
|
7 Elec. Bass 2 |
8 |
|
|
|
|
|
|
|
|
|
|
|
Dance3 |
1 Cosmic 3 |
|
2 |
|
Cosmic 4 |
4 |
8 Beat 2 |
|
|
|
|
|
|
|
|
|
|
|
5 Elec. Guitar 1 |
|
6 Synth. Strings 1 |
|
7 Elec. Bass 3 |
8 |
|
|
|
|
|
|
|
|
|
||
Dance4 |
1 Synth. Brass 1 |
|
2 Synth. Brass 2 |
|
Synth. Brass 1 |
4 Dance Pop 3 |
||
|
|
|
|
|
|
|
|
|
|
5 Cosmic 3 |
|
6 Elec. Guitar 1 |
|
7 Elec. Bass 2 |
8 |
|
|
|
|
|
|
|
|
|
||
Dance5 |
1 Glockenspiel |
|
2 Synth. Brass 1 (16') |
|
Synth. Bass 3 |
4 Dance Pop 1 |
||
|
|
|
|
|
|
|
|
|
|
5 Piano 2 |
|
6 Synth. Strings 1 |
|
7 Elec. Bass 2 |
8 |
|
|
|
|
|
|
|
|
|
|
|
Funk |
1 |
|
|
2 Brass 2 |
|
Trumpet 3 |
4 |
16 Beat 4 |
|
|
|
|
|
|
|
|
|
|
5 Elec. Guitar 1 |
|
6 |
|
7 Elec. Bass 2 |
8 |
|
|
|
|
|
|
|
|
|
|
|
Pops1 |
1 Synth. Brass 1 |
|
2 Glockenspiel |
|
Recorder |
4 |
8 Beat 4 |
|
|
|
|
|
|
|
|
|
|
|
5 Elec. Piano 1 |
|
6 Synth. Strings 2 |
|
7 Elec. Bass 1 |
8 |
|
|
|
|
|
|
|
|
|
|
|
Pops2 |
1 |
|
|
2 |
|
Whistle |
4 |
8 Beat 5 |
|
|
|
|
|
|
|
|
|
|
5 Piano 2 |
|
6 |
|
7 Elec. Bass 1 |
8 |
|
|
|
|
|
|
|
|
|
|
|
JazzySax. |
1 |
|
|
2 |
|
Saxphone 2 |
4 |
8 Beat 5 |
|
|
|
|
|
|
|
|
|
|
5 Piano 2 |
|
6 |
|
7 Elec. Bass 1 |
8 |
|
|
|
|
|
|
|
|
|
|
|
Jazz.Waltz |
1 |
|
|
2 |
|
Flugelhorn |
4 Jazz Waltz 2 |
|
|
|
|
|
|
|
|
|
|
|
5 Elec. Piano 1 |
|
6 Cosmic 4 |
|
7 Elec. Bass 1 |
8 |
|
|
|
|
|
|
|
|
|
||
Orch.Syn.1 |
1 Tutti 4 |
|
2 Brass 2 |
|
Synth. Brass 2 |
4 Bounce 3 |
||
|
|
|
|
|
|
|
|
|
|
5 Clavi (8') |
|
6 Synth. Clarinet 1 |
|
7 Synth. Bass 3 |
8 |
|
|
|
|
|
|
|
|
|
|
|
Orch.Syn.2 |
1 Brass 3 |
|
2 Synth. Brass 1 |
|
Trumpet 4 |
4 |
16 Beat 3 |
|
|
|
|
|
|
|
|
|
|
|
1 Elec. Piano 1 |
|
6 Cosmic 3 |
|
7 Elec. Bass 3 |
8 |
|
|
|
|
|
|
|
|
|
|
|
Cosmic1 |
1 Cosmic 7 |
|
2 Cosmic 1 |
|
Whistle (4') |
4 |
|
|
|
|
|
|
|
|
|
|
|
|
5 Cosmic 5 |
|
6 Cosmic 1 |
|
7 Cotrabass 2 |
8 |
|
|
|
|
|
|
|
|
|
|
|
Cosmic2 |
1 Cosmic 6 |
|
2 Cosmic 3 (4') |
|
Marimba |
4 |
|
|
|
|
|
|
|
|
|
|
|
|
5 Cosmic 9 |
|
6 Chorus 2 |
|
7 Cotrabass 2 |
8 |
|
|
|
|
|
|
|
|
|
|
|
|
1 |
:UPPER KEYBOARD VOICE 1 |
2 :UPPER KEYBOARD VOICE 2 |
:LEAD VOICE 1 |
4 |
:RHYTHM |
||
|
5 |
:LOWER KEYBOARD VOICE 1 |
6 :LOWER KEYBOARD VOICE 2 7 :PEDAL VOICE 1 |
8 |
:PEDAL VOICE 2 |
|||
18
4  Basic Operation
Registration Set-up
Voice Edit
(User Voice)
*The Controls and Effects may be applied differently depending on the selected type of Controls and Effects. See page 44 for more information.
Select the keyboard
to play |
|
|
|
Select the voice |
Select the rhythm |
|
|
(Voice Menu) |
(Rhythm Menu) |
|
|
|
|
|
|
Finely adjust the voice |
Finely adjust the rhythm |
|
Rhythm Program |
|
(User Rhythm |
||
(Voice Condition) |
(Rhythm Condition) |
|
|
|
/Rhythm Sequence) |
||
|
|
|
|
Add effects |
|
|
|
|
|
|
|
(Effect Set) |
|
|
|
Add reverb
1
Guide Introductory Quick
Adjust the total volume |
Setting Registration |
Loading the |
Saving the |
|
(Master Volume) |
registration data |
registration data |
||
Shift/Footswitch |
||||
|
|
|
||
|
/Knee Lever |
|
|
|
|
|
|
|
|
Playing Electone |
Recording the performance |
|
|
|
Expression Pedal |
|
Music Disk Recorder |
||
|
|
|
||
|
Playing back |
|
|
|
|
|
|
|
|
19

1
Guide Introductory Quick
5 Using the LCD Display
This section introduces you the convenient control functions of the LCD display. The LCD display lets you see at a glance the current settings and provides easy-to-understand graphic representation of all parameters.
Selecting a voice/rhythm
Press the panel voice/rhythm button which you want to use (For |
|||||||
example, press the STRINGS button in the Upper Keyboard Voice 1 |
|||||||
1 section). |
|
|
|
|
|
|
|
|
|
|
UPPER KEYBOARD VOICE 1 |
BRILLIANCE |
VOLUME |
||
|
|
|
|
|
|
BRILLIANT |
MAX |
STRINGS |
BRASS |
CLARI- |
SAXO- |
CHORUS |
HARMO- |
1 |
|
|
|
NET |
PHONE |
|
NICA |
|
|
|
|
|
|
|
|||
ORGAN |
PIANO |
GUITAR |
VIBRA- |
COSMIC |
TUTTI |
2 |
|
|
|
|
PHONE |
|
|
|
|
|
|
|
|
|
|
|
|
|
|
|
|
|
|
MELLOW |
MIN |
The following display will appear, showing all the available voices/ rhythms in the category (Strings Category in this case).
2 Press the Data Control button corresponding to the voice you want to play (Strings 3 in this case).
The selected voice/rhythm will be shown in the reversed box.
20
1
Using Data Control Buttons
Guide Introductory Quick
1
2 |
3 |
4 |
2 |
The Data Control buttons are used to select 1 a voice/rhythm or function shown on the display.
Press the STRINGS button in the Upper Keyboard Voice 1 section once again.
This LCD changes to show some of the other ways in which the Data Control buttons are used to control Electone functions.
Each pair of buttons corresponding to the section of the display directly above it increases/decreases 2 the value or chooses 3 a setting/ function. When you are setting the Pan position, each of them moves the cursor 4 to the right/left.
Using Page Buttons
PAGE
5
These buttons are used to select (when available) the various pages of the display, the names of which appear at the top right of the LCD. Use Page [s] to select the next page, and Page [w] to select the previous page.
21
1
Guide Introductory Quick
The Summary of the LCD Operation
1. To call up the LCD display
1)Pressing Panel Buttons
●Selecting voices or setting up the Voice Condition
●Selecting rhythms or setting up the Rhythm Condition
●Setting the Reverb effect
●Setting the Sustain
●Setting the User Keyboard Percussion
2)Pressing a Display Select button
●Displaying Voice Display (Manual Balance)
●Setting effects
●Setting A.B.C./M.O.C.
●Setting the Left-Footswitch
●Setting Registration Shift (Right-Footswitch)
●Setting the 2nd Expression Pedal
●Setting Pitch and Transpose
●Setting MIDI
●Entering Voice Edit
●Entering Rhythm Pattern Program
●Entering Rhythm Sequence Program
●Selecting Flute voices or setting Flute Voices
●Selecting and setting Tremolo/Chorus
LCD display
2. To Select Pages
Selecting the page you want to use with the Page buttons
3. To Actually Change the Settings
Using the Data Control buttons to:
●Select voices/rhythms/effects
●Turn on/off the Accompaniment and A.B.C. Memory
●Adjust Touch Tone and Reverb depth
●Edit the rhythm pattern/sequence
●Move the pan position and cursor position
22
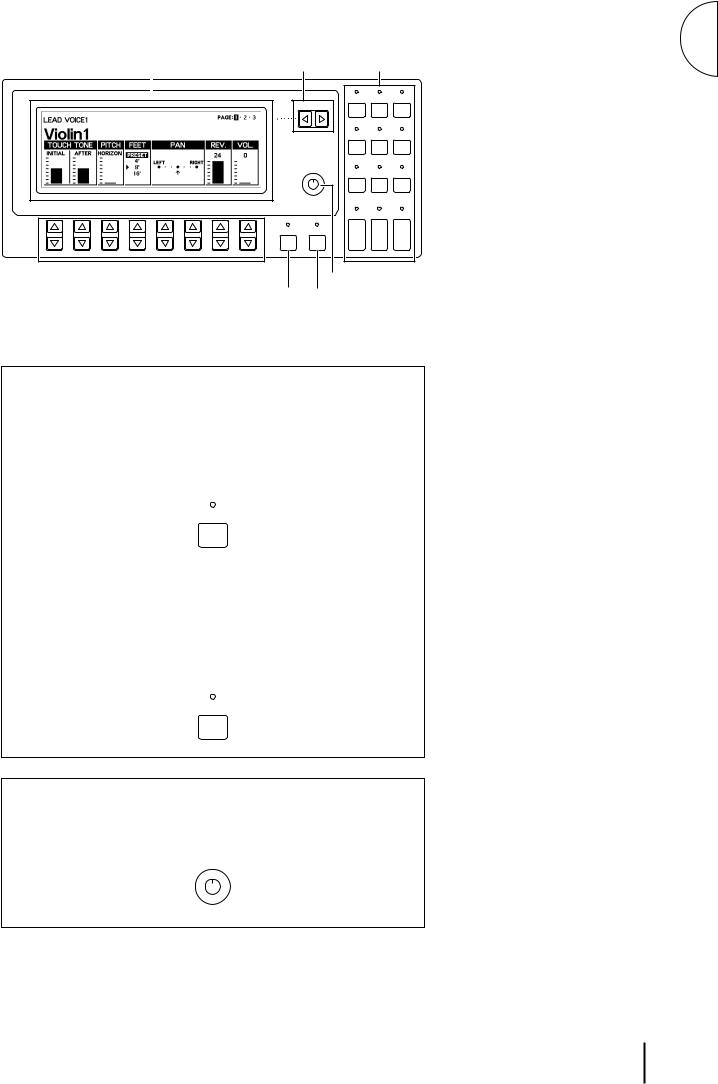
LCD Display |
Page Buttons |
Display Select Buttons |
||
|
|
|
|
|
|
|
VOICE |
EFFECT |
A. B. C. |
|
|
DISPLAY |
SET |
M. O. C. |
|
PAGE |
|
|
|
|
|
FOOT |
REGIST. |
EXP. |
|
|
SW. |
SHIFT |
PITCH/MIDI |
|
|
|
RHYTHM |
|
|
CONTRAST |
VOICE |
PROGRAM |
|
|
|
EDIT |
PATTERN SEQUENCE |
|
|
|
U. FLUTE |
L. FLUTE TREMOLO |
|
|
|
VOICE |
VOICE |
(FAST) |
|
COARSE HOLD |
|
|
|
DATA CONTROL |
|
DISPLAY SELECT |
||
Data Control Buttons
|
Contrast Dial |
Coarse Button |
Hold Button |
Hold
This button allows you to keep the LCD display at the current function. Normally, if the buttons of other functions are pressed, the LCD will switch to those functions. To keep this from happening, press the Hold button; the button s LED will remain lit as long as Hold is in effect. Press the button again to cancel Hold.
HOLD
Coarse Button
This button allows you to make quick jumps when changing values (of the parameters with bar indications). While holding the Coarse button down, press the Data Control button corresponding to the value you wish to change; the values will change rapidly toward the maximum or minimum.
COARSE
Contrast Dial
The Contrast Dial at the right side of the LCD display can be used for adjusting the relative sharpness of the characters displayed on the LCD.
CONTRAST
1
Guide Introductory Quick
23

1
Guide Introductory Quick
6  Voice List
A variety of voices can be divided into the following categories.
ORCHESTRAL |
|
|
|
|
|
|
|
|
The voice names in a square indicate they are created by VA (Virtual Acoustic) Synthesis. |
|||||||||||||||||||||||||||
Strings 1 |
|
|
Strings 2 |
|
|
|
Strings 3 |
|
|
Strings 4 |
|
|
|
|||||||||||||||||||||||
|
|
|
|
|
|
|
|
|
|
|
|
|
|
|
|
|
|
|
|
Strings 5 |
|
|
Strings 6 |
|
|
|
||||||||||
|
|
|
|
|
|
|
|
|
|
|
|
|
|
|
|
|
|
|
|
Strings 7 |
|
|
|
|
|
|
|
|||||||||
|
|
|
|
|
|
|
|
|
|
|
Tremolo Strings |
|
|
|
Synth Strings 1 |
|
|
|
Synth Strings 2 |
|
|
|
||||||||||||||
|
|
|
|
|
|
|
|
|
|
|
|
|
|
|
|
|
||||||||||||||||||||
|
|
|
|
|
|
|
|
|
|
|
Pizzicato Strings |
|
|
|
|
|
|
|
|
|
|
|
|
|
|
|
Synth Strings 3 |
|
|
|
||||||
Brass 1 |
|
|
Brass 2 |
|
|
|
|
|
|
|
|
|
|
|
|
|
|
|
|
|
|
|
|
|||||||||||||
|
|
|
|
|
|
|
|
|
|
|
Brass 3 |
|
|
|
Brass 4 |
|
|
|
|
|
|
|
||||||||||||||
|
|
|
|
|
|
|
|
|
|
|
|
|
|
|
|
|
|
|
|
Brass 5 |
|
|
|
|
|
|
|
|||||||||
|
|
|
|
|
|
|
|
|
|
|
Synth Brass 1 |
|
|
|
Synth Brass 2 |
|
|
Synth Brass 3 |
|
|
|
|||||||||||||||
|
|
|
|
|
|
|
|
|
|
|
|
|
|
|
|
|
|
|
|
Saw Lead |
|
|
|
|
|
|
|
|
|
|
|
|
||||
Clarinet 1 |
|
|
|
|
|
|
Clarinet 2 |
|
|
|
|
|
|
|
|
|
|
|
|
|
|
|
|
|
|
|
|
|||||||||
|
|
|
|
|
|
|
|
|
|
|
Bass Clarinet 1 |
|
|
|
|
|
|
|
|
|
|
|
|
|
|
|
|
|
|
|
|
|||||
|
|
|
|
|
|
|
|
|
|
|
|
|
|
|
|
|
|
|
|
|
|
|
|
|
|
|
|
|
|
|||||||
|
|
|
|
|
|
|
|
|
|
|
Synth Clarinet 1 |
|
|
|
Synth Clarinet 2 |
|
|
|
|
|
|
|
||||||||||||||
|
|
|
|
|
|
|
|
|
|
|
|
|
|
|
|
|
|
|
||||||||||||||||||
|
|
|
|
|
|
|
|
|
|
|
|
|
|
|
|
|
|
|
|
Soft Reed |
|
|
|
|
|
|
|
|
|
|
|
|
|
|||
|
|
|
|
|
|
|
|
|
|
|
V-Clarinet |
|
|
|
|
|
|
|
|
|
|
|
|
|
|
|
|
|
|
|
|
|
|
|||
|
|
|
|
|
|
|
|
|
|
|
|
|
|
|
|
|
|
|
|
|
|
|
|
|
|
|
|
|
|
|||||||
Saxophone 1 |
|
|
|
Saxophone 2 |
|
|
|
|
|
|
|
|
|
|
|
|
|
|
|
|
|
|||||||||||||||
|
|
|
|
|
|
Tenor Sax |
|
|
|
|
|
|
|
|||||||||||||||||||||||
|
|
|
|
|
|
|
|
|
|
|
|
|
|
|
|
|
|
|
|
Breath Sax |
|
|
|
|
|
|
|
|
|
|
||||||
|
|
|
|
|
|
|
|
|
|
|
Sax Ensemble 1 |
|
|
|
Sax Ensemble |
2 |
|
|
|
|
|
|
|
|||||||||||||
|
|
|
|
|
|
|
|
|
|
|
|
|
|
|
|
|
|
|
||||||||||||||||||
|
|
|
|
|
|
|
|
|
|
|
Soprano Sax |
|
|
|
Synth Sax |
|
|
|
|
|
|
|
Synth Lead 1 |
|
|
|
||||||||||
|
|
|
|
|
|
|
|
|
|
|
Alto Sax |
|
|
|
|
|
|
|
V-Soprano Sax |
|
|
|
|
Synth Lead 2 |
|
|
|
|||||||||
|
|
|
|
|
|
|
|
|
|
|
|
|
|
|
|
|
||||||||||||||||||||
|
|
|
|
|
|
|
|
|
|
|
|
|
|
|
|
|
|
|
|
|
|
|
|
|
|
|
|
|
|
|
|
Synth Lead 3 |
|
|
|
|
|
|
|
|
|
|
|
|
|
|
|
|
|
|
|
|
|
|
|
|
|
|
|
|
|
|
|
|
|
|
|
|
|
||||
|
|
|
|
|
|
|
|
|
|
|
|
|
|
|
|
|
|
|
|
|
|
|
|
|
|
|
|
|
|
|
|
Synth Lead 4 |
|
|
|
|
|
|
|
|
|
|
|
|
|
|
|
|
|
|
|
|
|
|
|
|
|
|
|
|
|
|
|
|
|
|
|
|
|
||||
|
|
|
|
|
|
|
|
|
|
|
Chorus 2 |
|
|
|
Chorus 3 |
|
|
|
|
|
|
|
|
|
|
Synth Lead 5 |
|
|
|
|||||||
|
|
|
|
|
|
|
|
|
|
|
|
|
|
|
|
|
|
|
|
|
|
|
|
|
||||||||||||
Chorus 1 |
|
|
|
|
|
|
|
|
|
|
|
|
|
|
|
|
|
|
Chorus 4 |
|
|
|
||||||||||||||
|
|
|
|
|
|
|
|
|
|
|
Vocal |
|
|
|
|
|
|
|
|
|
|
|
|
|
|
|
|
|
|
|
|
|||||
|
|
|
|
|
|
|
|
|
|
|
|
|
|
|
|
|
|
|
|
|
|
|
|
|
|
|
|
|
|
|||||||
|
|
|
|
|
|
|
|
|
|
|
Chorus 5 |
|
|
|
|
|
|
|
|
|
|
|
|
|
|
|
|
|
|
|
|
|||||
|
|
|
|
|
|
|
|
|
|
|
|
|
|
|
|
|
|
|
|
|
|
|
|
|
|
|
|
|
|
|||||||
Organ 1 |
|
|
|
|
|
Organ 2 |
|
|
|
|
|
|
|
|
|
|
|
|
|
|
|
|
|
|
|
|
||||||||||
|
|
|
|
|
|
|
|
|
|
|
Organ 3 |
|
|
|
|
|
|
|
|
|
|
|
|
|
|
|
|
|
|
|
|
|||||
|
|
|
|
|
|
|
|
|
|
|
|
|
|
|
|
|
|
|
|
|
|
|
|
|
|
|
|
|
|
|||||||
|
|
|
|
|
|
|
|
|
|
|
Theatre Organ 1 |
|
|
|
Theatre Organ 2 |
|
|
|
|
|
|
|
||||||||||||||
|
|
|
|
|
|
|
|
|
|
|
|
|
|
|
|
|
|
|
||||||||||||||||||
|
|
|
|
|
|
|
|
|
|
|
Pop Organ 1 |
|
|
|
Pop Organ 2 |
|
|
|
|
|
|
|
||||||||||||||
|
|
|
|
|
|
|
|
|
|
|
|
|
|
|
|
|
|
|
||||||||||||||||||
|
|
|
|
|
|
|
|
|
|
|
Jazz Organ 1 |
|
|
|
Jazz Organ 2 |
|
|
|
|
|
|
|
||||||||||||||
|
|
|
|
|
|
|
|
|
|
|
|
|
|
|
|
|
|
|
||||||||||||||||||
|
|
|
|
|
|
|
|
|
|
|
|
|
|
|
|
|
|
|
|
Jazz Organ 3 |
|
|
|
|
|
|
|
|||||||||
|
|
|
|
|
|
|
|
|
|
|
|
|
|
|
|
|
|
|
|
Jazz Organ 4 |
|
|
|
|
|
|
|
|||||||||
|
|
|
|
|
|
|
|
|
|
|
Accordion |
|
|
|
Organ 4 |
|
|
|
|
|
|
|
||||||||||||||
|
|
|
|
|
|
|
|
|
|
|
|
|
|
|
|
|
|
|
||||||||||||||||||
|
|
|
|
|
|
|
|
|
|
|
|
|
|
|
|
|
|
|
|
Bandoneon |
|
|
|
|
|
|
|
|||||||||
Piano 1 |
|
|
|
|
|
|
|
|
|
Piano 2 |
|
|
|
|
|
|
|
|
|
|
|
|
|
|
|
|
|
|
|
|
||||||
|
|
|
|
|
|
|
|
|
|
|
|
|
|
|
|
|
|
|
|
|
|
|
|
|
|
|
|
|||||||||
|
|
|
|
|
|
|
|
|
|
|
Honky Tonk Piano |
|
|
|
|
|
|
|
||||||||||||||||||
|
|
|
|
|
|
|
|
|
|
|
|
|
|
|
|
|
||||||||||||||||||||
|
|
|
|
|
|
|
|
|
|
|
Electric Piano 1 |
|
|
|
|
Electric Piano 2 |
|
|
|
|
|
|
|
|||||||||||||
|
|
|
|
|
|
|
|
|
|
|
|
|
|
|
|
|
|
|
|
|||||||||||||||||
|
|
|
|
|
|
|
|
|
|
|
Harpsichord |
|
|
|
Electric Piano 3 |
|
|
|
|
|
|
|
||||||||||||||
|
|
|
|
|
|
|
|
|
|
|
|
|
|
|
|
|
|
|
||||||||||||||||||
|
|
|
|
|
|
|
|
|
|
|
Clavichord |
|
|
|
Clavi. |
|
|
|
|
|
|
|
||||||||||||||
|
|
|
|
|
|
|
|
|
|
|
|
|
|
|
|
|
|
|
||||||||||||||||||
Guitar 1 |
|
|
|
|
|
|
|
|
Guitar 2 |
|
|
|
Guitar 3 |
|
|
|
|
|
|
|
||||||||||||||||
|
|
|
|
|
|
|
|
|
|
|
|
|
|
|
|
|||||||||||||||||||||
|
|
|
|
|
|
|
|
|
|
|
12Str. Guitar |
|
|
|
Jazz Guitar |
|
|
|
|
|
|
|
|
|||||||||||||
|
|
|
|
|
|
|
|
|
|
|
|
|
|
|
|
|
|
|
||||||||||||||||||
|
|
|
|
|
|
|
|
|
|
|
Electric Guitar 1 |
|
|
|
Electric Guitar 2 |
|
|
|
|
|
|
|
||||||||||||||
|
|
|
|
|
|
|
|
|
|
|
|
|
|
|
|
|
|
|
||||||||||||||||||
|
|
|
|
|
|
|
|
|
|
|
|
|
|
|
|
|
|
|
|
Steel Guitar |
|
|
|
|
|
|
|
|||||||||
|
|
|
|
|
|
|
|
|
|
|
|
|
|
|
|
|
|
|
|
|
|
|
|
|
|
|||||||||||
|
|
|
|
|
|
|
|
|
|
|
|
|
|
|
|
|
|
|
|
Distorted Guitar |
|
|
Distorted Lead |
|
|
|
||||||||||
|
|
|
|
|
|
|
|
|
|
|
|
|
|
|
|
|
|
|
|
|
|
|
||||||||||||||
|
|
|
|
|
|
|
|
|
|
|
Mandolin |
|
|
|
Muted Guitar |
|
|
Picked Guitar |
|
|
|
|
||||||||||||||
|
|
|
|
|
|
|
|
|
|
|
|
|
|
|
|
|
||||||||||||||||||||
|
|
|
|
|
|
|
|
|
|
|
|
|
|
Taisho-koto |
|
|
Sitar |
|
|
V-Sitar |
|
|||||||||||||||
|
|
|
|
|
|
|
|
|
|
|
|
|
||||||||||||||||||||||||
|
|
|
|
|
|
|
|
|
|
|
Banjo |
|
|
|
Shamisen |
|
|
|
|
|
|
|
||||||||||||||
|
|
|
|
|
|
|
|
|
|
|
|
|
|
|
|
|
|
|
||||||||||||||||||
|
|
|
|
|
|
|
|
|
|
|
Harp |
|
|
|
Koto |
|
|
|
|
|
|
|
||||||||||||||
|
|
|
|
|
|
|
|
|
|
|
|
|
|
|
|
|
|
|
||||||||||||||||||
Vibraphone |
|
|
|
Glockenspiel |
|
|
|
Celesta |
|
|
Music Box |
|
|
|
||||||||||||||||||||||
|
|
|
|
|
|
|
|
|||||||||||||||||||||||||||||
|
|
|
|
|
|
|
|
|
|
|
Marimba |
|
|
|
Xylophone |
|
|
|
|
|
|
|
||||||||||||||
|
|
|
|
|
|
|
|
|
|
|
|
|
|
|
|
|
|
|
||||||||||||||||||
|
|
|
|
|
|
|
|
|
|
|
Chime |
|
|
|
|
|
|
|
|
|
|
|
|
|
|
|
|
|
|
|
|
|||||
|
|
|
|
|
|
|
|
|
|
|
|
|
|
|
|
|
|
|
|
|
|
|
|
|
|
|
|
|
|
|||||||
|
|
|
|
|
|
|
|
|
|
|
Synth Chime |
|
|
|
|
|
|
|
|
|
|
|
|
|
|
|
|
|
|
|
|
|||||
|
|
|
|
|
|
|
|
|
|
|
|
|
|
|
|
|
|
|
|
|
|
|
|
|
|
|
|
|
|
|||||||
|
|
|
|
|
|
|
|
|
|
|
Steel Drum |
|
|
|
|
|
|
|
|
|
|
|
|
|
|
|
|
|
|
|
|
|||||
|
|
|
|
|
|
|
|
|
|
|
|
|
|
|
|
|
|
|
|
|
|
|
|
|
|
|
|
|
|
|||||||
Cosmic 1 |
|
|
|
Cosmic 11 |
|
|
|
|
|
|
|
|
|
|
|
|
|
|
|
|
|
|
|
|
||||||||||||
|
|
|
|
|
|
|
|
|
|
|
|
|
|
|
|
|
|
|
|
|
|
|||||||||||||||
|
|
|
|
|
|
|
|
|
|
|
Cosmic 13 |
|
|
|
|
|
|
|
|
|
|
|
|
|
|
|
|
|
|
|
|
|||||
|
|
|
|
|
|
|
|
|
|
|
|
|
|
|
|
|
|
|
|
|
|
|
|
|
|
|
|
|
|
|||||||
|
|
|
|
|
|
|
|
|
|
|
Custom 4 |
|
|
|
|
|
|
|
|
|
|
|
|
|
|
|
|
|
|
|
|
|
|
|||
|
|
|
|
|
|
|
|
|
|
|
|
|
|
|
|
|
|
|
|
|
|
|
|
|
|
|
|
|
|
|||||||
Cosmic 2 |
|
|
|
|
|
Cosmic 12 |
|
|
|
|
|
|
|
|
|
|
|
|
|
|
|
|
|
|
|
|
||||||||||
|
|
|
|
|
|
|
|
|
|
|
|
|
|
|
|
|
|
|
|
|
|
|||||||||||||||
|
|
|
|
|
|
|
|
|
|
|
Cosmic 14 |
|
|
|
|
|
|
|
|
|
|
|
|
|
|
|
|
|
|
|
|
|||||
|
|
|
|
|
|
|
|
|
|
|
|
|
|
|
|
|
|
|
|
|
|
|
|
|
|
|
|
|
|
|||||||
|
|
|
|
|
|
|
|
|
|
|
Custom 3 |
|
|
|
|
|
|
|
|
|
|
|
|
|
|
|
|
|
|
|
|
|
|
|||
|
|
|
|
|
|
|
|
|
|
|
|
|
|
|
|
|
|
|
|
|
|
|
|
|
|
|
|
|
|
|||||||
Cosmic 3 |
|
|
|
|
|
Cosmic 10 |
|
|
|
|
|
|
|
|
|
|
|
|
|
|
|
|
|
|
|
|
||||||||||
|
|
|
|
|
|
|
|
|
|
|
|
|
|
|
|
|
|
|
|
|
|
|||||||||||||||
|
|
|
|
|
|
|
|
|
|
|
Cosmic 15 |
|
|
|
|
|
|
|
|
|
|
|
|
|
|
|
|
|
|
|
|
|||||
|
|
|
|
|
|
|
|
|
|
|
|
|
|
|
|
|
|
|
|
|
|
|
|
|
|
|
|
|
|
|||||||
Cosmic 4 |
|
|
|
|
|
Cosmic 16 |
|
|
|
|
|
|
|
|
|
|
|
|
|
|
|
|
|
|
|
|
||||||||||
|
|
|
|
|
|
|
|
|
|
|
|
|
|
|
|
|
|
|
|
|
|
|
|
|||||||||||||
|
|
|
|
|
Custom 6 |
|
|
|
|
|
|
|
|
|
|
|
|
|
|
|
|
|
|
|
|
|
|
|||||||||
|
|
|
|
|
|
|
|
|
|
|
|
|
|
|
|
|
|
|
|
|
|
|||||||||||||||
Cosmic 5 |
|
|
|
|
|
|
|
|
|
|
|
|
|
|
|
|
|
|
|
|
|
|
|
|
|
|
|
|
||||||||
Cosmic 6 |
|
|
|
|
|
Custom 1 |
|
|
|
|
|
|
|
|
|
|
|
|
|
|
|
|
|
|
|
|
|
|
||||||||
|
|
|
|
|
|
|
|
|
|
|
|
|
|
|
|
|
|
|
|
|
|
|||||||||||||||
Cosmic 7 |
|
|
|
|
|
Custom 5 |
|
|
|
|
|
|
|
|
|
|
|
|
|
|
|
|
|
|
|
|
|
|
||||||||
|
|
|
|
|
|
|
|
|
|
|
|
|
|
|
|
|
|
|
|
|
|
|||||||||||||||
Cosmic 8 |
|
|
|
|
|
Talken Lead |
|
|
|
|
|
|
|
|
|
|
|
|
|
|
|
|
|
|
|
|
|
|||||||||
Cosmic 9 |
|
|
Custom 2 |
|
|
|
|
|
|
|
|
|
|
|
|
|
|
|
|
|
|
|
|
|
|
|||||||||||
|
|
|
|
|
|
|
|
|
|
|
|
|
|
|
|
|
|
|
|
|
||||||||||||||||
|
|
|
|
|
|
|
|
|
|
|
|
|
|
|
|
|
|
|
|
|
|
|
|
|
|
|
|
|
|
|
|
|
|
|
|
|
24

ORCHESTRAL
Tutti 1 |
|
|
|
|
|
|
Tutti 2 |
|
|
|
|
Tutti 7 |
||
|
|
|
|
|
|
|
Tutti 3 |
|
|
|
||||
|
|
|
|
|
|
|
|
|
||||||
|
|
|
|
|
|
|
Tutti 4 |
|
|
|
|
|
Tutti 5 |
|
|
|
|
|
|
|
|
|
|
|
|||||
Harmonica 1 |
|
|
|
|
Harmonica 2 |
|
|
|
Tutti 6 |
|||||
|
|
|
|
|
|
|||||||||
|
|
|
|
|
|
|
|
|||||||
|
|
|
|
|
|
Muted Lead |
||||||||
Horn 1 |
|
|
|
|
|
Thin Reed |
|
|
|
|
||||
|
|
|
|
|
|
|
||||||||
|
|
|
|
|
Horn 2 |
|
|
|
||||||
|
|
|
|
|
|
|||||||||
|
|
|
|
|
|
|
Horn 3 |
|
|
|
||||
|
|
|
|
|
|
|
|
|
||||||
|
|
|
|
|
|
|
Horn 4 |
|
|
|
||||
|
|
|
|
|
|
|
|
|
||||||
|
|
|
|
|
|
|
Muted Horn |
|
|
|
||||
|
|
|
|
|
|
|
|
|
||||||
|
|
|
|
|
|
|
|
|
|
|
|
|
|
|
LEAD
|
|
|
|
|
|
|
|
|
|
|
|
|
|
|
|
|
|
|
|
|
|
|
|
|
|
|
|
|
|
|
|
|
|
|
|
|
|
|
|
Violin 1 |
|
|
|
|
|
|
Violin 2 |
|
|
|
|
|
|
|
|
|
|
Violin 3 |
|
|
|
|
|
|
|
|
|
|
Bow Strings |
|
|
||||||||
|
|
|
|
|
|
|
|
|
Violin 4 |
|
|
|
|
|
|
|
|
|
|
|
|
|
|
|
|
|
|
||||||||||||
|
|
|
|
|
|
|
|
|
|
|
|
|
|
|
|
|
|
|
|
|
|
|
|
|
|||||||||||||||
|
|
|
|
|
|
|
|
|
Violin 5 |
|
|
|
|
|
|
|
|
|
|
|
|
|
|
|
|
|
|
||||||||||||
|
|
|
|
|
|
|
|
|
|
|
|
|
|
|
|
|
|
|
|
|
|
|
|
|
|||||||||||||||
|
|
|
|
|
|
|
|
|
Buzz String |
|
|
|
|
|
|
|
|
|
|
|
|
|
|
|
|
|
|
|
|||||||||||
|
|
|
|
|
|
|
|
|
|
|
|
|
|
|
|
|
|
|
|
|
|
|
|
|
|||||||||||||||
|
|
|
|
|
|
|
|
|
Pizzicato Violin |
|
|
|
|
|
|
|
|
|
|
|
|
|
|
|
|
|
|
||||||||||||
|
|
|
|
|
|
|
|
|
|
|
|
|
|
|
|
|
|
|
|
|
|
|
|
|
|||||||||||||||
|
|
|
|
|
|
|
|
|
Cello |
|
|
|
|
|
|
|
|
|
|
|
|
|
|
|
|
|
|
||||||||||||
|
|
|
|
|
|
|
|
|
|
|
|
|
|
|
|
|
|
|
|
|
|
|
|
|
|||||||||||||||
Flute 1 |
|
|
|
|
|
|
|
|
Kokyu |
|
|
|
|
|
|
|
|
|
|
|
|
|
V-Kokyu |
|
|
|
|
|
|
|
|
|
|||||||
|
|
|
|
|
|
|
|
|
|
|
|
|
|
|
|
|
|
|
|
||||||||||||||||||||
|
|
|
|
|
|
Flute 2 |
|
|
|
|
|
|
|
|
|
|
|
Shakuhachi |
|
|
|
|
|
|
|
|
|||||||||||||
|
|
|
|
|
|
|
|
|
|
|
|
|
|
|
|
|
|
|
|
|
V-Shakuhachi |
|
|||||||||||||||||
|
|
|
|
|
|
|
|
|
Recorder |
|
|
|
|
|
|
|
|
|
Pan Flute |
|
|
|
|
|
|
|
|
|
Ocarina |
|
|||||||||
|
|
|
|
|
|
|
|
|
|
|
|
|
|
|
|
|
|
|
|
|
|
|
|||||||||||||||||
|
|
|
|
|
|
|
|
|
|
|
|
|
|
|
|
|
|
|
|
|
|
|
Air Reed |
|
|
|
|
|
|
Pan Pipe |
|
|
|||||||
|
|
|
|
|
|
|
|
|
|
|
|
|
|
|
|
|
|
|
|
|
|
|
|||||||||||||||||
|
|
|
|
|
|
|
|
|
|
|
|
|
|
|
|
|
|
|
|
|
|
|
|
|
|
|
|
|
|
|
|
|
|
|
|
Woody Lead |
|
||
|
|
|
|
|
|
|
|
|
|
|
|
|
|
|
|
|
|
|
|
|
|
|
|
|
|
|
|
|
|
|
|
|
|
|
|||||
|
|
|
|
|
|
|
|
|
Whistle |
|
|
|
|
|
|
|
|
|
|
Piccolo |
|
|
|
|
|
|
|
|
|
|
|
|
Yokobue |
||||||
|
|
|
|
|
|
|
|
|
|
|
|
|
|
|
|
|
|
|
|
|
|
|
|
|
|
|
|
||||||||||||
Oboe 1 |
|
|
|
|
|
|
|
V-Flute |
|
|
|
|
|
|
|
|
|
|
|
|
|
|
|
|
|
|
|
|
|
||||||||||
|
|
|
|
|
|
|
|
|
|
|
|
|
|
|
|
|
|
|
|
|
|
|
|
||||||||||||||||
|
|
|
|
Oboe 2 |
|
|
|
|
|
|
|
|
|
|
|
|
|
|
|
|
|
|
|
||||||||||||||||
|
|
|
|
|
|
|
|
|
|
|
|
|
|
Grass Reed |
|
|
|
|
|
|
|
|
|||||||||||||||||
|
|
|
|
|
|
|
|
|
English Horn |
|
|
|
|
|
|
|
|
|
|
|
|
|
|
|
|
|
|
||||||||||||
|
|
|
|
|
|
|
|
|
|
|
|
|
|
|
|
|
|
|
|
|
|
|
|
|
|
||||||||||||||
|
|
|
|
|
|
|
|
|
Bassoon 1 |
|
|
|
Bassoon 2 |
|
|
|
|
|
|||||||||||||||||||||
|
|
|
|
|
|
|
|
|
|
|
|
|
|
|
|
|
|
||||||||||||||||||||||
Trumpet 1 |
|
|
|
|
|
V-Oboe |
|
|
|
|
|
|
|
|
|
|
|
|
|
|
|
|
Trumpet 6 |
||||||||||||||||
|
|
|
|
|
|
|
|
|
|
|
|
|
|
|
|
|
|
||||||||||||||||||||||
|
|
|
|
|
Trumpet 2 |
|
|
|
|
|
|
|
Trumpet 4 |
|
|
|
|
|
|
|
|
||||||||||||||||||
|
|
|
|
|
|
|
|
|
Trumpet 3 |
|
|
Flugelhorn |
|
|
|
Euphonium |
|||||||||||||||||||||||
|
|
|
|
|
|
|
|
|
|
|
|||||||||||||||||||||||||||||
|
|
|
|
|
|
|
|
|
Muted Trumpet |
|
|
Trumpet 5 |
|
|
|
|
|
||||||||||||||||||||||
|
|
|
|
|
|
|
|
|
Trombone 1 |
|
|
|
|
Waspy Horn |
|
|
|
|
|
|
|
||||||||||||||||||
|
|
|
|
|
|
|
|
|
|
|
|
|
|
|
|
|
|||||||||||||||||||||||
|
|
|
|
|
|
|
|
|
|
|
|
|
Trombone 2 |
|
|
|
|
|
|
|
|||||||||||||||||||
|
|
|
|
|
|
|
|
|
|
|
|
|
|
|
|
||||||||||||||||||||||||
|
|
|
|
|
|
|
|
|
V-Trumpet |
|
|
|
Muted Trombone |
|
|
|
|
|
|||||||||||||||||||||
|
|
|
|
|
|
|
|
|
|
|
|
|
|
||||||||||||||||||||||||||
|
|
|
|
|
|
|
|
|
|
|
|
|
|
|
|
|
|
|
|
|
|
|
|
|
|
|
|
|
|
||||||||||
|
|
|
|
|
|
|
|
|
|
|
|
|
|
|
|
|
|
|
|
|
|
|
V-Trombone |
|
|
|
|
|
|
||||||||||
|
|
|
|
|
|
|
|
|
|
|
|
|
|
|
|
|
|
|
|
|
|
|
|
|
|
|
|||||||||||||
|
|
|
|
|
|
|
|
|
|
|
|
|
|
|
|
|
|
|
|
|
|
|
|
|
|
|
|
|
|
|
|
|
|
|
|
|
|
|
|
BASS
Contrabass 1 |
|
|
|
|
|
|
Contrabass 2 |
|
|
|
|
|
|
|
|
||||
|
|
|
|
|
|
|
|
Contrabass 3 |
|
|
|
|
|
|
|
|
|||
|
|
|
|
|
|
|
|
|
|
|
|
|
|
|
|
||||
|
|
|
|
|
|
|
|
Pizzicato Bass |
|
Upright Bass |
|
|
|
|
|
|
|||
|
|
|
|
|
|
|
|
|
|
|
|
|
|
|
|||||
Electric Bass 1 |
|
|
|
Electric Bass 2 |
|
|
|
|
|
|
|
|
|||||||
|
|
|
|
|
|
|
|
Electric Bass 3 |
|
|
|
|
|
|
|
|
|||
|
|
|
|
|
|
|
|
|
|
|
|
|
|
|
|
||||
|
|
|
|
|
|
|
|
Electric Bass 4 |
|
|
|
|
|
|
|
|
|||
|
|
|
|
|
|
|
|
|
|
|
|
|
|
|
|
||||
|
|
|
|
|
|
|
|
Synth Bass 1 |
|
|
|
Synth Bass 2 |
|
Synth Bass 3 |
|
|
Edge Lead |
|
|
|
|
|
|
|
|
|
|
|
|
|
|
|
|||||||
Organ Bass 1 |
|
|
|
|
|
Organ Bass 2 |
|
|
Organ Bass 4 |
|
|
|
|
|
|
||||
|
|
|
|
|
|
|
|
Organ Bass 3 |
|
|
|
|
|
|
|
|
|||
|
|
|
|
|
|
|
|
|
|
|
|
|
|
|
|
||||
Tuba |
|
|
Timpani |
|
|
Timpani Roll |
|
|
|
|
|
|
|||||||
|
|
|
|
|
|
|
|
|
|
||||||||||
|
|
|
|
|
|
|
|
|
|
|
|
|
|
|
|
|
|
|
|
The Preset Voices for Upper/Lower Flute Voices
Jazz Organ 1 |
Jazz Organ 2 |
Jazz Organ 3 |
Jazz Organ 4 |
|
|
|
|
Pop Organ 1 |
Pop Organ 2 |
Pop Organ 3 |
Pop Organ 4 |
|
|
|
|
1
Guide Introductory Quick
25
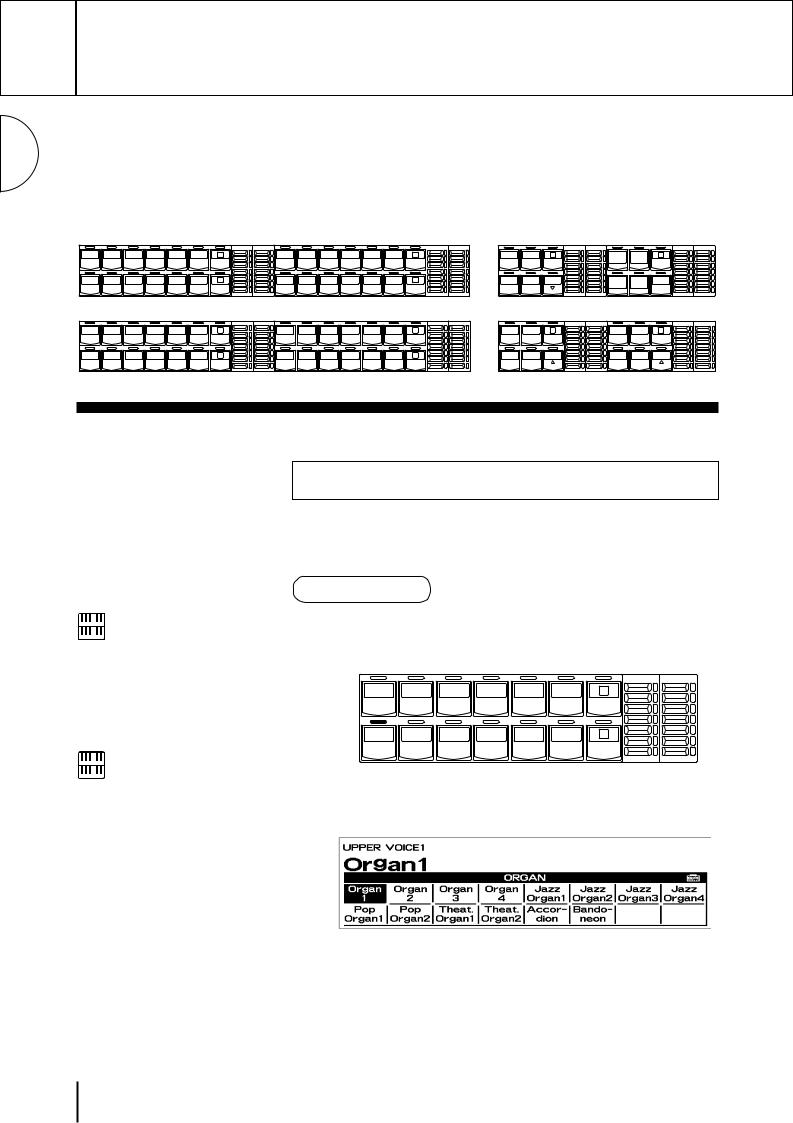
2 Voice Sections
2
Sections Voice
The EL-900 features 207 different high quality voices: 173 AWM/FM voices and 34 VA voices. Each of the AWM/FM voices can be used on the Upper keyboard, Lower keyboard and Pedalboard.
There are five voice sections for the Upper keyboard (including the Upper Flute Voice section), three voice sections for the Lower keyboard (including the Lower Flute Voice section), and two voice sections for the Pedalboard. Each voice section can, of course, have its own Voice Condition page(s), which allow you to finely set up voice and volume settings.
|
|
|
UPPER KEYBOARD VOICE 1 |
BRILLIANCE |
VOLUME |
|
|
UPPER KEYBOARD VOICE 2 |
BRILLIANCE |
VOLUME |
LEAD VOICE 1 |
|
BRILLIANCE |
VOLUME |
LEAD VOICE 2 |
|
BRILLIANCE |
VOLUME |
||||||
|
|
|
|
|
|
BRILLIANT |
MAX |
|
|
|
|
|
BRILLIANT |
MAX |
|
|
|
BRILLIANT |
MAX |
|
|
|
BRILLIANT |
MAX |
STRINGS |
BRASS |
CLARI- |
SAXO- |
CHORUS |
HARMO- |
1 |
STRINGS |
BRASS |
CLARI- |
SAXO- |
CHORUS |
HARMO- |
1 |
VIOLIN |
|
FLUTE |
1 |
|
|
VA |
VA |
1 |
|
|
|
|
NET |
PHONE |
|
NICA |
|
|
NET |
PHONE |
|
NICA |
|
|
|
|
|
ACOUS- |
VIRTUAL |
|
|
||||
|
|
|
|
|
|
|
|
|
|
|
|
|
|
|
|
|
|
|
|
TIC |
|
|
|
|
ORGAN |
PIANO |
GUITAR |
VIBRA- |
COSMIC |
TUTTI |
2 |
ORGAN |
PIANO |
GUITAR |
VIBRA- |
COSMIC |
TUTTI |
2 |
OBOE |
|
TRUM- |
TO |
|
|
VA |
VA |
SOLO |
|
|
|
|
|
PHONE |
|
|
|
|
|
PHONE |
|
|
|
|
PET |
LOWER |
|
|
ELEC- |
CUSTOM |
(KNEE) |
|
|
||
|
|
|
|
|
|
|
|
|
|
|
|
|
|
|
|
|
|
|||||||
|
|
|
|
|
|
|
|
|
|
|
|
|
|
|
|
|
|
|
|
TRONIC |
|
|
|
|
|
|
|
|
|
|
MELLOW |
MIN |
|
|
|
|
|
MELLOW |
MIN |
|
|
|
MELLOW |
MIN |
|
|
|
MELLOW |
MIN |
|
|
|
LOWER KEYBOARD VOICE 1 |
BRILLIANCE |
VOLUME |
|
|
LOWER KEYBOARD VOICE 2 |
BRILLIANCE |
VOLUME |
PEDAL VOICE 1 |
BRILLIANCE |
VOLUME |
PEDAL VOICE 2 |
BRILLIANCE |
VOLUME |
||||||||
|
|
|
|
|
|
BRILLIANT |
MAX |
|
|
|
|
|
BRILLIANT |
MAX |
|
|
|
BRILLIANT |
MAX |
|
|
|
BRILLIANT |
MAX |
STRINGS |
BRASS |
CLARI- |
SAXO- |
CHORUS |
HORN |
1 |
STRINGS |
BRASS |
CLARI- |
SAXO- |
CHORUS |
HORN |
1 |
CONTRA |
ELEC. |
1 |
|
|
CONTRA |
ELEC. |
1 |
|
|
|
|
|
NET |
PHONE |
|
|
|
|
NET |
PHONE |
|
|
BASS |
|
BASS |
|
|
BASS |
BASS |
|
|
||||
|
|
|
|
|
|
|
|
|
|
|
|
|
|
|
|
|
||||||||
ORGAN |
PIANO |
GUITAR |
VIBRA- |
COSMIC |
TUTTI |
2 |
ORGAN |
PIANO |
GUITAR |
VIBRA- |
COSMIC |
TUTTI |
2 |
ORGAN |
TUBA |
TO |
|
|
ORGAN |
TUBA |
TO |
|
|
|
|
|
|
PHONE |
|
|
|
|
|
PHONE |
|
|
BASS |
|
|
LOWER |
|
|
BASS |
|
LOWER |
|
|
||
|
|
|
|
|
|
|
|
|
|
|
|
|
|
|
|
|
|
|
||||||
|
|
|
|
|
|
MELLOW |
MIN |
|
|
|
|
|
MELLOW |
MIN |
|
|
|
MELLOW |
MIN |
|
|
|
MELLOW |
MIN |
NOTE:
Lead Voice 2 section consists of the VA (Virtual Acoustic Synthesis) voices, and the other sections consist of AWM/FM voices. For the detailed information on the VA and AWM/FM tone generation system see page 35 and 119, respectively.
NOTE:
VoicesoftheUpperandLowerFluteVoice sections are selected by a different procedure. Refer to the section Flute Voices on page 40 for details.
1 
 Selecting Voices from the Panel
Since selection of panel voices follows the same procedure throughout the various voice sections, instructions for only the Upper Keyboard Voice 1 are given here.
To select voices:
Select a voice from the Upper Keyboard Voice 1 section by pressing |
|||||||
1 one of the Voice buttons in that section. |
|
|
|||||
|
|
|
UPPER KEYBOARD VOICE 1 |
BRILLIANCE |
VOLUME |
||
|
|
|
|
|
|
BRILLIANT |
MAX |
STRINGS |
BRASS |
CLARI- |
SAXO- |
CHORUS |
HARMO- |
1 |
|
|
|
NET |
PHONE |
|
NICA |
|
|
|
|
|
|
|
|||
ORGAN |
PIANO |
GUITAR |
VIBRA- |
COSMIC |
TUTTI |
2 |
|
|
|
|
PHONE |
|
|
|
|
|
|
|
|
|
|
|
|
|
|
|
|
|
|
MELLOW |
MIN |
If, for example, you have selected the ORGAN voice, the following display (Voice Menu) will appear:
Notice that several different voice names are shown on this display. These are variations of the basic organ voice category.
26
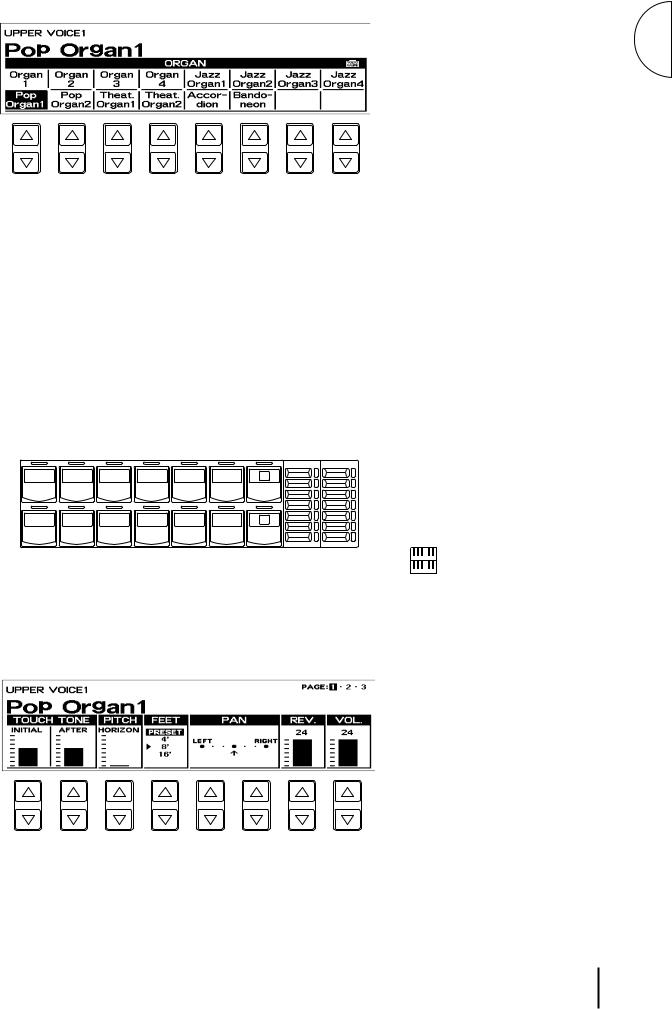
2 Press one of the Data Control buttons that corresponds to voice you wish to select.
The selected voice will be shown at the upper row of the LCD. In this case, Pop Organ 1 appears.
|
If you wish to, you can select voices from the other Upper Keyboard |
|||||||
|
Voice sections (Upper Voices 2, Lead Voice 1 and Lead Voice 2), |
|||||||
3 following steps #1 and #2 above. |
|
|
|
|||||
4 |
Set the volume for each voice section. There are two volume controls: |
|||||||
Coarse and Fine. |
|
|
|
|
|
|
||
|
Coarse: Use the VOLUME controls of each voice section on the panel |
|||||||
|
to set the desired level for each voice. The controls have seven volume |
|||||||
|
settings, from a minimum of 0, or no sound, to a maximum of full |
|||||||
|
volume. |
|
|
|
|
|
|
|
|
|
|
|
UPPER KEYBOARD VOICE 1 |
BRILLIANCE |
VOLUME |
||
|
|
|
|
|
|
|
BRILLIANT |
MAX |
|
STRINGS |
BRASS |
CLARI- |
SAXO- |
CHORUS |
HARMO- |
1 |
|
|
|
|
NET |
PHONE |
|
NICA |
|
|
|
|
|
|
|
|
|||
|
ORGAN |
PIANO |
GUITAR |
VIBRA- |
COSMIC |
TUTTI |
2 |
|
|
|
|
|
PHONE |
|
|
|
|
|
|
|
|
|
|
|
|
|
|
|
|
|
|
|
|
MELLOW |
MIN |
Fine: Pressing the same panel voice button again (or the same Data Control button corresponding to the selected voice) calls up the Voice Condition display. Use the Data Control buttons to the far right side to change the level of the desired voice. The relative level is indicated by the bar under each voice in the display as well as by a numeric value (from 0-24).
2
Sections Voice
NOTE:
Pressing a voice button once calls up that voice s Voice Menu display. Pressing it a second time calls up the Voice Condition display. Successive presses alternate between the two displays.
27
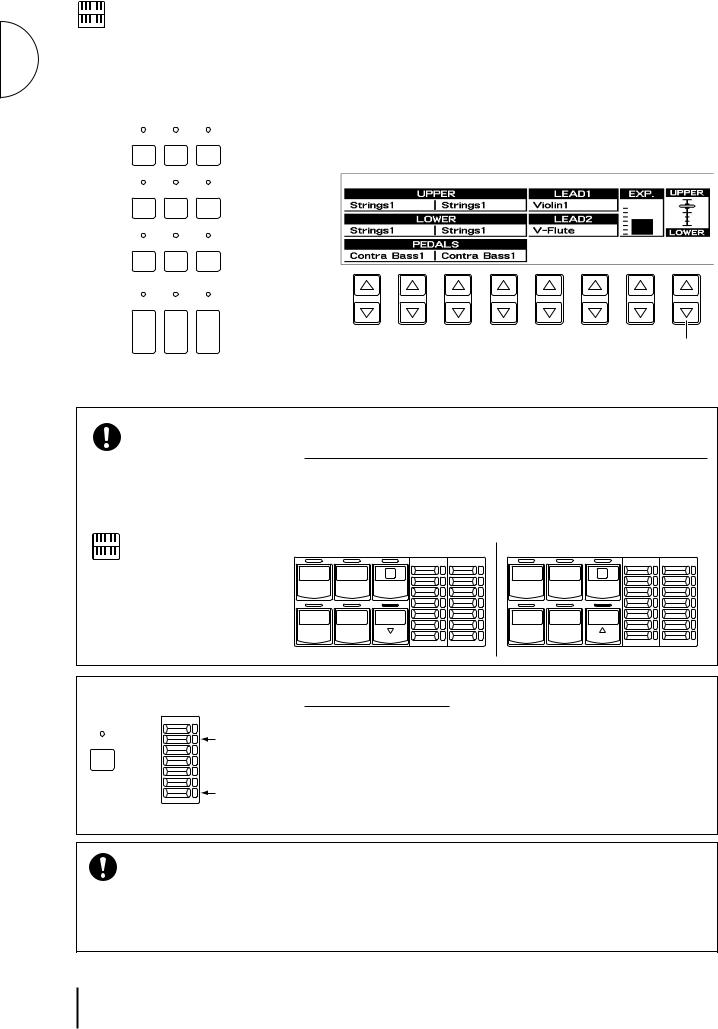
NOTE:
The Lead and Pedal Voices sound one note 2 at a time; when you simultaneously press two or more keys, only the highest note
will sound.
Voice |
|
|
|
Sections |
VOICE |
EFFECT |
A. B. C. |
|
DISPLAY |
SET |
M. O. C. |
|
FOOT |
REGIST. |
EXP. |
|
SW. |
SHIFT |
PITCH/MIDI |
|
|
RHYTHM |
|
|
VOICE |
PROGRAM |
|
|
EDIT |
PATTERN SEQUENCE |
|
5
6
Now select voices for the Lower keyboard and Pedalboard as you did for the Upper keyboard above. Also set the volumes of the voices.
Adjust the volume balance between the Upper and Lower Voices with the Balance Control provided on the Voice Display.
1.Return to the Voice Display by pressing the VOICE DISPLAY button in the DISPLAY SELECT section.
2.Adjust the balance with the corresponding Data Control buttons.
U. FLUTE |
L. FLUTE |
TREMOLO |
VOICE |
VOICE |
(FAST) |
Pressing this pair of Data DISPLAY SELECT Control buttons at the same
time restores the balance to the center position.
When the TO LOWER button is turned on, the Lead voices and Pedal voices cannot be played on the Upper keyboard and Pedalboard, respectively.
NOTE:
To Lower function is not available in the Lead Voice 2 section.
About TO LOWER - Playing Lead Voice 1 and Pedal Voice 1/ 2 from the Lower keyboard:
The Electone has a special To Lower function that lets you assign Lead (Lead Voice 1 only) or Bass voices to the Lower keyboard. Simply press the TO LOWER button on the voice section you wish to assign, and that voice will be playable from the Lower keyboard.
|
LEAD VOICE 1 |
BRILLIANCE |
VOLUME |
PEDAL VOICE 1 |
BRILLIANCE |
VOLUME |
|
|
|
BRILLIANT |
MAX |
|
|
BRILLIANT |
MAX |
VIOLIN |
FLUTE |
1 |
|
CONTRA |
ELEC. |
1 |
|
|
|
|
BASS |
BASS |
|
||
|
|
|
|
|
|
||
OBOE |
TRUM- |
TO |
|
ORGAN |
TUBA |
TO |
|
|
PET |
LOWER |
|
BASS |
LOWER |
|
|
|
|
MELLOW |
MIN |
|
|
MELLOW |
MIN |
About Mute function:
|
VOLUME |
|
MAX |
COARSE |
Actual |
|
volume |
|
setting |
|
When muted |
|
MIN |
The voices of the four voice sections of the Upper keyboard (two in the Lower and Pedal) sound together in a layer, and the balance of the voices in the layer is determined by these VOLUME controls. You can easily mute the voice of a voice section by holding down the COARSE button and pressing the panel volume control of the voice section you wish to mute. Repeating the procedure restores the original volume setting.
Turning the Electone off erases all panel settings you have made. When the Electone is turned on, Basic Registration 1 is automatically selected.
If you have made panel settings you wish to keep, save them to Registration Memory (see page 80) before turning the Electone off.
You can, however, restore the panel settings that were made before the Electone was last turned off. See page 86 for more information.
28
About Solo Mode
Unique to the Lead Voice 2 (VA) section is a Solo Mode function. Solo Mode lets you instantly switch to a solo Lead voice in the middle of your performance, muting all other Upper Keyboard voices.
To Use the Solo Mode:
1 Select the voice in the Lead Voice 2 section that you wish to play in the Solo Mode.
In this condition, the Normal Mode, all four voice sections for the Upper Keyboard (Upper Keyboard Voice 1 and 2, and Lead Voice 1 and 2) can be played.
2 Press the SOLO (KNEE) button in the Lead Voice 2 section. This sets Solo Mode to stand-by status. Pressing it again here returns to the Normal Mode.
3 To activate the Solo Mode, fold the Knee Lever down.
|
In this condition, the Solo Mode, only the Lead Voice 2 is playable |
|
from the Upper Keyboard. The voice on the Upper Keyboard |
|
changes to the voice selected in step #1 above. Fold up the Knee |
|
Lever again to return to the Normal Mode. |
4 |
Press the Knee Lever to the right with your knee while playing |
the keyboard. |
|
In this condition, the Upper Mode, all the voices set to the Upper |
Keyboard except for Lead Voice 2 are playable from the Upper Keyboard.
Each time you control (release or press) the Knee Lever you can alternates between the Solo Mode and Upper Mode, as long as the SOLO (KNEE) button is on.
Upper Keyboard Modes
|
|
Solo Button On |
|
|
Solo Button Off |
|
|
|
Knee Lever On |
Knee Lever Off |
|
|
(Normal Mode) |
||
|
(Upper Mode) |
(Solo Mode) |
|
|
|
||
|
|
|
|
|
Upper Keyboard |
Upper Keyboard |
|
|
Voice 1, 2 |
Voice 1, 2 |
|
Playable |
Lead Voice 1 |
Lead Voice 1 |
|
Voice |
|
||
(highest note priority) |
(highest note priority) |
|
|
Sections |
|
||
|
|
|
|
|
Lead Voice 2 |
|
Lead Voice 2 |
|
(highest note priority) |
|
(last note priority) |
|
|
|
|
NOTE:
TurningontheSOLO(KNEE)buttonallows youtousetheKneeLevertoswitchbetween Normal Mode and Solo Mode. Please remember that the Knee Lever is used to controlotherfunctionssuchasSustain;thus, you may unintentionally add the sustain effect when using the Knee Lever.
NOTE:
Anynotesplayedwhileswitchingbetweenthe UpperandSoloModesarenotabruptlycutoff but continue to sound.
NOTE:
The Lead voices (Lead Voice 1/2) sound only the highest note if two or more keys are played. However, in the Solo Mode, the Lead voice (Lead Voice 2) sounds for the last key played.
NOTE:
Lead Voice 2 voices cannot be separately recorded with the M.D.R.
2
Sections Voice
29
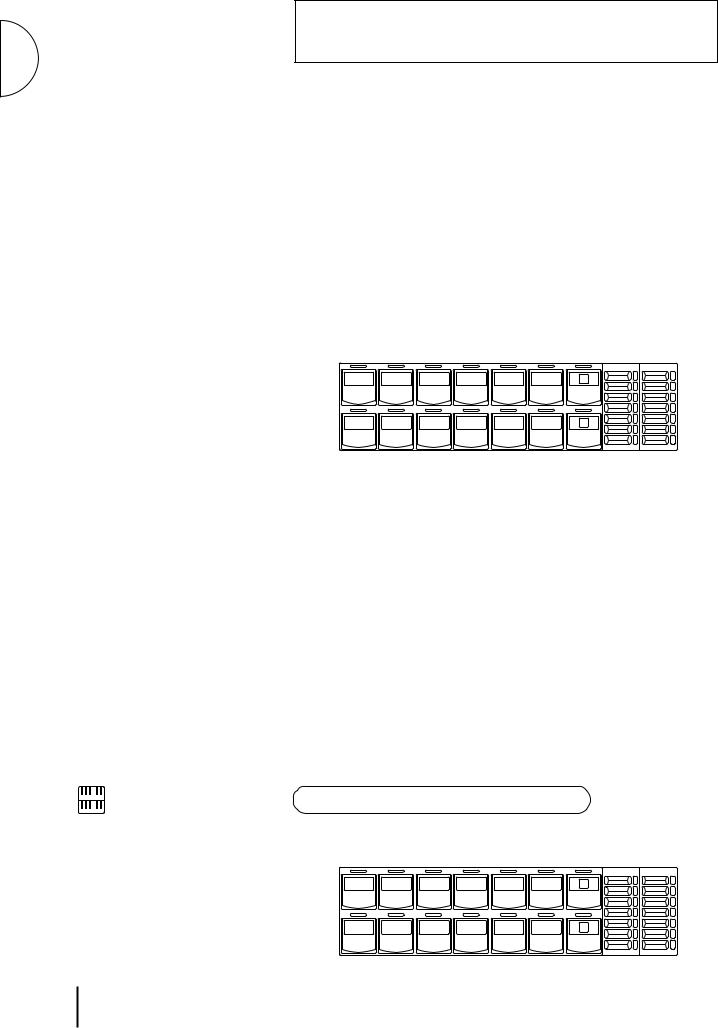
2
Sections Voice
NOTE:
The VA voices of the Lead Voice 2 section are not comprised in the Voice Menu pages which can be selected by the Page buttons, and therefore they cannot be selected using the dotted buttons. However, the dotted button in the Lead Voice 2 section allows you to select the Voice Menu voices, or the voices from other voice sections.
2 
 Selecting Voices from the Dotted Buttons
Dotted Buttons and User Voices
The EL-900 has a wide variety of voices from which you can choose-far greater than what is immediately apparent from the front panel controls. You ve already learned in the section above how to select the different voices that are available in the Voice Menu display of each panel voice. The Electone also has dotted buttons in each voice section (except for Lead Voice 2, VA), giving you access to even more voices by including space for storing and recalling voices you ve created yourself (User voices) by using Voice Edit function (page 110). Optional Voice Disk voices containing many new voices are also being made available for the EL900 (page 118).
Each voice section has one or two dotted buttons (except for Lead Voice 2), found on the right side of each voice section. These dotted buttons function as wild card Voice Menu selectors; any internal or User voices can be selected from these buttons.
|
|
|
UPPER KEYBOARD VOICE 1 |
BRILLIANCE |
VOLUME |
||
|
|
|
|
|
|
BRILLIANT |
MAX |
STRINGS |
BRASS |
CLARI- |
SAXO- |
CHORUS |
HARMO- |
1 |
|
|
|
NET |
PHONE |
|
NICA |
|
|
|
|
|
|
|
|||
ORGAN |
PIANO |
GUITAR |
VIBRA- |
COSMIC |
TUTTI |
2 |
|
|
|
|
PHONE |
|
|
|
|
|
|
|
|
|
|
|
|
|
|
|
|
|
|
MELLOW |
MIN |
The dotted buttons have three basic uses:
For playing any voice of the Voice Menus (except for VA voices) from any of the keyboards or Pedalboard. You can play on the Upper keyboard, for example, voices from the twenty-two Voice Menu pages (including User), and not be limited to only the twelve buttons (equivalent to twelve Voice Menu pages) that make up the Upper Voice section. Another advantage to this feature is that when the normally monophonic (one note) Lead and Pedal voices are assigned to the Upper or Lower keyboard Voice sections, they can be played polyphonically.
For having three different voices from the same Voice Menu page available for selection in the same song. For example, you can assign one of the voices to a dotted button in the Upper Keyboard Voice 1 section, the second voice to the other dotted button in the same section, and the third one on the Voice Menu.
For playing the User voices of your own creation or those from a Voice Disk. (page 110)
To select voices from the dotted buttons:
1 |
Press one of the dotted buttons in any of the voice sections. |
|||||||
|
|
|
UPPER KEYBOARD VOICE 1 |
BRILLIANT |
MAX |
|||
|
|
|
|
|
|
|
BRILLIANCE |
VOLUME |
|
STRINGS |
BRASS |
CLARI- |
SAXO- |
CHORUS |
HARMO- |
1 |
|
|
|
|
NET |
PHONE |
|
NICA |
|
|
|
|
|
|
|
|
|||
|
ORGAN |
PIANO |
GUITAR |
VIBRA- |
COSMIC |
TUTTI |
2 |
|
|
|
|
|
PHONE |
|
|
|
|
|
|
|
|
|
|
|
|
|
|
|
|
|
|
|
|
MELLOW |
MIN |
30
 Loading...