

Page 1
Upgrade Kit
OWNER’S MANUAL
Page 2
SPECIAL MESSAGE SECTION
PRODUCT SAFETY MARKINGS: Yamaha electronic
products may have either labels similar to the graphics
shown below or molded / stamped facsimiles of these
graphics on the enclosure. The explanation of these
graphics appears on this page.
Please observe all cautions indicated on this page and
those indicated in the safety instruction section.
CAUTION
RISK OF ELECTRIC SHOCK.
DO NOT OPEN
CAUTION: TO REDUCE THE RISK OF
ELECTRIC SHOCK, DO NOT REMOVE
COVER (OR BACK). NO USER-SERVICEABLE
PARTS INSIDE. REFER SERVICING TO
QUALIFIED SERVICE PERSONNEL.
See the name plate for graphic symbol markings.
The exclamation point within the
equilateral triangle is intended to alert
the user to the present of important
operating and maintenance
(servicing) instructions in the literature
accompanying the product.
The lightning flash with arrowhead
symbol within the equilateral triangle
is intended to alert the user to the
presence of uninsulated "dangerous
voltage" within the product's
enclosure that may be of sufficient
magnitude to constitute a risk of
electrical shock.
ENVIRONMENTAL ISSUES: Yamaha strives to produce
products that are both user safe and environmentally
friendly.
We sincerely believe that our products and the production
methods used to produce them, meet these goals. In
keeping with both the letter and the spirit of the law, we
want you to be aware of the following:
BATTERY NOTICE: This product MAY contain a small
nonrechargeable battery which (if applicable) is soldered
in place. The average life span of this type of battery is
approximately five years. When replacement becomes
necessary, contact a qualified service representative to
perform the replacement.
WARNING: Do not attempt to recharge, disassemble, or
incinerate this type of battery. Keep all batteries away from
children. Dispose of used batteries promptly and as
regulated by applicable laws. Note: In some areas, the
servicer is required by law to return the defective parts.
However, you do have the option of having the servicer
dispose of these parts for you.
DISPOSAL NOTICE: Should this product become
damaged beyond repair, or for some reason its useful life is
considered to be at an end, please observe all local, state,
and federal regulations that relate to the disposal of
products that contain lead, batteries, plastics, etc.
NOTICE: Service charges incurred due to lack of
knowledge relating to how a function or effect works (when
the unit is operating as designed) are not covered by the
manufacture's warranty, and are therefore the owner's
responsibility.
Please study this manual carefully and consult your dealer
before requesting service.
NAME PLATE LOCATION: The graphic below indicates
the location of the name plate. The model number, serial
number, power requirements, etc., are located on this
plate. You should record the model number, serial number,
and the date of purchase in the spaces provided below
and retain this manual as a permanent record of your
purchase.
IMPORTANT NOTICE: All Yamaha electronic products are
tested and approved by an independent safety testing
laboratory in order that you may be sure that when it is
properly installed and used in its normal and customary
manner, all foreseeable risks have been eliminated. DO
NOT modify this unit or commission others to do so unless
specifically authorized by Yamaha.
Product performance and/or safety standards may be
diminished. Claims filed under the expressed warranty may
be denied if the unit is/has been modified. Implied
warranties may also be affected.
SPECIFICATIONS SUBJECT TO CHANGE: The
information contained in this manual is believed to be
correct at the time of printing. However, Yamaha reserves
the right to change or modify any of the specifications
without notice or obligation to update existing units.
92-469-➀
Model
Serial No.
Purchase Date
Page 3
PRECAUTIONS
PLEASE READ CAREFULLY BEFORE PROCEEDING
* Please keep these precautions in a safe place for future reference.
WARNING
Always follow the basic precautions listed below to avoid the possibility of serious injury or even death from electrical shock,
short-circuiting, damages, fire or other hazards. These precautions include, but are not limited to, the following:
• Do not open the instrument or attempt to disassemble the internal parts or
modify them in any way. The instrument contains no user-serviceable parts.
If it should appear to be malfunctioning, discontinue use immediately and
have it inspected by qualified Yamaha service personnel.
• Do not expose the instrument to rain, use it near water or in damp or wet
conditions, or place containers on it containing liquids which might spill
into any openings.
• If the power cord or plug becomes frayed or damaged, or if there is a sudden
loss of sound during use of the instrument, or if any unusual smells or
smoke should appear to be caused by it, immediately turn off the power
switch, disconnect the electric plug from the outlet, and have the instrument
inspected by qualified Yamaha service personnel.
• Only use the voltage specified as correct for the instrument. The required
voltage is printed on the name plate of the instrument.
• Before cleaning the instrument, always remove the electric plug from the
outlet. Never insert or remove an electric plug with wet hands.
• Check the electric plug periodically and remove any dirt or dust which may
have accumulated on it.
CAUTION
Always follow the basic precautions listed below to avoid the possibility of physical injury to you or others, or damage to the
instrument or other property. These precautions include, but are not limited to, the following:
• Do not place the power cord near heat sources such as heaters or radiators,
and do not excessively bend or otherwise damage the cord, place heavy
objects on it, or place it in a position where anyone could walk on, trip over,
or roll anything over it.
• When removing the electric plug from the instrument or an outlet, always
hold the plug itself and not the cord. Pulling by the cord can damage it.
• Do not connect the instrument to an electrical outlet using a multipleconnector. Doing so can result in lower sound quality, or possibly cause
overheating in the outlet.
• Remove the electric plug from the outlet when the instrument is not to be
used for extended periods of time, or during electrical storms.
• Before connecting the instrument to other electronic components, turn off
the power for all components. Before turning the power on or off for all
components, set all volume levels to minimum. Also, be sure to set the
volumes of all components at their minimum levels and gradually raise the
volume controls while playing the instrument to set the desired listening
level.
• Do not expose the instrument to excessive dust or vibrations, or extreme
cold or heat (such as in direct sunlight, near a heater, or in a car during the
day) to prevent the possibility of panel disfiguration or damage to the internal
components.
• Do not use the instrument near other electrical products such as televisions,
radios, or speakers, since this might cause interference which can affect
proper operation of the other products.
• Do not place the instrument in an unstable position where it might accidentally
fall over.
• Before moving the instrument, remove all connected cables.
• When cleaning the instrument, use a soft, dry cloth. Do not use paint thinners,
solvents, cleaning fluids, or chemical-impregnated wiping cloths. Also, do
not place vinyl, plastic or rubber objects on the instrument, since this might
discolor the panel or keyboard.
• Do not rest your weight on, or place heavy objects on the instrument, and do
not use excessive force on the buttons, switches or connectors.
• Take care that the key cover does not pinch your fingers, and do not insert a
finger or hand in the key cover gap.
• Never insert or drop paper or metallic or other objects between the slits of
the key cover and the keyboard. If this happens, immediately turn off the
power and remove the electric plug from the outlet and have the instrument
inspected by qualified Yamaha service personnel.
• Do not place the instrument against a wall (allow at least 3 cm/one-inch
from the wall), since this can cause inadequate air circulation, and possibly
result in the instrument overheating.
• Do not operate the instrument for a long period of time at a high or
uncomfortable volume level, since this can cause permanent hearing loss. If
you experience any hearing loss or ringing in the ears, consult a physician.
■ USING THE BENCH
• Do not play carelessly with or stand on the bench. Using it as a tool or stepladder or for any other purpose might result in accident or injury.
• Only one person should sit on the bench at a time, in order to prevent the
possibility of accident or injury.
• If the bench screws become loose due to extensive long-term use, tighten
them periodically using the included tool.
■ SAVING USER DATA
• Always save data to a floppy disk frequently, in order to help prevent the loss
of important data due to a malfunction or user operating error.
Yamaha cannot be held responsible for damage caused by improper use or
modifications to the instrument, or data that is lost or destroyed.
Always turn the power off when the instrument is not in use.
(1)B-6
Page 4
Congratulations!
This manual provides the information related to the newly upgraded features and functions,
difference between EL-900 and EL-900m. You can enjoy specially tailored sophisticated
voices, convenient and versatile voice display functions, voice editing even with VA voices
and more.
Included Items
Registration Menu Disk
3.5" Floppy Disk
Owner’s Manual
To Authorized Service Personnel
Turning the Electone off erases all panel settings you have made. When the Electone is turned on, Basic
Registration 1 is automatically selected. If you have made panel settings you wish to keep, save them to
Registration Memory before turning the Electone off.
GM (General MIDI System Level 1) is an addition to the MIDI standard which ensures that any GM-compatible
music data can be accurately played by any GM-compatible tone generator, regardless of maker. The GM mark is
affixed to all software and hardware products that support the General MIDI standard.
XG is a new MIDI format created by Yamaha which significantly improves and expands upon the General MIDI
standard by providing a greater variety of high-quality voices plus considerably enhanced effect operation—while
being fully compatible with GM.
Products bearing the SONDIUS-XG logo are licensed under patents of Stanford University and Yamaha as listed on
the internet web site, <http://www.sondius-xg.com>.
• The screen displays and illustrations as shown in this owner’s manual are for instructional purposes only, and may appear somewhat different
from those on your instrument.
• Copying of the commercially available music sequence data is strictly prohibited except for your personal use.
• The company names and product names in this Owner’s manual are the trademarks or registered trademarks of their respective companies.
4
Page 5

Table of Contents
Panel Layout ....................................................................... 6
1 Registration Menu Disk .................................................... 9
Registration Menu List ............................................................................................................... 11
Voice Category List ..................................................................................................................... 14
2 New Voices .................................................................... 16
Strings Page .................................................................................................................................. 16
Brass Page .................................................................................................................................... 16
Trumpet Page ............................................................................................................................... 17
Tuba Page ..................................................................................................................................... 17
Flute Page ..................................................................................................................................... 18
Oboe Page ..................................................................................................................................... 18
Clarinet Page ................................................................................................................................ 19
Saxophone Page ........................................................................................................................... 20
Tutti Page...................................................................................................................................... 20
Chorus Page ................................................................................................................................. 21
Piano Page .................................................................................................................................... 22
Electric Bass Page ........................................................................................................................ 22
New Voices .................................................................................................................................... 23
Voice Menu ................................................................................................................................... 24
3 Additional Changes on Voice Display Pages ................... 26
Voice Display, Page 1 ................................................................................................................... 26
Voice Display, Page 2 ................................................................................................................... 26
Voice Display, Page 3 ................................................................................................................... 29
Basic Operation ........................................................................................................................... 30
UNIFORM and REGISTRATION SELECT ........................................................................... 30
Setting Examples ......................................................................................................................... 34
4 Pedal Polyphonic Mode .................................................. 36
5 VA Voice Edit .................................................................. 37
6 Registration Shift Next Song + ....................................... 41
7 Convenient Disk Copy Function ....................................... 42
Disk Copy 2 .................................................................................................................................. 42
Error Messages ............................................................................................................................ 43
8 MIDI Out filter ................................................................ 45
9 APPENDIX ...................................................................... 46
Details on Each Voice .................................................................................................................. 46
MIDI Data Format ...................................................................................................................... 50
MIDI Implementation Chart ..................................................................................................... 61
Specifications................................................................................................................................63
5
Page 6
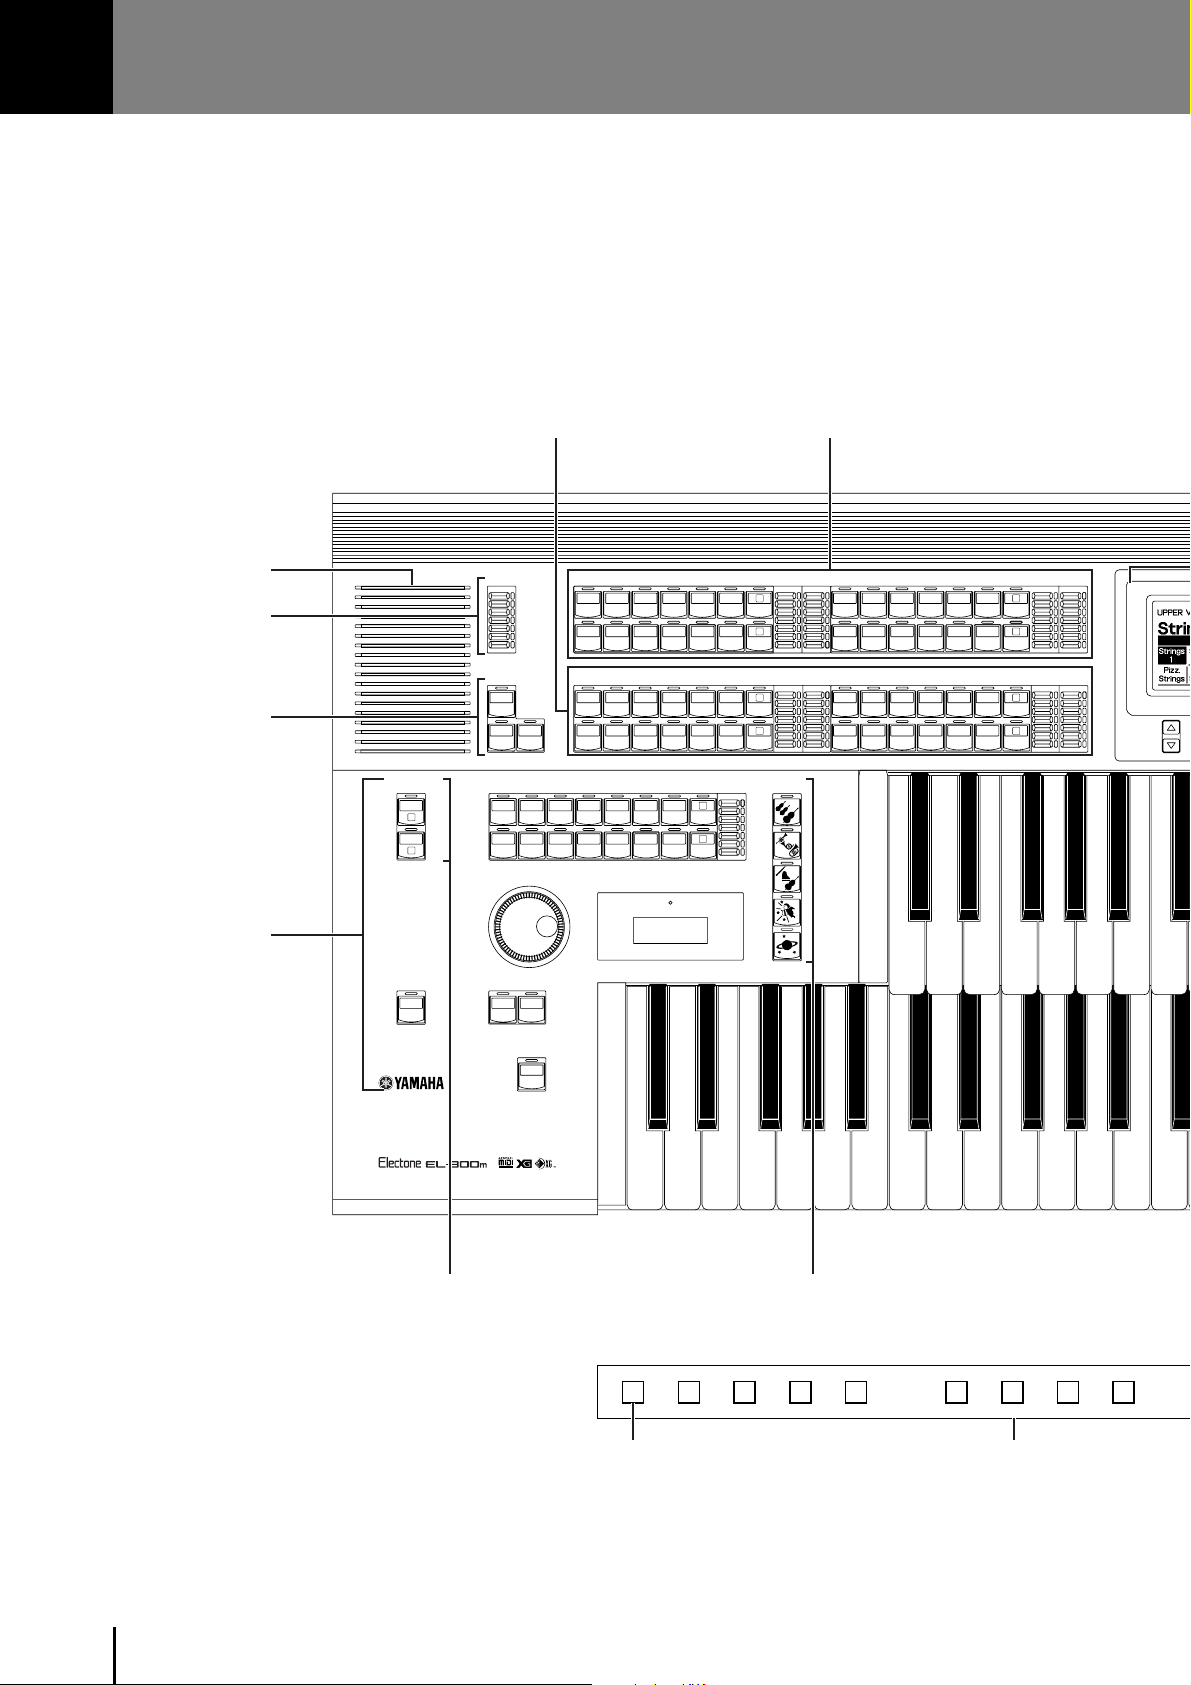
Panel Layout
EL-900m Panel Layout
LOWER KEYBOARD VOICE 1, 2 UPPER KEYBOARD VOICE 1, 2
Monitor Speaker
REVERB
SUSTAIN
RHYTHM
KEYBOARD
PERCUSSION
LOWER
1
PEDAL
2
INTRO.
ENDING
REVERB
MAX
MIN
SUSTAIN
UPPER
(KNEE)
LOWER
(KNEE)
SEQ.1SEQ.
SEQ.3SEQ.
SYNCHRO
START
STRINGS BRASS CLARI-
ORGAN PIANO GUITAR VIBRA-
STRINGS BRASS CLARI-
PEDAL
ORGAN PIANO GUITAR COSMIC TUTTI
RHYTHM
MARCH WALTZ SWING BOUNCE SLOW
2
USER 1 USER 2 USER 3 USER 4 A B
TANGO LATIN 1 LATIN 2 8 BEAT 16 BEAT
4
USER 5 USER 6 USER 7 USER 8 C D
TEMPO
START
FILL IN
UPPER KEYBOARD VOICE 1
CHORUS HARMO-
SAXO-
NET
PHONE
COSMIC TUTTI
PHONE
LOWER KEYBOARD VOICE 1
SAXO-
CHORUS
NET
PHONE
VIBRAPHONE
ROCK
BAR/BEAT
TEMPO
BRILLIANCE
VOLUME
BRILLIANT
MAX
MELLOW
BRILLIANT
MELLOW
BASIC
VOLUME
1
2
3
4
5
STRINGS BRASS SAXO-
ORGAN PIANO GUITAR VIBRA-
MIN
MAX
STRINGS BRASS CLARI-
ORGAN PIANO GUITAR VIBRA-
MIN
1
NICA
2
BRILLIANCE
HORN
1
2
VOLUME
REGIST.
MAX
1
2
MIN
UPPER KEYBOARD VOICE 2
CHORUS HARMO-
CLARI-
PHONE
NET
COSMIC TUTTI
PHONE
LOWER KEYBOARD VOICE 2
SAXO-
CHORUS
NET
PHONE
COSMIC TUTTI
PHONE
BRILLIANCE
VOLUME
BRILLIANT
MAX
1
NICA
2
MELLOW
MIN
BRILLIANCE
VOLUME
BRILLIANT
HORN
MAX
1
2
MELLOW
MIN
BASIC REGIST.KEYBOARD PERCUSSION
M.
13 14 15 16 1 2 3 4
/TO DISK
Registration MemoryM./TO DISK
6
Page 7
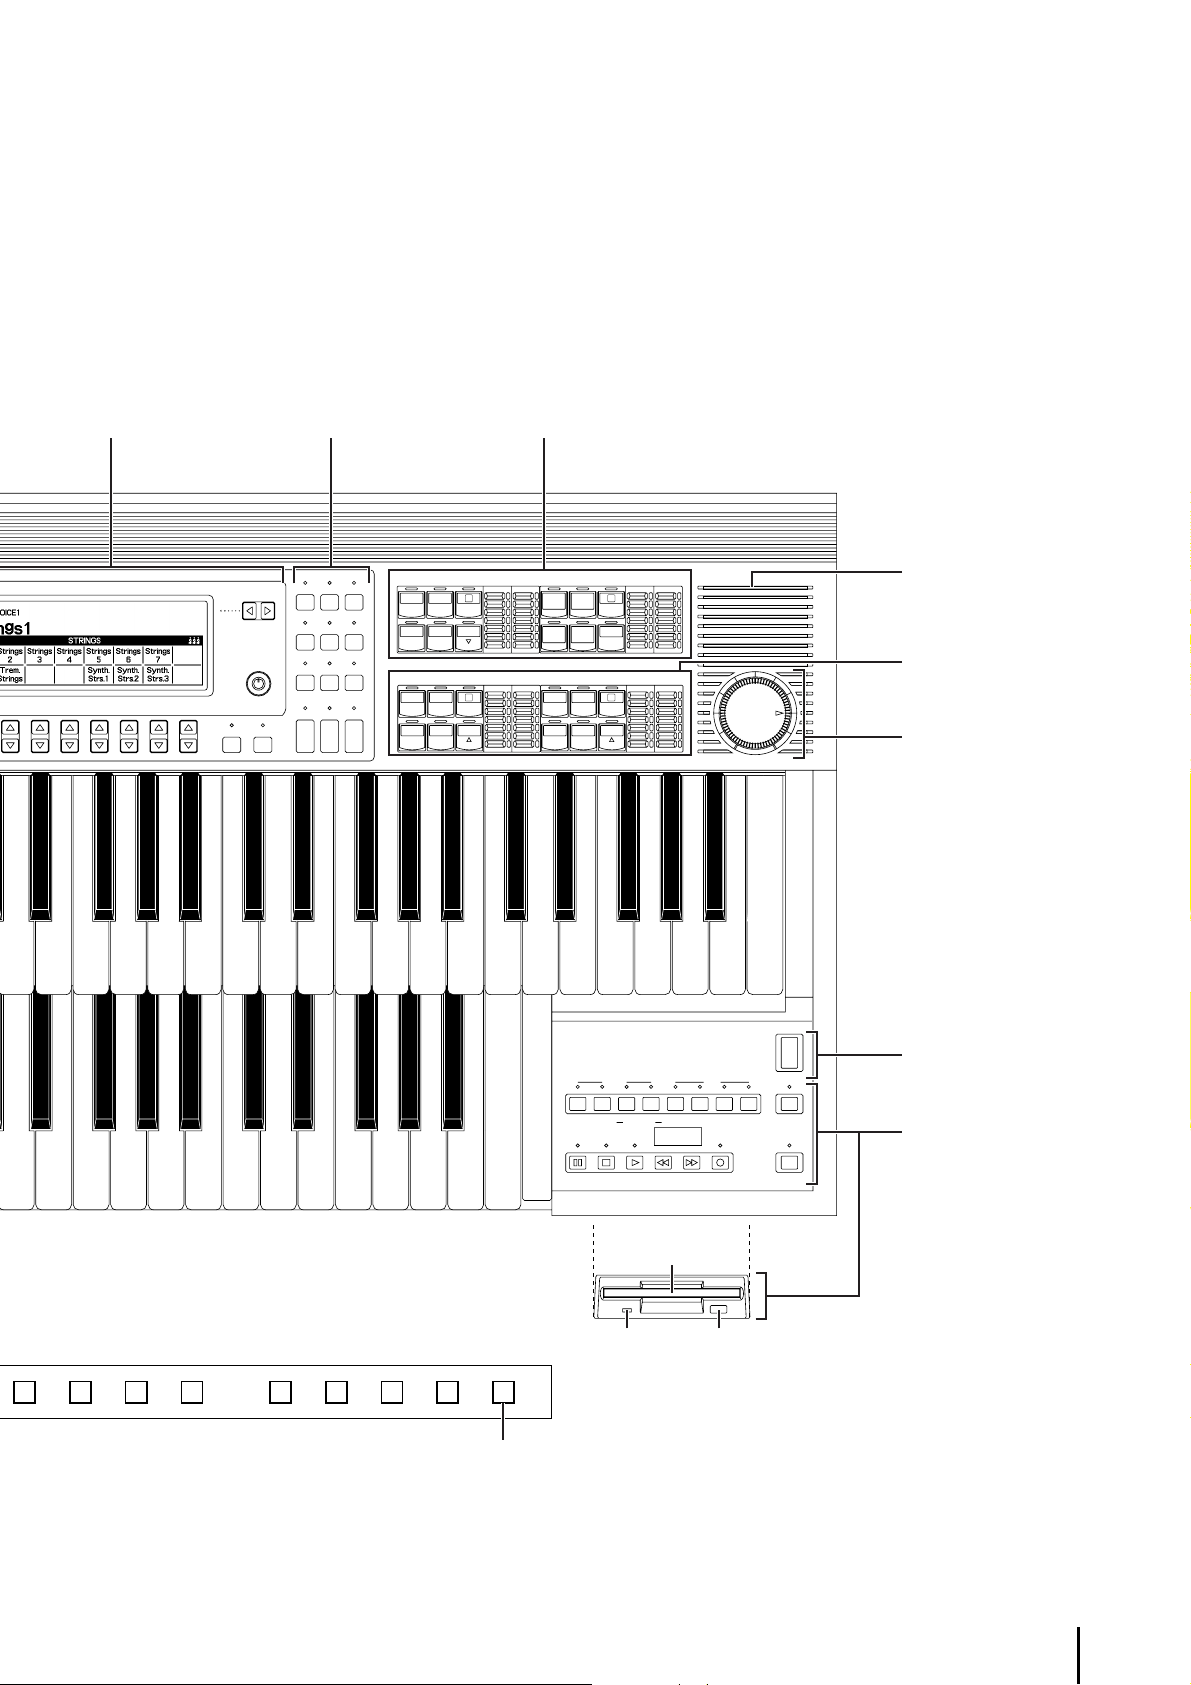
LEAD VOICE 1, 2LCD Display DISPLAY SELECT
DATA CONTROL
PAGE
CONTRAST
HOLDCOARSE
VOICE
DISPLAY
FOOT
SW.
VOICE
EDIT
U. FLUTE
VOICE
DISPLAY SELECT
EFFECT
A. B. C.
SET
M. O. C.
REGIST.
EXP.
SHIFT
PITCH/MIDI
RHYTHM
PROGRAM
PATTERNSEQUENCE
L. FLUTE
TREMOLO
VOICE
(FAST)
LEAD VOICE 1
VIOLIN FLUTE
OBOE TRUM-
PEDAL VOICE 1
CONTRA
BASS
BASS
PETTOLOWER
ELEC.
BASS
TUBAORGAN
LOWER
1
1
TO
BRILLIANCE VOLUME
BRILLIANT
MAX
MELLOW
MIN
VOLUME
BRILLIANCE
BRILLIANT
MAX
MELLOW
MIN
ACOUS-
ELEC-
TRONIC
CONTRA
BASS
BASS
VA
TIC
VA
LEAD VOICE 2
PEDAL VOICE 2
BRILLIANCE VOLUME
BRILLIANT
VA
VIRTUAL
VA
(KNEE)
CUSTOM
ELEC.
BASS
TUBAORGAN
LOWER
RECORD PLAY
UPPER LOWER PEDAL CONTROL UPPER LOWER PEDAL CONTROL
SONG
REPEAT
PAUSE STOP PLAY SONG SELECT RECORD
MUSIC DISK RECORDER
MAX
1
SOLO
MELLOW
MIN
BRILLIANCE
VOLUME
BRILLIANT
MAX
1
TO
MELLOW
MIN
FROM SONG DEL.
TO
SONG COPY
TEMPO– +
FORMAT
MASTER VOLUME
POWER
SHIFT
CUSTOM PLAY
Monitor Speaker
PEDAL VOICE 1, 2
MASTER VOLUME
POWER
MUSIC DISK
RECORDER
5 6 7 8 9 10 11 12 D.
D. (Disable)
Floppy Disk Slot
LED (Lamp in-use) Eject
7
Page 8
LCD Display/Display Select
LCD Display Page Buttons
VOICE
DISPLAY
PAGE
FOOT
SW.
CONTRAST
DATA CONTROL
DATA CONTROL Buttons
COARSE Button
Contrast Dial
VOICE
EDIT
U. FLUTE
VOICE
HOLDCOARSE
HOLD Button
EFFECT
SET
REGIST.
SHIFT
PITCH/MIDI
RHYTHM
PROGRAM
PATTERN SEQUENCE
L. FLUTE
VOICE
DISPLAY SELECT
A. B. C.
M. O. C.
EXP.
TREMOLO
(FAST)
VOICE DISPLAY Button
EFFECT SET Button
A. B. C. /M. O . C. Button
FOOT SW. Button
REGIST SHIFT Button
EXP./PITCH/MIDI Button
VOICE EDIT Button
RHYTHM PATTERN PROGRAM Button
RHYTHM SEQUENCE Button
TREMOLO (FAST) Button
L. FLUTE VOICE Button
U. FLUTE VOICE Button
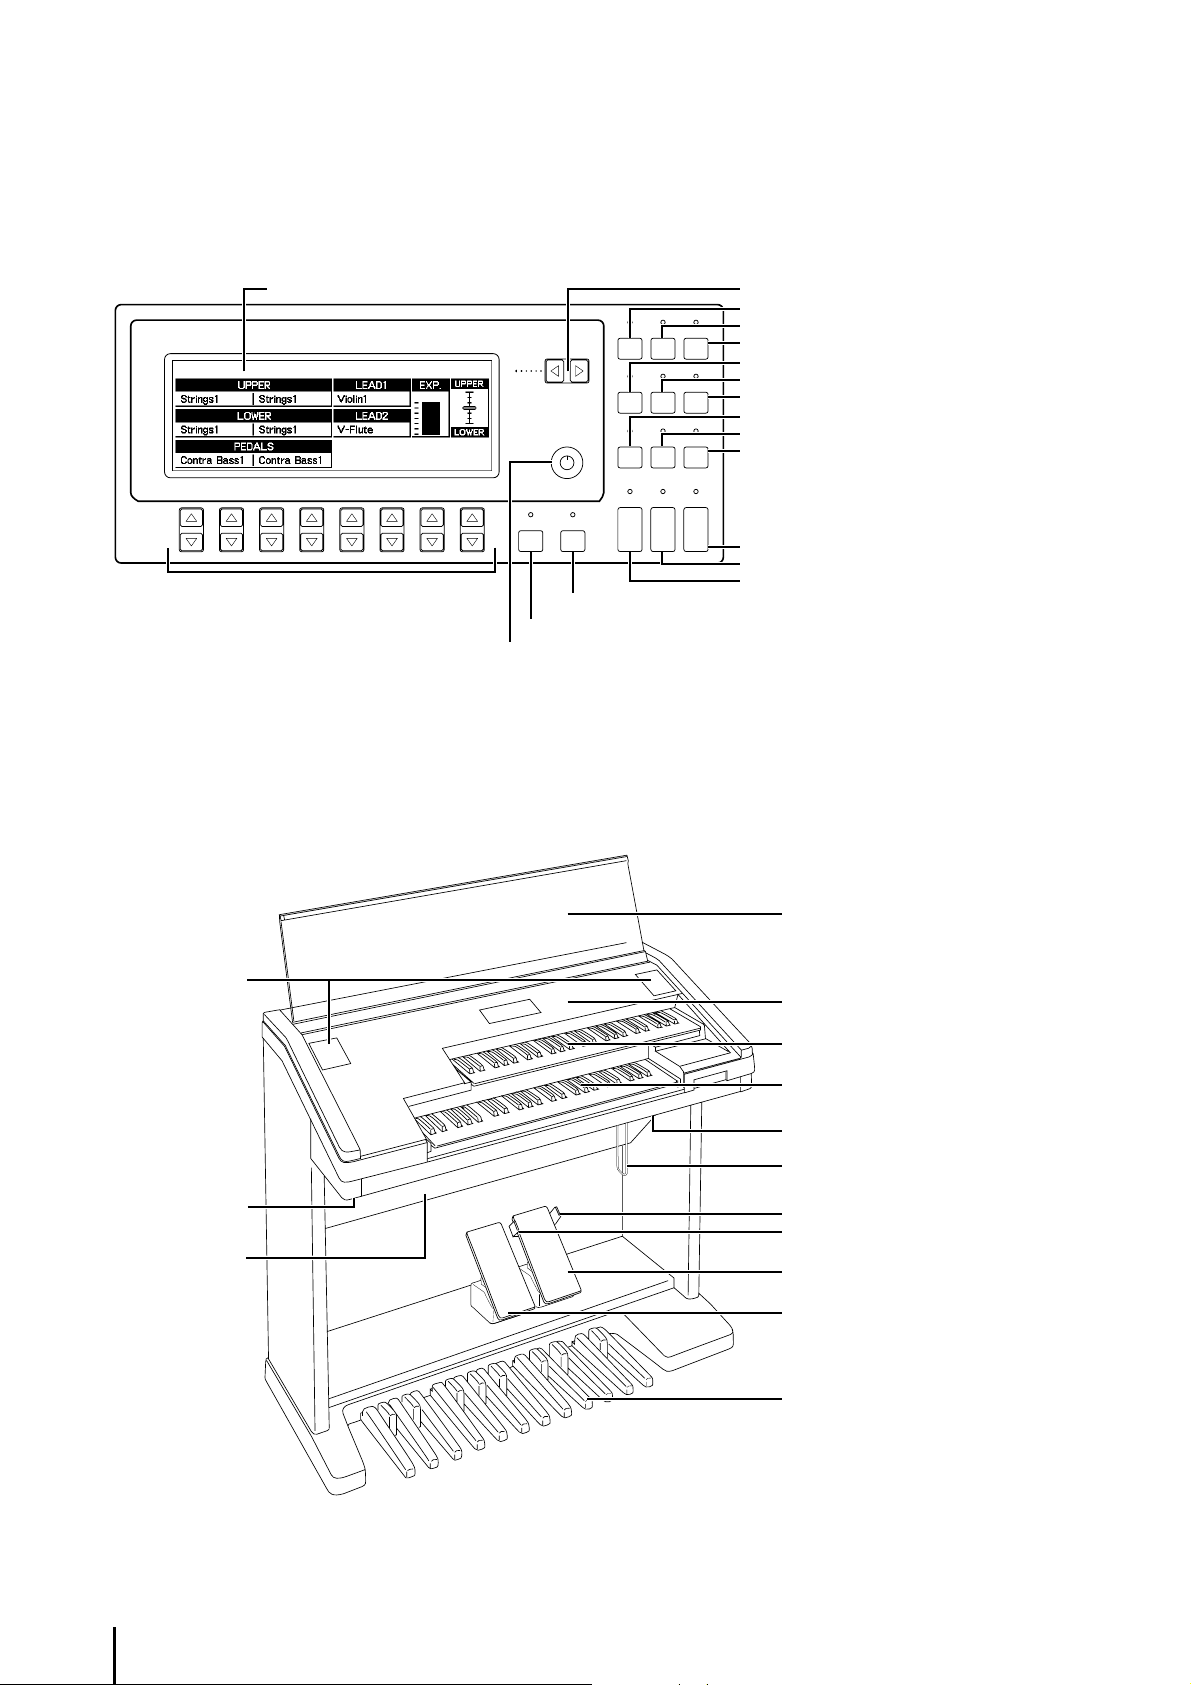
Others
Monitor Speakers
Jacks
Speaker Unit
Keyboard Cover/Music Stand
Front Panel
Upper Keyboard
Lower Keyboard
MIDI Jacks
Knee Lever
Right-Footswitch
Left-Footswitch
Expression Pedal
Second Expression Pedal
Pedalboard
8
Page 9
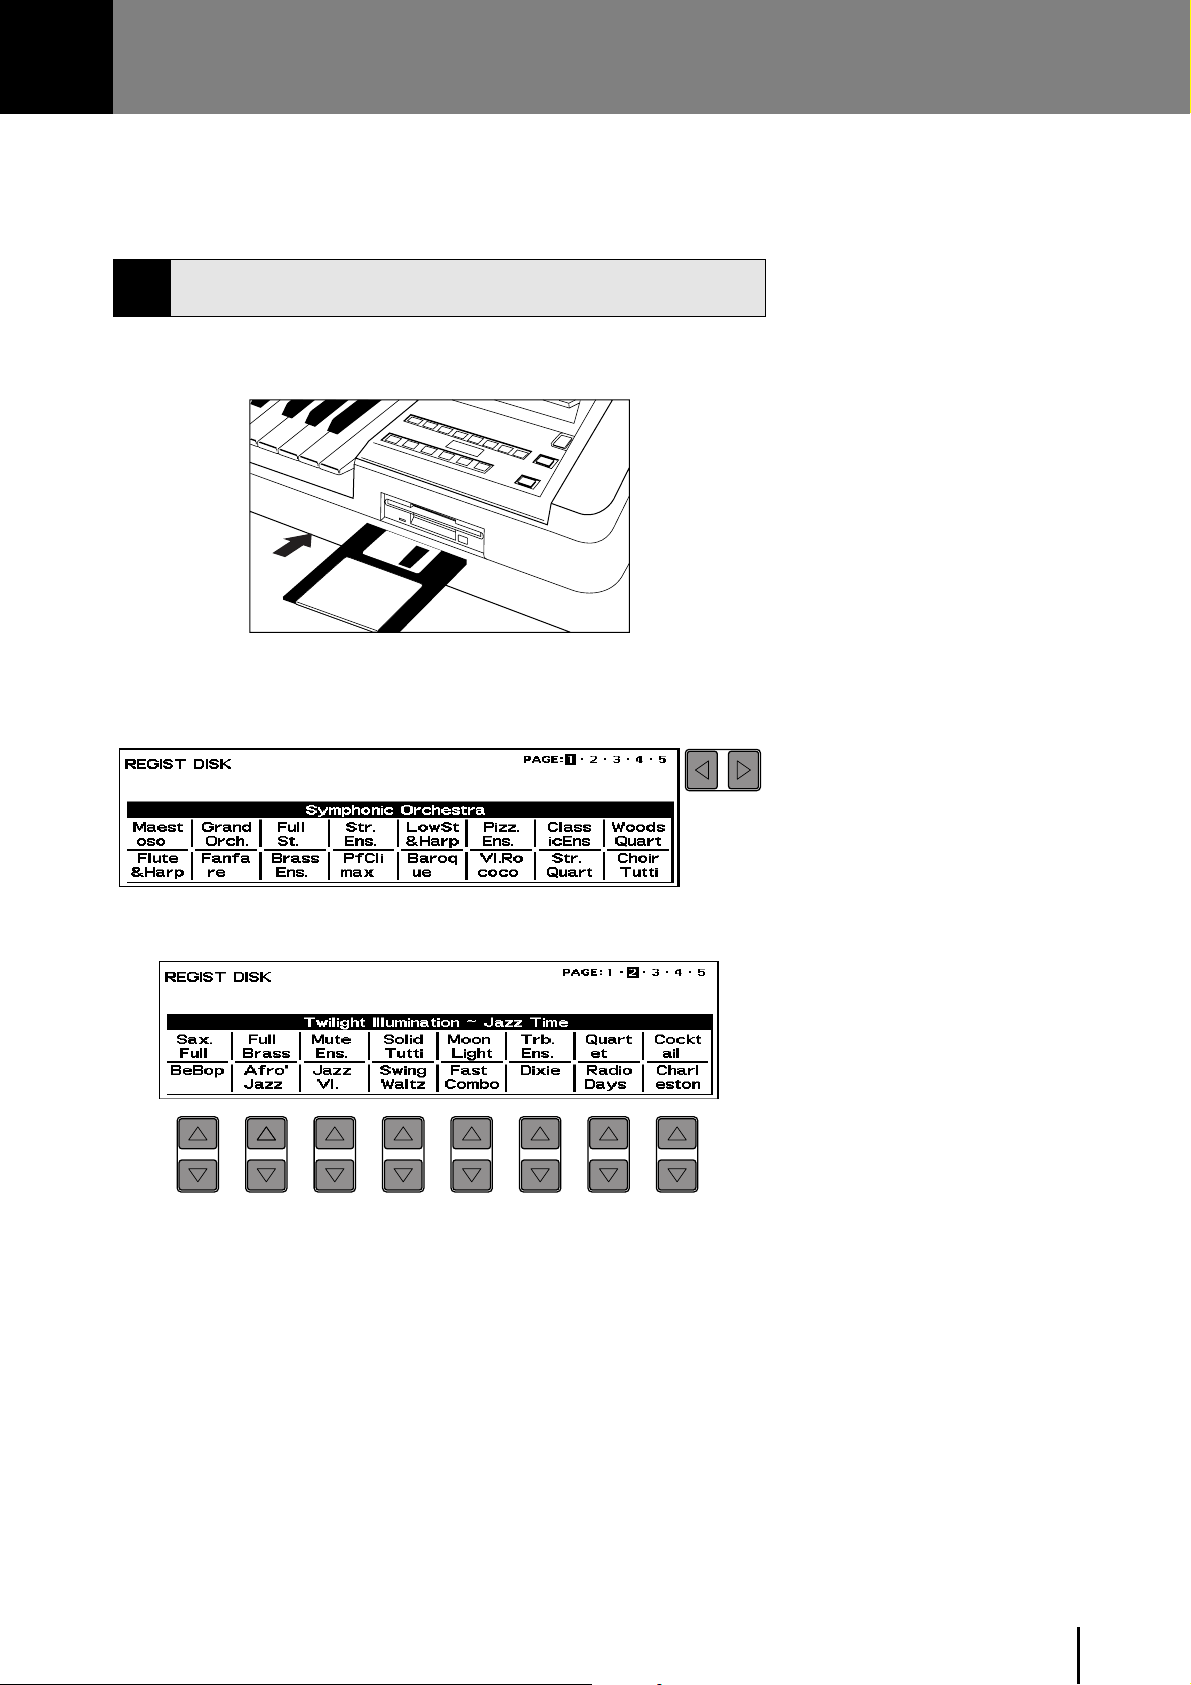
1 Registration Menu Disk
The contents of the registrations have been perfected with the new voice
combinations, compared to the ones of El-900.
80 registration patterns in five basic categories are available for you to play.
To use the Registration Menu:
Insert the included Registration Menu disk in to the slot.
1
Select the desired page, or the category you want to use, by pressing the
2
Page buttons.
Select the registration by pressing the appropriate Data Control buttons.
3
* Each registration is preset with various functions, rhythm, effects,
panning, etc., all suited to the voices.
The voices are elaborately combined to bring out the characteristics
of each voice. You can use them as your good reference when you
create your own registrations.
PAGE
9
Page 10
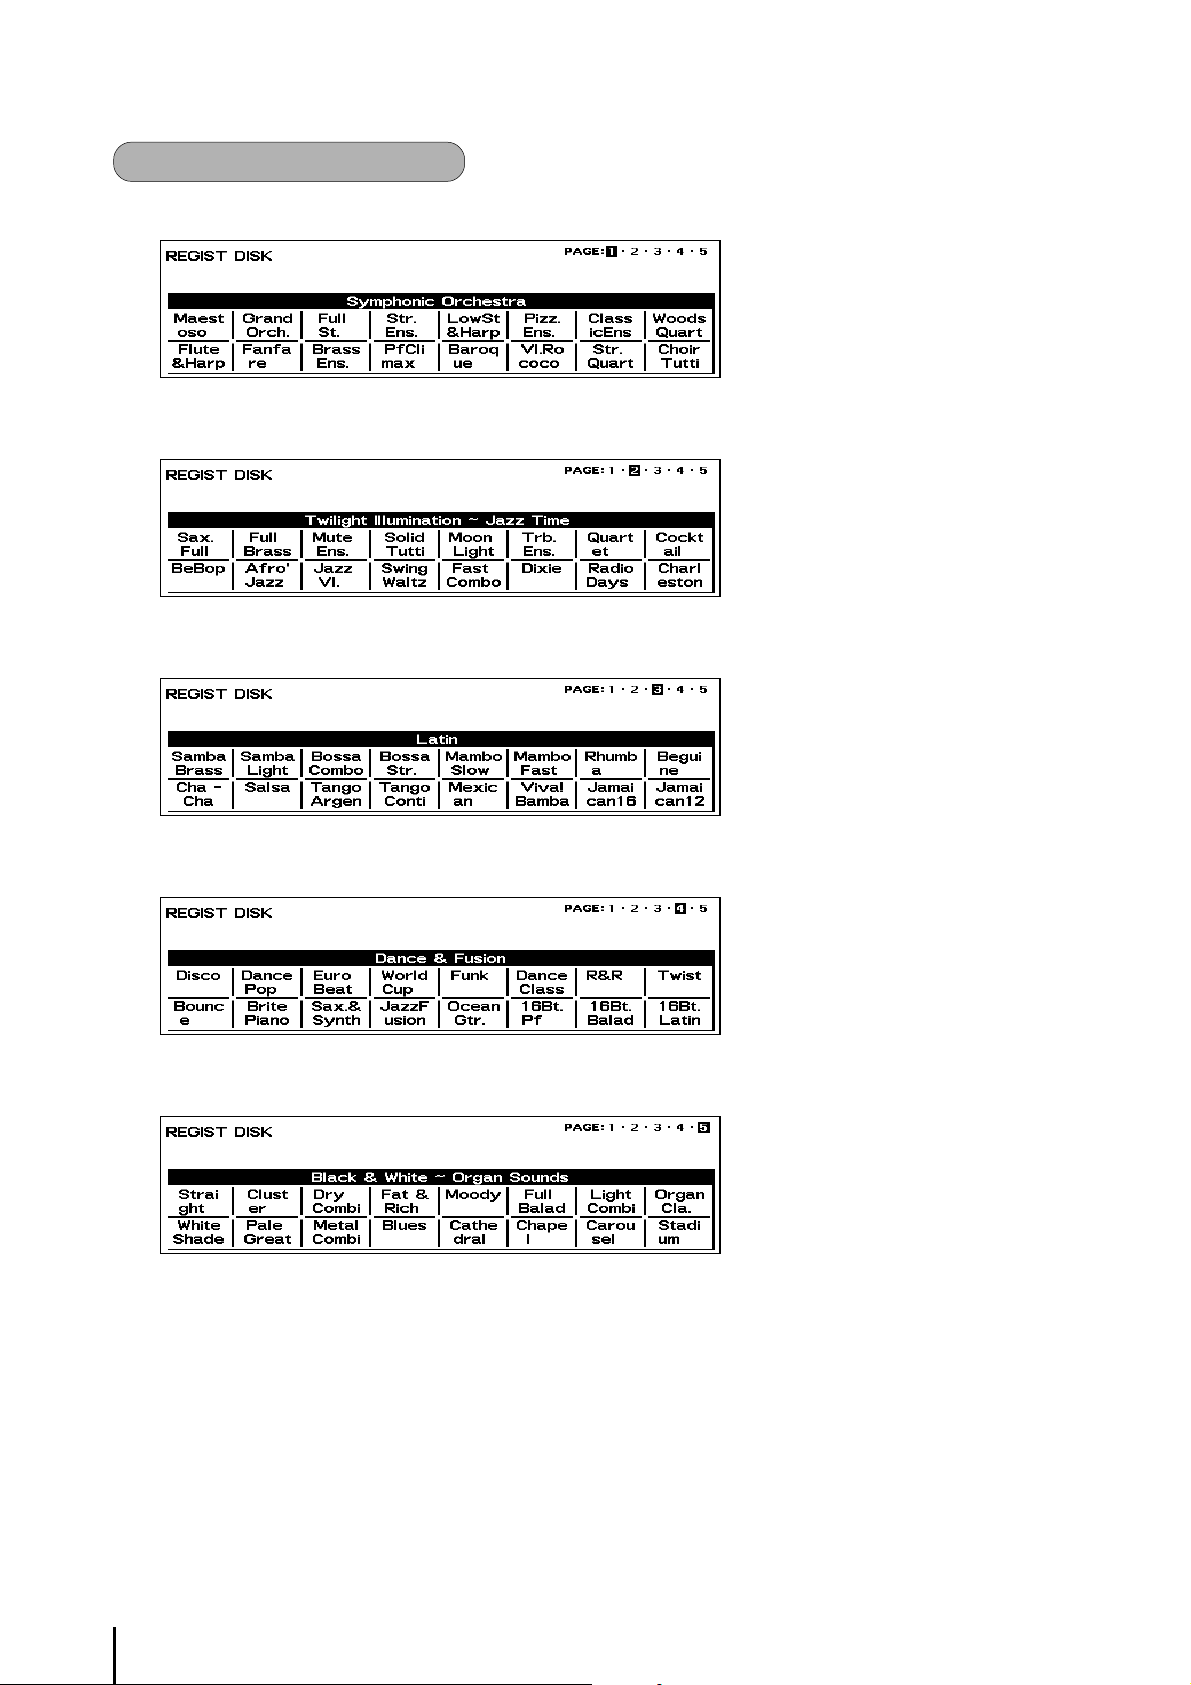
Take a brief look at each menu.
(page 1)
(page 2)
(page 3)
(page 4)
(page 5)
Each registration is briefly described in the following tables.
10
Page 11
Registration Menu List
Page 1: Symphonic Or chestra
LCD (Name) Content
Maestoso
1
GrandOrch.
2
Full St.
3
Str. Ens.
4
LowSt&Harp
5
Pizz.Ens.
6
ClassicEns
7
WoodsQuart
8
Flute&Harp
9
Fanfare
10
BrassEns.
11
PfClimax
12
Baroque
13
Symphonic Orchestra 1
Symphonic Orchestra 2
String Ensemble 1
String Ensemble 2
Strings & Harp
Pizz. Strings
Classical Orchestra
Wood Ensemble
Flute & Harp
Brass Ensemble 1
Brass Ensemble 2
Piano Concerto
Baroque 1
Vl.Rococo
14
Str. Quart
15
ChoirTutti
16
Baroque 2
String Quartet
Orchestra w/choir
Page 2: Twilight Illumination ~ Jazz Time
LCD (Name) Content
Sax. Full
1
Full Brass
2
Mute Ens.
3
SolidTutti
4
Moon Light
5
Trb. Ens.
6
Quartet
7
Cocktail
8
BeBop
9
Afro'Jazz
10
Jazz Vl.
11
Big Band Orchestra 1
Big Band Orchestra 2
Big Band Orchestra 3
Big Band Orchestra 4
Big Band Orchestra 5
Big Band Orchestra 6
Quartet
Quintet
Be Bop
Afro Cuban
Jazz Violin
SwingWaltz
12
Fast Combo
13
Dixie
14
RadioDays
15
Charleston
16
Jazz Waltz
Combo Jazz
Dixieland Jazz
Ragtime
Charleston
11
Page 12

Page 3: Latin
LCD (Name) Content
SambaBrass
1
SambaLight
2
BossaCombo
3
BossaStr.
4
MamboSlow
5
MamboFast
6
Rhumba
7
Beguine
8
Cha - Cha
9
Salsa
10
TangoArgen
11
TangoConti
12
Mexican
13
Viva!Bamba
14
Jamaican16
15
Samba 1
Samba 2
Bossanova 1
Bossanova 2
Mambo 1
Mambo 2
Rhumba
Beguine
Cha - Cha
Salsa
Tango 1
Tango 2
Mexican 1
Mexican 2
Caribbean 1
Jamaican12
16
Caribbean 2
Page 4: Dance & Fusion
LCD (Name) Content
Disco
1
DancePop
2
Euro Beat
3
WorldCup
4
Funk
5
DanceClass
6
R&R
7
Twist
8
Bounce
9
BritePiano
10
Sax.&Synth
11
JazzFusion
12
OceanGtr.
13
70's Disco
80's Dance
Euro Beat
Latin Beat
Funk
Dance Classic
Oldies 1
Oldies 2
16 Beat Shuffle
16 Beat 1
16 Beat 2
Jazz Fusion
West coast 1
12
16Bt.Pf
14
16Bt.Balad
15
16Bt.Latin
16
West coast 2
16 Beat Ballad
16 Beat Latin
Page 13

Page 5: Black & White ~ Organ Sounds
LCD (Name) Content
Straight
1
Cluster
2
Dry Combi
3
Fat &Rich
4
Moody
5
Full Balad
6
LightCombi
7
OrganCla.
8
WhiteShade
9
Pale Great
10
MetalCombi
11
Blues
12
Cathedral
13
Chapel
14
Carousel
15
Flute Combi. 1
Flute Combi. 2
Flute Combi. 3
Flute Combi. 4
Jazz Ballad 1
Jazz Ballad 2
Organ Bossa 1
Organ Bossa 2
8 Beat Ballad 1
8 Beat Ballad 2
Rock Organ 1
Rock Organ 2
Cathedral
Chapel
Carousel
16
Stadium
Stadium
13
Page 14

Voice Category List
A variety of voices can be divided into the following categories.
The voice names in a square indicate they are created by VA (Virtual Acoustic) synthesis.ORCHESTRAL
Strings 1
Brass 1
Clarinet 1
Saxophone 1
Chorus 1
Organ 1
Piano 1
Guitar 1
Vibraphone
Cosmic 1
Cosmic 2
Cosmic 3
Cosmic 4
Cosmic 5
Cosmic 6
Cosmic 7
Cosmic 8
Cosmic 9
Strings 2
Strings 8
Tremolo Strings
Pizzicato Strings
Brass 2
Brass 3
Synth Brass 1
Clarinet 2
Clarinet 3
Bass Clarinet 1
Synth Clarinet 1
V-Clarinet
Saxophone 2
Sax Ensemble 1
Soprano Sax
Alto Sax
Chorus 2
Vocal
Chorus 5
Chorus 8
Organ 2
Organ 3
Theatre Organ 1
Pop Organ 1
Jazz Organ 1
Accordion
Piano 2
Honky Tonk Piano
Electric Piano 1
Harpsichord
Clavichord
Guitar 2
12Str. Guitar
Electric Guitar 1
Mandolin
Banjo
Harp
Glockenspiel
Marimba
Chime
Synth Chime
Steel Drum
Cosmic 11
Cosmic 13
Custom 4
Cosmic 12
Cosmic 14
Custom 3
Cosmic 10
Cosmic 15
Cosmic 16
Custom 6
Custom 1
Custom 5
Talken Lead
Custom 2
Strings 3
Strings 5
Strings 7
Synth Strings 1
Brass 4
Brass 5
Synth Brass 2
Saw Lead
Synth Clarinet 2
Soft Reed
Tenor Sax
Breath Sax
Sax Ensemble 2
Synth Sax
V-Soprano Sax
Chorus 3
Theatre Organ 2
Pop Organ 2
Jazz Organ 2
Jazz Organ 3
Jazz Organ 4
Organ 4
Bandoneon
Electric Piano 2
Electric Piano 3
Electric Piano 4
Clavi.
Guitar 3
Jazz Guitar
Electric Guitar 2
Steel Guitar
Distorted Guitar
Muted Guitar
Taisho-koto
Shamisen
Koto
Celesta
Xylophone
Strings 4
Strings 6
Synth Strings 2
Synth Strings 3
Synth Brass 3
Synth Brass 4
Synth Lead 1
Synth Lead 2
Synth Lead 3
Synth Lead 4
Synth Lead 5
Chorus 4
Chorus 6
Chorus 7
Distorted Lead
Picked Guitar
Sitar
Music Box
Synth Lead 6
Synth Lead 7
V-Sitar
14
Page 15

ORCHESTRAL
The voice names in a square indicate they are created by VA (Virtual Acoustic) synthesis.
LEAD
Tutti 1
Harmonica 1
Horn 1
Violin 1
Flute 1
Oboe 1
Trumpet 1
Tutti 2
Tutti 3
Tutti 4
Tutti 9
Harmonica 2
Thin Reed
Horn 2
Horn 3
Horn 4
Muted Horn
Violin 2
Violin 4
Violin 5
Buzz String
Pizzicato Violin
Cello
Kokyu
Flute 2
Flute 3
Recorder
Whistle
V-Flute
Oboe 2
Oboe 3
English Horn 1
Bassoon 1
V-Oboe
Trumpet 2
Trumpet 3
Muted Trumpet
Trombone 1
V-Trumpet
Tutti 7
Tutti 5
Tutti 6
Muted Lead
Violin 3
V-Kokyu
Shakuhachi
Flute 4
Pan Flute
Air Reed
Piccolo
Grass Reed
Oboe 4
English Horn 2
Bassoon 2
Bassoon 3
Trumpet 4
Flugelhorn
Trumpet 5
Waspy Horn
Trombone 2
Trombone 3
Muted Trombone
V-Trombone
Tutti 8
Tutti 10
Bow Strings
V-Shakuhachi
Ocarina
Pan Pipe
Woody Lead
Yokobue
Trumpet 6
Euphonium
BASS
Contrabass 1
Electric Bass 1
Organ Bass 1
Tuba
The Preset Voices for Upper/Lower Flute Voices
Jazz Organ 1
Pop Organ 1
Contrabass 2
Contrabass 3
Pizzicato Bass
Electric Bass 2
Electric Bass 3
Electric Bass 4
Synth Bass 1
Organ Bass 2
Organ Bass 3
Timpani 1
Jazz Organ 2
Pop Organ 2
Upright Bass
Electric Bass 5
Synth Bass 2
Synth Bass 5
Organ Bass 4
Timpani 2
Timpani Roll
Jazz Organ 3
Pop Organ 3
Synth Bass 3 Edge Lead
Synth Bass 4
Jazz Organ 4
Pop Organ 4
15
Page 16

2 New Voices
23 new AWM+FM voices are added: from 173 voices to 196 voices with EL-900m.
23 new additional voices allow you to play a variety of music categories, from classicals to contemporary music.
The total number of voices has become 230; 196 AWM+FM voices and 34 VA voices.
Let's take a brief look at the newly added voices.
Strings Page
● Strings 8 (8')
Con sordino (with mute) strings. Reproduces softly played string sounds.
Subtle nuance can be produced by playing touch.
A. Dvorak: From the New world, 2nd Movement
NOTE:
Refer to Voice Category List.
If you play it on EL-900, String 1 is produced.
Brass Page
● Synth.Brass4(8')
Full-bodied synth. Brass sound with unique pitch characteristics.
If you play it on EL-900, Shynth Brass2 is produced.
16
Page 17

Trumpet Page
● Trombone3(UK16'/LK8')
Trombone with the characteristics having strong and resonant tone.
R. Wagner: Die Meistersinger von Nurnberg, Vorspiel 1 Aufzug
If you play it on EL-900, Trombone 1 is produced.
Tuba Page
● Timpani 2(8')
Expressive Timpani sounds played with softer mallets. Responsive to your
touch so that it can express strength from Piano to Forte. Good for classicals.
A. Dvorak: From the New world, 4th Movement
NOTE:
Although some of the voice names and the
locations of those on EL-900 may be
altered because of accommodating new
voices, they will not affect data compat-
ibility between EL-900m and other
models.
If you play it on EL-900, Timpani 1 is produced.
17
Page 18

Flute Page
● Flute3(8')
Jazz flute with unique attack. Suitable for both faster phrases and extended
ones. Vibrato is preset and fixed to the voice.
If you play it on EL-900, Flute 1 is produced.
● Flute4(8')
Classical flute with deep vibrato. Vibrato is preset and fixed to the voice.
C. A. Debussy: Prelude a l'apres-midi d'un faune
If you play it on EL-900, Flute 2 is produced.
Oboe Page
● Oboe 3(8')
Oboe suited to faster phrases. Vibrato is preset and fixed to the voice.
W. A. Mozart: From Konzert fur Oboe und Orchester
If you play it on EL-900, Oboe 1 is produced.
18
Page 19

● Oboe 4(8')
Expressive oboe for classicals.
P. I. Tchaikovsky: The Swan Lake
If you play it on EL-900, Oboe 2 is produced.
● English Horn2(8')
English horn with distinctive reed.
A. Dvorak: From the New world, 2nd Movement
If you play it on EL-900, English Horn1 is produced.
● Bassoon3(UK16'/LK8')
Bassoon with rich resonance even in the lower register.
If you play it on EL-900, Bassoon 1 is produced.
Clarinet Page
● Clarinet 3(8')
Sweet and expressive clarinet.
Clarinet Polka
If you play it on EL-900, Clarinet 1 is produced.
19
Page 20

Saxophone Page
● Synth. Lead6(8')
Comical synth. Lead with unique pitch characteristics.
If you play it on EL-900, Synth. Lead 1 is produced.
● Synth. Lead7(8')
Synth. Lead having Synth bass image.
If you play it on EL-900, Shynth Lead 1 is produced.
Tutti Page
NOTE:
● Tutti 8(8')
Gorgeous brass ensemble.
R. Wagner: From Lohengrin
If you play it on EL-900, Tutti 7 is produced.
● Tutti 9(8')
Magnificent string ensemble. Rich expressiveness with touch.
P. I. Tchaikovsky: Romeo and Juliet
Tutti, as you know, contains various types
of voices. Especially, you should be
conscious with the voice range when you
play in the lowest/highest registers.
If you play it on EL-900, Tutti 1 is produced.
● Tutti 10(8')
Wood winds ensemble. Thicker than Tutti 6. Also, it is attractive when
mixed with other voices.
If you play it on EL-900, Tutti 6 is produced.
20
Page 21

Chorus Page
● Chorus 6(8')
Mixed chorus for the sacred music. Having a slow and clean impression,
especially suited to chorale.
If you play it on EL-900, Chorus 3 is produced.
● Chorus 7(8')
Impressive chorus.
L. V. Beethoven: From Symphonie No. 9 "Choral"
NOTE:
Let's play the following score using the
registration, "Choir Tutti" in the category
of Symphonic Orchestra (page 1,
Registration Menu Disk).
See page 9 for more information on
Registration Menu Disk.
If you play it on EL-900, Chorus 3 is produced.
● Chorus 8(8')
Chorus for Gospel music.
If you play it on EL-900, Chorus 1 is produced.
21
Page 22

Piano Page
● Elec. Piano4(8')
Bright and brilliant electric piano.
If you play it on EL-900, Elec. Piano 1 is produced.
Electric Bass Page
● Elec. Bass 5(16')
Expressive Electric bass.
If you play it on EL-900, Elec. Bass 2 is produced.
● Syn. Bass 4(16')
Resonant synth. bass.
If you play it on EL-900, Synth. Bass 3 is produced.
● Synth. Bass 5(16')
Synth. Bass suitable for playing gradually changing sounds.
If you play it on EL-900, Synth. Bass 1 is produced.
22
Page 23

The following list summarizes the newly added voices. Refer to the Details on Each Voice at the end of this manual for
the information on the other voices.
New Voices
Page Voice Name Feet Effect Comment
STRINGS Strings 8 8' - Con sordino (with mute) strings.Reproduces softly played string sounds.
BRASS Synth. Brass 4 8' - Full-bodied synth. Brass sound with unique pitch characteristics.
TRUMPET Trombone 3
TUBA Timpani 2 8' - Expressive Timpani sounds played with softer mallets.
FLUTE Flute 3 8' - Jazz flute with unique attack.
Flute 4 8' - Classical flute with deep vibrato.
OBOE Oboe 3 8' - Oboe suited to faster phrases.
Oboe 4 8' - Expressive oboe for classicals.
English Horn 2 8' - English horn with distinctive reed.
Bassoon 3
CLARINET Clarinet 3 8' - Sweet and expressive clarinet.
SAXOPHONE Synth. Lead 6 8' - Comical synth. Lead with unique pitch characteristics.
Synth. Lead 7 8' - Synth. Lead having Synth bass image.
TUTTI Tutti 8 8' - Gorgeous brass ensemble.
Tutti 9 8' - Magnificent string ensemble.Rich expressiveness with touch.
Tutti 10 8' - Wood winds ensemble.Thicker than Tutti 6.
CHORUS Chorus 6 8' - Mixed chorus for the sacred music.
Chorus 7 8' - Impressive chorus.
Chorus 8 8' - Chorus for Gospel music.
PIANO Elec. Piano 4 8' - Bright and brilliant electric piano.
ELECTRIC BASS Elec. Bass 5 16' - Expressive Electric bass.
Synth. Bass 4 16' - Resonant synth. bass.
Synth. Bass 5 16' - Synth. Bass suitable for playing gradually changing sounds.
U16'/L8'
U16'/L8'
- Trombone with the characteristics having strong and resonant tone.
- Bassoon with rich resonance even in the lower register.
23
Page 24

Voice Menu
The following chart lists the voices available and their button/page assignment.
STRINGS Upper/Lower
STRINGS
Strings1Strings2Strings3Strings4Strings
Pizz.
Trem.
Strings
Strings
VIOLIN Lead
VIOLIN
Violin1Violin
Cello Kokyu
CONTRABASS Pedal
Violin3Violin4Violin5Pizz.
2
CONTRABASS
Contra
Contra
Bass 2
Contra
Bass 3
Bass 1
BRASS Upper/Lower
BRASS
Brass1Brass2Brass
Synth.
Synth.
Brass 1
Brass 2
3
Synth.
Brass 3
Brass4Brass
Synth.
Brass 4
Strings6Strings7Strings
5
Synth.
Synth.
Strs.1
Strs.2
Violin
Pizz.
Upright
Bass
Bass
5
Synth.
Strs.3
CLARINET Upper/Lower
CLARINET
Clari-
Clari-
8
net 1
Synth.
Cla.1
net 2
Synth.
Cla.2
Clarinet 3
Bass
Cla.
SAXOPHONE Upper/Lower
SAXOPHONE
Saxo-
Saxo-
phone1
Synth.
Lead1
phone2
Synth.
Lead2
Sopra.
Synth.
Lead3
Sax.
Sax.
Ens.1
Synth.
Lead4
Sax.
Ens.2
Synth.
Lead5
Synth.
Sax
Synth.
Lead6
Synth.
Lead7
TUTTI Upper/Lower
TUTTI
Tutti1Tutti
Tutti9Tutti
CHORUS Upper/Lower
Tutti3Tutti4Tutti5Tutti6Tutti7Tutti
2
10
8
CHORUS
Chorus
Chorus2Chorus3Chorus4Chorus5Chorus6Chorus7Chorus
1
Vocal
8
HORN Lower
HORN
Horn1Horn2Horn3Horn4Muted
TRUMPET Lead
Horn
TRUMPET
Trum-
Trum-
Trum-
Trum-
Trum-
pet 1
Trom-
bone1
pet 2
Trombone2
pet 3
Trombone3
pet 4
Muted
Trb.
pet 5
Flugel
Horn
Trum-
pet 6
TUBA Pedal
TUBA
Tuba Timpani1Timpani2Timpani
FLUTE Lead
FLUTE
Flute2Flute3Flute4Pic-
Flute
1
Recor-
Ocarina Shaku-
der
Pan
Flute
hachi
colo
Whistle
Muted
Trp.
Eupho-
nium
Roll
Yoko-
bue
HARMONICA Upper
HARMONICA
Harmo-
Harmo-
nica1
nica2
ORGAN Upper/Lower
Organ1Organ2Organ3Organ
Pop
Pop
Organ 1
Organ 2
Theat.
Organ 1
ORGAN BASS Pedal
ORGAN BASS
Organ
Organ
Bass 2
Organ
Bass 3
Tonk
Clavi.
Bass 1
PIANO Upper/Lower
Piano1Piano2Honky
Harpsi
-chord
ORGAN
4
Theat.
Organ 2
Organ
Bass 4
PIANO
Clavichord
Jazz
Organ 1
Accor-
dion
Elec.
Piano 1
Jazz
Organ 2
Bando-
neon
Elec.
Piano 2
Jazz
Organ 3
Elec.
Piano 3
Jazz
Organ 4
Elec.
Piano 4
OBOE Lead
Oboe1Oboe2Oboe3Oboe4English
Bas-
Bas-
soon2
Bas-
soon3
soon1
24
OBOE
Horn1
English
Horn2
GUITAR Upper/Lower
Guitar2Guitar
Guitar
1
Elec.
Elec.
Guitar2
Muted
Guitar
Guitar1
3
GUITAR
Banjo Mando-
12Str.
Guitar
Dist.
Harp koto Taisho
Guitar
lin
Steel
Guitar
Sitar Shami-
sen
koto
Page 25

VIBRAPHONE Upper/Lower
Page 4 5 61 2 3 7 8 9 1011 1213141516 17 18 19 20 21 22
VIBRAPHONE
Vibra-
Gloc-
phone
Chime Synth.
ken.
Chime
Celesta Music
Box
Marim-
ba
Steel
Drum
Xylo-
phone
ELECTRIC BASS Pedal
ELECTRIC BASS
Elec.
Elec.
Elec.
Elec.
Synth.
Elec.
Bass 5
Synth.
Bass 5
Bass1
Synth.
Bass1
Bass 2
Synth.
Bass 2
Bass 3
Synth.
Bass 3
Bass 4
Bass 4
COSMIC Upper/Lower
COSMIC
Cosmic1Cosmic2Cosmic3Cosmic4Cosmic5Cosmic6Cosmic7Cosmic
Cosmic10Cosmic11Cosmic12Cosmic13Cosmic14Cosmic15Cosmic
Cosmic
9
USER VOICE
USER VOICE
USER1USER2USER3USER4USER5USER6USER7USER
USER9USER10USER11USER12USER13USER14USER15USER
8
16
NOTE:
8
16
The VA voices of the Lead Voice 2
section are not comprised in the 22
Voice Menu pages.
LEAD VOICE 2(VA)
VA ACOUSTIC
VA ACOUSTIC
Flute Oboe Clari-
Trum-
Trom-
pet
bone
VA VIRTUAL
net
Sopra.
Sax.
Shaku-
hachi
VA VIRTUAL
Pan
Pipe
Buzz
String
Bow
String
VA ELECTRONIC
Air
Reed
Waspy
Horn
VA ELECTRONIC
Jazz
Picked
Guitar
Guitar
Edge
Dist.
Woody
Muted
Saw
Lead
Lead
Lead
Lead
Lead
Talken
VA CUSTOM
VA CUSTOM
Custom1Custom2Custom3Custom4Custom5Custom
Alto
Tenor
Sax
Sax.
Kokyu Sitar
Thin
Grass
Reed
Reed
Lead
6
Breath
Sax.
Soft
Reed
* The details for each voices such as octave (feet) setting and effect on/off status are shown in the list on page 46.
25
Page 26

3
Additional Changes on Voice Display Pages
Two pages are added to the Voice Display page, a page with useful indications for realtime performance, the
other for master control functions over various parameters; the Voice Display has become configured with total
three pages.
Voice Display, Page 1
This first page is the same as the one in EL-900 excepting that: "U" in negative
letter will be added to the top of the voice name indicating the current voice is a
User voice, if you have selected one of the User voices. If the name of the User
voice has been altered, its latest name will also be displayed.
Voice Display, Page 2
The indications assisting your realtime performance are prepared in this page.
It's convenient for you to display this page when you play the Electone since
you can visually confirm the functions related to realtime performance.
Tempo
Shows the current tempo, which is the same as the one on the Tempo LED in
the Rhythm section. You don't need to look aside and confirm the tempo every
time you want to check the current tempo in the middle of the performance.
NOTE:
"U" in negative letter is the prefix for the
AWM+FM User voices, while "C" in
negative letter is the one for the VA
Custom voices.
26
Page 27

Bar/Beat
As the name implies, this works as the bar and beat indicators. The difference
from the existing Bar/Beat Indicator (LED in the Rhythm section) is that this
indication is independent from the Tempo display and you will not miss every
beat even when the tempo change occurs.
Also, you don't need to twist your head to see the current bar/beat.
● Bar/Beat indication when rhythm starts:
● Bar/Beat indication when rhythm is off:
When you currently stop the rhythm, “STOP” is displayed.
● Bar/Beat indication when rhythm is in stand-by mode
(Synchro. Start):
Registration Shift
● Registration Shift, off:
The current position/registration is displayed.
● Registration Shift, in "Shift" mode:
The current registration number (left) and the next number (right) will be
displayed.
● Registration Shift, in "Jump" mode:
The current registration number (left) and the destination number (right) will
be displayed. You can change the destination number even in the middle of
the performance by pressing the appropriate Data Control buttons.
27
Page 28

● Registration Shift, in “User” mode:
Indicates the current position of the Registration Shift. You can change the
registration by moving the cursor to right and left. It's handy when you have
wrongly advanced the shift setting in the middle of your performance. You
cannot edit the user registration settings here.
M.D.R. Operation
Start, Stop and Song Select operations on the M.D.R. can be executed here. The
currently selected song number and its name will be displayed.
When you set the Next Song function, you can visually confirm if the next song
has been read, or not.
● M.D.R.: not displayed
Nothing is displayed when no disk is inserted or while one of the following
function is engaged: Recording, Song Delete, Song Copy and Disk Copy.
No Data Control button is operable, in this case.
● M.D.R.: displaying the song name when stopped
The number and name of the currently selected song are displayed.
Also, those of the XG songs are displayed.
● M.D.R.: displaying the song name during playback
Displayed during playback including song repeat function.
Only STOP button is available in this case.
When Next Song function is executed, the song number/name will be
changed.
28
Page 29

Voice Display, Page 3
You can adjust to "uniform" a specific parameter used in various voice group at one time.
Take Reverb here, for example, you may sometimes want
to change Reverb depth of the entire system equally
when you rehearse in a concert since each concert hall
has its own environmental characteristics, or resonance.
Although you know you can change the Reverb settings
of the entire system at one time even on the EL-900, the
EL-900m lets you do the same operation with various
parameters.
Furthermore, you can select from the several changing
methods: changing the specific parameter values in a
certain registration to the value in another registration at
one time or offsetting a certain amount of value from a
certain parameter in a registration on the basis of the one
in another registration.
● Let's check each section in the Voice Display.
1 2 3 4 5
1 Voice Group
Shows the currently selected voice group.
2 Parameter
Shows the current parameter.
3 Registration Memory Number
Shows the currently selected Registration Memory
number.
4 Voice Name
Shows the voice name currently assigned to the
displayed Voice Group.
6 Same Voice
A line under each registration number indicates that
the currently assigned voice to the registration is the
same as the one shown at the top 4.
7 Parameter Value
Shows the values of the currently selected parameter
2 to each registration.
Each value corresponds to the ones currently assigned
to each voice group.
6
7
5 Registration Memory (1 - 16)
The cursor (box) is positioned at the currently
selected Registration Memory number.
You can move the cursor to select another registration
by pressing the Data Control buttons corresponding to
the left/right arrows in REGISTRATION SELECT
section.
Notice that you cannot move the cursor by directly
pressing one of the Registration Memory buttons
between the Upper and Lower keyboards.
29
Page 30

Basic Operation
1
Select the desired parameter.→P.30
2
Select the appropriate registration that contains the parameter value you want to use it as
the master.→P.31
3
Select the targeted registration numbers that contain the parameter value you want to
change by turning on/off them.→P.31
4
Uniform the targeted parameter
value(s) to that of the registration at the
cursor position.→P.32
5
Offset the targeted parameter value(s).
→P.33
UNIFORM and REGISTRATION SELECT
214 35
1 PARAM(Parameter)
Selects the parameter you want to change its amount.
Available parameters are as follows:
Each press of the down arrow Data Control button selects the parameters in
order. Reverb Length is always selected when the Electone is turned on.
● Parameters
Related to Reverb settings:
Reverb Length
Reverb Depth
UK1 Reverb
UK2 Reverb
LK1 Reverb
LK2 Reverb
Lead1 Reverb
Lead2 Reverb
PK1 Reverb
PK2 Reverb
U.Flute Reverb
L.Flute Reverb
Percussion Reverb
Accompaniment Reverb
Related to Sustain settings:
UK Sustain
LK Sustain
PK Sustain
Related to Pan settings:
UK1 PAN
UK2 PAN
LK1 PAN
LK2 PAN
Lead1 PAN
Lead2 PAN
PK1 PAN
PK2 PAN
Related to Volume settings:
UK1 Volume
UK2 Volume
LK1 Volume
LK2 Volume
Lead1 Volume
Lead2 Volume
PK1 Volume
PK2 Volume
U.Flute Volume
L.Flute Volume
Percussion Volume
Accompaniment Volume
Related to Brilliance settings:
UK1 Brilliance
UK2 Brilliance
LK1 Brilliance
LK2 Brilliance
Lead1 Brilliance
Lead2 Brilliance
PK1 Brilliance
PK2 Brilliance
30
Page 31

● Selecting the desired parameter
1 By pressing PARAM and the appropriate panel button simultaneously:
You can directly select the parameter by pressing the panel button of the
desired parameter while holding down the appropriate Data Control buttons
corresponding to PARAM.
2 By pressing PARAM button:
Press the appropriate Data Control buttons corresponding to PARAM and
then release it. Parameter selection dialog box appears. Select the desired
parameter using the appropriate Data Control buttons (left most) and select
[Set] to execute the operation.
Parameter Selection Dialog Box
NOTE:
The parameters you can select using this
method are:
• Volume
• Brilliance
• Reverb Depth
• Sustain
NOTE:
Pressing the appropriate Data Control
buttons (left most) while holding down
COARSE button selects the parameters in
the same voice group.
2 Cursor (< >)
Selects the registration memory number you want to turn on/off or the
number you want to set it as the master.
The registration memory number 6 is currently selected in this case.
3 ON/OFF
Pressing “Off” after selecting the appropriate registration turns off (grayed
out) its parameter. Pressing "On" turns on the parameter (solid bar). All
parameters are selected after Power-On Reset operation.
NOTE:
The registration number encircled by the
cursor (positive box) indicates that it acts
as the master. Turning the Registration
Select "switch" on and off to select the
targeted registrations.
There are several unique methods to select the registration memory numbers:
31
Page 32

■ By pressing ON button while holding down COARSE button:
All the registration memory numbers can be selected by pressing the
Data Control buttons corresponding to "ON" with the COARSE button
held.
■ By pressing OFF button while holding down COARSE button:
All the registration memory numbers can be cancelled by pressing the
Data Control buttons corresponding to "OFF" with the COARSE button
held.
■ By holding ON and OFF simultaneously:
Holding down "ON" and "OFF" simultaneously turns on the registration
memory numbers that contains the same voice as the one which is
currently set in the registration at the cursor position.
In this case, the registrations 1, 2, 3, 4, 6, 7, 8, 14, 15 and 16 are shown in a solid bar
indicating that those contain the User Voice 2, Str.2.
4 SET
Uniforms the currently turned-on parameters' values to the one in the
currently selected registration (at the cursor position).
Pressing [Set] opens the dialog box urging you to confirm the operation.
In this case, the operation uniforms the brilliance values of the Upper keyboard Voice in the
registrations 1, 2, 3, 4, 6, 7, 8, 14, 15 and 16 to the one in the registration 6 (at the cursor
position).
If you proceed the operation, select [Uniform].
32
The completed message will momentarily be shown on the LCD.
Page 33

5 DEC.(Decrement)/INC.(Increment)
Offsets the currently turned-on parameters' values.
In the following case, you cannot increase the values the registrations 4, 8
and 14 relative to the one in the registration 6 since they are already set to
maximum.
The following message appears, in this case. Also, you cannot exceed the
minimum value when using decrement operation.
Alert Dialog Box
NOTE:
You can decrement value by pressing any
of the Data Control buttons just below
DEC.
NOTE:
You can increment value by pressing any
of the Data Control buttons just below
INC.
NOTE:
Be aware that you cannot retrieve the
original data once the [Confirm] is
engaged.
In this case, pressing [Confirm] continues the operation ignoring those with maximum value.
Pressing [Cancel] aborts the operation.
33
Page 34

Setting Examples
The display shows differently depending on the selected parameter.
Reverb Parameter
Shows the Pedal Voice 1 Reverb parameters.
Imagine, you want to decrease the value equally from the all parameters.
Select all the parameters by pressing "On" while holding down COARSE. Press
"DEC." button to gradually decrease the value.
Sustain Parameter
Shows the Lower Keyboard Voice Sustain parameters.
Try changes similar to the operation mentioned above.
34
 Loading...