

Page 1
Page 2
SPECIAL MESSAGE SECTION
PRODUCT SAFETY MARKINGS: Yamaha electronic prod-
ucts may have either labels similar to the graphics shown
below or molded / stamped facsimiles of these graphics on
the enclosure. The explanation of these graphics appears on
this page.
Please observe all cautions indicated on this page and those
indicated in the safety instruction section.
CAUTION
RISK OF ELECTRIC SHOCK.
DO NOT OPEN
CAUTION: TO REDUCE THE RISK OF
ELECTRIC SHOCK, DO NOT REMOVE
COVER (OR BACK). NO USER-SERVICEABLE
PARTS INSIDE. REFER SERVICING TO
QUALIFIED SERVICE PERSONNEL.
See the name plate for graphic symbol markings.
The exclamation point within the
equilateral triangle is intended to alert
the user to the present of important
operating and maintenance
(servicing) instructions in the
literature accompanying the product.
The lightning flash with arrowhead
symbol within the equilateral triangle
is intended to alert the user to the
presence of uninsulated "dangerous
voltage" within the product's
enclosure that may be of sufficient
magnitude to constitute a risk of
electrical shock.
ENVIRONMENTAL ISSUES: Yamaha strives to produce
products that are both user safe and environmentally
friendly.
We sincerely believe that our products and the production
methods used to produce them, meet these goals. In
keeping with both the letter and the spirit of the law, we want
you to be aware of the following:
BATTERY NOTICE: This product MAY contain a small
nonrechargeable battery which (if applicable) is soldered in
place. The average life span of this type of battery is
approximately five years. When replacement becomes
necessary, contact a qualified service representative to
perform the replacement.
WARNING: Do not attempt to recharge, disassemble, or
incinerate this type of battery. Keep all batteries away from
children. Dispose of used batteries promptly and as
regulated by applicable laws. Note: In some areas, the
servicer is required by law to return the defective parts.
However, you do have the option of having the servicer
dispose of these parts for you.
DISPOSAL NOTICE: Should this product become
damaged beyond repair, or for some reason its useful life is
considered to be at an end, please observe all local, state,
and federal regulations that relate to the disposal of
products that contain lead, batteries, plastics, etc.
NOTICE: Service charges incurred due to lack of knowledge
relating to how a function or effect works (when the unit is
operating as designed) are not covered by the
manufacture's warranty, and are therefore the owner's
responsibility.
Please study this manual carefully and consult your dealer
before requesting service.
NAME PLATE LOCATION: The graphic below indicates the
location of the name plate. The model number, serial
number, power requirements, etc., are located on this plate.
You should record the model number, serial number, and
the date of purchase in the spaces provided below and
retain this manual as a permanent record of your purchase.
IMPORTANT NOTICE: All Yamaha electronic products are
tested and approved by an independent safety testing
laboratory in order that you may be sure that when it is
properly installed and used in its normal and customary
manner, all foreseeable risks have been eliminated. DO NOT
modify this unit or commission others to do so unless
specifically authorized by Yamaha.
Product performance and/or safety standards may be
diminished. Claims filed under the expressed warranty may
be denied if the unit is/has been modified. Implied warranties
may also be affected.
SPECIFICATIONS SUBJECT TO CHANGE: The information
contained in this manual is believed to be correct at the time
of printing. However, Yamaha reserves the right to change or
modify any of the specifications without notice or obligation
to update existing units.
92-469-➀
Model
Serial No.
Purchase Date
Page 3

Congratulations!
You are the proud owner of a fine electronic organ,
Electone EL-37. The Yamaha EL-37 Electone
combines the most advanced AWM tone generation
technology with state-of-the-art digital electronics
and features to give you stunning sound quality
with maximum musical enjoyment.
In order to make the most of the Electone and
extensive performance potential, we urge you to
read the manual thoroughly while trying out the
various features described. Keep the manual in a
safe place for later reference.
1
Page 4

Main Features
Your Yamaha Electone is packed with many sophisticated functions. Yet it is amazingly easy to use.
The main features are briefly described here so that you can quickly understand the capabilities of your
Electone.
Included among the main features are:
Astoundingly True-to-life Sounds
The new AWM (Advanced Wave Memory) tone generation technologies combined with authentic touch
response for individual instrument voices, make this Electone a truly expressive musical instrument.
High-quality Digital Effects
Electone voices can also be enhanced with a full range of high-quality digital effects, including Tremolo (for
reproducing the sound of a rotating speaker), Reverb, and Flanger and Delay. (See page 27.)
Dynamic Rhythm Patterns
The Rhythm section of the Electone features authentic drum and percussion sounds, used by expert rhythm
programmers in creating a total of 38 rhythm patterns, ranging across all styles of music. (See page 30.) A
Keyboard Percussion function is also provided for playing the realistic percussion sounds from the Lower
keyboard and Pedalboard. (See page 39.)
Comprehensive Automatic Accompaniment
The Electone is also equipped with various automatic accompaniment functions, including Auto Bass Chord,
Accompaniment and Melody On Chord. (See pages 36, 40.)
Sophisticated Rhythm Pattern and Rhythm Sequence Programming
The Rhythm Pattern Program and Rhythm Sequence Program let you use the realistic Keyboard Percussion
sounds, along with additional percussion sounds on the upper keyboard, to create and record your own rhythm
patterns, then combine them (and the preset rhythms, if you wish) to make complete automatic rhythm tracks.
(See page 68.)
Wide Variety of Registration Menus
The Electone is equipped with convenient Registration Menus that allow you to instantly change all settings for
the entire instrument in real time, as you play! The EL-37 has 120 registrations available on disk. (See page 9.)
Recording of Performances with the Music Disk Recorder
The EL-37 also features a Music Disk Recorder for recording your performances. The recording is completely
digital and is stored to disk, which means that no matter how many times you play back the recording, it will
always sound exactly the same as the original performance. (See page 48.)
2
Turning the Electone off erases
all panel settings you have
made. When the Electone is
turned on, Basic Registration 1 is
automatically selected. If you have
made panel settings you wish to keep,
save them to Registration Memory
before turning the Electone off.
Page 5
1. Quick Introductory Guide
2. Voice Sections
3. Voice Controls and Effects
4. Rhythm, Accompaniment
and Percussion
5. Registration Memory
6. Music Disk Recorder
7. Rhythm Pattern Programming and
Rhythm Sequence Programming
8. Footswitches and Knee Lever
9. Pitch Controls
10. MIDI Controls
11. Accessory Jacks and Controls
12. Appendix
Table of Contents
Panel Layout . . . . . . . . . . . . . . . . . . . . . . . . . . . . . . . . . . . . . . . . . . . . . . . . . . . . . . . . . .4
1. Quick Introductory Guide . . . . . . . . . . . . . . . . . . . . . . . . . . . . . . . . . . . . . . . . . . . . .6
Getting Started . . . . . . . . . . . . . . . . . . . . . . . . . . . . . . . . . . . . . . . . . . . . . . . . . . . . . . . . . . . . . . . . . . . . .6
Playing Your Electone . . . . . . . . . . . . . . . . . . . . . . . . . . . . . . . . . . . . . . . . . . . . . . . . . . . . . . . . . . . . . . .7
Basic Registrations . . . . . . . . . . . . . . . . . . . . . . . . . . . . . . . . . . . . . . . . . . . . . . . . . . . . . . . . . . . . . . . . . . .7
Registration Menu Disk . . . . . . . . . . . . . . . . . . . . . . . . . . . . . . . . . . . . . . . . . . . . . . . . . . . . . . . . . . . . . . . .9
Registration Menu List . . . . . . . . . . . . . . . . . . . . . . . . . . . . . . . . . . . . . . . . . . . . . . . . . . . . . . . . . . . . . . .11
Using the LCD Display . . . . . . . . . . . . . . . . . . . . . . . . . . . . . . . . . . . . . . . . . . . . . . . . . . . . . . . . . . . . . .14
2. Voice Sections . . . . . . . . . . . . . . . . . . . . . . . . . . . . . . . . . . . . . . . . . . . . . . . . . . . .17
Selecting Voices from the Panel . . . . . . . . . . . . . . . . . . . . . . . . . . . . . . . . . . . . . . . . . . . . . . . . . . . . . .17
Selecting Additional Voices—Dotted Buttons and User Voices . . . . . . . . . . . . . . . . . . . . . . . . . . . .19
Voice Menus . . . . . . . . . . . . . . . . . . . . . . . . . . . . . . . . . . . . . . . . . . . . . . . . . . . . . . . . . . . . . . . . . . . . . .21
3. Voice Controls and Effects . . . . . . . . . . . . . . . . . . . . . . . . . . . . . . . . . . . . . . . . . . .22
Voice Controls . . . . . . . . . . . . . . . . . . . . . . . . . . . . . . . . . . . . . . . . . . . . . . . . . . . . . . . . . . . . . . . . . . . .22
Voice Condition Page 1 . . . . . . . . . . . . . . . . . . . . . . . . . . . . . . . . . . . . . . . . . . . . . . . . . . . . . . . . . . . . . . .23
1 Touch Tone . . . . . . . . . . . . . . . . . . . . . . . . . . . . . . . . . . . . . . . . . . . . . . . . . . . . . . . . . . . . . . . . . . . . . .23
2 Volume . . . . . . . . . . . . . . . . . . . . . . . . . . . . . . . . . . . . . . . . . . . . . . . . . . . . . . . . . . . . . . . . . . . . . . . . . .23
Voice Condition Page 2 . . . . . . . . . . . . . . . . . . . . . . . . . . . . . . . . . . . . . . . . . . . . . . . . . . . . . . . . . . . . . . .24
3 Feet . . . . . . . . . . . . . . . . . . . . . . . . . . . . . . . . . . . . . . . . . . . . . . . . . . . . . . . . . . . . . . . . . . . . . . . . . . . . .24
4 Effect . . . . . . . . . . . . . . . . . . . . . . . . . . . . . . . . . . . . . . . . . . . . . . . . . . . . . . . . . . . . . . . . . . . . . . . . . . .24
Voice Condition Page 3 . . . . . . . . . . . . . . . . . . . . . . . . . . . . . . . . . . . . . . . . . . . . . . . . . . . . . . . . . . . . . . .25
5 Vibrato . . . . . . . . . . . . . . . . . . . . . . . . . . . . . . . . . . . . . . . . . . . . . . . . . . . . . . . . . . . . . . . . . . . . . . . . . .25
Effects . . . . . . . . . . . . . . . . . . . . . . . . . . . . . . . . . . . . . . . . . . . . . . . . . . . . . . . . . . . . . . . . . . . . . . . . . . .27
1 Tremolo/Chorus . . . . . . . . . . . . . . . . . . . . . . . . . . . . . . . . . . . . . . . . . . . . . . . . . . . . . . . . . . . . . . . . . . .27
2 Symphonic/Celeste . . . . . . . . . . . . . . . . . . . . . . . . . . . . . . . . . . . . . . . . . . . . . . . . . . . . . . . . . . . . . . . .27
3 Delay and Flanger . . . . . . . . . . . . . . . . . . . . . . . . . . . . . . . . . . . . . . . . . . . . . . . . . . . . . . . . . . . . . . . . . .28
4 Reverb . . . . . . . . . . . . . . . . . . . . . . . . . . . . . . . . . . . . . . . . . . . . . . . . . . . . . . . . . . . . . . . . . . . . . . . . . . .29
5 Sustain . . . . . . . . . . . . . . . . . . . . . . . . . . . . . . . . . . . . . . . . . . . . . . . . . . . . . . . . . . . . . . . . . . . . . . . . . . .29
6 Glide . . . . . . . . . . . . . . . . . . . . . . . . . . . . . . . . . . . . . . . . . . . . . . . . . . . . . . . . . . . . . . . . . . . . . . . . . . . . .29
4. Rhythm, Accompaniment and Percussion . . . . . . . . . . . . . . . . . . . . . . . . . . . . . . .30
Rhythm Patterns . . . . . . . . . . . . . . . . . . . . . . . . . . . . . . . . . . . . . . . . . . . . . . . . . . . . . . . . . . . . . . . . . . .30
Fill In Patterns . . . . . . . . . . . . . . . . . . . . . . . . . . . . . . . . . . . . . . . . . . . . . . . . . . . . . . . . . . . . . . . . . . . . .32
Auto Variation and Percussion Volume . . . . . . . . . . . . . . . . . . . . . . . . . . . . . . . . . . . . . . . . . . . . . . . .33
Dotted Buttons . . . . . . . . . . . . . . . . . . . . . . . . . . . . . . . . . . . . . . . . . . . . . . . . . . . . . . . . . . . . . . . . . . . .33
Rhythm Menus . . . . . . . . . . . . . . . . . . . . . . . . . . . . . . . . . . . . . . . . . . . . . . . . . . . . . . . . . . . . . . . . . . . .35
Accompaniment Controls . . . . . . . . . . . . . . . . . . . . . . . . . . . . . . . . . . . . . . . . . . . . . . . . . . . . . . . . . . .35
Automatic Accompaniment—Auto Bass Chord . . . . . . . . . . . . . . . . . . . . . . . . . . . . . . . . . . . . . . . . .36
Keyboard Percussion . . . . . . . . . . . . . . . . . . . . . . . . . . . . . . . . . . . . . . . . . . . . . . . . . . . . . . . . . . . . . . .39
Melody On Chord . . . . . . . . . . . . . . . . . . . . . . . . . . . . . . . . . . . . . . . . . . . . . . . . . . . . . . . . . . . . . . . . . .40
5. Registration Memory . . . . . . . . . . . . . . . . . . . . . . . . . . . . . . . . . . . . . . . . . . . . . . . .42
Storing Registrations . . . . . . . . . . . . . . . . . . . . . . . . . . . . . . . . . . . . . . . . . . . . . . . . . . . . . . . . . . . . . . .42
Registration Shift . . . . . . . . . . . . . . . . . . . . . . . . . . . . . . . . . . . . . . . . . . . . . . . . . . . . . . . . . . . . . . . . . .44
Resetting the Registration Memory Buttons (Power On Reset) . . . . . . . . . . . . . . . . . . . . . . . . . . . .47
6. Music Disk Recorder . . . . . . . . . . . . . . . . . . . . . . . . . . . . . . . . . . . . . . . . . . . . . . . .48
Precautions . . . . . . . . . . . . . . . . . . . . . . . . . . . . . . . . . . . . . . . . . . . . . . . . . . . . . . . . . . . . . . . . . . . . . . .48
Formatting a Disk . . . . . . . . . . . . . . . . . . . . . . . . . . . . . . . . . . . . . . . . . . . . . . . . . . . . . . . . . . . . . . . . . .50
Recording . . . . . . . . . . . . . . . . . . . . . . . . . . . . . . . . . . . . . . . . . . . . . . . . . . . . . . . . . . . . . . . . . . . . . . . .51
Recording Registrations (and Bulk Data) . . . . . . . . . . . . . . . . . . . . . . . . . . . . . . . . . . . . . . . . . . . . . . .56
Recalling Recorded Registrations (and Bulk Data) . . . . . . . . . . . . . . . . . . . . . . . . . . . . . . . . . . . . . . .57
Replacing Registrations . . . . . . . . . . . . . . . . . . . . . . . . . . . . . . . . . . . . . . . . . . . . . . . . . . . . . . . . . . . .57
Playback . . . . . . . . . . . . . . . . . . . . . . . . . . . . . . . . . . . . . . . . . . . . . . . . . . . . . . . . . . . . . . . . . . . . . . . . .58
Other Functions . . . . . . . . . . . . . . . . . . . . . . . . . . . . . . . . . . . . . . . . . . . . . . . . . . . . . . . . . . . . . . . . . . .61
Messages on the M.D.R. LED Display . . . . . . . . . . . . . . . . . . . . . . . . . . . . . . . . . . . . . . . . . . . . . . . . .67
7. Rhythm Pattern Programming and Rhythm Sequence Programming . . . . . . . . . .68
Outline of Rhythm Programming Operation . . . . . . . . . . . . . . . . . . . . . . . . . . . . . . . . . . . . . . . . . . . .68
Panel Controls—Rhythm Pattern Program and Rhythm Sequence Program . . . . . . . . . . . . . . . . . .69
Rhythm Pattern Programming . . . . . . . . . . . . . . . . . . . . . . . . . . . . . . . . . . . . . . . . . . . . . . . . . . . . . . . .69
Programming Rhythm Sequence . . . . . . . . . . . . . . . . . . . . . . . . . . . . . . . . . . . . . . . . . . . . . . . . . . . . .81
Saving Rhythm Pattern and Rhythm Sequence Data to Disk . . . . . . . . . . . . . . . . . . . . . . . . . . . . . .88
Recalling Rhythm Pattern and Rhythm Sequence Data from Disk . . . . . . . . . . . . . . . . . . . . . . . . . .88
8. Footswitches and Knee Lever . . . . . . . . . . . . . . . . . . . . . . . . . . . . . . . . . . . . . . . .89
Footswitch Control . . . . . . . . . . . . . . . . . . . . . . . . . . . . . . . . . . . . . . . . . . . . . . . . . . . . . . . . . . . . . . . . .89
Knee Lever . . . . . . . . . . . . . . . . . . . . . . . . . . . . . . . . . . . . . . . . . . . . . . . . . . . . . . . . . . . . . . . . . . . . . . .90
9. Pitch Controls . . . . . . . . . . . . . . . . . . . . . . . . . . . . . . . . . . . . . . . . . . . . . . . . . . . . .92
10. MIDI Controls . . . . . . . . . . . . . . . . . . . . . . . . . . . . . . . . . . . . . . . . . . . . . . . . . . . . . .93
11. Accessory Jacks and Controls . . . . . . . . . . . . . . . . . . . . . . . . . . . . . . . . . . . . . . . .95
12. Appendix . . . . . . . . . . . . . . . . . . . . . . . . . . . . . . . . . . . . . . . . . . . . . . . . . . . . . . . . .96
Troubleshooting . . . . . . . . . . . . . . . . . . . . . . . . . . . . . . . . . . . . . . . . . . . . . . . . . . . . . . . . . . . . . . . . . . .96
Specifications . . . . . . . . . . . . . . . . . . . . . . . . . . . . . . . . . . . . . . . . . . . . . . . . . . . . . . . . . . . . . . . . . . . . .98
MIDI Specifications . . . . . . . . . . . . . . . . . . . . . . . . . . . . . . . . . . . . . . . . . . . . . . . . . . . . . . . . . . . . . . . . .99
MIDI Implementation Chart . . . . . . . . . . . . . . . . . . . . . . . . . . . . . . . . . . . . . . . . . . . . . . . . . . . . . . . . .103
Index . . . . . . . . . . . . . . . . . . . . . . . . . . . . . . . . . . . . . . . . . . . . . . . . . . . . . . . . . . . . . . . . . . . . . . . . . . .104
3
Page 6
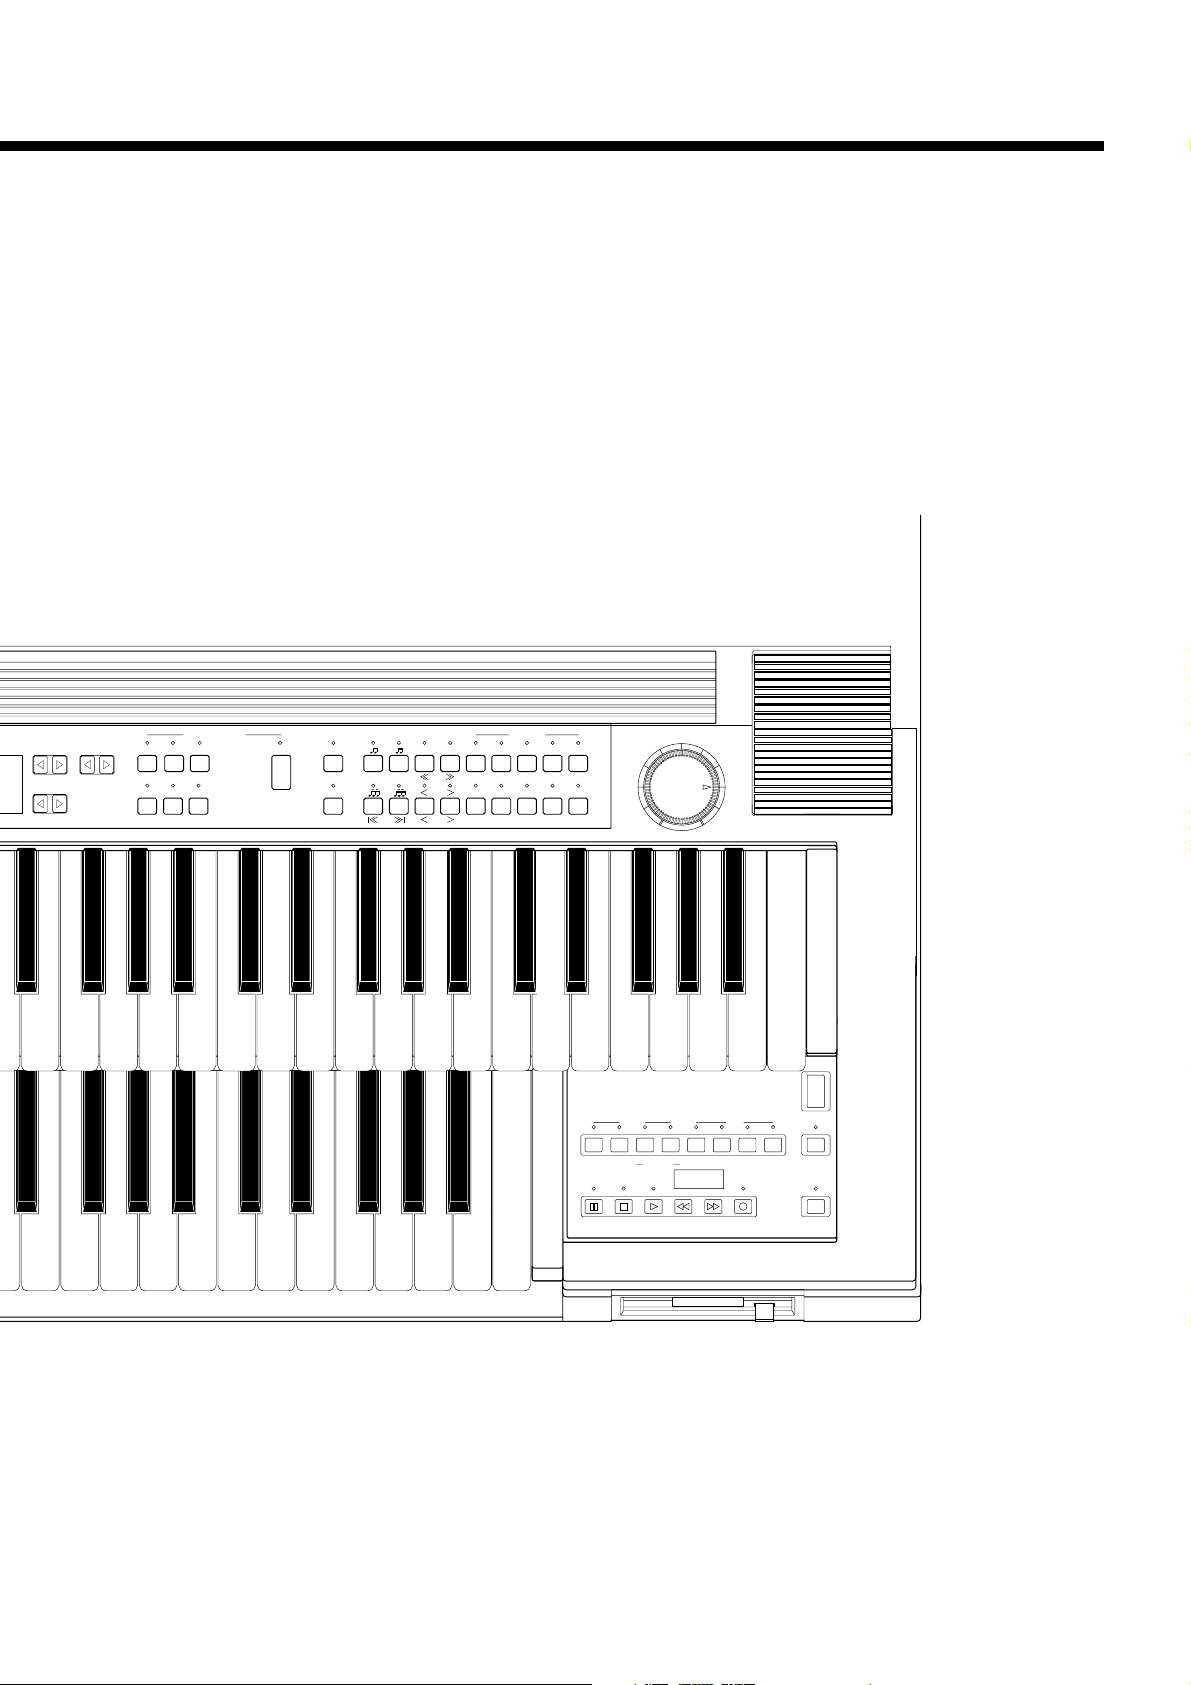
4
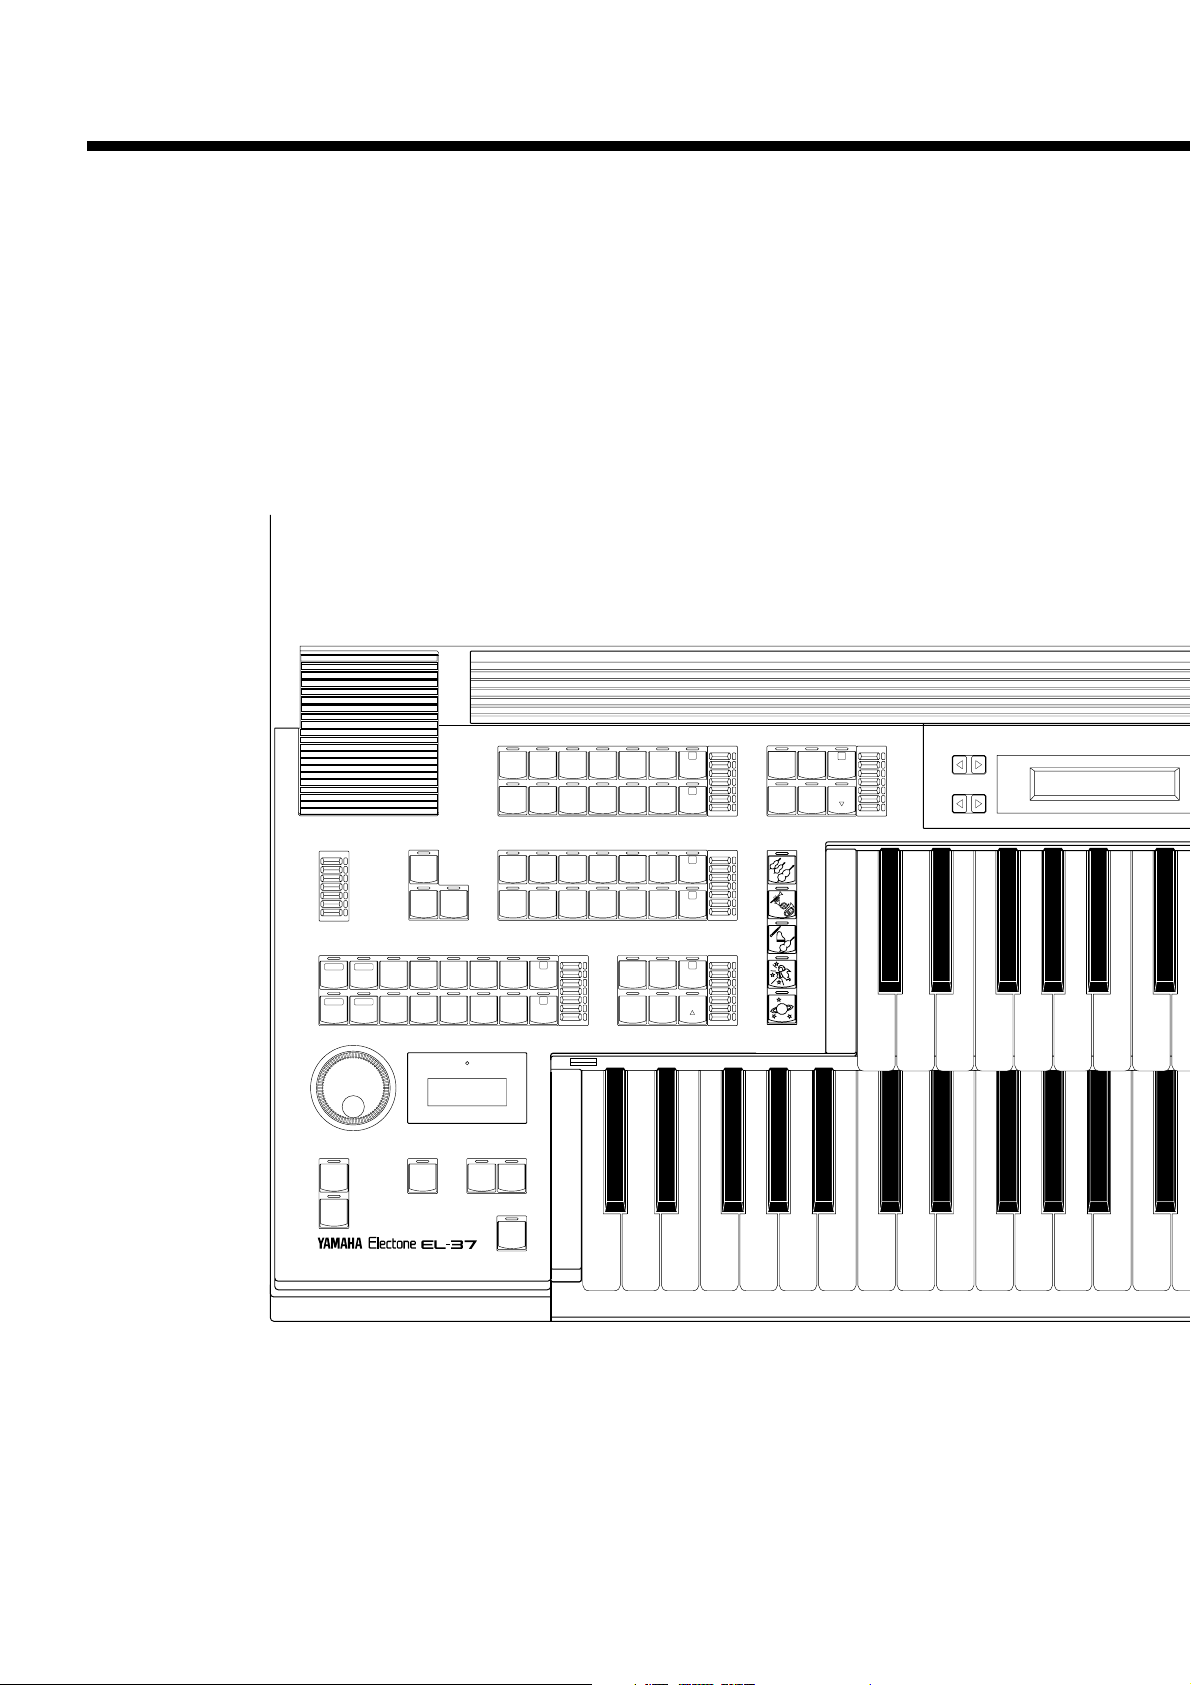
Panel Layout
BAR/BEAT
TEMPO
TEMPO
LOWER
KEYBOARD
PERCUSSION
SYNCHRO
START
REVERB SUSTAIN
UPPER
(KNEE)
LOWER
(KNEE)
PEDAL
ORGAN PIANO GUITAR VIBRA-
PHONE
COSMIC TUTTI
STRINGS BRASS
CLARI-
NET
SAXOPHONE
CHORUS
HARMO-
NICA
HORN
LEAD VOICE
VIOLIN FLUTE
OBOE TRUM-
PETTOLOWER
MARCH WALTZ SWING BOUNCE SLOW
ROCK
TANGO LATIN 1 LATIN 2 8 BEAT 16 BEAT
USER 1 USER 2 USER 3 USER 4 A B
USER 5 USER 6 USER 7 USER 8 C
VOLUME
MAX
MIN
VOLUME
VOLUME
VOLUME
VOLUME
PEDAL VOICE
ELEC.
BASS
CONTRA
BASS
TUBAORGAN
BASS
TO
LOWER
D
PEDAL
INTRO.
ENDING
START
FILL IN
DATA
CONTROL
RHYTHM
LOWER KEYBOARD VOICE
UPPER KEYBOARD VOICE
1
2
ORGAN PIANO GUITAR VIBRA-
PHONE
COSMIC TUTTI
STRINGS BRASS
CLARI-
NET
SAXOPHONE
CHORUS
MAX
MIN
1
2
MAX
MIN
1
MAX
MIN
MAX
MIN
1
MAX
MIN
SEQ. SEQ.
SEQ. SEQ.
12
34
1
2
BASIC
REGIST.
1
2
3
4
5
Page 7
5
VOICE
DISPLAY
FOOT
SW.
REGIST.
SHIFT
PITCH
MIDI
EFFECT
A.B.C.
M.O.C.
TREMOLO
(FAST)
MASTER VOLUME
PAUSE STOP PLAY SONG SELECT RECORD
UPPER LOWER PEDAL CONTROL UPPER LOWER PEDAL CONTROL
CUSTOM PLAY
SHIFT
POWER
RECORD
PLAY
FORMAT
SONG
REPEAT
FROM SONG DEL.
SONG COPY
TO
MUSIC DISK RECORDER
- TEMPO +
PATTERN
SEQUENCE
CLEAR CHANGE
PRESET
USER SET INS. DEL. CLEAR
PAGE
DISPLAY SELECT
3 3
DATA
CONTROL
ACCENTINSTRUMENTQUANTIZE
RHYTHM
PROGRAM
0
05678
1234
Page 8
6
1. Quick Introductory Guide
1. Quick Introductory Guide
Whether you are an advanced Electone performer or have never touched an electronic keyboard in
your life, we recommend that you take the time to go through this basic section. It shows you in the
simplest possible manner how to start playing your Electone. The basic operations and functions that
you learn in this section will also be important when you later use the Electone’s more advanced
features.
Getting Started
1. Plug the power cord in to an appropriate
electrical outlet.
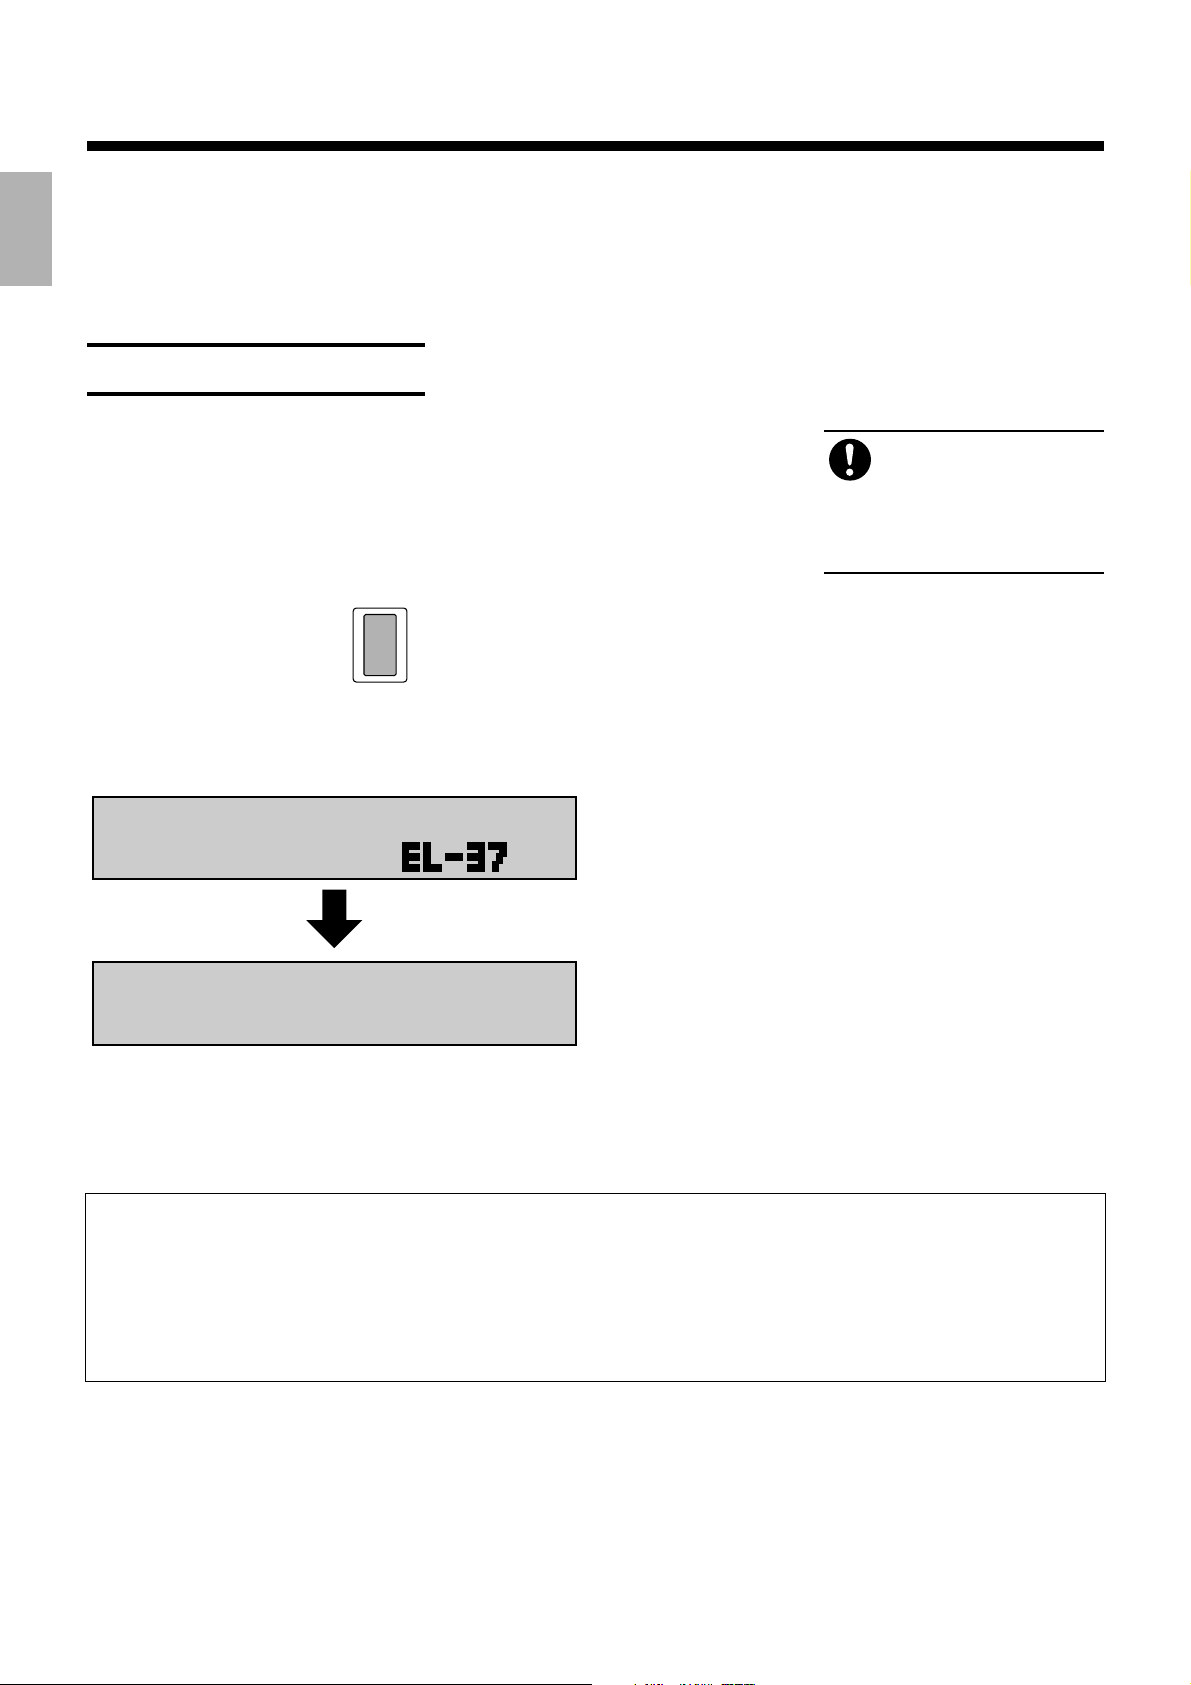
2. Tu rn on the Electone by pressing the POWER
switch
When you turn on the Electone, the following displays will appear in
succession on the LCD:
This last display, Voice Display, shows the currently assigned voice settings
for each voice section of the instrument, with the abbreviation for each voice
section beside the voice name: Upper (
£
), Lower (¢), Lead (¢™), and
Pedalboard (
¡
).
Tur ning the Electone off erases all panel settings you have made. When the Electone is turned on, Basic
Registration 1 is automatically selected. If you have made panel settings you wish to keep, save them to
Registration Memory (see page 42.) before turning the Electone off. You can, however, restore the panel
settings that were made before the Electone was last turned off. In doing this, first be careful NOT to press
any panel buttons (excepting those in Basic Registration) after you turn the Electone back on. Then, to
restore the previous settings, hold down the M (Memory) button and press the D (Disable) button.
Yamaha products are
manufactured specifically for
the supply voltage in the area
where they are to be sold. If you should
move, or if any doubt exists about the
supply voltage, please consult with a
qualified technician.
POWER
YAMAHA Electone
£Strings ¢™Violin
¢Strings ¡ContBass
Page 9
7
1. Quick Introductory Guide
3. Set the MASTER VOLUME control.
The MASTER VOLUME control is an overall control which affects the volume
of the entire instrument.
4. Press the Expression pedal down with your
foot.
The Expression pedal also controls the entire volume of the Electone. Once
you have set the MASTER VOLUME control to a suitable level, you can use
the Expression pedal to change the volume with your foot as you play.
For now, press the pedal down slightly beyond the halfway point.
Playing Your Electone
Your new Electone is fully equipped with an exceptionally wide variety of voice, rhythms, effects and other
convenient functions. Since it may takes some time to master the wealth of features available, the Electone
includes convenient Registrations that let you completely and instantly change the voices and other settings for
all of the keyboards, even as you play. Each registration is pre-programmed to be used for a specific music style
or instrumental combination.
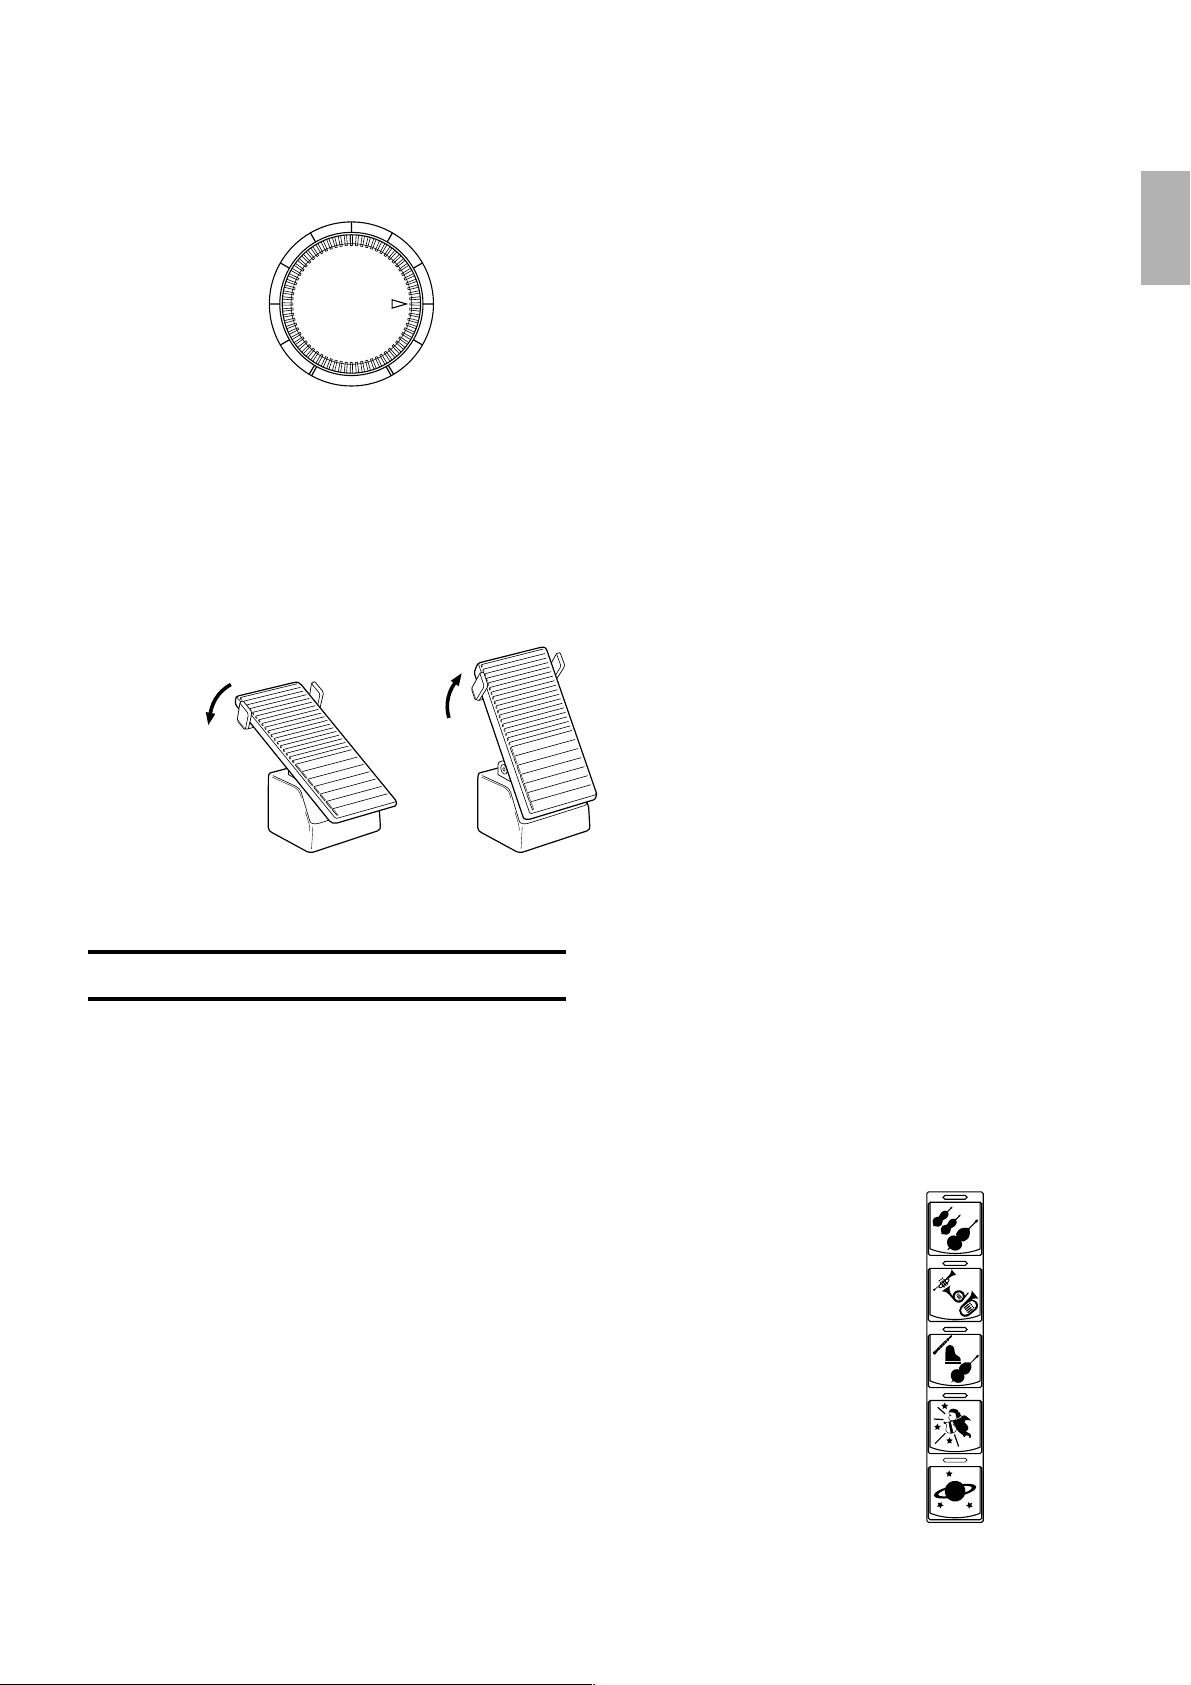
● Basic Registrations
The Basic Registration section has five factory preset registrations, each with
a different set of voices for the Upper/Lower keyboards and Pedalboard and
each specially suited for playing in a different music style.
When you turn the Electone on, the Electone automatically selects Basic
Registration 1. If another registration has been selected (the lamp on the
button will be lit), press the button for Basic Registration 1.
MASTER VOLUME
Set the control to roughly this position.
This is the normal playing level.
Maximum volume Minimum volume
BASIC
REGIST.
1
2
3
4
5
Page 10
8
1. Quick Introductory Guide
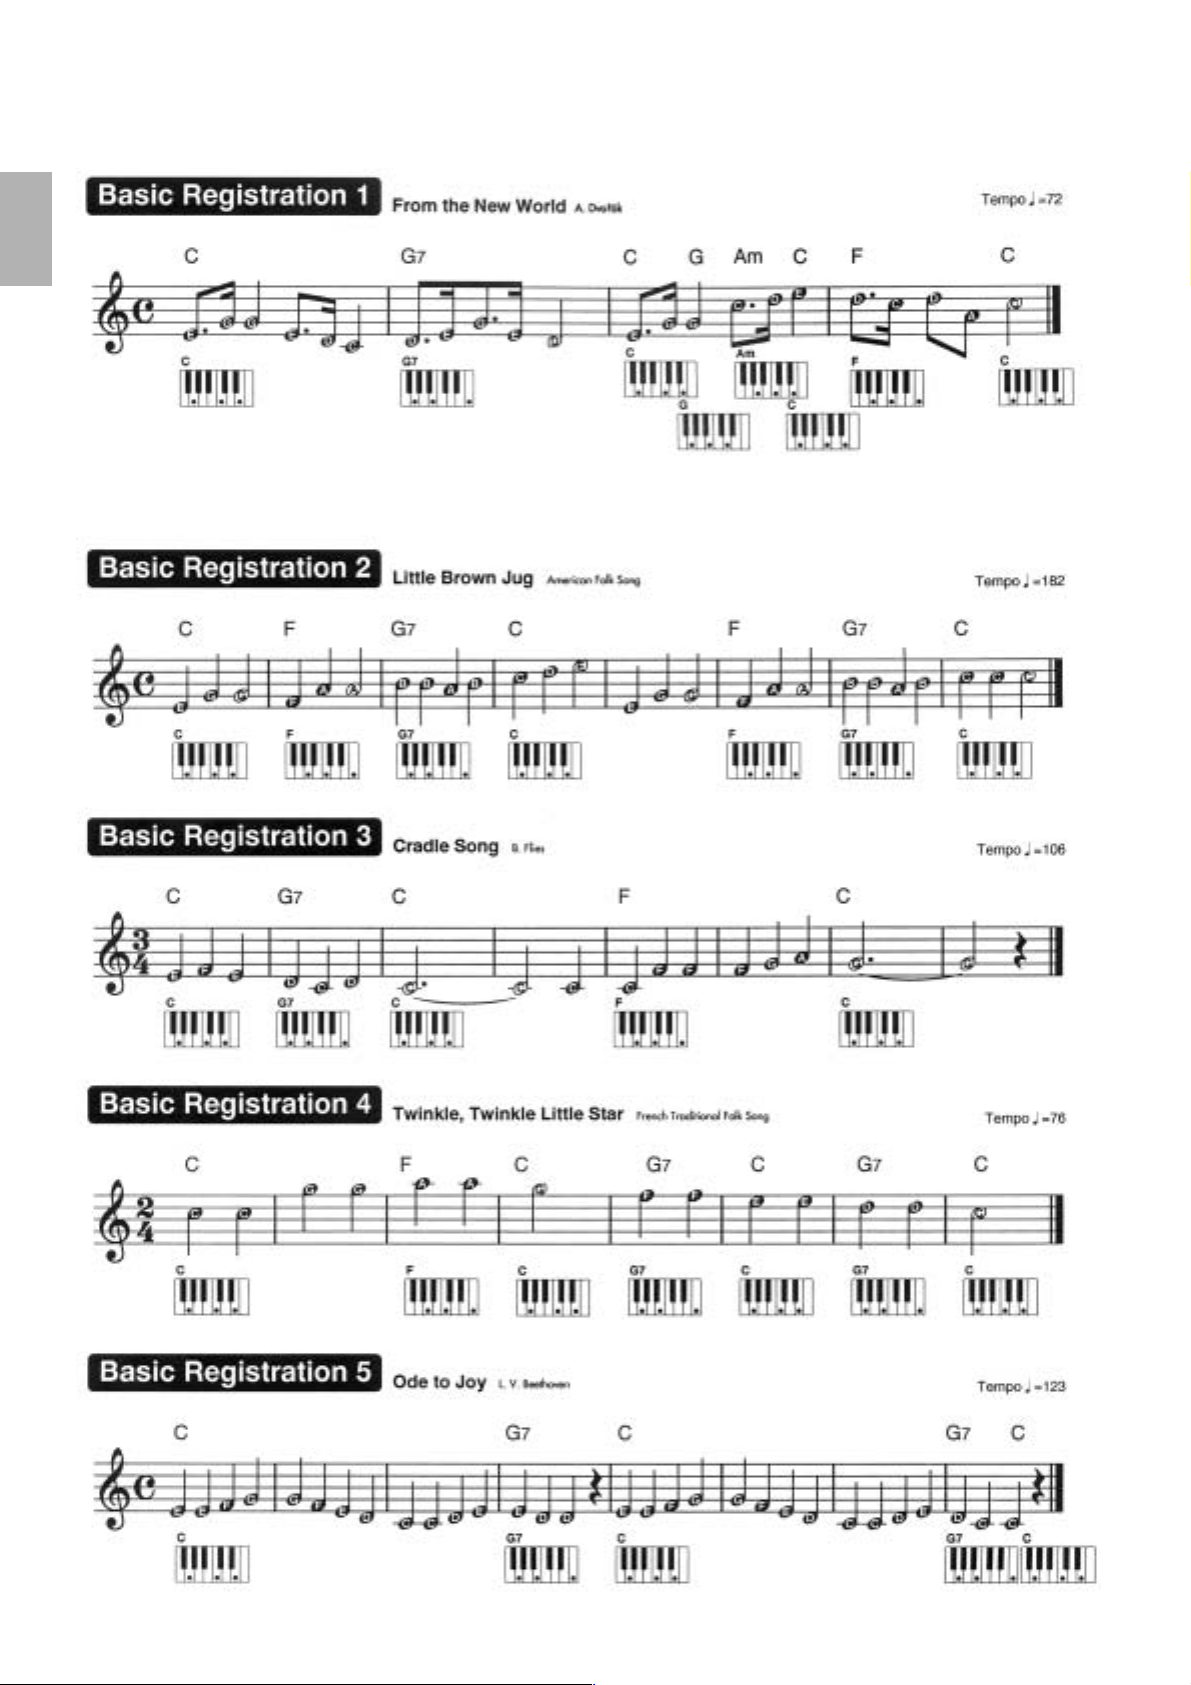
Try playing the melody line of following piece of music on the Upper
Keyboard, using the indicated registration.
Now, try out the rest of the Basic Registrations with the following music examples.
Press the appropriate buttons to select the registrations.
Each music example has been chosen to best suit its companion registration.
Page 11
9
1. Quick Introductory Guide
The chart below lists the voices that have been set for the Upper/Lower keyboards and Pedalboard in each of
the five Basic Registrations.
● Registration Menu Disk
In addition to the Basic Registrations, many more registrations are available on your Electone; supplied as the
Music Disk Recorder data in the included Registration Menu Disk 1 and Disk 2. These registrations include
voice and rhythm selections and have been specially created to suit a variety of music styles. With the variety
of registrations available, you’re certain to find the right registration that perfectly suits any style of music you
play.
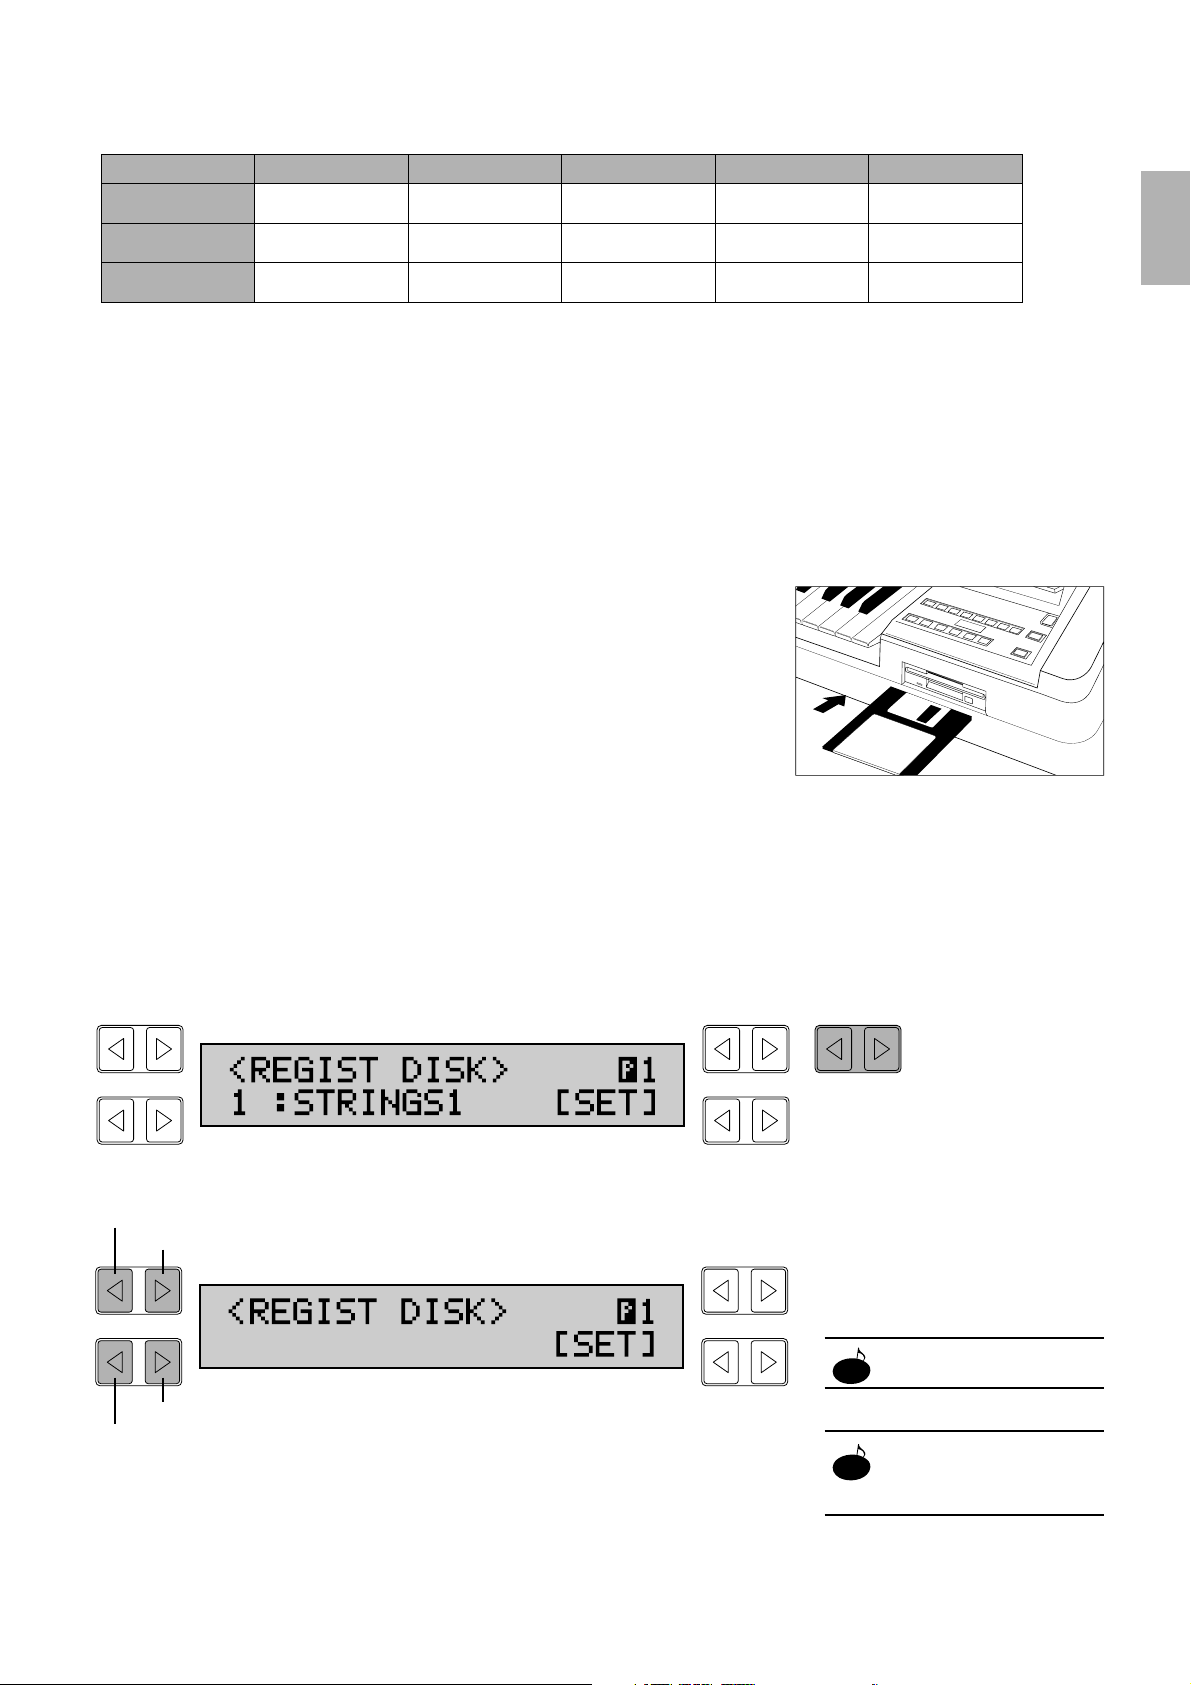
To select registrations from the Registration Menu Disk:
1. Put the Registration Menu Disk (with the label
of the disk facing upward and the sliding shutter
facing forward) into the Disk slot, located just under
the Music Disk Recorder at the right side of the
Electone.
Once you've securely inserted the disk into the slot, the LCD Display on the
panel will automatically change to show the available Registration Menus.
2. From the display that appears, first press the
Page [>] button to select the various menu “pages” of
registrations available on the disk...
...then, select the desired registration from each menu.
The bottom left Data Control buttons step through the various selections,
while the top left Data Control buttons are used to jump ahead or back by
ten selections.
See page 11 for the complete
list of the Registration Menus.
The Registration Menu Disk
does not operate when the
RHYTHM PROGRAM buttons
are on.
Basic Registration 1 Basic Registration 2 Basic Registration 3 Basic Registration 4
Upper Keyboard voice
Lower Keyboard voice
Pedal voice
Strings 1
Strings 1
Contrabass
Brass
Horn
Tuba Contrabass
Flute Cosmic 1
Piano
Cosmic 2
Cosmic 2
Basic Registration 5
Synth. Brass
Cosmic 3
Synth. Bass
Jump back ten numbers.
Jump ahead ten numbers.
9 :BRASS1
Selects next number.
Selects previous number.
PAGE
NOTE
NOTE
Page 12
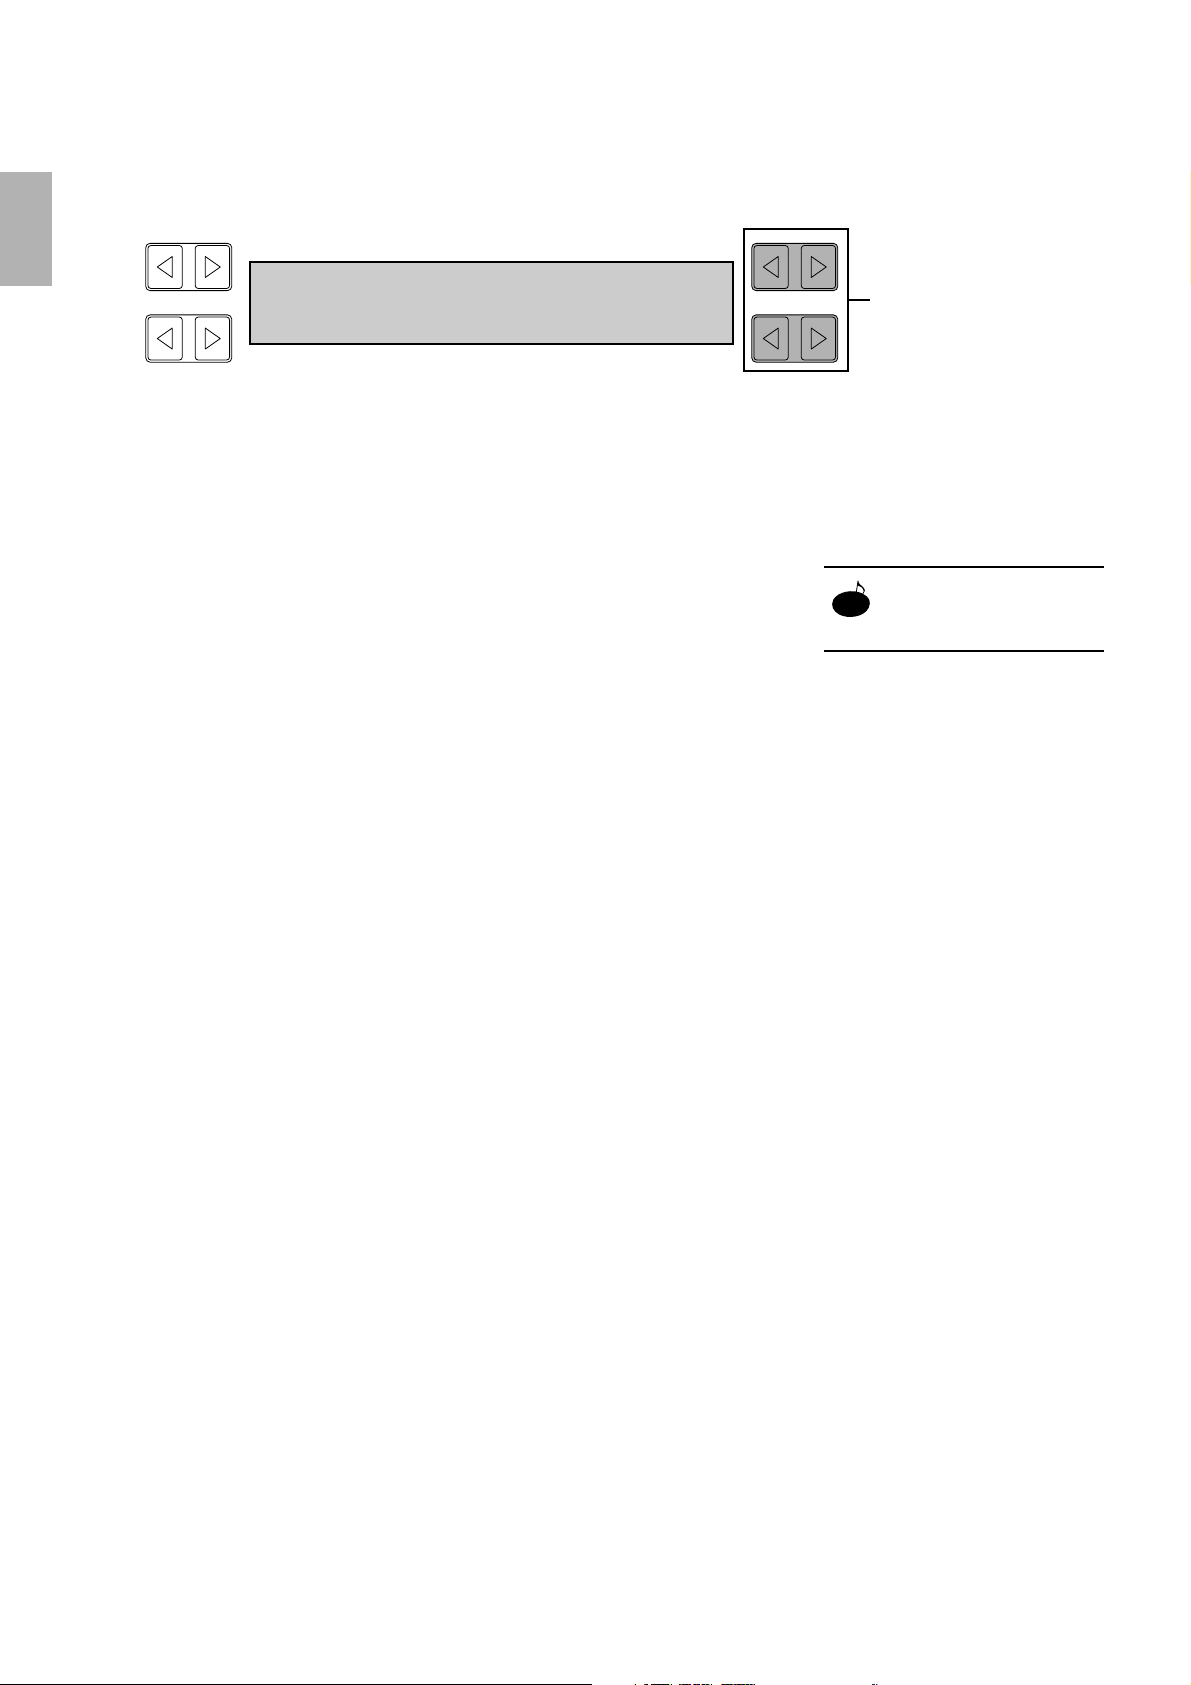
3. Finally, call up the selected registration by
selecting SET in the display.
The message “Completed...!!” briefly appears on the display.
You can now play the registration.
If you wish, try out some of the other selections by repeating the above steps.
If you’ve selected the registration with a rhythm set, press the START button
in the Rhythm section.
Pressing the START button starts up a rhythm pattern appropriate to the
music style you have selected. (To turn the pattern off, press the START
button again.)
You can also adjust the tempo of the rhythm to your liking by turning the
TEMPO dial, as indicated in the illustration below.
How to Return to the Registration Menu Display:
If you unintentionally change the display by pressing a button on the panel,
you can return to the display of the Registration Menu by pressing the PLAY
button in the Music Disk Recorder section.
10
1. Quick Introductory Guide
You can use the Automatic
Accompaniment (A.B.C.)
function. See page 36 for more
information on the A.B.C. function.
<REGIST DISK> ¡1
9 :BRASS1 [SET]
Pressing any of
these buttons
selects SET.
NOTE
Page 13
11
1. Quick Introductory Guide
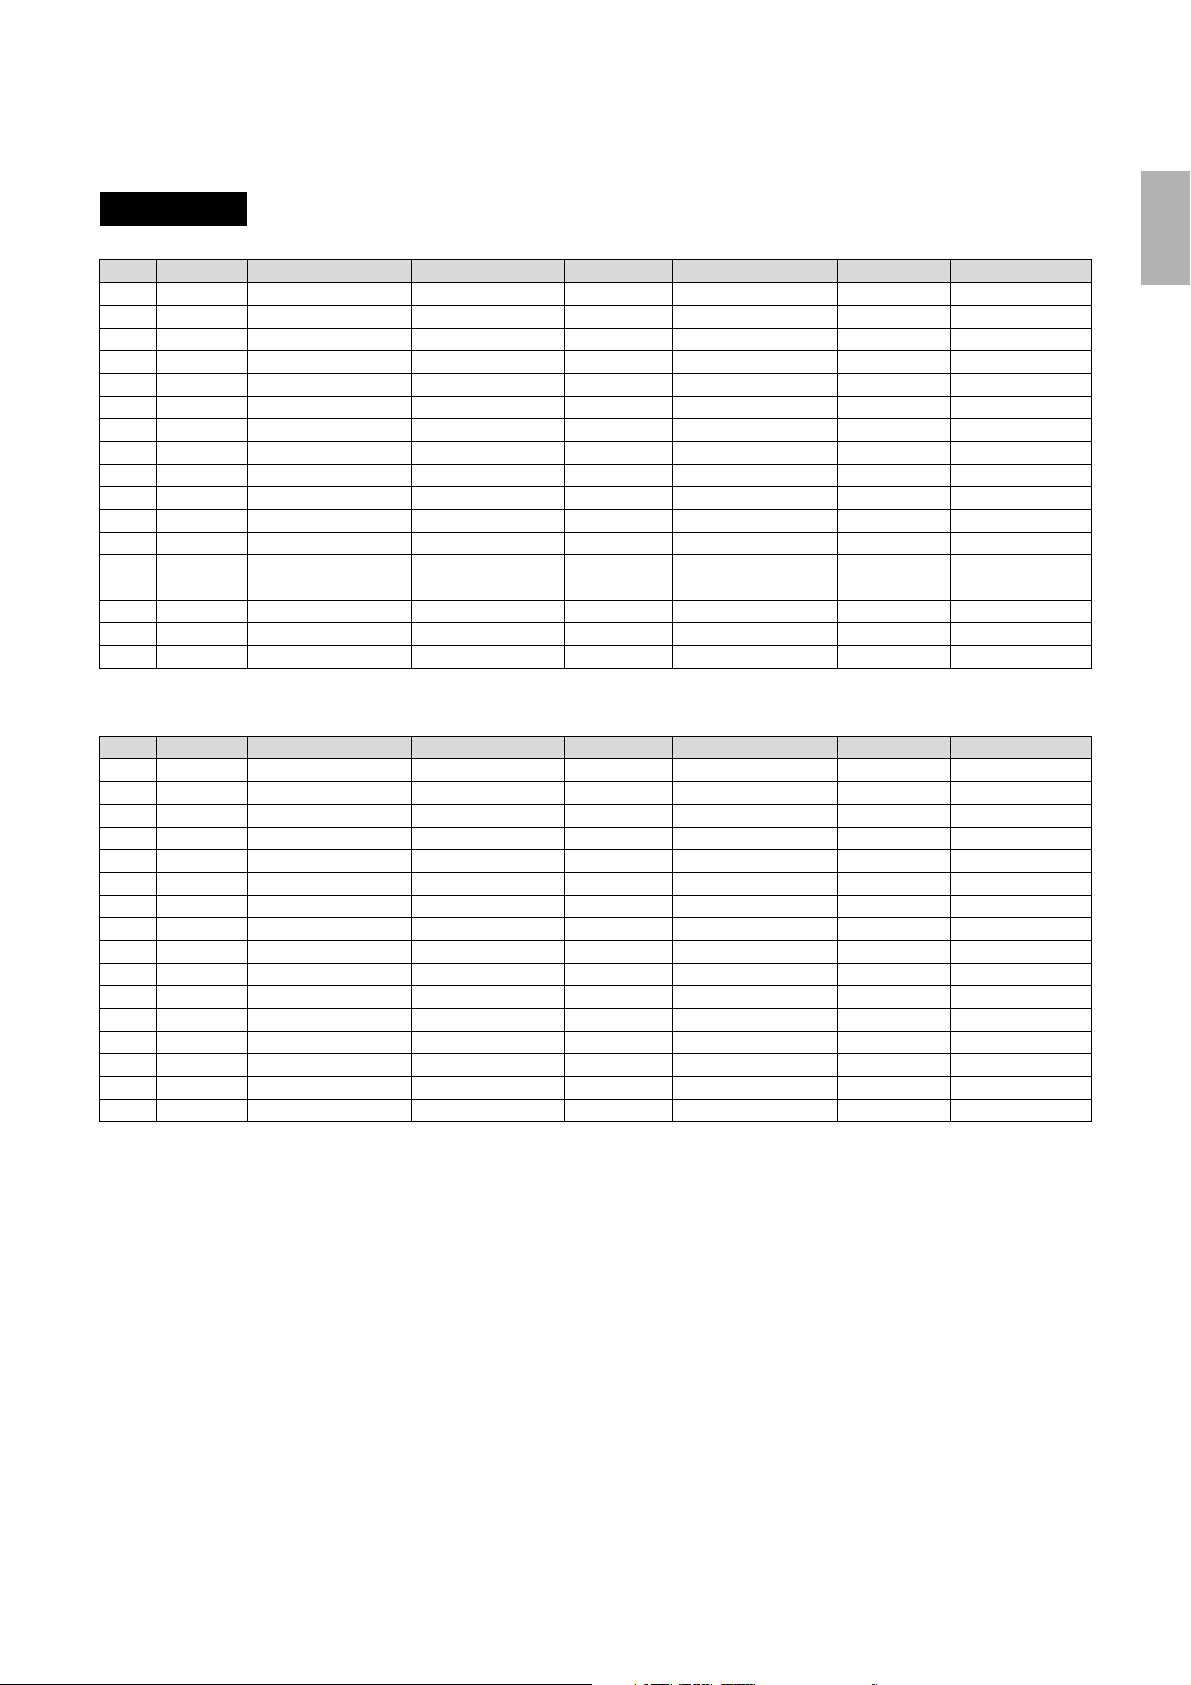
● Registration Menu List
Disk 1
Page 1
No. LCD Display Upper Keyboard Voice Lead Voice Lower Keyboard Voice Pedal Voice Rhythm (Tempo)
1 STRINGS1 Orchestra Strings Violin Horn Contrabass
2 STRINGS2 Pop Strings Strings Whistle Strings Pizzicato Bass
3 STRINGS3 Chamber Strings Strings Violin Strings Pizzicato Bass
4 STRINGS4 Solo Violin Violin Strings Contrabass
5 STRINGS5 Pops Orchestra 1 Strings Harpsichord Strings Elec. Bass
6 STRINGS6 Pizzicato Strings Pizzicato Strings — Pizzicato Strings Pizzicato Strings
7 STRINGS7 Pops Orchestra 2 Strings Trumpet Brass Pizzicato Bass
8 STRINGS8 Strings Ensemble Strings Strings (16') Strings Contrabass
9 BRASS1 Marching Band Brass Trombone Brass Tuba
10 BRASS2 Solo Trumpet Trumpet Horn Tuba
11 BRASS3 Big Band 1 Brass Saxophone Trombone Pizzicato Bass
12 BRASS4 Solo Trombone — Trombone Saxophone Pizzicato Bass
13 BRASS5
14 BRASS6 Jazz Combo 1 (Trumpet) Trumpet Elec. Bass Pizzicato Bass
15 BRASS7 Dixieland
16 BRASS8 Fusion Saxophone Saxophone Elec. Piano Elec. Bass (16')
Sound Image
Big Band 2 (Saxophone
Ensemble)
—
—
Saxophone Saxophone (8') Piano Pizzicato Bass
—
—
—
Clarinet Piano Pizzicato Bass
8Beat 1 (115)
Polka (130)
March (120)
Swing 1 (168)
Swing 2 (125)
Swing 1 (136)
Bossanova 2 (160)
Dixie (96)
16Beat 3 (80)
—
—
—
—
—
—
—
Page 2
No. LCD Display Upper Keyboard Voice Lead Voice Lower Keyboard Voice Pedal Voice Rhythm (Tempo)
1 LEAD1
2 LEAD2
3 LEAD3
4 LEAD4
5 LEAD5
6 LEAD6
7 LEAD7
8 LEAD8
9 DECAY1
10 DECAY2
11 DECAY3
12 DECAY4
13 DECAY5
14 DECAY6
15 DECAY7
16 DECAY8
* The numbers in the parentheses indicate that the "feet" settings for the assigned voice are different from the default.
* As for the registrations assigned with rhythm, the Fingered is selected for the A.B.C. function and both Lower and Pedal Memories are set to on.
Sound Image
Woodwind Ensemble Oboe Flute Clarinet Bassoon (8')
Solo Flute — Flute Pizzicato Strings Contrabass
Solo Oboe — Oboe Strings Contrabass
Polka — Clarinet Harmonica Pizzicato Bass
Whistle — Whistle Elec. Piano Elec. Bass
Harmonica — Harmonica Strings Contrabass
Tango Harmonica Harmonica (16') Strings Pizzicato Bass
Jazz Organ Jazz Organ Jazz Organ (4') Jazz Organ (8') Organ Bass
Acoustic Piano Piano — Piano Pizzicato Bass
Elec. Piano Elec. Piano — Elec. Piano Elec. Bass
Honky Tonk Piano Piano — Piano Piano
Jazz Guitar Elec. Bass Elec. Bass Strings Elec. Bass
Marimba Marimba — Piano Elec. Bass
Fantasy 1 Vibraphone (4') Whistle Strings Elec. Bass
Elec. Guitar Elec. Guitar — Elec. Piano Elec. Bass
Oriental Harpsichord Harpsichord Strings Contrabass
—
—
—
Polka (115)
8Beat 1 (78)
—
Tango 1 (120)
Bossanova 2 (150)
—
16Beat 3 (78)
Dixie (90)
Bossanova 1 (140)
Samba 1 (125)
Slow Rock 1 (72)
8Beat 3 (130)
—
Page 14
12
1. Quick Introductory Guide
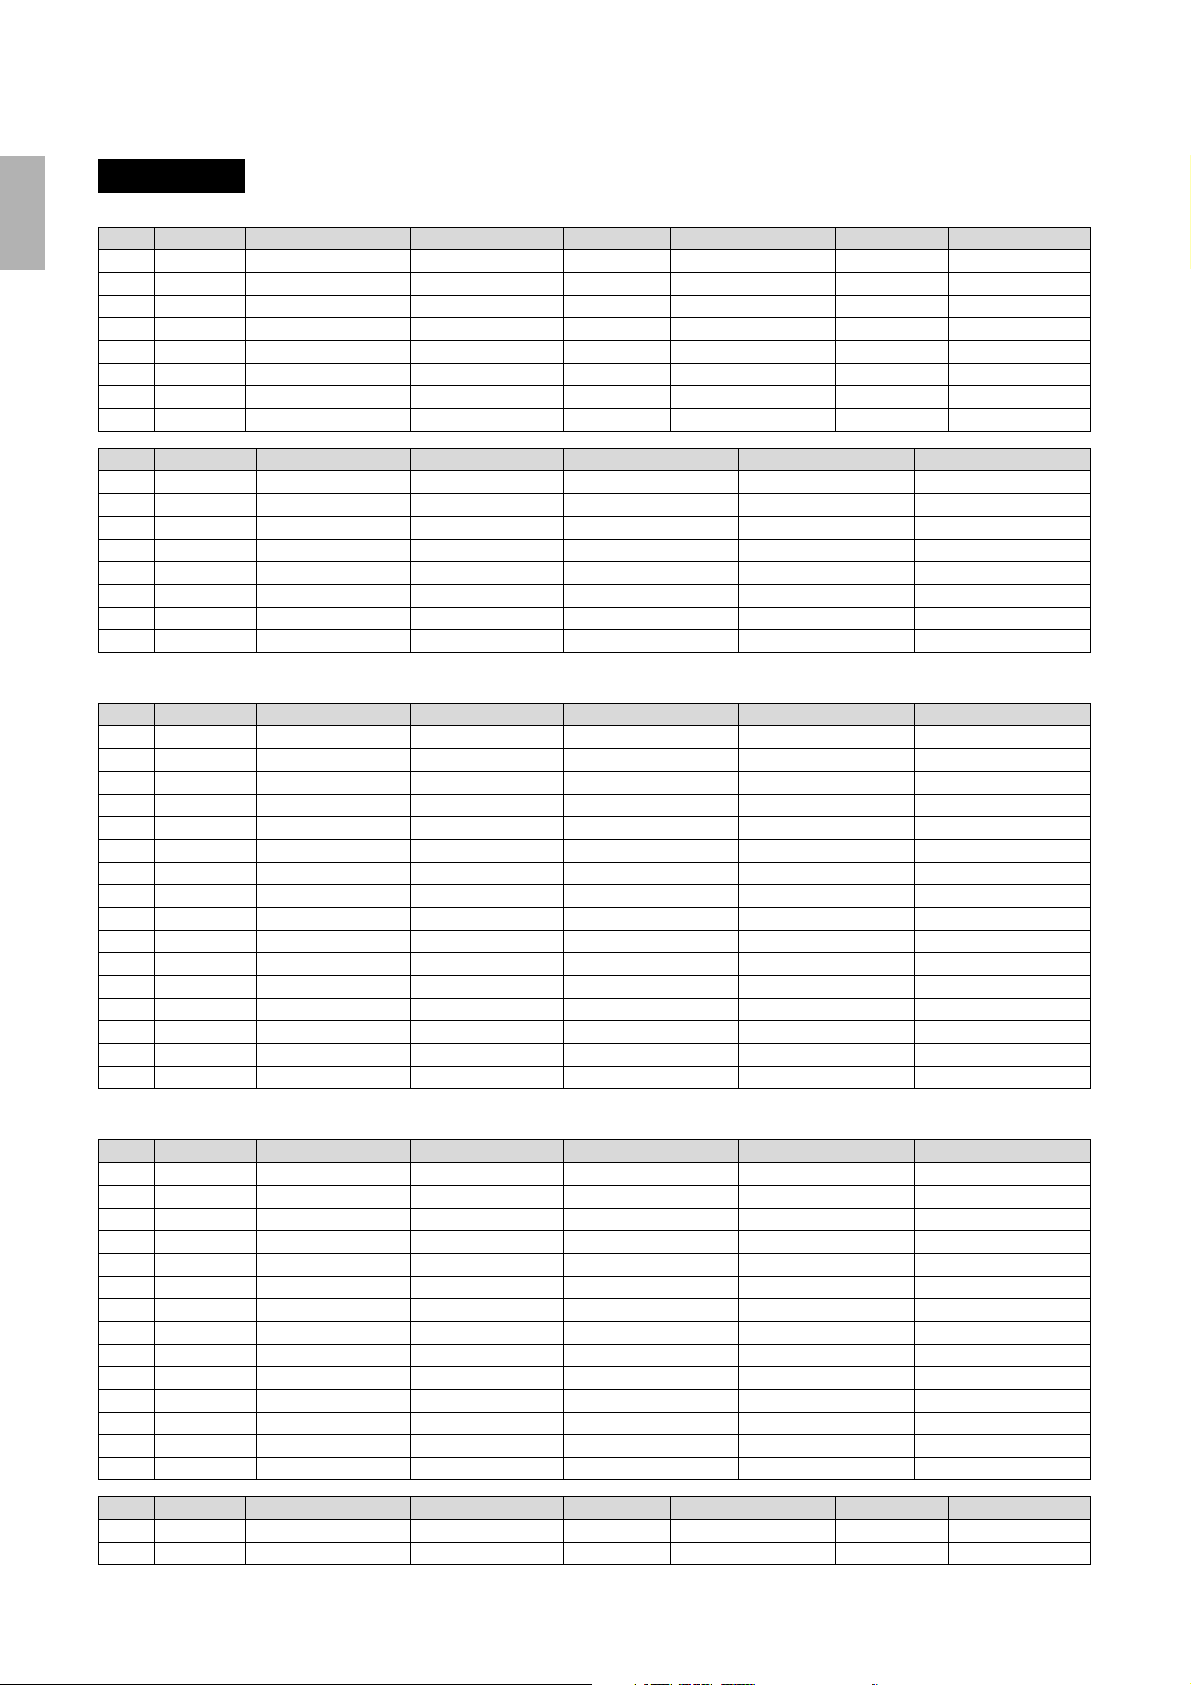
Disk 1
Page 3
No. LCD Display Upper Keyboard Voice Lead Voice Lower Keyboard Voice Pedal Voice Rhythm (Tempo)
1 SYNTH1
SYNTH12
2
SYNTH3
3
SYNTH4
4
SYNTH5
5
SYNTH6
6
SYNTH7
7
SYNTH8
8
No. LCD Display Rhythm Tempo Accompaniment Type Upper Keyboard Voice Lead Voice Pedal Voice
9 March 120 4 Brass Trumpet Tuba
10 Polka 110 4 Bassoon Flute (4') Pizzicato Bass
11 Country 112 1 —
12 Broadway 135 4 Vibraphone (4') Trumpet Pizzicato Bass
13 Waltz-1 105 4 Strings Strings (16') Pizzicato Bass (16')
14 Waltz-2 180 2 Strings Violin Pizzicato Bass
15 J. Waltz 140 4 Elec. Bass (16') Whistle Pizzicato Bass (16')
16 Bolero 136 1 Trumpet Pizzicato Bass (16')
Page 4
No. LCD Display Rhythm Tempo Accompaniment Type Upper Keyboard Voice Lead Voice Pedal Voice
1 Swing-1 160 3 Brass Trumpet Pizzicato Bass
2 Swing-2 138 4 —
3 J. Ballad 60 3 Trombone Pizzicato Bass
4 Dixie 108 4 Trumpet Tuba
5 Bounce-1 123 2 Guitar — Elec. Bass
6 Bounce-2 140 2 Clarinet Pizzicato Bass
7 Reggae1 132 4 Marimba — Elec. Bass
8 Reggae-2 120 4 Cosmic 2 Synth. Bass Elec. Bass (16')
9 Slow Rock-1 80 1 Elec. Guitar — Elec. Bass (16')
10 Slow Rock-2 74 1 Trumpet Elec. Bass (16')
11 Slow Rock-3 92 4 Saxophone Elec. Bass (16')
12 Tango-1 120 1 Harmonica Harmonica (16') Pizzicato Bass (16')
13 Tango-2 120 1 Strings
14 Tango-3 110 1 Harmonica (16') Elec. Bass (16')
15 Cha-Cha 126 4 Piano (16') Piano (4') Elec. Bass (16')
16 Rhumba 115 1 Trombone (8') Elec. Bass (16')
Sound Image
Wind Synth.
Synth. Brass 1
Cosmic Sound
Synth. Brass 2
Fusion
Fantasy 2
Fantasy 3
Fantasy 4
—
Synth. Brass
Cosmic 2
Tutti 2
—
Cosmic 1 (8')
Cosmic 2
Cosmic 3
Cosmic 3
Clarinet (4')
Whistle
Brass
Elec. Guitar
Whistle
Marimba (4')
Whistle
Harmonica
—
—
—
—
—
—
—
Elec. Guitar
Elec. Guitar
Elec. Piano
Elec. Guitar
Elec. Piano
Cosmic 2
Elec. Piano
Cosmic 3
Elec. Bass (16')
Elec. Bass
Elec. Bass
Elec. Bass (16')
Elec. Bass (16')
Contrabass
Elec. Bass
Elec. Bass
Harmonica Pizzicato Bass (16')
Clarinet Pizzicato Bass
Violin Pizzicato Bass (16')
8Beat 3 (150)
8Beat 1 (130)
8Beat 2 (120)
16Beat 3 (117)
16Beat Funk (120)
—
Dance Pop (125)
Bounce 1 (125)
Page 5
No. LCD Display Rhythm Tempo Accompaniment Type Upper Keyboard Voice Lead Voice Pedal Voice
1
Beguine 118 4 Strings Whistke Elec. Bass (16')
2
Mambo 100 4 Brass Saxophone Elec. Bass (16')
3
Samba-1 120 1 Saxophone Trumpet Elec. Bass (16')
4
Samba-2 112 1 Elec. Bass (16') Flute Elec. Bass (16')
5
Bossanova-1 1 03 1—Flute Elec. Bass (16')
6
Bossanova-2 1 24 2 — Saxophone Elec. Bass (16')
7
8 Beat-1 10 0 3 Cosmic 2 Vibraphone (4') Elec. Bass (16')
8
8 Beat-2 11 7 2 Elec. Piano — Elec. Bass (16')
9
8 Beat-3 15 2 3 Elec. Guitar Elec. Guitar Elec. Bass (16')
10
Dance Pop 130 4 Vibraphone (4') Elec. Piano Elec. Bass (16')
11
16 Beat-1 8 5 4 — Flute Elec. Bass (16')
12
16 Beat-2 124 4 Synth. Brass Synth. Brass (16') Elec. Bass (16')
13
16 Beat-3 112 4 Brass Trumpet Elec. Bass (16')
16 Beat Funk 118 4 Elec. Guitar (8') Cosmic 3 Elec. Bass (16')
14
1516Wedding
X'mas
Sound ImageNo. LCD Display Upper Keyboard Voice Lead Voice Lower Keyboard Voice Pedal Voice Rhythm (Tempo)
Wedding
X'mas
Organ
Cosmic 2
Organ (4')
Vibraphone (4')
Organ
Strings
Organ (16')
Contrabass
—
—
Page 15

13
1. Quick Introductory Guide
Disk 2
Page 1
No. LCD Display Sound Image Upper Keyboard Voice Lead Voice Lower Keyboard Voice Pedal Voice
1
STRINGS1 Solo Violin — Violin Strings Contrabass
2
STRINGS2 Strings Ensemble Strings Strings (4') Horn Pizzicato Bass
STRINGS3 Pop Strings 1 Strings Vibraphone (4') Horn Contrabass
3
STRINGS4 Pop Strings 2 Strings Clarinet Strings Pizzicato Bass
4
STRINGS5 Symphonic Orchestra Tutti 1 Tutti 2 (16') Strings Contrabass
5
BRASS1 Trumpet Ensemble Brass Trumpet Brass Tuba
6
BRASS2 Solo Trumpet — Trumpet Trombone Tuba
7
8
BRASS3 Solo Trombone — Trombone Trombone Tuba
9
BRASS4 Brass Ensemble Trumpet Trombone Horn Tuba
10
BRASS5 Big Band Brass Trombone Saxophone Pizzicato Bass
Page 2
No. LCD Display Sound Image Upper Keyboard Voice Lead Voice Lower Keyboard Voice Pedal Voice
LEAD1 Solo Flute 1 —
1
LEAD2 Solo Flute 2 Flute Clarinet Pizzicato Bass
2
LEAD3 Whistle Flute (4') Pizzicato Strings Pizzicato Bass
3
LEAD4 Flute Ensemble Flute Flute (4') Bassoon Pizzicato Bass
4
LEAD5 Pop Flute Vibraphone (4') Flute Strings Contrabass
5
LEAD6 Woodwind Ensemble 1 Bassoon Flute (4') Clarinet Pizzicato Bass
6
LEAD7 Solo Oboe Oboe Bassoon Pizzicato Bass
7
8
LEAD8 Woodwind Ensemble 2 Clarinet Bassoon Clarinet
LEAD9 Solo Clarinet Clarinet Horn Pizzicato Bass
9
10
LEAD10 Solo Saxophone Saxophone Strings Contrabass
—
—
—
—
—
Flute Strings Contrabass
—
Page 3
No. LCD Display Sound Image Upper Keyboard Voice Lead Voice Lower Keyboard Voice Pedal Voice
1
DECAY1 Piano Piano Piano Piano
2
DECAY2 Harpsichord Harpsichord Strings Contrabass
DECAY3 Marimba Marimba Clarinet Pizzicato Bass
3
DECAY4 Music Box Vibraphone (4') Vibraphone (4') Vibraphone (4')
4
DECAY5 Classical Guitar Guitar Strings Pizzicato Bass
5
ORGAN1 Organ Organ Organ Organ Bass
6
ORGAN2 Jazz Organ Jazz Organ (8') Jazz Organ (8') Organ Bass
7
8
BANDONEON Bandoneon Harmonica Harmonica Strings Pizzicato Bass
SYNTH1 Cosmic Sound 1 Cosmic 2 Cosmic 1 Chorus Contrabass
9
10
SYNTH2 Cosmic Sound 2 Cosmic 3 Synth. Bass (8') Cosmic 3 Synth. Bass
—
—
—
—
—
—
—
Page 4
No. LCD Display Rhythm Tempo Accompaniment Type Upper Keyboard Voice Lead Voice Pedal Voice
March 120 4 Brass Trumpet Tuba
1
Broadway 135 4 Trombone (8') Saxophone (8') Pizzicato Bass
2
Waltz 105 4 Strings Strings (16') Pizzicato Bass
3
Swing 160 3 Brass Trumpet Pizzicato Bass
4
Slow Rock 80 3 Guitar Elec. Bass Elec. Bass (16')
5
Tango 127 3 Harmonica Harmonica (16') Pizzicato Bass (16')
6
Cha-Cha 126 4 Piano (16') Piano (4') Elec. Bass (16')
7
Samba 120 1 Saxophone Trumpet Elec. Bass (16')
8
8Beat 100 3 Cosmic 2 Vibraphone (4') Elec. Bass (16')
9
16Beat 74 4 Harmonica Harmonica Elec. Bass (16')
10
* The numbers in the parentheses indicate that the "feet" settings for the assigned voice are different from the default.
* As for the registrations assigned with rhythm, the Fingered is selected for the A.B.C. function and both Lower and Pedal Memories are set to on.
Page 16
Using the LCD Display
The many sophisticated functions of the EL-37 are shown and controlled from the LCD display. The LCD display
lets you see at-a-glance the current settings of the selected functions.
This section introduces you to the control functions and conventions of the LCD display, allowing you to
operate your new Electone quickly and effectively.
1. First, call up the Voice Menu LCD display for the
Piano voice of the Upper keyboard by pressing the
PIANO button in the Upper Keyboard Voice section.
The following display will appear:
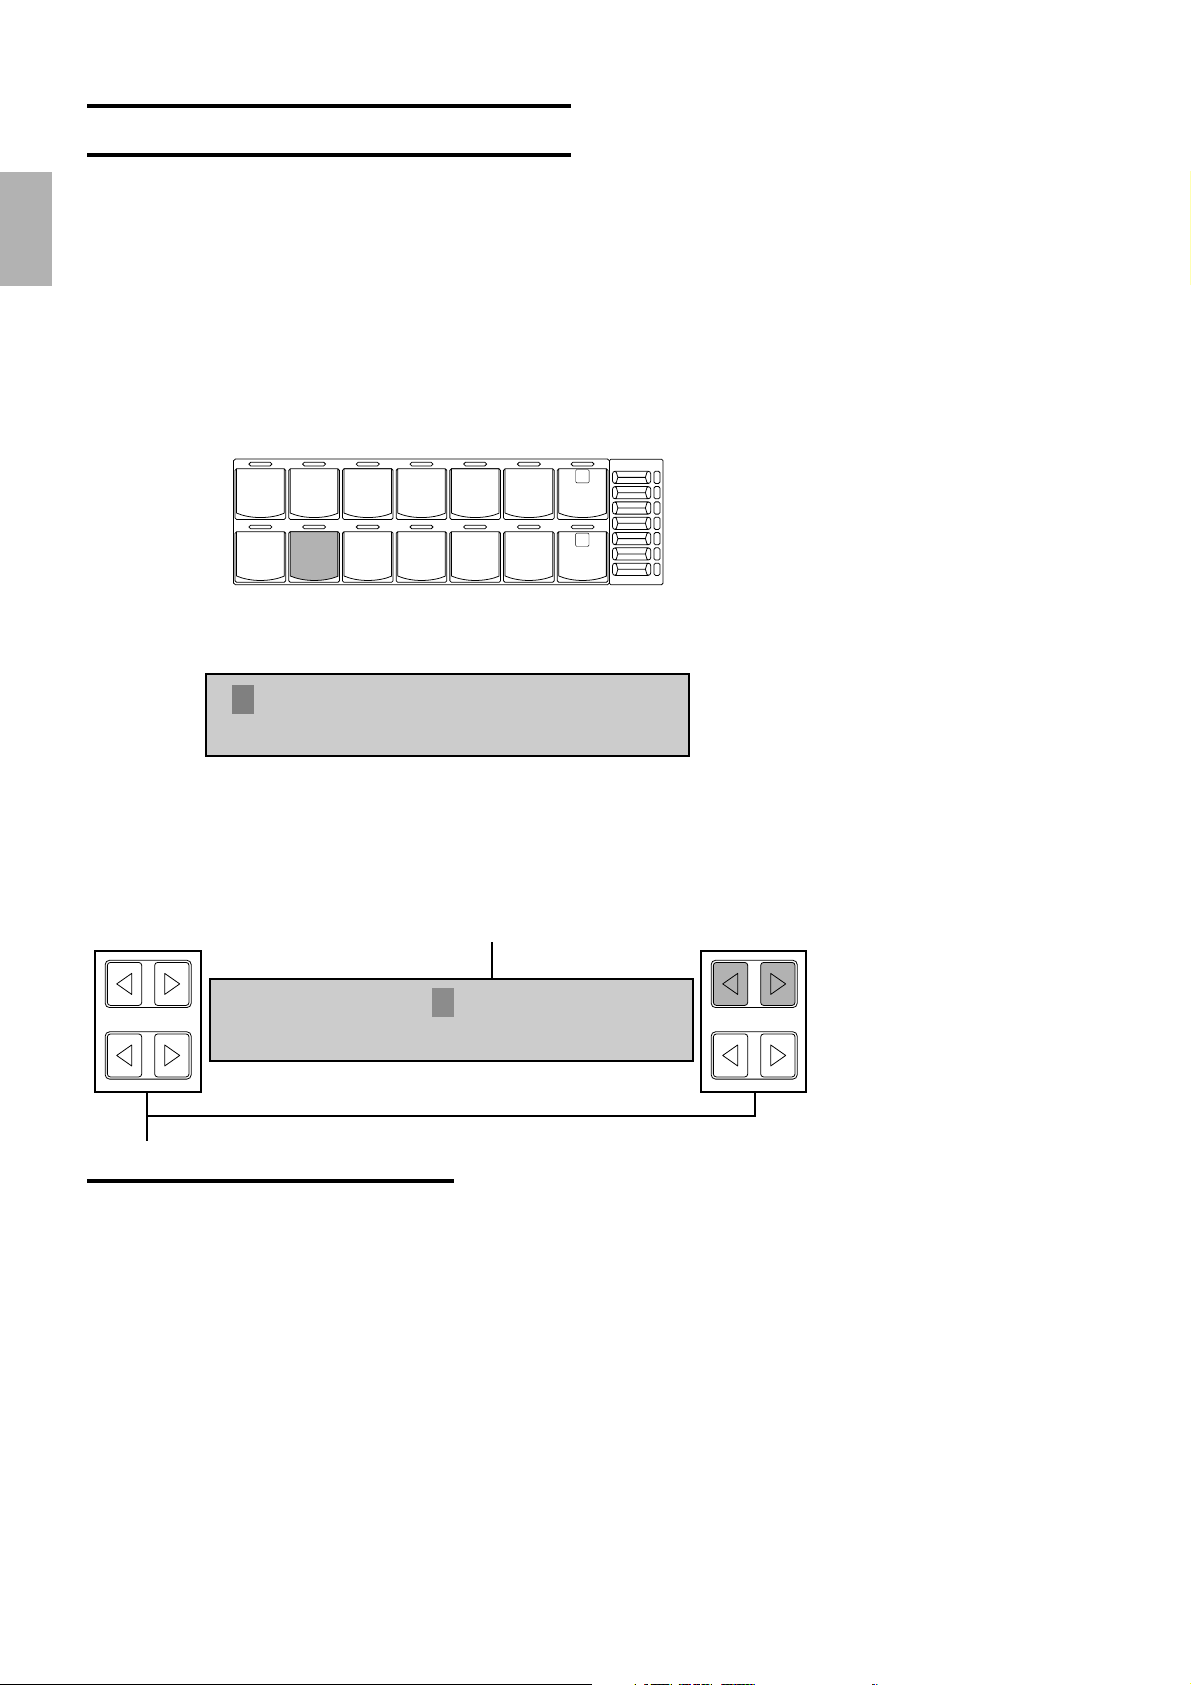
2. Press either one of the top right Data control
buttons (as indicated below) to select the E. Piano
voice.
Data Control Buttons
These buttons are used to select or adjust the settings shown on the display.
Generally, each pair of buttons corresponds to the section of the display
directly next to it. In this example, the top right Data Control buttons
correspond to the top right quarter of the display (E. Piano).
14
1. Quick Introductory Guide
UPPER KEYBOARD VOICE
CLARI-
STRINGS BRASS
ORGAN PIANO GUITAR VIBRA-
NET
SAXO-
PHONE
PHONE
CHORUS
HARMO-
NICA
COSMIC TUTTI
VOLUME
MAX
1
2
MIN
Piano E.Piano
Harpsi.
The first character flashes to indicate the selected voice.
Piano E.Piano
Harpsi.
Page 17
3. Let’s call up another display to see some of the
other uses of the Data Control buttons. Press the
PIANO button in the Upper Keyboard Voice section
once again (the same one you pressed in step #1
above) to call up the Voice Condition display for the
Piano voice.
The following display will appear:
You can change two different settings of the voice from this display: the
touch and volume.
4. First, let’s change the volume value. Press the
left button in the bottom right Data Control button
pair (indicated below).
Notice that the value of the volume decreases each time you press the
button. Try also pressing the right button in this Data Control button pair
and notice that the value increases.
5. Next, we’ll use the Page buttons. These buttons
are used to select (when available) the various
“pages” of the display, the numbers of which appear
at the top right of the LCD. Press Page [>] to select
page 2 shown below.
15
1. Quick Introductory Guide
UPPER KEYBOARD VOICE
CLARI-
STRINGS BRASS
ORGAN PIANO GUITAR VIBRA-
NET
SAXO-
PHONE
PHONE
CHORUS
HARMO-
NICA
COSMIC TUTTI
VOLUME
MAX
1
2
MIN
<UPPER> ¡1
TOUCH=4 VOL.=24
Pressing this button
decreases the value.
Pressing this button
increases the value.
<UPPER> ¡1
TOUCH=4 VOL.=24
Indicates the currently selected page.
<UPPER> ¡2
FEET=PRE.EFFECT=PRE.
PAGE
Page 18

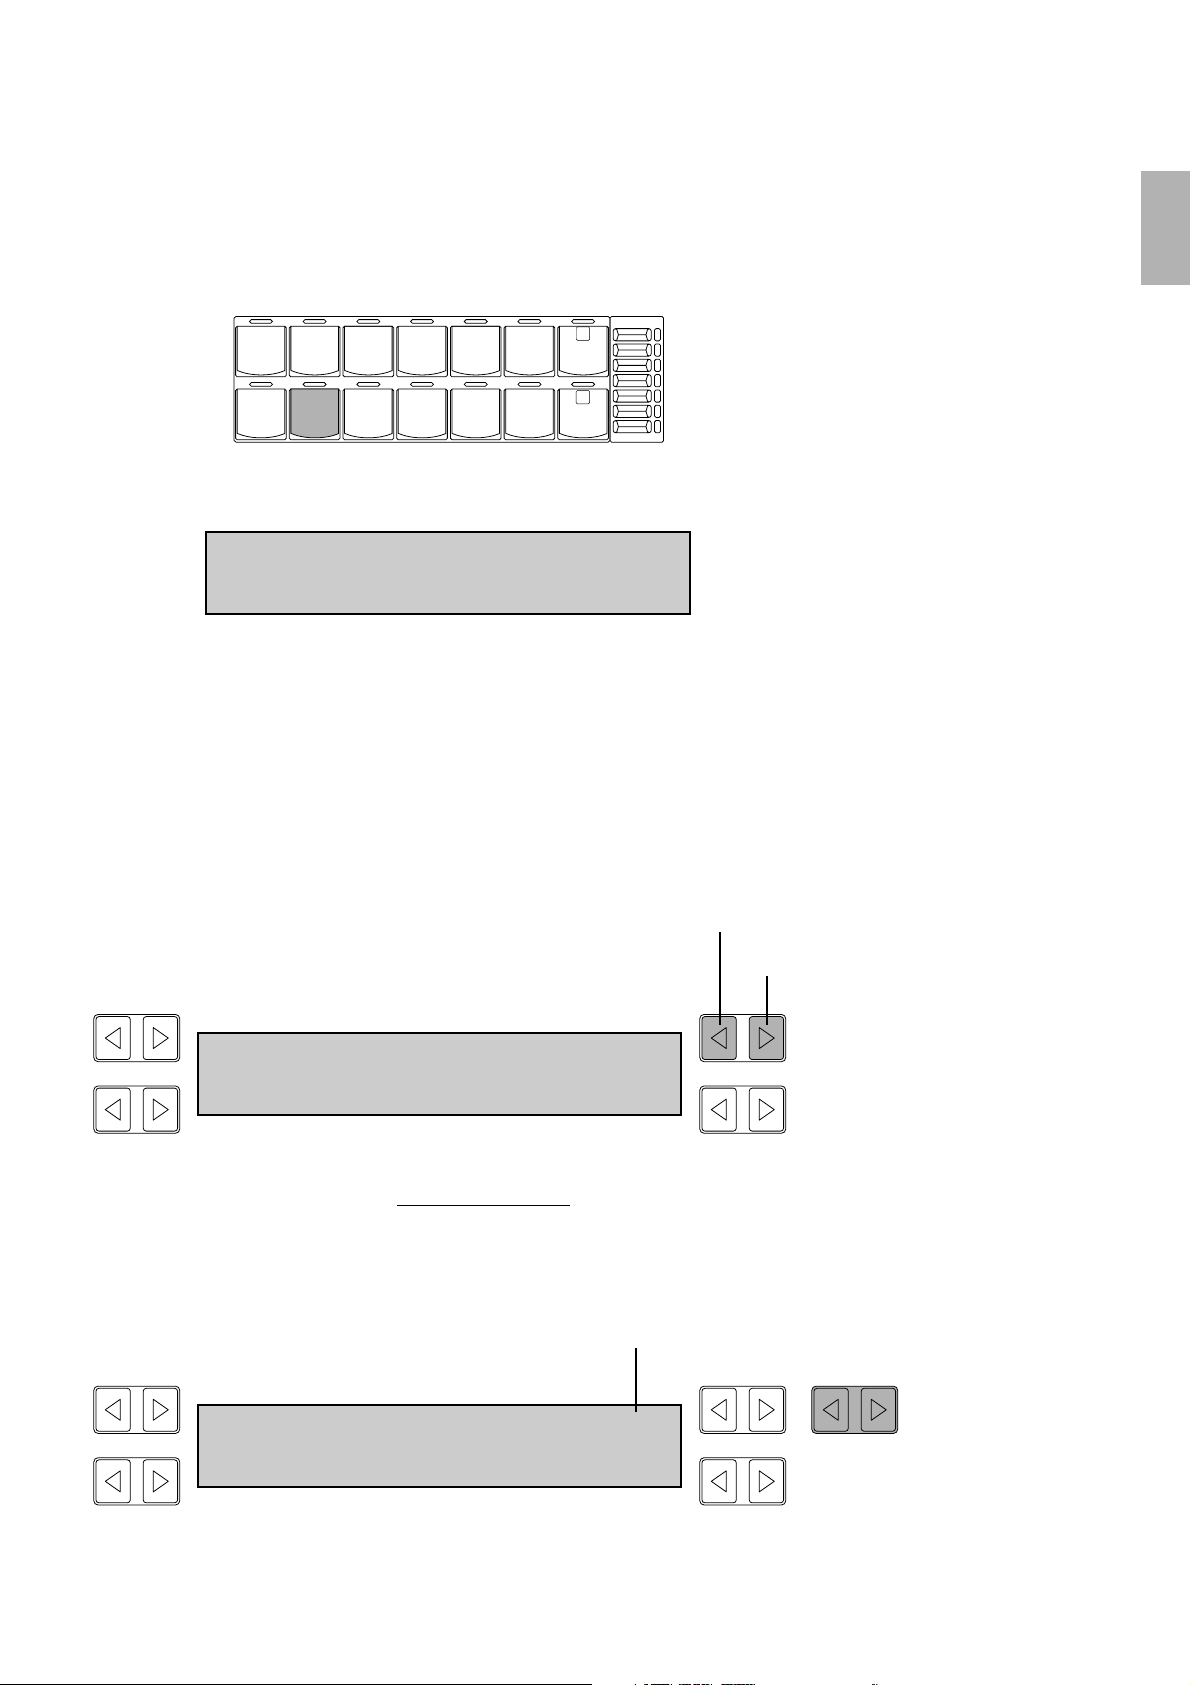
6. Tr y changing the effect setting now. Use the
bottom right Data Control button pair in much the
same way as you did with the volume setting above.
7. Press Page [>] to select page 3 which includes
the vibrato setting.
8. From the page you’ve just selected, try pressing
one of the bottom left Data Control buttons (indicated
below). These turn the User Vibrato (USER VIB.)
function on and off.
The box next to “USER VIB.” in the LCD indicates the on/off status; a solid
box means ON, and an outlined box means OFF.
The Data Control buttons are nearly always used in the ways you’ve seen in the
above steps. You’ll have noticed that the left button of a Data Control button
pair is usually used in a “negative” fashion-for instance, to decrease a value, or
select a previous setting or position. The right button is used in a “positive”
fashion-to increase a value, or select the next setting or position. In some cases,
the buttons are also used to turn functions on and off.
Display Select Buttons
These buttons access some of the major functions of the Electone and call up
their respective LCD displays. The LCD display changes when another
function has been selected.
There are two ways to call up LCD displays: One is by pressing the panel’s
voice/rhythm buttons or the sustain controls; the other is by pressing the
DISPLAY SELECT buttons.
The LEDs above the buttons momentarily flash when the buttons are pressed.
16
1. Quick Introductory Guide
Turning on Tremolo with the
TREMOLO button in the
DISPLAY SELECT section does
not call up an LCD display.
<UPPER> ¡2
FEET=PRE.EFFECT=SYM.
Pressing this button selects the next effect.
Pressing this button selects the previous effect.
<UPPER> ¡3
ŒUSER VIB.
PAGE
<UPPER> ¡3
„USER VIB.
Pressing either of these buttons turns User Vibrato on and off.
DISPLAY SELECT
VOICE
DISPLAY
FOOT
SW.
NOTE
A.B.C.
EFFECT
M.O.C.
REGIST.
PITCH
MIDI
SHIFT
TREMOLO
(FAST)
Page 19

2. Voice Sections
The Electone has four voice sections: Upper Keyboard Voice, Lead Voice, Lower Keyboard Voice, and
Pedal Voice. All voices are playable from the Upper or Lower keyboards or Pedalboard.
Selecting Voices from the Panel
Since selection of panel voices follows the same procedure throughout the various voice sections, instructions
for only the Upper Keyboard Voice section are given here.
1. Select a voice from the Upper Keyboard Voice
section by pressing one of the Voice buttons in that
section.
If, for example, you have selected the PIANO voice, the following display
will appear:
Notice that several different voice names are shown on this display.
These are variations of the basic Piano voice category.
To Select one of these voice variations.
2.
Press one of the Data Control buttons that
corresponds to the voice you wish to select.
17
2. Voice Sections
Some voice buttons have only
one voice.
UPPER KEYBOARD VOICE
CLARI-
STRINGS BRASS
ORGAN PIANO GUITAR VIBRA-
LOWER KEYBOARD VOICE
STRINGS BRASS
ORGAN PIANO GUITAR VIBRA-
NET
CLARI-
NET
SAXOPHONE
PHONE
SAXOPHONE
PHONE
CHORUS
HARMO-
NICA
COSMIC TUTTI
HORN
CHORUS
COSMIC TUTTI
VOLUME
MAX
1
2
MIN
VOLUME
MAX
1
2
MIN
LEAD VOICE
VIOLIN FLUTE
OBOE TRUM-
PETTOLOWER
PEDAL VOICE
ELEC.
CONTRA
BASS
BASS
TUBAORGAN
BASS
1
1
TO
LOWER
VOLUME
MAX
MIN
VOLUME
MAX
MIN
UPPER KEYBOARD VOICE
CLARI-
SAXO-
CHORUS
STRINGS BRASS
ORGAN PIANO GUITAR VIBRA-
NET
PHONE
PHONE
HARMO-
NICA
COSMIC TUTTI
Piano E.Piano
Harpsi.
VOLUME
MAX
1
2
MIN
NOTE
Page 20

18
2. Voice Sections
3. Set the volume for each voice section. There are
two volume controls: Coarse and Fine.
Coarse: Use the VOLUME controls of each voice section on the panel to
set the desired level for each voice. The controls have seven volume
settings, from a minimum of 0, or no sound, to a maximum of full
volume.
Fine: Pressing the same panel voice button again calls up the Voice
Condition display.
Use the Data Control buttons that correspond to the Volume setting to
change the level of the desired voice. The relative level is indicated by a
numeric value (from 0 – 24).
4. Now select voices for the Lower keyboard and
Pedalboard as you did for the Upper keyboard above.
Also set the volumes of the voices.
Playing Lead And Bass Voices from the Lower Keyboard:
The Electone has a special “To Lower” function that lets you assign Lead
or Bass voices to the Lower keyboard. Simply press the TO LOWER
button on the voice section you wish to assign, and that voice will be
playable from the Lower keyboard.
About Voice Section Volumes:
The Upper Keyboard and Lead voices (when not using the “To Lower”
function) sound together in a layer, and the balance of the voices in the
layer is determined by the VOLUME controls of each section. In order to
hear or audition one voice section, set the volume of the other voice
section to the minimum level.
Pressing a voice button once
calls up that voice's Voice Menu
display. Pressing it a second
time calls up the Voice Condition
display (as shown in the illustration).
Successive presses alternate between
the two displays.
The Lead Voice and Pedal
Voice sounds one note at a
time; when you simultaneously
press two or more keys, only the highest
note will sound.
As for been Upper and Lower keyboard
Voice voices, you can play up to 11
notes simultaneously. (Total polyphonic
capacity is 11 notes at one time.)
When the TO LOWER button is
turned on, the Lead voices and
Pedal voices cannot be played
on the Upper keyboard and Pedalboard,
respectively.
Turning the Electone off erases
all panel settings you have
made. When the Electone is
turned on, Basic Registration 1 is
automatically selected.
If you have made panel settings you
wish to keep, save them to Registration
Memory (See page 42) before turning
the Electone off.
You can, however, restore the panel
settings that were made before the
Electone was last turned off. See page
47 for more information.
UPPER KEYBOARD VOICE
CLARI-
STRINGS BRASS
ORGAN PIANO GUITAR VIBRA-
NET
SAXO-
PHONE
PHONE
CHORUS
HARMO-
NICA
COSMIC TUTTI
VOLUME
MAX
1
2
MIN
<UPPER> ¡1
TOUCH=4 VOL.=24
Pressing this button increases the value.
Pressing this button decreases the value.
NOTE
LEAD VOICE
VIOLIN FLUTE
OBOE TRUM-
PETTOLOWER
NOTE
VOLUME
MAX
1
MIN
PEDAL VOICE
CONTRA
BASS
BASS
ELEC.
BASS
TUBAORGAN
1
TO
LOWER
VOLUME
MAX
MIN
Page 21

About the Voice Display:
You can return to the Voice Display which shows the currently selected
voices on each keyboard by pressing the VOICE DISPLAY button in the
DISPLAY SELECT section.
Selecting Additional Voices—Dotted Buttons and User Voices
The EL-37 Electone has a variety of voices from which you can choose—far greater than what is immediately
apparent from the front panel controls. You've already learned in the section above how to select the different
voices that are available in the Voice Menu display of each panel voice. The Electone also has dotted buttons in
each voice section, giving you access to even more voice. Optional Voice Disk voices are also available for
storing to User Voices.
● Selecting Voices from the Dotted Buttons
Each voice section has one or two dotted buttons, found on the right side of each voice section. These dotted
buttons function as "wild card" Voice Menu selectors; any internal or User voices can be selected from these
buttons.
The dotted buttons have the following basic uses:
1) For playing any voice of the Voice Menus from any of the keyboards or
Pedalboard. You can play on the Upper keyboard, for example, voices from
the twenty-two Voice Menu pages (including User), and not be limited to
only the twelve buttons (equivalent to twelve Voice Menu pages) that make
up the Upper Voice section. Another advantage to this feature is that when
the normally monophonic (one note) Lead and Pedal voices are assigned to
the Upper or Lower keyboard voice sections, they can be played
polyphonically.
2) For having three different voices from the same Voice Menu page
available for selection in the same song.
For example, you can assign one of the voices to a dotted button in the
Upper Keyboard Voice section, the second voice to the other dotted button
in the same section, and the third one on the Voice Menu.
3) For storing voices from a Voice Disk. (See page 65.)
To select a voice from a dotted button:
1. Press one of the dotted buttons in any of the
voice sections.
19
2. Voice Sections
When you load the registrations
created by the other type
Electones, the voice name may
not be seen but a solid box may blink.
This is because the loaded registration
include the voice which EL-37 doesn’t
contain.
You can directly view and select
Voice Menu pages by holding
down one of the dotted buttons
and simultaneously pressing the desired
voice buttons in succession.
NOTE
UPPER KEYBOARD VOICE
STRINGS BRASS
ORGAN PIANO GUITAR VIBRA-
CLARI-
NET
SAXO-
PHONE
PHONE
CHORUS
HARMO-
NICA
COSMIC TUTTI
VOLUME
MAX
1
2
MIN
NOTE
Page 22

2. Select one of the pages with the PAGE buttons.
Each voice group appears in the LCD display when the page has been selected.
3. Select a voice from the display (PizzStrs, for
example).
Select the USER page when you wish to use a voice from a Voice Disk. (See
page 65.)
20
2. Voice Sections
The first character of the
selected voice's name flashes
to indicate that the voice has
been selected. As long as you do not
select a voice, this indication will not
appear.
When you load the registrations
created by the other type
Electones, the voice name may
not be seen but a solid box may blink.
This is because the loaded registration
include the voice which EL-37 doesn’t
contain.
Strings ¡1
PizzStrs
Strings ¡1
PizzStrs
NOTE
NOTE
USER 1 USER 2 ¡US
USER 3 USER 4
Page 23

● Voice Menus
The following chart lists the voices available and their button/page assignment. The numbers shown in the list
correspond to the page numbers shown in the display
.
21
2. Voice Sections
STRINGS (Upper/Lower)
Strings ¡1
PizzStrs
VIOLIN (Lead)
Violin ¡2
CONTRABASS (Pedal)
ContBass PizzBass ¡3
BRASS (Upper/Lower)
Brass SynBrass ¡4
HORN (Lower)
Horn ¡5
TRUMPET (Lead)
Trumpet ¡6
Trombone
TUTTI (Upper/Lower)
Tutti1 Tutti2 ¡12
CHORUS (Upper/Lower)
Chorus ¡13
HARMONICA (Upper)
Harmonic ¡14
ORGAN (Upper/Lower)
Organ JazzOrgn¡15
ORGAN BASS (Pedal)
OrgBass ¡16
PIANO (Upper/Lower)
Piano E.Piano ¡17
Harpsi.
TUBA (Pedal)
Tuba ¡7
FLUTE (Lead)
Flute ¡8
Whistle
OBOE (Lead)
Oboe Bassoon ¡9
CLARINET (Upper/Lower)
Clarinet ¡10
SAXOPHONE (Upper/Lower)
Saxophon ¡11
GUITAR (Upper/Lower)
Guitar ¡18
E.Guitar
VIBRAPHONE (Upper/Lower)
Vibrphon ¡19
Marimba
ELACTRIC BASS (Pedal)
E.Bass ¡20
SynBass
COSMIC (Upper/Lower)
Cosmic1 Cosmic2 ¡21
Cosmic3
USER 1 USER 2 ¡US
USER 3 USER 4
Page 24

22
3. Voice Controls and Effects
3. Voice Controls and Effects
The Electone is equipped with two general kinds of functions that can be used to change the sound of
the voices: Voice Controls and Effects.
These are used to change various aspects of the voices, such as the volume or octave (footage), or
enhance the sound of the voices, such as with Reverb, Tremolo, or Vibrato.
Each voice has been given certain factory-preset effect settings to best enhance its sound. However, you
can also change the effect to suit your preferences by using the controls described in this section.
Voice Controls/Effects Chart
This chart shows all of the Voice Controls and Effects for the various voice sections of the EL-37. A circle (Ø)
indicates that the setting is available. The bottom of the chart shows the relevant LCD titles for each setting.
Voice Controls & Effects
Voice Controls
Voice Condition Pages
To select the Voice Condition pages for changing the settings: Choose a
voice on the panel, then press that voice’s panel button twice. Use the
Page buttons to change the pages.
For the Lead Voice example shown below, press the VIOLIN button in the
Lead Voice section twice. To call up the corresponding Upper Voice
example, press the PIANO button in the Upper Keyboard Voice section twice.
There are some differences
between the functions in the
Lead and Upper/Lower voices.
Where appropriate, the different
displays are shown.
Touch
Related
LCD
Display
Upper/Lower
Lead
Pedal
Condition
LCD
Effect LCD
Sustain LCD
Foot Switch
LCD
Tone
(Initial/
After)
Ø
Ø
—
Ø
—
—
Tremolo/
SustainReverb
Volume
Fine
Ø
Ø
—
Ø
Feet
(Octave)
Ø
Ø
Ø
Ø
Chorus
Ø
Ø
Ø
*1
Ø
—
Ø
—
—
—
*1 After setting this, press Tremolo button on the panel. *2 After setting 1, adjust the parameter in 2.
Symphonic/
Celeste
Ø
Ø
Ø
Ø
Ø
Ø
Ø
*2 *2 *2
111
Ø
*2 *2 *2
222
Ø
—
—
—
—
FlangerDelay
Ø
Ø
Ø
Ø
—
Ø
Ø
Ø
Ø
—
Vibrato
Delay,
Depth,
Flanger
—
Ø
TouchDepth
Ø
Glide
—
Ø
—
—
Ø
—
NOTE
Ø
—
—
Ø
—
Ø
Ø
—
—
Ø
LEAD VOICE
VIOLIN FLUTE
OBOE TRUM-
PETTOLOWER
VOLUME
MAX
1
MIN
STRINGS BRASS
ORGAN PIANO GUITAR VIBRA-
UPPER KEYBOARD VOICE
CLARI-
SAXO-
PHONE
PHONE
CHORUS
COSMIC TUTTI
NET
HARMO-
NICA
VOLUME
MAX
1
2
MIN
Page 25

23
3. Voice Controls and Effects
Voice Condition Page 1
1 Touch Tone
The Touch Tone function gives you expressive control over the volume
and timbre of a voice. Two types of keyboard touch affect this function:
Initial Touch and After Touch. Range: 1-7
Initial Touch
Controls volume and timbre according to the velocity at which you strike
the keys. The harder you strike the keys, the greater the volume and the
brighter the timbre will become.
After Touch
Controls volume and timbre according to the pressure you apply to the
keys after playing them. The harder you press down on the keys, the
greater the volume and the brighter the timbre will become.
2 Volume
Fine adjustment of the voice volume. (Coarse volume settings are made
with the front panel VOLUME controls.) Range: 0-24
Some voices may not have a
remarkable effect.
<LEAD> ¡1
TOUCH=4 VOL.=16
!"
<LEAD> ¡1
TOUCH=4 VOL.=24
!"
<LEAD> ¡1
TOUCH=4 VOL.=16
NOTE
Increases the sensitivity.
Decreases the sensitivity.
<LEAD> ¡1
TOUCH=4 VOL.=16
Increases the volume.
Decreases the volume.
Page 26

24
3. Voice Controls and Effects
Voice Condition Page 2
3 Feet
Determines the octave setting of the voice. PRE. (Preset) is the original
(factory) setting; 4' is the highest and 16' is the lowest. Settings: PRE., 4',
8', 16'
By using different Feet settings in the Lower and Upper keyboards and
Pedalboard, you can duplicate the wide octave range of many
instruments. For example, with both the Lower and Upper keyboards set
to the Piano voice and Feet set to appropriate values, you can play the
voice nearly over the full range of a grand piano.
4 Effect
Determines the effect type applied to the voice. PRE. (Preset) selects the
original (factory) effect, while OFF cancels the effect. This is essentially
an on/off switch for the effects. Settings: PRE., OFF, TRM. (Tremolo),
SYM. (Symphonic), DLY. (Delay), FLG. (Flanger).
Though different effects can be applied to different voice sections, only one
effect can be selected at a time for each voice section. (In order to actually
apply the Tremolo, Symphonic/Celeste, Delay and Flanger effects, one more
step is necessary. Refer to the sections on those individual effects below.)
These effects are applied in
different degrees depending on
the voice selected.
<LEAD> ¡2
FEET=PRE.EFFECT=PRE.
34
<UPPER> ¡2
FEET=PRE.EFFECT=PRE.
34
PAGE
<LEAD> ¡2
FEET=PRE.EFFECT=PRE.
Selects next setting.
Selects previous setting.
<LEAD> ¡2
FEET=PRE.EFFECT=PRE.
PRE.
4'
8'
16'
PRE.
OFF.
TRM.
SYM.
DLY.
FLG.
Selects next setting.
Selects previous setting.
NOTE
Page 27

Voice Condition Page 3
5 Vibrato
Vibrato is an effect that periodically, or regularly, varies the pitch of a
voice for a quavering sound. Used properly, it can make a voice sound
richer and more natural.
Call up the Vibrato and Touch Vibrato settings on Voice Condition Page 3
by using the Page buttons.
5 -1 User Vibrato (USER VIB.)
When this is turned on, you can adjust the vibrato settings: Delay, Depth
and Speed for Lead voices, and Depth for Upper/Lower voices.
The Delay, Depth and Speed settings are set in the next page, Voice
Condition Page 3. The Delay, Depth and Speed settings are not displayed
and cannot be adjusted unless USER VIB. has been turned on in this
setting.
5 -2 Touch Vibrato (T. VIB) (Lead Voice only)
On/Off switch for the Touch Vibrato function. Touch Vibrato lets you
apply vibrato to individual notes as you play them. While playing a key,
press down harder on it to give the note vibrato. The harder you press
the key down, the greater the vibrato will be.
Call up the User Vibrato settings on Voice Condition Page 4 by using the
Page buttons.
25
3. Voice Controls and Effects
The Pedal Condition display has
only two pages.
Vibrato cannot be applied to the
Pedalboard voices.
The Delay, Depth and Speed
setting can be adjusted only
when the User Vib. on the Voice
Condition Page 3 is turned on.
Only the Delay is available for the Upper
and Lower keyboard voices.
<LEAD> ¡3
ŒUSER VIB. ŒT.VIB.
5 -1 5 -2
<UPPER> ¡3
ŒUSER VIB
5 -1
PAGE
NOTE
PAGE
<LEAD> ¡3
ŒUSER VIB. ŒT.VIB.
Press either of these buttons
to turn on User Vibrato.
5 -1 5 -2
Press either of these buttons
to turn on Touch Vibrato.
NOTE
NOTE
Page 28

Voice Condition Page 4
1 Delay (Lead Voice only)
Determines the amount of time that elapses between the playing of a key
and the start of the vibrato effect (see diagram). Higher settings increase
the delay of the vibrato onset. Range: 0-7
2 Depth
Determines the intensity of the vibrato effect (see diagram). Higher
settings result in a more pronounced vibrato. Range: 0-7
3 Speed (Lead Voice only)
Determines the speed of the vibrato effect (see diagram). Range: 0-7
The following diagram graphically shows the vibrato effect and is related
controls.
If User Vib. has not been turned on, the following display appears when
Page 3 is selected.
26
3. Voice Controls and Effects
When you set the DEPTH to 0,
the Touch Vibrato function will
be inactive.
1
<LEAD>VIB. DELAY=0¡4
DEPTH=0 SPEED=0
23
<UPPER>VIB. ¡4
DEPTH=0
2
PAGE
Vibrato Controls
Speed
Delay
Depth
Key On
<UPPER>VIB. ¡4
PRESET VIBRATO
NOTE
Page 29

Effects
The effects include the Tremolo, Symphonic, Delay and Flanger which should first be selected and turned on
for the specific voice section(s) on the Voice Condition page 2 above, and Reverb, Sustain and Guide.
1 Tremolo/Chorus
Tremolo recreates the rich, swirling sound of the popular rotating speaker effect. Just as with a conventional
rotating speaker, you can switch the effect on and off as you play. And like a motor-driven speaker, the
characteristic tremolo effect gradually changes speed after it is switched. The Tremolo effect can be switched in
real time as you play with the TREMOLO (FAST) button on the panel.
Tremolo Operation
1) Select TRM. (Tremolo) in each Voice Condition display page 2.
2) Turn on Tremolo as you play with the panel Tremolo button.
When TREMOLO (FAST) button is turned on while the TRM. is selected in
each Voice Condition display, the rotation effect is fast (Tremolo); when off,
it is slow (Chorus).
2 Symphonic/Celeste
Symphonic simulates the effect of a large ensemble, while Celeste creates the effect of a gradually expanding
sound.
Symphonic/Celeste Operation
1) Select SYM. (Symphonic) in each Voice Condition display Page 2.
2) Press the EFFECT button in the DISPLAY SELECT section, and call up
the Symphonic page 3 (Effect Page 3) by using the Page button. Select
Symphonic (or Celeste) by pressing any of the bottom Data Control
buttons.
27
3. Voice Controls and Effects
<UPPER> ¡2
FEET=4' EFFECT=SYM.
Selectng SYM. (Synphonic/Celeste) for
the selected voice section.
PAGE
<SYMPHONIC> ¡3
„Symphonic ŒCeleste
Use any of these Data Control buttons
to select the Symphonic/Celeste settings.
Page 30

28
3. Voice Controls and Effects
3 Delay and Flanger
Delay and Flanger are two unusual effects used often in contemporary music. Like Tremolo and Symphonic,
the Delay and Flanger effects are set in two steps, from two different groups of display page: the Voice
Condition pages and the Effect pages.
Delay and Flanger Operation
1) Select DLY. (Delay) or FLG. (Flanger) in each Voice Condition
display page 2.
2) Press the EFFECT button in the DISPLAY SELECT section, and use the
Page buttons to select the corresponding pages.
Delay Page (Effect Page 1)
Delay is a pronounced echo effect, with distinct delayed repeats of the
original sound.
1 F.B. (Feedback)
Determines the number of delayed repeats. Range: 0-100
2 SPEED
Determines the time between delayed repeats. Range: 0-100
3 BAL. (Balance)
Determines the volume of the delay effect, relative to the original sound.
Higher settings produce a louder delay. Range: 0-100
Flanger Page (Effect Page 2)
Flanger introduces a swirling, animated modulation effect to the sound.
1 F.B. (Feedback)
Controls the brightness and the metallic sound of the effect. Range: 0-100
2 SPEED
Determines the speed of the modulation. Range: 0-100
3 DEP. (Depth)
Determines the intensity of the effect. Range: 0-100
The Delay and Flanger effects
are available for the Upper,
Lower and Lead Voice sections.
NOTE
1
<DELAY> F.B.=20 ¡1
SPEED=25 BAL.= 5
23
PAGE
<FLANGER> F.B.=20 ¡2
SPEED=47 DEP.=10
1
23
PAGE
Page 31

4 Reverb
Reverb adds an echo-like effect to the sound, giving the impression of a performance in a large room or concert
hall. The effect is applied equally and simultaneously to all voice sections.
To adjust the reverb effect:
Press one of the REVERB buttons, located at the far left of the panel.
These controls determine the depth of the reverb effect. There are
seven settings, from a minimum of 0, or no reverb, to the maximum.
5 Sustain
The Sustain effect, selectable for the Upper, Lower and Pedal voices, causes voices to gradually fade out when
the keys are released. The sustain on/off and sustain length settings are independent for each keyboard,
providing maximum expressive control. Sustain is also independent from the other effects (such as Tremolo or
Symphonic) .
To add sustain to the voices and call up the Sustain Length page: Press
the UPPER (appropriate) button in the SUSTAIN section.
The lamp of the button lights up to indicate that sustain is on. Press the
button again to turn sustain off.
Sustain Length Page
UPPER, LOWER, PEDAL
Determines the length of sustain applied to each voice section. The display
shows the current sustain length values for each voice section. Range: 0- 12
6 Glide
Glide is a footswitch-activated effect; pressing the footswitch immediately lowers the pitch of the selected voice
or voices by a half-step. (Refer to the footswitch function on page 89.)
29
3. Voice Controls and Effects
If knee lever control of the
Upper or Lower sustain has
been turned on, pressing the
Upper or Lower buttons here will not
add sustain unless the knee lever is
pushed. (See page 90 for more
information.)
Sustain cannot be applied to the
Lead voices.
The values here must be set
high enough for the sustain
effect to be noticeable.
Remember that the SUSTAIN
buttons are on/off switches. If
you use them to simply check
the sustain length values, you may
unintentionally change the on/off status
of the effect. Remember to check
whether the sustain button lamps are on
or off before you start to play.
REVERB
MAX
MIN
SUSTAIN
UPPER
(KNEE)
PEDAL
LOWER
(KNEE)
1
<SUATAIN> UPPER=10
LOWER=10 PEDAL=6
23
NOTE
NOTE
NOTE
NOTE
Page 32

30
4. Rhythm, Accompaniment and Percussion
4. Rhythm, Accompaniment and Percussion
The Rhythm features of the Electone use actual drum and percussion sampled sounds to automatically
play various rhythm patterns. Automatic Accompaniment functions are used with the rhythm patterns,
providing appropriate and completely automatic accompaniment to match the style of the rhythm
pattern selected. Moreover, the Electone has a Keyboard Percussion feature that allows you to play
drum and percussion sounds from the Lower keyboard and Pedalboard.
Rhythm Patterns
Ten different rhythm categories in various styles can be instantly selected from the front panel. The Electone has
many more "hidden" rhythm patterns, however. A total of 38 rhythm patterns are available, and can be selected
by using the LCD display.
To select and play a rhythm pattern:
1. Choose a rhythm pattern by pressing one of the
Rhythm buttons in the Rhythm section on the panel.
To select a rhythm pattern from each category in the display, press the Data
Control button corresponding to the rhythm you wish to play, as you do with
the voices. The first character of the selected rhythm pattern’s name flashes.
(Refer to the Rhythm Menu list on page 35 for a list of available rhythms.)
2. Tu rn the rhythm on. You can use one of three
buttons to turn on the rhythm:
! START
This button does as its name indicates; the rhythm begins as soon as the
button is pressed. To stop the rhythm, press this button again.
SEQ. SEQ.
12
SEQ. SEQ.
34
MARCH WALTZ SWING BOUNCE SLOW
USER 1 USER 2 USER 3 USER 4 A B
TANGO LATIN 1 LATIN 2 8 BEAT 16 BEAT
USER 5 USER 6 USER 7 USER 8 C
March Polka
Country Broadway
RHYTHM
ROCK
VOLUME
MAX
1
2
D
MIN
INTRO.
ENDING
SYNCHRO
START
START
123
FILL IN
Page 33

31
4. Rhythm, Accompaniment and Percussion
" SYNCHRO START
This button puts the rhythm pattern in “stand-by”; the rhythm will start
when you press a note on the Lower keyboard or Pedalboard. To stop
the rhythm, press this button again.
# INTRO. ENDING
Pressing this button automatically plays a short introduction (of up to
eight measures) before starting the actual rhythm pattern. First, press the
INTRO. ENDING button, then the START or SYNCHRO START button to
actually start the rhythm.
While the introduction is playing, the TEMPO Display shows the
countdown to the first measure of the pattern. For example, if there is an
eight-measure lead-in for a pattern in 4/4 time, the following display
appears:
Pressing the INTRO. ENDING button again while the pattern is being played
will automatically add an ending phrase before stopping the rhythm.
LEAD IN
Pressing the START button while holding down the INTRO. ENDING button
automatically plays a special one-measure Lead In, with a click on each beat,
to cue you in to the beginning of the song.
3. Set the volume. Press the VOLUME controls to
the right of the Rhythm buttons to set the desired
level of the rhythm. The controls have seven volume
settings, from a minimum of 0, or not sound, to a
maximum of full volume.
Fine adjustments in the volume of the rhythm pattern can also be made from
the Rhythm Condition page (See page 33).
4.
Set the tempo.
! TEMPO Dial
For adjusting the speed of the rhythm. Turn the dial clockwise to increase
the tempo, and counter-clockwise to decrease it.
ABOUT SYNCHRO START:
The Synchro Start feature functions
quite differently when Auto Bass Chord
is turned on and Accompaniment
Memory is turned off. The rhythm pattern
starts when a key on the Lower
keyboard is played, but then
immediately stops when the key is
released. To keep this from happening,
turn the Memory function on. (Refer to
the A.B.C. section, page 36, for details
on Auto Bass Chord and Memory.)
When the Electone is turned on,
the rhythm volume is
automatically set to 0.
The left footswitch can also be
used to turn the rhythm off and
on in the middle of a song.
However, it cannot be used to start the
rhythm at the beginning of a song. (To
assign the footswitch for rhythm control,
See page 89.)
TEMPO
BAR/BEAT
TEMPO
NOTE
NOTE
TEMPO
BAR/BEAT
Tempo display:
shows the current tempo.
TEMPO
12
Page 34

32
4. Rhythm, Accompaniment and Percussion
" TEMPO Display (BAR/BEAT Indicator)
Shows the current tempo. (Displayed values are given in beats per
minute, just as on a conventional metronome.) The tempo range is 40 to
240 beats per minute.
When the rhythm pattern begins playing, the TEMPO display changes
function to a bar/beat indicator.
The number on the left indicates the current bar or measure and the one
on the right indicates the number of the beat in each bar. The beat indicator
lamp above the display also indicates the beats.
Fill In Patterns
Fill In Patterns are designed to be used as temporary and regular rhythmic breaks to spice up a repeating
rhythm pattern. Like the regular rhythm patterns, all Fill In patterns have been designed to perfectly match the
bass and chord parts of the Automatic Accompaniment feature.
To use the Fill In patterns:
1. Select and play a rhythm pattern.
2. As you play the Electone along with the rhythm
pattern, occasionally press the FILL IN button.
For best results, press the FILL IN button just at the beginning or the first beat
of a measure.
When you turn the TEMPO Dial
even while the rhythm is
playing, the display momentarily
changes to show the current tempo.
USING A FILL IN FOR THE START OF
A SONG:
Fill In patterns can also be used as
introductions; simply press the FILL IN
button before starting the rhythm with
the START or SYNCHRO START
buttons.
PLAYING PARTIAL FILL IN
PATTERNS:
You can also start Fill In patterns
within a bar, in order to play only the
final one or two beats of the Fill In
pattern and create additional rhythmic
interest. Since the Fill In feature is very
sensitive to bar/beat boundaries, you
should be very careful to “play” the
FILL IN button precisely on (or just
slightly before) the beat that you want
the Fill In pattern to begin.
BAR/BEAT
BAR/BEAT Indicator:
shows the current position in the measures
TEMPO
NOTE
INTRO.
ENDING
SYNCHRO
START
START
FILL IN
Page 35

33
4. Rhythm, Accompaniment and Percussion
Auto Variation and Percussion Volume
These two settings are controlled from each rhythm’s Rhythm Condition pages. There are three Rhythm
Condition pages.
To select the Rhythm Condition pages:
Choose a rhythm pattern, and press that pattern’s panel button again. (The button should be pressed only
once if the Rhythm display has already been called up; otherwise press the button twice.)
Rhythm Condition Page 1
1 AUTO VARI. (Auto Variation)
The Auto Variation function lets you set pattern variations to be played
automatically. When set to on, Auto Variation automatically substitutes
additional pattern variations to make the rhythm more interesting and
complex.
2 Volume
Fine adjustment of the overall volume of the rhythm patterns and
Keyboard Percussion. Range: 0-24
Rhythm Condition Page 2 and 3 are described later in this section. (See
page 36.)
Dotted Buttons
The Rhythm section also has, like the voice sections, dotted buttons from
which rhythm patterns can be selected. These dotted buttons function as
“wild card” rhythm pattern selectors; any of the rhythm patterns available
from the panel buttons, the Rhythm Menus or User rhythm can be selected
from these buttons.
The Auto Variation function is
not applied to some of the
rhythm patterns.
As with the Voice sections’
dotted buttons, you can set two
or three rhythm patterns from
the same page to be selected from
different buttons (one from the original
Rhythm button, and the others from the
dotted buttons).
SEQ. SEQ.
12
SEQ. SEQ.
34
RHYTHM
MARCH WALTZ SWING BOUNCE SLOW
USER 1 USER 2 USER 3 USER 4 A B
TANGO LATIN 1 LATIN 2 8 BEAT 16 BEAT
USER 5 USER 6 USER 7 USER 8 C
ROCK
VOLUME
MAX
1
2
D
MIN
<RHYTHM> ¡1
ŒAUTO VARI. VOL.=16
12
These buttons turn the Auto
Variation function on and off.
PAGE
Increases the volume.
Decreases the volume.
NOTE
NOTE
Page 36

34
4. Rhythm, Accompaniment and Percussion
To select a rhythm pattern from a dotted button:
1. Press one of the dotted buttons on the right side
of the Rhythm section.
2. Select one of the pages with the Page buttons.
3. Select one of the rhythms by pressing one of the
appropriate Data Control buttons.
For example, select Dixie by pressing one of the bottom right Data Control
buttons.
User Pages
Select the User pages when you wish to play rhythm patterns you’ve created
with the Rhythm Pattern Program function. (See page 68.)
While you scroll through the
pages with the Page buttons,
the originally selected rhythm
pattern will sound until you select
another pattern with the Data Control
buttons.
SEQ. SEQ.
12
SEQ. SEQ.
34
RHYTHM
MARCH WALTZ SWING BOUNCE SLOW
USER 1 USER 2 USER 3 USER 4 A B
TANGO LATIN 1 LATIN 2 8 BEAT 16 BEAT
USER 5 USER 6 USER 7 USER 8 C
ROCK
VOLUME
MAX
1
2
D
MIN
Swing1 Swing2
J.Ballad Dixie
PAGE
Swing1 Swing2
J.Ballad Dixie
NOTE
Page 37

Rhythm Menus
This chart lists all 38 of the rhythm patterns available on the Electone. The numbers in the chart correspond to
the page numbers shown in the display.
Accompaniment Controls
The Accompaniment function here is independent of the A.B.C. accompaniment and works with the Rhythm
section to automatically add arpeggiated chords and other instrumental embellishments. The Accompaniment
controls include the setting of the Accompaniment type and its volume.
To select the Accompaniment controls in the Rhythm Condition pages:
1. Press any one of the RHYTHM buttons on the
panel twice.
35
4. Rhythm, Accompaniment and Percussion
When the Electone is turned on,
the Accompaniment Volume is
automatically set to 0. Be sure
to set the Accompaniment Volume to the
appropriate value when using the
Accompaniment function.
Even if the Accompaniment
Type is changed, the
Intro/Ending pattern remains the
same.
MARCH LATIN 1
March Polka ¡1
Country Broadway
WALTZ LATIN 2
Waltz 1 Waltz 2 ¡2
J.Waltz Bolero
SWING 8 BEAT
Swing 1 Swing 2 ¡3
J.Ballad Dixie
BOUNCE 16 BEAT
Bounce 1 Bounce 2 ¡4
Reggae 1 Reggae 2
SLOW ROCK USER
S.Rock1 S.Rock2 ¡5
S.Rock3
Cha-cha Rhumba ¡7
Beguine Mambo
Samba 1 Samba 2 ¡8
Bossa.1 Bossa.2
8Beat1 8Beat2 ¡9
8Beat3 D.Pop
16Beat1 16Beat2 ¡10
16Beat3 Funk
USER1-A USER1-B ¡U1
USER1-C USER1-D
TANGO
Tango 1 Tango 2 ¡6
Tango 3
USER8-A USER8-B ¡U8
USER8-C USER8-D
SEQ. SEQ.
12
SEQ. SEQ.
34
RHYTHM
MARCH WALTZ SWING BOUNCE SLOW
USER 1 USER 2 USER 3 USER 4 A B
TANGO LATIN 1 LATIN 2 8 BEAT 16 BEAT
USER 5 USER 6 USER 7 USER 8 C
ROCK
VOLUME
MAX
1
2
D
MIN
NOTE
<RHYTHM> ¡1
ŒAUTO VARI. VOL.=0
NOTE
Page 38

2. Once the Rhythm Condition Page 1 display
(above) has been called up, use the Page buttons to
select Page 2.
Rhythm Condition Page 2
1 TYPE (1-4)
These settings provide types of rhythmic and melodic accompaniment,
and become more complex according to the type number (Type 1 is the
simplest, Type 4 the most complex).
2 VOL. (Volume)
Determines the volume of the Accompaniment. The Accompaniment can
be turned off by setting this parameter to the minimum value. Range: 0-24
Automatic Accompaniment—Auto Bass Chord
The Auto Bass Chord (A.B.C.) function works with the Rhythm section of the Electone to automatically
produce chord and bass accompaniment as you play. It adds a entirely new dimension to your performance by
effectively putting a full backing band at your disposal. Depending on the feature or mode selected, you can
play anything from a single note to a full chord on the Lower key board and hear complete, rhythmical bass
and chord accompaniment.
To select the A.B.C. function and call up Rhythm Condition Page 3:
1. Press any of the RHYTHM buttons twice to call
up the Rhythm Condition pages.
2.
Use the Page buttons to select Page 3, the
A.B.C. & Memory page.
Rhythm Condition Page 3
<ABC> <MEMORY> ¡3
Fingered ŒL ŒP
OFF
Single
Fingered
Custom
Turn the Pedalboard Memory (P)
on and off.
Turn the Lower keyboard Memory (L) on and off.
"
!
These buttons correspond to the bottom left of the LCD and
let you step through the various A.B.C. modes.
PAGE
<ACCOMPANIMENT> ¡2
TYPE=1 VOL.=0
PAGE
Increases volume.
Decreases volume.
Sets volume to maximum value.
Sets volume to minimum value.
Selects the Accompaniment type.
21
36
4. Rhythm, Accompaniment and Percussion
Page 39

37
4. Rhythm, Accompaniment and Percussion
Auto Bass Chord
1 Mode: Off, Single, Fingered, Custom
Off
Cancels the Auto Bass Chord function.
Single (Single Finger mode)
The Single Finger mode provides the fastest and easiest means to obtain
many different chord/bass combinations, by simply using one, or at most,
two or three fingers to play the chords.
Refer to the chart below, Chords Recognized in the Single Finger Mode,
for details on playing chords in this mode.
Fingered (Fingered Chord mode)
The Fingered Chord mode automatically produces bass and chord
accompaniment for chords played in the Lower keyboard. It allows you to
use a wider range of chord types than in the Single Finger mode. In the
Fingered Chord mode, you play all the notes of the chord while the Auto
Bass Chord function automatically selects the appropriate bass pattern and
rhythmic accents.
Refer to the chart below, Chords Recognized in the Fingered Chord Mode,
for details on playing chords in this mode.
Custom (Custom A.B.C. mode)
The Custom A.B.C. mode is a slight variation on the Fingered Chord
mode. It allows you to determine what bass notes will be played in the
accompaniment by playing a note on the Pedalboard along with the
chords you play in the Lower keyboard.
2 Memory
The Memory function allows you to have the bass and chord
accompaniment continue even after you release your fingers from the
keyboard. Independent Memory settings are available for the Lower
keyboard and Pedalboard, making it possible, for example, to have the bass
continue with the rhythm while the chord accompaniment “rests.” The
Memory function can also be used independently from the A.B.C. feature.
The bottom right Data Control button pair is used to control the Memory
function. The left button corresponds to the Lower keyboard, and the
right button corresponds to the Pedalboard.
L (Lower)
When Lower is set to on (solid box), the chord accompaniment of the
Lower Keyboard voices continues to play even after you release your
fingers from the Lower keyboard.
P (Pedal)
When Pedal is set to on (solid box), the bass accompaniment of the
Pedalboard voices continues to play even after you release your fingers
from the Lower keyboard.
The Auto Bass Chord function
can also be selected from the
A.B.C./ M.O.C. page. To select
the A.B.C./ M.O.C. page, press the
A.B.C./ M.O.C. button in the DISPLAY
SELECT section.
NOTE
Page 40

38
4. Rhythm, Accompaniment and Percussion
Chords Recognized in the Single Finger Mode (Key of C)
Major, minor, 7th and minor 7th chords can all be played in the Single Finger
mode.
Major chords: Press the root of the chord (the note that corresponds to the
chord’s name).
Minor chords: Simultaneously press the root and any one black key to the
left of it.
7th chords: Simultaneously press the root and any one white key to the left of it.
Minor 7th chords: Simultaneously press the root as well as any black key
and any white key to the left of it.
PLAYING SINGLE FINGER CHORDS WITHOUT RHYTHM:
Auto Bass Chord is generally used with rhythm patterns to create full
rhythmic accompaniment, but it can also be used in the Single Finger mode
to add full continuous chords to your performance without the use of the
rhythm. Simply leave the rhythm off in Single Finger mode, and play Single
Finger chords from the Lower keyboard.
Chords Recognized in the Fingered Chord Mode (Key of C)
Minor, 7th and minor 7th
chords
with black key roots
(such as Bor G) are played in
the same way as those with white key
roots.
With Single Finger, the chord
produced will sound in the
same octave regardless of
where it is played on the Lower
keyboard.
If you forget to cancel the
Single Finger or Fingered
Chord accompaniment
functions, single notes that you play will
sounded as continuous chords.
C
Cm
C7
Cm7
Chord Roots on the Lower Keyboard
GAB D E
FGABCDE
NOTE
NOTE
C Cm C7 Cm7 Cmaj7
Cm maj7 C+5 C7+5
C-5Cm7-5 C7-5 C6 Cm6
Cdim C7sus4
NOTE
Page 41

39
4. Rhythm, Accompaniment and Percussion
Keyboard Percussion
The various drum and percussion sounds (a total of 43 available) have been assigned to the Lower keyboard
and pedalboard for you to play.
To play the Keyboard Percussion sounds :
1. Tu rn on the Keyboard Percussion function by
pressing either or both the LOWER and PEDAL
buttons in the KEYBOARD PERCUSSION section.
(Keyboard Percussion switches for the Lower
keyboard and Pedalboard can be used together or
independently as you wish.)
2. Set the volume.
The volume of the percussion sounds is set together with that of the rhythm
by using the VOLUME controls in the Rhythm section. Set the volume to the
desired level.
3. Tu rn off all the Lower and Pedal voices by
setting each voice’s volume to MIN.
4. Play some notes on the Lower keyboard and
Pedalboard. The various percussion sounds have
been assigned to the keyboards as shown in the
charts below.
Percussion Assignments for the Lower Keyboard
Additional percussion sounds
are available on the Upper
keyboard when using the
RHYTHM PATTERN PROGRAM
function (See page 71).
KEYBOARD
PERCUSSION
LOWER
SEQ. SEQ.
12
MARCH WALTZ SWING BOUNCE SLOW
USER 1 USER 2 USER 3 USER 4 A B
RHYTHM
ROCK
VOLUME
MAX
1
PEDAL
SEQ. SEQ.
34
TANGO LATIN 1 LATIN 2 8 BEAT 16 BEAT
USER 5 USER 6 USER 7 USER 8 C
2
D
MIN
Orchestra Snare Drum
Snare Brush Shot
Snare Brush Roll
Synth. Tom 1
Synth. Tom 2
Synth. Tom 3
Claves
Tom 3
Tom 2
Snare Drum Roll
Tom 1
Triangle Closed
Triangle Open
Wood Block Low
Cowbell
NOTE
Wood Block High
Agogo High
Agogo Low
Hand Clap
Concert Bass Drum
Snare Drum Heavy
Bass Drum Heavy
Snare Drum Heavy
Bass Drum Light
Snare Drum Rim
Snare Drum Light
Snare Drum Reverb
Hi-hat Open
Hi-hat Closed
Ride Cymbal
Orchestra Cymbal 1
Crash Cymbal
Timbale Low
Tambourine
Castanet
Orchestra Cymbal 2
Timbale High
Conga Low
Conga High
Bongo Low
Bongo High
Cuica High
Cuica Low
Shaker
Page 42

40
4. Rhythm, Accompaniment and Percussion
Percussion Assignments for the Pedalboard
Melody On Chord
The Melody On Chord (M.O.C.) feature automatically adds a harmony part to the melodies you play on the
Upper keyboard. The harmony is derived from the chords you play on the Lower keyboard—or from the
chords that are played for you, if you use Automatic Accompaniment.
Melody On Chord has three different modes, each providing a different set of harmonies to accompany the
melody played. The modes are selected from the A.B.C./M.O.C. page.
To select the M.O.C. function:
Press the A.B.C./M.O.C. button in the DISPLAY
SELECT section.
Snare Brush Shot
Snare Brush Roll
Tom 3
Snare Drum Light
Snare Drum Reverb
Snare Drum Heavy
Bass Drum Heavy
Tom 2
Tom 1
Hi-hat Closed
Snare Drum Rim
Synth. Tom 3
Ride Cymbal
Hi-hat Open
Synth. Tom 2
Crash Cymbal
Synth. Tom 1
Orchestra Cymbal 1
VOICE
DISPLAY
FOOT
SW.
EFFECT
REGIST.
SHIFT
DISPLAY SELECT
A.B.C.
M.O.C.
PITCH
MIDI
TREMOLO
(FAST)
Page 43

41
4. Rhythm, Accompaniment and Percussion
1 Type
OFF
Cancels the Melody On Chord function.
MOC Type 1
Produces harmonies of up to two notes in a range close to the melody
played.
MOC Type 2
Produces harmonies of up to three notes in a range close to the melody
played.
MOC Type 3
Produces harmonies of up to four notes in a range relatively distant from
the melody played.
2 Knee
On/off switch for knee lever control over Melody On Chord operation.
When this is on, pressing the knee lever to the right activates the Melody
On Chord function. (Refer to Knee Lever Control, page 90.)
<MOC> ¡3
Even when Melody On Chord is
on, if the Upper keyboard
voices are set to 0, the function
will not sound.
OFF ŒKNEE
OFF
MOC TYPE1
MOC TYPE2
MOC TYPE3
1
2
NOTE
Page 44

5. Registration Memory
Registration Memory allows you to store virtually all the settings you make on the panel and LCD,
providing a convenient way to instantly change all voice settings and rhythms while you're playing,
with the simple touch of a single button on the Registration Memory panel. The buttons are
conveniently located between the upper and lower keyboards for easy access while playing.
The following functions and settings cannot be memorized:
• Registration Shift settings
• Pitch/Transpose settings
•Voice Disk voices
• User rhythms in the Rhythm Pattern Program (except for User rhythms
currently assigned to the Dotted buttons)
• Rhythm Sequences
• MIDI settings
Storing Registrations
Newly created registrations you make can be stored to the Registration Memory panel buttons. All registrations
in Registration Memory can also be saved to floppy disk for future recall.
To store registrations to the Registration Memory:
1. After creating your original registration, decide
which numbered button you wish to store.
2. While holding down the M (Memory) button in the
Registration Memory section, press the numbered
button to which you wish to store your registration.
When the registration is stored, the numbered button flashes momentarily.
To select registrations from Registration Memory:
Simply press the numbered button that corresponds to the registration you
wish to select.
USING THE D (DISABLE) BUTTON:
Rhythm and automatic accompaniment patterns also change when you select different Registration
Memory buttons. Pressing the D (Disable) button allows you to keep the same rhythm and
accompaniment patterns throughout all your registration changes, or make your own rhythm pattern
selections if you want to.
42
5. Registration Memory
M
1 2 3 4 5 6 7 8 D.
M
1) While holding down M button... 2) ...press desired numbered button.
1 2 3 4 5 6 7 8 D.
Page 45

To store all registrations to disk:
1. Insert a formatted disk into the disk slot under
the Music Disk Recorder (M.D.R.)
Make certain that the disk is either blank or has data you can erase. If the
disk is new and unformatted, you will have to format it. Refer to the
instructions how to format a disk (See page 50).
2. Select a song number on the M.D.R. by using the
SONG SELECT buttons.
There are 40 songs, or memory locations, available on a single disk.
3. While holding down the RECORD button on the
M.D.R., press the M (Memory) button in Registration
Memory.
This operation saves all 8 registrations in Registration Memory to one song.
The other 39 available songs on the disk can be used for saving additional
batches of 8 registrations.
43
5. Registration Memory
See pages 56 and 57 for the
details on saving/recalling
registrations to/from the M.D.R.
RECORD PLAY
UPPER LOWER PEDAL CONTROL UPPER LOWER PEDAL CONTROL
SHIFT
SONG
REPEAT
PAUSE STOP PLAY SONG SELECT RECORD
MUSIC DISK RECORDER
FROM SONG DEL.
TO
SONG COPY
TEMPO +–
FORMAT
CUSTOM PLAY
RECORD PLAY
UPPER LOWER PEDAL CONTROL UPPER LOWER PEDAL CONTROL
SONG
REPEAT
PAUSE STOP PLAY SONG SELECT RECORD
MUSIC DISK RECORDER
M
1 2 3 4 5 6 7 8 D.
FROM SONG DEL.
TO
SONG COPY
TEMPO +–
FORMAT
1) While holding RECORD button...
CUSTOM PLAY
SHIFT
NOTE
2) ...press M button.
Page 46

Registration Shift
The Registration Shift function allows you to change registrations, all the settings you make on the panel and
LCD, without taking your hands from the keyboards. By using the right footswitch on the expression pedal, you
can step through the panel registrations in sequence, either in numeric order or in any order you specify.
Registration Shift has two modes: Shift and User.
To select the Registration Shift functions:
Press the REGIST. SHIFT button in the DISPLAY
SELECT section.
Registration Shift Mode Page
1 OFF
Turns off the Registration Shift assignment.
2 SHIFT
Selection of the Shift mode. In the Shift mode, each press of the right
footswitch selects the Registration Memory buttons in their numerical
order. After the last preset is reached, the function “wraps around” to select
the first button again. The numbered buttons light up as they are selected.
3 USER
Selection of the User mode. In the User mode, each press of the right
footswitch selects registrations according to the order you specify.
There are two pages: Mode and Edit. (The Edit page can only be called up
when the User mode has been selected.)
Once you’ve selected the User mode, call up the Edit page by using the Page
buttons.
44
5. Registration Memory
DISPLAY SELECT
VOICE
EFFECT
DISPLAY
REGIST.
FOOT
SHIFT
SW.
A.B.C.
M.O.C.
PITCH
MIDI
TREMOLO
(FAST)
PAGE
<REGIST SHIFT>
„OFF ŒSHIFT ŒUSER
12 3
Use these Data Control buttons to select the
various settings: OFF, SHIFT or USER.
Page 47

● Cursor Controls
The cursor controls are used to move the cursor (the flashing box in the display)
along the registration row in the display. The entered registration numbers are
shown in the display; spaces not yet entered are represented by a dot. Move the
cursor to the point you wish to edit by using the appropriate Rhythm Sequence
buttons (arrows marked in green) on the panel and/or the Data Control buttons.
Cursor Controls-Panel Buttons
Cursor Controls-Data Control Buttons
1 |<<
Moves the cursor to the first position.
2 >>|
Moves the cursor to the last position.
3 <<
Moves the cursor ten spaces back.
4 >>
Moves the cursor ten spaces ahead.
5 <
Moves the cursor one step to the left.
6 >
Moves the cursor one step to the right.
<REGIST SHIFT> ¡MODE
G
45
5. Registration Memory
The cursor cannot be moved
unless registration numbers
have been entered.
There are 18 Registration Shift
steps available.
ŒOFF ŒSHIFT „USER
The selected box flashes.
Registration Shift Edit Page
<REGIST SHIFT> ¡EDIT
T12314545454541 E
NOTE
PAGE
RHYTHM
PROGRAM
PATTERN
CLEAR CHANGE
34
SEQUENCE
3 3
1256
12
<REGIST SHIFT> ¡EDIT
56
T12314545454541 E
ACCENTINSTRUMENTQUANTIZE
0
1234
PRESET
05678
USER SET INS. DEL. CLEAR
12
56
NOTE
Page 48

● Data Controls
The buttons in the Rhythm Sequence section described below are used to enter
and delete registration numbers in the registration row. Move the cursor to the
desired position and edit the registration data.
1 SET
For initially entering a registration number to a blank space in the
registration row, or for replacing a number at the current cursor position.
To enter a number, press the desired Registration Memory button (the
selected button will light), then press the SET button. After using SET to
enter registrations, the cursor can be moved among the numbers.
2 INS. (Insert)
For inserting a registration number just before the current cursor position.
The new registration number is inserted at the cursor position and all
other numbers to the right of the cursor are moved to accommodate the
new number. To perform the operation, first move the cursor to a
numbered position. Then press the desired Registration Memory button
(the selected button will light), and press the INS. button.
3 DEL. (Delete)
For deleting a registration number at the current cursor position. To delete
the unnecessary number, move the cursor to a numbered position and
press the Data Control button corresponding to DEL.
4 CLEAR
For erasing all current user Registration Shift settings. After selecting
CLEAR, the following display appears:
46
5. Registration Memory
RHYTHM
PROGRAM
PATTERN
SEQUENCE
3 3
CLEAR CHANGE
0
PRESET
05678
ACCENTINSTRUMENTQUANTIZE
1234
1234
USER SET INS. DEL. CLEAR
Select OK with any of these
buttons to clear all data.
<REGIST SHIFT> Clear
[ OK ] [Cancel]
Select Cancel with any of these
buttons to abort the operation.
Page 49

Registration numbers cannot be entered beyond the Registration Shift
function’s capacity of 18. The following message momentarily appears when
the 18 spaces have been filled:
First delete unnecessary registrations, then perform the operation again.
Resetting the Registration Memory Buttons (Power On Reset)
All current settings including Registration Memories and User rhythms can be deleted at once by using the
Power On Reset function. To do this:
1. Tu rn oft the power.
2. While holding down the top left Data Control
button, turn the power back on.
Tur ning the Electone off erases all panel settings you have made. When the Electone is turned on, Basic
Registration 1 is automatically selected. If you have made panel settings you wish to keep, save them to
Registration Memory before turning the Electone off. You can, however, restore the panel settings that were
made before the Electone was last turned off. In doing this, first be careful NOT to press any panel buttons
(excepting those in Basic Registration) after you turn the Electone back on. Then, to restore the previous
settings, hold down the M (Memory) button and press the D (Disable) button.
47
5. Registration Memory
Be careful when using this
operation, since it erases all
your existing data. Always save
your important data to a floppy disk
using M.D.R. (See page 56) in advance.
<REGIST SHIFT> ¡EDIT
Data Full...!!
POWER
Page 50

6. Music Disk Recorder
48
6. Music Disk Recorder
The Music Disk Recorder (M.D.R.) is a sophisticated recording device built into the Electone that lets
you
record your performances and registration settings. The Music Disk Recorder not only records the
notes you play; it also remembers the voices and rhythms you select, the front panel controls you
change,
as well as all expression pedal, footswitch and knee lever positions, to reproduce your performance
exactly as you play it. Moreover, you can separately record different parts of your performance,
building
up a song part by part.
Precautions
Be sure to handle floppy disks and treat the disk drive with care. Follow the important precautions below.
To eject a floppy disk:
Before ejecting the disk, be sure to confirm
that the M.D.R. is stopped (check if the LED
above the STOP button in the M.D.R.
section is lit and the LED below the disk slot
is off).
Press the eject button slowly as far as it will
go; the disk will automatically pop out.
When the disk is fully ejected, carefully
remove it by hand.
Never attempt to remove the disk or turn
the power off during recording, reading and
playing back. Doing so can damage the disk
and possibly the disk drive.
If the eject button is pressed too quickly, or
if it is not pressed in as far as it will go, the
disk may not eject properly. The eject
button may become stuck in a half-pressed
position with the disk extending from the
drive slot by only a few millimeters. If this
happens, do not attempt to pull out the
partially ejected disk, since using force in
this situation can damage the disk drive
mechanism or the floppy disk. To remove a
partially ejected disk, try pressing the eject
button once again, or push the disk back
into the slot and then repeat the eject
procedure.
Be sure to remove the floppy disk from the
disk drive before turning off the power. A
floppy disk left in the drive for extended
periods can easily pick up dust and dirt that
can cause data read and write errors.
Compatible Disk Type
3.5" 2DD and 2HD type floppy disks can be
used. A blank 2DD floppy disk has been
included with your Electone for you to record
your performances.
Inserting/Ejecting Floppy
Disks
To insert a floppy disk into the disk drive:
Hold the disk so that the label of the disk is facing
upward and the sliding shutter is facing forward,
towards the disk insertion slot. Carefully insert the
disk – shutter first – into the slot, slowly pushing it
all the way in until it clicks into place and the eject
button pops out.
Floppy disk slot
LED (Lamp in-use) Eject button
Page 51

49
6. Music Disk Recorder
Cleaning the Disk Drive
Read/Write Head
● Clean the read/write head regularly. This
instrument employs a precision magnetic read/write
head which, after an extended period of use, will
pick up a layer of magnetic particles from the disks
used that will eventually cause read and write errors.
● To maintain the disk drive in optimum working
order Yamaha recommends that you use a
commercially-available dry-type head cleaning disk
to clean the head about once a month. Ask your
Yamaha dealer about the availability of proper headcleaning disks.
Never insert anything but floppy disks into
the disk drive. Other objects may cause
damage to the disk drive or floppy disks.
About the Floppy Disks
To handle floppy disks with care:
Do not place heavy objects on a disk or
bend or apply pressure to the disk in any
way. Always keep floppy disks in their
protective cases when they are not in use.
Do not expose the disk to direct sunlight,
extremely high or low temperatures, or
excessive humidity, dust or liquids.
Do not open the sliding shutter and touch
the exposed surface of the floppy disk
inside.
Do not expose the disk to magnetic fields,
such as those produced by televisions,
speakers, motors, etc., since magnetic fields
can partially or completely erase data on the
disk, rendering it unreadable.
Never use a floppy disk with a deformed
shutter or housing.
Do not attach anything other than the
provided labels to a floppy disk. Also make
sure that labels are attached in the proper
location.
To protect your data (Write-protect Tab):
To prevent accidental erasure of important data, slide
the disk’s write-protect tab to the “protect” position
(tab open). If you attempt to modify the disk when
the write-protect tab is set to “on” position, “Prot
(Protected)” will appear on the LED display in the
M.D.R. section indicating that the operation is not
possible.
Protect Off
(tab closed: unlocked)
Rear side
Shutter
Write-protect tab
Protect On
(tab open: locked)
Page 52

50
6. Music Disk Recorder
Formatting a Disk
Before recording a performance to your blank disk, the disk must first be formatted.
To format a disk:
1. Put the disk, label facing up, into the
disk drive (insertion slot).
“Fort” will appear on the LED display indicating that the inserted
disk requires to be formatted.
2. While holding down the SHIFT button,
press the FORMAT button.
This step puts the format operation on stand-by, indicated by the
dashes on the LED display and the flashing LED above the
FORMAT button.
3. Press the FORMAT button again to begin
formatting.
The LED above the FORMAT button stays lit. The number "160"
appears on the LED display and counts down to "001" as the
disk is being formatted. When formatting is completed,
operation returns to the original STOP status.
About SHIFT button:
You will find the SHIFT button (printed in green) at the top right side of the M.D.R. section. Some buttons in
the M.D.R. section have dual functions: the first function is printed in white above each button; the second
function is printed in green below each button. The SHIFT button is used to select the second functions by
pressing each function button while holding down the SHIFT.
If you format a disk that contains previously
recorded data, all data on the disk will be
erased. To avoid inadvertently formatting a
disk after this step, press the STOP button.
RECORD PLAY
UPPER LOWER PEDAL CONTROL UPPER LOWER PEDAL CONTROL
SONG
REPEAT
PAUSE STOP PLAY SONG SELECT RECORD
MUSIC DISK RECORDER
UPPER LOWER PEDAL CONTROL UPPER LOWER PEDAL CONTROL
SONG
REPEAT
PAUSE STOP PLAY SONG SELECT RECORD
MUSIC DISK RECORDER
FROM SONG DEL.
TO
SONG COPY
TEMPO +–
RECORD PLAY
FROM SONG DEL.
TO
SONG COPY
FORMAT
----
TEMPO +–
FORMAT
SHIFT
CUSTOM PLAY
SHIFT
CUSTOM PLAY
RECORD PLAY
UPPER LOWER PEDAL CONTROL UPPER LOWER PEDAL CONTROL
SONG
REPEAT
PAUSE STOP PLAY SONG SELECT RECORD
MUSIC DISK RECORDER
UPPER LOWER PEDAL CONTROL UPPER LOWER PEDAL CONTROL
SONG
REPEAT
PAUSE STOP PLAY SONG SELECT RECORD
MUSIC DISK RECORDER
FROM SONG DEL.
TO
SONG COPY
160
TEMPO +–
RECORD PLAY
FROM SONG DEL.
TO
SONG COPY
FORMAT
01
TEMPO +–
FORMAT
SHIFT
CUSTOM PLAY
SHIFT
CUSTOM PLAY
Page 53

Recording
(1) To record a song:
1. Set the desired registrations on the
Electone.
Make all the Electone settings necessary for the song you will
record. This means entering the all registrations you will need
for the entire performance in the Registration Memory. Make
sure also to select the registration that you will use at the
beginning of the song.
2. Put a formatted disk into the disk slot.
3. Use the SONG SELECT (G, H) buttons
to select the song number for recording.
4. Press the RECORD button.
The RECORD lamp lights up and the PLAY and CUSTOM PLAY
lamps begins blinking, indicating that the Music Disk Recorder is
ready to record.
5. Press the PLAY button.
The PLAY lamp lights up and small bars flash across the LED
display from left to right, indicating that the M.D.R. is reading the
registrations and other settings.
If the selected song number already contains
recorded data, small bars ("--") appear at the left
part of LED display and flash along with the song
number, warning you that the selected song number
already contains recorded data. If you want to execute
recording operation over the song number, press the
RECORD button again. If you don't want, select another
song number for recording or press the STOP button to
cancel recording.
When a disk is first inserted, song number 01 is
automatically selected. The song numbers 01
through 40 are available and up to 40 songs can
be stored on a disk. However, available song numbers
may be reduced depending on the amount of the song
data you have recorded.
51
6. Music Disk Recorder
NOTE
RECORD PLAY
UPPER LOWER PEDAL CONTROL UPPER LOWER PEDAL CONTROL
SONG
REPEAT
PAUSE STOP PLAY SONG SELECT RECORD
MUSIC DISK RECORDER
UPPER LOWER PEDAL CONTROL UPPER LOWER PEDAL CONTROL
SONG
REPEAT
PAUSE STOP PLAY SONG SELECT RECORD
MUSIC DISK RECORDER
FROM SONG DEL.
TO
SONG COPY
01
TEMPO +–
RECORD PLAY
FROM SONG DEL.
TO
SONG COPY
FORMAT
01
TEMPO +–
FORMAT
SHIFT
CUSTOM PLAY
SHIFT
CUSTOM PLAY
NOTE
RECORD PLAY
UPPER LOWER PEDAL CONTROL UPPER LOWER PEDAL CONTROL
SONG
REPEAT
PAUSE STOP PLAY SONG SELECT RECORD
MUSIC DISK RECORDER
FROM SONG DEL.
TO
SONG COPY
--
TEMPO +–
FORMAT
SHIFT
CUSTOM PLAY
Page 54

52
6. Music Disk Recorder
6. After numbers appear on the LED
display of the M.D.R., begin playing.
Once the setup operation in step #5 is complete, a number will
appear on the LED display indicating that you can begin
recording your performance. The number also indicates the
amount of memory left on the disk.
If you make a mistake during recording:
1) Press the PLAY button while the M.D.R. is still
running.
This stops the recording and returns you to the starting point of
the song.
The letters "rE" (retry) appear on the left side of the LED
display and the PLAY and CUSTOM PLAY LEDs start flashing,
indicating that you can re-record the song.
2) Press PLAY again to begin re-recording the song.
Re-recording starts from the beginning of the song and replaces
the previously recorded performance with the newly recorded
performance.
7. When you finish playing, press the STOP
button.
When the STOP button is pressed, both the RECORD and PLAY
lamps go out, and recording is stopped.
8. To hear your newly recorded
performance, press the PLAY button.
Playback will begin after a couple of seconds. For more
information on playback and other playback-related functions,
see page 58.
The short time it takes to set up for recording is
recorded as well, causing a short pause before
playback of the song.
Be sure to remove the floppy disk from the disk
drive after the STOP lamp lights up and the LED
below the disk slot goes out.
When the available memory reaches "008" or less, the
numbers begin flashing to warn you. If this happens,
stop recording before the display reaches "000."
Never attempt to press the eject button or turn the
power off during recording, reading and playing
back. Doing so can damage the disk and possibly
the disk drive. Be sure to remove the floppy disk from the
disk drive before turning off the power.
RECORD PLAY
UPPER LOWER PEDAL CONTROL UPPER LOWER PEDAL CONTROL
SONG
REPEAT
PAUSE STOP PLAY SONG SELECT RECORD
MUSIC DISK RECORDER
FROM SONG DEL.
TO
SONG COPY
622
TEMPO +–
FORMAT
NOTE
SHIFT
CUSTOM PLAY
RECORD PLAY
UPPER LOWER PEDAL CONTROL UPPER LOWER PEDAL CONTROL
SONG
REPEAT
PAUSE STOP PLAY SONG SELECT RECORD
MUSIC DISK RECORDER
UPPER LOWER PEDAL CONTROL UPPER LOWER PEDAL CONTROL
SONG
REPEAT
PAUSE STOP PLAY SONG SELECT RECORD
FROM SONG DEL.
TO
SONG COPY
TEMPO +–
RECORD PLAY
FROM SONG DEL.
TO
SONG COPY
FORMAT
01
SHIFT
CUSTOM PLAY
SHIFT
CUSTOM PLAY
MUSIC DISK RECORDER
TEMPO +–
FORMAT
NOTE
 Loading...