

Page 1
Page 2
PRECAUTIONS
PLEASE READ CAREFULLY BEFORE PROCEEDING
* Please keep this manual in a safe place for future reference.
WARNING
Always follow the basic precautions listed below to avoid the possibility of serious injury or even death from
electrical shock, short-circuiting, damages, fire or other hazards. These precautions include, but are not
limited to, the following:
Power supply/Power cord
• Only use the voltage specified as correct for the instrument. The
required voltage is printed on the name plate of the instrument.
• Check the electric plug periodically and remove any dirt or dust
which may have accumulated on it.
• Use only the supplied power cord/plug.
• Do not place the power cord near heat sources such as heaters or
radiators, and do not excessively bend or otherwise damage the
cord, place heavy objects on it, or place it in a position where
anyone could walk on, trip over, or roll anything over it.
Do not open
• Do not open the instrument or attempt to disassemble the internal
parts or modify them in any way. The instrument contains no
user-serviceable parts. If it should appear to be malfunctioning,
discontinue use immediately and have it inspected by qualified
Yamaha service personnel.
Water warning
•Do not expose the instrument to rain, use it near water or in damp
or wet conditions, or place containers on it containing liquids
which might spill into any openings.
• Never insert or remove an electric plug with wet hands.
Fire warning
• Do not put burning items, such as candles, on the unit.
A burning item may fall over and cause a fire.
If you notice any abnormality
• If the power cord or plug becomes frayed or damaged, or if there
is a sudden loss of sound during use of the instrument, or if any
unusual smells or smoke should appear to be caused by it,
immediately turn off the power switch, disconnect the electric plug
from the outlet, and have the instrument inspected by qualified
Yamaha service personnel.
CAUTION
Always follow the basic precautions listed below to avoid the possibility of physical injury to you or others, or
damage to the instrument or other property. These precautions include, but are not limited to, the following:
Power supply/Power cord
• When removing the electric plug from the instrument or an outlet,
always hold the plug itself and not the cord. Pulling by the cord
can damage it.
• Remove the electric plug from the outlet when the instrument is
not to be used for extended periods of time, or during electrical
storms.
2
• Do not connect the instrument to an electrical outlet using a
multiple-connector. Doing so can result in lower sound quality, or
possibly cause overheating in the outlet.
Assembly
• Read carefully the attached documentation explaining the
assembly process. Failure to assemble the instrument in the
proper sequence might result in damage to the instrument or even
injury.
(1)B-7 1/2
Page 3

Location
• Do not expose the instrument to excessive dust or vibrations, or
extreme cold or heat (such as in direct sunlight, near a heater, or
in a car during the day) to prevent the possibility of panel
disfiguration or damage to the internal components.
•Do not use the instrument in the vicinity of a TV, radio, stereo
equipment, mobile phone, or other electric devices. Otherwise, the
instrument, TV, or radio may generate noise.
• Do not place the instrument in an unstable position where it might
accidentally fall over.
• Before moving the instrument, remove all connected cables.
• Do not place the instrument against a wall (allow at least 3 cm/
one-inch from the wall), since this can cause inadequate air
circulation, and possibly result in the instrument overheating.
• Never insert or drop paper, metallic, or other objects into the gaps
on the panel or keyboard. If this happens, turn off the power
immediately and unplug the power cord from the AC outlet. Then
have the instrument inspected by qualified Yamaha service
personnel.
• Do not place vinyl, plastic or rubber objects on the instrument,
since this might discolor the panel or keyboard.
• Do not rest your weight on, or place heavy objects on the
instrument, and do not use excessive force on the buttons,
switches or connectors.
•Do not operate the instrument for a long period of time at a high or
uncomfortable volume level, since this can cause permanent
hearing loss. If you experience any hearing loss or ringing in the
ears, consult a physician.
Connections
• Before connecting the instrument to other electronic components,
turn off the power for all components. Before turning the power on
or off for all components, set all volume levels to minimum. Also,
be sure to set the volumes of all components at their minimum
levels and gradually raise the volume controls while playing the
instrument to set the desired listening level.
Maintenance
•When cleaning the instrument, use a soft, dry cloth. Do not use
paint thinners, solvents, cleaning fluids, or chemical-impregnated
wiping cloths.
Handling caution
• Do not insert a finger or hand in any gaps on the instrument.
Using the bench (If included)
• Do not place the bench in an unstable position where it might
accidentally fall over.
• Do not play carelessly with or stand on the bench. Using it as a
tool or step-ladder or for any other purpose might result in
accident or injury.
• Only one person should sit on the bench at a time, in order to
prevent the possibility of accident or injury.
• If the bench screws become loose due to extensive long-term use,
tighten them periodically using the included tool.
Saving data
Saving and backing up your data
• All panel settings and Registration Memories are lost when you
turn off the power to the instrument. If you want to keep the
settings, save the data to a floppy disk (see page 67).
Backing up the floppy disk
• To protect against data loss through media damage, we
recommend that you save your important data onto two floppy
disks.
Yamaha cannot be held responsible for damage caused by improper use or modifications to the instrument, or data that is lost or destroyed.
Always turn the power off when the instrument is not in use.
(1)B-7 2/2
3
Page 4

Congratulations!
You are the proud owner of a fine electronic organ, Electone EL-100.
The Yamaha EL-100 Electone combines the most advanced AWM tone generation
technology with state-of-the-art digital electronics and features to give you stunning sound
quality with maximum musical enjoyment.
In order to make the most of the Electone and extensive performance potential, we urge you
to read the manual thoroughly while trying out the various features described.
Keep the manual in a safe place for later reference.
Included Items
Owner’s Manual
Music Stand
Dust Cover
Bench
Turning the Electone off erases all panel settings you have made. When the Electone is turned on, Basic
Registration 1 is automatically selected.
GM (General MIDI System Level 1) is an addition to the MIDI standard that ensures that any GM-compatible
music data can be accurately played by any GM-compatible tone generator, regardless of maker.
The GM mark is affixed to all software and hardware products that support the General MIDI standard.
XG is a new MIDI format created by Yamaha that significantly improves and expands upon the General MIDI
standard by providing a greater variety of high-quality voices plus considerably enhanced effect operation – while
being fully compatible with GM.
• The screen displays and illustrations as shown in this owner’s manual are for instructional purposes only, and may appear somewhat different
from those on your instrument.
• Copying of the commercially available music sequence data is strictly prohibited except for your personal use.
• The company names and product names in this Owner’s manual are the trademarks or registered trademarks of their respective companies.
• This product incorporates and bundles computer programs and contents in which Yamaha owns copyrights or with respect to which it has license
to use others’ copyrights. Such copyrighted materials include, without limitation, all computer software, styles files, MIDI files, WAVE data and
sound recordings. Any unauthorized use of such programs and contents outside of personal use is not permitted under relevant laws. Any
violation of copyright has legal consequences. DON’T MAKE, DISTRIBUTE OR USE ILLEGAL COPIES.
4
Page 5
Table of Contents
Main Features ............................... 6
Panel Layout ................................. 7
EL-100 Panel Layout.......................................................... 8
1 Quick Introductory Guide ........ 10
1Getting Started ................................................... 10
2 Basic Registrations ............................................. 11
3 Basic Operation .................................................. 12
4 LCD DISPLAY ................................................... 13
2Voice Sections ......................... 17
1Voice Display ....................................................... 17
2 Selecting Voices from the Panel ........................ 18
3 Selecting Voices from the Dotted Buttons ....... 21
4Voice Menus ........................................................ 23
3Voice Controls and Effects ....... 29
1 Selecting from Voice Condition Pages ............. 30
(PAGE 1) .............................................................. 30
1 Initial Touch .................................................... 30
2 Feet .................................................................. 30
(PAGE 2) .............................................................. 31
1 Volume ............................................................. 31
2 Panning ............................................................ 31
3 Reverb .............................................................. 31
(PAGE 3) .............................................................. 32
1 Effect ............................................................... 32
(PAGE 4) .............................................................. 33
1 Vibrato ............................................................. 33
(PAGE 5) .............................................................. 34
1 Tune ................................................................. 34
2 Slide ................................................................. 34
2 Selecting from Effect Set Page ......................... 34
1 Tremolo/Chorus .............................................. 35
2 Symphonic/Celeste ......................................... 35
3 Delay ................................................................ 36
4 Flanger ............................................................. 38
5 Distortion ......................................................... 39
3 Selecting from the Panel .................................... 40
1 Reverb .............................................................. 40
2 Sustain ............................................................. 41
3 Tremolo/Chorus .............................................. 42
5 Registration Memory .............. 67
1 Storing Registrations ......................................... 67
2 Selecting Registrations ...................................... 68
3Saving the Registration Data to Disk .............. 68
4 Registration Shift ............................................... 69
6 Music Disk Recorder (M.D.R.) .. 73
1Precautions on M.D.R. ...................................... 73
2Formatting a Disk .............................................. 75
3 Recording ............................................................ 76
4 Recording Registrations (and Bulk Data) ...... 82
5Recalling Recorded Registrations
(and Bulk Data) .................................................. 83
6 Replacing Registrations .................................... 83
7 Playback .............................................................. 84
8Other Functions .................................................. 88
7 Footswitches and
Expression Pedal .................... 97
1Footswitch ........................................................... 97
2 Expression Pedal .............................................. 100
8Transpose and Pitch Controls 101
9 MIDI ...................................... 102
10
Accessory Jacks and Controls ....
11 Appendix ............................. 105
MIDI .......................................................................... 105
MIDI Data Format .................................................. 111
MIDI Implementation Chart ................................. 120
Troubleshooting ....................................................... 122
EL-100 ASSEMBLY INSTRUCTIONS ................ 125
EL-100 Specifications .............................................. 129
Index .......................................................................... 131
104
Quick Introductory
Guide
1
Voice Sections
2
Voice Controls
and Effects
3
Rhythm and
Accompaniment
4
Registration Memory
5
Music Disk Recorder
(M.D.R.)
6
Footswitches and
Expression Pedal
7
Transpose and
Pitch Controls
8
4 Rhythm and Accompaniment .. 45
1 Selecting Rhythms from the Panel................... 45
2Rhythm Condition Pages .................................. 48
3Dotted Buttons and User Rhythms .................. 49
4Rhythm Menus ................................................... 51
5Automatic Accompaniment -
Auto Bass Chord (A.B.C.) ................................ 52
6Accompaniment Controls ................................. 54
7Preset/User Keyboard Percussion .................... 56
8 Melody On Chord (M.O.C.) ............................. 64
The Index on page 131 can be of your help in finding the functions and terms.
9
10
11
MIDI
Accessory Jacks
and Controls
Appendix
5
Page 6

Main Features
1 Astoundingly True-to-life Sounds
The new AWM (Advanced Wave Memory) tone generation technologies combined with authentic touch
response make this Electone a truly expressive musical instrument.
You can enjoy playing a total of 173 AWM voices using the touch response function.
2 Wide Variety of High Quality Effects
Electone voices can also be enhanced with a full range of high-quality digital effects, ranging from Tremolo
and Reverb to Flanger, Delay and Distortion. Stereo panning is independent of effect on/off status. (page 34)
3 Dynamic Rhythm Patterns and Programmable Percussion Sounds
The Rhythm section of the Electone features authentic drum and percussion sounds, used by expert rhythm
programmers in creating a total of 66 rhythm patterns, ranging across all styles of music. (page 45)
The Keyboard Percussion function lets you play 120 different percussion sounds, each of which can be
assigned onto any key. (page 56)
4 Convenient Registration Functions
The Basic Registrations let you instantly change the voices for playing any styles of music. (page 11)
Also, Registration Memory Function lets you set up and record your own Electone settings, and call up them
in the middle of the performance. (page 67)
5 Versatile Functions of the Music Disk Recorder
The Electone also features a Music Disk Recorder (MDR) for recording your registrations and performances
to a floppy disk. In addition, the MDR allows you to copy a song from a disk to another, duplicate a disk, and
play commercially available XG song data. (page 73)
6 LCD for Systematic and Intuitive Operation
The systematic and intuitive LCD allows you to smoothly understand almost all the Electone operation.
6
Page 7

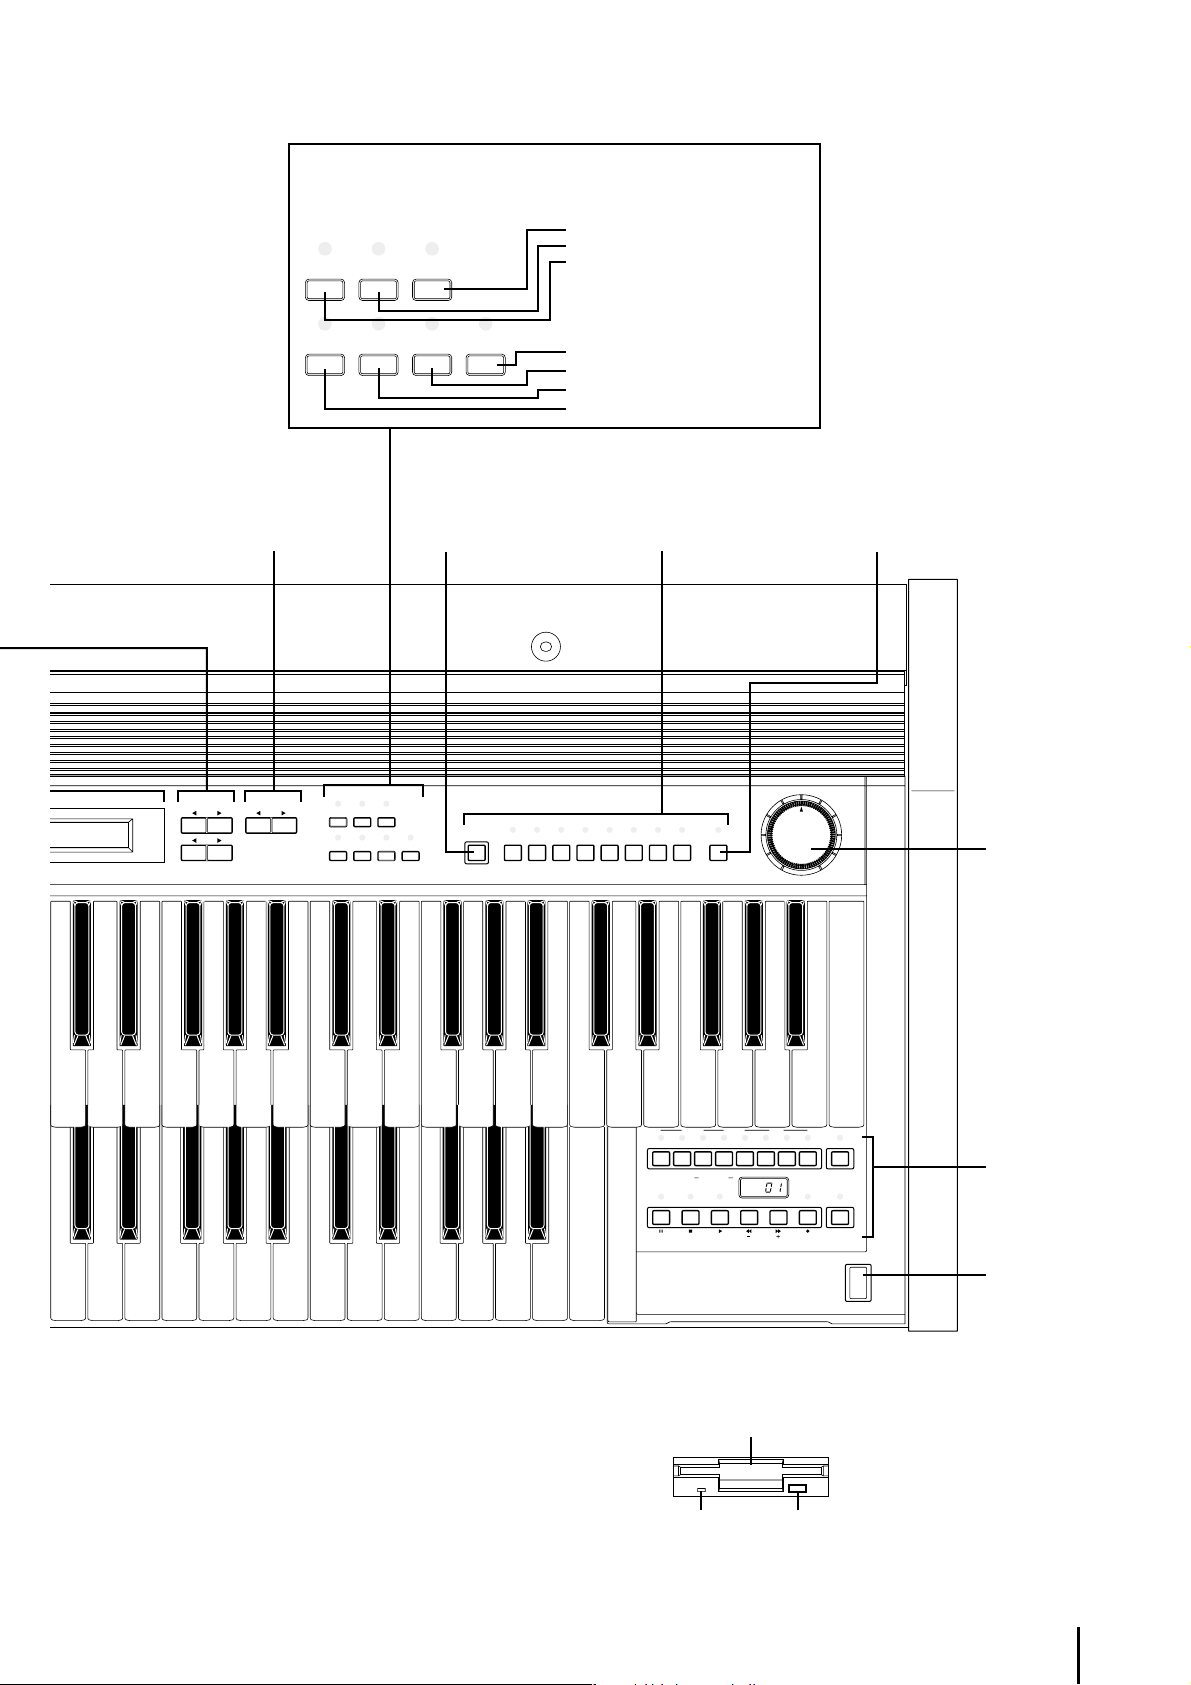
Panel Layout
Music Stand
Upper Keyboard
Front Panel (pages 8-9)
Jacks (page 104)
Speaker Unit
Lower Keyboard
MIDI Jacks (page 104)
Right-Footswitch (page 69)
Left-Footswitch (page 97)
Expression Pedal (page 11)
Pedalboard
7
Page 8
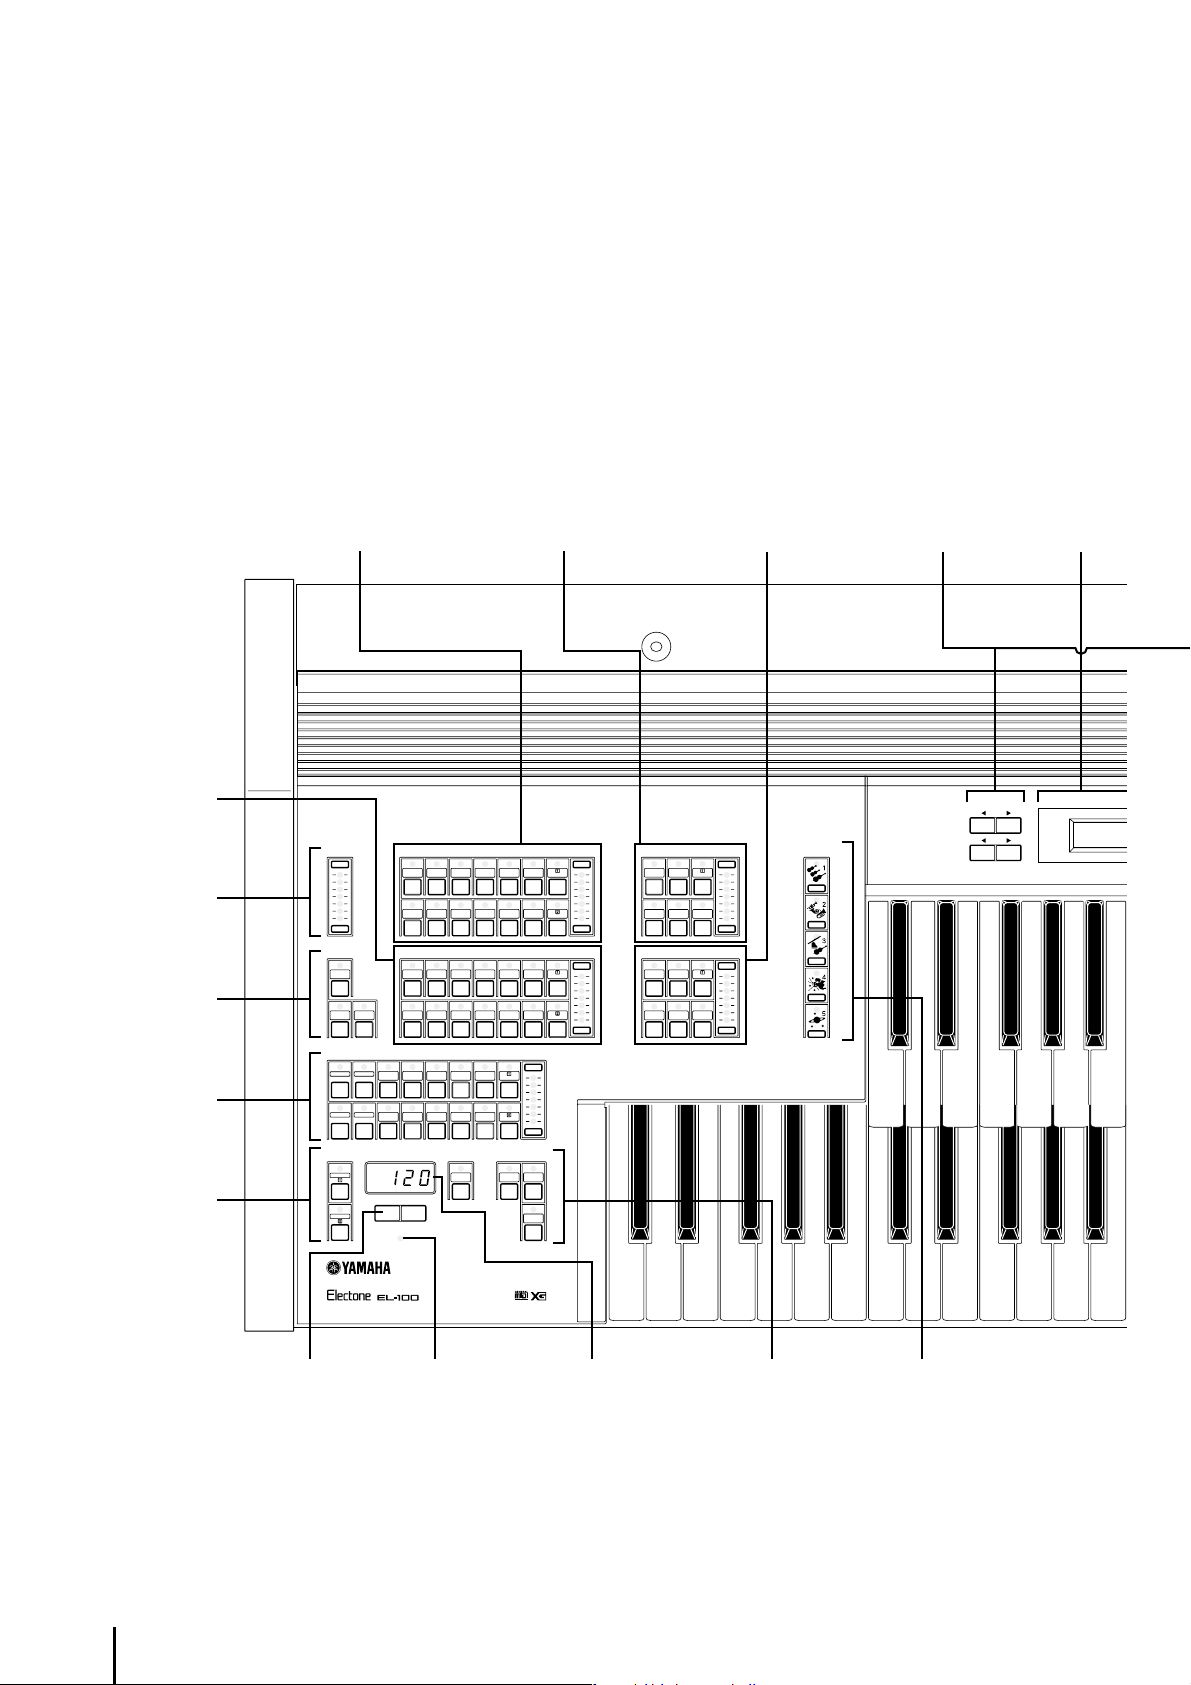
EL-100 Panel Layout
LOWER KEYBOARD
VOICE
(page 17)
REVERB
(page 40)
SUSTAIN
(page 41)
RHYTHM
(page 45)
KEYBOARD
PERCUSSION
(page 56)
UPPER KEYBOARD VOICE
(page 17)
REVERB
MAX
MIN
SUSTAIN
UPPER
LOWER PEDAL
SEQ.
1
SEQ.
3
KEYBOARD
PERCUSSION
LOWER
PEDAL
STRINGS BRASS CLARI-
ORGAN PIANO GUITAR VIBRA- COSMIC TUTTI
STRINGS BRASS CLARI-
ORGAN PIANO GUITAR VIBRA- COSMIC TUTTI
SEQ. MARCH WALTZ SWING BOUNCE SLOW
2ROCK
SEQ. TANGO
4
RHYTHM
LATIN1LATIN 8 BEAT 16 BEAT
BAR/ BEAT
TEMPO
BAR/ BEAT
UPPER KEYBOARD VOICE
SAXO- CHORUS HARMO-
NET
PHONE NICA
PHONE
LOWER KEYBOARD VOICE
SAXO-
NET
PHONE
PHONE
2
INTRO.
ENDING
RHYTHM
CHORUS HORN
SYNCHRO
START
LEAD VOICE
(page 17)
MAX
MIN
MAX
MIN
MAX
MIN
START
FILL IN
VIOLIN FLUTE
OBOE TRUM-
CONTRA
BASS
ORGAN
BASS
LEAD VOICE
PETTOLOWER
PEDAL VOICE
ELEC.
BASS
TUBA
LOWER
TO
PEDAL VOICE
(page 17)
MAX
MIN
MAX
MIN
BASIC
REGIST.
DATA CONTROL
(page 14)
DATA CONTROL
LCD Display
(page 13)
¨⁄String
Ò⁄String
TEMPO
(page 47)
BAR/BEAT
(page 47)
BAR/BEAT/TEMPO
(page 47)
RHYTHM
(page 46)
BASIC REGIST.
(page 11)
8
Page 9
DISPLAY SELECT (page 15)
s1ÎViolin1 ⁄
s1∏⁄ContBs.1
PAG E
(page 14)
DATA CONTROL PAGE
DISPLAY SELECT
VOICE EFFECT A.B.C.
DISPLAY SET M.O.C.
FOOT REGIST. PITCH TREMOLO
SW. SHIFT MIDI (FAST)
M./TO DISK
(page 67)
DISPLAY SELECT
VOICE EFFECT A.B.C.
DISPLAY SET M.O.C.
FOOT REGIST.PITCH TREMOLO
SW. SHIFT MIDI (FAST)
/TO DISK
M.
A.B.C./M.O.C. Button (pages 52, 64)
EFFECT SET Button (page 34)
VOICE DISPLAY Button (page 20)
TREMOLO (FAST) Button (page 44)
PITCH/MIDI Button (pages 101, 102)
REGIST. SHIFT Button (page 69)
FOOT SW. Button (page 97)
Registration Memory
(page 67)
REGISTRATION MEMORY
12345678 D.
D. (Disable)
(page 68)
MASTER VOLUME
MASTER VOLUME
(page 11)
RECORD PLAY
UPPER UPPERLOWER PEDAL CONTROL LOWER PEDAL CONTROL SHIFT
SONG SONG DEL.
FROM TO
REPEAT
SONG COPY
PAUSE STOP PLAY SONG SELECT RECORD CUSTOM PLAY
MUSIC DISK RECORDER
TEMPO FORMAT
Floppy Disk Slot
LED (Lamp in-use) Eject
POWER
MUSIC DISK
RECORDER
(page 73)
POWER
(page 10)
9
Page 10
1 Quick Introductory Guide
1 Getting Started
Plug the power cord in to an appropriate electrical outlet.
1
2
Only use the voltage specified as correct
for the Electone. The required voltage is
printed on the name plate of the Electone.
Yamaha products are manufactured
specifically for the supply voltage in the
area where they are to be sold. If you
should move, or if any doubt exists about
the supply voltage, please consult with a
qualified technician.
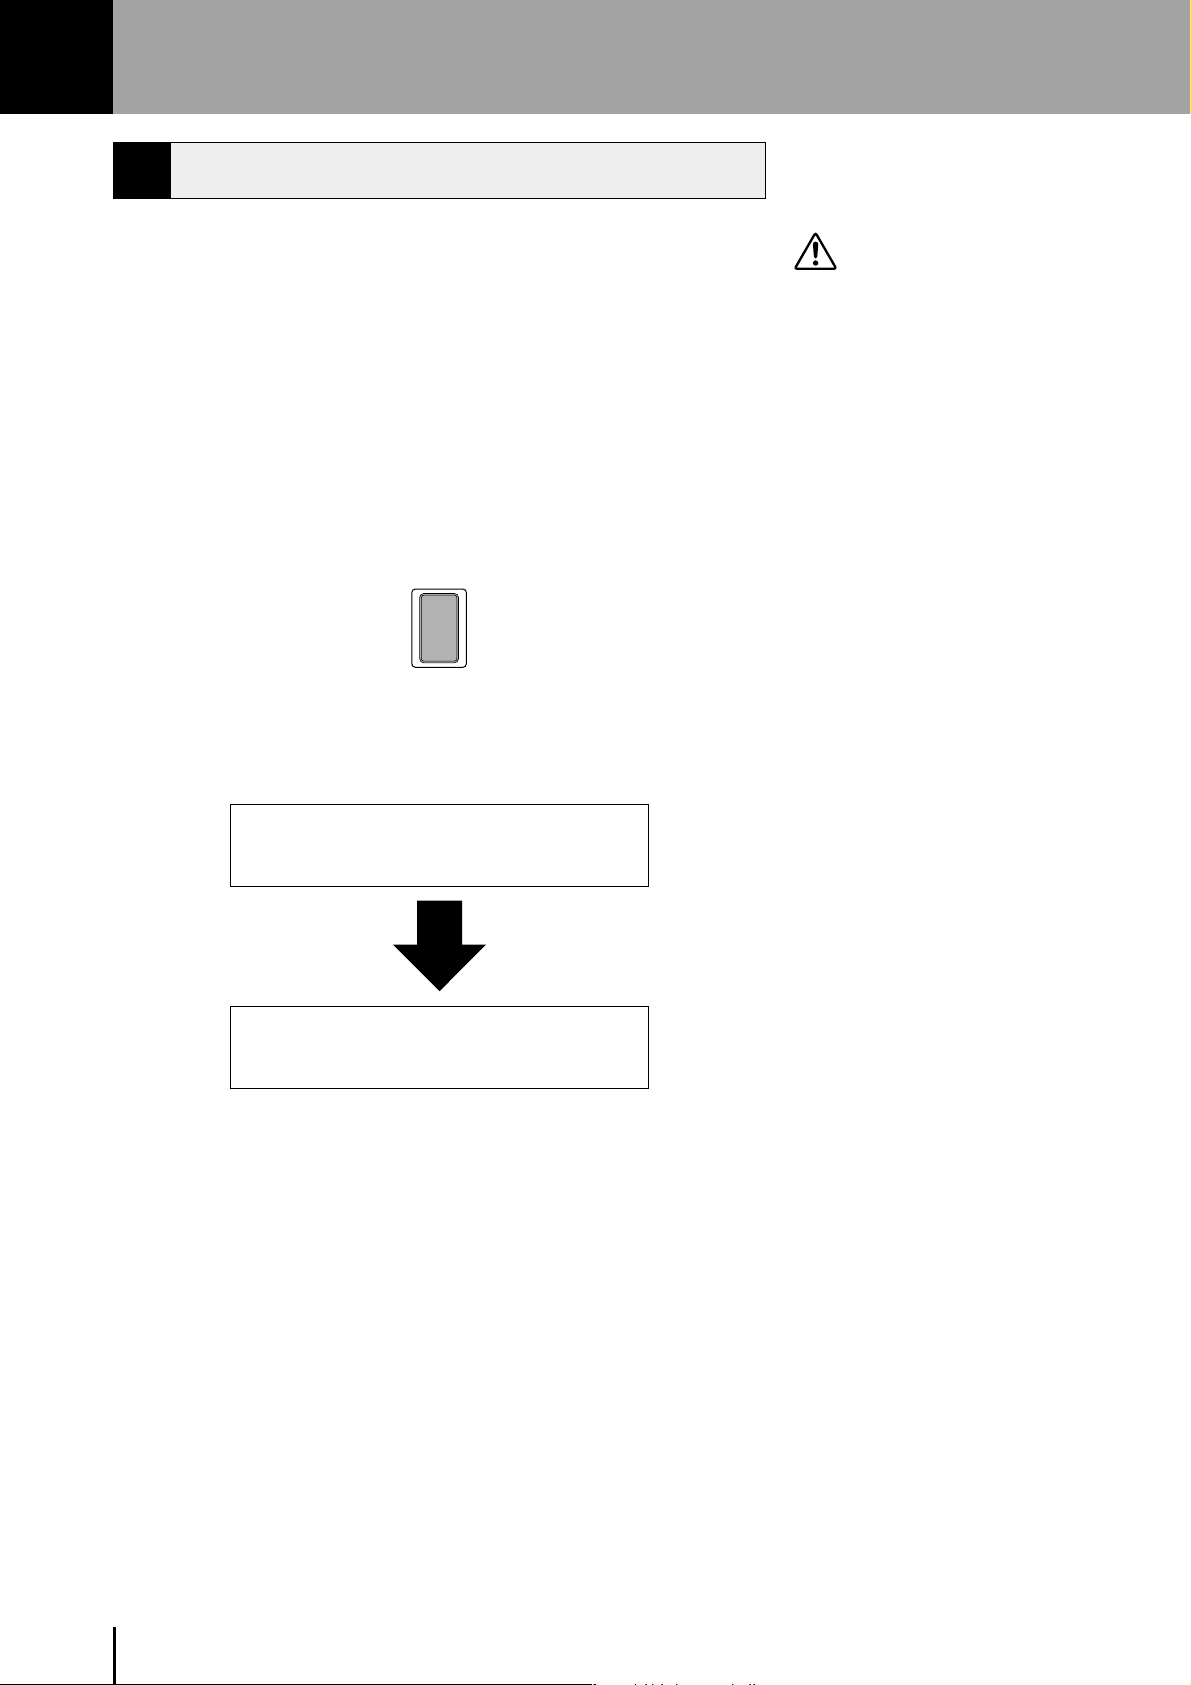
Turn on the Electone by pressing the POWER switch.
POWER
When you turn on the Electone, the following displays will appear one
after the other on the LCD display:
YAMAHA
Electone
¨⁄Strings1ÎViolin1 ⁄
Ò⁄Strings1∏⁄ContBs.1
This last display, Voice Display, shows you the currently assigned
voice settings for each voice section.
When the Electone is turned on, Basic Registration 1 is automatically
selected.
10
Page 11
3
4
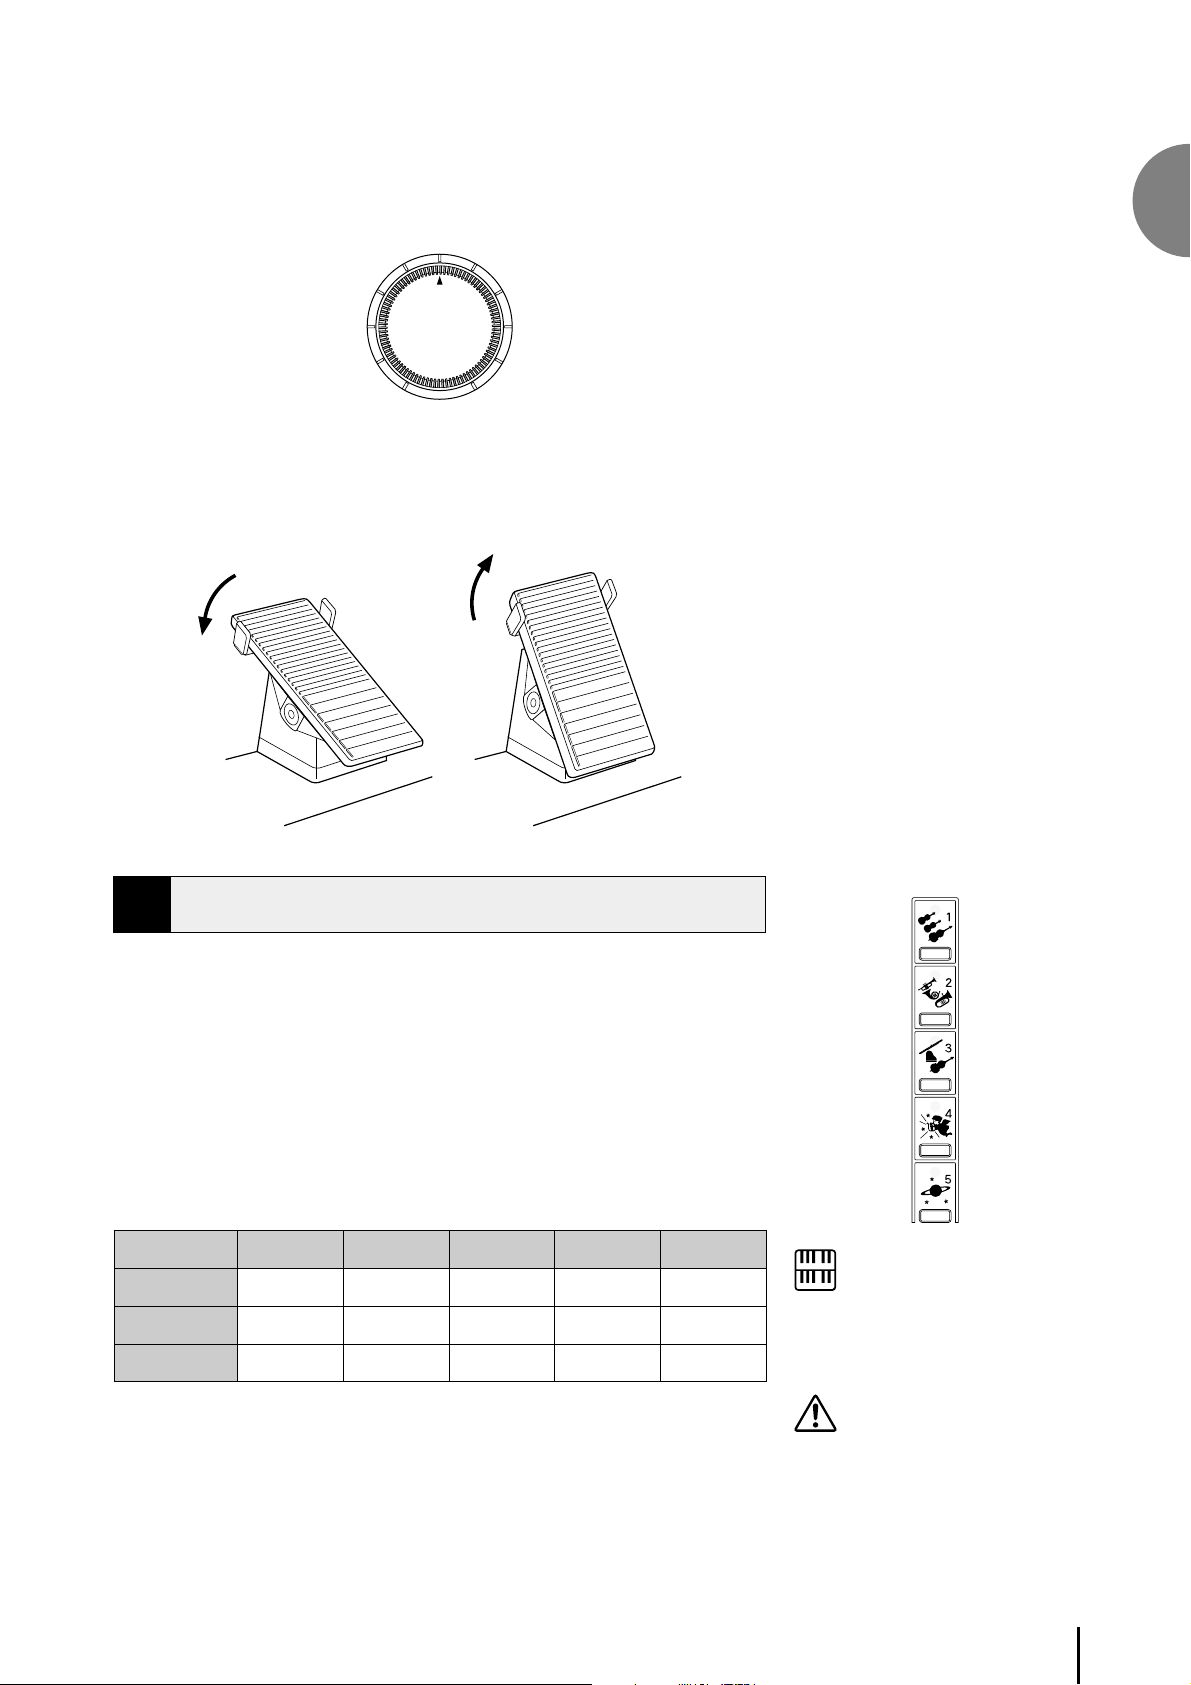
Set the MASTER VOLUME control.
The MASTER VOLUME control is an overall control which affects the
volume of the entire instrument.
MASTER VOLUME
Press the Expression pedal down with your foot.
Once you have set the MASTER VOLUME control to a suitable level,
you can use the Expression pedal to change the volume with your foot
as you play.
1
Quick Introductory Guide
Louder Softer
2 Basic Registrations
“Registration” indicates a panel setting including upper keyboard voices,
lower keyboard voices, pedal voices, a rhythm and so on. The Basic
Registration section has five factory preset registrations, each with a
different set of voices for Upper/Lower keyboards and Pedalboard and
each specially suited for playing in a different music style.
To select Basic Registrations:
Press the BASIC REGIST. buttons to select each Basic Registration.
When you turn the power on, the Electone automatically selects Basic
Registration 1.
Upper Keyboard
Voice
Lower Keyboard
Voice
Pedal Voice
Basic
Registration 1
Strings 1
Strings 1
Contra Bass1
Basic
Registration 2
Brass 1
Horn1
Tuba
Basic
Registration 3
Flute 1
Piano 1
Contra Bass 1
Basic
Registration 4
Cosmic 1
Cosmic 2
Cosmic 2
Basic
Registration 5
Synth. Brass 1
Cosmic 3
Synth. Bass 1
BASIC
REGIST.
NOTE:
Additional basic registrations are preset on
the Registration Memory locations from 1
to 8. See page 67 for the details.
Turning the Electone off erases all panel
settings you have made. When the
Electone is turned on, Basic Registration 1
is automatically selected.
11
Page 12
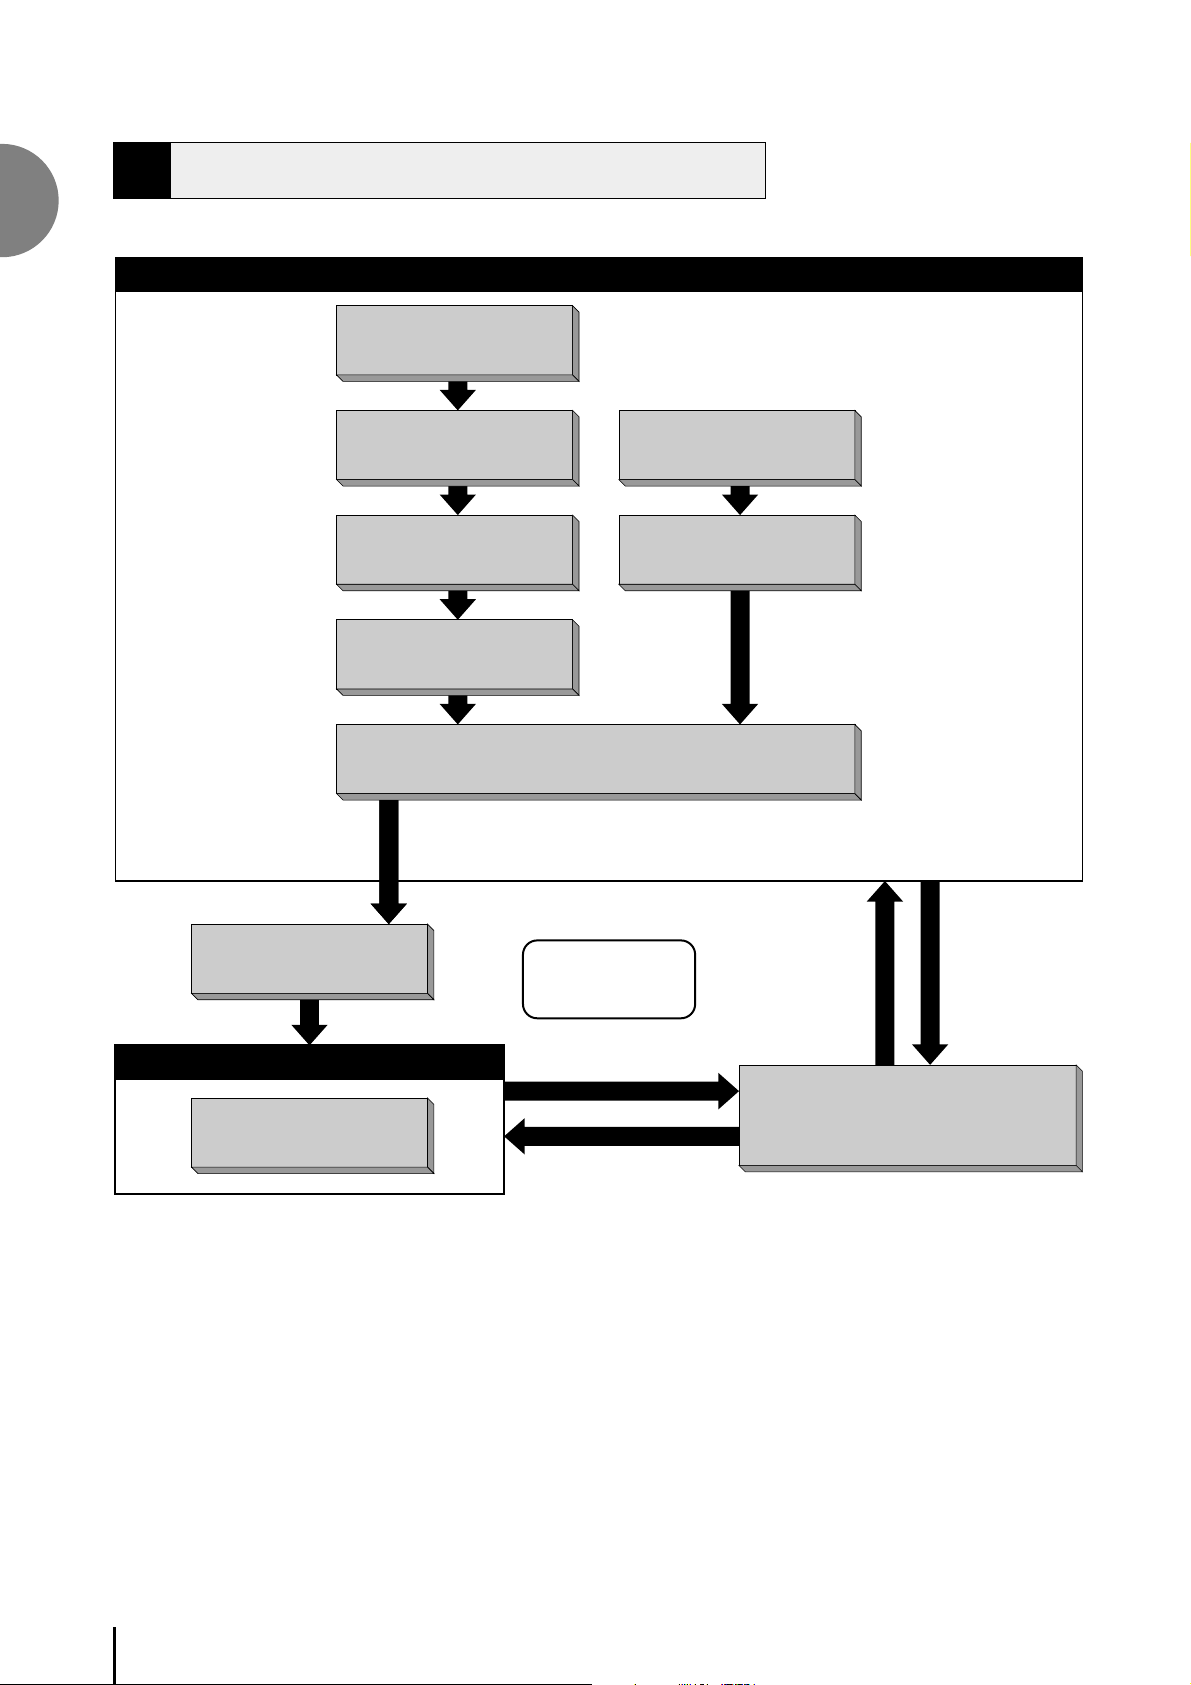
3 Basic Operation
1
Quick Introductory Guide
Registration Set-up
Select the keyboard
to play
* The Controls and Effects may
be applied differently depending
on the selected type of Controls
and Effects. See page 29 for
more information.
Adjust the total volume
(Master Volume)
Select the voice
(Voice Menu)
Finely adjust the voice
(Voice Condition)
Add effects
(Effect Set)
Setting Registration
Finely adjust the rhythm
(Rhythm Condition)
Add reverb
Shift/Footswitch
Select the rhythm
(Rhythm Menu)
Loading the
registration data
Saving the
registration data
Playing Electone
Expression Pedal
Recording the performance
Music Disk Recorder
Playing back
12
Page 13
4 LCD DISPLAY
This section introduces you the convenient control functions of the LCD
display. The LCD display lets you see at a glance the current settings and
provides easy-to-understand graphic representation of all parameters.
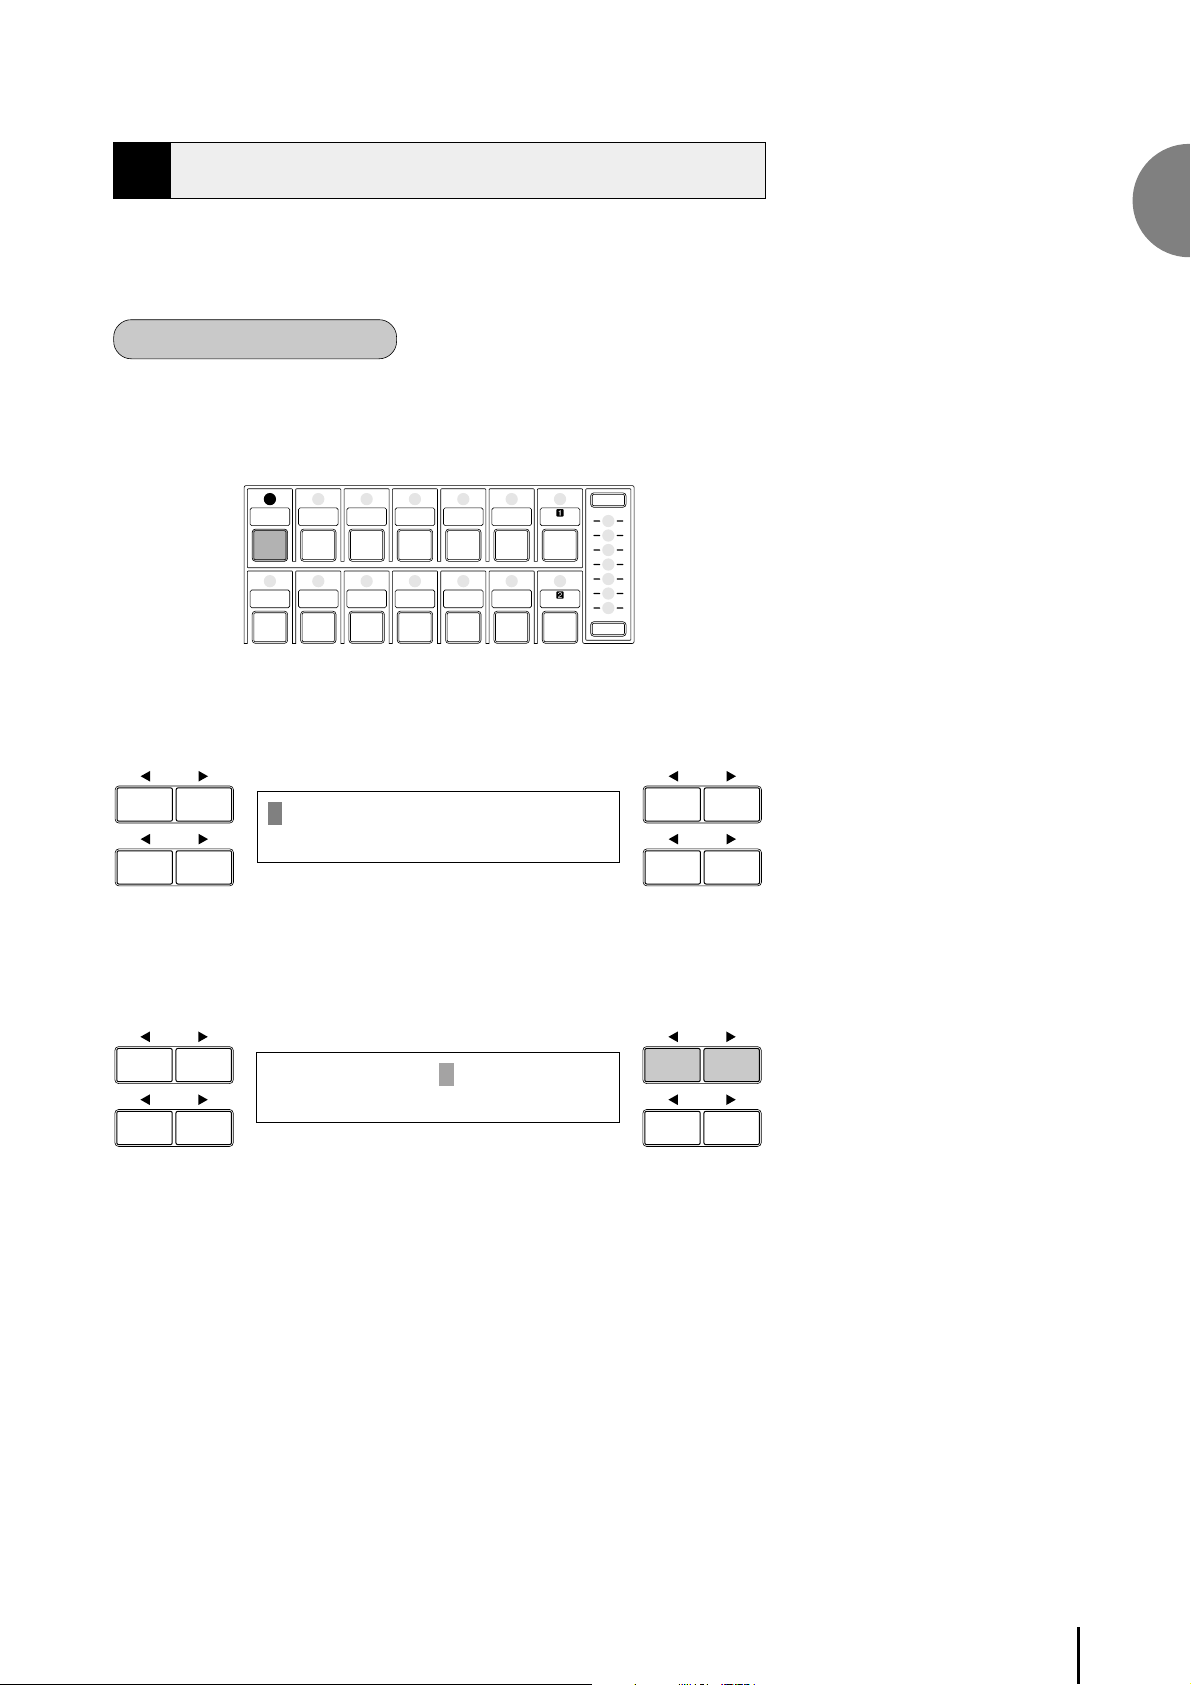
Selecting a voice/rhythm
Press the panel voice/rhythm button which you want to use (For
1
DATA CONTROL DATA CONTROL
example, press the STRINGS button in the Upper Keyboard Voice
section).
UPPER KEYBOARD VOICE
STRINGS BRASS CLARI-
ORGAN PIANO GUITAR VIBRA- COSMIC TUTTI
The following display will appear, showing all the available voices/
rhythms in the category (Strings Category in this case).
SAXO- CHORUS HARMO-
NET
PHONE NICA
PHONE
MAX
MIN
1
Quick Introductory Guide
Strings1 Strings2
Pizz.Strs Syn.Strs1
Press the Data Control button corresponding to the voice you want to
2
DATA CONTROL DATA CONTROL
play (Strings 2 in this case).
Strings1 Strings2
Pizz.Strs Syn.Strs1
The first letter of the selected voice/rhythm will start blinking.
For more information on the Voice Menu list see page 23.
13
Page 14
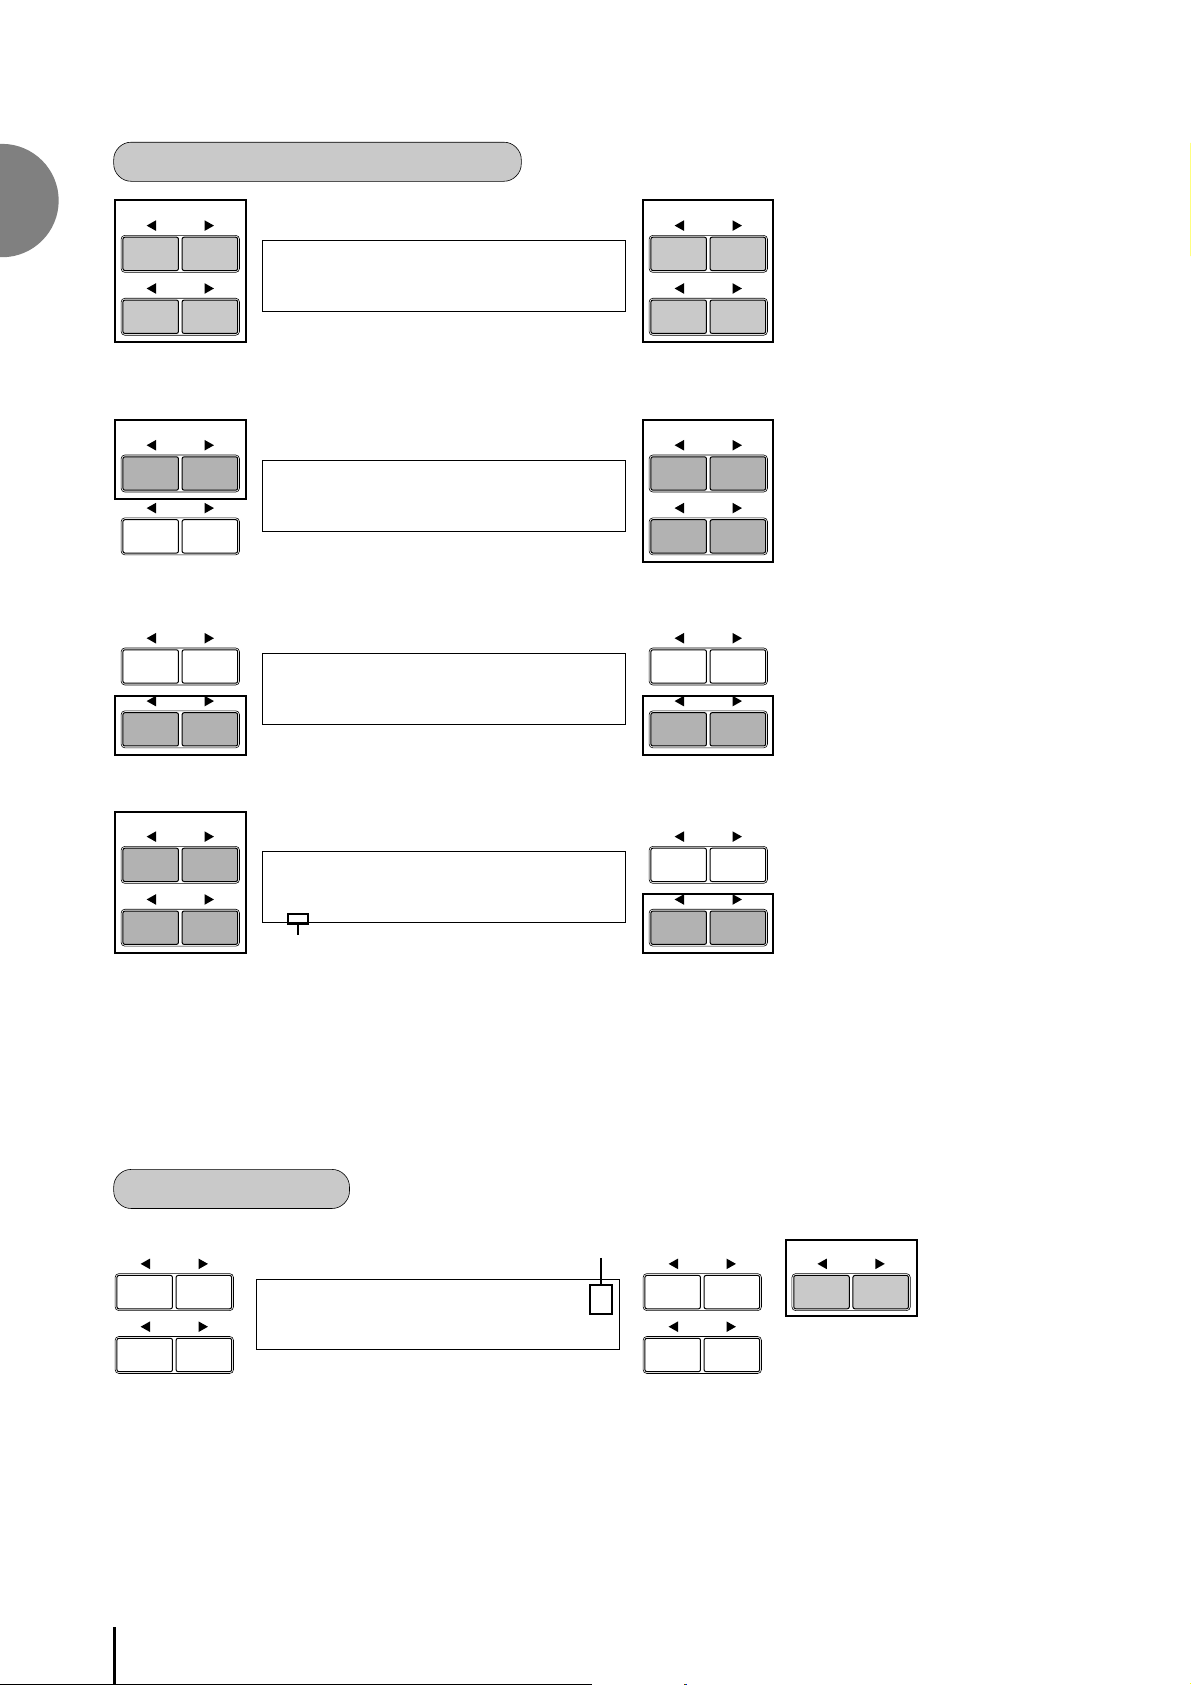
Function of the Data Control Buttons
1
Quick Introductory Guide
DATA CONTROL DATA CONTROL
2
Strings1 Strings2
Pizz.Strs Syn.Strs1
11
DATA CONTROLDATA CONTROL
VOL.:24 PAN:C ¨1¤
REVERB:24
2
DATA CONTROLDATA CONTROL
EFFECT:SYMPHONIC ¨1‹
”SYMPHONIC ’CELESTE
33
DATA CONTROL DATA CONTROL
<R.SHIFT>[INS][DEL]¤
T_???????????????????
Cursor
44
The Data Control buttons are used to select 1 a voice/rhythm or function
shown on the display. Each pair of buttons corresponding to the section of the
display directly above it increases/decreases 2 the value or chooses 3 a
setting/function. When you are setting the Registration Shift, each of them
moves the cursor 4 to the right/left.
Using Page Buttons
DATA CONTROL DATA CONTROL PAG E
pages
¨⁄Strings1ÎViolin1 ⁄
Ò⁄Strings1∏⁄ContBs.1
5
These buttons 5 are used to select (when available) the various ‘pages’ of the
display, the names of which appear at the top right of the LCD. Use Page F to
select the next page, and Page E to select the previous page.
14
Page 15
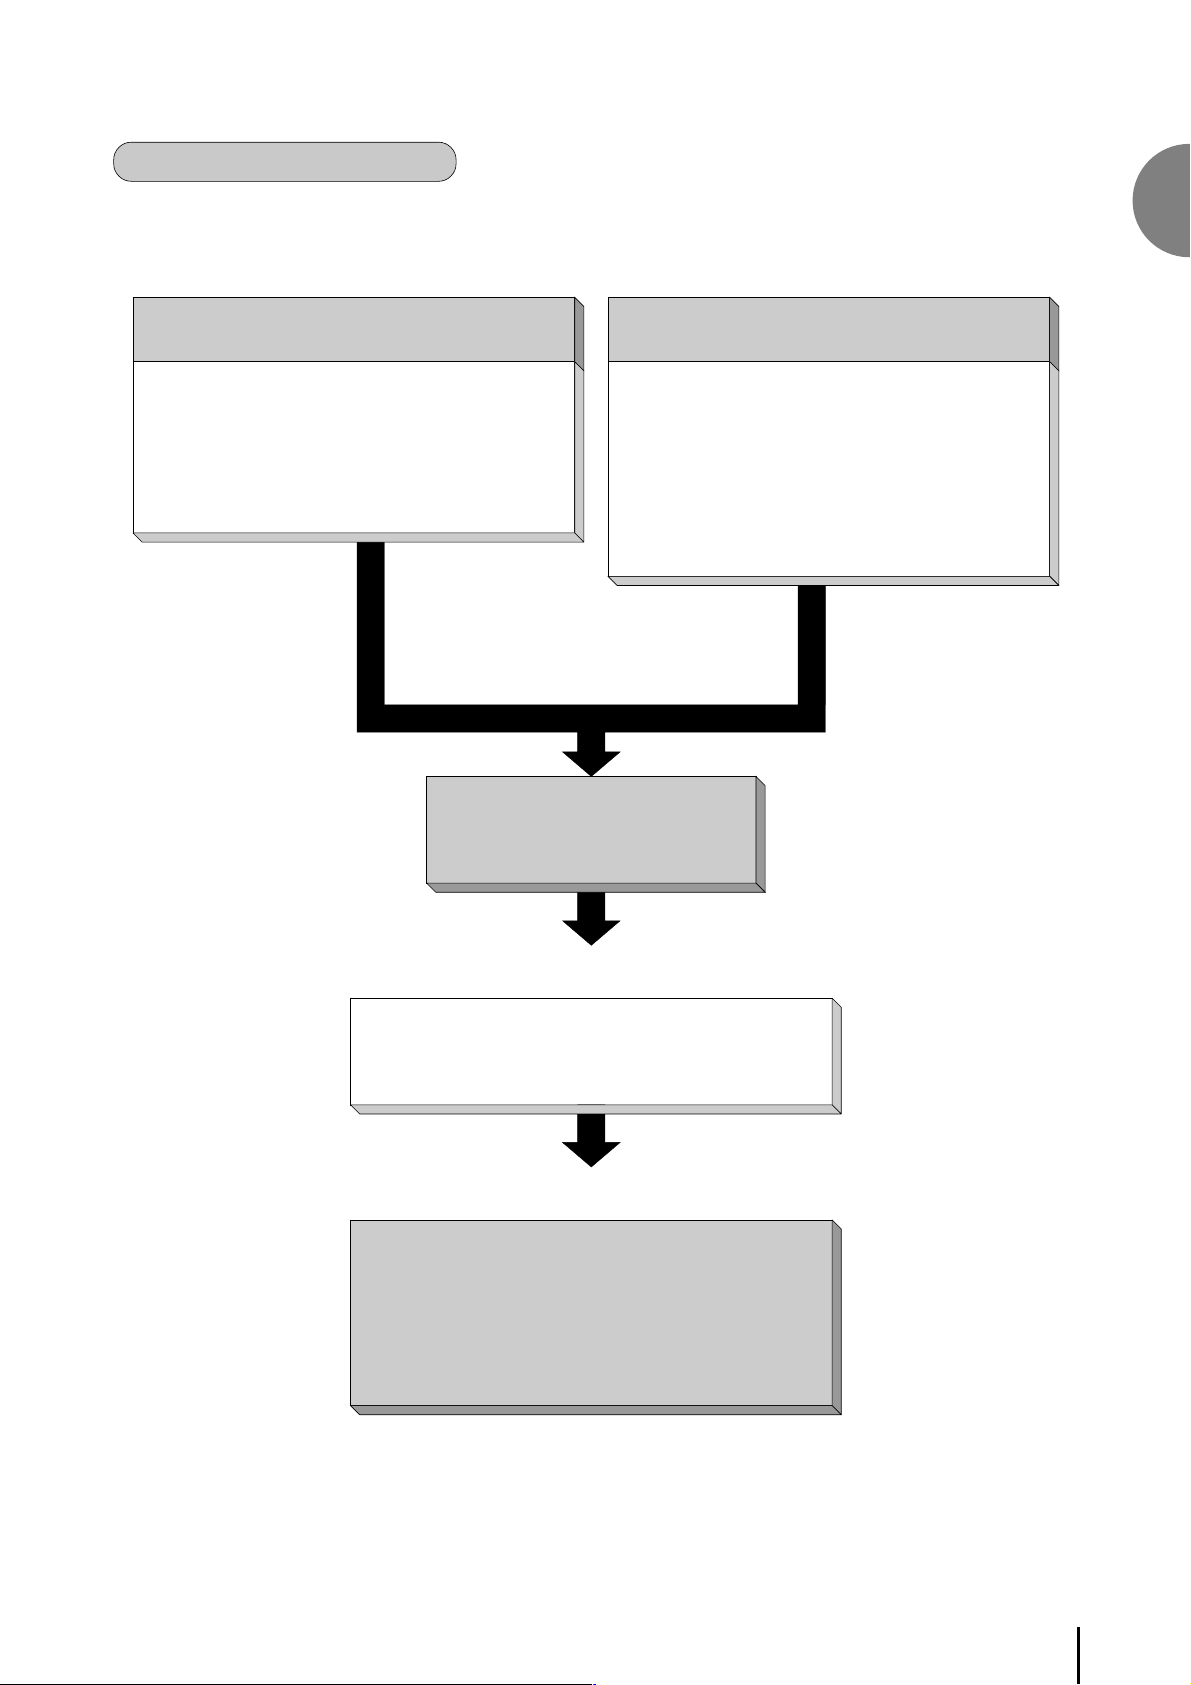
Summary of the LCD Operation
The following chart gives you a general view of the basic operations on the Electone.
1. To call up the LCD display
1) Pressing Panel Buttons
● Selecting voices or setting up the Voice Condition
● Selecting rhythms or setting up the Rhythm
Condition
● Setting the Reverb effect
● Setting the Sustain
● Setting the User Keyboard Percussion
2) Pressing a Display Select button
● Displaying Voice Display (Manual Balance)
● Setting effects
● Setting A.B.C./M.O.C.
● Setting the Left-Footswitch
● Setting Registration Shift (Right-Footswitch)
● Setting Pitch and Transpose
● Setting MIDI
● Selecting and setting Tremolo/Chorus
1
Quick Introductory Guide
LCD display
2. To Select Pages
Selecting the page you want to
use with the Page buttons
3. To Actually Change the Settings
Using the Data Control buttons to:
● Select voices/rhythms/effects
● Turn on/off the Accompaniment and A.B.C. Memory
● Adjust Initial Touch and Reverb depth
● Move the pan position and cursor position
15
Page 16

Language on the LCD
1
Quick Introductory Guide
LCD display can be shown in two languages, English and Japanese.
How to select the language:
1. Press the VOICE DISPLAY button in the DISPLAY SELECT section.
The page 1 will be displayed.
DATA CONTROL DATA CONTROL
2. Press the PAGE button to select the page 3.
DATA CONTROL DATA CONTROL PA G E
DISPLAY SELECT
VOICE EFFECT A.B. C.
DISPLAY SET M.O.C.
FOOT REGIST. PITCH TREMOLO
SW. SHIFT MIDI (FAST)
¨⁄Strings1ÎViolin1 ⁄
Ò⁄Strings1∏⁄ContBs.1
<v(4∂/Display> ‹
’i-y∫ ”English
3. Pressing each pair of Page buttons at the bottom select the language: the
right ones select English and the left ones select Japanese.
DATA CONTROL DATA CONTROL
<v(4∂/Display> ‹
’i-y∫ ”English
16
Page 17

2 Voice Sections
The EL-100 features 173 different high quality AWM voices. Each of the AWM voices can be used on the Upper
keyboard, Lower keyboard and Pedalboard. There are two voice sections for the Upper keyboard, one voice
section for the Lower keyboard and Pedalboard, respectively.
Each voice section can, of course, have its own Voice Condition page(s), which allow you to finely set up voice
and volume settings.
UPPER KEYBOARD VOICE
LEAD VOICE
STRINGS BRASS CLARI -
ORGAN PIANO GUITAR VIBRA- COSMIC TUTTI
STRINGS BRASS CLARI -
ORGAN PIANO GUITAR VIBRA- COSMIC TUTTI
SAXO- CHORUS HARMO-
NET
PHONE NICA
PHONE
LOWER KEYBOARD VOICE
CHORUS HORN
SAXO-
NET
PHONE
PHONE
MAX
MIN
MAX
MIN
VIOLIN FLUTE
OBOE TRUM-
CONTRA
BASS
ORGAN
BASS
1 Voice Display
You can visually confirm the voice assignments to each keyboard.
Pressing the VOICE DISPLAY button in the DISPLAY SELECT section selects
the Voice Display. (The Voice Display always appears when the Electone is
turned on.)
DISPLAY SELECT
VOICE EFFECT A.B. C.
DISPLAY SET M.O.C.
PETTOLOWER
PEDAL VOICE
ELEC.
BASS
TO
TUBA
LOWER
MAX
MIN
MAX
MIN
2
Voice Sections
FOOT REGIST. PITCH TREMOLO
SW. SHIFT MIDI (FAST)
The Voice Display is configured with three pages. Each page can be selected
using the Page buttons.
Page 1 and 2 show the currently assigned voice settings for each voice section,
as well as the overall balance between the Upper and Lower voices.
(page 1)
DATA CONT ROL DATA CONTROL
UPPER KEYBOARD VOICE LEAD VOICE
¨⁄Strings1ÎViolin1 ⁄
Ò⁄Strings1∏⁄ContBs.1
LOWER KEYBOARD VOICE PEDAL VOICE
PAG E
17
Page 18

2
Voice Sections
(page 2)
Volume Balance
DATA CONTROL DATA CONTROL PA GE
UPPER KEYBOARD VOICE 2
between UPPER
and LOWER (Page 20)
¨¤Strings1 M.BAL: 0¤
Ò¤Strings1∏¤ContBs.1
LOWER KEYBOARD VOICE 2 PEDAL VOICE 2
In addition to the four panel voice groups such as Upper Keyboard Voice, Lower
Keyboard Voice, Pedal Voice and Lead Voice, the EL-100 has three “hidden”
voice groups, Upper Keyboard Voice 2, Lower Keyboard Voice 2, Pedal Voice 2.
These three voice groups are displayed on page 2 of the Voice Display screen.
This fact indicates the EL-100 owns the same voice group numbers as those of
the upper models like EL-500. Accordingly, the EL-100 can play back the
registrations created with the upper models like EL-500. You can change the
settings of each “hidden” voice group as you do with the panel voice groups.
See page 27 for the details.
You can select the language shown on the LCD display on page 3 of the Voice
Display (page 16).
DATA CONTROL DATA CONTROL PA GE
NOTE:
For more information on the volume
balance between the Upper Keyboard and
the Lower Keyboard see page 20.
<v(4∂/Display> ‹
’i-y∫ ”English
2
Selecting Voices from the Panel
Since selection of panel voices follows the same procedure throughout the
various sections, instructions for only the Upper Keyboard Voice are given
here.
Select a voice from the Upper Keyboard Voice section by pressing one
1
of the Voice buttons in that section.
UPPER KEYBOARD VOICE
STRINGS BRASS CLARI -
ORGAN PIANO GUITAR VIBRA- COSMIC TUTTI
SAXO- CHORUS HARMO-
NET
PHONE NICA
PHONE
MAX
MIN
If, for example, you have selected the ORGAN voice, the following
display (Voice Menu) will appear:
DATA CONTROL DATA CONTROL
Organ1 JazzOrgan1
PopOrgan1 Accordion
Notice that several different voice names are shown on this display.
18
These are variations of the basic organ voice category.
Page 19

Press one of the Data Control buttons that corresponds to the voice you
2
DATA CONTROL DATA CONTROL
wish to select. (Pop Organ 1, in this case)
Organ1 JazzOrgan1
PopOrgan1 Accordion
The first letter of the selected voice will start blinking. You have
selected Pop Organ 1 for the Upper Keyboard Voice.
If you wish to, you can select voices from Lead Voice, Lower
3
4
Keyboard Voice and Pedal Voice sections, following steps #1 and #2
above.
Set the volume for each voice section.
There are two volume controls:
Coarse:
Use the VOLUME controls of each voice section on the panel to set the
desired level for each voice. The controls have seven volume settings,
from a minimum of 0, or no sound, to a maximum of full volume.
2
Voice Sections
UPPER KEYBOARD VOICE
STRINGS BRASS CLARI -
ORGAN PIANO GUITAR VIBRA- COSMIC TUTTI
Fine:
Pressing the same panel voice button again (or the same Data Control
button corresponding to the selected voice) calls up the Voice
Condition display. Use the Page buttons to select page 2, which
contains Volume setting.
DATA CONT ROL DATA CO NTROL PA G E
SAXO- CHORUS HARMO-
NET
PHONE NICA
PHONE
MAX
MIN
INIT.T: 8 ¨1⁄
FEET:PRESET
19
Page 20

2
Voice Sections
Use the top left side Data Control button pair to change the level of the
desired voice. Fine volume settings, 0-24, are available.
DATA CONTROL DATA CONTROL
VOL.:24 PAN:C ¨1¤
REVERB:24
Now select voices for the Lower keyboard and Pedalboard as you did
5
6
for the Upper keyboard above. Also set the volumes of the voices.
Adjust the volume balance between the Upper and Lower Voices with
the Balance Control provided on the Voice Display.
To adjust the volume balance:
1. Press the VOICE DISPLAY button in the DISPLAY SELECT
section. The Voice Display always appears when the Electone is
turned on.
DISPLAY SELECT
VOICE EFFECT A.B. C.
DISPLAY SET M.O.C.
NOTE:
Pressing a voice button once calls up that
voice’s Voice Menu display. Pressing it a
second time calls up the Voice Condition
display. Successive presses alternate
between the two displays.
NOTE:
The Lead and Pedal Voices sound one note
at a time; when you simultaneously press
two or more keys, only the highest note
will sound.
FOOT REGIST. PITCH TREMOLO
SW. SHIFT MIDI (FAST)
2. Select page 2 of the Voice Display using Page buttons at the right
side of the LCD display.
DATA CONTROL DATA CONTROL PA G E
¨⁄Strings1ÎViolin1 ⁄
Ò⁄Strings1∏⁄ContBs.1
3. Adjust the balance with the corresponding Data Control buttons, at
the top right side. The positive values increase the Upper Keyboard
volume, while the negative values lower it, or increase the Lower
Keyboard volume. Range: -6 - +6
DATA CONTROL DATA CONTROL
¨¤Strings1 M.BAL:+4¤
Ò¤Strings1∏¤ContBs.1
NOTE:
Pressing this pair of Data Control buttons
at the same time restores the balance to the
center position.
20
Page 21

About TO LOWER - Playing (Upper) Lead Voice and Pedal Voice from the Lower keyboard:
The Electone has a special ‘To Lower’ function that lets you assign Lead or
Bass voices to the Lower keyboard. Simply press the TO LOWER button
on the voice section you wish to assign, and that voice will be playable
from the Lower keyboard.
LEAD VOICE
VIOLIN FLUTE
MAX
CONTRA
BASS
PEDAL VOICE
ELEC.
BASS
MAX
When the TO LOWER button is turned on,
the Lead voices and Pedal voices cannot
be played on the Upper keyboard and
Pedalboard, respectively.
2
Voice Sections
TUBA
TO
LOWER
MIN
OBOE TRUM -
PETTOLOWER
Turning the Electone off erases all panel settings you have made. When the Electone is turned on, Basic Registration 1 is automatically selected.
If you have made panel settings you wish to keep, save them to the floppy disk before turning the Electone off. See page 68 for more information.
MIN
ORGAN
BASS
3 Selecting Voices from the
Dotted Buttons
The EL-100 has a wide variety of voices from which you can choose – far
greater than what is immediately apparent from the front panel controls.
You’ve already learned in the section above how to select the different
voices that are available in the Voice Menu display of each panel voice.
The Electone also has dotted buttons in each voice section, giving you access to
even more voices. These dotted buttons function as ‘wild card’ Voice Menu
selectors; any internal voices can be selected from these buttons.
UPPER KEYBOARD VOICE
STRINGS BRASS CLARI -
ORGAN PIANO GUITAR VIBRA- COSMIC TUTTI
SAXO- CHORUS HARMO-
NET
PHONE NICA
PHONE
The dotted buttons have two basic uses:
● For playing any voice of the Voice Menus from any of the keyboards or
Pedalboard. You can play on the Upper keyboard, for example, voices
from the twenty-two Voice Menu pages (including User), and not be
limited to only the twelve buttons (equivalent to twelve Voice Menu
pages) that make up the Upper Voice section. Another advantage to this
feature is that when the normally monophonic (one note) Lead and
Pedal voices are assigned to the Upper or Lower keyboard Voice
sections, they can be played polyphonically.
● For having three different voices from the same Voice Menu page
available for selection in the same song. For example, you can
assign one of the voices to a dotted button in the Upper Keyboard
Voice section, the second voice to the other dotted button in the
same section, and the third one on the Voice Menu.
MAX
MIN
21
Page 22

To select voices from the dotted buttons:
Press one of the dotted buttons in any of the voice sections.
1
Select Honky Tonk piano, for example, to the Dotted button 1 in Upper
Keyboard Voice.
UPPER KEYBOARD VOICE
2
Voice Sections
STRINGS BRASS CLARI -
ORGAN PIANO GUITAR VIBRA - COSMIC TUTTI
STRINGS, Voice Menu 1, appears.
DATA CONTROL DATA CONTROL
SAXO- CHORUS HARMO-
NET
PHONE NICA
PHONE
MAX
MIN
<STRINGS> ¨1‚⁄
01:Strings1
Select one of the pages with the Page buttons, and choose a Voice
2
DATA CONTROL DATA CONTROL PA GE
Menu. (PIANO, page 17, in this case)
<PIANO> ¨1⁄‡
01:Piano1
NOTE:
Select 03: Honky Tonk piano voice using the Data Control buttons.
3
DATA CONTROL DATA CONTROL
<PIANO> ¨1⁄‡
03:Honky Tonk
You have selected Honky Tonk for the Upper Keyboard Voice.
About User voices:
Page 22 is “User” area. Although EL-100 cannot exactly play back the user
voices created with the upper models like EL-900, the automatic conversion
function allows your EL-100 play back the voices fairly close to the original
sounds. However, some voices may not be reproduced properly.
DATA CONTROL DATA CONTROL
<USER VOICE> ¨1¤¤
01:******
You can directly view and select Voice
Menu pages by holding down one of the
Dotted buttons and simultaneously
pressing the desired voice buttons in
succession.
22
Page 23

4 Voice Menus
The following chart lists the voices that are shown by pressing the panel
voice buttons. The other voices that are only available when using the
Dotted buttons are shown on pages 24 - 26.
STRINGS Upper/Lower
Strings1 Strings2
Pizz.Strs Syn.Strs1
CONTRABASS Pedal
ContBass1 ContBass2
Pizz.Bass UprghtBass
HORN Lower
Horn1 Horn2
Horn3 Huted Horn
TUBA Pedal
Tuba Timpani
Timp.Roll
OBOE Lead
Oboe1 Oboe2
Bassoon1 EnglshHorn
VIOLIN Lead
Violin1 Violin2
Cello PizzViolin
BRASS Upper/Lower
Brass1 Brass2
Brass3 Syn.Brass1
TRUMPET Lead
Trumpet1 Trumpet2
Trombone1 Muted Trp
FLUTE Lead
Flute1 Piccolo
Recorder Whistle
CLARINET Upper/Lower
Clarinet1 Clarinet2
Bass Cla. Syn.Cla.1
2
Voice Sections
SAXOPHONE Upper/Lower
Saxophon1 Saxophon2
Sopra.Sax Syn.Lead1
CHORUS Upper/Lower
Chorus1 Chorus2
Chorus3 Vocal
ORGAN Upper/Lower
Organ1 JazzOrgan1
PopOrgan1 Accordion
PIANO Upper/Lower
Piano1 E.Piano1
E.Piano2 Harpsi.
VIBRAPHONE Upper/Lower
Vibrphone Glocken.
Marimba Syn.Chime
TUTTI Upper/Lower
Tutti1 Tutti2
Tutti3 Tutti4
HARMONICA Upper
Harmoni.1 Harmoni.2
ORGAN BASS Pedal
Org.Bass1 Org.Bass2
Org.Bass3 Org.Bass4
GUITAR Upper/Lower
Guitar1 Guitar2
ElecGtr.1 Harp
ELECTRIC BASS Pedal
ElecBass1 ElecBass2
Syn.Bass1 Syn.Bass2
COSMIC Upper/Lower
Cosmic1 Cosmic2
Cosmic3 Cosmic4
The details for each voice such as octave (feet) setting and effect on/off status are shown in the list on pages 24 - 26.
USER VOICE Upper/Lower/Pedal
<USER VOICE>
01:******
23
Page 24

2
Voice Sections
Details on All Voices
Page/Section Voice Name
1. Upper/Lower ● 01: Strings 1 8' - Large strings ensemble.
Feet Effect
The voices not lead by a bullet indicate that they are only selectable using the Dotted buttons.
Preset
Comments
STRINGS ● 02: Strings 2 8' - Relatively small strings ensemble for contemporary music.
03: Strings 3 8' - Small strings ensemble.
04: Strings 4 8' - Having specific harmonics for layering other voices.
05: Strings 5 8' - For legato playing.
06: Strings 6 8' - Strings with clarity. Appropriate for the fast passages.
07: Strings 7 8' - Expressive full bodied strings with a slow attack.
● 08: Pizz. Strings 8' - Pizzicato strings.
09: Trem. Strings 8' - Tremolo strings.
● 10: Synth. Strings 1 8' Cele. Synth. strings with softer attack.
11: Synth. Strings 2 8' Sym. Bright synth. strings.
12: Synth. Strings 3 8' Cele Softer Synth. strings.
2. Lead ● 01: Violin 1 8' - For multi purposes.
VIOLIN ● 02: Violin 2 8' - For solo with sharp attack.
03: Violin 3 8' - Bright fidle for country music.
04: Violin 4 8' - Darker synth. violin with wider dynamic range.
05: Violin 5 8' - Violin with deep vibrato, also suited for chord playing.
● 06: Pizz. Violin 8' - Pizzicato violin.
● 07: Cello 8' - Cello with realistic rubbed string-instrument feel.
08: Kokyu 8' - Ancient Chinese fiddle.
3. Pedal ● 01: Contrabass 1 8' - Standard type.
CONTRABASS ● 02: Contrabass 2 8' - True-to-life tight contrabass sounding in an octave unison.
03: Contrabass 3 16' - Realistic contrabass solo.
● 04: Pizz. Bass 8' - Pizzicato contrabass for classicals.
● 05: Upright Bass 8' - For jazz.
4. Upper/Lower ● 01: Brass 1 8' - Trumpet and trombone ensemble for classicals.
BRASS ● 02: Brass 2 8' - For big band with brighter attack.
● 03: Brass 3 8' - With strong impact. Can be used as orchestra hit.
04: Brass 4 U16'/L8' - Trombone ensemble.
05: Brass 5 8' - Tight octave brass for contemporary music.
● 06: Synth. Brass 1 8' - Synth. brass with sharp attack. Used for Basic Regist. 5.
07: Synth. Brass 2 8' - Analog type. Can be used as melody line.
08: Synth. Brass 3 8' - Fat synth. brass.
5. Lower ● 01: Horn 1 8' - Standard horn for classicals.
HORN ● 02: Horn 2 8' - Horn unison solo. Alpenhorn.
● 03: Horn 3 8' - For solo playing.
04: Horn 4 8' - Impressive horn ensemble.
● 05: Muted Horn 8' - Muted horn.
6. Lead ● 01: Trumpet 1 8' - Standard trumpet for classicals.
TRUMPET ● 02: Trumpet 2 8' - Jazz trumpet 1 with full-bodied sounds.
03: Trumpet 3 8' - Sweet voice.
04: Trumpet 4 8' - Jazz trumpet 2 with a peculiar attack.
05: Trumpet 5 8' - Comical synth. trumpet.
06: Trumpet 6 8' - Resonant trumpet solo.
● 07: Muted Trp. 8' - Harmon mute.
● 08: Trombone 1 U16'/L8' - For legato playing.
09: Trombone 2 U16'/L8' - Bright trombone solo. For fast phrases.
10: Muted Trb. U16'/L8' - Cup mute.
11: Flugel Horn 8' - Flugelhorn.
12: Euphonium U16/L8 - Euphonium with softer sounds.
7. Pedal ● 01: Tuba 16' - Accentuated by touch.
TUBA ● 02: Timpani 8' - Standard timpani.
● 03: Timpani Roll 8' - Typical timpani roll.
8. Lead ● 01: Flute 1 8' - Standard flute solo.
FLUTE 02: Flute 2 8' - For legato playing.
● 03: Piccolo 4' - Standard piccolo.
04: Yokobue 4' - Japanese pipe with clear sounds.
● 05: Recorder 4' - Block floete.
06: Ocarina 4' - Ocarina with simple but warm sounds.
07: Pan Flute 8' - Pan Flute.
08: Shakuhachi 8' - Japanese Shakuhachi with realistic breath noises.
● 09: Whistle 4' - Whistle.
24
Page 25

Page/Section Voice Name
9. Lead ● 01: Oboe 1 8' - Softer oboe.
Preset
Feet Effect
Comments
OBOE ● 02: Oboe 2 8' - Rounder tone with characteristic tonguing. For fast phrases.
● 03: English Horn 8' - Cor Anglais.
● 04: Bassoon 1 U16'/L8' - For legato playing.
05: Bassoon 2 U16'/L8' - For staccato playing.
10. Upper/Lower ● 01: Clarinet 1 8' - Standard clarinet.
CLARINET ● 02: Clarinet 2 8' - Clarinet solo for jazz and contemporary.
● 03: Bass Cla. 8' - Bass clarinet with fat and resonant sounds.
● 04: Synth. Cla. 1 8' - Resonant synth. clarinet.
05: Synth. Cla. 2 8' - Synth. reed with a unique attack sound.
11. Upper/Lower ● 01: Saxophone 1 U16'/L8' - Alto sax.
SAXOPHONE ● 02: Saxophone 2 U16'/L8' - Characteristic tenor sax with strong tonguing.
● 03: Sopra. Sax. 8' - Standard soprano sax.
04: Sax. Ens. 1 U16'/L8' - Softer sounds for classicals.
05: Sax. Ens. 2 U16'/L8 - Saxophone section for bigband.
06: Synth. Sax. 8' - Wind synthesizer with thick sounds in the middle and lower range.
● 07: Synth. Lead 1 8' - Softer analog synth. reed.
08: Synth. Lead 2 8' - Clear synth. reed with a sharp attack.
09: Synth. Lead 3 4' - Hoarse noise reed.
10: Synth. Lead 4 8' - Digital synth. reed.
11: Synth. Lead 5 8' - Synth. reed with thick fourth notes.
12. Upper/Lower ● 01: Tutti 1 8' - Strings unison and wood winds ensemble.
TUTTI ● 02: Tutti 2 8' - Strings unison and the brasses.
● 03: Tutti 3 8' - The brasses for classicals and bands.
● 04: Tutti 4 8' - Big band. Softer playing = sax only. Harder playing = 1 octave higher brasses added.
05: Tutti 5 8' - Wood winds ensemble. Instruments vary depending on the register played.
06: Tutti 6 8' - Wood winds quintet.
07: Tutti 7 8' - Brass ensemble.
13. Upper/Lower ● 01: Chorus 1 8' - Female “Ah”.
CHORUS ● 02: Chorus 2 8' - Male “Wh”.
● 03: Chorus 3 8' - Mixed chorus.
04: Chorus 4 8' - Mixed chorus with beautiful resonance. Wh.
05: Chorus 5 8' - Scat type vocal ensemble.
● 06: Vocal 8' - Accentuated solo vocal, “Ah”.
14. Upper ● 01: Harmonica 1 8' - Standard type with pitch modulated vibrato.
HARMONICA ● 02: Harmonica 2 8' - Solo harmonica with filter and amplitude modulated vibrato.
15. Upper/Lower ● 01: Organ 1 8' - Small pipe organ. 8'.
ORGAN 02: Organ 2 8' - Big pipe organ with full coupler.
03: Organ 3 8' - Nasard stops. 8'+2 2/3'.
04: Organ 4 8' - Harmonium.
● 05: Jazz Organ 1 16' Chor. For solo playing. 16'+8'+5 1/3'.
06: Jazz Organ 2 16' Trem. 16'+8'+2'.
07: Jazz Organ 3 16' Trem. For cluster playing. 16'+1 3/5'+1 1/3'+1'.
08: Jazz Organ 4 16' Chor. Fat and noisy jazz organ.
● 09: Pop Organ 1 8' Chor. Bright sounds for jazz. 8'+4'+2 2/3'.
10: Pop Organ 2 8' Chor. For multi purposes.
11: Theat. Organ 1 8' Sym. 8'+4' with slower attack.
12: Theat. Organ 2 8' - 16'+8' with slower attack.
● 13: Accordion 8' - Slower attack.
14: Bandoneon 8' - Attack can be controlled by initial touch.
16. Pedal ● 01: Organ Bass 1 8' - Combination organ bass.
ORGAN BASS ● 02: Organ Bass 2 16' - Pipe organ bass 1. Standard type.
● 03: Organ Bass 3 16' - For jazz. 16'.
● 04: Organ Bass 4 16' - Pipe organ bass 2. Full coupler.
17. Upper/Lower ● 01: Piano 1 8' - For multi purposes.
PIANO 02: Piano 2 8' - Brighter sounds. CP80 type.
03: Honkytonk 8' - Honky tonk piano.
● 04: Elec. Piano 1 8' Cele. DX7 type.
● 05: Elec. Piano 2 8' Cele. Old fashioned, full bodied electric piano.
06: Elec. Piano 3 8' - Electric piano with clearly brilliant but deep sounds.
● 07: Harpsichord 8' - Standard cembalo.
08: Clavi. 16' - Funky clavi.
09: Clavichord 8' - Clavichord with stable and grave sounds.
2
Voice Sections
25
Page 26

2
Voice Sections
Page/Section Voice Name
18. Upper/Lower ● 01: Guitar 1 U16'/L8' - Folk guitar. Steel string.
Preset
Feet Effect
Comments
GUITAR ● 02: Guitar 2 U16'/L8' - Acoustic jazz guitar. Tone varies depending on the touch.
03: Guitar 3 U16'/L8' - Classic guitar. Suitable to backing for bossanova.
04: 12Str. Guitar U16/L8 - 12-string classic guitar with gorgeous sounds.
05: Banjo 8' - For country and dixieland.
06: Mandolin 8' Cele. Standard mandolin.
07: Sitar 8' - Indian sitar with the different resonances between lower and mid./high ranges.
08: Shamisen 8' - Japanese classical shamisen.
● 09: Elec. Guitar 1 U16'/L8' - For backing.
10: Elec. Guitar 2 U16'/L8' - For solo playing.
11: Muted Guitar U16'/L8' - Muted guitar.
12: Dist. Guitar U16'/L8' - Distorted guitar.
● 13: Harp 8' - Grand harp.
14: Steel Guitar 8' - Hawaiian guitar. Effective when used with the glide function.
15: Koto 8' - Japanese Koto.
16: Taisho Koto 4' Cele. Japanese Taisho Koto.
19. Upper/Lower ● 01: Vibraphone 8' - Standard vibraphone.
VIBRAPHONE ● 02: Glocken 4' - Glockenspiel.
03: Celesta 4' - Celesta.
04: Music Box 4' - Antique music box.
● 05: Marimba 8' - Concert marimba.
06: Xylophone 4' - Tone varies depending on the initial touch.
07: Chime 4' - Chime.
● 08: Synth. Chime 8' Cele. Starry chime.
09: Steel Drum 8' - Steel Drum.
20. Pedal ● 01: Elec. Bass 1 8' - For multi purposes.
ELECTRIC BASS ● 02: Elec. Bass 2 16' - Slap bass.
03: Elec. Bass 3 16' - Plucked bass with hard attack.
04: Elec. Bass 4 16' Cele. Fretless bass, also suited for solo playing.
● 05: Synth. Bass 1 16' - Sustained sounds.
● 06: Synth. Bass 2 16' - With remarkable attack.
07: Synth. Bass 3 16' - Tone varies depending on the touch.
21. Upper/Lower ● 01: Cosmic 1 4' - Decay type. For multi purposes. UK in Basic Regist. 4.
COSMIC ● 02: Cosmic 2 8' - The lower register of celesta. LK and PK in Basic Regist. 4.
● 03: Cosmic 3 8' - Brass type.LK in Basic Regist. 5.
● 04: Cosmic 4 8' - Decay type. With fantastic image.
05: Cosmic 5 8' - Spacious sounds with feedback.
06: Cosmic 6 8' - Synth. brass type.
07: Cosmic 7 8' - Vocal type with feedback.
08: Cosmic 8 8' - Distortion type with feedback.
09: Cosmic 9 8' - Decay type with unique feedback.
10: Cosmic 10 8' - Clear synth. pad.
11: Cosmic 11 8' - Digital synth. pad.
12: Cosmic 12 8' - Chorus type synth. pad.
13: Cosmic 13 8' - Special sound effect with a slower attack. The sounds drastically changes.
14: Cosmic 14 8' - Fantastic digital music box.
15: Cosmic 15 8' - Ethnic synth. percussion.
16: Cosmic 16 16' - Special sound effect with a complicated mixture of various sounds.
Some of the voices may be different from the ones on the upper models like EL-900 even if they have the same voice names.
26
Page 27

To select the “hidden” voices
(Upper Keyboard Voice 2, Lower Keyboard Voice 2 and Pedal Voice 2):
You can call up the “hidden” voices on the LCD display and select them.
This function allows you to layer the voices on each keyboard to make the
sound thicker.
The procedure is explained with the selection of Upper Keyboard Voice 2,
as an example.
1. Press one of the voice buttons in the Upper Keyboard Voice section
while holding down the VOICE DISPLAY button in the DISPLAY
SELECT section.
2
Voice Sections
DISPLAY SELECT
VOICE EFFECT A.B.C.
DISPLAY SET M.O.C.
FOOT REGIST. PITCH TREMOLO
SW. SHIFT MIDI (FAST)
STRINGS BRASS CLARI -
ORGAN PIANO GUITAR VIBRA- COSMIC TUTTI
UPPER KEYBOARD VOICE
SAXO- CHORUS HARMO-
NET
PHONE NICA
PHONE
If, for example, you have selected the ORGAN voice, the following
display (Voice Menu) will appear:
DATA CONTROL DATA CONTROL
Organ1 JazzOrgan1
PopOrgan1 Accordion
Notice that several different voice names are shown on this display.
These are variations of the basic organ category.
2. Press one of the Data Control buttons that corresponds to the voice you
wish to select. (Pop Organ 1, in this case)
MAX
MIN
NOTE:
In this case the lamp on/off status in the
Upper Keyboard Voice section will not be
affected since you are dealing with the
Upper Keyboard Voice 2.
DATA CONTROL DATA CONTROL
Organ1 JazzOrgan1
PopOrgan1 Accordion
The first letter of the selected voice will start blinking. You have
selected Pop Organ 1 for the Upper Keyboard Voice 2.
27
Page 28

3. Set the volume for the Upper Keyboard Voice 2.
Pressing the same Data Control button corresponding to the selected
voice calls up the Voice Condition display. Use the Page buttons to
select page 2, which contains Volume setting.
DATA CONTROL DATA CONTROL PA GE
2
Voice Sections
INIT.T: 8 ¨2⁄
FEET:PRESET
Use the top left side Data Control button pair to change the level of the
desired voice.
DATA CONTROL DATA CONTROL
VOL.:24 PAN:C ¨2¤
REVERB:24
You can select the voices of Lower Keyboard Voice 2 and Pedal Voice
2 in the same manner.
NOTE:
Also, you can change the volume of the
Upper Keyboard Voice 2 voices by
pressing the Upper Keyboard Voice
volume buttons on the panel while
holding VOICE DISPLAY button.
NOTE:
The panel volume lamp position will not
be affected even if you change the
volume of Upper Keyboard Voice 2.
The volume buttons on the panel are
exclusive for the panel voice groups.
28
Page 29

3 Voice Controls and Effects
The Electone is equipped with two general kinds of functions that can be used to change the sound of the voices:
Voice Controls and Effects.
Certain effects may have been applied to some of the voices, but can be modified as you like. All built-in effects
are digital.
The chart below shows the various voice controls and effects for the individual voice sections. Available
functions are indicated by circles. The controls and effects are differently applied depending on those types:
applied to each voice group, to each keyboard or to the entire system.
Sym-
Reverb
*2
Tremolo
/Chorus
*1
phonic/
Celeste
Delay
Flanger
Distortion
Vibrato
Upper Keyboard Voice
Lower Keyboard Voice
Lead Voice
Inital
To uc h
Feet
Volume
Pan
Lead
Slide
Lead
Tu ne
Sustain
3
Voice Controls and Effects
Pedal Voice
Voice Condition Page 1
Voice Condition Page 2
Voice Condition Page 3
Voice Condition Page 4
Related Pages
Voice Condition Page 5
(Lead Voice only)
Effect Set Page
Reverb Page
Sustain Page
Tremolo Page
*1 Turning tremolo/chorus on/off and switching between tremolo and chorus are common to all voice sections.
*2 The total reverb depth and length are controlled on the reverb page, though the different reverb settings can be done for each voice section.
To change the settings and add the effects, display the appropriate page:
1. Selecting from Voice Condition Pages
2. Selecting from Effect Set Pages
3. Selecting from the Panel
29
Page 30

1 Selecting from Voice
Condition Pages
To call up the Voice Condition Pages:
Choose a voice on the panel, then press that voice’s panel button again. The
Voice Condition Choose a voice on page appears on the LCD display.
LEAD VOICE
3
Voice Controls and Effects
VIOLIN FLUTE
OBOE TRUM -
PETTOLOWER
Each voice group’s Voice Condition (except for Lead Voice) is configured with
four pages. Voice Condition of the Lead Voice consists of five pages.
Voice Condition [PAGE 1]
DATA CONTROL DATA CONTROL
1
MAX
MIN
INIT.T: 8 Î ⁄
FEET:PRESET
2
The included items are different between Pedal Voice group and the others
(Only Feet setting is available with Pedal Voice group).
Pedalboard
∏1⁄
FEET:PRESET
1 Initial Touch
Controls volume and timbre according to the velocity at which you strike the
keys.
The harder you strike the keys, the greater the volume and the brighter the
timbre will become. All voices are provided with this expressive function,
making it possible to perfectly reproduce the subtle dynamic and tonal changes
of actual instruments.
Higher settings make the change wider.
Range: 0 - 14
2 Feet
Determines the octave setting of the voice group. You can use a certain voice in
the broader range.
PRESET is the original (factory) setting; 4' is the highest and 16' is the lowest.
2' setting is added to the Pedal Voice sections.
NOTE:
Minimum setting produces no effect at all.
30
Page 31

Voice Condition [PAGE 2]
Press the Page buttons to select PAGE 2.
DATA CONTROL DATA CONTROL PAG E
12
VOL.: 0 PAN:C Î ¤
REVERB:24
3
1 Volume
Fine adjustment of the voice volume. See page 20 for more information.
Range: 0 - 24
2 Panning
Determines the position of the voice in the stereo image.
Seven pan positions are available.
3 Reverb
Determines the amount of reverb applied to each Voice section. When the panel
REVERB control is set to the minimum, the setting here will have no effect.
See page 40 for the details.
3
Voice Controls and Effects
Range: 0 - 24
31
Page 32

Voice Condition [PAGE 3]
Press the Page buttons to select PAGE 3.
3
Voice Controls and Effects
DATA CONTROL DATA CONTROL PA GE
1
EFFECT:PRESET Î ‹
PRESET
1
-1
OFF
1
-2
TREMOLO
1
-3
SYMPHONIC
1
-4
DELAY
1
-5
FLANGER
1
-6
DISTORTION
1
-7
1 Effect
Determines the effect type applied to each voice section.
Each press of top left F Data Control button selects Preset, Off, Tremolo,
Symphonic, Delay, Flanger and Distortion, in order. Each press of top left E
Data Control button selects in the reversed order.
-1
1
Preset
Selects the original (factory) effect. When PRESET is selected, some
of the voices have already got a certain type of effects.
Effect can also be selected in the Effect
Set page (page 34).
NOTE:
1
1
1
1
1
1
-2
Off
Cancels the effect.
-3
Tremolo
Selects Tremolo/ Chorus. See page 42 for the details of the Tremolo/
Chorus setting.
-4
Symphonic
Selects Symphonic/ Celeste. See page 35 for the details of the
Symphonic/ Celeste setting.
-5
Delay
Selects Delay. See page 36 for the details of the Delay setting.
-6
Flanger
Selects Flanger. See page 38 for the details of the Flanger setting.
-7
Distortion
Selects Distortion. See page 39 for the details of the Distortion setting.
32
Page 33

Voice Condition [PAGE 4]
Press the Page buttons to select PAGE 4.
DATA CONTROL DATA CONTROL PA GE
1-1
VIB:PRESET Î ›
DATA CONTROL DATA CONTROL
1-3
VIB:USER DEPTH: 0Î ›
DELAY: 0 SPEED: 0
1-2 1-4
1 Vibrato
Vibrato function vibrates the voices to create softer image. Applied to each
voice group.
-1
1
1
PRESET/USER
Selects the original (factory) effect. When PRESET is selected, some
of the voices have already got vibrato effect.
Selecting User allows you to access the Vibrato parameters to create
your own vibrato setting.
-2
Delay
Determines the amount of time that elapses between the playing of a
key and the start of the vibrato effect (see diagram). Higher settings
increase the delay of the vibrato onset.
The User vibrato may not be effective for
some voices such as Harmonica2, Electric
Piano1 and Synth. Chime.
The Vibrato parameters, Delay, Depth and
Speed, are not displayed as long as Preset
is selected.
3
Voice Controls and Effects
NOTE:
NOTE:
1
1
Range: 0 - 14
-3
Depth
Determines the intensity of the vibrato effect (see diagram). Higher
settings result in a more pronounced vibrato.
Range: 0 - 14
-4
Speed
Determines the speed of the vibrato effect (see diagram).
Range: 0 - 14
Vibrato Control
Delay
Speed
Depth
33
Page 34

Voice Condition [PAGE 5]
Press the Page buttons to select PAGE 5.
3
Voice Controls and Effects
DATA CONTROL DATA CONTROL PA GE
1
TUNE: 0 Î fi
SLIDE:OFF S.TIME: 0
2-1 2-2
1 Tune
Determines the pitch of the Lead voice. This control lets you detune the Lead
voice relative to the other voices of the Electone, for producing a richer sound.
The higher the value set, the higher the pitch.
Range: 0-24 (max. 28.88 cents; 1 step= Ca.1.2cents)
2 Slide
Slide applies a portamento effect to notes played in legato. For example, if you
play one note, then play another before completely releasing the first note, the
pitch of the first note will ‘slide’ up or down to the second note. The Slide
function is effective within a one-octave range.
-1
2
On/Off
Determines on/off status of the Slide effect.
-2
2
Slide Time
Determines the speed of the slide or portamento effect. The higher the
value that is set, the slower the speed.
Range: 0 - 14
2 Selecting from Effect Set
Page
To call up the Effect Set page:
Pressing the EFFECT SET button in the DISPLAY SELECT section calls up the
Effect Set pages.
DISPLAY SELECT
VOICE EFFECT A.B. C.
DISPLAY SET M.O.C.
FOOT REGIST. PITCH TREMOLO
SW. SHIFT MIDI (FAST)
See page 32 for the information on Preset and Off.
The explanation on each effect is given here.
34
Page 35

DATA CONTROL DATA CONTROL PA GE
EFFECT:PRESET ¨1
PRESET
OFF
TREMOLO
1
SYMPHONIC
2
DELAY
3
FLANGER
4
DISTORTION
5
Selecting Voice Group
You can select the voice section to which the effect should be applied, by
pressing the Page buttons. The acronyms indicate each voice group.
3
Voice Controls and Effects
: Upper Keyboard Voice
¨1
:Lower Keyboard Voice
Ò1
: Lead Voice
Î
: Pedalboard Voice
1
: Upper Keyboard Voice 2
¨2
:Lower Keyboard Voice 2
Ò2
: Pedalboard Voice 2
2
1 Tremolo/Chorus
See Tremolo section on page 42. Independently applied to each voice section.
2 Symphonic/Celeste
Determines the type of the Symphonic effect, SYMPHONIC (Sym.) or
CELESTE (Cele.).
Symphonic is a subtle echo effect that makes one voice sound like an ensemble.
For example, a solo violin voice played through Symphonic would sound like
many violins playing together.
SYMPHONIC simulates the effect of a large ensemble, while CELESTE creates
the effect of a gradually expanding sound.
Press the appropriate Data Control button to turn on the desired effect. The solid
(negative) box indicates the effect is turned on.
DATA CONTROL DATA CONTROL
2
2
EFFECT:SYMPHONIC ¨1
”SYMPHONIC ’CELESTE
2-1 2-2
-1
Symphonic
Selects the Symphonic effect to the designated voice section.
-2
Celeste
Selects the Celeste effect to the designated voice section.
NOTE:
In the illustration at the left, Symphonic is
selected and effective.
35
Page 36

3
Voice Controls and Effects
3 Delay
Delay is a pronounced echo effect, with distinct delayed repeats of the original
sound. Independently applied to each voice section.
Delay Effect
Signal
Time
Delayed Signal
Adjusts the delay interval using TIME parameter
Adjust the number of repeated sounds using FEEDBACK parameter
DATA CONTROL DATA CONTROL
Adjusts the level
balance using
BALANCE
parameter
EFFECT:DELAY ¨1
ÚÆTIME----242mSec
TIME
3
3-1
3
3
3
-2
-3
-4
-5
F.B.
BAL.
MODE
-1
3
Parameter Settings
The bottom left Data Control buttons select available Delay parameters.
Available parameters are as follows:
-2
3
Time
Determines the time between delayed repeats.
DATA CONTROL DATA CONTROL
EFFECT:DELAY ¨1
ÚÆTIME----242mSec
Range: 5mSec – 956mSec
-3
3
Feedback
Determines the number of delayed repeats.
DATA CONTROL DATA CONTROL
EFFECT:DELAY ¨1
ÚÆF.B.----28.5%
36
Range: 0.2% - 46.9%
Page 37

-4
3
DATA CONTROL DATA CONTROL
Balance
Determines the volume of the delay effect, relative to the original
sound. Higher settings produce a louder delay.
EFFECT:DELAY ¨1
ÚÆBAL.----60.6%
Range: 0% - 100%
-5
3
DATA CONTROL DATA CONTROL
Mode
Selects the delay type from Mono, ST (Stereo) 1, 2, 3.
Selecting one of the Stereo Delays produces more expanding image or
an image sounds move from right to left, or left to right.
EFFECT:DELAY ¨1
ÚÆMODE----MONO
3
Voice Controls and Effects
Range: Mono, ST1, ST2, ST3
Characteristics of Each Delay Type
Monaural
Normal monaural delay.
ST1
Multi delay with complicated reflections. Provides the most pronounced
effect.
ST2
Simple stereo delay. Feedback is 0 and the first reflection only. Special
effects can be obtained.
ST3
Adds thickness and brilliance to the monaural delay.
37
Page 38

4 Flanger
Flanger introduces a swirling, animated modulation effect to the sound.
Independently applied to each voice section.
Flanger Effect
3
Voice Controls and Effects
Signal
Time
DATA CONTROL DATA CONTROL
Changes the pitch using
SPEED parameter
Intensifies the pitch change
using FEEDBACK parameter
Sets the depth using
DEPTH parameter
EFFECT:FLANGER ¨1
ÚÆSPEED--- 4.5Hz
SPEED
4
4
-1
-1
4
Parameter Settings
The bottom left Data Control buttons select available Flanger
parameters. Available parameters are as follows:
-2
4
Speed
Determines the speed of the modulation.
DATA CONTROL DATA CONTROL
4
4
-2
F.B.
-3
DEPTH
-4
EFFECT:FLANGER ¨1
ÚÆSPEED--- 4.5Hz
Range: 0Hz - 12.1Hz
-3
4
Feedback
Controls the brightness and the metallic sound of the effect.
DATA CONTROL DATA CONTROL
EFFECT:FLANGER ¨1
ÚÆF.B.----35.2%
Range: 0.6% - 94.0%
-4
4
Depth
Determines the intensity of the effect.
DATA CONTROL DATA CONTROL
EFFECT:FLANGER ¨1
ÚÆDEPTH---52.3%
38
Range: 37.8% - 87.8%
Page 39

5 Distortion
Distortion adds a distorted image to the sounds usually found in electric guitars.
Independently applied to each voice section.
Distortion Effect
Signal
DATA CONTROL DATA CONTROL
Determines the depth
using LEVEL parameter
Changes the
timbre using
HIPASS
parameter
EFFECT:DISTORTION ¨1
ÚÆLEVEL---16.4dB
LEVEL
5
-1
-1
5
5
DATA CONTROL DATA CONTROL
Parameter Settings
The bottom left Data Control buttons select available Distortion
parameters. Available parameters are as follows:
-2
Level
Determines the depth of the distorted sounds.
5-2
5-3
HI PASS
3
Voice Controls and Effects
EFFECT:DISTORTION ¨1
ÚÆLEVEL---16.4dB
Range: 0dB – 21.8dB
-3
5
DATA CONTROL DATA CONTROL
High Pass
Changes the timbre of the distorted sounds.
EFFECT:DISTORTION ¨1
ÚÆHI PASS- 476Hz
Range: 20Hz - 1036Hz
39
Page 40

3
3 Selecting from the Panel
Reverb, Sustain and Tremolo/Chorus pages are called up by pressing the
respective panel buttons.
1 Reverb
Reverb adds an echo-like effect to the sound, giving the impression of a
performance in a large room or concert hall. Reverb effect can be applied to the
entire system or to each voice section (page 31) independently. Also, Reverb
can be applied to the rhythm and accompaniment independently.
Voice Controls and Effects
Press one of the REVERB buttons, located to the left of the panel, to set the
Reverb effect. The following display appears.
REVERB
MAX
MIN
REVERB page
1
DATA CONTROL DATA CONTROL
-1
<REVERB> TYPE:HALL
LENGTH:3 DEPTH:16
1
1
-2
-1
Type
Determines the type of reverb effect: Room, Hall and Church. Each
type simulates a different acoustic environment; Room is the smallest
and Church the largest.
1
-3
40
1
1
-2
Length
Determines the acoustic liveliness of the simulated room in the effect.
Higher settings make the room more reverberant.
Range: 0 - 6
-3
Depth
Fine adjustment of the depth of reverberation or the level of the
reflected sounds. Coarse reverb depth settings are made with the panel
REVERB buttons.
Range: 0 - 24
NOTE:
When this parameter or the panel
REVERB control is set to the minimum,
the settings in each voice condition page
(page 31) have no effect.
Page 41

2 Sustain
The Sustain effect, selectable for the Upper, Lower and Pedal voices, causes
voices to gradually fade out when the keys are released. The sustain on/off and
sustain length settings are independent for each keyboard, providing maximum
expressive control.
Press one of the SUSTAIN buttons, located to the left of the panel, to set the
Sustain effect. The following display appears.
The lamp of the button lights up to indicate that sustain is on. Press the button
again to turn sustain off.
SUSTAIN
UPPER
LOWER PEDAL
SUSTAIN Page
DATA CONTROL DATA CONTROL
3
Voice Controls and Effects
<SUSTAIN> UPPER:10
LOWER:10 PEDAL: 6
Upper/Lower/Pedal
Determines the length of sustain applied to each keyboard. The display shows
the current sustain length values for each keyboard. The values here must be set
high enough for the sustain effect to be noticeable.
Range: 0 - 12
NOTE:
Sustain cannot be applied to the Lead
voices.
NOTE:
Remember that the SUSTAIN buttons are
on/off switches. If you use them to simply
check the sustain length values, you may
unintentionally change the on/off status of
the effect. Remember to check whether the
sustain button lamps are on or off before
you start to play.
41
Page 42

3 Tremolo/Chorus
Tremolo recreates the rich, swirling sound of the popular rotating speaker effect.
Just as with a conventional rotating speaker, you can switch between slow and
fast speeds. And like a motor-driven speaker, the characteristic tremolo effect
gradually changes speed after it is switched. You can also adjust the maximum
speed of the effect to suit your playing style. The Tremolo effect can be
switched in real time as you play with either the front panel button or the Left
Footswitch (when properly set for Footswitch operation).
3
Voice Controls and Effects
■ Tremolo Operation
For Panel Voices (Voice Menu)
1
Select (turn on) Tremolo effect in each Voice Condition
page 3.
2
Adjust the Tremolo setting in Tremolo
Control (or Effect Set) page.
3
Assign footswitch for Tremolo Control, if desired.
Turn on Tremolo as you play,
with Tremolo button or Footswitch.
42
Page 43

1) Turning on the Tremolo effect (set to standby):
You cannot use the Tremolo effect only by turning on the TREMOLO (FAST)
button. First, you need to turn the effect on in the desired voice section(s).
Independently applied to each voice section.
Select (turn on) Tremolo
Press the desired voice button on the panel twice to display one of the
1
2
DATA CONT ROL DATA CONTROL PA GE
Voice Condition pages.
LEAD VOICE
VIOLIN FLUTE
OBOE TRUM -
PETTOLOWER
The Voice Condition page appears.
Select page 3 of the Voice Display using PAGE buttons at the right side
of the LCD display.
MAX
MIN
3
Voice Controls and Effects
EFFECT:PRESET Î ‹
Select Tremolo to turn it on.
3
DATA CONTROL DATA CONTROL
EFFECT:TREMOLO Î ‹
43
Page 44

3
2) Setting the Tremolo Effect
Tremolo setting made here are global; in other words, they are applied the same
to all voices for which Tremolo has been turned on (set to standby).
To turn on the Tremolo effect and call up the Tremolo Control page:
Press the TREMOLO (FAST) button in the DISPLAY SELECT section.
The following display appears.
DISPLAY SELECT
VOICE EFFECT A.B. C.
DISPLAY SET M.O.C.
Voice Controls and Effects
FOOT REGIST. PITCH TREMOLO
SW. SHIFT MIDI (FAST)
DATA CONTROL DATA CONTROL
<TREMOLO> <CHORUS>
SPEED:6.82 MODE:SLOW
12
The lamp of the button lights up to indicate that Tremolo is on. Press the button
again to turn Tremolo off and Chorus on (the LED turns off).
1 Tremolo Speed
Determines the speed of the Tremolo (rapid rotation) effect.
Range: 4.75Hz – 7.77Hz
2 Chorus Mode
Determines the effect applied when Tremolo is switched off: a slow chorus
effect (SLOW) or STOP. Use the SLOW setting when you want to have a
constant rotating speaker sound.
3) Realtime control of Tremolo effect
Once the Tremolo effect has been turned on and set, you can control the effect
in real time from the panel or from the Left Footswitch (page 97). Simply press
the TREMOLO (FAST) button in the DISPLAY SELECT section to turn the
Tremolo effects on and off while you’re playing. This button functions just like
the fast/slow switch on an actual rotating speaker cabinet. When Tremolo is on,
the rotation effect is fast; when off (Chorus), it is slow. The speed change is
gradual, effectively simulating the slowing down and speeding up of a rotating
speaker. You can also use the Left Footswitch to control the Tremolo effect in
the same way, if the Footswitch has been properly assigned.
44
Page 45

4 Rhythm and Accompaniment
The Rhythm features of the Electone use actual drum and percussion sampled sounds to automatically play
various rhythms. Automatic Accompaniment functions are used with the rhythms, providing appropriate and
completely automatic accompaniment to match the style of the selected rhythm. Moreover, the Electone has a
Keyboard Percussion feature that allows you to play drum and percussion sounds from the Lower keyboard
and Pedalboard.
1
Selecting Rhythms from the Panel
Ten different rhythm categories in various styles can be instantly selected
from the front panel. The Electone has many more ‘hidden’ rhythms,
however. A total of 66 rhythms are available, and can be selected by using
the display.
1) To select and play a rhythm:
Press any of the RHYTHM buttons once.
1
SEQ.
SEQ. MARCH WALTZ SWING BOUNCE SLOW
1
2ROCK
SEQ.
SEQ. TANGO
3
4
Designated Rhythm Menu page will be displayed.
DATA CONTROL DATA CONTROL
RHYTHM
LATIN1LATIN 8 BEAT 16 BEAT
2
MAX
MIN
8Beat1 8Beat2
DancePop1 DancePop2
The first letter of the currently selected rhythm will start blinking.
Press the Data Control button corresponding to the rhythm you wish to
2
DATA CONTROL DATA CONTROL
play, as you do with the voices.
The first letter of the selected rhythm will start blinking. Dance Pop 1
is selected here, for example.
8Beat1 8Beat2
DancePop1 DancePop2
4
Rhythm and Accompaniment
NOTE:
In addition to 10 different rhythm styles,
four types of metronome sounds, simple
metronome, two four, three four and four
four, are assigned to the SEQ 1 – 4
buttons, respectively, as the defaults.
NOTE:
The chord/bass patterns matching with the
designated rhythm will be selected
automatically when the A.B.C. function is
turned on. (Refer to the Auto Bass Chord
section, page 52, for details on Auto Bass
Chord and Memory.)
45
Page 46

Turn the rhythm on.
3
You can use one of three buttons to turn on the rhythm:
1 START
2 SYNCHRO START
4
Rhythm and Accompaniment
3 INTRO. ENDING
RHYTHM
SYNCHRO
INTRO.
ENDING
START
START
123
FILL IN
This button does as its name indicates; the rhythm begins as soon as
the button is pressed. To stop the rhythm, press this button again.
This button puts the rhythm in ‘stand-by’ status. The rhythm will
start when you press a note on the Lower keyboard or Pedalboard.
Pressing this button automatically adds a short introduction (of up to
eight measures) before starting the actual rhythm.
First, press the INTRO. ENDING button, then the START or
SYNCHRO START button to actually start the rhythm.
NOTE:
The Left Footswitch can also be used to
turn the rhythm on and off in the middle of
song. To assign the Footswitch for rhythm
control, see page 98.
While the introduction is playing, the display shows the countdown
to the first measure of the pattern. For example, if there is an eightmeasure lead-in for a pattern in 4/4 time, the following display
appears.
Pressing the INTRO. ENDING button again while the pattern is
being played will automatically add an ending phrase before
stopping the rhythm.
BAR/ BEAT
LEAD IN
Pressing the START button while holding down the INTRO. ENDING
button automatically plays a special one-measure Lead In, with a click on
each beat, to cue you in to the beginning of the song.
Set the volume using the panel rhythm volume button.
4
The controls have seven volume settings, from a minimum of 0, or no
sound, to a maximum of full volume. Fine adjustments in the volume of
the rhythm can also be made from the Rhythm Condition page (page 48).
RHYTHM
NOTE:
ABOUT SYNCHRO START:
Synchro Start functions quite differently
when the Auto Bass Chord feature is
turned on and the Accompaniment
Memory is turned off. The rhythm starts
when a key on the Lower keyboard is
played, but then immediately stops when
the key is released. To keep this from
happening, turn the Memory function on.
(Refer to the Auto Bass Chord section,
page 52, for details on Auto Bass Chord
and Memory.)
NOTE:
When the Electone is turned on, the
Rhythm Volume is automatically set to 0.
46
SEQ.
SEQ. MARCH WALTZ SWING BOUNCE SLOW
1
2ROCK
SEQ.
3
SEQ. TANGO
4
LATIN1LATIN 8 BEAT 16 BEAT
2
MAX
MIN
Page 47

Set the rhythm tempo using the Tempo button in the rhythm section.
5
BAR/ BEAT
2
(TEMPO Display:
shows current tempo)
TEMPO
1
BAR/ BEAT
1 TEMPO Button
For adjusting the speed of the rhythm. Pressing the right button
increases the tempo and pressing the left button decreases it.
2 TEMPO Display (BAR/BEAT Indicator)
Shows the current tempo. (Displayed values are given in beats per
minute, just as on a conventional metronome.)
Range: 40 - 240
When the rhythm begins playing, the TEMPO display changes
function to a Bar/Beat indicator.
BAR/ BEAT
The number on the left indicates the current bar
or measure and the one on the right indicates
the number of the beat in each bar.
The beat indicator lamp below the TEMPO
buttons also indicates the beats.
(BAR/BEAT Indicator: shows the
current position in the measures)
4
Rhythm and Accompaniment
NOTE:
When you press the TEMPO Button even
while the rhythm is playing, the display
momentarily changes to show the current
tempo.
2) To use the Fill In patterns:
Fill In patterns are designed to be used as temporary and regular rhythmic
breaks to spice up a repeating rhythm. Like the regular rhythms, all Fill In
patterns have been designed to perfectly match the bass and chord parts of the
Automatic Accompaniment feature.
Select and play a rhythm.
1
As you play the Electone along with the rhythm, occasionally press the
2
FILL IN button.
INTRO.
ENDING
RHYTHM
SYNCHRO
START
START
FILL IN
NOTE:
USING A FILL IN FOR THE START
OF A SONG:
Fill In patterns can also be used as
introductions; simply press the FILL IN
button before starting the rhythm with the
START or SYNCHRO START buttons.
NOTE:
PLAYING PARTIAL FILL IN
PATTERNS:
You can also start Fill In patterns within a
bar, in order to play only the final one or
two beats of the Fill In pattern and create
additional rhythmic interest. Since the Fill
In feature is very sensitive to bar/beat
boundaries, you should be very careful to
‘play’ the FILL IN button precisely on (or
just slightly before) the beat that you want
the Fill In pattern to begin.
47
Page 48

4
2 Rhythm Condition Pages
The Rhythm Condition includes the following two pages: the Rhythm
Condition page used to adjust the rhythms and the Instrument page used to
make up each drum/percussion instrument, each of which comprises the
rhythms and is playable using the Keyboard Percussion function.
To select the Rhythm Condition page:
Choose a rhythm, and press that pattern’s panel button again (or again press the
Data Control button corresponding to the selected rhythm). (The button should
be pressed only once if the Rhythm display has already been called up;
otherwise press the button twice.)
RHYTHM
SEQ.
SEQ. MARCH WALTZ SWING BOUNCE SLOW
1
2ROCK
MAX
Rhythm and Accompaniment
Rhythm Condition [PAGE 1]
DATA CONTROL DATA CONTROL
1 Volume
Fine Adjustment of rhythm/keyboard percussion volume.
Range: 0 - 24
2 BAL. (Balance)
Determines the balance between two main sound types of the rhythms: the
drum sounds and the cymbal sounds. Positive settings emphasize the cymbal
sounds, while negative settings emphasize the drums.
Range: -6 - 0 - +6
3 Reverb
Determines the amount of reverb applied to the rhythms and percussion
sounds used in the rhythms. When the panel REVERB control is set to the
minimum, the setting here will have no effect.
SEQ.
3
SEQ. TANGO
4
LATIN1LATIN 8 BEAT 16 BEAT
2
12
VOL.: 0 BAL.: 0 ⁄
REV.:12 ’AUTO VARI.
34
MIN
NOTE:
Pressing this pair of Data Control buttons
at the same time restores the balance to the
center position.
Range: 0 - 24
4 Auto Variation
On/off switches of the Auto Variation function. Use the bottom right Data
Control button to turn on the Auto Variation function (Solid box indicates
the function is effective). The Auto Variation function lets you set pattern
variations to be played automatically. When set to ON, Auto Variation
automatically substitutes additional pattern variations to make the rhythm
more interesting and complex.
48
NOTE:
The Auto Variation function is not applied
to some of the rhythms.
Page 49

Rhythm Condition [PAGE 2]
DATA CONTROL DATA CONTROL
ACC.VOL.: 0 ”ON’OFF¤
ACC.REV.:24 TYPE:1
The settings related to Accompaniment are available on this page. See page 54
for the details.
3 Dotted Buttons and User
Rhythms
The Rhythm section also has, like the voice sections, dotted buttons from
which rhythms can be selected. These dotted buttons function as ‘wild
card’ rhythm selectors; any of the rhythms available from the panel
buttons, the Rhythm Menus or User rhythms loaded from optional Pattern
Disk can be selected from these buttons.
4
Rhythm and Accompaniment
1) To select a rhythm from a dotted button:
Press one of the dotted buttons on the right side of the Rhythm section.
1
SEQ.
SEQ. MARCH WALTZ SWING BOUNCE SLOW
1
2ROCK
SEQ.
SEQ. TANGO
3
4
MARCH, Rhythm Menu 1, appears.
DATA CONTROL DATA CONTROL
RHYTHM
LATIN1LATIN 8 BEAT 16 BEAT
2
MAX
MIN
<MARCH> ‚⁄
01:March1
Select one of the pages with the Page buttons, and choose a Rhythm
2
DATA CONTROL DATA CONTROL PA G E
Menu.
<SWING> ‚‹
01:Swing1
49
Page 50

Select the desired rhythm using the Data Control buttons.
3
DATA CONTROL DATA CONTROL
<SWING> ‚‹
07:JazzBallad
2) To call up the User rhythms:
Yo u can call up the rhythms created by the other Electone that has Rhythm
Pattern Programming function and those on optional Pattern Disks.
4
Rhythm and Accompaniment
1
DATA CONTROL DATA CONTROL PA G E
Press Page buttons to select the User page.
Press to select the User rhythm number and its Type.
2
DATA CONTROL DATA CONTROL
<USER RHYTHM> ⁄⁄
01:USER1-A
<USER RHYTHM> ⁄⁄
04:USER1-D
50
Page 51

4 Rhythm Menus
This chart lists all 66 of the rhythms available on the Electone.
MARCH
March1 Polka1
Country1 Broadway
WALTZ
Waltz1 Waltz2
J.Waltz1 Bolero
NOTE:
The Baroque on the March page is
configured with accompaniment only; it
does not contain any drum or percussion.
SWING
Swing1 Swing2
J.Ballad Dixieland1
SLOW ROCK
SlowRock1 SlowRock2
SlowRock3
LATIN1
ChaCha Rhumba
Beguine Mambo
8 BEAT
8Beat1 8Beat2
DancePop1 DancePop2
USER RHYTHM
<USER RHYTHM>
01:USER1-A
Page Category LCD
●
01 MARCH
02 WALTZ
03 SWING
04 BOUNCE
01:March1
02:March2
03:March3
●
04:Polka1
05:Polka2
●
06:Country1
07:Country2
●
08:Broadway
09:Baroque
●
01:Waltz1
●
02:Waltz2
03:Waltz3
04:Waltz4
05:Waltz5
●
06:JazzWaltz1
07:JazzWaltz2
08:JazzWaltz3
●
09:Bolero
●
01:Swing1
●
02:Swing2
03:Swing3
04:Swing4
05:Swing5
06:Swing6
●
07:JazzBallad
●
08:Dixieland1
09:Dixieland2
●
01:Bounce1
●
02:Bounce2
03:Bounce3
●
04:Reggae1
●
05:Reggae2
BOUNCE
Bounce1 Bounce2
Reggae1 Reggae2
TANGO
Tango1 Tango2
Tango3
LATAN2
Samba1 Samba2
Bossa.1 Bossa.2
16 BEAT
16Beat1 16Beat2
Funk1 Funk2
Page Category LCD
05 SLOW ROCK
06 TANGO
07 LATIN1
08 LATIN2
09 8 BEAT
10 16 BEAT
●
●
●
●
●
●
●
●
●
●
●
●
●
●
●
●
●
●
●
●
●
●
The rhythms not lead by a bullet can be selectable only through the Dotted buttons.
Page Category LCD
01:SlowRock1
02:SlowRock2
03:SlowRock3
01:Tango1
02:Tango2
03:Tango3
01:ChaCha
02:Rhumba
03:Beguine
04:Mambo
05:Salsa
01:Samba1
02:Samba2
03:Samba3
04:Bossanova1
05:Bossanova2
06:Bossanova3
01:8Beat1
02:8Beat2
03:8Beat3
04:8Beat4
05:8Beat5
06:DancePop1
07:DancePop2
08:DancePop3
09:DancePop4
01:16Beat1
02:16Beat2
03:16Beat3
04:16Beat4
05:16Beat5
06:Funk1
07:Funk2
08:Funk3
11
USER RHYTHM
01:USER1-A
02:USER1-B
03:USER1-C
04:USER1-D
05:USER2-A
06:USER2-B
07:USER2-C
08:USER2-D
09:USER3-A
10:USER3-B
11:USER3-C
12:USER3-D
13:USER4-A
14:USER4-B
15:USER4-C
16:USER4-D
17:USER5-A
18:USER5-B
19:USER5-C
20:USER5-D
21:USER6-A
22:USER6-B
23:USER6-C
24:USER6-D
25:USER7-A
26:USER7-B
27:USER7-C
28:USER7-D
29:USER8-A
30:USER8-B
31:USER8-C
32:USER8-D
4
Rhythm and Accompaniment
51
Page 52

5 Automatic Accompaniment -
Auto Bass Chord (A.B.C.)
The Auto Bass Chord (A.B.C.) function works with the Rhythm section of the
Electone to automatically produce chord and bass accompaniment as you play.
There are three modes to obtain Automatic Accompaniment patterns.
To select the A.B.C. function:
Press the A.B.C./M.O.C. button in the DISPLAY SELECT section.
DISPLAY SELECT
VOICE EFFECT A.B. C.
DISPLAY SET M.O.C.
4
Rhythm and Accompaniment
The following display appears.
A.B.C. [PAGE 1]
DATA CONTROL DATA CONTROL
1 A.B.C. Type
You can select one of three automatic accompaniment functions here.
Each press of bottom left F Data Control button selects Off, Single
Finger, Fingered Chord and Custom A.B.C., in order. Each press of bottom
left E Data Control button selects in the reversed order.
FOOT REGIST. PITCH TREMOLO
SW. SHIFT MIDI (FAST)
12
<ABC> <MEMORY> ⁄
OFF ’L ’P
OFF
1-1
SINGLE
1-2
FINGERED
1-3
CUSTOM
1-4
2-1
2-2
52
1
1
1
1
-1
Off
Cancels the Auto Bass Chord function.
-2
Single Finger
Provides the fastest and easiest means to obtain many different
chord/bass combinations, by simply using one, or at most, two or
three fingers to play the chords.
-3
Fingered Chord
Automatically produces bass and chord accompaniment for chords
played in the Lower keyboard. It allows you to use a wider range of
chord types than in the Single Finger mode. In the Fingered Chord
mode, you play all the notes of the chord while the Auto Bass Chord
function automatically selects the appropriate bass pattern.
-4
Custom A.B.C.
A slight variation on the Fingered Chord mode. It allows you to
determine what bass notes will be played in the accompaniment by
playing a note on the Pedalboard along with the chords you play in
the Lower keyboard.
Page 53

2 Memory
When you start a rhythm with this memory function on, A.B.C. automatic
accompaniment keeps playing even after you release your fingers from the
Lower keyboard.
-1
2
Lower
Use the bottom right E Data Control button to turn on the Lower
keyboard Memory function (Solid box indicates the function is
effective). Selecting this keeps the chord accompaniment of the
Lower Keyboard voices playing even after you release your fingers
from the Lower keyboard.
-2
2
PEDAL
Use the bottom right F Data Control button to turns on the
Pedalboard Memory function (Solid box indicates the function is
effective). Selecting this keeps the chord accompaniment of the
Pedalboard voices playing even after you release your fingers from
the Lower keyboard.
2) Chords Recognized in the Single Finger Mode
Major, minor, 7th and minor 7th chords can all be played in the Single Finger
mode.
GAB D E
4
Rhythm and Accompaniment
NOTE:
With Single Finger, the chord produced
will sound in the same octave regardless of
where it is played on the Lower keyboard.
(Key of C)
C
Cm
C7
Cm7
FGABCDE
Major chords:
Press the root of the chord (the note that corresponds to the
chord’s name).
Minor chords:
Simultaneously press the root and any one black key to the left
of it.
7th chords:
Simultaneously press the root and any one white key to the left
of it.
Minor 7th chords:
Simultaneously press the root as well as any black key and any
white key to the left of it.
NOTE:
PLAYING SINGLE FINGER CHORDS
WITHOUT RHYTHM:
Auto Bass Chord is generally used with
rhythms to create full rhythmic accompaniment, but it can also be used in the
Single Finger mode to add full continuous
chords to your performance without the
use of the rhythm. Simply leave the
rhythm off in Single Finger mode, and
play Single Finger chords from the Lower
keyboard.
NOTE:
If you forget to cancel the Single Finger or
Fingered Chord accompaniment functions,
single notes that you play will be sounded
as continuous chords.
NOTE:
Minor, 7th and minor 7th chords with
black key roots (such as B or G) are
played in the same way as those with
white key roots.
53
Page 54

3) Chords Recognized in the Fingered Chord Mode
(Key of C)
C Cm C7 Cm7 Cmaj7
4
Rhythm and Accompaniment
6 Accompaniment Controls
The Accompaniment function described in this section is independent of the
A.B.C. accompaniment. When rhythms are used, A.B.C. provides
rhythmical chords and bass, while the Accompaniment of this section
provides arpeggiated chords and other instrumental embellishments.
This control is selected from the Rhythm Menu and Rhythm Condition
pages.
C+5Cm maj7 C7+5 Cdim C7sus4
C-5Cm7-5 C7-5 C6 Cm6
Press any of the RHYTHM buttons twice.
1
SEQ.
SEQ. MARCH WALTZ SWING BOUNCE SLOW
1
2ROCK
SEQ.
SEQ. TANGO
3
4
RHYTHM
LATIN1LATIN 8 BEAT 16 BEAT
2
MAX
MIN
Rhythm Condition page 1 appears.
DATA CONTROL DATA CONTROL
VOL.: 0 BAL.: 0 ⁄
REV.:12 ’AUTO VARI.
54
Page 55

Press the Page buttons to select PAGE 2.
2
DATA CONT ROL DATA CO NTROL PA G E
ACC.VOL.: 0 ”ON’OFF¤
ACC.REV.:24 TYPE:1
Rhythm Condition [PAGE 2]
DATA CONTROL DATA CONTROL
12
ACC.VOL.: 0 ”ON’OFF¤
ACC.REV.:24 TYPE:1
34
1 ACCOMPANIMENT
Determines the volume of the Accompaniment.
Range: 0 - 24
2 On/Off
On/off switches of the Accompaniment function. Use the top right
Data Control buttons to turn on/off the Accompaniment function.
3 ACC. Reverb
Determines the amount of reverb applied to the Accompaniment.
When the panel REVERB control is set to the minimum, the setting
here will have no effect.
Range: 0 - 24
4 Type
Four types of accompaniment are available.
These settings provide various types of rhythmic and melodic
accompaniment, and generally become more complex according to
the type number.
4
Rhythm and Accompaniment
3
Start the rhythm by pressing START button and play the Lower
keyboard.
An appropriate accompaniment pattern, suited to the current rhythm
and the chord played on the Lower keyboard, will be played
automatically.
NOTE:
Even if the Accompaniment Type is
changed, the Intro/Ending and Fill In
patterns remain the same.
NOTE:
When the Electone is turned on, the
Accompaniment Volume is automatically
set to 0 (factory setting). Be sure to set the
Accompaniment Volume to the appropriate value when using the Accompaniment
function.
55
Page 56

7 Preset/User Keyboard
Percussion
The keyboard Percussion function features a total of 120 different drum
and percussion sounds, playable from the keyboards and pedalboard.
The Keyboard Percussion has two different modes, Preset and User. Preset
Keyboard Percussion lets you play 43 different sounds from the Lower
keyboard and Pedalboard, while the User Keyboard Percussion lets you
freely assign the 120 available sounds to any key or pedal you wish.
1) To use the Preset Keyboard Percussion:
Turn off the Lower and/or Pedal voices by setting each voice’s volume
4
Rhythm and Accompaniment
1
2
to MIN.
Turn on the Keyboard Percussion function by pressing the LOWER/1
and/or PEDAL/2 buttons in the KEYBOARD PERCUSSION section
on the left side of the panel.
KEYBOARD
PERCUSSION
LOWER
PEDAL
DATA CONTROL DATA CONTROL
<KBP1>
”LK PRESET ’USER1
Set the volume.
3
The volume of the percussion sounds is set together with that of the
rhythm volume.
RHYTHM
SEQ.
SEQ. MARCH WALTZ SWING BOUNCE SLOW
1
2ROCK
SEQ.
3
SEQ. TANGO
4
LATIN1LATIN 8 BEAT 16 BEAT
2
MAX
MIN
56
4
Play some notes on the Lower keyboard and/or Pedalboard. The 43
percussion sounds have been assigned to the keyboards as shown in the
chart below.
NOTE:
Pressing the KEYBOARD PERCUSSION
button call up the Menu display. You can
select from Preset (LK/PK preset) or User
(one of the eight Users you created). LK
Preset/PK Preset is selected as the
defaults. If not, select the Preset.
Page 57

Preset Keyboard Percussion
Preset Percussion Assignments for the Lower Keyboard (43)
Orchestra Snare Drum
Snare Drum Roll
Tom 1
Tom 2
Tom 3
Snare Drum Rim 1
Snare Drum Light
Snare Drum Reverb 1
Hi-hat Open
Hi-hat Closed
Triangle Closed
Triangle Open
Ride Cymbal 1
Orchestra Cymbal 2
Orchestra Cymbal 1
Crash Cymbal 1
Cowbell 1
Tambourine
Synth. Tom 2
Synth. Tom 3
Claves
Snare Brush Shot 1
Snare Brush Roll
Synth. Tom 1
Concert Bass Drum
Bass Drum Heavy
Bass Drum Light
Snare Drum Heavy
Snare Drum Heavy
Preset Percussion Assignments for the Pedalboard (18)
Wood Block High
Wood Block Low
Timbale 1 Low
Castanet
Timbale 1 High
Agogo High
Agogo Low
Conga Low
Conga High
Bongo Low
Hand Clap
Bongo High
NOTE:
Cuica High
Cuica Low
4
Rhythm and Accompaniment
Shaker
Snare Brush Shot 1
Snare Brush Roll
Bass Drum Heavy
Tom 3
Snare Drum Light
Snare Drum Reverb 1
Snare Drum Heavy
Tom 1
Tom 2
Hi-hat Closed
Snare Drum Rim 1
Synth. Tom 3
Ride Cymbal 1
Hi-hat Open
Synth. Tom 2
Crash Cymbal 1
You can rearrange the key assignments of
the drum and percussion sounds using the
following User Keyboard Percussion
function.
Synth. Tom 1
Orchestra Cymbal 1
57
Page 58

4
2) To use the User Keyboard Percussion:
A total of 120 different drum and percussion sounds can be assigned to any key
or pedal, and your original setups can be saved to eight memory locations: User
1 through User 8. (For this example, use User1)
Turn on the Keyboard Percussion function by pressing the LOWER/1
1
button in the KEYBOARD PERCUSSION section.
KEYBOARD
PERCUSSION
LOWER
<KBP1>
”LK PRESET ’USER1
PEDAL
Rhythm and Accompaniment
2
The Menu display appears on the LCD, and indicates that the LK
(Lower Keyboard) PRESET is currently selected.
The Menu can be selected from LK PRESET and eight Users, USER 1
through USER 8.
When the PEDAL/2 button is used to call up the Menu display:
KEYBOARD
PERCUSSION
LOWER
PEDAL
The Menu can be selected from PK (Pedalboard) PRESET and eight
Users, USER 1 through USER 8.
Select User 1 using the bottom right Data Control buttons. This means
that you change the function of the Keyboard Percussion button from
Preset to User. You have selected User 1 for the LOWER/1 button.
When you select one of the Users, a Page number will be added to the
top right side of the display.
<KBP2>
”PK PRESET ’USER1
NOTE:
User 1 and User 2 contain the LK Preset
data and PK Preset data, respectively, as
the defaults.
DATA CONTROL DATA CONTROL
<KBP1> [COPY] ⁄
’LK PRESET ”USER1
58
Page 59

3
Press the Page buttons to select PAGE 2.
The page 2 allows you to assign the instruments to each key/
pedalboard.
DATA CONTROL DATA CONTROL
13
‚⁄CYMBAL [SET] ¤
01:Crash Cym1[CLEAR]
24
1 Group
Lets you select the percussion group you want using the top left
Data Control buttons. The percussion groups are 12, 01 – 12. (Refer
to the User Keyboard Percussion Categories list below.)
2 Instrument Names
The individual instruments are shown in the display and can be
selected with the appropriate Data Control buttons. (Refer to the
User Keyboard Percussion Categories list below.)
3 Set
Assigns the selected instrument to the key you wish. (See the
following explanation in the step #4.)
4 Clear
This function is used to erase User assignment for User 1.
CLEAR works in two ways: either to erase a single instrument, or to
erase all instruments. (See step #5 below.)
4
Rhythm and Accompaniment
NOTE:
Playing back EL-100’s MDR reproduces
the instrument condition set by EL-900/
700/500.
59
Page 60

User Keyboard Percussion Categories
Category LCD
01 CYMBAL 01:Crash Cym1
02 HI-HAT 01:HH Open
4
Rhythm and Accompaniment
03 SNARE DRUM 01:SD Light
04 SNARE BRUSH 01:SD BrShot1
05 TOM 01:Tom1
06 BASS DRUM 01:BD Light
07 CONGA/BONGO 01:Conga High
02:Crash Cym2
03:CrashCym M
04:Ride Cym1
05:Ride Cym2
06:RideCymCup
07:Orch.Cym1
08:Orch.Cym2
09:Orch.Cym M
10:Cym March
11:Cym BrShot
12:Tam-Tam
02:HH Close
03:HH Pedal1
04:HH Pedal2
05:AnalogHH O
06:AnalogHH C
02:SD Heavy
03:SD Rim1
04:SD Rim2
05:SD Accent1
06:SD Accent2
07:SD Reverb1
08:SD Reverb2
09:Synth.SD
10:Orch.SD
11:SD Roll
12:Analog SD
02:SD BrShot2
03:SD BrRoll
02:Tom2
03:Tom3
04:Tom4
05:TomBrShot1
06:TomBrShot2
07:TomBrShot3
08:TomBrShot4
09:Synth.Tom1
10:Synth.Tom2
11:Synth.Tom3
02:BD Heavy
03:BD Attack
04:Synth.BD
05:BD March
06:Concert BD
07:Analog BD1
08:Analog BD2
02:Conga Low
03:Conga Slap
04:Conga Muff
05:CongaSlide
06:Bongo High
07:Bongo Low
08:Bongo Slap
09:Bongo Mute
Category LCD
08 CUICA/SURDO 01:Cuica High
02:Cuica Med.
03:Cuica Low
04:Tamborim O
05:Tamborim M
06:Surdo Open
07:Surdo Mute
08:Surdo Rim
09:Surdo Muff
09 TIMBALE/COW 01:Timbale1 H
02:Timbale1 L
03:Timbale2 H
04:Timbale2 L
05:Timbale3 H
06:Timbale3 L
07:Timbale4 H
08:Timbale 4 L
09:Cowbell1
10:Cowbell2
11:Cowbell3
12:Cowbell4
10 PERCUSSION1 01:Cabasa
02:Shaker
03:Maracas H
04:Maracas L
05:GuiroShort
06:Guiro Long
07:Wood High
08:Wood Med.
09:Wood Low
10:Claves
11:Castanet
12:Vibraslap
11 PERCUSSION2 01:Agogo High
02:Agogo Low
03:Triangle O
04:Triangle C
05:Windbell1
06:Windbell2
07:Tambourine
08:Pandeiro
09:Bell
10:Hand Claps
11:Fingersnap
12:Scratch
13:Noise Per.
12 PERCUSSION3 01:Kotsuzumi1
02:Kotsuzumi2
03:Kotsuzumi3
04:Kotsuzumi4
05:Ohtsuzumi1
06:Ohtsuzumi2
07:Taiko1
08:Taiko2
09:Ohdaiko1
10:Ohdaiko2
11:Kakegoe1
12:Kakegoe2
13:Kakegoe3
60
Page 61

To assign an instrument to a particular key or pedal:
4
Simultaneously hold down the Data Control button corresponding to
[Set] and press the key (or pedal) to which the instrument is to be
assigned. The currently displayed instrument will be assigned to the
key you press down as a part of User 1.
‚flBASS DRUM [SET] ¤
02:BD Heavy [CLEAR]
Continue the operation above to build up your own User Keyboard
Percussion set.
DATA CONTROL
Upper Keyboard
Lower Keyboard
Pedalboard
or
4
If you want, you can erase the instrument assignment.
5
To erase one instrument:
Simultaneously hold down the Data Control button corresponding to
CLEAR and press the key (or pedal) corresponding to the instrument
you wish to erase.
(A short ‘beep’ sound indicates that the instrument has been erased.)
To erase all instruments:
1. Press, then release the Data Control button corresponding to
CLEAR. The following display appears, prompting confirmation of
the operation.
DATA CONTROL DATA CONTROL
≥ Assign All Clear?≥
≥ [CLEAR] [CANCEL]≥
2. Press any of the bottom left Data Control buttons (corresponding to
[Clear] in the display) to erase all data. When [Clear] is selected, a
‘Completed’ message momentarily appears on the display.
Press any of the bottom right Data Control buttons (corresponding
to [Cancel] in the display) to abort the operation.
Rhythm and Accompaniment
NOTE:
Though eight User Keyboard Percussion
setups can be created, they cannot be
memorized to Registration Memory. Only
on/off data and the Keyboard Percussion
Menu are memorized to Registration
Memory.
NOTE:
Two User Keyboard Percussions currently
selected by LOWER/1 and PEDAL/2 are
playable if both buttons are on.
61
Page 62

3) Other User Keyboard Percussion Functions
Additional operations in the User mode include copying of Lower/Pedal Preset
Keyboard Percussion to one of the Users, and copying from one User location to
another.
To copy the Lower Preset Keyboard Percussion to one
of the Users:
The following operation allows you to copy the Lower Preset Keyboard
Percussion to one of the Users. The copy operation is convenient for
creating a slight modification from the Preset.
1. Turn on the Keyboard Percussion function by pressing the LOWER/
1 button in the KEYBOARD PERCUSSION section.
4
Rhythm and Accompaniment
DATA CONTROL DATA CONTROL
DATA CONTROL DATA CONTROL
DATA CONTROL DATA CONTROL
2. Select the User number to which you want to copy using the bottom
3. Press the top right Data Control buttons to select Copy function.
right Data Control buttons.
<KBP1> [COPY] ⁄
’LK PRESET ”USER1
<KBP1> [COPY] ⁄
’LK PRESET ”USER1
The following display appears:
≥ ÚÆPRESET Copy? ≥
≥ [COPY] [CANCEL]≥
4. Press top left Data Control buttons to select the copy source (in this
case, Lower Preset Keyboard Percussion).
DATA CONTROL DATA CONTROL
≥ ÚÆPRESET Copy? ≥
≥ [COPY] [CANCEL]≥
62
Page 63

5. Press any of the bottom left Data Control buttons (corresponding to
[Copy] in the display) to copy the data. When [Copy] is selected, a
‘Completed’ message momentarily appears on the display.
Press any of the bottom right Data Control buttons (corresponding
to [Cancel] in the display) to abort the operation.
DATA CONTROL DATA CONTROL
≥ PRESET Copy ≥
≥ Completed!! ≥
The Pedal Preset Keyboard Percussion (PK PRESET) can be copied
in the same way.
DATA CONTROL DATA CONTROL
<KBP2>
”PK PRESET ’USER1
To copy from one User location to another:
1. Turn on the Keyboard Percussion function by pressing the LOWER/
1 (or PEDAL/2) button in the KEYBOARD PERCUSSION section.
2. Select the User number to which you want to copy using the bottom
right Data Control buttons.
DATA CONTROL DATA CONTROL
<KBP1> [COPY] ⁄
’LK PRESET ”USER3
3. Press the top right Data Control buttons to select Copy function.
DATA CONTROL DATA CONTROL
4
Rhythm and Accompaniment
<KBP1> [COPY] ⁄
’LK PRESET ”USER3
The following display appears:
DATA CONTROL DATA CONTROL
≥ ÚÆUSER1 Copy? ≥
≥ [COPY] [CANCEL]≥
63
Page 64

4. Select the User number from which you want to copy using the top
DATA CONTROL DATA CONTROL
5. Press any of the bottom left Data Control buttons (corresponding to
4
Rhythm and Accompaniment
DATA CONTROL DATA CONTROL
left Data Control buttons.
≥ ÚÆUSER1 Copy? ≥
≥ [COPY] [CANCEL]≥
In this case, the destination User number will not be displayed as
the source number, or selectable on the display.
[Copy] in the display) to copy the data. When [Copy] is selected, a
‘Completed’ message momentarily appears on the display.
Press any of the bottom right Data Control buttons (corresponding
to [Cancel] in the display) to abort the operation.
≥ USER1 Copy ≥
≥ Completed!! ≥
8 Melody On Chord (M.O.C.)
The Melody On Chord (M.O.C.) feature automatically adds a harmony
part to the melodies you play on the Upper keyboard. The harmony is
derived from the chords you play on the Lower keyboard – or from the
chords that are played for you, if you use Automatic Accompaniment.
Melody On Chord has three different modes, each providing a different set
of harmonies to accompany the melody played.
To display the M.O.C. function, press A.B.C./M.O.C. button in the DISPLAY
SELECT and then select the Page 2.
DISPLAY SELECT
VOICE EFFECT A.B. C.
DISPLAY SET M.O.C.
FOOT REGIST. PITCH TREMOLO
SW. SHIFT MIDI (FAST)
64
Page 65

M.O.C. [PAGE 2]
DATA CONTROL DATA CONTROL
<MOC> ¤
MODE:OFF
1
1 Mode
You can select one of three automatic accompaniment functions here.
Each press of bottom left F Data Control button selects Off, 1, 2 and 3, in
order. Each press of bottom left E Data Control button selects in the
reversed order.
2 Off
Cancels the Melody On Chord function.
3 1
Produces harmonies of up to two notes in a range close to the melody
played.
4 2
Produces harmonies of up to three notes in a range close to the melody
played.
5 3
Produces harmonies of up to four notes in a range relatively distant from the
melody played.
2
3
4
5
OFF
1
2
3
4
Rhythm and Accompaniment
NOTE:
Melody On Chord applies only when the
Upper keyboard voice section’s volume is
set to the appropriate value.
65
Page 66

About the Rhythm Sequence
Rhythm Sequence is built up with various different rhythm patterns, and
can be programmed by the other Electone such as EL-900.
The EL-100 doesn’t have Rhythm Sequence function, but it can read and
load the rhythm sequence data recorded on the MDR (a floppy disk) to its
four SEQ buttons in the Rhythm section and play back them, as follows:
1. Insert the floppy disk containing rhythm sequence data into the EL-100’
s MDR slot. The rhythm sequence data is recorded as a part of
registration data (explained on page 78).
2. Select the song number containing the registration data and press PLAY
4
Rhythm and Accompaniment
button on the MDR to load the data. The rhythm sequence data has been
loaded to the Electone, or SEQ button(s).
3. Press the desired SEQ button. The SEQ button’s lamp will be lit.
RHYTHM
SEQ.
SEQ. MARCH WALTZ SWING BOUNCE SLOW
1
2ROCK
MAX
NOTE:
You can have up to all four rhythm
sequences play back automatically by
pressing the SEQ buttons.
SEQ.
3
SEQ. TANGO
4
LATIN1LATIN 8 BEAT 16 BEAT
2
MIN
4. Turn the START button on and play the rhythm sequence(s).
RHYTHM
START
INTRO.
ENDING
SYNCHRO
START
FILL IN
During the rhythm sequence playback, the rhythm name currently
played back is displayed on the LCD.
NOTE:
Four types of metronome sounds,
simple metronome, two four, three four
and four four, are assigned to the SEQ 1
– 4 buttons, respectively, as the
defaults.
NOTE:
As soon as you load the sequence data
using MDR, the default settings on each
SEQ button, four types of metronome
sounds, will be overwritten, or lost.
Turning the power off resets the
Electone to the defaults.
Also, pressing any of the BASIC
REGIST. buttons generates a short beep
sound and retrieves the metronome
sounds.
66
Page 67

5 Registration Memory
Registration Memory allows you to store virtually all the settings you make on the panel and LCD, providing a
convenient way to instantly change all voice settings and rhythms while you’re playing, with the simple touch of
a single button on the Registration Memory panel.
REGISTRATION MEMORY
M.
/TO DISK
Functions and settings that cannot be memorized are:
12345678 D.
● Reverb type
● Pan, Reverb, Tune and Volume settings for the
instruments (Drum and percussion sounds)
●
User Keyboard Percussion settings (except for User
numbers currently assigned to the Lower/Pedal buttons)
● Registration Shift settings
When turned on, various types of basic registrations are preset on the
numbered buttons from 1 through 8.
No. Name
1Marching Band
2 Polka
38 Beat Ballad
4 Strings Waltz
When you record your registration setting to one of the numbered buttons, the
preset registration on that button will be overwritten and erased as a result.
No. Name
5 Latin
62 Beat
7Organ Ballad
8Dance Pop
● Pitch/Transpose settings
● User rhythm patterns in a Pattern Disk (except for
User rhythm numbers currently assigned to the
Dotted buttons)
● Rhythm Sequence
● MIDI settings
NOTE:
When you turn off the Electone, your own
registration setting(s) will be reset to the
default, or erased. Turning the Electone
back to on restores the preset registration
settings (the defaults).
If you want to keep your own registration
settings, you need to record them onto a
floppy disk before turning the Electone
off. Refer to page 68 for details on saving
registration data to disk.
5
Registration Memory
1 Storing Registrations
Newly created registrations you make can be stored to the Registration
Memory panel buttons. All registrations in Registration Memory can also
be saved to floppy disk for future recall.
After creating your original registration, decide which numbered button
1
2
you wish to store.
While holding down the M (Memory) button in the Registration
Memory section, press the numbered button to which you wish to save
your registration.
REGISTRATION MEMORY
M.
/TO DISK
1. While holding down M button.. 2. ...Press desired numbered button.
When the registration is stored, the lamp above the numbered button
flashes momentarily.
12345678 D.
Be careful when turning off the power,
since it erases all your existing data.
Always save your important data to a
floppy disk using M.D.R. (page 68) in
advance.
NOTE:
Although the number of the Registration
Memory buttons of EL-100 are limited to
eight, from Registration Memory 1
through Registration Memory 8, the
Registration Memory 9 through Registration Memory 16 can be accessible when
using MDR playback and Registration
Shift functions.
67
Page 68

2 Selecting Registrations
Simply press the numbered button that corresponds to the registration you
wish to select.
Using the D (Disable) button:
NOTE:
Although the number of registration memory
locations is limited to eight, from 1 through
8, the registrations assigned in the memory
locations from 9 through 16 of an upper
model are accessible using the following
method. To select the number between the
registration memory 9 and 16, press one of
the eight registration memory buttons while
holding down the VOICE DISPLAY button
in the DISPLAY SELECT section (in this
case, the buttons 1 through 8 correspond to
the buttons 9 through 16, respectively). Any
of the numbered button lamps is not lit while
the registration between 9 and 16 is selected.
5
Registration Memory
Rhythm and automatic accompaniment patterns also change when you
select different Registration Memory buttons. Pressing the D (Disable)
button allows you to keep the same rhythm and accompaniment patterns
throughout all your registration changes, or make your own rhythm
selections if you want to.
REGISTRATION MEMORY
M.
/TO DISK
12345678 D.
3 Saving the Registration Data
to Disk
Insert a formatted disk into the disk slot under the Music Disk Recorder
1
(M.D.R.). Make certain that the disk is either blank or has data you can
erase. If the disk is new and unformatted, you will have to format it.
Refer to the instructions how to format a disk (page 75).
NOTE:
The settings, can be disabled, are:
■ Current rhythm pattern
■ Rhythm Condition
■ Tempo
■ A.B.C./M.O.C. settings
NOTE:
See pages 82 and 83 for the details on
saving/recalling registrations to/from the
M.D.R.
68
2
Select a song number on the M.D.R. using the SONG SELECT buttons.
You can also select a song number shown on the display using the
appropriate Data Control button and (if necessary) using Page buttons
to display the appropriate page. A song name is displayed next to the
song number that already contains data.
RECORD PLAY
UPPER UPPERLOWER PEDAL CONTROL LOWER PEDAL CONTROL SHIFT
SONG FROM
REPEAT SONG COPY
PAUSE STOP PL AY SONG SELECT RECORD
MUSIC DISK RECORDER
TO
TEMPO FORMAT
SONG DEL.
CUSTOM PLAY
There are 40 songs (ten song numbers on the four pages), or memory
locations, available on a single disk.
NOTE:
Song name may not be displayed
depending on the Electone model created
the data.
<SONG NAME> ⁄
01:
 Loading...