

Page 1
DVD RECEIVER
DVR-S150
UB
OWNER’S MANUAL
Page 2
IMPORTANT SAFETY INSTRUCTIONS
1 Read these instructions.
CAUTIO
N
RISK OF ELECTRIC SHOCK
DO NOT OPEN
CAUTION: TO REDUCE THE RISK OF
ELECTRIC SHOCK, DO NOT REMOVE
COVER (OR BACK). NO USER-SERVICEABLE
PARTS INSIDE. REFER SERVICING TO
QUALIFIED SERVICE PERSONNEL.
* Explanation of Graphical Symbols
The lightning flash with arrowhead
symbol, within an equilateral triangle,
is intended to alert you to the presence
of uninsulated “dangerous voltage”
within the product’s enclosure that may
be of sufficient magnitude to constitute
a risk of electric shock to persons.
The exclamation point within an
equilateral triangle is intended to alert
you to the presence of important
operating and maintenance (servicing)
instructions in the literature
accompanying the appliance.
IMPORTANT
Please record the serial number of this unit in the space
below.
MODEL:
Serial No.:
The serial number is located on the rear or the bottom of
this unit.
Retain this Owner’s Manual in a safe place for future
reference.
2 Keep these instructions.
3 Heed all warnings.
4 Follow all instructions.
5 Do not use this apparatus near water.
6 Clean only with dry cloth.
7 Do not block any ventilation openings. Install in
accordance with the manufacturer’s instructions.
8 Do not install near any heat sources such as radiators,
heat registers, stoves, or other apparatus (including
amplifiers) that produce heat.
9 Do not defeat the safety purpose of the polarized or
grounding-type plug. A polarized plug has two blades
with one wider than the other. A grounding type plug has
two blades and a third grounding prong. The wide
blade or the third prong are provided for your safety. If
the provided plug does not fit into your outlet, consult an
electrician for replacement of the obsolete outlet.
10 Protect the power cable from being walked on or pinched
particularly at plugs, convenience receptacles, and the
point where they exit from the apparatus.
11 Only use attachments/accessories specified by the
manufacturer.
12 Use only with the cart, stand, tripod,
bracket, or table specified by the
manufacturer, or sold with the
apparatus. When a cart is used, use
caution when moving the cart/
apparatus combination to avoid injury
from tip-over.
13 Unplug this apparatus during lightning storms or when
unused for long periods of time.
i CAUTION
14 Refer all servicing to qualified service personnel.
Servicing is required when the apparatus has been
damaged in any way, such as power-supply cord or plug
is damaged, liquid has been spilled or objects have fallen
into the apparatus, the apparatus has been exposed to
rain or moisture, does not operate normally, or has been
dropped.
15 Be sure to allow spaces of at least 10 cm above, behind
and on both sides of the DVR-S150.
16 Do not place the following objects on this unit:
A vessel with water in it.
If the vessel falls by vibrations and water spills, it may
cause damage to the unit, and/or you may get an electric
shock.
Page 3

FCC INFORMATION (for US customers)
IMPORTANT SAFETY INSTRUCTIONS
1. IMPORTANT NOTICE : DO NOT MODIFY THIS
UNIT!
This product, when installed as indicated in the instructions
contained in this manual, meets FCC requirements.
Modifications not expressly approved by Yamaha may void
your authority, granted by the FCC, to use the product.
2. IMPORTANT :
When connecting this product to accessories and/or another
product use only high quality shielded cables. Cable/s
supplied with this product MUST be used. Follow all
installation instructions. Failure to follow instructions could
void your FCC authorization to use this product in the USA.
3. NOTE :
This product has been tested and found to comply with the
requirements listed in FCC Regulations, Part 15 for Class
“B” digital devices. Compliance with these requirements
provides a reasonable level of assurance that your use of this
product in a residential environment will not result in
harmful interference with other electronic devices.
This equipment generates/uses radio frequencies and, if not
installed and used according to the instructions found in the
users manual, may cause interference harmful to the
operation of other electronic devices.
Compliance with FCC regulations does not guarantee that
interference will not occur in all installations. If this product
is found to be the source of interference, which can be
determined by turning the unit “OFF” and “ON”, please try
to eliminate the problem by using one of the following
measures:
Relocate either this product or the device that is being
affected by the interference.
Utilize power outlets that are on different branch (circuit
breaker or fuse) circuits or install AC line filter/s.
In the case of radio or TV interference, relocate/reorient the
antenna. If the antenna lead-in is 300 ohm ribbon lead,
change the lead-in to coaxial type cable.
If these corrective measures do not produce satisfactory
results, please contact the local retailer authorized to
distribute this type of product. If you can not locate the
appropriate retailer, please contact Yamaha Electronics
Corp., U.S.A. 6660 Orangethorpe Ave, Buena Park, CA
90620.
The above statements apply ONLY to those products
distributed by Yamaha Corporation of America or its
subsidiaries.
We Want You Listening For A Lifetime
YAMAHA and the Electronic Industries Association’s Consumer
Electronics Group want you to get the most out of your equipment by playing it at a safe level. One that lets the sound come
through loud and clear without annoying blaring or distortion –
and, most importantly, without affecting your sensitive hearing.
Since hearing damage from loud sounds is often
undetectable until it is too late, YAMAHA and the
Electronic Industries Association’s Consumer
Electronics Group recommend you to avoid prolonged exposure from excessive volume levels.
CAUTION ii
Page 4

CAUTION: READ THIS BEFORE OPERATING YOUR UNIT.
1 To assure the finest performance, please read this manual
carefully. Keep it in a safe place for future reference.
2 Install this sound system in a well ventilated, cool, dry, clean
place with at least 10 cm on the top, 10 cm on the left and right,
and 10 cm at the back of DVR-S150 — away from direct
sunlight, heat sources, vibration, dust, moisture, and/or cold.
3 Locate this unit away from other electrical appliances, motors, or
transformers to avoid humming sounds.
4 Do not expose this unit to sudden temperature changes from cold
to hot, and do not locate this unit in an environment with high
humidity (i.e. a room with a humidifier) to prevent condensation
inside this unit, which may cause an electrical shock, fire,
damage to this unit, and/or personal injury.
5 Avoid installing this unit where foreign object may fall onto this
unit and/or this unit may be exposed to liquid dripping or
splashing. On the top of this unit, do not place:
– Other components, as they may cause damage and/or
discoloration on the surface of this unit.
– Burning objects (i.e. candles), as they may cause fire, damage
to this unit, and/or personal injury.
– Containers with liquid in them, as they may fall and liquid
may cause electrical shock to the user and/or damage to this
unit.
6 Do not cover this unit with a newspaper, tablecloth, curtain, etc.
in order not to obstruct heat radiation. If the temperature inside
this unit rises, it may cause fire, damage to this unit, and/or
personal injury.
7 Do not plug in this unit to a wall outlet until all connections are
complete.
8 Do not operate this unit upside-down. It may overheat, possibly
causing damage.
9 Do not use force on switches, knobs and/or cords.
10 When disconnecting the power cable from the wall outlet, grasp
the plug; do not pull the cable.
11 Do not clean this unit with chemical solvents; this might damage
the finish. Use a clean, dry cloth.
12 Only voltage specified on this unit must be used. Using this unit
with a higher voltage than specified is dangerous and may cause
fire, damage to this unit, and/or personal injury. YAMAHA will
not be held responsible for any damage resulting from use of this
unit with a voltage other than specified.
13 To prevent damage by lightning, disconnect the power cable from
the wall outlet during an electrical storm.
14 Do not attempt to modify or fix this unit. Contact qualified
YAMAHA service personnel when any service is needed.
The cabinet should never be opened for any reasons.
15 When not planning to use this unit for long periods of time (i.e.
vacation), disconnect the AC power plug from the wall outlet.
16 Be sure to read the “Troubleshooting” section on common
operating errors before concluding that this unit is faulty.
17 Before moving this unit, press STANDBY/ON to set this unit in
standby mode, and disconnect the AC power plug from the wall
outlet.
18 Condensation will form when the surrounding temperature
changes suddenly. Disconnect the power cable from the outlet,
then leave the unit alone.
19 When using the unit for a long time, the unit may become warm.
Turn the power off, then leave the unit alone for cooling.
This unit is not disconnected from the AC power source as
long as it is connected to the wall outlet, even if this unit itself
is turned off. This state is called the standby mode. In this
state, this unit is designed to consume a very small quantity of
power.
FOR CANADIAN CUSTOMERS
To prevent electric shock, match wide blade of plug to wide
slot and fully insert.
This Class B digital apparatus complies with Canadian
ICES-003.
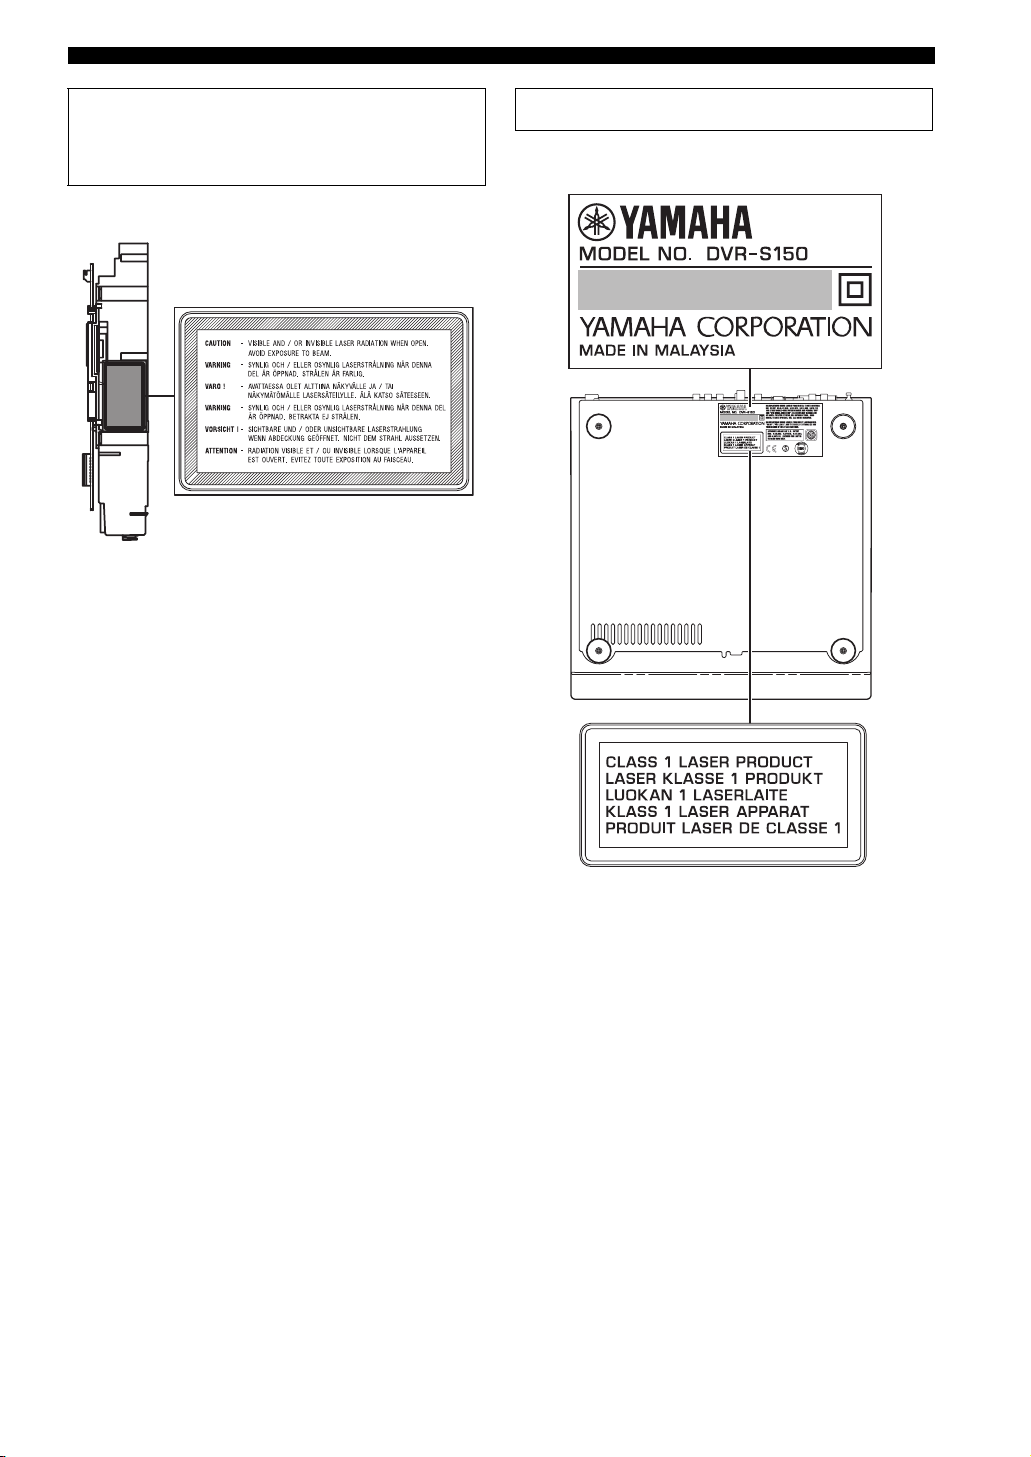
DANGER
When this unit is plugged to the wall outlet, do not place your
eyes close to the opening of the disc tray and other openings to
look into inside.
The laser component in this product is capable of emitting
radiation exceeding the limit for Class 1.
WARNING
TO REDUCE THE RISK OF FIRE OR ELECTRIC SHOCK,
DO NOT EXPOSE THIS APPLIANCE TO RAIN OR
MOISTURE.
■ For U.K. customers
If the socket outlets in the home are not suitable for the plug
supplied with this appliance, it should be cut off and an
appropriate 3 pin plug fitted. For details, refer to the instructions
described below.
Note
The plug severed from the mains lead must be destroyed, as a
plug with bared flexible cord is hazardous if engaged in a live
socket outlet.
■ Special Instructions for U.K. Model
IMPORTANT
THE WIRES IN MAINS LEAD ARE COLOURED IN
ACCORDANCE WITH THE FOLLOWING CODE:
Blue: NEUTRAL
Brown: LIVE
As the colours of the wires in the mains lead of this apparatus may not correspond with the coloured markings
identifying the terminals in your plug, proceed as follows:
The wire which is coloured BLUE must be connected to
the terminal which is marked with the letter N or coloured
BLACK. The wire which is coloured BROWN must be
connected to the terminal which is marked with the letter L
or coloured RED.
Making sure that neither core is connected to the earth
terminal of the three pin plug.
iii CAUTION
Page 5
CAUTION: READ THIS BEFORE OPERATING YOUR UNIT.
CAUTION
Use of controls or adjustments or performance of procedures
other than those specified herein may result in hazardous
radiation exposure.
¶ The name plate is located on the bottom of the unit.
CAUTION iv
Page 6

Contents
CONTENTS
INTRODUCTION
Introduction ............................................................ 3
About this manual...................................................... 3
Supplied Accessories .............................................. 3
Controls and Functions .......................................... 4
Top and front panels .................................................. 4
Display....................................................................... 5
Remote control........................................................... 6
PREPARATION
Connecting Speakers .............................................. 9
Connecting speakers
(Front/Surround/Center) ...................................... 10
Connecting a subwoofer .......................................... 10
Using commercially available speakers or cables ...11
Connecting a TV ................................................... 12
Connecting Antennas ........................................... 13
Connecting the FM antenna..................................... 13
Connecting the AM loop antenna ............................ 13
Connecting External AV Components ............... 14
Connecting a VCR................................................... 15
Connecting a game console ..................................... 16
Connecting a CD recorder or MD recorder ............. 17
Connecting the Power Cables.................................. 17
Installing Batteries in the Remote Control ........ 18
Using the Remote Control.................................... 18
BASIC OPERATION
Turning the Power to On/Standby...................... 19
Selecting an Input Source .................................... 19
Adjusting the Volume Level ................................ 20
Muting the Sound (Mute) .................................... 20
Auto Speaker Setup (YPAO) ............................... 21
Enjoying Sound Field Programs
(DSP Programs) ................................................ 26
Setting the Sleep Timer ........................................ 28
Changing DVD Settings on the TV
(On-Screen Menu) ............................................ 29
Operating the On-Screen Menu ............................... 29
On-Screen Menu guide ............................................ 30
ENJOYING MOVIE AND MUSIC DISCS
Supported Disc Types ...........................................32
Basic Playback Operations ...................................33
Useful Playback Operations .................................34
Specifying an elapsed time for playback (Time
Search)................................................................. 34
Customizing playback order (Program Play) .......... 35
Repeating playback (Repeat Play)........................... 37
Operating disc menus (DVD menu/Video CD
Playback Control)................................................ 39
Selecting Audio and Subtitle Languages ............40
Selecting a Viewing Angle ...................................41
Zooming Images ...................................................42
Restricting Playback (Parental Control) ...........43
Setting the Parental Control level............................ 43
Locking discs ........................................................... 44
Playing locked discs ................................................ 44
Changing the password............................................ 45
Enjoying High-Quality Video
(NTSC/Progressive Scan) ................................46
Enjoying JPEG Images .........................................47
ENJOYING RADIO
Tuning Radio Stations ..........................................48
Tuning radio stations automatically
(Auto Tuning)...................................................... 48
Tuning radio stations manually (Manual Tuning)... 48
Selecting preset radio stations (Preset Tuning) .......49
Receiving FM RDS stations
(U.K. and Europe models only)........................... 49
Presetting Radio Stations .....................................51
Presetting FM stations automatically
(Auto Preset)........................................................ 51
Presetting radio stations manually
(Manual Preset) ................................................... 52
Changing the order of preset radio stations ............. 52
ENJOYING EXTERNAL AV SOURCES
Playing Back External Sources............................53
TV playback ............................................................ 53
VCR playback.......................................................... 53
Game console playback ........................................... 54
Recording AV Sources With External AV
Components .......................................................55
Recording audio sources with CinemaStation......... 55
Copying video component sources to a video
cassette................................................................. 56
1
Page 7

Contents
SOUND OPTIONS
Enjoying Sound with Specific Speakers.............. 57
Enjoying 6.1/5.1ch sources with all speakers
including a virtual speaker (Matrix 6.1) .............. 57
Enjoying 2ch sources with all speakers
(Dolby Pro Logic II)............................................ 58
Enjoying DSP programs with the front speakers
only (Virtual CINEMA DSP).............................. 59
Enjoying DSP Programs in a Variety of
Ways ................................................................... 60
Listening with headphones
(“SILENT CINEMA”) ........................................ 60
Listening at low volume
(Night Listening) ................................................. 61
Enjoying High-Quality Sound ............................. 62
Enjoying original Dolby and DTS sounds............... 62
Enjoying original 2ch sound (Stereo) ...................... 63
ADVANCED CONFIGURATION
Adjusting the Speaker Balance During
Playback.............................................................64
Adjusting the speaker balance with test tones ......... 64
Adjusting the speaker balance during playback ...... 65
Configuring Dolby Pro Logic II Music
Settings ............................................................... 67
DSP Program Delay Time Settings ..................... 68
Configuring the Audio Input Signal Setting.......70
Checking the Audio Input Signal Type ................... 71
Controlling External Components ...................... 72
Setting remote control codes ................................... 72
Available operations ................................................ 73
Configuring Various Parameters (Set Menu) ....75
Operating the Set Menu........................................... 76
APPENDIX
Troubleshooting .................................................... 80
General..................................................................... 80
Remote control ........................................................ 83
Disc playback .......................................................... 84
Radio reception........................................................ 85
Additional Information ........................................ 86
Disc Information...................................................... 86
Handling a disc ........................................................ 87
Glossary .................................................................88
Audio formats .......................................................... 88
Sound field programs............................................... 89
Audio information ................................................... 89
Video signal information ......................................... 90
Copyright and logo marks ....................................... 91
Specifications ......................................................... 92
2
Page 8
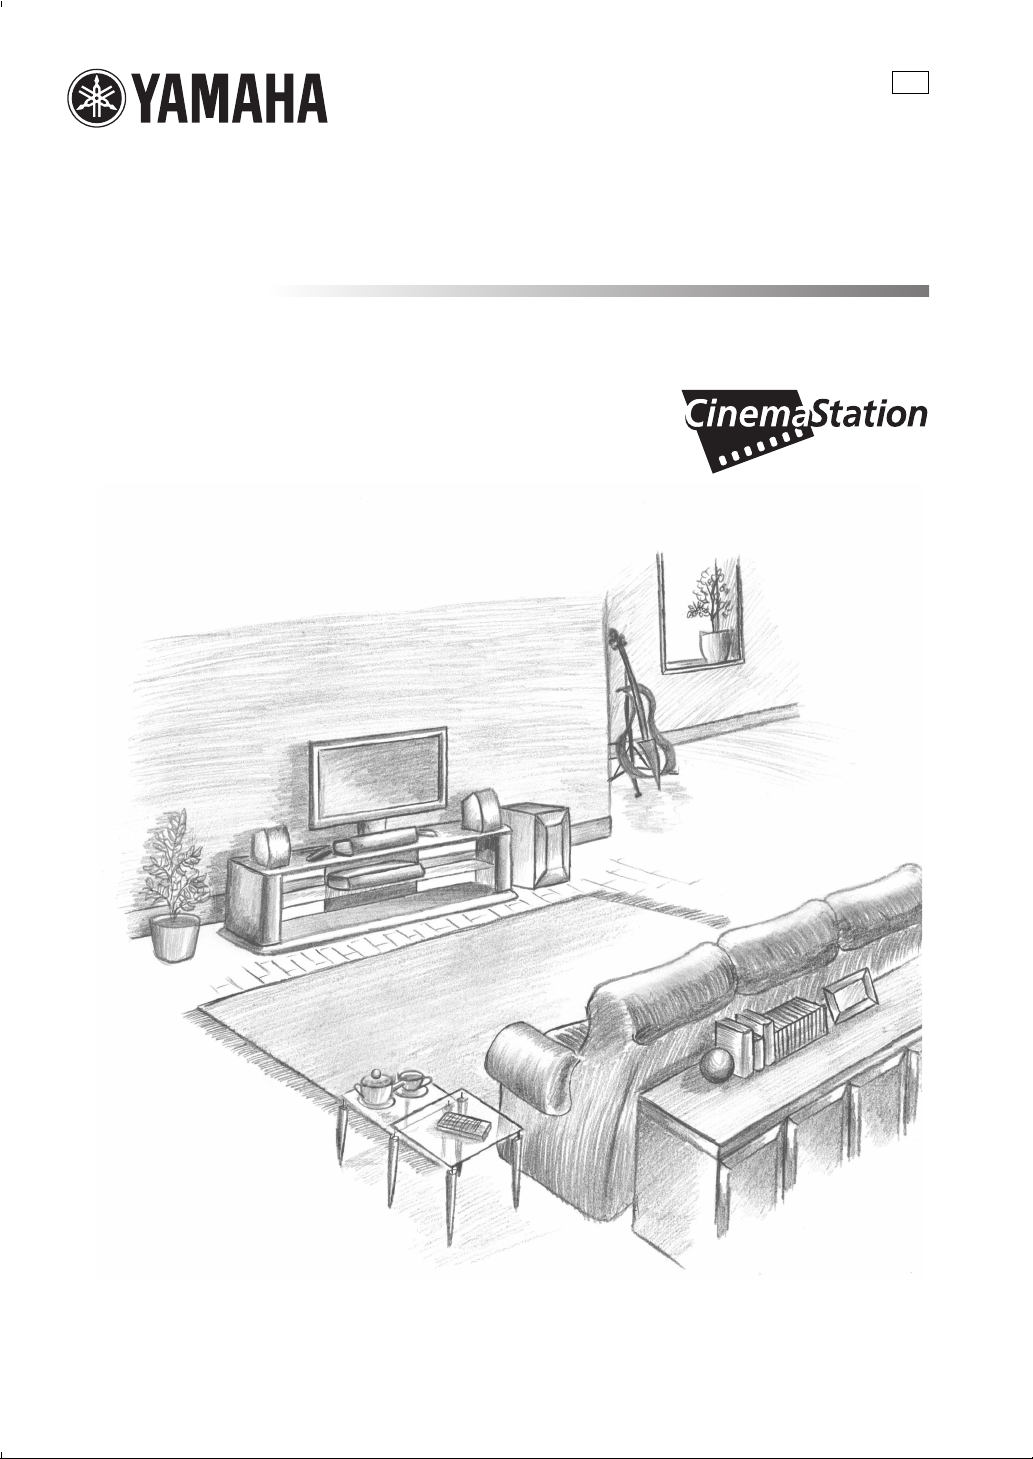
Introduction
The YAMAHA CinemaStation “DVR-S150” is a slimline DVD receiver equipped with a digital amplifier. This product provides you
with the best sound possible, allowing you to enjoy not just DVDs and CDs, but various other AV sources as well. We hope the
“DVR-S150” brings you great listening pleasure and satisfaction.
About this manual
• This manual provides information relevant only to the YAMAHA CinemaStation “DVR-S150”. For information on speakers or other
AV equipment, refer to the manual for that product.
• In this manual, operations that can be performed using either the DVD receiver or its remote control are explained using the remote
control.
• Remote control descriptions and illustrations in this manual are based on the U.K. and Europe models unless otherwise specified.
• y indicates a tip for your operation.
• Notes contain important information about safety and operating instructions.
• This manual is printed prior to production. Design and specifications are subject to change in part as a result of improvements, etc. In
case of differences between the manual and the product, the product has priority.
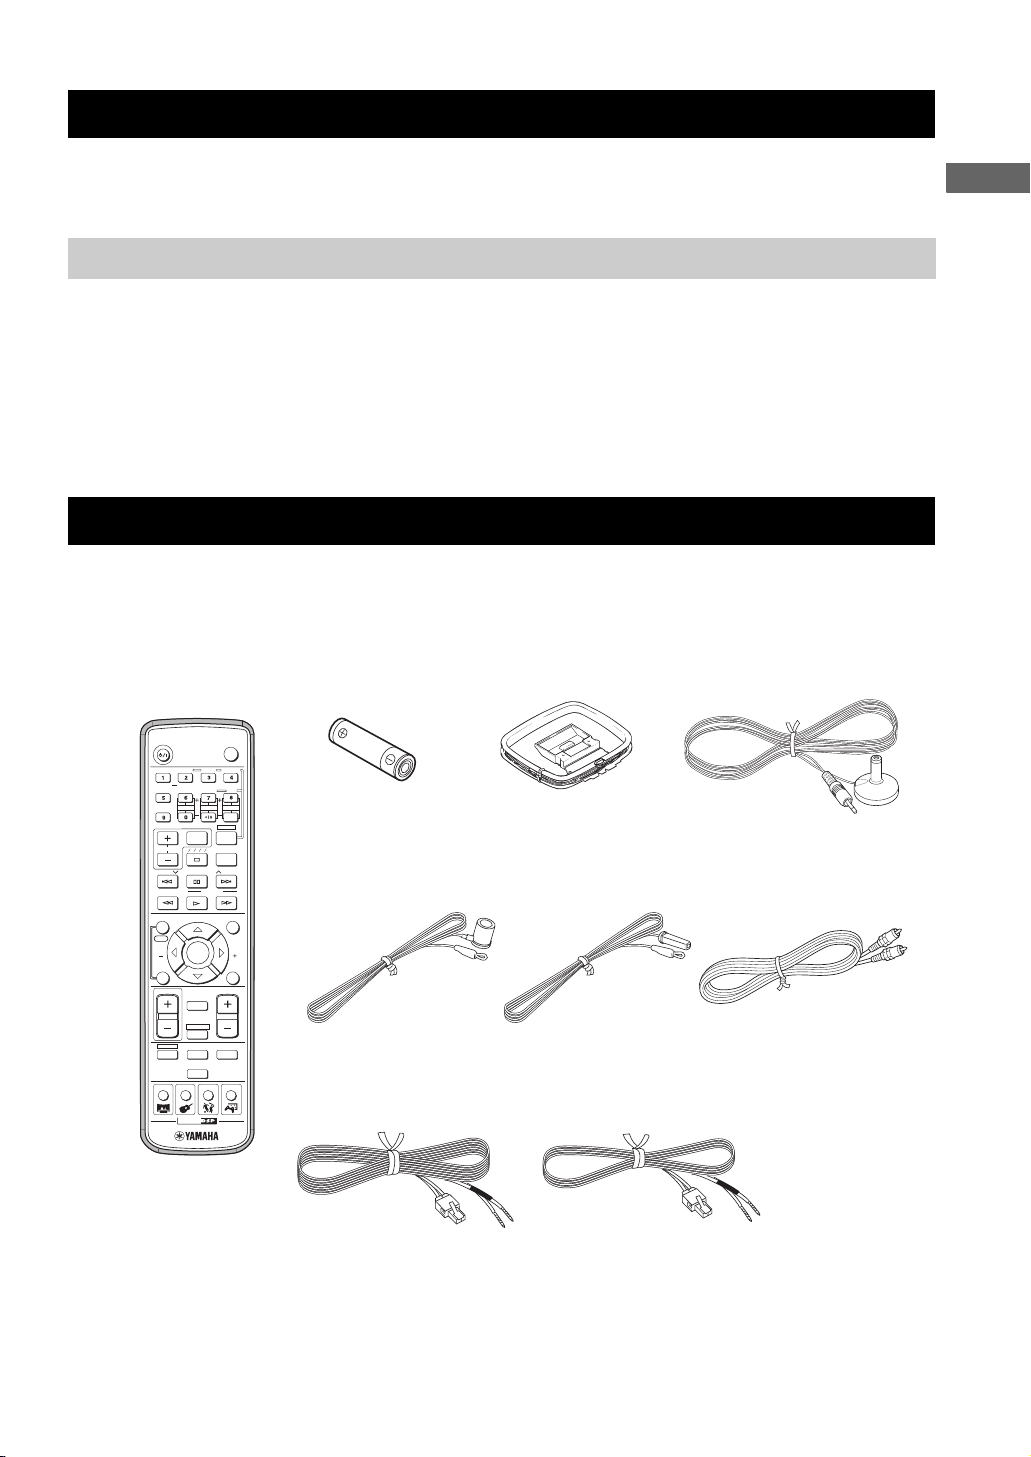
Supplied Accessories
This product includes the following accessories. Before connecting speakers or a TV to this product, make sure you received all of the
following parts.
INTRODUCTION
Remote
control
STANDBY/ON
AUDIO
ANGLE
SELECT
SURROUND
REPEAT
NIGHT
SW
CENTER
SET MENU
TV INPUT
TV CH
A B C D E
PRESET PRESET
PTY SEEK
MODE
FREQ/RDS
ON SCREEN
START
YPAO
CH
ENTER
STATUS
ON/OFF
TV VOL
MUTE
AMP
DVD/CD
VCR
TUNER
MOVIE MUSIC SPORTS GAME
CINEMA
TEST
POWER
SUBTITLE
SHIFT
SLEEP
VOLUME
VIDEO
(AA, R06, UM-3)
Optimizer microphoneAM loop antennaBatteries (2)
TV
STEREOMATRIX 6.1
A-B
SURR
Indoor FM antenna
(U.S.A., Canada, China,
START
MENU
CH
RETURN
Asia and General
models)
(Europe, U.K.,
Australia and Korea
models)
Video pin
cable
Speaker cables
Surround
15m (2)
Front, Center
5m (3)
3
Page 9
CONTROLS AND FUNCTIONS
Controls and Functions
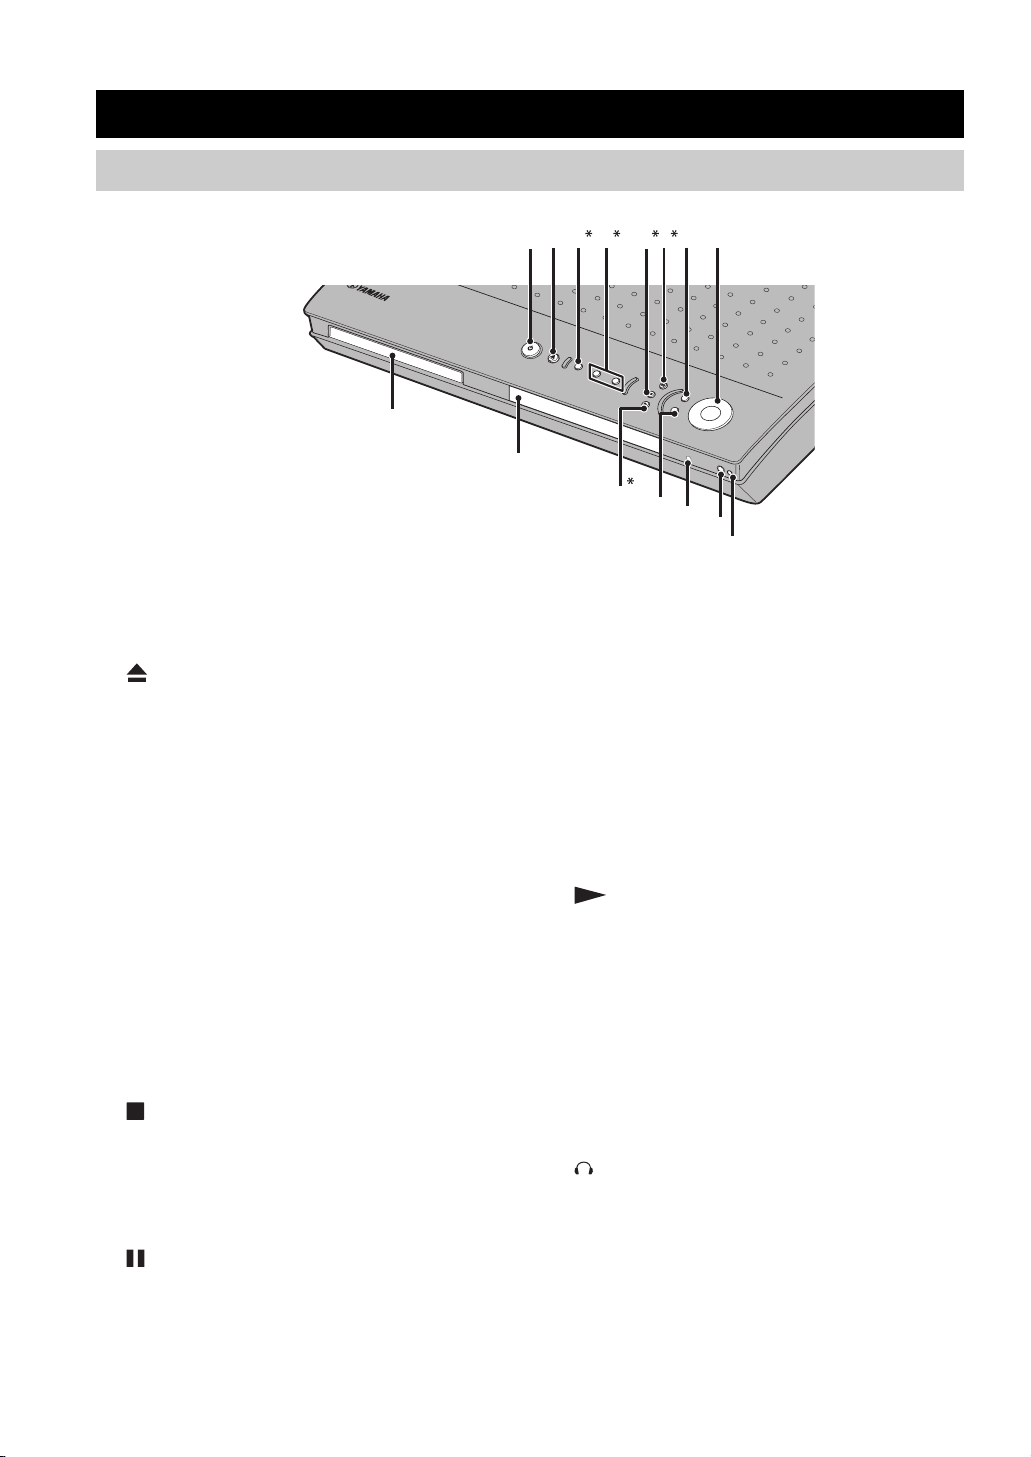
Top and front panels
Buttons indicated with an asterisk (*) perform different functions depending on the selected mode of operation.
B
7
C
8
D
E
12 3 4 56
9
0
A
1 STANDBY/ON
Turn this unit on. Press to set the unit in the standby mode.
(page 19)
2
Opens and closes the disc tray.
3 PROGRESSIVE (MEMORY)
[MEMORY (for U.K. and Europe models)]
(DVD/CD mode)
Switches DVD playback between progressive scan and
interlace outputs. (page 46)
(Tuner mode)
Stores the current radio station for Preset Tuning.
(page 52)
4 b/w, f/a (d PRESET/TUNING u)
(DVD/CD mode)
Selects the previous/next track or chapter. Press and hold
to fast forward or fast reverse.
(Tuner mode)
Selects a preset number or adjusts the frequency. (page 51)
5 (A/B/C/D/E)
(DVD/CD mode)
Stops disc playback.
(Tuner mode)
Selects a preset group. (page 52)
6 (PRESET/BAND)
(DVD/CD mode)
Pauses disc playback.
(Tuner mode)
Switches between FM and AM. (page 48)
7 INPUT
Selects an input source or sets the priority level for the
audio input signals (if any equipment is connected to both
OPTICAL IN and AUDIO IN jacks).
8 VOLUME
Adjusts the overall volume level.
9 Disc tray
Holds a disc to be played.
0 Display
Displays playback information or settings. (page 5)
A (AUTO/MAN’L)
(DVD/CD mode)
Starts disc playback.
(Tuner mode)
Switches between Auto Tuning and Manual Tuning
modes. (page 48)
B DSP
Switches the DSP programs in the selected DSP program
group. Press and hold to switch the DSP program groups.
(page 26)
C SILENT CINEMA jack
Connects headphones.
D Remote control sensor
Receives signals from the remote control.
E YPAO MIC jack
Connects the optimizer microphone.
4
Page 10

Display
MATRIX
0
PROGRESSIVE
DVD VCD
A
CD
B
C
1
DIGITAL
PCM
D
2
PL DSP
TITLE TRACK CHAP
E
3
56
4
VIRTUAL SILENT REP
(U.K. and Europe models only)
PROG SLEEP
Controls and Functions
8
MEMORY
TUNED
CT
HOLD
9
G
H
7
A-B
ALL AUTO ST
PS
PTY RT
PTY
F
I
INTRODUCTION
1 Decoder indicator
Displays the icon for the selected internal decoder.
2 DSP
Lights up when a DSP program is selected.
3 DSP program indicator
Displays the icon for the selected DSP program.
4 VIRTUAL
Lights up when Virtual CINEMA DSP is activated.
5 SILENT CINEMA indicator
Lights up when the Silent Cinema mode is activated.
6 Playback mode indicator
Displays the icon for the selected playback mode.
7 AUTO
Lights up when using the Auto Tuning or Auto Preset
mode.
8 SLEEP
Lights up when the Sleep Timer is on.
9 ST
Lights up when receiving a strong FM radio signal in the
Auto Tuning or Auto Preset mode.
0 PROGRESSIVE
Lights up when the progressive scan function is activated.
B Playback icon
Lights up during disc playback.
C Pause icon
Lights up when disc playback is paused.
D PCM
Lights up when playing PCM signals such as CDs.
E Display mode indicator
Displays the indicator for the information type shown in
the CinemaStation display.
F Display
Displays various information such as a title, chapter or
track number, or elapsed playing time.
G TUNED
Lights up when receiving an FM/AM broadcast.
H MEMORY
Blinks when presetting an FM/AM radio station.
■ U.K. and Europe models only
I RDS indicators
Light up when receiving an RDS signal. “PTY HOLD”
lights up when the PTY SEEK mode is activated.
(page 50)
A Disc indicator
Displays the icon for the disc.
5
Page 11
Controls and Functions
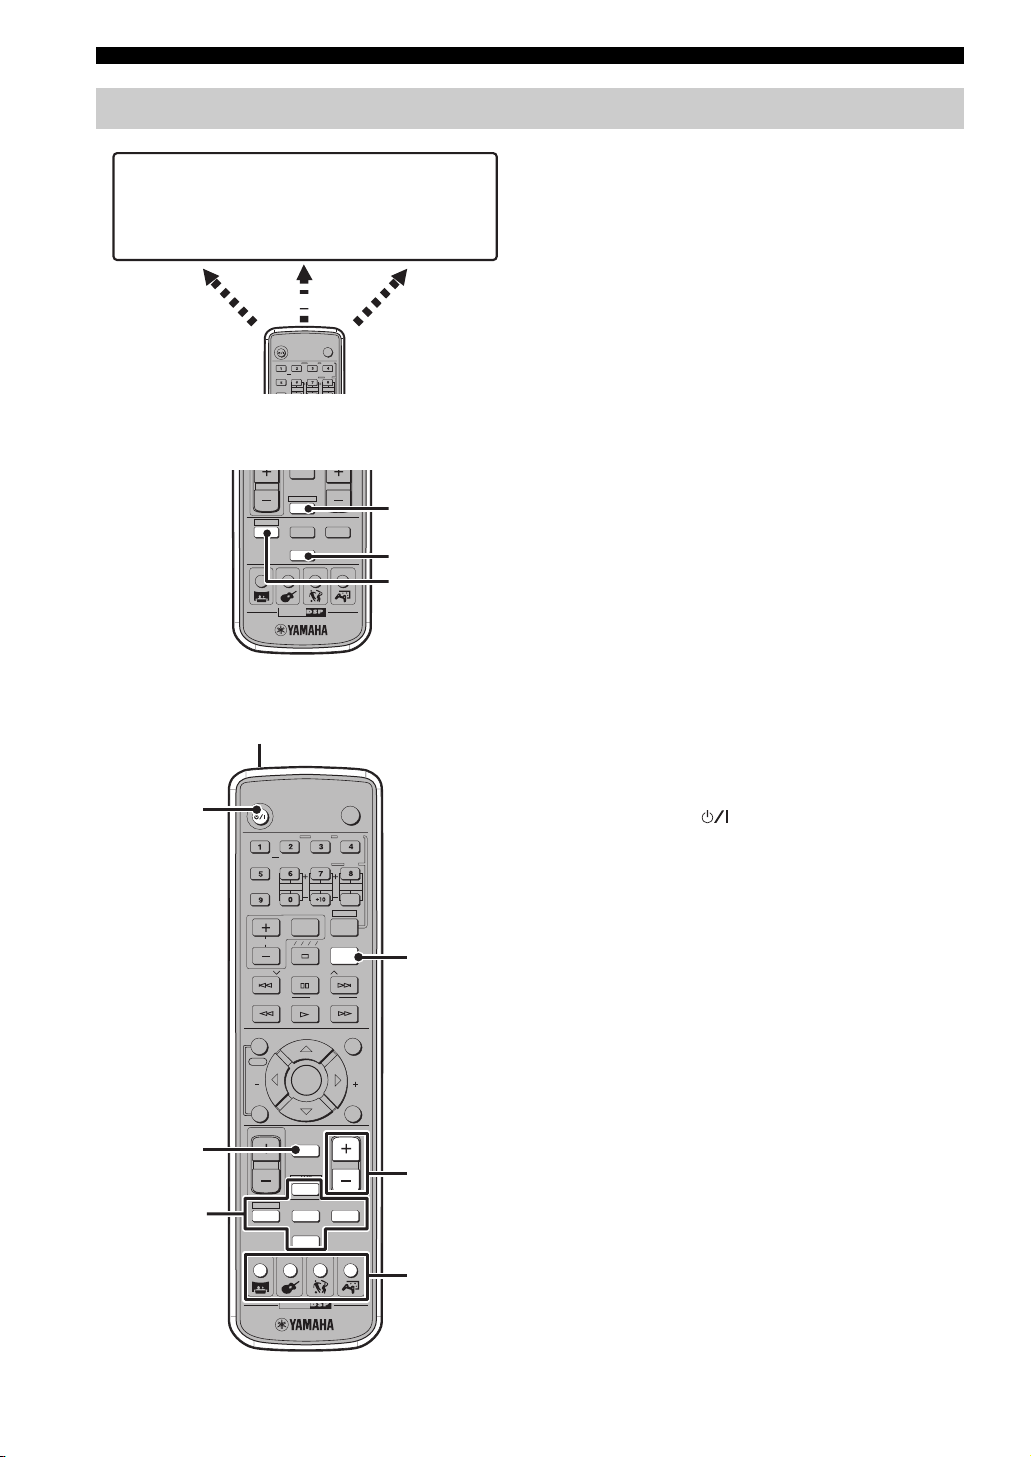
Remote control
AMP
• DSP program
selection
• Input selection,
etc.
Amp mode
DVD/CD
• Playback
• Subtitle and
audio language
selection, etc.
DVD/CD mode
DVR-S120 WB56650
POWER
POWER
TV
SUBTITLE
AUDIO
ANGLE
SELECT
STEREOMATRIX 6.1
SURROUND
A-B
REPEAT
NIGHT
SW
CENTER
SURR
FM/AM
• Radio station
tuning
• Radio station
preset, etc.
Tun er mo de
CinemaStation has three main operation modes. Before
operating functions in each mode, you need to select a
mode to change the remote control button assignments.
To switch the operation mode
• Amp mode: Press AMP. (page 7)
• DVD/CD mode: Press DVD/CD. (page 8)
• Tuner mode: Press TUNER. For details on tuner
operations, refer to “Tuning Radio Stations” (page 48).
y
You can also operate the TV or VCR connected to the
CinemaStation using the remote control. For details, refer to
“Controlling External Components” (page 72).
AMP
DVD/CD
VCR
TUNER
MOVIE MUSIC SPORTS GAME
CINEMA
■ Common functions
1
STANDBY/ON
2
AUDIO
SELECT
SURROUND
NIGHT
SW
SET MENU
TV INPUT
TV CH
A B C D E
PRESET PRESET
FREQ/RDS
MODE
ON SCREEN MENU
START
YPAO
CH
ENTER
STATUS
ON/OFF
TV VOL
3
4
MUTE
AMP
DVD/CD
VCR
TUNER
MOVIE MUSIC SPORTS GAME
CINEMA
ANGLE
REPEAT
CENTER
PTY SEEK
VIDEO
SHIFT
SLEEP
TEST
VOLUME
POWER
TV
SUBTITLE
STEREOMATRIX 6.1
A-B
SURR
START
CH
RETURN
VIDEO
AMP
TUNER
DVD/CD
5
6
7
Operations common to all modes
1 Infrared signal transmitter
Sends signals to the CinemaStation.
2 STANDBY/ON ( )
Turn the CinemaStation on, or set it to the standby mode.
(page 19)
3 MUTE
Turns off the volume. Press again to resume the volume.
4 Input selection buttons
Select an input source to operate. (page 19)
5 SLEEP
Sets the Sleep Timer. (page 28)
6 VOLUME +/–
Adjusts the overall volume level.
7 DSP program buttons
Selects a DSP program. (page 26)
6
Page 12
Controls and Functions
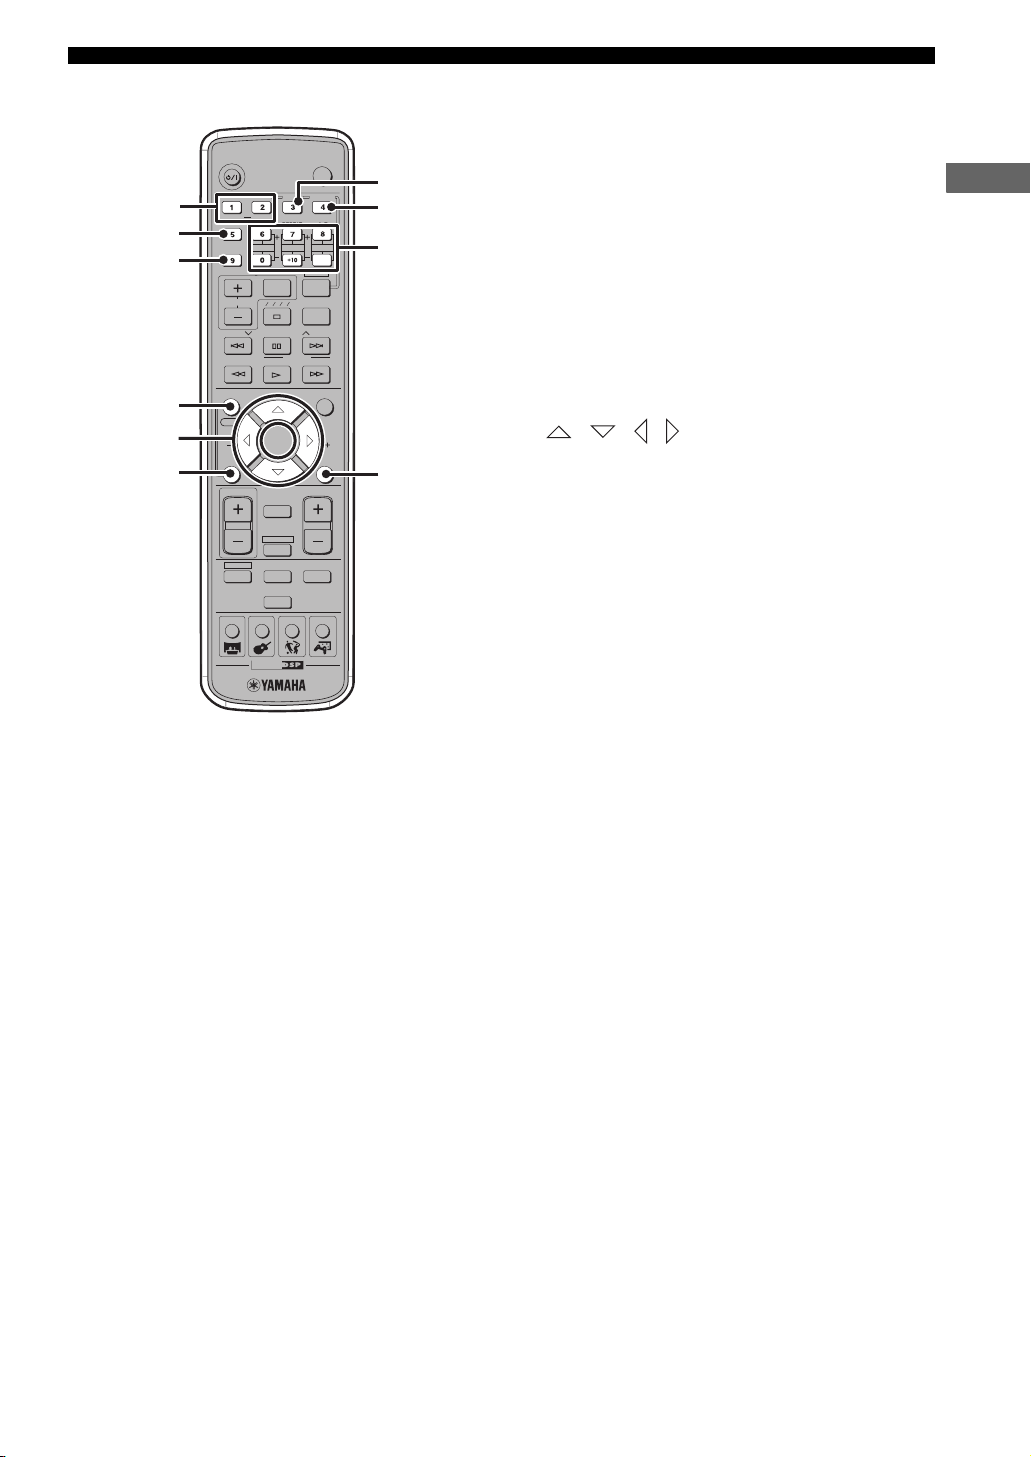
■ Amp mode Operations available only in amp mode
1 SURROUND, SELECT
Sets Dolby Digital or DTS. Press SURROUND and then
SELECT to set Dolby Pro Logic II for 2ch sources.
(page 58)
2 NIGHT
Sets the CinemaStation to the Night Listening mode.
(page 61)
3 SET MENU
Enters the Set Menu. (page 76)
4 YPAO
Starts the YPAO function. (page 21)
5 / / /
Adjusts the test tone (page 64) or Set Menu (page 76).
6 ON/OFF
Turns the YPAO mode on/off. (page 23)
7 MATRIX 6.1
Sets the Matrix 6.1 decoder. (page 57)
8 STEREO
Switches between normal stereo sound and audio with a
sound field effect. (page 63)
9 Speaker volume buttons
Adjusts the speaker balance (volume level of each
speaker). (page 65)
SW +/–: Adjusts the subwoofer volume.
CENTER +/–: Adjusts the center speaker volume.
SURR +/–: Adjusts the surround speaker volume.
0 TEST
Outputs a test tone. (page 64)
y
Amp mode operations are indicated in purple on the remote
control.
1
2
3
4
5
6
STANDBY/ON
SURROUND
NIGHT
SET MENU
TV CH
PRESET PRESET
FREQ/RDS
ON SCREEN MENU
START
YPAO
CH
STATUS
ON/OFF
TV VOL
DVD/CD
MOVIE MUSIC SPORTS GAME
AUDIO
SELECT
SW
A B C D E
CINEMA
TV INPUT
MODE
ENTER
MUTE
AMP
VCR
TUNER
ANGLE
REPEAT
CENTER
PTY SEEK
TEST
VOLUME
POWER
SUBTITLE
SHIFT
SLEEP
VIDEO
STEREOMATRIX 6.1
SURR
START
TV
A-B
CH
RETURN
7
8
9
0
INTRODUCTION
7
Page 13
Controls and Functions
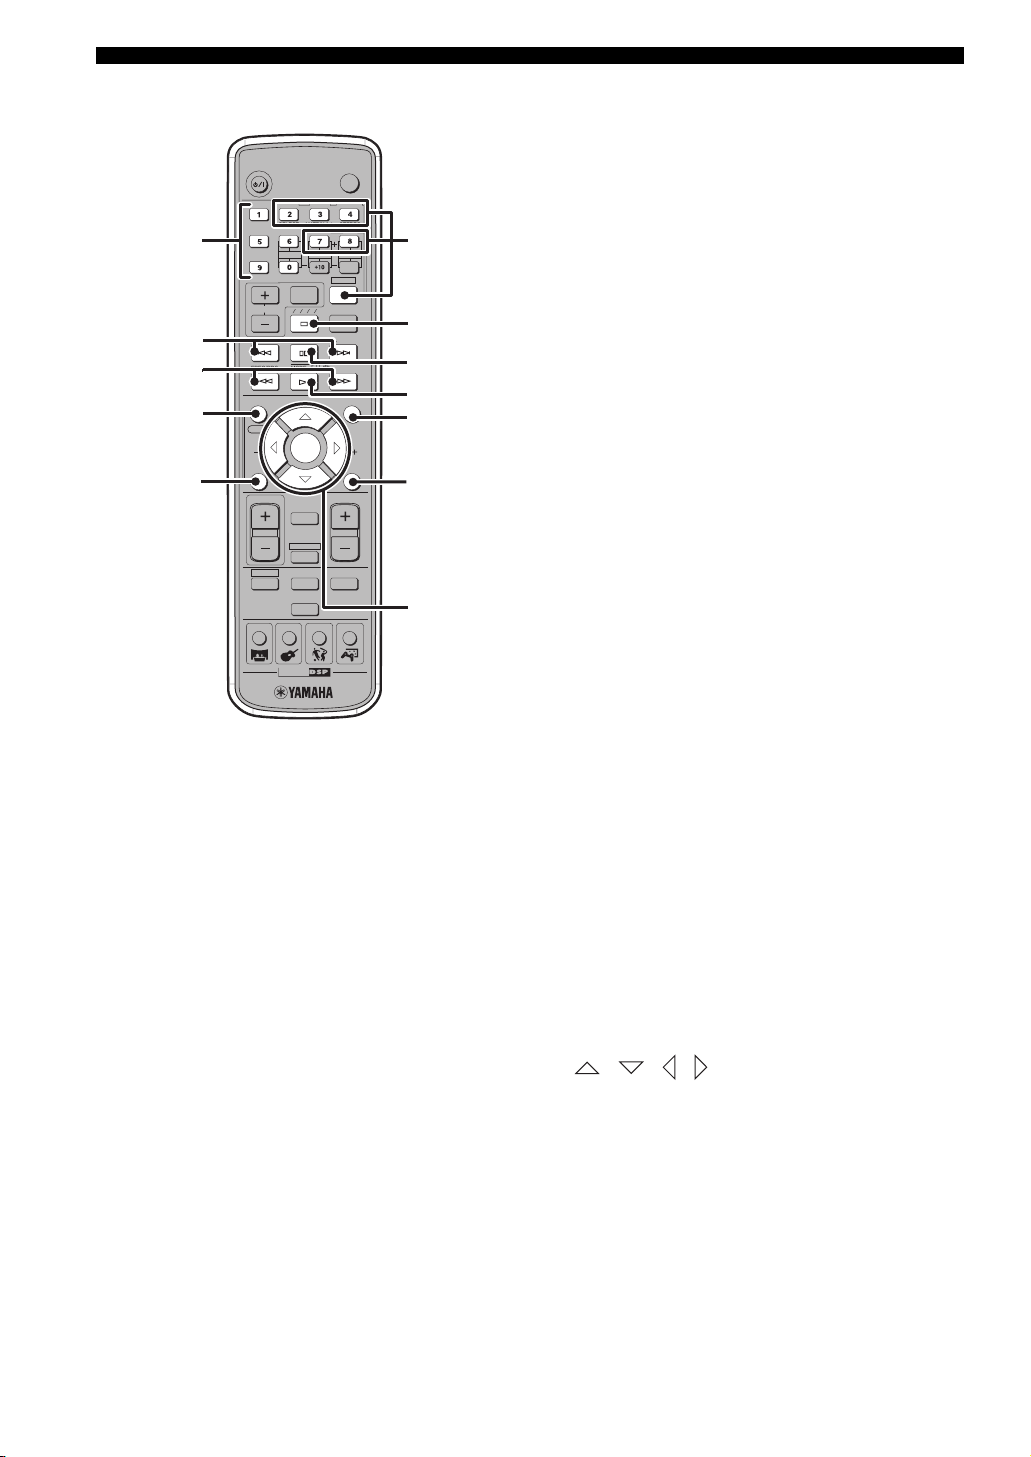
■ DVD/CD mode Operations available only in DVD/CD mode
1 Number buttons (1 to 9, 0)
STANDBY/ON
16
2
3
4
5
SURROUND
NIGHT
SET MENU
TV CH
PRESET PRESET
FREQ/RDS
ON SCREEN MENU
START
YPAO
CH
STATUS
ON/OFF
TV VOL
DVD/CD
MOVIE MUSIC SPORTS GAME
AUDIO
SELECT
SW
CINEMA
TV INPUT
A B C D E
MODE
ENTER
MUTE
AMP
VCR
TUNER
ANGLE
REPEAT
CENTER
PTY SEEK
SHIFT
SLEEP
TEST
VOLUME
VIDEO
POWER
TV
SUBTITLE
STEREOMATRIX 6.1
A-B
SURR
START
CH
RETURN
7
8
9
0
A
B
Inputs numerals to specify parameters such as track or
chapter numbers.
2 b, a
Skips to the start of current track or next track.
3 w, f
Fast forwards/fast reverses.
4 ON SCREEN
Displays the On-Screen Menu on the TV screen. (page 29)
5 STATUS
Displays the status information such as disc type, total
time or elapsed time of current track/chapter on the TV
screen. To display the status information, the “Status
window” setting in the On-Screen Menu (page 29) should
be set to “On”.
6 Settings buttons
While holding down SHIFT, press a button below to
enable the corresponding operation.
REPEAT: Enables the Repeat Play mode. (page 37)
A-B: Enables the A-B Repeat mode. (page 38)
AUDIO: Selects the audio language of the DVD video.
(page 40)
ANGLE: Selects the disc viewing angle. (page 41)
SUBTITLE: Selects the subtitle language of the DVD
video. (page 40)
7 s
Stops disc playback.
8 e
Pauses disc playback or advances to the next frame.
9 h
Starts disc playback.
0 MENU
Displays the DVD menu on the TV screen. (page 39)
A RETURN
Returns the DVD menu to the previous screen. (page 39)
B / / / / ENTER
Operates the On-Screen Menu (page 29) or specify
various parameters.
y
DVD/CD mode operations are indicated in green on the remote
control.
8
Page 14

CONNECTING SPEAKERS
Connecting Speakers
Follow the procedure below to connect speakers to the CinemaStation. Here, the connection example uses the YAMAHA
NX-P150 (consisting of four satellite speakers, a center speaker and a subwoofer) and its supplied cables. For
information on your speakers, refer to the owner’s manual for the speakers.
y
You can also use commercially available speakers and cables (see page 11).
Note
Do not connect the power cable of the CinemaStation until all cable connections are completed.
PREPARATION
Front R speaker
Speaker cable
(cable plug: red)
Speaker cable
(cable plug: gray)
SPEAKERS
FRONT
CENTER FRONT
SURROUND
SPEAKER IMPEDANCE: 6 MIN.
Speaker cable
(cable plug: blue)
Center speaker
SURROUND
Speaker cable
(cable plug: green)
Speaker cable
(cable plug: white)
SUBWOOFER
OUT
RLRL
SYSTEM
CONNECTOR
System
control
cable*
AUDIO
Subwoofer
cable*
VCR
OUT
VCR
IN
VIDEO
IN
Front L speaker
AM
ANT
GND
FM
ANT
75 UNBAL
MONITOR
OUT
(DVD ONLY)
Y
P
B
PR
COMPONENT
VIDEO
MONITOR
OUT
(DVD ONLY)
CinemaStation
VIDEOS VIDEO
MONITOR
VCR
OUT
OUT
VCR
VIDEO
IN
IN
DIGITAL
AUDIO
IN
OUT
OPTICAL
Surround R
speaker
Surround L
speaker
* Supplied with the subwoofer.
SYSTEM
CONNECTOR
INPUT
Subwoofer
9
Page 15
Connecting Speakers
N
7
Connecting speakers (Front/Surround/Center)
1 Insert the cable plug of the speaker cable
into the speaker jack of the same color until
you hear it click into place.
• FRONT R (Red), CENTER (Green), FRONT L
(White): Insert the cable plug facing the tub
upwards.
• SURROUND R (Gray), SURROUND L (Blue):
Insert the cable plug facing the tub downwards.
Red
Tab
Green
Color
band
White
Blue
SPEAKERS
FRONT
CENTER FRONT
SURROUND
SURROUND
SPEAKER IMPEDANCE: 6 MIN.
LR
Tab
Gray
Note
Do not use excessive force when inserting the cable plug. Doing
so may damage the cable plug or speaker jack.
2 Connect the cable core of the speaker cable
with the color band to the + connector on the
speaker and other cable core to the –
connector.
Cable core
Connecting a subwoofer
Note
Do not connect the power cable of the CinemaStation or
subwoofer until all cable connections are completed.
SUBWOOFER
T
UND
MIN.
OUT
SYSTEM
CONNECTOR
System
control
cable
INPUT
SYSTEM
CONNECTOR
1 Connect the SUBWOOFER OUT jack on the
CinemaStation to the INPUT jack on the
subwoofer using the subwoofer cable.
2 Connect the SYSTEM CONNECTOR jack on
the CinemaStation to the SYSTEM
CONNECTOR jack on the subwoofer using
the system control cable.
VCR
OUT
VCR
IN
VIDEO
IN
RL
AUDIO
Subwoofer
cable
Subwoofer
Lever
Press the lever
down, then insert the
cable core into the
hole and release the
lever.
Notes
• Do not allow the cable cores to touch each other or any metal
part. Doing so may damage the unit or speakers.
• Make sure you connect the cable cores to the correct
connectors. Reversed connections may produce unnatural
sounds during playback.
10
Page 16
Connecting Speakers
Using commercially available speakers or cables
When using speakers or cables other than those of the
YAMAHA NX-P150 (consisting of four satellite speakers,
a center speaker and a subwoofer) and its supplied cables,
be careful of the following. When using a commercially
available speaker cable, remove the cable plug from one of
the supplied speaker cables and attach it to the cable you
are using.
When using commercially available speakers
• Use speakers with 6-ohm impedance or more. If a
speaker with less than 6-ohm impedance is used, the
protective circuit may trip or the speaker may
malfunction.
• Use magnetically shielded speakers to prevent
interferences with a TV. If these speakers still interfere
with a TV, move the speakers a little away from the TV.
• We recommend using speakers of the same
manufacturer that have identical sound qualities. If
they are mixed, certain sounds may be heard
unnaturally.
• Use speaker cables that are the same thickness as the
supplied cables.
When using commercially available speaker
cables
• Use speaker cables that are the same thickness as the
supplied cables.
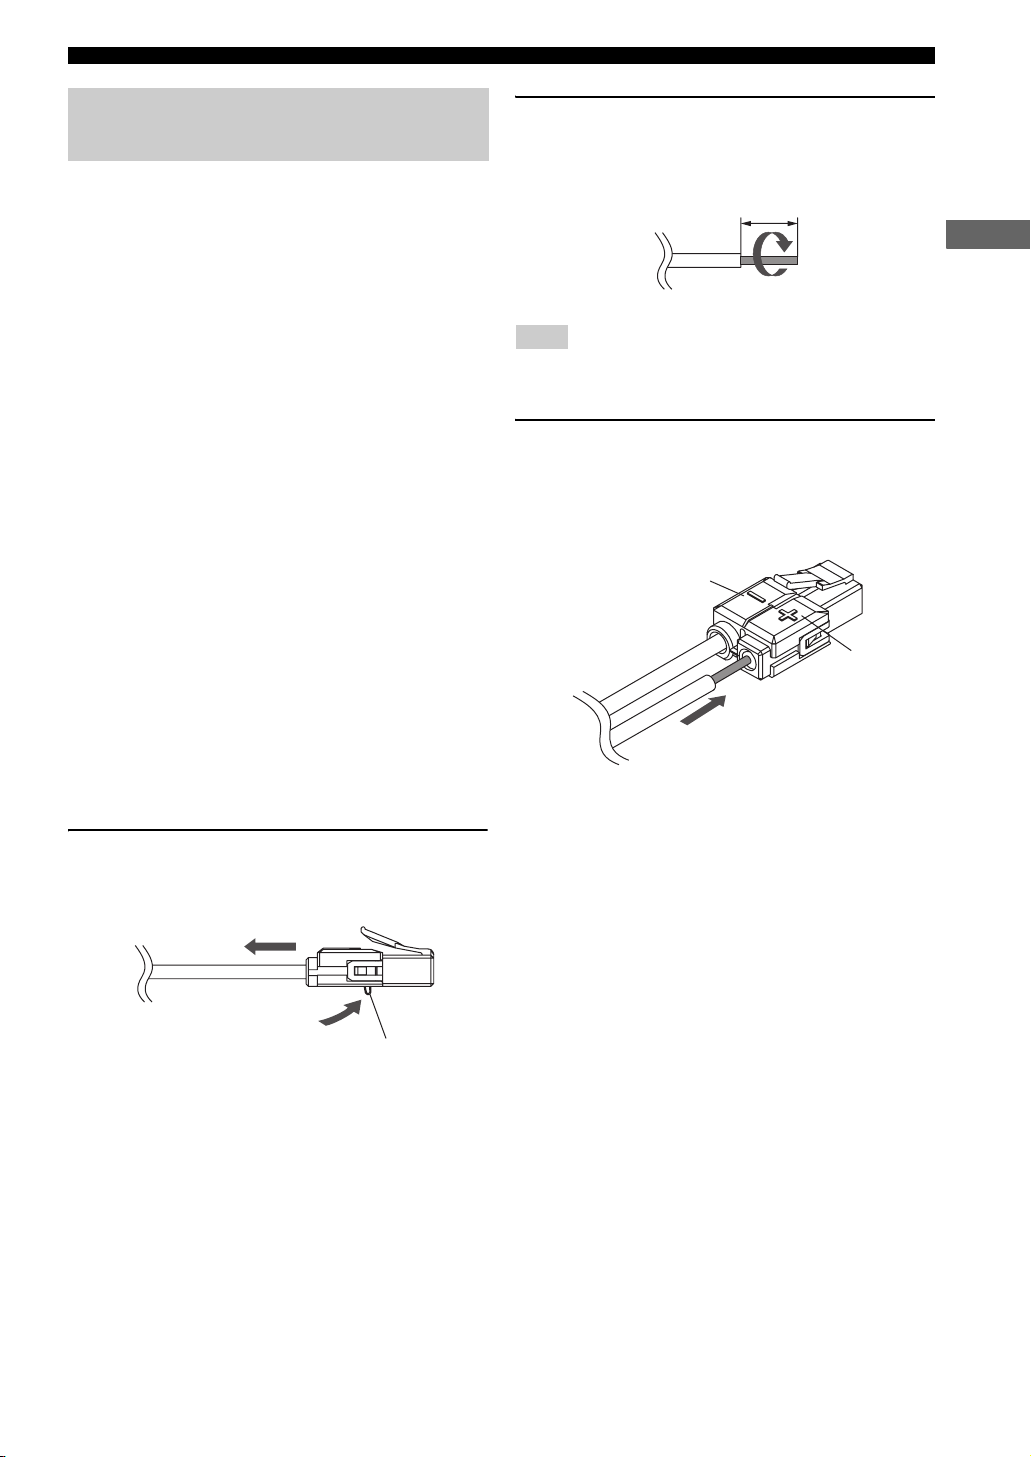
2 Peel away about 10 mm (10/32”) of covering
from the tip of the new cable and twist the
cable core firmly in a clockwise direction.
10 mm (10/32”)
PREPARATION
Clockwise
Note
Be sure to twist the cable core firmly in a clockwise direction.
Twisting loosely may cause a short.
3 Press and hold the release button, insert the
cable core into the cable plug, then release
the button.
Match the speaker cable polarity (+/–) with the
polarity mark (+/–) of the cable plug.
Polarity mark –
Polarity mark +
■ To replace speaker cables
1 Press and hold the release button and
remove the supplied speaker cable from the
cable plug.
Release button
11
Page 17
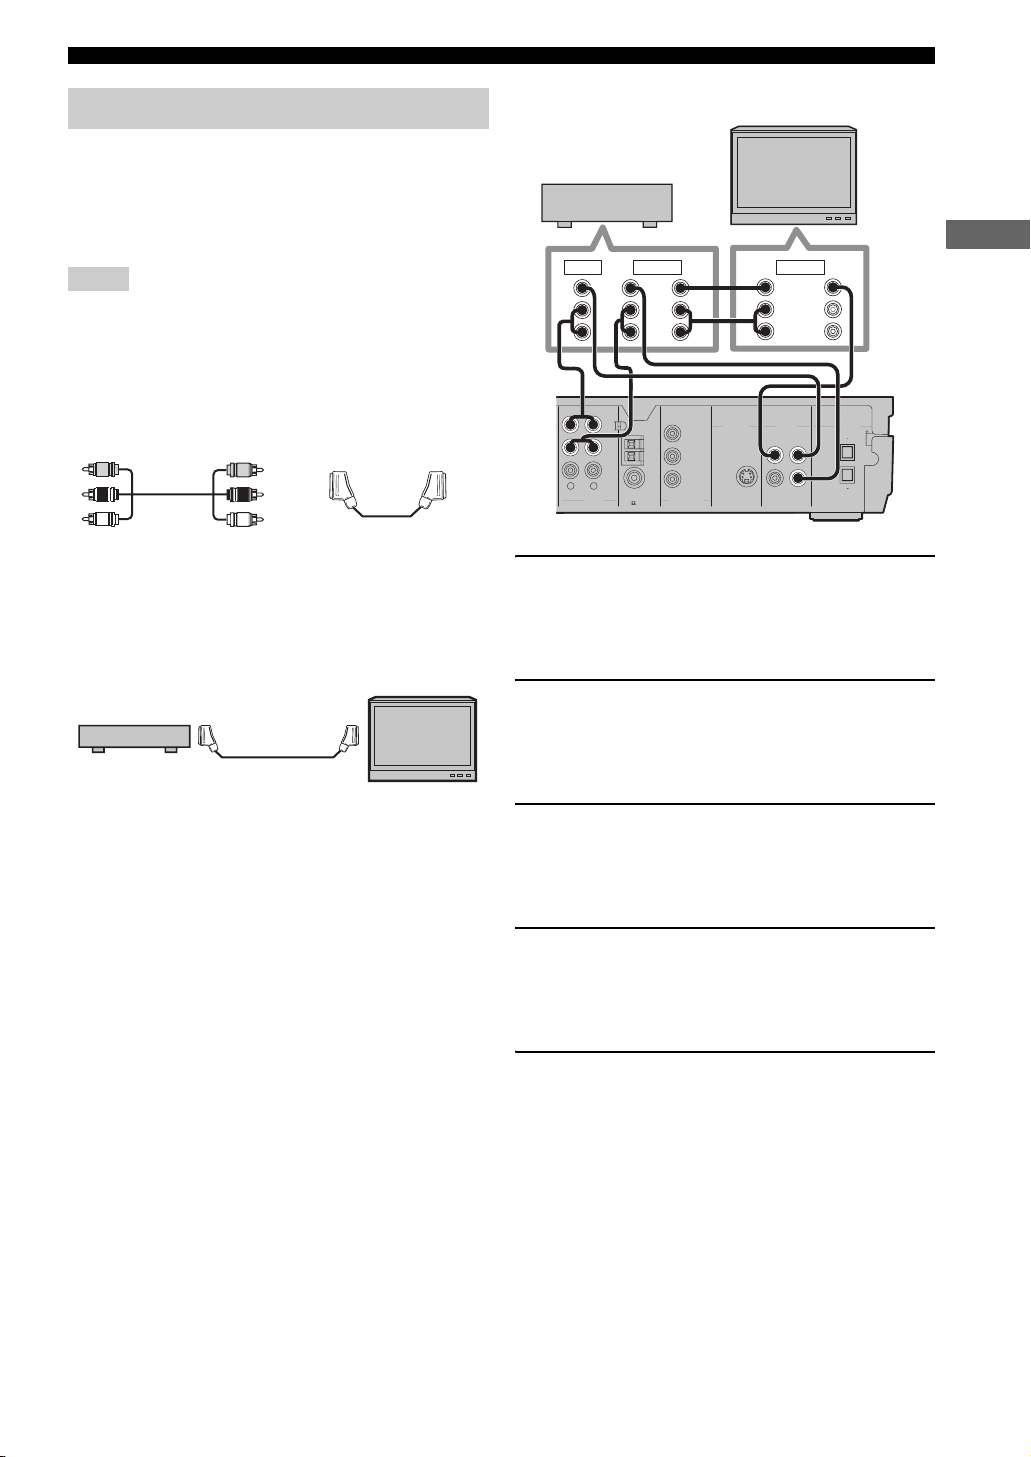
CONNECTING A TV
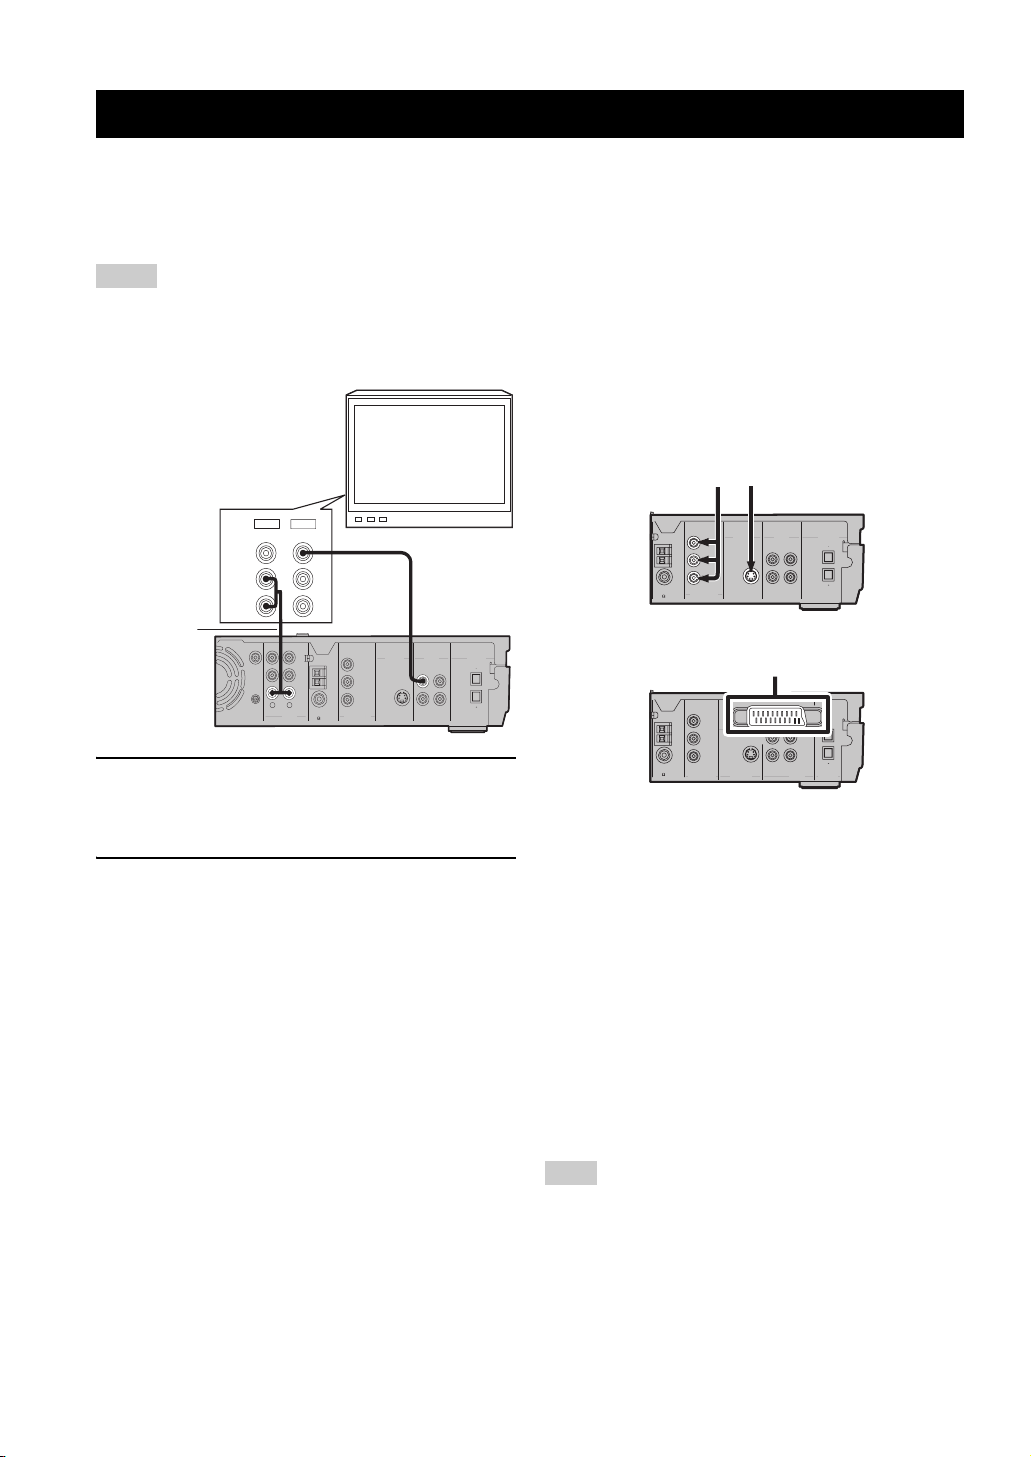
Connecting a TV
Follow the procedure below to connect your TV to CinemaStation using the supplied video pin cable. If you want to
output sound from the speakers connected to CinemaStation, prepare a commercially available audio pin cable to connect
them. Also, you can enjoy high-quality pictures with the component video, S-Video, or SCART (U.K. and Europe
models only) connection. For information about your TV, refer to the supplied manual.
Notes
• Do not connect the power cable of the CinemaStation until all cable connections are completed.
• Turn off the TV before connecting it to the CinemaStation.
TV
OUT
IN
2 Audio cable
(commercially
VIDEO
AUDIO
L
R
1 Video pin
cable
(supplied)
available)
SUBWOOFER
OUT
SYSTEM
CONNECTOR
RL
AUDIO
MONITOR
OUT
(DVD ONLY)
VCR
OUT
Y
AM
VCR
ANT
IN
VIDEO
IN
75 UNBAL
MONITOR
OUT
P
B
GND
(DVD ONLY)
FM
P
R
ANT
COMPONENT
VIDEO
MONITOR
DIGITAL
VIDEOS VIDEO
AUDIO
VCR
IN
OUT
OUT
OUT
VCRINVIDEO
OPTICAL
IN
1 Connect the MONITOR OUT (VIDEO) jack on
the CinemaStation to the video input jack on
your TV using the supplied video pin cable.
2 To output sound from the speakers
connected to CinemaStation, connect the
VIDEO IN L/R (AUDIO) jacks on the
CinemaStation to the audio output L/R jacks
on your TV using the commercially available
audio pin cable.
■ Other connection methods
To make a component video, S-Video, or SCART (U.K.
and Europe models only) connection, a corresponding
cable is required.
Component video S-Video
MONITOR
OUT
(DVD ONLY)
Y
AM
ANT
MONITOR
OUT
B
P
GND
(DVD ONLY)
FM
PR
ANT
COMPONENT
VIDEO
75 UNBAL
SCART
AV MONITOR OUT
MONITOR
OUT
(DVD ONLY)
Y
AM
75 UNBAL
ANT
GND
FM
ANT
COMPONENT
VIDEO
MONITOR
P
B
OUT
MONITOR
OUT
PR
(DVD ONLY)
S VIDEO
(U.K. and Europe models)
Component video
Connect the MONITOR OUT Y/P
VIDEO) jacks on the CinemaStation to the component
video input Y/P
B/PR jacks on your TV using a
commercially available component video cable.
S-Video
Connect the MONITOR OUT (S VIDEO) jack on the
CinemaStation to the S-Video input jack on your TV using
a commercially available S-Video cable.
DIGITAL
VIDEOS VIDEO
AUDIO
MONITOR
VCR
IN
OUT
OUT
OUT
VCRINVIDEO
OPTICAL
IN
(DVD ONLY)
IN
VCR
OUT
VCR
IN
OUT
VIDEO
OPTICAL
IN
DIGITAL
VIDEO
AUDIO
B/PR (COMPONENT
12
SCART (for U.K. and Europe models)
Connect the AV MONITOR OUT jack on the
CinemaStation to the SCART input jack on your TV using
a commercially available SCART video cable.
Note
(For U.K. and Europe models)
If you set the Video Output setting to “RGB” in the On-Screen
Menu (page 29), the MONITOR OUT (S VIDEO) jack cannot
output video signals.
Page 18
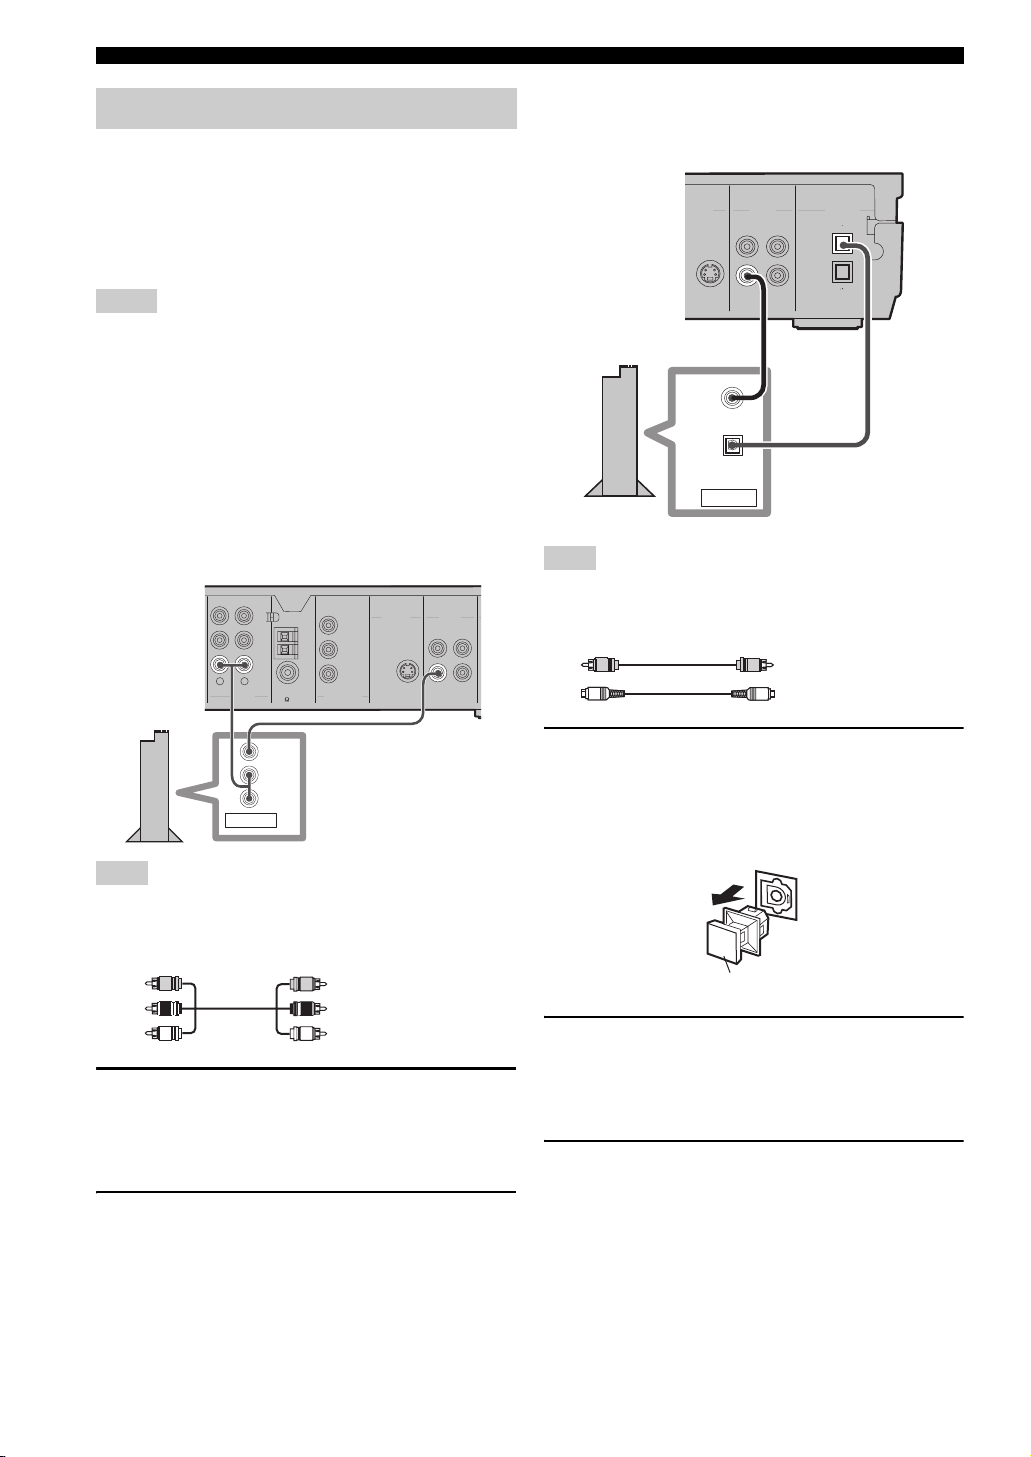
CONNECTING ANTENNAS
Connecting Antennas
To enjoy radio on the CinemaStation, you need to connect AM and FM antennas to the CinemaStation. This product
includes an AM loop antenna and indoor FM antenna. If there is a problem of weak radio wave reception in your area or
you want to improve radio reception, we recommend that you use optional outdoor antennas. For details, consult the
nearest authorized YAMAHA dealer or service center.
PREPARATION
Indoor FM
antenna
(supplied)
AM
ANT
GND
O
FM
ANT
75 UNBAL
MONITOR
OUT
(DVD ONLY)
Y
P
B
PR
COMPONENT
VIDEO
MONITOR
OUT
(DVD ONLY)
MONITOR
OUT
VIDEO
IN
VIDEOS VIDEO
VCR
OUT
VCR
IN
AM loop
antenna
(supplied)
DIGITAL
AUDIO
IN
OUT
OPTICAL
Ground (GND terminal)
■ About grounding
For maximum safety and minimum interference, connect
the antenna GND terminal to a good earth ground. A good
earth ground is a metal stake driven into moist earth.
Connecting the FM antenna
1 Connect the supplied indoor FM antenna to
the FM ANT jack on the CinemaStation.
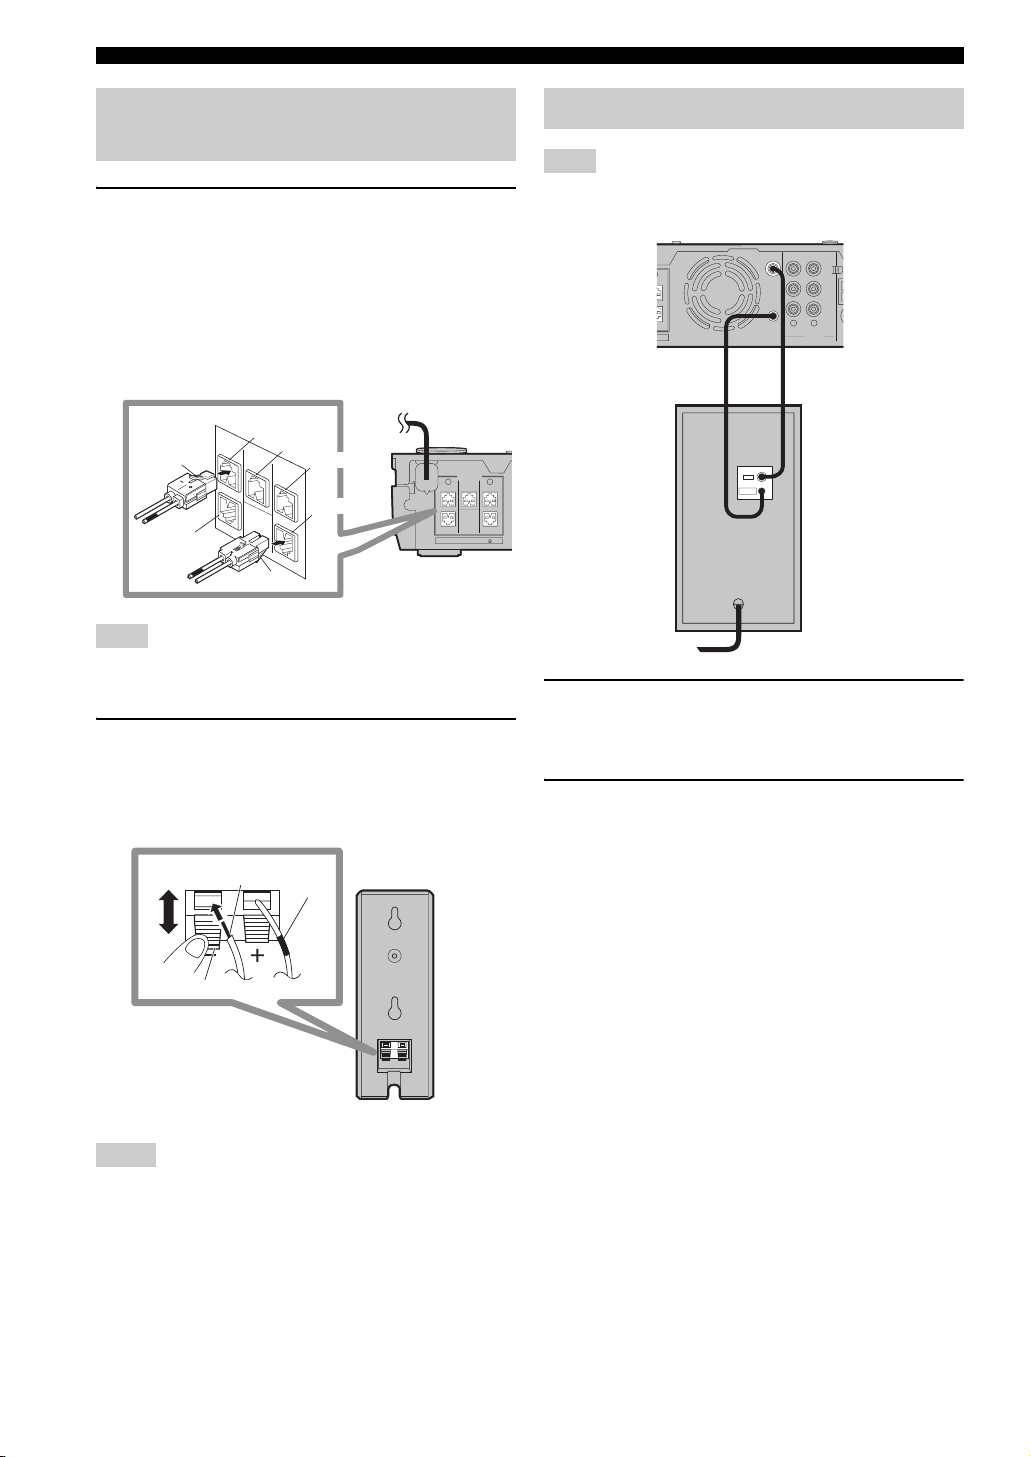
Connecting the AM loop antenna
1 Attach the antenna stand to the antenna.
When attaching the antenna to the wall, you do not
need to use the antenna stand.
2 Open the lever to the right and insert the
antenna’s cord cores into the AM ANT and
GND terminals.
AM ANT terminal
Cord Core
White
Lever
2 Place the antenna away from the
CinemaStation and speaker cables.
Black
GND terminal
3 Close the lever and then pull the cord lightly
to make sure it is fastened properly.
4 Place the antenna away from the
CinemaStation and speaker cables.
While listening to the radio, rotate the antenna head
to find the best angle for reception.
13
Page 19
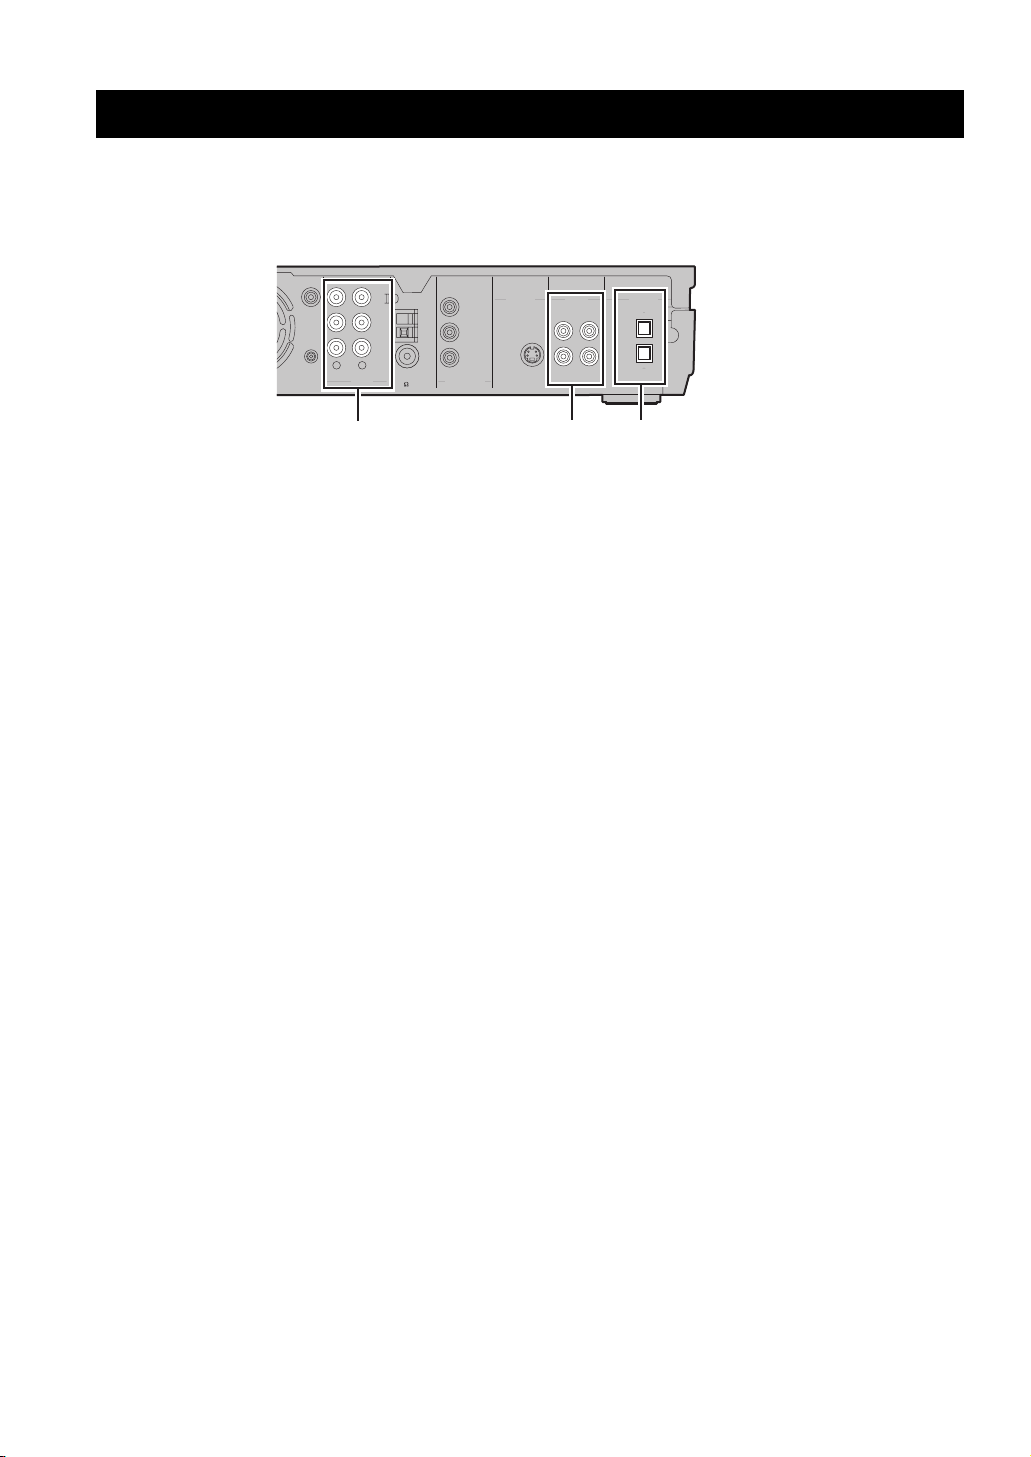
CONNECTING EXTERNAL AV COMPONENTS
Connecting External AV Components
If you connect external AV equipment such as a VCR, video camera, or game console to the following AV jacks on the
CinemaStation, you can enjoy those AV sources with the CinemaStation. Also, you can record AV sources played on the
CinemaStation using the recording equipment. This section provides some examples of other AV equipment connections.
For information on your AV equipment, refer to the manual for it.
75 UNBAL
ANT
GND
ANT
AM
FM
MONITOR
OUT
(DVD ONLY)
Y
P
B
PR
COMPONENT
VIDEO
MONITOR
(DVD ONLY)
SUBWOOFER
OUT
SYSTEM
CONNECTOR
RL
AUDIO
VCR
OUT
VCR
VIDEO
IN
IN
AUDIO jacks
■ About the AUDIO jacks
• You cannot use both IN and OUT jacks for a same
category simultaneously. For example, the signal input
from the VCR IN jack does not output from the VCR
OUT jack.
• CinemaStation’s digital and analog signal circuits are
independent of each other. Analog input signals can
only output from analog output jacks and digital input
signals can only output from digital output jacks.
■ About the DIGITAL AUDIO jacks
• The digital jacks are compatible with PCM, Dolby
Digital and DTS signals.
• The digital jacks are designed based on EIA standards.
To make a digital connection, use an optical cable that
meets EIA standards.
• The OPTICAL IN jack is compatible with a digital
signal that has a 96 kHz or less sampling frequency.
• You can use “Input Assign” in the Set Menu
(page 78) to assign VIDEO or VCR to the OPTICAL
IN jack. The default setting is “VIDEO”.
VIDEOS VIDEO
MONITOR
OUT
OUT
VIDEO
IN
VIDEO jacks
DIGITAL
AUDIO
VCR
IN
OUT
OUT
VCR
OPTICAL
IN
DIGITAL AUDIO jacks
■ Connecting a TV to an audio input
Enjoy TV sound with CinemaStation by connecting the
TV audio output jack to the AUDIO IN jack using a
commercially available audio cable. Press VIDEO on the
remote control to input TV sound.
14
Page 20
Connecting External AV Components
Connecting a VCR
If you connect a VCR to the CinemaStation using
commercially available audio/video cables, you can enjoy
videos with the CinemaStation and record AV sources
played on the CinemaStation on the VCR. For information
on your VCR, refer to the owner’s manual for the VCR.
Notes
• Do not connect the power cable of the CinemaStation until all
cable connections are completed.
• Turn off the AV equipment before connecting it to the
CinemaStation.
• Use commercially available audio/video cables (shown below)
to connect a VCR to the CinemaStation or a TV. To make all
connections, three audio/video cables are required.
Audio/Video cable SCART cable
• For U.K. and Europe models only: Do not connect a TV to
CinemaStation via a VCR using SCART connections. The
copyright protection technology incorporated in the
CinemaStation may not allow the VCR to play.
TV
CinemaStation
TV
VCR
IN OUT IN
VIDEO
VIDEO
L
R
AUDIO
AUDIO
5
L
R
VIDEO
LRL
AUDIO
R
4
1
RL
AUDIO
VCR
OUT
VCR
VIDEO
3
AM
ANT
IN
GND
IN
FM
ANT
75 UNBAL
MONITOR
OUT
(DVD ONLY)
Y
B
P
PR
COMPONENT
VIDEO
2
MONITOR
OUT
(DVD ONLY)
MONITOR
OUT
DIGITAL
VIDEOS VIDEO
IN
AUDIO
VCR
IN
OUT
OUT
VCRINVIDEO
OPTICAL
1 Connect the VCR OUT L/R (AUDIO) jacks on
the CinemaStation to the audio input L/R
jacks on your VCR using a commercially
available audio/video cable.
2 Connect the VCR OUT (VIDEO) jack on the
CinemaStation to the video input jack on
your VCR using the audio/video cable (used
in step 1).
PREPARATION
3 Connect the VIDEO IN L/R (AUDIO) jacks on
the CinemaStation to the audio output L/R
jacks on your VCR using another audio/video
cable.
4 Connect the VIDEO IN (VIDEO) jack on the
CinemaStation to the video output jack on
your VCR using the audio/video cable (used
in step 3).
5 To watch videos when the CinemaStation is
turned off, connect the audio and video
output jacks on your VCR to the audio and
video input jacks on your TV using another
audio/video cable.
y
For information on how to connect a TV to CinemaStation, refer
to “Connecting a TV” (page 12).
15
Page 21
Connecting External AV Components
Connecting a game console
If you connect a game console to the CinemaStation using
a commercially available audio/video cable (for analog
connections) or a video cable and optical cable (for digital
connections), you can enjoy games or videos with the
CinemaStation. For information, refer to the manual
supplied with your game console.
Notes
• Do not connect the power cable of the CinemaStation until all
cable connections are completed.
• Turn off the AV equipment before connecting it to the
CinemaStation.
■ Analog connections
Follow the procedure below to connect a game console or
with an analog connection. If you are using VIDEO IN
(AUDIO) jacks for connecting your TV (page 12),
connect a game console or video camera using digital
connections.
MONITOR
OUT
75 UNBAL
VIDEO
AUDIO
ANT
GND
ANT
AM
FM
(DVD ONLY)
Y
P
B
PR
COMPONENT
VIDEO
MONITOR
OUT
(DVD ONLY)
VIDEOS VIDEO
VCR
MONITOR
OUT
OUT
VCR
VIDEO
IN
IN
2
VCR
OUT
VCR
IN
VIDEO
IN
RL
Game
console
AUDIO
1
L
R
OUTPUT
Note
Use a commercially available audio/video cable (shown below) to
connect your game console to the CinemaStation using analog
connections.
■ Digital connections
Follow the procedure below to connect a game console
using digital connections.
VCR
OUT
VCR
IN
Video pin
cable
DIGITAL
AUDIO
IN
OUT
OPTICAL
Optical
cable
Game console
VIDEO
TOR
T
NLY)
VIDEO
DIGITAL
MONITOR
VIDEO
OPTICAL
OUT
VIDEO
OUT
IN
Note
Use a commercially available video pin cable and an optical cable
(shown below) to connect your game console to the
CinemaStation with a digital connection.
Video pin cable
Optical cable
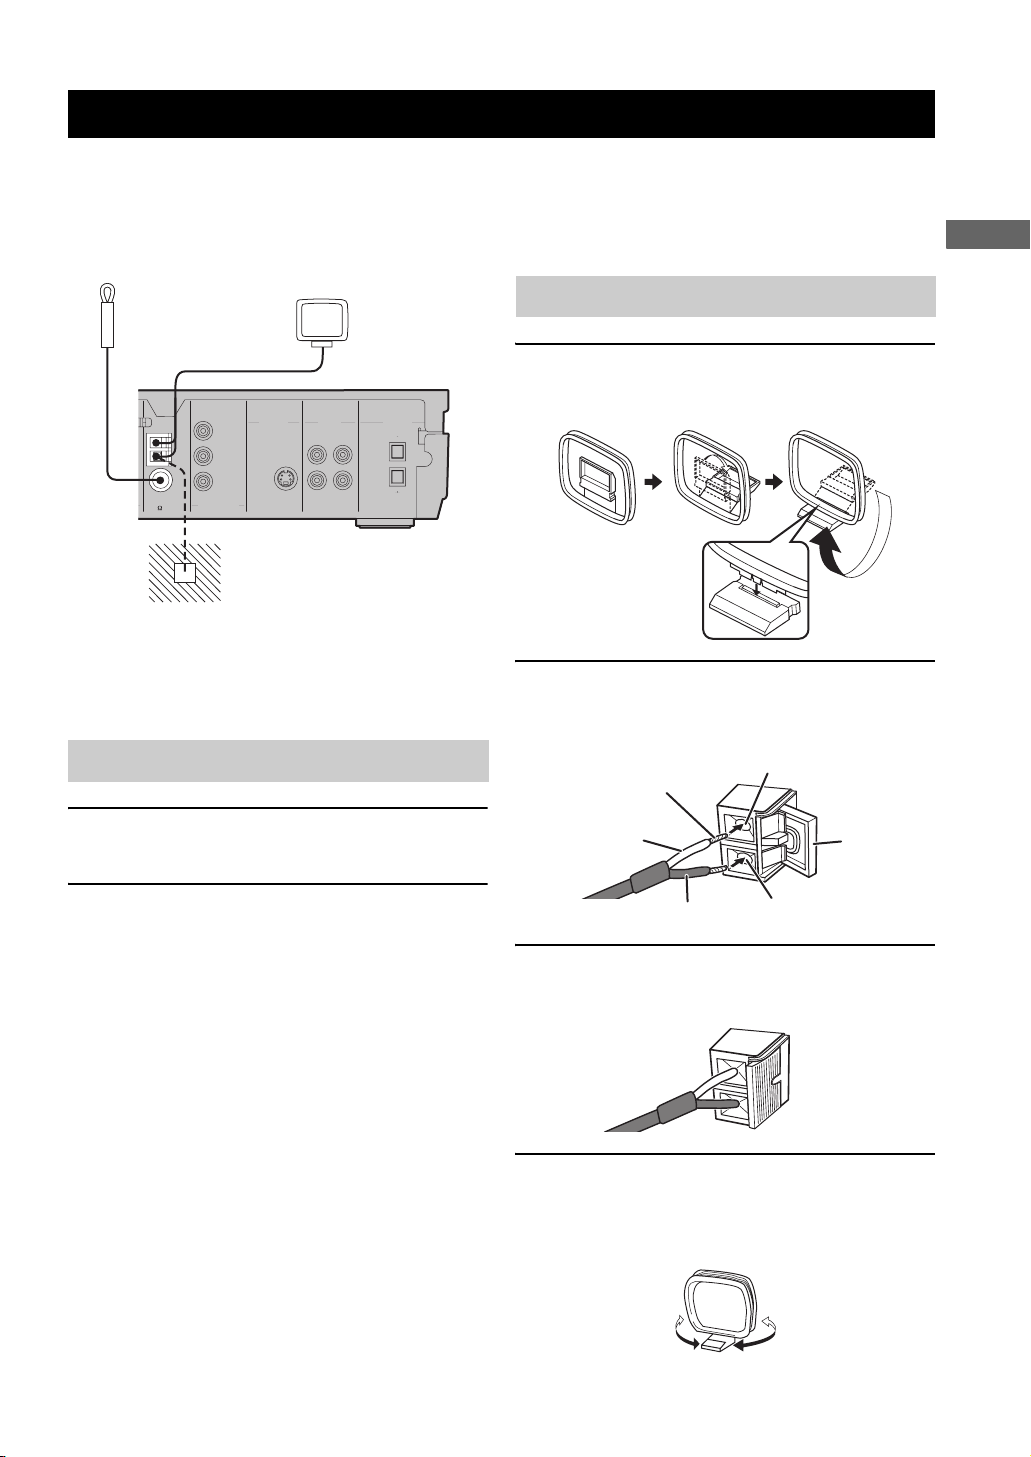
1 Remove the anti-dust cap from the OPTICAL
IN (DIGITAL AUDIO) jack on the
CinemaStation.
Keep the cap to re-attach it when the jack is not in
use.
Audio/Video cable
1 Connect the VIDEO IN L/R (AUDIO) jacks on
the CinemaStation to the audio output L/R
jacks on your game console using a
commercially available audio/video cable.
2 Connect the VIDEO IN (VIDEO) jack on the
CinemaStation to the video output jack on
your game console using the audio/video
cable (used in step 1).
16
Anti-dust cap
2 Connect the VIDEO IN (VIDEO) jack on the
CinemaStation to the video output jack on
your game console using a commercially
available video pin cable.
3 Connect the OPTICAL IN (DIGITAL AUDIO)
jack on the CinemaStation to the optical
digital output jack on your game console
using a commercially available optical cable.
Page 22
Connecting External AV Components
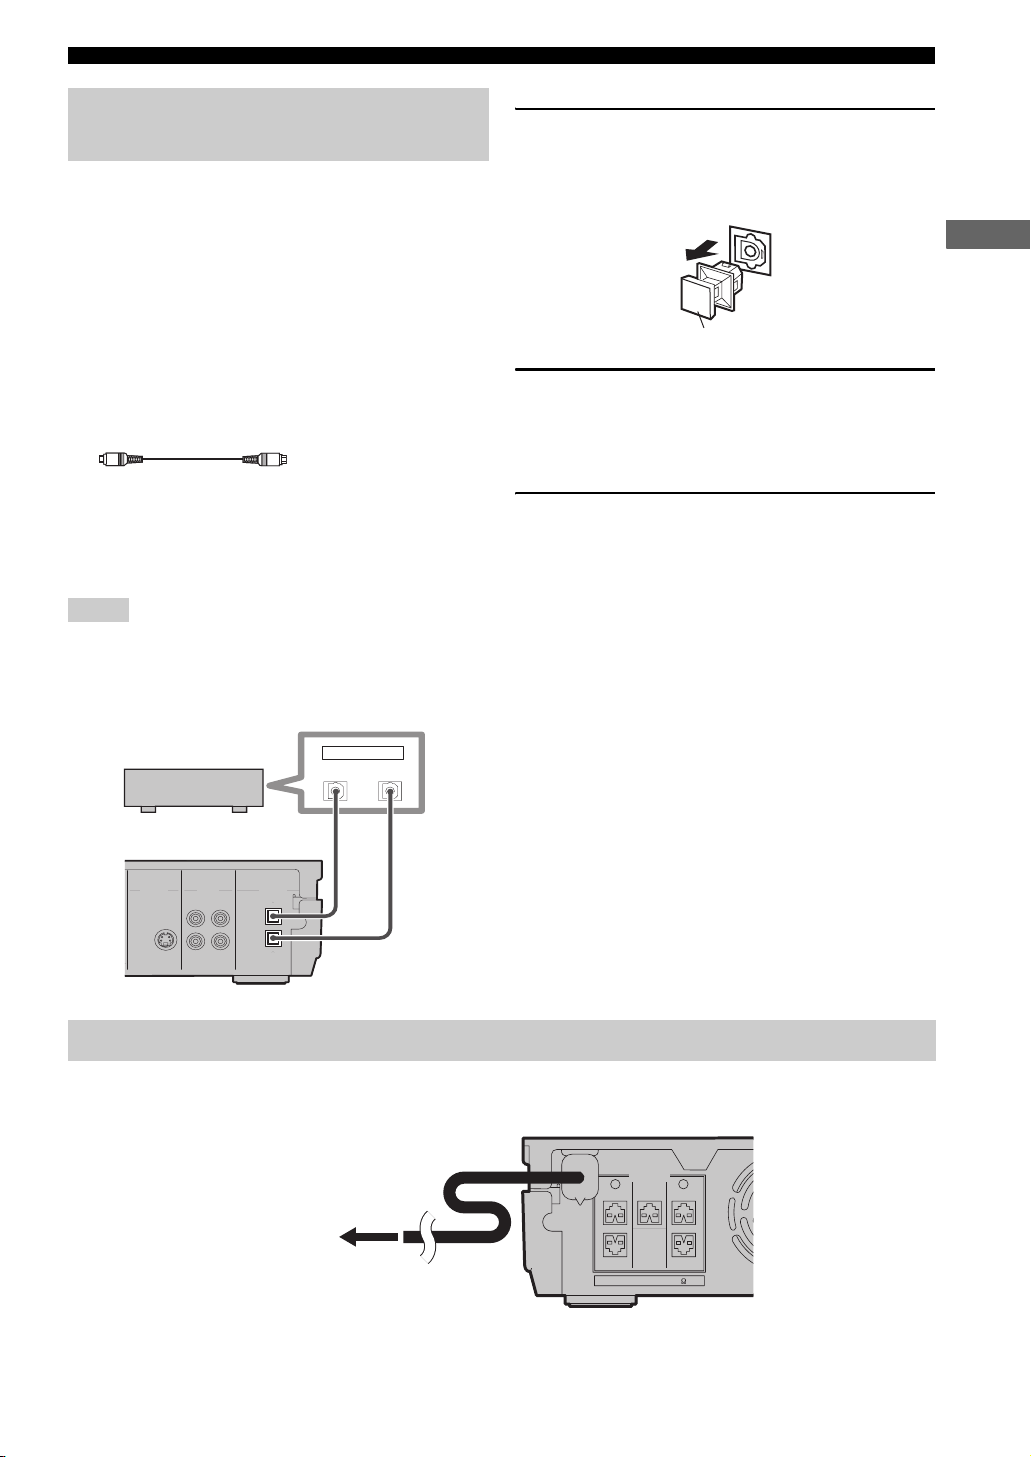
Connecting a CD recorder or MD recorder
If you connect a CD recorder or MD recorder to the
CinemaStation using commercially available optical
cables, you can record audio sources played on the
CinemaStation. Also, you can enjoy audio sources played
on the recorder with the CinemaStation. For information
on your CD recorder or MD recorder, refer to the manual
for it.
y
• Use a commercially available optical cable (shown below) to
connect your CD recorder or MD recorder to the
CinemaStation. To make all connections, two optical cables are
required.
Optical cable
• AM/FM broadcasts cannot be output from this unit’s OPTICAL
OUT (DIGITAL AUDIO) jack. To record AM/FM broadcasts,
use a commercially available audio cable to connect the VCR
OUT jack on the CinemaStation to the analog input jack on
your recorder (see page 55).
Notes
• Do not connect the power cable of the CinemaStation until all
cable connections are completed.
• Turn off the AV component before connecting it to the
CinemaStation.
1 Remove the anti-dust caps from the
OPTICAL (DIGITAL AUDIO) jacks on the
CinemaStation.
Keep the cap to re-attach it when the jack is not in use.
PREPARATION
Anti-dust cap
2 Connect the OPTICAL OUT (DIGITAL AUDIO)
jack on the CinemaStation to the optical
digital input jack on your recorder using a
commercially available optical cable.
3 To listen to audio sources played on the
recorder with the CinemaStation, connect the
OPTICAL IN (DIGITAL AUDIO) jack on the
CinemaStation to the optical digital output
jack on your recorder using another optical
cable.
CD recorder or
MD recorder
OUT
OPTICAL
IN
Optical
cable
Optical
cable
MONITOR
OUT
(DVD ONLY)
MONITOR
OUT
VIDEO
IN
VIDEOS VIDEO
DIGITAL
AUDIO
VCR
IN
OUT
OUT
VCR
OPTICAL
IN
Connecting the Power Cables
After you made all connections, connect the power cables of the CinemaStation and subwoofer.
SPEAKERS
LR
CENTER FRONT
FRONT
To an AC wall outlet
SURROUND
SPEAKER IMPEDANCE: 6 MIN.
SURROUND
17
Page 23
INSTALLING BATTERIES IN THE REMOTE CONTROL
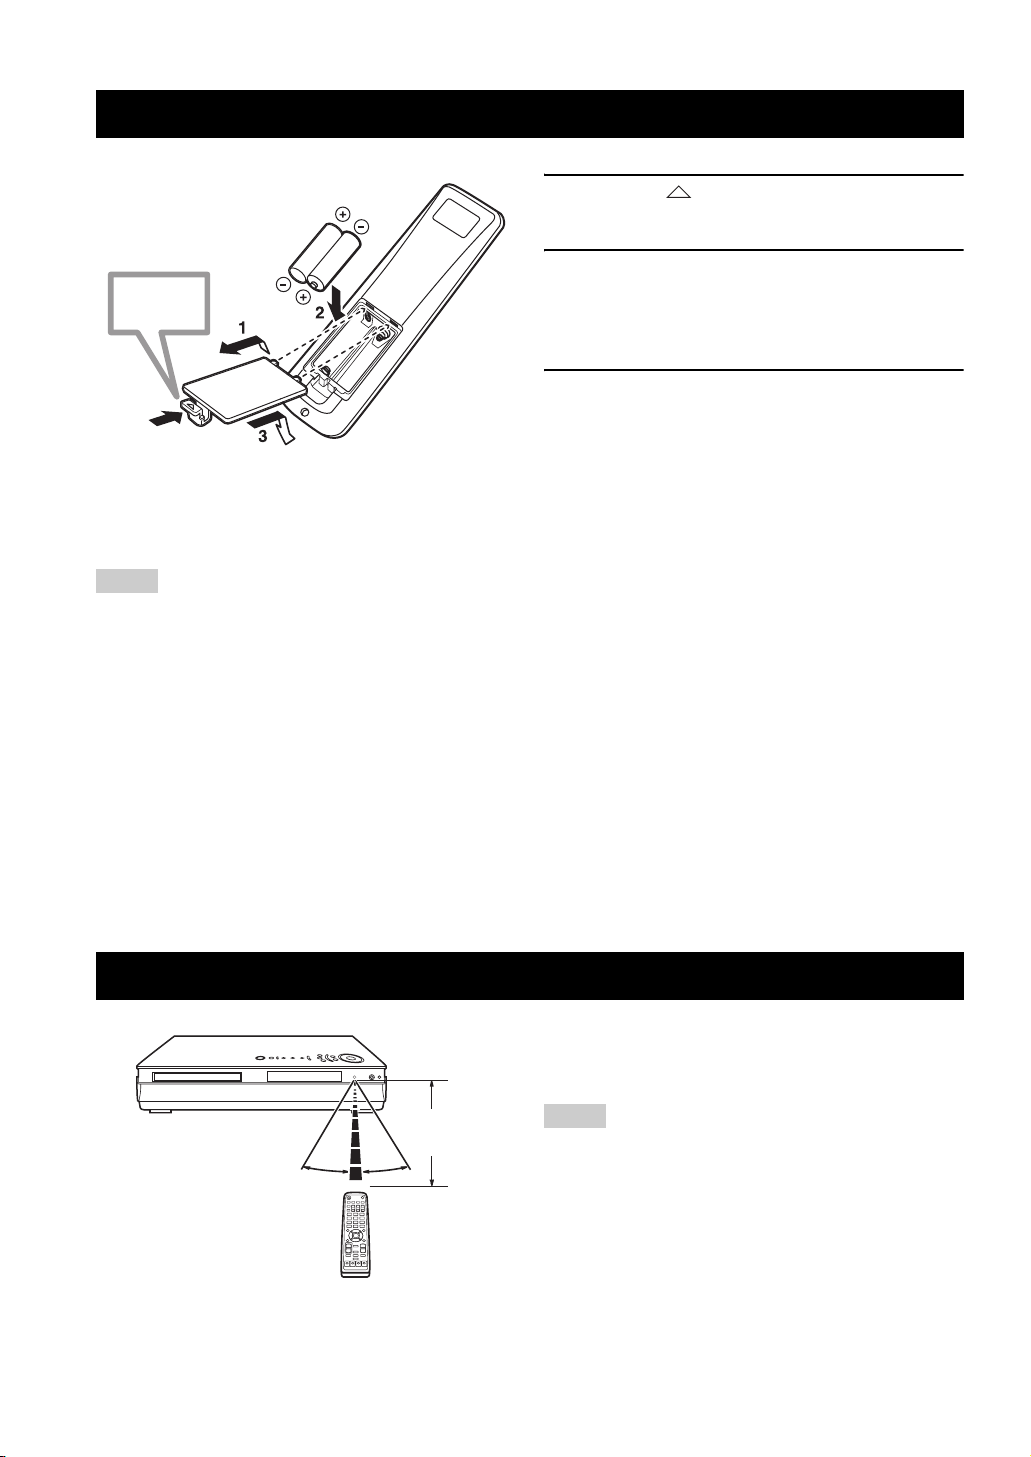
Installing Batteries in the Remote Control
Press %
■ To replace the batteries
If the batteries grow old, the effective operation distance of the
remote control decreases considerably. If this happens, replace
the batteries with two new ones as soon as possible.
Notes
• Do not use an old battery together with new one.
• Do not use different types of batteries (for example, alkaline
and manganese) together. Each type of battery has its own
characteristics even if they are similar in shape.
• If the batteries run out, immediately remove them from the
remote control to prevent an explosion or acid leak.
• Dispose of the batteries according to the regional regulations.
• If a battery starts leaking, dispose of it immediately. Be careful
not to let leaking battery acid come into contact with your skin
or clothing. Before inserting new batteries, wipe the
compartment clean.
• Replace the batteries within two minutes to preserve the
memory in the remote control.
1 Press the mark on the battery cover and
slide off the cover.
2 Insert the two supplied batteries (AA, R06,
UM-3) into the battery compartment.
Make sure you insert the batteries according to the
polarity markings (+ and –).
3 Close the battery cover.
18
Using the Remote Control
Use the remote control within 6 m (20 feet) of the
CinemaStation and point it toward the remote control
sensor (page 4).
Within 6 m
(20 feet)
30˚ 30˚
Notes
• Be careful not to spill liquid on the remote control.
• Be careful not to drop the remote control.
• Do not leave the remote control in the following places:
– hot or humid places, such as near a heater or in a bathroom
– extremely cold places
– dusty places
Page 24
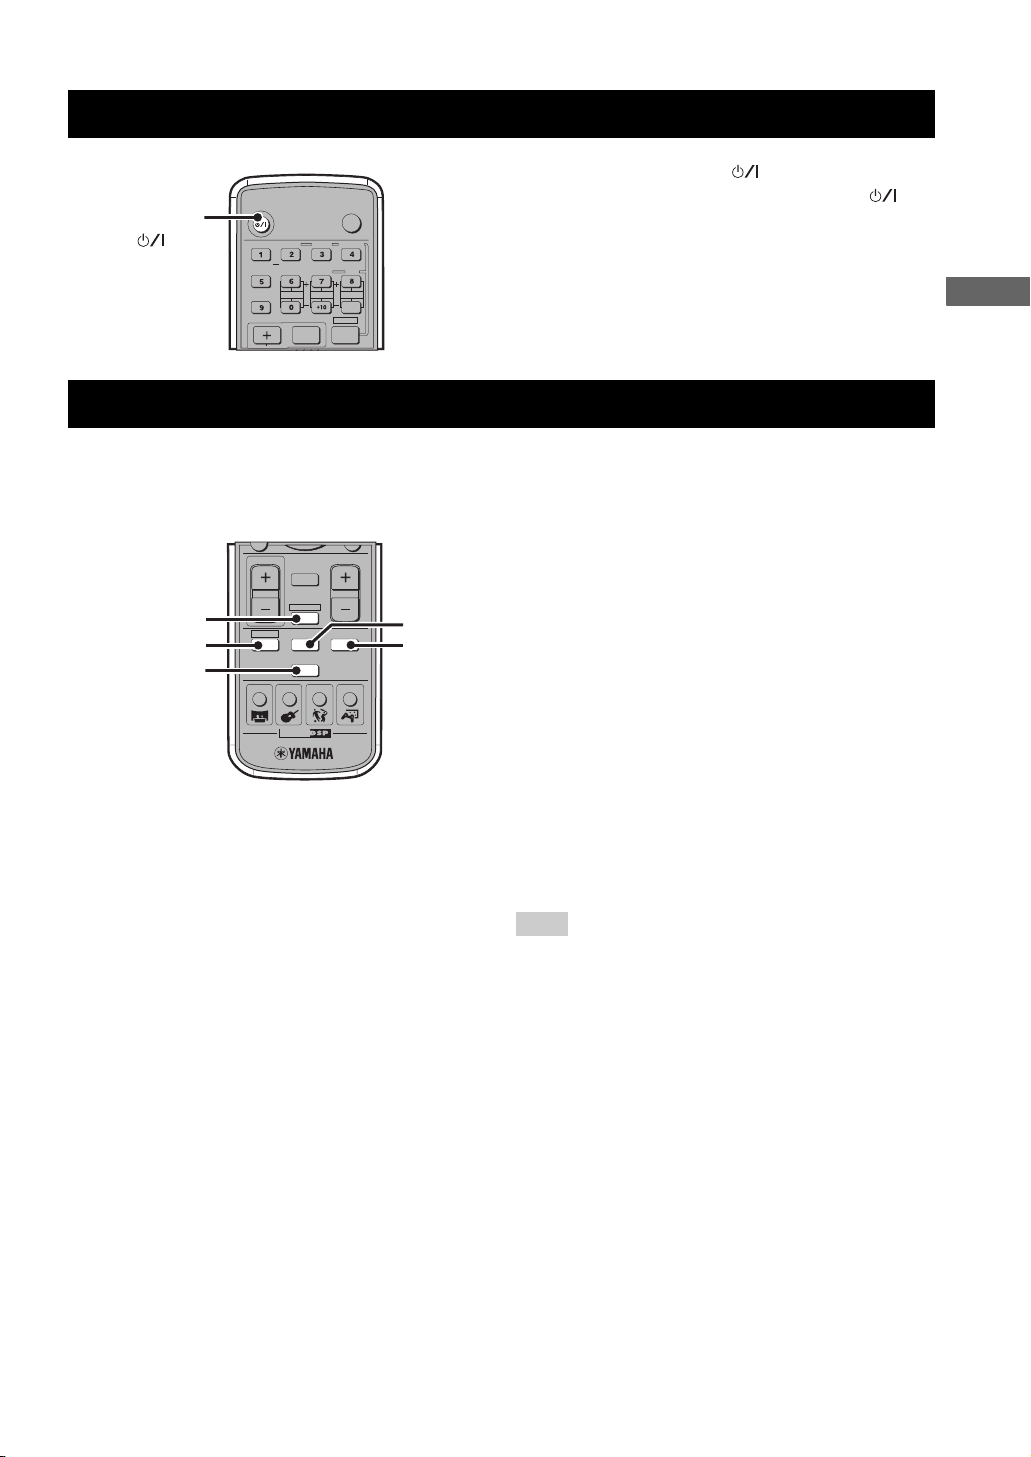
Turning the Power to On/Standby
Turning the Power to On/Standby
Press STANDBY/ON ( ) once to turn on the
CinemaStation. Press STANDBY/ON ( )
once more to place the CinemaStation in
standby mode.
STANDBY/ON
()
STANDBY/ON
SURROUND
NIGHT
SET MENU
TV CH
AUDIO
SELECT
SW
TV INPUT
ANGLE
REPEAT
CENTER
POWER
TV
SUBTITLE
STEREOMATRIX 6.1
A-B
SURR
SHIFT
Selecting an Input Source
You can enjoy various AV sources with the CinemaStation. After connecting the TV, speakers, antennas, or other AV
equipment, follow the procedure below to select an input source you want to play on the CinemaStation. For information
on connection methods, refer to pages 9 to 17.
Perform one of the following operations
To switch to the CinemaStation amp mode
functions (page 7):
Press AMP.
To switch to DVD/CD input:
Press DVD/CD.
To switch to tuner input (AM/FM radio):
Press TUNER.
To switch to VCR source input (your VCR
connected to the CinemaStation):
Press VCR.
AMP
DVD/CD
TUNER
CINEMA
MUTE
TUNER
TEST
VOLUME
AMP
VIDEO
VCR
ON/OFF
TV VOL
DVD/CD
MOVIE MUSIC SPORTS GAME
VCR
VIDEO
BASIC OPERATION
To switch to video source input (your game
console connected to the CinemaStation):
Press VIDEO.
Note
The CinemaStation itself does not provide video playback or
game features. To play videotapes or games, you need to connect
a VCR or game console to the CinemaStation. For details, refer to
“Connecting External AV Components” (page 14).
19
Page 25
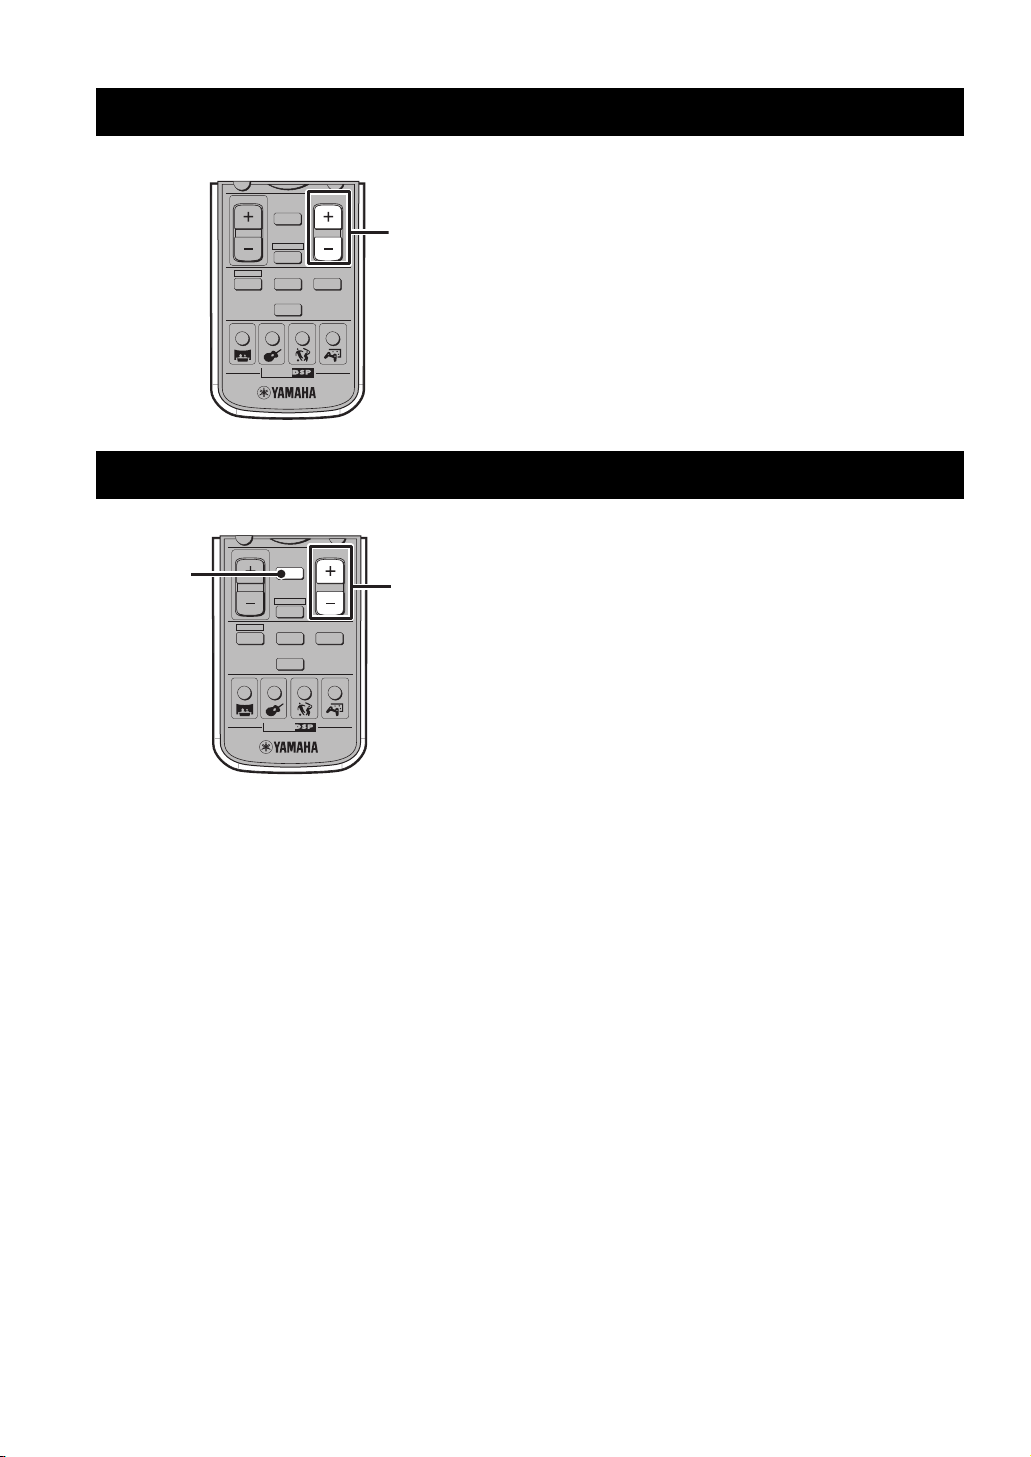
Adjusting the Volume Level
Adjusting the Volume Level
MUTE
ON/OFF
CINEMA
CINEMA
MUTE
TUNER
TUNER
AMP
VCR
MUTE
TEST
VOLUME
VIDEO
TEST
VOLUME
AMP
VIDEO
VCR
ON/OFF
TV VOL
DVD/CD
MOVIE MUSIC SPORTS GAME
TV VOL
DVD/CD
MOVIE MUSIC SPORTS GAME
Press VOLUME + to increase the volume level
and VOLUME – to decrease.
VOLUME +/–
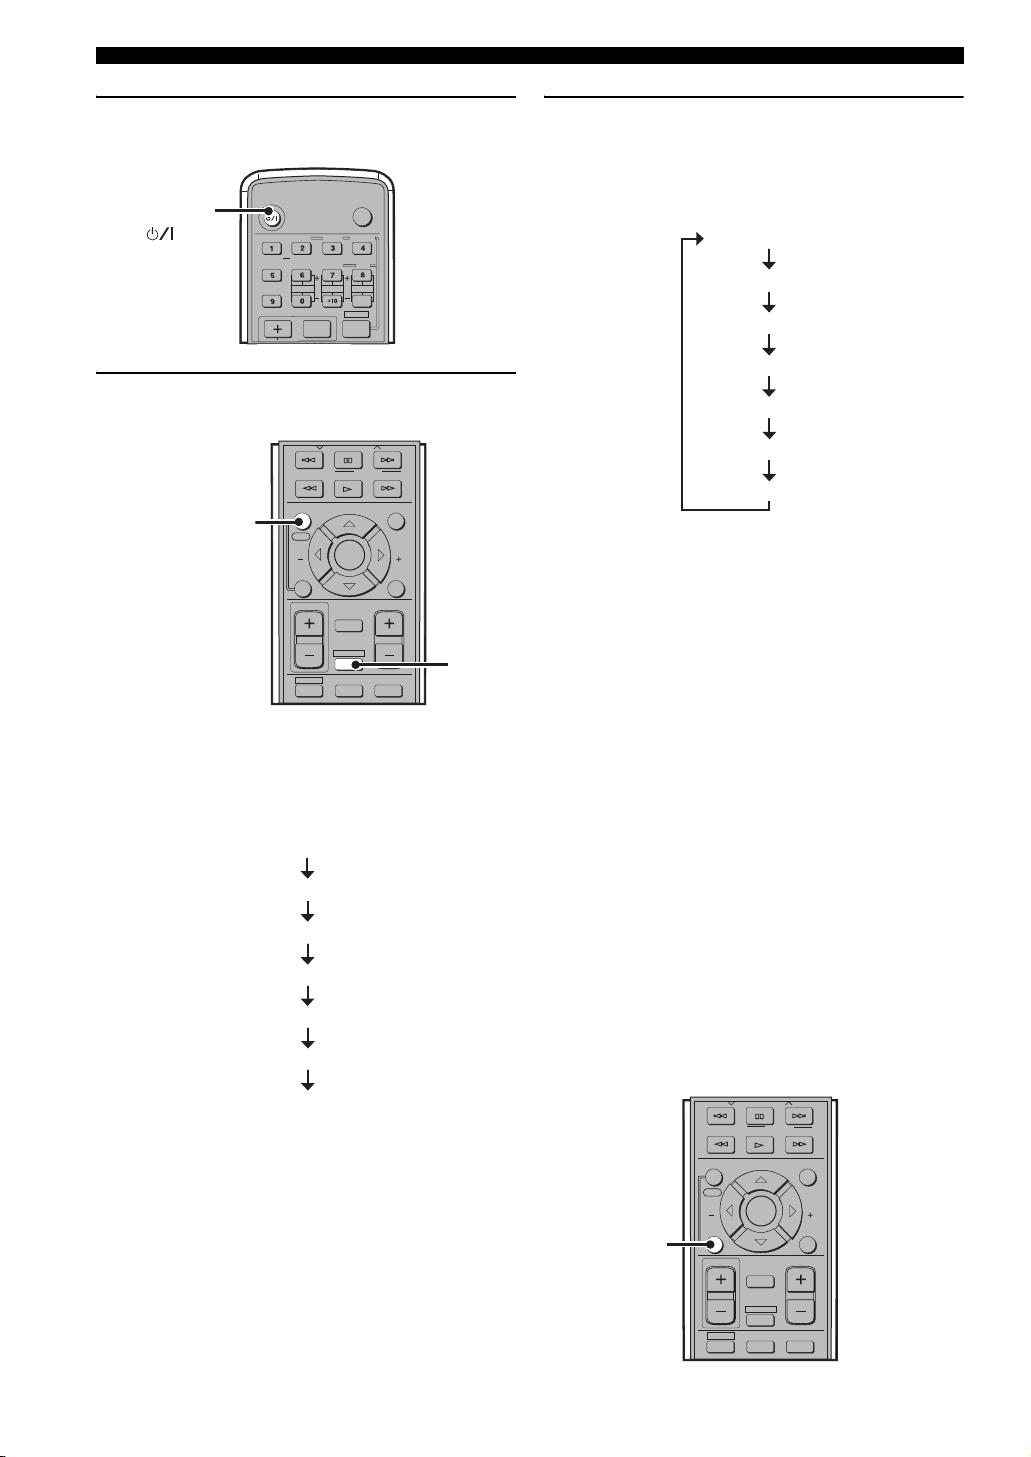
Muting the Sound (Mute)
Press MUTE to mute the sound.
To restore audio output to the previous volume level, press
VOLUME +/–
MUTE again or press VOLUME +/–.
20
Page 26

Auto Speaker Setup (YPAO)
Auto Speaker Setup (YPAO)
With the YAMAHA Parametric Room Acoustic Optimizer (YPAO) feature, you can avoid troublesome speaker setup and
achieve highly accurate sound adjustments. The supplied optimizer microphone collects and analyzes the sound that the
speakers produce in your actual listening environment. We recommend that you perform YPAO each time when you
change the speaker layout or listening position. To configure the speaker settings manually, refer to “Adjusting the
Speaker Balance During Playback” (page 64).
YPAO performs the following adjustments:
YPAO performs the following checks and makes
appropriate adjustments to give you the best possible
sound from your system.
• Wiring/Polarity
Checks which speakers are connected and the polarity
of each speaker. Also checks and adjusts the sound
level (volume) of each speaker so that the sound level
of each speaker is the same when heard from the
listening position.
• Distance/Phase
Checks the distance of each speaker from the listening
position and adjusts the delay of each channel so that
the sound from each speaker reaches the listening
position at the same time. Also checks the phase of
each speaker.
•Size
Checks the speakers frequency response and sets the
crossover/high cut frequency for the subwoofer to
improve the sound relationship between the speakers
and the subwoofer.
y
The CinemaStation stores speaker settings configured by YPAO
and manual setup individually. You can switch between them by
turning on/off the YPAO mode (page 23).
Notes
• Since loud test tones will be output during the setup procedure,
be sure to keep small children out of the room.
• For the best results, make sure the room is as quiet as possible
during the setup procedure. If there is too much noise, the
results may not be satisfactory.
• Disconnect the headphones from the SILENT CINEMA
jack on the CinemaStation before starting the setup procedure.
• Be sure to disconnect the optimizer microphone when you have
completed the setup procedure.
• The optimizer microphone is sensitive to heat. Do not place it
on top of the CinemaStation or in direct sunlight.
1 Make sure the CinemaStation and subwoofer
are turned off (in standby mode).
2 Connect the supplied optimizer microphone
to the YPAO MIC jack on the CinemaStation.
Optimizer microphone
3 Place the optimizer microphone on a flat
level surface with the omni-directional
microphone head upward, at your normal
listening position.
If possible, use a stand such as a tripod to affix the
optimizer microphone at the same height as your ears
would be when you are seated in your listening
position.
Optimizer microphone position
y
If your subwoofer has adjustable volume and crossover/high cut
frequency controls, set the volume low but not minimum
(as shown below) and set the crossover/high cut frequency to the
maximum.
VOLUME
CROSSOVER/
HIGH CUT
BASIC OPERATION
MIN
MAX
Subwoofer
MAX
MIN
21
Page 27
Auto Speaker Setup (YPAO)
4 Press STANDBY/ON to turn on the
CinemaStation.
STANDBY/ON
()
STANDBY/ON
SURROUND
NIGHT
SET MENU
TV CH
AUDIO
SELECT
SW
TV INPUT
ANGLE
REPEAT
CENTER
POWER
TV
SUBTITLE
STEREOMATRIX 6.1
A-B
SURR
SHIFT
5 Press AMP, then press YPAO to start the
setup procedure.
PRESET PRESET
PTY SEEK
MODE
ENTER
MUTE
START
CHCH
RETURN
TEST
VOLUME
AMP
VIDEO
VCR
AMP
FREQ/RDS
ON SCREEN MENU
YPAO
YPAO
STATUS
TV VOL
DVD/CD
START
ON/OFF
Test tones (the volume is adjustable) are output from
each speaker, and the display changes as follows.
Check that the speaker from which the test tone is
being output and the name of the speaker appearing
in the display are the same.
TEST LEFT
TEST CENTER
TEST RIGHT
TEST R SUR.
TEST L SUR.
TEST SWFR
OK?
6 Press YPAO once more to continue the setup
procedure.
“AUTO SETUP” appears in the display, and
measurement begins. Test tones are output from each
speaker in turn, and the display changes as follows.
TEST LEFT
TEST CENTER
TEST RIGHT
TEST R SUR.
TEST L SUR.
TEST SWFR
OK?
The progress status appears in the display as a
percentage (normally, it takes about two minutes).
If the setup procedure is successful, “YPAO ON” and
the speaker connection status appear alternately in the
display. For information on the speaker connection
status, refer to “Speaker wiring indications” below.
If a warning is detected, “WARNING” and the
speaker connection status appear alternately in the
display. For details, refer to “Error and warning
messages” (page 24).
■ Speaker wiring indications
2.0 F – – – : Front speakers only
2.1 F – – SW : Front speakers and the subwoofer
3.0 F C – – : Front speakers and the center speaker
3.1 F C – SW : Front speakers, center speaker and the
subwoofer
4.0 F – SR – : Front speakers and surround speakers
4.1 F – SR SW : Front speakers, surround speakers and
the subwoofer
5.0 F C SR – : Front speakers, center speaker and
surround speakers
5.1 F C SR SW : Front speakers, center speaker,
surround speakers and the subwoofer
■ To cancel YPAO mode during setup
Press ON/OFF during the setup procedure.
PRESET PRESET
PTY SEEK
MODE
ENTER
MUTE
TEST
VOLUME
START
CHCH
RETURN
ON/OFF
FREQ/RDS
ON SCREEN MENU
START
YPAO
STATUS
ON/OFF
TV VOL
22
DVD/CD
AMP
VIDEO
VCR
Page 28
■ To turn the YPAO mode on/off
You can switch between speaker settings configured by
YPAO and manual setup by turning on/off the YPAO
mode.
ON SCREEN MENU
START
ON/OFF
YPAO
STATUS
TV VOL
ON/OFF
ENTER
MUTE
AMP
TEST
VOLUME
CHCH
RETURN
AMP
1 Press AMP.
2 Press ON/OFF to display the currently
selected mode, then press ON/OFF again to
select “YPAO ON” or “YPAO OFF”.
• YPAO ON: The CinemaStation uses speaker
settings configured by YPAO. If an error occurs
during testing, this changes to “W YPAO ON”.
• YPAO OFF: The CinemaStation uses speaker
settings configured by manual setup.
y
• If a warning occurs during the YPAO measurement process,
“W YPAO ON” appears in the display. If this happens, use
or to switch the display.
• If you select “YPAO OFF”, settings are returned to their
previously set values.
Auto Speaker Setup (YPAO)
BASIC OPERATION
Notes
• In the YPAO mode, you can make fine adjustments for YPAO
speaker settings such as level and distance, etc.
• If you make fine adjustments to your YPAO speaker settings,
these are reflected whenever you select the YPAO mode.
23
Page 29
Auto Speaker Setup (YPAO)
■ Error and warning messages
If an error or warning message appears, check the cause and follow the remedy corresponding to the message, then carry
out the setup procedure once more (page 21).
Error messages before setup
Error message Cause Remedy
Connect MIC
Unplug HP
Error and warning messages during setup
Message Cause Remedy
NO FRONT L
NO FRONT R
NO SURR L
NO SURR R
NO SIGNAL
CANCEL
Optimizer microphone is not connected. • Connect the supplied optimizer microphone to the
Headphones are connected. • Unplug the headphones.
The front left channel signal is not detected. • Select the front speakers with SPEAKER A or B.
The front right channel signal is not detected. • Select the front speakers with SPEAKER A or B.
The left surround channel signal is not detected. • Check the left surround speaker connection.
The right surround channel signal is not detected. • Check the right surround speaker connection.
The optimizer microphone does not detect test tones. • Check the microphone setting.
• The setup procedure was cancelled due to user
activity.
• The setup procedure was cancelled because YPAO
ON/OFF was pressed.
YPAO MIC jack on the front panel.
• Check the front left speaker connection.
• Check the front right speaker connection.
• Check the speaker connections and placement.
• Perform the setup procedure again. Do not adjust
VOLUME (etc.) during the auto setup procedure.
Error messages after setup
If “WARNING” appears in the display after measurement is complete:
Press or .
The error message appears. If multiple errors are detected, press or to switch between them.
Message Cause Remedy
W PHASE L
W PHASE R
W PHASE C
W PHASE SR L
W PHASE SR R
The speaker polarity (+/–) for the front left channel is
incorrect. This message may appear even if the speaker
is connected correctly.
The speaker polarity (+/–) for the front right channel is
incorrect. This message may appear even if the speaker
is connected correctly.
The speaker polarity (+/–) for the center channel is
incorrect. This message may appear even if the speaker
is connected correctly.
The speaker polarity (+/–) for the surround left channel
is incorrect. This message may appear even if the
speaker is connected correctly.
The speaker polarity (+/–) for the surround right
channel is incorrect. This message may appear even if
the speaker is connected correctly.
• Check the speaker connection for the proper polarity
(+ or –).
• Check the speaker connection for the proper polarity
(+ or –).
• Check the speaker connection for the proper polarity
(+ or –).
• Check the speaker connection for the proper polarity
(+ or –).
• Check the speaker connection for the proper polarity
(+ or –).
24
Page 30

Auto Speaker Setup (YPAO)
Message Cause Remedy
W LEVEL L
W LEVEL R
W LEVEL C
W LEVEL SR L
W LEVEL SR R
W LEVEL SW
W DIST L
The volume level of the front left speaker is outside the
specified range. (No level correction is made.)
The volume level of the front right speaker is outside
the specified range. (No level correction is made.)
The volume level of the center speaker is outside the
specified range. (No level correction is made.)
The volume level of the surround left speaker is outside
the specified range. (No level correction is made.)
The volume level of the surround right speaker is
outside the specified range. (No level correction is
made.)
The volume level of the subwoofer is outside the
specified range. (No level correction is made.)
The front left speaker is placed too far away from the
listening position.
• Readjust the speaker installation so that all speakers are
set in locations with similar conditions.
• Check the speaker connections.
• Use speakers of similar quality and efficiency.
• Readjust the speaker installation so that all speakers are
set in locations with similar conditions.
• Check the speaker connections.
• Use speakers of similar quality and efficiency.
• Readjust the speaker installation so that all speakers are
set in locations with similar conditions.
• Check the speaker connections.
• Use speakers of similar quality and efficiency.
• Readjust the speaker installation so that all speakers are
set in locations with similar conditions.
• Check the speaker connections.
• Use speakers of similar quality and efficiency.
• Readjust the speaker installation so that all speakers are
set in locations with similar conditions.
• Check the speaker connections.
• Use speakers of similar quality and efficiency.
• Readjust the speaker installation so that all speakers are
set in locations with similar conditions.
• Check the speaker connections.
• Use speakers of similar quality and efficiency.
• Adjust the output volume of the subwoofer.
• Bring the speaker closer to the listening position.
BASIC OPERATION
W DIST R
W DIST C
W DIST SR L
W DIST SR R
W DIST SW
W NOISY
The front right speaker is placed too far away from the
listening position.
The center speaker is placed too far away from the
listening position.
The surround left speaker is placed too far away from
the listening position.
The surround right speaker is placed too far away from
the listening position.
The subwoofer is placed too far away from the
listening position.
Background noise is too loud. • Try the setup procedure in a quiet environment.
• Bring the speaker closer to the listening position.
• Bring the speaker closer to the listening position.
• Bring the speaker closer to the listening position.
• Bring the speaker closer to the listening position.
• Bring the subwoofer closer to the listening position.
• Turn off noisy electric equipment like air conditioners
etc., or move them away from the optimizer
microphone.
Notes
• If a phase warning appears, adjustments are made, but they may not be optimal. In this case, follow the remedy and carry out the setup
procedure again (page 21).
• If a level warning appears, no adjustments are made. In this case, follow the remedy and carry out the setup procedure again (page 21).
25
Page 31

Enjoying Sound Field Programs (DSP Programs)
Enjoying Sound Field Programs (DSP Programs)
Digital Sound Field Processor (DSP) programs feature a variety of sound fields that allow you to enjoy movies and
music. At the touch of a button, the DSP program automatically sets your speaker settings, such as reflected sound,
reverberant sound and the delay time for each channel to match your audio source.
y
• You can change the delay time for each DSP program as necessary. For information on the default delay time and how to change it,
refer to “DSP Program Delay Time Settings” (page 68).
• The CinemaStation has other sound field effects not listed below. Also, you can enjoy DSP programs with headphones or low volume.
For details, refer to “Enjoying DSP Programs in a Variety of Ways” (page 60).
• Feel free to choose a sound field program based on your listening preference, and not purely on the name of the program itself.
• To play back 2ch sources such as CDs faithful to the original sound, turn off the DSP program feature. For details, refer to “Enjoying
2ch sources with all speakers (Dolby Pro Logic II)” (page 58).
• Experiment with different sound field effects until you find the DSP program that you feel best matches your source. For details, refer
to “Enjoying Sound with Specific Speakers” (page 57).
Movie programs
Each time you press the MOVIE button, the
program changes as follows:
Action
MOVIE
Drama
Sci-Fi
Spectacle
Theater
Action
Enhances the stereoscopic effect for a thrilling sense of presence only found in an action
movie.
Drama
Expresses surround sounds softly so that voice and dialog are clear and crisp.
Sci-Fi (Science Fiction)
Fills the space with music and sound that have an eerie sense of reality. Suitable for serious
science fiction that has a good story line.
Spectacle
Expresses super-wide spaces. Suitable for a movie that has a powerful visual impact.
Theater
Preserves the power of Dolby or DTS Surround for experiencing the rich acoustical presence
of a movie theater.
Music programs
Each time you press the MUSIC button, the
program changes as follows:
Music Video
MUSIC
Classic Hall
Jazz Club
Rock Concert
5ch Stereo
Music Video
Magnifies the feeling of listening to live rock or jazz in a concert hall. The screen image and
sound field space stretch out to the fullest, engulfing you in an atmosphere of excitement.
Classic Hall (The Munich Philharmonic Hall)
Puts you in a front row seat at the Munich Philharmonic Hall, surrounded in calm, voluptuous
sound.
Jazz Club (The Bottom Line)
Reproduces the acoustics of sitting right in front of the stage at The Bottom Line, a popular
New York City jazz club. Experience the lively, realistic throb of a wide stage.
Rock Concert (The Roxy Theater)
Recreates the acoustic personality of a nightclub seating for an audience of about 460.
5ch Stereo
Fills the space with sound and allows all listeners to enjoy the same high-quality sound no
matter where they are sitting or standing in the room. A DSP program that is especially
suitable for home parties.
26
Page 32

Sports program
Press the SPORTS button. Live Sports
SPORTS
In a live stereo sports broadcast, announcer voices are central, engulfed in the cheers and
emotional whirl of the stadium.
Game program
Press the GAME button. Game
GAME
Gives TV games extra depth and surround. You can enjoy TV games with monaural or stereo
sound.
Enjoying Sound Field Programs (DSP Programs)
BASIC OPERATION
27
Page 33

Setting the Sleep Timer
Setting the Sleep Timer
If you set the Sleep Timer, the CinemaStation automatically turns to the Standby mode after the specified time.
Press SLEEP to select the time setting.
STANDBY/ON
SURROUND
NIGHT
SET MENU
TV CH
PRESET PRESET
FREQ/RDS
ON SCREEN MENU
START
YPAO
CH
STATUS
ON/OFF
TV VOL
DVD/CD
MOVIE MUSIC SPORTS GAME
AUDIO
SELECT
SW
TV INPUT
A B C D E
MODE
ENTER
MUTE
AMP
VCR
TUNER
ANGLE
REPEAT
CENTER
PTY SEEK
TEST
VOLUME
POWER
SUBTITLE
SHIFT
SLEEP
VIDEO
TV
STEREOMATRIX 6.1
SURR
START
RETURN
A-B
SLEEP
CH
Each time you press the SLEEP button, the time setting
changes as follows:
SLEEP 120 min
SLEEP 90 min
SLEEP 60 min
SLEEP 30 min
SLEEP OFF
The “SLEEP” indicator lights up in the CinemaStation display.
y
• The Sleep Timer only works for the CinemaStation. It does not
turn off other equipment connected to the CinemaStation.
• The Sleep Timer cancels if you turn the CinemaStation to the
Standby mode.
• The CinemaStation stores the mode or playback settings in its
memory when it automatically turns to the Standby mode. You
can use those settings when you turn on the CinemaStation next
time.
CINEMA
■ To cancel the Sleep Timer
Press SLEEP repeatedly to select “SLEEP OFF”.
28
Page 34

Changing DVD Settings on the TV (On-Screen Menu)
Changing DVD Settings on the TV (On-Screen Menu)
You can change the various settings for DVD playback using the menu displayed on the TV screen (On-Screen Menu)
connected to the CinemaStation. For details on the available menu items, refer to “On-Screen Menu guide” (page 30).
Operating the On-Screen Menu
In this procedure, we adjust the color saturation for
example. The actual screen may differ depending on the
selected menu.
ON SCREEN
DVD/CD
STANDBY/ON
SELECT
SURROUND
NIGHT
SET MENU
TV CH
PRESET PRESET
FREQ/RDS
ON SCREEN MENU
START
YPAO
CH
STATUS
ON/OFF
TV VOL
DVD/CD
MOVIE MUSIC SPORTS GAME
AUDIO
SW
A B C D E
CINEMA
TV INPUT
MODE
ENTER
TUNER
MUTE
AMP
VCR
ANGLE
REPEAT
CENTER
PTY SEEK
TEST
POWER
TV
SUBTITLE
STEREOMATRIX 6.1
A-B
SURR
SHIFT
SLEEP
START
RETURN
VOLUME
VIDEO
CH
ENTER
1 Press DVD/CD, then press ON SCREEN to
display the On-Screen Menu on your TV.
2 Press or to select a main menu item
(Preferences) , then press .
Preferences
Toolbar
Setup
Features
Picture
3 Press or to select a submenu item
(Picture) , then press .
Saturation
Features
Picture
Contrast
Color settings
Brightness
Sharpness
4 Press or to select a setting item
(Saturation).
Video shift
Saturation
Contrast
Color settings
0
BASIC OPERATION
5 Press or to adjust the setting for the
selected item.
You can also use or depending on the
selected item.
Video shift
Saturation
Contrast
Color settings
+2
6 Press ENTER.
7 To exit the On-Screen Menu, press ON
SCREEN.
29
Page 35

Changing DVD Settings on the TV (On-Screen Menu)
On-Screen Menu guide
Main Menu Submenu Setting Item Function
Preferences Features Status window
Picture Video shift
Saturation
Contrast
Color settings (Colour
settings)
Brightness
Sharpness
Toolbar Program Clear All
Tracks
Program
Play list (Playlist)
View Zoom
Angle
Chapter Preview
Rotate
Play Option Audio
Disc Navigation
Sub-title (Subtitle)
Search Frame by Frame
Fast
Time
Slow
Slide Show Picture Time
Sets the status information display to “On” or “Off”.
On: You can display or hide status information using the
STATUS button on the remote control. Status information
includes disc type and total time or elapsed time of the
current track/chapter.
Off: Status information does not appear.
Adjusts the screen position (+1 to +7).
Adjusts the picture color saturation (–7 to +7).
Adjusts the picture contrast (–7 to +7).
Adjusts the picture shade.
Select a setting from “Rich”, “Natural”, “Soft” and
“Animation”. If you select “Personal”, you can manually adjust
each image setting.
Adjusts the picture brightness (–7 to +7).
Adjusts the picture sharpness (–7 to +7).
Clears the Program Play contents. (page 36)
Selects chapters or tracks for Program Play. (page 35)
Sets Program Play to “On” or “Off” (page 36).
Shows the Program Play contents. (page 36)
Enlarges the picture. (page 42)
Switches the picture angle. (page 41)
When this item is set, you can preview the beginning of each
chapter in turn.
Rotates a JPEG image to –180°, –90°, 0°, 90°, or 180°.
The image is rotated counter-clockwise for negative values, and
clockwise for positive values.
Selects the audio language. (page 40)
Selects a title, chapter, or track to play.
Selects the subtitle language. You can only select languages the
disc contains. (page 40)
Advances/reverses one frame at a time. Frame Reverse is not
available with video CDs.
Sets the playback speed to –8, –4, +1, +4, or +8x (negative
number to reverse and positive number to advance).
Specifies an elapsed time for playback. (page 34)
Sets the playback speed to –1, –1/2, –1/4, –1/8, 0, +1/8, +1/4,
+1/2, or +1x (negative number to reverse, 0 to pause, and
positive number to advance).
Sets the duration for each image to Slow, Medium or Fast for
JPEG slide show playback.
30
Page 36

Changing DVD Settings on the TV (On-Screen Menu)
Main Menu Submenu Setting Item Function
Setup Access Disc lock
Change PIN
Enter PIN
Parental level
Country
TV
*
1
TV shape
TV system
Video Output
(For U.K. and Europe
models: When
connecting the TV to
Sets Disc lock to “On” or “Off”. (page 44)
Changes the password. (page 45)
Enters the password. (page 44)
Sets the Parental Control level (0 to +8). (page 43)
Selects the country in which you are using the CinemaStation.
Sets the screen aspect of your TV to “4:3 panscan”, “4:3
letterbox”, or “Wide-screen (Widescreen)”.
Sets the video signal system of your TV to “NTSC”, “PAL”, or
“AUTO”.
When using a TV compatible with both NTSC and PAL, set this
to “AUTO”. When using Progressive Scan (page 46), set this to
“NTSC” or “PAL” that matches to your TV.
Sets the output signal of the AV MONITOR OUT jack to
“YUV” or “RGB”. When connecting your TV to the MONITOR
OUT (S VIDEO) jack, set this to “YUV”.
the AV MONITOR OUT
jack, press s again to
display “YUV<->RGB”.
Otherwise, skip this
step.)
Language Default Sub-title
(Default Subtitle)
Menu Language
Default Audio
Audio Menu Digital output
Features PBC
Selects a default subtitle language.
When playing a disc, the CinemaStation automatically uses the
selected language for the subtitle. If you play a disc that is not
compatible with the selected language, another language will be
selected automatically.
Select the language for the On-Screen Menu.
Selects a default audio language.
When playing a disc, the CinemaStation automatically uses the
selected language for the audio. If you play a disc that is not
compatible with the selected language, another language will be
selected automatically.
Sets the output signal of the OPTICAL OUT jack to “All” or
“PCM Only”.
All: Outputs all types of digital signals that the CinemaStation
can reproduce.
PCM Only: Converts the signal to PCM before outputting it
(except for DTS sources). (When “PCM Only” is selected,
signals will not be output from the speakers, VCR OUT jack or
OPTICAL OUT jack during DTS playback.)
Sets video CD playback control to “On” or “Off”.
On: Playback control is activated, and you can display or hide a
disc menu using the MENU button on the remote control
(page 39).
Off: Disc menus do not appear on the TV screen.
BASIC OPERATION
*1Before configuring items in this menu, refer to the manual for your TV to make sure of the correct settings. Incorrect settings may
disable TV functions. If this happens and you cannot operate the On-Screen Menu due to the failure, carry out the procedure below.
■ To recover TV settings from a failure
1)
Press DVD/CD.
2)
Press s (for about 5 seconds) until “NTSC<->PAL” appears in the CinemaStation Display.
3)
For U.K. and Europe models: When connecting the TV to the AV MONITOR OUT jack, press s again to display
“YUV<->RGB”.
For all other models: Skip this step.
4)
Press e to switch the settings.
5)
If “NTSC/PAL SET” or “YUV/RGB SET” appears in the CinemaStation display, the recovery procedure is complete.
31
Page 37

Supported Disc Types
Supported Disc Types
You can enjoy movie or music discs with CinemaStation. Since some CinemaStation disc operations are limited to
specific disc types, the supported disc types are indicated using the icons shown below. Each icon means that the
operation is limited to the corresponding disc type. For information on supported disc standards and disc usage notes,
refer to “Disc Information” (page 86) and “Handling a disc” (page 87). Operations with no icon indicated are available
for all disc types.
DVD video Video CD Music CD
DVD-V
VCD
About MP3 and JPEG picture discs
Root
Album (Folder)
Track (File)
CD
You can play MP3 files recorded on a CD-R or CD-RW
with similar uses as a music CD. The CinemaStation
regards folders in the MP3 disc as albums, and files as
tracks (as shown on the left). Also you can play JPEG
picture files recorded on a CD-R or CD-RW. For details
about how to play JPEG picture discs, refer to “Enjoying
JPEG Images” (page 47).
What is MP3?
“MP3 (MPEG-1 Audio Layer-3)” is a standard technology
and format for compressing an audio sequence into a
small-sized file. However it preserves the original level of
sound quality when it is played.
Notes
• Depending on recording conditions such as recording software
settings, the CinemaStation may not be able to play the disc or
play tracks in the order they were recorded.
• The CinemaStation is compatible with a bit rate range of 32, 64,
96, 128, 192, or 256 kbps and variable bit encoded MP3 files.
• The CinemaStation is compatible with a sampling frequency of
32, 44.1, or 48 kHz.
What is JPEG?
“JPEG” is a compression format for still images. With
only a slight drop in image quality (part of the data is
removed), still image data can be compressed to
approximately 1/10 to 1/100 of its original size.
32
Notes
• The Program Play feature is not available for JPEG images.
• This unit does not support the progressive JPEG format.
Page 38

Basic Playback Operations
Basic Playback Operations
Follow the procedures below to carry out basic disc playback operations. The CinemaStation also provides various useful
functions for disc playback. For details, refer to “Useful Playback Operations” (page 34).
■ To advance frame-by-frame
b
w
STANDBY/ON
SURROUND
NIGHT
SET MENU
TV CH
PRESET PRESET
FREQ/RDS
ON SCREEN MENU
START
YPAO
AUDIO
SELECT
SW
A B C D E
TV INPUT
MODE
ENTER
ANGLE
REPEAT
CENTER
PTY SEEK
POWER
TV
SUBTITLE
STEREOMATRIX 6.1
A-B
SURR
SHIFT
SLEEP
START
Number
buttons
s
e
a
f
h
CHCH
■ To start playback
Press p.
■ To stop playback
Press s.
y
Whenever you stop playback, the CinemaStation automatically
memorizes the stopping position, and the message “To start
playback from the beginning, press s once more. To resume
playback from where it was stopped, press
h, playback resumes from where it left off.
press
h.” appears. If you
■ To pause playback
Press e.
To return to normal playback, press p.
DVD-V
Press e to pause playback, then press e repeatedly.
Each time you press e, playback advances one frame at a
time. To return to normal playback, press p.
■ To fast reverse or fast forward
To fast reverse, press w. To fast forward, press f.
Each time you press the button, the speed changes
(reverse: –4, –8, or –32x, forward: 4, 8, or 32x).
Notes
• –32 and 32x are not available for music CD playback.
• The speakers do not produce any sound if you fast forward/
reverse while playing a Dolby Digital or DTS disc.
■ To slow reverse and slow forward
DVD-V
Press e to pause playback, then press w to slow
reverse or press f to slow forward.
Each time you press w or f, the speed changes
(reverse: –1/8, –1/4, or –1/2x, forward: 1/8, 1/4, or 1/2x).
To return to normal playback, press .
Note
The slow reverse feature is not available for video CD playback.
■ To skip chapters (tracks)
To skip to the start of the current chapter (track), press
b.
To skip to the next chapter (track), press a.
To skip to the previous chapter (track), quickly press b
twice.
VCD
VCD
ENJOYING MOVIE AND MUSIC DISCS
Note
The Skip feature may not work properly when using Playback
Control (page 39) to play a video CD.
■ To specify a track for playback
VCD
Use the Number buttons to enter the track number you
want to play.
To enter 2-digit number, press a number button for the
second digit place, then press a number button for the first
digit place.
y
You can also use the On-Screen Menu (page 29) to advance
frame-by-frame, fast or slow reverse/forward. Reversing frameby-frame is available only with the On-Screen Menu.
CD
33
Page 39

Useful Playback Operations
Useful Playback Operations
You can enjoy movie or music discs with various useful features on the CinemaStation. For information on basic disc
playback operations, refer to “Basic Playback Operations” (page 33).
Specifying an elapsed time for playback (Time Search)
You can specify an elapsed time where you want playback
to start. The Time Search feature is only available with the
On-Screen Menu (page 29).
Notes
• This feature is not available during Program Play of a video CD.
• The Time Search feature is not available during Program Play
of a video CD.
ON SCREEN
ENTER
DVD/CD
STANDBY/ON
SURROUND
NIGHT
SET MENU
TV CH
PRESET PRESET
FREQ/RDS
ON SCREEN MENU
START
YPAO
CH
STATUS
ON/OFF
TV VOL
DVD/CD
MOVIE MUSIC SPORTS GAME
AUDIO
SELECT
SW
CINEMA
TV INPUT
A B C D E
MODE
ENTER
MUTE
AMP
VCR
TUNER
ANGLE
REPEAT
CENTER
PTY SEEK
SHIFT
SLEEP
TEST
VOLUME
VIDEO
POWER
TV
SUBTITLE
STEREOMATRIX 6.1
A-B
SURR
START
CH
RETURN
Number
buttons
2 Press or to select “Toolbar”, then
press .
Program
Preferences
Toolbar
Setup
View
Play Option
Search
3 Press or to select “Search”, then
press .
View
Play Option
Search
Frame by Frame
Fast
Time
Slow
4 Press or to select “Time”, then press
.
Frame by Frame
Fast
Time
Slow
0:00:28
5 Press or to select a parameter (hour,
minute, or second), then use the number
buttons to enter the time where you want to
start playback.
Frame by Frame
Fast
Slow
Cursor
0:02:09Time
1 Press DVD/CD, then press ON SCREEN to
display the On-Screen Menu on your TV.
34
6 Press ENTER to start playback from the
specified position.
7 To exit the On-Screen Menu, press ON
SCREEN.
Page 40

Useful Playback Operations
Customizing playback order (Program Play)
You can customize the playback order for chapters or
tracks stored in the disc. Also, you can display the
playback order, disable the Program Play feature, or clear
all Program Play contents after customizing the playback
order. The Program Play feature is available only with the
On-Screen Menu (page 29).
Notes
• In this procedure, we use the DVD disc for example. The actual
screen may differ depending on the disc type you use.
• The Playback Control feature (page 39) is not available during
Program Play of a video CD.
ON SCREEN
DVD/CD
STANDBY/ON
SURROUND
NIGHT
SET MENU
TV CH
PRESET PRESET
FREQ/RDS
ON SCREEN MENU
START
YPAO
CH
STATUS
ON/OFF
TV VOL
DVD/CD
MOVIE MUSIC SPORTS GAME
AUDIO
SELECT
SW
CINEMA
TV INPUT
A B C D E
MODE
ENTER
MUTE
AMP
VCR
TUNER
ANGLE
REPEAT
CENTER
PTY SEEK
SHIFT
SLEEP
TEST
VOLUME
VIDEO
POWER
TV
SUBTITLE
STEREOMATRIX 6.1
A-B
SURR
START
CH
RETURN
p
ENTER
3
Press
or
to select “Program”, then
press .
4
Press
Program
View
Play Option
Search
or
Audio
Disc Navigation
Sub-title
to select “Tracks”, then press
.
Clear all
Tracks
Program
Play list
T1 C1
5 When using a DVD or video CD, press or
to select the title and press , then
press or to select the chapter you
want to store as a Program Play content and
press ENTER.
When using a music CD, press or to
select the track you want to store as a
Program Play content, then press ENTER.
Program
Preferences
Toolbar
Setup
View
Play Option
Search
Repeat this step until you store all desired chapters
(tracks). To select chapters in another title, press .
6 Press to return to the screen in step 3,
then press ON SCREEN to exit the On-Screen
Menu.
The Playback mode indicator (“PROG”) lights up in
the CinemaStation display and Program Play starts
automatically. If playback does not start
automatically, press p.
ENJOYING MOVIE AND MUSIC DISCS
1 Press DVD/CD, then press ON SCREEN to
display the On-Screen Menu on your TV.
2
Press
.
or
to select “Toolbar”, then press
Program
Preferences
Toolbar
Setup
View
Play Option
Search
35
Page 41

Useful Playback Operations
STANDBY/ON
SURROUND
NIGHT
SET MENU
TV CH
PRESET PRESET
FREQ/RDS
ON SCREEN
ON SCREEN MENU
YPAO
CH
STATUS
TV VOL
DVD/CD
MOVIE MUSIC SPORTS GAME
START
ON/OFF
AUDIO
SELECT
SW
CINEMA
TV INPUT
A B C D E
MODE
ENTER
MUTE
AMP
VCR
TUNER
ANGLE
REPEAT
CENTER
PTY SEEK
SHIFT
SLEEP
TEST
VOLUME
VIDEO
POWER
TV
SUBTITLE
STEREOMATRIX 6.1
A-B
SURR
START
CH
RETURN
■ To check Program Play contents
You can check the chapters (tracks) you stored as Program
Play contents.
1 Carry out steps 1 to 3 in the “Customizing
playback order (Program Play)” procedure
(page 35).
2 Press or to select “Play list”
(“Playlist”), then press .
p
3 Press or to scroll the list of chapters
(tracks).
■ To enable/disable Program Play
The CinemaStation automatically enables Program Play if
you customize playback order. This playback order
remains even after playback of all chapters (tracks) stored
as the Program Play contents are finished. To return to
normal playback, follow the procedure below to disable
Program Play. Even if you disable it, the playback order
remains in the memory until you clear it, so you can use
the playback order again by enabling Program Play and
pressing p.
1 Carry out steps 1 to 3 in the “Customizing
playback order (Program Play)” procedure
(page 35).
2 Press or to select “Program”, then
press .
3 Press or to select “On” or “Off”.
Note
If you press and remove the disc you made Program Play
settings for, the settings are cancelled.
■ To clear Program Play contents
Follow the procedure below to clear all Program Play
contents.
1 Carry out steps 1 to 3 in the “Customizing
playback order (Program Play)” procedure
(page 35).
2 Press or to select “Clear All”, then
press p.
The message “Cleared” appears on the TV screen and
all Program Play contents are cleared.
36
Page 42

Useful Playback Operations
Repeating playback (Repeat Play)
You can repeat single chapter (track), single title, or entire
disc. Also, you can set two points (start and end points) to
repeat the specified section of a title (track) with A-B
Repeat (page 38).
Notes
• Repeat Play may not work depending on DVD disc types.
• Repeat Play does not work while playing back a video CD using
the Playback Control feature (page 39).
STANDBY/ON
SURROUND
NIGHT
SET MENU
TV CH
PRESET PRESET
FREQ/RDS
ON SCREEN MENU
START
YPAO
CH
STATUS
ON/OFF
TV VOL
DVD/CD
MOVIE MUSIC SPORTS GAME
AUDIO
SELECT
SW
A B C D E
CINEMA
TV INPUT
MODE
ENTER
MUTE
AMP
VCR
TUNER
ANGLE
REPEAT
CENTER
PTY SEEK
SHIFT
SLEEP
TEST
VOLUME
POWER
TV
SUBTITLE
STEREOMATRIX 6.1
A-B
SURR
START
RETURN
VIDEO
REPEAT
SHIFT
CH
1 Play back the disc, title, or chapter (track)
you want to repeat.
For details, refer to “Basic Playback Operations”
(page 33).
2 While holding down SHIFT, press REPEAT to
select the Repeat Play mode.
Every time you press the button, the display on the
TV screen changes as follows:
DVD Video
↓
Off (Normal playback)
↓
Repeat (Repeat Play for currently
playing chapter)
↓
Title (Repeat Play for currently
playing title)
↓
Disc (Repeat Play for currently
playing disc)
Video CD/Music CD
↓
Off (Normal playback)
↓
Repeat (Repeat Play for currently playing track)
↓
Disc (Repeat Play for currently
playing disc)
Repeat Play starts and the following playback mode
indicator lights up in the CinemaStation display.
REP: Repeats the title, chapter or track.
REP ALL: Repeats the disc.
ENJOYING MOVIE AND MUSIC DISCS
■ To cancel Repeat Play
While holding down SHIFT, press REPEAT to select
“Off”.
37
Page 43

Useful Playback Operations
■ To repeat between two points
(A-B Repeat)
You can repeat the specified section of a title (track) by
setting two points (start and end points).
Notes
• Repeat Play may not work depending on DVD disc types.
• You can use A-B Repeat only within one title (track).
STANDBY/ON
SURROUND
NIGHT
SET MENU
TV CH
PRESET PRESET
FREQ/RDS
ON SCREEN MENU
START
YPAO
CH
STATUS
ON/OFF
TV VOL
DVD/CD
MOVIE MUSIC SPORTS GAME
AUDIO
SELECT
SW
TV INPUT
A B C D E
MODE
ENTER
MUTE
AMP
VCR
TUNER
ANGLE
REPEAT
CENTER
PTY SEEK
TEST
VOLUME
POWER
TV
SUBTITLE
STEREOMATRIX 6.1
A-B
SURR
SHIFT
SLEEP
START
RETURN
VIDEO
A-B
SHIFT
CH
1 Play back the title or track that includes the
section you want to repeat.
For details, refer to “Basic Playback Operations”
(page 33).
2 At the position where you want to set as the
start point of the repeat section, hold down
SHIFT and press A-B.
“ Repeat A” appears on the TV screen and the
playback mode indicator (“REP A-” lights up in the
CinemaStation display).
3 At the position where you want to set as the
end point of the repeat section, hold down
SHIFT and press A-B again.
A-B Repeat starts.
“ A/B” appears on the TV screen and the
playback mode indicator (“REP A-B” lights up in the
CinemaStation display).
■ To cancel A-B Repeat
While holding down SHIFT, press A-B.
“ A/B Off” appears on the TV screen, and A-B Repeat
is cancelled.
CINEMA
38
Page 44

Operating disc menus (DVD menu/ Video CD Playback Control)
Many DVDs and video CDs include original navigational
menus called “DVD menus” and “video CD Playback
Control menus”. These menus provide a convenient way
to operate the disc. Follow the procedure below to use a
DVD menu or video CD Playback Control with the
CinemaStation.
Note
Menu contents or operation method of each disc may vary. For
information about the disc you are using, refer to the operating
instructions in the disc’s menu or on its jacket.
TEST
VOLUME
DVD-V
MENU
CH
RETURN
VIDEO
■ To operate the DVD menu
ON SCREEN MENU
START
YPAO
CH
ENTER
STATUS
ENTER
ON/OFF
TV VOL
MUTE
AMP
DVD/CD
VCR
TUNER
MOVIE MUSIC SPORTS GAME
CINEMA
Useful Playback Operations
■ To operate the video CD Playback
Control menu
If you play back a video CD that includes the Playback
Control feature, the menu automatically appears on the
TV screen. To operate the Playback Control feature with
the CinemaStation remote control, use the following
buttons.
b
Number buttons: Selects an item.
a: Moves to the next screen.
b or RETURN: Returns to the previous screen.
Note
The Playback Control feature does not work during Program Play
(page 35).
VCD
STANDBY/ON
SURROUND
NIGHT
SET MENU
TV CH
PRESET PRESET
FREQ/RDS
ON SCREEN MENU
START
YPAO
STATUS
ON/OFF
AUDIO
SELECT
SW
TV INPUT
A B C D E
MODE
ENTER
ANGLE
REPEAT
CENTER
PTY SEEK
POWER
SUBTITLE
SHIFT
SLEEP
TEST
STEREOMATRIX 6.1
SURR
START
TV
A-B
CHCH
RETURN
Number
buttons
a
RETURN
ENJOYING MOVIE AND MUSIC DISCS
1 Press MENU.
The DVD menu appears on the TV screen.
y
Depending on the disc, the DVD menu may automatically appear
after the disc is loaded.
2 Press / / / to select a menu item,
then press ENTER.
39
Page 45

Selecting Audio and Subtitle Languages
Selecting Audio and Subtitle Languages
DVD-V
You can select audio and subtitle languages for DVD playback. Also, you can set default languages for DVD playback
with the On-Screen Menu. For details on setting default languages, refer to “On-Screen Menu guide” (page 30).
Note
This selection is available only with multi-language compatible discs. Also, languages available for each disc may vary. For information
about the disc you are using, refer to the operating instructions in the disc’s menu or on its jacket.
1 While playing a disc or pausing, hold down
SHIFT and press AUDIO or SUBTITLE.
ON SCREEN
STANDBY/ON
SURROUND
NIGHT
SET MENU
TV CH
PRESET PRESET
FREQ/RDS
ON SCREEN MENU
START
YPAO
STATUS
ON/OFF
AUDIO
SELECT
SW
TV INPUT
A B C D E
MODE
ENTER
ANGLE
REPEAT
CENTER
PTY SEEK
POWER
SUBTITLE
SHIFT
SLEEP
TEST
TV
STEREOMATRIX 6.1
A-B
SURR
START
RETURN
SUBTITLEAUDIO
Number
buttons
SHIFT
CHCH
The audio language selection screen or subtitle
language selection screen appears on the TV screen.
Audio language selection screen
Audio
Subtitle language selection screen
Sub-title
1 ja
2 ja
3 en
1 ja
2 ja
3 en
2 Press or or the number buttons to
select the language you want to use for audio
or subtitle.
y
You can also select a language by pressing AUDIO or SUBTITLE
while holding down SHIFT.
3 To exit the language selection screen, press
ON SCREEN.
■ To turn off the subtitle
Select “None” in step 2 above.
40
Page 46

Selecting a Viewing Angle
Selecting a Viewing Angle
DVD-V
You can select a viewing angle for DVD playback.
Note
This selection is available only with multi-angle compatible discs. Also, viewing angles available for each disc may vary. For
information on your disc, refer to the operating instructions in the DVD menu or on its jacket.
1 While playing a disc or pausing, hold down
ANGLE
ON SCREEN
STANDBY/ON
SURROUND
SELECT
NIGHT
SET MENU
TV CH
PRESET PRESET
FREQ/RDS
ON SCREEN MENU
START
YPAO
STATUS
ON/OFF
AUDIO
SW
A B C D E
MODE
TV INPUT
ENTER
ANGLE
REPEAT
CENTER
PTY SEEK
TEST
POWER
TV
SUBTITLE
STEREOMATRIX 6.1
A-B
SURR
SHIFT
SLEEP
START
RETURN
SHIFT and press ANGLE.
The viewing angle selection screen appears on the TV
Number
buttons
SHIFT
screen.
Viewing angle selection screen
2
Angle
3
4
5
2 Press or or the number buttons to
CHCH
select the viewing angle.
y
You can also select a viewing angle by pressing ANGLE while
holding down SHIFT.
ENJOYING MOVIE AND MUSIC DISCS
3 To exit the viewing angle selection screen,
press ON SCREEN.
41
Page 47

Zooming Images
Zooming Images
DVD-V
You can zoom in a specified part of picture during DVD playback. The Zoom feature is available only with the
On-Screen menu (page 29).
4
ON SCREEN
DVD/CD
STANDBY/ON
AUDIO
ANGLE
SELECT
SURROUND
REPEAT
NIGHT
SW
CENTER
SET MENU
TV INPUT
TV CH
A B C D E
START
ON/OFF
CINEMA
SLEEP
PTY SEEK
MODE
ENTER
TEST
VOLUME
MUTE
AMP
VCR
TUNER
PRESET PRESET
FREQ/RDS
ON SCREEN MENU
YPAO
CH
STATUS
TV VOL
DVD/CD
MOVIE MUSIC SPORTS GAME
POWER
SUBTITLE
STEREOMATRIX 6.1
SURR
SHIFT
START
VIDEO
TV
A-B
RETURN
Press
.
5 Press / / / to specify the center
CH
of a zooming part (+ mark position), then
press ENTER.
Each time you press ENTER, the zooming scale
changes as follows:
or
Zoom
Angle
Chapter Preview
to select “
Zoom in
Zoom
”, then press
↓
Zoom 2 (2x)
1 Press DVD/CD, then press ON SCREEN to
display the On-Screen Menu on your TV.
↓
Zoom 4 (4x)
↓
Zoom 8 (8x)
2 Press or to select “Toolbar”, then
press .
↓
Zoom 1 (original scale)
3
42
Press
.
Preferences
Toolbar
Setup
or
Program
View
Play Option
Search
Program
View
Play Option
Search
to select “
Zoom
Angle
Chapter Preview
View
”, then press
6 To exit the On-Screen Menu, press ON
SCREEN.
■ To return to the original scale
Select “Zoom 1” in step 5 above.
Page 48

Restricting Playback (Parental Control)
Restricting Playback (Parental Control)
DVD-V
You can set playback restrictions for certain discs using Parental Control. Only users who know the password can access
the locked discs.
Setting the Parental Control level
You can restrict playback according to a predetermined
level (Parental Control level). For information on the
Parental Control level of each disc, refer to the instruction
on its jacket.
ON SCREEN
DVD/CD
STANDBY/ON
SURROUND
NIGHT
SET MENU
TV CH
PRESET PRESET
FREQ/RDS
ON SCREEN MENU
START
YPAO
CH
STATUS
ON/OFF
TV VOL
DVD/CD
MOVIE MUSIC SPORTS GAME
AUDIO
SELECT
SW
TV INPUT
A B C D E
MODE
ENTER
MUTE
AMP
VCR
TUNER
ANGLE
REPEAT
CENTER
PTY SEEK
TEST
VOLUME
POWER
TV
SUBTITLE
STEREOMATRIX 6.1
A-B
SURR
SHIFT
SLEEP
START
RETURN
VIDEO
Number
buttons
s
CH
4 Press or to select “Enter PIN”, then
press .
Disc lock
Parental level
Enter PIN
Change PIN
Country
* * * *
5 Press the number buttons to enter the
password (4 digits).
Disc lock
Parental level
Enter PIN
Change PIN
Country
* * * *
Notes
• The default password is “0000”. To change the password, carry
out the “Changing the password” procedure (page 45).
• If you forget your password, press s four times instead of
entering the password. The restricted icon appears. If you press
s another four times, “Enter the new PIN” appears.
6 Press or to select “Parental level”,
then press .
ENJOYING MOVIE AND MUSIC DISCS
CINEMA
1 Press DVD/CD, then press ON SCREEN to
display the On-Screen Menu on your TV.
2 Press or to select “Setup”, then
press .
Access
TV
Language
Audio Menu
Features
to select “Access”, then
Disc lock
Parental level
Enter PIN
Change PIN
Country
3
Press
press .
Preferences
Toolbar
Setup
or
Access
TV
Language
Disc lock
Parental level
Enter PIN
Change PIN
0
7 Press or to adjust the Parental Control
level, then press ENTER.
Disc lock
Parental level
Enter PIN
Change PIN
0: Parental Control is off. (Users can play all discs without
entering the password.)
1 to 7: Users cannot play a disc that is rated above the level
without entering the password. (The smaller the number, the
stricter the Parental Control level.)
8: Users can play all discs without entering the password.
8
To exit the On-Screen Menu, press ON SCREEN.
+3
43
Page 49

Restricting Playback (Parental Control)
Locking discs
You can use this function to lock all video discs to restrict
playback. Only those discs you select to unlock in
“Playing locked discs” are available for access.
STANDBY/ON
SURROUND
NIGHT
SET MENU
TV CH
PRESET PRESET
FREQ/RDS
ON SCREEN
ENTER
ON SCREEN MENU
YPAO
STATUS
TV VOL
1 Carry out steps 1 to 5 in the “Setting the
Parental Control level” procedure (page 43).
2 Press or to select “Disc lock”, then
press .
START
ON/OFF
AUDIO
SELECT
SW
TV INPUT
A B C D E
MODE
POWER
TV
SUBTITLE
ANGLE
STEREOMATRIX 6.1
Number buttons
A-B
REPEAT
CENTER
SURR
SHIFT
SLEEP
PTY SEEK
ENTER
TEST
VOLUME
MUTE
s
START
CHCH
RETURN
Playing locked discs
Follow the procedure below to access a locked disc by
entering the password.
1 Load a disc into the disc tray.
If the disc is locked, the password input screen
appears on the TV screen.
2 Press or to select “Play once” or
“Play always”, then press .
Play once: Requires that the password be entered
when playing the disc next time.
Play always: Does not require that the password be
entered when playing the disc next time.
3 Use the number buttons to enter the
password (4 digits).
Playback starts.
y
• Even if you select “Play always”, you can change the setting to
“Play once” by pressing s within 10 seconds after the icon
appears on the TV screen.
• The CinemaStation automatically memorizes disc information
for up to 120 discs. If you load the 121st disc, the
CinemaStation automatically deletes the disc information for
the first (oldest) one.
Disc lock
Parental level
Enter PIN
Off
3 Press or to select “On”, then press
ENTER.
Disc lock
Parental level
Enter PIN
On
Off
4 To exit the On-Screen Menu, press ON
SCREEN.
■ To disable a lock applied to a disc
Select “Off” in step 3.
Notes
• The default password is “0000”. To change the password, carry
out the “Changing the password” procedure.
• If you forget your password, press s four times instead of
entering the password. The restricted icon appears. If you press
s another four times, “Enter the new PIN” appears.
44
Page 50

Changing the password
Follow the procedure below to change the password to
access locked disc.
1 Carry out steps 1 to 5 in the “Setting the
Parental Control level” procedure (page 43).
2 Press or to select “Change PIN”,
then press .
Restricting Playback (Parental Control)
3 Use the number buttons to enter the current
password (4 digits).
Notes
• The default password is “0000”.
• If you forget your password, press s four times instead of
entering the password. The restricted icon appears. If you press
s another four times, “Enter the new PIN” appears.
4 Use the number buttons to enter the new
password (4 digits).
5 Use the number buttons to re-enter the new
password (4 digits) for confirmation.
6
To exit the On-Screen Menu, press ON SCREEN.
ENJOYING MOVIE AND MUSIC DISCS
45
Page 51

Enjoying High-Quality Video (NTSC/Progressive Scan)
Enjoying High-Quality Video (NTSC/Progressive Scan)
DVD-V
Progressive Scan is video that represent a frame with one pass of sequential scan lines whereas interlace output video,
which is usually adopted for most TVs, represents a frame with two passes. Progressive Scan provides better video
quality by reducing picture noises. To enjoy DVDs with Progressive Scan, you need to connect the CinemaStation to a
TV that has component video input jacks compatible with Progressive Scan. For details on connections, refer to “Other
connection methods” (page 12). Also, Progressive Scan is available only for NTSC signal output. You can set the video
signal system of your TV to “NTSC” with the On-Screen Menu (page 29).
PROGRESSIVE (MEMORY)
■ To turn on the Progressive Scan mode
While disc playback is stopped, press and hold
PROGRESSIVE (MEMORY) on the CinemaStation
for 2 seconds or longer.
The Progressive Scan mode is activated and the
“PROGRESSIVE” indicator lights up in the
CinemaStation display.
■ To turn off the Progressive Scan mode
While disc playback is stopped, press and hold
PROGRESSIVE (MEMORY) on the CinemaStation
for 2 seconds or longer.
y
• When the Progressive Scan mode is off, the CinemaStation
provides video with interlace output mode.
• During playback, you cannot switch between the Progressive
Scan mode and the interlace output mode.
Notes
• If you play video with a 4:3 aspect ratio on a 16:9 wide television screen, Progressive Scan may fill the screen top to bottom. In this
case, change the screen aspect setting of your TV with the On-Screen Menu (page 29). If you cannot adjust the ratio, press
PROGRESSIVE (MEMORY) to turn off the Progressive Scan mode (use the interlace output mode).
• When the Progressive Scan mode is activated, a video signal will only output from the COMPONENT VIDEO jacks. Since the
COMPONENT VIDEO jack and Progressive Scan are available only for DVD playback, you cannot enjoy sources other than DVDs
with the Progressive Scan mode.
• CONSUMERS SHOULD NOTE THAT NOT ALL HIGH DEFINITION TELEVISION SETS ARE FULLY COMPATIBLE WITH
THIS PRODUCT AND MAY CAUSE ARTIFACTS TO BE DISPLAYED IN THE PICTURE. IN CASE OF 525 PROGRESSIVE
SCAN PICTURE PROBLEMS, IT IS RECOMMENDED THAT YOU SWITCH THE CONNECTION TO THE “STANDARD
DEFINITION” OUTPUT. IF THERE ARE QUESTIONS REGARDING YOUR VIDEO MONITOR COMPATIBILITY WITH THIS
UNIT, PLEASE CONTACT OUR CUSTOMER SERVICE CENTER.
This unit is compatible with the complete line of YAMAHA projectors (including the DPX-1, DPX-1000, DPX-1100, LPX-500 and
LPX-510), and YAMAHA plasma displays (including the PDM-1, PDM-4210 and PDM-4210E).
For U.K. and Europe models only
• When “Video Output” is set to an item other than “YUV”, Progressive Scan is not available.
• When this unit is connected to a PAL monitor and you are playing back a PAL disc, if “TV system” is set to “AUTO” in the On-Screen
Menu (page 29), Progressive Scan is not available.
• When “TV system” is set to “NTSC” in the On-Screen Menu (page 29), Progressive Scan is available only with NTSC signals (PAL
signals are converted into NTSC signals).
46
Page 52

Enjoying JPEG Images
Enjoying JPEG Images
You can view JPEG pictures in a commercial JPEG CD or personally recorded on a CD-R or CD-RW disc on the TV
screen.
b
ENTER
STANDBY/ON
AUDIO
ANGLE
SURROUND
SELECT
REPEAT
NIGHT
SW
CENTER
SET MENU
TV CH
PRESET PRESET
FREQ/RDS
ON SCREEN MENU
START
YPAO
CH
STATUS
ON/OFF
TV VOL
DVD/CD
MOVIE MUSIC SPORTS GAME
A B C D E
CINEMA
TV INPUT
MODE
ENTER
MUTE
AMP
VCR
TUNER
PTY SEEK
TEST
VOLUME
SHIFT
SLEEP
POWER
TV
SUBTITLE
STEREOMATRIX 6.1
A-B
SURR
START
RETURN
VIDEO
1 Load a disc in the disc tray.
Playback starts automatically and thumbnails appear
on the TV screen.
To move through the list of thumbnails, press
b or a.
s
a
p
MENU
CH
2 Press / / / to select the
thumbnail, then press ENTER.
To return to the thumbnail screen, press MENU.
3 Press p to start the slide show.
To stop the slide show, press s.
To return to the thumbnail screen, press MENU.
y
You can configure the slide show setting or rotate pictures with
the On-Screen Menu. For details, refer to “On-Screen Menu
guide” (page 30).
ENJOYING MOVIE AND MUSIC DISCS
47
Page 53

Tuning Radio Stations
Tuning Radio Stations
The CinemaStation provides several methods for tuning AM/FM radio stations, such as Auto Tuning (FM only), Manual
Tuning (AM/FM) and Preset Tuning (AM/FM). Follow the procedure below to tune your favorite radio stations.
About the display
123
4
5
1 Preset group
Displays the preset group (page 51).
2 Preset number
Displays the preset number (page 51).
3 Mode indicator
Preset mode: Displays a colon.
Tuning mode: No colon is displayed.
4 Band
Displays the band (AM or FM).
5 Frequency
Displays the frequency.
Tuning radio stations automatically (Auto Tuning)
If the radio wave reception is strong in your area, Auto
Tuning is a quick and useful way to tune radio stations.
d PRESET/TUNING u PRESET/BAND
Display
1
Press PRESET/BAND on the CinemaStation to
select FM (Tuning mode) or AM (Tuning mode).
Each time you press the button, the mode changes as follows:
↓
“FM” (Tuning mode)
↓
“AM” (Tuning mode)
↓
“FM:” (Preset mode)
2
Press AUTO/MAN’L to select Auto Tuning mode.
Make sure “AUTO” lights up in the CinemaStation display.
PROG
REP
3 Press PRESET/TUNING u or d to select the
radio station you want to receive.
The CinemaStation automatically detects radio
stations that have strong signals for your selection.
A-B
ALL
AUTO/MAN’L
SLEEP
AUTO ST
Lights up
MEMORY
TUNED
Tuning radio stations manually (Manual Tuning)
If the radio wave reception is weak in your area, tune radio
stations manually.
1
Press PRESET/BAND on the CinemaStation to
select FM (Tuning mode) or AM (Tuning mode).
Each time you press the button, the mode changes as
follows:
↓
“FM” (Tuning mode)
“AM” (Tuning mode)
“FM:” (Preset mode)
2 Press AUTO/MAN’L to select Manual Tuning
mode.
Make sure “AUTO” disappears from the
CinemaStation display.
3 Press PRESET/TUNING u or d to adjust the
frequency.
y
If you use Manual Tuning for FM stations, the CinemaStation’s
radio wave reception mode automatically changes to the
monaural mode to increase the signal quality.
↓
↓
PROG SLEEP
REP
A-B
ALL
MEMORY
TUNED
Disappears
ST
48
Page 54

Selecting preset radio stations (Preset Tuning)
If you preset your favorite radio stations with Auto Preset
(page 51) or Manual Preset (page 52) on the
CinemaStation, you can tune the radio stations simply by
selecting the preset group and number.
PRESET d
STANDBY/ON
SURROUND
NIGHT
SET MENU
TV CH
PRESET PRESET
FREQ/RDS
AUDIO
SELECT
SW
A B C D E
MODE
TV INPUT
ANGLE
REPEAT
CENTER
PTY SEEK
POWER
SUBTITLE
STEREOMATRIX 6.1
SURR
SHIFT
SLEEP
START
TV
A-B
A/B/C/D/E
u PRESET
Tuning Radio Stations
■ To switch frequency and RDS modes
While receiving an FM RDS station (an RDS
indicator lights up), press FREQ/RDS.
AUTO ST
MEMORY
PS
TUNED
PTY
PTY
Each time you press the button, the mode changes as
follows:
PS
PTY
RT
CT
CT
HOLD
Lights up
RDS mode
ENJOYING RADIO
1 Press A/B/C/D/E to select the preset group of
the radio station you want to listen to.
Each time you press the button, the preset group
changes.
2 Press d PRESET/TUNING u to select the
preset number of the radio station you want
to listen to.
“TUNED” lights up in the CinemaStation display and
the radio plays.
y
You can also select preset radio stations by pressing A/B/C/D/E
and d PRESET/TUNING u on the CinemaStation.
Receiving FM RDS stations (U.K. and Europe models only)
RDS (Radio Data System) is a transmission system for
FM stations used mainly in the U.K. and Europe. RDS
transmissions include various types of information such as
PS (Program Service), PTY (Program Type), RT (Radio
Text), and CT (Clock Time). Follow the procedure below
to receive FM stations by the RDS transmissions on the
CinemaStation.
PRESET d
FREQ/RDS
STANDBY/ON
SURROUND
NIGHT
SET MENU
TV CH
PRESET PRESET
FREQ/RDS
ON SCREEN MENU
YPAO
STATUS
AUDIO
SELECT
SW
START
ON/OFF
ANGLE
REPEAT
CENTER
TV INPUT
A B C D E
PTY SEEK
MODE START
ENTER
TEST
POWER
SUBTITLE
STEREOMATRIX 6.1
SURR
SHIFT
SLEEP
TV
A-B
CHCH
RETURN
u PRESET
PTY SEEK
START
PTY SEEK MODE
RDS mode OFF
About information type
RDS includes the following types of information.
• PS (Program Service)
Displays the station name.
• PTY (Program Type)
Displays the program type (genre). For details, refer to
the “Program Type (genre)” list (page 50).
• RT (Radio Text)
Displays text information related to the RDS broadcast.
(Shows an under bar for a non-identifiable character.)
• CT (Clock Time)
Displays the current time. (Shows the message “CT
WAIT” when time data cannot be received properly.)
Notes
• The available RDS information types vary depending on the
station.
• If the FM RDS station’s signal transmission is too weak, the
CinemaStation may not be able to receive RDS information
completely. In particular, RT (Radio Text) information uses a lot
of bandwidth, so it may not be available even when other modes
are selectable.
• RDS information may not transmit under weak radio wave
conditions. In this case, press AUTO/MAN’L on the
CinemaStation to let the CinemaStation’s radio wave reception
mode automatically change to the monaural mode to increase
the signal quality.
• If radio wave interference occurs, the message “...WAIT”
appears in the CinemaStation display. In this case, the
CinemaStation cannot receive RDS information.
49
Page 55

Tuning Radio Stations
■ To select stations by program type
(genre)
You can tune FM RDS stations by selecting a program
type (genre). Once you select a program type, the
CinemaStation automatically searches for FM RDS
stations currently broadcasting the corresponding
programs.
1 Press PTY SEEK MODE.
The program type you selected last time appears in
the CinemaStation display.
2 Press PRESET u or d to select the program
type you want to listen to.
The available program types are as follows:
Program Type (genre)
NEWS News
AFFAIR Current Affairs
INFO General Information
SPORT Sports
EDUCATE Education
DRAMA Drama
CULTURE Culture
SCIENCE Science
VARIED Light Entertainment
POP M Pops
ROCK M Rock
M.O.R. M Middle-Of-the-Road Music (easy-listening)
LIGHT M Light Classics
CLASSICS Serious Classics
OTHER M Other Music
■ To cancel steps 1 or 2
Press PTY SEEK MODE twice.
3 Press PTY SEEK START to start searching
stations.
“PTY HOLD” lights up in the CinemaStation display
during a search.
PS
TUNED
CT
PTY
PTY
HOLD
Lights up
If the CinemaStation finds a FM RDS station that
matches the program type you selected, the radio
plays.
4 Repeat step 3 until the CinemaStation finds
your favorite FM RDS station.
50
Page 56

Presetting Radio Stations
You can preset your favorite radio stations automatically (FM stations only) or manually to tune the stations simply by
selecting the preset group and number. The CinemaStation can store up to 40 stations (5 groups x 8 stations) in its memory.
■ To specify a starting group and number
Presetting FM stations automatically (Auto Preset)
If the FM radio wave reception is strong in your area, Auto
Preset is a quick and useful way to preset FM radio stations. If
you want to preset AM stations or the FM radio wave reception
is weak in your area, preset stations manually (page 52).
PRESET/BANDA/B/C/D/E
MEMORY
Display
1 Press PRESET/BAND on the CinemaStation
to select FM (Preset mode).
Each time you press the button, the mode changes as
follows:
“FM” (Tuning mode)
“AM” (Tuning mode)
“FM:” (Preset mode)
2
Press AUTO/MAN’L to select Auto Preset mode.
Make sure “AUTO” lights up in the CinemaStation
display.
3
Press and hold MEMORY for about three seconds.
“MEMORY” and “AUTO” blinks in the CinemaStation
display, then Auto Preset starts at the frequency currently
selected toward higher frequency in a few seconds.
When Auto Preset finishes, “MEMORY” and
“AUTO” turns off and the CinemaStation
automatically applies a preset group and number to
each detected FM station.
↓
↓
↓
PROG
REP
AUTO/MAN’L
d PRESET/TUNING u
SLEEP
AUTO ST
MEMORY
TUNED
Lights up
A-B
ALL
You can specify a preset group and number that store the
first detected FM station. Also, you can start Auto Preset
at the frequency currently selected toward higher or lower
frequency.
1 Carry out steps 1 and 2 in the “Presetting FM
stations automatically (Auto Preset)”
procedure on this page.
2 Press and hold MEMORY for about three
seconds.
The MEMORY indicator blinks in the display.
3 While MEMORY is blinking, press A/B/C/D/E
to select the starting preset group, then
press PRESET/TUNING u or d to select the
preset start number.
4 Press PRESET/BAND to turn off the colon (:),
then press PRESET/TUNING u or d.
76.0
C1
When you press PRESET/TUNING d, Auto Preset
starts at the frequency currently displayed and tunes
toward the lower frequencies, and when you press
PRESET/TUNING u, Auto Preset tunes toward the
higher frequencies.
y
• When presetting a radio station, the CinemaStation
automatically sets the reception mode (stereo or monaural) at
the same time.
• Auto Preset automatically stops after searching the whole
frequency range or detecting 40 stations.
• If you select a preset number that has been already applied to
other station, it will be replaced with the new station.
• If the MEMORY indicator stops blinking before you perform
step 3 above, Auto Preset is cancelled and you must start the
procedure again.
FM
Disappears
ENJOYING RADIO
51
Page 57

Presetting Radio Stations
Presetting radio stations manually (Manual Preset)
If you want to preset AM stations or FM radio wave
reception is weak in your area, follow the procedure below
to preset radio stations manually.
MEMORY
Display
1 Tune the radio station you want to preset.
For details, refer to “Tuning Radio Stations”
(page 48).
2 Press MEMORY.
“MEMORY” blinks in the CinemaStation display for
about five seconds.
3 Press A/B/C/D/E to select the preset group
(A to E) to where you want to store the
currently selected station.
Make sure the colon (:) appears in the CinemaStation
display.
C1
Appears
4 Press d PRESET/TUNING u to select the
preset number (1 to 8) to where you want to
store the currently selected station.
5 Press MEMORY.
The CinemaStation applies the selected preset group
and number to the station.
y
• When presetting a radio station, the CinemaStation
automatically sets the reception mode (stereo or monaural) at
the same time.
• If you select a preset number that has been already applied to
other station, it will be replaced with the new station.
• If the MEMORY indicator stops blinking before you perform
step 3 above, Auto Preset is cancelled and you must start the
procedure again.
A/B/C/D/E
d PRESET/TUNING u
FM
630
Changing the order of preset radio stations
Follow the procedure below to change the order of preset
radio stations. In this procedure, we switch the radio
stations preset to E1 and A5 for example.
PRESET/BAND
d PRESET/TUNING u
1 Select the radio station preset to E1.
For details, refer to “Selecting preset radio stations
(Preset Tuning)” (page 49).
2 Press and hold PRESET/BAND for about
three seconds.
“E1” and “MEMORY” blink in the CinemaStation
display.
3 While MEMORY is blinking, press A/B/C/D/E
to select the preset group “A”, then press
d PRESET/TUNING u to select the preset
number “5”.
“A5” and “MEMORY” blink in the CinemaStation
display.
4 Press PRESET/BAND.
“EDIT E1-A5” appears in the CinemaStation display
and the order of the stations changes.
y
If the MEMORY indicator stops blinking before you perform step
3 above, Auto Preset is cancelled and you must start the
procedure again.
52
Page 58

Playing Back External Sources
TV
POWER
AUDIO
SELECT
NIGHT
SW
CENTER
SURR
SHIFT
STEREOMATRIX 6.1
A-B
REPEAT
ANGLE
SUBTITLE
CINEMA
AMP
DVD/CD
VCR
VIDEO
TUNER
MOVIE MUSIC SPORTS GAME
TV
POWER
AUDIO
SELECT
NIGHT
SW
CENTER
SURR
SHIFT
STEREOMATRIX 6.1
A-B
REPEAT
ANGLE
SUBTITLE
CINEMA
AMP
DVD/CD
VCR
VIDEO
TUNER
MOVIE MUSIC SPORTS GAME
If you connect an external AV component to CinemaStation, you can enjoy AV sources played back on that component
with CinemaStation. For details on connection methods, refer to “Connecting External AV Components” (pages 14 to
17). Also, you can operate the component using the CinemaStation remote control by setting a remote control code
(page 72).
Note
Make sure you read the owner’s manual for your external AV component before making any connections or operating it.
TV playback
If you connect the VIDEO IN L/R (AUDIO) jacks on the
CinemaStation to the audio output L/R jacks on your TV
using an audio pin cable (page 12), you can enjoy TV
sounds with the CinemaStation.
STANDBY/ON
STANDBY/ON
()
1 Turn on the TV, then press STANDBY/ON
( ) to turn on the CinemaStation.
SURROUND
MODE
PTY SEEK
VIDEO
START
VCR playback
If you connect the VCR IN L/R (AUDIO VIDEO) jacks
on the CinemaStation to the audio/video output L/R jacks
on your VCR using an audio/video cable (page 15), you
can enjoy VCR sounds with the CinemaStation.
Note
When you set the “Input Assign” to “VCR” (page 78) and “Input
Mode” to “AUTO” (page 79) in the Set Menu, the CinemaStation
outputs the source from the OPTICAL IN jack if any source is
input from it. To listen to the source input from the VCR IN jacks,
stop playback on the equipment connected to the OPTICAL IN
jack.
STANDBY/ON
()
STANDBY/ON
SURROUND
VCR
ENJOYING EXTERNAL AV SOURCES
2 Press VIDEO.
1 Turn on the TV and VCR, then switch the TV
input to which the CinemaStation is
connected.
2 Press STANDBY/ON ( ) to turn on the
CinemaStation.
3 Press VCR.
4 Start playback on the VCR.
53
Page 59

Playing Back External Sources
TV
POWER
AUDIO
SELECT
NIGHT
SW
CENTER
SURR
SHIFT
STEREOMATRIX 6.1
A-B
REPEAT
ANGLE
SUBTITLE
CINEMA
AMP
DVD/CD
VCR
VIDEO
TUNER
MOVIE MUSIC SPORTS GAME
Game console playback
If you connect the VIDEO IN L/R (AUDIO/VIDEO) jacks
on the CinemaStation to the audio/video output L/R jacks
on your game console using an audio/video cable
(page 16), you can enjoy game sounds with the
CinemaStation.
y
You can also connect the CinemaStation and a game console with
the digital connection (page 16).
Note
When you set the “Input Assign” to “VIDEO” (page 78) and
“Input Mode” to “AUTO” (page 79) in the Set Menu, the
CinemaStation outputs the source from the OPTICAL IN jack if
any source is input from it. To listen to the source input from the
VIDEO IN jacks, stop playback on the equipment connected to
the OPTICAL IN jack.
STANDBY/ON
STANDBY/ON
()
SURROUND
VIDEO
1 Turn on the TV and game console, then
switch the TV input to which the
CinemaStation is connected.
2 Press STANDBY/ON ( ) to turn on the
CinemaStation.
3 Press VIDEO.
4 Start playing a game.
54
Page 60

Recording AV Sources With External AV Components
TV
POWER
AUDIO
SELECT
NIGHT
SW
CENTER
SURR
SHIFT
STEREOMATRIX 6.1
A-B
REPEAT
ANGLE
SUBTITLE
CINEMA
AMP
DVD/CD
VCR
VIDEO
TUNER
MOVIE MUSIC SPORTS GAME
If you connect an external recorder to the CinemaStation, you can record AV sources played back on the CinemaStation
or external AV equipment. For details on the connection methods, refer to “Connecting External AV Components” (pages
14 to 17). Also, you can operate those equipment with the CinemaStation remote control by setting the remote control
codes (page 72).
Note
Make sure you read the manuals for your equipment to operate them.
Recording audio sources with CinemaStation
If you connect the OPTICAL OUT (DIGITAL AUDIO)
jack on the CinemaStation to the optical digital input jack
on an external recorder such as a CD recorder or MD
recorder using optical cables (page 17), you can record
audio sources from the CinemaStation.
Notes
• Radio stations are not output from the OPTICAL OUT jack. To
record AM/FM broadcasts, use a commercially available audio
cable to connect the VCR OUT jack on the CinemaStation to
the analog input jack on your recorder.
• Be sure to perform a test recording before an actual recording.
• Sound field effects on the CinemaStation cannot be recorded
with external recorders.
• Turning off the external recorder connected to the
CinemaStation may distort playback sounds or reduce the
volume. In this case, turn on external recorder.
• The volume level, audio quality, and sound field effect settings
have no effect on the recorded sound during recording.
However, in the DVD/CD mode, the output sound for recording
may cut off if any of the operations below are performed.
– Output a test tone.
– Change a DSP program.
– Connect/disconnect the headphones.
• Depending on the recorder, some DTS software audio signals
may not record properly.
• The CinemaStation outputs a signal from the DIGITAL IN jack
only to the DIGITAL OUT jack. The signal input from the
DIGITAL IN jack is not output from the analog output jacks,
and the signal input from the analog input jacks is not output
from the DIGITAL OUT jacks.
• Audio recordings that you make cannot be used for any purpose
other than private enjoyment without the consent of the
copyright holder.
STANDBY/ON
()
1 Turn on the recorder, then press STANDBY/
ON ( ) to turn on the CinemaStation.
2 Use the Input selection buttons to select the
input source, then start playback.
3 Start recording on the recorder.
■ About timer playback/recording
You can use a commercially available audio timer for
playback and recordings. Since available operations vary
depending on the product, read the manual for it.
y
• When the CinemaStation is in the standby mode, the timer
automatically recalls the CinemaStation’s memory contents
(e.g. input source, AM/FM frequency) for playback or
recording.
• If you want to perform timer recording without hearing sounds,
reduce the volume level before timer recording starts. The
volume level has no effect on the recorded sound.
STANDBY/ON
SURROUND
Input
selection
buttons
ENJOYING EXTERNAL AV SOURCES
55
Page 61

Recording AV Sources With External AV Components
TV
POWER
AUDIO
SELECT
NIGHT
SW
CENTER
SURR
SHIFT
STEREOMATRIX 6.1
A-B
REPEAT
ANGLE
SUBTITLE
CINEMA
AMP
DVD/CD
VCR
VIDEO
TUNER
MOVIE MUSIC SPORTS GAME
Copying video component sources to a video cassette
If you use analog connections to connect a VCR and video
component to the CinemaStation (pages 15 to 16), you can
copy video component sources to a video cassette on the
VCR.
Note
Copying video sources guarded by copy protection may result in
picture distortion of the recording due to copy protection signals.
STANDBY/ON
STANDBY/ON
()
SURROUND
VIDEO
1 Turn on the TV, video component and VCR,
then switch the TV input to the input
connected to the CinemaStation.
2 Press STANDBY/ON ( ) to turn on the
CinemaStation.
3 Press VIDEO.
4 Prepare to record with the VCR.
For example, insert a video cassette into the VCR and
switch the VCR input to external.
For details on VCR operations, refer to the manual
for your VCR.
5 Start playback on the video component and
start recording on the VCR.
For details on VCR operations, refer to the manual
for your VCR.
56
Page 62

Enjoying Sound with Specific Speakers
You can enjoy movies or music with various sound effects produced by the specified speakers.
Enjoying 6.1/5.1ch sources with all speakers including a virtual speaker (Matrix 6.1)
You can use Matrix 6.1 to produce virtual surround back
sound from your left and right surround speakers, creating
a realistic sense of surround back sound (sound that travels
from directly in front of the listening position to directly in
back of it). When you play a 6.1ch source such as a Dolby
Digital Surround EX or DTS-ES disc, you can enjoy
Dolby Digital plus Matrix 6.1 or DTS plus Matrix 6.1
sounds without adjusting any settings. Also, you can enjoy
5.1 channel sources with Matrix 6.1.
STANDBY/ON
SURROUND
NIGHT
SET MENU
TV CH
PRESET PRESET
FREQ/RDS
ON SCREEN MENU
START
YPAO
CH
STATUS
ON/OFF
TV VOL
DVD/CD
MOVIE MUSIC SPORTS GAME
AUDIO
SELECT
SW
CINEMA
TV INPUT
A B C D E
MODE
ENTER
MUTE
AMP
VCR
TUNER
ANGLE
REPEAT
CENTER
PTY SEEK
TEST
POWER
SUBTITLE
STEREOMATRIX 6.1
SURR
SHIFT
SLEEP
START
VOLUME
VIDEO
TV
A-B
CH
RETURN
MATRIX 6.1
AMP
1 Press AMP.
2 Press MATRIX 6.1 to select the mode.
Each time you press the button, the mode changes as
follows:
↓
AUTO
↓
Matrix 6.1
↓
OFF
• AUTO
When playing back a 6.1 channel source (Dolby
Digital Surround EX or DTS-ES), the sound is
automatically switched either to Dolby Digital plus
Matrix 6.1 or DTS plus Matrix 6.1 audio. If you
play a 5.1 channel source with this mode, a virtual
surround back speaker is not created.
• Matrix 6.1
Select this mode to play a 5.1 channel source with
Matrix 6.1. Sound outputs from a virtual surround
back speaker.
• OFF
The Matrix 6.1 decoder is not enabled. Even if you
play a Dolby Digital Surround EX or DTS-ES disc,
no sound outputs from the virtual surround back
speaker.
y
When the Matrix 6.1 decoder is working, “MATRIX” lights up in
the CinemaStation display and “6.1” appears beside the DSP
program name (e.g. “Action 6.1”).
Notes
• Some Dolby Digital Surround EX or DTS-ES discs do not
contain a signal (flag) that CinemaStation cannot recognize
automatically. To play this type of disc with 6.1ch sound, press
MATRIX 6.1 to select “Matrix 6.1”.
• Turning on the CinemaStation automatically sets the parameter
to “AUTO”.
• In the following cases, 6.1ch sound playback is not available.
– “SUR.” is set to “NON” in the Set Menu (page 77).
– Stereo playback is selected (no sound field effect) (page 63).
– Headphones are connected to the SILENT CINEMA jack
on the CinemaStation.
– A Dolby Digital KARAOKE source is being played.
– The DSP program is set to “5ch Stereo” (page 26).
– Dolby Digital or DTS is set to “SUR. STANDARD”
(page 62).
SOUND OPTIONS
57
Page 63

Enjoying Sound with Specific Speakers
Enjoying 2ch sources with all speakers (Dolby Pro Logic II)
Dolby Pro Logic II converts a 2ch source into virtual
multi-channel source for enjoying 2ch sounds with all
speakers.
SURROUND
STANDBY/ON
SURROUND
NIGHT
SET MENU
TV CH
PRESET PRESET
FREQ/RDS
ON SCREEN MENU
START
YPAO
CH
STATUS
ON/OFF
TV VOL
DVD/CD
MOVIE MUSIC SPORTS GAME
AUDIO
SELECT
SW
TV INPUT
A B C D E
MODE
ENTER
MUTE
AMP
VCR
TUNER
ANGLE
REPEAT
CENTER
PTY SEEK
SHIFT
SLEEP
TEST
VOLUME
POWER
TV
SUBTITLE
STEREOMATRIX 6.1
A-B
SURR
START
CH
RETURN
VIDEO
SELECT
AMP
1 Play the 2ch source (e.g. music) you want to
listen to.
2 Press AMP.
3 Press SURROUND.
4 Press SELECT to select “PL II”.
5 Press SURROUND to select “PL II” mode.
Each time you press the button, the mode changes as
follows:
↓
PL II Movie
↓
PL II Music
↓
PL II Game
• PL II Movie: Suited for movie audio sources.
• PL II Music: Suited for music audio sources.
• PL II Game: Suited for game audio sources.
y
• You can also switch the mode by pressing the DSP buttons on
the CinemaStation.
• You can make detailed settings for PL II Music. For details,
refer to “Configuring Dolby Pro Logic II Music Settings”
(page 67).
CINEMA
Note
When a monaural source is being played, Dolby Pro Logic II is
not available.
58
Page 64

Enjoying Sound with Specific Speakers
Enjoying DSP programs with the front speakers only (Virtual CINEMA DSP)
Since Virtual CINEMA DSP processes an audio input
source to reproduce virtual surround speakers, you can
enjoy DSP program only with the front speakers.
SET
MENU
STANDBY/ON
SURROUND
NIGHT
SET MENU
TV CH
PRESET PRESET
FREQ/RDS
ON SCREEN MENU
START
YPAO
CH
STATUS
ON/OFF
TV VOL
DVD/CD
MOVIE MUSIC SPORTS GAME
AUDIO
SELECT
SW
A B C D E
CINEMA
TV INPUT
MODE
ENTER
MUTE
TUNER
AMP
VCR
ANGLE
REPEAT
CENTER
PTY SEEK
SLEEP
TEST
VOLUME
POWER
TV
SUBTITLE
STEREOMATRIX 6.1
A-B
SURR
SHIFT
START
RETURN
VIDEO
CH
AMP
DSP program buttons
1 Play the source you want to listen to.
2 Press AMP.
3 Press the DSP program button to select the
DSP program you want to use.
For details, refer to “Enjoying Sound Field Programs
(DSP Programs)” (page 26).
4 Set “SUR” to “NON” in the Set Menu.
For details, refer to “Configuring Various Parameters
(Set Menu)” (page 75).
y
When Virtual CINEMA DSP is activated, “VIRTUAL” lights up
in the CinemaStation display.
Note
Virtual CINEMA DSP playback is not available in the following
cases.
– During stereo playback (no sound field effects are applied).
– When headphones are connected to the SILENT
CINEMA jack on the CinemaStation.
– When a Dolby Digital KARAOKE source is being played.
– When the DSP program is set to “5ch Stereo”, “PRO
LOGIC”, “SUR. STANDARD”, “PLII Movie”, “PLII Music”,
or “PL II Game”.
– While test tones are being output.
SOUND OPTIONS
59
Page 65

Enjoying DSP Programs in a Variety of Ways
Enjoying DSP Programs in a Variety of Ways
You can enjoy the presence of sound effects with DSP programs even when you use headphones or reduce the volume
level.
Listening with headphones (“SILENT CINEMA”)
“SILENT CINEMA” allows you to enjoy multi-speaker
simulation sounds with headphones.
* “SILENT CINEMA” is a registered trademark of YAMAHA
CORPORATION.
SILENT CINEMA jack
STANDBY/ON
SURROUND
SELECT
NIGHT
SET MENU
TV CH
PRESET PRESET
FREQ/RDS
ON SCREEN MENU
START
YPAO
CH
STATUS
ON/OFF
TV VOL
AUDIO
SW
TV INPUT
A B C D E
MODE
ENTER
MUTE
ANGLE
REPEAT
CENTER
PTY SEEK
SUBTITLE
SHIFT
SLEEP
TEST
VOLUME
POWER
TV
STEREOMATRIX 6.1
A-B
SURR
START
RETURN
CH
1 Connect the headphones to the SILENT
CINEMA jack on the CinemaStation.
2 Play the source you want to listen to.
3 Press AMP.
4 Press a DSP program button to select the
DSP program you want to use.
For details, refer to “Enjoying Sound Field Programs
(DSP Programs)” (page 26).
y
• When “SILENT CINEMA” is activated, the SILENT CINEMA
indicator lights up in the CinemaStation display.
• The CinemaStation mixes LFE channel audio and other channel
audio.
• If you do not select a DSP program, the headphone produces
normal stereo sound (see “Enjoying original Dolby and DTS
sounds” on page 62).
• When headphones are connected to the SILENT CINEMA
jack on the CinemaStation, sound does not output from any
speaker regardless of whether sound field effect is on or off.
60
AMP
DVD/CD
MOVIE MUSIC SPORTS GAME
CINEMA
TUNER
VIDEO
VCR
AMP
DSP program buttons
Page 66

Enjoying DSP Programs in a Variety of Ways
Listening at low volume (Night Listening)
Since Night Listening tones down large sound effect and
clears speech or vocal sounds, you can enjoy DSP
programs even at low volume.
NIGHT
STANDBY/ON
SURROUND
NIGHT
SET MENU
TV CH
PRESET PRESET
FREQ/RDS
ON SCREEN MENU
START
YPAO
CH
STATUS
ON/OFF
TV VOL
DVD/CD
MOVIE MUSIC SPORTS GAME
AUDIO
SELECT
SW
CINEMA
TV INPUT
A B C D E
MODE
ENTER
MUTE
AMP
VCR
TUNER
ANGLE
REPEAT
CENTER
PTY SEEK
TEST
VOLUME
POWER
TV
SUBTITLE
STEREOMATRIX 6.1
SURR
SHIFT
SLEEP
START
RETURN
VIDEO
A-B
CH
AMP
DSP program
buttons
1 Play the source you want to listen to.
2 Press AMP.
3 Press a DSP program button to select the
DSP program you want to use.
For details, refer to “Enjoying Sound Field Programs
(DSP Programs)” (page 26).
4 Press NIGHT.
y
When Night Listening is working, “Night L. ON” appears in the
CinemaStation display.
■ To return to normal playback
Press NIGHT again.
“Night L. OFF” appears in the CinemaStation display.
Note
When headphones are connected to the SILENT CINEMA
jack on the CinemaStation, Night Listening is not available.
SOUND OPTIONS
61
Page 67

Enjoying High-Quality Sound
Enjoying High-Quality Sound
You can play back Dolby, DTS, and 2ch sources true to the original sound.
Enjoying original Dolby and DTS sounds
You can play back original sounds processed with Dolby
Digital, Dolby Pro Logic or DTS.
SURROUND
STANDBY/ON
SURROUND
SELECT
NIGHT
SET MENU
TV CH
PRESET PRESET
FREQ/RDS
ON SCREEN MENU
START
YPAO
CH
STATUS
ON/OFF
TV VOL
DVD/CD
MOVIE MUSIC SPORTS GAME
AUDIO
SW
TV INPUT
A B C D E
MODE
ENTER
MUTE
AMP
VCR
TUNER
ANGLE
REPEAT
CENTER
PTY SEEK
SHIFT
SLEEP
TEST
VOLUME
POWER
TV
SUBTITLE
STEREOMATRIX 6.1
A-B
SURR
START
RETURN
VIDEO
SELECT
CH
AMP
1 Play the source you want to listen to.
2 Press AMP.
3 When playing a 2ch source, press
SURROUND, then press SELECT to select
“PRO LOGIC”. When playing a source other
than a 2ch source, press SURROUND.
The CinemaStation automatically selects one of the
following modes depending on the input source.
• Dolby Digital: “PRO LOGIC” appears and
q DIGITAL lights up in the CinemaStation
display.
• DTS: “SUR. STANDARD” appears and t
lights up in the CinemaStation display.
62
CINEMA
Page 68

Enjoying High-Quality Sound
Enjoying original 2ch sound (Stereo)
You can play back original stereo sounds such as music
CDs with the front speakers.
STANDBY/ON
SURROUND
NIGHT
SET MENU
TV CH
PRESET PRESET
FREQ/RDS
ON SCREEN MENU
START
YPAO
CH
STATUS
ON/OFF
TV VOL
DVD/CD
MOVIE MUSIC SPORTS GAME
AUDIO
SELECT
SW
CINEMA
TV INPUT
A B C D E
MODE
ENTER
MUTE
AMP
VCR
TUNER
ANGLE
REPEAT
CENTER
PTY SEEK
SHIFT
SLEEP
TEST
VOLUME
POWER
TV
SUBTITLE
STEREOMATRIX 6.1
A-B
SURR
START
CH
RETURN
VIDEO
STEREO
AMP
1 Play the 2ch source you want to listen to.
2 Press AMP.
3 Press STEREO.
The sound field effect turns off and Stereo playback
starts.
y
If Stereo is activated, “STEREO” appears in the CinemaStation
display.
■ To turn off Stereo playback (turn on the
sound field effect)
Press STEREO again.
y
• Either front speakers or subwoofer produce(s) LFE channel
sounds depending on the “BASS” setting in the Set Menu
(page 77).
• If “BASS” is set to “BOTH” or “FRONT” is set to “SML” in
the Set Menu (page 77), the subwoofer produces low tones.
Notes
• If Stereo playback is selected (no sound field effect), either
center speaker or surround speakers produce(s) no sound.
• If Stereo playback is selected (no sound field effect) and “D.
Range” is set to “MIN” in the Set Menu (page 78), the volume
may become very low. In this case, turn off Stereo playback.
• If you play a Dolby Digital or DTS sound when Stereo playback
is selected (no sound field effect), the volume balance of the
front speakers may be disturbed because the compressed
dynamic range mixes the front speaker’s channel sounds. In this
case, turn off Stereo playback.
SOUND OPTIONS
63
Page 69

ADJUSTING THE SPEAKER BALANCE DURING PLAYBACK
Adjusting the Speaker Balance During Playback
The speaker settings configured by YPAO (page 21) are suitable for most conditions. However, depending on room
conditions or listening position, you may need to adjust the speaker balance manually. This adjustment is important
because it brings out the maximum effect of the DSP program, and faithfully reproduces the acoustic characteristics of
Dolby Pro Logic, Dolby Pro Logic II, Dolby Digital and DTS. You can adjust the speaker balance using test tones or
playback source.
y
Since the following procedures base on the volume level of the front speakers, you cannot adjust the front speaker’s L/R balance with
these procedures. To adjust the L/R balance of the front speakers, refer to “Configuring Various Parameters (Set Menu)” (page 75).
Notes
• Disconnect the headphones from the SILENT CINEMA jack on the CinemaStation before starting the setup procedure.
• Adjust the speaker balance at your listening position with the remote control.
Adjusting the speaker balance with test tones
STANDBY/ON
SURROUND
NIGHT
SET MENU
TV CH
PRESET PRESET
FREQ/RDS
ON SCREEN MENU
START
YPAO
CH
STATUS
ON/OFF
TV VOL
AMP
DVD/CD
MOVIE MUSIC SPORTS GAME
1 Press AMP.
2 Press TEST.
The CinemaStation starts to output test tones.
AUDIO
SELECT
SW
A B C D E
CINEMA
TV INPUT
MODE
ENTER
MUTE
AMP
VCR
TUNER
ANGLE
REPEAT
CENTER
PTY SEEK
SLEEP
TEST
VOLUME
POWER
TV
SUBTITLE
STEREOMATRIX 6.1
A-B
SURR
SHIFT
START
CH
RETURN
VIDEO
TEST
VOLUME +/–
3
While a test tone is output from the front left
speaker, press VOLUME +/– to adjust the
volume to appropriate level.
4 While a test tone is output from the speaker
you want to adjust, press or to adjust it
to the same volume level as the front left
speaker.
The name of the speaker currently outputting a test
tone appears in the CinemaStation display.
Test tones are output in the following order:
Front (R)Front (L)
Subwoofer
Surround (L)
5
When you finished the adjustment, press TEST.
y
• The volume level adjustment range is –10 to +10 dB.
• If you raise the volume level of the center and/or surround L/R
speakers to +10 dB and this is still less than the front speaker,
set “F. Level” to –10 dB in the Set Menu (page 77) and carry out
this procedure again.
Notes
• If “CENTER” is set to “NON” in the Set Menu (page 77), you
cannot adjust the center speaker volume.
• If “SUR.” is set to “NON” in the Set Menu (page 77), you
cannot adjust the surround speaker volume.
• If “BASS” is set to “FRONT” in the Set Menu (page 77), you
cannot adjust the subwoofer volume.
• The test tone output from the subwoofer is different from the
others, but this is not a defect.
Center
Surround (R)
64
Page 70

Adjusting the Speaker Balance During Playback
Adjusting the speaker balance
during playback
If you feel the speaker balance is not proper during audio
playback, follow the procedure below.
SW +/–
AMP
STANDBY/ON
SURROUND
NIGHT
SET MENU
TV CH
PRESET PRESET
FREQ/RDS
ON SCREEN MENU
START
YPAO
CH
STATUS
ON/OFF
TV VOL
DVD/CD
MOVIE MUSIC SPORTS GAME
AUDIO
SELECT
SW
TV INPUT
A B C D E
MODE
ENTER
MUTE
AMP
VCR
TUNER
ANGLE
REPEAT
CENTER
PTY SEEK
TEST
VOLUME
POWER
TV
SUBTITLE
STEREOMATRIX 6.1
A-B
SURR
SHIFT
SLEEP
START
RETURN
VIDEO
CENTER +/–
SURR +/–
CH
1 Press AMP.
2 Adjust the volume level of each speaker.
To adjust the center speaker volume, press
CENTER +/–.
To adjust the surround speaker volume, press
SURR +/–.
To adjust the subwoofer volume, press SW +/–.
y
• We recommend that you first adjust the speaker balance with
test tones. For details, refer to “Adjusting the speaker balance
with test tones” (page 64).
• The volume level adjustment range is –10 to +10 dB.
• You cannot adjust the left and right surround speakers
individually with this procedure. To adjust them individually,
carry out the “Adjusting the speaker balance with test tones”
procedure (page 64).
• If you set one of the surround speakers to max (+10 dB) or min
level (–10 dB), you cannot raise or reduce the volume level of
another surround speaker with this procedure.
Notes
• If “CENTER” is set to “NON” in the Set Menu (page 77), you
cannot adjust the center speaker volume.
• If “SUR.” is set to “NON” in the Set Menu (page 77), you
cannot adjust the surround speaker volume.
• If “BASS” is set to “FRONT” in the Set Menu (page 77), you
cannot adjust the subwoofer volume.
ADVANCED CONFIGURATION
CINEMA
65
Page 71

Adjusting the Speaker Balance During Playback
■ To adjust the speaker balance for 5ch
Stereo DSP programs
You can adjust the speaker balance applied to “5ch
Stereo” DSP programs.
1 Play a source.
2 Press AMP.
MUSIC
STANDBY/ON
SURROUND
NIGHT
SET MENU
TV CH
PRESET PRESET
FREQ/RDS
ON SCREEN MENU
START
YPAO
CH
STATUS
ON/OFF
TV VOL
DVD/CD
MOVIE MUSIC SPORTS GAME
AUDIO
SELECT
SW
CINEMA
TV INPUT
A B C D E
MODE
ENTER
MUTE
AMP
VCR
TUNER
ANGLE
REPEAT
CENTER
PTY SEEK
TEST
VOLUME
POWER
SUBTITLE
SHIFT
SLEEP
VIDEO
STEREOMATRIX 6.1
SURR
START
TV
A-B
CH
RETURN
AMP
3 Press MUSIC to select “5ch Stereo”.
For details, refer to “Enjoying Sound Field Programs
(DSP Programs)” (page 26).
4 Press or to select the speaker of
which you want to adjust the volume level.
Each time you press the button, the speaker changes
as follows:
↓
CT LEV (Center)
↓
RL LEV (Surround L)
↓
RR LEV (Surround R)
5 Press or to adjust the speaker volume
level.
Specify the speaker volume level (e.g. 100: Max.,
50: Half, 0: Min.). The factory setting is 100.
Notes
• The volume level adjusted with this procedure replaces the
volume adjusted with the CENTER button, SURR button or test
tones while using “5ch Stereo” DSP programs. Although the
CinemaStation display does not show the change in level, the
actual volume level changes according to the settings you made
in step 5 you specified.
• If “CENTER” is set to “NON” in the Set Menu (page 77), you
cannot adjust the center speaker volume.
• If “SUR.” is set to “NON” in the Set Menu (page 77), you
cannot adjust the surround speaker volume.
66
Page 72

Configuring Dolby Pro Logic II Music Settings
You can configure the parameters for Dolby Pro Logic II Music to fine-tune the sound field effect.
STANDBY/ON
AUDIO
ANGLE
SURROUND
SELECT
REPEAT
NIGHT
SW
CENTER
SET MENU
TV CH
PRESET PRESET
FREQ/RDS
ON SCREEN MENU
START
YPAO
CH
STATUS
ON/OFF
TV VOL
DVD/CD
MOVIE MUSIC SPORTS GAME
A B C D E
CINEMA
TV INPUT
MODE
ENTER
MUTE
AMP
VCR
TUNER
PTY SEEK
TEST
VOLUME
SHIFT
SLEEP
POWER
TV
SUBTITLE
STEREOMATRIX 6.1
A-B
SURR
START
RETURN
VIDEO
1 Carry out the “Enjoying 2ch sources with all
speakers (Dolby Pro Logic II)” procedure
(page 58) and select “PL II Music”.
2 Press or to select “PANORAMA”,
“DIM.” or “CT WIDTH”.
For details on each parameter, refer to “About the
Dolby Pro Logic II Music parameters” below.
3 Press or to configure the parameter.
4 To configure other parameters, repeat steps
CH
2 and 3.
■ About the Dolby Pro Logic II Music
parameters
ADVANCED CONFIGURATION
PANORAMA
Gives front L/R channel sound a wraparound effect,
distributed throughout the entire surround sound field, for
an expansive feeling.
Function: Expands the front sound field of Dolby Pro
Logic II.
Selection item: OFF/ON
Default setting: OFF
DIM. (Dimension)
Adjusts the difference in volume between front and
surround channels to the volume balance you desire.
Function: Adjusts the difference between front surround
sound field and surround volume.
Variable range: –3 (stronger toward the surround
direction) to +3 (stronger toward the front direction)
Default setting: STD (Standard)
CT WIDTH
Distributes the center channel sound to the left and right.
Function: Expands audio from the front sound field to
the left and right.
Variable range: 0 to 7
If set to 0 center channel sound will only output from the
center speaker. As the value rises center channel sound is
incrementally distributed to the L/R speakers. When set to
7, sound will only output from the L/R speakers.
Default setting: 3
67
Page 73

DSP PROGRAM DELAY TIME SETTINGS
DSP Program Delay Time Settings
Each DSP program is designed to draw out the maximum effect from the source audio. The CinemaStation provides the
DSP programs with optimum value of parameters including reflected sound, reverberant sound and delay time. Among
these parameters, you can change the delay time to match to your speaker positions. Delay time is the time gap in
playback between front speaker audio and surround speaker audio. The bigger the value becomes the later the surround
audio plays back, and the larger the sound space feels. Since delay time is preset at an optimum value for each DSP
program, the default value (page 69) will work well for your listening enjoyment. However, depending on the audio
source or listening environment, you can adjust each DSP program the way you like.
SURROUND
STANDBY/ON
SURROUND
NIGHT
SET MENU
TV CH
PRESET PRESET
FREQ/RDS
ON SCREEN MENU
START
YPAO
CH
STATUS
ON/OFF
TV VOL
DVD/CD
MOVIE MUSIC SPORTS GAME
AUDIO
SELECT
SW
CINEMA
TV INPUT
A B C D E
MODE
ENTER
MUTE
AMP
VCR
TUNER
ANGLE
REPEAT
CENTER
PTY SEEK
SLEEP
TEST
VOLUME
POWER
SUBTITLE
SHIFT
VIDEO
TV
STEREOMATRIX 6.1
SURR
START
RETURN
1 Play a source.
A-B
SELECT
2 Press AMP.
3 Select the DSP program for which you want
to adjust the delay time.
To select a Movie, Music, Sports, or Game DSP
program, press the corresponding DSP program
button (MOVIE, MUSIC, SPORTS or GAME).
To select Dolby Digital or DTS, press SURROUND.
To select Dolby Pro Logic (PRO LOGIC), press
SURROUND, then press SELECT to select
CH
AMP
DSP program
buttons
“PRO LOGIC”.
To select Dolby Pro Logic II, press SURROUND,
press SELECT to select “PL II”, then press
SURROUND to select the PL II mode (Movie,
Music, or Game).
4 Press or .
“DELAY” appears in the CinemaStation display.
5 Press or to adjust the delay time of the
selected DSP program.
y
• You can also adjust the delay time of Matrix 6.1.
• With “SP Distance” in the Set Menu (page 78), you can adjust
the delay time of the center speaker.
Notes
• Depending on the input source, unnatural sound effects may be
produced if you raise the delay time too much. In this case,
reduce the delay time.
• While adjusting the delay time, you hear no sound temporarily.
68
Page 74

■ Program default settings
DSP Program Delay Time Settings
Program
Group
MOVIE 1 Action* 20
MUSIC 1 Music Video 21
SPORTS 1 Live Sports 10
GAME 1 Game 36
Program Name
Action 6.1** 15
2Drama* 20
Drama 6.1** 15
3Sci-Fi* 20
Sci-Fi 6.1** 15
4 Spectacle* 23
Spectacle 6.1** 15
5 Theater* 20
Theater 6.1** 5
2 Classic Hall 30
3 Jazz Club 30
4 Rock Concert 15
Default Setting
(ms)
Program Name
PRO LOGIC*
(Dolby Pro Logic)
SUR. STANDARD**
(Dolby Digital, DTS)
PL II Movie*
(Dolby Pro Logic II Movie)
PL II Music*
(Dolby Pro Logic II Music)
PL II Game*
(Dolby Pro Logic II Game)
* 2ch source
** Multi-channel source
Items without an asterisk (*/**) appearing next to them can be
either 2ch or multi-channel sources.
Default Setting
(ms)
10
0
10
0
10
ADVANCED CONFIGURATION
69
Page 75

CONFIGURING THE AUDIO INPUT SIGNAL SETTING
Configuring the Audio Input Signal Setting
You can play back most audio sources without a problem with the factory audio input signal setting (AUTO). However,
depending on your needs, you can configure the audio input mode to specify an input signal type that can be used on the
CinemaStation. Also, you can check the type of the audio signal currently input into the CinemaStation (page 71) with
the CinemaStation display.
y
• You can also switch input modes for the currently selected input
STANDBY/ON
AUDIO
ANGLE
SURROUND
SELECT
REPEAT
NIGHT
SW
CENTER
SET MENU
TV CH
PRESET PRESET
FREQ/RDS
ON SCREEN MENU
START
YPAO
CH
STATUS
ON/OFF
TV VOL
DVD/CD
MOVIE MUSIC SPORTS GAME
CINEMA
TV INPUT
A B C D E
MODE
ENTER
MUTE
AMP
VCR
TUNER
PTY SEEK
TEST
VOLUME
SHIFT
SLEEP
POWER
TV
SUBTITLE
STEREOMATRIX 6.1
A-B
SURR
START
RETURN
VIDEO
CH
Input selection
buttons
by pressing and holding INPUT on the CinemaStation.
• If a Dolby Digital or DTS signal is input while the input mode is
set to “AUTO”, the CinemaStation automatically select the
most suitable decoder for the signal.
• With “Input Mode” in the Set Menu (page 79), you can set the
mode that the CinemaStation automatically selects when it is
turned on.
Notes
• You cannot set “ANLG” for the DVD/CD input selection
button.
• You cannot switch input mode for the button if no external AV
equipment is connected to the corresponding input jacks.
• To play back a DTS signal, be sure to set the input mode to
“AUTO” or “DTS”. Setting the mode to “ANLG” may produce
noises or no sounds.
• The following conditions may happen if a DTS signal is input
while the input mode is set to “AUTO”.
– If the CinemaStation detects a DTS signal, it automatically
switches to DTS mode (t lights up). Once DTS audio
playback finishes, the t blinks for a while. While it is
blinking, you cannot play back audio source other than DTS
signals. If you want to play normal PCM audio soon after
DTS playback, set the input mode to “AUTO” again.
– If the DTS signal is interrupted when you perform Search or
Skip, the t may blink. If this condition continues for over
30 seconds, the Input mode automatically changes from DTS
to normal digital (PCM) and the t goes out.
1 Press and hold the Input selection button for
the current input source until the input mode
you want to select appears in the
CinemaStation display.
While holding down the button, the input mode
changes as follows:
↓
AUTO
↓
DTS
↓
ANLG
AUTO: Plays a source according digital signals priority
over analog signals.
DTS: Plays only DTS signals.
ANLG: Plays only analog signals.
70
Page 76

Configuring the Audio Input Signal Setting
Checking the Audio Input Signal Type
You can check the information on the audio input signal
currently played back on the CinemaStation.
STANDBY/ON
SURROUND
NIGHT
SET MENU
TV CH
PRESET PRESET
FREQ/RDS
ON SCREEN MENU
START
YPAO
CH
STATUS
ON/OFF
TV VOL
DVD/CD
MOVIE MUSIC SPORTS GAME
1 Play the source of which you want to check
the audio input signal type.
2 Press AMP.
3 Press STEREO
Stereo playback starts.
AUDIO
SELECT
SW
CINEMA
TV INPUT
A B C D E
MODE
ENTER
MUTE
AMP
VCR
TUNER
ANGLE
REPEAT
CENTER
PTY SEEK
SLEEP
TEST
VOLUME
POWER
TV
SUBTITLE
STEREOMATRIX 6.1
A-B
SURR
SHIFT
START
RETURN
VIDEO
STEREO
CH
AMP
4 Press .
Audio input signal information appears on the
CinemaStation display.
Each time you press the button, information changes
depending on the input source.
• Audio input signal type
Shows the format of the audio signal. When the
digital audio input cannot be recognized, the mode
is automatically set to analog audio input.
• Audio channels (only for Dolby Digital and
DTS)
Shows the number of audio channels the input
signal contains. For example, “in: 3/2/LFE”
indicates 3 front channels, 2 surround channels,
and LFE. “1+1” indicates main/sub audio in
bilingual broadcasts or other 2-channel audio, and
MLT indicates audio with 3 channels or more.
• Frequency (fs) (only for digital signals)
Shows the frequency sampling of the input signal.
If the sampling frequency cannot be measured,
“unknown” appears.
• Bit rate (rate) (only for Dolby Digital and
DTS)
Shows the amount of data the input signal contains
per second. If the bit rate cannot be measured,
“unknown” appears.
• Flag (flg) (only for Dolby Digital and DTS)
Shows the recognition signal (flag) the input signal
contains. If the flag cannot be recognized, “None”
appears.
■ About digital signals that exceed 48 kHz
CinemaStation’s digital input jack supports a sampling
frequency up to 96 kHz. Before connecting an AV
equipment to the digital input jack, read the manual for it
to check the sampling frequency. Also, be sure to the
following notes when inputting a digital signal that
exceeds 48 kHz.
• DSP Programs are not selectable. You can only listen
to normal 2ch stereo from the front speakers.
• During playback, you cannot adjust the volume level of
center and surround L/R speakers.
• Depending on the “Setting speaker sizes (Speaker Set)”
settings in the Set Menu (page 77), the Subwoofer may
output sound.
ADVANCED CONFIGURATION
71
Page 77

CONTROLLING EXTERNAL COMPONENTS
Controlling External Components
In addition to controlling this unit, you can operate your TV, VCR, CD recorder or MD recorder with the CinemaStation
remote control by selecting the appropriate remote control code (refer to “LIST OF REMOTE CONTROL CODES” at
the end of this manual).
Note
Depending on the product, the CinemaStation remote control may not be able to operate the external component. In this case, use the
remote control supplied with the product.
Setting remote control codes
The TV button selects a remote control code for a TV. The
VCR button selects a remote control code for a VCR, CD
recorder, or MD recorder.
STANDBY/ON
SURROUND
NIGHT
SET MENU
TV CH
PRESET PRESET
FREQ/RDS
ON SCREEN MENU
START
YPAO
CH
STATUS
ON/OFF
TV VOL
DVD/CD
MOVIE MUSIC SPORTS GAME
AUDIO
SELECT
SW
CINEMA
TV INPUT
A B C D E
MODE
ENTER
MUTE
AMP
VCR
TUNER
ANGLE
REPEAT
CENTER
PTY SEEK
SLEEP
TEST
VOLUME
POWER
TV
SUBTITLE
STEREOMATRIX 6.1
A-B
SURR
SHIFT
START
RETURN
VIDEO
TV
Number
buttons
SHIFT
CH
VCR
1 While holding down SHIFT, press TV or VCR,
then while still holding down SHIFT, press
the number buttons to enter the three-digit
remote control code (refer to “LIST OF
REMOTE CONTROL CODES” at the end of
this manual) for the manufacturer of your
component.
If the setting is successful, the message “Code Set
OK” appears in the CinemaStation display.
If the setting fails, the message “Code Set NG”
appears. In this case, perform this step again.
The factory settings are “299” (YAMAHA TV) for
TV and “399” (YAMAHA VCR) for VCR.
2 Refer to “Available operations” (page 73) and
try one of the button operations for your
component to check that the setting is
working properly.
If the button operation does not work properly, the
remote control code may be incorrect. In this case,
perform step 1 again.
Notes
• Even if you set a remote control code, it will be cleared about
two minutes after the remote control batteries run out. In this
case, store remote control codes again after replacing the
batteries. (Be careful not to press the remote control buttons
while replacing the batteries. Doing so may clear the settings.)
• Depending on the product, the CinemaStation remote control
may not be able to operate the external component. In this case,
use the remote control supplied with the product.
• If the manufacturer of your component has more than one code,
try each of them until you find the correct one.
72
Page 78

Available operations
By carrying out step 1 in “Setting remote control codes”
(page 72), you can operate the following functions on your
external component using the CinemaStation remote
control.
Controlling External Components
■ TV operations
Press TV (POWER) for TV operations.
1
2
STANDBY/ON
SURROUND
NIGHT
SET MENU
TV CH
PRESET PRESET
FREQ/RDS
ON SCREEN MENU
START
YPAO
CH
STATUS
ON/OFF
TV VOL
DVD/CD
MOVIE MUSIC SPORTS GAME
AUDIO
SELECT
SW
TV INPUT
A B C D E
MODE
ENTER
MUTE
AMP
VCR
TUNER
ANGLE
REPEAT
CENTER
PTY SEEK
TEST
VOLUME
POWER
TV
SUBTITLE
STEREOMATRIX 6.1
A-B
SURR
SHIFT
SLEEP
START
RETURN
VIDEO
CH
3
4
5
Functions for TV operation
1 TV CH +/–
Switches the TV channels.
2 TV VOLUME +/–
Adjusts the TV volume level.
3 TV (POWER)
Turn the TV on, or set it to the standby mode.
4 TV INPUT
Switches the TV inputs.
5 VCR
Sets the remote control to the VCR, CD recorder, or MD
recorder operation mode.
ADVANCED CONFIGURATION
CINEMA
73
Page 79

Controlling External Components
■ VCR operations
Press VCR for VCR operations.
STANDBY/ON
AUDIO
ANGLE
SURROUND
SELECT
REPEAT
NIGHT
SW
CENTER
SET MENU
TV INPUT
TV CH
A B C D E
PRESET PRESET
PTY SEEK
MODE
FREQ/RDS
1
ON SCREEN MENU
START
YPAO
CH
2
ENTER
STATUS
ON/OFF
TV VOL
MUTE
AMP
DVD/CD
VCR
TUNER
MOVIE MUSIC SPORTS GAME
CINEMA
TEST
VOLUME
POWER
TV
SUBTITLE
STEREOMATRIX 6.1
SURR
SHIFT
SLEEP
START
RETURN
VIDEO
Functions for VCR operation
1 w
Rewinds.
3
A-B
4
5
6
7
CH
8
2 / (CH–/CH+)
Switches the video channels.
3 TV (POWER)
Sets the remote control to the TV operation mode.
4 s
Stops video playback.
5 e
Pauses video playback.
6 f
Fast forwards.
7 h
Starts video playback.
8 VCR
Sets the remote control to the VCR, CD recorder, or MD
recorder operation mode.
■ CD recorder and MD recorder operations
Press VCR for CD recorder or MD recorder operations.
1
2
3
4
STANDBY/ON
SURROUND
NIGHT
SET MENU
TV CH
PRESET PRESET
FREQ/RDS
ON SCREEN MENU
START
YPAO
CH
STATUS
ON/OFF
TV VOL
DVD/CD
MOVIE MUSIC SPORTS GAME
AUDIO
SELECT
CINEMA
SW
TV INPUT
A B C D E
MODE
ENTER
TUNER
POWER
TV
5
SUBTITLE
ANGLE
STEREOMATRIX 6.1
6
A-B
REPEAT
CENTER
SURR
SHIFT
SLEEP
7
START
VOLUME
VIDEO
8
9
CH
RETURN
0
PTY SEEK
TEST
MUTE
AMP
VCR
Functions for CD recorder and MD recorder
operation
1 e
Pauses disc playback.
2 b
Skips to the start of the current track.
3 w
Reverses.
4 h
Starts disc playback.
5 TV (POWER)
Sets the remote control to the TV operation mode.
6 Number buttons (1 to 9, 0, +10)
Inputs numerals to specify parameters such as track
numbers or elapsed time.
7 s
Stops disc playback.
8 a
Skips to the start of the next track.
9 f
Fast forwards.
0 VCR
Sets the remote control to the VCR, CD recorder, or MD
recorder operation mode.
74
Page 80

Configuring Various Parameters (Set Menu)
In the Set Menu, you can configure various parameters for your CinemaStation system. In most cases, you can enjoy
AV sources on the CinemaStation with the default settings. However, depending on the speakers or listening
environment, you need to configure parameters for your system.
■ Set Menu list
You can configure the following parameters by carrying out the “Operating the Set Menu” procedure (page 76).
Main menu Submenu Default setting
Speaker Set (page 77) CENTER SML
FRONT SML
SUR. SML
BASS SWFR
F. L eve l Nr m
LFE Level (page 78) SP LFE 0 dB
HP LFE 0 dB
SP Distance (page 78) UNIT U.S.A. and Canada: feet (ft)
Other models: meters (m)
FRONT L 10 ft
3.0 m
ADVANCED CONFIGURATION
FRONT R 10 ft
3.0 m
CENTER 10 ft
SURR L 10 ft
SURR R 10 ft
SWFR 10 ft
D. Range (page 78) SP D.R MAX
HP D.R MAX
L/R Balance (page 78) – Center
Input Assign (page 78) – VIDEO
Input Mode (page 79) MODE AUTO
Display set (page 79) DIMMER 0
Tuner Step (page 79)
(Asia, Korea, China and General
models only)
– AM9/FM50
3.0 m
3.0 m
3.0 m
3.0 m
75
Page 81

Configuring Various Parameters (Set Menu)
Operating the Set Menu
Follow the procedure below to operate the Set Menu to
configure parameters. For details on menu items and
parameters, refer to pages 77 to 79.
SET MENU
STANDBY/ON
SURROUND
NIGHT
SET MENU
TV CH
PRESET PRESET
FREQ/RDS
ON SCREEN MENU
START
YPAO
CH
STATUS
ON/OFF
TV VOL
DVD/CD
MOVIE MUSIC SPORTS GAME
AUDIO
SELECT
SW
CINEMA
TV INPUT
A B C D E
MODE
ENTER
MUTE
AMP
VCR
TUNER
ANGLE
REPEAT
CENTER
PTY SEEK
TEST
VOLUME
POWER
TV
SUBTITLE
STEREOMATRIX 6.1
A-B
SURR
SHIFT
SLEEP
START
RETURN
VIDEO
CH
AMP
DSP program
buttons
1 Press AMP, then press SET MENU.
2 Press or to select a main menu item
in the CinemaStation display, then press
or .
3 If the selected menu item contains two or
more submenu items, press or to
select a submenu item in the CinemaStation
display, then press . Otherwise, skip this
step.
The current setting appear in the CinemaStation
display.
4 Press or to change the setting.
5 To exit the Set Menu, press SET MENU or one
of the DSP program buttons.
76
Page 82

Configuring Various Parameters (Set Menu)
■ Setting speaker sizes (Speaker Set)
Submenu: CENTER
Sets whether the center speaker is present or not, and sets
the size of the center speaker.
Selection items: LRG (Large), SML (Small), NON
(None)
Default setting: SML
LRG: Select this setting when using a large center
speaker. The entire frequency band of the center channel
signal is output as it is from the center speaker.
SML: Select this setting when using a small center
speaker. A center channel signal with a low tone is output
from the speaker set to “BASS”.
NON: Select this setting when not using a center speaker.
The center channel signal distributes the same volume
level to the front L/R speakers.
Submenu: FRONT
Sets the size of the front speakers.
Selection items: LRG (Large), SML (Small)
Default setting: SML
LRG: Select this setting when using large front speakers.
The entire frequency band of the front L/R channel signal
is output as it is from the front L/R speakers.
SML: Select this setting when using small front Speakers.
A front L/R channel signal with a low tone of is output
from the speaker set to “BASS”.
Submenu: SUR.
Sets whether the surround L/R speakers are present or not,
and sets the size of the surround L/R speakers.
Selection items: LRG (Large), SML (Small), NON
(None)
Default setting: SML
LRG: Select this setting when using large surround L/R
speakers or when using surround L/R Speakers with
surround subwoofers connected by speaker cables. The
entire frequency band of the surround L/R channel signal
is output as it is from the surround speakers.
SML: Select this setting when using small surround L/R
speakers. A surround L/R channel signal with a low tone
is output from the speaker set to “BASS”.
NON: Select this setting when not using surround L/R
speakers. The surround L/R channel signal distributes the
same volume level to the front L/R speakers (page 59).
Submenu: BASS
Selects the speaker to output a LFE/bass (low tone) signal.
LFE stands for Low Frequency Effect and it is used to
output bands of 90 Hz and below when Dolby Digital or
DTS is active.
Selection items: SWFR (Subwoofer), FRONT,
BOTH
Default setting: SWFR
SWFR: Select this setting when using a subwoofer. The
LFE and low tone sound from other channels, depending
on “CENTER”, “FRONT” and “SUR.” settings, are output
from the subwoofer.
FRONT: Select this setting when not using a subwoofer.
The LFE and low tone sound from other channels,
depending on “CENTER”, “FRONT” and “SUR.”
settings, are output from the front L/R speakers.
BOTH: Select this item to mix a low tone with a LFE
channel when using a subwoofer and independent of the
front speaker sound mode setting. The entire frequency
band of the front L/R channel is output from both the front
L/R speakers and subwoofer. Sounds can be output from
the subwoofer during 2ch or Dolby Surround playback.
Submenu: F. Level
Selects the front speaker level. When the front speaker
volume level is extremely high and out of alignment with
that of other speakers, you can lower the volume level and
adjust the balance.
Selection items: Nrm (Normal), –10 dB
Default setting: Nrm
Nrm: Usually this setting is selected.
–10 dB: Use this setting if the output level of the center
or surround speakers is out of alignment with the front
speakers. The volume level of the front speakers decreases
10 dB (about 1/3).
y
• Even if “FRONT” is set to “SML” while “BASS” is set to
“FRONT”, low tones of the front L/R channel signal will be
output from the front speakers.
• If you select any DSP Program when “SUR.” is set to “NON”,
the CinemaStation automatically enters Virtual CINEMA DSP
mode (page 59).
• These settings are not reflected when connecting headphones.
Note
When a sampling digital signal over 48 kHz is input, some
settings may not be reflected in the playback sound.
ADVANCED CONFIGURATION
77
Page 83

Configuring Various Parameters (Set Menu)
■ Adjusting the playback level of the LFE
signal (LFE Level)
You can adjust the LFE channel output level while playing
a Dolby Digital or DTS signal. Adjust the LFE level to
match the performance of the subwoofer and headphones.
Submenu: SP LFE, HP LFE
Variable range: –20 to 0 dB
Default setting: 0 dB
■ Adjusting the delay time of each speaker
(SP Distance)
Use this feature to manually input the distance of each
speaker and adjust the delay applied to respective channel.
Ideally, each speaker should be the same distance from the
main listening position. However, this is not possible in
most home situations. Thus, a certain amount of delay
must be applied to the sound from each speaker so that all
sound will arrive at the listening position at the same time.
Submenu: UNIT
Selection items: meters (m), feet (ft)
Default setting:
U.S.A. and Canada models: feet (ft)
Other models: meters (m)
• Select meters to input speaker distances in meters.
• Select feet to input speaker distances in feet.
Speaker distances
Choices: 0.3 to 24.00 m (1 to 80 ft)
• FRONT L adjusts the distance of the front left speaker.
Initial setting: 3.0 m (10.0 ft)
• FRONT R adjusts the distance of the front right
speaker. Initial setting: 3.0 m (10.0 ft)
• CENTER adjusts the distance of the center speaker.
Initial setting: 3.0 m (10.0 ft)
• SURR L adjusts the distance of the surround left
speaker. Initial setting: 3.0 m (10.0 ft)
• SURR R adjusts the distance of the surround right
speaker. Initial setting: 3.0 m (10.0 ft)
• SWFR adjusts the distance of the subwoofer. Initial
setting: 3.0 m (10.0 ft)
■ Setting the dynamic range during Dolby
Digital playback (D. Range)
You can select the dynamic range (spread between the
max. and min. volume) of Dolby Digital playback from
three levels.
Submenu: SP D.R, HP D.R
Selection items: MAX (Maximum), STD (Standard),
MIN (Minimum)
Default setting: MAX
MAX: Plays back the dynamic range of the source at the
maximum limit.
STD: Recommended by software manufacturers for home
use.
MIN: Easy to hear even at a low volume, dynamic range
suitable for evening listening.
Note
Depending on the Dolby Digital playback source, “MIN” may not
work and result in an extremely low volume. In this case, set the
dynamic range to “MAX” or “STD”.
■ Adjusting the volume balance of the
front speakers (L/R Balance)
You can set the volume balance of the front L/R speakers.
This setting also applies to the headphones.
Variable range: L/R 10 levels
Default setting: Center
Press to make the sound smaller in the front L speaker,
and press to make the sound smaller in the front R
speaker. You cannot turn off the sound for either one of the
front speakers.
■ Changing the optical input jack
assignment (Input Assign)
You can assign CinemaStation’s OPTICAL IN jack to
“VIDEO” or “VCR”. When set to “VIDEO”, press the
VIDEO button to operate the device connected to the
OPTICAL IN jack and the input source name will appear
as “VIDEO”. When set to “VCR”, press the VCR button
to operate the device connected to the OPTICAL IN jack
and the input source name will appear as “VCR”.
Selection items: VIDEO, VCR
Default setting: VIDEO
78
Page 84

■ Setting the input mode when powering
on (Input Mode)
Sets the input mode (page 70) for powering on when
playback devices are connected to both digital and analog
jacks.
Selection items: AUTO, LAST
Default setting: AUTO
AUTO: When CinemaStation is turned on, the input mode
(page 70) automatically sets to “AUTO”.
LAST: The last selected input mode is applied.
■ Adjusting the CinemaStation display
brightness (Display set)
Dimmer
You can adjust the CinemaStation display brightness.
Variable range: –4 to 0
Default setting: 0
Press to increase the brightness and to decrease.
Configuring Various Parameters (Set Menu)
ADVANCED CONFIGURATION
■ Setting frequency step (Tuner Step)
(Asia, Korea, China and General models
only)
The inter-station frequency spacing differs depending on
the areas. Set the frequency step according to the
frequency spacing in your area.
Selection items: AM9/FM50, AM10/FM100
Default setting: AM9/FM50
Notes
• Be sure to turn off (standby) the CinemaStation after you
change the frequency step setting. The new setting becomes
effective after restarting the CinemaStation.
• The frequency spacing setting for North, Central and South
America is AM10/FM100 and for other areas is AM9/FM50.
79
Page 85

TROUBLESHOOTING
Troubleshooting
If there is any problem with your CinemaStation system, check the following items. If you cannot solve your problem
with the following remedies or if your problem is not listed below, turn off and unplug the CinemaStation, then consult
the nearest authorized YAMAHA dealer or service center.
General
Problem Cause Solution
Power turns on but
immediately shuts off
The speakers make no
sound
The TV shows no picture The cables may be connected
Sound suddenly turns off The Sleep Timer (page 28) might be
Sound is too low on one
side
Speakers other than the
front ones make no sound
The system cable may be connected
improperly.
The power cable may be connected
improperly.
The speaker cable may be shorted. Make sure all speaker cables are
The CinemaStation may receive a
strong electrical shock such as from a
lightening bolt or excessive static
electricity.
The volume may be set to minimum
level.
The Mute function may be enabled. Cancel the Mute function. (page 20)
The input source or input setting may
be incorrect.
The cables may be connected
improperly.
The disc loaded into the
CinemaStation may be not
compatible.
You are playing a DTS source and
“PCM Only” is selected for “Digital
output” in the On-Screen Menu.
improperly.
set.
The cables may be connected
improperly.
You may be listening to stereo
sounds without the sound field effect.
You may be listening to an audio
source (Dolby Digital or DTS) that
does not contain any special effect
signal.
Make sure the system cable is
connected properly. (page 10)
Make sure the power cable is plugged
into the outlet firmly. (page 17)
connected properly. (page 10)
Set the CinemaStation to the Standby
mode, then disconnect the power cable.
Wait for about 30 seconds, then connect
the power cable and turn on the
CinemaStation.
Adjust the volume level. (page 20)
Select the correct input source or input
setting. (pages 19 and 70)
Make sure all cables are connected
properly. (page 9)
Make sure you use a disc supported by
the CinemaStation. (page 32)
Select “All” for “Digital output” in the
On-Screen Menu. (page 30)
Make sure all cables are connected
properly. (page 12)
Turn on the CinemaStation and play the
source again.
Make sure all cables are connected
properly. (page 9)
Press STEREO to enable the sound
field effect. (page 63)
Select another DSP program. (page 26)
80
Page 86

Problem Cause Solution
The center speaker makes
no sound
The surround speakers
make no sound
The subwoofer makes no
sound
The subwoofer makes
strange sounds
The speaker does not
output low tones properly
The volume does not
increase or sounds are
distorted
Recording sounds does
not reflect the sound field
effect settings
A source being played
back on CinemaStation
(DVD, CD, AM/FM
broadcast, etc.) does not
record when using an
external component
A source being played
back on an AV component
connected to the
CinemaStation (MD
recorder, etc.) does not
record when using an
external recorder
The CinemaStation does
not operate properly
The volume of the center speaker
may be set to minimum level.
You may be listening to a Dolby
Digital or DTS audio source.
One of the DSP program in the
Music group (other than 5ch Stereo)
may be selected.
In the Set Menu, “CENTER” may be
set to “NON”.
The volume of the surround speakers
may be set to minimum level.
You may be listening to a monaural
source with the Theater DSP
Program (page 26).
The volume of the subwoofer may
be set to minimum level.
You may be listening to an audio
source that does not contain any low
tone signal such as LFE.
The subwoofer may be placed
improperly.
The subwoofer cable may be
connected improperly.
The speaker setting may be
improper.
The power of the equipment
connected to a CinemaStation’s
output jack may be turned off.
The sound field effects are not
available for recording.
You may be trying to make a digital
recording of an AM/FM broadcast.
You may be trying to make a
recording of a DTS source.
You may be trying to make a digital
recording of an analog source, or
analog recording of a digital source.
The CinemaStation may receive a
strong electrical shock, such as from
a lightening bolt or excessive static
electricity, or drop in power supply.
Troubleshooting
Adjust the volume level of the center
speaker. (page 65)
Dolby Digital and DTS audio sources do
not contain a center speaker signal.
Select another DSP program. (page 26)
Configure the Set Menu properly.
(page 77)
Adjust the volume level of the surround
speakers. (page 65)
Select another DSP program. (page 26)
Adjust the volume level of the subwoofer.
(page 65)
The subwoofer does not support signals
outside the specified range.
Place the subwoofer in the correct
position. For details, refer to the manual
for the subwoofer.
Make sure the subwoofer cable is
connected properly. (page 10)
Make sure you configure the speaker
settings properly. (page 77)
Turn on the power of the equipment
connected to a CinemaStation’s output
jack.
Use the analog recording method. (pages
17 and 55)
Depending on the recorder, DTS sources
may not record properly. For further
information, refer to the owner’s manual
supplied with the recorder you are using.
Use the proper audio source.
Set the CinemaStation to the Standby
mode, then disconnect the power cable.
Wait for about 30 seconds, then connect
the power cable and turn on the
CinemaStation.
APPENDIX
81
Page 87

Troubleshooting
Problem Cause Solution
A digital equipment or highfrequency equipment
produces noises
The Set Menu configurations
have been cleared
The volume does not
increase or sounds are
distorted
Recording sounds does not
reflect the sound field effect
settings
Sound played on the
CinemaStation cannot be
recorded with an external
recorder
Sounds played on the AV
equipment connected to the
CinemaStation cannot be
recorded with external
recording equipment
The CinemaStation does not
operate properly
A digital equipment or highfrequency equipment
produces noises
The Set Menu
configurations have been
cleared
The CinemaStation may be placed
close to the digital equipment or
high-frequency equipment.
The power to the CinemaStation may
be lost more than a week.
The power of the component
connected to a CinemaStation’s
output jack may be turned off.
The sound field effects are not
available for recording.
You may be trying to make a digital
recording with an analog source, or
analog recording with a digital
source.
The recording equipment may be
connected to the CinemaStation with
an analog connection.
Either the AV equipment or recording
equipment may be connected to the
CinemaStation with a digital
connection.
The CinemaStation may receive a
strong electrical shock, such as from
a lightening bolt or excessive static
electricity, or drop in power supply.
The CinemaStation may be placed
close to digital equipment or highfrequency equipment.
The power to the CinemaStation may
be lost more than a week.
Place the CinemaStation further away
from such equipment.
Make sure the power cable is plugged
into the outlet firmly, then configure the
Set Menu settings again. (page 75)
Turn on the power of the component
connected to a CinemaStation’s output
jack.
Use proper audio sources.
Connect them with a digital connection.
(page 16)
Connect those equipment to the
CinemaStation with analog
connections. (page 16)
Set the CinemaStation to the Standby
mode, then disconnect the power cable.
Wait for about 30 seconds, then connect
the power cable and turn on the
CinemaStation.
Place the CinemaStation further away
from such equipment.
Make sure the power cable is plugged
into the outlet firmly, then configure the
Set Menu settings again. (page 75)
82
Page 88

Remote control
Problem Cause Solution
The remote control does not
work for operating the
CinemaStation
The remote control does not
work for operating other AV
equipment
Troubleshooting
The remote control may be operated
outside the remote control operation
range.
The remote control sensor on the
CinemaStation may be exposed to
direct sunlight or lighting (inverted
fluorescent lamps).
The remote control mode selection
may be improper.
The batteries may be worn out. Replace the batteries with new ones.
You may be trying to operate a
system component.
The remote control code may be
incorrect.
For information on the remote control
operation range, refer to “Using the
Remote Control” (page 18).
Change the lighting or CinemaStation’s
orientation.
Select the mode that suits your purpose.
(page 6)
(page 18)
You cannot operate a system
component with the CinemaStation
remote control. Use the remote control
supplied with the product.
Set the correct remote control code.
(page 72) Depending on the model and
year of the product, the CinemaStation
remote control may not be able to
operate it partly or wholly. In this case,
use the remote control supplied with
each product.
APPENDIX
83
Page 89

Troubleshooting
Disc playback
Problem Cause Solution
Some button operations do
not work
Playback does not start or
stops immediately when
pressing h
An audio or subtitle
language does not switch
No subtitles appear The subtitle may be set to “None”. Select a subtitle language you want to
A viewing angle does not
switch
DVD videos cannot be
copied with the VCR
Picture looks poor In some cases, picture may look poor
The TV shows no picture or
its screen size looks
strange
The TV shows overlapped
picture partly
Status information does not
appear
The disc is ejected without
an operation
The message “No Disc”
appears in the
CinemaStation display even
though a disc is inserted
Some discs do not support certain
CinemaStation functions.
The disc may not be set in the disc
tray properly.
The disc may be dirty. Wipe the disc clean.
The disc loaded into the
CinemaStation may be not
compatible.
When moved the CinemaStation
from a cold place to warm one,
condensation may be form on the
disc reading lens.
The disc may not support the multilanguage feature.
The disc may not contain subtitle
data.
When using the A-B Repeat function,
the subtitle may not appear at the
parts other than the selected section.
The disc may not support the multiangle feature.
You may be trying to copy a copyprotected DVD.
while fast forwarding or reversing,
but this is not a defect.
In the On-Screen Menu, the Picture
settings may be improper.
The Progressive Scan mode may be
used with a TV that does not support
it.
The disc content does not match the
Progressive Scan mode due to the
editing method or other conditions.
In the On-Screen Menu, the Status
window may be set to “Off”.
The disc loaded into the
CinemaStation may be not
compatible.
The disc may not be set in the disc
tray.
Set the disc in the disc tray properly.
Make sure you use a disc supported by
the CinemaStation. (page 32)
Wait for one to two hours, then try
again.
Make sure you use a disc that supports
the multi-language feature.
display. (page 40)
Make sure you use a disc with subtitle
data.
Cancel the A-B Repeat function.
(page 38)
Make sure you use a disc that supports
the multi-angle feature.
Most commercially available DVDs
include copy protect features. You
cannot make a copy of these DVDs.
Adjust the Picture settings in the OnScreen Menu. (page 29)
Turn off the Progressive Scan mode.
(page 46)
Turn off the Progressive Scan mode.
(page 46)
Set the Status window to “On” in the
On-Screen Menu. (page 29)
Make sure you use a disc supported by
the CinemaStation. (page 32)
Set the disc in the disc tray properly.
84
Page 90

Radio reception
■ FM/AM
Problem Cause Solution
The Preset Tuning function
(page 49) does not work
■ FM
Problem Cause Solution
Too much noise is
generated during stereo
broadcast
Even with an outdoor
antenna, radio wave
reception is weak (audio is
distorted)
The Auto Tuning function
(page 48) does not work
■ AM
Problem Cause Solution
The Auto Tuning function
(page 48) does not work
Too much noise is
generated
The preset (memory) may have been
erased.
The FM antenna may be connected
improperly.
The radio station you selected may
be far away from your area or radio
wave reception is weak in your area.
Multipath reflection or other radio
interferences may occur.
The radio station you selected may
be far away from your area or radio
wave reception is weak in your area.
The AM loop antenna may be
connected improperly.
The radio station you selected may
be far away from your area or radio
wave reception is weak in your area.
The noises may be generated from
atmospheric electricity, lightening,
fluorescent lights, motors, or
thermostat electric devices.
If too much noise is generated
especially in the evening, the
CinemaStation may be placed close
to a TV.
Troubleshooting
Preset radio stations again. (page 51)
Make sure the FM antenna is connected
properly. (page 13)
Try Manual Tuning to increase the
signal quality (page 48) or use a
multi-channel outdoor antenna.
Change the antenna’s height, direction,
or placement.
Try Manual Tuning to increase the
signal quality (page 48) or use a multichannel outdoor antenna.
APPENDIX
Make sure the AM loop antenna is
connected properly. (page 13)
Try Manual Tuning to increase the
signal quality (page 48).
Connect an outdoor antenna and
establish better grounding to decrease
noises. However, it is difficult to
eliminate these types of noises.
Place the CinemaStation further away
from a TV.
85
Page 91

ADDITIONAL INFORMATION
Additional Information
Disc Information
The following tables explain the disc types supported by the CinemaStation.
Video Discs
Type of Disc Disc Logo Mark
DVD Video
SVCD
(Super Video CD)
Video CD
DIGITAL VIDE
O
DIGITAL VIDE
O
Video CDs made by copying an MPEG
movie file onto a CD-R or CD-RW
JPEG still image playback
CinemaStation supports playback of JPEG still images
contained on CD-R and CD-RW media.
DVD region codes
The region code (an ID number assigned to each market
region) is set for normal DVD players and DVD video
discs. The CinemaStation supports the discs with the
region codes shown in the right table. For details, read the
information on the disc jacket.
Music Discs
Type of Disc Disc Logo Mark
Music CD (Compact disc
digital audio)
Destination
Music CDs made by copying onto a CD-R or CD-RW (including
MP3 format files)
U.S.A.
Canada
U.K.
Europe
Australia
Korea
General
Asia
Region code of
Cinema Station
1
2
4
3
Playable discs
ALL
1
ALL
2
ALL
4
ALL
3
y
Disc logo marks are printed on the disc and the disc jacket.
86
Page 92

Additional Information
Notes
• The following discs cannot be played on the CinemaStation.
CD-ROM, DVD-ROM, DVD-RAM, CDV. (This product can
play some types of DVD-R (Video format only), DVD-RW
(Video format only), DVD+R or DVD+RW discs.)
• The CinemaStation cannot play a CD-R, CD-RW, DVD-R,
DVD-RW, DVD+R or DVD+RW disc that has not been
finalized. Finalizing is a process that prepares a disc for
playback on a compatible device.
• Only use discs from a reputable manufacturer. Some discs
cannot be played back, depending on recording conditions and
disc characteristics.
• Do not use discs with non-standard shapes or sizes.
• Some DVD video or video CD discs may operate and function
differently than noted in this manual. That is by manufacturer
design and not a defect in this unit. For details read the
information on the disc jacket.
• This unit can play the disc types associated with the logos
shown on page 86. (Do not attempt to load any other type of
disc into the unit, or the unit may be damaged.)
• Some discs cannot be played depending on the recording
conditions such as PC environment and application software.
Failure can also result from disc characteristics and condition,
like material quality, scratches or curvature.
Handling a disc
• Do not touch the surface of the
disc. Hold a disc by its edge and
center hole.
• Do not leave a disc in the tray when
you are not playing it.
• Do not write on the disc with a pencil or other marker.
• Do not stick tape, seals or other attachments to a disc, and do
not bring into contact with glue.
• Do not use a protective cover to prevent scratches.
• Do not use a disc whose surface can be printed with a
commercially available label printer.
• Do not put a disc in a place with
direct sunlight, high
temperature, high humidity or a
lot of dust.
• If a disc becomes dirty, wipe it
with a clean, dry cloth from the
center out to the edge. Do not use
record cleaner or paint thinner.
• To avoid malfunction, do not use a
commercially available lens
cleaner.
Caution
APPENDIX
87
Page 93

GLOSSARY
Glossary
Audio formats
■ Dolby Digital
Dolby Digital is a digital surround sound system that gives
you completely independent multi-channel audio. With 3
front channels (left, center, and right), and 2 surround
stereo channels, Dolby Digital provides 5 full-range audio
channels. With an additional channel especially for bass
effects, called LFE (low frequency effect), the system has
a total of 5.1-channels (LFE is counted as 0.1 channel). By
using 2-channel stereo for the surround speakers, more
accurate moving sound effects and surround sound
environment are possible than with Dolby Surround.
■ Dolby Pro Logic
A surround system that takes a 4-channel signal and
records it as a 2-channel signal, then by way of some
arithmetic processing converts back to an independent
4-channel signal for playback.
■ Dolby Pro Logic II
Dolby Pro Logic II is an improved technique used to
decode vast numbers of existing Dolby Surround software.
This new technology enables a discrete 5-channel
playback with 2 front left and right channels, 1 center
channel, and 2 surround left and right channels (instead of
only 1 surround channel for conventional Pro Logic
technology). Music and Game modes are also available for
2-channel sources in addition to the Movie mode.
■ Matrix 6.1
CinemaStation incorporates a Matrix 6.1 decoder for
Dolby Digital and DTS multi-channel software that
enables 6.1-channel reproduction by adding the surround
back channel to existing 5.1-channel format. (The
surround back channel is created from surround left and
right channels, and output from a virtual surround back
speaker.) With this additional channel, you can experience
more dynamic and realistic moving sound especially
scenes with “fly-over” and “fly-around” effects.
■ DTS (Digital Theater Systems)
The 5.1-channel surround system adopted by most movie
theaters. With an abundance of audio data, it is able to
provide authentic-sounding effects.
■ Linear PCM (LPCM)
A signal that is changed to digital format without
compression. A CD is recorded with 16-bit sound at 44.1
kHz, while DVD recording is anywhere from 16 bits at 48
kHz to 24 bits at 192 kHz, which makes it a higher quality
sound than CD. This signal also has a type called Packed
PCM (P.PCM) that can be compressed without any loss of
data.
88
Page 94

Sound field programs Audio information
Glossary
■ CINEMA DSP (Digital Sound Field
Processor)
Since the Dolby Surround and DTS systems were
originally designed for use in movie theaters, their effect
is best felt in a theater having many speakers and designed
for acoustic effects. Since home conditions, such as room
size, wall material, number of speakers, and so on, can
differ so widely, it’s inevitable that there are differences in
the sound heard as well. Based on a wealth of actually
measured data, YAMAHA CINEMA DSP uses
YAMAHA original sound field technology to combine
Dolby Pro Logic, Dolby Digital and DTS systems to
provide the visual and audio experience of movie theater
in the listening room of your own home.
■ “SILENT CINEMA”
“SILENT CINEMA” was developed by YAMAHA as a
natural, realistic sound effect DSP algorithm for
headphones.
Parameters for headphones have been set for each sound
field so that accurate representations of all the sound field
programs can be enjoyed on headphones.
■ Virtual CINEMA DSP
YAMAHA has developed a Virtual CINEMA DSP
algorithm that allows you to enjoy DSP sound field
surround effects even without any surround speakers by
using virtual surround speakers.
It is even possible to enjoy Virtual CINEMA DSP using a
minimal two-speaker system that does not include a center
speaker.
■ Bit stream
A signal that is compressed and changed into digital
format. Then depending on the decoder it can be
processed as 5.1 multi-channel audio.
■ Channel (ch)
A channel is an audio type that has been divided based on
range and other characteristics.
Ex. 5.1 channel
• Front speakers, Left (1ch), Right (1ch)
• Center speaker (1 ch)
• Surround speakers, Left (1ch), Right (1ch)
• Subwoofer (1 ch x 0.1* = 0.1 ch)
* In contrast to a full 1-channel band, a component designed to
enhance low frequency sound for added effect.
■ Dynamic range
The difference between the smallest sound that can be
heard above the equipment noise and the biggest sound
that can be heard without distortion is the dynamic range.
■ LFE (Low Frequency Effect) 0.1 channel
This channel is for the reproduction of low bass signals.
The frequency range for this channel is 20 Hz to 120 Hz.
This channel is counted as 0.1 because it only enforces a
low frequency range compared to the full-range
reproduced by the other 5/6 channels in Dolby Digital or
DTS 5.1/6.1-channel systems.
■ Sampling frequency and quantized bit
rate
When converting an analog signal to digital, the number of
times the signal is sampled per second is called the
sampling frequency, while the degree of fineness when
converting the sound level into a numeric value is called
the quantized bit rate.
The frequency band that can be played back is determined
by the sampling rate, while the dynamic range expressing
the difference in sound level is determined by the
quantized bit rate. In principle, the higher the sampling
rate, the wider the frequency range that can be played
back, and the higher the quantized bit rate, the finer the
sound that can be reproduced.
APPENDIX
89
Page 95

Glossary
■ Track (CD/Video CD)
A CD or Video CD can be divided into a number of
segments (tracks). Each division is called a title number.
■ YPAO (YAMAHA Parametric Room
Acoustic Optimizer)
YPAO is an original YAMAHA system that configures
speaker settings such as speaker balance (volume level of
each speaker), delay time of each channel, and crossover/
high cut frequency for the subwoofer automatically.
YPAO uses the supplied optimizer microphone to collect
and analyze sounds output from the speakers in the actual
listening environment.
Video signal information
■ Component video signal
With the component video signal system, the video signal
is separated into the Y signal for the luminance and the PB
R signals for the chrominance. Color can be
and P
reproduced more faithfully with this system because each
of these signals is independent. The component signal is
also called the “color difference signal” because the
luminance signal is subtracted from the color signal.
■ Decoder
A device that converts encoded data on DVD and other
media back to its original audio or video signal.
■ Film and video data
In general, DVD media can be classified into the 2 types
below.
• Film Data
Video recorded at 24 frames/second. (The film used for
shooting movies is recorded at 24 frames/second.)
Recently 30 frames/second progressive video has made
its debut.
• Video Data
Video recorded at 30 frames/second.
CinemaStation will automatically recognize whether the
source recorded on DVD is film or video, then select the
best method to convert it into progressive output.
■ Interlace and progressive outputs
Up to now the standard video signal has been NTSC with
525i (i: interlaced) scan lines. In contrast, 525p
(p: progressive) is a high-density signal with double the
number of scan lines.
■ NTSC
NTSC is a video signal system (525 lines, 30 frames per
second) used in North America, Central America, a
number of South American countries, and some Asian
countries, including Japan.
■ PA L
PAL is a video signal system (625 lines, 25 frames per
second) used in the United Kingdom, much of the rest of
western Europe, several South American countries, some
Middle East and Asian countries, several African
countries, Australia, New Zealand, and other Pacific
island countries.
90
Page 96

■ Pan & Scan and Letterbox
In general, DVD Video is produced for viewing on a wide
television screen with an aspect ratio of 16:9. This means
you can now view most material with the intended aspect
ratio on a wide-screen television.
This ratio will not fit on a standard television that has an
aspect ratio of 4:3. Two picture styles, Pan & Scan and
Letterbox, deal with this problem.
• Pan & Scan cuts off the left and right portions of the
picture to fill the screen.
• Letterbox inserts black bands at the top and bottom of
the picture to reproduce an aspect ratio of 16:9.
Glossary
Copyright and logo marks
This product incorporates copyright protection technology
that is protected by method claims of certain U.S. patents
and other intellectual property rights owned by
Macrovision Corporation and other rights owners. Use of
this copyright protection technology must be authorized
by Macrovision Corporation, and is intended for home and
other limited viewing uses only unless otherwise
authorized by Macrovision Corporation. Reverse
engineering or disassembly is prohibited.
■ S-Video signal
With the S-Video signal system, the video signal normally
transmitted using a pin cable is separated and transmitted
as the Y signal for the luminance and the C signal for the
chrominance through the S-Video cable. Using the
S VIDEO jack eliminates video signal transmission loss
and allows recording and playback of even more beautiful
images.
■ Title, Chapter (DVD Video)
DVD video lets you divide a disc in a big way by titles or a
small way by chapters. Each division is either called a title
number or a chapter number.
“SILENT CINEMA” is a registered trademark of
YAMAHA CORPORATION.
Manufactured under license from Dolby Laboratories.
“Dolby”, “Pro Logic”, and the double-D symbol are
trademarks of Dolby Laboratories.
“DTS” and “DTS Digital Surround” are registered
trademarks of Digital Theater Systems, Inc.
MPEG Layer-3 audio decoding technology licensed from
Fraunhofer IIS and Thomson multimedia.
APPENDIX
91
Page 97

SPECIFICATIONS
Specifications
AUDIO SECTION
• Front L/R, Center, Surround L/R
Min RMS output power
(1 kHz, 0.9% THD, 6 Ω)................................................... 45 W
Min RMS output power (U.S.A. and Canada models)
(20 Hz to 20 kHz, 0.9% THD, 6 Ω).................................. 45 W
Max power -EIAJ- (Asia, Korea, China, and General models)
(1 kHz, 10% THD, 6 Ω).................................................... 55 W
Total harmonic distortion (FRONT L/R) .............. less than 0.05%
Signal to Noise Ratio (IHF-A Network, shorted) ..................90 dB
Input Sensitivity
VIDEO, VCR ...................................................... 200 mV/47 k Ω
Output Level (when 200 mV is input)
REC OUT........................................................... 200 mV/1.2 k Ω
Phones Output...................................................... 200 mV/100 Ω
VIDEO SECTION
• Video Signal Level
Video...........................................................................1 Vp-p/75 Ω
S-Video (Y/C) ......................................... 1 Vp-p/0.286 Vp-p/75 Ω
Component (Y/PB, PR)................................ 1 Vp-p/0.7 Vp-p/75 Ω
Signal to Noise Ratio .............................................................50 dB
TUNER SECTION
• FM Tuning Range
U.S.A. and Canada models ............................... 87.5 to 107.9 MHz
Other Models.....................................................87.5 to 108.0 MHz
• AM Tuning Range
U.S.A. and Canada models .................................. 530 to 1710 kHz
U.K., Europe, Australia and Korea models.......... 531 to 1611 kHz
Asia and General models ..................... 530/531 to 1710/1611 kHz
GENERAL
• Power Supply
U.S.A. and Canada models .................................. AC 120 V, 60 Hz
Australia model ................................................... AC 240 V, 50 Hz
U.K. and Europe models ..................................... AC 230 V, 50 Hz
Korea model......................................................... AC 220 V, 60 Hz
Asia model................................................... AC 220–240 V, 50 Hz
General model ............................................. AC 110–120 V, 50 Hz
• Power consumption ................................................................... 85 W
• Standby power consumption
Asia and General models....................................................... 0.5 W
Other models ......................................................................... 0.4 W
• Laser Pickup
Type..................................................Semiconductor laser GaAIAs
Wave length ............................650 nm (DVD), 790 nm (VCD/CD)
Output Power.................... 1.45 mW (DVD), 1.31 mW (VCD/CD)
• Dimensions (W x H x D).....................................360 x 75 x 360 mm
(Approx. 14 3/16 x 2 15/16 x 14 13/16 in.)
• Weight.......................................................................................6.4 kg
(Approx. 14 lbs 2 oz)
• Operating Temperature Range................... + 5 to +35ºC (41 to 95ºF)
• Operating Humidity Range................... 5 to 90% (No Condensation)
Specifications are subject to change without notice.
92
Page 98

LIST OF REMOTE CONTROL CODES
TV
YAMAHA 299/292
Admiral 292/293
Aiko 287
Aiwa 294/276/283
Akai 295/296
Alba 296
AOC 297/286
Audiovox 285
Belcor 297
Bell & Howell 292
Bestar 298
Blaupunkt 229/222
Blue sky 298
Bradford 285
Brandt 223
Brocsonic 297
Brokwood 297
Bush 296
Candle 286/297
Citizen 286/287/297
Clatronic 298
Contec 285
Craig 224/285
Croslex 225
Crown 285
Curtis Mathis 297/226/286
CXC 285
Daewood 297/298/224/227/
228/287
Dayton 239/297
Dual 298
Dumont 297
Emerson 297/224/239/232/
285
Envision 286/297
Ferguson 223/265/266
First line 298
Fisher 295/233
Fraba 298
Funai 277/278/285
Futuretec 285
GE 293/297/234/235/
236
Gilbralter 297
LG/Goldstar 297/298/239/237
Goodmans 296/298/223
Grundig 229/238/249
Havard 285
Hitachi 297/239/242/243
ICE 296
Irradio 296
Itt/Nokia 244/245
JC Penny 293/297/234/237/
286
JVC (Victor) 296/246/247
Kendo 298
Kenwood 297
KTV 297/239/285
Loewe 298/248
LXI 293/297/225/226/
233
Magnavox 297/225/239/286
Marantz 286/297
Matsui 295
MGA 286/297
Mitsubishi 299/297/259
MTC 286/297
Multitec 285
NEC 297/292/282/286
Nikko 286/287/297
Nokia 244/245
Nokia Oceanic 245
Nordmende 265/266
NTC 287
Onwa 296/285
Panasonic 234/235/236/253
Philco 297/225/239/286
Philips 225
Pilot 297/
Pioneer 226/235/254/255/
268
Portland 297/256/287
Quasar 238/235
Radio Shack 299/293/297/285/
296
RCA 293/297/234/256/
257/258
Realistic 299/293/297/285/
286
SABA 223/269/265/266
Sampo 286/297
Samsung 297/239/248/262/
275/286
Sanyo 295/233/279/272/
273/274
Schneider 296
Scott 297/285
Sharp 292/239/232/284
Shogun 297
Siemens 229
Signature 292
Sony 263
Soundesign 285
SSS 285/297
Starlite 285
Sylvania 297/225/286
Teknika 297/285/287
Telefunken 269/264/265/266
Thomson 223/266
Toshiba 292/226/267
Videch 297/242
Wards 297/239/232/286
VCR
YAMAHA 399/392/393/394
Admiral 395
Aiwa 396/397/398/329/
339
Akai 322/323/324
Asha 363
Audio Dynamic 392/394
Audiovox 396
Beaumark 363
Bell & Howell 393
Blaupunkt 325/326
Brocsonic 327
Bush 322
Calix 396
Candle 335/363/396
Canon 325/328
CGM 396/332
Citizen 396
Curtis Mathis 397/328/333/392
Cybernex 363
Daewood 328/334/335
DBX 392/394
Dimensia 333
Dynatech 397
Electrohome 396
Electrophonic 396
Emerson 327/334/396/397
Fisher 393/336
Garrard 397
GE 328/333/387/363
LG/Goldstar 396/388/392
Goodmans 334/337
Grandiente 397
Grundig 332/338
Hitachi 325/333/349/342/
343
Harman Kardon 392
Instant Replay 325/328
Itt/Nokia 393
JCL 328
JC Penny 392/393/394/328/
333/349/363/396
JVC (Victor) 392/394/344/345/
346/347
Kendo 396
Kenwood 392/394/396
Kodak 396
Lyold 397
Loewe 396/337
Luxor 395
LXI 393/396/397/336/
349
Magnavox 325/326/328
Magnin 363
Marantz 392/394328
Marta 396
Matsui 396
MEI 328
Memorex 328/336/363/396/
397
Minolta 333/349/342
Mitsubishi 399/344/348/359/
352/353
MTC 363/397
Multitech 397/348/354
NEC 392/384/344/383
Nikko 396
Noblex 363
Nokia 393/395
Nokia Oceanic 395
Okano 323
Olympic 325/328
Orion 327
Panasonic 325/328/355/378/
384/385
Pentax 333/349/342
Philco 325/328
Philips 325/326/328/337/
356/357
Phonola 337
Pilot 396
Pioneer 325
Quasar 325/328
Radio Shack 396/397
Radix 396
RCA/PROSCAN 325/326/328/333/
335/349/358/369/
363/342
Realistic 393/397/328/336/
359/362/396
Samsung 354/358/363/364/
365/366/335
Sansui 394
Sanyo 393336/367/363
Schneider 337
Scott 399/335/336/348/
359/352/354/358
Sears 328/342/396
Seleco 322
Sharp 395/362/382
Siemens 393
Signature 2000 393
Sony 368/379/372/373/
374/375
Sylvania 397/325/326/328
Symphonic 397
Tandberg 334
Tashiro 396
Tatung 392/394
Teac 392/394/397
Technics 325/328
Teknika 328/396/397
Telefunken 376/377
Thorn 393/396
Toshiba 335/369/383
Totevision 363/396
Universam 396/327/376
Vector Research 392
Videosonic 363
W.WHouse 396
Wards 395/396/336/362/
328/342/363/397
CD recorder
YAMAHA 499
DENON 422/423
Hitachi 424
JVC (Victor) 425/428
Kenwood 422
Marantz 422
Philips 422
Pioneer 426
Sony 427
Teac 429
MD recorder
YAMAHA 599/522/598
Denon 523/524
JVC (Victor) 525
Kenwood 526
Onkyo 592
Pioneer 527
Sharp 528
Sony 522
Teac 593
Page 99

YAMAHA ELECTRONICS CORPORATION, USA
©
YAMAHA CANADA MUSIC LTD.
YAMAHA ELECTRONIK EUROPA G.m.b.H.
YAMAHA ELECTRONIQUE FRANCE S.A.
YAMAHA ELECTRONICS (UK) LTD.
YAMAHA SCANDINAVIA A.B.
YAMAHA MUSIC AUSTRALIA PTY, LTD.
135 MILNER AVE., SCARBOROUGH, ONTARIO M1S 3R1, CANADA
J A WETTERGRENS GATA 1, BOX 30053, 400 43 VÄSTRA FRÖLUNDA, SWEDEN
6660 ORANGETHORPE AVE., BUENA PARK, CALIF. 90620, U.S.A.
SIEMENSSTR. 22-34, 25462 RELLINGEN BEI HAMBURG, F.R. OF GERMANY
RUE AMBROISE CROIZAT BP70 CROISSY-BEAUBOURG 77312 MARNE-LA- VALLEE CEDEX02, FRANCE
YAMAHA HOUSE, 200 RICKMANSWORTH ROAD WATFORD, HERTS WD18 7GQ, ENGLAND
17-33 MARKET ST., SOUTH MELBOURNE, 3205 VIC., AUSTRALIA
2004 All rights reserved.
Printed in Malaysia WD57200
 Loading...