

Page 1
DME Designer Installation Guide
SPECIAL NOTICES
• The software and this owner’s manual are the exclusive copyrights of Yamaha
Corporation.
• Use of the software and this manual is governed by the license agreement which the
purchaser fully agrees to upon breaking the seal of the software packaging. (Please
read carefully the Software Licensing Agreement at the end of this manual before
installing the application.)
• Copying of the software or reproduction of this manual in whole or in part by any
means is expressly forbidden without the written consent of the manufacturer.
•Yamaha makes no representations or warranties with regard to the use of the
software and documentation and cannot be held responsible for the results of the
use of this manual and the software.
• This disk is a CD-ROM. Do not attempt to play the disk on an audio CD player.
Doing so may result in irreparable damage to your audio CD player.
• Copying of the commercially available musical data including but not limited to MIDI
data and/or audio data is strictly prohibited except for your personal use.
BESONDERE HINWEISE
• Die Yamaha Corporation besitzt das ausschließliche Copyright an dieser Software
und diesem Handbuch.
• Die Verwendung der Software sowie dieser Bedienungsanleitung unterliegen der
Lizenzvereinbarung, mit deren Bestimmungen sich der Käufer bei Öffnen des
Softwarepakets ausdrücklich und automatisch einverstanden erklärt. (Bitte lesen Sie
die Lizenzvereinbarungen am Ende dieser Anleitung vor dem Installieren des
Programms sorgfältig durch.)
• Das Kopieren der Software und die Vervielfältigung dieser Bedienungsanleitung als
Ganzes oder in Teilen sind nur mit ausdrücklicher schriftlicher Genehmigung des
Herstellers erlaubt.
•Yamaha übernimmt keinerlei Garantie hinsichtlich der Benutzung dieser Software
und der dazugehörigen Dokumentation und kann nicht für die Folgen der
Benutzung von Handbuch und Software verantwortlich gemacht werden.
• Diese Disc ist eine CD-ROM. Spielen Sie diese CD nicht in einem Audio-CD-Player
ab. Dies kann zu irreparablen Schäden an Ihrem Audio-CD-Player führen.
• Das Kopieren von kommerziell erhältlichen Musikdaten (einschließlich, jedoch ohne
darauf beschränkt zu sein, MIDI- und/oder Audio-Daten) ist mit Ausnahme für den
privaten Gebrauch strengstens untersagt.
• Windows is the registered trademarks of Microsoft® Corporation.
• Adobe, the Adobe logo, Acrobat, and the Acrobat logo are the trademarks of Adobe
Systems Incorporated.
• All other company names and product names in this Installation Guide are the
trademarks or registered trademarks of their respective companies.
• The screen displays as illustrated in this Installation Guide are for instructional
purposes, and may appear somewhat different from the screens which appear on
your computer.
• Relevant software (such as drivers) may be revised and updated without prior
notice. Make sure to check and download the latest version of the software from the
following site.
http://www.yamahaproaudio.com/
• Future upgrades of application and system software and any changes in
specifications and functions will be announced separately.
®
• Windows ist ein eingetragenes Warenzeichen der Microsoft
• Adobe, das Adobe-Logo, Acrobat und das Acrobat-Logo sind Warenzeichen von
Adobe Systems Incorporated.
• Alle anderen in dieser Installationsanleitung erwähnten Firmen- und Produktnamen
sind Warenzeichen bzw. eingetragene Warenzeichen der betreffenden Firmen.
• Die in dieser Installationsanleitung abgebildeten Bildschirmdarstellungen dienen
nur der Veranschaulichung und können von der auf Ihrem Computer angezeigten
Darstellung abweichen.
• Entsprechende Software (wie z. B. Treiber) kann ohne vorherig Benachrichtigung
überarbeitet und aktualisiert werden. Achten Sie darauf, auf der folgenden Website
nach der neuesten Version der Software zu suchen und sie herunterzuladen:
http://www.yamahaproaudio.com/
• Zukünftige Aktualisierungen von Anwendungs- und Systemsoftware sowie jede
Änderung der technischen Daten und Funktionen werden separat bekanntgegeben.
Corporation.
EnglishDeutschFrançaisEspañol
REMARQUES PARTICULIÈRES
• Le logiciel et ce mode d'emploi sont sous copyright exclusif de Yamaha
Corporation.
• L'usage de ce logiciel et de ce manuel est régi par le contrat de licence auquel
l'acheteur déclare souscrire sans réserve lorsqu'il ouvre l'emballage scellé du
logiciel. (Veuillez donc lire attentivement l'accord de licence du logiciel situé à la fin
de ce manuel avant d'installer le logiciel).
•Toute copie du logiciel ou de ce mode d'emploi en tout ou en partie, par quelque
moyen que ce soit, est expressément interdite sans le consentement écrit du
fabricant.
•Yamaha n'offre aucune garantie quant à l'usage du logiciel ou de la documentation
et ne peut être tenu pour responsable des résultats de l'usage de ce mode d'emploi
ou du logiciel.
• Ce disque est un CD-ROM. N'essayez donc pas de l'insérer dans un lecteur de CD
audio.
Vous risqueriez d'endommager ce dernier de manière irréversible.
• La copie des données musicales disponibles dans le commerce, y compris, mais
sans s'y limiter, les données MIDI et/ou audio, est strictement interdite, sauf pour un
usage personnel.
AVISOS ESPECIALES
• El software y este manual del propietario son copyright exclusivo de Yamaha
Corporation.
• La utilización del software y de este manual debe ajustarse al acuerdo de licencia
con el que el comprador manifiesta su total conformidad al abrir el paquete de
software. (Lea detenidamente el Acuerdo de licencia de software que se incluye al
final de este manual antes de instalar la aplicación).
• La copia del software o la reproducción total o parcial de este manual sin la
autorización escrita del fabricante está expresamente prohibida.
•Yamaha no asume responsabilidad alguna ni ofrece garantía alguna en relación con
el uso del software y de la documentación, y no puede ser declarada responsable
de los resultados de la utilización de este manual ni del software.
• Este disco es un CD-ROM. No intente reproducir el disco en un reproductor de CDs
de audio.
Al hacerlo se podrían causar daños irreparables en el reproductor.
• Queda terminantemente prohibida la copia de datos musicales disponibles
comercialmente, incluidos, pero no exclusivamente los datos MIDI y/o los datos de
audio, excepto para su uso personal.
®
• Windows est une marque déposée de Microsoft
• Adobe, le logo Adobe, Acrobat et le logo Acrobat sont des marques commerciales
de Adobe Systems Incorporated.
• Les noms des firmes et des produits apparaissant dans ce manuel d'installation
sont des marques commerciales ou des marques déposées appartenant à leurs
détenteurs respectifs.
• Les écrans qui illustrent ce manuel d'installation sont fournis à titre d'information et
peuvent être légèrement différents de ceux qui apparaissent sur votre ordinateur.
• Les logiciels pertinents (tels que les pilotes) sont susceptibles d'être révisés et mis à
jour sans avertissement préalable. Prenez soin de vérifier la version du logiciel
utilisée et de télécharger la dernière version en date sur le site suivant :
http://www.yamahaproaudio.com/
• Les mises à jour des logiciels d'application et des logiciels système ainsi que toutes
les modifications apportées aux spécifications et aux fonctions seront annoncées
séparément.
• Windows es la marca registrada de Microsoft
• Adobe, el logotipo de Adobe, Acrobat y el logotipo de Acrobat son marcas
registradas de Adobe Systems Incorporated.
• El resto de los nombres de compañías y de productos que aparecen en esta guía
de instalación son marcas o marcas registradas de sus respectivas compañías.
• Las ilustraciones de las pantallas de esta guía de instalación tienen fines
meramente instructivos y pueden diferir ligeramente de las pantallas que aparecen
en su equipo.
• El software correspondiente (como los controladores) se puede revisar y actualizar
sin previo aviso. Asegúrese de que comprueba y descarga la versión más reciente
del software en el sitio siguiente:
http://www.yamahaproaudio.com/
• Las futuras actualizaciones de la aplicación y del software del sistema, y cualquier
cambio en las especificaciones y funciones, se anunciarán independientemente.
Corporation.
®
Corporation.
EN
DE
FR
ES
Page 2
1 Confirm that your computer and operating system are compatible with the software in this CD-ROM. (See page 10.)
2 Install the appropriate driver (YAMAHA USB-MIDI Driver/YAMAHA DME-N Network Driver) on your computer.
3 Make appropriate settings for the driver.
English
4 Install the DME Designer.
5 Start the DME Designer.
For instructions and details on using the software, refer to the DME Designer Owner’s Manual.
®
This CD-ROM is only compatible with Windows
XP Professional/XP Home Edition/2000 Professional.
In this manual, “DME” is used to refer to Digital Mixing Engine models such as the DME64N and DME24N; however,
this does not include the DME32.
CD-ROM Installation Procedure
CD-ROM Contents
Never attempt to play back the included CD-ROM on an audio CD player.
Doing so may result in damage to your hearing as well as to your CD player/audio speakers.
This CD-ROM contains the following software.
Folder Content Description
USBdrv2k_ YAMAHA USB-MIDI Driver Enables your computer to communicate with the DME when your
computer and the DME are connected using a USB cable.
Networkdrv_ YAMAHA DME-N Network Driver Enables your computer to communicate with the DME when your
computer and the DME are connected using Ethernet.
DMEDesigner_ DME Designer Application for designing configurations of the DME, sending data to
the DME, controlling the DME, and so on.
Firmware Program Program area firmware Program data for updating DME. Use DME Designer for updating.
Refer to the DME Designer Owner’s Manual for details.
Component Component area firmware Component data for updating DME. Use DME Designer for updating.
Refer to the DME Designer Owner’s Manual for details.
Manual English Manuals English Installation Guide and Owner’s Manual. —
German Manuals German Installation Guide and Owner’s Manual. —
French Manuals French Installation Guide and Owner’s Manual. —
Spanish Manuals Spanish Installation Guide and Owner’s Manual. —
Japanese Manuals Japanese Installation Guide and Owner’s Manual. —
Relevant
pages
3
5
10
—
—
2 DME Designer Installation Guide
Page 3

YAMAHA USB-MIDI Driver
To connect a DME and a computer via USB, it is necessary to install the YAMAHA USB-MIDI Driver to the computer.
The YAMAHA USB-MIDI Driver is software that enables to transmit MIDI signal between computer and DME via USB cables or
USB-MIDI interface.
Installation
• • • • • • • • • • • • • • • • • • • • • • • • • • • • • • • • • • • • • • • • • • • • • • • • • • • • • • • • • • • • • • • • • •
Windows 2000
1 Start the computer and use the “Administrator” account
to log into Windows 2000.
2 Select [My Computer] → [Control Panel] → [System] →
[Hardware] → [Driver Signing] → [File Signature
Verification] and check the radio button to the left of
“Ignore – Install all files, regardless of file signature” and
click [OK].
3 Insert the included CD-ROM into the CD-ROM drive.
4 Make sure the POWER switch on the DME is set to OFF
and use the USB cable to connect the USB terminal of
the computer (or the USB hub) to the USB terminal of the
DME. When the DME is turned on, the computer
automatically displays the “Found New Hardware
Wizard.” Click [Next].
5 Check the radio button to the left of “Search for the
suitable driver for your device. (Recommended).”
The window that appears enables you to select the
location for installing the driver.
6 Check the “CD-ROM drives” box and uncheck all other
items. Click [Next].
n The system may ask you to insert a Windows CD-ROM while
it checks for the driver. Specify the “USBdrv2k” folder in the
CD-ROM drive (for example, D:\ USBdrv2k_\) and continue
installation.
7 When the installation is complete, the system displays
“Completing the Found New Hardware Wizard.”
Click [Finish].
n Some computers may take about ten seconds to show this
screen after installation is complete.
8 Restart the computer.
The driver has been installed.
Windows XP
1 Start the computer.
2 Select [Start] → [Control Panel].
If the control panel shows “Pick a category,” click “Switch
to Classic View” in the upper left of the window. All control
panels and icons will be displayed.
3 Select [System] → [Hardware] → [Driver Signing] → [File
Signature Verification], and check the radio button to the
left of “Ignore – Install all files, regardless of file signature”
and click [OK].
4 Click [OK] to close the System Properties window, then
click the Close button ([X]) at the top right of the window
to close the Control Panel.
5 Insert the included CD-ROM into the CD-ROM drive.
6 Make sure the POWER switch on the DME is set to OFF
and use the USB cable to connect the USB terminal of
the computer (or the USB hub) to the USB terminal of the
DME. When the DME is turned on, the computer
automatically displays the “Found New Hardware
Wizard.”
n Some computers may take a few minutes to show this
screen.
7 Check the radio button next to “Install the software
automatically (Recommended)” then click [Next].
The system starts installation.
8 When the installation is complete, the system displays
“Completing the Found New Hardware Wizard.” Click
[Finish].
n Some computers may take about a few minutes to show this
screen after the installation is complete.
9 Restart the computer.
The driver has been installed.
English
DME Designer Installation Guide 3
Page 4
•
Setup
• • • • • • • • • • • • • • • • • • • • • • • • • • • • • • •
1
English
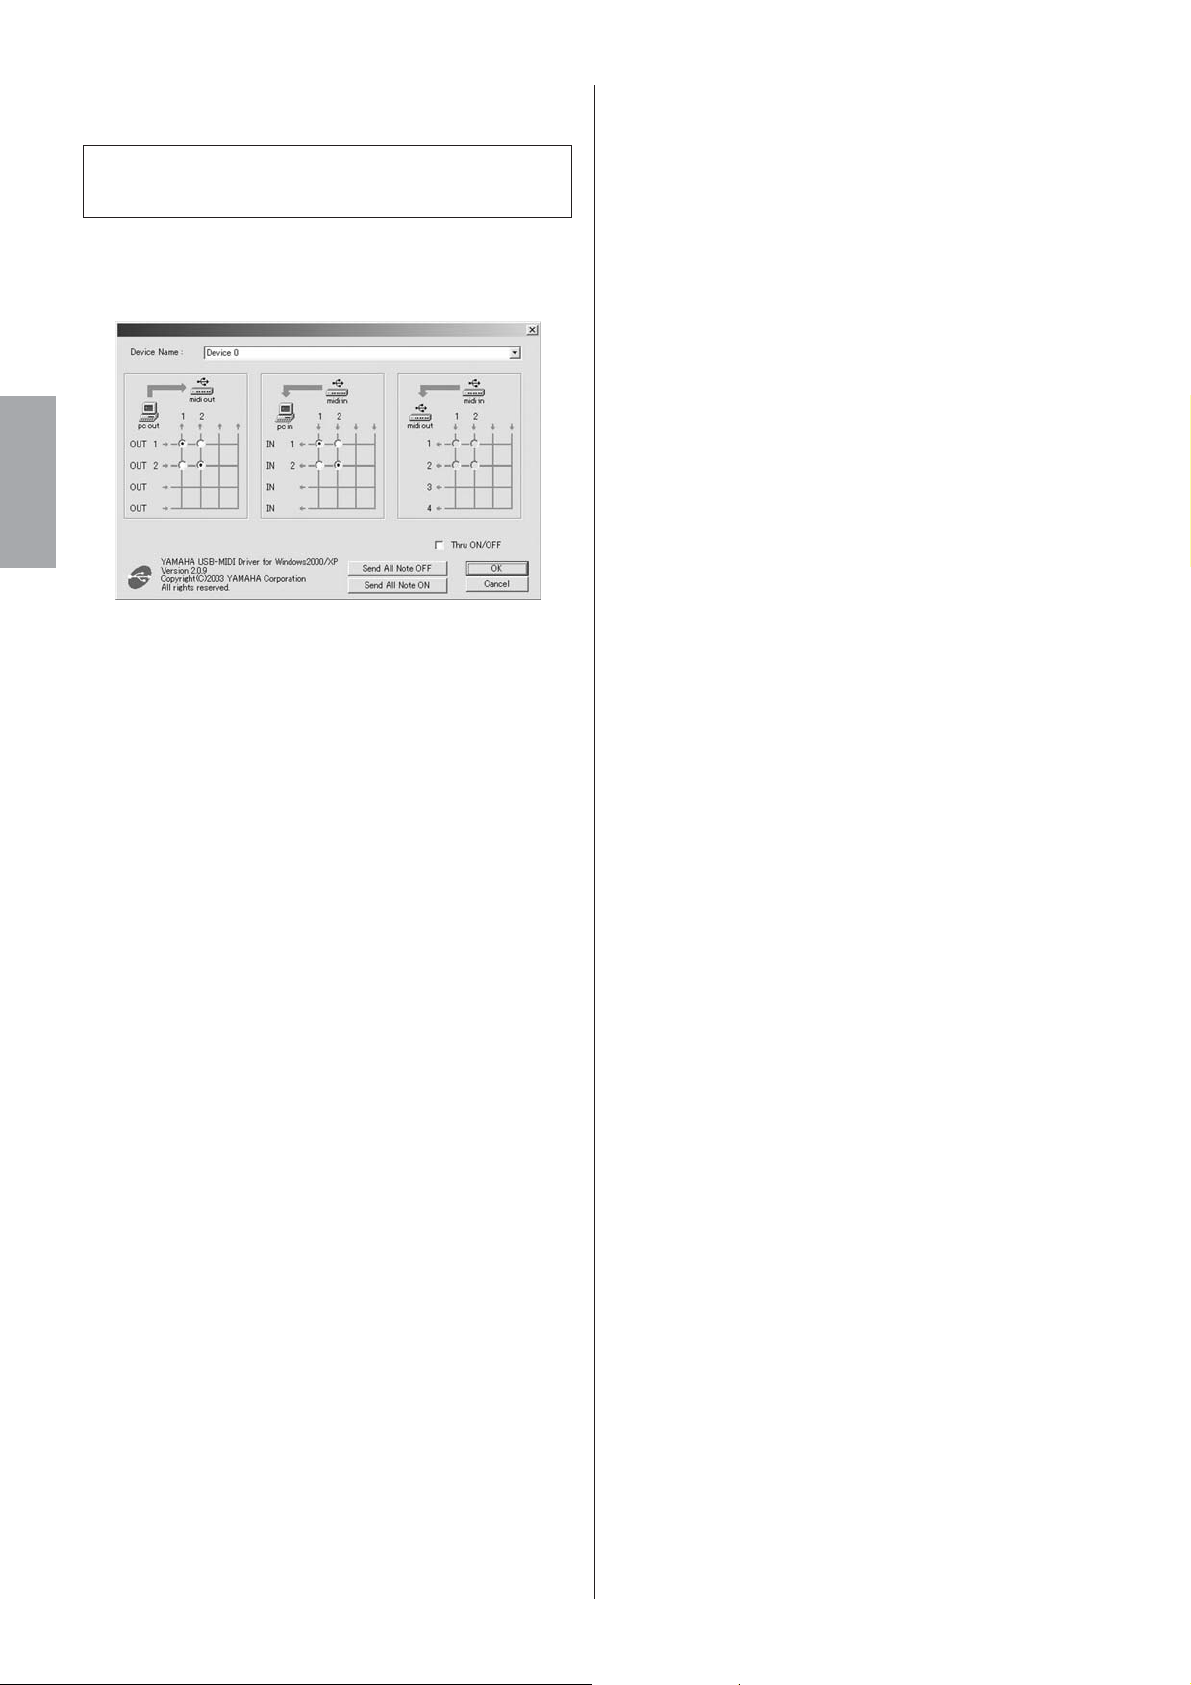
2 Setup the driver in the “YAMAHA USB-MIDI Driver”
In general, there is no need to change the initial
settings.
Select [Start] → [Control Panel] → [MIDI-USB Driver].
The “YAMAHA USB-MIDI Driver” window will appear.
window.
[Device Name]
For selecting the USB device to be used with the USBMIDI Driver.
MIDI OUT setting
For selecting the appropriate MIDI OUT port of the
computer application to correspond to the port number of
the USB MIDI signal sent from the computer.
MIDI IN setting
For selecting the appropriate MIDI IN port of the
computer application to correspond to the port number of
the USB MIDI signal received by the computer.
MIDI THRU setting
For selecting the port number of the USB MIDI input/
output signals passing through the computer.
[Thru ON/OFF]
Switches MIDI THRU on/off.
[Send All Note OFF]
Transmits All Note OFF signal to all MIDI OUT ports.
[Send All Note ON]
Transmits All Note ON signal to all MIDI OUT ports.
3 Click [OK] and close the “YAMAHA USB-MIDI Driver”
window.
The settings made in the window are entered.
n To close the window without entering the settings, click
[Cancel].
4 DME Designer Installation Guide
Page 5

•
•
• • • • • • • • • • • • • • • • • • • • • • • • • • • • • • • •
YAMAHA DME-N Network Driver
To connect a DME and a computer via Ethernet, you will need to install the YAMAHA DME-N Network Driver to the computer.
The YAMAHA DME-N Network Driver enables transmission of MIDI data between the computer and the DME via Ethernet
cables.
Installation
• • • • • • • • • • • • • • • • • • • • • • • • • • • • • • •
1
Double-click on the “Networkdrv_” folder.
Various files are shown, including “Setup.exe.”
2 Double-click on “Setup.exe.”
When the setup has been initialized, a “Welcome”
window appears.
3 Click [Next]. The YAMAHA DME-N Network Driver will be
installed. When installation is complete, a message
appears indicating that setup has been completed.
4 In order for the newly installed YAMAHA DME-N Network
Driver to take effect, select “Yes, I want to restart my
computer now” and click [OK]. The computer will restart.
n When running under Windows XP SP2, an “Windows
Security Alert” window may appear after the system is
restarted. Select the “Unblock” option.
The YAMAHA DME-N Network Driver has been installed.
Uninstalling
• • • • • • • • • • • • • • • • • • • • • • • • • • • • • • •
1
Select [Start] → [Settings] → [Control Panel] → [Add/
Remove Programs].
The “Add/Remove Programs” window appears.
2 Click [Change/Remove] for the YAMAHA DME-N Network
Driver.
Follow the onscreen instructions to uninstall the driver.
n The button names or menus may differ depending on the
computer OS.
n If you attempt to reinstall the software after uninstalling it
without first restarting your computer, the following message
will appear and the install process will be aborted. “Restart
your computer, then run the installer.” The installer should
run normally after your computer has been restarted.
Setup
1
Select [Start] → [Control Panel]→ [DME-N Network
Driver].
The “DME-N Network Driver” window appear.
n If an application that uses the YAMAHA DME-N Network
Driver is running at this time the “Quit all applications that
use the DME-N Network Driver in order to change settings.”
message will appear. The DME-N Network Driver settings
cannot be changed while any application that uses the
YAMAHA DME-N Network Driver is running.
2 Set up the driver parameters via the “DME-N Network
Driver” window.
1
English
2
3
n In order to use the YAMAHA DME-N Network Driver, all
computer network devices (hubs, routers, etc.) must be
properly connected and configured. Use a cross cable if
you will be directly connecting a DME64N/24N to the
computer without using any other network devices.
DME Designer Installation Guide 5
Page 6

English
1 Target Device List
The name, number, IP address, MAC address, and MIDI
port number of all devices registered to communicate
with the YAMAHA DME-N Network Driver are shown in
this list. Click the title bars to sort accordingly.
When a device is selected in the list, information related
to that device will appear in the device information area
2 below the list.
Device Name
This column lists the names of devices registered to
communicate with the YAMAHA DME-N Network
driver. When a device is selected in the list it’s name
also appears in the Device Name field in the device
information area
2 below the list.
Device IP Address
The IP number of the corresponding device. When a
device is selected in the list it’s IP number also
appears in the Device IP Number field in the device
information area
2 below the list.
Device MAC Address
The MAC address of the corresponding device. When
a device is selected in the list it’s MAC address also
appears in the Device MAC Address field in the
device information area
2 below the list.
Device Port No.
The MIDI port number of the corresponding device.
When a device is selected in the list it’s MIDI port
number also appears in the Device Port No. field in
the device information area
2 below the list.
[New] Button
Click this button to add a new device to the list. Edit
the device’s parameters as required via the fields in
the device information area
click the [APPLY] button to add the specified device.
2 below the list, then
[Duplicate] Button
This button adds a device to the list by copying the
data from the currently selected device. Edit the new
device’s parameters as required via the fields in the
device information area
the [APPLY] button to add the specified device.
2 below the list, then click
[Remove] Button
Deletes the selected device from the list. If the
removed device is not the lowest device in the list, all
devices below the removed device will be shifted
upward to maintain the continuity of the list.
[Remove ALL] Button
Deletes all devices from the list.
[Device Name]
This is the name of the device selected in the Target
Device List. The initial default settings are “UNIT1”
through “UNIT256”, but the name can be edited as
required in the Device Name field.
[Device IP Address]
The IP address of the device selected in the Target
Device List can be set via these fields. Refer to the
manual of the corresponding device for details on
checking and setting its IP address.
n The IP address must be set properly or communication
with the device will not be possible.
[Device MAC Address]
The MAC (Media Access Control) address of the
device selected in the Target Device List can be set
via these fields. The MAC address of each device is
permanently assigned when the device is
manufactured and cannot be changed. The MAC
address parameter is included to prevent data from
being sent to the wrong device if the IP address in
inadvertently set incorrectly. Refer to the manual of
the corresponding device for details on checking its
MAC address.
n The MAC address must be set properly or
communication with the device will not be possible.
n The MAC address of the connected device cannot be
changed.
[Device Port No.]
The MIDI port number of the device selected in the
Target Device List can be set via this menu. The MIDI
port number also functions as device ID number. It
should be set to “1” for DME64N/24N units.
n The MIDI port number must be set properly or
communication with the device will not be possible.
[Apply] Button
Click the [Apply] button after editing the Device
Name, Device IP Address, Device MAC Address, or
Device Port No. parameters to actually apply the
changes. Also, devices added to the Target Device
List
1 by pressing the [NEW] or [DUPLICATE]
buttons will only actually be registered for
communication with the YAMAHA DME-N Network
Driver when the [Apply] button is pressed.
3 [Advanced Settings] Button
Opens the “Advanced Settings” window.This window
provides access to advanced settings. For details refer to
the “Advanced Settings” section.
[Undo] Button
This button provides a one-step undo function that
allows you to undo a single operation and revert to
the previous state. The [Undo] button will be grayed
out and inaccessible immediately after an undo
operation or after the control panel is launched.
2 Device Information
When a device that is registered for communication with
the YAMAHA DME-N Network Driver is selected in the
Target Device List, the communication parameters for
that device can be viewed and edited in the Device
Information fields.
6 DME Designer Installation Guide
Page 7

3 When all parameters have been set up as required, click
the [Save and Close] button to close the “DME-N
Network Driver” window and save the settings.
n Click the [Cancel] button if you want to close the window
without saving any changes.
n This button is grayed out and is not accessible while an
application that is using the YAMAHA DME-N Network Driver
is running.
6 Detected Device List
This list shows all detected devices that are capable of
communication with the YAMAHA DME-N Network Driver.
No devices will be displayed initially.
[Add] Checkbox
Checked devices will be added to the Target Device
List when the [Add to Device List] button (below) is
clicked. Devices that are already registered cannot
be checked.
“Advanced Settings” Window
The parameters in the “Advanced Settings” window set up
the YAMAHA DME-N Network Driver for automatic device
detection, and allow saving and loading setup files.
[Device IP Address]
The IP address of the corresponding detected
device.
[Device Name]
If a name has been registered for the detected device
1
2
3
45
it will be displayed here, otherwise no name will be
displayed.
[Device MAC Address]
The MAC address of the corresponding detected
device.
English
6
7
9
8
)
Auto Detect
Allows automatic detection of connected devices that can
communicate with the YAMAHA DME-N Network Driver. A
maximum of 254 addresses (***.***.***.1 through
***.***.***.254) can be detected.
n Only MAC addresses of devices on the same subnet as the
computer can be detected. Before searching for MAC
addresses make sure that the computer is connected to the
subnet to be searched, and that an appropriate IP address is
assigned.
1 Detect from
Specifies the start IP address for automatic detection.
2 Detect to
Specifies the end IP address for automatic detection.
3 Currently searching
Displays the IP address being checked during automatic
detection. No display when automatic detection is not in
progress.
7 [Add to Device List] Button
Devices with checked [Add] checkboxes will be added
to the Target Device List when this button is clicked.
8 [Cancel] Button
Closes the window without making any changes.
9 [Import Setup from File] Button
When working in a different environment it is possible to
load a previously saved setup file. Click to open the
“Open” window. Select a setup file and then click the
[Open] button to import the corresponding settings.
) [Export Setup to File] Button
It is possible to save the setup data to a file that can then
be reloaded when working in a different environment.
Click to open the “Save As” window.
Enter a file name and click the [Save] button to save the
setup file.
4 [Start] Button
Initiates automatic detection, and causes the detected
device list 6 to be updated accordingly. This button is
grayed out and is not accessible during automatic
detection.
5 [Abort] Button
Aborts automatic detection.
This button is grayed out when automatic detection is not
in progress.
DME Designer Installation Guide 7
Page 8

Windows XP SP2
TCP/IP Settings
1 Select [Start] → [Control Panel].
2 If the “Control Panel” is in Category display, click [Switch
3 Double-click [Network Connections] → [Local Area
English
4 Click [Properties] on the [General] tab.
5 Select [Internet Protocol (TCP/IP)] on the [General] tab,
6 Click [Advanced...], then [Properties] on the [Options]
7 Select “Permit All” for TCP Ports, then click [OK].
The “Control Panel” is displayed.
to Classic View].
Connection].
The “Local Area Connection Status” dialog box will be
displayed.
The “Local Area Connection Properties” dialog box will
be displayed.
then click [Properties].
The “Internet Protocol (TCP/IP) Properties” dialog box will
be displayed.
tab.
The “TCP/IP Filtering” dialog will be displayed.
9 Enter your computer’s IP address into [IP address], the
Gateway’s IP address into [Default gateway], and
“255.255.255.0” into [Subnet mask].
n When installing on the same subnet as the DME unit(s), set
the gateway
’s host address to 254.
10 Click [OK].
11 Restart your computer.
The display returns to the “Advanced TCP/IP Settings”
dialog. Click [OK] to return to the “Internet Protocol (TCP/
IP) Properties” dialog.
8 Click [Use the following IP address] on the [General] tab.
8 DME Designer Installation Guide
Page 9

Windows 2000
1 Select [Start] → [Settings] → [Control Panel] → [Network
and Dial-Up Connections] → [Local Area Connection].
The “Local Area Connection Status” dialog box will be
displayed.
2 Click [Properties] on the [General] tab.
The “Local Area Connection Properties” dialog box will
be displayed.
3 Click [Internet Protocol (TCP/IP)] on the [General] tab,
then click [Properties].
The “Internet Protocol (TCP/IP) Properties” dialog box will
be displayed.
4 Click [Advanced…], then [Properties] on the [Options]
tab.
The “TCP/IP Filtering” dialog will be displayed.
5 Select “Permit All” for TCP Ports, then click [OK].
6 Click [Use the following IP address] on the [General] tab.
7 Enter your computer’s IP address into [IP address], the
Gateway's IP address into [Default gateway], and
“255.255.255.0” into [Subnet mask].
n When installing on the same subnet as the DME unit(s), set
the gateway's host address to 254.
8 Click [OK].
9 Restart your computer.
English
The display returns to the “Advanced TCP/IP Settings”
dialog. Click [OK] to return to the “Internet Protocol (TCP/
IP) Properties” dialog.
An example of four DME settings in a single area
The explanation in this example is based on both the zone and computer sharing the following IP address pattern:
“192.168.000.***.”
If you will be following the instructions in “Controlling from a Computer That Has the Same Network Address” on page 26 of
the “DME64N/24N Owner’s Manual,” you will need to make some changes to the network settings of your computer in
addition to the DME-N Network settings described on page 5.
For the first DME, “192.168.000.2” is set as the zone master IP address.
For the second DME, “192.168.000.3” is set as a zone slave IP address.
For the third DME, “192.168.000.4” is set as a zone slave IP address.
For the fourth DME, “192.168.000.5” is set as a zone slave IP address.
For the computer, “192.168.000.001” is set as the IP address.
“255.255.255.0” is set as the subnet mask.
If the default gateway is not connected to an external network, there is no setting. If connected to an external network, set
“192.168.000.254”.
Allow all TCP ports in TCP/IP filtering.
If you are using Windows XP, disable the Internet connection firewall setting.
*1 There are two zone master host addresses.
*2 Any address between 3 and 253 is a zone slave host address.
*3 For the IP address set on the PC, you can select host address 1 or 3 through 253, as long the one you set does not duplicate a DME address.
*4 The gateway host addresses is fixed as 254.
*4
*3
*1
*2
*2
*2
DME Designer Installation Guide 9
Page 10

•
•
• • • • • • • • • • • • • • • • • • • • • • • • • • • • • • • •
DME Designer
System Requirements
• • • • • • • • • • • • • • • • • • • • • • • • • • • • • • •
OS: Windows® XP Professional/XP Home Edition/2000
CPU: 1GHz or higher; Intel
Memory: 256MB or more
Hard disk space: 300MB or more
Display: 1024 x 768; high color (16-bit) or higher
Other: Mouse, CD-ROM drive, 100Base-TX/10Base-T
English
Installation
• • • • • • • • • • • • • • • • • • • • • • • • • • • • • • •
n If an older version of DME Designer is installed on your
1 Double-click on the “DMEDesigner” folder.
2 Double-click on “setup.exe.”
3 Execute the installation by following the onscreen
Professional
processor
Ethernet or USB connection
computer, you will need to uninstall it before proceeding.
An executable file “setup.exe” is shown.
A Setup window for DME Designer appears.
instructions.
After installation is complete, the DME Designer folder
appears on your computer (in “Program Files\YAMAHA\
OPT Tools” folder, as the default).
®
Pentium®/Celeron® family
Uninstalling
Method 1
1 Select [Start] → [All Programs] → [YAMAHA OPT Tools] →
[DME Designer] → [Setup].
The “YAMAHA DME Designer” dialog box appears.
2 Select [Remove] in “YAMAHA DME Designer” dialog box
and click [Next].
The dialog box for confirmation appears.
3 Click [Yes].
DME Designer is uninstalled.
Method 2
1 Select [Start] → [Settings] → [Control Panel] → [Add/
Remove Programs].
The “Add/Remove Programs” window appears.
2 Click [Change/Remove] of the DME Designer.
Follow the onscreen instructions to uninstall the driver.
n The button names or menus may differ depending on the
computer OS.
For details on operation, refer to the DME Designer Owner’s
Manual.
You can access the DME Designer Owner’s Manual by
selecting each folder in the “Manual” folder.
n In order to view the DME Designer Owner’s Manual, Adobe
Acrobat Reader must be installed to your computer. If you do not
have Adobe Acrobat Reader, you can download it for free from
the Adobe website below.
http://www.adobe.com/
10 DME Designer Installation Guide
Page 11

Troubleshooting
The YAMAHA USB-MIDI Driver cannot be installed.
• Is the USB cable connected correctly?
Refer to the DME64N/24N Owner’s Manual to confirm proper
connection of USB cables.
• Is the USB function enabled on your computer?
When you connect the DME to the computer for the first time,
if the “Add New Hardware Wizard” does not appear, the USB
function on the computer may be disabled. Perform the
following steps.
1 Select [Start] → [Settings] → [Control Panel] → [System].
The “System” window appears.
2 Double-click the “Device Manager” tab and make sure
that no “!” or “x” marks appear at “Universal serial bus
controller” or “USB Root Hub.”
If you see the “!” or “x” mark, the USB controller is
disabled. Refer to the owner’s manual of your computer for
details.
• Is any unknown device registered?
If driver installation fails, the DME will be shown as an
“Unknown device,” and you will not be able to install the
driver. Delete the “Unknown device” by following the steps
below.
1 Select [Start] → [Settings] → [Control Panel] → [System].
The “System” window appears.
2 Double-click the “Device Manager” tab. With the “View
devices by type” check box checked, look for “Other
devices.”
3 If you find “Other devices,” double-click it to extend the
tree to look for “Unknown device.” If one appears, select it
and click the [Remove] button.
4 Remove the USB cable from the DME, and make the
connection again.
5 Install the driver again according to the instructions
following step 4 on page 3.
When controlling the DME from your computer via
USB, the DME does not operate correctly.
• Did you install the driver?
• Is the USB cable connected correctly?
• Are you using the latest YAMAHA USB-MIDI driver?
The latest driver can be downloaded from the Yamaha
website (address given at the end of this manual).
•Have you selected USB as MIDI port in the DME?
Select USB for the MIDI port.
• Did you launch DME Designer after connecting a USB
cable and turning the device ON?
Be sure to connect the USB cable and turn the device on
before launching DME Designer.
•Was the USB cable disconnected during operation?
If the USB cable is accidentally disconnected, DME designer
will not recognize the device even if the cable is reconnected.
You will have to restart DME Designer.
English
When controlling the DME from your computer via
Ethernet, the DME does not operate correctly.
• Did you install the driver?
• Is the Ethernet cable connected correctly?
• Is the YAMAHA DME-N Network Driver set up
appropriately? Did you enter an appropriate IP address?
• Is the computer network setup appropriate?
Select [Start] → [Settings] → [Control Panel] → [Network
Connections] → [Local Area Connection], and confirm the
network setup.
• Are the settings of DME and peripheral network devices
(including switching hubs) appropriate?
Refer to the relevant owner’s manuals for the DME and
peripheral network devices (including switching hubs) for
details.
•Have you selected an appropriate network port in the DME
Designer?
• Are you using the latest YAMAHA DME-N Network Driver?
The latest driver can be downloaded from the Yamaha
website (URL below).
http://www.yamahaproaudio.com/
• Do you have security software running on your system?
Either disable the security software, or set it to allow use of
TCP port 12300 on the network card being used by the DMEN Network Driver.
• Is the YAMAHA USB-MIDI Driver set up appropriately?
•Have you selected an appropriate port in the DME
Designer or another relevant MIDI application?
Make sure that the settings in one application have either the
combination of “YAMAHA USB IN 0-1” and “YAMAHA USB
OUT 0-1,” or the combination of “YAMAHA USB IN 0-2” and
“YAMAHA USB OUT 0-2.”
Settings combining different port numbers (i.e., “YAMAHA
USB IN 0-1” and “YAMAHA USB OUT 0-2,” or “YAMAHA USB
IN 0-2” and “YAMAHA USB OUT 0-1”) cannot be used.
•Have you selected the same USB ports in both the DME
Designer and another relevant MIDI application?
Change the setting of the USB port so that both the DME
Designer and the other MIDI application match.
Cannot suspend or resume the computer correctly.
• Do not suspend the computer while the DME Designer is
running.
If you are using Windows 2000, you may not be able to
suspend/resume normally, depending on the particular
environment (USB Host Controller, etc.). (Even so, simply
disconnecting and connecting the USB cable will allow you to
use the DME functions again.)
DME Designer Installation Guide 11
 Loading...