

Page 1
Page 2

The serial number of this product may be found on the bottom of
the unit. You should note this serial number in the space provided
below and retain this manual as a permanent record of your
purchase to aid identification in the event of theft.
Model No.
DD-9
Serial No.
Entsorgung leerer Batterien
(nur innerhalb Deutschlands)
Leisten Sie einen Beitrag zum Umweltschutz. Verbrauchte
Batterien oder Akkumulatoren dürfen nicht in den Hausmüll. Sie
können bei einer Sammelstelle für Altbatterien bzw. Sondermüll
abgegeben werden. Informieren Sie sich bei Ihrer Kommune.
Page 3

Welcome
Contents
Congratulations! You are now the
proud owner of a powerful new musical instrument capable of inspiring
and fueling your musical creativity.
This is not just another digital percussion instrument. The DD-9 is the
result of passion, vision, and commitment from people who want you
to enjoy yourself every time you
play it. We’re sure you’ll agree as
you discover the limitless possibilities of your new digital percussion
instrument! Keep this manual in a
safe place for future reference.
The DD-9 At a Glance........................ 2
Setting Up .......................................... 3
Playing the Demo .............................. 4
Percussion Set .................................. 4
Pad Assign......................................... 5
Style.................................................... 5
Tempo ................................................ 6
Tap Start............................................. 6
Auto Roll ............................................ 7
Sound Effect ...................................... 7
Troubleshooting................................ 8
Specifications.................................... 8
Percussion Set List......................... 33
Voice List ......................................... 33
Taking Care of the DD-9
Avoid Heat
Avoid placing the DD-9 near windows, heaters
or other areas subject to excessive heat or in a
car exposed to direct sunlight.
Avoid Dust and Moisture
Avoid locations where the DD-9 is likely to be
exposed to excessive dust or moisture.
Avoid Physical Shocks
Do not subject the DD-9 to strong physical
shocks and avoid placing heavy objects on it.
Avoid Television and Radio Interference
The DD-9 contains digital circuitry and may
cause interference if it is placed too close to
radio or television receivers. If interference
occurs, move the DD-9 farther away from the
affected receiver(s).
Cleaning the DD-9
Use only a soft, dry or slightly damp cloth to
clean the DD-9. Never use solvents or thinners
to clean the instrument.
Avoid Power Cord Damage
Do not place the DD-9 where somebody is liable
to step on, trip over or crush the power cord or
any other connecting cables.
Making Connections
Before making any connections, turn off the
power of the DD-9 and any other equipment.
Lower the volume on all audio equipment to the
minimum level when turning the power on.
1
Page 4
57-60 FUNK
61-65 SWING
66-67 JAZZ BALLAD
66-71 FUSION
72-73 BOSSA NOVA
74-76 SAMBA
77-79 SALSA
80-81 REGGAE
82 CALYPSO
83 MERENGUE
84 BEGUINE
85 RHUMBA
86 MAMBO
87 CHA-CHA
88 TANGO
89-90 AFRICAN
91 COUNTRY
92-93 MARCH
94-96 WALTZ
97-99 METRONOME
1
2
3
4
ASSIGN
OFF
ECHO
FLAM
ROLL
SE
SELECT
PAD
TAP
START
STYLE
PERC.
SET
TEMPO
DEMO
START/
STOP
AUTO
ROLL
STYLE LIST
00-06 DANCE
06-09 HOUSE
10-13 HIP HOP
14-16 RAP
17-19 DISCO
20-23 POP ROCK
24-26 HARD ROCK
27-28 HEAVY METAL
29-31 CONTEMPO. ROCK
32-35 8 BEAT
36-39 16 BEAT
40-43 ROCK SHUFFLE
44 PROGRE, ROCK
45 PUNK ROCK
46 TECHNO ROCK
47 LATIN ROCK
48-50 ROCK'N'ROLL
51-53 RHYTHM & BLUES
54-56 SOUL
SELECTOR
VOLUME
SOUND EFFECT PADS
POWER
OFF ON
STYLE/PERC.SET/TEMPO
BEAT
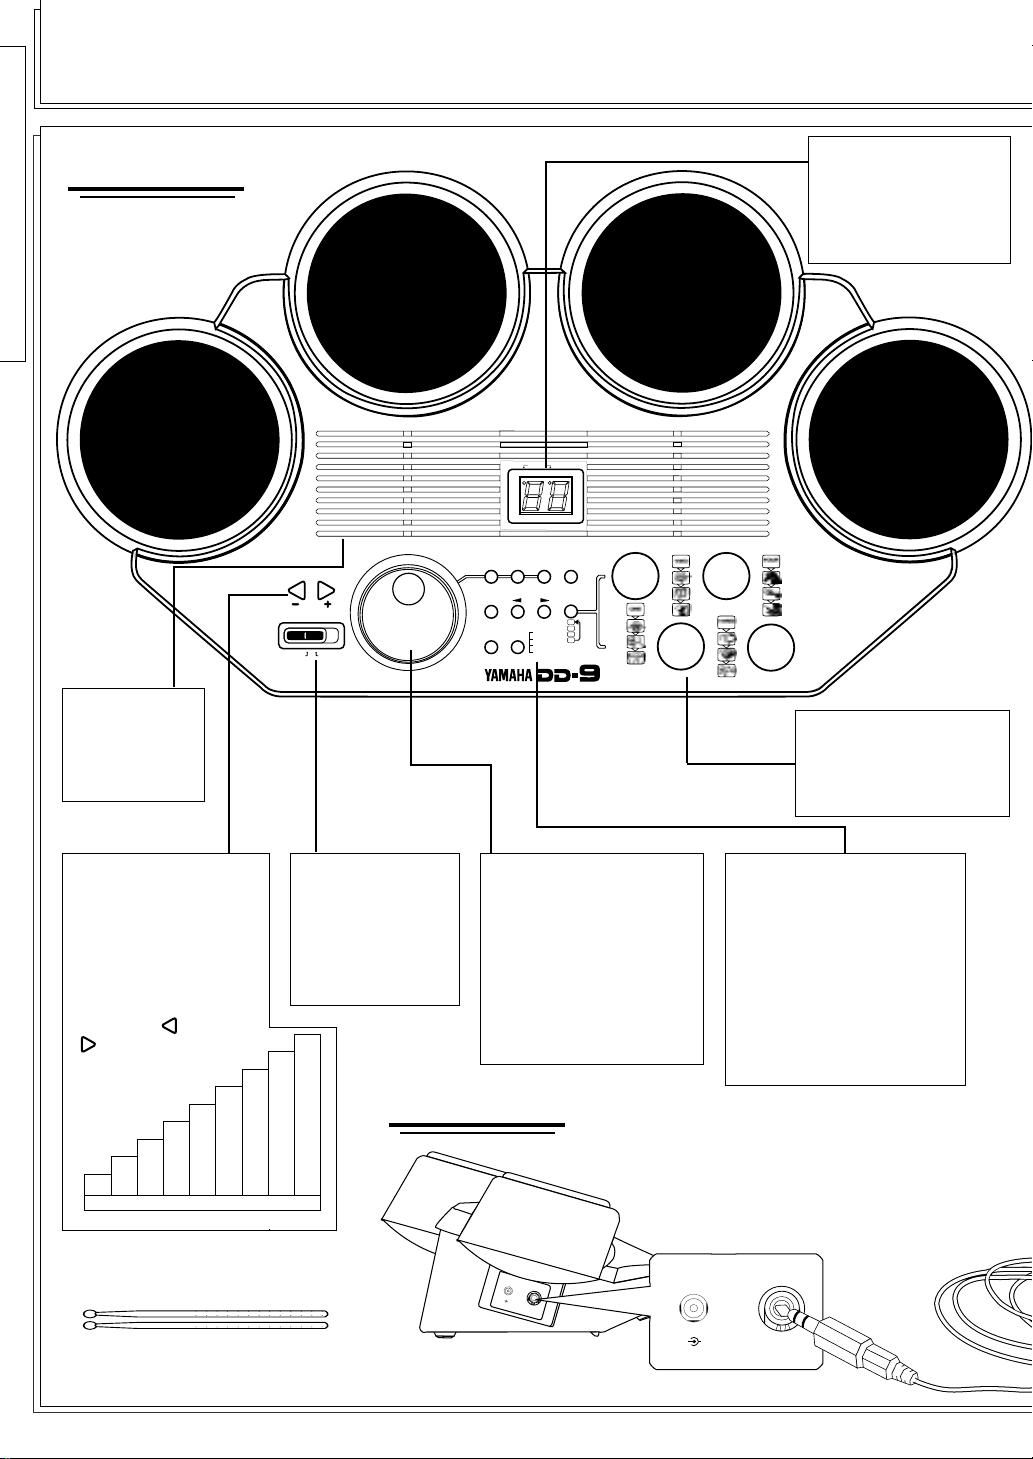
The DD-9 At a Glance
Front View
LED display
LED display shows, the
selected Style, Volume,
Percussion Set, Tempo,
Sound Effect, Auto Roll,
and other settings.
STYLE list
The Style list is
on the front
panel for easy
reference.
VOLUME buttons
The volume of the DD9 is controlled by the
two VOLUME buttons.
The maximum volume
is automatically set
when you turn on the
power. Holding down
either the
or
button decreases
or increases
the volume
rapidly.
-15dB
-18dB
-21dB
-24dB
L1 L2 L3 L4 L5 L6 L7 L8 L9
Supplied Accessories
• Percussion Sticks
• Voice List
-6dB
-9dB
-12dB
POWER switch
To turn on the
DD-9, move the
POWER switch to
the right; to turn it off
move the POWER
switch to the left.
MAX
-3dB
SELECTOR dial
The SELECTOR dial can
be an extremely quick
way to adjust the
Percussion Set, Pad
Assignment, Auto
Rhythm Style, Tempo
and Sound Effect sets.
Refer to each section
appropriately, for details.
Side View
+
_
D
C
I
N
1
0
H
-
1
E
2
A
V
D
P
H
O
N
A
E
U
S
X
/
.
O
U
T
DC IN 10-12V
SOUND EFFECT pads
The DD-9 has four
Sound Effect pads
featuring a total of 16
realistic sound effects.
Operating buttons
STYLE (See page 5.)
PERC. SET (See page 4.)
TEMPO (See page 6.)
DEMO (See page 4.)
TAP START (See page 6.)
PAD ASSIGN (See page 5.)
SE SELECT (See page 7.)
START/ STOP
(See pages 4, 5 and 6.)
AUTO ROLL (See page 7.)
_
+
HEADPHONES/
AUX. OUT
2
Page 5

Per cussion
Pads
Striking two percussion pads
at the same time produces
simultaneous sounds according to the voices assigned to
the respective pads.
Sensitivity
The DD-9’s main percussion
pads feature touch sensors so
that they respond just like
acoustic percussion instruments. Striking the percussion pads with different force
results in relatively loud or
soft sounds accordingly. Be
careful not to strike the pads
with excessive force as this
may seriously damage the
percussion pad sensors.
Headphones
You can use a standard pair of
stereo headphones, such as
Yamaha’s HPE-3 or HPE-150,
with the DD-9 for private
practice.
To connect headphones insert
the headphone plug into the
HEADPHONES/AUX. OUT
jack. The DD-9’s internal
speakers will switch off
automatically when you plug
in a pair of headphones.
Setting Up
Supplying Power
The DD-9 will operate on either an optional power adaptor or
optional batteries.
▼ To connect a power adaptor:
1. Connect only a Yamaha PA-1, PA-1B or
PA-3 power adaptor to the DC IN jack of
the DD-9.
2. Plug the power adaptor into an
AC power
outlet.
_
+
DC IN 10-12V
Caution: The use of any other power adaptors may
cause serious damage to the DD-9.
▼ To insert batteries:
1. Remove the battery compartment cover located on the bottom
of the DD-9.
2. Insert six (6) 1.5 V “AA” (R-6, SUM-3) or equivalent batteries into the battery compartment.
Make sure the polarities are lined up as indicated in the battery
compartment.
HEADPHONES/
AUX. OUT
OPEN
3. Replace the battery compartment cover securely.
Caution: To prevent damage due to battery leakage,
remove all the batteries from the instrument when it is
not to be used for an extended period of time.
❏
When the batteries are low, replace with a complete set of six new batteries.
Never mix old and new batteries or different types of batteries. The batteries
are low when the DD-9’s voices become noticeably distorted or the DD-9
resets to default settings unexpectedly
.
3
Page 6

Playing the Demo
P ercussion Set
To give you an idea of the DD-9’s sophisticated
capabilities, it comes with a demonstration song.
▼ To play back the demonstration
song:
1. Press the DEMO button.
2. To stop playback, press either the DEMO
button again or the START/STOP button.
DEMO
You can begin playing the DD-9’s percussion
pads as soon as you turn the POWER switch on
and adjust the volume to an appropriate level.
DEMO
OR
START/
STOP
The DD-9 allows you to choose from ten
different Percussion Sets quickly and easily.
Nine Percussion Sets have preset voice combinations. (See Percussion Set List on page 33.).
The DD-9 has one Custom Percussion Set
allowing you to combine any four of the DD-9’s
voices into a set. (See “Pad Assign” on page 5.)
▼ To select a Percussion Set:
1. Press the PERC. SET button to enter the
Percussion Set mode.
PERC.
SET
The current Percussion Set number appears in
the LED display.
You have approximately three seconds after
the PERC. SET button is released to start
selecting a Percussion Set before the DD-9
returns to the Auto Rhythm Style mode.
2. Press the PERC. SET button repeatedly or
turn the SELECTOR dial until the desired
Percussion Set number appears in the LED
display.
PERC.
SET
OFF ON
VOLUME
POWER
STYLE LIST
00-06 DANCE
06-09 HOUSE
10-13 HIP HOP
14-16 RAP
17-19 DISCO
20-23 POP ROCK
24-26 HARD ROCK
27-28 HEAVY METAL
29-31 CONTEMPO. ROCK
SELECTOR
32-35 8 BEAT
36-39 16 BEAT
40-43 ROCK SHUFFLE
44 PROGRE, ROCK
45 PUNK ROCK
46 TECHNO ROCK
47 LATIN ROCK
48-50 ROCK'N'ROLL
51-53 RHYTHM & BLUES
54-56 SOUL
STYLE
TAP
START
START/
STOP
BEAT
STYLE/PERC.SET/TEMPO
PERC.
TEMPO
SET
ASSIGN
PAD
AUTO
OFF
ROLL
ECHO
FLAM
ROLL
OR
57-60 FUNK
84 BEGUINE
61-65 SWING
85 RHUMBA
66-67 JAZZ BALLAD
86 MAMBO
66-71 FUSION
87 CHA-CHA
72-73 BOSSA NOVA
88 TANGO
74-76 SAMBA
89-90 AFRICAN
91 COUNTRY
77-79 SALSA
92-93 MARCH
80-81 REGGAE
82 CALYPSO
94-96 WALTZ
83 MERENGUE
97-99 METRONOME
SOUND EFFECT PADS
DEMO
SE
SELECT
1
2
3
4
The Percussion Set numbers only cycle
forward when you press the PERC. SET
button.
The SELECTOR dial turns either clockwise
or counterclockwise and the Percussion Set
numbers cycle up or down accordingly.
❏
Percussion Sets appear in the LED display as P0P9. P0 is the Custom Percussion Set and P1-P9
represent different combinations of four voices.
❏
Percussion Set P1 is automatically selected when
the power is turned on.
4
Page 7

StylePad Assign
The DD-9 contains a total of 55 high quality
voices that can be assigned to each of the four
percussion pads. The Custom Set pad assignment allows any combinations of the 55 voices.
▼ To assign a voice to a percussion
pad:
1. Strike the percussion pad to which you want to
assign a voice.
STYLE LIST
32-35 8 BEAT
57-60 FUNK
00-06 DANCE
06-09 HOUSE
10-13 HIP HOP
14-16 RAP
17-19 DISCO
20-23 POP ROCK
24-26 HARD ROCK
27-28 HEAVY METAL
29-31 CONTEMPO. ROCK
VOLUME
POWER
OFF ON
2. Press and hold either the or PAD
ASSIGN button.
PAD ASSIGN
The currently assigned voice number is
shown in the LED display.
3. While holding either PAD ASSIGN button,
strike the same percussion pad repeatedly or
turn the SELECTOR dial until the desired
voice number appears in the LED display.
(See the supplied Voice List or page 33.)
84 BEGUINE
36-39 16 BEAT
61-65 SWING
85 RHUMBA
40-43 ROCK SHUFFLE
66-67 JAZZ BALLAD
86 MAMBO
44 PROGRE, ROCK
66-71 FUSION
87 CHA-CHA
BEAT
72-73 BOSSA NOVA
45 PUNK ROCK
88 TANGO
46 TECHNO ROCK
74-76 SAMBA
89-90 AFRICAN
91 COUNTRY
47 LATIN ROCK
77-79 SALSA
48-50 ROCK'N'ROLL
92-93 MARCH
80-81 REGGAE
51-53 RHYTHM & BLUES
82 CALYPSO
94-96 WALTZ
STYLE/PERC.SET/TEMPO
54-56 SOUL
83 MERENGUE
97-99 METRONOME
SELECTOR
SOUND EFFECT PADS
PERC.
TEMPO
DEMO
STYLE
SET
SE
TAP
ASSIGN
PAD
SELECT
START
1
AUTO
2
START/
OFF
3
ROLL
STOP
ECHO
4
FLAM
ROLL
The DD-9 features a large variety of Auto
Rhythm Styles including variations of basic 8
and 16 beat patterns as well as more exotic
styles such as Son Afro and Calypso. You can
play along with any of the DD-9 Auto Rhythm
Styles. (See the front panel for the Style list.)
▼ To select and play back an Auto
Rhythm Style:
1. Press the STYLE button repeatedly or turn
the SELECTOR dial until the desired Auto
Rhythm Style number appears in the LED
display.
STYLE
OR
The Auto Rhythm Style numbers only cycle
forward when you press the STYLE button.
The SELECTOR dial turns either clockwise
or counterclockwise and the Auto Rhythm
Style numbers cycle up or down accordingly.
2. Press the START/STOP button.
START/
STOP
OR
Voice numbers cycle from 00 to 54 to 00
when striking the percussion pad.
The
voice number and the
PAD ASSIGN button decreases the
PAD ASSIGN
button increases the voice number.
4. Release the
or PAD ASSIGN button.
A new voice is now assigned to the designated percussion pad.
5. Repeat steps 1 to 4 for any or all of the other
DD-9 percussion pads to set the four percussion pads to the desired voice(s).
❏
The DD-9 always returns to Custom Set P0 when
assigning voices to a percussion pad.
❏
All pad assignment changes are memorized in
Custom Set P0 until the power is turned off.
The currently selected Auto Rhythm Style
plays back.
To stop playback, press the START/STOP
button again.
❏
You can select another Auto Rhythm Style or
enter the Tempo, Percussion Set or Sound Effect
Set mode while any Auto Rhythm Style is playing.
❏
Auto Rhythm Style “Dance 1” is automatically
selected and “00” appears in the LED
display when the power is turned on.
❏
Auto Rhythm Style “00” is selected and appears
automatically in the LED display when the
demonstration song is stopped.
5
Page 8

Tempo
Tap Start
The tempo can be adjusted in 35 steps, from 40
to 280 beats per minute (bpm). The steps are
shown in the LED display as values from 01 to
35. The default tempo varies according to Auto
Rhythm Style.
▼ To adjust the tempo:
1. Press the TEMPO button to enter the Tempo
mode.
TEMPO
The currently selected Tempo value appears
in the LED display and the right Tempo dot
lights.
You have approximately three seconds after
releasing the TEMPO button to start adjusting the tempo setting before the DD-9 returns
to Auto Rhythm Style mode.
2. Press the TEMPO button repeatedly or turn
the SELECTOR dial until the desired tempo
value appears in the LED display.
TEMPO
The DD-9 features a Tap Start function that sets
the overall tempo depending on how fast you
strike the percussion pads. This is an advanced
feature that is very useful for coordinating your
playing tempo with the selected Auto Rhythm
Style tempo.
▼ To set the tempo with Tap Start:
1. Press the TAP START button to enter the
Tap Start mode.
TAP
START
The left Tempo dot flashes at the current
tempo indicating that you are in Tap Start
standby mode.
To cancel the Tap Start mode, press the TAP
START button again.
2. Strike any percussion pad three
or four times depending on the
time signature of the selected
Auto Rhythm Style.
OR
3. Playback of the currently selected
Auto Rhythm Style will start at the desired
tempo right after the third or fourth strike on
the percussion pad.
4. To stop playback, press the START/STOP
The tempo values only cycle forward when
you press the TEMPO button.
The SELECTOR dial turns either clockwise
or counterclockwise and the tempo values
cycle up or down accordingly.
The range of available tempos is from 40 to
button.
To stop playback and enter Tap Start standby
mode, press the TAP START button.
START/
STOP
OR
TAP
START
280 bpm. You can change the current tempo
while any Auto Rhythm Style is playing.
LED display Tempo Dots
The DD-9 has two tempo lights in the top of the LED display. During Auto Rhythm Style playback, the two
lights flash in a specific pattern so you can keep the beat easily.
The tempo lights flash as follows:
1st measure
1st Beat
2nd Beat
3rd Beat 4th Beat
2nd measure
6
Page 9

Auto Roll
Sound Effect
The DD-9 is equipped with three Auto Roll
effects that help enhance your playing. The
effects include ECHO, FLAM and ROLL. Each
of these effects varies according to the selected
tempo so that the initial strike starts the effect
and the DD-9 keeps the beat throughout the
effect’s duration. Auto Roll effects work only
with the percussion pads.
▼ To select an Auto Roll effect:
1. Press the AUTO ROLL button once to enter
the Auto Roll mode.
AUTO
ROLL
The current Auto Roll setting will appear in
the LED display for approximately 3 seconds.
2. Select an effect from the list next to the
AUTO ROLL button and press the AUTO
ROLL button in succession until the desired
effect setting appears in the LED display.
The Auto Roll OFF setting is automatically
selected when the power is turned on.
❏
The Auto Roll function may produce unexpected
effects or not produce any effect at all, depending
on the voice selected and the tempo setting.
OFF
ECHO
FLAM
ROLL
The DD-9 has four sound effect pads that feature
16 realistic and versatile sound effects. A set of
four different sound effects, represented by the
symbols printed on the DD-9’s front panel, is
available for each sound effect pad.
▼ To select different sound effects:
1. Press the SE SELECT button to enter the
Sound Effect mode.
SE
SELECT
The current sound effect set number will
appear in the LED display.
You have approximately three seconds, after
releasing of the SE SELECT button to start
selecting the sound effect setting before the
DD-9 returns to the Auto Rhythm Style
mode.
2. Press the SE SELECT button repeatedly or
turn the SELECTOR dial until the desired
sound effect set number appears in the LED
display.
SE
SELECT
OR
Effect Setting
(OFF)
(ECHO)
(FLAM)
(ROLL)
Description
No Auto Roll effects
are assigned.
The DD-9 will produce a
fading echo sound automatically.
The DD-9 will produce a
double note (called a
flam) for every single
note you play.
The DD-9 will produce a
drum roll synchronized
with the tempo setting.
Each time you strike a
percussion pad a roll will
follow.
The sound effect set numbers only cycle
forward from E1 to E4 when you press the
SE SELECT button.
The SELECTOR dial turns either clockwise
or counterclockwise and the sound effect set
numbers cycle up or down accordingly.
7
Page 10

Troubleshooting
Specifications
In many cases, seemingly big problems or
malfunctions can be remedied easily. Please
check the following list before deciding that
your DD-9 is broken.
If the problem is not listed here or the suggested
remedy is ineffective, take the DD-9 to an
authorized Yamaha dealer for proper diagnosis
and repairs. Do not attempt to repair this digital
percussion instrument as serious damage may
occur.
A buzz or click occurs momentarily when the DD-9
is turned ON or OFF.
❏ This is a normal power surge noise that occurs
when the POWER switch is operated.
The LED display is completely dark.
❏ The batteries are low and should be replaced
immediately.
No sound comes from the speakers.
❏ The volume is turned down too low and should be
adjusted up appropriately.
❏ A plug is inserted into the HEADPHONES/AUX.
OUT jack and should be taken out immediately.
The wrong voice plays when you strike a percussion pad.
❏ The desired voice has not been assigned to the
percussion pad. Use the PAD ASSIGN function to
program the desired voice to the appropriate
percussion pad.
The custom pad voice assignments have disappeared or defaulted.
❏ The batteries are low and should be replaced
immediately.
❏ The POWER switch has been turned OFF and ON
and the default voices have replaced the desired
voices. Use the PAD ASSIGN function to program
the desired voices again.
When the percussion pads are struck, the LED
display goes dark momentarily and then changes
to the default reading “00”.
❏ The batteries are low and should be replaced
immediately.
Percussion pads
4 (touch sensitive)
SE pads
4
Percussion sets
9 preset + 1 custom
Auto Rhythm Styles
100
Instrument and Sound Effect Voices
55
Auxiliary Functions
Tap Start, Auto Roll, Auto
Rhythm Style, Demonstration
Song
Panel Controls
POWER switch, SELECTOR
dial, VOLUME buttons, STYLE
button, PERC. SET button,
TEMPO button, TAP START
button, PAD ASSIGN buttons,
START/STOP button, AUTO/
ROLL button, SE SELECT
button, DEMO button
LED Display
STYLE/PERCUSSION SET/
TEMPO and other settings
Connectors
DC IN 10-12V
Headphones/AUX.OUT
Main amplifier
3.8W (EIAJ)
Speaker
10.0cm
Power Source
AC power adaptor
YAMAHA PA-1, PA-1B, or PA-3
(sold separately)
Batteries
Six “AA” size, SUM-3, R-6, or
equivalent batteries
(sold separately)
Dimensions (W x D x H)
435mm x 236mm x 160mm
(17 1/8” x 9 1/4” x 6 1/3”)
Weight
1.4 Kg (3 lbs., 1oz.)
Supplied accessories
Percussion Sticks
Voice List
* Specifications subject to change without notice.
8
Page 11

Page 12

 Loading...