

Yamaha CLP-880M, Clavinova CLP-820, Clavinova CLP-880PE, Clavinova CLP-840, Clavinova CLP-820S Owner's Manual
...

L---
__
SP_E_C_IA_L_M_E_S_S_A_G_E_S_E_C_T_IO_N
__
J
PRODUCT
products may have either labels similar to the graphics
shown below or molded/stamped facsimiles
graphics on the enclosure. The explanation
ics appears on this page. Please observe all cautions indicated on this page and those indicated in the safety in-
struction section.
See bottom
SAFETY
CAUTION:
REFER
SERVICING
of
Keyboard enclosure for graphic symbol markings
MARKINGS:
RISK
OF
ELECTRIC
DO
NOT
OPEN
TO
REDUCE
THE
REMOVE
TO
QUALIFIED
RISK
COVER
DO
NOT
NO
USER·SERVICEABLE
The exclamation point within the equilateral triangle is intended to alert the
user to the presence
ating and maintenance (servicing) instructions in the literature accompany-
ing the product.
Yamaha electronic
of
SHOCK
OF
ELECTRIC
(OR
PARTS
SERVICE
+
~
SHOCK.
BACK).
INSIDE.
PERSONNEL.
of
important oper-
of
these
these graph-
Battery
rechargable battery which (if applicable) is soldered in
place. The average life span
proximately five years. When replacement becomes necessary, contact a qualified service representative to perform the replacement.
Warning:
incinerate this type
from children. Dispose
regulated by applicable laws. Note: In some areas, the
servicer is required by law to return the defective parts.
However, you do have the option
dispose
Disposal Notice: Should this product become damaged
beyond repair, or for some reason its useful life is considered to
federal regulations that relate
that contain lead, batteries, plastics, etc.
NOTICE:
edge relating
unit is operating as designed) are not covered by the
manufacturer's warranty, and
responsibility. Please study this manual carefully and consult your dealer before requesting service.
Notice: This product MA Y contain a small non-
of
this type
Do not attempt
of
these parts for you.
be
at an end, please observe all local, state, and
Service charges incurred due to lack
to
how a function or effect works (when the
to
recharge, disassemble,
of
battery. Keep all batteries away
of
used batteries promptly and
to
the disposal
are therefore the owners
of
battery is ap-
of
having the servicer
of
products
of
or
knowl-
as
The lightning flash with arrowhead
symbol, within the equilateral triangle,
is intended to alert the user to the pres-
of
ence
age" within the product's enclosure that
may be
stitute a risk
IMPORTANT
ucts are tested and approved by an independent safety
testing laboratory in order that you may be sure that when
it is properly installed and used in its normal and customary manner, all foreseeable risks have been eliminated.
DO NOT modify this unit or commission others to do so
unless specifically authorized by Yamaha. Product per-
formance and/or safety standards may be diminished.
Claims filed under the expressed warranty may be denied
if
the unit is/has been modified. Implied warranties may
also be affected.
SPECIFICA
information contained in this manual is believed
correct at the time
the right to change or modify any
without notice or obligation to update existing units.
NOTICE:
TIONS
of
uninsulated "dangerous volt-
of
sufficient magnitude to con-
of
electrical shock.
All Yamaha electronic prod-
SUBJECT
printing. However, Yamaha reserves
TO
CHANGE:
of
the specifications
The
to
be
NAME
cates the location
serial number, power requirements, etc., are located on
this plate. You should record the model number, serial
number, and the date
below and retain this manual as a permanent record
your purchase.
CLP-880/880M/880PE
PLATE
LOCA
TION:
of
the name plate. The model number,
of
purchase in the spaces provided
The
graphic below indi-
of
ENVIRONMENTAL
duce products that are both user safe and environmentally
We
friendly.
production methods used
goals. In keeping with both the letter and the spirit
law, we want you
sincerely believe that our products and the
ISSUES: Yamaha strives to pro-
to
produce them, meet these
to
be aware
of
the following:
of
the
Model
Serial No.
______________________________
_______________
__
_
PRECAUTIONS
PLEASE READ CAREFULL Y BEFORE
*
Please
~WARNING
Always
short-circuiting,
•
•
•
follow
Do
not
open
modify
them
If
it
should
appear
have
it
inspected
Do
not
expose
conditions,
into
any
openings.
If
the
power
loss
of
sound
smoke
should
the
the
instrument
in
any
by
the
or
place
cord
or
during
appear
basic
precautions
damages,
or
attempt
way.
The
instrument
to
be
malfunctioning,
qualified
Yamaha
instrument
containers
plug
becomes
use
of
the
to
be
caused
to
fire
or
other
to
disassemble
contains
discontinue
service
rain,
use
on
it
containing
frayed
or
instrument,
by
iI,
~CAUTION
Always
instrument
•
follow
•
Do
not
place
and
do
not
objects
on
or
roll
anything
When
removing
hold
the
plug
•
Do
not
connect
nector.
Doing
heating
in
•
Remove
the
used
for
extended
•
Before
connecting
the
power
components,
•
Do
not
expose
cold
or
heat
day)
to
prevent
na
components.
•
Do
not
use
radios,
or
proper
operation
•
Do
not
place
tally
fall
over.
•
Before
moving
•
When
cleaning
solvents,
cleaning
not
place
vinyl,
discolor
the
•
On
the
CLP-880PE,
too
hard
since
•
On
the
CLP-880PE,
lain,
or
other
•
Do
not
rest
not
use
excessive
the
basic
or
other
the
power
excessively
it,
or
place
it
over
it.
the
electric
itself
and
the
instrument
so
can
result
the
outlet.
electric
plug
periods
the
for
all
components.
set
all
volume
the
instrument
(such
as
in
the
possibility
the
instrument
speakers,
your
of
the
the
instrument
the
instrument,
the
instrument,
fluids,
plastic
panel
or
gently
small
bumping
hard
objects
weight
force
since
keyboard.
particles
precautions
property.
cord
bend
in aposition
not
from
instrument
direct
near
other
or
or
rubber
can
on,
on
These
near
heat
sources
or
otherwise
where
plug
from
the
the
cord.
Pulling
to
an
electrical
in
lower
sound
the
outlet
when
of
lime,
or
during
to
other
Before
turning
levels
to
minimum.
to
excessive
sunlight,
near aheater,
of
panel
disfiguration
other
electrical
this
might
cause
products.
in
an
unstable
remove
all
use asoft,
chemical-impregnated
remove
of
the
cause
or
place
the
objects
dust
and
dirt
can
surface
the
heavy
buttons,
dry
on
scratch
of
finish
objects
switches
keep
these
listed
below
hazards.
the
no
user-serviceable
use
personnel.
it
near
water
liquids
damaged,
immediately
or
if
listed
or
any
below
precautions
such
as
heaters
damage
the
anyone
could
instrument
by
quality,
electrical
electronic
dust
position
connected
cloth.
the
dirt
the
or
the
cord
outlet
using amultiple-con-
or
possibly
the
instrument
storms.
components,
the
power
or
vibrations,
or
or
damage
products
interference
where
cables.
Do
not
wiping
instrument,
with asoft
the
instrument's
instrument
to
crack
or
on
the
or
connectors.
precautions
to
avoid
These
internal
immediately
or
in
damp
which
might
if
there
is asudden
unusual
smells
turn
off
the
to
avoid
include,
or
radiators,
cord,
place
walk
on,
trip
an
outlet,
can
damage
cause
is
not
on
or
off
or
in acar
during
to
the
such
as
televisions,
which
can
it
might
acciden-
use
paintthinners,
cloths.
since
this
cloth.
Do
finish.
with
metal,
peel.
Use
instrument,
in a safe
the
possibility
precautions
parts
or
parts.
and
or
wet
spill
or
power
the
but
are
heavy
over,
always
it.
over-
to
be
turn
off
for
all
extreme
the
inter-
affect
Also,
do
might
not
wipe
porce-
caution.
and
do
place
include,
switch,
inspected
•
Only
voltage
•
Before
outlet
•
Check
have
possibility
not
limited
•
(For
pinch
•
(For
other
happens,
the
outlet
personnel.
•
Do
not
from
bly
result
•
Read
cess.
result
•
Do
not
comfortable
you
cian.
.USING
•
Do
not
step-ladder
•
Only
possibility
•
(For
while
posed
mechanism
•
If
the
them
.SAVING
•
Save
in
order
user
Yamaha
PROCEEDING
for
future
of
serious
disconnect
use
is
cleaning
Never
the
accumulated
of
instruments
your
instruments
objects
place
the
carefully
Failure
in
operate
experience
play
one
height-adjustable
sitting
on
bench
periodically
all
data
to
operating
cannot
injury
but
are
not
the
by
qual
ified
the
voltage
specified
printed
on
the
the
instrument,
insert
or
electric
plug
on
it.
physical
to,
fingers,
immediately
and
wall),
in
damage
THE
person
of
the
USER
help
injury
the
following:
with akey
and
with akey
between
have
the
the
instrument
since
this
the
instrument
the
attached
to
assemble
to
the
the
instrument
volume
level,
any
hearing
BENCH
carelessly
or
for
any
should
accident
on
the
bench,
adjustment
or
even
injury.
screws
become
using
DATA
to
an
external
prevent
error.
be
held
responsible
electric
Yamaha
name
remove
periodically
do
the
turn
instrument
instrument
with
other
or
benches)
the
the
reference.
or
even
death
limited
can
(if
sit
injury.
mechanism,
device
to,
plug
from
service
as
correct
plate
of
always
an
electric
and
to
you
cover)
Take
not
insert afinger
cover)
Never
slits
of
the
off
the
power
inspected
against a wall
cause
inadequate
overheating.
documentation
the
instrument
or
for a long
since
this
can
loss
or
ringing
included)
or
stand
purpose
might
on
the
bench
Do
not
since
this
can
loose
due
included
tool.
such
as
loss
of
important
for
damage
from
the'
following:
the
outlet,
personnel.
for
the
instrument.
the
instrument.
remove
the
plug
with
remove
any
or
others,
care
that
or
hand
insert
or
key
cover
and
and
remove
by
qualified
(allow
air
explaining
in
the
even
injury.
period
cause
permanent
in
the
on
the
bench.
result
at atime,
attempt
to
cause
excessive
possibly
resulting
to
extensive
the
Yamaha
data
caused
by
electrical
and
have
electric
wet
hands.
dirt
or
the
key
in
drop
paper
the
the
at
least 3 cm/one-inch
circulation,
proper
of
time
ears,
Using
in
accident
in
order
adjust
long-term
MIDI
due
improper
shock,
the
instrument
The
required
plug
from
or
dust
which
damage
the
electric
the
to amalfunction
to
cover
does
key
cover
or
metallic
keyboard.
plug
Yamaha
and
assembly
sequence
at ahigh
hearing
consult aphysi-
it
as atool
or
injury.
to
prevent
the
bench
force
to
in
damage
use,
Data
Filer
use
Of
modi-
the
may
the
not
gap.
or
If
this
from
service
possi-
pro-
might
or
un-
loss.
If
or
the
height
be
im-
to
the
tighten
MDF3,
or
Introduction
Thank you for choosing a
advanced
Yamaha
music technology.
musical pleasure.
• Stereo sampling
power,
realistic reproductions
• Piano-like
control
•
Dual
mode
• Split
•
'.
• 2-track digital recorder
•
• Built-in computer interface for direct connection
mode
hands.
On
the CLP-880/860, damper
voices, simulating
Metronome feature
board.
MIDI
compatibility
of
advanced
vanced music
Yamaha
while
the
touch
and
outstanding
allows 2
(CLP-880/860) allows different voices
MIDI
software.
Clavinova.
With
the
of
the
acoustic
AWM
(Advanced
of
all
other voices.
response
the
and a range
music systems.
- adjustable
playability.
voices
to
string
and
with
variable tempo facilitates practice.
lets
you
Your
proper care, your Clavinova will give you many years
piano
voices offers unmatched
Wave
be
played
pedal
includes
sound-board
record
of
and
MIDI
Clavinova
Memory)
in
4 stages - provides extensive expressive
simultaneously.
natural
resonance
play back anything
functions
is
a fine musical instrument that employs
realism
tone
generator
to
be
played
resonance effect
make
the
to
personal computers running
by
of acoustic
you
Clavinova
system
the
left
for
pianos.
play
useful
and
on
expressive
offers
and
the piano
the
in a range
of
rich,
right
key-
ad-
In order to make the most
of
your Clavinova's perfonnance potential and features, we urge you to read
this Owner's Manual thoroughly, and keep it in a safe place for later reference.
*
The
models
Owner's
CLP-880M,
Manual.
CLP-880PE
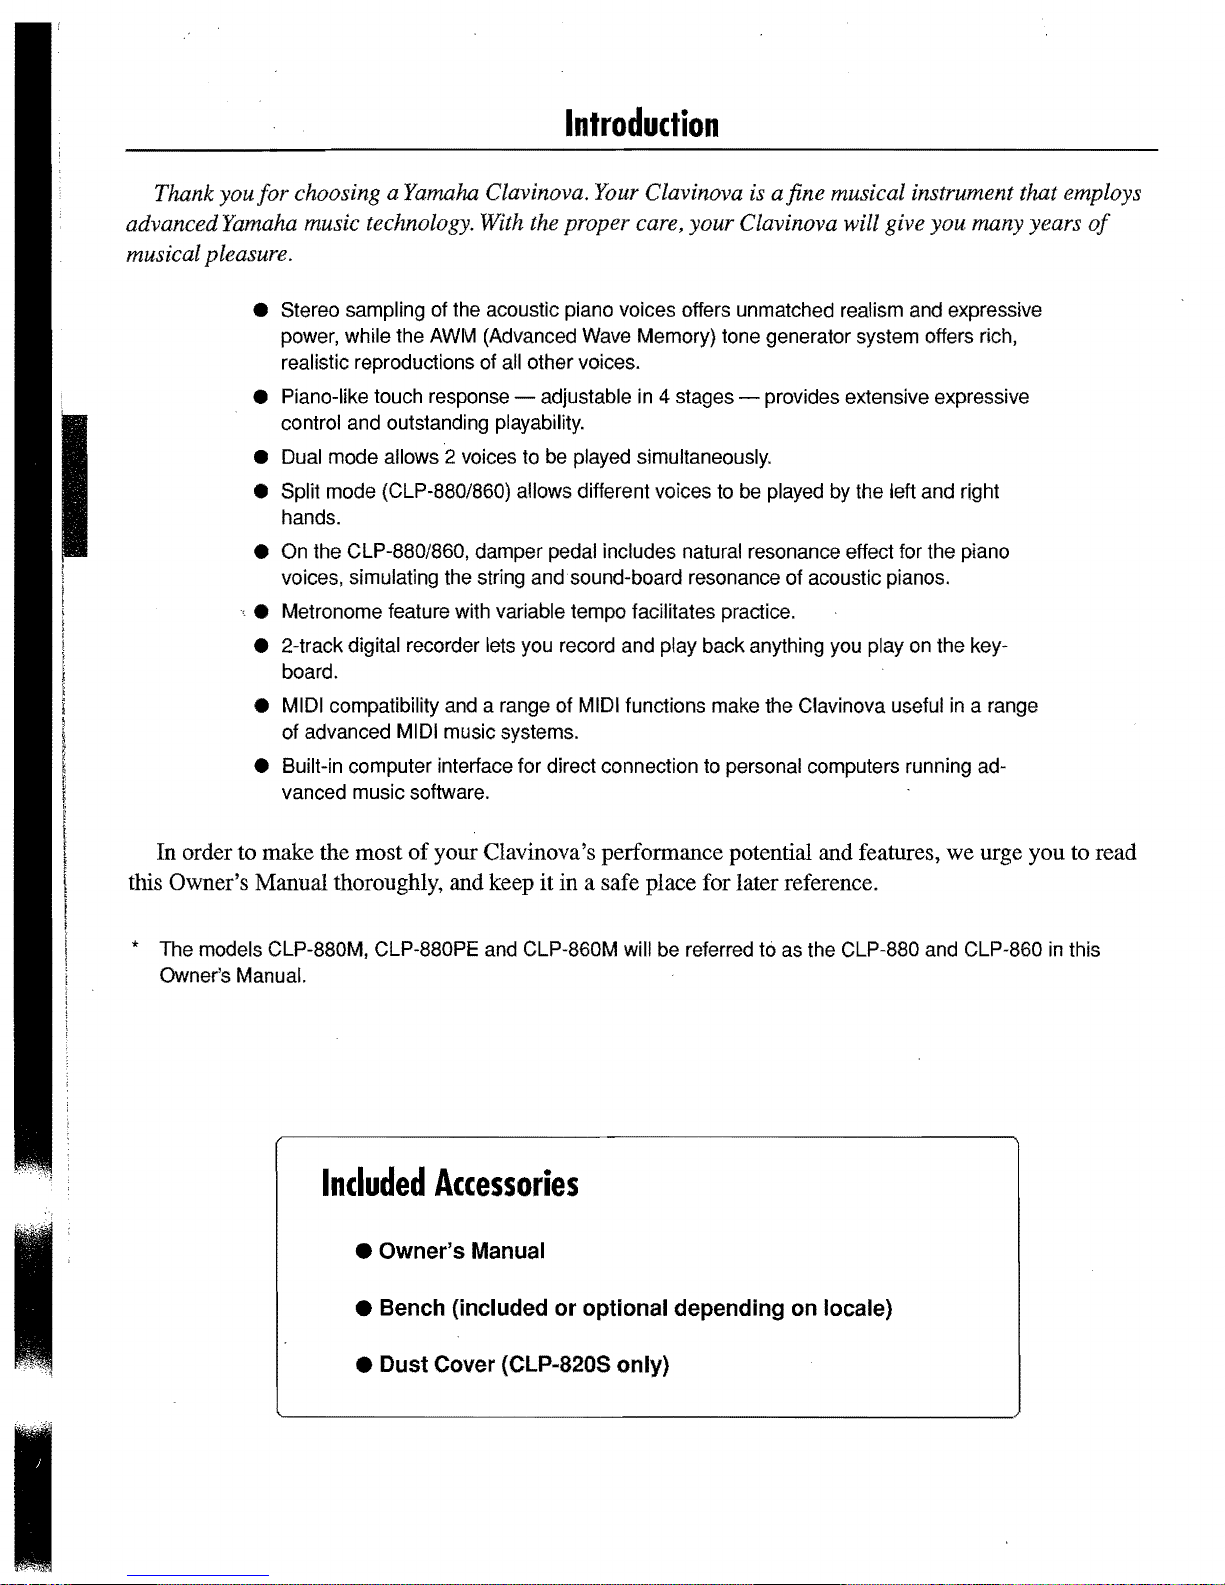
Included
• Owner's Manual
• Bench (included or optional depending
• Dust Cover (CLP-820S only)
and
CLP-860M
Accessories
will
be
referred
t6
as
on
the
CLP-880
locale)
and
CLP-860
in
this
Contents
The
Control
Panel
..........................................................
6
Key
Cover & Music
Stand
..............................................
8
Connections
.................................................................
10
Selecting & Playing
Voices
...........................................
11
Playing
the
Demonstration
Tunes
................................
12
• Voice Demo .............................................................. 12
• Piano Song .............................................................. 13
• Piano Song A-B Repeat .......................................... 14
• Piano Song Part Cancel .........................................
15
• Synchro Start ..................................................... 15
• Left Pedal Start/Stop .........................................
15
The
Dual
Mode
............................................................
16
• Other Dual Mode- Functions ............................... 16
The
Split
Mode
(CLP-880/860)
........................................ 17
• Selecting the Right and Left Voices ................... 17
• Setting the Split Point ........................................
17
• Other Split Mode Functions ............................... 17
Reverb
.............................:..........................................
18
• Adjusting Reverb Depth ..................................... 18
The
Effect
(CLP-880/860/840)
..........................................
19
• Adjusting Effect Depth ....................................... 19
Brilliance
(CLP-880/860/840)
........................................... 19
The
Pedals
...................................................................
20
• Damper (Right) Pedal ........................................ 20
• Sostenuto (Center) Pedal
(except
for
CLP·820S)
.....
20
• Soft (Left) Pedal ................................................. 20
Touch
Sensitivity
.........................................................
21
Transposition
...............................................................
21
Tuning
.........................................................................
22
• Tuning
Up
.......................................................... 22
• Tuning Down ...................................................... 22
•
To
Restore Standard Pitch ................................. 22
The
Metronome & Tempo
Control
................................
23
• The Metronome ....................................................... 23
• Metronome Time Signature ............................... 23
• Metronome Volume Function ............................. 23
• Tempo Control ......................................................... 23
Using
the
Recorder
......................................................
24
• Recording ................................................................ 24
• Changing the Initial Settings .............................. 25
• Erasing a Single Track ....................................... 25
• Playback .................................................................. 26
• Synchro Start ..................................................... 26
• Left Pedal Start/Stop ......................................... 26
The
Function
Mode
......................................................
27
•
To
Select a Function ........................................ 27
• F1: Tuning ................................................................ 28
• F2: Scale .................................................................. 28
F2.1
: Scale ........................................................... 28
F2.2: Base Note ................................................... 28
• F3: Dual Mode Functions ....................................... 29
F3.1
: Dual Balance ............................................... 29
F3.4: 2nd Voice Octave Shift ................................ 29
F3.5: 1
st
Voice Effect Depth (CLP-880/860/840)
........
30
F3.6: 2nd Voice Effect Depth
(CLP·880/860/840)
.......
30
F3.5: Reset
(CLP·820/B20S)
.....................................
30
F3.7: Reset
(CLp·880/860/840)
..................................
30
• F4: CLP-880/860 Split Mode Functions ................. 30
F4.1: Split Point .................................................... 30
F4.2: Split Balance ............................................... 30
F4.3: Right Voice Octave Shift .............................
31
F4.4: Left Voice Octave Shift ................................
31
F4.5: Right Voice Effect Depth .............................
31
F4.6: Left Voice Effect Depth ...............................
31
F4.7: Damper Range ............................................
31
F4.8: Reset ...........................................................
31
• F4: CLP-840/820/820S Left Pedal Mode ................ 32
• F5: CLP-880/860 Pedal Functions ......................... 32
F5.1: Left Pedal Mode .......................................... 32
F5.2: Damper Mode ............................................. 32
F5.3: Soundboard Depth ...................................... 32
• F5: CLP-840/820/820S Metronome Volume ........... 33
• F6: CLP-880/860 Metronome Volume .................... 33
• F6:
Clp·840/820/820S
Piano
Song
Part
Cancel
Volume
..
33
• F7:
CLp·880/B60
Piano
Song
Part
Cancel
Volume
....... 33
• F7: CLP-840/820/820S
MIDI
Functions .................. 34
• F8: CLP-880/B60
MIDI
Functions ...........................
34
• A Brief Introduction to MIDI ................................ 34
F7 .1/F8.1 : MIDI Transmit Channel Selection ....... 34
F7.2/F8.2: MIDI Receive Channel Selection ........ 34
F7.3/F8.3: Local Control ON/OFF ........................ 35
F7 A/F8.4: Program Change ON/OFF .................. 35
F7.5/F8.5: Control Change ON/OFF .................... 36
F7.6/F8.6: MIDI Transmit Transpose .................... 36
F7.7/F8.7: Panel/Status Transmit.. ....................... 36
F7.8/F8.8:
Bulk Data Dump .................................. 36
• F8: CLP-840/820/820S Backup Functions ............. 37
• F9: CLP-880/860 Backup Functions ...................... 37
F8.1!F9.1 : Voice ................................................... 37
F8.2/F9.2: MIDI .................................................... 37
F8.3/F9.3: Tuning ................................................. 37
F8.4/F9A: Pedal ................................................... 37
Connecting
to a Personal
Computer
.............................
38
•
Connecting
to
an
Apple
Macintosh
Series
Computer
.... 38
• Connecting
to
an
IBM·PC/AT
Series Computer ........ 39
Factory
Preset
Recall
...........:......................................
40
Troubleshooting
...........................................................
40
Options & Expander
Modules
......................................
40
Demo and Piano Song List.. ............................................. ;41
Factory Setting List ............................................................
42
MIDI Data Format ................................................................ 43
MIDI Implementation Chart ................................................ 47
CLP-880: Keyboard Stand Assembly ............................... 48
CLP-860/840/820: Keyboard Stand Assembly ................. 56

IJ
IJ
I
JJJ
• :
•
:'
·:
..
The
t:
I
I
Control
O~
OfW.I.l
0_
OIllolU
O~
O$f.>O/i O$OFT
00
ee
O~
QCII:I!'IllS
O>WJ..'
QS'\WIO/IC
Q>W.l.:
0$1',.,.,
oao
eoe
OIWW
OTRE.t.la.O
OfIiU:UI:
QCEl.AY
QSI.lf'f
o~
o~o........,
o~oo~
OCEl.AY
Qson'
Panel
I
HHH
HHH
I
HHH
I
I
o
~.
o 0
o
o
-
(50
~.
o
0 •
D
;
PHONES
.............................
Jacks
Tuning
(Bottom
panel)
keys
(See
(See
page
page
10)
o [POWER] Switch
Press the
power ON, a second time to turn the power OFF.
When the power
selector LED will light, and the power indicator
located below the left end
(except for CLP-820S).
[POWER]
is
switch once to turn the
initially turned ON, a voice
of
the keyboard will light
HHH
I
I
22)===§§~~t============~~~
phone volume when a pair
into the PHONES jack (page
8 [BRILLIANCE] Control (CLP-880/860/840)
The
[BRILLIANCE]
or
"timbre"
to
a bright tone.
of
the output sound from a mellow tone
of
headphones is plugged
lO).
Control adjusts the tonality
8 [MASTER VOLUME] Control
The
[MASTER
volume (level)
Clavinova's internal stereo sound system. The
fMASTRR VOl
VOLUME] control adjusts the
of
sound produced by the
JIMFl
/Control
::ll<;:o
::lrlill<;:t<;:
hp!OlrL
o[DEMO] Button
Activates the demo playback mode in which you
can select playback
sequences for each
page 12 for details.
of
different demonstration
of
the Clavinova's voices. See
The
Control
Panel
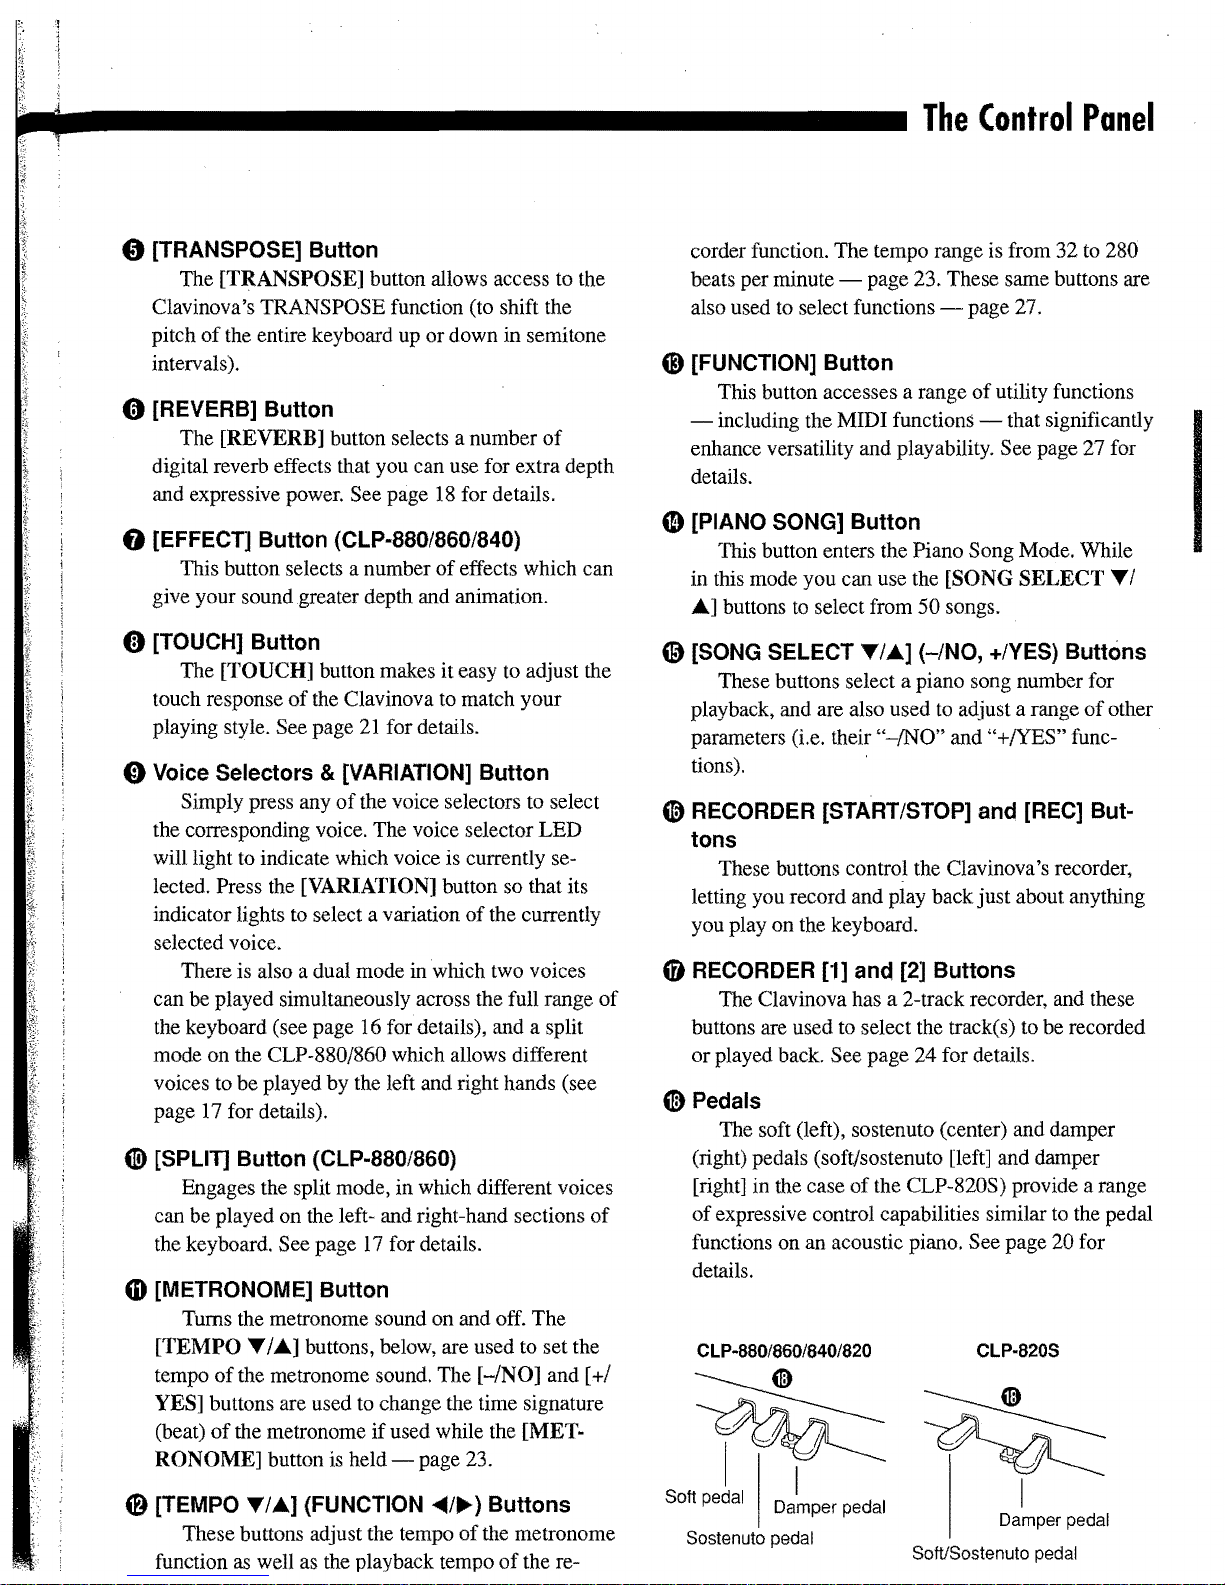
tt[TRANSPOSE]
Button
The [TRANSPOSE] button allows access to the
Clavinova's TRANSPOSE function (to shift the
pitch
of
the entire keyboard up
or
down in semitone
intervals).
o [REVERB] Button
The [REVERB] button selects a number
of
digital reverb effects that you can use for extra depth
and expressive power. See page
18
for details.
8 [EFFECT] Button (CLP-880/860/840)
This button selects a number
of
effects which can
give your sound greater depth and animation.
8 [TOUCH] Button
The [TOUCH] button makes it easy to adjust the
touch response
of
the Clavinova to match your
playing style. See page
21
for details.
o Voice Selectors & [VARIATION]
Button
Simply press any
of
the voice selectors to select
the corresponding voice. The voice selector
LED
will light to indicate which voice is currently selected. Press the [VARIATION] button so that its
indicator lights to select a variation
of
the currently
selected voice.
There is also a dual mode in which two voices
can be played simultaneously across the full range
of
the keyboard (see page 16 for details), and a split
mode on the CLP-880/860 which allows different
voices to be played by the left and right hands (see
page 17 for details).
(i) [SPLIT] Button (CLP-880/860)
Engages the split mode, in which different voices
can be played on the left- and right-hand sections
of
the keyboard. See page
17
for details.
CD
[METRONOME] Button
Turns the metronome sound on and off. The
[TEMPO
T /
A]
buttons, below, are used to set the
tempo
of
the metronome sound. The
[-/NO]
and [+/
YES] buttons are used to change the time signature
(beat)
of
the metronome
if
used while the
[MET·
RONOME]
button is held page 23.
o [TEMPO
T/A]
(FUNCTION
....
1... )
Buttons
These buttons adjust the tempo
of
the metronome
function
as
well as the playback tempo
of
the re-
corder function. The tempo range is from 32 to 280
beats per minute - page 23. These same buttons are
also used to select functions - page 27.
fi)
[FUNCTION] Button
This button accesses a range
of
utility functions
including the MIDI functions that significantly
enhance versatility and playability. See page 27 for
details.
(D
[PIANO SONG]
Button
'This
button enters the Piano Song Mode. While
in this mode you can use the [SONG
SELECT
TI
A]
buttons
to
select from 50 songs.
e [SONG SELECT
T/A]
(-/NO, +/YES) Buttons
These buttons select a piano song number for
playback, and are also used to adjust a range
of
other
parameters (Le. their
"-/NO"
and "+/YES" func-
tions).
t@
RECORDER [START/STOP] and [REC] Buttons
These buttons control the Clavinova's recorder,
letting you record and play back just about anything
you play on the keyboard.
o RECORDER
['1]
and [2]
Buttons
The Clavinova has a 2-track recorder, and these
buttons are used to select the track(s) to be recorded
or
played back. See page 24 for details.
~
Pedals
The soft (left), sostenuto (center) and damper
(right) pedals (soft/sostenuto [left] and damper
[right] in the case
of
the CLP-820S) provide a range
of
expressive control capabilities similar to the pedal
functions on an acoustic piano. See page 20 for
details.
CLp·880/860/840/820
CLp·820S
~
~
T
~r----
~
Soft pedal Damper pedal
I
Damper pedal
Sostenuto pedal
Sof1lSostenuto pedal
I
IJ
IJ
I
Key
Cover
&
Music
Stand
f
JJJ
II
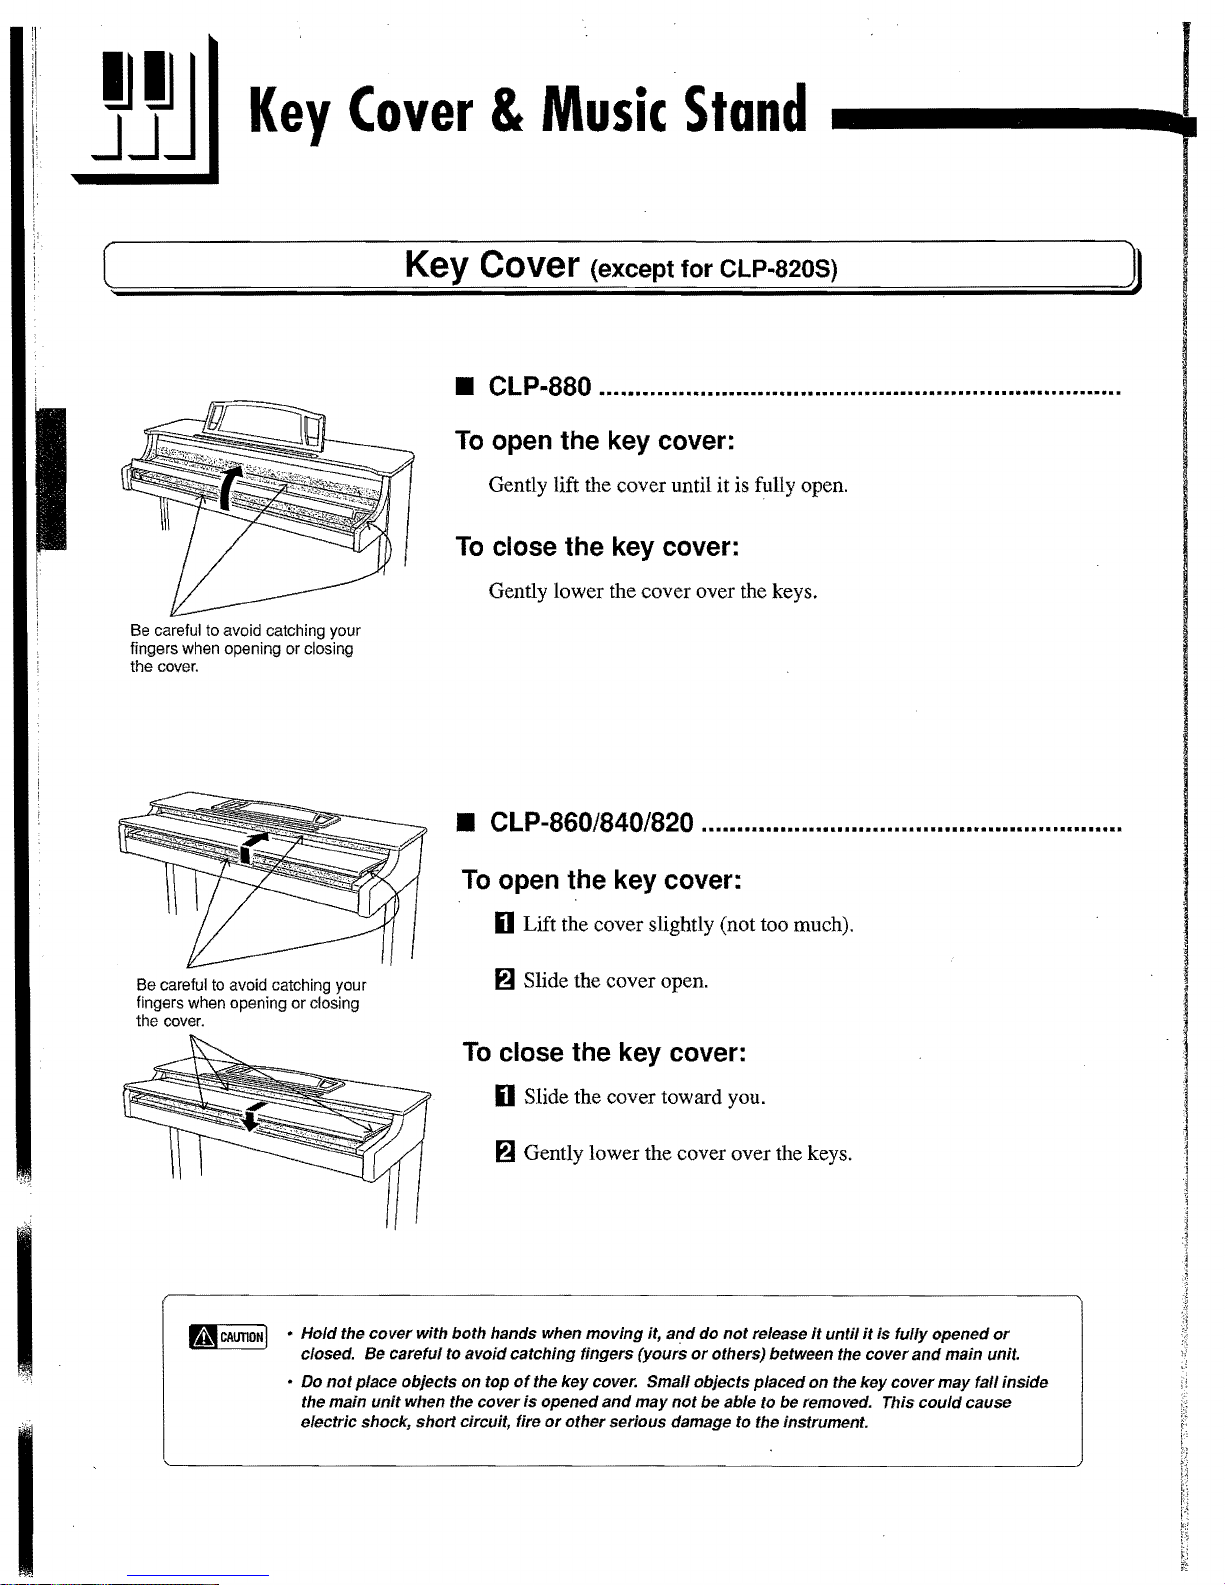
CLP-880 ......................................................................... .
I
To
open the key cover:
Gently lift the cover until it is fully open.
To
close the key cover:
Gently lower the cover over the keys.
Be careful to avoid catching your
fingers when opening or closing
the cover.
II
CLP-860/840/820 .......................................................... .
To
open the key cover:
D Lift the cover slightly (not too much).
Be careful
to
avoid catching your
~
Slide the cover open.
fingers when opening
or
closing
the cover.
To
close the key cover:
D Slide the cover toward you.
~
Gently lower the cover over the keys.
UCAUTlONI
• Hold the cover with both hands when moving it, and do
not
release
It
until
it
is fully opened
or
closed.
Be
careful to avoid catching fingers (yours
or
others) between the cover
and
main unit .
•
Do
not
place objects on top
of
the key cover. Small objects placed on the key cover may fall inside
the main unit when the cover
is
opened
and
may
not
be able to be removed. This
could
cause
electric shock, short Circuit, fire
or
other serious damage to the instrument.
Key
Cover & Music
Stand'
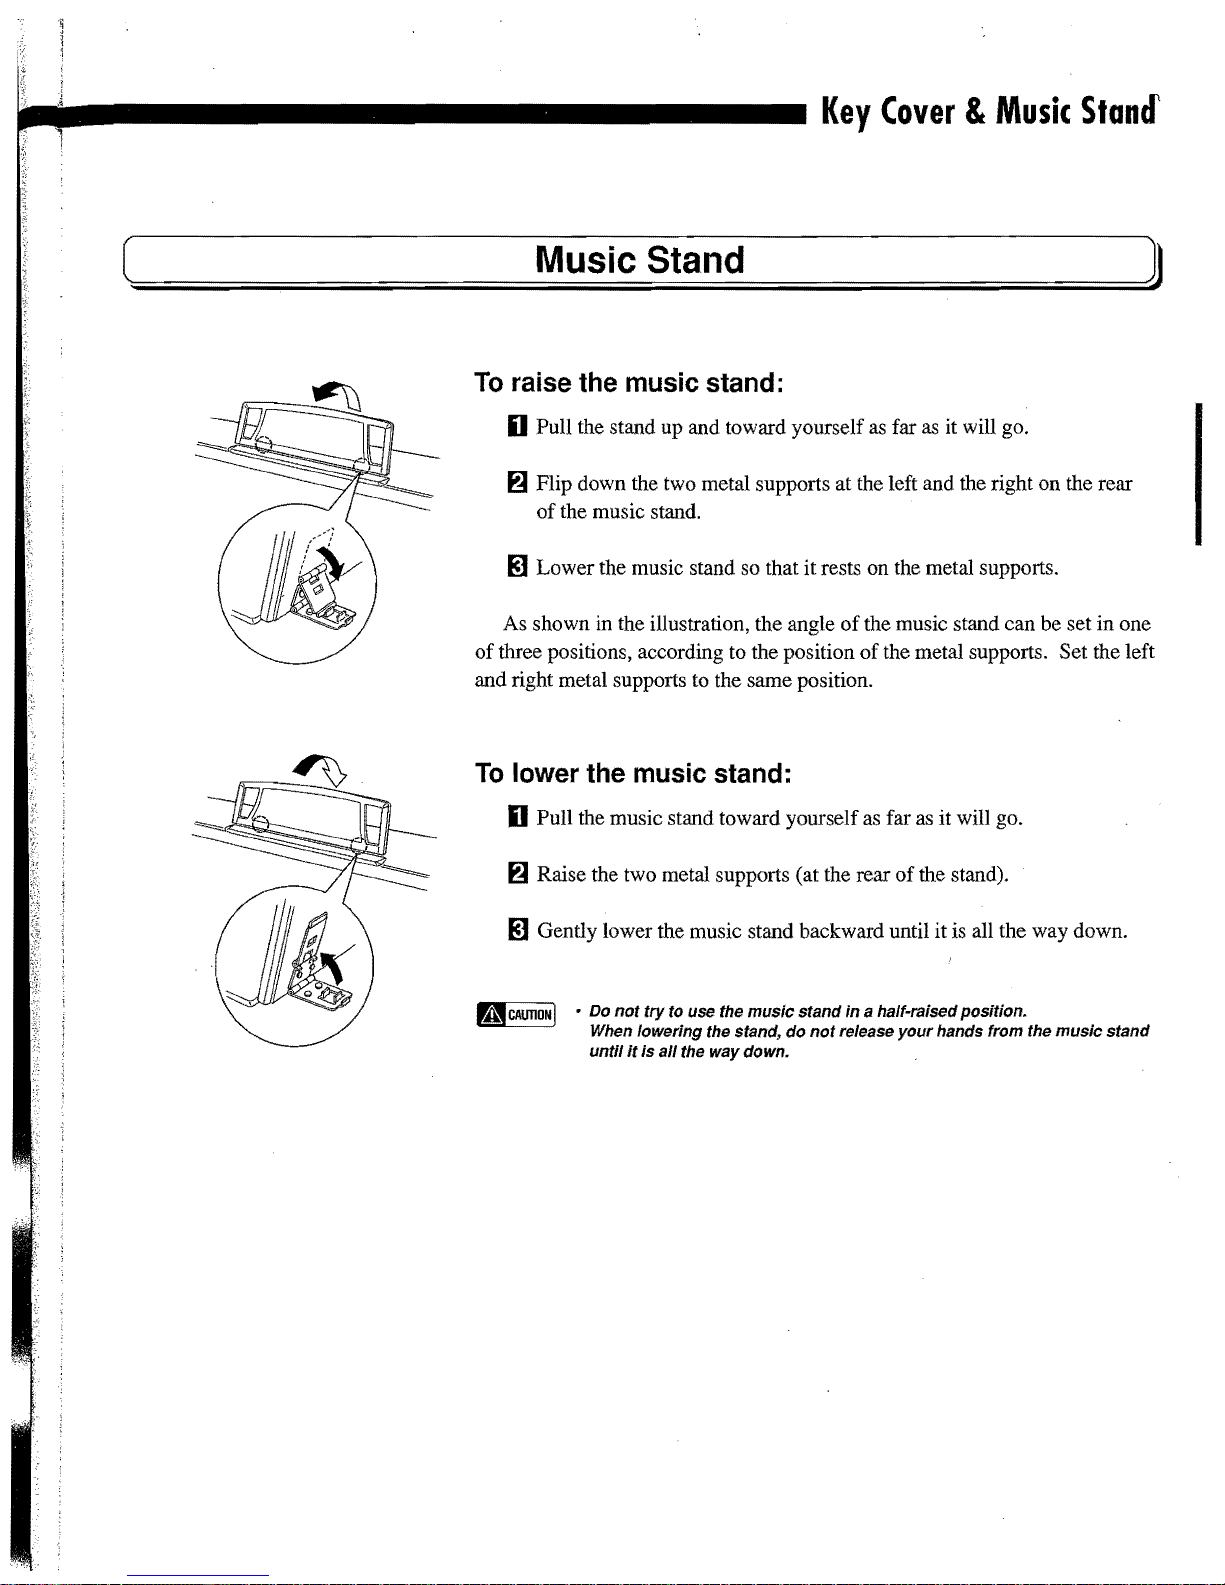
To
raise
the
music
stand:
o Pull the stand up and toward yourself
as
far as it will go.
~ Flip down the two metal supports at the left and the right on the rear
of
the music stand.
81
Lower the music stand so that it rests on the metal supports.
As shown in the illustration, the angle
of
the music stand can be set in one
of
three positions, according to the position
of
the metal supports. Set the left
and right metal supports to the same position.
To
lower
the
music
stand:
o Pull the music stand toward yourself
as
far as it will go.
~
Raise the two metal supports (at the rear
of
the stand).
81
Gently lower the music stand backward until it is all the way down.
• Do
not
try
to use the music stand
in
a half-raised position.
When lowering the stand,
do
not
release
your
hands from the
music
stand
until
it
is
aI/ the way down.
11111
JJJ
Connections
AUX!N
R .,,,.
.-
..
L/l
..
@ @ @ @
0
AUXOUT
R ......... ,
••
R
I.A.+R
f}
PEOAL
~
tl
IN
@
............
.•••
e
M~OI
OUT
................
@
THRU
@
0
TO
HOST
~
DOU-10
o
o
AUXOUT
n
....
Stereo
···•·
..
lA.+R
System
AUXIN
R···········l./t.+R
o
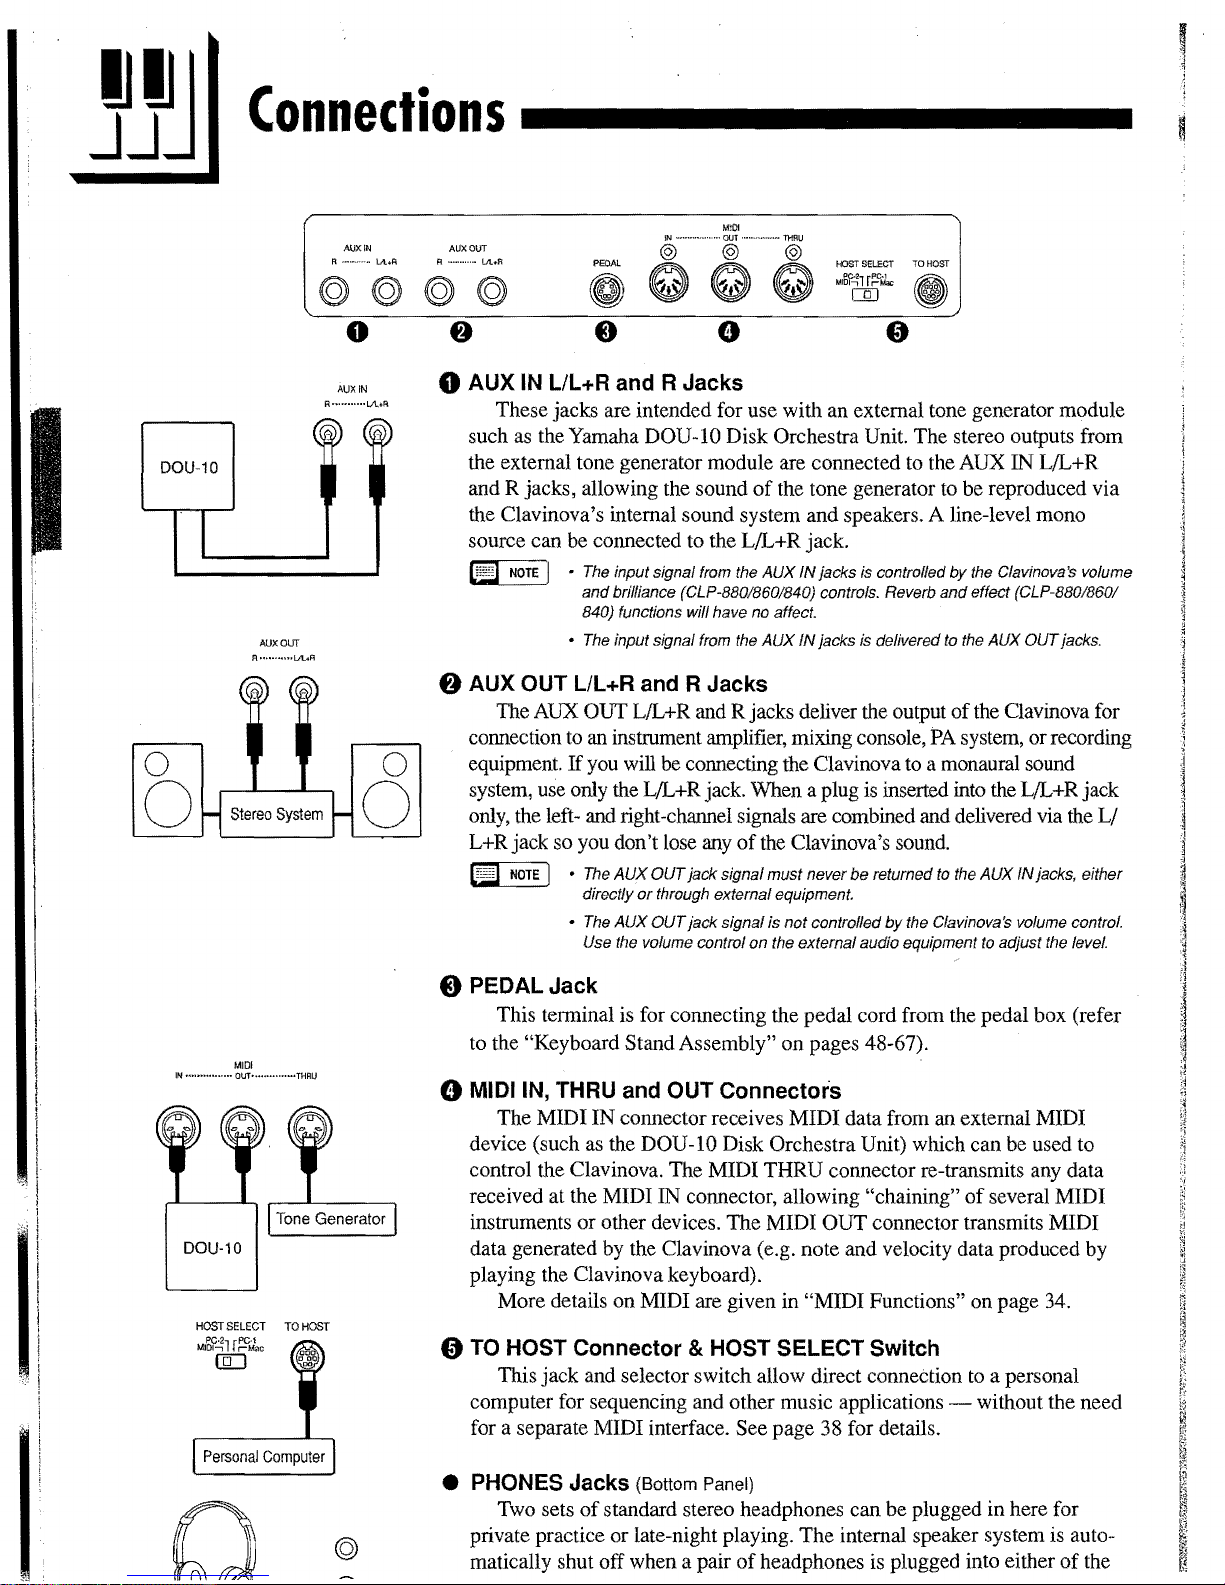
o AUX IN LlL+R and R Jacks
These jacks are intended for use with an external tone generator module
such as the Yamaha DOU-lO Disk Orchestra Unit. The stereo outputs from
the external tone generator module are connected to the AUX
and R jacks, allowing the sound
the Clavinova's internal sound system and speakers. A line-level mono
source can be connected to the L/L+R jack.
~
NOTE
1 • The input signal from the
and
brilliance (CLP-88018601840) controls. Reverb
840) functions
• The input Signal from the
f}
AUX OUT LlL+R and R Jacks
The AUX OUT L/L+R and R jacks deliver the output
connection to an instrument amplifier, mixing console,
If
o
equipment.
system, use only the L/L+R jack. When a plug is inserted into the L/L+R jack
only, the left- and right-channel signals are combined and delivered via the
L+R jack so you don't lose any
~
NOTE
you will be connecting the Clavinova to a monaural sound
1 • The
AUX
directly
• The
AUX
Use the volume control
of
the tone generator to be reproduced via
AUX
IN
will have no affect.
AUX
IN
of
the Clavinova's sound.
OUT
jack signal must never
or
through external equipment.
OUT
jack signal is
not
on
the external audio equipment to adjust the level.
jacks
is
controlled
jacks is delivered to the
by
and
of
PA
be
returned to the
controlled
by
the Clavinova's volume control.
IN
L/L+R
the Clavinova's volume
effect (CLP-88018601
AUX
OUT
jacks.
the Clavinova for
system, or recording
L/
AUX
IN
jacks, either
MIDI
IN
••••
H
..........
Oi.JT
•••••••• "
•••••
THRU
Tone
Generator
HOST
SELECT
TOHCST
M,b?~l
r~Jac
IQJ
Personal
Computer
o©
tl
PEDAL Jack
This terminal is for connecting the pedal cord from the pedal box (refer
to the "Keyboard Stand Assembly"
on
pages 48-67).
e MIDI IN, THRU and OUT Connectors
The MIDI
device (such as the DOU-IO Disk Orchestra Unit) which can be used to
control the Clavinova. The MIDI THRU connector re-transmits any data
received at the MIDI IN connector, allowing "chaining"
instruments or other devices. The MIDI
data generated by the Clavinova (e.g. note and velocity data produced by
playing the Clavinova keyboard).
More details on MIDI are given
IN
connector receives MIDI data from an external MIDI
of
several MIDI
OUT
connector transmits MIDI
in
"MIDI Functions" on page 34.
o TO HOST Connector & HOST SELECT Switch
This
jack
and selector switch allow direct connection
computer for sequencing and other music applications - without the need
for a separate MIDI interface. See page 38 for details.
• PHONES Jacks (Bottom Panel)
Two sets
of
standard stereo headphones can be plugged
private practice or late-night playing. The internal speaker system is auto-
of
matically shut off when a pair
headphones is plugged into either
to
a personal
in
here for
of
the

IJ
IJ
I
Selecting
&
Playing
Voices
JJJ
1
MASTER
2
VOLUME
MAX
d
3
CLP-880
o GRAND
OClASS~tk
Jf\ZZ
0
ROCK
0 0
PIANO
PIANO'
"PIANO
PIANO
E.
PIANO
1
E.
PIANO
2
o~
~
~c.::!:?
~
000000
4
BRILLIANCE
5
/
BRIGHT
OAOCM
o
CHORUS
o HALL 1
o
SYMPHONIC
o HALL 2 oTREMOLO
oSTAGE
OOELAY
REVERB
EFFECT
/
0
0
Turn Power On
.................................................................................................
.
After making sure that the Clavinova's AC cord is properly plugged
into the Clavinova itself and plugged into a convenient
AC
wall outlet,
press the
[POWER]
switch located
to
the
right
of
the keyboard to tum
the power ON. In some areas a plug adaptor may be provided to match
the pin configuration
of
the AC wall outlets in your area.
When the power is turned ON, one
of
the voice selector LEDs will
light, and the power indicator located below the left end
of
the key-
board will light (except for CLP-820S).
Set the Volume
.................................................................................................
.
Initially set the
[MASTER
VOLUME] control about half way
between the "MIN" and "MAX" settings. Then, when you start playing,
re-adjust the [MASTER VOLUME] control for the most comfortable
listening level.
Select a Voice
....................................................................................................
.
Select the desired voice by pressing one
of
the voice selectors. Use
the [VARIATION] button to select a variation
of
the current voice, as
required.
o
VARIATION
o
Play
...............................................................................................................................
.
The Clavinova also offers keyboard touch response, so the volume
and timbre
of
notes played can be controlled according to how "hard"
you play the keys. The amount
of
variation available depends on the
selected voice.
Add Effects As Required
.....................................................................
..
You
can add or change reverb, effects (CLP-880/860/840) and
brilliance (CLP-880/860/840) as desired by using the [REVERB]
button (page 18),
[EFFECT]
button (page 19) and the [BRIL-
LIANCE]
control (page 19).

IJ
IJ
I
JJJ
Playing
Demonstration tunes are provided that effectively demonstrate each of the
Clavinova's voices. There are also 50 piano songs that you can play individually,
all
in
sequence, or
demo tunes.
Ilil
NOTE
* See
page
the
1 • The demo
• No MIDI reception occurs in the demo/piano song mode.
The
demo/piano song data is
•
41
for
Demonstration
in
random order. Here's how you can select and play the
or
piano song mode cannot be engaged while the recorder (page 24) is in use .
not
transmitted via the MIDI connectors.
a complete listing
of
the
demo
tunes
Tunes
and
piano
songs.
I
CLP-880
o
GRAND
0CWlSiCAI..
0 JI\ZZ 0
ROCK
000000
OHARPSI·
0 0
PIPE
(X;HURCH 0 JI\ZZ
000000
0 0
Engage the Demo Mode
Press the [DEMO] button to engage the demo mode - the voice
will
selector indicators
f
2
Playa
from the corresponding voice demo tune - featuring the voice nor-
mally selected
STOP]
0
demo tune
selector button
LED display.
during playback by simply pressing the corresponding voice selector.
You can stop playback at any time by pressing the
button
Ilil
Voice Demo
Press one
NOTE
of
the voice selectors to start playback
by
button instead
will begin playback.) The indicator
will flash during playback, and
You
or
the voice selector
1 • Use the [MASTER VOLUME] control to adjust the volume
[BRILLIANCE] control (CLP-880/860/840) to adjust the brilliance (page
19).
flash in sequence.
......................................................................................
that voice selector button.
of
a voice selector button, the GRAND PIANO
can start playback
l.I Exit From the Demo Mode
.......................................................................
of
all songs starting
(If
you press the [START/
of
the selected voice
"-
- -" will appear on the
of
any other voice demo tune
[START/STOP]
of
the currently playing demo.
and
.................................................................
..
..
the
..
Press the [DEMO] button to exit from the demo mode and return to
the normal play mode.

Playing
the
Demonstration
Tunes
(~~~~~~~~=P=ia=n=o=S=o~ng~~~~~~~~]
1
*IANO
Y:iONS
Engage the Piano Song Mode
Press the [PIANO SONG] button to engage the piano song mode -
the [PIANO SONG],
[1] and [2] indicators will light.
........................................................
.
~
2
Playa
I,
i
(
]
[Jg~
SONG
.,
SELECT
...
+
STARTI
STOP
LECT
(the number will appear on the LED display), then press the [START/
STOP] button. Playback will stop automatically when playback
selected piano song has fmished.
quence,
dom order. Press the [START/STOP] button to stop playback.
Piano Song
To
play any
T
1.6..]
Select
"R
or
select .or n
........................................................................................
of
the 50 piano songs provided, use the [SONG SE-
buttons to select the number
L L " instead
of
a number to play all piano songs in se-
d"
to continuously play all piano songs in ran-
of
the tune you want to play
of
.
the
~
oPlANO
SONG
~
~
NOTE
1 •
Use
the
[MASTER
•
You
can
required.
50"
the
•
The
song
"rnd"
•
playing
•
type
piano
and
board.
automatically started
automatically be selected,
use
This
through
selected
default tempo"· -"
is
selected,
playback.
You
can
play
on
You
can
change
that
is
song
Touch
When
!I Exit From the Piano Song Mode
VOLUME]
the
[TEMPO
produces a relative
u_ -_n
to
"50"
at
song.
is
or
playback
the
keyboard along with
the
keyboard
applied
playback,
sensitivity
a new piano
can
the
Brilliance control
to
the
You
that
in
continuous
control
to
adjust
"'I"']
buttons
to
adjust
tempo
maximum;
automatically selected whenever a new piano
of
a new piano song begins during
be
changed.
voice
you play
can
change
is applied
song
is selected or a new piano song is
variation,
the
range
the
piano song
(CLP-88018601840)
on
the
the
Effect
to
the
voice
play,
the
HALL 1 reverb
.......
m
Press the [PIANO SONG] button to exit from the piano song mode,
the indicator will go off, and return to the normal play mode.
the
volume.
the
playback
with a range
will differ depending
playback.
and
keyboard and for
type
(CLP-88018601840)
you play
........................................
on
the
type
tempo
as
from
"-
on
"RL L "or
The
voice
Reverb
the
keywill
..

Playing
the
Demonstration
Tunes
............................
I
i
-I
M
~
(
___
R_J
[R
b]
RECORDER
"J."
...,., 1 ......
DO
START/
?uNCTION
~
PUNCTION
~
"'~
" 2
The A-B Repeat function can be used
specified phrase within a piano song. Combined with the Part Cancel
function described below, this provides an excellent way to practice
difficult phrases.
1 Specify the Beginning
Select and
the beginning
("R - " will appear on the display).
To
set the "A" point at the very beginning
[FUNCTION] button before starting playback.
2 Specify the
Press the
phrase. This sets the
this point repeat playback will begin between the specified A and B
points.
3 Stop Playback
Press the [START/STOP] button to stop playback while retaining
the specified A and B points. A-B repeat playback will resume
[START/STOP] button is then pressed again.
To
cancel the A and B points press the [FUNCTION] button once.
playa
piano song, then press the [FUNCTION] button at
of
the phrase you want to repeat. This sets the "A" point
End
(B) of the Phrase
[FUNCTION]
"B"
.................,.................................................................................
(A)
button a second time at the end
point ("R -
to
continuously repeat a
of the Phrase
of
the song, press the
.............................
.............................................
b"
will appear on the display). At
of
the
if
.
..
.
the
~D
C!l
NOTE
1 •
•
The
A and B points are automatically canceled
selected .
The
A-B Repeat function cannot
back.
be
used during
when
"RL L "or
a new
song
is
':'-
rid"
play-

f
Playing
the
Demonstration
Tunes
(~============P=ia=n=o=S=o=n;g=P=a=rt=C=a=n=ce=I==========~]
RECORDER
::+'"
0
D~2
STARTI
STOP
REC
DO
RECORDER
"I"
;4fl
0 2
DO
RECORDER
::+'
0
£0
STOP
REC
DO
~
(
The 50 piano songs have separate left- and right-hand parts that can
be turned on and off
as
required so you can practice the corresponding
part
on
the keyboard. The right-hand part is played by the recorder'S
U-1
track, and the left-hand part is played by recorder's [2] track. (Some
of
the songs are arrangements for four-hands, tracks [1] and
[2]
corre-
spond to primo and secondo parts
of
the arrangement.)
1
Turn the Desired Part Off
.....................................................................
.
Press the RECORDER
[1]
or
[2] button to tum the corresponding
part off - the corresponding indicator will go out (these buttons
alternately toggle the corresponding part on and off).
~
NOTE
I .
The
parts can be turned on
or
off even during playback.
•
The
Piano
Song Part Cancel function cannot be used during
'\9L L "or
'\-
rid"
playback,
•
The
"Piano
Song Part Cancel Volume" function described on page 33 can
be
used
to
set the canceled part so that it plays at a volume
from
"0"
(no
sound)
to
"20",
The
default setting
is
"5".
• Both parts are automatically turned ON whenever a new song is selected.
D Synchro Start
.....................................................................................................
.
When the Synchro Start function is engaged, playback
of
the se-
lected piano song will begin automatically as soon
as
you start playing
on the keyboard.
To
engage the Synchro Start function press the [START/STOP]
button while holding the part button corresponding to the part which is
ON. A 'dot will appear in the lower right comer
of
the display. (Repeat
the previous operation to disengage the Syncro Start function.)
Playback will then start as soon as you begin playing on the key-
board.
~
NOTE
I .
If
you hold a track button which
is
OFF while pressing
the
[START/STOP]
button, that track will be turned ON and
the
Synchro Start mode will be
engaged.

IJ
IJ
I
JJJ
Voice numbering
2 3 4
OGRAND
000000
OHARPS1- 0 a
000000
I I I I I
OCI.ASSICALO
I I I I I I
7 8 9 10
The
the entire range of the keyboard.
I
priority
JAZZ"
a
ROCK
0 a
PIPE
(X:;HURCH a
Dual
Mode
The dual mode makes it possible to play two voices sim.ultaneously across
To
activate the dual mode simply press two voice selectors at the
same time (or press one voice selector while holding another). The
of
voice indicators
is active.
To
both selected voices will light when the dual mode
return to the normal single-voice play mode, press any
single voice selector.
According to the voice numbering priority
as
shown in the diagram
on the left, lower valued voice numbers will be designate.!i,as the 1st
5 6
Voice (the other voice will be designated
as
the 2nd Voice).
The [STRINGS] [VARIATION] voice has a slow attack. This
in the Dual Mode to
be
engaged
if
the variation is engaged for
dual
mode is
to turn the variation for both voices
one
of
the voices the setting
F3 (see
page
29)
as
you
like.
button - see
button - see page 18) will
page
JAZZ
11
voice can sometimes be used with another voice
a
12
produce a better "blend".
IilU
NOTE
I . The
dual
and
time.
• The [VARIATION] button indicator will light
or
or
off.
made
both
To
use the variation for
prior
in
in
to the 1
either
the [VARIATION] button can be
on
be
[EFFECT]
•
Depending upon the conditions one effect type will take priority
other. Depth will
voice combination. However, using function
change the depth value for each voice
Effect depth setting via the
YES] buttons while holding the
applied to the 1
[REVERB]
•
The reverb type assigned to the 1st Voice will take priority over the other.
(If the reverb is
Reverb depth setting via the
YES] buttons while holding the
applied
split modes (CLP-8801860) cannot
of
the dual-mode voices. While the
used
only
to engaging the dual mode.
the
Dual
Mode
be
decided according to the depth default value
panel
controls (i.e. pressing the
[EFFECT]
st
Voice only.
the
Dual
Mode
set
to OFF, the
st
Voice only.
2nd
Voice's reverb type will be in affect.)
panel
controls (i.e. pressing the
[REVERB]
at
engaged
over
you
[-INa]
19) will
[-INa]
the
must
of
can
or
I
same
the
the
[+1
be
or
[+1
be
~
1
1
,I
j
J
D Other Dual Mode Functions
..............................................................
The Clavinova Function mode provides access to a number
dual-mode functions, listed below. See the corresponding pages for
details.
• Dual Balance ................................................. 29
• Dual Detune .................................................. 29
• 1 st Voice Octave Shift ................................... 29
• 2nd Voice Octave Shift .................................. 29
• 1 st Voice Effect Depth ................................... 30
• 2nd Voice Effect Depth .................................. 30
• Reset ............................................................. 30
of
.
other

I
~~
I
The
Split
Mode
(CLP-880/860)
JJj
I
The split mode makes it possible to play two different voices on the keyboard
one with the left hand and another with the right hand. The Left Voice is
played
on
all keys to the left of (and including) a specified "split pgint"
key,
while
the Right Voice is played
on
all keys to the right of the split point
key.
~...
/
IZZ 0 ROCK
0
~/~~c
~
/!lm1n~
Example:
~
A-
I
b:
,
('
-,
IF
-,?
II
,
,_
c
A-1
B~-1
C2
F~2
o
"~"
is
indicated with a
lower"
n,
o
"fi"
is indicated with an upper
u-",
To activate the split mode simply press the
[SPLIT]
button so thats
indicator lights. The split mode
can
be
turned off at any time by pressing the
[SPLIT]
button again so that its indicator goes out.
[jj]l,l]
NOTE
1 • The dual
and
split modes cannot be engaged
at
the same time.
o Selecting the Right and Left Voices
..................................................
..
The
voice that was selected before the split mode was engaged becomes
the Right Voice in the split mode. (The Right Voice can also be changed while
in the split mode, by simply pressing the corresponding voice selector.)
To select a Left Voice press the corresponding voice selector while
holding the
[SPLIT]
button (default: [BASS]).
The
indicator
of
the Left
Voice selector will light while
the
[SPLIT]
button is pressed, then only the
Right Voice selector
and
[SPLIT]
button indicators will remain lit.
~
NOTE
1 • The variation can be individually tumed on
and
off
for the split mode voices.
Normally the voice indicator
of
the Right
Voice
lights in the split mode. The
[VARIATION] can
be
used
to
turn the variation for the Right Voice on
or
off as
required. While the [SPLIT] button is held, however, the voice indicator
of
the
Left Voice lights,
and
in this state the [VARIATION] button can be used to turn
the variation for the Left Voice on
or
off
as required .
• [EFFECT] in the
Split
Mode
Depending upon the conditions, one effect type will take priority over the other.
Depth will
be
decided according to the depth default value
of
the voice
combination. However, using function F4 (see page 30) you can change the
depth value for each voice
as
you like.
Effect depth setting via the panel controls (i.e. pressing the [-INO]
or
[+IYES]
buttons while holding the [EFFECT] button - see page
19) will be applied to
the Right Voice
only.
• [REVERB] In the
Split
Mode
The reverb type assigned to the Right Voice will take priority over the other. (It
the reverb is set to
OFF,
the Left Voices reverb type will be in affect.)
Reverb depth setting via the panel controls (i.e. pressing the [-INO]
or
[+lYES]
buttons while holding the [REVERB] button - see page
18) will be applied to
the Right Voice
only.
o Setting the Split Point
........................................................................................
.
The
split point is initially set at the F#2 key by default. You can change
the split point to any other key by pressing the key while holding the
[SPLIT]
button (the
name
of
the current split-point key appears
on
the
LED
display while
the
[SPLIT]
button is held).
The
split point
can
also be set via
the Function
mode
(see below).
o Other Split Mode Functions
.......................................................................
..
The
Clavinova Function
mode
provides access to a
number
of
other
split-mode functions, listed below.
See
the corresponding pages for details.
o Split Point ...................................................... 30
• Split Balance ................................................. 30
• Right Voice Octave Shift ...............................
31
• Left Voice Octave Shift ..................................
31
• Right Voice Effect Depth ...............................
31
• Left Voice Effect Depth ..................................
31

IJ
IJ
I
Reverb
JJJ
The [REVERB] button selects a number of digital reverb effects that you can
use for extra depth and expressive power.
I
I
)~
o
HALL
1
o
HALL
2
o
STAGE
To
select a reverb type press the [REVERB] button a few times
until the indicator corresponding to the desired type lights (the indicators light in sequence each time the [REVERB] button is pressed). No
reverb is produced when all indicators are off.
OFF
No reverb effect is selected when no REVERB indicator is lit. .
ROOM
This setting add a continuous reverb effect to the sound that is similar
to the type of acoustic reverberation you would hear in a room.
HALL 1
For a "bigger" reverb sound, use the HALL 1 setting. This effect
simulates the natural reverberation of a small-size concert hall.
HALL 2
For a really spacious reverb sound, use the HALL 2 setting. This effect
simulates the natural reverberation of a large concert hall.
STAGE
A simulation of the type of reverb produced in a stage environment.
CE
NOTE
1 • The default reverb type (including OFF)
and
depth settings are different
for each voice.
o Adjusting Reverb Depth
........................................................................
.
Adjust the reverb depth for the selected voice by using the
[-/NO]
and [+iYES] buttons while holding the [REVERB] button. The depth
range
is
from 0 through 20 (the current depth setting appears on the
LED display while the
[REVERB]
button is held). A setting
of
"0"
produces no effect, while a setting
of
"20"
produces maximum reverb
depth. Press the
[-/NO]
and [+/YES] buttons simultaneously while
holding the
[REVERB]
button to recall the default setting for the
current voice (default depth settings are different for each voice).

IJ
IJ
I
JJJ
The
Effect
(CLP-880/860/840)
The [EFFECT] button allows you to select one of the effects that can give
your sound greater depth and animation.
I
I
To
select an effect type press the
[EFFECT]
button a few times
::itHORUS
until the indicator corresponding to the desired type lights (the indica-
GSVMPHONIC
o
TREMOLO
tors light in sequence each time the
[EFFECT]
button is pressed). No
o
DELAY
effect is produced when all indicators are off.
OFF
No effect
is
selected when
no
EFFECT indicator
is
lit.
CHORUS
Shimmering, broadening effect
SYMPHONIC
Adds a deep, symphonic backdrop
TREMOLO
Tremolo effect
DELAY
Echo effect
rEm
NOTE)
•
The
default effect
type
(including
OFF)
and
depth
settings are different for
each
voice.
6JJ
Adjusting Effect Depth
.....................................................
:
......................
.
Effect depth can be individually adjusted for the selected voice by
using the [-/NO] and [+/YES] buttons while holding the
[EFFECT]
button. The depth range is from 0 through 20 (the current depth setting
appears on the LED display while the
[EFFECT]
button is held). A
setting
of
"0"
produces no effect, while a setting
of
"20" produces
maximum effect depth. Press the
[-IN
0]
and [+/YES] buttons simulta-
neously while holding the
[EFFECT]
button to recall the default
setting for the current voice (the default depth settings are different for
each voice).
Brilliance
(CLP-880
/860 /840)
I
This control can be used to change the tonality or "timbre" of the sound
output. The control range is from MELLOW to BRIGHT.
IJ
IJ
I
JJJ
For a brighter or "sharper" tone, slide the control towards the
BRIGHT position. For a "rounder" more mellow tone, slide the control
towards the MELLOW position.
I

I
11111
The
Pedals
JJ~
I
The CLP-820S has two and other models have three foot pedals that
produce a range of expressive effects similar to those produced
by
the
pedals
on
an
acoustic piano.
CLP·880/860/840/820
Soft
pedal
Damper
pedal
Sostenuto
pedal
CLP·820S
Damper
pedal
Soft/Sostenuto
pedal
I
!
I
"
~
!
I
I
~
I
I
1,
I
!
JDamper (Right) Pedal
..............................................................................
..
The
damper pedal functions in the same way
as
a damper pedal on
an acoustic piano. When the damper pedal is pressed notes played have
a long sustain. Releasing the pedal immediately stops (damps) any
sustained notes.
On
the CLP-880/860, when GRAND PIANO, CLASSICAL PI-
ANO,
or
JAZZ PIANO is selected the damper pedal also produces a
special "resonance" that simulates the ring
of
the strings and the sound
board
of
an acoustic piano.
The CLP-880/860 damper pedal additionally features continuous
damping. This allows you to create shorter effects by pressing the
damper pedal down only part
of
the way.
~~
•
On
the
CLP·8801860,
soundboard
depth
and damper pedal
mode
(switchl
continuous) settings
can
be changed using
the
"Pedal
Functions"
(page
32)
in
the
function
mode.
Sostenuto (Center) Pedal (except
for
CLP-820S)
....................
.
If
you
playa
note or chord on the keyboard and press the sostenuto
pedal while the note(s) are held, those notes will be sustained
as
long as
the pedal is held (as
ifthe
damper pedal had been pressed) but all
subsequently played notes will not be sustained. This makes it possible
to sustain a chord, for example, while other notes are played "staccato."
IEm
NOTE
1 •
Organ
and string
voices
will continue
to
sound for
as
long
as
the
soste-
nuto
pedal
is
depressed.
o Soft
(left)
Pedal
.......................,.....................................................................
..
The soft pedal reduces the volume and slightly changes the timbre
of
notes played while the pedal is pressed. The soft pedal will not affect
notes which are already playing when
it
is pressed.
The left pedal can also be assigned to song start/stop operation (or
sostenuto in the case
of
the CLP-820S) via the "Left Pedal Mode"
described on page 32.

Transposition
instrumentalist.
IJ
IJ
I
JJJ
Touch
Sensitivity
Four different types of keyboard touch sensitivity - HARD, MEDIUM, SOFT
or FIXED - can be selected to match different playing styles and preferences.
I
I
erHARD
»-~EDIUM
600FT
The Clavinova's TRANSPOSE function makes it possible to shift the pitch of
the entire keyboard up or down in semitone intervals up to a maximum of
12
semitones
(Le.
a maximum of one octave up or down). "Transposing" the pitch
of the Clavinova keyboard facilitates playing
in
difficult key signatures, and you
can easily match the pitch of the keyboard to the range of a singer or other
Use the
[-!NO]
or [+/YES] button while holding the [TRANS-
POSE]
button to transpose down or up as required. The transposition
range
is
from
"-12"
(down one octave) through
"0"
(normal pitch) to
"12" (up one octave). The amount
of
transposition appears on the LED
display while the [TRANSPOSE] button is held. The default transpose
setting
is
"0".
DE
NOTE
I . The [TRANSPOSE] button indicator remains lit when a transpose setting
other than "0"
is selected.
To
select a touch sensitivity type press the [TOUCH] button a few
times until the indicator corresponding to the desired type lights (the
indicators light in sequence each time the [TOUCH] button
is
pressed).
HARD
The HARD setting requires the keys to be played quite hard to
produce maximum loudness.
MEDIUM
The MEDIUM setting produces a fairly "standard" keyboard response.
This is the initial factory default setting.
SOFT
The SOFT setting allows maximum loudness to be produced with
relatively light key pressure.
FIXED
(no indicator lit)
All
notes are produced at the same volume no matter how hard the
keyboard is played.
When the
FIXED type is selected, the volume of notes played in the
FIXED mode can be set by using the
[-/NO] and [+/yES] buttons
while the [TOUCH] button is held (the current volume level appears on
the display). The volume range is from 1 through 127. The default
setting is 64.
DE
NOTE
I • This setting does not change the weight
of
the keyboard.
• The touch sensitivity type
and
volume
set
in the FIXED mode will become
the common setting for a/l voices.

IJ
IJ
I
JJJ
Tuning
Tuning makes it possible to adjust the pitch of the Clavinova over a 427.0 Hz
... 453.0 Hz (corresponding to the A3 note's Hz) range in approximately 0.2
Hertz intervals. Pitch control is useful for tuning the Clavinova to match other
instruments or recorded music.
I I
D
Tuning
Up
...............................................................................................................
.
SONG
g~
SONG
"SELECT
...
Q~
o To tune up (raise pitch), hold the
~ Press any key between C3 and B3. Each time a key in this range is
pressed the pitch is increased
The
[-/NO] and [+IYES] buttons can also be used to tune down or up,
respectively, in approximately 1 Hz increments. Press the
[+/YES] buttons simultaneously to recall standard tuning (A3 = 440
Hz).
~ Release the
D
Tuning
A-I
Down
and B-1 keys.
.....................................................................................................
o To tune down (lower pitch), hold the
neously.
~
Press any key between C3 and B3. Each time a key in this range is
pressed the pitch is decreased by approximately 0.2 Hz.
The [-/NO] and
respectively, in approximately
{+/YES] buttons simultaneously
Hz).
~
Release the
[+IYES] buttons can also be used to tune down or up,
A-I
andA#-1 keys.
A-I
and B-1 keys simultaneously.
by
approximately 0.2 Hz.
A-I
and A#-1 keys simulta-
1Hz increments. Press the [-/NO] and
to
recall standard tuning (A3 = 440
[-/NO] and
..
D
To
Restore
o
To
restore the default pitch (A3 =440 Hz), hold the
B-1 keys simultaneously.
~
Press any key between C3 and B3.
~
Release the
of
In terms
Hz. The current tuning setting is shown on the LED display while the tuning
is being adjusted. Tenths
appearance and position
Display
'-f'-fa
'-I.
'-1'-1.a
'-1 '-1
'-I.
mE
I
I
IJIJI
The
Metronome
&
Tempo
Control
I JJJ
I
The Clavinova built-in metronome
is
a convenient feature for practice, and it
can also provide a solid rhythmic guide when recording using the Recorder
feature, described in the next section.
(
The
Metronome
METRO-
I
:J
n
NOME
I
eLI.
Beat indicator
~
METRO-
/
SONG
~ICr~
/;J /
-INO
+/YE.
\\
(
L/)
The metronome sound is alternately turned on and off by pressing
the
[METRONOME] button. When on, the beat indicator flashes at the
current tempo.
o Metronome Time Signature
...............................................................
.
The time signature (beat)
of
the metronome can be set by using the
[-/NO] and [+/YES] buttons while holding the [METRONOME]
button.
You
can set the beat to
0,2,3,4
or
6 (the
cunent
setting appears
on
the LED display while the [METRONOME] button is held). Press
the
[-/NO] and [+/YES] buttons simultaneously while holding the
[METRONOME] button to recall the default setting
"0"
(no accent).
o Metronome Volume Function
..........................................................
.
The volume
of
the metronome sound can be adjusted via the Metro-
nome Volume function in the Function
mode-page
33.
(~==============Ti=em=p~o=C=o=n~tr=o=I============~]
The tempo
of
the metronome and recorder playback (the recorder is
described in the next section) can
be
set from 32 to 280 beats per
minute by using the
[TEMPO
.....
I
A]
buttons. The selected tempo will
appear on the LED display while in the normal play mode and while the
[TEMPO
.....
IA] buttons are being used to adjust the tempo in the
recording/playback mode. The default tempo (120
or
the recorded song
tempo when the recorder contains data and the playback track indicator
is
lit) can
be
recalled by simultaneously pressing the [
.....
] and
[A]
buttons.

Using
the
Recorder
The Clavinova features a two-track recorder that let you record what you play
on the keyboard and then play it back.
Two
tracks mean that you can "overdub"
one part on top of another, using a different voice if you like. The recorder feature
is a useful adjunct to any keyboard study program, since it lets you hear exactly
how you sound from the listener's perspective. It can also be just plain fun.
The recorder actually records the following data:
•
Entire
Song
• Tempo • Time signature (beat) • Reverb type (including OFF)
• Effect type (CLP·880/860/840)
• Individual Tracks
• Notes played • Voice selection • Voice variation
• Dual mode voices • Split mode voices (CLP-880/860)
• Damper pedal • Soft pedal
• Sostenuto pedal (not recorded as an initial setting)
• Effect depth
• Dual balance (F3) • Dual detune (F3) • Dual octave shift (F3)
• Split balance (F4: CLP-880/860) • Split octave shift (F4: CLP-880/860)
(CLP-880/860/840) • Reverb depth
o
GRAND
OClASS!CA\:.:.JAZZ 0 ROCK
I
0
oo~oc
RECORDER
~.-
T" 1 0 2
DO
STARTI
c5~
RECORDER
...
J.,,-
~~
STOP
REG
\ \
DO
ClP·880/860
r 5
LLl
1 Make
All
Necessary Initial Settings
..........................................
Before actually beginning to record, select the voice you want to
record with (or voices
if
you will be using the dual or split mode). You
might also want to set the volume and tempo controls.
2 Engage the Record Ready Mode
................................................
Press the RECORDER [REC] button to engage the record ready mode
(recording does not actually start yet). The record ready mode can be
disengaged before recording by pressing the [REC] button a second time.
~
NOTE
1 • The record ready mode cannot be engaged while the demo/piano song
3 Select the
is engaged. .
mode
Record
Track
.......;................................................................
When the record mode is engaged in the previous step, the lastrecorded track will automatically be selected for recording and its indicator - i.e. the [1] or [2] button indicator will glow red.
record on a different track, press
the
appropriate track button so that its
If
you want to
indicator glows red.
•
The
~
NOTE
1
track button indicators
will glow green (unless the track is turned
previously-recorded data on the non-record track will normally be played
back
as
you record,
If you don't want
you want
track etc.,), press the playback track button before pressing the {REG]
button (step
• Recording on
data on that track.
• When the record mode is engaged the amount
recording will be shown on the LED display in approximate kilobytes
(starting
to
to
record a song different from what you recorded on the previous
1,
above) so that its indicator goes out.
a track which already contains data will erase all previous
at
"50" on the GLP·880/860
of
tracks which contain previously recorded data
so
you can play along with a previously-recorded track.
hear
the previously recorded track as you record (when
off
as described below).
and
"25" on
of
memoty available for
thA
nl
p-R4nIR/nIR,W::1
..
..
.
The

i
RECORDER
"i,..,
o 1
~""2
DO
START!
~D
RECORDER
o
~,..,.
1 ... ,
....
2
DO
START!
~D
RECORDER
o
~,..,
1 ...
I"
2
DO
START!
D~
RECORDER
o 0
1 2
DO
START!
STOP
REC
GJD
~
Press
twice.
Using
the
Recorder
4 Start Recording
...............................................................................................
.
Recording will begin automatically as soon as you
playa
note
on
the
keyboard
or
press the [START/STOP] button. The current measure
number will appear on the display while recording.
[BE
NOTE
1 .
The
left pedal
can
be assigned
to
start and stop recording
via
the
"Left
Pedal
Mode" function described
on
page
32.
•
If
the
metronome
was
on
when
you started
recording,
you'll
be
able
to
keep
time
with
the
metronome
while
recording, but
the
metronome
sound
will not
be
recorded.
•
You
can record
up
to
a maximum
of
about
10,000
notes
on
the
CLP-880/
860 or 5,000 notes
on
the
CLP-840/820/820S, depending
on
pedal
usage
and other
factors.
The
record track indicator will begin
to
flash
when
recorder memo!}, is almost
full.
If
the
memory becomes full during
recording,
"F
UL
" will appear
on
the
display and recording will
stop
automatically.
(All
recorded data
up
to
that point will
be
retained.)
5 Stop Recording
...............................................................................................
.
Press either the
RECORDER
[REC]
or
[START/STOP] button to
stop recording.
The indicator
of
the recorded track will glow green to indicate that it
now contains data.
o Changing the Initial Settings
............................................................
.
The initial voice, tempo, reverb type, reverb depth, and effect settings
made in step 1
of
the recording procedure are actually recorded by the
Clavinova.
These initial settings can
be
changed after the recording is fmished by
pressing the [REC] button to engage the record ready mode, pressing the
appropriate track button, making the required changes, and then pressing
the [REC] button again to exit from the record ready mode and register
the changes.
If
you do this, be careful not to press the [START/STOP] button or a
key on the keyboard, either
of
which will start recording and erase all
previous recorded data on the selected track.
It is possible to cancel the operation even after changes have been
made: change tracks and then press the
[REC]
button to exit from the
record mode (this also cancels data for the entire song).
[BE
NOTE
1
•
The
following
data
for initial settings cannot
be
changed:
"Dual
balance
(F3)".
"Dual detune
(F3)':
"Dual
octave shift
(F3)".
"Split balance (F4:CLP-
880/860)"
or
"Split octave shift (F4:CLP-880/860)".
o Erasing a Single Track
...........................................................................
..
All data can be erased from either
of
the recorder'S tracks by engaging the record mode, selecting the track you want to erase, and then
pressing the [START/STOP] button twice without recording any data.

Using
the
Recorder
RECORDER
"I"
"~1
0 2
DO
START!
~D
RECORDER
J:o
STOP
RED
GJD
~
I
'2
_
L,;;,o'
'-1
'1
~
"~1:""
To play back what you've recorded, first make sure that the green track
indicators
of
the tracks you want to play are lit. Ifnot, press the corresponding
track button(s) so that they are lit. Then press the RECORDER [START!
STOP]
button. Playback starts from the beginning
of
the recorded data, and
will stop automatically at the end
of
the recorded data.
You
can also stop
playback at any time by pressing the [START/STOP] button.
To
mute a track so that it doesn't play back, press the corresponding track
button so that its indicator goes out (press again to
tum
the track back on).
The
current measure number appears on the display during playback.
n~rNOTfJ
. It
is
possible
to
play along on the keyboard during playback. In this case, the
playback voice and the voice you
play
on the keyboard are not the same. The
playback voice
is the voice that was
set
when the data was recorded. The voice
you
play
on the keyboard is the voice that is selected on the panel.
• The playback volume
and
tempo can be adjusted
by
using the [MASTER VOL-
UME] control
and
[TEMPO
~/,A]
buttons (press both [TEMPO
~/,A]
buttons
simultaneously
to
recall the default tempo).
•
All
recorder data will
be
retained in memory for about one week after the power is
turned off.
If
you want to keep your recorded data for longer periods, tum the power
on for
a few minutes
at
least once a week. It is also possible
to
store
it
to
an
external MIDI storage device such
as the
Yamaha
MIDI Data Filer MDF3
by
using
the Bulk Data Dump function described on page 36.
• The track indicators
wilJ
not light automatically when the
power
is turned on even
if
the recorder contains data.
It
is therefore necessary to press the track buttons so
that the corresponding green indicators light before starting RECORDER playback.
It
is also a
good
idea to press the track buttons
to
check
if
the tracks contain data
before recording.
If
the green indicator lights when the corresponding track button
is pressed, that track contains data which will
be
erased
and
replaced
by
the
newly-recorded data.
• If the metronome is being used during playback, the metronome will automatically
stop when playback
is stopped.
• During recorder playback, the volume
of
a track which
is
turned
off
will always
be
"0" (i.e. the "Piano Song Part Cancel Volume" function -
page
33
only affects
piano song playback.
• The playback data
is
not
transmitted
via
the MIDI
OUT
connector.
• Playback cannot be started when the demo/piano song mode
is engaged.
• Playback cannot be started when the recorder contains no data,
or
when both track
buttons are off.
• When using REVERB
or
EFFECT during playback, depending upon the conditions
one reverb type
and
one effect type will take priority.
D
Synchro
Start
..................................................................................................................
..
When the Synchro Start function is engaged, recorder playback will begin
automatically as soon as you start playing on the keyboard.
To engage the Synchro Start function press the [START/STOP] button
while holding a track button which is ON.
The
rightmost dot on the display will
flash at the current tempo. (Repeat the previous operation to disengage the
Syncro Start function.) Playback will then start as soon as you begin playing on
the keyboard.
If
you hold a track button which
is
OFF while pressing the [START/STOP]
button, that track will be turned ON and the Synchro Start mode will
be
engaged.

The
Function
Mode
~r
~~
:>~
,'~
q
;:1
i
~~
~
;1
1
,
~
-!
• Operation Example
.~
,~
:i
.'
i
[£TIl
"
TEMPO
g~
[F
3.
~]
+ Press [+IYES]
...
[,c
The [FUNCTION] button provides access
Clavinova extraordinary versatility. The functions are categorized
follows:
CLP·8401
820/8205
F1
F2
F3
F4
F5
F6
F7
Fa
CLP·8801
860
Tuning ............................................................. 28
F1
Scale ............................................................... 28
F2
F3 Dual Mode Functions ....................................
F4
Split Mode Functions ....................................
Left Pedal Mode .............................................
F5
Pedal Functions .............................................
F6
Metronome Volume ........................................
F7 Piano Song Part Cancel Volume ..................
Fa
l1li101
Functions ...............................................
F9
Backup Functions ...... .................................... 37
D
To
Select a Function ...
to
a range of functions that give the
..........................................................................
U Press the [FUNCTION] button so that its indicator lights.
~
NOTE
I . Functions cannot be selected during demolpiano song playback
the recorder is in operation.
~
3.
...
7]
(sub-mode)
Use the
function:
on the CLP-880/860.
~
In the case
CLP-880/860), Pedal Functions (F5: CLP-880/860), MIDI (F7:
CLP-840/820/820S, F8: CLP-880/860), and Backup (F8: CLP-840/
820/820S, F9: CLP-880/860) functions, you will have to press the
[+/YES] button once to enter the respective sub-mode after the
function has been selected, and then use the
[~]
FUNCTION [....
FI
through F8 on the CLP-840/820/820S;
of
the Scale (F2), Dual Mode (F3), Split Mode (F4:
buttons again to select the desired sub-function.
] and
[~]
buttons to select the desired
in
groups as
29
30
32
32
33
33
34
FI
through F9
FUNCTION [....
or
when
] and
.
+ Use FUNCTION
[<0lIl],
[/-3.2]
Press [-/NO] or [+IYES]
once
+
[-
:o]
...
~
...
[ :0]
+ Use [-/NO] , [+IYES]
5]
[~]
~
NOTE
I . The Dual
and
is not engaged,
corresponding sub-mode will not be available.
.•
The
Function mode
be engaged.
!1
Set the function
buttons (see the individual function descriptions, below).
~
NOTE
I •
After
[-INO}
~
Press the [FUNCTION] button so that its indicator goes out to exit
from the function mode.
or
Split (CLP-8801860j mode must be engaged before the F3
F4 functions can be selected, respectively. If the corresponding mode
Dual mode can be engaged while in the Function mode, but the
selecting the function, the current setting will be displayed when the
or
'~c
1-
"
or
'~c
'-{
- " will appear on the display
must
be exited before the Split mode (CLP-8801860j can
as
required by using the
[+IYES} button is pressed for the first time.
[-/NO]
and
and [+/YES]
the

The
Function
Mode
ID
ID
Tuning
plished via the
approximately 0.2 Hz increments (the first time the
simply switches to the tuning value display without actually changing the tuning). The overall
tuning range is from 427.0 Hz to 453.0 Hz (corresponding to the A3 note's Hz). Press the
[-/NO]
or two dots,
Scale
--------------
-------------------
In
addition to the tuning method described
PI
function.
After selecting
and [+IYES] buttons simultaneously to recall the default value "440 Hz".
Tenths
Display
i
'-{'-{A
LJ.'-{O
!..fun
'-{!..fa.
LI.!..fa.
of
l.U
"PI",
use the
a Hertz are indicated
as
in the following example:
Value
440.0
440.2
440.4
440.6
440.8
[-iNO]
on
the LED display by the appearance and position
and
on
page 22, overall tuning can also be accom-
[+/YES]
buttons to lower
[-/NO]
or
[+/YES]
or
raise the pitch in
button is pressed
of
one
After selecting
then use the
below.
o F2.1: Scale
In
addition to the standard Equal Temperament tuning, the Clavinova includes 6 classic
tunings that you can select and use to play music
with in a more modem context. The tunings are:
1: Equal Temperament
2: Pure Major
3: Pure Minor
4: Pythagorean
Use the
[-INO]
tuning).
and
o F2.2: Base Note
Unlike Equal Temperament tuning, these classic tunings must be tuned to a specific key.
Use the
to be based. The selected key will appear on the display, followed by a low bar
"R _")
[-/NO]
or
a high bar
Press the
",c
2'::1",
press the [+/YES] button to engage the scale function sub-mode,
FUNCTION
.........................................................................................................................................................
[-/NO]
[+/YES]
and
and
[-/NO]
[~]
and [ ... ] buttons to select the desired scale function,
as
listed
.
of
the corresponding period,
5: Mean Tone
6:
Werckmeister
7: Kirnberger
[+/YES]
buttons simultaneously to recall the default settings (Equal Temperament
buttons to select the number
of
the desired tuning. Press the
............................................................................................................................................
[+/YES]
if
sharp (e.g.
and [+/YES] buttons simultaneously to recall the default settings "C".
buttons to select the key you want the previously selected tuning
",c -").
or
experiment
if
flat (e.g.
.

The
Function
Mode
iii
Dual Mode Functions
------------
After selecting "F 38", press the [+/YES] button to engage the dual-mode function sub-
mode, then use the
FUNCTION [
....
] and [ ... ] buttons
to
select the desired dual mode func-
tion, as listed below.
If
the Dual mode is not engaged "F
3.
-" will appear instead
of
"F
3.'::1"
and the Dual mode
functions cannot
be
selected.
If
this happens engage the Dual mode and proceed.
[ •
~HORTCUT:
You
can
.J.·u.m.
p directly
to
the
dual-mode functions
(F3)
by
pressing
the
[FUNCTION]
button
while
holding
the
two
dual-mode voice selectors.
r!D
NOTE
1 • Dual mode function settings are set individually for each voice combination.
o F3.1: Dual Balance
...................................................
,
................................................................................
.
The volume levels
of
the two voices combined in the dual mode can
be
adjusted
as
re-
quired by using this function. Use the
[-/NO]
and [+IYES] buttons to adjust the balance as
required. The balance range is from 0 through 20. A setting
of
"10"
produces equal balance
between the two dual-mode voices. Settings below "10" increase the volume
of
the 2nd Voice
in relation to the 1st Voice, and settings above "10" increase the volume
of
the 1st Voice in
relation
to
the 2nd Voice ("1st" and "2nd"
is
explained
on
page 16). Press the
[-/NO]
and
[+1
YES]
buttons simultaneously to recall the default setting (different for each voice combina-
tion).,
You
can set one voice as the main voice, and another voice as a softer, mixed voice.
o F3.2: Dual Detune
......................................................................................................................................
.
This function makes it possible
to
detune the 1st and 2nd dual-mode Voices
to
create a
thicker sound. Use the
[-/NO]
and [+/YES] buttons to set the amount
of
detuning as required.
The detune range is from
-10
through 10. A setting
of
"0"
sets both voices to the same pitch.
Settings below
"0"
increase the pitch
of
the 2nd Voice in relation
to
the 1st Voice, and settings
above
"0"
increase the pitch
of
the 1st Voice in relation to the 2nd Voice ("1st" and "2nd" is
explained on page 16). Press the
[-/NO]
and [+/YES] buttons simultaneously
to
recall the
default setting (different for each voice combination).
IdJ
F3.3: 15t Voice Octave Shift
..........................................................................................................
..
.t
D F3.4: 2nd Voice Octave Shift
.........................................................................................................
.
Depending on which voices you combine using the dual mode, the combination may sound
better
if
one
of
the voices is shifted up
or
down an octave. Use the
[-/NO]
and [+IYES]
buttons to set the octave
of
the 1st or 2nd Voice
as
required ("1st" and "2nd" is explained on
page 16). The available settings are
"0"
for normal pitch,
"-1"
to shift the pitch down one
octave, and
"1"
to shift the pitch up one octave. Press the
[-/NO]
and [+IYES] buttons simul-
taneously to recall the default setting (different for each voice combination).

The
Function
Mode
IdJ
F3.5: 1 st Voice Effect Depth (CLP·880/860/840)
...................................................................
.
III
o F3.6: 2nd Voice Effect Depth (CLP-880/860/840)
These functions make it possible to individually set the depth
2nd dual-mode Voices ("1st" and "2nd" is explained on page 16). Use the
YES] buttons to set the effect depth for the corresponding voice as required. The depth range
is from 0 through 20. A setting
maximum effect depth. Press the
default setting (different for each voice combination).
L!l
NOTE
I . The effect depth settings cannot
exited before EFFECT can be turned ON.
IdJ
F3.5: Reset (CLP-820/820S)
o F3.7: Reset (CLP-880/860/840)
This function resets all dual-mode functions to their default values. Press the [+/YES]
button to reset the values.
reset.
CLP-880/860 Split Mode Functions
After selecting "F'-1.:l", press the [+/YES] button to engage the split-mode function sub-
mode, then use the
tion,
as
listed below.
If
the Split mode is not engaged "F
functions cannot be selected. Also note that you must exit from the Function mode before the
Split mode can be engaged .
FUNCTION [....
"E
of
"0"
produces no effect, while a setting
[-/NO]
.....................................................................................................................
tid"
will appear on the display when all functions have been
and [+/YES] buttons simultaneously to recall the
be
changed unless the EFFECT
................................................................................................................
] and
[~]
buttons to select the desired split mode func-
Y.
- " will appear instead
................................................................
of
the effect for the 1st and
[-/NO]
of
is
ON. The Function mode must be
"20"
and
produces
-------
of
"F
Y8"
and the Split mode
..
[+1
..
.
• SHORTCUT:
L!l
NOTE
I . Split mode function settings are
o F4.1: Split Point
In
addition to the split point setting method described on page 17, the split point can be set
via this function. Use the
simply press the appropriate key
[+/YES] buttons simultaneously to recall the default setting
o F4.2: Split Balance
The volume levels
quired by using this function. Use the
required. The balance range is from 0 through 20. A setting
between the two split-mode voices. Settings below "10" increase the volume
in relation to the Right Voice, and settings above
You
can
jump
directly to the split-mode functions (F4)
[FUNCTION] button while holding the [SPLIT] button.
set
individually for each voice combination.
..........................................................................................................................................
[-IN
0]
and [+/YES] buttons to set the split point
on
the keyboard: from
"A-I"
to "C7". Press the
"Fi2".
....................................................................................................................................
of
the two voices combined in the split mode can be adjusted
[-/NO]
and [+/YES] buttons to adjust the balance as
of
"10" produces equal balance
"10"
increase the volume
by
pressing the
as
required, or
of
of
the Right Voice
..
[-/NO]
the Left Voice
as
and
re-
.

The
Function
Mode
g F4.3: Right Voice Octave Shift
...........................................................................................
,
.........
.
D F4.4: Left Voice Octave Shift
.........................................................................................................
.
Depending on which voices you combine using the split mode, the combination may sound
better
if
one
of
the voices is shifted up
or
down an octave. Use the [-/NO] and [+/YES]
buttons to set the octave
of
the Left
or
Right Voice as required. The available settings are
"0"
for normal pitch,
"-1"
to shift the pitch down one octave,
and"
1" to shift the pitch up one
octave. Press the
[-/NO] and [+/YES] buttons simultaneously to recall the default setting
(different for each voice combination).
Set according to the pitch extent for the song you want to play.
g F4.S: Right Voice Effect Depth
.....................................................................................................
.
DJ
F4.6: Left Voice Effect Depth
.........................................................................................................
.
These functions make it possible to individually set the depth
of
the effect for the Left and
Right split-mode Voices. Use the
[-/NO] and [+/YES] buttons to set the effect depth for the
corresponding voice
as
required. The depth range is from 0 through 20. A setting
of
"0"
produces no effect, while a setting
of
"20" produces maximum effect depth. Press the
[-INO]
and [+/YES] buttons simultaneously
to
recall the default setting (different for each voice
combination).
~
NOTE
I .
The
effect
depth
settings cannot
be
changed unless
the
EFFECT is
ON.
The
Function
mode
must be
exited before EFFECT
can
be
turned
ON.
D F4.7: Damper Range
...............................................................................................................................
.
The Damper Range function determines whether the damper pedal affects the Right Voice,
the Left Voice, or both the Left and Right Voices in the split mode. Use the
[-/NO] and
[+1
YES] buttons to select
"2"
for the Left Voice,
"1"
for the Right Voice, or "ALL" for both
voices. Press the
[-/NO] and [+/YES] buttons simultaneously to recall the default setting
"ALL".
DJ
F4.8: Reset
........................................................................................................................................................
.
j
This function resets all split-mode functions to their default values. Press the [+/YES]
button to reset the values.
"E
,..,d" will appear on the display when all functions have been
reset.

The
Function
Mode
III
CLP-840/820/820S Left Pedal Mode
------
This function sets the left pedal for normal soft-pedal operation, for song start/stop opera-
tion, or for sostenuto (CLP-820S only) operation. Use the [-/NO] and
[+/YES] buttons to
select the desired left-pedal mode.
"1"
is the normal soft-pedal mode, "2" is the start/stop
mode, and
"3"
is the sostenuto mode (CLP-820S only). When the start/stop mode is selected,
the left pedal functions in the same way as the panel [START/STOP] button. Press the
[-/NO]
and [+/YES] buttons simultaneously to recall the default setting
"I".
iii
CLP-880/860 Pedal Functions
--------
After selecting "F 58", press the [+/YES] button to engage the pedal functions sub-mode,
then use the
FUNCTION [.....
] and [
....
] buttons to select the desired pedal functions,
as
listed
below.
J
FS.1:
Left
Pedal
Mo'de
...........................................................................................................................
.
This function conveniently lets you set the left pedal for normal soft pedal operation, or for
song startlstop operation. Use the
[-IN
0]
and [+/YES] buttons to select the desired left-
pedal mode. Press the
[-INO]
and [+/YES] buttons simultaneously to recall the default
setting" 1".
1: Soft The left pedal functions as the soft pedal.
2: StarVStop
The left pedal functions
in
the same manner as the [START/STOP] button.
D
FS.2:
Damper
Mode
.................................................................................................................................
..
This function lets you set how the damper pedal affects the sustain sound. There are two
modes for pedal operation.
1:
Switch
In
this mode the pedal acts as a simple on/off switch for sustain.
2: Continuous
In
this mode the pedal continuously changes the amount of sustain (in eightstep gradations) i.e., the further down you press the pedal the longer the sound
sustains.
Use the
[-/NO]
and [+/YES] buttons to select the desired damper mode. Press the
[-/NO]
and [+/YES] buttons simultaneously to recall the default setting "2".
D
FS.3:
Soundboard Depth
....................................................................................................................
.
Certain piano voices (GRAND PIANO, CLASSICAL PIANO, and JAZZ PIANO) feature
a special effect which recreates the ring
of
the strings and the soundboard resonance
of
an
actual acoustic piano when the damper pedal is pressed. This function lets you adjust the
depth
of
this effect. Use the
[-/NO]
and [+/YES] buttons to set the effect depth
as
required.
The effect depth range is from 0 through 20. A setting
of
"0"
produces no effect, while a
setting
of
"20" produces maximum effect depth. Press the
[-/NO]
and [+/YES] buttons
simultaneously to recall the default setting "12".

The
Function
Mode
lID
iii
iii
iii
CLP-840/820/820S Metronome Volume
CLP-880/860 Metronome Volume
• SHORTCUT:
The volume
[-/NO]
the
is from 1 through 20. A setting
produces maximum metronome volume. Press the
neously to recall the default setting "10".
You
can jump directly to the metronome functions
TION] button while holding the [METRONOME] button.
of
the metronome sound can be changed. After selecting "F 5" or "F
and [+/YES] buttons to set the metronome volume as required. The volume range
of
"1" produces minimum sound, while a setting
-------
[-/NO]
-----
by
pressing the [FUNC-
f,",
of
"20"
and [+/YES] buttons simulta-
CLP-840/820/820S Piano Song Part Cancel Volume CLP-880/860 Piano Song Part Cancel Volume
---
use
This function sets the volume at which a "canceled" part is played during piano song
15
playback (see page
YES] buttons to set the volume as required. The volume range is from 0 through 20. A setting
of
"0"
produces no sound, while a setting
NO] and [+/YES] buttons simultaneously to recall the default setting "5".
Adjust the part volume to a comfortable level to use the "canceled" part as a guide to play
along with. Set to
~
.
for information on the "part-cancel" function). Use the [-/NO] and
of
"20" produces maximum volume. Press the [-I
"0"
if
you
don't
want to hear the part.
[+1

The
Function
Mode
iii
iii
CLP-840/820/820S MIDI Functions
CLP-880/860 MIDI Functions
--------
______
• A Brief Introduction to MIDI
MIDI, the Musical Instrument Digital Interface, is a world-
MIDI Gable
MIDI IN
1
DOu·,·1
Clavinova
note and velocity (touch response) information via the MIDI OUT connector whenever a note
keyboard.
etc.) or a tone generator (essentially a synthesizer with no keyboard), the second keyboard or tone generator will
respond precisely to.notes played on the original transmitting keyboard. The result is that you can effectively
play two instruments at once, providing thick multi-instrument sounds.
Clavinova
If
the MIDI OUT connector
Data Being Recorded sequence recording. A sequence recorder can be used to "record"
Playback Data
DOU-10
standard communication interface that allows MIDI-compatible
musical instruments and equipment to share musical information and
control one another. This makes it possible to create
MIDI instruments and equipment that offer far greater versatility and
control than
most MIDI keyboards (including the Clavinova,
is
connected to the MIDI IN connector
This same type
MIDI data received from a Clavinova, for example. When the
recorded data is played back, the Clavinova automatically "plays"
MIDI IN
the recorded performance in precise detail.
The examples given above really only scratch the surface. MIDI
can do much, much more. The Clavinova MIDI functions allow it to
be used in fairly sophisticated MIDI systems.
is
available with isolated instruments. For example,
of
a second keyboard (synthesizer,
of
musical information transfer
"systems"
of
course) transmit
is
is
of
played on the
used for MIDI
_
After selecting
mode, then use the
below.
~
I:!J
F7.1/FB.1:
D
F7.2/FB.2:
MIDI OUT
DOU-l0
• The rear-panel
NOTE
I
the
are using (see
and
• Always use a high-quality MIDI cable to connect MIDI
than about
(Set
channel
MIDI sequence recorder could be used to
the instruments or tone generators could
receive on channel
channel-l information transmitted by the sequence recorder, while the second instrument or tone
",e
1':1"
or "F
8.':1",
press the [+/YES] button to engage the MIDI function sub-
FUNCTION [.,..]
HOST
TO
HOST
out
of
the
15 meters, since cables longer than this can pick up noise which can cause data errors.
MIDI
Transmit Channel Selection
MIDI
Receive Channel Selection
to
receive
on
2)
SELECT
connector,
page
38). In this situation, a/l MIDI settings described
TO
HOST
MIDI
\fi~J
Clavinova
(Sello
and [..-] buttons to select the desired MIDI function,
switch must be
set
the
HOST
SELECT switch to the appropriate position for the type
connector .
MIDI IN
receive on MID!
"play" two different instruments or tone generators. One
be
set to receive only on
2.
In this situation the first instrument or tone generator will respond only to
1
t"\
•
£_
set
channell)
as
listed
to "MIDI" in order to use the MIDI connectors. When you use
below
will have affect
OUT
to MIDI
IN
terminals. Never use MIDI cables longer
............................................................................
...............................................................................
of
computer you
on
the MIDI signal in
.
.
The MIDI system allows transmission
and reception
of
MIDI data
on
16
differ-
ent channels. Multiple channels have
been implemented to allow selective
control
of
certain instruments or devices
connected in series. For example, a single
of
channell,
while the other is set to

2
The
Function
Mode
In any MIDI control setup, the MIDI channels
of
the transmitting and receiving equipment must
be
matched for proper data transfer. A "Multi-timbre" receive mode is also available, which allows
simultaneous reception
of
different parts
on
all 16 MIDI channels, allowing the Clavinova
to
play
multi-channel song data received from a music computer
or
sequencer. There's also a "1-2" mode
which allows simultaneous reception
on
channels 1 and
2.
Use the [-INO] and [+/YES] buttons to select the desired transmit
or
receive channel. The
transmit channel parameter can also be turned "OFF"
if
you don't want the Clavinova
to
transmit
any MIDI data.
To
select the multi-timbre receive mode, set the receive channel to "ALL". Select
"1-2" for multi-timbre reception on channels 1 and 2 only.
Press the
[-/NO] and [+/YES] buttons simultaneously to recall the default setting: transmit "1";
receive
= "ALL".
~
NOTE
1
•
In
the
duaf
mode
first voice
data
is
transmitted
on
its
set
channel,
and
in
the
spfit
mode
right
voice
data
is
transmitted
on
its
set channel.
In
the
dual
mode
second
voice
data is transmitted
on
the
next greater channel
number
of
the
set
channel,
and
in
the
split
mode
left
voice
data
is transmitted
on
the
next greater channel
number of
the
set
channel.
In
either
mode,
no
data
is
transmitted
if
the
transmit channel is set
to
"OFF".
• Demo/piano song
data
and recorder playback
data
are not transmitted
via
MIDI.
•
No
MIDI reception occurs
when
the
demo/piano song
mode
is
engaged.
•
Program
change and other
like
channel messages received will not affect
the
Clavinova's panel settings or
what
is baing pfayed
on
the
keyboard.
DJ
F7.3/FS.3: Local Control ON/OFF
..........................................................................................................
.
"Local Control" refers to the fact that, normally, the
Clavinova keyboard controls its internal tone generator,
allowing the internal voices to
be
played directly from
the keyboard. This situation is "Local Control On"
since the internal tone generator is controlled locally by
Clavinova its own keyboard.
Local control can be turned OFF, however, so that the Clavinova keyboard does not play the
internal voices, but the appropriate MIDI information
is
still transmitted via the MIDI OUT connec-
tor when notes are played
on
the keyboard. At the same time, the internal tone generator responds to
MIDI information received via the MIDI IN connector.
When using the DOU-lO Disk Orchestra Unit with the Clavinova, for example, Local Control
should
be
turned OFF when recording using the DOU-lO voices only, and ON when recording the
Clavinova voices while listening to playback
of
the
DOU-I0
voices.
Use the
[-/NO]
and [+/YES] buttons to turn local control
"On"
or
"OFF".
Press the [-!NO] and
[+iYES] buttons simultaneously to recall the default setting "On".
DOU·10
MIOI
IN
DJ
F7.4/FS.4: Program Change ON/OFF
................................................................................................
.
Normally the Clavinova will respond
to
MIDI program change numbers received from an external keyboard or other MIDI device, causing the correspondingly numbered voice to be selected on
the corresponding channel (the keyboard voice does not change). The Clavinova will normally also
send a MIDI program change number whenever one
of
its voices is selected, causing the correspond-
ingly numbered voice or program to be selected
on
the external MIDI device
if
the device is set up to
receive and respond to MIDI program change numbers.
This function makes
it
possible to cancel program change number reception and transmission so
that voices can be selected on the Clavinova without affecting the external MIDI device,
Use the
[-/NO] and [+/YES] buttons
to
tum program change transmission and reception "On" or
"OFF",
Press the
[-/NO] and [+iYES] buttons simultaneously
to
recall the default setting "On".

r
The
Function
Mode
IdJ
F7.5/FB.5:
Control Change ON/OFF
.......................................................................................
.
I
Normally the Clavinova will respond to MIDI control change data received from an
external MIDI device or keyboard, causing the voice on the corresponding channel to be
affected by pedal and other
"control" settings received from the controlling device (the key-
I
board voice is not affected). The Clavinova also transmits MIDI control change information
when one
of
its pedals or other appropriate controls are operated.
This function makes
it
possible
to
cancel control change data reception and transmission so
that, for example, the Clavinova pedals and other controls can be operated without affecting
an external MIDI device.
Use the
[-/NO]
and [+/YES] buttons to tum control change transmission and reception
"On"
or "OFF".
Press the
[-iNO]
and [+/YES] buttons simultaneously to recall the default setting "On".
tlil
NOTE
1 •
For
information on control changes that can
be
used with the Clavinova, refer to the MIDI Data
Format on page 43.
D
F7.6/FB.6:
MIDI
Transmit Transpose
......................................................................................
.
This function allows the MIDI note data transmitted by the Clavinova to be transposed up
or
down in semitone increments by up to plus or minus 12 semitones. The pitch
of
the
Clavinova itself is not affected.
Use the
[-/NO]
and [+/YES] buttons to set the desired amount
of
MIDI transmit transposi-
tion. The range is from
"-12"
(down one octave) through
"0"
(no transposition) to "12" (up
one octave).
Press the
[-!NO]
and [+/YES] buttons simultaneously
to
recall the default setting "0".
D
F7.7/FB.7:
Panel/Status Transmit
.............................................................................................
..
This function causes all the current Clavinova panel settings (selected voice, etc.) to be
transmitted via the MIDI OUT terminal. This is particularly useful
if
you will be recording
performances to a MIDI sequence recorder such as the Yamaha MIDI Data Filer MDF3 which
. will be used to control the Clavinova on playback. By transmitting the Clavinova panel set-
tings and recording them on the MIDI sequence recorder prior to the actual performance data,
the Clavinova will be automatically restored to the same settings when the performance is
played back.
Press the
[+/YES] button
to
transmit the panel/status data.
"E
Ii
d"
will appear on the LED
display when the data has been successfully transmitted.
tlil
NOTE
1 • See page 44 for list
of
the "Panel Data Contents" transmitted
by
this function.
• Panel setting data that is transmitted
to
an external device can only be reloaded on a model
of
the
same type. Panel setting data can also be directly transferred to
or
from instruments
of
the same
model type.
IdJ
F7.B/FB.B:
Bulk
Data
Dump
.............................................................................................................
..
This function is used to transmit all data stored in the Recorder memory to a MIDI data
storage device such
as
the Yamaha MIDI Data Filer MDF3, other sequence recorders, or MIDI
compatible computers.
Press the [+/YES] button
to
begin bulk transmission.
nd"
will appear on the LED
display when the data has been successfully transmitted.
tlil
NOTE
1 • Bulk data dump will not function when the recorder is in operation.
• Recorder data that is transmitted
to
an extemal device can only be reloaded on a model
of
the same
type. Recorder data can also be directly transferred
to
or from instruments
of
the same model
type.
• The reload operation cannot be executed when thp. Rp.,.,nrrl",r
i"
in
nn"'r~tir""
nr ,... ~ c.
on~"~_
---'-
:-

The
Function
Mode
1m
Ii
so
CLP-840/820/820S Backup Functions
_____
_
CLP-880/860 Backup Functions
_______
_
After selecting "F
8.':1"
or
"F
9.':/",
press the [+/YES] button to engage the backup function
sub-mode, then use the
FUNCTION [ ... ]
and [....
] buttons to select the desired backup func-
tion,
as
listed below.
I!l]
NOTE
1 • The backup settings themselves,
and
the contents
of
the recorder memory, are always backed up .
• Even
if
the Backup is turned on, factory presets can
be
recalled
at
any time (see
page
40). The
factory setting list
is found on page 42.
Even
if
backup is turned
on
via one
of
the functions described below, the data will only be
retained in memory for about 1 week
if
the power is not turned on during this time. Ifthe
backup period is exceeded, all settings will be reset to their default values.
If
you want to
retain the backup settings for longer periods,
be
sure to turn the power switch on for a few
minutes at least once a week.
D FS.1/F9.1: Voice
............................................................................................................................................
.
Turns backup
of
the voice functions listed below
on
or
off. Use the [-!NO] and [+/YES]
buttons to turn backup
"On"
or "OFF".
The default backup mode is "OFF".
• Voice (Keyboard, Dual, and Split)
• Dual (ON/OFF, Voice, and Dual Functions for each voice combination)
• Split (ON/OFF, Voice, and Split Functions for each voice combination: CLP-880/860)
• Reverb (ON/OFF, Type, and Depth for each voice)
• Effect (ON/OFF, Type, and Depth for each
voice:
CLP-880/860/840)
• Variation (for each voice)
• Touch Sensitivity (including the FIXED volume)
• Metronome (Beat, Volume)
• Piano Song Part Cancel Volume
D FS.2/F9.2:
MIDI
...............................................................................................................................................
.
Turns backup
of
the MIDI functions listed below on or off. Use the [-/NO] and [+/YES]
buttons to turn backup
"On"
or "OFF".
The default backup mode is "OFF".
• Channel (Transmit, Receive)
• Local ON/OFF
• Program Change ON/OFF • Control Change ON/OFF
• MIDI
Transmi~
Transpose
IdJ
FS.3/F9.3: Tuning
........................................................................................................................................
.
Turns backup
of
the tuning functions listed below on or off. Use the [-/NO] and [+/YES]
buttons to turn backup "On" or "OFF".
The default backup mode is "OFF".
• Transpose • Tuning • Scale (including base note)
D FS.4/F9.4: Pedal
..........................................................................................................................................
..
Turns backup
of
the pedal functions listed below on or off. Use the
[-/NO]
and [+/YES]
buttons to turn backup
"On"
or "OFF".
The default backup mode is "OFF".

IJ
IJ
t
JJJ
Connecting
to
a
Personal
Computer
Although the Clavinova can be connected to a personal computer via the
MIDI IN/OUT connectors and a
MIDI interface, the TO HOST connector and
HOST SELECT switch allow direct connection to Apple Macintosh or IBM-PC/AT
personal computers for sequencing and other music applications without the
need for a separate MIDI interface.
o
Connecting
Computer
to
an
Apple
Macintosh
Series
............................................................................................................
.
HOST
MI~r~J.c
c::n
Set
to
the
position.
SELECT
I
"Mac"
TO
HOST
Apple
Macintosh
Series Computer
Connect the TO HOST connector
of
the Clavinova to the modern (
printer port on your Macintosh, depending on which port your MIDI
software is using for MIDI data communication, using a standard
Macintosh 8-pin system peripheral cable. Set the HOST SELECT
switch to the
"Mac"
You may also have to make other MIDI interface settings
computer side, depending on the type
software owner's manual).
position.
In
of
software you use (refer to yo
any case the clock speed should
on
be
the
set
1 MHz .
•
"Mac"
• 8-pin system peripheral cable .
• Data transfer rate: 31,250 bps.
Cable
El,,--I
MINI
a-PIN
Connections
---,OIJJ--~rno,------","IB
1
DIN
0~--------02(HSKi)
20
3 0
40--··
5
o·
60
7~
80
o 1
(HSKO)
05
(RxD-)
04GND
03
(TxO·)
Q8(RxO+)
07(GPi)
o 6
(TxD+)
MINI
a-PIN
DIN
tl
~.~
• When using the [TO HOST] terminal
computer before connecting the cable. After connecting the cable, turn the power
Clavinova.
• When not using the [TO HOST] terminal
terminal.
• "Hsr" will appear in the display
nected, the
this case, turn the power
position
power
• When the
To
use the MIDI connectors for connection via a standard MIDI interface,
of
the Clavinova, first turn the power
of
If
the cable is left connected, the Clavinova may not function properly.
if
HOST
SELECT switch is not in the proper position,
of
the
HOST
of
the computer on first, then the Clavinova, to check
HOST
off
SELECT switch. Once the connection
SELECT switch is
the host computer is not turned on, the connecting cable is not properly con-
on both the Clavinova
the Clavinova, make sure the cable is disconnected from the [TO HOST]
or
the MIDI driver
and
HOST
if
the MIDI driver
"PC-2, no data transfer occurs via the MIDI connectors.
set
to
and
"Mac", "PC-t
the computer.
",
or
off
on both the Clavinova
of
the computer on first, then the
or
and
check the cable connection
SELECT switch position
set
MIDI application is
and
MIDI application function properly.
the HOST SELECT switch to "MIDI".
is
and
the
not
active. In
and
the
verified, turn the

Connecting
to a Personal
Con1puter
or
HOSTSELEOT
M,br.::;lr~M~c
UD
TO
o
I
Set to the "PC-2"
position.
~
NOTE
Series Computer
l .
•
D Connecting to an IBM-PC/AT Series Computer
Connect the TO HOST connector
HOST
co
cc
oc
IBM-PC/AT
If
your system doesn't
different settings. Check your software operation manual and if
HOST SELECT switch
When
using
the
TO
HOST terminal
be
installed in
World
Wide
the
personal
Web,
<http://www.yamaha.co.jp/englishlxg/>.
on your IBM computer, using a standard 8-pin MINI DIN
cross cable. Set the HOST SELECT switch to the "PC-2" position.
Refer to your software owner's manual for information on any
settings you might have to make
•
work
to
"PC-2"
• 8-pin mini DIN ~9-pin D-SUB cable.
• Data transfer rate: 38,400 bps.
properly
"PC-1
".
to
computer.
Ell
with
the
connect
The
Cable
MINI DIN
8-PIN
Yamaha
Connections
om
10
20
>------~------<O
30
o--...---------{)5
connections and settings listed
to
a personal computer using
MIDI driver can
----------------------------'
----------<OS(CTS)
-----------<0
-----------<0
of
on
the computer side.
it
requires a 31,250
be
above,
Windows, a Yamaha
obtained at
...........
.
the Clavinova to the RS-232C port
--7 9-pin D-SUB
D·SUB
7
(RST)
(RxO)
(GNO)
9-PIN
2
o
your software may
bps.
data
transfer
Yamaha's
home
require
rate,
set
the
MIDI driver must
page
on
the
• Connector
MINI
34
0
D-SUB
Pin
DIN
78
1 2
8-PIN
5
9-PIN
Numbers
•
Trademarks
• Apple and Macintosh are trademarks
• IBM-PC/AT is a trademark
• Windows is the registered trademark
All other trademarks are the property
of
International Business Machines Corporation.
of
Apple Computer, Inc.
of
Microsoft® Corporation.
of
their respective holders.

Factory
Preset
Recall
.All
dual mode, split mode, reverb, effect, touch sensitivity, tuning
settings, and the settings affected by the Backup Functions can
be
restored to their original factory preset values by holding the C7 key
(rightmost key on the keyboard) while turning the
[POWER]
switch
ON. This also erases all recorder data, and sets all Backup on/off
settings (F8: CLP-840/820/820S, F9: CLP-880/860)
to
"OFF".
~
NOTE
I . The factory setting list
is
found on page 42.
Troubleshooting
If
you
encounter what appears
to
be
a malfunction, please check the following points before assuming
that your Clavinova
is
faulty.
1. No Sound When the Power is Turned
ON
4.
Intermittent Static Noise
Is the AC plug properly connected to the Clavinova
This is usually due to turning ON or OFF a house-
and an
AC
wall outlet? Check the AC connection
hold appliance
or
other electronic equipment which
carefully. Is the MASTER VOLUME control turned is fed by the same AC mains line as your Clavinova.
up to a reasonable listening level?
5.
Interference Appears On Radio orTV Sets
Also make sure that a pair
of
headphones is not
Located Near the Clavinova
plugged into the PHONES jack, and that the Local
The Clavinova contains digital circuitry which can
Control (page 35) is ON.
generate radio-frequency noise. The solution is to
2.
The Damper Pedal Doesn't Work
move the Clavin ova further away from the affected
If
the damper pedal doesn't work,
or
notes are
equipment,
or
vice versa.
sustained even when the pedal is not pressed, make
6.
Distorted Sound When the Clavinova is
sure that the pedal cord is properly plugged into the
Connected
to
An
External Amplifier/Speaker
main unit (page 66:
CLP-820S, page 60: CLP-860/
System
840/820, page 52: CLP-880).
If
the Clavinova is connected to a stereo system
or
3.
The Clavinova Reproduces Radio
or
TV
instrument amplifier and the sound is distorted,
Sound
reduce the volume
of
the external equipment to a
!
This can occur
if
there is a high-power transmitter in
level at which the distortion ceases.
Ii
a
your vicinity. Contact your Yamaha dealer.
I
• If "Sc
n"
appears on the display an internal malfunction has occurred. In
this
case, contact
your
Yamaha dealer .
. I
I
I
Opl'ions
&
Expander
Modules
• Options
• Expander Modules
BC-8 Bench
DOU-10 Disk Orchestra Unit
A comfortable bench styled to match your Yamaha
A range
of
MIDI recording and playback func-
Clavinova.
tions, plus Yamaha DOC software, Disklavier
HPE-160 Stereo Headphones
PianoSoft™, and General MIDI/Standard MIDI File
High-performance lightweight dynamic headphones
disk playback
capabilit~.
with extra-soft ear pads.
KC-883 Key Cover (for the
ClP-820S
only)
A
c-onvp,nip.nt
Wl'lV
tCl
Ie",,,,,,,
VClllr
lepvhCl"rn
rjp<>n
Clnrl
 Loading...