

Page 1

Integrated Amplifier
Integrated Amplifier
Amplificateur Intégré
Amplificateur Intégré
G
G
OWNER’S MANUAL
OWNER’S MANUAL
MODE D’EMPLOI
MODE D’EMPLOI
BEDIENUNGSANLEITUNG
BEDIENUNGSANLEITUNG
BRUKSANVISNING
BRUKSANVISNING
MANUALE DI ISTRUZIONI
MANUALE DI ISTRUZIONI
MANUAL DE INSTRUCCIONES
MANUAL DE INSTRUCCIONES
GEBRUIKSAANWIJZING
GEBRUIKSAANWIJZING
ИНСТРУКЦИЯ ПО ЭКСПЛУАТАЦИИ
Page 2
CAUTION: READ THIS BEFORE OPERATING YOUR UNIT.
1 To assure the finest performance, please read this manual
carefully. Keep it in a safe place for future reference.
2 Install this sound system in a well ventilated, cool, dry,
clean place - away from direct sunlight, heat sources,
vibration, dust, moisture, and/or cold. For proper
ventilation, allow the following minimum clearances
around this unit.
Top: 30 cm (11-3/4 in)
Rear: 20 cm (7-7/8 in)
Sides: 20 cm (7-7/8 in)
3 Locate this unit away from other electrical appliances,
motors, or transformers to avoid humming sounds.
4 Do not expose this unit to sudden temperature changes
from cold to hot, and do not locate this unit in an
environment with high humidity (i.e. a room with a
humidifier) to prevent condensation inside this unit,
which may cause an electrical shock, fire, damage to this
unit, and/or personal injury.
5 Avoid installing this unit where foreign object may fall
onto this unit and/or this unit may be exposed to liquid
dripping or splashing. On the top of this unit, do not
place:
– Other components, as they may cause damage and/or
discoloration on the surface of this unit.
– Burning objects (i.e. candles), as they may cause fire,
damage to this unit, and/or personal injury.
– Containers with liquid in them, as they may fall and
liquid may cause electrical shock to the user and/or
damage to this unit.
6 Do not cover this unit with a newspaper, tablecloth,
curtain, etc. in order not to obstruct heat radiation. If the
temperature inside this unit rises, it may cause fire,
damage to this unit, and/or personal injury.
7 Do not plug in this unit to a wall outlet until all
connections are complete.
8 Do not operate this unit upside-down. It may overheat,
possibly causing damage.
9 Do not use force on switches, knobs and/or cords.
10 When disconnecting the power cable from the wall outlet,
grasp the plug; do not pull the cable.
11 Do not clean this unit with chemical solvents; this might
damage the finish. Use a clean, dry cloth.
12 Only voltage specified on this unit must be used. Using
this unit with a higher voltage than specified is dangerous
and may cause fire, damage to this unit, and/or personal
injury. Yamaha will not be held responsible for any
damage resulting from use of this unit with a voltage
other than specified.
13 To prevent damage by lightning, keep the power cable
and outdoor antennas disconnected from a wall outlet or
this unit during a lightning storm.
14 Do not attempt to modify or fix this unit. Contact
qualified Yamaha service personnel when any service is
needed. The cabinet should never be opened for any
reasons.
15 When not planning to use this unit for long periods of
time (i.e. vacation), disconnect the AC power plug from
the wall outlet.
16 Be sure to read the “TROUBLESHOOTING” section on
common operating errors before concluding that this unit
is faulty.
17 Before moving this unit, press A to turn off this unit, and
then disconnect the AC power plug from the wall outlet.
18 Condensation will form when the surrounding
temperature changes suddenly. Disconnect the power
cable from the outlet, then leave this unit alone.
19 When using this unit for a long time, this unit may
become warm. Turn the power off, then leave this unit
alone for cooling.
20 Install this unit near the AC outlet and where the AC
power plug can be reached easily.
21 The batteries shall not be exposed to excessive heat such
as sunshine, fire or the like. When you dispose of
batteries, follow your regional regulations.
22 Excessive sound pressure from earphones and
headphones can cause hearing loss.
As long as this unit is connected to the AC wall outlet, it is not
disconnected from the AC power source even if you turn off this
unit by
A or set it to the standby mode by A button on the remote
control. In this state, this unit is designed to consume a very small
quantity of power.
WARNING
TO REDUCE THE RISK OF FIRE OR ELECTRIC SHOCK, DO
NOT EXPOSE THIS UNIT TO RAIN OR MOISTURE.
A-S500 only
This label is required to be attached to a product of which the
temperature of the top cover may be hot during operation.
i En
Page 3

CONTENTS
INTRODUCTION
USEFUL FEATURES ............................................ 1
SUPPLIED ACCESSORIES ................................. 1
CONTROLS AND FUNCTIONS .........................2
Front panel and Remote control ................................ 2
About the remote control...........................................3
Rear panel.................................................................. 4
OPERATION
PLAYING AND RECORDING.............................8
Playing a source.........................................................8
Adjusting the tonal quality ........................................8
Recording a source ....................................................9
PLAYING BACK TUNES FROM
YOUR iPhone/iPod ...........................................10
Using a Universal Dock for iPod............................. 11
Using a Wireless System for iPod ........................... 12
PREPARATION
CONNECTIONS .................................................... 5
Connecting speakers and source components............5
Connecting the power cable.......................................7
ADDITIONAL INFORMATION
TROUBLESHOOTING .......................................13
SPECIFICATIONS...............................................17
■ About this manual
• y indicates a tip for your operation.
• Some operations can be performed by using either the buttons on the main unit or on the remote control. In cases
when the button names differ between the main unit and the remote control, the names of the buttons on the remote
control are given in parentheses.
• This manual is printed prior to production. Design and specifications are subject to change in part as a result of
improvements, etc. In case of differences between the manual and the product, the product has priority.
INTRODUCTION
USEFUL FEATURES
PREPARATIONINTRODUCTION
OPERATION
INFORMATION
ADDITIONAL
This unit allows you to:
◆ Improve sound quality by using the Pure Direct (p. 8)
function
◆ Play back music from your iPhone/iPod (optional Yamaha
product required; p. 10)
◆ Select the recording source independently of the listening
source (A-S500 only; p. 9)
SUPPLIED ACCESSORIES
Please check that you received all of the following parts:
Remote control Batteries (× 2)
(AA, R6, UM-3)
◆ Control other Yamaha components using this unit’s
remote control (p. 3)
◆ Boost bass sounds by connecting a subwoofer (p. 5)
◆ Save power by using POWER MANAGEMENT switch
(p. 7)
English
1 En
Page 4

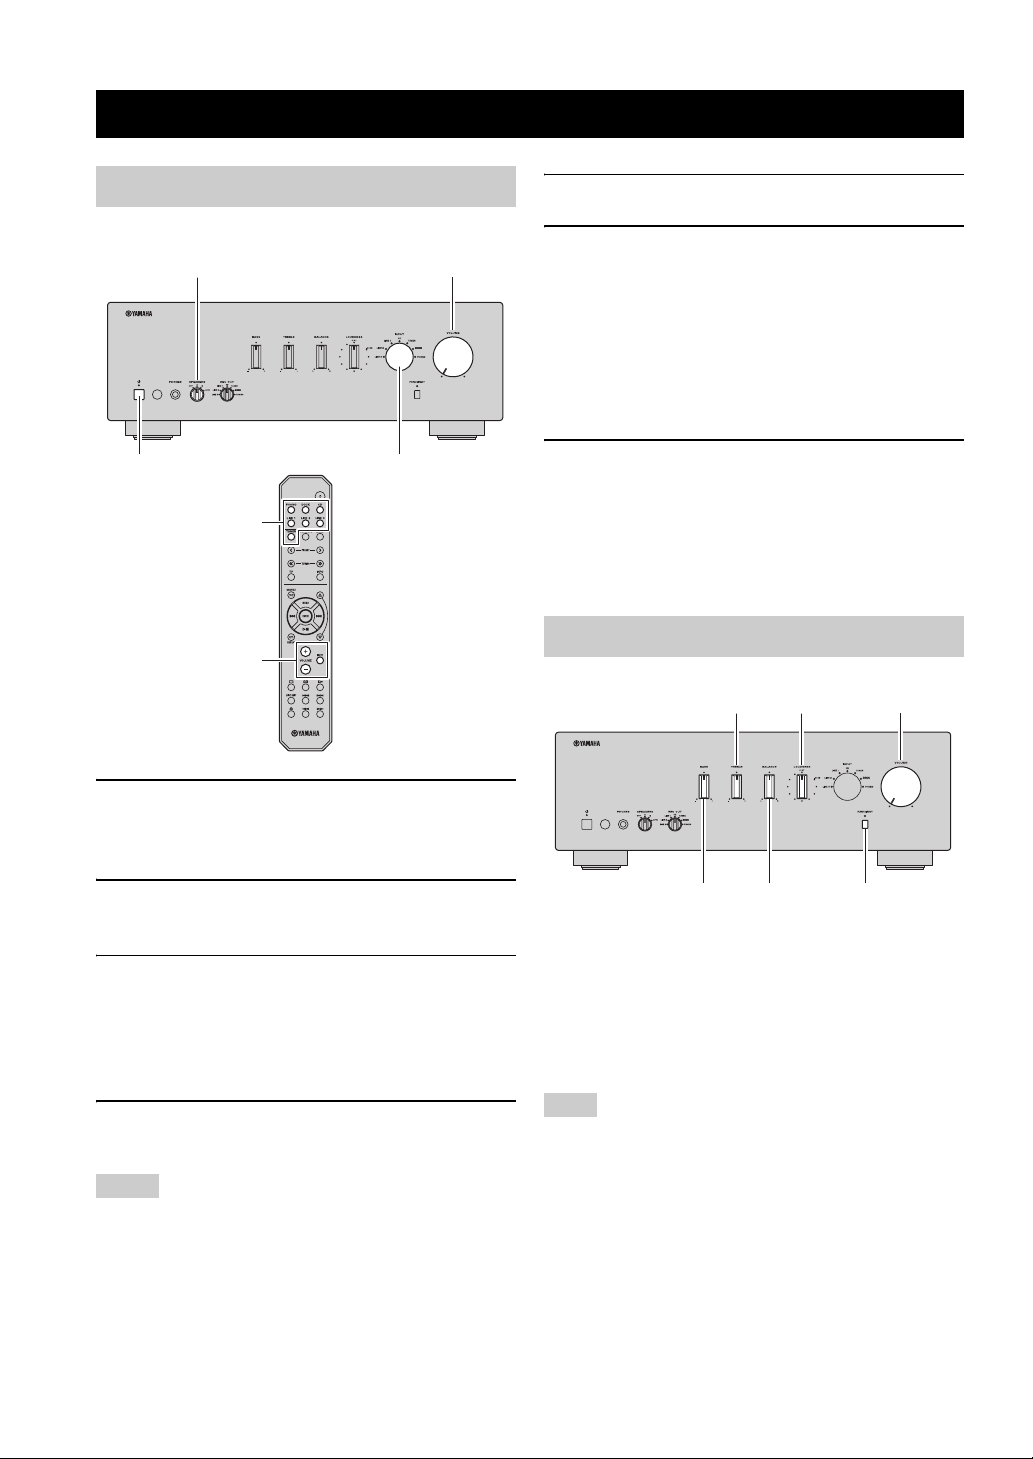
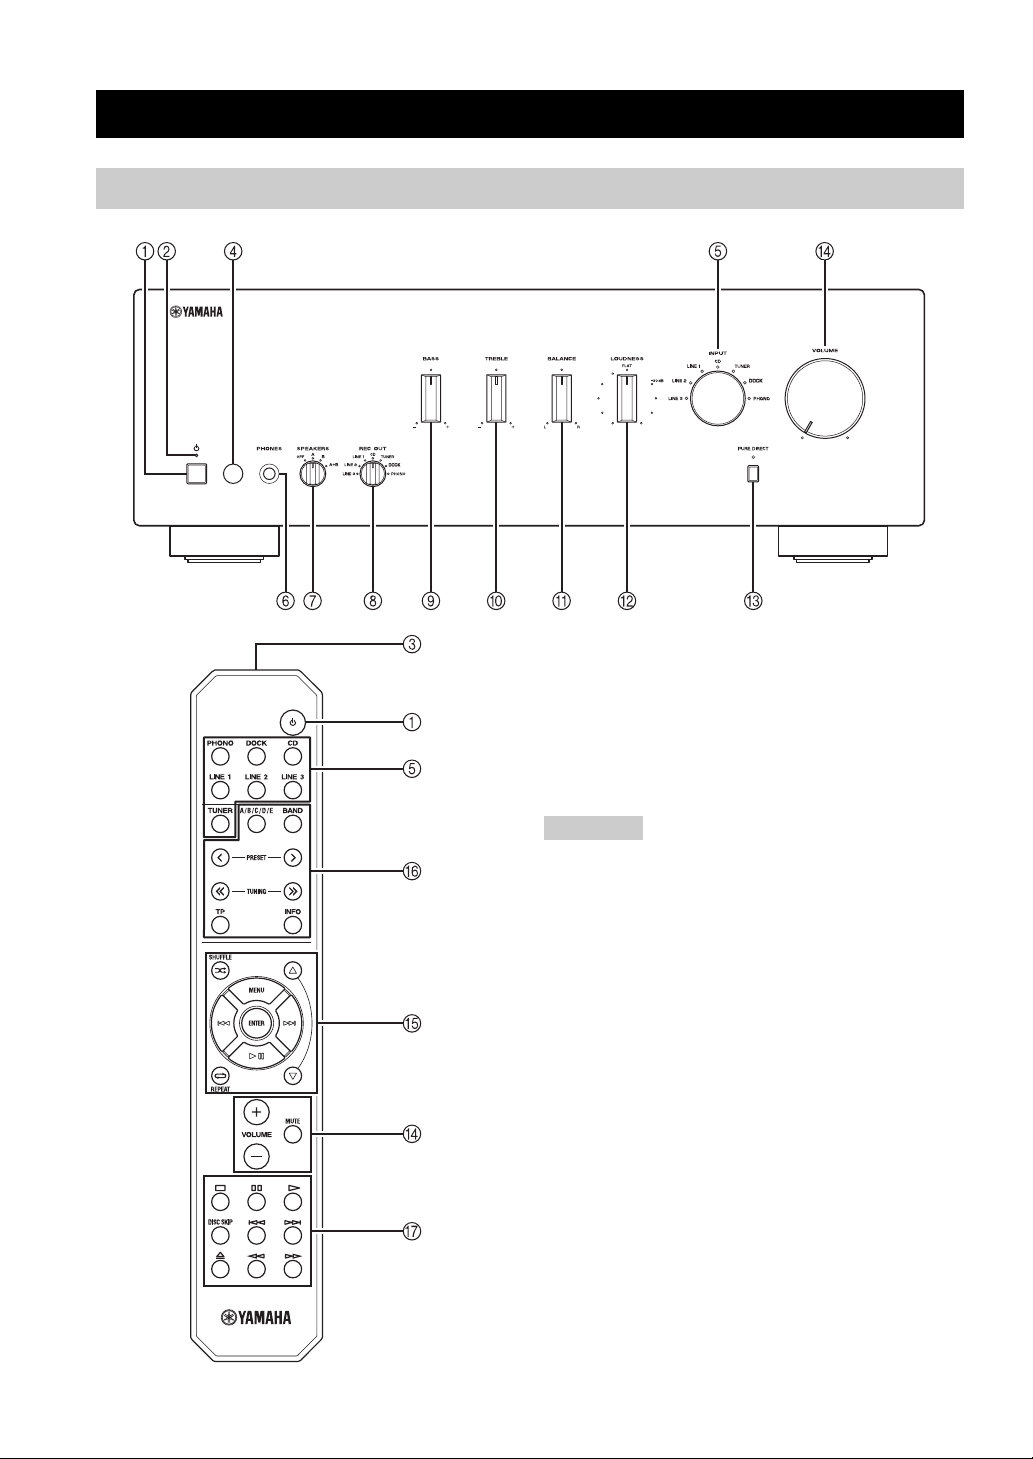
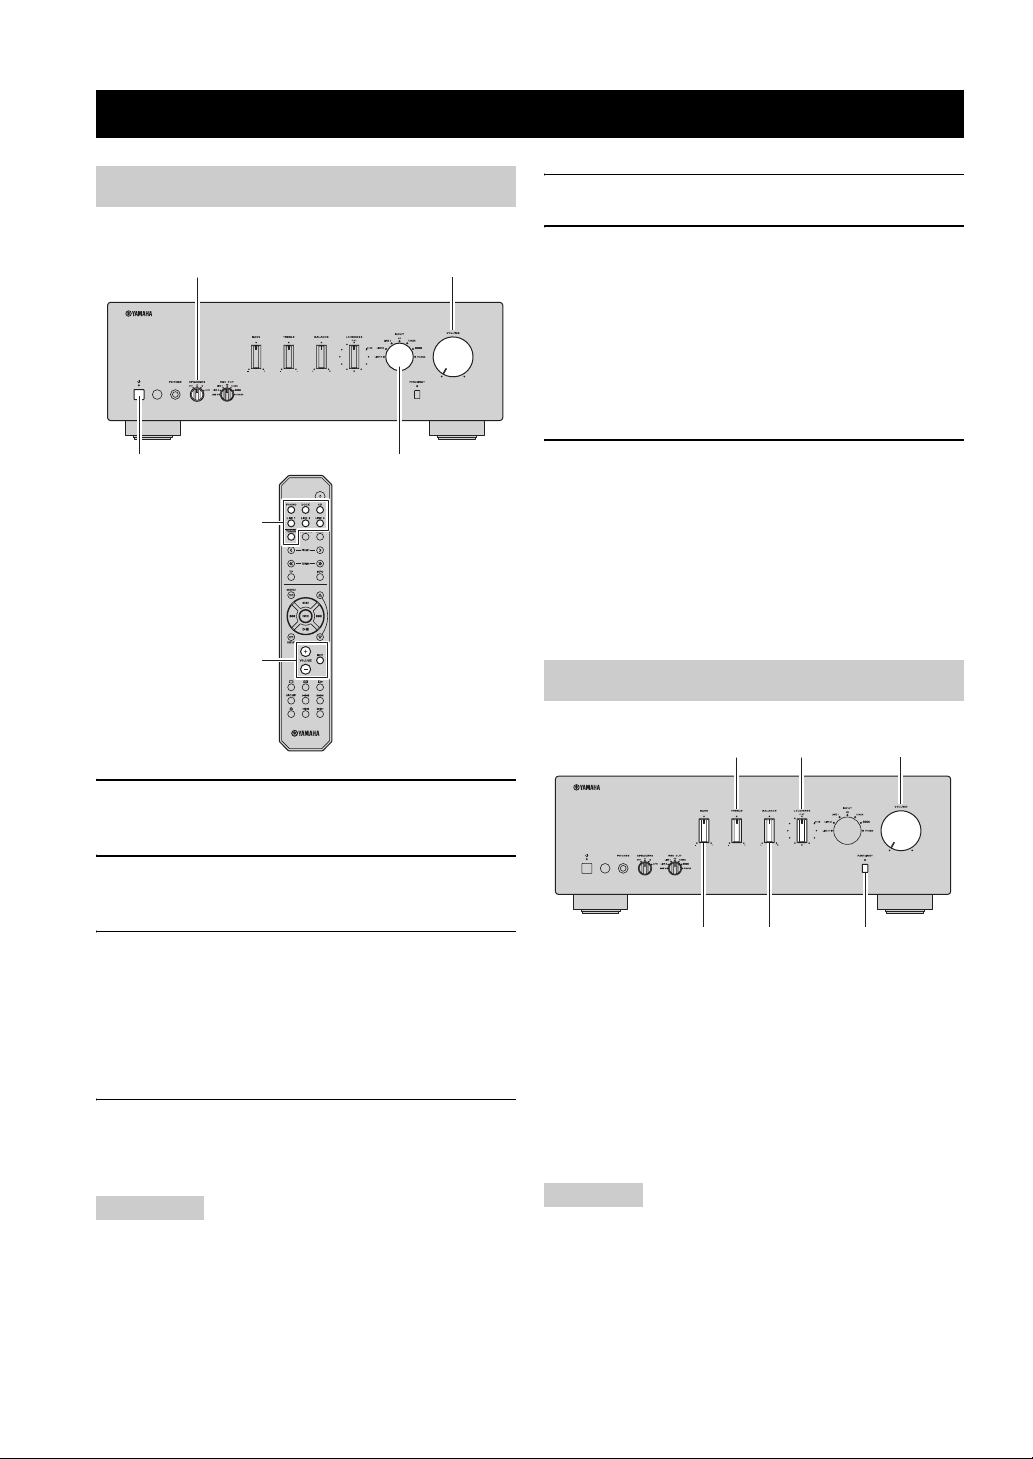
CONTROLS AND FUNCTIONS
Front panel and Remote control
(A-S500)
1 A (POWER)
Front panel: A switch
Turns on and off the power of this unit.
On position: Pushed inward
Off position: Released outward
Remote control: A button
When this unit is turned on: turns this unit on or sets it to
standby mode.
Note
This unit consumes a small amount of power even when turned
off or when in standby mode.
2 POWER on indicator
Lights up as follows:
Brightly lit: Power is on
Dimly lit: Standby mode
Off: Power is off
y
The POWER on indicator remains brightly lit while an iPhone/
iPod is being charged, even if this unit is in standby mode.
3 Infrared signal transmitter
Sends signals to the main unit.
4 Remote control sensor
Receives signals from the remote control.
5 INPUT selector and indicators
Select the input source you want to listen to. The input
source indicators light up when the corresponding input
sources are selected.
y
The input source names correspond to the names of the
connection jacks on the rear panel.
2 En
Page 5

CONTROLS AND FUNCTIONS
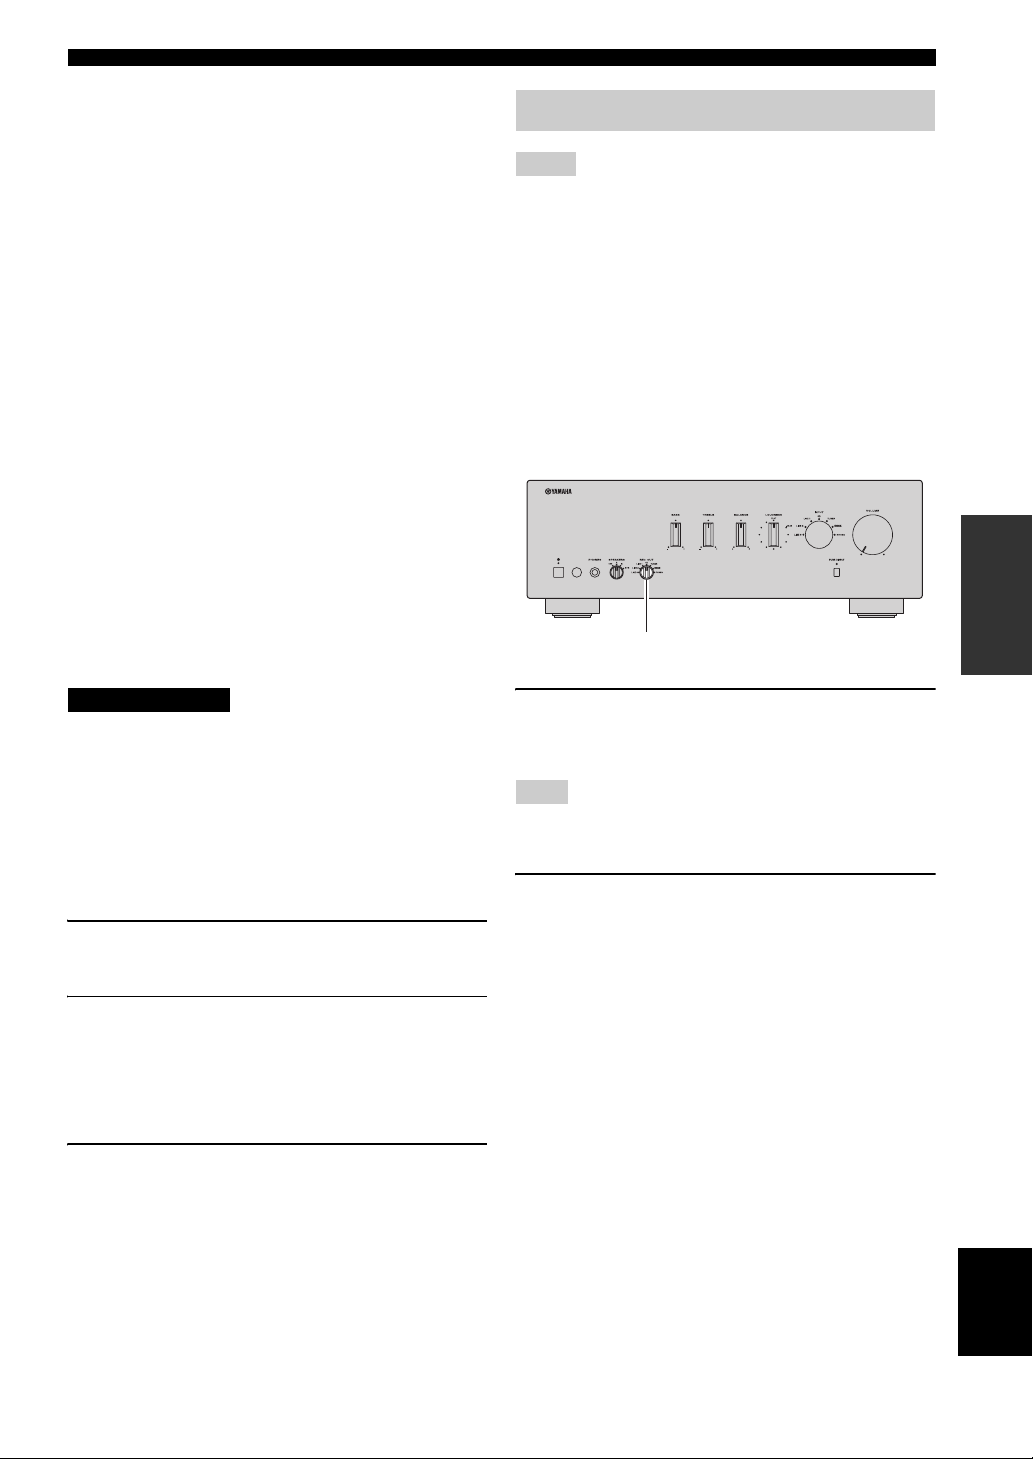
6 PHONES jack
Connect headphones for private listening. If you do not
want sound to be heard from the speakers, set the
SPEAKERS selector to OFF.
7 SPEAKERS selector
Turn on or off the speaker set connected to the
SPEAKERS A and/or B terminals on the rear panel each
time the corresponding SPEAKERS selector is set to A, B
or A+B.
8 REC OUT selector (A-S500 only)
Select a source for recording independently of the INPUT
selector setting, allowing you to record the selected source
while listening to another source (see page 9).
9 BASS control
Increases or decreases the low frequency response (see
page 9).
0 TREBLE control
Increases or decreases the high frequency response (see
page 9).
A BALANCE control
Adjusts the sound output balance of the left and right
speakers (see page 9).
B LOUDNESS control
Retains a full tonal range at any volume level (see page 9).
C PURE DIRECT switch and indicator
Reproduces any input source in the purest sound possible.
The indicator above it lights up when this function is
turned on (see page 8).
D VOLUME control
VOLUME +/–
Control the sound output level.
This does not affect the REC level for recording.
MUTE button (Remote control only)
Decreases the current volume by about 20 dB.
y
• The INPUT indicator for the current input source blinks while
the output is muted.
• The mute is released when MUTE button is pressed again, or
when the volume is adjusted by rotating the VOLUME control
on the front panel or by pressing the VOLUME +/– buttons on
the remote control.
E iPhone/iPod control buttons
Control an iPhone/iPod that is connected using an optional
Yamaha Universal Dock for iPod (see page 11) or
Wireless System for iPod (see page 12).
F Yamaha tuner control buttons
Control various functions of a Yamaha tuner.
Note
Even when using a Yamaha tuner, certain components and
features may not be available. Refer to your component’s owner’s
manual for more information.
G Yamaha CD player control buttons
Control various functions of a Yamaha CD player.
Note
Even when using a Yamaha CD player, certain components and
features may not be available. Refer to your component’s owner’s
manual for more information.
INTRODUCTION
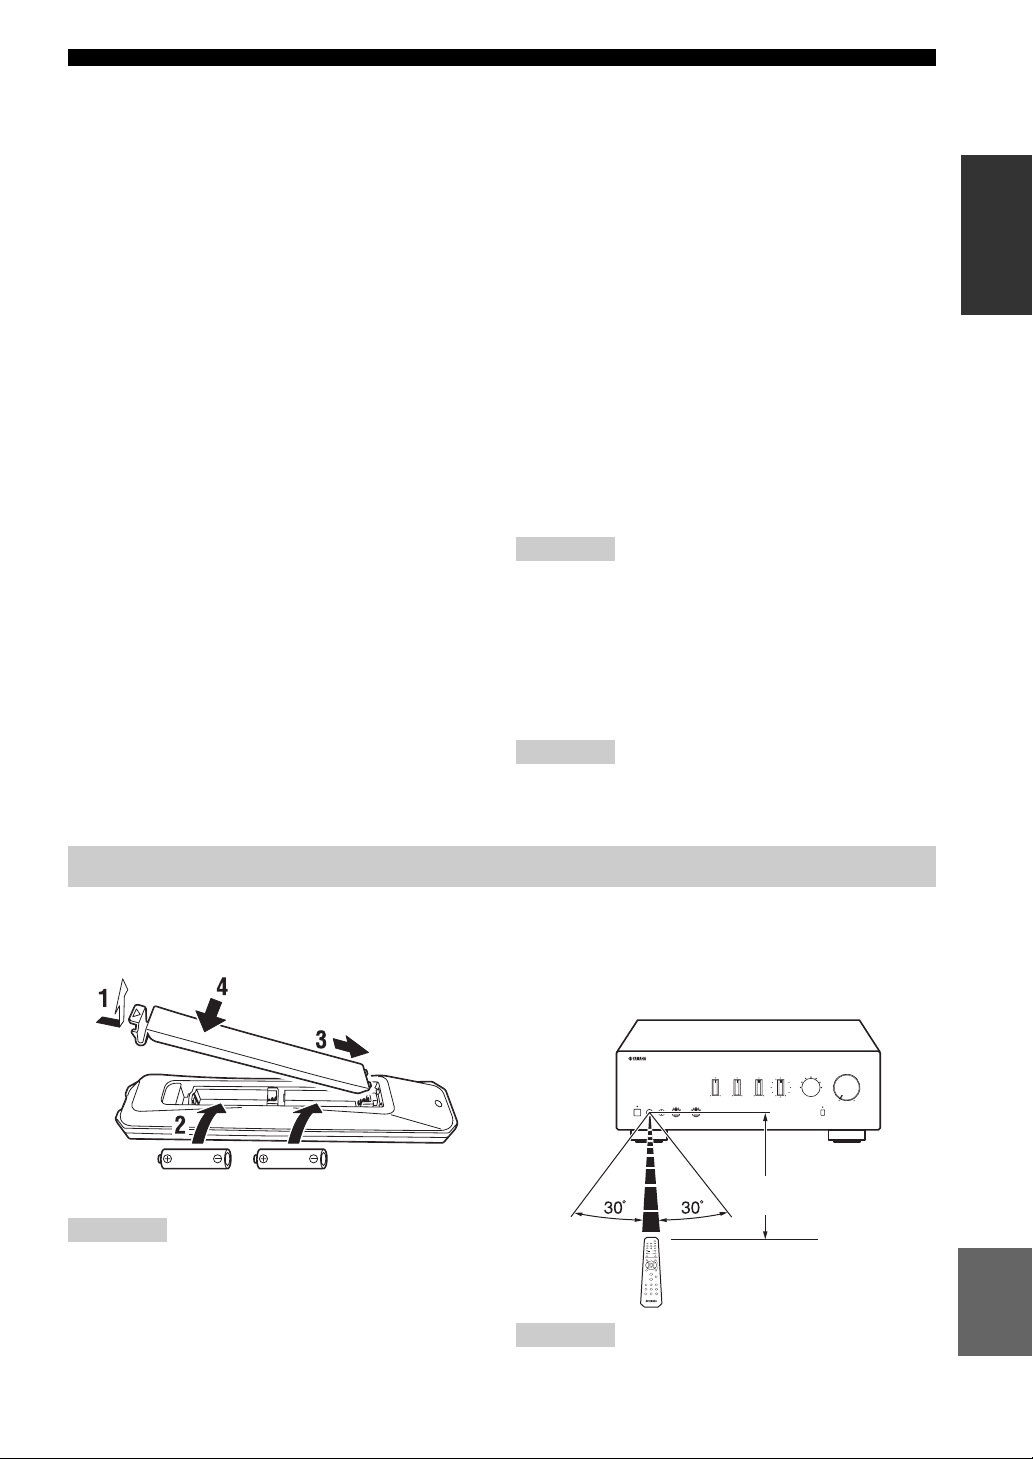
About the remote control
■ Installing batteries in the remote control
AA, R6, UM-3 batteries
Note
Make sure that the polarities are correct. See the illustration
inside the battery compartment.
■ Using the remote control
The remote control transmits a directional infrared beam.
Be sure to aim the remote control directly at the remote
control sensor on the front panel of this unit during
operation.
Within 6m
(20 ft)
English
Note
The area between the remote control and this unit must be clear of
large obstacles.
3 En
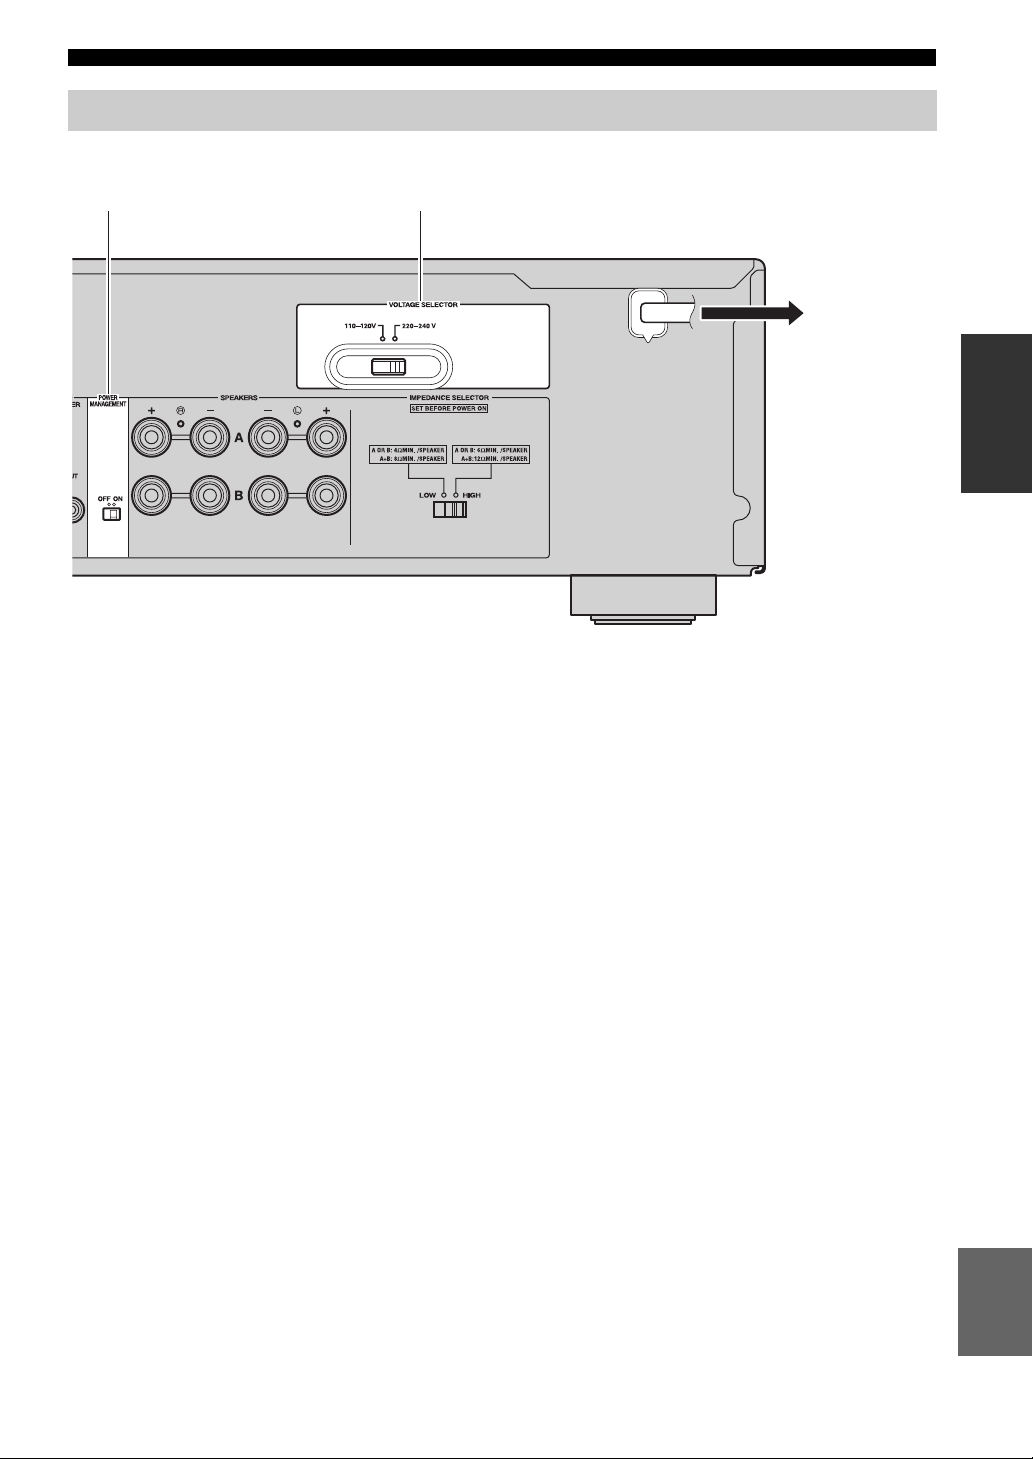
Page 6
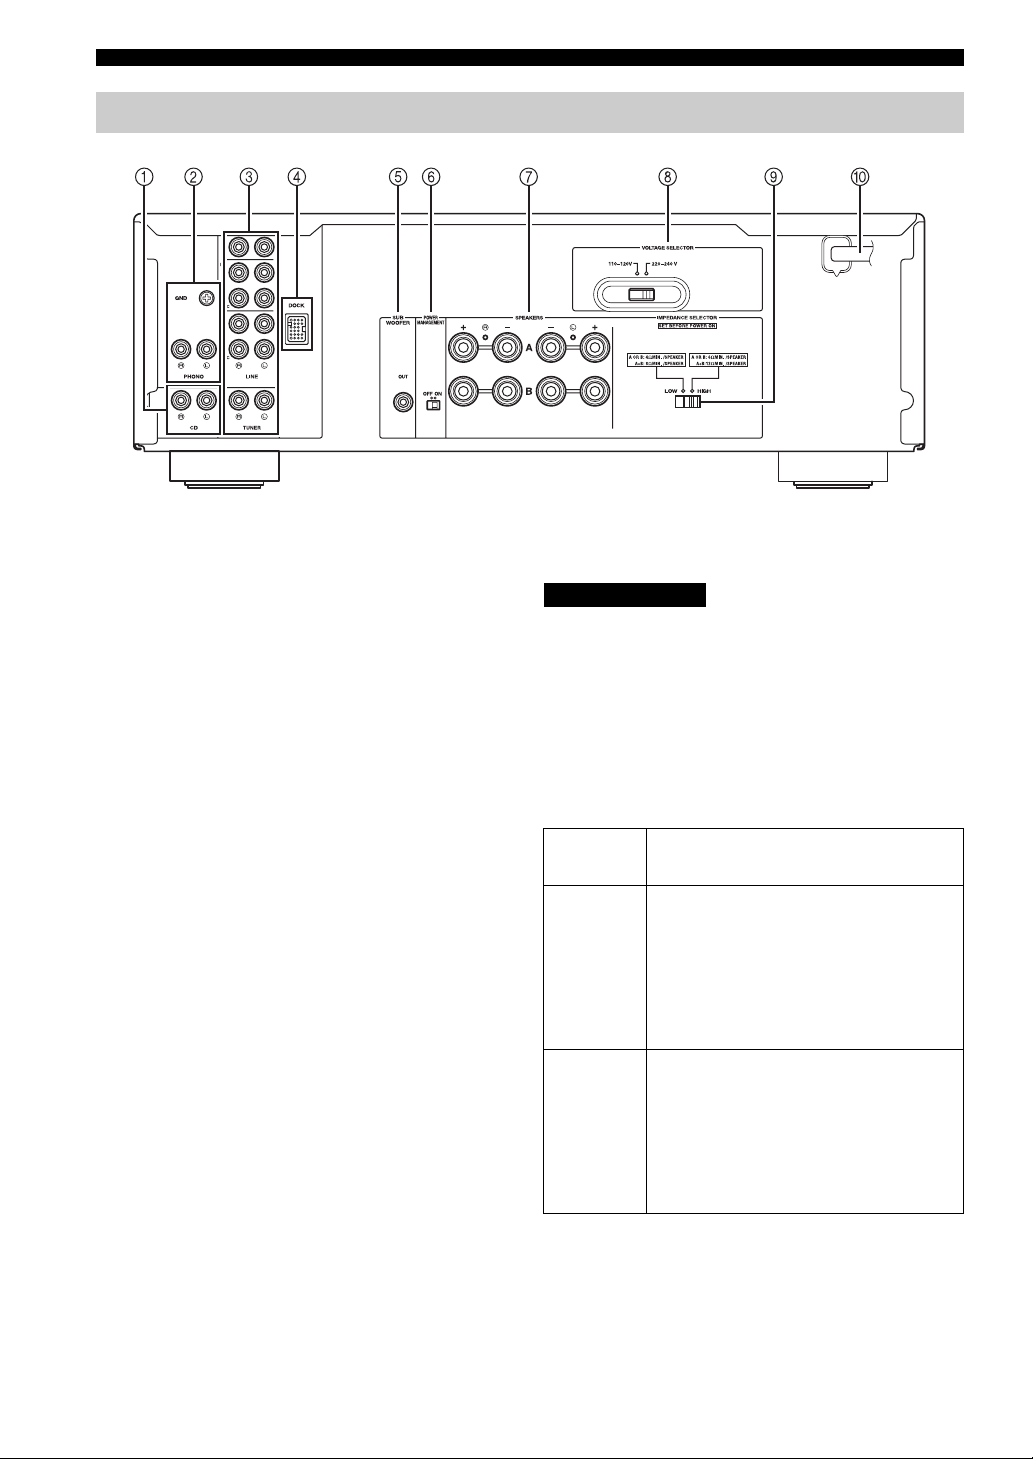
CONTROLS AND FUNCTIONS
Rear panel
(Taiwan and Central/South America models)
1 CD input jacks
Used to connect a CD player (see page 5).
2 PHONO jacks and GND terminal
Used to connect a turntable that uses an MM cartridge,
and to ground the terminal (see page 5).
3 Audio input/output jacks
Used to connect external components, such as a tuner, etc
(see page 5).
4 DOCK jack
Used to connect an optional Yamaha Universal Dock for
iPod or Wireless System for iPod (see page 10).
5 SUBWOOFER OUT jack
Used to connect a subwoofer with built-in amplifier (see
page 5).
y
The SUBWOOFER OUT jack attenuates signals over 90 Hz.
6 POWER MANAGEMENT switch
Enables or disables the automatic power down function
(see page 7).
7 SPEAKERS A/B terminals
Used to connect one or two speaker sets (see page 5).
8 VOLTAGE SELECTOR switch
(Taiwan and Central/South America models
only)
The VOLTAGE SELECTOR switch must be set to your
local main voltage before plugging the power cable into
the wall outlet (see page 7).
9 IMPEDANCE SELECTOR switch
See IMPEDANCE SELECTOR switch on this page.
■ IMPEDANCE SELECTOR switch
CAUTION
Do not change the IMPEDANCE SELECTOR switch
while the power of this unit is turned on, as doing so may
damage the unit.
If the unit fails to turn on, the IMPEDANCE SELECTOR
switch may not be fully slid to either position. If this is the
case, remove the power cable and slide the switch all the
way to either position.
Select the switch position (LOW or HIGH) according to
the impedance of the speakers in your system.
Switch
position
HIGH
LOW
• If you use one set (A or B), the impedance of
each speaker must be 6
• If you use two sets (A and B) simultaneously,
the impedance of each speaker must be 12
or higher.
• If you make bi-wire connections, the
impedance of each speaker must be 6
higher. See page 6 for details.
• If you use one set (A or B), the impedance of
each speaker must be 4
• If you use two sets (A and B) simultaneously,
the impedance of each speaker must be 8
higher.
• If you make bi-wire connections, the
impedance of each speaker must be 4
higher. See page 6 for details.
Impedance level
Ω or higher.
Ω
Ω or
Ω or higher.
Ω or
Ω or
0 Power cable
Connect the power cable into the wall outlet (see page 7).
4 En
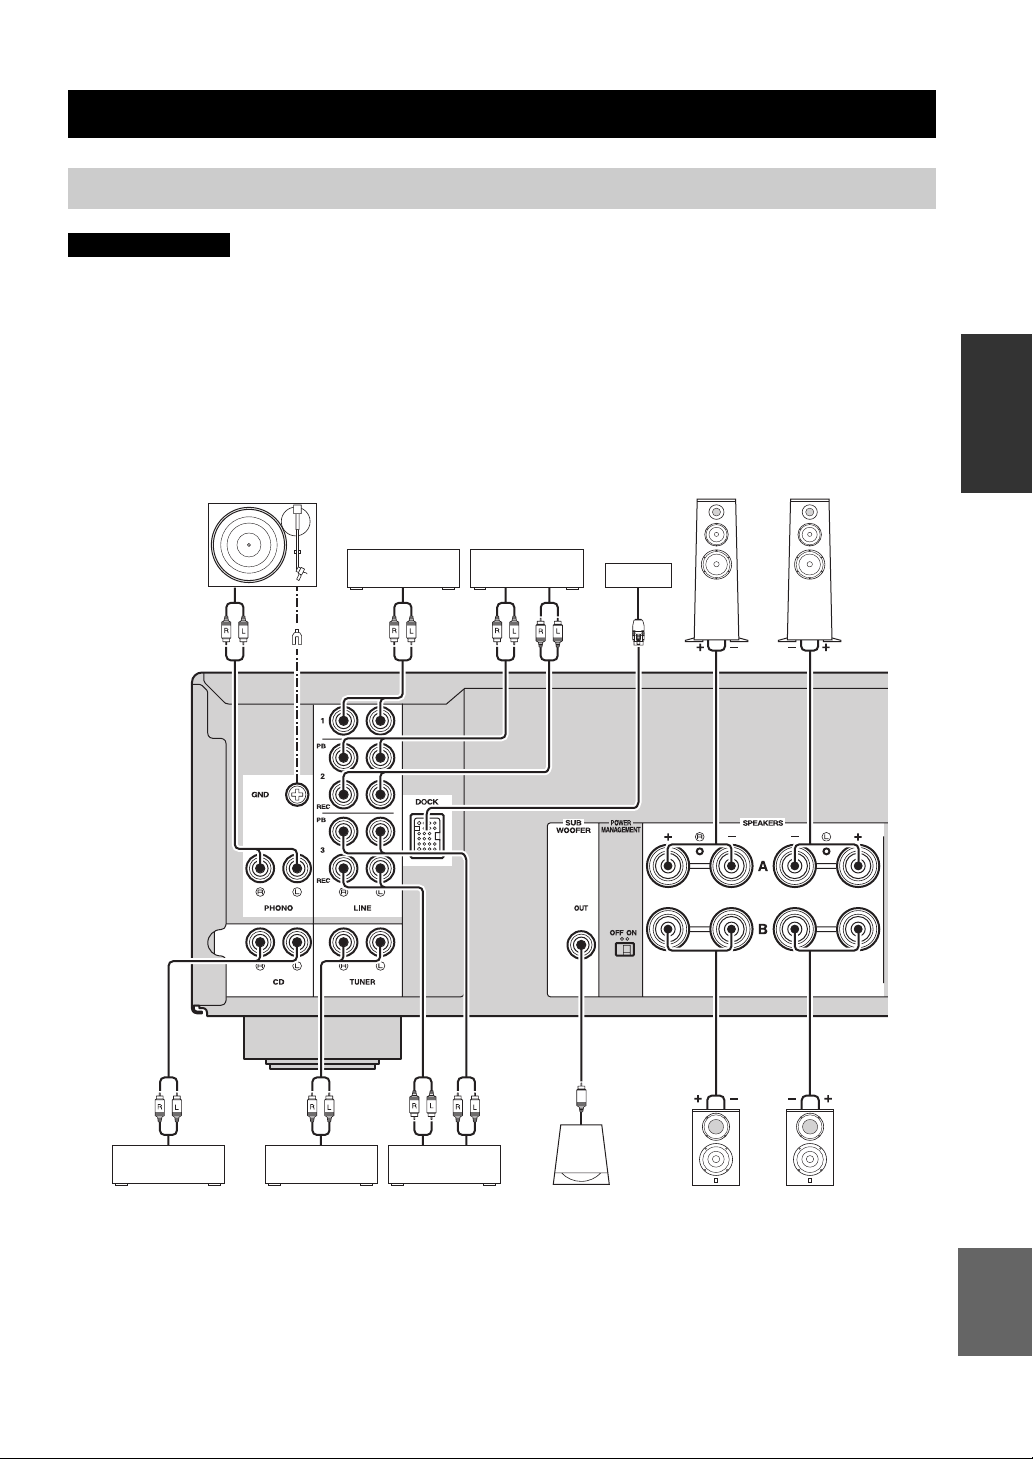
Page 7

PREPARATION
CONNECTIONS
Connecting speakers and source components
CAUTION
• Do not connect this unit or other components to the main power until all connections between components are
complete.
• All connections must be correct: L (left) to L, R (right) to R, “+” to “+” and “–” to “–”. If the connections are faulty,
no sound will be heard from the speakers, and if the polarity of the speaker connections is incorrect, the sound will be
unnatural and lack bass. Refer to the owner’s manual for each of your components.
• Use RCA cables for audio components (except for speaker connections and DOCK jack connections).
PREPARATION
Audio
out
Turntable
GND
DVD player,
etc.
Audio
out
CD recorder,
Audio
out
etc.
Speakers A
DOCK jack
connections
(see page 10)
Audio
in
Audio
out
Audio
out
Audio
in
Tuner SubwooferCD player
Tape deck, etc.
Audio
out
Speakers B
y
• The PHONO jacks are designed for connecting a turntable with an MM cartridge.
• Connect your turntable to the GND terminal to reduce noise in the signal. However, for some turntables, you may hear less noise
without the GND connection.
English
5 En
Page 8
CONNECTIONS
CAUTION
• The IMPEDANCE SELECTOR switch must be set to the appropriate position before connecting speaker sets. See
page 4 for details.
• Do not let the bare speaker wires touch each other or any metal part of this unit. This could damage this unit and/or the
speakers.
• Do not connect this unit or other components to the main power until all connections between components are
complete.
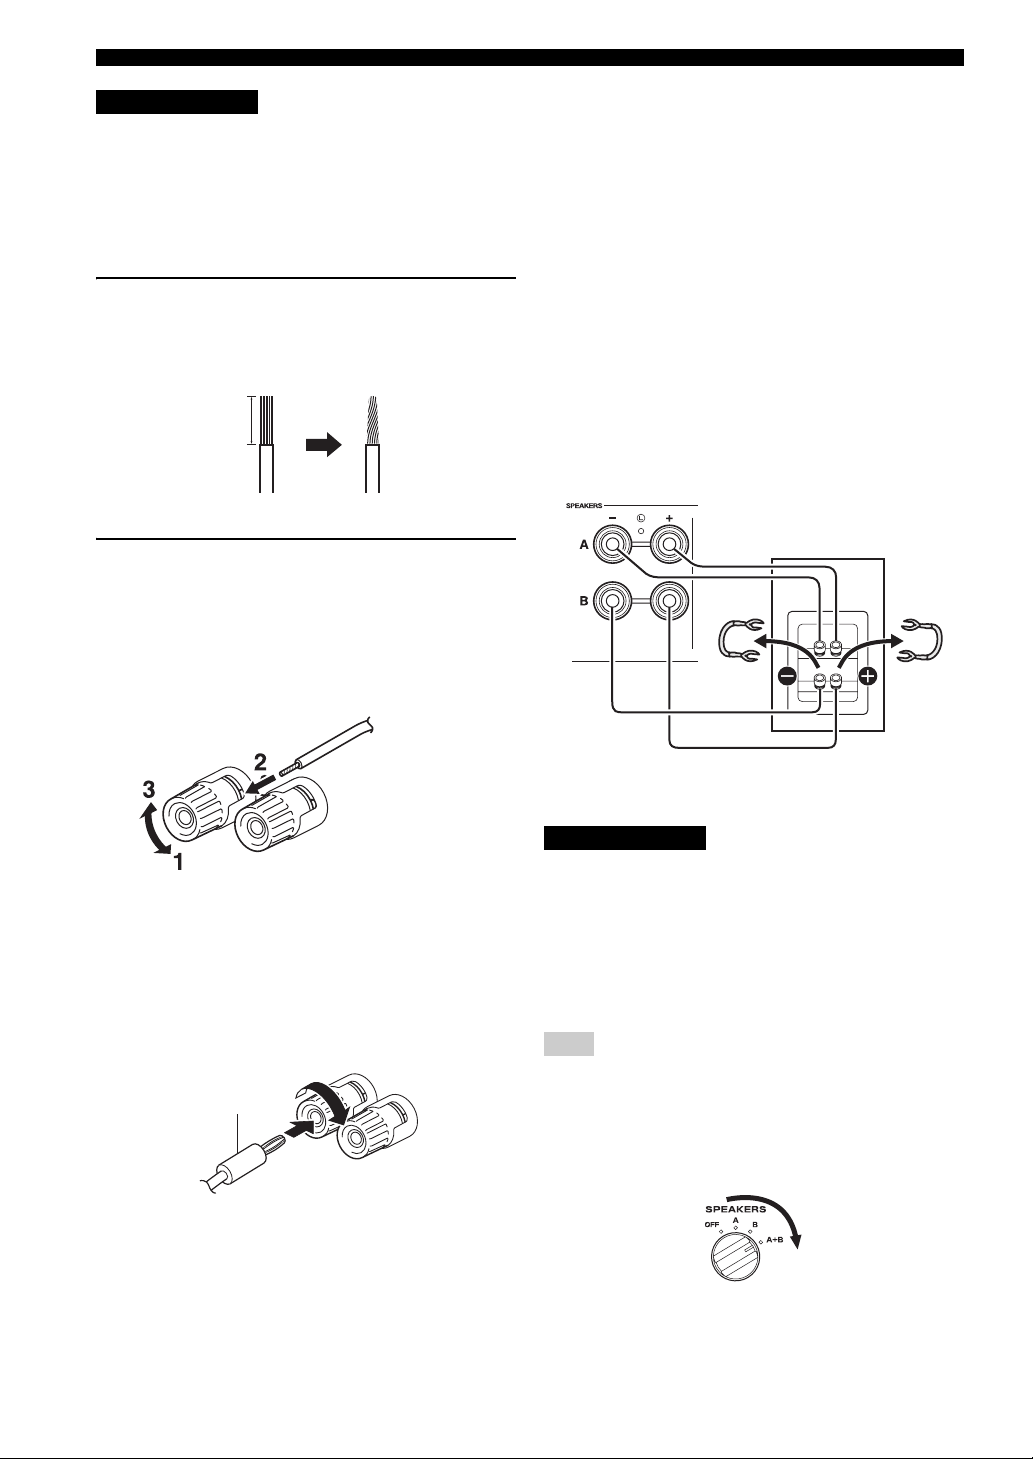
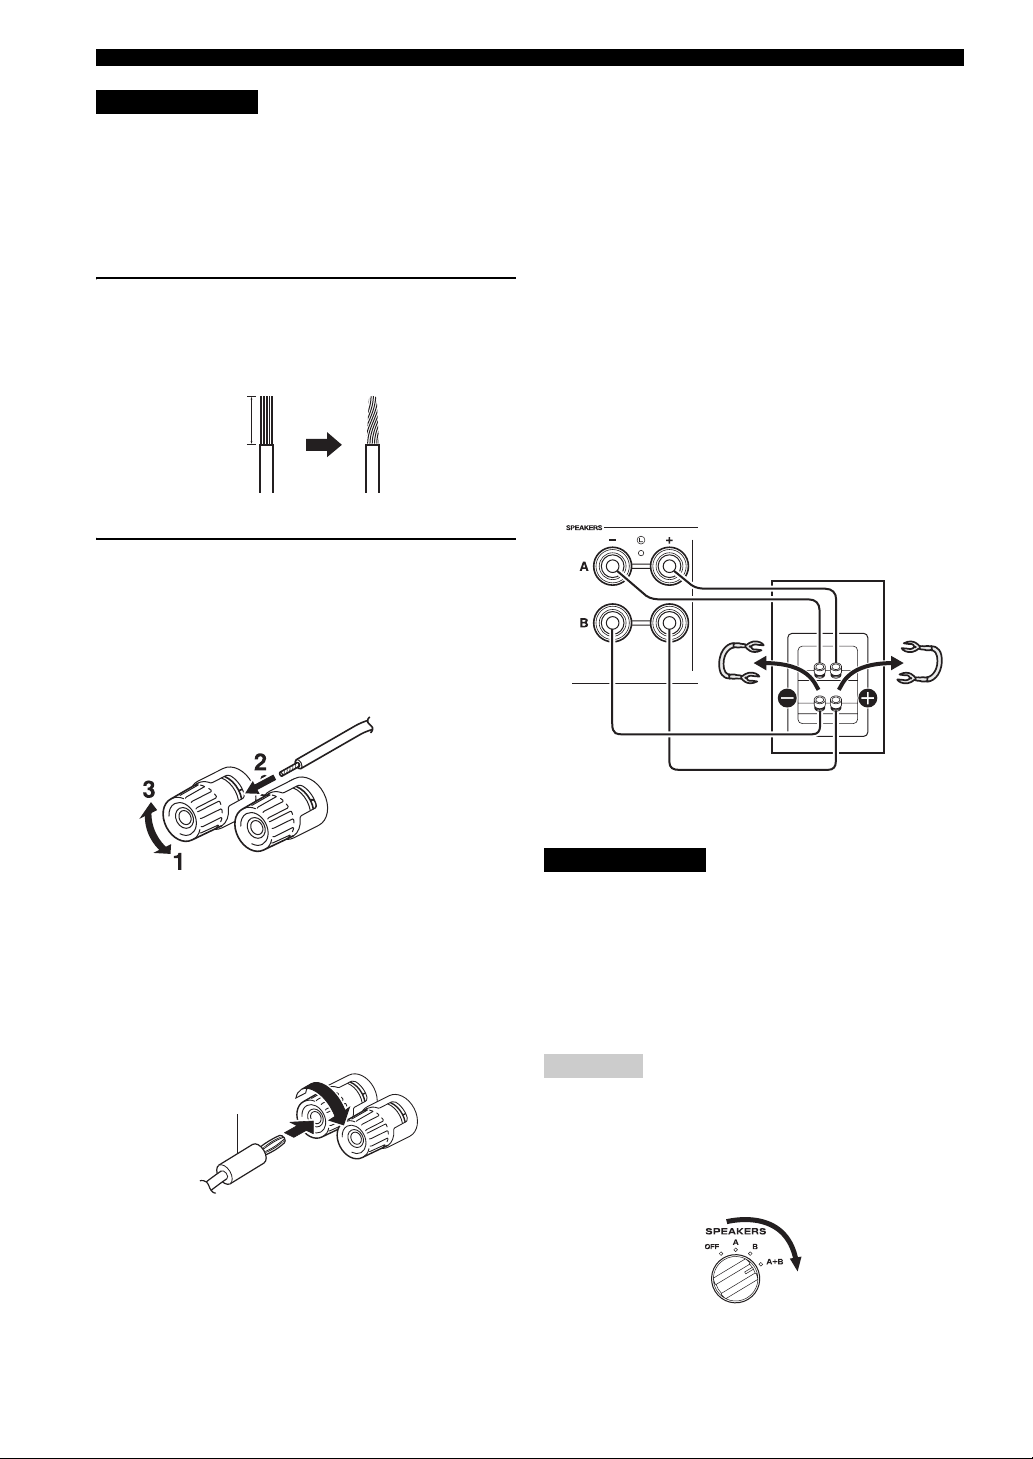
■ Bi-wire connection
1 Remove approximately 10 mm (3/8 in) of
insulation from the end of each speaker
cable and twist the exposed wires of the
cable together to prevent short circuits.
10 mm (3/8 in)
Bi-wire connection separates the woofer from the
combined midrange and tweeter section. A bi-wire
compatible speaker has four binding post terminals. These
two sets of terminals allow the speaker to be split into two
independent sections. With these connections, the mid and
high frequency drivers are connected to one set of
terminals and the low frequency driver to another set of
terminals.
This unit
Speaker
2 Connect the speaker cable.
1 Unscrew the knob.
2 Insert one bare wire into the hole in the side
of each terminal.
3 Tighten the knob to secure the wire.
Red: positive (+)
Black: negative (–)
■ Connecting via banana plug
(Except for Asia, U.K. and Europe
models)
Tighten the knob and then insert the banana plug into the
end of the corresponding terminal.
Banana plug
Connect the other speaker to the other set of terminals in
the same way.
CAUTION
When making bi-wire connections, set the IMPEDANCE
SELECTOR switch to HIGH or LOW depending on the
impedance of your speakers:
6 Ω or higher: HIGH
4 Ω or higher: LOW
See page 4 for more information about the IMPEDANCE
SELECTOR switch.
Note
When making bi-wire connections, remove the shorting bridges
or cables on the speaker.
y
To use the bi-wire connections, switch the SPEAKERS selector
to the A+B position.
6 En
Page 9
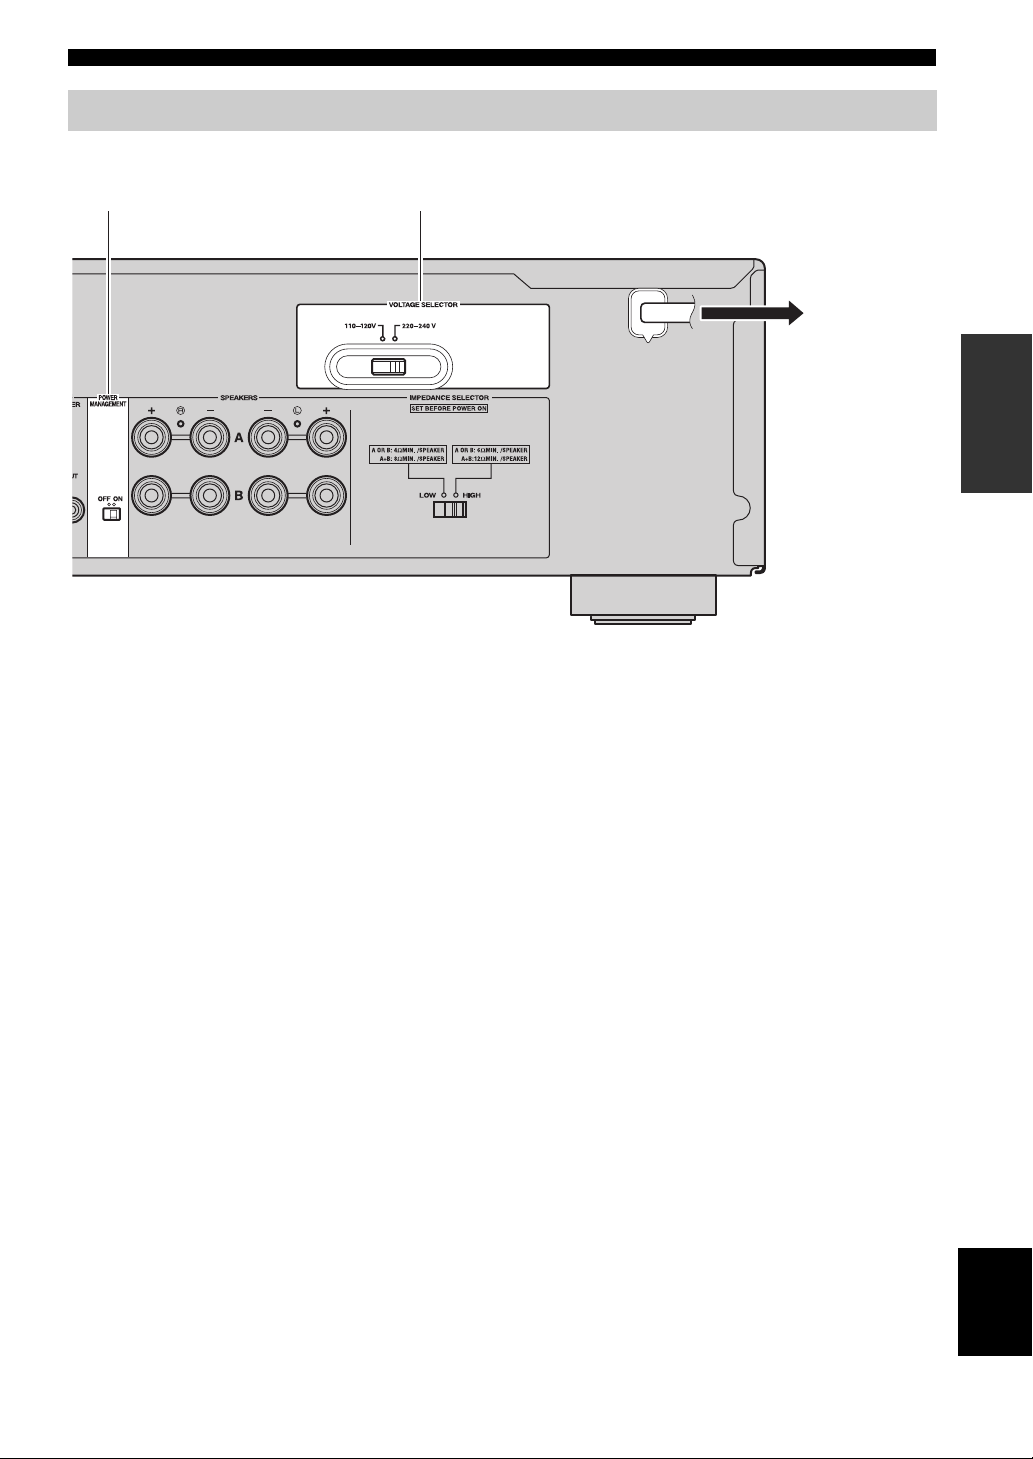
Connecting the power cable
CONNECTIONS
POWER
MANAGEMENT
VOLTAGE
SELECTOR
■ POWER MANAGEMENT switch
Enables or disables the automatic power down function.
When the automatic power down function is enabled, this
unit will automatically switch to standby mode if no
operations are performed for 8 hours.
To the wall outlet with
the power cable
PREPARATION
(Taiwan and Central/South America models)
■ Connecting the power cable
Plug the power cable into the wall outlet after all other
connections are complete.
■ VOLTAGE SELECTOR switch
(Taiwan and Central/South America
models only)
The VOLTAGE SELECTOR switch on the rear panel of
this unit must be set for your local main voltage BEFORE
plugging the power cable into the wall outlet.
Improper setting of the VOLTAGE SELECTOR switch
may cause damage to this unit and create a potential fire
hazard.
Select the switch position (left or right) according to your
local voltage using a straight slot screwdriver. Voltages
are AC 110-120/220-240 V, 50/60 Hz.
English
7 En
Page 10
OPERATION
PLAYING AND RECORDING
Playing a source
SPEAKERS VOLUME
INPUT
VOLUME
5 Play the selected input source.
6 Rotate the VOLUME control on the front
panel (or press VOLUME +/– buttons on the
remote control) to adjust the sound output
level.
y
You can adjust the tonal quality by using the BASS, TREBLE,
BALANCE and LOUDNESS controls, or the PURE DIRECT
switch on the front panel.
INPUTA
7 When finished listening, press A switch on
the front panel outward to turn off this unit.
y
If A button on the remote control is pressed while the A switch on
the front panel is in the on position, this unit enters standby mode.
Press A button again to turn this unit on.
Adjusting the tonal quality
VOLUMELOUDNESSTREBLE
1 Rotate the VOLUME control on the front
panel to the extreme counterclockwise
position.
2 Press A switch on the front panel inward to
turn on this unit.
3 Rotate the INPUT selector on the front panel
(or press one of the INPUT selector buttons
on the remote control) to select the input
source you want to listen to.
The indicator for the selected input source lights up.
4 Rotate the SPEAKERS selector on the front
panel to select SPEAKERS A, B or A+B.
Notes
• Set the SPEAKERS selector to the A+B position when two sets
of speakers are connected using bi-wire connections, or when
using two sets of speakers simultaneously (A and B).
• If you do not want sound to be heard from the speakers while
listening with headphones, set the SPEAKERS selector to OFF.
BASS BALANCE PURE
DIRECT
■ Using the PURE DIRECT switch
Routes input signals from your audio sources. As a result,
the input signals bypass the BASS, TREBLE, BALANCE
and LOUDNESS controls, thus eliminating any alterations
to the audio signals to produce more direct and high-grade
sound from all input sources.
Note
The BASS, TREBLE, BALANCE and LOUDNESS controls do
not function while the PURE DIRECT switch is turned on.
8 En
Page 11
■ Adjusting the BASS and TREBLE
controls
The BASS and TREBLE controls adjust high and low
frequency response.
The center position produces a flat response.
BASS
When you feel there is not enough bass (low frequency
sound), rotate clockwise to boost. When you feel there is
too much bass, rotate counterclockwise to suppress.
Control range: –10 dB to +10 dB (20 Hz)
TREBLE
When you feel there is not enough treble (high frequency
sound), rotate clockwise to boost. When you feel there is
too much treble, rotate counterclockwise to suppress.
Control range: –10 dB to +10 dB (20 kHz)
■ Adjusting the BALANCE control
The BALANCE control adjusts the sound output balance
of the left and right speakers to compensate for sound
imbalance caused by speaker locations or listening room
conditions.
■ Adjusting the LOUDNESS control
Retain a full tonal range at any volume level, thus
compensating for the human ears’ loss of sensitivity to
high and low-frequency ranges at low volume.
PLAYING AND RECORDING
Recording a source
Notes
• For the A-S500, audio signals are not output via the LINE 2
REC or LINE 3 REC output jacks when LINE 2 or LINE 3 is
selected with the REC OUT selector.
• For the A-S300, audio signals are not output via the LINE 2
REC or LINE 3 REC output jacks when LINE 2 or LINE 3 is
selected with the INPUT selector.
• This unit must be turned on in order to record.
• The VOLUME, BASS, TREBLE, BALANCE and
LOUDNESS controls and the PURE DIRECT switch have no
effect on the source being recorded.
• Check the copyright laws in your country before recording from
records, CDs, radio, etc. Recording copyright-protected
material may infringe on copyright laws.
REC OUT
(A-S500 only)
OPERATION
CAUTION
If the PURE DIRECT switch is turned on with the
LOUDNESS control set at a certain level, the input signals
bypass the LOUDNESS control, resulting in a sudden
increase in the sound output level. To prevent your ears or
the speakers from being damaged, be sure to press PURE
DIRECT switch AFTER lowering the sound output level
or AFTER checking that the LOUDNESS control is
properly set.
1 Set the LOUDNESS control to the FLAT
position.
2 Rotate the VOLUME control on the front
panel (or press VOLUME +/– buttons on the
remote control) to set the sound output level
to the loudest listening level that you would
listen to.
3 Rotate the LOUDNESS control until the
desired volume is obtained.
y
After setting the LOUDNESS control, enjoy listening to music at
your preferred volume level. If the effect of the LOUDNESS
control setting is too strong or weak, readjust the LOUDNESS
control.
1 Rotate the REC OUT selector on the front
panel to select the source you want to record
(A-S500 only).
Note
When using the A-S300, the current input source will be
recorded.
2 Play the source and begin recording using
the recording device connected to the REC
output jacks (LINE 2 and/or LINE 3) on the
rear panel. See page 5.
y
A-S500 only: While recording, you can select another input
source using the INPUT selector or the remote control and listen
to another input source without affecting recording.
English
9 En
Page 12
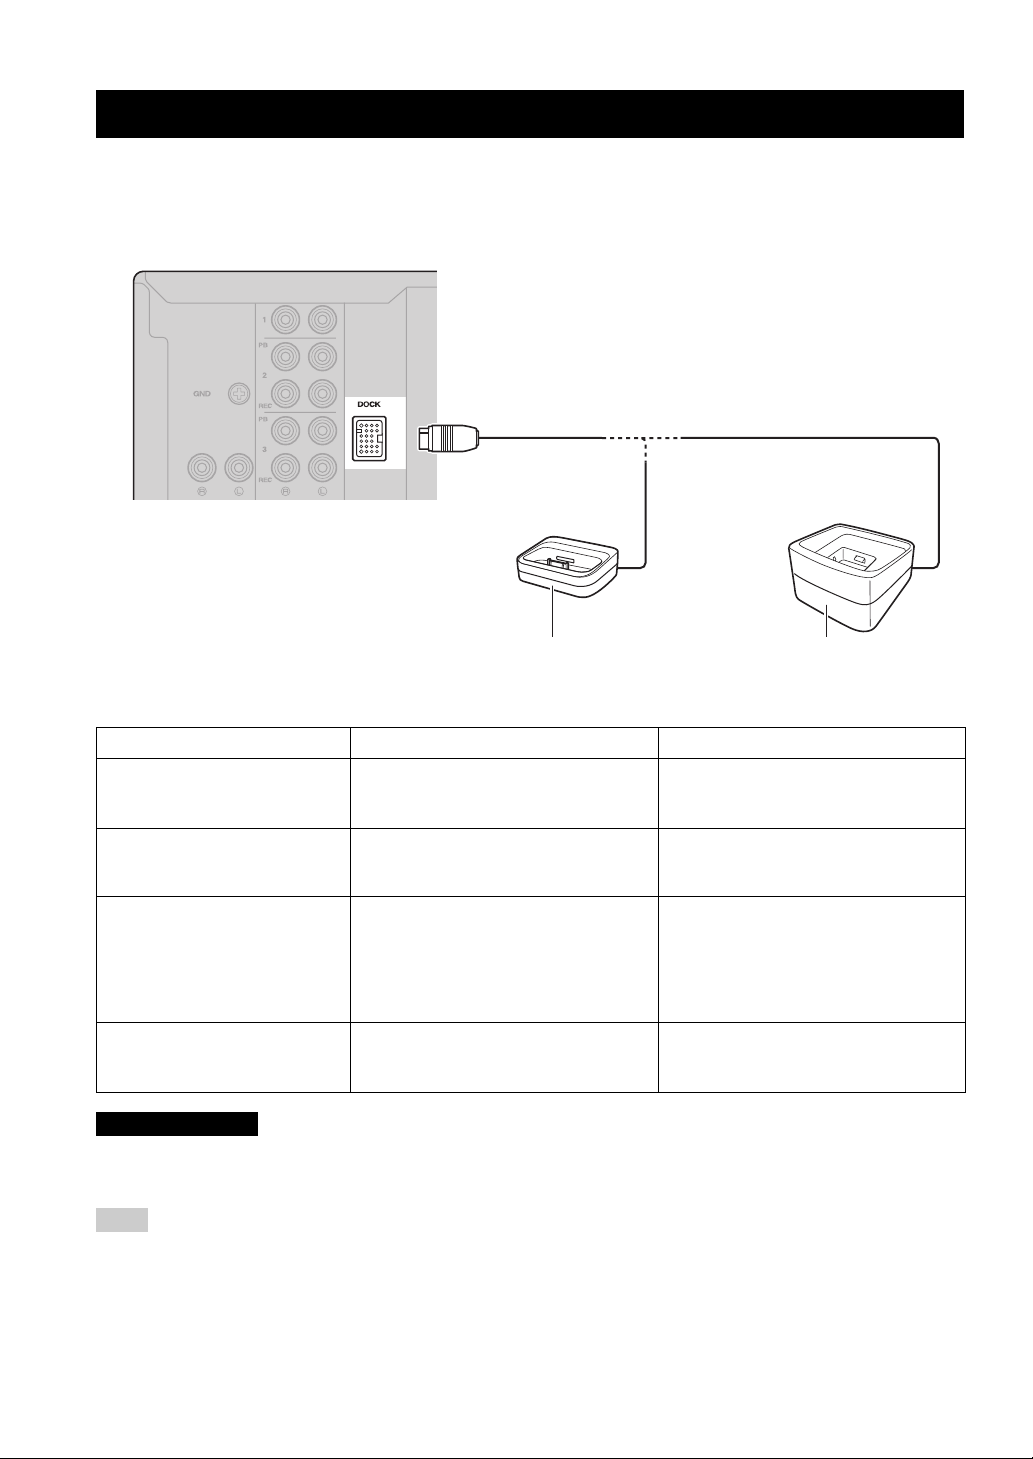
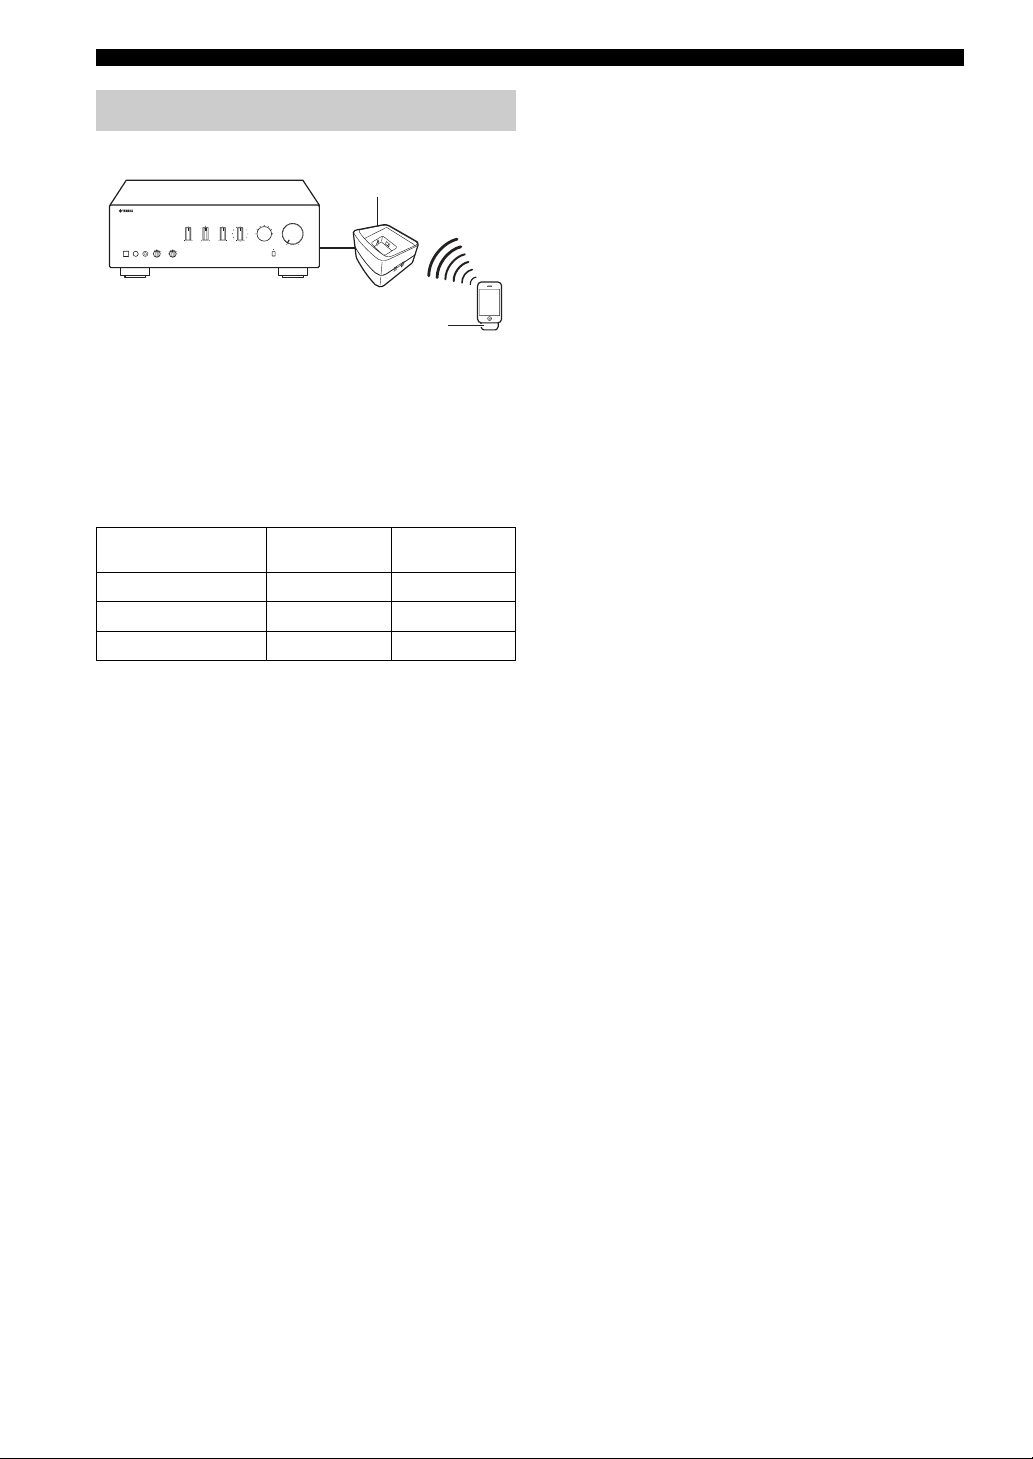
PLAYING BACK TUNES FROM YOUR iPhone/iPod
Once you have connected an optional Yamaha Universal Dock for iPod or Wireless System for iPod to the DOCK jack
on the rear panel of this unit, you can enjoy playback of your iPhone/iPod using the remote control supplied with this
unit.
Position the connected device
as far as possible from the unit.
Universal Dock for iPod Wireless System for iPod
Universal Dock for iPod Wireless System for iPod
Model
(As of July 2010)
Operated by
Supported iPhone/iPod
(As of July 2010)
Remarks
• YDS-12
• YDS-11
• YDS-10
• Remote control
• iPhone/iPod connected to the dock
• iPod touch
• iPod (4th Gen/5th Gen/classic)
• iPod nano
•iPod mini
•iPhone
•iPhone 3G/3GS
• iPhone/iPod charging also supported.
• The YDS-10/YDS-11 does not support iPhone
connection.
YID-W10
• iPhone/iPod connected to the YID-W10
transmitter
• Remote control
• iPod touch
• iPod (5th Gen/classic)
• iPod nano
• iPhone
• iPhone 3G/3GS
iPhone/iPod charging also supported.
CAUTION
To prevent accidents, unplug the power cable of this unit before connecting a Universal Dock for iPod or a Wireless
System for iPod.
Note
If the iPhone connected to the YID-W10 receives a call while this unit is in standby mode, the unit turns on automatically and the
ringtone is heard through this unit. If you do not want this unit to turn on when a call is received, set the iPhone to silent mode.
10 En
Page 13
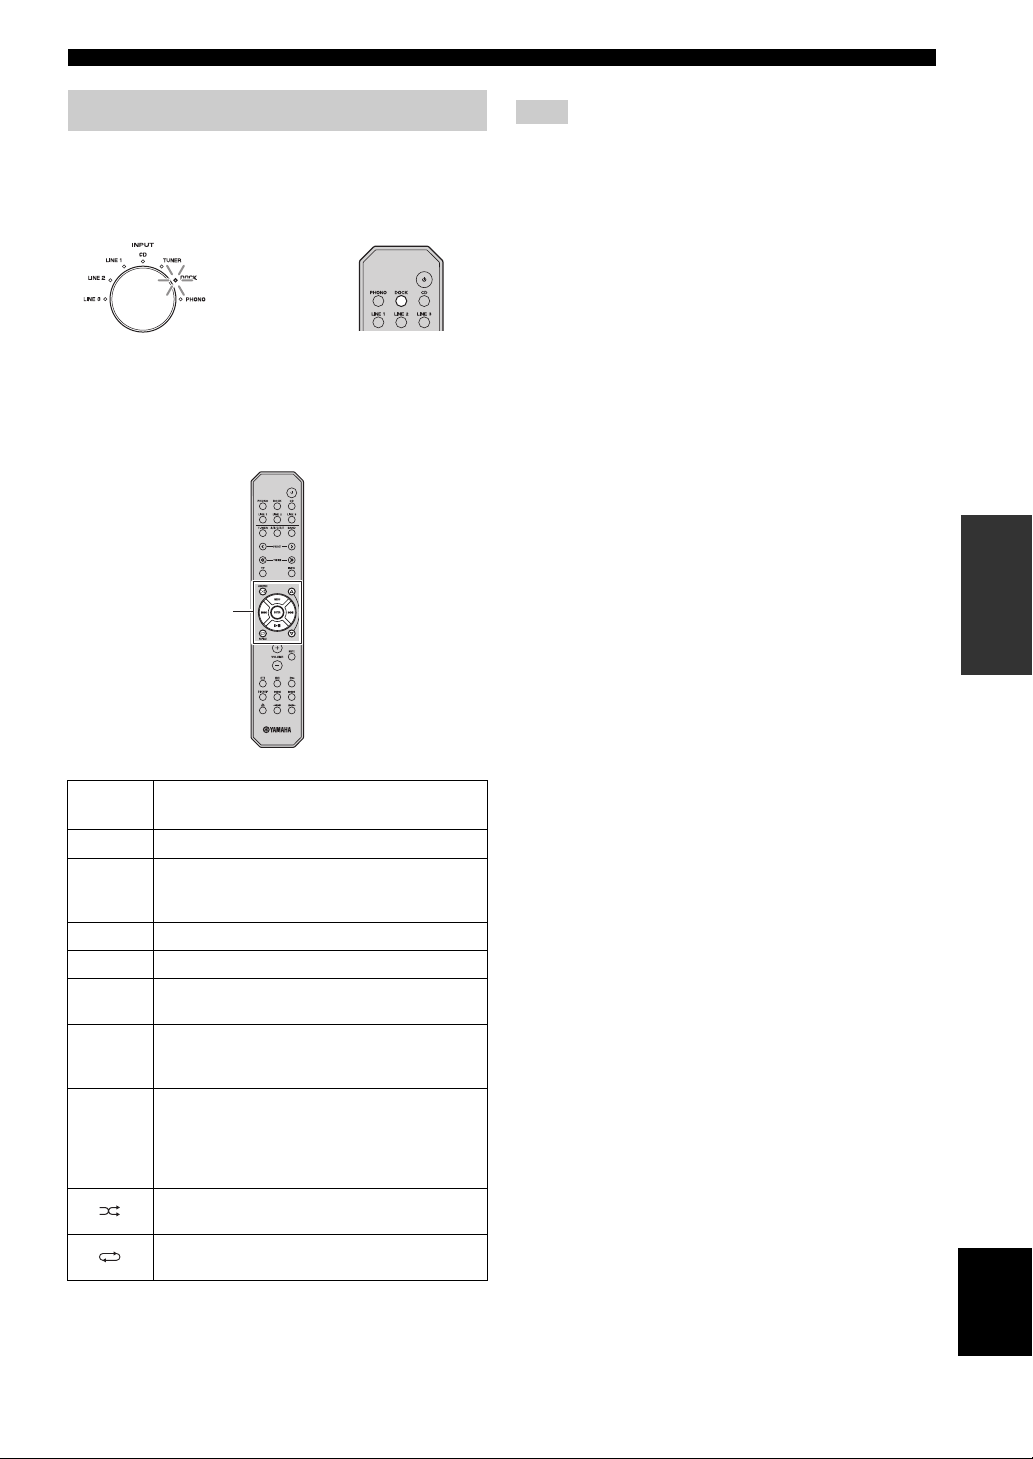
PLAYING BACK TUNES FROM YOUR iPhone/iPod
Using a Universal Dock for iPod
After setting your iPhone/iPod in your dock, rotate the
INPUT selector on the front panel (or press DOCK button
on the remote control) to select DOCK as the input source
to play your iPhone/iPod.
or
Front panel Remote control
While viewing the information displayed on your iPhone/
iPod, use the following remote control buttons to operate
(playback, pause, skip, etc.) your iPhone/iPod.
iPhone/iPod
control
Note
Some shuffle modes and repeat modes may not be available
depending on the model or the software version of your iPhone/
iPod.
y
When this unit is turned on or is in standby mode, your iPhone/
iPod can be charged automatically if it is connected to a
Universal Dock for iPod. If an iPhone/iPod is charged while this
unit is in standby mode, the POWER on indicator lights up
brightly.
OPERATION
Remote
control
MENU
ENTER
B
C
Ee
a
b
Operation
Displays the menu.
• If an item is selected: Confirms the item and
displays the next screen.
• If a song is selected: Plays the selected song.
Scroll up.
Scroll down.
• If a song is playing: Pauses the song.
• If a song is paused: Plays the song.
• If a song is playing or paused: Skips to the
beginning of the next song.
• If pressed and held: Searches forward.
• If a song is playing or paused: Skips to the
beginning of the current song.
• Pressing repeatedly skips one song backwards with
each press.
• If pressed and held: Searches backward.
Switches between shuffle modes (Off → Songs →
Albums → Off).
Switches between repeat modes (Off → One → All
→ Off).
English
11 En
Page 14
PLAYING BACK TUNES FROM YOUR iPhone/iPod
Using a Wireless System for iPod
YID-W10 receiver
YID-W10 transmitter
■ Establishing a wireless connection
Once the iPhone/iPod is connected to the transmitter and
playback begins, it takes about 5 seconds for audio to be
heard. During this time the wireless connection between
the transmitter and receiver is established.
The status of the wireless connection between the transmitter
and receiver is indicated by the respective status indicator.
Status of
connection
No connection Off Off
Confirming connection Green, flashing Blue, flashing
Connected Green, lit Blue, lit
Transmitter
indicator
Receiver
indicator
– Communication between the transmitter and
receiver becomes disrupted due to interference from
other wireless LAN devices, cordless telephones,
microwave ovens, etc.
y
• You can use the remote control to control the iPhone/iPod. For
more information, see page 11.
• When this unit is turned on or is in standby mode, your iPhone/
iPod can be charged automatically if the transmitter connected
to your iPhone/iPod is stationed to the receiver. If an iPhone/
iPod is charged while this unit is in standby mode, the POWER
on indicator lights up brightly.
• Refer to the operating instructions of the YID-W10 for more
information.
■ Controlling this unit with your iPhone/
iPod
• When playback begins on an iPhone/iPod that is
connected to a transmitter, and if the transmitter is
within range of the receiver, this unit performs as
follows:
– If this unit is already turned on when playback
begins: The input source switches to DOCK.
– If this unit is in standby mode when playback
begins: This unit turns on and the input source
switches to DOCK.
• Adjusting the volume on the iPhone/iPod also adjusts
the volume of this unit. Note that the iPhone/iPod can
only be used to increase this unit’s volume to a certain
level; to increase it further, adjust the volume using this
unit’s VOLUME control or the remote control.
• In the following situations, the wireless connection
between the transmitter and receiver is disconnected.
After 30 seconds this unit automatically enters standby
mode.
– The iPhone/iPod is not operated for about 30-120
seconds after the playback is paused.
– The sleep timer of the iPhone/iPod is activated.
– The iPhone/iPod is disconnected from the
transmitter.
– The iPhone/iPod battery level decreases to a level
where it cannot provide enough power to the
transmitter.
– The transmitter is moved outside of the wireless
communication range of the receiver.
12 En
Page 15

ADDITIONAL INFORMATION
TROUBLESHOOTING
Refer to the chart below if this unit does not function properly. If the problem you are experiencing is not listed below or
if the instructions below do not help, turn off this unit, disconnect the power cable, and contact the nearest authorized
Yamaha dealer or service center.
■ General
Problems Possible Causes Solutions
This unit is not turned
on. The POWER on
indicator also does
not light up.
This unit turns off
suddenly and the
POWER on indicator
blinks.
This unit is turned off
after several seconds
of turning on, and the
POWER on indicator
blinks.
The power cable is not connected. Connect the power cable firmly. 7
The A button is pressed on the remote
control while this unit is turned off.
There is a problem with the internal
circuitries of this unit.
The speaker wires are touching each other
or shorting out against the rear panel.
The speaker is malfunctioning. Replace the speaker set and press the A switch again.
The protection circuitry has been activated
because of excessive input or excessive
volume level.
The protection circuitry has been activated
due to excessive internal temperature.
The IMPEDANCE SELECTOR switch is
not fully slid to either position.
The IMPEDANCE SELECTOR switch is
not set to the correct position.
This unit has been exposed to a strong
external electric shock (such as lightning
or strong static electricity).
There is a problem with the internal
circuitries of this unit.
Press A switch on the front panel to ON.
Disconnect the power cable and contact the nearest
authorized Yamaha dealer or service center. If an
unusual odor or noise is generated from the unit, do
not turn on the power, disconnect the power cable,
and contact a service center for repair.
Connect the speaker cables properly and press the A
switch again. The INPUT indicators blink and the
volume is decreased automatically. After the volume
has decreased to the lowest setting, the INPUT
indicators stop flashing, the INPUT indicator of the
last input source selected lights up, and the unit may
be used again. Confirm normal sound output from
speakers by increasing the volume gradually, then
operate this unit normally.
The INPUT indicators blink and the volume is
decreased automatically. After the volume has
decreased to the lowest setting, the INPUT indicators
stop flashing, the INPUT indicator of the last input
source selected lights up, and the unit may be used
again. Confirm normal sound output from speakers
by increasing the volume gradually, then operate this
unit normally.
Rotate the VOLUME control on the front panel to
decrease the volume level and then turn the power on
again.
Allow about 30 minutes for the temperature inside
this unit to decrease, rotate the VOLUME control on
the front panel to lower the volume and then turn the
power on again. Set the unit in a place where heat can
readily dissipate from the unit.
Turn the power off and slide the IMPEDANCE
SELECTOR switch all the way to the correct
position.
Set the IMPEDANCE SELECTOR switch to the
position that corresponds to the impedance of your
speakers.
Set this unit to standby mode, disconnect the power
cable, plug it back in after 30 seconds, then use the
unit normally.
Disconnect the power cable and contact the nearest
authorized Yamaha dealer or service center. If an
unusual odor or noise is generated from the unit, do
not turn on the power, disconnect the power cable,
and contact a service center for repair.
Refer to
page
2
—
6
—
—
—
4
4
—
—
INFORMATION
ADDITIONAL
English
13 En
Page 16

TROUBLESHOOTING
Problems Possible Causes Solutions
No sound. Sound is muted. Press MUTE button on the remote control or rotate
Incorrect cable connections. Connect the stereo cable for audio units and the
Playback has been stopped on the
connected component.
No appropriate input source has been
selected.
The SPEAKERS selector is not set
properly.
The sound suddenly
goes off.
Only the speaker on
one side can be
heard.
There is a lack of
bass and no
ambience.
A “humming” sound
can be heard.
The volume level is
low while playing a
record.
The volume level
cannot be increased,
or the sound is
distorted.
The sound is
degraded when
listening with the
headphones
connected to the CD
player or the tape
deck connected to
this unit.
The sound level is
low.
The protection circuitry has been activated
because of a short circuit, etc.
This unit has become too hot. Reconsider the location where this unit is installed.
The automatic power down function has
turned this unit off.
Incorrect cable connections. Connect the cables properly. If the problem persists,
Incorrect setting for the BALANCE
control.
The + and – wires are connected in
reverse at the amplifier or the speakers.
Incorrect cable connections. Connect the audio plugs firmly. If the problem
No connection from the turntable to the
GND terminal.
The turntable is connected to the jacks
other than the PHONO jacks.
The record is being played on a turntable
with an MC cartridge.
The component connected to the LINE 2
REC or LINE 3 REC jacks of this unit is
turned off.
This unit is turned off or is in standby
mode.
Sound is muted. Press MUTE button on the remote control or rotate
The loudness control function is
operating.
the VOLUME control.
speaker wires properly. If the problem persists, the
cables may be defective.
Turn the component on and start playback.
Select an appropriate input source with the INPUT
selector on the front panel (or one of the INPUT
selector buttons on the remote control).
Set the corresponding SPEAKERS selector to A, B or
A+B position.
Check that the IMPEDANCE SELECTOR setting is
correct.
Check that the speaker wires are not touching each
other or shorting out against the rear panel of this
unit, and then turn this unit on again.
Make sure the openings on the top panel are not
blocked.
Confirm that there are no other issues causing this
problem, and then turn this unit on again.
the cables may be defective.
Set the BALANCE control to the appropriate
position.
Connect the speaker wires to the correct + and –
phase. 6
persists, the cables may be defective.
Make the GND connection between the turntable and
this unit.
Connect the turntable to the PHONO jacks.
Use a turntable equipped with an MM cartridge.
Turn on the power of the component.
Turn this unit on.
the VOLUME control.
Turn down the volume, set the LOUDNESS control
to the FLAT position, and then adjust the volume
again.
Refer to
page
3
5
8
8
8
4
5
—
7
5
9
5
5
5
—
—
8
3
9
14 En
Page 17

TROUBLESHOOTING
Problems Possible Causes Solutions
Using the BASS,
TREBLE, BALANCE
and LOUDNESS
controls does not
affect the tonal quality.
The PURE DIRECT switch is turned on. The PURE DIRECT switch must be turned off to use
those controls.
■ Universal Dock for iPod and Wireless System for iPod
Problems Possible Causes Solutions
No sound.
You cannot operate
the iPhone/iPod.
When using a
Wireless System for
iPod:
Sound frequently cuts
out.
Noise is heard.
When using the
Universal Dock for
iPod:
Your iPhone/iPod is
not being charged
even though it is
connected to the
Universal Dock for
iPod.
When using the
Wireless System for
iPod:
Your iPhone/iPod is
not being charged
even though the YIDW10 transmitter
connected to your
iPhone/iPod is
stationed in the YIDW10 receiver.
There is a problem with the signal path
from your iPhone/iPod to the unit.
The iPhone/iPod being used is not
supported by the unit.
The wireless connection is poor. Place the YID-W10 receiver as far away from this
This unit is not turned on. Turn on this unit or set it to standby mode. 2
The iPhone/iPod is not connected
securely.
This unit is not turned on. Turn on this unit or set it to standby mode. 2
The YID-W10 transmitter is not stationed
securely in the YID-W10 receiver.
Turn off the unit and reconnect the Universal Dock
for iPod or the Wireless System for iPod to the
DOCK jack of the unit.
Remove your iPhone/iPod from the Universal Dock
for iPod or the Wireless System for iPod and then
place it back in the dock.
Connect an iPhone/iPod supported by the unit.
unit as possible.
Connect the iPhone/iPod securely to the Universal
Dock for iPod.
Station the YID-W10 transmitter connected to your
iPhone/iPod securely in the YID-W10 receiver.
Refer to
page
8
Refer to
page
10
10
10
10
10
10
INFORMATION
ADDITIONAL
15 En
English
Page 18

TROUBLESHOOTING
■ Remote control
Problems Possible Causes Solutions
The remote control
does not work nor
function properly.
■ Notes on batteries
• Change both batteries when the operation range of the
remote control decreases.
• Remove the batteries if the remote control is not to be
used for an extended period of time.
• Do not use old batteries together with new ones.
• Do not use different types of batteries (such as alkaline
and manganese batteries) together. Read the packaging
carefully as these different types of batteries may have
the same shape and color.
• If the batteries have leaked, dispose of them
immediately. Avoid touching the leaked material or
letting it come into contact with clothing, etc. Clean the
battery compartment thoroughly before installing new
batteries.
The remote control is too far away or
tilted too much.
Direct sunlight or lighting (from an
inverter type of fluorescent lamp, etc.) is
striking the remote control sensor of this
unit.
The batteries are weak. Replace all batteries. 3
The remote control will function within a maximum
range of 6 m (20 ft) and no more than 30 degrees offaxis from the front panel.
Reposition this unit or lighting.
■ Handling the remote control
• Do not spill water or other liquids on the remote
control.
• Do not drop the remote control.
• Do not leave or store the remote control in the
following types of conditions:
– high humidity, such as near a bath
– high temperature, such as near a heater or a stove
– extremely low temperatures
– dusty places
• Do not expose the remote control sensor to strong
lighting, in particular, an inverter type fluorescent
lamp; otherwise, the remote control may not work
properly. If necessary, position the unit away from
direct lighting.
• Do not throw away batteries with general house waste;
dispose of them correctly in accordance with your local
regulations.
Refer to
page
3
—
16 En
Page 19

SPECIFICATIONS
AUDIO SECTION
• Minimum RMS output power
(8 Ω, 20 Hz to 20 kHz, 0.019% THD)
[A-S500] ................................................................ 85 W + 85 W
[A-S300] ................................................................ 60 W + 60 W
(6 Ω, 20 Hz to 20 kHz, 0.038% THD) [Except for Asia model]
[A-S500] ............................................................ 100 W + 100 W
[A-S300] ................................................................ 70 W + 70 W
• Dynamic power per channel (IHF) (8/6/4/2 Ω)
[A-S500] ......................................................... 130/150/185/220 W
[A-S300] ......................................................... 100/120/140/150 W
• Maximum power per channel [U.K. and Europe models only]
(1 kHz, 0.7% THD, 4 Ω)
[A-S500] ............................................................................ 120 W
[A-S300] ............................................................................. 95 W
• IEC power [U.K. and Europe models only]
(1 kHz, 0.019% THD, 8 Ω)
[A-S500] ........................................................................... 100 W
[A-S300] ............................................................................. 75 W
• Power band width
[A-S500] (0.06% THD, 42.5 W, 8 Ω) ................. 10 Hz to 50 kHz
[A-S300] (0.06% THD, 30 W, 8 Ω).................... 10 Hz to 50 kHz
• Damping factor (SPEAKERS A)
1 kHz, 8 Ω................................................................... 240 or more
• Maximum effective output power (JEITA)
(1kHz, 10% THD, 8 Ω) [Asia, China, Taiwan and Central/South
America models only]
[A-S500] ........................................................................... 130 W
[A-S300] ........................................................................... 100 W
(1kHz, 10% THD, 6 Ω) [China, Taiwan and Central/South
America models only]
[A-S500] ........................................................................... 150 W
[A-S300] ........................................................................... 110 W
• Input sensitivity/Input impedance
PHONO (MM)........................................................ 3.0 mV/47 kΩ
CD, etc. .................................................................. 200 mV/47 kΩ
• Maximum input signal
PHONO (MM) (1 kHz, 0.003% THD).................. 60 mV or more
CD, etc. (1 kHz, 0.5% THD) ................................... 2.2 V or more
• Output level/Output impedance
REC............................................................ 200 mV/1.0 kΩ or less
• PHONES jack rated output/Impedance
CD, etc. (Input 1 kHz, 200 mV, 8 Ω)
[A-S500] ............................................................. 430 mV/470 Ω
[A-S300] ............................................................. 360 mV/470 Ω
• Frequency response
CD, etc. (20 Hz to 20 kHz) ............................................ 0 ± 0.5 dB
CD, etc. PURE DIRECT on (10 Hz to 100 kHz) .......... 0 ± 1.0 dB
• RIAA equalization deviation
PHONO (MM).................................................................. ± 0.5 dB
• Total harmonic distortion
PHONO (MM) to REC (20 Hz to 20 kHz, 3 V) ..... 0.025% or less
CD, etc. to SPEAKERS
[A-S500] (20 Hz to 20 kHz, 42.5 W, 8 Ω) .......... 0.015% or less
[A-S300] (20 Hz to 20 kHz, 30 W, 8 Ω) ............. 0.015% or less
• Signal to noise ratio (IHF-A network)
PHONO (MM) (5 mV input shorted) ..................... 85 dB or more
CD, etc. PURE DIRECT on
(200 mV input shorted)...................................... 100 dB or more
• Residual noise (IHF-A network) ............................................ 30 µV
• Channel separation
CD, etc. (5.1 kΩ input shorted, 1/10 kHz) ......... 65/50 dB or more
• Tone control characteristics
BASS
Boost/Cut (50 Hz) ........................................................... ±10 dB
Turnover frequency.......................................................... 350 Hz
TREBLE
Boost/Cut (20 kHz) ......................................................... ±10 dB
Turnover frequency......................................................... 3.5 kHz
• Continuous loudness control
Attenuation (1 kHz)............................................................. –30 dB
• Gain tracking error (0 to –99 dB)................................ 0.5 dB or less
GENERAL
• Power supply
[U.S.A. and Canada models] ............................. AC 120 V, 60 Hz
[Asia model]........................................... AC 220-240 V, 50/60 Hz
[Taiwan and Central/South America models]
.............................................. AC 110-120/220-240 V, 50/60 Hz
[China model]..................................................... AC 220 V, 50 Hz
[Australia model] .............................................. AC 240 V, 50 Hz
[U.K., Europe and Russia models] .................... AC 230 V, 50 Hz
• Power consumption
[A-S500]
[U.S.A. and Canada models].............................. 240 W, 330 VA
[Asia model]..................................................................... 220 W
[Other models]. ................................................................ 240 W
[A-S300].............................................................................. 190 W
• Standby power consumption ....................................... 0.5 W or less
• YID-W10 standby power consumption
(YID-W10 connect) ..................................................... 1.2 W or less
• iPod charge power consumption
[A-S500]..................................................................... 35 W or less
[A-S300]..................................................................... 25 W or less
• Maximum power consumption [Taiwan and Central/South America
models only]
(6 Ω, 1 kHz, 10% THD)
[A-S500]........................................................................... 510 W
[A-S300]........................................................................... 400 W
• Dimensions (W × H × D) ............................... 435 × 151 × 387 mm
(17-1/8" × 6" × 15-1/4")
•Weight
[A-S500]............................................................. 10.3 kg (22.7 lbs)
[A-S300]............................................................... 9.0 kg (19.8 lbs)
Specifications are subject to change without notice.
iPhone, iPod
iPhone, iPod, iPod classic, iPod nano and iPod touch are
trademarks of Apple Inc., registered in the U.S. and other
countries.
INFORMATION
ADDITIONAL
English
17 En
Page 20

ATTENTION : VEUILLEZ LIRE CE QUI SUIT AVANT D’UTILISER
L’APPAREIL.
1 Pour utiliser l’appareil au mieux de ses possibilités, lisez
attentivement ce mode d’emploi. Conservez-le
soigneusement pour référence.
2 Installez cet ensemble audio dans un endroit bien aéré,
frais, sec et propre - veillez à ce qu’il soit à l’abri de la
lumière directe du soleil, des sources de chaleur, des
vibrations, des poussières, de l’humidité et/ou du froid.
Pour une ventilation correcte, ménagez l’espace
minimum suivant autour de cet appareil.
Au-dessus : 30 cm
À l’arrière : 20 cm
Sur les côtés : 20 cm
3 Placez l’appareil loin des équipements, moteurs et
transformateurs électriques, pour éviter les ronflements
parasites.
4 N’exposez pas l’appareil à des variations brutales de
température, ne le placez pas dans un environnement très
humide (par exemple dans une pièce contenant un
humidificateur) car cela peut entraîner la condensation
d’humidité à l’intérieur de l’appareil qui elle-même peut
être responsable de décharge électrique, d’incendie, de
dommage à l’appareil ou de blessure corporelle.
5 Evitez d’installer l’appareil dans un endroit où des objets
peuvent tomber, ainsi que là où l’appareil pourrait être
exposé à des éclaboussures ou des gouttes d’eau. Sur le
dessus de l’appareil, ne placez pas :
– d’autres appareils qui peuvent endommager la surface
de l’appareil ou provoquer sa décoloration.
– des objets se consumant (par exemple, une bougie)
qui peuvent être responsables d’incendie, de
dommage à l’appareil ou de blessure corporelle.
– des récipients contenant des liquides qui peuvent être
à l’origine de décharge électrique ou de dommage à
l’appareil.
6 Ne couvrez pas l’appareil d’un journal, d’une nappe, d’un
rideau, etc. car cela empêcherait l’évacuation de la
chaleur. Toute augmentation de la température intérieure
de l’appareil peut être responsable d’incendie, de
dommage à l’appareil ou de blessure corporelle.
7 Ne branchez pas la fiche du câble d’alimentation de
l’appareil sur une prise secteur aussi longtemps que tous
les raccordements n’ont pas été effectués.
8 Ne pas faire fonctionner l’appareil à l’envers. Il risquerait
de chauffer et d’être endommagé.
9 N’exercez aucune force excessive sur les commutateurs,
les boutons et les cordons.
10 Pour débrancher la fiche du câble d’alimentation au
niveau de la prise secteur, saisissez la fiche et ne tirez pas
sur le cordon.
11 Ne nettoyez pas l’appareil au moyen d’un solvant
chimique, ce qui pourrait endommager la finition.
Utilisez un chiffon sec et propre.
12 N’alimentez l’appareil qu’à partir de la tension prescrite.
Alimenter l’appareil sous une tension plus élevée est
dangereux et peut être responsable d’incendie, de
dommage à l’appareil ou de blessure corporelle. Yamaha
ne saurait être tenue responsable des dommages résultant
de l’alimentation de l’appareil sous une tension autre que
celle prescrite.
13 Pour empêcher tout dommage causé par les éclairs,
déconnectez le câble d’alimentation et toute antenne
extérieure de la prise murale pendant un orage.
14 Ne tentez pas de modifier ni de réparer l’appareil.
Consultez le service Yamaha compétent pour toute
réparation qui serait requise. Le coffret de l’appareil ne
doit jamais être ouvert, quelle que soit la raison.
15 Si vous envisagez de ne pas vous servir de l’appareil
pendant une longue période (par exemple, pendant les
vacances), débranchez la fiche du câble d’alimentation au
niveau de la prise secteur.
16 Lisez la section intitulée « GUIDE DE DÉPANNAGE »
où figurent une liste d’erreurs de manipulation
communes avant de conclure que l’appareil présente une
anomalie de fonctionnement.
17 Avant de déplacer l’appareil, appuyez sur A pour mettre
l’appareil hors tension, puis débranchez la fiche du
cordon d’alimentation au niveau de la prise secteur.
18 La condensation se forme lorsque la température
ambiante change brusquement. En ce cas, débranchez la
fiche du câble d’alimentation et laissez l’appareil reposer.
19 La température de l’appareil peut augmenter en raison
d’une utilisation prolongée. En ce cas, coupez
l’alimentation de l’appareil et laissez-le au repos pour
qu’il refroidisse.
20 Installez cet appareil à proximité de la prise secteur et à
un emplacement où la fiche du câble d’alimentation est
facilement accessible.
21 Les piles ne doivent pas être exposées à une chaleur
extrême, par exemple au soleil, à une flamme, etc. Lors
de la mise au rebut des piles, suivez vos réglementations
locales.
22 Une pression excessive du son par les écouteurs et le
casque d’écoute peut entraîner la perte de l’ouïe.
Aussi longtemps que cet appareil est raccordé à la prise secteur
murale, il n’est pas débranché de la source d’alimentation secteur
même si vous le mettez hors tension à l’aide de la touche A ou le
mettez en mode veille à l’aide de la touche A de la
télécommande. En mode veille, l’appareil consomme une très
faible quantité de courant.
AVERTISSEMENT
POUR RÉDUIRE LES RISQUES D’INCENDIE OU DE
DÉCHARGE ÉLECTRIQUE, N’EXPOSEZ PAS CET
APPAREIL À LA PLUIE OU À L’HUMIDITÉ.
A-S500 uniquement
Cette étiquette doit être apposée sur un produit dont le capot
supérieur peut devenir chaud lorsqu’il fonctionne.
i Fr
Page 21

TABLE DES MATIÈRES
INTRODUCTION
FONCTIONS UTILES........................................... 1
ACCESSOIRES FOURNIS................................... 1
COMMANDES ET FONCTIONS ........................ 2
Panneau avant et télécommande................................2
À propos de la télécommande.................................... 3
Panneau arrière.......................................................... 4
OPÉRATION
LECTURE ET ENREGISTREMENT ..................8
Lecture d’une source.................................................. 8
Réglage de la qualité des tonalités............................. 8
Enregistrement d’une source..................................... 9
LECTURE DE MORCEAUX DE
VOTRE iPhone/iPod...........................................10
Utilisation d’un Dock Universal pour iPod............. 11
Utilisation d’un système sans fil pour iPod.............12
PRÉPARATION
RACCORDEMENTS............................................. 5
Raccordement des enceintes et des composants source..... 5
Raccordement du cordon d’alimentation................... 7
INFORMATIONS COMPLÉMENTAIRES
GUIDE DE DÉPANNAGE...................................13
SPÉCIFICATIONS...............................................17
■ À propos de ce manuel
•Le symbole y attire votre attention sur un conseil d’utilisation.
• Certaines opérations peuvent être effectuées à l’aide des touches de l’unité principale ou de la télécommande. Si les
noms des touches de l’unité principale et de la télécommande sont différents, ceux de la télécommande sont indiqués
entre parenthèses.
• Ce mode d’emploi a été imprimé avant la fabrication de l’appareil. Dans l’intérêt de l’amélioration du produit, les
caractéristiques et l’aspect de cet appareil sont sujets à des modifications. En cas de différences entre le manuel et le
produit, le produit prime.
INTRODUCTION
FONCTIONS UTILES
PRÉPARATIONINTRODUCTION
OPÉRATION
COMPLÉMENTAIRES
INFORMATIONS
Cet appareil permet d’effectuer les opérations suivantes :
◆ Améliorer la qualité sonore à l’aide de la fonction Pure
Direct (p. 8)
◆ Lire de la musique enregistrée sur votre iPhone/iPod
(nécessite un produit Yamaha en option ; p. 10)
◆ Sélectionner la source d’enregistrement indépendamment
de la source d’écoute (A-S500 uniquement ; p. 9)
ACCESSOIRES FOURNIS
Vérifiez que vous avez reçu tous les articles suivants :
Télécommande Piles (× 2)
(AA, R6, UM-3)
◆ Contrôler les autres composants Yamaha à l’aide de la
télécommande de cet appareil (p. 3)
◆ Amplifier les basses grâce à un caisson de graves (p. 5)
◆ Économiser l’énergie à l’aide de Commutateur POWER
MANAGEMENT (p. 7)
Français
1 Fr
Page 22
COMMANDES ET FONCTIONS
Panneau avant et télécommande
(A-S500)
1 A (ALIMENTATION)
Panneau avant : commutateur A
Permet de mettre l’appareil sous et hors tension.
Position ON (marche) : enfoncé
Position OFF (arrêt) : désarmé
Télécommande : touche A
Lorsque l’appareil est allumé : met l’appareil sous tension
ou le fait passer en mode veille.
Remarque
Cet appareil consomme une faible quantité d’énergie même
lorsqu’il est éteint ou en mode veille.
2 Témoin d’alimentation
S’allume comme suit :
Allumé pleinement : l’appareil est sous tension
Allumé faiblement : l’appareil est en mode veille
Éteint : l’appareil est hors tension
y
Le témoin d’alimentation reste allumé pleinement lorsqu’un
iPhone/iPod est en charge, même si l’appareil est en mode veille.
3 Émetteur de signal infrarouge
Envoie des signaux à l’unité principale.
4 Capteur de télécommande
Reçoit les signaux émis par la télécommande.
5 Sélecteur et témoins INPUT
Pour sélectionner la source d’entrée que vous souhaitez
écouter. Les témoins de source d’entrée s’allument
lorsque la source d’entrée correspondante est sélectionnée.
y
Les noms des sources d’entrée correspondent à ceux des prises de
raccordement du panneau arrière.
2 Fr
Page 23
COMMANDES ET FONCTIONS
6 Prise PHONES
Pour le raccordement d’un casque en vue d’une écoute
individuelle. Si vous souhaitez qu’aucun son ne sorte des
enceintes, placez le sélecteur SPEAKERS sur OFF.
7 Sélecteur SPEAKERS
Pour activer ou désactiver le jeu d’enceintes raccordé aux
bornes SPEAKERS A et/ou B situées sur le panneau
arrière lorsque le sélecteur SPEAKERS correspondant est
réglé sur A, B ou A+B.
8 Sélecteur REC OUT (A-S500 uniquement)
Pour sélectionner la source d’enregistrement
indépendamment du réglage du sélecteur INPUT, ce qui
vous permet d’enregistrer la source sélectionnée tout en
écoutant une autre source (voir page 9).
9 Commande BASS
Pour augmenter ou réduire la réponse dans les basses
fréquences (voir page 9).
0 Commande TREBLE
Pour augmenter ou réduire la réponse dans les hautes
fréquences (voir page 9).
A Commande BALANCE
Pour équilibrer le son reproduit par les enceintes gauche et
droite. (voir page 9).
B Commande LOUDNESS
Pour conserver une plage de tonalités complète à
n’importe quel niveau de volume (voir page 9).
C Commutateur et témoin PURE DIRECT
Pour reproduire toute source d’entrée avec le son le plus
pur possible. Le témoin situé au-dessus de cette fonction
s’allume lorsqu’elle est active (voir page 8).
D Commande VOLUME
VOLUME +/–
Pour régler le niveau sonore.
Cela n’affecte pas le niveau sonore REC pour l’enregistrement.
Touche MUTE (sur la télécommande uniquement)
Pour réduire le volume sélectionné d’environ 20 dB.
y
• Le témoin INPUT de la source d’entrée clignote lorsque le son
est désactivé.
• Le son est réactivé lorsque vous appuyez à nouveau sur la
touche MUTE ou lorsque le volume est réglé à l’aide de la
commande VOLUME sur le panneau avant ou en appuyant sur
les touches VOLUME +/– de la télécommande.
E Touches de commande iPhone/iPod
Commandez un iPhone/iPod connecté à l’aide d’un Dock
Universal pour iPod (voir page 11) ou d’un système sans
fil pour iPod (voir page 12) Yamaha en option.
F Touches de commande d’un syntoniseur Yamaha
Commandent différentes fonctions d’un syntoniseur Yamaha.
Remarque
Même si vous utilisez un syntoniseur Yamaha, il se peut que certains
composants et fonctions ne soient pas disponibles. Pour plus
d’informations, reportez-vous au mode d’emploi du composant.
G Touches de commande d’un lecteur de CD
Yamaha
Commandent différentes fonctions d’un lecteur de CD
Yamaha.
Remarque
Même si vous utilisez un lecteur de CD Yamaha, il se peut que
certains composants et fonctions ne soient pas disponibles. Pour plus
d’informations, reportez-vous au mode d’emploi du composant.
INTRODUCTION
À propos de la télécommande
■ Installation des piles dans la
télécommande
Piles AA, R6, UM-3
Remarque
Assurez-vous que les pôles sont correctement orientés. Voir
l’illustration à l’intérieur du logement des piles.
■ Utilisation de la télécommande
La télécommande émet un faisceau infrarouge directionnel.
Veillez à diriger la télécommande directement vers le
capteur de télécommande situé sur le panneau avant de cet
appareil pendant le fonctionnement.
Maximum 6 m
Français
Remarque
Entre la télécommande et l’appareil, l’espace doit être libre d’obstacle.
3 Fr
Page 24

COMMANDES ET FONCTIONS
Panneau arrière
(Modèles pour Taïwan et l’Amérique centrale/du Sud)
1 Prises d’entrée CD
Pour connecter un lecteur de CD (voir page 5).
2 Prises PHONO et borne GND
Pour connecter une platine utilisant une cartouche MM et
pour mettre la borne à la terre (voir page 5).
3 Prises d’entrée/sortie audio
Pour connecter des périphériques externes, tels qu’un
syntoniseur, etc. (voir page 5).
4 Prise DOCK
Pour connecter un Dock Universal pour iPod ou un
système sans fil pour iPod (voir page 10) Yamaha en
option.
5 Prise SUBWOOFER OUT
Pour connecter un caisson de graves avec un amplificateur
intégré (voir page 5).
y
La prise SUBWOOFER OUT atténue les signaux qui dépassent
90 Hz.
6 Commutateur POWER MANAGEMENT
Permet d’activer ou de désactiver la fonction de mise hors
tension automatique (voir page 7).
7 Bornes SPEAKERS A/B
Pour le raccordement d’un ou deux jeux d’enceintes (voir
page 5).
8 Commutateur VOLTAGE SELECTOR
(Modèles pour Taïwan et l’Amérique centrale/
du Sud uniquement)
Le commutateur VOLTAGE SELECTOR doit être réglé
sur votre tension secteur locale avant le raccordement du
cordon d’alimentation à la prise murale (voir page 7).
9 Commutateur IMPEDANCE SELECTOR
Voir Commutateur IMPEDANCE SELECTOR sur cette page.
0 Cordon d’alimentation
Branchez le cordon d’alimentation sur la prise secteur
(voir page 7).
■ Commutateur IMPEDANCE SELECTOR
ATTENTION
Ne modifiez pas le commutateur IMPEDANCE
SELECTOR lorsque cet appareil est sous tension, car vous
risqueriez de l’endommager.
Si l’appareil ne se met pas sous tension, il est possible que
le commutateur IMPEDANCE SELECTOR ne soit pas
correctement réglé dans l’une ou l’autre position. Dans ce
cas, enlevez le cordon d’alimentation et faites glisser le
commutateur à fond sur l’une ou l’autre position.
Sélectionnez la position du commutateur (LOW ou
HIGH) selon l’impédance des enceintes de votre système.
Position du
commutateur
• Si vous utilisez un jeu (A ou B), l’impédance
• Si vous utilisez deux jeux (A et B)
HIGH
• Si vous établissez des connexions bifilaires,
• Si vous utilisez un jeu (A ou B), l’impédance
• Si vous utilisez deux jeux (A et B)
LOW
• Si vous établissez des connexions bifilaires,
Niveau d’impédance
de chaque enceinte doit être de 6
supérieure.
simultanément, l’impédance de chaque
enceinte doit être de 12
l’impédance de chaque enceinte doit être de
Ω ou supérieure. Voir page 6 pour plus
6
d’informations.
de chaque enceinte doit être de 4
supérieure.
simultanément, l’impédance de chaque
enceinte doit être de 8
l’impédance de chaque enceinte doit être de
Ω ou supérieure. Voir page 6 pour plus
4
d’informations.
Ω ou supérieure.
Ω ou supérieure.
Ω ou
Ω ou
4 Fr
Page 25
PRÉPARATION
RACCORDEMENTS
Raccordement des enceintes et des composants source
ATTENTION
• Ne raccordez pas cet appareil ou d’autres composants au secteur tant que toutes les connexions entre les composants
ne sont pas établies.
• Toutes les connexions doivent être correctes : L (gauche) à L, R (droite) à R, « + » à « + » et « – » à « – ». Si le
raccordement est défectueux, aucun son n’est émis par l’enceinte, et si la polarité de la connexion est incorrecte, les
sons manquent de naturel et de composantes graves. Reportez-vous au mode d’emploi de chaque composant.
• Utilisez des câbles RCA pour les composants audio (à l’exception des raccordements des enceintes et des
raccordements de la DOCK).
PRÉPARATION
Tourne-disque
Sortie
audio
GND
(Masse)
Lecteurs de
DVD, etc.
Sortie
audio
Enregistreur
de CD, etc.
Sortie
audio
Raccordements
Enceintes A
de la prise
DOCK (voir
page 10)
Entrée
audio
Sortie
audio
Lecteur de CD
Sortie
audio
Syntoniseur Caisson de
Entrée
audio
Platine à
cassette, etc.
Sortie
audio
graves
Enceintes B
y
• Les prises PHONO sont destinées au raccordement d’un tourne-disque doté d’une cartouche MM.
• Raccordez votre tourne-disque à la borne GND afin de réduire le bruit dans le signal. Toutefois, il se peut que vous entendiez moins de
bruit en débranchant certains tourne-disques de la borne GND.
5 Fr
Français
Page 26
RACCORDEMENTS
ATTENTION
• Le commutateur IMPEDANCE SELECTOR doit être réglé sur la position appropriée avant de raccorder des jeux
d’enceintes. Voir page 4 pour plus de détails.
• Ne laissez pas les fils d’enceinte dénudés se toucher et évitez qu’ils entrent en contact avec les pièces métalliques de
cet appareil. Cela risquerait d’endommager l’appareil et/ou les enceintes.
• Ne raccordez pas cet appareil ou d’autres composants au secteur tant que toutes les connexions entre les composants
ne sont pas établies.
■ Connexion bifilaire
1 Retirez environ 10 mm d’isolation à
l’extrémité de chaque câble d’enceinte et
torsadez les fils dénudés du câble afin
d’éviter tout court-circuit.
10 mm
Une connexion bifilaire a pour effet de séparer les graves
des médiums et des aigus. Une enceinte compatible avec
ce type de connexion est pourvue de quatre bornes de
connexion. Ces deux jeux de bornes permettent de diviser
l’enceinte en deux sections indépendantes. Lorsque ces
connexions sont effectuées, les circuits d’attaque des
médiums et des aigus sont reliés à un jeu de bornes et le
circuit d’attaque des graves est relié à l’autre jeu de
bornes.
Cet appareil
2 Raccordez le câble d’enceinte.
1 Dévissez le bouton.
2 Insérez un fil dénudé dans l’orifice situé sur
le côté de chaque borne.
3 Serrez le bouton pour fixer le fil.
Rouge : positif (+)
Noir : négatif (–)
■ Raccordement avec une fiche banane
(Sauf modèles pour l’Asie, le RoyaumeUni et l’Europe)
Serrez le bouton et insérez la fiche banane dans
l’extrémité de la borne correspondante.
Fiche banane
Enceinte
Raccordez l’autre enceinte à l’autre jeu de bornes en
procédant de la même manière.
ATTENTION
Lorsque vous établissez des connexions bifilaires, réglez
le commutateur IMPEDANCE SELECTOR sur HIGH ou
sur LOW en fonction de l’impédance de vos enceintes :
6 Ω ou supérieure : HIGH
4 Ω ou supérieure : LOW
Voir page 4 pour plus d’informations sur le commutateur
IMPEDANCE SELECTOR.
Remarque
Lorsque vous établissez des connexions bifilaires, retirez les
ponts de court-circuitage ou les câbles des enceintes.
y
Pour utiliser les connexions bifilaires, réglez le sélecteur
SPEAKERS sur la position A+B.
6 Fr
Page 27
Raccordement du cordon d’alimentation
RACCORDEMENTS
POWER
MANAGEMENT
VOLTAGE
SELECTOR
■ Commutateur POWER MANAGEMENT
Permet d’activer ou de désactiver la fonction de mise hors
tension automatique.
Lorsque cette fonction est activée, l’appareil entre
automatiquement en mode veille s’il reste inactif pendant
8 heures.
Vers la prise murale
avec le cordon
d’alimentation
(Modèles pour Taïwan et l’Amérique centrale/du Sud)
■ Raccordement du cordon d’alimentation
Une fois tous les raccordements effectués, branchez le
cordon d’alimentation sur la prise secteur.
PRÉPARATION
■ Commutateur VOLTAGE SELECTOR
(Modèles pour Taïwan et l’Amérique
centrale/du Sud uniquement)
Le commutateur VOLTAGE SELECTOR situé sur le
panneau arrière de cet appareil doit être réglé sur votre
tension secteur locale AVANT le raccordement du câble
d’alimentation à la prise murale.
Un réglage incorrect de le commutateur VOLTAGE
SELECTOR peut endommager l’appareil et créer un
risque d’incendie.
Sélectionnez la position du commutateur (gauche ou
droite) en fonction de votre tension locale à l’aide d’un
tournevis. Les tensions sont : 110-120/220-240 V CA,
50/60 Hz.
Français
7 Fr
Page 28
OPÉRATION
LECTURE ET ENREGISTREMENT
Lecture d’une source
SPEAKERS VOLUME
INPUT
VOLUME
5 Lisez la source d’entrée sélectionnée.
6 Tournez le bouton VOLUME du panneau
avant (ou appuyez sur les touches VOLUME
+/– de la télécommande) pour régler le
niveau sonore.
y
Vous pouvez régler la qualité des tonalités à l’aide des
commandes BASS, TREBLE, BALANCE et LOUDNESS ou du
commutateur PURE DIRECT du panneau avant.
INPUTA
7 Une fois l’écoute terminée, appuyez sur le
commutateur A du panneau avant pour
éteindre l’appareil.
y
Si vous appuyez sur la touche A de la télécommande alors que le
commutateur A du panneau avant est en position ON, l’appareil
entre en mode veille. Appuyez à nouveau sur la touche A pour
allumer l’appareil.
Réglage de la qualité des tonalités
TREBLE
LOUDNESS
VOLUME
1 Tournez le bouton VOLUME du panneau
avant à fond vers la gauche.
2 Enfoncez le commutateur A du panneau
avant pour allumer l’appareil.
3 Tournez le sélecteur INPUT du panneau
avant (ou appuyez sur l’une des touches du
sélecteur d’entrée de la télécommande) pour
sélectionner la source d’entrée à écouter.
Le témoin correspondant à la source d’entrée choisie
s’allume.
4 Tournez le sélecteur SPEAKERS du panneau
avant afin de sélectionner SPEAKERS A, B
ou A+B.
Remarques
• Réglez le sélecteur SPEAKERS sur la position A+B si deux jeux
d’enceintes sont connectés à l’aide de connexions bifilaires ou si
vous utilisez deux jeux d’enceintes simultanément (A et B).
• Si vous souhaitez qu’aucun son ne sorte des enceintes lorsque
vous utilisez un casque, placez le sélecteur SPEAKERS sur
OFF.
BASS BALANCE PURE
DIRECT
■ Utilisation du commutateur PURE
DIRECT
Achemine les signaux d’entrée provenant de vos sources
audio. Par conséquent, les signaux d’entrée contournent
les commandes BASS, TREBLE, BALANCE et
LOUDNESS, éliminant ainsi toute altération des signaux
audio afin de produire un son plus direct de haut niveau à
partir de toutes les sources d’entrée.
Remarque
Les commandes BASS, TREBLE, BALANCE et LOUDNESS ne
fonctionnent pas lorsque le commutateur PURE DIRECT est
activé.
8 Fr
Page 29
■ Réglage des commandes BASS et TREBLE
Les commandes BASS et TREBLE permettent de régler la
réponse dans les hautes et les basses fréquences.
La position centrale produit une réponse plate.
BASS
Si vous estimez qu’il n’y a pas assez de graves (son de
basse fréquence), tournez dans le sens horaire pour les
amplifier. Si vous estimez qu’il y a trop de graves, tournez
dans le sens antihoraire pour les supprimer.
Plage de commande : –10 dB à +10 dB (20 Hz)
TREBLE
Si vous estimez qu’il n’y a pas assez d’aigus (son de haute
fréquence), tournez dans le sens horaire pour les amplifier.
Si vous estimez qu’il y a trop d’aigus, tournez dans le sens
antihoraire pour les supprimer.
Plage de commande : –10 dB à +10 dB (20 kHz)
■ Réglage de la commande BALANCE
La commande BALANCE permet d’équilibrer le son
reproduit par les enceintes gauche et droite afin de compenser
le déséquilibre sonore provoqué par l’emplacement des
enceintes ou les conditions de la pièce d’écoute.
■ Réglage de la commande LOUDNESS
Conservez une plage de tonalités complète à tout niveau
de volume, en compensant ainsi la perte de sensibilité de
l’oreille humaine aux plages hautes et basses fréquences
en présence d’un faible volume.
LECTURE ET ENREGISTREMENT
Enregistrement d’une source
Remarques
• Pour le modèle A-S500, les signaux audio ne sont pas émis via
les prises de sortie LINE 2 REC ou LINE 3 REC si vous avez
sélectionnez LINE 2 ou LINE 3 à l’aide du sélecteur REC OUT.
• Pour le modèle A-S300, les signaux audio ne sont pas émis via
les prises de sortie LINE 2 REC ou LINE 3 REC si vous avez
sélectionnez LINE 2 ou LINE 3 à l’aide du sélecteur INPUT.
• Cet appareil doit être sous tension pour pouvoir enregistrer.
• Les commandes VOLUME, BASS, TREBLE, BALANCE et
LOUDNESS et le commutateur PURE DIRECT n’ont aucun
effet sur la source enregistrée.
• Vérifiez la législation sur les droits d’auteur de votre pays avant
d’effectuer des enregistrements à partir de disques, de CD, de la
radio, etc. L’enregistrement d’œuvres protégées par les droits
d’auteur peut constituer une violation de la législation sur les
droits d’auteur.
REC OUT
(A-S500 uniquement)
OPÉRATION
ATTENTION
Si le commutateur PURE DIRECT est activé et si la
commande LOUDNESS est réglée à un certain niveau, les
signaux d’entrée contournent la commande LOUDNESS,
entraînant ainsi une augmentation soudaine du niveau
sonore. Pour éviter d’altérer votre ouïe ou d’endommager
les enceintes, veillez à appuyer sur le commutateur PURE
DIRECT APRES avoir réduit le niveau sonore ou APRES
avoir vérifié que la commande LOUDNESS est
correctement réglée.
1 Réglez la commande LOUDNESS sur la
position FLAT.
2 Tournez le bouton VOLUME du panneau
avant (ou appuyez sur les touches VOLUME
+/– de la télécommande) pour régler le
niveau sonore sur le niveau d’écoute le plus
élevé de votre choix.
3 Tournez la commande LOUDNESS jusqu’à
l’obtention du volume souhaité.
y
Une fois la commande LOUDNESS réglée, écoutez de la
musique à votre niveau de volume préféré. Si l’effet du réglage de
la commande LOUDNESS est trop puissant ou trop faible,
réajustez la commande LOUDNESS.
1 Tournez le sélecteur REC OUT du panneau
avant afin de sélectionner la source à
enregistrer (A-S500 uniquement).
Remarque
Si vous utilisez le modèle A-S300, la source d’entrée sélectionnée
est enregistrée.
2 Lisez la source et lancez l’enregistrement sur
l’appareil raccordé aux prises de sortie REC
(LINE 2 et/ou LINE 3) du panneau arrière. Voir
page 5.
y
Modèle A-S500 uniquement : pendant l’enregistrement, vous
pouvez sélectionner une autre source d’entrée à l’aide du
sélecteur INPUT ou de la télécommande et écoutez une autre
source d’entrée sans affecter l’enregistrement.
Français
9 Fr
Page 30

LECTURE DE MORCEAUX DE VOTRE iPhone/iPod
Lorsque vous avez connecté un Dock Universal pour iPod ou un système sans fil pour iPod Yamaha en option à la prise
DOCK du panneau arrière de l’appareil, vous pouvez écouter votre iPhone/iPod à l’aide de la télécommande fournie avec
l’appareil.
Placez le périphérique connecté le
plus loin possible de l’appareil.
Dock Universal pour iPod Système sans fil pour iPod
Dock Universal pour iPod Système sans fil pour iPod
(à compter de juillet 2010)
Modèle
Commande
iPhone/iPod pris en charge
(à compter de juillet 2010)
Remarques
• YDS-12
• YDS-11
• YDS-10
• Télécommande
• iPhone/iPod connecté à la station
• iPod touch
• iPod (4e génération/5e génération/classic)
• iPod nano
•iPod mini
•iPhone
•iPhone 3G/3GS
• Recharge de l’iPhone/iPod également prise en
charge.
• Les modèles YDS-10 et YDS-11 ne prennent
pas en charge la connexion avec un iPhone.
YID-W10
• iPhone/iPod connecté à l’émetteur YID-W10
• Télécommande
• iPod touch
• iPod (5e génération/classic)
• iPod nano
• iPhone
• iPhone 3G/3GS
Recharge de l’iPhone/iPod également prise en
charge.
ATTENTION
Afin d’éviter les accidents, débranchez le cordon d’alimentation de l’appareil avant de connecter un Dock Universal pour
iPod ou un système sans fil pour iPod.
Remarque
Si l’iPhone connecté au YID-W10 reçoit un appel alors que l’appareil est en mode veille, l’appareil s’allume automatiquement et émet
la sonnerie. Si vous ne voulez pas que l’appareil s’allume lors de la réception d’un appel, mettez l’iPhone en mode silencieux.
10 Fr
Page 31

LECTURE DE MORCEAUX DE VOTRE iPhone/iPod
Utilisation d’un Dock Universal pour iPod
Après avoir placé votre iPhone/iPod sur la station, tournez le
sélecteur INPUT du panneau avant (ou appuyez sur la touche
DOCK de la télécommande) pour sélectionner DOCK comme
source d’entrée pour lire le contenu de votre iPhone/iPod.
ou
Panneau avant Télécommande
Tout en regardant les informations affichées sur votre
iPhone/iPod, utilisez les touches suivantes de la
télécommande pour faire fonctionner (lecture, pause, saut,
etc.) votre iPhone/iPod.
Commande
iPhone/iPod
Remarque
Il se peut que certains modes de lecture aléatoire et de répétition
ne soient pas disponibles en fonction du modèle ou de la version
logicielle de votre iPhone/iPod.
y
Lorsque l’appareil est allumé ou en mode veille, votre iPhone/
iPod peut être rechargé automatiquement s’il est connecté à un
Dock Universal pour iPod. Lorsqu’un iPhone/iPod est chargé
alors que l’appareil est en mode veille, le témoin d’alimentation
est fortement éclairé.
OPÉRATION
Télécom
mande
MENU
ENTER
B
C
Ee
a
b
Opération
Affiche le menu.
• Si un élément est sélectionné : confirme l’élément
et affiche l’écran suivant.
• Si un morceau est sélectionné : lit le morceau
sélectionné.
Fait défiler vers le haut.
Fait défiler vers le bas.
• Si la lecture d’un morceau est en cours : suspend la
lecture du morceau.
• Si la lecture d’un morceau a été suspendue :
poursuit la lecture du morceau.
• Si la lecture d’un morceau est en cours ou
suspendue : passe à la chanson suivante.
• Si vous maintenez la touche enfoncée : effectue
une recherche avant.
• Si la lecture d’un morceau est en cours ou
suspendue : revient au début du morceau.
• À chaque fois que vous appuyez sur cette touche,
vous passez au morceau précédent.
• Si vous maintenez la touche enfoncée : effectue
une recherche arrière.
Permet de changer de mode de lecture aléatoire
(Non → Morceaux → Albums → Non).
Permet de modifier le mode de répétition (Non →
Un → Tous → Non).
Français
11 Fr
Page 32

LECTURE DE MORCEAUX DE VOTRE iPhone/iPod
Utilisation d’un système sans fil pour iPod
Récepteur YID-W10
Émetteur YID-W10
■ Établissement d’une connexion sans fil
Une fois que l’iPhone/iPod est connecté à l’émetteur et
que la lecture commence, le son n’est audible qu’après
environ 5 secondes. Pendant ce temps, la connexion sans
fil entre l’émetteur et le récepteur est établie.
L’état de la connexion sans fil entre l’émetteur et le
récepteur est indiqué par le témoin d’état correspondant.
– L’émetteur se trouve en dehors du rayon de portée
pour la communication sans fil du récepteur.
– La communication entre l’émetteur et le récepteur
est perturbée par l’interférence causée par d’autres
périphériques LAN sans fil, téléphones sans fil,
fours à micro-ondes, etc.
y
• Vous pouvez utiliser la télécommande pour commander
l’iPhone/iPod. Pour plus d’informations, voir page 11.
• Lorsque l’appareil est allumé ou en mode veille, votre iPhone/
iPod peut être rechargé automatiquement si l’émetteur connecté
à votre iPhone/iPod est placé sur votre récepteur. Lorsqu’un
iPhone/iPod est chargé alors que l’appareil est en mode veille,
le témoin d’alimentation est fortement éclairé.
• Reportez-vous au mode d’emploi du YID-W10 pour plus
d’informations.
État de connexion
Aucune connexion Éteint Éteint
Confirmation de la
connexion
Connecté Vert, allumé Bleu, allumé
Témoin de
l’émetteur
Vert, clignotant Bleu, clignotant
Témoin du
récepteur
■ Commande de l’appareil avec votre
iPhone/iPod
• Lorsque la lecture commence sur un iPhone/iPod connecté
à un émetteur, et si l’émetteur se trouve dans le rayon de
portée du récepteur, l’appareil fonctionne comme suit :
– Si l’appareil est déjà allumé lorsque la lecture
commence : la source d’entrée est réglée sur
DOCK.
– Si l’appareil est en mode veille lorsque la lecture
commence : l’appareil s’allume et la source d’entrée
est réglée sur DOCK.
• Régler le volume sur l’iPhone/iPod règle également le
volume de l’appareil. Notez que l’iPhone/iPod peut
uniquement servir à augmenter le volume de l’appareil
jusqu’à un certain niveau ; au-delà, réglez le volume à
l’aide de la commande VOLUME de l’appareil ou de la
télécommande.
• Dans les situations suivantes, la connexion sans fil
entre l’émetteur et le récepteur est déconnectée. Après
30 secondes, l’appareil entre automatiquement en
mode veille.
– L’iPhone/iPod n’est pas utilisé pendant environ 30 à
120 secondes après la suspension de la lecture.
– La minuterie de veille de l’iPhone/iPod est activée.
– L’iPhone/iPod est déconnecté de l’émetteur.
– La batterie de l’iPhone/iPod est trop faible pour
alimenter suffisamment l’émetteur.
12 Fr
Page 33

INFORMATIONS COMPLÉMENTAIRES
GUIDE DE DÉPANNAGE
Reportez-vous au tableau suivant si l’appareil ne fonctionne pas comme il devrait. Si le problème que vous rencontrez n’est pas
mentionné ci-dessous, ou encore si les actions correctives suggérées sont sans effet, mettez l’appareil hors tension, débranchez
le cordon d’alimentation et prenez contact avec le revendeur ou le service après-vente agréé Yamaha le plus proche.
■ Généralités
Anomalies Causes possibles Solutions
L’appareil ne se met
pas sous tension. Par
ailleurs, le témoin
d’alimentation ne
s’allume pas.
L’appareil s’éteint
soudainement et le
témoin d’alimentation
clignote.
L’appareil est resté
sous tension
plusieurs secondes,
puis s’est mis hors
tension et le témoin
d’alimentation
clignote.
Le cordon d’alimentation n’est pas
branché.
Vous avez appuyé sur la touche A de la
télécommande alors que l’appareil était
hors tension.
Un problème lié aux circuits internes de
l’appareil est survenu.
Les fils d’enceinte se touchent ou sont en
court-circuit avec le panneau arrière.
L’enceinte est défectueuse. Remplacez le jeu d’enceintes et appuyez à nouveau
Le circuit de protection a été actionné en
raison d’un niveau d’entrée ou de volume
excessif.
Le circuit de protection a été actionné en
raison d’une température interne
excessive.
Le commutateur IMPEDANCE
SELECTOR n’est pas correctement réglé
sur l’une ou l’autre position.
Le commutateur IMPEDANCE
SELECTOR n’est pas réglé sur la position
appropriée.
L’appareil a été soumis à une forte
décharge électrique (provoquée par
exemple par un orage ou une décharge
d’électricité statique).
Un problème lié aux circuits internes de
l’appareil est survenu.
Branchez fermement le cordon d’alimentation.
Enfoncez le commutateur A du panneau avant en
position ON. 2
Débranchez le cordon d’alimentation et prenez contact
avec le revendeur ou le service après-vente agréé
Yamaha le plus proche. Si l’appareil génère une odeur
ou un bruit inhabituel, ne le mettez pas sous tension,
débranchez le cordon d’alimentation et prenez contact
avec un service après-vente afin de le faire réparer.
Raccordez correctement les câbles d’enceinte et
enfoncez à nouveau le commutateur A. Les témoins
INPUT clignotent et le volume est réduit
automatiquement. Une fois le volume réduit à son
réglage le plus bas, les témoins INPUT arrêtent de
clignoter, le témoin INPUT de la dernière source
d’entrée sélectionnée s’allume et il est à nouveau
possible d’utiliser l’appareil. Vérifiez que le son
reproduit par les enceintes est correct en augmentant
graduellement le volume, puis vous pouvez utiliser
l’appareil normalement.
sur le commutateur A. Les témoins INPUT clignotent
et le volume est réduit automatiquement. Une fois le
volume réduit à son réglage le plus bas, les témoins
INPUT arrêtent de clignoter, le témoin INPUT de la
dernière source d’entrée sélectionnée s’allume et il
est à nouveau possible d’utiliser l’appareil. Vérifiez
que le son reproduit par les enceintes est correct en
augmentant graduellement le volume, puis vous
pouvez utiliser l’appareil normalement.
Tournez la commande VOLUME du panneau avant
pour réduire le niveau de volume, puis remettez
l’appareil sous tension.
Laissez la température à l’intérieur de l’appareil
diminuer pendant environ 30 minutes, tournez la
commande VOLUME du panneau avant pour réduire
le volume, puis remettez l’appareil sous tension.
Installez l’appareil à un endroit où la chaleur qu’il
dégage peut se dissiper aisément.
Mettez l’appareil hors tension et faites glisser le
commutateur IMPEDANCE SELECTOR à fond sur
la position souhaitée.
Placez le commutateur IMPEDANCE SELECTOR
sur la position correspondant à l’impédance de vos
enceintes.
Mettez cet appareil en mode veille, débranchez le
cordon d’alimentation, rebranchez-le après
30 secondes, puis utilisez-le normalement.
Débranchez le cordon d’alimentation et prenez contact
avec le revendeur ou le service après-vente agréé
Yamaha le plus proche. Si l’appareil génère une odeur
ou un bruit inhabituel, ne le mettez pas sous tension,
débranchez le cordon d’alimentation et prenez contact
avec un service après-vente afin de le faire réparer.
Voir la
page
7
—
6
COMPLÉMENTAIRES
INFORMATIONS
—
—
—
4
4
—
Français
—
13 Fr
Page 34

GUIDE DE DÉPANNAGE
Anomalies Causes possibles Solutions
Aucun son. Le son est désactivé. Appuyez sur la touche MUTE de la télécommande ou
Raccordement incorrect des câbles. Connectez correctement le câble stéréo pour appareils
La lecture a été interrompue sur le
composant connecté.
Aucune source d’entrée appropriée n’est
sélectionnée.
Le sélecteur SPEAKERS n’est pas
correctement réglé.
Le son se coupe
soudainement.
Seule l’enceinte de
gauche ou de droite
émet des sons.
Basses insuffisantes
et absence
d’ambiance.
Un « bourdonnement »
se fait entendre.
Le niveau sonore est
trop faible pendant la
lecture d’un disque.
Impossible
d’augmenter le niveau
de volume, ou le son
est déformé.
Le son est de moins
bonne qualité lorsque
vous écoutez avec un
casque raccordé au
lecteur de CD ou à la
platine à cassette
connecté à l’appareil.
Le niveau sonore est
faible.
Le circuit de protection a été actionné du
fait de la présence d’un court-circuit, etc.
L’appareil a chauffé de manière
excessive.
La fonction de mise hors tension
automatique a éteint l’appareil.
Raccordement incorrect des câbles. Raccordez correctement les câbles. Si l’anomalie
Réglage incorrect de la commande
BALANCE.
Les fils + et – sont inversés sur
l’amplificateur ou les enceintes.
Raccordement incorrect des câbles. Raccordez fermement les fiches audio. Si l’anomalie
Pas de connexion du tourne-disque à la
borne GND.
Le tourne-disque est raccordé à d’autres
prises que les prises PHONO.
La lecture du disque s’effectue sur un
tourne-disque doté d’une cartouche MC.
Le composant raccordé aux bornes LINE
2 REC ou LINE 3 REC de l’appareil est
hors tension.
L’appareil est hors tension ou en mode
veille.
Le son est désactivé. Appuyez sur la touche MUTE de la télécommande ou
La fonction de la commande Loudness est
activée.
tournez la commande VOLUME.
audio et les fils d’enceinte. Si l’anomalie persiste, il
se peut que les câbles soient défectueux.
Allumez le composant et lancez la lecture.
Sélectionnez une source d’entrée appropriée à l’aide
du sélecteur INPUT du panneau avant (ou de l’une
des touches du sélecteur INPUT de la
télécommande).
Réglez le sélecteur SPEAKERS correspondant sur la
position A, B ou A+B.
Vérifiez que le commutateur IMPEDANCE
SELECTOR est correctement réglé.
Vérifiez que les fils d’enceinte ne sont pas en contact
entre eux ou ne sont pas en court-circuit avec le
panneau arrière de l’appareil, puis remettez l’appareil
sous tension.
Changez éventuellement l’appareil de place. Vérifiez
que les ouvertures situées sur le panneau supérieur ne
sont pas obstruées.
Vérifiez qu’aucune autre anomalie n’a causé le
problème, puis remettez l’appareil sous tension.
persiste, il se peut que les câbles soient défectueux.
Réglez la commande BALANCE sur la position
appropriée.
Raccordez les fils d’enceinte en respectant la phase +
et –. 6
persiste, il se peut que les câbles soient défectueux.
Raccordez le tourne-disque à la borne GND de cet
appareil.
Raccordez le tourne-disque aux prises PHONO.
Utilisez un tourne-disque équipé d’une cartouche MM.
Mettez le composant sous tension.
Mettez l’appareil sous tension.
tournez la commande VOLUME.
Réduisez le volume, réglez la commande
LOUDNESS sur la position FLAT, puis réajustez le
volume.
Voir la
page
3
5
8
8
8
4
5
—
7
5
9
5
5
5
—
—
8
3
9
14 Fr
Page 35

GUIDE DE DÉPANNAGE
Anomalies Causes possibles Solutions
L’utilisation des
commandes BASS,
TREBLE, BALANCE et
LOUDNESS n’affecte
pas la qualité des
tonalités.
Le commutateur PURE DIRECT est
activé.
Le commutateur PURE DIRECT doit être désactivé
pour utiliser ces commandes.
■ Dock Universal pour iPod et système sans fil pour iPod
Anomalies Causes possibles Solutions
Aucun son.
Impossible d’utiliser
l’iPhone/iPod.
Lors de l’utilisation
d’un système sans fil
pour iPod :
Le son se coupe
fréquemment.
L’appareil génère des
bruits parasites.
En cas d’utilisation
du Dock Universal
pour iPod :
Votre iPhone/iPod
n’est pas rechargé
même s’il est
connecté au Dock
Universal pour iPod.
En cas d’utilisation
du système sans fil
pour iPod :
Votre iPhone/iPod
n’est pas rechargé
même si l’émetteur
YID-W10 connecté à
votre iPhone/iPod est
placé sur le récepteur
YID-W10.
Un problème lié au trajet de signalisation
entre votre iPhone/iPod et l’appareil est
survenu.
L’iPhone/iPod utilisé n’est pas pris en
charge par l’appareil.
La connexion sans fil est médiocre. Éloignez le plus possible le récepteur YID-W10 de
Impossible de mettre cet appareil sous
tension.
L’iPhone/iPod n’est pas connecté
correctement.
Impossible de mettre cet appareil sous
tension.
L’émetteur YID-W10 n’est pas placé
correctement sur le récepteur YID-W10.
Mettez l’appareil hors tension et reconnectez le Dock
Universal pour iPod ou le système sans fil pour iPod à
la prise DOCK de l’appareil.
Débranchez votre iPhone/iPod du Dock Universal
pour iPod ou du système sans fil pour iPod, puis
replacez-le sur la station d’accueil.
Connectez un iPhone/iPod pris en charge par
l’appareil.
cet appareil.
Mettez l’appareil sous tension ou en mode veille.
Connectez l’iPhone/iPod correctement au Dock
Universal pour iPod.
Mettez l’appareil sous tension ou en mode veille.
Placez correctement l’émetteur YID-W10 connecté à
votre iPhone/iPod sur le récepteur YID-W10.
Voir la
page
8
Voir la
page
10
10
10
10
2
10
2
10
COMPLÉMENTAIRES
INFORMATIONS
15 Fr
Français
Page 36

GUIDE DE DÉPANNAGE
■ Télécommande
Anomalies Causes possibles Solutions
La télécommande ne
fonctionne pas
correctement.
■ Remarques concernant les piles
• Changez les deux piles lorsque vous remarquez que la
portée de la télécommande diminue.
• Retirez les piles si la télécommande n’est pas utilisée
pendant un certain temps.
• Ne combinez jamais des piles neuves et des piles usagées.
• N’utilisez pas non plus des piles de deux types différents
(par exemple, des piles alcalines et des piles au
manganèse). Lisez attentivement les indications présentes
sur l’emballage, car leur forme et leur couleur peuvent
être identiques alors que leur type diffère.
• Si les piles ont fui, mettez-les au rebut immédiatement.
Dans la mesure du possible, ne touchez pas le produit
qui a fui et évitez qu’il ne vienne en contact avec vos
vêtements, etc. Nettoyez soigneusement le logement
des piles avant de mettre en place des piles neuves.
• Ne jetez pas les piles avec les ordures ménagères ;
traitez-les conformément à la réglementation locale.
La télécommande est trop éloignée ou trop
inclinée.
Les rayons directs du soleil ou un éclairage
direct (provenant d’une lampe fluorescente à
changement de fréquence, etc.) frappent le
capteur de télécommande de l’appareil.
Les piles sont déchargées. Remplacez toutes les piles. 3
La télécommande fonctionne jusqu’à une portée de
6 m et à un angle de 30 degrés maximum par rapport
au panneau avant.
Repositionnez l’appareil ou l’éclairage.
■ Manipulation de la télécommande
• Ne renversez pas d’eau ou d’autre liquide sur la
télécommande.
• Ne laissez pas tomber la télécommande.
• Ne conservez pas ou ne rangez pas la télécommande
dans les endroits suivants
– très humides, par exemple près d’un bain
– très chauds, par exemple près d’un appareil de
chauffage ou d’un poêle
– exposés à des températures très basses
– poussiéreux
• N’exposez pas le capteur de télécommande à une
lumière puissante, en particulier à une lampe
fluorescente à onduleur, sinon la télécommande ne
fonctionnera pas correctement. Le cas échéant, faites
en sorte que le boîtier ne soit pas directement éclairé.
Voir la
page
3
—
16 Fr
Page 37

SPÉCIFICATIONS
SECTION AUDIO
• Puissance minimale de sortie efficace
(8 Ω, 20 Hz à 20 kHz, 0,019 % DHT)
[A-S500] .................................................................85 W + 85 W
[A-S300] .................................................................60 W + 60 W
(6 Ω, 20 Hz à 20 kHz, 0,038 % DHT) [sauf modèle pour l’Asie]
[A-S500] .............................................................100 W + 100 W
[A-S300] .................................................................70 W + 70 W
• Puissance dynamique par canal (IHF) (8/6/4/2 Ω)
[A-S500] ..........................................................130/150/185/220 W
[A-S300] ..........................................................100/120/140/150 W
• Puissance maximale par canal [Modèles pour le Royaume-Uni et
l’Europe uniquement]
(1 kHz, 0,7 % DHT, 4 Ω)
[A-S500] ............................................................................ 120 W
[A-S300] .............................................................................. 95 W
• Puissance selon CEI [Modèles pour le Royaume-Uni et l’Europe
uniquement]
(1 kHz, 0,019 % DHT, 8 Ω)
[A-S500] ............................................................................ 100 W
[A-S300] .............................................................................. 75 W
• Largeur de la bande de puissance
[A-S500] (0,06 % DHT, 42,5 W, 8 Ω) ...................10 Hz à 50 kHz
[A-S300] (0,06 % DHT, 30 W, 8 Ω) ......................10 Hz à 50 kHz
• Coefficient d’amortissement (SPEAKERS A)
1 kHz, 8 Ω................................................................. 240 minimum
• Puissance de sortie maximale efficace (JEITA)
(1 kHz, 10 % DHT, 8 Ω) [Modèles pour l’Asie, la Chine, Taïwan
et l’Amérique centrale/du Sud uniquement]
[A-S500] ............................................................................ 130 W
[A-S300] ............................................................................ 100 W
(1 kHz, 10 % DHT, 6 Ω) [Modèles pour la Chine, Taïwan et
l’Amérique centrale/du Sud uniquement]
[A-S500] ............................................................................ 150 W
[A-S300] ............................................................................ 110 W
• Sensibilité et impédance d’entrée
PHONO (MM)......................................................... 3,0 mV/47 kΩ
CD, etc. ................................................................... 200 mV/47 kΩ
• Signal d’entrée maximal
PHONO (MM) (1 kHz, 0,003 % DHT)............... 60 mV minimum
CD, etc. (1 kHz, 0,5 % DHT) ................................ 2,2 V minimum
• Niveau et impédance de sortie
REC...................................................... 200 mV/1,0 kΩ maximum
• Impédance/sortie nominale de la prise PHONES
CD, etc. (entrée 1 kHz, 200 mV, 8 Ω)
[A-S500] .............................................................. 430 mV/470 Ω
[A-S300] .............................................................. 360 mV/470 Ω
• Réponse en fréquence
CD, etc. (20 Hz à 20 kHz) .............................................. 0 ± 0,5 dB
CD, etc. PURE DIRECT on (10 Hz à 100 kHz).............0 ± 1,0 dB
• Écart d’égalisation RIAA
PHONO (MM)................................................................... ± 0,5 dB
• Distorsion harmonique totale
PHONO (MM) vers REC (20 Hz à 20 kHz, 3 V)
....................................................................... 0,025 % maximum
CD, etc. vers SPEAKERS
[A-S500] (20 Hz à 20 kHz, 42,5 W, 8 Ω)...... 0,015 % maximum
[A-S300] (20 Hz à 20 kHz, 30 W, 8 Ω).........0,015 % maximum
• Rapport signal/bruit (réseau IHF-A)
PHONO (MM) (5 mV entrée court-circuitée) ...... 85 dB minimum
CD, etc. PURE DIRECT on (200 mV entrée court-circuitée)
......................................................................... 100 dB minimum
• Bruit résiduel (réseau IHF-A) .................................................. 30 µV
• Séparation de canaux
CD, etc. (5,1 kΩ entrée court-circuitée, 1/10 kHz)
.......................................................................65/50 dB minimum
• Caractéristiques du contrôle du son
BASS
Renforcement/Coupure (50 Hz)....................................... ±10 dB
Fréquence de transition .....................................................350 Hz
TREBLE
Renforcement/Coupure (20 kHz)..................................... ±10 dB
Fréquence de transition ....................................................3,5 kHz
• Commande du volume en continu
Atténuation (1 kHz)............................................................. –30 dB
• Erreur de suivi du gain (0 à –99 dB) ...................... 0,5 dB maximum
GÉNÉRALITÉS
• Tension d’alimentation
[Modèles pour les États-Unis et le Canada]....... CA 120 V, 60 Hz
[Modèle pour l’Asie]...............................CA 220-240 V, 50/60 Hz
[Modèles pour Taïwan et l’Amérique centrale/du Sud]
.............................................. CA 110-120/220-240 V, 50/60 Hz
[Modèle pour la Chine] ....................................... CA 220 V, 50 Hz
[Modèle pour l’Australie] ................................. CA 240 V, 50 Hz
[Modèles pour le Royaume-Uni, l’Europe et la Russie]
......................................................................... CA 230 V, 50 Hz
• Consommation
[A-S500]
[Modèles pour les États-Unis et le Canada]...........240 W, 330 VA
[Modèle pour l’Asie]......................................................... 220 W
[Autres modèles] ............................................................... 240 W
[A-S300]............................................................................... 190 W
• Consommation en mode veille................................ 0,5 W maximum
• Consommation en mode veille du YID-W10 (YID-W10 raccordé)
................................................................................. 1,2 W maximum
• Consommation de recharge pour l’iPod
[A-S500]................................................................ 35 W maximum
[A-S300]................................................................ 25 W maximum
• Consommation maximale [Modèles pour Taïwan et l’Amérique
centrale/du Sud uniquement]
(6 Ω, 1 kHz, 10 % DHT)
[A-S500]............................................................................ 510 W
[A-S300]............................................................................ 400 W
• Dimensions (L × H × P) .................................. 435 × 151 × 387 mm
•Poids
[A-S500].............................................................................. 10,3 kg
[A-S300]................................................................................ 9,0 kg
Les spécifications peuvent être modifiées sans avis préalable.
iPhone, iPod
iPhone, iPod, iPod classic, iPod nano et iPod touch sont des
marques d’Apple Inc., deposées aux Etats-Unis et dans d’autres
pays.
COMPLÉMENTAIRES
INFORMATIONS
Français
17 Fr
Page 38

VORSICHT: VOR DER BEDIENUNG DIESES GERÄTES DURCHLESEN.
1 Um optimales Leistungsvermögen sicherzustellen, lesen
Sie bitte die Anleitung aufmerksam durch. Bewahren Sie
die Anleitung danach für spätere Nachschlagzwecke
sorgfältig auf.
2 Installieren Sie diese Sound-Anlage an einem gut
belüfteten, trockenen, sauberen Ort - entfernt von
direktem Sonnenlicht, Wärmequellen, Erschütterungen,
Staub und Feuchtigkeit. Um eine ausreichende Belüftung
zu gewährleisten, beachten Sie die folgenden
Mindestabstände rund um dieses Gerät.
Oben: 30 cm
Hinten: 20 cm
Seiten: 20 cm
3 Stellen Sie dieses Gerät entfernt von anderen elektrischen
Haushaltgeräten, Motoren oder Transformatoren auf, um
Brummgeräusche zu vermeiden.
4 Setzen Sie dieses Gerät keinen plötzlichen
Temperaturänderungen von kalt auf warm aus, und
stellen Sie dieses Gerät nicht an Orten mit hoher
Luftfeuchtigkeit auf (z.B. in Räumen mit
Luftbefeuchtern), um Kondensation im Inneren des
Gerätes zu vermeiden, da es anderenfalls zu elektrischen
Schlägen, Feuer, Beschädigung dieses Gerätes und/oder
zu persönlichen Verletzungen kommen kann.
5 Vermeiden Sie die Aufstellung dieses Gerätes an Orten,
an welchen Fremdkörper in das Gerät fallen können bzw.
an welchen Flüssigkeiten auf das Gerät verschüttet
werden können. Stellen Sie auf der Oberseite des Gerätes
niemals Folgendes auf:
– Andere Komponenten, da diese Beschädigung und/
oder Verfärbung der Oberfläche dieses Gerätes
verursachen können.
– Brennende Objekte (z.B. Kerzen), da diese Feuer,
Beschädigung des Gerätes und/oder persönliche
Verletzungen verursachen können.
– Mit Flüssigkeiten gefüllte Behälter, da diese umfallen
und die Flüssigkeit auf das Gerät verschütten können,
wodurch es zu elektrischen Schlägen für den
Anwender und/oder zu Beschädigung des Gerätes
kommen kann.
6 Decken Sie dieses Gerät niemals mit Zeitungen,
Tischdecken, Vorhängen usw. ab, damit die
Wärmeabfuhr nicht behindert wird. Falls die Temperatur
im Inneren des Gerätes ansteigt, kann es zu Feuer,
Beschädigung des Gerätes und/oder zu persönlichen
Verletzungen kommen.
7 Schließen Sie dieses Gerät erst an eine Wandsteckdose
an, nachdem alle anderen Anschlüsse ausgeführt wurden.
8 Stellen Sie dieses Gerät niemals mit der Unterseite nach
oben auf, da es sonst beim Betrieb zu Überhitzung mit
möglichen Beschädigungen kommen kann.
9 Wenden Sie niemals Gewalt bei der Bedienung der
Schalter, Knöpfe und/oder Kabel an.
10 Wenn Sie das Netzkabel von der Wandsteckdose
abtrennen, fassen Sie immer den Netzstecker an; ziehen
Sie niemals an dem Kabel.
11 Reinigen Sie dieses Gerät niemals mit chemisch
behandelten Tüchern; anderenfalls kann das Finish
beschädigt werden. Verwenden Sie ein reines, trockenes
Tuch.
12 Verwenden Sie nur die für dieses Gerät vorgeschriebene
Netzspannung. Falls Sie eine höhere als die
vorgeschriebene Netzspannung verwenden, kann es zu
Feuer, Beschädigung dieses Gerätes und/oder zu
persönlichen Verletzungen kommen. Yamaha kann nicht
verantwortlich gemacht werden für Schäden, die auf die
Verwendung dieses Gerätes mit einer anderen als der
vorgeschriebenen Spannung zurückzuführen sind.
13 Um Beschädigungen durch Blitzschlag zu vermeiden,
ziehen Sie den Netzstecker von der Netzdose ab, wenn es
ein Gewitter gibt.
14 Versuchen Sie niemals ein Modifizieren oder Ändern
dieses Gerätes. Falls eine Wartung erforderlich ist,
wenden Sie sich bitte an einen Yamaha-Kundendienst.
Das Gehäuse sollte niemals selbst geöffnet werden.
15 Falls Sie das Gerät für längere Zeit nicht verwenden (z.B.
während der Ferien), ziehen Sie den Netzstecker von der
Netzdose ab.
16 Lesen Sie unbedingt den Abschnitt „STÖRUNGSSUCHE“
durch, um übliche Bedienungsfehler zu berichtigen, bevor
Sie auf eine Störung des Gerätes schließen.
17 Bevor Sie dieses Gerät an einen anderen Ort
transportieren, drücken Sie die A-Taste, um das Gerät
auszuschalten, und ziehen Sie danach den Netzstecker
aus der Steckdose.
18 Es kommt zu Kondensatbildung, wenn die
Umgebungstemperatur plötzlich ändert. Ziehen Sie den
Netzstecker von der Netzdose ab, und lassen Sie das
Gerät ruhen.
19 Falls Sie das Gerät für längere Zeit in Betrieb halten,
kann sich das Gerät erwärmen. Schalten Sie die
Stromversorgung aus, und lassen Sie danach das Gerät
abkühlen.
20 Stellen Sie dieses Gerät in die Nähe der Steckdose und so
auf, dass der Netzstecker gut zugänglich ist.
21 Die Batterien dürfen nicht starker Hitze wie direktem
Sonnenschein, Feuer o.ä. ausgesetzt werden. Entsorgen
Sie Batterien gemäß den örtlichen Vorschriften.
22 Zu starker Schalldruck von Ohrhörern und Kopfhörern
kann zu Gehörschäden führen.
Solange dieses Gerät an eine Netzsteckdose angeschlossen ist, bleibt
es mit dem Stromnetz verbunden, auch wenn Sie es mit A
ausgeschaltet oder mit der Taste A auf der Fernbedienung in den
Bereitschaftsmodus geschaltet haben. Auch in diesem Status weist
das Gerät einen geringen Stromverbrauch auf.
WARNUNG
UM DIE GEFAHR EINES FEUERS ODER EINES
ELEKTROSCHOCKS ZU VERMEIDEN, DARF DAS GERÄT
WEDER REGEN NOCH FEUCHTIGKEIT AUSGESETZT
WERDEN.
Nur für A-S500
Dieses Etikett muss bei Produkten angebracht werden, deren
Oberseite während des Betriebs heiß werden kann.
i De
Page 39

INHALTSVERZEICHNIS
EINFÜHRUNG
NÜTZLICHE MERKMALE................................. 1
MITGELIEFERTES ZUBEHÖR ......................... 1
BEDIENELEMENTE UND FUNKTIONEN ...... 2
Frontblende und Fernbedienung................................ 2
Über die Fernbedienung ............................................3
Rückseite....................................................................4
BETRIEB
WIEDERGABE UND AUFNAHME.....................8
Wiedergeben einer Signalquelle................................8
Einstellen des Klangs.................................................8
Aufnehmen einer Signalquelle ..................................9
TITEL VON IHREM iPhone/iPod
WIEDERGEBEN ..............................................10
Verwenden eines Universal-Dock für iPod............. 11
Verwenden eines Wireless-System für iPod............ 12
VORBEREITUNG
ANSCHLÜSSE ....................................................... 5
Anschließen der Lautsprecher und Quellkomponenten..... 5
Anschließen des Netzkabels......................................7
ZUSÄTZLICHE INFORMATIONEN
STÖRUNGSSUCHE .............................................13
TECHNISCHE DATEN .......................................17
■ Über diese Anleitung
• y zeigt einen Tipp für Ihre Bedienung an.
• Einige Funktionen lassen sich mit den Tasten am Hauptgerät oder auf der Fernbedienung ausführen. In den Fällen, in
denen sich die Namen der Tasten am Hauptgerät von denen auf der Fernbedienung unterscheiden, werden die Namen
der Tasten auf der Fernbedienung in Klammern angegeben.
• Diese Anleitung wurde vor der Produktion gedruckt. Änderungen des Designs und der technischen Daten im Sinne
ständiger Verbesserungen usw. vorbehalten. Im Fall von Unterschieden zwischen Anleitung und Produkt hat das
Produkt Priorität.
EINFÜHRUNG
NÜTZLICHE MERKMALE
VORBEREITUNGEINFÜHRUNG
BETRIEB
INFORMATIONEN
ZUSÄTZLICHE
Mit diesem Gerät können Sie:
◆ Die Klangqualität verbessern mit der FunktionPure Direct
(S. 8)
◆ Musik von Ihrem iPhone/iPod wiedergeben (zusätzliches
Yamaha-Produkt erforderlich; S. 10)
◆ Die Aufnahmequelle unabhängig von der zu hörenden
Signalquelle wählen (nur A-S500; S. 9)
MITGELIEFERTES ZUBEHÖR
Bitte überprüfen Sie, ob Sie alle folgenden Teile erhalten haben:
Fernbedienung Batterien (× 2)
(AA, R6, UM-3)
◆ Andere Yamaha-Komponenten mit der Fernbedienung
dieses Geräts steuern (S. 3)
◆ Den Bass-Signalanteil durch Anschluss eines Subwoofers
verstärken (S. 5)
◆ Energie sparen mit Schalter POWER MANAGEMENT
(S. 7)
Deutsch
1 De
Page 40

BEDIENELEMENTE UND FUNKTIONEN
Frontblende und Fernbedienung
(A-S500)
1 A (NETZ)
Frontblende: A-Schalter
Schaltet dieses Gerät ein und aus.
Stellung Ein: Eingedrückt
Stellung Aus: Nicht gedrückt
Fernbedienung: A-Taste
Wenn dieses Gerät eingeschaltet ist: Schaltet dieses Gerät
ein oder in Bereitschaft.
Hinweis
Dieses Gerät verbraucht auch im ausgeschalteten Zustand oder in
der Bereitschaft eine geringe Menge Leistung.
2 Netzanzeige
Leuchtet folgendermaßen:
Leuchtet hell: Gerät ist eingeschaltet
Leuchtet schwach: Bereitschaftsmodus
Leuchtet nicht: Gerät ist ausgeschaltet
y
Die Netzanzeige leuchtet, während ein iPhone/iPod aufgeladen wird,
auch dann weiterhin hell, wenn dieses Gerät in Bereischaft ist.
3 Infrarotsender
Sendet Infrarotsignale an das Hauptgerät.
4 Fernbedienungssensor
Empfängt die Signale von der Fernbedienung.
5 Wahlschalter INPUT und Anzeigen
Zum Auswählen der Eingangsquelle, die zu hören sein
soll. Die Eingangsquellenanzeigen leuchten, wenn die
entsprechende Eingangsquelle ausgewählt wird.
y
Die Namen der Eingangsquellen entsprechen den Namen der
Anschlussbuchsen an der Rückseite.
2 De
Page 41

BEDIENELEMENTE UND FUNKTIONEN
6 Kopfhörerbuchse PHONES
Zum Anschließen von Kopfhörern für privates
Hörvergnügen. Wenn Sie das Tonsignal aus den
Lautsprechern nicht hören möchten, stellen Sie den
SPEAKERS-Wahlschalter auf OFF (Aus).
7 Wahlschalter SPEAKERS
Schalten die an den rückseitigen Anschlüssen SPEAKERS
A und/oder B angeschlossenen Lautsprecherpaare ein oder
aus, je nachdem, ob der Wahlschalter SPEAKERS auf A, B
oder A+B gestellt wird.
8 Wahlschalter REC OUT (nur A-S500)
Zum Auswählen einer Signalquelle für die von der
Stellung des Wahlschalters INPUT unabhängige
Aufnahme, d. h. Sie können die hier ausgewählte
Signalquelle aufnehmen, während Sie eine andere
Signalquelle wiedergeben (finden Sie auf Seite 9).
9 Regler BASS
Erhöht oder verringert den Pegel der niedrigen
Frequenzen (finden Sie auf Seite 9).
0 Regler TREBLE
Erhöht oder verringert den Pegel der hohen Frequenzen
(finden Sie auf Seite 9).
A Regler BALANCE
Stellt das Lautstärkeverhältnis zwischen linkem und
rechtem Lautsprecher ein (finden Sie auf Seite 9).
B Regler LOUDNESS
Bewirkt einen vollen Klang bei jeder Lautstärke (finden
Sie auf Seite 9).
C Schalter und Anzeige PURE DIRECT
Zur Wiedergabe des Signals einer beliebigen Eingangsquelle
mit reinstmöglichem Klang. Die Anzeige darüber leuchtet,
wenn diese Funktion aktiviert ist (finden Sie auf Seite 8).
D Regler VOLUME
VOLUME +/–
Steuert die Gesamtlautstärke.
Dadurch wird der REC-Pegel beim Aufnehmen nicht
beeinflusst.
MUTE-Taste (nur auf der Fernbedienung)
Verringert die eingestellte Lautstärke um etwa 20 dB.
y
• Die INPUT-Anzeige der gewählten Eingangsquelle blinkt,
während die Tonausgabe stummgeschaltet ist.
• Die Stummschaltung wird aufgehoben, wenn die MUTE-Taste
erneut gedrückt wird, oder wenn die Lautstärke durch Drehen
am VOLUME-Regler an der Frontblende oder mittels der
VOLUME-Tasten +/– auf der Fernbedienung verändert wird.
E Tasten zum Steuern eines iPhone/iPod
Steuern ein iPhone/iPod, das am optionalen UniversalDock für iPod (finden Sie auf Seite 11) oder WirelessSystem für iPod (finden Sie auf Seite 12) von Yamaha
angeschlossen ist.
F Tasten zum Steuern eines Tuners von Yamaha
Steuern verschiedene Funktionen eines Yamaha-Tuners.
Hinweis
Auch dann, wenn Sie einen Tuner von Yamaha verwenden, sind
bestimmte Komponenten und Merkmale evtl. nicht vorhanden.
Einzelheiten dazu finden Sie in der Bedienungsanleitung zum
Ihrer Komponente.
G Tasten zum Steuern eines CD-Players von
Yamaha
Steuern verschiedene Funktionen eines Yamaha-CD-Players.
Hinweis
Auch dann, wenn Sie einen CD-Player von Yamaha verwenden,
sind bestimmte Komponenten und Merkmale evtl. nicht
vorhanden. Einzelheiten dazu finden Sie in der
Bedienungsanleitung zum Ihrer Komponente.
EINFÜHRUNG
Über die Fernbedienung
■ Einlegen der Batterien in die
Fernbedienung
Batterien des Typs AA, R6, UM-3
Hinweis
Achten Sie auf korrekte Polarität. Beachten Sie dazu die
Abbildung im Inneren des Batteriefachs.
■ Verwenden der Fernbedienung
Die Fernbedienung gibt einen gerichteten Infrarotstrahl aus.
Achten Sie darauf, die Fernbedienung beim Bedienen des
Geräts direkt auf den Fernbedienungssensor an der
Vorderseite des Geräts zu richten.
Reichweite 6 m
Deutsch
Hinweis
Zwischen der Fernbedienung und diesem Gerät dürfen sich keine
großen Hindernisse befinden.
3 De
Page 42

BEDIENELEMENTE UND FUNKTIONEN
Rückseite
(Taiwanesisches und mittel-/südamerikanisches Modell)
1 CD-Eingangsbuchsen
Hier wird ein CD-Player angeschlossen (finden Sie auf Seite 5).
2 Buchsen PHONO und Anschluss GND
Hier wird ein Plattenspieler mit MM-Tonabnehmer
(Moving Magnet) angeschlossen, für das Tonsignal sowie
zur Erdung des Anschlusses (finden Sie auf Seite 5).
3 Audio-Ein-/-Ausgangsbuchsen
Hier werden externe Audiokomponenten angeschlossen
wie z. B. Tuner, usw. (finden Sie auf Seite 5).
4 Buchse DOCK
Hier wird ein optionales Universal-Dock für iPod oder
Wireless-System für iPod von Yamaha angeschlossen
(finden Sie auf Seite 10).
5 Buchse SUBWOOFER OUT
Hier wird ein Subwoofer mit eingebautem Verstärker
angeschlossen (finden Sie auf Seite 5).
y
Die Buchse SUBWOOFER OUT schwächt Signale über 90 Hz.
6 Schalter POWER MANAGEMENT
Hiermit wird die automatische Abschaltungsfunktion einoder ausgeschaltet (finden Sie auf Seite 7).
7 Anschlüsse SPEAKERS A/B
Schließen Sie hier ein oder zwei Lautsprecherpaare an
(finden Sie auf Seite 5).
8 VOLTAGE SELECTOR-Schalter
(nur Taiwanesisches und mittel-/
südamerikanisches Modell)
Der Schalter VOLTAGE SELECTOR muss auf die lokale
Netzspannung eingestellt werden, bevor Sie das
mitgelieferte Netzkabel an eine Netzsteckdose
anschließen (finden Sie auf Seite 7).
9 Schalter IMPEDANCE SELECTOR
Siehe Schalter IMPEDANCE SELECTOR auf dieser Seite.
0 Netzkabel
Schließen Sie das Netzkabel an einer Netzsteckdose an
(finden Sie auf Seite 7).
■ Schalter IMPEDANCE SELECTOR
VORSICHT
Stellen Sie den Schalter IMPEDANCE SELECTOR nicht
um, solange das Gerät eingeschaltet ist. Andernfalls kann
das Gerät beschädigt werden.
Wenn sich das Gerät nicht einschalten lässt, befindet sich
der Schalter IMPEDANCE SELECTOR möglicherweise
nicht richtig in einer der Positionen. Ziehen Sie in diesem
Fall das Netzkabel ab und schieben Sie den Schalter ganz
in die gewünschte Stellung.
Wählen Sie die Schalterstellung (LOW oder HIGH) je
nach der Impedanz der Lautsprecher Ihrer Anlage aus.
Schalterstellung Impedanzpegel
• Wenn Sie ein Lautsprecherpaar (A oder
B) verwenden, muss die Impedanz der
HIGH
LOW
einzelnen Lautsprecher mindestens 6
betragen.
• Wenn Sie zwei Lautsprecherpaare
(A und B) gleichzeitig verwenden, muss
die Impedanz der einzelnen Lautsprecher
mindestens 12
• Wenn Sie die Lautsprecher per BiWiring anschließen, muss die Impedanz
der einzelnen Lautsprecher mindestens
6
Ω betragen. Einzelheiten dazu finden
Sie auf Seite 6.
• Wenn Sie ein Lautsprecherpaar (A oder B)
verwenden, muss die Impedanz der einzelnen
Lautsprecher mindestens 4
• Wenn Sie zwei Lautsprecherpaare
(A und B) gleichzeitig verwenden, muss
die Impedanz der einzelnen Lautsprecher
mindestens 8
• Wenn Sie die Lautsprecher per BiWiring anschließen, muss die Impedanz
der einzelnen Lautsprecher mindestens
4
Ω betragen. Einzelheiten dazu finden
Sie auf Seite 6.
Ω betragen.
Ω betragen.
Ω betragen.
Ω
4 De
Page 43

VORBEREITUNG
ANSCHLÜSSE
Anschließen der Lautsprecher und Quellkomponenten
VORSICHT
• Schließen Sie dieses Gerät und die anderen Komponenten erst an das Stromnetz an, wenn alle Anschlüsse zwischen
den Komponenten vorgenommen wurden.
• Nehmen Sie alle Anschlüsse richtig vor: L (links) mit L, R (rechts) mit R, „+“ mit „+“ und „–“ mit „–“. Wenn die
Anschlüsse fehlerhaft sind, ist von den Lautsprechern kein Ton zu hören, und wenn die Polarität der
Lautsprecheranschlüsse nicht stimmt, klingt es unnatürlich und es fehlen Bässe. Schlagen Sie bitte in der
Bedienungsanleitung der einzelnen Komponenten nach.
• Verwenden Sie Cinch-Kabel für Audiokomponenten (mit Ausnahme der Lautsprecheranschlüsse und des DOCK-Anschlusses).
VORBEREITUNG
Plattenspieler
GND
AudioausgangAudioausgang
DVD-Player
usw.
Audioausgang
CD-Recorder
usw.
Verbindungen
zum DOCK-
Anschluss
(finden Sie auf
Seite 10)
Audioeingang
Lautsprecher A
Audioausgang Audioausgang Audioausgang
Tuner SubwooferCD-Player
Audioeingang
Kassettendeck
usw.
Lautsprecher B
y
• Die Buchsen PHONO dienen zum Anschließen eines Plattenspielers mit einem MM-Tonabnehmersystem.
• Schließen Sie den Plattenspieler an den Anschluss GND an, um die Rauschstörungen im Signal zu verringern. Bei manchen
Plattenspielern kann es jedoch sein, dass ohne GND-Verbindung das Rauschen geringer ist.
Deutsch
5 De
Page 44

ANSCHLÜSSE
VORSICHT
• Der Wahlschalter IMPEDANCE SELECTOR muss sich in der richtigen Stellung befinden, bevor Sie Lautsprecher
anschließen. Einzelheiten dazu finden Sie auf Seite 4.
• Achten Sie darauf, dass die abisolierten Lautsprecheradern sich nicht gegenseitig und auch keine anderen Metallteile
dieses Geräts berühren. Andernfalls könnten das Gerät und/oder die Lautsprecher beschädigt werden.
• Schließen Sie dieses Gerät und die anderen Komponenten erst an das Stromnetz an, wenn alle Anschlüsse zwischen
den Komponenten vorgenommen wurden.
■ Bi-Wiring-Anschluss
1 Entfernen Sie etwa 10 mm der Isolierung am
Ende der einzelnen Lautsprecherkabel und
verdrillen Sie die blanken Adern, um
Kurzschlüsse zu vermeiden.
10 mm
Beim doppelt verdrahteten Bi-Wiring-Anschluss wird der
Tieftöner von der kombinierten Mittel- und
Hochtönersektion getrennt. Ein mit Bi-Wiring
kompatibler Lautsprecher ist mit vier Anschlüssen
versehen. Diese zwei Anschlusspaare am Lautsprecher
ermöglichen die Aufteilung in zwei unabhängige
Bereiche. Mit diesen Verbindungen werden die Mittelund Hochtonfrequenztreiber mit einem Anschlusspaar und
der Bassfrequenztreiber mit dem anderen Anschlusspaar
verbunden.
Dieses Gerät
2 Schließen Sie das Lautsprecherkabel an.
1 Drehen Sie den Knopf auf.
2 Stecken Sie jeweils eine abisolierte Ader in
das seitliche Loch der einzelnen Anschlüsse.
3 Drehen Sie den Knopf fest, um die Litze zu
befestigen.
Lautsprecher
Rot: positiv (+)
Schwarz: negativ (–)
■ Anschluss per Bananenstecker
(außer Modelle für Asien,
Großbritannien und Europa)
Drehen Sie zuerst den Knopf fest und stecken Sie den
Bananenstecker dann vorne in den entsprechenden
Anschluss hinein.
Bananensteck
Schließen Sie den anderen Lautsprecher auf gleiche Weise
am anderen Anschlusssatz an.
VORSICHT
Beim Anschließen per Bi-Wiring stellen Sie den Schalter
IMPEDANCE SELECTOR je nach Impedanz Ihrer
Lautsprecher auf HIGH oder LOW ein:
6 Ω oder höher: HIGH
4 Ω oder höher: LOW
Informationen zum Schalter IMPEDANCE SELECTOR
finden Sie auf Seite 4.
Hinweis
Beim Anschließen über Bi-Wiring entfernen Sie
Kurzschlussbrücken oder -kabel am Lautsprecher.
y
Stellen Sie beim Anschließen über Doppelverdrahtung den
Wahlschalter SPEAKERS in die Position A+B.
6 De
Page 45

Anschließen des Netzkabels
ANSCHLÜSSE
POWER
MANAGEMENT
VOLTAGE
SELECTOR
■ Schalter POWER MANAGEMENT
Hiermit wird die automatische Abschaltungsfunktion einoder ausgeschaltet.
Wenn die automatische Abschaltungsfunktion
eingeschaltet ist, schaltet dieses Gerät automatisch in
Bereitschaft, wenn 8 Stunden lang keine Eingabe erfolgt.
Mit einem Netzkabel
zur Netzsteckdose
VORBEREITUNG
(Taiwanesisches und mittel-/südamerikanisches Modell)
■ Anschließen des Netzkabels
Stecken Sie den Stecker des Netzkabels in eine geeignete
Netzsteckdose, sobald alle anderen Anschlüsse
vorgenommen wurden.
■ VOLTAGE SELECTOR-Schalter
(nur Taiwanesisches und mittel-/
südamerikanisches Modell)
Der rückseitige Schalter VOLTAGE SELECTOR muss
auf die lokale Netzspannung eingestellt werden, BEVOR
Sie das Netzkabel an eine Netzsteckdose anschließen.
Wenn der Schalter VOLTAGE SELECTOR nicht richtig
eingestellt ist, kann dieses Gerät beschädigt werden und es
besteht Brandgefahr.
Wählen Sie die Schalterstellung (links oder rechts) je nach
der örtlichen Netzspannung mit einem
Schlitzschraubendreher. Die einstellbaren Spannungen
sind 110–120/220–240 V (U~), 50/60 Hz.
Deutsch
7 De
Page 46
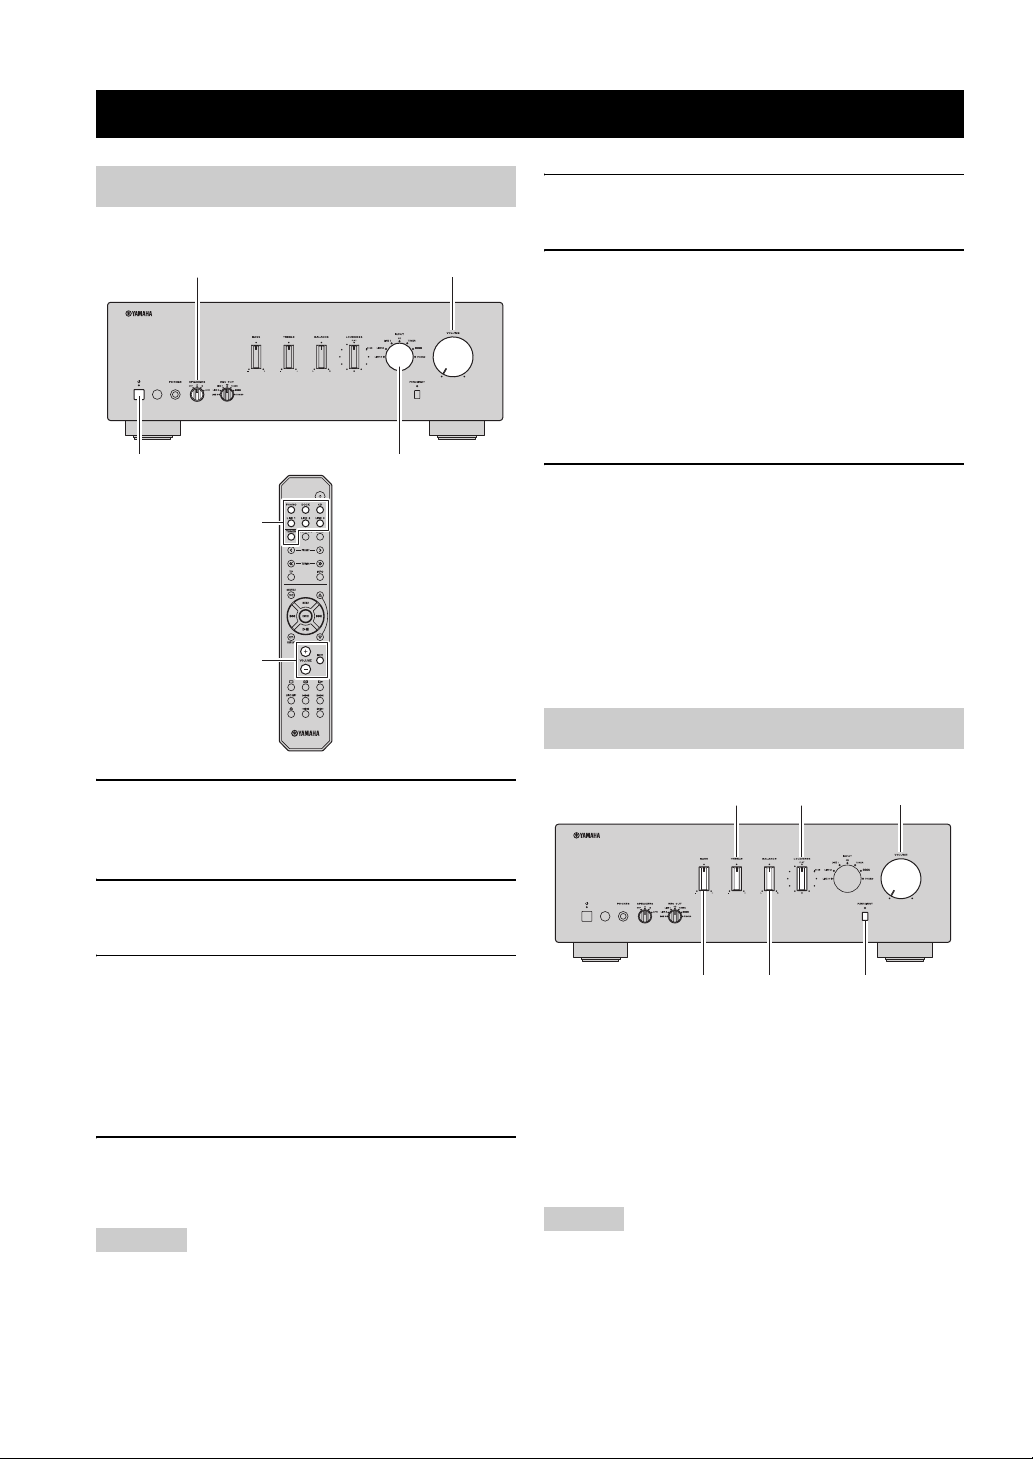
BETRIEB
WIEDERGABE UND AUFNAHME
Wiedergeben einer Signalquelle
SPEAKERS VOLUME
INPUTA
INPUT
VOLUME
5 Starten Sie die Wiedergabe an der
Eingangsquelle.
6 Drehen Sie den Regler VOLUME an der
Frontblende (oder drücken Sie VOLUME +/–
auf der Fernbedienung), um die
Ausgangslautstärke einzustellen.
y
Sie können den Klang mit den Reglern BASS, TREBLE,
BALANCE und LOUDNESS und dem Schalter PURE DIRECT
an der Frontblende einstellen.
7 Nach dem Hören drücken Sie den Schalter A
an der Frontblende, so dass er
herausspringt, um dieses Gerät wieder
auszuschalten.
y
Wenn Taste A auf der Fernbedienung gedrückt wird, während die
Schalter A an der Frontblende eingeschaltet ist, schaltet dieses
Gerät in Bereitschaft. Drücken Sie erneut A, um dieses Gerät
einzuschalten.
Einstellen des Klangs
1 Drehen Sie den Regler VOLUME an der
Frontblende gegen den Uhrzeigersinn ganz
nach links.
2 Drücken Sie den Schalter A an der Frontblende
hinein, um dieses Gerät einzuschalten.
3 Drehen Sie den Wahlschalter INPUT an der
Frontblende (oder drücken Sie eine der
Wahltasten INPUT auf der Fernbedienung)
und wählen Sie die gewünschte
Eingangsquelle aus.
Die Anzeige für die ausgewählte Eingangsquelle
leuchtet auf.
4 Drehen Sie den Wahlschalter SPEAKERS an
der Frontblende und wählen Sie SPEAKERS
A, B oder A+B.
Hinweise
• Stellen Sie den Wahlschalter SPEAKERS in die Position A+B,
wenn Sie Bi-Wiring verwenden, oder wenn Sie zwei
Lautsprecherpaare (A und B) gleichzeitig verwenden.
• Wenn Sie beim Hören über Kopfhörer das Tonsignal aus den
Lautsprechern nicht hören möchten, stellen Sie den
SPEAKERS-Wahlschalter auf OFF (Aus).
VOLUMELOUDNESSTREBLE
BASS BALANCE PURE
DIRECT
■ Verwenden des Schalters PURE DIRECT
Die Eingangssignale von den Signalquellen werden
durchgeschleift. Folglich umgehen die Eingangssignale
die Regler BASS, TREBLE, BALANCE und
LOUDNESS, so dass Änderungen an den Audiosignalen
ausgeschlossen werden und der Ton von allen
Eingangsquellen direkter und reiner ausgegeben wird.
Hinweis
Die Regler BASS, TREBLE, BALANCE und LOUDNESS
funktionieren nicht, solange der Schalter PURE DIRECT
aktiviert ist.
8 De
Page 47

■ Einstellen der Regler BASS und TREBLE
Die Regler BASS und TREBLE stellen den relativen
Pegel der hohen und der tiefen Frequenzen ein.
In der Mittelstellung wird ein linearer Frequenzgang erzeugt.
BASS
Wenn Sie das Gefühl haben, dass die Bässe (der Klang der
tiefen Frequenzen) zu schwach sind, drehen Sie den
Regler zum Anheben im Uhrzeigersinn. Wenn Sie das
Gefühl haben, dass die Bässe zu stark sind, drehen Sie den
Regler zum Absenken gegen den Uhrzeigersinn.
Regelbereich: –10 dB bis +10 dB (20 Hz)
TREBLE
Wenn Sie das Gefühl haben, dass die Höhen (der Klang
der hohen Frequenzen) zu schwach sind, drehen Sie den
Regler zum Anheben im Uhrzeigersinn. Wenn Sie das
Gefühl haben, dass die Höhen zu stark sind, drehen Sie
den Regler zum Absenken gegen den Uhrzeigersinn.
Regelbereich: –10 dB bis +10 dB (20 kHz)
■ Einstellen des Reglers BALANCE
Der BALANCE-Regler stellt das Lautstärkeverhältnis
zwischen linkem und rechtem Lautsprecher ein, um
Unterschiede durch die Anordnung der Lautsprecher oder
durch Raumgegebenheiten auszugleichen.
WIEDERGABE UND AUFNAHME
Aufnehmen einer Signalquelle
Hinweise
• Beim A-S500 werden keine Audiosignale an den
Ausgangsbuchsen LINE 2 REC oder LINE 3 REC ausgegeben,
wenn mit dem REC-OUT-Wahlschalter LINE 2 oder LINE 3
gewählt ist.
• Beim A-S300 werden keine Audiosignale an den
Ausgangsbuchsen LINE 2 REC oder LINE 3 REC ausgegeben,
wenn mit dem INPUT-Wahlschalter LINE 2 oder LINE 3
gewählt ist.
• Dieses Gerät muss für die Aufnahme eingeschaltet sein.
• Die Regler VOLUME, BASS, TREBLE, BALANCE und
LOUDNESS und der Schalter PURE DIRECT haben keine
Auswirkung auf die aufgenommene Signalquelle.
• Beachten Sie vor der Aufnahme von Schallplatten, CDs,
Radiosendungen usw. bitte die Bestimmungen des
Urheberrechts in Ihrem Land. Das Aufnehmen von
urheberrechtlich geschütztem Material verstößt unter
Umständen gegen diese Bestimmungen.
BETRIEB
■ Einstellen des Reglers LOUDNESS
Gewährleistet bei jeder Lautstärke einen vollen und klaren
Klang, indem die geringere Empfindlichkeit des
menschlichen Gehörs für tiefe und hohe Frequenzen bei
geringer Lautstärke durch Pegelanhebung ausgeglichen wird.
VORSICHT
Wenn der Regler LOUDNESS auf einen bestimmten
Pegel eingestellt ist und Sie den Schalter PURE DIRECT
aktivieren, kommt es zu einer plötzlichen Erhöhung der
Lautstärke, weil nun das Eingangssignal den
LOUDNESS-Regler umgeht. Um Gehörschäden oder
Schäden an den Lautsprechern zu vermeiden, sollten Sie
den Schalter PURE DIRECT erst dann drücken,
NACHDEM Sie die Lautstärke verringert bzw. überprüft
haben, ob der Regler LOUDNESS richtig eingestellt ist.
1 Stellen Sie den Regler LOUDNESS in die
Position FLAT.
2 Drehen Sie den Regler VOLUME an der
Frontblende (oder drücken Sie die VOLUME +/
–-Tasten auf der Fernbedienung) und stellen
Sie die Gesamtlautstärke auf den höchsten
für die Wiedergabe gewünschten Wert.
REC OUT
(nur A-S500)
1 Drehen Sie am REC OUT-Wahlschalter an der
Frontblende, um die aufzunehmende
Signalquelle auszuwählen (nur A-S500).
Hinweis
Beim A-S300 wird die ausgewählte Eingangsquelle
aufgenommen.
2 Starten Sie die Wiedergabe der Signalquelle
und starten Sie die Aufnahme am
Aufnahmegerät, das an den rückseitigen
REC-Ausgangsbuchsen (LINE 2 und/oder
LINE 3) angeschlossen ist. Siehe Seite 5.
y
Nur A-S500: Während der Aufnahme können Sie mit dem
Wahlschalter INPUT oder mittels Fernbedienung eine andere
Eingangsquelle auswählen und hören, ohne die Aufnahme zu
beeinträchtigen.
3 Drehen Sie den Regler LOUDNESS, bis die
gewünschte Lautstärke eingestellt ist.
y
Nach Einstellen des Reglers LOUDNESS hören Sie die Musik
nun mit der gewünschten Lautstärke. Wenn die Wirkung der
Einstellung des LOUDNESS-Reglers zu stark oder schwach ist,
stellen Sie den LOUDNESS-Regler etwas anders ein.
Deutsch
9 De
Page 48

TITEL VON IHREM iPhone/iPod WIEDERGEBEN
Sofern Sie ein optionales Universal-Dock für iPod oder Wireless-System für iPod von Yamaha an den rückseitigen
Buchsen DOCK dieses Geräts angeschlossen haben, können Sie die Wiedergabe Ihres iPhone/iPod mittels der
Fernbedienung dieses Geräts steuern und hören.
Positionieren Sie das angeschlossene Gerät so
weit wie möglich entfernt von diesem Gerät.
Universal-Dock für iPod Wireless-System für iPod
Universal-Dock für iPod Wireless-System für iPod
Modell
(Stand Juli 2010)
Bedient durch
Unterstützte iPhones/iPods
(Stand Juli 2010)
Bemerkungen
• YDS-12
• YDS-11
• YDS-10
• Fernbedienung
• iPhone/iPod angeschlossen am Dock
• iPod touch
• iPod (4. Generation/5. Generation/classic)
• iPod nano
•iPod mini
•iPhone
•iPhone 3G/3GS
• Das Laden des iPhone/iPod wird ebenfalls
unterstützt.
• YDS-10/YDS-11 unterstützen nicht den
iPhone-Anschluss.
YID-W10
• iPhone/iPod angeschlossen am YID-W10Transmitter
• Fernbedienung
• iPod touch
• iPod (5. Generation/classic)
• iPod nano
• iPhone
• iPhone 3G/3GS
Das Laden des iPhone/iPod wird ebenfalls
unterstützt.
VORSICHT
Um Unfälle zu vermeiden, ziehen Sie das Netzkabel dieses Geräts heraus, bevor Sie ein Universal-Dock für iPod oder
ein Wireless-System für iPod anschließen.
Hinweis
Wenn das am YID-W10 angeschlossene iPhone einen Anruf empfängt, während dieses Gerät in Bereitschaft ist, schaltet sich dieses
Gerät automatisch ein, und der Klingelton ertönt über dieses Gerät. Wenn Sie nicht möchten, dass sich dieses Gerät einschaltet, wenn
ein Anruf empfangen wird, versetzen Sie das iPhone in den Stummmodus.
10 De
Page 49

TITEL VON IHREM iPhone/iPod WIEDERGEBEN
Verwenden eines Universal-Dock für iPod
Nachdem Sie Ihr iPhone/iPod am Dock angeschlossen
haben, drehen Sie den Wahlschalter INPUT an der
Frontblende (oder drücken Sie die Taste DOCK auf der
Fernbedienung), um DOCK als Eingangsquelle zu
wählen, so dass Sie Ihr iPhone/iPod hören können.
oder
Vorderseite Fernbedienung
Während Sie die auf Ihrem iPhone/iPod angezeigten
Informationen betrachten, verwenden Sie die folgenden
Tasten der Fernbedienung, um Ihr iPhone/iPod zu steuern
(Wiedergabe, Pause, Titelsprung usw.).
Steuerung des
iPhone/iPod
Hinweis
Einige Shuffle- und Repeat-Modi sind je nach Modell oder
Software-Version Ihres iPhone/iPod eventuell nicht verfügbar.
y
Wenn dieses Gerät eingeschaltet oder in Bereitschaft ist, kann Ihr
iPhone/iPod automatisch aufgeladen werden, sobald es in einem
Universal-Dock für iPod steckt. Wenn ein iPhone/iPod geladen
wird, während dieses Gerät in Bereitschaft ist, leuchtet die
Netzanzeige hell.
BETRIEB
Fernbedienung Betrieb
MENU
ENTER
B
C
Ee
a
b
Zeigt das Menü an.
• Wenn ein Eintrag gewählt ist: Bestätigt den
Eintrag und zeigt den nächsten Bildschirm an.
• Wenn ein Titel ausgewählt ist: Spielt den
gewählten Titel ab.
Rollen nach oben.
Rollen nach unten.
• Wenn ein Titel läuft: Pausiert den Titel.
• Wenn ein Titel auf Pause steht: Setzt die
Titelwiedergabe fort.
• Wenn ein Titel läuft oder auf Pause steht:
Springt zum Anfang des nächsten Titels.
• Bei Gedrückthalten: Suchlauf vorwärts.
• Wenn ein Titel läuft oder auf Pause steht:
Springt zum Anfang des aktuellen Titels.
• Bei mehrfachem Drücken erfolgt bei jedem
Druck ein Sprung um jeweils einen Titel
rückwärts.
• Bei Gedrückthalten: Suchlauf rückwärts.
Schaltet um zwischen den Shuffle-Modi (Aus →
Title → Alben → Aus).
Schaltet um zwischen den Repeat-Modi (Aus →
Ein → Alle → Aus).
Deutsch
11 De
Page 50

TITEL VON IHREM iPhone/iPod WIEDERGEBEN
Verwenden eines Wireless-System für iPod
YID-W10-Receiver
YID-W10-Transmitter
■ Aufbau einer Wireless-Verbindung
Sobald das iPhone/iPod mit dem Transmitter verbunden
ist und die Wiedergabe beginnt, dauert es etwa 5
Sekunden, bis die Audiosignale zu hören sind. Während
dieser Zeit wird die kabellose Verbindung zwischen
Transmitter und Receiver aufgebaut.
Der Status der kabellosen Verbindung zwischen Transmitter
und Receiver wird durch die entsprechende Statusanzeige
dargestellt.
Verbindungsstatus
Keine Verbindung Aus Aus
Verbindung bestätigen Grün, blinkt Blau, blinkt
Verbunden Grün, leuchtet Blau, leuchtet
Transmitter-
Anzeige
Receiver-
Anzeige
– Der Akku des iPhone/iPod wird so schwach, dass er
nicht mehr genügend Leistung an den Transmitter
liefern kann.
– Der Transmitter wird außerhalb des
Empfangsbereichs des Receivers positioniert.
– Die Kommunikation zwischen Transmitter und
Receiver wird aufgrund von Störungen durch
andere Wireless-LAN-Geräte, Handys/Mobilteile,
Mikrowellengeräte usw. unterbrochen.
y
• Sie können die Fernbedienung dieses Geräts verwenden, um
das iPhone/iPod zu bedienen. Für weitere Informationen finden
Sie auf Seite 11.
• Wenn dieses Gerät eingeschaltet oder in Bereitschaft ist, kann
Ihr iPhone/iPod automatisch aufgeladen werden, sofern der an
Ihrem iPhone/iPod angeschlossene Transmitter im Receiver
stationiert ist. Wenn ein iPhone/iPod geladen wird, während
dieses Gerät in Bereitschaft ist, leuchtet die Netzanzeige hell.
• Lesen Sie die Bedienungsanleitung Ihres YID-W10 für weitere
Informationen.
■ Bedienen dieses Geräts mit dem iPhone/
iPod
• Wenn die Wiedergabe auf einem am Transmitter
angeschlossenen iPhone/iPod beginnt, und wenn sich
der Transmitter innerhalb des Empfangsbereichs des
Receivers befindet, verhält sich dieses Gerät wie folgt:
– Wenn dieses Gerät bei Beginn der Wiedergabe
bereits eingeschaltet war: Die EingangsSignalquelle schaltet um auf DOCK.
– Wenn dieses Gerät bei Beginn der Wiedergabe in
Bereitschaft war: Dieses Gerät schaltet sich ein und
die Eingangs-Signalquelle schaltet um auf DOCK.
• Einstellen der Lautstärke am iPhone/iPod stellt auch
die Lautstärke an diesem Gerät ein. Beachten Sie, dass
die Lautstärke dieses Geräts mit dem iPhone/iPod nur
auf einen bestimmten Pegel angehoben werden kann;
um sie weiter zu erhöhen, stellen Sie die Lautstärke am
Regler VOLUME oder auf der Fernbedienung ein.
• In den folgenden Situationen wird die kabellose
Verbindung zwischen Transmitter und Receiver
unterbrochen. 30 Sekunden danach schaltet dieses
Gerät automatisch in Bereitschaft.
– Das iPhone/iPod wird für 30–120 Sekunden nicht
mehr bedient, nachdem die Wiedergabe auf Pause
geschaltet wurde.
– Der Sleep-Timer des iPhone/iPod wird
eingeschaltet.
– Das iPhone/iPod wird vom Transmitter getrennt.
12 De
Page 51

ZUSÄTZLICHE INFORMATIONEN
STÖRUNGSSUCHE
Sehen Sie in der Tabelle unten nach, wenn das Gerät nicht einwandfrei funktioniert. Falls das aufgetretene Problem
unten nicht aufgeführt ist oder die dortigen Anweisungen nicht helfen, schalten Sie das Gerät aus, ziehen Sie den
Netzstecker heraus, und wenden Sie sich an den nächsten autorisierten Yamaha-Fachhändler oder -Kundendienst.
■ Allgemeines
Probleme Mögliche Ursachen Abhilfemaßnahmen
Dieses Gerät ist nicht
eingeschaltet. Die
Netzanzeige leuchtet
nicht auf.
Das Gerät schaltet
sich unvermittelt aus
und die Netzanzeige
blinkt.
Einige Sekunden
nach dem Einschalten
schaltet sich das
Gerät aus und die
Netzanzeige blinkt.
Das Netzkabel ist nicht angeschlossen. Schließen Sie das Netzkabel sicher an. 7
Die Taste A auf der Fernbedienung wird
gedrückt, während das Gerät
ausgeschaltet ist.
An den internen Schaltkreisen des Geräts
liegt ein Problem vor.
Die Adern von Lautsprecherkabeln
berühren einander oder die Rückwand und
erzeugen einen Kurzschluss.
Der Lautsprecher funktioniert nicht. Schließen Sie ein anderes Lautsprecherpaar an und
Die Schutzschaltung wurde aufgrund zu
starker Eingangssignale oder eines zu
hohen Lautstärkepegels aktiviert.
Die Schutzschaltung wurde aufgrund zu
hoher Temperaturen im Geräteinneren
aktiviert.
Der Schalter IMPEDANCE SELECTOR
ist nicht vollständig auf eine der
möglichen Positionen gestellt.
Der Schalter IMPEDANCE SELECTOR
steht nicht in der richtigen Position.
Dieses Gerät wurde einem starken
externen Stromschlag (wie Blitzschlag
oder starke statische Elektrizität)
ausgesetzt.
An den internen Schaltkreisen des Geräts
liegt ein Problem vor.
Drücken Sie den Schalter A an der Frontblende
hinein, so dass er eingeschaltet ist (ON). 2
Ziehen Sie den Stecker des Netzkabels heraus und
wenden Sie sich an den nächsten autorisierten YamahaFachhändler oder -Kundendienst. Wenn Sie vom Gerät
ungewöhnliche Gerüche oder Geräusche feststellen,
schalten Sie es nicht wieder ein, ziehen Sie den Stecker
des Netzkabels heraus und wenden Sie sich zu
Reparaturzwecken an einen Kundendienst.
Schließen Sie die Lautsprecherkabel richtig an und
drücken Sie nochmals die Taste A. Die INPUTAnzeigen blinken, und die Lautstärke wird automatisch
verringert. Nachdem die Lautstärke auf die niedrigste
Einstellung verringert wurde, hören die INPUTAnzeigen auf zu blinken, die INPUT-Anzeige der
zuletzt gewählten Eingangsquelle leuchtet, und das
Gerät lässt sich wieder normal verwenden. Prüfen Sie,
ob aus den Lautsprechern ein normales Tonsignal
erklingt, indem Sie die Lautstärke langsam erhöhen, und
bedienen Sie dann das Gerät wie gewohnt.
drücken Sie erneut den Schalter A. Die INPUT-
Anzeigen blinken, und die Lautstärke wird automatisch
verringert. Nachdem die Lautstärke auf die niedrigste
Einstellung verringert wurde, hören die INPUTAnzeigen auf zu blinken, die INPUT-Anzeige der
zuletzt gewählten Eingangsquelle leuchtet, und das
Gerät lässt sich wieder normal verwenden. Prüfen Sie,
ob aus den Lautsprechern ein normales Tonsignal
erklingt, indem Sie die Lautstärke langsam erhöhen, und
bedienen Sie dann das Gerät wie gewohnt.
Drehen Sie den Lautstärkepegel mit dem Regler
VOLUME an der Vorderseite herunter und schalten
Sie das Gerät wieder ein.
Warten Sie etwa 30 Minuten, bis sich die Temperatur
im Geräteinneren verringert hat, drehen Sie die
Lautstärke mit dem Regler VOLUME an der
Vorderseite herunter und schalten Sie das Gerät dann
wieder ein. Stellen Sie das Gerät an einen Ort, an dem
die Hitze gut abgeleitet wird.
Schalten Sie das Gerät aus und schieben Sie den
Schalter IMPEDANCE SELECTOR ganz in die
richtige Position.
Stellen Sie den Schalter IMPEDANCE SELECTOR
entsprechend der Impedanz der Lautsprecher auf die
richtige Position.
Schalten Sie das Gerät in den Bereitschaftsmodus,
ziehen Sie den Netzstecker heraus, schließen Sie
diesen nach 30 Sekunden wieder an und verwenden
Sie das Gerät dann wie üblich.
Ziehen Sie den Stecker des Netzkabels heraus und
wenden Sie sich an den nächsten autorisierten YamahaFachhändler oder -Kundendienst. Wenn Sie vom Gerät
ungewöhnliche Gerüche oder Geräusche feststellen,
schalten Sie es nicht wieder ein, ziehen Sie den Stecker
des Netzkabels heraus und wenden Sie sich zu
Reparaturzwecken an einen Kundendienst.
Siehe
Seite
—
6
—
—
—
4
4
—
—
INFORMATIONEN
Deutsch
ZUSÄTZLICHE
13 De
Page 52

STÖRUNGSSUCHE
Probleme Mögliche Ursachen Abhilfemaßnahmen
Es ist kein Ton zu
hören.
Das Tonsignal setzt
plötzlich aus.
Nur der Ton des
Lautsprechers einer
Seite ist zu hören.
Es fehlen die Bässe,
und das
Richtungshören ist
stark eingeschränkt.
Ein
„Brummgeräusch“ ist
zu hören.
Der Lautstärkepegel
ist beim Abspielen
einer Schallplatte
sehr niedrig.
Der Lautstärkepegel
lässt sich nicht
erhöhen oder der Ton
ist verzerrt.
Die Tonqualität ist
schlechter, wenn Sie
über Kopfhörer hören
und diese an einem
an dieses Gerät
angeschlossenen CDPlayer bzw. ein
Kassettendeck
angeschlossen sind.
Der Ton ist sehr leise. Der Ton ist stummgeschaltet. Drücken Sie die Taste MUTE auf der Fernbedienung,
Der Ton ist stummgeschaltet. Drücken Sie die Taste MUTE auf der Fernbedienung,
Fehlerhafte Kabelanschlüsse. Schließen Sie die Stereokabel für Audiogeräte und
Die Wiedergabe wurde an der
angeschlossenen Komponente gestoppt.
Es wurde keine geeignete Eingangsquelle
ausgewählt.
Der Wahlschalter SPEAKERS ist nicht
richtig eingestellt.
Die Schutzschaltung wurde aufgrund
eines Kurzschlusses usw. aktiviert.
Dieses Gerät wurde zu heiß. Überdenken Sie den Aufstellort des Gerätes. Stellen
Das Gerät wurde durch die automatische
Abschaltfunktion ausgeschaltet.
Fehlerhafte Kabelanschlüsse. Schließen Sie die Kabel richtig an. Falls das Problem
Der Regler BALANCE ist falsch
eingestellt.
Die Adern + und – wurden am Verstärker
oder an den Lautsprechern vertauscht.
Fehlerhafte Kabelanschlüsse. Achten Sie darauf, dass die Audiostecker fest sitzen.
Der Plattenspieler wurde nicht mit dem
Anschluss GND verbunden.
Der Plattenspieler ist an anderen Buchsen
als den Buchsen PHONO angeschlossen.
Die Schallplatte wird auf einem
Plattenspieler mit einem MCTonabnehmer abgespielt.
Die an den Anschlüssen LINE 2 REC
oder LINE 3 REC dieses Geräts
angeschlossene Komponente ist
ausgeschaltet.
Dieses Gerät ist ausgeschaltet oder in
Bereitschaft.
Die Loudness-Funktion ist aktiv. Regeln Sie die Lautstärke herunter, stellen Sie den
oder drehen Sie am Regler VOLUME.
die Lautsprecherkabel richtig an. Falls das Problem
weiterhin besteht, sind vielleicht die Kabel defekt.
Schalten Sie die Komponente ein und starten Sie die
Wiedergabe.
Wählen Sie mit dem Wahlschalter INPUT an der
Frontblende (oder mit einer der Wahltasten INPUT
auf der Fernbedienung) eine geeignete
Eingangsquelle aus.
Stellen Sie den Wahlschalter SPEAKERS in die
Position A, B oder A+B.
Überprüfen Sie, ob der Impedanzwahlschalter
IMPEDANCE SELECTOR richtig eingestellt ist.
Stellen Sie sicher, dass die Adern von
Lautsprecherkabeln nicht einander oder die
Rückwand berühren und einen Kurzschluss erzeugen.
Schalten Sie das Gerät dann wieder ein.
Sie sicher, dass die Öffnungen oben am Gerät nicht
blockiert sind.
Überprüfen Sie, ob keine anderen Gründe für dieses
Problem vorliegen, und schalten Sie dann dieses
Gerät wieder ein.
weiterhin besteht, sind vielleicht die Kabel defekt.
Stellen Sie den Regler BALANCE in eine geeignete
Stellung.
Schließen Sie die Lautsprecheradern richtig an die
Anschlüsse + und – an.
Falls das Problem weiterhin besteht, sind vielleicht
die Kabel defekt.
Stellen Sie die Masseverbindung zwischen
Plattenspieler und diesem Gerät am GND-Anschluss
her.
Schließen Sie den Plattenspieler an den PHONOBuchsen an.
Verwenden Sie eine Plattenspieler mit einem MMTonabnehmersystem. —
Schalten Sie die Komponente ein.
Schalten Sie dieses Gerät ein.
oder drehen Sie am Regler VOLUME.
LOUDNESS-Regler in die Stellung FLAT, und
stellen Sie dann die Lautstärke nach Wunsch ein.
Siehe
Seite
3
5
8
8
8
4
5
—
7
5
9
6
5
5
5
—
8
3
9
14 De
Page 53

STÖRUNGSSUCHE
Probleme Mögliche Ursachen Abhilfemaßnahmen
Die Regler BASS,
TREBLE, BALANCE
und LOUDNESS haben
keine Auswirkung auf
den Klang.
Der Schalter PURE DIRECT ist aktiviert. Der Schalter PURE DIRECT muss ausgeschaltet
sein, damit diese Regler eine Wirkung haben.
■ Universal-Dock für iPod und Wireless-System für iPod
Probleme Mögliche Ursachen Abhilfemaßnahmen
Es ist kein Ton zu
hören.
Sie können Ihr
iPhone/iPod nicht
bedienen.
Bei Verwendung
eines WirelessSystem für iPod:
Der Ton setzt häufig
aus.
Es sind Rauschen
oder Geräusche zu
hören.
Verwenden eines
Universal-Dock für
iPod:
Ihr iPhone/iPod wird
nicht geladen, obwohl
es am Universal-Dock
für iPod
angeschlossen ist.
Bei Verwendung
eines WirelessSystem für iPod:
Ihr iPhone/iPod wird
nicht geladen, obwohl
der am iPhone/iPod
angeschlossene YIDW10-Transmitter im
YID-W10-Receiver
stationiert ist.
Im Signalpfad von Ihrem iPhone/iPod
zum Gerät liegt ein Problem vor.
Das verwendete iPhone/iPod wird nicht
von diesem Gerät unterstützt.
Die kabellose Verbindung ist schlecht. Platzieren Sie den YID-W10-Receiver so weit von
Dieses Gerät ist nicht eingeschaltet. Schalten Sie dieses Gerät ein oder in Bereitschaft. 2
Das iPhone/iPod ist nicht richtig
angeschlossen.
Dieses Gerät ist nicht eingeschaltet. Schalten Sie dieses Gerät ein oder in Bereitschaft. 2
Der YID-W10-Transmitter ist nicht
richtig im YID-W10-Receiver stationiert.
Schalten Sie dieses Gerät aus und schließen Sie das
Universal-Dock für iPod oder das Wireless-System
für iPod an der DOCK-Buchse dieses Geräts an.
Nehmen Sie Ihr iPhone/iPod aus dem UniversalDock für iPod oder dem Wireless-System für iPod
heraus und platzieren Sie es erneut im Dock.
Schließen Sie ein iPhone/iPod an, welches von
diesem Gerät unterstützt wird.
diesem Gerät entfernt wie möglich.
Schließen Sie das iPhone/iPod richtig am UniversalDock für iPod an.
Stationieren Sie den an Ihrem iPhone/iPod
angeschlossenen YID-W10-Transmitter richtig im
YID-W10-Receiver.
Siehe
Seite
8
Siehe
Seite
10
10
10
10
10
10
INFORMATIONEN
ZUSÄTZLICHE
15 De
Deutsch
Page 54

STÖRUNGSSUCHE
■ Fernbedienung
Probleme Mögliche Ursachen Abhilfemaßnahmen
Die Fernbedienung
funktioniert nicht
oder nicht richtig.
■ Hinweise zu Batterien
• Tauschen Sie beide Batterien aus, wenn die Reichweite
der Fernbedienung abnimmt.
• Nehmen Sie die Batterien aus der Fernbedienung heraus,
wenn Sie sie längere Zeit nicht benutzen wollen.
• Verwenden Sie alte Batterien nicht zusammen mit neuen.
• Verwenden Sie keine unterschiedlichen Batterietypen
(wie z. B. Alkali- und Manganbatterien) zusammen.
Achten Sie sorgfältig auf die Aufschrift bzw.
Verpackung dieser verschiedenen Batterietypen, da sie
die gleiche Form und Farbe haben können.
• Wenn Batterien ausgelaufen sind, entsorgen Sie sie bitte
umgehend. Berühren Sie die ausgelaufene Flüssigkeit
nicht und lassen Sie sie nicht mit Kleidern usw. in
Kontakt kommen. Reinigen Sie das Batteriefach
gründlich, bevor Sie neue Batterien einlegen.
• Werfen Sie Batterien nicht in den Hausmüll. Batterien
müssen vorschriftsmäßig entsorgt werden.
Sie richten die Fernbedienung aus zu
großer Entfernung oder aus einem zu
schrägen Winkel auf das Gerät.
Der Fernbedienungssensor am Gerät ist
direktem Sonnenlicht oder starkem Licht
(z. B. einer Leuchtstoffröhre) ausgesetzt.
Die Batterien sind zu schwach. Tauschen Sie alle Batterien aus. 3
Die Fernbedienung funktioniert innerhalb einer
Reichweite von 6 m und innerhalb von 30 Grad
Abweichung von der Richtung direkt gegenüber der
Frontblende.
Ändern Sie die Positionen von Gerät bzw.
Lichtquelle. —
■ Umgang mit der Fernbedienung
• Verschütten Sie kein Wasser oder andere Flüssigkeiten
auf die Fernbedienung.
• Lassen Sie die Fernbedienung nicht fallen.
• Lassen Sie die Fernbedienung nicht an einem Ort, an
dem sie folgenden Bedingungen ausgesetzt ist:
– hoher Luftfeuchtigkeit, z. B. in einem Badezimmer
– hohen Temperaturen, z. B. in der Nähe eines
Heizgeräts oder eines Ofens
– extrem niedrigen Temperaturen
– an staubigen Orten
• Schützen Sie den Fernbedienungssensor vor allem vor
starken Lichtquellen, wie z. B. einer Leuchtstoffröhre.
Andernfalls funktioniert die Fernbedienung
möglicherweise nicht richtig. Stellen Sie das Gerät
gegebenenfalls weiter entfernt von der direkten
Lichtquelle auf.
Siehe
Seite
3
16 De
Page 55

TECHNISCHE DATEN
AUDIOSEKTION
• Minimale RMS-Ausgangsleistung
(8 Ω, 20 Hz bis 20 kHz, 0,019% THD)
[A-S500] .................................................................85 W + 85 W
[A-S300] .................................................................60 W + 60 W
(6 Ω, 20 Hz bis 20 kHz, 0,038% THD)
[ausgenommen asiatisches Modell]
[A-S500] .............................................................100 W + 100 W
[A-S300] .................................................................70 W + 70 W
• Impulsleistung pro Kanal (IHF) (8/6/4/2 Ω)
[A-S500] ..........................................................130/150/185/220 W
[A-S300] ..........................................................100/120/140/150 W
• Maximale Leistung pro Kanal [nur englisches und europäisches Modell]
(1 kHz, 0,7% THD, 4 Ω)
[A-S500] ............................................................................ 120 W
[A-S300] .............................................................................. 95 W
• Leistung nach IEC [nur englisches und europäisches Modell]
(1 kHz, 0,019% THD, 8 Ω)
[A-S500] ............................................................................ 100 W
[A-S300] .............................................................................. 75 W
• Leistungsbandbreite
[A-S500] (0,06% THD, 42,5 W, 8 Ω) .................10 Hz bis 50 kHz
[A-S300] (0,06% THD, 30 W, 8 Ω)....................10 Hz bis 50 kHz
• Dämpfungsfaktor (SPEAKERS A)
1 kHz, 8 Ω............................................................... 240 oder höher
• Maximale effektive Ausgangsleistung (JEITA)
(1kHz, 10% THD, 8 Ω) [nur Modelle für Asien, China, Taiwan
und Mittel-/Südamerika]
[A-S500] ............................................................................ 130 W
[A-S300] ............................................................................ 100 W
(1kHz, 10% THD, 6 Ω) [nur Modelle für China, Taiwan und
Mittel-/Südamerika]
[A-S500] ............................................................................ 150 W
[A-S300] ............................................................................ 110 W
• Eingangsempfindlichkeit/Eingangsimpedanz
PHONO (MM)......................................................... 3,0 mV/47 kΩ
CD usw. .................................................................. 200 mV/47 kΩ
• Maximales Eingangssignal
PHONO (MM) (1 kHz, 0,003% THD).............. 60 mV oder höher
CD usw. (1 kHz, 0,5% THD) ...............................2,2 V oder höher
• Ausgangspegel/Ausgangsimpedanz
REC.................................................. 200 mV/1,0 kΩ oder weniger
• Nominelle Ausgangsleistung/-impedanz der PHONES-Buchse
CD usw. (Eingang 1 kHz, 200 mV, 8 Ω)
[A-S500] .............................................................. 430 mV/470 Ω
[A-S300] .............................................................. 360 mV/470 Ω
• Frequenzgang
CD usw. (20 Hz bis 20 kHz)...........................................0 ± 0,5 dB
CD usw. PURE DIRECT Ein (10 Hz bis 100 kHz) .......0 ± 1,0 dB
• Abweichung von der RIAA-Entzerrkurve
PHONO (MM)................................................................... ± 0,5 dB
• Gesamte harmonische Verzerrungen (THD)
PHONO (MM) bis REC (20 Hz bis 20 kHz, 3 V)
................................................................... 0,025% oder weniger
CD usw. bis SPEAKERS
[A-S500] (20 Hz bis 20 kHz, 42,5 W, 8 Ω)
................................................................ 0,015% oder weniger
[A-S300] (20 Hz bis 20 kHz, 30 W, 8 Ω)
................................................................ 0,015% oder weniger
• Signal-Rauschabstand (IHF-A-Schaltkreis)
PHONO (MM) (5 mV, Eingang kurzgeschlossen)
.......................................................................... 85 dB oder höher
CD usw. PURE DIRECT Ein (200 mV, Eingang kurzgeschlossen)
........................................................................ 100 dB oder höher
• Eigenrauschen (IHF-A-Schaltkreis)......................................... 30 µV
• Kanaltrennung
CD usw. (5,1 kΩ, Eingang kurzgeschlossen, 1/10 kHz)
..................................................................... 65/50 dB oder höher
• Eigenschaften der Klangregelung
BASS
Anhebung/Absenkung (50 Hz) ........................................ ±10 dB
Übernahmefrequenz ..........................................................350 Hz
TREBLE
Anhebung/Absenkung (20 kHz) ...................................... ±10 dB
Übernahmefrequenz .........................................................3,5 kHz
• Kontinuierliche Loudness-Regelung
Abdämpfung (1 kHz) .......................................................... –30 dB
• Verstärkungsgleichlauffehler (0 bis –99 dB) ....0,5 dB oder weniger
ALLGEMEIN
• Stromversorgung
[Modelle für USA und Kanada]....................... 120 V (U~), 60 Hz
[Asiatisches Modell] ............................220–240 V (U~), 50/60 Hz
[Modelle für Taiwan und Mittel-/Südamerika]
........................................... 110–120/220–240 V (U~), 50/60 Hz
[Chinesisches Modell].......................................220 V (U~), 50 Hz
[Australisches Modell]..................................... 240 V (U~), 50 Hz
[Englisches, europäisches und russisches Modell]
....................................................................... 230 V (U~), 50 Hz
• Stromverbrauch
[A-S500]
[US-amerikanisches und kanadisches Modell]
.............................................................................240 W, 330 VA
[Asiatisches Modell] ......................................................... 220 W
[Andere Modelle].............................................................. 240 W
[A-S300]............................................................................... 190 W
• Stromverbrauch in Bereitschaft.......................... 0,5 W oder weniger
• Stromverbrauch des YID-W10 in Bereitschaft
(YID-W10 angeschlossen) ................................. 1,2 W oder weniger
• Stromverbrauch beim Laden des iPod
[A-S500]........................................................... 35 W oder weniger
[A-S300]........................................................... 25 W oder weniger
• Maximale Leistungsaufnahme [nur Modelle für Taiwan und Mittel-/
Südamerika]
(6 Ω, 1 kHz, 10% THD)
[A-S500]............................................................................ 510 W
[A-S300]............................................................................ 400 W
• Abmessungen (B × H × T) .............................. 435 × 151 × 387 mm
•Gewicht
[A-S500].............................................................................. 10,3 kg
[A-S300]................................................................................ 9,0 kg
Änderungen der technischen Daten jederzeit ohne
Vorankündigung vorbehalten.
iPhone, iPod
iPhone, iPod, iPod classic, iPod nano und iPod touch sind
Warenzeichen der Apple Inc., eingetragen in den USA und
anderen Ländern.
INFORMATIONEN
ZUSÄTZLICHE
Deutsch
17 De
Page 56

OBSERVERA: LÄS DETTA INNAN ENHETEN TAS I BRUK.
1 Läs noga denna bruksanvisning för att kunna ha största
möjliga nöje av enheten. Förvara bruksanvisningen nära
till hands för framtida referens.
2 Installera ljudanläggningen på en välventilerad plats där
det är svalt, torrt och rent – på avstånd från direkt solljus,
värmekällor, vibration, damm, fukt och/eller kyla. Lämna
följande mellanrum ovanför och bakom enheten för
ventilation:
Ovanför: 30 cm
Bakom: 20 cm
Sidor: 20 cm
3 Placera enheten på behörigt avstånd från andra
elapparater, motorer, transformatorer och annat som kan
orsaka störningar.
4 Utsätt inte enheten för hastiga temperaturväxlingar och
placera den inte på ett ställe där luftfuktigheten är hög
(t.ex. nära en luftfuktare) då fuktbildning i enheten skapar
risk för brand, elstötar, skador på enheten eller
personskador.
5 Placera inte enheten på ett ställe där främmande föremål
kan tränga in i den eller där den kan utsättas för droppar
eller vattenstänk. Placera aldrig det följande ovanpå
enheten:
– Övriga apparater då sådana kan orsaka skador och/eller
missfärgning av enhetens hölje.
– Brännbara föremål (t.ex. stearinljus) då sådana skapar
risk för brand, skador på enheten och/eller
personskador.
– Vätskebehållare som kan falla och spilla vätska över
enheten, vilket skapar risk för elstötar och/eller skador
på enheten.
6 Täck aldrig över enheten med en tidning, duk, gardin
el.dyl. då detta skapar risk för överhettning. En alltför hög
temperatur inuti enheten kan leda till brand, skador på
enheten och/eller personskador.
7 Anslut inte enheten till ett vägguttag förrän samtliga
övriga anslutningar slutförts.
8 Använd aldrig enheten vänd upp och ned. Detta kan leda
till överhettning som orsakar skador.
9 Hantera inte tangenter, reglage och kablar onödigt
hårdhänt.
10 Fatta tag i själva kontakten när nätkabeln kopplas bort från
vägguttaget; dra aldrig i kabeln.
11 Använd aldrig några kemiska lösningar för rengöring då
dessa kan skada ytbehandlingen. Använd en ren, torr trasa.
12 Använd endast den spänning som står angiven på enheten.
Anslutning till en strömkälla med högre spänning än den
angivna kan orsaka brand, skador på enheten och/eller
personskador. Yamaha åtar sig inget ansvar för skador
beroende på att enheten används med en spänning utöver
den angivna.
13 Koppla bort nätkabeln från vägguttaget för att undvika
skador p.g.a. blixtnedslag om ett åskväder uppstår.
14 Försöka aldrig att utföra egna reparationer. Kontakta en
kvalificerad tekniker från Yamaha om servicebehov
föreligger. Du får inte under några omständigheter ta av
höljet.
15 Koppla bort nätkabeln från vägguttaget om enheten inte
ska användas under en längre tid (t.ex. under semestern).
16 Läs avsnittet ”FELSÖKNING” om vanligt förekommande
driftsproblem innan du förutsätter att enheten är söndrig.
17 Innan enheten flyttas ska du trycka på A för att stänga av
den och sedan koppla bort nätkabeln från vägguttaget.
18 Kondensation (imma) uppstår, om den omgivande
temperaturen plötsligt ändras. Koppla i så fall loss
nätkabeln från nätuttaget och låt apparaten vila.
19 Vid långvarig användning kan det hända att apparaten blir
väldigt varm. Slå i så fall av strömmen och låt apparaten
vila tills den har svalnat.
20 Installera receivern nära ett nätuttag och där
stickkontakten lätt kan kommas åt.
21 Utsätt inte batterierna för kraftig värme från exempelvis
solljus, eld eller liknande. Följ regionala bestämmelser vid
kassering av förbrukade batterier
22 För högt ljudtryck från öronsnäckor eller hörlurar kan
orsaka hörselförlust.
Så länge den här enheten är ansluten till vägguttaget, är den inte
bortkopplad från nätströmmen, även om enheten stängs av med A
eller ställs i standbyläge med A-knappen på fjärrkontrollen. I detta
läge förbrukar enheten minimal ström.
VARNING
UTSÄTT INTE ENHETEN FÖR REGN ELLER FUKT DÅ
DETTA SKAPAR RISK FÖR BRAND ELLER ELSTÖTAR.
Endast A-S500
Denna etikett måste fästas på produkter som kan bli varma
utanpå medan de används.
OBSERVERA
Apparaten kopplas inte bort från växelströmskällan
(nätet) så länge som den är ansluten till vägguttaget,
även om själva apparaten har stängts av.
ADVARSEL
Netspæendingen til dette apparat er IKKE afbrudt,
sålæenge netledningen siddr i en stikkontakt, som er t
endt - også selvom der or slukket på apparatets
afbryder.
VAROITUS
Laitteen toisiopiiriin kytketty käyttökytkin ei irroita
koko laitetta verkosta.
i Sv
Page 57

INNEHÅLL
INTRODUKTION
PRAKTISKA FUNKTIONER .............................. 1
MEDFÖLJANDE TILLBEHÖR .......................... 1
REGLAGE OCH FUNKTIONER ........................ 2
Frontpanel och fjärrkontroll.......................................2
Om fjärrkontrollen..................................................... 3
Bakpanel ....................................................................4
FÖRBEREDELSE
ANSLUTNINGAR.................................................. 5
Ansluta högtalare och källkomponenter....................5
Ansluta nätkabeln ...................................................... 7
■ Om denna bruksanvisning
• y anger tips om användningen.
• En del funktioner kan utföras antingen med knapparna på huvudenheten eller på fjärrkontrollen. I de fall där
knapparnas beteckningar inte stämmer överens mellan huvudenheten och fjärrkontrollen så visas fjärrkontrollens
knappar inom parentes.
• Denna bruksanvisning är tryckt före tillverkningen av produkten. Utförande och tekniska data kan delvis ändras på
grund av förbättringar etc. Om någon skillnad mellan bruksanvisningen och produkten skulle förekomma, så har
produkten företräde.
INTRODUKTION
ANVÄNDNING
SPELA UPP OCH SPELA IN................................8
Spela en källa............................................................. 8
Justera ljudets kvalitet ...............................................8
Spela in en källa.........................................................9
SPELA UPP MUSIK FRÅN EN iPhone/iPod ....10
Använda Universell Dockningsstation för iPod ...... 11
Använda trådlöst system för iPod............................ 12
YTTERLIGARE INFORMATION
FELSÖKNING ......................................................13
SPECIFIKATIONER ...........................................17
PRAKTISKA FUNKTIONER
INTRODUKTION
FÖRBEREDELSE
ANVÄNDNING
YTTERLIGARE
INFORMATION
Med den här apparaten kan du:
◆ Förbättra ljudkvaliteten med hjälp av funktionen Pure
Direct (sid. 8)
◆ Spela upp musik från din iPhone/iPod (extra Yamahaprodukt krävs; sid. 10)
◆ Välja inspelningskälla oberoende av lyssningskällan
(endast A-S500; sid. 9)
MEDFÖLJANDE TILLBEHÖR
Kontrollera att följande delar finns med i förpackningen:
Fjärrkontroll Batterier (× 2)
(AA, R6, UM-3)
◆ Styra andra Yamaha-komponenter med den här apparatens
fjärrkontroll (sid. 3)
◆ Förbättra basåtergivningen genom att ansluta en
bashögtalare (sid. 5)
◆ Spara ström genom att använda POWER
MANAGEMENT-omkopplare (sid. 7)
Svenska
1 Sv
Page 58

REGLAGE OCH FUNKTIONER
Frontpanel och fjärrkontroll
(A-S500)
1 A (STRÖM)
Frontpanel: omkopplaren A
Slår på och stänger av strömmen till den här apparaten.
På: Intryckt
Av: Ute
Fjärrkontroll: knappen A
När apparaten är påslagen: slår på apparaten eller ställer
den i standbyläge.
Anmärkning
Apparaten förbrukar en liten mängd ström även när den är
avstängd eller i standbyläge.
2 Strömindikator
Lyser enligt följande:
Lyser starkt: Strömmen är på
Lyser svagt: Standbyläge
Släckt: Strömmen är av
y
Strömindikatorn lyser starkt medan en iPhone/iPod laddas, även
om apparaten är i standbyläge.
3 Sändare för infraröda signaler
Sänder signaler till huvudenheten.
4 Fjärrkontrollsensor
Tar emot signaler från fjärrkontrollen.
5 INPUT-väljare och indikatorer
Välj den ingångskälla du vill lyssna på. Ingångskällans
indikatorer lyser när du väljer motsvarande ingångskällor.
y
Ingångskällornas namn motsvarar anslutningarnas namn på
bakpanelen.
2 Sv
Page 59

REGLAGE OCH FUNKTIONER
6 PHONES-uttag
Denna utgång matar ut ljud för lyssning via hörlurar. Om
du inte vill att ljudet ska höras i högtalarna ställer du
SPEAKERS-väljaren på OFF.
7 SPEAKERS-väljare
Kopplar in eller ur det högtalarpar som är anslutet till
anslutningarna SPEAKERS A och/eller B på bakpanelen när
motsvarande SPEAKERS-väljare ställs på A, B eller A+B.
8 REC OUT-väljare (endast A-S500)
Väljer en källa för inspelning oberoende av INPUTväljarens inställning, vilket gör att du kan spela in den
valda källan samtidigt som du lyssnar på en annan källa
(se sidan 9).
9 BASS-reglage
Ökar eller minskar den låga frekvensåtergivningen (se sidan 9).
0 TREBLE-reglage
Ökar eller minskar den höga frekvensåtergivningen (se sidan 9).
A BALANCE-reglage
Ställer in balansen mellan vänster och höger högtalare
(se sidan 9).
B LOUDNESS-reglage
Bevarar hela tonområdet oberoende av volymnivå (se sidan 9).
C PURE DIRECT-omkopplare och indikator
Återger alla ingångskällor med renast möjliga ljud. Indikatorn
ovanför tänds när funktionen är påslagen (se sidan 8).
D VOLUME-reglage
VOLUME +/–
Reglerar volymnivån.
Det påverkar inte REC-nivån för inspelning.
MUTE-knapp (endast fjärrkontroll)
Minskar den aktuella volymen med ungefär 20 dB.
y
• INPUT-indikatorn för den aktuella ljudkällan blinkar när
MUTE har tryckts in.
• Du stänger av funktionen genom att trycka på MUTE igen, eller
genom att ändra volymen med VOLUME-reglaget på
frontpanelen eller knapparna VOLUME +/– på fjärrkontrollen.
E iPhone/iPod-kontrollknappar
Styr en iPhone/iPod som är ansluten med
extrautrustningen Yamaha Universell Dockningsstation
för iPod (se sidan 11) eller trådlöst system för iPod
(se sidan 12).
F Yamaha-tunerknappar
Styr olika funktioner hos en Yamaha-tuner.
Anmärkning
Även om du använder en Yamaha-tuner kanske vissa
komponenter och funktioner inte är tillgängliga. Se
komponentens bruksanvisning för mer information.
G Yamaha CD-spelarknappar
Styr olika funktioner på en Yamaha CD-spelare.
Anmärkning
Även om du använder en Yamaha CD-spelare kanske vissa
komponenter och funktioner inte är tillgängliga. Se
komponentens bruksanvisning för mer information.
INTRODUKTION
Om fjärrkontrollen
■ Sätta i batterier i fjärrkontrollen
AA, R6, UM-3 batterier
Anmärkning
Kontrollera att batteripolerna är vända åt rätt håll. Se
illustrationen inuti batterifacket.
■ Använda fjärrkontrollen
Fjärrkontrollen sänder en riktad infraröd stråle.
Se till att rikta fjärrkontrollen direkt mot
fjärrkontrollsensorn på den här apparatens frontpanel vid
användning.
Inom 6 m
Svenska
Anmärkning
Inga stora hinder får förekomma mellan fjärrkontrollen och den
här apparaten.
3 Sv
Page 60

REGLAGE OCH FUNKTIONER
Bakpanel
(Modeller till Taiwan och Central-/Sydamerika)
1 CD-ingångar
Används för att ansluta en CD-spelare (se sidan 5).
2 PHONO-uttag och GND-anslutning
Används för att ansluta en skivspelare som har MMkassett och för att jorda anslutningen (se sidan 5).
3 Ljudingångar/-utgångar
Används för att ansluta externa komponenter, till exempel
en tuner etc. (se sidan 5).
4 DOCK-uttag
Används för att ansluta extrautrustningen Yamaha
Universell Dockningsstation för iPod eller trådlöst system
för iPod (se sidan 10).
5 SUBWOOFER OUT-uttag
Används för att ansluta en bashögtalare med inbyggd
förstärkare (se sidan 5).
y
SUBWOOFER OUT-uttaget dämpar signaler över 90 Hz.
6 POWER MANAGEMENT-omkopplare
Aktiverar eller inaktiverar den automatiska
avstängningsfunktionen (se sidan 7).
7 SPEAKERS-anslutningar A/B
Används för att ansluta ett eller två högtalarpar
(se sidan 5).
8 VOLTAGE SELECTOR-omkopplare
(endast Modeller till Taiwan och Central-/
Sydamerika)
VOLTAGE SELECTOR måste ställas in på den lokala
nätspänningen innan nätkabeln ansluts till ett vägguttag
(se sidan 7).
9 IMPEDANCE SELECTOR-omkopplare
Se IMPEDANCE SELECTOR-omkopplare på denna sida.
0 Nätkabel
Anslut nätkabeln till vägguttaget (se sidan 7).
■ IMPEDANCE SELECTOR-omkopplare
FÖRSIKTIGT
Ändra inte IMPEDANCE SELECTOR-omkopplaren när
spänningen är påslagen eftersom apparaten kan skadas.
Om apparaten inte startar kan det hända att IMPEDANCE
SELECTOR-omkopplaren inte är fullständigt förd åt ena
eller andra hållet. Ta i så fall bort nätkabeln och skjut
omkopplaren helt åt endera hållet.
Välj omkopplarläget (LOW eller HIGH) beroende på
impedansen hos systemets högtalare.
Omkopplarläge Impedansnivå
• Om du använder ett högtalarpar (A eller
B) måste impedansen för varje högtalare
Ω eller högre.
vara 6
• Om du använder två högtalarpar (A och
HIGH
LOW
B) samtidigt måste impedansen för varje
högtalare vara 12
• Om du ansluter med dubbla kablar (biwire) måste impedansen för varje
högtalare vara 6
för detaljinformation.
• Om du använder ett högtalarpar (A eller
B) måste impedansen för varje högtalare
Ω eller högre.
vara 4
• Om du använder två högtalarpar (A och
B) samtidigt måste impedansen för varje
högtalare vara 8
• Om du ansluter med dubbla kablar (biwire) måste impedansen för varje
högtalare vara 4
för detaljinformation.
Ω eller högre.
Ω eller högre. Se sidan 6
Ω eller högre.
Ω eller högre. Se sidan 6
4 Sv
Page 61

FÖRBEREDELSE
ANSLUTNINGAR
Ansluta högtalare och källkomponenter
FÖRSIKTIGT
• Anslut inte den här apparaten eller andra komponenter till nätspänning förrän samtliga anslutningar mellan
komponenterna är gjorda.
• Alla anslutningar måste vara korrekta: L (vänster) till L, R (höger) till R, ”+” till ”+” och ”–” till ”–”. Om
anslutningarna är felaktiga hörs inget ljud från högtalarna, och om högtalarnas polaritet är felaktig kommer ljudet att
låta onaturligt och sakna bas. Läs även bruksanvisningen för respektive komponent.
• Använd RCA-kablar för ljudkomponenter (utom för högtalaranslutningar och DOCK-kontaktanslutningar).
FÖRBEREDELSE
Ljud
ut
Skivspelare
GND
DVD-spelare
etc.
Ljud
ut
CD-brännare
Ljud
ut
etc.
DOCK-
kontaktanslu
tningar (se
sidan 10)
Ljud
in
Högtalare A
Ljud
ut
Ljud
ut
Ljud
in
Tuner BashögtalareCD-spelare
Kassettdäck
Ljud
ut
Högtalare B
etc.
y
• Kontakterna PHONO är avsedda för anslutning av en skivspelare med MM-kassett.
• Anslut skivspelaren till jordanslutningen GND för att minska brus i signalen. Med vissa skivspelare kan det emellertid hända att
mindre brus uppstår om de inte är anslutna till jordintaget GND.
Svenska
5 Sv
Page 62

ANSLUTNINGAR
FÖRSIKTIGT
• Omkopplaren IMPEDANCE SELECTOR måste stå i rätt läge innan du ansluter något högtalarpar. Se sidan 4 för
detaljinformation.
• Låt inga blottade trådar i högtalarkablarna komma i kontakt med varandra eller med någon metalldel på den här
apparaten. Det kan skada apparaten och/eller högtalarna.
• Anslut inte den här apparaten eller andra komponenter till nätspänning förrän samtliga anslutningar mellan
komponenterna är gjorda.
■ Anslutning med dubbla kablar
1 Skala bort cirka 10 mm av isoleringen i
änden på varje högtalarkabel och tvinna ihop
de blottade trådarna på kabeln för att
förhindra kortslutning.
10 mm
(bi-wiring)
En bi-wire-anslutning separerar bashögtalarsektionen från
den kombinerade mellanregister- och
diskanthögtalarsektionen. En bi-wire-kompatibel
högtalare har fyra kontakter med polskruvar. Dess
kontaktpar gör det möjligt att dela upp högtalaren i två
oberoende sektioner. Med dessa anslutningar är
mellanregister- och diskantelementen kopplade till det ena
kontaktparet och baselementet till det andra kontaktparet.
Den här apparaten
2 Anslut högtalarkabeln.
1 Skruva loss knoppen.
2 Stick in en avskalad tråd i hålet på sidan av
varje anslutningskontakt.
3 Spänn fast tråden genom att dra åt knoppen.
Röd: positiv (+)
Svart: negativ (–)
■ Anslutning med banankontakt
(Gäller ej modeller till Asien,
Storbritannien och Europa)
Dra först åt knoppen och skjut därefter in banankontakten
i änden på respektive högtalarutgång.
Banankontakt
Högtalare
Anslut den andra högtalaren till den andra
kontaktuppsättningen på samma sätt.
FÖRSIKTIGT
Vid bi-wire-anslutningar, ställ IMPEDANCE
SELECTOR-omkopplaren på HIGH eller LOW beroende
på högtalarnas impedans:
6 Ω eller högre: HIGH
4 Ω eller högre: LOW
Se sidan 4 för mer information om IMPEDANCE
SELECTOR-omkopplaren.
Anmärkning
När anslutning med dubbla kablar ska göras, ta bort
kortslutningsbryggorna eller -kablarna på högtalarna.
y
För att anslutningar med dubbla kablar ska kunna användas måste
omkopplaren SPEAKERS ställas i läget A+B.
6 Sv
Page 63

Ansluta nätkabeln
ANSLUTNINGAR
POWER
MANAGEMENT
VOLTAGE
SELECTOR
■ POWER MANAGEMENT-omkopplare
Aktiverar eller inaktiverar den automatiska
avstängningsfunktionen.
Om den automatiska avstängningsfunktionen är aktiverad
växlar apparaten automatiskt till standbyläge om inga
åtgärder utförs på 8 timmar.
Till vägguttag med
nätkabeln
FÖRBEREDELSE
(Modeller till Taiwan och Central-/Sydamerika)
■ Ansluta nätkabeln
Sätt in nätkabeln i ett vägguttag när alla andra
anslutningar är klara.
■ VOLTAGE SELECTOR-omkopplare
(endast Modeller till Taiwan och
Central-/Sydamerika)
Spänningsomkopplaren på apparatens bakpanel måste
ställas in på den lokala nätspänningen INNAN nätkabeln
ansluts till ett vägguttag.
Felaktig inställning av nätspänningsomkopplaren kan
medföra skada på apparaten och orsaka brandfara.
Använd en spårskruvmejsel och ställ omkopplaren i rätt
läge (vänster eller höger) beroende på den lokala
nätspänningen. Spänningarna är växelspänning 110-120/
220-240 V, 50/60 Hz.
Svenska
7 Sv
Page 64

ANVÄNDNING
SPELA UPP OCH SPELA IN
Spela en källa
SPEAKERS VOLUME
INPUT
VOLUME
5 Spela upp den valda ingångskällan.
6 Vrid på VOLUME-ratten på frontpanelen (eller
tryck på VOLUME +/– på fjärrkontrollen) för
att ställa in ljudnivån.
y
Du kan justera ljudets egenskaper med kontrollerna BASS,
TREBLE, BALANCE och LOUDNESS eller PURE DIRECTomkopplaren på frontpanelen.
7 När du har lyssnat klart trycker du ut
INPUTA
omkopplaren A på frontpanelen för att
stänga av apparaten.
y
Om du trycker på knappen A på fjärrkontrollen medan
omkopplaren A på frontpanelen är i läget PÅ, övergår apparaten i
standbyläge. Tryck på knappen A igen för att slå på apparaten.
Justera ljudets kvalitet
VOLUMELOUDNESSTREBLE
1 Vrid VOLUME-ratten på frontpanelen så långt
det går moturs.
2 Tryck in strömbrytaren A på frontpanelen för
att slå på apparaten.
3 Välj den ingångskälla du vill lyssna på
genom att vrida INPUT-omkopplaren på
frontpanelen (eller trycka på en av INPUTväljarknapparna på fjärrkontrollen).
Indikatorn för den valda ingångskällan tänds.
4 Vrid SPEAKERS-väljaren på frontpanelen för
att välja SPEAKERS A, B eller A+B.
Anmärkningar
• Ställ SPEAKERS-omkopplaren i läget A+B om två högtalarpar
är anslutna med dubbla kablar, eller om du använder två
högtalarpar samtidigt (A och B).
• Om du inte vill att ljudet ska höras i högtalarna när du lyssnar
med hörlurar ställer du SPEAKERS-väljaren på OFF.
BASS BALANCE PURE
DIRECT
■ Använda PURE DIRECT-omkopplaren
Kopplar insignaler från ljudkällor. Insignalerna kopplas då
förbi kontrollerna BASS, TREBLE, BALANCE och
LOUDNESS och eliminerar på så sätt alla förändringar i
ljudsignalerna för att skapa ett mer direkt och högklassigt
ljud från alla ingångskällor.
Anmärkning
Reglagen BASS, TREBLE, BALANCE och LOUDNESS
fungerar inte när PURE DIRECT-omkopplaren är på.
8 Sv
Page 65

■ Justera BASS och TREBLE
Reglagen BASS och TREBLE reglerar bas- och
diskantåtergivningen.
Mittläget ger en rak frekvensåtergivning.
BASS
Om du tycker att det inte är tillräckligt mycket bas
(lågfrekvent ljud) ökar du basen genom att vrida medurs.
Om du tycker att det är för mycket bas sänker du basen
genom att vrida moturs.
Inställningsintervall: –10 dB till +10 dB (20 Hz)
TREBLE
Om du tycker att det inte är tillräckligt mycket diskant
(högfrekvent ljud) ökar du diskanten genom att vrida
medurs. Om du tycker att det är för mycket diskant sänker
du diskanten genom att vrida moturs.
Inställningsintervall: –10 dB till +10 dB (20 kHz)
■ Justera BALANCE
Reglaget BALANCE korrigerar ljudbalansen mellan
vänster och höger högtalare med hänsyn till högtalarnas
placering eller förhållandena i lyssningsrummet.
■ Justera LOUDNESS
Bevarar hela tonområdet oberoende av volymnivå och
kompenserar på så sätt för det mänskliga örats nedsatta
känslighet för höga och låga frekvenser vid låg volym.
FÖRSIKTIGT
SPELA UPP OCH SPELA IN
Spela in en källa
Anmärkningar
• På A-S500 matas inte ljudsignalerna ut via uttagen LINE 2
REC eller LINE 3 REC när LINE 2 eller LINE 3 har valts med
REC OUT-väljaren.
• På A-S300 matas inte ljudsignalerna ut via uttagen LINE 2
REC eller LINE 3 REC när LINE 2 eller LINE 3 har valts med
INPUT-väljaren.
• Den här apparaten måste vara påslagen för att du ska kunna
spela in.
• Kontrollerna VOLUME, BASS, TREBLE, BALANCE och
LOUDNESS och knappen PURE DIRECT har ingen effekt på
den källa som spelas in.
• Kontrollera de copyright-bestämmelser som gäller för det land
där du spelar in grammofonskivor, CD-skivor, radio etc. Att
spela in copyright-skyddat material kan bryta mot lagen om
upphovsrätt.
REC OUT
(endast A-S500)
ANVÄNDNING
Om du trycker in PURE DIRECT-knappen när
LOUDNESS-reglaget står vid en viss nivå går
insignalerna förbi LOUDNESS-reglaget, vilket kan
resultera i en plötslig ökning av ljudnivån. För att skydda
dina öron och högtalarna mot skada ska du se till att trycka
på knappen PURE DIRECT EFTER det att du sänkt
volymen eller EFTER det att du kontrollerat att
LOUDNESS-reglaget är rätt inställt.
1 Ställ in LOUDNESS i läge FLAT.
2 Vrid på VOLUME på frontpanelen (eller tryck
på VOLUME +/– på fjärrkontrollen) för att
justera ljudnivån till den högsta nivå du vill
lyssna till.
3 Vrid på LOUDNESS tills du erhåller önskad
ljudnivå.
y
När du ställt in LOUDNESS kan du lyssna på musik med önskad
ljudnivå. Justera LOUDNESS igen om LOUDNESS-effekten är
för stark eller svag.
1 Välj den källa du vill spela in genom att vrida
på REC OUT-väljaren på frontpanelen
(endast A-S500).
Anmärkning
På A-S300 spelas den aktuella ingångskällan in.
2 Spela upp källan och starta inspelning på
den inspelningsenhet som är ansluten till
uttagen REC (LINE 2 och/eller LINE 3) på
bakpanelen. Se sidan 5.
y
Endast A-S500: Under inspelning kan du välja en annan
ingångskälla med INPUT-väljaren eller fjärrkontrollen och lyssna
på denna ingångskälla utan att inspelningen påverkas.
Svenska
9 Sv
Page 66

SPELA UPP MUSIK FRÅN EN iPhone/iPod
Om du har anslutit extrautrustningen Yamaha Universell Dockningsstation för iPod eller trådlöst system för iPod till
DOCK-kontakten på apparatens bakpanel kan du lyssna på musik från din iPhone/iPod med hjälp av den här apparatens
fjärrkontroll.
Placera den anslutna enheten så långt
från den här apparaten som möjligt.
Universell Dockningsstation för iPod Trådlöst system för iPod
Universell Dockningsstation för iPod Trådlöst system för iPod
Modell
(Gäller juli 2010)
Styrs av
iPhone/iPod som stöds
(Gäller juli 2010)
Anmärkningar
• YDS-12
• YDS-11
• YDS-10
• Fjärrkontroll
• iPhone/iPod ansluten till dockan
• iPod touch
• iPod (4:e generationen/5:e generationen/
classic)
• iPod nano
•iPod mini
•iPhone
•iPhone 3G/3GS
• Även laddning av iPhone/iPod stöds.
• YDS-10/YDS-11 har inte stöd för iPhoneanslutning.
YID-W10
• iPhone/iPod ansluten till sändaren YID-W10
• Fjärrkontroll
• iPod touch
• iPod (5:e generationen/classic)
• iPod nano
• iPhone
• iPhone 3G/3GS
Även laddning av iPhone/iPod stöds.
FÖRSIKTIGT
Ta ut nätsladden till den här apparaten innan du ansluter Universell Dockningsstation för iPod eller trådlöst system för
iPod för att förhindra olyckor.
Anmärkning
Om den iPhone som är ansluten till YID-W10 får ett inkommande samtal medan den här enheten är i standbyläge, slås apparaten
automatiskt på och ringsignalen hörs genom den här apparaten. Om du inte vill att den här apparaten ska slås på när du får ett samtal
ställer du din iPhone i tyst läge.
10 Sv
Page 67

SPELA UPP MUSIK FRÅN EN iPhone/iPod
Använda Universell Dockningsstation för iPod
Sedan du satt din iPhone/iPod i dockan vrider du INPUTväljaren på frontpanelen (eller trycker på knappen DOCK
på fjärrkontrollen) för att välja DOCK som ingångskälla
för att spela upp från din iPhone/iPod.
eller
Frontpanel Fjärrkontroll
Medan du tittar på den information som visas på iPhone/
iPod kan du använda följande knappar på fjärrkontrollen
för att manövrera (spela upp, göra paus, hoppa över o.s.v.)
din iPhone/iPod.
iPhone/iPod-
reglage
Anmärkning
Vissa lägen för slumpmässig uppspelning och repetering är
kanske inte tillgängliga beroende på aktuell modell av eller
programversionen i iPhone/iPod.
y
När den här apparaten är påslagen eller i standbyläge kan en
iPhone/iPod som är ansluten till Universell Dockningsstation för
iPod laddas automatiskt. Om en iPhone/iPod laddas medan den
här apparaten är i standbyläge lyser strömindikatorn starkt.
ANVÄNDNING
Fjärrkontroll Användning
MENU
ENTER
B
C
Ee
a
b
Visar menyn.
• Om ett objekt är valt: Bekräftar objektet och
visar nästa skärm.
• Om en låt är vald: Spelar den markerade låten.
Bläddra uppåt.
Bläddra nedåt.
• Om en låt spelas: Gör paus i uppspelningen.
• Om en låt är pausad: Spelar låten.
• Om en låt spelas eller är pausad: Hoppar till
början av nästa låt.
• Om den hålls intryckt: Söker framåt.
• Om en låt spelas eller är pausad: Hoppar till
början av låten.
• Om du trycker upprepade gånger hoppar den
en låt bakåt för varje tryckning.
• Om den hålls intryckt: Söker bakåt.
Växlar mellan lägena för slumpmässig
uppspelning (Av → Spår → Album → Av).
Växlar mellan repeteringslägena
(Av → Ett → Alla → Av) .
Svenska
11 Sv
Page 68

SPELA UPP MUSIK FRÅN EN iPhone/iPod
Använda trådlöst system för iPod
Mottagaren YID-W10
Sändaren YID-W10
■ Upprätta en trådlös anslutning
När en iPhone/iPod är ansluten till sändaren och
uppspelningen börjar tar det ungefär 5 sekunder innan
ljudet hörs. Under den tiden upprättas den trådlösa
anslutningen mellan sändaren och mottagaren.
Den trådlösa anslutningens status visas av respektive
statusindikator.
Anslutningens
status
Ingen anslutning Av Av
Bekräftar anslutning Grön, blinkar Blå, blinkar
Ansluten Grön, lyser Blå, lyser
Sändarens
indikator
Mottagarens
indikator
– Om kommunikationen mellan sändaren och
mottagaren avbryts på grund av störningar från
andra trådlösa LAN-enheter, trådlösa telefoner,
mikrovågsugnar eller liknande.
y
• Du kan använda fjärrkontrollen för att styra en iPhone/iPod. För
mer information, se sidan 11.
• När den här apparaten är påslagen eller i standbyläge kan en
iPhone/iPod laddas automatiskt om sändaren som är ansluten
till denna iPhone/iPod är placerad vid mottagaren. Om en
iPhone/iPod laddas medan den här apparaten är i standbyläge
lyser strömindikatorn starkt.
• Mer information finns i bruksanvisningen för YID-W10.
■ Styra den här apparaten från en iPhone/
iPod
• När uppspelningen börjar på en iPhone/iPod som är
ansluten till en sändare, och om sändaren är inom
mottagarens räckvidd, fungerar den här apparaten
enligt följande:
– Om den här apparaten redan är påslagen när
uppspelningen börjar: Ingångskällan växlar till
DOCK.
– Om den här apparaten är i standbyläge när
uppspelningen börjar: Den här apparaten slås på och
ingångskällan växlar till DOCK.
• Om du ändrar volymen på iPhone/iPod ändras även
volymen på den här apparaten. Observera att iPhone/
iPod endast kan höja den här apparatens volym upp till
en viss nivå. Om du vill höja den ytterligare måste du
använda den här apparatens VOLUME-reglage eller
fjärrkontrollen.
• I följande situationer kopplas den trådlösa anslutningen
mellan sändaren och mottagaren bort. Efter
30 sekunder om den här apparaten automatiskt övergår
till standbyläge.
– Om en ansluten iPhone/iPod inte används under
30-120 sekunder sedan uppspelningen pausats.
– Om vilolägestimern i iPhone/iPod aktiveras.
– Om en ansluten iPhone/iPod kopplas bort från
sändaren.
– Om batterinivån i iPhone/iPod sjunker till en nivå
då den inte kan förse sändaren med tillräckligt
mycket ström.
– Om sändaren flyttas utanför mottagarens räckvidd.
12 Sv
Page 69

YTTERLIGARE INFORMATION
FELSÖKNING
Gå igenom tabellen nedan om den här apparaten inte fungerar som den ska. Om aktuellt problem inte finns upptaget i
tabellen nedan, eller om det inte kan lösas med hjälp av anvisningarna i felsökningstabellen, stäng av apparaten, koppla
loss nätkabeln och kontakta närmaste auktoriserade Yamaha-återförsäljare eller servicecenter.
■ Allmänt
Problem Möjlig orsak Åtgärd Se sidan
Den här apparaten är
inte påslagen.
Strömindikatorn lyser
inte.
Den här apparaten
stängs plötsligt av
och strömindikatorn
blinkar.
Apparaten stängs av
några sekunder efter
påslag och
strömindikatorn
blinkar.
Nätkabeln är inte ansluten. Anslut nätkabeln ordentligt. 7
Du har tryckt på fjärrkontrollens A-knapp
när den här apparaten var avslagen.
Det har uppstått ett problem med de
interna kretsarna i apparaten.
Högtalarkablarnas trådar vidrör varandra
eller orsakar kortslutning mot bakpanelen.
Högtalaren fungerar inte. Byt ut högtalarna och tryck på omkopplaren A igen.
Skyddskretsen har aktiverats på grund av
för hög insignal eller för hög volymnivå.
Skyddskretsen har aktiverats på grund av
för hög invändig temperatur.
Omkopplaren IMPEDANCE SELECTOR
har inte skjutits helt till något av
ändlägena.
IMPEDANCE SELECTOR-omkopplaren
står inte i rätt läge.
Apparaten har utsatts för en stark elektrisk
stöt (t.ex. blixturladdning eller hög statisk
elektricitet).
Det har uppstått ett problem med de
interna kretsarna i apparaten.
Tryck på A-omkopplaren på frontpanelen till ON.
Koppla loss nätkabeln och kontakta närmaste
auktoriserade Yamaha-återförsäljare eller
servicecenter. Om du märker ovanlig lukt eller oljud
från apparaten, slå inte på den utan dra ut nätkabeln
och kontakta närmaste servicecenter för reparation.
Anslut högtalarkablarna korrekt och tryck på
omkopplaren A igen. INPUT-indikatorerna blinkar
och volymen minskas automatiskt. När volymen har
minskats till den lägsta inställningen slutar INPUTindikatorerna blinka, INPUT-indikatorn för den
senast valda ingångskällan tänds och apparaten kan
användas igen. Kontrollera att högtalarna avger
normalt ljud vid gradvis ökning av volymen. Sedan
kan du använda apparaten normalt.
INPUT-indikatorerna blinkar och volymen minskas
automatiskt. När volymen har minskats till den lägsta
inställningen slutar INPUT-indikatorerna blinka,
INPUT-indikatorn för den senast valda ingångskällan
tänds och apparaten kan användas igen. Kontrollera
att högtalarna avger normalt ljud vid gradvis ökning
av volymen. Sedan kan du använda apparaten
normalt.
Vrid på frontpanelens VOLUME-kontroll för att
minska volymen och sätt på apparaten igen.
Låt apparaten svalna i ca 30 minuter, minska volymen
med frontpanelens VOLUME-kontroll och sätt på
apparaten igen. Placera apparaten på ett svalt ställe
för att avleda värmen.
Stäng av apparaten och för IMPEDANCE
SELECTOR-omkopplaren hela vägen åt ena eller
andra hållet.
Ställ IMPEDANCE SELECTOR-omkopplaren i det
läge som motsvarar högtalarnas impedans.
Ställ apparaten i standbyläge, koppla loss nätkabeln,
anslut nätkabeln igen efter 30 sekunder och använd
därefter apparaten normalt.
Koppla loss nätkabeln och kontakta närmaste
auktoriserade Yamaha-återförsäljare eller
servicecenter. Om du märker ovanlig lukt eller oljud
från apparaten, slå inte på den utan dra ut nätkabeln
och kontakta närmaste servicecenter för reparation.
2
—
6
—
—
—
4
4
—
—
YTTERLIGARE
INFORMATION
Svenska
13 Sv
Page 70

FELSÖKNING
Problem Möjlig orsak Åtgärd Se sidan
Inget ljud. Ljudet är avstängt. Tryck på MUTE-knappen på fjärrkontrollen eller vrid
Felaktiga kabelanslutningar. Anslut stereokabeln för ljudenheter och
Uppspelningen har stoppats för den
anslutna komponenten.
Ingen passande ingångskälla har valts. Välj en lämplig ingångskälla med ingångsväljaren
SPEAKERS-omkopplaren är felaktigt
inställd.
Ljudet upphör
plötsligt.
Endast högtalaren på
ena sidan hörs.
Återgivet ljud saknar
bas och atmosfär.
Ett ”brummande” ljud
kan höras.
Volymnivån är låg vid
uppspelning av en
grammofonskiva.
Volymnivån kan inte
ökas, eller ljudet är
förvrängt.
Ljudet är försämrat
vid återgivning med
hörlurar som är
anslutna via en CDspelare eller ett
kassettdäck till denna
apparat.
Ljudnivån är låg. Ljudet är avstängt. Tryck på MUTE-knappen på fjärrkontrollen eller vrid
Skyddskretsen har aktiverats på grund av
kortslutning etc.
Den här apparaten har blivit för varm. Försök placera den på något annat ställe. Kontrollera
Den automatiska avstängningsfunktionen
har stängt av apparaten.
Felaktiga kabelanslutningar. Rätta till anslutningarna. Om problemet kvarstår kan
BALANCE-reglaget är fel inställt. Ställ BALANCE-reglaget i lämpligt läge. 9
Ledningarna + och – i högtalarkablarna är
omkastade på förstärkaren eller
högtalarna.
Felaktiga kabelanslutningar. Anslut ljudkablarnas kontakter ordentligt. Om
Skivspelaren är inte ansluten till
jordanslutningen GND.
Skivspelaren är ansluten till andra uttag än
PHONO-uttagen.
Skivan spelas på en skivspelare med MCkassett.
Komponenten som är ansluten till
apparatens LINE 2 REC- eller LINE 3
REC-uttag är avstängd.
Den här apparaten är avstängd eller i
standbyläge.
Funktionen Loudness-kontroll är
aktiverad.
på VOLUME-kontrollen.
högtalarkablarna korrekt. Om problemet kvarstår kan
kablarna vara defekta.
Sätt på komponenten och starta uppspelningen.
INPUT på frontpanelen (eller en INPUT-väljarknapp
på fjärrkontrollen).
Ställ in motsvarande SPEAKERS-omkopplare till
läge A, B eller A+B.
Kontrollera att IMPEDANCE SELECTOR är korrekt
inställd.
Kontrollera att högtalarkablarnas trådar inte vidrör
varandra eller orsakar kortslutning på baksidan av
apparaten, och slå sedan på strömmen till apparaten
igen.
att öppningarna på ovansidan inte är blockerade.
Kontrollera att det inte finns några andra fel som
orsakar problemet och slå sedan på apparaten igen.
kablarna vara defekta.
Anslut högtalarkablarnas ledningar fasriktigt till +
och –. 6
problemet kvarstår kan kablarna vara defekta.
Anslut skivspelaren till apparatens jordanslutning
GND.
Anslut skivspelaren till PHONO-uttagen.
Använd en skivspelare med en MM-kassett.
Sätt på aktuell komponent.
Slå på den här apparaten.
på VOLUME-kontrollen.
Sänk volymen, ställ in LOUDNESS-kontrollen i läget
FLAT och ställ sedan in volymen igen.
3
5
8
8
8
4
5
—
7
5
5
5
5
—
—
8
3
9
14 Sv
Page 71

Problem Möjlig orsak Åtgärd Se sidan
BASS-, TREBLE-,
BALANCE- och
LOUDNESSkontrollerna påverkar
inte klangfärgen.
PURE DIRECT-omkopplaren är
påslagen.
PURE DIRECT-omkopplaren måste vara av för att
dessa reglage ska kunna användas.
■ Universell Dockningsstation för iPod och trådlöst system för iPod
Problem Möjlig orsak Åtgärd Se sidan
Inget ljud.
Det går inte att
använda iPhone/iPod.
Vid användning av
trådlöst system för
iPod:
Ljudet avbryts ofta.
Störningar kan höras.
När du använder en
Universell
Dockningsstation för
iPod:
Det är problem med signalen från iPhone/
iPod till den här apparaten.
Den iPhone/iPod som används stöds inte
av apparaten.
Den trådlösa anslutningen är dålig. Placera mottagaren YID-W10 så långt från den här
Enheten har inte slagits på. Slå på enheten eller ställ den i standbyläge. 2
iPhonen/iPoden har inte anslutits säkert. Anslut iPhonen/iPoden säkert till Universell
Stäng av apparaten och anslut Universell
Dockningsstation för iPod eller trådlöst system för
iPod till apparatens DOCK-anslutning igen.
Ta bort din iPhone/iPod från Universell
Dockningsstation för iPod eller trådlöst system för
iPod och sätt tillbaka den i dockan igen.
Anslut en iPhone/iPod som stöds av apparaten.
apparaten som möjligt.
Dockningsstation för iPod.
FELSÖKNING
8
10
10
10
10
iPhones/iPoden
laddas inte även om
den är ansluten till
Universell
Dockningsstation för
iPod.
När du använder ett
trådlöst system för
iPod:
iPhonen/iPoden
laddas inte även om
YID-W10-sändaren
som är ansluten till
iPhonen/iPoden är
placerad i YID-W10mottagaren.
Enheten har inte slagits på. Slå på enheten eller ställ den i standbyläge. 2
YID-W10-sändaren är inte säkert placerad
i YID-W10-mottagaren.
Placera YID-W10-sändaren som är ansluten till
iPhonen/iPoden säkert i YID-W10-mottagaren.
YTTERLIGARE
10
10
INFORMATION
Svenska
15 Sv
Page 72

FELSÖKNING
■ Fjärrkontroll
Problem Möjlig orsak Åtgärd Se sidan
Fjärrkontrollen
fungerar inte alls eller
fungerar dåligt.
För långt avstånd eller fel vinkel. Fjärrkontrollen fungerar inom ett längsta avstånd på
Fjärrkontrollsensorn på den här apparaten
utsätts för direkt solljus eller stark
belysning (från ett lysrör av invertertyp
etc.).
Batterierna är svaga. Byt ut alla batterierna. 3
6 m och i högst 30 graders vinkel mot frontpanelen.
Flytta den här apparaten eller ändra belysningen.
3
—
■ Anmärkningar angående batterier
• Byt ut båda batterierna när du upptäcker att
fjärrkontrollens räckvidd minskar.
• Ta ur batterierna om fjärrkontrollen inte ska användas
under en längre tid.
• Använd inte gamla batterier tillsammans med nya.
• Använd inte olika typer av batterier (t.ex. alkaliska
batterier och manganbatterier) tillsammans. Läs noga
vad som står på batteriförpackningen, eftersom dessa
olika typer av batterier kan ha samma form och färg.
• Gör dig av med batterierna omedelbart om de skulle ha
läckt. Undvik att vidröra det ämne som har läckt ut,
och försök undvika att det kommer i kontakt med
kläder etc. Rengör batterifacket noggrant innan nya
batterier sätts i.
• Kasta inte batterier tillsammans med vanliga sopor,
utan avyttra dem i enlighet med lokala bestämmelser.
■ Hantering av fjärrkontrollen
• Spill inte vatten eller andra vätskor på fjärrkontrollen.
• Tappa inte fjärrkontrollen.
• Fjärrkontrollen får inte läggas eller förvaras på platser
där följande förhållanden råder:
– hög luftfuktighet, t.ex. nära ett badkar
– hög temperatur, t.ex. nära ett värmeelement eller en
kamin
–extrem kyla
– mycket dammigt
• Utsätt inte fjärrkontrollsensorn för stark belysning,
eftersom det kan göra att fjärrkontrollen inte fungerar
ordentligt. Undvik särskilt inverterat ljus från en
lysrörslampa. Flytta vid behov förstärkaren för att
skydda den från direkt ljus.
16 Sv
Page 73

SPECIFIKATIONER
LJUDDELEN
• Minimal uteffekt (effektivvärde)
(8 Ω, 20 Hz till 20 kHz, 0,019 % THD)
[A-S500] .................................................................85 W + 85 W
[A-S300] .................................................................60 W + 60 W
(6 Ω, 20 Hz till 20 kHz, 0,038 % THD) [Förutom modell till Asien]
[A-S500] .............................................................100 W + 100 W
[A-S300] .................................................................70 W + 70 W
• Dynamisk effekt per kanal (IHF) (8/6/4/2 Ω)
[A-S500] ..........................................................130/150/185/220 W
[A-S300] ..........................................................100/120/140/150 W
• Maximal effekt per kanal [Modeller till Storbritannien och Europa]
(1 kHz, 0,7 % THD, 4 Ω)
[A-S500] ............................................................................ 120 W
[A-S300] .............................................................................. 95 W
• IEC-effekt [modeller till Storbritannien och Europa]
(1 kHz, 0,019 % THD, 8 Ω)
[A-S500] ............................................................................ 100 W
[A-S300] .............................................................................. 75 W
• Effektbandbredd
[A-S500] (0,06 % THD, 42,5 W, 8 Ω)................10 Hz till 50 kHz
[A-S300] (0,06 % THD, 30 W, 8 Ω)...................10 Hz till 50 kHz
• Dämpningsfaktor (SPEAKERS A)
1 kHz, 8 Ω.................................................................. 240 eller mer
• Maximal effektiv uteffekt (JEITA)
(1kHz, 10 % THD, 8 Ω) [Modeller till Asien, Kina, Taiwan och
Central-/Sydamerika]
[A-S500] ............................................................................ 130 W
[A-S300] ............................................................................ 100 W
(1kHz, 10 % THD, 6 Ω) [Modeller till Kina, Taiwan och Central-/
Sydamerika]
[A-S500] ............................................................................ 150 W
[A-S300] ............................................................................ 110 W
• Insignalkänslighet/insignalimpedans
PHONO (MM)......................................................... 3,0 mV/47 kΩ
CD, etc. ................................................................... 200 mV/47 kΩ
• Maximal insignal
PHONO (MM) (1 kHz, 0,003 % THD)................ 60 mV eller mer
CD, etc. (1 kHz, 0,5 % THD) ................................. 2,2 V eller mer
• Utsignalnivå/utsignalimpedans
REC....................................................200 mV/1,0 kΩ eller mindre
• Märkeffekt/märkimpedans för PHONES-uttag
CD, etc. (Ineffekt 1 kHz, 200 mV, 8 Ω)
[A-S500] .............................................................. 430 mV/470 Ω
[A-S300] .............................................................. 360 mV/470 Ω
• Frekvensåtergivning
CD, etc. (20 Hz till 20 kHz)............................................0 ± 0,5 dB
CD, etc. PURE DIRECT på (10 Hz till 100 kHz) ..........0 ± 1,0 dB
• RIAA-frekvenskorrigering
PHONO (MM)................................................................... ± 0,5 dB
• Total harmonisk distorsion
PHONO (MM) till REC (20 Hz till 20 kHz, 3 V)
....................................................................0,025 % eller mindre
CD, etc. till SPEAKERS
[A-S500] (20 Hz till 20 kHz, 42,5 W, 8 Ω)..... 0,015 % eller mindre
[A-S300] (20 Hz till 20 kHz, 30 W, 8 Ω)......0,015 % eller mindre
• Signal-/brusförhållande (IHF-A-nätverk)
PHONO (MM) (5 mV med kortsluten ingång) ......85 dB eller mer
CD, etc. PURE DIRECT på (200 mV med kortsluten ingång)
...........................................................................100 dB eller mer
• Grundbrus (IHF-A-nätverk) ..................................................... 30 µV
• Kanalseparation
CD, etc. (5,1 kΩ med kortsluten ingång, 1/10 kHz)
........................................................................ 65/50 dB eller mer
• Egenskaper för tonkontroll
BASS
Ökning/minskning (50 Hz) .............................................. ±10 dB
Övergångsfrekvens............................................................350 Hz
TREBLE
Ökning/minskning (20 kHz) ............................................ ±10 dB
Övergångsfrekvens...........................................................3,5 kHz
• Steglös loudness-kontroll
Dämpning (1 kHz)............................................................... –30 dB
• Förstärkning av spårningsfel (0 till –99 dB) ....... 0,5 dB eller mindre
ALLMÄNT
• Nätspänning
[Modeller till USA och Kanada]........................ AC 120 V, 60 Hz
[Modell till Asien]..................................AC 220–240 V, 50/60 Hz
[Modeller till Taiwan och Central-/Sydamerika]
............................................. AC 110–120/220–240 V, 50/60 Hz
[Modell till Kina] ................................................ AC 220 V, 50 Hz
[Modell till Australien] ..................................... AC 240 V, 50 Hz
[Modeller till Storbritannien, Europa och Ryssland]
......................................................................... AC 230 V, 50 Hz
• Effektförbrukning
[A-S500]
[Modeller till USA och Kanada] .........................240 W, 330 VA
[Modell till Asien]............................................................. 220 W
[Övriga modeller].............................................................. 240 W
[A-S300]............................................................................... 190 W
• Effektförbrukning i standbyläge ......................... 0,5 W eller mindre
• YID-W10-effektförbrukning i standbyläge
(YID-W10-anslutning)......................................... 1,2 W eller mindre
• Effektförbrukning vid laddning av iPod
[A-S500]............................................................. 35 W eller mindre
[A-S300]............................................................. 25 W eller mindre
• Maximal effektförbrukning [Modeller till Taiwan och Central-/
Sydamerika]
(6 Ω, 1 kHz, 10 % THD)
[A-S500]............................................................................ 510 W
[A-S300]............................................................................ 400 W
• Mått (B × H × D) ............................................. 435 × 151 × 387 mm
•Vikt
[A-S500].............................................................................. 10,3 kg
[A-S300]................................................................................ 9,0 kg
Tekniska data är föremål för ändringar utan föregående avisering.
iPhone, iPod
iPhone, iPod, iPod classic, iPod nano och iPod touch är
varumärken som tillhör Apple Inc., registrerade i USA och andra
länder.
YTTERLIGARE
INFORMATION
Svenska
17 Sv
Page 74

ATTENZIONE: PRIMA DI USARE QUEST’UNITÀ.
1 Per assicurarsi le migliori prestazioni dell’unità, leggere
questo manuale per intero. Conservarlo poi in un luogo
sicuro per poterlo riutilizzare al momento del bisogno.
2 Installare questo sistema audio in una posizione ben
ventilata, asciutta e pulita - lontano da luce solare diretta,
sorgenti di calore, vibrazioni, polvere, umidità e/o freddo.
Per una ventilazione corretta, lasciare intorno all’unità
uno spazio minimo libero come di seguito indicato.
Sopra: 30 cm
Retro: 20 cm
Ai lati: 20 cm
3 Installare quest’unità lontano da elettrodomestici, motori
o trasformatori, perché possono causare ronzi.
4 Non esporre quest’unità a variazioni repentine della
temperatura ambiente e non installarle in stanze molto
umide (ad esempio dove è in uso un umidificatore) per
evitare che in essa si formi condensa, che a sua volta può
causare folgorazioni, incendi, guasti e/o ferite.
5 Evitare di installare l’unità in una posizione dove possano
su di essa cadere oggetti o liquidi. Inoltre, non posare su
di essa:
– Altri componenti, dato che possono causare danni e/o
lo scolorimento della superficie dell’apparecchio.
– Candele o altri oggetti che bruciano, dato che possono
causare incendi, danni all’unità e/o ferite a persone.
– Contenitori di liquidi, dato che possono cadere e
causare folgorazioni all’utente e guasti a quest’unità.
6 Non coprire quest’unità con giornali, tovaglie, tende o
altro per non impedirne la dispersione del calore. Se la
temperatura al suo interno dovesse salire, può causare
incendi, guasti e/o ferite.
7 Non collegare quest’unità ad una presa di corrente sino a
che tutti i suoi collegamenti sono completi.
8 Non usare l’unità capovolta. Potrebbe surriscaldarsi e
guastarsi.
9 Non agire con forza eccessiva su interruttori, manopole e/
o cavi.
10 Per scollegare un cavo, tirare la spina e mai il cavo stesso.
11 Non pulire mai quest’unità con solventi ed altre sostanze
chimiche. Essi possono danneggiarne le finiture. Usare
semplicemente un panno soffice e pulito.
12 Usare solo corrente elettrica del voltaggio indicato. L’uso
di voltaggi superiori è pericoloso e può causare incendi,
guasti e/o ferite. Yamaha non può venire considerata
responsabile di danni risultanti dall’uso di quest’unità
con un voltaggio superiore a quello prescritto.
13 Per evitare danni dovuti a fulmini, scollegare il cavo di
alimentazione dalla presa durante temporali.
14 Non tentare di modificare o riparare quest’unità. Affidare
qualsiasi riparazione a personale qualificato Yamaha. In
particolare, non aprirla mai per alcun motivo.
15 Se si prevede di non dover fare uso di quest’unità per
qualche tempo, ad esempio per andare in vacanza,
scollegarne la spina di alimentazione dalla presa di
corrente.
16 Prima di concludere che l’unità è guasta, non mancate di
leggere la sezione di questo manuale dedicata alla
“RISOLUZIONE DEI PROBLEMI”.
17 Prima di spostare l’unità, premere il pulsante A per
spegnerla, quindi disconnettere la spina del cavo di
alimentazione dalla presa di corrente.
18 Quando la temperatura ambiente cambia
improvvisamente, si forma condensa. Scollegare il cavo
di alimentazione dalla presa di corrente e lasciare
riposare l’apparecchio.
19 Se viene usata a lungo, quest’unità si può surriscaldare.
Spegnerla e lasciarla riposare perché si raffreddi.
20 Installare quest’unità vicino ad una presa di corrente
alternata dove la spina del cavo di alimentazione possa
venire facilmente raggiunta.
21 Le batterie vanno protette da calore eccessivo, ad
esempio luce solare diretta, fiamme, e così via. In caso di
smaltimento di batterie, rispettare le normative locali.
22 Il volume eccessivo in cuffia e l’uso eccessivo di cuffie
possono danneggiare gravemente l’udito.
Finché l’unità è collegata alla presa di corrente, rimane connessa
alla rete di c.a. anche dopo essere stata spenta premendo A o
essere stata posta in standby con il pulsante A sul telecomando. In
questo stato, l’unità consuma una quantità minima di corrente.
AVVERTENZA
PER RIDURRE IL RISCHIO DI INCENDI E FOLGORAZIONI,
NON ESPORRE QUEST’UNITÀ A PIOGGIA O UMIDITÀ.
Solo A-S500
Quest’etichetta è obbligatoria per i prodotti il cui pannello
superiore diventa caldo durante il funzionamento.
i It
Page 75

SOMMARIO
INTRODUZIONE
CARATTERISTICHE PRINCIPALI .................. 1
ACCESSORI IN DOTAZIONE............................ 1
CONTROLLI E FUNZIONI .................................2
Pannello anteriore e telecomando.............................. 2
Note sul telecomando ................................................ 3
Pannello posteriore.................................................... 4
FUNZIONAMENTO
RIPRODUZIONE E REGISTRAZIONE.............8
Riproduzione di una sorgente .................................... 8
Regolazione dei toni.................................................. 8
Registrazione di una sorgente....................................9
RIPRODUZIONE DEI BRANI DA iPhone/iPod.... .10
Utilizzo di un dispositivo Dock Universale per iPod ...11
Utilizzo di un dispositivo Sistema wireless per iPod ... 12
PREPARATIVI
COLLEGAMENTI................................................. 5
Collegamento di diffusori e sorgenti varie................5
Collegamento del cavo di alimentazione................... 7
INFORMAZIONI AGGIUNTIVE
RISOLUZIONE DEI PROBLEMI......................13
SPECIFICHE TECNICHE ..................................17
■ Informazioni sul manuale
• y indica un suggerimento riguardante un’operazione.
• Alcune operazioni sono eseguibili utilizzando i pulsanti sull’unità principale oppure sul telecomando. Nei casi in cui i
nomi dei pulsanti differiscano tra quelli sull’unità principale e quelli sul telecomando, quelli del telecomando sono
indicati tra parentesi.
• Il presente manuale è stato stampato prima della produzione dell’unità. Design e specifiche sono soggetti a modifiche
e/o migliorie. Nel caso in cui si riscontrino differenze tra il manuale e il prodotto, quest’ultimo ha priorità.
INTRODUZIONE
CARATTERISTICHE PRINCIPALI
Con questa unità è possibile:
◆ Migliorare la qualità sonora utilizzando la funzione Pure
Direct (pag. 8)
◆ Riprodurre musica dai dispositivi iPhone/iPod (è richiesto
l’acquisto di un prodotto Yamaha opzionale; pag. 10)
◆ Selezionare la sorgente da registrare indipendentemente
da quella che si sta ascoltando (solo A-S500; pag. 9)
◆ Controllare altri dispositivi Yamaha utilizzando il
telecomando in dotazione con l’unità (pag. 3)
◆ Incrementare le basse frequenze collegando un subwoofer
(pag. 5)
◆ Risparmiare corrente utilizzando Interruttore POWER
MANAGEMENT (pag. 7)
PREPARATIVIINTRODUZIONE
FUNZIONAMENTO
AGGIUNTIVE
INFORMAZIONI
ACCESSORI IN DOTAZIONE
Controllare che la confezione contenga tutte le seguenti parti:
Telecomando Batterie (× 2)
(AA, R6, UM-3)
Italiano
1 It
Page 76

CONTROLLI E FUNZIONI
Pannello anteriore e telecomando
(A-S500)
1 A (ALIMENTAZIONE)
Pannello anteriore: interruttore A
Accende o spegne l’unità.
Posizione di accensione: interruttore spinto verso
l’interno
Posizione di spegnimento: interruttore rilasciato verso
l’esterno
Telecomando: pulsante A
Quando l’unità è accesa: accende l’unità o la fa entrare in
modalità standby.
Nota
2 It
L’unità consuma una quantità minima di corrente anche quando è
spenta o in modalità standby.
2 Spia di alimentazione
Si accende come di seguito descritto:
Luce brillante: unità accesa
Luce tenue: modalità Standby
Spenta: unità spenta
y
La spia di alimentazione rimane accesa con luce brillante durante la
carica di un iPhone/iPod, anche se l’unità è in modalità standby.
3 Trasmettitore a infrarossi
Invia segnali all’unità principale.
4 Sensore del telecomando
Riceve i segnali dal telecomando.
5 Selettore e spie INPUT
Seleziona la sorgente di ingresso che si desidera ascoltare.
Le spie della sorgente di ingresso si accendono quando
sono selezionate le corrispondenti sorgenti di ingresso.
y
I nomi delle sorgenti di ingresso corrispondono ai nomi dei
connettori sul pannello posteriore.
Page 77

CONTROLLI E FUNZIONI
6 Connettore PHONES
Per il collegamento di un paio di cuffie stereofoniche. Se
non si desidera ascoltare il suono dai diffusori, impostare
il selettore SPEAKERS in posizione OFF.
7 Selettore SPEAKERS
Attiva o disattiva la coppia di diffusori collegata ai
terminali SPEAKERS A e/o B, con diverse configurazioni
possibili (A, B o A+B).
8 Selettore REC OUT (solo A-S500)
Seleziona una sorgente indipendentemente
dall’impostazione del selettore INPUT, in modo
consentire la registrazione di una sorgente mentre se ne
ascolta un’altra (consultare la pagina 9).
9 Controllo BASS
Incrementa o riduce la risposta delle basse frequenze
(consultare la pagina 9).
0 Controllo TREBLE
Incrementa o riduce la risposta delle alte frequenze
(consultare la pagina 9).
A Controllo BALANCE
Regola il bilanciamento del segnale in uscita dai diffusori
sinistro e destro (consultare la pagina 9).
B Controllo LOUDNESS
Preserva la gamma timbrica della sorgente a qualsiasi
livello di volume (consultare la pagina 9).
C Interruttore e spia PURE DIRECT
Riproduce qualsiasi sorgente di ingresso con il suono più
puro possibile. La spia al di sopra si accende quando la
funzione è attivata (consultare la pagina 8).
D Controllo VOLUME
VOLUME +/–
Regola il livello di uscita del suono.
Non influisce sul livello REC di registrazione.
Pulsante MUTE (solo sul telecomando)
Riduce il volume attuale di circa 20 dB.
y
• In condizioni di audio in mute (escluso), la spia INPUT della
sorgente di ingresso selezionata lampeggia.
• Lo stato di mute può essere annullato premendo nuovamente il
pulsante MUTE, oppure modificando l’impostazione di volume
ruotando il controllo VOLUME sul pannello anteriore o
premendo i pulsanti VOLUME +/– sul telecomando.
E Pulsanti di controllo iPhone/iPod
Controllano l’iPhone/iPod connesso mediante i dispositivi
opzionali Dock Universale per iPod (consultare la
pagina 11) o Sistema wireless per iPod di Yamaha
(consultare la pagina 12).
F Pulsanti di controllo sintonizzatore Yamaha
Controllano le diverse funzioni di un sintonizzatore Yamaha.
Nota
Anche utilizzando un sintonizzatore Yamaha, alcuni dispositivi e
funzionalità potrebbero non essere disponibili. Fare riferimento al
manuale di istruzioni del dispositivo per maggiori informazioni al
riguardo.
G Pulsanti di controllo del lettore CD Yamaha
Controllano le diverse funzioni di un lettore CD Yamaha.
Nota
Anche utilizzando un lettore CD Yamaha, alcuni dispositivi e
funzionalità potrebbero non essere disponibili. Fare riferimento al
manuale di istruzioni del dispositivo per maggiori informazioni al
riguardo.
INTRODUZIONE
Note sul telecomando
■ Inserimento delle batterie nel
telecomando
Batterie AA, R6, UM-3
Nota
Assicurarsi di orientare correttamente le polarità delle batterie.
Osservare l’illustrazione all’interno del vano portabatteria.
■ Utilizzo del telecomando
Il telecomando trasmette un raggio direzionale a infrarossi.
Assicurarsi di puntare il telecomando direttamente verso
l’apposito sensore sul pannello anteriore dell’unità
durante il funzionamento.
Entro 6 m
Italiano
Nota
L’area tra il telecomando e l’unità deve essere priva di ostacoli di
grandi dimensioni.
3 It
Page 78

CONTROLLI E FUNZIONI
Pannello posteriore
(Modelli per Taiwan e Centro/Sud America)
1 Connettori di ingresso CD
Consentono il collegamento di un lettore CD (consultare la
pagina 5).
2 Connettori PHONO e terminale GND
Permettono il collegamento di un giradischi con cartuccia
MM, e il collegamento a terra del terminale (consultare la
pagina 5).
3 Connettori di ingresso/uscita audio
Permettono il collegamento di dispositivi esterni, come ad
esempio un sintonizzatore, ecc. (consultare la pagina 5).
4 Connettore DOCK
Utilizzabile per il collegamento dei dispositivi opzionali
Dock Universale per iPod o Sistema wireless per iPod di
Yamaha (consultare la pagina 10).
5 Connettore SUBWOOFER OUT
Utilizzabile per il collegamento di un subwoofer
amplificato (consultare la pagina 5).
y
Il connettore SUBWOOFER OUT attenua i segnali al di sopra dei
90 Hz.
6 Interruttore POWER MANAGEMENT
Abilita o disabilita la funzione di spegnimento automatico
(consultare la pagina 7).
7 Terminali SPEAKERS A/B
Utilizzabili per la connessione di una o due coppie di
diffusori (consultare la pagina 5).
8 Interruttore VOLTAGE SELECTOR (solo
Modelli per Taiwan e Centro/Sud America)
L’interruttore VOLTAGE SELECTOR deve essere
impostato sulla base della tensione principale locale prima
di collegare il cavo di alimentazione alla presa di rete
(consultare la pagina 7).
9 Interruttore IMPEDANCE SELECTOR
Consultare Interruttore IMPEDANCE SELECTOR in
questa pagina.
0 Cavo di alimentazione
Collegare il cavo di alimentazione alla presa di corrente
(consultare la pagina 7).
■ Interruttore IMPEDANCE SELECTOR
ATTENZIONE
Non modificare l’impostazione dell’interruttore
IMPEDANCE SELECTOR mentre l’unità è accesa; in
caso contrario è possibile arrecare gravi danni alla stessa.
Se l’unità non si accende, l’interruttore IMPEDANCE
SELECTOR potrebbe essere rimasto “a metà strada” tra le
due impostazioni. In questo caso, disconnettere il cavo di
alimentazione e spostare il selettore nella posizione
desiderata.
Selezionare la posizione dell’interruttore (LOW o HIGH)
in base all’impedenza dei diffusori del sistema.
Posizione
dell’interruttore
• Se si utilizza una sola coppia di diffusori (A
• Se si utilizzano due coppie di diffusori (A e
HIGH
• Se si utilizzano connessioni bi-wire,
• Se si utilizza una sola coppia di diffusori (A
• Se si utilizzano due coppie di diffusori (A e
LOW
• Se si utilizzano connessioni bi-wire,
Livello di impedenza
o B), l’impedenza di ciascun diffusore deve
essere di almeno 6
B) contemporaneamente, l’impedenza di
ciascun diffusore deve essere di almeno
Ω.
12
l’impedenza di ciascun diffusore deve essere
di almeno 6
dettagli.
o B), l’impedenza di ciascun diffusore deve
essere di almeno 4
B) contemporaneamente, l’impedenza di
ciascun diffusore deve essere di almeno 8
l’impedenza di ciascun diffusore deve essere
di almeno 4
dettagli.
Ω.
Ω. Consultare la pagina 6 per i
Ω.
Ω. Consultare la pagina 6 per i
Ω.
4 It
Page 79

PREPARATIVI
COLLEGAMENTI
Collegamento di diffusori e sorgenti varie
ATTENZIONE
• Non connettere l’unità o altri dispositivi alla presa di corrente finché non sono stati completati tutti i collegamenti tra
gli apparati.
• Effettuare tutti i collegamenti rispettando le indicazioni: L (sinistra) su L, R (destra) su R, “+” su “+” e “–” su “–”. Se
i collegamenti sono sbagliati, i diffusori non emetteranno alcun suono; inoltre, invertendo la polarità dei collegamenti
degli stessi si otterrà un suono innaturale e privo di basse frequenze. Fare riferimento al manuale del produttore di
ciascun dispositivo.
• Utilizzare cavi audio RCA specifici per dispositivi audio (a eccezione del collegamento dei diffusori e del connettore
DOCK).
PREPARATIVI
Piatto giradischi
Uscita
audio
GND
Lettore DVD,
ecc.
Uscita
audio
Registratore
Uscita
audio
CD, ecc.
Connettore
Diffusori A
DOCK
(consultare la
pagina 10)
Ingress
o audio
Uscita
audio
Uscita
audio
Sintonizzatore SubwooferLettore CD
Ingress
o audio
cassette, ecc.
Piastra a
Uscita
audio
Diffusori B
y
• I connettori PHONO sono stati cablati per il collegamento di un piatto giradischi con cartuccia MM.
• Collegare il piatto giradischi al terminale GND per ridurre il rumore di fondo nel segnale. Alcuni giradischi, tuttavia, potrebbero
generare minor rumore di fondo senza il collegamento alla presa GND.
Italiano
5 It
Page 80

COLLEGAMENTI
ATTENZIONE
• Verificare che l’interruttore IMPEDANCE SELECTOR sia correttamente impostato prima di effettuare il
collegamento dei diffusori. Consultare la pagina 4 per i dettagli.
• Non lasciare che cavi scoperti si tocchino tra loro o che vengano in contatto con le parti metalliche dell’unità, dato che
ciò potrebbe danneggiare l’unità e/o i diffusori.
• Non connettere l’unità o altri dispositivi alla presa di corrente finché non sono stati completati tutti i collegamenti tra
gli apparati.
■ Collegamento bi-wire
1 Spellare circa 10 mm di guaina isolante
dall’estremità di ciascun cavo per diffusore e
avvolgere insieme i fili esposti per evitare
corto circuiti.
10 mm
Il collegamento bi-wire separa la sezione del woofer da
quella combinata dei medi e delle alte frequenze. Un
diffusore bi-wire compatibile dispone di quattro terminali
di supporto obbligatori. Questi due gruppi di terminali
permettono al diffusore di essere diviso in due sezioni
indipendenti. Mediante queste connessioni, i driver a
media ed alta frequenza sono collegati a un gruppo di
terminali e il driver a bassa frequenza a un altro gruppo di
terminali.
L’unità
2 Collegare il cavo del diffusore.
1 Allentare la manopola.
2 Inserire un cavo scoperto nel foro al lato di
ciascun terminale.
3 Serrare la manopola per fissare il cavo.
Rosso: positivo (+)
Nero: negativo (–)
■ Collegamento tramite connettore a
banana
(a eccezione dei modelli per Asia, Regno
Unito e Europa)
Innanzitutto, serrare la manopola, quindi inserire il
connettore a banana nell’estremità del terminale
corrispondente.
Connettore a
banana
Diffusore
Collegare allo stesso modo l’altro diffusore alla seconda
coppia di terminali.
ATTENZIONE
Per i collegamenti bi-wire, impostare l’interruttore
IMPEDANCE SELECTOR su HIGH o LOW in base
all’impedenza dei diffusori utilizzati:
6 Ω o maggiore: HIGH
4 Ω o maggiore: LOW
Consultare la pagina 4 per maggiori informazioni
sull’interruttore IMPEDANCE SELECTOR.
Nota
Quando si eseguono collegamenti bi-wire, eliminare i ponti o cavi
di messa in corto sul diffusore.
y
Per utilizzare i collegamenti bi-wire, impostare il selettore
SPEAKERS in posizione A+B.
6 It
Page 81

Collegamento del cavo di alimentazione
COLLEGAMENTI
POWER
MANAGEMENT
VOLTAGE
SELECTOR
■ Interruttore POWER MANAGEMENT
Abilita o disabilita la funzione di spegnimento automatico.
Quando si abilita la funzione, l’unità entra
automaticamente in standby una volta trascorse 8 ore
dall’ultima operazione eseguita.
Alla presa di rete con
il cavo di
alimentazione
PREPARATIVI
(Modelli per Taiwan e Centro/Sud America)
■ Collegamento del cavo di alimentazione
Dopo aver completato tutti gli altri collegamenti, inserire
la spina del cavo in una presa di corrente elettrica.
■ Interruttore VOLTAGE SELECTOR
(solo Modelli per Taiwan e Centro/Sud
America)
L’interruttore VOLTAGE SELECTOR sul pannello
posteriore dell’unità deve essere impostato in base alla
principale tensione locale PRIMA di collegare il cavo di
alimentazione alla presa di rete.
Un’impostazione errata dell’interruttore VOLTAGE
SELECTOR può causare danni all’unità e creare un
potenziale rischio di incendio.
Selezionare la posizione (sinistra o destra) in base alla
tensione locale utilizzando un cacciavite a testa piatta. Le
opzioni di voltaggio disponibili sono CA 110-120/
220-240 V, 50/60 Hz.
Italiano
7 It
Page 82

FUNZIONAMENTO
RIPRODUZIONE E REGISTRAZIONE
Riproduzione di una sorgente
SPEAKERS VOLUME
INPUTA
INPUT
VOLUME
5 Riprodurre la sorgente di ingresso
selezionata.
6 Ruotare il controllo VOLUME sul pannello
anteriore (oppure premere i pulsanti
VOLUME +/– sul telecomando) per regolare il
livello di uscita del suono.
y
È possibile regolare la qualità dei toni utilizzando i controlli
BASS, TREBLE, BALANCE e LOUDNESS, oppure
l’interruttore PURE DIRECT sul pannello anteriore.
7 Al termine della fase di ascolto, premere
l’interruttore A sul pannello anteriore per
spegnere l’unità.
y
Premendo il pulsante A sul telecomando quando l’interruttore A è
spinto in avanti, l’unità entra in modalità standby. Per accendere
l’unità, premere nuovamente il pulsante A.
Regolazione dei toni
VOLUMELOUDNESSTREBLE
1 Ruotare il controllo VOLUME sul pannello
anteriore completamente in senso antiorario.
2 Premere l’interruttore A sul pannello
anteriore per accendere l’unità.
3 Ruotare il selettore INPUT sul pannello
anteriore (oppure premere uno dei pulsanti
INPUT sul telecomando) per selezionare la
sorgente di ingresso che si desidera
ascoltare.
La spia della sorgente di ingresso selezionata si accende.
4 Ruotare il selettore SPEAKERS sul pannello
anteriore per selezionare SPEAKERS A, B o
A+B.
Note
• Impostare il selettore SPEAKERS nella posizione A+B se si
sono collegate due coppie di diffusori cablati in bi-wire, oppure
se si desidera utilizzare due coppie di diffusori simultaneamente
(A e B).
• Se non si desidera ascoltare il suono dai diffusori mentre si
utilizzano le cuffie, impostare il selettore SPEAKERS in
posizione OFF.
BASS BALANCE PURE
DIRECT
■ Utilizzo dell’interruttore PURE DIRECT
Ruota i segnali di ingresso dalle fonti audio. Di
conseguenza, i segnali di ingresso non passano dai
controlli BASS, TREBLE, BALANCE e LOUDNESS,
eliminando pertanto qualsiasi alterazione timbrica dei
segnali audio per produrre un suono diretto di qualità
superiore.
Nota
I controlli BASS, TREBLE, BALANCE e LOUDNESS non
funzionano mentre è attivo l’interruttore PURE DIRECT.
8 It
Page 83

■ Regolazione dei controlli BASS e TREBLE
I controlli BASS e TREBLE regolano la risposta delle
basse e alte frequenze.
La posizione centrale produce una risposta piatta.
BASS
Per incrementare i bassi, (basse frequenze), ruotare il
controllo in senso orario. Per ridurli, ruotare la manopola
in senso antiorario.
Intervallo di controllo: da –10 dB a +10 dB (20 Hz)
TREBLE
Per incrementare gli alti, (alte frequenze), ruotare il
controllo in senso orario. Per ridurli, ruotare la manopola
in senso antiorario.
Intervallo di controllo: da –10 dB a +10 dB (20 kHz)
■ Regolazione del controllo BALANCE
Il controllo BALANCE gestisce il bilanciamento di uscita
del suono dai diffusori sinistro e destro per compensare il
mancato bilanciamento del suono causato dalla posizione
dei diffusori o dalle condizioni ambientali di ascolto.
■ Regolazione del controllo LOUDNESS
Preserva intatta l’intera gamma timbrica a un livello di
volume qualsiasi, per compensare la perdita di sensibilità
dell’apparato uditivo alle alte e basse frequenze quando il
volume è basso.
RIPRODUZIONE E REGISTRAZIONE
Registrazione di una sorgente
Note
• Per il modello A-S500, i segnali audio non vengono ruotati ai
connettori di uscita LINE 2 REC o LINE 3 REC quando si
seleziona LINE 2 o LINE 3 con il selettore REC OUT.
• Per il modello A-S300, i segnali audio non vengono ruotati ai
connettori di uscita LINE 2 REC o LINE 3 REC quando si
seleziona LINE 2 o LINE 3 con il selettore INPUT.
• La registrazione può essere effettuata solo con l’unità accesa.
• I controlli VOLUME, BASS, TREBLE, BALANCE e
LOUDNESS e l’interruttore PURE DIRECT non influiscono
sul segnale registrato.
• Controllare le leggi di copyright del paese in cui si registra dai
dischi, CD, radio, ecc. La registrazione del materiale protetto da
copyright può violare le leggi sul diritto d’autore.
REC OUT
(solo A-S500)
FUNZIONAMENTO
ATTENZIONE
Se si attiva l’interruttore PURE DIRECT con il controllo
LOUDNESS impostato a un certo livello, i segnali di
ingresso bypassano il controllo LOUDNESS,
determinando un aumento improvviso del livello di uscita
del suono. Per evitare di danneggiare l’apparato uditivo o i
diffusori, assicurarsi di premere l’interruttore PURE
DIRECT solo DOPO aver abbassato il livello di uscita del
suono o DOPO aver accertato un’adeguata impostazione
del controllo LOUDNESS.
1 Impostare il controllo LOUDNESS nella
posizione FLAT.
2 Ruotare il controllo VOLUME sul pannello
anteriore (oppure premere i pulsanti
VOLUME +/– sul telecomando) per impostare
l’uscita del suono al livello di ascolto più alto
che si desidera sentire.
3 Ruotare il controllo LOUDNESS finché non si
ottiene il volume desiderato.
y
Dopo l’impostazione del controllo LOUDNESS, è possibile
ascoltare la musica al livello di volume preferito. Se l’effetto
dell’impostazione del controllo LOUDNESS è troppo forte o
debole, agire nuovamente sul controllo LOUDNESS.
1 Ruotare il selettore REC OUT sul pannello
anteriore per selezionare la sorgente che si
desidera registrare (solo A-S500).
Nota
Per il modello A-S300, la registrazione avrà luogo per la sorgente
di ingresso selezionata.
2 Riprodurre la sorgente e iniziare la
registrazione sul dispositivo collegato alle
uscite REC (LINE 2 e/o LINE 3) sul pannello
posteriore. Consultare la pagina 5.
y
Solo A-S500: durante la registrazione è possibile selezionare e
ascoltare un’altra sorgente di ingresso utilizzando il selettore
INPUT o il telecomando, senza interrompere la registrazione
della prima sorgente.
Italiano
9 It
Page 84

RIPRODUZIONE DEI BRANI DA iPhone/iPod
Collegando i dispositivi Dock Universale per iPod o Sistema wireless per iPod Yamaha al connettore DOCK sul
pannello posteriore dell’unità, è possibile usufruire dei contenuti memorizzati su iPhone/iPod utilizzando il telecomando
in dotazione.
Collocare il dispositivo connesso
il più lontano possibile dall’unità.
Dock Universale per iPod Sistema wireless per iPod
Dock Universale per iPod Sistema wireless per iPod
Modello
(a tutto Luglio 2010)
Utilizzo mediante
iPhone/iPod compatibili
(a tutto Luglio 2010)
Note
• YDS-12
• YDS-11
• YDS-10
• Telecomando
• iPhone/iPod collegato alla dock
• iPod touch
• iPod (4a generazione/5a generazione/classic)
• iPod nano
•iPod mini
•iPhone
•iPhone 3G/3GS
• Ricarica iPhone/iPod supportata.
• I dispositivi YDS-10/YDS-11 non supportano
la connessione con iPhone.
YID-W10
• iPhone/iPod collegato al trasmettitore
YID-W10
• Telecomando
• iPod touch
• iPod (5a generazione/classic)
• iPod nano
• iPhone
• iPhone 3G/3GS
Ricarica iPhone/iPod supportata.
ATTENZIONE
Per prevenire incidenti, disconnettere il cavo di alimentazione dall’unità prima di collegare i dispositivi Dock Universale
per iPod o Sistema wireless per iPod.
Nota
Se si riceve una chiamata mentre l’iPhone è connesso (attraverso il dispositivo YID-W10) all’unità in standby, quest’ultima si accende
automaticamente riproducendo la suoneria. Se non si desidera far accendere l’unità al ricevimento di una chiamata, impostare l’iPhone
in modalità silenziosa.
10 It
Page 85

RIPRODUZIONE DEI BRANI DA iPhone/iPod
Utilizzo di un dispositivo Dock Universale per iPod
Dopo aver sistemato l’iPhone/iPod sulla dock, ruotare il
selettore INPUT sul pannello anteriore (o premere il
pulsante DOCK sul telecomando) per selezionare DOCK
come sorgente d’ingresso.
oppure
Pannello
anteriore
Mentre si visualizzano le informazioni sul display
dell’iPhone/iPod, utilizzare i seguenti pulsanti del
telecomando per interagire con il dispositivo
(riproduzione, pausa, salta, ecc.).
Controllo
iPhone/iPod
Telecomando
Nota
Alcune modalità shuffle e di ripetizione potrebbero non essere
disponibili, e ciò in base al modello o alla versione software
installata sui dispositivi iPhone/iPod.
y
I dispositivi iPhone/iPod collegati tramite la Dock Universale per
iPod vengono automaticamente messi sotto carica sia quando
l’unità è accesa, sia quando è in standby. In modalità standby, se
si collega un iPhone/iPod per la carica, la spia di alimentazione
emetterà una luce brillante.
FUNZIONAMENTO
Telecomando Funzionamento
MENU
ENTER
B
C
Ee
a
b
Mostra il menu.
• Se si è selezionato un elemento: conferma
della selezione e apertura della schermata
successiva.
• Se si è selezionato un brano musicale:
riproduzione del brano.
Scorrimento in alto.
Scorrimento in basso.
• Se un brano è in riproduzione: pausa della
riproduzione.
• Se un brano è in pausa: riproduzione del
brano.
• Se un brano è in riproduzione o in pausa:
accesso all’inizio del brano successivo.
• Se tenuto premuto: ricerca in avanti.
• Se un brano è in riproduzione o in pausa:
ritorno all’inizio del brano corrente.
• Premuto ripetutamente: selezione del brano
precedente a ogni pressione.
• Se tenuto premuto: ricerca indietro.
Alterna le modalità shuffle (No → Brani →
Album → No).
Alterna le modalità di ripetizione (No → Uno
→ Tutto → No).
Italiano
11 It
Page 86

RIPRODUZIONE DEI BRANI DA iPhone/iPod
Utilizzo di un dispositivo Sistema wireless per iPod
Ricevitore YID-W10
Trasmettitore YID-W10
■ Creazione di una connessione wireless
Dopo aver connesso il dispositivo iPhone/iPod al
trasmettitore e aver avviato la riproduzione, sono
necessari circa 5 secondi per poter ascoltare il segnale
audio. Quest’intervallo di tempo viene impiegato per
stabilire una connessione wireless tra il trasmettitore e il
ricevitore.
Lo stato della connessione wireless tra il trasmettitore e il
ricevitore è segnalato dalle rispettive spie luminose.
Stato della
connessione
Nessuna connessione Spenta Spenta
In attesa di conferma Verde,
Connesso Verde, accesa Blu, accesa
Spia
trasmettitore
lampeggiante
Spia
ricevitore
Blu,
lampeggiante
– Il livello di carica della batteria dell’iPhone/iPod
cala fino a non poter più garantire abbastanza
corrente al trasmettitore.
– Il trasmettitore viene spostato al di fuori della
portata di comunicazione wireless con il ricevitore.
– La connessione tra il trasmettitore e il ricevitore
viene interrotta a causa dell’interferenza di altri
dispositivi wireless LAN, telefoni senza fili, forni a
microonde, ecc.
y
• I dispositivi iPhone/iPod possono essere controllati con il
telecomando dell’unità. Per maggiori informazioni, consultare
la pagina 11.
• Quando l’unità è accesa o in standby, collocando il trasmettitore
nel ricevitore è possibile caricare automaticamente l’iPhone/
iPod. In modalità standby, se si collega un iPhone/iPod per la
carica, la spia di alimentazione emetterà una luce brillante.
• Per ulteriori informazioni, consultare il manuale di istruzioni
del dispositivo YID-W10.
■ Controllo dell’unità da parte di iPhone/
iPod
• All’avvio della riproduzione su un iPhone/iPod
connesso tramite il trasmettitore (posto a una distanza
utile dal ricevitore), l’unità risponde come di seguito
descritto:
– Se l’unità è già accesa all’avvio della riproduzione:
viene selezionata DOCK come sorgente di ingresso.
– Se l’unità è in standby all’avvio della riproduzione:
l’unità si accende e seleziona DOCK come sorgente
di ingresso.
• La regolazione del volume sull’iPhone/iPod viene
riportata anche sull’unità. Da notare che l’iPhone/iPod
può alzare il volume dell’unità fino a un certo livello;
per andare oltre, è necessario utilizzare il controllo
VOLUME dell’unità stessa o il telecomando.
• La connessione wireless tra trasmettitore e ricevitore
viene interrotta nei seguenti casi. Dopo 30 secondi,
l’unità entra automaticamente in standby.
– L’iPhone/iPod non esegue alcuna operazione per
30-120 secondi dopo aver posto in pausa la
riproduzione.
– Si è attivato lo spegnimento automatico
dell’iPhone/iPod.
– L’iPhone/iPod viene disconnesso dal trasmettitore.
12 It
Page 87

INFORMAZIONI AGGIUNTIVE
RISOLUZIONE DEI PROBLEMI
Fare riferimento alla seguente tabella se l’unità non funziona correttamente. Se il problema riscontrato non è presente
nell’elenco o se i rimedi proposti non sono di aiuto, spegnere l’unità, disconnettere il cavo di alimentazione e mettersi in
contatto col rivenditore Yamaha autorizzato o centro assistenza più vicino.
■ Generale
Problemi Possibili cause Soluzioni
L’unità è spenta.
Anche la spia di
alimentazione non si
accende.
L’unità si spegne
all’improvviso e la spia
di alimentazione
lampeggia.
L’unità si spegne dopo
qualche secondo di
funzionamento e la
spia di alimentazione
lampeggia.
Verificare di aver collegato il cavo di
alimentazione.
Il pulsante A è stato premuto sul
telecomando con l’unità spenta.
Si è verificato un problema con i circuiti
interni dell’unità.
I cavi dei diffusori sono in contatto tra
loro o vanno in corto sul pannello
posteriore.
I diffusori non funzionano bene. Sostituire i diffusori, quindi premere di nuovo
Il circuito di protezione è stato attivato a
causa del livello di ingresso o volume
eccessivo.
Il circuito di protezione è stato attivato a
causa dell’eccessiva temperatura interna.
L’interruttore IMPEDANCE SELECTOR
non è stato spostato completamente in una
delle due posizioni.
L’interruttore IMPEDANCE
SELECTOR non è stato correttamente
impostato.
L’unità è stata esposta a forti scariche
elettriche (ad esempio fulmini o
elettricità statica).
Si è verificato un problema con i circuiti
interni dell’unità.
Collegare il cavo di alimentazione in modo stabile.
Premere l’interruttore A ON sul pannello anteriore.
Disconnettere il cavo di alimentazione e rivolgersi al
rivenditore o centro di assistenza Yamaha autorizzato
più vicino. In caso di odore o rumore inconsueto
generato dall’unità, non accendere l’apparecchio,
disconnettere il cavo di alimentazione e quindi
contattare il centro di assistenza per le riparazioni.
Collegare i cavi dei diffusori correttamente, quindi
premere di nuovo l’interruttore A. Le spie INPUT
lampeggiano e il volume si abbassa
automaticamente. Dopo aver raggiunto il livello di
volume minimo, le spie INPUT cessano di
lampeggiare, la spia INPUT dell’ultima sorgente
selezionata si accende e l’unità può essere
nuovamente utilizzata. Verificare la normale uscita
del suono dai diffusori aumentando gradualmente il
volume, quindi utilizzare l’unità normalmente.
l’interruttore A. Le spie INPUT lampeggiano e il
volume si abbassa automaticamente. Dopo aver
raggiunto il livello di volume minimo, le spie INPUT
cessano di lampeggiare, la spia INPUT dell’ultima
sorgente selezionata si accende e l’unità può essere
nuovamente utilizzata. Verificare la normale uscita del
suono dai diffusori aumentando gradualmente il
volume, quindi utilizzare l’unità normalmente.
Ruotare il controllo VOLUME sul pannello
anteriore per ridurre il livello del volume, quindi
accendere nuovamente l’unità.
Attendere circa 30 minuti affinché la temperatura
all’interno dell’unità si riduca, ruotare il controllo
VOLUME sul pannello anteriore per abbassare il
volume, quindi accendere nuovamente l’unità.
Collocare l’unità in un luogo in cui il calore possa
dissiparsi facilmente.
Spegnere l’unità e spostare l’interruttore
IMPEDANCE SELECTOR verso una delle due
posizioni.
Impostare l’interruttore IMPEDANCE SELECTOR
nella posizione corrispondente all’impedenza dei
diffusori utilizzati.
Impostare l’unità in modalità standby, disconnettere
il cavo dalla presa di corrente, ricollegarlo dopo 30
secondi e quindi utilizzare l’unità normalmente.
Disconnettere il cavo di alimentazione e rivolgersi al
rivenditore o centro di assistenza Yamaha autorizzato
più vicino. In caso di odore o rumore inconsueto
generato dall’unità, non accendere l’apparecchio,
disconnettere il cavo di alimentazione e quindi
contattare il centro di assistenza per le riparazioni.
Fare
riferimento a
pagina
7
2
—
6
—
—
—
4
4
—
—
INFORMAZIONI
AGGIUNTIVE
Italiano
13 It
Page 88

RISOLUZIONE DEI PROBLEMI
Problemi Possibili cause Soluzioni
Nessun suono in
uscita.
Il suono si interrompe
all’improvviso.
Si riesce a sentire un
solo diffusore.
Mancano i bassi e il
suono sembra piatto.
Si sente un “ronzio”. Collegamenti dei cavi errati. Collegare i connettori audio in modo stabile. Se il
Il disco viene
riprodotto a un volume
troppo basso.
Non si riesce ad
aumentare il livello del
volume, oppure il
suono è distorto.
Il suono ascoltato con
le cuffie inserite nel
lettore CD o nella
piastra a cassette
collegati all’unità è
scadente.
Il livello del suono è
basso.
Il suono è escluso. Premere il pulsante MUTE sul telecomando, oppure
Collegamenti dei cavi errati. Utilizzare cavi stereo per i dispositivi audio e
La riproduzione si è interrotta sul
dispositivo connesso.
Non è stata selezionata alcuna sorgente di
ingresso valida.
Il selettore SPEAKERS non è impostato
correttamente.
Il circuito di protezione è stato attivato a
causa di un corto circuito, ecc.
L’unità si scalda troppo. Verificare che la collocazione dell’unità sia
L’unità si è spenta a causa della funzione
di auto spegnimento.
Collegamenti dei cavi errati. Collegare correttamente i cavi. Se il problema
Impostazione non corretta del controllo
BALANCE.
I poli + e – dei cavi sono stati invertiti
sull’amplificatore o sui diffusori.
Il giradischi non è stato connesso al
terminale GND.
Il giradischi non è stato collegato ai
connettori PHONO.
Il disco è riprodotto su un giradischi con
una cartuccia MC.
Il dispositivo collegato ai connettori
LINE 2 REC o LINE 3 REC dell’unità è
spento.
L’unità è spenta o in modalità standby. Accendere l’unità.
Il suono è escluso. Premere il pulsante MUTE sul telecomando, oppure
La funzione di controllo Loudness è stata
attivata.
ruotare il controllo VOLUME.
cablare i cavi dei diffusori correttamente. Se il
problema persiste, i cavi potrebbero essere difettosi.
Accendere il dispositivo e avviare la riproduzione.
Selezionare una sorgente di ingresso valida con il
selettore INPUT sul pannello anteriore (o con uno
dei pulsanti INPUT sul telecomando).
Impostare il corrispondente selettore SPEAKERS
nella posizione A, B o A+B.
Controllare che l’impostazione IMPEDANCE
SELECTOR sia corretta.
Verificare che i cavi dei diffusori non si tocchino, o
che vadano in corto all’uscita dal pannello posteriore
dell’unità, quindi accendere nuovamente l’unità.
adeguata. Verificare di non aver ostruito le prese
d’aria sul pannello superiore.
Verificare che il problema non derivi da altre cause,
quindi accendere nuovamente l’unità.
persiste, i cavi potrebbero essere difettosi.
Impostare il controllo BALANCE nella posizione
appropriata.
Collegare i poli dei diffusori prestando attenzione
alle fasi + e –.
problema persiste, i cavi potrebbero essere difettosi.
Eseguire il collegamento GND tra il giradischi e
l’unità.
Collegare il giradischi ai connettori PHONO.
Utilizzare un giradischi dotato di una cartuccia MM.
Accendere il dispositivo.
ruotare il controllo VOLUME.
Abbassare il volume, impostare il controllo
LOUDNESS in posizione FLAT e regolare
nuovamente il volume.
Fare
riferimento a
pagina
3
5
8
8
8
4
5
—
7
5
9
6
5
5
5
—
—
8
3
9
14 It
Page 89

RISOLUZIONE DEI PROBLEMI
Problemi Possibili cause Soluzioni
L’utilizzo dei controlli
BASS, TREBLE,
BALANCE e LOUDNESS
non influisce sui toni.
L’interruttore PURE DIRECT è stato
attivato.
L’interruttore PURE DIRECT deve essere
disattivato per poter utilizzare i controlli di tono.
■ Dock Universale per iPod e Sistema wireless per iPod
Problemi Possibili cause Soluzioni
Nessun suono in
uscita.
Impossibile far
funzionare l’iPhone/
iPod.
Durante l’utilizzo del
dispositivo Sistema
wireless per iPod:
Il suono si interrompe
spesso.
Si sente del rumore.
Durante l’utilizzo del
dispositivo Dock
Universale per iPod:
L’iPhone/iPod non
viene caricato,
sebbene sia stato
connesso al
dispositivo Dock
Universale per iPod
Durante l’utilizzo del
dispositivo Sistema
wireless per iPod:
L’iPhone/iPod non
viene caricato,
sebbene il
trasmettitore YID-W10
connesso al
dispositivo sia stato
collocato nel ricevitore
YID-W10.
Si è verificato un problema con il
percorso del segnale dall’iPhone/iPod
all’unità.
L’iPhone/iPod utilizzato non è
compatibile con l’unità.
La connessione wireless tra i dispositivi è
scadente.
L’unità è spenta. Accendere l’unità, o porla in modalità standby. 2
L’iPhone/iPod non è stato collegato
correttamente.
L’unità è spenta. Accendere l’unità, o porla in modalità standby. 2
Il trasmettitore YID-W10 non è stato
collocato correttamente nel ricevitore
YID-W10.
Spegnere l’unità e ricollegare i dispositivi Dock
Universale per iPod o il Sistema wireless per iPod al
connettore DOCK dell’unità.
Rimuovere e ricollocare l’iPhone/iPod nel
dispositivo Dock Universale per iPod o Sistema
wireless per iPod.
Collegare un iPhone/iPod compatibile.
Collocare il ricevitore YID-W10 il più lontano
possibile dall’unità.
Collegare correttamente l’iPhone/iPod al dispositivo
Dock Universale per iPod.
Collocare correttamente il trasmettitore YID-W10,
connesso all’iPhone/iPod, nel ricevitore YID-W10.
Fare
riferimento a
pagina
8
Fare
riferimento a
pagina
10
10
10
10
10
10
INFORMAZIONI
AGGIUNTIVE
15 It
Italiano
Page 90

RISOLUZIONE DEI PROBLEMI
■ Telecomando
Problemi Possibili cause Soluzioni
Il telecomando non
funziona
correttamente.
Il telecomando è troppo distante o troppo
inclinato.
La luce solare o l’illuminazione diretta
(da una lampada a fluorescenza di tipo
inverter, ecc) colpisce il sensore a
infrarossi dell’unità.
Le batterie sono quasi esaurite. Sostituire le batterie. 3
Il telecomando può operare entro una portata
massima di 6 m e con un’angolazione massima di
30 gradi fuori asse dal pannello anteriore.
Spostare l’unità o la lampada.
Fare
riferimento a
pagina
3
—
■ Note sulle batterie
• Sostituire entrambe le batterie quando si nota una
riduzione della portata del telecomando.
• Rimuovere le batterie se il telecomando non viene
utilizzato per un periodo di tempo prolungato.
• Non utilizzare insieme batterie usate e nuove.
• Non utilizzare insieme tipi di batterie differenti (come
batterie alcaline e al manganese). Leggere attentamente
quanto riportato sulla confezione, in quanto l’aspetto
esteriore delle batterie potrebbe essere simile.
• Se dalle batterie sembra essere uscito del liquido,
smaltirle immediatamente. Evitare di toccare il liquido
fuoriuscito e di farlo venire in contatto con abiti
Pulire il vano portabatteria a fondo prima di installare
delle nuove batterie.
• Non gettare le batterie tra i rifiuti domestici, ma smaltirle
correttamente nel rispetto della normativa locale.
, ecc.
■ Cura del telecomando
• Non versare acqua o altri liquidi sul telecomando.
• Non far cadere il telecomando.
• Non lasciare o conservare il telecomando nelle
seguenti condizioni:
– in ambienti a elevata umidità, come accanto a un bagno
– in luoghi eccessivamente caldi, come accanto a un
termosifone o una stufa
– in ambienti estremamente freddi
– in ambienti polverosi
• Non esporre il sensore del telecomando a luci intense,
in particolare a una lampada a fluorescenza di tipo
inverter; diversamente, il telecomando potrebbe non
funzionare correttamente. Se necessario, collocare
l’unità distante dalla luce diretta.
16 It
Page 91

SPECIFICHE TECNICHE
SEZIONE AUDIO
• Potenza di uscita RMS minima
(8 Ω, da 20 Hz a 20 kHz, 0,019% DAC)
[A-S500] .................................................................85 W + 85 W
[A-S300] .................................................................60 W + 60 W
(6 Ω, da 20 Hz a 20 kHz, 0,038% DAC) [Eccetto modello per Asia]
[A-S500] .............................................................100 W + 100 W
[A-S300] .................................................................70 W + 70 W
• Potenza dinamica per canale (IHF) (8/6/4/2 Ω)
[A-S500] ..........................................................130/150/185/220 W
[A-S300] ..........................................................100/120/140/150 W
• Potenza massima per canale [Solo modelli per Regno Unito ed Europa]
(1 kHz, 0,7% DAC 4 Ω)
[A-S500] ............................................................................ 120 W
[A-S300] .............................................................................. 95 W
• Potenza IEC [Solo modelli per Regno Unito ed Europa]
(1 kHz, 0,019% DAC, 8 Ω)
[A-S500] ............................................................................ 100 W
[A-S300] .............................................................................. 75 W
• Ampiezza di banda della potenza
[A-S500] (0,06% DAC, 42,5 W, 8 Ω) ...............da 10 Hz a 50 kHz
[A-S300] (0,06% DAC, 30 W, 8 Ω)..................da 10 Hz a 50 kHz
• Fattore di smorzamento (SPEAKERS A)
1 kHz, 8 Ω...............................................................240 o maggiore
• Potenza di uscita massima effettiva (JEITA)
(1kHz, 10% DAC, 8 Ω) [Solo modelli per Asia, Cina, Taiwan e
Centro/Sud America]
[A-S500] ............................................................................ 130 W
[A-S300] ............................................................................ 100 W
(1 kHz, 10% DAC, 6 Ω) [Solo modelli per Cina, Taiwan e Centro/
Sud America]
[A-S500] ............................................................................ 150 W
[A-S300] ............................................................................ 110 W
• Sensibilità di ingresso/Impedenza di ingresso
PHONO (MM)......................................................... 3,0 mV/47 kΩ
CD, ecc. .................................................................. 200 mV/47 kΩ
• Segnale di ingresso massimo
PHONO (MM) (1 kHz, 0,003% DAC)..............60 mV o maggiore
CD, ecc. (1 kHz, 0,5% DAC) ..............................2,2 V o maggiore
• Livello di uscita/Impedenza di uscita
REC......................................................... 200 mV/1,0 kΩ o minore
• Uscita nominale connettore PHONES/Impedenza
CD, ecc. (Input 1 kHz, 200 mV, 8 Ω)
[A-S500] .............................................................. 430 mV/470 Ω
[A-S300] .............................................................. 360 mV/470 Ω
• Risposta in frequenza
CD, ecc. (da 20 Hz a 20 kHz) .........................................0 ± 0,5 dB
CD, ecc. PURE DIRECT attivata (da 10 Hz a 100 kHz)
.....................................................................................0 ± 1,0 dB
• Deviazione di equalizzazione RIAA
PHONO (MM)................................................................... ± 0,5 dB
• Distorsione armonica totale
da PHONO (MM) a REC (da 20 Hz a 20 kHz, 3 V)
.......................................................................... 0,025% o minore
da CD, ecc. a SPEAKERS
[A-S500] (da 20 Hz a 20 kHz, 42,5 W, 8 Ω)
....................................................................... 0,015% o minore
[A-S300] (da 20 Hz a 20 kHz, 30 W, 8 Ω)....... 0,015% o minore
• Rapporto segnale/rumore (IHF-A network)
PHONO (MM) (5 mV ingresso in corto) ........... 85 dB o maggiore
CD, ecc. PURE DIRECT attivata (200 mV ingresso in corto)
....................................................................... 100 dB o maggiore
• Rumore residuo (IHF-A network)............................................30 µV
• Separazione canali
CD, ecc. (5,1 kΩ ingresso in corto, 1/10 kHz)
.................................................................... 65/50 dB o maggiore
• Caratteristiche dei controlli di tono
BASS
Incremento/Taglio (50 Hz)............................................... ±10 dB
Frequenza di turnover .......................................................350 Hz
TREBLE
Incremento/Taglio (20 kHz)............................................. ±10 dB
Frequenza di turnover ......................................................3,5 kHz
• Controllo continuo loudness
Attenuazione (1 kHz) .......................................................... –30 dB
• Errore Gain tracking (da 0 a –99 dB)....................... 0,5 dB o minore
DATI GENERALI
• Alimentazione
[Solo modelli per Stati Uniti e Canada] ............ CA 120 V, 60 Hz
[Modello per Asia] ..................................CA 220-240 V, 50/60 Hz
[Modelli per Taiwan e Centro/Sud America]
.............................................. CA 110-120/220-240 V, 50/60 Hz
[Modello per Cina].............................................. CA 220 V, 50 Hz
[Modello per Australia]...................................... CA 240 V, 50 Hz
[Modelli per Regno Unito, Europa e Russia]..... CA 230 V, 50 Hz
• Consumo energetico
[A-S500]
[Modelli per Stati Uniti e Canada]......................240 W, 330 VA
[Modello per Asia] ............................................................ 220 W
[Altri modelli] ................................................................... 240 W
[A-S300]............................................................................... 190 W
• Consumo in standby .................................................. 0,5 W o minore
• Consumo in standby dispositivo YID-W10 (YID-W10 connessa)
................................................................................... 1,2 W o minore
• Consumo con iPod in carica
[A-S500].................................................................. 35 W o minore
[A-S300].................................................................. 25 W o minore
• Consumo energetico massimo [Solo modelli per Taiwan e Centro/
Sud America]
(6 Ω, 1 kHz, 10% DAC)
[A-S500]............................................................................ 510 W
[A-S300]............................................................................ 400 W
• Dimensioni (L × A × P) .................................. 435 × 151 × 387 mm
•Peso
[A-S500].............................................................................. 10,3 kg
[A-S300]................................................................................ 9,0 kg
Dati tecnici soggetti a modifiche senza preavviso.
iPhone, iPod
iPhone, iPod, iPod classic, iPod nano, e iPod touch sono marchi
registrati di Apple Inc. depositati negli USA e in altri paesi.
INFORMAZIONI
AGGIUNTIVE
Italiano
17 It
Page 92

PRECAUCIÓN: LEA LAS INDICACIONES SIGUIENTES ANTES DE
UTILIZAR ESTE APARATO
1 Para asegurar el mejor rendimiento de este aparato, lea
atentamente este manual. Y luego guárdelo en un lugar
seguro para poder consultarlo en el futuro en caso de ser
necesario.
2 Instale este sistema de sonido en un lugar bien ventilado,
fresco, seco y limpio, y alejado de la luz solar directa,
fuentes de calor, vibración, polvo, humedad y/o frío. Para
garantizar una ventilación correcta deberán existir las
siguientes distancias mínimas alrededor de la unidad.
Arriba: 30 cm
Atrás: 20 cm
A los lados: 20 cm
3 Coloque este aparato lejos de otros aparatos eléctricos,
motores o transformadores, para evitar así los ruidos de
zumbido.
4 No exponga este aparato a cambios bruscos de
temperaturas, del frío al calor, ni lo coloque en lugares
muy húmedos (una habitación con deshumidificador, por
ejemplo), para impedir así que se forme condensación en
su interior, lo que podría causar una descarga eléctrica, un
incendio, daños en el aparato y/o lesiones a las personas.
5 Evite instalar este aparato en un lugar donde puedan
caerle encima objetos extraños y/o donde quede expuesto
al goteo o a la salpicadura de líquidos. Encima de este
aparato no ponga:
– Otros componentes, porque pueden causar daños y/o
decoloración en la superficie de este aparato.
– Objetos con fuego (velas, por ejemplo), porque pueden
causar un incendio, daños en el aparato y/o lesiones a
las personas.
– Recipientes con líquidos, porque pueden caerse y
derramar el líquido, causando descargas eléctricas al
usuario y/o dañando el aparato.
6 No tape este aparato con un periódico, mantel, cortina,
etc. para no impedir el escape del calor. Si aumenta la
temperatura en el interior del aparato, esto puede causar
un incendio, daños en el aparato y/o lesiones a las
personas.
7 No enchufe este aparato a una toma de corriente hasta
después de haber terminado todas las conexiones.
8 No ponga el aparato al revés. Podría recalentarse y
posiblemente causar daños.
9 No utilice una fuerza excesiva con los conmutadores, los
controles y/o los cables.
10 Cuando desconecte el cable de alimentación de la toma
de corriente, sujete la clavija y tire de ella; no tire del
propio cable.
11 No limpie este aparato con disolventes químicos porque
podría estropear el acabado. Utilice un paño limpio y
seco para limpiar el aparato.
12 Utilice solamente la tensión especificada en este aparato.
Utilizar el aparato con una tensión superior a la
especificada resulta peligroso y puede producir un
incendio, daños en el aparato y/o lesiones a las personas.
Yamaha no se hará responsable de ningún daño debido al
uso de este aparato con una tensión diferente de la
especificada.
13 Para impedir daños debidos a relámpagos, desconecte el
cable de alimentación y antenas externas de la toma de
corriente durante una tormenta eléctrica.
14 No intente modificar ni arreglar este aparato. Póngase en
contacto con el personal de servicio Yamaha cualificado
cuando necesite realizar alguna reparación. La caja no
deberá abrirse nunca por ninguna razón.
15 Cuando no piense utilizar este aparato durante mucho
tiempo (cuando se ausente de casa por vacaciones, por
ejemplo) desconecte el cable de alimentación de la toma
de corriente.
16 Asegúrese de leer la sección “SOLUCIÓN DE
PROBLEMAS” antes de dar por concluido que su
aparato está averiado.
17 Antes de trasladar este aparato, pulse A para apagarlo, y
luego desconecte el cable de alimentación de CA de la
toma de corriente.
18 La condensación se formará cuando cambie de repente la
temperatura ambiental. Desconecte en este caso el cable
de alimentación de la toma de corriente y no utilice el
aparato.
19 El aparato se calentará cuando la utilice durante mucho
tiempo. Desconecte en este caso la alimentación y luego
no utilice el aparato para permitir que se enfríe.
20 Instale este aparato cerca de la toma de CA y donde se
pueda alcanzar fácilmente la clavija de alimentación.
21 Las baterías no deberán exponerse a un calor excesivo
como, por ejemplo, el que producen los rayos del sol, el
fuego y similares. Cuando deseche las baterías, por favor
cumpla las regulaciones de su región.
22 La presión acústica excesiva de los auriculares puede
causar pérdida auditiva.
Si la unidad está conectada a la toma de CA, no se desconecta de
la fuente de alimentación de CA incluso si la apaga con A o si la
pone de espera con el botón A del mando a distancia. En este
estado, este aparato ha sido diseñada para que consuma un
cantidad de corriente muy pequeña.
ADVERTENCIA
PARA REDUCIR EL RIESGO DE INCENDIO O DESCARGA
ELÉCTRICA, NO EXPONGA ESTE APARATO A LA LLUVIA
NI A LA HUMEDAD.
Sólo para A-S500
Es necesario pegar esta etiqueta a los productos cuya cubierta
superior pueda estar caliente durante el funcionamiento.
i Es
Page 93

ÍNDICE
INTRODUCCIÓN
CARACTERÍSTICAS DE UTILIDAD ................ 1
ACCESORIOS SUMINISTRADOS ..................... 1
CONTROLES Y FUNCIONES............................. 2
Panel frontal y mando a distancia..............................2
Acerca del mando a distancia .................................... 3
Panel trasero............................................................... 4
FUNCIONAMIENTO
REPRODUCCIÓN Y GRABACIÓN ....................8
Reproducción de una fuente ...................................... 8
Ajuste de la calidad tonal...........................................8
Grabación de una fuente............................................ 9
REPRODUCCIÓN DE TEMAS DESDE EL
iPhone/iPod ........................................................10
Uso de una Dock Universal para iPod..................... 11
Uso de un sistema inalámbrico para iPod................12
PREPARACIÓN
CONEXIONES ....................................................... 5
Conexión de los altavoces y los componentes fuente........ 5
Conexión del cable de alimentación.......................... 7
INFORMACIÓN ADICIONAL
SOLUCIÓN DE PROBLEMAS...........................13
ESPECIFICACIONES .........................................17
■ Acerca de este manual
• y indica un consejo para su utilización.
• Algunas operaciones se pueden realizar con los botones de la unidad principal o desde el mando a distancia. En los
casos en los que los nombres de los botones de la unidad principal y del mando a distancia no coincidan, se facilita el
nombre del botón del mando a distancia entre paréntesis.
• Este manual se imprime antes de la producción. El diseño y las especificaciones están sujetos a cambios fruto de las
mejoras, etc. Si hay diferencias entre el manual y el producto, el producto tiene prioridad.
INTRODUCCIÓN
CARACTERÍSTICAS DE UTILIDAD
PREPARACIÓNINTRODUCCIÓN
FUNCIONAMIENTO
INFORMACIÓN
ADICIONAL
Esta unidad permite:
◆ Mejorar la calidad del sonido utilizando la función Pure
Direct (p. 8)
◆ Reproducir música desde el iPhone/iPod (producto
Yamaha opcional necesario; p. 10)
◆ Seleccionar la fuente de grabación independientemente de
la fuente de escucha (sólo A-S500; p. 9)
ACCESORIOS SUMINISTRADOS
Verifique que ha recibido los siguientes accesorios:
Mando a distancia Pilas (× 2)
(AA, R6, UM-3)
◆ Controlar otros componentes Yamaha utilizando el mando
a distancia de esta unidad (p. 3)
◆ Potenciar sonidos graves conectando un subwoofer (p. 5)
◆ Ahorrar potencia usando Interruptor POWER
MANAGEMENT (p. 7)
Español
1 Es
Page 94

CONTROLES Y FUNCIONES
Panel frontal y mando a distancia
(A-S500)
1 A (ALIMENTACIÓN)
Panel frontal: interruptor A
Enciende y apaga la alimentación en esta unidad.
Posición de encendido: botón presionado
Posición de apagado: botón no presionado
Mando a distancia: botón A
Cuando la unidad está encendida: enciende la unidad o la
pone en modo de espera.
Nota
2 Es
Esta unidad consume una pequeña cantidad de energía aunque
esté apagada o en modo de espera.
2 Indicador de alimentación
Se ilumina del siguiente modo:
Fuertemente iluminado: alimentación encendida
Suavemente iluminado: modo de espera
Apagado: alimentación apagada
y
El indicador de alimentación permanece iluminado fuertemente
mientras se carga un iPhone/iPod, aunque la unidad esté en modo de
espera.
3 Transmisor de señales infrarrojas
Envía señales a la unidad principal.
4 Sensor del mando a distancia
Recibe las señales del mando a distancia.
5 Selector e indicadores INPUT
Seleccione la fuente de entrada que quiera escuchar. Los
indicadores de las fuentes de entrada se iluminan cuando
se selecciona la fuente de entrada correspondiente.
y
Los nombres de las fuentes de entrada se corresponden con los
nombres de las tomas de conexión del panel trasero.
Page 95

CONTROLES Y FUNCIONES
6 Toma PHONES
Conecte los auriculares para escuchar música de forma
privada. Si no desea que el sonido salga por los altavoces,
ponga el selector SPEAKERS en posición OFF.
7 Selector SPEAKERS
Cada vez que el selector SPEAKERS correspondiente se
ajusta en A, B o A+B, los altavoces conectados a los
terminales SPEAKERS A y/o B se activan y se desactivan.
8 Selector REC OUT (sólo A-S500)
Selecciona una fuente para grabar independientemente de
la posición del selector INPUT. Con ello podrá grabar la
fuente seleccionada mientras escucha otra fuente distinta
(consulte la página 9).
9 Control BASS
Aumenta o reduce la respuesta de las frecuencias bajas
(consulte la página 9).
0 Control TREBLE
Aumenta o reduce la respuesta de alta frecuencia (consulte
la página 9).
A Control BALANCE
Ajusta el balance de salida de sonido de los altavoces
izquierdo y derecho (consulte la página 9).
B Control LOUDNESS
Mantiene un rango tonal completo en todos los niveles de
volumen (consulte la página 9).
C Interruptor e indicador PURE DIRECT
Reproduce cualquier fuente de entrada con el sonido más
puro posible. El indicador anterior se ilumina al encender
la unidad (consulte la página 8).
D Control VOLUME
VOLUME +/–
Controla el nivel de salida de sonido.
No afecta al nivel REC en la grabación.
Botón MUTE (sólo mando a distancia)
Reduce el volumen actual unos 20 dB.
y
• El indicador INPUT de la fuente de entrada actual parpadea
cuando se silencia la salida.
• El silencio se anula al volver a pulsar el botón MUTE o cuando se
regula el volumen girando el control VOLUME del panel frontal o
pulsando los botones VOLUME +/– en el mando a distancia.
E Botones de control del iPhone/iPod
Controlan un iPhone/iPod conectado mediante una Dock
Universal para iPod (consulte la página 11) o un sistema
inalámbrico para iPod (consulte la página 12) opcionales
Yamaha.
F Botones de control del sintonizador Yamaha
Controla diversas funciones del sintonizador Yamaha.
Nota
Es posible que ciertos componentes y características no estén
disponibles aunque se utilice un sintonizador Yamaha. Para más
información, consulte el manual de instrucciones del componente.
G Botones de control del reproductor de CD
Yamaha
Controlan diversas funciones de un reproductor de CD Yamaha.
Nota
Es posible que ciertos componentes y características no estén
disponibles aunque se utilice un reproductor de CD Yamaha. Para
más información, consulte el manual de instrucciones del
componente.
INTRODUCCIÓN
Acerca del mando a distancia
■ Inserción de las pilas en el mando a
distancia
Pilas AA, R6, UM-3
Nota
Asegúrese de que las polaridades sean correctas. Observe la
ilustración que hay dentro del compartimento de pilas.
■ Uso del mando a distancia
El mando a distancia transmite un haz infrarrojo dirigido.
Es importante dirigir correctamente el mando a distancia
hacia el sensor del mando a distancia situado en el panel
frontal cuando lo utilice.
Alcance de 6 m
Español
Nota
La zona entre el mando a distancia y la unidad debe estar despejada.
3 Es
Page 96

CONTROLES Y FUNCIONES
Panel trasero
(Modelos para Taiwán y Centroamérica/Sudamérica)
1 Tomas de entrada de CD
Se utilizan para conectar un reproductor de CD (consulte
la página 5).
2 Tomas PHONO y terminal GND
Se utilizan para conectar un tocadiscos con cartucho MM
y para poner a tierra el terminal (consulte la página 5).
3 Tomas de entrada/salida de audio
Se utilizan para conectar componentes externos, como un
sintonizador, etc. (consulte la página 5).
4 Toma DOCK
Se utiliza para conectar una Dock Universal para iPod o
un sistema inalámbrico para iPod (consulte la página 10)
opcionales Yamaha.
5 Toma SUBWOOFER OUT
Se utiliza para conectar un subwoofer con amplificador
incorporado (consulte la página 5).
y
La toma SUBWOOFER OUT atenúa señales por encima de los
90 Hz.
6 Interruptor POWER MANAGEMENT
Activa o desactiva la función de apagado automático
(consulte la página 7).
7 Terminales SPEAKERS A/B
Se utilizan para conectar uno o dos conjuntos de altavoces
(consulte la página 5).
8 Interruptor VOLTAGE SELECTOR
(sólo Modelos para Taiwán y Centroamérica/
Sudamérica)
El interruptor VOLTAGE SELECTOR debe estar ajustado
según la tensión principal local antes de enchufar el cable
de alimentación a la toma de pared (consulte la página 7).
9 Interruptor IMPEDANCE SELECTOR
Consulte Interruptor IMPEDANCE SELECTOR en esta
página.
0 Cable de alimentación
Conecte el cable de alimentación a la toma de pared
(consulte la página 7).
■ Interruptor IMPEDANCE SELECTOR
PRECAUCIÓN
No cambie el interruptor IMPEDANCE SELECTOR
mientras la unidad esté encendida. Si lo hace, podría
averiarla.
Si la unidad no se enciende, es posible que el interruptor
IMPEDANCE SELECTOR no esté ajustado en la
posición correcta. En tal caso, desconecte el cable de
alimentación y deslice el interruptor hasta el tope de una
de las dos posiciones.
Seleccione la posición del interruptor (LOW o HIGH) en
función de la impedancia de los altavoces de su sistema.
Posición del
interruptor
HIGH
LOW
• Si utiliza un conjunto (A o B), la impedancia
de cada altavoz debe ser de 6
• Si utiliza dos conjuntos (A y B)
simultáneamente, la impedancia de cada
altavoz debe ser de 12
• Si realiza conexiones de dos cables, la
impedancia de cada altavoz debe ser de 6
superior. Para más información, consulte la
página 6.
• Si utiliza un conjunto (A o B), la impedancia
de cada altavoz debe ser de 4
• Si utiliza dos conjuntos (A y B)
simultáneamente, la impedancia de cada
altavoz debe ser de 8
• Si realiza conexiones de dos cables, la
impedancia de cada altavoz debe ser de 4
superior. Para más información, consulte la
página 6.
Nivel de impedancia
Ω o superior.
Ω o superior.
Ω o
Ω o superior.
Ω o superior.
Ω o
4 Es
Page 97

PREPARACIÓN
CONEXIONES
Conexión de los altavoces y los componentes fuente
PRECAUCIÓN
• No conecte esta unidad ni otros componentes a la toma principal de alimentación hasta que no haya finalizado las
conexiones entre todos los componentes.
• Todas las conexiones deben estar realizadas correctamente: L (izquierdo) con L, R (derecho) con R, “+” con “+” y “–” con
“–”. Si las conexiones son incorrectas, no obtendrá sonido en los altavoces. Si la polaridad de las conexiones de los
altavoces es incorrecta, el sonido no será natural y notará ausencia de graves. Consulte también el manual de instrucciones
de cada componente.
• Utilice cables RCA para los componentes de audio (excepto para las conexiones de altavoz y las conexiones de toma
DOCK).
PREPARACIÓN
Salida
de audio
Tocadiscos
GND
Reproductor
de DVD, etc.
Salida
de audio
Salida de
audio
Grabadora de
CD, etc.
Conexiones de
la toma DOCK
(consulte la
página 10)
Entrada
de audio
Altavoces A
Salida de
audio
de CD
Salida de
audio
Sintonizador SubwooferReproductor
Entrada
de audio
Pletina de
cinta, etc.
Salida de
audio
Altavoces B
y
• Las tomas PHONO están diseñadas para conectar un tocadiscos con un cartucho MM.
• Conecte el tocadiscos al terminal GND para reducir el ruido en la señal. No obstante, en algunos tocadiscos, es posible que escuche
menos ruido sin la conexión GND.
5 Es
Español
Page 98

CONEXIONES
PRECAUCIÓN
• El mando IMPEDANCE SELECTOR debe estar en la posición adecuada antes de conectar los altavoces. Para más
información, Consulte la página 4.
• No deje que los cables pelados de los altavoces se toquen entre sí ni toquen pieza metálica alguna de esta unidad.
Podría averiar la unidad y/o los altavoces.
• No conecte esta unidad ni otros componentes a la toma principal de alimentación hasta que no haya finalizado las
conexiones entre todos los componentes.
■ Conexión de doble cable
1 Quite aproximadamente 10 mm de
recubrimiento aislante en cada extremo de
cable de los altavoces y retuérzalos para
evitar cortocircuitos.
10 mm
La conexión de doble cable separa el altavoz para graves
del rango medio combinado y la sección de agudos. Un
altavoz compatible con doble cable tiene cuatro terminales
de conexión. Estos dos conjuntos de terminales permiten
dividir el altavoz en dos secciones independientes. Con
estas conexiones, los potenciadores de frecuencias medias
y altas se conectan a un conjunto de terminales, y el
potenciador de frecuencias bajas se conecta a otro
conjunto de terminales.
Esta unidad
2 Conecte el cable de los altavoces.
1 Afloje el interruptor.
2 Introduzca un cable pelado en el orificio
situado en el lateral de cada terminal.
3 Apriete el interruptor para fijar el cable.
Rojo: positivo (+)
Negro: negativo (–)
■ Conexión mediante la clavija banana
(Excepto en modelos de Asia, Reino
Unido y Europa)
Afloje el interruptor e inserte la clavija banana en el
extremo del terminal correspondiente.
Clavija banana
Altavoz
Conecte el otro altavoz al otro conjunto de terminales de
la misma forma.
PRECAUCIÓN
Al realizar conexiones de doble cable, ponga el interruptor
IMPEDANCE SELECTOR en posición HIGH o LOW
según la impedancia de los altavoces:
6 Ω o superior: HIGH
4 Ω o superior: LOW
Consulte la página 4 para obtener más información sobre
el interruptor IMPEDANCE SELECTOR.
Nota
Cuando realice conexiones de doble cable, quite los puenteados o
los cables de los altavoces.
y
Para poder utilizar las conexiones de doble cable, gire el selector
SPEAKERS hasta la posición A+B.
6 Es
Page 99

Conexión del cable de alimentación
CONEXIONES
POWER
MANAGEMENT
VOLTAGE
SELECTOR
■ Interruptor POWER MANAGEMENT
Activa o desactiva la función de apagado automático.
Cuando la función de apagado automático está activada, la
unidad pasará automáticamente al modo de espera si no se
realiza ninguna operación en 8 horas.
A la toma de pared
con el cable de
alimentación
(Modelos para Taiwán y Centroamérica/Sudamérica)
■ Conexión del cable de alimentación
Inserte el cable de alimentación en la toma de pared una
vez realizado el resto de conexiones.
PREPARACIÓN
■ Interruptor VOLTAGE SELECTOR
(sólo Modelos para Taiwán y
Centroamérica/Sudamérica)
El interruptor VOLTAGE SELECTOR del panel trasero
de la unidad debe estar ajustado al voltaje de la red local
ANTES DE conectar el cable de alimentación
suministrado a la toma de pared.
Un ajuste incorrecto del interruptor VOLTAGE
SELECTOR podría causar daños en la unidad y provocar
riesgo de incendio.
Seleccione la posición del interruptor (izquierda o derecha)
según el voltaje local utilizando un destornillador plano. Los
voltajes disponibles son 110-120/220-240 V CA, 50/60 Hz.
Español
7 Es
Page 100

FUNCIONAMIENTO
REPRODUCCIÓN Y GRABACIÓN
Reproducción de una fuente
SPEAKERS VOLUME
INPUTA
INPUT
VOLUME
5 Reproduzca la fuente de entrada
seleccionada.
6 Gire el control VOLUME en el panel frontal (o
pulse los botones VOLUME +/– en el mando
a distancia) para ajustar el nivel de salida de
sonido.
y
Puede ajustar la calidad tonal con los controles BASS, TREBLE,
BALANCE y LOUDNESS, o con el interruptor PURE DIRECT
del panel frontal.
7 Al terminar la escucha, pulse el interruptor A
del panel frontal para apagar la unidad.
y
Si se pulsa el botón A del mando a distancia mientras el botón A
del panel frontal está en posición de encendido, la unidad pasará a
modo de espera. Vuelva a pulsar el botón A para encender la
unidad.
Ajuste de la calidad tonal
VOLUMELOUDNESSTREBLE
1 Gire el control VOLUME en el panel frontal
hasta su posición máxima en sentido
antihorario.
2 Pulse el interruptor A en el panel frontal para
encender la unidad.
3 Gire el selector INPUT del panel frontal (o
pulse uno de los botones de selección INPUT
del mando a distancia) para seleccionar la
fuente de entrada que quiera escuchar.
El indicador de la fuente de entrada seleccionada se
iluminará.
4 Gire el selector SPEAKERS del panel frontal
para seleccionar SPEAKERS A, B o A+B.
Notas
• Ajuste el selector SPEAKERS a la posición A+B cuando haya
conectados dos conjuntos de altavoces utilizando conexiones de
doble cable o si utiliza dos conjuntos de altavoces al mismo
tiempo (A y B).
• Si no desea que el sonido salga por los altavoces cuando utiliza
los auriculares, ponga el selector SPEAKERS en posición OFF.
BASS BALANCE PURE
DIRECT
■ Uso del interruptor PURE DIRECT
Enruta las señales de entrada de las fuentes de audio.
Como resultado, las señales de entrada omiten el ajuste de
los controles BASS, TREBLE, BALANCE y
LOUDNESS, eliminando así las posibles alteraciones de
las señales de sonido y conseguir una calidad más directa
y perfecta en todas las fuentes de entrada.
Nota
Los controles BASS, TREBLE, BALANCE y LOUDNESS no
funcionan mientras PURE DIRECT está activado.
8 Es
 Loading...