

Xylem HYDROVAR HV2.2f, HYDROVAR HV3.11f, HYDROVAR HV3.5f, HYDROVAR HV3.7f, HYDROVAR HV3.15e Operating Instructions Manual
...Page 1

Operating Instructions
HV2.1f – HV3.11f HV3.15e – HV3.22e
HV3.30e-HV3.45e
V 2012/03A
771079342
HV2_1-3_45-V-EN-6A
English
Page 2

2
Index
1 Important safety instructions...........................................................................5
2 System Design...................................................................................................8
2.1 Pressure tank............................................................................................8
3 Technical Data...................................................................................................9
4 Dimensions and Weights ................................................................................12
5 Mechanical mounting of the HYDROVAR unit on the motor.........................16
5.1 Included mounting material ..................................................................16
5.2 Optional components ............................................................................16
5.2.1 Fittings ..................................................................................................................16
5.2.2 Bus interface.......................................................................................................... 17
5.2.3 Sensors (4-20mA) .................................................................................................. 17
5.2.4 Filter ...................................................................................................................... 17
5.2.5 Motor cables for direct-installation........................................................................ 17
5.3 Assemble Instruction .............................................................................18
6 Electrical installation and wiring....................................................................22
6.1 Means of protection ..............................................................................22
6.2 EMC-electromagnetic compatibility ......................................................23
6.3 Wiring and connections .........................................................................25
6.3.1 Main Voltage Terminals ......................................................................................... 26
6.3.2 Motor connection.................................................................................................. 28
6.3.3 Control Terminals .................................................................................................. 29
6.3.3.1 Connection examples................................................................................ 31
6.4 Selection of the switching-frequency....................................................34
6.5 Reduction of the maximum output current ..........................................34
6.6 RFI - switch .............................................................................................35
7 Programming ..................................................................................................36
7.1 Display – control panel ..........................................................................36
7.2 Function of the push buttons................................................................37
7.3 Language Selection................................................................................37
8 Parameters of the main menu ........................................................................38
9 Parameters of the Secondary Menu ...............................................................42
9.1 JOG-MODE..............................................................................................42
9.2 Window ..................................................................................................43
9.3 Ramp Hysteresis .....................................................................................43
9.4 Ramp 1: Fast acceleration time..............................................................44
Page 3

3
9.5 Ramp 2: Fast deceleration time .............................................................44
9.6 Ramp 3: Slow acceleration time ............................................................44
9.7 Ramp 4: Slow deceleration time............................................................44
9.8 Maximum Frequency..............................................................................45
9.9 Minimum Frequency ..............................................................................45
9.10 Operation at minimum frequency .......................................................46
9.11 Delay time to shut off below minimum frequency .............................46
9.12 Boost ....................................................................................................46
9.13 Sensor – Adjust ....................................................................................47
9.14 Sensor - Curve ......................................................................................47
9.15 Setting of the sensor range .................................................................47
9.16 Operation Mode...................................................................................48
9.17 Regulation mode..................................................................................49
9.18 Start Value ...........................................................................................49
9.19 2
nd
Required Value ...............................................................................50
9.20 Configuration of the pump running relay (X2/4-5-6)..........................51
9.21 Submenu Offset ...................................................................................51
9.21.1 Source of the Offset input ................................................................................... 51
9.21.2 1
st
Offset level...................................................................................................... 52
9.21.3 2
nd
Offset level..................................................................................................... 52
9.21.4 Intensity 1............................................................................................................ 52
9.21.5 Intensity 2............................................................................................................ 52
9.21.6 Example for the Offset......................................................................................... 53
9.22 Submenu Sequence control.................................................................54
9.22.1 Lift Value (actual value increase).......................................................................... 54
9.22.2 Fall Value (actual value decrease)......................................................................... 54
9.22.3 Enable sequence control...................................................................................... 55
9.22.4 Switch Interval..................................................................................................... 55
9.22.5 Source of required value...................................................................................... 55
9.22.6 Submenu Synchronous Control ........................................................................... 56
9.22.6.1 Synchronous Limit .................................................................................. 56
9.22.6.2 Synchronous Window............................................................................. 56
9.22.7 Pump status indication ........................................................................................ 57
9.22.8 Busarbit-Diag. - Counter for interface communication problems......................... 57
9.23 Submenu - RS 485 Interface ................................................................58
9.23.1 Pump Address...................................................................................................... 58
9.23.2 ADC Reference..................................................................................................... 58
9.24 Frequency Lifting .................................................................................59
9.25 Lift- Amount (Intensity) .......................................................................59
9.26 Analogue - Output ...............................................................................60
9.27 Dimension Unit ....................................................................................60
9.28 Automatic test run...............................................................................60
9.29 Submenu for manual test run .............................................................61
Page 4

4
9.29.1 Activate manual test run...................................................................................... 61
9.29.2 Test Frequency..................................................................................................... 61
9.29.3 Boost for manual test run.................................................................................... 61
9.30 Submenu - Error...................................................................................62
9.30.1 Conveyor Limit..................................................................................................... 62
9.30.2 Delay Time........................................................................................................... 62
9.30.3 Automatic Error reset .......................................................................................... 62
9.30.4 Clear Errors.......................................................................................................... 62
9.31 Operating Hours...................................................................................63
9.32 Display – Contrast ................................................................................63
9.33 Set Password........................................................................................63
9.34 Lock Function .......................................................................................63
9.35 Internal Heater .....................................................................................63
9.36 Setting Default Values .........................................................................64
9.36.1 Default Values Europe ......................................................................................... 64
9.36.2 Default Values USA.............................................................................................. 64
9.37 Saving...................................................................................................64
10 Error Signals..................................................................................................65
11 RS 485 - Interface..........................................................................................69
12 Auxiliary Texts...............................................................................................69
13 Maintenance .................................................................................................69
Follow the Pump Operating and Maintenance Instructions
We reserve the right to alter specifications
Page 5

5
1 Important safety instructions
Read and follow the operating instructions and safety
instructions carefully before starting operations!
All modifications must be done by qualified technicians!
Warns that failure to observe the precaution may cause electric shock
Warns that failure to observe the precaution may cause personal injury or
damage to property.
In addition to the instructions contained in these operating instructions please pay
attention to universal safety and accident prevention regulations.
Basically the HYDROVAR must be disconnected from the power supply before any work can
be carried out in the electrical or mechanical part of the system.
Installation, maintenance and repair work may only be carried out by trained, skilled and
qualified personnel.
Unauthorized modifications or changes to the system make all guarantees null and void.
During operation, the motor can be stopped by open a digital input or manually operated,
whereby the HYDROVAR and the motor remain under voltage. For safety reasons, the
HYDROVAR has to be disconnected from the power supply when carrying out work on the
machinery.
When the HYDROVAR is connected to power supply, the components of the
power unit as well as certain components of the master control unit are also
connected to the power supply.
Touching these components seriously endangers life!
Before removing the HYDROVAR cover the system must be disconnected from
the power supply. After switching off the power supply wait
at least 5 minutes before starting work on or in the HYDROVAR (the
capacitors in the intermediate circuit are discharged by the installed discharge
resistors first).
Voltages of up to 800 volts are possible (if there are faults it can be higher)
Page 6
6
All work, carried out at opened HYDROVAR, may only be performed by
qualified and authorized staff.
Furthermore, care must be taken not to short circuit the neighbouring
components when connecting the external control wires and that open cable
ends which are not in use are isolated.
The HYDROVAR contains electronic safety devices which switch off the control
element in the event of faults, whereby the motor has zero current but
remains energised and comes to a halt. The motor can also be halted by
mechanical blocking. If it is switched off electronically the motor is
disconnected from the mains voltage through the electronics of the
HYDROVAR but is not potential-free in the circuit.
In addition voltage fluctuations, especially power failures can cause the
system to switch off itself.
Repair of faults can cause the motor to start up again!
The system may only be put into operation when it has been grounded.
In addition, equipotential bonding of all pipes must be ensured.
The operating instructions must be read, understood and followed by the
operating personnel. We point out that we accept no liability for damage
and operating disorders which are the result of non-compliance with the
operating instructions.
High voltage tests of the HYDROVAR or the motor may damage the
electronic components! Hence bridge the in- and outgoing
terminals L1 - L2 - L3 - U- V-W before.
To avoid incorrect metering by capacitors incorporated in the electronic
part isolate the motor from the HYDROVAR.
Page 7

7
Transport, Handling, Storage, Disposal:
• Check the HYDROVAR immediately upon delivery/receipt of dispatch for damage or
missing parts
• The HYDROVAR unit must be transported carefully and by competent personnel.
• Avoid serious impacts
NOTICE!
The use of the WEEE-Symbol indicates that this product may not be treated as
household waste.
Dispose of all packing materials and the unit in accordance with local
regulations.
For more detailed information about the recycling of this product, please
contact your local authority, your household waste disposal service provider
ort he shop where you purchased the product.
CAUTION!
Lifting aids (stacker, crane, crane mounting device, lifting blocks, sling ropes,
etc.) must have the proper dimensions so that they can bear the weight of the
HYDROVAR.
CAUTION!
It is not allowed to carry the HYDROVAR around by using the connected
cables.
Do not damage the cable during transport (do not squeeze, bend or drag).
The cable ends must be kept dry.
WARNING!
• Do not stand underneath suspended loads
• take note of the general regulations on prevention of accidents
• The HYDROVAR must be secured against tipping over and slipping until it
has been fixed in its final location.
Page 8

8
2 System Design
The following diagrams show typical single pump and multi-pump systems using the
HYDROVAR control unit. Connection can be made directly to a water supply. In such a case, a
pressure switch on the suction side should be used.
Single Pump Layout Multi Pump Layout
(1) pump with HYDROVAR
(2) diaphragm tank
(3) distribution panel
(4) gate valve
(5) non return valve
(6) low water control
(7) pressure gauge
(8) pressure transmitter
(9) drain tap
2.1 Pressure tank
A diaphragm pressure tank is used on the discharge side of the pump to maintain pressure in
the line when there is no demand. This will keep the pumps from continuing to run at zero
demand. With the HYDROVAR, it isn’t necessary to have a large tank for supply purposes.
The tank must be permitted and suitable for systems pressure. The tank should have a
capacity of min. 10% of the maximum system flow rate [l/min] of one pump (also valid for
multi-pump system).
Example:
Maximum flow rate of the pump = 250 litres per minute
Minimum volume of the tank = 250 x 0.10 = 25 litres
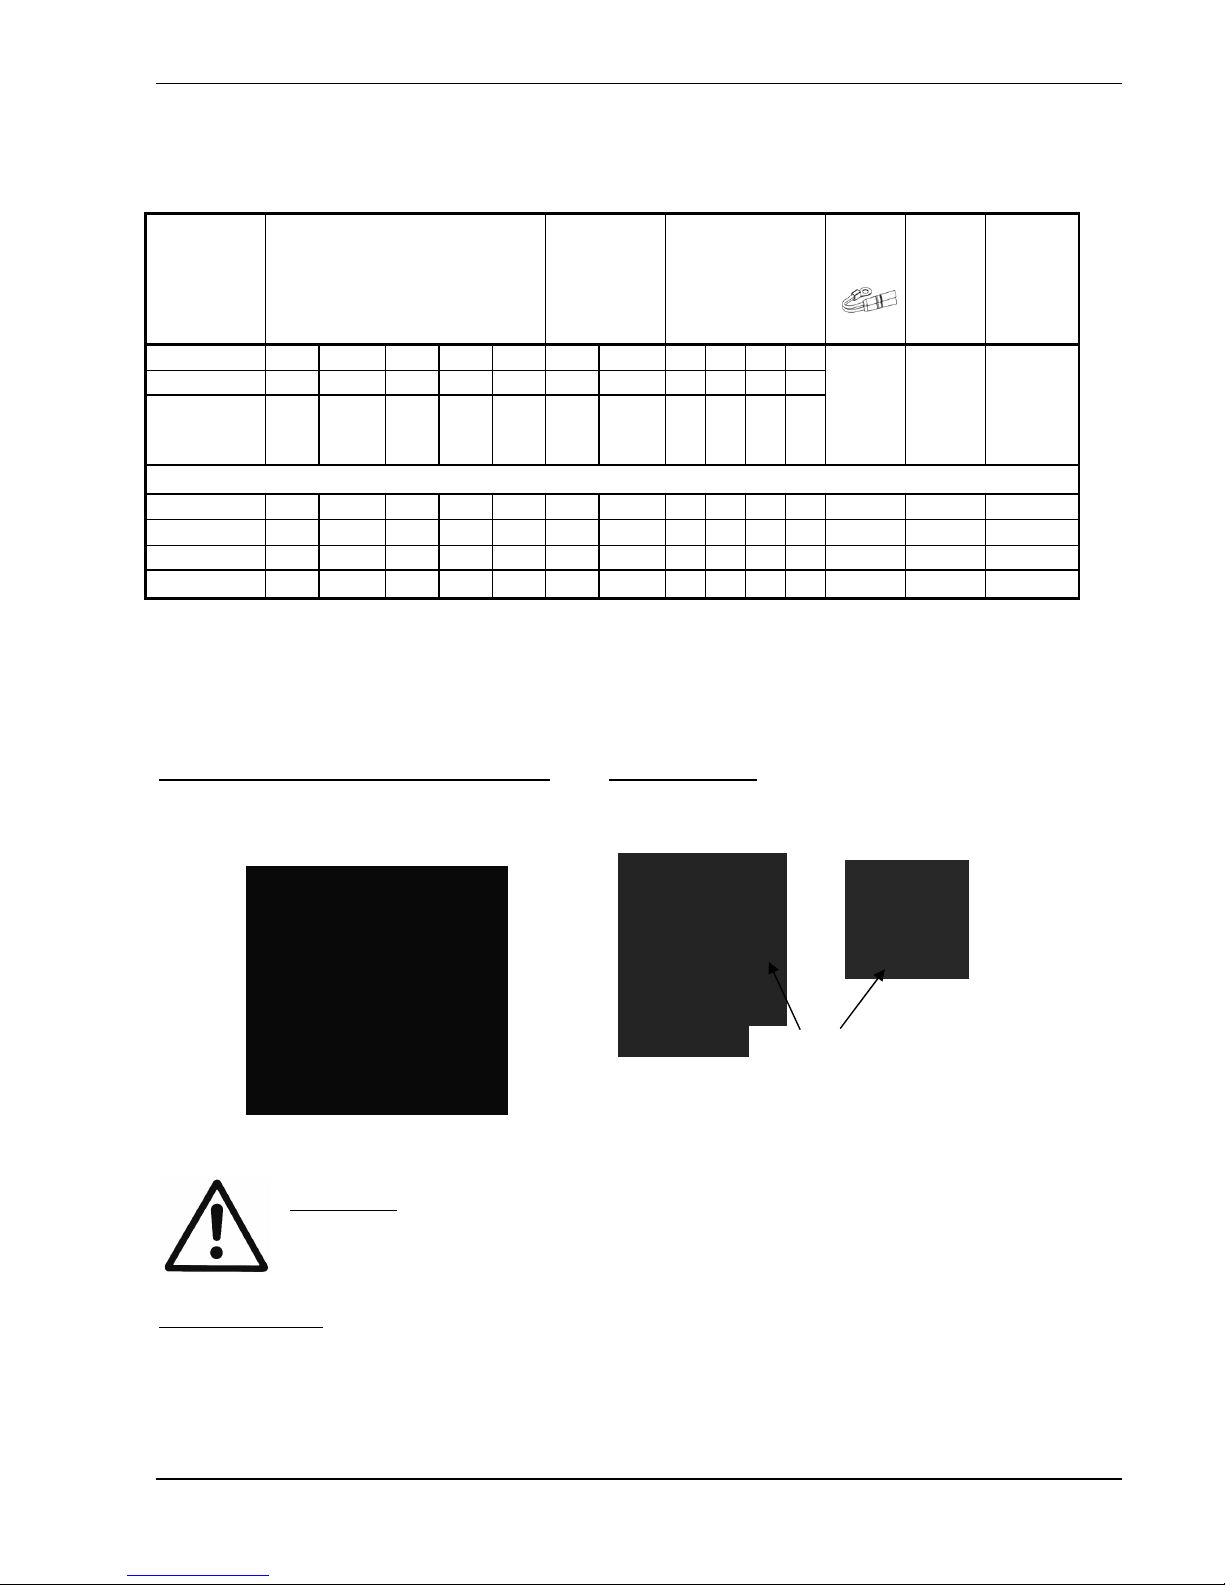
The pre-charge pressure of the tank can be determined in the following table:
NOTICE:
To check and set the right pre-charge pressure, please make the tank
pressure less before.
required pressure (bar)
precharge pressure (bar)
Page 9

9
3 Technical Data
HYDROVAR Power Supply
Type Rated
output
Voltage limits
48-62 Hz
Rated
current input
line protection
max.
Maximum
connection
HV [kW] [V] [A] [A] [mm²]
2.1f 1,5 12,7 20
2.2f 2,2
1x220-240 -10% +15%
16,5 25
10
3.2f 2,2 6,3 13
3.3f 3 7.4 13
3.4f 4
3x380-460 ± 15%
9,5 16
10
3.5f 5,5 12,6 20
3.7f 7,5 16,3 25
3.11f 11
3x380-460 ± 15%
23,2 32
10
3.15e 15 31,6 40
3.18e 18,5 39 50
3.22e 22
3x380-460 -15% +10%
46,3 63
25
3.30e 30 61 80
3.37e 37 74,7 100
3.45e 45
3x380-460 -15% +10%
89,5 125
50
HYDROVAR Output to the motor
Type Rated
Output
Max. Voltage
Output
Rated Current
output
Motor connection cables
HV [kW] [V] [A] mm²
2.1f 1,5 7
2.2f 2,2
3x Uin
10
4x1,5 – 4x4
3.2f 2,2 5,7
3.3f 3 7
3.4f 4
3x Uin
9
4x1,5 – 4x4
3.5f 5,5 13,5
3.7f 7,5 17
3.11f 11
3x Uin
23
4x2,5 – 4x6
3.15e 15 30
3.18e 18,5 37
4x6 – 4x25
3.22e 22
3x Uin
43 4x10 - 4x25
3.30e 30 58 4x25 – 4x50
3.37e 37 71
3.45e 45
3x Uin
85
3x35+1x25 – 4x50
Make sure that the Hydrovar’s electrical data match those of the electric pump.
Improper combinations may cause malfunctions and fail to ensure the protection
of the electric motor.
Page 10

10
The rated current of the motor must be lower than the rated current of the Hydrovar to
prevent overheating or shutdown due to “OVERLOAD”.
The max. output current of the HYDROVAR could reach 110% of the nominal current for
max. 10 sec. before the error “Overload” will occur.
Ambient temperature:
0° C ... +40°C
At higher temperatures a reduction of the output current or
the use of the next HYDROVAR type is necessary.
o Protect the HYDROVAR against direct sunlight!
o Outdoor installation without protection of the
HYDROVAR is not permitted!
Storage temperature:
-25° .C ... +55° C (+70°C during max. 24 hours.)
Humidity:
RH max. 50% at 40°C, unlimited
RH max. 90% at 20°C, max. 30 days per year
75% average per year (Class F)
Condensation is not permitted!
Air pollution:
The air may contain dry dust as found in workshops where
there is no excessive quantity of dust due to machines.
Excessive amounts of dust, acids, corrosive gases, salts etc.
are not permitted
Altitude:
max. 1000m above sea level
At sites over 1000 m above sea level, the maximum output
power has to be derated by 1% for every additional 100m.
If the installation site is higher than 2000 m above sea level,
please contact your local distributor.
Class of protection:
HV2.1 - HV3.11f IP 55 (NEMA 4)
HV3.15 - HV3.45e IP 54 (NEMA 12)
Certifications:
CE, UL, C-Tick, cU
L
0
10
20
30
40
50
60
70
80
90
100
110
0 102030405060
max. ambient temperature [°C]
max. output current [%]
Page 11

11
The HYDROVAR complies with the general EMC regulations and is tested according to the
following standards:
• High Frequency Field Interference
ENV 50204
• Electrostatic Discharge
EN 61000-4
• Radio interference Suppression
EN 61000-6-1 (2002)
EN 61000-6-2 (2002)
EN 61000-6-3 (2002)
EN 61000-6-4 (2002)
Page 12

12
4 Dimensions and Weights
HV 2.1/2.2/3.2/3.3/3.4 f
Type Weight HV +
WM-Kit
[kg] [kg]
HV 2.1f
HV 2.2f
6,80
HV 3.2f
HV 3.3f
HV 3.4f
5,80
8,40
All dimensions in millimetres! Drawings are not in scale!
a … centre-distance between the HYDROVAR 300 [mm]
b … expansion space for maintenance 120 [mm]
Wall-mounting version:
high: 265 [mm] width: 195 [mm] depth: 195 [mm]
Mounting space around the HYDROVAR:
150 [mm]
Page 13

13
HV 3.5/3.7/3.11 f
Type Weight HV +
WM-Kit
[kg] [kg]
HV 3.5f
HV 3.7f
HV 3.11f
10,00 12,60
All dimensions in millimetres! Drawings are not in scale!
a … centre-distance between the HYDROVAR 430 [mm]
b … expansion space for maintenance 120 [mm]
Wall-mounting version:
high: 305 [mm] width: 280 [mm] depth: 280 [mm]
Mounting space around the HYDROVAR: 150 [mm]
Page 14

14
HV 3.15/3.18/3.22 e
Type Weight HV +
WM-Kit
[kg] [kg]
HV 3.15e 40,00
HV 3.18e 40,00
HV 3.22e
29,00
40,00
All dimensions in millimetres! Drawings are not in scale!
a … centre-distance between the HYDROVAR 550 [mm]
b … expansion space for maintenance 300 [mm]
max. diameter of the motor fan cover 385 [mm]
Wall-mounting version:
Mounting space: - above: 300 [mm]
- beside: 200 [mm]
- below: 150 [mm]
Wall-mounting
version
[mm]
High 430
wide 365
deep 361
Page 15

15
HV 3.30/3.37/3.45 e
Not available as motor-mounted version!
Type Weight
[kg]
HV 3.30e 57,00
HV 3.37e 57,00
HV 3.45e 60,00
Mounting space above:
Beside and below the HYDROVAR:
500 [mm]
150 [mm]
All dimensions in millimetres!
Drawings are not in scale!
Page 16
16
5 Mechanical mounting of the HYDROVAR unit on the motor
5.1 Included mounting material
Included
components
Cable gland Cable gland Closing gland PTC
Motor
Center-
piece
Terminals
for max.
[mm²]
M M M M M PG PG M M PG PG
12 16 20 25 40 16 29 12 16 16 29
Cable
diameter
[mm]
3,5-7 4,5-10 7-13 9-17 19-28 9-14 14-25
HV-type
2.1-3.4 f 2 (3) 2 2 3 1 1 1 10
3.5-3.11 f 2 (3) 2 2 3 1 1 1 10
3.15-3.22 e 0 (2) 1 (2) 1 1 1 25
3.30-3.45 e 2 (3) 2 (2) 2 (2) 3 1 1 50
( ) max. available cable entries
5.2 Optional components
5.2.1 Fittings
Mounting clamps for motor-mounting
4 pieces per set
(only available for HV 1.15-3.11f)
Mounting ring
Available for the diameters: 140 mm
155 mm
CAUTION!
If you use a motor with plastic fan cover, you have to use a steel mounting
ring.
Distance-bushes
Distance - bushes which are mounted between the HYDROVAR and the motor fan
cover. Different bushes are available, which depends to the output and the type
of the motor. (only necessary for the types HV 3.15-3.22e)
Mounting ring
Page 17

17
45° Adapter
Available for HV 2.1 – 3.11f
Remote Display
Available for HV 2.1 – 3.11f
5.2.2 Bus interface
MODBUS
for installation in the
HYDROVAR
for external installation
– switching cabinet
for external installation –
wall mounting
5.2.3 Sensors (4-20mA)
• pressure-transducer
• differential-pressure-transducer
• level-sensor
• temperature-sensor
• flow indicator
(orifice plate, inductive flow metering)
5.2.4 Filter
• Motor-coils
• Line-coils
• EMC Filter (see chapter 6.2 EMV)
5.2.5 Motor cables for direct-installation
Available for HV 2.1f – 3.22e
Page 18

18
5.3 Assemble Instruction
HV 2.1f – HV 3.11f
Gasket
Display
(changeable by 180°)
Pressure transmitter
Motor conduit box
4 Mounting clamps
Centre bit
4 Screws
M5x60
Motorcable
HYDROVAR - cover
3 screws (to fix the cover)
PTC
Motor fan cover
Motor
Page 19

19
To remove the HYDROVAR – cover, open the 3 fastening screws.
o Be careful not to lose the small gaskets!
o Ensure that there is no water on the unit before you open the cover.
o Be careful not to damage the connecting cable!
• Position the HYDROVAR on the motor fan cover.
• Try to centre it as good as possible using the rubber centre bit.
o
If you use a motor with plastic fan cover, you have to use a steel mounting ring.
• Install the HYDROVAR on the motor fan cover by using the mounting brackets, the four
screws and the related washers.
• Make sure the converter is well centred and then tighten the four screws.
• Tighten each fastening screw until the two bottom teeth in the brackets start to grip the
fan cover.
• After connecting the electrical components, mount the cover on the HYDROVAR and
tighten the three fastening screws.
o Make sure of a good connection of the connecting cable and the ground wire.
o Control the gasket of the HYDROVAR and don’t forget to install the gaskets of the
fastening screws.
o Ensure that the mounting of the cable glands is done properly and use closing glands
for cable-bushings which aren’t used.
Page 20

20
HV 3.15e – HV 3.22e
Motor
Motorcable
Motor conduit box
Motor fan cover
4 fixing screws
Display-unit (8 fixing- screws)
HYDROVAR - cover
4 screws (to fix the cover)
Pressure transmitter
Page 21

21
• Position the HYDROVAR at the motor, try to centre it as good as possible and prepare the
boreholes for the fixing screws.
o Ensure that the position of the display is correct
If it is necessary, Display is changeable by 180°
Working process to turn the control-board:
- to turn the control-board you have to disconnect the connection to the
power- board
- open the 4 hexagonal bolts (use a 7mm socket wrench) and turn the
control-board
- mount the control-board and connect the 40 pin-plug to the power-board
o remove the motor-fan-cover if you have to install the HYDROVAR horizontal
• Mount the HYDROVAR by using the suitable fixing screws (M8), distance bushes and screw-
nuts (this should be self-locking) at the motor-fan-cover
o If the HYDROVAR is mounted horizontal, a additional bracing may be required
Page 22

22
6 Electrical installation and wiring
All installations and maintenance have to be performed by properly trained
and qualified personal with proper tools!!
In case of a failure, disconnect or switch off electrical power and wait
5 minutes for capacitor discharge before servicing the HYDROVAR.
Otherwise it can cause shock, burns or death.
6.1 Means of protection
Ask your power supply company which means of protection are required.
Applicable:
• protective earthing
• AC and DC residual current operated protective devices (RCD)
• TN systems
Protective earthing:
• Please note that there can be a current to earth due to the capacitors in the input filter.
• A suitable protection unit has to be selected (according local regulations).
Residual current device (RCD):
• When using an RCD, make sure that it also releases in the event of a short circuit inside the
DC-part of the HYDROVAR to earth!
o single phase HYDROVAR => use pulse sensitive RCDs
o three phase HYDROVAR => use AC/DC sensitive RCDs
• The RCD has to be installed according local regulations!
Automatic circuit breaker:
• Use automatic circuit breaker with C-type characteristic curve
• Rating of the line-protection (see chapter 3. Technical Data)
Internal protective devices of the HYDROVAR:
• The malfunctions short circuit, under- and over-voltage and the overheating of the
electronic components (overload) are controlled by the HYDROVAR.
External protective devices:
• Additional protective functions like motor overheat and low water protection, are
controlled by external equipment.
Page 23

23
6.2 EMC-electromagnetic compatibility
To ensure the electromagnetic compatibility the following points must be observed for cable
installation:
Earth / ground to ensure EMC
• Protection earth
It is important to connect the HYDROVAR to PE, because of the earth leakage current.
• HF earth connection
Ground cables should be as short as possible and with lowest impedance.
Signal cables
Control and signal cables should be screened types to prevent disturbances from outside.
The screen should be only connected to ground on one side; otherwise it is possible that the
screen has a ground current. The screen should be connected with cable-clips extensive to
HYDROVAR GND.
Signal cables should be installed separate from motor- and power- supply cables
If signal cables are installed in parallel to motor-cables or to power supply cables for a longer
distance, the distance between these cables should be more than 200mm.
Don’t cross power cables with control cables-if this is not possible, cross them only 90°
Motor cables
To prevent EMC and capacitive currents, we advise to install the HYDROVAR directly at the
motor. If the HYDROVAR is mounted separately, keep the motor cable as short as possible.
We recommend using a screened cable or one protected by a metal sheath.
• It is necessary to connect both ends of the screen to ground, but these connections
couldn’t replace the potential equalization.
• We suggest a cable-clip for an optimal connection of the screen.
• Pigtails should be prevented, because they raise the impedance of the screen and affect the
shielding effect at a high frequency.
• The power cable and the motor cable should be installed as distant as possible.
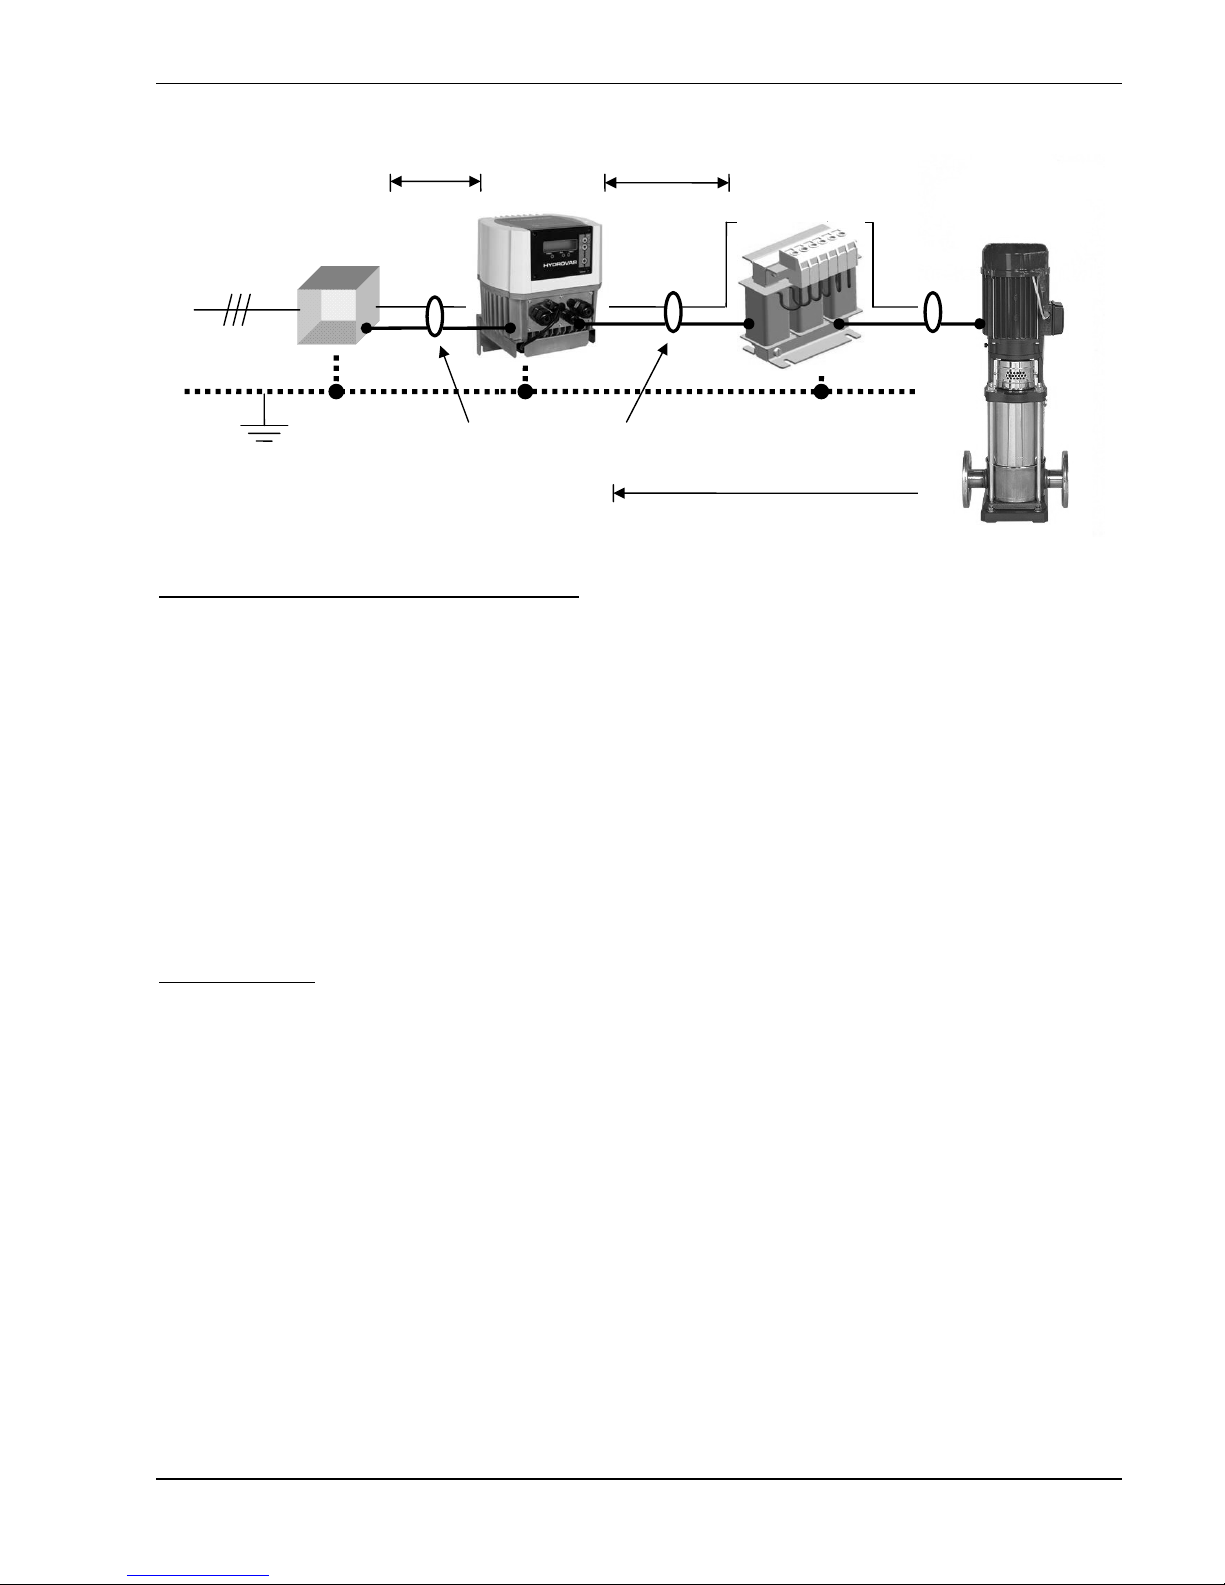
For motor cable lengths from 20 to 100 meters it is necessary to install an output filter
between the HYDROVAR and the motor as shown in the diagram below.
The filter has to be mounted as close as possible to the HYDROVAR (max. distance 2 meters).
For further information contact our sales or service department.
Page 24
24
Additional component line choke (coil)
Line coils are available as an option and should be mounted between the HYDROVAR and the
main fuse. The Line coil should be as near as possible at the HYDROVAR (max. 30 cm distance)
Advantages:
• better efficiency
• reduction of current harmonics
Applications:
• high short circuit currents
• compensation-plants without a coil
• asynchronous motors who are responsible for a voltage drop >20% of the line voltage
EMC summary
• Install potential equalization according local regulations
• Don’t install the motor-cable in parallel to the signal-cable or the power cable
• Use screened motor- and signal-cables
• Connect both ends of the screen of the motor-cable to the ground
• Connect only one end of the screen of a signal-cable to the ground
• Motor-cable as short as possible
• Use a motor-coil if the cable is longer than 20 meters (max. 100 meters motor-cable)
• Pigtails should be prevented
max. 30cm max. 2 m
Supply
Screened cable
GND
max. 100 m
motorcoil motor/pump
HYDROVAR
line filter
Page 25

25
6.3 Wiring and connections
Remove the screws holding the top cover of the HYDROVAR.
(Caution: At HV3.15e - 3.22e also the 8 screws of the display have to be removed!)
Lift off the top cover and you could see the following parts.
HV 2.1f – 3.11f
HV3.15e – HV3.45e
RS 485-terminals
Control terminal blocks
24VDC output
(max. 800mA)
for external
fan / modbus
Connection to power
board
Connection to
Display
DIP-switch
Motor connections
Power supply
3x400 VAC
RS-485 terminals
Indication LEDs
push buttons
LCD-Display
24VDC output
(max. 1A)
for external
fan / modbus
Connection to
power board
Control terminal blocks
Page 26

26
6.3.1 Main Voltage Terminals
The power supply is connected to the power section:
terminal L1+N (1 x 230 VAC, single-phase)
terminal L1+ L2 + L3 (3 x 400 VAC, three-phase)
HV 2.1f / 2.2f HV3.2f - 3.11f
HV 3.15e – 3.22e
Power Supply
3x 400VAC
Motor connection
Power Supply
1x230 VAC
Motor connection
Power Supply
3x400 VAC
Motor connection
Page 27

27
HV 3.30e – HV 3.45e
Mounting the distance bolts to enable the HYDROVAR operating with closed panel door.
This should be done before mounting the unit on the wall:
1) Affix the adhesive label on the outside of the panel door
2) Open the door and mount the adhesive label for the display and the control buttons
3) Justify the distance bolts (three pieces are included) on the control buttons you want to
control from outside when the panel door is closed
4) Close the door of the switchboard and press the control buttons to affix the distance on
the outside adhesive label.
Cable entry:
On the bottom side of the HYDROVAR there are holes for 2xM40 screwed cable gland for
motor and power supply cable and 3xM12 and 2xM16 screwed cable gland for control cables.
Cooling:
Both fans inside the HYDROVAR start when the motor is running.
The fans on the backside of the cooling body are controlled with an NTC and start when the
temperature of the power module reaches 50°C.
Optional:
Impedance coils
Power supply L1,L2,L3
400VAC
Motor connection
without
Impedance coils
Control card
Motor connection
with
Impedance coils
Page 28

28
6.3.2 Motor connection
Mounting of the PTC
Variant A : Variant B :
1. Open the cover of the conduit box and remove also the terminal block inside
2. Fix the PTC (Variant A or B)
3. Remounting of the terminal block
4. Electrical connection of the motor cables
The PTC should be fixed to the metal compound of the motor. This is necessary to
measure the right temperature of the motor!
The connection of the motor cable depends on the type of the motor and can be done in staror delta connection.
The right connection for the motor has to be selected as shown on the motor label according
to the output voltage of the HYDROVAR.
star - connection
delta - connection
U
V
H
Y
D
R
O
V
A
U
V
W
Motor block
PTC
Rubber gasket
Cover of the
conduit bo
x
H
Y
D
R
O
V
A
PTC
PTC
U
V
W
U
V
W
PTC
Page 29

29
6.3.3 Control Terminals
All control cables which are connected to the control- or RS485-terminal have to be screened.
If unscreened control cables are used, signal interference may occur and could interfere
to the function and signals of the HYDROVAR.
Don’t connect the ground of the control card to different voltage potentials.
All electronic ground terminals and GND of the RS 485-interface are connected internally.
1 GND, electronic ground
2 Actual value input 4-20mA, [Ri= 50 Ohm]
3 Power supply for external sensor [15VDC, max. 100mA]
4 GND, electronic ground
5 External on/off (release) [5VDC, Ri=10kOhm]
contacts suitable for switching <10VDC are necessary
6 GND, electronic ground
7 Low water [5VDC, Ri=10kOhm]
(e.g. incoming pressure switch or water level switch)
8 Thermal switch or PTC
(mounted in the motor terminal box) [5VDC, Ri=10kOhm]
9 Thermal switch or PTC
10 GND, electronic ground
11 Analogue output 0-10 VDC, [max. 2mA]
to show actual value or actual frequency
12 Current signal input 4-20mA
to determine the required value or the offset
13 Voltage signal input 0-10VDC or 2-10VDC
to determine the required value or the offset
Terminals:
X1/
14 Digital input for 2nd Required value
1
NC
2
CC
3
Fault signal relay
NO
4
NC
5
CC
Terminal:
(dry contacts)
X2/
6
Pump running relay
NO
[Max. 250VAC]
[Max. 220VDC]
[Max. 30VDC]
[0,3A resistive load]
[0,3A resistive load]
[2A resistive load]
NOTICE! In case of no error, the fault relay (X2/2 - X2/3) is closed!
Terminal: X5 and X6/ 1
RS 485 SIO - LOW
2
RS 485 SIO + HIGH
3
RS 485 GND
4
RS 485 + 5 VDC [max. 20mA]
supply of external interface converter
Page 30

30
Pump running signal
Fault signal
Digital input
Voltage signal input 0/2 - 10V
Current signal input 4 - 20m
A
Analogue output 0 - 10V
Ground
Ground
Actual-value-signal input 4
–
20mA
+15 VDC Transducer supply
External on/off
Low Water
Motor thermoswitch or PTC
RS 485
Page 31

31
6.3.3.1 Connection examples
Terminal X1
• Transducer – Actual-value- signal input
o Connection of a 2-wire transducer (e.g. standard pressure transducer PA22)
o Connection of an active actual-value-signal
• Actual value – Frequency indicator (how to program see chapter 9.26)
e.g.: to display the actual motor frequency
• 2
nd
Required value (how to program see chapter 9.19)
external voltage signal
or
external current signal
• Offset (how to program see chapter 9.21)
external voltage signal
or
external current signal
or
2nd actual-value-sensor 4-20mA
to enable the 2
nd
required value, close the switch!
Page 32

32
Terminal X2
• Pump running signal (how to program see chapter 9.20)
X2/ 5 and 6 closed: Î motor run indication
Î or start/stop of a fixed speed pump
• Fault signal
X2/ 1 and 2 closed: Î if there is an Fault / Error or power supply of the HYDROVAR
is cut of
Ext. 250VAC / 220VDC
Ext. 250VAC / 220VDC
Page 33

33
Terminal X5 / X6
For multi-pump applications (synch. or multicontroller) you have to connect each HYDROVAR
(max. 4) via the RS 485 interface. (Use screened cables!)
Using the optional Modbus interface, one or more HYDROVAR could communicate via the
standardized Modbus-protocol with an external-control-device (e.g. PLC).
The terminal “HV RS485“ is the RS485 interface to the HYDROVAR.
SIO-, SIO+ and GND must be connected with the corresponding terminals of the RS 485
interface of the HYDROVAR.
Caution! GND must be connected because it is the ground connection for the whole
interface.
For the power supply of the interface you have to connect the terminal of the fan on the
Modbus - interface and the HYDROVAR. (see chapter 6.3)
The second terminal on the Modbus could be used to connect a fan.
HYDROVAR 4
fan connection
Power
supply
Page 34

34
6.4 Selection of the switching-frequency
Before changing the switching frequency, disconnect the power supply,
otherwise the HYDROVAR power module could be destroyed.
A switching-frequency of 8kHz only should be selected if the HYDROVAR is mounted directly
on the motor in order to reduce the noise level.
In case of longer motor cables the switching-frequency should be decreased to reduce losses
in the cable as well as the temperature in the motor.
For applications with submersible pumps select 2,5kHz switching-frequency.
SW switching-
1 2
OFF OFF 8kHz (standard)
ON OFF 5kHz
OFF ON 4kHz
ON ON 2.5kHz
6.5 Reduction of the maximum output current
When a motor with lower nominal power is used, the max. output current should be adjusted
accordingly. Only possible for HV 2.1 f - 3.11 f
Output current [A] HV
Type
100% 85% 65% 50%
2.1 7.00 5.95 4.55 3.50
2.2 10.00 8.50 6.50 5.00
3.2 5.70 4.85 3.71 2.85
3.3 7.00 5.95 4.55 3.50
3.4 9.00 7.65 5.85 4.50
3.5 13.50 11.48 8.78 6.75
3.7 17.00 14.45 11.05 8.50
3.11 23.00 19.55 14.95 11.50
Possible
setting
SW30A SW30B SW31A SW31
B
100% ON OFF OFF OFF
85% OFF ON OFF OFF
65% OFF OFF ON OFF
50% OFF OFF OFF ON
The reduction of the maximum output
current also affects the Overload-detection!
SW 30/SW 31
DIP-Switches to
decrease the max.
output current
DIP-Switch to
select the
switching
frequency
HV 3.15e - 3.45e
HV 2.1f - 3.11f
Page 35

35
6.6 RFI - switch
For the HYDROVAR types HV2.1 – HV3.22 there are installed new additional filter capacitors,
which provides an improved filter characteristic in order to avoid RFI (Radio Frequency
Interferences) when mounting the HYDROVAR on the wall and using longer cables between
the HYDROVAR and the motor.
This filter element is switch able and is deactivated in the default setting (switch contact
opened), because for standard mounting version (motor mounted and using standard motor
cable length) the filter is not required.
The filter should be only activated in case of separate mounting (Wall mounted versions) of
the HYDROVAR.
NOTE: Due to the additional filter capacity the earth leakage current will increase, if the filter
is activated. Therefore in case of using ELCB-relays (earth-leakage circuit breakers, RCD), they
must be suitable for VFDs (suitable for protecting equipment with a DC-content in the faulty
current) as well as suitable for a high leakage current => 300mA.
HV 2.1f / 2.2f HV 3.2f – 3.11f
HV 3.15f – 3.22f Switch contact
Opened:
RFI filter function deactivated (default setting)
Closed:
RFI filter function activated (for wall mounted version)
WARNING:
The switch may not be operated in case the HYDROVAR is still connected to the
mains supply. Before changing the position of the switch (ON/OFF) you have to be sure that
the HYDROVAR is disconnected from the mains supply.
Page 36

36
7 Programming
7.1 Display – control panel
HV 2.1f – 3.11f
HV 3.15e – 3.22e
HV 3.30e – 3.45e - inside
Select
Power
Run
Fault
Select
ON/+
OFF/-
Fault
Run
Power
OFF/-
ON/+
Page 37

37
7.2 Function of the push buttons
Ï Start of the HYDROVAR or increase the value in the menu
Ð Stop of the HYDROVAR or decrease the value in the menu
¾ Short pressing: Change to next parameter in the menu
¾ + Ð Change to previous parameter in the menu
¾ Long pressing: Enter the submenu or change back to the main menu
Ï + Ð Saving of all settings
¾ + Ï Long pressing: The auxiliary texts of the actual parameter is shown
or language selection in the first window
Ð + short Ï Change to faster scrolling down of the value
Ï + short Ð Change to faster scrolling up of the value
¾ + Ð + Ï RESET of a failure by pressing all three buttons simultaneously for about
5 seconds
7.3 Language Selection
The information on the display and all parameters can be called up in the following
languages:
• German • French • Dutch
• English • Spanish
• Italian • Portuguese
To select the desired language proceed as follows:
• Shortly press ¾ + Ï simultaneously (in 1
st
display)
⇒ The actual language will now appear in the second line
• The desired language can be selected with the button Ï or Ð.
• After the language has been selected, shortly press the ¾ button and the display will
change back to the first window of the main menu.
• The selection of the language will be saved automatically
Page 38

38
8 Parameters of the main menu
After connecting the HYDROVAR to the power supply the following index will be shown:
SW-Ver: VOG 120
Date: xxxx
The current software version with the date of
programming is displayed for about 3 seconds
If the connection of terminal X1/4-X1/5 (external release contact) is open, the following
message appears:
INVERTER LOCKED
enable inverter
To start the HYDROVAR, bridge these two terminals or close the external ON/OFF switch.
If any other error occurs, see chapter 10. Error messages!
The following two windows (1st Window and Required value) depend on the selected mode:
(see chapter 9.16)
a) Active MODE = Controller: (Default setting)
1. ITT INDUSTRIES
XX.X BAR
1st display at Mode Controller
Press the ¾ button to change to the next parameter
REQUIRED VALUE 1
X.XX BAR
2.
Set the desired required pressure with either Ï or Ð
and then shortly press the ¾- button.
(Default setting 3,5 bar)
If you want to change to the 2
nd
Required Value you have to close the external contact
at terminals X1/10-X1/14.
After closing this contact, the display changes from REQUIRED VALUE 1 to
2.1 REQUIRED VALUE 2
ADC-X XX.X BAR
In this window the configuration of the 2nd required
value is shown. (see chapter 9.19)
ADC-X or INT: shows the source of the external or internal Required Value 2.
XX.X Bar: shows the actual value of the Required Value 2.
Press the ¾ button to change to the next parameter (menu 3)
Page 39

39
b) Active MODE = Actuator:
1. ITT INDUSTRIES
Frequency XX.X Hz
1st display at Mode Actuator
• In this mode an external controller is used, so the HYDROVAR will not control the set value
but will only be responsible for running the connected motor at a frequency proportional
to the value of the analogue input signal originating from the external source.
• In the “Actuator” mode, the output frequency is proportional to the input signal on
terminal X1/2 ⇒ 4-20 mA = 0 - max. frequency
• The frequency varies with fast RAMPS 1 and 2.
• The functions “Lack of water”, “Motor overheat”, “external ON/OFF” and all other internal
protections still work.
Press the ¾ button to change to the next parameter (menu 3)
c) Active MODE = Synch. Controller or Multi-controller:
1. ADR X (x) P X
XX.X Bar
1st display at the Synch. Controller or Multicontroller
mode.
ADR X Pump address (see chapter 9.23.1)
(x) Indicates the source of the required value. It is always shown at the current
HYDROVAR which delivers the active required value.
(To select the source, see chapter 9.22.5)
(x)=(1) ⇒ required value 1 of the active HYDROVAR
(x)=(2) ⇒ required value 2 of the active HYDROVAR
P X Indicates the current pump positioning within the system, where as P1 = Master
pump, P2 = 1st lag pump, and so on…
Press the ¾ button to change to the next parameter
2. REQUIRED VALUE 1
X.XX BAR
Set the desired set pressure with either Ï or Ð and
then shortly press the ¾-button.
If several HYDROVARs are connected via the RS-485 interface, one unit must be ready for
operation when the set pressure is changed, otherwise the set value will not be accepted by
the follow-up pumps. Afterwards the new required pressure has to be saved (see parameter
SAVE) in all pumps.
If you want to change to the 2nd Required Value you have to close the external contact
connected to X1/10-X1/14.
After closing this contact, the display changes from REQUIRED VALUE 1 to
2.1 REQUIRED VALUE 2
ADC-X XX.X BAR
This window shows the condition of the second
required value. (see chapter 9.19)
ADC-X or INT: shows the source of the external or internal Required Value 2.
XX.X Bar: shows the actual value of the Required Value 2.
Press the ¾ button to change to the next parameter (menu 3)
Page 40

40
d) Active MODE = Manual Control:
1. ITT INDUSTRIES
Frequency XX.X Hz
1st display at Mode Manual Control local.
Continue by pressing the ¾-button
2.
MANUAL CONTROL
X.X Hz X.XX BAR
Set the desired set pressure with either Ï or Ð and
then shortly press the ¾-button.
Press the ¾ button to change to the next parameter (menu 3)
The following parameters of the main menu are valid for all selected Modes!
3. AUTO - START
ON
Select (ON) with Ï or (OFF) with the Ð button.
If AUTO-START = ON, the HYDROVAR starts automatically after a remedy of a failure or
disconnection of the power supply.
If AUTO-START = OFF, the HYDROVAR won’t start automatically after a remedy of a failure or
disconnection of the power supply.
After remedy of the failure or reconnection of the power supply the following message is
shown:
3.1 NO AUTOSTART
disable inverter
To restart the HYDROVAR, press Ð to quit and Ï to
restart.
Press the ¾ button to change to the next parameter
Page 41

41
Error memory
All errors are only readable in English.
4. E R R O R 1
.........................
Latest error, happened on the HYDROVAR
Press the ¾ button to change to the next parameter
5. E R R O R 2
.........................
Error, happened before the latest error
Press the ¾ button to change to the next parameter
6. E R R O R 3
.........................
Error, happened before error 2
Press the ¾ button to change to the next parameter
7. E R R O R 4
.........................
Error, happened before error 3
Press the ¾ button to change to the next parameter
8. E R R O R 5
.........................
Error, happened before error 4
More information about errors, see chapter 10.
No Error … is shown if the error memory is empty and no failure happened!
Press the ¾ button to change to the next parameter
TOTAL RUN TIME
0000:00
9.
Runtime of the motor / HYDROVAR. This parameter
shows how long the motor was powered by the
HYDROVAR
Press the ¾ button to change to the next parameter
10. SAVE ???
Ï + Ð
Simultaneously press buttons Ï and Ð until...
11. SAVE ???
SAVED
appears on the display. After five seconds the
display changes back to the 1st display
NOTICE! All changes has to be saved, otherwise they would be lost in case of a
disconnection of the power supply!
Page 42

42
9 Parameters of the Secondary Menu
Before entering the secondary menu these instructions must be read
carefully to prevent incorrect settings which will cause malfunction.
All parameters can also be set during operation. Therefore you should be trained how to
use the secondary menu.
We suggest stopping the HYDROVAR by pressing Ð OFF during the first start-up.
INVERTER STOP
ON -> START
Press ¾ for 3 seconds to change to
PASSWORD
0000
Set Password (0066 = Default) by pressing Ï or Ð
NOTICE: The password must be entered at each entry into the submenu
PASSWORD
0066
Confirm by pressing ¾ and the first window of the sub
menu is shown
J O G – MODE
0.0Hz X.XX Bar
In the following chapters all available parameters of the secondary menu are listed
(on the index window there is shown the European default setting).
9.1 JOG-MODE
J O G – MODE
0.0Hz X.XX Bar
Both Actual output frequency and actual value are
shown.
• By pressing Ï or Ð in this menu, the internal controller of the HYDROVAR will be shut off
and the inverter changes to manual mode.
• With the buttons Ï and Ð you can set any constant speed, with no influence of the actual
value of the control signal!
• If this value becomes 0 Hz the HYDROVAR stop.
• If you set a frequency above 0.0 Hz, the HYDROVAR will start operating normally again in
automatic mode as soon as you change window.
Press the ¾ button to change to the next parameter
Page 43

43
The parameters Window and Ramp Hysteresis and the Ramp settings as well are responsible
for the control characteristic of the HYDROVAR and also guarantee the stop of the pumps at 0
demand in boosters and water supply stations.
9.2 Window
WINDOW
5%
• Determines the band, where the slow Ramp changes to
the fast Ramp
• Possible setting: between 0% - 100% of required value
- for steep pump-curves and
closed loop systems ~20-30%
Press the ¾ button to change to the next parameter
9.3 Ramp Hysteresis
RAMP HYSTERESIS
80%
• Determines the band, where the fast Ramp changes to
the slow Ramp or rather the change between the slow
Ramps
• Possible setting: between 0% - 100%
- for an accurate controlling
(without automatic shut-off) ~99%
Press the ¾ button to change to the next parameter
R1: Ramp 1 – speed ramp fast increase
R2: Ramp 2 – speed ramp fast decrease
R3: Ramp 3 – speed ramp slow increase
R4: Ramp 4 – speed ramp slow decrease
Pressure, speed
set rated required value
Set hysteresis %
Set hysteresis %
Window setting
in % of the
re
q
uired value
t time
Page 44

44
Ramp settings:
• Time setting of the Ramps will influence the control of the pump and shouldn’t be changed
at standard operation.
• Possible setting of each Ramp 0,05 - 1000 sec.
• The fast Ramps 1 and 2 are determined by the type (power) of the HYDROVAR.
(Default = 4 sec.; depending on the power of the HYDROVAR you should increase the time
up to 15s)
• The Ramps 3 and 4 determine the speed of the internal HYDROVAR controller and depend
on the system, that has to be controlled. (Default = 70 sec.)
To adjust the Ramps, press Ï or Ð
9.4 Ramp 1: Fast acceleration time
RAMP 1
4.0 Sec
• Excessively fast running up time may cause an error
(OVERLOAD) during the HYDROVAR is starting.
• Excessively slow running up time may cause a drop of
the outgoing pressure during operation.
Press the ¾ button to change to the next parameter
9.5 Ramp 2: Fast deceleration time
RAMP 2
4.0 Sec
• Excessively fast running down time tends to cause an
error (OVERVOLTAGE)
• Excessively slow running down time tends to generate
over pressure.
Press the ¾ button to change to the next parameter
9.6 Ramp 3: Slow acceleration time
RAMP 3
70 Sec
• A too fast running up time may lead to oscillation
and/or an error (OVERLOAD).
• A too slow running up time can cause a drop of the
outgoing pressure during variation of the demand.
Press the ¾ button to change to the next parameter
9.7 Ramp 4: Slow deceleration time
RAMP 4
70 Sec
• A too fast running down time leads to oscillation of
the HYDROVAR and thereby of the pump.
• A too slow running down time can cause pressure
fluctuations during variation of the demand.
Press the ¾ button to change to the next parameter
Page 45

45
9.8 Maximum Frequency
This parameter determines the maximum speed of the pump and at which output frequency
the HYDROVAR has its max. output voltage.
The standard setting is according to the nominal frequency of the connected motor.
MAX. FREQUENCY
50.0 Hz
Possible setting between 40 and 70 Hz
Attention:
Settings higher than 50 Hz may overload the motor!
Settings of 10% above nominal frequency cause a 33% higher power
consumption!
Press the ¾ button to change to the next parameter
9.9 Minimum Frequency
MIN. FREQUENCY
0.0 Hz
Possible setting between 0Hz and Max. frequency
At operation below the right min. frequency the HYDROVAR works with the fast Ramps.
Attention:
The min. frequency depends on the selected pump type.
Especially for borehole applications the min. frequency must be set to ~30Hz.
Press the ¾ button to change to the next parameter
Page 46

46
9.10 Operation at minimum frequency
CONFIG FMIN
f => fmin
Possible setting: f->0 or f->f
min
f->0: After reaching the required pressure the frequency will go down to the selected
MINIMUM FREQUENCY and the HYDROVAR will keep running for the selected “STOP DELAY”
time (see next parameter). After this time the HYDROVAR will stop automatically.
f->f
min
: With these setting the pump will never stop automatically. Only the frequency will go
down to the selected MINIMUM FREQUENCY. To stop the pump you have to open the
external ON/OFF (terminals X1/4 and 5) or press the Ð button.
Applications: circulation systems
The setting f->fmin can overheat the pump, when there is no flow through
the pump. => bypass line for circulation pumps!
Press the ¾ button to change to the next parameter
9.11 Delay time to shut off below minimum frequency
STOP-DELAY FMIN
5 s
Possible setting between 0 and 100s
• After running the pump for this selected time at minimum frequency, the pump will stop, if
parameter CONFIG. FMIN is set to f -> 0
• If the limit of the parameter ENABLE SEQUENCE CONTROL is exceeded and the relay
configuration is set to SIMPLE MULTICONTROLLER (see chapter 9.20), the pump running
relay (X2/4-5-6) will be closed after running the pump for this selected time.
Press the ¾ button to change to the next parameter
9.12 Boost
BOOST
5.0 %
Setting of the motor starting voltage in % of rated
voltage (0 - 25% of maximum input voltage is possible)
This value determines the characteristics of the voltage/frequency curve.
In particular, it refers to the voltage increase during the motor starting stage as a percentage
of the nominal voltage. Take care that settings are kept as low as possible so that the motor
does not become thermally overloaded at lower frequencies.
If the boost is set too low, a failure (OVERLOAD) may occur because the starting-current is too
high.
Press the ¾ button to change to the next parameter
NOTICE: Problems with shut off the pump at 0 demand (too small or no pressure tank)
may be solved by exceeding the required value during this delay-time.
Page 47

47
9.13 Sensor – Adjust
Zero point adjustment (4mA) of the transducer: Necessarily required for multi pump
applications.
SENSOR ADJUST
Ï + Ð
Make sure that the system is not pressurized.
Press buttons Ï + Ð simultaneously until a new
message appears …
SENSOR ADJUST
Adjusted
This message confirms the calibration of the
transmitter’s zero point by associating the minimum
value of the transmitter’s output signal (4mA) for
example to a pressure of zero bar.
SENSOR ADJUST
out of range
This message appears when the presence of residual
pressure in the system does not enable the calibration of
the zero point. Depressurize the system completely and
change the adjustment.
Press the ¾ button to change to the next parameter´
9.14 Sensor - Curve
SENSOR-CURVE
Linear
Internal calculation base of the actual value (4-20mA)
Possible Setting and its application:
• linear: Pressure control, differential pressure control, level, temperature and flow
control (inductive or mechanical).
• quadratic: Flow control with an orifice plate together with a differential pressure
transmitter.
Press the ¾ button to change to the next parameter
9.15 Setting of the sensor range
Before changing the senor range, you have to select the right dimension unit (see 9.27).
SENSOR RANGE
20mA = 10.0Bar
Determines the end value (=20mA) of the measuring
transmitter (e.g. 10.0 bar pressure transmitter)
Adjustable range: 20mA = 100% of the sensor range
Following values corresponds to the possible adjustable ranges!
Bar: 0,2...100 bar psi: 2,9...1450,5 psi m3/h: 4...2400m³/h
g/min: 17...10560g/min ft: max. 6-3345ft mH2O: max. 1019,5mH2O
without unit: 2-1000 %: 0...100 %
Press the ¾ button to change to the next parameter
Page 48

48
9.16 Operation Mode
MODE:
Controller
Select with the Ï and Ð buttons
Possible Settings:
Controller:
This mode should be selected if only one HYDROVAR pump is in operation and there is no
connection to any other HYDROVAR via RS485 interface.
Multicontroller:
If more than one pump should operate together via the RS485 interface (follow-up pump
control), this mode must be set.
Advantages: If the pumps are connected via RS485 interface there are the possibilities of
automatic switch over because of pumps being out of order, cyclic change of lead and lag
pumps or automatic start and stop of lag pumps following the actual demand.
Synchronous Controller:
The Synchronous Controller mode is working in the same way like the Multicontroller mode.
The only difference is that all pumps in the multi pump system are running at the same
frequency.
Advantages: In the synchronous mode the pumps are running with a better efficiency.
Actuator:
The Actuator application is only used if you have an external controller and the HYDROVAR is
used like a standard frequency converter.
In the Actuator-Mode, the internal controller is shut off, and the output frequency is
proportional to the input signal (X1/2) ⇒ 4-20 mA = 0 - f
max
.
The frequency changes with the programmed Ramps 1 and 2. The functions of low water,
thermal protection and external ON/OFF are still working.
Page 49

49
Manual Control:
If MANUAL CONTROL is selected, the parameter REQUIRED VALUE will change to MANUAL
CONTROL in the main menu, where the actual frequency and the actual value are displayed
(according to the JOG-MODE in the submenu).
• Now the frequency can be changed with the Ï and Ð buttons
• The speed of the pump will change along the fast Ramps
• After selecting the right frequency, it can be saved in the standard SAVE window
• After a supply failure, the pump will run with this selected frequency (depending on the
parameter AUTO-START) automatically.
• In the 1
st
display, the actual frequency is shown.
• CONFIG. FMIN will not work in this mode.
Attention: Driving the pump in a not allowed speed range can damage the motor or
the HYDROVAR!
Press the ¾ button to change to the next parameter
9.17 Regulation mode
REGULATION MODE
Normal
Normal: Speed is increased with falling actual value
signals. (e.g.: Control at constant output pressure)
Inverse: Speed is reduced with falling actual value
signal. (e.g.: Control at constant suction pressure or at
constant level)
Press the ¾ button to change to the next parameter
9.18 Start Value
START VALUE
disabled
This parameter gives you the start value after pump stop
in percentage of the required value.
Adjustable between disabled and sensor range.
e.g. required value: 5.0 bar
start value: 2.5 bar
If the pump system has reached the required pressure of 5.0 bar and there is no more
consumption, the HYDROVAR shuts off the pump.
When the consumption grows up and the pressure goes down the pump will normally start. If
you have selected a START VALUE of 2,5bar the pump will start after the pressure drops
below.
Press the ¾ button to change to the next parameter
Page 50

50
9.19 2
nd
Required Value
CONFIG. REQ. VAL.2
OFF
With this parameter a 2nd independent required value
can be selected and at the same time the source of it
will be determined.
The changeover between 1st and the 2nd required value can be done via the digital input,
terminal X1/14 on the control card. If this input is connected to Ground (X1/10), the 2nd
required value will be active.
Possible settings with Ï or Ð:
OFF
2nd required value is not active (Using only standard set point)
INT
Internal 2nd required value, setting according to existing required value in
the main menu, but at closed digital input (X1/14).
EXT ADC-I
The 2
nd
required value is given from the value of a current signal
(4-20mA) connected to terminals X1/12, X1/10 (Ground).
Notice:
If the incoming current signal is below 4mA, an error message
will be shown on the display and a failure is indicated (failure relay is
closed). The failure is also shown at a multi pump layout, but no failure
would be indicated (failure relay is not closed) only the master-pump will
be exchanged. If the current signal fails at all HYDROVARs, the failure
would be indicated also.
EXT ADC-U 0-10V
or
EXT ADC-U 2-10V
The 2nd required value is given from the value of a voltage signal (0-10V
or 2-10V) connected to terminals X1/13, X1/10 (Ground).
The max. value of the analogue signal is equal to the defined SENSOR RANGE.
(see chapter 9.15)
Setting the 2nd required value:
The active required value is shown in the actual display of the parameter “Required value”.
If the 2nd required value is enabled (digital input, terminal X1/14, closed), there is shown
“Required value 2” in the first line.
The second line will shown the source of the 2
nd
required value, selected in the parameter
CONFIG. REQ VAL.2, and also the actual value of this input as well.
INT: setting according the existing required value in the main menu
EXT: only display of the value of the 2
nd
analogue input signal.
In case of saving, both required values will be saved automatically.
Press the ¾ button to change to the next parameter
Page 51

51
9.20 Configuration of the pump running relay (X2/4-5-6)
RELAY CONFIG.
Run Motor
Possible selection with Ï and Ð.
• Simple Multicontr. ⇒ Allows to start/stop a fixed speed
pump.
• Run Motor ⇒ motor run indication (via the relay)
If you have selected Simple Multicontroller, the following parameters will have new additional
functions:
The start level of the lag pump you enter at the parameter “Enable Seg. Ctl.”, and the stop
value in the parameter “Synchron. Limit”. Using the parameter “Stop Delay Fmin.” you are
able to switch on the lag pump after a selectable delay time.
e.g. if the HYDROVAR controlled pump reaches the start level, the relay will closed -> fixed
speed pump switched ON. It will be switched OFF, the output frequency drops below the
defined stop level.
Press the ¾ button to change to the next parameter
9.21 Submenu Offset
The 2nd analogue input either could be used as 2nd required value or as the source for a
recalculation (offset) of the required value.
S U B M E N U
Offset
Press ¾ for about 3 seconds to enter the submenu
Press the ¾ button shortly to change to the next
parameter (-> chapter 9.22)
9.21.1 Source of the Offset input
OFFSET INPUT
Off
Possible settings with Ï or Ð
OFF
Offset deactivated
EXT ADC-I
Offset will be calculated according to the current input (4-20mA)
connected to terminals X1/12 (X1/10=Ground).
There is also the possibility to connect a 2nd actual value sensor to
terminals X1/3 (supply for the sensor) and X1/12.
Notice: If the incoming offset signal is below 4mA, an error message
will be shown on the display and a failure is indicated (failure relay
is closed). The failure is also shown at a multi pump layout, but no
failure would be indicated (failure relay is not closed) only the
master-pump will be exchanged. If the offset signal fails at all
HYDROVARs, the failure would be indicated also.
EXT ADC-U 0-10V
EXT ADC-U 2-10V
Offset will be calculated according to the voltage input (0-10V or 2-
10V) connected to terminals X1/13 (X1/10=Ground)
Press the ¾ button to change to the next parameter
Page 52

52
9.21.2 1
st
Offset level
LEVEL 1
XX.X %
The level 1 is the start level of the 1st Offset.
Adjustable between 0 and 100% of the additional
analogue input.
Press the ¾ button to change to the next parameter
9.21.3 2
nd
Offset level
LEVEL 2
XX.X %
The level 2 is the start level of the 2nd Offset.
Adjustable between 0 and 100% of the additional
analogue input.
Press the ¾ button to change to the next parameter
9.21.4 Intensity 1
INTENSITY 1
+XX.X %
Only in combination with Level 1!
This is the intensity of the 1st Offset of the required value
at the zero point of the second analogue input.
Setting range: -200% up to +200% of the sensor range
Press the ¾ button to change to the next parameter
9.21.5 Intensity 2
INTENSITY 2
+XX.X %
Only in combination with Level 2!
This is the intensity of the 2ndOffset of the required value
at the maximum point of the second analogue input.
Setting range: -200% up to +200% of the sensor range
To leave the submenu press ¾ longer than 3 seconds to change to
S U B M E N U
Offset
Press the ¾ button to change to the next parameter
Page 53

53
9.21.6 Example for the Offset
SENSOR RANGE: 20mA ≙ 10 bar
REQUIRED VALUE: 5 bar
LEVEL 1: 30% of the Offset signal
LEVEL 2: 80% of the Offset signal
INTENSITY 1: -100% ≙ -5 bar (refer to the sensor range)
INTENSITY 2: +20% ≙ +2 bar (refer to the sensor range)
At the parameter Level 1 you have entered the required value in percent from the
Offset signal input (30%), also proceed with the second level (80%).
Intensity one and two are depending on the Sensor range of the external value signal.
The Intensity 1 that you have entered is valid till you reach Level 1, after reaching Level 1 the
Required Value has no offset.
The standard Required Value will be valid till you reach the Level 2. After reaching level 2, the
new value, depending on the Intensity 2, is valid.
Press the ¾ button to change to the next parameter
Intensity 2
20%
0%
20%
40%
60%
80%
100%
0% 20% 40% 60% 80% 100%
5 bar
7 bar
+
-
0 bar
0% = 4mA (0V/2V) 100% = 20mA (10V)
Level 1
30%
Level 2
80%
Intensity 2
+20%
Intensity 1
-100%
Actual Value
in
p
ut
Required
Value 1
Offset signal
Page 54

54
9.22 Submenu Sequence control
Using the parameters in that submenu all necessary settings can be done for running a multipump system. Each parameter within this submenu must be changed only on one HYDROVAR
of the system, because it will be transferred via the RS485 interface to each connected
HYDROVAR. Up to four pumps can be connected using the integrated RS-485 interface.
S U B M E N U
Seq. Control
Press ¾ for about 3 seconds to enter the submenu
Press the ¾ button shortly to change to the next
parameter (-> chapter 9.23)
Application Example:
1) Pump 1 reaches fmax (maximum speed)
2) Pressure falls and reaches the start-value of the 2
nd
pump
(=REQUIRED VALUE–ACTU. VALUE DEC.)
ÎPump 2 is switched on automatically
3) The required value is calculated new, after starting the 2
nd
pump in the following way:
NEW REQUIRED VALUE = REQUIRED VALUE – ACTU. VALUE DEC. + ACU. VALUE INC.
Calculation of the new required value for multi pumps application (Multicontroller Mode):
k ... Number of active pumps (k >1)
p = p
set
+ (k-1)*[lift value – fall value]
• Lift value = Fall value ⇒ Pressure constant even all pumps are in operation
• Lift value > Fall value ⇒ Pressure rises when lag-pump switches on
• Lift value < Fall value ⇒ Pressure falls when lag-pump switches on
The following 3 parameters are responsible for switching ON/OFF the lag pumps and for the
calculation of the new required value as well.
9.22.1 Lift Value (actual value increase)
ACTU. VALUE INC.
0.35 Bar
Adjustable between 0 to the pre selected Sensor range
Press the ¾ button to change to the next parameter
9.22.2 Fall Value (actual value decrease)
ACTU. VALUE DEC.
0.15 BAR
Adjustable between 0 to the pre selected Sensor range
Press the ¾ button to change to the next parameter
Page 55

55
9.22.3 Enable sequence control
With this parameter you can select the desired start-value for the following pumps. If a pump
in the system reaches this release-frequency and the system pressure drops below the
“Required value” - “actual value decrease”, the next pump will start.
ENABLE SEQ. CTL.
48.0 Hz
Adjustable from 0.0 Hz to 70 Hz.
In general this release frequency should be set 1-2 Hz lower than the max. frequency.
If the following pump(s) are not necessary to cover a higher demand, but want to be used
for automatic change over to provide even wear or in case of a failure, the release frequency
must be set higher than the max. frequency.
This parameter is used also to start a fixed speed pump, when Simple Multicontr. is set.
When this frequency level is reached, the dry contact of the relay X2/5 – X2/6 will be closed.
With the parameter Stop Delay Fmin (chapter 9.11), you could select a delay time.
Press the ¾ button to change to the next parameter
9.22.4 Switch Interval
This parameter allows an automatic change over of the master pump and the following
pumps, in order to provide even wear and achieve even operating hours of the pumps.
This is the interval of time after which the starting sequence of the pumps is automatically
switched in order to ensure the uniform use of all the pumps available (the interval is based
on the operating time of the pumps, MOTOR HOURS parameter).
SWITCH INTERVAL
12 hours
Adjustable between 1 and 100 hours.
If an interval of more than 100 hours is selected, the automatic changeover is disabled.
Manual change of the master pump in the 1st display with the Ï - button.
Press the ¾ button to change to the next parameter
9.22.5 Source of required value
SOURCE REQ. VALUE
OFF
By using a 2
nd
required value in a multi-pump system,
there are different options to set the source of this value.
For selecting you have to choose the desired pump-address which should be the source of the
required value. Following adjustments are possible:
OFF, ADR1, ADR2, ADR3 and ADR4
If an additional analogue input is active, you have to enter the address where this input is
connected. If the right address is selected, the additional input is active for the whole system,
which means that only one input is necessary also for a multi-pump system.
At active Multicontroller or Synch. Controller mode, the active value (required value 1 or 2) is
shown in the centre of the display in the first line of the first window (see chapter 8c).
If “#” is shown in the second line of the display, the pump will work with a required value
from another pump in the multi-pump system. On the pump, which is the source of the
required value, no “#” is shown.
If the source of the required value is set to “OFF”, no 2
nd
required value is used, or the source
for this value is always taken of the actual master.
Press the ¾ button to change to the next parameter
Page 56

56
9.22.6 Submenu Synchronous Control
By using the synchronous control all pumps in the system maintain the set pressure by
running on the same frequency. The 2nd pump starts, when the 1st pump reaches the
release frequency (ENABLE SEQ. CONTR.) and both pumps will run synchronously. The
follow-up pump will be stopped, when the frequency drops below the set SYNCHRON.
LIMIT. This function creates a hysteresis effect which prevents the follow-up against a
frequent on/off operation.
S U B M E N U
Synch. Control
Press ¾ for about 3 seconds to enter the submenu
Press the ¾ button shortly to change to the next
parameter (-> chapter 9.22.7)
9.22.6.1 Synchronous Limit
Tip to find out the right Setting:
1. Start the first pump in JOG Mode (1st Window in the submenu), increase the
frequency till you reach the required value. Check the frequency ( = f
0
) at zero
consumption
2. Set the synchronous limit (f
0
+ 2..3 Hz)
3. Set the synchronous window between 1 or 2 Hz
(depending on the pump curve and set point).
SYNCHRON. LIMIT
0,0 Hz
Frequency limit adjustable between 0 Hz and the set
maximum frequency.
Switch off limit of the first follow-up pump. So if the frequency of both pumps is lower than
this selected value, the first follow-up pump will be switched off.
This parameter is also used for the stop value using an external fixed speed pump with
activated Simple Multicontroller in the parameter CONFIGURATION RELAY.
Press the ¾ button to change to the next parameter
9.22.6.2 Synchronous Window
SYNCHRON-WINDOW
2.0 Hz
Adjustable between 0...10 Hz
Frequency limit for switching off the next follow-up
pump.
Switching of the 3rd pump:
All 3 pumps are running with an output frequency<SYNCHRON. LIMIT+SYNCHRON-WINDOW
Switching of the 4th pump:
All 4 pumps are running with an output frequency< SYNCHRON. LIMIT+2xSYNCHRON-WINDOW
To leave the submenu press ¾ longer than 3 seconds to change to
Page 57

57
S U B M E N U
Synch. Control
Press the ¾ button to change to the next parameter
9.22.7 Pump status indication
PUMP – SEQUENCY
Adr1 disabled
Shows the status of the individual HYDROVAR in a
multipump system (adjustable between addresses 1 to 4)
The following diagnosis parameters can be also be read in this display window:
AdrX *
Address of the pump that is being read
( “*” is shown for the address of the current used pump)
hold Px Pump is stopped by the system (external on/off closed)
run Px Pump is running
stop Px Pump is stopped, because f< start frequency of the previous pump
disabled Pump not ready to start (external on/off opened, manually stopped)
Error HYDROVAR error
Fault Polling failure (RS-485 interface connection wrong or not connected)
detected Polling successful (RS-485)
Adr5
To check the communication between the HYDROVAR and a connected
external unit. (fault / detected)
X … indicates the selected pump (1-4)
Press the ¾ button to change to the next parameter
9.22.8 Busarbit-Diag. - Counter for interface communication problems
BUSARBIT-DIAG.
0
Shows the number of errors happened during the
communication attempts on the RS-485 interface.
At rising values, a malfunction of the RS-485 interface could be possible.
To leave the submenu press ¾ longer than 3 seconds to change to
S U B M E N U
Seq. Control
Press the ¾ button to change to the next parameter
Page 58

58
9.23 Submenu - RS 485 Interface
S U B M E N U
RS 485-Interface
Press ¾ for about 3 seconds to enter the submenu
Press the ¾ button shortly to change to the next
parameter (-> chapter 9.24)
9.23.1 Pump Address
PUMP-ADDRESS
OFF
If only one pump is used, the setting remains OFF.
If several pumps are connected via the RS-485 interface (max. 4) each pump must be
allocated its own pump-address number (1-4). Address 5 is reserved for an external
control device.
Each address may only be used once!
Press the ¾ button to change to the next parameter
9.23.2 ADC Reference
ADC REFERENCE
Local
Reference for the local ADC (Analogue/Digital-Converter)
or SIO (RS485 interface).
Possible Settings:
LOCAL: Actual value sensor (Terminal X1/ 1-2)
REMOTE: Actual value via RS-485 (Terminal X5 or X6/ 1-2-3)
To leave the submenu press ¾ longer than 3 seconds to change to
S U B M E N U
RS 485-Interface
Press the ¾ button to change to the next parameter
Page 59

59
9.24 Frequency Lifting
Control according to a system curve (increase of the set pressure, depending upon the
delivery rate or speed).
FREQU. – LIFTING
30.0 Hz
Adjustable between 6 Hz and the set MAXIMUM
FREQUENCY.
The setting determines the output-frequency where the set pressure starts to be increased.
The right setting should be the frequency when the pump reaches the set pressure at zero
flow. (Can be found out by using the JOG MODE)
Press the ¾ button to change to the next parameter
9.25 Lift- Amount (Intensity)
LIFT – AMOUNT
0.0 %
Adjustable from 0% to 199,9%
This value states how much the set value should be continually increased, till the maximum
speed (maximum volume) is reached.
Application example:
1) Enter the set pressure (see main menu)
2) Find out the frequency where set pressure is reached at zero demand (see Jog Mode) and
enter this value in parameter FREQU. LIFTING
3) Set desired lift at maximum speed in % of the set pressure in the parameter
LIFT-AMOUNT.
Press the ¾ button to change to the next parameter
A...set pressure
B... window
C... lift intensity in % of set
pressure
Page 60

60
9.26 Analogue - Output
ANALOG - OUT
Actual value
Analogue output 0 – 10 VDC = 0 - 100% (max. 2 mA)
(at terminal X1/11, X2/10=ground)
Possible settings:
♦ Actual value (signal at terminal X1/2)
♦ Output frequency (0 - f
max
)
Press the ¾ button to change to the next parameter
9.27 Dimension Unit
DIMENSION UNIT
Bar
Can be changed with Ï or Ð.
Adjustable units: bar, psi, m3/h, g/min, ft, mH2O, % or without unit
By changing the DIMENSION UNIT, the SENSOR RANGE (see chapter 9.15) will be
automatically calculated according to the new unit! Therefore after changing the UNIT, you
have to check the setting of the SENSOR RANGE!
Press the ¾ button to change to the next parameter
9.28 Automatic test run
TEST RUN
after 100 h.
Adjustable between 10...100 operating hours.
The test run starts the pump at the set time after the last stop for 20 seconds to a speed of
30 Hz.
Deactivating test run:
• Set 100 hours -> keep button Ï depressed, shortly press the button Ð in addition
->”deactivated” appears on the display
• To reactivate the test run, set the desired hours using the Ð button.
The test run is only active, when the pump is stopped and external on/off is closed!
Press the ¾ button to change to the next parameter
Page 61

61
9.29 Submenu for manual test run
S U B M E N U
TEST RUN man.
Press ¾ for about 3 seconds to enter the submenu
Press the ¾ button shortly to change to the next
parameter (-> chapter 9.30)
9.29.1 Activate manual test run
TEST RUN man.
Ï + Ð
By simultaneously pressing Ï + Ð a test run will be
started.
The HYDROVAR speeds up to the test frequency with Ramp1 and then decreases the speed till
stop with Ramp2.
Press the ¾ button to change to the next parameter
9.29.2 Test Frequency
TEST-FREQUENCY
30.0 Hz
Frequency for manual test run.
Can be set from 6.0 Hz up to 70,0 Hz
Press the ¾ button to change to the next parameter
9.29.3 Boost for manual test run
BOOST TEST-RUN
10.0 %.
Setting of the motor starting voltage in % of rated input
voltage (0 - 25% of maximum input voltage is possible)
To leave the submenu press ¾ longer than 3 seconds to change to
S U B M E N U
TEST RUN man.
Press the ¾ button to change to the next parameter
Page 62

62
9.30 Submenu - Error
S U B ME N U
ERRORS
Press ¾ for about 3 seconds to enter the submenu
Press the ¾ button shortly to change to the next
parameter (-> chapter 9.31)
9.30.1 Conveyor Limit
CONVEYOR-LIMIT
disabled
Adjustable between 0.00 and max. SENSOR RANGE.
• To disable the conveyor limit, press Ð till “disabled” is shown on the display. (0bar)
• An adjusted value >0 has to be reached till the programmed “DELAY TIME”.
• If this value can’t be reached, the HYDROVAR stops and the failure “VAL. RANGE
CONTR.” will be indicated.
Press the ¾ button to change to the next parameter
9.30.2 Delay Time
DELAY TIME
2 Sec
Adjustable between 0...100 Sec.
Delay time to switch-off the HYDROVAR in case the actual value drops below the conveyor
limit or a connected external low water protection opens the terminals X1/6-X1/7.
Notice: The Conveyor Limit function is also active during the start period of the pump!
Therefore the delay time has to be set higher than the duration till the pump reaches this
value also during the start of the pump!
Press the ¾ button to change to the next parameter
9.30.3 Automatic Error reset
ERROR – RESET
disabled
This parameter allows an automatic restart for 5 times in
case of a failure. To activate this function a certain delaytime (0-250sec) has to be selected by pressing the Ï
button. (not for internal “error 1-9”)
After the 5th restart the HYDROVAR will shut off definitely and an error message is shown.
(The internal counter of the automatic error reset would be decreased after each operating
hour, so if an error could be reset after 3 restarts, there are 3 restarts possible after an hour, 4
after two hours and 5 automatic restarts after 3 operating hours.)
To deactivate this parameter press the Ð button until “disabled” appears.
Press the ¾ button to change to the next parameter
9.30.4 Clear Errors
CLEAR ERRORS
0000
The error memory can be deleted by entering a
password.
For more information contact your distributor!
To leave the submenu press ¾ longer than 3 seconds to change to
S U B ME N U
ERRORS
Press the ¾ button to change to the next parameter
Page 63

63
9.31 Operating Hours
OPPERATING HOURS
0000 h.
Total time the HYDROVAR is connected to the power
supply. Reset: press Ï and Ð together, till
“TIMER-RESET” appears.
In parallel, the TOTAL RUN TIME of the motor, in the main menu would be reset.
Press the ¾ button to change to the next parameter
9.32 Display – Contrast
DISP. CONTRAST
50 %
Can be adjusted between 10 and 100% for improved
clarity of the display, depending on the installation
position.
Press the ¾ button to change to the next parameter
9.33 Set Password
SET PASSWORD
0066
The pre-set password (0066) can be changed if necessary.
Set Password by pressing Ï or Ð
If the password will be modified, it is recommended to make some notes about the new
password.
Press the ¾ button to change to the next parameter
9.34 Lock Function
LOCK FUNCTION
OFF
Possible settings with Ï or Ð
OFF: All parameters in the main menu can be changed without the need of a password.
ON: If the LOCK FUNCTION is activated, it’s not possible to make any changes in the main
menu. The HYDROVAR can be just started or stopped by using the buttons Ï and Ð
.
In order to change the set value, the LOCK FUNCTION must be reset to OFF.
Press the ¾ button to change to the next parameter
9.35 Internal Heater
HEATING
ON
Internal heating during standstill to prevent
condensation in the HYDROVAR
If “ON” is selected (should be the general configuration) a heating resistance
(approx. 10 watt) is switched on, when the motor is at a standstill and the supply of the
HYDROVAR is O.K.
Notice:
If the HYDROVAR is cut from the supply the internal heater doesn’t work!
So if the HYDROVAR isn’t used for a longer time (e.g. winter season) it shouldn’t be
disconnected from the power-supply.
Press the ¾ button to change to the next parameter
Page 64

64
9.36 Setting Default Values
S U B M E N U
DEFAULT VALUES
Press ¾ for about 3 seconds to enter the submenu
Press the ¾ button shortly to change to the next
parameter ( -> chapter 9.37)
You reset all settings to the default settings for two different areas (EUROPE or USA).
If you suspect you made a mistake by entering parameter-settings but are unable to identify
the location, you can start again from the beginning by reloading the factory settings.
9.36.1 Default Values Europe
DEFAULT EUROPE
Ï + Ð
Load the DEFAULT – PARAMETERS for Europe by
pressing the Ï + Ð for approx. 5 seconds.
(max. frequency 50 Hz, display unit = bar)
Press the ¾ button to change to the next parameter
9.36.2 Default Values USA
DEFAULT USA
Ï + Ð
Load the DEFAULT – PARAMETER for the USA by
pressing the Ï + Ð for approx. 5 seconds.
(max. frequency 60 Hz, display unit = psi)
IMPORTANT!
After reloading the default settings the display is flashing. To deactivate the
flashing you have to save this change (see next parameter).
To leave the submenu press ¾ longer than 3 seconds and change to
S U B M E N U
DEFAULT VALUES
Press the ¾ button to change to the next parameter
9.37 Saving
SAVE ???
Ï + Ð
All values must be saved (stored in an EEPROM) after
changing.
If they aren’t saved, all changes will be lost in case of a power failure!
Saving: Press Ï + Ð till the message “SAVED” is shown on the display.
After saving, the display changes automatically to the 1st display after a few seconds.
Page 65

65
10 Error Signals
The active Error messages are shown in the selected language, but the last 5 Error messages
stored in the Error memory (main menu) are displayed in English language only!
After the cause has been remedied, the error can be reset by cutting off the power supply
for >60 seconds, or pressing all three buttons (Ï,Ð and ¾) together for about 5 seconds.
All error signals are indicated at terminal X2/1-2-3 (failure relay).
If no Error is active, the relay switches on and terminals X2/2 and X2/3 are closed.
NOTICE: If “AUTO – START” is ON and automatic “ERROR-RESET” is enabled, the
HYDROVAR can start again automatically after a power failure.
Error-picture Probability cause Solution
No error-message on the display - No red LED
no AUTOSTART after
power failure
Parameter AUTOSTART is set
to “OFF”
Check Parameter AUTOSTART
Display shows INVERTER
LOCKED / ENABLE
INVERTER
external ON/OFF contact is
opened
check if switch or external contact is
closed or bridge X1/4 and X1/5
EXT ADC-I <4mA is
blinking on the display
Either 2nd Required Value or
OFFSET is active but no signal
(4-20mA) connected
check external analogue signal (on
terminals X1/10-12)
No operation even system
pressure < set pressure
Pressure higher than the start
value, regulation mode isn’t
set to NORMAL.
check parameter START VALUE
and/or REGULATION MODE
Error-message on the Display - red LED on
Lack of water Low water contact is open
• protection of incoming pressure or
min. level to less
• bridge X1/6-7, if there is no ext.
low water protection
• adjust Parameter DELAY TIME if
the failure happens only for short
time
Conveyer Limit adjustable value of
Parameter CONVEYER LIMIT
is not reached
• check booster unit, adjust
Parameter DELAY TIME
• Parameter ERROR RESET set to ON,
to enable 5 restarts
(e.g. in empty system)
Page 66

66
Motor overheat
PTC in the conduit box has
reached its release
temperature
• close X1/8 - 9 if there is no PTC
available (e.g. submersible pumps)
• no proper motor cooling
• outside temperature too high
• MOTOR OVERLOAD
• check star/delta connection
Inverter overheat too high temperature inside
the HYDROVAR
• no proper cooling
• contamination of the motor vents
• ambient temperature too high
Over voltage
DC voltage of the
HYDROVAR too high
• Parameter Ramp 2 too fast
• Power supply too high
• Voltage peaks too high
(Solution: Line filters, Line
inductance, RC-Element)
Under voltage
DC voltage of the
HYDROVAR too low
• supply voltage too low
• phase failure at the input
• asymmetry of the Phases
Overloaded
(shown on the display, but
HYDROVAR keeps on
running)
Power limit of the
HYDROVAR is reached
• check Parameter settings, and
operation point of the motor
• input power too high
• check characteristics of the
HYDROVAR
Overload
Power limit of the
HYDROVAR is exceeded
• check Parameter Ramp 1/2 (too
short) and BOOST (too low)
• check motor connection
(star/delta) and cable
• Pump blocked
• Motor turns in the wrong direction
before running
(Non return-valve defect)
• Not allowed operation point or
Parameter Max. frequency too high
• check Parameter BOOST in the
menu MANUAL TEST RUN
Output short Current rise at the output
too high
• check connection-terminals of the
HYDROVAR
• check the connection-terminal of
the motor
• check the motor-cable
• check the windings of the motor
Act. Value Sensor
Data signal on terminals
X1/2<4mA
• ACTUAL VALUE signal (pressure
transducer) faulty
• wrong connection
• Sensor (Transducer) fault
• faulty Transducer cable
Page 67

67
To quit the following errors you have to cut he power supply for >30 seconds. If the error
signal should appear again, contact customer service and provide a detailed description of
the error.
Internal errors
Error-message on the Display - red LED on
ERROR 1
EEPROM-ERROR
(corresponding data block
malfunction)
Reset - after repeated error-message
⇒ change control card
ERROR 2
Security error /
Software protection error
Reset - after repeated error-message
⇒ change control card
ERROR 3 RAM-error
Reset - after repeated error-message
⇒ change control card
ERROR 4
Button error
(e.g.: jammed key)
• check push buttons,
• Display-board may be defect
ERROR 5 EPROM-error
Reset - after repeated error-message
⇒ change control card
ERROR 6
Program error:
Watchdog error
Reset - after repeated error-message
⇒ change control card
ERROR 7
Program error:
Processor pulse error
Reset - after repeated error-message
⇒ change control card
ERROR 8
Program error:
invalid processor command
• check the installation of the cables,
connection of the screen and
potential equalization
• check earth/ground
• install additional inductances for
the signal-cables (e.g. ferrites)
ERROR 9 Counter of operation time
Reset - after repeated error-message
⇒ change control card
Page 68

68
Examples
Booster unit
Problem: no stop of the HYDROVAR
Parts to check Solution
• existing demand
• non return valve is not closed
• pre charge pressure in the pressure tank
• no correct settings of WINDOW and
RAMPHYSTERESIS
• shut down RAMP too slow
• suction line too long
• check pipes and valves
• change non return valve
• adjust according the diagram
• set WINDOW (ca.10%) and
RAMPHYSTERESIS (80-50%)
• set RAMP 2 to 4...15 sec.
• the MINIMUM FREQUENCY should be
activated for pressure increase at 0 demand
Control on constant flow
Problem: control fluctuations
Parts to check Solution
control characteristics are set to low
enlarger WINDOW and RAMPHYSTERESIS to
99% to control with RAMP 3 and 4
Circulating pump
Problem: oscillation of the motor speed
Parts to check Solution
control settings too fast
• increase RAMP 3 and 4: 100...200sec
• WINDOW (ca.20%) and
RAMPHYSTERESIS (ca.99%)
Problem: ACTUAL VALUE can't be hold
Parts to check Solution
Ramphysteresis too big RAMPHYSTERESIS: 90-99%
Submersible pumps
Problem: motor cables are too long
Solution: reduce SWITCHING FREQUENCY, BOOST: 10-20%
General
Problem: pressure fluctuations, analogue signal not constant
Solution:
• check cables and connection of the screen
• check earth connection of the Transmitter
• use screened cables
Page 69

69
11 RS 485 - Interface
Standardised Bus-Interface for communication between the HYDROVAR and/or an overruling
external control system.
The data protocol complies with ISO 1745 for RS 485 interfaces and contains the following
configurations:
Data rate: 9600 Baud (1 Start Bit, 8 Data, 1 Stop Bit)
An interface inverter RS 232/RS 485 is necessary in case communication with a 24V interface of
a PC or another external control system is wanted.
The whole interface protocol can be obtained upon request.
12 Auxiliary Texts
These are available for all parameters. To call them up press the buttons ¾ + Ï. Each
auxiliary text then appears as "running text" in the second line of the window.
13 Maintenance
The HYDROVAR does not require special maintenance.
However, the cooling fan and the vents should be freed of dust occasionally. Also the
temperature around the unit should be checked from time to time.
All modifications must be done by qualified technicians! For mounting and repairs at the
HYDROVAR, qualified service technicians are available.
Demounting:
The HYDROVAR must be disconnected from the power supply before any work can be
carried out. Look at the pump- and motor-instruction.
Notes:
When replacing the control card in a plant with more than one pump, ensure that the
software / hardware is compatible with all other control cards.
For further information, please ask your distributor!
Page 70

70
I
T
T
I
N
D
U
S
T
R
I
E
S
x
.
x
x
B
a
r
R
e
q
u
ir
e
d
V
a
lu
e
1
3
.
5
0
B
a
r
A
u
t
o
-
S
t
a
r
t
O
N
E
r
r
o
r
1
E
r
r
o
r
2
E
r
r
o
r
3
E
r
r
o
r
4
E
r
r
o
r
5
T
o
t
a
l R
u
n
T
im
e
0
0
0
0
:
0
0
S
a
v
e
?
?
+
¿
À
P
a
s
s
w
o
r
d
0
0
0
0
J
O
G
-
M
o
d
e
5
0
.
0
H
z
x
.
x
x
B
a
r
W
i
n
d
o
w
5
%
R
a
m
p
H
y
s
t
e
r
i
s
is
8
0
%
R
a
m
p
1
4
.
0
S
e
c
R
a
m
p
2
4
.
0
S
e
c
R
a
m
p
3
70
S
e
c
R
a
m
p
4
7
0
S
e
c
M
a
x
.
F
r
e
q
u
e
n
c
y
5
0
.
0
H
z
M
in
.
F
r
e
q
u
e
n
c
y
0
.
0
H
z
C
o
n
f
ig
.
F
m
i
n
F
-
>
0
S
t
o
p
-
D
e
l
a
y
F
m
in
0
S
e
k
B
o
o
s
t
5
.
0
%
S
e
n
s
o
r
A
d
j
u
s
t
?
o
u
t
o
f
r
a
n
g
e
S
e
n
s
o
r
-
C
u
r
v
e
L
in
e
a
r
S
e
n
s
o
r
R
a
n
g
e
2
0
m
A
=
1
0
.
0
B
a
r
M
o
d
e
C
o
n
t
r
o
lle
r
R
e
g
u
la
t
io
n
M
o
d
e
N
o
r
m
a
l
S
t
a
r
t
V
a
lu
e
d
is
a
b
le
d
C
o
n
f
ig
.
R
e
q
.
V
a
l.
2
O
F
F
R
e
l
a
y
C
o
n
f
i
g
.
R
u
n
M
o
t
o
r
S
U
B
M
E
N
U
O
f
f
s
e
t
O
f
f
s
e
t
-
I
n
p
u
t
O
F
F
L
e
v
e
l
1
0
.
0
%
L
e
v
e
l
2
0
.
0
%
I
n
t
e
n
s
it
y
1
+
0
.
0
%
I
n
t
e
n
s
i
t
y
2
+
0
.
0
%
S
U
B
M
E
N
U
S
e
q
.
C
o
n
t
r
o
l
A
c
t
u
.
V
a
lu
e
In
c
.
0
.
3
5
B
a
r
A
c
t
u
.
V
a
lu
e
D
e
c
.
0
.
1
5
B
a
r
E
n
a
b
le
S
e
q
.
C
T
L
.
4
8
.
0
H
z
S
w
i
t
c
h
I
n
t
e
r
v
a
l
1
2
h
o
u
r
s
S
o
u
r
c
e
R
e
q
.
V
a
lu
e
O
F
F
S
U
B
M
E
N
U
S
y
n
c
h
.
C
o
n
t
r
o
l
S
y
n
c
h
r
o
n
.
L
i
m
it
0
.
0
H
z
S
y
n
c
h
r
o
n
-
W
in
d
o
w
2
.
0
H
z
P
u
m
p
-
S
e
q
u
e
n
c
e
A
d
r
1
f
a
u
l
t
B
u
s
a
r
b
it
-
D
i
a
g
.
0
S
U
B
M
E
N
U
R
S
4
8
5
-
I
n
t
e
r
f
a
c
e
P
u
m
p
-
A
d
d
r
e
s
s
O
F
F
A
D
C
R
e
f
e
r
e
n
c
e
L
o
c
a
l
L
if
t
-
A
m
o
u
n
t
0
.
0
%
A
n
a
lo
g
-
O
u
t
A
c
t
u
a
l
V
a
lu
e
D
i
m
e
n
s
io
n
U
n
it
B
a
r
T
e
s
t
R
u
n
a
f
t
e
r
1
0
0
h
.
S
U
B
M
E
N
U
T
e
s
t
R
u
n
m
a
n
.
T
e
s
t
R
u
n
m
a
n
.
¿
À
+
T
e
s
t
-
F
r
e
q
u
e
n
c
y
3
0
.
0
H
z
B
o
o
s
t
T
e
s
t
-
R
u
n
1
0
.
0
%
S
U
B
M
E
N
U
E
r
r
o
r
C
o
n
v
e
y
o
r
-
L
im
it
d
i
s
a
b
l
e
d
D
e
la
y
T
i
m
e
2
S
e
c
E
r
r
o
r
-
R
e
s
e
t
d
i
s
a
b
l
e
d
C
le
a
r
E
r
r
o
r
s
0
0
0
0
O
p
e
r
a
t
i
n
g
H
o
u
r
s
0
0
0
0
h
.
D
is
p
.
-
C
o
n
t
r
a
s
t
5
0
%
S
e
t
P
a
s
s
w
o
r
d
0
0
6
6
H
e
a
t
in
g
O
N
D
e
f
a
u
l
t
E
u
r
o
p
e
+
¿
À
D
e
f
a
u
lt
U
S
A
+
¿
À
S
U
B
M
E
N
U
D
e
f
a
u
lt
V
a
lu
e
s
S
a
v
e
?
?
+
¿
À
L
o
c
k
F
u
n
c
t
io
n
O
F
F
S
t
a
r
t
F
r
e
q
u
.
-
L
if
t
i
n
g
3
0
.
0
H
z
Page 71

71
Notes:
“ITT” and „Engineered for life“ are registered trademarks of ITT Industries, Inc. All other trademarks or registered trademarks
are property of their respective owners.
Page 72

XYLEM WATER SOLUTIONS AUSTRIA
GMBH
Ernst-Vogel Strasse 2
2000 Stockerau
Österreich
Telefon: +43 (0) 2266 / 604
Telefax: +43 (0) 2266 / 65311
e-mail: info.austria@xylem
inc.com
web: www.xylemau
stria.co
m
Xylem Water Solutions Austria GmbH reserves the right to make modifications without prior notice.
© 2012 Xylem, Inc
 Loading...