


Instruction Manual
MODEL: XM-D749
MODEL: XM-D750
1-Din Digital Multimeida Player
7” Motorized TFT Touch Screen
AM/FM Receiver, USB , Bluetooth

IMPORTANT:
 Do not operate this digital video player while the vehicle is moving.
This is a safety feature to prevent driver distraction.
 It’s illegal in most country for the driver to view video while the vehicle is moving.
The digital video functions will be only operated when vehicle is in park and the
parking brake is engaged.
To establish a safe level:
Start your volume control at a low setting.
 Slowly increase the sound until you can hear it comfortably and clearly, and
 without distortion, we want you listening for a lifetime.
Once you have established a comfortable sound level, set the dial and leave it there.
How to Handle Discs:
Handle a disc by its edges. Do not touch the playing side.  Before inserting a disc, wipe the disc outward from the disc
  center with a clean, soft, dry and lint-free cloth. Do not use solvents or thinners such a petrol/benzene or cleaners.
After removing a disc from the disc slot, place the disc in a sleeve or case to keep it clean and prevent scratches.
Do not stick paper or tape on the disc surface. If there is glue(or  adhesive) on the disc surface, remove it before using the disc.
Precautions:
1.To reduce the risk of fire, electric shock, and interference, do not attempt to repair this product yourself. Refer all servicing to a qualified technician.
2.This digital video player is compatible with VIDEO/AUDIO discs with 12 cm size:
-DVD disc
-VCD disc
-CD, CD-R, CD-RW disc
-MP3 disc
3.Do not switch on this digital video player for long time when the vehicle’s motor is switched o . This could cause the vehicle battery to discharge and the vehicle can no longer be started.
4.Do not apply strong mechanical stress like drop, shock or any force to the TFT LCD. Do not too hard hit, press or rub the TFT LCD display surface. If the display surface is dirty, please wipe the surface softly with cotton swab or clean cloth.
5.Never place any foreign objects into the openings of this product such as disc slot, USB port, AUX IN jack. Otherwise you might damgage the slots and connectors.
6.Do not throw the battery cell of remote control into fire as this may cause an explosion. Keep battery cells out of reach of children.
1

Copyright Notes:
This product incorporates copyright protection technology that is protected by method claims of certain U.S. patents and other intellectual property rights owned by Macrovision Corporation and other rights owners.
Use of this copyright protection technology must be authorized by Macrovision Corporation, and is intended for home and other limited viewing uses only unless otherwise authorized by Macrovision Corporation. Reverse engineering or disassembly is prohibited.
Region Management information:
This product is designed and manufactured to respond to the Region Management
Information that is recorded on a DVD disc. If the Region number described on the DVD disc does not correspond to the Region number of this digital video player. the disc cannot be played on by this digital video player.
INSTALLATION:
 Before Installation:
- We recommend you to let a professional technician install the unit in vehicle. - Disconnect negative battery terminal of vehicle.
 Installation Process:
- Carefully remove the existing head unit.
- Before finally installing this product, connect wiring harness temporarily and make sure it’s all connected up properly and test the head unit if it can work properly. (Consult a qualified technician if you unsure)
- Lift the left or right top corner of the plastic outer trim ring then pull it o to remove it.
- Insert the two bracket keys into the left and right side of the chassis to separate the chassis from the housing.
- Insert the mounting sleeve into the dashboard and bend the mounting tabs out with a screwdriver. Make sure that the lock lever is flush with the mounting sleeve and it dose not project beyond it.
- Slide the digital video player carefully into the already fixated mounting sleeve till it clicks into place.
- Use a metal strap to fix the rear part of the chassis. - Connect wires as illustrated in the “wiring diagram”. - Install the plastic outer trim ring.
Note: if you need other screws to fix other terminal, please buy from your dealer according to the drilling of holes size.
2

INSTALLATION:

 Dash Board
Hex Nut |
Metal Mounting Strap |
Spring Washer |
|
Plain Washer |
Console |
Tapping Screw

Slide Bracket Housing
Hex Bolt
Screwdriver
Tabs
Key Plate
Key Plate


 Plastic Trim Out
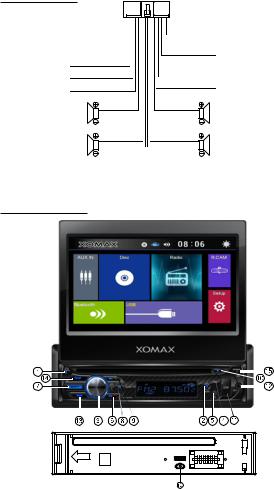
Wiring Connections:
ANT
Audio/Audio I/O Connections |
1.Rear View Video input (Yellow)
2.Subwoofer Output 2 (Green)
3.Subwoofer Output 1 (Green)
4.Video input (Yellow)
5.Left Audio input (White)
6.Right Audio input (Red)
7.Video Output 1 (Yellow)
8.Rear Left RCA Output (White)
9.Rear Right RCA Output (Red)
10.Video Output 2 (Yellow)
11.Front Left RCA Output (White)
12.Front Right RCA Output (Red)
10A
FUSE 10A
Speaker/Power Connections
Gray: Front Right (+)
Gray/Black: Front Right (-)
White: Front Left (+)
White/Black: Front Left (-)
Violet: Rear Right (+)
Violet/Black: Rear Right (-)
Green: Rear Left (+)
Green/Black: Rear Left (-)
Red: ACC 12V (+)
Yellow: BATTERY 12V (+)
Black: GND (-)
Blue: ANT (+)
Orange: BACK (+)
Pink: BRAKE (-)
Orange/Black: ILL (+)
Brown: SWC 1
Brown/white: SWC 2
Black: SWC-GND
3
Wiring Connections:
ACC |
RED |
|
|
||
B+ |
YELLOW |
|
BLACK |
||
GROUND |
||
|
||
POWER ANTENNA |
BLUE |
|
|
||
FRONT LEFT |
WHITE |
|
|
||
CHANNEL SPEAKER |
WHITE/BLACK |
|
REAR LEFT |
GREEN |
|
|
||
CHANNEL SPEAKER |
GREEN/BLACK |
BLACK |
SWC - GND |
|
BROWN |
||
SWC - 1 |
||
|
||
BROWN / WHITE SWC - 2 |
||
ORANGE |
REVERSE (+) |
|
PINK |
||
PARKING BRAKE (B-) |
||
ORANGE / BLACK |
||
ILLUMINATION (+) |
||
|
||
GRAY |
FRONT RIGHT |
|
|
||
GRAY / BLACK |
CHANNEL SPEAKER |
|
VIOLET |
REAR RIGHT |
|
|
||
VIOLET/BLACK |
CHANNEL SPEAKER |
|
Note: the ground connection cable (parking brake B-) must be connected in order for pictures to be played back to the monitor. If the cable has not been correctly connected, warning message appears on the monitor.
Control Panel Buttons:
4
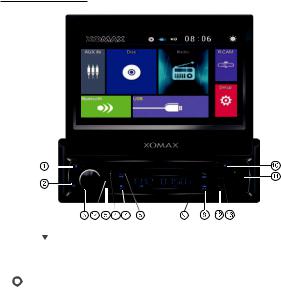
Control Panel Buttons:
1. OPEN/  BUTTON
Briefly press to slide the monitor out of slot.
Repeatedly press this button to tilt up and down the monitor.
Press and hold this button to slide the monitor inside of the slot.
2.  /MODE BUTTON
In power o mode, press it to turn on the unit. Long press it to turn o the unit.
In power on mode, short press it repeatedly to select one mode of the RADIO,
DISC, USB, Bluetooth and AUX IN(AV IN).
3. Volume KNOB / SELECT BUTTON
Rotate the VOL knob to increase or decrease the volume level.
Press the SEL button to access to audio settings: Volume, Dimmer, Bass, Treble, Balance, Fader, Loundness On/o , EQ Standard/Classic/Rock/Pop/Jazz/ Electric /User.
4. Handsfree Microphone
Uses the bluetooth handsfree system to receive your voice when calling.
5.IR REMOTE SENSOR
6.Tune Previous/ Skip Previous track, Reject and End Call ( )
)
In Radio mode, press it to tune radio frequency downward one step at a time.
Press and hold to scan strong singal radio station downward step by step.
In Disc/USB/BT music playback, press this button to skip previous track.
Press and hold this button to fast backward playback.
In BT mode, press this button to reject an income call or end a call.
5
 Loading...