

Page 1
Documents Xpress —
Xerox Web Document
®
Submission Software
Version 2.0
System Administration Guide
Documents Xpress —
Part Number 701P37979
Xerox Web Document Submission Software Version 2.0
System Administration Guide
Version 1.01
February 2002
Page 2

Xerox Corporation
Global Knowledge and Language Services
800 Phillips Road
Building 845, 845-17S
Webster, New York 14580
USA
©2002 XEROX CORPORATION. All rights reserved.
Copyright protection claimed includes all forms and matters of copyrightable
material and information now allowed by statutory or judicial law or hereinafter
granted, including without limitations, material generated from the software
programs which are displayed on the screen such as styles, templates, icons,
screen displays looks, and so on.
XEROX®, The Document Company®, the digital X®, Xerox Canada Ltd.®, Xerox
Europe®, and all identifying numbers used in connection with the Xerox products
mentioned in this publication are trademarks of XEROX CORPORATION.
All non-Xerox brands and product names are trademarks or registered
trademarks of their respective companies.
While every care has been taken in the preparation of this material, no liability
will be accepted by Xerox Corporation arising out of any inaccuracies or
omissions.
Changes are periodically made to this document. Changes, technical
inaccuracies, and typographical errors will be corrected in subsequent editions.
This product includes software developed by the Apache Software Foundation
(http://www.apache.org/).
Page 3

Table of Contents
1. Introduction...................................................................................1-1
Documents Xpress — Xerox Web Document Submission Software ...... 1-1
Intended Audience.................................................................................. 1-1
Assumptions ........................................................................................... 1-2
Conventions............................................................................................ 1-2
Related Documentation .......................................................................... 1-3
2. Product Overview .........................................................................2-1
Responsibilities....................................................................................... 2-1
System Administrator ........................................................................... 2-1
Print Shop Administrator....................................................................... 2-2
Print Shop Operator ............................................................................. 2-2
User ..................................................................................................... 2-3
3. Installation Requirements............................................................3-1
Hardware Requirements......................................................................... 3-1
Server Requirements ........................................................................... 3-1
Client Requirements............................................................................. 3-1
Software Requirements .......................................................................... 3-2
Server Requirements ........................................................................... 3-2
Client Requirements............................................................................. 3-2
Information Requirements.......................................................................3-2
YSTEM ADMINISTRATION GUIDE III
S
Page 4

ABLE OF CONTENTS
T
OCUMENTS XPRESS
D
EROX WEB DOCUMENT SUBMISSION SOFTWARE VERSION
— X
4. System Administration Tasks......................................................4-1
Adding users to the system (Chapter 6 – Managing Users).................. 4-2
Customizing the User Interface (Chapter 7 – Customizing
the User Interface).............................................................................. 4-2
Establishing a backup strategy (Chapter 9 – System Backup).............. 4-2
Setting or modifying system parameters (Chapter 10 – Configuring
System Parameters)............................................................................. 4-2
Creating or Modifying Templates (Chapter 12 – Modifying
Job Templates)................................................................................... 4-3
Maintaining the Documents Xpress System ......................................... 4-3
Installing the Xpress Print Driver on client workstations
(Chapter 8 – Installing the Xpress Print Driver)................................... 4-3
5. Starting Up and Shutting Down...................................................5-1
Starting Documents Xpress .................................................................... 5-2
Starting Documents Xpress.................................................................. 5-2
Shutting Down Documents Xpress ......................................................... 5-3
Shutting Down Documents Xpress....................................................... 5-3
2.0
6. Managing Users............................................................................6-1
User Group Directory Administration Tool (UGD Tool) ........................... 6-1
Importing Users from an External User Data File ...................................6-2
Importing an External User Data File.................................................... 6-2
Data File Format for the User File................................................... 6-3
Comma-delimited File Format......................................................... 6-3
Step 1 – Modifying or Building the User File......................................... 6-4
Step 2 – Modifying the User Field Configuration................................... 6-5
System User Fields ........................................................................ 6-5
Added Default User Fields.............................................................. 6-5
Adding a Field to the User Field Configuration................................ 6-6
Removing a Field from the User Field Configuration....................... 6-8
Step 3 – Building or Modifying the User Import Mappings .................... 6-8
IV
YSTEM ADMINISTRATION GUIDE
S
Page 5

OCUMENTS XPRESS
D
EROX WEB DOCUMENT SUBMISSION SOFTWARE VERSION
— X
2.0 T
ABLE OF CONTENTS
Creating and Saving New Mappings............................................... 6-9
Modifying User Import Mappings .................................................. 6-12
Additional Menus in UGD Admin – Import Mappings Window....... 6-15
Step 4 – Import Users .........................................................................6-15
Choices Available in the Import Users Window............................. 6-17
Troubleshooting a Faulty Import..........................................................6-18
Adding Users One at a Time.................................................................6-18
Adding a User to Documents Xpress...................................................6-18
Modifying User Information................................................................... 6-19
Modifying User Information for a Group of Users.................................6-19
Modifying User Information for a Single User ......................................6-20
Changing a User Password .................................................................. 6-21
Deleting / Inactivating Users ................................................................. 6-22
Inactivating Users................................................................................6-22
Inactivating an Individual User...................................................... 6-22
Inactivating a Group of Users ....................................................... 6-23
Assigning Privileges and Groups to Users............................................ 6-24
Resource Types ........................................................................... 6-25
Rights........................................................................................... 6-25
Viewing the Permissions and Group Memberships
Assigned to a User ............................................................................6-25
Assigning a User to a Group ...............................................................6-26
Removing Users from a Group............................................................6-27
Adding a New User Group...................................................................6-28
Adding Permissions to a Group...........................................................6-29
Deleting a User Group.........................................................................6-30
Modifying a Group Name.....................................................................6-31
7. Customizing the User Interface ...................................................7-1
Starting the UI Configuration Tool...........................................................7-1
Configurable Sections of the User Interface ........................................... 7-3
Configuring Colors................................................................................ 7-4
Configuring the Header Image.............................................................. 7-7
Configuring Text................................................................................... 7-8
YSTEM ADMINISTRATION GUIDE V
S
Page 6

ABLE OF CONTENTS
T
OCUMENTS XPRESS
D
EROX WEB DOCUMENT SUBMISSION SOFTWARE VERSION
— X
Configuring the Main Page Text ..........................................................7-10
Tips about creating the Main Page Text ....................................... 7-12
Restoring the Default User Interface Configuration .............................. 7-13
User Interface Configuration Defaults................................................... 7-14
8. Installing the Xpress Print Driver ................................................8-1
Windows 2000 Workstation XPD Setup.................................................. 8-2
Windows NT / Windows 2000 Server Setup ......................................... 8-2
Windows 2000 Professional Client Setup............................................. 8-2
Installing the XPD print driver ......................................................... 8-2
Setting the Printer Properties.......................................................... 8-3
Windows NT Workstation XPD Setup..................................................... 8-5
Windows NT Server Setup ................................................................... 8-5
Windows NT Workstation Client Setup ................................................. 8-5
Installing the XPD........................................................................... 8-5
Setting the Printer Properties.......................................................... 8-6
Windows 95 / 98 / ME XPD Setup .......................................................... 8-8
Windows NT Server Setup ................................................................... 8-8
Modifying Windows NT Server File For Windows 95 / 98 / ME
Installation...................................................................................... 8-8
Windows 95 / 98 / ME Client Setup ...................................................... 8-9
Installing the XPD........................................................................... 8-9
2.0
9. System Backup.............................................................................9-1
Backing up Documents Xpress............................................................... 9-1
Restoring Documents Xpress from a Backup ......................................... 9-2
10. Configuring System Parameters ...............................................10-1
Parameter Locations............................................................................. 10-2
Configuration Manager Tool ................................................................. 10-3
Modifying the Configuration Categories................................................ 10-4
Properties............................................................................................10-4
VI
YSTEM ADMINISTRATION GUIDE
S
Page 7

OCUMENTS XPRESS
D
EROX WEB DOCUMENT SUBMISSION SOFTWARE VERSION
— X
2.0 T
ABLE OF CONTENTS
Configuring a Properties Parameter.............................................. 10-5
Exceptions...........................................................................................10-7
Configuring an Exceptions Parameter .......................................... 10-7
System Job States ..............................................................................10-9
Configuring System Job States Parameters ................................. 10-9
Launcher ...........................................................................................10-11
11. Modifying Job and Document Options .....................................11-1
Job Control Panel Tool ......................................................................... 11-1
Modifying the Job Control Categories................................................... 11-2
Job Options: optionNames ..................................................................11-3
optionNames Properties ............................................................... 11-4
Adding an optionName................................................................. 11-5
Removing an optionName ............................................................ 11-6
Adding a Hold Value..................................................................... 11-7
Removing a Hold value................................................................. 11-9
HTML Properties .......................................................................... 11-9
Tags ........................................................................................... 11-10
Format........................................................................................ 11-10
Case Sensitivity.......................................................................... 11-11
Cut and Paste Method................................................................ 11-11
HTML Tags for Variables............................................................ 11-11
Adding a Drop-down Menu Choice ............................................. 11-11
Document Options: optionNames......................................................11-14
LPR Settings .............................................................................. 11-15
Modifying an LPR setting............................................................ 11-15
Adding an LPR setting ................................................................ 11-16
Removing an LPR setting ........................................................... 11-16
XJT Settings ............................................................................... 11-17
12. Modifying Templates ..................................................................12-1
Template Manager Tool........................................................................ 12-1
Modifying a Template ..........................................................................12-1
About Templates................................................................................... 12-2
YSTEM ADMINISTRATION GUIDE VII
S
Page 8

ABLE OF CONTENTS
T
OCUMENTS XPRESS
D
EROX WEB DOCUMENT SUBMISSION SOFTWARE VERSION
— X
Value Names.......................................................................................12-3
Looping the HTML code in coversheet.tpl and deliverysheet.tpl ... 12-3
13. Installing the Documents Xpress Link to DocuShare
(Optional) ..................................................................................13-1
Copying Documents Xpress Files to DocuShare .................................13-1
Copying the customized Documents Xpress files to DocuShare... 13-2
Modifying an existing dslib.vdf file................................................. 13-3
Changing the DocuShare Schema ......................................................13-5
14. Troubleshooting .........................................................................14-1
Debugging Apache and Tomcat ........................................................... 14-1
Debugging Documents Xpress Services............................................... 14-2
Re-initializing the User Database.......................................................... 14-2
15. Contacts and Escalation Process ............................................. 15-1
Documents Xpress Support Process....................................................15-1
Support Contacts..................................................................................15-2
2.0
16. Removing Documents Xpress 2.0 .............................................16-1
Removing Documents Xpress 2.0 ........................................................ 16-1
Removing Third-party Software ............................................................ 16-2
A. Default Configuration Manager Values ...................................... A-1
xdxConf: properties: System Properties .................................................A-2
xdxConf: properties: Application Homes.................................................A-3
xdxConf: properties: Users .....................................................................A-4
xdxConf: properties: Database ...............................................................A-5
xdxConf: properties: Documents.............................................................A-7
xdxConf: properties: Web Server............................................................A-8
VIII
YSTEM ADMINISTRATION GUIDE
S
Page 9

OCUMENTS XPRESS
D
EROX WEB DOCUMENT SUBMISSION SOFTWARE VERSION
— X
2.0 T
ABLE OF CONTENTS
xdxConf: properties: Logging................................................................A-10
xdxConf: properties: Configuration Files...............................................A-11
XdxConf: properties: Email ...................................................................A-12
xdxConf: properties: DocuShare...........................................................A-13
xdxConf: properties: Conversion...........................................................A-13
xdxConf: properties: Printing.................................................................A-14
xdxConf: properties: Pricing..................................................................A-15
xdxConf: properties: Launcher..............................................................A-16
xdxConf: properties: Licensing..............................................................A-18
xdxConf: properties: Exceptions ...........................................................A-19
xdxConf: properties: System Job States...............................................A-21
xdxConf: properties: Launcher..............................................................A-22
xdxConf: properties: Launcher: Database Server.................................A-27
xdxConf: properties: Launcher: Web Application Server.......................A-27
xdxConf: properties: Launcher: Services ..............................................A-28
B. Default Job Control Panel Values............................................... B-1
Jobs: Printshop Print Job: Job Options: optionNames............................B-2
Jobs: Printshop Print Job: Job Options: hold ..........................................B-3
Jobs: Printshop Print Job: Job Options: HTML .......................................B-4
Jobs: Printshop Print Job: Document Options: optionNames .................B-5
Jobs: Printshop Print Job: Document Options: hold................................B-7
Jobs: Printshop Print Job: Document Options: HTML.............................B-7
Jobs: Printshop Print Job: Document Options: LPR: page_sides ...........B-8
Jobs: Printshop Print Job: Document Options: LPR: paper_size............B-9
Jobs: Printshop Print Job: Document Options: XJT: paper_size.............B-9
Jobs: Printshop Print Job: Document Options: XJT: paper_color .........B-10
Jobs: Printshop Print Job: Document Options: XJT: page_sides..........B-11
YSTEM ADMINISTRATION GUIDE IX
S
Page 10

ABLE OF CONTENTS
T
OCUMENTS XPRESS
D
EROX WEB DOCUMENT SUBMISSION SOFTWARE VERSION
— X
Jobs: Printshop Print Job: Document Options: XJT: paper_weight.......B-11
Jobs: Printshop Print Job: Document Options: XJT: stapling................B-12
Jobs: Printshop Print Job: Document Options: XJT:
front_cover_paper_color.......................................................................B-12
Jobs: Printshop Print Job: Document Options: XJT:
back_cover_paper_color.......................................................................B-13
Index ...................................................................................... Index-1
2.0
X
YSTEM ADMINISTRATION GUIDE
S
Page 11

1. Introduction
This chapter describes Documents Xpress — Xerox Web Document
Submission Software Version 2.0 and how to use this manual.
Documents Xpress — Xerox Web Document Submission Software
Documents Xpress allows end users to submit print jobs electronically
using industry standard browsers. Once submitted, production personnel
efficiently update job status as documents move through the production
cycle, providing users with information about their jobs. Web-based
printing generates cost savings and improvements in quality, productivity,
and turnaround time.
The system uses several services that can be loaded on one or more
servers, depending on the print shop configuration.
Intended Audience
This manual is intended for use by personnel who are responsible for the
administration of the Documents Xpress 2.0 system.
YSTEM ADMINISTRATION GUIDE
S
1-1
Page 12

NTRODUCTION
I
Assumptions
Conventions
OCUMENTS XPRESS
D
EROX WEB DOCUMENT SUBMISSION SOFTWARE VERSION
— X
The person administering Documents Xpress should have experience in
the following areas:
• Documents Xpress 2.0
• Windows NT server and / or Windows 2000 server administration
• Applicable workstation operating systems experience
• Hypertext Markup Language (HTML)
• Extensible Markup Language (XML)
• JavaServer Pages (JSP)
• Structured Query Language (SQL)
This guide uses the following conventions:
2.0
• Menu items and buttons appear in bold text.
• Screen, text box, and drop-down list titles are spelled and punctuated
exactly as they appear on the screen.
• Document titles appear in italics.
• Content representative of text that is displayed on a computer monitor
is displayed in Courier New font and enclosed in a shaded table as
shown in Table 1-1.
Table 1-1. Example of text displayed on a computer monitor
INSERT INTO Field {field_name,custom_name}
1-2 S
YSTEM ADMINISTRATION GUIDE
Page 13

OCUMENTS XPRESS
D
Related Documentation
EROX WEB DOCUMENT SUBMISSION SOFTWARE VERSION
— X
2.0 I
The following manuals provide further information on the
Documents Xpress system:
• Documents Xpress — Xerox Web Document Submission Software
Version 2.0 Product Overview Guide – 701P37980
• Documents Xpress — Xerox Web Document Submission Software
Version 2.0 Installation Planning Guide – 701P37977
• Documents Xpress — Xerox Web Document Submission Software
Version 2.0 Installation and Configuration Guide – 701P37978
• Documents Xpress — Xerox Web Document Submission Software
Version 2.0 Product Overview Training – 701P37981
Note: Operator / Administrator and User instructions are available as
online help while using the Documents Xpress system.
NTRODUCTION
YSTEM ADMINISTRATION GUIDE
S
1-3
Page 14

Page 15

2. Product Overview
Documents Xpress is a web-based application used to submit and track
jobs.
System users access the software via three web interfaces:
• A User interface for submitting print jobs
• An Operator interface for printing jobs
• A Printer Administrator interface for setting up printers and templates,
customizing the user interface, and establishing pricing
Responsibilities
System Administrator
The System Administrator manages user, operator, and print shop
administrative permissions for a print shop installation. Specific tasks
include:
• Managing Documents Xpress software
• Customizing the Documents Xpress user interface
• Managing user / operator permissions for a single print shop
The System Administrator will have a detailed understanding how the
Documents Xpress software works.
YSTEM ADMINISTRATION GUIDE
S
2-1
Page 16

RODUCT OVERVIEW
P
OCUMENTS XPRESS—XEROX WEB DOCUMENT SUBMISSION SOFTWARE VERSION
D
Print Shop Administrator
The Printer Administrator is a user who manages a print shop. Specific
tasks include:
• Establishing specific print shop policies
• Configuring printers
• Generating reports using Documents Xpress tools
• Load pricing data into Documents Xpress
The Print Shop Administrator must understand how to configure a printer
and how printer communications work.
Print Shop Operator
The Print Shop Operator is a user who manages the printing workflow in
a print shop. Specific tasks include:
• Printing jobs sent by end users
• Modifying the job status as jobs move through the workflow
• Distributing printed materials
2.0
The Print Shop Operator must have detailed knowledge of scheduling
and prioritizing print jobs as well as a solid understanding of the
capabilities and capacities of the print shop.
2-2 S
YSTEM ADMINISTRATION GUIDE
Page 17

OCUMENTS XPRESS—XEROX WEB DOCUMENT SUBMISSION SOFTWARE VERSION
D
User
The User submits documents and jobs to Documents Xpress over the
Internet using a web browser, the Xpress Print Driver (XPD), or through
DocuShare. Specific tasks include:
• Using Documents Xpress as the interface to the print shop
• Uploading documents into Documents Xpress
• Requesting printing and conversion services using
Documents Xpress
• Converting documents to PDF format using Documents Xpress
The User must be knowledgeable about basic web browser use, general
Internet use (downloading, uploading, and navigation), and printer driver
installation.
2.0 P
RODUCT OVERVIEW
YSTEM ADMINISTRATION GUIDE
S
2-3
Page 18

Page 19

3. Installation Requirements
Documents Xpress requires a specific combination of hardware, software,
and information to ensure a successful installation. These requirements
are documented in the Documents Xpress — Xerox Web Document
Submission Software Installation Planning Guide.
These installation instructions assume that the Documents Xpress server
has had the proper operating system installed and has a working
connection to the Internet.
Hardware Requirements
Server Requirements
• One Windows NT 4.0 or Windows 2000 server
• 9-GB hard disk
• 512-MB random access memory (RAM)
• One 10 / 100 MBPS network interface card (NIC)
• One available drop on a 100-MBPS network
• Simple Mail Transfer Protocol (SMTP) server supporting Anonymous
SMTP connections for outgoing mail
• An uninterruptible power supply (UPS) for the server
Client Requirements
YSTEM ADMINISTRATION GUIDE
S
• Workstation capable of using a supported operating system and a
supported browser
3-1
Page 20

NSTALLATION REQUIREMENTS
I
Software Requirements
Server Requirements
Client Requirements
OCUMENTS XPRESS—XEROX WEB DOCUMENT SUBMISSION SOFTWARE VERSION
D
2.0
• Microsoft Windows NT Server 4.0 or Microsoft Windows 2000 Server
• Microsoft TCP / IP Printing service (LPR service) installed (Windows
NT Server 4.0 only)
• Microsoft Office XP
• Adobe Acrobat Reader
• Documents Xpress software
• Internet Explorer 5.5 (or later) or Netscape Navigator 4.75 (or later)
• WinZip or equivalent
• Any one of the following operating systems:
• Windows NT Workstation 4.0
• Windows 2000 Professional
• Windows 95 / 98 / ME
• Adobe Acrobat Reader
• Internet Explorer 5.5 (or later) or Netscape Navigator 4.75 (or later)
• WinZip or equivalent
Information Requirements
• See the Documents Xpress — Xerox Web Document Submission
Software Version 2.0 – Installation Planning Guide for a complete list
of the information requirements.
3-2 S
YSTEM ADMINISTRATION GUIDE
Page 21

4. System Administration Tasks
This chapter outlines tasks that must take place after installation. Most of
these are ongoing System Administrator tasks. Figure 4-1 shows the post
installation process.
Figure 4-1. Post installation process
Post installation
process
1. Add users to the system
2. Customize the User
Inte rface
3. Establish back up
procedures
4. Set / modify system
parameters
5. Maintain XDX system
6. Install XPD on clie nt
workstations
YSTEM ADMINISTRATION GUIDE
S
4-1
Page 22

YSTEM ADMINISTRATION TASKS
S
Adding users to the system (Chapter 6 – Managing Users)
Customizing the User Interface (Chapter 7 – Customizing the User Interface)
Establishing a backup strategy (Chapter 9 – System Backup)
OCUMENTS XPRESS—XEROX WEB DOCUMENT SUBMISSION SOFTWARE VERSION
D
2.0
Users must be added to the system and assigned proper Group
Memberships and Permissions. These tasks are accomplished through
the User Group Directory (UGD) Admin tool in the Xerox Documents
Xpress (XDX) Control Center.
As installed, Documents Xpress has a generic user interface. The existing
interface can be customized by using the User Interface (UI) Config tool
in the XDX Control Center.
It is important to establish a backup strategy to protect the system and the
customers using Documents Xpress. The instructions given in the System
Backup chapter are generic, but provide enough information to back up
the correct files.
Setting or modifying system parameters (Chapter 10 – Configuring System Parameters)
The Configuration Manager tool in the XDX Control Center allows system
parameters must be modified should the need arise. The Configuring
Parameters chapter details how to make these changes.
4-2 S
YSTEM ADMINISTRATION GUIDE
Page 23

OCUMENTS XPRESS—XEROX WEB DOCUMENT SUBMISSION SOFTWARE VERSION
D
Creating or Modifying Templates (Chapter 12 – Modifying Job Templates)
The Template Manager tool allows the System Administrator to create or
modify cover sheet and delivery sheet templates. The templates can be
modified at any time to meet the needs of a customer
Maintaining the Documents Xpress System
There is no chapter dedicated to this topic, as everything in this guide
relates to the care and maintenance of the Documents Xpress system. It
is the responsibility of the System Administrator to ensure the system is
operating properly.
Installing the Xpress Print Driver on client workstations (Chapter 8 – Installing the Xpress Print Driver)
2.0 S
YSTEM ADMINISTRATION TASKS
Instructions are available online for users to install the Xpress Print Driver
(XPD) on their own client workstation. For users that are uneasy with the
process, it is repeated here for the System Administrator.
The XPD driver for Windows 95 / 98 / ME must be updated on the
Documents Xpress server before any of these clients can use the driver.
See Chapter 8 for more details.
YSTEM ADMINISTRATION GUIDE
S
4-3
Page 24

Page 25
5. Starting Up and Shutting Down
The XDX Control Center application is used to start and stop the various
Documents Xpress components. When starting Documents Xpress it is
necessary to go the server and run the Control Center.
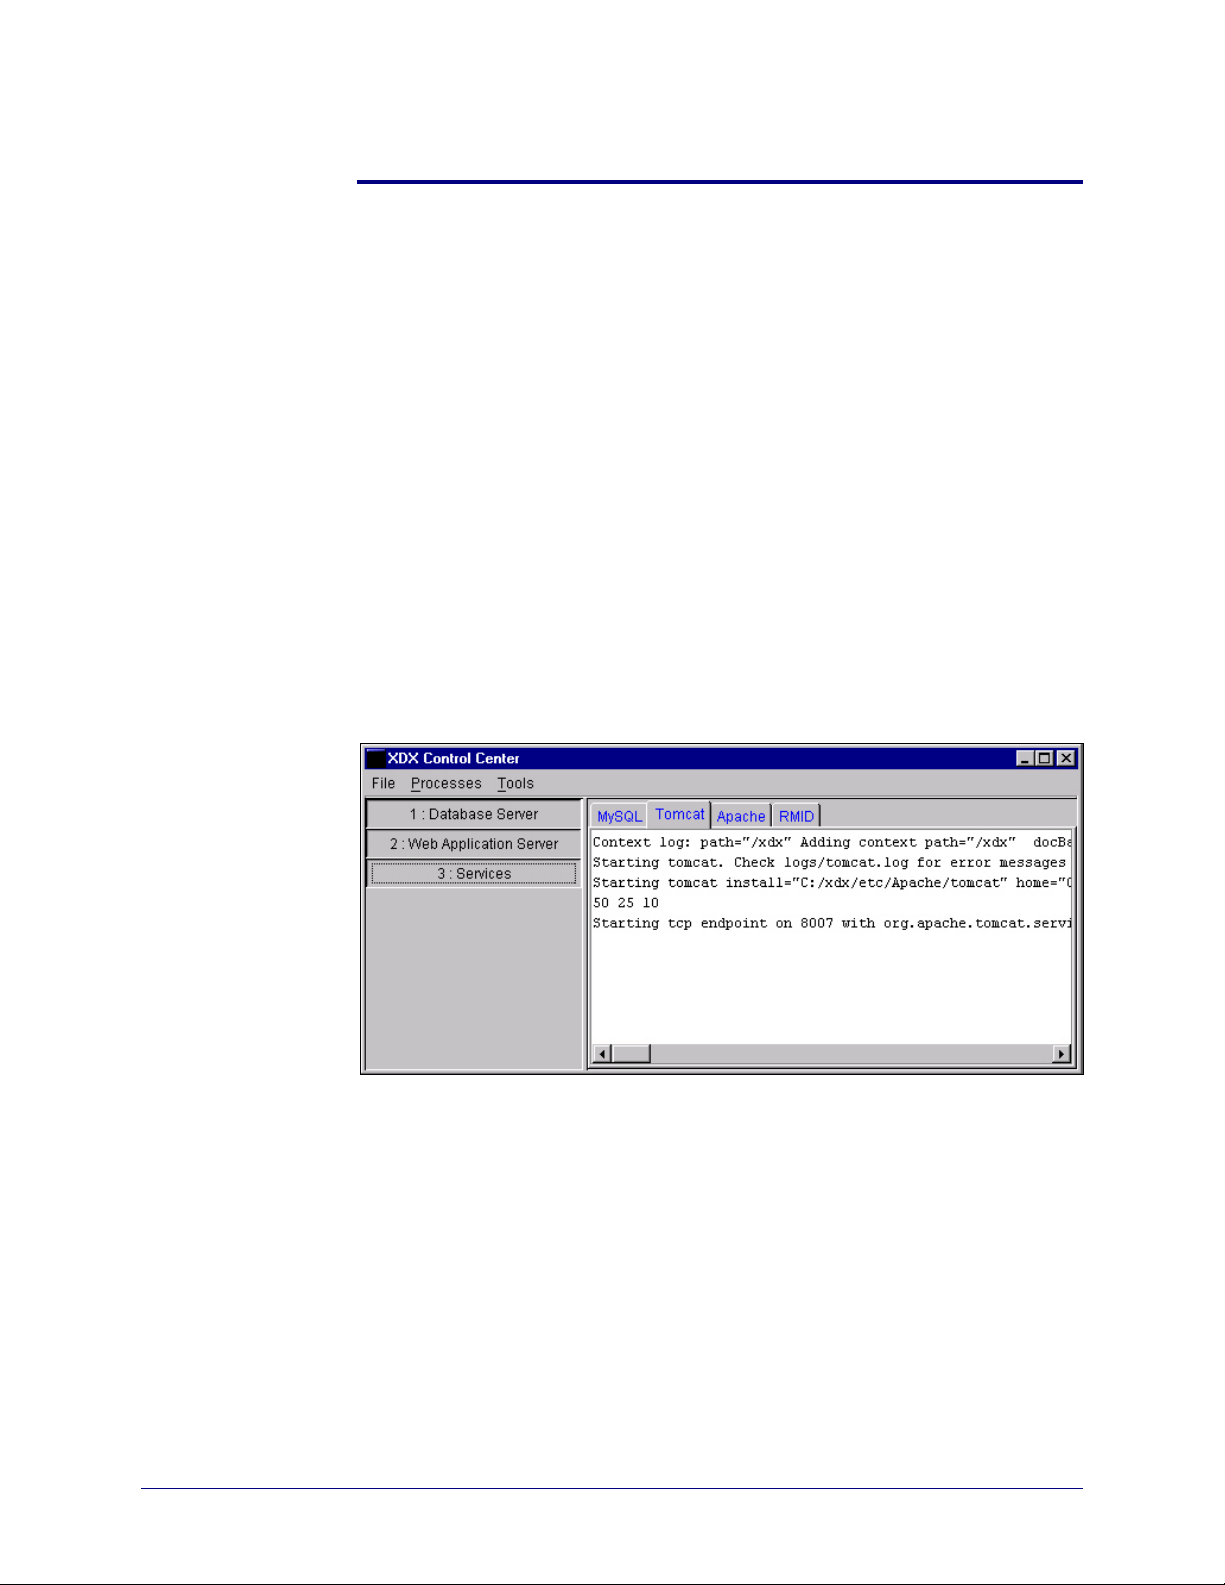
A tab appears in the Control Center for each component as it is
accessed. Tab names are red if the component is loading, black if the
component is waiting to be loaded, and blue if the component has loaded
properly. An example of the Control Center appears in Figure 5-1.
CAUTION: After using the Control Center to start Documents Xpress
services, minimize the Control Center but DO NOT close it.
Closing the Control Center shuts down Documents
Xpress.
Figure 5-1. XDX Control Center as it appears on the Documents
Xpress server
YSTEM ADMINISTRATION GUIDE
S
5-1
Page 26
TARTING UP AND SHUTTING DOWN
S
Starting Documents Xpress
Starting Documents Xpress requires using the XDX Control Center
application on the Documents Xpress server.
Note: Documents Xpress checks for the status of the current license at
Starting Documents Xpress
Perform the following to start Documents Xpress:
1. On the Documents Xpress server, double-click My Computer. Go to
2. Once the Control Center has started, click
OCUMENTS XPRESS
D
EROX WEB DOCUMENT SUBMISSION SOFTWARE VERSION
— X
startup. The system will warn the System Administrator if the
license is within one month of expiring.
C:\xdx\scripts and double-click ControlCenter.
1 : Database Server > 2 : Web Application Server > 3 : Services.
2.0
Note: After starting the processes, wait approximately one minute before
starting access from any client machines.
The following figure, Figure 5-2, describes the components started with
the Control Center.
Figure 5-2. Description of components started with the Control Center
Component Description
RMID (Remote Method
Invocation Daemon)
MySQL (Database Server) The database management system that tracks
Tomcat (used by Web
Server)
Apache (Web Server) The web server for the Documents Xpress system
A utility that XDX services use for activation
users and jobs in the system
Tomcat is a servlet container with a Java Server
Pages (JSP) environment. A servlet container is a
runtime shell that manages and invokes servlets
on behalf of users.
5-2 S
YSTEM ADMINISTRATION GUIDE
Page 27
OCUMENTS XPRESS
D
Shutting Down Documents Xpress
EROX WEB DOCUMENT SUBMISSION SOFTWARE VERSION
— X
To shut down the system, first close the Documents Xpress components
from the Control Center and then close the Control Center.
Shutting Down Documents Xpress
Perform the following to shut down Documents Xpress using the
Control Center:
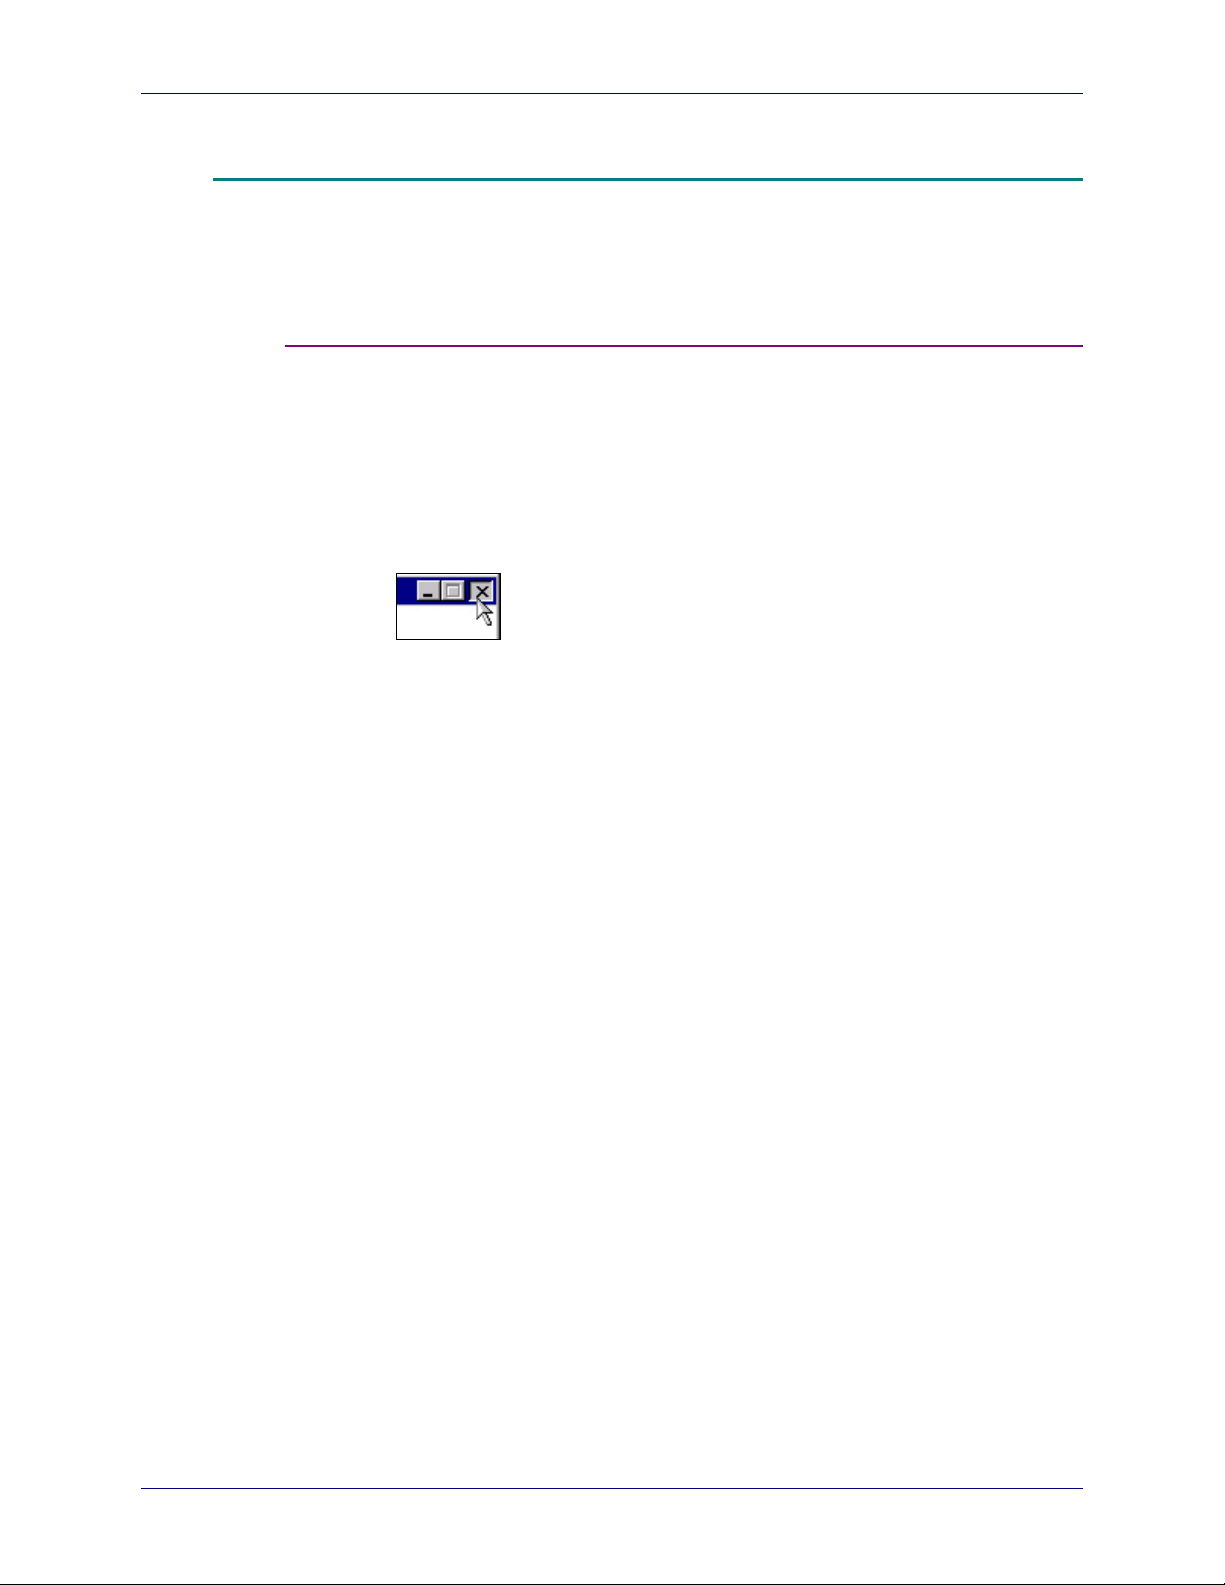
1. On the Documents Xpress server, click in the following order:
1 : Database Server > 2 : Web Application Server > 3 : Services.
2. Close the Control Center by clicking X.
2.0 S
TARTING UP AND SHUTTING DOWN
YSTEM ADMINISTRATION GUIDE
S
5-3
Page 28

Page 29
6. Managing Users
Once the Documents Xpress system has been installed, users
must be added. This chapter describes the processes for:
• importing users
• adding users
• modifying user information
• deleting / inactivating users
• setting permissions and group memberships
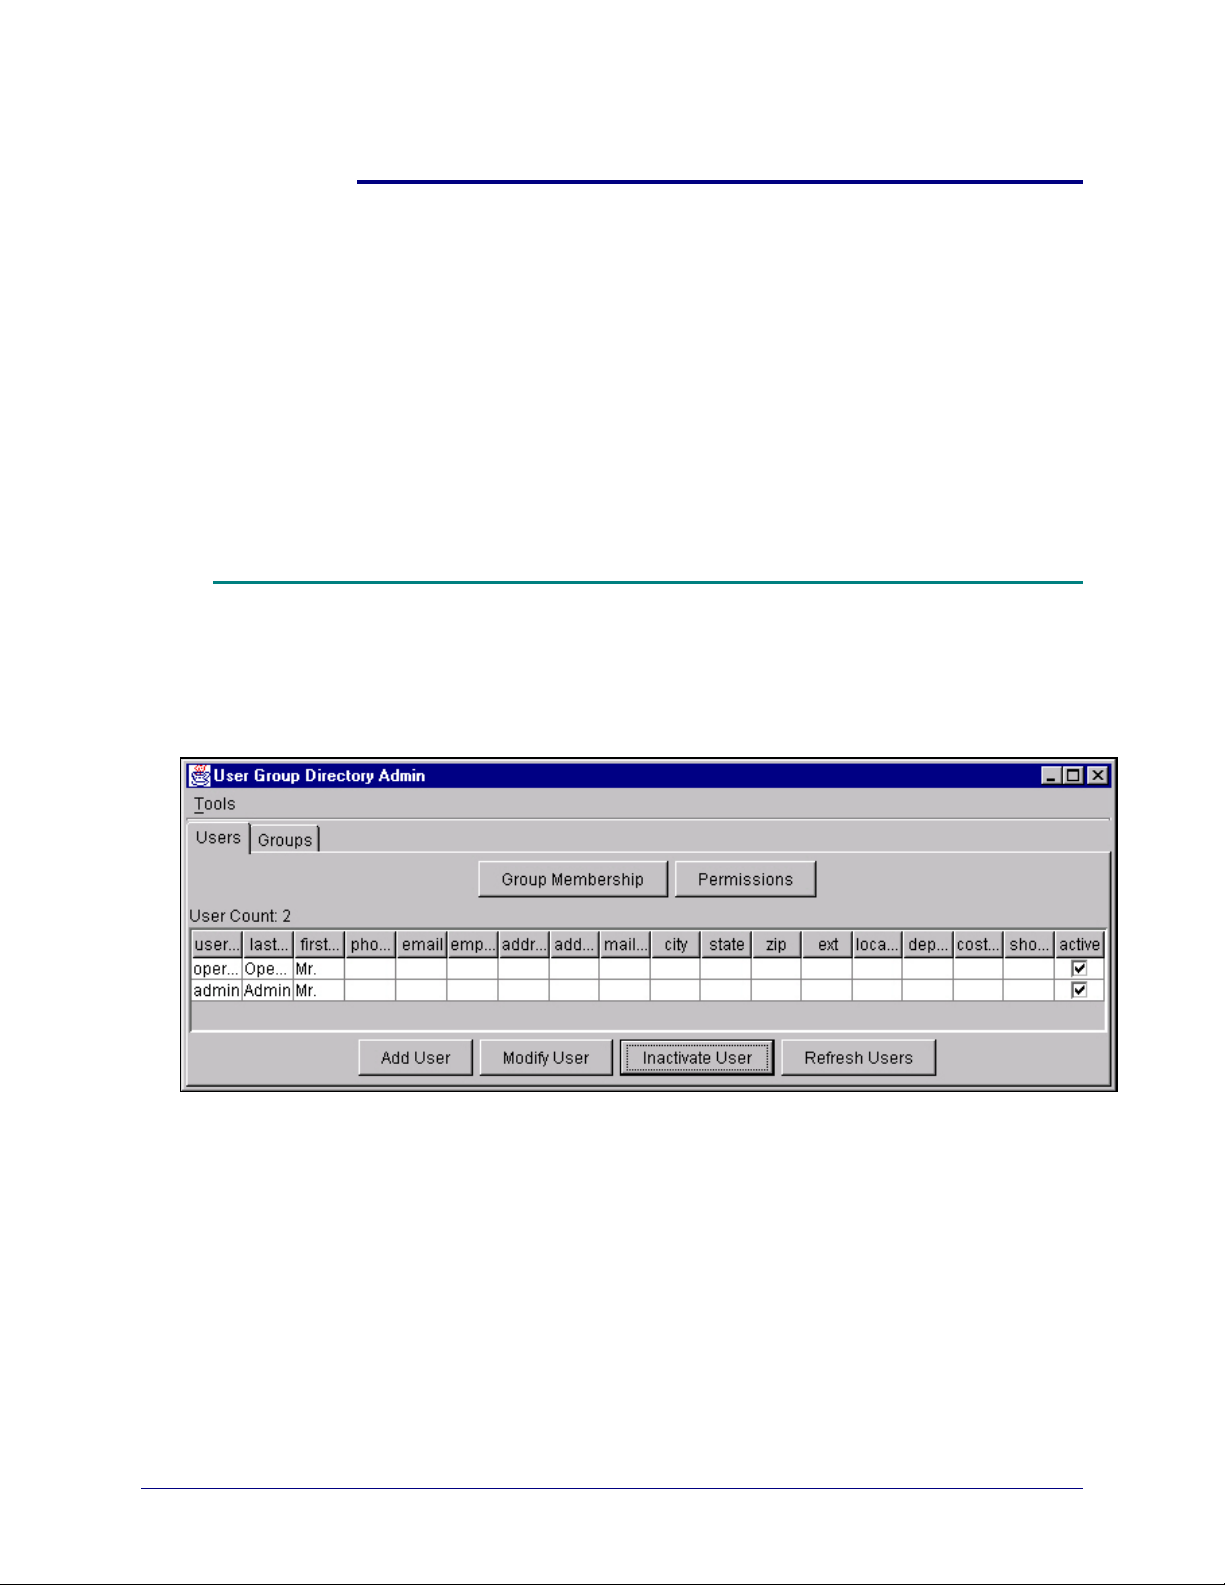
User Group Directory Administration Tool (UGD Tool)
All user management is done through the use of the UGD tool, which is
found in the XDX Control Center. The tool is shown in Figure 6-1.
Figure 6-1. User Group Directory Administration Tool
YSTEM ADMINISTRATION GUIDE
S
6-1
Page 30

ANAGING USERS
M
Importing Users from an External User Data File
OCUMENTS XPRESS
D
EROX WEB DOCUMENT SUBMISSION SOFTWARE VERSION
— X
Users are added to the Documents Xpress system in two ways:
• By importing an external user data file.
• By entering users on a one-by-one basis through the UGD Admin tool.
Users may be imported from an external data file. This data file can be
used to initially place users in the Documents Xpress system, and then to
keep the system updated. Using the Update Users, Synchronization
Mode, and Create Batch File functions of the import module, an external
file can be set up to automatically add, update, and inactivate users.
Importing an External User Data File
The following instructions assume Documents Xpress has been installed
and is operating correctly.
2.0
Note: When importing a customer data file for Documents Xpress users,
work on a small sample of the file if possible. This allows for rapid
error detection without the delay of a long user file load.
Perform the following steps to import a user data file:
1. Modify or build the user file
2. Modify the User Field Configuration to add required user fields to
those that Documents Xpress uses.
3. Modify or build the User Import Mappings to either add additional
fields from the user file that are not already present in the Documents
Xpress fields or to create mappings from scratch.
4. Import the user data.
6-2 S
YSTEM ADMINISTRATION GUIDE
Page 31

OCUMENTS XPRESS
D
EROX WEB DOCUMENT SUBMISSION SOFTWARE VERSION
— X
2.0 M
ANAGING USERS
Data File Format for the User File
Comma-delimited is the only data format Documents Xpress uses for
importing user files. Each customer will have a different set of
requirements for the user file and the default set of fields for the user
database will have to be modified.
Comma-delimited File Format
Use a plain text editor, such as Notepad, or a spreadsheet, such as
Excel, to create or modify the user file. Ensure that there is only one line
break at the end of each line. An example file is shown in Figure 6-2.
Figure 6-2. Example of a comma-delimited user file
User Name,Email Address,First Name,Last Name,Phone
istravinsky,igor.stravinsky@tasc.sk.edu,Igor,Stravinsky,513-366-1015
jthorsteinson,jeff.thorsteinson@tasc.sk.edu,Jeff,Thorsteinson,513-366-1016
slaing,scott.laing@tasc.sk.edu,Scott,Laing,513-366-1018
The first line of the data file is the data definition for the lines that follow
as shown in Figure 6-3.
Figure 6-3. Data definition for comma-delimited file
User Name,Email Address,First Name,Last Name,Phone
In the example above, the first field is User Name. Each line that follows
represents a new record for a user, istravinsky for example. This means
that the first data element (field) in a line must always be the user name.
Email Address is the next field name in the first line, so in every line that
follows the second data element (field) is the user’s e-mail address.
Figure 6-4 shows this pattern repetition.
YSTEM ADMINISTRATION GUIDE
S
6-3
Page 32

ANAGING USERS
M
OCUMENTS XPRESS
D
EROX WEB DOCUMENT SUBMISSION SOFTWARE VERSION
— X
Figure 6-4. Pattern for records and fields in comma-delimited file
User Name Email Address
istravinsky igor.stravinsky@tasc.sk.edu
jthorsteinson jeff.thorsteinson@tasc.sk.edu
slaing scott.laing@tasc.sk.edu
This pattern repeats with a line break at the end of each user to be
included. There may be fewer or more fields required for any particular
customer.
Note: Ensure there are no trailing blank lines in any of the files to be
modified in this chapter. Blank lines may appear harmless, but can
cause large problems later.
Step 1 – Modifying or Building the User File
Using the information from the previous section, ensure that the user data
file that is modified or built is clean of extra line breaks. If possible, select
a small sample to test the import of the data. Once the test data file has
loaded successfully, load the entire user file.
2.0
Note: All users must have a unique user name or ID number.
The new user file can be located anywhere on the file system.
Have a printed copy of the first page of the new user data file available for
reference. Ensure that the first line of the file includes the file’s field
names.
6-4 S
YSTEM ADMINISTRATION GUIDE
Page 33

OCUMENTS XPRESS
D
EROX WEB DOCUMENT SUBMISSION SOFTWARE VERSION
— X
2.0 M
Step 2 – Modifying the User Field Configuration
System User Fields
Documents Xpress has the following system user fields that cannot be
changed:
user_id
first_name
last_name
phone
email
A user file can be built using these default fields but it is more likely that a
customer wants other fields included.
Added Default User Fields
ANAGING USERS
As installed, Documents Xpress 2.0 has the following user fields added:
address_line_1
address_line_2
mail_code
city
state
zip
e-mail
phone
ext
location
department
cost_center
Note: Any of these fields may be modified or deleted as required to meet
customer specifications.
YSTEM ADMINISTRATION GUIDE
S
6-5
Page 34

ANAGING USERS
M
User Name,Email Address,First Name,Last Name,Phone,Supervisor
istravinsky,igor.stravinsky@tasc.sk.edu,Igor,Stravinsky,513-366-1015,A. Jones
jthorsteinson,jeff.thorsteinson@tasc.sk.edu,Jeff,Thorsteinson,513-366-1016,B. Bo
slaing,scott.laing@tasc.sk.edu,Scott,Laing,513-366-1018,C. Clements
OCUMENTS XPRESS
D
Examine which fields in the new user file will map to existing fields in the
system. Any fields that cannot be mapped must be added to the user file.
If the previous example of a comma-delimited file shown in Figure 6-2 on
page 6-3 is expanded to include an extra field, supervisor, the file would
look like Figure 6-5 shown below.
Figure 6-5: Sample user file
Upon examination, all the fields map to existing fields in Documents
Xpress with the exception of Supervisor. This field will have to be added
to Documents Xpress.
Adding a Field to the User Field Configuration
This example will add Supervisor to the list of User Fields.
EROX WEB DOCUMENT SUBMISSION SOFTWARE VERSION
— X
2.0
Perform the following to add a field to the User Field configuration:
Note: Ensure the Database Server is started in the XDX Control Center.
1. From the XDX Control Center click Tools > UDG Admin.
2. Click Tools > User Field Config.
3. The User Field Configuration window appears. The 11 User Field
Mappings listed in the previous section are present if this is the first
time this tool is being used. These fields can be ignored or deleted if
they will not be used.
6-6 S
YSTEM ADMINISTRATION GUIDE
Page 35

OCUMENTS XPRESS
D
EROX WEB DOCUMENT SUBMISSION SOFTWARE VERSION
— X
2.0 M
Double-click in the next available blank line under the User Field
Mapping column. Type supervisor as the field name.
There can be a maximum of 20 user fields.
Note: User Field Mapping names must contain no spaces. In place of a
space, use an underscore.
4. Press Enter on the keyboard. Documents Xpress accepts the entry.
Note: When the last field has been added, ensure that Enter is pressed
on the keyboard to force Documents Xpress to accept the entry. If
Enter is not pressed, the last entry will be lost.
CAUTION: The Clear Data button erases all data for all users in the user
field where the cursor appears. It does not clear a field name
that has been typed.
ANAGING USERS
5. To accept the User Field Configuration additions, click Save. The
UGD Admin – User Field Config window appears saying that the
mappings are updated. Click OK. Click Close.
The User Group Directory Admin window refreshes to show the
modifications to the user fields. In this example, supervisor appears
as the last field listed.
YSTEM ADMINISTRATION GUIDE
S
6-7
Page 36

ANAGING USERS
M
OCUMENTS XPRESS
D
EROX WEB DOCUMENT SUBMISSION SOFTWARE VERSION
— X
2.0
Removing a Field from the User Field Configuration
Unneeded user fields, or fields that were added in error, can be removed.
Perform the following to remove fields from the User Field
Configuration:
Note: Ensure that the Database Server has been started in the XDX
Control Center.
1. From the XDX Control Center click Tools > UDG Admin.
2. Click Tools > User Field Config.
3. The User Field Configuration window appears. Double-click the
name of the field that is to be removed.
4. Delete the name of the field that is to be removed and press Enter on
the keyboard.
5. Click Save. The UDG Admin – User Field Config window appears
stating that field mappings have been removed. Click Yes to complete
the deletion of the field.
6. A window appears to confirm the deletion of the field. Click OK. Click
Close.
Step 3 – Building or Modifying the User Import Mappings
Once the desired fields have been added to Documents Xpress, the field
names in the user data file need to be mapped to field names that
Documents Xpress uses.
Continuing to use the data file example from the last step, a new Import
Mapping will be created.
6-8 S
YSTEM ADMINISTRATION GUIDE
Page 37

OCUMENTS XPRESS
D
EROX WEB DOCUMENT SUBMISSION SOFTWARE VERSION
— X
2.0 M
Creating and Saving New Mappings
The default mapping is provided as a starting point for development of a
user database. If a different mapping is needed, it can be created and
saved.
Figure 6-6 shows the user data file field names and how they will map to
Documents Xpress names.
Figure 6-6. User file field names that map to Documents Xpress field
names
ANAGING USERS
User File Field Names
Documents Xpress
Field Names
User Name maps to user_id*
Email Address maps to email*
First Name maps to first_name*
Last Name maps to last_name*
Phone maps to phone*
Supervisor maps to supervisor
* system fields
Perform the following to create and save a new mapping:
1. From the XDX Control Center click Tools > UDG Admin.
2. The User Group Directory Admin window opens.
Click Tools > User Import Mappings.
YSTEM ADMINISTRATION GUIDE
S
6-9
Page 38

ANAGING USERS
M
OCUMENTS XPRESS
D
EROX WEB DOCUMENT SUBMISSION SOFTWARE VERSION
— X
2.0
3. The UGD Admin - User Import Mappings Window opens. The
screen is divided into three sections: a window showing any saved
mappings, the Import Field Label, and the User Field Mapping.
4. Click Add under the column where the default mapping is listed.
5. The UGD Admin - New User Mapping window appears. Type a
mapping name. For this example, type Test as the mapping name.
Click OK.
6. A blank UGD Admin - User Import Mappings window appears. Click
Add.
7. The UGD Admin - User Field Import Mapping window appears. The
field names from the user data file must be entered, one at a time,
and matched with a Documents Xpress field. Using the chart in figure
6-6, six import mappings must be created. Type the field name as it
appears in the user file in the Imported field name text box.
6-10 S
YSTEM ADMINISTRATION GUIDE
Page 39

OCUMENTS XPRESS
D
EROX WEB DOCUMENT SUBMISSION SOFTWARE VERSION
— X
2.0 M
8. Scroll through the list of UGD User Defined Fields to find the
Documents Xpress field that maps to Imported field name. Use the
>> button to move the field into the Import Mapping window. Use the
<< button to remove a field moved in error. Click OK.
9. The updated UGD Admin - User Import Mappings window
reappears. Click Add to add an additional mapping. Repeat steps 7
and 8 to add all the required mappings.
ANAGING USERS
Note: Fields can be combined. An example of this is where the import file
has both first and last names contained a single field. In a case like
this, create a mapping and move one name field and then the other
name field, in the order used in the import file.
10. To save the mappings, click Actions > Save. A confirmation message
appears that the mappings were saved. Click OK.
YSTEM ADMINISTRATION GUIDE
S
6-11
Page 40

ANAGING USERS
M
OCUMENTS XPRESS
D
EROX WEB DOCUMENT SUBMISSION SOFTWARE VERSION
— X
2.0
11. Click X to exit the UGD Admin – User Import Mappings window.
Modifying User Import Mappings
If additional fields are added or removed from a user import file, the
mapping for that import file will have to be modified.
Perform the following to modify the default User Import Mappings:
1. From the XDX Control Center click Tools > UDG Admin.
2. The User Group Directory Admin window opens.
Click Tools > User Import Mappings.
3. The UGD Admin - User Import Mappings Window opens as shown
below. The screen is divided into three sections: a window showing
any saved mappings, the Import Field Label, and the User Field
Mapping.
The Import Field Label matches the field name in the import file. The
User Field Mapping is the Documents Xpress field where the user
data will be placed.
6-12 S
YSTEM ADMINISTRATION GUIDE
Page 41

OCUMENTS XPRESS
D
EROX WEB DOCUMENT SUBMISSION SOFTWARE VERSION
— X
To see the structure of the mappings, click the line that begins with
First Name and then click Modify.
2.0 M
ANAGING USERS
4. A new UGD Admin - User Field Import Mapping window opens.
This window is where the field names in the import file are matched
with the Documents Xpress system uses for field names internally.
YSTEM ADMINISTRATION GUIDE
S
6-13
Page 42

ANAGING USERS
M
OCUMENTS XPRESS
D
EROX WEB DOCUMENT SUBMISSION SOFTWARE VERSION
— X
Type the name of any new Import filed name and then scroll through
the list of UGD User Defined Fields to find the Documents Xpress field
into which that particular field will be imported. Use the >> button to
move the field into the Import Mapping window. Use the << button to
remove a field moved in error.
5. When finished modifying the mappings, click OK.
2.0
Note: Fields can be combined. An example of this is where the import file
has both first and last names contained a single field. In a case like
this, create a mapping and move one name field and then the other
name field, in the order used in the import file.
6. The UGD Admin - User Import Mappings window reappears.
7. To save the mappings, click Actions > Save. A confirmation message
appears that the mappings were saved. Click OK.
6-14 S
YSTEM ADMINISTRATION GUIDE
Page 43

OCUMENTS XPRESS
D
EROX WEB DOCUMENT SUBMISSION SOFTWARE VERSION
— X
8. Click X to exit the UGD Admin - User Import Mappings window.
Additional Menus in UGD Admin – Import Mappings Window
There are two additional menu choices listed under the Actions menu.
1. Reload – reloads the default user mappings.
2. Default Mapping – allows the selection of which mapping will be the
default mapping on the UGD Admin - Import Users window.
Step 4 – Import Users
Once the user file has been mapped to data that Documents Xpress will
use, importing the file is the last step.
2.0 M
ANAGING USERS
Perform the following to import users:
1. From the XDX Control Center click Tools > UDG Admin.
2. The User Group Directory Admin window opens.
Click Tools > Import Users.
YSTEM ADMINISTRATION GUIDE
S
6-15
Page 44

ANAGING USERS
M
OCUMENTS XPRESS
D
EROX WEB DOCUMENT SUBMISSION SOFTWARE VERSION
— X
3. The UGD Admin - Import Users window opens.
4. Click Browse and locate the user file to be imported.
5. Click the User mapping drop-down menu and select the mapping to
be used for the import. Continuing with the example file, select test.
2.0
Click View to ensure this is the correct mapping to be used for the
import. Click X to close the view window.
6. Click Import. A summary screen appears when the process is
complete. Click OK.
7. The User Group Directory Admin window reappears. All imported
users appear and are active.
6-16 S
YSTEM ADMINISTRATION GUIDE
Page 45

OCUMENTS XPRESS
D
EROX WEB DOCUMENT SUBMISSION SOFTWARE VERSION
— X
2.0 M
8. Click X to exit the User Group Directory Admin window.
Note: Users that are imported from the system are in the database
permanently. Once they are made inactive, they still appear in the
user list unless their names are filtered. Filtering is accomplished
by right-clicking on any user name. A Filter Users menu appears.
Clear the Inactive Users choice and only the active users will
appear.
Choices Available in the Import Users Window
ANAGING USERS
• User mapping – Allow the selection of a previously configured
mapping if other than the default mapping is required.
• View – View the selected User mapping.
• Update users – If selected, any users information that already exists
in the database will be updated if the user is listed in the import file.
• Synchronization mode – If selected, any users that exist in the
database, but are not listed in the import file will be inactivated. This
synchronizes the database users with the import file users.
• Import – Begin the import process.
• Create Batch File – If clicked, creates a batch file that can be used to
run the import process outside of the UGD Admin tool. This file can be
used to schedule imports on Windows by the System Administrator.
The batch file stores the information selected in the import dialog.
• Cancel – Exit from this window without taking any action.
YSTEM ADMINISTRATION GUIDE
S
6-17
Page 46

ANAGING USERS
M
Adding Users One at a Time
OCUMENTS XPRESS
D
EROX WEB DOCUMENT SUBMISSION SOFTWARE VERSION
— X
Troubleshooting a Faulty Import
If the user file did not import properly, there may be a database of users
with incorrect or incomplete information. Documents Xpress does not
allow these users to be deleted. They can only be inactivated.
If the system has not been put into production, all the Documents Xpress
databases, including users and jobs, can be re-initialized. Read, and use
with caution, the Re-initializing the User Database section in
Chapter 14 – Troubleshooting on page 14-2 of this guide.
The UGD tool can also add users one at a time. This procedure assumes
that the user database has already been configured. If it has not been
configured, use Step 2 Modifying the User Field Configuration on page
6-5 in this chapter.
2.0
Adding a User to Documents Xpress
Perform the following to add a user to Documents Xpress:
1. From the XDX Control Center click Tools > UDG Admin.
2. The User Group Directory Admin window opens.
3. Click Add User.
4. Select Active in the top left corner of the New User window.
6-18 S
YSTEM ADMINISTRATION GUIDE
Page 47

OCUMENTS XPRESS
D
Modifying User Information
EROX WEB DOCUMENT SUBMISSION SOFTWARE VERSION
— X
2.0 M
5. Click in the user-id field and type a unique user identification for the
user being entered.
6. Press the Tab key twice to move to the next field. Type in all the
required user information.
Note: Clicking the mouse in the Field Value column will also allow data
entry for a particular field. This may speed up data entry if not all
the fields are required for a user.
7. When the last field value is typed for a user, press Enter on the
keyboard. Pressing Enter forces Documents Xpress to accept the last
field entered.
8. Click OK. A confirmation message appears. Click OK. The User
Group Directory Admin window reappears and refreshes to show
the newly added user.
ANAGING USERS
User information can be modified in a batch by importing an updated user
file, or one at a time.
Modifying User Information for a Group of Users
If there are a large number of users to be modified, Documents Xpress
can import a modified user list and update users whose user profiles have
changed.
Perform the following to modify a group of users:
1. Open the latest version of the user list and modify the user profile for
any user that requires updating.
2. From the XDX Control Center click Tools > UDG Admin.
YSTEM ADMINISTRATION GUIDE
S
6-19
Page 48

ANAGING USERS
M
OCUMENTS XPRESS
D
EROX WEB DOCUMENT SUBMISSION SOFTWARE VERSION
— X
3. The User Group Directory Admin window opens.
Click Tools > Import Users.
4. The UGD Admin - Import Users window opens. Click Browse and
locate the updated user file.
5. Select the correct User mapping.
6. Ensure that Yes is selected for Update Users.
7. Ensure that No is selected for Synchronization mode.
8. Click Import. A summary screen appears when the process is
complete. Click OK.
9. The User Group Directory Admin window reappears. All users with
new profile information are updated.
10. Click X to exit the User Group Directory Admin window.
2.0
Modifying User Information for a Single User
1. From the XDX Control Center click Tools > UDG Admin.
2. The User Group Directory Admin window opens. Click the line
where the user to be modified appears. The line becomes highlighted.
3. Click Modify User. The Modify User window opens.
4. Click in the Field Value and change any information that requires
modification. Press Enter on the keyboard when the last modification
has been made to force Documents Xpress to accept the last change
made to a field.
5. Click Update. A confirmation window appears. Click OK.
6-20 S
YSTEM ADMINISTRATION GUIDE
Page 49

OCUMENTS XPRESS
D
Changing a User Password
EROX WEB DOCUMENT SUBMISSION SOFTWARE VERSION
— X
2.0 M
6. To exit the Modify User window, click Close.
7. The User Group Directory Admin window reappears. The user with
the updated profile information appears with the updated information.
8. Click X to exit the User Group Directory Admin window.
Users select their own password during registration. If they forget their
password, or require it changed, the System Administrator must change it
for them. Users cannot change their own password.
Perform the following to change a user password:
ANAGING USERS
1. From the XDX Control Center click Tools > UDG Admin.
2. The User Group Directory Admin window opens. Click the line
where the user to be modified appears. The line becomes highlighted.
3. Click Modify User. The Modify User window opens.
4. Click Change Password.
5. The UGD Admin - Modify User window opens. Type the new
password for the user and click OK.
6. A confirmation window appears. Click OK.
7. To exit the Modify User window, click Close.
8. The User Group Directory Admin window reappears.
YSTEM ADMINISTRATION GUIDE
S
6-21
Page 50

ANAGING USERS
M
Deleting / Inactivating Users
OCUMENTS XPRESS
D
9. Click X to exit the User Group Directory Admin window.
Documents Xpress users are never deleted from the system. Since there
may still be jobs in process associated with the user, they are inactivated
instead.
Inactivating Users
Users may be inactivated individually, or in a group by re-importing the
user file.
EROX WEB DOCUMENT SUBMISSION SOFTWARE VERSION
— X
2.0
Inactivating an Individual User
Perform the following to inactivate individual users:
1. From the XDX Control Center click Tools > UDG Admin.
2. The User Group Directory Admin window opens. Locate the user to
be inactivated and click on the line containing their name. The line
should be highlighted. Click Inactivate User.
3. The UGD - Inactivate User window appears. Click Yes.
4. A confirmation window appears. Click OK. If the user list is set to filter
out inactivated users, the name just inactivated will disappear.
6-22 S
YSTEM ADMINISTRATION GUIDE
Page 51

OCUMENTS XPRESS
D
EROX WEB DOCUMENT SUBMISSION SOFTWARE VERSION
— X
2.0 M
Inactivating a Group of Users
If there are a large number of users to be inactivated Documents Xpress
can import a user list and inactivate users not in the updated user list.
Note: If selected, any users that exist in the database, but are not listed in
the import file will be inactivated. This synchronizes the database
users with the import file users
Perform the following to inactivate a group of users:
1. Open the latest version of the user list that was imported and remove
any users that should be inactivated.
2. From the XDX Control Center click Tools > UDG Admin.
3. The User Group Directory Admin window opens. Click
Tools > Import Users.
4. The UGD Admin - Import Users window opens. Click Browse and
locate the updated user file.
ANAGING USERS
5. Select the correct User mapping.
6. For the Synchronization mode select Yes.
7. Click Import. A summary screen appears when the process is
complete. Click OK.
8. The User Group Directory Admin window reappears. All imported
users should appear and be active while those removed from the
imported user file should be inactivated.
9. Click X to exit the User Group Directory Admin window.
YSTEM ADMINISTRATION GUIDE
S
6-23
Page 52

ANAGING USERS
M
Assigning Privileges and Groups to Users
OCUMENTS XPRESS
D
EROX WEB DOCUMENT SUBMISSION SOFTWARE VERSION
— X
2.0
By default, there are only two accounts established during installation:
• admin, the administrator account
• operator, the print operator account
These two accounts are placed, respectively, into the Xerox Business
Systems (XBS) Admin and XBS Operator groups.
Users, when they register for access to the Documents Xpress system,
are placed in the user group. Because users should not have access to
the admin or operator accounts directly, users can be reassigned to to
one of these groups to better reflect their job position.
Figure 6-6 shows the default list of user groups and permissions available
in the Documents Xpress system. If these groupings are insufficient, they
can be added to or modified.
Figure 6-6. Default list of user groups and permissions
Permissions
User Groups
XBS
Operator
user system system Use
Resource
Type
printshop default Printer Administration
printshop default Run JobsXBS Admin
system system Use
printshop default Run Jobs
system system Use
Resource Name Right
6-24 S
YSTEM ADMINISTRATION GUIDE
Page 53

OCUMENTS XPRESS
D
EROX WEB DOCUMENT SUBMISSION SOFTWARE VERSION
— X
2.0 M
Resource Types
System – The system resource type refers to resources using the
Documents Xpress system via the Documents Xpress user interface.
Printshop – The printshop resource type refers to resources related to
the printshop itself such as adding printers.
Rights
Printer Administration – A user with this right can add printers to
Documents Xpress.
Run Jobs – A user with this right can perform tasks using the
Administrator interface.
Use – A user with this right can perform any tasks using the User
interface.
ANAGING USERS
Viewing the Permissions and Group Memberships Assigned to a User
Users may be members of more than one group. It is possible to view
what permissions a user has and what groups they are associated with.
Perform the following to view the permissions and group
memberships assigned to a user:
1. From the XDX Control Center click Tools > UDG Admin.
2. The User Group Directory Admin window opens.
3. Click on the name of the user. The line becomes highlighted.
4. Click Group Membership to view the groups a user has been
assigned. Click X to close the User Group Membership window.
YSTEM ADMINISTRATION GUIDE
S
6-25
Page 54

ANAGING USERS
M
OCUMENTS XPRESS
D
5. Click Permissions to view the permissions a user has been assigned.
Click X to close the User Permissions window.
Assigning a User to a Group
All users, when they register for access to the system, are placed in the
user group. Any user can be reassigned to a new group. This example
will place a user in the XBS Operator group. To place a user in the XBS
Admin group follow the same steps except choose XBS Admin as the
Group Name.
Perform the following to assign a user to a group:
1. From the XDX Control Center click Tools > UDG Admin.
2. The User Group Directory Admin window opens. Click the Groups
tab.
EROX WEB DOCUMENT SUBMISSION SOFTWARE VERSION
— X
2.0
3. The window refreshes and the user groups appear. Click XBS
Operator. The XBS Operator line becomes highlighted. Click Users.
4. The User Group Membership window opens. Locate the user, or
users, that need the rights of an operator. Click the user name to
select the user or hold the Ctrl key down and click to select multiple
user names.
5. Click >> to move the user names to the Group User Names column.
If an error is made, select the erroneous name in the Group User
Names column and click <<.
6. Click Save. A confirmation message appears. Click OK. Click Close.
6-26 S
YSTEM ADMINISTRATION GUIDE
Page 55

OCUMENTS XPRESS
D
EROX WEB DOCUMENT SUBMISSION SOFTWARE VERSION
— X
7. The User Group Directory Admin window reappears. To exit the
User Group Directory Admin window, click X.
Removing Users from a Group
Perform the following to remove a user from a group:
1. From the XDX Control Center click Tools > UDG Admin.
2. The User Group Directory Admin window opens. Click the Groups
tab.
2.0 M
ANAGING USERS
3. The window refreshes and the user groups appear. Click the name of
the group from which the user is to be removed. The selected line
becomes highlighted. Click Users.
4. The User Group Membership window opens. Locate the user, or
users in the Group User Names window. Click the user name to
select the user or hold the Ctrl key down and click to select multiple
user names.
5. Click << to move the user names to the User Names column. If an
error is made, select the erroneous name in the User Names column
and click >>.
6. Click Save. A confirmation message appears. Click OK. Click Close.
YSTEM ADMINISTRATION GUIDE
S
6-27
Page 56

ANAGING USERS
M
OCUMENTS XPRESS
D
7. The User Group Directory Admin window reappears. To exit the
User Group Directory Admin window, click X.
Adding a New User Group
New user groups can be added to the Documents Xpress system.
Perform the following to add a new user group:
1. From the XDX Control Center click Tools > UDG Admin.
2. The User Group Directory Admin window opens. Click the Groups
tab.
EROX WEB DOCUMENT SUBMISSION SOFTWARE VERSION
— X
2.0
3. The window refreshes and the user groups appear. Click Add Group.
4. The UGD - Add Group window appears. Type the name of the new
user group and click OK.
5. A confirmation window appears. Click OK.
Note: This user group will have no users or permissions assigned to it.
6. The User Group Directory Admin window reappears. To exit the
User Group Directory Admin window, click X.
6-28 S
YSTEM ADMINISTRATION GUIDE
Page 57

OCUMENTS XPRESS
D
EROX WEB DOCUMENT SUBMISSION SOFTWARE VERSION
— X
Adding Permissions to a Group
Once a group is established, it needs to have permissions assigned.
Perform the following to add permissions to a group:
1. From the XDX Control Center click Tools > UDG Admin.
2. The User Group Directory Admin window opens. Click the Groups
tab.
3. The window refreshes and the user groups appear. Click the name of
the group that requires permissions. The line becomes highlighted.
Click Permissions.
2.0 M
ANAGING USERS
4. The Group Permissions window opens.
Click Add Permission.
YSTEM ADMINISTRATION GUIDE
S
6-29
Page 58

ANAGING USERS
M
OCUMENTS XPRESS
D
5. The UGD - Permissions window opens. Using Figure 6-5, on page
6-6 as a guide, along with the explanation of Resource Types that
follow it, construct a new permission for this type of user.
6. When done adding permissions, click Save.
7. A confirmation window appears. Click OK. Click Close.
8. Add users to this group by following the instructions on assigning a
user to a group given above.
Deleting a User Group
If a group is no longer required, it can be deleted.
CAUTION: DO NOT delete XBS Admin, XBS Operator, or user groups.
Perform the following to delete a user group:
1. From the XDX Control Center click Tools > UDG Admin.
EROX WEB DOCUMENT SUBMISSION SOFTWARE VERSION
— X
2.0
2. The User Group Directory Admin window opens. Click the Groups
tab.
3. The window refreshes and the user groups appear. Click the name of
the group that is to be deleted. The name of the group becomes
highlighted. Click Delete Group.
4. A confirmation window appears. Click Yes.
5. A second confirmation window appears confirming the removal of the
user group. Click OK.
6-30 S
YSTEM ADMINISTRATION GUIDE
Page 59

OCUMENTS XPRESS
D
EROX WEB DOCUMENT SUBMISSION SOFTWARE VERSION
— X
6. The User Group Directory Admin window reappears. To exit the
User Group Directory Admin window, click X.
Modifying a Group Name
An existing group name can be modified.
CAUTION: Do NOT delete XBS Admin, XBS Operator, or user groups.
Perform the following to modify a group name:
1. From the XDX Control Center click Tools > UDG Admin.
2. The User Group Directory Admin window opens. Click the Groups
tab.
2.0 M
ANAGING USERS
3. The window refreshes and the user groups appear. Click the name of
the group that is to be modifed. The name of the group becomes
highlighted. Click Modify Group.
4. The UGD - Modify Group window appears with the existing group
name. Press the Backspace key on the keyboard to clear the existing
name. Type the new group name and click OK.
5. A confirmation window appears. Click OK.
YSTEM ADMINISTRATION GUIDE
S
6-31
Page 60

ANAGING USERS
M
OCUMENTS XPRESS
D
EROX WEB DOCUMENT SUBMISSION SOFTWARE VERSION
— X
6. The User Group Directory Admin window reappears. To exit the
User Group Directory Admin window, click X.
2.0
6-32 S
YSTEM ADMINISTRATION GUIDE
Page 61

7. Customizing the User Interface
The User Interface (UI) Configuration tool in the XDX Control Center
customizes the user interface for Documents Xpress. There are four
areas of the user interface that can be customized:
• Colors – Text, links, and navigation bars can have colors modified.
• Image – The header image can be changed to a new image.
• Text – Any text visible on the screen in the user interface can be
modified for font, font size and font style.
• Main Page Text – Once logged on to the system, there is a section of
the Home page where text can be modified.
If unsatisfied with changes, the original interface configuration can be
restored.
Starting the UI Configuration Tool
Perform the following to start the UI Configuration tool:
1. From the XDX Control Center click Tools > UI Config.
YSTEM ADMINISTRATION GUIDE
S
7-1
Page 62

USTOMIZING THE USER INTERFACE
C
OCUMENTS XPRESS
D
EROX WEB DOCUMENT SUBMISSION SOFTWARE VERSION
— X
2. The uiconfi_control_panel window opens.
2.0
7-2 S
YSTEM ADMINISTRATION GUIDE
Page 63

OCUMENTS XPRESS
D
Configurable Sections of the User Interface
Figure 7-1. User Interface Items that can be selected in the UI Configuration Tool
EROX WEB DOCUMENT SUBMISSION SOFTWARE VERSION
— X
2.0 C
USTOMIZING THE USER INTERFACE
The sections of the user interface referred to in the UI Configuration Tool
are shown below in Figures 7-1 and 7-2.
YSTEM ADMINISTRATION GUIDE
S
7-3
Page 64

USTOMIZING THE USER INTERFACE
C
Figure 7-2. User Interface Items that can be selected in the UI Configuration Tool
Configuring Colors
OCUMENTS XPRESS
D
EROX WEB DOCUMENT SUBMISSION SOFTWARE VERSION
— X
2.0
To change colors for any of the configurable user interface sections follow
the general procedure outlined below. This procedure assumes that the
User Interface Configuration tool has been opened.
The default values for the Configure Colors section of the User Interface
Configuration tool follow at the end of this chapter.
7-4 S
YSTEM ADMINISTRATION GUIDE
Page 65

OCUMENTS XPRESS
D
EROX WEB DOCUMENT SUBMISSION SOFTWARE VERSION
— X
2.0 C
USTOMIZING THE USER INTERFACE
Perform the following to modify a configurable color item:
1. From the Configure Colors drop-down menu, select the item to be
changed. This example will change the Main Page Text Color.
2. The Current Color text box refreshes to show the color currently
selected for the Main Page Text Color. Click Color Browse.
3. The Color Chooser opens. There are three methods of choosing a
color, each selectable by clicking their respective tab.
Swatches – Select a color from the palette presented.
HSB – Move the slider up or down to select a hue, then click the
mouse in the color block to select the saturation and brightness
desired.
RGB – If the red, blue, and green values are known for a desired
color, move the sliders or type the values to obtain that color.
YSTEM ADMINISTRATION GUIDE
S
7-5
Page 66

USTOMIZING THE USER INTERFACE
C
Note: Only the Foreground color can be selected.
OCUMENTS XPRESS
D
EROX WEB DOCUMENT SUBMISSION SOFTWARE VERSION
— X
2.0
4. Once the desired color has been selected, click OK. The Current
Color text box refreshes to show the modification.
5. To see the modification, click Commit Changes. A Login window will
appear if this is the first modification made this session. Type Admin
for the Username and 22222 for the Password. Click OK.
6. Open a browser window and go to the Documents Xpress 2.0 home
page. Logon and move to the page where the change has been
made. If the change is unsatisfactory, repeat the steps to choose a
new color.
Note: If a new color is selected to replace a color that was selected in the
procedure above, commit the changes and click Refresh on the
browser window to see the new changes. A new browser window
does not have to be opened.
7-6 S
YSTEM ADMINISTRATION GUIDE
Page 67

OCUMENTS XPRESS
D
EROX WEB DOCUMENT SUBMISSION SOFTWARE VERSION
— X
7. When the desired color changes are completed, click X to exit the
User Interface Configuration tool.
Configuring the Header Image
The header image can be changed to a different image with these
restrictions:
• The image must be 700 X 82 pixels.
• The image must be saved as either a GIF or JPG format picture.
• The image may be located outside of the Documents Xpress program
folder but should reside on the Documents Xpress server.
When creating an image for the header, be aware that large company
logos will not scale well to the small size required in the header. Use an
image-editing program to create the best possible header image.
2.0 C
USTOMIZING THE USER INTERFACE
This procedure assumes that the User Interface Configuration tool has
been opened.
The default value for the Configure Image section of the User Interface
Configuration tool follows at the end of this chapter.
Perform the following to modify a header image item:
1. From the Configure Image drop-down menu, select Header Image.
2. The Current Color text box refreshes to show the color currently
selected for the Main Page Text Color. Click Color Browse.
3. The Open dialog box appears. Browse to the folder where the new
image is located by clicking the Look in drop-down menu.
YSTEM ADMINISTRATION GUIDE
S
7-7
Page 68

USTOMIZING THE USER INTERFACE
C
4. When the image has been located, click the name of the image. The
5. The Current Image text box refreshes with the new image file name.
6. Open a browser window and go to the Documents Xpress 2.0 home
Note: If a browser window is already open and on a Documents Xpress
7. When the desired header changes are complete, click X to exit the
OCUMENTS XPRESS
D
EROX WEB DOCUMENT SUBMISSION SOFTWARE VERSION
— X
2.0
image name appears in the File name text box. Click Open.
Click Commit Changes. A Login window will appear if this is the first
modification made this session. Type Admin for the Username and
22222 for the Password. Click OK.
page. The new header image is now present. If the change is
unsatisfactory, repeat the steps to choose a different header image.
2.0 page, click Refresh on the browser window to see the new
header image. A new browser window does not have to be opened.
User Interface Configuration tool.
Configuring Text
To change the text attributes for any of the configurable user interface
sections follow the general procedure outlined below. This procedure
assumes that the User Interface Configuration tool has been opened.
The default values for the Configure Text section of the User Interface
Configuration tool follow at the end of this chapter.
7-8 S
YSTEM ADMINISTRATION GUIDE
Page 69

OCUMENTS XPRESS
D
EROX WEB DOCUMENT SUBMISSION SOFTWARE VERSION
— X
2.0 C
USTOMIZING THE USER INTERFACE
Perform the following to modify a configurable text item:
1. From the Configure Text drop-down menu, select the item to be
changed. This example will change the Main Page Text Weight.
2. The Current Value text box refreshes to show the color currently
selected for the Main Page Text Weight. Type the new text weight
desired into the Current Value text box.
3. Click Commit Changes. A Login window will appear if this is the first
modification made this session. Type Admin for the Username and
22222 for the Password. Click OK.
4. Open a browser window and go to the Documents Xpress 2.0 home
page. The new change in text weight is now present. If the change is
unsatisfactory, repeat the steps to choose a different text weight.
Note: If a browser window is already open and on a Documents Xpress
2.0 page, click Refresh on the browser window to see the new
change. A new browser window does not have to be opened.
5. When the desired text changes are complete, click X to exit the User
Interface Configuration tool.
YSTEM ADMINISTRATION GUIDE
S
7-9
Page 70

USTOMIZING THE USER INTERFACE
C
Table 7-1. Values that can be used for Text attributes
OCUMENTS XPRESS
D
EROX WEB DOCUMENT SUBMISSION SOFTWARE VERSION
— X
Table 7-1 shows acceptable attribute values for text.
Acceptable Values for Text
Text Family Text Weight Text Size
2.0
Use standard
browser fonts such
as
arial
and
times
bold
normal
roman
Note: There is no
capitalization of font
names
Configuring the Main Page Text
The Main Page Text is a configurable section of text that appears on the
user home page. Using the User Interface Configuration tool modifies this
text. This procedure assumes that the UI Configuration tool has been
opened.
Figure 7-3 illustrates a home page that has been modified by changing
colors, header image, and main page text. This procedure will illustrate
how to modify the main page text.
xx-small
x-small
small
normal
large
x-large
7-10 S
YSTEM ADMINISTRATION GUIDE
Page 71

OCUMENTS XPRESS
D
Figure 7-3. Home page with modified header image and modified main page text
EROX WEB DOCUMENT SUBMISSION SOFTWARE VERSION
— X
2.0 C
USTOMIZING THE USER INTERFACE
Perform the following to modify the main page text:
1. Below the Configure Text section of the UI Configuration tool is the
Main Page Text section of the tool. Using standard HTML, modify the
code to reflect any required customer text.
2. When the code changes have been completed, click Commit
Changes. A Login window will appear if this is the first modification
made this session. Type Admin for the Username and 22222 for the
Password. Click OK.
3. Open a browser window and go to the Documents Xpress 2.0 home
page. The changes to the main page text are now present. If the
change is unsatisfactory, repeat the steps to change the HTML code.
YSTEM ADMINISTRATION GUIDE
S
7-11
Page 72

USTOMIZING THE USER INTERFACE
C
Note: If a browser window is already open and on a Documents Xpress
4. When the desired changes are complete, click X to exit the User
Tips about creating the Main Page Text
• HTML code can be entered directly into the Main Page Text window in
• Create the code needed, including any desired images. The code
• Save all images for Main Page Text as GIF or JPG images and in the
• The font for the Main Page Text is controlled in the Configure Text
• Allowable changes inside the HTML code include:
• Use a utility, like Eye Dropper, to assist with picking colors. These
• The code for the sample Main Page Text in Figure 7-3 follows in
OCUMENTS XPRESS
D
EROX WEB DOCUMENT SUBMISSION SOFTWARE VERSION
— X
2.0 page, click Refresh on the browser window to see the new
change. A new browser window does not have to be opened.
Interface Configuration tool.
the User Interface Configuration tool, but it is much quicker to create
the code in a visual HTML editor like, Dreamweaver.
created in a visual editor can be cut and pasted directly into the Main
Page Text window.
following folder on the Documents Xpress server –
c:\xdx\etc\Apache\tomcat\webroot\images\2_0_images.
Save a copy of these files outside the c:\xdx folder.
part of the UI Configuration tool. Do not change fonts in the HTML
text.
• color and size of text
• justification of text and images
• insertion of images
utilities allow a user to obtain color values for any onscreen images
making color matching a simpler process.
Figure 7-4.
2.0
7-12 S
YSTEM ADMINISTRATION GUIDE
Page 73

OCUMENTS XPRESS
D
EROX WEB DOCUMENT SUBMISSION SOFTWARE VERSION
— X
2.0 C
USTOMIZING THE USER INTERFACE
Figure 7-4. HTML code sample for the Main Page Text in Figure 7-3.
<br/>
<font size="+1"> <font color="#A8C8FF">Welcome to the Telephone
Laboratories Print Shop</font></font><br/><br/>
<img src="/images/2_0_images/finger2.jpg" width="60" height="58" align="left"
hspace="2">Remember that the main printing facility will be closed for printer
upgrades on March 2 and 3. Ensure that all your print jobs are forwarded to
the Suffolk printers.<br/><br/>
Additionally, remember that even print jobs with hard copies need to be
entered through this system. If you need assistance, consult the online Help
system or ring our Help Desk staff at the Marshall Frank Building: 0171 888
5555<br/>
<p align="center"><i>Thank you for letting us be of assistance to you.</i>
• Do not include any of the standard required HTML tags in the Main
Page Text. These tags include <html>, <head>, <title>, and <body>.
Restoring the Default User Interface Configuration
If the need arises, the default interface can be restored to the Documents
Xpress system. This procedure assumes that the UI Configuration tool
has been opened.
CAUTION: This procedure will cancel all changes made to the user
interface. It is not a reversible procedure.
Perform the following to restore the default user interface:
1. Click Restore Defaults.
2. A Confirm window appears. Click Yes to restore the default system
values.
YSTEM ADMINISTRATION GUIDE
S
7-13
Page 74

USTOMIZING THE USER INTERFACE
C
3. Close the UI Configuration tool window by clicking X.
4. Reopen the UI Configuration tool and click Commit Changes. A
5. Open a browser window and go to the Documents Xpress 2.0 home
Note: If a browser window is already open and on a Documents Xpress
User Interface Configuration Defaults
OCUMENTS XPRESS
D
EROX WEB DOCUMENT SUBMISSION SOFTWARE VERSION
— X
Login window will appear if this is the first modification made this
session. Type Admin for the Username and 22222 for the Password.
Click OK.
page. The default user interface is now present.
2.0 page, click Refresh on the browser window to see the restored
default interface. A new browser window does not have to be
opened.
2.0
The following tables contain the default values for the User Interface.
Table 7-2. Configure Colors
Configure Colors
Configurable Section Default
Default Text Color #000000
Main Page Text Color #000000
Warnings and Information Text
Color
Top Navigational Links Text Color #000000
#FF0000
7-14 S
YSTEM ADMINISTRATION GUIDE
Page 75

OCUMENTS XPRESS
D
EROX WEB DOCUMENT SUBMISSION SOFTWARE VERSION
— X
Figure 7-2. Configure Colors (continued)
Configure Colors
Configurable Section Default
Title Bar Text Color #FF0000
Sub Title Bar Text Color #000000
Title Bar Color #FF0000
Title Bar Link Hover Color #0000FF
Sub Title Bar Color #EFEFEF
Alternating Colored Bars I #EFEFEF
Alternating Colored Bars II #CCCCCC
Button Bar #666666
Link Color #0000FF
Active Link Color #0000FF
Visited Link Color #0000FF
2.0 C
USTOMIZING THE USER INTERFACE
Link Hover Color #9999FF
Table 7-3. Configure Image
Configure Image
Configurable Section Default
Header Image 2_0_images/
logo.gif
YSTEM ADMINISTRATION GUIDE
S
7-15
Page 76

USTOMIZING THE USER INTERFACE
C
OCUMENTS XPRESS
D
EROX WEB DOCUMENT SUBMISSION SOFTWARE VERSION
— X
Table 7-4. Configure Text
Configure Text
Configurable Section Default
Default Text Family arial
Default Text Weight bold
Default Text Size x-small
Main Page Text Family arial
Main Page Text Weight bold
Main Page Text Size x-small
2.0
Warnings and Informational
arial
Text Family
Warnings and Informational
bold
Text Weight
Copyright Text Family arial
Copyright Text Weight normal
Copyright Text Size xx-small
Top Navigational Links Text
arial
Family
Top Navigational Links Text
bold
Weight
Top Navigational Links Text
x-small
Size
Title Bar Text Family arial
Title Bar Text Weight bold
Title Bar Text Size x-small
Sub Title Bar Text Family arial
Sub Title Bar Text Weight bold
7-16 S
YSTEM ADMINISTRATION GUIDE
Page 77

OCUMENTS XPRESS
D
EROX WEB DOCUMENT SUBMISSION SOFTWARE VERSION
— X
Table 7-4. Configure Text (continued)
Configure Text
Configurable Section Default
Sub Title Bar Text Size small
2.0 C
USTOMIZING THE USER INTERFACE
YSTEM ADMINISTRATION GUIDE
S
7-17
Page 78

Page 79

8. Installing the Xpress Print Driver
The Xpress Print Driver (XPD) allows the uploading and conversion of
documents from within a Windows application. There are three separate
setups:
• Windows 2000 client machines
• Windows NT Workstation client machines
• Windows 95 / 98 / ME client machines (this client needs the XPD file
configured on the server before allowing users to download it).
The System Administrator should set this driver up on client workstations
for users to send jobs to Documents Xpress directly from Windows
applications.
Note: WinZip or equivalent is needed for installing the XPD. A copy of
WinZip may be downloaded from www.winzip.com.
YSTEM ADMINISTRATION GUIDE
S
8-1
Page 80

NSTALLING THE
I
Windows 2000 Workstation XPD Setup
XPD D
OCUMENTS XPRESS
EROX WEB DOCUMENT SUBMISSION SOFTWARE VERSION
— X
Windows NT / Windows 2000 Server Setup
No setup on the server is required.
Windows 2000 Professional Client Setup
This procedure assumes that WinZip, or equivalent, is installed on the
client workstation.
Installing the XPD print driver
Perform the following to install the XPD print driver on a Window
2000 Professional client machine:
2.0
1. Create a folder named XPD on the C: drive of the workstation.
2. From the Documents Xpress home page, click Download Driver and
download the Windows 2000 XPD driver to the newly created XPD
folder.
3. Unzip Xpdy2k.zip to C:\XPD on the client workstation.
4. Click Start > Settings > Printers.
5. Double-click Add Printer.
6. The Add Printer Wizard appears. Click Next.
7. The Local or Network Printer window appears. Click Local Printer.
Clear Automatically detect and install my Plug and Play Printer.
Click Next.
8. For the port select File. Click Next.
8-2 S
YSTEM ADMINISTRATION GUIDE
Page 81

OCUMENTS XPRESS
D
EROX WEB DOCUMENT SUBMISSION SOFTWARE VERSION
— X
2.0 I
NSTALLING THE
9. The list of manufacturers of printers appears. Click Have Disk.
10. The Install from Disk dialog box appears. Click Browse and browse
to C:\XPD.
11. When in the XPD folder, the file name webxpd.inf will appear in the
File name text box. Click Open.
12. The Install From Disk dialog box reappears. Click OK.
13. Select DocumentsXpress PS Color Plugin. Click Next.
Note: Only the color driver needs to be selected since it will handle both
color and black and white jobs.
14. Keep the default printer name. Click Next.
15. Click Do not share this printer. Click Next.
16. To ensure that a test page is not printed click No. Click Next
17. The Completing the Add Printer Wizard window appears. Click
Finish.
XPD
18. A warning that the Digital Signature not found appears. Click Yes.
19. Close all open windows. The XPD print driver has been installed.
Setting the Printer Properties
Perform the following to set the printer properties:
1. Right-click the installed printer name in the Printer folder
(Start > Settings > Printers). Click Properties.
2. Select the Configuration tab from the Properties Dialog box.
YSTEM ADMINISTRATION GUIDE
S
8-3
Page 82

NSTALLING THE
I
XPD D
3. Select Server is Available.
In the appropriate fields, type the following:
Server Name = <Documents Xpress server IP address>
Port =
80
URL Post Path =
/xdx/servlet/simple?request.action=upd.action.upload
URL Get Path =
/xdx/upd.jsp?request.action=upd.action.dt&DT=%s&AG
=%s&PD=%s&PK=%s&NP=%d&NC=%d
Write to Spool = do not select
4. Click OK.
OCUMENTS XPRESS
EROX WEB DOCUMENT SUBMISSION SOFTWARE VERSION
— X
2.0
5. Configure the default browser by selecting Internet Explorer or
Netscape before using the driver, especially if using a proxy server on
the network.
Note: Test the installation by opening up a Windows application. Print to
Documents Xpress with the XPD driver by using
File > Print and then selecting the DocumentsXpress PS Color
Plugin driver.
8-4 S
YSTEM ADMINISTRATION GUIDE
Page 83

OCUMENTS XPRESS
D
Windows NT Workstation XPD Setup
EROX WEB DOCUMENT SUBMISSION SOFTWARE VERSION
— X
Windows NT Server Setup
No setup on the server is required.
Windows NT Workstation Client Setup
Installing the XPD
Perform the following to install the XPD print driver on a Windows
NT Workstation client machine:
1. Create a folder named XPD on the C: drive of the workstation.
2.0 I
NSTALLING THE
XPD
2. From the Documents Xpress home page, click Download Driver and
download the Windows NT XPD driver to the newly created XPD
folder.
3. Unzip xpd-1.1.3.zip to C:\XPD on the client workstation.
4. Click Start > Settings > Printers. Double-click Add Printer.
5. Click My Computer to install a local printer. Click Next.
6. Choose an unused local printer port (LPT1 for example). Click Next.
7. Click Have Disk and browse to C:\XPD.
8. Click webxpd.inf. Click Open.
9. Click OK.
10. Select DocumentsXpress PS Color Plugin. Click Next.
YSTEM ADMINISTRATION GUIDE
S
8-5
Page 84

NSTALLING THE
I
XPD D
Note: Only the color driver needs to be selected since it will handle both
color and black and white jobs.
11. To complete the installation click Next.
12. Keep the default printer name. Click Next.
13. Click Not Shared. Click Next.
14. Click No to skip printing a test page. Click Finish.
Setting the Printer Properties
Perform the following to set the printer properties:
1. Right-click the installed printer name in the Printer folder
(Start > Settings > Printers). Click Properties.
2. Select the Configuration tab from the Properties Dialog box.
3. Select Server is Available.
In the appropriate fields, type the following:
OCUMENTS XPRESS
EROX WEB DOCUMENT SUBMISSION SOFTWARE VERSION
— X
2.0
Server Name = <Documents Xpress server IP address>
Port =
80
URL Post Path =
/xdx/servlet/simple?request.action=upd.action.upload
URL Get Path =
/xdx/upd.jsp?request.action=upd.action.dt&DT=%s&AG=%
s&PD=%s&PK=%s&NP=%d&NC=%d
Write to Spool = do not select
8-6 S
YSTEM ADMINISTRATION GUIDE
Page 85

OCUMENTS XPRESS
D
EROX WEB DOCUMENT SUBMISSION SOFTWARE VERSION
— X
2.0 I
NSTALLING THE
4. Click OK.
5. Configure the default browser by selecting Internet Explorer or
Netscape before using the driver, especially if using a proxy server on
the network.
Note: Test the installation by opening up a Windows application. Print to
Documents Xpress with the XPD printer driver by using File > Print
and then selecting the DocumentsXpress PS Color Plugin printer
driver.
XPD
YSTEM ADMINISTRATION GUIDE
S
8-7
Page 86

NSTALLING THE
I
Windows 95 / 98 / ME XPD Setup
XPD D
OCUMENTS XPRESS
The Windows 95 / 98 / ME XPD installation files must be configured on
the server before they can be downloaded by each individual workstation.
This is a one-time change on the server.
Windows NT Server Setup
Modifying Windows NT Server File For Windows 95 / 98 / ME Installation
This procedure assumes that WinZip, or equivalent, is installed on the
server.
Perform the following to modify the Windows NT Server file for
Windows 95 / 98 XPD installation:
EROX WEB DOCUMENT SUBMISSION SOFTWARE VERSION
— X
2.0
1. On the Documents Xpress server, locate and double-click
C:\xdx\webroot\xpd\UPD.zip. The zip file will open in a window and
list all files contained in the zip file.
2. Double-click Docsxprs.inf. A text editor opens the inf file.
8-8 S
YSTEM ADMINISTRATION GUIDE
Page 87

OCUMENTS XPRESS
D
[AddReg.Url]
HKLM,"Software\Xerox\Documents Xpress\Post
URL",,0,"http://MACHINE2:80/xdx/servlet/simple?request.action=upd.a
ction.upload"
HKLM,"Software\Xerox\Documents Xpress\Get
URL",,0,http://MACHINE2:80/xdx/upd.jsp?request.action=upd.action.dt
&DT=%s&AG=%s&PD=%s&PK=%s&NP=%d&NC=%d”
EROX WEB DOCUMENT SUBMISSION SOFTWARE VERSION
— X
2.0 I
NSTALLING THE
3. Scroll down to the end of the file to the [AddReg.Url] header. Replace
both instances of MACHINE2 with the IP address for the Documents
Xpress server. See the example below:
Note: If the [AddReg.Url] section does not resemble the text above,
replace the existing [AddReg.Url] section with the one above.
4. Click File > Save to save the modified file in the Zip archive. Close
the text editor.
5. A confirmation window appears asking to Update archive with this
file. Click Yes. Close Winzip. The UPD.zip file is now ready to be
downloaded by Windows 95 / 98 / ME users.
XPD
Windows 95 / 98 / ME Client Setup
Once the installation files have been saved on the Windows NT Server,
install the client software for Windows 95 / 98 / ME.
Installing the XPD
Perform the following to install the XPD on a Windows 95 / 98 client
machine:
1. Create a folder named XPD on the C: drive of the workstation.
2. From the Documents Xpress home page, click Download Driver and
download the Windows 95/98/ME XPD driver to the newly created
XPD folder.
YSTEM ADMINISTRATION GUIDE
S
8-9
Page 88

NSTALLING THE
I
XPD D
3. Unzip UPD.zip to C:\XPD on the client PC.
4. Click Start > Settings > Printers. Double-click Add Printer. Click
Next.
5. Choose Local Printer. Click Next.
6. Click Have Disk and browse to C:\XPD.
7. Highlight Docsxprs.inf. Click OK.
8. Click OK.
9. Select the DocumentsXpress Color Plugin for color printing or black
and white printing and click Next.
10. Select LPT1 for the printer port. Click Next.
11. Leave the default printer name. Ensure that No for the default printer
choice is selected. Click Next.
12. Select No to skip printing a test page. Click Finish.
OCUMENTS XPRESS
EROX WEB DOCUMENT SUBMISSION SOFTWARE VERSION
— X
2.0
At this point, the XPD installation is now complete.
13. Test the installation by opening up a Windows application. Print to
Documents Xpress with the XPD driver by using File > Print and then
selecting the DocumentsXpress Color Plugin driver.
8-10 S
YSTEM ADMINISTRATION GUIDE
Page 89

9. System Backup
The System Administrator is responsible for ensuring regular completion
of backups for Documents Xpress. Schedule backups to occur at
non-peak hours. Depending upon the backup method chosen, system
performance may be degraded or clients may be prevented from using
Documents Xpress.
The instructions in this chapter are generic backup instructions. Specific
instructions depend on the type of backup software and hardware used.
Backing up Documents Xpress
Perform the following to back up Documents Xpress:
1. On the Documents Xpress server, shut down all the Documents
Xpress services and close the XDX Control Center.
CAUTION: Any files flagged as in use will not be backed up, therefore all
software programs on the Documents Xpress server should
be closed.
2. Follow the instructions provided by the backup software and perform a
backup of the complete server. At a minimum the C:\xdx folder needs
to be backed up.
3. Once the backup is complete, restart Documents Xpress by restarting
the XDX Control Center and services on the server.
YSTEM ADMINISTRATION GUIDE
S
9-1
Page 90

YSTEM BACKUP
S
Restoring Documents Xpress from a Backup
OCUMENTS XPRESS
D
EROX WEB DOCUMENT SUBMISSION SOFTWARE VERSION
— X
Perform the following to restore Documents Xpress:
1. Following the instructions included with the backup software, restore
all hard drives from the backup.
2. Reboot all the servers.
3. Restart the XDX Control Center and services on each server.
4. Test the system to confirm a user can perform tasks such as logging
on, printing, and converting.
2.0
9-2 S
YSTEM ADMINISTRATION GUIDE
Page 91

10. Configuring System Parameters
This chapter outlines how to use the Configuration Manager to make
changes to the default system parameter values in Documents Xpress.
All configurable values are modified through the XDX Control Center.
Configuration tools are outlined in Figure 10-1.
Figure 10-1. Configuration Tools in Documents Xpress
XDX Control Center Tools
UGD Admin
(see Chapter 6)
UI Config
(see Chapter 7)
Configuration
Manager
(this chapter)
Job Control Panel
(see Chapter 11)
Template Control
Panel
(see Chapter 12)
User Group Directory Administration – Users are
imported, added, modified, and inactivated here. Group
memberships can be established and users can be
moved into groups. This tool can also import user
database information from customer supplied files.
User Interface Configuration – The User interface can
be customized using the UI Config tool.
The Configuration Manager allows changes to system
parameters, to the Documents Xpress system.
The Job Control Panel allows an administrator to define
customer-specific print shop and accounting options,
such as finishing and billing.
Creation and editing of printable sheets such as print
job delivery sheets and coversheets, used as job
tickets.
YSTEM ADMINISTRATION GUIDE
S
10-1
Page 92

ONFIGURING SYSTEM PARAMETERSDOCUMENTS XPRESS
C
Parameter Locations
Use Figure 10-2 to help reconfigure commonly modified system
parameters. These directions assume that at the XDX Control Center, the
Configuration Manager has been started, and that the xdxConf folder has
been opened.
Figure 10-2. Common configuration parameter changes
To change: Go to:
Server IP address properties > System Properties > Server IP
Mail server IP address properties > Email > Email Server (two instances)
Administrator e-mail address properties > Email > Admin Email Address (two
Footer in e-mail messages properties > Email > Email Footer
EROX WEB DOCUMENT SUBMISSION SOFTWARE VERSION
— X
instances)
2.0
Enabling / Disabling of email
properties > Email > Email Enabled
messages to users
Print shop name properties > Email > Printshop Name
Database access user name properties > Database > Database Username
Database access user password properties > Database > Database Password
User data file properties > Users > User Import File
Number of days the system keeps
documents before deletion
Number of days the system holds user
properties > Documents > Document Lifetime (two
instances)
properties > Web Server > Document Lifetime
documents before deletion
Error message Exceptions
Job statuses System Job States
DocuShare address <optional> properties > DocuShare
Licensing warnings properties > Licensing
10-2 S
YSTEM ADMINISTRATION GUIDE
Page 93

OCUMENTS XPRESS
D
Configuration Manager Tool
EROX WEB DOCUMENT SUBMISSION SOFTWARE VERSION
— X
2.0 C
ONFIGURING SYSTEM PARAMETERS
The Configuration Manager Tool is used to modify system parameters in
Documents Xpress.
Perform the following to start the Configuration Manager Tool:
1. From the XDX Control Center click Tools > Configuration Manager.
2. The configuration_control_panel window appears. Using the
mouse, adjust the vertical bar so that the left side pane can be
completely seen.
3. Click the + beside xdxConf to open the configuration folder.
4. The configuration tool divides itself into four major categories:
• properties – Allows configuration of Documents Xpress
• Exceptions – Allows customization of Documents Xpress
error messages
• System Job States – Allows customization of job state
messages
• Launcher – Handles settings for processes started by the
Control Center
Each section varies in how it is configured and will be dealt with
separately in the following sections.
YSTEM ADMINISTRATION GUIDE
S
10-3
Page 94

ONFIGURING SYSTEM PARAMETERSDOCUMENTS XPRESS
C
5. After any configuration changes are made, ensure the changes are
saved. Stop and restart the system for the changes to take effect.
Modifying the Configuration Categories
Each major category in the Configuration Control Panel differs from the
next in how settings are changed. Refer to these following sections, along
with Appendix A – Default Configuration Manager Values to change
configuration values. These instructions will illustrate how to change
values in each section, and how to save those changes.
Properties
The properties section in the Configuration Control Panel is the section
where most of the settings for Documents Xpress are found. Figure 10-3
shows the sub-folders that contain the settings for this section.
EROX WEB DOCUMENT SUBMISSION SOFTWARE VERSION
— X
2.0
10-4 S
YSTEM ADMINISTRATION GUIDE
Page 95

OCUMENTS XPRESS
D
EROX WEB DOCUMENT SUBMISSION SOFTWARE VERSION
— X
2.0 C
ONFIGURING SYSTEM PARAMETERS
Figure 10-3. Subfolders in the properties configuration folder
Configuring a Properties Parameter
This example will show how to modify and then save a properties
parameter. The example used is changing the IP address of the
Documents Xpress server. All other Properties parameters are changed
in the same manner.
Perform the following to configure a properties parameter:
1. Locate the parameter to be changed. In this example, the server IP
address. The server IP address can be found in the System
Properties folder. Click the + beside System Properties to open the
folder.
2. The System Properties folder opens. Click Server IP.
YSTEM ADMINISTRATION GUIDE
S
10-5
Page 96

ONFIGURING SYSTEM PARAMETERSDOCUMENTS XPRESS
C
Note: Be careful to only single-click a parameter name.
Double-clicking a name allows the name to be changed. If a
parameter name is changed, and then saved, the system will not
function properly.
3. The right side of the Configuration Control Panel refreshes and lists
the current settings for the Server IP address parameter
4. As shown in the illustration above, this Property Value can be
changed because the Editable check box is selected. If the Editable
check box does not have a check mark, the value cannot be changed.
Type a new value.
EROX WEB DOCUMENT SUBMISSION SOFTWARE VERSION
— X
2.0
5. When the value has been changed, either select another value to
change from the properties list on the left, or click File > Save to
save any changes.
6. A Login window appears. Enter the Administrator Username and
Password and click OK.
10-6 S
YSTEM ADMINISTRATION GUIDE
Page 97

OCUMENTS XPRESS
D
EROX WEB DOCUMENT SUBMISSION SOFTWARE VERSION
— X
7. If there are no additional changes to be made, close the
configuration_control_panel by clicking X.
For the changes to take effect, the Documents Xpress system must be
shut down and restarted.
Exceptions
The Exceptions section in the Configuration Control Panel is the section
where the error messages for Documents Xpress can be modified. For a
listing of all the error messages, see Appendix A – Default Configuration
Manager Values.
Configuring an Exceptions Parameter
2.0 C
ONFIGURING SYSTEM PARAMETERS
This example will show how to modify and then save an Exceptions
parameter. The example used is changing the message that appears
when there is an error when canceling a job. All other Exceptions
parameters are changed in the same manner.
Perform the following to configure an Exceptions parameter:
1. Locate the parameter to be changed. In this example, the
CancelJobException error message is being changed. Click the +
beside Exceptions to open the folder.
2. The Exceptions folder opens. Click the parameter name to be
changed. In this example, the CancelJobException parameter will be
changed.
YSTEM ADMINISTRATION GUIDE
S
10-7
Page 98

ONFIGURING SYSTEM PARAMETERSDOCUMENTS XPRESS
C
3. The right side of the Configuration Control Panel refreshes and lists
the current settings for CancelJobException parameter.
4. Type the new error message in the Error Message text box.
5. When the value has been changed, either select another value to
change from the list on the left, or click File > Save to save any
changes. If this is the first time a modification has been made to a
configuration property value in this session, a Login window appears.
Enter the Username and Password and click OK.
EROX WEB DOCUMENT SUBMISSION SOFTWARE VERSION
— X
2.0
6. If there are no additional changes to be made, close the
configuration_control_panel by clicking X.
10-8 S
YSTEM ADMINISTRATION GUIDE
Page 99

OCUMENTS XPRESS
D
EROX WEB DOCUMENT SUBMISSION SOFTWARE VERSION
— X
System Job States
The System Job States section of the Configuration Control Panel allows
customization of the text that displays to show job notification states.
Configuring System Job States Parameters
This example will show how to modify and then save a System Job States
parameter. In this example, the createdState property will be changed.
All other System Job States parameters are changed in the same
manner.
Note: Any job states added will appear in the Status pull-down on the
Administrator side of Documents Xpress.
Perform the following to configure a System Jobs States parameter:
1. Locate the parameter to be changed. In this example, the
createdState display string is being changed. Click the + beside
System Job Strings to open the folder.
2.0 C
ONFIGURING SYSTEM PARAMETERS
2. The System Job States folder opens. Click the parameter name to
be changed.
YSTEM ADMINISTRATION GUIDE
S
10-9
Page 100

ONFIGURING SYSTEM PARAMETERSDOCUMENTS XPRESS
C
3. The right side of the Configuration Control Panel refreshes and lists
the current settings for CancelJobException parameter.
4. Click the Display Strings drop-down so see if any other Display
Strings have been added.
EROX WEB DOCUMENT SUBMISSION SOFTWARE VERSION
— X
2.0
5. If the desired string is present in the drop-down menu, select it. The
selected string appears in the Display Strings drop-down box. If the
desired string is not present type the new string in the Display Strings
box and click Add.
6. If a string has been created in error or is no longer needed, select it
from the drop-down box. Click Del to removed the string from the list.
10-10 S
YSTEM ADMINISTRATION GUIDE
 Loading...