

g
Documents Xpress —
Xerox Web Document
®
Submission Software
Version 2.0
Installation and Configuration
Guide
uration Guide
Documents Xpress —
Xerox Web Document Submission Software Version 2.0
Installation and Confi
Part Number 701P37978
Version 1.01
February 2002

Xerox Corporation
Global Knowledge and Language Services
800 Phillips Road
Building 845, 845-17S
Webster, New York 14580
USA
©2002 XEROX CORPORATION. All rights reserved.
Copyright protection claimed includes all forms and matters of copyrightable
material and information now allowed by statutory or judicial law or hereinafter
granted, including without limitations, material generated from the software
programs which are displayed on the screen such as styles, templates, icons,
screen displays looks, and so on.
XEROX®, The Document Company®, the digital X®, Xerox Canada Ltd.®, Xerox
Europe®, and all identifying numbers used in connection with the Xerox products
mentioned in this publication are trademarks of XEROX CORPORATION.
All non-Xerox brands and product names are trademarks or registered
trademarks of their respective companies.
While every care has been taken in the preparation of this material, no liability
will be accepted by Xerox Corporation arising out of any inaccuracies or
omissions.
Changes are periodically made to this document. Changes, technical
inaccuracies, and typographical errors will be corrected in subsequent editions.
This product includes software developed by the Apache Software Foundation
(http://www.apache.org/).

Table of Contents
1. Introduction...................................................................................1-1
Documents Xpress — Xerox Web Document Submission Software ...... 1-1
Intended Audience.................................................................................. 1-1
Assumptions ........................................................................................... 1-2
Conventions............................................................................................ 1-2
Related Documentation .......................................................................... 1-3
2. Product Overview .........................................................................2-1
Responsibilities....................................................................................... 2-1
System Administrator ........................................................................... 2-1
Print Shop Administrator....................................................................... 2-2
Print Shop Operator ............................................................................. 2-2
User ..................................................................................................... 2-3
3. Installation Requirements............................................................3-1
Hardware Requirements......................................................................... 3-1
Server Requirements ........................................................................... 3-1
Client Requirements............................................................................. 3-1
Software Requirements .......................................................................... 3-2
Server Requirements ........................................................................... 3-2
Client Requirements............................................................................. 3-2
Information Requirements....................................................................... 3-2
NSTALLATION AND CONFIGURATION GUIDE III
I

ABLE OF CONTENTS
T
OCUMENTS XPRESS
D
EROX WEB DOCUMENT SUBMISSION SOFTWARE VERSION
— X
4. Installing the Software .................................................................4-1
Third-party Software and Printer Driver Installation ................................ 4-2
Installing Adobe Acrobat Reader .......................................................... 4-2
Adding the Printer Driver ...................................................................... 4-3
Windows NT 4.0 Server.................................................................. 4-3
Windows 2000 Server..................................................................... 4-4
Installing Microsoft Office XP................................................................ 4-5
Post Installation Tasks.......................................................................... 4-6
Documents Xpress License Generation ................................................. 4-6
Installing Documents Xpress .................................................................. 4-9
Documents Xpress Software Installation .............................................4-10
Exit the Installation Program................................................................4-13
Configuring the Documents Xpress Core Installation...........................4-14
Configure Apache Administrator E-mail Address.................................4-15
5. Starting Up and Shutting Down...................................................5-1
Starting Documents Xpress .................................................................... 5-2
Starting Documents Xpress For the First Time..................................... 5-2
Testing Documents Xpress..................................................................... 5-4
Testing Documents Xpress .................................................................. 5-4
Shutting Down Documents Xpress ......................................................... 5-6
Shutting Down Documents Xpress ....................................................... 5-6
2.0
6. Troubleshooting ...........................................................................6-1
Installation Problems ..............................................................................6-1
Debugging Apache and Tomcat ............................................................. 6-1
Debugging Documents Xpress Services................................................. 6-2
7. Contacts and Escalation Process ...............................................7-1
Documents Xpress Support Process ...................................................... 7-1
IV
NSTALLATION AND CONFIGURATION GUIDE
I

OCUMENTS XPRESS
D
EROX WEB JOB PRINTING SOFTWARE VERSION
— X
2.0 T
ABLE OF CONTENTS
Support Contacts....................................................................................7-2
A. Install Verification Procedure ..................................................... A-1
Functional Areas Being Verified..............................................................A-1
Administrative Functions ......................................................................A-1
Client Functions.................................................................................... A-2
Operator Functions............................................................................... A-3
Install Verification Procedures ................................................................A-4
1. Administrator Verification Procedures............................................... A-4
1.1 Logging on as Administrator .....................................................A-4
1.2 Adding a Printer........................................................................ A-5
1.3 Editing the User Interface Using Admin Tools........................... A-5
2. Client Verification Procedures .......................................................... A-7
2.1 Registering a Client Account – Self Registration....................... A-7
2.2 Logging on as a User................................................................ A-8
2.3 Editing a User Profile................................................................ A-9
2.4 Submitting a Print Job Request – MS Word Document............. A-9
2.5 Submitting a Print Job Request – MS Excel Document........... A-10
2.6 Submitting a Print Job Request – Hard Copy Document......... A-11
2.7 Editing the Personal Address Book......................................... A-12
2.8 Editing the Document Repository............................................A-12
3. Operator Verification Procedures.................................................... A-13
3.1 Logging on as Operator ..........................................................A-13
3.2 Editing a Client Job Request – MS Word Document............... A-14
3.3 Fulfilling a Client Job Request – MS Word Document............. A-14
3.4 Fulfilling a Client Job Request – MS Excel Document............. A-15
3.5 Fulfilling a Client Job Request – Hard copy Document ........... A-16
3.6 Sending a Job to Each Installed Printer .................................. A-17
Install Verification Record .....................................................................A-18
Results............................................................................................... A-18
Administrative Functions............................................................... A-19
Client Functions............................................................................ A-19
Operator Functions....................................................................... A-20
Index ...................................................................................... Index-1
NSTALLATION AND CONFIGURATION GUIDE V
I

ABLE OF CONTENTS
T
OCUMENTS XPRESS
D
EROX WEB DOCUMENT SUBMISSION SOFTWARE VERSION
— X
2.0
VI
NSTALLATION AND CONFIGURATION GUIDE
I

1. Introduction
This chapter describes Documents Xpress — Xerox Web Document
Submission Software Version 2.0 and how to use this manual.
Documents Xpress — Xerox Web Document Submission Software
Documents Xpress allows end users to submit print jobs electronically
using industry standard browsers. Once submitted, production personnel
efficiently update job status as documents move through the production
cycle, providing users with information about their jobs. Web-based
printing generates cost savings and improvements in quality, productivity,
and turnaround time.
The system uses several services that can be loaded on one or more
servers, depending on the print shop configuration.
Intended Audience
This manual is intended for use by Xerox personnel who are responsible
for the installation of this system.
NSTALLATION AND CONFIGURATION GUIDE
I
1-1

NTRODUCTION
I
Assumptions
Conventions
OCUMENTS XPRESS
D
EROX WEB DOCUMENT SUBMISSION SOFTWARE VERSION
— X
2.0
The person installing Documents Xpress software should have
experience in the following areas:
• Windows NT server and / or Windows 2000 server administration
• Applicable workstation operating systems experience
• Hypertext Markup Language (HTML)
• Extensible Markup Language (XML)
• JavaServer Pages (JSP)
• Structured Query Language (SQL)
This guide uses the following conventions:
• Menu items and buttons appear in bold text.
• Screen, text box, and drop-down list titles, are spelled and punctuated
exactly as they appear on the screen.
• Document titles appear in italics.
• Content representative of text that is displayed on a computer monitor
is displayed in Courier New font and enclosed in a shaded table as
shown in Table 1-1.
Table 1-1. Example of text displayed on a computer monitor
INSERT INTO Field {field_name,custom_name}
1-2 I
NSTALLATION AND CONFIGURATION GUIDE

OCUMENTS XPRESS
D
EROX WEB JOB PRINTING SOFTWARE VERSION
— X
Related Documentation
The following manuals provide further information on the
Documents Xpress system:
• Documents Xpress — Xerox Web Document Submission Software
Installation Planning Guide – 701P37977
• Documents Xpress — Xerox Web Document Submission Software
System Administration Guide – 701P37979
• Documents Xpress — Xerox Web Document Submission Software
Product Overview Guide – 701P37980
• Documents Xpress — Xerox Web Document Submission Software
Product Overview Training – 701P37981
Note: Operator / Administrator and User instructions are available as
online help while using the Documents Xpress system.
2.0 I
NTRODUCTION
NSTALLATION AND CONFIGURATION GUIDE
I
1-3


Responsibilities
System Administrator
2. Product Overview
Documents Xpress is a web-based application used to submit and track
jobs.
System users access the software via three web interfaces:
• A User interface for submitting print jobs
• An Operator interface for printing jobs
• A Printer Administrator interface for setting up printers and templates,
customizing the user interface, and establishing pricing
The System Administrator manages user, operator, and print shop
administrative permissions for a print shop installation. Specific tasks
include:
• Managing Documents Xpress software
• Customizing the Documents Xpress user interface
• Managing user / operator permissions for a single print shop
The System Administrator will have a detailed understanding how the
Documents Xpress software works.
NSTALLATION AND CONFIGURATION GUIDE
I
2-1

RODUCT OVERVIEW
P
OCUMENTS XPRESS
D
Print Shop Administrator
The Printer Administrator is a user who manages a print shop. Specific
tasks include:
• Establishing specific print shop policies
• Configuring printers
• Generating reports using Documents Xpress tools
• Load pricing data into Documents Xpress
• Creating templates
The Print Shop Administrator must understand how to configure a printer
and how printer communications work.
Print Shop Operator
The Print Shop Operator is a user who manages the printing workflow in
a print shop. Specific tasks include:
• Printing jobs sent by end users
• Modifying the job status as jobs move through the workflow
• Distributing printed materials
EROX WEB DOCUMENT SUBMISSION SOFTWARE VERSION
— X
2.0
The Print Shop Operator must have detailed knowledge of scheduling
and prioritizing print jobs as well as a solid understanding of the
capabilities and capacities of the print shop.
2-2 I
NSTALLATION AND CONFIGURATION GUIDE

OCUMENTS XPRESS
D
EROX WEB JOB PRINTING SOFTWARE VERSION
— X
User
The User submits documents and jobs to Documents Xpress over the
Internet using a web browser, the Xpress Print Driver (XPD), or in some
installations through DocuShare. Specific tasks include:
• Using Documents Xpress as the interface to the print shop and local
printers
• Uploading documents into Documents Xpress
• Requesting printing and resubmission services using Documents
Xpress
The User must be knowledgeable about basic web browser use, general
Internet use (downloading, uploading, and navigation), and printer driver
installation.
2.0 P
RODUCT OVERVIEW
NSTALLATION AND CONFIGURATION GUIDE
I
2-3


3. Installation Requirements
Documents Xpress requires a specific combination of hardware, software,
and information to ensure a successful installation. These requirements
are documented in the Documents Xpress — Xerox Web Document
Submission Software Installation Planning Guide.
These installation instructions assume that the Documents Xpress server
has had the proper operating system installed and has a working
connection to the Internet.
Hardware Requirements
Server Requirements
• One Windows NT 4.0 or Windows 2000 server
• 9-GB hard disk
• 512-MB random access memory (RAM)
• One 10/100 MBPS network interface card (NIC)
• One available drop on a 100-MBPS network
• Simple Mail Transfer Protocol (SMTP) server supporting Anonymous
SMTP connections for outgoing mail
• An uninterruptible power supply (UPS) for the server
Client Requirements
• Workstation capable of using a supported operating system and a
supported browser
NSTALLATION AND CONFIGURATION GUIDE
I
3-1

NSTALLATION REQUIREMENTS
I
D
Software Requirements
Server Requirements
• Microsoft Windows NT Server 4.0 or Microsoft Windows 2000 Server
• Microsoft TCP / IP Printing service (LPR service) installed (Windows
NT Server 4.0 only)
• Microsoft Office XP
• Adobe Acrobat Reader
• Documents Xpress software
• Internet Explorer 5.5 (or later) or Netscape Navigator 4.75 (or later)
• WinZip
Client Requirements
• Any one of the following operating systems:
• Windows NT Workstation 4.0
• Windows 2000 Professional
• Windows 95 / 98 / ME
• Adobe Acrobat Reader
• Internet Explorer 5.5 (or later) or Netscape Navigator 4.75 (or later)
• WinZip
OCUMENTS XPRESS
EROX WEB DOCUMENT SUBMISSION SOFTWARE VERSION
— X
2.0
Information Requirements
See the Documents Xpress — Xerox Web Document Submission
Software Version 2.0 – Installation Planning Guide for a complete list of
the information requirements.
3-2 I
NSTALLATION AND CONFIGURATION GUIDE
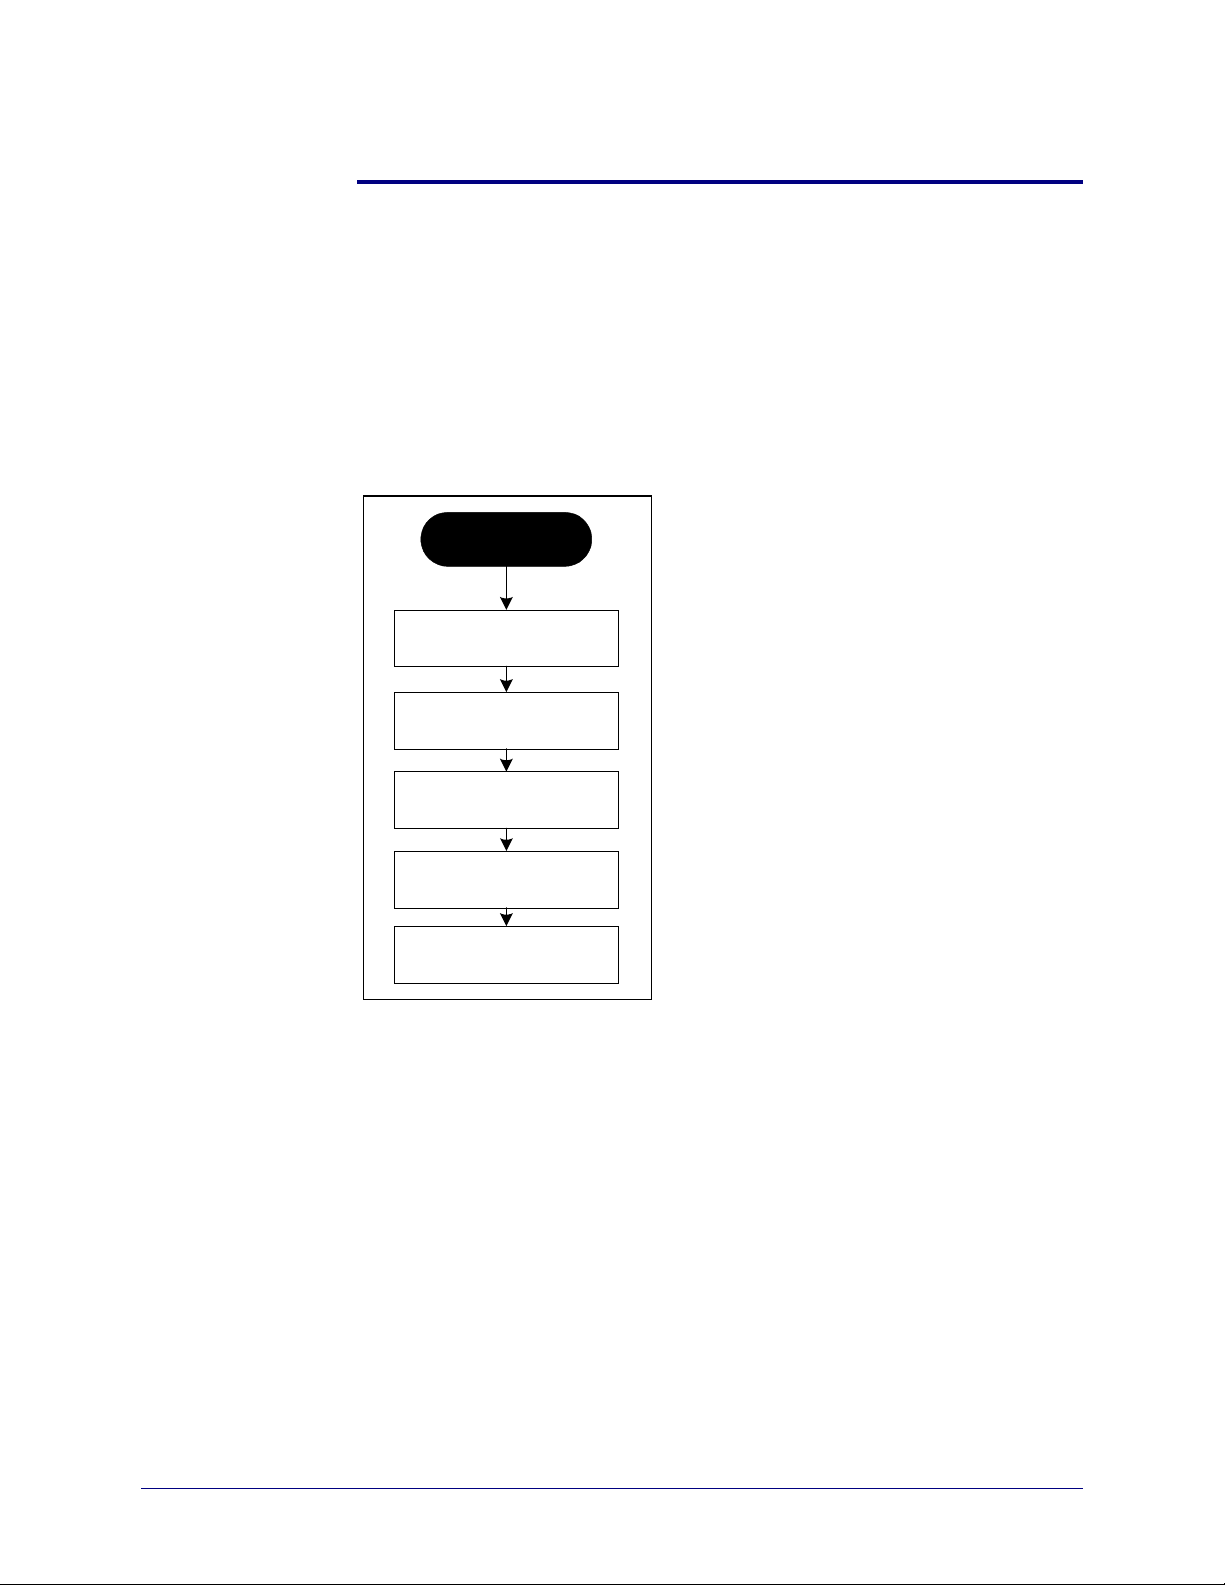
4. Installing the Software
Obtain the Documents Xpress — Xerox Web Document Submission
Software Version 2.0 – Installation Planning Guide before installing the
software. The following figure, Figure 4-1 gives an overall look at the
workflow for the complete installation process.
Figure 4-1. Documents Xpress installation process
Installation
process
Gather customer
installation information
Schedule installation
Install, configure and test
software
Customize and test
software as required
Software training as
required
NSTALLATION AND CONFIGURATION GUIDE
I
4-1

NSTALLING THE SOFTWARE
I
OCUMENTS XPRESS
D
EROX WEB DOCUMENT SUBMISSION SOFTWARE VERSION
— X
When performing an installation, the following, including third-party
software and printer driver, must be present and properly configured on
the server before installing Documents Xpress software:
• Adobe Acrobat Reader
• XDX PDFwriter print driver
• Microsoft Office XP
It is recommended that the server be assigned a name and physically
labeled with the applicable name and machine IP address. An example is
shown in Figure 4-2.
Figure 4-2. Example server label
Example label
Documents Xpress
Server
IP: xxx.xxx.xxx.xxx
Third-party Software and Printer Driver Installation
2.0
Installing Adobe Acrobat Reader
The system uses Adobe Acrobat Reader to convert documents to PDF
format. If Adobe Acrobat Reader is not already installed on the
Documents Xpress server, it must be downloaded from Adobe and then
installed.
Perform the following to install Adobe Acrobat Reader:
1. Go to http://www.adobe.com and download a copy of Acrobat Reader.
Choose either the base version, or the version that can search PDF
files. Either free version will work with Documents Xpress.
2. Follow the instructions from Adobe to install Adobe Acrobat Reader.
4-2 I
NSTALLATION AND CONFIGURATION GUIDE

OCUMENTS XPRESS
D
EROX WEB JOB PRINTING SOFTWARE VERSION
— X
Note: Restarting the server is not necessary at this time. The server will
be restarted as part of the final installation procedure.
Adding the Print Driver
The Xpress Print Driver (XPD) is used to convert documents to PostScript
before they are sent to the printer.
Perform the following to add the XPD:
Windows NT 4.0 Server
1. Create a folder named XPD on the C: drive of the server.
2. Unzip xpd-1.1.3.zip into the newly created XPD folder. This file is in a
Java archive (jar) file on the installation CD at
<CD ROM drive>/ installer.jar. Use WinZip to open installer.jar.
When the file listing appears in WinZip, locate and double-click
webAppServer_dist.zip. Inside this zip file is xpd-1.1.3.zip. Unzip
this file without closing any previous WinZip windows.
2.0 I
NSTALLING THE SOFTWARE
3. Click Start > Settings > Printers.
4. Double-click Add Printer.
5. Ensure My Computer is selected and click Next.
6. For the port, select File. Click Next.
7. The list of manufacturers of printers appears. Click Have Disk.
8. The Install from Disk dialog box appears. Browse to C:/XPD.
9. When in the XPD folder click webxpd.inf. Click Open.
10. The Install From Disk dialog box appears. Click OK.
NSTALLATION AND CONFIGURATION GUIDE
I
4-3

NSTALLING THE SOFTWARE
I
OCUMENTS XPRESS
D
EROX WEB DOCUMENT SUBMISSION SOFTWARE VERSION
— X
11. Select Documents Xpress PS Color Plugin. Click Next.
Note: Only the color driver needs to be selected for the server since it
will handle both color and black and white jobs.
12. Type XDX PDFwriter in the Printer name text box. Click Next.
Note: This is case and space sensitive. There is a space between the
letter X and the letter P.
13. Click Not shared. Click Next.
14. Click No to bypass printing a test page. Click Finish.
Windows 2000 Server
1. Create a folder named XPD on the C: drive of the server.
2. Unzip Xpdy2k.zip into the newly created XPD folder. This file is in a
Java archive (jar) file on the installation CD at
<CD ROM drive>/ installer.jar. Use WinZip to open installer.jar.
When the file listing appears in WinZip, locate and double-click
webAppServer_dist.zip. Inside this zip file is Xpdy2k.zip. Unzip this
file without closing any previous WinZip windows.
2.0
3. Click Start > Settings > Printers.
4. Double-click Add Printer.
5. The Add Printer Wizard appears. Click Next.
6. The Local or Network Printer window appears. Click Local Printer.
Clear Automatically detect and install my Plug and Play Printer.
Click Next.
7. For the port select File. Click Next.
8. The list of manufacturers of printers appears. Click Have Disk.
4-4 I
NSTALLATION AND CONFIGURATION GUIDE

OCUMENTS XPRESS
D
EROX WEB JOB PRINTING SOFTWARE VERSION
— X
2.0 I
NSTALLING THE SOFTWARE
9. The Install from Disk dialog box appears. Click Browse and browse
to C:/XPD.
10. When in the XPD folder click webxpd.inf. Click Open.
11. The Install From Disk dialog box reappears. Click OK.
12. Select Documents Xpress PS Color Plugin. Click Next.
Note: Only the color driver needs to be selected since it will handle both
color and black and white jobs.
13. Type XDX PDFwriter in the Printer name text box. Click Next.
Note: The print name is case and space sensitive. There is a space
between the letter X and the letter P.
14. Click Do not share this printer. Click Next.
15. To ensure that a test page is not printed click No Click Next.
16. The Completing the Add Printer Wizard window appears. Click
Finish.
17. A warning that the Digital Signature not found appears. Click Yes.
18. Close all open windows. The XDX printer driver has been installed.
Installing Microsoft Office XP
Microsoft Office XP must be installed in order for print drivers to process
Office documents.
Perform the following to install Microsoft Office:
1. Insert the Microsoft Office CD in the CD-ROM drive.
NSTALLATION AND CONFIGURATION GUIDE
I
4-5

NSTALLING THE SOFTWARE
I
Post Installation Tasks
OCUMENTS XPRESS
D
EROX WEB DOCUMENT SUBMISSION SOFTWARE VERSION
— X
2.0
Note: If the Microsoft Office installation does not begin after inserting the
CD, follow the instructions distributed with Microsoft Office on
manually starting an installation.
2. Start the installation process and choose Typical installation.
3. Accept all defaults ensuring that Word, Excel, and PowerPoint are
installed.
4. Remove the CD from the CD-ROM drive.
5. Restart Windows when prompted.
In order for the Documents Xpress system to operate, Adobe Acrobat
Reader, and Microsoft Office must be started to accept license
agreements. Failure to do so will keep the system from operating.
Start both Adobe Acrobat and Microsoft Office. Accept their licensing
agreements and then close Acrobat and Office before installing
Documents Xpress.
Documents Xpress License Generation
The Documents Xpress installation program requires a license diskette.
Generate a license using the XDX License Generation Tool 1.0 before
installing Documents Xpress.
The computer where the XDX License Generation Tool 1.0 is run must
have Java 2 Runtime Standard Edition v1.3.1 installed in order to use the
tool.
4-6 I
NSTALLATION AND CONFIGURATION GUIDE

OCUMENTS XPRESS
D
EROX WEB JOB PRINTING SOFTWARE VERSION
— X
2.0 I
NSTALLING THE SOFTWARE
CAUTION: Do not install Java 2 Runtime on the Documents Xpress
server. Documents Xpress will not run properly if Java 2
Runtime is installed on the server. Instead, install Java 2
Runtime on a laptop or client workstation to use the license
tool.
Note: This procedure requires a blank floppy disk.
Perform the following to generate a license:
1. Double-click license_gen.jar.
2. The XDX License Generation Tool 1.00 window appears. Type the
following information into the appropriate fields:
• Company Name – Type the full company name
• Expiration Date – Type the date that is one year from the installation
date
• Serial Number – Type the nine digit serial number
• Web App Server IP – Type the IP address of the Documents Xpress
server
• Database Server IP – Type the IP address of the Documents Xpress
server
• License File Location – Type the name of the license file in the
following format:
<floppy drive letter>:\<license file name>.lic
When all the fields are complete, ensure there is a floppy disk in drive A
and click Generate License File.
NSTALLATION AND CONFIGURATION GUIDE
I
4-7

NSTALLING THE SOFTWARE
I
OCUMENTS XPRESS
D
EROX WEB DOCUMENT SUBMISSION SOFTWARE VERSION
— X
3. The License Generator window appears. Click OK. Remove and
label the floppy disk for use in the installation process.
2.0
Note: If the program indicates an error with the expiration date, exit the
program and start the licensing process again. The expiration date
cannot be edited once set.
4-8 I
NSTALLATION AND CONFIGURATION GUIDE

OCUMENTS XPRESS
D
EB DOCUMENT SUBMISSION SOFTWARE VERSION
— W
Installing Documents Xpress
This section gives procedures on installing the core Documents Xpress
software. Once operational, the chapters that follow give procedures on
testing the installed configuration of the software at a customer site.
CAUTION: Ensure that the Display Properties for the server monitor is
set to a minimum of 256 colors. The installation program will
not appear on the screen if a lower number of colors is
selected.
The Documents Xpress server contains the application server software,
the database server, the web server software and the repository. Figure
4-3 illustrates the workflow for installing the core product.
Figure 4-3. Documents Xpress software installation workflow
Begin Core
Installation
2.0 I
NSTALLING THE SOFTWARE
DX Server
Manually install and
configure third party
applications
1. Adobe Acrobat Reader
2. XDX PDFwriter
3. Microsoft Office
Install Documents
Xpress 2.0 software:
Configure core Documents
Xpress
1. System e-mail
2. Apache Admin e-mail
3. Load pricing tables
Additional Configuration
and Customization
Consult the System
Administration Guide
1. User management
2. Configure UI
3. Set system parameters
4. Backup strategy
5. Optional DocuShare link
Core Installation
Complete
Validate installation
1. Log on as Admin
2. Create User
3. Test UI configuration
4. Submit jobs
5. Test Operator functions
NSTALLATION AND CONFIGURATION GUIDE
I
4-9

NSTALLING THE SOFTWARE
I
Documents Xpress Software Installation
OCUMENTS XPRESS
D
EROX WEB DOCUMENT SUBMISSION SOFTWARE VERSION
— X
Perform the following to install Documents Xpress software on the
server:
1. Insert the Documents Xpress installation CD into the CD-ROM drive
of the server.
2. Double-click My Computer.
3. Double-click the CD-ROM drive where the Documents Xpress
software appears.
4. Double-click runInstaller.bat.
5. A command window appears followed the WebXpress Installation
window. Click Full Installation.
2.0
Note: The WebXpress Installation window may appear behind the
Command window when installing on a Windows 2000 server.
Minimize the Command window to see the Installation window.
4-10 I
NSTALLATION AND CONFIGURATION GUIDE

OCUMENTS XPRESS
D
EROX WEB JOB PRINTING SOFTWARE VERSION
— X
2.0 I
NSTALLING THE SOFTWARE
6. The License File window appears. Insert the license floppy disk in
drive A. Click Browse.
7. Ensure that the license file is in the File Name window. Click Select
License File.
NSTALLATION AND CONFIGURATION GUIDE
I
4-11

NSTALLING THE SOFTWARE
I
OCUMENTS XPRESS
D
EROX WEB DOCUMENT SUBMISSION SOFTWARE VERSION
— X
8. The License File window reappears. Click Next.
9. The Installation Location window appears. The default installation
directory is C:/xdx. Ensure the Server address is the IP address of
the server where Documents Xpress is being installed. Click Install.
2.0
4-12 I
NSTALLATION AND CONFIGURATION GUIDE

OCUMENTS XPRESS
D
EROX WEB JOB PRINTING SOFTWARE VERSION
— X
10. After several minutes, the Installation Complete window appears.
Click Done.
Exit the Installation Program
2.0 I
NSTALLING THE SOFTWARE
Perform the following to exit the installation program:
1. The WebXpress Installation window reappears. To exit the
installation program, click X.
2. Remove the installation CD.
3. Restart the server.
If there were problems and the installation did not complete properly,
consult Chapter 6 – Troubleshooting.
NSTALLATION AND CONFIGURATION GUIDE
I
4-13

NSTALLING THE SOFTWARE
I
Configuring the Documents Xpress Core Installation
OCUMENTS XPRESS
D
EROX WEB DOCUMENT SUBMISSION SOFTWARE VERSION
— X
2.0
The addresses for the e-mail server and administrator must be configured
for the Documents Xpress system to operate properly.
CAUTION: Without these addresses configured, the Documents Xpress
system will not validate any new users.
Perform the following to set e-mail server and administrator
addresses for the system:
1. On the server, double-click My Computer. Go to C:\xdx\scripts and
double-click ControlCenter.
Note: To simplify startup of Documents Xpress, create a shortcut to
Control Center on the desktop.
2. Once the Control Center has started, the database must be started.
Click 1 : Database Server. The MySQL tab appears.
3. On the XDX Control Center click Tools > Configuration Manager.
4. The configuration_control_panel window opens. Click the + next to
the xdxConf folder.
5. Click the + next to properties.
6. Click the + next to the Email folder.
Note: This next set of configuration items deals with e-mail properties.
Consult the Documents Xpress Installation Planning Guide for the
required information for this section.
7. Click Email Subject. Type the subject line of the e-mail messages
sent to warn users that their documents will be deleted in place of the
default property value.
8. Click Admin Email Address. Type the Documents Xpress
administrator e-mail address in place of the default property value.
4-14 I
NSTALLATION AND CONFIGURATION GUIDE

OCUMENTS XPRESS
D
EROX WEB JOB PRINTING SOFTWARE VERSION
— X
2.0 I
NSTALLING THE SOFTWARE
9. Click Email Footer. Type the text to be appended to the end of every
outgoing e-mail message in place of the default property value.
10. Click Printshop Name. Type the name of the print shop, used in
e-mails to users in place of the default property value.
11. Click Email Server. Type the IP address of the designated e-mail
server in place of the default property value.
12. Click File > Save to save all changes.
13. If required, enter the Username Admin and the Password 22222.
Click OK.
14. Click X to close the configuration_control_panel window.
15. Click File > Reload XML. When asked Are you sure you want to
stop all processes… click Yes.
16. All processes stop. The core system is now installed.
Configure Apache Administrator E-mail Address
The Apache web server software can e-mail the system administrator if
there are internal problems with the web server. Follow these instructions
to set the e-mail address:
Perform the following to configure the Apache Administrator e-mail
address:
1. On the server double-click My Computer.
Go to C:\xdx\etc\Apache\conf.
2. Open httpd.conf in a text editor.
NSTALLATION AND CONFIGURATION GUIDE
I
4-15

NSTALLING THE SOFTWARE
I
OCUMENTS XPRESS
D
EROX WEB DOCUMENT SUBMISSION SOFTWARE VERSION
— X
3. Search for the line ServerAdmin @admin_email@ and replace
@admin_email@ with the System Administrator e-mail address.
4. Save the file, overwriting the existing httpd.conf.
5. Close all open windows.
2.0
4-16 I
NSTALLATION AND CONFIGURATION GUIDE

5. Starting Up and Shutting Down
The XDX Control Center application is used to start and stop the various
Documents Xpress components. When starting Documents
Xpress it is necessary to go the Documents Xpress server and run the
XDX Control Center.
A tab appears in the Control Center for each component as it is
accessed. Tab names are red if the component is loading, black if the
component is waiting to be loaded, and blue if the component has loaded
properly. An example of the Control Center appears in Figure 5-1.
CAUTION: After using the Control Center to start Documents Xpress
services, minimize the Control Center but DO NOT close it.
Closing the Control Center shuts down Documents
Xpress.
NSTALLATION AND CONFIGURATION GUIDE
I
5-1

TARTING UP AND SHUTTING DOWN
S
OCUMENTS XPRESS
D
Figure 5-1. XDX Control Center as it appears on the Documents Xpress
server with all components loaded and operational
Starting Documents Xpress
EROX WEB DOCUMENT SUBMISSION SOFTWARE VERSION
— X
2.0
Starting Documents Xpress requires using the XDX Control Center
application on the Documents Xpress server.
Starting Documents Xpress For the First Time
Perform the following to start Documents Xpress for the first time:
1. On the server, double-click My Computer. Go to C:\xdx\scripts and
double-click ControlCenter.
2. Once the Control Center has started, click
1 : Database Server > 2 : Web Application Server > 3 : Services.
3. Double-click My Computer. Go to C:\xdx\scripts and double-click
Admin-LoadPricing.
5-2 I
NSTALLATION AND CONFIGURATION GUIDE

OCUMENTS XPRESS
D
EROX WEB JOB PRINTING SOFTWARE VERSION
— X
2.0 S
TARTING UP AND SHUTTING DOWN
CAUTION: Only load the Pricing Tables this one time. It initializes the
MySQL tables for use by Document Xpress Print Shop
Administrators. Loading the Pricing Tables again will erase
any changes made since the tables were initialized the first
time.
Note: After starting the processes, wait approximately one minute before
starting access from any client machines.
The following figure, Figure 5-2, describes the components started with
the Control Center.
NSTALLATION AND CONFIGURATION GUIDE
I
5-3

TARTING UP AND SHUTTING DOWN
S
Figure 5-2. Description of components started with the Control
Center
OCUMENTS XPRESS
D
EROX WEB DOCUMENT SUBMISSION SOFTWARE VERSION
— X
Component Description
2.0
RMID (Remote Method
Invocation Daemon)
MySQL (Database Server) The database management system that tracks
Tomcat (used by Web
Server)
Apache (Web Server) The web server for the Documents Xpress system
Testing Documents Xpress
Once Documents Xpress has been installed, test the software to ensure
that it is operating correctly. The following steps are only a basic test to
see if the software is functioning. To test system operations completely,
consult the Install Verification Procedure chapter in Appendix A.
Testing Documents Xpress
Perform the following to test the Documents Xpress user log on:
A utility that XDX services use for activation
users and jobs in the system
Tomcat is a servlet container with a Java Server
Pages (JSP) environment. A servlet container is a
runtime shell that manages and invokes servlets
on behalf of users.
1. Open a browser window on a workstation connected to the network or
one of Documents Xpress servers.
2. In the address line, type the IP address that will point to the
Documents Xpress Web Application Server. In most cases, it is the IP
address of the Documents Xpress server, which hosts the web server
software.
5-4 I
NSTALLATION AND CONFIGURATION GUIDE

OCUMENTS XPRESS
D
EROX WEB JOB PRINTING SOFTWARE VERSION
— X
2.0 S
TARTING UP AND SHUTTING DOWN
http:// <Documents Xpress server IP address>/xdx
3. The initial log on screen appears after several moments. Log on with
the User Name admin and the password 22222. Attempt to submit a
job.
Perform the following to test the Documents Xpress administrator
log on:
1. Open a browser window on a workstation connected to the network or
one of Documents Xpress servers.
2. In the address line, type the IP address that will point to the
Documents Xpress Web Application Server. In most cases, it is the IP
address of the Documents Xpress server, which hosts the web server
software.
http:// <Documents Xpress server IP address>/xdx/admin
3. The initial log on screen appears after several moments. Log on with
the User Name admin and the password 22222. Attempt to view the
job submitted
NSTALLATION AND CONFIGURATION GUIDE
I
5-5

TARTING UP AND SHUTTING DOWN
S
OCUMENTS XPRESS
D
Shutting Down Documents Xpress
To shut down the system, first close the Documents Xpress components
from the Control Center and then close the Control Center.
Shutting Down Documents Xpress
Perform the following to shut down Documents Xpress using the
Control Center:
1. On Server 1, click in the following order:
1 : Database Server > 2 : Web Application Server > 3 : Services.
2. Close the Control Center by clicking X.
EROX WEB DOCUMENT SUBMISSION SOFTWARE VERSION
— X
2.0
5-6 I
NSTALLATION AND CONFIGURATION GUIDE

6. Troubleshooting
This section describes two methods for helping to diagnose problems that
may occur. For further assistance with troubleshooting problems, consult
Chapter 7 – Contacts and Escalation Process.
Installation Problems
The simplest way to ensure there are no installation problems is to have a
clean server. If there are old versions of Documents Xpress, they must be
removed. Any existing versions of MySQL and any Java must also
removed.
If an installation is not working, often it is easier to delete the C:\xdx
folder and begin the installation again. Shut down Documents Xpress and
reboot the server. After the server has restarted, remove the C:\xdx
folder. Complete instructions are given in the Documents Xpress Web
Document Submission Software Version 2.0 System Administration
Guide.
Debugging Apache and Tomcat
The Apache server logs (access.log and error.log) are located in
C:\xdx\etc\Apache\logs and the Tomcat servlet engine logs (jasper.log,
servlet.log, and tomcat.log) are located in C:\xdx\etc\Apache\tomcat\logs.
These logs provide valuable troubleshooting information if the software is
not operating properly.
NSTALLATION AND CONFIGURATION GUIDE
I
6-1

ROUBLESHOOTING
T
OCUMENTS XPRESS
D
EROX WEB DOCUMENT SUBMISSION SOFTWARE VERSION
— X
In addition, at c:\xdx are two additional log files – RMID.log and
Tomcat.log.
Note: Each time Apache is started, the previous error log is reopened
and new information is appended to the end of the file. If there is an
error in the system, the logs will contain debugging information.
Debugging Documents Xpress Services
Debugging output is saved to file and displayed by each Documents
Xpress service. If there is an error with the system, examine the XDX
Control Panel window of the appropriate service to determine where the
error has occurred. Generally, if there is a problem, a Java exception will
be displayed in the window. This message can be used to determine
exactly what errors have occurred in the system.
The log file messages that appear for Tomcat can modified by starting the
Configuration Control Panel from the XDX Control Center. These steps
assume the XDX Control Center is operational and the Documents
System is running.
2.0
Perform the following to modify the logging messages for Tomcat:
1. On the XDX Control Center click Tools > Configuration Manager.
2. The configuration_control_panel window opens. Click the + next to
the xdxConf folder.
3. Click the + next to properties.
4. Click the + next to the Logging folder.
5. Change the Property Value from info to debug. This will increase the
level of information returned from the system.
6-2 I
NSTALLATION AND CONFIGURATION GUIDE

OCUMENTS XPRESS
D
EROX WEB JOB PRINTING SOFTWARE VERSION
— X
2.0 T
6. Click File > Save to save all changes.
7. If required, enter the Username Admin and the Password 22222.
Click OK.
8. Click X to close the configuration_control_panel window.
The log for any tab in the Control Panel window can be cleared by
right-clicking the tab and selecting Clear output.
ROUBLESHOOTING
NSTALLATION AND CONFIGURATION GUIDE
I
6-3


7. Contacts and Escalation Process
This chapter describes the support process and support contacts
available for Documents Xpress.
Documents Xpress Support Process
At the time of installation, a Customer Solution Administrator (CSA) will
be identified. The CSA is available to manage all software-related issues.
The CSA, who has the skills of a system administrator, handles the dayto-day service and support operations at the customer site. The CSA is
the main interface to the Documents Xpress Support Center.
Note: If a problem relates to a Xerox output device and not the software
please contact the appropriate Xerox Support Center for that
product. If a problem relates to the computer server hardware,
contact the manufacturer of the server.
Here is the process for initiating support:
1. When the end user or operator encounters an error with the software,
they should contact the CSA.
2. The CSA performs system level isolation and problem resolution for
Documents Xpress.
3. If the CSA is not able to resolve the problem, the problem is escalated
to Documents Xpress Support Center for support.
Note: Only the CSA can call the hotline for support.
NSTALLATION AND CONFIGURATION GUIDE
I
7-1

ONTACTS AND ESCALATION PROCESS
C
Support Contacts
Documents Xpress has an e-Support website available at
http://www.xerox.com/webdocumentsubmission/support. The e-Support
website provides a searchable knowledgebase, Frequently Asked
Questions (FAQ’s), and the ability to submit a support request via e-mail.
Contact the designated CSA for support. The CSA will contact the
Documents Xpress Support Center if they require additional assistance.
The Support Center can be reached at
1-888-508-5244, 8:00 a.m. to 5:00 p.m., Monday through Friday, local
time.
OCUMENTS XPRESS
D
EB DOCUMENT SUBMISSION SOFTWARE VERSION
— W
2.0
7-2 I
NSTALLATION AND CONFIGURATION GUIDE

A. Install Verification Procedure
Use this chapter to verify a successful installation of Documents Xpress.
Record all test results pertinent to a specific install in the worksheets
provided in this chapter.
Functional Areas Being Verified
This section provides an overview of the functional areas verified after
software installation.
Administrative Functions
Administrative functions that will be tested are listed in Table A-1.
Table A-1. Administrative functions and procedures
Function Test Procedure
Log on as Administrator 1.1
Add Printer (Default and others in print shop) 1.2
Edit User Interface Using Admin Tools 1.3
NSTALLATION AND CONFIGURATION GUIDE
I
A-1

NSTALL VERIFICATION PROCEDURE
I
Client Functions
Client functions that will be tested are listed in Table A-2.
Table A-2. Client functions and procedures
Function Test Procedure
Register Your Account 2.1
Log on as End User 2.2
Edit User Profile 2.3
Submit Print Job Request – MS Word Document 2.4
Submit a Print Job Request – MS Excel Document 2.5
Submit a Print Job Request – Hard copy Document 2.6
Edit Personal Address Book 2.7
Edit Document Repository 2.8
OCUMENTS XPRESS
D
EROX WEB DOCUMENT SUBMISSION SOFTWARE VERSION
— X
2.0
A-2 I
NSTALLATION AND CONFIGURATION GUIDE

OCUMENTS XPRESS
D
Function Test Procedure
Log on as Operator 3.1
Edit a Client Job Request – MS Word Document 3.2
Fulfill a Client Job Request – MS Word Document 3.3
Fulfill a Client Job Request – MS Excel Document 3.4
Fulfill a Client Job Request – Hard copy Document 3.5
Send a Print Job to Each Installed Printer 3.6
EROX WEB JOB PRINTING SOFTWARE VERSION
— X
Operator Functions
Operator functions that will be tested are listed in Table A-3.
Table A-3. Operator functions and procedures
2.0 I
NSTALL VERIFICATION PROCEDURE
NSTALLATION AND CONFIGURATION GUIDE
I
A-3

NSTALL VERIFICATION PROCEDURE
I
OCUMENTS XPRESS
D
Install Verification Procedures
These install verification procedures test the basic system functionality of
Documents Xpress. Run the Administrator and Operator verification
procedures from any workstation on the system network except where
noted. Test Client verification procedures from a corporate client
workstation.
Record all Pass / Fail results and provide a summary in the Install
Verification Record at the end of this chapter.
1. Administrator Verification Procedures
The Administrator verification procedures test the major functions of a
System Administrator using Documents Xpress.
EROX WEB DOCUMENT SUBMISSION SOFTWARE VERSION
— X
2.0
1.1 Logging on as Administrator
Perform the following to log on as Administrator:
1. Open a browser window on a workstation connected to the network,
or one of the Documents Xpress servers.
2. In the address line, type the IP address for the Documents Xpress
server:
http:// <Documents Xpress server IP address>/xdx/admin
3. Type admin in the User Name text box.
4. Type the admin password 22222 in the Password text box and click
Log On.
A-4 I
NSTALLATION AND CONFIGURATION GUIDE

OCUMENTS XPRESS
D
EROX WEB JOB PRINTING SOFTWARE VERSION
— X
2.0 I
NSTALL VERIFICATION PROCEDURE
Verify that the log on was successful. If unsuccessful, please note the
observed system response.
__________________________________________________________
__________________________________________________________
1.2 Adding a Printer
Perform the following to add a printer:
1. While logged on as Administrator, click Printers. From the Manage
Printers drop-down menu chose Add Printer.
2. Type the Printer Name, Server Address, Printer Location, and
Printer Description in the text boxes provided. Select and click Add
Printer to save the printer data.
3. On the Manage Printers drop-down menu, click View Printers.
Verify that the added printer is displayed according to the definition
just supplied. If unsuccessful, please note the observed system
response.
__________________________________________________________
__________________________________________________________
1.3 Editing the User Interface Using Admin Tools
Perform the following to edit the user interface using the Admin
tools:
1. Move to the Documents Xpress server and restore the XDX Control
Center screen.
NSTALLATION AND CONFIGURATION GUIDE
I
A-5

NSTALL VERIFICATION PROCEDURE
I
2. Click Tools > UI Config. From the Configure Colors drop-down
3. In the Current Color text box type:
4. Click Commit Changes and type the Admin Username and Password
5. Open a web browser to verify that, after logging on, the welcome
6. Change the Current Color for the Main Page Text Color back to:
7. Click Commit Changes and type the Admin Username and Password
8. Click File > Reload XML. Click Yes to stop all processes and reload
OCUMENTS XPRESS
D
EROX WEB DOCUMENT SUBMISSION SOFTWARE VERSION
— X
menu, select Main Page Text Color.
#0000ff
if requested.
message has blue text.
#000000
if requested.
the XML file.
2.0
9. Click 1 > 2 > 3 to restart Documents Xpress and return to the Home
page.
Verify that the changes were saved and UI updates are visible on the
affected web pages. If unsuccessful, please note the observed system
response.
__________________________________________________________
__________________________________________________________
A-6 I
NSTALLATION AND CONFIGURATION GUIDE

OCUMENTS XPRESS
D
EROX WEB JOB PRINTING SOFTWARE VERSION
— X
2. Client Verification Procedures
The Client verification procedures exercise the major end user functions
of Documents Xpress.
2.1 Registering a Client Account – Self Registration
Perform the following to register a client account:
1. Open a browser window on a workstation connected to the network,
or one of the Documents Xpress servers.
2. In the address line, type the IP address for the Documents Xpress
server:
http:// <Documents Xpress server IP address>/xdx
3. Click Self Registration.
2.0 I
NSTALL VERIFICATION PROCEDURE
4. Type a user name and a valid e-mail address. To send the registration
request click Continue.
5. In the Temporary Password field, type the temporary password
provided on the system generated e-mail.
Note: The temporary password will be e-mailed to the address entered
in step 4. The password can also be located at the end of the
Tomcat window in the XDX Control Center.
6. In the New Password and the Verify Password fields, type a new
password.
7. To log on to Documents Xpress click Finish.
NSTALLATION AND CONFIGURATION GUIDE
I
A-7

NSTALL VERIFICATION PROCEDURE
I
__________________________________________________________
__________________________________________________________
2.2 Logging on as a User
Perform the following to log in as an end user:
1. Close the browser window from procedure 2.1. Open a new browser
2. In the address line, type the IP address for the Documents Xpress
OCUMENTS XPRESS
D
EROX WEB DOCUMENT SUBMISSION SOFTWARE VERSION
— X
Verify that a system-generated e-mail was sent to the registering end
user containing the assigned system password. If unsuccessful,
please note the observed system response.
window.
server:
http:// <Documents Xpress server IP address>/xdx
2.0
3. Type the user name registered in procedure 2.1.
4. Type the registered password in the Password box. Click Log On.
Verify that the log on was successful. If unsuccessful, please note
observed the system response.
__________________________________________________________
__________________________________________________________
A-8 I
NSTALLATION AND CONFIGURATION GUIDE

OCUMENTS XPRESS
D
EROX WEB JOB PRINTING SOFTWARE VERSION
— X
2.0 I
2.3 Editing a User Profile
Perform the following to edit a user profile:
1. From the Home page, click User Profile.
2. Fill in or modify User Profile fields for the user.
3. Click Update Profile. Click Finish to save the updates.
Verify that the user profile updates were successful by clicking Log
Off, logging back on as the same user, and selecting User Profile
from the menu. If unsuccessful, please note the observed system
response.
__________________________________________________________
__________________________________________________________
NSTALL VERIFICATION PROCEDURE
2.4 Submitting a Print Job Request – MS Word Document
Perform the following to submit an MS Word document print job
request:
1. From the User Home page, click Submit.
2. Click Browse. Select any MS Word document and click Open.
3. Click Next to upload the MS Word document to the repository on the
Documents Xpress server.
4. Type Test description in the Description text box. Click Next.
5. The recipients for the job appear. Click Next.
NSTALLATION AND CONFIGURATION GUIDE
I
A-9

NSTALL VERIFICATION PROCEDURE
I
6. Type These are special instructions in the Special Instructions
7. The Verify your order window appears. Review the order and then
8. Record the Job ID for this job. This Job ID will be required for test
__________________________________________________________
__________________________________________________________
2.5 Submitting a Print Job Request – MS Excel Document
Perform the following to submit an MS Excel document print job
request:
OCUMENTS XPRESS
D
EROX WEB DOCUMENT SUBMISSION SOFTWARE VERSION
— X
text box. Click Next.
click Submit Order. Wait for the screen to refresh.
procedure 3.2. Click Finish
Verify that the submitted job was successful. If unsuccessful, please
note the observed system response.
2.0
1. From the User Home page, click Submit.
2. Click Browse. Select any MS Excel document and click Open.
3. Click Next to upload the MS Excel document to the repository on the
Documents Xpress server.
4. Select any print options for this document job. Click Next.
5. The recipients for the job appear. Click Next.
6. Type These are special instructions in the Special Instructions
text box. Click Next.
7. The Verify your order window appears. Review the order and then
click Submit Order. Wait for the screen to refresh.
A-10 I
NSTALLATION AND CONFIGURATION GUIDE

OCUMENTS XPRESS
D
EROX WEB JOB PRINTING SOFTWARE VERSION
— X
2.0 I
NSTALL VERIFICATION PROCEDURE
Verify that the submitted job was successful. If unsuccessful, please
note the observed system response.
__________________________________________________________
__________________________________________________________
2.6 Submitting a Print Job Request – Hard Copy Document
Perform the following to submit a hard copy document print job
request:
1. From the User Home page click Submit.
2. Click Hard Copy.
3. Select the print options for this document. Click Next.
4. The recipient’s window appears. Click Next.
5. Type These are special instructions in the Special Instructions
text box. Click Next.
6. The Verify your order window appears. Review the order.
7. Click Submit Order to submit the print job order to the print shop.
Wait for the screen to refresh.
Verify that the submitted job was successful. If unsuccessful, please
note the observed system response
__________________________________________________________
__________________________________________________________
NSTALLATION AND CONFIGURATION GUIDE
I
A-11

NSTALL VERIFICATION PROCEDURE
I
2.7 Editing the Personal Address Book
Perform the following to edit the Personal Address Book:
1. From the User Home page, click Personal Address Book.
2. Click Add User.
3. Fill in the fields with an imaginary user. When finished click Add User.
__________________________________________________________
__________________________________________________________
2.8 Editing the Document Repository
OCUMENTS XPRESS
D
EROX WEB DOCUMENT SUBMISSION SOFTWARE VERSION
— X
Verify that the new address was successful saved by clicking the
name link of the user just added. Ensure the edits made were saved.
If unsuccessful, please note the observed system response.
2.0
Perform the following to edit the Document Repository:
1. From the User Home page, click Repository.
2. Select a document from the repository. Select Extend. Click Delete
or Extend Document.
Verify that the document selected for extension was extended from
the repository. Typically, since there is just one document in the
repository from these tests, the number of days remaining should not
change. If unsuccessful, please note the observed system response.
__________________________________________________________
__________________________________________________________
A-12 I
NSTALLATION AND CONFIGURATION GUIDE

OCUMENTS XPRESS
D
EROX WEB JOB PRINTING SOFTWARE VERSION
— X
3. Operator Verification Procedures
The Operator verification procedures test the major functions of an
Operator using Documents Xpress.
3.1 Logging on as Operator
Perform the following to log on as Operator:
1. Open a browser window on a workstation connected to the network.
2. In the address line, type the IP address for the Documents Xpress
server:
http:// <Machine2 IP address or URL>/xdx/admin
3. Type operator in the User Name text box.
4. Type the operator password 22222 in the Password text box and click
Log On.
2.0 I
NSTALL VERIFICATION PROCEDURE
Verify that the log on was successful. If unsuccessful, please note the
observed system response.
__________________________________________________________
__________________________________________________________
NSTALLATION AND CONFIGURATION GUIDE
I
A-13

NSTALL VERIFICATION PROCEDURE
I
3.2 Editing a Client Job Request – MS Word Document
Perform the following to edit an MS Word document client job
request:
1. From the Operator Home page locate the Job ID of the MS Word
2. From the Options drop-down menu, choose Edit Job. Make some
3. Click Submit Edits. The screen will refresh. Click Finish.
4. From the Options drop-down menu, choose Inspect Job.
__________________________________________________________
OCUMENTS XPRESS
D
EROX WEB DOCUMENT SUBMISSION SOFTWARE VERSION
— X
document previously submitted.
type of change to the job.
Verify that the job properties were updated. If unsuccessful, please
note the observed system response.
2.0
__________________________________________________________
3.3 Fulfilling a Client Job Request – MS Word Document
A printer must already be added to the Documents Xpress system and
the installer logged in as Administrator for this test to work.
Perform the following to fulfill an MS Word document client job
request:
1. Using the job just edited in 3.2, from the Options drop-down menu,
choose Print Job.
2. Under Print Full Job, select a printer from the drop-down menu.
A-14 I
NSTALLATION AND CONFIGURATION GUIDE

OCUMENTS XPRESS
D
EROX WEB JOB PRINTING SOFTWARE VERSION
— X
2.0 I
NSTALL VERIFICATION PROCEDURE
3. Clear the Skip Job Ticket checkbox and click Print.
4. Click Job Status. Select Succeeded from the Change Status to:
drop-down menu.
5. Click Submit to update the job status.
6. Click Set Page Count to confirm status change and update the page
count if necessary.
7. Click Job Status Page.
Verify that the Job Status is Succeeded. If unsuccessful, please note
the observed system response.
Note: If e-mail notification is activated, verify that the end user received
an e-mail notification of job completion.
__________________________________________________________
__________________________________________________________
3.4 Fulfilling a Client Job Request – MS Excel Document
Perform the following to fulfill an MS Excel document client job
request:
1. Using the job just edited in 3.2, from the Options drop-down menu,
choose Print Job.
2. Under Print Full Job, select a printer from the drop-down menu.
3. Clear the Skip Job Ticket checkbox and click Print.
4. Click Job Status. Select Succeeded from the Change Status to:
drop-down menu.
5. Click Submit to update the job status.
NSTALLATION AND CONFIGURATION GUIDE
I
A-15

NSTALL VERIFICATION PROCEDURE
I
6. Click Set Page Count to confirm status change and update the page
7. Click Job Status Page.
Note: If e-mail notification is activated, verify that the end user received
__________________________________________________________
__________________________________________________________
3.5 Fulfilling a Client Job Request – Hard copy Document
Perform the following to fulfill a hard copy document client job
request:
1. From the Operator Home page, locate the Job ID of the hard copy
OCUMENTS XPRESS
D
EROX WEB DOCUMENT SUBMISSION SOFTWARE VERSION
— X
count if necessary.
Verify that the Job Status is Succeeded. If unsuccessful, please note
the observed system response.
an email notification of job completion.
document previously submitted.
2.0
2. From the Options drop-down menu, click Inspect Job.
3. Click Edit job ticket to examine the job options selected for the hard
copy document.
4. Print the job according to the client’s print request.
5. On the Documents Xpress Operator page click Job Status. Select
Succeeded from the Change Status to: drop-down menu.
6. Click Submit to update the job status.
7. Click Set Page Count to confirm status change and update the page
count if necessary.
A-16 I
NSTALLATION AND CONFIGURATION GUIDE

OCUMENTS XPRESS
D
EROX WEB JOB PRINTING SOFTWARE VERSION
— X
2.0 I
NSTALL VERIFICATION PROCEDURE
8. Click Job Status Page.
Verify that the Job Status is Succeeded. If unsuccessful, please note
the observed system response.
Note: If e-mail notification is activated, verify that the end user received
an e-mail notification of job completion.
__________________________________________________________
__________________________________________________________
3.6 Sending a Job to Each Installed Printer
Perform the following to send a job to each installed printer:
1. From the Operator Home page, locate any Job ID with status of
Received in Print Shop.
Note: If there is no job with the status of Received in Print Shop,
change the status of any job to Received in Print Shop.
2. From the Options drop-down menu, click Inspect Job to view the job
properties.
3. Click Print Job.
4. Under the heading Print Full Job, select a printer from the
drop-down menu.
5. Click Print to send the job to the selected printer.
6. Repeat steps 4 and 5 for each installed printer.
7. Click Job Status. Select Succeeded from the Change Status to:
drop-down menu.
NSTALLATION AND CONFIGURATION GUIDE
I
A-17

NSTALL VERIFICATION PROCEDURE
I
OCUMENTS XPRESS
D
8. Click Submit to update the job status.
9. Click Set Page Count to confirm status change and update the page
count if necessary.
10. Click Job Status Page.
Verify that the job was successful and all printers could print job requests.
If unsuccessful, please note the observed system response.
__________________________________________________________
__________________________________________________________
Install Verification Record
Use the following section to record results of the installation verification
procedures. Comments concerning failure observations are recorded at
the bottom of each procedure the previous section.
EROX WEB DOCUMENT SUBMISSION SOFTWARE VERSION
— X
2.0
Results
Record results using the following tables. Please describe what is
observed if a procedure fails.
A-18 I
NSTALLATION AND CONFIGURATION GUIDE

OCUMENTS XPRESS
D
EROX WEB JOB PRINTING SOFTWARE VERSION
— X
2.0 I
NSTALL VERIFICATION PROCEDURE
Administrative Functions
Test results for Administrative functions are recorded in Table A-4
Table A-4. Administrative functions and test procedures
Function Test
Log on as Administrator 2.1.1
Add Printers (Default and others in print shop) 2.1.2
Edit User Interface Using Admin Tools 2.1.3
Client Functions
Test results for Client functions are recorded in Table A-5.
Table A-5. Client functions and test procedures
Function Test
Register Your Account 2.2.1
Log on as End User 2.2.2
Edit User Profile 2.2.3
Submit Print Job Request – MS Word
Document
Procedure
Procedure
2.2.4
Results
P – Pass or F – Fail
Results
P – Pass or F – Fail
Submit a Print Job Request – MS Excel
Document
Submit a Print Job Request – Hardcopy
Document
Submit a File Conversion Job Request – PDF 2.2.7
NSTALLATION AND CONFIGURATION GUIDE
I
2.2.5
2.2.6
A-19

NSTALL VERIFICATION PROCEDURE
I
Table A-5. Client functions and test procedures (continued)
OCUMENTS XPRESS
D
EROX WEB DOCUMENT SUBMISSION SOFTWARE VERSION
— X
2.0
Function Test
Procedure
Submit a File Conversion Job Request –
2.2.8
PostScript
Edit Personal Address Book 2.2.9
Edit Document Repository 2.2.10
Operator Functions
Test results for Operator functions are recorded in Table A-6.
Table A-6. Operator functions and test procedures
Function Test
Procedure
Log on as Operator 2.3.1
Edit a Client Job Request – MS Word
Document
Fulfill a Client Job Request – MS Word
Document
2.3.2
2.3.3
Results
P – Pass or F – Fail
Results
P – Pass or F – Fail
Fulfill a Client Job Request – MS Excel
2.3.4
Document
Fulfill a Client Job Request – Hard copy
2.3.5
Document
Send a Job to Each Installed Printer 2.3.6
A-20 I
NSTALLATION AND CONFIGURATION GUIDE

Index
A
Acrobat Reader
installation, 4-2
Apache web server
debugging, 6-1
e-mail address setup, 4-15
D
display properties. See installation – display
properties
Documents Xpress
overview, 2-1
related documentation, 1-3
support contacts, 7-2
support process, 7-1
E
e-mail properties configuration, 4-14
G
generating license, 4-6
H
hardware requirements, 3-1
I
information requirements, 3-2
installation, 4-1
Acrobat Reader, 4-2
administrator e-mail address, 4-14
configuring core installation, 4-14
display properties, 4-9
e-mail properties configuration, 4-14
e-mail server address, 4-14
license file, 4-11
Microsoft Office XP, 4-5
post installation tasks, 4-6
process, 4-1
testing, 5-3
verification procedure
administrative functions, A-1
administrator procedures, A-4
client functions, A-2
client procedures, A-7
install verification record, A-18
operator functions, A-3
operator procedures, A-13
workflow diagram, 4-9
XDX printer driver, 4-3
L
license
generating, 4-6
license file, 4-11
M
Microsoft Office XP
installation, 4-5
P
post installation tasks, 4-6
printers
XDX Printer Driver
adding, 4-3
R
requirements
hardware, 3-1
client, 3-1
server, 3-1
information, 3-2
software, 3-2
roles and responsibilities
print shop administrator, 2-2
print shop operator, 2-2
system administrator, 2-1
user, 2-3
S
shutdown, 5-4
using XDX Control Center, 5-4
software requirements, 3-2
startup
using XDX Control Center, 5-2
support contacts, 7-2
support process, 7-1
T
testing solution installation, 5-3
V
verification
installation, A-1
W
Web server
debugging, 6-1
X
XDX Printer Driver
adding, 4-3
NSTALLATION AND CONFIGURATION GUIDE
I
NDEX
I
-1

EROX CORPORATION
X
2002
 Loading...