

Page 1

Version 1.0
November 2008
®
SquareFold
User Guide
Trimmer Module
Page 2

Xerox Corporation
Global Knowledge & Language Services
800 Phillips Road
Building 218
Webster, New York 14580
© Copyright 2008 by Xerox Corporation. All Rights Reserved.
Xerox®, the sphere of connectivity design, and SquareFold® Omtool™, Equitrac™ and FreeFlow™ SMARTsend™ are trademarks of Xerox
Corporation in the United States and/or other countries.
Copyright protection claimed includes all forms and matters of copyrighted material and information now allowed by statutory or judicial law
or hereinafter granted, including without limitation, material generated from the software programs that are displayed on the screen such as
styles, templates, icons, screen displays, looks, etc.
Microsoft, MS-DOS, Windows, Windows NT, Microsoft Network, and Windows Server are either trademarks or registered trademarks of
Microsoft Corporation in the United States and/or other countries. Novell, NetWare, IntranetWare and NDS are registered trademarks of
Novell, Inc. in the United States and other countries. Adobe, Acrobat, PostScript, PostScript3, and PostScript Logo are trademarks of Adobe
Systems Incorporated. Apple, AppleTalk, EtherTalk, LocalTalk, Macintosh, MacOS and TrueType are trademarks of Apple Computer, Inc.,
registered in the U.S. and other countries. HP, HPGL, HPGL/2, and HP-UX are registered trademarks of Hewlett-Packard Corporation.
All product/brand names are trademarks or registered trademarks of the respective holders.
Page 3

Table of contents
Overview 1
Introduction . . . . . . . . . . . . . . . . . . . . . . . . . . . . . . . . . . . . . . . . . . . . . . . . . . . . .1
Identifying the components. . . . . . . . . . . . . . . . . . . . . . . . . . . . . . . . . . . . . . .2
Main components . . . . . . . . . . . . . . . . . . . . . . . . . . . . . . . . . . . . . . . . . . . .2
Paper path . . . . . . . . . . . . . . . . . . . . . . . . . . . . . . . . . . . . . . . . . . . . . . . . . . .3
Control panel. . . . . . . . . . . . . . . . . . . . . . . . . . . . . . . . . . . . . . . . . . . . . . . . .4
Square Fold Settings. . . . . . . . . . . . . . . . . . . . . . . . . . . . . . . . . . . . . . . . . . . . . . 6
Trimmer Mode Settings . . . . . . . . . . . . . . . . . . . . . . . . . . . . . . . . . . . . . . . . . . .8
Hints and tips 10
Printing full-page images on booklets . . . . . . . . . . . . . . . . . . . . . . . . . . . . 10
Follow these tips . . . . . . . . . . . . . . . . . . . . . . . . . . . . . . . . . . . . . . . . . . . . 11
Problem solving 12
Jam clearance. . . . . . . . . . . . . . . . . . . . . . . . . . . . . . . . . . . . . . . . . . . . . . . . . . 12
Fault Codes . . . . . . . . . . . . . . . . . . . . . . . . . . . . . . . . . . . . . . . . . . . . . . . . . . . . 14
Technical data 18
Specifications . . . . . . . . . . . . . . . . . . . . . . . . . . . . . . . . . . . . . . . . . . . . . . . . . . 18
Physical characteristics. . . . . . . . . . . . . . . . . . . . . . . . . . . . . . . . . . . . . . 18
SquareFold Trimmer User Guide i
Page 4

Table of contents
ii SquareFold Trimmer User Guide
Page 5
Introduction
p
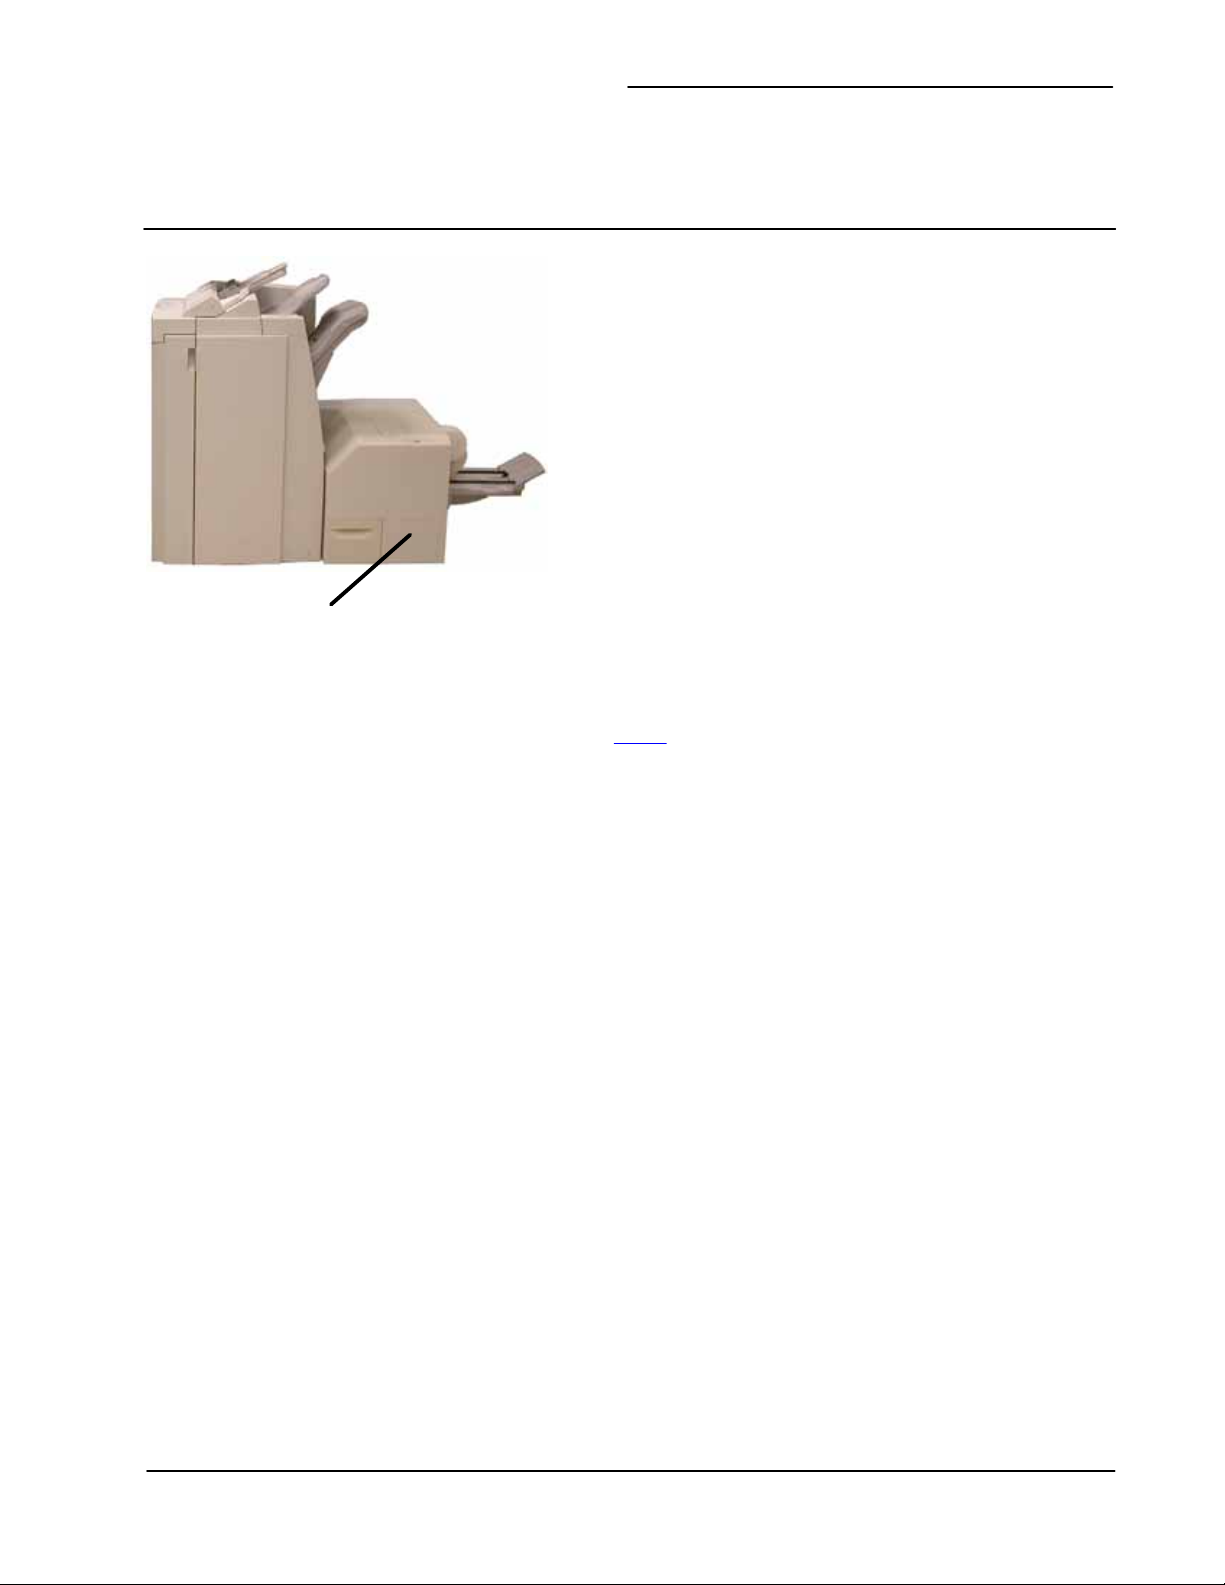
SquareFold Trimmer Module
Overview
The SquareFold Trimmer Module is an optional finishing
device that is used in conjunction with another optional
finishing device that contains a booklet maker.
The SquareFold Trimmer Module:
Receives the booklet from the booklet maker area of the •
finisher,
Flattens the booklet spine, thereby reducing the •
booklet’s thickness and giving it the appearance of a
perfect-bound book, and
Trims/cuts away the face (edge) of the booklet, •
resulting in a neat finished edge.
Tip: Always refer to the Hints and Tips section of this manual
before using the SquareFold Trimmer Module. The Hints and
Tips section provides valuable information about setting up
your jobs, which in turn ensures the best possible output for
your print/copy jobs.
Note 1: The booklet is assembled and stapled in the booklet
area of the finisher; therefore, the booklet enters the
SquareFold Trimmer Module already assembled. Any
adjustments to the image of the original and its
lacement on the booklet page must be done either from
the machine’s UI or from your print driver.
Note 2: You may want to run one or more test prints/copies
before running larger jobs.
SquareFold Trimmer User Guide 1
Page 6
Overview
j
.
Identifying the components
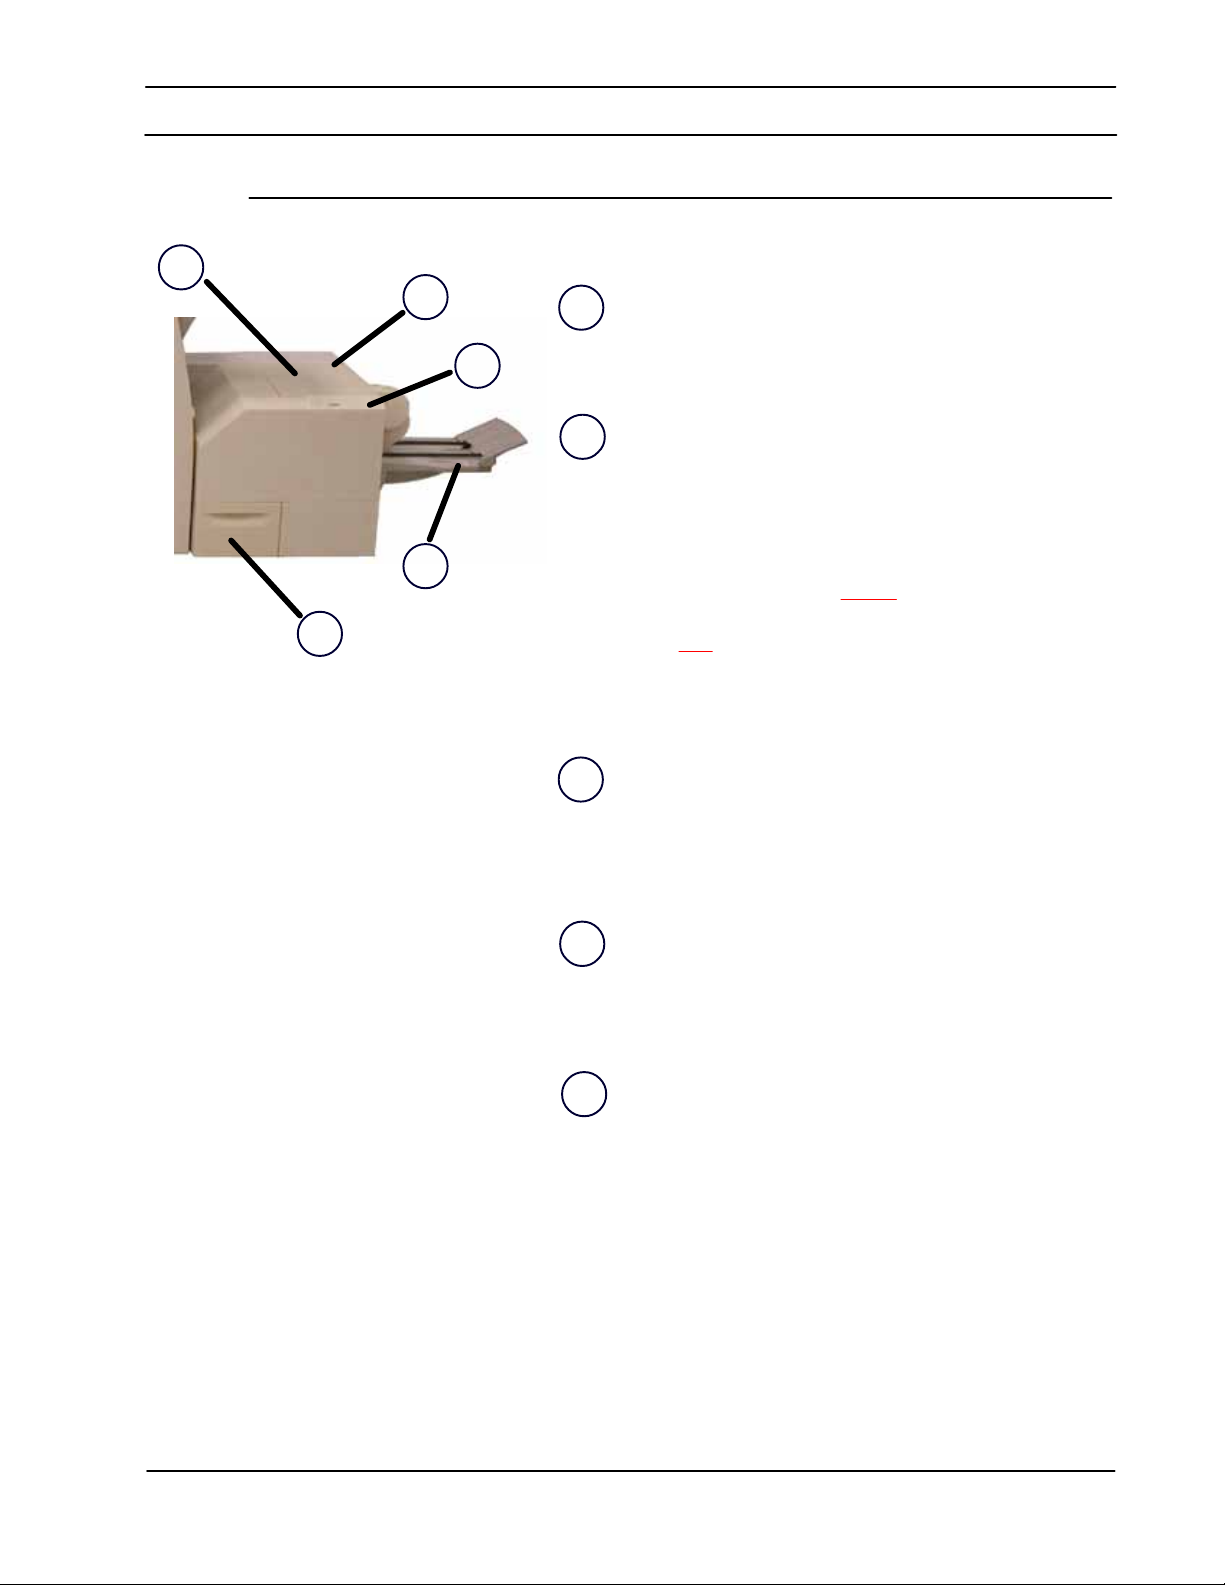
Main components
1.
2.
4.
5.
The main components consist of the following:
Top Left Cover: Open this cover to remove paper jams. The
1.
square fold mechanism is found in this area.
3.
Top Right Cover: Open this cover to remove paper jams. The
2.
trimming mechanism is found in this area.
Important!: The top covers cannot
operation or when the machine is idle. The covers can be
opened only
am/fault occurs within the SquareFold Trimmer Module
when an indicator is lit (refer to page 4) and a
be opened during normal
Control Panel: The Control Panel consists of a mimic display,
3.
buttons, and various indicator lights. The control panel is
discussed in more detail on page 4.
Booklet Output Tray: This tray receives square-fold booklet
4.
output from the finisher.
Trimmer Waste Container: Collects scrap/waste from the
5.
trimmer. Pull open to remove and dispose of trimmer waste
scraps.
2
SquareFold Trimmer User Guide
Page 7
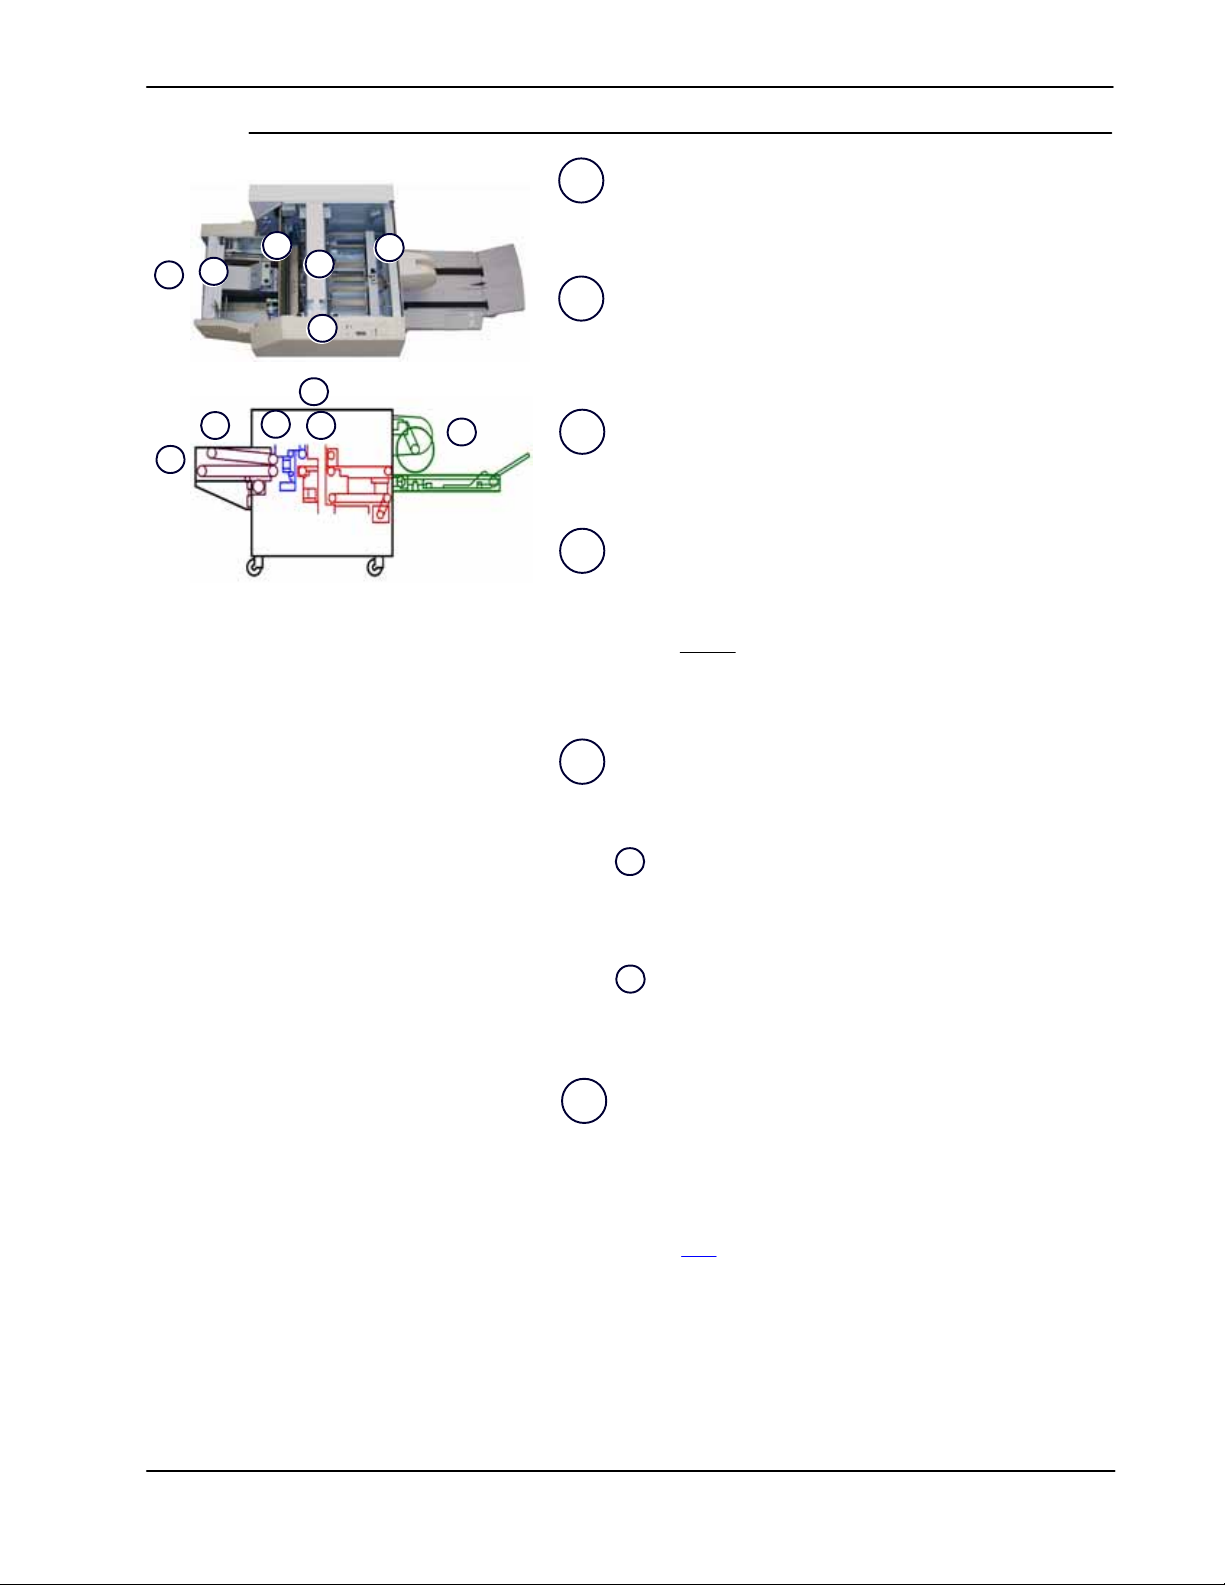
Paper path
p
The booklet leaves the booklet area of the finisher and enters
1.
SquareFold Trimmer Module.
Overview
3.
2.
1.
5.
4.
6.
The Booklet Exit sensor (in the SquareFold Trimmer Module)
2.
detects the lead edge (spine) of booklet and moves the
booklet to square fold area.
4.
2.
1.
3.
5.
6.
Once the booklet spine reaches the square fold area, the
3.
booklet is clamped and the square-folding operation begins.
The booklet is flattened and the spine squared according to
4.
the square-fold setting indicated on the control panel.
For detailed information on each of Square Fold settings,
refer to page 6
After the booklet is flattened and the spine squared, it is
5.
moved to the trimmer area.
.
Based on the finished booklet size, the booklet is moved
a.
until the trail edge reaches the trimmer cutter.
The trail edge is trimmed/cut (based on the finished
b.
booklet size entered for the Trimmer Mode Setting).
The booklet then moves to the exit area where it is
6.
transported to the Booklet Output Tray.
Tip: Booklets exiting/leaving the SquareFold Trimmer
Module may
reviously trimmed booklet. This is due to static electricity
build-up and is normal. If booklets contain trim
remnants/scraps, simply remove and discard them.
contain trim remnants/scraps from the
3SquareFold Trimmer User Guide
Page 8
Overview
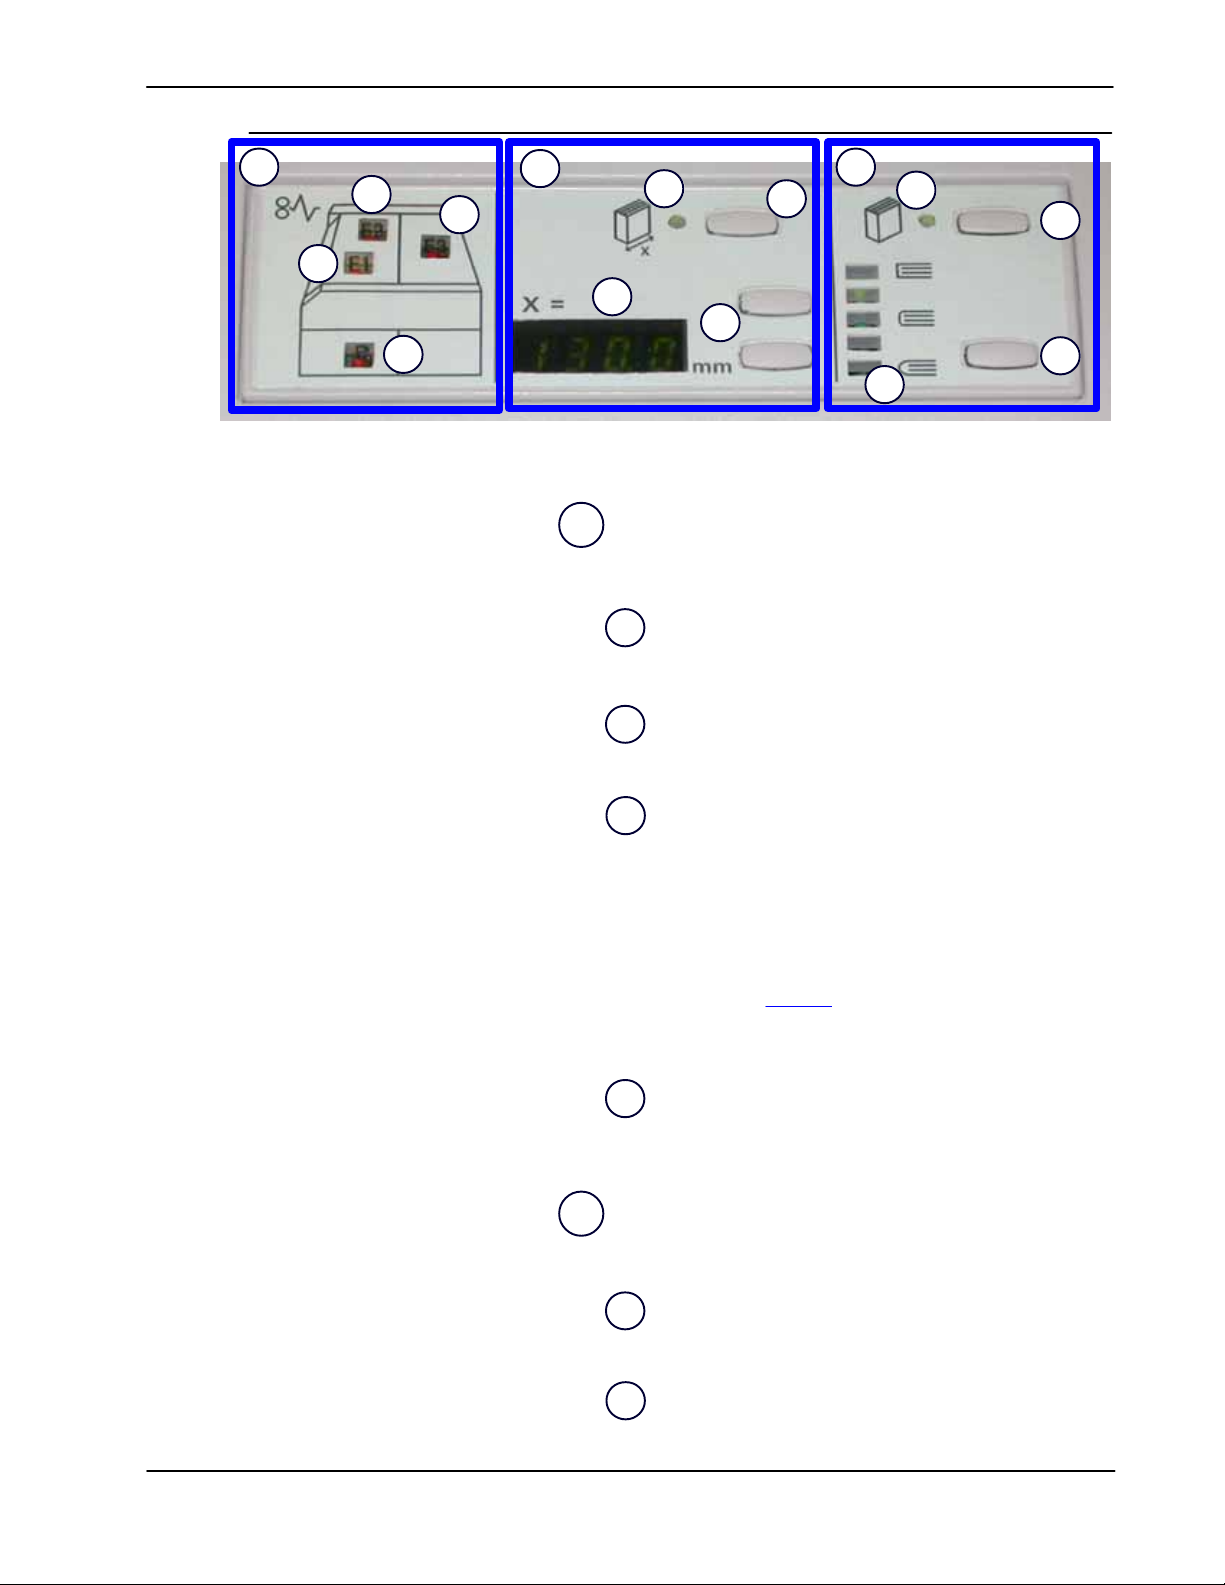
Control panel
1.
1b.
1c.
2.
2a.
2b.
3.
3a.
3b.
1a.
2d.
2c.
1d.
3c.
3d.
The Control Panel consists of the following:
Fault indicators: These indicators light when a fault or jam
1.
occurs in either a particular area of the SquareFold Trimmer
Module or in the finisher:
This indicator lights when a jam occurs as the booklet is
1a.
leaving the exit area of the finisher.
This indicator lights when a jam occurs in the square
1b.
fold area.
This indicator lights when a jam occurs in the trimmer
1c.
area.
Tip: If one of these indicators (1a, 1b, 1c) is lit, the top
covers can be opened, and the jam/fault cleared; otherwise,
during normal operation or when the machine is idle, the top
covers cannot be opened. For information on jam/fault
clearance, refer to page 12.
This indicator lights when the Trimmer Waste Container
1d.
is pulled out or when it is full.
Trimmer functions: This area of the control panel contains
2.
the following:
Trimmer power indicator: This lights when the Trimmer
2a.
Mode is on.
Trimmer on/off button: Press this button to switch
2b.
on/off the Trimmer Mode.
4
SquareFold Trimmer User Guide
Page 9

Up/down buttons: Press the up or down button to
2c.
adjust the Trimmer Mode setting; refer to 2d.
Trimmer Mode Setting: This displays the trimmer
2d.
setting in millimeters. The trimmer setting is based on
the final output booklet size and is adjustable. This is
discussed in more detail on page 8.
Square Fold functions: This area of the control panel
3.
contains the following:
Square Fold power indicator: This lights when the
3a.
Square Fold Mode is on.
Square Fold on/off button: Press this button to switch
3b.
on or off the Square Fold Mode.
Overview
Settings button: Press this button to adjust the Square
3c.
Fold setting; refer to 3d
Square Fold Setting: Select the desired setting; these
3d.
settings are discussed in more detail on page 6.
.
SquareFold Trimmer User Guide 5
Page 10

Overview
Square Fold Settings
Note: You may want to run one or more test prints/copies
before running larger jobs.
2.
1.
5.
3.
4.
The Square Fold Settings are found on the SquareFold
Trimmer Module control panel. The settings can be switched
on or off based on user preference. When the settings are
switched on, you can select one of five options depending on
your requirements for the finished booklet job:
+2: Use this setting when you want the most amount of
1.
pressure applied to the spine of the booklet. The more
pressure applied to the booklet, the more square the booklet
spine will be. +2 is the greatest
be applied to the booklet.
Additionally, you may want to select this setting when your
finished booklet is five pages or less and on heavier weight
paper (200 g/m² or greater).
+1: Use this setting when you want a greater amount of
2.
pressure applied to the spine of the booklet, but not as much
pressure as the +2 setting uses.
amount of pressure that can
Auto: This is the machine default setting and is used for
3.
most jobs.
-1: Use this setting when you want less pressure applied to
4.
the spine of the booklet. The less pressure applied to the
booklet, the more rounded the booklet spine will be.
-2: Select this setting when your finished booklet is five pages
5.
or less and on lighter weight paper (100 g/m² or lower). -2 is
the least
booklet.
Choose the setting that best fits your needs for the booklet
output.
amount of pressure that can be applied to the
6
SquareFold Trimmer User Guide
Page 11
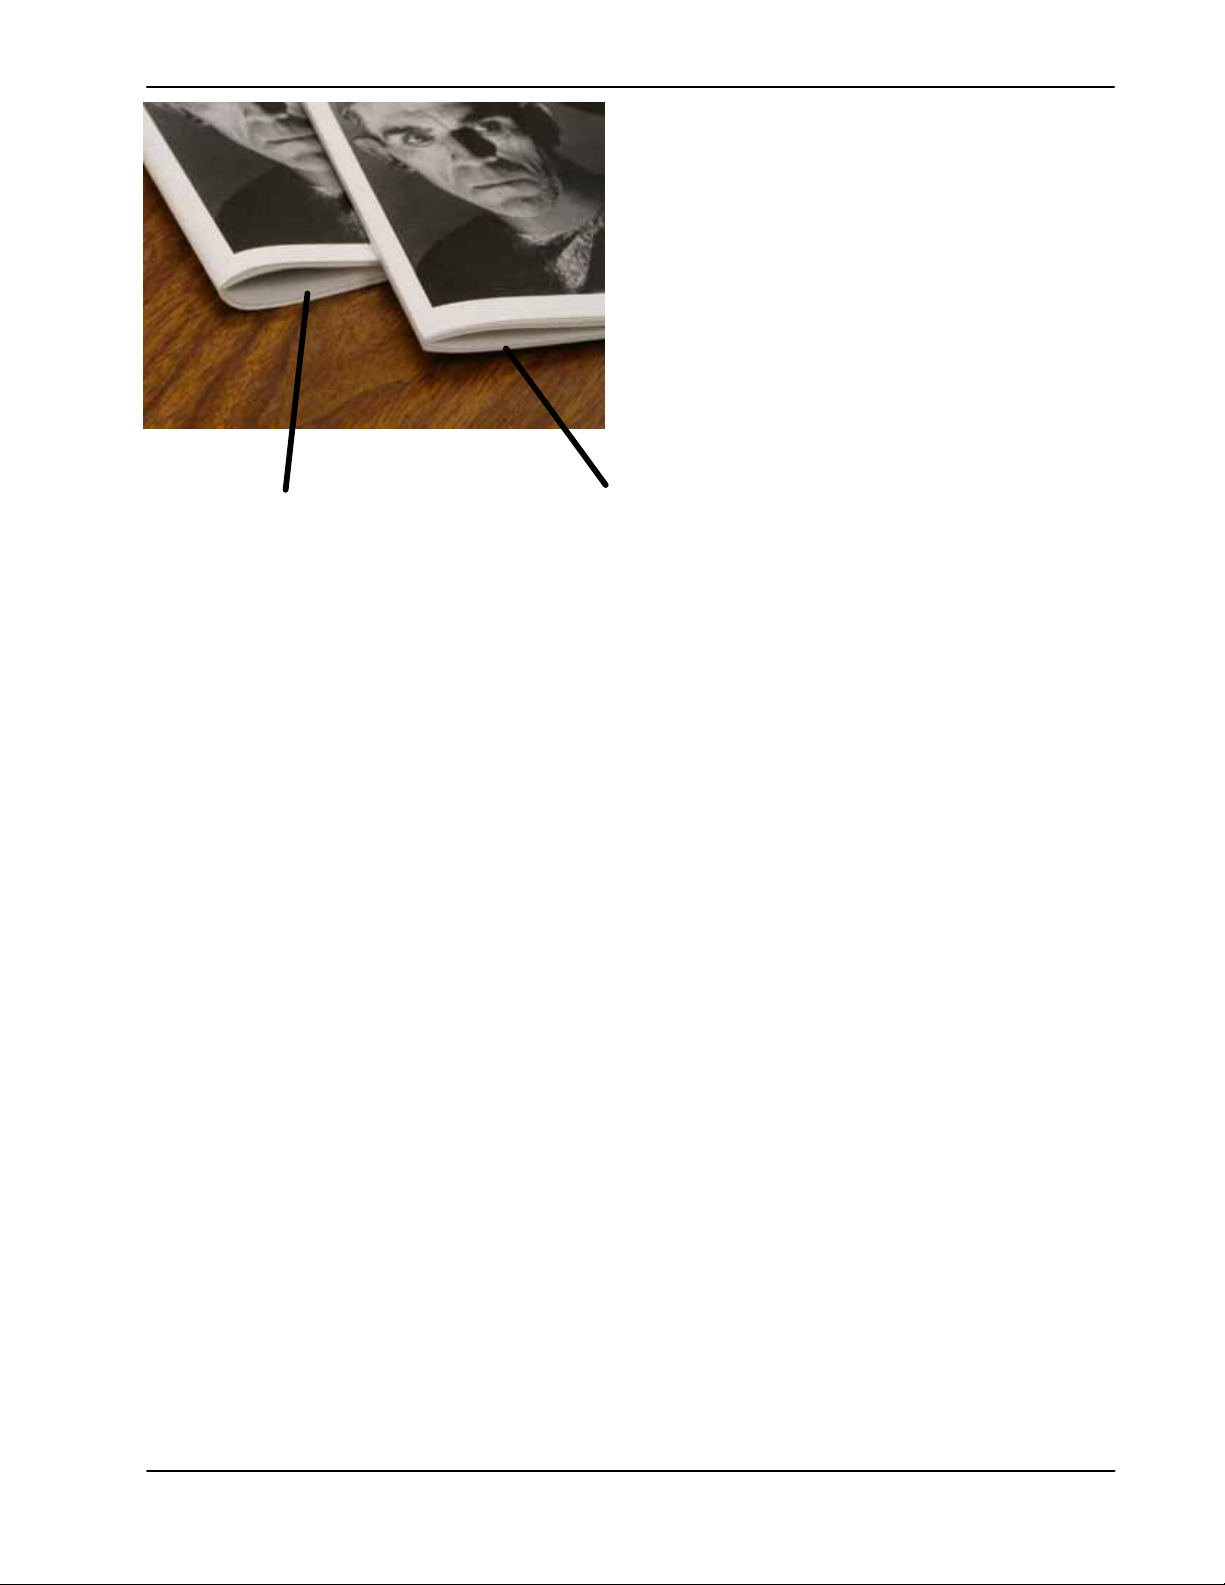
This booklet was not square-folded. It has a
more rounded, thicker appearance to the
spine of the booklet.
Overview
The following illustration shows two different booklets: one
booklet which was square-folded and one booklet that was
not square-folded.
This booklet was square-folded. The booklet spine
is flattened and squared, giving it the appearance
of a perfect-bound book.
SquareFold Trimmer User Guide
7
Page 12

Overview
Trimmer Mode Settings
1.
2.
Tip: Booklets exiting/leaving the SquareFold Trimmer
Module may contain trim remnants/scraps from the
previously trimmed booklet. This is due to static electricity
build-up and is normal. If booklets contain trim
remnants/scraps, simply remove and discard them.
The Trimmer Mode Settings are found on the SquareFold
Trimmer Module control panel. The settings can be switched
on or off based on user preference. When the settings are
switched on, you can enter a desired setting by pressing the
up/down buttons.
Trimmer setting up/down buttons
1.
Adjustments can be made in 0.1 mm increments by pressing
the up/down buttons on the Control Panel.
Trimmer setting
2.
The trimmer setting is based on:
The number of sheets in the finished booklet,•
The finished booklet• width
or 5.5 in/149 mm),
The media type (coated/uncoated, glossy, etc.), and•
The media weight•
Note: Trim settings are always entered using millimeters
(mm).
Important!:You may have to experiment with various
settings in order to determine the best settings for your
particular job. Also, you may want to run one or more test
prints/copies before running larger jobs in order to ensure the
best possible booklet output.
Note: Trim settings cannot be adjusted to remove less than
2 mm (0.078 in.) or more than 20 mm (0.787 in.) of edge
material from the booklet. Adjustments less than 2 mm
(0.078 in.) may produce poor trim quality, and adjustments
greater 20 mm (0.078 in.) will result in no trimming to the
booklet edge.
size (such as 8.5 in./210 mm
SquareFold Trimmer User Guide8
Page 13

Overview
Tip: The following table shows various scenarios using
different paper weights, media types, and trim setting
selections. Use this table as a guideline when selecting a
trim setting for your specific job. The settings shown in the
following table are provided as examples
and are not
meant to represent every possible job scenario; again, use
this table as a guideline only.
Scenario
Paper Size Finished booklet
number
1
2 8.5 x 11 in./A4 (210 x
3
4
5
6
7
8
9
10
11
8.5 x 11 in./A4 (210 x
297 mm)
297 mm)
8.5 x 11 in./A4 (210 x
297 mm)
8.5 x 11 in./A4 (210 x
297 mm)
8.5 x 11 in./A4 (210 x
297 mm)
8.5 x 14 in./B4 (250 x
353 mm)
8.5 x 14 in./B4 (250 x
353 mm)
11 x 17 in./A3 (297 x
420 mm)
11 x 17 in./A3 (297 x
420 mm)
11 x 17 in./A3 (297 x
420 mm)
11 x 17 in./A3 (297 x
420 mm)
size
Paper weight
(lbs./g/m²)
Approximate Trim
setting (mm)
Number of
pages in finished
booklet
5.5 x 8.5 in./149 x 210
mm
5.5 x 8.5 in./149 x 210 mm24 lbs./90 g/m² 125 14
5.5 x 8.5 in./149 x 210
mm
5.5 x 8.5 in./149 x 210
mm
5.5 x 8.5 in./149 x 210
mm
8.5 x 7 in./250 x 176.5
mm
8.5 x 7 in./250 x 176.5
mm
8.5 x 11 in./A4 (210 x
297 mm)
8.5 x 11 in./A4 (210 x
297 mm)
8.5 x 11 in./A4 (210 x
297 mm)
8.5 x 11 in./A4 (210 x
297 mm)
20 lbs./75g/m² 130 20
32 lbs./120 g/m² 135 10
20 lbs./75g/m² 125 10
80 lbs./120 g/m² 135 12
20 lbs./75g/m² 172 6
24 lbs./90 g/m² 170 6
24 lbs./90 g/m² 200 14
80 lbs./216 g/m² 205 5
20 lbs./80 g/m² 210 22
24 lbs./90 g/m² 210 8
12
13
14
15
16
17
11 x 17 in./A3 (297 x
420 mm)
12 x 18 in./305 x 458 mm6 x 9 in./152 x 229 mm 80 lbs./120 g/m² 220 6
12 x 18 in./305 x 458 mm6 x 9 in./152 x 229 mm 80 lbs./216 g/m² 215 5
12 x 18 in./305 x 458 mm6 x 9 in./152 x 229 mm 80 lbs./210 g/m² 210 4
12 x 18 in./305 x 458 mm6 x 9 in./152 x 229 mm 28 lbs./ 105 g/m² 220 16
12 x 18 in./305 x 458 mm6 x 9 in./152 x 229 mm 80 lbs./120 g/m² 210 14
SquareFold Trimmer User Guide
8.5 x 11 in./A4 (210 x
297 mm)
80 lbs./120 g/m² 205 10
9
Page 14

Hints and tips
Printing full-page images on booklets
When using full-page images, ensure that the finished
1.
2.
booklet size accommodates any full-page images, and that
when the booklet is trimmed, these images are not
truncated. Refer to the illustration.
1.
2.
This booklet has preprinted front and back covers with
a full-page image. It was printed on 8.5 x 14 in./B4
paper. The front cover, which was trimmed, displays the
entire image.
This same booklet was printed on 8.5 x 11 in./A4 paper.
The image on the front cover is truncated after
trimming it.
Before you print/copy any booklet job, you should consider
your whole
job, including the following:
What is the desired size of the finished booklet?•
Does the booklet contain full-page images?•
Are you using preprinted covers with full-page images?•
Are you trimming the booklet?•
Do you need to shift any full-page images in order to •
ensure they fit on the finished booklet?
10
SquareFold Trimmer User Guide
Page 15

Follow these tips
Hints and tips
These are important questions which can affect the output
of your booklet jobs, especially if you are using full-page
images and trimming the booklet edges.
Follow these tips to ensure you get your desired output
Always run one or more test prints of your job before •
running a larger output quantity.
Review your test prints for truncated images/text.•
If any images/text need shifting:•
Use the various selections from your application’s •
print driver; refer to your print driver’s Help
information, and/or
Use the various selections from the machine’s UI for •
the booklet creation and image shift features; refer
to your machine’s user guide for more information
Remember: it may take one or more test prints/copies •
before you achieve your desired output.
SquareFold Trimmer User Guide
11
Page 16

j
.
Jam clearance
2.
1.
Clear any paper jams that may occur
along the paper path
Problem solving
Important!: The top covers cannot be opened during normal
operation or when the machine is idle. The covers can be
opened only
am/fault occurs within the SquareFold Trimmer Module
If a jam occurs, the machine stops printing a fault code
appears on the SquareFold Trimmer Module Control Panel,
and a message may
Note: If a message is displayed on the machine's UI, it will
always indicate a jam/fault within the finisher.
Tip: To determine if the jam/fault is within the finisher or
with the SquareFold Trimmer Module, always begin your
troubleshooting with the SquareFold Trimmer Module.
when an indicator is lit (refer to page 4) and a
be displayed on the User Interface (UI).
Use the following procedure to clear the jam or fault and
resume printing:
The Control Panel on the SquareFold Trimmer Module is
displaying a fault code and/or a fault indicator is lit:
Yes: Continue to the next step of this procedure•
No: Refer to the machine’s UI and clear any possible •
finisher jam/fault.
Open the Top Left Cover and the Top Right Cover.
12
SquareFold Trimmer User Guide
Page 17

Problem solving
4.
3.
Look for any jammed booklets within the SquareFold
Trimmer Module paper path and remove them.
Check for loose trim scraps along the paper path and remove
them.
Close the Top Left and Right Covers.
5.
Empty the Trimmer Waste Container.
6.
Ensure that the Trimmer Waste Container is completely
7.
pushed in/closed.
Ensure that all covers on the SquareFold Trimmer Module are
8.
closed.
If the SquareFold Trimmer Module Control Panel and/or the
9.
machine’s UI indicate there is a still a jam, recheck the
SquareFold Trimmer Module (steps 1-8).
If necessary, open the finisher to look for jams/faults along
10.
the finisher path.
Follow the instructions displayed on the machine’s UI to
11.
resume printing/copying.
SquareFold Trimmer User Guide 13
Page 18

Problem solving
j
.
Fault Codes
If a jam/fault occurs in the SquareFold Trimmer Module, a
fault code is displayed on the Control Panel. The machine’s
UI may also display a jam/fault message. The following
table provides a list of fault codes for the SquareFold
Trimmer Module and also provides a list of related finisher
fault codes.
Important!: The top covers cannot be opened during normal
operation or when the machine is idle. The covers can be
opened only
am/fault occurs within the SquareFold Trimmer Module
Fault code Possible cause Recommended solution
when an indicator is lit (refer to page 4) and a
E100
E101
E102
E103
E104
E105
E106
E915
E916
E917
E918
E919
Jam/fault with the SquareFold Trimmer
Module
Open the Top Left and Right Covers of the SquareFold
1.
Trimmer Module.
Carefully remove all sheets and paper scraps from jam
2.
clearance areas.
Close the SquareFold Trimmer Module Top Left and Right
3.
Covers.
Check the Trimmer Waste Container:
4.
If full, empty the container and reinsert it •
into the SquareFold Trimmer Module.
If the container is partially pulled out, push •
it completely in.
If necessary, follow any remaining instructions on the
5.
machine’s UI.
If fault persists, repeat Steps 1-5; if fault persists after that,
6.
call for service.
14
SquareFold Trimmer User Guide
Page 19

Fault code Possible cause Recommended solution
Problem solving
E221 E222
E223 E224
E225 E226
E227 E228
E229 E230
E231 E232
E233 E234
E235 E236
E237 E238
E239 E240
E241 E242
E243 E246
E303
E101
E102
E103
E104
E105
E106
Jam or communication error with
the SquareFold Trimmer Module
Jam/fault with the SquareFold
Trimmer Module
Power off/on the copier/printer.
1.
If fault persists, call for service.
2.
Open the Top Left and Right Covers of the SquareFold
1.
Trimmer Module.
Carefully remove all sheets and paper scraps from jam
2.
clearance areas.
Close the SquareFold Trimmer Module Top Left and Right
3.
Covers.
Check the Trimmer Waste Container:
4.
If full, empty the container and reinsert it •
into the SquareFold Trimmer Module.
If the container is partially pulled out, push it •
completely in.
If machine’s UI continues to reflect a fault/jam, open the
5.
finisher and remove any jams.
Close the finisher cover(s).•
Follow the instructions shown on the machine’s UI to
6.
resume printing/copying.
SquareFold Trimmer User Guide
15
Page 20

Problem solving
Fault code Possible cause Recommended solution
E303
E304
E308
E940
E941
A top cover is open. Open the Top Left and Right Covers of the SquareFold
The Trimmer Waste Container is full or
has a fault.
1.
Trimmer Module.
Close the SquareFold Trimmer Module Top Left and Right
2.
Covers.
If fault persists, power off/on the copier/printer.
3.
If fault persists, call for service.
4.
Pull open the container and empty any trimmer scraps from
1.
it.
Reinsert the container into the SquareFold Trimmer Module.
2.
Ensure that the container is fully pushed in, and that the
3.
indicator light is not lit.
E943 Booklet Tray on the SquareFold
Trimmer Module is full.
If fault persists, repeat Steps 1-3.
4.
If fault persists, power off/on the copier/printer.
5.
If fault persists, call for service.
6.
Remove any booklets from the tray.
1.
If fault persists, power off/on the copier/printer.
2.
If fault persists, call for service.
3.
16
SquareFold Trimmer User Guide
Page 21

Fault code Possible cause Recommended solution
Problem solving
012 115
012 264
012 302
Finisher jam/fault
If machine’s UI continues to reflect a fault/jam, open the
1.
finisher and remove any jams.
Close the finisher cover(s).•
Follow the instructions shown on the machine’s UI to
2.
resume printing/copying.
If necessary, power off/on the copier/printer.
3.
If fault persists, call for service.
4.
SquareFold Trimmer User Guide
17
Page 22

Specifications
Physical characteristics
Technical data
SquareFold Trimmer Module size:
Weight:
50 in. (1271. 4 mm) width x 28.5 in. (724.3 mm) depth x 22
in. (558.8 mm) height
209 lb. (95 kg)
18
SquareFold Trimmer User Guide
Page 23

Page 24

© 2008 Xerox Corporation. All rights reserved.
Xerox®, the sphere of connectivity design, and SquareFold® are trademarks of Xerox Corporation in the United States and/or other
countries.
 Loading...