


Version 1.0
March 2020
702P08306
Xerox
Technology for the Xerox
®
Adaptive CMYK Plus
®
C9065/C9070 Printer
Accessory Reference Guide
PrimeLink
™

©2020 Xerox Corporation. All rights reserved. Xerox®, Xerox and Design®, and PrimeLink™are trademarks of Xerox
Corporation in the United States and/or other countries.
®
Adobe
JobReady
Fiery
, Adobe PDF logo, Adobe®Reader®, Adobe®Type Manager®, ATM™, Flash®, Macromedia®, Photoshop®,
®
, Illustrator®, InDesign®, and PostScript®are trademarks or registered trademarks of Adobe Systems, Inc.
®
and PrintMe®are registered trademarks of Electronics For Imaging, Inc.

Table of Contents
1 Safety .......................................................................................................................................... 5
Notices and Safety......... . .......... .......... . ......... . .......... . ......... . .......... ......... . . ......... . ......... . . ......... .. 6
Warning Symbols.. . ......... . . ......... . ......... . ......... . .......... .. ......... .......... . ......... . .......... .......... . .......... 7
Power Cord Safety Information ........ . . ......... .......... . ......... . .......... . ......... . .......... ......... . . ......... . .... 8
Vacuum Cleaner Use for Toner Spills .......... . ......... . .......... ......... . . .......... ......... . . ......... .......... . ..... 9
Printer Supplies .... . ......... . .......... .......... . .......... .......... . ......... . .......... ......... . . ......... . ......... . . ......... 10
Powering Off the Printer. . .......... .......... . ......... . .......... . ......... . .......... ......... . . ......... . ......... . . ......... 11
General Power Off........ . ......... . .......... .......... . .......... .......... . ......... . ......... . ......... . . ......... . ...... 11
Powering Off the Main Power........ .......... . ......... . ......... . . ......... . ......... . ......... . .......... .. ......... 11
2 Getting Started........................................................................................................................13
Overview.. .......... . .......... ......... . . ......... . ......... . .......... .......... . ......... . .......... .......... . .......... ......... . . . 14
Adaptive CMYK Plus Technology Options..... .......... . ......... . .......... . ......... . .......... ......... . . ......... ... 15
Dedicated Toner Dispenser Assemblies. . . ......... .......... . . ......... .......... . ......... . .......... .......... . ........ 17
Dedicated Developer Drawer Assemblies . ......... . .......... ......... . . ......... .. ......... .......... . ......... . ....... 18
Cart .. . ......... . .......... ......... . . ......... . ......... . . ......... .......... . ......... . .......... . ......... . .......... .......... . ........ 19
3 Replacing a Toner Kit .............................................................................................................21
Replacing a Toner Kit ..... . .......... .......... . ......... . .......... . ......... . .......... ......... . . ......... . ......... . . ......... 22
Setting the NVM Values. . ......... . .......... . ......... . .......... ......... . . ......... . ......... . . ......... .......... . ......... . 23
Powering Off the Printer. . .......... .......... . ......... . .......... . ......... . .......... ......... . . ......... . ......... . . ......... 24
Removing the Toner Cartridges ........ . . ......... .. ......... .......... . ......... . .......... .......... . .......... ......... . . . 25
Removing the Drum Cartridges ..... .......... . ......... . .......... . ......... . .......... ......... . . ......... . ......... . . ..... 26
Removing the Toner Dispenser Assembly.... . .......... . ......... . .......... .......... . ......... . ......... . . ......... ... 27
Removing the Developer Drawer Assembly.. . . ......... .......... . ......... . .......... . ......... . .......... ......... . . . 28
Installing the Replacement Developer Drawer Assembly.... . ......... . . ......... .......... . ......... . .......... . 29
Installing the Replacement Toner Dispenser Assembly.. ......... . ......... . ......... . .......... . ......... . ....... 30
Reinstalling the Drum Cartridges.. . .......... . ......... . .......... .......... . ......... . ......... . . ......... . ......... . ...... 31
Installing the Replacement Toner Cartridges . . .......... ......... . . .......... ......... . . ......... .......... . .......... 33
Powering On the Printer ........ . ......... . .......... . ......... . .......... ......... . . ......... . ......... . . ......... .......... . ... 34
Evaluating Print Quality ....... ......... . . ......... . ......... . . ......... .......... . ......... . .......... . ......... . .......... ..... 35
4 Maintenance ...........................................................................................................................37
5 Troubleshooting......................................................................................................................39
General Print-Quality Problems and Solutions ..... . . ......... .. ......... .......... . ......... . .......... .......... . .... 40
Toner Cross-Reference Chart... . . ......... . ......... . . ......... .......... . ......... . .......... . ......... . .......... ......... . . . 42
Xerox®Adaptive CMYK Plus Technology for the Xerox®PrimeLink™C9065/C9070 Printer
Accessory Reference Guide
3

Table of Contents
4
Xerox®Adaptive CMYK Plus Technology for the Xerox®PrimeLink™C9065/C9070 Printer
Accessory Reference Guide

1
Safety
This chapter contains:
• Notices and Safety..... . .......... .......... . ......... . ......... . . ......... . ......... . ......... . .......... .......... . .......... .......... 6
• Warning Symbols ........ . . ......... .......... . ......... . .......... .......... . .......... ......... . . ......... .......... . . ......... ......... 7
• Power Cord Safety Information .... . .......... .......... . ......... . ......... . . ......... . ......... . ......... . .......... . ......... . .. 8
• Vacuum Cleaner Use for Toner Spills..... . . ......... .......... . ......... . .......... . ......... . .......... ......... . . ......... . .... 9
• Printer Supplies . ......... . .......... .......... . .......... ......... . . ......... . ......... . ......... . .......... . ......... . .......... ........ 10
• Powering Off the Printer....... . .......... ......... . . ......... . ......... . . ......... .......... . ......... . .......... . ......... . ........ 11
For complete safety information, refer to the Xerox
can obtain documentation on the Xerox website at www.support.xerox.com/support. In the search
field, enter PrimeLink C9065/C9070, then select the needed documentation.
®
PrimeLink™C9065/C9070 Printer User Guide. You
Xerox®Adaptive CMYK Plus Technology for the Xerox®PrimeLink™C9065/C9070 Printer
Accessory Reference Guide
5

Safety
Notices and Safety
Before operating your printer, read the following instructions carefully. Refer to these instructions to
ensure the continued safe operation of your printer.
Your Xerox
requirements include safety agency evaluation and certification, and compliance with
electromagnetic regulations and established environmental standards.
The safety and environment testing and performance of this product have been verified using Xerox
materials only.
For complete safety information, refer to the Xerox
can obtain documentation on the Xerox Website at www.support.xerox.com/support. In the Search or
Choose field, enter PrimeLink C9065/C9070, then select the needed documentation.
®
printer and supplies are designed and tested to meet strict safety requirements. Safety
®
PrimeLink™C9065/C9070 Printer User Guide. You
®
6
Xerox®Adaptive CMYK Plus Technology for the Xerox®PrimeLink™C9065/C9070 Printer
Accessory Reference Guide

Safety
Warning Symbols
This device is equipped with a strong permanent magnet that can interfere with medical device
operation. Individuals with medical devices such as pacemakers should maintain a distance of 30 cm
(12 in.) from this component.
Xerox
®
Adaptive CMYK Plus Technology for the Xerox®PrimeLink™C9065/C9070 Printer
Accessory Reference Guide
7

Safety
Power Cord Safety Information
Before operating your printer, read the following instructions carefully. For details, contact your Xerox
representative.
WARNING:
• The electrical supply for the device must meet the requirements stated on the data plate on
the rear of the device. If you are not sure that your electrical supply meets the requirements,
consult your local electricity provider or a licensed electrician.
• Do not use an extension cord.
• Do not remove or modify the power cord.
Refer to these instructions to ensure the continued safe operation of your printer.
• Use the power cord supplied with your printer.
• Plug the power cord directly into a properly grounded electrical outlet. Ensure that each end of the
cord is connected securely. If you do not know if an outlet is grounded, ask an electrician to check
the outlet.
• Do not use a ground adapter plug to connect the printer to an electrical outlet that does not have
a ground connection terminal.
WARNING: Avoid the potential of electrical shock by ensuring that the printer is
grounded properly. Electrical products can be hazardous if misused.
• Verify that the printer is plugged into an outlet that provides the correct voltage and power.
Review the electrical specification of the printer with an electrician, if necessary.
• Do not place the printer in an area where people can step on the power cord.
• Do not place objects on the power cord.
• Replace the power cord if it becomes frayed or worn.
• Do not unplug or plug the power cord while the printer is powered on.
• To avoid electrical shock and damage to the cord, grasp the plug when unplugging the power
cord.
• Ensure that the electrical outlet is near the printer and is easily accessible.
The power cord is attached to the printer as a plug-in device on the back of the printer. If it is
necessary to disconnect all electrical power from the printer, disconnect the power cord from the
electrical outlet. For details, refer to Powering Off the Printer.
8
Xerox®Adaptive CMYK Plus Technology for the Xerox®PrimeLink™C9065/C9070 Printer
Accessory Reference Guide

Safety
Vacuum Cleaner Use for Toner Spills
Use a broom or wet cloth to wipe off spilled toner. To minimize generation of dust particles, sweep or
wipe slowly. Avoid using a vacuum. If you must use a vacuum, ensure that the unit is designed to
contain combustible dusts. Ensure that the vacuum includes an explosion-rated motor and nonconductive hose.
Xerox
®
Adaptive CMYK Plus Technology for the Xerox®PrimeLink™C9065/C9070 Printer
Accessory Reference Guide
9

Safety
Printer Supplies
• Store all supplies in accordance with the instructions given on the package or container.
• Keep all supplies away from the reach of children.
• Never throw toner, print cartridges, drum cartridges, or toner containers into an open flame.
• When handling supplies, avoid skin and eye contact. Eye contact can cause irritation and
inflammation.
• Do not attempt to disassemble supplies, which can increase the risk of skin or eye contact.
Caution: Use of non-Xerox supplies is not recommended. The Xerox Warranty and the Service
Agreement do not cover damage, malfunction, or degradation of performance caused by use
of non-Xerox supplies, or the use of Xerox supplies not specified for this printer.
10
Xerox®Adaptive CMYK Plus Technology for the Xerox®PrimeLink™C9065/C9070 Printer
Accessory Reference Guide
Safety
Powering Off the Printer
GGeenneerraall PPoowweerr OOffff
Note: Before powering off the printer, wait 5 seconds after any active job completes.
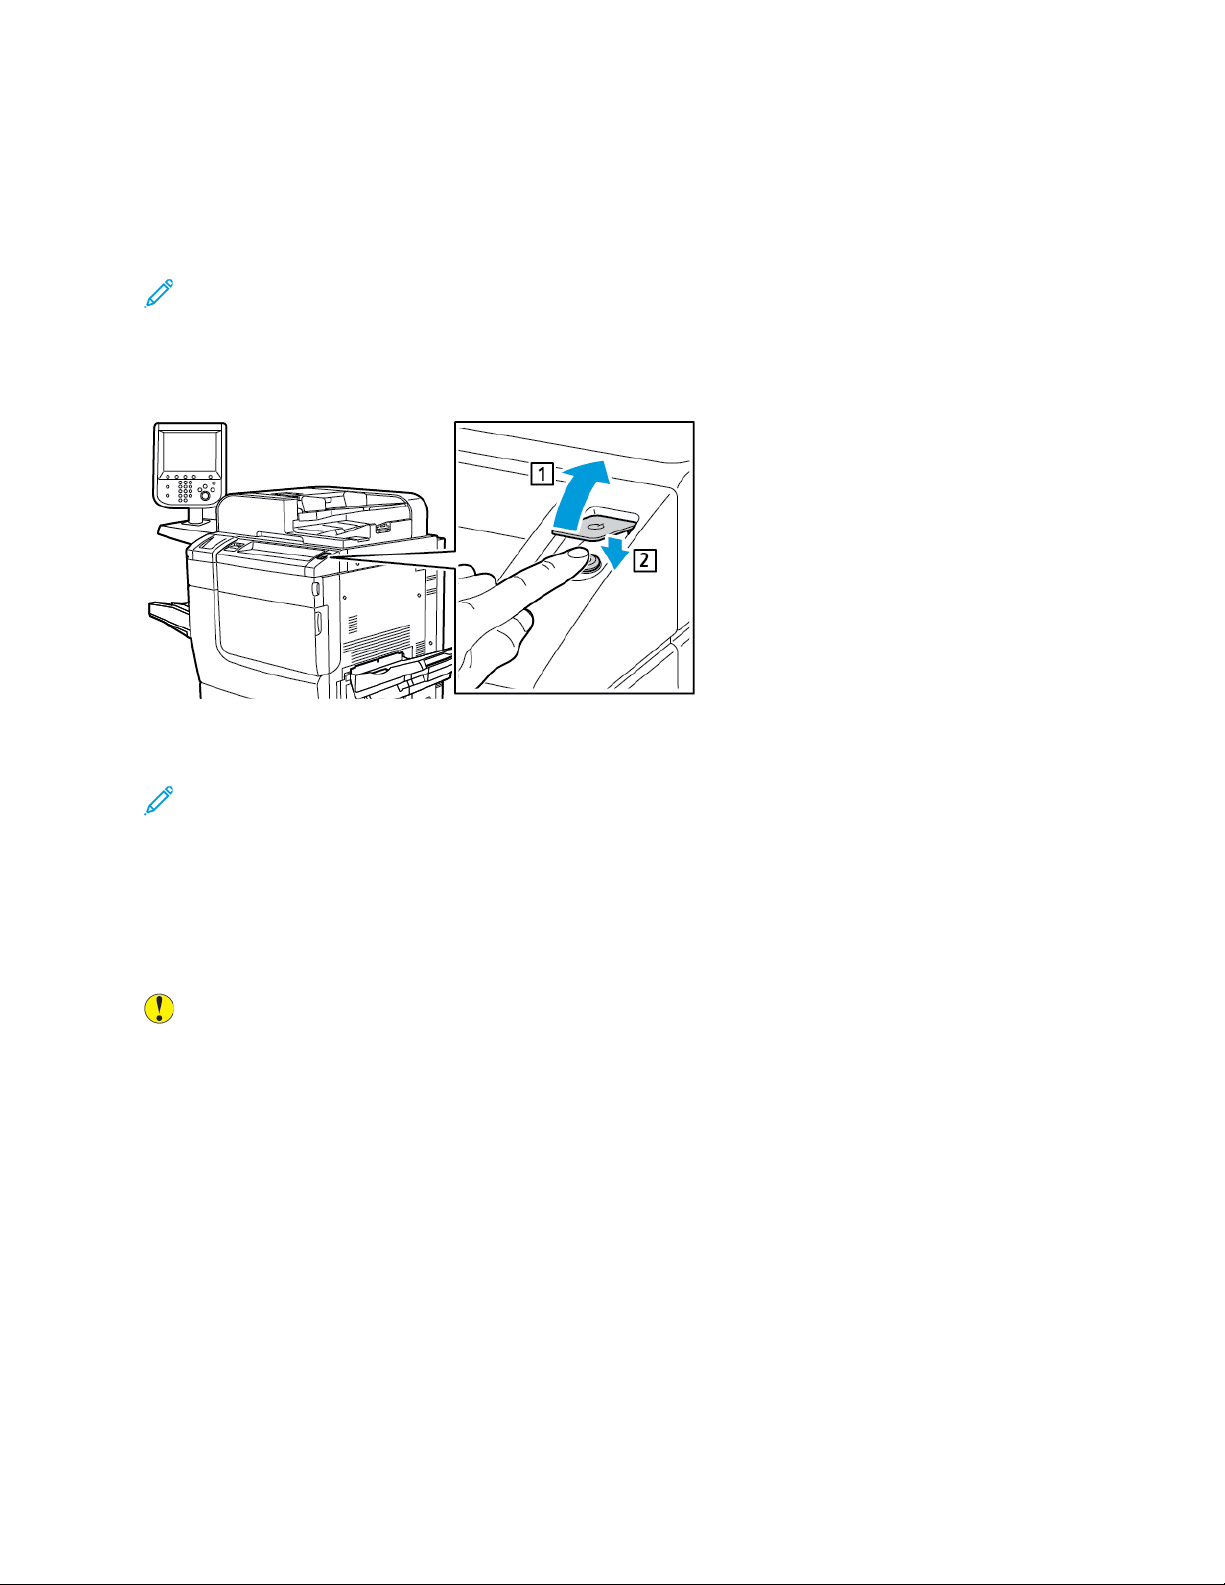
To power off the device, press the power On/Off button. For general use, to power on and power off
the printer, press the power On/Off button. Do not use the main power switch to power on and power
off the printer unless required.
If you select the Energy Saver option, the printer enters an energy-saver mode immediately. If there
are jobs in the print queue, a job status message appears.
Note: To reactivate the printer when it is in Energy Saver mode, press the Energy Saver button.
PPoowweerriinngg OOffff tthhee MMaaiinn PPoowweerr
The main power switch controls the main power into the printer. For normal printer operation, leave
the main power on. Before connecting a cable, cleaning the printer, or when a restart is required,
press the main power switch to the Off position.
Caution:
• Before unplugging the power cord, press the main power switch to the Off position. Failure
to do so can damage the printer or cause a printer malfunction.
• After you power on the printer, wait a few seconds before you power off the main power.
Failure to do so can damage the printer hard drive or cause a printer malfunction.
• After you press the printer On/Off power button, wait a few seconds before you press the
main power switch to the Off position. Failure to do so can damage the printer hard drive or
cause a printer malfunction. After you power off the printer, wait until the control panel
touch screen goes dark. Wait 10 seconds, then press the main power switch to the Off
position.
Xerox
®
Adaptive CMYK Plus Technology for the Xerox®PrimeLink™C9065/C9070 Printer
Accessory Reference Guide
11
Safety
• While a job is processing, or while the Energy Saver button is blinking, do not press the main
power switch. Doing so can damage the printer hard drive or cause a printer malfunction.
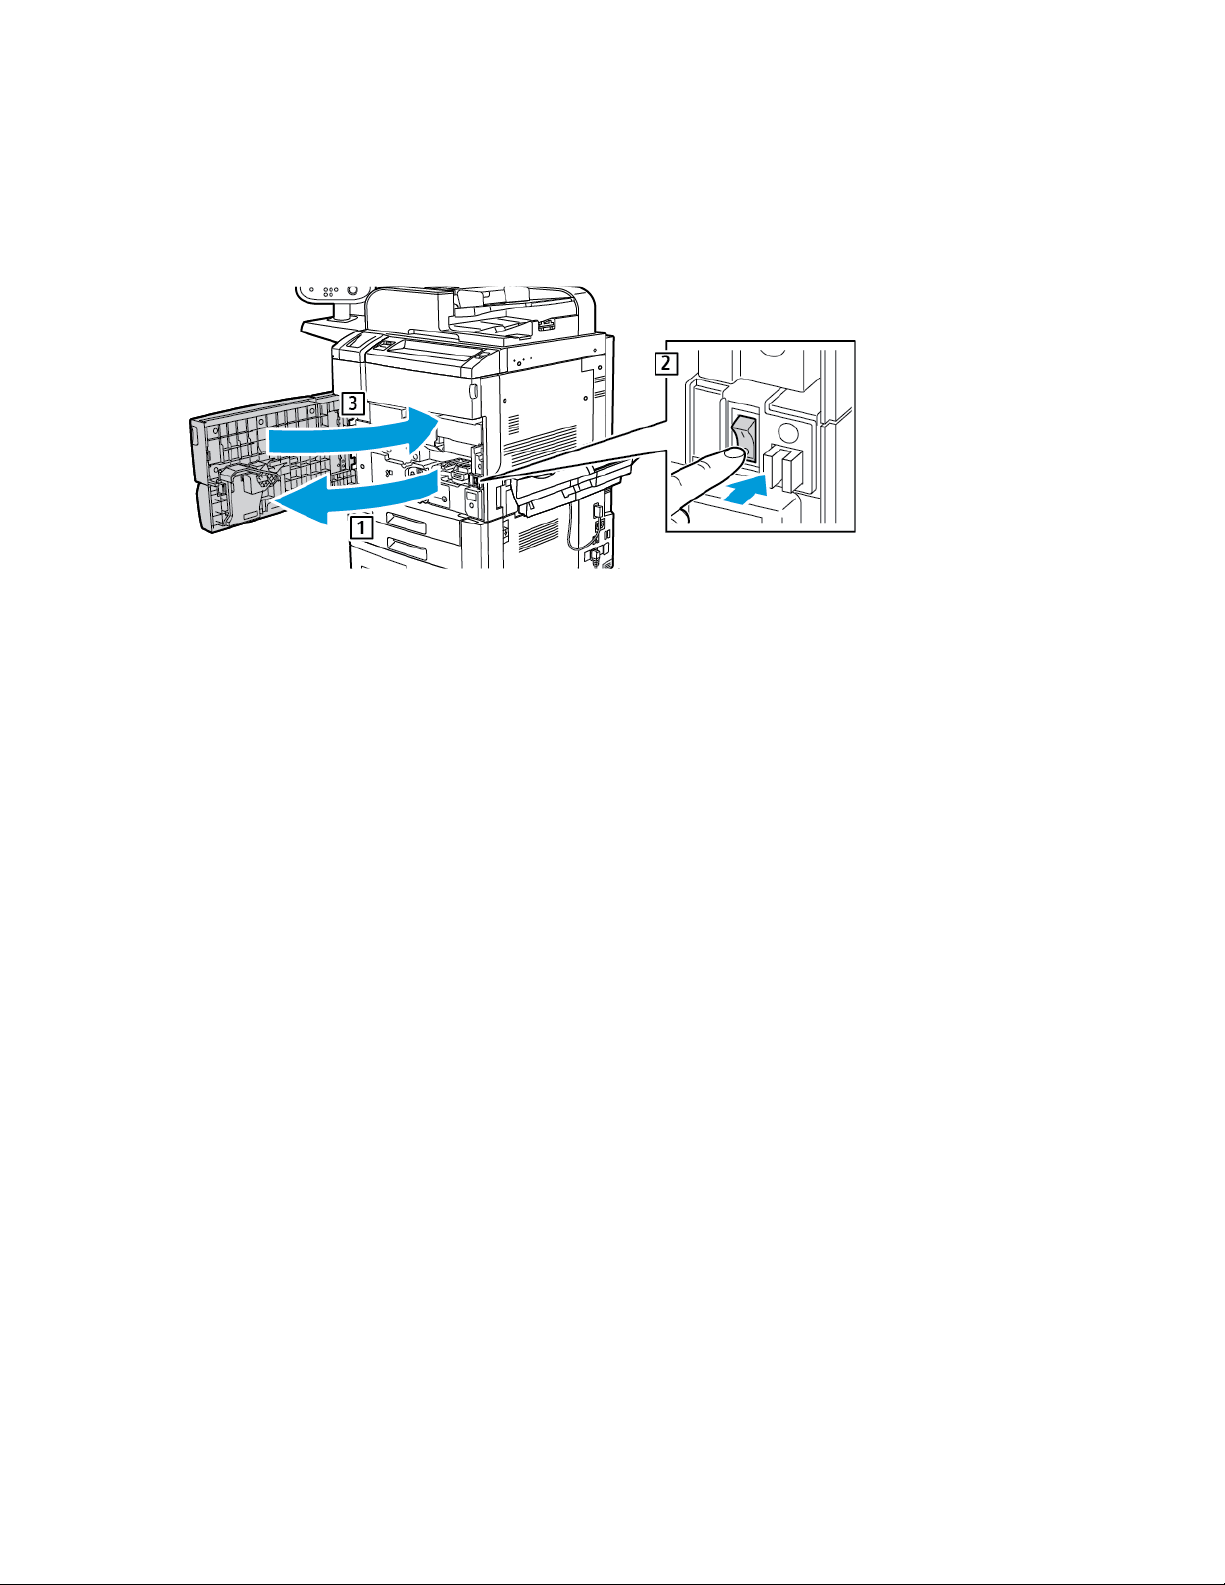
To power off the main power switch:
1. Open the front cover, then press the main power switch to the Off position.
2. Close the front cover.
12
Xerox®Adaptive CMYK Plus Technology for the Xerox®PrimeLink™C9065/C9070 Printer
Accessory Reference Guide

2
Getting Started
This chapter contains:
• Overview....... . . ......... .......... . ......... . .......... .......... . .......... ......... . . ......... . ......... . ......... . .......... . ......... . 14
• Adaptive CMYK Plus Technology Options. .......... . ......... . ......... . . ......... . ......... . ......... . .......... .......... . 15
• Dedicated Toner Dispenser Assemblies ........ .......... . .......... .......... . ......... . ......... . ......... . . ......... . ...... 17
• Dedicated Developer Drawer Assemblies ...... .......... . ......... . .......... .......... . .......... .......... . ......... . ..... 18
• Cart .......... . ......... . .......... .......... . ......... . ......... . . ......... . ......... . ......... . .......... . ......... . .......... .......... . .... 19
This reference guide is intended for trained users only.
Xerox®Adaptive CMYK Plus Technology for the Xerox®PrimeLink™C9065/C9070 Printer
Accessory Reference Guide
13

Getting Started
Overview
The Xerox®Adaptive CMYK Plus Technology allows you to add new toner color options to your printer,
in addition to the traditional black, cyan, magenta, and yellow.
Each Xerox
dispenser assembly, a developer drawer assembly, and a cart.
®
Adaptive CMYK Plus Technology kit consists of a unique set of toner cartridges, a toner
14
Xerox®Adaptive CMYK Plus Technology for the Xerox®PrimeLink™C9065/C9070 Printer
Accessory Reference Guide

Getting Started
Adaptive CMYK Plus Technology Options
Available specialty toner kits for a Xerox®PrimeLink™C9065/C9070 Printer with Adaptive CMYK Plus
Technology:
Vivid Toner Kit, Order Number 097N02388
Cart
Dedicated toner dispenser assembly
Dedicated developer drawer assembly
Gold (GLD) toner
White (WHT) toner
Silver (SLV) toner
Clear (CLR) toner
Vivid and Fluorescent Combination Toner Kit, Order Number 097N02389
Cart
Dedicated toner dispenser assembly
Dedicated developer drawer assembly
Gold (GLD) toner
White (WHT) toner
Silver (SLV) toner
Clear (CLR) toner
Fluorescent Cyan (C-fl) toner
Fluorescent Magenta (M-fl) toner
Fluorescent Yellow (Y-fl) toner
Available specialty toners for a Xerox
®
PrimeLink™C9065/C9070 Printer with Adaptive CMYK Plus
Technology:
®
Specialty Toners for a Xerox
Adaptive CMYK Plus Technology:
Xerox®Gold Toner for Xerox®PrimeLink™C9065/C9070 Printer 006R01802
®
Xerox
Xerox
Xerox
White Toner for Xerox®PrimeLink™C9065/C9070 Printer 006R01803
®
Silver Toner for Xerox®PrimeLink™C9065/C9070 Printer 006R01804
®
Clear Toner for Xerox®PrimeLink™C9065/C9070 Printer
PrimeLink™C9065/C9070 Printer with
Order Number
006R01805
Xerox®Adaptive CMYK Plus Technology for the Xerox®PrimeLink™C9065/C9070 Printer
Accessory Reference Guide
15

Getting Started
Specialty Toners for a Xerox®PrimeLink™C9065/C9070 Printer with
Adaptive CMYK Plus Technology:
Xerox®Fluorescent Cyan Toner for Xerox®PrimeLink™C9065/C9070 Printer 006R01792
®
Xerox
Xerox
Fluorescent Magenta Toner for Xerox®PrimeLink™C9065/C9070 Printer 006R01793
®
Fluorescent Yellow Toner for Xerox®PrimeLink™C9065/C9070 Printer 006R01794
Order Number
16
Xerox®Adaptive CMYK Plus Technology for the Xerox®PrimeLink™C9065/C9070 Printer
Accessory Reference Guide

Getting Started
Dedicated Toner Dispenser Assemblies
To prevent cross-contamination of toners, each toner kit includes a dedicated toner dispenser
assembly.
Xerox®Adaptive CMYK Plus Technology for the Xerox®PrimeLink™C9065/C9070 Printer
Accessory Reference Guide
17

Getting Started
Dedicated Developer Drawer Assemblies
To prevent cross-contamination of toners, each toner kit includes a dedicated developer drawer
assembly.
18
Xerox®Adaptive CMYK Plus Technology for the Xerox®PrimeLink™C9065/C9070 Printer
Accessory Reference Guide

Cart
To store each toner kit, a custom cart is provided.
Getting Started
Xerox®Adaptive CMYK Plus Technology for the Xerox®PrimeLink™C9065/C9070 Printer
Accessory Reference Guide
19

Getting Started
20
Xerox®Adaptive CMYK Plus Technology for the Xerox®PrimeLink™C9065/C9070 Printer
Accessory Reference Guide

3
Replacing a Toner Kit
This chapter contains:
• Replacing a Toner Kit . . .......... .......... . ......... . ......... . . ......... . ......... . ......... . .......... . ......... . .......... ........ 22
• Setting the NVM Values...... . . ......... . ......... . . ......... .......... . ......... . .......... . ......... . .......... .......... . ........ 23
• Powering Off the Printer....... . .......... ......... . . ......... . ......... . . ......... .......... . ......... . .......... . ......... . ........ 24
• Removing the Toner Cartridges .... . .......... .......... . .......... ......... . . ......... . ......... . .......... .......... . ......... . 25
• Removing the Drum Cartridges . .......... . ......... . .......... .......... . ......... . ......... . . ......... .......... . .......... .... 26
• Removing the Toner Dispenser Assembly . .......... . ......... . ......... . ......... . . ......... .. ......... .......... . ......... . 27
• Removing the Developer Drawer Assembly ......... .......... . ......... . .......... . ......... . ......... . ......... . . ......... 28
• Installing the Replacement Developer Drawer Assembly. ......... . .......... .......... . ......... . .......... . ........ 29
• Installing the Replacement Toner Dispenser Assembly...... . .......... .......... . ......... . .......... . ......... . ..... 30
• Reinstalling the Drum Cartridges ......... . ......... . .......... ......... . . ......... . ......... . . ......... .......... . ......... . .... 31
• Installing the Replacement Toner Cartridges ......... . .......... .......... . .......... ......... . . ......... . ......... . ...... 33
• Powering On the Printer .... . ......... . .......... . ......... . ......... . ......... . .......... .. ......... .......... . ......... . .......... . 34
• Evaluating Print Quality .. . ......... . .......... . ......... . .......... .......... . ......... . .......... . ......... . ......... . ......... . ... 35
This chapter provides step-by-step instructions for replacing a toner kit in your Xerox
C9065/C9070 Printer. Before you complete these steps, ensure that your printer is configured to
support Xerox
Customer Support.
®
Adaptive CMYK Plus Technology. For further information, contact Xerox Technical
®
PrimeLink
™
Xerox®Adaptive CMYK Plus Technology for the Xerox®PrimeLink™C9065/C9070 Printer
Accessory Reference Guide
21

Replacing a Toner Kit
Replacing a Toner Kit
Note: Use gloves for all procedures.
To replace a toner kit, perform each of the following procedures in the order provided.
1. Setting the NVM Values
2. Powering Off the Printer
3. Removing the Toner Cartridges
4. Removing the Drum Cartridges
5. Removing the Toner Dispenser Assembly
6. Removing the Developer Drawer Assembly
7. Installing the Replacement Developer Drawer Assembly
8. Installing the Replacement Toner Dispenser Assembly
9. Reinstalling the Drum Cartridges
10. Installing the Replacement Toner Cartridges
11. Powering On the Printer
12. Evaluating Print Quality
22
Xerox®Adaptive CMYK Plus Technology for the Xerox®PrimeLink™C9065/C9070 Printer
Accessory Reference Guide

Replacing a Toner Kit
Setting the NVM Values
Before you install or change a specialty toner kit, assign the Non-Volatile Memory (NVM) values for
each toner kit.
To assign the NVM values for each toner kit:
1. At the device control panel, log in as Administrator.
a. Press the Log In/Out button.
b. Type admin, then touch Next.
c. Type the administrator password, then touch Enter.
2. Press the Machine Status button, then touch the Tools tab.
3. Touch System Settings→Common Service Settings→Maintenance→NVM Read/Write.
4. To enter the NVM code 762–998, for Chain-Link, in the first box, type 762. In the second box,
type 998. Touch Confirm.
The current NVM value appears.
5. For the toner kit that is being installed, for New Value, type 0–2 as appropriate, then touch Save.
The values for the toners are listed as follows:
• 0: Black, Cyan, Magenta, Yellow
• 1: Gold, White, Silver, Clear (Vivid Toner Kit)
• 2: Black, Flo-Cyan, Flo-Magenta, Flo-Yellow (Fluorescent Toner Kit)
6. To restart the printer, touch Reboot Now.
The printer restarts and accepts the new value.
Note: If there is a mismatch between the NVM setting and the installed toner kit, an error
message appears. Verify that the NVM setting is correct for the installed toner kit. If the error
message still appears, verify that the correct toner kit is installed.
Xerox
®
Adaptive CMYK Plus Technology for the Xerox®PrimeLink™C9065/C9070 Printer
Accessory Reference Guide
23

Replacing a Toner Kit
Powering Off the Printer
Note: Before powering off the printer, ensure that there are no active jobs.
1. Before powering off the printer, wait approximately 60 seconds to exit the power saver mode.
2. To power off the printer, press the Power On/Off button on the right side of the top front panel.
3. Before proceeding to the next step, wait for the power saver indicator to stop blinking.
Note: To power off the printer, do not use the main power switch.
Caution: Unplugging the power cord with the main power on can damage the printer
internal hard drive or cause a printer malfunction.
Caution: Powering off the main power immediately after powering on the main power can
damage the printer internal hard drive or cause a printer malfunction.
Caution: Powering off the main power immediately after pressing the Power On/Off button
can damage the printer internal hard drive or cause a printer malfunction.
Caution: Powering off the main power while a job is processing or while the Energy Saver
indicator is blinking can damage the printer internal hard drive or cause a printer
malfunction.
4. To power off the main switch, open the front door, then press the main power switch to the Off
position.
5. Close the front door.
6. Disconnect the power cable from the electrical outlet to the printer.
24
Xerox®Adaptive CMYK Plus Technology for the Xerox®PrimeLink™C9065/C9070 Printer
Accessory Reference Guide

Replacing a Toner Kit
Removing the Toner Cartridges
1. Before you remove any cartridges, protect the work area. Place paper on the floor so that any
excess toner falls on the paper.
2. Open the toner cover above the printer front door.
3. Keep cartridge level and avoid touching the bottom of the cartridge.
4. To remove each cartridge, grasp the cartridge handle, then pull the cartridge straight out of the
printer.
Caution: Be careful to not spill toner on your clothing or your surroundings.
WARNING: Never use a vacuum cleaner when you clean spilled toner. An explosion can
occur as the toner fills the vacuum cleaner and creates sparks. To clean spilled toner, use a
broom or a cloth moistened with a neutral detergent.
Xerox
®
Adaptive CMYK Plus Technology for the Xerox®PrimeLink™C9065/C9070 Printer
Accessory Reference Guide
25

Replacing a Toner Kit
Removing the Drum Cartridges
Caution: Do not expose drum cartridges to direct sunlight or strong light from indoor
fluorescent lighting for more than 2 minutes. When the drum cartridges are exposed to light,
image quality can deteriorate.
1. Leave the printer powered off. Open the front door.
2. To open the developer drawer, lower latch R1–R4, then hold the drawer handle and pull out the
developer drawer until it stops.
3. To remove each drum cartridge, use the finger rings provided at both ends of the drum cartridge.
4. Carefully, lift each cartridge straight up and out of the printer.
5. Cover the drum cartridges and store them in a clean, dark area. The drum cartridges are
reinstalled later in the procedure.
26
Xerox®Adaptive CMYK Plus Technology for the Xerox®PrimeLink™C9065/C9070 Printer
Accessory Reference Guide

Replacing a Toner Kit
Removing the Toner Dispenser Assembly
1. Leave the printer powered off and keep the front door open.
2. For easy access to the toner dispenser assembly, slide the developer drawer halfway into the
printer.
3. To access the toner dispenser assembly, lower the toner door.
4. To remove the toner dispenser assembly, grasp both sides, and pull the assembly out of the
printer.
5. Store the toner dispenser assembly inside the cart.
Xerox
®
Adaptive CMYK Plus Technology for the Xerox®PrimeLink™C9065/C9070 Printer
Accessory Reference Guide
27

Replacing a Toner Kit
Removing the Developer Drawer Assembly
1. To remove the developer drawer assembly, slide out the developer drawer until it stops.
Caution: Be careful to not spill toner on your clothing or your surroundings.
2. Using both hands, lift the developer drawer assembly out of the rail assembly.
3. Place the developer drawer assembly inside the cart, using the built-in rails, on the same shelf
where you placed the corresponding toner dispenser assembly.
28
Xerox®Adaptive CMYK Plus Technology for the Xerox®PrimeLink™C9065/C9070 Printer
Accessory Reference Guide

Replacing a Toner Kit
Installing the Replacement Developer Drawer Assembly
1. From the cart, remove the developer drawer assembly associated with the required toner kit.
2. Hold the developer drawer assembly above the rail assembly and line up the arrow guides on the
drawer frame to the slots on the rail assembly.
3. Lower the developer drawer assembly into position on the rail assembly.
4. Push the developer drawer into the printer until the developer drawer clicks into place.
Tip: The click sound indicates that the developer drawer is seated properly inside the
printer.
Xerox
®
Adaptive CMYK Plus Technology for the Xerox®PrimeLink™C9065/C9070 Printer
Accessory Reference Guide
29

Replacing a Toner Kit
Installing the Replacement Toner Dispenser Assembly
1. For easy access to the printer frame, pull out the developer drawer assembly approximately 254
mm (10 in.).
2. From the cart, remove the toner dispenser assembly for the required toner kit.
3. Open the toner assembly door, then slide the toner dispenser assembly into the printer and push
the assembly firmly into place.
4. Close the toner cover.
30
Xerox®Adaptive CMYK Plus Technology for the Xerox®PrimeLink™C9065/C9070 Printer
Accessory Reference Guide

Replacing a Toner Kit
Reinstalling the Drum Cartridges
1. Pull out the developer drawer fully.
2. If you are using the developer drawer for the first time, for each developer housing, pull back the
housing cover and remove the protective tab.
3. The drum cartridges have labels that indicate the front and the back of the cartridge. Align the
front of the drum cartridge with the front of the developer drawer, and place the cartridge in the
drawer.
Caution: Do not touch or scratch the surface of the drum cartridges.
Caution: When the drum cartridges are exposed to light, image quality can deteriorate.
4. To ensure that the drum cartridges are seated fully, press down both ends of the drum cartridges.
®
Xerox
Adaptive CMYK Plus Technology for the Xerox®PrimeLink™C9065/C9070 Printer
Accessory Reference Guide
31

Replacing a Toner Kit
5. Push the developer drawer into the printer until the developer drawer clicks into place. To secure
the drawer in place, lower the drawer handle, then lift latch R1–R4.
Tip: The click sound indicates that the developer drawer is seated properly inside the
printer.
6. Close the printer door.
32
Xerox®Adaptive CMYK Plus Technology for the Xerox®PrimeLink™C9065/C9070 Printer
Accessory Reference Guide

Replacing a Toner Kit
Installing the Replacement Toner Cartridges
1. Open the toner cover above the printer front door.
2. From the cart, remove the required toner cartridges from the toner kit.
Caution: Do not mix toner cartridges from different specialty toner kits. Ensure that the
correct toner cartridges are installed for each kit. If the color toner cartridges are inserted
incorrectly, the toner dispenser assembly becomes contaminated and a Service Call is
required.
3. To insert each toner cartridge, hold the cartridge in both hands, then align the arrow on the
cartridge with the printer. Push the cartridge into the toner dispenser assembly until the cartridge
clicks in place.
Note: To ensure that the toner cartridges are installed in the correct positions, review the
labels inside the toner door. Insert the correct toner cartridge color into the correct location
in the printer.
4. Close the toner cover.
5. If the toner is spilled, clean the area using a damp cloth.
Xerox
®
Adaptive CMYK Plus Technology for the Xerox®PrimeLink™C9065/C9070 Printer
Accessory Reference Guide
33

Replacing a Toner Kit
Powering On the Printer
Caution: Powering on the main power immediately after powering off the main power can
damage the printer internal hard drive or cause a printer malfunction.
1. Connect the power cable from the electrical outlet to the printer.
2. To power on the main printer power, open the front door, then press the main power switch to
the On position.
3. Close the front cover.
4. To power on the printer, press the Power On/Off button on the right side of the top front panel.
After the printer is powered on, a status message appears. The message is generated because the
Vivid Toner Kit contains one gold toner starter cartridge. Print quality is not affected and you can
continue to print. When a second gold toner cartridge is installed, the message does not appear.
34
Xerox®Adaptive CMYK Plus Technology for the Xerox®PrimeLink™C9065/C9070 Printer
Accessory Reference Guide

Replacing a Toner Kit
Evaluating Print Quality
1. To evaluate the print quality, copy a test print, then ensure that the print is free of print defects.
2. As required, use the Adjust Image Transfer feature.
Xerox
®
Adaptive CMYK Plus Technology for the Xerox®PrimeLink™C9065/C9070 Printer
Accessory Reference Guide
35

Replacing a Toner Kit
36
Xerox®Adaptive CMYK Plus Technology for the Xerox®PrimeLink™C9065/C9070 Printer
Accessory Reference Guide

4
Maintenance
To clean any spilled toner, use a broom or a cloth moistened with a neutral detergent.
Caution: Be careful to not spill toner on your clothing or your surroundings.
WARNING: Never use a vacuum cleaner when you clean spilled toner. An explosion can occur
as the toner fills the vacuum cleaner and creates sparks. To clean spilled toner, use a broom or
a cloth moistened with a neutral detergent.
If you need any assistance for maintaining your printer:
• Visit the Xerox website at www.support.xerox.com/support. In the search field, enter PrimeLink
C9065/C9070, then select the needed documentation.
• Contact Xerox Technical Customer Support.
Xerox®Adaptive CMYK Plus Technology for the Xerox®PrimeLink™C9065/C9070 Printer
Accessory Reference Guide
37

Maintenance
38
Xerox®Adaptive CMYK Plus Technology for the Xerox®PrimeLink™C9065/C9070 Printer
Accessory Reference Guide

5
Troubleshooting
This chapter contains:
• General Print-Quality Problems and Solutions . . .......... .......... . .......... .......... . ......... . ......... . ......... . ... 40
• Toner Cross-Reference Chart......... . .......... . ......... . .......... ......... . . ......... . ......... . . ......... .......... . ......... . 42
Xerox®Adaptive CMYK Plus Technology for the Xerox®PrimeLink™C9065/C9070 Printer
Accessory Reference Guide
39

Troubleshooting
General Print-Quality Problems and Solutions
Use the following table to find solutions to print-quality problems.
Problem Solution
Smears, smudges, and streaks:
Dark or light marks appear on your output.
Repeating spots or lines:
Spot or lines appear at regular intervals on the prints.
Colors look wrong:
Colors do not look accurate or look drastically wrong.
Colors are too light or too dark:
The print or color density is too light, missing, or the
background is foggy.
To remove toner that has accumulated on the fuser,
run a print job that consists of several blank pages.
If the problem persists, to help determine which
component is causing the image-quality problem,
print the test pages.
• If the defect occurs in one color only, replace the
corresponding imaging unit.
• If the defect occurs in all colors and is visible on
all the test pages, replace the fuser.
1 To identify the part responsible for the repeating
spots or lines, measure the intervals between the
marks or spots.
2 To correct the problem, replace the printer part
identified by the interval.
1 Ensure that you have installed the correct toner
dispenser assembly and developer drawer.
2 Perform the Calibrate Color procedure.
1 Verify that the paper that you are using is the
correct type for the printer and that the paper is
loaded properly.
2 Verify that the paper loaded in the tray matches
the paper type selected at the control panel and
in the print driver.
3 To maximize the printed image quality, adjust
your 2nd Transfer setting.
4 Your application or incorrect settings in the print
driver can cause the print-quality problems.
40
Xerox®Adaptive CMYK Plus Technology for the Xerox®PrimeLink™C9065/C9070 Printer
Accessory Reference Guide

Problem Solution
Troubleshooting
Toner is missing or easy to rub off:
Toner appears to be missing from the print or is easy
to rub off.
Error message indicates that there is a mismatch
between the NVM setting and the toner kit installed.
1 Verify that the paper that you are using is the
correct type for the printer and that the paper is
loaded properly.
2 Calibrate the paper type.
3 Raise or lower the fuser temperature setting.
4 At the control panel, select a heavier paper.
Note: Papers from lightest to heaviest are:
• For uncoated paper: Plain, Lightweight
Cardstock, Cardstock, and Heavyweight
Cardstock
• For coated paper: Lightweight Glossy
Cardstock, Glossy Cardstock, and
Heavyweight Glossy Cardstock.
1 Verify that the NVM setting is correct for the
toner kit installed. For details, refer to Setting the
NVM Values.
2 If the NVM setting is correct and the message still
appears, verify that the correct toner kit is
installed.
Xerox®Adaptive CMYK Plus Technology for the Xerox®PrimeLink™C9065/C9070 Printer
Accessory Reference Guide
41

Troubleshooting
Toner Cross-Reference Chart
Toner Kit Position 1 Position 2 Position 3 Position 4 Position 5
Standard Black 1 Black 2 Cyan Magenta Yellow
Vivid Gold (GLD) White (WHT) Silver (SLV) Clear (CLR)
Fluorescent Black 1 Black 2 Fluorescent
Cyan (C-fl)
Fluorescent
Magenta (M-fl)
Fluorescent
Yellow (Y-fl)
42
Xerox®Adaptive CMYK Plus Technology for the Xerox®PrimeLink™C9065/C9070 Printer
Accessory Reference Guide


 Loading...