

Xerox PHASER 4400 User Manual [sv]

Phaser
Laserskrivare
Felsöknings-
™
4400
guide

Copyright © 2002, Xerox Corporation. Med ensamrätt. Rättigheterna för opublicerat material skyddas av de upphovsrättslagar
som gäller i USA. Innehållet i den här publikationen får inte reproduceras i någon form utan tillåtelse från Xerox Corporation.
Upphovsrätten innefattar allt material och all information som är upphovsrättsskyddad enligt lag eller i enlighet med detta avtal.
Detta avser också, utan begränsningar, det material som genereras av programvaran och som visas på bildskärmen, såsom format,
mallar, ikoner, skärmbilder, utseende osv.
®
XEROX
, The Document Company®, det stiliserade X:et, CentreWare®, DocuPrint® och Workset® är registrerade varumärken
som tillhör Xerox Corporation. infoSMART™, Phaser™, PhaserPort™, PhaserSMART™ och PhaserTools™ är varumärken
som tillhör Xerox Corporation.
®
, Acrobat®, Acrobat® Reader®, Illustrator®, PageMaker®, Photoshop®, PostScript®, ATM®, Adobe Garamond®,
Adobe
®
Birch
, Carta®, Mythos®, Quake® och Tekton® är registrerade varumärken och Adobe Jenson™, Adobe Brilliant Screens™
technology och IntelliSelect™ är varumärken som tillhör Adobe Systems Incorporated eller deras dotterbolag som kan vara
registrerade i vissa områden.
®
, LaserWriter®, LocalTalk®, Macintosh®, Mac® OS, AppleTalk®, TrueType2®, Apple Chancery®, Chicago®, Geneva®,
Apple
®
Monaco
och New York® är registrerade varumärken och QuickDraw™ är ett varumärke som tillhör Apple Computer
Incorporated.
Marigold™ och Oxford™ är varumärken som tillhör AlphaOmega Typography.
Avery™ är ett varumärke som tillhör Avery Dennison Corporation.
®
och HP-GL® är registrerade varumärken som tillhör Hewlett-Packard Corporation.
PCL
Hoefler Text är utformat av Hoefler Type Foundry.
®
ITC Avant Guard Gothic
ITC Zapf Dingbats
, ITC Bookman®, ITC Lubalin Graph®, ITC Mona Lisa®, ITC Symbol®, ITC Zapf Chancery® och
®
är registrerade varumärken som tillhör International Typeface Corporation.
Bernhard Modern™, Clarendon™, Coronet™, Helvetica™, New Century Schoolbook™, Optima™, Palatino™, Stempel
Garamond™, Times™ och Univers™ är varumärken som tillhör Linotype-Hell AG och/eller dess dotterbolag.
®
MS-DOS
Wingdings™ i TrueType
och Windows® är registrerade varumärken som tillhör Microsoft Corporation.
®
-format är en produkt som tillhör Microsoft Corporation. WingDings är ett varumärke som tillhör
Microsoft Corporation och TrueType är ett registrerat varumärke som tillhör Apple Computer, Inc.
Albertus™, Arial™, Gill Sans™, Joanna™ och Times New Roman™ är varumärken som tillhör Monotype Corporation.
®
Antique Olive
är ett registrerat varumärke som tillhör M. Olive.
Eurostile™ är ett varumärke som tillhör Nebiolo.
®
och NetWare® är registrerade varumärken som tillhör Novell, Incorporated.
Novell
®
Sun
och Sun Microsystems® är registrerade varumärken som tillhör Sun Microsystems, Incorporated.
®
SPARC
är ett registrerat varumärke som tillhör SPARC International, Incorporated. SPARCstation™ är ett varumärke som
tillhör SPARC International, Incorporated, exklusivt licensierat till Sun Microsystems, Incorporated.
®
är ett registrerat varumärke i USA och andra länder, licensierat exklusivt genom X/Open Company Limited.
UNIX
Xerox Corporation är E
Namnet och logotypen E
NERGY STAR
NERGY STAR är märken som är registrerade i USA.
®
-partner, och den här produkten uppfyller E
NERGY STAR
-riktlinjerna för energispardrift.
Den här produkten använder kod för SHA-1 skriven av John Halleck och används med tillstånd av honom.
Produkten innehåller en implementering av LZW som är licensierat under amerikanskt patent 4 558 302.
Andra märken är varumärken eller registrerade varumärken som tillhör de företag till vilka de är knutna.

Innehåll
Resurser. . . . . . . . . . . . . . . . . . . . . . . . . . . . . . . . . . . . . . . . . . . . . . . . . . . . .1
Visa sidan Hjälpguide . . . . . . . . . . . . . . . . . . . . . . . . . . . . . . . . . . . . . . . . . . . . . . . . . . . . . 1
Menykarta . . . . . . . . . . . . . . . . . . . . . . . . . . . . . . . . . . . . . . . . . . . . . . . . . . . . . . . . . . . . . . . 1
Felmeddelanden . . . . . . . . . . . . . . . . . . . . . . . . . . . . . . . . . . . . . . . . . . . . . . . . . . . . . . . . . . 2
Diagnostisera problem med utskriftskvaliteten. . . . . . . . . . . . . . . . . . . . . 3
Pappersstopp . . . . . . . . . . . . . . . . . . . . . . . . . . . . . . . . . . . . . . . . . . . . . . . .4
Förebygga pappersstopp . . . . . . . . . . . . . . . . . . . . . . . . . . . . . . . . . . . . . . . . . . . . . . . . . . 5
Vad orsakar ett pappersstopp?. . . . . . . . . . . . . . . . . . . . . . . . . . . . . . . . . . . . . . . . . . . . . . 5
Stopp orsakat av pappersstorlek . . . . . . . . . . . . . . . . . . . . . . . . . . . . . . . . . . . . . . . . . . . . 6
Pappersstopp i facket . . . . . . . . . . . . . . . . . . . . . . . . . . . . . . . . . . . . . . . . . . . . . . . . . . . . . 7
Pappersstopp i flerfunktionsfacket . . . . . . . . . . . . . . . . . . . . . . . . . . . . . . . . . . . . . . . . . 10
Pappersstopp i utmatningen . . . . . . . . . . . . . . . . . . . . . . . . . . . . . . . . . . . . . . . . . . . . . . . 13
Pappersstopp vid främre luckan. . . . . . . . . . . . . . . . . . . . . . . . . . . . . . . . . . . . . . . . . . . . 15
Pappersstopp vid bakre luckan . . . . . . . . . . . . . . . . . . . . . . . . . . . . . . . . . . . . . . . . . . . . 16
Pappersstopp vid sorteringsfacket . . . . . . . . . . . . . . . . . . . . . . . . . . . . . . . . . . . . . . . . . 19
Stopp i kuvertmataren . . . . . . . . . . . . . . . . . . . . . . . . . . . . . . . . . . . . . . . . . . . . . . . . . . . . 21
Regelbundet skrivarunderhåll . . . . . . . . . . . . . . . . . . . . . . . . . . . . . . . . . .25
Rengöra skrivarens utsida . . . . . . . . . . . . . . . . . . . . . . . . . . . . . . . . . . . . . . . . . . . . . 25
Underhållssats . . . . . . . . . . . . . . . . . . . . . . . . . . . . . . . . . . . . . . . . . . . . . .26
Skrivarkassett . . . . . . . . . . . . . . . . . . . . . . . . . . . . . . . . . . . . . . . . . . . . . . .32
Utmatningsrulle för flerfunktionsfack. . . . . . . . . . . . . . . . . . . . . . . . . . . . 34
Ompackningsinstruktioner . . . . . . . . . . . . . . . . . . . . . . . . . . . . . . . . . . . .37
Index. . . . . . . . . . . . . . . . . . . . . . . . . . . . . . . . . . . . . . . . . . . . . . . . . . . . . . .40
Copyright © 2002 Xerox Corporation. Med ensamrätt. i

Phaser™ 4400 laserskrivare
Resurser
En stor mängd information finns samlad i skrivaren som utskrivbara sidor. På följande sidor visas
Hjälpguiden, en utskrivbar sida över resurser för att få hjälp.
P4400-77
Alla utskrivbara sidor har det här formatet, med fält både överst och underst på sidan. Skriv ut de här
sidorna från skrivarens frontpanel.
Visa sidan Hjälpguide
Du når sidan Hjälpguide från Menyn för utskrivbara sidor:
1. På frontpanelen bläddrar du till Menyn för utskrivbara sidor med hjälp av tangenterna
Ned-pil eller Upp-pil och trycker sedan på tangenten OK.
2. Bläddra till Skriv ut Hjälpguide med hjälp av tangenterna Ned-pil eller Upp-pil och tryck
sedan på tangenten OK.
Menykarta
För en fullständig lista över utskrivbara sidor kan du skriva ut Menykartan:
1. Välj Menyer på frontpanelen och tryck på tangenten OK.
2. Välj Skriv ut menykarta och tryck på tangenten OK.
Copyright © 2002 Xerox Corporation. Med ensamrätt. 1

Resurser
Felmeddelanden
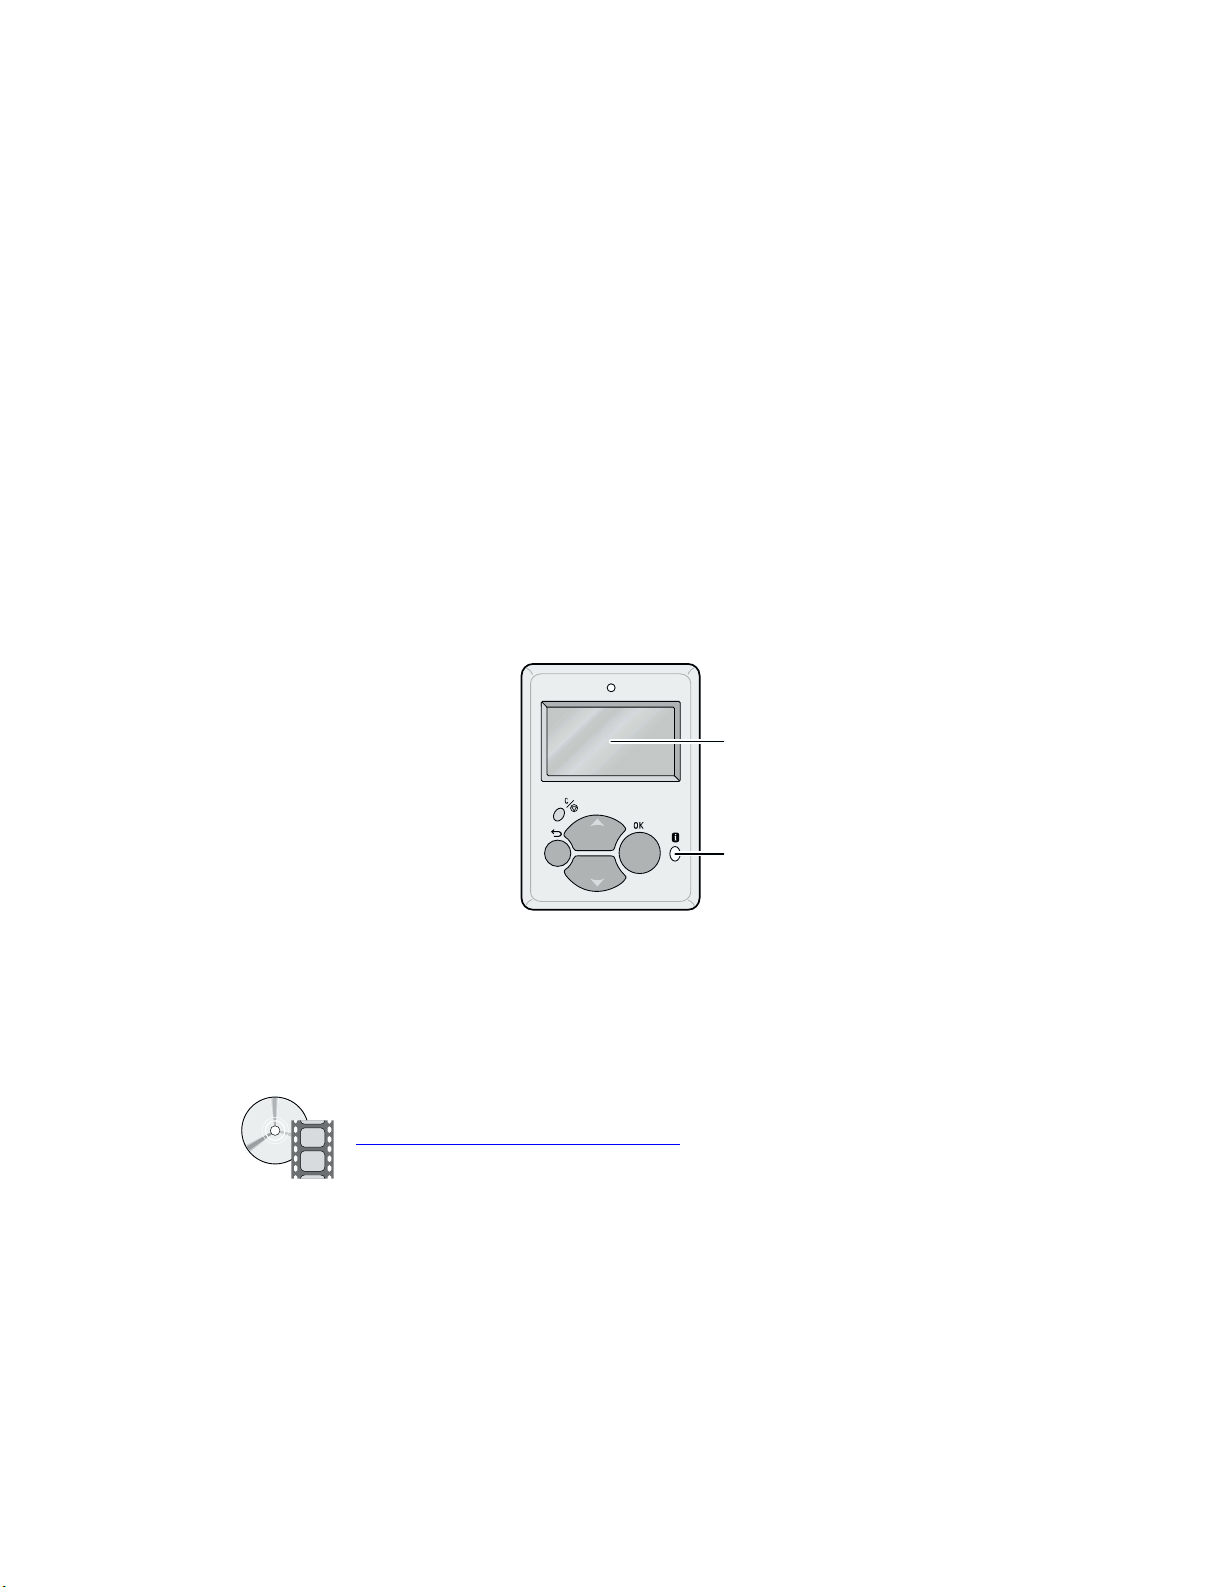
Om det uppstår ett problem med skrivaren visas ett felmeddelande på frontpanelen (1). Tryck på
knappen i (2) om du vill ha mer information om felet och förslag på åtgärder.
1
2
P4400-113
Phaser™ 4400 laserskrivare 2

PHASERTM 4400 LASER PRINTER
Help Guide
Resources
CentreWare® Internet Services (IS)
Printer management tool that helps System Administrators:
• Configure and manage multi-vendor printers.
• Provide remote diagnostics and troubleshooting for printer problems.
• Monitor printer and consumable status.
• Hotlink to software updates and Technical Support.
CentreWare IS uses TCP/IP to communicate directly with the printer's embedded web server and runs on any
computer with a web browser.
To launch CentreWare IS, enter your printer's IP address in a web browser (xxx.xxx.xxx.xxx). The IP address is
listed on your front panel. To view the IP Address on the front panel, highlight Printer Identification and press OK.
For detailed information on CentreWare IS software, refer to its online help.
PhaserSMARTTM (English Only)
Automated printer diagnostics and troubleshooting through the web and your web browser.
Launch CentreWare IS: From a web browser, enter your printer's IP address. Select Support. Select the
Technical Support link to access PhaserSMART.
For Windows: From your Phaser printer driver properties, select the Troubleshooting tab. Select the
PhaserSMART Technical Support web link.
infoSMART
This is the same troubleshooting knowledge base used by Xerox Customer Support. Provides solutions for
printer issues, such as error codes, print quality, media jams, software installation, networking, and more.
www.xerox.com/officeprinting/infoSMART
TM
(English Only)
Interactive Documentation CD-ROM
Detailed printer information in the form of topics, instructions, and videos. Information includes printer setup,
networking, loading trays/paper, driver and printer features, troubleshooting, and support.
Front panel
The front panel offers a suite of tools along with information pages to help solve print-quality, paper feed,
supplies, and printer administration problems.
Page 1 of 3

Button
You can press the Information button at any time to get additional information about the message displayed
on the front panel.
Printable pages
To print a Menu Map, navigate the front panel and its menu items:
1. Select Menus and press OK.
2. Select Print Menu Map and press OK.
Driver help
If you are using Windows 95/98, Windows 2000, or Windows NT, install the driver from your printer's software CD-ROM
and access the printer driver to:
• Link to relevant web sites from the Troubleshooting tab.
• View information about the printer features on the driver tabs by clicking the Help button on the tab.
• View troubleshooting information by clicking a Help button, then selecting the Troubleshooting Guide.
Troubleshooting
Paper jams
PhaserSMART
After you launch PhaserSMART, select the Troubleshooting Guide to help identify your printer's problem. If your printer
detects a jam error, PhaserSMART will point you to a specific solution. Otherwise, select Media Jams for PhaserSMART
to lead you to the best solution.
Interactive Documentation CD-ROM
For paper jams and error messages, see the Troubleshooting section.
Driver help
In the Troubleshooting Guide, refer to Error Messages for Paper Jams.
Print-quality problems
Ensure the paper type selected in the front panel matches the paper loaded in the trays and the Multi-Purpose Tray
(MPT). Tray settings can be found by selecting Printer Setup Menu and then Tray Setup Menu.
The following table provides a list of printable pages that are accessible from the Support Menu
and Improve Print Quality?:
Condition Printable page
For additional paper tips: Print Paper Tips Page
To troubleshoot print-quality symptoms: Print Diagnostic Pages
Page 2 of 3

PhaserSMART
After you launch PhaserSMART, select the Troubleshooting Guide to help identify your printer's problem. Starting with
Print/Image Quality Issues, PhaserSMART will walk you through a decision tree to resolve print-quality problems.
Interactive Documentation CD-ROM
For print-quality problems, see the Troubleshooting section.
Networking problems
Printable pages
To obtain information on printer options, configurations and settings:
1. On the front panel, highlight Printable Pages and press OK.
2. Scroll to Print Configuration Pages and press OK.
To obtain information on network, parallel and USB connections and setting:
1. On the front panel, highlight Menus and press OK.
2. Scroll to Connection Setup Menu and press OK.
3. Scroll to Print Connection Setup Page and press OK.
Interactive Documentation CD-ROM
For network setup and troubleshooting, see the Networking section.
Replacing consumables
Interactive Documentation CD-ROM
Refer to the Support section for instructions and videos that walk you through the replacement of consumables.
Instruction Sheets
Each consumable comes with instructions included in the original packaging.
Web links
To link to product and supplies information, download printer
drivers, view documents, and access support information:
To access the troubleshooting knowledge base
used by Xerox Customer Support staff:
To view technical support information:
To order Xerox supplies:
To find your local sales and support center:
www.xerox.com/officeprinting
www.xerox.com/officeprinting/infoSMART
www.xerox.com/officeprinting/4400support
www.xerox.com/officeprinting/4400supplies
www.xerox.com/officeprinting/contacts
Page 3 of 3

Phaser™ 4400 laserskrivare
Diagnostisera problem med utskriftskvaliteten
En stor mängd information finns samlad i skrivaren som utskrivbara sidor. På följande sidor visas den
utskrivbara sidan Diagnostisera problem med utskriftskvaliteten med information om åtgärder för
problem med utskriftskvalitet.
P4400-77
Alla utskrivbara sidor har det här formatet, med fält både överst och underst på sidan. Skriv ut de här
sidorna från skrivarens frontpanel.
Visa sidan Diagnostisera problem med utskriftskvaliteten
Du når sidan Diagnostisera problem med utskriftskvaliteten från
Menyn för utskrivbara sidor:
1. På frontpanelen bläddrar du till Menyn för utskrivbara sidor med hjälp av tangenterna
Ned-pil eller Upp-pil och trycker sedan på tangenten OK.
2. Bläddra till Skriv ut diagnossidor med hjälp av tangenterna Ned-pil eller Upp-pil och
tryck på tangenten OK.
Menykarta
För en fullständig lista över utskrivbara sidor kan du skriva ut Menykartan:
1. Välj Menyer på frontpanelen och tryck på tangenten OK.
2. Välj Skriv ut menykarta och tryck på tangenten OK.
Copyright © 2002 Xerox Corporation. Med ensamrätt. 3

Symptom: Light or faint prints
The overall image is lighter than normal.
Possible causes and solutions:
• The paper stock may be damp. Replace the paper stock.
• If you are using Draft Mode, turn off Draft Mode.
• The toner level may be low. If the Print Cartridge is low on toner, replace it.
Symptom: Blank prints
The entire printed page is blank with no visible print.
Possible causes and solutions:
• If you just installed a new Print Cartridge, the yellow sealing tape may still be in place.
Remove the tape.
PHASERTM 4400 LASER PRINTER
Diagnosing Print-Quality Problems
• Multiple sheets may have been fed from the paper tray at the same time. Remove the paper from
the paper tray and fan it. Also, ensure that the paper is correctly loaded in the tray.
• Printable data may not have been received from the computer. To test this, print a Configuration
Page. If the Configuration Page is normal, check the Interface cable between the computer and
printer, the printer set up, and application software. If the Configuration Page is blank, contact
your Customer Support Center.
• The Print Cartridge may be defective or low on toner. Replace the Print Cartridge.
Symptom: Black prints
The entire printed page is black.
Possible causes and solutions:
• The Print Cartridge may be defective. Replace the Print Cartridge.
• The Printer's power supply may have failed; contact your Customer Support Center.
Page 1 of 5
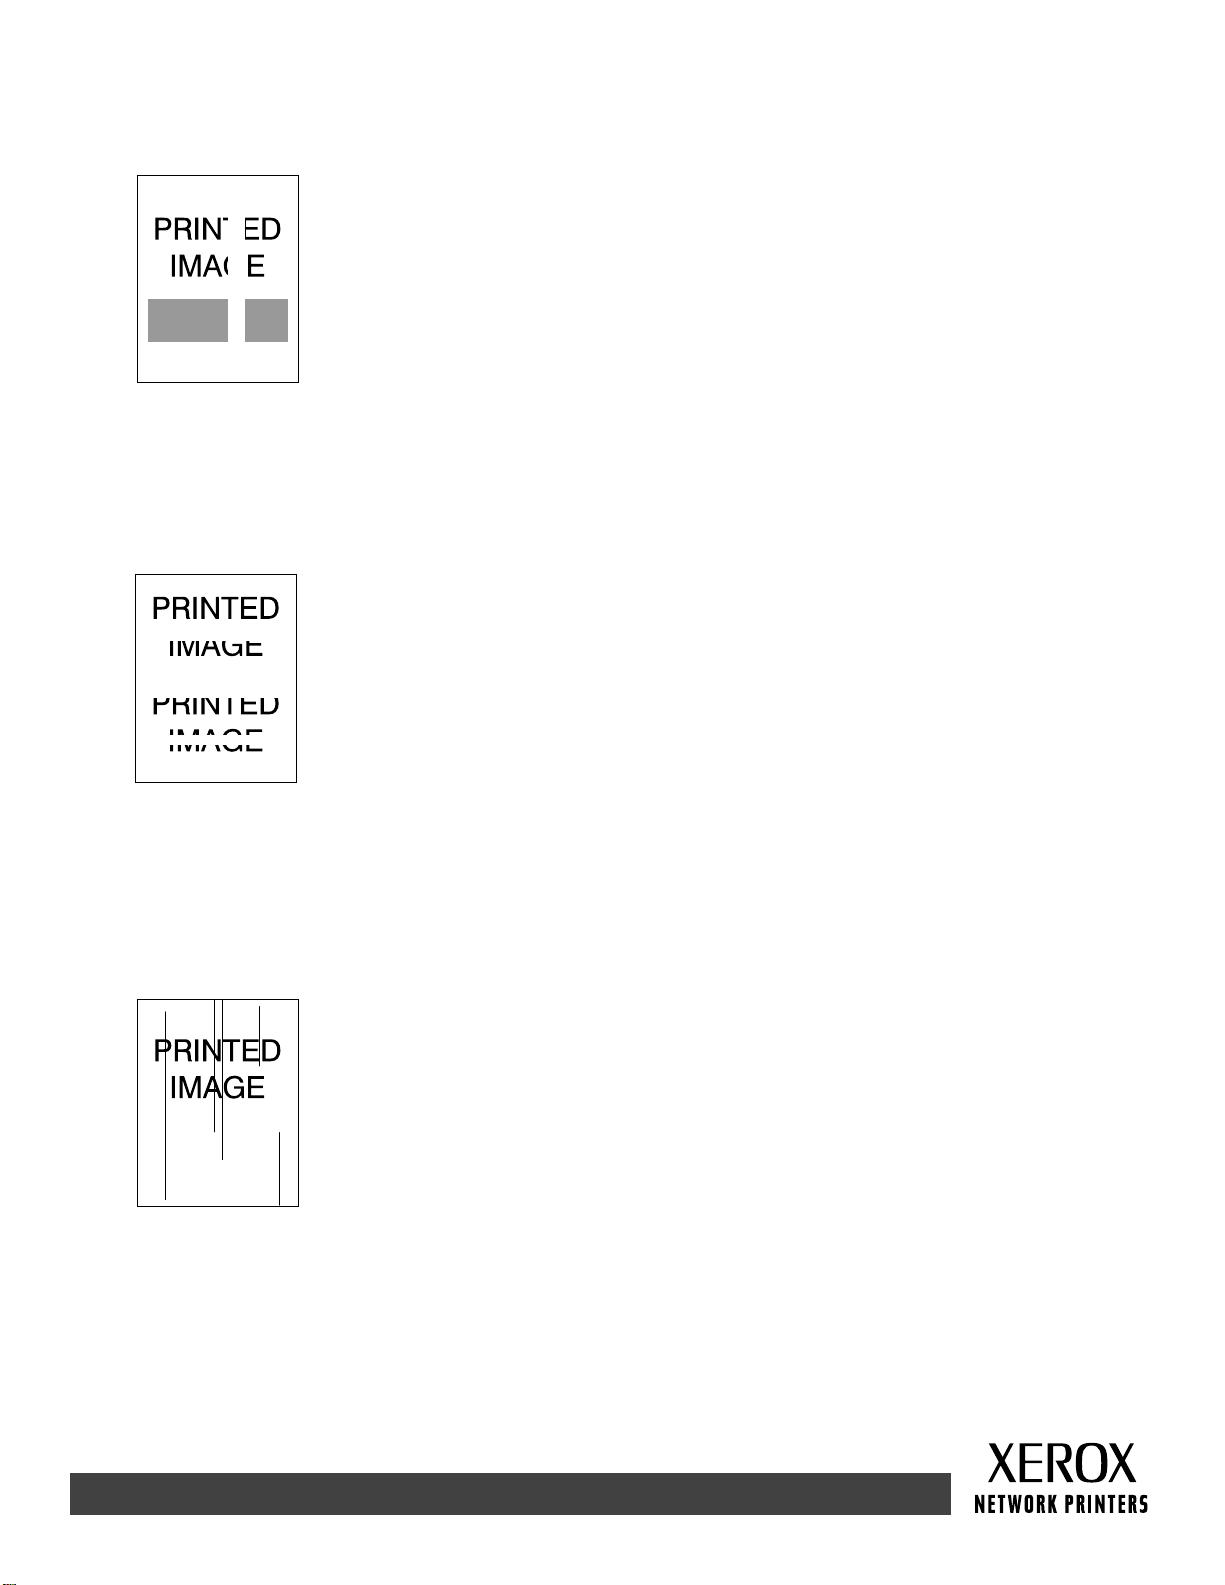
Symptom: Vertical line deletions
There are localized print deletions forming narrow lines.
Possible causes and solutions:
• The Print Cartridge may not be installed correctly. Remove then re-install the Print Cartridge.
• The Print Cartridge may be defective or at the end of its life. Replace the Print Cartridge.
Symptom: Horizontal line deletions
There are localized print deletions appearing as bands running across the paper.
Possible causes and solutions:
• The paper stock may be defective with creases, folds, etc. Replace the paper stock.
• The Print Cartridge may be defective or at the end of its life. Replace the Print Cartridge.
Symptom: Vertical dark streaks
There are black lines running across the print.
Possible causes and solutions:
• The Print Cartridge may be defective or at the end of its life. Replace the Print Cartridge.
• The fuser may be defective. Replace the fuser (in the Maintenance Kit).
Page 2 of 5

Symptom: Repetitive horizontal dark streaks
There are black lines running across the page. For more information, see the Repeating defects section on page 5.
Possible causes and solutions:
• The paper path may be contaminated with toner. Print several blank sheets of paper
to remove the toner accumulations.
• The Print Cartridge may be defective or at the end of its life. Replace the Print Cartridge.
• The fuser may be defective. Replace the fuser (in the Maintenance Kit).
• The Transfer Roll may be defective. Replace the Transfer Roll (in the Maintenance Kit).
Symptom: Dark spots or marks
There are dark spots or marks on the page in a random pattern.
Possible causes and solutions:
• The paper path may be contaminated with toner. Print several blank sheets of paper to remove
the toner accumulations.
• The Print Cartridge may be defective. Replace the Print Cartridge.
• The fuser may be defective. Replace the fuser (in the Maintenance Kit).
• The Transfer Roll may be defective. Replace the Transfer Roll (in the Maintenance Kit).
Symptom: Unfused or partially fused image
The printed image is not fully fused to the paper and easily rubs off.
Possible causes and solutions:
• The paper stock may be damp. Replace the paper stock.
• Heavy or unusual paper stock may be in the tray. Replace that paper with approved paper.
Make sure that the fuser temperature is set correctly for the paper type.
• The fuser may be defective. Replace the fuser (in the Maintenance Kit).
• Make sure that the printer is located in the recommended environment for temperature
(between 5 to 35 degrees C / 41 to 95 degrees F) and relative humidity (between 15 percent to
85 percent). Move the printer to a suitable area, away from air conditioning vents, open loading
docks, etc.
Page 3 of 5

Symptom: Wrinkled prints
The prints are wrinkled, creased, or torn.
Possible causes and solutions:
• Verify the paper is correctly loaded in the paper tray.
• The paper stock may be in poor condition. Replace the paper stock.
• The paper stock may be damp. Replace the paper stock.
• The fuser may be at the end of its life. Replace the fuser (contained in the Maintenance Kit).
Symptom: Blurred prints
The image is blurred at the edges.
Possible causes and solutions:
• The paper stock may be in poor condition. Replace the paper stock.
• The paper stock may be damp. Replace the paper stock.
• The Print Cartridge may be defective. Replace the Print Cartridge.
Symptom: Random or spot deletions
Areas of the print are extremely light or missing.
Possible causes and solutions:
• The paper stock may be in poor condition. Replace the paper stock.
• The paper stock may be damp. Replace the paper stock.
• The Print Cartridge may be defective or at the end of its life. Replace the Print Cartridge.
Page 4 of 5

Repeating defects (recurring marks, spots, lines, or voids)
Replace the Print Cartridge if the defect occurs every:
• 38 mm (1.5 in.)
• 50 mm (2.0 in.)
• 90 mm (3.54 in.)
Replace the Transfer Roll if the defect occurs every:
• 59 mm (2.32 in.)
Replace the Fuser Assembly if the defect occurs every:
• 94 mm (3.7 in.)
• 104 mm (4.10 in.)
Ordering supplies
See www.xerox.com/officeprinting/4400supplies for information on ordering supplies or print the Paper Tips page to
view Xerox part numbers.
Page 5 of 5
Phaser™ 4400 laserskrivare
Pappersstopp
Förutom information om pappersstopp och vad som orsakar pappersstopp innehåller det här avsnittet
instruktioner för att åtgärda följande typer av stopp:
Stopp orsakat av pappersstorlek — se sidan 6.
■
Pappersstopp i facket — se sidan 7.
■
Pappersstopp i flerfunktionsfacket — se sidan 10.
■
Pappersstopp i utmatningen — se sidan 13.
■
Pappersstopp vid främre luckan — se sidan 15.
■
Pappersstopp vid bakre luckan — se sidan 16.
■
Pappersstopp vid sorteringsfacket — se sidan 19.
■
Stopp i kuvertmataren — se sidan 21.
■
Om det uppstår ett pappersstopp visas ett felmeddelande för pappersstopp på frontpanelen (1). Tryck på
knappen i (2) om du vill ha mer information om hur du åtgärdar stoppet.
Var försiktig
Undvik att röra vid den toner som finns på det papper som har fastnat, eftersom tonern
kanske inte fäst på pappret och kan smeta av sig.
1
2
P4400-113
Det finns videofilmer som beskriver hur pappersstopp åtgärdas. Filmerna finns på cdromskivan Interaktiv dokumentation och på Xerox webbplats:
www.xerox.com/officeprinting/4400support/
Copyright © 2002 Xerox Corporation. Med ensamrätt. 4

Förebygga pappersstopp
Bläddra igenom papper innan du lägger det i facken eller i flerfunktionsfacket.
■
Använd rena, oskadade papper. Använd inte papper som rullat ihop sig.
■
Fyll på papper från ett nytt paket.
■
Fyll inte på papper ovanför fackets påfyllningsstreck.
■
Kontrollera att pappersstyrskenorna är rätt inställda för pappersstorleken.
■
Använd lämpliga pappersstorlekar som skrivaren kan hantera. Information om pappersstorlekar
■
finns i avsnittet Papper som stöds i Fack- och pappersguiden på cd-romskivan
Interaktiv dokumentation.
Fyll på papper på rätt sätt. Information om hur papper läggs i de olika facken finns i avsnittet
■
Ladda fack
i
Fack- och pappersguiden
på cd-romskivan Interaktiv dokumentation.
Vad orsakar ett pappersstopp?
Pappersstopp inträffar oftast under följande omständigheter:
Pappersstopp
Pappret uppfyller inte speficikationerna.
■
Det papper som lagts i har en storlek eller vikt som inte fungerar i facket.
■
Pappret är skadat, fuktigt, hoprullat, skrynkligt eller vikt.
■
Pappret har inte lagts i på rätt sätt.
■
Fackets sidoguider och bakre guider har inte justerats för pappret.
■
Facket är överfullt: papper har lagts i ovanför fackets påfyllningsstreck.
■
Phaser™ 4400 laserskrivare 5
 Loading...