


DocuWorks™ 7
Setup Guide
1 Before You Install DocuWorks
1.1 What to Check Before Installation ...................................................................................... 5
1.2 Installation Overview .......................................................................................................... 6
2 Installing Software
2.1 Installing DocuWorks 7..................................................................................................... 10
2.2 Installing Adobe PDF Creation Add-On............................................................................ 15
2.3 Installing DocuWorks Image Capture 1.0 ......................................................................... 16
2.4 Installing DocuWorks Viewer Light 7 ................................................................................ 19
3 Executing the Configuring of Personal Settings
3.1 Executing the Configuring of Personal Settings ............................................................... 23
3.2 Changing the Personal Settings ....................................................................................... 28
4 Uninstalling Software
4.1 Uninstalling DocuWorks 7................................................................................................. 31
4.2 Uninstalling Adobe PDF Creation Add-On ....................................................................... 31
4.3 Uninstalling Adobe Reader............................................................................................... 32
4.4 Uninstalling DocuWorks Image Capture 1.0..................................................................... 32
4.5 Uninstalling DocuWorks Viewer Light 7............................................................................ 32

2
Preface
Thank you for using DocuWorks™.
DocuWorks document handling software provides you with a uniform way to handle data in a wide variety
of office situations.
With DocuWorks, you can handle both documents created by PC (personal computer) applications and data
acquired by scanning as DocuWorks format data. This data can also be sent as e-mail or printed on a printer.
This manual describes how to install the software from the DocuWorks 7 CD-ROM. Be sure to read this
manual before using DocuWorks.
For an overview of DocuWorks and the basic operations, refer to the "Beginners Guide to DocuWorks 7",
which will be installed along with DocuWorks.
For the details of the functions of DocuWorks, refer to Help.
The description assumes that the user knows the basic operations of Microsoft
Windows® XP, or Microsoft® Windows Vista® (hereafter called Windows 2000, Windows XP, Windows
Vista).
Xerox Corporation
®
Windows® 2000, Microsoft
®
Microsoft, Windows, Windows Vista, and Internet Explorer are registered trademarks or trademarks of Microsoft Corporation in the
United States and/or other countries.
Pentium is a registered trademark of Intel Corporation, and its subsidiaries in the United States and/or in other countries.
Adobe, Acrobat, and Reader are registered trademarks or trademarks of Adobe Systems Incorporated in the United States and/or
other countries.
All product/brand names are trademarks or registered trademarks of the respective holders.
Permission has been obtained from Microsoft Corporation for use of software screen shots.
Fuji Xerox is not responsible for any breakdown of machines due to infection of computer virus or computer hacking.
Important
1 This manual is copyrighted with all rights reserved. Under the copyright laws, this manual may not be copied or modified in
whole or part, without the written consent of the publisher.
2 Parts of this manual are subject to change without prior notice.
3 We welcome any comments on ambiguities, errors, or omissions, or missing pages.
XEROX and the sphere of connectivity design are registered trademarks or trademarks of
Xerox Corporation in the US and or other countries.
DocuWorks is a trademark of Fuji Xerox Co., Ltd.

About DocuWorks Manuals
The manuals of DocuWorks are contained in the CD-ROM.
Type of Manuals
The following manuals provide information on the functions and operations of DocuWorks.
Manual Name Description Manual File Format
Setup Guide
(this manual)
Beginners Guide to
DocuWorks 7
Help
z Contents
It explains operating environments and installation procedure of
DocuWorks.
z Contents
It describes the basic operations such as viewing, creating, and
editing documents.
z How to display
You can view it by opening [Beginners Guide to DocuWorks 7] in
the workspace on DocuWorks Desk.
Or by selecting [Start] > [All Programs] > [Xerox] > [DocuWorks] >
[Beginners Guide to DocuWorks 7].
z Contents
Help explains the overall features of DocuWorks and details of
each function. You can use Help as a reference to understand the
general description, as well as each operation and functionality of
DocuWorks. You can also refer to Help to find out about setting
procedures in dialog boxes while using DocuWorks.
It mainly describes the following main points.
z Overview and new functions
z Setting up and usage of operating environment with windows
z All operations
z Menus and functions of dialog boxes
z Specifications, compatibilities, cautions and constraints
3
DocuWorks file
DocuWorks file
Booklet (sold separately)
CHM file
Release Note
z How to display
You can view it by selecting [Help] > [DocuWorks Help] on
DocuWorks Desk or DocuWorks Viewer window.
z Contents
It describes information you should read before working with
DocuWorks.
Cautions and Constraints concerning DocuWorks are explained.
z How to display
You can view it by selecting [Start] > [All Programs] > [Xerox] >
[DocuWorks] > [Readme] > [Readme].
HTML file

Using This Manual
This manual includes the following contents.
1Before You Install DocuWorks
Before installing DocuWorks, this section describes requirements for operating environments and
installation settings.
2Installing Software
This section describes procedures to install application software contained in the CD-ROM.
3Executing the Configuring of Personal Settings
This section describes how to configure the required personal settings when using DocuWorks for the first
time.
4Uninstalling Software
This section describes procedures to uninstall application software.
Conventions
4
The following symbols are used in the manual.
Symbol Use of the symbol
Important Indicates important information that you should read.
Note Indicates additional information on operations or features.
Reference Indicates the titles, manuals or Help for references.
" " Represents names of other manuals, and titles of sections within this manual for references.
Also represents folder names, file names, and directory path names.
[ ] Represents dialog box names, and item names and button names in the dialog box, e.g. Click the
[OK] button.
Also represents Help titles.
> Represents hierarchy of the menus, e.g. Select the [Start] menu of Windows, and [All Programs] >
[Xerox] > [DocuWorks].
z This manual describes the DocuWorks screens and operations taking Windows Vista as an example. For
those who use operating systems other than Windows Vista, please read information according to the
respective environment.
z The term, "select" used in this manual refers to an operation to choose the menu items or items in the
dialog box. The term, "click" refers to an operation to place a cursor over a button in the dialog box and
press the left button of the mouse.
z The following terms may be abbreviated in some cases:
• "DocuWorks Desk" may be abbreviated as "Desk".
• "DocuWorks Viewer" may be abbreviated as "Viewer".
• "[DocuWorks Desk] window" may be abbreviated as "Desk window".
• "[DocuWorks Viewer] window" may be abbreviated as "Viewer window".
z A "DocuWorks document" and a "DocuWorks binder" together may be called "DocuWorks file"
collectively.

1 Before You Install DocuWorks
1 Before You Install DocuWorks
Before you install DocuWorks, check the necessary environment and settings for installation.
1.1 What to Check Before Installation
Check the operating environment before installation.
Operating Environment
To use DocuWorks 7, the hardware must meet the following requirements:
5
Operating system
(OS)
CPU PentiumIII
Memory 256 MB or more (512 MB or more is recommended)
Display 800 x 600 pixels or more (1024 x 768 pixels or more is recommended)
Minimum hard disk space
required during installation
Required software Microsoft® Internet Explorer® 6 or
Compatible scanners TWAIN32 compliant
Other required devices CD-ROM drive
Browser supporting
DocuWorks Viewer Control
Versions of Office products
supporting DocuWorks
Creator for Microsoft Office
Conversion function to
®
Adobe
*1
*2
*3
PDF
To display PDF files in thumbnails or to use the PDF search function, Service Pack 4 is required.
According to the recommended values for OS you use.
To install the provided software, additional free space is required. Additional 200 MB or more is
Microsoft® Windows® 2000(with Service Pack 3/4*1)
Microsoft
Microsoft
full color
240MB
Windows® Internet Explorer® 7
Microsoft® Internet Explorer® 6
*4
Windows® Internet Explorer® 7
Microsoft
Microsoft® Office 2003
2007 Microsoft Office
Adobe® PDF Creation Add-On
Acrobat® Elements 6.0, Adobe® Acrobat® 8, Adobe® Acrobat® 7.0, or Adobe
Acrobat® 6.0 is required.
Adobe
ROM.
®
Windows® XP(with Service Pack 1/2/3)
®
Windows Vista® (without Service Pack or with Service Pack 1)
®
333 MHz or higher
*3
®
Office XP
®
System
®
PDF Creation Add-On
*5*6
, Adobe® Acrobat® 7.0 Elements, Adobe
*5*6
is included on the DocuWorks installation CD-
*2
recommended for the actual operation.
*4
This function displays DocuWorks files using a web browser and edits files such as adding annotations.
*5
To use Adobe® PDF Creation Add-On, Adobe® Reader, which is included on the CD-ROM, must be
installed.
*6
Adobe® PDF Creation Add-On operates on the following OS.
•Microsoft
•Microsoft
•Microsoft
®
Windows® 2000 Service Pack 4
®
Windows® XP Service Pack 2
®
Windows Vista® without Service Pack
®
®

1 Before You Install DocuWorks
User Privileges
The user who will install DocuWorks must have Administrator privileges. Check whether the user who will
install the DocuWorks belongs to the Administrator group.
1.2 Installation Overview
To use DocuWorks 7, you must install DocuWorks 7 on your computer and then configure "Personal
Settings".
Once the installation is complete, the necessary files are copied to your computer. By using Personal
Settings, you can configure the DocuWorks environment for each user.
New Installation or Upgrading an Earlier Version of DocuWorks
DocuWorks 7 has installation methods as described below.
New Installation
Used to newly install DocuWorks 7 on computers which have no earlier version of DocuWorks installed.
When newly installing an upgrade package of DocuWorks 7, a DocuWorks 5.0/6.x serial number is required.
6
Upgrading an Earlier Version of DocuWorks
Used to upgrade DocuWorks 5.0/6.x to DocuWorks 7 by overwriting them.
Contents of the DocuWorks 7 CD-ROM
DocuWorks 7 CD-ROM contains the following items.
DocuWorks 7
Reference For information on how to install DocuWorks 7, refer to "Installing DocuWorks 7" (P.10).
Adobe PDF Creation Add-On
Adobe PDF Creation Add-On is PDF file creating software provided by Adobe Systems Incorporated.
Once the installation of Adobe PDF Creation Add-On is complete, you can use the [Conversion to PDF] plug-
in on DocuWorks Desk. In addition, files including the DocuWorks files can be converted into PDF files by
using the virtual printer [Adobe PDF].
Reference For information on how to install Adobe PDF Creation Add-On, refer to "Installing Adobe PDF
Creation Add-On" (P.15).
DocuWorks Image Capture 1.0
DocuWorks Image Capture 1.0 monitors the specified folder, and converts the image file in the folder into a
DocuWorks document.
Reference For information on how to install DocuWorks Image Capture 1.0, refer to "Installing DocuWorks
Image Capture 1.0" (P.16).
1 Before You Install DocuWorks
DocuWorks Viewer Light 7
DocuWorks Viewer Light is free software to view DocuWorks files. This application enables you to view the
DocuWorks files even in an environment that does not have DocuWorks installed.
Reference For information on how to install DocuWorks Viewer Light 7, refer to "Installing DocuWorks Viewer
Light 7" (P.19).
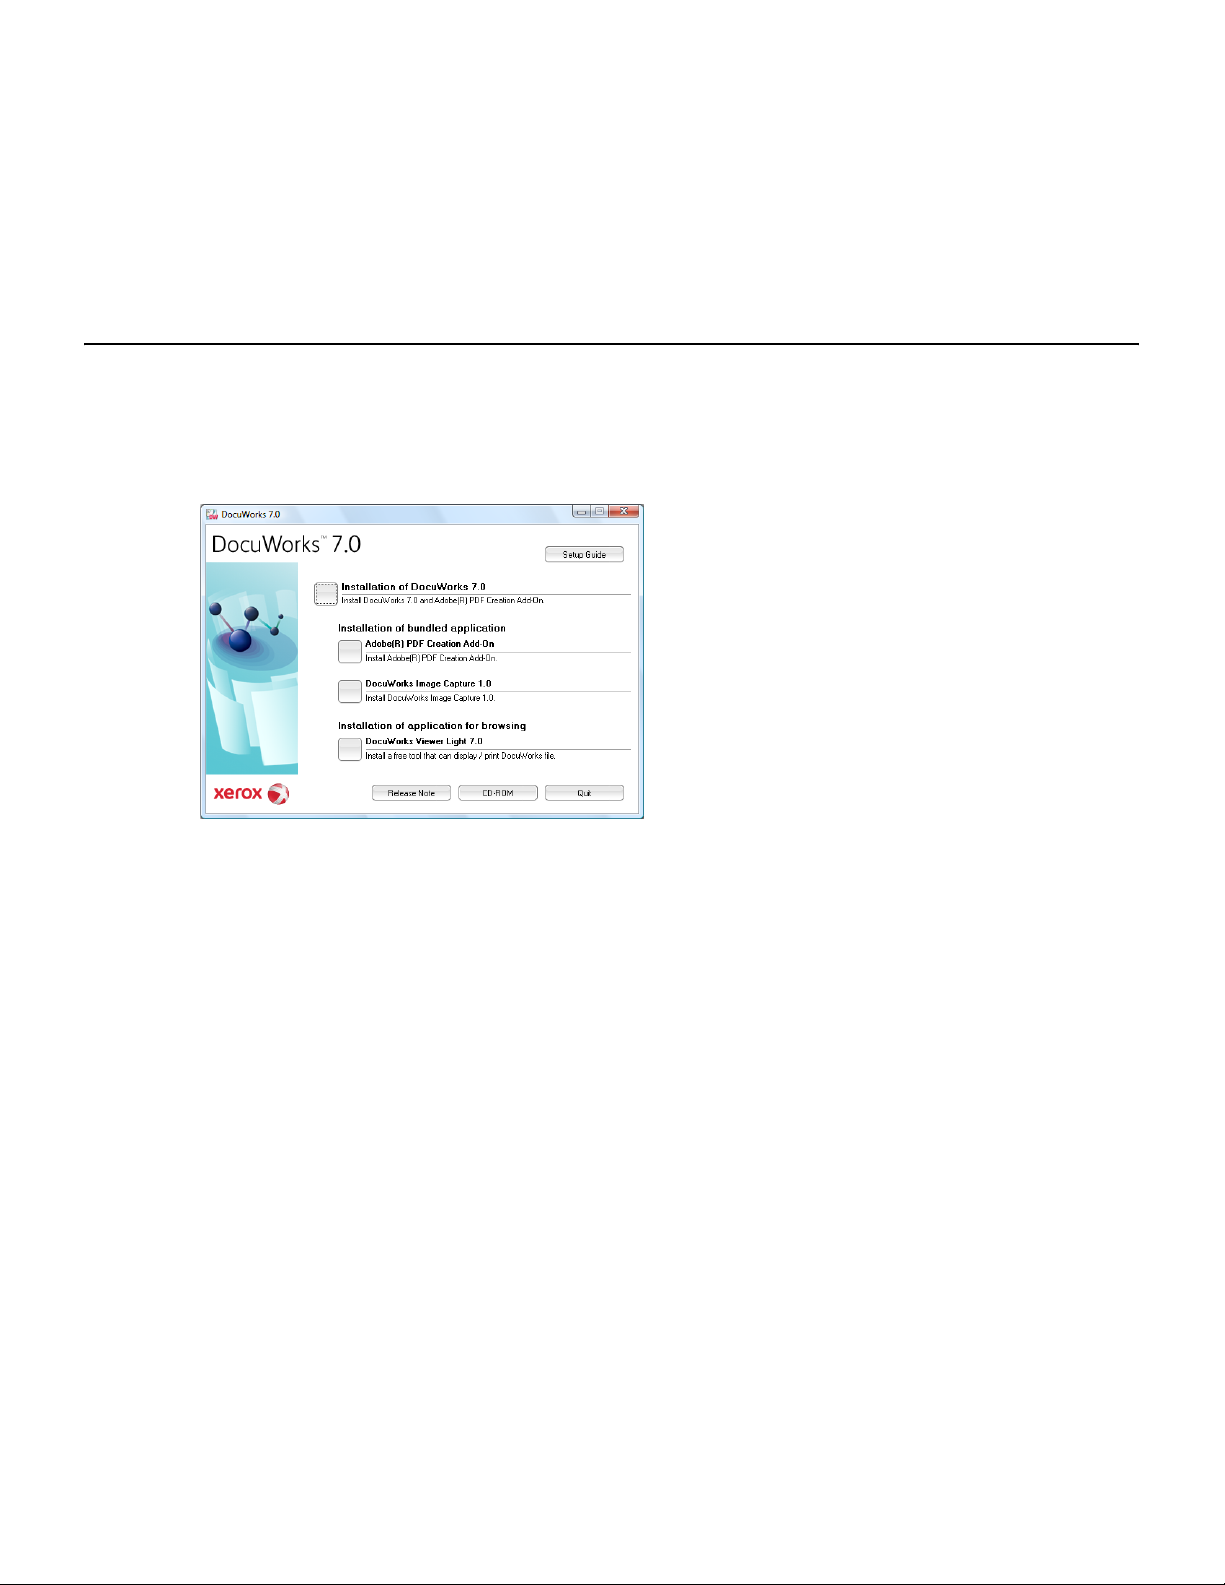
The Installation Screen
When setting the DocuWorks 7 CD in a CD-ROM drive, the following installation screen appears.
Note Depending on the language version of the software, the language selection screen appears first.
Selecting the language you want to install displays the installation screen.
Note If the screen does not appear, execute the "Autorun.exe" file under the "autorun" folder in the CD-ROM.
7
Setup Guide
If you click this button, "DocuWorks 7 Setup Guide" (this manual) appears.
Installation of DocuWorks 7.x
If you click this button, DocuWorks 7 will be installed.
Reference "Installing DocuWorks 7" (P.10)
Adobe® PDF Creation Add-On
If you click this button, Adobe Reader and Adobe PDF Creation Add-On will be installed.
Reference "Installing Adobe PDF Creation Add-On" (P.15)
DocuWorks Image Capture 1.0
If you click this button, DocuWorks Image Capture 1.0 will be installed.
Reference "Installing DocuWorks Image Capture 1.0" (P.16)
DocuWorks Viewer Light 7.x
If you click this button, DocuWorks Viewer Light 7 will be installed.
Reference "Installing DocuWorks Viewer Light 7" (P.19)
1 Before You Install DocuWorks
Release Note
If you click this button, Release Note for the entire CD-ROM is displayed. By clicking the links inside, you
can display individual Release Notes. Release Notes describe the cautions and constraints. Be sure to read
them before using the software.
CD-ROM
If you click this button, the files in the CD-ROM are displayed.
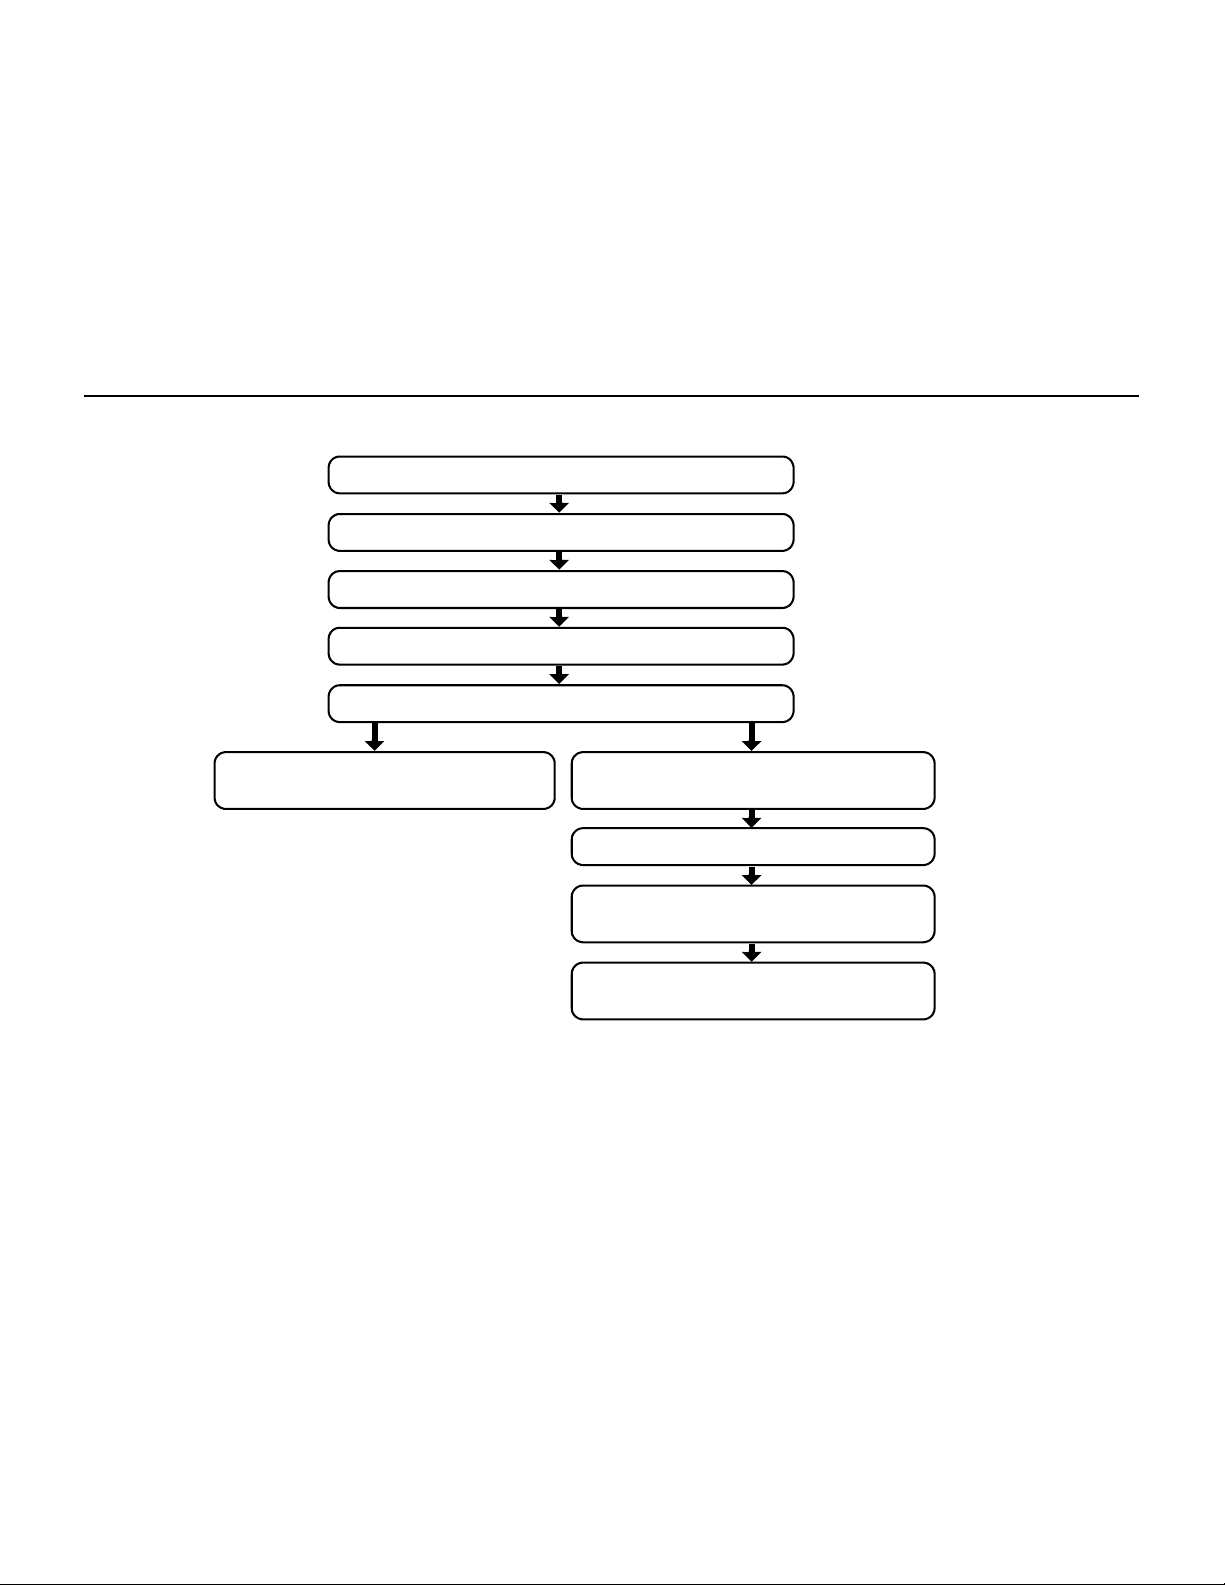
Flow of Installing DocuWorks 7
The installation flow of DocuWorks 7 is as follows:
Exit the running applications
Set the CD-ROM in the drive
Select [Installation of DocuWorks 7.x] in the installation screen
Register customer information
8
All the items are set as the default.
[Standard]
Select the setup type
Select whether or not to use DocuWorks Viewer
Select whether or not to create the shortcut to Desk
Select all the items sequentially.
Select the installation destination
[Custom]
Control
1 Before You Install DocuWorks
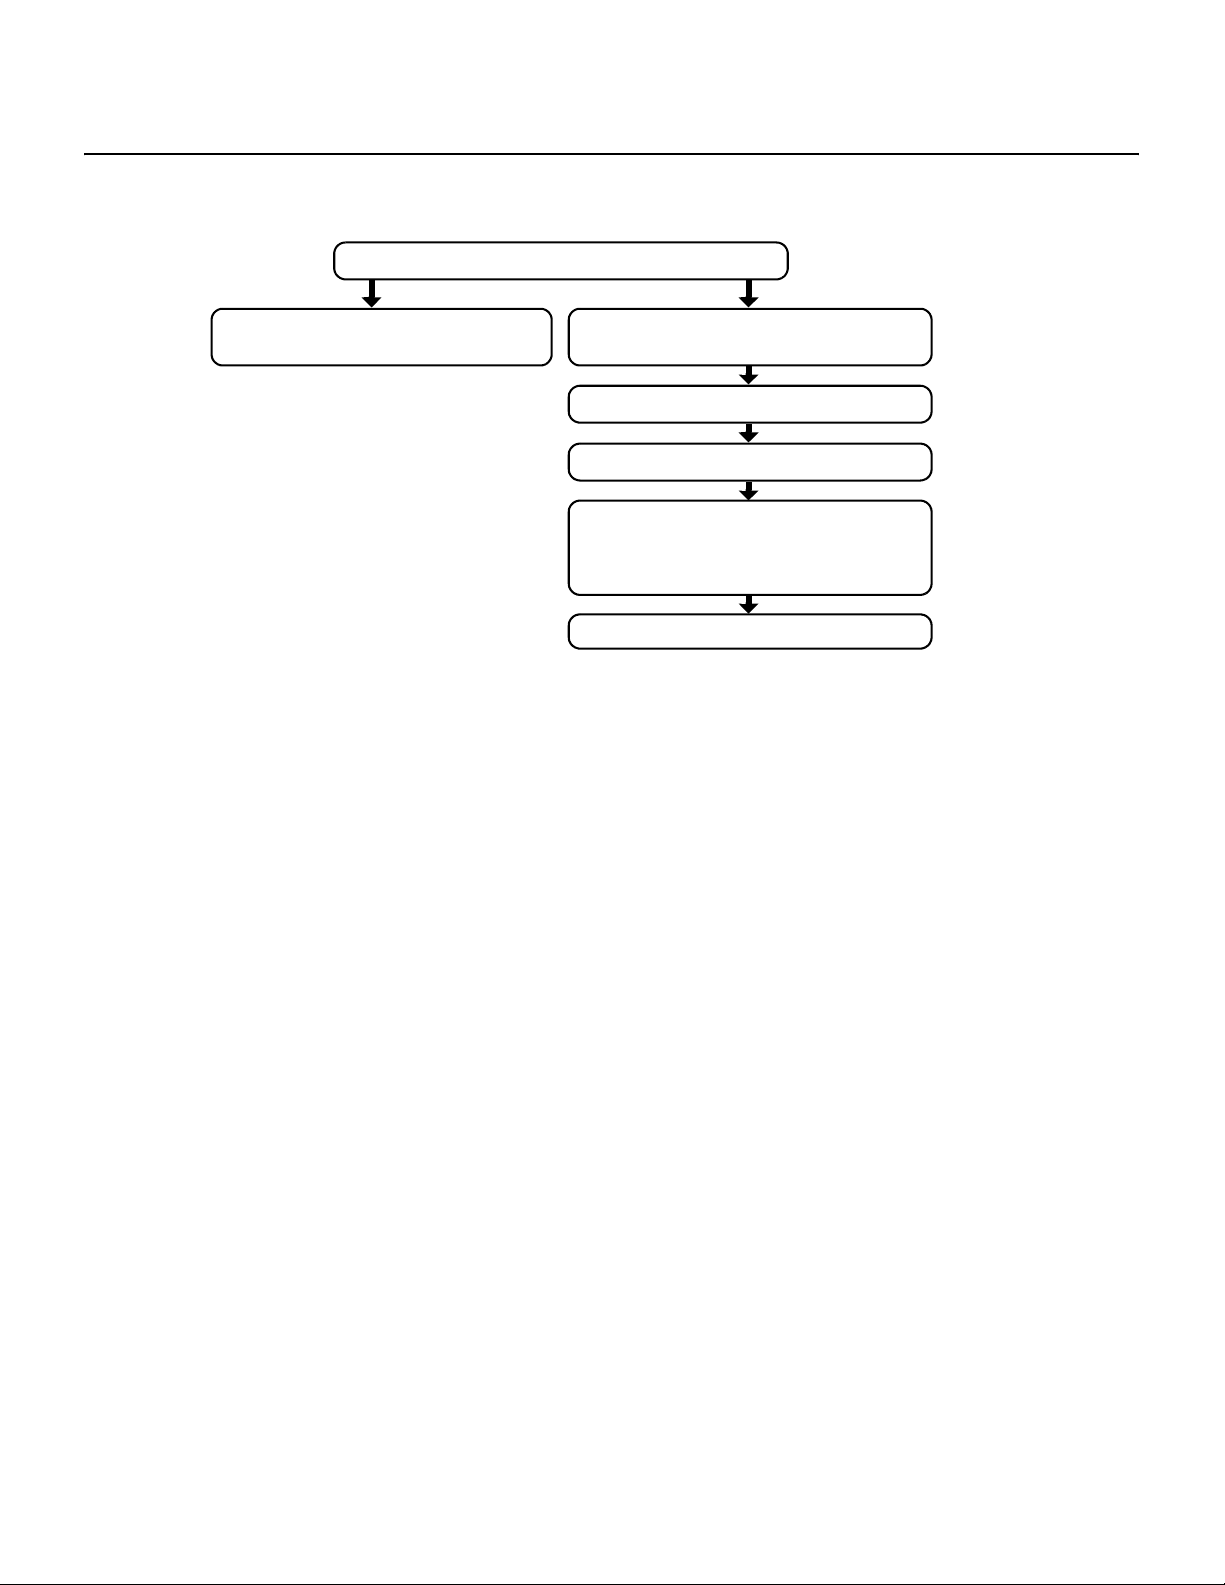
Flow of Personal Settings
When you use DocuWorks for the first time, you must configure Personal Settings.
The flow of Personal Settings is as follows:
9
Select install method
[Standard settings]
All the items are set as the default.
[Customize settings]
Select all the items sequentially.
Select a Desk folder
Select the folder for temporary files
Select the application in which DocuWorks Creator for
Microsoft Office is enabled
Select the shortcut to be created
2 Installing Software
2 Installing Software
This section describes how to install each application software from the DocuWorks 7 CD-ROM.
After the installation, configure Personal Settings by referring to "Executing the Configuring of Personal
Settings" (P.23).
Note In DocuWorks 7, you can do "Silent Installation" which does not display the dialog boxes when installing
the software. For details, refer to Help [Customize DocuWorks] > [Customize Installation].
2.1 Installing DocuWorks 7
This section explains how to newly install DocuWorks 7 or upgrade an earlier version.
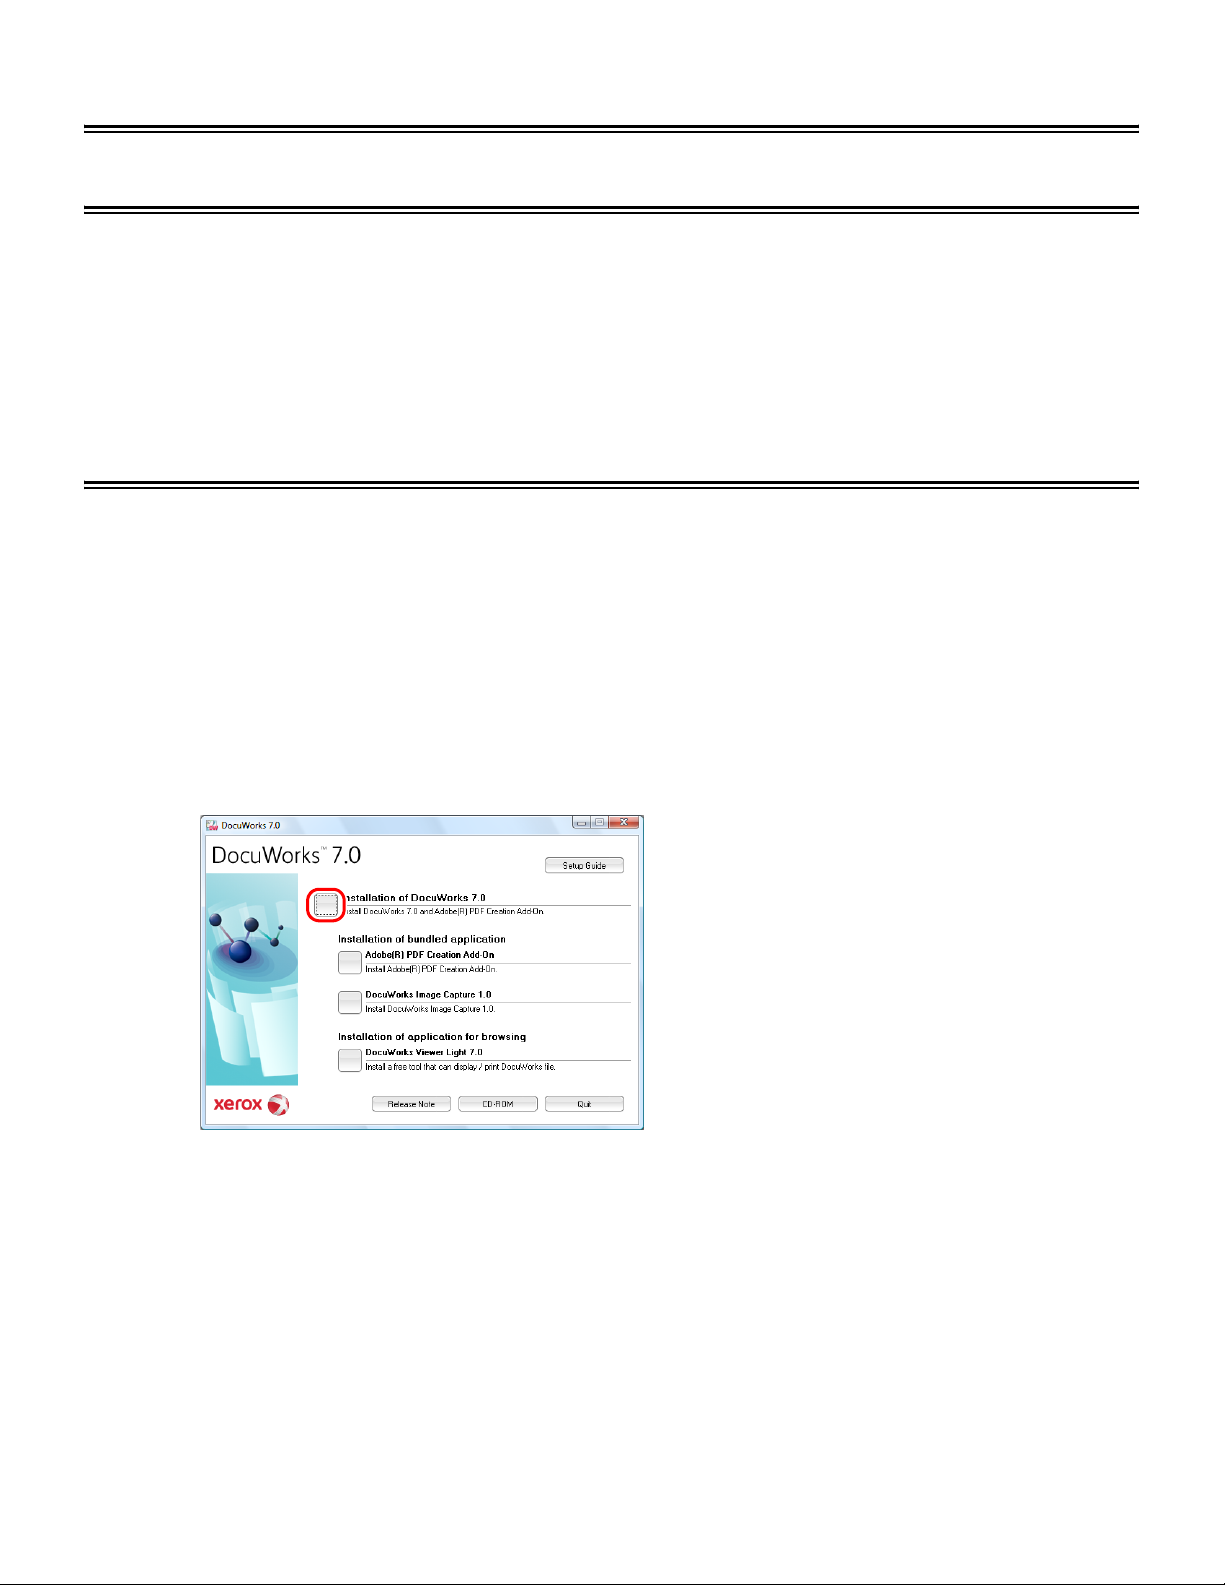
1 Close all the active applications and insert the DocuWorks 7 installation CD into the CD-
ROM drive.
The installation screen appears.
10
Note If the [AutoPlay] dialog box appears, click [Run Autorun.exe].
Note If nothing launches, execute the "Autorun.exe" file under the "autorun" folder in the CD-ROM.
2 Click the button on the left of [Installation of DocuWorks 7.x].
3 In the [User Account Control] dialog box, click [Continue].
2 Installing Software
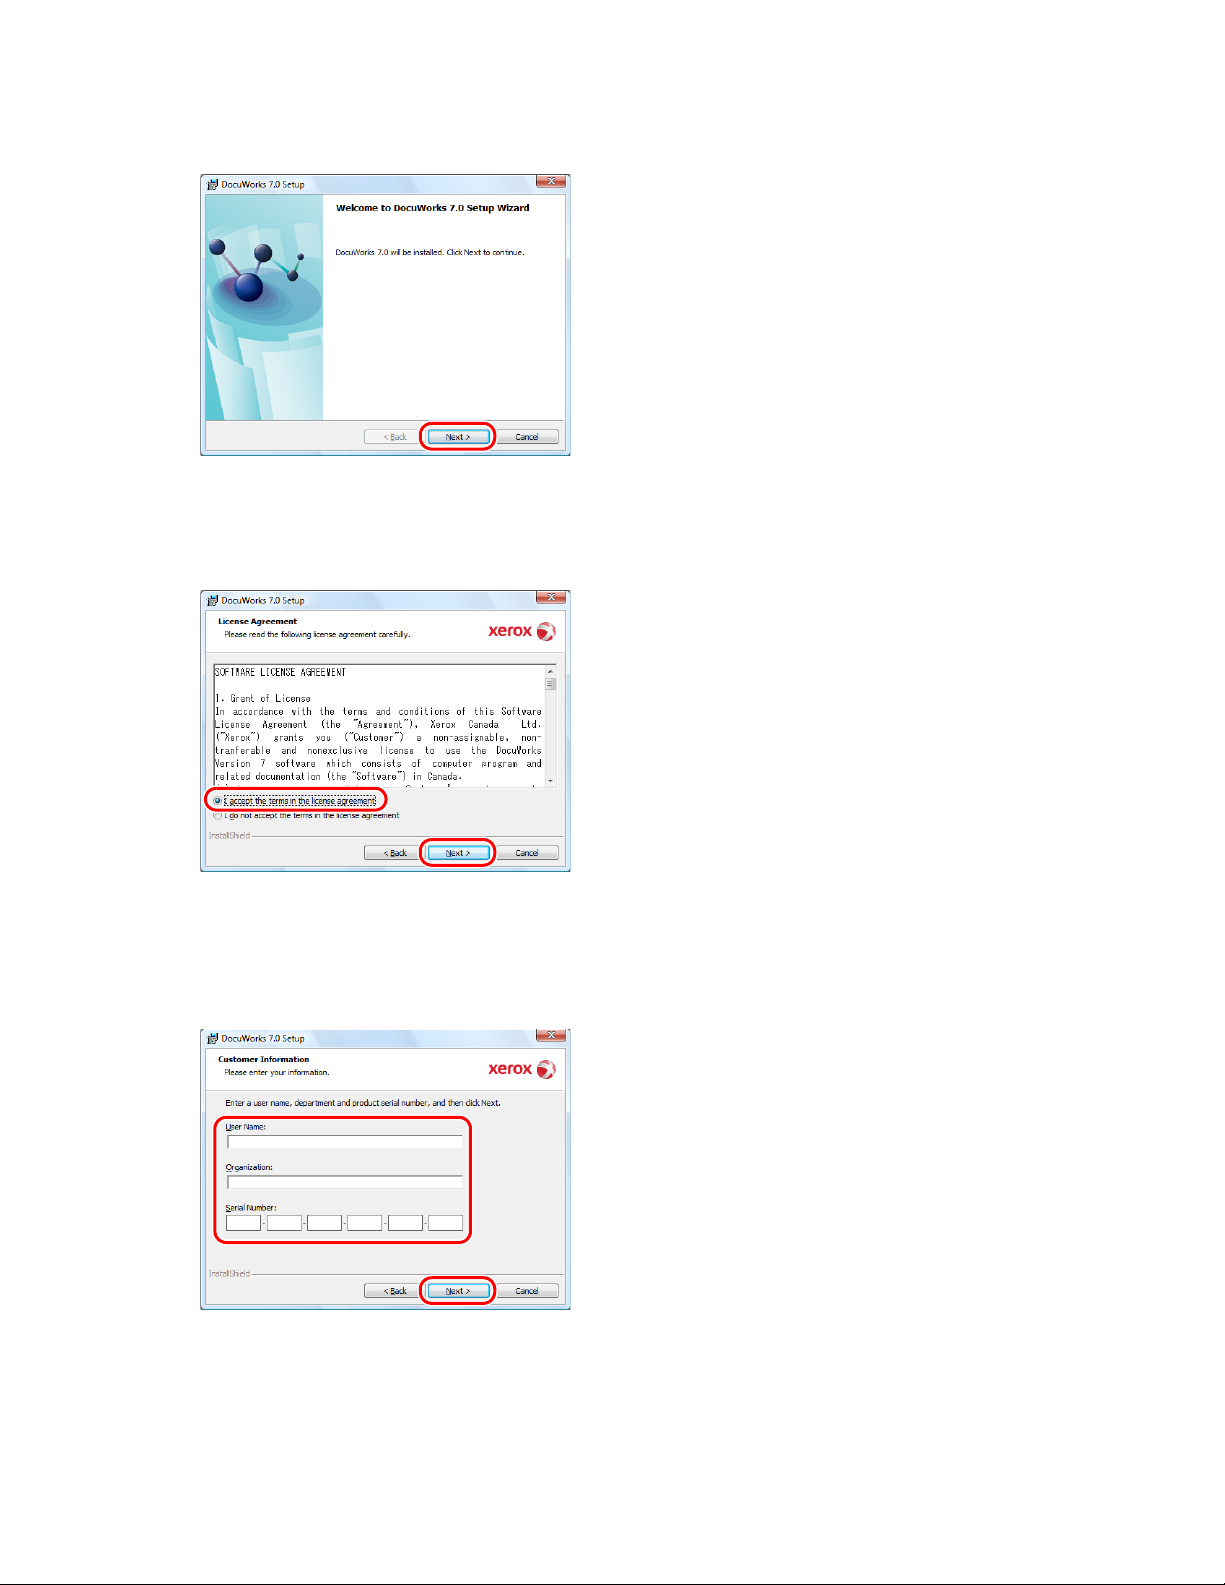
4 Click [Next].
5 Verify the information displayed in the DocuWorks licensing agreement. If you agree to
the licensing conditions, select [I accept the terms in the license agreement], and then
click [Next].
11
6 Enter [User Name], [Organization], and [Serial Number], and then click [Next].
When installing an upgrade package of DocuWorks 7 on environments which have no DocuWorks 5.0/6.x
installed, the window to enter a serial number for the product you upgrade appears. Enter a DocuWorks 5.0/
6.x serial number, and then click [Next].

2 Installing Software
7 Select the setup type, and click [Next].
The default is [Standard].
• [Standard]
Install items as the default settings. Proceed to Step 11.
• [Custom]
Install items changing the default settings. Proceed to Step 8.
8 Select the installation destination folder, and click [Next].
12
Important Do not install DocuWorks to the following locations. Otherwise the software may malfunction.
• Network folder
• Directly under the drive such as "C:\"
• Removal media such as CD-R/RW, MO, or memory card
Note In new installation, the default is "C:\Program Files\Xerox\DocuWorks".
When upgrading an earlier version, the default is the folder where an earlier version of DocuWorks has
been installed.

2 Installing Software
9 Select whether or not to use DocuWorks Viewer Control, and click [Next].
If you select [Use], you can edit the DocuWorks files displayed on a web browser such as by pasting
annotations or changing attributes, and save it.
10 Select whether or not to create the shortcut to Desk on the desktop, and click [Next].
13
11 Confirm the settings, and click [Install].

2 Installing Software
12 Click [Finish].
Important • The screen prompting you to restart the computer appears when there is a file that cannot be
When you use DocuWorks for the first time after the installation, you must configure Personal Settings for
each user.
14
overwritten. However, the installation can be completed if you restart the computer accordingly.
• Restart your computer when prompted and refer to the instructions under "Installing Adobe PDF
Creation Add-On" (P.15) to install Adobe PDF Creation Add-On.
Reference For information on how to configure Personal Settings, refer to "Executing the Configuring of
Personal Settings" (P.23).
13 If a message asking you to restart your computer does not appear, a message appears
asking you whether or not to install Adobe PDF Creation Add-On.
Click [Yes] to install Adobe PDF Creation Add-On and continue to step 14.
Clicking [No] cancels the installation and closes the installer.
Reference Adobe PDF Creation Add-On or Acrobat 6.0 or later is required to use the DocuWorks PDF
conversion function. For details, refer to "When Adobe Acrobat products are installed on your
system" (P.15) to determine if installing Adobe PDF Creation Add-On is necessary.
14 Follow the on-screen instructions to install first Adobe Reader and then Adobe PDF
creation Add-On.
After the installation of Adobe Reader has finished, restart your computer when prompted and follow the
instructions under "How to install Adobe PDF Creation Add-On" (P.15). Adobe PDF Creation Add-On is
installed.

2 Installing Software
2.2 Installing Adobe PDF Creation Add-On
Adobe PDF Creation Add-On or Adobe Acrobat 6.0 or later is required to use the DocuWorks PDF
conversion function.
Adobe PDF Creation Add-On is included on the DocuWorks 7 CD-ROM. This section explains how to install
Adobe PDF Creation Add-On from the DocuWorks 7 CD-ROM.
Note Adobe Reader is also installed when you install Adobe PDF Creation Add-On from the DocuWorks 7 CD-
ROM.
When Adobe Acrobat products are installed on your system
The following table shows whether you need to install Adobe PDF Creation Add-On to use the DocuWorks
PDF Conversion function, if Adobe Acrobat products are installed on your computer.
15
Currently installed Adobe
Acrobat products
Adobe Acrobat 5.0 or earlier Necessary You cannot use the DocuWorks PDF conversion function.
Adobe Acrobat 6.0 Professional
Adobe Acrobat 6.0 Standard
Adobe Acrobat Elements 6.0
Adobe Acrobat 7.0 Professional
Adobe Acrobat 7.0 Standard
Adobe Acrobat 7.0 Elements
Adobe Acrobat 8 Professional
Adobe Acrobat 8 Standard
Unnecessary You can use the DocuWorks PDF conversion function
Is Adobe PDF Creation Add-On necessary?
You must first uninstall Adobe Acrobat and then install
Adobe PDF Creation Add-On to use the DocuWorks PDF
conversion function.
without installing Adobe PDF Creation Add-On.
How to install Adobe PDF Creation Add-On
1 Close all the active applications and insert the DocuWorks 7 installation CD into the CD-
ROM drive.
The installation screen appears.
Note If the [AutoPlay] dialog box appears, click [Run Autorun.exe].
Note If nothing launches, execute the "Autorun.exe" file under the "autorun" folder in the CD-ROM.

2 Installing Software
2 Click the button on the left of [Adobe(R) PDF Creation Add-On].
3 In the [User Account Control] dialog box, click [Allow].
Adobe Reader is installed first, and then Adobe PDF Creation Add-On is installed.
Follow the on-screen instructions to install the software.
After the installation of Adobe Reader has finished, restart your computer when prompted and repeat the
procedure from step 1. Adobe PDF Creation Add-On is installed.
16
2.3 Installing DocuWorks Image Capture 1.0
DocuWorks Image Capture periodically monitors a specified folder, converts a detected image file (JPEG
and TIFF file) to a DocuWorks document, and outputs the converted file to DocuWorks Desk, the currentlyopen folder.
Important If DocuWorks is not already installed, install it before installing DocuWorks Image Capture 1.0.
1 Close all the running applications and insert the DocuWorks 7 CD-ROM into the drive.
The installation screen appears.
Note If the [AutoPlay] dialog box appears, click [Run Autorun.exe].
Note If nothing launches, execute the "Autorun.exe" file under the "autorun" folder in the CD-ROM.
2 Click the button on the left of [DocuWorks Image Capture 1.0].

2 Installing Software
3 In the [User Account Control] dialog box, click [Continue].
4 Click [Next].
5 Verify the information displayed in the DocuWorks Image Capture licensing agreement. If
you agree to the licensing conditions, select [I accept terms in the license agreement],
and then click [Next].
17
6 Select the installation destination folder, and click [Next].
Note To install DocuWorks Image Capture 1.0 in another folder, click [Browse] to specify the installation
destination.

2 Installing Software
7 If DocuWorks Image Capture is to be enabled automatically on start-up, please select
[Create DocuWorks Image Capture shortcut in startup menu], and then click [Next].
Note By checking this box, a shortcut to DocuWorks Image Capture will be placed in the start-up menu which
8 Confirm the settings, then click [Next].
18
will automatically start DocuWorks Image Capture once the operating system is launched.
9 Click [Finish].
Important The screen prompting you to restart the computer appears when there is a file that cannot be
overwritten. However, the installation can be completed if you restart the computer accordingly.

2 Installing Software
2.4 Installing DocuWorks Viewer Light 7
DocuWorks Viewer Light is free software to view DocuWorks files. This application enables you to view the
DocuWorks files even in an environment that does not have DocuWorks installed.
Note You do not have to install DocuWorks Viewer Light on a PC which has DocuWorks installed.
You can view and print DocuWorks files, search and copy a character string, jump by using the link
annotation, extract original data, and view DocuWorks files on a web browser. However, you cannot edit
DocuWorks files.
Important If DocuWorks Viewer Light for Web 5.x has been installed, do not uninstall it. Just overwrite it with
DocuWorks Viewer Light 7.
Note DocuWorks Viewer Light for Web is software provided with the earlier versions of DocuWorks. In this
version, the functions of DocuWorks Viewer Light for Web have been integrated into those of DocuWorks
Viewer Light.
1 Close all the active applications and insert the DocuWorks 7 installation CD into the CD-
ROM drive.
The installation screen appears.
Note If the [AutoPlay] dialog box appears, click [Run Autorun.exe].
19
Note If nothing launches, execute the "Autorun.exe" file under the "autorun" folder in the CD-ROM.
2 Click the button on the left of [DocuWorks Viewer Light 7.x].
3 In the [User Account Control] dialog box, click [Continue].

2 Installing Software
4 Click [Next].
5 Verify information displayed in the DocuWorks Viewer Light licensing agreement. If you
agree to the licensing conditions, select [I accept the terms in the license agreement],
and click [Next].
20
6 Select the setup type, and click [Next].
The default is [Standard].
• [Standard]
Install items as the default settings. Proceed to Step 9.
• [Custom]
Install items changing the default settings. Proceed to Step 7.

2 Installing Software
7 Select the installation destination folder, and click [Next].
Note It is recommended to set the same folder as that of the installation destination of DocuWorks 7.
8 Select whether or not to use DocuWorks Viewer Light Control, and click [Next].
If you select [Use], DocuWorks files can be displayed on a web browser.
21
Note If you have installed DocuWorks Viewer Control, even if you select [Use] for DocuWorks Viewer Light
Control, DocuWorks files are opened by DocuWorks Viewer Control on a web browser.
9 Confirm the settings, and click [Install].

2 Installing Software
10 Click [Finish].
Important The screen prompting you to restart your computer appears when there is a file that cannot be
22
overwritten. However, the installation can be completed if you restart the computer accordingly.

3 Executing the Configuring of Personal Settings
3 Executing the Configuring of
Personal Settings
When using DocuWorks for the first time, you need to individually specify the location of the Desk folder, and
location of the folder for temporary files to be used for each Windows user account. You can use DocuWorks
only after Personal Settings are complete. The contents of the Personal Settings can be changed later.
This chapter describes how to configure Personal Settings and to change the settings later.
3.1 Executing the Configuring of Personal Settings
The instructions for configuring personal settings are separated between the new installation and upgrading
an earlier version.
Newly Installing DocuWorks
23
When you run DocuWorks for the first time after installation, the DocuWorks Personal Settings Tool starts
automatically, and the screen shown in step 2 appears.
1 From the Windows [Start] menu, select [All Programs] > [Xerox] > [DocuWorks] >
[DocuWorks Personal Settings Tool].
The [DocuWorks Personal Settings] dialog box appears.
2 Click [Next].

3 Executing the Configuring of Personal Settings
3 Select either [Standard settings] or [Customize settings], and click [Next].
The default is [Standard settings].
• [Standard settings]
Configure Personal Settings in the default values. Proceed to Step 10.
• [Customize settings]
Configure Personal Settings changing the default values. Proceed to Step 4.
4 Select a location to create a Desk folder, and click [Next].
24
This is the folder where the user folders to be used on Desk will be created. Sufficient free space is required
since the user data will be stored here.
The default is "<Personal folder>\Xerox\DocuWorks\DWFolders".
Note The location of the <Personal folder> is as follows:
• For Windows Vista C:\Users\User name\Documents
• For Windows 2000/XP C:\Documents and Settings\User name\My Documents
Note If you specify Personal Settings for the first time after upgrading an earlier version, a Desk folder is, by
default, in the location where the Desk folder of the earlier version was stored.
5 Click [Yes] on the [Personal Settings] dialog box that appears when you configure
Personal Settings for the first time and specify the location as the default value in the
previous step.

3 Executing the Configuring of Personal Settings
6 Select a location to create a temporary file folder, and click [Next].
This is the folder that DocuWorks program uses temporarily during operation.
The default is "<Application Data folder>\Xerox\DocuWorks\DWTemp".
Important Do not install DocuWorks to the following locations. Otherwise the software may malfunction.
• Directly under the drive such as "C:\"
• Removal media such as CD-R/RW, MO, or memory card
• If you specify a network folder, it cannot be shared between two or more users.
Note The location of the <Application Data folder> is as follows:
• For Windows Vista C:\Users\User name\AppData\Roaming
• For Windows 2000/XP C:\Documents and Settings\User name\Application Data
25
7 Click [Yes] on the [Personal Settings] dialog box that appears when you configure
Personal Settings for the first time and specify the location as the default value in the
previous step.
8 Select the Office application in which the DocuWorks Creator for Microsoft Office is
enabled, and then click [Next].
If you enable the DocuWorks Creator for Microsoft Office, the [Convert to DocuWorks] button will be created
on the toolbar of the selected Microsoft Office application.
By default, all of them are checked.

3 Executing the Configuring of Personal Settings
9 Select the shortcut to be created, and click [Next].
If selecting [[Send To] menu], DocuWorks Printer will be added on the [Send To] menu displayed when rightclicking on Windows Explorer.
If selecting [Quick Launch toolbar], [Starting DocuWorks Desk] will be added on the Quick Launch items
displayed on Windows Taskbar.
By default, all of them are checked.
10 Confirm the settings, and click [Next].
26
11 Click [Finish].

3 Executing the Configuring of Personal Settings
Upgrading DocuWorks
This section explains how to configure Personal Settings when upgrading an earlier version.
1 Follow the procedures to step 3 under "Newly Installing DocuWorks" on page 23.
2 If you selected [Standard settings] in step 3 under "Newly Installing DocuWorks" on
page 24, perform steps 10 and 11 on page 26.
Personal Settings are configured.
If you selected [Customize settings] in step 3 under "Newly Installing DocuWorks" on page 24, follow the
steps 4 through 7 on page 24 before following steps 3 through 5 on page 27.
3 Keep the check mark to [Continue to use] if you continue to use the same settings for
plug-in that you customized prior to upgrading.
Remove the check mark if you wish to replace them with the standard settings of this
version.
Click [Next].
27
4 Keep the check mark to [Continue to use] if you continue to use the same settings for
annotation tool, Template tool, or Drawing tool that you customized prior to upgrading.
Remove the check mark if you wish to replace them with the standard settings of this
version.
Click [Next].
5 Follow the procedures after step 8 under "Newly Installing DocuWorks" on page 25.
Personal Settings are configured.
3 Executing the Configuring of Personal Settings
3.2 Changing the Personal Settings
If you want to change the Desk folder destination to another folder in case of insufficient free hard disk space
or the like when using DocuWorks, use the DocuWorks Personal Settings Tool.
DocuWorks Personal Settings Tool allows you to change the settings of Desk folder destination, temporary
file folder destination, and DocuWorks Creator for Microsoft Office.
1 From the Windows [Start] menu, select [All Programs] > [Xerox] > [DocuWorks] >
[DocuWorks Personal Settings Tool].
The [DocuWorks Personal Settings] dialog box appears.
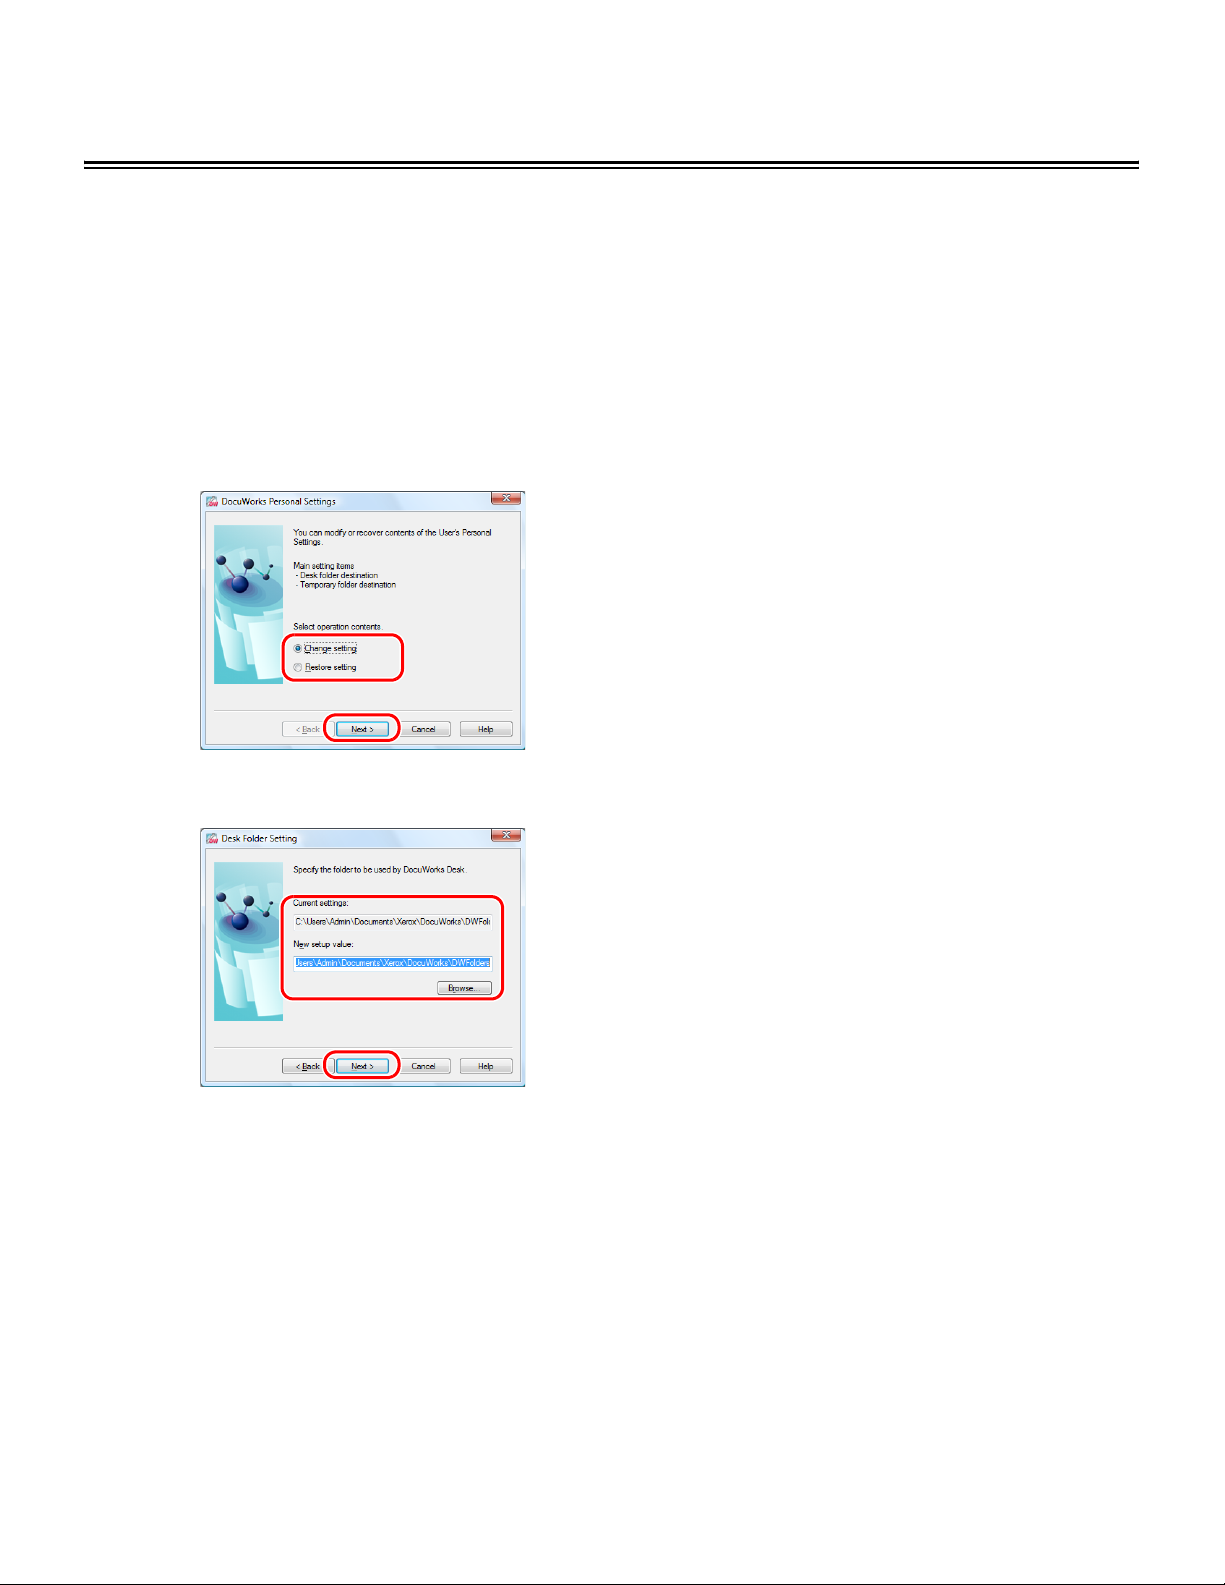
2 Select [Change setting], and click [Next].
28
3 Specify the Desk folder in [New setup value], and click [Next].
Note If the location of the Desk folder is changed, the settings of link folder, annotation tool file, Electronic
Signature Case data file will be inherited to the new Desk folder.

3 Executing the Configuring of Personal Settings
4 Specify the folder where the temporary files will be generated in [New setup value], and
click [Next].
5 Select the Office application in which the DocuWorks Creator for Microsoft Office is
enabled, and click [Next].
29
6 Select the shortcut to be created, and click [Next].

3 Executing the Configuring of Personal Settings
7 Confirm the settings, and click [Next].
8 Click [Finish].
30

4 Uninstalling Software
4 Uninstalling Software
This chapter describes how to uninstall software in the DocuWorks 7 CD-ROM. When you uninstall
DocuWorks, the Personal Settings will not be deleted automatically and so should be deleted individually
after the uninstallation.
Reference For details, refer to Help [Customize DocuWorks] > [Customize Personal Settings] > [Setup Personal
Settings].
4.1 Uninstalling DocuWorks 7
1 From the Windows [Start] menu, select [Control Panel] > [Uninstall a program].
2 Select [Xerox DocuWorks 7.x] from the list of program names, and then click [Uninstall].
Note If the [Programs and Features] dialog box appears, click [Yes].
31
3 In the [User Account Control] dialog box, click [Allow].
DocuWorks 7 is uninstalled.
Important When the screen prompting you to restart your computer appears, restart your computer. The screen
prompting you to restart the computer appears when there is a file that cannot be deleted during
uninstallation. However, the uninstallation can be completed if you restart the computer accordingly.
4.2 Uninstalling Adobe PDF Creation Add-On
1 From the Windows [Start] menu, select [Control Panel] > [Uninstall a program].
2 Select [Adobe® PDF Creation Add-On] from the list of programs and click [Uninstall/
Change].
3 In the [User Account Control] dialog box, click [Continue].
4 On the [Adobe® PDF Creation Add-On Application Maintenance] screen, click [Next].
5 On the [Program Maintenance] screen, select [Remove] and click [Next].
6 On the [Remove the Program] screen, click [Remove].
Adobe PDF Creation Add-On is uninstalled.
7 On the [Setup Completed.] screen, click [Finish].

4 Uninstalling Software
8 Click [Yes] on the message prompting you to restart your computer.
Note Uninstall Adobe PDF Creation Add-On and Adobe Reader in any order.
4.3 Uninstalling Adobe Reader
1 From the Windows [Start] menu, select [Control Panel] > [Uninstall a program].
2 Select Adobe Reader from the list of program names, and then click [Uninstall].
Note If the [Programs and Features] dialog box appears, click [Yes].
3 In the [User Account Control] dialog box, click [Allow].
Adobe Reader is uninstalled.
4.4 Uninstalling DocuWorks Image Capture 1.0
32
1
From the Windows [Start] menu, select [Control Panel] > [
Uninstall a program].
2 Select [Xerox DocuWorks Image Capture 1.0.x] from the list of program names, and then
click [Uninstall].
3 In the [User Account Control] dialog box, click [Continue].
4 In the [Confirm Uninstall] dialog box, click [OK].
DocuWorks Image Capture 1.0 is uninstalled.
5 In the [Uninstall completed] dialog box, click [Finish].
Important When the screen prompting you to restart your computer appears, restart your computer. The screen
prompting you to restart your computer appears if a file could not be deleted during uninstallation.
However, the uninstallation can be completed if you restart the computer accordingly.
4.5 Uninstalling DocuWorks Viewer Light 7
1 From the Windows [Start] menu, select [Control Panel] > [Uninstall a program].
2 Select [Xerox DocuWorks Viewer Light 7.x] from the list of program names, and then click
[Uninstall].
Note If the [Programs and Features] dialog box appears, click [Yes].

4 Uninstalling Software
3 In the [User Account Control] dialog box, click [Allow].
DocuWorks Viewer Light 7 is uninstalled.
Important When the screen prompting you to restart your computer appears, restart your computer. The screen
33
prompting you to restart the computer appears when there is a file that cannot be deleted during
uninstallation. However, the uninstallation can be completed if you restart the computer accordingly.

34
DocuWorks 7 Setup Guide
No. XE3030EN0-1 (Edition 1)
December 2008
Fuji Xerox Co., Ltd. Copyright© 2008 by Fuji Xerox Co., Ltd.
 Loading...