


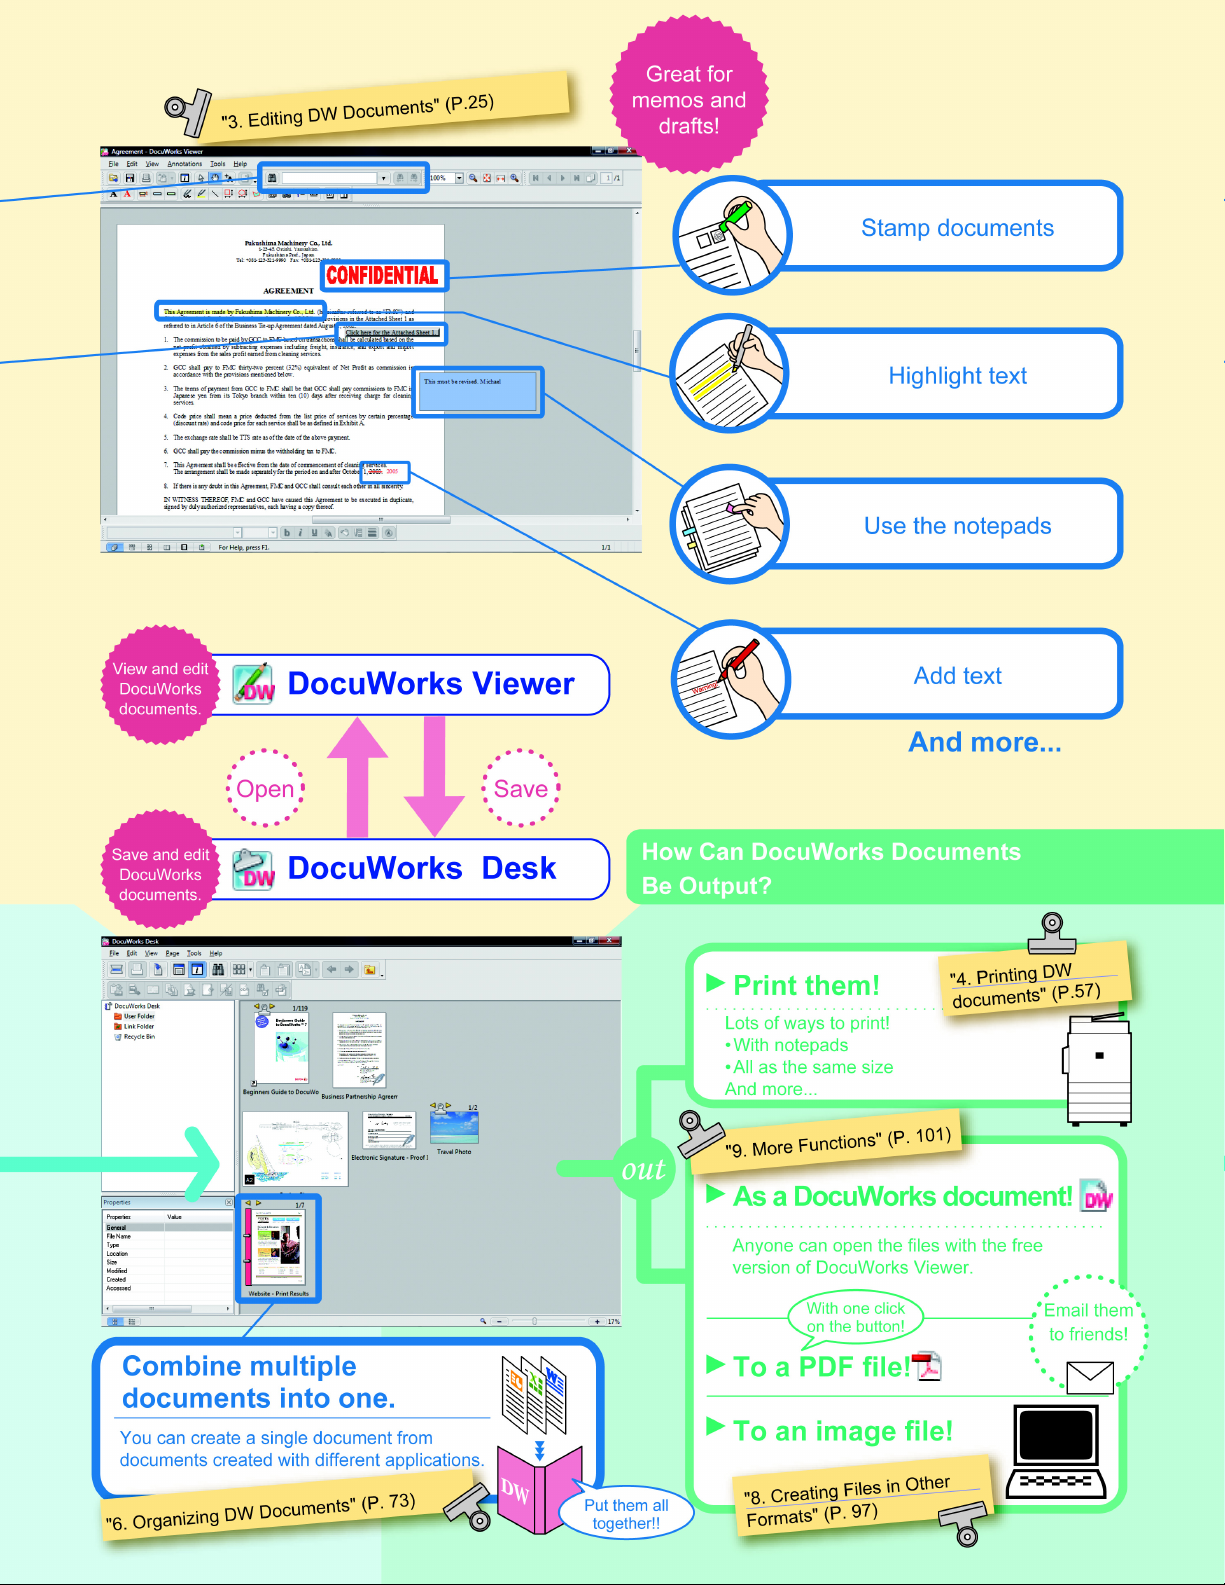
What Can
DocuWorks Do?
I
II

Table of Contents
● What Can DocuWorks Do? ....................................................................................... I
● Introduction ...............................................................................................................V
1 Creating DW Documents
1.1 Desk: Creating DW Documents........................................................................... 2
1.2 DocuWorks Printer: Creating DW Documents................................................... 6
1.3 Creating DW Documents from Office Applications........................................... 8
1.4 Desk/Viewer: Processing DW Documents.......................................................... 9
2 DocuWorks: How to see DocuWorks
2.1 Differences between Desk and Viewer ............................................................. 12
2.2 Desk: How to see Desk ...................................................................................... 14
2.3 Viewer: How to see Viewer ................................................................................ 18
3 Editing DW Documents
3.1 Viewer: Adding to DW Documents (Annotating) ............................................. 26
3.2 Viewer: Moving and Deleting Pages ................................................................. 40
3.3 Viewer: Inserting Titles and Page Numbers..................................................... 44
3.4 Viewer: Creating a Table of Contents ............................................................... 46
3.5 Desk/Viewer: Converting Images of Text to Text Data .................................... 51
4 Printing DW Documents
4.1 Desk/Viewer: Printing......................................................................................... 58
4.2 Desk: Printing with the Same Settings ............................................................. 60
4.3 Desk: Printing Several Pages on One Page ..................................................... 63
5 Searching DW Documents
5.1 Viewer: Searching for Text................................................................................. 66
5.2 Desk: Marking the Search Result...................................................................... 69
5.3 Desk: Searching for Multiple DW Documents.................................................. 71
6 Organizing DW Documents
6.1 Desk: Stacking/Unstacking Multiple DW Documents...................................... 74
6.2 Desk: Creating Binders and Organizing........................................................... 78
6.3 Desk: Linking to Folders Other Than the User Folder .................................... 85

6.4 Desk: Creating a Folder and Organizing .......................................................... 87
7 Protecting DW Documents
7.1 Types of Security and Function Prohibition .................................................... 90
7.2 Desk/Viewer: Setting Passwords ...................................................................... 92
8 Creating Files in Other Formats
8.1 Desk: Creating a PDF file from a DW document on Desk............................... 98
8.2 Desk/Viewer: Creating an Image File from a DW Document ........................ 100
9 More Functions
9.1 All About Plug-ins............................................................................................. 102
9.2 Sending DW Documents to Someone Who Does Not Have DocuWorks .... 104
9.3 Desk: Creating DW Documents with Information Hidden............................. 105
● Index....................................................................................................................... 108
Introduction
Thank you for purchasing DocuWorks.
About this Book
This book is for first time users of DocuWorks. It provides an outline and an explanation of the
basic functions of DocuWorks.
Explanations in this book are based on the assumption that you understand the basic
operations of Microsoft® Windows 2000, Microsoft Windows XP, and Microsoft Windows
Vista® (hereafter referred to as Windows 2000, Windows XP, and Windows Vista).
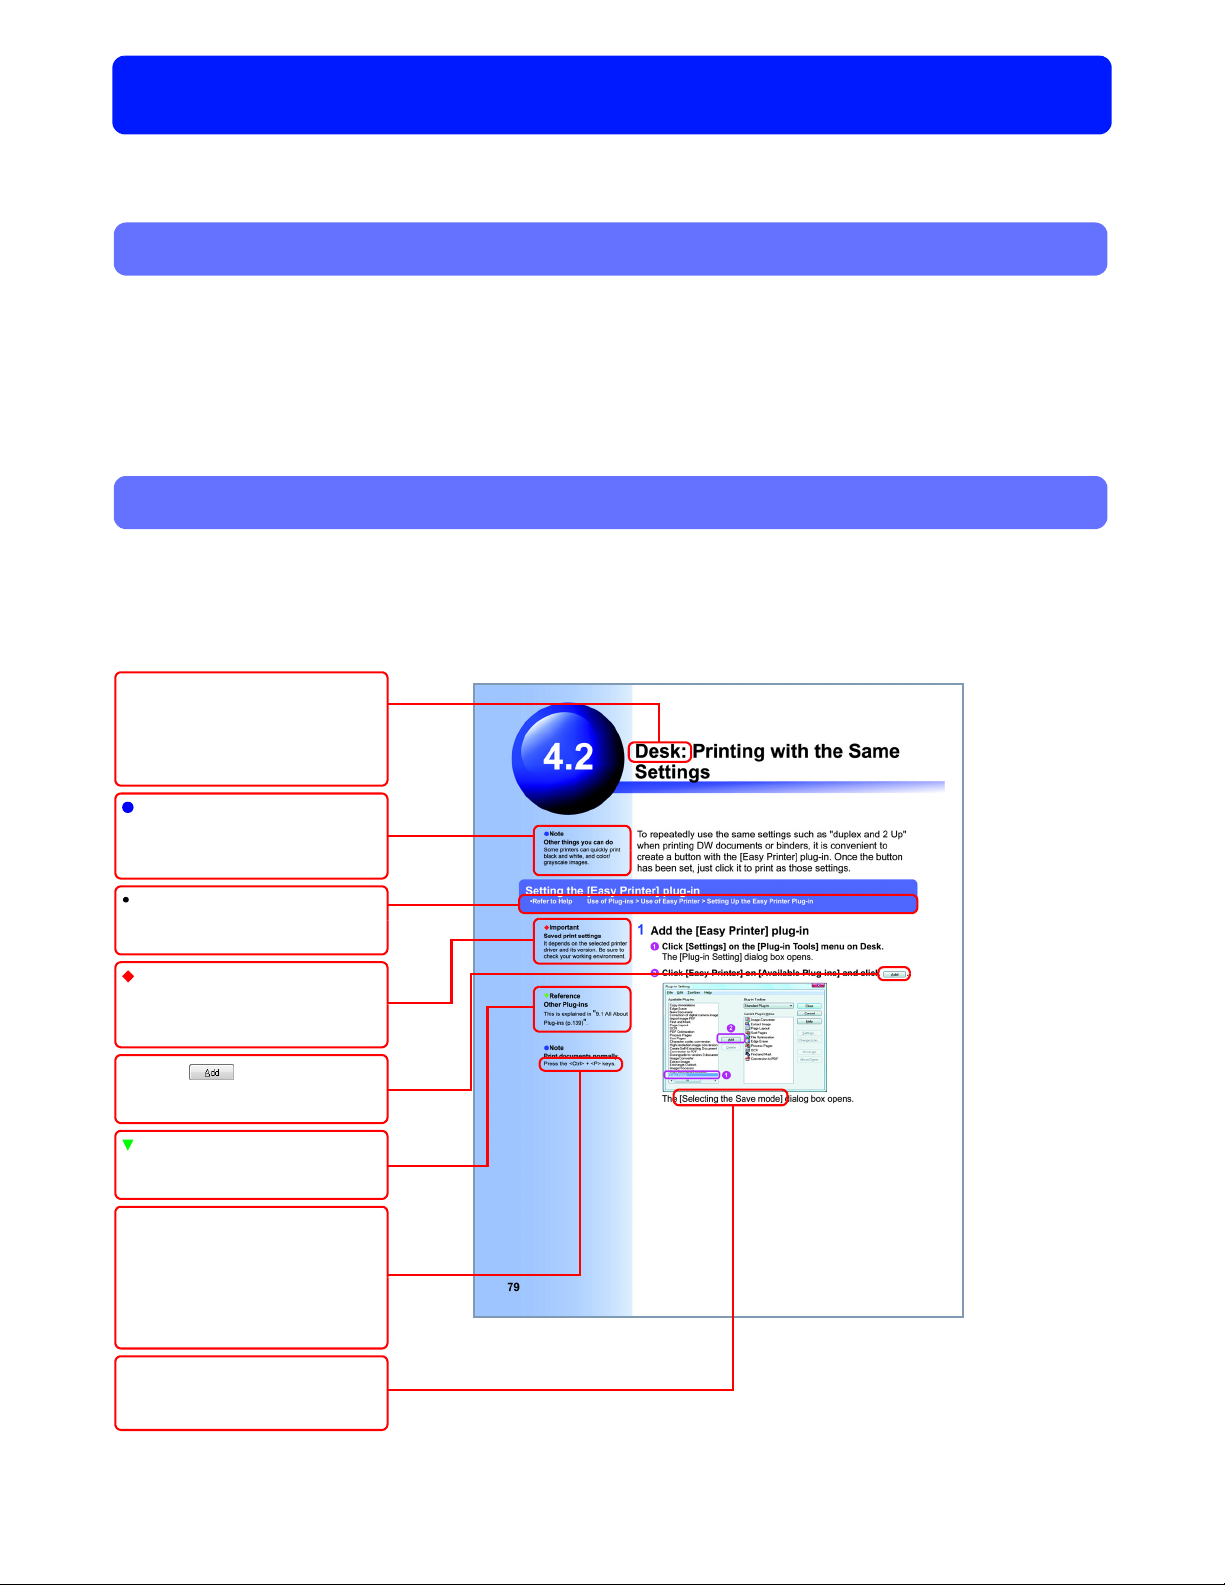
How to Read this Book
This book uses screenshots and operations from Windows Vista as examples for
explanations. Explanations should be revised accordingly for operations on operating
systems other than Windows Vista.
This book explains operations mainly using sample DW documents in Desk.
Sections with titles beginning with
"Desk:" explains operations on Desk,
and those with "Viewer:" explains
operations on Viewer.
Note
Supplementary information about
operations.
Refer to Help
References to DocuWorks Help.
Important
Precautions about operations. Please
be sure to read these.
Icons like : Buttons in dialog
boxes.
Reference
References to other parts of this book.
Text in <angle brackets>: Names of
keys on the keyboard. For example,
"press the <Ctrl> + <P> keys" means
pressing the <P> key while holding
down the <Ctrl> key.
Text in [brackets]: Text that appears on
screen, such as the names of items or
dialog boxes.
V
Introduction
When Printing This Book
Select the [Fit to the print area if the document size may be larger than the paper size] check
box, which is explained in page 59, and print again when the edges are not printed.
Use both sides printing without N up to print "What Can DocuWorks Do? (I)" as a doublepage spread.
About Setup Guide, Help, and Release Note
Besides this book, the following manuals are provided in digital format for DocuWorks.
They can be used according to your needs.
All of these manuals are written on the premise that the reader has a basic understanding
Windows operations.
● Setup Guide
Explains how to install DocuWorks, configure Personal Settings, and uninstall DocuWorks.
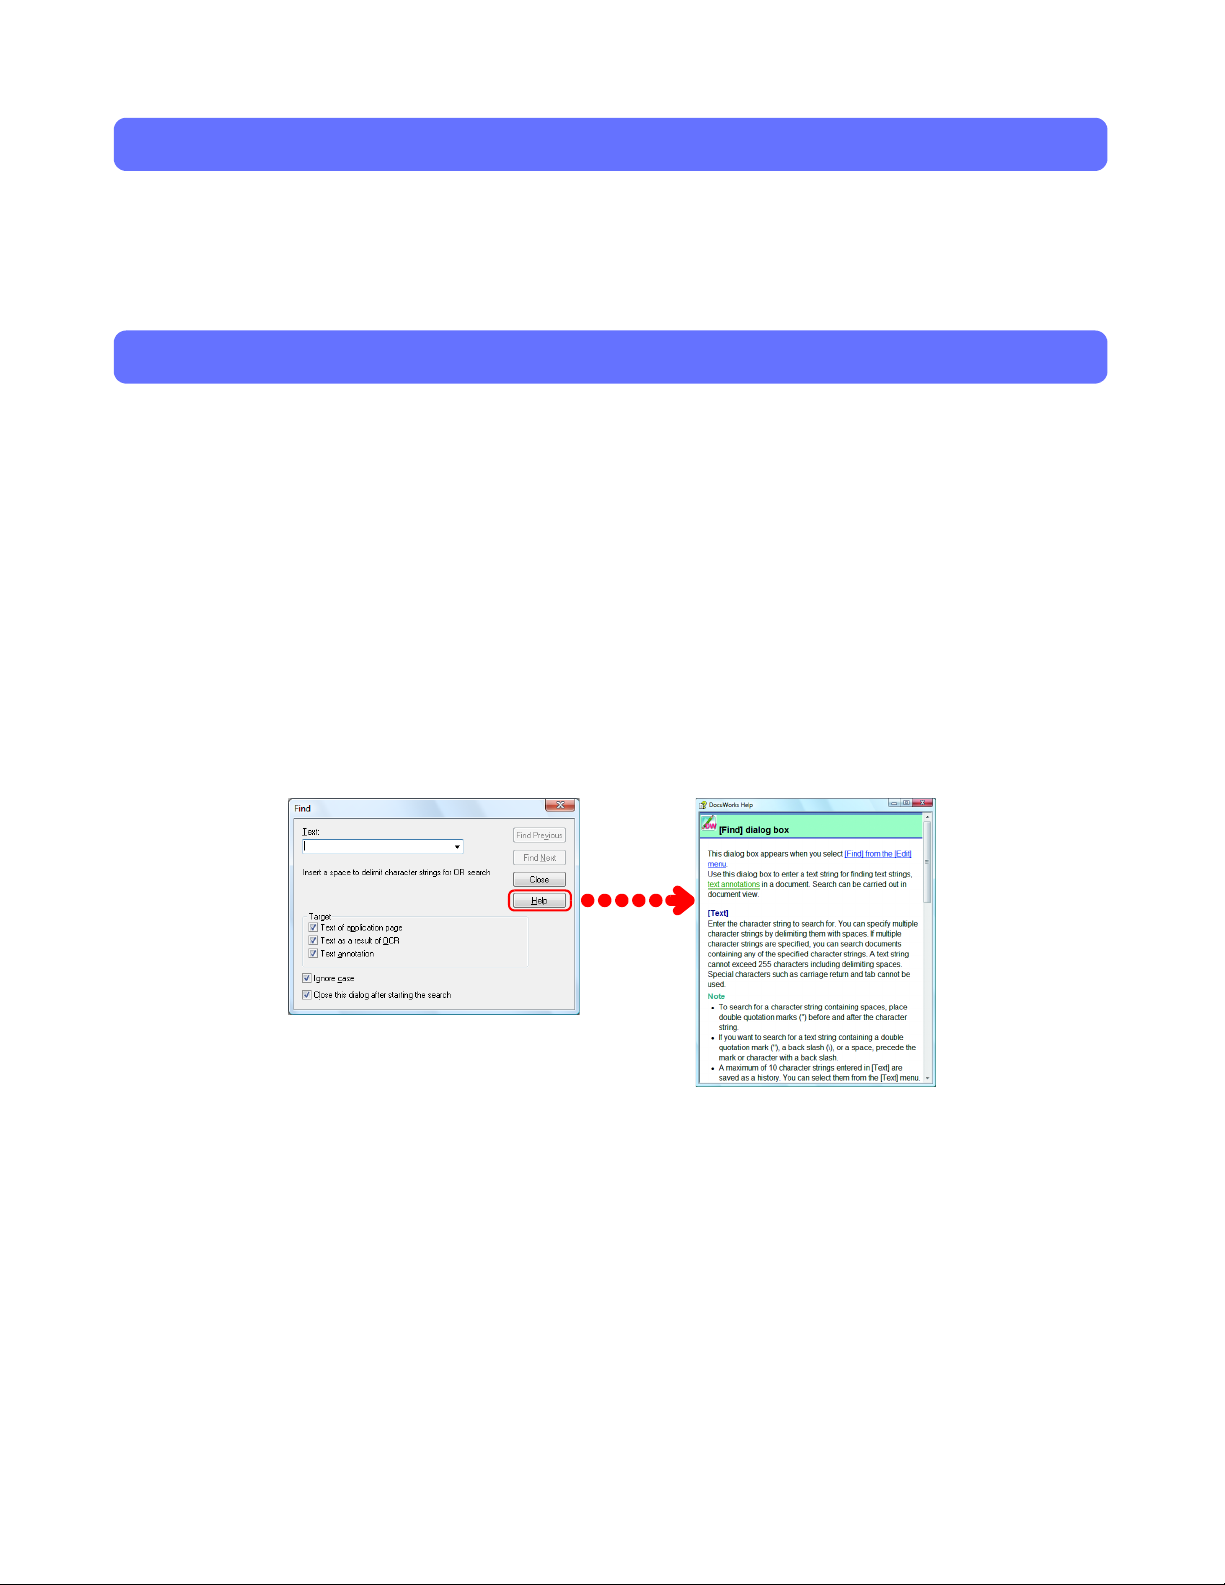
● Help
Explains operating procedures for all functions of DocuWorks. Use it in the following
situations.
• To learn about settings in dialog boxes that appear while operating DocuWorks
Click the [Help] button in the dialog box for an explanation of that dialog box.
VI
Introduction
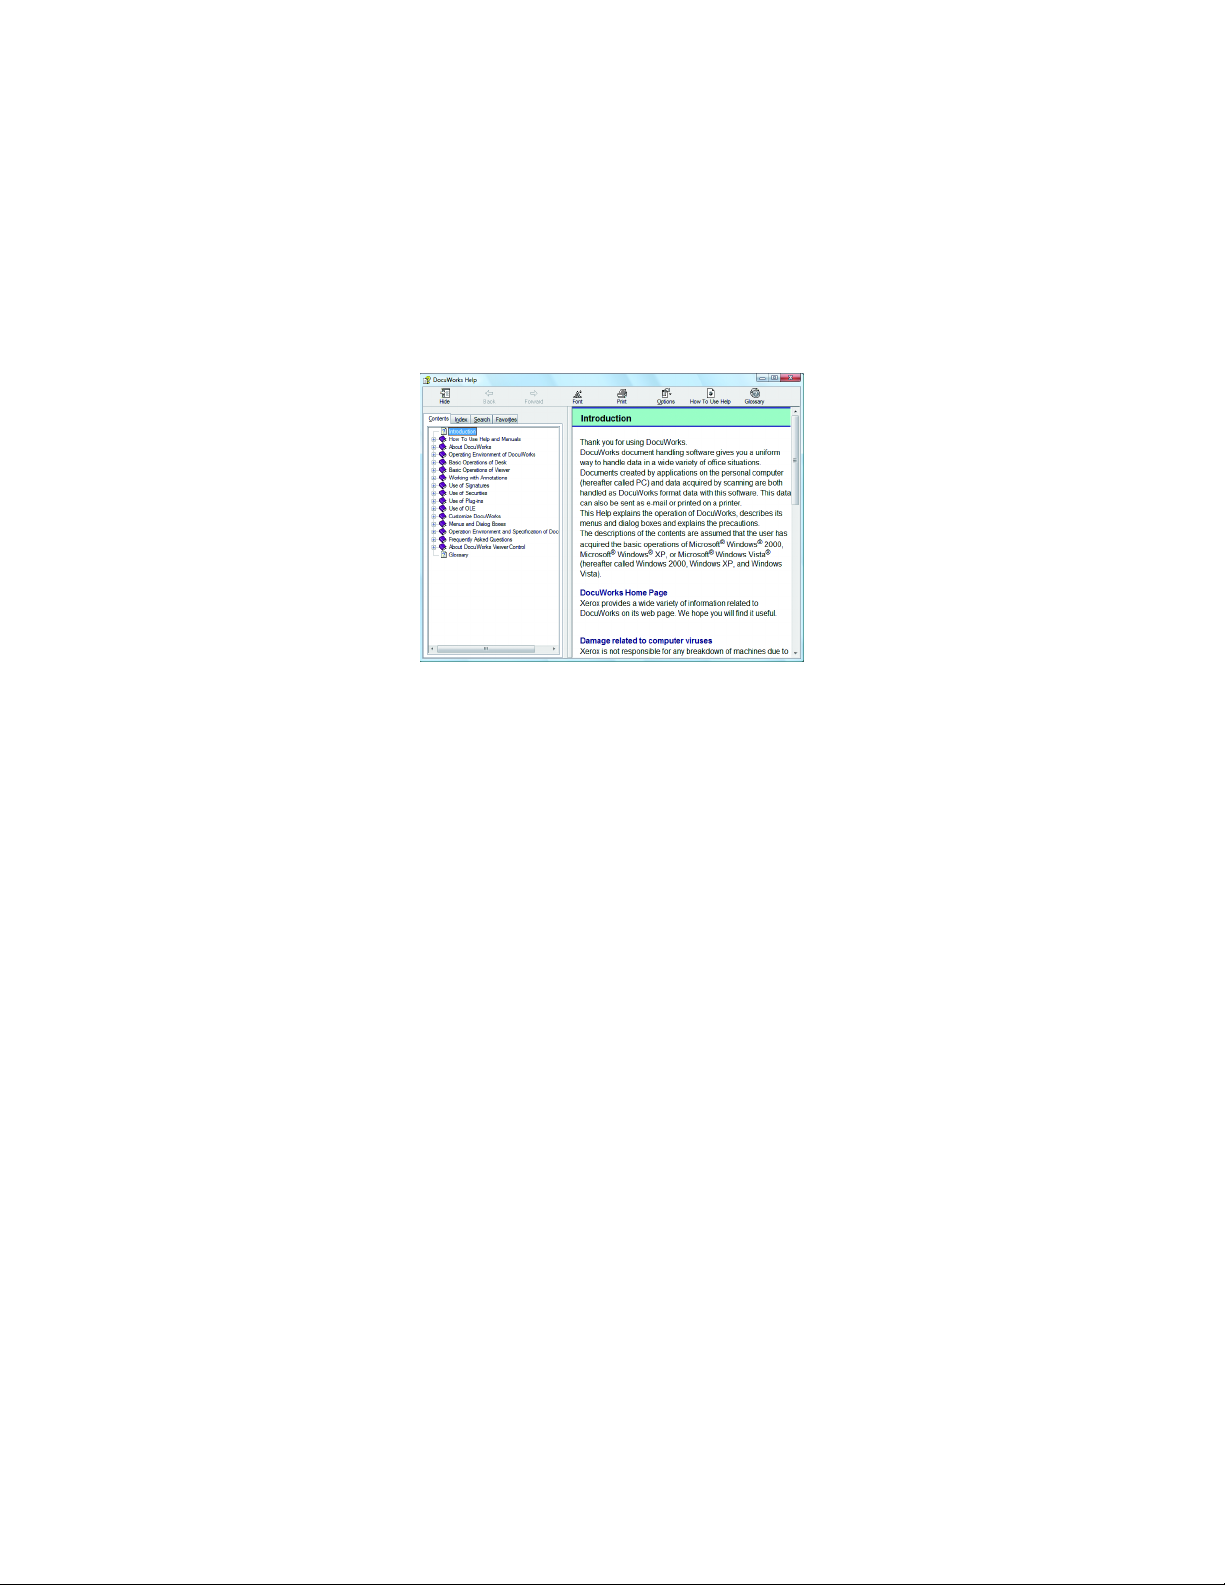
• To learn about DocuWorks overall
To learn details about various operations and functions
To learn vocabulary and frequently asked questions
Use one of the following methods to open DocuWorks Help and then the topic you want to
know.
• Click [DocuWorks Help] on the [Help] menu in the Desk or Viewer window.
• Click [Start] on the Windows Taskbar and then select [All Programs] > [Xerox] >
[DocuWorks] > [DocuWorks Help].
● Release Note
Explains about the precautions, limitations, and the operating environment for DocuWorks.
Click [Start] on the Windows Taskbar and then select [All Programs] > [Xerox] >
[DocuWorks] > [Readme] > [Readme] to view it in a web browser.
VII

Creating DW Documents
Creating DW Documents
Let's create a DW document from paper documents and data from applications that you
have on hand.
To create DW documents from applications, you have two ways explained in "1.1 Desk:
Creating DW Documents (p.2)" and "1.2 DocuWorks Printer: Creating DW Documents
(p.6)".
For Office applications, you can also follow the way explained in "1.3 Creating DW
Documents from Office Applications (p.8)".
Desk: Creating DW Documents
1.1
First, let's create a DW document from data from Windows
applications.
Creating a DW Document from an Application File
•Refer to Help Basic Operations of Desk > Creating DocuWorks Documents > Creating Documents from Application Data >
Creating Documents by Dragging-and-dropping to the Workspace
1.1
Note
Other Ways
Double-click the icon on the desktop.
icon can be created if [Create] was
selected in the [Shortcut to DocuWorks
Desk] wizard during installation.
Reference
If DW documents cannot be created
by dragging and dropping files
Use the procedure described in "1.2
DocuWorks Printer: Creating DW
Documents (p.6)" to create a DW document.
Note
Procedure to create a DW document
from a whole folder
Drag and drop a folder to the Desk
Workspace. A DW document is created from
the files in the folder when specifying
[Specify target file to import within folder] and
clicking .
1 Start Desk
Click [Start] and select [All Programs] > [Xerox] >
[DocuWorks] > [DocuWorks Desk].
Desk starts up.
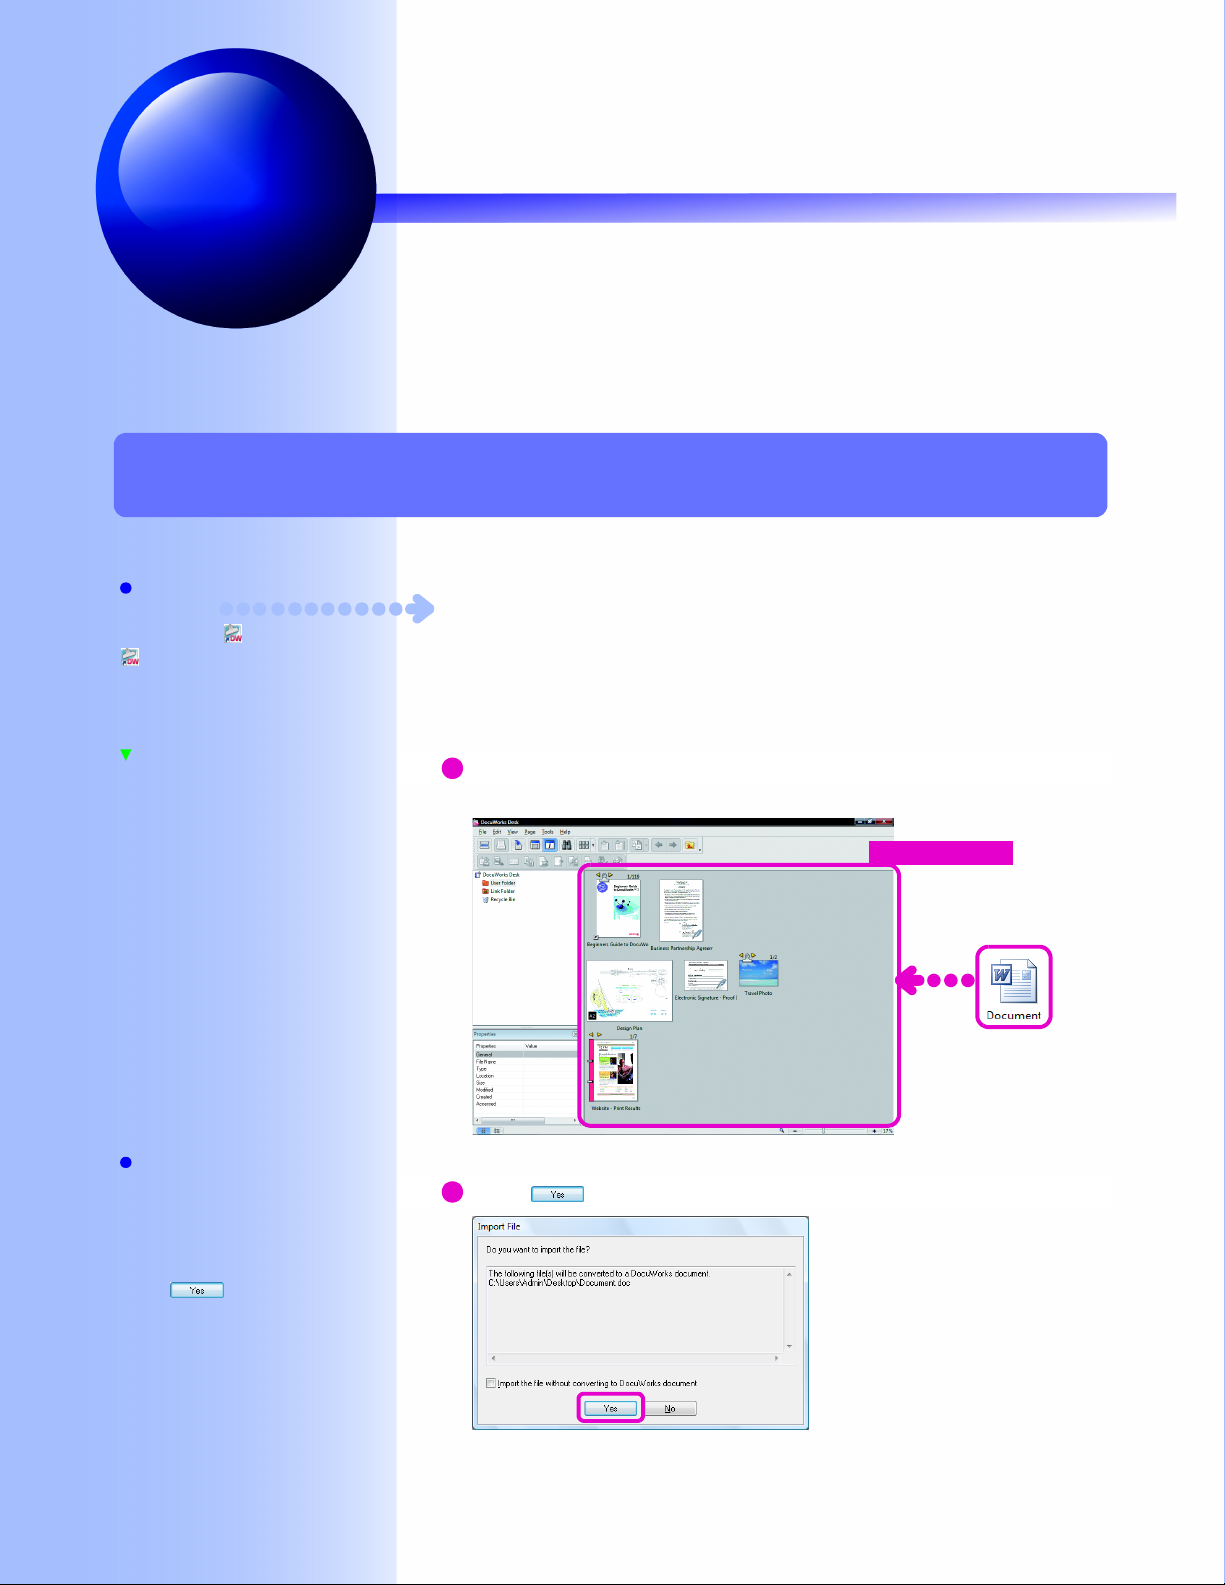
2 Create a DW document
1
Drag and drop one or more data files to the Desk
Workspace.
Workspace
The [Import File] dialog box opens.
2
Click .
The [Convert application file] dialog box opens.
2
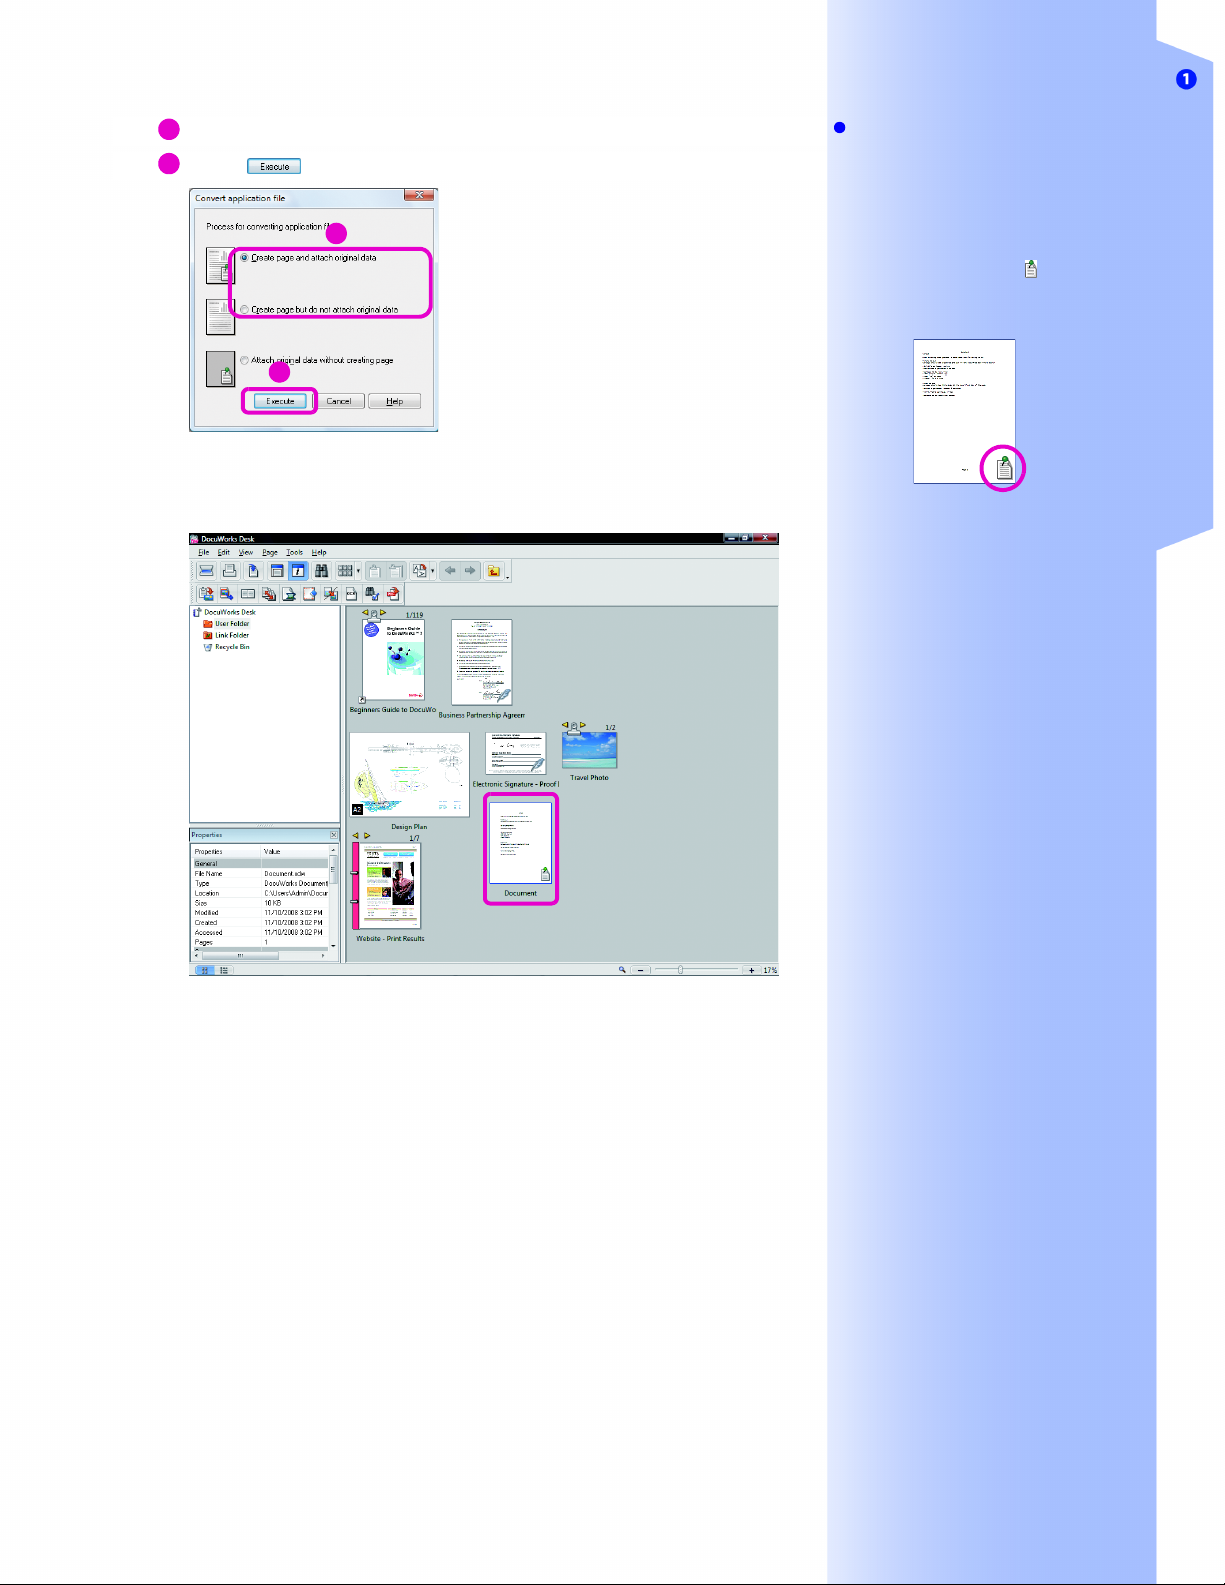
3
Select whether to attach the original data.
4
Click .
3
4
A DW document is created on Desk.
The new DW document is given the same name as the original
file.
1.1 Desk: Creating DW Documents
Note
What is original data?
The original data is a copy of the data from
which the DW document was made.
Selecting [Create page and attach original
data] makes it possible to edit the original
data later. It is also possible to create a new
DW document after editing it.
If the original data is attached, is shown
on the thumbnail (which displays the
reduced image).
The extension of DW documents
".xdw"
Creating DW Documents
3
1.1 Desk: Creating DW Documents
Creating a DW Document from an Image File
•Refer to Help Basic Operations of Desk > Creating DocuWorks Documents > Creating Documents from Image Files >
Creating Documents by Dragging-and-dropping to the Workspace
Note
TIFF compatible compression formats
• TIFF-FX
• TIFF Revision 6.0 (uncompressed)
• G3 1d/G3 2d/G4/JPEG/Packbits
Other Ways
Double-click the icon on the desktop.
icon can be created if [Create] was
selected in the [Shortcut to DocuWorks
Desk] wizard during installation.
The following image file formats can be made into DW
documents.
•BMP files
• JPEG files
•TIFF files
1 Start Desk
Click [Start] and select [All Programs] > [Xerox] >
[DocuWorks] > [DocuWorks Desk].
Desk starts up.
2 Create a DW document
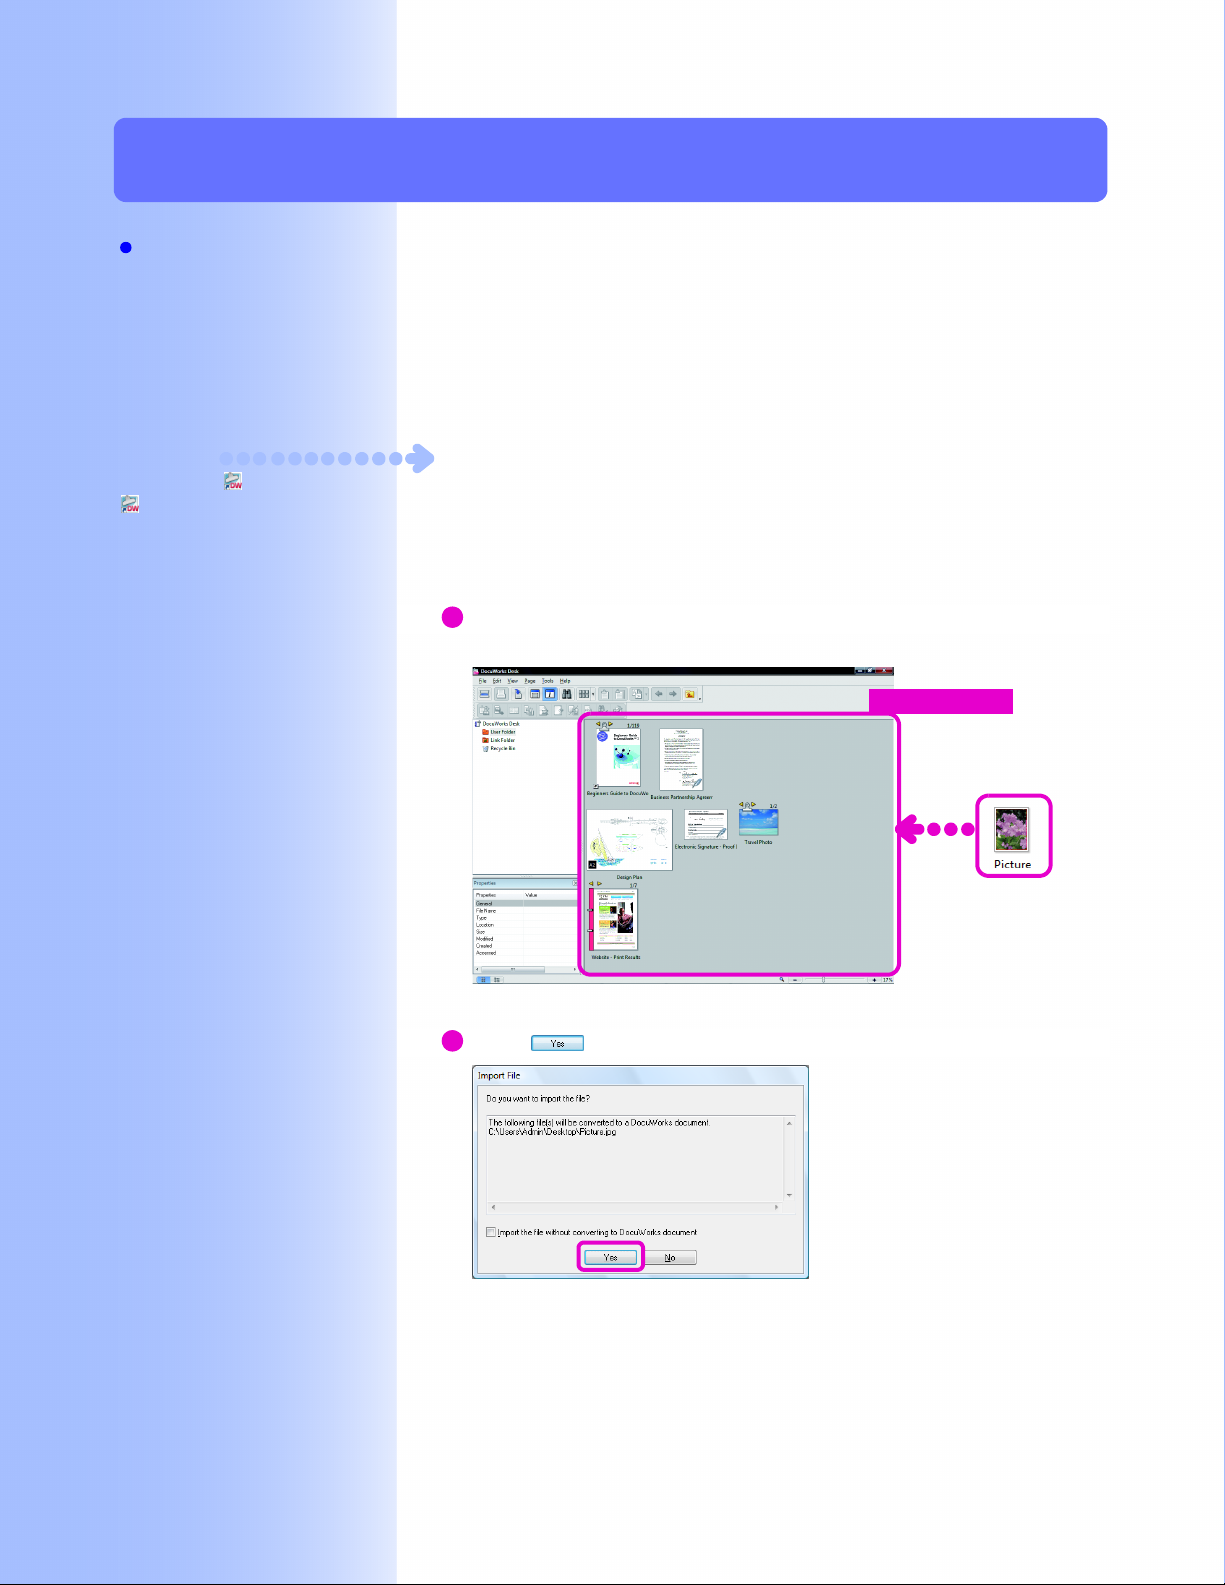
1
Drag and drop one or more image files onto the Desk
Workspace.
Workspace
Import files without opening the
[Import Image File(s)] dialog box
Click [DocuWorks Desk Options] on the
[Tools] menu to open the [DocuWorks Desk
Options] dialog box. Set the paper size in the
[Import Files] tab.
4
The [Import File] dialog box opens.
2
Click .
The [Import Image File(s)] dialog box opens.
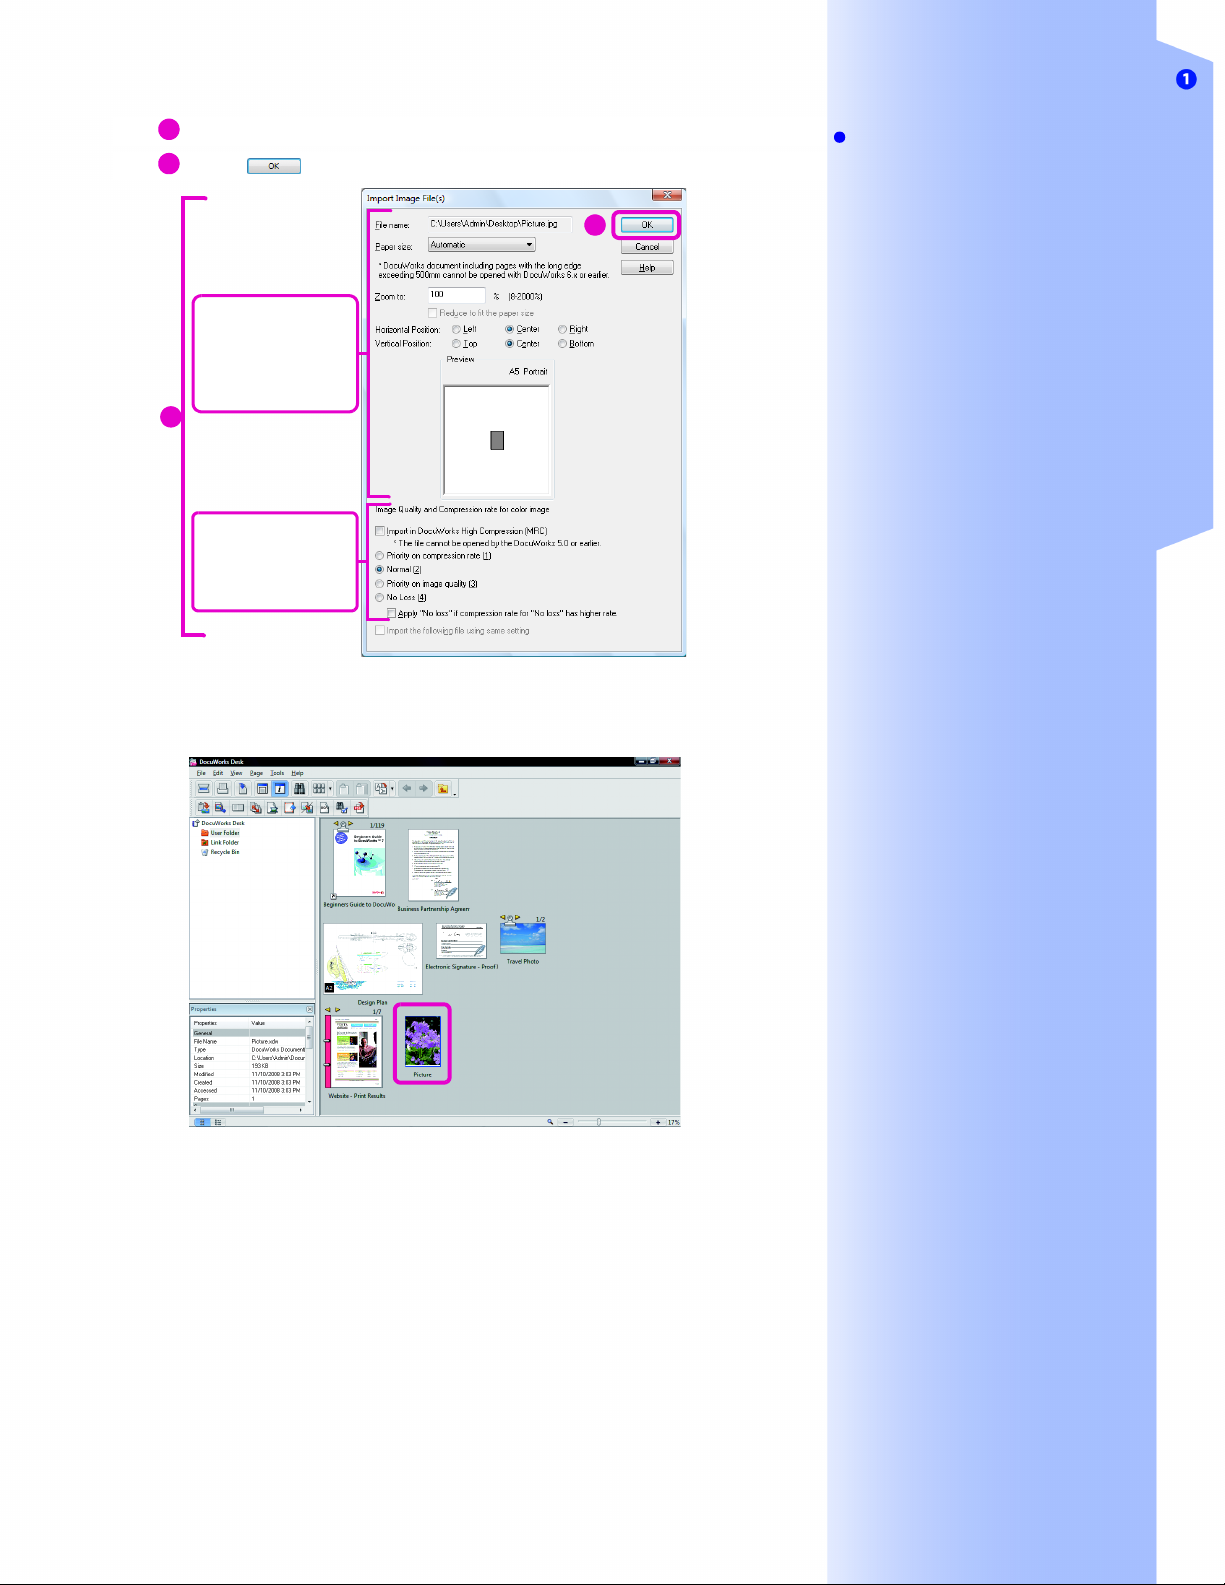
3
Configure any settings if necessary.
4
Click .
Set the size and the
position of the image
while referring to a
preview.
3
Set whether to give
image quality or
compression priority.
1.1 Desk: Creating DW Documents
Creating DW Documents
Note
[Paper size]
• For photos and images without set sizes,
select [Same size as the image] to create
a DW document without white margins.
4
Select [Automatic] to import the image in
the smallest set size (e.g. A4).
• The file size to import needs to be between
30mm x 30mm and 2400mm x 2400mm.
A DW document is created on Desk.
The DW document that is created is given the same name as the
original file.
[Import the following file using same
setting]
Select the check box to import more images
with the same settings, to eliminate the need
to open the dialog box for each file.
5
1.2
DocuWorks Printer: Creating DW Documents
•Refer to Help Basic Operations of Desk > Creating DocuWorks Documents > Creating
Documents from Application Data > Creating Documents by Printing to a
DocuWorks Printer
1.2
Note
What is a virtual printer?
A virtual printer enables you to output or
convert files like printing them by a printer.
Create DW documents from Web
pages
DocuWorks Printer can be used to easily
create DW documents from web pages.
These documents must be used with care to
copyrights.
Let's create a DW document from the [Print] dialog box of an
application by using a virtual "DocuWorks Printer". DocuWorks
Printer is automatically created when DocuWorks is installed. It
does not need to be installed separately.
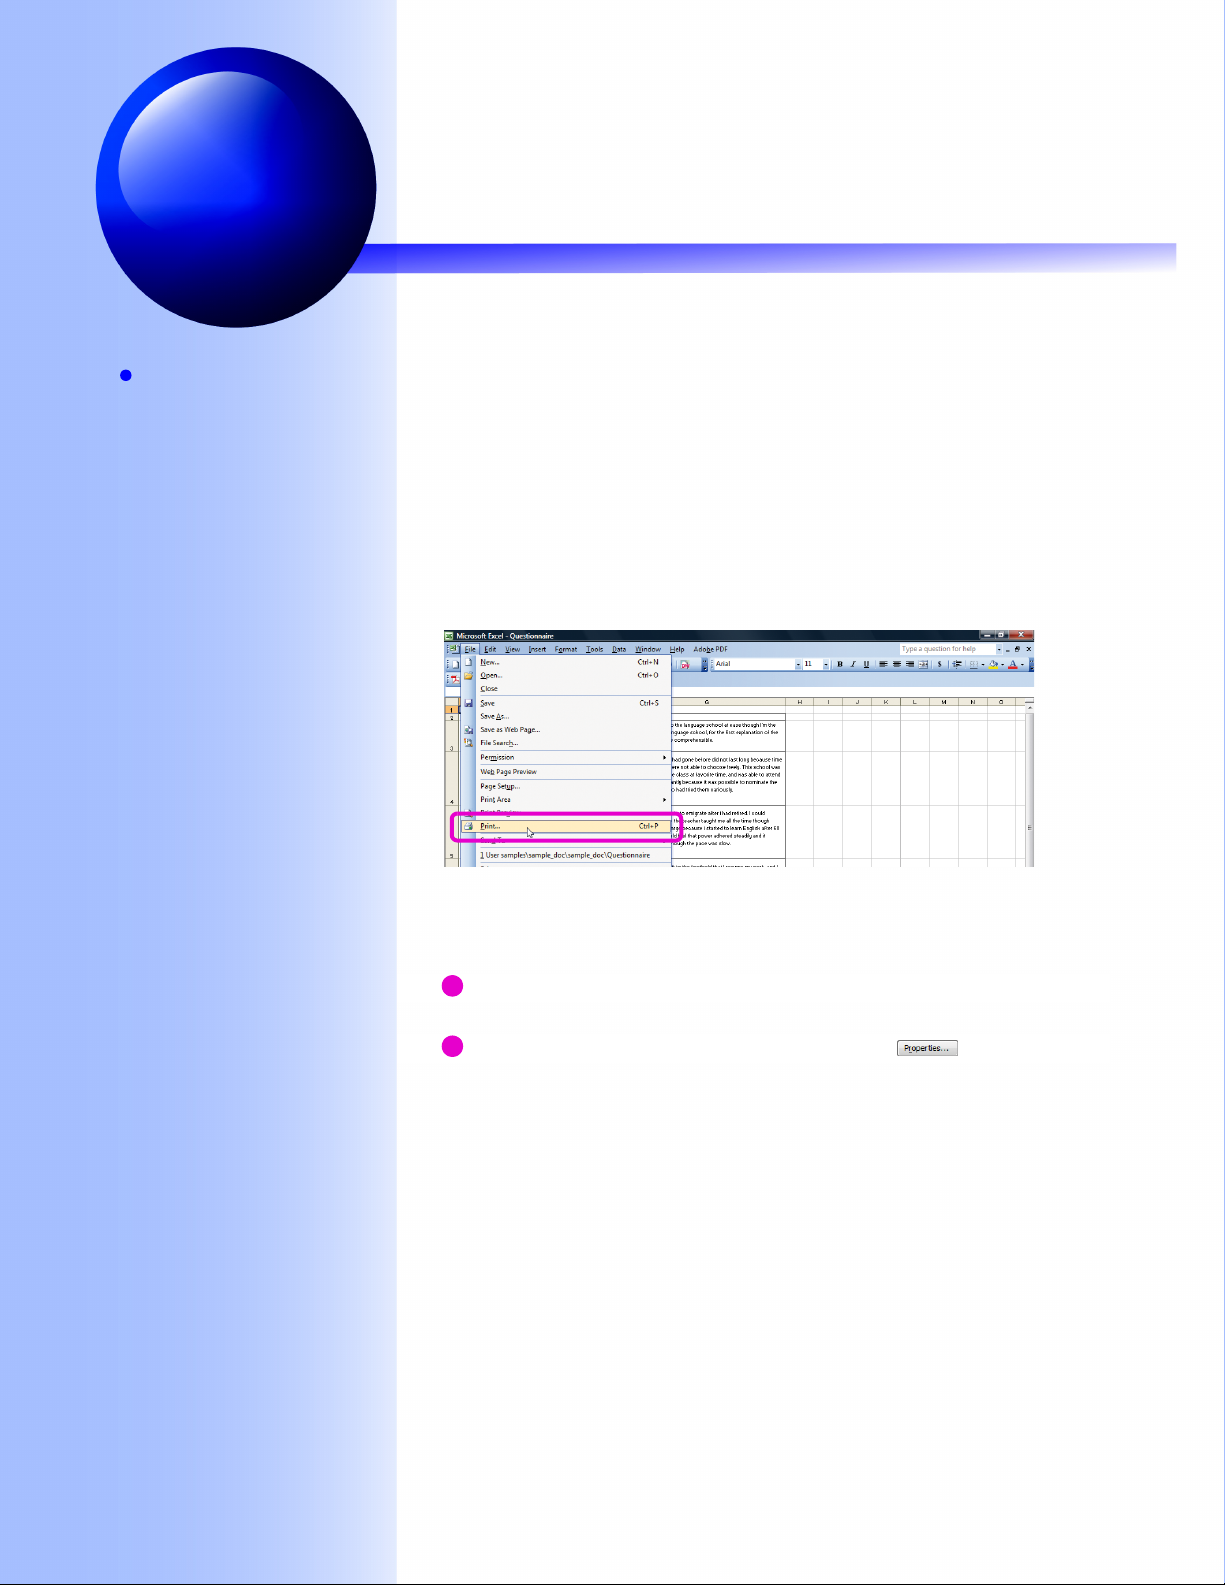
1 Display the [Print] dialog box
Print the document from the application. For example
using an Excel document, open the document and click
[Print] on the [File] menu.
The [Print] dialog box opens.
2 Create a DW Document
1
Select [DocuWorks Printer] from the list of [Name] under
[Printer].
2
To set the paper and image quality, click , and
configure the settings in the [DocuWorks Printer Properties]
dialog box.
6
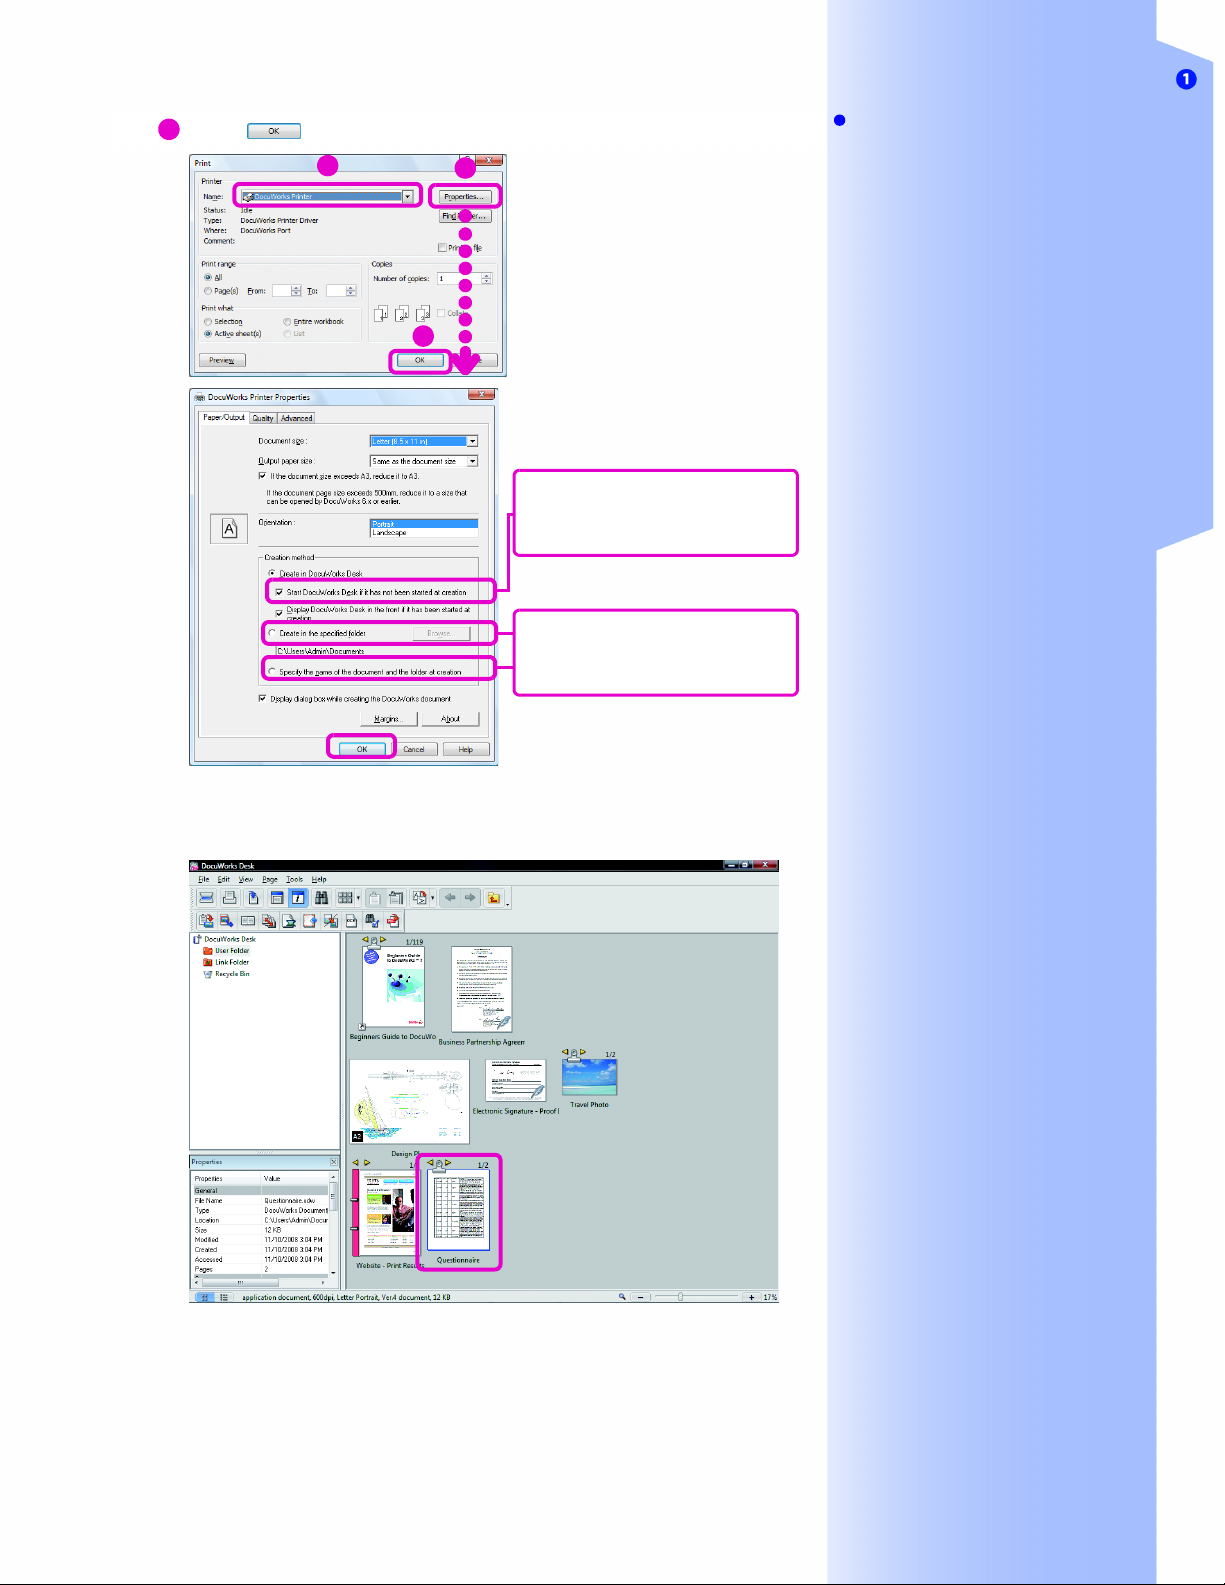
3
Click .
1.2 DocuWorks Printer: Creating DW Documents
Creating DW Documents
Note
Create a single DW document from
1
2
3
Clear the check box if you do not want
Desk to start up after creating DW
documents.
Select and specify the value if you
want to create DW documents on
other than Desk.
multiple worksheets in Excel
A DW document from only the displayed
worksheet is created when creating a DW
document from an Excel file with multiple
worksheets.
To create a DW document from multiple
worksheets in an Excel file, set the
[Resolution] to 600 dpi, the same print
resolution as DocuWorks Printer, in the
[Quality] tab for all the Excel worksheets.
And, set [Print what] to [Entire workbook] in
the [Print] dialog box.
A DW document is created on Desk after Desk started if it had
not yet started. The DW document that is created is given the
same name as the original file.
7
1.3
Creating DW Documents from Office Applications
•Refer to Help Menus and Dialog Boxes > Personal Settings
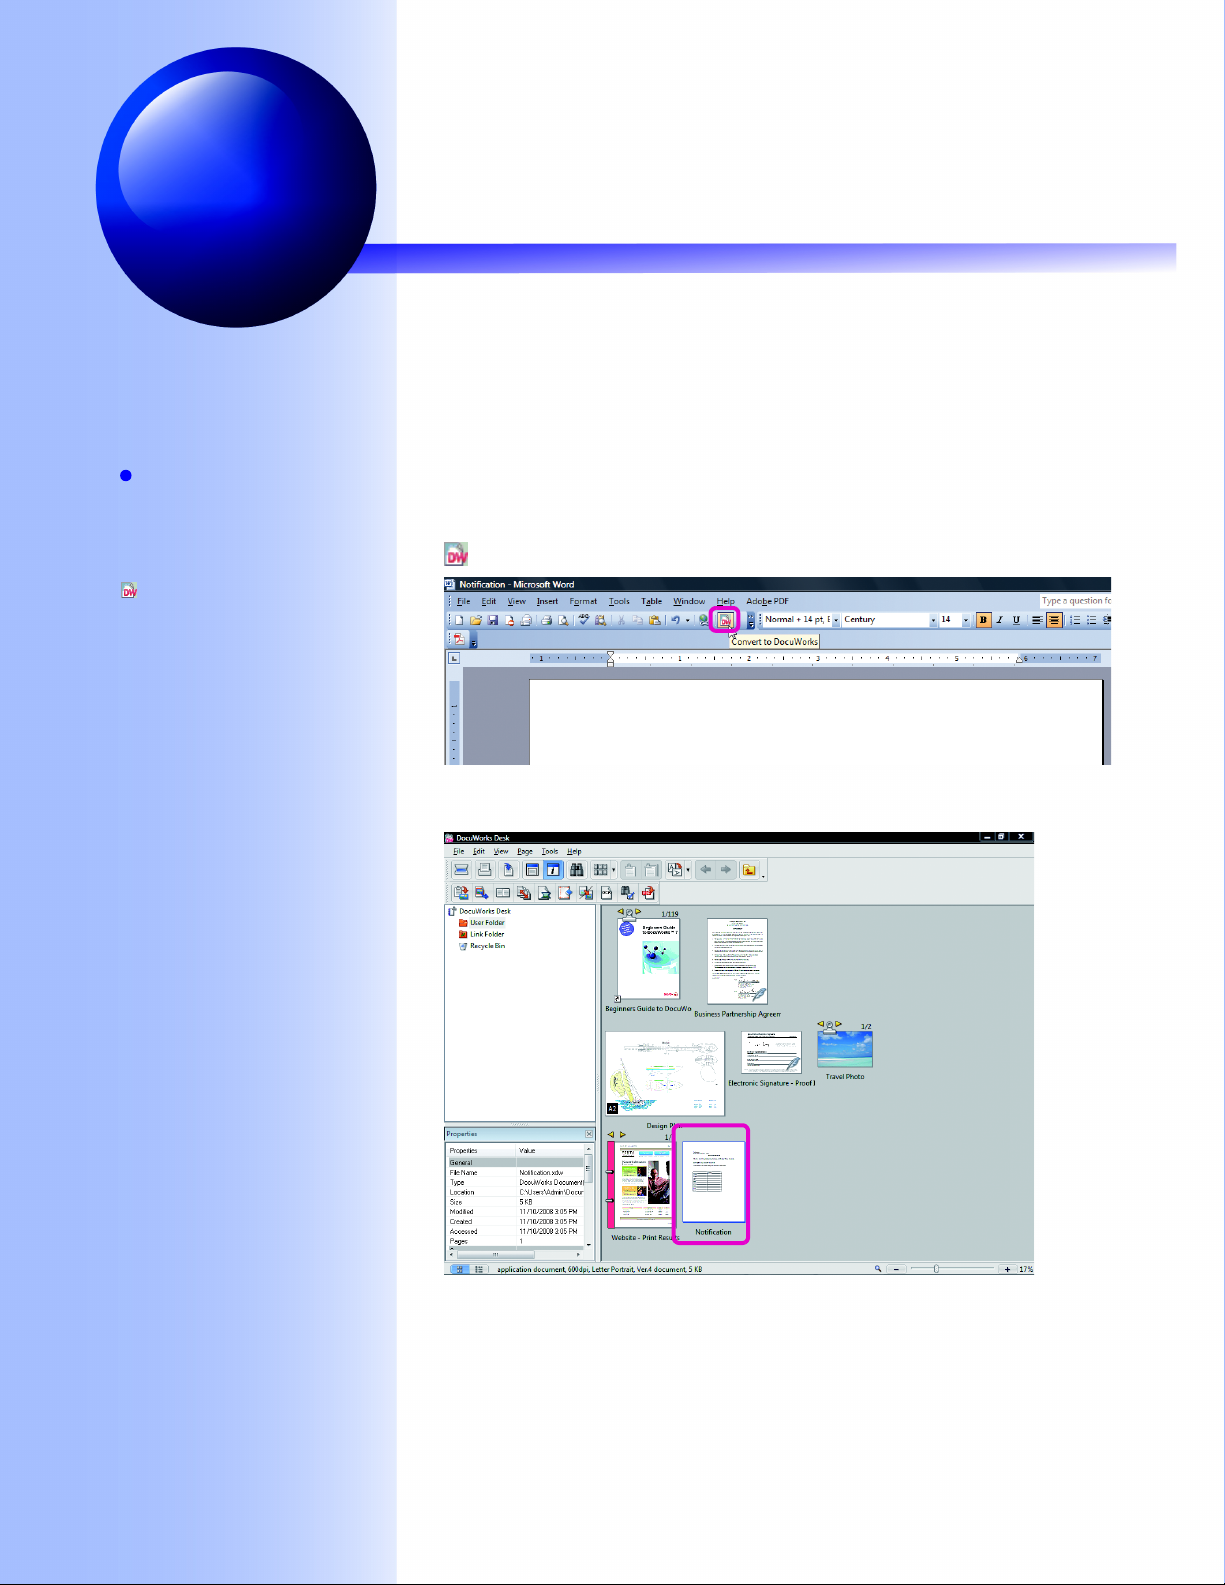
Just click the [Convert to DocuWorks] button in Office
applications (Word, Excel, or Power Point) to create a DW
document.
1.3
Note
Compatible Office versions
•Microsoft® Office XP
•Microsoft
• 2007 Microsoft Office
You need to select the application being
used (Word, Excel, or PowerPoint) in
[DocuWorks Creator for Microsoft Office
Settings] in Personal Settings in advance. In
the default settings, all the applications are
selected. For how to configure Personal
Settings, refer to "Setup Guide".
Start up Desk
Desk does not start up when selecting the
[Create in the specified folder] or [Specify the
name of the document and the folder at
creation] check box under [Creation method]
in the [DocuWorks Printer Properties] dialog
box (page 7).
®
Office 2003
[Convert to DocuWorks]
®
System
1 Create a DW Document
Open a Word, Excel, or PowerPoint file, and click
[Convert to DocuWorks] on the Standard Toolbar.
A DW document is created on Desk after Desk started if it had not
yet started.
8
1.4
Desk/Viewer: Processing DW Documents
Creating DW Documents
1.4
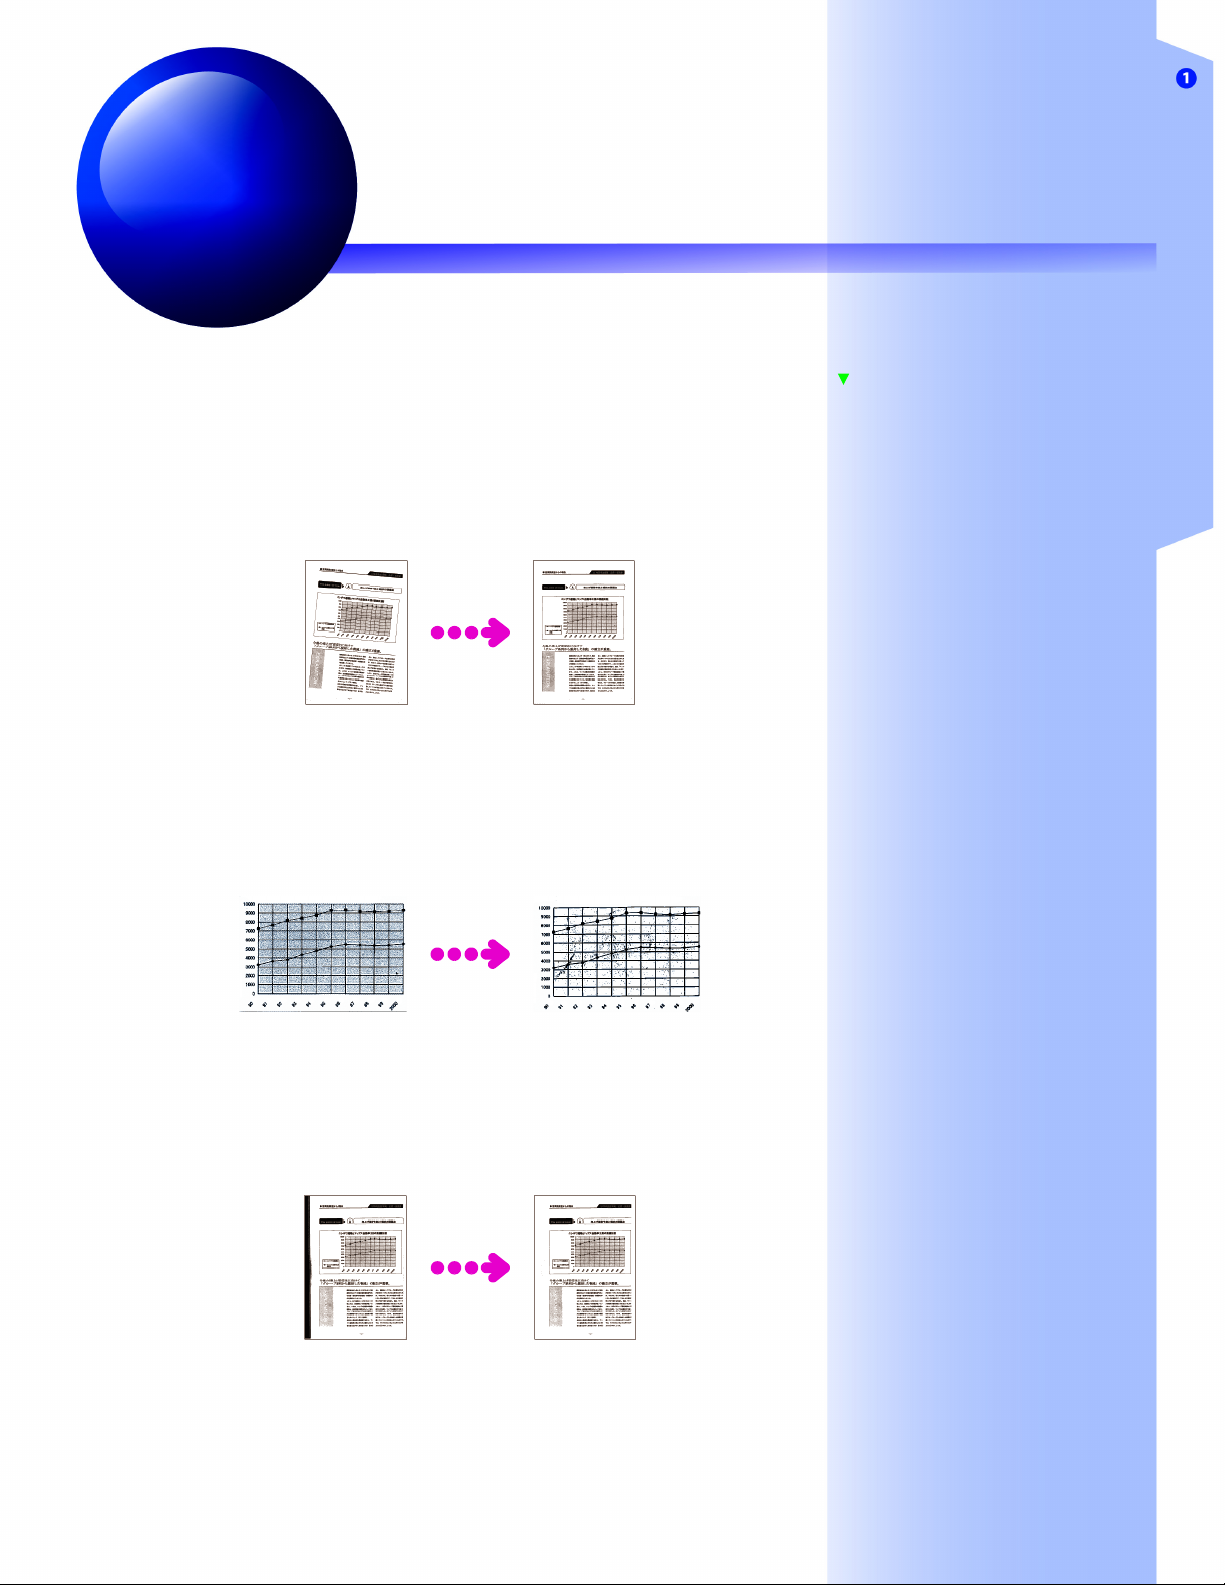
You can process DW documents made from scanned documents
using a multi-function scanner by the following methods.
• To correct a skewed image from paper documents that
was scanned at an angle
You can correct it by using the [Process Pages] plug-in on
Desk, or [Deskew] on the [Edit] menu on Viewer.
•Refer to Help Use of Plug-ins > Process Pages (File Optimizing)
Basic Operations of Viewer > Work on Pages > Deskewing Pages
• To reduce small black dots on data that are scanned in
black and white
You can reduce them by using the [Process Pages] plug-in on
Desk, or [Noise Reduction] on the [Edit] menu on Viewer.
Reference
Run OCR
You can convert images of text into digital
text data by OCR. This is explained in
"3.5 Desk/Viewer: Converting Images of
Text to Text Data (p.51)".
•Refer to Help Use of Plug-ins > Process Pages (File Optimizing)
Basic Operations of Viewer > Work on Pages > Reducing Noise from
Pages
• To remove black margins caused when paper documents
are scanned
You can remove them with the [Edge Erase] plug-in on Desk.
•Refer to Help Use of Plug-ins > Edge Erase
9

1.4 Desk/Viewer: Processing DW Documents
10

DocuWorks: How to see
DocuWorks: How to see DocuWorks
DocuWorks
Let's try basic operations on Desk and Viewer.
2.1
Differences between Desk and Viewer
2.1
Note
Other Ways
Double-click the icon on the desktop.
icon can be created if [Create] was
selected in the [Shortcut to DocuWorks
Desk] wizard during installation.
Exit
•Click .
• Click [Exit] on the [File] menu.
Reference
Binders
This is explained in "6.2 Desk: Creating
Binders and Organizing (p.78)".
What you can do in Desk
This is explained in pages titled "Desk"
such as in "1.1 Desk: Creating DW
Documents (p.2)".
•Refer to Help About DocuWorks > DocuWorks Components
Basic Operations of Desk > Opening and Closing Desk
Basic Operations of Viewer > Opening and Closing Viewer
DocuWorks is composed of Desk and Viewer.
This section explains the basic differences between Desk and
Viewer.
Desk
How do I start it?
Click [Start] and select [All Programs] > [Xerox] > [DocuWorks] > [DocuWorks Desk].
Stack or unstack DW documents
This is explained in "6.1 Desk: Stacking/
Unstacking Multiple DW Documents
(p.74)".
12
What is it?
DW documents and binders are located on it like a desk. On the left side, the composition of the
folders, on the right side, the files on the folders are displayed.
You can also stack, and unstack individual files.

Viewer
2.1 Differences between Desk and Viewer
DocuWorks: How to see DocuWorks
How do I start it?
Double-click a DW document or a binder on Desk.
Note
Other Ways
Viewer starts up when you double-click a
DW document or a binder in Explorer.
Exit
•Click .
• Click [Exit] on the [File] menu.
The dialog box asking whether to save the
changes or not appears if you have edited a
DW document or a binder.
Click to save, not to
save.
What is it?
It displays an image of a DW document or a binder you can move around and look at on Desk. Viewer
lets you do more than enlarge DW documents or binders, you can edit individual pages too.
Reference
What you can do in Viewer
This is explained in pages titled "Viewer"
such as in "3.1 Viewer: Adding to DW
Documents (Annotating) (p.26)".
13
2.2
Desk: How to see Desk
•Refer to Help Operating Environment of DocuWorks > Desk > Make-up of the Desk Window
Let's look at the Desk window.
This area shows the files and folders that are in a folder clicked in the
Folder area.
They can also be shown in List View.
They are shown in Thumbnails View by default.
When in List View: Icons shown in List View:
Menu bar
Standard Toolbar
Standard Plug-in Toolbar
This area shows the folder hierarchy.
Click on it and the contents in the folder are
shown in the Workspace. The [User Folder]
is shown by default. How to see Folder area
is also explained below.
Folder area
Workspace
a DW document
a binder
2.2
This area shows the properties of the DW
documents or binders clicked on the
Workspace.
This button switches the Workspace display
between thumbnail display and list display.
Folder area
Properties
Change Display Button
Note
[User Folder]
The [User Folder] is in the location specified in Personal Settings. In the default setting, it
is in the following location.
Documents\Xerox\DocuWorks\DWFolders
The "Documents" folder varies depending on your OS.
Reference
[Link Folder]
The [Link Folder] is displayed when specifying folders linked to Desk.
You can manipulate the files in the linked folder just the same as those in the [User
Folder].
This is explained in "6.3 Desk: Linking to Folders Other Than the User Folder (p.85)".
Important
[Recycle Bin]
The [Recycle Bin] on [DocuWorks Desk] is different from the [Recycle Bin] on the Windows
Desktop. Right-clicking on [Recycle Bin] and clicking [Empty Recycle Bin] removes the files
in [Recycle Bin]. Be aware that files that are deleted from the [Recycle Bin] do not go into
the Windows [Recycle Bin].
The message from DocuWorks or
information about the clicked file is
displayed.
Status Bar
Slider Bar
To zoom thumbnails
in and out (10-34%),
click the
buttons or drag the
slider left or right.
14
2.2 Desk: How to see Desk
Thumbnail: How to See Thumbnails
•Refer to Help Operating Environment of DocuWorks > Desk > Workspace View Modes
This table explains about the thumbnails shown on Desk.
With the blue frame
Covered with diagonal lines
With numbers 1/2 and
DW documents in
Selected (Clicked) DW
document
DW document opened in
Viewer
Multiple page DW document
Binder and DW documents in
binder
DocuWorks: How to see DocuWorks
Note
In the default setting, the blue frame is
displayed. To change the color, follow the
procedures below.
Click [DocuWorks Desk Options] on the [Tools]
menu to open the [DocuWorks Desk Options]
dialog box. Then change the value in
[Selection] under [Color setting] on the
[General] tab.
Note
Click to change the page being
viewed. Double-click to change to an
unstacked page by page DW document.
Reference
This is explained in " Binder: How to See
Binders (p.81)".
With
With
With lock mark
DW document with original
data attached
Signed DW document and
binder using a digital certificate
or an electronic signature
Secured DW document and
binder
Note
Sign DW documents or binders to check
whether or not they have been falsified after
the sign.
Note
Lock mark changes its shape depending on the
type of security being used. Type of security is
explained in "7.1 Types of Security and
Function Prohibition (p.90)".
15
2.2 Desk: How to see Desk
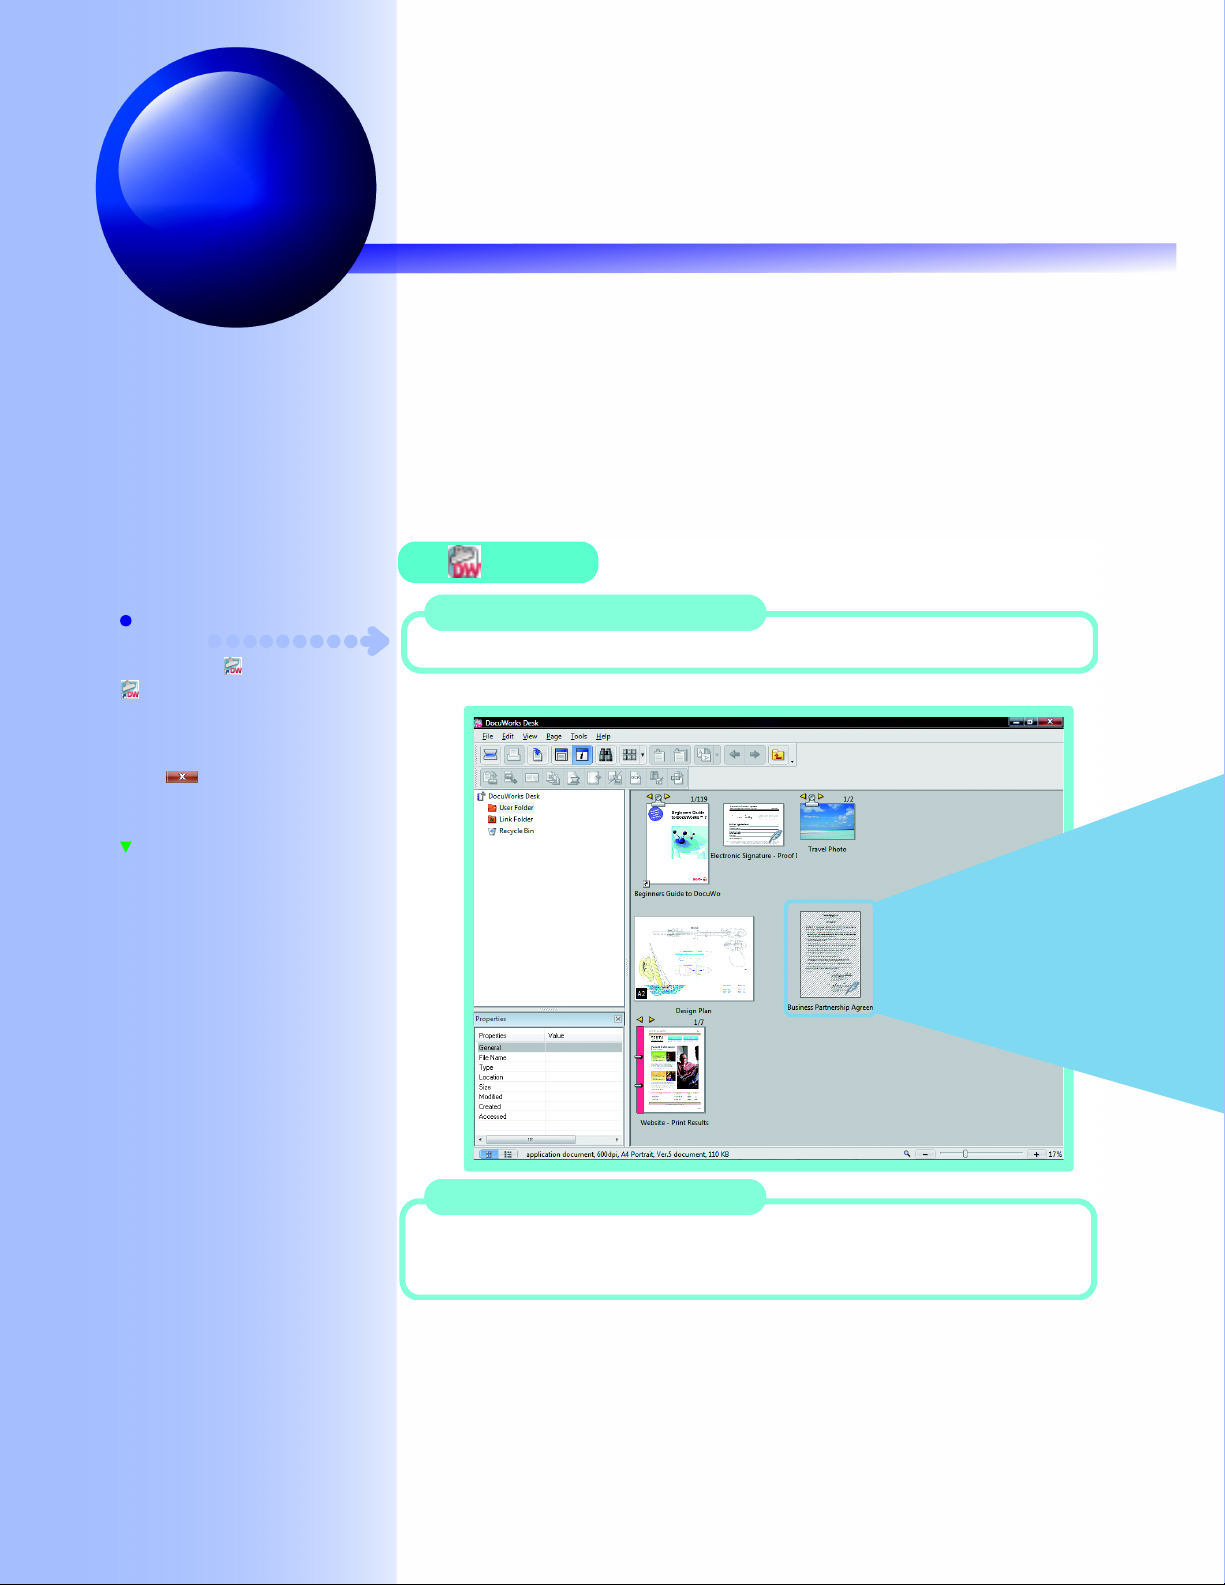
With mark
DW document displayed as the
thumbnail of A3 that actually is
Note
The following procedure displays a DW
document in the actual size without the
mark.
1. Click [DocuWorks Desk Options] on the [Tools]
menu to display the [DocuWorks Desk Options]
dialog box.
2. Select [Display in thumbnail view of the same
zoom ratio] under [Large size (page with the long
edge exceeding 500mm)] on the [View] tab, and
click .
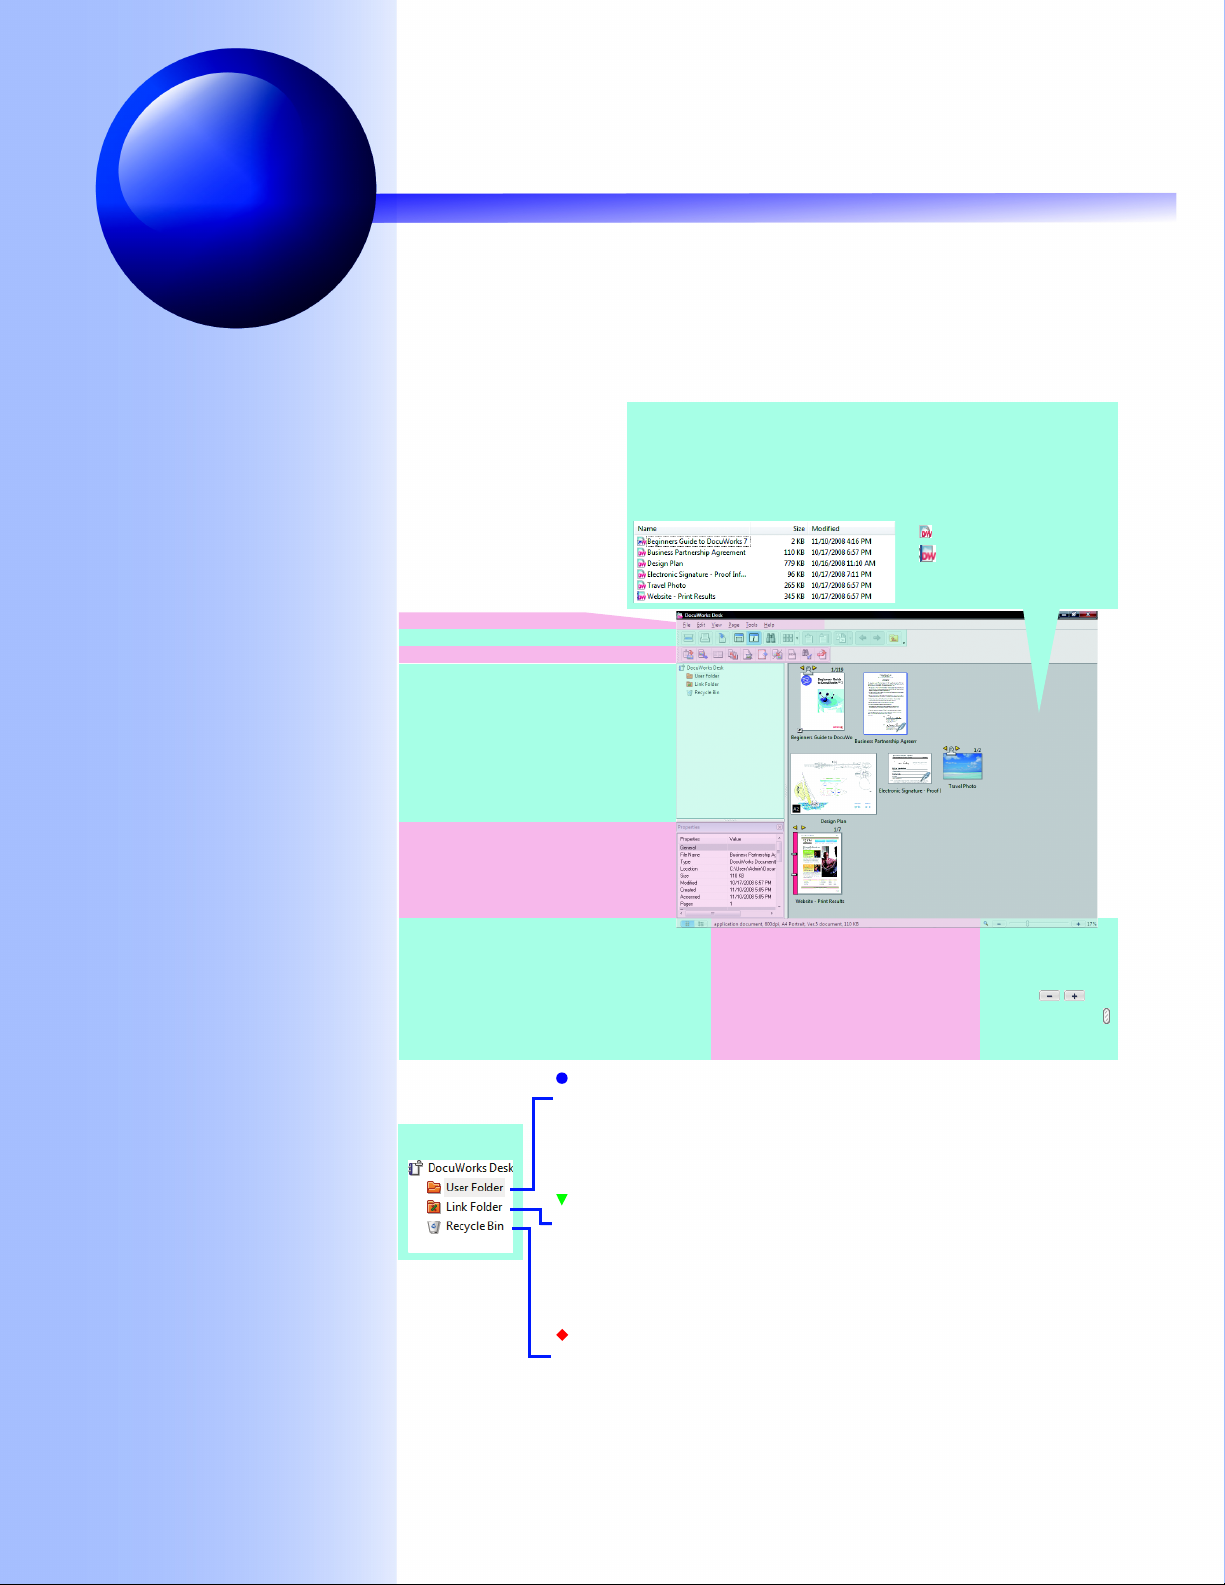
Note
If a PDF file has an attached file, there is .
With
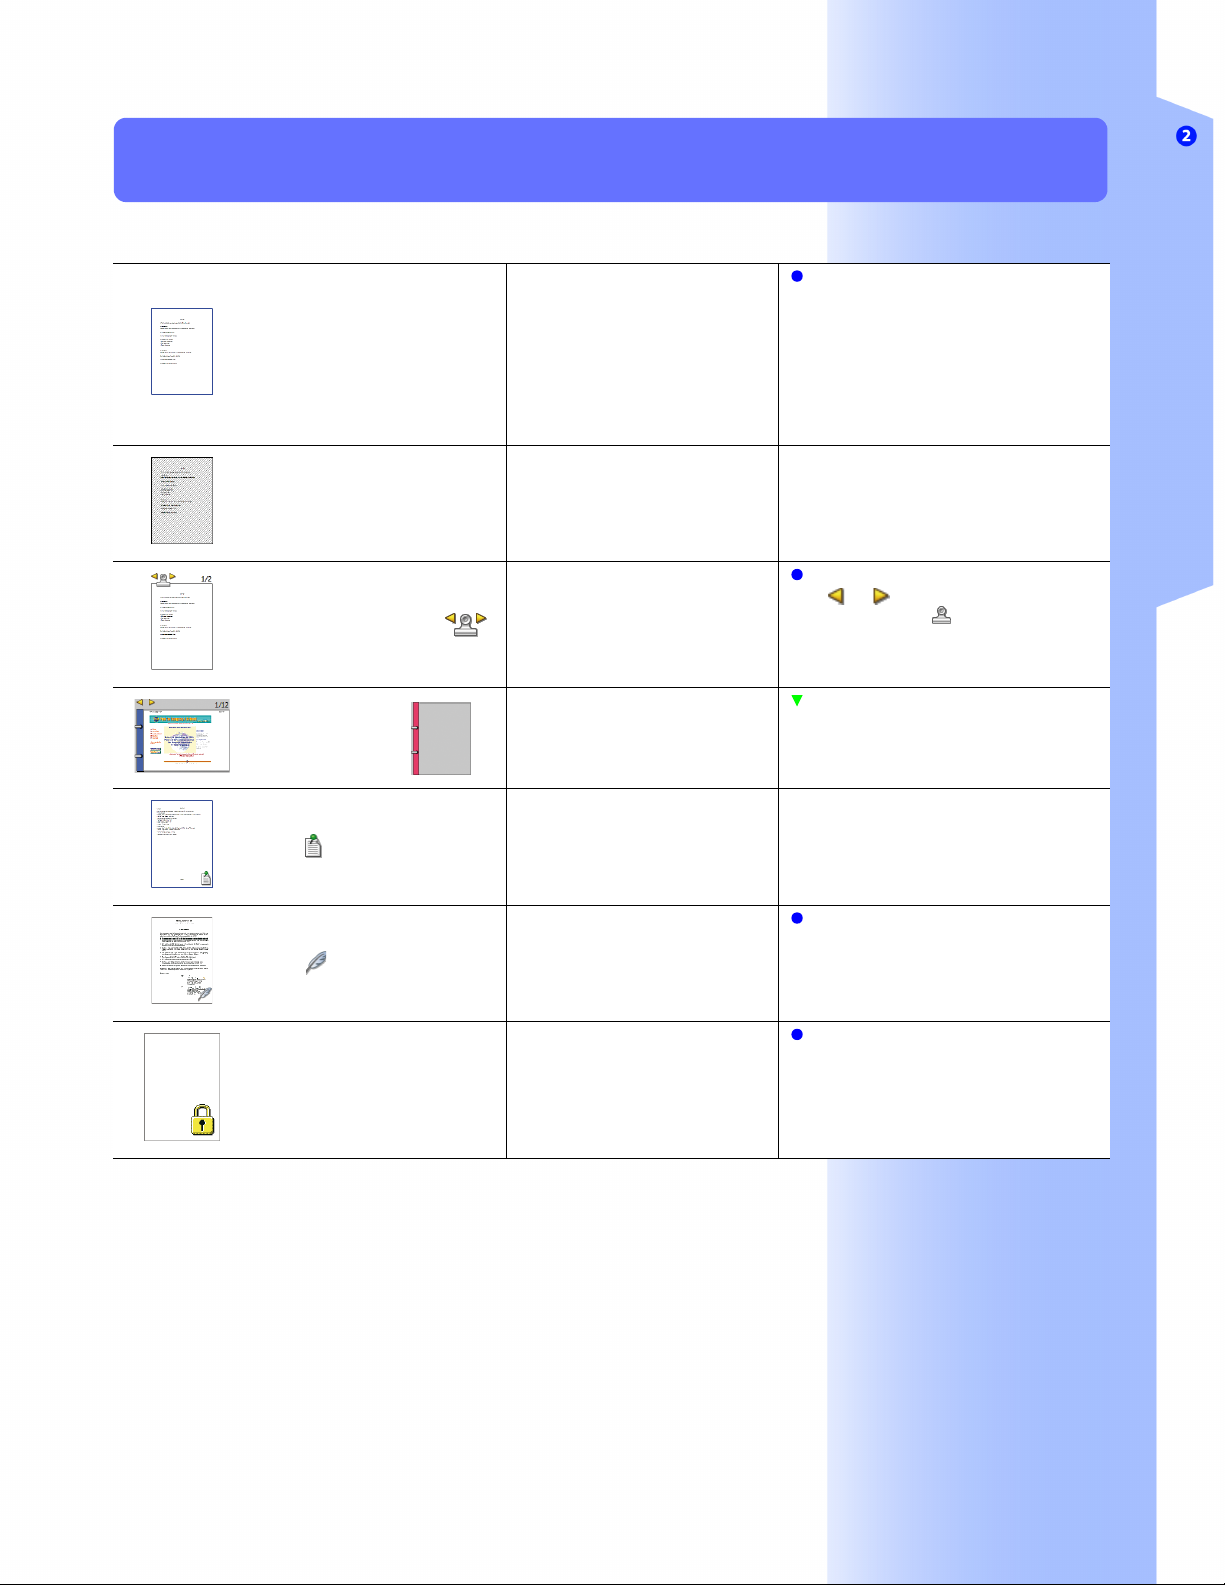
With or
PDF file
Image file
Reference
How to create PDF files from DW documents
are explained in "8.1 Desk: Creating a PDF file
from a DW document on Desk (p.98)".
Note
This icon changes depending on the type of
application related to the image file.
Reference
How to create image files from DW documents
is explained in "8.2 Desk/Viewer: Creating an
Image File from a DW Document (p.100)".
Putting Files other than DW Documents and Binders into [User Folder]
•Refer to Help Basic Operations of Desk > Common Operations > Displaying Non-DocuWorks Files
Note
When putting Word, Excel or
PowerPoint files into the [User Folder]
Files which can be displayed as thumbnails
on Explorer are shown as thumbnails also on
Desk.
XPS file
XPS stands for "XML Paper
Specification".
Install "DocuWorks Thumbnail
Extension 1.0" to display XPS files as
thumbnails. You can download "DocuWorks
Thumbnail Extension 1.0" from the
DocuWorks web site for free. Click [Help] on
Desk and select [Xerox Web Page] >
[DocuWorks Home Page] to display the
DocuWorks web site.
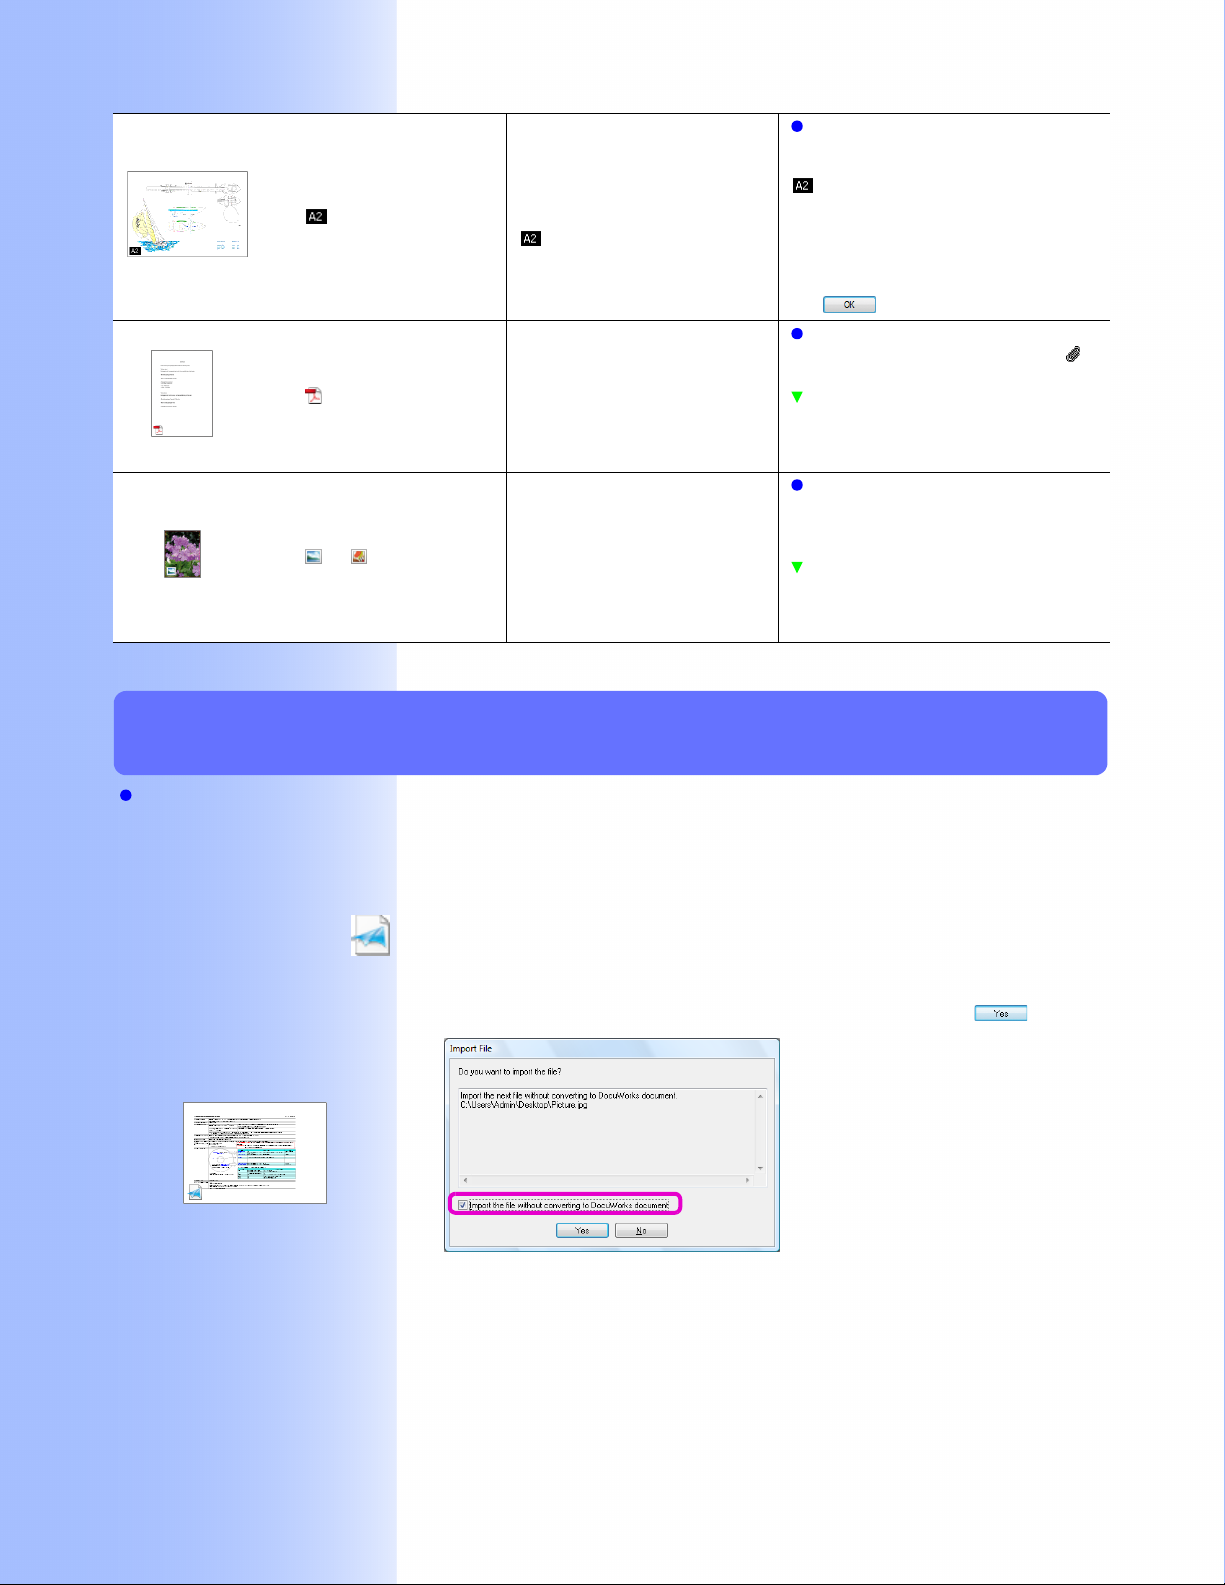
You can put files other than DW documents and binders on Desk.
You have the following two ways to put files other than DW
documents and binders into [User Folder].
• Drag and drop a file onto the Workspace while holding down
the <Ctrl> key.
• Drag and drop a file onto the Desk Workspace and select the
[Import the file without converting to DocuWorks document]
check box in the [Import File] dialog box, and click .
16

2.2 Desk: How to see Desk
DocuWorks: How to see DocuWorks
17
2.3
Viewer: How to see Viewer
•Refer to Help Operating Environment of DocuWorks > Viewer > Make-up of the Viewer Window
2.3
Reference
Annotations
This is explained in "3.1 Viewer: Adding to
DW Documents (Annotating) (p.26)".
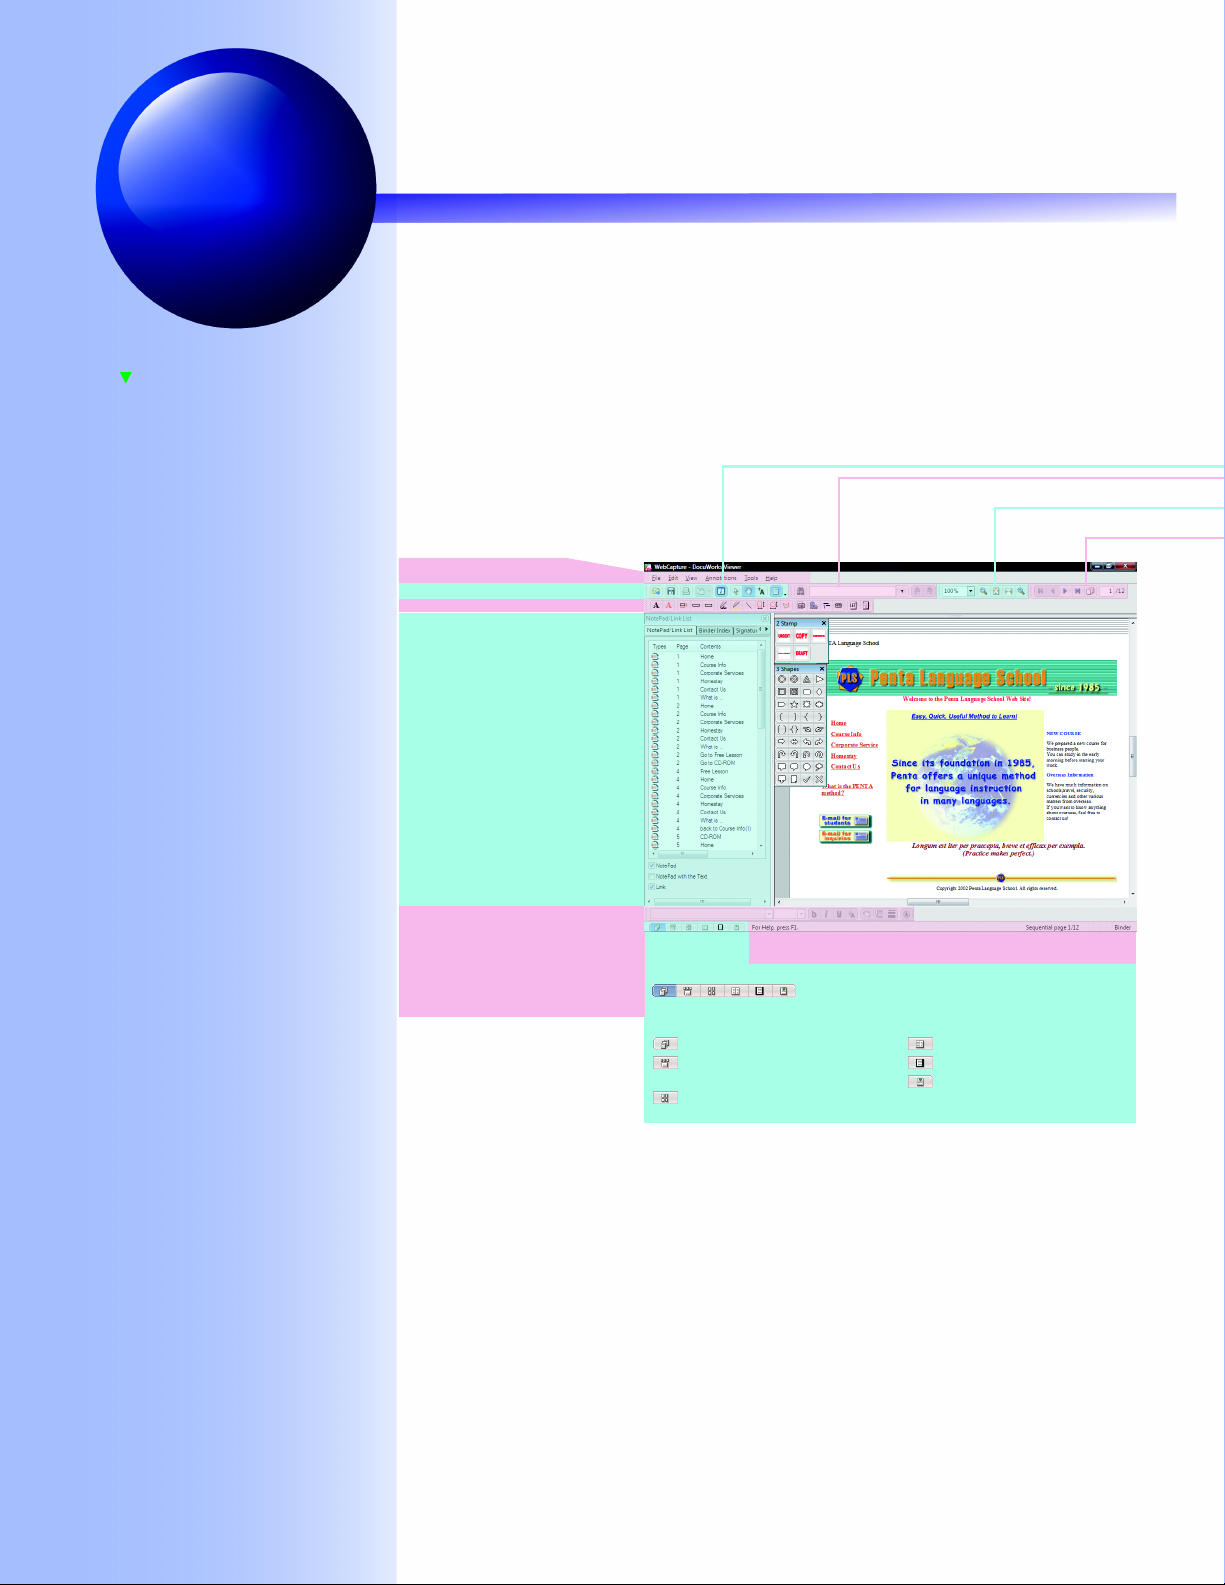
Let's look at the Viewer window.
Menu bar
Toolbars (explained in the next page)
Annotation Toolbar
Displays various information about DW
documents and binders and lets you
edit them. This is explained in "
InfoView: How to See InfoView (p.22)".
Lets you change the properties of
attached annotations.
InfoView
Property Toolbar
Lets you check the message and page number.
Change Display Button
18
Lets you change how the DW document is displayed.
[Document] view
[Page Sorter and Document]
view
[Page Sorter] view
[Split Document View]
[Full Screen] view
[Original Data] view
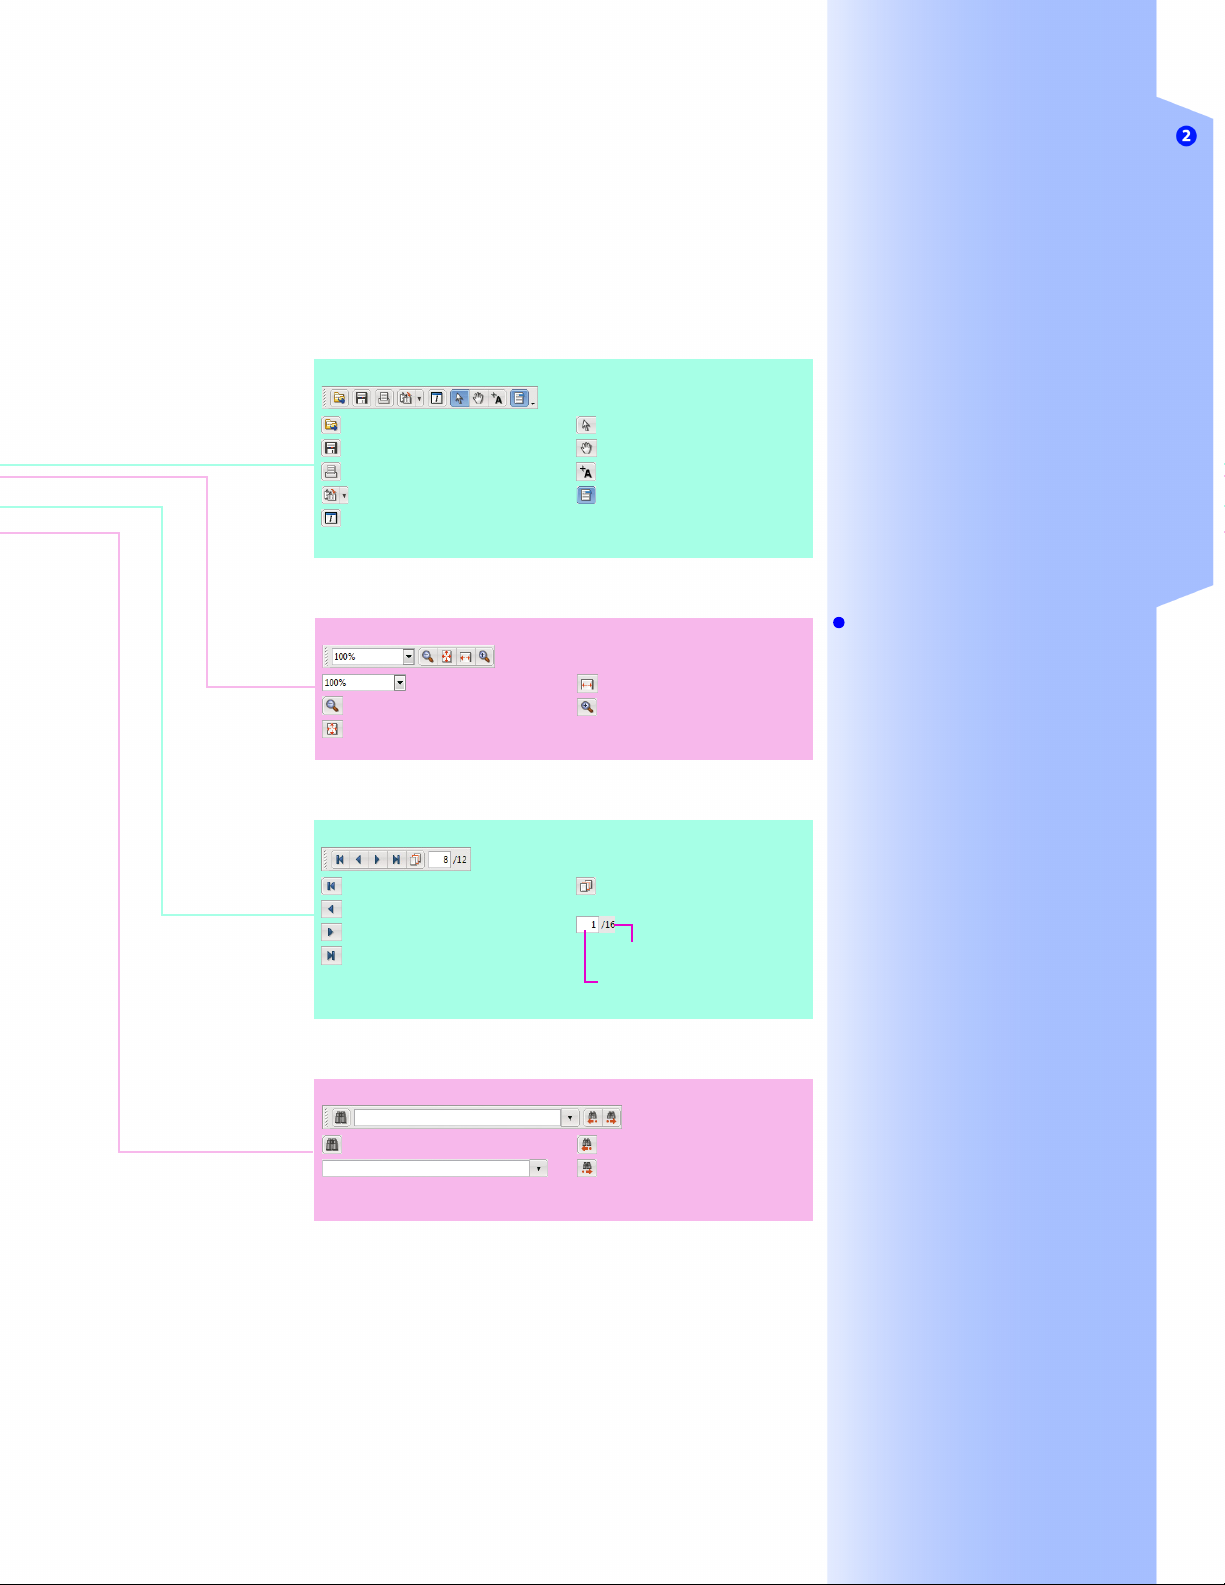
Standard Toolbar
2.3 Viewer: How to see Viewer
DocuWorks: How to see DocuWorks
[Open]
[Save]
[Print]
Rotates the document
[Toggle InfoView]
Zoom Toolbar
[Zoom] (10 - 1600%)
[Zoom Out]
[Fit to Whole Page]
Page Up/Down Toolbar
Shows the first page
Shows the previous page
Shows the next page
Shows the last page
[Pointing Mode]
[Scrolling Mode]
[Text Mode]
Shows/Hides annotations
[Fit to Page Width]
[Zoom In]
Shows the [Go to Page] dialog
box
Shows the total number of
pages
Displays the page specified in
this box
Note
Change the zoom ratio
You can use the following ways other than
the Zoom Toolbar.
• Press the <Ctrl> key while rolling the
mouse wheel.
• Click [Zoom] on the [View] menu to display
the [Zoom] dialog box and specify the ratio.
Find Toolbar
Shows the [Find] dialog box
[Text String]
[Find Previous]
[Find Next]
19

2.3 Viewer: How to see Viewer
How to Change/Display Pages
•Refer to Help Basic Operations of Viewer > Work on Pages > Turning a Page
Note
[Turn & Scroll Page]
If you click [Turn & Scroll Page] on the
[Tools] menu, pages scroll down when
turning pages.
The upper half of the next page or the lower
half of the previous page is shown.
• Scroll pages
A
B
P.1 P.2
• Non-scroll pages
A
B
P.1 P.2
Reference
Binder
This is explained in "6.2 Desk: Creating
Binders and Organizing (p.78)".
C
D
C
D
● Click the Page Up/Down Toolbar buttons
Use the buttons on the Page Up/Down Toolbar to turn pages. For
the function of buttons, refer to the previous page.
The [Go to Page] dialog box displayed when clicking varies
depending on the type of the file: a DW document or a binder
• a DW document
The specified page is displayed as in Page Up/Down
Toolbar.
• a binder
Note
Display thumbnail of page
Press the <Shift> key while putting the
cursor on the overlapping pages to display
the thumbnail with page number.
Double-click on notepad on the
notepad list
The notepads are listed on the [NotePad/
Link List] tab in InfoView. Double-click on the
notepad to show the page where the
notepad is stuck.
● Click the overlapping pages
The pages of the DW document or binder with multiple pages are
shown overlapping. Put the cursor on the overlapping pages to
display the page number. Click to open to the page number
displayed.
First page
Displayed page
Last page
Page Number
● Click the notepad
Click on the notepad to show the page where that notepad is
stuck.
20
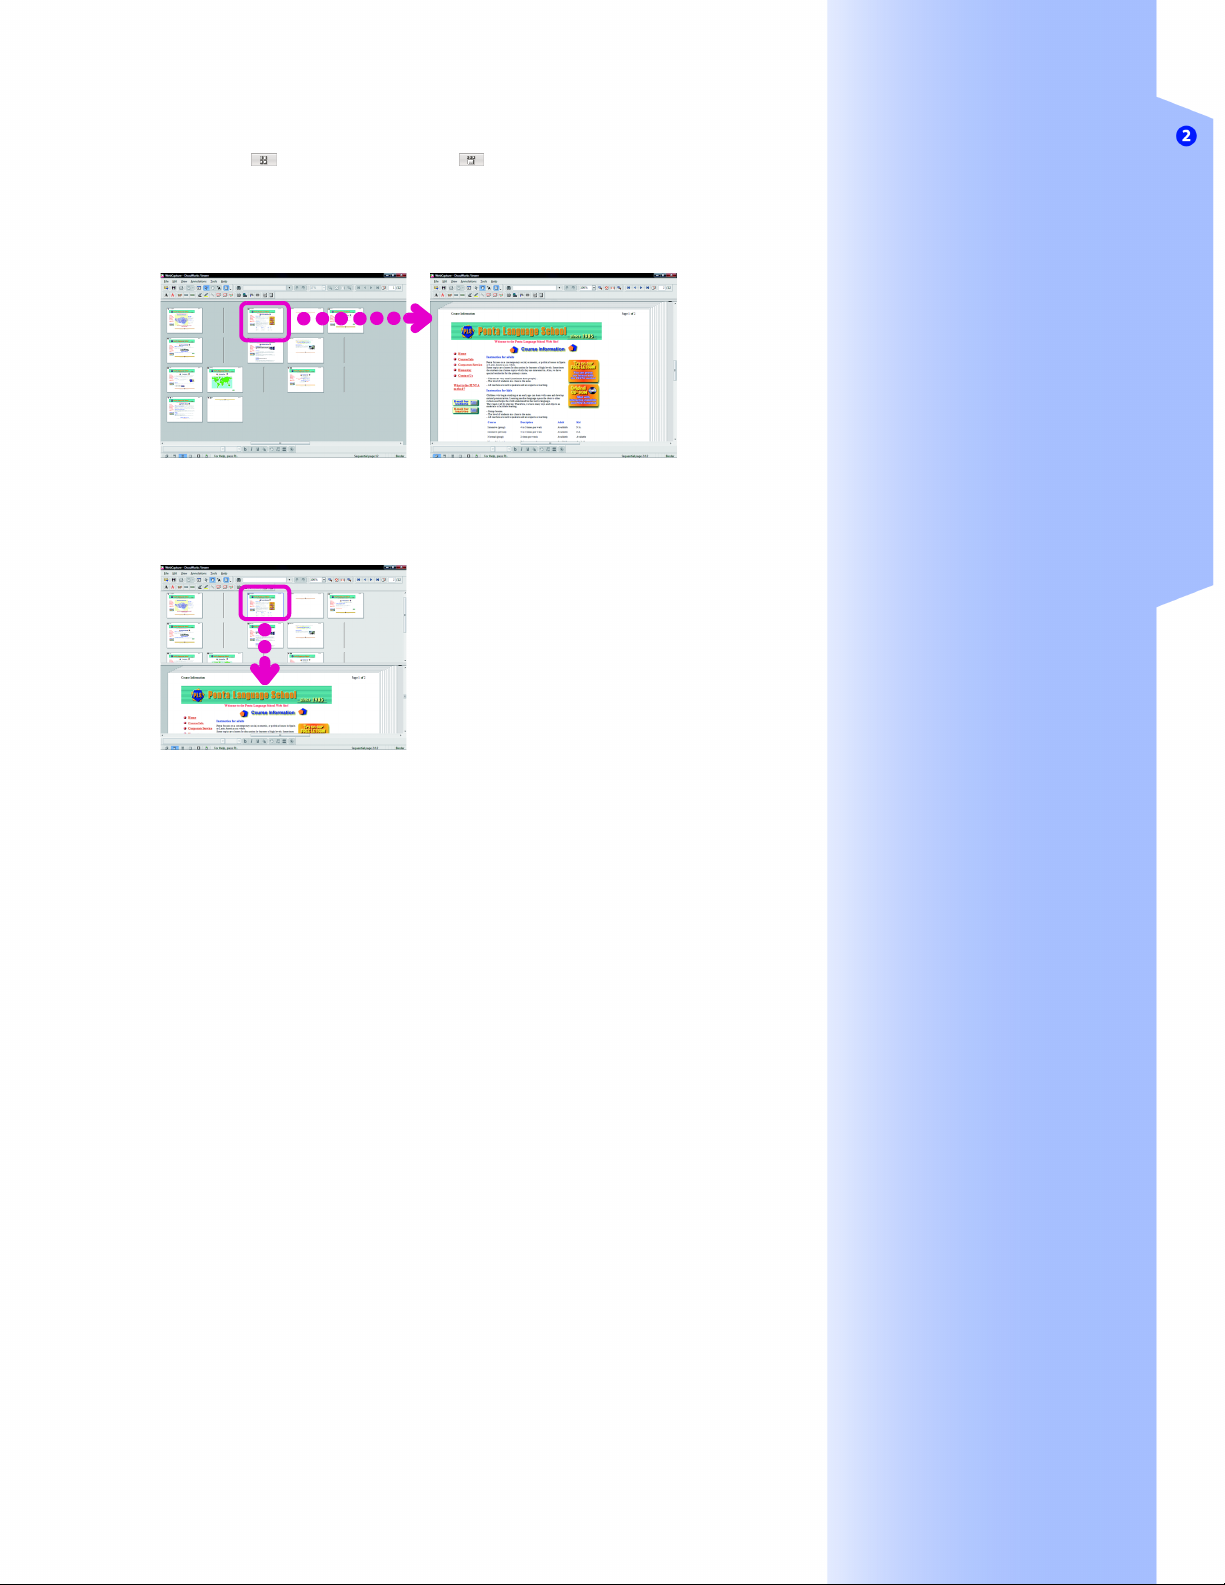
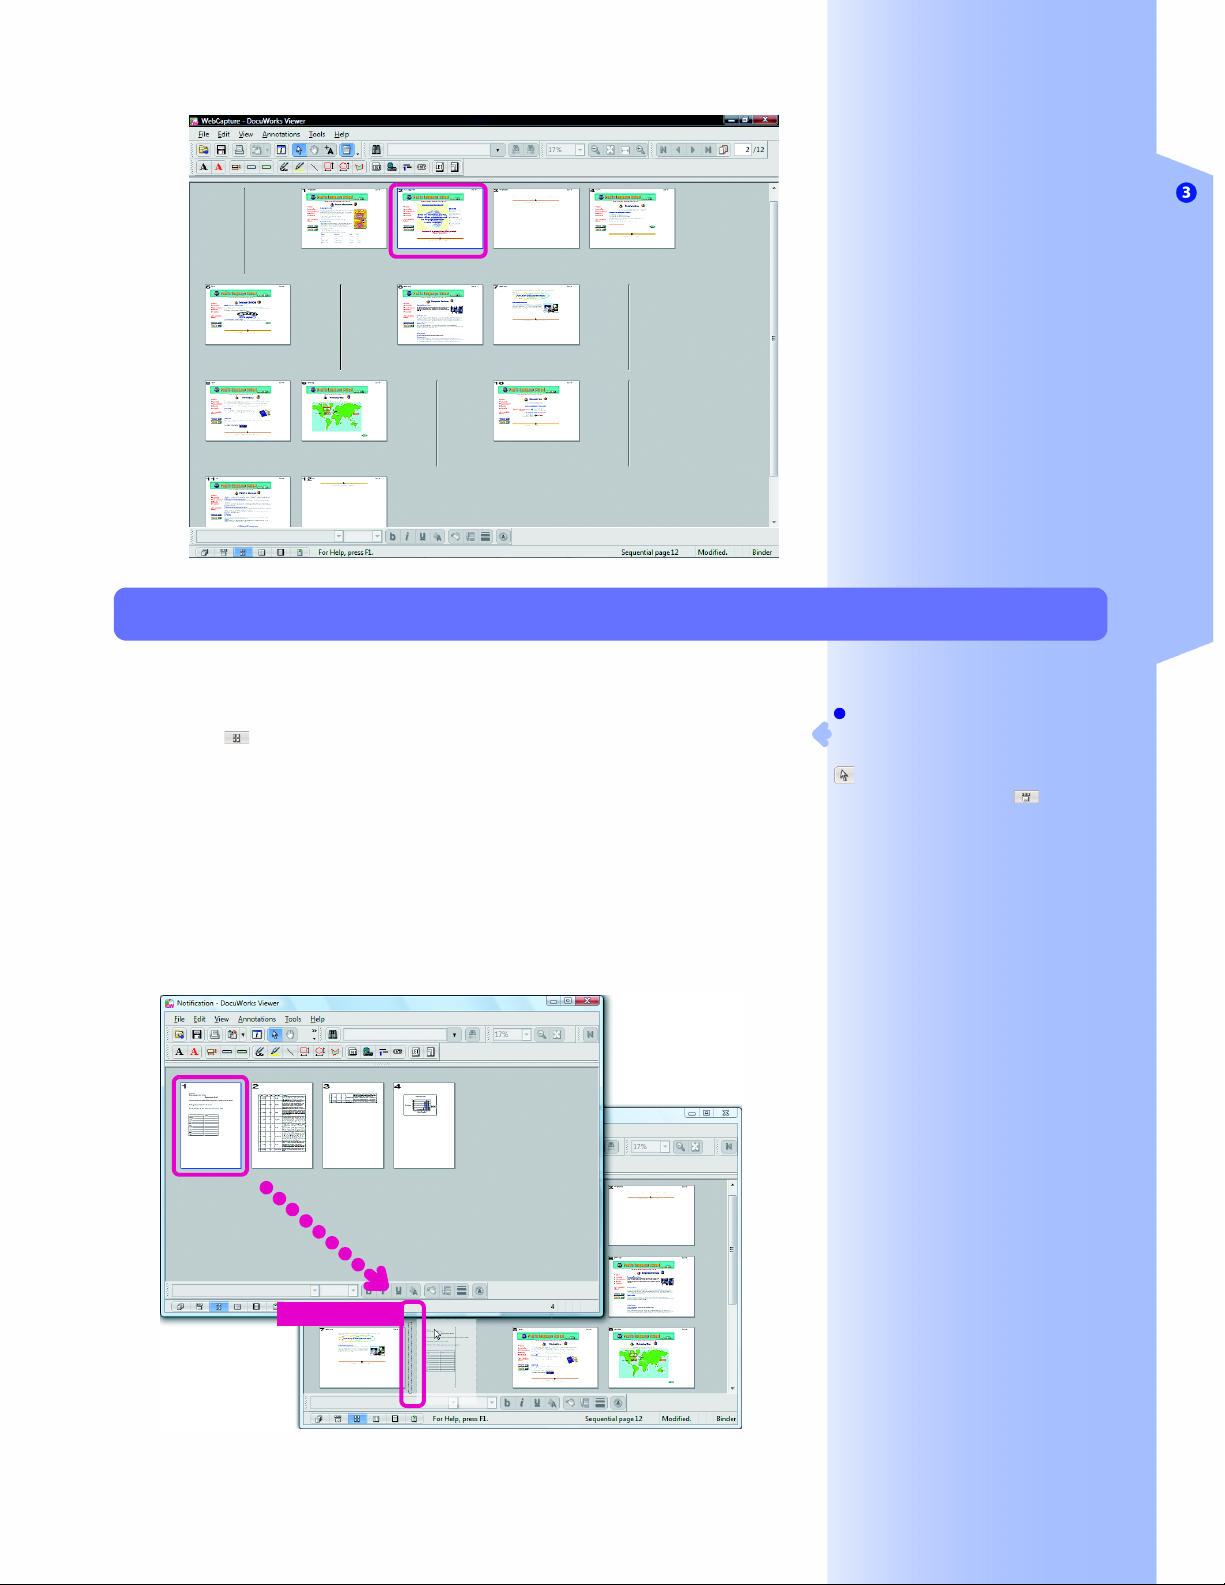
● Change to the Page Sorter view and click a page
Click either (Page Sorter) or (Page Sorter and Document)
on the Change Display Button to show the pages in Thumbnails
View. Click the page you want to see.
• In Page Sorter view
• In Page Sorter and Document view
The selected page is enlarged and shown in the bottom part of
the screen.
2.3 Viewer: How to see Viewer
DocuWorks: How to see DocuWorks
● Use the keyboard
Press the corresponding key to change pages.
• Previous page: <Page Up> key
• Next page: <Page Down > key
• First page: <Home> key
• Last page: <End> key
● Use the mouse wheel
Press the <Shift> key while rolling the mouse wheel to turn pages
one at a time. Roll the wheel forward to go to the previous page
and backward to go to the next page.
● Use the menus
Click [Previous Page] or [Next Page] on the [View] menu.
21
2.3 Viewer: How to see Viewer
InfoView: How to See InfoView
•Refer to Help Operating Environment of DocuWorks > Viewer > Make-up of InfoView (Viewer)
Note
Show/hide tabs
Select the check boxes of the names of tabs
to show under [Display Tabs in InfoView] on
the [View] menu. Clear the check box to hide
a tab.
Change the tab order
Drag and drop a tab onto another tab.
Reference
NotePad/Link
This is explained in "3.1 Viewer: Adding to
DW Documents (Annotating) (p.26)".
Binder
This is explained in "6.2 Desk: Creating
Binders and Organizing (p.78)".
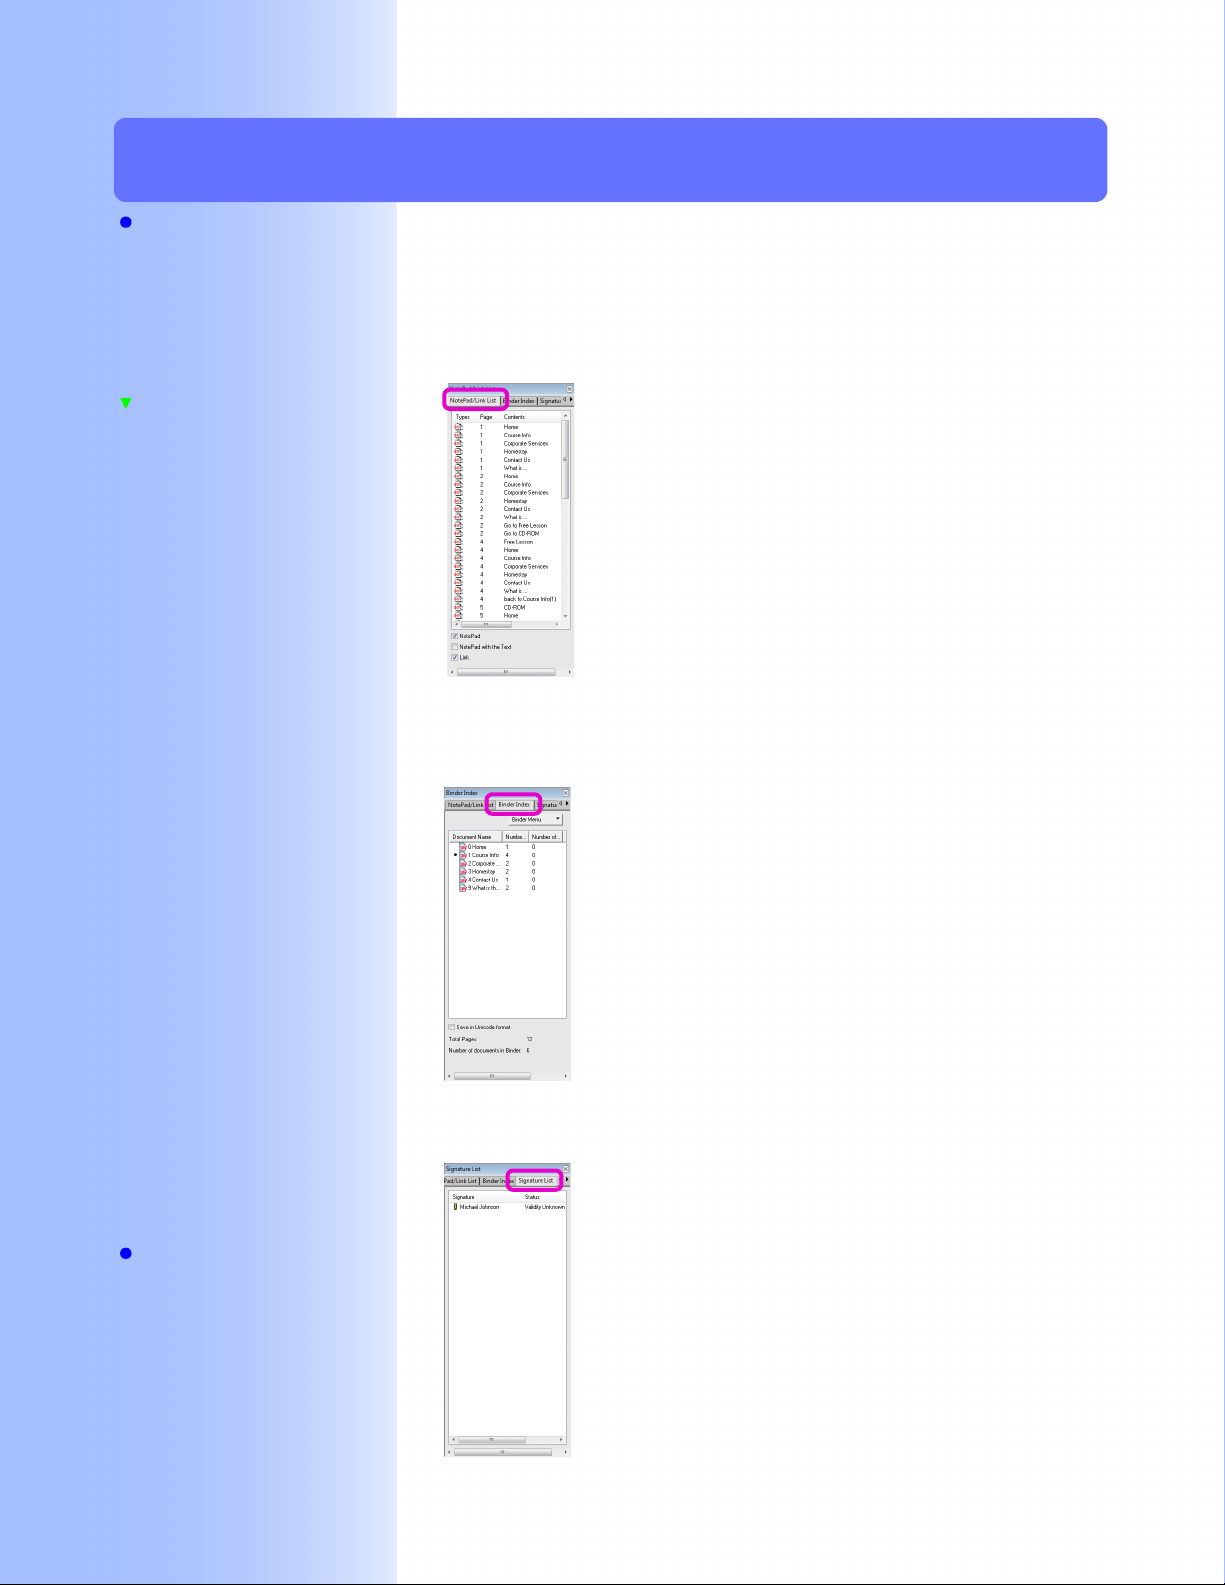
The 6 tabs in the InfoView can show you information about the
DW document or binder that is displayed.
The tabs let you manipulate the DW documents or binders.
• [NotePad/Link List] tab (Information about notepads and
links)
Any notepads or links in the DW document
are listed.
You can check the strings in notepads or
links. Double-clicking a notepad opens the
page where the notepad is stuck. Clicking
on a link jumps to the linked destination.
• [Binder Index] tab (Information about DW documents in a
binder)
If a binder is open, the DW documents in
the binder are listed.
[Binder Menu] lets you put DW documents
into binders, change the name of DW
documents in binders, and other things.
Signature
This is explained in "7.1 Types of Security
and Function Prohibition (p.90)".
Note
Verify Signatures
Check if the signature is reliable or if it is
edited after the signature.
22
• [Signature List] tab (Information about document signatures)
Any signatures in the DW document or
binder are listed on this tab. You can check
signature information or open signed
pages.
You can also use the menu that appears
when you right-click on the signature to
verify signatures or recover DW documents.
2.3 Viewer: How to see Viewer
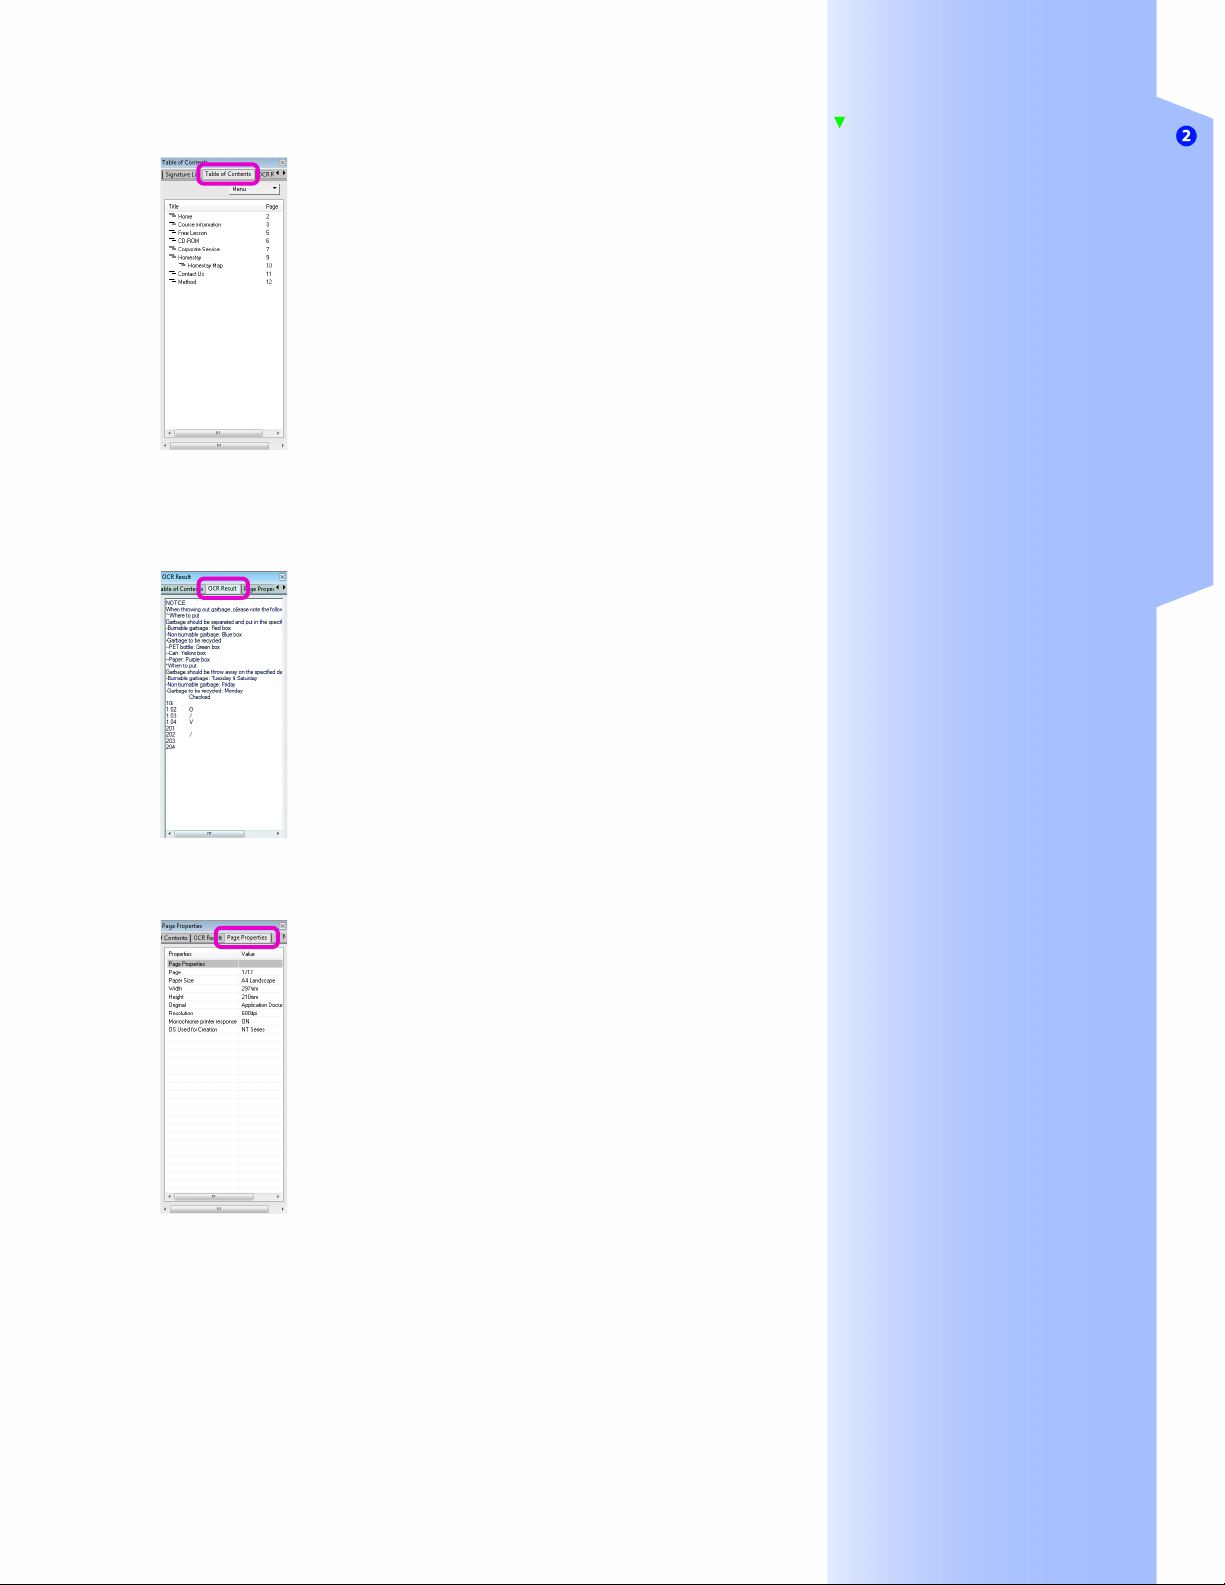
• [Table of Contents] tab (Information about title annotation)
Any title annotations in the DW document or
binder are listed on this tab. Double-clicking
a title annotation opens the page where it is
located. You can also change the title or
make other changes on the menu displayed
when right-clicking on the title annotation.
• [OCR Result] tab (Looking at DW documents scanned with
OCR)
The strings of the OCR results of a page
scanned using OCR are shown.
You can select, add, delete, and input text
in OCR results.
Reference
Table of Contents (Title Annotation)
This is explained in "3.4 Viewer: Creating
a Table of Contents (p.46)".
OCR
This is explained in "3.5 Desk/Viewer:
Converting Images of Text to Text Data
(p.51)".
DocuWorks: How to see DocuWorks
• [Page Properties] tab (Information about page properties)
This area shows the properties of open
documents.
You can check the paper size, type of data
of the original document, resolution, etc.
23

2.3 Viewer: How to see Viewer
24

Editing DW Documents
Editing DW Documents
Let's add information such as notepads and text to DW documents you've created and
samples included with DocuWorks.
Information can be added as if you were using paper documents.
This section also explains how to change the order of and remove pages in DW
documents.

3.1
Viewer: Adding to DW Documents (Annotating)
3.1
Note
Undo
Pressing the <Ctrl> + <Z> keys or clicking
[Undo] on the [Edit] menu enables you to
undo up to 10 antecedent operations.
Let's add notepads, and text as memos, and draw lines with a
marker on DW documents. Notepads, text, and markers are
known as "Annotations". This section explains the types of
annotations and how to add frequently used annotations.
What Can You Do with Annotations?
•Refer to Help Working with Annotations > About Annotations
You can annotate DW documents by clicking the buttons on the
Annotation Toolbar. After annotating, you can change the size,
color, and shape of certain annotations. Also, you can move,
Reference
Annotation Toolbar
The Annotation Toolbar shown on the
right is the default toolbar.
You can hide unnecessary buttons or add
the annotations you created.
This is explained in " Customizing the
Annotation Toolbar (p.38)".
copy, or delete the annotations.
● Annotation Toolbars
Annotation Toolbars have three types; Basic, Stamp, and
Shapes. This section explains what you can do with each button.
Basic Annotation Toolbar
1 2 3 4 6 7 8 9
10 11 1312 1614 15517
Note
What is OLE (Object Linking and
Embedding)?
OLE is a function that shares and exchanges
information among multiple Windows
applications. OLE objects are flags,
diagrams, and videos added to a DW
document using OLE functions.
26
1
Write text in black
2
Write text in red
3
Add yellow notepads without text
4
Add blue notepads with text
5
Add green notepads with text (*1)
6
Draw black lines by freehand
7
Highlight text yellow
8
Draw a straight black line
9
Draw a red rectangle
10
Draw a red ellipse
11
Draw a polygon with a red frame and a blue interior
12
Insert an OLE object
13
Insert links
14
Add title annotations to create a table of contents

3.1 Viewer: Adding to DW Documents (Annotating)
15
Add a date
16
Insert a portrait Letter blank page
17
Insert a blank page
(*1) The width of a notepad changes depending on the width of
entered text.
Stamp Annotation Toolbar
1
1
Add stamps
Shapes Annotation Toolbar
1
2
3
Editing DW Documents
4
1
Add figures
2
Add brackets or hand marks
3
Add block arrows
4
Add balloons, check marks, or X
Stamp and Shapes Annotation Toolbars are floating in the
default. Dragging them to the right, left, upper, or lower side fixes
them on the position to which you dragged.
Note
Show/hide Stamp or Shapes
Annotation Toolbars
To hide the toolbars, click .
To show them, click [View] and select
[Toolbars] > [Annotation Toolbar] > [2
Stamp] or [3 Shapes].
To make the toolbars float again, drag on the left side of the
toolbar.
27

3.1 Viewer: Adding to DW Documents (Annotating)
● Examples for using annotations
Ellipse
Link
Stamp
Polygon
Marker
Freehand
Line
Adding Notepads with Text
•Refer to Help Working with Annotations > Use of Annotations > Using NotePad Annotations
This section explains how to add notepads with text.
Reference
Print a DW document with notepads
When you want to print the DW document
including notepads, you need to select the
[Fit to the print area if the document size may
be larger than the paper size] and [Include
also overflowed annotation] check boxes in
the [Detailed Settings] dialog box which
opens on the [Print] dialog box. This is
explained in "4.1 Desk/Viewer: Printing
(p.58)".
1 Add a notepad
1
Click (NotePad/Blue/with Text) on the Annotation Toolbar.
The cursor changes to .
2
Click where you want to add the notepad.
1
Block Arrow
Text
NotePad
Callout
OLE
28
The notepad is added.
2 Enter text
1
Double-click .
The cursor changes to .
2
Delete .
2

3.1 Viewer: Adding to DW Documents (Annotating)
3
Enter text.
4
When you finish entering text, click outside the notepad.
Modifying Annotation Properties
•Refer to Help Working with Annotations > Work with Annotations (Common Operation) > Displaying or Modifying
This section explains how to modify the properties of annotations
using the notepad and text.
Annotation Properties
1 Change the color of notepads
1
Click [Pointing Mode] on the Standard Toolbar.
2
Click the brim of the notepad.
3
Click [Fill Color] on the Property Toolbar to display the
drop-down menu. And then click a color on the menu.
1
Note
Other Ways
Double-clicking the brim of the notepad
displays the [NotePad Properties] dialog
box. Select [Color] on the [Color and line]
tab, and click .
Editing DW Documents
2
[Other Colors]
Clicking [Other Colors] on the drop-down
menu displays the [Color] dialog box.
On this dialog box, you can specify the color
using a palette.
3
29

3.1 Viewer: Adding to DW Documents (Annotating)
Note
Change the size of notepads
Click the notepad, put the cursor on , and
drag the arrow to change the size.
Change the size of the text entry area
1. Click the text entry area.
2. Click [Starch Off] on the [Edit] menu.
3. Drag the text entry area.
The notepad color changes.
2 Change the size and color of text
1
Click the text you want to change.
2
Click [Font Size] on the Property Toolbar to display the
drop-down menu. And then click the text size on the menu.
1
2
The text size changes.
30

3.1 Viewer: Adding to DW Documents (Annotating)
3
Click [Text Color] on the Property Toolbar to display the
drop-down menu. And then click the text color on the menu.
The text color changes.
Note
[Other Colors]
Clicking [Other Colors] on the drop-down
menu displays the [Color] dialog box.
On this dialog box, you can specify the color
using a palette.
Editing DW Documents
Highlighting Text
•Refer to Help Working with Annotations > Use of Annotations > Using FreeHand Annotations
Let's highlight text to add emphasis.
1 Highlight text
1
Click (Marker/Yellow/7pt) on the Annotation Toolbar.
The cursor changes to .
2
Click the mouse where you want to start highlighting and
hold the button down as you highlight. Release the button
when finished.
The text is highlighted.
Highlight straight across
Highlighting text while holding down the
<Shift> key allows the highlighter to be
drawn vertically or horizontally.
Change the color and weight
Double-click the marker when in
Properties] dialog box. Change the value in
[Color] and [Weight] on the [Color and line]
tab, and click .
Note
[Pointing Mode] to display [FreeHand
31

3.1 Viewer: Adding to DW Documents (Annotating)
Drawing a Straight Line and Adding Arrows
•Refer to Help Working with Annotations > Use of Annotations > Using Line Annotations
Let's draw a line and add arrows.
1 Draw a line
1
Click (Line/Black/1pt) on the Annotation Toolbar.
The cursor changes to .
2
Note
Drawing lines in 15 degree increments
Hold down the <Shift> key while drawing a
line to select a direction in 15 degree
increments.
Click the mouse where you want to start the line and hold
the button down as you draw. Release the button when
finished.
A line is drawn.
Other Ways
Click on the line while clicking [Properties] on
the [Edit] menu.
[Style]
[Wide PolyLine]
[PolyLine]
[Fill]
2 Add an arrow
1
Double-click on a line.
The [Line Properties] dialog box opens.
2
Select the type and style of the arrow. You can also change
the color and width of the line as necessary.
3
Click .
2
3
An arrow is added to the line.
2
32

3.1 Viewer: Adding to DW Documents (Annotating)
Inserting Links
•Refer to Help Working with Annotations > Use of Annotations > Using "Link" Annotations
Annotations that jump to the link destinations are called "Link
Annotations". This is useful when you want to set the reference to
information related to the DW document.
● Settable link destinations
• Web pages
Editing DW Documents
Specify a web address (URL). Clicking the link button launches
a web browser and displays the specified web page.
• DW document pages
Specify a page number. You can specify a page number of
other DW documents and of DW documents within binders,
and a sequential page number of other binders. Clicking the
link button displays the specified page.
Note
List of links
A list of notepads and links in
the DW document is
viewable on the [NotePad/
Link List] tab in InfoView.
Double-clicking a link on the
list displays the page where it
is inserted. Also, rightclicking a link and clicking
[Jump to the Link Target] on
the displayed menu opens
the web page just like
clicking the link annotation.
33

3.1 Viewer: Adding to DW Documents (Annotating)
Note
Set a link to a link annotation
If a page number is specified in a link and the
page number changes, the page you want is
not displayed. To avoid this problem, insert a
link annotation on the page you want to
specify and link to the annotation.
• Other link annotations in documents
Specify another link annotation title. You can specify a link
annotation in other DW documents or binders. Clicking the link
button displays the page where the specified link annotation is
inserted.
• Files from other applications
Specify the file name. Clicking the link button launches the
related application and displays the specified file.
Set DW document text to a link
annotation
Select text with [Text Mode] selected and
right-click. Clicking [Create Link Annotation]
on the displayed menu creates a transparent
link annotation over the selected text.
• E-mail address
Clicking the link button launches the email software and opens
a new message with the specified e-mail address entered as
the recipient.
● Insert links
1 Display the [Link Properties] dialog box
1
Click (Link) on the Annotation Toolbar.
The cursor changes to .
2
Click where you want to add the link button.
The [Link Properties] dialog box opens.
34
2 Configure settings of the link
1
Click the [Advanced] tab.
2
Enter text to display on the link button in [Title].

3
Configure any settings necessary.
4
Select the [Link type].
5
Click .
1
2
3
5
4
A link settings dialog box opens.
The dialog box differs depending on the [Link type].
6
Configure the settings in the dialog box.
7
Click .
[Web page] [DocuWorks data]
6
[E-mail address]
6
7
7
3.1 Viewer: Adding to DW Documents (Annotating)
Note
Link to a page of other DW files
Set the file and page in the [DocuWorks File
7
6
Settings] dialog box.
Link to another link annotation
You must set the link annotation for the link
destination in advance. Select any [Link
type] for the link annotation.
The file and link annotation of the link
destination are set in the [DocuWorks File
Settings] dialog box for the link annotation in
the link source.
Editing DW Documents
[Other files]
6
8
Configure any settings on the other tabs if necessary.
7
35

3.1 Viewer: Adding to DW Documents (Annotating)
9
Click .
The link button is added to the DW document.
Note
When a link is enabled
The button is displayed in gray.
● Move link buttons and change link settings
When a link button is added, it is considered enabled.
8
9
Remove link buttons
After disabling a link, right-click the link
button with [Pointing Mode] selected and
click [Delete].
Or, press the <Delete> key.
Other Ways
You can move link buttons by pressing the
< >, < >, < >, or < >key while
pressing the <Alt> key.
Enable links
Click [Edit All Links/Titles] on [Link/Title] in
the [Tools] menu to clear the check.
When a link is enabled, clicking a link button jumps to the
specified destination. With this state, the link button cannot be
moved. The link must be temporarily disabled.
A link is disabled when you click [Edit All Links/Titles] on [Link/
Title] in the [Tools] menu. When a link is disabled, the button is
displayed in white.
• Moving links
After disabling a link, click the link button with [Pointing
Mode] selected and move it.
• Editing links
After disabling a link, double-click the link button with
[Pointing Mode] selected. When the [Link Properties] dialog
box appears, edit the link as necessary.
36

3.1 Viewer: Adding to DW Documents (Annotating)
Adding the Same Annotation Repeatedly
•Refer to Help Menus and Dialog Boxes > Viewer > Menu > [Annotations] > [Continuous Annotation Mode]
● Double-click a button on the Annotation Toolbar
Double-click the button on the Annotation Toolbar you want to
add repeatedly.
The annotation of the button you double-clicked can be added
repeatedly.
Note
Repeat
Pressing the <Ctrl> + <Y> keys repeats the
current operation. After adding an
annotation, the same annotation will be
added.
However, you cannot decide where to add.
Editing DW Documents
To remove this setting, click another button on the Standard
Toolbar or Annotation Toolbar.
● Click [Continuous Annotation Mode]
Selecting [Continuous Annotation Mode] on the [Annotations]
menu enables you to add annotations repeatedly.
When adding another annotation, click [Continuous Annotation
Mode] to deselect on the [Annotations] menu.
37

3.1 Viewer: Adding to DW Documents (Annotating)
Customizing the Annotation Toolbar
•Refer to Help Working with Annotations > Customize Annotation Tools
Let's customize the Annotation Toolbar to make it easier to use.
Note
Customize the entire toolbar
• Use the menu displayed when rightclicking on the toolbar and the dialog box
displayed when clicking [Customize].
● Add user created annotations to the Annotation Toolbar
Add user created annotations to the toolbar to make repeated
use easier.
1 Display the [Add to Annotation Toolbar] dialog
box
1
• Click [Toolbar Options] > [Add or
Remove Buttons] on the Standard Toolbar
and customize the toolbars using the
displayed menu.
Click on the Standard Toolbar to enter Pointing Mode.
2
Click the annotation you want to add to the toolbar.
[Decide shape when pasting]
The name changes depending on the
annotation to add. For example, it will be
[Decide character string when pasting] when
adding text.
3
Click [Add to Annotation Toolbar] on the [Annotations]
menu.
The [Add to Annotation Toolbar] dialog box opens.
2 Add to the Annotation Toolbar
1
Enter a [Name].
2
Click [Decide shape when pasting] to decide the shape
when pasting.
3
Select the Annotation Toolbar you want to add to from
[Annotation toolbar].
4
Click .
4
1
2
3
The button is added to the Annotation Toolbar.
Click the button to add the registered annotation.
38

3.1 Viewer: Adding to DW Documents (Annotating)
● Hide buttons on the Annotation Toolbar
You can hide unused annotation buttons on the toolbar to
streamline the screen.
1 Display the [Annotation Toolbar Options] dialog
box
Click [Annotation Toolbar Settings] on the [Tools] menu.
The [Annotation Toolbar Options] dialog box opens.
Editing DW Documents
2 Hide annotations
1
Click the tab with the annotation to hide.
2
Click to the left of the button you want to hide so it
changes to .
3
Click the button.
1
2
The [Toolbar Options] dialog box appears.
4
Click .
Note
Delete buttons on the Annotation
Toolbar
Click the annotation to delete, and press the
<Delete> key.
Other Ways
Click [Exit] from the [File] menu.
3
Use the customized Annotation
Toolbar on other PCs
Copy a file named "Annotation Toolbar
Name.ann" which is located in
"Documents\Xerox\DocuWorks\DWFolders"
to the same location on other PCs to use it.
The selected tool buttons are no longer displayed.
39

3.2
Viewer: Moving and Deleting Pages
•Refer to Help Basic Operations of Viewer > Work on Pages > Copying, Moving, or Deleting
Pages
3.2
Note
Undo
Pressing the <Ctrl> + <Z> keys or clicking
[Undo] on the [Edit] menu enables you to
undo up to 10 antecedent operations.
Let's move pages to change the order and delete unnecessary
pages. How to copy pages is explained in Note.
Moving Pages Within a DW Document
Note
Other Ways
Double-click a page of a DW document with
[Pointing Mode] selected.
You can also move pages in (Page
Sorter and Document).
Copy Pages
Drag and drop a page onto the location you
want while holding down the <Ctrl> key.
1 Move pages
1
Click (Page Sorter) on the Change Display Button.
A DW document is displayed in Thumbnails View.
2
Drag and drop the page to move onto the desired location.
The guideline is displayed on the point you drag the page to.
2
Guideline
40
1
The page is moved.
Moving Pages into Other DW Documents
3.2 Viewer: Moving and Deleting Pages
Editing DW Documents
1 Display pages in Page Sorter view
Click (Page Sorter) on the Change Display Button both
on the DW documents with the page you want to move
from and to.
The pages of the DW documents are displayed in Thumbnails View.
2 Move the page
Drag and drop the page to move into the desired position
in the new document.
The guideline is displayed on the point you drag the page to.
Note
Other Ways
Double-click a page of a DW document with
[Pointing Mode] selected.
You can also move pages in (Page
Sorter and Document).
Copy pages to a DW document
You can copy pages by holding down the
<Ctrl> key and dragging and dropping the
pages onto the window of the DW document
to which you copy the pages.
Create another DW document from
pages
Drag and drop pages onto Explorer or
Desktop.
Guideline
The page is moved.
41

3.2 Viewer: Moving and Deleting Pages
Deleting Pages
Note
Other Ways
• Click [Delete] on the [Edit] menu.
• Right-click on the page and click [Delete]
on the displayed menu.
● Delete pages one at a time
1 Display the page you want to delete
Display the page you want to delete using the Page Up/
Down Toolbar.
2 Delete pages
1
Press the <Delete> key.
A dialog box to confirm whether to delete the page opens.
2
Click .
The displayed page is deleted.
● Delete multiple pages at once
1 Display pages in Page Sorter view
Click (Page Sorter) on the Change Display Button.
The display is changed.
42

3.2 Viewer: Moving and Deleting Pages
2 Select the pages to delete
Press the <Ctrl> key while clicking pages you want to
delete.
Note
Select consecutive pages to delete
To select consecutive pages, click on the
first page you want to delete and while
holding down the <Shift> key, click on the
last page.
Editing DW Documents
3 Delete pages
Press the <Delete> key.
The selected pages are deleted.
43

3.3
Viewer: Inserting Titles and Page Numbers
•Refer to Help Basic Operations of Viewer > Operation on DocuWorks Documents > Setting Up
Headers and Footers
3.3
Reference
What is a binder?
Binders allow you to collect and store DW
documents together but individually. How
to operate on binders is explained in "6.2
Desk: Creating Binders and Organizing
(p.78)".
Stack DW documents
You can stack multiple DW documents
into a single document. This is explained
in " Stacking DW Documents (p.74)".
You can add header/footer text strings, images, and page
numbers for DW documents and binders. This is useful for adding
titles and sequential page numbers when creating a single DW
document or a binder from multiple files.
<Examples of using page numbers>
Page number: 1-3
Create DW documents
Stack
Specify the sequential page numbers from 1 to 12 and the
common headers.
Page number: 1-5
Page number: 1-4
<Examples of inserting items>
Margins
Header
44
Top Image
Page number
Footer
1 Display the [Setup Header/Footer] dialog box
Click [Setup Header/Footer] in [Header/Footer] on the
[Tools] menu.
The [Setup Header/Footer] dialog box opens.
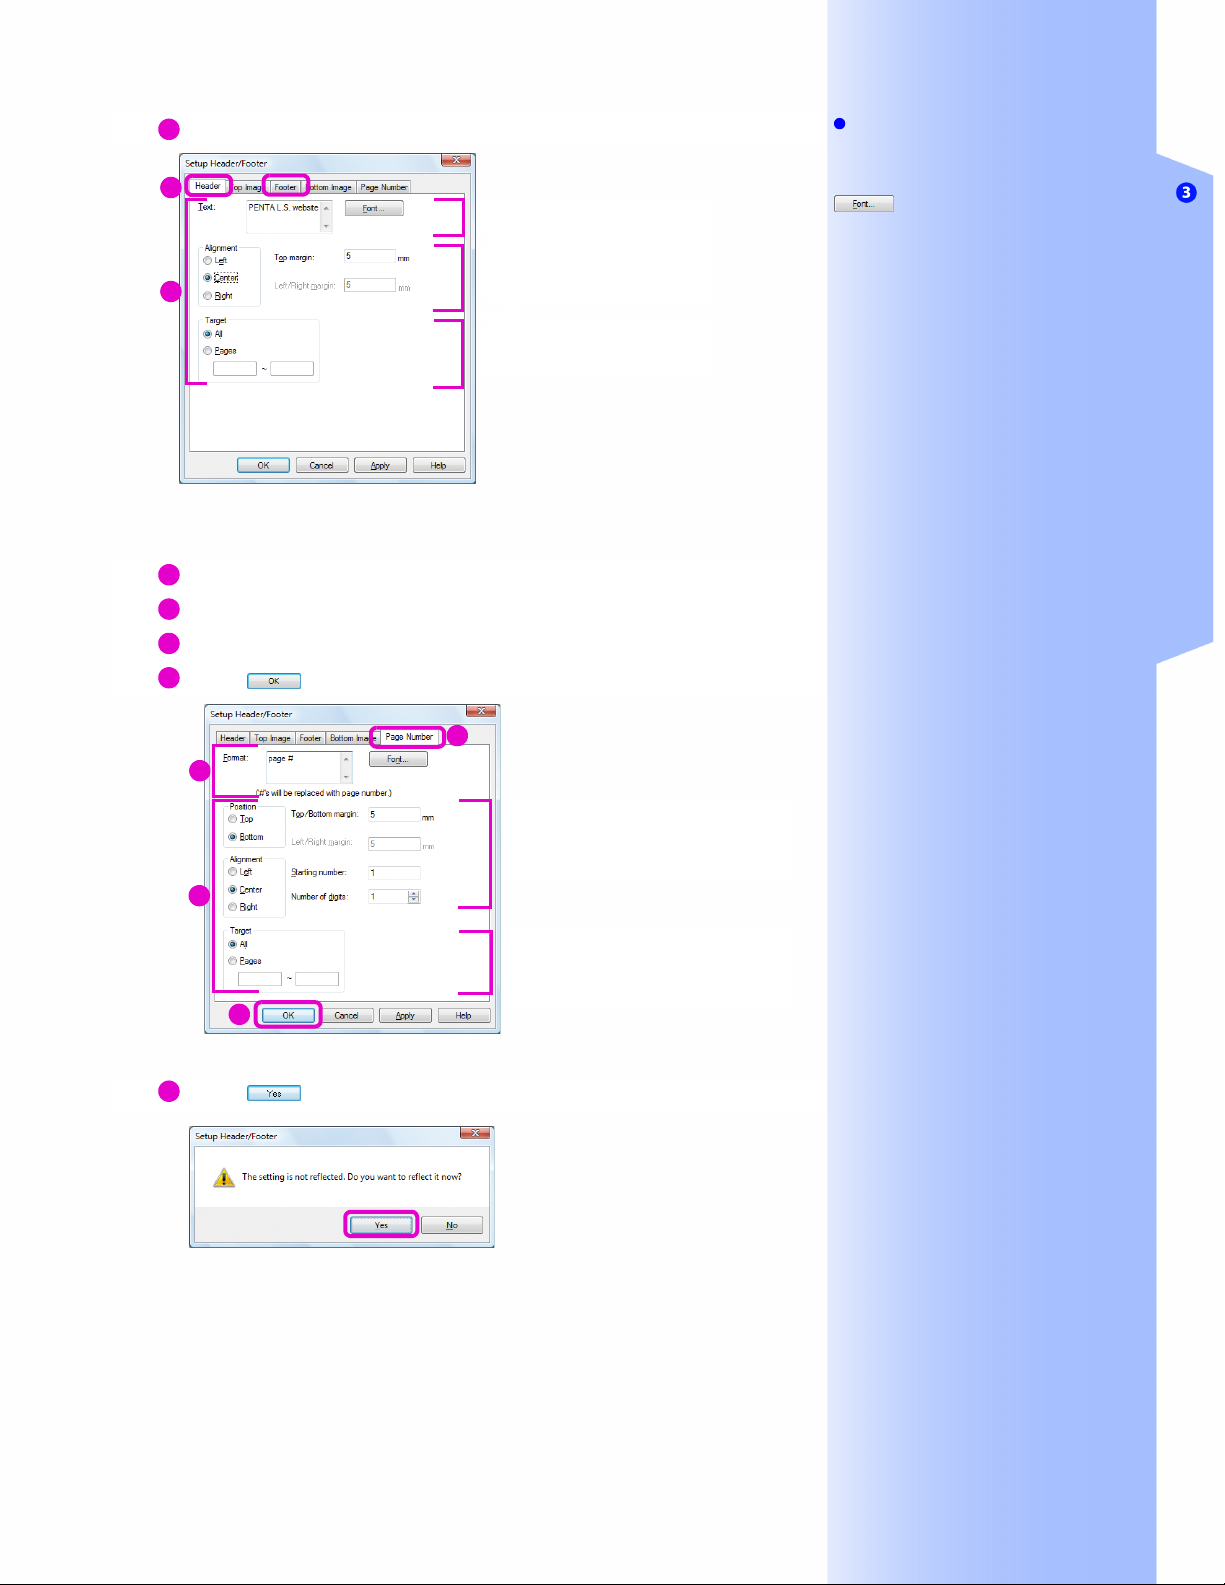
2 Configure the titles
1
Click the [Header] or [Footer] tab.
3.3 Viewer: Inserting Titles and Page Numbers
2
Configure any settings necessary.
1
2
3 Set the page number
1
Click the [Page Number] tab.
2
Configure the page number format if necessary.
3
Configure any other settings as necessary.
4
Click .
2
3
Enter text for the title.
Set the position of the title.
Set the page to add a title to.
1
Set the position of page numbers.
Set the page to add a number to.
Note
Specify the text style for header,
footer, or page number
In the dialog box that appears when you click
, you can set the text style.
Set the title image
Click the [Top Image] and [Bottom Image]
tabs and configure the settings.
Only BMP files under 9.5MB can be
specified here.
Page number format
When a single-byte "#" is entered in [Format]
on the [Page Number] tab, the "#" represents
the page number.
For example, inputting "-#-" displays "-63-".
Titles and page numbers
Titles and page numbers are not
automatically updated when DW documents
are stacked or the page order is changed.
Click [Update Header/Footer] in [Header/
Footer] on the [Tools] menu.
Delete titles and page numbers
Click [Delete Header/Footer] in [Header/
Footer] on the [Tools] menu.
Editing DW Documents
4
A dialog box to confirm whether to apply the settings opens.
5
Click .
The set title and page number are reflected in the DW document.
45

3.4
Viewer: Creating a Table of Contents
•Refer to Help Basic Operations of Viewer > Creating and Deleting a Table of Contents
3.4
Reference
What is a binder?
Binders allow you to collect and store DW
documents together but individually. This is
explained in "6.2 Desk: Creating Binders and
Organizing (p.78)".
You can easily create a table of contents from DW documents
and binders. A table of contents is useful if a DW document or a
binder has been created from multiple files. Set the title with a
"Title Annotation" first, and create a table of contents.
Creating a Table of Contents
Note
When InfoView is not shown
Click [Toggle InfoView] on the Standard
Toolbar.
The [Table of Contents] tab in InfoView
Setting title annotations while displaying the
[Table of Contents] tab in InfoView allows
you to see how the table of contents looks.
1 Display the [Table of Contents] tab in InfoView
Click on InfoView and the [Table of Contents] tab to
display the tab.
Position of title annotations
Always adding title annotations in the same
position, for example, on the left, helps to
increase readability.
46
2 Add title annotations
1
Display the page you want to add a title to.
2
Click (Title/Level1) on the Annotation Toolbar.
The mouse cursor becomes .
3
Click where you want to add the title annotation.
The [Title Properties] dialog box opens.
4
Click the [Advanced] tab.

5
Enter a text string to make a table of contents in [Title].
6
Set [Level].
7
Configure settings on the [Position and size] and [Custom]
tabs as necessary.
8
Click .
7
5
6
7
4
3.4 Viewer: Creating a Table of Contents
Note
[Title]
While in [Text Mode], copy the title in the
DW document and paste it in [Title].
[Level]
Set to create a table of contents structured
like the one in this book.
1. Creating DW Documents
1.1 Desk: Creating DW Documents
Creating a DW document from an
application file
Creating a DW document from an
image file
Set as follows to create a structure like that
above. Enter "1." from above in [Title].
• 1. Create DW documents: Level 1
• 1.1 Desk: Creating DW Documents: Level
2
• Creating a DW document from an
application file: Level 3
• Creating a DW document from an image
file: Level 3
Editing DW Documents
8
The title annotation is added.
9
Add title annotations to other pages.
3 Create a table of contents
1
Click [Create Table of Contents] on [Table of Contents] in
the [Tools] menu.
The [Create Table of Contents] dialog box opens.
2
Configure any settings as necessary.
3
Click .
2
3
[Color and line]/[Font] tab
The settings on the [Color and line] and
[Font] tabs cannot be configured because
title annotations are transparent.
The table of contents is created on the point you specified in
[Location to Insert Table of Contents] on the [Create Table of
Contents] dialog box.
47

3.4 Viewer: Creating a Table of Contents
Changing Title Annotations Using InfoView
Note
Recreate a table of contents
If a table of contents already exists and you
click [Create Table of Contents] on [Table of
Contents] in the [Tools] menu, a dialog box
opens asking you to confirm the deletion of
the existing table of contents. Click
to delete.
Delete a table of contents
Click [Delete Table of Contents] on [Table of
Contents] in the [Tools] menu.
Title annotations can be changed on the menu that appears when
you right-click on the [Table of Contents] tab in InfoView.
• [Go To Page]
Shows the page with the title annotation.
• [Move Up]
Moves it one position up.
• [Move Down]
Moves it one position down.
48
• [Level Up]
Moves it one level up.
• [Level Down]
Moves it one level down.
• [Rename]
Changes the title.

3.4 Viewer: Creating a Table of Contents
Changing, or Copying Title Annotations on Pages
Title annotations are transparent and their position is fixed. Unfix
a title annotation to move it.
1 Display a title annotation and unfix it
1
Right-click on the page with the title annotation to edit and
on the menu that appears click [Edit All Links/Titles].
The title annotation is displayed.
Editing DW Documents
2
Right-click on the title annotation and click [Starch Off] on
the menu that appears.
The title annotation can now be edited.
49

3.4 Viewer: Creating a Table of Contents
2 Change, copy, move, or delete
Change, copy, move, and delete title annotations as
necessary.
To change the titles or levels, right-click the title
annotation and click [Properties] on the menu that
appears.
To copy, hold down the <Ctrl> key and drag the title.
To delete, click the title annotation and press the <Delete>
key.
50

3.5
Desk/Viewer: Converting Images of Text to Text Data
Editing DW Documents
3.5
DW documents created from paper documents cannot be treated
as text data, for the text is part of image data. OCR converts text
in DW documents created from paper documents into text data,
and enables you to use the data.
Note
What is OCR?
OCR stands for "Optical Character
Recognition". It converts images of text into
digital text data through a character
recognition process.
Things that Can Be Done with OCR Processed DW Documents
•Refer to Help Basic Operations of Viewer > Use of Data on Pages > The OCR Processing of an Image Data
● Edit OCR results
Select a text string shown on the [OCR Result] tab of InfoView in
Viewer and copy, cut, paste, delete, or input text. You can use the
results of the edits when copying with [Text Mode] selected and
when searching for text.
● Search for a text string
When searching for text string in Desk or Viewer, you can also
search OCR processed documents.
Note
Edit OCR results
Even if you edit the OCR results, the results
of the edits are not reflected on the text
displayed on DW documents.
Reference
Searching for a text string
This is explained in "5 Searching DW
Documents (p. 65)".
Desk: OCR Processing
•Refer to Help Use of Plug-ins > OCR
1 Display the [OCR] dialog box
Select a DW document or a binder and then click [OCR]
on the Standard Plug-in Toolbar.
The [OCR] dialog box opens.
2 Configure settings (as necessary)
1
Click .
Note
Select DW documents or binders
You can select multiple DW documents and
binders.
DW documents or binders that can do
OCR
DW documents and binders that have
"Image Document" as the [Original] in the
[Page Properties] tab in Viewer InfoView.
51

3.5 Desk/Viewer: Converting Images of Text to Text Data
The [OCR Setting] dialog box opens.
2
Configure any settings if necessary.
Note
[Reduce noise of image before OCR]
under [Option for OCR]/[Perform
automatic deskew] of the [OCR
Advanced Settings] dialog box
To display the [OCR Advanced Settings]
dialog box, click .
When selecting these check boxes, do
Noise Reduction/Deskew so the text is
easier to recognize during OCR processing.
This does not effect the DW document.
[OCR processing for color image]
Select either recognition or speed as the
priority when OCR processing. [Put priority
on recognition] enables recognition of
outline text, faint text, and text superimposed
on a background.
Specify recognition area
You can select the area of the page for
recognition when using the internal OCR
and [Specify the area and recognize] on the
[General] tab in the [OCR Advanced
Settings] dialog box is selected.
3
Click .
2
The [OCR] dialog box re-opens.
3 Do OCR processing
3
If OCR is done again to the same page
The existing data is lost and the new OCR
data overwrites the existing OCR data.
1
Click .
The process starts and the progress of the recognition process is
shown in the [OCR] dialog box.
2
When the process finished, click .
2
52

3.5 Desk/Viewer: Converting Images of Text to Text Data
Viewer: OCR Processing
•Refer to Help Basic Operations of Viewer > Use of Data on Pages > The OCR Processing of an Image Data
1 Display the [OCR] dialog box
Click [OCR] on the [Tools] menu.
The [OCR] dialog box opens.
Note
DW documents and binders that can
do OCR
DW documents and binders that have
"Image Document" as the [Original] in the
[Page Properties] tab in InfoView.
2 Do OCR processing
1
Configure any settings as necessary.
2
Click .
Editing DW Documents
1
2
When the process finished, the text string recognized by OCR
process is shown in the [OCR Result] tab on InfoView.
53

3.5 Desk/Viewer: Converting Images of Text to Text Data
Viewer: Viewing or Copying OCR Results
•Refer to Help Basic Operations of Viewer > Use of Data on Pages > The OCR Processing of an Image Data
Note
DW documents and binders that have
done OCR
[OCR Processed] is displayed on the Status
bar of Desk when clicking it in Thumbnails
View.
When InfoView is not shown
Click [Toggle InfoView] on the Standard
Toolbar.
When the [OCR Result] tab is hidden
Click [View] and select [Display Tabs in
InfoView] > [OCR Result Tab].
OCR Result
The text strings may get garbled due to the
condition of the paper documents, the
accuracy of the scanner, and the settings of
OCR process.
If there are garbage characters, edit the text
strings in the [OCR Result] tab.
1 View results
Click and the [OCR Result] tab in InfoView to display the OCR
results.
The text strings recognized by OCR processing are shown.
Other Ways
Click and drag the cursor on text string
to copy on a page. Lines or pages of text are
selected.
2 Copy and paste text string (as necessary)
1 Drag the cursor on text string to copy on the [OCR Result] tab in
InfoView.
2
Click [Copy] on the menu that appears when you right-click on the
text.
The selected text string is copied.
1
2
54

3.5 Desk/Viewer: Converting Images of Text to Text Data
3
Paste the copied text string to application file.
Editing DW Documents
55

3.5 Desk/Viewer: Converting Images of Text to Text Data
56

Printing DW Documents
This chapter explains how to print DW documents.
Printing DW Documents
The basic procedure is the same as other software such as Office applications.
Some applicable printing methods are also presented.

4.1
Note
Other Ways
• Click [Print] on the Standard Toolbar.
• Click [Print] on the [File] menu.
Desk/Viewer: Printing
•Refer to Help Basic Operations of Desk > Print DocuWorks Documents
Let's print some DW documents.
Printing can be done from either Desk or Viewer.
Document sizes can be adjusted to fit the paper, and notepads
that stick out can be printed.
1 Display the [Print] dialog box
1
For Desk, select a DW document or a binder.
For Viewer, double-click a DW document or a binder to
open.
2
Press the <Ctrl> + <P> keys.
The [Print] dialog box opens.
2 Print the DW document
Basic Operations of Viewer > Print DocuWorks Documents
4.1
Print including NotePad annotation
Configure settings in the [Detailed Settings]
dialog box. This is explained in page 59.
Print Preview
Click [Print Preview] on the [File] menu in
Viewer to see the preview.
1
Configure any settings in the [Print] dialog box if necessary.
2
Click to configure any settings in the [Detailed
Settings] dialog box if necessary.
3
Click .
1
32
Printing starts.
58

[Fit to paper size]
Select this option to enlarge or shrink the DW document to the size of the paper. For example, if a DW document
is made of a mixture of A2, A4, and postcard size documents, they can all be adjusted and printed on A4 size
paper.
4.1 Desk/Viewer: Printing
A4
A4
A4
A4 Postcard A2
2
[Include also overflowed annotation]
If this option is selected, the data is shrunk so that annotations that hang off the edge are
printed.
Printing DW Documents
Print area
[Fit to the print area if the document size may be larger than the paper size]
Select this option to automatically shrink data on a page to the size that the printer can print. This is useful to
print fax headers or information on the edges of DW documents. This check box is cleared in the default
setting.
Print area
59

4.2
Desk: Printing with the Same Settings
4.2
Note
Other things you can do
Some printers can quickly print black and
white, and color/grayscale images.
To repeatedly use the same settings such as "duplex and 2 Up"
when printing DW documents or binders, it is convenient to
create a button with the Easy Printer plug-in. Once the button has
been set, just click it to print as those settings.
Setting the Easy Printer Plug-in
•Refer to Help Use of Plug-ins > Easy Printer > Setting Up the Easy Printer Plug-in
Important
Saved print settings
It depends on the selected printer driver and
its version. Be sure to check your working
environment.
1 Add the Easy Printer plug-in
1
Click [Setting] in [Plug-in] on the [Tools] menu on Desk.
The [Plug-in Setting] dialog box opens.
2
Click [Easy Printer] on [Available Plug-ins] and click .
Note
[Save the printer name and the
printing settings.]/[Save only the
printer name.]
[Save the printer name and the printing
settings.] saves the settings in the [Print
Setup] dialog box, but [Save only the printer
name.] does not.
We recommend to select [Save the printer
name and the printing settings.].
60
The [Selecting the Save mode] dialog box opens.
2 Configure settings
1
Click .
The [Print Setup] dialog box opens.

4.2 Desk: Printing with the Same Settings
2
Set the printer, paper size, one/both-side printing, N Up, etc,
and click .
3
Enter a suitable printer name such as "Letter/Duplex/2up" in
the Easy Printer plug-in that was added to [Current Plug-in].
4
Click .
4
Printing DW Documents
3
The Easy Printer button is added to the Standard Plug-in
Toolbar.
Note
Change icons
Click to change the icons on the
Plug-in Toolbar.
Multiple Easy Printers
You can set multiple Easy Printers and use
them as applicable. When registering an
Easy Printer set the name and icon
according to the settings so they are easy to
differentiate.
61

4.2 Desk: Printing with the Same Settings
Using the Easy Printer Plug-in to Print
•Refer to Help Use of Plug-ins > Easy Printer > Executing the Easy Printer Plug-in
Important
When a printer driver has been
updated
Reconfigure the Easy Printer plug-in.
Click the DW document or binder to print, and then click the set
Easy Printer button to print as the specified settings.
62

4.3
Desk: Printing Several Pages on One Page
•Refer to Help Use of Plug-ins > Page Layout
4.3
Printing DW Documents
Try using the [Page Layout] plug-in to print multiple pages on a
single page.
You can use the [Page Layout] plug-in to enlarge or shrink the
pages to fit the paper size and change the order of pages for a
booklet.
You can improve printing efficiency by making page layouts in
advance for printing DW documents or binders that are printed
with the same settings.
● To print a 2 Up DW document
[Page Layout] plug-in
● To print a booklet with a printer that does not have a
booklet function
[Page Layout] plug-in
Duplex printing
Note
Execute the [Page Layout] plug-in
Double-click on a DW document or a binder,
and click [Page Layout] on the Standard
Plug-in Toolbar.
Name of DW document after layout is
arranged
The name of a DW document created using
the [Page Layout] plug-in has "_NUp" or
"_Booklet" added to it. The original DW
document or binder is not affected. When
two pages are put on one page, the name
will be "_2Up", and when four pages are put
on one page, it will be named as "_4Up".
What is a booklet?
A booklet is a document printed on both
sides of the page and folded in the middle
with numbered pages.
4
3
2
1
41
23
63

4.3 Desk: Printing Several Pages on One Page
64

Searching DW Documents
This chapter explains how to search DW documents.
The basic procedure is the same as other software such as Office applications.
Searching DW Documents
Some applicable search methods are also presented.

Viewer: Searching for Text
5.1
Let's search for a text string in a DW document. You can also
search for text strings in OCR results, and text annotations. You
cannot search for a text string that goes across a page break.
Searching Using the Find Toolbar
•Refer to Help Operating Environment of DocuWorks > Viewer > Description of Bars > Find Toolbar
The Find Toolbar searches through the entire document.
Note
Example procedure to copy and paste a
text string from a DW document
1. With [Text Mode] selected, select the
text string to search for.
2. Right-click on it and click [Copy] on the
displayed menu.
3. Right-click on the text box in Find Toolbar,
and click [Paste].
Other Ways
Press the <F3> key.
When searching for "A or B"
Separate the words with a space.
Example: FMC GCC
1 Search
1
Enter the text string to search for in the Find Toolbar text
box.
2
Click [Find Next].
1 2
5.1
If text annotation is found
The entire annotation is selected.
If text in OCR results is found
Lines or pages are selected.
66
If the text string is found, it is selected.
To continue searching, click [Find Next].
If the text string is not found, the dialog box shown below is
displayed. Click .

5.1 Viewer: Searching for Text
If the text string is not found though you continued search, the
dialog box shown below is displayed. Click .
Searching Using the [Find] Dialog Box
•Refer to Help Basic Operations of Viewer > Use of Data on Pages > Searching for Text String
The [Find] dialog box search specifies search target and text type
to ignore.
1 Display the [Find] dialog box
Click [Find] on the Standard Toolbar.
The [Find] dialog box opens.
2 Search with conditions
1
Enter the text string to search for in [Text].
2
Specify the search target and text type to ignore.
3
Click .
1
3
Note
From the second search
The text string from the previous search is
shown in the [Text String] text box. A
maximum of 10 text strings from past
searches can be recorded.
Note
Other Ways
• Click [Find] on the [Edit] menu.
• press the <Ctrl> + <F> keys.
Example procedure to copy and paste
a text string from a DW document to
search
1. With [Text Mode] selected, select the
text string to search for.
2. Right-click on it and click [Copy] on the
displayed menu.
3. Right-click on the text box and click
[Paste] on the displayed menu.
When searching for "A or B"
Separate the words with a space.
Example: FMC GCC
Searching DW Documents
2
When a text string is found, it is selected.
To continue searching, click [Find Next].
If the text string is not found, the dialog box shown below is
displayed. Click .
If text annotation is found
The entire annotation is selected.
If text string in OCR results is found
Lines or pages are selected.
Other Ways
Press the <F3> key.
67

5.1 Viewer: Searching for Text
Note
From the second search
The text string from the previous search is
shown in the [Text] box. A maximum of 10
text strings from past searches can be
recorded.
If the text string is not found though you continued search, the
dialog box shown below is displayed. Click .
68

5.2
Desk: Marking the Search Result
•Refer to Help Use of Plug-ins > Find and Mark
5.2
Searching DW Documents
When searching for a text string using the [Find and Mark] plug-in
on Desk, all the occurrences of the text string are annotated in
one operation.
It is convenient in the following points compared to the method
explained in "5.1 Viewer: Searching for Text (p.66)".
• You can keep the search result, because all the occurrences of
the text string are annotated.
• You can see the location of the searched text, because the
searched text string is marked with rectangle annotations and
the page is marked with notepad annotations.
Annotations are added to the copied version of searched DW
documents and binders. The original DW documents and binders
remain as they were.
1 Display the [Find and Mark] dialog box
Select a DW document or a binder to search on Desk, and
then click [Find and Mark] on the Standard Plug-in
Toolbar.
The [Find and Mark] dialog box opens.
Important
Text strings that cannot be searched
for
You cannot search for received stamp/
text annotations.
2 Find and mark
1
Enter the text string to search for.
2
Configure any other settings if necessary.
69

5.2 Desk: Marking the Search Result
Note
Set the annotation to use on the
search result
Click , and configure the settings in
the [Find and Mark Plug-in Settings] dialog
box that opens.
Search again in the search result
You can search in the search result
("Original document name-mark"). When
searching for another text string from the first
search, we recommend to click
and change the annotation color.
3
Click .
1
2
3
The search results are created separate from the original document
and named "Original document name-mark" on the Workspace if
the text string is found. Pages on which the text string being
searched for are found are annotated. The original DW document or
binder remains.
Example of searching for "FMC"
Rectangle (highlight found text.)
70
Notepad (attached to pages on which text is found. The found
text appears on it.)

Desk: Searching for Multiple DW
5.3
Documents
•Refer to Help Basic Operations of Desk > Search DocuWorks Documents
You can search for the key words of various items in DW
documents and binders. It is convenient when you have many
DW documents and binders. You can also search for DW
documents and binders with a certain text string in multiple DW
documents and binders.
5.3
Searching DW Documents
1 Display the [Find] dialog box
Click [Find] on the Standard Toolbar.
The [Find] dialog box opens.
2 Search with search conditions
1
Configure any items on one or more tabs.
2
Click .
Specify the updated date
and file size.
Specify document
names and locations
to search for.
You can specify
folders other than
the User Folder.
Specify a text string and
conditions to search for.
Specify the document properties set in
the [General] and [Custom] tabs on the
[Document Properties] dialog box.
1
2
Note
Other Ways
• Click [Find] on the [Edit] menu.
• Press the <F3> key.
• Press the <Ctrl>+<F> keys.
The [Document Properties] dialog box
Click [Properties] on the [File] menu in
Viewer to display the [Document Properties]
dialog box.
[Narrow down from the search result]
Select this check box to make the DW
documents and binders listed in [Search
result] to be search target.
View the search results as thumbnails
Click [View As Thumbnails] on the [View]
menu.
The [Frequently used conditions] tab
Register the search conditions specified in
the other tabs on the list, and specify the
conditions registered on the list in the other
tabs.
Configure the settings on the tabs in
their defaults
Click .
71

5.3 Desk: Searching for Multiple DW Documents
DW documents that satisfy the conditions are shown in [Search
result].
3 Open DW documents or binders that were found
Double-click a DW document or a binder in [Search
result].
When searching for text input in [Text] on the [Text] tab, the first text
string found is selected when the document is opened.
Examples of searching when entering "FMC" in [Text] on the [Text] tab
72

Organizing DW Documents
This chapter explains how to combine multiple DW documents into one on Desk.
This chapter also explains, how to link to folders that are not on Desk and how to add
folders to Desk in order to tidy up.
Organizing DW Documents
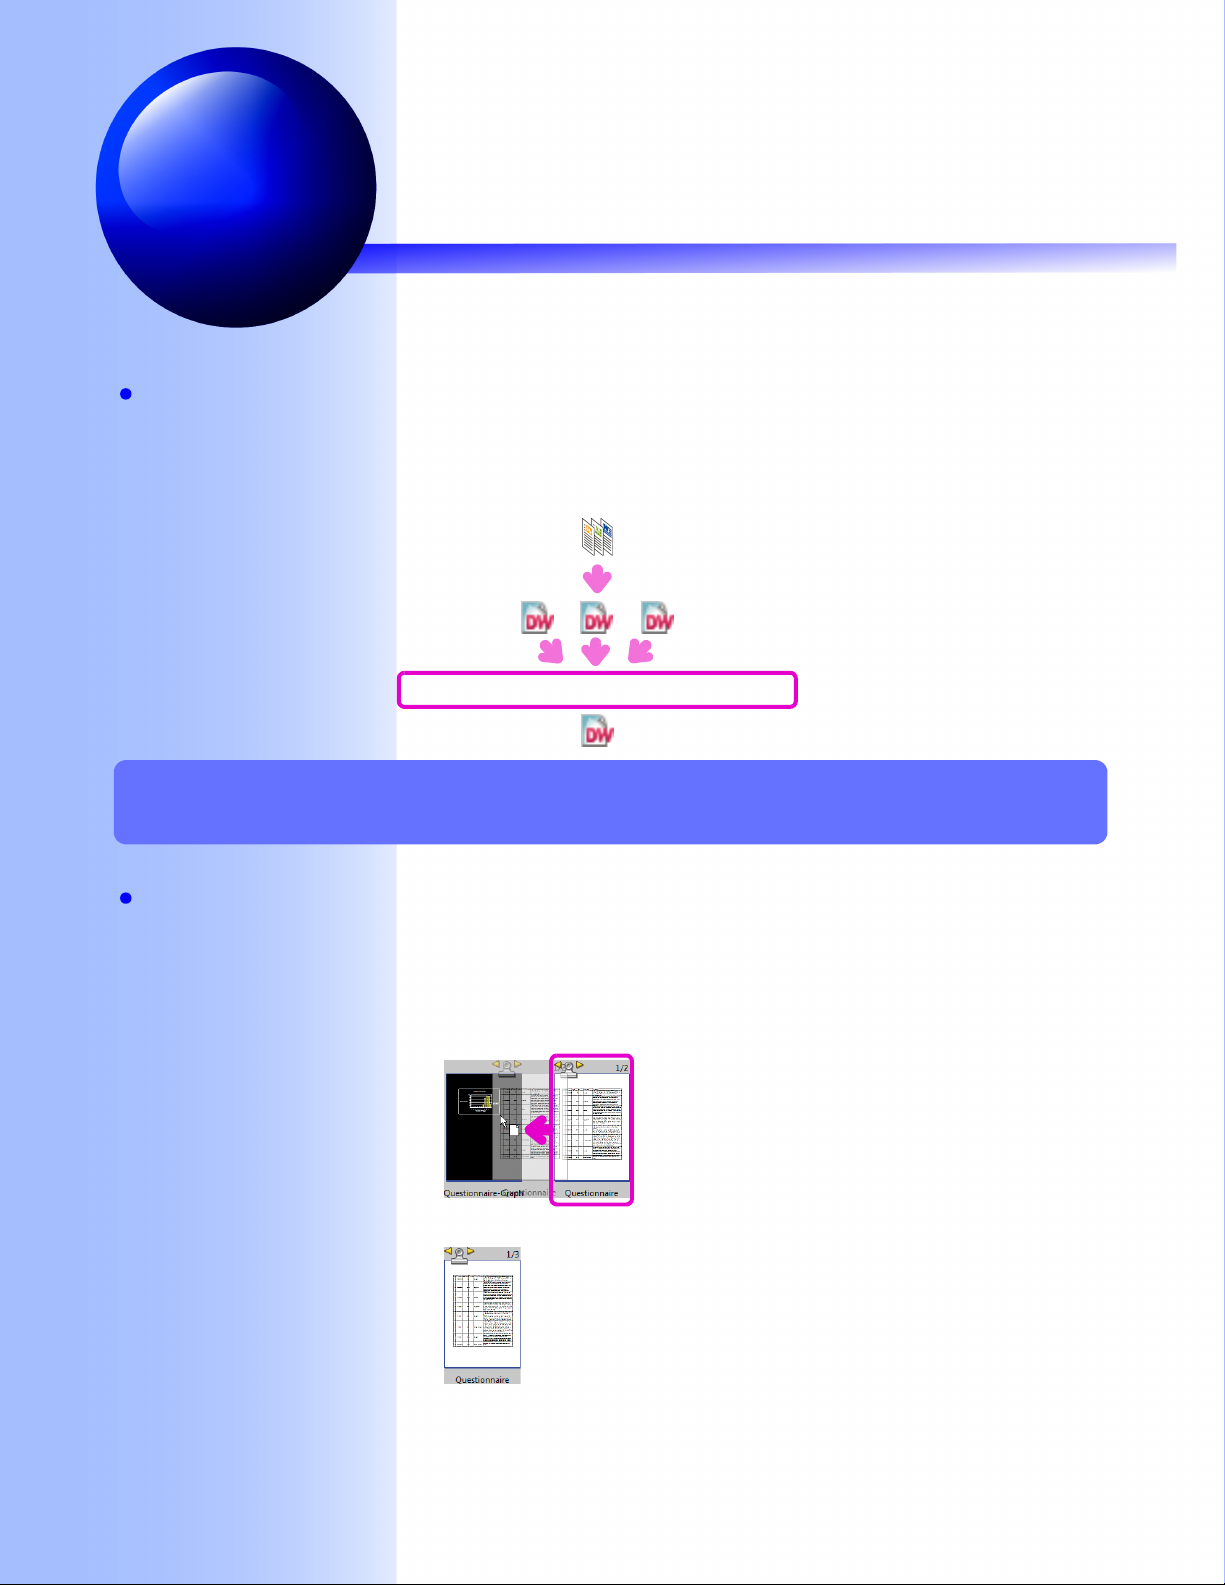
6.1
Desk: Stacking/Unstacking Multiple DW Documents
6.1
Note
Undo
Pressing the <Ctrl> + <Z> keys or clicking
[Undo] on the [Edit] menu enables you to
undo the last operation.
View modes
Stacking and unstacking can only be done in
Thumbnails View.
Let's stack multiple DW documents into a single DW document.
They can be stacked even if the paper size or orientation is
different.
Let's also try unstacking a DW document with multiple pages into
individual pages.
Stack DW documents and put them together.
Stacking DW Documents
•Refer to Help Basic Operations of Desk > Operation on DocuWorks Documents > Stacking Documents
DW documents are stacked in the two ways.
Note
Files that cannot be stacked on DW
documents
• Protected DW documents
• Signed DW documents
• Files other than DW documents
Drag and drop
• You can drag and drop multiple DW
documents.
• The DW document you dragged and
dropped will be the first part of the stacked
DW document.
PDF files
Stacking and unstacking are possible
between PDF files.
● Stack DW documents by drag and drop
1 Stack DW documents
Drag and drop a DW document onto another DW
document.
74
The DW documents are stacked into a single DW document.
The stacked DW document name will be that of the DW document
you dragged and dropped.
To change the name, click on the name and enter a new one.

6.1 Desk: Stacking/Unstacking Multiple DW Documents
● Use [Stack] on the Standard Toolbar
DW documents are stacked in the order they are selected.
1 Select DW documents to stack
1
Click the DW document you want as the first page in the
stack of DW documents.
2
Press the <Ctrl> key while clicking the other DW documents
you want to stack.
1 22
2 Stack DW documents
Click [Stack] on the Standard Toolbar.
The DW documents are stacked in the clicked order and become a
single DW document.
The name of the first clicked DW document is used for the name of
the stacked DW document.
Note
Other Ways
• Hold down the left button of the mouse and
drag the selection box around the DW
documents.
Selection box
• Press the <Shift> key while clicking DW
documents.
Other Ways
• Click [Stack] on the [Edit] menu.
• Right-click on top of the DW documents to
stack and click [Stack].
Organizing DW Documents
Enter text after clicking the DW document name to change it.
75

6.1 Desk: Stacking/Unstacking Multiple DW Documents
Unstacking DW Documents
•Refer to Help Basic Operations of Desk > Operation on DocuWorks Documents > Unstacking a Document
● Unstack a DW document to make single-page DW
documents
Note
Other Ways
• Click on a DW document and then click
[Unstack documents] on the Standard
Toolbar.
• Click on a DW document and then click
[Unstack] on the [Edit] menu.
Organize Unstacked DW Documents
Unstacked DW documents are shown in an
overlapping stack. Click [Name] on [Arrange]
in the [View] menu to arrange unstacked DW
documents in their original order.
1 Unstack a DW document
Double-click on a DW document.
The selected DW document is unstacked as single-page DW
documents.
The unstacked DW documents are named with the original
document's name and a number in series. For example, when
unstacking a DW document named "Notification", the unstacked
DW documents names will be "Notification", "Notification-2",
"Notification-3" ...
First page
Third page
Second page
The page exported or copied
The exported page or copied page is named
"Original document name-2".
76
● Extract the page displayed in Thumbnails View
Click [Extract Front Page] on the [Edit] menu to extract just the
front page. Or, use [Duplicate Front Page] to copy the page being
shown and create a single page DW document while keeping the
original DW document unchanged.
[Extract Front Page]
Extracted page

6.1 Desk: Stacking/Unstacking Multiple DW Documents
● Split the page displayed in Thumbnails View
Click [Split Displayed Page] on the [Edit] menu to split a DW
document into two DW documents divided at the page that is
displayed as the thumbnail.
[Split Displayed Page]
Before
displayed page
Displayed
page to end
Note
The displayed page to end
The displayed page to end is named
"Original document name-2".
Organizing DW Documents
77

6.2
Desk: Creating Binders and Organizing
6.2
Note
Undo
Pressing the <Ctrl> + <Z> keys or clicking
[Undo] on the [Edit] menu enables you to
undo the last operation.
Let's create a binder and put multiple DW documents into it. It is
useful when putting a group of related DW documents together.
Binders allow you to collect and store DW documents together
but individually.
DW documents in a binder can be copied, renamed, and
reordered.
● The difference with "Stacking"
Stacking combines multiple DW documents into a single DW
document. In a binder the DW documents are kept separate. This
makes it possible to insert and remove DW documents without
losing original data, titles, page numbers, properties and other
information.
Stack
Put in binder
A single DW
document
DW documents are
kept separate.
Creating Binders
•Refer to Help Basic Operations of Desk > Operations Unique to Binders > Creating a Binder
Note
Other Ways
Right-click on an open area in the
Workspace and click [DocuWorks Binder] on
[New] in the menu that appears.
1 Display the [New Binder] dialog box
Click [DocuWorks Binder] on [New] in the [File] menu on
Desk.
The [New Binder] dialog box opens.
2 Create a binder
1
Set the [Binder size] and [Binder color] if necessary.
78

2
Click .
1
6.2 Desk: Creating Binders and Organizing
Note
2
[Binder size]
Size of thumbnails on Desk.
An empty binder is created on the Workspace.
3
If necessary input a name for the binder and press the
<Enter> key.
The name of the binder changes.
[A3 Portrait] [A4
[Maximum page size]
Configure this to set the maximum page size
as the size of the largest DW document in
the binder.
For example, if A3, A4, and A5 size DW
documents are placed in a binder, the
maximum page size is A3.
When binders are displayed in
Explorer
The binder name will be the file name. The
extension is ".xbd".
Portrait]
[A5
Portrait]
Organizing DW Documents
79

6.2 Desk: Creating Binders and Organizing
Putting DW Documents in a Binder
•Refer to Help Basic Operations of Desk > Operations Unique to Binders > Importing Documents to a Binder
Note
DW documents that cannot be put in
binders
• Protected DW documents
• Signed DW documents
Other Ways
Double-click on binder rings to display the
[Binder Index] dialog box and drag and drop
a DW document into it.
Binder rings
The order of DW documents in a
binder
The DW document put in first becomes the
first DW document of the binder. By doing
the following way, the DW documents are
put in a binder in reverse order.
1. Click [DocuWorks Desk Options] on the
[Tools] menu to display the [DocuWorks
Desk Options] dialog box.
2. Click [Add to front] under [Position for
adding document to binder] on the
[Document Operation] tab.
1 Put DW documents in a binder
1
Drag and drop a DW document on to the top of a binder.
The DW document is put in a binder.
2
Put other DW documents in a binder.
80

6.2 Desk: Creating Binders and Organizing
Binder: How to See Binders
•Refer to Help Basic Operations of Desk > Operations Unique to Binders > About Binders
● When binders are shown in Thumbnails View on Desk
Change pages button
Click them to change the page being viewed in the binder.
Page counter
Shows the current page number over the total
number of pages in the binder. It is hidden if the
binder has no DW documents.
Binder rings
Double-click to open the [Binder Index] dialog box.
● When binders are shown in Page Sorter view or in Page
Sorter and Document view
Organizing DW Documents
The dividers are shown between DW documents.
81
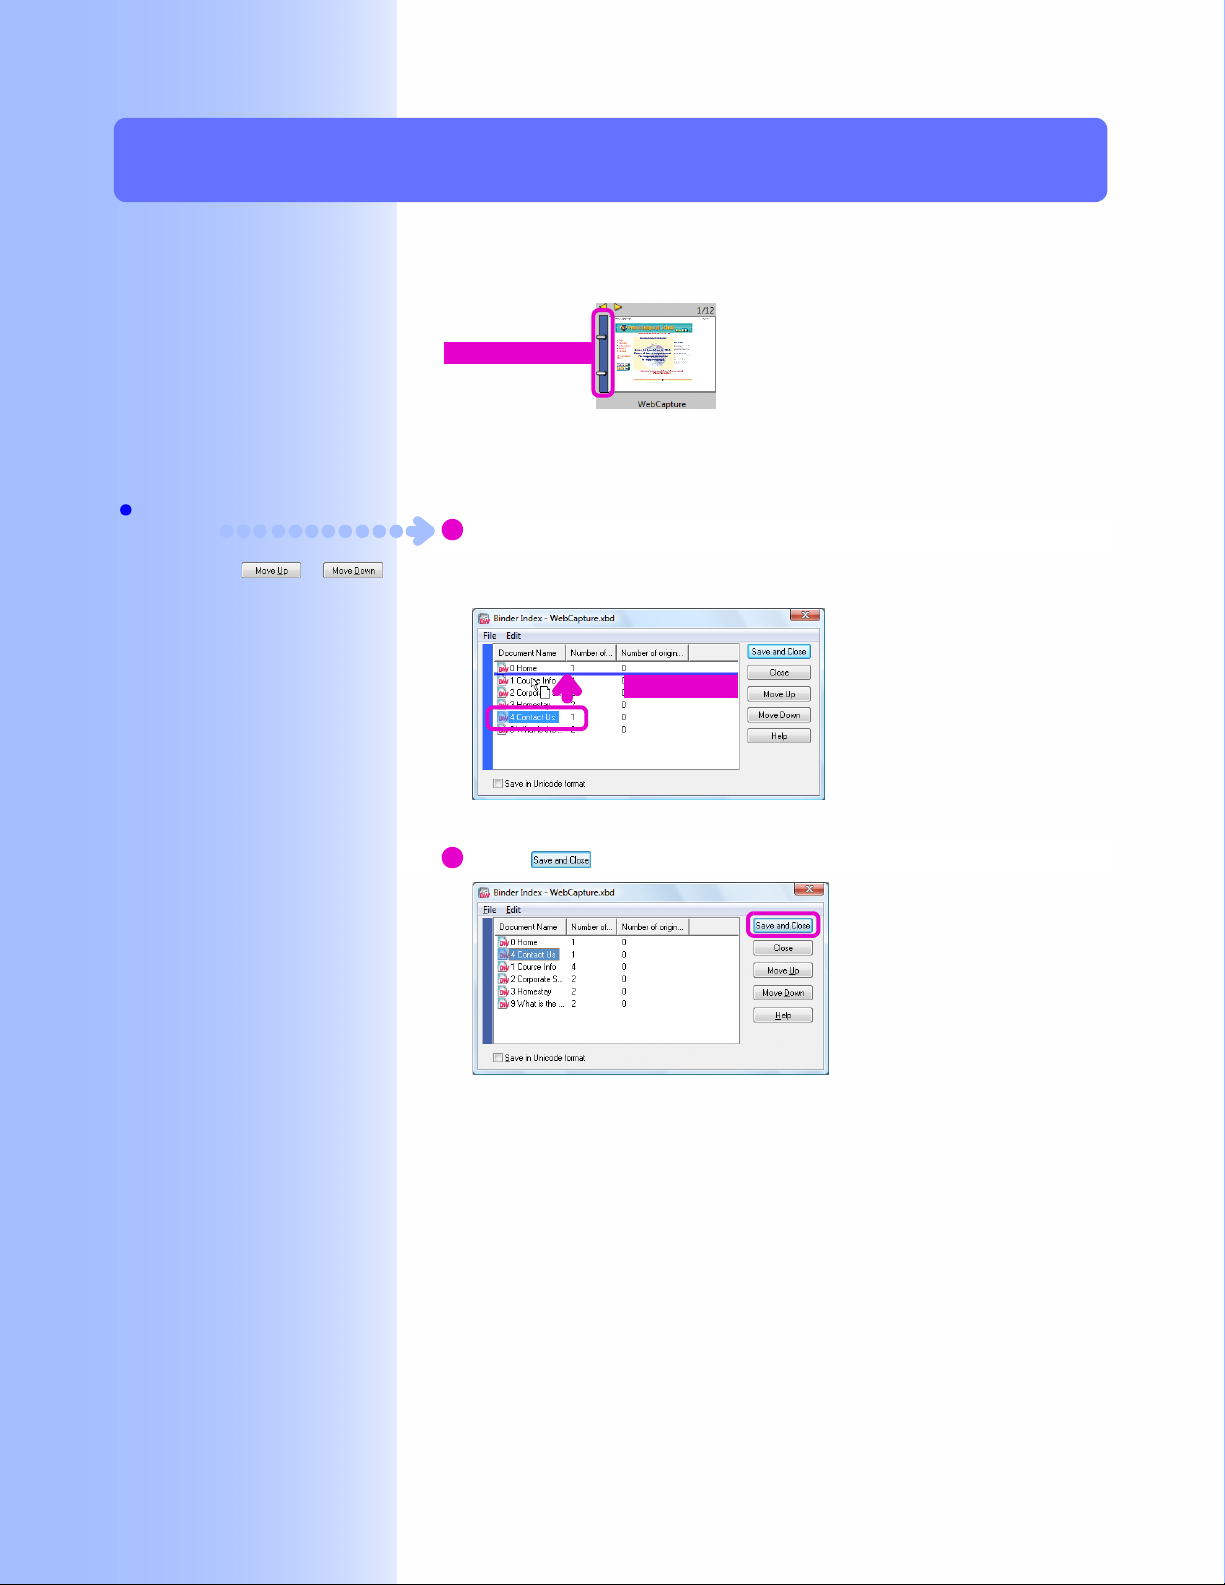
6.2 Desk: Creating Binders and Organizing
Moving DW Documents in a Binder
•Refer to Help Basic Operations of Desk > Operations Unique to Binders > Modifying the Document Organization in a Binder
1 Display the [Binder Index] dialog box
Double-click the binder rings of a binder on Desk.
Binder rings
The [Binder Index] dialog box opens.
2 Move a DW document
Note
Other Ways
In the [Binder Index] dialog box, click a DW
document and click or .
1
Click a DW document to move and drag and drop it where
you want it.
A guideline appears where the DW document is moved to.
Guideline
The DW document is moved.
2
Click .
The changes to the binder are saved.
82

6.2 Desk: Creating Binders and Organizing
Exporting DW Documents from a Binder
•Refer to Help Basic Operations of Desk > Operations Unique to Binders > Exporting Documents from a Binder
1 Display the [Binder Index] dialog box
Double-click the binder rings of a binder on Desk.
Binder rings
The [Binder Index] dialog box opens.
2 Export a DW document
Note
1
Select a DW document to export, and drag and drop it on the
Workspace on Desk.
Other Ways
Right-click a DW document in the [Binder
Index] dialog box, and click [Copy] or [Cut]
on the displayed menu.
Copy and export DW documents
Drag and drop a DW document while holding
down the <Ctrl> key.
Copy and export DW documents to
Explorer
Drag and drop a DW document onto
Explorer.
Organizing DW Documents
The DW document is exported.
2
Click .
The changes to the binder are saved.
83

6.2 Desk: Creating Binders and Organizing
Viewer: Deleting DW Documents from a Binder
•Refer to Help Basic Operations of Viewer > Operations Unique to Binders > Modifying the Document Organization in a
Binder
Note
How to delete DW documents on Desk
Double-click the binder rings to open the
[Binder Index] dialog box. Right-click the DW
document to delete, and click [Delete] on the
displayed menu.
Note that the content of DW documents
cannot be checked while deleting them on
Desk.
When InfoView is not shown
Click [Toggle InfoView] on the Standard
Toolbar.
This section explains how to use Viewer to check the content of
DW documents while deleting them.
1 Open the [Binder Index] tab
Click the [Binder Index] tab in InfoView.
The names of the DW documents in the binder are shown in a list,
DW documents that are currently open have a mark by their names.
Display mark
2 Delete DW documents
1
Double-click a DW document to delete.
The front page of the selected DW document opens.
Other Ways
Right-click a DW document and click
[Delete] on the displayed menu.
84
2
Confirm the DW document and press the <Delete> key.
The DW document is deleted.

6.3
Desk: Linking to Folders Other Than the User Folder
•Refer to Help Basic Operations of Desk > Operating on Folder > Operating on Link Folder
6.3
You can link to folders other than the User Folder and access
their content on Desk.
You can also manipulate (stack, unstack, put in a binder, run
plug-ins etc.) the DW documents in those linked folders the same
as folders in the User Folder.
Windows folder that is linked to Desk
Desk functions, such as stack, unstack, and plug-ins,
can be used on the DW documents in this folder and
they can be viewed on Desk.
Windows folder that is not linked to
Desk
Desk
Desk
Note
If a network folder is linked
Files can be shared with many users.
Important
If a network folder is linked
Link folders may not be usable after
Windows is restarted if [Map Network Drive]
is not selected in Windows Desktop or
Explorer.
Note
Create shortcut to DW documents and
binders on Desk
You can also manipulate (stack, unstack, put
in a binder, run plug-ins etc.) the DW
documents and binders in shortcut
destinations the same as ones in the User
Folder.
Display DW documents and binders as
thumbnails on Explorer
It is possible to view DW documents and
binders as thumbnails on Explorer if those
can be displayed in Thumbnails View on
Desk.
Organizing DW Documents
Desk functions, such as stack, unstack, and
plug-ins, cannot be used on the DW
documents in this folder.
85

6.3 Desk: Linking to Folders Other Than the User Folder
Note
Other Ways
Drag and drop a folder from Windows
Explorer to the Folder area on Desk. The
[Folder Property] dialog box opens, click
.
Change the color of the Workspace
Specify [Background] under [Workspace
Colors]. You may become aware that you
are operating with folders other than Desk by
changing the color of the Workspace.
1 Display the [Folder Property] dialog box
Click [New Link] in [Link] on the [Tools] menu.
The [Folder Property] dialog box opens.
2 Link to the folder
1
Click , and select the folder for the link destination.
2
Configure any other settings if necessary.
3
Click .
3
2
1
Disconnect links
Click [Disconnect Link] in [Link] on the
[Tools] menu. In the [Disconnect Link] dialog
box that opens, click a folder to disconnect
and click .
The linked folder appears under [Link Folder] in the Folder area.
The contents of the folder are shown in the Workspace.
86

6.4
Desk: Creating a Folder and Organizing
6.4
•Refer to Help Basic Operations of Desk > Operating on Folder > Creating or Deleting
a Folder
Basic Operations of Desk > Common Operations > Moving a File
Let's create a new folder under [User Folder] to organize the DW
documents and binders that are accumulating on Desk.
1 Create a folder
1
Click [User Folder].
2
Click [Folder] on [New] in the [File] menu.
A folder is created in [User Folder].
3
Input the name of the folder you created.
2
1
3
Note
Arrange files
Click [Line Up] or [Arrange] on the [View]
menu to arrange DW documents and
binders.
Other Ways
Right-click on [User Folder] and click [New
Folder] on the displayed menu.
Organizing DW Documents
2 Move DW documents or binders to the folder
Drag and drop DW documents or binders onto the folder.
The DW documents or binders are moved.
Move and copy files
• You can move and copy files from other
applications.
• Press the <Ctrl> key and drag and drop a
DW document to copy it.
• You can drag and drop DW documents
onto Explorer to copy them.
87

6.4 Desk: Creating a Folder and Organizing
88

Protecting DW Documents
DW documents can be protected by setting a password.
This chapter explains how you can set passwords and other security measures.
Protecting DW Documents

7.1
Types of Security and Function Prohibition
7.1
Note
Binders
You can also configure security for binders.
You can configure security for DW documents so only people
who know the password or have a specified electronic signature
can open them. You can also prohibit printing and editing.
It is also possible to sign DW documents just like you would sign
or impress a seal on a paper document. Signing a DW document
protects it from being forged or falsified because the contents of
the DW document when signed or who signed it can be checked
by third parties who receive it. This section explains three security
measures and operations you can prohibit.
Types of Security
•Refer to Help Use of Securities > About Securities > About Protecting Documents
With the following three security measures, you can use various
different methods to specify who can open or manipulate DW
documents.
Reference
Set a password
This is explained in "7.2 Desk/Viewer:
Setting Passwords (p.92)".
● Set a password (for individuals)
The person configuring the security measures specifies the
password. Inform any people who are allowed to open the DW
document what the password is.
Set
Password
AAA
Open
Password
AAA
Important
Electronic Signature
Signatures created using electronic
signature do not use digital certificates
issued by the Certificate Authority (CA).
Paper documents printed from DW
documents with seal impressions or
signature images cannot be treated as
legally sealed or signed documents.
90
● Create an electronic signature and use it (for small
groups)
This is a proprietary DocuWorks function. Each person in the
group creates their own electronic signature. Then they exchange
information verifying their electronic signatures. The person
configuring the security specifies the electronic signature of the
people receiving the DW document in advance. Only people who
have the specified electronic signature can open the DW
document.

7.1 Types of Security and Function Prohibition
Set
Seal for
opening
•Refer to Help Use of Securities > Set Up Securities > Set Up a New Security >
Configuring Electronic Signature-protected Security
Open
Personal
seal
● Configure a digital certificate (for large groups or for many
unspecified people)
DW documents can be configured so that only people who have
the digital certificate issued by Certificate Authority (CA) can
open and manipulate DW documents. Each person first has to
get a digital certificate from Certificate Authority (CA) and then
exchange the certification with each other.
•Refer to Help Use of Securities > Set Up Securities > Set Up a New Security >
Configuring Digital Certificate-protected Security
Functions that Can Be Prohibited
•Refer to Help Use of Securities > About Securities > About Restricting Operations
You can restrict the following four functions with a password,
electronic signature, or digital certificate.
Note
Certificate Authority (CA)
CA stands for Certificate Authority. It is an
organization which issues digital certificates
to authenticate identity on a network.
Protecting DW Documents
● Prohibit editing DW documents
You can prohibit editing functions (moving or rotating pages, etc.)
except for annotations.
● Prohibit annotating DW documents
You can prohibit editing of annotations.
● Prohibit printing
You can prohibit printing and using the Viewer print preview
functions.
● Prohibit copying
You can prohibit copying of pages, annotations, DW documents
in binders, original data, or other content of DW documents.
Note
Print Preview
It is displayed when you click [Print Preview]
on the [File] menu in Viewer.
91

7.2
Desk/Viewer: Setting Passwords
7.2
Note
Binders
You can also configure security for binders.
Let's configure DW documents so only people who know the password
can open them.
Setting a Password
•Refer to Help Use of Securities > Set Up Securities > Set Up a New Security > Configuring Password-protected Security
Note
For Desk
You can select multiple DW documents.
What are security modules?
They are tools for configuring security.
[Password (128bit V4 noncompatible)]
The encryption used for security is stronger
than [Password (V4 compatible)]. However,
it cannot be opened with DocuWorks 4.x.
1 Display the [Security Module Options] dialog box
For Desk, click a DW document to protect with a
password, and then click [Security Settings] on [Security]
in the [Tools] menu.
For Viewer, click [Security Settings] on [Security] in the
[Tools] menu.
The [Security Module Options] dialog box opens.
2 Select security module options
1
Click [Password (V4 compatible)] or [Password (128bit V4
non-compatible)].
2
Click .
1
2
92
The [Security Settings] dialog box opens.
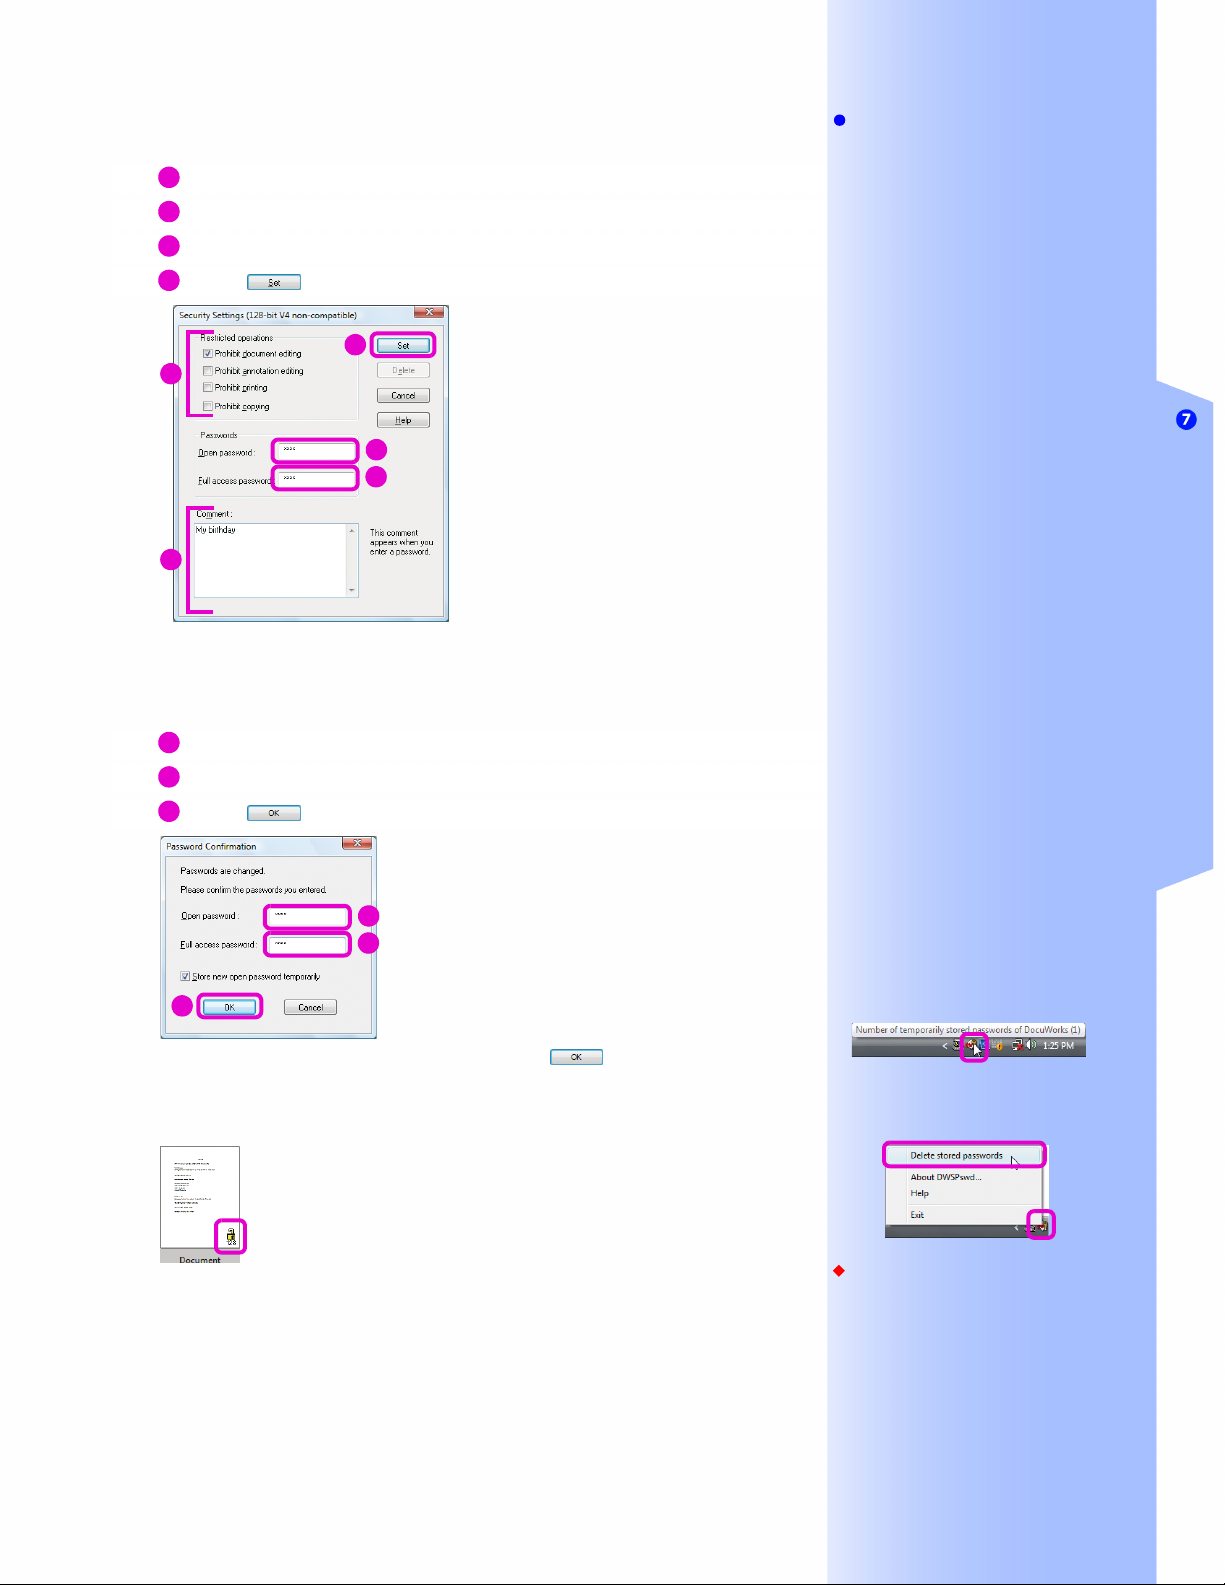
7.2 Desk/Viewer: Setting Passwords
3 Set a password
1
Enter [Open password].
2
Enter [Full access Password]
3
Configure any other settings if necessary.
4
Click .
4
3
1
2
3
The [Password Confirmation] dialog box opens.
4 Check the password
Note
Text that can be used for passwords
Single-byte alphanumerics and symbols can
be used. A maximum of 255 characters can
be used.
[Full access password]
• When configured
Input the Full access password after opening
a DW document to enter Full Access Mode.
• When not configured
Full Access Mode can be used after opening
a DW document.
Full Access Mode
All the operations on a DW document are
possible. The operations prohibited in
[Restricted operations] are also possible in
this mode.
[Restricted operations]
If a DW document has [Restricted
operations] specified, the operations are
restricted even if you input the [Open
password] to open it. All the operations are
enabled in Full Access Mode only.
[Comment]
When specified, it is displayed on the dialog
box requesting a password when a DW
document is opened.
Protecting DW Documents
1
Enter [Open password] again.
2
Input [Full access password] again.
3
Click .
1
2
3
If a confirmation dialog box opens, click .
For Viewer, save and close the DW document.
A lock mark appears on the thumbnail of the DW document.
5 Distribute your password
Inform any people who are allowed to open the protected DW
document what the password is by phone or e-mail.
[Store new open password
temporarily]
Specify whether to store the password
temporarily.
If this is selected, the password is stored
when you input the password. After that, you
do not have to input the password when
opening or displaying the thumbnails of DW
documents that have the same [Open
password]. For details, refer to Help [Menus
and Dialog Boxes] > [Security Function] >
[DWSPswd].
Remove the temporarily stored
password
When a password is temporarily stored, the
icon as below is shown on the Taskbar.
To remove the password, right-click on the
icon and click [Delete stored passwords] on
the displayed menu.
Important
A password protected DW document
There is no way to open such a DW
document except by inputting a password.
Be careful that you do not forget your
password.
93
 Loading...