

Page 1

Xerox Document Services
Platform
Color Management Guide
701P40210
Version 3.7
May, 2003
Page 2

Xerox Corporation
Global Knowledge and Language Services
800 Phillips Road
Building 845-17S
Webster, New York 14580
USA
Copyright 2003
Copyright protection claimed includes all forms and matters of copyrighted material and information now
allowed by statutory or judicial law hereinafter granted including without limitation, material generated from
the software programs that are displayed on the screen such as styles, templates, icons, screen displays,
looks, and so on.
Printed in the U.S.A., U.K., and France.
Copywright by Xerox Corporation. All rights reserved.
XEROX®, XEROX Europe®, and XEROX Canada Limited®, The Document Company, the stylized X, and
all names identifying numbers used in connection with Xerox products mentioned in this publication are
trademarks of XEROX CORPORATION. All non-Xerox brands and product names are trademarks or
registered trademarks of their respective companies. Other company trademarks are also acknowledged.
This product includes software developed by the Apache Software Foundation (http://www.apache.org/).”
SWOP® is a registered trademark of SWOP, Inc.
While the information in this Guide is correct at the time of this publication, Xerox reserves the right at any
time to change the information without notice. Changes are made periodically to this document. Changes
and technical updates will be added in subsequent editions.
Page 3

Table of contents
1. Introduction . . . . . . . . . . . . . . . . . . . . . . . . . . . . . . . . . . . . . . . . . . .1-1
Assumptions . . . . . . . . . . . . . . . . . . . . . . . . . . . . . . . . . . . . . . . . . . . . . 1-1
Multiple print engines . . . . . . . . . . . . . . . . . . . . . . . . . . . . . . . . . . . . . . 1-1
About this guide . . . . . . . . . . . . . . . . . . . . . . . . . . . . . . . . . . . . . . . . . . . 1-1
Conventions . . . . . . . . . . . . . . . . . . . . . . . . . . . . . . . . . . . . . . . . 1-2
Related documentation . . . . . . . . . . . . . . . . . . . . . . . . . . . . . . . . . . . . . 1-2
Customer Support . . . . . . . . . . . . . . . . . . . . . . . . . . . . . . . . . . . . . . . . . 1-3
2. DocuSP color management . . . . . . . . . . . . . . . . . . . . . . . . . . . . . .2-1
Queue overrides . . . . . . . . . . . . . . . . . . . . . . . . . . . . . . . . . . . . . . . . . . 2-1
Color workflows . . . . . . . . . . . . . . . . . . . . . . . . . . . . . . . . . . . . . . . . . . . 2-2
Color path charts . . . . . . . . . . . . . . . . . . . . . . . . . . . . . . . . . . . . 2-2
ICC standard path . . . . . . . . . . . . . . . . . . . . . . . . . . . . . . 2-3
Xerox enhanced path . . . . . . . . . . . . . . . . . . . . . . . . . . . . 2-4
CMYK Native path . . . . . . . . . . . . . . . . . . . . . . . . . . . . . . 2-5
Fast Reprint path . . . . . . . . . . . . . . . . . . . . . . . . . . . . . . . 2-5
PANTONE® path . . . . . . . . . . . . . . . . . . . . . . . . . . . . . . . 2-5
Color Manager . . . . . . . . . . . . . . . . . . . . . . . . . . . . . . . . . . . . . . . . . . . . 2-6
Associations . . . . . . . . . . . . . . . . . . . . . . . . . . . . . . . . . . . . . . . . 2-6
Calibration . . . . . . . . . . . . . . . . . . . . . . . . . . . . . . . . . . . . 2-6
New Stock . . . . . . . . . . . . . . . . . . . . . . . . . . . . . . . . . . . . 2-6
Assign profile . . . . . . . . . . . . . . . . . . . . . . . . . . . . . . . . . . 2-6
New color group (stock group) . . . . . . . . . . . . . . . . . . . . . 2-6
Color profiles . . . . . . . . . . . . . . . . . . . . . . . . . . . . . . . . . . . . . . . 2-7
User TRCs . . . . . . . . . . . . . . . . . . . . . . . . . . . . . . . . . . . . . . . . . 2-7
Color tools . . . . . . . . . . . . . . . . . . . . . . . . . . . . . . . . . . . . . . . . . . . . . . . 2-7
Print engine specific mode . . . . . . . . . . . . . . . . . . . . . . . . . . . . . 2-7
Xerox consistent color mode . . . . . . . . . . . . . . . . . . . . . . . . . . . 2-9
Custom color mode (default) . . . . . . . . . . . . . . . . . . . . . . . . . . 2-10
Color adjustments . . . . . . . . . . . . . . . . . . . . . . . . . . . . . 2-10
Image quality tools . . . . . . . . . . . . . . . . . . . . . . . . . . . . . 2-10
Expert color . . . . . . . . . . . . . . . . . . . . . . . . . . . . . . . . . . 2-11
Print as grayscale . . . . . . . . . . . . . . . . . . . . . . . . . . . . . . . . . . . 2-12
Spot color editor . . . . . . . . . . . . . . . . . . . . . . . . . . . . . . . . . . . . 2-12
OPI (Open PrePress Interface) . . . . . . . . . . . . . . . . . . . . . . . . 2-13
DRIs (Display Resolution Images) . . . . . . . . . . . . . . . . . . . . . . 2-13
3. Stock Management and Calibration. . . . . . . . . . . . . . . . . . . . . . . .3-1
Color Manage me nt Gui de i
Page 4

Table of contents
Characterization . . . . . . . . . . . . . . . . . . . . . . . . . . . . . . . . . . . . . . . . . . 3-1
Tips for use of Xerox Qualified Stocks . . . . . . . . . . . . . . . . . . . . 3-3
Calibration process overview . . . . . . . . . . . . . . . . . . . . . . . . . . . . . . . . 3-3
Calibrating the DocuColor 2045/2060/6060 family . . . . . . . . . . . 3-4
Calibrating the DocuColor iGen3 . . . . . . . . . . . . . . . . . . . . . . . . 3-4
Calibration target tips . . . . . . . . . . . . . . . . . . . . . . . . . . . . 3-4
Stock Management hints and tips . . . . . . . . . . . . . . . . . . . . . . . . . . . . . 3-7
General Stock Workflow Setups . . . . . . . . . . . . . . . . . . . . . . . . . 3-7
Unspecified Stock Name Model Setup . . . . . . . . . . . . . . 3-7
Three Stock Model Setup . . . . . . . . . . . . . . . . . . . . . . . . 3-8
Custom and Colored Stock hints . . . . . . . . . . . . . . . . . . . . . . . 3-11
4. Using color t oo ls . . . . . . . . . . . . . . . . . . . . . . . . . . . . . . . . . . . . . . .4-1
Using Custom color mode (default) . . . . . . . . . . . . . . . . . . . . . . . . . . . . 4-1
Basic color tools . . . . . . . . . . . . . . . . . . . . . . . . . . . . . . . . . . . . . 4-2
Image quality tools . . . . . . . . . . . . . . . . . . . . . . . . . . . . . . . . . . . 4-3
User Tonal Reproduction Curves (TRCs) . . . . . . . . . . . . . . . . . . 4-4
Expert color tools . . . . . . . . . . . . . . . . . . . . . . . . . . . . . . . . . . . . 4-5
Spot Color Editor . . . . . . . . . . . . . . . . . . . . . . . . . . . . . . . . . . . 4-10
Understanding the Spot Color Editor window . . . . . . . . 4-10
Open PrePress Interface (OPI) . . . . . . . . . . . . . . . . . . . . . . . . 4-11
Using Print Engine Specific mode . . . . . . . . . . . . . . . . . . . . . . . . . . . . 4-13
Using XCC (Xerox Consistent Color) mode . . . . . . . . . . . . . . . . . . . . 4-13
5. Troubleshooting. . . . . . . . . . . . . . . . . . . . . . . . . . . . . . . . . . . . . . . .5-1
Image paths . . . . . . . . . . . . . . . . . . . . . . . . . . . . . . . . . . . . . . . . . . . . . . 5-1
Things to remember . . . . . . . . . . . . . . . . . . . . . . . . . . . . . . . . . . . . . . . 5-2
A. System Specified defaults . . . . . . . . . . . . . . . . . . . . . . . . . . . . . . .A-1
B. Glossary Of Color Management Terms . . . . . . . . . . . . . . . . . . . . .B-1
ii Color Management Guide
Page 5

Assumptions
1. Introduction
This guide is a reference to the DocuSP controller color
management features. The DocuSP controller serves as the
digital front end for preparing and processing jobs to print on
Xerox color print engines.
The DocuSP operator uses the information in this guide to
enhance the use of the color management tools to achieve
quality color output.
This guide assumes that the DocuSP operator is familiar with the
DocuSP controller and the attached print engine, and is also
familiar with color printing.
Refer to the DocuSP on-line help system for procedures on how
to use the DocuSP color tools.
Multiple print engines
The DocuSP controller includes colo r management tools for the
DocuColor 2045/2060/6060 and iGen3 Digital Production
Presses.
This guide provides general color management information for
the DocuSP controller; also, printer-specific information is noted
where necessary.
About this guide
Before you read in this guide, become familiar with its contents
and conventions.
Color Manage me nt Gui de 1-1
Page 6

Introduction
Conventions
This guide includes the following conventions:
• Angle brackets: Variable information that is displayed on your
window or that can be entered as part of a command line is
enclosed within angle brackets. Examples include "Unable to
copy <filename>;" “set –p <printer>.”
• Square brackets: Square brackets are used fo r the following:
– Names of menu options that you select; for example,
[Printer Default]
– Names of buttons that you select; for examp le , [OK] and
[Cancel]
– Names of text boxes, list boxes, and fields; for example,
"the [From] text box," "the [Directories] list box," “the
[Color Source] field”
• Bold: Boldface type is used for the following:
– Directory paths; for example, “Browse to the Color
– Text that you enter; for example, "Enter purple or Xerox."
– Calling attention to text that is particularly important; for
– Introductory wor ds or phrases t hat begin items in a list; for
• Note: Notes are hints that help you perform a task or
understand the text. Notes are presented in italics, in
separate paragraphs. Example:
NOTE: You cannot submit a job unless the printer is
connected to your workstation.
Related documentation
profiles directory.”
example, “Select [Stop] on the user interface window. Do
not press the red stop button on the controller.”
example,
[Hold job]: The document is held at the printer...
[Cancel job]: The document is not printed...
Further information on the specific Xerox print engines or the
DocuSP controller may be obtained by referring to the
documentation that was delivered with the elements of the
system.
1-2 Color Management Guide
Page 7

Customer Support
Introduction
For service and software support, dial 1-800-821-2797. This
number is enabled for TTY bridges. To reach Xerox
Documentation and Software Services, dial 1-800-327-9753.
Color Manage me nt Gui de 1-3
Page 8

Introduction
1-4 Color Management Guide
Page 9

2. DocuSP color management
Color management is a process of attempting to match colors
across input (scanners, digital cameras), display (computer
monitors), and output devices (color printers).
Hardware devices such as Spectrophotometers for calibration
and software tools such as color profiles, tone reproduction
curves (TRCs) and color tools are used to match or adjust color
to achieve a quality color image.
Spectrophotometers are used to calibrate data for the print
engine. Calibration da t a i s use d to ad j ust co lor ba la nce for st ock
by halftone.
Color manageme nt softw a re conv erts RGB and CMYK input
color profiles to the color gamut of a specific output device.
DocuSP supports the traditional CMYK workflow as well as the
ICC Profile workflow.
Queue overrides
TRCs and other color tools allow you to make custom color
adjustments, fine tuning the color image.
DocuSP provides the software color management tools you can
use to produce quality color output.
Refer to the DocuSP on-line help system for detailed informat ion
and step-by-step usage procedures for all tools and processes
presented in th is guide.
An override can be set for ma ny of the queue properties in
Queue Manager. A selected override property is applied to all
jobs submitted to that queue, regardless of job or job ticket
settings.
Color Manage me nt Gui de 2-1
Page 10

DocuSP color management
Color workflows
A color image follows a path as it is converted from an input color
profile to the output CMYK of the print engine. Factors that
determine the path are:
• the characteristics and type of the input profile
• conversions needed for the output profile of the print engine
• enhancements made by you, the user
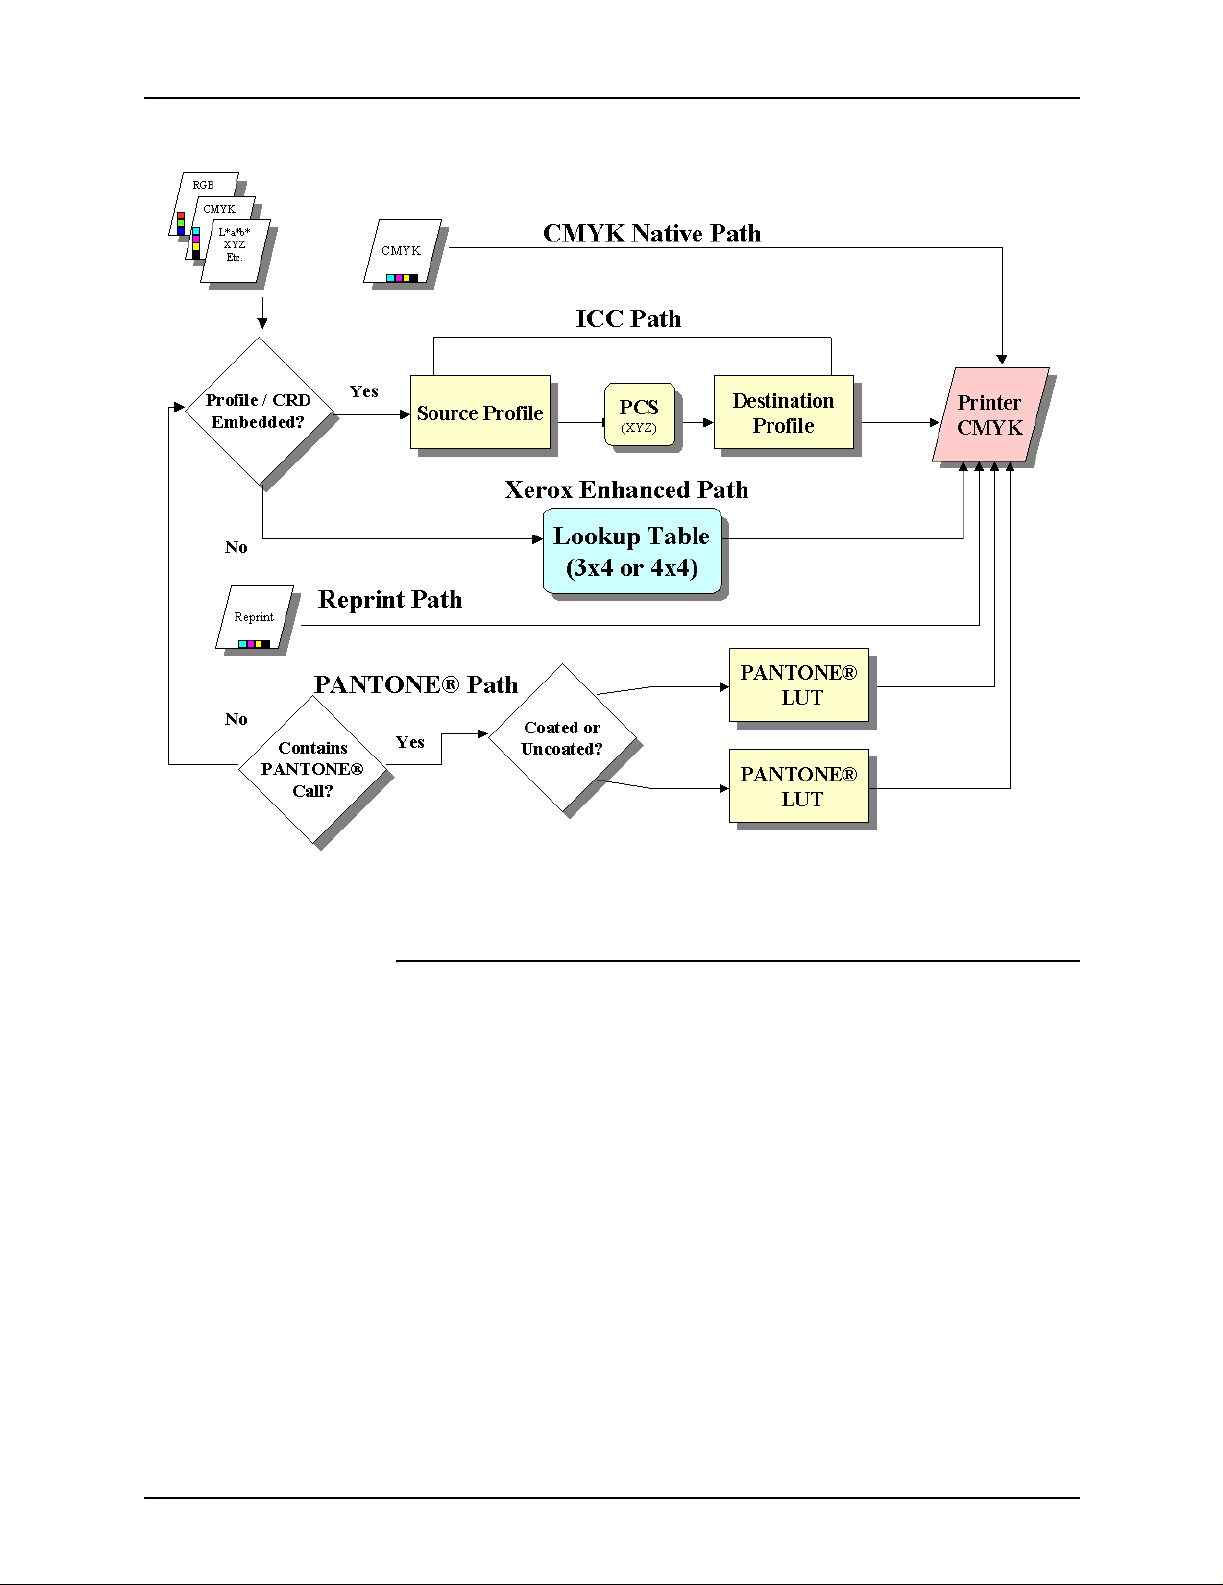
Color path charts
Jobs take one of five paths through the DocuSP controller.
Whenever possible, you should use the Xerox Enhanced Path
which provides the highest quality color for incoming SWOP™
CMYK color and faster RIP speed.
The color path chart (see Figure 2-1. Simplified DocuSP Color
Workflow) displays the paths different documents take as they
move through the DocuSP color management system and are
processed for print.
The paths are:
• ICC Standard Path
• Xerox Enhanced Path
• CMYK Native Path
• Fast Reprint Path
• PANTONE® Path
2-2 Color Management Guide
Page 11
DocuSP color management
Figure 2-1. Simplified DocuSP Color Workflow
ICC standard path
Jobs undergo a color transformation to an independent color
space before color transformation to the DocuSP print engine
CMYK color space. This path requires more RIP time as the
color is transformed from Input (such as RGB or input CMYK) to
Profile Connection Space (PCS) to output CMYK or SWOP™
CMYK. The K channel will not be preserved for incoming CMYK
data.
The chief benefit of using this path is its ease of use.
The following conditions guarantee a job follows the ICC
standard path:
• A user output profile has been assigned to the job.
• A color adjustment (lightness, co ntrast, satu ration, color cast,
trapping, black o verprint, or anti-aliasing ) has been set for t he
job.
Color Manage me nt Gui de 2-3
Page 12

DocuSP color management
• The incoming job contains embedded profiles that result in
Xerox enhanced path
Incoming RGB or CMYK data uses the DocuSP Xerox Enhance d
Path Look Up Table (LUT) or Emulation LUT when performing
the SWOP™ CMYK to DocuSP print engine CMYK
transformation.
Benefits of using this p ath include:
• Faster RIP time via use of the LUTs as contrasted with the
• This path preser ves the Black (K) channel and Black
Look Up Tables provide a quick, effective translation from the
source space to the specific printer’s CMYK space. These tables
are faster because the CMYK values are translated directly to
output space, instead of fi rst bein g tra nsla ted to deviceindependent space and then to the print-engine-specific space.
the printer driver creating a Color Space Array (CSA) for the
color data. These PDL instructions are honored by the
system.
ICC Path.
darkness.
RGB data is converted using 3 x 4 LUTs.
4 x 4 LUTs provide direct CMYK to CMYK mapping, preserving
black. When pure black is passed thr ough a source profile (ICC
profile path), it is converted to XYZ. Once in XYZ, ther e is no way
for the color management system to know that the color was
originally pure black. Thus, pure K is converted to a CMYK
combination (Gray Component Removal, or GCR, is involved in
this process). In contrast, the 4 x 4 tables recognize pure K and
output the appropriate K for the source-to-destination mapping.
The following conditions guarantee a job follows the Xerox
enhanced path:
• The incoming job is untagged and using a pre-installed
output profile.
• A Xerox stock is programmed for the job
• A non-Xerox stock that is a member of an unaltered Xerox
color group is programmed for the job
• A Xerox output color profile, included with the system, has
been assign ed to the job
2-4 Color Management Guide
Page 13

DocuSP color management
CMYK Native path
Color management is performed within the application using
DocuSP output color ICC profiles to create jobs composed with
the DocuSP print engine CMYK color profile. These jobs are sent
directly to the RIP with no color transformations, assuming you
have not programmed any color adjustments.
Documents destined for this path MUST be designed using the
appropriate CM YK color space for the DocuSP destination print
engine. This is u sually achieved by using the CMYK destination
profile for the destination media/engine combination.
Benefits of using this p a t h in clude:
• Fastest RIP performance of any of the paths
• Color will be consistent throughout, since the job is created
and submitted expressly for the specific print engin e
Fast Reprint path
Fast Reprint jobs, accessed thr ough Reprin t Manager, are saved
using “Print and Save” or “Save” commands when processing
the job. Fast Reprint jobs do not require re-RIPping. Color
management properties are se t prior to saving t he job.
The only color change that can be applied to a job on the Fast
Reprint path is a User TRC.
Benefits of using this p a t h in clude:
• No need to re-submit jobs
• Fast print times (achieving engine-rated speed) since the RIP
is bypassed on reprint
• No need to reset Color Management properties
NOTE: Calibration TRCs and User TRCs may be applied to
the reprint job, since TRC processing is done in the
hardware.
PANTONE® path
An incoming job is scanned by the controller and, if the job
contains PANTONE® calls , the P ANT ONE® pat h is invoked. The
job’s color information is processed using a pair of Look Up
Tables (one for Coated and one for Uncoated) and then passes
directly to the pr inter output, b yp assing all other co lor pro cessing
except for User TRCs.
Color Manage me nt Gui de 2-5
Page 14

DocuSP color management
Color Manager
Color Manager provides access to color management tools for
calibration, characterizat i on, assigning color profiles, managing
color groups, creatin g and applying TRCs, and importing or
exporting ICC profiles.
Associations
The Associations tab provides a list of stocks, their properties,
date last calibrated, and the assigned profile.
Calibration
Calibration is used to return the print engine to a standard
condition insuring color consistency for each stock or color
group. For more in-d epth information regarding calibratio n, see
chapter 3.
New Stock
Destination colo r profiles are required for each stock or color
group.
Stocks added from the catalog (Xerox Qualified Stocks) will
automatically be placed in the proper color group.
New custom stocks will automatically be placed in the default
color group.
Assign profile
Each stock is automatically assign ed to a profile based on its
color group.
Color profiles can be assigned to any stock or color group,
including pre-defined stocks.
New color group (stock group)
Stocks are assigned groups based upon their whitepoint. Any
stock in the group can be calib rated, and the resulting TRCs are
assigned to all stocks in the color group.
2-6 Color Management Guide
Page 15

Color profiles
DocuSP color management
NOTE: You should calibrate a stock that best represents the
other stock in the group; therefore, you should calibrate using a
stock that has a whitepoint at about the median of the stocks in
the group.
It is recommended that most users confine their use of color
groups to the 3 pre-installed groups. This method provides
excellent color results with relatively little user intervention.
For a more in-depth discussion of color groups, see chapter 3:
Calibration.
The Color Profiles tab provides a list of color profiles (both
source and destination) with their descriptions.
User TRCs
Color tools
Print engine specific mode
User Tone Reproduction Curves (TRCs) provide the skilled user
with a tool for adj usti ng the indivi dual CMYK co lor sep a rati ons i n
an image and saving those adjustments for use on other images.
The User TRCs tab provides a list of user-created TRCs and
allows you to cr eate new TRCs.
Color tools allow you to make adjustments that impact the color
characteristics of a print job. Color tools can affect jobs or
queues, if assigned at the controller, or can be assigned by an
application at the client workstation.
Selected at the queue level, the print engine or product specific
mode is unique to each Xerox color print engine and optimizes
performance fo r that print engine. Print engi ne specific mode
provides the best possible default color interpretation and
rendering values for the widest range of images.
Color Manage me nt Gui de 2-7
Page 16
DocuSP color management
T able 2-1. DocuColor iGen3 Digital Production Press
Queue Property Queue Setting
Rendering Intent Relative Colorimetric
RGB Source sRGB
mode default property settings
CMYK Source
CMY Source
Gray Source
Destination ICC Profile Front/
Back
Lightness 0
Contrast 0
Saturation 0
Color Cast (all) 0
TRCs None
Press Color Emulation None
SWOP
System Specified
System Specified (pre-installed
and optimized for the iGen3)
™
Tabl e 2-2. DocuColor 2045/2060/6060 mode defa ult
property settings
Queue Property Queue Setting
Rendering Intent Relative Colorimetric
RGB Source sRGB
CMYK Source
CMY Source
Gray Source
Destination ICC Profile Front/
Back
Lightness 0
Contrast 0
Saturation 0
Color Cast (all) 0
SWOP
System Specified
System Specified (pre-installed
and optimized for theDC20xx/
60xx)
™
2-8 Color Management Guide
Page 17
Tabl e 2-2. DocuColor 2045/2060/6060 mode defa ult
Queue Property Queue Setting
TRCs None
Press Color Emulation None
Xerox consistent color mode
Selected at the queue level, Xerox consistent color mode
standardizes the print engine response to undefined color
spaces by assigning them default source files. De fault Source
files provide output that looks similar when submitted from the
DocuSP to a compatible Xerox color print engine, currently the
DocuColor 2045/2060/6060 and the DocuColor iGen3.
DocuSP color management
property settings
Table 2-3. XCC mode default and override settings
Queue Property Queue Setting Applicability
Rendering Intent Images
Rendering Intent Text
Rendering Intent Graphics
RGB Source XCC Mode RGB Default
CMYK Source
CMY Source
Gray Source
Destination ICC
Profile Front/Back
Lightness 0 Override
Contrast 0 Override
Saturation 0 Override
Relative Colorimetric Default
Pure Default
Saturation Default
SWOP
System Specified Default
System Specified Override
™ Coated
Default
Color cast (all) 0 Override
TRCs None Override
Color Manage me nt Gui de 2-9
Page 18

DocuSP color management
Table 2-3. XCC mode default and override settings
Queue Property Queue Setting Applicability
Press Color
Emulation
Custom color mode (default)
Selected at the queue level, Custom Color mode allows users
with a high level of color management skills to make specific
color adjustments using industry standard color tools.
Skilled users create queues with specific color properties,
defaults and overrides. Jobs sent to these queues are assigned
the queue properties automatically, improving the flow of jobs
through the DocuSP controller and reducing the adjustments
required on a standard set of color jobs.
Color adjustments
Color tools provide a m eans for you to make adju stments in colo r
images.
None Override
• Lightness controls the relative brigh tness or darkn ess of the
color image.
• Contrast is the ratio between the light tones and dark tones
in an image.
• Saturation controls the strength or purity of the color imag e.
• Color Cast adjustments provide you with the ability to
increase or decrease the amount of a single color in an
image.
• User TRCs are created to provide a consistent color
rendering based upon a given set of properties. TRCs are
saved and appl ied to jobs.
Image quality tools
Image quality tools provide you a means to improve image
quality.
• Trapping compensates for misregistration that creates white
gaps and shifted hues.
2-10 Color Management Guide
Page 19

DocuSP color management
• Black Overprint compensates for the band of white t hat may
appear when black text is printed directly on top of a color.
NOTE: Black Over print produces sometimes-unex pected
results using iGen3, due to its unique technology. Therefore,
you should avoid using this feature on the iGen3.
• Anti-aliasing reduces the jagged appearance of lines and
curves in text and line art.
Expert color
Expert color contains a set of tools for the skilled user to optimize
color quality.
•The Source color tab provides access to a list of source color
profiles. This selection is used to translate undefined data in
the incoming job. DocuSP honors embedded source profiles.
•The Output color tab provides access to a set of tools that
are applied as part of the color transformation from the device
independent s pace to the print eng ine CMYK space.
– Halftones are screen patterns achieved by printing dots
or lines in a specific pattern. The distance between the
dots is fixed. Dot size varies in acco rdance to the stren gth
of the color. The darker the color the larger the dot.
Halftones supported on the iGen3 include 150 dot, 175
dot, 200 dot and stochastic screens. The DC 20xx/60xx
series supports 150 dot, 200 dot, 200 line, 300 line, and
600 line screens.
Stochastic halftones randomly apply screens when the
difference in tone varies by different concentrations of
dots and by dot sizes.
– Image Resample
Interpolation is a method to achieve maximum image
quality. Interpolation estimates a value of function
between two known values and attempts to produce a
smooth trans ition between adjacent samples rather than
replicating pixels which would result in “blocky” images.
The supported interpolation methods include:
Nearest neighbor
Bi-linear
Smart
Color Manage me nt Gui de 2-11
Page 20

DocuSP color management
NOTE: These image resample methods are detailed in
Chapter 4: Using Color Tools.
– Output
Destination Profiles convert PCS to CMYK.
There are pre-defined destination profiles for GCR
(Gray Component Replacement). GCR replaces
equivalent percentages of the gray component for
colors (CMY), replacing the gray with black. This
conserves dry ink and prevents dry ink buildup.
Emulation can be selected in place of destination
profiles allowing you to select a color profile that
emulates a specific type of output profile for media or a
printing device.
Rendering intent provides color mapping options.
The available rendering intents are covered in detail in
Chapter 4: Using Color Tools and are as follows:
Print as grayscale
Print as grayscale converts color conte nt to gray. Refer to on-line
help for the details, as well as for information on billing.
Spot color editor
DocuSP has a built-in color lookup table to map incoming spot
color (PANTONE® Coated or Uncoated) to the matching
P ANT ONE® color created in DocuS P CMYK. If the PostScript o r
PDF file contains Uncoate d, Process or Pro Sim color, the CMYK
color represen tation is created using the color valu es in the
PostScript f ile.
Saturation
Perceptual
Relative Colorimetric
Absolute Colorimetric
Pure
The Spot Color Editor is provided allowing you to change the
standard DocuSP output for each PANTONE® color.
2-12 Color Management Guide
Page 21

The Spot Color Editor tab is covered in more detail in Chapter 4:
Using Color Tools.
OPI (Open PrePress Interface)
OPI is a process to replace low-resolution images with highresolution images at RIP time. This speeds up job submission
time because you can submit a job with the low-resolution
images much faster than with high-resolution images.
OPI is covered in more detail in Chapter 4:Using Color Tools.
DRIs (Display Resolution Images)
The option exists in the Job: Proper ties tab to save the DRIs
embedded in a job. This must be enable d to allow viewing and
editing within a job at the DocuSP.
DocuSP color management
Color Manage me nt Gui de 2-13
Page 22

DocuSP color management
2-14 Color Management Guide
Page 23

3. Stock Management and Calibrati on
Color DocuSP systems achieve high-quality color results due to
an efficient and flexible stock management model. Stock
associations, calibrat ion, an d characterization are important
processes used for stock management.
Calibration is a process that is used to return the print engine to
a known standard to achieve and maintain consistent color
quality for each stock or color group and ha lftone.
DocuSP calibration uses the X-Rite DTP41 Spectrophotometer
to measure and adjust the gray balance of the CMYK color
output. You should ca lib rate the X- Rite DTP 41 da ily. Refer to the
DocuSP on-line help for complete calibration instructions.
Calibration is generally performed once for each color group/
halftone combination. If you do not use a specific halftone for
printing, you need not calibrate it.
Characterization
Once a stock is calibrated, DocuSP saves that calibration and
automatically selects the latest calibration f or the stock wh en the
stock is required by a job. DocuSP can save up to five
calibrations per stock. These saved calibrations are assigned to
the color group in which the sto ck resides, f or use with an y stock
within that color group.
Characterization is the process of creating a destination color
profile for stocks. Stocks have different characteristics such as
coated and uncoated, color, and weight which impact how color
appears on the sheet. For most users, characterization is not
recommended for a new stock; instead, you should place the
new stock in an existing color group.
DocuSP comes with 3 pre-installed color groups, containing
Xerox Qualified S tocks. Xerox Qualified Stocks are automatically
part of one of the pre-installed color groups and have a
destination profile pre-assigned to th em; therefore, they do not
require characterization.
Color Manage me nt Gui de 3-1
Page 24

Stock Management and Calibration
New or custom stocks may require characterization if you
choose to place them in a new color group. If the new or custom
stock is placed within one of the pre-installed color grou ps, the
stock picks up the profile assigned to the color group. Each new
or custom stock needs to be characterized only once. This
characterization is assigned to the color group and is invoked
each time the stock is selected for use in a job.
Once created, a color profile is assigned to any stock within the
color group.
The three pre-instal l ed color gr ou p s ar e:
• Bright White (L* > 95)
• White (93.7 < L*< 95)
• Other (L* < 93.7)
NOTE: The L* values are white point values and can be
obtained by looking at the ream wrapper and/or from the
manufacturer.
The three pre-installed color groups cannot be deleted; Xerox
Qualified Stocks may be removed from your Stock Library, but
not from the Stock Catalog. However, you may add new, nonXerox stocks to the existing stock groups. It is advantageous to
do so, as long as the new stocks share the same white point
value.
Additionally, it is suggested that you place any colored stocks
you wish to use in the Othe r group, although pe rfectly fine result s
can be achieved by placing all stocks in the white group. While
these suggestions may not seem to make sense, they work well
in practice. Most user s who print on beige stock, or light blue
stock, for instance, are generally willing to trade off maximum
color consistency for the ability to produce good-looking prints on
non-standard media.
An advantage to maintaining the “3-stock” model is that it limits
calibration to only three representative stocks. The “ 3-stock”
model is recommended for mo st workflows, requiring a little
more setup than the “unspecified” workflow but achieving better
color outcomes.
3-2 Color Management Guide
Page 25

Tips for use of Xerox Qualified S t ock s
Here are some general tips for using Xerox Qualified Stocks:
• You are able to modify certain attributes of Xerox Qualified
Stocks. Some fundamental attributes cannot be modified, as
they affect color processing.
The fundamental attributes are:
–Name
–Color
– Weight
– Coating
– Type (Type, Opac it y, Drilled, Modu l us)
– Finish (iGen3 only)
– Color group
Stock Management and Calibration
• Xerox Qualified Stocks cannot be moved from color group to
color group. Only User Defined Stocks can be moved and
fully edited at will.
Calibration process overview
Refer to the on-li ne help for a detailed calibration proc edure.
Prior to initiating the calibration process, the stock you plan to
use for calibration needs to be in a paper tray and that tray
programmed for that stock.
Begin by calibrating the DTP41 X-Rite Spectrophotometer.
NOTE: Calibrating the Spectrophotometer needs only be done
once a day.
You need the reflective strip card that has the same serial
number as the spectrophotometer. Follow the X-Rite
instructions.
In the DocuSP Color Manager: Associations window select a
stock or color group rep resenta tive. Ope n the Calib ration Wizar d
and follow the on-screen in str uctions.
When calibration is complete, accep t the calibration data. The
calibration is now assigned to the stock or color group used for
calibration.
Color Manage me nt Gui de 3-3
Page 26

Stock Management and Calibration
Calibrating the DocuColor 2045/2060/6060 family
For the DC 2045/2060 and 6060, you should calibrate at least
once or twice a day or more often when printing jobs that are
“color-critical.”
The default number of prints of the calibration targets is 5 for the
DC 2045/2060/60 60 family. However , you ma y choose to print as
many as 200 calibration targets at one t i me; we recommend
printing 5 prints (of the 2-page target) and then choosing the 5th
print to use for calibration.
Calibrating the DocuColor iGen3
Calibration should be performed at least once per color group,
per halftone per eight hour shift for the DocuColor iGen3.
For example, if jobs to be printed during the night shift require
Stock A using 175 dot halftone for job #1 and a 200 dot halftone
for job #2, a calibration is needed for Stock A at 175 dot and at
200 dot.
These calibrations are assigned to Stock A with a 175 dot
halftone and Stock A with a 200 dot halftone.
When calibrating 8.5 x 11 - A4 stock print 40 single sided copies
of the (2-pag e) t arget. For l arger sized stock pr int 20 single sid ed
copies of the target; we recommend using the final print for
calibration.
Calibration target tips
DocuSP calibration software checks the first color at the top of
each calibration stri p as a me thod o f insuri ng th at strip s 1-13 ar e
read in the correct order. If the top color is not detected, or is
detected improper ly, calibration fails. Due to image-to-page t op
variation associated mainly with the iGen3 engine, calibration
errors can occur if you pushes the target too far into the
Spectrophotometer.
Primarily, this can occur using the 11”x17” calibration targets,
which must be cut down manually to 8.5”x17” in order to feed
correctly into the X-Rite. This introduces the image-to-page top
variation previousl y men tioned.
This section provides pictorial instructions for successful
calibration in s pite of target image location fluctuation on the
calibration target.
3-4 Color Management Guide
Page 27
Stock Management and Calibration
This procedure is more likely to be necessary for iGen3 due to
image-to-pag e reg istra tion erro rs, bu t may also b e ap plicab le for
DC20xx/60xx printers.
Figure 3-1. Calibration t a rget and whitespace
Figure 3-2. Calibration step 1
Color Manage me nt Gui de 3-5
Page 28

Stock Management and Calibration
Figure 3-3. Calibration step 2
Figure 3-4. Calibration step 3
3-6 Color Management Guide
Page 29
Stock Management and Calibration
Figure 3-5. Calibration step 4
Stock Management hints and tips
General Stock Workflow Setups
Unspecified Stock Name Model Setup
The settings outlined in this section use the “Unspecified Stock
Name” model. This workflow is best for customers that have a
limited number of stocks and want very consistent color
outcomes with very easy system operation.
Key Points to this approach:
• One calibration event covers all of the stocks at a site.
• You accept the default characteristics for all stocks.
Therefore, stocks with slightly different whiteness (Bright
White, White and Non-White) will be treated the same by the
system.
Color Manage me nt Gui de 3-7
Page 30

Stock Management and Calibration
Recommendations:
• Use this workflow when you are not concerned about small
amounts of whiteness differences on stocks.
• This workflow provides simple and very quick setup.
• It is simple to maintain consistent color using this workflow
because only one calibration applies to all stocks all the time.
• You, the customer, never need to go into Color Manager;
using this workflow, you need only to use the Printer
Manager.
• Use this workflow if you want to avoid ineligible jobs fo und in
the named model.
Setup Steps (after software installation):
1. Open Printer Manager/Paper Trays and select a tray (e.g,
tray 1).
2. Select the desired stock size, type, coating etc. and close.
Leave the name Unspecified.
3. The same should be done for the other trays with physical
stock attributes selected and name remaining Unspecified.
Calibrate ANY stock named Unspecified
• In Printer Manager: Paper Trays, right click on any tray/stock
and select [calibration]. Perform the calibration process.
• You have now calibrated and loaded all stocks and trays on
the system. Any incomi ng job that matc hes an att ribute of the
stock, such as the size, pulls from the appr opriate tray.
Workflow Notes:
• Any Unspecified stocks are always placed in the default
group and use the default group’s calibration and destination
profiles.
• The default group can be cha nged a nd be use d therea fter by
any and all Unspecified stocks on the system.
Three Stock Model Setup
This set-up utilizes three stock groups to represent all the stock
you use. Three Xerox created groups represent Bright White,
White, and Other substrates.
The purpose of t his set-up, as compared to the Unspecified
workflow, is to account for common wh iteness differences in
stocks by using only three groups.
3-8 Color Management Guide
Page 31

Stock Management and Calibration
In this set-up, you add any Non-Xerox stocks you wish to print on
to one of the three groups.
• Bright White (Greater than 95)
• White (93.7 > L* <= 95)
• Other (L* <= 93.7)
NOTE: White point values can be found on the ream wrapper
and/or from the manufacturer.
Key Points to this approach:
• Accounts for the various wh i ten ess in a stock mix.
• Limits calibration to only three stock types.
• Recommended for most workflows.
• Requires three sto ck calibra tions i nstead of one ( Unspecifi ed
Model).
Adding a Xerox Qualified Stock:
1. Select [Printer Manager: Stock Library: Stock Catalog].
2. Select a Xerox stock and add the stock from the Stock
Catalog to the Stock Library.
3. Select your stock in Printe r Mana ger an d calibr ate if requi red .
NOTE: The pre-installed stocks have 1 of 3 stock profiles: Bright
White, White, or Other, based on their color group.
Adding New Stock: Non-Xerox:
1. Select Printer Mana ger : Ne w Stock.
2. Add your custom name.
3. Select the color group, i f a group othe r than the def ault group
is desired.
4. Y our new stock will automatically pick up the calibration of the
group.
NOTE: Keep in mind, if any other stock with the same whiteness
group has been calibrated, then this new stock will automatically
acquire the group’s calibratio n.
NOTE: On iGen3, custom stock will be created at the Press
Interface and will always be automatically part of the default
group. You can move the stock to another group at the DocuSP
controller.
Color Manage me nt Gui de 3-9
Page 32

Stock Management and Calibration
Table 3-1. DocuSP Sample Stock Grouping
Group
Name
Bright
White
White Digital Color Colotech+ SuperGloss 3r95451 135 95.0 (93.7 < L* <=
Paper Name Rnumber gsm L* Grouping
Criteria by L*
Color Expressions 98 Bright White Cover 3r11160 270 97.8 (L* > 95)
Color Expressions 98 Bright White Cover 3r5533 176 97.7
Color Expressions 98 Bright White Cover 3r6386 163 97.6
Digital Color Colotech Natural White 3r97102 100 97.5
Color Expressions+ 96 3r11390 163 97.1
Color Expressions+ 96 3r11385 105 97.0
Color Expressions+ 96 3r11387 120 97.0
Color Expressions+ 96 3r11380 90 96.8
Digital Color Super Gloss 3r6290 8pt 94.8
Digital Color Super Gloss 3r6294 10pt 94.7
Digital Color Super Gloss 3r6350 12pt 94.4
Digital Color Colotech+ Silk Coated 3r97166 120 94.3
95)
Digital Color Gloss Cover 3r11339 280 94.2
Digital Color Colotech+ 3r94641 90 94.1
Digital Color Silk 3r11360 140 93.9
Digital Color Silk Cover 3r11363 280 93.8
Digital Color Silk Cover 3r11357 210 93.8
Digital Color Colotech+ 3r94672 250 93.8
3-10 Color Management Guide
Page 33

Stock Management and Calibration
Table 3-1. DocuSP Sample Stock Grouping
Other Digital Color Gloss Cover 3r11333 210 93.7 (L* <= 93.7)
Digital Color Colotech+ Gloss Coated 3r95224 120 93.7
Digital Color Colotech+ 3r97098 280 93.7
Digital Color Colotech+ Gloss Coated 3r97163 280 93.6
Digital Color Colotech+ 3r94668 220 93.5
Digital Color Gloss Text 3r11336 140 93.4
Digital Color Graphics White Fiber 3r11166 105 93.4
Digital Color Colotech+ 3r94661 200 93.3
Digital Color Colotech+ 3r94646 100 93.3
Digital Color Colotech+ 3r94656 160 93.3
Digital Color Gloss Text 3r11330 120 93.2
Custom and Colored Stock hints
It is recommended that you place all your stocks, including new
or custom stocks, in one of the three pre-existing color groups.
This limits the need for calibration to three groups of halftones.
It may be useful to place all colored stocks into a single group.
Since all colored stock by definition will have a lower white point
than L* 93.7, the non-white stocks are expected to be placed in
the Other colo r group. However, you may prefer the results you
achieve using white or bright white profiles on the non-white
stock.
A simple way to determine which color group would be best for
your specific colored stock is:
1. Add your stock to a tray.
2. If desired, within [P rinter Manage r: Tr ays], select the option to
force feed from the tray. Alternat ively, you can just pro gram a
specific stock for your job.
NOTE: The option to force feed from a tray is not available
on the iGen3.
3. Submit a job to a hold queue on the controll er . The job should
contain a variety of image types, i.e. photos, halftones, and
graphics, as well as text. Y ou should be familiar with how this
job prints on white coa ted or uncoated stock.
4. Open properties for the job within Job Manager.
Color Manage me nt Gui de 3-11
Page 34

Stock Management and Calibration
5. Select [Expert Color: Output Color].
6. On the Output Color tab, select the radio button for
Destination Profile and open the pull-down menu.
7. Select the profil e for one of the three pre-inst alled colo r group
profiles.
8. Select [OK] to close the Expert Color dialog, and [OK] again
to save your Job Property changes.
9. Right-click on the job in Job Manager and select [Proof] from
the context menu. The job is released to RIP.
10. Retrieve your print from the output tray of your printer.
11.Repeat steps 4 through 10 twice, selecting a different
Destination profile each time.
NOTE: After the job proofs, it will appear in the inactive jobs
list of the Job Manager, and will be designated as
“successfully proofed.” This is where you will find it the
second and third time you proof it.
12.Compare the three prints. By determining which of the
destination prof iles produces the most pleasing prints on your
colored media , y ou can decide to which color group you
should add your colored stock.
If none of the three print s are satisfacto ry to meet your needs,
then you may choose t o cre ate a n ew color g roup in which to
place your new, colored stock. In addition, you may need to
use a specific user TRC to match specific colors.
NOTE: Most users will find that the White group meets most
of their color needs regardless of the color, coating, white
point, or weight of their stocks.
3-12 Color Management Guide
Page 35

4. Using color tools
The DocuSP controller pr ovi d es a nu m ber of color management
tools. Determine which color management tools to use based
upon your job requirements and your own skills and knowledge.
To address the diverse levels of job requ irements and user skill
and knowledge, the DocuSP controller provides three levels of
color management, all capable of producing high-quality col or
output.
• Automatic Color Management provides high-quality
consistent color with routine calibration and by applying
Xerox Consistent Color Mode or Print Engine Specific Mode
at the queue level.
• Simple Color Management provides hig h- qual ity con s is ten t
color with routine calibration and easy to use color tools to
adjust color cast using simple slider bars for lightness,
contrast and saturation. Trapping, Black Overprint and antialiasing can also be appli ed.
• Expert Color Management provides high-quality consistent
color with routine calibration and provides you with a full
compliment of industry-standard color management tools for
making color adjustments.
Using Custom color mode (default)
Custom Color mode is the default for new queues and will
produce great results for most jobs. Custom color mod e can be
used by skilled color users to make adjustmen ts in color
properties, renderings, image resampling, emulations, and User
TRCs. Custom color adjustments can be made at the job or
queue level.
Skilled users can create queues with specific color property
settings so that jobs sent to these queues are automatically
assigned the queue properties.
Color Manage me nt Gui de 4-1
Page 36

Using color tools
Basic color tools
Queues of this type pr ovid e opera tors a pa th to p rint hi gh-qu ality
color output without requiring a detailed knowledge of color
profiles. The profiles are pre-set prior to operator intervention.
Basic color tools can be applied at the queue, job or page level.
The adjustments a re ma de on al l of t he colo rs and are addi tive if
more than one adjustment is made on an image.
The adjustments are made during the RIP creating the DocuSP
CMYK output profile.
Basic color tools are used when an image requires a global
adjustment that can be made by one of the tools.
• Use Lightness to lighten or dar ken an image.
• Increase Contrast to lighten highlights and darken shadows.
Decrease Contrast to darken highlights and lighten
shadows.
• Increase Saturation when you want to print stronger colors.
Decrease Saturation to weaken colors.
Figure 4-1. Lightness, Contrast, and Saturation color
controls
• Adding or subt racting col ors using Color Cast impacts all the
colors in the image.
4-2 Color Management Guide
Page 37

Using color tools
Figure 4-2. Color Cast controls
– Cyan vs. Red - moving the slider bar towards cyan adds
cyan by reducing the amoun t of red. Mo ving the slid er bar
towards red adds red by reducing the amount of cyan.
– Magenta vs. Green - moving the slider bar towards
– Yellow vs. Blue - moving the slider bar towards yellow
Image quality tools
Image quality tools can be applied at the queue, job or page
level.
Magenta adds magenta by reducing green. Moving the
slider bar towards green adds green by reducing
magenta.
adds yellow by reducing blue. Moving the slider bar
towards blue adds blue by reducing yellow.
Figure 4-3. Image Quality Tools
• Trapping compensates for white gaps between colors and
regions of shifted hues caused by misregistration.
Color Manage me nt Gui de 4-3
Page 38

Using color tools
Figure 4-4. Trapping Setup dialog
Trapping should be done on the DocuSP controller but can
be done at the client application lev el as well, depending on
the application If tr app i ng i s applied at the application, do no t
trap at the controller.
• Black overprint
– DocuColor 2045/2060/6060 black overprint prevents the
background of a black object from being removed,
causing the black image to be printed on top of the
underneath color and eliminating bands of white around
the black object. To view the dialog in which to find and
set this feature, see Figure 4-3.
– DocuColor iGen3 lays the colors onto the image in a
unique manner with black being laid down first. Using
black overprint causes muddy looking blacks.
The default setting fo r Bl ack O v erpr i nt on the i Gen 3 i s off
and it is recommended that you only use this feature
when you must.
• Anti-aliasing reduces the jagged appearance of curves and
lines in text and line art. To view the dialog in which to find
and set this feature, see Figure 4-3.
User Tonal Reproduction Curves (TRCs)
User TRCs provide th e skilled user a tool for adjusting color
output on all or individual color separations of an image.
4-4 Color Management Guide
Page 39

Using color tools
Create User TRCs to make and save color adjustments that can
be applied to jobs. The creation of User TRCs should be
performed by users with a high level of color knowledge.
For example, create a TR C that compensate s for j obs submi tted
from a specific device that generates a consistent magenta tint.
A TRC adjusting for that tint could be created and applied to
every job submitted from that device. This saves job preparation
time and assures that the same adjustment is made to all jobs
submitted from that device.
Expert color tools
Skilled users employ expert color tools for high level color
adjustments. Users select source and destination color profiles
to be used in conversion to engine CMYK.
Usage of the expert color tools is dependent upon your color
requirements. You can use these tools to improve color quality.
• Source color allows you to sele ct RGB, CMYK and Gray
input color profile for the image, on an object-type basis.
Figure 4-5. User TRC setup window
Color Manage me nt Gui de 4-5
Page 40

Using color tools
Selecting a source color profile places the image on that
source profile’s color processing path when there is no
embedded profile for the image.
Figure 4-6. Expert Color: Source Color dialog
• Output color allows you to select profiles that maximize the
color potential of the output print engine.
– Halftones are created by breaking an image into a
pattern of color do ts. The larger the dots the darker the
color.
For iGen3, we suggest you use the default 175 dot for
most jobs and 200 for coated stock jobs.
For DC 20xx/60xx, we suggest you use the def ault profile .
– Image Resample: The DocuSP controller provides you
with the ability to select an interp olation, or image
resample, method to scale images for output in order to
achieve maximum Image Quality at the desired RIP
performance. Interpolation is defined as the process of
estimating a value of a function between two known
values. In the Image Interpolation context, the function of
known values is the input image, and the estimated
values are the values calculated for the output image.
Image interpolation attempts to produce a smooth
transition between adjacent samples rather than simply
replicating pixels (which would result in “blocky” images).
4-6 Color Management Guide
Page 41

Using color tools
Figure 4-7. Interpolation methods
The interpolation methods that may be selected include:
Nearest Neighbor Interpolation: A method used to
scale image data (pixels) from one resolution to
another. The output pixel value is simply the value of
the input pixel closest to the output location. Nearest
neighbor interpolation is the highest speed
interpolation on the DocuSP controller.
Bi-Linear Interpolation: A method used to scale
image data (pixels) from one resolution to another.
The replacement pixel in the scaled image is
calculated using a weighted sum of the four nearest
pixel values in the source image. This metho d offers
higher quality than Nearest Neighbor Interpolation.
Smart Interpolation: A method used to scale image
data (pixels) from one resolution to another. This
interpolation method automatically chooses between
bi-linear interpolation and filtered interpolation based
on the input ima ge charact eris tics. Sm art inte rp olat ion
is the highest quality interpolation available on
DocuSP.
Color Manage me nt Gui de 4-7
Page 42

Using color tools
Filtered Interpolation is a method used to scale image
data (pixels) from one resolution to another. The
output pixel is calculate d by passing the neighborho od
of the input pixel through the filter to determine the
output pixel. The DocuSP controller uses a filter
dynamically deter mined by the frequ ency of the output
halftone and the input image characteristics. Filtered
Interpolation is used as part of the Smart Interpolation
option in the DocuSP controller.
– Output allows you to select the output profiles.
Destination Profile provides a list of color profiles that
can be assigned to the job. An y profile can be selected
and will take precedence over the profile assigned by
the color group.
The listing includes profiles for assigning Gray
Component Remova l (GCR). GCR is a process for
replacing an equal percentage of gray with black
reducing the amount of dry ink u sed.
You can select a GCR profile for most stocks.
However, it is often best to use the System
Specified setting, which is optimized for your
system.
Use destination profiles to override the color profile
assigned by a stock’s color group.
Emulation
Use an emulation to render an RGB or native CMYK
image to simulate the look of a specific press. An
example would be selecting SW OP™ Co ate d to
simulate a SWOP™ press.
Rendering
Rendering can applied automatically to all of the data
objects in an image or individual ren dering can be
applied to a specific data image, text or graphic
objects in an image.
Image objects are defined as photographs and graphic
objects are defined as line art and business graphics.
For RGB images, using System Specified (default)
rendering is perfectly acceptable.
4-8 Color Management Guide
Page 43
For CMYK images, using System Specified (default)
rendering is perfectly acceptable. The Saturation
intent for CMYK 4x4 LUT is derived from the Relative
Colorimetric intent.
In general, use Rel ative Col orime tri c to mat ch a proo f.
Use the other rendering intents based upon
preference.
Table 4-1. System Specified Defaults
Object Type Rendering
Images Relative Colorimetric
Graphics Saturation
Text Pure
Use Saturation for rendering business graphics
such as Microsoft Power Point documents, charts,
graphs, etc.
Using color tools
Use Perceptual for rendering photographic
images to achieve a more press-like appearance.
Use Relative Colorimetric when attempting to
apply the closest color values in the print engine
color profile to the input profile, taking into
consideration the white point of the media. Used
for color matching such as matching a SWOP™
proof.
Use Absolute Colorimetric when attempting to
apply the closest color values in the print engine
color profile to the input profile using a standard
white point. Absolute Colorimetric is used for
comparing to an absolute value. Highlights tend to
be washed out and colors appear light using
Absolute Colorimetric rendering.
Use Pure for rendering text and line art, as it
subdues halftone textures to increase the visibility
of text on colored backgrounds. Pure works best
with RGB text.
Color Manage me nt Gui de 4-9
Page 44
Using color tools
Spot Color Editor
The Spot Color Editor window displays a list of spot colors
recognized by the system. The list can display PANTONE®
Colors, Edited P ANTONE® Colors and Custom User Colors. The
operator can view the properties of all colors, edit all colors and
delete custom colors. You can print a swatch book of
PANTONE® Uncoated or PANTONE® Coated colors, or print a
proof of a color being edited.
Understanding the Spot Color Editor window
The Spot Color Editor contains several menus as well as lists
that enable you to view spo t color prop erties and ed it spot colors .
Figure 4-8. The Spot Color Editor tab
•The View menu: The View menu is a drop-box that enables
you to set the Table to show one of the following choices:
–All
– PANTONE® Coated
– PANTONE® Uncoated
4-10 Color Management Guide
Page 45

Using color tools
–Custom
• Color Type (icon): A column that displays a tool tip (if
present) when you pass the mouse pointer over the graphic
icon.
• CMYK: A column that co ntains numerical values
corresponding to the respective values of Cyan, Magenta,
Yellow, and Black that are present in each spot color.
• Preview: A column that contains representations of each
spot color in the Table.
NOTE: These representations are not necessarily coloraccurate and are intended for use only as a guide.
• Right-Click or Context menu: A menu that is available
when you right-click the mouse within a row in the Table.
The options available in the Right - Click menu are:
– Edit...: Opens the Edit dialog
– New...: Opens the New dialog
– Print Swatch Book...: Enables you to print out a full book
of PANTONE® color swatches.
– Revert: Available when an edited PANTONE® color is
selected, this control reverts an edited color back to its
original settings.
– Delete: Available when a custom color is selected, this
control displays the Delete Confirmation Alert box.
– Redisplay: refreshes the view in the Spot Color Ed itor.
• Color Name: A text field that can be used to find a specific
color name. When there is text present in the field, the [Find
Next] button becomes available. The [Find Next] button
locates the next instance of the text string in the list of color
names. If the end of the list is reached without finding a
match, an alert box will appear, stating “No Matching Name
Found.”
Open PrePress Interface (OPI)
The DocuSP controller enables you to employ Open PrePress
Interface (OPI). This feature allows for full-resolution image
substitution at RIP t ime, speeding up job subm ission time as well
as diminishing job creation/processing time.
Color Manage me nt Gui de 4-11
Page 46

Using color tools
Figure 4-9. OPI setup dialog
This process works as follows:
1. An image reposito r y is created on the DocuSP controller tha t
contains all of the full-resolution images that will be employed
by the document creators.
2. An OPI Search path is cre ated in the Setup menu so that the
DocuSP controller knows where to find a local copy of the
full-resolution tiff image.
3. A queue is set u p with OPI Sub stitu tion enable d. Th is fe ature
is found in the Queue Properties: PostScript/PDF tab.
4. A low-resolution im age is cre ated as an a nalogue to each ful lresolution image; these are distributed to the document
creators.
5. The document creators position the im ages in their
documents, and i nclude placem ent, sizing and cropping
information as well as OPI comments (these are generally
done by the application).
NOTE: Supported applications include (but are not limited
to) Pagemaker™, InDesign™, Quark™, and Freehand™)
6. The job is submitted to the DocuSP controller’s OPI-enabled
queue.
4-12 Color Management Guide
Page 47

7. At RIP time, the controller will substitute the full-resolution
images for the low-resolution images that were submitted
with the job.
Using Print Engine Specific mode
Use the Print Engine Specific mode if the job is to be printed on
multiple print e ngines of the sam e model, or if you use the TIFF
save option.
Using color tools
Figure 4-10. Example of Print Engine Specific Mode (iGen3
Print Engine Specific mode provides pre-defined settings that
optimize the performance of specific DocuSP based print
engines. This mode provides a consistent profile conversion path
for undefined profiles providing the best default color
interpretation and rendering values for the print engine. The print
engine default settings are ap plied if there is no c orresponding
property set within the job.
The Print Engine Specific mode is selected at the queue and
applied to all jobs submitted to that queue.
Using XCC (Xerox Consistent Color) mode
Use XCC mode for those jobs that have no unique color
requirements and may be printed on other Xerox print engines.
CMYK)
Color Manage me nt Gui de 4-13
Page 48
Using color tools
Figure 4-11. Se lecting XCC mode
XCC is selected at the queue an d applie d to all jo bs submi tted to
that queue.
Using XCC produces an image of the same document that is
similar when it is submitted to any Xerox color print engine
running in XCC mode. XCC standardizes the way the DocuSP
controller interprets unknown input color profiles and
standardizes the conversion through a Xerox standard output
profile.
When XCC is selected, you cannot make any other color
adjustments. The color properties are grayed out and not
selectable.
Many of the jobs that use XCC are saved in Fast Reprint format
for reprinting.
4-14 Color Management Guide
Page 49

5. Troubleshooting
What do you do if you experience color or image quality
problems with printed images? Determining where the problem
occurs is primary in the troubleshooting process.
Determining and defining exactly what the problem is helps
identify where the problem resi des.
Questions to ask at this stage are:
• Is the problem with the image itself?
• Is there an application setup problem?
• Are there inco rrect property settings at the DocuSP?
• Are there problems w ith the print engine?
• Can the problem be solved at the DocuSP or does it need to
escalated?
Image paths
This troubleshooting module assumes that actions can be taken
at the DocuSP to solve the problem.
A good place to st art trou bleshooting is to ident ify the image path
the job took through the system. Determine whethe r the job took
the Xerox Enhanced, Standard, Fast Reprint or Native path and
submit the job using another path. If the job successfully prints
with satisfactory color results, the problem is isolated to a
particular path.
If the imaging p ath is no t the caus e of the pr obl em, the next step
is to isolate the rendering intents used. It is possible that the
rendering intent chosen on the job is being overridden by the
rendering intent chosen for the queue.
Color Manage me nt Gui de 5-1
Page 50

Troubleshooting
A third possibility should be tested if the first two are not the
cause of the imaging problem: a source color mismatch may
exist between the queue and the job’s input color space. For
example, if the intent of the job is to render a CMYK document
which was originally designed for a SWOP™ press, you need to
select “SWOP™ Coated CMYK” as the source CMYK color
space. If FOGRA Gloss is selected in Job Properties and
SWOP™ CMYK is selected in Queue Properties a mismatch
exists.
Things to remember
In closing out this chap ter, we wanted to provide you w ith a short
list of things to remember:
• Color Adjustments ar e performed in PCS (XYZ), thus always
invoking the ICC path.
• Calibration an d Us e r TRC s ar e a pp li e d i n ha r dwar e. They do
not affect RIP performance or color pathway.
• The Xerox Enhanced Path always provides improved RIP
performance and better image quality.
• Using pre-installed profiles and Look Up Tables is sufficient
for most customer jobs and most stock.
• Building and utilizing profiles will always invoke the ICC path.
• When using untagged files, make sure the appropriate
source RGB or CMYK space is selected on the queue or job.
• If there is a mismatch between the Source CMYK and the
Destination Emulation, the resu lts will be unpredictable.
• Most PDF files have the Relative Colorimetric intent specified
in the file. If you want to change the renderi ng, a qu eue or job
override must be selected.
5-2 Color Management Guide
Page 51

A. System Specified defaults
This section details the various Color Management tools and
their system-specified, default states.
Table A-1.
Color
Management
tool DC 2045/2060/6 060 DC iGen3
Color Mode 0 +/- 100 0 +/- 100
Lightness 0 +/- 100 0 +/- 100
Contrast 0 +/- 100 0 +/- 100
Color Cast:
• Cyan vs.
Red
• Magenta
vs. Green
•Yellow vs.
Blue
• 0 +/- 100 (all Cyan
vs. all Red)
• 0 +/- 100 (all
Magenta vs. all
Green)
• 0 +/- 100 (all Yellow
vs. all Blue)
• 0 +/- 100 (all Cyan
vs. all Red)
• 0 +/- 100 (all
Magenta vs. all
Green)
• 0 +/- 100 (all Yellow
vs. all Blue)
Trapping Off
When enabled:
• height = 1
• width = 1
Image/Graphic
Trapping
Black Overprint Off Off
Anti-Aliasing Off Off
Source Color • RGB - sRGB
Output Colorhalftone
Off Off
•CMYK - SWOP
Coated CMYK
• GRAY - DC2000
GRAY
200 dot 175 dot
™
Off
When enabled:
•height = 1
• width = 1
• RGB - sRGB
• CMYK - SWOP
• GRAY - iGen3 GRAY
™
Coated CMYK
Color Manage me nt Gui de A-1
Page 52

System Specified defaults
Table A-1.
Color
Management
tool DC 2045/2060/6 060 DC iGen3
Output Color:
Image
Resample:
Destination
Profile
Emulation Off Off
Rendering
Intent:
• Saturation
• Perceptual
• Relative
Colorimetric
• Absolute
Colorimetric
•Pure
OPI Off Off
• Bi-linear
•Filtered
• Nearest Neighbor
•Smart
System Specified System Specified
• Images - Relative
Colorimetric
• Text - Pure
• Graphics - Saturation
• Bi-linear
•Filtered
• Nearest Neighbor
•Smart
• Images - Relative
•Text - Pure
• Graphics - Saturation
Colorimetric
A-2 Color Management Guide
Page 53

B. Glossary Of Color Management
Terms
Absolute
Colorimetric
Associations The DocuSP controller uses stock associations to create color
Calibration Calibration is a process that enables the user to measure the
CIELAB A standard color space model defined by the Committee
CMYK A color space model that defines the relative amounts of Cyan,
A rendering intent that maps colors to the nearest hue based
upon a perfect illuminant. When printing usin g this intent,
highlights tend to be washed out and colors ap pear lighter.
groups of similar stocks that can u se a single calibration. Once a
stock is associated with a color group, it ‘inherits’ attributes from
the group.
printer’s output against a known standard, by using a
Spectrophotometer to scan test patterns. The process enables
the user to adjust for “drift” in the color response of the printer
and achieve consistent results.
Internationale de l’Eclairage, an international standards
committee. L*A*B* is a color space that describes color in terms
of human eye response.
Magenta, Y ellow , and Black toner or ink that will be applied to the
print. CMYK can be found in both in put and output profiles.
Coated Coated refers to whether the stoc k in use has been coated or
was left uncoated. Generally, prints on coated stock will appear
glossier than do prints on uncoated or matte stocks. This visual
color difference may not be measurable, but it exists.
Color Cast The technical term for an overall color imbalance affecting an
entire image. The DocuSP contro ll e r enabl es you to adju st the
color cast in order to balance the image.
Colorimetric Refers to mapping an output color directly to the input color.
Contrast In display systems, the relation between the intensity of color,
brightness, or shading of an ar ea. High-contrast images have
darker shadows and brighter highlights, while low-contrast
images have light er shadows and dulle r highlights.
Color Manage me nt Gui de B-1
Page 54

Glossary Of Color Management Terms
Destination Profile The color profile that converts PC S to the output device’s color
space. In other w ords, a destination profile can be sent to the
printer.
Gamut The complete range of colors a device can produce. Most
printers have unique gamuts compared to other printers. Often,
however, the printer can emulate the output of a different printer
through use of a Color Space Transformation.
GCR Gray Component Replacement: the process of removing the
graying componen t, or dirtying co lor , from a colo r and replacing it
with black. For example, a red containing 100% magenta, 80%
yellow and 20% cyan withou t GCR mi g ht con tain 90% magenta,
70% yellow, 10% cyan, and 10% black after GCR has been
applied.
Halftone A pattern of dots of varying sizes applied to an image of varying
tones, or same-sized dots applied to a tint of color. Used to
reduce moire and other artifacts of the printing process.
ICC International Color Consortium
JPEG An image file format which is in RGB color space. The .jpg files
in a print job will need to be converted to CMYK prior to printing.
Lightness The perceived reflectance of a surface.
Matte Matte refers to an attribute of a stock which is a fla t color with no
glossiness. Matte stocks tend to appear halfway between
uncoated stock and coated stock.
OPI Open PrePress Interface: the process of substituting full-
resolution images residing in a reposi tory for low-resolution
images at RIP time.
PCS Profile Conn ection Space. DocuSP employs XYZ as its Profile
Connection Spa ce. XYZ i s a co lor sp ace model t hat m ap s color s
according to human eye response.
Perceptual A rendering intent that maps colors to the nearest hue relative to
the white point of the media and compresses the printer’s gamut.
The intent maps colors relative to each other, allowing more
distinction between colors and increased shadow detail.
Press Emulation The DocuSP controller can emulate outputs from other types of
printers. Examples include SWOP Fogra Matte, Fogra
Uncoated, Fogra Coated, Commercial Coated, as well as either
iGen3 CMYK or DC 2000/6000 CMYK (depending upon your
printer).
Pure A rendering intent that warps colors close to a pure colorant (C,
M, Y, K, R, G, and B) to the pure colorant.
B-2 Color Management Guide
Page 55

Glossary Of Color Management Terms
Relative
Colorimetric
Rendering Intent As part of the Profile Color Conversion in the Profile Connection
RGB A color space model that defines the relative amounts of Red,
Saturation A rendering intent that maps RGB CMYK to CMYK. The G is the
A rendering intent that maps colors to the nearest hue relative to
the white point of the media. The ga mut mapping strategy will
clip out-of-gamut colors to the gamut boundary.
Space, rendering intents can be applied to the job to achieve
specific results. The DocuSP controller provides 5 rendering
intents:
• Absolute Colorimetric
• Relative Colorimetric
• Perceptual
• Saturation
•Pure
Green, and Blue light in the image. The RGB color space is
generally seen as an input profile; the printer will need to convert
RGB to CMYK in order to print the job.
printer’s G, the B is the printer’s B, and the R is a saturated Red.
Source Profile The color profile with which the job was created at the client
workstation prior to submission. It is often embedded as part of
the PDL, but if not embedded, a source profile can be assigned
by the DocuSP controller at the job or queue level.
Spectro-
photometer
Spot Color Spot colors are selected from books or charts that contain
sRGB Standard (device-independent) RGB.
SWOP S tandard Web Of fset Press. A type of printing press f or which the
TIFF Tagged Image File Format.
A tool which measures the quality of the printed test pattern and
enables calibration of the printer. This is accomplished by
measuring the spe ctral wavelength of light reflected from a
substrate (surface).
printed color samples, each of which is identified by some
number. Usually, the numbered color s are also described in the
CMYK system. One widely used n umbering sche me is known as
the PANTONE® Matching System, or PMS. The DocuSP
controller contains a spot color editor that provides PANTONE®
Coated and Uncoated color definitions.
DocuSP controller provides an emulation.
Color Manage me nt Gui de B-3
Page 56

Glossary Of Color Management Terms
TRC Tone Reproduction Cur v e. TRCs may be cre at ed and store d by
users who wish to achieve certain effects on a consistent basis.
User TRCs can be applied to all jobs, including those that
originate as Reprint files.
Uncoated Uncoated defines whether a stock has been coated or was left
uncoated. Generally, prints on uncoated stock will appear flatter
than do prints on coated stocks.
XYZ A color space which maps to human eye response. The DocuSP
controller utilizes XYZ as its Profile Connection Space (PCS).
B-4 Color Management Guide
Page 57

Index
A
Assign profile 2-6
Associations tab 2-6
B
Basic color tools 4-2
Bi-linear Interpolation 4-7
C
Calibration process overview 3-3
Calibration target tips 3-4
Calibration targets
DC 20xx/60xx family 3-4
DC iGen3 3-4
Characterization 3-1
CMYK Native path 2-5
Color manager 2-6
Color paths 2-2
Color profiles 2-7
Color Tools
using 4-1
Colored Stock hints 3-11
Custom color mode 2-10
Color Tools 2-10
Expert Color 2-11
Image Quality tools 2-10
using 4-1
D
Destination Profiles 2-12, 4-8
DocuSP workflow chart 2-3
DRIs (Display Resolution Im ag es) 2-13
E
Emulation 2-12, 4-8
Expert color tools 4-5
Page 58

F
Fast reprint path 2-5
H
Halftones 4-6
I
ICC standard path 2-3
Image quality tools 4-3
Image Resample 4-6
N
New Color group 2-6
New stock 2-6
O
Open PrePress Interface 4-11
Open PrePress Interface (OPI) 2-13
P
PANTONE path 2-5
Print engine specific mode 2-7, 4-13
Q
Queue Overrides 2-1
R
Rendering 4-8
Rendering intent 2-12
Absolute Colorimetric 4-9
Perceptual 4-9
Pure 4-9
Relative Colorimetric 4-9
Saturation 4-9
S
Smart Interpolation 4-7
Spectrophotometer 2-1
Spot color editor 2-12
using 4-10
Stock Management
hints and tips 3-7
Stock Workflow setups 3-7
T
Three Stock Model setup 3-8
Page 59

Troubleshooting 5-1
U
Unspecified Stock Name Model setup 3-7
User TRCs 2-7, 4-4
X
XCC mode
using 4-13
Xerox consistent color mode 2-9
Xerox Qualified Stocks
tips for use 3-3
Page 60

 Loading...