

Page 1

Network Quick Install Cards Overview
1. Configure the Document Centre for Token Ring or Dynamic TCP/IP addressing (If applicable)
Page 1
For 100MBps Ethernet or
Token Ring Networks
Dynamic TCP/IP addressing
Use the
Routing.
The Document Centre 460/470 has DHCP enabled by default. Use the
disable DHCP then use the
mation on your Document Centre.
100BaseT Ethernet or Token Ring Interface Quick Install Card
Static (Manual) TCP/IP Addressing Quick Install Card
2. Install the Document Centre on your network
Novell NetWare Networks
All other Networks
Novell NetWare users can use either the
install their printer. For CentreWare instructions refer to the
your Document Centre.
Locate and perform the procedures indicated the Quick Install Card that apply to your network environment. Use
Network Installation and Trouble Shooting Guide
the
Novell NetWare 3. X (or 4.1X Bindery Mode)
Microsoft Windows (TCP/ IP) Peer- to- Peer Networks
Banyan VINES Network
OS/ 2 Networks (Peer-to-Peer or Warp 4.0 NetBEUI and TCP/ IP)
NetWare Quick Install
3. Distribute the CentreWare applications and print drivers to all users
Distribute Print Drivers
Use the instructions on the back of this card to distribute CentreWare print drivers to your network users.
Card to set Ring Speed and Source
DHCP / BOOTP Quick Install Card
to configure TCP/IP infor-
Cards OR Xerox CentreWare software to
CentreWare Network Services Guide
to install on the following networks:
to
supplied with
CentreWare Conductor
CentreWare Conductor is software for Microsoft Windows 95/98, Windows NT Workstation, and Windows 2000
Clients on Novell networks that allows a user to monitor a printer. Refer to the
Guide
supplied with your Document Centre for installation and usage instructions on print driver and Centre-
Ware applications.
4. Install an optional Network Scan, Accounting or Fax feature (If necessary)
Scanning
Network Accounting
Network FAX
Refer to the
option.
Refer to the
by the EquiTrac OfficeTrac software application.
Refer to the
server.
Network Scanning Services Guide
Equitrac OfficeTrac Quick Install
RightFAX Network FAX Quick Install
found in the Scanning Services Kit to install the scanning
Card to control and monitor your networked Document Centre
Cards to connect your Document Centre to your RightFAX
CentreWare Network Services
701P34132
Page 2
DISTRIBUTING PRINT DRIVERS
Page 2
Before You Start
Once you have installed your printer on the network, you will probably need to load one or more
print drivers on other workstations. Distributing
the CD-ROM can be a very time consuming
task. The information on this card will help you to
distribute the drivers quickly and with minimal
administration.
The Network Services CD (CD 2)
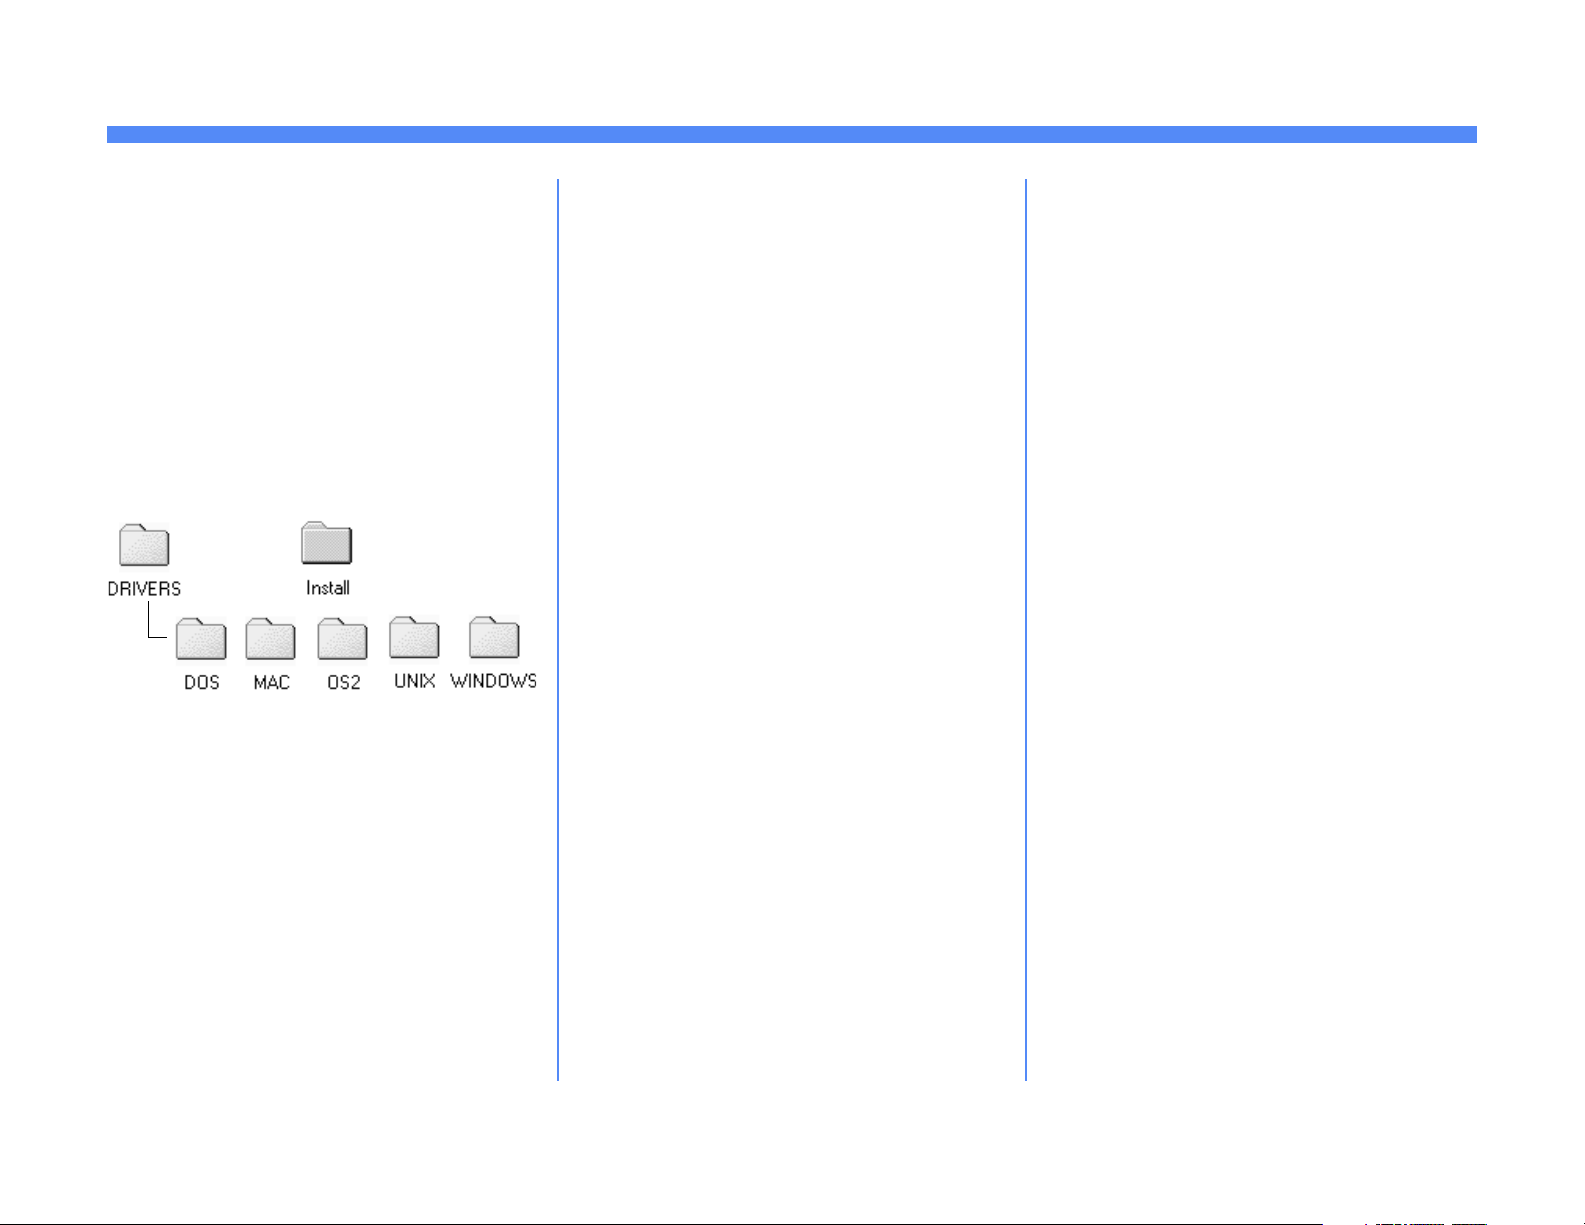
Directory structure
The CD-ROM contains the following directories:
Conductor
disk folders
are here
These folders contain the various PostScript and
PCL drivers that support the Document Centre
as well as other Xerox printers.
You should open these folders to decide which
drivers and PPD files you will need for your
application then review the rest of this card to
decide the best method for distribution.
Distribution by Shared Resource
On Client/Server or Peer to Peer networks you
may want to copy the necessary folders or individual drivers to a shared drive, or mount the
entire CD as a shared volume. If your users
have access to an intranet, you might want to
have the drivers available on an internal Web
Server.
PROS:
• A large number of workstations can have
drivers loaded.
• A large variety of print drivers can be distributed easily.
• Users at remote sites (dial-in accounts) can
connect, load drivers, and use local printers.
CONS:
• Network bandwidth is consumed loading
drivers.
• The shared resource must be available to
each individual in order to load drivers.
Once you have established this shared
resource, you can distribute a hard copy document or an email message with instructions on
installation to all workstation users that will use
these drivers.
Installation instructions for the print drivers can
be found in the
ment.
Network Services Guide
docu-
Distribution by E-Mail
You may want to email individual drivers to all
users. Due to its size, it is NOT recommended
you distribute the CentreWare Conductor software in this manner.
PROS:
• Users will not need access to a shared
resource.
• Users will get just the driver they need and
no others.
• Installation instructions and the driver can
be sent in the same message.
CONS:
• Due to the size of some drivers, Email servers can be overloaded when a distribution
takes place.
• E-Mail storms may occur when users forward drivers to each other.
Once you have established an E-Mail message
distribution list you can update drivers when
necessary.
©1999 Xerox Corporation. Product names used on these cards may be trademarks or registered trademarks of their respective companies and are hereby acknowledged. 701P97322
Page 3
What you need to know about your Document Centre 460/470 ST
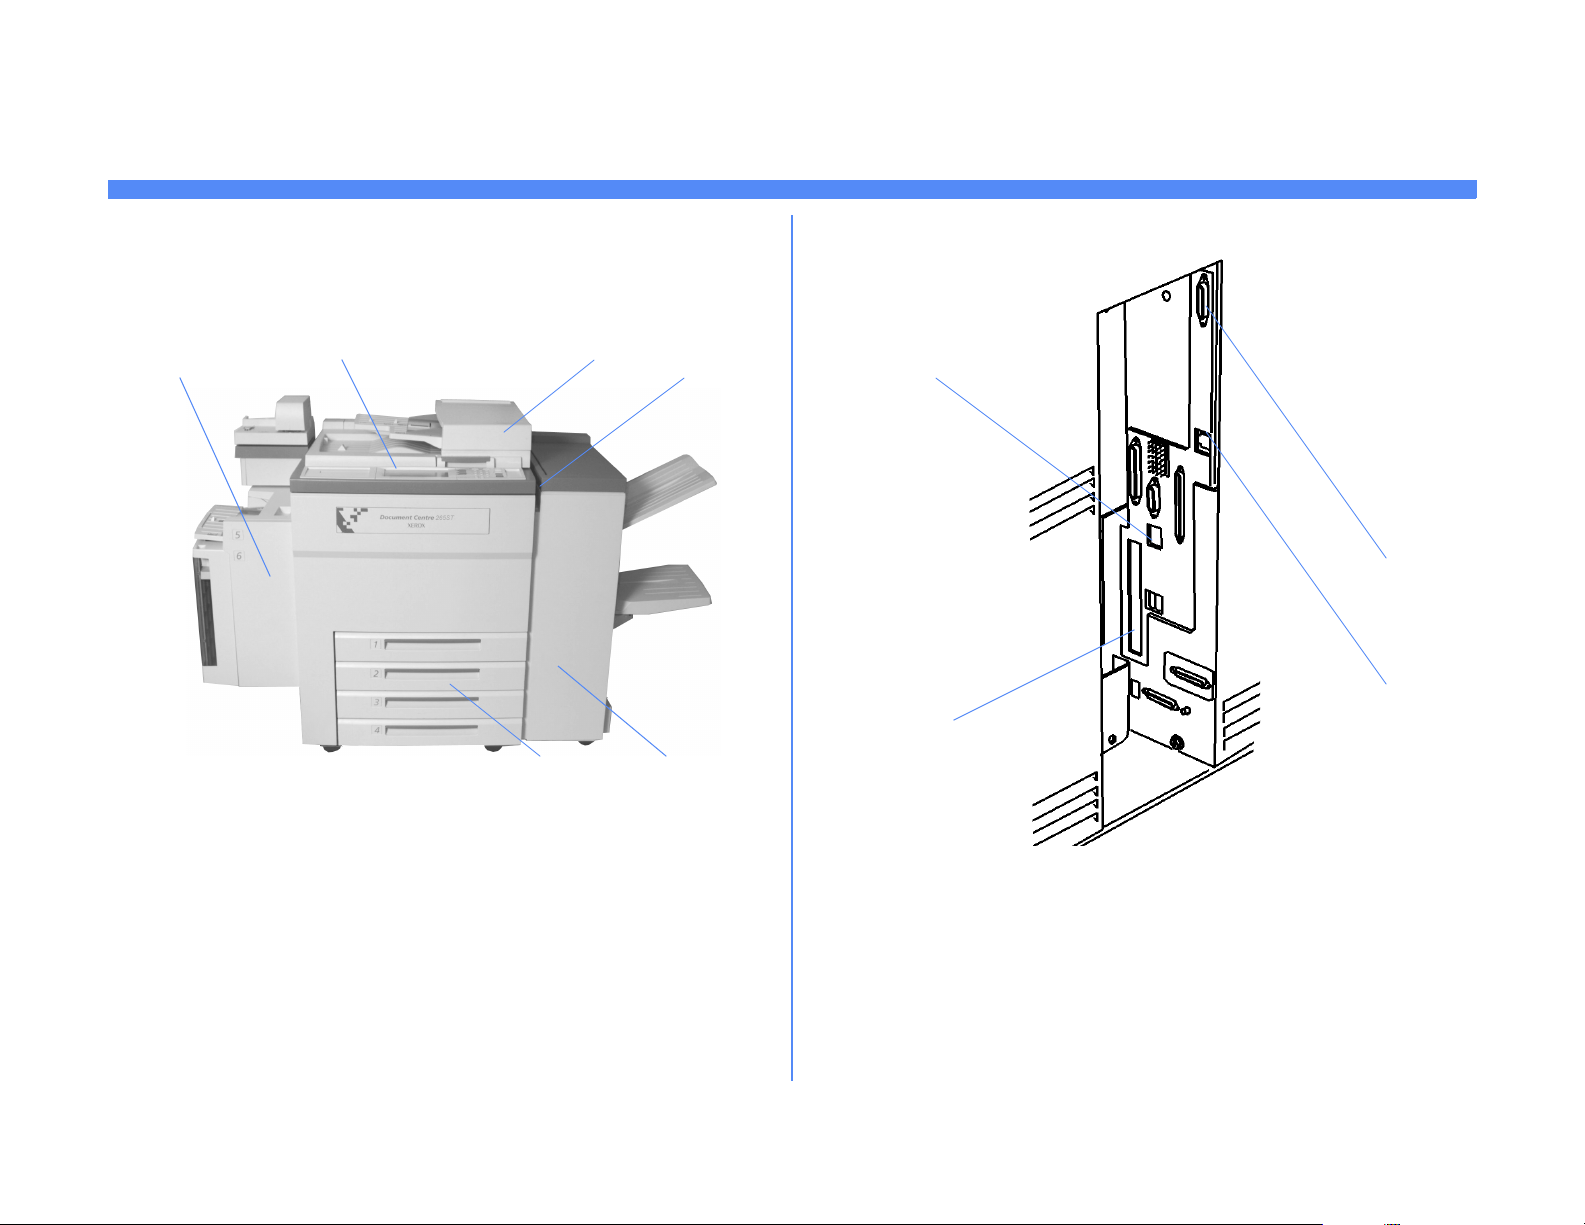
FRONT VIEW BACK VIEW
1
23
1.
Bypass Tray (Tray 5) and High Capacity Feeder (Tray 6)
2.
User Interface (see Details on the back of this card)
4
2
3
4
1
56
1.
Token Ring card slot
2.
Standard Ethernet Port (RJ45) 10/100 Mbps
3.
Document Feeder (ST model ONLY, with scanner glass
underneath)
4.
Power Switch (you will use this during network installation)
5.
Finisher (for automatic stapling and offset collation)
6.
Paper Trays 1-4
3.
4.
Page 1
Foreign Device Interface for Card Reader or Keypad
Service Modem Port for Remote Diagnostic Testing
Page 4
What you need to know about your Document Centre 460/470 ST
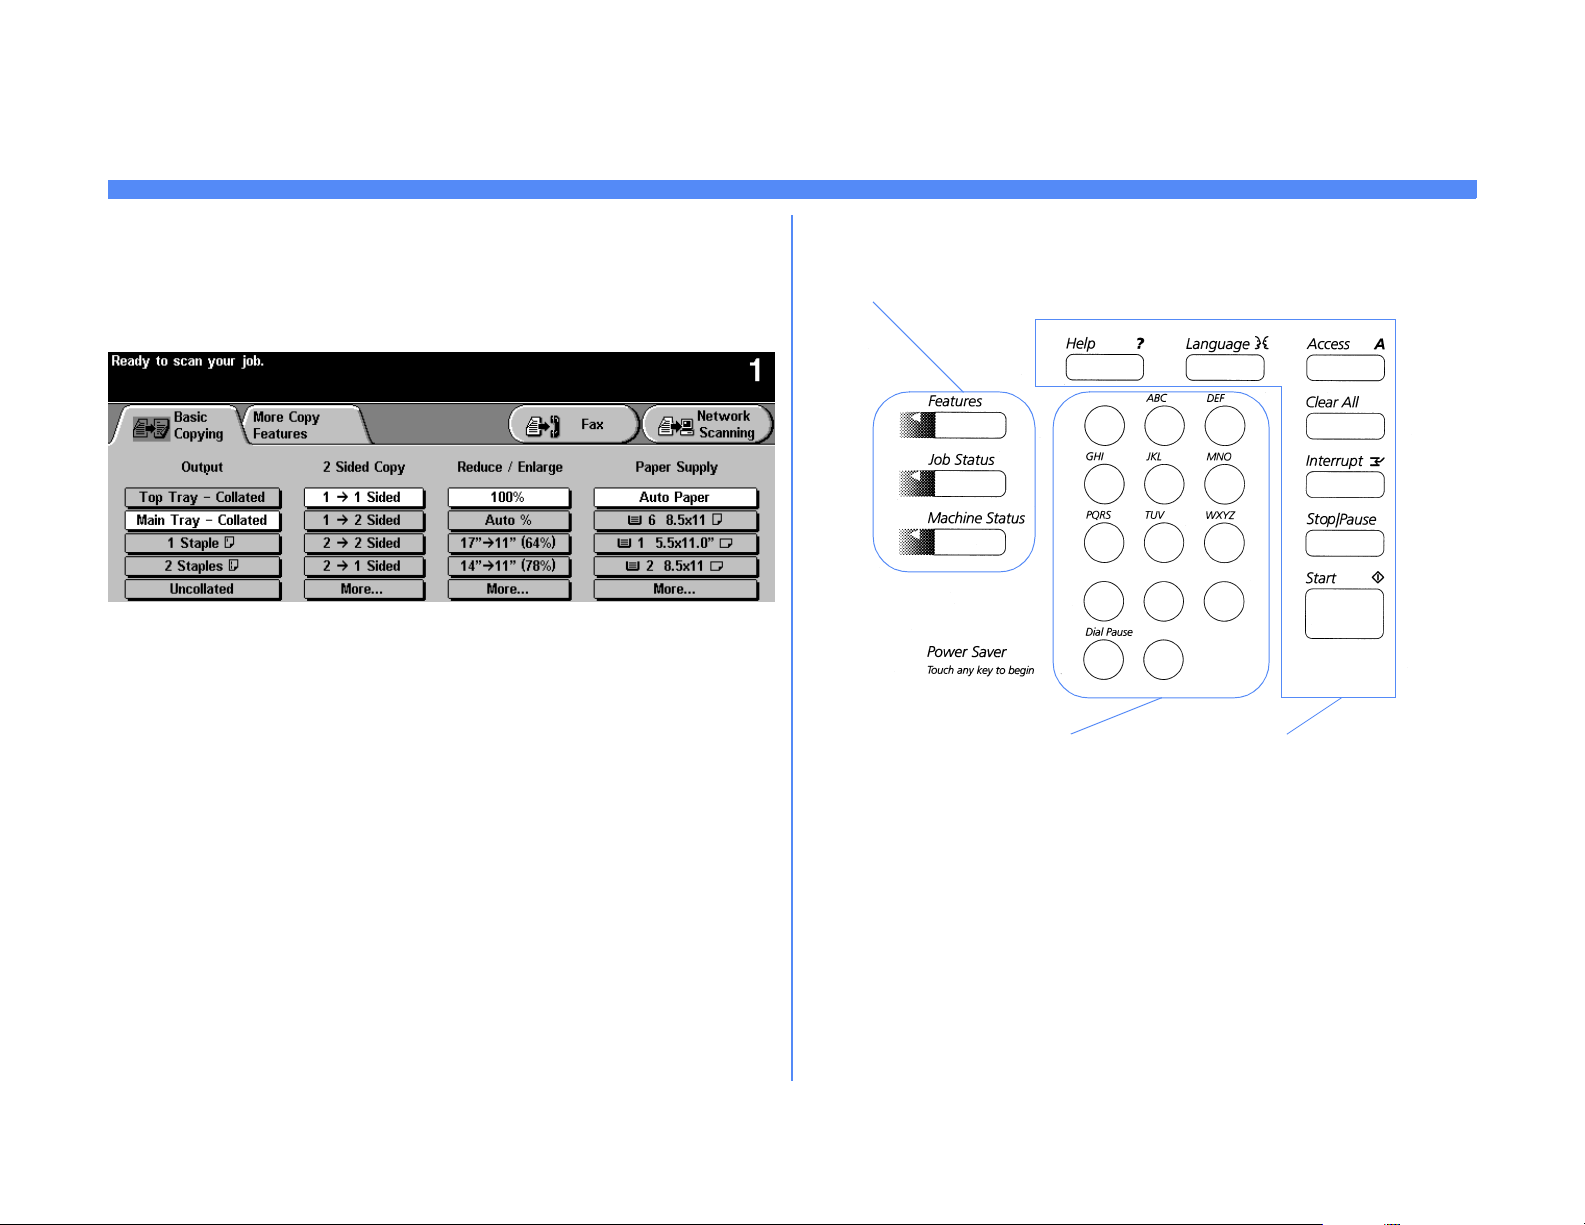
TOUCH SCREEN
1
2
3
1.
System Message Area (3 Lines of information)
PATHWAY, KEYPAD and FEATURE BUTTONS
1
23
1.
Pathway Buttons (to select what is displayed in the touch screen)
2.
Tool Bar Area (to change the type of job to copy, scan or fax and
basic seletions of how each job is built and output)
3.
Programming Area (to select or change specific copy, scan or fax
job features)
2.
3.
Page 2
Keypad (for numeric data entry)
Feature Buttons (to start and stop copier/printer functions, get
help, change the display language, and the Access button which
will be used to access the administrator Tools menu)
Page 5

100BaseT Ethernet or Token Ring Interface Quick Install Card
Xerox Document Centre 460/470 ST
Before You Connect to a 100BaseT
Ethernet Network
For instructions on how to connect to a Token
Ring network, see the reverse side of this card.
The Document Centre Ethernet Interface has
speed settings of 10MBPS (10 Megabits per
second), 100MBPS (100 Megabits per second)
and Auto (AutoSensing).
If your network has hubs or concentrators that
have Auto-Sensing enabled, it is possible that if
the Document Centre is set to Auto, the hub/
concentrator will not arbitrate to the correct
speed.
Before you connect the printer to your network,
perform the procedure in the next column on this
page entitled
Go to the printer and...
Go to the printer and...
1.
Enter the
a)
b)
c)
2.
Set or Change the Ring Speed or Source
Routing
a)
b)
c)
To ol s
pathway
Press the
On the keypad enter
current password. Press the
button when finished. Press the
Tools
The Touch Screen will be used for the
remainder of the data entry.
Press the
Setup
Press the
Press the
Access
button.
Connectivity and Network
button.
Physical Media
Ethernet
()
1111
button.
button.
or the
Enter
button.
Go to
3.
4. Wait a MINIMUM of 7 minutes
5.
Exit the Tools menu
a)
Press the
printer to reset.
a)
Obtain a
from your printer and verify that your
settings have been retained.
Connect your Document Centre to the
network with the appropriate cabling.
Exit Tools
Configuration Report
button.
for the
page
NOTE:Auto-Sensing hubs may not arbitrate
correctly with the Document Centre when
Auto is selected. If your hubs/concentrators
support the 100BaseT speed it is recommended you select 100MBPS in Step d
below. (Be sure your Ethernet cable is Category 5)
d)
Select the desired Speed (
100MBps
e)
When finished with your changes
press
For assistance, contact your local Xerox Customer Support Center:
USA: 1-800-821-2797 Canada: 1-800-939-3769
Auto
, or
Save
.
Page 1
10MBps,
).
Page 6

100BaseT Ethernet or Token Ring Interface Quick Install Card
Xerox Document Centre 460/470 ST
Before You Connect to a Token RingNetwork
If your printer is equipped with a Token Ring
interface, to avoid problems with your network
you must set the Ring Speed and Source Routing settings for your environment prior to connecting the printer to your network.
The default settings for the Token Ring interface
Ring Speed and Source Routing are
None
and
values for your network you do not need to perform the procedures on this card.
As with any other Token Ring device, connecting
the Document Centre 460/470 Token Ring interface to your network while it is set at the incorrect Ring Speed can cause severe problems on
your network.
Before you connect the printer to your network,
perform the procedure in the next column on this
page entitled
. If you do not need to change these
Go to the printer and...
16Mbps
Go to the printer and...
1.
Enter the
a)
b)
c)
2.
Set or Change the Ring Speed or Source
Routing
a)
b)
c)
d)
e)
To o ls
pathway
Press the
On the keypad enter
current password. Press the
button when finished. Press the
Tools
The Touch Screen will be used for the
remainder of the data entry.
Press the
Setup
Press the
Press the
Press the
button.
Select the desired Ring Speed (4 or
Megabits
Access
button.
Connectivity and Network
button.
Physical Media
Token Ring
Token Ring Settings
per second).
()
1111
button.
button.
or the
Enter
button.
Go to
16
3.
4.
5. Wait a MINIMUM of 7 minutes
6.
Change your printer’s MAC Address.
Perform this step ONLY if required by
your network environment. Otherwise
skip to Step 4
are assigned a default MAC address from
the factory.
a)
Press the
b)
Enter the six (6) hexadecimal pairs on
the touch keypad separated by colons.
c)
When finished press
Press the
printer to reset.
a)
Obtain a
from your printer and verify that your
Token Ring Settings have been
retained.
Connect your Document Centre to the
network with the appropriate cabling.
. All Token Ring interfaces
MAC Address
Exit Tools
Configuration Report
button.
Save
button
.
for the
page
f)
Select the desired method of Source
Routing (
Broadcast
g)
When finished with your changes
press
None, Single Route
All Route Broadcast
or
Save
.
Page 2
).
Page 7

Static (Manual) TCP/IP Addressing Quick Install Card
Xerox Document Centre 460/470 ST
Before You Start
To enable 100BaseT or a Token Ring interface,
refer to the
Ring Interface Quick Install Card
the Speed and Source Routing settings for your
environment. Then return to this card and
perform the procedure here.
NOTE: By default, DHCP is enabled on the
Document Centre. This card will show you
how to disable DHCP and manually set your
TCP/IP information.
Your Document Centre supports printing from a
variety of operating systems that support TCP/
IP.
Review the Quick Install Cards that were
supplied with your printer. If there is no specific
card for your type of TCP/IP network, the
procedure contained on this card will enable you
to connect your printer in any TCP/IP
environment:
100BaseT Ethernet and Token
to configure
Go to the printer and...
1.
Connect your Document Centre 460/470
to the network with the appropriate
cabling.
2. Enter the Tools pathway.
a)
Press the
b)
On the keypad enter
current password. Press the
button when finished. Press the
Tools
c)
The Touch Screen will be used for the
remainder of the data entry.
Access
button.
()
1111
button.
or the
3. Enter the Network Setup menus
a)
Wait for the screen to refresh and
press the
Setup
b)
Wait for the screen to refresh and
press the
c)
Press the
Connectivity and Network
button.
Network Setup
TCP/IP Options
button.
button.
Enter
Go to
4. Enable the network interface and
protocol.
a)
Press the
b)
Press the
c)
Press the
Media buttons appear, select either
Ethernet
5. Set the Host Name
a)
Press the
b)
One at a time press the soft buttons on
the Touch Screen for each octet of the
IP address and enter the numbers
using the keypad.
c)
Press the
d)
When the soft keypad appears, type
the host name EXACTLY as you want
it to appear with correct case. When
finished press the
record the changes and exit to the
TCP/IP Settings
TCP/IP Settings
Protocol and Media
Enable
or
Host/Address
Host Name
button. If Physical
Token Ring
Save
Screen.
button.
. Press
button.
button.
button to
button.
Save
.
Record the following information:
IP Address ____________________________
Subnet Mask ___________________________
Default Gateway ________________________
For assistance, contact your local Xerox Customer Support Center:
USA: 1-800-821-2797 Canada: 1-800-939-3769
Page 1
Page 8

Static (Manual) TCP/IP Addressing Quick Install Card
Xerox Document Centre 460/470 ST
6. Set the Subnet Mask and Gateway
a)
Press the
button.
b)
Press the soft buttons on the Touch
Screen one at a time for each octet of
the Subnet Mask and enter the
numbers using the keypad. Repeat
this process for the IP Gateway
address. When finished press
record the changes and exit to the
TCP/IP Settings
NOTE: The Broadcast Address will be calculated automatically.
Subnet and Gateway
Save
screen.
to
Enable lp or lpr printing
7.
7b if you DO NOT want to print using lp or
lpr).
a)
Press the
button. At the next screen press the
Enable
NOTE: While you can change the port num-
ber at which your Document Centre
will accept lpr print jobs it is recommended that you do this ONLY with
extreme caution as most lpr spoolers
are set to send print jobs to the default
port.
b)
If you wish to change the lpr port for
your printer press the port soft button
and enter the desired port number at
the keypad. Press
TCP/IP - Line Printer
button.
(skip steps 7a-
Save
.
8. Exit the Tools Menu
a)
Press the
Exit Tools
button.
Go to a workstation and...
1.
Create a test job and send it to the printer
with an lpr utility or through a queue your
operating system may support.
2.
Check your test job for quality and use the
problem solving section of the
Centre 460/470 Reference Guide
resolving print defects.
3.
If your print job does not print, refer to the
troubleshooting section in the document
entitled
Troubleshooting Guide
problem.
4.
Repeat this
procedure at each workstation that will
print to this printer.
Network Installation and
to correct the
Go to a workstation and...
Document
for
Page 2
Page 9

DHCP / BOOTP Dynamic IP Address Assignment Quick Install Card
Xerox Document Centre 460/470 ST
6.
Before You Start
To enable 100BaseT or a Token Ring interface,
refer to the
Ring Interface Quick Install Card
the Speed and Source Routing settings for your
environment. Then return to this card and follow
the instructions.
NOTE: By default, DHCP is enabled on the
Document Centre. This card will show you
how to disable DHCP (or enable it if it was
disabled) and set your TCP/IP information
using BOOTP.
DHCP servers vary in the information that they
return to the host computer requesting service.
Your Document Centre can retrieve the following
values from a DHCP server:
TCP/IP Address
Host Name
Subnet Mask
Gateway TCP/IP Address
Broadcast Address
Consult the documentation supplied with your
DHCP server software to verify what TCP/IP
information it is capable of supplying.
100BaseT Ethernet and Token
to configure
Go to the DHCP server and...
1.
Configure the DHCP server with the TCP/
IP information you want assigned to your
printer. Use the documentation supplied
with your server software for this task.
Go to the printer and...
2.
Connect your Document Centre to the
network with the appropriate cabling.
3.
Enter the
a)
b)
c)
4.
Enter the Network Setup menus.
a)
b)
c)
5.
Enable TCP/IP printing.
a)
b)
c)
To ol s
pathway
Press the
On the keypad enter
current password. Press the
button when finished. Press the
Tools
The Touch Screen will be used for the
remainder of the data entry.
Wait for the screen to refresh and
press the
Setup
Wait for the screen to refresh and
press the
Press the
Press the
Press the
Press the
Media buttons appear, select either
Ethernet
Access
button.
Connectivity and Network
button.
Network Setup
TCP/IP Options
TCP/IP Settings
Protocol and Media
Enable
or
()
1111
button. If Physical
Token Ring
button.
or the
button.
button.
button.
. Press
Enter
Go to
button.
Save
.
Set the Host Name (skip steps 6a-6c if
your DHCP server supplies this
information).
a)
Press the
b)
Press the
c)
When the soft keypad appears, type
the host name EXACTLY as you want
it to appear with correct case. When
finished press the
record the changes and exit to the
TCP/IP Settings
7.
Set the Subnet Mask and Gateway (skip
steps 7a-7b if your DHCP server supplies
this information). The Document Centre
will only accept one Gateway address
from the DHCP server.
a)
Press the
button.
b)
Press the soft buttons on the Touch
Screen one at a time for each octet of
the Subnet Mask and enter the
numbers using the keypad. Repeat
this process for the IP Gateway
address. When finished press
record the changes and exit to the
TCP/IP Settings
Name/Address
Host Name
Save
Screen.
Subnet and Gateway
Screen.
button.
button.
button to
Save
to
For assistance, contact your local Xerox Customer Support Center:
USA: 1-800-821-2797 Canada: 1-800-939-3769
Page 1
Page 10

DHCP / BOOTP Dynamic IP Address Assignment Quick Install Card
Xerox Document Centre 460/470 ST
8.
Press the
a)
9.
Enable lp and
9b if you
Document Centre using lp or lpr.
a)
NOTE: While you can change the port num-
ber at which your Document Centre
will accept lpr print jobs it is recommended that you do this ONLY with
extreme caution as most lpr spoolers
are set to send print jobs to the default
port.
b)
Close
button.
Press the
button. At the next screen select
DHCP or BOOTP
Press the
button. At the next screen press the
Enable
If you wish to change the lpr port for
your printer press the port soft button
and enter the desired port number at
the keypad. Press
Dynamic Addressing
and press
lpr
printing (Skip steps 9a-
DO NOT
wish to print to your
TCP/IP - Line Printer
button.
Save
Save
.
.
a)
Obtain a
from your printer. Verify the TCP/IP
information was assigned correctly.
b)
Update the lease time (if necessary) at
the DHCP/BOOTP server depending
on your printer usage patterns.
Consult your DHCP server
documentation for details.
Configuration Report
page
Where to go from here
After you have verified that the TCP/IP
information you have assigned to your
Document Centre is correct, retrieve the Quick
Install Card that applies to your network
operating system or protocol and perform the
procedures indicated.
c)
Press the
10.
Press the
NOTE: Your Document Centre will not reboot
unless you have changed a physical
media setting (Ethernet or Token
Ring).
11.Wait a MINIMUM of 7 minutes
printer to reset.
Close
Exit Tools
button.
button.
for the
Page 2
Page 11

RARP Dynamic TCP/ IP Address Assignment Quick Install Card
Xerox Document Centre 460/470 ST
Before You Start
To enable 100BaseT or a Token Ring interface,
refer to the
Ring Interface Quick Install Card
the Speed and Source Routing settings for your
environment. Then return to this card and follow
the instructions.
NOTE: By default, DHCP is enabled on the
Document Centre. This card will show you
how to disable DHCP (or enable it if it was
disabled) and set your TCP/IP information
using RARP.
Your Document Centre can retrieve the following
values from a RARP server:
TCP/IP Address
Subnet Mask
Gateway Address
Consult the documentation supplied with your
RARP server software to verify what TCP/IP
information it is capable of supplying.
100BaseT Ethernet and Token
to configure
Go to the RARP server and...
1.
Configure the RARP or BOOTP server
with the TCP/IP information you want
assigned to your printer.
Go to the printer and...
3.
Enter the Tools pathway.
a)
Press the
b)
On the keypad enter
current password. Press the
button when finished. Press the
Tools
c)
The Touch Screen will be used for the
remainder of the data entry.
4.
Enter the Network Setup menus.
a)
Wait for the screen to refresh and
press the
Setup
b)
Wait for the screen to refresh and
press the
c)
Press the
5.
Enable TCP/IP printing.
a)
Press the
b)
Press the
c)
Press the
Media buttons appear, select
Token Ring
or
d)
Press the
button. At the next screen select
RARP
Access
button.
Connectivity and Network
button.
Network Setup
TCP/IP Options
TCP/IP Settings
Protocol and Media
Enable
. Press
Dynamic Addressing
and press
()
button.
1111
or the
Enter
Go to
button.
button.
button.
button.
button. If Physical
Ethernet
Save
.
Save
.
6.
Press the
will reboot.
a)
b)
NOTE: The Broadcast Address will be calculated automatically.
7.
Set the Host Name (skip steps 7a-7c if your
RARP server supplies this information).
a)
b)
c)
Exit Tools
Obtain the
page from your printer. Verify the
Document Centre printer TCP/IP
information was assigned correctly by
the RARP server.
Repeat Steps 3a-5a then go to step 7.
Press the
Press the
When the soft keypad appears, type
the host name EXACTLY as you want
it to appear with correct case. When
finished press the
record the changes and exit to the
TCP/IP Settings
button. The device
Configuration Report
Name/Address
Host Name
button.
Save
Screen.
button to
button.
2.
Connect your Document Centre to the network with the appropriate cabling.
For assistance, contact your local Xerox Customer Support Center:
USA: 1-800-821-2797 Canada: 1-800-939-3769
Page 1
Page 12

RARP Dynamic TCP/ IP Address Assignment Quick Install Card
Xerox Document Centre 460/470 ST
8.
Set the Subnet Mask and Gateway (skip
steps 8a-8b if your RARP server supplies
this information).
a)
Press the
button.
b)
One at a time press the soft buttons on
the Touch Screen for each octet of the
Subnet Mask and enter the numbers
using the keypad. Repeat this process
for the IP Gateway address. When
finished press
changes and exit to the
Settings
c)
Press the
9.
Enable lp and
9b if you
Document Centre using lp or lpr.
a)
Press the
button. At the next screen press the
Enable
NOTE: While you can change the port num-
ber at which your Document Centre
will accept lpr print jobs it is recommended that you do this ONLY with
extreme caution as most lpr spoolers
are set to send print jobs to the default
port.
Subnet and Gateway
Save
to record the
screen.
Close
button.
lpr
printing (skip steps 9a-
DO NOT
wish to print to your
TCP/IP - Line Printer
button.
TCP/IP
10.
Press the
11.
Verify that any setting changes have been
retained
a)
b)
c)
d)
Exit Tools
Obtain a Configuration Report from
your Document Centre.
Review the
page
Obtain the Document Centre printer
MAC address
information from the Configuration
Report page.
If your RARP Server does not
dynamically update its
/etc/hosts
will need to do this manually. Consult
your RARP or BOOTP server
documentation for details.
button.
Configuration Report
TCP/IP address
and
/etc/ethers
files with a host name, you
and
Where to go from here
After you have verified that the TCP/IP
information you have assigned to your
Document Centre is correct, retrieve the Quick
Install Card that applies to your network
operating system or protocol and perform the
procedures indicated.
b)
If you wish to change the lpr port for
your printer press the port soft button
and enter the desired port number at
the keypad. Press
Save
.
Page 2
Page 13

Novell NetWare 4.X and 5.X NDS Quick Install Card
Xerox Document Centre 460/470 ST
Before You Start
To enable 100BaseT or a Token Ring interface,
refer to the
Ring Interface Quick Install Card
the Speed and Source Routing settings for your
environment. Then return to this card.
NOTE: If you wish to connect your Document
Centre using NDPS, you may download the
Xerox Agent and printer drivers from
www.xerox.com.
The CentreWare software supplied with your
printer can be used to set up your printer on your
Novell network. Refer to the document entitled
Network Services Guide.
assumes you ran NWADMIN or PCONSOLE to
set up a print server object. Please refer to the
documentation supplied by Novell to complete
this task. Record precisely (Observe upper and
lower case, dot notation etc.) the following:
NDS Tree _____________________________
NDS Context Name ______________________
Print Server Name _______________________
100BaseT Ethernet and Token
to configure
This procedure
NOTE:
a password. When your printer will service
queues on multiple fileservers, the Print Server
name must be the same on all fileservers and
the Print Server password must be the same on
all fileservers.
ALL Print Servers you create must have
Go to the printer and...
1.
Connect your Document Centre to the network with the appropriate cabling.
2.
Enter the
a)
b)
c)
3.
Enable the Network Protocol
a)
b)
To ol s
pathway.
Press the
On the keypad enter
current password. Press the
button when finished. Press the
Tools
The Touch Screen will be used for the
remainder of the data entry.
Press the
Setup
Wait for the screen to refresh and
press the
Access
button.
Connectivity and Network
button.
Network Setup
()
1111
button.
or the
button.
Enter
Go to
e)
Press the
Media buttons appear, select either
Ethernet
4.
Set the Frame Type
a)
Press the
b)
Select the frame type desired then
press
exit to the NetWare Options screen.
5.
Set the NDS Settings
a)
Press the
Novell suggests using typeful names
when entering Name Context and
Directory Service Tree information.
TYPEFUL NAME EXAMPLE:
cn=contextname.ou=organization.o=company.c=country
b)
At this screen press the
Context
panel keyboard to enter the context in
which this printer resides. To access
numeric characters and punctuation,
press the
When finished press
Enable
or
Frame Type
Save
NDS Settings
button and use the touch
More Characters
button. If Physical
Token Ring
to retain your changes and
. Press
button.
button.
Name
Save
.
Save
button.
.
Print Server password ____________________
Additionally, you must set
ture
option to 0,1, or 2 (3 is not supported), AND
Reply to get nearest server
set
least one file server that is on the same segment as the printer.
NCP Packet Signa-
to ON for at
c)
Press the
d)
Wait for the screen to refresh and
press the
NetWare
Protocol and Media
button.
Page 1
button.
Page 14

Novell NetWare 4.X and 5.X NDS Quick Install Card
Xerox Document Centre 460/470 ST
7.
c)
Press the
button and enter the NDS tree name
where the Context chosen in the
previous step resides. Be sure to
press
6.
Set the Print Server Name and Password.
a)
Press the
b)
Press the
and use the Touch Screen keyboard to
enter the name you assigned to your
print server (it is recommended you
use all UPPER CASE characters). A
default name will appear. Use the
backspace key (it looks like an arrow
pointing to the left) to clear out the
default name prior to entering your
new name. When finished press
to retain the changes and return to the
Print Server screen.
c)
Press the
button and use the touch screen
keyboard to enter the print server
password you recorded when you set
up your print server then press
Directory Service Tree
Save
when you have finished.
Print Server
Print Server Name
Print Server Password
button.
button
Save
Save
.
OPTIONAL STEP: Change the desired
SAP rate or Poll Interval for your printer
a)
Press the
b)
Press the box under
Interval
from the keypad. The default values
are recommended. When finished,
press
return to the NetWare Options screen.
8.
Exit the Tools Menu
a)
Press the
9.
Prepare for print driver installation
a)
From the documentation package
supplied with your printer, retrieve the
CentreWare Network Services CDROM
CentreWare Network Services
Guide
this procedure called
Workstation and...
Rates
button.
SAP Rate
and enter the desired number
Save
to retain your changes and
Exit Tools
and the document entitled
. Proceed to the next section of
button.
Go to a
or
Poll
Go to a workstation and...
1.
Use the
CD-ROM
dows-based workstation. Details for this
are found in the document supplied with
your printer entitled
Services Guide
2.
Connect the print driver you loaded above
to the queue you created on the NetWare
server.
3.
Open an application and print a test job.
4.
Check your test job for quality and use the
problem solving section of the
Centre 460/470 Reference Guide
resolving print defects.
5.
If your test job does not print, refer to the
troubleshooting section in the document
entitled
Troubleshooting Guide
problem.
6.
Repeat this
procedure at each workstation that will
print to this printer.
CentreWare Network Services
to install print drivers on a Win-
CentreWare Network
.
Network Installation and
to correct the
Go to a workstation and...
Document
for
d)
For assistance, contact your local Xerox Customer Support Center:
USA: 1-800-821-2797 Canada: 1-800-939-3769
Save
Press
screen and save your changes.
to exit the Print Server
Page 2
Page 15

UNIX (Solaris/SunOS) (HP-UX)(AIX) Quick Install Card
Xerox Document Centre 460/470 ST
Before You Start
Go to the printer and...
4.
Enable the network interface and protocol.
To enable 100BaseT or a Token Ring interface,
refer to the
Ring Interface Quick Install Card
the Speed and Source Routing settings for your
environment. Then return to this card and
perform the procedure here.
NOTE: By default, DHCP is enabled on the
Document Centre. This card will show you
how to disable DHCP and manually set your
TCP/IP information.
You can use BOOTP or RARP servers to assign
TCP/IP information to your Document Centre.
Refer to the RARP or BOOTP Quick Install
Cards for details.
Record the following information on this card for
use during the procedure:
IP Address ____________________________
Subnet Mask ___________________________
Default Gateway ________________________
Your Document Centre printer supports printing
from a variety of UNIX platforms.
100BaseT Ethernet and Token
to configure
1.
Connect your Document Centre to the network with the appropriate cabling.
2.
Enter the
a)
b)
c)
3.
Enter the Network Setup menus.
a)
b)
c)
Tool s
pathway.
Press the
On the keypad enter
current password. Press the
button when finished. Press the
Tools
The Touch Screen will be used for the
remainder of the data entry.
Wait for the screen to refresh and
press the
Setup
Wait for the screen to refresh and
press the
Press the
Access
button.
Connectivity and Network
button.
Network Setup
TCP/IP Options
()
button.
1111
or the
Enter
button.
button.
Go to
a)
Press the
b)
Press
c)
Press
d)
Press the
e)
Press the
Media buttons appear, select either
Ethernet
NOTE: The Broadcast Address will be calculated automatically.
5.
Set the Host Name.
a)
Press the
b)
One at a time press the soft buttons on
the Touch Screen for each octet of the
IP address and enter the numbers
from the keypad.
c)
Press the
d)
When the soft keypad appears, type
the host name EXACTLY as you want
it to appear with correct case. When
finished press the
record the changes and exit to the
TCP/IP Settings
TCP/IP Settings
Dynamic Addressing
Disabled
then press
Protocol and Media
Enable
or
Name/Address
Host Name
button. If Physical
Token Ring
Save
Screen.
button.
. Press
button.
button.
button to
.
Save
button.
.
Save
.
Page 1
Page 16

UNIX (Solaris/SunOS) (HP-UX)(AIX) Quick Install Card
Xerox Document Centre 460/470 ST
6.
Set the Subnet Mask and Gateway
a)
Press the
button.
b)
Press the soft buttons on the Touch
Screen one at a time and enter the
numbers from the keypad for the
Gateway IP address. When finished
press
exit to the
c)
Press the
button. At the next screen press the
Enable
NOTE: While you can change the port num-
ber at which your Document Centre
will accept lpr print jobs it is recommended that you do this ONLY with
extreme caution as most lpr spoolers
are set to send print jobs to the default
port.
d)
If you wish to change the lpr port for
your printer press the port soft button
and enter the desired port number at
the keypad. Press
Subnet and Gateway
Save
to record the changes and
TCP/IP Settings
TCP/IP - Line Printer
button.
Save
.
screen.
7.
Press the
8.
Prepare for print driver installtion
a)
Exit Tools
From the documentation package
supplied with your printer, retrieve the
CentreWare Network Services CDROM
and the document entitled
Network Services Guide
the next section of this procedure
Go to a Workstation and...
called
button.
. Proceed to
Go to a workstation and...
1.
Mount the
vices
Details for these procedures are contained
in the document entitled
vices Guide
2.
Add the printers host name, TCP/IP
address, hardware address to your
hosts
your UNIX version.
3.
Create a queue using the CentreWare tool
OR by using the native tools available in
your operating system version.
4.
Create a print job and send it to the printer.
5.
Check your test job for quality and use the
problem solving section of the
Centre 460/470 Reference Guide
resolving print defects.
6.
If your job does not print, refer to the troubleshooting section in the document entitled
Troubleshooting Guide
problem.
CentreWare Network Ser-
CD-ROM and load the
Network Ser-
.
NIS database
file or
Network Installation and
depending on
to correct the
DCPR
Tool.
/etc/
Document
for
For assistance, contact your local Xerox Customer Support Center:
USA: 1-800-821-2797 Canada: 1-800-939-3769
Page 2
7.
Repeat this
procedure at each workstation that will
print to this printer.
Go to a workstation and...
Page 17

Microsoft Windows 2000 LPR and IPP Printing Quick Install Card
Xerox Document Centre 460/470 ST
Before You Start
To enable 100BaseT or a Token Ring interface,
refer to the
Ring Interface Quick Install Card
the Speed and Source Routing settings for your
environment. Then return to this card and
perform the procedure here.
Your Document Centre now has DHCP, LPR,
and NetBIOS over the IP protocol enabled by
default. If your DHCP server will provide host
name, IP address, Gateway address, and Subnet Mask, the Document Centre TCP/IP information will be configured on initial boot.
This means that if you have configured your
DHCP server with the desired information, you
may connect your Document Centre to your network and go right to the section on the back of
this card entitled
and....
You can use BOOTP or RARP servers to assign
TCP/IP information to your Document Centre.
Refer to the DHCP/BOOTP and RARP Quick
Install cards for details.
If you are not using Dynamic Addressing, record
the following TCP/IP information:
IP Address ____________________________
Subnet Mask ___________________________
Default Gateway ________________________
100BaseT Ethernet and Token
to configure
Go to the Server/Workstation
Go to the printer and...
1.
Connect your Document Centre to the
network with the appropriate cabling
2.
Enter the Tools pathway
a)
Press the
b)
On the keypad enter
current password. Press the
button when finished. Press the
Tools
c)
The Touch Screen will be used for the
remainder of the data entry.
3.
Enter the Network Setup menus
a)
Wait for the screen to refresh and
press the
Setup
b)
Wait for the screen to refresh and
press the
c)
Press the
4.
Enable the Protocol and Media
a)
Press the
b)
Press the
c)
Press the
Media buttons appear, select either
Ethernet
NOTE: The Broadcast Address will be calculated automatically.
5.
Set the Host Name
Access
button.
Connectivity and Network
button.
Network Setup
TCP/IP Options
TCP/IP Settings
Protocol and Media
Enable
or
()
button.
1111
button. If Physical
Token Ring
. Press
or the
Enter
button.
button.
button.
button.
Go to
Save
a)
Press the
b)
One at a time press the soft buttons on
the Touch Screen for each octet of the
IP address and enter the numbers
using the keypad.
c)
Press the
d)
When the soft keypad appears, type
the host name EXACTLY as you want
it to appear with correct case. When
finished press the
record the changes and exit to the
TCP/IP Settings Screen.
6.
Set the Subnet Mask and Gateway
a)
Press the
button.
b)
One at a time press the soft buttons on
the Touch Screen for each octet of the
Subnet Mask and enter the numbers
using the keypad. Repeat this process
for the IP Gateway address. When
finished press
changes and exit to the TCP/IP
Settings screen.
c)
Press the
button. At the next screen press
Enable
NOTE: While you can change the port num-
.
ber at which your Document Centre will
accept lpr print jobs, it is recommended that you do this ONLY with
extreme caution as most lpr spoolers
Name/Address
Host Name
Save
Subnet and Gateway
Save
to record the
TCP/IP - Line Printer
then press
Save
button.
button.
button to
.
For assistance, contact your local Xerox Customer Support Center:
USA: 1-800-821-2797 Canada: 1-800-939-3769
Page 1
Page 18

Microsoft Windows 2000 LPR and IPP Printing Quick Install Card
Xerox Document Centre 460/470 ST
are set to send print jobs to the default
port.
d)
If you wish to change the lpr port for
your printer press the port soft button
and enter the desired port number at
the keypad. Press
e)
Press the
7.
Exit the Tools Menu
a)
Press the
8.
Prepare for printer installation
a)
Proceed to the next section of this
procedure called
and...
Close
Exit Tools
Save
.
button.
button.
Go to the server
Go to the Server/Workstation and...
1.
Verify the correct software is loaded
a)
At the Desktop, right mouse click the
2.
Add the printer
a)
b)
My Network Places
Properties
Local Area Connection
verify that the
IP)
protocol has been loaded.
Open the
click
Printer
Ver i f y that
and click
. Right mouse click on the
Control Panel
Printers
icon. Double-click
. The Add printer Wizard starts.
Network Printer
Next>
icon and select
icon and
Internet Protocol (TCP/
and double-
Add
is selected
.
c)
d)
Locate your Printer
The
appear.
Follow the steps to Create a LPR
printer below OR Create an IPP printer
in the right column.
To create a LPR Printer
a)
Select
matically detect and install my Plug
and Play printer.
b)
Select
Standard TCP/IP port
down menu. Click
c)
Enter the
address
either the Host Name or the SMB Host
Name as shown on the configuration
report, depending on the name
resolution used (WINS or DNS). The
Port Name
you but you can change it if you want
to. Click
d)
The Wizard will automatically detect
the Printer Model for you. If that does
not happen select
choose the your Printer Model from
the pull-down menu.
e)
Click
Local Printer
Click
Create a new port
Printer Name
. The Printer Name can be
is automatically filled in for
Next
.
Finish
. Go to Step 3.
screen will
; deselect
Next.
and choose
from the pull-
Next
twice.
or its
Standard
Auto-
IP
and
Create an IPP printer
a)
Select
b)
Select
Internet or on your intranet
http://
IP address in the URL field. The Printer
Name can be either the Host Name or
the SMB Host Name as shown on the
configuration report, depending on the
name resolution used (WINS or DNS).
3.
Click
driver. Go to Step 3.
Select the driver to be used (Document
Centre drivers are included on the
Windows 2000 CD-ROM)
a)
A driver list will be displayed. Select
Xerox from the
Then select the desired print driver from
Printers:
the
wil be installed.
b)
c)
Default Printer
The
Select
printer, otherwise click the
At the
Wizard
Print a Test Page
Repeat this
Workstation and...
workstation on the network that will print
to the printer.
Network Printer
Connect to a printer on the
followed by the printer's name or
Next
.Click OK to install the printer
Manufacturers:
and click OK. The driver
window will open.
Yes
to make this the default
Completing the Add Printer
screen, click the
. Verify that it prints.
Go to the Server/
procedure for each
. Click
Next>
Finish
Next
. Type
area.
button.
button.
.
Page 2
Page 19

Microsoft Windows NT 4.0 Server (TCP/IP) Quick Install Card
Xerox Document Centre 460/470 ST
Before You Start
Go to the printer and...
4.
Enable the Protocol and Media
To enable 100BaseT or a Token Ring interface,
refer to the
Ring Interface Quick Install Card
the Speed and Source Routing settings for your
environment. Then return to this card.
Your Document Centre has DHCP enabled by
default. If you have configured a DHCP server
with TCP/IP information, you can connect your
Document Centre to your network and it will
retrieve its TCP/IP information from the DHCP
server when it is turned on.
You can manually assign or use BOOTP or
RARP servers to assign TCP/IP information to
your Document Centre. Refer to the Static,
DHCP/BOOTP, and RARP Quick Install Cards
for details.
If you are using DHCP, perform
through 6c
Then read the note before step 6d and
determine if you wish to change the lpr port
number. After choosing, complete the
remainder of the procedure.
Record the following information:
IP Address ____________________________
100BaseT Ethernet and Token
to configure
Steps 1
DO NOT
but
change any values.
1.
Connect your Document Centre to the
network with the appropriate cabling
2.
Enter the Tools pathway
a)
Press the
b)
On the keypad enter
current password. Press the
button when finished. Press the
Tools
c)
The Touch Screen will be used for the
remainder of the data entry.
3.
Enter the Network Setup menus
a)
Wait for the screen to refresh and
press the
Setup
b)
Wait for the screen to refresh and
press the
c)
Press the
Access
button.
Connectivity and Network
button.
Network Setup
TCP/IP Options
()
1111
button.
or the
button.
button.
Enter
Go to
a)
Press the
b)
Press the
c)
Press the
Media buttons appear, select either
Ethernet
NOTE: The Broadcast Address will be calculated automatically.
5.
Set the Host Name
a)
Press the
b)
One at a time press the soft buttons on
the Touch Screen for each octet of the
IP address and enter the numbers
using the keypad.
c)
Press the
d)
When the soft keypad appears, type
the host name EXACTLY as you want
it to appear with correct case. When
finished press the
record the changes and exit to the
TCP/IP Settings Screen.
TCP/IP Settings
Protocol and Media
Enable
or
Name/Address
Host Name
button. If Physical
Token Ring
Save
button.
. Press
button.
button.
button to
button.
Save
.
Subnet Mask ___________________________
Default Gateway ________________________
For assistance, contact your local Xerox Customer Support Center:
USA: 1-800-821-2797 Canada: 1-800-939-3769
Page 1
Page 20

Microsoft Windows NT 4.0 Server (TCP/IP) Quick Install Card
Xerox Document Centre 460/470 ST
6.
Set the Subnet Mask and Gateway
a)
Press the
button.
b)
One at a time press the soft buttons on
the Touch Screen for each octet of the
Subnet Mask and enter the numbers
using the keypad. Repeat this process
for the IP Gateway address. When
finished press
changes and exit to the TCP/IP
Settings screen.
c)
Press the
button. At the next screen press the
Enable
NOTE: While you can change the port num-
ber at which your Document Centre
will accept lpr print jobs it is recommended that you do this ONLY with
extreme caution as most lpr spoolers
are set to send print jobs to the default
port.
d)
If you wish to change the lpr port for
your printer press the port soft button
and enter the desired port number at
the keypad. Press
7.
Exit the Tools Menu
a)
Press the
Subnet and Gateway
Save
to record the
TCP/IP - Line Printer
button.
Save
.
Exit Tools
button.
8.
Prepare for print driver installtion
a)
From the documentation package
supplied with your printer, retrieve the
CentreWare Network Services CDROM
and the document entitled
Network Services Guide
the next section of this procedure
Go to the server and...
called
Go to the server and...
1.
Verify the correct software is loaded
a)
At the Desktop, right mouse click the
Network Neighborhood
Properties
b)
2.
Add the printer
a)
b)
select
Protocols
TCP/IP
Select the
that
loaded. If this software is not present,
install it using the documentation
provided by Microsoft. Then return to
the next step in this document.
Open the
click
Printer
Verify that
and click
protocol has been loaded.
Services TAB
Microsoft TCP/IP Printing
Control Panel
Printers
. The Add printer Wizard starts.
My Computer
Next>
. Click on the
TAB and verify that the
icon. Double-click
.
. Proceed to
icon and
and verify
is
and double-
Add
is selected
d)
This will open up the
compatible printer
the IP address of the Document
Centre printer and the printer name
and select OK.
e)
The Wizard will return you to the
previous dialog. Verify the new IP
address you entered is in the list and
correct.
f)
The check box to the left of the
address must be checked if it is not,
check it then select
g)
h)
i)
j)
CentreWare Networks
Insert
Services CD-ROM
Disk
.
Click the
the directory containing the Windows
NT drivers. Details for this are
contained in the document entitled
Network Services Guide.
PRINTER.INF
The Wizard will return you to the
previous dialog. Verify the path and file
name are correct and click OK.
At the next dialog, enter a name for
the printer and select whether you
want that printer to be the default then
click
Browse
Next>
file then click
.
Add LPR
window. Type in
Next>
.
and click
button and select
Select the
Open
Have
.
c)
Click
appears select
Port
.
Add Port
Page 2
. From the list that
LPR Port
. Click
New
Page 21

Microsoft Windows NT 4.0 Server (TCP/IP) Quick Install Card
Xerox Document Centre 460/470 ST
k)
If the printer will not be shared, click
Next>
. To share the printer, check the
share
checkbox, enter a Share Name,
then click
l)
At the next dialog it is recommended
that you print a test page. Click
m)
Wait for the Test Print to print. A new
dialog will ask for confirmation of the
test print. If the page printed, click
If it did not print; run the Printing
Troubleshooter in NT to solve the
problem.
3.
Send a test job to the printer
a)
Check your test job for quality and use
the problem solving section of the
Document Centre 460/470
Reference Guide
defects.
b)
If your print job does not print, refer to
the troubleshooting section in the
document entitled
Installation and Troubleshooting
Guide
Next>
to correct the problem.
.
Finish
for resolving print
Network
Yes.
Go to the workstation and...
1.
Verify that the TCP/IP protocol stack is
loaded.
2.
Use the
.
CD-ROM
this are found in the document supplied
with your printer entitled
Services Guide
3.
Connect the printer that you just created to
the shared resource on the server.
4.
Open an application on the workstation
and print a test page to verify operation.
5.
Check your test job for quality and use the
problem solving section of the
Centre 460/470 Reference Guide
resolving print defects.
6.
Repeat this
procedure for each workstation on the
network that will print to the printer.
CentreWare Network Services
to install print drivers. Details for
.
Go to the workstation and...
Network
Document
for
Page 3
Page 22

Page 23

Microsoft Windows (NetBEUI) Peer-to-Peer Networks Quick Install Card
Xerox Document Centre 460/470 ST
5.
Before You Start
To enable 100BaseT or a Token Ring interface,
refer to the
Ring Interface Quick Install Card
the Speed and Source Routing settings for your
environment. Then return to this card.
.
Record the following information:
Network Interface Type ___________________
Workgroup Name _______________________
SMB Host Name ________________________
Printer Name ___________________________
OPTIONAL INFORMATION:
SMB Host Description ____________________
100BaseT Ethernet and Token
to configure
c)
The Touch Screen will be used for the
remainder of the data entry.
3.
Enable Microsoft Network printing.
a)
Press the
Setup
b)
At the next screen, press the
Setup
4.
Enable the Protocol and Media.
a)
At the next screen, press the
Microsoft Networks
b)
At the next screen, press the
Transport and Media
c)
Press the
Media buttons appear, select either
Ethernet
Connectivity and Network
button.
button.
Enable
Token Ring
or
Network
button.
button.
button. If Physical
. Press
Save
.
Assign the Workgroup and Host Names
a)
You will be returned to the previous
screen, press the
Host
button.
b)
At the next screen, press the
Workgroup Name
Touch Screen keys, enter the name of
the workgroup in which you want the
printer to appear then press
c)
You will be returned to the previous
screen. Press the
button. Using the touch panel keys,
enter the desired text for this item then
Save
press
d)
OPTIONAL STEP: Press the
Host Description
desired text then press
be returned to the previous screen.
Workgroup and
button. Using the
SMB Host Name
.
button, enter the
Save
Save
.
SMB
. You will
Printer Description _______________________
Go to the printer and...
1.
Connect your Document Centre to the network with the appropriate cabling.
2.
Enter the
a)
b)
For assistance, contact your local Xerox Customer Support Center:
USA: 1-800-821-2797 Canada: 1-800-939-3769
Tools
pathway
Press the
On the keypad enter
current password. Press the
button when finished. Press the
Tools
Access
button.
()
1111
button.
or the
Enter
Go to
Page 1
e)
6.
Assign a Printer Name and Description
a)
b)
c)
Save
Press
previous screen.
Press the
Press the
the touch panel keys, enter the
desired text for this item then press
Save
the previous screen.
OPTIONAL STEP: Press the
Description
Screen keys, enter the desired text for
this item then press
again to return to the
Printer Description
Printer Name
. Press
Save
again to return to
button, using the Touch
Save
button.
button, using
Printer
.
Page 24

Microsoft Windows (NetBEUI) Peer-to-Peer Networks Quick Install Card
Xerox Document Centre 460/470 ST
d)
Press the
7.
Set Maximum Connections and Timeout
a)
Touch the
soft button on the Touch Screen and
using the keypad enter the desired
maximum connection number
between 1 and 30. It is recommended
that this value should be set at the
default.
b)
Touch the
button on the Touch Screen. On the
keypad enter the desired number of
second between 0 and 9999. Press
Save
8.
Exit the Tools Menu
a)
Press the
9.
Prepare for print driver installtion
10.
Obtain a
printer to use in the remainder of the
installation.
11.
From the documentation package supplied
with your printer, retrieve the
Network Services CD-ROM
document entitled
Guide
. Proceed to the next section of this
procedure called
and.
Connections
Maximum Connections
Connection Timeout
to exit the Connections Screen.
Exit Tools
Configuration Report
Network Services
Go to the workstations
button.
button.
and the
soft
from the
CentreWare
Go to the workstations and...
1.
Verify that the
(ALL Windows 3.11 or greater versions).
2.
Use the
CD-ROM
Windows-based workstation. Details for
this are found in the document supplied
with your printer entitled
Services Guide
3.
On the Configuration Report review the
NetBIOS:
Host Name,
NetBEUI
CentreWare Network Services
to install print drivers on a
.
area and note the
and
protocol is loaded
Network
Workgroup
Printer Name
.
Windows for Workgroups Users
Printers
Connect
.
Control Panel
icon.
.
and double-click
Network
• Open the
the
• Select the printer driver you just installed
and click
• Select an available port and click
• Double-click the name of the WorkGroup for
the printer.
• Double-click the Host Name of the printer.
• Click once on the Printer Name then click
OK
Windows 95, Windows 98 and Windows
NT 4.X Workstation Users
.
Start
Properties
Details
Add Port
.
button and select
entry in the cascade
tab on the Properties
button and browse to the
Configuration Report
• Click the
• From the cascade menu select
• Select a printer with the right mouse button.
• Select the
menu.
• Select the
dialog.
• Click the
Workgroup.
,
.
• Double-click the name of the WorkGroup for
the printer as shown on the
Report
• Double-click the Host Name of the printer as
shown on the
• Click once on the Printer Name then click
OK
4.
Open an application and print a test page
to verify operation.
5.
If your print job does not print, refer to the
Troubleshooting section of the
Installation and Troubleshooting Guide
to solve the problem.
Settings
Printers
Configuration
Network
.
.
.
Page 2
Page 25

WINS (Windows Internet Name Service) Quick Install Card
Xerox Document Centre 460/470 ST
Before You Start
To enable 100BaseT or a Token Ring interface,
refer to the
Ring Interface Quick Install Card
the Speed and Source Routing settings for your
environment. Then return to this card and
perform the procedure here.
Your Document Centre now has DHCP, LPR,
and NetBIOS over the IP protocol enabled by
default. If your DHCP server will provide host
name, IP address, Gateway address, and Subnet Mask, the Document Centre TCP/IP information will be configured on initial boot.
This means that if you have configured your
DHCP server with the desired information, you
may connect your Document Centre to your network and it will boot and register with the WINS
server automatically.
In this mode the default host name for the device
will be the letters
address of the network interface. Example:
XRX08003E313E0A
If this host name is acceptable you can go right
to the section on this card entitled
Workstation and....
To change the
Steps 1,2, and 3 then skip to Step 5 and finish
the Go to the Printer... portion. When you finish
that section, go to the section on this card
entitled
complete those steps.
100BaseT Ethernet and Token
to configure
XRX
followed by the MAC
Go to the
and complete those steps.
host name
Go to the Workstation and....
for your printer follow
and
Go to the printer and...
1.
Connect your Document Centre to the
network with the appropriate cabling
2.
Enter the Tools pathway
a)
Press the
b)
On the keypad enter
current password. Press the
button when finished. Press the
Tools
c)
The Touch Screen will be used for the
remainder of the data entry.
3.
Enter the Network Setup menus
a)
Wait for the screen to refresh and
press the
Setup
b)
Wait for the screen to refresh and
press the
c)
Press the
4.
Enable the Transport and Media
a)
Press the
button.
b)
Press the
Media buttons appear, select either
Ethernet
5.
Set the NetBIOS Host Name
Access
button.
Connectivity and Network
button.
Network Setup
Microsoft Networks
Transport and Media
Enable
or
()
1111
button. If Physical
Token Ring
button.
or the
button.
. Press
Enter
Go to
button.
Save
a)
Press the
button.
b)
Press the
c)
When the soft keypad appears, type
the host name EXACTLY as you want
it to appear with correct case. When
finished press the
record the changes.
d)
Press the
e)
The Document Centre will reconfigure
itself with the new settings and
automatically register its TCP/IP
address and NetBIOS host name with
your WINS server.
Workgroup and Host
SMB Host Name
Save
Exit Tools
button.
button.
button to
Go to the workstation and...
1.
Create a new lpr printer on the NT
workstation
a)
With an LPR port as the desired
destination, enter the Microsoft
Networking host name.
b)
Enter a queue name to identify the
printer.
c)
When prompted, select the desired
.
PostSricpt or PCL driver from the
CentreWare Network Services CD
a directory where drivers are stored.
or
For assistance, contact your local Xerox Customer Support Center:
USA: 1-800-821-2797 Canada: 1-800-939-3769
Page 1
Page 26

Page 27

Apple Macintosh (AppleTalk) Network Quick Install Card
Xerox Document Centre 460/470 ST
Before You Start
Go to the printer and...
3.
Enable the AppleTalk protocol
To enable 100BaseT or a Token Ring interface,
refer to the
Ring Interface Quick Install Card
the Speed and Source Routing settings for your
environment. Then return to this card and
perform the procedure here.
The information on this card will enable you to
print to the Document Centre with the AppleTalk
protocol from your Macintosh Computer.
Follow the steps as shown. The AppleTalk
name for your Xerox printer is set at the factory
as the network interface address of the
Document Centre. You may change the
AppleTalk Name with the PUtility program found
on the CentreWare Network Services CD. Refer
to the document supplied with your Document
Centre entitled CentreWare Network Services
Guide for details on how to install PUtility.
Record the following information:
AppleTalk Name ________________________
100BaseT Ethernet and Token
to configure
1.
Connect your Document Centre to the network with the appropriate cabling.
2.
Enter the
a)
b)
c)
Tool s
pathway
Press the
On the keypad enter
current password. Press the
button when finished. Press the
Tools
The Touch Screen will be used for the
remainder of the data entry.
Access
button.
()
button.
1111
or the
Enter
Go to
a)
Press the
Setup
b)
At the next screen, press the
Setup
c)
At the next screen, press the
AppleTalk
d)
At the next screen, press the
and Media
e)
Press the
Media buttons appear, select either
Ethernet
4.
Assign a Name and Zone to your printer.
a)
You will be returned to the previous
screen. Press the
button.
Connectivity and Network
button.
button.
button.
button.
Enable
or
button. If Physical
Token Ring
Name and Zone
Network
Protocol
. Press
Save
.
AppleTalk Zone ________________________
For assistance, contact your local Xerox Customer Support Center:
USA: 1-800-821-2797 Canada: 1-800-939-3769
Page 1
Page 28

Apple Macintosh (AppleTalk) Network Quick Install Card
Xerox Document Centre 460/470 ST
6.
b)
At the next screen, press the
Name
want for the printer (this is the name
that will appear in the Chooser on your
workstations) using the touch panel
keys.
c)
Press the
the desired text for this item using the
touch panel keys, then press
(the printer default is * which means
the printer will appear in ALL zones).
5.
Exit the Tools Menu
a)
Press the
Printer
button and enter the name you
Zone Name
Exit Tools
button, enter
Save
button.
Prepare for print driver installtion
a)
Obtain a
from your printer.
b)
Review the
of the
and verify that
the
the
used).
c)
From the documentation package
supplied with your printer, retrieve the
CentreWare Network Services
ROM and the document entitled
CentreWare Network Services
Guide
this procedure called
Workstation and...
Configuration Report
AppleTalk Settings:
Configuration Report
AppleTalk
AppleTalk Name
AppleTalk Zone
. Proceed to the next section of
is enabled,
is correct, and
is correct (if
Go to a
page
area
page
CD-
Go to the workstation and...
1.
Use the
CD-ROM
Macintosh PUtility on the workstation.
Details for this are found in the document
supplied with your printer entitled
Ware Network Services Guide
2.
Send a test job to the printer from an
application program.
3.
Check your test job for quality and use the
problem solving section of the
Centre 460/470 Reference Guide
resolve print defects.
4.
If your job did not print see the
Troubleshooting section of the
Installation and Troubleshooting Guide
CentreWare Network Services
to install print drivers and the
Centre-
.
Document
to
Network
.
Page 2
Page 29

Internet Services Quick Install Card
Xerox Document Centre 460/470 ST
Overview
Your Document Centre printer includes an
integrated Web Server.
This means you can now print to and check up
on your printer status using your favorite Web
Browser software!
This card will show you how to set up this
feature.
Before You Start
It is mandatory that you install a Java enabled
browser on the workstation(s) which will use the
Internet Services Tool. For best performance
and compatibility use Netscape Navigator 4.0 or
Microsoft Internet Explorer 4.0 or later.
Your printer and workstation(s) must be
connected to a network which has the TCP/IP
protocol enabled.
This procedure assumes you have a general
knowledge of your network type and the
operation of your Web Browser software, and
that your Document Centre printer has been
assigned all TCP/IP information.
Configure your printer
1.
Connect your Document Centre 460/470
to the network with the appropriate
cabling.
2. Enter the Tools pathway.
a)
Press the
b)
On the keypad enter
current password. Press the
button when finished. Press the
Tools
a)
Wait for the screen to refresh and
press the
Setup
b)
Wait for the screen to refresh and
press the
c)
Press the
d)
Press the
e)
Press the
f)
Press the
3.
Record the TCP/IP Address assigned to
your printer and proceed to the next
section of this procedure called
your Web Browser.
Access
button.
Connectivity and Network
button.
Network Setup
TCP/IP Options
HTTP/IPP
Enable
Exit Tools
()
button.
1111
button.
button.
button.
or the
Enter
Go to
button.
button.
Configure
Configure your Web Browser
This procedure will configure your Web Browser
software to connect to your printer on the
network.
1.
Print a
the page for the steps below.
2.
Launch your Web Browser software.
3.
Enter your printer’s TCP/IP address from
your
Address
browser (this name is browser dependent)
and press RETURN.
4.
Your browser will connect to the imbedded
web server on your printer and display the
printer’s “
5.
Once you have established
communication with your printer, be sure
to save the URL in your Favorites, or
Bookmarks (this name is also browser
dependent), so you can quickly reconnect
when necessary.
6.
To make it easier for browser software on
other workstations to find the printer, be
sure to update your DNS or NIS database
to include the printer.
7.
Refer to the document entitled
Services Guide
on how to use Internet Services.
Configuration Report
Configuration Report
Location
or
Home Page
field on your
”.
for detailed instructions
and retain
into the
Internet
For assistance, contact your local Xerox Customer Support Center:
USA: 1-800-821-2797 Canada: 1-800-939-3769
Page 1
Page 30

Page 31

EquiTrac OfficeTrac Network Accounting Quick Install Card
Xerox Document Centre 460/470 ST
Overview
EquiTrac Corporations OfficeTrac software
provides the ability to control access to, and
monitor up to twenty networked Document
Centres for the following functions:
Copying
Printing
Faxing
Scanning
With OfficeTrac you may set up user accounts,
keep data on usage patterns, and track office
expenses effectively using a single tool.
Feature-rich standard reports and available
custom reports are combined with powerful data
export to make OfficeTrac a complete asset
management solution.
The OfficeTrac application communicates with
the imbedded Document Centre Web Server
(Internet Services) to configure, and retrieve
information from your Document Centre. This
card will show you how to enable this feature.
This procedure assumes that your OfficeTrac
server has already been installed, your
Document Centre has had the required upgrade
installed, and is properly connected to your
network. It also assumes that the OfficeTrac
administrator has performed a site setup in
OfficeTrac for the Document Centre. Details for
performing a Site Setup are contained in your
OfficeTrac documentation.
Before You Start
Your printer and your OfficeTrac server must be
connected to a network which has the TCP/IP
protocol enabled and all TCP/IP information
such as hostname, Default Gateway and
Broadcast address have been set.
Your Document Centre has the DHCP protocol
enabled by default. If there is a DHCP server on
your network it can assign a new IP address
when your Document Centre is powered on.
If Dynamic TCP/IP addressing must be used, be
sure to set lease times long enough to allow for
normal maintenenace shutdowns. If your
Document Centre appears to have stopped
communicating with the OfficeTrac server when
Dynamic Addressing is in use, check the TCP/IP
settings to be sure they have not changed.
As a quick test to verify all the requirements
have been met, start the Web Browser from your
OfficeTrac server and enter the IP address of
the Document Centre to see if you can
communicate with it using the HTTP protocol. If
the Browser connects and you can see the
“Home Page” proceed to the next section
entitled
Go to the printer and...
Go to the printer and...
1. Enter the Tools pathway
a)
Press the
b)
On the keypad enter
current password. Press the
button when finished. Press the
Tools
c)
The Touch Screen will be used for the
remainder of the data entry.
Access
button.
()
1111
button.
or the
Enter
2. Enter the Access and Accounting
menus
a)
Press the
button.
b)
Press the
button.
Enable Network Accounting
3.
a)
Press the
button.
b)
Press
Access and Accounting
Authentication Mode
Network Accounting
Save
to retain the settings.
Go to
For assistance, contact your local Xerox Customer Support Center:
USA: 1-800-821-2797 Canada: 1-800-939-3769
Page 1
Page 32

EquiTrac OfficeTrac Network Accounting Quick Install Card
Xerox Document Centre 460/470 ST
4. Perform the Network Accounting Setup
a)
Press the
Setup
b)
Press the
c)
Press the
settings and continue.
d)
Press the
Network Accounting
button.
Enabled
Save
Exit Tools
button.
button to retain the
button.
5. Verify Accounting is enabled
a)
Press the
front panel then press the
button.
b)
The Touch Panel should display a
screen with two buttons. One is the
User ID
Account ID
system has enabled accounting
successfully.
Go to the OfficeTrac server and...
Job Status
button and the other is the
button. This indicates the
button on the
Features
1. Activate the Document Centre Site
Setup
a)
Open the
Verify that the Document Centre is
displayed as
Troubleshooting information is
contained in the OfficeTrac
Administrators documentation.
2.
Proceed to the next section of this
procedure called
and...
Terminal Status
dcsOnLine
Go to the workstations
screen.
.
Go to the workstation and...
1. Install Print drivers
not already been installed, use the
CentreWare Network Services CD-ROM
to install print drivers. Details for this are
found in the document supplied with your
printer entitled
Workstations with existing Document
Centre drivers must be upgraded to the
new drivers to allow for printing with
Network Accounting enabled.
(If print drivers have
Network Services Guide
2. Enable Accounting in the print driver
a)
At your Windows 95/98/NT 4.0
desktop, click the
Settings
select
b)
From the cascade menu select
Printers
c)
Select a printer with the right mouse
button.
d)
Select the
cascade menu.
e)
Select the
the Properties dialog.
f)
Click the
checkbox.
g)
If you do not want users to have to
enter their User and Account ID each
time they print, select the
Accounting Codes
.
Properties
User Preferences
Enable Accounting
Start
.
button and
entry in the
tab on
Save
checkbox.
h)
If desired you may also select the
Conceal User ID
Account ID
)
asterisk (*) character echoed when
this information is entered.
i)
When finished making selections, click
OK
to close the driver and save the
settings.
checkboxes to have the
and
Conceal
3. Test the accounting function of the
driver
a)
Open an application and print a job.
Verify that you are presented with the
User ID and Accounting ID screen.
b)
Enter a valid User and Accounting ID
and click OK (If you selected
Accounting Codes
necessary to enter this information the
first time the driver is used).
c)
If your print job does not print, try to
copy a job at the Document Centre
using the same Account and User ID.
If the copy job completes then the
Account and User ID are valid.
d)
It may be necessary to check the
OfficeTrac server configuration to
verify the proper User ID and Account
ID.
e)
Repeat this
and...
on the network that will print to the
printer.
Go to the workstation
procedure for each workstation
it will only
Save
Page 2
Page 33

RightFAX (FTP over TCP/IP) Quick Install Card
Xerox Document Centre 460/470 ST
Overview
The RightFax Fax Server provides the ability to
fax paper documents from your Document
Centre as well as modify, forward, and distribute
electronic copies of documents to other Fax
devices or to user workstation.
Feature-rich client utilities combined with
powerful enterprise management applications
make RightFax and the Xerox Document Centre
a complete paper to electronic digital document
solution for fax communication.
This procedure assumes the following:
• Your RightFax server has already been
installed.
• Your Document Centre is installed on your
network and working as a printer, and your
Document Centre has the fax option
installed that will allow it to send fax
documents to a Fax Repository (destination
directory).
• You want to send faxes to the repository by
FTP (File Transfer Protocol) using the TCP/
IP protocol.
If you want your Document Centre to send fax
documents to a Novell NetWare server Fax
Repository, use the card in this set entitled
RightFax (Novell IPX/SPX) Quick Install Card
Before You Start
Your Document Centre and your RightFax
server must be connected to a network which
has the TCP/IP protocol enabled. Additionally,
record TCP/IP information for both the RightFax
server and your Document Centre.
It is strongly recommended your RightFax
server is assigned a static IP address. If
necessary, refer to the
Addressing Quick Install Card
this card set to configure your Document Centre
in this manner.
Your Document Centre has DHCP enabled by
default. Dynamic IP Addressing may be used
for the RightFax server provided the DHCP
server has been configured with sufficient lease
time so that the RightFax server and Document
Centre normal maintenence or service times will
not result in a change in TCP/IP address.
An account must be created on the server to
which the Document Centre will FTP the fax
documents that has sufficient rights or
permissions to allow the Document Centre to
read files, write files, delete files, and create new
directories. Anonymous FTP logins will not allow
these rights. Record the login name, home
directory, and password of this account for use
during this procedure.
.
Proceed to the next section entitled
Document Centre and...
Static (Manual) TCP/IP
contained in
Go to the
Go to the Document Centre and...
1. Enter the Tools pathway
a)
Press the
front panel.
b)
On the keypad enter
current password. Press the
button when finished. Press the
Tools
c)
The Touch Screen will be used for the
remainder of the data entry.
Access
button.
()
button on the
1111
or the
Enter
2. Enter the Fax Repository Settings
menu
a)
Press the
the
appear on the touch screen (the
number of times required to press the
More button changes depending on
which options are installed on your
Document Centre).
b)
Press the
button.
c)
Select the
More
button until you see
Fax Repository Settings
Fax Repository Settings
FTP
button.
button
3. Set the login name used by your
Document Centre to connect to the fax
repository
a)
Press the
Name screen will appear.
b)
Press the
Login
button and the Login
Login Name
button.
Go to
Page 1
Page 34

RightFAX (FTP over TCP/IP) Quick Install Card
Xerox Document Centre 460/470 ST
Set the server address to which fax
c)
Use the touch screen keyboard to
enter the login name for the account
created for the Document Centre.
(observe case sensitivity)
d)
Press
Save
to retain the settings.
4. Set the password used by your
Document Centre to connect to the fax
repository
a)
Press the
Password screen will appear.
b)
Press the
c)
Use the touch screen keyboard to
enter the password for the account
created for the Document Centre.
(observe case sensitivity)
d)
Press
e)
Press
Fax Repository Settings screen.
Password
Password
Save
to retain the settings.
Save
again to be returned to the
button and the
button.
6.
documents will be sent
a)
Press the
b)
Press the soft buttons on the Touch
Screen one at a time for each octet of
the server TCP/IP address and enter
the numbers from the keypad. When
finished press the
will be returned to the
Settings
7.
Exit the Tools Menu
a)
Press the
Server
screen.
Exit Tools
button.
Save
button.
Go to the RightFAX server and...
1. Set the RightFax server options for
receiving Document Centre fax
documents
provided with your RightFAX server)
(Refer to the documentation
button. You
Fax Repository
g)
Create a Mailbox for the Document
Centre (Walkup, Anonymous or
Default).
Go to the workstation and...
1. Install the new upgraded print drivers
a)
Test your installation by opening an
application and print a test fax
document and verify its receipt.
b)
If your fax document does not reach its
destination refer to the troubleshooting
information in the RightFax
documentation.
5. Set the path for the Fax Repository
a)
Press the
b)
The Path screen will appear. Press
the
c)
Use the touch screen keyboard to
enter the path to the Fax Repository
created for the Document Centre
(observe case sensitivity).
d)
Press
Fax Repository Settings screen.
Path
Save
Path
button.
button.
again to be returned to the
a)
Open the
b)
Select the appropriate WorkServer
then select
c)
Enable the
d)
Add the path and home directory of
the Fax Repository that will be
monitored by the RightFax server.
e)
Close the WorkServer Control Panel.
f)
Open Enterprise Fax Manager.
WorkServer
Xerox Configuration
Xerox DCS Interface
Control Panel.
Page 2
.
.
Page 35

RightFax (Novell IPX/SPX) Quick Install Card
Xerox Document Centre 460/470 ST
Overview
The RightFax Fax Server provides the ability to
fax paper documents from your Document
Centre as well as modify, forward, and distribute
electronic copies of documents to other Fax
devices or to user workstations.
Feature-rich client utilities combined with
powerful enterprise management applications
make RightFax and the Xerox Document Centre
a complete paper to electronic digital document
solution for fax communication.
This procedure assumes the following:
• Your RightFax server has already been
installed.
• Your Document Centre is installed on your
network and working as a printer, and your
Document Centre has the fax option
installed that will allow it to send fax
documents to a fax repository (destination
directory).
• You want to send faxes to a repository that
is on a Novell NetWare server.
If you want your Document Centre to send fax
documents to a TCP/IP server Fax Repository,
use the card in this set entitled
IP) Quick Install Card
installation.
for this type of
RightFax (TCP/
Before You Start
Your Document Centre and your RightFax
server must be connected to a network which
has the Novell NetWare server which contains
the Fax Repository.
An account must be created on the NetWare
server to which the Document Centre will send
the fax documents. This account must have
sufficient rights or permissions to allow the
Document Centre to read files, write files, delete
files, and create new directories. Record the
NDS Tree (if applicable), Context (if applicable)
login name, home directory, and password of
this account for use during this procedure.
Proceed to the next section entitled
Document Centre and...
Go to the
Go to the Document Centre and...
1. Enter the Tools pathway
a)
Press the
front panel.
b)
On the keypad enter
current password. Press the
button when finished. Press the
Tools
c)
The Touch Screen will be used for the
remainder of the data entry.
Access
button.
()
button on the
1111
or the
Enter
2. Enter the Fax Repository Settings
menu
a)
Press the
the
appear on the touch screen (the
number of times required to press the
More
which options are installed on your
Document Centre).
b)
Press the
button.
c)
Select the
More
button until you see
Fax Repository Settings
button changes depending on
Fax Repository Settings
NetWare
button.
button
3. Set the login name used by your
Document Centre to connect to the Fax
Repository
a)
Press the
Name screen will appear.
Login
button and the Login
Go to
Page 1
Page 36

RightFax (Novell IPX/SPX) Quick Install Card
Xerox Document Centre 460/470 ST
Set the server name and volume to
b)
Press the
the touch screen keyboard to enter the
login name for the account created.
c)
Press
continue.
Login Name
Save
to retain the settings and
button and use
4. Set the password used by your
Document Centre to connect to the fax
repository
a)
Press the
Password screen will appear.
b)
Press the
the touch screen keyboard to enter the
password for the account created for
the Document Centre. (observe case
sensitivity)
c)
Press
continue.
Password
Password
Save
to retain the settings and
button and the
button and use
6.
which fax documents will be sent
a)
Press the
b)
Press the
use the touch screen keyboard to
enter the server name for the account
created for the Document Centre.
(observe case sensitivity). When
finished press the
c)
Press the
use the touch screen keyboard to
enter the volume name for the account
created for the Document Centre.
(observe case sensitivity). When
finished press the
d)
You will be returned to the
Repository Settings
Server and Volume
Server Name
Server Volume
7. Configure the NDS settings for the fax
d)
5. Set the path for the Fax Repository
a)
b)
c)
Save
Press
Fax Repository Settings screen.
Press the
The Path screen will appear. Press
Path
the
screen keyboard to enter the path to
the fax repository created for the
Document Centre. (observe case
sensitivity)
Press
Fax Repository Settings screen.
again to be returned to the
Path
button.
button and use the touch
Save
again to be returned to the
repository
connecting to an NDS server)
a)
Press the
b)
Press the
use the touch screen keyboard to
enter the NDS Context for the account
created for the Document Centre
(observe case sensitivity). When
finished press the
c)
Press the
the touch screen keyboard to enter the
NDS Tree for the account created for
the Document Centre (observe case
(skip this step if you are not
NDS Settings
NDS Context
NDS Tree
button.
button and
Save
button.
button and
Save
button.
Fax
screen.
button.
button and
Save
button.
button and use
sensitivity). When finished press the
Save
button.
d)
Press the
Exit Tools
button.
Go to the RightFax server and...
1. Set the RightFax server options for
receiving Document Centre fax
documents
are available in the documentation
provided with your RightFax server)
a)
Enable Xerox DCS transactions.
b)
Add the path and home directory of
the Fax Repository that will be
monitored by the RightFax server.
(details for these procedures
Go to the workstation and...
1. Install the new upgraded print/fax
drivers
a)
Use the
Services CD-ROM
fax drivers. Details for this are found in
the document supplied with your
Document Centre entitled
Services Guide
b)
Test your installation by opening an
application and print a test fax
document and verify its receipt.
c)
If your fax document does not reach its
destination refer to the troubleshooting
information in the RightFax
documentation.
CentreWare Network
to install print and
Network
.
Page 2
Page 37

Port 9100 TCP/IP Printing Quick Install Card
Xerox Document Centre 460/470 ST
Before You Start
Go to the printer and...
4.
Enable the network interface and protocol.
To enable 100BaseT or a Token Ring interface,
refer to the
Ring Interface Quick Install Card
the Speed and Source Routing settings for your
environment. Then return to this card and
perform the procedure here.
Your Document Centre has DHCP enabled by
default. If your DHCP server is configured with
the TCP/IP information for the Document
Centre, you should Skip Steps 5 and 6 on this
card and go to Step 7 to enable Port 9100
printing. If you wish toconfigure your TCP/IP
information statically, complete ALL Steps on
this card.
Your Document Centre supports printing from a
variety of operating systems that support TCP/IP
and now supports Port 9100 (RAW) printing.
Record the following information assigned to
your Document Centre:
IP Address ____________________________
100BaseT Ethernet and Token
to configure
1.
Connect your Document Centre to the network with the appropriate cabling.
2.
Enter the
a)
b)
c)
3.
Enter the Network Setup menus
a)
b)
c)
Tool s
pathway.
Press the
On the keypad enter
current password. Press the
button when finished. Press the
Tools
The Touch Screen will be used for the
remainder of the data entry.
Wait for the screen to refresh and
press the
Setup
Wait for the screen to refresh and
press the
Press the
Access
button.
Connectivity and Network
button.
Network Setup
TCP/IP Options
()
1111
button.
or the
Enter
button.
button.
Go to
a)
Press the
b)
Press the
c)
Press the
Media buttons appear, select either
Ethernet
5.
Set the Host Name.
a)
Press the
b)
One at a time press the soft buttons on
the Touch Screen for each octet of the
IP address and enter the numbers
using the keypad.
c)
Press the
d)
When the soft keypad appears, type
the host name EXACTLY as you want
it to appear with correct case. When
finished press the
record the changes and exit to the
TCP/IP Settings
TCP/IP Settings
Protocol and Media
Enable
or
Name/Address
Host Name
button. If Physical
Token Ring
Save
Screen.
button.
. Press
button.
button.
button to
button.
Save
.
Subnet Mask ___________________________
Default Gateway ________________________
For assistance, contact your local Xerox Customer Support Center:
USA: 1-800-821-2797 Canada: 1-800-939-3769
Page 1
Page 38

Port 9100 TCP/IP Printing Quick Install Card
Xerox Document Centre 460/470 ST
6.
Set the Subnet Mask and Gateway.
Go to a workstation and...
a)
Press the
button.
b)
Press the soft buttons on the Touch
Screen one at a time for each octet of
the Subnet Mask and enter the
numbers using the keypad. Repeat
this process for the IP Gateway
address. When finished press
record the changes and exit to the
TCP/IP Settings
NOTE: The Broadcast Address will be calculated automatically.
7.
Enable
a)
Press the
b)
At the next screen press
press
8.
Exit the Tools Menu
a)
Press the
Subnet and Gateway
screen.
Port 9100
Save
printing .
Port 9100 printing
.
Exit Tools
Enable
button.
Save
to
button.
then
1.
Create a test job and send it to the printer
with a workstation utility or through a
queue on your operating system that supports Port 9100 printing.
2.
Check your test job for quality and use the
problem solving section of the
Centre 460/470 Reference Guide
resolving print defects.
3.
If your print job does not print, refer to the
troubleshooting section in the document
entitled
Troubleshooting Guide
problem.
4.
Repeat this
procedure at each workstation that will
print to this printer or at other servers
where a queue has been created.
Network Installation and
to correct the
Go to a workstation and...
Document
for
Page 2
 Loading...