

Page 1
Page 2

Page 3

Table of Contents
Scanning Overview 1
Scanning Using Mailboxes 2
Scanning Using Templates 2
How to Scan Using Mailboxes 3
Basic Scanning Tab 5
Output Color 6
Scanning Resolution 7
2 Sided Originals 8
T
ABLE OF CONTENTS
Scan Options Tab 10
2 Sided Originals 11
Reduce/Enlarge 12
Using Presets 12
Using Variable% 13
Using Auto % 14
Scan Size 15
Bound Originals 16
Mixed Size Originals 18
Border Erase 19
Image Quality / File Format Tab 20
Original Type 21
Image Compression 22
Lighter/Darker/Contrast 23
Auto Exposure 24
TABLE OF CONTENTS
i
Page 4

T
ABLE OF CONTENTS
How to Pause or Cancel a Scanning Job 25
How to Cancel Scanning Jobs from the Workstation 25
Checking or Deleting a Scan Job on the Machine 26
Checking a Scan Job 26
Deleting a Scan Job 27
Scanning in Batches 28
Managing Scanned Documents 29
Retrieving/Deleting Scanned Documents 29
Retrieving a Scanned Document 29
Deleting a Scanned Document 29
Configuring the Client for Scanning 30
Installing the Network Scanner Utility 30
Required Environment 30
Installation 31
Uninstallation 31
Changing Network Scanner Utility Settings 32
Importing Scanned Data 32
Importing to an Application 32
ii
Page 5

Scanning Overview
3. User Guide (Scan)
Your printer/copier can also be used as a scanner. You can either
store your scanned job in a mailbox on the printer and retrieve it at
your workstation, or you can select a template, that you have
previously created using Internet services, on your desktop. The
template will determine the characteristics of your scanned job
and its destination.
3–1
USER GUIDE (SCAN)
Page 6
U
SER GUIDE
(S
CAN
)
Scanning Using Mailboxes
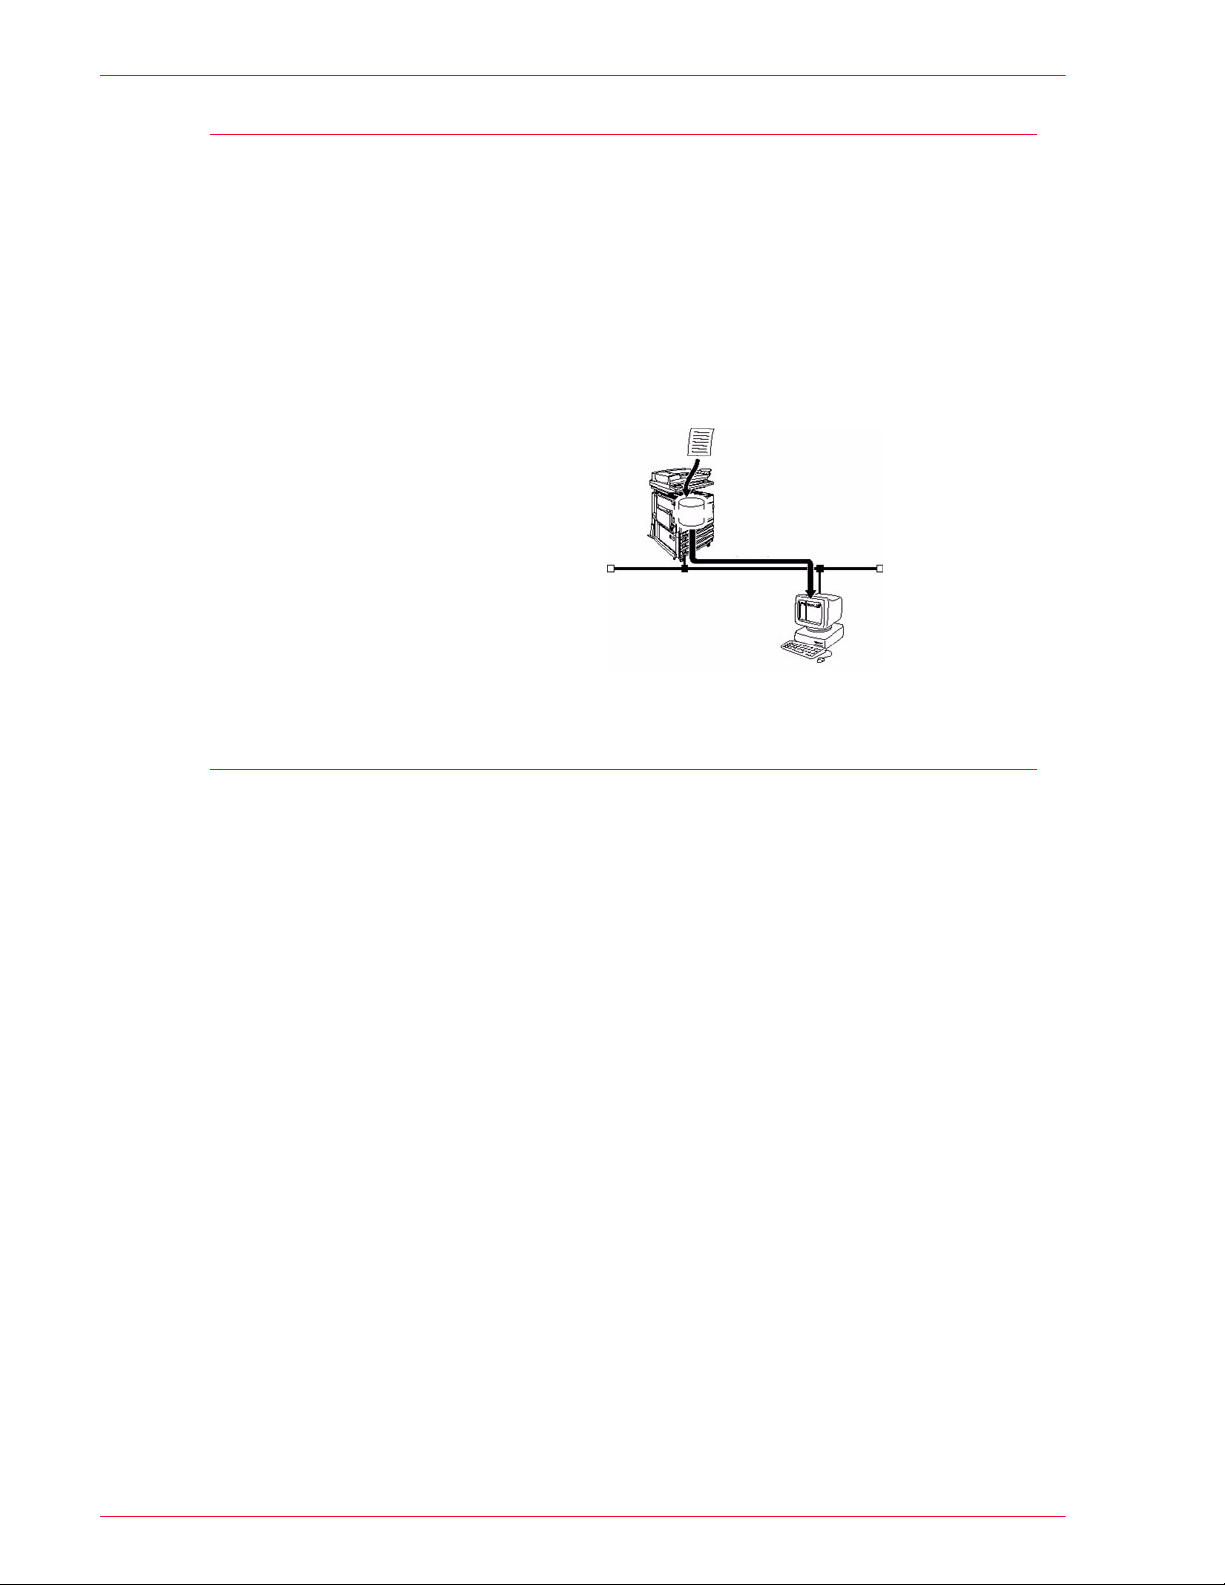
The scanner function is available when you are connected to the
network environment using TCP/IP protocol.
You can scan your originals using the printer/copier and apply
most of the features to scanned output, just as when making
copies. The scans are stored in an electronic mailbox that has
been created in the machine. The stored data can be retrieved on
your client workstation if it has the appropriate scanning driver and
if it has been connected to the network.
Scanning Using Templates
Job Templates can be created, edited, copied, and deleted using
Internet Services. You can create these templates with different
features and settings that will be applied to specified scan jobs on
the machine. You can retrieve the job template by selecting the
Job Template tab in Internet Services. Up to 250 job templates
can be stored on the machine.
For more information on Job Templates, refer to the Internet
Services Online help system.
For more information on Internet Services, refer to the User Guide
(Print).
3–2
Page 7
How to Scan Using Mailboxes
You can scan originals, and then store the scanned document in
mailboxes. The scanned document can be saved in JPEG or
TIFF format.
NOTE: In order to use this machine as a scanner, the IP address,
Port, and mailboxes must be properly configured. Contact your
System Administrator to set up a mailbox for you.
Place the document in the DADF or on the Document Glass.
1
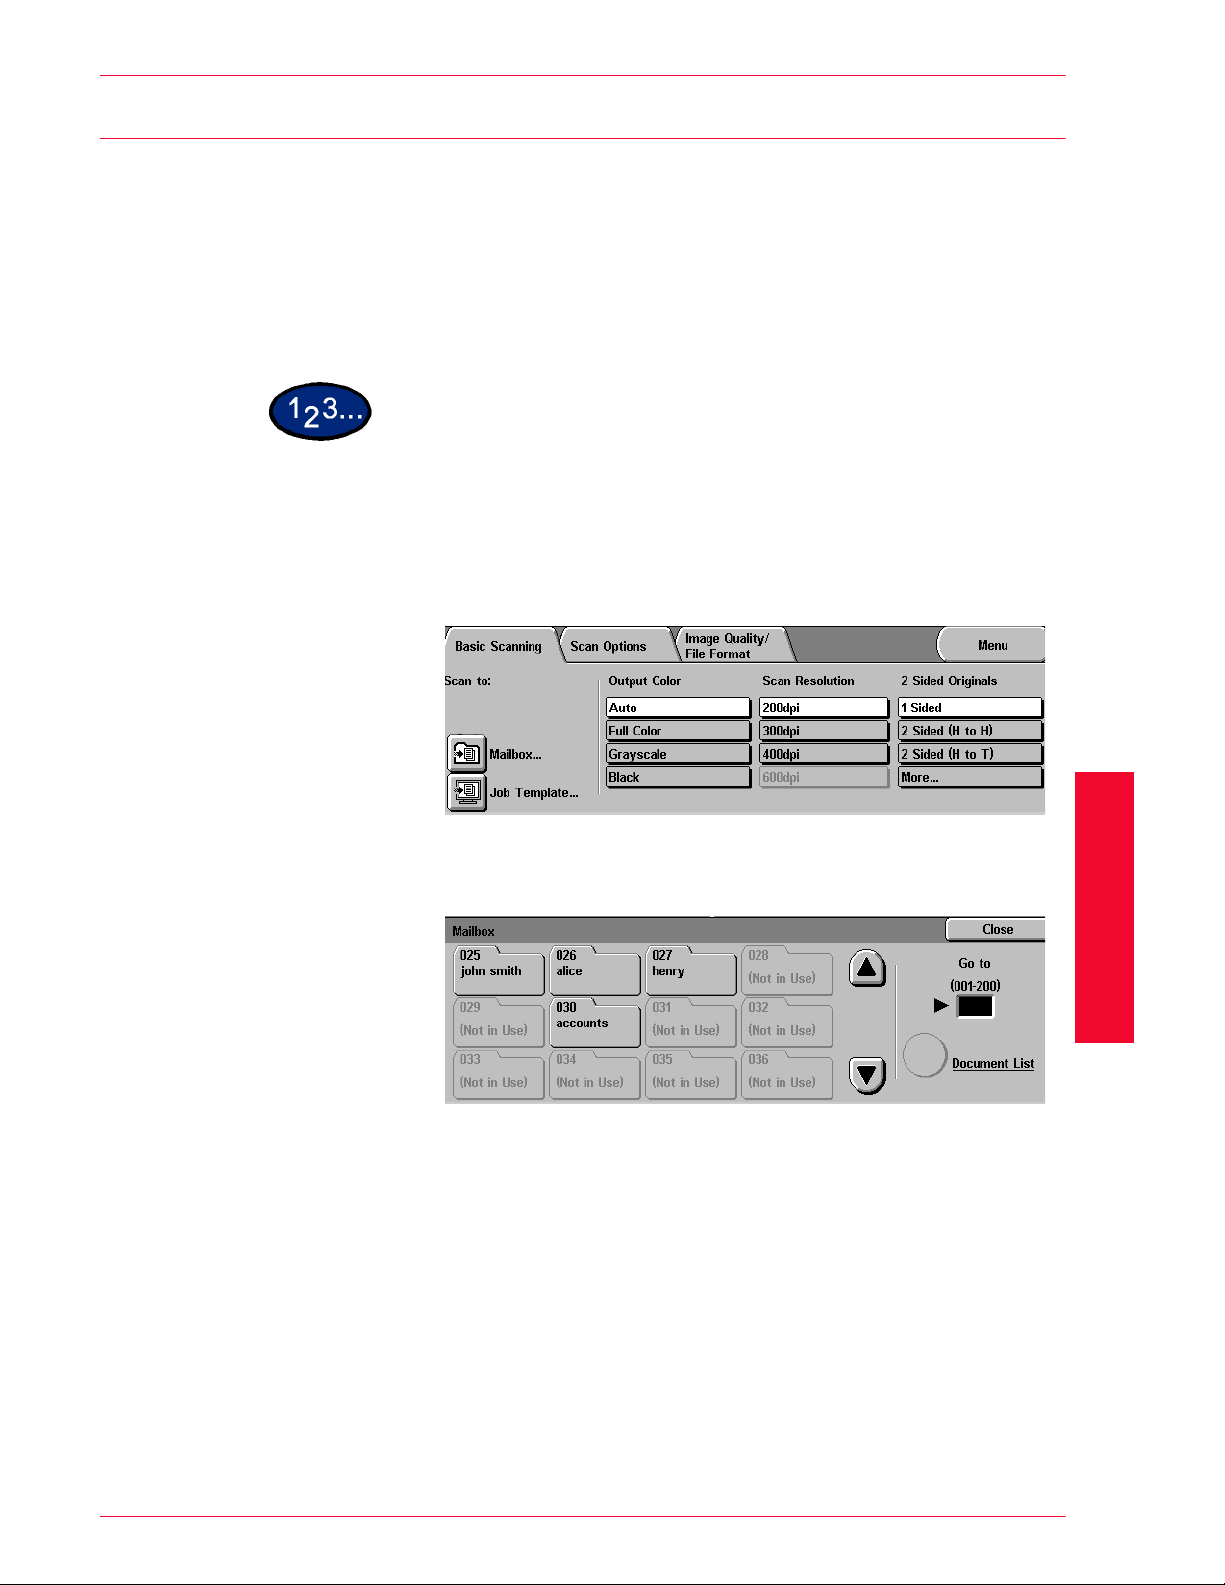
Select Scan from the Menu screen. The Basic Scanning screen is
2
displayed.
U
SER GUIDE
(S
CAN
)
Select Mailbox. The Mailbox screen is displayed.
3
I
USER GUIDE (SCAN)
3–3
Page 8
U
SER GUIDE
(S
CAN
)
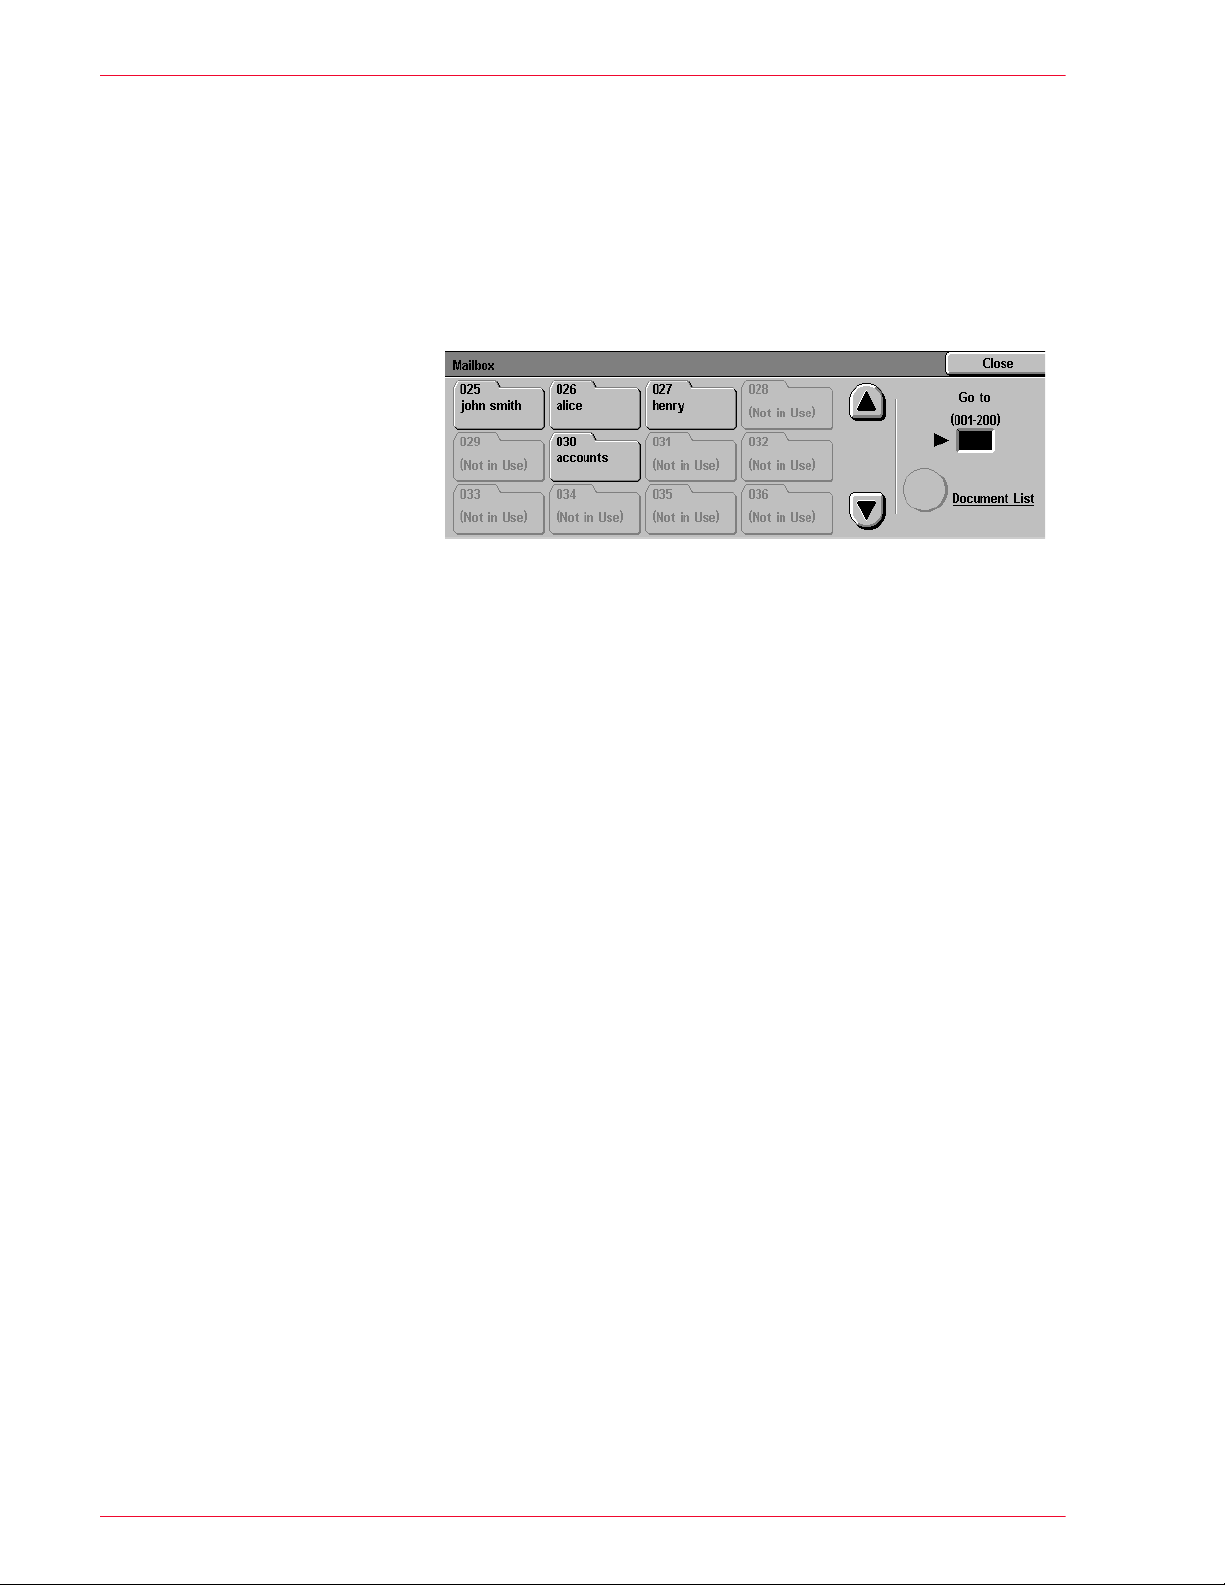
Select the mailbox where the scanned data is to be stored.
4
You can go to the previous screen by touching the up arrow, and
the next screen by touching the down arrow. Or using the
numeric keypad, you can enter numbers in the Go to box to go
directly to a specific Mailbox.
Once a mailbox is selected, any documents stored in the box will
be displayed in the Number of Docs box.
NOTE: If you select Mailbox and press Document List, you can
check the documents stored in the Mailbox.
Press Start to begin scanning, or press Close to select additional
5
scanning functions. The scan data will be saved in the specified
mailbox.
For more information on scanning functions, refer to the following
sections.
To view or retrieve scanned documents, refer to the Managing
Scanned Documents section in this chapter.
3–4
Page 9
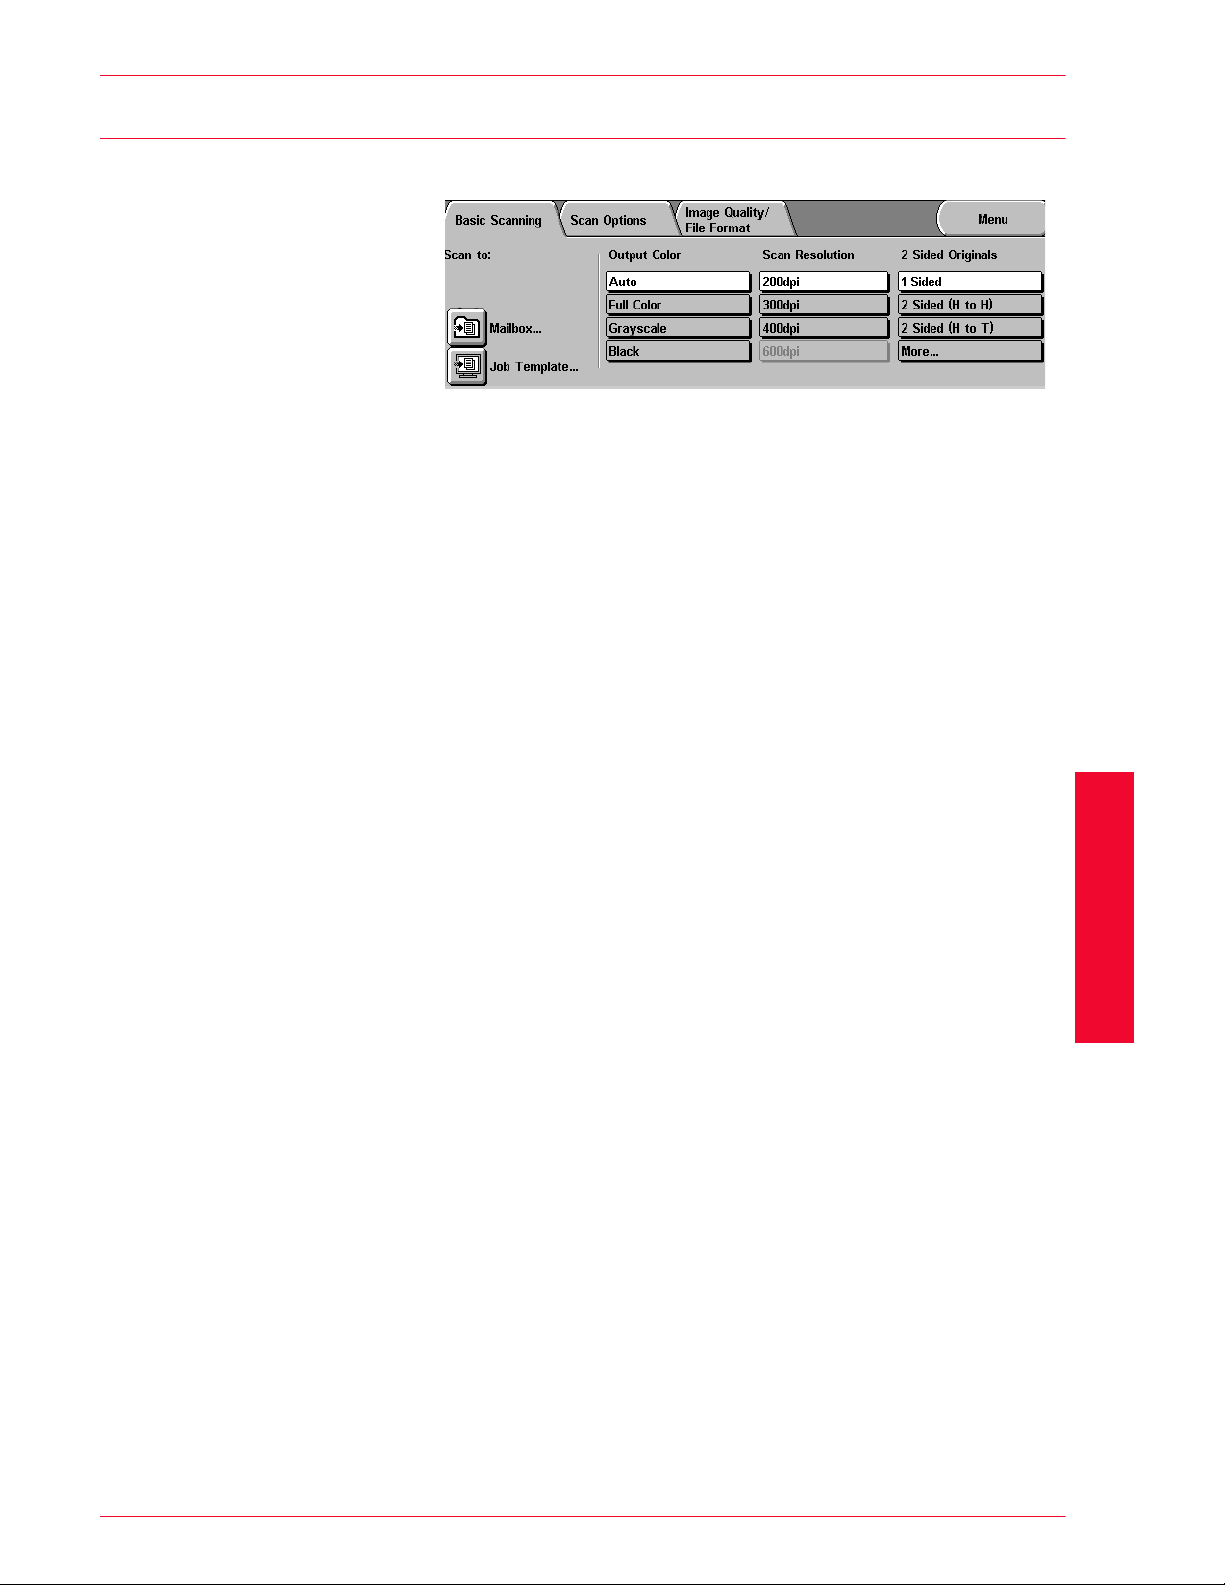
Basic Scanning Tab
Mailbox Allows you to scan originals and then store the scan data in
Job Template Allows you to apply preexisting job templates to jobs on the
Output Color Allows you to select the output color for specific types of originals.
U
SER GUIDE
(S
CAN
Below is a brief explanation of each feature available on the Basic
Scanning tab. Each feature is explained in detail on the following
pages.
mailboxes. The scan data can be saved in JPEG or TIFF format.
machine.
You can choose from Auto, Full Color, Grayscale, or Black.
)
Scan Resolution Allows you to select the desired scan resolution. Select from 200
dpi, 300 dpi, 400 dpi, or 600 dpi.
2 Sided Originals You can scan both sides of 2-sided originals automatically.
USER GUIDE (SCAN)
3–5
Page 10

U
SER GUIDE
(S
CAN
)
Output Color
Auto The Auto Color option enables the copier to determine if the
Full Color Best used when scanning color originals. The text in the
Grayscale Select when scanning originals with different shades of black and
Output Color allows you to define the kind of original document
you wish to scan. The default is Auto.
The following options are available:
document is black and white or color.
The DADF must be closed for the Auto option to function.
In order for the scanner to accurately sense color on a document,
2
the color area must be greater than 50 mm
2
inches
Very dark colors may be sensed as black. In this case, select the
Full Color option as well.
document will be clearer, and the color graduation will be
represented in greater detail.
white. This option can be used for originals that cannot be
scanned in black and white only.
). If the color area is less, select the Full Color option.
(approximately 2
Black Select when the desired output is a black and white copy. Black
and white copies can be made from any original. With Black
selected only Black toner is used.
Load your originals and select the mailbox where the scanned
1
data is to be stored.
Select the Output Color from the Basic Scanning screen.
2
3–6
Select additional scanning features, or press Start to begin
3
scanning.
Page 11
Scanning Resolution
Scan Resolution allows you to select the desired scan resolution.
Select from 200 dpi, 300 dpi, 400 dpi, or 600 dpi.
The higher the scanning resolution, the larger the image file
created.
Load your originals and select the mailbox where the scanned
1
data is to be stored.
Select the desired Scan Resolution from the Basic Scanning
2
screen.
U
SER GUIDE
(S
CAN
)
Select additional scanning features, or press Start to begin
3
scanning.
USER GUIDE (SCAN)
3–7
Page 12

U
SER GUIDE
(S
CAN
)
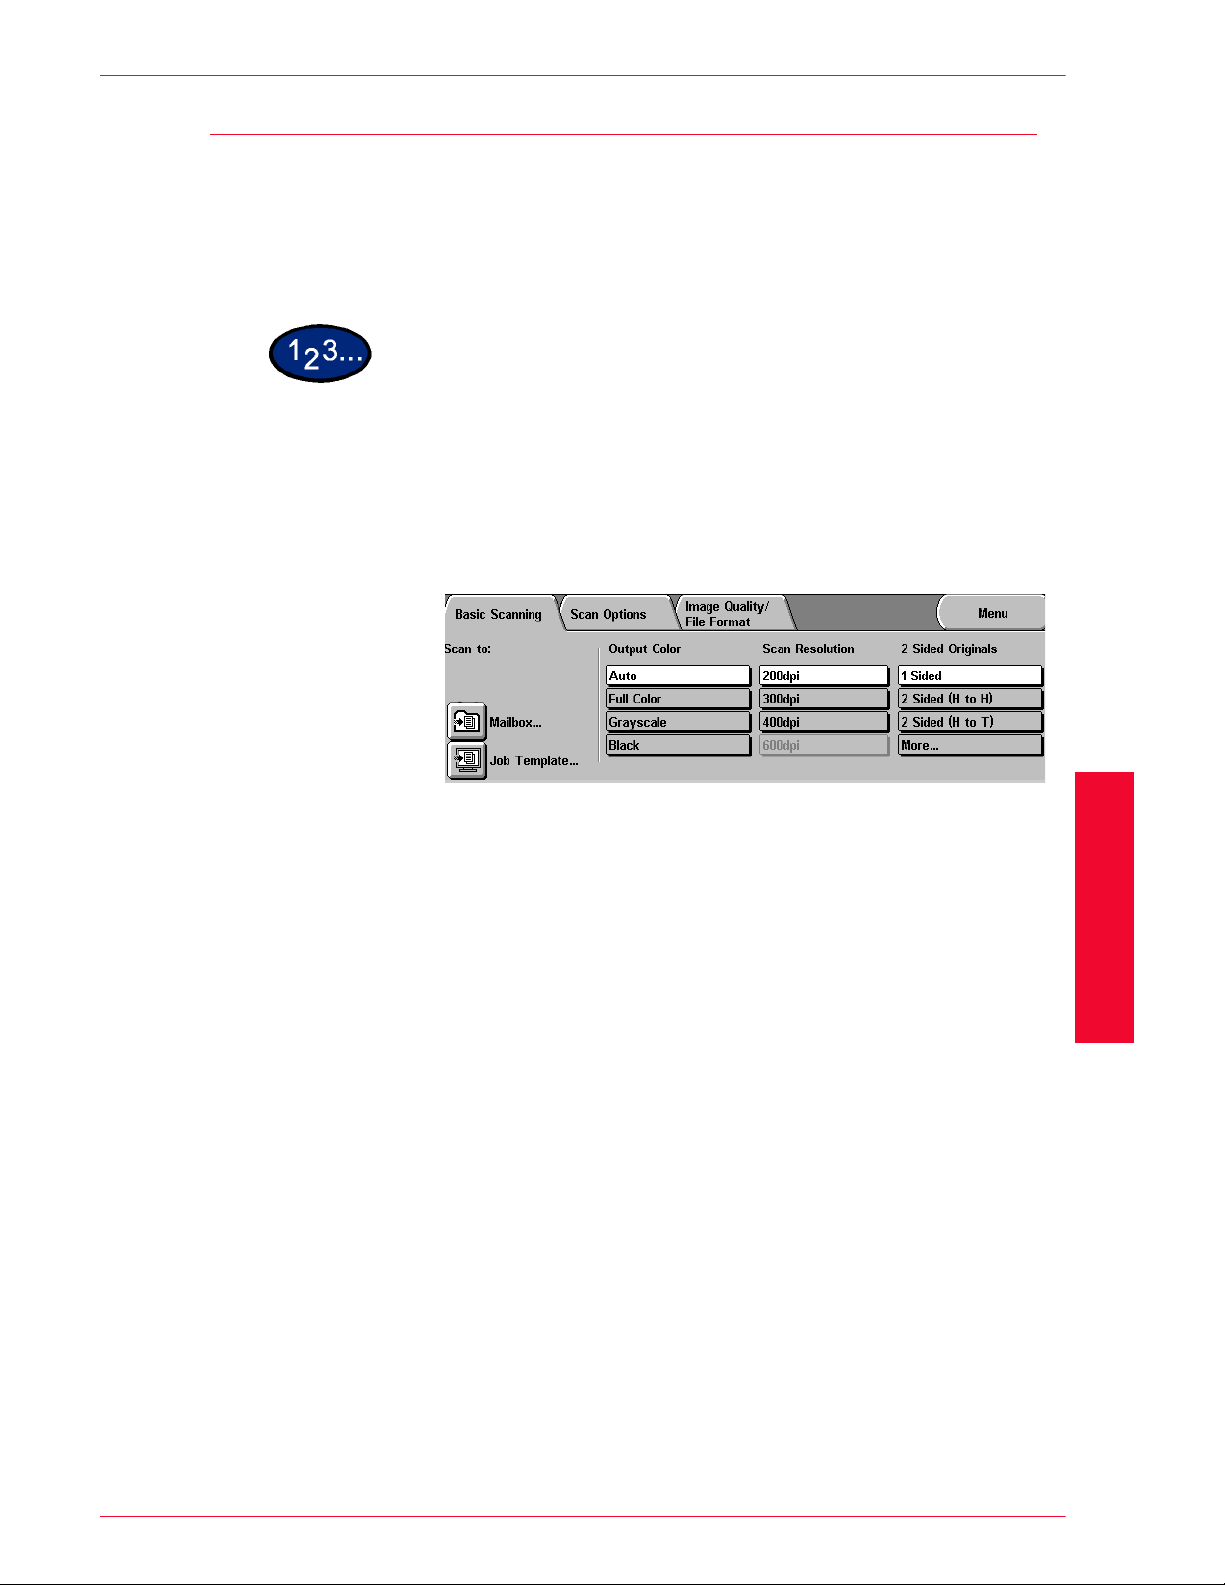
2 Sided Originals
2 Sided Originals allows you to select 1 Sided or 2 Sided originals
and output. You can select 2-Sided options from the Basic
Scanning tab or select the More... button to get a complete set of
options.
The 2 Sided Originals feature can be set on the Basic Scanning
tab and the Scan Options tab.
2 Sided (H to H) Select 2 Sided Head to Head if your originals are two-sided, head-
to-head.
2 Sided (H to T) Select 2 Sided Head to Toe if your originals are two-sided, head-
to-toe.
More... Select the More... button to get a complete set of options.
Load your originals and select the mailbox where the scanned
1
data is to be stored.
Display the Basic Scanning screen.
2
Select the desired option:
3
• 2 Sided (Head to Head)
• 2 Sided (Head to Toe)
• More...
3–8
Page 13

When More... is selected the 2 Sided Originals screen is
displayed.
Select 1 Sided or 2 Sided.
4
• If 1 Sided has been selected, proceed to the next step.
• If 2 Sided has been selected, select Head to Head or
Head to Toe for the Original.
U
SER GUIDE
(S
CAN
)
In Original Orientation, select the icon that most closely resembles
5
the orientation for the loaded document(s), Head to Top or Head
to Left.
Select additional scanning features, or press Start to begin
6
scanning.
USER GUIDE (SCAN)
3–9
Page 14

U
SER GUIDE
(S
CAN
)
Scan Options Tab
2 Sided Originals Use this setting to specify the original orientation when using the
Reduce/Enlarge The Reduce/Enlarge feature allows you to copy the image at
Below is a brief explanation of each feature available on the Scan
Options tab. Each feature is explained in detail on the following
pages.
DADF for scanning.
When the DADF is used for scanning, the original orientation must
be set in order to specify the “Head” position of the document.
different magnifications. Copies may be reduced/enlarged
between 25% - 400%.
Scan Size Allows you to scan the original for automatic size detection, or the
size may be input manually.
Bound Originals Allows you to scan the original for automatic size detection, or the
size may be input manually.
Mixed Size Originals Automatically determines the correct paper size, based on the
original size and the selected reduction/enlargement.
Border Erase Allows you to erase unwanted edge markings from the original on
the scanned image.
3–10
Page 15

2 Sided Originals
1
2
3
U
SER GUIDE
When the DADF is used for scanning, the original orientation must
be set in order to specify the “Head” position of the document.
2 Sided Originals can be set on the Basic Scanning tab and the
Scan Options tab.
Load your originals and select the mailbox where the scanned
data is to be stored.
Display the Scan Options screen.
Select 2 Sided Originals from Scan Options screen. The 2 Sided
Originals screen is displayed.
(S
CAN
)
Select 1 Sided or 2 Sided on the 2 Sided Originals screen.
4
Based on how the originals are loaded, select either Head to Top
5
or Head to Left from Original Orientation.
Select additional scanning features, or press Start to begin
6
scanning.
USER GUIDE (SCAN)
3–11
Page 16

U
SER GUIDE
(S
CAN
)
Reduce/Enlarge
Preset % There are 7 preset percentages to choose from. The selected
Variable % Select the Variable% option to enter the desired percentage for
Auto % This option automatically reduces or enlarges the copy, based on
Using Presets
The Reduce/Enlarge feature allows you to copy the image at
different magnifications. Copies may be reduced/enlarged
between 25% - 400%.
The following options are available:
percentage displays in the value box on the Reduce/Enlarge
screen. These presets can be changed in System Settings mode.
Reduce/Enlarge. Use either the up and down arrows or the
number buttons that display on the Touch Screen. Copies may be
reduced/enlarged between 25% - 400%, in 1% increments.
the size and orientation of the document and the paper supply
selected. This option is applied only to standard size documents.
Load your originals and select the mailbox for saving the scanned
1
data.
On the Scan Options screen, select Reduce/Enlarge. The
2
Reduce/Enlarge screen is displayed.
Select Preset %.
3
Select the desired percentage.
4
Select additional scanning features, or press Start to begin
5
scanning.
3–12
Page 17

Using Variable%
Load your originals and select the mailbox for saving the scanned
1
data.
On the Scan Options screen, select Reduce/Enlarge. The
2
Reduce/Enlarge screen is displayed.
U
SER GUIDE
(S
CAN
)
Select Variable%.
3
Perform one of the following:
4
• Press the up arrow to increase the percentage value in
increments of 1.
• Press the down arrow to decrease the percentage value in
decrements of 1.
• Use the Numeric Keypad on the Control Panel to enter a
specific percentage from 25% - 400%. Use C to clear the
value entered.
Select additional scanning features, or press Start to begin
5
scanning.
USER GUIDE (SCAN)
3–13
Page 18

U
SER GUIDE
(S
CAN
)
Using Auto %
1
2
Load your originals and select the mailbox for saving the scanned
data.
On the Scan Options screen, select Reduce/Enlarge. The
Reduce/Enlarge screen is displayed.
Select Auto %.
3
Select the desired Output Size.
4
Select additional scanning features, or press Start to begin
5
scanning.
3–14
Page 19

U
SER GUIDE
(S
CAN
Scan Size
The Scan Size feature lets you to specify how the size of the
original document is determined.
Auto Size Detect The copier automatically recognizes the size of standard originals
in the DADF. This is the default setting.
Standard Sizes Select the document size from one of the 11 preset sizes. These
presets can be changed in System Settings mode. You must
place the original on the Document Glass.
Non-standard Sizes Allows you to manually enter the size of the document placed on
the Document Glass.
Load your originals and select the mailbox for saving the scanned
1
data.
)
Select Scan Size from the Scan Options screen. The Scan Size
2
Input screen is displayed.
Select the desired option:
3
•Select Auto Size Detect to have the machine identify the
size of the original document.
• Select the appropriate size from one of the preset buttons.
• Enter the width (x) and the length (y) dimensions of the
original document.
Press the left or right arrows to decrease or increase the x
dimension. X dimensions range from 15 to 432 mm in 1
mm increments.
USER GUIDE (SCAN)
Press the up or down arrows to increase or decrease the Y
dimension. Y dimensions range from 15 to 297 mm in 1
mm increments.
Select additional scanning features, or press Start to begin
4
scanning.
3–15
Page 20

U
SER GUIDE
(S
CAN
)
Bound Originals
The Bound Originals feature enables you to scan bound originals
such as books, magazines or journals, notebooks, glued forms, or
stapled sets.
When this feature is selected, each page is scanned into a
separate file.
The pages of the book may be any size up to 8.5 x 11 inches (A4).
The Center Erase option allows you to remove the shadow
caused by the center binding of bound originals when they are
scanned.
CAUTION: Do not force the DADF down onto the book. Forcing
the DADF down could damage it. Instead, leave the DADF open
and apply a slight pressure with your hand to the book to keep it
flat against the Document Glass.
Load your originals and select the mailbox for saving the scanned
1
data.
Select Bound Originals from the Scan Options screen. The
2
Bound Originals screen is displayed.
Select the desired option:
3
• Left Page then Right
• Right Page then Left
• Top Page then Bottom
3–16
Page 21

U
SER GUIDE
Select the pages that you want scanned:
4
• Both Pages
• Left Page only
• Right Page only
Enter the value for the Center Erase, if necessary.
5
• Center Erase is used to delete the center shadow from the
output. Use the arrows to adjust the amount of erase.
Center Erase values range from 0 to 50 mm.
Place the open document face down with the upper outside corner
6
of the right page in the upper left corner of the document glass.
Select additional scanning features, or press Start to begin
7
scanning.
(S
CAN
)
3–17
USER GUIDE (SCAN)
Page 22

U
SER GUIDE
(S
CAN
)
Mixed Size Originals
This feature automatically determines the correct paper size when
scanning different size documents. The correct paper size will be
determined based on the original size and the selected reduction/
enlargement.
Load your originals and select the mailbox for saving the scanned
1
data.
Select Mixed Size Originals on the Scan Options screen. The
2
Mixed Size Originals screen is displayed.
Select On.
3
Select additional scanning features, or press Start to begin
4
scanning.
3–18
Page 23

Border Erase
The Border Erase feature enables you to eliminate unwanted
marks near the edges of the original from the output copy. The
range for Border Erase is 0 through 50 mm in 1mm increments.
Border Erase offers the following options which can be used
individually or combined together:
Top & Bottom The default is 5mm.
Left & Right The default is 5mm.
Center (Gutter) The default is 5mm.
The selected settings are applied to both Side 1 and Side 2 of 2sided copies.
When the image is reduced or enlarged, the selected percentage
will be applied to the border erase.
When making copies the copier always automatically adds a
border erase of 2mm to the top, bottom, left and right. This cannot
be eliminated.
U
SER GUIDE
(S
CAN
)
Load your originals and select the mailbox for saving the scanned
1
data.
On the Scan Options tab select Border Erase. The Border Erase
2
screen is displayed.
Select Normal or Variable Erase.
3
Press the up or down arrows to increase or decrease the Border
4
Erase amount for Top & Bottom, Left & Right, and Center.
Select the icon that most closely resembles the Original
5
Orientation.
USER GUIDE (SCAN)
Select additional scanning features, or press Start to begin
6
scanning.
3–19
Page 24

U
SER GUIDE
(S
CAN
)
Image Quality / File Format Tab
Original Type When the Original Type is specified, the machine automatically
makes adjustments to optimize the copy quality.
Image Compression Selecting this feature saves the scanned data in either high,
normal, or low compression rates.
Lighter/Darker/Contrast Allows you to adjust the lightness, darkness and contrast of the
scanned original.
Auto Exposure Prevents undesired marks or images that are printed on the back
of an original from appearing on the scanned images.
3–20
Page 25

U
SER GUIDE
Original Type
Original Type enables you to define the kind of original document
you wish to scan. The machine automatically makes adjustments
to optimize the copy quality based on the original type. The
following types are available:
Text & Photo Use for originals that contain pictures and printed text, as in
magazines or professional journals.
Text Use for text originals composed of fine line characters or other
high contrast originals with bright, dense colors. Selecting this
option suppresses background color.
Photo Use for photographs or lithographs.
Load your originals and select the mailbox for saving the scanned
1
data.
(S
CAN
)
On the Image Quality/File Format tab, select Original Type. The
2
Original Type screen is displayed.
Select the desired option:
3
• Text & Photo
• Text
• Photo
Select additional scanning features, or press Start to begin
4
scanning.
USER GUIDE (SCAN)
3–21
Page 26

U
SER GUIDE
(S
CAN
)
Image Compression
High Files will be saved at a high compression rate. The file size will be
Normal Files will be saved at a standard compression rate. This is the
Low Files will be saved at a low compression rate. Image quality will
1
2
When Full Color or Grayscale has been selected for Output Color,
you can select how to compress full color originals.
small, but may impact image quality.
best balance between image quality and file size.
be optimum, but file size will be large.
Load your originals and select the mailbox for saving the scanned
data.
Select Image Compression from the Image Quality/File Format
tab. The Image Compression screen is displayed.
Press the desired compression rate.
3
Select additional scanning features, or press Start to begin
4
scanning.
3–22
Page 27

Lighter/Darker/Contrast
Lighter/Darker enables you to adjust the overall lightness or
darkness of the output image.
NOTE: If Full Color or Gray Scale is selected in Output Color, the
contrast level can be set as well.
Contrast allows you to adjust the clarity of the image. If you
increase the Contrast, the copy appears sharp & vivid. If you
decrease the Contrast, the copy is softer.
Load your originals and select the mailbox for saving the scanned
1
data.
Select Lighter/Darker/Contrast from the Image Quality/File
2
Format tab. The Lighter/Darker/Contrast screen is displayed.
U
SER GUIDE
(S
CAN
)
Press the up or down arrow to lighten or darken the original.
3
Press the up and down arrow to adjust the Contrast of the original.
4
NOTE: Contrast can only be set when Full Color or Gray Scale is
selected in Output Color.
Select additional scanning features, or press Start to begin
5
scanning.
USER GUIDE (SCAN)
3–23
Page 28

U
SER GUIDE
(S
CAN
)
Auto Exposure
Auto Exposure automatically reduces or eliminates undesired
marks or images that are printed on the back of an original from
appearing on the scanned image.
Load your originals and select the mailbox for saving the scanned
1
data.
Select Auto Exposure from the Image Quality/File Format tab.
2
The Auto Exposure screen is displayed.
.
Select On
3
Select additional scanning features, or press Start to begin
4
scanning.
3–24
Page 29

How to Pause or Cancel a Scanning Job
You can cancel a scan job during the scanning process or delete
scan jobs that are stored in the machine. In order to pause or
cancel a scan job the procedure below:
Press Stop to pause scanning. The machine will stop.
1
Press Stop to end scanning, or press Start to resume scanning.
2
How to Cancel Scanning Jobs from the Workstation
You can use Internet Services to cancel scanning from the
workstation.
U
SER GUIDE
(S
CAN
)
For more information on how to cancel a scanned document refer
to the User Guide (Print).
USER GUIDE (SCAN)
3–25
Page 30

U
SER GUIDE
(S
CAN
)
Checking or Deleting a Scan Job on the Machine
This section explains how to check or delete documents saved in
the mailbox using the Control Panel.
Checking a Scan Job
Select the mailbox where the job is stored.
1
Select Document List. The screen for the selected mailbox is
2
displayed.
Check the document or select the document to be deleted. Select
3
the up or down arrow to view your document.
3–26
Page 31

Deleting a Scan Job
U
SER GUIDE
(S
Select the document to be deleted, and then select Delete.
NOTE: You can delete all documents listed by selecting the
Select All button.
The Confirmation screen is displayed.
Check the contents on the screen, and then select Yes.
Select Close repeatedly to return to the Basic Scanning tab.
CAN
)
3–27
USER GUIDE (SCAN)
Page 32

U
SER GUIDE
(S
CAN
)
Scanning in Batches
This section describes how to scan multiple originals as one scan
job if you have more originals to be scanned than can fit into the
DADF.
Begin scanning your first original, then select Next Original.
1
NOTE:
• When using the DADF, wait until the machine has
completed scanning the first batch of originals before
loading the next batch.
• If no action is carried out after the above screen has been
displayed, the machine will assume that there are no more
originals to be scanned and end the job.
Load the next original and then press Start.
2
Select Last Original after all originals have been scanned.
3
3–28
Page 33

Managing Scanned Documents
NOTE: In order to manage scanned documents, the Scan Driver
must be loaded on your client workstation.
For more information about the Scan Driver, refer to the section
entitled, Installing the Network Scanner Utility, in this chapter.
Retrieving/Deleting Scanned Documents
Images can be viewed, retrieved, or deleted from Mailboxes using
the Printer’s Internet Services.
Retrieving a Scanned Document
To retrieve a scanned document perform the following:
• To retrieve the entire document, select the Retrieve
button.
U
SER GUIDE
(S
CAN
)
• To retrieve specific pages of the document, put a check in
the Enable box, type in the Page Number, then select the
Retrieve button.
• Open or Save the scanned document.
Deleting a Scanned Document
Select the document you want to delete, then select Delete.
USER GUIDE (SCAN)
3–29
Page 34

U
SER GUIDE
(S
CAN
)
Configuring the Client for Scanning
You need to install the scanner driver on your client workstation to
retrieve scanned documents directly from the Printer’s Mailboxes
into an image editing application.
Installing the Network Scanner Utility
Network Scanner Utility allows you to access stored data in the
mailbox from a client. This section describes the installation and
uninstallation of the Network Scanner Utility using the Driver/
Network Utility CD.
Required Environment
To install Network Scanner Utility, a client must meet the following
requirements:
Target Operating System • Microsoft Windows 95/98/ME
• Microsoft Windows NT version 4.0/2000/XP
NOTE: Windows NT Server TSE (Terminal Server Edition) and
Windows 2000 Server/Advanced Server Terminal Service are not
compatible with this feature.
Client Workstation • i486DX4/100 MHz processor or above (Pentium 100 MHz or
above is recommended.
• 32 MB memory.
• 40 MB or more of free hard disk space (not including space for
scanned data).
Network A client must be connected to a network and be able to
communicate with the TCP/IP protocol.
Target Application
Software
To import the data stored in the mailbox to application software,
the software must be compatible with the TWAIN interface.
3–30
Page 35

U
SER GUIDE
Installation
The Network Scanner Utility includes the following software:
Network Scanner Driver Scan driver to import the data stored in the mailbox of the machine
to software compatible with TWAIN.
Insert the Driver/Network Utility (Windows) CD into your client’s
1
CD-ROM drive.
Open Windows Explorer, select the drive letter for your CD-ROM
2
drive and open SCN\Disk1.
Double click Setup.exe and follow the instructions displayed on
3
the screen.
(S
CAN
)
Uninstallation
This section describes the procedure to remove the Network
Scanner Utility.
Double click My Computer > Control Panel. Select Add/
1
Remove Programs.
Select Network Scanner Utility, then select Add/Remove.
2
Select Yes.
3
USER GUIDE (SCAN)
3–31
Page 36

U
SER GUIDE
(S
CAN
)
Changing Network Scanner Utility Settings
For help in changing the configuration of Network Scanner driver
settings, select Help in the driver (e.g., TWAIN) portion of your
image editing application.
Importing Scanned Data
This section describes how to import data in the mailbox of the
machine to the computer.
• Import data saved in a mailbox to an application.
Importing to an Application
Start the application program.
1
NOTE: The application must support TWAIN.
From the File menu, select the command for selecting scan
2
source (TWAIN source).
Select DocuColor 2240/1632 from Sources, then select OK.
3
From the File menu, select the command to import the image from
4
the scanner. For example, select Import, then select TWAIN.
Select the scanner for connection from the list, then select
5
Scanner, or double click the displayed scanner name.
Enter the mailbox password, and select Open Mailbox.
6
Select the desired document, and select Import.
7
3–32
 Loading...