


DesignPro Tools
Font Editor for AFP
User Guide

Elixir Technologies Corporation
721 East Main Street
Ventura, CA 93003
Copyright ©2006 by Elixir Technologies Corporation.
All rights reserved.
DP200608V200
To report any errors you might find, please send a note to errata@elixir.com. Please note: emails
are used to correct future versions of this guide and may not receive an individual reply. For
technical support, please see "Customer Support" on page 12.
2 DesignPro Font Editor for AFP User Guide

Contents
Chapter 1: Introduction 7
Font Editor Overview ............................................................................7
Associated DesignPro Modules.............................................................8
About this User Guide ...........................................................................8
Who Should Use this Guide?....................................................................... 9
Related Guides.............................................................................. .... ..... ...... 9
Conventions.........................................................................................10
Typographic Conventions.......................................................................... 10
Symbolic Conventions............................................................................... 11
Getting the Answers You Need...........................................................12
Customer Support...................................................................................... 12
Elixir Web Site Support............................................................................. 13
Elixir Training ...........................................................................................13
Product Help.............................................................................................. 13
Chapter 2: Font Editor Environment 15
DesignPro Font Editor Overview.............................................................. 15
What is in the Workspace? ....................................................................... 16
Using Workspace Tools............................................................................. 18
Navigating the Workspace......................................................................... 21
Chapter 3: Font Structure 23
Font Structure ......................................................................................23
Type Family............................................................................................... 24
Typeface ....................................................................................................24
Type Font............................................................................. .... ..... ............. 24
AFP Font Components.........................................................................25
Character Set.............................................................................................. 25
Code Page.................................................................................................. 25
Coded Font ................................................................................................ 26
AFP Font Types...................................................................................26
Bounded Box Fonts...................................................................................26
Unbounded Box Fonts............................................................................... 27
Contents 3

AFP Font Naming Conventions ..........................................................27
Bounded Box Naming Convention ........................................................... 27
Unbounded Box Naming Convention....................................................... 27
Code Page Naming Convention ................................................................ 28
Font Characteristics.............................................................................28
Character Placement.................................................................................. 28
Inline (Print) Direction.............................................................................. 29
Character Baseline..................................................................................... 29
Character Rotation..................................................................................... 30
Character Orientation ................................................................................ 31
Toned-Pel Box........................................................................................... 31
Printing Adjacent Characters..................................................................... 32
Raster-Pattern Box.............................................................. .... ................... 33
Ascenders and Descenders........................................................................ 34
Baseline Positioning.................................................................................. 34
Kerning...................................................................................................... 35
Elixir Legacy Font Structure..................................................................... 36
Elixir Font Converted from a Non-AFP Source........................................ 36
Elixir Font Converted from an AFP Source.............................................. 36
Chapter 4: Font Editor Basics 39
Managing Fonts...................................................................................39
Opening Fonts ........................................................................................... 40
Creating Font............................................................................................. 46
Saving Fonts.............................................................................................. 58
Setting File Format Properties................................................................... 62
Chapter 5: Customizing DesignPro Font Editor 65
Changing Application Default Options..................................................... 65
Customizing Toolbars and Menus............................................................. 67
Chapter 6: Editing Fonts 71
Editing Fonts .......................................................................................71
Font Characteristics................................................................................... 71
Changing Fonts.......................................................................................... 73
Formatting Fonts ....................................................................................... 78
Character Properties .................................................................................. 86
Font Properties........................................................................................... 91
Using Drawing Tools ................................................................................ 93
4 DesignPro Font Editor for AFP User Guide

Editing Characters ............................................................................ ..... ....94
Using the Preview Tool........................................................................... 101
Chapter 7: Transforming Fonts 105
Using Character Transform Tools .....................................................105
Appendix A: Glossary 121
Index 133
Contents 5

6 DesignPro Font Editor for AFP User Guide

Chapter 1:
Introduction
This guide provides both background and procedural information for using DesignPro
Tools Font Editor. Because business requirements and user preferences can vary for each
company , the material contained herein should be viewed as a general guide only.
As you step through the material, please remember that your specific business needs will
govern selection of the options and preferences described. Similarly, certain selections
will require that some tasks be repeated, while other selections will allow you to omit
tasks entirely.
Font Editor Overview
DesignPro Font Editor is a bitmap character set editor that allows you to create and edit
various fonts in a what-you-see-is-what-you-get (WYSIWYG) environment.
DesignPro Font Editor enables you to perform the following operations:
! Create character sets, legacy fonts, code pages, and coded fonts through the use of
convenient wizards.
! Edit individual font characters using tools to manipulate each character bitmap.
! Apply transformations to one, all, or a sequence of font characters to embolden,
italicize, underline, and apply other transformations.
! Display and change character or font properties such as kerning, baseline offset, and
orientation.
! Convert character sets to AFP format and AFP format fonts to other supported
formats.
DesignPro Font Editor fully supports character set editing and conversion to and from
AFP bounded-box and unbounded-box fonts. It also supports opening, editing, and saving
double-byte fonts.
Working together with DesignPro Manag er and Converter, you can import and convert
fonts to the Elixir generic format, perform desired edits, and then reconvert to original or
other formats.
7

Associated DesignPro Modules
DesignPro Tools for AFP employs five integrated modules to provid e advanced
functionality for designing forms.
Following are the DesignPro Tools for AFP modules:
! DesignPro Manager – a Windows-based desktop program for launching and
managing applications. You can also convert resource files to and from m ultiple
formats using the Converters application in the DesignPro Manager.
! DesignPro Form Editor – an advanced forms design tool used to create and edit
forms for AFP printers.
! DesignPro Visual PPFA – a combined form editing and application building tool
for creating IBM PPFA PageDefs and FormDefs.
! DesignPro Font Editor – a complete font design application used for creating and
editing AFP raster fonts as well as elixir and PCL fonts. You can also open true type
fonts in this editor.
! DesignPro Graphics Editor – a full service bitmap editor providing vario us
transformations and commands for tiling graphics into raster fonts.
About this User Guide
The DesignPro Font Editor User Guide provides definitions and step-by-step instructions
to help you understand the different font types and their structure and to create and edit
AFP raster fonts, elixir, and PCL fonts.
The guide is organized to explain the font creation and editing process. Each chapter
describes tasks in the same order you can use for creating and editing different font types
and then transforming them to suit your needs:
Chapter 1: Introduction, provides an overview of the DesignPro Font Editor and related
application modules, identifies available support resources and describes application start
and exit procedures.
Chapter 2: Font Editor Environment, provides an overview of DesignPro Font Editor
Font Editor environment, including workspace, menu bar and toolbars.
Chapter 3: Font Structure, describes font structures and how DesignPro Fon t Edito r
handles fonts.
8 DesignPro Font Editor for AFP User Guide

Chapter 4: Font Editor Basics, describes basic DesignPro Font Editor operations,
including opening and saving AFP and Elixir Legacy fonts and character sets, loading
images in character sets, converting True Type and ATM fonts to Elixir Legacy format
and setting file format properties.
Chapter 5: Customizing DesignPro Font Editor, provides information for specifying
application default settings for DesignPro Font Editor and for customizing workspace
menu bar and toolbar displays.
Chapter 6: Editing Fonts, explains how to edit Elixir and AFP-format fonts, and set and
change font properties.
Chapter 7: Transforming Fonts, describes using DesignPro Font Editor to perform
transform operations on single character or all characters in a font or font character set.
Appendix A: Glossary, provides an alphabetical listing of product-specific or unique
terms and abbreviations used in this guide.
Who Should Use this Guide?
This guide assumes you are already familiar with Microsoft Windows operations, printer
and font management operations and PC peripherals. You should also have access to
reference manuals for PC software and hardware, including any printers you are using for
the design and print process.
Related Guides
If you require further information about a specific topic or wish to obtain product
background information, reference the following resources, all of which are part of the
DesignPro Tools for AFP documentation package.
! DesignPro Tools for AFP Getting Started Guide.
! DesignPro Manager for AFP User Guide.
! DesignPro Form Editor for AFP User Guide
! DesignPro Visual PPFA User Guide.
! DesignPro Graphics Editor for AFP User Guide.
Chapter 1: Introduction 9
Conventions
Elixir products adhere to Microsoft Windows conventions for using menus, menu
commands, dialogs, command buttons, icons and mouse. See your Windows manual for
more information.
This guide uses the following typographic and symbolic conventions to identify special
information.
Typographic Conventions
This guide uses the following typographic conventions to identify special information.
Convention Information Type/Example
< > (angle brackets),
<Shift> + <F1>.
Bold type
Keystrokes
Example: <Enter>
Key combinations are denoted by a plus sign between keys.
Example: <Shift> + <F1>.
! Field names within an explanation.
Example: Use rules set by selected Start on option.
! Dialog areas referenced in tasks.
Example: Select an item from the List of used Fonts. Click the
Options tab.
! Tool names referenced in dialogs/windows.
Example: Make sure the Text tool is selected.
! Button names with text written on them.
Example: Click OK to save settings.
! Any text that you must type.
Example: Enter LPT1 for the following option.
10 DesignPro Font Editor for AFP User Guide
Convention Information Type/Example
Italic type ! References to other guides.
Example: For more information, see “Chapter 6: File Format
Dictionary” in DesignPro Manager for AFP User Guide.
! References to other chapters.
Example: For more information, see "Managing Images" on page
25 in Chapter 3: "Graphics Editor Basics"
! Toolbar names.
Example: Click any tool on the Drawing toolbar.
! Window names.
Example: Message window displays.
! File paths and directories.
Example: drive:\Elixir\Fonts\Elixir.
! Captions.
Quotation marks
! References to tasks, activities, or concepts.
Example: For more information, see “Using Colors” in Chapter 5:
“Editing Images”.
Symbolic Conventions
Look for the following symbols as you read through this guide to identify special
information.
The Note symbol calls your attention to additional information.
The Tip symbol highlights a helpful tip.
The Shortcut symbol calls your attention to an easier way of accomplishing a
task.
Chapter 1: Introduction 11

The War ning symbol warns you of problems you might encounter.
Getting the Answers You Need
Elixir Technologies provides you with multiple ways to learn and use DesignPro Font Editor:
! "Customer Support" on page 12
! "Elixir Web Site Support" on page 13
! "Elixir Training" on page 13
! "Product Help" on page 13
Customer Support
If you purchased this product directly from Elixir Technologies, you can contact the
Customer Support Center for your region at the number listed below.
North and South America:
! +1 805 641 5900 ext. 3
Monday - Friday, 7:00 am to 4:00 pm Pacific Standard Time; if closed, press 2 to
reach Elixir’s extended Support coverage.
! Elx_support@elixir.com
Asia Pacific:
! Asia_support@elixir.com
Europe:
! +44 (0) 207 993-4811
Monday - Friday, 6:00 am to 4:00 pm Central European Time
! +1 805 641 5900 ext. 3
Monday - Friday, 4:00 pm to 2:00 am Central European Time
! Europe_support@elixir.com
An Elixir Product Specialist will take your call and ask for the following information:
! Your name, organization, telephone number and address.
12 DesignPro Font Editor for AFP User Guide

! Elixir product name and version number.
! A complete description of the problem, including any error messages printed or
displayed on your monitor.
Elixir Web Site Support
You can obtain product support from the Elixir web page at www.elixir.com.
Select Support to:
! Ask a question of Elixir Support.
! Find answers from a list of Frequently Asked Questions.
! Review the latest Tips and Techniques for increasing productivity.
! Download the latest Product Releases and Patches.
! View the latest product Release Notes.
! Access newsgroups to see how others are using Elixir products.
! Sign up for an Elixir Learning Program.
Elixir Training
Elixir Technologies offers training for its full-range of Windows-based products. For
more information, contact:
Elixir Learning
+1 805 641 5900, ext. 4
Product Help
Elixir software uses the Microsoft Windows Help program to provide online help for all
product functions.
This online tool includes step-by-step procedures that you can follow as you work.
! Context-Sensitive Help can be activated from within the software for dialogs by
clicking in the upper-right corner of a dialog. You can also get this information by
right-clicking the control and selecting What’s This? from pop-up menu or selecting
a dialog control such as an input field, radio button, or drop-down list, and then
pressing Shift + F1.
! Online Help can be opened by selecting Help>Contents from the menu.
Chapter 1: Introduction 13

14 DesignPro Font Editor for AFP User Guide

Chapter 2:
Font Editor
Environment
In this chapter...
! What is in the Workspace?
! Using Workspace Tools
! Navigating the Workspace
! Choosing Commands
! Undoing and Repeating Commands
This chapter provides information on DesignPro Font Editor for AFP environment.
DesignPro Font Editor Overview
DesignPro Font Editor is a bitmap character set editor that provides tools for creating and
editing fonts. The Font Editor enables you to work in a what-you-see-is-what-you-get
(WYSIWYG) environment.
With the DesignPro Font Editor you can:
! Create new raster fonts using an existing vector fonts, or from scratch
! Edit, transform or delete characters in a character set
! Merge characters from one character set into another
! Edit a single character spacing or placement
! Edit character cells width or height
! Manage images saved as fonts
! Convert fonts to different formats.
15
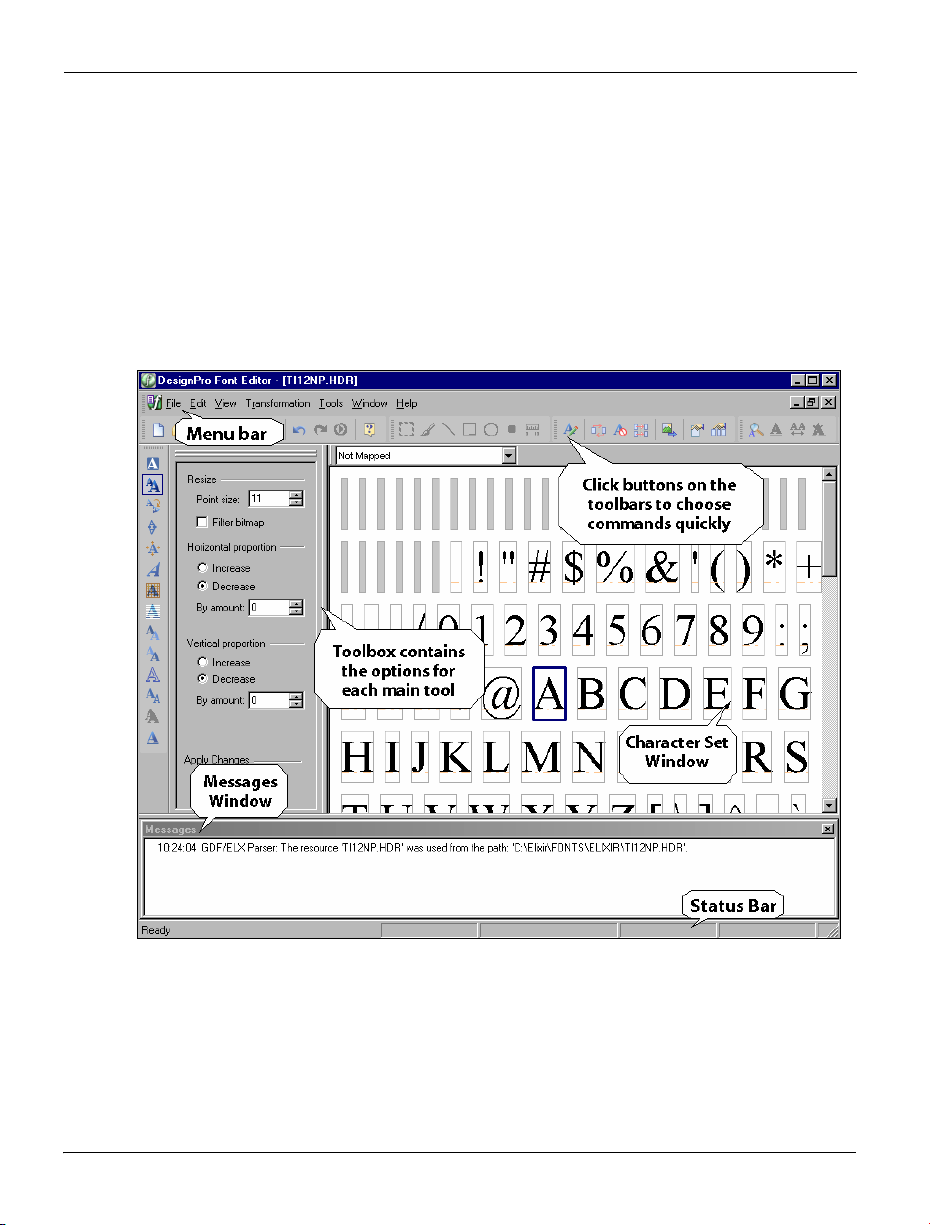
What is in the Workspace?
The Font Editor workspace comprises the following main components:
! Character set window
! Toolbox
! Messages window
You can customize the position and size of the windows to meet your requirements. The
workspace windows can be, displayed as either floating, docked, or can also be hidden
from view. The following sections explain each window in detail.
Font Editor components.
16 DesignPro Font Editor for AFP User Guide
Character Set Window
The character set window displays immediately below the toolbar and contains the active
character set. The character set window is vertically scrollable only. You use the character
set window to create, edit and save character sets.
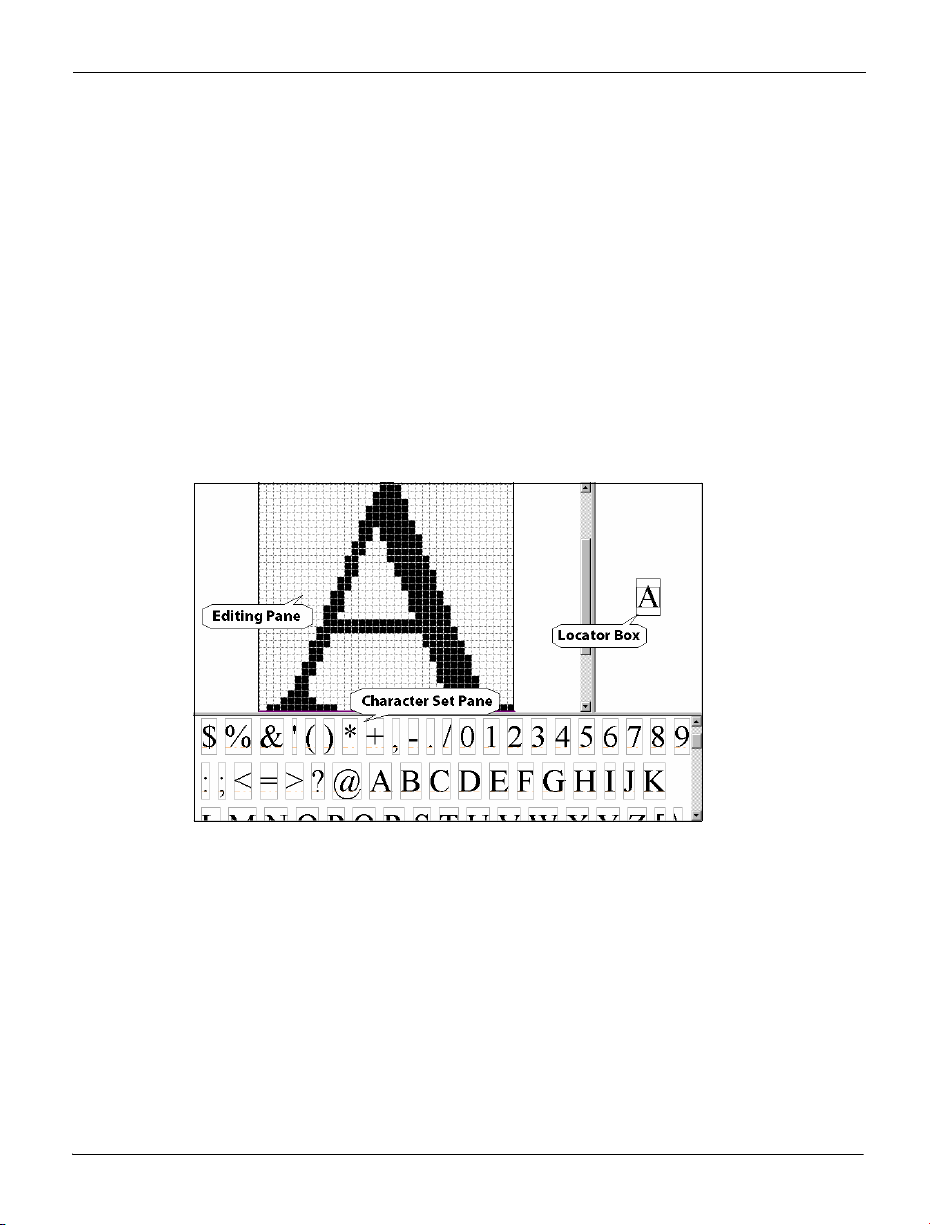
Double clicking a character in the character set window enables you to edit the selected
character. In edit mode, the character set window is split into three panes:
! Character set pane displays at the bottom of the screen.
! Editing pane shows the selected character in magnified view for editing.
! The right most pane displays the selected character in its original size. Magnifying or
reducing the view displays a locator box over the character allowing panning of the
character. Panning is a display method for scanning the selected character
horizontally or vertically. You can click and drag the locator box to bring an offscreen extension of the selected character smoothly into view in the editing pane.
Character set window split into three panes in edit mode.
Toolbox
Toolbox is displayed at the left of the design area by default. The Toolbox displays
different options available for most toolbar items in the Drawing toolbar and the
Transform toolbar. Clicking on the toolbar item displays the associated options in the
Toolbox. The last selected toolbar item options are not changed in the Toolbox until
another toolbar item (whose options are available) is selected.
Chapter 2: Font Editor Environment 17
Messages Window
The Messages window is docked at the bottom of the workspace by default and can be
docked to any other position as required. This window displays processing and
compilation errors, warnings and informational messages as generated by the application.
You can clear messages in this window by pressing <Ctrl > + <D> on the keyboard. You
can also close the Messages window by selecting View>Messages or by clicking at
the top of the Messages window or by pressing <Ctrl> + <Shift> + <M> on the keyboard.
Closing the Messages window provides more space within which you can work; however,
this window automatically redisplays whenever a message is generated by the application.
You can change the message display settings by right-clicking in the Messages
window and choosing the required options. You can also change the Messages
window defaults using the Options dialog Messages category.
Using Workspace Tools
DesignPro Font Editor provides toolbars for easy access to the most commonly used
application commands. You can perform standard MS-Windows operations to hide or
display a toolbar, or dock a toolbar at the edge of the workspace. For detailed information
on customizing the workspace tools, see "Customizing Toolbars and Menus" on page 67
in Chapter 5: "Customizing DesignPro Font Editor".
Menu bar and Toolbars
A menu bar with drop-down menus displays directly below the application title bar by
default. These drop-down menus provide both standard MS-Windows and applicationspecific options. Selecting a menu item performs the associated action or displays a
submenu or a dialog.
Directly below the menu bar are toolbars with buttons that provide access to the most
commonly used commands and tools. You can hide or display all available toolbars by
selecting View>Toolbars>toolbar name from the menu bar. The toolbar items provide
access to the frequently used menu bar commands.
Status Bar
The status bar displays, by default, along the lower edge of the DesignPro Font Editor
workspace. The status bar displays a tooltip when the mouse pointer is placed over a
command.
18 DesignPro Font Editor for AFP User Guide
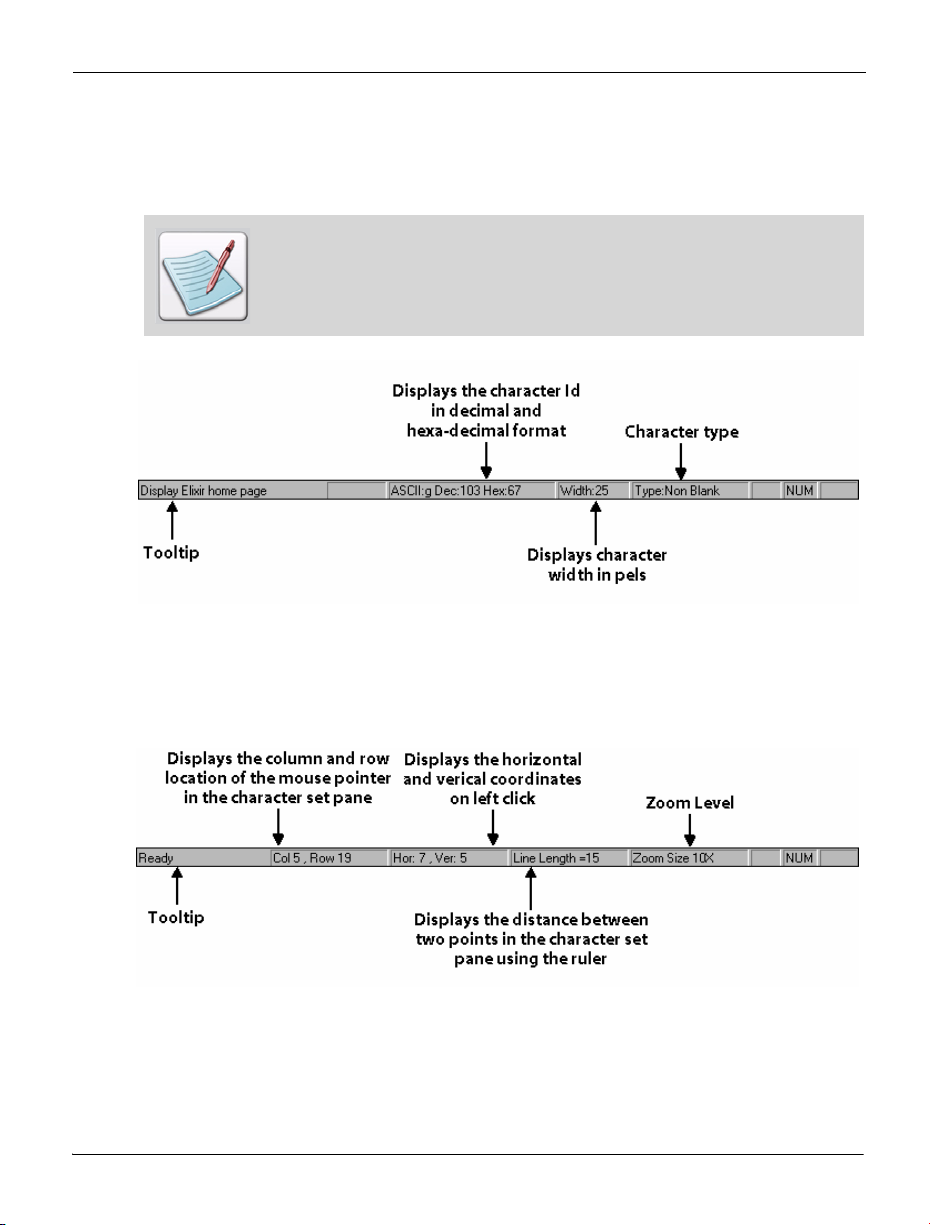
When you move the mouse pointer over a character, the status bar displays the Character
Id in decimal and in hexa-decimal format, character width in pels, and character type such
as blank, non-blank or spacing.
Type spacing specifies a blank bitmap used to provide space between
characters or words. All other characters containing bitmaps are non-blank
characters.
Status bar showing the tooltip, selected character width and type, and the character id.
In edit mode, the status bar displays additional information about the character; column
and row locations, zoom magnification and reduction sizes, and horizontal and vertical
coordinates. The coordinates help you in drawing objects within the editing pane.
Status bar in the edit mode.
Chapter 2: Font Editor Environment 19
Grid
You can activate the grid by clicking on the View toolbar or by selecting View>Grid
from the menu bar. The grid feature allows you to position and align objects accurately in
the character set window. In Font Editor the grid can be activated when the zoom is set 3X
(three times) the object size or greater in the edit mode only.
You can also use <F4> shortcut key to enable or disable the grid.
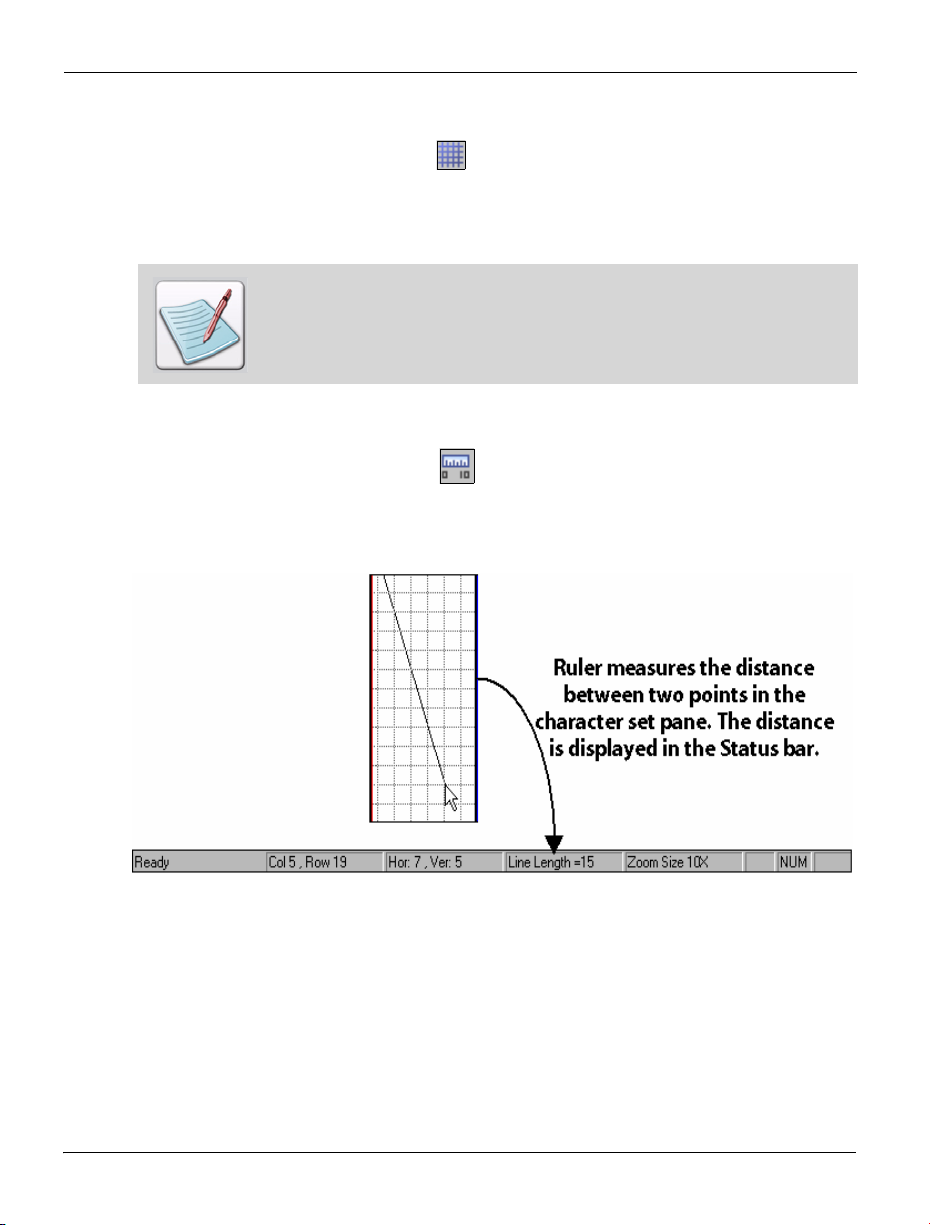
Ruler
You can activate the ruler by clicking on the Drawing toolbar. The ruler feature helps
you in accurately editing an object in the character set window . This feature is available in
the edit mode only. It is used to measure the distance between two points. The distance is
shown as line length in the status bar.
The difference between the two points is dis played in the status bar.
20 DesignPro Font Editor for AFP User Guide

Navigating the Workspace
Workspace components are organized in various parts of the window according to
purpose. You can navigate to the workspace components and choose a command as
follows:
! To use a menu bar:
Click the appropriate menu, and then select the required o ption from drop-down list.
! To show a toolbar:
From the View menu, select Toolbars > toolbar name. A check mark next to the
required toolbar indicates selection.
! To use a toolbar:
Click the required icon on the toolbar to perform an operation.
! To use right-click menu:
Position the cursor in the character set window, right-click the mouse, and then
select the required option.
Choosing Commands
A command instructs DesignPro Font Editor to perform a specific action. Y ou can choose
a command by either:
! Clicking a toolbar button
! Selecting a menu command
! Using a shortcut menu
! Using a shortcut key
In the chapters that follow, command selection is described using the most common
method for the described task. However, related command selections can be used to
accomplish the same instruction and are listed down in notes.
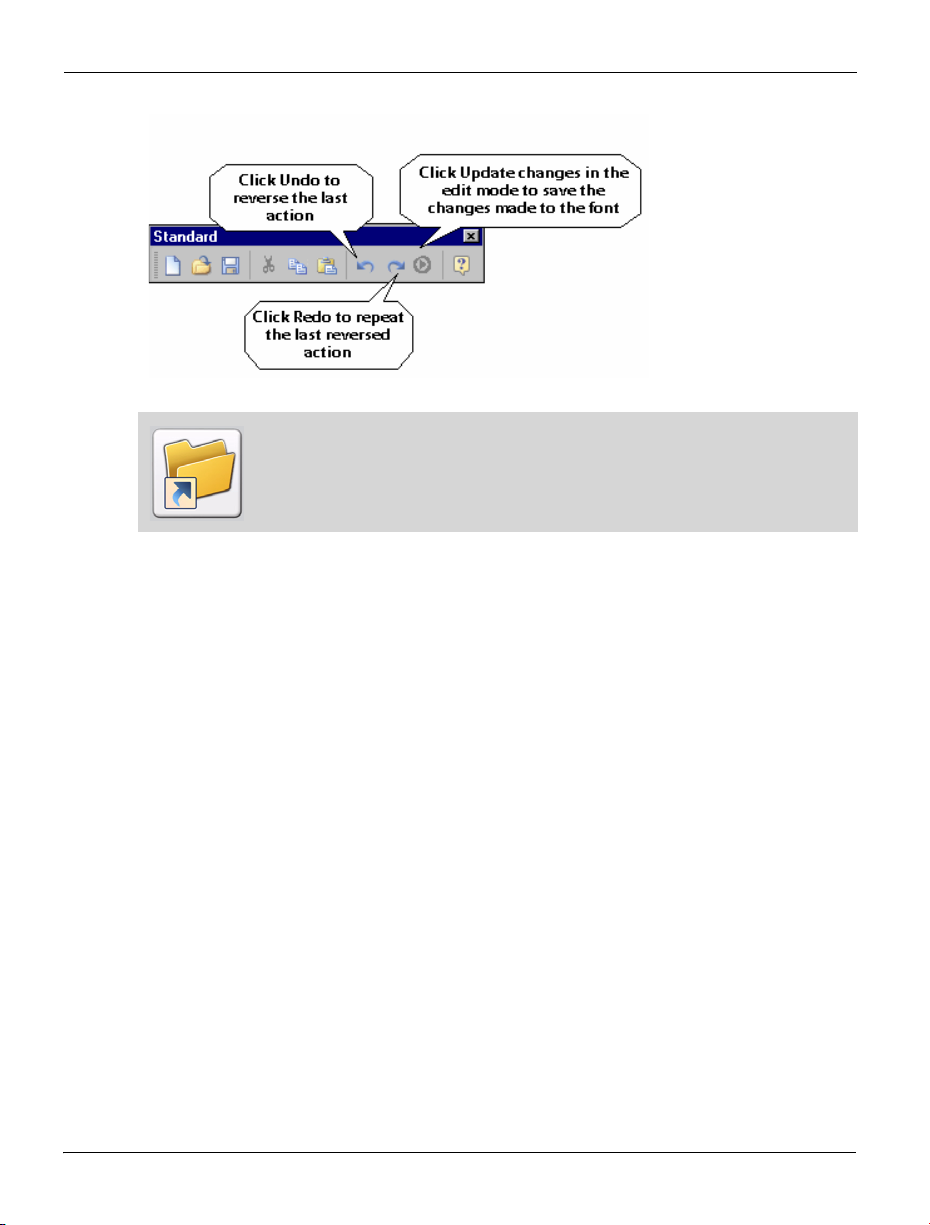
Undoing and Repeating Commands
Font Editor keeps track of your editing and formatting changes. If you want to undo a
change or command selection, you can usually reverse several previous actions.
Redo command is available in the main view only. You can repeat the last reversed action
using the redoing command. It is not activated in the edit mode.
You can update the changes made to the font by clicking Update changes on the Standard
toolbar. This command is enabled in the edit mode only. Updating the changes disables
the undo command.
Chapter 2: Font Editor Environment 21
Use <Ctrl> + <Z> and <Ctrl> + <Y> shortcut keys to perform the undo and
redo actions respectively.
22 DesignPro Font Editor for AFP User Guide

Chapter 3:
Font Structure
In this chapter...
! AFP Font Types
! AFP Font Components
! AFP Font Naming Conventions
! Elixir Legacy Font Structure
! Elixir Font Converted from a Non-AFP Source
! Elixir Font Converted from an AFP Source
This chapter describes font structures and how DesignPro Font Editor handles fonts
originating from AFP and non-AFP sources. For detailed information on AFP fonts, refer
to IBM's Font Object Content Architecture Reference (S544-3285-05) manual.
Font Structure
A font is a set of graphic characters of a given typeface and other properties, such as size,
pitch, and style. There can be up to 256 characters in a font (for AFP fonts, you can have a
character set with more than 256 characters), consisting of numerals, letters, punctuation
marks, and symbols.
Each typeface (Times New Roman, Arial, etc.) can have many fonts. Each font has a
specific set of properties defining all of the above characteristics. Most Windows
applications blur this definition by allowing you to choose a typeface and then set the
other options that define a specific font.
DesignPro Font Editor uses a proprietary structure that enables you to display and edit
characters in a WYSIWYG format. In addition, you can also convert TrueType and ATM
font formats to Elixir format fonts.
DesignPro Manager converters allow you to convert AFP Bounded Box and Unbounded
Box fonts to Elixir format fonts.
23

The following sections describe components of a font type family, a term that
encompasses all characteristics of printed text.
Type Family
A type family is a group of typefaces that have a common basic design, but may vary in
size and style. Examples of type family are:
! Sonoran Sans Serif
! Courier
! ITC Avant Garde Gothic
Ty p e f a c e
A typeface is a collection of characters having the same style, weight, and width, as
described below:
! Style is the inclination of characters with respect to the vertical axis (e.g., Roman
[upright] or italic [top slant to the right]).
! Weight is the degree of boldness of a typeface (e.g., semi-light, light, medium or
bold).
! Width is the degree of horizontal spacing of a character (e.g., condensed or normal).
Typeface examples include:
! Sonoran Sans Serif Roman medium normal
! Helvetica italic bold condensed
! Times italic light nor mal .
Type Font
A type font (also called a font) is a collection of characters that share the same type family,
typeface and size. Font examples include:
! Sonoran Sans Serif 10-point Roman medium normal
! Helvetica 8-point italic bold condensed
! Times 12-point italic light normal
24 DesignPro Font Editor for AFP User Guide
AFP Font Components
Each AFP font has three components:
! Character set
! Code page
! Coded font
Character Set
A character set consists of a finite set of characters. The character set corresponds to the
type font (or font) described in
type family, typeface, bitmap, and point size, and can also include information about the
baseline positioning, rotation, ascenders, descenders, etc. Each character within the
character set is assigned a unique identifier called a graphic character ID (GCID), or
Graphic Character ID.
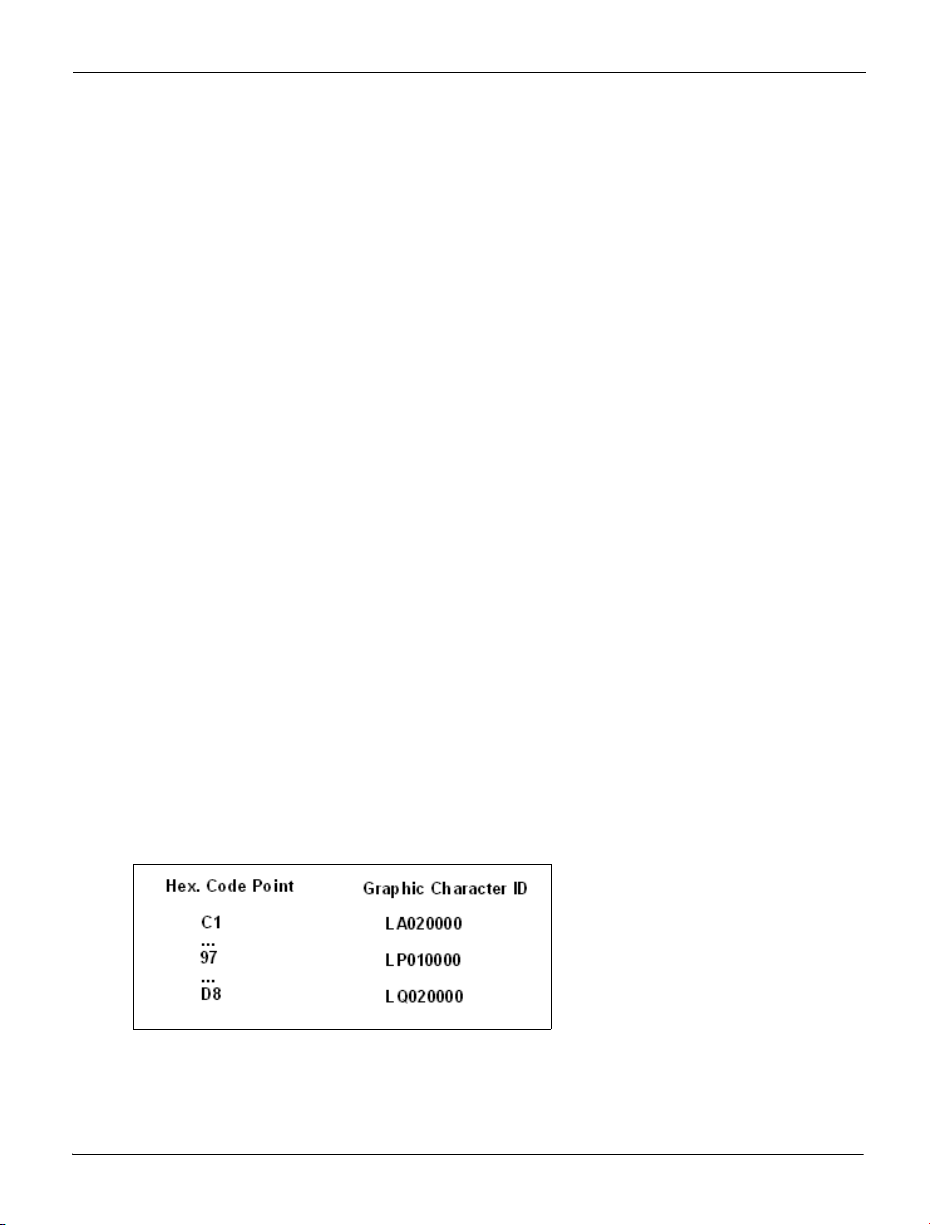
Code Page
A code page provides a map for the AFP printer to find the correct character for printing in
a selected character set. A code page contains hexadecimal identifiers for graphic
characters within a character set (each key on a keyboard corresponds to a hexadecimal
code point identifier). Arrays of code points representing characters establish a numeral
order of these characters. Each code point, or point on the code page, has a GCID which
corresponds to the GCID in the character set. When printing on an AFP printer, the code
point is matched to a GCID in the code page. This allows you to use different code pages.
For example, to print subsets of characters in a character set (like for different European
languages).
Font Structure
. A character set contains information about a single
Code page displaying the hexadecimal code point identifiers along with the
corresponding graphics character Ids.
Chapter 3: Font Structure 25
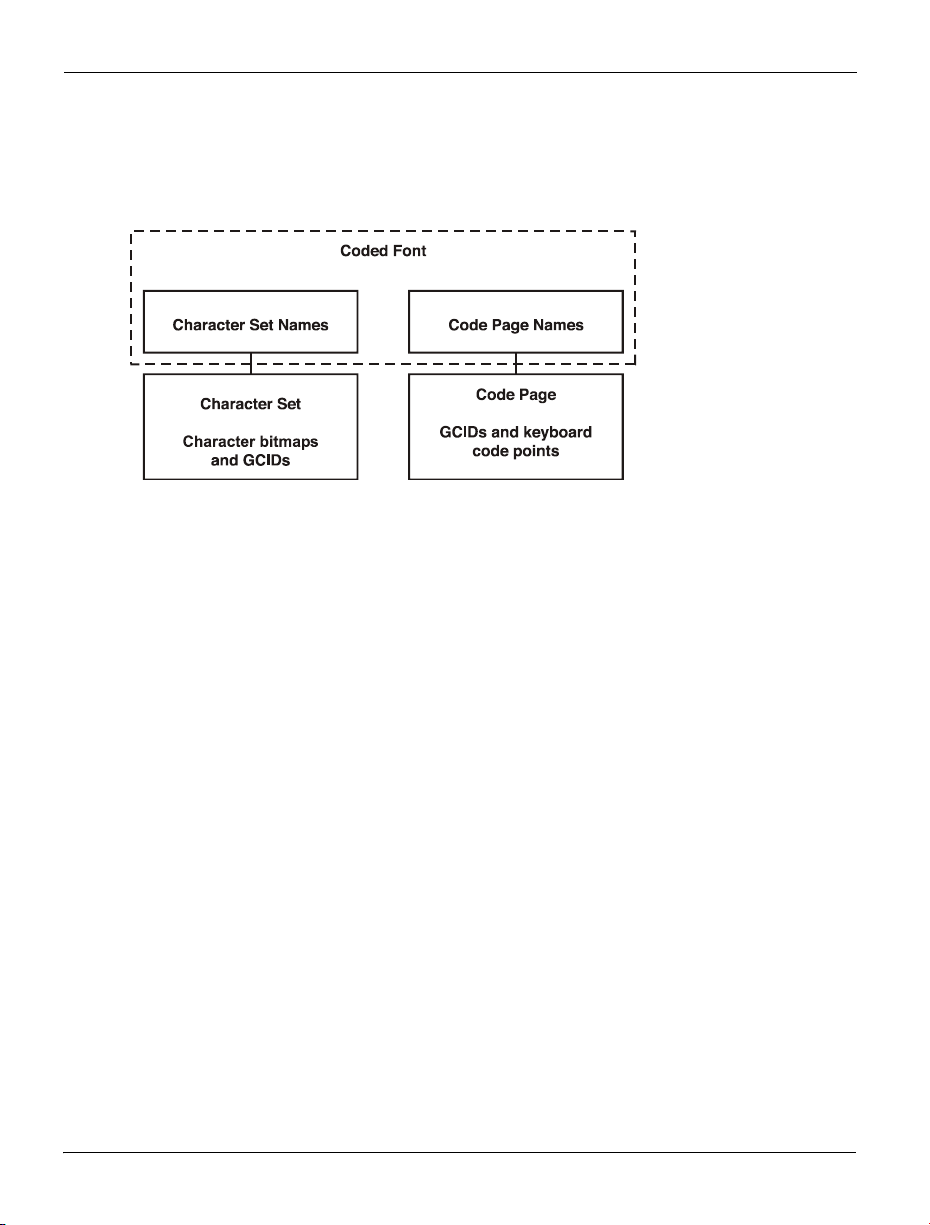
Coded Font
A coded font is a font file that associates (links) the character set with the code page. In
order for a character to be printed, you must include it in the character set, and list it in a
code page, and the two must link in a coded font.
AFP Font Components.
For example, the binary representation of upper case A on a host keyboard is 11000001 or
hexadecimal C1 (also called the code point). When printing the letter A:
! Corresponding code point (C1) is matched to a GCID in the code page for the font
(LA020000 as shown in the code page figure above).
! GCID is matched to a raster pattern in the character set for the font.
! Raster pattern is printed as upper case A.
Note that you must include all GCIDs (in the code page) in the character set, otherwise an
error condition will exist at print time.
AFP Font Types
AFP fonts can be either Bounded Box or Unbounded Box. .
Bounded Box Fonts
Bounded Box fonts are AFP fonts for IBM printers other than 3800. For printing rotated
fonts on these printers, only one font version is required, all rotations are included in one
font.
26 DesignPro Font Editor for AFP User Guide
Unbounded Box Fonts
Unbounded Box fonts are AFP fonts for IBM 3800 printers. A characteristic of
Unbounded Box fonts is that for printing rotated text, a separate font is required for each
of the four rotations (i.e. 0
o
, 90o, 180o, and 270o from inline print direction).
AFP Font Naming Conventions
AFP font naming conventions relate the inline (print) direction and character rotation
combination, to a two-character file name prefix. AFP font names are limited to eight
characters. The two-character prefix identifies the coded font or character set, and the
remaining (one to six) characters are the coded font ID or character set ID (refer to Font
Object Content Architecture Reference (S544-3285-05) manual for more information). In
order to track and manage fonts, it is recommended that you use a font naming
convention.
Bounded Box Naming Convention
All Bounded Box coded fonts are prefixed with X0, and all Bounded Box character sets
are prefixed with C0.
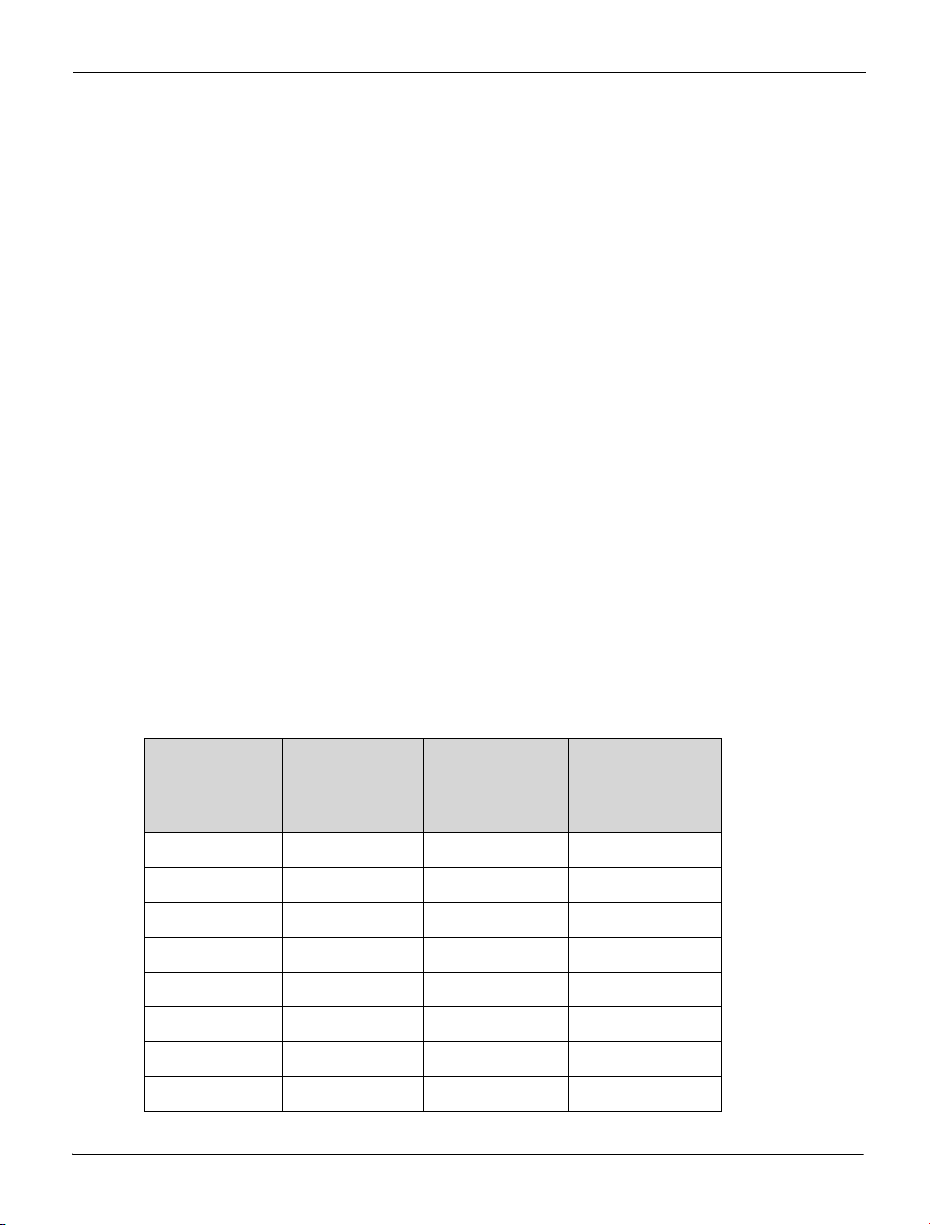
Unbounded Box Naming Convention
Unbounded Box font file name prefixes depend on inline (print) direction and font
rotation, as shown in the following table:
Coded
Font ID
Prefix
X1
X2
X4
X5
X6
X8
X9
XA
Inline
(Print)
Direction
o
0
o
90
o
270
o
0
o
90
o
270
o
0
o
90
Character
Rotation
o
0
o
0
o
0
o
90
o
90
o
90
o
180
o
180
Character
Set ID Prefix
C1
C2
C4
C5
C6
C8
C9
CA
Chapter 3: Font Structure 27
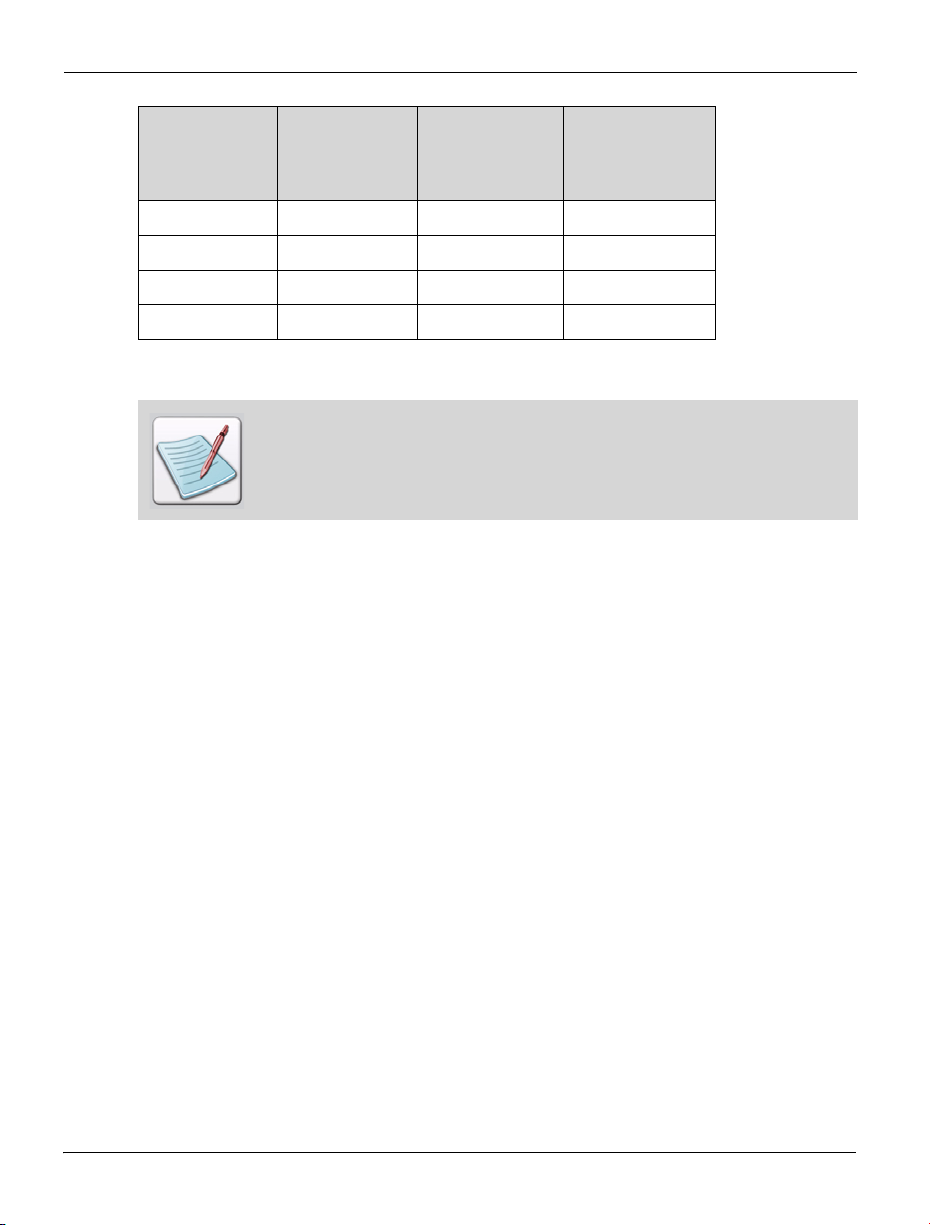
Coded
Font ID
Prefix
XC
XD
XE
XG
Unbounded Box fonts do not support printing in the 180 degree inline (print)
direction.
Inline
(Print)
Direction
o
270
o
0
o
90
o
270
Elixir currently supports only X1, X2, and X4 rotations.
Code Page Naming Convention
AFP code page file names are always prefixed with T1.
Character
Rotation
o
180
o
270
o
270
o
270
Character
Set ID Prefix
CC
CD
CE
CG
Font Characteristics
This section describes some font characteristics, particularly their appearance on a printed
page.
Character Placement
Characters are placed on the printed page using the following concepts. For more
information on these concepts, refer to the tasks immediately after this section.
Bounded-Box
Bounded Box characters are placed using the following:
! Character reference point
! Character A-space
! A-space
28 DesignPro Font Editor for AFP User Guide

! Character baseline offset
! Uniform baseline offset
! Character increment
! Uniform increment
! Raster-pattern box
Unbounded-Box
Unbounded Box characters are placed using the following:
! Character reference point
! Uniform inline offset
! Uniform baseline offset
! Character increment
! Uniform increment
! Raster-pattern box.
Inline (Print) Direction
The inline print direction (or simply print direction) is the direction in which characters
are added to a line of text. The inline print direction has four possible values: 0o, 90o,
o
180
, or 270o.
Limitation - Unbounded Box fonts do not support 180o print directions.
Character Baseline
The character baseline is a reference to which characters align as they are added to the
page in the inline (print) direction. The character baseline is always parallel to the inline
(print) direction.
Chapter 3: Font Structure 29
Character baseline.
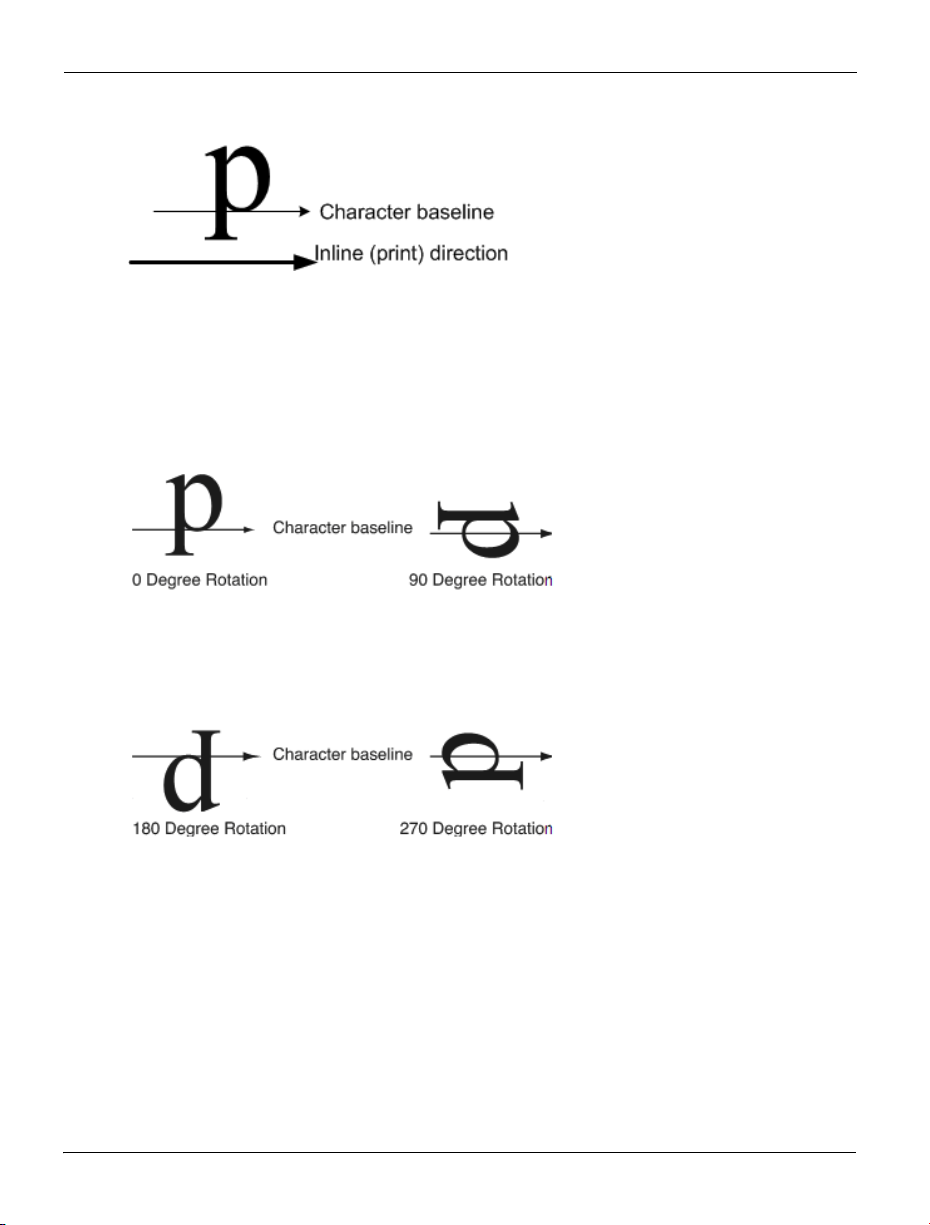
Character Rotation
Character rotation are the angles through which a printed character is rotated clockwise in
o
90
increments about the character baseline. The following figure shows the four character
o
rotations for the 0
Character rotations for inline print direction.
inline (print) direction:
As there are four inline print directions, there are a total of 16 combinations of inline
(print) directions and character rotations. Since Unbounded Box fonts do not support the
o
180
print directions, only 12 combinations apply for Unbounded Box fonts.
30 DesignPro Font Editor for AFP User Guide

Character Orientation
Character orientation is specified as portrait, landscape, inverse portrait and inverse
landscape. Text printing depends on page orientation, which can be portrait or lan dscape.
The following figure illustrates the effect of printing text with different orientations on
portrait and landscape pages:
Character orientation.
Toned-Pel Box
A toned-pel box defines the boundaries of a character bitmap. Each character bitmap in a
character set comprises an ordered array of black dots (toned-pels) and non-printing blank
dots (untoned-pels). Toned-pels define the shape of the character; untoned-pels define the
white space in and about the character.
Chapter 3: Font Structure 31

Toned-pel box.
Printing Adjacent Characters
When printing side-by-side characters (as text in a word), each character is positioned
according to its character reference point and character escapement point. Character
reference point defines the current print position for the character.
Character escapement point marks the end of the space along the baseline allocated for the
character. When printing adjacent characters, the reference point of the next character is
placed at this point.
The distance from the character reference point to the near edge of the toned-pel box is the
character’s A-space; the toned-pel box width is the character’s B-space; and the distance
from the far edge of the toned-pel box to the escapement point is the character’s C-space.
Character measurements.
32 DesignPro Font Editor for AFP User Guide

A-space, B-space, and C-space are measured in pels (dots). The sum of the A-space, Bspace, and C-space ) is the character increment.
If a font's characters have the same increment (or uniform increment), the font is a
monospaced or fixed pitch font; if a font's character increments differ for each character,
the font is a proportional-spaced or typographic font.
Raster-Pattern Box
A Raster-pattern box encloses or is superimposed upon the toned-pel box. The Rasterpattern box provides another method of placing characters on a printed page.
Raster-pattern box.
For a Bounded Box font, the width of the Raster-pattern box is measured along the inline
(print) direction; for an Unbounded Box font, the width of the Raster-pattern box is always
measured along the top edge of the printed form.
For a Bounded Box font, the A-space is the number of pels in the character's A-space from
the near edge of the Raster-pattern box to the character reference point. The A-space can
be zero or positive (zero means that the character reference point lies on the near edge of
the Raster-pattern box).
Monospaced Bounded Box fonts have the same A-space value for all characters. In an
Unbounded Box font, this measurement is the Uniform Inline Offset and is used to shift
characters left when kerning (for more information, refer to "Kerning" on page 35).
Chapter 3: Font Structure 33

Ascenders and Descenders
The character ascender is the distance from the character baseline to the topmost tonedpel. The character descender is the distance from the character baseline to the lowest
toned-pel.
Ascenders and descenders.
Ascenders and descenders are different for different rotations of a character.
Baseline Positioning
The character baseline offset specifies the character placement relative to the character
baseline. The following figure shows the baseline offset (measured in pels) for different
character rotations.
Baseline offsets.
34 DesignPro Font Editor for AFP User Guide

If the baseline offset is the same for all characters in a given rotation of a character set, it is
a Uniform Baseline Offset. If the baseline offset is different for characters in a given
rotation, the largest offset is the Maximum Baseline Offset.
Kerning
Kerning is a technique of printing characters so that they partially overlap. Kerning is
normally used to place italicized characters closer to each other for a more pleasing
appearance.
Left kerning example.
Kerning can be of two types:
! A left-kerned character partially overlaps the preceding character, as in the letter “i”
in the figure above. A left-kerned character has a negative A-space.
! A right-kerned character partially overlaps the next character, as in the letter “f” in
the following example. A right-kerned character has a negative C-space.
Right kerning example.
Chapter 3: Font Structure 35

Elixir Legacy Font Structure
When converted to Elixir format, a font can be edited and transformed in a number of
ways (e.g., a font can be resized, rotated, underlined, etc.). The operations you can
perform on a font and individual font characters depend on the source of the font (i.e.,
whether font was converted from an AFP character set or from non-AFP sourced fonts).
The following sections describe how DesignPro Font Editor handles fonts originating
from AFP (Bounded Box and Unbounded Box) and fonts originating from non-AFP
sources.
Subsequent chapters describe how to edit and transform AFP and non-AFP sourced fonts.
Elixir Font Converted from a Non-AFP Source
Each Elixir format font includes at least three components with different file extensions in
the drive:\Elixir\Fonts\Elixir directory. These are:
! .HDR component (file containing font header information).
! .GLH component (file containing header information for each character).
! .GLY component (file defines actual character bitmaps).
Elixir Font Converted from an AFP Source
When an AFP (Bounded Box or Unbounded-box) font is converted to an Elixir format
font, you can choose to create either a PC-mapped or full Elixir version of the AFP font
(for more information, refer to “Chapter 6: File Format Dictionary” in DesignPro
Managers for AFP User Guide.
PC-Mapped Elixir Fonts
The PC-mapped option creates an Elixir version that is a subset of the AFP font. Because
an AFP character set may contain more characters than allowed by other non-AFP fonts,
the PC-mapped version limits the number of characters to 256. An Elixir Keyboard
Mapping Table determines the subset that is converted (the table is a .KMP file in
drive:\Elixir\Fonts\Maps).
A number of .KMP files are written to the drive:\Elixir\Fonts\Maps directory during
DesignPro Manager installation. Each .KMP file is an ASCII file listing GCIDs with
corresponding ASCII (hex) keyboard positions. Y ou can select the .KMP file used for font
conversion in DesignPro Manager unless generating fonts in another language (refer to
DesignPro Manager for AFP User Guide for more information).
36 DesignPro Font Editor for AFP User Guide

The PC-mapped font contains the three .HDR, .GLH, and .GL Y components (described in
"Elixir Font Converted from a Non-AFP Source" on page 36” ). The PC-mapped Elixir
font stem name starts with X0 (if source was a Bounded Box font) or X1, X2, or X4 (i f
source was an Unbounded Box font).
You should not edit a PC-mapped font unless you do not plan to convert it back
to AFP format.
Full Character Set Elixir Fonts
The full character set option converts an entire AFP character set to an Elixir-format font.
This option is used when you want to edit an Elixir-format font, and then reconvert it back
to AFP format (Bounded Box or Unbounded-box). When creating a full font, the
following components are generated in the drive:\Elixir\Fonts\Elixir directory:
Bounded Box Fonts
! .HDR, .GLH, and .GLY components (described in "Elixir Font Converted from a
Non-AFP Source" on page 36). The stem names are the same as the AFP character
set and start with C0.
! .GL1, .GL2, .GL3, and .GL4 files. The stem name of each file is the same as the stem
name of the Bounded Box character set (for example, C0A075N0.GL1,
C0A075N0.GL2, etc.). The files correspond to 0
the Bounded Box character set. Each is an ASCII file containing metrics information
(such as A-space, B-space, C-space, GCID, and orientation) and other information
for each character set character. All four files are created during conversion.
! .HDA file with the same stem name as the Bounded Box character set (starting with
C0). This file contains additional font header information for the Bounded Box font.
o
, 90o, 180o, and 270o rotations of
Unbounded Box Fonts
! .HDR, .GLH, and .GLY components (described in "Elixir Font Converted from a
Non-AFP Source" on page 36). The stem names are the same as the AFP Unbounded
Box font file and start with C1, C2, or C4, depending on the source font orientation.
! A .GL0 file (called the GCID Mapping List) with the same stem name as the
Unbounded Box font (starting with C1 through CG, depending on source font
orientation). The file includes metrics information (such as A-space, B-space, Cspace, GCID, and orientation) and other information for each character in the set
character.
Chapter 3: Font Structure 37

! An .HDA file with the same stem name as the Unbounded Box character set (starting
with C1 through C4, depending on source font orientation). This file contains
additional font header information for the Elixir version of the Unbounded Box font.
The following components are created for both Unbounded Box and Bounded Box fonts:
! A .COD file with the same stem name as the character set (starting with T1). This is
an ASCII file derived from the AFP Code Page comprising a list of EBCDIC code
points and corresponding GCIDs for each AFP character set character.
! A .CDF file with the same stem name as the character set (starting with X0, X1, X2,
or X4, depending on the source font). This is an ASCII file derived from the AFP
Coded Font listing correspondence between character set name, code page name, and
the Keyboard Mapping File (.KMP).
Differences Between Character Set and Font
The differences described below assume you are familiar with editing AFP and Elixirformat character sets and non-AFP fonts described in the following chapters.
DesignPro Font Editor handles AFP and Elixir-format character sets and non-AFP fonts
differently, as follows:
! AFP-originated character sets are arranged in order of GCID; non-AFP fonts are
arranged in ASCII-sorted order in the displayed character cells.
! When using the merge insert mode option in an Elixir format character set, the
program prompts you for an alternate character GCID if the GCID already exists in
the target font. You can use the suggested GCID or enter your own. The merge insert
mode option cannot be used in a non-AFP font.
! Character properties dialogs for AFP and non-AFP character sets are different.
! AFP fonts are raster fonts; non- AFP fonts, such as TrueType and ATM fonts are
vector fonts.
! DesignPro Font Editor supports Unicode TrueType fonts and ATM Type 1 fonts.
38 DesignPro Font Editor for AFP User Guide

Chapter 4:
Font Editor Basics
In this chapter...
! Opening Fonts
! Creating Font
! Saving Fonts
! Setting File Format Properties
This chapter describes basic operations performed in the DesignPro Font Editor.
Managing Fonts
DesignPro Font Editor enables you to open, create, save, and edit fonts. It also enables you
to change the file type and attributes of fonts. You can open and save fonts in the
following input and output formats:
Input Formats (Open):
! Adobe Type Manager Fonts
! AFP Character Set (C0*;C1*;C2*;C3*;C4*)
! AFP Code Page (T1*)
! AFP Coded Font (X0*;X1*;X2*;X3*;X4*)
! Elixir Legacy Fonts (*.hdr)
! Elixir Legacy Code Page (*.cod)
! Elixir Legacy Coded Font (*.cdf)
! PCL Fonts (*.pcl, *.flj)
! True Type Fonts
39

Windows applications use True Type or Postscript fonts. The True Type fonts are
Windows-based outline fonts technology used by Microsoft. Adobe Type Manager
(ATM) fonts are PostScript Adobe Type 1 fonts. ATM is a utility to render smooth
characters on PC screens from font outlines (Type 1 fonts) instead of using bitmap or
raster fonts.
! Output Formats (Save As):
! AFP Character Set (C0*;C1*;C2*;C3*;C4*)
! AFP Code Page (T1*)
! AFP Coded Font (X0*;X1*;X2*;X3*;X4*)
! Elixir Fonts (*.hdr)
! Elixir Legacy Code Page (*.cod)
! Elixir Legacy Coded Font (*.cdf)
! PCL Fonts (*.pcl, *.flj)
Opening Fonts
DesignPro Font Editor enables you to load AFP, Elixir Legacy, PCL, or Window fonts.
The font character bitmaps are arranged with a predefined left-to-right and top-to-bottom
order according to the predefined ASCII position of characters in the font.
Each character in a font has an ASCII number assigned to it denoting its position
in the font. This number is defined in the font header .HDR file.
The maximum number of characters in a font is 256. Y ou can set the range of the character
set using the ASCII numbers. For more information on setting the range of the character
set, see "Opening Window Fonts" on page 45.
40 DesignPro Font Editor for AFP User Guide

When opening a font you can edit the property settings by clicking Edit Property
settings, which displays the GDF/Elixir Form, AFPDS, and PCL property dialog(s),
depending on the file type selected in the Files of type in the Open dialog. You can also
restore the default setting of the application by clicking Restore default settings in the
Open dialog. For more information, refer to "Setting File Format Properties" on page 62.
For detailed information, you can refer to “Chapter 6: File Format Dictionary” in the
DesignPro Manager for AFP User Guide.
You can also edit required property settings or restore default settings using
or respectively. (Refer to "Setting File Format Properties" on page 62)
Opening AFP Fonts
To open an AFP font:
1 Select File>Open from the menu bar.
The Open dialog displays.
You can also use one of following methods to open a font:
! Click on the Standard toolbar.
! Use <Ctrl> + <O> shortcut key.
2 Select the required AFP Character Set, AFP Coded Font, or AFP Code Page from
the Files of type drop-down list.
The path automatically updates to the specified profile directory for the selected
Files of type if Elixir is selected from the left panel of the Open dialog. For
example, the default profile lists drive:\elixir\fonts\elixir as the directory for Elixir
Legacy Fonts.
3 Select the required font and click Open.
The Messages window displays custom mappings for Graphics Character ID’s
(GCID) in the Resource Map. The font opened contains some customized GCIDs,
which are not part of the standard IBM GCIDs.
Chapter 4: Font Editor Basics 41

The Messages window.
To view or select the currently opened code pages in Font Editor, select the
required code page from the drop-down list in the character set window.
Opening Elixir Legacy Fonts
To open an Elixir Legacy font:
1 Select File>Open from the menu bar.
The Open dialog displays.
2 Select the required Elixir Legacy Font, Elixir Legacy Coded Font, or Elixir
Legacy Code Page from the Files of type drop-down list.
3 Select the required font and click Open.
If the font is in ASCII format, the Reformat to AFP dialog displays. For more
information see the "Reformatting to AFP Character Set" on page 43.
4 Do either one of the following:
Click Yes in the Reformat to AFP dialog to open the Reformatting to AFP Character
Set dialog to set the AFP character set properties.
Or
Click No in the Reformat to AFP dialog to open the character set and return to the
application without reformatting.
The Messages window displays messages regarding the location of the font.
42 DesignPro Font Editor for AFP User Guide

To view or select the currently opened code pages in Font Editor, select the
required code page from the drop-down list in the character set window.
Reformatting to AFP Character Set
DesignPro Font Editor enables you to reformat a font in ASCII format to an AFP character
set. When opening or creating a non AFP font, DesignPro Font Editor confirms if the font
needs to be reformatted to AFP character set by opening the Reformat to AFP message
box. The message box is only displayed if the Reformat ASCII option is selected from
the Options dialog.
You can either choose to reformat to an AFP character set when opening a font or you can
choose to reformat later by selecting Tools>Reformat from the menu bar.
You can also use the <Ctrl> + <Shift> + <R> shortcut key to open the
Reformatting to AFP Character Set dialog.
To reformat to an AFP character set:
1 Select Tools>Reformat from the menu bar.
The Reformatting to AFP Character Set dialog displays.
2 Select the required AFP font type option from the following:
! Bounded – uses bounded AFP font.
! 3800 Unbounded – uses unbounded AFP font. This option is enabled only when
the 240 fixed pels resolution option is selected.
Chapter 4: Font Editor Basics 43

3 Select the required DPI resolution option from the following:
Resolution refers to the sharpness and clarity of an image. The term is most often
used to describe monitors, printers, and bit-mapped graphic images. DPI (dots per
inch) indicates the resolution of images. Greater number of DPI indicates higher
resolution.
! 240 fixed pels – sets the character resolution to 240 pels.
! 300 relative units – sets the AFP header bounded fonts to a relative character
resolution of 300 units.
! 600 relative units – sets the AFP header bounded fonts to a relative character
resolution of 600 units.
4 Enter a name identifying the AFP character set in Name.
5 Browse for the required GCID (Graphic Character ID) mapping list by clicking
next to the GCID Mappings List option. The list maps character indexes in the font
to the GCID’s.
6 Select the Resize glyph to the selected resolution option to change the current font
resolution to the resized resolution value. This option is enabled only when the actual
font resolution option is not selected.
7 Click OK to reformat and return to the application.
Opening PC Mapped Fonts
To open a PC mapped font:
1 Select File>Open from the menu bar.
The Open dialog displays.
2 Select Elixir Legacy Font (*.hdr) format from the Files of type drop-down list.
3 Select the required font. The PC mapped fonts are prefixed by X0, X1, X2, X3, or
X4.
4 Click Open.
The PC mapped font opens in the application window.
44 DesignPro Font Editor for AFP User Guide

Opening Window Fonts
T o open a Windows font:
1 Select File>Open Windows Font from the menu bar.
The Font dialog displays.
You can also use <Ctrl> + <Shift> + <O> shortcut key to open a Windows font.
2 Specify the font type, size, style, orientation, and resolution in this dialog.
You can view a sample of your selections in the Sample area.
3 Select the font character set from the Script list.
4 T o set the Output Na me , do either one of the following:
Select Auto to use the automatically generated name of the selected font.
Or
Select Custom to enter a custom name of the selected font.
5 Select the Character Set Range by specifying the ASCII lower and upper values
from the drop-down lists.
6 Click OK to select the desired windows (True Type) font.
The Reformat to AFP dialog displays.
7 Do either one of the following:
Click Yes in the Reformat to AFP dialog to reformat the font and return to the
application.
Or
Click No in the Reformat to AFP dialog to open the character set and return to the
application without reformatting.
For more information, see the "Reformatting to AFP Character Set" on page 43.
Chapter 4: Font Editor Basics 45

Opening Recently Used Fonts
To open a recently used font, you can either:
1 Select a font from the File menu.
2 Select File>Open from the menu bar.
3 Select History from the side pane in the Open dialog and select the required font.
The Messages window displays messages regarding the location of the font.
Creating Font
DesignPro Font Editor enables you to create both ASCII and AFP type fonts. It also
enables you to create Elixir Legacy fonts and AFP character sets from Windows font
sources.
To create an ASCII or AFP font, you can use the new or existing character sets and code
pages. The DesignPro Font Editor provides a wizard to walk you through the necessary
steps for creating a character set.
Creating an ASCII Font
To create an ASCII (PC Mapped) font:
1 Select File>New>Character Set from the menu bar.
The New Character Set dialog displays.
2 Select the ACSII Font option to specify the character set type as ASCII.
3 Enter a file name in the External name text box.
DesignPro Font Editor assigns a default name to the new font. You can change the
default name and specify a custom name for the font.
4 Enter the following character set properties:
! Number of characters – sets the number of null characters for the ASCII font.
The value can be between 1 and 256.
! Baseline from bottom – sets the distance in pels from the character baseline to
the character box bottom edge. The value can be between 1 and 99 for ASCII
fonts.
The character type for ASCII font is NULL by default and can be reviewed from All
Type(s). Since all of the character cells are null, most of the settings do not display any
change.
46 DesignPro Font Editor for AFP User Guide

5 Specify the following character box dimensions:
! Width – sets the character raster pattern horizontal length in pels. For ASCII
font, the value of width is always 8 pels. The character cell width does not show
for null characters.
! Height – sets the character raster pattern vertical length in pels. The value can be
between 2 and 2000.
6 Click Next to set the font properties.
The Font Properties dialog displays. For more information on setting font
properties, see the "Setting Font Properties" on page 50.
7 Do either one of the following:
Click Back to review or edit your selections made in the Font dialog.
Or
Click Finish to create an ASCII font with a null character set and return to the
application.
Most of the settings made during creation of fonts can be changed later using the
Font Properties dialog. For more information, see "Font Properties" on page 91
in Chapter 6: "Editing Fonts".
Creating an AFP Character Set
Creating an AFP character set involves going through six different dialogs. The DesignPro
Font Editor provides a wizard that guides the user through each dialog. The first dialog is
covered in this task; subsequent dialogs are covered in following subtasks. The sequence
in the wizard must be followed, as illustrated in the figure below:
Chapter 4: Font Editor Basics 47

To create an AFP character set:
1 Select File>New>Character Set from the menu bar.
The New Character Set dialog displays.
48 DesignPro Font Editor for AFP User Guide

2 Select the AFP Character Set type option to specify the character set type as AFP.
3 Enter a file name in the External name text box. The DesignPro Font Editor assigns
a default name to the new font. You can change the default name and specify a
custom name for the font. The name should be prefixed by C0. The name cannot be
greater than 8 characters in length including the prefix.
4 Enter the following character set properties:
! Number of characters – sets the number of spacing characters for AFP fonts.
The value can be between 1 and 1000.
! Baseline from bottom – sets the distance in pels from the character baseline to
the character box bottom edge. The value can be between 1 and 59 for AFP fonts.
The character type for AFP font is SPACING by default and can be reviewed from All
Type(s).
5 Enter the following character box dimensions:
! Width – sets the character raster pattern horizontal length in pels. The value can
be between 0 and 512.
! Height – sets the character raster pattern vertical length in pels. The value can be
between 2 and 127.
6 Click Next to specify the AFP character set properties. For more information on
setting the AFP character set properties refer to "Creating a New AFP Character Set"
on page 49.
Creating a New AFP Character Set
To create a new AFP character set using the New AFP Character Set dialog:
You can view the file name for the new AFP character set from Character set name.
1 Select the required AFP font type option from the following:
! Bounded – uses bounded AFP font.
! 3800 Unbounded – uses unbounded AFP font. This option is enabled only when
the 240 Fixed pels resolution option is selected.
2 Select the required resolution option from the following:
! 240 Fixed pels – sets the character resolution to 240 pels.
! 300 Relative units – sets the AFP header bounded fonts to a relative character
resolution of 300 units.
! 600 Relative units – sets the AFP header bounded fonts to a relative character
resolution of 600 units.
Chapter 4: Font Editor Basics 49

3 Select Yes as a Resolution change option to change current font resolution to the
resized resolution value. You can view the current and resize resolutions from
Current resolution and Resize to.
4 Click Next to set font properties. For more information, see "Setting Font Properties"
on page 50.
Setting Font Properties
To set font properties for an ASCII or an AFP character set using the Font Properties
dialog:
1 Select the required font character orientation option from the following:
! Port – sets to portrait.
! IPort – sets to inverse portrait.
! Land – sets to landscape.
! ILand – sets to inverse landscape.
You cannot set the font orientation and resolution options when creating an AFP
character set.
DesignPro Font Editor displays the characters only in portrait style. The
orientation results are visible in printing.
2 Select the required resolution option from the following:
! 240 – sets the glyph resolution to 240 pels.
! 300 – sets the glyph resolution to 300 pels.
! 600 – sets the glyph resolution to 600 pels.
Review the glyph horizontal and vertical resolution in pels displayed under Hor
resolution and Ver resolution repectively. The values depend on the resolution
option selected.
You cannot set the font orientation and resolution options when creating an AFP
character set.
3 Select the required pitch (number of characters per linear inch) option from the
following:
! Fixed – uses the same horizontal spacing for characters in the character set.
! Proportional – uses variable horizontal spacing for characters in the character
set.
50 DesignPro Font Editor for AFP User Guide

4 Enter or select the following:
! Enter fixed width – enters a fixed width in pels. The value can be between 0 and
2000.
! Bitmap placement – sets the font character bitmap alignment from the drop-
down list.
The Bitmap placement (character alignment) does not display any difference
for null characters. The alignment of characters in the character cells becomes
visible when cell width is greater than the character.
These options are enabled only when Fixed pitch option is selected.
5 Enter the required distance information in the following:
! Distance above – sets the character distance above the baseline in pels.
! Below – sets the character distance below the baseline in pels.
! Leading – sets the leading space between two consecutive lines. The value can
be between –999 and 999.
The sum of Distance above, Below, and Leading values gives the total space
between two consecutive lines. You can view the total space entered from Total.
6 Enter the required value specifying the last character position in the character set in
Last character at. The value can be between 0 and 255.
You can view the Point Size initialized by 0 for ASCII font and 1 for AFP fonts. The point
size is dependant on the pixel height but does not have any effect during font creation.
You can also view the pixel height from Pixel Height set in the New Character Set dialog.
7 Enter the required value in Amount to change cell width. The value can be between
–512 and 512.
8 Click Finish to create an ASCII font and if you are creating an AFP font, click Next
to specify character set attributes. For more information, see "Setting Character Set
Attributes" on page 52.
You can click Back to go to the previous dialogs and change or review your
settings.
Chapter 4: Font Editor Basics 51

Setting Character Set Attributes
To set character set attributes using the Character Set Attrib utes dialog:
1 Enter a name identifying the typeface (characters having the same styles) in the
Typeface name.
2 Review the font type following information:
! Bounded – uses bounded AFP font. Bounded fonts have no white space around
glyph or raster in the character cell. They use one AFP font for all character
rotations (0, 90, 180, 270) and all print directions (across, down, back, up).
! Unbounded – uses unbounded AFP font. Unbounded fonts allow white space
around glyph or raster in the character cell. They use separate AFP font for all
character rotations (0, 90, 180, 270) and all print directions (across, down, back,
up).
! Both – uses both bounded and unbounded AFP fonts.
Selection depends on the Character type selected in the New AFP Character Set
dialog.
3 Select the font style option from the following:
! Weight – sets character weight (degree of boldness of a typeface) style.
! Width – sets character width style.
! Point size – sets character point size (number of dots measured vertically from
baseline to baseline) in pels.
4 Select the character descriptors option from the following:
! Italic – uses italicized font.
! Outline – uses outline font.
! Underscored – uses underlined font.
! OverStruck – uses overstruck font.
5 Select MICR Flag to allow usage of Magnetic Ink Character Recognition (MICR), a
character recognition system. MICR uses special ink and characters that can be
magnetized and read automatically.
6 Click Next to specify required character set spacing increments. For more
information, the see "Setting Character Set Increments" on page 53.
52 DesignPro Font Editor for AFP User Guide

Setting Character Set Increments
To set character set increments using the Character Set Increments dialog:
1 Select the character rotation option from the following:
! 0 – rotates character 0 degrees.
! 90 – rotates character 90 degrees.
! 180 – rotates character 180 degrees.
! 270 – rotates character 270 degrees.
2 Review the following information for character spacing:
! Monospaced – uses the same horizontal spacing for characters in the character
set.
! Typographic – uses variable horizontal spacing for characters in the character
set.
Selection depends on the Pitch option selected from the Font Properties dialog.
3 Enter the required value in Character increment (0 to 256). It specifies the uniform
character increment for monospaced and maximum character increment for
typographic character set in pels. The value of increment can be between 0 and 256.
4 Enter the required value in Baseline offset (-256 to 256). It specifies the character
set maximum baseline offset value in pels. The value can be between -256 and 256.
5 Enter the required value in A-Space (-256 to 256). It specifies the uniform A-space
value for monospaced and minimum A-space value for typographic character set in
pels. The value can be between -256 and 256.
6 Click Next to specify the character set designs. For more information, see "Setting
Character Set Designs" on page 53.
Setting Character Set Designs
To set character set design from the Character Set Design dialog:
1 Enter a name identifying the typeface in the Typeface name.
You can view the font display resolution in pels per inch multiplied by a factor of ten
to the value in Pel resolution.
2 Enter the character height information in the following:
! x-Height (-256 to 256) – enters the lower case x character (GCID LX010000)
height value in pels. The value can be between –256 and 256.
! M-Height (-256 to 256) – enters the upper case M character (GCID LM020000)
height value in pels. The value can be between –256 and 256.
Chapter 4: Font Editor Basics 53

You can view the EmSpace (0 to 255) specifying Emspace character increment value in
pels. The value can be between 0 and 255.
1 Enter the required underscore information in the following:
! Width (-255 to 255) – enters the underscore stroke thickness value in pels. The
value can be between –255 and 255.
! Position (-255 to 255) – enters the underscore top pel distance from baseline
value in pels. The value can be between –255 and 255.
2 Review the following information for character box format:
! Uniform – uses the same size for the character raster-pattern boxes.
! Variable – uses variable size for the character raster-pattern boxes.
Selection depends on the Pitch option selected from the Font Properties dialog.
3 Review the following information for box dimension:
! Width (+1) – displays the character set raster pattern box width in pels. It
displays the largest character width in the variable raster pattern character set.
! Height (+1) – displays the character set raster pattern box height in pels. It
displays the largest character height in the variable raster pattern character set.
4 You can click Finish to create an AFP character set and return to the application
window.
Creating an AFP Coded Font
To create an AFP coded font:
1 Select File>New>Coded Font from the menu bar.
The New Coded Font dialog displays.
You can also use one of following methods to create an AFP coded font:
! Click on the Standard toolbar.
! Use <Ctrl> + <N> shortcut key.
2 Enter a name identifying the AFP coded font in Coded Font. The name should be
prefixed by X0. The name cannot be greater than 8 characters in length including the
prefix.
3 Select the required character set option from the following:
! Existing – selects an existing character set.
! New – creates a new character set.
54 DesignPro Font Editor for AFP User Guide

4 Do either one of the following:
! Click Select to load an existing character set. This option is enabled only when
Existing is selected from Character set. The Open Character Set dialog
displays. Browse for the required character set and click Open.
! Click Create to create a new character set. This option is enabled only when
New is selected from Character set. The New Character Set dialog displays. For
more information on creating a new character set, see "Creating a New AFP
Character Set" on page 49.
5 Select the required code page option from the following:
! Existing – selects an existing code page.
! New – creates a new code page.
6 Do either one of the following:
! Click Select to load an existing code page. This option is enabled only when
Existing is selected from Code page. The Open Code Page dialog displays.
Browse for the required code page and click Open.
! Click Create to create a new character set. This option is enabled only when
New is selected from Code page. The New Code Page Properties dialog
displays. For more information on creating a new code page, see "Creating a
Code Page" on page 55.
7 Click OK to create the coded font and return to the application.
Creating a Code Page
To create a code page:
1 Select File>New>Code Page from the menu bar.
The New Code Page Properties dialog displays.
2 Enter a brief narrative describing the code page in the Description text box.
You can view the number of points in code page from the No of code points.
3 Set the default character options from the following:
! Default char GCID – sets the default GCID (Graphic Character ID) character.
! On position – sets the default character position in the code page.
! Hex – displays the On position value in hexadecimal format.
! Dec – displays the On position value in decimal format.
Chapter 4: Font Editor Basics 55

4 Select the required flag options from the following:
! Valid – does not flag the character for processing.
! Printed – flags the character for presentation.
! Incremented – flags the character for character incrementing.
5 Set the default character options from the following:
! On position – sets variable space character position in the code page.
! Hex – displays the On position value in hexadecimal format.
! Dec – displays the On position value in decimal format.
6 Select Variable space enabled to flag space character for a variable space
incrementing.
7 Click OK to create a code page and return to the application.
Creating a PC Mapped Font
To create a PC mapped font:
1 Open or create the required coded font.
2 Select File>Save As Coded Font from the menu bar.
The Save As dialog displays.
3 Select Elixir Legacy Coded Font (X0*.cdf; X1*.cdf; X2*.cdf; X3*.cdf; X4*.cdf)
from Save as.
4 Click Edit Property settings.
The ElixirForm dialog displays.
5 Click the Fonts category to display the associated options.
6 Select Bounded or Unbounded option from Raster Fonts Output.
7 Select Create PC Mapped Font.
8 Select the required KMP file from the KMP list.
9 Click Apply and OK to save settings.
10 Enter the file name and click Save to create a PC mapped font.
56 DesignPro Font Editor for AFP User Guide

Creating an Elixir Legacy Font from a Windows Font
To create an Elixir legacy font from a Windows font:
1 Open a windows font. For more information, see the "Opening Window Fonts" on
page 45.
You can create an Elixir Legacy font even without reformatting the font to an
AFP character set.
2 Select File>Save from the menu bar.
The Save As dialog displays.
You can also use one of following methods to create an Elixir Legacy font:
! Click on the Standard toolbar.
! Use <Ctrl> + <S> shortcut key.
3 Select Elixir Legacy Font (*.hdr) from the Files of type drop-down list.
4 Enter the file name and click Save to create an Elixir Legacy font from the selected
Windows font.
Creating an AFP Character Set from a Windows Font
To create an AFP character set from a Windows font:
1 Open a Windows font. For more information, see "Opening W indow Fonts" on page
45.
You cannot create an AFP character set without reformatting the font to an AFP
character set.
2 Select File>Save from the menu bar.
The Save As dialog displays.
3 Select AFP Character Set (C0*;C1*;C2*;C3*;C4*) from the Files of type drop-
down list.
Chapter 4: Font Editor Basics 57

4 Enter the file name and click Save to create an AFP character set from the selected
Windows font.
Saving Fonts
DesignPro Font Editor enables you to save a character set or a code page. You can also
associate character sets with code pages and save these associations as coded fonts.
The character set must be saved to AFP format before it can be used on an AFP prin ter.
You have to reformat the character set to AFP and then save it as an AFP character set.
When saving a font, you can edit the property settings by clicking Edit Property settings,
which displays the GDF/Elixir Form, AFPDS, and PCL property dialog(s), depending on
the file type selected in the Files of type in the Save/Save as dialog. You can also restore
the default setting of the application by clicking Restore default settings in the Save/Save
as dialog. For more information, refer to"Setting File Format Properties" on page 62. For
detailed information, you can refer to “Chapter 6: File Fo rm at Dictionary” in DesignPro
Manager for AFP User Guide.
You can also edit required property settings or restore default settings using
or respectively. (For more information, refer to"Setting File Format
Properties" on page 62)
Saving a Font as an Elixir Legacy Font
To save a font as an Elixir Legacy font:
1 Open or create the required font.
The code pages or coded fonts cannot be saved as Elixir Legacy fonts.
You can save a font as an Elixir Legacy font even after reformatting the font to an
AFP character set.
2 Select File>Save As from the menu bar.
The Save As dialog displays.
3 Select Elixir Legacy Font (*.hdr) from Save as. Enter the file nam e and click Save.
The font is saved as an Elixir Legacy font. The Messages window displays messages
regarding the location of the font.
58 DesignPro Font Editor for AFP User Guide

Make sure that the name of the Elixir Legacy font has a maximum lenght of eight
characters.
Saving a PC Mapped Font to an Elixir for AFP Font
To save a PC mapped font as an Elixir for AFP font:
1 Open or create a PC mapped font.
2 Select Tools>Reformat from the menu bar to reformat the font as an AFP character
set. For more information, see "Reformatting to AFP Character Set" on page 43.
3 Select File>Save As from the menu bar.
The Save As dialog displays.
4 Select Elixir Legacy Font (*.hdr) from Save as.
5 Enter the file name and click Save.
The font is saved as an Elixir for AFP font. The Messages window displays
messages regarding the location of the font.
Saving a Font as a PCL Font
DesignPro Font Editor enables non-ASCII format fonts to be saved in PCL format. You
can save an Elixir Legacy, PCL, or a Windows font as a PCL font.
To save a font as a PCL font:
1 Open or create the required font.
You cannot save a font as a PCL font if you reformat the font to an AFP character
set.
2 Select File>Save As from the menu bar.
The Save As dialog displays.
3 Select PCL Font (*.flj;*.pcl) from Save as. Enter the file name and click Save.
The font is saved as a PCL font.
Chapter 4: Font Editor Basics 59

Saving as an AFP Character Set
To save a font as an AFP character set:
1 Open or create the required font.
The code pages, coded, and PCL fonts cannot be saved as an AFP character set.
2 Select Tools>Reformat from the menu bar to reformat the font as an AFP character
set. For more information, see "Reformatting to AFP Character Set" on page 43.
3 Select File>Save As from the menu bar.
The Save As dialog displays.
4 Select AFP Character Set (C0*;C1*;C2*;C3*;C4*) from the Save as option.
5 Enter the file name and click Save.
The font is saved as an AFP character set. The Messages window displays messages
regarding the location of the font.
Saving as a Coded Font
In DesignPro Font Editor, you can save either an AFP coded font or an Elixir Legacy
coded font.
T o save a font as a coded font:
1 Open or create the required font.
2 Select File>Save As Coded Font from the menu bar.
The Save As dialog displays.
3 Select either AFP Coded Font (X0*;X1*;X2*;X3*;X4*) or select Elixir Legacy
Coded Font (X0*.cdf;X1*.cdf;X2*.cdf;X3*.cdf;X4*.cdf) from Save as.
4 Browse for the required character set by clicking next to the Charset option.
You can only load a reformatted character set in Charset. The default prefix for the
reformatted character set is C0, C1, C2, C3 and C4.
60 DesignPro Font Editor for AFP User Guide

5 Browse for the required code page by clicking next to the Code page option.
If you are using a character set or a code page, it is automatically loaded in
Charset or Code page fields respectively. You can change them according to
your requirements.
6 Enter the file name and click Save.
The font is saved as an AFP coded font. The Messages window displays messages
regarding the location of the font.
The file name should be prefixed by X0, X1, X2, X3, or X4. The name cannot be
greater than 8 characters in length including the prefix.
Saving a Code Page
In DesignPro Font Editor, you can save either an AFP code page or an Elixir Legacy code
page.
To save a code page:
1 Open or create the required code page.
2 Select File>Save As from the menu bar.
The Save As dialog displays.
3 Select either AFP Code Page (T1*) or select Elixir Legacy Code Page (*.cod)
from Save as.
4 Enter the file name and click Save.
The font is saved as a code page. The Messages window displays messages
regarding the location of the font.
For an AFP code page, the file name should be prefixed by T1. The name cannot
be greater than 8 characters in length including the prefix.
Chapter 4: Font Editor Basics 61

Setting File Format Properties
DesignPro T ools s upports many industry standard formats. AFP printers typically support
only AFP format resources; however, DesignPro Tools enables you to use a variety of
resource formats, and set or change resource format processing options. For more
information on specific file format properties options, see “Chapter 6: File Format
Dictionary” in DesignPro Manager for AFP User Guide.
The input and output formats menu contains selections for the following format types:
! AFPDS – Advanced Function Presentation Data Streams.
! PCL – Print Control Language.
! GDF – Elixir Generic Document Format.
Setting Input Format Properties
You can access the input format properties from either the Open or Save As dialogs or
directly from the Tools menu.
To change the input format properties:
1 Select Tools>Application Format Settin g>Input Formats from the menu bar to
change the application-level input format settings.
2 Select the required input formats type.
The associated input formats dialog displays with the following category selections:
Category Name
Fonts
General
Main
Shading
Page
Paper
FormDef
Resources
62 DesignPro Font Editor for AFP User Guide

Category Name
Resources – Fonts
Resources – Forms
Resources – Images
Resources – ResGroups
Synthesizer
Tags
3 Click the appropriate Category to display the associated options.
Categories displaying in the input format dialogs depend on the selected format
type.
4 Review the dialog selections and make your changes.
5 Click Apply, and then click OK to save the settings.
Setting Output Format Properties
To change the output format properties:
1 From the menu bar, select Tools>Application Format Setting>Output Formats.
2 Select the required output format type.
The associated output format dialog displays with the following category selections:
Category Name
Code Pages
Error Handling
Fonts
Images
Chapter 4: Font Editor Basics 63

Category Name
Main
Page
Paper
Simplifier
3 Click the appropriate Category to display the associated options.
Categories displaying in the output format dialogs depend on the selected format
type.
4 Review dialog selections and make your changes.
5 Click Apply, and then click OK to save the settings.
Setting Elixir Properties
To change the output format properties:
1 From the menu bar, select Tools>Application Format Setting>Elixir Properties.
The associated output format dialog displays with the following category selections:
Category Name
Resources
Resource Library
Caching
2 Click the appropriate Category to display the associated options.
3 Review the dialog selections and make your changes.
4 Click Apply, and then click OK to save the settings.
64 DesignPro Font Editor for AFP User Guide

Chapter 5:
Customizing
DesignPro Font Editor
In this chapter...
! Changing Application Default Options
! Customizing Toolbars and Menus
! Adding Buttons to Toolbars
This chapter provides information on specifying application and page default settings, and
customizing workspace menu bar and toolbars for the DesignPro Font Editor.
Changing Application Default Options
DesignPro Font Editor includes an Options dialog that allows you to review, enter, or
change the default settings that control the operation and appearance of the application.
Thus, you can customize the work environment to meet the individual business
requirements.
The Options dialog provides five category settings. Preferences are selected from these
categories by using checkboxes and entering or changing field information. New settings
take effect when you either select another category or close the Options dialog. They
remain in effect until changed.
Use the following steps to view and set preferences for the listed categories:
1 Select Tools>Options from the menu bar.
The Options dialog displays.
2 Select the required category from Category.
3 Review dialog selections and make your changes.
4 Click Apply, and then click OK.
65

Setting General Parameters
The General category in the Options dialog allows you to customize application general
parameters. It provides message display and file filter options.
To set the general parameters:
1 Select the General category from the Options dialog.
The available options are displayed.
2 Set or review the following available options.
! Send all messages to window – displays all error, warning, and informational
messages in the Messages window. If this option is unchecked, each message
generated displays as a separate message box.
! Allow All Files in fileselectors – displays all file formats specified in the file
selectors feature for the Open and Save dialogs.
3 Select the Reformat ASCII option as required. Selecting this option will reformat
the font to the ASCII format.
You can save a font as an AFP character set using the Save As dialog after
reformatting.
4 Click in front of Default Charset, to launch the Open dialog.
5 Browse to select the required default character set. A code page has only GCID and
code points defined in it. The character glyphs in the code page are read from the
default character set.
6 Click Apply to save the changes.
You can set all default files (such as country keyboard map, code page, and GCID
file) in the System Data category.
66 DesignPro Font Editor for AFP User Guide

For information on Symbols, System Data, Messages, and Info Server
categories, see “Chapter 4: Customizing DesignPro Manager” in DesignPro
Manager for AFP User Guide.
Customizing Toolbars and Menus
You can customize DesignPro Font Editor toolbars to better serve your business and
personal requirements. You can add frequently used commands to toolbars and remove
toolbars and toolbar items you do not need.
Customizing Toolbar Display
You can specify the toolbars that display in the workspace and their appearance in Font
Editor.
To display a toolbar in the workspace:
1 Select View>toolbars>Customize from the menu bar.
The Customize dialog displays.
2 Select the Toolbars tab.
3 Select the toolbar you want to display in the workspace from the Toolbars list.
The name of the selected toolbar displays in the Toolbar name text box.
You cannot deselect the Menu bar option.
4 Click OK and return to the application window.
The toolbar is added to the application window.
Chapter 5: Customizing DesignPro Font Editor 67

Customizing the Toolbar buttons
To set the appearance of the displayed toolbars:
1 Select the Toolbars tab from the Customize dialog.
2 Set or review the available options.
! Show Tooltips - displays the tooltips associated with the toolbar buttons.
! Cool Look - displays the toolbar buttons in the smooth look mode.
You can also display a toolbar by selecting View>Toolbars>Toolbar name from the
menu bar.
The workspace reflects the toolbar with (1) Cool Look on and (2) Cool Look off.
! Large Buttons - displays the toolbar buttons in the enlarged mode.
The workspace reflects the toolbar (1) without Large Buttons and (2) with Large
Buttons.
! Reset/Delete - resets the default toolbar to the default settings. This button
toggles to Delete when a user-defined toolbar is selected, and can be used to
delete that toolbar.
3 Click OK to save the settings.
Creating a New Toolbar
You can create a new toolbar using the Customize dialog.
To create a new toolbar:
1 Select the Toolbars tab from the Customize dialog.
2 Click New to open the New Toolbar dialog for creating a new toolbar.
68 DesignPro Font Editor for AFP User Guide

3 Enter the name of the new toolbar in the Toolbar name field.
You can modify this name later in the Toolbars tab. The names of the default
toolbars are not editable.
4 Click OK, the new toolbar displays in the workspace without any buttons added.
You can now add buttons to the newly created toolbar later.
Adding Buttons to Toolbars
You can add buttons to the toolbars using DesignPro Font Editor. You can use this feature
to add buttons to the frequently used toolbars.
T o add a command button to an existing toolbar:
1 Select the Commands tab from the Customize dialog.
2 Select the required toolbar from the Categories list.
The buttons associated with the toolbar display under Buttons. A brief narrative
describing the selected toolbar buttons displays under Description.
3 Click and drag the required button displayed under Buttons to the target toolbar
displaying in the design area, then release the mouse.
The selected button is then appended to the required toolbar at the specified place.
While dragging the required button, the mouse cursor changes from to .
If you place the button anywhere in the application window other than on a
toolbar, Font Editor automatically creates a new toolbar for the button. If you
then select the Toolbars tab, the newly created toolbar name (default name is
ToolBar1) displays in the Toolbars list.
Chapter 5: Customizing DesignPro Font Editor 69

Below is an example of adding a button to a toolbar.
Adding a button to a toolbar.
70 DesignPro Font Editor for AFP User Guide

Chapter 6:
Editing Fonts
In this chapter...
! Editing Fonts
! Changing Fonts
! Formatting Fonts
! Editing Characters
! Using the Preview Tool
This chapter describes how to modify fonts and set the font and character properties. It
also describes the use of drawing tools to perform associated operations
Editing Fonts
The DesignPro Font Editor provides tools for editing individual character bitmaps to
create customized fonts. Customized fonts are used to create company logos, corporate
fonts, and signature fonts without the surplus characters to manage the fonts more
efficiently. The fonts process and print faster than graphics making the print operation
efficient.
Directly below the menu bar are toolbars with buttons that provide access to various font
modification tools.
Font Characteristics
Elixir fonts are placed in drive:\Elixir\Fonts\Elixir directory during installation. The font
stem name provides information about font type. For example, HE07NP is a Helvetica 7point, normal portrait font. The figure below illustrates characteristics of a character in a
cell:
71

Character attributes.
! Blanks left – blank dots to the left of the characters.
! Blanks right – blank dots to the right of the characters.
! Baseline offset – characters in a font are aligned with an imaginary line called the
baseline The baseline is used to align characters horizontally The character baseline
offset specifies where to place the character relative to the character baseline
Baseline offset is the distance between the baseline and the character glyph bottom If
the bitmap is above the baseline, the offset will be positive and if the bitmap is below
the baseline, the value will be negative.
! Above baseline –distance from the baseline to the top edge of the character cell This
is equal to cell height - baseline.
! Below baseline – distance from the baseline to the bottom edge of the character cell.
! Cell width – width of the character box.
The figure below illustrates character and line-spacing attributes on a printed page:
72 DesignPro Font Editor for AFP User Guide

Character and line attributes.
Line spacing is the space, expressed in points, between lines of text, measured from the
baseline (bottom) of one line to the baseline of the next.
The following formula is used to calculate line spacing:
Line spacing = above baseline + below baseline + leading.
Leading is the additional space that can be inserted between rows of character raster
patterns to alter the line spacing value for the font.
For more information on the font properties, see Chapter 3: "Font Structure" on
page 23.
Changing Fonts
The DesignPro Font Editor enables you to modify individual and multiple characters in a
character set using the standard operations such as copy and paste
Selecting and Deselecting Characters
The DesignPro Font Editor provides three options for the selection of character(s). You
can choose either one of the following:
! Select an individual character.
! Select multiple characters.
! Select all of the characters in the character set.
Chapter 6: Editing Fonts 73

To select an individual character:
Click the required character in the character set window. The character is selected.
To select multiple characters, you can either:
! Press <Ctrl> and click on the other required characters. The characters are selected.
! To select a range of continuous characters. Select the first character in the required
range, press <Shift> and select the last required character. All of the characters in the
range of the first and last characters are selected.
To select all characters in the character set:
Select Edit>Select All from the menu bar. All of the characters in the font are selected.
You can also use the <Ctrl> + <A> shortcut key to select all of the characters in
the character set.
You can click anywhere in the white area between the character cells or in the
character set window to cancel all selections made.
Copying and Pasting Characters
The DesignPro Font Editor enables you to copy and paste individual and multiple
characters within a character set.
Copying and Pasting Individual Characters
To copy and paste a character in a character set:
1 Load the required character set in the application.
2 Select the required source character from the character set.
3 Do either of the following to copy the selected source character:
! Select Edit>Copy from the menu bar.
! Select from the Standard toolbar.
! Right-click on the character and select Copy from the pop-up menu.
74 DesignPro Font Editor for AFP User Guide

You can also copy the character using the <Ctrl> + <C> shortcut key.
You can only copy characters within the same character set.
4 Select the required target character from the character set.
5 Do either of the following to paste the selected character in the target character:
! Select Edit>Paste from the menu bar.
! Select from the Standard toolbar.
! Right-click on the character and select Paste from the pop-up menu.
You can also paste the character using the <Ctrl> + <V> shortcut key.
The New GCID dialog displays. This dialog displays if a duplicate GCID already
exists in the character set.
6 Enter either a new GCID or select the GCID suggested by DesignPro Font Editor.
7 Click OK.
The copied character is copied to the target cell.
Cutting Individual Characters
1 Load an AFP character set in the application.
2 Select the required source character from the character set.
Chapter 6: Editing Fonts 75

3 Do either of the following to cut the selected character:
! Select Edit>Cut from the menu bar.
! Select from the Standard toolbar.
! Right-click on the character and select Cut from the pop-up menu.
You can also cut the character using the <Ctrl> + <X> shortcut key.
The selected character is removed from the character set.
Copying and Pasting Multiple Characters
To copy and paste multiple characters in a character set:
1 Load the required character set in the application.
2 Select the required characters from the character set.
3 Select Edit>Copy from the menu bar.
4 Select the required target characters from the character set.
If the number of target characters selected is less than the copied source
characters, the number of pasted characters will be the same as the selected
target characters.
5 Select Edit>Paste from the menu bar.
The selected characters are pasted on the target character cells as shown in the
following image:
76 DesignPro Font Editor for AFP User Guide

An example of copying and pasting multiple characters.
Undoing a Change
The DesignPro Font Editor keeps track of your editing and formatting changes. You can
undo a change or a command selection by reversing the previous actions. There are
several methods to undo a change
To undo a change:
! Select Edit>Undo from the menu bar.
! Click on the Standard toolbar.
! Use the <Ctrl> + <Z> shortcut key.
Chapter 6: Editing Fonts 77

Formatting Fonts
Formatting tools allow you to swap, kill, and modify individual characters. These tools
can also be used to set the character set properties. You can use the merge tool to load
multiple fonts, and copy or replace font characters. The Formatting toolbar is active only
when a character set is loaded in the application window.
Inserting a Font Character
You can choose to copy not only the character glyph but also the GCID from one
character set to another using the merge tool. Merging fonts in this mode is valid for AFP
character sets only.
T o insert characters:
1 Open the required source and target character sets.
You can arrange the font windows according to your requirement from the Window
menu. For more information on arranging windows, see the DesignPro Graphics
Editor for AFP User Guide.
2 Click on the Formatting to olbar and select Insert from the drop-down menu.
You cannot use this option to insert characters in the same character set. If you
try to insert characters in the same character set, the character will be replaced
instead of being inserted.
3 Select the required character from the source character set.
4 Click and drag the required character from the source character set to the target
character set.
The selected character is added to the target character set.
78 DesignPro Font Editor for AFP User Guide

Before inserting a character.
After inserting a character.
If the GCID of the selected character already exists in the target character set,
the New GCID dialog displays. You can enter the new GCID for the inserted
character in Suggested new GCID or (enter new GCID), or accept the
GCID generated by the DesignPro Font Editor.
Chapter 6: Editing Fonts 79

Replacing a Font Character
You can choose to copy only the character glyph from one character to another using the
merge tool.
To replace characters:
1 Open the required source and target character.
You can arrange the font windows according to you requirements using the Window
menu. For more information on arranging windows, see the DesignPro Graphics
Editor for AFP User Guide.
2 Click on the Formatting toolbar and select Replace from the drop-down menu.
You can replace characters within the same character set or between different
character sets.
3 Select the required character in the source character set.
4 Click and drag the required character from the source character set to the target
character in the target character set.
The New GCID dialog displays. This dialog displays if a duplicate GCID already
exists in the character set.
5 Enter either a new GCID or select the GCID suggested by DesignPro Font Editor.
6 Click OK.
The selected character is added to the target character set by replacing the selected
character in the target character set.
80 DesignPro Font Editor for AFP User Guide

Before replacing a character.
After replacing a character.
Swapping Characters
You can switch the positions of two characters in a font by using the swap character tool.
You can only swap characters in the same character set.
To swap characters:
1 Load the required character set in the application.
2 Select a character from the character set.
3 Click on the Formatting toolbar.
Chapter 6: Editing Fonts 81

4 Select a target character from the character set.
The character positions are switched.
An example of swapping characters.
Replacing Non-blank characters with Spacing Characters
You can replace a non-blank character with a spacing character using the kill character
tool.
To replace non-blank characters with spacing characters:
1 Load the required character set in the application.
2 Select a character from the character set.
3 Click on the Formatting toolbar and select Blank from the drop-down menu
options.
The selected character is replaced with a spacing character.
82 DesignPro Font Editor for AFP User Guide

An example of replacing a non-blank character.
Deleting Characters
The DesignPro Font Editor provides the kill character tool that enables you to either delete
the entire character or remove the character glyph from the selected character.
To delete a character:
1 Load the required character set in the application.
The Delete option is enabled only for the AFP character sets. To delete
characters from a non-AFP character set, reformat the character set to an AFP
character set. For more information, see Reformatting to AFP Character Set in
Chapter 4: "Font Editor Basics" on page 39.
2 Select a character from the character set.
3 Click on the Formatting toolbar and select Delete from the drop-down menu.
The selected character is deleted from the character set.
Delete example.
Chapter 6: Editing Fonts 83

4 Load the required character set in the application. The character is removed.
To remove a character glyph:
1 Select a character from the character set.
2 Click on the Formatting toolbar and select Blank from the drop-down menu.
The glyph is removed from the selected character.
Blank example.
Importing Images in a Font
You can import required images in the selected character cell using the import image tool.
The supported image formats for importing images are:
! AFP Files (*.seg) (S1)
! Bitmap Files (*.bmp)
! Elixir legacy graphics (*.lp3)
! PC paintbrush bitmap format files (*.pcx)
! PCL files (*.prn).
! Tagged image format files (*.tif)
Importing Images
To import images into a character cell:
1 Load the required font in the application.
2 Select the required character(s) from the character set.
3 Click on the Formatting toolbar.
4 Select the required file type from the Files of type drop-down list.
84 DesignPro Font Editor for AFP User Guide

Selecting the Elixir icon in the left dialog pane automatically locates the target
folder based on the selected file type. For example, when you select AFP Files
in Files of type and then select Elixir from the side pane, the default path for
AFP image is automatically set to drive:\Elixir\Pics\AFP.
5 Select the required image and click Open to import the image.
The selected image is imported in the application as a character.
Importing Images Larger than the Character Cell
To import images larger than the character cell:
1 Load the required font in the application.
2 Select the required character(s) from the character set.
3 Click on the Formatting toolbar.
The Open dialog displays.
4 Select the required file type from the Files of type drop-down list.
Selecting the Elixir icon in the left dialog pane automatically locates the target
folder based on the selected file type. For example, when you select AFP Files
in Files of type and then select Elixir from the side pane, the default path for
AFP image is automatically set to drive:\Elixir\Pics\AFP.
5 Select the required image and click Open to import the image.
The Cell Resize Options dialog displays.
6 Select the required cell resize option from the following:
! E – extends the selected characters cell beyond its boundaries to fit the imported
image in the cell. The character cell cannot be extended beyond the cell width
limit for fonts.
! S – skips the importing operation for the selected character.
! A – aborts the importing operation for all of the selected characters and returns to
the application without importing.
The image is imported into the font as per the selections made.
Chapter 6: Editing Fonts 85

Character Properties
You can view and set individual character and code point properties for AFP and non-AFP
font character sets and code pages.
Setting Non-AFP Font Character Properties
To set the non-AFP font character properties:
1 Load the required non-AFP font in the application.
2 Select a character from the character set.
3 Click on the Formatting toolbar.
The Character Properties dialog displays.
You can also right-click the character and select Properties from the pop-up
menu to launch the Character Properties dialog.
4 Enter or review the following character properties information:
! Cell width – sets the character cell width (character width or delta-X).
! Baseline offset – sets the character baseline offset in pels It is measured from the
character bitmap bottom to the character baseline.
! Blanks left – sets the distance between the character cell left edge and the
character bitmap start in pels.
! Blanks right – displays the distance between the character bitmap right edge and
the right character cell edge in pels.
! Left kerning – sets the character left kerning in pels 9700 family printers do not
support this option.
! Character number – displays the font character ordinate position in decimal.
! Equiv ASCII char – displays the font character ASCII character equivalent.
! Equiv hex char – displays the font character hexadecimal character equivalent.
! Bitmap width – displays the character bitmap width in pels.
! Bitmap height – displays the character bitmap height in pels.
86 DesignPro Font Editor for AFP User Guide

5 Select the required character type option from the following:
! Nonblank – sets the character type to non-blank.
! Spacing – sets the character type to spacing.
! Null – sets the character type to null.
6 Select the required floating accent option from the following:
! High accent – maps high accent position to the character.
! No accent – accent position is not mapped to the character.
! Low accent – maps low accent position to the character.
7 Click < Prev to view the preceding character properties.
A confirmation message is displayed if the character properties have been changed.
Click Yes to accept the changes made.
8 Click Next > to view the next character properties.
9 A confirmation message is displayed if the character properties have been changed.
Click Yes to accept the changes made.
10 Click OK to save changes and return to the application.
Setting Null Character Properties
To set the null character properties:
1 Load the required non-AFP font in the application.
2 Select a character from the character set.
3 Click on the Formatting toolbar.
The Properties of Null Character dialog displays .
4 Review the following null character properties information:
! Character number – displays the font character coordinate position in decimal.
! Equiv ASCII char – displays the font character ASCII character equivalent.
! (Hex) – displays the font character hexadecimal character equivalent.
5 Click < Prev to view the preceding character properties.
A confirmation message is displayed if the character properties have been changed
Click Yes to accept the changes made.
Chapter 6: Editing Fonts 87

6 Click Next > to view the next character properties.
A confirmation message is displayed if the character properties have been changed
Click Yes to accept the changes made.
7 Click OK to save changes and return to the application.
Setting Spacing Character Properties
To set the spacing character properties:
1 Load the required non-AFP font in the application.
2 Select a character from the character set.
3 Click on the Formatting toolbar.
The Properties of Spacing Character dialog displays.
4 Review the following spacing character properties information:
! Character number – displays the font character ordinate position in decimal.
! Equiv ASCII char –displays the font character ASCII character equivalent.
! (Hex) – displays the font character hexadecimal character equivalent.
5 Select the required character type option from the following:
! Spacing – sets the character type to spacing.
! Null – sets the character type to null.
6 Click < Prev to view the preceding character properties.
7 A confirmation message is displayed if the character properties have been changed
Click Yes to accept the changes made.
8 Click Next > to view the next character properties.
A confirmation message is displayed if the character properties have been changed
Click Yes to accept the changes made.
9 Click OK to save changes and return to the application.
88 DesignPro Font Editor for AFP User Guide

Setting AFP Font Character Properties
T o set the AFP font character properties:
1 Load the required AFP font in the application.
2 Select a character from the character set.
3 Click on the Formatting toolbar.
The Character and CodePoint Properties dialog displays.
You can also right-click the character and select Properties from the pop-up
menu to launch the Character and CodePoint Properties dialog.
4 Select the required character rotation option from the following:
! 0 – no character rotation is set.
! 90 – sets the character rotation to 90 degrees.
! 180 – sets the character rotation to 180 degrees.
! 270 – sets the character rotation to 270 degrees.
5 Set the character’s Graphic Character Identifier (GCID) in Graphic char ID.
Chapter 6: Editing Fonts 89

6 Enter or review the following information on character properties:
! A-space – sets the distance from the character reference point to the nearest
raster-pattern edge in pels.
! C-space – sets the distance from the character raster-pattern far edge to the
character escapement point.
! Char increment – displays the sum of character’s A-space, raster-pattern width,
and C-space.
! Baseline offset – sets the character baseline offset in pels It is measured from the
character bitmap bottom to the character baseline.
! Char index – displays the character index number The first font character has a
character index of zero.
! Raster width – displays the character bitmap width in pels.
! Raster height – displays the character bitmap height in pels.
! Char ascender – displays the distance from the character baseline to the
character topmost toned-pel in pels.
! Char descender – displays the distance from the character baseline to the lowest
character toned-pel in pels.
7 Review the code point information specifying the current character hexadecimal
code point representation from Code point.
8 Review the flag information from the following:
! Valid – the character is not used for processing.
! Printed – allows the character presentation.
! Incremented – allows the character incrementing.
The selection depends on the flags selected in the code page mapped with the
character set.
9 Click < Prev to view the preceding character properties.
A confirmation message is displayed if the character properties have been changed.
You can click Yes to accept the changes made.
10 Click Next > to view the next character properties.
A confirmation message is displayed if the character properties have been changed.
You can click Yes to accept the changes made.
11 Click OK to save changes and return to the application.
90 DesignPro Font Editor for AFP User Guide

Setting Code Point Properties
T o set the code point properties:
1 Load the required code page in the application.
2 Select a character from the character set.
3 Click on the Formatting toolbar.
The CodePoint Properties dialog displays.
You can also right-click the character and select Properties from the pop-up
menu to launch the CodePoint Properties dialog.
4 Enter or review the following code point description information:
! Graphic character ID – sets the character’s Graphic Character Identifier
(GCID).
! Position – displays the default character position in the code page.
! Hex – displays the Position value in hexadecimal format.
! Dec –displays the Position value in decimal format.
5 Set the code point flags from the following:
! Valid – the character is not used for processing.
! Printed – allows the character presentation.
! Incremented – allows the character incrementing.
6 Click OK to save changes and return to the application.
Font Properties
The DesignPro Font Editor enables you to view and set the font properties for AFP, nonAFP character sets, and code pages.
Setting Non-AFP Character Set Properties
To set non-AFP character set properties:
1 Load the required non-AFP font in the application.
2 Select a character from the character set.
Chapter 6: Editing Fonts 91

3 Click on the Formatting toolbar.
The Font Properties dialog displays.
4 Select the Font Properties tab. For more information on this tab, see "Setting Font
Properties" on page 50 in Chapter 4: "Font Editor Basics".
5 Click Apply to save the settings and select the HPPCL Properties tab to set the
typeface properties.
6 Enter a unique name identifying the character set in Typeface Name.
7 Enter the character cell width (character width or delta-X) in Typeface.
8 Enter the character cell width (character width or delta-X) in Symbol set.
9 Select the required weight style of a straight or curved line that is used to create
character shape.
You can select the character shape style from the Stroke Weigh t list.
10 Select Italic to italicize the font characters.
11 Click Apply and OK to save the settings and return to the application.
Setting AFP Character Set Properties
To set the AFP character set properties:
1 Load the required non-AFP font in the application.
2 Select a character from the character set.
3 Click on the Formatting toolbar.
The Font Properties dialog displays.
4 Select the Font Properties tab. For more information on this tab, see "Setting Font
Properties" on page 50 in Chapter 4: "Font Editor Basics".
5 Click Apply to save the settings and select the HPPCL Properties tab to set the
typeface properties.
6 Enter a unique name identifying the character set in Typeface Name.
7 Enter the character cell width (character width or delta-X) in Typeface.
92 DesignPro Font Editor for AFP User Guide

8 Enter a unique code identifying the symbol set in Symbol set.
9 Select the required weight style of a straight or curved line that is used to create
character shape.
You can select the character shape style from the Strok e Weight list.
10 Select Italic to italicize the font characters.
11 Select the Char Set Attribute tab. For more information on this tab, see "Setting
Character Set Attributes" on page 52 in Chapter 4: "Font Editor Basics".
12 Select the Char Set Increment tab. For more information on this ta b, see "Setting
Character Set Increments" on page 53 in Chapter 4: "Font Editor Basics".
13 Select the Char Set Design tab. For more information on this tab, see "Setting
Character Set Designs" on page 53 in Chapter 4: "Font Editor Basics".
14 Click Apply and OK to save the settings and return to the application.
Setting Code Page Properties
To set the code page properties:
1 Load the required code page in the application.
2 Select a character from the character set.
3 Click on the Formatting too lbar.
The Font Properties dialog displays.
4 Select the Code Page Properties tab. For more information on this tab, see
"Creating a Code Page" on page 55 in Chapter 4: "Font Editor Basics".
5 Click Apply and OK to save the settings and return to the application.
Using Drawing Tools
The DesignPro Font Editor provides drawing tools for editing individual character
bitmaps. The drawing tools are located on the Drawing toolbar and are enabled only when
a character is open in the edit mode. You can show or hide the Drawing toolbar by
selecting View>Toolbars>Drawing from the menu bar.
Chapter 6: Editing Fonts 93

Editing Characters
You perform editing operations using the drawing tools in the edit mode. To switch to the
edit mode, you can click on the Formatting toolbar.
You can also double-click a character in the character set to switch to the edit
mode.
The character set window splits into three panes in edit mode.
The characters in a character set display in the character set pane at the lower end of the
application. The selected character displays in a magnified view in the editing pane. You
can exit the edit mode by clicking .
The character bitmap displays as dots in the editing pane. A character initially displays at
8X magnification. Each dot in the bitmap displays as a black or white box that is 8 bits
high and 8 bits wide.
94 DesignPro Font Editor for AFP User Guide

Selecting Areas
You can use the select tool in DesignPro Font Editor to copy and paste a rectangular area
in a character cell. This tool enables you to define straight-edged areas that you can move
or make changes to in the character.
To copy and move areas in a character cell:
1 Select the required character in the edit mode.
2 Click on the Drawing toolbar.
The Toolbox displays the associated options.
3 Select the required select type option from the following:
! – moves the selected area to another cell location.
! – copies the selected area.
4 Draw a marquee around the area that you want to copy.
5 Click and drag to place the selected area at the required location.
6 Click on the Standard toolbar to apply changes to the selected character.
Example of moving the selected area.
Chapter 6: Editing Fonts 95

Drawing Lines
You can use the line tool to draw lines in a character cell.
To draw a line:
1 Select the required character in the edit mode.
2 Click on the Drawing toolbar.
The Toolbox displays the associated options.
3 Enter the required line width in dots in Thickness.
4 Select the line color option from the following:
! – sets the line color to white.
! – sets the line color to black.
! – sets the line color to inverse. The line is drawn in the color opposite to the
background color.
5 Click the required area in the character cell and drag the mouse to draw a line.
6 Click on the Standard toolbar to apply changes to the selected character.
Examples of line thickness.
96 DesignPro Font Editor for AFP User Guide

Drawing Boxes
You can use the box tool to draw hollow or filled boxes in a character cell.
To draw a box:
1 Select the required character in the edit mode.
2 Click on the Drawing toolbar.
The Toolbox displays the associated options.
3 Enter the required border width in dots in Thickness.
4 Select the box color option from the following:
! – sets the box color to white.
! – sets the box color to black.
! – sets the box color to inverse. The box is drawn in the color opposite to the
background color.
5 Select the box fill type option from the following:
! – sets the box type to hollow.
! – sets the box type to filled.
6 Click the required area in the character cell and drag the mouse to draw a box.
7 Click on the Standard toolbar to apply changes to the selected character.
A box is drawn over the character “@” with invert and fill options selected.
Chapter 6: Editing Fonts 97

Using a Box as an Eraser
You can use the box tool to erase objects in a character cell.
To use the box tool as an eraser:
1 Select the required character in the edit mode.
2 Click on the Drawing toolbar.
The Toolbox displays the associated options.
3 Set the box color similar to the background color of the character cell for erasing
objects.
For more information on drawing boxes, refer to the previous task.
4 Click on the Standard toolbar to apply changes to the selected character.
The selected area is erased using the box tool.
Drawing Circles
You can use the circle tool to draw hollow or filled boxes in a character cell.
To draw a circle:
1 Select the required character in the edit mode.
2 Click on the Drawing toolbar.
The Toolbox displays the associated options.
3 Enter the required line thickness in dots in Thickness.
98 DesignPro Font Editor for AFP User Guide

4 Select the circle color option from the following:
! – sets the circle color to white.
! – sets the circle color to black.
! – sets the circle color to inverse. The circle is drawn in the color opposite to
the background color.
5 Select the circle fill type option from the following:
! – sets the circle type to hollow.
! – sets the circle type to filled.
6 Click the required area in the character cell and drag the mouse to draw a circle.
7 Click on the Standard toolbar to apply changes to the selected character.
Circle examples.
Drawing Dots
You can use the dot tool to draw dots in a character cell.
To draw a dot:
1 Select the required character in the edit mode.
2 Click on the Drawing toolbar.
The Toolbox displays the associated options.
3 Enter the required dot thickness in dots in Thickness.
Chapter 6: Editing Fonts 99

4 Select the dot color option from the following:
! – sets the dot color to white.
! – sets the dot color to black.
! – sets the dot color to inverse. The dot is drawn in the color opposite to the
background color.
5 Click the required area in the character cell to draw a dot.
6 Click on the Standard toolbar to apply changes to the selected character.
Dot thickness example.
Using the Brush Tool
You can use the brush tool to paint continuous strokes in black, white, or invert colors
with a specified thickness.
To paint using the brush tool:
1 Select the required character in the edit mode.
2 Click on the Drawing toolbar.
The Toolbox displays the associated options.
3 Enter the required brush tip thickness in dots in Thickness.
4 Select the painting color option from the following:
! – sets the brush color to white.
! – sets the brush color to black.
! – sets the brush color to inverse. The object is drawn in the color opposite to
the background color.
5 Click and drag the brush tip in the required area in a character cell to paint.
100 DesignPro Font Editor for AFP User Guide
 Loading...