

Page 1

Version 2.0
2014-09-01
FreeFlow Print Server
Online Help
Page 2

© 2014 Xerox Corporation. All rights reserved. Xerox®, Xerox and Design®, FreeFlow®,
and DocuSP are trademarks of Xerox Corporation in the US and/or other countries.
Microsoft, Windows, Windows 2000, Windows XP, Windows Vista, and Windows 7 are
registered trademarks of Microsoft Corporation.
PANTONE® is a registered trademark of Pantone, Inc.
Macintosh is a registered trademark of Apple Computer, Inc., registered in the US and
other countries.
Adobe, Acrobat, Distiller, Illustrator, InDesign, and Photoshop are registered trademarks
of Adobe Systems, Inc. PostScript is an Adobe registered trademark used with the Adobe
PostScript Interpreter, the Adobe pagedescription language, and other Adobe products.
This product is not endorsed or sponsored by Adobe Systems.
Page 3

Table of Contents
1 The Xerox FreeFlow Print Server..........................................................1-1
About the Xerox FreeFlow Print Server User Interface..........................................1-1
About the Features of the User Interface (UI).........................................................1-2
About the Banner...................................................................................................1-2
Supported Languages and Regions...................................................1-3
Selecting a Display Language..............................................................1-3
Selecting a Region....................................................................................1-3
About the Site Navigation Bar..........................................................................1-4
About the Status Area..........................................................................................1-4
About the Icons Used in the Status Area........................................1-5
About the Printer Message Field.........................................................1-5
About the Pause Printer and Resume Printer Buttons................1-5
About the Printer Mimic.........................................................................1-5
About the Display Options....................................................................1-6
About the Default Home Screen......................................................................1-7
Additional Information and Settings.............................................................1-8
About User Interface (UI) Button Use...........................................................1-8
2 Logon and Password Security...............................................................2-1
About System Logon and Logoff...................................................................................2-1
Logging On to the System..................................................................................2-1
Logging Off the System.......................................................................................2-2
About Password Security...................................................................................................2-2
About Weak and Strong Passwords.................................................................2-3
Changing User Passwords...................................................................................2-3
Changing Passwords for the Operator or System
Administrator.....................................................................................................2-4
Setting Password Expiration...............................................................................2-4
3 Job Manager...............................................................................................3-1
Accessing the Job Manager Window...........................................................................3-1
About the Job Manager Window..................................................................................3-2
About Job Manager Menu...............................................................................................3-2
About the All Jobs Menu Option......................................................................3-2
About the Active Menu Option.........................................................................3-2
About the Held Menu Option............................................................................3-2
About the Completed Menu Option...............................................................3-3
About the Job Manager Toolbar....................................................................................3-3
Online Help
iFreeFlow Print Server
Page 4

Table of Contents
About the More Actions Menu in Job Manager......................................................3-3
About the Search Field......................................................................................................3-4
Configuring the Display of the Window.....................................................................3-4
About Ineligible Jobs..........................................................................................................3-5
About Faulted Jobs..............................................................................................................3-6
About the Job Properties Window.................................................................................3-6
About Icon Use.....................................................................................................................3-7
About the Basic Settings Tab........................................................................................3-12
About the Paper Stock Tab............................................................................................3-17
About the Output Tab.....................................................................................................3-19
Clearing Ineligible Jobs Using the Ineligible Job Window.....................3-5
Clearing Faults Using the Faulted Job Window..........................................3-6
Accessing the Job Properties Window............................................................3-7
Exiting from the Properties Window...............................................................3-7
About the Icons Used for the Job Properties Tabs....................................3-8
About the Unique Action Icons Used in Job Properties..........................3-9
About the Common Icons Used in Job and Queue Properties.............3-9
About Quantity.....................................................................................................3-13
About Collation.....................................................................................................3-13
About Administrative Pages............................................................................3-13
About Banner Pages..............................................................................3-13
About Attribute Reports.......................................................................3-14
About Start Message..........................................................................................3-14
About Pages to Print...........................................................................................3-15
About Format........................................................................................................3-15
About PDF/X Processing....................................................................................3-15
About Banner Page Message..........................................................................3-16
About Sides Imaged...........................................................................................3-16
About Stock List....................................................................................................3-16
About Job Processing.........................................................................................3-16
Strategies for Configuring the Paper Stock Tab.......................................3-17
About Stock Name..............................................................................................3-18
About Stock Size...................................................................................................3-18
About Stock Weight............................................................................................3-18
About Stock Color................................................................................................3-18
About Stock Type.................................................................................................3-19
About Drilled Holes.............................................................................................3-19
About Stock Front Coating...............................................................................3-19
About Stock Back Coating................................................................................3-19
About Stapling/Finishing..................................................................................3-20
FreeFlow Print Serverii
Online Help
Page 5

Table of Contents
About Sides Imaged...........................................................................................3-20
About Output Location......................................................................................3-20
About Offset..........................................................................................................3-20
About Collation.....................................................................................................3-21
About Output Delivery.......................................................................................3-21
About Collated Sets Offset Interval.............................................................3-21
About Output Order............................................................................................3-21
About Slip Sheets.................................................................................................3-21
About Slip Sheet Stock.......................................................................................3-21
About the Image Quality Tab......................................................................................3-22
About Color Balance...........................................................................................3-22
About Adjusted Preview....................................................................................3-23
About Color Mode................................................................................................3-23
About Grayscale Printing.....................................................................3-23
About the Overprint and Enhancement Check Boxes...........................3-24
About Halftones and Screens.........................................................................3-24
About RGB to Black for Text and Graphics................................................3-25
About Image Interpolation.............................................................................3-25
About Resolution..................................................................................................3-26
About the Color Management Tab............................................................................3-26
About the Color Management Controls Area...........................................3-26
About the Icons Used in the Color Management Tab..........................3-27
About the CMYK Tab..........................................................................................3-27
Additional Information About CMYK Color Space....................3-27
About Using Embedded Profile for CMYK & RGB......................3-28
About CMYK Source Color Space for Images & Text and
Graphics Enhancement..................................................................3-28
About CMYK & RGB Rendering Intent for Images, Text,
and Graphics......................................................................................3-28
Explanation of Job Rendering...........................................................3-29
Additional Information About Using Embedded
Rendering for CMYK & RGB..........................................................3-29
About the RGB Tab..............................................................................................3-30
Additional Information About RGB Color Space.......................3-30
About Using Embedded Profile for CMYK & RGB......................3-31
About RGB Source Color Space for Images & Text and
Graphics Enhancement..................................................................3-31
About CMYK & RGB Rendering Intent for Images, Text,
and Graphics......................................................................................3-31
Explanation of Job Rendering...........................................................3-32
Additional Information About Using Embedded
Rendering for CMYK & RGB..........................................................3-32
Online Help
iiiFreeFlow Print Server
Page 6

Table of Contents
About the Image Placement Tab................................................................................3-35
About the Special Pages Tab........................................................................................3-36
About the Icons Used for Special Pages..................................................................3-37
About Front Cover and Back Cover.............................................................................3-37
About New Exception Page(s)......................................................................................3-39
About the Gray Tab.............................................................................................3-33
Additional Information About the Gray Source Color
Space.....................................................................................................3-33
About Using Embedded Profile for Gray Source Color
Space.....................................................................................................3-34
About Gray Source Color Space for Images and Text and
Graphics Enhancement..................................................................3-34
About the Spot Processing Tab.......................................................................3-34
About Destination Profile.................................................................................3-35
About the Color Management Flow Diagram..........................................3-35
About Layout Type..............................................................................................3-35
About Image Rotation.......................................................................................3-36
About Image Shift...............................................................................................3-36
About Making the Front Cover & Back Cover the Same.......................3-38
About Print On.......................................................................................................3-38
About Stock Size...................................................................................................3-38
About Stock Weight............................................................................................3-38
About Stock Color................................................................................................3-39
About Stock Type.................................................................................................3-39
About Drilled Holes.............................................................................................3-39
About Stock Front Coating...............................................................................3-39
About Stock Back Coating................................................................................3-39
About the Basic Settings Tab..........................................................................3-40
About Page(s)...........................................................................................3-40
About Stock Size.....................................................................................3-40
About Stock Weight...............................................................................3-40
About Stock Color...................................................................................3-40
About Stock Type....................................................................................3-41
About Drilled Holes................................................................................3-41
About Stock Front Coating.................................................................3-41
About Stock Back Coating..................................................................3-41
About Sides Imaged..............................................................................3-41
About Image Shift.................................................................................3-41
About the Image Quality Tab.........................................................................3-42
About Page(s)...........................................................................................3-42
About Color Balance..............................................................................3-42
FreeFlow Print Serveriv
Online Help
Page 7

Table of Contents
About Adjusted Preview.......................................................................3-43
About Color Mode..................................................................................3-43
About the Overprint and Enhancement Check Boxes.............3-44
About Halftones and Screens............................................................3-44
About RGB to Black for Text and Graphics...................................3-45
About Image Interpolation................................................................3-45
About Resolution....................................................................................3-46
About the Color Management Tab...............................................................3-46
About the Color Management Controls Area.............................3-46
About the Icons Used in the Color Management Tab.............3-47
About the CMYK Tab.............................................................................3-47
About the RGB Tab.................................................................................3-50
About the Gray Tab................................................................................3-53
About the Spot Processing Tab.........................................................3-54
About Destination Profile....................................................................3-55
About the Color Management Flow Diagram............................3-55
About Inserts.......................................................................................................................3-55
About Page(s)........................................................................................................3-55
About Quantity.....................................................................................................3-56
About Stock Size...................................................................................................3-56
About Stock Weight............................................................................................3-56
About Stock Color................................................................................................3-56
About Stock Type.................................................................................................3-56
About Drilled Holes.............................................................................................3-56
About Stock Front Coating...............................................................................3-56
About Stock Back Coating................................................................................3-56
About Time Stamps..........................................................................................................3-57
About Submission Time....................................................................................3-57
About Processing Start Time...........................................................................3-57
About Print Start Time.......................................................................................3-57
About Total Print Suspend Time....................................................................3-57
About Completion Time....................................................................................3-57
About Processing End Time.............................................................................3-57
About Print End Time.........................................................................................3-58
About Total Processing Suspend Time........................................................3-58
About the Option Conflict Gray-out Feature..........................................................3-58
Managing Print Jobs........................................................................................................3-58
Uploading a New Print Job to the Print Server.........................................3-59
Viewing Thumbnail Images of a Print Job................................................3-59
Making Multiple Job or Queue Selections..................................................3-59
Online Help
vFreeFlow Print Server
Page 8

Table of Contents
Changing Job Properties...................................................................................3-60
Renaming a Print Job.........................................................................................3-60
Moving a Print Job to a Different Queue....................................................3-60
Releasing a Job to Print.....................................................................................3-61
Deleting a Print Job.............................................................................................3-61
4 Queue Manager.........................................................................................4-1
Working with Printer Queues...........................................................................................4-1
About Default Queues........................................................................................................4-1
About the Queue Manager Window............................................................................4-2
Accessing the Queue Manager Window.......................................................4-3
Configuring the Queue Manager Window...................................................4-3
Understanding the Override Option...............................................................4-3
Creating New Queues........................................................................................................4-4
Creating a New Printer Queue...........................................................................4-4
About the Print Line.................................................................................4-5
Setting or Changing Queue Properties........................................................................4-6
Accessing the Queue Properties Window...................................................................4-6
Exiting from the Properties Window............................................................................4-6
About Queue Properties....................................................................................................4-7
About the More Actions Menu in Queue Manager...................................4-7
About the Queue Manager Icon Toolbar......................................................4-8
About Icon Use........................................................................................................4-9
About the Icons Used for the Queue Properties Tabs.................4-9
About the Unique Icons Used in Queue Properties..................4-10
About the Common Icons Used in Job and Queue
Properties.............................................................................................4-10
About the Basic Settings Tab..........................................................................4-13
About Quantity........................................................................................4-14
About Collation.......................................................................................4-14
About Administrative Pages...............................................................4-14
About Start Message.............................................................................4-15
About Sides Imaged..............................................................................4-16
About Format...........................................................................................4-16
About PDF/X Processing.......................................................................4-16
About Banner Page Message.............................................................4-17
About Stock List.......................................................................................4-17
About the Paper Stock Tab...............................................................................4-17
Strategies for Configuring the Paper Stock Tab.........................4-18
About Stock Name.................................................................................4-19
About Stock Size.....................................................................................4-19
FreeFlow Print Servervi
Online Help
Page 9

Table of Contents
About Stock Weight...............................................................................4-19
About Stock Color...................................................................................4-19
About Stock Type....................................................................................4-19
About Drilled Holes................................................................................4-19
About Stock Front Coating.................................................................4-19
About Stock Back Coating..................................................................4-19
About the Output Tab........................................................................................4-20
About Stapling/Finishing.....................................................................4-20
About Sides Imaged..............................................................................4-20
About Output Location........................................................................4-21
About Offset.............................................................................................4-21
About Output Order...............................................................................4-21
About Collation.......................................................................................4-21
About Collated Sets Offset Interval................................................4-21
About Output Delivery..........................................................................4-22
About the Image Quality Tab.........................................................................4-22
About Color Balance..............................................................................4-22
About Adjusted Preview.......................................................................4-23
About Color Mode..................................................................................4-23
About the Overprint and Enhancement Check Boxes.............4-24
About Halftones and Screens............................................................4-24
About RGB to Black for Text and Graphics...................................4-25
About Image Interpolation................................................................4-25
About Resolution....................................................................................4-26
About the Color Management Tab...............................................................4-26
About the Color Management Controls Area.............................4-26
About Destination Profile....................................................................4-35
About the Color Management Flow Diagram............................4-35
About the Image Placement Tab..................................................................4-35
About Layout Type.................................................................................4-35
About Image Rotation.........................................................................4-36
About Image Shift.................................................................................4-36
About the PDL Settings Tab.............................................................................4-36
About PostScript Resolution (dpi)....................................................4-37
About Minimum Line Width...............................................................4-37
About FreeFlow VI Project Container Filter (VPCF)...................4-37
Managing Printer Queues..............................................................................................4-37
Setting the Default Queue...............................................................................4-38
Deleting a Queue.................................................................................................4-38
Setting a Queue to Accept Print Jobs..........................................................4-38
Online Help
viiFreeFlow Print Server
Page 10

Table of Contents
Setting a Queue to Reject Print Jobs............................................................4-38
Setting a Queue to Release Print Jobs.........................................................4-39
Setting a Queue to Hold Print Jobs...............................................................4-39
Setting a Queue to Be Locked.........................................................................4-39
Setting a Queue to Be Unlocked....................................................................4-40
Enabling a Queue As a Hot Folder................................................................4-40
Disabling a Queue As a Hot Folder...............................................................4-40
5 Printer.............................................................................................................5-1
About the Stock Library Tab............................................................................................5-1
About the Paper Trays Tab...............................................................................................5-2
About the Icons Used in Printer........................................................................5-3
About the Consumables Tab...........................................................................................5-3
6 Administration............................................................................................6-1
About Administration.........................................................................................................6-1
Accessing the Administration Window..........................................................6-1
About the Icons Used for the Administration Tabs..................................6-2
About the Icons Used in Administration.......................................................6-3
About the System Tab........................................................................................................6-4
About the Restart and Shut down Section...................................................6-4
About the Backup Configuration Section.....................................................6-4
About the Restore Section..................................................................................6-5
About the Setup Tab...........................................................................................................6-5
About the Regional Settings Section..............................................................6-5
About Using Standardized Regional Settings................................6-6
About Using Multiple Regional Settings..........................................6-6
About the Job Section..........................................................................................6-6
About Scheduling Mode.........................................................................6-7
About Job Completion Options...........................................................6-7
About Thumbnail Range........................................................................6-7
About 2 Sided Conflict Resolution......................................................6-7
About PostScript Font Substitution....................................................6-7
About the Administrative Page Settings Section.......................................6-8
About Stock List.........................................................................................6-8
About Sides Imaged................................................................................6-8
About Site Message.................................................................................6-8
About Sender Name.................................................................................6-8
About the Finishers Section................................................................................6-9
About the Asset Section.......................................................................................6-9
About the User Access Tab...............................................................................................6-9
FreeFlow Print Serverviii
Online Help
Page 11

Table of Contents
About the User Accounts Section....................................................................6-9
About Adding a New User Account................................................6-10
About Editing a User Account...........................................................6-10
About the Password Management and Password Setting(s)
Section...............................................................................................................6-11
About the Automatic Logoff Section...........................................................6-12
About the Login Security Section..................................................................6-13
About the Accounting Tab.............................................................................................6-13
About the Accounting Logs Table.................................................................6-13
About the Records Menu.....................................................................6-14
About the Details Icon.........................................................................6-14
About the Export Accounting Records Icon.................................6-15
About the Printing Accounting Records Icon..............................6-15
About the Accounting Setup Icon...................................................6-16
About the Delete Icon..........................................................................6-16
About the Redisplay Icon....................................................................6-17
About the Network Tab...................................................................................................6-17
About the Socket Section.................................................................................6-17
About the LPR Section.......................................................................................6-18
About the WSD Section.....................................................................................6-18
About the SNMP Section..................................................................................6-18
About Common Settings.....................................................................6-18
About Enable Authentication Trap..................................................6-19
About the License Tab.....................................................................................................6-19
About the Load License Icon...........................................................................6-20
About the Properties Icon................................................................................6-20
Online Help
ixFreeFlow Print Server
Page 12

Table of Contents
FreeFlow Print Serverx
Online Help
Page 13

1
The Xerox FreeFlow Print Server
The FreeFlow® Print Server software provides an easy-to-use UI that enables quick access
to the following functions of your Xerox® printing system:
Note
Some features described are enabled through a Productivity Pack license.
Note
Depending on the configuration of your system, not all of the features described may
be available.
• Job Manager: Enables you to manage print jobs.
• Queue Manager: Enables you to manage print queues.
• Printer: Enables you to manage a library of stocks, enable or disable trays, and to
monitor consumption of the dry inks.
• Administration: Enables you to perform system administration tasks.
About the Xerox FreeFlow Print Server User Interface
The FreeFlow® Print Server software provides a user interface (UI) to control all of the
features and functions for your Xerox® printing system.
The UI consists of windows, tabs, and dialogs that are accessed with buttons and menus.
In addition, the UI displays status and error messages which provide feedback on job
processing.
Online Help
1-1FreeFlow Print Server
Page 14

The Xerox FreeFlow Print Server
About the Features of the User Interface (UI)
The following areas of the UI are displayed regardless of which window is open:
• Top Banner: This area contains helpful links to other windows of the UI, to external
support web sites, and to online Help documentation.
• Site Navigation: This area displays a navigation bar that includes tabs to help you
navigate the site quickly and easily.
• Status Area: This area indicates the status of the printer and of the print job, dry ink
levels, and paper levels.
Related Topics:
About the Banner
About the Status Area
About the Site Navigation Bar
About the Banner
The top banner remains the same regardless of which window is open. The banner
includes the following links:
• Xerox FreeFlow Print Server: Takes you to a product-specific web site that has
information about the Print Server.
• Logon: Returns you to the Logon window so you can log on to the system as a different
type of user. The link displays the type of user that you are currently logged in as.
• Logout: Logs you off the system.
• Language: Opens the Language and Region window where you can:
- Select the display language for the site
- Select the region used to determine the standard regional settings in the Setup
tab of Administration
• Help: Opens a menu where you can:
- View the Help documentation
- Print the Help documentation
- Print a configuration report
- Obtain information about the FreeFlow® Print Server
• Xerox Logo: Takes you to the Xerox® home web site.
FreeFlow Print Server1-2
Online Help
Page 15

The Xerox FreeFlow Print Server
Related Topics:
Supported Languages and Regions
Selecting a Display Language
Selecting a Region
Supported Languages and Regions
As of the 2.0 launch, the following languages are supported in the Xerox® Freeflow® Print
Server and are automatically installed on supported printers:
• German
• US English
• Spanish
• French
• Italian
• Dutch
• Portuguese/Brazilian
• Russian
Note
Japanese is supported. However, it is implemented and managed by FX and is not
included in the global language set provided by the FreeFlow Print Server software.
Selecting a Display Language
The Language link enables you to select the display language for the FreeFlow® Print
Server software.
1. Click the Language link.
2. Select the desired display language.
3. Click Save.
The entire display is updated to appear in the selected language.
Selecting a Region
The Language link enables you to select the region for use in the Regional Settings
section of the Setup tab in Administration.
1. Click the Language link.
2. Select the desired region.
3. Click Save.
The standardized regional settings for the region selected are applied to the options
in the Standard Regional section of the Setup tab in Administration.
Online Help
1-3FreeFlow Print Server
Page 16
The Xerox FreeFlow Print Server
About the Site Navigation Bar
The Site Navigation bar is always displayed under the status area of the screen.
Use the Site Navigation bar to access the following sections of the UI:
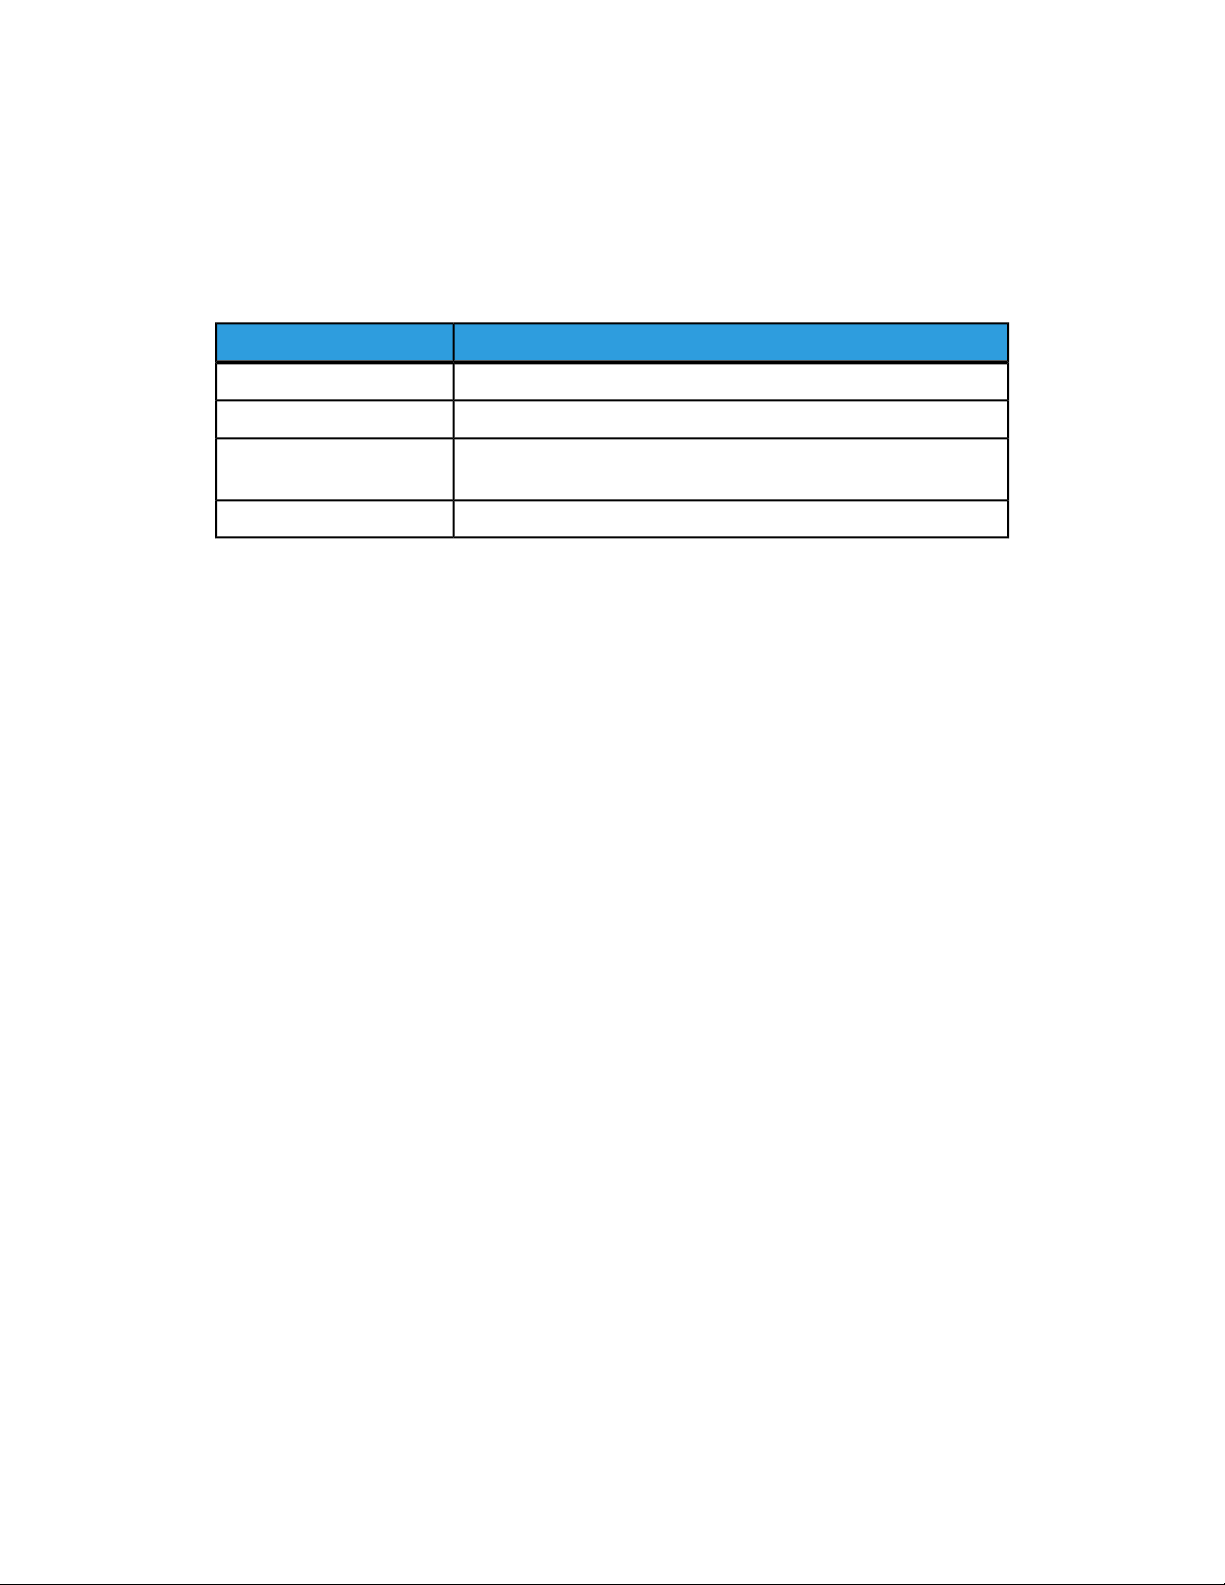
Table 1. Site Navigation Bar Options
DescriptionName
Enables you to manage all print jobs.Job Manager
Enables you to manage all print queues.Queue Manager
Printer
Enables you to manage paper stock and printer trays and to
monitor the use of the dry inks.
Enables you to access administrative functions.Administration
About the Status Area
The user interface includes a status area that is always displayed. It contains special
features that communicate job and printer status, monitor ink and paper usage, and
help you to perform basic, frequent actions.
The status area includes the following features:
• Special Fields
- Status Area: Provides the current status of the Print Server and the printer.
- Printer Message Field: Displays any printer fault messages or error warnings.
• Buttons
- Pause Printer: Pauses the printing of the job.
- Resume Printer: Resumes the printing of the job.
• Mimic
- Printer Mimic: Indicates status and/or state of the printer and its components
such as busy, ready, faulted, and paused conditions.
• Display Options Indicators
- Job Progress: Shows the printing and processing progress made for an active
print job.
- Consumable Levels: Displays the current level of each dry ink.
- Paper Tray Levels: Displays the type of paper and the remaining volume of
paper in each tray.
FreeFlow Print Server1-4
Online Help
Page 17
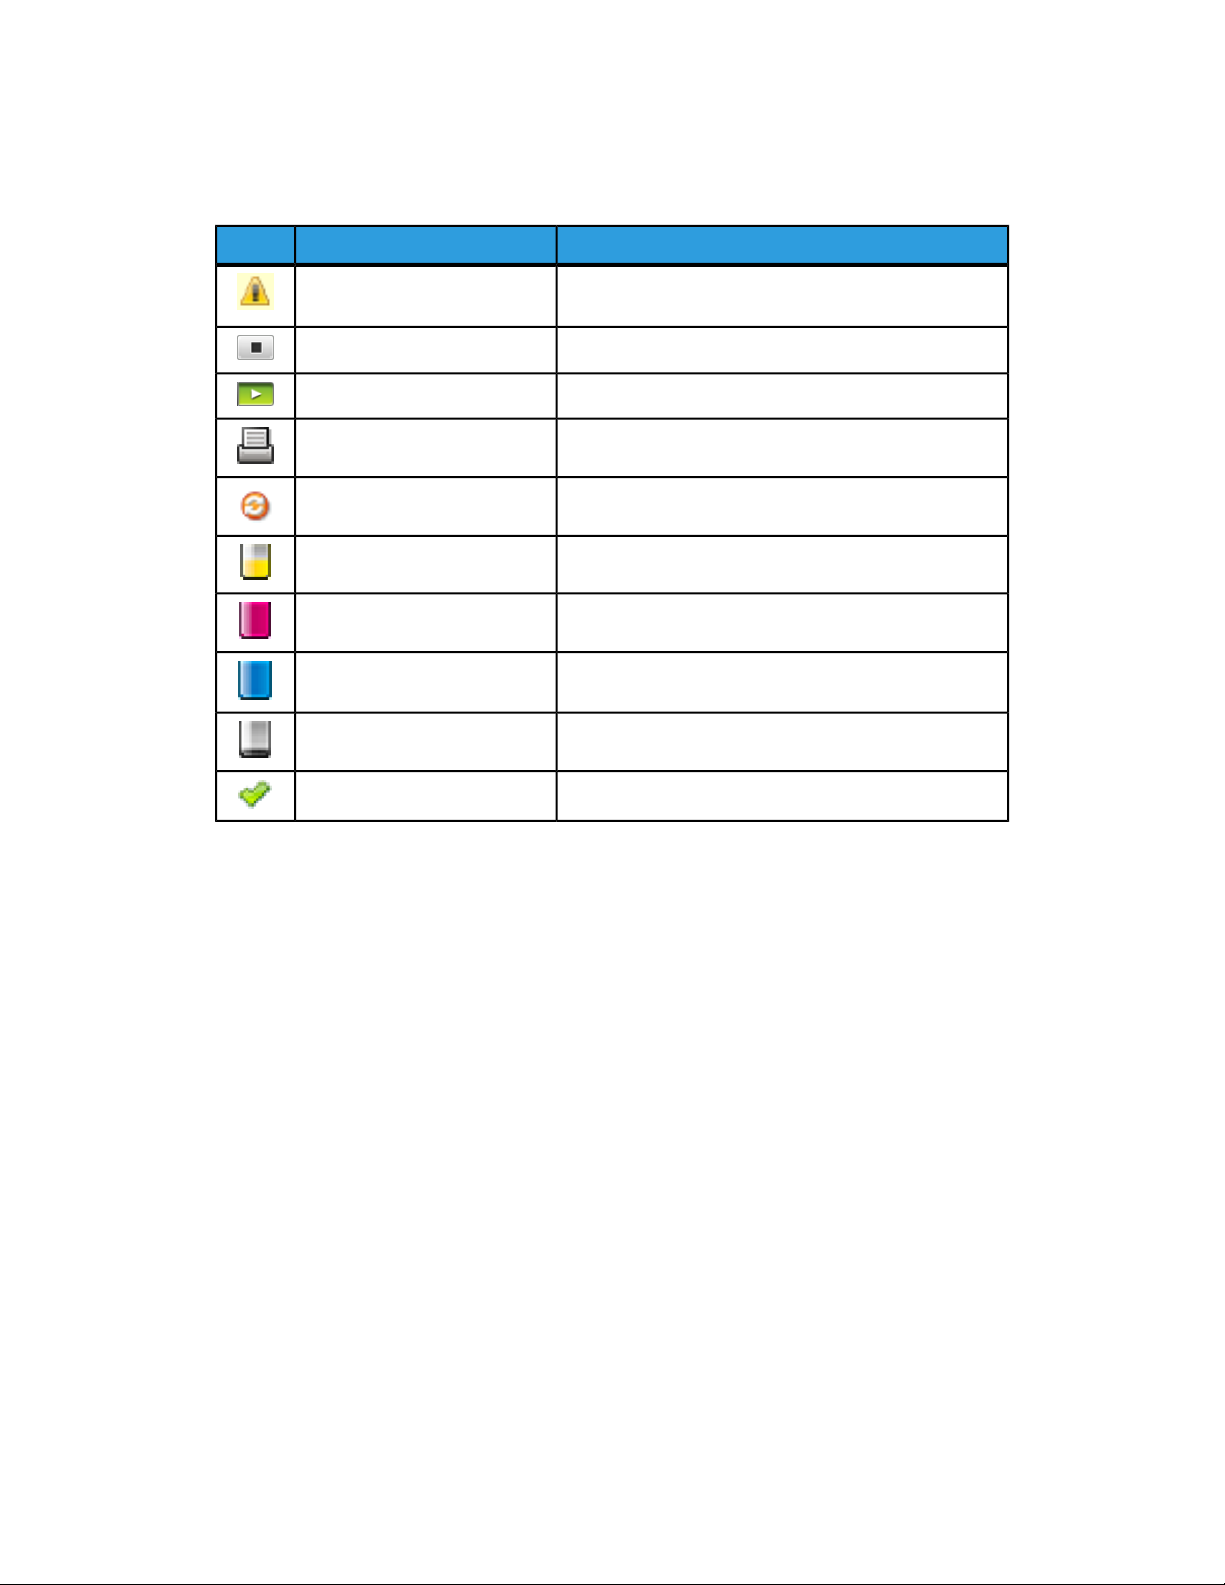
About the Icons Used in the Status Area
Table 2. Identification of Icons Used in the Status Area
DescriptionNameIcon
The Xerox FreeFlow Print Server
Alert
Indicates that the printer needs attention or that the
indicated ink supply is low.
Enables you to pause the printer.Pause Printer
Enables you to resume the printer.Resume Printer
Informs you of a job’s printing status and progress.Printing Progress
Informs you of a job’s processing status and progress.Processing Progress
Indicates the remaining level of yellow dry ink.Yellow Ink Level Indicator
Indicates the remaining level of magenta dry ink.Magenta Ink Level Indicator
Indicates the remaining level of cyan dry ink.Cyan Ink Level Indicator
Indicates the remaining level of black dry ink.Black Ink Level Indicator
Indicates an acceptable level of dry ink.Green Check Mark
About the Printer Message Field
The Printer Message field displays status messages for the printer such as:
• Printer Idle
• Printer Warming Up
• Printer Offline
About the Pause Printer and Resume Printer Buttons
The Pause Printer and Resume Printer buttons toggle the printer between paused and
resumed states.
About the Printer Mimic
The Printer Mimic displays a graphical representation of the printer.
The mimic indicates the following printer conditions:
• Idle
Online Help
1-5FreeFlow Print Server
Page 18

The Xerox FreeFlow Print Server
• Busy
• Ready
• Faulted
• Paused
By hovering the cursor over a specific area of the mimic, you can obtain any additional
information that may be available.
About the Display Options
The Display Options menu enables you to quickly view the status of print jobs, ink levels,
and paper levels.
Using the Job Progress Option to Monitor Your Print Job
The Job Progress option enables you to monitor the progress of your print job.
1. From the Display Options menu on the UI, click Job Progress.
A window appears with both processing and printing information about:
• percentage complete
• number of pages printed
• number of images printed
• number of sets completed
2. To make a different selection, click the Right-Arrow button next to the display window.
Related Topics:
About Job Processing
Using the Consumable Levels Option to Monitor Dry Ink Levels
The Consumables Levels option enables you to monitor the remaining level of each dry
ink.
1. From the Display Options menu on the UI, click Consumable Levels.
A window appears that displays an icon for each color of dry ink used. The height of
the colored area in the icon represents the level of dry ink remaining. The following
colored icons appear:
• Yellow
• Magenta
• Cyan
• Black
• Black2
FreeFlow Print Server1-6
Online Help
Page 19

The Xerox FreeFlow Print Server
The window also displays a percentage of ink remaining, as well as a graphic status
indicator:
• Check Mark: Indicates that the dry ink level is satisfactory for continued printing.
• Attention Symbol: Indicates that the dry ink level is not satisfactory for continued
printing and must be replenished.
2. To make a different selection, click the Right-Arrow button next to the display window.
Related Topics:
About the Consumables Tab
Using the Paper Tray Levels Option to Monitor Paper Usage
The Paper Tray Levels option enables you to monitor the remaining amount of paper
in each tray used.
If the color of the Tray icon is yellow, the remaining paper supply is low and should be
refilled.
If the color of the Tray icon is red, the paper tray is empty and must be filled before
printing can be resumed.
1. From the Display Options menu on the UI, click Paper Tray Levels.
A window appears that displays the following information for each paper tray in use:
• Tray Icon and Name
• Paper Size
• Color
• Weight
2. Use the scroll arrow to view additional trays.
3. To make a different selection, click the Right-Arrow button next to the display window.
Related Topics:
About the Paper Trays Tab
About the Default Home Screen
The Job Manager window is the default Home screen for the system.
The Job Manager window enables you to perform tasks related to jobs. It organizes
jobs based on their status such as active, held, or completed. It also enables you to
perform operations on and select options for individual jobs or groups of jobs.
Online Help
1-7FreeFlow Print Server
Page 20

The Xerox FreeFlow Print Server
Additional Information and Settings
The FreeFlow® Print Server software provides access to additional information through
tabs, menus, and action icons.
Tabs provide access to different information, settings, and options from within the same
window.
Menus enable you to control functionality at the job or queue level. Menus are accessed
by right-clicking or double-clicking on a particular job, queue, or list item.
Action icons make it easy to perform basic tasks such as to create new or edit existing
queues and user accounts, and to print or export accounting records.
About User Interface (UI) Button Use
The most-frequently used buttons on the UI include:
• Ok: Saves all changes to a tab or dialog and closes the active window.
• Save: Saves your changes and closes the window.
• Apply: Saves all changes to a tab or dialog without closing the window. You do not
need to select Apply before selecting Ok to save changes.
• Cancel: Closes a window without saving changes.
• Close: Closes a window after saving the changes.
• Reset: Restores previous settings without leaving the window, if the changes you
made are incorrect.
FreeFlow Print Server1-8
Online Help
Page 21

2
Logon and Password Security
The Logon menu enables you to log on, log off, and change your password.
About System Logon and Logoff
You must log on to the Xerox® Freeflow® Print Server system before you can use all the
available features.
The following user types are allowed access to the FreeFlow® Print Server:
• User: The walk up User has minimum access rights.
• Operator: The Operator requires a logon and a password and has restricted access.
The Operator level is designated for the Print Operator.
• System Administrator: The System Administrator requires a logon and a password
and has restricted access; however, the System Administrator has fewer restrictions
than the Operator. The System Administrator can access and control all system and
job data except service data and service functions.
• Customer Service Engineer: The Customer Service Engineer requires a logon and a
password.
It is recommended that you log out of the FreeFlow® Print Server software rather than
only closing the web site.
Logging On to the System
For access to the Xerox® Freeflow® Print Server software, you must correctly log on to
the system.
You must know your User Name and Password before you can log on to the system.
Online Help
2-1FreeFlow Print Server
Page 22

Logon and Password Security
1. At the Logon menu, enter your User Name (User Level) using either method below:
• Type your User Name directly into the field.
• Select your User Name from the menu.
2. Enter your password.
Note
To see the password you entered, click the Eye icon.
3. Click Logon.
Note
To maintain security, the logon passwords should be changed at regular intervals.
Note
Selecting the Remember Me check box enables you to log on to the system within
a designated time after your previous logon without having to enter your password.
This feature is only available if the system administrator enabled the option in the
Administration section of the software.
Related Topics:
Changing User Passwords
Changing Passwords for the Operator or System Administrator
About Weak and Strong Passwords
Logging Off the System
When you are done using the system, it is recommended that you log off before closing
the web site.
If the Default Logoff is enabled, the system automatically logs you off after a certain
period of inactivity.
Click the Logout link that appears under the URL address at the top of any window.
The Logon window is displayed.
About Password Security
Password security is an integral part of maintaining the security of your entire Xerox
Freeflow® Print Server system.
®
The logon passwords for the System Administrator and Operator should be changed
after the system has been installed and at regular intervals thereafter.
Related Topics:
FreeFlow Print Server2-2
Online Help
Page 23

Logon and Password Security
About Weak and Strong Passwords
Changing User Passwords
About Weak and Strong Passwords
The Xerox® Freeflow® Print Server provides the means for enforcing a strong password
policy.
Weak passwords do not meet strict security guidelines. The only requirement for weak
passwords is that they contain zero to eight alphanumeric characters, as determined by
the system administrator.
Strong passwords can help you meet strict security guidelines. Strong passwords must
contain all of the following criteria:
• At least eight characters
• At least one upper case, alphabetic character
• At least one numeric character (0-9)
• At least one special character including, but not limited to: !, @, $, %, period (.),
underscore (_), and hyphen (-)
The following behaviors apply to the Strong Password policy:
• Strong Password Checking is disabled by default.
• The Strong Password policy applies to all accounts.
• The Strong Password policy and the Login Attempts Allowed policies can be controlled
independently.
The Strong Password feature can be enabled by account level. When the feature is
enabled for a user level, new users of that account level must create a strong password
for their account. The passwords for existing users of that account level can remain the
same. Users can continue to use their passwords because the passwords were created
before the Strong Password feature was enabled.
Related Topics:
About the Password Management and Password Setting(s) Section
Enabling Strong Passwords
Changing User Passwords
Individual users can change their own passwords.
1. At the Logon window, click the Right-Arrow button in the Change Password field.
2. In the Change Password window, type your current password into the Old Password
field.
3. Type your new password into the New Password field. Typed characters appear as
asterisks.
To see the characters typed, click the Eye icon.
Online Help
2-3FreeFlow Print Server
Page 24

Logon and Password Security
Weak passwords require zero to eight alphanumeric characters, as determined by
your System Administrator.
4. Type the same new password again into the Confirm New Password field.
5. Click Change.
If you decide not to save the change, select Cancel to restore the original password.
An error message appears if any entry is not valid.
Related Topics:
About Weak and Strong Passwords
About the Password Management and Password Setting(s) Section
Enabling Strong Passwords
Changing Passwords for the Operator or System Administrator
Only the System Administrator has the authority to set and change the passwords for
the Operator and System Administrator. Individual users can change their own passwords.
Setting Password Expiration
The Password Management section of the User Access tab in Administration offers the
System Administrator many password settings including the ability to set a password
expiration duration on a user account.
1. Select the Set password to expire after a duration check box.
2. Use the Up and Down arrows to select the desired number of days.
The valid range is from 1 day to 25 days.
3. Click Save.
FreeFlow Print Server2-4
Online Help
Page 25

3
Job Manager
The Job Manager section of the user interface enables you to:
• preview jobs
• print jobs
• hold jobs
• resume jobs
• delete jobs
• change job properties and options
The Job Manager is the default screen of the Xerox® Freeflow® Print Server user interface.
Accessing the Job Manager Window
Click Job in the navigation bar.
Online Help
3-1FreeFlow Print Server
Page 26

Job Manager
About the Job Manager Window
The Job Manager window contains tabs, buttons, More Actions menu, Search Job Details
field, and the job list.
About Job Manager Menu
The menu enables you to select which category or state of print jobs within the system
is displayed in the resulting list. If necessary, use the scroll bar to view additional jobs
not shown.
The Job Manager menu includes the following options:
• All Jobs
• Active
• Held
• Completed
About the All Jobs Menu Option
Selecting All Jobs displays a list of the jobs that are in the following states:
• being received
• waiting to be printed
• being printed
• being saved
Note
Once a job is saved, it is no longer an active job.
About the Active Menu Option
Clicking Active displays a list of the jobs that are in the process of being printed.
About the Held Menu Option
Held jobs are those that are in the printer queue, but are not being printed.
Clicking Held displays a list of the jobs that cannot be printed because they are being
held or because of a fault or error.
FreeFlow Print Server3-2
Online Help
Page 27

Job Manager
About the Completed Menu Option
Completed jobs are those that have already been printed.
Clicking Completed displays a list of jobs that are completed.
Note
If Retain PDL File is enabled, the PDL is kept in the system for later printing from the
Completed list.
About the Job Manager Toolbar
The toolbar offers only a couple of the options available from the More Actions menu.
The toolbar includes:
• Properties: Enables you to view and modify the properties of an existing queue.
• Resume: Starts to print the held job.
• Hold: Prevents the queue from automatically releasing jobs to print. Jobs can only
be printed once they are manually set to be released or if the queue status is changed.
About the More Actions Menu in Job Manager
Note
All options in the More Actions menu are also available by right-clicking any entry in the
job list.
The More Actions menu in the Job Manager includes:
• Upload New Job: Enables you to upload a print job to the Print Server.
Note
Jobs sent to the Print Server must be of a PDF or image file format.
• Properties: Enables you to change the property options of a print job.
• Thumbnails...: Enables you to view the print job before it is printed.
• Print Next: Prints the next job.
• Resume: Starts to print the held job.
• Hold: Prevents the queue from automatically releasing jobs to print. Jobs can only
be printed once they are manually set to be released or if the queue status is changed.
Online Help
3-3FreeFlow Print Server
Page 28

Job Manager
• Move to Queue: Moves the print job to the designated queue.
• Delete: Enables you to delete an existing print job.
• Select All: Highlights all of the print jobs in the job list.
• Clears All: Clears all selected (highlighted) print jobs in the job list.
• Redisplay: Updates the job list displayed.
Note
To choose more than one print job when selecting the Delete and Hold options, use
either method below:
• Press and hold down the <CTRL> (Control) key and select each individual job.
• To select multiple print jobs that are sequential in the list, press and hold down the
<SHIFT> key while selecting the first and last job names you want to select. This
action highlights the first and last selected job names and all jobs in between.
About the Search Field
The search field enables you to perform a key word search to reduce the number of
resulting jobs displayed. You can search on specific job details across all fields.
This feature makes a lengthy list more manageable by displaying only those jobs of
particular interest.
For example, to see only those jobs that are ineligible, enter the word ineligible into the
search field. To view only those jobs submitted on a given day, enter that day of the
week or calendar date.
When you start typing in the search field, a window appears offering potential matches
to the string of characters entered. Select any of the choices from the window or continue
typing.
To view the entire job list again, clear the Search Job Details field and press <ENTER>,
or click the X.
Configuring the Display of the Window
1. To change the order of the data categories that appear in the list, click on a column
heading and drag it to the desired location in the heading row.
2. To change the width of a displayed column, do the following steps:
a) Click on the desired column separator.
The mouse cursor changes to a double-headed arrow.
FreeFlow Print Server3-4
Online Help
Page 29

Job Manager
b) Hold down the left mouse button and drag the column separator appropriately:
left to decrease column width;
right to increase column width
Note
If the width of a column is too small to display the entire contents of a cell, hover
the cursor over the cell to view the full contents.
About Ineligible Jobs
A print job is ineligible for printing because the printer is not set up appropriately to
accommodate the configured job options. When this situation occurs, the job status in
the queue is updated to say Ineligible - Waiting for Resources. Additionally, an alert
icon, an Ineligible Job message, and a Details button appear in the banner area of the
Job Properties window.
For more information about the ineligible job, click the Details button located in the
Job Properties window.
An ineligible job cannot be printed because a resource required for printing is not
available. For example, if you send a job that uses a Stock property selection of Ledger
to a printer that is not loaded with Ledger stock, the job becomes ineligible. The job is
placed in the Paused list where it remains ineligible until either Ledger stock is loaded
at the designated printer or you change the job Stock property to a stock that is loaded
at the printer.
Clearing Ineligible Jobs Using the Ineligible Job Window
1. Open the Job Properties window by double-clicking the ineligible job.
2. Click the Details button in the Job Properties window.
The Ineligible Job window opens and displays a list of the resources that are needed
for the job to be printed.
3. Perform one of the following:
• Load the needed resources. When the system detects that the resources are
available, the job is automatically scheduled to print. For example, if the job
requires blue stock, the job starts to print when blue stock is added at the printer
and programmed into the Printer Manager.
• Change the job property setting to a resource that the printer currently supports.
For example, if the requested job property stock setting is blue stock and the
printer does not contain blue stock, but does contain white stock, change the job
property stock setting to white. The job is then eligible to print.
Online Help
3-5FreeFlow Print Server
Page 30

Job Manager
4. Click the Previous and Next buttons to move back and forth through the ineligible
jobs.
5. Click Close to exit the window.
About Faulted Jobs
When a print job has faulted, the job status in the queue is updated to say Faulted.
Additionally, an alert icon, a Faulted Job message, and a Details button appear in the
banner area of the Job Properties window.
A faulted job may contain errors that cause any of the following results:
• The job is prevented from being printed.
• The job is printed with errors.
• Only the cover sheet is printed.
For more information about clearing the job fault, click the Details button on the Job
Properties window.
Clearing Faults Using the Faulted Job Window
1. Open the Job Properties window by double-clicking the faulted job.
2. Click the Details button in the Job Properties window.
The Faulted Job window appears.
3. Follow the instructions to clear the fault.
4. Click the Previous and Next buttons to move back and forth through multiple faulted
jobs.
5. Click the Clear Fault button to dismiss the fault and proceed with the job.
6. Click Close to exit the window.
About the Job Properties Window
The Job Properties window enables you to review the details of Ineligible and Faulted
jobs, to change the properties of a print job, and to expedite printing.
The Job Properties window includes the following property tabs:
• Basic Settings: Contains default job property settings for jobs submitted to the queue.
• Paper Stock: Contains stock and tray choices for your print job.
• Output: Contains features used to determine job output options.
• Image Quality: Enables you to make image quality adjustments.
FreeFlow Print Server3-6
Online Help
Page 31

Job Manager
• Color Management: Contains two sections: the color data flow diagram and the
controls area. The color data flow diagram represents the paths that color data follow
while being processed by the system. The controls area enables you to set functions
that enhance the quality of the printed image based on the type of file printed and
the fonts used.
• Image Placement: Contains features that enable you to modify original images for
output.
• Special Pages: Contains settings you can select to configure and add the following
types of special pages into a print job:
- Front Cover
- Back Cover
- Exceptions
- Inserts
• Time Stamps: Provides information about submission, processing, and print times.
Accessing the Job Properties Window
To access the Job Properties window, use any method below:
• Double-click the job.
• Right-click the job and select Properties.
• Select the job and click the Properties icon in the toolbar.
• Select the job and select Properties from the More Actions menu.
Exiting from the Properties Window
To return to either the Job Manager window or the Queue Manager window from the
Properties window without saving changes, use any method below:
• Click Cancel.
• Click the X icon in the upper, right corner of the window.
• Press the <Esc> key.
About Icon Use
Icons are used throughout the user interface to provide quick access to frequently used
actions.
Some icons are used throughout the entire UI. Other icons are unique to a particular
tab.
3-7FreeFlow Print Server
Online Help
Page 32

Job Manager
Related Topics:
About the Common Icons Used in Job and Queue Properties
About the Unique Icons Used in Queue Properties
About the Icons Used for the Job Properties Tabs
Table 3. Identification of Icons Used for Job Properties Tabs
Tab NameIcon
Basic Settings
Paper Stock
Output
Image Quality
Color Management
Image Placement
Special Pages
Time Stamps
FreeFlow Print Server3-8
Online Help
Page 33

About the Unique Action Icons Used in Job Properties
Table 4. Identification of Action Icons Unique to Job Properties
DescriptionNameIcon
Releases a pending job.Resume
Holds an active print job.Hold
Job Manager
Thumbnails...
Print Next
Move to Queue
Faulted Job
Ineligible Job
Enables you to view thumbnail images of a print job
before it is printed.
Advances a job in the print queue so that it is the next
job to be printed.
Enables you to move the print job to a different
printer queue.
Removes a print job from the queue.Delete a Job
Indicates that the job has encountered an error while
printing.
Indicates that the printer is not set up appropriately
to accommodate the job properties selected. Example:
Legal sized paper is not loaded in the paper tray.
About the Common Icons Used in Job and Queue Properties
Table 5. Identification of Common Icons Used
DescriptionNameIcon
General
Online Help
Override Disabled
Override Enabled
Indicates that there is no queue override applied to
the property.
Indicates that the queue property option selected
is set up to override the same option that was set
as a job property in Job Manager.
Provides access to the Job Properties window.Properties
3-9FreeFlow Print Server
Page 34

Job Manager
Basic Settings
DescriptionNameIcon
Output
Uncollated
Collated
One Sided
Two Sided
Head-to-Toe
Indicates that the pages are not printed in sequence,
but by quantity. Example: 1, 1, 1, 2, 2, 2, 3, 3, 3.
Indicates that the pages of the print job are printed
sequentially by set. Example: 1, 2, 3, 1, 2, 3, 1, 2, 3.
Indicates a file format of PDF.PDF
Indicates a file format of TIFF.TIFF
Indicates a file format of PostScript.PostScript
Indicates that the file format is not known.Unknown Format
Indicates that the job is printed on only one side of
the paper.
Indicates that the job is printed on both sides of the
paper.
Indicates that the job is printed with the top of the
images positioned at opposite ends of the sheet of
paper.
Output Delivery System Specified
Up
Down
Output Order Ascending (1-N)
Output Order Descending (N-1)
Output Order System
Specified
Indicates that the output delivery method is specified by the system.
Indicates that printer pages are delivered face up.Output Delivery Face
Indicates that printer pages are delivered face down.Output Delivery Face
Indicates that the output order has page 1 on top
and the last page on the bottom.
Indicates that the output order has the last page
on top and page 1 on the bottom.
Indicates that the output order is specified by the
system.
Indicates that slip sheets are in use.Slip Sheets Enable
Indicates that slip sheets are not in use.Slips Sheets Disable
FreeFlow Print Server3-10
Online Help
Page 35

Image Quality
Job Manager
DescriptionNameIcon
Indicates a color mode of Normal.Normal
Normal with Enhanced
Gloss
System Specified
System Specified
Nearest Neighbor
Bi-Linear
Indicates a color mode of Normal with Enhanced
Gloss.
Indicates a color mode of Grayscale.Grayscale
Indicates a color mode of Fast Black.Fast Black
Indicates that halftone screen used is system selected.
Indicates that a Dot halftone screen is in use.Dot
Indicates that a Line halftone screen is in use.Line
Indicates that a Stochastic halftone screen is in use.Stochastic
Indicates that the interpolation method used is
system selected.
Indicates that the Nearest Neighbor interpolation
method is in use.
Indicates that the Bi-Linear interpolation method is
in use.
Filtered
Smart
Indicates that the Filtered interpolation method is
in use.
Indicates that the Smart interpolation method is in
use.
Online Help
3-11FreeFlow Print Server
Page 36

Job Manager
Image Placement
DescriptionNameIcon
Indicates that no layout type is selected.None
N Up
Booklet
Signature
Indicates that the layout type N Up is selected where
multiple pages of content can be printed on a single
sheet of paper.
Indicates that the layout type Booklet is selected
where the content is bound and usually has a cover.
Indicates that the layout type Signature is selected
where a large sheet of paper is printed with four or
a multiple of four pages that when folded creates
a section of a book.
Indicates that the page display is vertical.Portrait
Indicates that the page display is sideways.Landscape
Indicates that the image is not rotated.Rotation 0 Degrees
Indicates that the image is rotated 180 degrees.Rotation 180 Degrees
About the Basic Settings Tab
The Basic Settings tab enables you to view and change default job settings that are
applied to jobs submitted to the queue.
From the Basic Settings window you can configure the following basic printing properties:
• Quantity
• Collation
• Administrative Pages
• Start Message
• Pages to Print
• Format
• Process as PDF/X check box
• Disable Printer Simulation for PDF/X Jobs check box
• Banner Page Message
• Sides Imaged
FreeFlow Print Server3-12
Online Help
Page 37

• Stock List
• Bytes Processed
• Images Processed
• Total Pages Printed
• Sets Completed
When you are finished making selections, click either:
• Cancel to exit the window without saving your selections
• Save to save your selections and close the window
About Quantity
Use the Up and Down arrows to change the number of desired prints.
About Collation
Click your preference for collated or uncollated print sets.
Job Manager
About Administrative Pages
Administrative Pages are optional pages that can be printed with the job. Either the
System Administrator or the Operator can configure a print job to include Administrative
Pages options.
Different Administrative Pages can be enabled for each print job, or one Administrative
Page can be created for a several print jobs.
The types of Administrative Pages that can be printed for a job include the following:
• Banner Pages
• Attributes Report
Related Topics:
About Banner Pages
About Attribute Reports
About Banner Pages
A Banner Page is a break page that prints at the beginning of each job and contains
specific job information by default.
Banner Pages provide the following information:
• Job Name: Specifies the name of the job and is used to identify and track the job in
the queue.
3-13FreeFlow Print Server
Online Help
Page 38

Job Manager
• Job Sender: The name of the person who sent the job. This field cannot be edited.
• Job Recipient: The name of the person who is to receive the job. If you do not know
the name of the intended recipient, you may enter a recipient location.
• Banner Page Message: Information you want to be printed on the Banner Page.
• Printing Date and Time: Specifies when the job was printed.
• Number of Copies: The number of job copies that were printed.
• Product Name and Current Software Version
• Account Number: Can be a number used for billing purposes.
• Job ID: The job identification set at the Print Server.
• Server Name and Queue Name: Identifies the server and queue.
To include a printed Banner Page as the first page of the job, select the Print Banner
Pages check box.
Important
The Print Banner Pages check box must be selected for the Banner Page Message to
be printed.
About Attribute Reports
The Attributes Report is a one-page summary of the selected job or queue settings.
The Attributes Report includes information about the following:
• Job Identification
• Stock
• Output
• Image Quality
To print an Attributes Report, select the Print Attributes Report check box.
To view the Attributes Report, open the Properties window for the job or queue and click
the View Report button.
About Start Message
The Start Message box is intended for you to record any special instructions or
information for the print operator. The Start Message is not printed.
Type any special instructions or information for the print operator into the message box.
Example: You can include a description of the queue or include directions such as, “Send
only 8.5 x 14 inch jobs.”
FreeFlow Print Server3-14
Online Help
Page 39

Job Manager
About Pages to Print
Select the Print All Pages check box or use the Up and Down arrows to designate the
page range to be printed. The From field represents the first page to be printed, and the
To field represents the last page to be printed.
About Format
Use the menu to make one of the following selections:
• PDF
• PostScript
• TIFF
• JPEG
• Unknown
Note
If you select either PostScript™ or PDF, two additional check boxes appear:
• Process as PDF/X
• Disable Printer Simulation for PDF/X Jobs
About PDF/X Processing
When the Process as PDF/X check box is enabled, the Output Intent profile specified in
a PDF/X job is applied. Some CMYK and RGB settings are ignored as they are incompatible
with PDF/X. PDF jobs that are not PDF/X compliant print normally using the color settings
specified in the Color Management tab.
If the Disable RGB Emulation for PDF/X Jobs is selected, the Destination Profile is only
applied to Device CMYK colors.
Note
The Color Mode option must be set to Normal to enable PDF/X support. When the Color
Mode option is set to Grayscale, the PDF/X controls are automatically cleared and are
not available.
Note
If the option is viewed from a Queue Properties window, an Override icon is available
next to the option. Click the Override icon to lock (override) or unlock the setting. When
an Override icon is locked, the settings associated with the override take precedence
over what is configured in the job.
Online Help
3-15FreeFlow Print Server
Page 40

Job Manager
About Banner Page Message
The Banner Page Message box is intended for the user’s own message or notes. The text
entered in the message box is printed along with the Job ID, server information, and
queue information.
Important
The Print Banner Pages check box must be selected for the Banner Page Message to
be printed.
Type directly into the message box, the desired text to be printed on the Banner Page
of the print job.
About Sides Imaged
This option determines the placement and positioning of the image or text on the page.
• 1 Sided: Only the front side of the sheet of paper is printed.
• 2-Sided: Both the front and the back sides of the paper are printed.
• Head-to-Toe: 2-sided printing where the top of each page is positioned at opposite
ends of the sheet of paper. To read the back side of the sheet, turn the sheet over
from top to bottom.
About Stock List
This option displays a table that lists all available stock papers loaded in the printer and
ready for use. If you make a selection from the stock list, you do not have to configure
the following properties on the Paper Stock tab:
• Size
• Color
• Type
• Weight
• Coating
About Job Processing
Job processing information is updated at regular intervals and at significant events.
The Job Processing options include:
• Bytes Processed
• Images Processed
• Total Pages Printed
FreeFlow Print Server3-16
Online Help
Page 41

Job Manager
• Sets Completed
Note
This information is also displayed in the Display Options window of the Status Area.
Related Topics:
Using the Job Progress Option to Monitor Your Print Job
About the Paper Stock Tab
Note
The features and options available depend upon the configuration of your system.
Note
If you selected a stock from the Stock List on the Basic Settings tab, the following
properties are pre-selected:
• Size
• Weight
• Color
• Type
• Front Coating
• Back Coating
If you did not select a stock from the Stock List, you can use the properties listed above
to configure the paper stock options. Additionally, you will need to select an option for
the Drilled property.
When you are finished making selections, click either:
• Cancel to exit the window without saving your selections
• Save to save your selections and close the window
Related Topics:
Strategies for Configuring the Paper Stock Tab
Strategies for Configuring the Paper Stock Tab
Note
The features and options available depend upon the configuration of your system.
Choose from the following strategy options:
• Use the default stock settings.
Online Help
3-17FreeFlow Print Server
Page 42

Job Manager
Any attributes not specified either by the submitter or in the data file are acquired
from the queue defaults.
• Select a stock from the Stock List.
This option ensures that the job uses an available stock.
• Set all properties except for Size to Use-Ready.
The system uses any available stock of the correct size. When using this option, you
can either select a size, or permit the size to be determined by the data file.
Note
If a job uses multiple page sizes, do not to set a specific size.
• Set properties to Unspecified.
• Select the Custom option for the property and enter a unique value.
Note
If the selections are not available in the printer when the job is ready to print, the
job becomes ineligible or creates a Stock Not Loaded fault.
About Stock Name
If you selected a stock from the Stock List on the Basic Settings tab, that stock name
appears in this field.
About Stock Size
Select the desired paper size.
If you select Custom, the Width and Height fields appear where you can enter the
appropriate measurements.
Note
The acceptable range for each dimension appears under its entry field.
About Stock Weight
Select the desired paper weight.
Note
The supported media weight is 70-250 GSM.
About Stock Color
Select the desired paper color.
If you select Custom, an additional field appears where you can enter the desired color.
FreeFlow Print Server3-18
Online Help
Page 43

Job Manager
About Stock Type
Select the desired type of stock.
If you select Custom, an additional field appears where you can enter the desired stock.
About Drilled Holes
Select the desired number of holes to be drilled.
About Stock Front Coating
Select the desired coating for the front side of the print.
About Stock Back Coating
Select the desired coating for the back side of the print.
About the Output Tab
The Output tab enables you to configure finishing options. Finishing is a general term
that refers to the processes that are typically performed on a job after it is printed. The
specific finishing options that are available vary based on the capabilities of your printer
and any attached finishing units. If no finishing unit is available, the default setting is
None.
From the Output window you can configure the following basic printing properties:
• Stapling/Finishing
• Sides Imaged
• Output Location
• Offset
• Collation
• Output Delivery
• Collated Sets Offset Interval
• Output Order
• Slip Sheets
• Slip Sheets Stock
When you are finished making selections, click either:
Online Help
3-19FreeFlow Print Server
Page 44

Job Manager
• Cancel to exit the window without saving your selections
• Save to save your selections and close the window
About Stapling/Finishing
Select the desired option for stapling, hole punching, and/or folding.
Note
Depending on your selections, additional Stapling and/or Hole Punch menus or options
may appear where you can make additional selections.
Note
The graphical representation of the printed pages is updated to show the results of the
options selected.
About Sides Imaged
This option determines the placement and positioning of the image or text on the page.
• 1 Sided: Only the front side of the sheet of paper is printed.
• 2-Sided: Both the front and the back sides of the paper are printed.
• Head-to-Toe: 2-sided printing where the top of each page is positioned at opposite
ends of the sheet of paper. To read the back side of the sheet, turn the sheet over
from top to bottom.
About Output Location
Choose one of the following selections:
• System Specified: Allows the system to select the most appropriate output location
based on the job properties selected and the available finishing components on the
printer.
• Top Tray 1: Used for simpler jobs that do not require finishing or collated stacking.
This tray is also used as the purge destination.
• Stacker Cart: Used for most large jobs that require stacking or stapling.
• Top Tray 2: Used for simpler jobs that do not require finishing or collated stacking.
• Stacker Tray: Used for most small jobs that require stacking or stapling.
About Offset
Choose one of the following selections:
• None: Offset is not performed. This is the default selection.
• Each Collated Set: The offset occurs between each set printed.
FreeFlow Print Server3-20
Online Help
Page 45

Job Manager
• Each Uncollated Stack: The offset occurs between each stack printed.
• Each Set and Stack: The offset occurs between each set and stack printed.
About Collation
Click your preference for collated or uncollated print sets.
About Output Delivery
Choose one of the following selections:
• System Specified
• Face Up
• Face Down
About Collated Sets Offset Interval
Use the Up and Down arrows to select the desired number of sets for the offset interval.
About Output Order
Choose one of the following selections:
• 1-N: Ascending order
• N-1: Descending order
• System Specified
About Slip Sheets
Slip sheets are pieces of paper or other media that are inserted between document sets
in a print job. Slip sheets differ from job inserts in that slip sheets separate one job set
from another, while job inserts separate pages of a job.
Click your preference to disable or enable use of slip sheets.
About Slip Sheet Stock
Select the stock to be used from the table.
Online Help
3-21FreeFlow Print Server
Page 46

Job Manager
About the Image Quality Tab
When adusting image quality control settings, it is important to make small, incremental
adjustments. Making large adjustments can create image quality problems.
The Image Quality tab enables you to configure or select the following color properties:
• Color Balance
• Adjusted Preview
• Color Mode
• Overprint check box
• Black Overprint check box
• Text and Graphics Enhancement check box
• Halftone
• RGB to Black (for Text and Graphics)
• Interpolation Method
• Resolution (dpi)
When you are finished making selections, click either:
• Cancel to exit the window without saving your selections
• Save to save your selections and close the window
About Color Balance
The Color Balance adjustments enable you to fine-tune color balance for CMYK
collectively, or for each color individually. The C (Cyan) button is selected by default, but
you may select any of the buttons. By using the three sliding scales, you can adjust color
balance for the following:
• Highlights: Move the slider up (positive values) to make the highlights in the image
darker. Move the slider down (negative values) to make the highlights in the image
lighter.
• Midtones: Move the slider up (positive values) to make the midtones in the image
darker. Move the slider down (negative values) to make the midtones in the image
lighter.
• Shadows: Move the slider up (positive values) to make the shadows in the image
darker. Move the slider down (negative values) to make the shadows in the image
lighter.
FreeFlow Print Server3-22
Online Help
Page 47

Job Manager
Note
The buttons above the sliders each have three values that change to show the numerical
effect that changing the slider has on that particular color.
Note
To reset all of the sliding scales, click the Rest All To Zero button.
Note
If you make an adjustment using the C, M, Y, or K buttons, the All Colors button becomes
unavailable.
About Adjusted Preview
The check box enables you to toggle between a representation of the original color
balance settings and your adjusted color settings. The preview of your job images is only
available for PostScript™, PDF, and TIFF file types. For other file types, such as PCL or
VIPP, stock images are used for the preview.
If you select and then clear the Adjusted Preview check box, you can show or hide the
effect of the color balance adjustment to obtain before and after views of the displayed
image.
Note
To select a different stock image for the adjusted preview, use either method below:
• Click the Right-Arrow and Left-Arrow icons to move forwards or backwards through
the stock preview images sequentially.
• Click the White Circle, located at the bottom of the preview image, that represents
the position of the desired image within the set of stock images.
About Color Mode
Color Mode: Choose one of the following:
• Normal
• Normal with Enhanced Gloss
• Grayscale
• Fast Black
Related Topics:
About Grayscale Printing
About Grayscale Printing
Selecting a Grayscale option disables any Image Quality features that are incompatible
with grayscale printing.
3-23FreeFlow Print Server
Online Help
Page 48

Job Manager
About the Overprint and Enhancement Check Boxes
The Image Quality tab includes the following check boxes to control overprinting and
enhancement:
• Overprint: Select the check box to enable overprint.
• Black Overprint: Select the check box to enable black overprint.
• Text and Graphics Enhancement: Select the check box to enable text and graphic
enhancement.
About Halftones and Screens
Halftone Screen refers to the pattern of dots or lines of varying sizes applied to an image
of varying tones, or same sized dots applied to a tint of color for color systems.
The System Specified halftone screen is the default option applied.
Make the desired selection.
Tip
The number values seen in the list of options refer to the screen frequencies of the
various dot screen and line screen patterns described. It is important to note that a
higher-value screen frequency does not necessarily produce a better result. The novice
user is encouraged to accept the default setting, as this setting is designed to produce
the best general results of the available settings.
The general differences among the various kinds of halftone screens are described below:
Note
Selections available vary by printer type.
• Dot Screening: Dot screening applies a rosette type pattern to the screen, which is
a commonly desired screen pattern. The dot screen halftone makes seeing artifacts
and patterns in a large halftone much less likely. However, when two straight line
areas meet one another, slight jags may be visible. A dot screen is particularly useful
for large gradients and other shading areas likely to produce visible lines from a line
screen pattern.
• Line Screen Halftone: A line screen provides a linear dot pattern. The line screen
halftone makes seeing artifacts and patterns in a large halftone more likely compared
to a dot screen. However, when two straight lines adjoining halftone areas meet, the
linear nature of the screen avoids the jagged border areas that are more often found
in a dot screen pattern.
FreeFlow Print Server3-24
Online Help
Page 49

Job Manager
• Stochastic Screens: Stochastic screening uses randomly placed dots instead of the
traditional halftone dots aligned along designated screen angles. The concept of
stochastic screening is that dots placed randomly do not cause moire patterns.
However, completely random positioning does not work well. The stochastic screen
prevents screening interference patterns, but it can cause graininess and other visual
artifacts. Therefore, stochastic screening as implemented by your printer uses a
complex algorithm to determine the optimum placement of dots in order to appear
random while reducing graininess. This random arrangement of dots means there is
no direction to the screen; and therefore no screen angle exists. The variable spacing
of the dots means there is no fixed spacing, and therefore there is no screen frequency.
So, without frequency or angle, there is no possibility of moire among the four
process-color screens, or even of moire from patterns within an image.
About RGB to Black for Text and Graphics
Select one of the following:
• Off
• Black Uses K Only
• Black and Gray Use K Only
About Image Interpolation
Image interpolation, or image resample, attempts to produce a smooth transition
between adjacent samples rather than simply replicating pixels which would result in
blocky images.
The FreeFlow® Print Server enables you to select an interpolation method in order to
achieve maximum image quality at the desired RIP performance. Image interpolation
is the process of estimating the value of the output image based on the known values
of the input images.
The several interpolation methods available that are used to scale image data, or pixels,
from one resolution to another are described below:
• System Specified: Use this default method if you are unsure of which other method
to use.
• Nearest Neighbor: The output pixel value is simply the value of the input pixel closest
to the output location. Nearest neighbor interpolation is the quickest interpolation
method.
• Bi-Linear: The replacement pixel in the scaled image is calculated using a weighted
sum of the four nearest pixel values in the source image. The Bi-Linear method offers
better quality results than Nearest Neighbor interpolation.
• Filtered: This method uses an anti-aliasing filter to construct a smooth analog signal
from a digital input.
3-25FreeFlow Print Server
Online Help
Page 50

Job Manager
• Smart: This method automatically chooses between Bi-Linear interpolation and
Filtered interpolation based on the input image characteristics. Smart interpolation
provides the best quality interpolation.
About Resolution
Select one of the following:
• 300x300x8 dpi
• 600x600x8 dpi
Note
For best results, match the resolution of the print file to the resolution setting of the
print queue.
About the Color Management Tab
The Color Management tab enables you to select advanced color settings that affect
the printed image quality.
The Color Management window is divided into two sections:
• Controls Area: This area enables you to select and configure options for:
- CMYK
- RGB
- Gray Source
- Spot Color Processing
• Color Data Flow Diagram: This diagram illustrates the path that the color data
follow while being processed by the system.
About the Color Management Controls Area
The color controls area uses several tabs to group the settings by color space (CMYK,
RGB, and Gray) and associated processing options (Spot Color Processing).
Note
The Destination Profile is not located within the tabbed areas because it affects all color
spaces.
FreeFlow Print Server3-26
Online Help
Page 51

About the Icons Used in the Color Management Tab
Table 6. Identification of Icons Used in the Color Management Tab
NameIcon
CMYK
RGB
Gray
Spot
About the CMYK Tab
The CMYK tab includes the following settings:
Job Manager
CMYK Source Color Space
• Use Embedded Profile check box
- Images
- Text and Graphics Enhancement
CMYK Rendering Intent
• Use Embedded Rendering check box
- Images
- Text
- Graphics
Additional Information About CMYK Color Space
The CMYK Color Space section of the Color Management Tab has two areas: CMYK
Source Color Space and CMYK Rendering Intent. Each area has a check box that can
be selected to use embedded profile or rendering information in the job, or can be cleared
to ignore embedded information.
Note
If the option is viewed from a Queue Properties window, an Override icon is available
next to the option. Click the Override icon to lock (override) or unlock the setting. When
an Override icon is locked, the settings associated with the override take precedence
over what is configured in the job.
3-27FreeFlow Print Server
Online Help
Page 52

Job Manager
The CMYK Source Color Space area contains two menus: Images and Text and Graphics
Enhancement. The CMYK Rendering Intent area contains three menus: Images, Text,
and Graphics. These menus enable you to make separate adjustments that cause the
system to perform specific optimization for CMYK.
About Using Embedded Profile for CMYK & RGB
By enabling or disabling the Use Embedded Profile check box, you can choose whether
to use or ignore any embedded profiles that may be in the print job. By default, the
check box is not selected and any profiles are ignored. When selected, any embedded
profiles take precedence over the queue default settings. If there are no embedded
profiles in the job, the queue default settings are used even if the Use Embedded Profile
check box is selected.
Note
Selection of the Use Embedded Profile check box for RGB is recommended. Enabling
this feature gives the most accurate output from the intent of the file creator.
About CMYK Source Color Space for Images & Text and Graphics Enhancement
The CMYK options for the Source Color Space menus (Images and Text and Graphics
Enhancement) are the same.
Make the desired selection.
About CMYK & RGB Rendering Intent for Images, Text, and Graphics
The CMYK and RGB options for the three menus (Images, Text, and Graphics) are the
same.
Select one of the following:
• Saturation
• Perceptual
• Relative Colorimetric
• Absolute Colorimetric
The Rendering Intent and Color Space features enable the system to perform specific
optimizations for CMYK or RGB. For example, a Colormetric selection is best used for
CMYK color matching, while a value of Perceptual is best used for RGB professional
photographs.
Related Topics:
Explanation of Job Rendering
Additional Information About Using Embedded Rendering for CMYK & RGB
FreeFlow Print Server3-28
Online Help
Page 53

Job Manager
Explanation of Job Rendering
Occasionally, the requested colors in an image are outside the gamut of the target
printer and cannot be exactly reproduced. Rendering provides color mapping between
the color gamut of the source image and the color gamut of the printer.
Select the Rendering option that best fits the images in the source files as they map to
the printer.
Additional Information About Using Embedded Rendering for CMYK & RGB
By enabling or disabling the Use Embedded Rendering check box, you can choose
whether to use or ignore any embedded rendering intents that may be in the print job.
By default, the check box is not selected and any rendering intents are ignored. When
selected, any embedded rendering intents take precedence over the queue default
settings. If there is no embedded rendering intent in the job, the queue default settings
are used even if the Use Embedded Rendering check box is selected.
Tip
The default settings on this window give optimal results with most print jobs. Only make
changes to the settings if you understand the effect that the changes will have to the
output.
To use the rendering already embedded within the job, select the Use Embedded
Rendering check box.
Otherwise, choose among the following options on the Images, Text, and Graphics
menus:
• Saturation: Optimizes the rendering of business graphics, such as charts and graphs.
Preserves 100% K, making it good for text.
• Perceptual: Optimizes the rendering of photographic images. Preserves the visual
relationship among colors as they are perceived by the human eye. All or most colors
are proportionally scaled to fit the output gamut, but their relationship does not
change.
• Relative Colorimetric: Optimizes the rendering of spot color and logos. This
transformation, however, uses additional information, such as hue and saturation,
specified in the source profile to select the most appropriate value within the printer
gamut. Colors that fall within the Output Color space remain the same. Only colors
that fall outside are changed to the closest possible color within the Output Color
space.
• Absolute Colorimetric: Optimizes the rendering of spot color and logos by identifying
the closest value within the printer gamut.
3-29FreeFlow Print Server
Online Help
Page 54

Job Manager
Note
You can choose different rendering options for images, text, and graphics to optimize
each output type appropriately.
About the RGB Tab
The RGB tab includes the following settings:
RGB Source Color Space
• Use Embedded Profile check box
- Images
- Text and Graphics Enhancement
- Enable Printer Simulation check box
RGB Rendering Intent
• Use Embedded Rendering check box
- Images
- Text
- Graphics
Additional Information About RGB Color Space
The RGB Color Space section of the Color Management Tab has two areas: RGB Source
Color Space and RGB Rendering Intent. Each area has a check box that can be selected
to use embedded profile or rendering information in the job, or can be cleared to ignore
embedded information.
Note
If the option is viewed from a Queue Properties window, an Override icon is available
next to the option. Click the Override icon to lock (override) or unlock the setting. When
an Override icon is locked, the settings associated with the override take precedence
over what is configured in the job.
The RGB Source Color Space area contains two menus: Images and Text and Graphics
Enhancement. The RGB Rendering Intent area contains three menus: Images, Text,
and Graphics. These menus enable you to make separate adjustments that cause the
system to perform specific optimization for RGB.
By selecting the Enable Printer Simulation check box, you can control emulation
processing. The default setting for RGB Emulation is Off. When the check box is selected,
RGB processing follows the CMYK path.
FreeFlow Print Server3-30
Online Help
Page 55

Job Manager
Tip
If you are trying to match an industry standard and your file contains RGB and CMYK
input, select the Enable Printer Simulation check box so the RGB and CMYK elements
will match.
If you have a document that contains RGB and CMYK data and want all of the data to
match, it is also recommended that you select the Enable Printer Simulation check box.
The RGB data is converted to CMYK using the CMYK Color Space chosen in the CMYK
Color Space area.
When the Enable Printer Simulation check box is selected, the following are true:
• The RGB Rendering Intent adjustments are unavailable since the Printer Simulation
is enabled via the auto-generation of RGB-to-CMYK DeviceLink ICC profiles and image
adjustment is applied on the Lab color space.
• Some settings are unavailable in the Color Management tab.
About Using Embedded Profile for CMYK & RGB
By enabling or disabling the Use Embedded Profile check box, you can choose whether
to use or ignore any embedded profiles that may be in the print job. By default, the
check box is not selected and any profiles are ignored. When selected, any embedded
profiles take precedence over the queue default settings. If there are no embedded
profiles in the job, the queue default settings are used even if the Use Embedded Profile
check box is selected.
Note
Selection of the Use Embedded Profile check box for RGB is recommended. Enabling
this feature gives the most accurate output from the intent of the file creator.
About RGB Source Color Space for Images & Text and Graphics Enhancement
The RGB options for the Source Color Space menus (Images and Text and Graphics
Enhancement) are the same.
Select one of the following:
• Adobe RGB
• sRGB
• Apple RGB
• Color Match RGB
About CMYK & RGB Rendering Intent for Images, Text, and Graphics
The CMYK and RGB options for the three menus (Images, Text, and Graphics) are the
same.
Online Help
3-31FreeFlow Print Server
Page 56

Job Manager
Select one of the following:
• Saturation
• Perceptual
• Relative Colorimetric
• Absolute Colorimetric
The Rendering Intent and Color Space features enable the system to perform specific
optimizations for CMYK or RGB. For example, a Colormetric selection is best used for
CMYK color matching, while a value of Perceptual is best used for RGB professional
photographs.
Related Topics:
Explanation of Job Rendering
Additional Information About Using Embedded Rendering for CMYK & RGB
Explanation of Job Rendering
Occasionally, the requested colors in an image are outside the gamut of the target
printer and cannot be exactly reproduced. Rendering provides color mapping between
the color gamut of the source image and the color gamut of the printer.
Select the Rendering option that best fits the images in the source files as they map to
the printer.
Additional Information About Using Embedded Rendering for CMYK
& RGB
By enabling or disabling the Use Embedded Rendering check box, you can choose
whether to use or ignore any embedded rendering intents that may be in the print job.
By default, the check box is not selected and any rendering intents are ignored. When
selected, any embedded rendering intents take precedence over the queue default
settings. If there is no embedded rendering intent in the job, the queue default settings
are used even if the Use Embedded Rendering check box is selected.
Tip
The default settings on this window give optimal results with most print jobs. Only make
changes to the settings if you understand the effect that the changes will have to the
output.
To use the rendering already embedded within the job, select the Use Embedded
Rendering check box.
Otherwise, choose among the following options on the Images, Text, and Graphics
menus:
FreeFlow Print Server3-32
Online Help
Page 57

Job Manager
• Saturation: Optimizes the rendering of business graphics, such as charts and graphs.
Preserves 100% K, making it good for text.
• Perceptual: Optimizes the rendering of photographic images. Preserves the visual
relationship among colors as they are perceived by the human eye. All or most colors
are proportionally scaled to fit the output gamut, but their relationship does not
change.
• Relative Colorimetric: Optimizes the rendering of spot color and logos. This
transformation, however, uses additional information, such as hue and saturation,
specified in the source profile to select the most appropriate value within the printer
gamut. Colors that fall within the Output Color space remain the same. Only colors
that fall outside are changed to the closest possible color within the Output Color
space.
• Absolute Colorimetric: Optimizes the rendering of spot color and logos by identifying
the closest value within the printer gamut.
Note
You can choose different rendering options for images, text, and graphics to optimize
each output type appropriately.
About the Gray Tab
The Gray tab includes the following settings:
Gray Source Color Space
• Use Embedded Profile
- Images
- Text and Graphics Enhancement
Additional Information About the Gray Source Color Space
The Gray Source Color Space section of the Color Management tab has a Use Embedded
Profile check box that can be selected to use embedded profile information in the job,
or cleared to ignore embedded information.
Note
If the option is viewed from a Queue Properties window, an Override icon is available
next to the option. Click the Override icon to lock (override) or unlock the setting. When
an Override icon is locked, the settings associated with the override take precedence
over what is configured in the job.
The Gray Source Color Space area contains two menus: Images and Text and Graphics
Enhancement. These menus enable you to make separate adjustments that cause the
system to perform specific optimization for the color gray.
3-33FreeFlow Print Server
Online Help
Page 58

Job Manager
About Using Embedded Profile for Gray Source Color Space
By enabling or disabling the Use Embedded Profile check box, you can choose whether
to use or ignore any embedded profiles that may be in the print job. By default, the
check box is not selected and any profiles are ignored. When selected, any embedded
profiles take precedence over the queue default settings. If there are no embedded
profiles in the job, the queue default settings are used even if the Use Embedded Profile
check box is selected.
About Gray Source Color Space for Images and Text and Graphics Enhancement
The Gray options for the two Source Color Space menus (Images and Text and Graphics
Enhancement) are the same.
Choose one of the following selections:
• Gamma 1_8
• Gamma 2_2
• LPC70 Gray
About the Spot Processing Tab
The Spot Processing tab includes the check box to enable spot color processing.
When the color path is disabled, the alternative color space is used instead of the spot
colors.
Note
If the option is viewed from a Queue Properties window, an Override icon is available
next to the option. Click the Override icon to lock (override) or unlock the setting. When
an Override icon is locked, the settings associated with the override take precedence
over what is configured in the job.
The Print Server honors all PANTONE® and spot colors that are defined in the spot color
table. The spot colors in PostScript and PDF files can be specified by the PostScript
setcustomcolor operators as well as the separation and DeviceN color operators. The
alternative color spaces are used in case the spot color is not found in the spot color
table.
The following scenario exemplifies the value of this feature: You want to print a document
that contains spot color text, graphics, and images. Viewed on the computer monitor,
the spot color data within the document is seen; however when the document is printed,
the colors look very different from what was seen on the monitor. Because the Print
Server does not support spot color processing for images, you might prefer to disable
spot color processing and eliminate this problem.
FreeFlow Print Server3-34
Online Help
Page 59

Job Manager
A second example scenario follows: Within the document there are spot color objects
and CMYK objects next to each other that should match. If you disable spot color
processing, the spot color data goes through the CMYK path, resulting in objects that
look the same.
About Destination Profile
Select the desired profile to be used.
About the Color Management Flow Diagram
The color flow diagram always reflects the current state of the control area settings.
The diagram is refreshed any time the settings are changed.
Place the mouse over any area of the diagram to display a tool tip containing information
about that specific area of the diagram.
About the Image Placement Tab
The Image Placement window enables you to configure:
• Layout Type
• Image Rotation
• Image Shift
When you are finished making selections, click either:
• Cancel to exit the window without saving your selections
• Save to save your selections and close the window
About Layout Type
The Layout Type option enables you to select the desired printed layout.
The following selections are available:
• None: No special layout is applied.
• N Up: This layout is often used to provide a down-scaled proof print of the job. Enables
you to designate how many pages (N) are to be printed on a single sheet of paper.
• Booklet: A booklet is made up of individual sheets of paper that are bound between
a front and back cover.
• Signature: A signature sheet is a sheet of paper that is folded one or more times to
become a single unit of several pages in multiples of four.
3-35FreeFlow Print Server
Online Help
Page 60

Job Manager
About Image Rotation
The Image Rotation option enables you to rotate the printing or image 180 degrees.
Select between no rotation (0 degrees) and 180 degree rotation.
About Image Shift
The Image Shift option enables you to adjust where on a page printing occurs.
Use the Up and Down arrows to increase or decrease the amount of desired shift in
either or both the X and Y directions.
Note
A positive X value, shifts printing up; a negative value shifts printing down.
A positive Y value, shifts the printing to the right; a negative value shifts printing to the
left.
To center the printing on the page, click the Center button.
If the print is 2-sided, repeat the process for Side 2.
About the Special Pages Tab
The Special Pages entry window displays all of the created special pages. You may use
the task icons to perform basic file management actions. Select the desired file, and
click the appropriate icon:
• Edit Icon: Opens the selected Special Page for editing.
• Delete Icon: Deletes the selected Special Page in the list.
• Delete All Icon: Deletes all Special Pages created.
• Refresh Icon: Updates the displayed list of Special Pages.
To create a new Special Page, click one of the following icons used to categorize the
different page types:
• Front Cover
• Back Cover
• Exceptions
• Inserts
A new window appears where you can configure various related properties.
Related Topics:
FreeFlow Print Server3-36
Online Help
Page 61

Job Manager
About Front Cover and Back Cover
About New Exception Page(s)
About Inserts
About the Icons Used for Special Pages
Table 7. Identification of Icons Used for Special Pages Tabs
Tab NameIcon
Front Cover
Back Cover
Exceptions
Inserts
Table 8. Identification of Icons Used in Special Pages
DescriptionNameIcon
Edit
Enables you to edit the properties of the selected
special page.
Deletes the selected special page.Delete
Deletes all special pages.Delete All
Updates the display in the window.Refresh
About Front Cover and Back Cover
The method for configuring the Front Cover and Back Cover is similar. Both setup windows
include the same configuration options as described below.
Note
The features and options available depend upon the configuration of your system.
From the Front Cover and Back Cover windows you can configure the following properties:
3-37FreeFlow Print Server
Online Help
Page 62

Job Manager
• Making Front Cover & Back Cover Same
• Print On
• Size
• Weight
• Color
• Type
• Drilled
• Front Coating
• Back Coating
When you are finished making selections, click either:
• Cancel to exit the window without saving your selections
• Ok to save your selections and close the window
About Making the Front Cover & Back Cover the Same
Select the check box if the front and back covers are to be the same.
About Print On
Print On: Use the menu to make one of the following selections in regards to the front
and back covers:
• None
• Inside Only
• Outside Only
• Both Sides
About Stock Size
Select the desired paper size.
If you select Custom, the Width and Height fields appear where you can enter the
appropriate measurements.
Note
The acceptable range for each dimension appears under its entry field.
About Stock Weight
Select the desired paper weight.
FreeFlow Print Server3-38
Online Help
Page 63

Job Manager
Note
The supported media weight is 70-250 GSM.
About Stock Color
Select the desired paper color.
If you select Custom, an additional field appears where you can enter the desired color.
About Stock Type
Select the desired type of stock.
If you select Custom, an additional field appears where you can enter the desired stock.
About Drilled Holes
Select the desired number of holes to be drilled.
About Stock Front Coating
Select the desired coating for the front side of the print.
About Stock Back Coating
Select the desired coating for the back side of the print.
About New Exception Page(s)
The New Exception Page(s) Properties window enables you to configure special
characteristics for specific pages or a range of pages within a print job.
The New Exception Page(s) Properties window includes three tabs:
• Settings: Enables you to configure basic paper properties.
• Image Quality: Enables you to configure basic color settings such as color mode,
color balance, and method of interpolation.
• Color Management: Enables you to configure advanced color settings such as spot
color processing, CMYK source color space, and RGB rendering intent.
Note
The New Exceptions Page(s)window opens to display
the configuration options of the Settings tab.
Related Topics:
Online Help
3-39FreeFlow Print Server
Page 64

Job Manager
About the Image Quality Tab
About the Color Management Tab
About the Basic Settings Tab
From the Settings window you can configure the following properties:
• Size
• Weight
• Color
• Sides Imaged
• Image Shift
• Type
• Drilled
• Front Coating
• Back Coating
About Page(s)
The Pages(s) option remains at the top of the window regardless of which tab is selected.
Enter the page numbers and/or the range of pages using commas to separate the entries.
About Stock Size
Select the desired paper size.
If you select Custom, the Width and Height fields appear where you can enter the
appropriate measurements.
Note
The acceptable range for each dimension appears under its entry field.
About Stock Weight
Select the desired paper weight.
Note
The supported media weight is 70-250 GSM.
About Stock Color
Select the desired paper color.
If you select Custom, an additional field appears where you can enter the desired color.
FreeFlow Print Server3-40
Online Help
Page 65

Job Manager
About Stock Type
Select the desired type of stock.
If you select Custom, an additional field appears where you can enter the desired stock.
About Drilled Holes
Select the desired number of holes to be drilled.
About Stock Front Coating
Select the desired coating for the front side of the print.
About Stock Back Coating
Select the desired coating for the back side of the print.
About Sides Imaged
This option determines the placement and positioning of the image or text on the page.
• 1 Sided: Only the front side of the sheet of paper is printed.
• 2-Sided: Both the front and the back sides of the paper are printed.
• Head-to-Toe: 2-sided printing where the top of each page is positioned at opposite
ends of the sheet of paper. To read the back side of the sheet, turn the sheet over
from top to bottom.
About Image Shift
The Image Shift option enables you to adjust where on a page printing occurs.
Use the Up and Down arrows to increase or decrease the amount of desired shift in
either or both the X and Y directions.
Note
A positive X value, shifts printing up; a negative value shifts printing down.
A positive Y value, shifts the printing to the right; a negative value shifts printing to the
left.
To center the printing on the page, click the Center button.
If the print is 2-sided, repeat the process for Side 2.
Online Help
3-41FreeFlow Print Server
Page 66

Job Manager
About the Image Quality Tab
Selecting the Image Quality tab enables to you to configure the following properties:
• Color Balance
• Adjusted Preview
• Color Mode
• Overprint check box
• Black Overprint check box
• Text and Graphics (Enhancement) check box
• Halftone
• RGB to Black (for Text and Graphics)
• Interpolation Method
When you are finished making selections, click either:
• Cancel to exit the window without saving your selections
• Ok to save your selections and close the window
About Page(s)
The Pages(s) option remains at the top of the window regardless of which tab is selected.
Enter the page numbers and/or the range of pages using commas to separate the entries.
About Color Balance
The Color Balance adjustments enable you to fine-tune color balance for CMYK
collectively, or for each color individually. The C (Cyan) button is selected by default, but
you may select any of the buttons. By using the three sliding scales, you can adjust color
balance for the following:
• Highlights: Move the slider up (positive values) to make the highlights in the image
darker. Move the slider down (negative values) to make the highlights in the image
lighter.
• Midtones: Move the slider up (positive values) to make the midtones in the image
darker. Move the slider down (negative values) to make the midtones in the image
lighter.
• Shadows: Move the slider up (positive values) to make the shadows in the image
darker. Move the slider down (negative values) to make the shadows in the image
lighter.
FreeFlow Print Server3-42
Online Help
Page 67

Job Manager
Note
The buttons above the sliders each have three values that change to show the numerical
effect that changing the slider has on that particular color.
Note
To reset all of the sliding scales, click the Rest All To Zero button.
Note
If you make an adjustment using the C, M, Y, or K buttons, the All Colors button becomes
unavailable.
About Adjusted Preview
The check box enables you to toggle between a representation of the original color
balance settings and your adjusted color settings. The preview of your job images is only
available for PostScript™, PDF, and TIFF file types. For other file types, such as PCL or
VIPP, stock images are used for the preview.
If you select and then clear the Adjusted Preview check box, you can show or hide the
effect of the color balance adjustment to obtain before and after views of the displayed
image.
Note
To select a different stock image for the adjusted preview, use either method below:
• Click the Right-Arrow and Left-Arrow icons to move forwards or backwards through
the stock preview images sequentially.
• Click the White Circle, located at the bottom of the preview image, that represents
the position of the desired image within the set of stock images.
About Color Mode
Color Mode: Choose one of the following:
• Normal
• Normal with Enhanced Gloss
• Grayscale
• Fast Black
Related Topics:
About Grayscale Printing
About Grayscale Printing
Selecting a Grayscale option disables any Image Quality features that are incompatible
with grayscale printing.
3-43FreeFlow Print Server
Online Help
Page 68

Job Manager
About the Overprint and Enhancement Check Boxes
The Image Quality tab includes the following check boxes to control overprinting and
enhancement:
• Overprint: Select the check box to enable overprint.
• Black Overprint: Select the check box to enable black overprint.
• Text and Graphics Enhancement: Select the check box to enable text and graphic
enhancement.
About Halftones and Screens
Halftone Screen refers to the pattern of dots or lines of varying sizes applied to an image
of varying tones, or same sized dots applied to a tint of color for color systems.
The System Specified halftone screen is the default option applied.
Make the desired selection.
Tip
The number values seen in the list of options refer to the screen frequencies of the
various dot screen and line screen patterns described. It is important to note that a
higher-value screen frequency does not necessarily produce a better result. The novice
user is encouraged to accept the default setting, as this setting is designed to produce
the best general results of the available settings.
The general differences among the various kinds of halftone screens are described below:
Note
Selections available vary by printer type.
• Dot Screening: Dot screening applies a rosette type pattern to the screen, which is
a commonly desired screen pattern. The dot screen halftone makes seeing artifacts
and patterns in a large halftone much less likely. However, when two straight line
areas meet one another, slight jags may be visible. A dot screen is particularly useful
for large gradients and other shading areas likely to produce visible lines from a line
screen pattern.
• Line Screen Halftone: A line screen provides a linear dot pattern. The line screen
halftone makes seeing artifacts and patterns in a large halftone more likely compared
to a dot screen. However, when two straight lines adjoining halftone areas meet, the
linear nature of the screen avoids the jagged border areas that are more often found
in a dot screen pattern.
FreeFlow Print Server3-44
Online Help
Page 69

Job Manager
• Stochastic Screens: Stochastic screening uses randomly placed dots instead of the
traditional halftone dots aligned along designated screen angles. The concept of
stochastic screening is that dots placed randomly do not cause moire patterns.
However, completely random positioning does not work well. The stochastic screen
prevents screening interference patterns, but it can cause graininess and other visual
artifacts. Therefore, stochastic screening as implemented by your printer uses a
complex algorithm to determine the optimum placement of dots in order to appear
random while reducing graininess. This random arrangement of dots means there is
no direction to the screen; and therefore no screen angle exists. The variable spacing
of the dots means there is no fixed spacing, and therefore there is no screen frequency.
So, without frequency or angle, there is no possibility of moire among the four
process-color screens, or even of moire from patterns within an image.
About RGB to Black for Text and Graphics
Select one of the following:
• Off
• Black Uses K Only
• Black and Gray Use K Only
About Image Interpolation
Image interpolation, or image resample, attempts to produce a smooth transition
between adjacent samples rather than simply replicating pixels which would result in
blocky images.
The FreeFlow® Print Server enables you to select an interpolation method in order to
achieve maximum image quality at the desired RIP performance. Image interpolation
is the process of estimating the value of the output image based on the known values
of the input images.
The several interpolation methods available that are used to scale image data, or pixels,
from one resolution to another are described below:
• System Specified: Use this default method if you are unsure of which other method
to use.
• Nearest Neighbor: The output pixel value is simply the value of the input pixel closest
to the output location. Nearest neighbor interpolation is the quickest interpolation
method.
• Bi-Linear: The replacement pixel in the scaled image is calculated using a weighted
sum of the four nearest pixel values in the source image. The Bi-Linear method offers
better quality results than Nearest Neighbor interpolation.
• Filtered: This method uses an anti-aliasing filter to construct a smooth analog signal
from a digital input.
3-45FreeFlow Print Server
Online Help
Page 70

Job Manager
• Smart: This method automatically chooses between Bi-Linear interpolation and
Filtered interpolation based on the input image characteristics. Smart interpolation
provides the best quality interpolation.
About Resolution
Select one of the following:
• 300x300x8 dpi
• 600x600x8 dpi
Note
For best results, match the resolution of the print file to the resolution setting of the
print queue.
About the Color Management Tab
The Color Management tab enables you to select advanced color settings that affect
the printed image quality.
The Color Management window is divided into two sections:
• Controls Area: This area enables you to select and configure options for:
- CMYK
- RGB
- Gray Source
- Spot Color Processing
• Color Data Flow Diagram: This diagram illustrates the path that the color data
follow while being processed by the system.
About the Color Management Controls Area
The color controls area uses several tabs to group the settings by color space (CMYK,
RGB, and Gray) and associated processing options (Spot Color Processing).
Note
The Destination Profile is not located within the tabbed areas because it affects all color
spaces.
FreeFlow Print Server3-46
Online Help
Page 71

About the Icons Used in the Color Management Tab
Table 9. Identification of Icons Used in the Color Management Tab
NameIcon
CMYK
RGB
Gray
Spot
About the CMYK Tab
The CMYK tab includes the following settings:
CMYK Source Color Space
Job Manager
• Use Embedded Profile check box
- Images
- Text and Graphics Enhancement
CMYK Rendering Intent
• Use Embedded Rendering check box
- Images
- Text
- Graphics
Additional Information About CMYK Color Space
The CMYK Color Space section of the Color Management Tab has two areas: CMYK
Source Color Space and CMYK Rendering Intent. Each area has a check box that can
be selected to use embedded profile or rendering information in the job, or can be cleared
to ignore embedded information.
Note
If the option is viewed from a Queue Properties window, an Override icon is available
next to the option. Click the Override icon to lock (override) or unlock the setting. When
an Override icon is locked, the settings associated with the override take precedence
over what is configured in the job.
Online Help
3-47FreeFlow Print Server
Page 72

Job Manager
The CMYK Source Color Space area contains two menus: Images and Text and Graphics
Enhancement. The CMYK Rendering Intent area contains three menus: Images, Text,
and Graphics. These menus enable you to make separate adjustments that cause the
system to perform specific optimization for CMYK.
About Using Embedded Profile for CMYK & RGB
By enabling or disabling the Use Embedded Profile check box, you can choose whether
to use or ignore any embedded profiles that may be in the print job. By default, the
check box is not selected and any profiles are ignored. When selected, any embedded
profiles take precedence over the queue default settings. If there are no embedded
profiles in the job, the queue default settings are used even if the Use Embedded Profile
check box is selected.
Note
Selection of the Use Embedded Profile check box for RGB is recommended. Enabling
this feature gives the most accurate output from the intent of the file creator.
About CMYK Source Color Space for Images & Text and Graphics Enhancement
The CMYK options for the Source Color Space menus (Images and Text and Graphics
Enhancement) are the same.
Make the desired selection.
About CMYK & RGB Rendering Intent for Images, Text, and Graphics
The CMYK and RGB options for the three menus (Images, Text, and Graphics) are the
same.
Select one of the following:
• Saturation
• Perceptual
• Relative Colorimetric
• Absolute Colorimetric
The Rendering Intent and Color Space features enable the system to perform specific
optimizations for CMYK or RGB. For example, a Colormetric selection is best used for
CMYK color matching, while a value of Perceptual is best used for RGB professional
photographs.
Related Topics:
Explanation of Job Rendering
Additional Information About Using Embedded Rendering for CMYK & RGB
FreeFlow Print Server3-48
Online Help
Page 73

Job Manager
Explanation of Job Rendering
Occasionally, the requested colors in an image are outside the gamut of the target
printer and cannot be exactly reproduced. Rendering provides color mapping between
the color gamut of the source image and the color gamut of the printer.
Select the Rendering option that best fits the images in the source files as they map to
the printer.
Additional Information About Using Embedded Rendering for CMYK & RGB
By enabling or disabling the Use Embedded Rendering check box, you can choose
whether to use or ignore any embedded rendering intents that may be in the print job.
By default, the check box is not selected and any rendering intents are ignored. When
selected, any embedded rendering intents take precedence over the queue default
settings. If there is no embedded rendering intent in the job, the queue default settings
are used even if the Use Embedded Rendering check box is selected.
Tip
The default settings on this window give optimal results with most print jobs. Only make
changes to the settings if you understand the effect that the changes will have to the
output.
To use the rendering already embedded within the job, select the Use Embedded
Rendering check box.
Otherwise, choose among the following options on the Images, Text, and Graphics
menus:
• Saturation: Optimizes the rendering of business graphics, such as charts and graphs.
Preserves 100% K, making it good for text.
• Perceptual: Optimizes the rendering of photographic images. Preserves the visual
relationship among colors as they are perceived by the human eye. All or most colors
are proportionally scaled to fit the output gamut, but their relationship does not
change.
• Relative Colorimetric: Optimizes the rendering of spot color and logos. This
transformation, however, uses additional information, such as hue and saturation,
specified in the source profile to select the most appropriate value within the printer
gamut. Colors that fall within the Output Color space remain the same. Only colors
that fall outside are changed to the closest possible color within the Output Color
space.
• Absolute Colorimetric: Optimizes the rendering of spot color and logos by identifying
the closest value within the printer gamut.
Note
You can choose different rendering options for images, text, and graphics to optimize
each output type appropriately.
Online Help
3-49FreeFlow Print Server
Page 74

Job Manager
About the RGB Tab
The RGB tab includes the following settings:
RGB Source Color Space
• Use Embedded Profile check box
- Images
- Text and Graphics Enhancement
- Enable Printer Simulation check box
RGB Rendering Intent
• Use Embedded Rendering check box
- Images
- Text
- Graphics
Additional Information About RGB Color Space
The RGB Color Space section of the Color Management Tab has two areas: RGB Source
Color Space and RGB Rendering Intent. Each area has a check box that can be selected
to use embedded profile or rendering information in the job, or can be cleared to ignore
embedded information.
Note
If the option is viewed from a Queue Properties window, an Override icon is available
next to the option. Click the Override icon to lock (override) or unlock the setting. When
an Override icon is locked, the settings associated with the override take precedence
over what is configured in the job.
The RGB Source Color Space area contains two menus: Images and Text and Graphics
Enhancement. The RGB Rendering Intent area contains three menus: Images, Text,
and Graphics. These menus enable you to make separate adjustments that cause the
system to perform specific optimization for RGB.
By selecting the Enable Printer Simulation check box, you can control emulation
processing. The default setting for RGB Emulation is Off. When the check box is selected,
RGB processing follows the CMYK path.
FreeFlow Print Server3-50
Online Help
Page 75

Job Manager
Tip
If you are trying to match an industry standard and your file contains RGB and CMYK
input, select the Enable Printer Simulation check box so the RGB and CMYK elements
will match.
If you have a document that contains RGB and CMYK data and want all of the data to
match, it is also recommended that you select the Enable Printer Simulation check box.
The RGB data is converted to CMYK using the CMYK Color Space chosen in the CMYK
Color Space area.
When the Enable Printer Simulation check box is selected, the following are true:
• The RGB Rendering Intent adjustments are unavailable since the Printer Simulation
is enabled via the auto-generation of RGB-to-CMYK DeviceLink ICC profiles and image
adjustment is applied on the Lab color space.
• Some settings are unavailable in the Color Management tab.
About Using Embedded Profile for CMYK & RGB
By enabling or disabling the Use Embedded Profile check box, you can choose whether
to use or ignore any embedded profiles that may be in the print job. By default, the
check box is not selected and any profiles are ignored. When selected, any embedded
profiles take precedence over the queue default settings. If there are no embedded
profiles in the job, the queue default settings are used even if the Use Embedded Profile
check box is selected.
Note
Selection of the Use Embedded Profile check box for RGB is recommended. Enabling
this feature gives the most accurate output from the intent of the file creator.
About RGB Source Color Space for Images & Text and Graphics Enhancement
The RGB options for the Source Color Space menus (Images and Text and Graphics
Enhancement) are the same.
Select one of the following:
• Adobe RGB
• sRGB
• Apple RGB
• Color Match RGB
About CMYK & RGB Rendering Intent for Images, Text, and Graphics
The CMYK and RGB options for the three menus (Images, Text, and Graphics) are the
same.
Select one of the following:
Online Help
3-51FreeFlow Print Server
Page 76

Job Manager
• Saturation
• Perceptual
• Relative Colorimetric
• Absolute Colorimetric
The Rendering Intent and Color Space features enable the system to perform specific
optimizations for CMYK or RGB. For example, a Colormetric selection is best used for
CMYK color matching, while a value of Perceptual is best used for RGB professional
photographs.
Related Topics:
Explanation of Job Rendering
Additional Information About Using Embedded Rendering for CMYK & RGB
Explanation of Job Rendering
Occasionally, the requested colors in an image are outside the gamut of the target
printer and cannot be exactly reproduced. Rendering provides color mapping between
the color gamut of the source image and the color gamut of the printer.
Select the Rendering option that best fits the images in the source files as they map to
the printer.
Additional Information About Using Embedded Rendering for CMYK
& RGB
By enabling or disabling the Use Embedded Rendering check box, you can choose
whether to use or ignore any embedded rendering intents that may be in the print job.
By default, the check box is not selected and any rendering intents are ignored. When
selected, any embedded rendering intents take precedence over the queue default
settings. If there is no embedded rendering intent in the job, the queue default settings
are used even if the Use Embedded Rendering check box is selected.
Tip
The default settings on this window give optimal results with most print jobs. Only make
changes to the settings if you understand the effect that the changes will have to the
output.
To use the rendering already embedded within the job, select the Use Embedded
Rendering check box.
Otherwise, choose among the following options on the Images, Text, and Graphics
menus:
• Saturation: Optimizes the rendering of business graphics, such as charts and graphs.
Preserves 100% K, making it good for text.
FreeFlow Print Server3-52
Online Help
Page 77

Job Manager
• Perceptual: Optimizes the rendering of photographic images. Preserves the visual
relationship among colors as they are perceived by the human eye. All or most colors
are proportionally scaled to fit the output gamut, but their relationship does not
change.
• Relative Colorimetric: Optimizes the rendering of spot color and logos. This
transformation, however, uses additional information, such as hue and saturation,
specified in the source profile to select the most appropriate value within the printer
gamut. Colors that fall within the Output Color space remain the same. Only colors
that fall outside are changed to the closest possible color within the Output Color
space.
• Absolute Colorimetric: Optimizes the rendering of spot color and logos by identifying
the closest value within the printer gamut.
Note
You can choose different rendering options for images, text, and graphics to optimize
each output type appropriately.
About the Gray Tab
The Gray tab includes the following settings:
Gray Source Color Space
• Use Embedded Profile
- Images
- Text and Graphics Enhancement
Additional Information About the Gray Source Color Space
The Gray Source Color Space section of the Color Management tab has a Use Embedded
Profile check box that can be selected to use embedded profile information in the job,
or cleared to ignore embedded information.
Note
If the option is viewed from a Queue Properties window, an Override icon is available
next to the option. Click the Override icon to lock (override) or unlock the setting. When
an Override icon is locked, the settings associated with the override take precedence
over what is configured in the job.
The Gray Source Color Space area contains two menus: Images and Text and Graphics
Enhancement. These menus enable you to make separate adjustments that cause the
system to perform specific optimization for the color gray.
Online Help
3-53FreeFlow Print Server
Page 78

Job Manager
About Using Embedded Profile for Gray Source Color Space
By enabling or disabling the Use Embedded Profile check box, you can choose whether
to use or ignore any embedded profiles that may be in the print job. By default, the
check box is not selected and any profiles are ignored. When selected, any embedded
profiles take precedence over the queue default settings. If there are no embedded
profiles in the job, the queue default settings are used even if the Use Embedded Profile
check box is selected.
About Gray Source Color Space for Images and Text and Graphics Enhancement
The Gray options for the two Source Color Space menus (Images and Text and Graphics
Enhancement) are the same.
Choose one of the following selections:
• Gamma 1_8
• Gamma 2_2
• LPC70 Gray
About the Spot Processing Tab
The Spot Processing tab includes the check box to enable spot color processing.
When the color path is disabled, the alternative color space is used instead of the spot
colors.
Note
If the option is viewed from a Queue Properties window, an Override icon is available
next to the option. Click the Override icon to lock (override) or unlock the setting. When
an Override icon is locked, the settings associated with the override take precedence
over what is configured in the job.
The Print Server honors all PANTONE® and spot colors that are defined in the spot color
table. The spot colors in PostScript and PDF files can be specified by the PostScript
setcustomcolor operators as well as the separation and DeviceN color operators. The
alternative color spaces are used in case the spot color is not found in the spot color
table.
The following scenario exemplifies the value of this feature: You want to print a document
that contains spot color text, graphics, and images. Viewed on the computer monitor,
the spot color data within the document is seen; however when the document is printed,
the colors look very different from what was seen on the monitor. Because the Print
Server does not support spot color processing for images, you might prefer to disable
spot color processing and eliminate this problem.
FreeFlow Print Server3-54
Online Help
Page 79

Job Manager
A second example scenario follows: Within the document there are spot color objects
and CMYK objects next to each other that should match. If you disable spot color
processing, the spot color data goes through the CMYK path, resulting in objects that
look the same.
About Destination Profile
Select the desired profile to be used.
About the Color Management Flow Diagram
The color flow diagram always reflects the current state of the control area settings.
The diagram is refreshed any time the settings are changed.
Place the mouse over any area of the diagram to display a tool tip containing information
about that specific area of the diagram.
About Inserts
Note
The features and options available depend upon the configuration of your system.
From the New Insert(s) window you can configure the following properties:
• Page(s)
• Quantity
• Size
• Weight
• Color
• Type
• Drilled
• Front Coating
• Back Coating
When you are finished making selections, click either:
• Cancel to exit the window without saving your selections
• Ok to save your selections and close the window
About Page(s)
Enter the page numbers and/or the range of pages using commas to separate the entries.
3-55FreeFlow Print Server
Online Help
Page 80

Job Manager
About Quantity
Use the Up and Down arrows to change the number of desired prints.
About Stock Size
Select the desired paper size.
If you select Custom, the Width and Height fields appear where you can enter the
appropriate measurements.
Note
The acceptable range for each dimension appears under its entry field.
About Stock Weight
Select the desired paper weight.
Note
The supported media weight is 70-250 GSM.
About Stock Color
Select the desired paper color.
If you select Custom, an additional field appears where you can enter the desired color.
About Stock Type
Select the desired type of stock.
If you select Custom, an additional field appears where you can enter the desired stock.
About Drilled Holes
Select the desired number of holes to be drilled.
About Stock Front Coating
Select the desired coating for the front side of the print.
About Stock Back Coating
Select the desired coating for the back side of the print.
FreeFlow Print Server3-56
Online Help
Page 81

Job Manager
About Time Stamps
The Time Stamps tab enables you to view various time-related information for a print
job.
The Time Stamp tab displays the following data about printed jobs:
• Submission Time
• Processing Start Time
• Print Start Time
• Total Print Suspend Time
• Completion Time
• Processing End Time
• Print End Time
• Total Processing Suspend Time
About Submission Time
Submission Time: The time that the job was submitted and accepted by the Print Server.
About Processing Start Time
Processing Start Time: The time that the Print Server started to process the job.
About Print Start Time
Print Start Time: The time that the job started to be printed.
About Total Print Suspend Time
Total Suspend Time: The time that the job was suspended while being printed.
About Completion Time
Completion Time: The amount of time the job took to be completed.
About Processing End Time
Processing End Time: The time that the Print Server finished processing the job.
Online Help
3-57FreeFlow Print Server
Page 82

Job Manager
About Print End Time
The Print End Time: The time that the job finished being printed.
About Total Processing Suspend Time
Total Processing Suspend Time: The amount of time that the job was suspended while
being processed.
About the Option Conflict Gray-out Feature
The FreeFlow® Print Server uses a Conflict Gray-out feature to prevent you from selecting
conflicting features on the same tab.
If you select a Stapling/Finishing option of Staple, the Output Location changes to a
location that supports your finishing selection. The Output Location menu is grayed-out
until you select a finishing option that is supported by multiple sources.
This feature prevents the job from faulting and prevents you from having to locate the
conflicting features.
Restriction
Due to Java limitations, this feature cannot cause individual selections within a menu
to be grayed-out. The Programming Conflicts dialog detects conflicts resulting between
tabs and within menus. If a conflict occurs, the Programming Conflicts dialog displays
a description of the conflict and instructions for resolution.
Managing Print Jobs
The features in Job Manager enable you to perform all of the following tasks and actions:
• View thumbnail images of the print job prior to sending the job to print.
• Upload a new print job to the Print Server.
• Make multiple selections to enact the same action to several jobs simultaneously.
• Release a job to print from the Held or Completed queue list.
• Move a print job to a different queue.
• Delete a print job.
• Change properties of a print job.
FreeFlow Print Server3-58
Online Help
Page 83

Job Manager
• Rename a print job.
Uploading a New Print Job to the Print Server
1. To open the Upload New Job window, use either method below:
• Right-click the mouse anywhere in the job list and select Upload New Job.
• Select Upload New Job from the More Actions window.
The Upload New Job... window appears.
2. Use the Browse button to navigate to the directory containing the file to be printed.
3. Double-click the desired file, or single-click the file and click Open.
The desired file name appears in the File Name field.
4. Click in the Submit to Queue field to display the list of available print queues.
5. Select the desired print queue.
6. Click Upload Job.
The Uploading File window opens and tracks the processing progress. Shortly, the
job appears as Active in the Queue list.
Viewing Thumbnail Images of a Print Job
Only print jobs in the Held queue are available for viewing prior to printing.
A PostScript™ license is required to access this feature.
Thumbnail images of a print job can be viewed prior to submitting the job to print. The
Thumbnail... feature provides a low resolution preview to verify job composition and
layout.
1. To open the Thumbnail... window, use either method below:
• Select the job to be viewed from the Held queue list, and select Thumbnails...
from the More Actions menu.
• Right-click the job to be viewed from the Held queue list, and select Thumbnails....
2. Once the process is completed, the selected job appears in the Thumbnails... window.
3. Use the buttons as described below:
a) Click Previous and Next to navigate through the pages of the job.
b) Click Rotate to rotate the thumbnail images.
4. When done viewing the thumbnail images, click Close.
Making Multiple Job or Queue Selections
To select multiple jobs or queues, use either method below:
• For individual items, press and hold down the <CTRL> (Control) key and select
each item by left-clicking the mouse.
Online Help
3-59FreeFlow Print Server
Page 84

Job Manager
• For multiple, sequential items, press and hold down the <SHIFT> key and select
the first and last items that you want from the list.
This action highlights the first and last selected file or queue names and all entries
in between.
Changing Job Properties
1. To modify the properties of submitted print jobs, use any method below:
• Double-click the job.
• Right-click the job and select Properties.
• Select the job and click the Properties icon in the toolbar.
• Select the job and select Properties from the More Actions menu.
The Job Property windows opens.
2. Make the desired changes.
3. Click Save.
Renaming a Print Job
To change a job name in the Completed list, the Retain PDL Files option must be selected
in System Preferences. There are no limitations for changing job names in any of the
other job lists.
1. Use any method below to open the Job Properties window:
• Double-click the desired job.
• Right-click the job and select Properties.
• Select the job and select Properties from the More Actions menu.
• Select the job and click the Properties icon on the toolbar.
The Job Property windows opens.
2. Highlight or select the current name in the Name field.
3. Type the new job name.
4. Click Save.
When you return to the job list, the new file name appears.
Moving a Print Job to a Different Queue
1. Perform either action from the Job Manager window:
• Right-click the job and select Move to Queue.
• Select the job and select Move to Queue from the More Actions menu.
2. Select a print queue from the list and click OK.
FreeFlow Print Server3-60
Online Help
Page 85

Job Manager
The job is moved to the selected queue.
Releasing a Job to Print
Releasing jobs for printing can be done from the Held queue list and the Completed
queue list if the Retain PDL option is enabled in the General tab of Administration.
1. Select the job to be released in the Held or Completed list.
2. Click the Resume icon on the toolbar.
Deleting a Print Job
1. Perform either action from the Job Manager window:
• Right-click the job and select Delete.
• Select the job and select Delete from the More Options menu.
2. When the Confirmation window appears, select Yes to remove the job from the
system.
The job is completely removed from the system.
Online Help
3-61FreeFlow Print Server
Page 86

Job Manager
FreeFlow Print Server3-62
Online Help
Page 87

4
Queue Manager
The Queue Manager section enables you to create and manage print queues and ensure
the steady flow of jobs through the printing system.
The Queue Manager also enables you to:
• change the properties of a queue
• change the job status of a queue
Working with Printer Queues
For a job to be printed, it must be submitted to the printer through a print queue.
The function of a print queue is to manage the flow of print jobs through the FreeFlow
Print Server to the printer.
About Default Queues
Three predefined queues are created automatically on new FreeFlow® Print Server
installations or on systems that reload the operating system.
Note
Predefined queues are not created during FreeFlow® Print Server upgrade installations.
This installation feature enables you to use the Print, Save, and Hold queue capabilities
immediately without the need to create each queue manually once the software is
installed.
The following queues are created automatically:
®
Online Help
4-1FreeFlow Print Server
Page 88

Queue Manager
• HostName_PRINT: The Print queue is created with the standard set of default
settings.
• HostName_SAVE:
- Color printers: The Save queue is created with typical color attribute settings.
For example, Fast Reprint Format, Save DRI, and Gather Images are enabled.
- Monochrome printers: The Save queue is created with typical monochrome
image quality attribute settings.
• HostName_HOLD: The Hold queue is created with the standard set of default settings.
The queue is set to Do Not Release Jobs. This setting prevents the queue from
automatically releasing jobs to print. Jobs can only be printed once they are manually
set to be released or if the queue status is changed.
These three queues function similarly to any other queue you may create. You can
change the queue properties and copy or delete the queue at any time.
Note
If you select a different display language for the system, the system prompts you whether
you want the three predefined queues renamed using the selected language. Follow the
displayed instructions.
About the Queue Manager Window
The Queue Manager window displays all of the queues available on the printer.
Each queue is like a virtual printer which has unique characteristics that are defined
when the queue is created. The columns of the Queue list display information on the
following topics for each available printer queue on the system:
• Queue Name: Name of the queue.
• Priority: Each queue for the printer is assigned a priority. The priority designates the
order in which the queues are to be processed. The priority of a queue can be set
between 1 (highest priority) and 100 (lowest priority). The default priority setting is
50.
• Accept: The Accept column displays either Yes or No. If Yes is displayed, the queue
is enabled to accept new jobs for printing. If No is displayed, the queue is prevented
from accepting new jobs for printing.
• Release: The Release column displays either Yes or No. If Yes is displayed, the queue
automatically prints incoming jobs. If No is displayed, the queue can only print if it
is manually set to release or if the queue status is changed.
• Lock: The Lock column displays either Yes or No. If Yes is displayed, the queue is
locked. If No is displayed, the queue is unlocked. Properties of a locked queue cannot
be changed without first unlocking the queue.
FreeFlow Print Server4-2
Online Help
Page 89

Queue Manager
• Hot Folder: The Hot Folders option enables you to print jobs by copying jobs into a
Hot Folder enabled queue. The Hot Folder column displays either Yes or No. If Yes is
displayed, the Hot Folders option is enabled. If No is displayed, the Hot Folders option
is disabled.
Accessing the Queue Manager Window
Click Queue on the navigation bar.
Configuring the Queue Manager Window
1. To change the order of the job data categories that appear in the queue list, click on
a column heading and drag it to the desired location in the heading row.
2. To change the width of a displayed column, do the following steps:
a) Click on the desired column separator.
The mouse cursor changes to a double-headed arrow.
b) Hold down the left mouse button and drag the column separator appropriately:
Left to decrease column width;
Right to increase column width.
Note
If the width of a column is too small to display the entire contents of a cell, hover
the cursor over the cell to view the full contents.
Understanding the Override Option
When you enable the Override icon in Queue Manager for any queue property, that
selection applies to any jobs submitted to that queue and takes precedence over any
property selections that are made in the Job Manager or programmed into the job.
Before you create a queue and begin making property selections for it, you must
understand the Override option.
The priority levels of the Override option are listed below:
1. Queue overrides
2. Exception page programming
3. Job ticket settings
4. Submission print protocol (lp, lpr, nprint) settings
5. PDL Level options (setpagedevice & PCL options)
6. Queue defaults
Online Help
4-3FreeFlow Print Server
Page 90

Queue Manager
For example, any Exception Page settings (priority 2) overrides any Job Ticket settings
(priority 3). Any Queue Property override settings take precedence over all other property
features.
Creating New Queues
Before jobs can be printed, they must be submitted to the printer through a print queue.
The function of a queue is to manage the flow of print jobs through the Print Server to
the printer.
Creating a New Printer Queue
Create a new queue when you need to control the flow or handling of documents in
different ways.
1. From the Queue Manager window, do one of the following:
• Click the New icon in the toolbar.
• Right-click on any queue and select New.
The New Queue window opens.
2. In the Name field, enter a name that identifies the queue. For example, if the queue
is set to release jobs, the name may be PRINTER3RELEASE.
The name may consist of letters and/or numbers and can have up to 25 characters,
including underscores.
When creating a queue to be used for lp/lpr printing, the queue name is limited to
14 characters. A queue name longer than 14 characters is not visible to the lp/lpr
gateway. This is a limitation of the gateway.
Note
The Printer Name is read only. It contains the name of the connected printer.
3. Enable the Override icon if you want the setting to take precedence over programming
associated with individual jobs.
4. Make option selections using the following tabs:
• The Basic Settings tab: Enables you to set queue property options.
• The Paper Stock tab: Enables you to select the queue default paper stock.
• The Output tab: Enables you to select queue output options.
• The Image Quality tab: Enables you to set basic functions that enhance the
quality of the printed image.
• The Color Management tab: Enables you to make selections regarding use of
embedded profiles and intended rendering.
• The Image Placement tab: Enables you to modify the original images for output.
FreeFlow Print Server4-4
Online Help
Page 91

Queue Manager
• The PDL Settings tab: Enables you to select decomposer (processing) options.
Note
If you do not have a valid PostScript™ license on the system, you will see PostScript
in the list of format options, but it will be grayed out and it cannot be selected.
5. When you are finished making selections, do one of the following:
• Click Cancel to exit the window without creating a new queue.
• Click Add Queue to create the new queue and exit the window.
6. Set a priority between 1 (highest priority) and 100 (lowest priority) for the queue.
The default priority setting is 50.
Each queue for the printer is assigned a priority. The priority indicates the order in
which the queues are to be processed. All jobs in the queue with the highest priority
are processed before jobs in queues having lower priorities. If a priority is not set, a
default priority of 50 is assigned to the queue when it is created. If more than one
queue has the same priority, the queues are processed in repeating succession.
7. Make any other necessary changes to the remaining fields:
• Accept
• Release
• Lock
• Hot Folder
About the Print Line
The Print Line represents the current physical setup of the print system including print
speed, resolution, and sides imaged.
The Print Line is established on the UI of the printer. The printer UI sends information
about the currently active Print Line and a list of the system’s Print Lines to the FreeFlow
Print Server. The Print Server uses Print Line information in the following ways:
• The active Print Line name is displayed in the main UI status area.
• Each queue is linked to a specific Print Line which is selected when the queue is
created.
• A job sent to a queue linked to a non-active Print Line can be scheduled and ripped,
but it will not be printed until the required Print Line is active.
®
Non-selectable Print Line information is displayed in the Basic Settings tab of the Queue
Properties or Job Properties window.
Note
The Print Line selection cannot be changed on an existing queue.
4-5FreeFlow Print Server
Online Help
Page 92

Queue Manager
Note
When using Copy Queue, the new queue inherits the Print Line selection of the copied
queue.
Setting or Changing Queue Properties
Once a new queue is created, most of its properties can be added, deleted, and modified;
however, the Queue Name and Printer Name cannot be modified.
Note
When you enable the Override icon in Queue Manager for any queue property, that
selection applies to any jobs submitted to that queue and takes precedence over any
property selections that are made in the Job Manager or programmed into the job.
Accessing the Queue Properties Window
Use any method below:
• Double-click a queue.
• Right-click a queue and select Properties.
• Select a queue and select Properties from the More Actions menu.
• Select a queue and click the Properties icon in the toolbar.
The Queue Properties window appears.
Exiting from the Properties Window
To return to either the Job Manager window or the Queue Manager window from the
Properties window without saving changes, use any method below:
• Click Cancel.
• Click the X icon in the upper, right corner of the window.
FreeFlow Print Server4-6
Online Help
Page 93

Queue Manager
• Press the <Esc> key.
About Queue Properties
The Queue Properties window enables you to view and specify parameters that are used
as default settings to process all jobs submitted to the queue.
The Queue Properties window contains the following tabs:
• Basic Settings: Contains default job property settings for jobs submitted to the queue.
• Paper Stock: Contains stock and tray choices for your print job.
• Output: Contains features used to determine job output options.
• Image Quality: Enables you to make image quality adjustments.
• Color Management: Contains two sections: the color data flow diagram and the
controls area. The color data flow diagram represents the paths that color data follow
while being processed by the system. The controls area enables you to set functions
that enhance the quality of the printed image based on the type of file printed and
the fonts used.
• Image Placement: Contains features that enable you to modify original images for
output.
• PDL Settings: PDL settings determine how jobs sent to the queue are decomposed
(ripped), or prepared for printing based on their PDL.
Note
If you do not have a valid PostScript™ license on the system, you will see PostScript
in the list of format options, but it will be grayed out and it cannot be selected.
About the More Actions Menu in Queue Manager
Note
All options in the More Actions menu are also available by right-clicking any entry in the
queue list.
The More Actions menu in the Queue Manager includes:
• Properties: Enables you to view and modify the properties of an existing queue.
• New: Enables you to create a new queue.
• Delete: Enables you to delete an existing queue.
• Set as Default: Enables you to set a default queue.
• Enable Hot Folder: Enables use of the Hot Folders option that lets you print jobs by
copying jobs into a Hot Folder enabled queue.
4-7FreeFlow Print Server
Online Help
Page 94

Queue Manager
• Disable Hot Folder: Disables use of the Hot Folders option.
• Accept: Enables the queue to accept new jobs for printing.
• Reject: Prevents the queue from accepting new jobs for printing.
• Release: Sets the queue to automatically send incoming jobs to print.
• Hold Jobs: Prevents the queue from automatically releasing jobs to print. Jobs can
only be printed once they are manually set to be released or if the queue status is
changed.
• Lock: Enables you to lock one or multiple queues.
• Unlock: Enables you to unlock one or multiple queues.
• Select All: Highlights all of the queues in the queue list.
• Clear All: Clears all selected (highlighted) queues in the queue list.
• Redisplay: Updates the queue list display.
To choose more than one queue when selecting the Delete, Accept, Reject, Release, and
Hold Jobs options, use either action below:
• Press and hold down the <CTRL> (Control) key and select each individual queue.
• To select multiple queues that are sequential in the list, press and hold down the
<SHIFT> key while selecting the first and last queue names you want to select. This
action highlights the first and last selected queue names and all queues in between.
About the Queue Manager Icon Toolbar
The toolbar offers several of the same options available from the More Actions menu.
The toolbar includes the following buttons:
• New Queue: Enables you to create a new queue.
• Queue Properties: Enables you to view and modify the properties of an existing
queue.
• Release Jobs: Sets the queue to automatically send incoming jobs to print.
• Hold Jobs: Prevents the queue from automatically releasing jobs to print. Jobs can
only be printed once they are manually set to be released or if the queue status is
changed.
To choose more than one queue when selecting the Release or the Hold Jobs options,
use either method below:
• Press and hold down the <CTRL> (Control) key and select each individual queue.
• To select multiple queues that are sequential in the list, press and hold down the
<SHIFT> key while selecting the first and last queue names you want to select. This
action highlights the first and last selected queue names and all queues in between.
FreeFlow Print Server4-8
Online Help
Page 95

Queue Manager
About Icon Use
Icons are used throughout the user interface to provide quick access to frequently used
actions.
Some icons are used throughout the entire UI. Other icons are unique to a particular
tab.
Related Topics:
About the Common Icons Used in Job and Queue Properties
About the Unique Icons Used in Queue Properties
About the Icons Used for the Queue Properties Tabs
Table 10. Identification of Icons Used for Queue Properties Tabs
Tab NameIcon
Basic Settings
Paper Stock
Output
Image Quality
Color Management
Image Placement
PDL Settings
Online Help
4-9FreeFlow Print Server
Page 96

Queue Manager
About the Unique Icons Used in Queue Properties
Table 11. Identification of Icons Unique to Queue Properties
DescriptionNameIcon
New Queue
Launches the Queue Properties window so you can
configure the properties for a new queue.
Sets the selected queue to accept print jobs.Accept Jobs Queue
Sets the selected queue to reject print jobs.Reject Jobs Queue
Sets the selected queue to release print jobs.Release Jobs in Queue
Sets the desired queue to not release print jobs.Hold Jobs in Queue
Deletes the selected queue.Delete Queue
Indicates the queue that is set as the default queue.Default Queue
About the Common Icons Used in Job and Queue Properties
Table 12. Identification of Common Icons Used
DescriptionNameIcon
General
Override Disabled
Override Enabled
Indicates that there is no queue override applied to
the property.
Indicates that the queue property option selected
is set up to override the same option that was set
as a job property in Job Manager.
Provides access to the Job Properties window.Properties
FreeFlow Print Server4-10
Online Help
Page 97

Basic Settings
Queue Manager
DescriptionNameIcon
Output
Uncollated
Collated
One Sided
Two Sided
Head-to-Toe
Indicates that the pages are not printed in sequence,
but by quantity. Example: 1, 1, 1, 2, 2, 2, 3, 3, 3.
Indicates that the pages of the print job are printed
sequentially by set. Example: 1, 2, 3, 1, 2, 3, 1, 2, 3.
Indicates a file format of PDF.PDF
Indicates a file format of TIFF.TIFF
Indicates a file format of PostScript.PostScript
Indicates that the file format is not known.Unknown Format
Indicates that the job is printed on only one side of
the paper.
Indicates that the job is printed on both sides of the
paper.
Indicates that the job is printed with the top of the
images positioned at opposite ends of the sheet of
paper.
Output Delivery System Specified
Up
Down
Output Order Ascending (1-N)
Output Order Descending (N-1)
Output Order System
Specified
Indicates that the output delivery method is specified by the system.
Indicates that printer pages are delivered face up.Output Delivery Face
Indicates that printer pages are delivered face down.Output Delivery Face
Indicates that the output order has page 1 on top
and the last page on the bottom.
Indicates that the output order has the last page
on top and page 1 on the bottom.
Indicates that the output order is specified by the
system.
Indicates that slip sheets are in use.Slip Sheets Enable
Indicates that slip sheets are not in use.Slips Sheets Disable
Online Help
4-11FreeFlow Print Server
Page 98

Queue Manager
Image Quality
DescriptionNameIcon
Indicates a color mode of Normal.Normal
Normal with Enhanced
Gloss
System Specified
System Specified
Nearest Neighbor
Bi-Linear
Indicates a color mode of Normal with Enhanced
Gloss.
Indicates a color mode of Grayscale.Grayscale
Indicates a color mode of Fast Black.Fast Black
Indicates that halftone screen used is system selected.
Indicates that a Dot halftone screen is in use.Dot
Indicates that a Line halftone screen is in use.Line
Indicates that a Stochastic halftone screen is in use.Stochastic
Indicates that the interpolation method used is
system selected.
Indicates that the Nearest Neighbor interpolation
method is in use.
Indicates that the Bi-Linear interpolation method is
in use.
Filtered
Smart
Indicates that the Filtered interpolation method is
in use.
Indicates that the Smart interpolation method is in
use.
FreeFlow Print Server4-12
Online Help
Page 99

Image Placement
Queue Manager
DescriptionNameIcon
Indicates that no layout type is selected.None
N Up
Booklet
Signature
About the Basic Settings Tab
Indicates that the layout type N Up is selected where
multiple pages of content can be printed on a single
sheet of paper.
Indicates that the layout type Booklet is selected
where the content is bound and usually has a cover.
Indicates that the layout type Signature is selected
where a large sheet of paper is printed with four or
a multiple of four pages that when folded creates
a section of a book.
Indicates that the page display is vertical.Portrait
Indicates that the page display is sideways.Landscape
Indicates that the image is not rotated.Rotation 0 Degrees
Indicates that the image is rotated 180 degrees.Rotation 180 Degrees
The Basic Settings tab enables you to view and change default job settings that are
applied to jobs submitted to the queue.
Note
When you enable the Override icon in Queue Manager for any queue property, that
selection applies to any jobs submitted to that queue and takes precedence over any
property selections that are made in the Job Manager or programmed into the job.
From the Basic Settings window you can configure the following basic printing properties:
• Quantity
• Collation
• Administrative Pages
• Start Message
• Sides Imaged
• Format
• Banner Page Message
• Stock List
Online Help
4-13FreeFlow Print Server
Page 100

Queue Manager
When you are finished making selections, click either:
• Cancel to exit the window without saving your selections
• Save to save your selections and close the window
About Quantity
Use the Up and Down arrows to change the number of desired prints.
About Collation
Click your preference for collated or uncollated print sets.
About Administrative Pages
Administrative Pages are optional pages that can be printed with the job. Either the
System Administrator or the Operator can configure a print job to include Administrative
Pages options.
Different Administrative Pages can be enabled for each queue, or one Administrative
Page can be created for a group of queues.
The types of Administrative Pages that can be printed for a printer queue include the
following:
• Banner Pages
• Attributes Report
• Error Page
Note
Enabling the Override icon causes each setting to take precedence over any property
selections made in the Job Manager or programmed into the job. For example, if you
want to print a Banner Page and/or an Attributes Report on a particular queue, enable
the Override icon.
About Banner Pages
A Banner Page is a break page that prints at the beginning of each job and contains
specific job information by default.
Banner Pages provide the following information:
• Job Name: Specifies the name of the job and is used to identify and track the job in
the queue.
• Job Sender: The name of the person who sent the job. This field cannot be edited.
• Job Recipient: The name of the person who is to receive the job. If you do not know
the name of the intended recipient, you may enter a recipient location.
• Banner Page Message: Information you want to be printed on the Banner Page.
FreeFlow Print Server4-14
Online Help
 Loading...