

Page 1

Version 3.0
March 2012
Xerox® Color 800/1000 Press
User Guide
Page 2

© 2012 Xerox Corporation. All rights reserved. Xerox®, and Xerox and Design® are
trademarks of Xerox Corporation in the United States and/or other countries.
FreeFlow®, SquareFold®, Xerox prInteract™, MeterAssistant™, SuppliesAssistant™, and
RemoteAssistant™ are trademarks of Xerox Corporation in the United States and/or other
countries. Product status, build status, and/or specifications are subject to change without
notice.
Microsoft, Windows, Windows 2000, Windows XP, Windows Vista, and Windows 7 are
registered trademarks of Microsoft Corporation.
PANTONE® is a registered trademark of Pantone, Inc.
Macintosh is a registered trademark of Apple Computer, Inc., registered in the US and
other countries. Elements of Apple's Technical User Documentation used by permission
from Apple Computer, Inc.
Adobe, the Adobe logo, Acrobat, the Acrobat logo, Acrobat Reader, Distiller, Adobe PDF
logo, Adobe PDF JobReady, Illustrator, InDesign, and Photoshop are registered trademarks
of Adobe Systems, Inc. PostScript is an Adobe registered trademark used with the Adobe
PostScript Interpreter, the Adobe page description language, and other Adobe products.
This product is not endorsed or sponsored by Adobe Systems, publisher of Adobe
Photoshop.
Fiery®, is a registered trademark of Electronics For Imaging, Inc. Creo® is a registered
trademark of Creo, Inc. Plockmatic™ is a trademark of CFS Products Inc. GBC® and
AdvancedPunch™ are trademarks or registered trademarks of General Binding Corporation.
GBC®, and e/Binder 200™ are trademarks or registered trademarks of General Binding
Corporation. HP, HPGL, HPGL/2, and HP-UX are registered trademarks of Hewlett-Packard
Corporation. Netscape® is registered trademark of Netscape Communications. UNIX®
is a registered trademark of the Open Group. Mozilla FireFox™ is a trademark of Mozilla
Foundation.
Page 3

Table of Contents
1 Product overview........................................................................................1-1
Quick start/links....................................................................................................................1-2
User Interface........................................................................................................................1-2
Logon...........................................................................................................................1-3
Language...................................................................................................................1-3
Change language......................................................................................1-4
Power saver................................................................................................................1-4
Print server overview...........................................................................................................1-4
Full Width Array....................................................................................................................1-5
Clear dry ink...........................................................................................................................1-5
Productivity...............................................................................................................1-6
Full flood.....................................................................................................................1-6
Spot..............................................................................................................................1-6
Power on/off the machine................................................................................................1-7
Feeding and finishing devices.........................................................................................1-7
Oversized High Capacity Feeder (OHCF).......................................................1-8
Interface Module....................................................................................................1-8
GBC AdvancedPunch.............................................................................................1-9
High Capacity Stacker (HCS)..............................................................................1-9
Perfect Binder........................................................................................................1-10
Standard Finisher.................................................................................................1-11
Booklet Maker Finisher......................................................................................1-11
SquareFold Trimmer Module...........................................................................1-12
Standard Finisher Plus........................................................................................1-12
Third-party finishing devices...........................................................................1-13
2 Where to find help....................................................................................2-1
User Interface help..............................................................................................................2-1
Help on the World Wide Web..........................................................................................2-2
Print server customer documentation.........................................................................2-2
3 Machine/job status...................................................................................3-1
Machine status......................................................................................................................3-1
System menu............................................................................................................3-1
Dry ink/toner status area.....................................................................................3-2
Billing and Counters...............................................................................................3-2
Viewing/reseting Billing Meters/Usage Counters.........................3-2
Billing and counters information........................................................3-3
Xerox® Color 800/1000 Press
User Guide
i
Page 4

Table of Contents
Impressions information........................................................................3-3
Maintenance (on the UI).....................................................................................3-4
Job status................................................................................................................................3-5
Job/machine status area.....................................................................................3-5
Job summary............................................................................................................3-6
Pause............................................................................................................................3-6
4 Submitting a print job.............................................................................4-1
Printing from your computer...........................................................................................4-1
Printing from the Xerox FreeFlow Print Server..........................................................4-1
Printing from the Xerox EX Print Server, Powered by EFI.....................................4-2
Printing from the Xerox CX Print Server, Powered by Creo..................................4-2
5 System Administrator overview...........................................................5-1
Logging on as Administrator...........................................................................................5-1
System administrator options.........................................................................................5-1
6 Paper information.....................................................................................6-1
Loading media in Trays 1 and 2.....................................................................................6-1
Loading paper..........................................................................................................6-1
Loading tab stock...................................................................................................6-1
Loading transparencies........................................................................................6-2
Loading pre-drilled stock for 1-sided print jobs..........................................6-3
Loading pre-drilled stock for 2-sided print jobs..........................................6-3
Skew adjustment levers.....................................................................................................6-4
Tray Properties.......................................................................................................................6-7
Tray stock mismatch...........................................................................................................6-8
7 Manage Stock Library..............................................................................7-1
Recommended Media List (RML)..................................................................................7-2
Stock management.............................................................................................................7-3
Manage Stock Library window.......................................................................................7-4
Adding a stock entry.............................................................................................7-5
Copying a stock entry...........................................................................................7-6
Creating a new stock (from Manage Stock Library).................................7-7
Creating a new stock (from Tray Properties)...............................................7-8
Editing an existing stock in the Stock Library..............................................7-9
Removing a stock from the Stock Library...................................................7-10
8 Advanced Stock Setup.............................................................................8-1
Advanced Stock Setup options.......................................................................................8-2
Tips for using Advanced Stock Setup options.............................................8-3
Create/modify Advanced Stock Setup options...........................................8-4
ii
Xerox® Color 800/1000 Press
User Guide
Page 5

Table of Contents
Paper tray/paper feed options........................................................................................8-5
Stock By Name Only..............................................................................................8-5
Multifeed Detection...............................................................................................8-6
Near Empty Detection Level..............................................................................8-6
Tray Air Assist...........................................................................................................8-7
Enable Tray Heater.................................................................................................8-8
Paper path/paper transportation options..................................................................8-8
Aligner Roll Pressure...............................................................................................8-8
Second (2nd) bias transfer roll..........................................................................8-9
Mottle..........................................................................................................8-11
Color shift...................................................................................................8-12
Selecting the 2nd Bias Transfer Roll settings...............................8-13
Fuser Temperature...............................................................................................8-14
Fold Adjustment Profile..................................................................................................8-15
9 Maintenance...............................................................................................9-1
Cleaning procedures...........................................................................................................9-1
Cleaning the UI screen.........................................................................................9-1
Cleaning the paper path......................................................................................9-1
Cleaning the paper path area 2..........................................................9-2
Cleaning the paper path areas 3 and 4...........................................9-4
Cleaning the paper path area 5..........................................................9-7
Cleaning the paper path area 6.......................................................9-10
Cleaning the paper path area 7.......................................................9-13
Replacing consumable supplies...................................................................................9-17
Consumable supplies..........................................................................................9-17
Replacing a dry ink/toner cartridge..............................................................9-18
Dry ink/toner waste bottle...............................................................................9-20
Replacing a dry ink/toner waste bottle..........................................9-21
Replacing the fuser web assembly................................................................9-23
10 Problem solving.....................................................................................10-1
Locating the machine serial number.........................................................................10-1
Machine serial number on the UI.................................................................10-1
Serial number on the machine.......................................................................10-1
Calling for service..............................................................................................................10-2
General problems..............................................................................................................10-3
Jam clearance.....................................................................................................................10-7
Paper jams in Trays 1 and 2.............................................................................10-7
Paper jams in area 2...........................................................................................10-8
Paper jams in areas 3 and 4.........................................................................10-11
Xerox® Color 800/1000 Press
User Guide
iii
Page 6

Table of Contents
Paper jams in area 5........................................................................................10-14
Paper jams in area 6........................................................................................10-17
Paper jams in area 7........................................................................................10-20
Fault codes........................................................................................................................10-24
Image quality...................................................................................................................10-46
Charge corotrons...............................................................................................10-48
When to replace a charge corotron assembly..........................10-49
Which charge corotron assembly to replace............................10-49
Banding samples..................................................................................10-49
11 Technical data.......................................................................................11-1
Machine specifications...................................................................................................11-1
Tray capacity..........................................................................................................11-1
Throughput information for all paper trays..............................................11-1
Machine warmup time.......................................................................................11-2
First print-out time..............................................................................................11-2
Paper specifications..........................................................................................................11-3
Environmental specifications.......................................................................................11-4
12 Offset Catch Tray (OCT)....................................................................12-1
Enabling the Offset Mode on the EX Print Server................................................12-1
13 Oversized High Capacity Feeder (OHCF)....................................13-1
Overview................................................................................................................................13-1
Postcard bracket...................................................................................................13-1
Using the Postcard bracket.................................................................13-2
Loading media in the OHCF..........................................................................................13-4
Loading paper in the OHCF.............................................................................13-4
Loading tabs in the OHCF................................................................................13-4
Loading transparencies in the OHCF...........................................................13-5
Loading pre-drilled stock into the OHCF for 1-sided print
jobs......................................................................................................................13-5
Loading pre-drilled stock into the OHCF for 2-sided print
jobs......................................................................................................................13-6
Skew adjustment levers..................................................................................................13-7
Tray Properties....................................................................................................................13-9
Tray stock mismatch......................................................................................................13-10
OHCF problem solving..................................................................................................13-11
Clearing OHCF jams.........................................................................................13-11
Paper jams inside the OHCF trays.................................................13-12
OHCF paper jams at lever 1a and knob 1c................................13-13
OHCF paper jams at lever 1b and knob 1c................................13-14
iv
Xerox® Color 800/1000 Press
User Guide
Page 7

Table of Contents
OHCF paper jams at lever 1d and knob 1c................................13-15
OHCF fault codes...............................................................................................13-17
OHCF specifications.......................................................................................................13-18
14 Interface Module..................................................................................14-1
Overview................................................................................................................................14-1
Control panel.........................................................................................................14-2
Paper path..............................................................................................................14-3
Paper curl settings on the Interface Module..........................................................14-3
Preset decurler settings.....................................................................................14-3
Manual decurler buttons...................................................................................14-3
Problem solving..................................................................................................................14-4
Clearing jams.........................................................................................................14-4
Paper jams at lever 1a..........................................................................14-4
Paper jams at lever 2a..........................................................................14-5
Paper jams at lever 2b..........................................................................14-7
Fault codes..............................................................................................................14-8
15 High Capacity Stacker (HCS)...........................................................15-1
Overview................................................................................................................................15-1
Identifying the components...........................................................................15-2
Control panel.........................................................................................................15-3
HCS top tray...........................................................................................................15-3
Unloading the Stacker Tray...........................................................................................15-4
Problem solving..................................................................................................................15-5
General problems.................................................................................................15-5
Jam clearance........................................................................................................15-5
HCS entrance jams (E1, E2, and E3)...............................................15-5
HCS transport jams (E4, E5, and E6)...............................................15-6
HCS top tray jam (E7)...........................................................................15-8
HCS exit jam (E8)....................................................................................15-9
Hints and tips for using the HCS.................................................................15-10
Loss of power......................................................................................................15-11
Fault codes...........................................................................................................15-11
Specifications...................................................................................................................15-15
16 Perfect Binder........................................................................................16-1
Binder components..........................................................................................................16-1
External components..........................................................................................16-1
Cover inserter.........................................................................................................16-3
Internal components..........................................................................................16-4
Binder control panel............................................................................................16-5
Xerox® Color 800/1000 Press
User Guide
v
Page 8

Table of Contents
Book binding path.............................................................................................................16-7
Power on/off.....................................................................................................................16-10
Loading media in the cover inserter tray..............................................................16-11
Removing books from the binder.............................................................................16-12
Submitting a job to the binder..................................................................................16-12
Maintenance....................................................................................................................16-25
Binder problem solving.................................................................................................16-27
Binder circuit breaker..........................................................................................16-6
Bypass path............................................................................................................16-7
Standard path.......................................................................................................16-8
Cover inserter path..............................................................................................16-9
Power Saver mode.............................................................................................16-10
Printing from your computer to the binder.............................................16-12
Printing from the Xerox FreeFlow Print Server to the Perfect
Binder..............................................................................................................16-13
Binder manual mode with the FreeFlow Print Server............16-13
Printing/binding with preprinted covers to the FreeFlow
Print Server.......................................................................................16-14
Printing/binding from a single file to the FreeFlow Print
Server..................................................................................................16-16
Printing from the Xerox CX Print Server, Powered by Creo to the
Perfect Binder...............................................................................................16-17
Binder manual mode with the CX Print Server.........................16-17
Printing/binding from a single file to the CX Print
Server..................................................................................................16-18
Printing/binding from two files to the CX Print Server..........16-19
Printing from the Xerox EX Print Server, Powered by EFI to the
Perfect Binder...............................................................................................16-21
Binder manual mode with the EX Print Server.........................16-21
Printing/binding with preprinted covers to the EX Print
Server..................................................................................................16-21
Printing/binding from a single file to the EX Print
Server..................................................................................................16-23
Cleaning the binder..........................................................................................16-25
Empty the trimmer waste tray.....................................................................16-25
Adhesive filling tray..........................................................................................16-26
Replenishing the adhesive filling tray..........................................16-27
Paper jams in areas E1 and E2....................................................................16-28
Paper jams in area E3......................................................................................16-28
Paper jams in area E4......................................................................................16-30
Paper jams in areas E5 and E6....................................................................16-31
General problems..............................................................................................16-34
Power interruption during operation............................................16-34
vi
Xerox® Color 800/1000 Press
User Guide
Page 9

Table of Contents
Adjusting the printed image and trim.........................................16-34
Fault codes...........................................................................................................16-34
Binder specifications.....................................................................................................16-71
17 Standard/Booklet Maker Finisher..................................................17-1
Manual decurling feature on the finisher................................................................17-3
Folding feature...................................................................................................................17-4
Fold types................................................................................................................17-4
Loading paper/tabs in Tray 8/T1 (Post-Process Inserter)..................................17-6
Maintenance.......................................................................................................................17-7
Standard/Booklet Maker consumable supplies........................................17-7
Replace the standard staple cartridge........................................................17-8
Replace the booklet staple cartridge............................................................17-9
Replacing the Staple Waste Container on the finisher......................17-11
Empty the Punch Waste Container............................................................17-13
Finisher problem solving..............................................................................................17-14
Paper jams in Tray 8/T1 (Post-Process Inserter)...................................17-15
Paper jams at lever 1a and knob 1c..........................................................17-16
Paper jams at lever 1d.....................................................................................17-17
Paper jams at lever 1b.....................................................................................17-18
Paper jams at lever 3b and 3d.....................................................................17-19
Paper jams at lever 3e and knob 3c...........................................................17-21
Paper jams at lever 3g and knob 3f...........................................................17-22
Paper jams at lever 4b and knob 3a..........................................................17-23
Paper jams at lever 2a and knob 3a..........................................................17-24
Paper jams at lever 2b and knob 2c..........................................................17-25
Paper jams at 2c, 2e, 2f, and 2d..................................................................17-27
Paper jams at 2d and lever 2g.....................................................................17-28
Paper jams at unit 4 and knob 4a..............................................................17-29
Paper jams at finisher top tray....................................................................17-31
Paper jams at finisher stacker tray.............................................................17-32
Paper jams at the optional booklet maker tray....................................17-33
Stapler faults.......................................................................................................17-34
Staple jams in the standard staple cartridge...........................17-35
Staple jams in the booklet maker cartridge..............................17-36
Reinserting the standard staple cartridge...............................................17-38
Fault codes...........................................................................................................17-40
Specifications...................................................................................................................17-43
Standard/Booklet Maker Finisher...............................................................17-43
Optional C/Z Folder..........................................................................................17-46
Xerox® Color 800/1000 Press
User Guide
vii
Page 10

Table of Contents
18 SquareFold Trimmer Module...........................................................18-1
Overview................................................................................................................................18-1
Identifying the components.........................................................................................18-2
Main components................................................................................................18-2
Paper path..............................................................................................................18-3
Control panel.........................................................................................................18-4
Square Fold feature..........................................................................................................18-4
Square fold options.............................................................................................18-5
Accessing the Square Fold options...............................................................18-6
Trimmer feature.................................................................................................................18-7
Trimmer options...................................................................................................18-7
Trim guidelines......................................................................................................18-8
Accessing the Trimmer options...................................................................18-10
Hints and tips...................................................................................................................18-10
Printing full-page images on booklets......................................................18-10
Follow these tips................................................................................................18-11
Problem solving...............................................................................................................18-12
Jam clearance.....................................................................................................18-12
Clearing jams.........................................................................................18-12
Clearing E1/E2 jams............................................................................18-13
Clearing E3 jams..................................................................................18-15
Fault codes...........................................................................................................18-16
Technical data..................................................................................................................18-18
Specifications......................................................................................................18-18
19 Standard Finisher Plus........................................................................19-1
Overview................................................................................................................................19-1
Finisher Module..................................................................................................................19-2
Finisher Module main components..............................................................19-2
Folding feature......................................................................................................19-3
Fold types...................................................................................................19-3
Loading paper/tabs in Tray 8/T1 (Post-Process Inserter).....................19-5
Finishing Transport...........................................................................................................19-6
Finishing Transport main components........................................................19-6
Finishing Transport status indicators...........................................................19-7
Standard Finisher Plus maintenance.........................................................................19-8
Standard Finisher Plus consumable supplies............................................19-8
Replace the standard staple cartridge........................................................19-8
Replacing the Staple Waste Container on the finisher......................19-10
Empty the Punch Waste Container............................................................19-12
viii
Xerox® Color 800/1000 Press
User Guide
Page 11

Table of Contents
Problem solving...............................................................................................................19-14
Paper jams in the Finisher Module.............................................................19-14
Paper jams in Tray 8/T1 (Post-Process Inserter)......................19-14
Paper jams inside the finisher left cover.....................................19-15
Paper jams at lever 1a and knob 1c................................19-15
Paper jams at lever 1d..........................................................19-16
Paper jams at lever 1b..........................................................19-17
Paper jams inside the finisher right cover..................................19-19
Paper jams at lever 3b and 3d..........................................19-19
Paper jams at lever 3e and knob 3c................................19-20
Paper jams at lever 3g and knob 3f................................19-21
Paper jams at lever 4b and knob 3a...............................19-23
Paper jams at the optional C/Z Folder.........................................19-24
Paper jams at lever 2a and knob 3a...............................19-24
Paper jams at lever 2b and knob 2c................................19-25
Paper jams at 2c, 2e, 2f, and 2d.......................................19-27
Paper jams at 2d and lever 2g..........................................19-28
Paper jams in areas 4b and 4c..........................................19-30
Paper jams at the finisher output area.......................................19-31
Paper jams at finisher top tray..........................................19-31
Paper jams at finisher stacker tray..................................19-32
Paper jams in the Finishing Transport......................................................19-33
Paper jams in area 1...........................................................................19-33
Paper jams in area 2...........................................................................19-34
Paper jams in area 3...........................................................................19-35
Paper jams in area 4...........................................................................19-36
Stapler faults.......................................................................................................19-37
Staple jams in the standard staple cartridge...........................19-37
Standard Finisher Plus fault codes.............................................................19-39
Finisher Module fault codes.............................................................19-39
Finishing Transport fault codes......................................................19-40
Third-party DFA fault codes.............................................................19-40
Specifications...................................................................................................................19-41
Finisher Module specifications....................................................................19-41
Optional C/Z Folder.............................................................................19-45
Finishing Transport specifications..............................................................19-45
Xerox® Color 800/1000 Press
User Guide
ix
Page 12

Table of Contents
x
Xerox® Color 800/1000 Press
User Guide
Page 13
1
Product overview
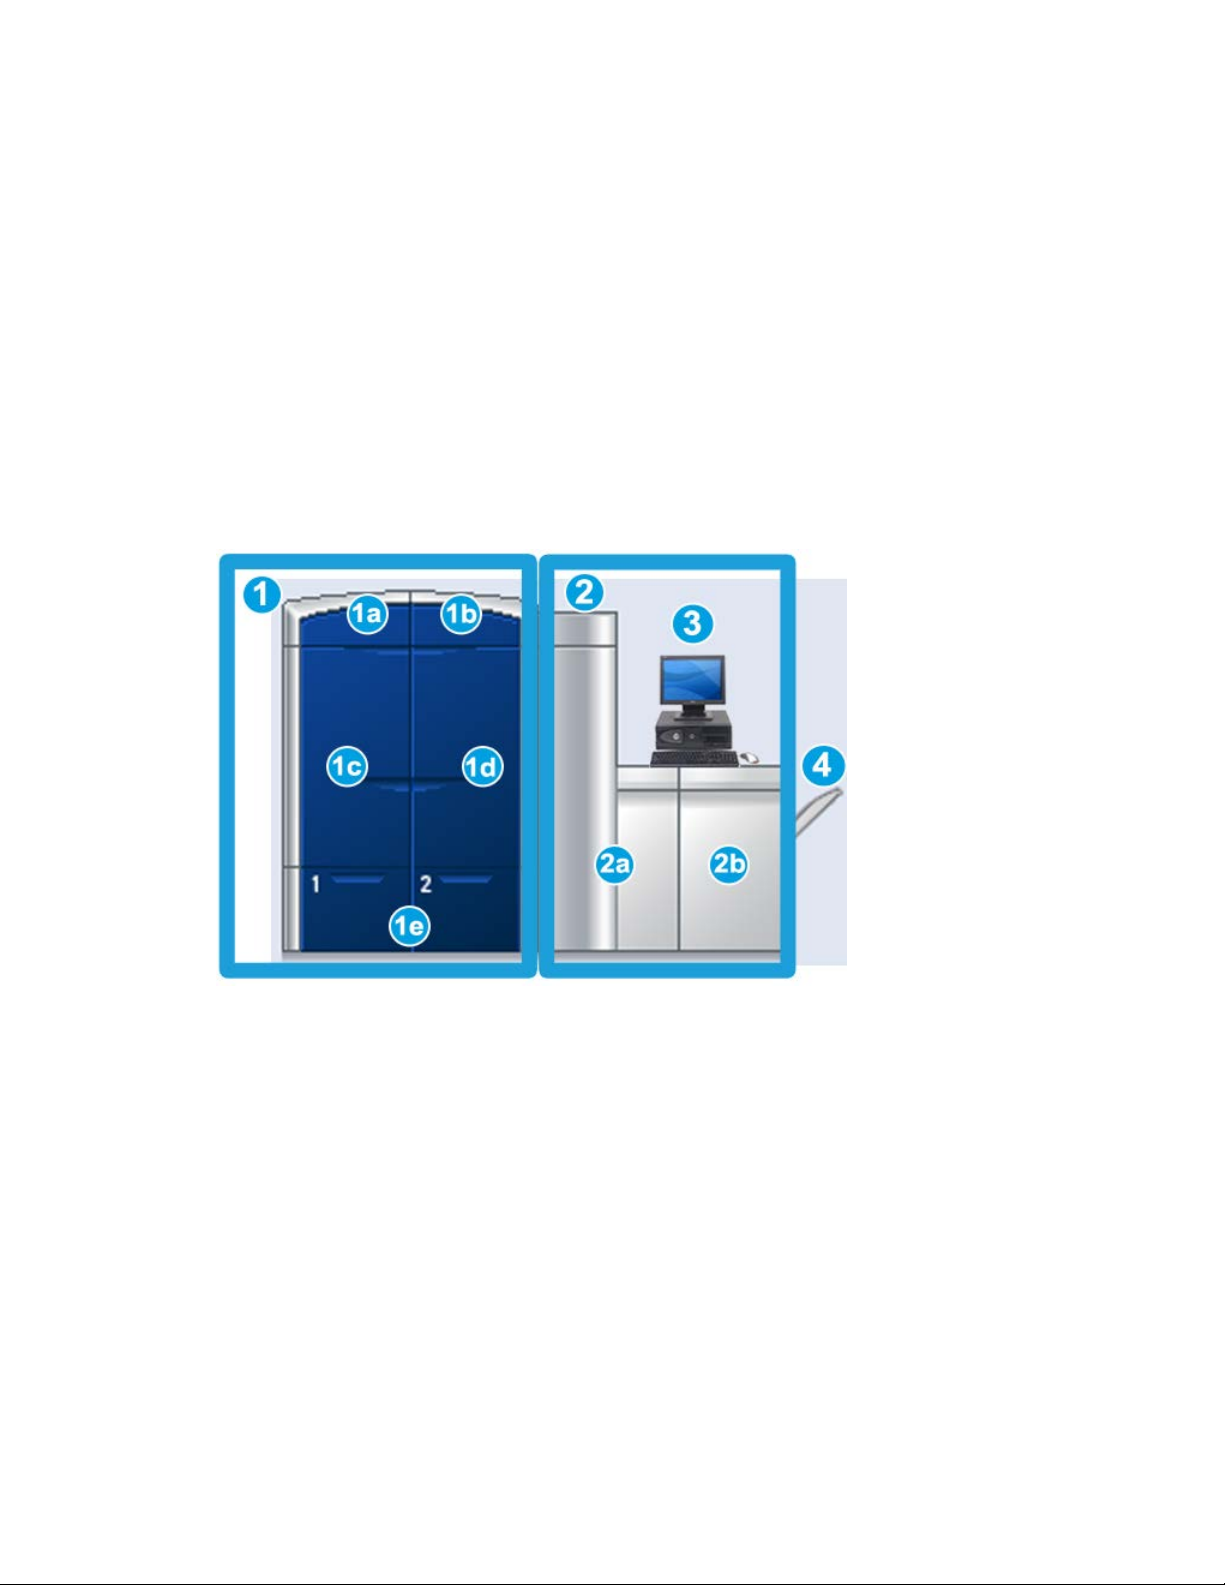
The Xerox 800/1000 Color Press is a full color/black and white network printer that
operates at a speed of 80/100 prints per minute.
The following illustration shows a basic configuration of the digital press:
1. Print engine - left side
a. Upper left door: containing dry ink/toner cartridges
b. Upper right door: containing dry ink/toner cartridges
c. Left front door
d. Right front door
e. Trays 1 and 2; additional feeding accessories available
2. Print engine - right side
a. Left front door
b. Right front door
3. User Interface (UI)
4. Optional Offset Catch Tray (OCT); additional optional finishing accessories available
Xerox® Color 800/1000 Press
User Guide
1-1
Page 14
Product overview
Quick start/links
The following quick links will help you start using your machine quickly and easily:
• Power on/off the machine
• Where to find help
• Loading paper
• Submitting a print job
• Jam clearance
• Replacing a dry ink/toner cartridge
• Replacing a dry ink/toner waste bottle
• Logging on as Administrator
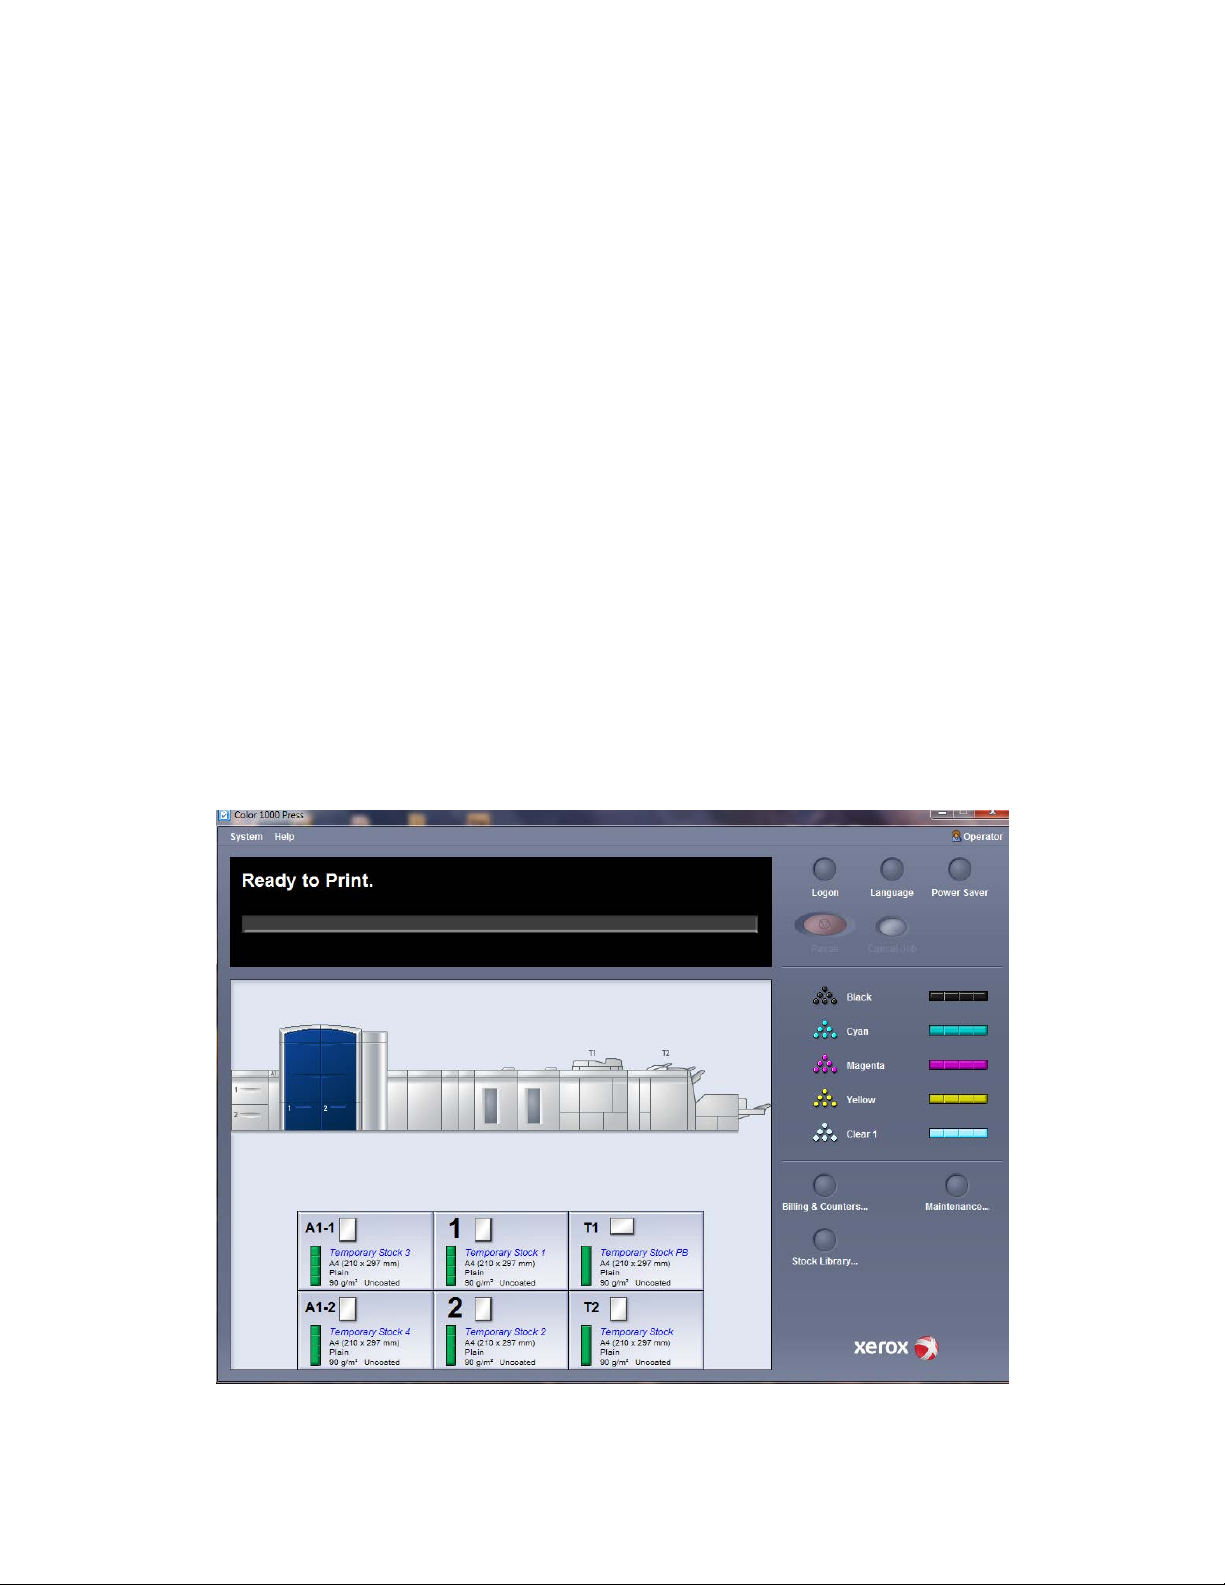
User Interface
The User Interface (UI) displays messages that indicate the status of the machine during
idle, run, or fault conditions.
1-2
Xerox® Color 800/1000 Press
User Guide
Page 15

Related Topics:
User Interface help
System menu
Job status
Logon
Language
Power saver
Pause
Dry ink/toner status area
Maintenance (on the UI)
Manage Stock Library
Paper information
Machine status
Logon
Product overview
There are three logon levels:
• Operator: This is the default logon level.
• Administrator: This level allows you to customize the system defaults for your machine
and to customize particular print jobs by creating, setting, or changing parameters
for certain features.
• Technical Key Operator: This level is reserved for users who are certified by Xerox
to perform certain maintenance activities that are normally done by a customer
service engineer (CSE).
Note
Refer to the System Administration Guide for more information on the Administrator
and Technical Key Operator features.
Related Topics:
Logging on as Administrator
Language
Note
The number of languages available on your system depends on what was installed during
the initial installation process.
Selecting a particular Language button immediately changes the language. No
confirmation is required.
Xerox® Color 800/1000 Press
User Guide
1-3
Page 16

Product overview
Change language
To change the language, use the following procedure.
1. Select the Language button on the UI.
2. Select the desired language button; the language on the UI changes to the new
language and closes the Language window.
3. Select the Cancel button to return to the main UI screen.
Power saver
The machine automatically enters the power saver mode after fifteen minutes of
inactivity. This time may be changed to reflect a value of 1-240 minutes; you must enter
the Administrator mode to change it.
There are two Power Saver modes:
• System PC & Print Engine: Selecting this option places both the machine and the
System PC in power saver mode.
• Print Engine Only: Selecting this option places only the machine in power saver
mode.
The system exits the Power Saver mode when a job is sent to be printed or the UI on
the System PC is activated.
Note
To manually exit Power Saver mode, press the Power Saver button on the System PC.
Refer to the System Administration Guide for more information on this feature.
Print server overview
One of three print servers may be used with your digital press:
• Xerox® FreeFlow Print Server, for the Xerox® Color 800/1000 Press
• Xerox® CX Print Server, Powered by Creo
• Xerox® EX Print Server, Powered by Fiery
Note
For detailed information on your specific print server, refer to the customer
documentation that was delivered with it.
®
®
1-4
Xerox® Color 800/1000 Press
User Guide
Page 17

Product overview
Full Width Array
Your digital press may include an internal color calibration function referred to as Full
Width Array. This is located in Area 6 of the print engine right side.
Note
The Full Width Array is an OPTIONAL feature that can be purchased for your system.
For more information, contact your Xerox representative.
The Full Width Array feature uses xerographic parameters and diagnostics to scan the
finished image and correct errors in registration, density and color. This is the process
of calibrating the Print Server with the digital press. There are now internal color
calibration strips (or tiles) used as reference for known colors of a test pattern. These
color values are automatically adjusted to produce accurate and consistent reproductions,
and this means that no longer is customer intervention required. It also allows the
customer to maintain tighter image quality control over the output of their system.
Note
Refer to your Print Server user documentation when performing the calibration workflow
of the Print Server in conjunction with the digital press. Also refer to the System
Administration Guide for detailed information on the Full Width Array feature.
Clear dry ink
The clear dry ink is an optional fifth module that provides full and spot page coverage
enhancement to print jobs.
The clear dry ink capability utilizes two methods to enhance the coverage area of printed
output. These two methods are full flood and spot (applied to specific areas only). Both
workflow methods use a “varnish” or clear coat to achieve desired effects, while also
maintaining machine productivity. The clear dry ink module is supported by all print
servers.
Xerox® Color 800/1000 Press
User Guide
1-5
Page 18

Product overview
Productivity
With the usage of the clear dry ink module, machine productivity is maintained across
all supported media, expanding the realm of endless capabilities including:
• Maintains full rated speed of 80/100 prints per minute (ppm) in five-color mode
• Supports both text and images
Full flood
Full flood varnish provides a uniform, glossy finish on the printed output when it is used
with high-end applications. The full flood option provides full page coverage as a clear,
glossy finish (varnish) which enhances the overall appearance within an application or
on a single sheet.
Spot
Using the spot option within a supported application allows the user to indicate a specific
area, or multiple areas where a clear dry ink will be applied to the printed output. This
is done in order to accent or highlight the desired area. Spot varnish can be used to:
• “Varnish” (apply a glossy finish to) specific areas of a print job
• Create artistic effects and highlights on a print job
• Enhance the appearance of metallic items with key colors such as silver, gold, or
copper
• Enhance pastel colors with a pearly luster affect
• Highlight images for visual variety to make them lift off the page (a three-dimensional
affect)
• Draw attention to headline text
• Highlight photos, logos, or other image areas
• Highlight watermarks
1-6
Xerox® Color 800/1000 Press
User Guide
Page 19
Product overview
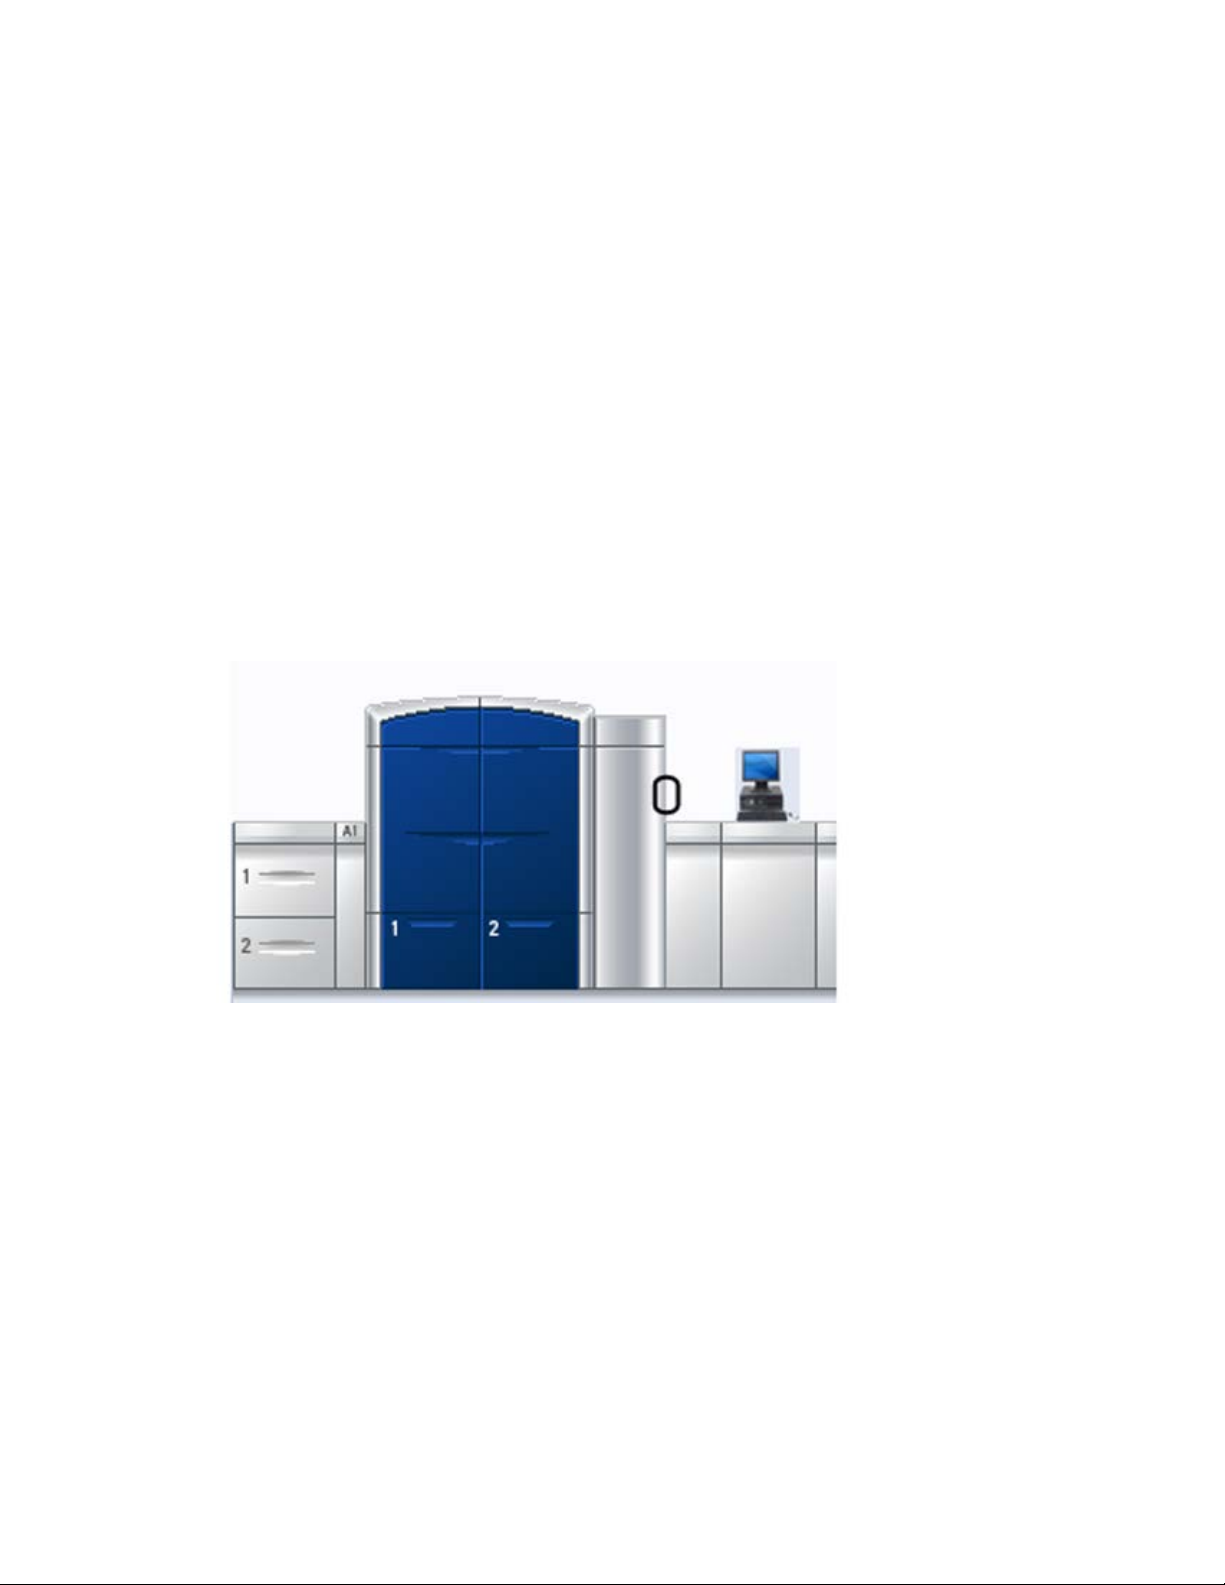
Power on/off the machine
Use the power switch to power ON or power OFF the machine.
• Power on: Press the power switch to the ON position to power on the machine.
A screen message advises of a short wait while the fuser warms up and the machine
runs a system check. You can program the machine for a job during this time and
the printing process will start automatically when the machine is ready.
• Power off: Press the power switch to the OFF position to power off the machine.
Note
Allow the machine to remain off for a minimum of 10 seconds before switching the
power on again.
The Power on/off switch is found on the Print Engine Right Side as shown in the following
illustration. The circled area indicates the location of the power switch.
Feeding and finishing devices
Available with your machine is a variety of optional feeding and finishing devices. These
devices are briefly discussed on the following pages along with where to find specific
information on each device.
Xerox® Color 800/1000 Press
User Guide
1-7
Page 20
Product overview
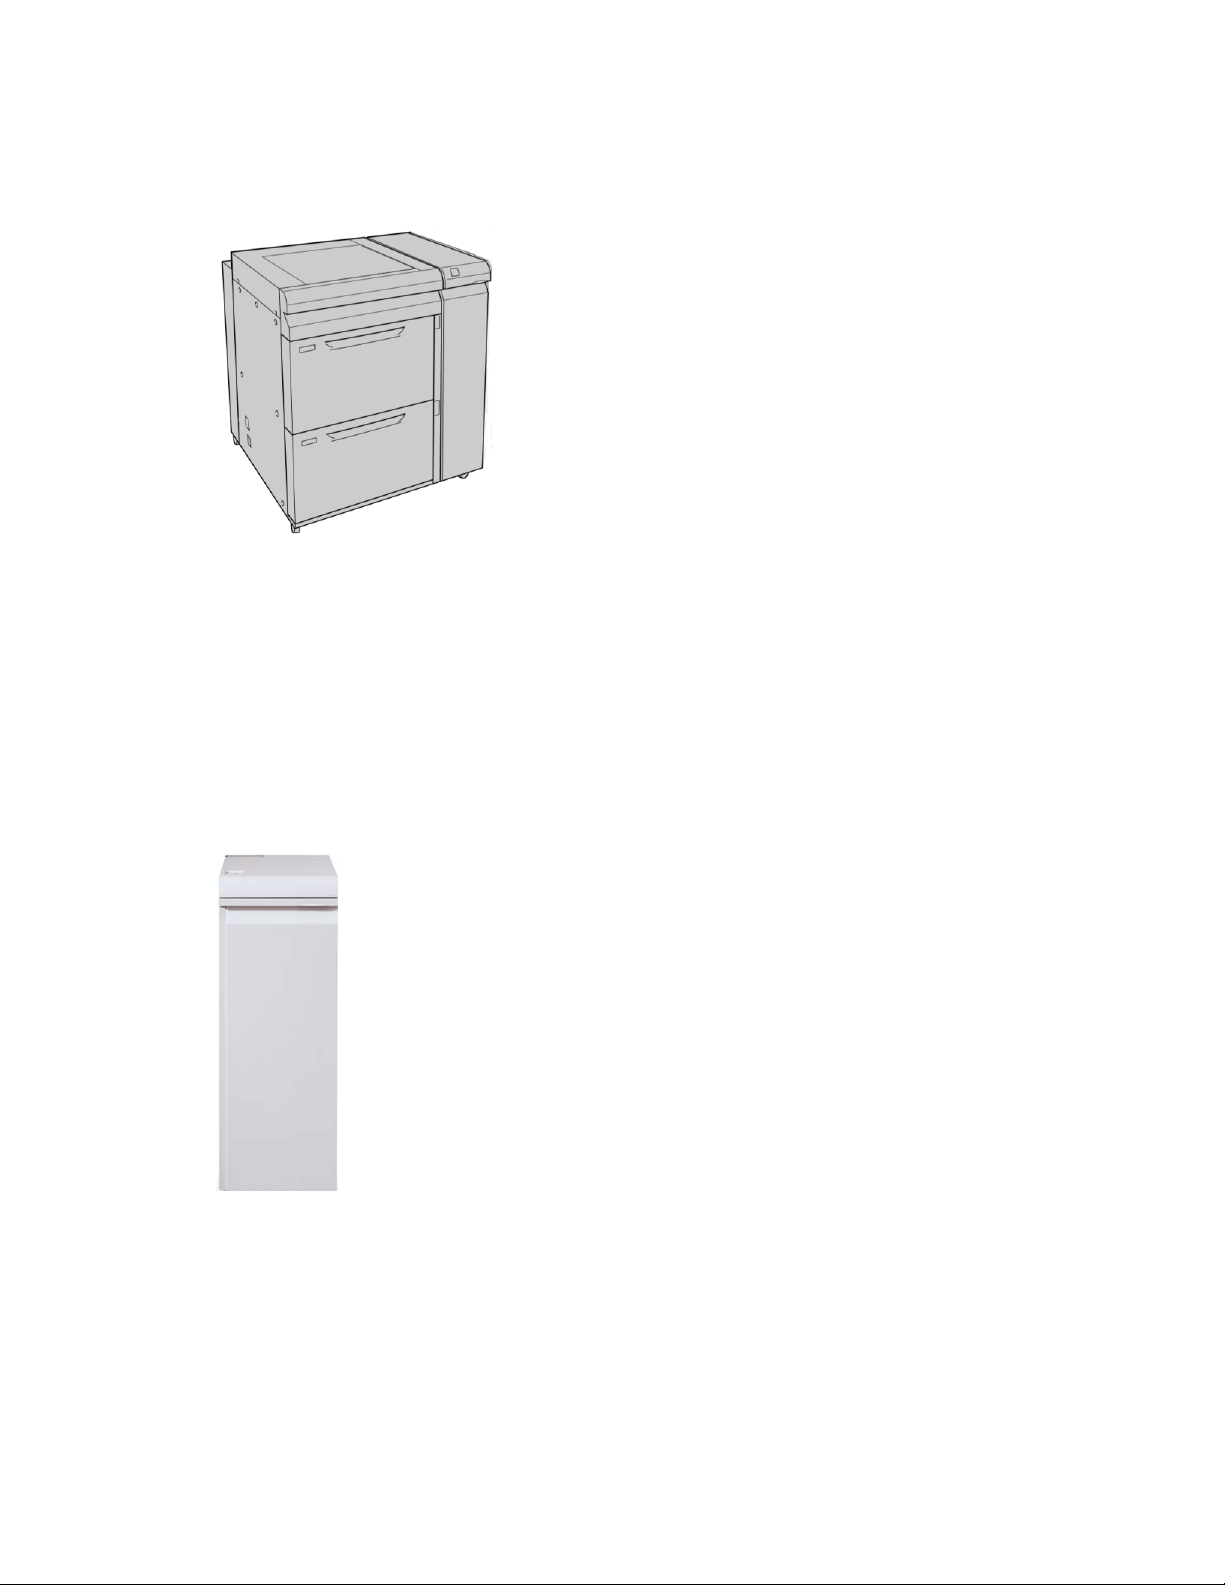
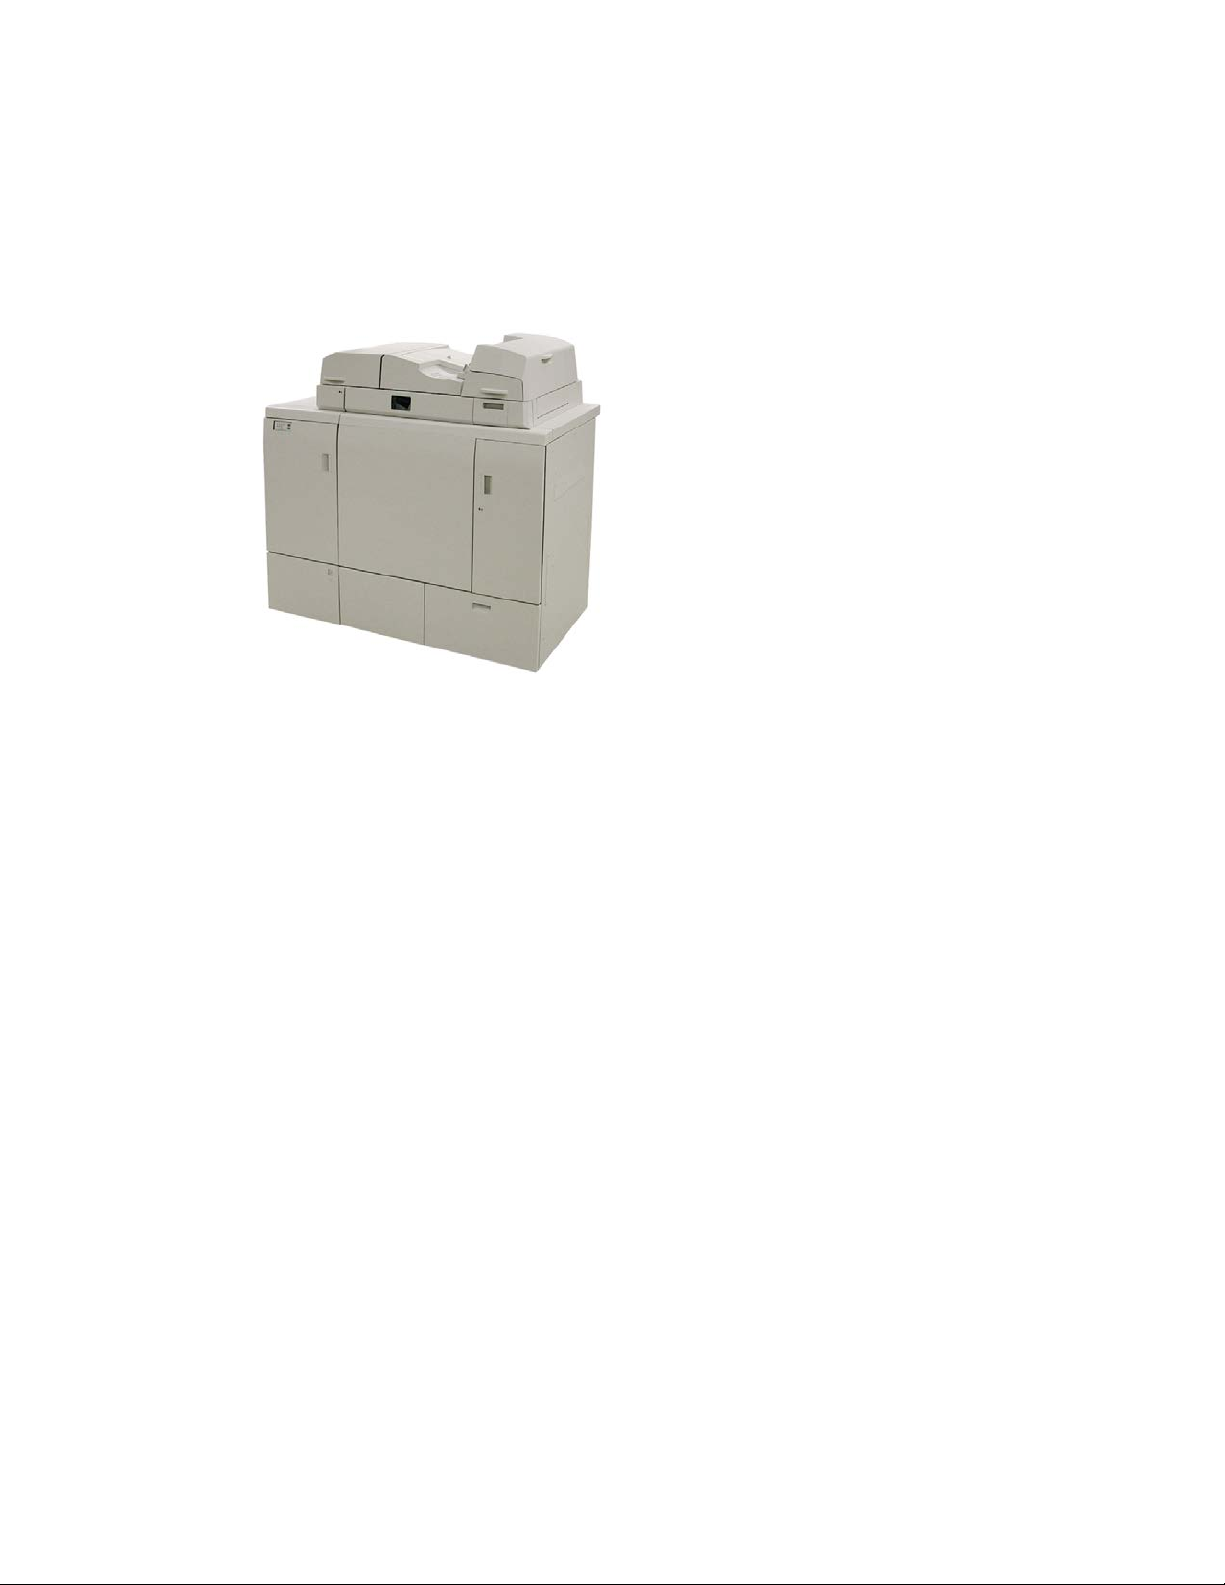
Oversized High Capacity Feeder (OHCF)
2-tray Oversized High Capacity Feeder (OHCF)
Related Topics:
Oversized High Capacity Feeder (OHCF)
Interface Module
Important
The Interface Module is required with ALL finishing devices.
The Interface Module provides communication and a paper path between the print
engine and any attached finishing device or devices.
Related Topics:
Interface Module
1-8
Xerox® Color 800/1000 Press
User Guide
Page 21
Product overview
GBC AdvancedPunch
The GBC AdvancedPunch provides another level of finishing options to your output by
allowing you to punch holes in 8.5 x 11 in./A4 documents which support a variety of
binding styles. Punch types include 19-hole to a maximum of 32-Hole for 8.5 x 11 in.
media. A4 media supports punch types 21-hole to a maximum of 47-hole.
Note
The GBC AdvancedPunch is shown here with the required Interface Module and with
the optional Booklet Maker Finisher. The GBC AdvancedPunch can be attached to a
variety of optional finishing accessories.
Information on this accessory can be downloaded from www.xerox.com to download
the latest version of the desired user guide by entering the product name in the Search
field and then selecting the User Documentation link.
High Capacity Stacker (HCS)
The High Capacity Stacker (HCS) is an optional finishing device that provides stacking
and offsetting capabilities for output to a Stacker Tray.
Related Topics:
High Capacity Stacker (HCS)
Xerox® Color 800/1000 Press
User Guide
1-9
Page 22
Product overview
Perfect Binder
The Perfect Binder is an optional finishing device that takes the printed output and binds
it into a finished book; an optional front and back cover may be included with the bound
output.
Perfect binding is a process in which the leaves (pages) are bound by using an adhesive
and trimming off the excess edges. The adhesive holds the interior sheets of the book
together. Front and back covers may be included if desired. The final output is a finished,
perfect bound book with a wrap-around cover.
Note
The Perfect Binder requires the Interface Module.
Related Topics:
Perfect Binder
1-10
Xerox® Color 800/1000 Press
User Guide
Page 23
Product overview
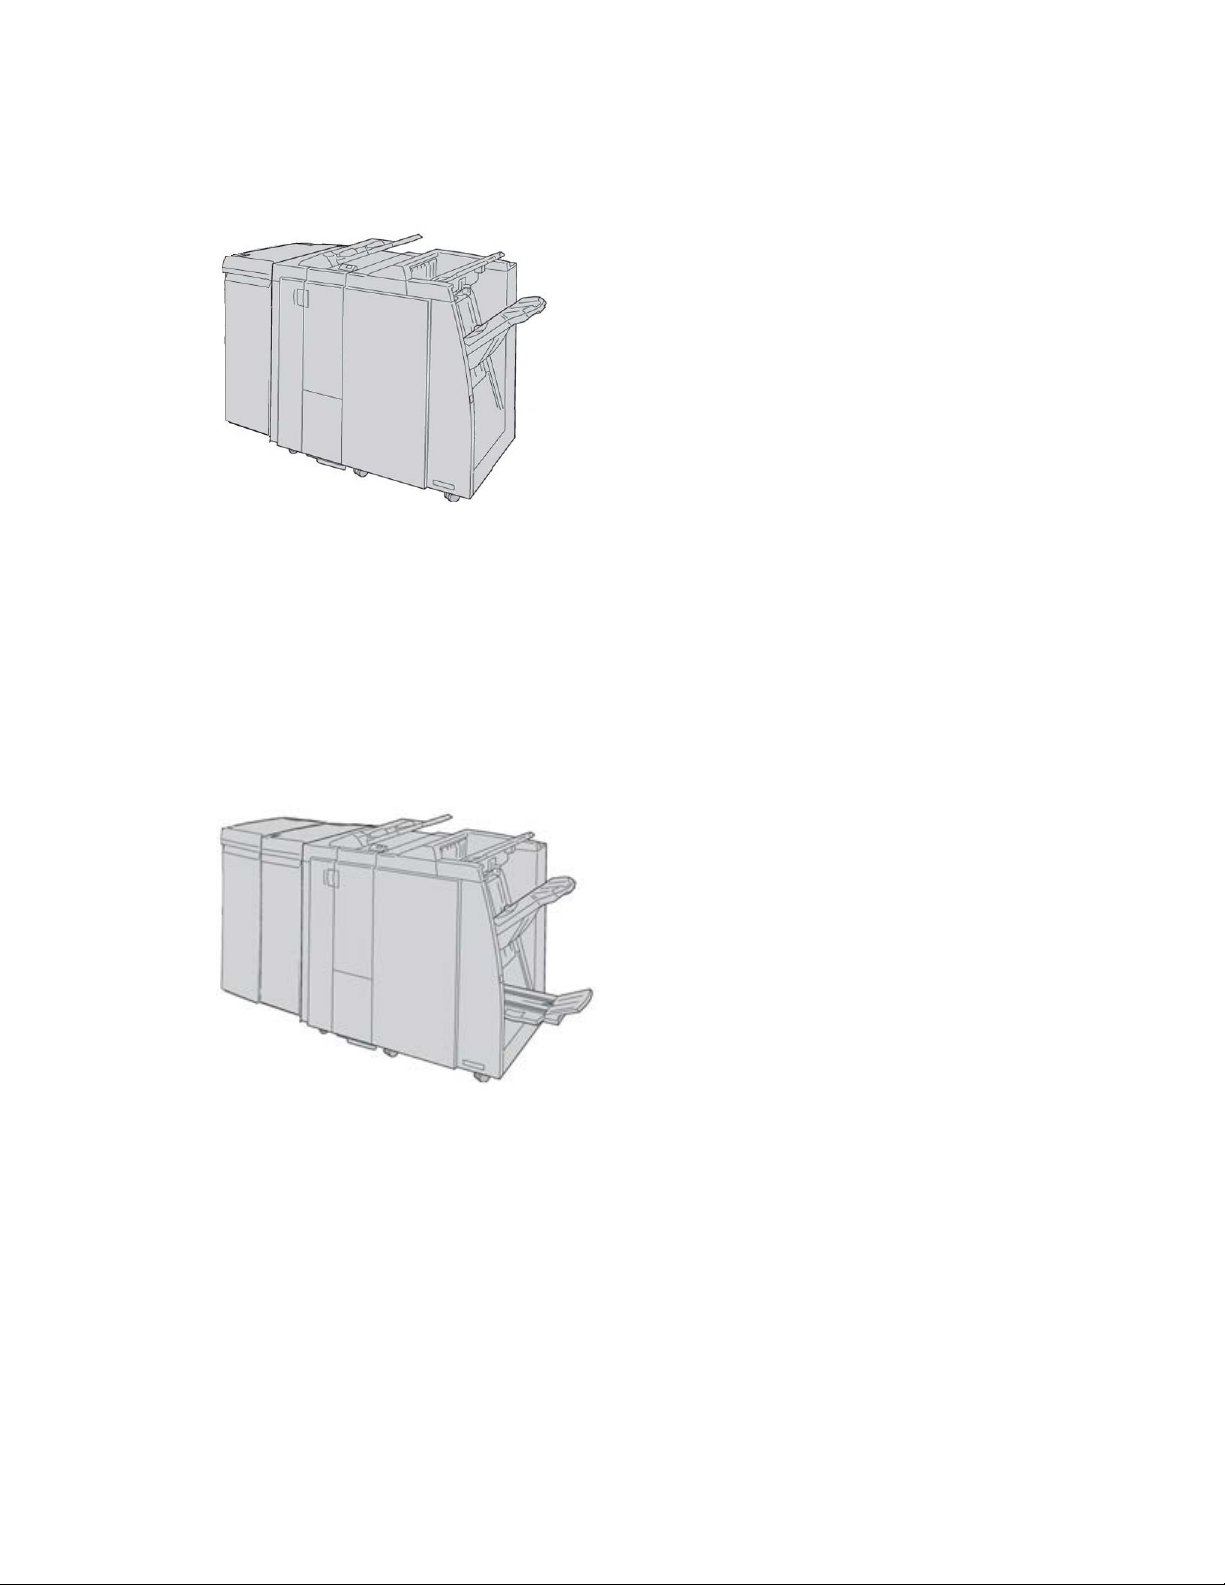
Standard Finisher
This finisher provides a wide range of finishing/folding options.
Note
The Standard Finisher is shown here with the required Interface Module and with the
optional C/Z Folder.
Related Topics:
Standard/Booklet Maker Finisher
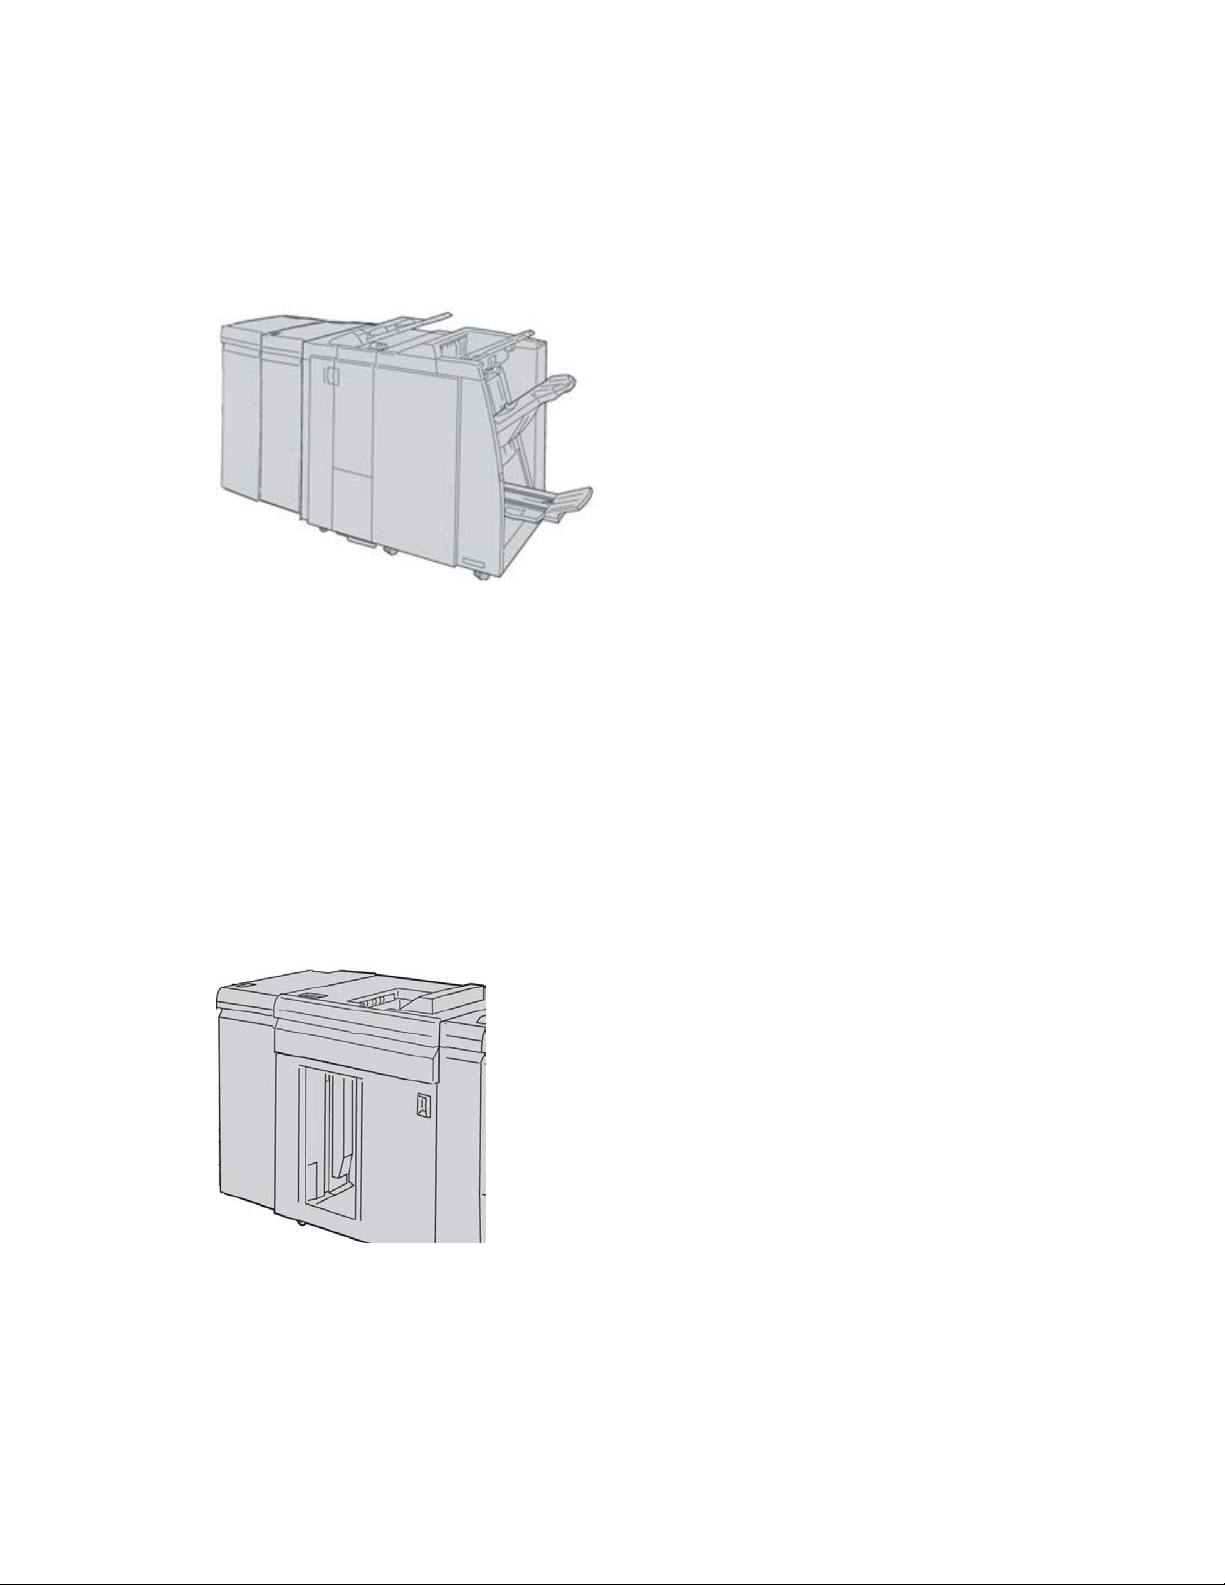
Booklet Maker Finisher
This finisher provides a wide range of finishing/folding options.
Note
The Booklet Maker Finisher is shown here with the required Interface Module and with
the optional C/Z Folder.
Related Topics:
Standard/Booklet Maker Finisher
Xerox® Color 800/1000 Press
User Guide
1-11
Page 24
Product overview
SquareFold Trimmer Module
The SquareFold Trimmer Module is an optional finishing device that is used in conjunction
with a finishing device that contains a booklet maker.
Note
The SquareFold Trimmer Module is shown here with the required Interface Module and
the required Booklet Maker Finisher.
Related Topics:
SquareFold Trimmer Module
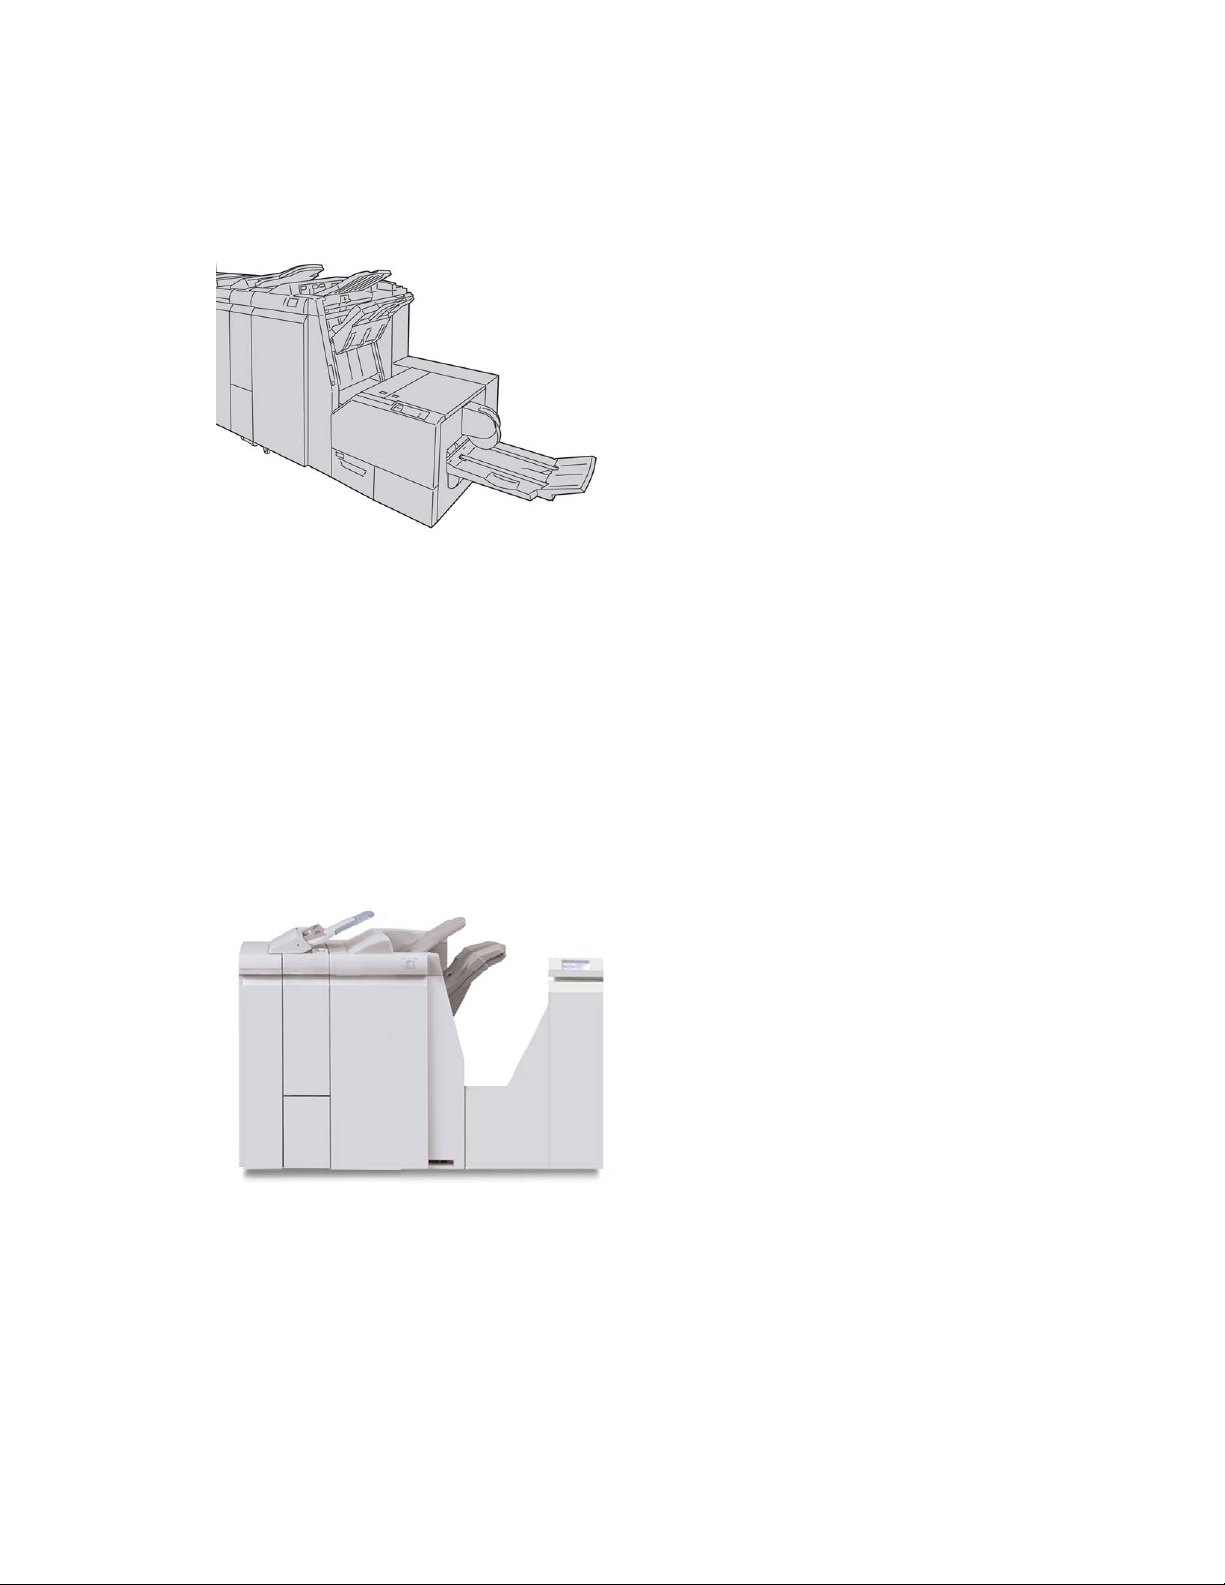
Standard Finisher Plus
The Standard Finisher Plus serves as an interface to transfer paper between the print
engine and any third-party, Document Finishing Architecture (DFA) device attached to
the machine.
Note
The Standard Finisher Plus requires the Interface Module.
Related Topics:
Standard Finisher Plus
1-12
Xerox® Color 800/1000 Press
User Guide
Page 25

Product overview
Third-party finishing devices
Additional third-party, Document Finishing Architecture (DFA) devices are also available.
Always refer to the Finishing Solutions Guide and/or contact the Xerox sales
representataive for more information.
Note
All third-party, DFA devices require BOTH the Inteface Module and the Standard Finisher
Plus.
Xerox® Color 800/1000 Press
User Guide
1-13
Page 26

Product overview
1-14
Xerox® Color 800/1000 Press
User Guide
Page 27

2
Where to find help
User Interface help
Your machine’s User Interface (UI) comes with online Help.
This online Help provides information on:
• How to use and maintain your machine and optional accessories
• How to set up and change passwords and default settings
Selecting Color 800/1000 Help from the Help pull-down menu opens a new window
which displays the same type of information as provided in both this guide and the
System Administration Guide.
Once the main Help window opens, various help topics and information are available:
• On the left side of the help window two tabs are available:
- Content: Select this tab to have access to the various machine help information,
such as Product Overview or Paper Information.
- Index: Select this tab to access a full index and the selection of specific topics/areas
of interest or point of need.
• In the Content area main topics are displayed to the right of the book icons. Selecting
a book icon expands the view and provides selections to subtopics.
Xerox® Color 800/1000 Press
User Guide
2-1
Page 28

Where to find help
• The right and left arrow buttons advance forward or backward one topic at a time
using the same order as displayed on the Content tab.
Help on the World Wide Web
Xerox on the World Wide Web: For system support, user help, customer documentation,
and service support, go to www.xerox.com and click on the Contact Us link for specific
contact information/telephone numbers in your area.
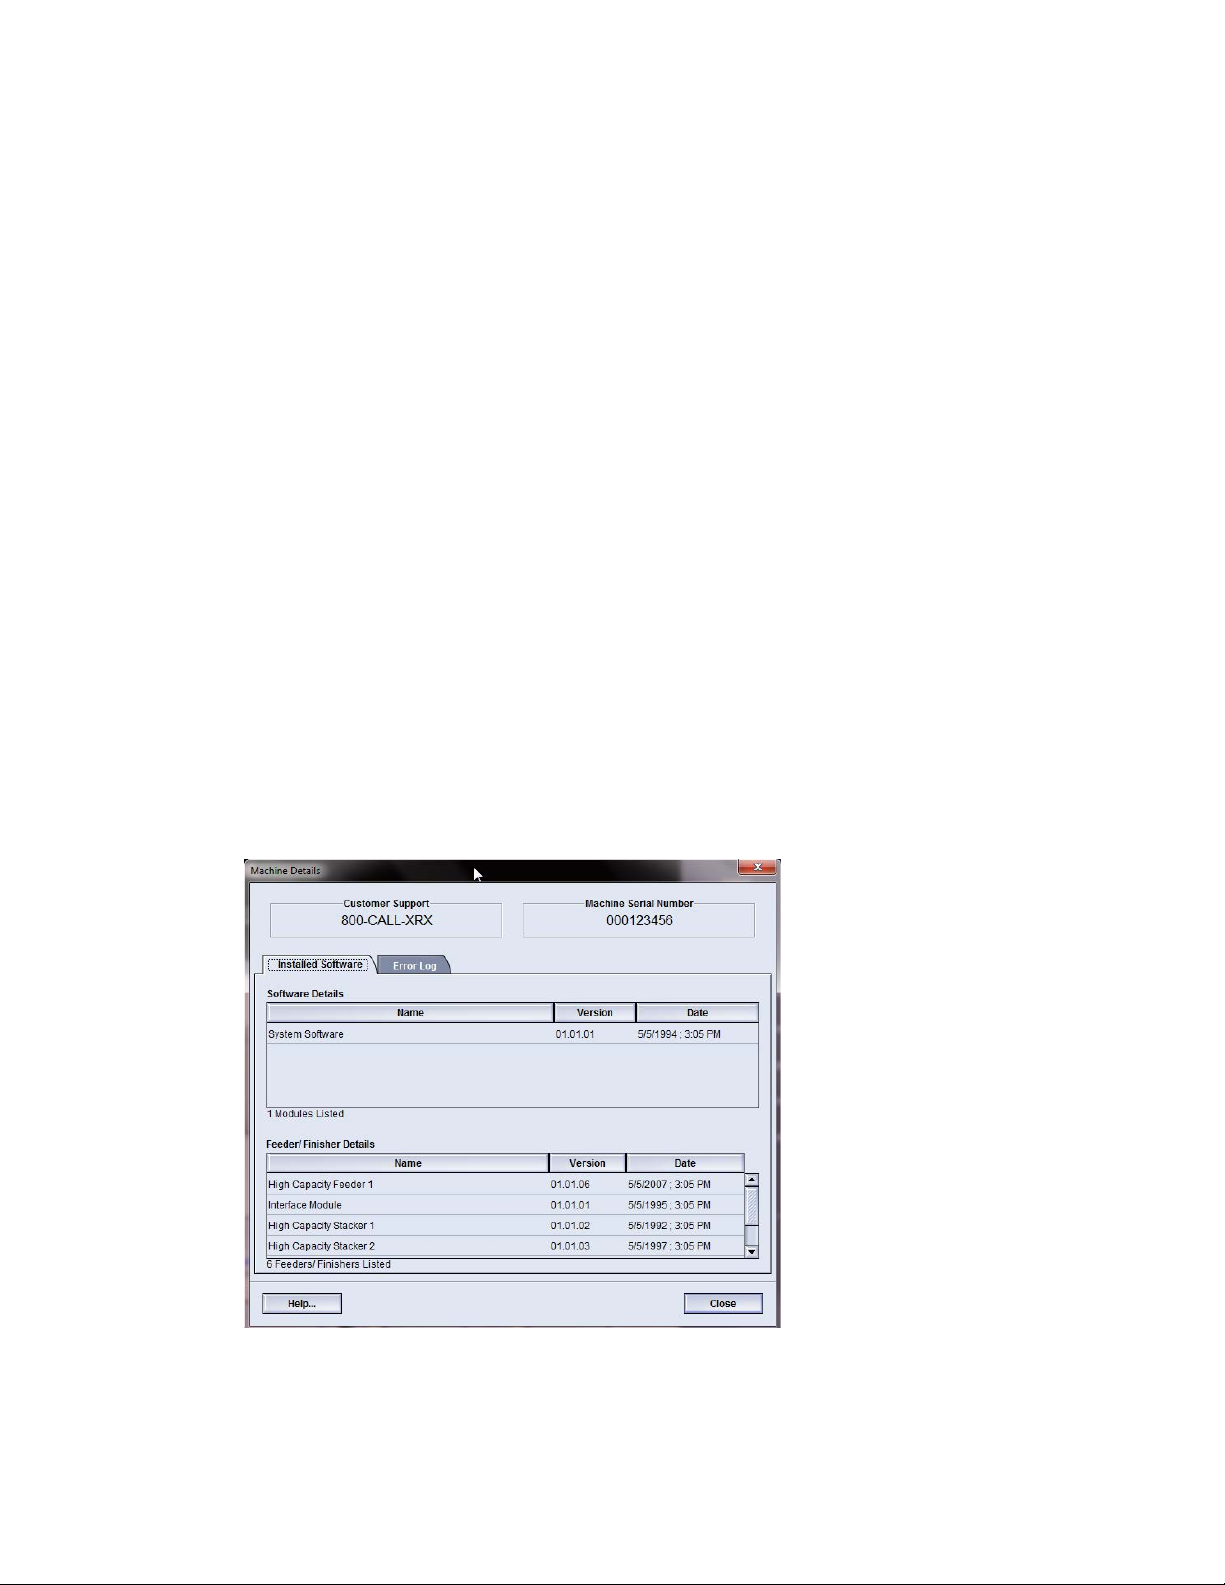
It may be helpful to know your machine serial number before calling for support. The
machine serial number is shown on the Machine Details tab ( System > Machine Details).
Related Topics:
System menu
Print server customer documentation
Supporting customer documentation for your print server is on a CD/DVD and is shipped
with the print server. You or your System Administrator should print these documents,
after the installation is complete.
2-2
Xerox® Color 800/1000 Press
User Guide
Page 29
3
Machine/job status
Related Topics:
Locating the machine serial number
Calling for service
Machine status
System menu
The System menu allows you to select the following options:
• Machine Details: This option provides information about the installed system
software, any attached optional feeding/finishing accessories, error log details,
customer support telephone number, and the machine serial number.
• Shutdown System PC: This option shuts down the User Interface and the system
PC.
Xerox® Color 800/1000 Press
User Guide
3-1
Page 30

Machine/job status
• Restart User Interface: This option stops and exits the User Interface and then
restarts it.
• Exit User Interface: This option exits the User Interface but leaves the System PC
running.
Dry ink/toner status area
This area of the UI displays the status of the dry ink/toner cartridges with a gauge
indicating the level/amount of dry ink/toner for each cartridge.
Note
Your machine may have an optional fifth dry ink/toner cartridge installed. All
characteristics described for the dry ink/toner cartridges also applies to the optional fifth
dry ink/toner cartridge as well.
Related Topics:
Replacing a dry ink/toner cartridge
Billing and Counters
The meters/counters vary depending on your machine configuration and setup.
Related Topics:
Billing and counters information
Impressions information
Viewing/reseting Billing Meters/Usage Counters
Viewing/reseting Billing Meters/Usage Counters
Note
The Billing Meters CANNOT be reset.
1. From the machine’s UI, select the Billing and Counters feature.
2. The Billing Meters and Usage Counters screen is displayed.
3. To reset the counters, perform the following:
3-2
Xerox® Color 800/1000 Press
User Guide
Page 31

Machine/job status
Select the Usage Counters tab.a)
b) Select Reset All.
A screen displays the following message: Are you sure you want to reset all the
usage counters to zero?
c) Select Yes to reset the counters; select No to exit and return to the meters/counters.
4. Select Close to exit the meters/counters and return to the main UI.
Billing and counters information
• The Billing Meters tab displays the total number of prints for both black and white
and color output. The information displayed may vary from market place to market
place.
Note
These meters CANNOT be reset.
• The Usage Counter tab works the same way as a trip odometer in a car. It can be
reset to zero. Once it is reset to zero, it keeps track of the print count from that point
forward until you select the Reset All button.
Note
If the optional clear dry ink/toner is present, the Usage Counters tab displays two
additional print counters: Clear Impressions and Clear Large Impressions.
Note
The information displayed on this screen may vary from market place to market place.
Impressions information
The meter and counters display the total impression amount. An impression is the image
on one side of one sheet of media. The meters and counters display the total impression
amount for all printed jobs. The impression information is separated into the following
categories:
• Color Impressions: This value (number) represents the total number of color
impressions regardless of the media size.
- For each color, one-sided printed output, the meter increases by one.
- For each color, two-sided printed output, the meter increases by two.
• Black Impressions: This value (number) represents the total number of black-only
impressions regardless of the media size.
- For each black-only, one-sided printed output, the meter increases by one.
- For each black-only, two-sided printed output, the meter increases by two.
• Total Impressions: This value (number) represents the total number of ALL impressions
regardless of size or color. It is the sum of the Color Impressions and the Black
Impressions combined.
Xerox® Color 800/1000 Press
User Guide
3-3
Page 32
Machine/job status
• Color Large Impressions: This value (number) represents the total number of large
color impressions. These impressions are one side of one sheet of large media (for
example 11 x17 in./A3). Large Impressions are any prints that are larger than 8.5 x
14 in./B4 size.
- For each large, color, one-sided printed output, the meter increases by one.
- For each large, color, two-sided printed output, the meter increases by two.
Note
This meter/counter is NOT added to the Total Impressions meter/counter since it is
already added to the Color Impressions meter/counter.
• Black Large Impressions: This value (number) represents the total number of large,
black-only impressions. These impressions are one side of one sheet of large media
(for example 11 x17 in./A3). Large Impressions are any prints that are larger than
8.5 x 14 in./B4 size.
- For each large, black-only, one-sided printed output, the meter increases by one.
- For each large, black-only, two-sided printed output, the meter increases by two.
Note
This meter/counter is NOT added to the Total Impressions meter/counter since it is
already added to the Black Impressions meter/counter.
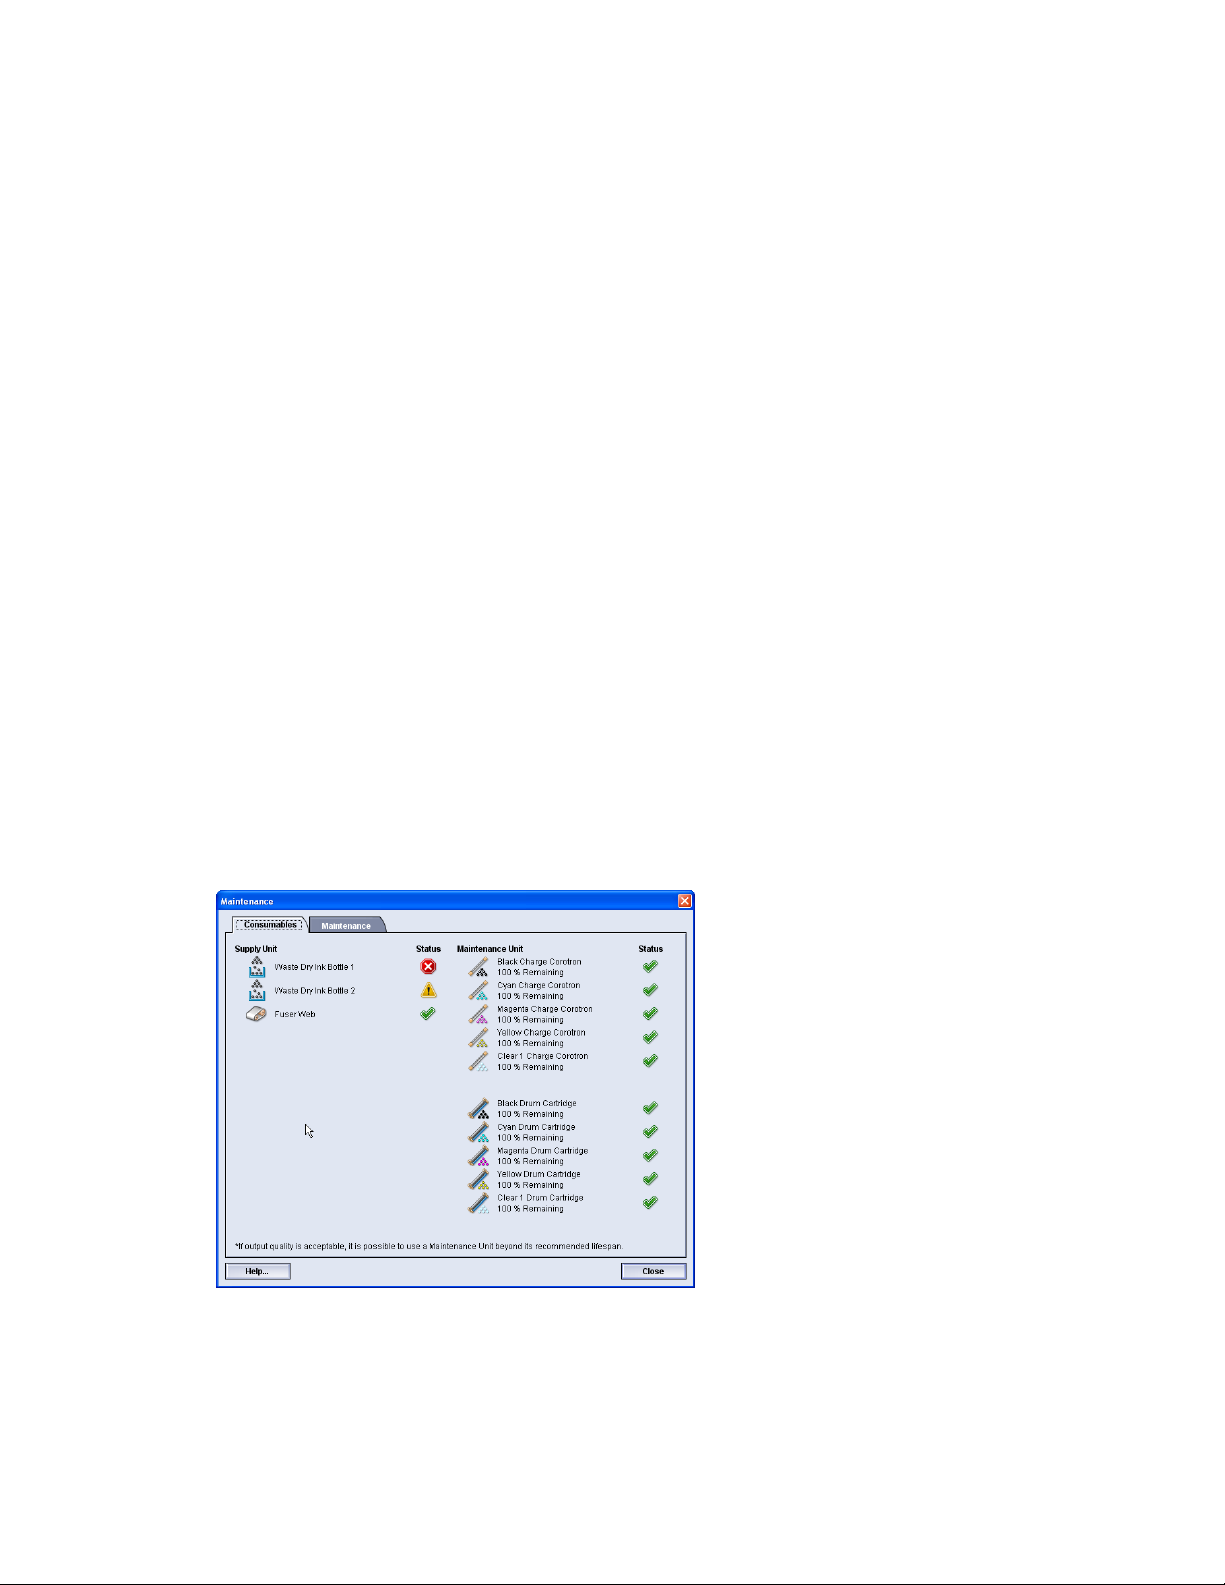
Maintenance (on the UI)
Selecting Maintenance on the UI opens a window which displays a status of each
consumable.
If logged on as Administrator, the additional Maintenance tab is available. Refer to
the System Administration Guide for more information
3-4
Xerox® Color 800/1000 Press
User Guide
Page 33
Machine/job status
Note
When a Customer Replaceable Unit (CRU) consumable item is depleted, the machine
automatically interrupts the current job and does not restart until the consumable is
replaced.
Tip
The machine does not interrupt a job or stop running if a Service Representative
Replaceable Unit status indicates a low or depleted level. Your Service Representative
Replaceable Unit may continue to perform as expected far beyond the average life
indicator. Your Service Representative uses this status indicator information each time
service is performed on your machine.
Related Topics:
Replacing consumable supplies
Consumable supplies
Job status
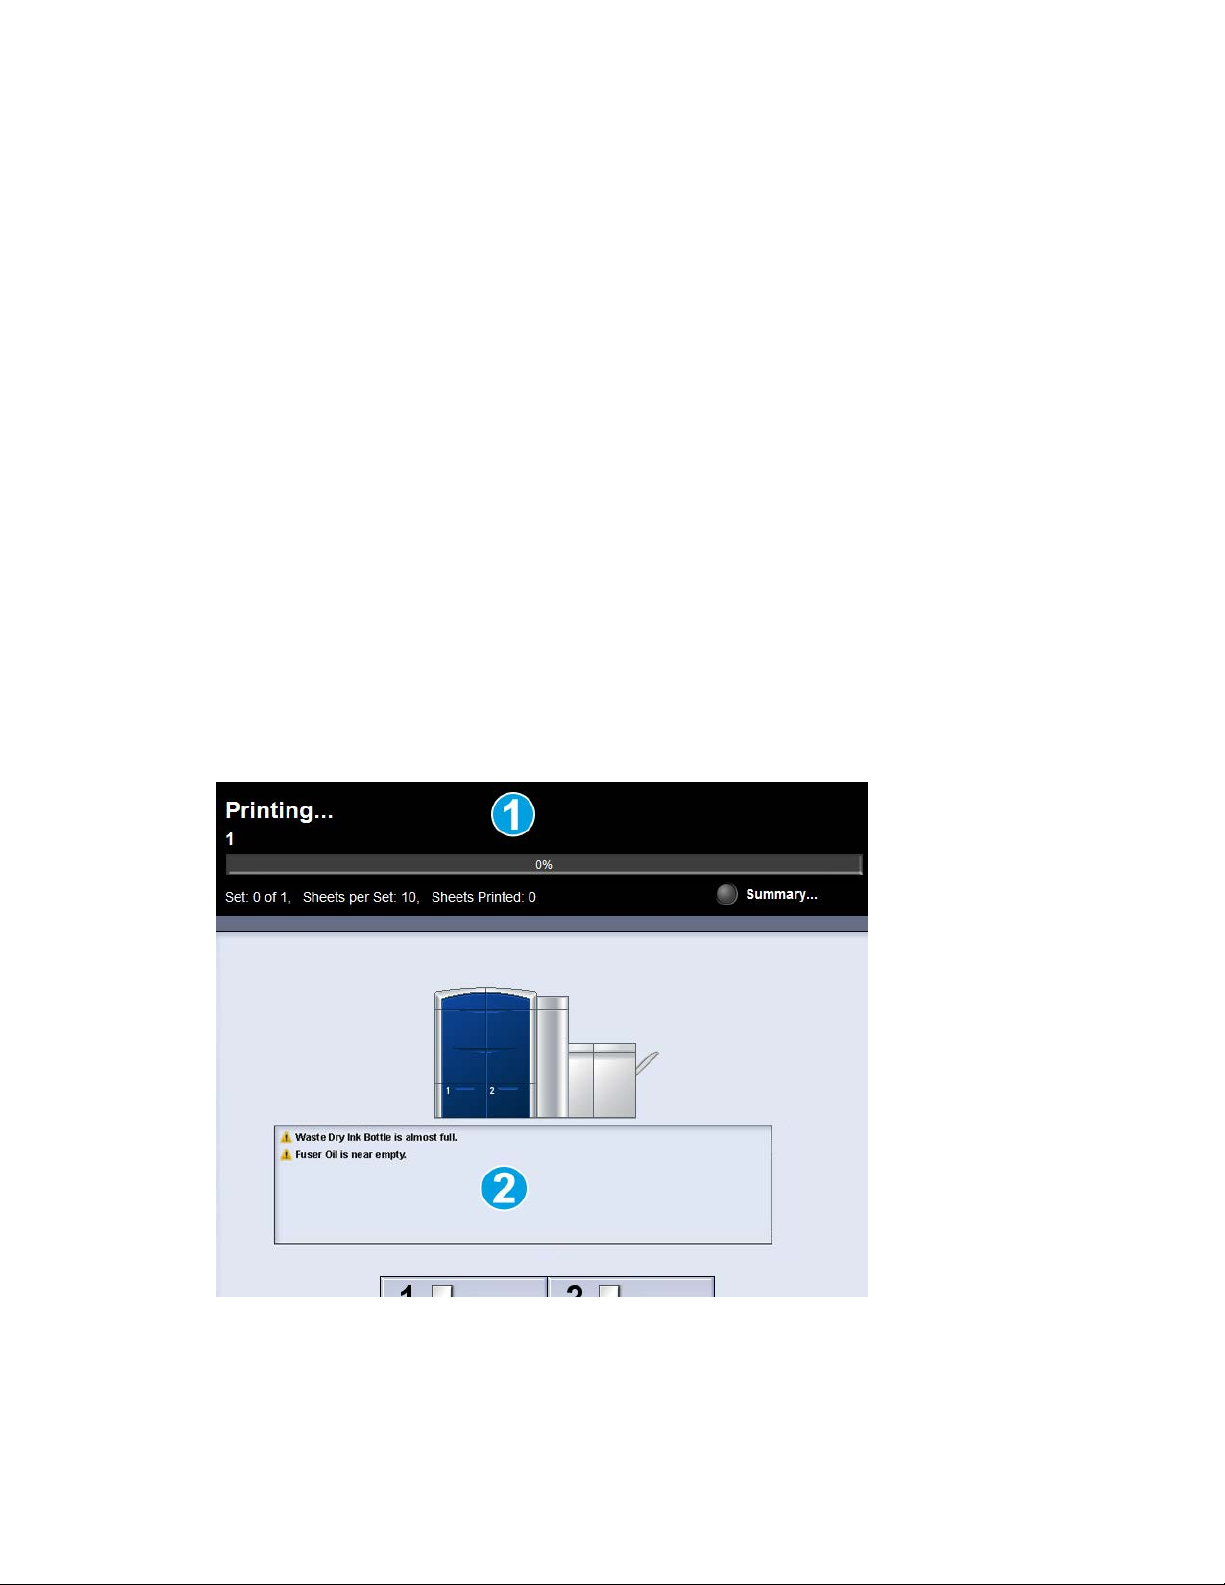
Job/machine status area
This area of the screen displays the status of the machine as well as displaying the status
of any currently printing job (Summary button).
1. Job status area
2. Machine status area
Xerox® Color 800/1000 Press
User Guide
3-5
Page 34
Machine/job status
Tip
Some print servers do not update the print engine with the status of the job that is
currently printing. This means that the progress bar on the print engine’s UI may continue
to display zero percentage (0%) for the printing status. If this occurs, always check the
print server’s UI for the status of the currently printing job.
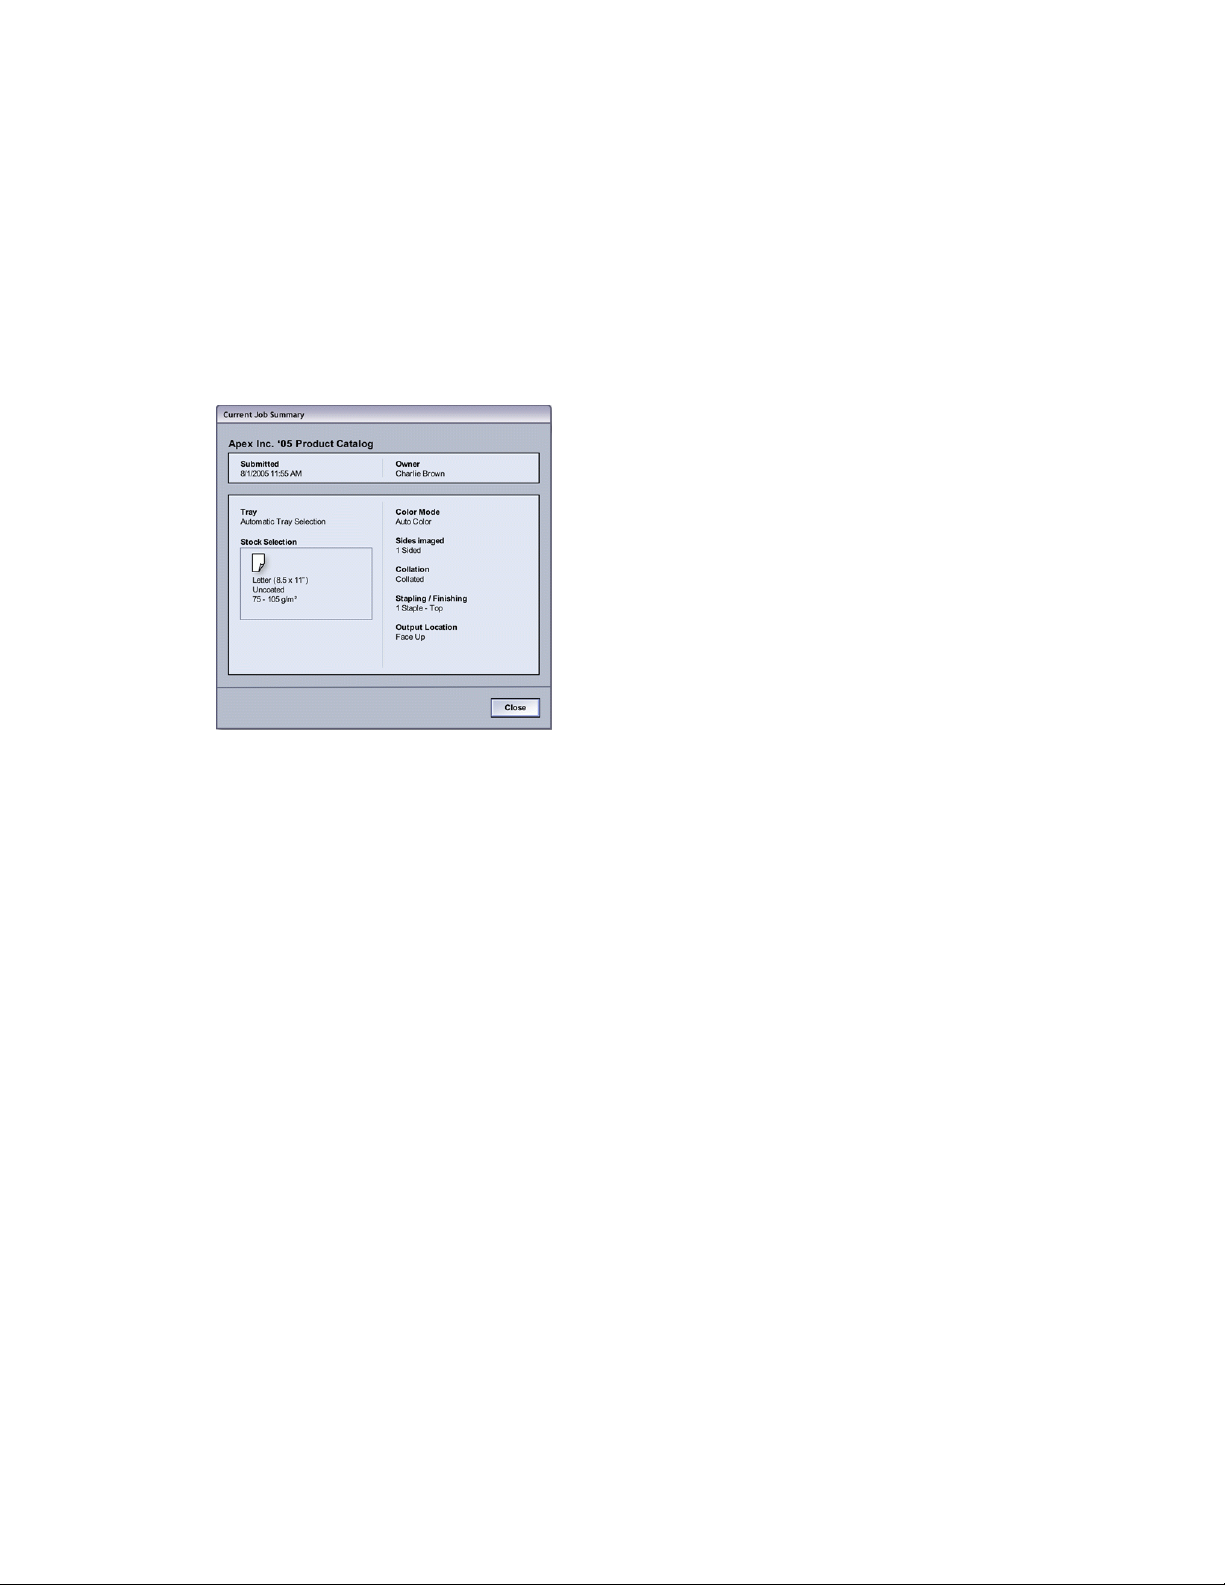
Job summary
Selecting the Summary button opens the Current Job Summary window. The Summary
button is selectable only when jobs are currently printing.
Pause
Selecting the Pause button during a print job stops or pauses the printing process.
Once a print job is paused, you may resume printing or cancel the job.
Note
Depending on the Administrator setting, your machine may automatically resume
printing after a preset period of time without selecting the Resume button. Ask your
Administrator about this, or refer to the System Administration Guide for more
information.
3-6
Xerox® Color 800/1000 Press
User Guide
Page 35

4
Submitting a print job
These exercises require the PDF files for the User Guide and System Administration
Guide. If you do not have an electronic copy of these PDFs, download them from
www.xerox.com.
The exercises instruct you on how to print one of the customer documentation guides
(User Guide or System Administration Guide).
Printing from your computer
1. From your computer open one of the PDFs files in Adobe Acrobat Reader.
2. Select File > Print.
3. Select the desired printer and print queue.
4. Select the Properties button (for that machine).
5. Select the desired output options (such as quantity, 1- or 2-sided printing).
6. Select OK to close the Properties window.
7. Select OK to send the job to the printer.
Printing from the Xerox FreeFlow Print Server
1. Copy the customer documentation PDF files onto a storage device (such as a flash
drive or CD/DVD).
2. Connect your storage device to the print server.
3. From the FreeFlow Printer Server, select Services > Print from File.
4. Select Browse.
5. Browse to your storage device containing the PDF files.
6. Select and highlight one of the PDF files (User Guide, System Administration Guide).
7. Select OK.
8. Select the desired print queue.
9. Select the desired output options (such as quantity, 1- or 2-sided printing).
Xerox® Color 800/1000 Press
User Guide
4-1
Page 36

Submitting a print job
10. Select Print.
The job is sent to the desired queue and either held or immediately printed.
11. Select Close; this closes the Print From File window.
Printing from the Xerox EX Print Server, Powered by EFI
1. Copy the customer documentation PDF files onto a storage device (such as a flash
drive or CD/DVD).
2. Connect your storage device to the print server.
3. From the Xerox EX Printer Server, select File > Import Job.
4. Select the desired queue (such as Print or Hold).
5. Select Add.
6. Browse to your storage device containing the PDF files.
7. Select and highlight one of the PDF files (User Guide, System Administration Guide).
8. Select Open.
9. Select Import.
The job is sent to the selected queue or to the printer for immediate printing.
Printing from the Xerox CX Print Server, Powered by Creo
1. Copy the customer documentation PDF files onto a storage device (such as a flash
drive or CD/DVD).
2. Connect your storage device to the print server.
3. From the Xerox CX Printer Server, select File > Import.
4. Select the desired queue (such as ProcessStore or ProcessPrint).
5. Browse to your storage device containing the PDF files.
6. Select and highlight one of the PDF files (User Guide, System Administration Guide).
7. Select Add.
8. Select Import.
The job is sent to the selected queue or to the printer for immediate printing.
4-2
Xerox® Color 800/1000 Press
User Guide
Page 37

System Administrator overview
Logging on as Administrator
1. Select the Logon button from the main UI window.
The Logon screen appears.
2. From the Logon screen select Administrator.
3. Use the keyboard to enter the Administrator password.
Note
For security reasons, only asterisks are displayed on the screen.
5
4. Select the OK button.
Note
It is recommended that you change the Administrator password as soon as possible
after installing the machine in order to prevent unauthorized access to the
Administrator mode.
5. To exit the Administrator mode, select the Logoff button.
System administrator options
The system Administrator mode includes setting, changing, and testing the following
features:
• Paper Curl Settings (Advanced Stock Setup)
• Running test prints (for changes made to Advanced Stock Setup options)
• System Setting functions, including:
- Language
- Changing the Administrator password
- Resetting the Technical Key Operator password
- Automatic display of fault windows
Xerox® Color 800/1000 Press
User Guide
5-1
Page 38

System Administrator overview
- Date and time
- Productivity settings
- Power saver settings
- Attention sounds
- Tray options, such as automatic tray switching (ATS)
- Output Devices
- Image quality options
- Full Width Array
• Profiles functions, including:
- Alignment
- Fold Adjustment; this feature is displayed if the optional finisher is attached
- Finishing Devices: This option is available only if an optional, third-party, Document
Finishing Architecture (DFA) device is attached to your system. This feature allows
you to choose specific settings for that attached DFA device.
For detailed information and instructions on the various Administrator functions, refer
to the System Administration Guide.
5-2
Xerox® Color 800/1000 Press
User Guide
Page 39

6
Paper information
Loading media in Trays 1 and 2
Loading paper
1. Select the appropriate paper stock for your print job.
2. Pull out the tray slowly until it stops.
3. Open the ream of paper with the seam side facing up.
4. Fan the sheets before loading them into the tray.
5. Load and register the paper against the right side of the tray.
6. Adjust the paper guides by pressing in the guide release and carefully moving the
Edge Guide until it lightly touches the edge of the material in the tray.
Do not load materials above the MAX line located on the rear Edge Guide.
7. If necessary, set the skew adjustment levers to the desired position for your print job.
8. Gently push in the tray until it comes to a stop.
If enabled by your System Administrator, the Paper Tray Properties screen may be
displayed on the UI.
9. From the Tray Properties window, enter the correct paper information, including size,
type, weight, and if necessary, paper curl and/or alignment option.
10. Select OK to save the information and close the Tray Properties window.
Loading tab stock
1. Select the appropriate paper stock for your print job.
2. Pull out the tray slowly until it stops.
3. Fan the tab paper before loading into the tray.
4. Load and align the edge of the tab paper against the right edge of the tray in the
LEF direction as shown in following illustration:
Xerox® Color 800/1000 Press
User Guide
6-1
Page 40
Paper information
5. Adjust the paper guides by pressing in the guide release and carefully moving the
Edge Guide until it lightly touches the edge of the material in the tray.
Do not load materials above the MAX line located on the rear Edge Guide.
6. If necessary, set the skew adjustment levers to the desired position for your print job.
7. Gently push in the tray until it comes to a stop.
If enabled by your System Administrator, the Paper Tray Properties screen may be
displayed on the UI.
8. From the Tray Properties window, enter the correct paper information, including size,
type, weight, and if necessary, paper curl and/or alignment option.
9. Select OK to save the information and close the Tray Properties window.
Loading transparencies
1. Select the appropriate paper stock for your print job.
2. Pull out the tray slowly until it stops.
3. Fan the transparencies to stop them from sticking together before loading into the
tray.
4. Load transparencies on top of a small stack of same-size paper and align the edge
of the transparency against the right edge of the as shown in following illustration:
5. Adjust the paper guides by pressing in the guide release and carefully moving the
Edge Guide until it lightly touches the edge of the material in the tray.
Do not load materials above the MAX line located on the rear Edge Guide.
6. If necessary, set the skew adjustment levers to the desired position for your print job.
7. Gently push in the tray until it comes to a stop.
If enabled by your System Administrator, the Paper Tray Properties screen may be
displayed on the UI.
6-2
Xerox® Color 800/1000 Press
User Guide
Page 41

Paper information
8. From the Tray Properties window, enter the correct paper information, including size,
type, weight, and if necessary, paper curl and/or alignment option.
9. Select OK to save the information and close the Tray Properties window.
Loading pre-drilled stock for 1-sided print jobs
1. Select the appropriate paper stock for your print job.
2. Pull out the tray slowly until it stops.
3. Open the ream of paper with the seam side facing up.
4. Fan the sheets before loading them into the tray.
5. Load and register the paper against the right side of the tray as depicted below for
LEF direction:
6. Adjust the paper guides by pressing in the guide release and carefully moving the
Edge Guide until it lightly touches the edge of the material in the tray.
Do not load materials above the MAX line located on the rear Edge Guide.
7. If necessary, set the skew adjustment levers to the desired position for your print job.
8. Gently push in the tray until it comes to a stop.
If enabled by your System Administrator, the Paper Tray Properties screen may be
displayed on the UI.
9. From the Tray Properties window, enter the correct paper information, including size,
type, weight, and if necessary, paper curl and/or alignment option.
10. Select OK to save the information and close the Tray Properties window.
Loading pre-drilled stock for 2-sided print jobs
Load drilled paper into any tray in either Long Edge Feed (LEF) or Short Edge Feed (SEF)
direction.
1. Select the appropriate paper stock for your print job.
2. Pull out the tray slowly until it stops.
3. Open the ream of paper with the seam side facing up.
4. Fan the sheets before loading them into the tray.
Xerox® Color 800/1000 Press
User Guide
6-3
Page 42

Paper information
5. Load and register the paper against the right side of the tray as depicted below for
LEF direction:
6. Load and register the paper against the right side of the tray as depicted below for
SEF direction:
7. Adjust the paper guides by pressing in the guide release and carefully moving the
Edge Guide until it lightly touches the edge of the material in the tray.
Do not load materials above the MAX line located on the rear Edge Guide.
8. If necessary, set the skew adjustment levers to the desired position for your print job.
9. Gently push in the tray until it comes to a stop.
If enabled by your System Administrator, the Paper Tray Properties screen may be
displayed on the UI.
10. From the Tray Properties window, enter the correct paper information, including size,
type, weight, and if necessary, paper curl and/or alignment option.
11. Select OK to save the information and close the Tray Properties window.
Skew adjustment levers
The skew adjustment levers are found in all paper trays. These levers are used to improve
paper feed accuracy and to reduce paper skew problems.
6-4
Xerox® Color 800/1000 Press
User Guide
Page 43

Paper information
1. Rear skew adjustment lever
2. Right-side skew adjustment lever
• These levers should remain in their default position. The position of these levers
should be changed only when there is a skew problem when running a specific print
job and/or specific media type.
• Changing the skew adjustment levers from their default position may cause more
skew problems when running certain media types, such as coated, label, transparency,
and film.
Use the following procedure to set the skew adjustment levers.
1. Pull out the tray slowly until it stops.
2. Slide the rear skew adjustment lever to the right (as shown in the above picture).
3. Gently push in the tray until it comes to a stop.
4. From the Tray Properties window, enter the correct paper information, including size,
type, weight, and if necessary, paper curl and/or alignment option.
5. Select OK to save the information and close the Tray Properties window.
6. Run your print job.
• The paper is fed accurately without skew and the printed output is satisfactory;
you are finished.
• The paper is skewed and the printed output is unsatisfactory; proceed to the next
step.
7. Pull out the tray slowly until it stops.
8. Return the rear skew adjustment lever to its left, default position.
9. Slide the right-side skew adjustment lever toward the front of the paper tray.
10. Gently push in the tray until it comes to a stop.
11. From the Tray Properties window, enter the correct paper information, including size,
type, weight, and if necessary, paper curl and/or alignment option.
Xerox® Color 800/1000 Press
User Guide
6-5
Page 44

Paper information
12. Select OK to save the information and close the Tray Properties window.
13. Run your print job.
• The paper is fed accurately without skew and the printed output is satisfactory;
you are finished.
• The paper is skewed and the printed output is unsatisfactory; proceed to the next
step.
14. Pull out the tray slowly until it stops.
15. Return the right-side skew adjustment lever toward the rear of the paper tray; this is
its default position.
16. Gently push in the tray until it comes to a stop.
17. If you are still having skew adjustment problems, refer to the Advanced Stock Setup
information located in the System Administration Guide.
6-6
Xerox® Color 800/1000 Press
User Guide
Page 45

Tray Properties
Paper information
From the Tray Properties window the user can view and select a variety of functions on
the paper tray. Selections available for the tray vary depending on whether the user is
logged in as Operator or Administrator. The following information represents the
selections available when logged in as Operator.
• Stock Details: This area displays the current tray information including the paper
size, type, weight, color, and orientation of the paper (LEF or SEF).
- Comment: This section allows the user to enter information about the paper, such
as a brand name or job-specific information. A maximum of 256 characters is
allowed.
- Long Edge Feed/Short Edge Feed (LEF/SEF): Indicates the orientation direction
that the paper is loaded in the tray: either in the LEF or SEF direction.
• Enable Tray: Permits the selected tray to be used.
• Disable Tray: Prohibits the selected tray to be used.
Xerox® Color 800/1000 Press
User Guide
6-7
Page 46

Paper information
• Override:
- When this selection is cleared, the UI displays a message if the current media
loaded in the tray does not match the media information displayed on the Tray
Properties window. The user must load the tray with the same media as indicated
on the Tray Properties window.
- If selected, the UI never displays a message when there is a media mismatch
between the actual tray contents and the information shown on the UI for that
tray.
• Display Tray Properties automatically when Tray is open: When selected, the Tray
Properties window always opens when the tray is open.
• Stock Library: This opens the Manage Stock Library window, which contains the
names of all the paper stocks that were either created by the user or copied and/or
edited from the Recommended Media List (RML). The user selects a desired stock
from the list, and that stock is assigned to the tray.
• Recommended Media List (RML): Provides a list of all the default, preprogrammed
stocks that are available for the machine. The user can select a stock from the RML
to assign temporarily to the tray. Once the Tray Properties window is closed, the stock
appears name appears in blue/italics indicating that it is a temporary stock. The stock
is deleted once a different stock is selected.
• Create New Stock: Allows the user to create a new stock that is assigned to the tray.
This stock may be saved permanently to the stock library, or it can remain as a
temporary stock.
• Alignment Profile: Allows the user to select the system default profile or a specific
profile that was created and saved from the Administrator mode.
Related Topics:
Manage Stock Library
Advanced Stock Setup options
Recommended Media List (RML)
Creating a new stock (from Tray Properties)
Tray stock mismatch
If the paper loaded in a tray does not match the information on the Tray Properties
window, the UI may alert you with a Tray Stock Size Mismatch message.
Note
This functionality is available only if it is enabled by the Administrator: refer to the
System Administration Guide for more information.
6-8
Xerox® Color 800/1000 Press
User Guide
Page 47

Paper information
If you receive this message, do the following:
1. Load the stock indicated on the Tray Stock Size Mismatch window, or
2. Change the Tray Properties to match the contents of the tray.
a) Verify the paper size, type (coated, uncoated), and weight of the paper loaded in
the tray.
b) Enter that information on the Tray Properties window.
Xerox® Color 800/1000 Press
User Guide
6-9
Page 48

Paper information
6-10
Xerox® Color 800/1000 Press
User Guide
Page 49

7
Manage Stock Library
The Stock Library enables you to define attributes for a stock (such as size, color, type,
and weight) and assign a name to identify the stock and its associated attributes.
Selecting the Stock Library button opens the Manage Stock Library window.
Note
The appearance of the Stock Library button on the UI is dependent on how the
administrator sets this feature in System Settings (while logged on in the Administrator
mode). If the Stock Library button is not displayed on the UI, then the administrator
has restricted its access to administrators only. In this case, contact your administrator
for more information and/or refer to the System Administration Guide.
The Manage Stock Library window contains the Recommended Media List (RML) and
the Stock Library list:
• Recommended Media List (RML): This list contains the names of all the
preprogrammed stocks that are available for the machine.
Xerox® Color 800/1000 Press
User Guide
7-1
Page 50

Manage Stock Library
• Stock Library: Much like the RML, this list contains the names of all the stocks that
are available for the machine. Unlike the RML, this is a list of stocks that were either
created by the user or copied and/or edited from the Recommended Media List (RML).
The user selects a desired stock for each tray and/or for specific print jobs.
Related Topics:
Stock management
Recommended Media List (RML)
Manage Stock Library window
Recommended Media List (RML)
Always refer to the Recommended Media List for paper guidelines. The Recommended
Media List is updated as required to include new papers and other media. The RML is
available at www.xerox.com.
The RML is also available on your machine either through the Tray Properties window
or from the Stock Library feature.
7-2
Xerox® Color 800/1000 Press
User Guide
Page 51

Manage Stock Library
Stock management
Once a stock type is defined, named, and saved as a new stock, it can be easily referenced
from the Stock Library. A saved stock can be quickly selected and used for a desired
paper tray or print job.
You can perform the following tasks from the Manage Stock Library window:
• Add a stock from the RML to the Stock Library
• Copy RML stocks and customize those stock properties as required
• Copy an existing stock in the Stock Library and customize the stock properties as
required
• Edit/change an existing stock entry
• Create and save a new stock; these stocks can be created in one of two ways:
- From Manage Stock Library
- From Tray Properties
• Remove/delete a stock entry
• Change the order stocks are shown by moving a stock up/down in the Stock Library
list
Xerox® Color 800/1000 Press
User Guide
7-3
Page 52
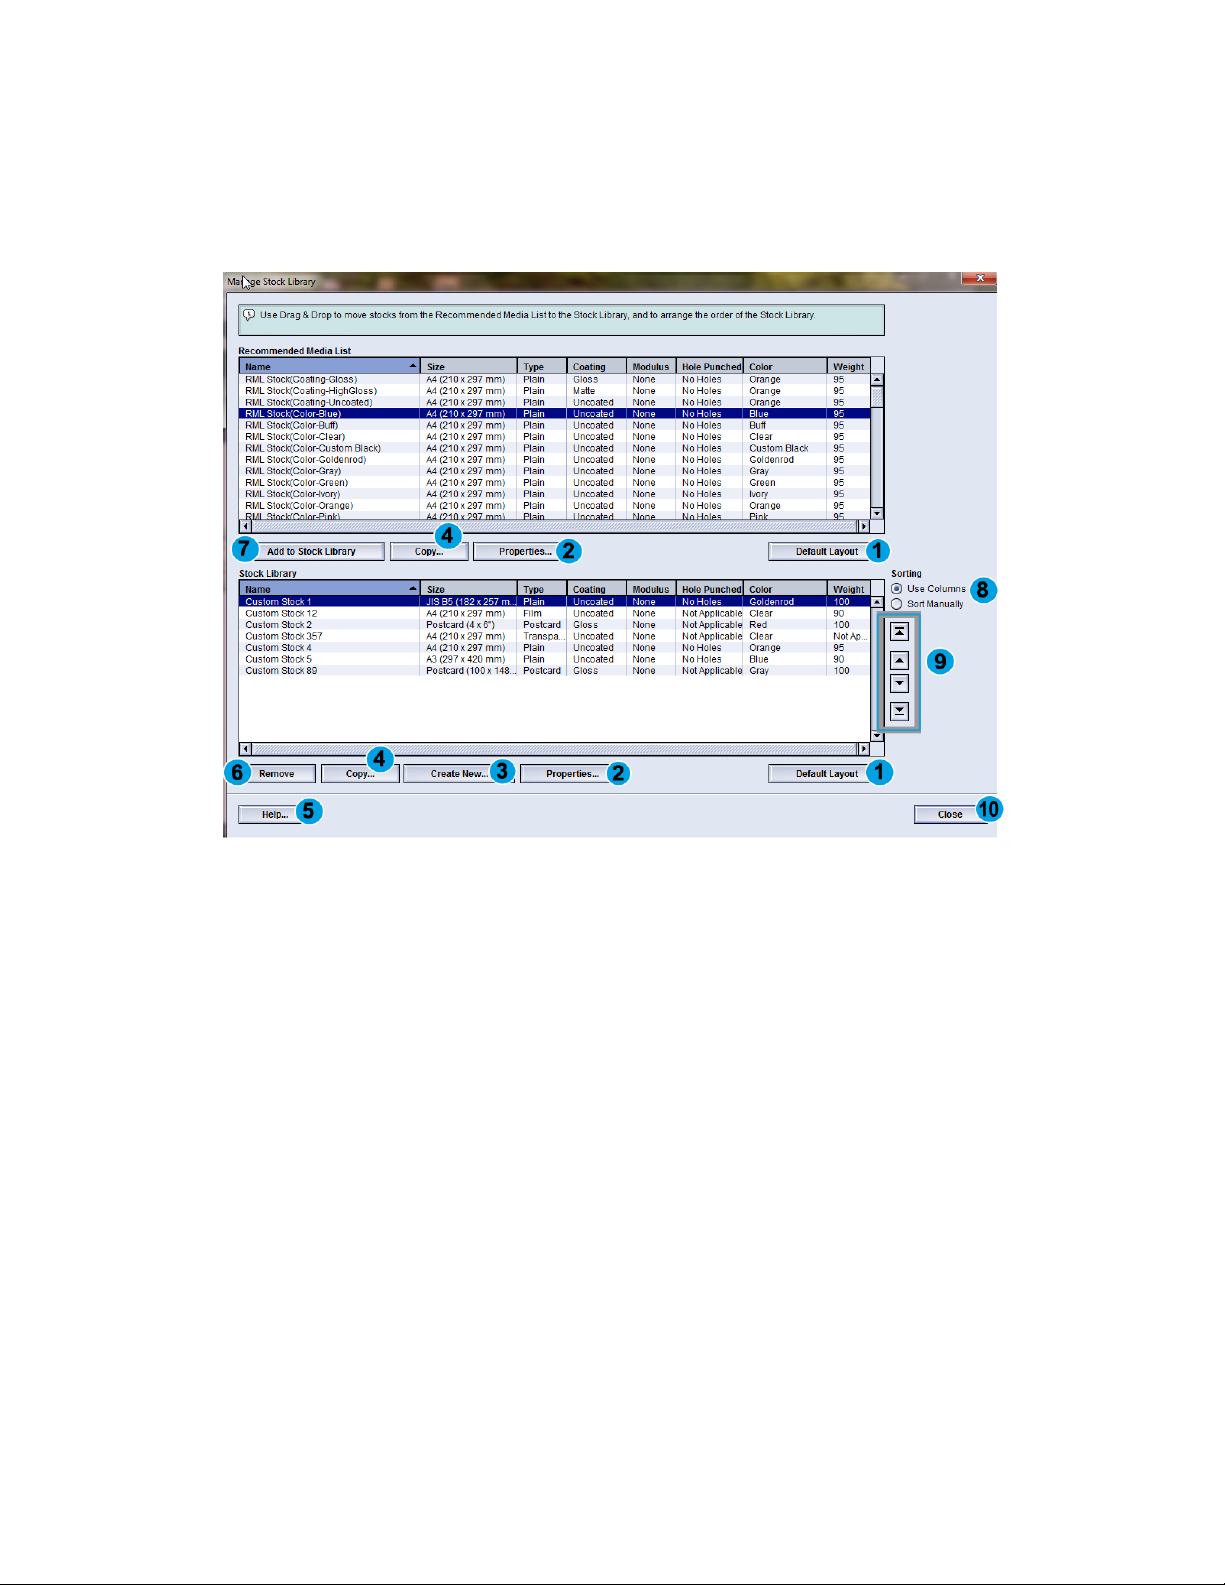
Manage Stock Library
Manage Stock Library window
The Manage Stock Library window consists of the Recommended Media List (RML),
Stock Library list, and the following:
1. Default Layout: Select this option to return the Stock Library view to its original
layout.
2. Properties: Allows the user to view and/or change the properties of stocks listed in
the Stock Library list. The stock name cannot be edited/changed. Properties of a stock
in the RML can be viewed only; the properties CANNOT be changed.
3. Create New: Allows the user to create and save a new stock to the Stock Library list.
4. Copy: Allows the user to copy an existing stock from either the RML or the Stock
Library list, edit the stock properties, and save it to the Stock Library as a new stock.
5. Help: Select this to get online Help information about the Manage Stock Library
feature.
6. Remove: Allows the user to delete (remove) a stock from the Stock Library list.
7. Add to Stock Library: Allows the user to add a stock from the RML to the Stock Library
list.
8. Sorting: Select either Use Columns or Sort Manually.
9. Up/down buttons: Moves a stock up or down in the Stock Library list.
10. Close: Closes/exits the Manage Stock Library window.
7-4
Xerox® Color 800/1000 Press
User Guide
Page 53

Manage Stock Library
Related Topics:
Adding a stock entry
Copying a stock entry
Creating a new stock (from Manage Stock Library)
Creating a new stock (from Tray Properties)
Editing an existing stock in the Stock Library
Removing a stock from the Stock Library
Adding a stock entry
Use the following procedure when adding a stock to the Stock Library from the Manage
Stock Library window.
Note
Only preexisting stocks from the RML can be added to the Stock Library.
1. Select Stock Library.
The Manage Stock Library window opens.
2. Select the desired stock from the RML.
3. Select the Add Stock Library button.
The RML stock is added to the bottom of the Stock Library list.
Xerox® Color 800/1000 Press
User Guide
7-5
Page 54
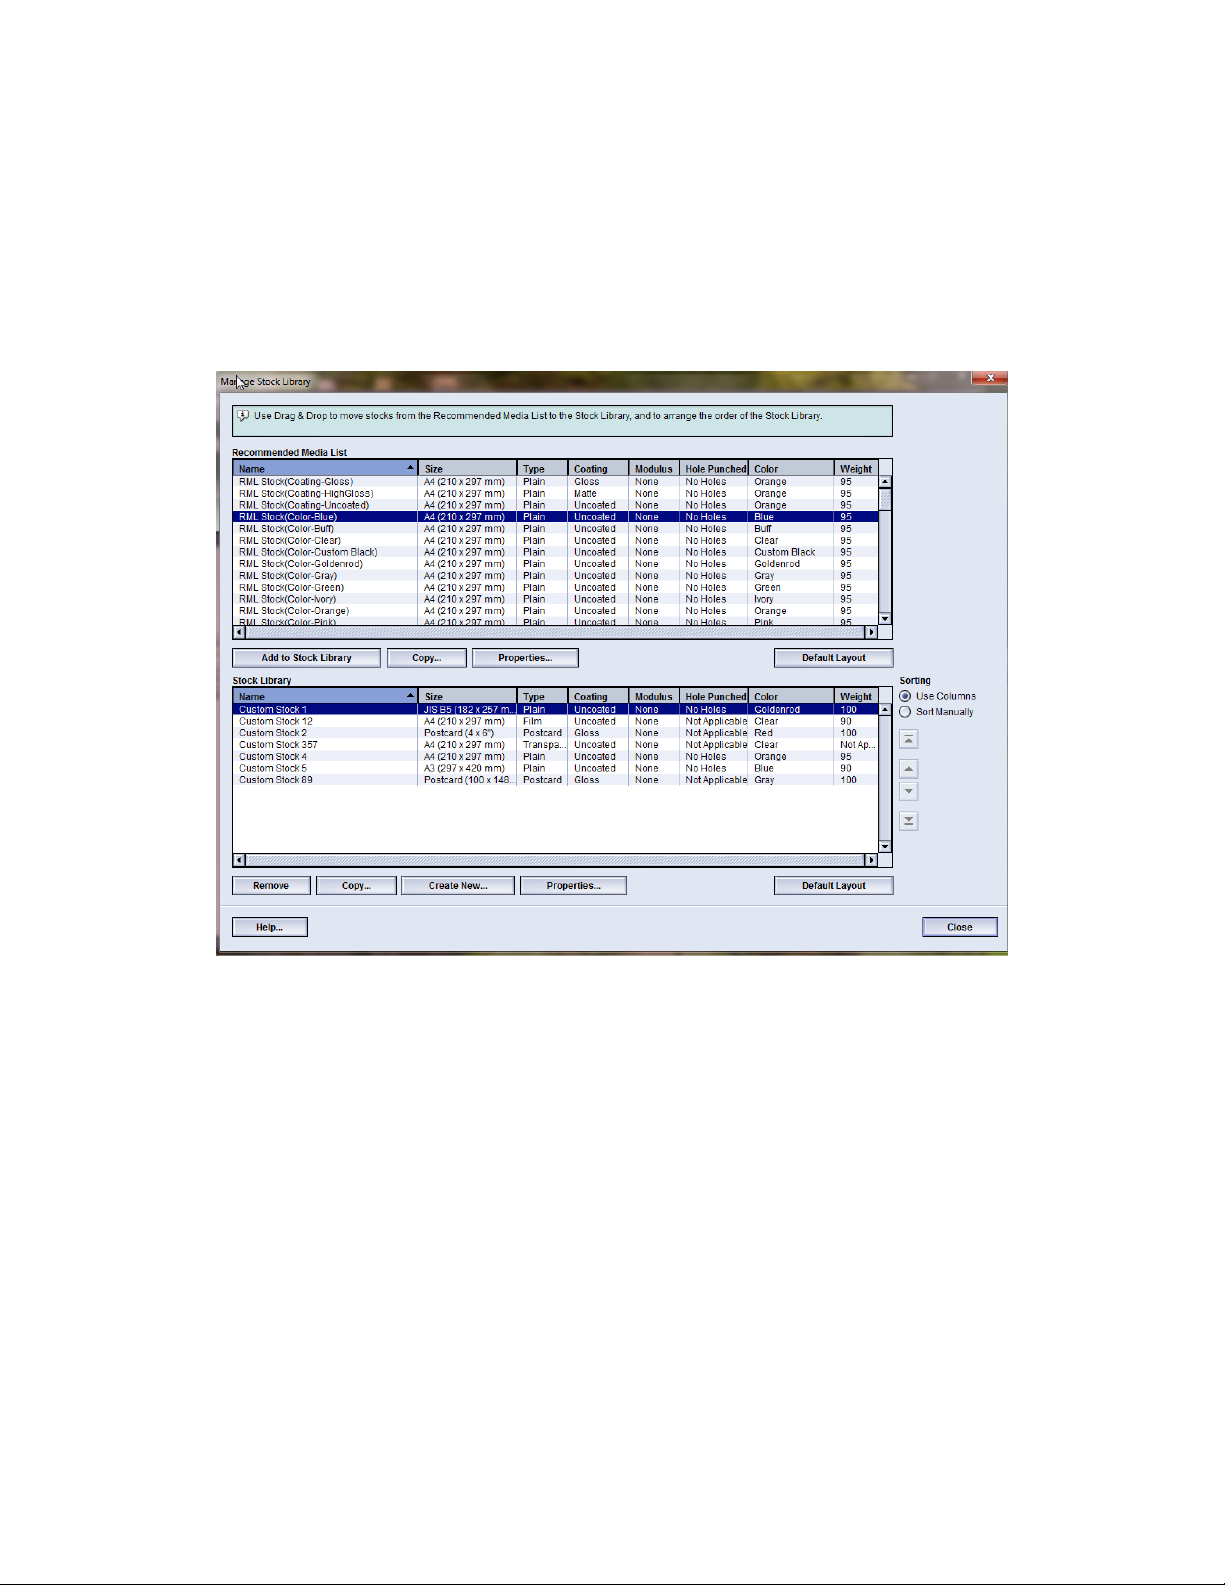
Manage Stock Library
4. Use the Up/Down buttons to move the stock within the Stock Library List.
5. Select Close to exit Manage Stock Library.
Copying a stock entry
Sometimes an existing stock entry (either from the RML or the Stock Library list) already
contains most of the attributes required for a new stock entry. In this case, the user
simply copies an existing stock and modifies its attributes to create a new stock entry.
1. Select Stock Library.
The Manage Stock Library window opens.
2. Select the desired stock from either the RML or the Stock Library list.
3. Select the Copy button.
The Stock Properties window opens.
4. Type a new stock name and modify the attributes as required.
5. Select the Advanced Setup button.
a) Select the various Advanced Stock Setup options as required.
b) Select OK to save any selections made and close the Advanced Stock Setup window.
6. Select OK to save and close the Stock Properties window.
The stock is added to the bottom of the Stock Library List.
7. Use the Up/Down buttons to move the stock within the Stock Library List.
8. Select Close to exit Manage Stock Library.
7-6
Xerox® Color 800/1000 Press
User Guide
Page 55

Related Topics:
Advanced Stock Setup options
Create/modify Advanced Stock Setup options
Creating a new stock (from Manage Stock Library)
Manage Stock Library
1. Select Stock Library.
The Manage Stock Library window opens.
2. Select the Create New button.
The New Stock Setup window opens.
3. Type a new stock name and modify the attributes as required.
4. Select the Advanced Setup button.
a) Select the various Advanced Stock Setup options as required.
b) Select OK to save any selections made and close the Advanced Stock Setup window.
5. Select OK to save and close the New Stock Setup window.
The stock is added to the bottom of the Stock Library List.
6. Use the Up/Down buttons to move the stock within the Stock Library List.
7. Select Close to exit Manage Stock Library.
Xerox® Color 800/1000 Press
User Guide
7-7
Page 56
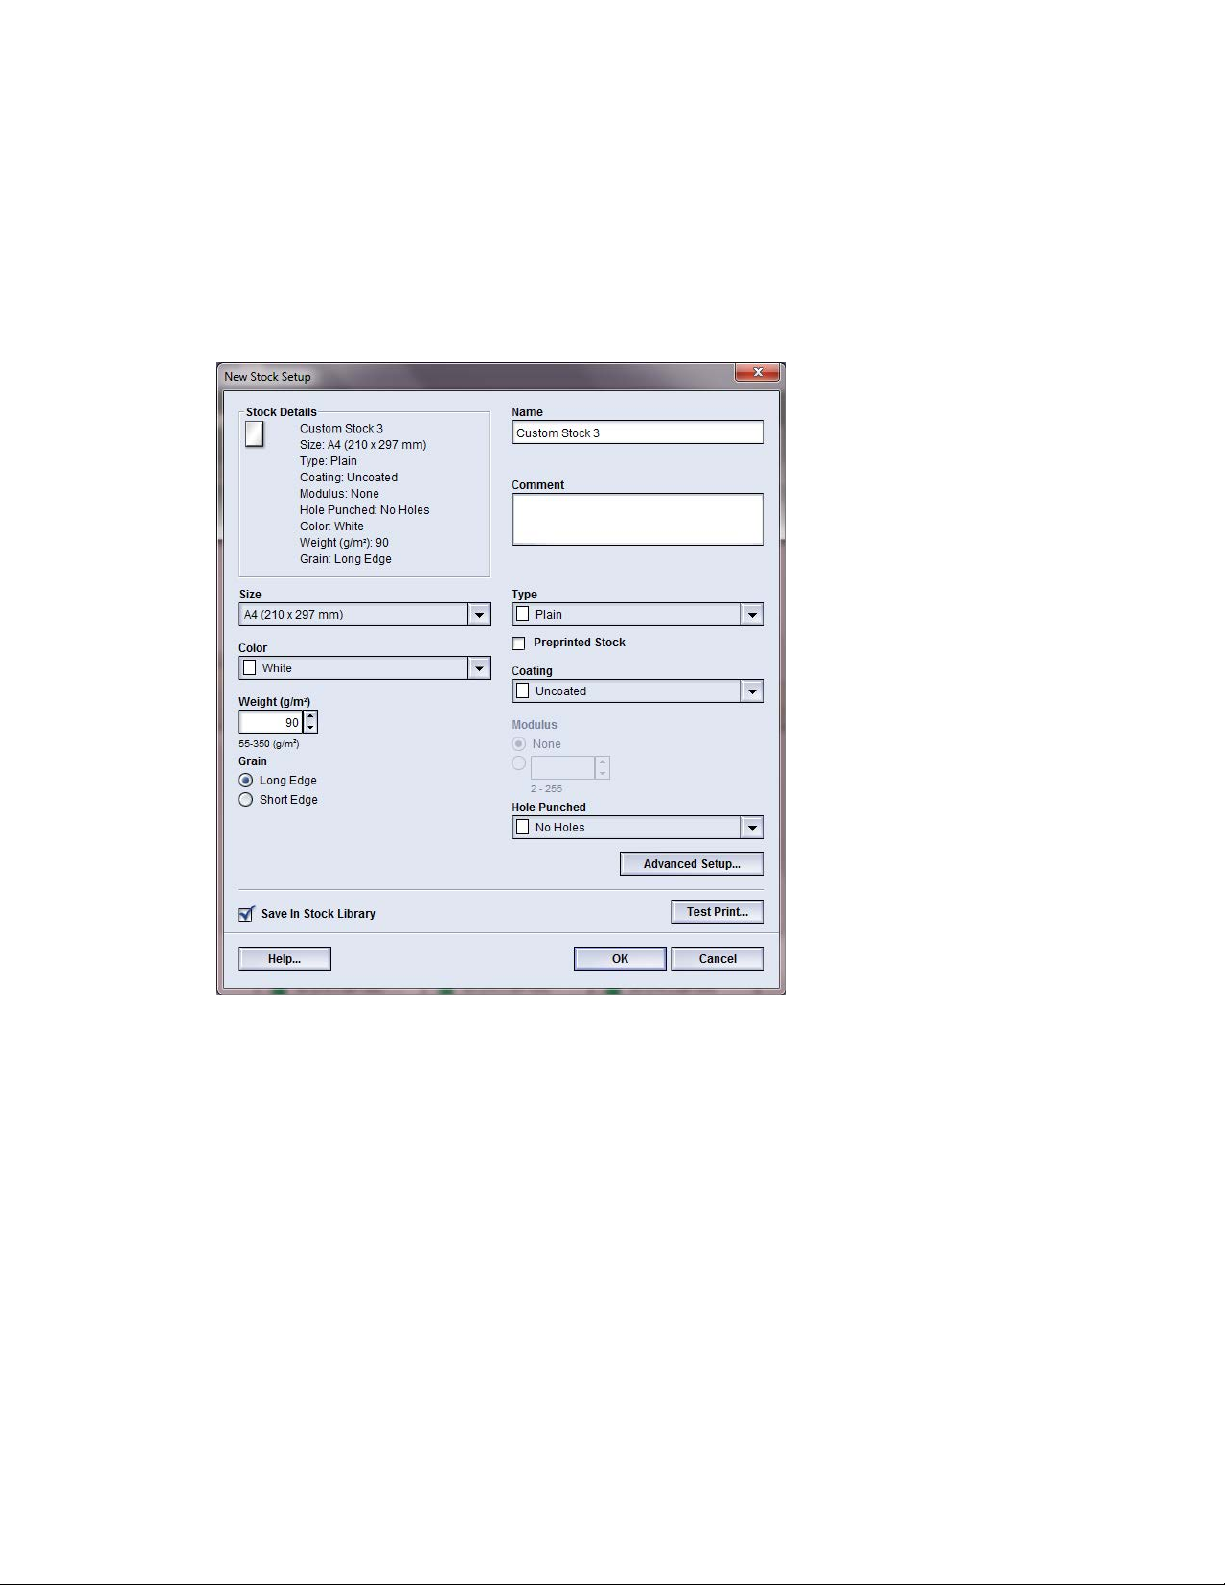
Manage Stock Library
Related Topics:
Advanced Stock Setup options
Create/modify Advanced Stock Setup options
Creating a new stock (from Tray Properties)
Creating a new stock (from Tray Properties)
1. From the machine’s UI, double-click on the desired tray where the new stock will be
loaded.
The Tray Properties window for that tray opens.
2. Select the Create New button.
The New Stock Setup window opens.
3. Type a new stock name and modify the attributes as required.
4. Select the Advanced Setup button.
a) Select the various Advanced Stock Setup options as required.
b) Select OK to save any selections made and close the Advanced Stock Setup window.
5. The stock may be either a temporary stock or a permanent stock in the Stock Library:
7-8
Xerox® Color 800/1000 Press
User Guide
Page 57
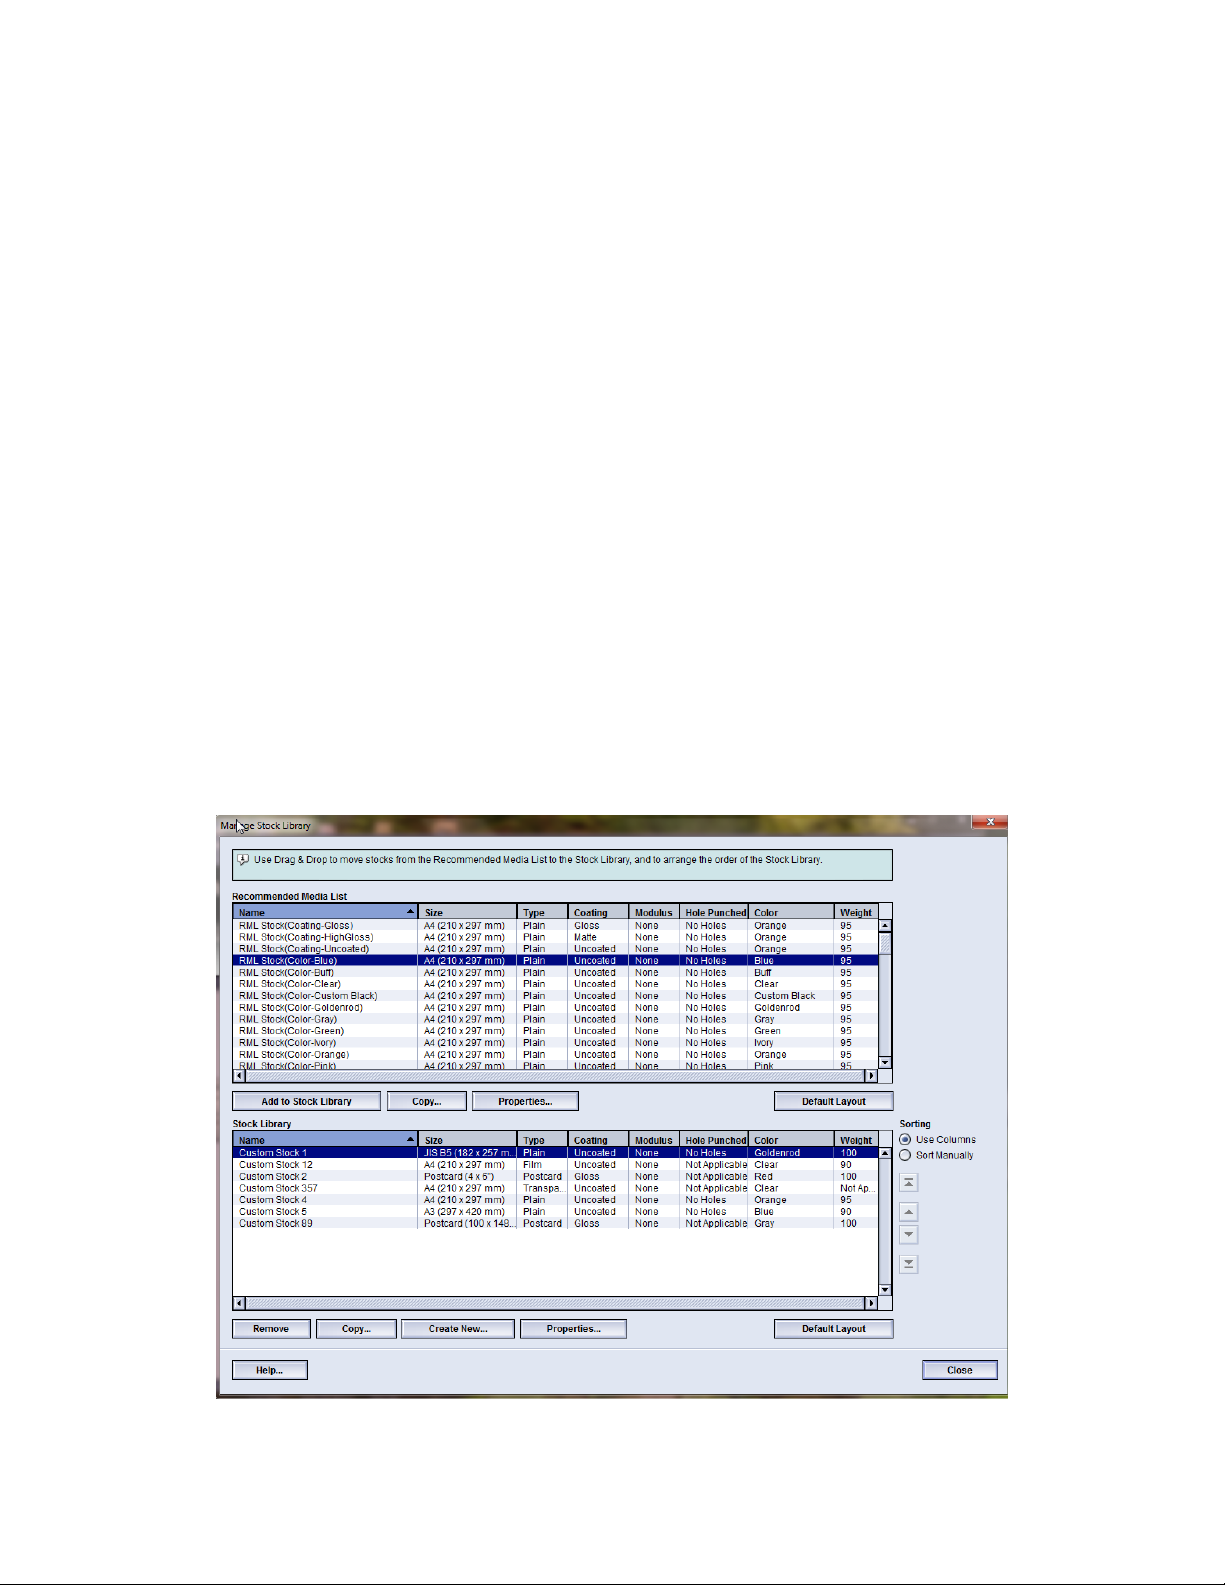
Manage Stock Library
To make the stock a temporary stock, ensure that the Save In Stock Library
•
checkbox is UNCHECKED.
• To permanently save the stock to the Stock Library, ensure that the Save In Stock
Library checkbox is CHECKED.
6. Select OK to save and close the New Stock Setup window.
7. Select OK again to close the Tray Properties window.
The new stock is displayed on the UI.
Note
Before running the job, be sure to load the tray with the same stock as programmed.
Related Topics:
Tray Properties
Advanced Stock Setup options
Create/modify Advanced Stock Setup options
Creating a new stock (from Manage Stock Library)
Editing an existing stock in the Stock Library
Use the following procedure to edit an existing stock in the Stock Library.
Xerox® Color 800/1000 Press
User Guide
7-9
Page 58

Manage Stock Library
1. Select Stock Library.
The Manage Stock Library window opens.
2. Select the desired stock from the Stock Library list.
3. Select the Properties button.
The Stock Properties window opens.
4. Modify the attributes as required.
5. Select the Advanced Setup button.
a) Select the various Advanced Stock Setup options as required.
b) Select OK to save any selections made and close the Advanced Stock Setup window.
6. Select OK to save the changes to the stock and close the Stock Properties window.
7. Select Close to exit Manage Stock Library.
Related Topics:
Advanced Stock Setup options
Create/modify Advanced Stock Setup options
Removing a stock from the Stock Library
Use the following procedure to remove a stock from the Stock Library list.
7-10
Xerox® Color 800/1000 Press
User Guide
Page 59

Manage Stock Library
1. Select Stock Library.
The Manage Stock Library window opens.
2. Select the desired stock from the Stock Library list.
3. Select the Remove button.
A question window opens and asks Are you sure you want to Delete this stock?
Select Yes to delete the stock from the Stock Library list.
4. Select Close to exit Manage Stock Library.
Xerox® Color 800/1000 Press
User Guide
7-11
Page 60

Manage Stock Library
7-12
Xerox® Color 800/1000 Press
User Guide
Page 61

8
Advanced Stock Setup
The Advanced Stock Setup feature allows the user to further customize stocks beyond
the typical size, weight, type, and other characteristics.
The Advanced Stock Setup feature is accessed from either the Stock Properties window
or the New Stock Setup window.
Different media (including paper type, weight, and coating/uncoating, paper curl) may
require specific and/or special handling by the machine as it is moving through the paper
path. For example, some media types may skew or curl as they progress through the
printing path of the machine. This may occur on frequently-run jobs and/or on jobs with
a high volume output.
Xerox® Color 800/1000 Press
User Guide
8-1
Page 62

Advanced Stock Setup
The Advanced Stock Setup feature allows you set specific custom parameters for
different types of media and jobs, such as outlined in the above paragraph. These custom
stocks may be used at point of need in order to ensure optimum output quality of your
prints/jobs. The stocks may be either a temporary stock for a specific, one-time job, or
they can be a permanent stock added to the Stock Library list.
By setting custom stocks for specific media types, you can avoid output prints that are
skewed, curled, have too much dry ink/toner or not enough dry ink/toner in areas, or
images that are not registered properly on the output print, such as Side 1 and/or Side
2 images that are misregistered.
Note
Once a custom stock is created, either temporarily or permanently, the machine passes
this information on to your print server. The print server in turn reflects this information
in the print options for the print jobs.
Related Topics:
Advanced Stock Setup options
Stock By Name Only
Multifeed Detection
Near Empty Detection Level
Tray Air Assist
Enable Tray Heater
Aligner Roll Pressure
Second (2nd) bias transfer roll
Fuser Temperature
Fold Adjustment Profile
Create/modify Advanced Stock Setup options
Advanced Stock Setup options
The Advanced Stock Setup feature includes options that affect these areas of the
machine:
• Paper tray/paper feed, including:
- Stock By Name Only
- Near Empty Detection Level
- Tray Air Assist
- Multifeed Detection
- Enable Tray Heater
• Paper path/paper transportation, including:
- Aligner Roll Pressure
8-2
Xerox® Color 800/1000 Press
User Guide
Page 63

Advanced Stock Setup
- 2nd Bias Transfer Roll
- Fuser Temperature
• Folder Adjustment Profile
Each of these options is discussed throughout the remainder of this section, and where
required, step-by-step procedures also are provided.
Important
Paper Curl Correction options and the ability to run test prints are available ONLY when
logged in as Administrator. Refer to the System Administrator Guide for detailed
information.
Related Topics:
Stock By Name Only
Multifeed Detection
Near Empty Detection Level
Tray Air Assist
Enable Tray Heater
Aligner Roll Pressure
Second (2nd) bias transfer roll
Fuser Temperature
Fold Adjustment Profile
Create/modify Advanced Stock Setup options
Tips for using Advanced Stock Setup options
Before using any of the Advanced Stock Setup options, keep the following information
in mind:
• It is recommended that you choose only one option at a time. This helps you
determine whether or not that option is providing the desired printed output.
Important
It is HIGHLY recommended that you run test prints after selecting each Advanced
Stock option. This allows you to evaluate the printed output and determine if it is
acceptable or not. In order to run test prints, you MUST be logged on as Administrator.
• If you determine that the output is unacceptable, either further adjust the value for
a particular option (if applicable) or return the option to its default value and continue
to the next option.
• It is important to remember that any settings for a particular option that is used
today for a specific print job may not achieve the same desired outcome/output
when used on different day for that same print job. This is especially relevant if the
room in which the machine is located experiences changes in temperature and
humidity.
Xerox® Color 800/1000 Press
User Guide
8-3
Page 64
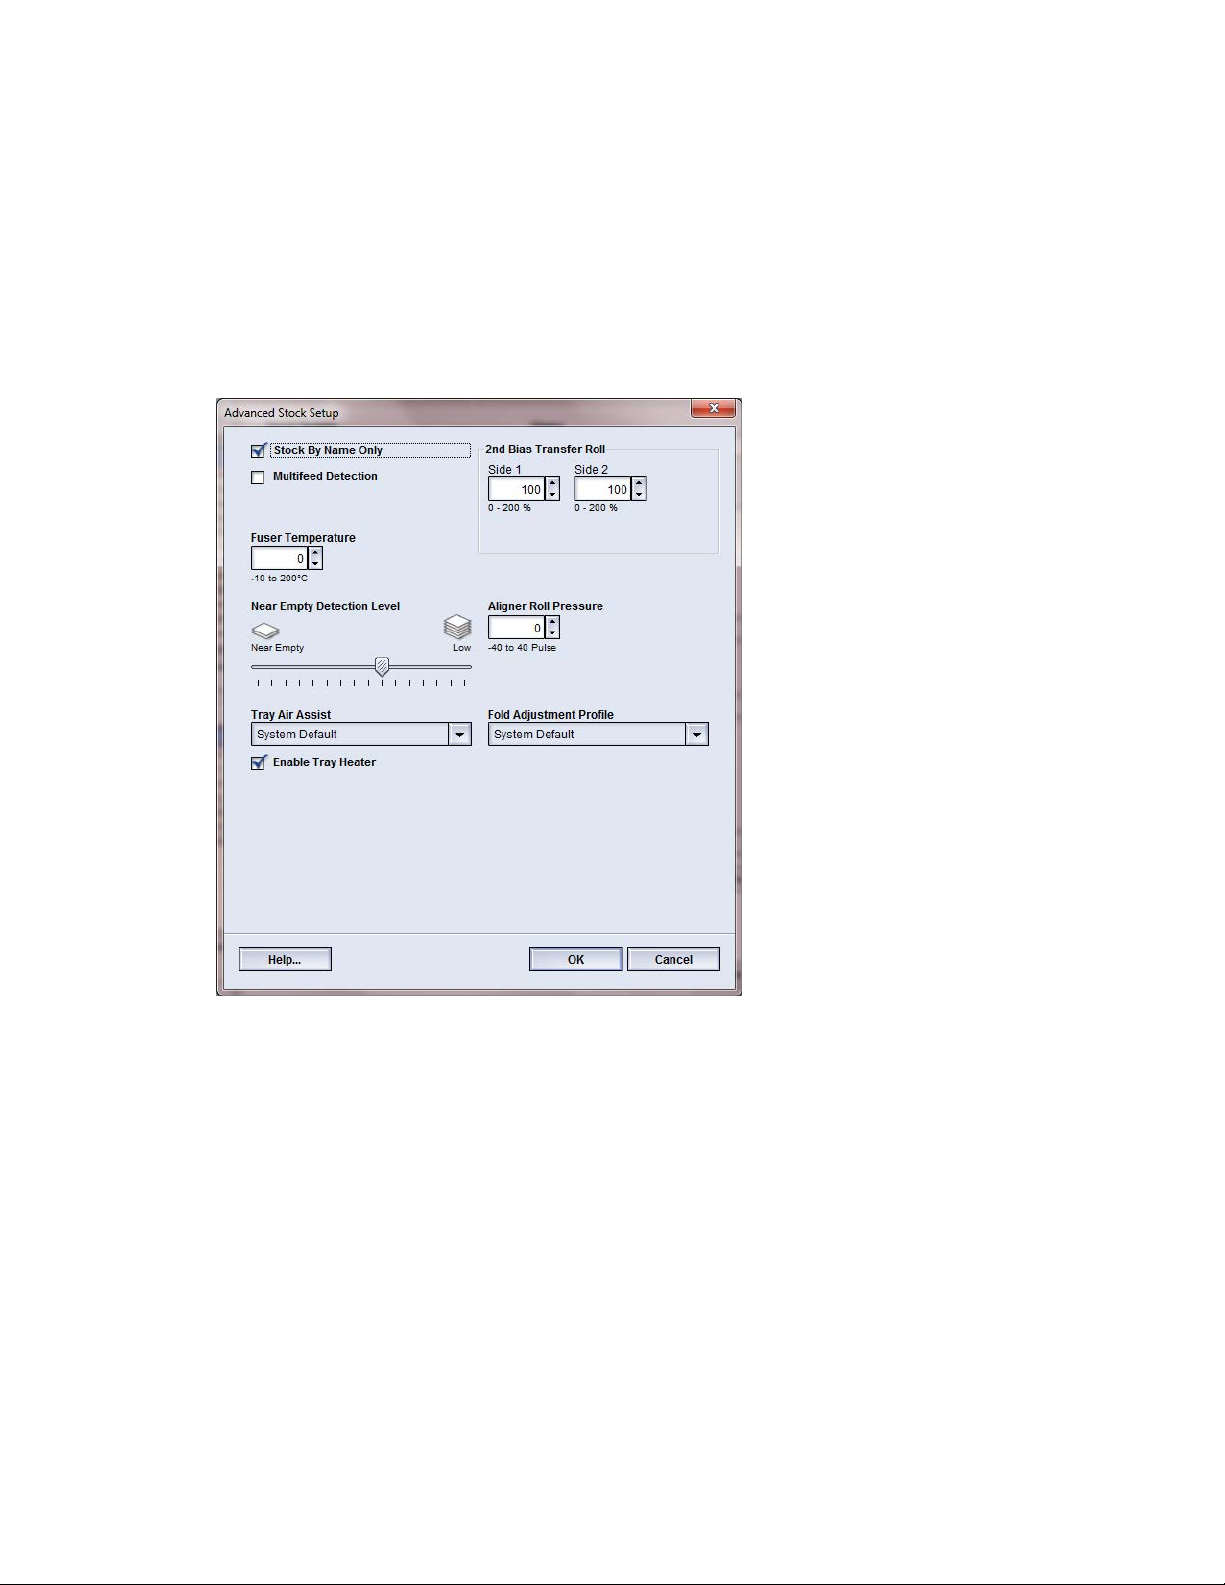
Advanced Stock Setup
• If you determine that your output still is unacceptable after repeating procedures,
log in as Administrator, select the desired options and run test prints. Repeat this
process several times, each time running test prints and evaluating the output. If the
output is still unacceptable, call your Customer Support Center for help/assistance.
Create/modify Advanced Stock Setup options
Use the following procedure to select the various Advanced Stock Setup options for a
new stock entry or to modify/edit an existing stock entry.
1. Perform one of the following:
a) Create a new stock entry (from the Manage Stock Library window), or
b) Copy an existing stock entry (either from the Manage Stock Library window or
from the Tray Properties window), or
c) Modify an existing stock entry (from the Manage Stock Library window) by
selecting the Properties button.
2. From either the New Stock Setup or Stock Properties window, select/modify the
attributes as required, including entering a new stock name (if applicable).
3. Select the Advanced Setup button.
The Advanced Stock Setup window opens.
4. Select the desired Advanced Stock Setup window, select the various options as
required, including:
8-4
Xerox® Color 800/1000 Press
User Guide
Page 65

Advanced Stock Setup
Stock By Name Onlya)
b) Multifeed Detection
c) 2nd Bias Transfer Roll; refer to the Selecting the 2nd Bias Transfer Roll settings
procedure for step-by-step instructions
d) Fuser Temperature
e) Near Empty Detection Level
f) Aligner Roll Pressure
g) Tray Air Assist
h) Fold Adjustment Profile (available only if the optional finisher is attached to your
machine)
5. Select OK to close the Advanced Stock Setup window.
6. Select OK to save and close either the New Stock Setup window or the Stock Properties
window.
7. Select Close to exit Manage Stock Library.
Related Topics:
Stock By Name Only
Multifeed Detection
Near Empty Detection Level
Tray Air Assist
Enable Tray Heater
Aligner Roll Pressure
Second (2nd) bias transfer roll
Fuser Temperature
Fold Adjustment Profile
Selecting the 2nd Bias Transfer Roll settings
Paper tray/paper feed options
Stock By Name Only
When this option is selected/checked (yes or true), stock can be selected from the print
server or from the client’s print driver only by explicitly selecting its specific stock name
(as shown in the Stock Library) and not by matching various parameters (such as weight,
type, and coating). Selecting this option (placing a checkmark in the box) prevents the
inadvertent use of expensive or specialty stocks for slip-sheets, automatic paper selection,
or generic paper requests by the user.
Xerox® Color 800/1000 Press
User Guide
8-5
Page 66

Advanced Stock Setup
When this option is unchecked (no or false), stocks can be selected from the print server
or from the client’s print driver by matching the same attributes (such as weight, type,
and coating) as those listed for stocks in the Stock Library. Stock names also examined,
but are not used exclusively for selection for print jobs.
Multifeed Detection
This option is used in vary rare cases, such as when a job requires the same paper tray
to have different media stocks loaded in it. For example, a job requires a special
application with heavier stock media:
• Tray 1 is loaded with both 24 lb./90 gsm and 130 lb. Cover (350 gsm)
• The print job pulls both stocks from the same tray for the same job.
• With Multifeed Detection selected, the machine detects and avoids any possible
multifeed issues. This allows the job to continue running, pulling both stocks from
the same tray, and completes the print job without faults or jams.
Near Empty Detection Level
This option is available only if the Tray Near Empty option is selected for the Auto Tray
Switch Timing feature ( System Settings > Tray Options); otherwise, this option is
ignored. When available, this option informs the user that a tray is nearing an empty
level. This message is displayed to the user depending on where the Near Empty Detection
Level indicator is set.
8-6
Xerox® Color 800/1000 Press
User Guide
Page 67

Advanced Stock Setup
Tray Air Assist
The Tray Air Assist option allows you to optimize and control the environmental conditions
in your paper trays, which in turn ensures optimum print capability.
Use this feature to switch on/off fans in a paper tray in order to eliminate misfeeds,
multifeeds, paper jams, or other possible tray feeding problems. These fans blow air to
the paper stack during the feeding operation and separate sheets of paper thereby
providing a stable feed of paper.
The Tray Air Assist options includes the following selections:
• System Default: As its name states, this is the default selection. With this selection
the paper tray blowers automatically adjust by using system settings that are
optimized for Xerox papers.
• Multifeed Support Table: Select this option when you have a multifeed condition.
This changes the air assist function to lower the air volume so it does not fluff or pick
up as many sheets of paper. This is a preset lower volume that is already stored in
the machine NVM (NonVolatile Memory).
• Mis-Feed Support Table: Select this option when you have a misfeed condition. This
changes the air assist function to lower the air volume so that it may reduce paper
jams. This is also a preset lower air volume that is stored in the machine NVM.
• Forced Off: Select this option when neither of the above options produce a change
in the output. This option switches off all air assist functions.
Xerox® Color 800/1000 Press
User Guide
8-7
Page 68
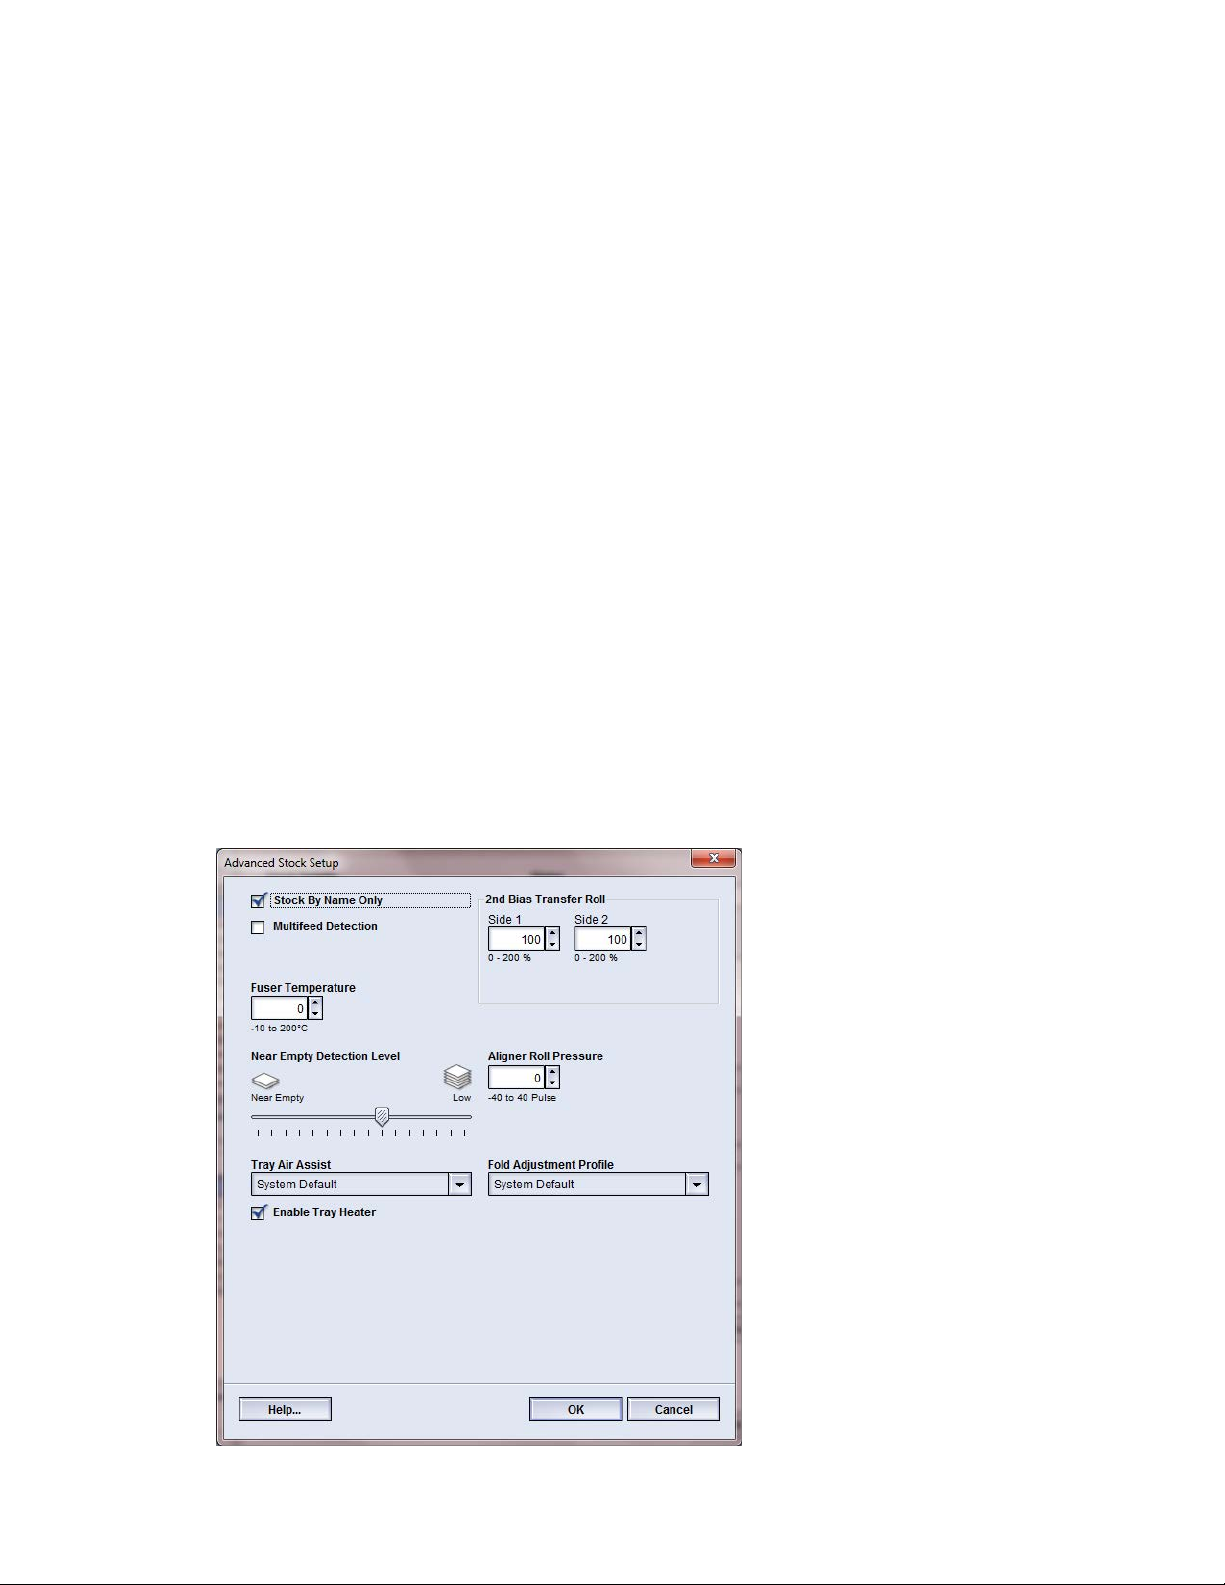
Advanced Stock Setup
• Custom 1-8: By default, these are blank NVM storage settings. If necessary, they are
used to create a custom air assist parameter. If none of the other options remedy
the situation, your Xerox representative works with both the customer and the Xerox
personnel to create a custom setting. This is based on the stock being used and the
best air assist values for producing the desired outcome. These values are then entered
into the machine NVM and assigned to a specific Custom setting (1-8).
Enable Tray Heater
The Enable Tray Heater option works in conjunction with the Tray Air Assist option.
Checking this box, enables the tray heater. The heater maintains the appropriate internal
temperature of the paper tray. Depending on the external temperature and humidity,
the heater sends information to the tray blowers. The paper tray blowers then switch
on and provide the required air to the paper stack, thereby preventing multifeeds or
misfeeds from occurring.
Paper path/paper transportation options
Aligner Roll Pressure
Use this option with special paper types that slip or skew thereby causing image
misregistration on the printed output. This feature is also used with some light-weight
or heavy-weight paper stocks that require less or more roll pressure in order to avoid
edge damage to the printed output.
8-8
Xerox® Color 800/1000 Press
User Guide
Page 69

Advanced Stock Setup
Examples:
• Some coated, heavier paper types slip and skew, thereby misregistering the image
on the output prints. In this case, you may want to increase the roll pressure in order
to compensate for the slippage and skewing.
• Some light-weight papers may have too much roll pressure applied to them, thereby
causing edge damage to the output prints. In this case, you may to decrease the roll
pressure.
Tip
Increasing the roll pressure for some faults, may allow you to postpone a service call.
However, you may want to call your service representative as soon as possible in order
to restore the machine to its full feeding capabilities.
Note
The default setting is 0. It is recommended that you leave this option at its default
setting until you run test prints and evaluate the output of the prints.
Important
Changing the default setting should be considered a temporary solution because
environmental conditions vary from day to day. It is recommended that upon completion
of the print job, you return the option to its default setting.
Second (2nd) bias transfer roll
The second bias transfer roll is where the image is transferred from the belt to the paper.
The 2nd Bias Transfer Roll (2nd BTR) option is normally used with special stocks like
heavier weight paper, such as 220 gsm and greater, 10 pt, or 12 pt. However there are
times when it is also used with lighter weight paper as well. When using either heavier
or lighter weight paper, you may want or need to adjust Side 1 for all 1-sided jobs.
Xerox® Color 800/1000 Press
User Guide
8-9
Page 70
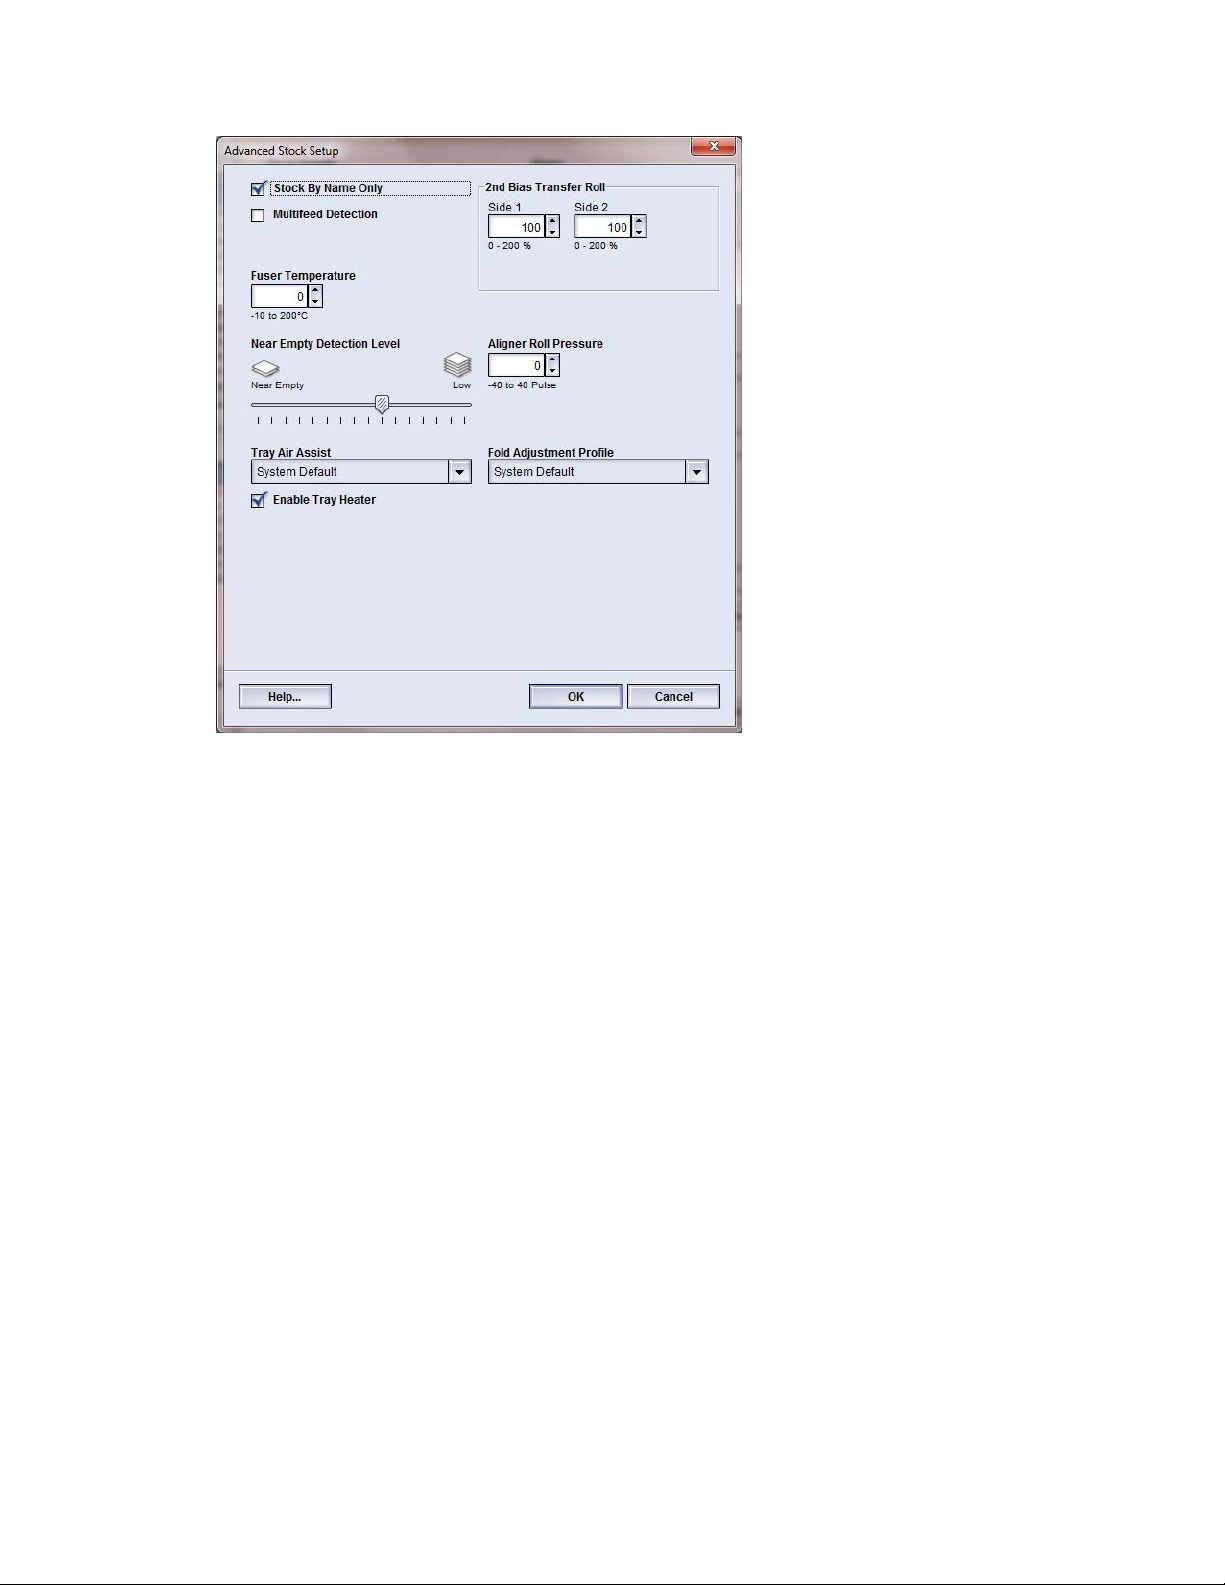
Advanced Stock Setup
If defects continually occur in a printed job when using heavier weight paper, check the
following areas on your printed output to determine if 2nd Bias Transfer Roll (2nd BTR)
adjustments (side 1 and/or side 2) are appropriate.
1. If the job is printed face down or 1-N, check Side 1 for defects on the topside (upper
portion) of the stacked sheets, and check Side 2 for defects on the downside (lower
portion) of the stacked sheets.
2. If the job is printed face up or N-1, check Side 2 for defects on the topside (upper
portion) of the stacked sheets, and check Side 1 for the downside (lower portion) of
the stacked sheets.
Note
The default setting for both Sides 1 and 2 is 100%. It is recommended that you leave
this option at its default setting until you run test prints and evaluate the output of the
prints.
Tip
Test prints may be run in order to check the printed output before saving the changes
made to the 2nd Bias Transfer Roll option. However, in order to run test prints, you must
be logged in as Administrator. The Test Print option is available ONLY in the Administrator
mode.
8-10
Xerox® Color 800/1000 Press
User Guide
Page 71
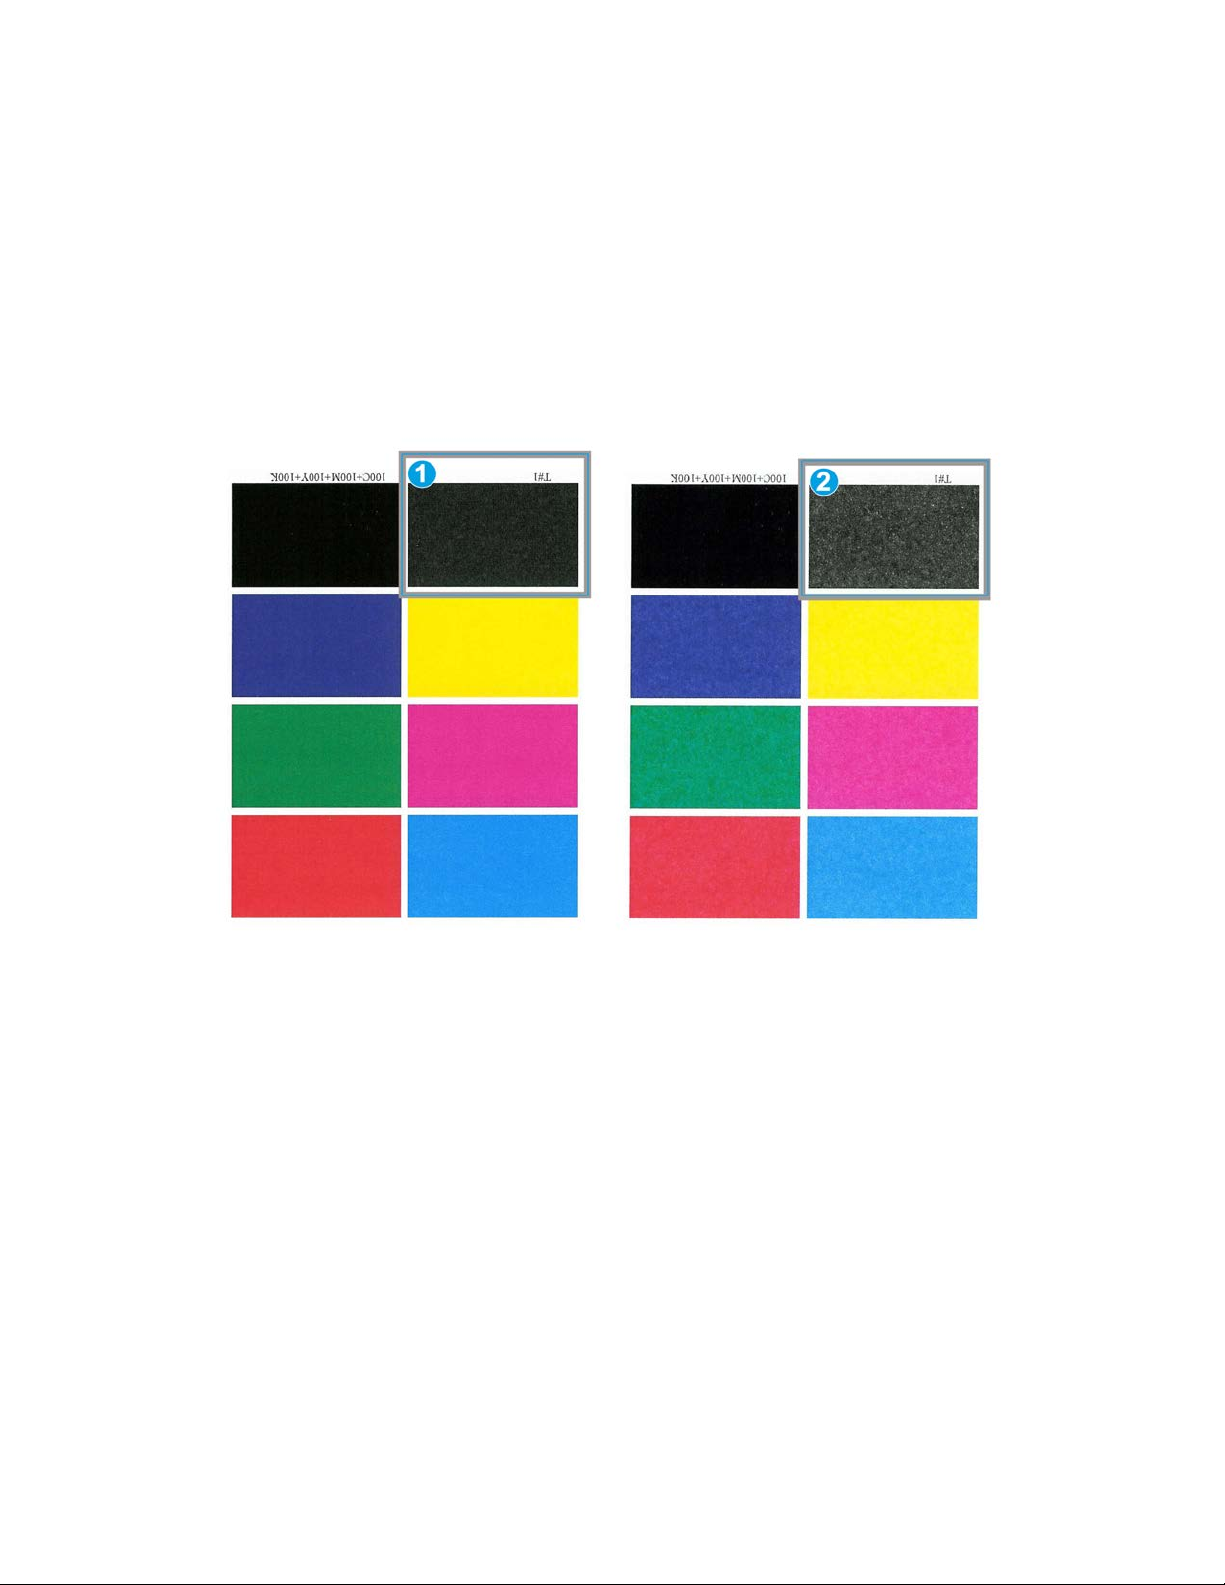
Advanced Stock Setup
Related Topics:
Mottle
Color shift
Selecting the 2nd Bias Transfer Roll settings
Mottle
Use the 2nd Bias Transfer Roll option when your prints have mottle, which is uneven
spotty dry ink/toner coverage that occurs when printing large, solid areas of flat color.
Refer to the following illustration for an example of prints with and without mottle.
1. No mottle
2. Mottle
If mottle exists, increase one or both of the 2nd BTR values. Evaluate the image quality.
If the image quality is equal to or worse than the 100% default setting, decrease one
or both of the 2nd BTR values until a satisfactory image quality is obtained.
Xerox® Color 800/1000 Press
User Guide
8-11
Page 72
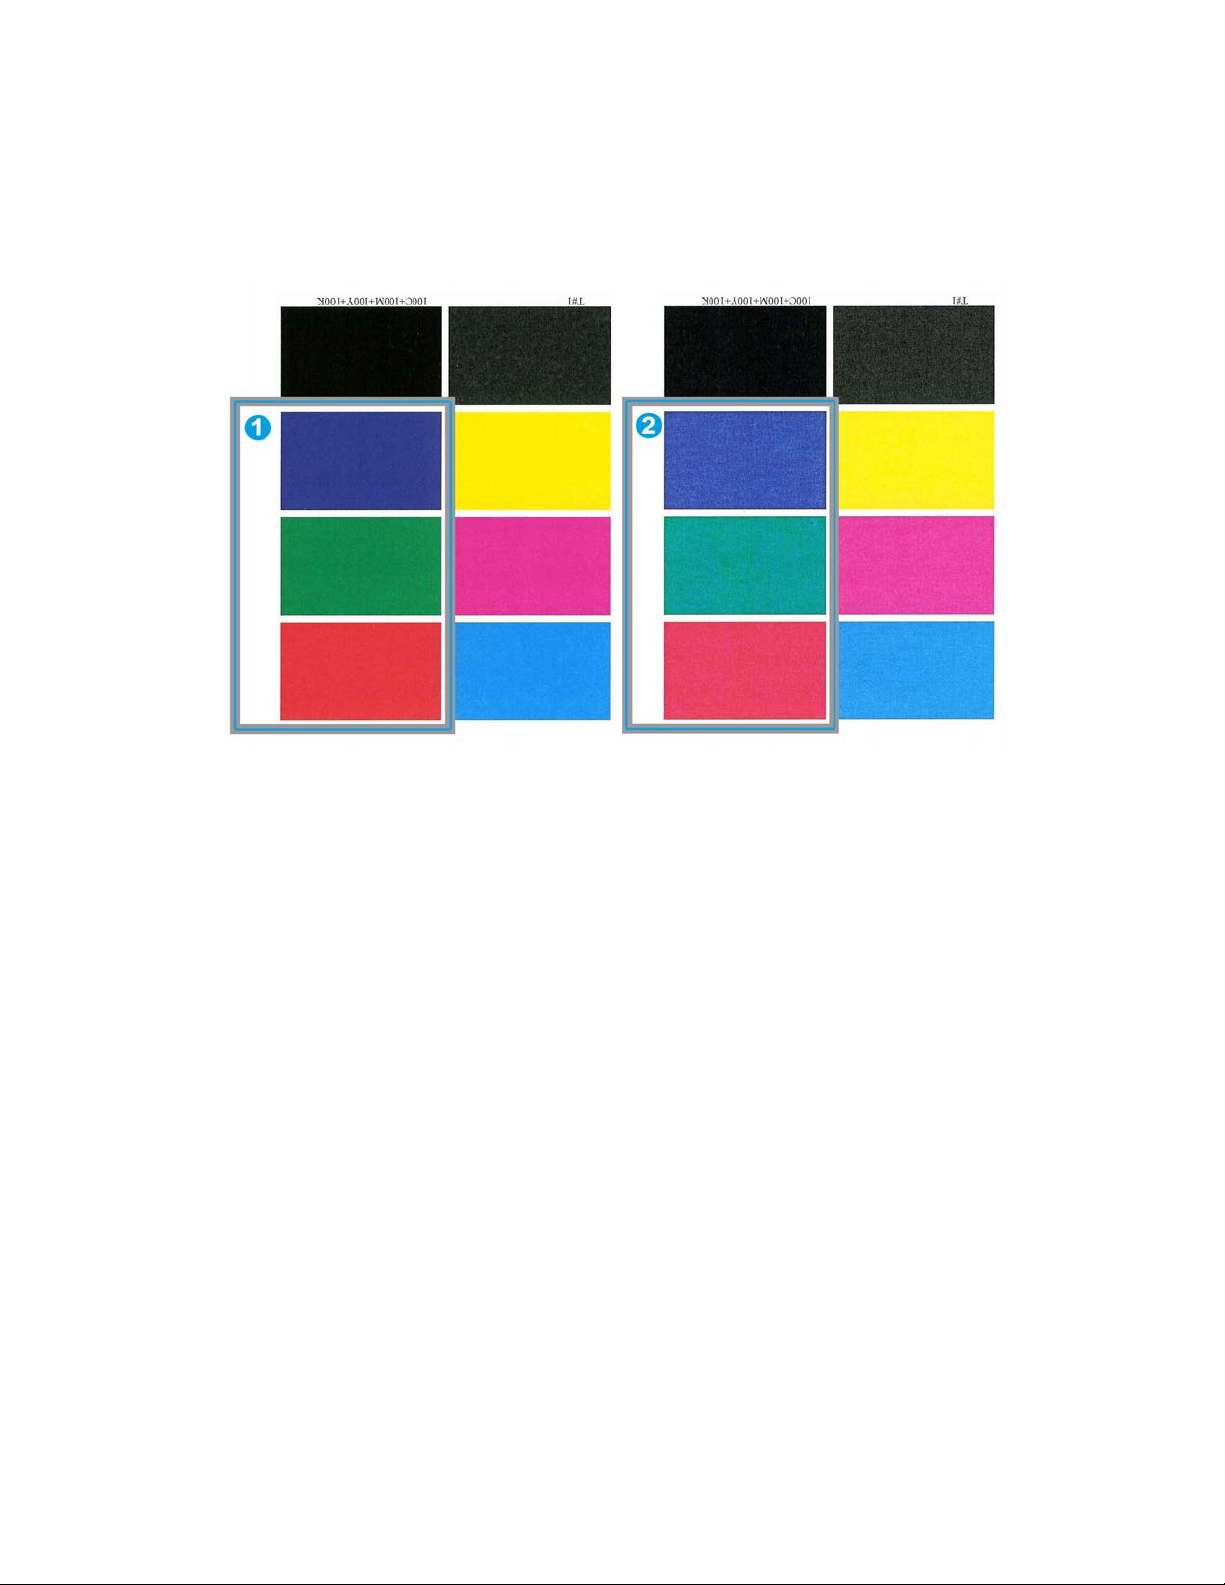
Advanced Stock Setup
Color shift
Use the 2nd Bias Transfer Roll option when your prints have color shift where the colors
are much different than what you desire. Refer to the following illustration for an example
of prints with and without color shift.
1. No color shift: this is the desired output
2. Color shift: this is an undesired output
If color shift exists, increase one or both of the 2nd BTR values.
Important
Changing the default setting should be considered a temporary solution because
environmental conditions vary from day to day. It is recommended that upon completion
of the print job, you return the option to its default setting.
8-12
Xerox® Color 800/1000 Press
User Guide
Page 73
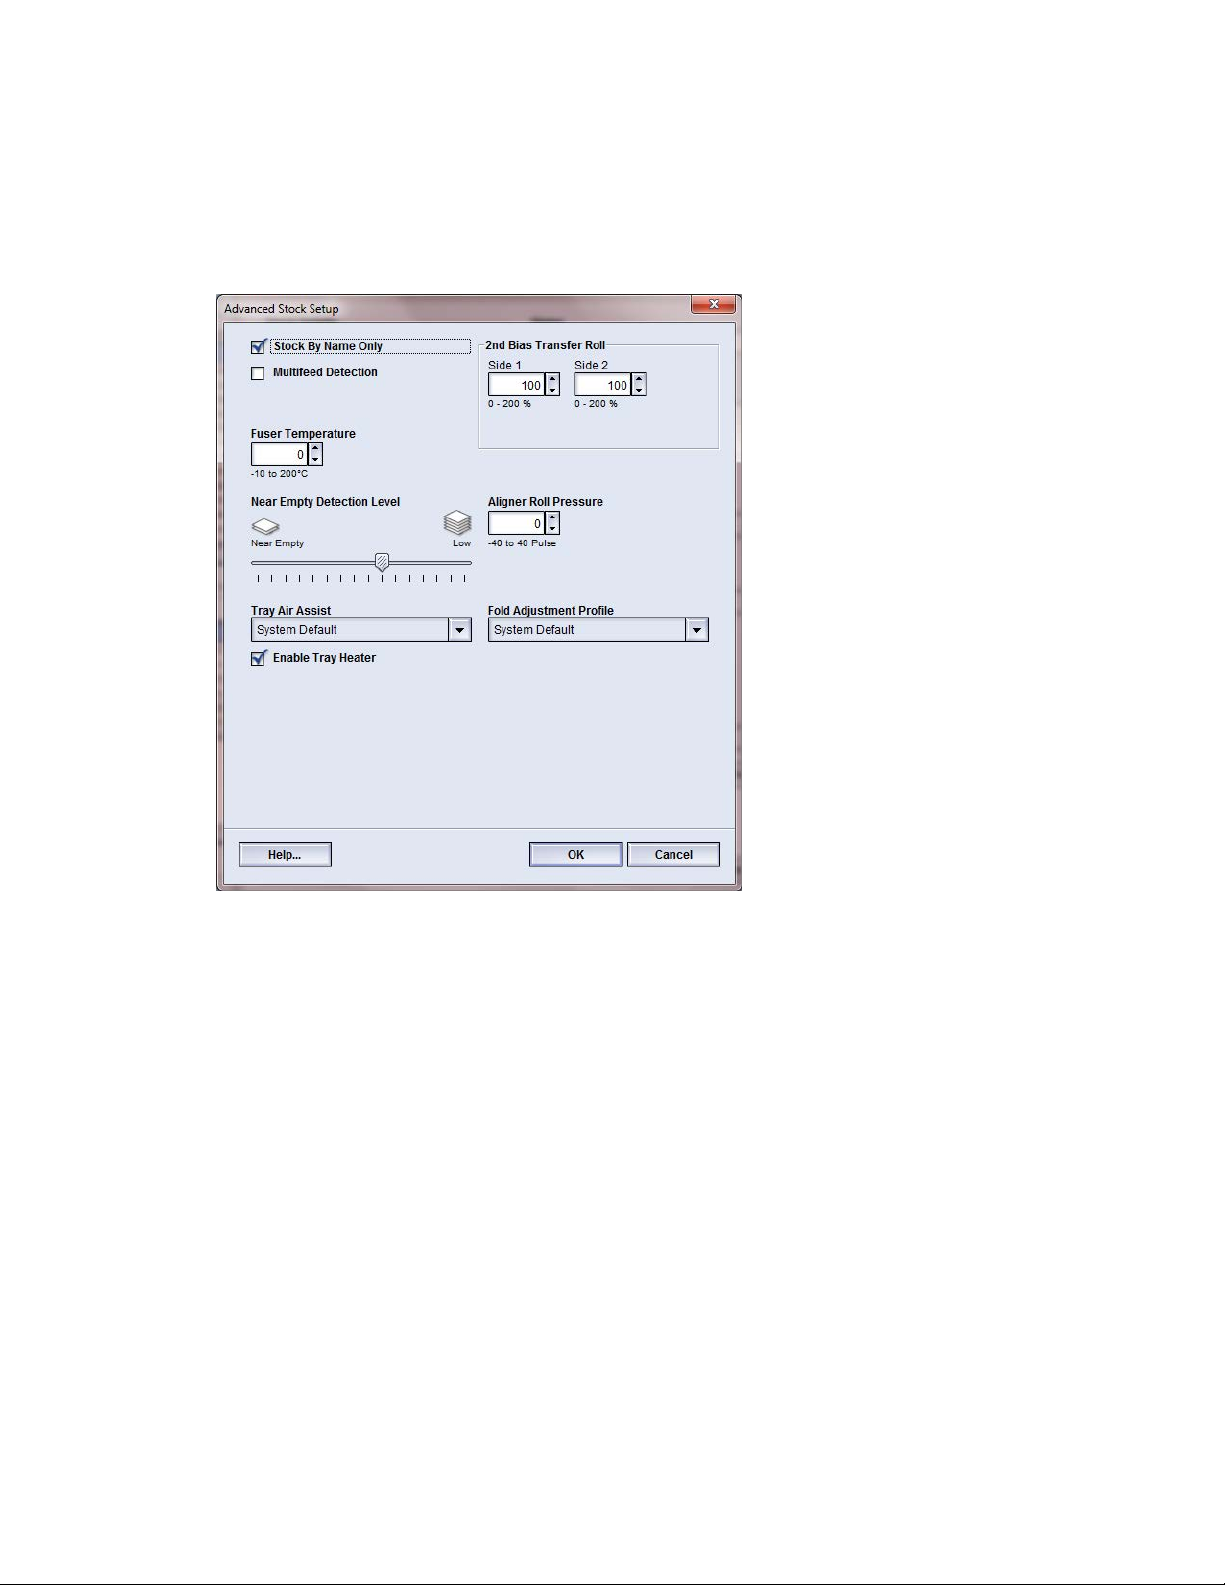
Advanced Stock Setup
Selecting the 2nd Bias Transfer Roll settings
Use the following procedure to select the settings for the 2nd Bias Transfer Roll (on the
Advanced Stock Setup window).
1. Select Stock Library.
The Manage Stock Library window opens.
2. Perform one of the following:
a) Select the Create New button or
b) Select the desired stock from either the RML or the Stock Library list, and then
select the Copy button or
c) Select the desired stock from the Stock Library list, and then select the Properties
button.
Either the New Stock Setup window or the Stock Properties window opens.
3. Modify the attributes as required.
4. Select the Advanced Setup button.
The Advanced Stock Setup window opens.
5. Select the desired 2nd Bias Transfer Roll settings for Side 1 and/or Side 2 as required
by using the up/down arrow buttons.
6. Select OK to close the Advanced Stock Setup window.
Xerox® Color 800/1000 Press
User Guide
8-13
Page 74

Advanced Stock Setup
7. Select OK to save and close either the New Stock Setup window or the Stock Properties
window.
8. Select Close to exit Manage Stock Library.
Fuser Temperature
This option allows the user to adjust the fuser temperature for specific media types.
Adjusting the fuser temperature allows the machine to maintain the highest productivity
possible when running mixed media jobs, and thereby allows the fuser belt and related
components to be cooled rapidly when switching from heavy-weight paper to
lighter-weight paper.
In order to maintain the highest productivity possible when running mixed media jobs,
the fuser and its related components need to be cooled rapidly when switching from
heavy weight paper to lighter weight paper. The technology of this fuser and its related
components provide this rapid heating and cooling, thereby ensuring the highest
productivity on printed output, especially when running mixed media jobs.
Under most conditions, the fuser temperature is adjusted automatically by the machine
at point of need. On those very rare occasions, however, the user may need to minimally
adjust the fuser temperature for specific stock weights or a specific job flow (such as
running heavy weight cover stock with lighter weight paper).
The Fuser Temperature option allows the user to set the temperature within a range of
-1 degree to +5 degrees Celsius (30.2 - 41.5 degrees Fahrenheit).
8-14
Xerox® Color 800/1000 Press
User Guide
Page 75

Advanced Stock Setup
Note
The default setting is 0. It is recommended that you leave this option at its default
setting until you run test prints and evaluate the output of the prints.
Tip
Changing the default setting should be considered a temporary solution because
environmental conditions vary from day to day. It is recommended that upon completion
of the print job, you return the option to its default setting.
Fold Adjustment Profile
This option allows you to select a desired fold adjustment profile.
Note
This option is available only if your machine has the optional Standard Finisher, Booklet
Maker Finisher, or Standard Finisher Plus attached to it.
From the Fold Adjustment Profile pull-down menu, select the desired profile, as required.
These profiles are preset profiles, which are created and maintained from the Profiles
feature on the UI.
Note
Refer to the Profiles chapter of the System Administration Guide for detailed information.
Xerox® Color 800/1000 Press
User Guide
8-15
Page 76

Advanced Stock Setup
8-16
Xerox® Color 800/1000 Press
User Guide
Page 77

9
Maintenance
Cleaning procedures
If the exterior surfaces require cleaning, dampen a paper towel or a soft, clean cloth
with a liquid, nonabrasive glass cleaner or water.
Caution
Do not use any other cleaners or solvents on the machine as they may interact with the
paint on the covers, eventually causing the paint to peel.
Caution
Do not pour or spray liquid directly into any of the paper trays. Always apply the liquid
to the cloth first.
Cleaning the UI screen
Clean the UI screen at the start of each day. Remove all dust and fingerprints by wiping
the screen with a clean, lint-free cloth.
Caution
To avoid damage, do not use any Xerox cleaner, water, or commercial cleaner on the
screen.
Cleaning the paper path
Note
It is recommended that you perform the following procedures on a daily basis, preferably
at the start of the day before the machine is switched on and the fuser is cool. Only
clean the recommended areas of the paper path as described in these procedures.
Warning
If the machine is switched on and the fuser is hot, be sure to switch off the machine
power and allow 30 minutes for the fuser to cool before performing this procedure.
Xerox® Color 800/1000 Press
User Guide
9-1
Page 78

Maintenance
Note
If large amounts of paper dust are frequently observed, contact your Xerox supplies
representative for alternate paper recommendations. If a Xerox analysis determines
that persistent paper contamination is due to cut papers or the use of non-recommended
material, the customer may be liable for any extended costs that fall outside the scope
of their service contract.
Cleaning the paper path area 2
1. Open the left and right front doors (print engine left side).
9-2
Xerox® Color 800/1000 Press
User Guide
Page 79

Maintenance
2. Use a damp, water-moistened (not wet), lint-free cloth to clean the paper path only
in the green lever jam clearance areas as shown in the illustration.
a) Open each area and clean the surfaces of the green-handle areas.
b) Remove any residual moisture with a dry, lint-free cloth.
3. Return all the green levers to their original positions.
4. Close the left and right front doors (print engine left side).
Xerox® Color 800/1000 Press
User Guide
9-3
Page 80
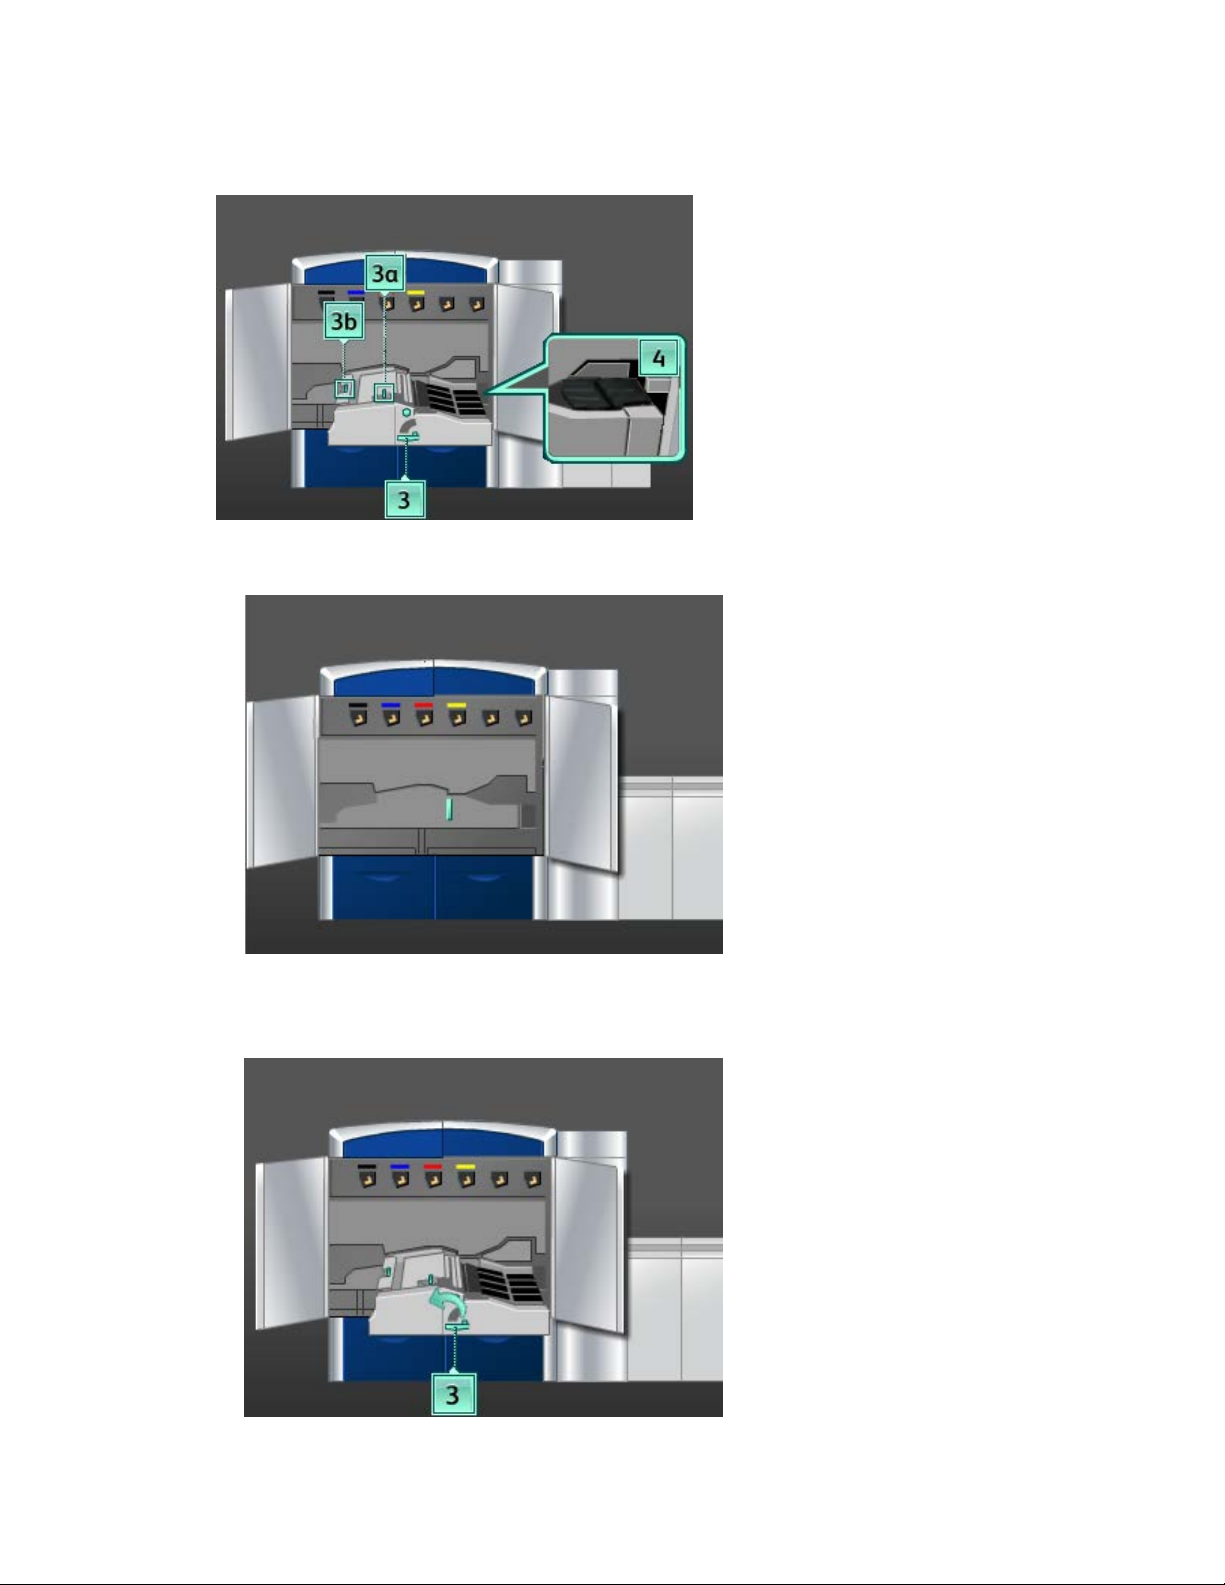
Maintenance
Cleaning the paper path areas 3 and 4
1. Open the left and right front doors (print engine left side).
2. Grasp handle 3 and rotate it in the direction of the arrow.
9-4
Xerox® Color 800/1000 Press
User Guide
Page 81

Maintenance
3. Slowly pull out the paper transport drawer until it stops.
4. Use a damp, water-moistened (not wet), lint-free cloth to clean the paper path only
in the green lever jam clearance areas as shown in the illustration.
a) Open each area and clean the surfaces of the green-handle areas.
b) Remove any residual moisture with a dry, lint-free cloth.
5. Return all the green levers to their original positions.
6. Using a lint-free cloth, clean the belts in Area 3 by rotating them in the direction that
paper travels.
Continue to wipe the belts as you rotate them until all the belts are clean.
Note
Do not rotate the belts with your bare hands as this will leave grease and dirt on them
and may create paper jams. Rotate the belts by using a lint-free cloth.
7. Grasp handle 3 and slowly push in the paper transport drawer until it stops. Turn the
handle in the direction of the arrow to lock the module in place.
Xerox® Color 800/1000 Press
User Guide
9-5
Page 82
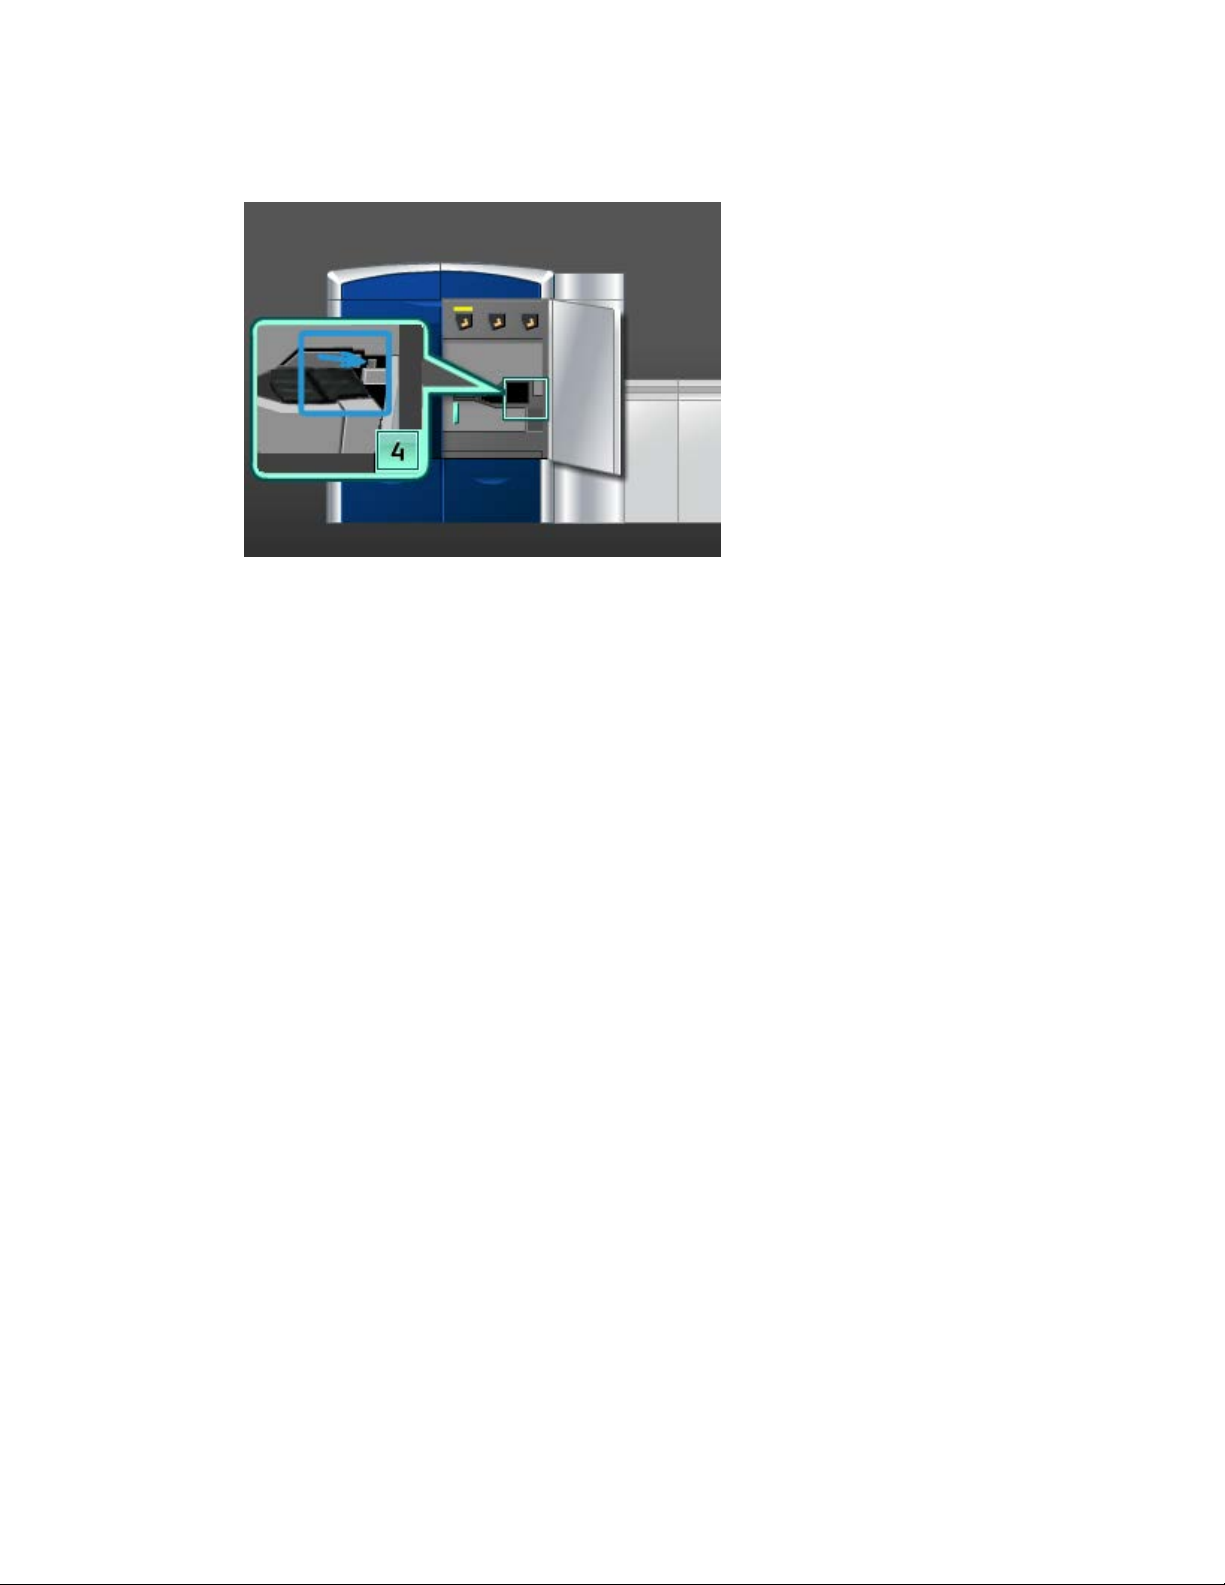
Maintenance
8. Using a lint-free cloth, clean the belts in Area 4 by rotating them in the direction that
paper travels.
Continue to wipe the belts as you rotate them until all the belts are clean.
Note
Do not rotate the belts with your bare hands as this will leave grease and dirt on them
and may create paper jams. Rotate the belts by using a lint-free cloth.
9. Close the left and right front doors (print engine left side).
9-6
Xerox® Color 800/1000 Press
User Guide
Page 83
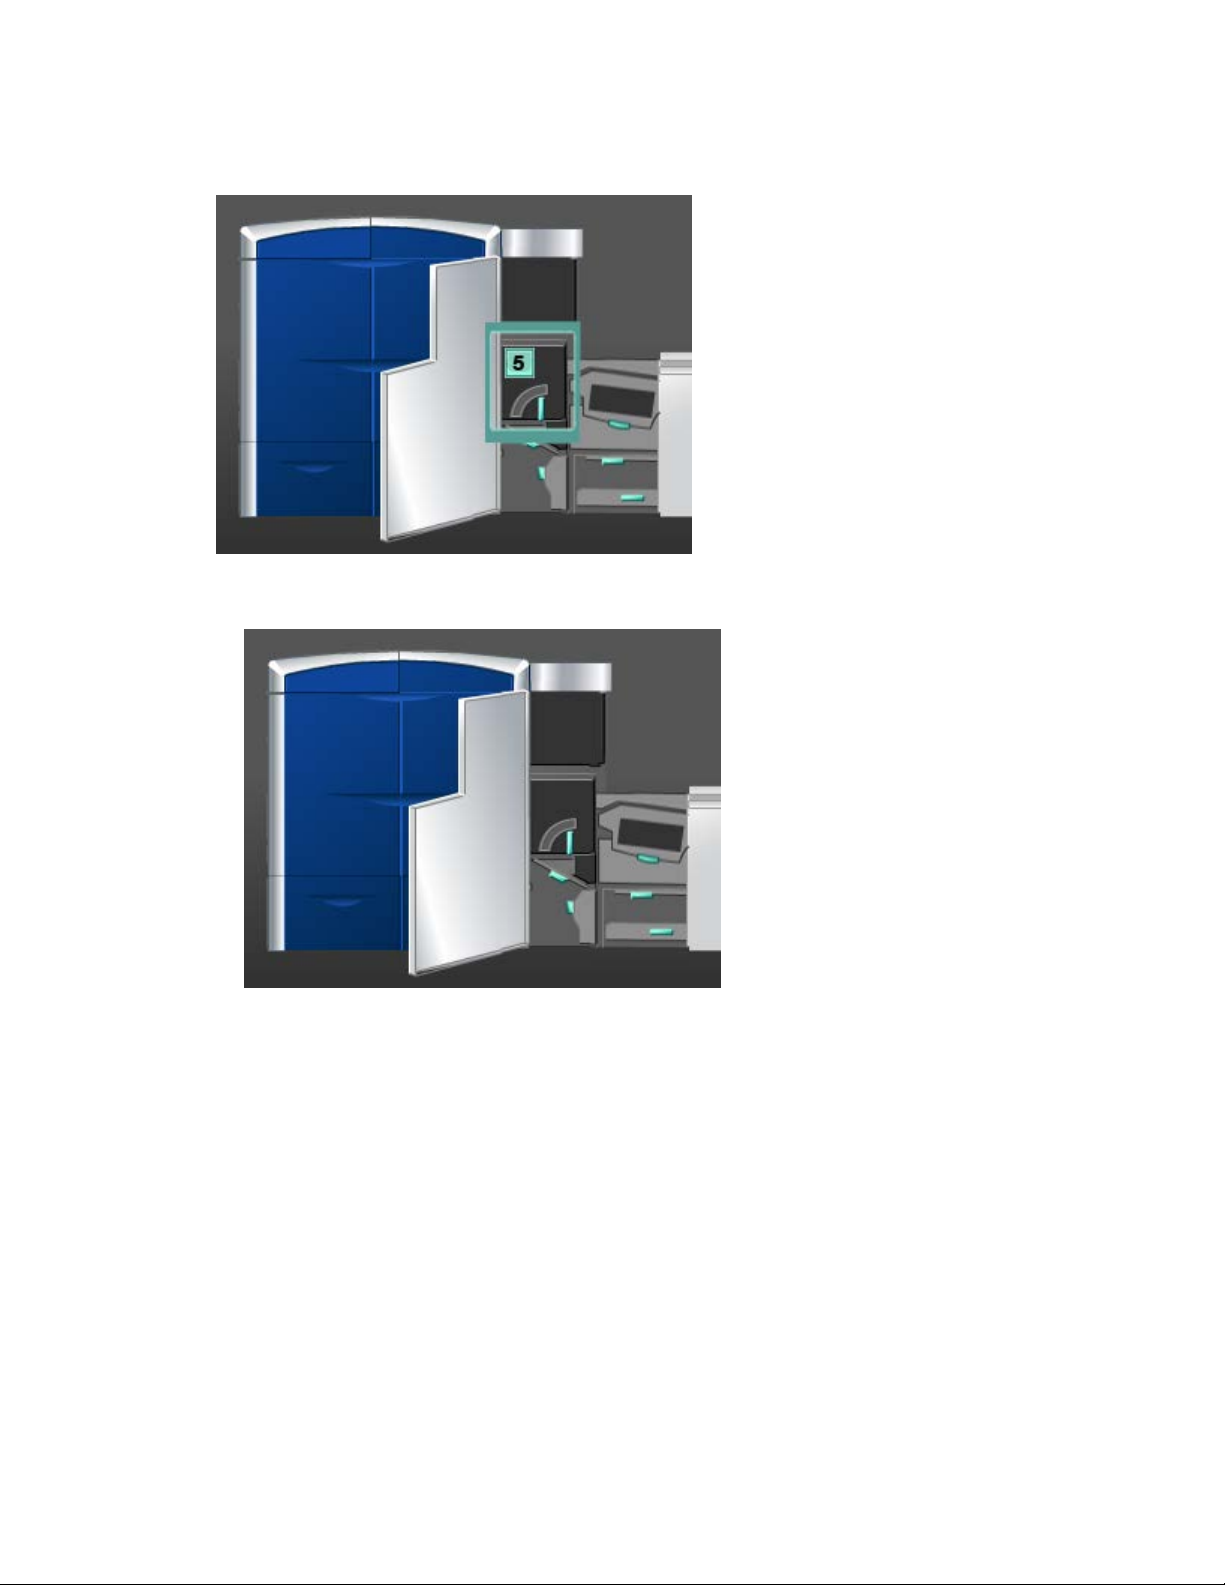
Cleaning the paper path area 5
1. Open the left front door (print engine right side).
Maintenance
Xerox® Color 800/1000 Press
User Guide
9-7
Page 84
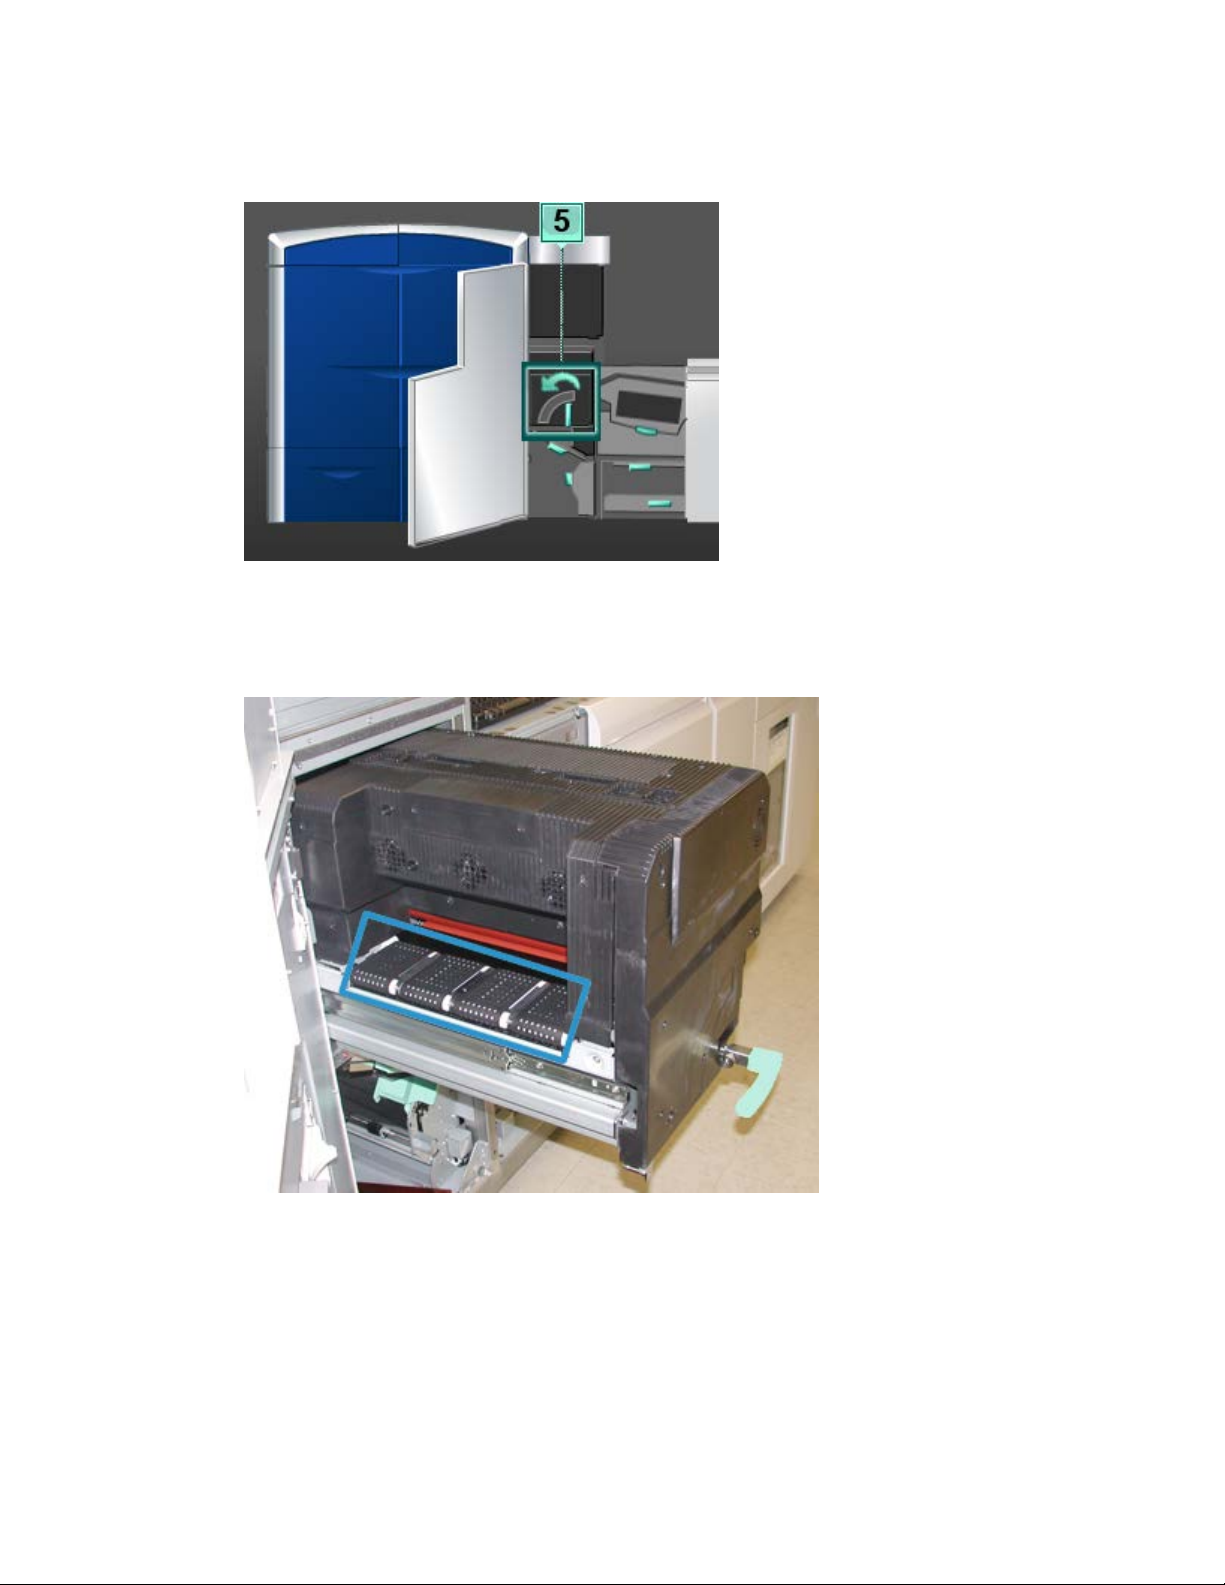
Maintenance
2. Grasp handle 5 and rotate it in the direction of the arrow, and slowly pull out the
fuser until it stops.
3. Using a lint-free cloth, clean the belts in Area 5 (left side) by rotating them in the
direction that paper travels.
Continue to wipe the belts as you rotate them until all the belts are clean.
Note
Do not rotate the belts with your bare hands as this will leave grease and dirt on them
and may create paper jams. Rotate the belts by using a lint-free cloth.
9-8
Xerox® Color 800/1000 Press
User Guide
Page 85

Maintenance
4. Using a lint-free cloth, clean the belts in Area 5 (right side) by rotating them in the
direction that paper travels.
Continue to wipe the belts as you rotate them until all the belts are clean.
Note
Do not rotate the belts with your bare hands as this will leave grease and dirt on them
and may create paper jams. Rotate the belts by using a lint-free cloth.
5. Grasp handle 5 and gently push in the fuser until it stops.
6. Close the left front door (print engine right side).
Xerox® Color 800/1000 Press
User Guide
9-9
Page 86
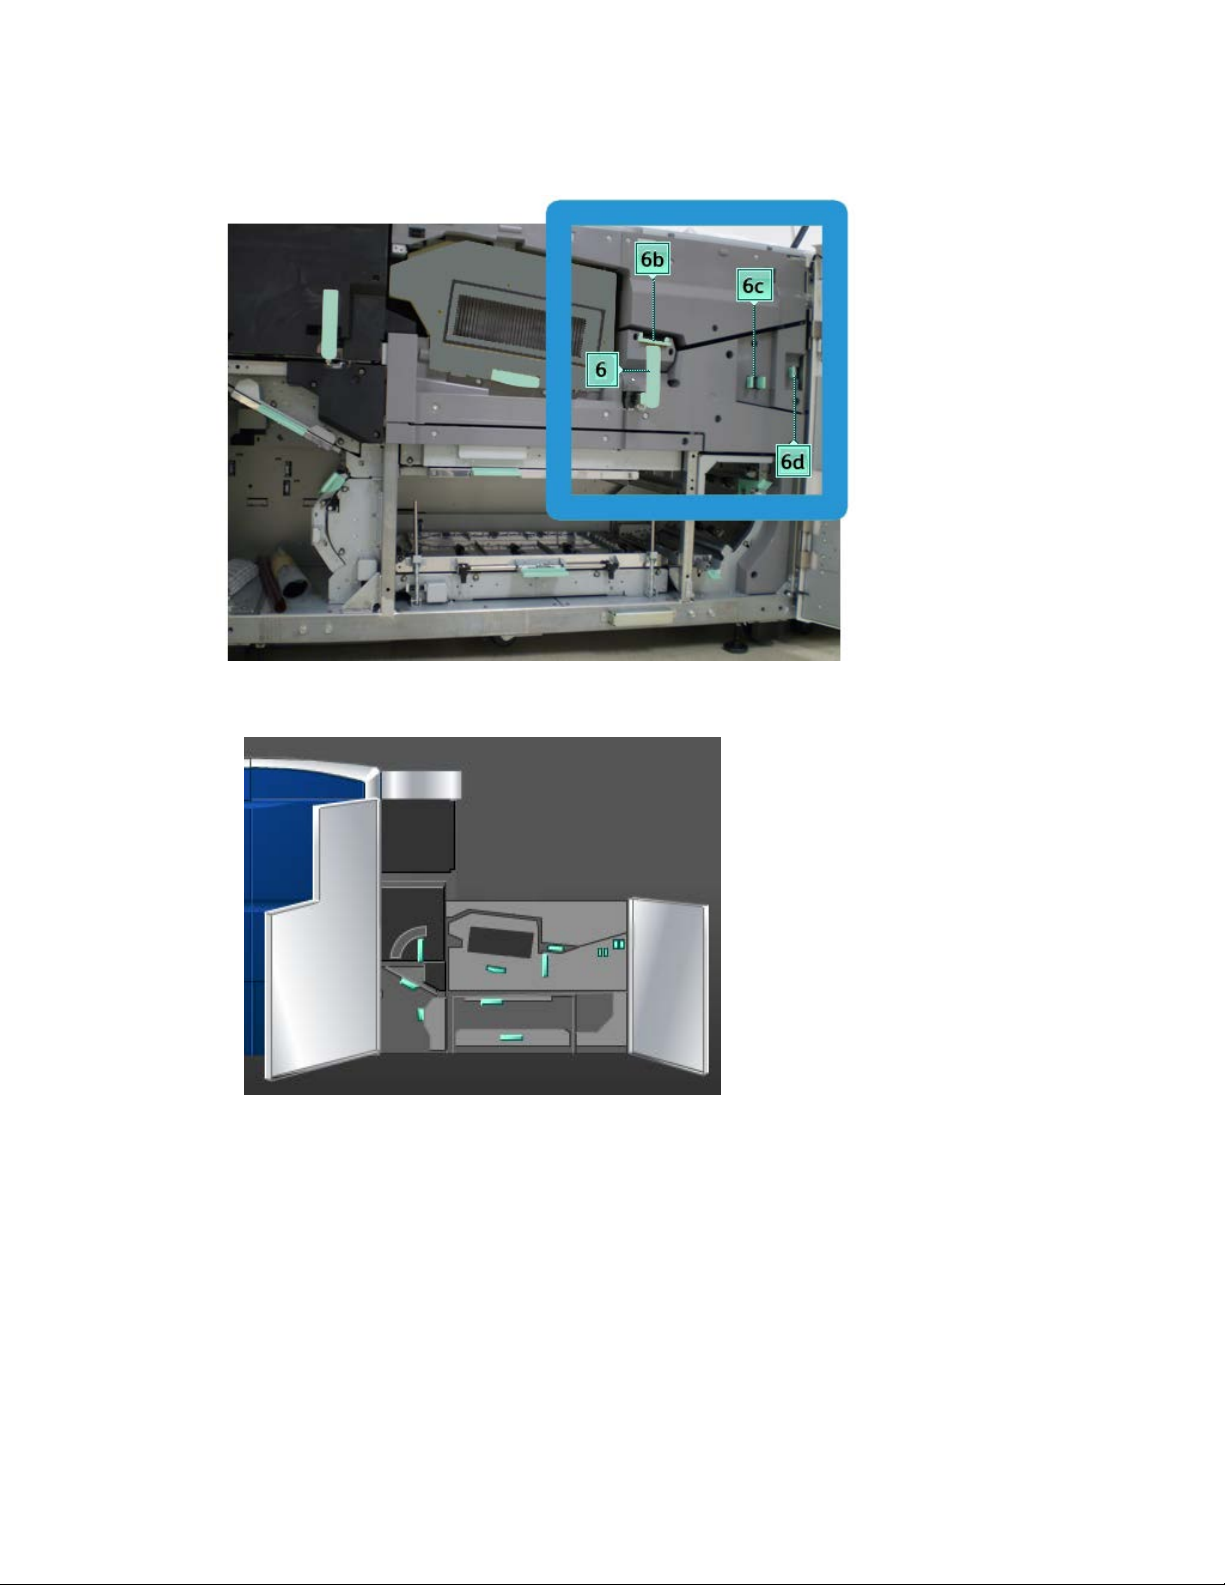
Maintenance
Cleaning the paper path area 6
1. Open the left and right front doors (print engine right side).
9-10
Xerox® Color 800/1000 Press
User Guide
Page 87
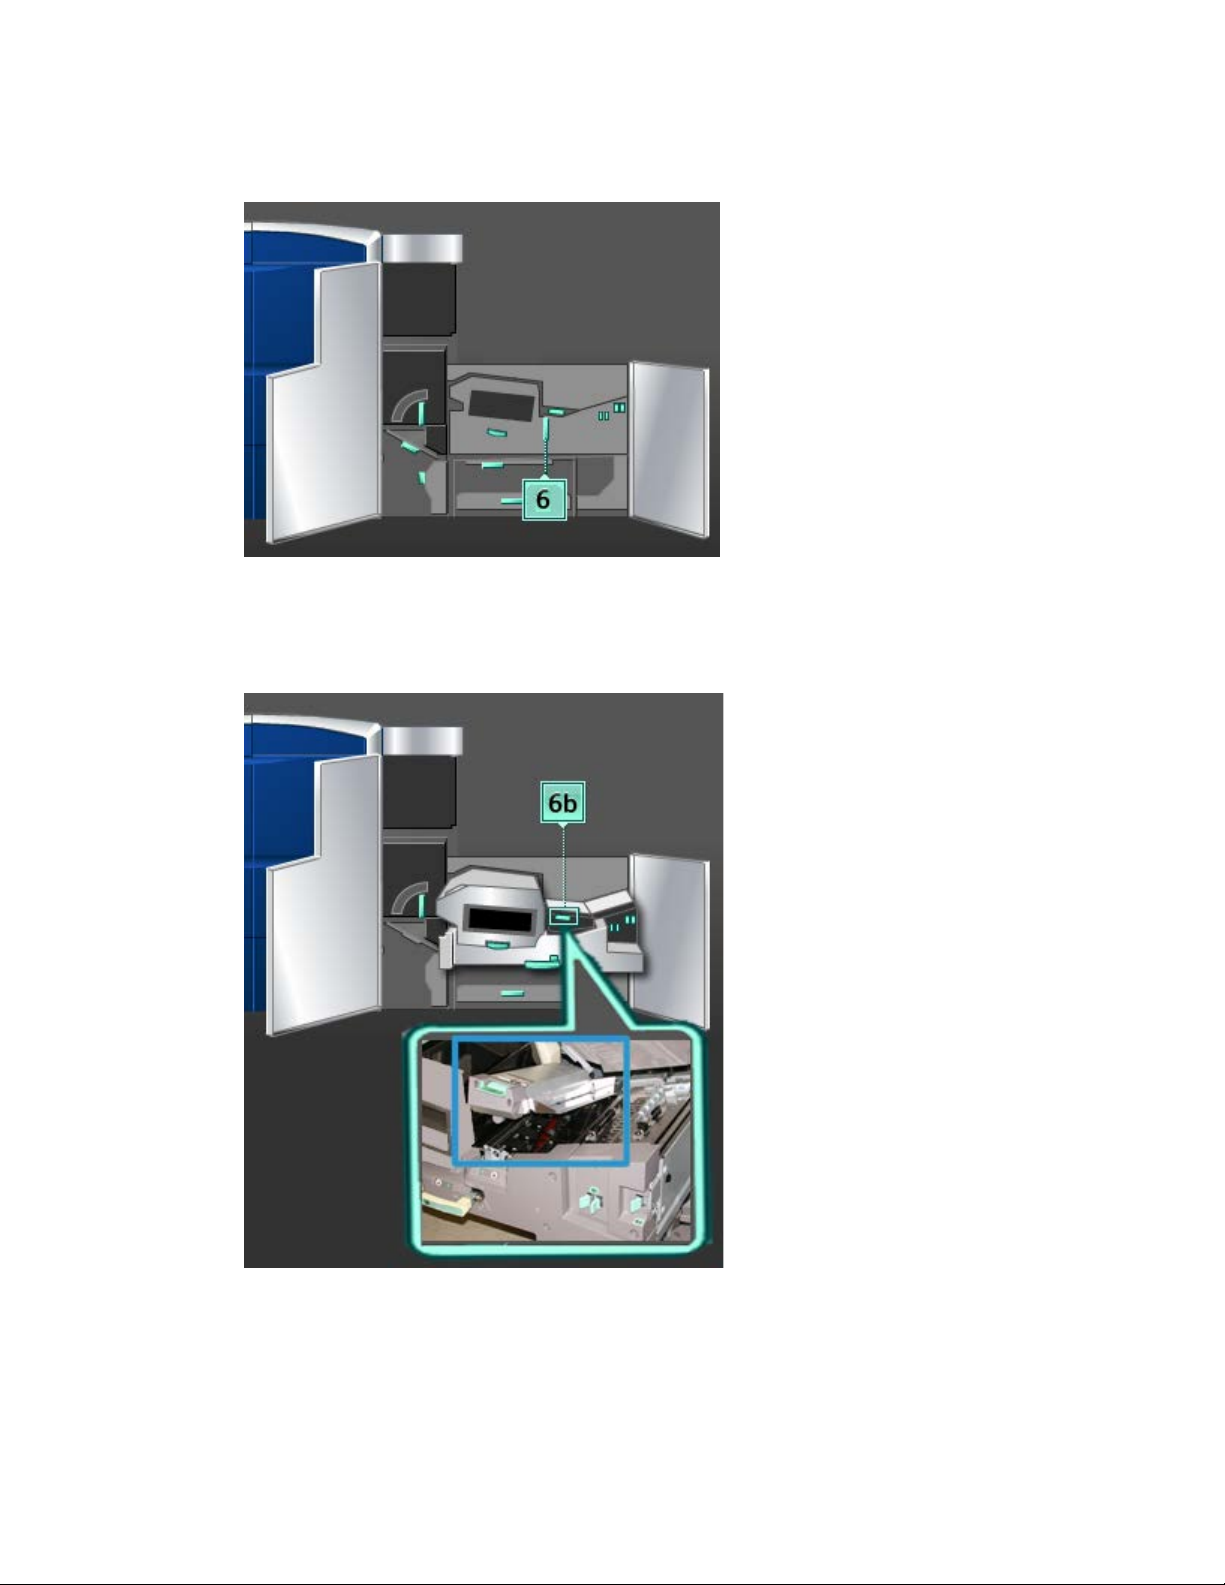
Maintenance
2. Grasp handle 6 and rotate it in the direction of the arrow, and slowly pull out the exit
drawer assembly until it stops.
3. Use a damp, water-moistened (not wet), lint-free cloth to clean the paper path only
in the green lever jam clearance areas as shown in the illustration.
Note
Avoid touching the White Reference Roll when cleaning area 6.
a) Open each area and clean the surfaces of the green-handle areas.
Xerox® Color 800/1000 Press
User Guide
9-11
Page 88

Maintenance
b) Remove any residual moisture with a dry, lint-free cloth.
4. Return lever 6b to its original position.
5. Use a damp, water-moistened (not wet), lint-free cloth to clean the paper path only
in the green lever jam clearance areas as shown in the illustration.
a) Open each area and clean the surfaces of the green-handle areas.
b) Remove any residual moisture with a dry, lint-free cloth.
6. Return lever 6c to its original position.
7. Return lever 6d to its original position.
8. Grasp handle 6 and gently push in the exit drawer assembly until it stops.
9. Rotate handle 6 in the direction of the arrow to lock the exit drawer assembly in
place.
10. Close the left front door (print engine right side).
9-12
Xerox® Color 800/1000 Press
User Guide
Page 89
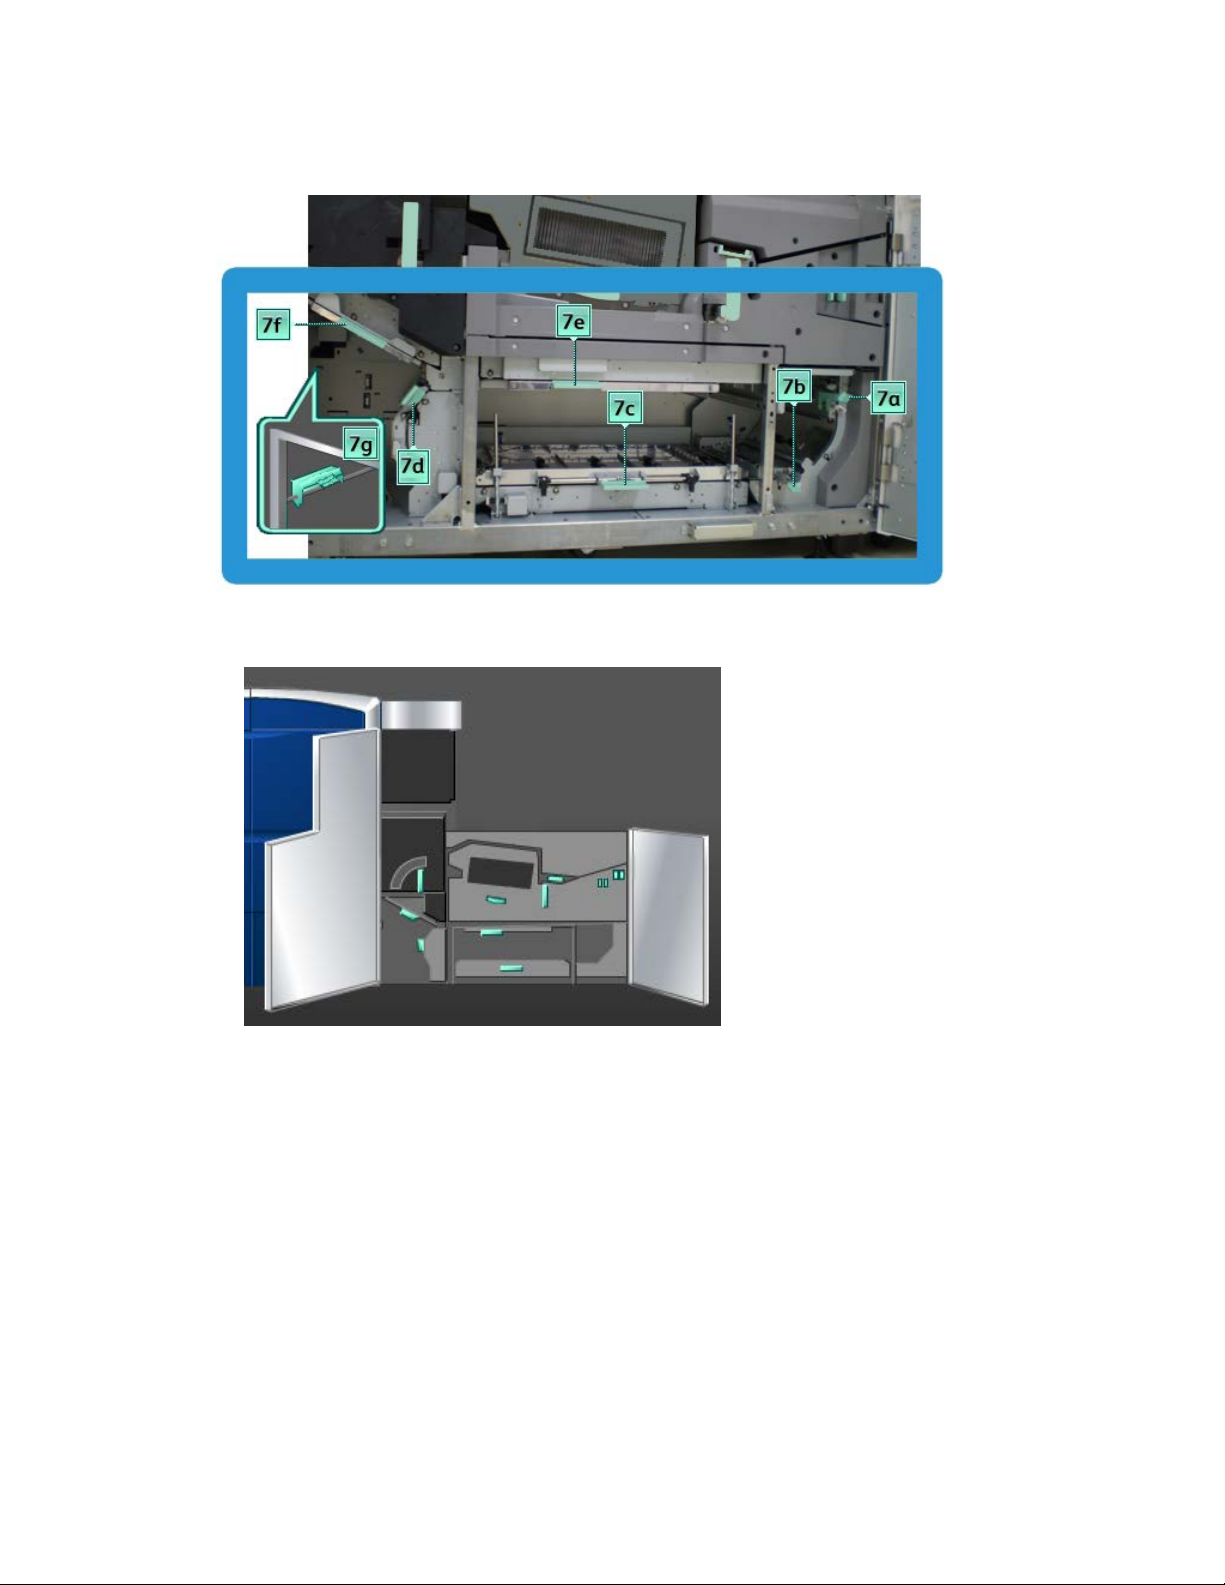
Cleaning the paper path area 7
1. Open the left and right front doors (print engine right side).
Maintenance
Xerox® Color 800/1000 Press
User Guide
9-13
Page 90

Maintenance
2. Lift lever 7g and move it to right.
3. Use a damp, water-moistened (not wet), lint-free cloth to clean the paper path only
in the green lever jam clearance areas as shown in the illustration.
a) Open each area and clean the surfaces of the green-handle areas.
b) Remove any residual moisture with a dry, lint-free cloth.
4. Return lever 7g to its original position.
5. Grasp lever 7f and move it downward.
6. Use a damp, water-moistened (not wet), lint-free cloth to clean the paper path only
in the green lever jam clearance areas as shown in the illustration.
a) Open each area and clean the surfaces of the green-handle areas.
b) Remove any residual moisture with a dry, lint-free cloth.
7. Return lever 7f to its original position.
9-14
Xerox® Color 800/1000 Press
User Guide
Page 91
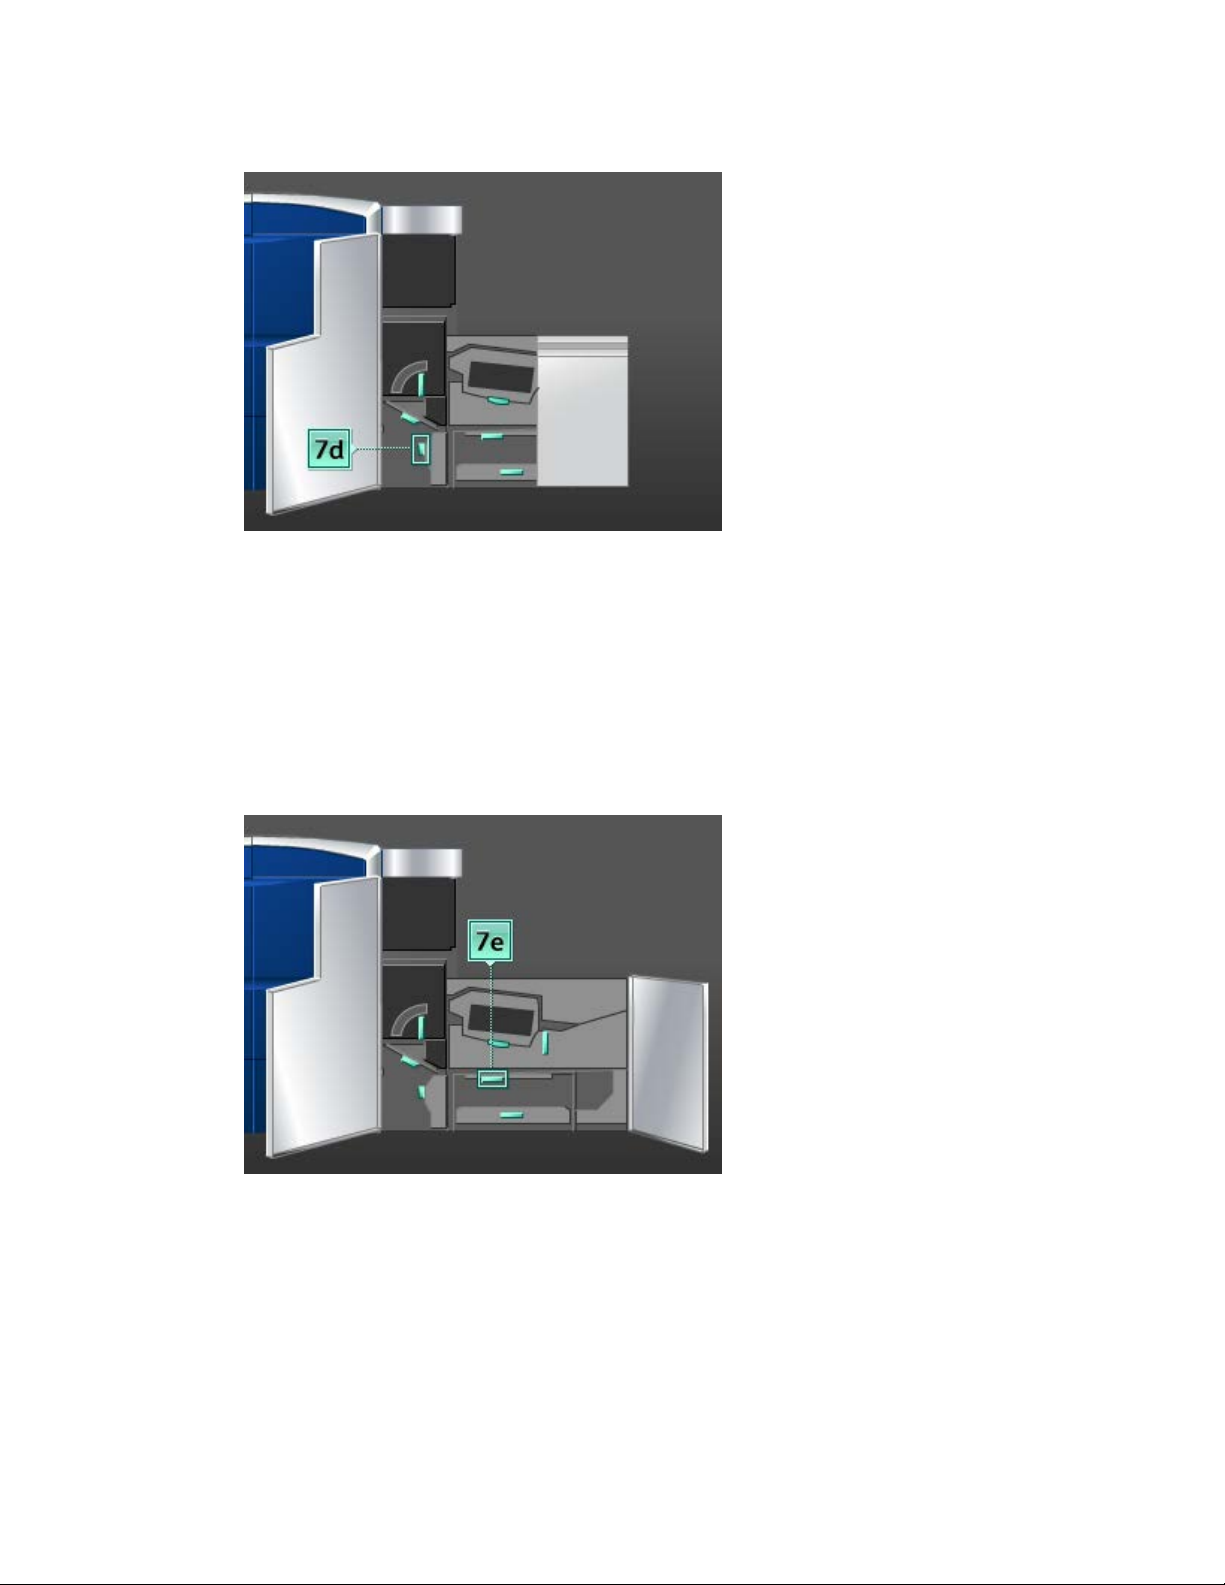
Maintenance
8. Grasp lever 7d and move it to the left.
9. Use a damp, water-moistened (not wet), lint-free cloth to clean the paper path only
in the green lever jam clearance areas as shown in the illustration.
a) Open each area and clean the surfaces of the green-handle areas.
b) Remove any residual moisture with a dry, lint-free cloth.
10. Return lever 7d to its original position.
11. Grasp lever 7e and move it downward.
12. Use a damp, water-moistened (not wet), lint-free cloth to clean the paper path only
in the green lever jam clearance areas as shown in the illustration.
a) Open each area and clean the surfaces of the green-handle areas.
b) Remove any residual moisture with a dry, lint-free cloth.
13. Return lever 7e to its original position.
Xerox® Color 800/1000 Press
User Guide
9-15
Page 92

Maintenance
14. Lift lever 7c.
15. Use a damp, water-moistened (not wet), lint-free cloth to clean the paper path only
in the green lever jam clearance areas as shown in the illustration.
a) Open each area and clean the surfaces of the green-handle areas.
b) Remove any residual moisture with a dry, lint-free cloth.
16. Return lever 7c to its original position.
17. Lift lever 7b.
18. Use a damp, water-moistened (not wet), lint-free cloth to clean the paper path only
in the green lever jam clearance areas as shown in the illustration.
a) Open each area and clean the surfaces of the green-handle areas.
b) Remove any residual moisture with a dry, lint-free cloth.
19. Return lever 7b to its original position.
20. Grasp lever 7a and move it to the left.
9-16
Xerox® Color 800/1000 Press
User Guide
Page 93

Maintenance
21. Use a damp, water-moistened (not wet), lint-free cloth to clean the paper path only
in the green lever jam clearance areas as shown in the illustration.
a) Open each area and clean the surfaces of the green-handle areas.
b) Remove any residual moisture with a dry, lint-free cloth.
22. Return lever 7a to its original position.
23. Close the left front door (print engine right side).
Replacing consumable supplies
Consumable supplies
Xerox supplies, paper, and throughput material can be ordered from Xerox by going to
www.xerox.com and clicking on either the Contact Us link for specific contact
information/telephone numbers in your area or by clicking on the Supplies and
entering/selecting your specific machine information (product family and model type).
Note
Always refer to www.xerox.com for the latest Consumable Replaceable Units (CRUs)
part numbers.
Store supply items and Xerox parts in their original packages in a convenient location.
The following items are consumables for this machine. It is recommended that you have
a supply of these items available to eliminate downtime when they need to be replaced.
Supply Item
Supply Unit Shipped with
machine/Reorder Quantity
Approximate Print
Yield/Carton (Full Color
Prints)
50K1/boxDry Ink/Toner Cartridge (Black)
55K1/boxDry Ink/Toner Cartridge (Cyan)
51K1/boxDry Ink/Toner Cartridge (Magenta)
55K1/boxDry Ink/Toner Cartridge (Yellow)
55K1/boxDry Ink/Toner Cartridge (Clear)
120k1Dry Ink/Toner Waste Bottle
400K1Fuser Web Assembly
Note
• Dry Ink/Toner yield projections are based on 7.5 percent area coverage per color (4
colors = 30 percent) at standardized conditions on A4 (8.5 x 11 in.) Xerox Digital Color
Xpressions+, 24 lb. (90 g/m2) and Colotech Plus 90 g/m2 reference paper. Actual yields
vary greatly, depending on color intensity, area coverage, paper stock, and run mode
selected.
Xerox® Color 800/1000 Press
User Guide
9-17
Page 94

Maintenance
• Please call your Xerox service representative to reorder the Dry Ink/Toner Bottle
Waste, the Fuser Web Assembly, and any of the charge corotron units. These parts
are provided to you at no charge when ordered by a Xerox service representative.
Important
The charge corotrons can only be replaced by a trained, qualified Technical Key Operator
(TKO).
Replacing a dry ink/toner cartridge
Note
Dry ink/toner cartridges include Black (K), Cyan (C), Magenta (M), Yellow (Y), and any
optional cartridges that were purchased. Optional cartridges are shown in the above
illustration with the yellow box around them.
Caution
To prevent spillage, remove dry ink/toner cartridges only when the “Replace the Dry Ink
Cartridge” message is displayed on the UI.
1. Place a drop cloth below the dry ink/toner area.
2. On the print engine left side, open the upper right and/or upper left door(s).
9-18
Xerox® Color 800/1000 Press
User Guide
Page 95

Maintenance
3. Rotate the cartridge to the unlock position, as shown in the following illustration.
4. Remove and dispose of the empty cartridge according to local regulations.
Tip
Do not use warm or hot water, or cleaning solvents, to remove dry ink/toner from
your skin or clothing. This will set the dry ink/toner and make it difficult to remove.
If any dry ink/toner gets on your skin or clothing, use a brush to remove it, blow it off,
or wash it off with cold water and mild soap.
5. Remove a new cartridge from the box.
6. Vigorously shake and/or slap the new cartridge with your hand until the Dry Ink/Toner
is completely loosened.
Caution
Dry ink/toner settles and compacts during shipping and must be loosened before
inserting the cartridge into the machine. Failure to completely loosen the material
may cause damage to the gear at the end of the cartridge.
Xerox® Color 800/1000 Press
User Guide
9-19
Page 96
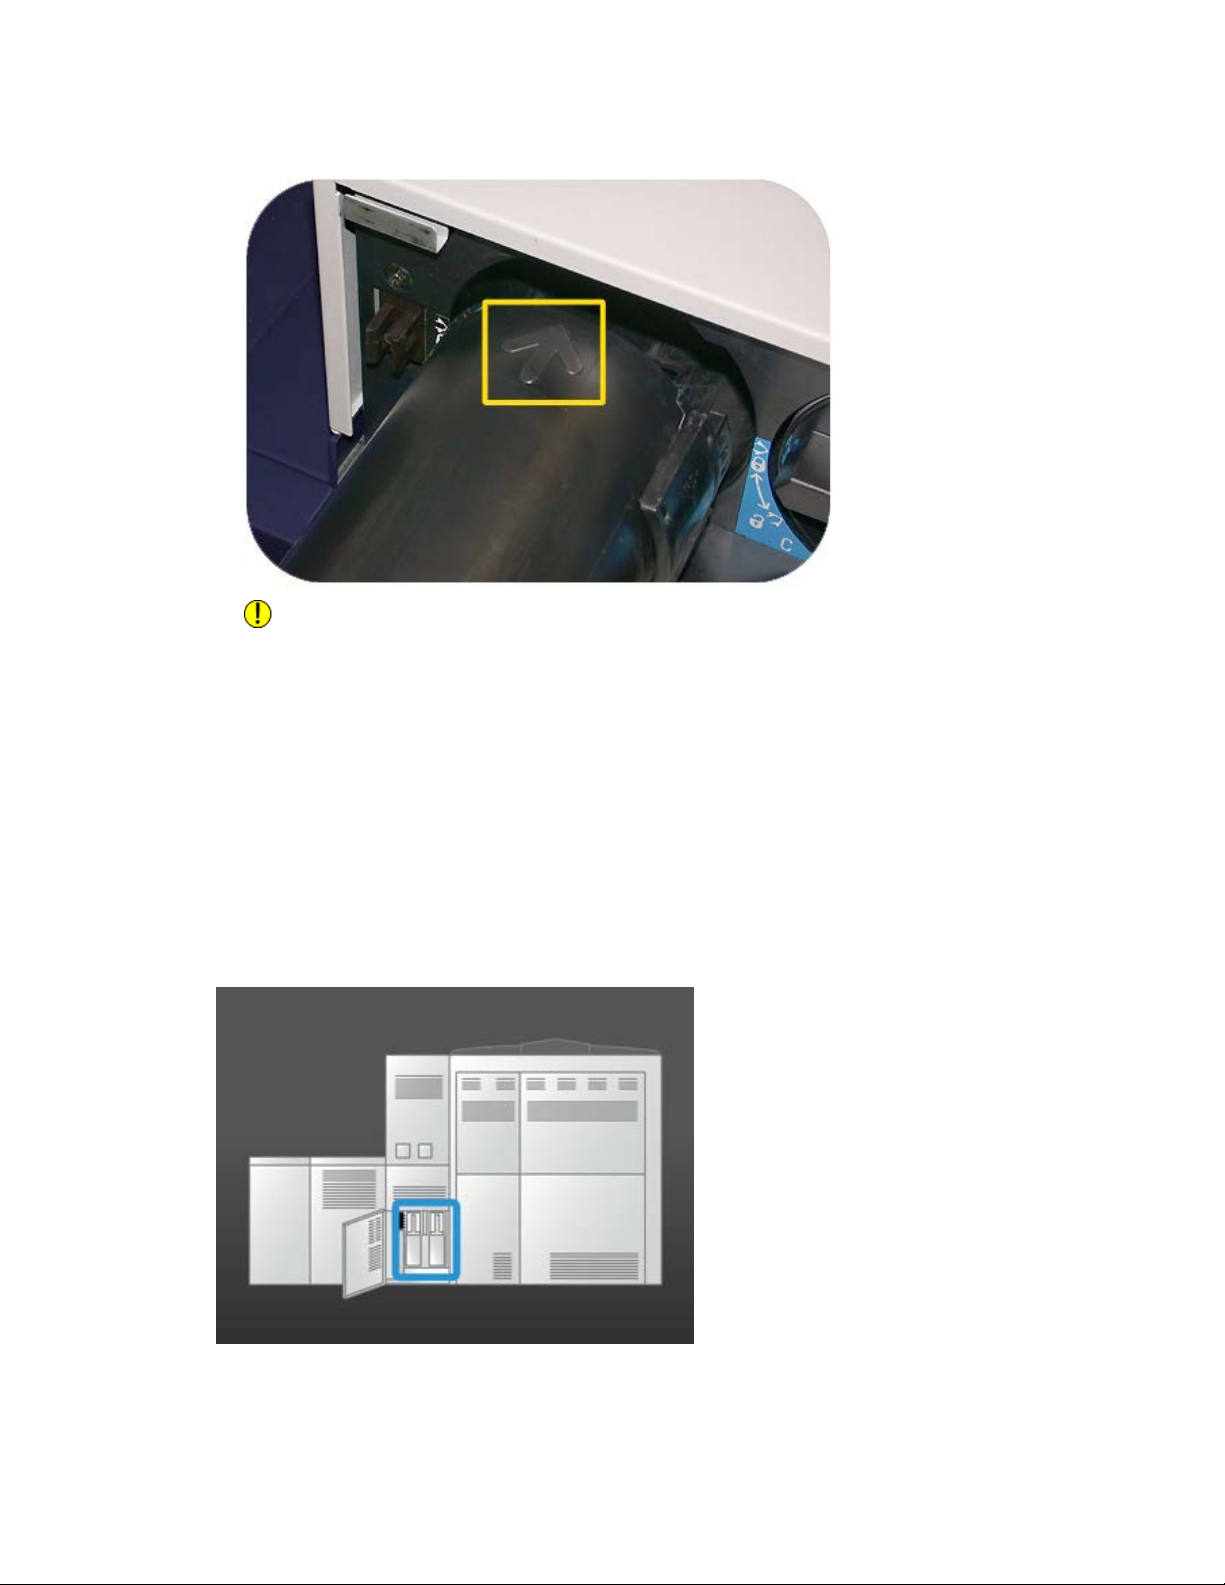
Maintenance
7. To install the new cartridge, insert it into the compartment with the arrow at the top
and gently push it in as far as it will.
Caution
If more than one cartridge needs to be replaced at the same time, ensure that the
cartridges are replaced in their correct color locations.
8. Rotate the cartridge to the lock position.
9. On the print engine left side, close the upper right and/or upper left door(s).
Dry ink/toner waste bottle
The dry ink/toner waste bottle collects the waste dry ink/toner that occurs during the
printing process. The machine contains two dry ink/toner waste bottles which are both
located in the rear of the machine.
9-20
Xerox® Color 800/1000 Press
User Guide
Page 97
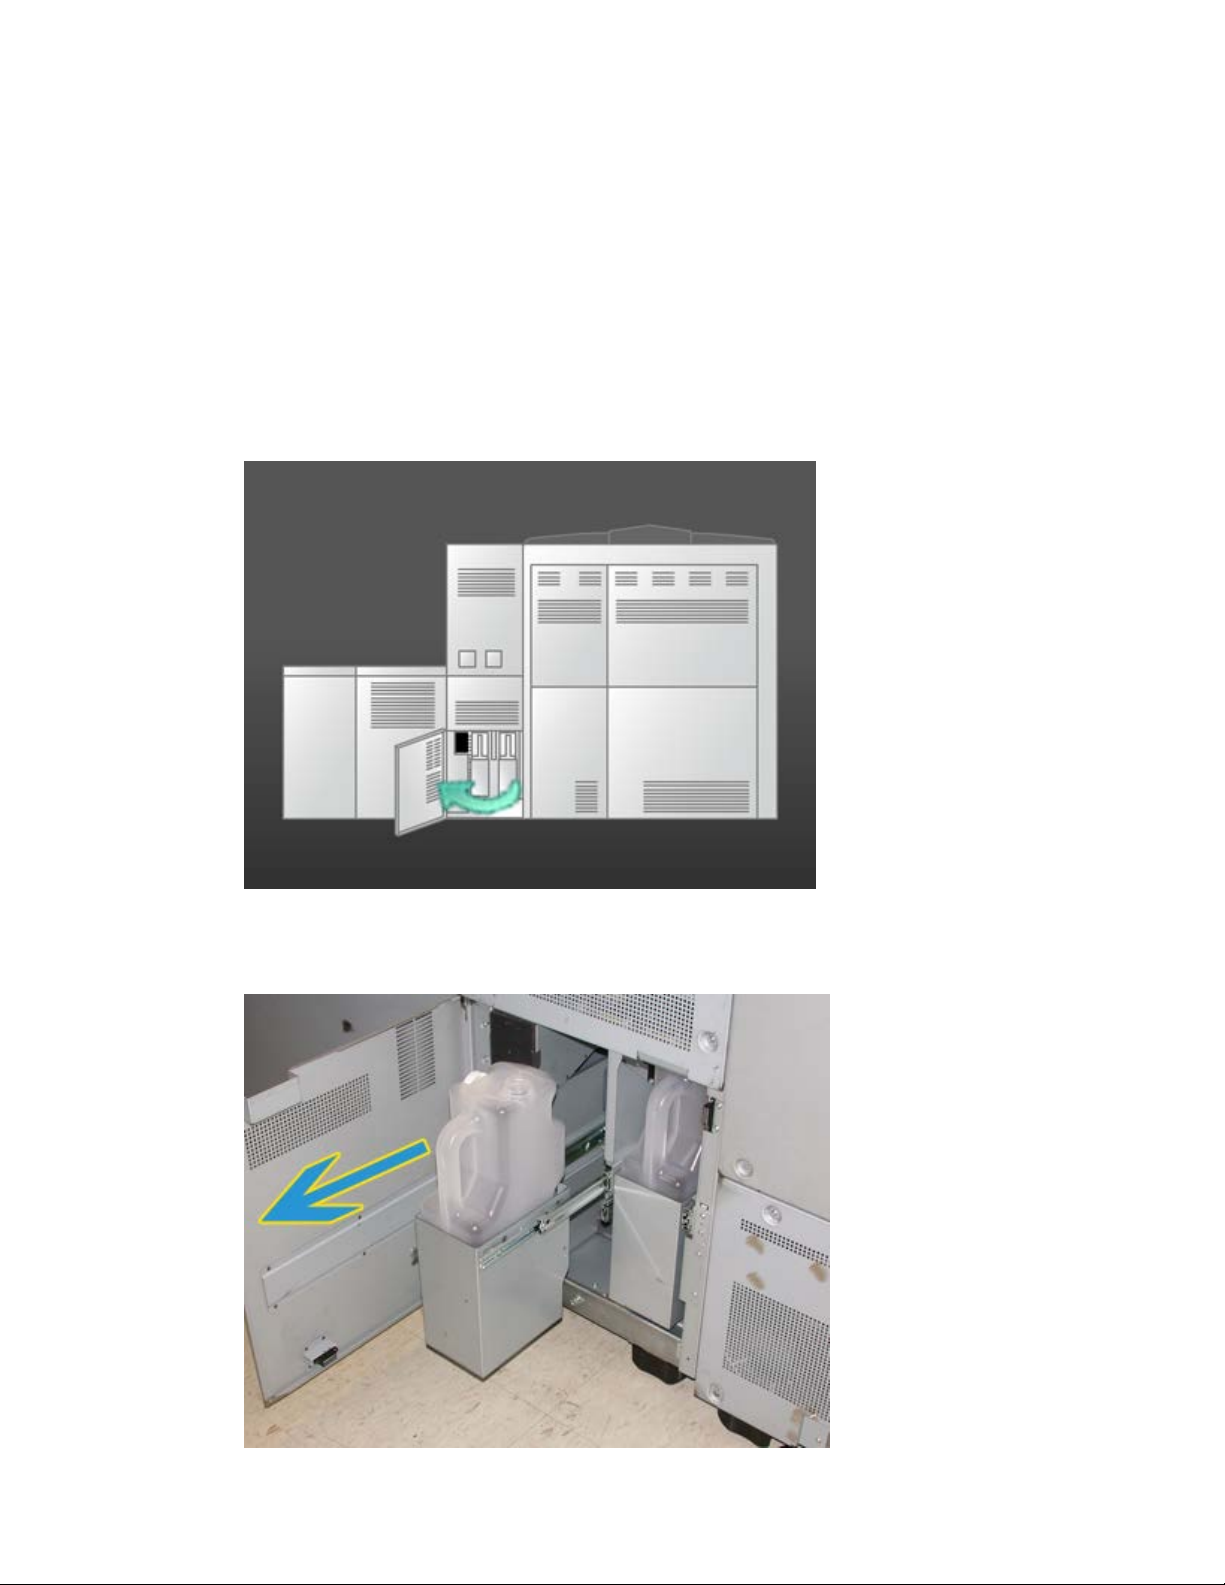
Maintenance
When a waste bottle is full, a message appears on the UI advising you when to replace
the bottle. Since there is a second waste bottle, the machine continues to run as long
as that second waste bottle is not full. This allows you to exchange the full bottle with
an empty one while the machine continues to print.
Replacing a dry ink/toner waste bottle
Note
When removing a full dry ink/toner waste bottle, SLOWLY pull it out of the machine.
This will prevent any dry ink/toner from from spilling out of a full waste bottle.
1. Open the dry ink/toner waste bottle panel at the rear of the machine.
2. Grasp the handle of the full bottle and pull it out of the machine.
Xerox® Color 800/1000 Press
User Guide
9-21
Page 98
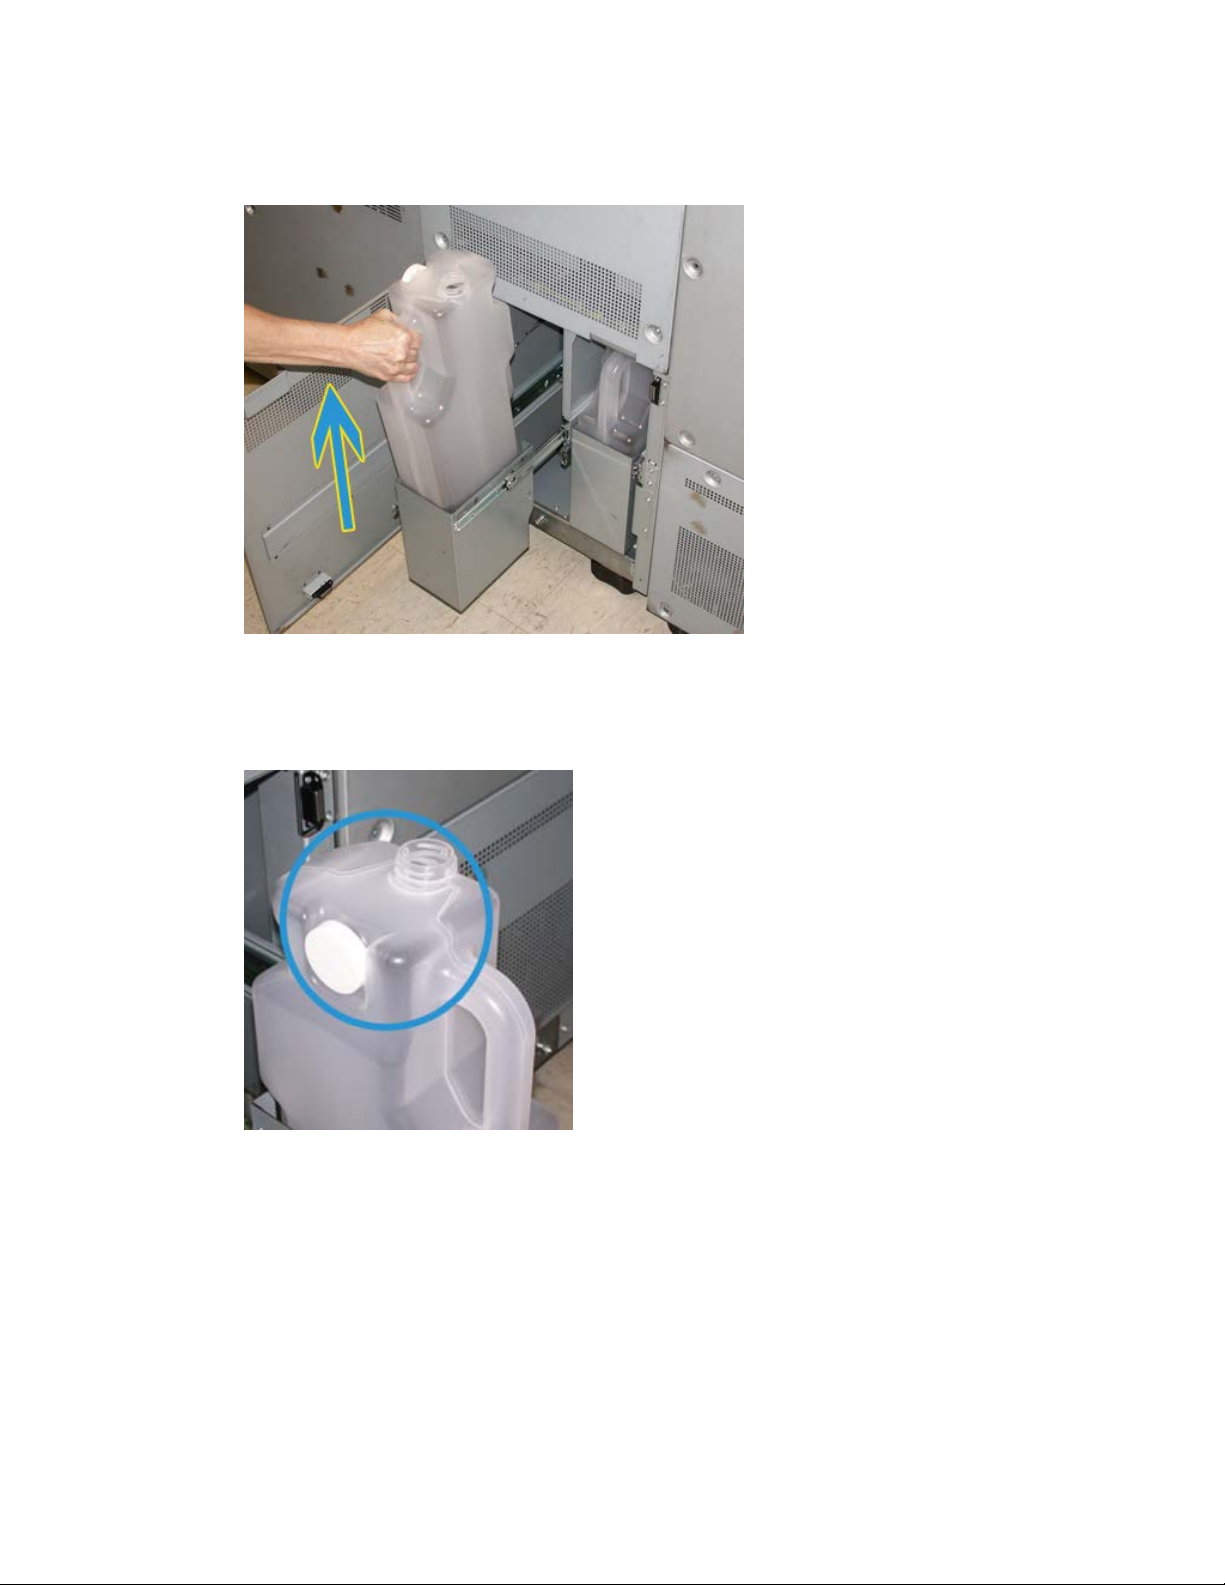
Maintenance
3. Lift the full bottle out of the machine.
4. Remove the cap from the cap holder on the side of the full bottle, and press the cap
securely into the open hole on the top of the full bottle.
5. Dispose of the full bottle according to your local regulations.
6. Remove a new, empty bottle from the carton and insert it into the machine.
7. Gently push the new bottle into the machine.
8. Close the dry ink/toner waste bottle panel at the rear of the machine.
9-22
Xerox® Color 800/1000 Press
User Guide
Page 99
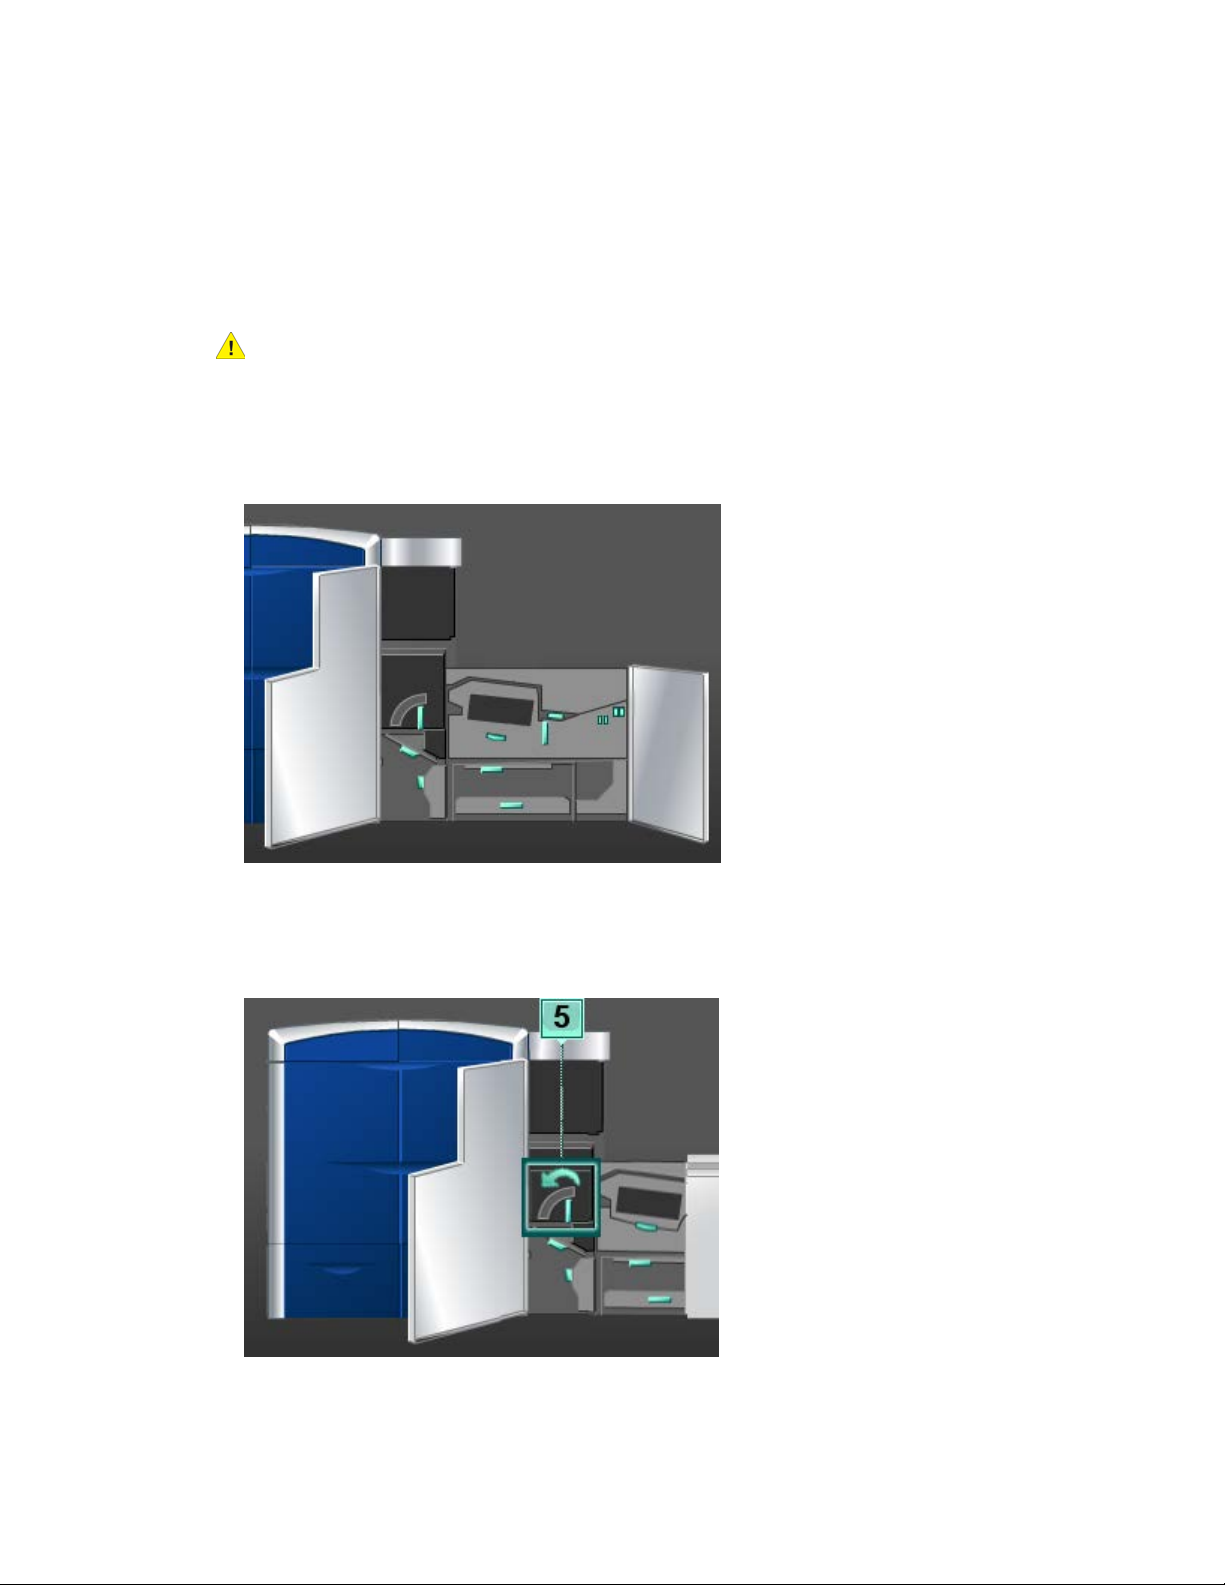
Maintenance
Replacing the fuser web assembly
Two messages will display on the UI regarding the fuser web assembly. The first advises
you that the web is almost used up and you should be sure to have a new unit on hand.
The second message displays when the fuser web is completely used and you must
replace it. When this message displays, the machine shuts down and will not print until
the web is replaced.
Warning
Be careful when clearing jams in the fuser area, the fuser is extremely hot and will cause
injury.
1. Open the left and right front doors (print engine right side).
2. Grasp handle 5 and rotate it in the direction of the arrow, and slowly pull out the
fuser until it stops.
Xerox® Color 800/1000 Press
User Guide
9-23
Page 100
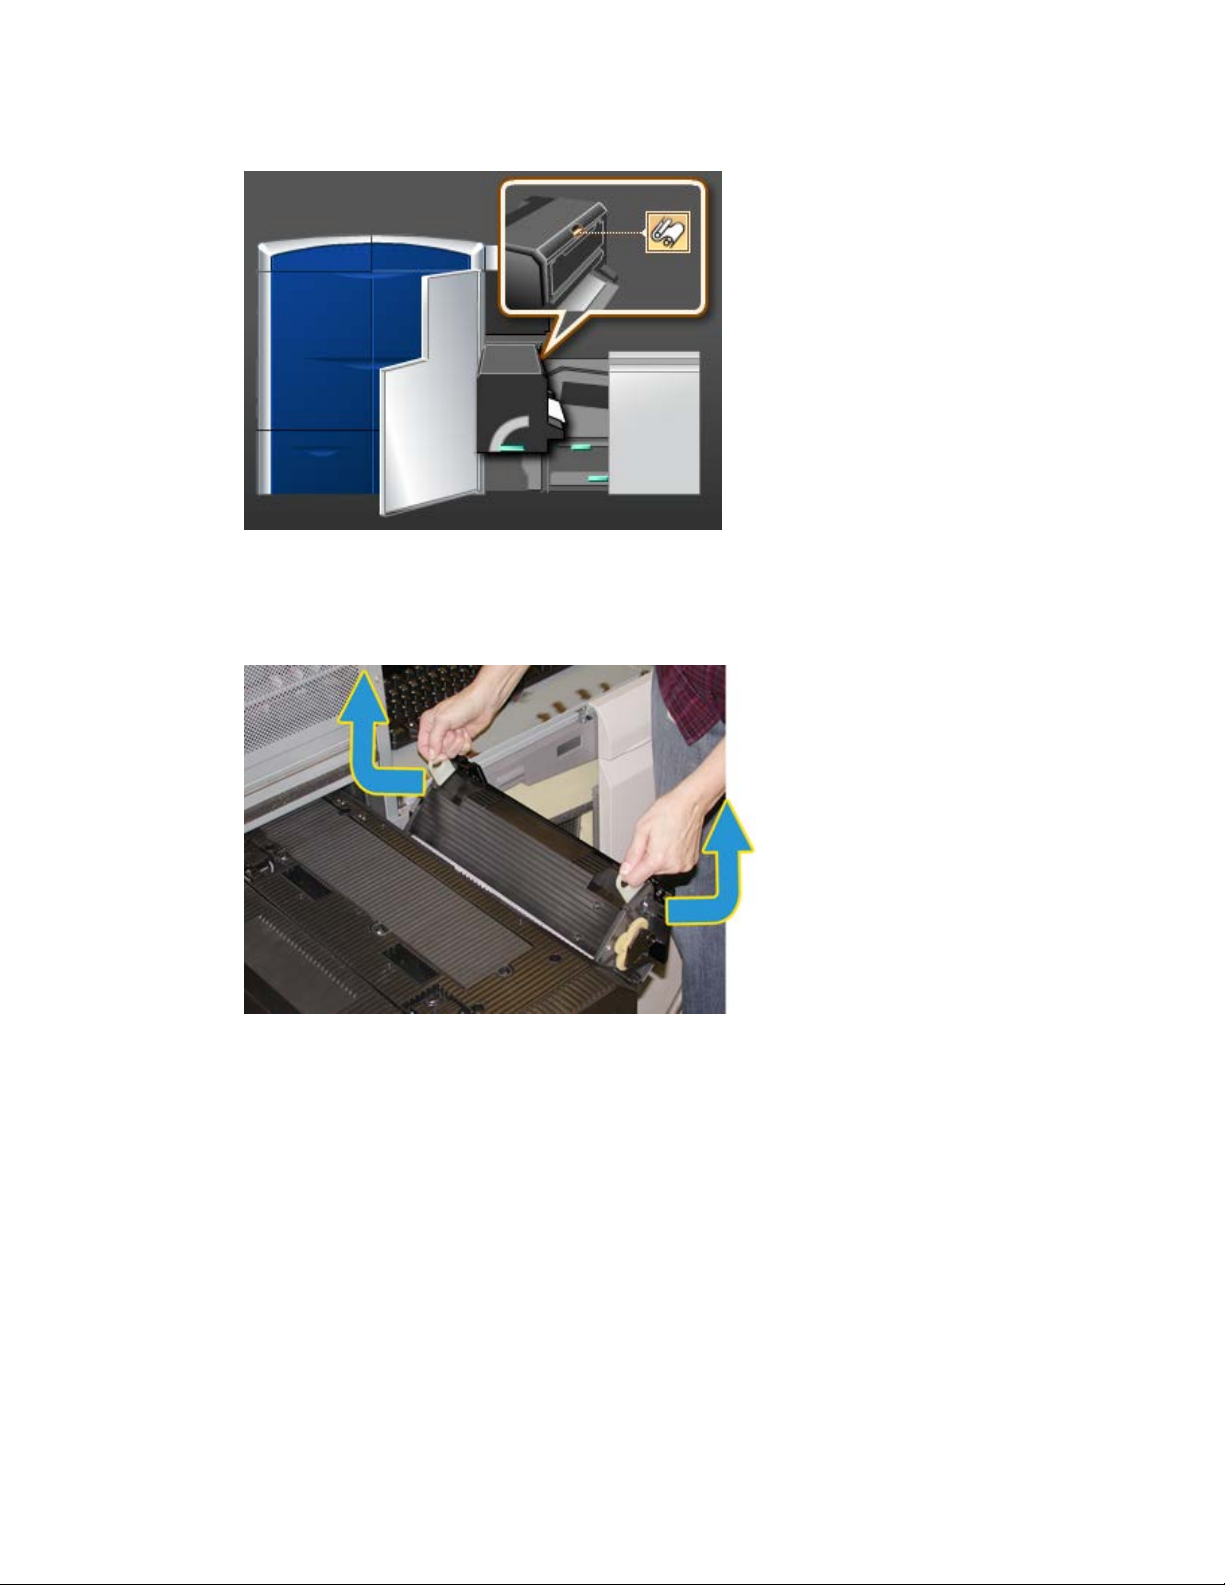
Maintenance
3. Push down on the lever; the fuser exit area opens.
4. Grasp the handles on the fuser web assembly and pull it up and out to remove the
assembly.
Dispose of the old fuser web assembly according to your local regulations.
5. Remove the new fuser web assembly from the box and the protective covering.
9-24
Xerox® Color 800/1000 Press
User Guide
 Loading...