


Xerox EX Print Server, Powered by Fiery® for
the Xerox Color 1000 Press
Fiery Graphic Arts Package

© 2010 Electronics for Imaging, Inc. The information in this publication is covered
under Legal Notices for this product.
45089771
15 February 2010

CONTENTS
CONTENTS
CONTENTS 3
INTRODUCTION 7
Terminology and conventions 7
About this document 8
Fiery Graphic Arts Package, Premium Edition 9
Viewing the status of Fiery Graphic Arts Package 10
Viewing the status on Windows 10
Viewing the status on Mac OS X 11
Setting up your monitor and the monitor profile 12
PAPER SIMULATION WHITE POINT EDITING 13
Paper simulation workflow 13
Printing with default Paper Simulation 13
Paper Simulation print option 14
Paper Simulation White Point editing 14
Printing with custom paper simulation values 15
SPOT-ON WITH TWO-COLOR PRINT MAPPING 17
Setting up Two-Color Print Mapping 18
Printing a job with Two-Color Print Mapping 19
COLOR SETUP FEATURES 21
Control Bar 21
Control Bar workflow 22
Printing with the default Control Bar 22
Setting up a custom Control Bar 24
Printing with a custom Control Bar 24

CONTENTS 4
Configurable Auto Trapping 25
Configurable Auto Trapping workflow 25
Printing with default Auto Trapping 25
Setting up configurable Auto Trapping 27
Printing with configurable Auto Trapping 27
Progressives 28
Progressives workflow 28
Printing with the default Progressives 29
Setting up Progressives 30
Printing with custom Progressives 30
Halftone Simulation 31
Halftone Simulation workflow 31
Halftone Simulation print option 31
Printing with pre-defined halftone screens 32
Setting up custom Halftone Simulation 33
Printing with custom halftone screens 33
Supported applications 34
Calibrating for custom halftone screens 34
IMAGEVIEWER 36
Accessing ImageViewer 36
PREFLIGHT 39
HOT FOLDERS FILTERS 40
POSTFLIGHT 41
About Postflight 42
Postflight Test Page 42
Postflight color-coded pages 42
Postflight reports 43
Postflight print option 45

CONTENTS 5
Postflight workflow 45
Scenario 1: Diagnose an unexpected color 47
Scenario 2: Check the calibration status 49
Scenario 3: Check the quality of the output profile 50
Scenario 4: Diagnose a color problem of a specific object 51
MULTIPLE PLATE SEPARATIONS 52
Multiple plate separations workflow 52
Combine Separations print option 53
Supported applications 53
PAPER SIMULATION 54
Paper Simulation workflow 54
Paper Simulation print option 55
UGRA/FOGRA MEDIA WEDGE 56
Printing the Ugra/FOGRA Media Wedge 56
Reading the Ugra/FOGRA Media Wedge 57
Using the Ugra/FOGRA Media Wedge for quality control 57
INTEGRATED ALTONA VISUAL TEST 58
Altona Visual Test file 58
Interpreting test results 59
Using a PDF/X workflow not compatible with Altona 61
INDEX 63

INTRODUCTION
Terminology and conventions
INTRODUCTION 7
This document explains the Fiery Graphic Arts Package features and how they work. Because
of the flexibility of the controls Fiery Graphic Arts Package provides, users in any
environment can benefit from the Fiery Graphic Arts Package features. Novice users can
use the default settings to obtain optimal results. Expert users with specific needs and
requirements in graphic arts and other markets can also obtain optimal results by customizing
the settings.
The documentation for the Xerox EX Print Server, Powered by Fiery for the Xerox Color
1000 Press uses the following terminology and conventions.
Term or convention Refers to
Aero EX Print Server (in illustrations and examples)
EX Print Server Xerox EX Print Server, Powered by Fiery for the Xerox Color 1000
Press
Mac OS Apple Mac OS X
Press Xerox Color 1000 Press
Titles in italics Other documents in this set
Windows Microsoft Windows XP, Windows Vista,
Windows Server 2003/2008, Windows 7
Topics for which additional information is available by starting Help
in the software
Tips and information
A warning concerning operations that may lead to death or injury to
persons if not performed correctly. To use the equipment safely,
always pay attention to these warnings.
A caution concerning operations that may lead to injury to persons
if not performed correctly. To use the equipment safely, always pay
attention to these cautions.
Operational requirements and restrictions. Be sure to read these
items carefully to operate the equipment correctly, and avoid
damage to the equipment or property.

INTRODUCTION 8
About this document
This document describes the features that are available through print options and utilities
such as Command WorkStation. The features are organized as follows:
• Features accessible from Command WorkStation
–
Paper Simulation White Point Editing describes the white point editing feature.
–
Spot-On with Two-Color Print Mapping describes the feature used to map document
colors with print colors.
–
Color Setup describes the following features: Control Bar, Auto Trapping, Progressives,
and Halftone Simulation.
–
ImageViewer describes how to start the ImageViewer application.
–
Preflight describes how to perform the Preflight check of your job.
• Features accessible from utilities other than Command WorkStation
–
Hot Folders Filters describes the filters features.
• Other features
–
Postflight describes the Postflight feature and its workflow examples.
–
Multiple Plate Separations describes the combine separation feature for more than
four plates.
–
Paper Simulation describes the fixed Paper Simulation feature.
–
Ugra/FOGRA Media Wedge describes the color test file called the Ugra/FOGRA Media
Wedge .
–
Integrated Altona Visual Test describes the test integrated in the EX Print Server to
check for PDF/X compatibility as tested by the Altona Test Suite.

INTRODUCTION 9
Fiery Graphic Arts Package, Premium Edition
The following features are included in Fiery Graphic Arts Package, Premium Edition:
Feature Where to set values or access Print option name See
Paper simulation white
point editing
Spot-On: two-color
print mapping
Control bar
Configurable auto trapping
Progressives
Halftone screening
ImageViewer
Preflight
Hot Folders file filters
Postflight
Multiple plate separations
Command WorkStation:
Paper Simulation
Command WorkStation:
Spot-On
Command WorkStation:
Paper Simulation Paper Simulation White Point
Editing
Two-Color Print Mapping Spot-On with Two-Color Print
Mapping
Control Bar Color Setup Features
Color Setup
Command WorkStation:
Auto Trapping Color Setup Features
Color Setup
Command WorkStation:
Progressives Color Setup Features
Color Setup
Command WorkStation:
Halftone Simulation Color Setup Features
Color Setup
Command WorkStation:
ImageViewer
ImageViewer
Command WorkStation:
Preflight
Preflight
Hot Folders Hot Folders filters
Command WorkStation:
Postf light Postf light
ImageViewer
Combine Separation Multiple Plate Separations
Fixed paper simulation
Ugra/FOGRA Media Wedge
Integrated Altona Visual Test
Paper Simulation Paper Simulation
Ugra/FOGRA Media Wedge
Integrated Altona Visual Test

INTRODUCTION 10
Viewing the status of Fiery Graphic Arts Package
You can view the status of the Fiery Graphic Arts Package, Premium Edition on your
computer.
Viewing the status on Windows
Use the following procedure to view the status of Fiery Graphic Arts Package, Premium
Edition on a Windows computer.
NOTE: Before viewing the status on a Windows computer, you must install the printer driver.
For information about installing the printer driver, see Printing.
TO VIEW THE STATUS ON A WINDOWS COMPUTER
1 Open the Printers (or Printers and Faxes) window.
2 Right-click the EX Print Server and choose Properties.
The Properties dialog box appears.
3 Click the Installable Options tab.
Fiery Graphic Arts Package, Premium Edition appears in the Installed Options list.
NOTE: If you use the Point and Print method to install the printer driver and printer
description file, you must enable Two-Way Communication on the monitor at the EX Print
Server for each connection (print, hold, or direct) before you install them on your computer.
For more information about Point and Print, see Printing.
4 Click OK to close the dialog box.

INTRODUCTION 11
Viewing the status on Mac OS X
Use one of the following procedures to view the status of Fiery Graphic Arts Package on a
computer running Mac OS X.
NOTE: Before viewing the status on a computer running Mac OS X, install the printer driver.
For information about installing the printer driver, see Printing.
TO VIEW THE STATUS ON A COMPUTER RUNNING MAC OS X V10.5
1 Choose System Preferences from the Apple menu and then choose Print & Fax.
The Print & Fax dialog box appears.
2 In the Printer List, select the EX Print Server and click Options & Supplies.
3 Click the Driver tab.
Fiery Graphic Arts Package, Premium Edition appears as the GA Package setting.
4 Quit System Preferences.
TO VIEW THE STATUS ON A COMPUTER RUNNING MAC OS X V10.4.X
1 Start Printer Setup Utility.
2 Select the EX Print Server in the Printer List.
3 Choose Show Info from the Printer menu.
The Printer Info dialog box appears.
4 Choose Installable Options.
Fiery Graphic Arts Package, Premium Edition appears as the GA Package setting.
5 Close the dialog box.

INTRODUCTION 12
Setting up your monitor and the monitor profile
Some Fiery Graphic Arts Package features require that a job be displayed with correct colors
on your monitor.
The following features require the correct monitor display:
• Paper Simulation White Point editing (see page 13)
• ImageViewer previewing from Command WorkStation (see page 36)
To display the colors correctly on your monitor, you must set up the monitor display
according to the manufacturer’s recommendations and specify the correct monitor profile
for your monitor.
Specify the following settings for the monitor display:
• At the monitor: Brightness, Contrast, and Temperature
• From the control panel of the operating system: Resolution, Refresh rate, and Number
of colors
For more information about setting up your monitor and the monitor profile, see the
documentation that accompanies the monitor.

PAPER SIMULATION WHITE POINT EDITING 13
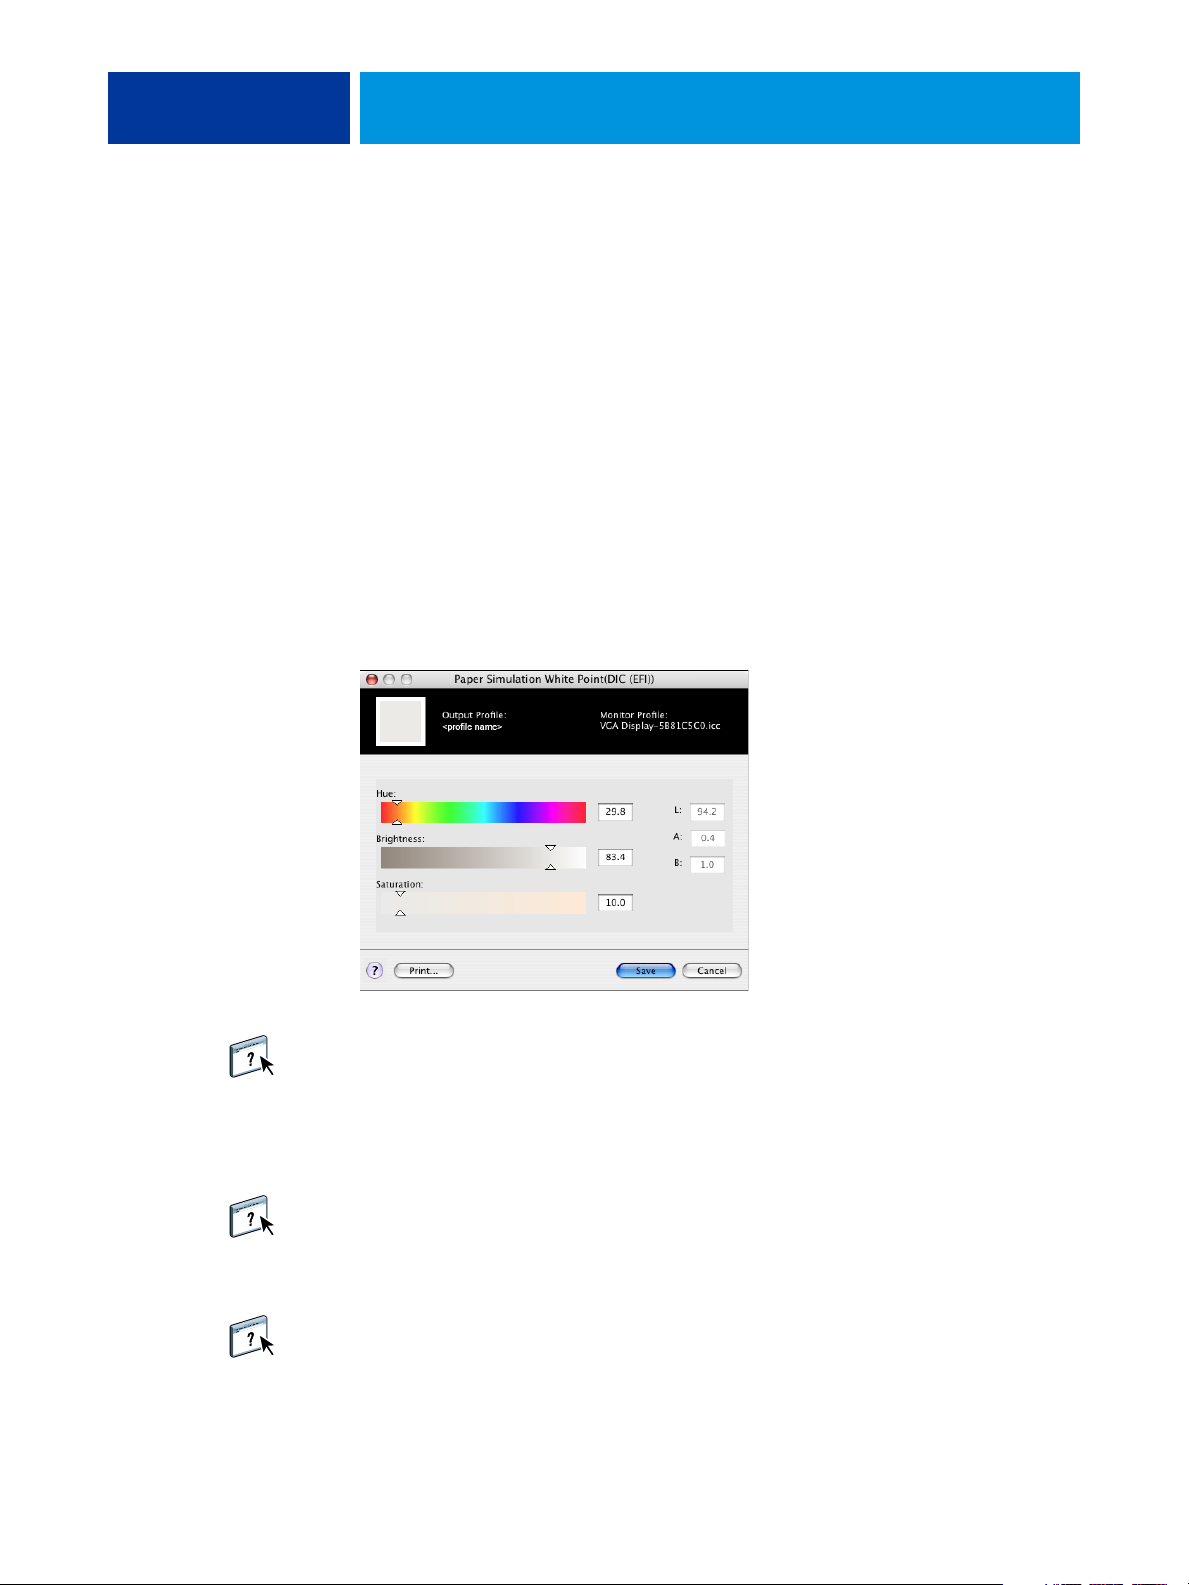
PAPER SIMULATION WHITE POINT EDITING
Although an ICC profile contains a definition of “white,” the white may not always visually
match the human eye, requiring a perceptual adjustment. The Paper Simulation White Point
editing feature allows you to perceptually adjust the hue, brightness, and saturation of the
simulated paper white defined in the ICC profile.
Paper simulation workflow
You can print a job with the Paper Simulation feature set to On from the printer driver
without customizing paper simulation. Many jobs may print satisfactorily with the fixed
default Paper Simulation setting. However, you can customize the paper simulation by editing
the white point values with Command WorkStation. After you customize the values, print the
job with the custom paper simulation values from the printer driver by setting the Paper
Simulation print option to On.
To print a job with the fixed Paper Simulation setting, use the procedure on page 13.
For more information about editing Paper Simulation White Point values and printing
with custom paper simulation values, see page 14.
Printing with default Paper Simulation
Use the following procedure to print a job with the fixed Paper Simulation value.
NOTE: The procedures for printing a job from a Mac OS or a Windows computer are similar.
TO PRINT A JOB WITH DEFAULT PAPER SIMULATION
1 Choose Print from your application.
2 Select the EX Print Server as your printer and click Properties.
The Properties dialog box appears with the Fiery Printing tab selected.
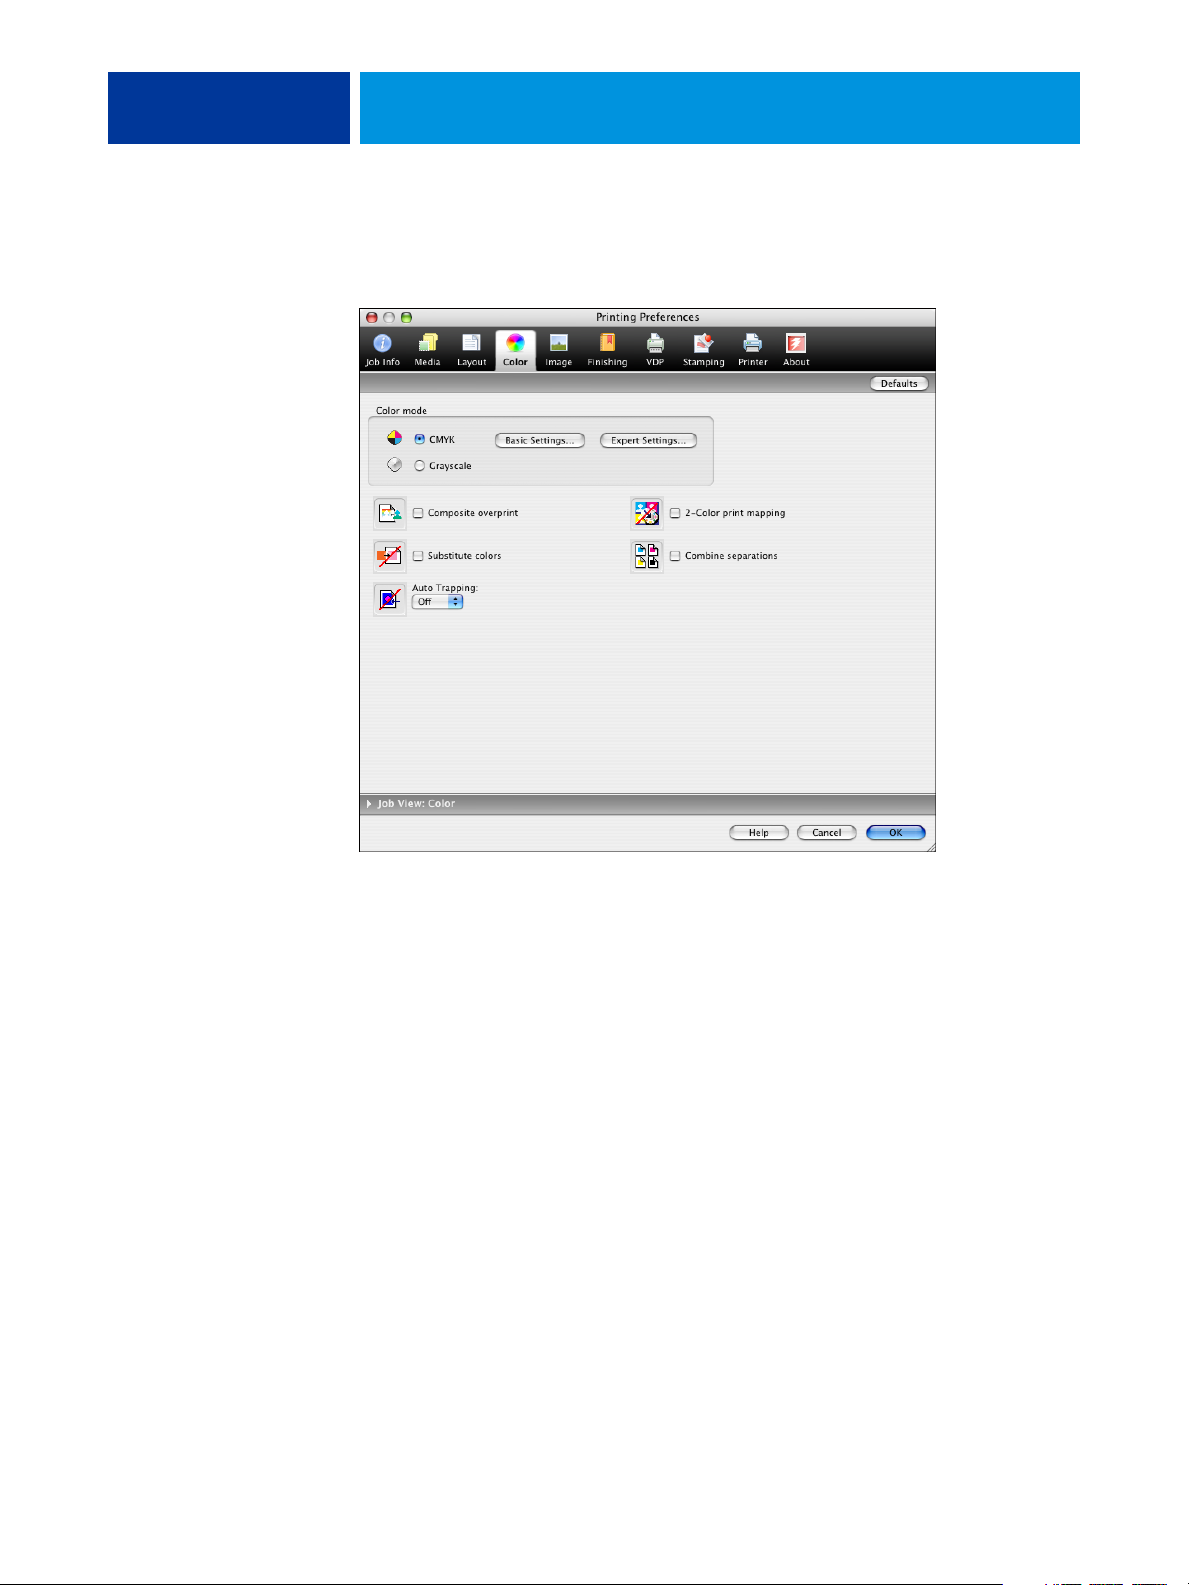
3 Click the Color icon.
4 Click Expert Settings.
The Advanced Edit dialog box appears.
5 Under the Color Input tab, select Paper Simulation.
6 Click OK to close the Advanced Edit dialog box.
7 Click OK to close the Properties dialog box.
8 Click Print.
The job prints with the default Paper Simulation White Point setting.
PAPER SIMULATION WHITE POINT EDITING 14
Paper Simulation print option
The following values are available for the Paper Simulation print option:
• Off (Default)
•On
NOTE: If you have not edited the Paper Simulation White Point values with Command
WorkStation and selected On for this option, your job is printed with the default Paper
Simulation values. If you edited the values, your job is printed with the custom Paper
Simulation values.
Paper Simulation White Point editing
Your job may print satisfactorily with the fixed Paper Simulation setting. However, you can
customize the Paper Simulation setting by editing the Paper Simulation White Point values
with Command WorkStation.
NOTE: To display the colors correctly with your monitor, you must set the monitor and
monitor settings correctly. For more information, see Command WorkStation Help.
To edit a custom profile, do the following:
• Select a CMYK Source Profile.
• Link the CMYK source profile to an output profile.
To access the Paper Simulation White Point dialog box, see the instructions in Command
WorkStation Help.
NOTE: If Paper Simulation is set to On, and you have defined a substitute color as
C=0, M=0, Y=0, K=0, the values defined in Substitute Colors override those for Paper
Simulation. For information about Substitute Colors, see Command WorkStation Help.

PAPER SIMULATION WHITE POINT EDITING 15
Printing with custom paper simulation values
After you edit the paper simulation values in Command WorkStation, you can print a
document with the custom paper simulation values from the printer driver. You can also
override the setting in Job Properties.
NOTE: The procedures for printing a job from a Windows or Mac OS computer are
fundamentally the same. The following procedure uses illustrations from a Mac OS computer.
Use the following procedure to print a job with the custom paper simulation values.
TO PRINT A JOB WITH EDITED PAPER SIMULATION VALUES
1 Choose Print in your application.
The print dialog box appears.
2 Mac OS X v10.5 only: Expand the dialog box, if necessary, by clicking the arrow next to the
Printer name.
3 Mac OS X v10.3.9 and 10.4.x: Click Copiers & Pages, choose ColorSync from the drop-down
list, and then choose In Printer from the Color Conversion list.
Mac OS X v10.5: Click Preview, choose Color Matching from the drop-down list, and then
select In Printer.
4 Choose Fiery Features from the drop-down list.
5 Select Two-Way Communication.
For information about enabling Two-Way Communication, see printer driver Help.
6 Click Full Properties, and then click the Color icon.
The Color pane appears.
PAPER SIMULATION WHITE POINT EDITING 16
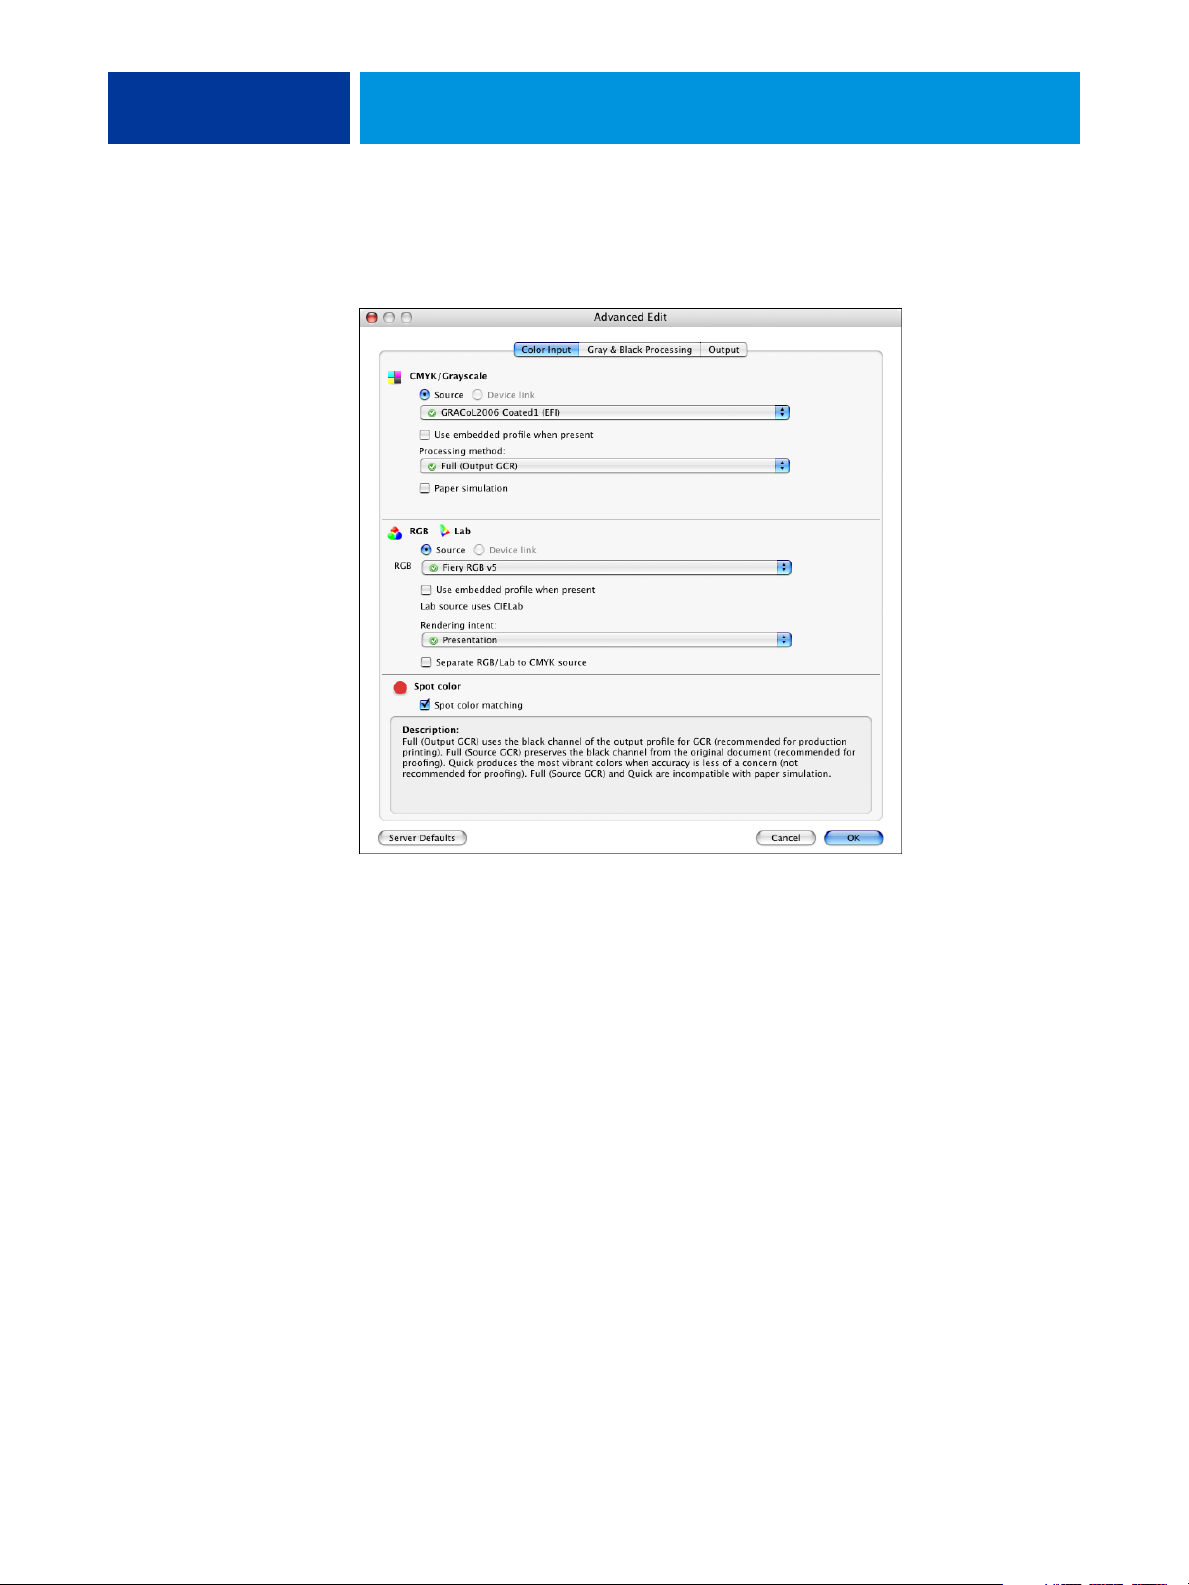
7 Click Expert Settings.
The Advanced Edit dialog box appears.
8 Under the Color Input tab, select the following settings.
• Choose the custom profile from the CMYK/Grayscale Source list. Choose the profile you
saved after editing the Paper Simulation White Point values.
• Select Full (Output GCR) for the CMYK/Grayscale Processing Method option.
• Select Paper Simulation.
9 Under the Output tab, choose the output profile that you linked to the custom CMYK Source
profile from the Output Profile list.
10 Click OK.
The Color pane reappears.
11 Click OK, and then click Print.
The job is printed using your custom CMYK Source profile with the edited White Point
values.

SPOT-ON WITH TWO-COLOR PRINT MAPPING 17
SPOT-ON WITH TWO-COLOR PRINT MAPPING
In addition to managing “named” colors, the Spot-On spot color editor in Command
WorkStation allows you to assign spot colors and process colors to the generic colors that are
used in a job. The Two-Color Print Mapping feature is designed for print shop operators to
do the proofing for a two-color press. You can print a two-color job to a two-color device by
mapping the colors in a job to the colors that are already created on the device.
For information about managing named colors with Spot-On, see Command WorkStation
Help.
NOTE: The RGB colors in a document are first converted to CMYK colors and then the
Two-Color Print Mapping is applied.
The following limitations apply when you use the Two-Color Print Mapping feature:
• The settings for Two-Color Print Mapping are ignored when the Composite Overprint
and Combine Separation features are enabled.
• Postflight does not report on Two-Color Print Mapping, because Postflight reports the
source state of a document. The color space that the press receives before any conversions
is reported in Postflight.
• You cannot select the Two-Color Print Mapping and Substitute Color options at the same
time. Also, you cannot select a substitute color to be used in the Two-Color Print Mapping
feature.
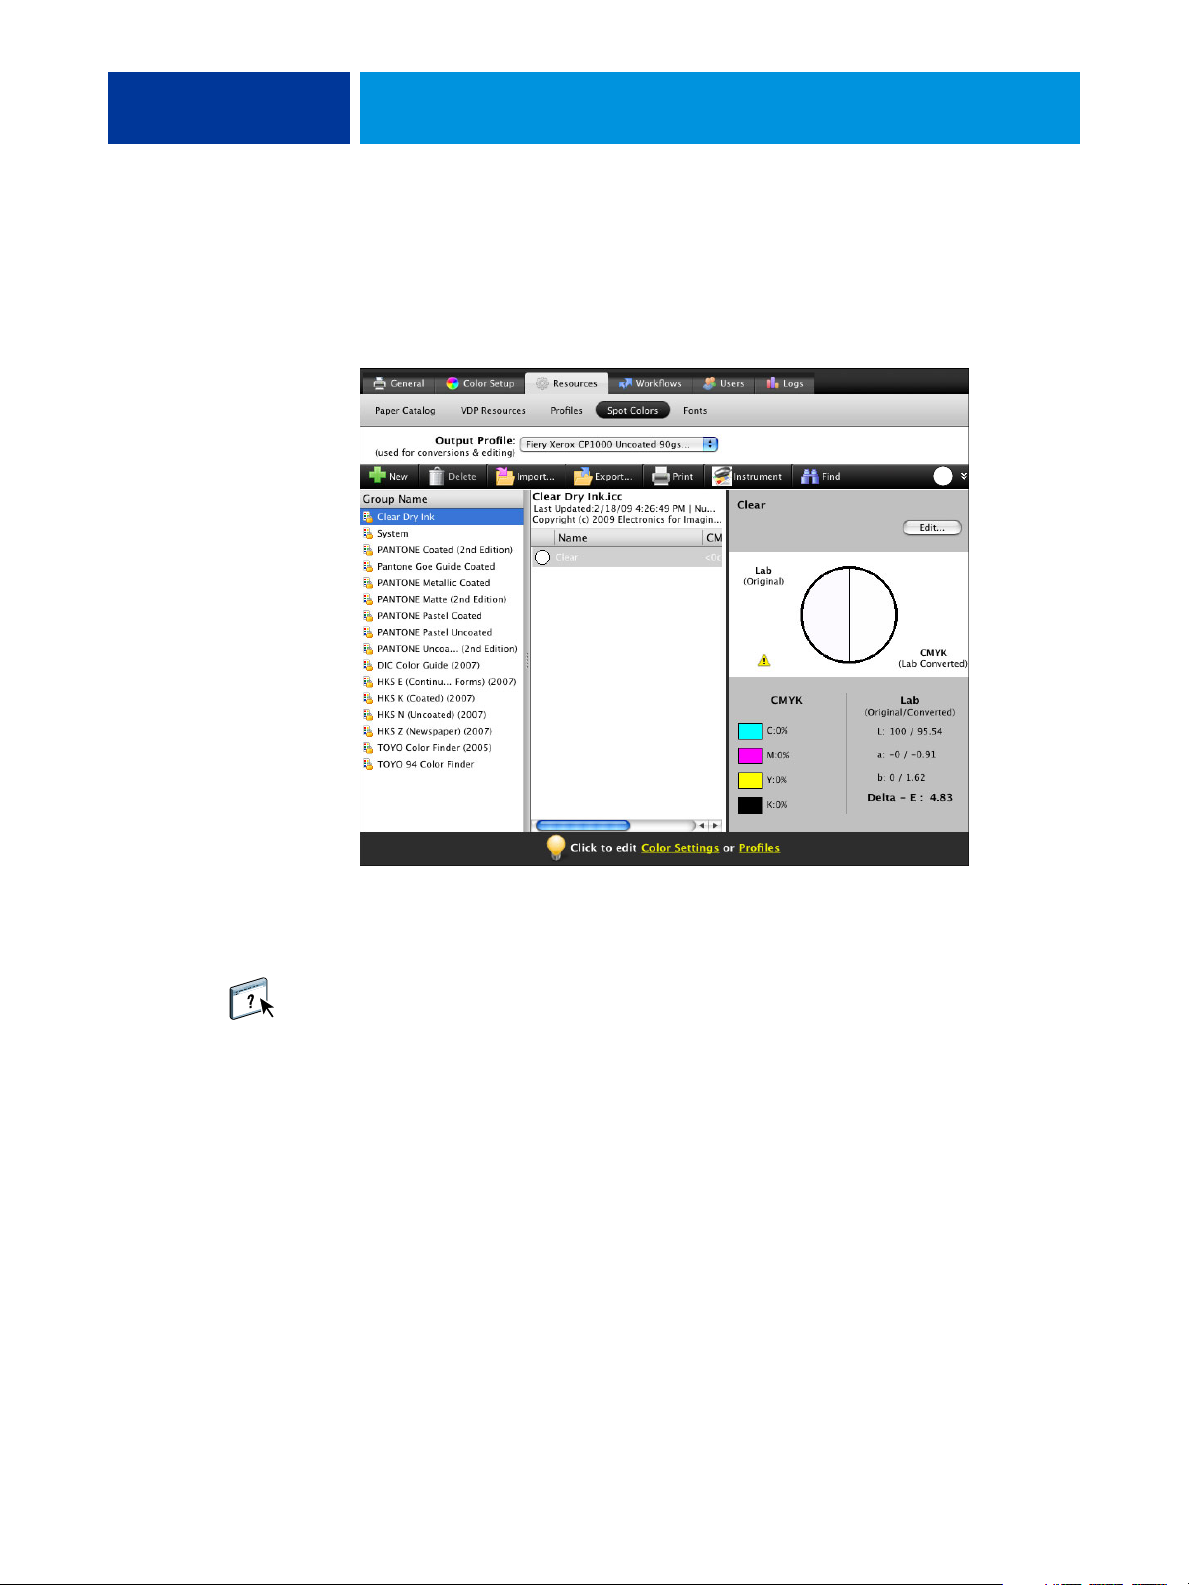
Setting up Two-Color Print Mapping
1 Click to open the Define
2-Color Print Mapping
window
SPOT-ON WITH TWO-COLOR PRINT MAPPING 18
In the Two-Color Print Mapping feature, the colors that are used in a job are mapped with the
colors to print. From Spot-On, open the Define 2-Color Print Mapping window and then
reassign the document colors to the named or custom colors to print with.
1
When the Two-Color Print Mapping print option is enabled for a job, the EX Print Server
replaces the document colors with the colors you defined in the Define 2-Color Print
Mapping window.
To define the color mappings in the Define 2-Color Print Mapping window, see the
instructions in Command WorkStation Help.

SPOT-ON WITH TWO-COLOR PRINT MAPPING 19
Printing a job with Two-Color Print Mapping
After you map the colors in the Define 2-Color Print Mapping window in Spot-On, you can
print a two-color job from the printer driver. You can also override the print option setting
using Command WorkStation Job Properties.
NOTE: When you print a job, select the same output profile from the printer driver as you
selected when you set up Two-Color Print Mapping in Spot-On. Otherwise, print mappings
that are defined in Spot-On have no effect.
NOTE: The procedures for printing a job from a Mac OS and a Windows computer
are similar.
TO PRINT A TWO-COLOR JOB
1 Open a document in your application.
2 Choose Print.
3 Mac OS X v10.5 only: Expand the dialog box, if necessary, by clicking the arrow next to the
Printer name.
4 Mac OS X v10.3.9 and 10.4.x: Click Copiers & Pages and choose Fiery Features from the drop-
down list.
Mac OS X v10.5: Click Preview and choose Fiery Features from the drop-down list.
SPOT-ON WITH TWO-COLOR PRINT MAPPING 20
5 Click Full Properties, and then click the Color icon.
The Color pane appears.
6 Select 2-Color Print Mapping.
7 Click OK and then click Print.
The job is printed with the mapping you defined in Spot-On.
 Loading...