

Xerox EX Print Server, Powered by Fiery® for
the Xerox Color 1000 Press
Printing

© 2010 Electronics for Imaging, Inc. The information in this publication is covered
under Legal Notices for this product.
45089750
15 February 2010
CONTENTS
CONTENTS
CONTENTS 3
INTRODUCTION 7
Terminology and conventions 7
About this document 8
User software 9
System requirements 9
PRINTING FROM MAC OS X 10
Installing the Mac OS X printer driver files 10
Installing from the User Software DVD 11
Downloading printer drivers using WebTools 11
Downloading printer drivers from the EX Print Server 12
Uninstalling printer driver files 13
Setting up the EX Print Server for printing 14
Setting up printing with Mac OS X v10.5.x or v10.6.x 15
Setting up printing with Mac OS X v10.4.x 19
Setting up printing with Mac OS X v10.3.9 23
Adding a non-English printer on Mac OS X v10.5 and v10.6 26
Configuring Installable Options 26
Using Desktop Printer (optional) 26
Printing from Mac OS X computers 27
Selecting the EX Print Server in the Printer List 28
Setting print options and printing from Mac OS X applications 30
Defining and printing custom page sizes 37
Viewing the press status 37

CONTENTS 4
PRINTING FROM WINDOWS 38
Installing Windows printer drivers 38
Installing printer drivers by Point and Print 40
Downloading printer drivers using WebTools 43
Downloading printer drivers from the EX Print Server 44
Installing printer drivers from the User Software DVD 45
Installing and connecting to a virtual printer 48
Uninstalling printer drivers 51
Setting up the EX Print Server for printing 52
Setting up printing connections 52
Completing the SMB printing connection 52
Completing Standard TCP/IP Port (Raw or LPR) printing connections 53
Completing IPP connections 56
Configuring installable options 59
Printing from Windows computers 60
Setting print options and printing from Windows applications 61
Specifying default print options for print jobs 67
Customizing the Quick Access icon 68
Defining and printing custom page sizes 69
Viewing the press status 69
Saving files to print at a remote location 69
PRINTING METHODS 70
Configuring and using Job Monitor 71
Configuring the connection 71
Using Job Monitor 71
E-mail Service 71
Printing using an e-mail client 72
Managing print jobs with e-mail commands 74

CONTENTS 5
Printing from a USB device 75
FTP printing 76
Sample printing 77
Using Sample Print 77
Job Batching 78
Cancelling batch jobs 78
Using Command WorkStation Print Next and Rush Print commands with batch jobs 78
Accounting batch jobs 78
Adobe PDF Print Engine (APPE) 79
Printing with APPE workflow 79
Printing multiple files with APPE 81
PRINT OPTIONS 82
About printer drivers and printer description files 82
Setting print options 83
Print option override hierarchy 83
Print options and default settings 84
Job Info options 85
Media options 87
Layout options 90
Color options 95
Image options 99
Finishing options 101
Variable Data Printing (VDP) options 103
Stamping/Watermark options 104
Overriding print option settings 105

CONTENTS 6
Additional information 106
Auto Trapping 106
Booklet Maker 106
Booklet Maker in the printer driver 108
Booklet Maker in Job Properties 108
Clear Dry Ink Mode option 113
Collate 114
Document size and Paper size 115
Duplex printing 116
Folding options 117
Gang-up printing 118
Image Shift 119
Mixed Media 119
Output Delivery 121
Punch Position and Hole Punching 122
Scale 123
Scale to Fit 123
Stapler Mode 124
User Authentication 125
INDEX 127
INTRODUCTION
INTRODUCTION 7
This document describes how to install the printer drivers and printer description files for the
Xerox EX Print Server, Powered by Fiery for the Xerox Color 1000 Press, set up the EX Print
Server for printing, and print from Apple Mac OS and Microsoft Windows computers. It also
provides information about the EX Print Server print options and describes several printing
methods that can be used to print to the EX Print Server.
For information about setting up network servers and clients to use the EX Print Server, see
Configuration and Setup. For general information about using the color press, your computer,
application software, or network, see the documentation that accompanies those products.
For information about supported operating systems and system requirements, see Welcome.
Terminology and conventions
This document uses the following terminology and conventions.
Term or convention Refers to
Aero EX Print Server (in illustrations and examples)
EX Print Server Xerox EX Print Server, Powered by Fiery for the Xerox Color 1000
Mac OS Apple Mac OS X
Press Xerox Color 1000 Press
Titles in italics Other documents in this set
Windows Microsoft Windows XP, Windows Vista,
Press
Windows Server 2003/2008, Windows 7
Topics for which additional information is available by starting
Help in the software
Tips and information
A warning concerning operations that may lead to death or injury
to persons if not performed correctly. To use the equipment safely,
always pay attention to these warnings.
INTRODUCTION 8
Term or convention Refers to
About this document
This document covers the following topics:
• Installing printer files on Mac OS computers
• Setting up the EX Print Server for printing from Mac OS computers
• Printing from Mac OS computers
• Installing printer files on Windows computers
A caution concerning operations that may lead to injury to persons
if not performed correctly. To use the equipment safely, always pay
attention to these cautions.
Operational requirements and restrictions. Be sure to read these
items carefully to operate the equipment correctly, and avoid
damage to the equipment or property.
• Setting up the printing connections on Windows computers
• Printing from Windows computers
• EX Print Server print options
• Using other printing methods to print to the EX Print Server
INTRODUCTION 9
User software
The following table lists the user software that is described in this document. This is the user
software you need for setting up basic printing on the EX Print Server. Other documents may
describe other user software depending on what you are trying to accomplish.
User software Description
PostScript Printer Description
(PPD) file and associated files
(for Windows)
PostScript Printer Description
(PPD/Plugin) files
(for Mac OS X)
PageMaker PPD files Files that allow you to print to the EX Print Server from Adobe
PostScript screen fonts
(for Mac OS X)
Job Monitor
(for Windows)
Printer Delete Utility
(for Windows)
Files that provide information about the EX Print Server and your
particular press model to your application and printer driver.
Files that are used with the PostScript printer driver that allow the
EX Print Server to appear in the Print and Page Setup dialog boxes of
popular applications. The EX Print Server PPDs provide
information about the press to your application and printer driver.
PageMaker. You must install the appropriate PPD in PageMaker. See
the PageMaker documentation for instructions.
PostScript/TrueType screen fonts that correspond to the printer fonts
installed on the EX Print Server. For a complete list of PostScript/
TrueType fonts installed on the EX Print Server, print a Font List.
For more information, see Command WorkStation Help.
Monitor the status of connected EX Print Servers and print jobs sent
to them. Job Monitor is automatically installed when the printer
driver is installed on a Windows computer.
For more information, see “Configuring and using Job Monitor” on
page 71.
Uninstall the Windows printer driver.
For more information, see “Uninstalling printer drivers” on page 51.
Fiery Software Uninstaller
Utility
(for Mac OS X)
When you install user software on a Windows computer, you use the Fiery User Software
Installer.
System requirements
For information about supported operating systems and system requirements, see Welcome.
Uninstall the Mac OS X printer and associated printer driver files.
For more information, see “Uninstalling printer driver files” on
page 13.

PRINTING FROM MAC OS X 10
PRINTING FROM MAC OS X
To set up the EX Print Server as a PostScript printer on a Mac OS X computer, install the
printer driver files that correspond to your press and set up the EX Print Server for printing.
Printer drivers provide a way to communicate information about print jobs between your
applications, the EX Print Server, and the press.
For the location of each procedure, see the following table.
Procedure See
Installing the Mac OS X printer files page 10
Setting up the EX Print Server for printing page 14
Printing from Mac OS X computers page 27
Installing the Mac OS X printer driver files
The Mac OS X printer driver files are provided on the User Software DVD or can be
downloaded from the EX Print Server over the network or using WebTools. The following
sections describe how to install the printer files for the EX Print Server.
You can install printer drivers as follows:
• From the User Software DVD
• From WebTools, using the Downloads tab to download the printer driver files before
installing the printer driver
NOTE: WebTools is available if the administrator has enabled Internet access to the EX Print
Server.
• From the EX Print Server by downloading the printer driver files over the network before
installing the printer driver
For the location of each procedure, see the following table.
Procedure See
Installing printer drivers from the User Software DVD page 11
Downloading printer drivers using WebTools page 11
Downloading printer drivers from the EX Print Server page 12
Uninstalling printer driver files page 13

PRINTING FROM MAC OS X 11
Installing from the User Software DVD
The User Software DVD provides the following software for Mac OS X (see the OSX: Printer
Driver folder):
•
OSX Installer: Installs the printer driver files required to print from Mac OS X.
•
Language folders: Printer description files that are installed by OSX Installer. You do not
need to open these folders or install them manually on your computer. The appropriate
files are installed by OSX Installer.
TO INSTALL THE PRINTER DRIVER FILES FOR MAC OS X
1 Quit all open applications.
2 Mac OS X v10.3.9 and v10.4.x: Make sure that the Printer Setup Utility is not running on your
computer.
Printer Setup Utility updates the list of available printers when it starts. If a printer description
file is added while Printer Setup Utility is running, you cannot select the associated printer
model until you restart.
Mac OS X v10.5.x and v10.6.x: Proceed to step 3.
3 Insert the User Software DVD into the DVD drive.
4 Open the OSX: Printer Driver folder on the User Software DVD.
If you are installing from a folder you downloaded from WebTools or the EX Print Server,
browse to the Printer Driver folder on your desktop.
5 Double-click the OSX Installer icon to start installing the printer driver.
6 Follow the on-screen instructions.
The OSX Installer installs the printer driver files that correspond to the EX Print Server.
7 When copying is complete, click Quit.
Downloading printer drivers using WebTools
WebTools allows you to download installers for printer drivers to your computer directly from
the EX Print Server.
Before you download the printer driver files, the administrator must enable Internet access to
the EX Print Server.
For more information about setting up and starting WebTools, see Utilities.

PRINTING FROM MAC OS X 12
TO DOWNLOAD PRINTER DRIVERS WITH WEBTOOLS
1 Start your Internet or intranet browser and type the DNS name or IP address of the EX Print
Server.
2 Click the Downloads tab.
3 Click the link for the printer drivers that you want to install (Printer Files for Mac OS X).
A file named OSX.dmg is downloaded to your desktop. The file contains a folder named
Printer Driver in a compressed format. If your Internet browser is equipped with an expander
utility, such as StuffIt Expander, the folder decodes and decompresses automatically.
If the Printer Driver folder does not automatically decode and decompress, double-click the
file to start the utility that performs that function.
4 Open the OSX: Printer Driver folder.
5 Double-click the OSX Installer icon to start installing the printer driver.
Follow the on-screen instructions.
For instructions on installing the printer driver for Mac OS X, see page 11.
Downloading printer drivers from the EX Print Server
You can download printer driver files to your computer directly from the EX Print Server over
the network.
TO DOWNLOAD PRINTER DRIVER FILES FROM THE EX PRINT SERVER
1 In the Finder, choose Connect to Server from the Go menu.
2 Type SMB:// followed by the name or IP address of the EX Print Server and click Connect.
If you cannot locate your EX Print Server, contact your administrator.
3 Type the user name and password in the SMB/CIFS File System Authentication dialog box.
The “Guest” account can be used as the default. The Guest account does not require a
password. If the Guest account cannot be used, ask your network administrator for an
account.
4 Select the Mac_User_SW folder from the shared volume list and click OK.
5 Open the OSX : Printer Driver folder.
6 Double-click the OSX Installer icon to start installing the printer driver.
Follow the on-screen instructions.
For instructions on installing the printer driver for Mac OS X, see page 11.

PRINTING FROM MAC OS X 13
Uninstalling printer driver files
The Fiery Software Uninstaller utility is installed and used locally. You do not need to connect
to the EX Print Server before you use the software.
The Fiery Software Uninstaller is available from the OSX folder of the User Software DVD.
You can also download it to your computer directly from the EX Print Server over the
network.
TO INSTALL AND USE THE FIERY SOFTWARE UNINSTALLER UTILITY
1 Copy the Fiery Software Uninstaller.dmg to the Desktop from the User Software DVD or the
Mac_User_SW folder from the shared volume list on the EX Print Server.
2 On the Desktop, double-click the Fiery Software Uninstaller.dmg.
The Fiery Software Uninstaller opens in the Finder showing the Fiery Software Uninstaller
icon and an arrow pointing to a link to the Applications folder.
3 Select the Fiery Software Uninstaller icon on the left and drag it onto the Applications folder
to install.
4 Browse to the Applications folder and double-click the Fiery Software Uninstaller icon.
5 Click the Printers tab if it is not already selected.
6 Select a printer from the Installed Printers list and do one of the following:
• Click Remove Printer and Driver to remove the printer along with its printer driver files.
If you want to remove the printer and the associated printer driver, you can select only one
printer at a time.
• Click Remove Printer to remove only the printer from the Installed Printers list, but leave
the printer driver installed.
The utility can remove only printers that are not currently in use or open on the Dock.
NOTE: If more than one printer uses a printer driver, removing the printer driver also removes
all printers using that driver.
7 To confirm that you wish to delete the printer, type your password in the dialog box and click
OK.
8 Click the Drivers tab to view the installed printer drivers.
9 Close the Fiery Software Uninstaller dialog box.
TO DELETE THE FIERY SOFTWARE UNINSTALLER UTILITY
• Delete the Fiery Software Uninstaller icon from the Mac OS X Applications folder.

PRINTING FROM MAC OS X 14
Setting up the EX Print Server for printing
The following section describes how to set up the EX Print Server on a Mac OS X computer.
NOTE: The steps for setting up the EX Print Server on a computer with Mac OS X v10.6.x,
Mac OS X v10.5.x, Mac OS X v10.4.x, and Mac OS X v10.3.9 are different. Any differences
are noted in the following sections.
For the location of each procedure, see the following table.
Procedure See
Setting up printing with Mac OS X v10.5.x or v10.6.x page 15
Setting up printing with Mac OS X v10.4.x page 19
Setting up printing with Mac OS X v10.3.9 page 23
Configuring Installable Options page 26
Using Desktop Printer (optional) page 26

PRINTING FROM MAC OS X 15
Setting up printing with Mac OS X v10.5.x or v10.6.x
Use the following procedures to set up the EX Print Server on a computer with Mac OS X
v10.5.x or v10.6.x.
TO SET UP THE EX PRINT SERVER FROM THE PRINT DIALOG BOX
1 Open a file in your application.
2 Choose Print from the File menu.
The Print dialog box appears.
3 Select Add Printer from the Printer list.
In the dialog box that appears, select a printer connection. Use one of the printer connections
in the following table to add a printer.
TO SET UP THE EX PRINT SERVER USING PRINT & FAX
1 Choose System Preferences from the Apple menu, and then choose Print & Fax.
The Print & Fax dialog box appears.
2 Click the “+” button to add a printer.
In the dialog box that appears, select a printer connection. Use one of the following
connections to add a printer.
Printing connection See
Default (Bonjour or AppleTalk) page 16
IP Printer page 17
AppleTalk page 18
PRINTING FROM MAC OS X 16
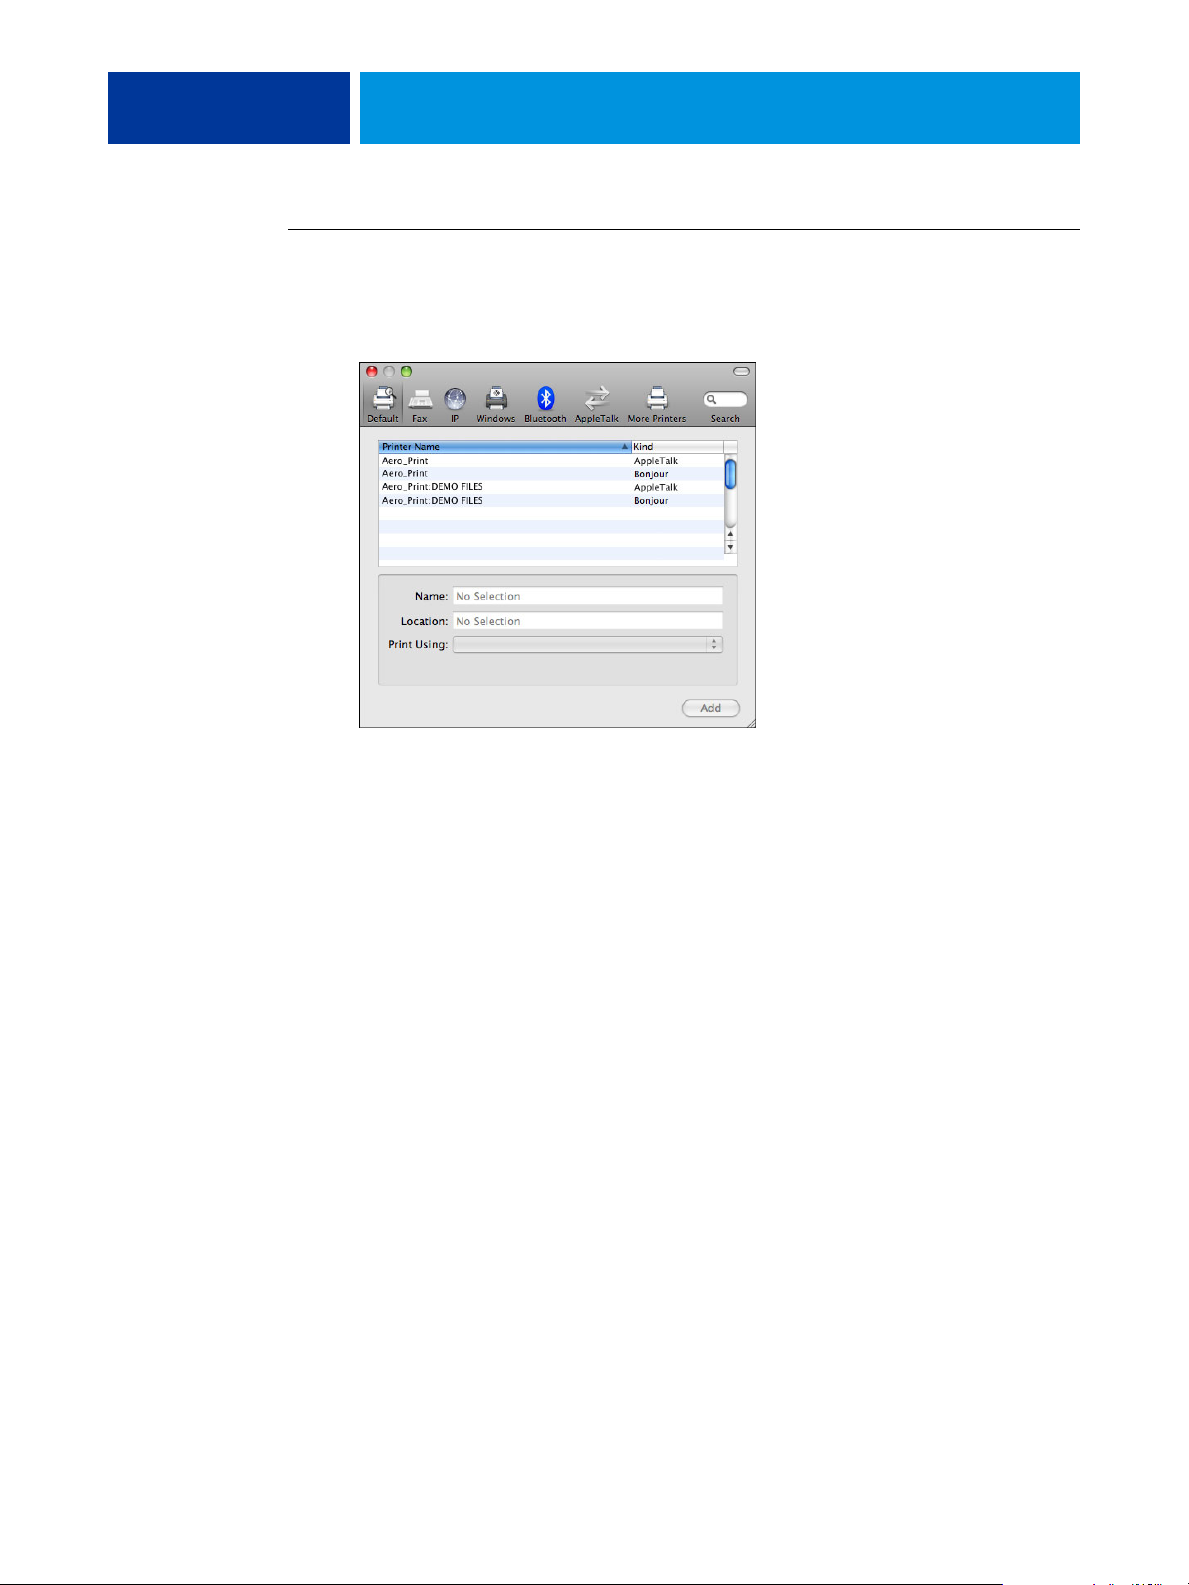
TO ADD A PRINTER WITH THE DEFAULT (BONJOUR OR APPLETALK) CONNECTION
1 Click the Default icon in the dialog box.
The Default pane appears.
The names of printers with default connections are listed. The virtual printers that are
configured at the EX Print Server are also listed.
NOTE: The names of the virtual printers appear as <printer name: virtual printer name> in the
Printer Name list.
2 Select the EX Print Server from the list.
The information about the selected printer appears at the bottom of the Default pane. The
appropriate PPD file for the EX Print Server is automatically selected.
3 Click Add.
AppleTalk:
The EX Print Server name appears in the Printer List of the Print & Fax dialog
box.
Bonjour: The Installable Options pane in the Print & Fax dialog box appears. Click Continue
to return to the Print & Fax dialog box. The EX Print Server name appears in the Printer List.
4 Choose the EX Print Server from the Printer List.
5 Click Options & Supplies, and then click the Driver tab.
6 Specify the installable option settings, and then click OK.
PRINTING FROM MAC OS X 17
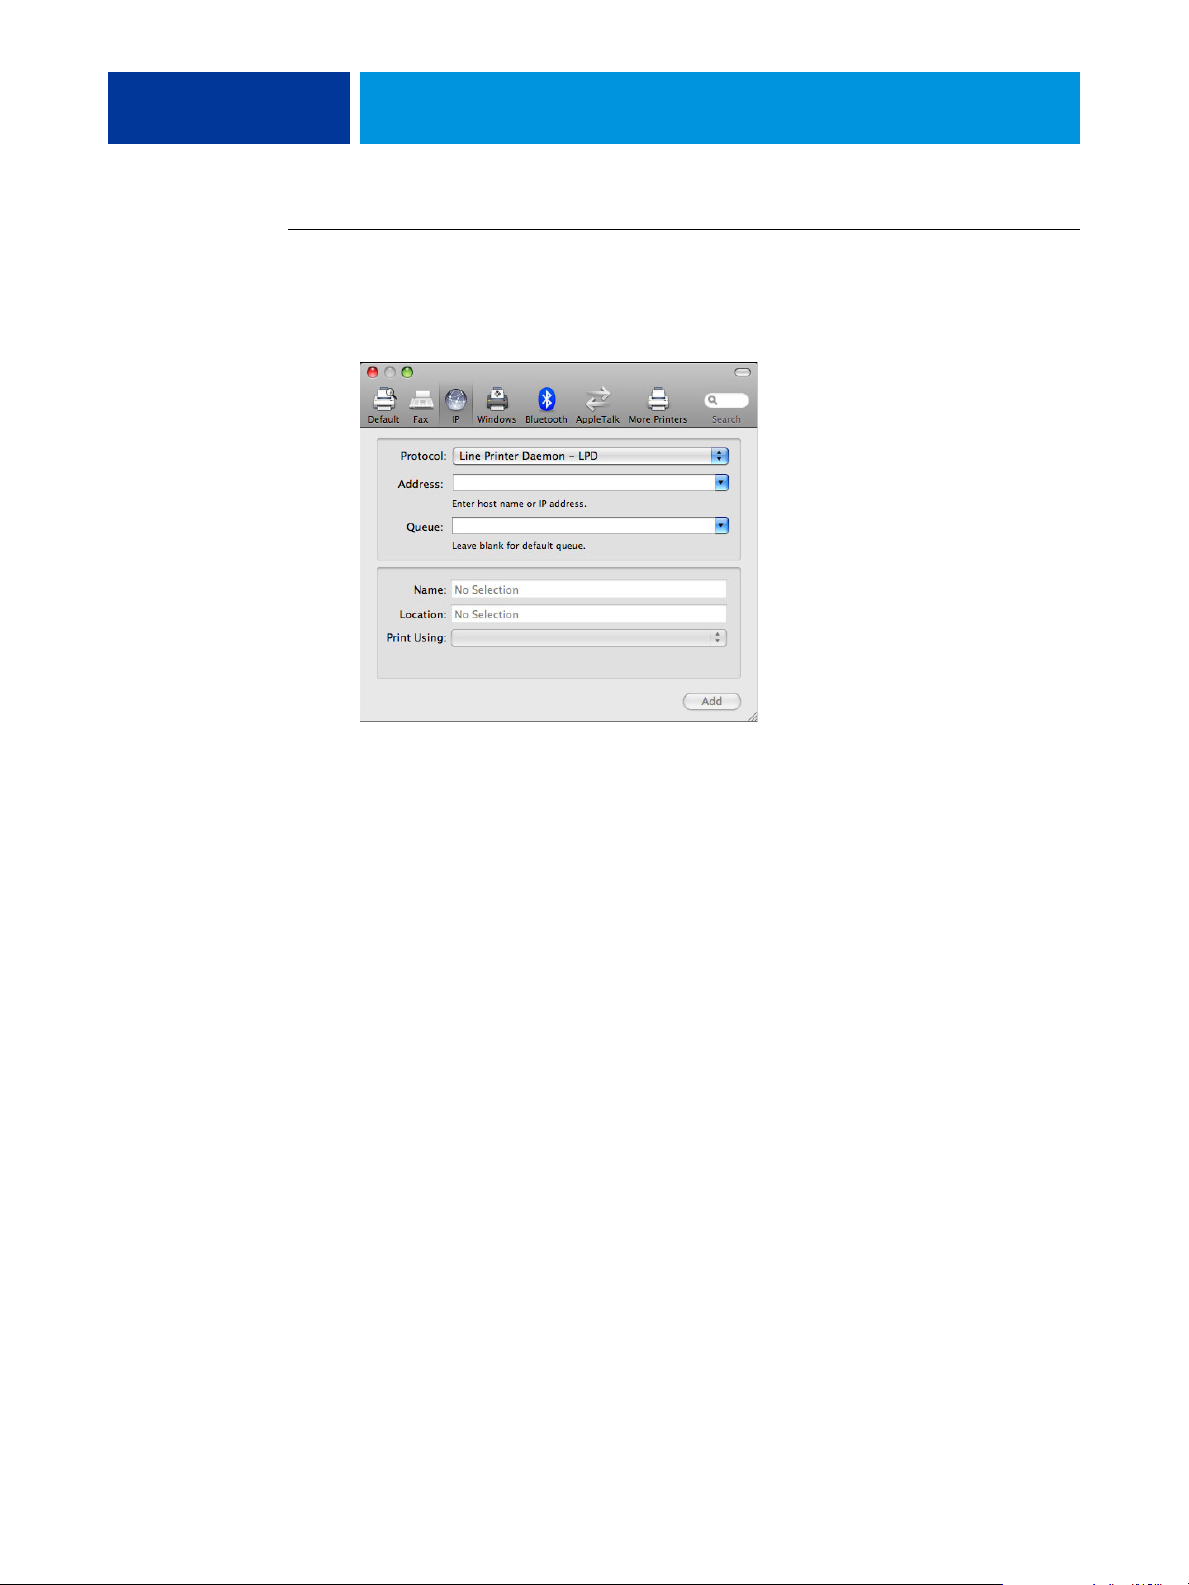
TO ADD A PRINTER WITH THE IP PRINTER CONNECTION
1 Click the IP icon in the dialog box.
The IP pane appears.
2 LPD printing: Select Line Printer Daemon - LPD from the Protocol list, type the EX Print Server
IP address or DNS name in the Address field, and then type the print connection (print, hold
or direct) in the Queue field. Proceed to step 4.
IP printing: Select Internet Printing Protocol - IPP from the Protocol list and type the
EX Print Server IP address or DNS name in the Address field. Proceed to step 3.
The IP address or DNS name appears in the Name field.
3 Type “ipp/” followed by the print connection (print, hold, direct or name of virtual printer)
in lowercase letters in the Queue field.
NOTE: The EX Print Server requires a queue name. Do not leave the Queue field empty.
4 For Mac OS X v10.5.x: Choose “Select a driver to use” from the Print Using menu.
For Mac OS X v10.6.x: Choose “Select Printer Software” from the Print Using menu.
5 Type Xerox in the search filter to narrow the search, and then select the PPD file from the list.
6 Click Add.
The Installable Options pane in the Print & Fax dialog box appears.
7 Click Continue.
The EX Print Server with its IP address appears in the Printer List.
PRINTING FROM MAC OS X 18
8 Choose the EX Print Server from the Printer List.
9 Click Options & Supplies, and then click the Driver tab.
10 Specify the installable option settings, and then click OK.
For information about configuring installable options, see printer driver Help.
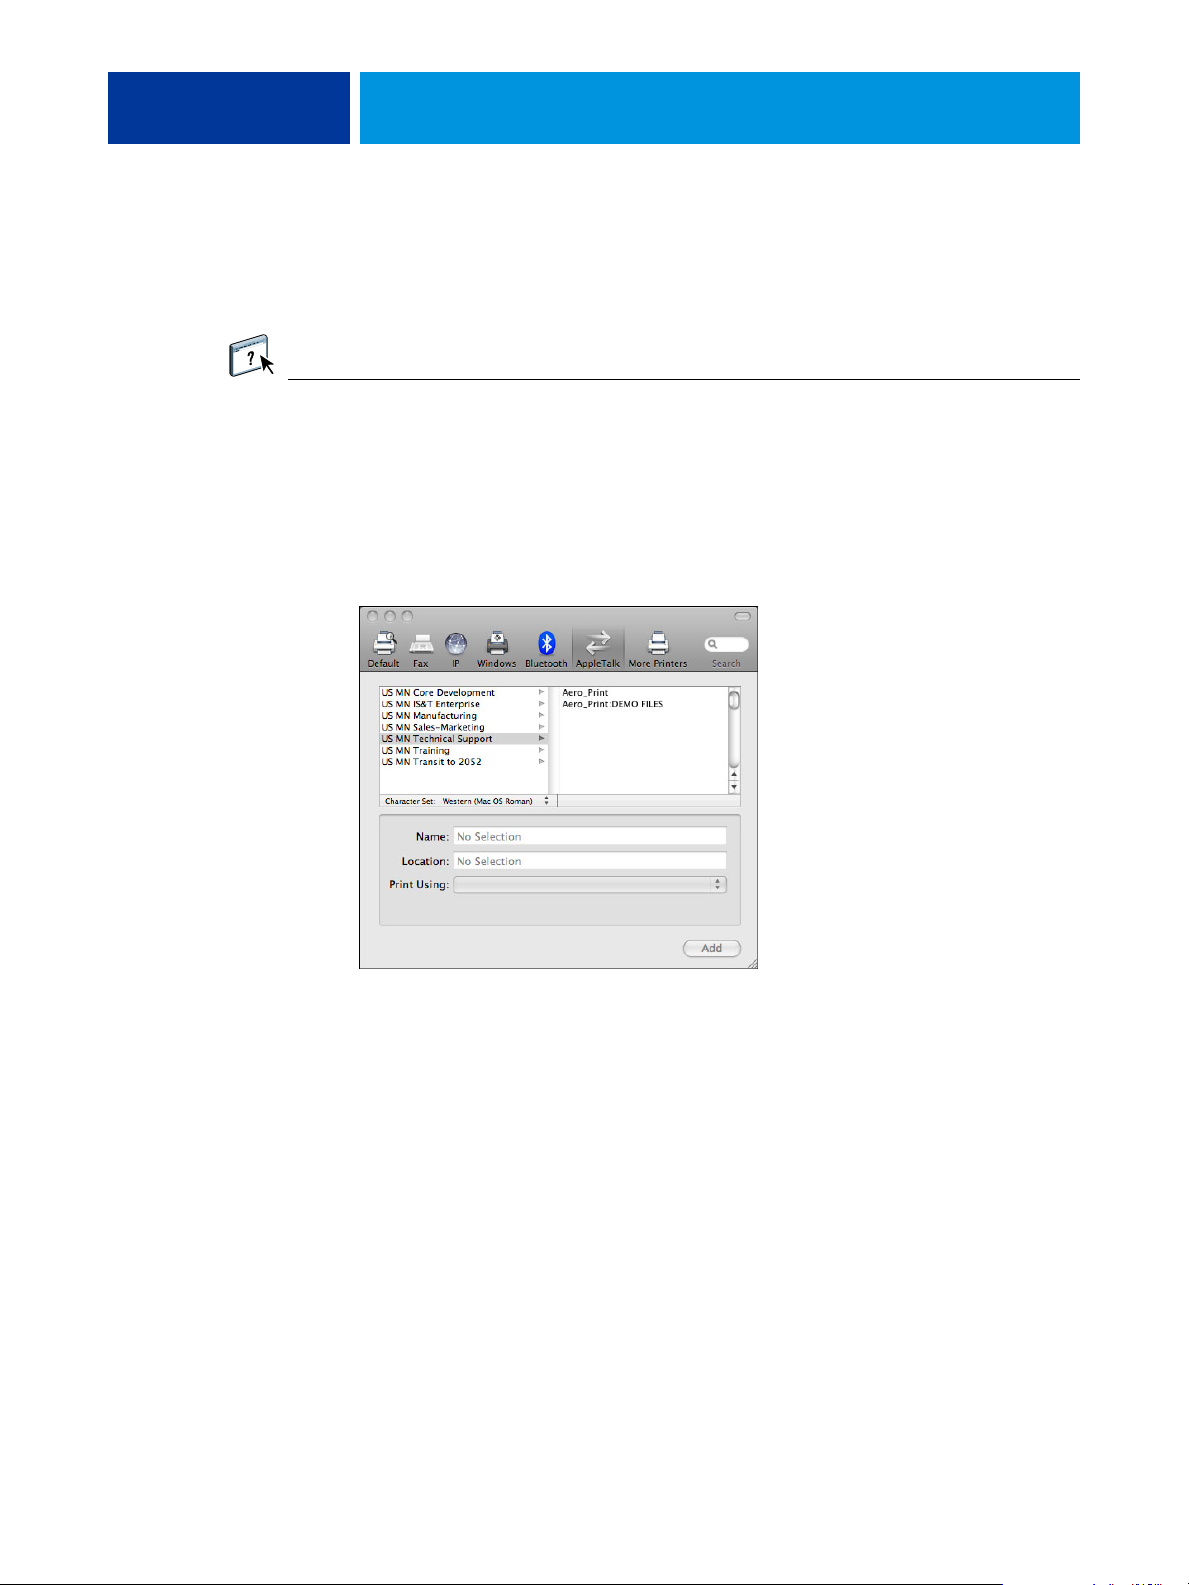
TO ADD A PRINTER WITH THE APPLETALK CONNECTION
NOTE: Use this procedure if the EX Print Server is in a different AppleTalk zone than your
computer. If the EX Print Server is in the same zone, it is displayed as a default following the
procedure on page 16.
1 Click the AppleTalk icon in the dialog box.
The AppleTalk pane appears.
2 Select the AppleTalk zone for the EX Print Server from the list.
The AppleTalk printers in the specified zone are listed. The virtual printers that are
configured at the EX Print Server are also listed.
NOTE: The names of the virtual printers appear as <printer name: virtual printer name> in the
Name list.
3 Select the EX Print Server name in the Printer List and click Add.
The EX Print Server name appears in the Printer List of the Print & Fax dialog box.
4 Choose the EX Print Server from the Printer List.
5 Click Options & Supplies, and then click the Driver tab.
6 Specify the installable option settings, and then click OK.
PRINTING FROM MAC OS X 19
Setting up printing with Mac OS X v10.4.x
Use the following procedures to set up the EX Print Server on a computer with Mac OS X
v10.4.x.
TO SET UP THE EX PRINT SERVER FROM THE PRINT DIALOG BOX
1 Open a file in your application.
2 Choose Print from the File menu.
The Print dialog box appears.
3 Select Add Printer from the Printer list.
In the dialog box that appears, select a printer connection. Use one of the printer connections
in the following table to add a printer.
TO SET UP THE EX PRINT SERVER USING PRINTER SETUP UTILITY
1 In the Finder, choose Utilities from the Go menu.
2 Start Printer Setup Utility.
The Printer List dialog box appears.
3 Click Add.
In the dialog box that appears, select a printer connection. Use one of the printer connections
in the following table to add a printer.
TO SET UP THE EX PRINT SERVER USING PRINT & FAX
1 Choose System Preferences from the Apple menu, and then choose Print & Fax.
The Print & Fax dialog box appears.
2 Click the “+” button to add a printer.
In the dialog box that appears, select a printer connection. Use one of the following
connections to add a printer.
Printing connection See
Default Browser (Bonjour or AppleTalk) page 20
IP Printer page 21
AppleTalk page 22
PRINTING FROM MAC OS X 20
TO ADD A PRINTER WITH THE DEFAULT BROWSER (BONJOUR OR APPLETALK) CONNECTION
NOTE: Bonjour printers are available to Mac OS X v10.4.x computers only if Bonjour is
enabled on the EX Print Server.
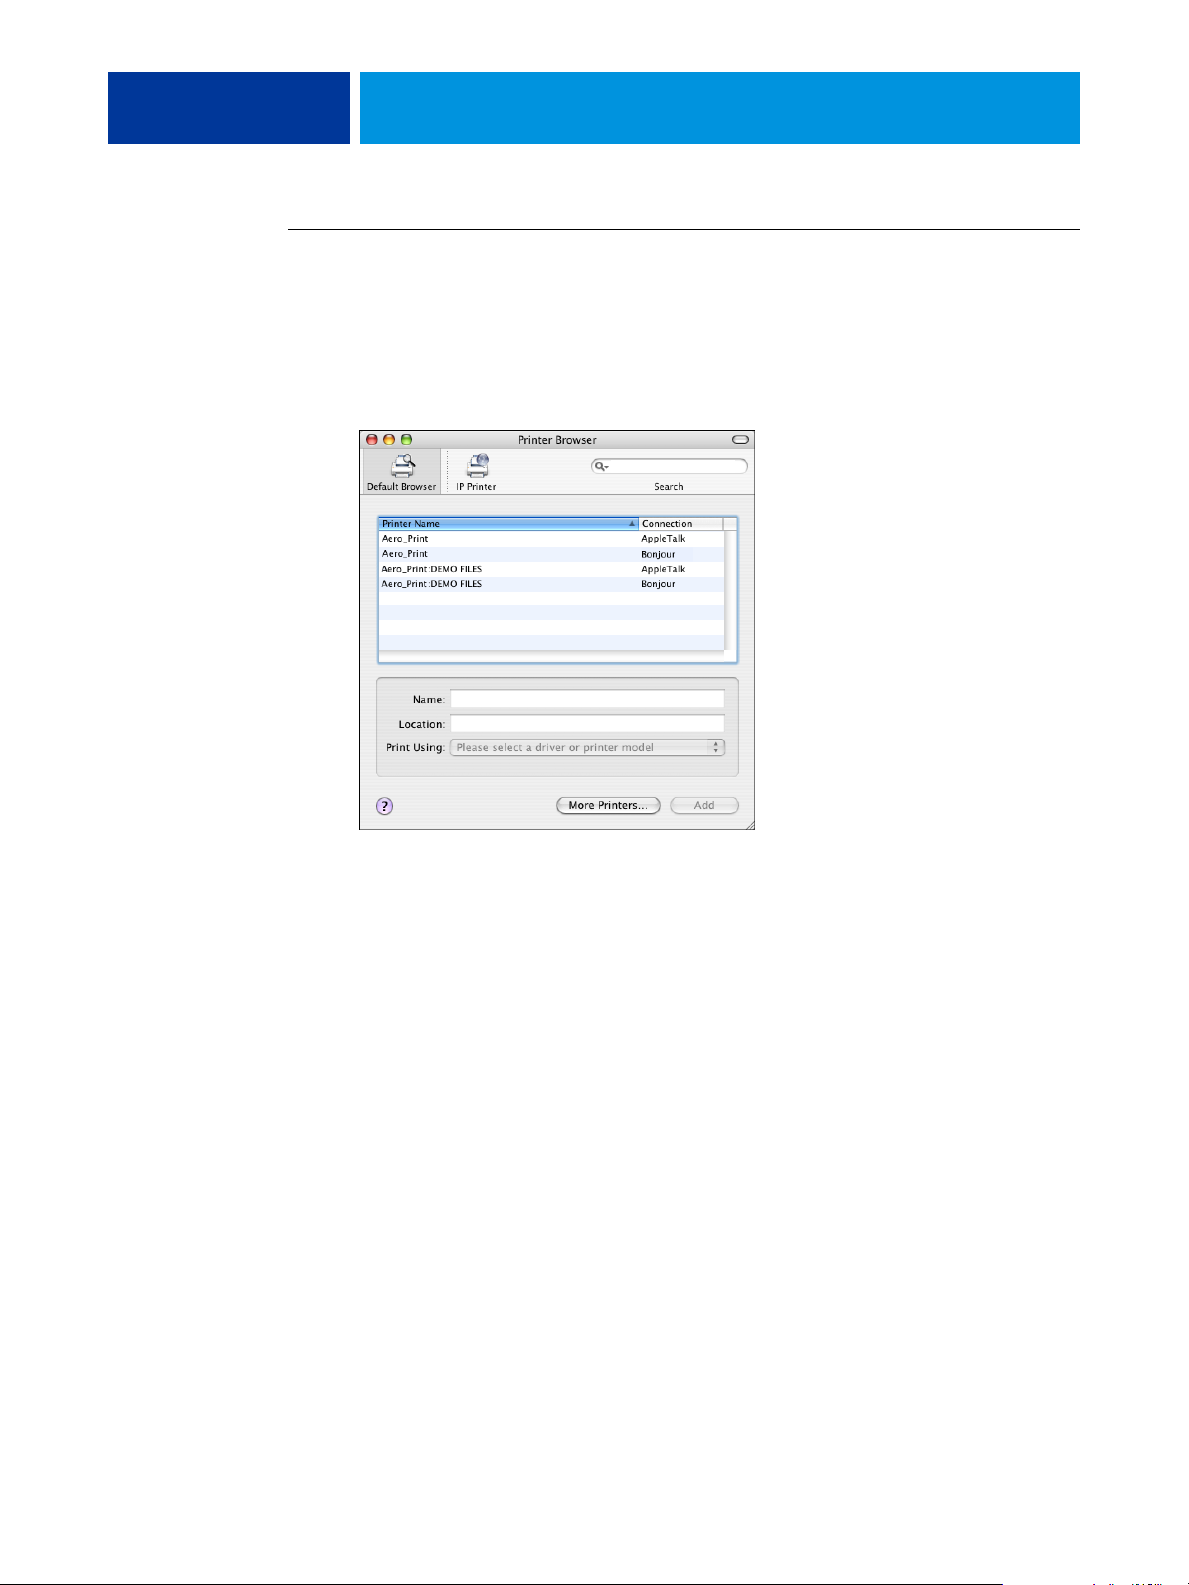
1 Click Default Browser in the Printer Browser dialog box.
The Default Browser pane appears.
The names of printers with default connections are listed. The virtual printers that are
configured at the EX Print Server are also listed.
If the printer is not listed in the Printer Name list, click More Printers.
NOTE: The names of the virtual printers appear as <printer name: virtual printer name> in the
Name list.
2 Select the EX Print Server from the list.
The information about the selected printer appears at the bottom of the Default Browser
pane. The appropriate PPD file for the EX Print Server is automatically selected.
3 Click Add.
AppleTalk:
The EX Print Server name appears in the Printer List of the Print & Fax dialog
box.
Bonjour: The Installable Options pane in the Printer Browser dialog box appears. Click
Continue to return to the Print & Fax dialog box. The EX Print Server name appears in the
Printer List.
PRINTING FROM MAC OS X 21
4 Choose the EX Print Server from the Printer List and click Show Info.
5 In the Printer Info dialog box, choose Installable Options, specify the installable option
settings, and then click Apply Changes.
6 Close the Printer Info dialog box.
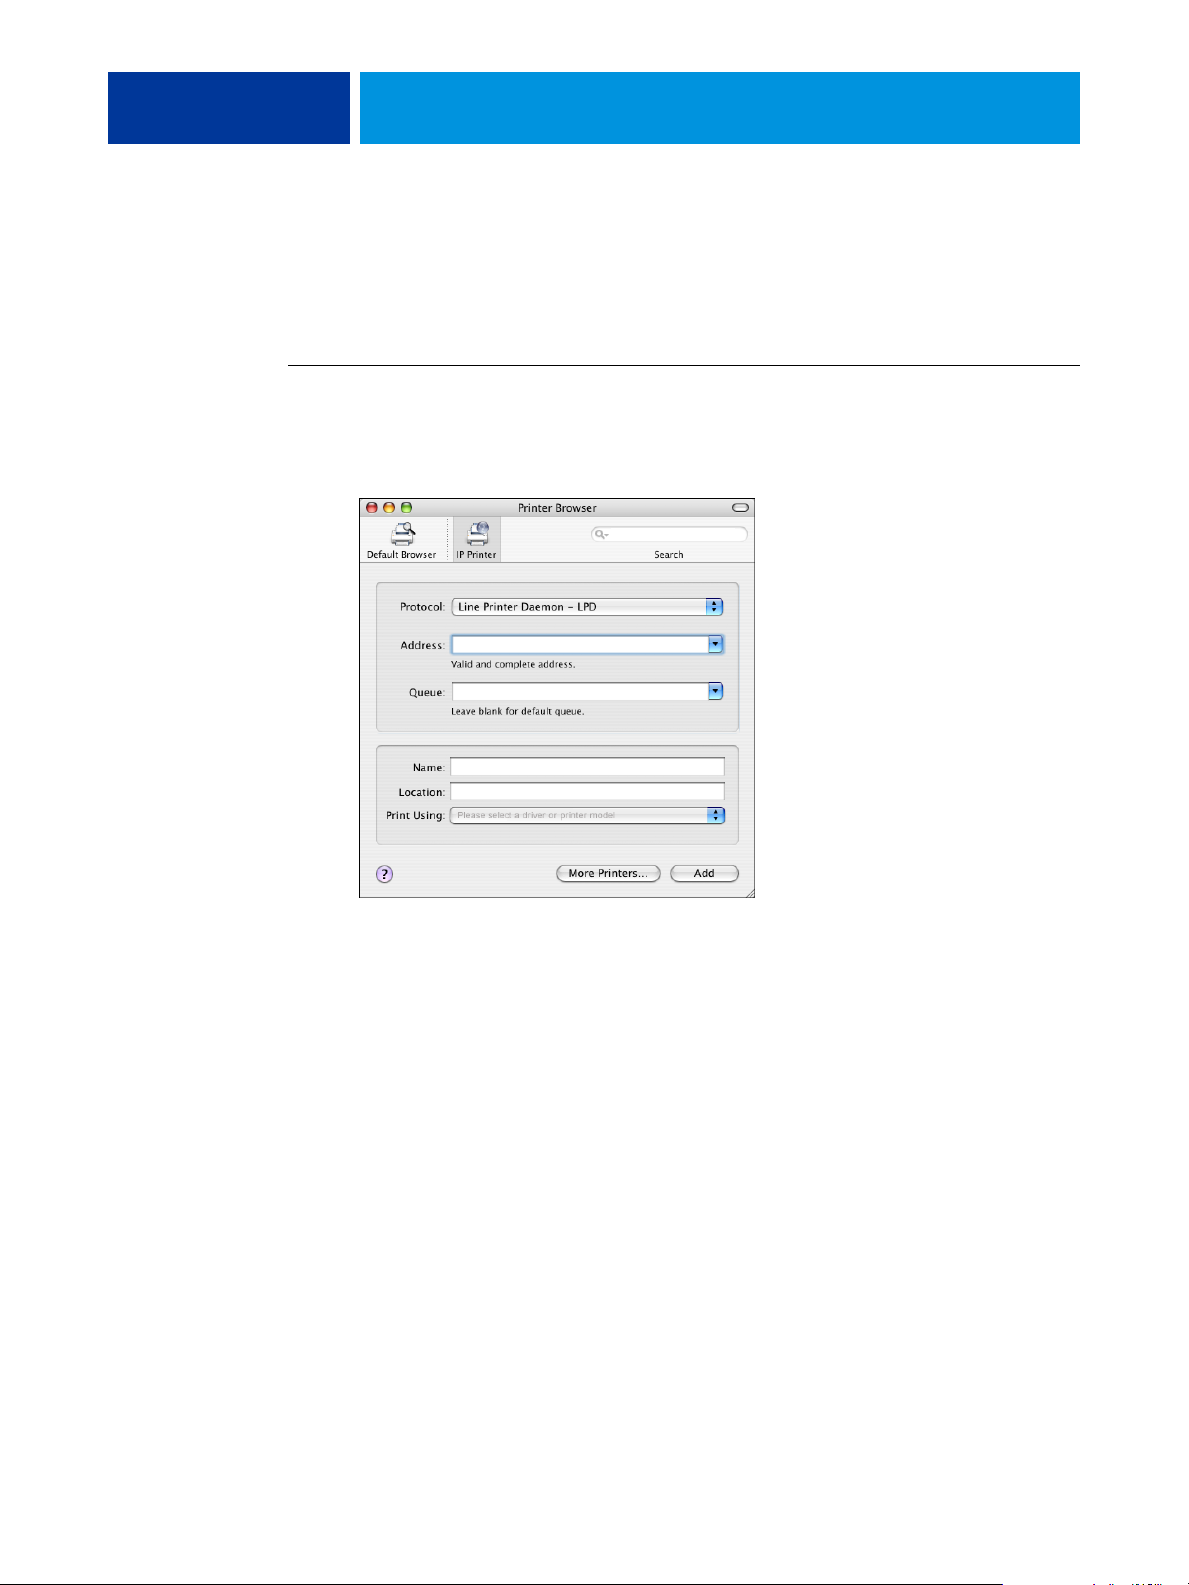
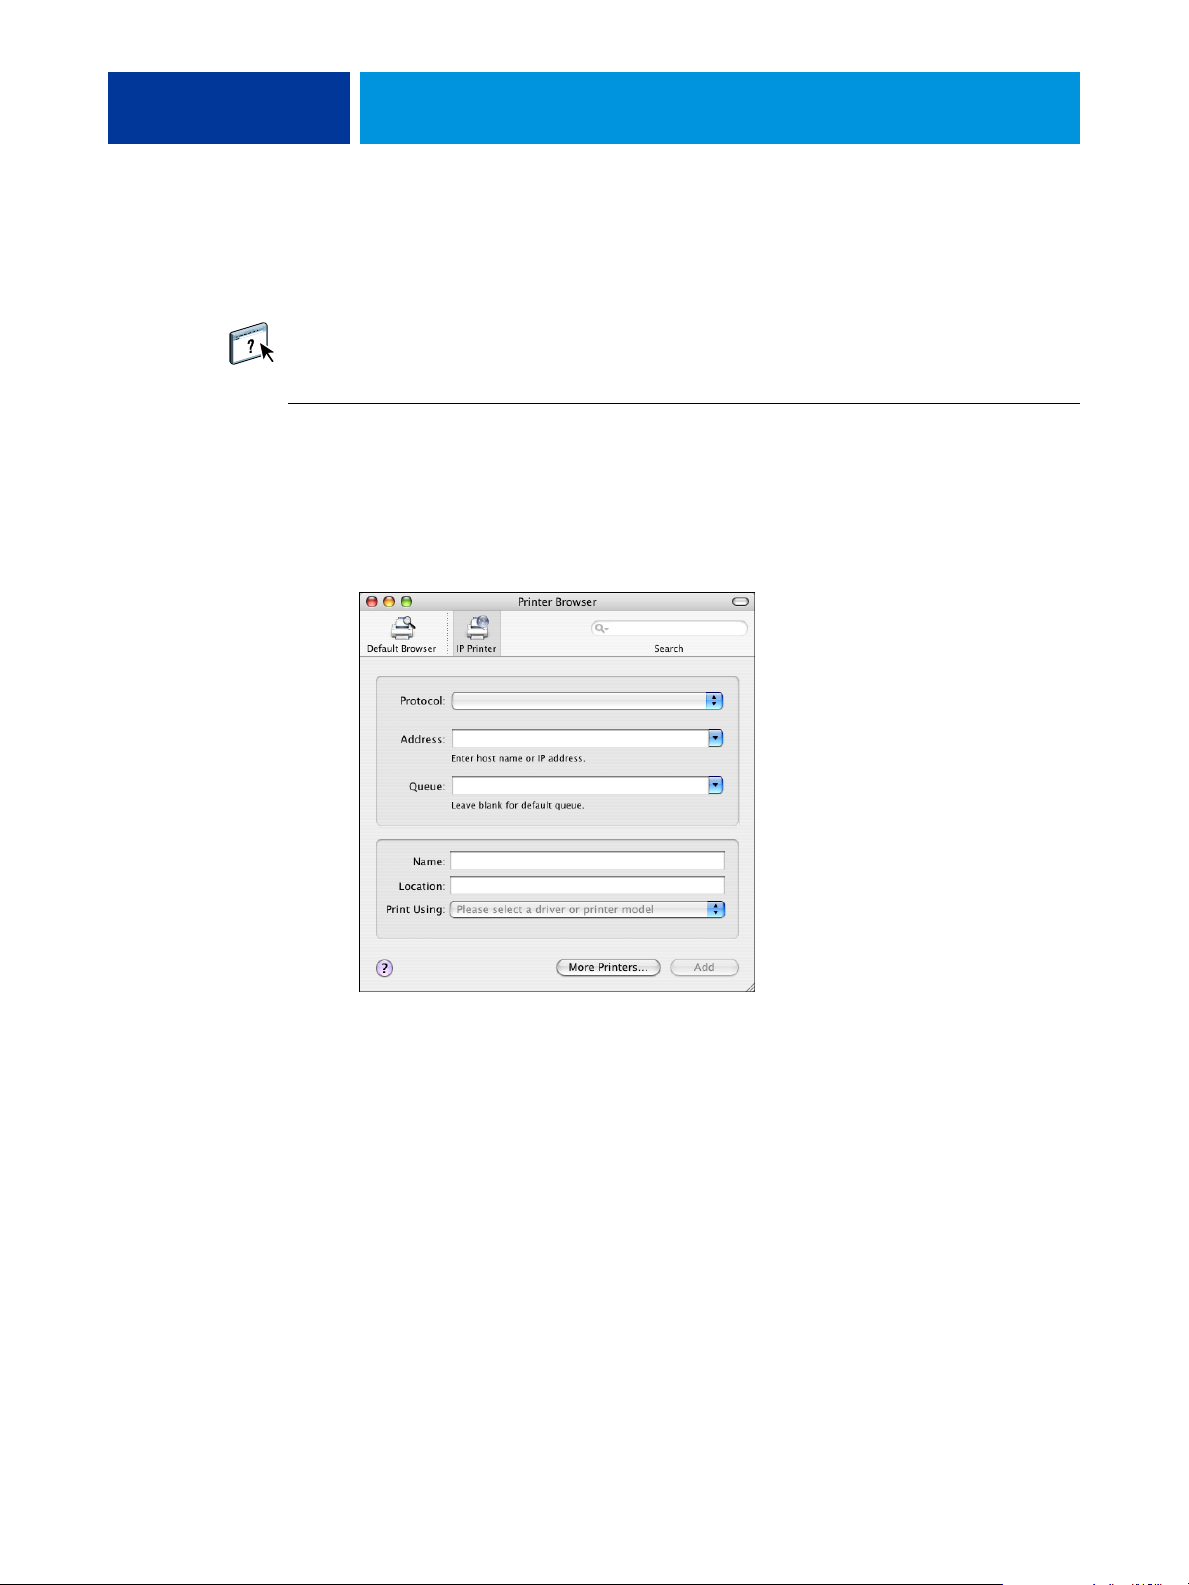
TO ADD A PRINTER WITH THE IP PRINTER CONNECTION
1 Click IP Printer in the Printer Browser dialog box.
The IP Printer pane appears.
2 LPD printing: Select Line Printer Daemon - LPD from the Protocol list, type the EX Print Server
IP address or DNS name in the Address field, and then type the print connection (print, hold
or direct) in the Queue field. Proceed to step 6.
IP printing: Select Internet Printing Protocol - IPP from the Protocol list and type the
EX Print Server IP address or DNS name in the Address field. Proceed to step 3.
The IP address or DNS name appears in the Name field.
3 Type “ipp/” followed by the print connection (print, hold, direct or name of virtual printer)
in lowercase letters in the Queue field.
NOTE: The EX Print Server requires a queue name. Do not leave the Queue field empty.
4 Print Using: Choose the appropriate manufacturer name or model, and then select the file for
the EX Print Server PPD.
5 Click Add.
The Installable Options pane in the Printer Browser dialog box appears.
6 Click Continue.
The EX Print Server with its IP address appears in the Printer List.
PRINTING FROM MAC OS X 22
7 Choose EX Print Server from the Printer List and click Show Info.
8 In the Printer Info dialog box, choose Installable Options, specify the installable option
settings, and then click Apply Changes.
For information about configuring installable options, see printer driver Help.
9 Close the Printer Info dialog box.
TO ADD A PRINTER USING THE APPLETALK CONNECTION
NOTE: Use this procedure if the EX Print Server is in a different AppleTalk zone than your
computer. If the EX Print Server is in the same zone, it is displayed as a default following the
procedure on page 20.
1 Click Default Browser or IP Printer in the Printer Browser dialog box.
2 Click More Printers.
The dialog box with a list of other connections appears.
3 Select AppleTalk from the connection list.
The AppleTalk pane appears.
4 Select the AppleTalk zone for the EX Print Server from the list.
The AppleTalk printers in the specified zone are listed. The virtual printers that are
configured at the EX Print Server are also listed.
NOTE: The names of the virtual printers appear as <printer name: virtual printer name> in the
Name list.
5 Select the EX Print Server name in the Name list and click Add.
The EX Print Server name appears in the Printer List dialog box.

PRINTING FROM MAC OS X 23
6 Choose EX Print Server from the Printer List and click Show Info.
7 In the Printer Info dialog box, choose Installable Options, specify the installable option
settings, and then click Apply Changes.
8 Close the Printer Info dialog box.
Setting up printing with Mac OS X v10.3.9
Use the following steps for setting up the EX Print Server on a computer with Mac OS X
v10.3.9.
TO SET UP THE EX PRINT SERVER FOR PRINTING
1 In the Finder, choose Utilities from the Go menu.
2 Start Printer Setup Utility or Print Center.
The Printer List dialog box appears.
3 Click Add.
In the dialog box that appears, select a printer connection. Use one of the following
connections to add a printer.
Printing connection See
AppleTalk page 24
LPD/LPR page 25
PRINTING FROM MAC OS X 24
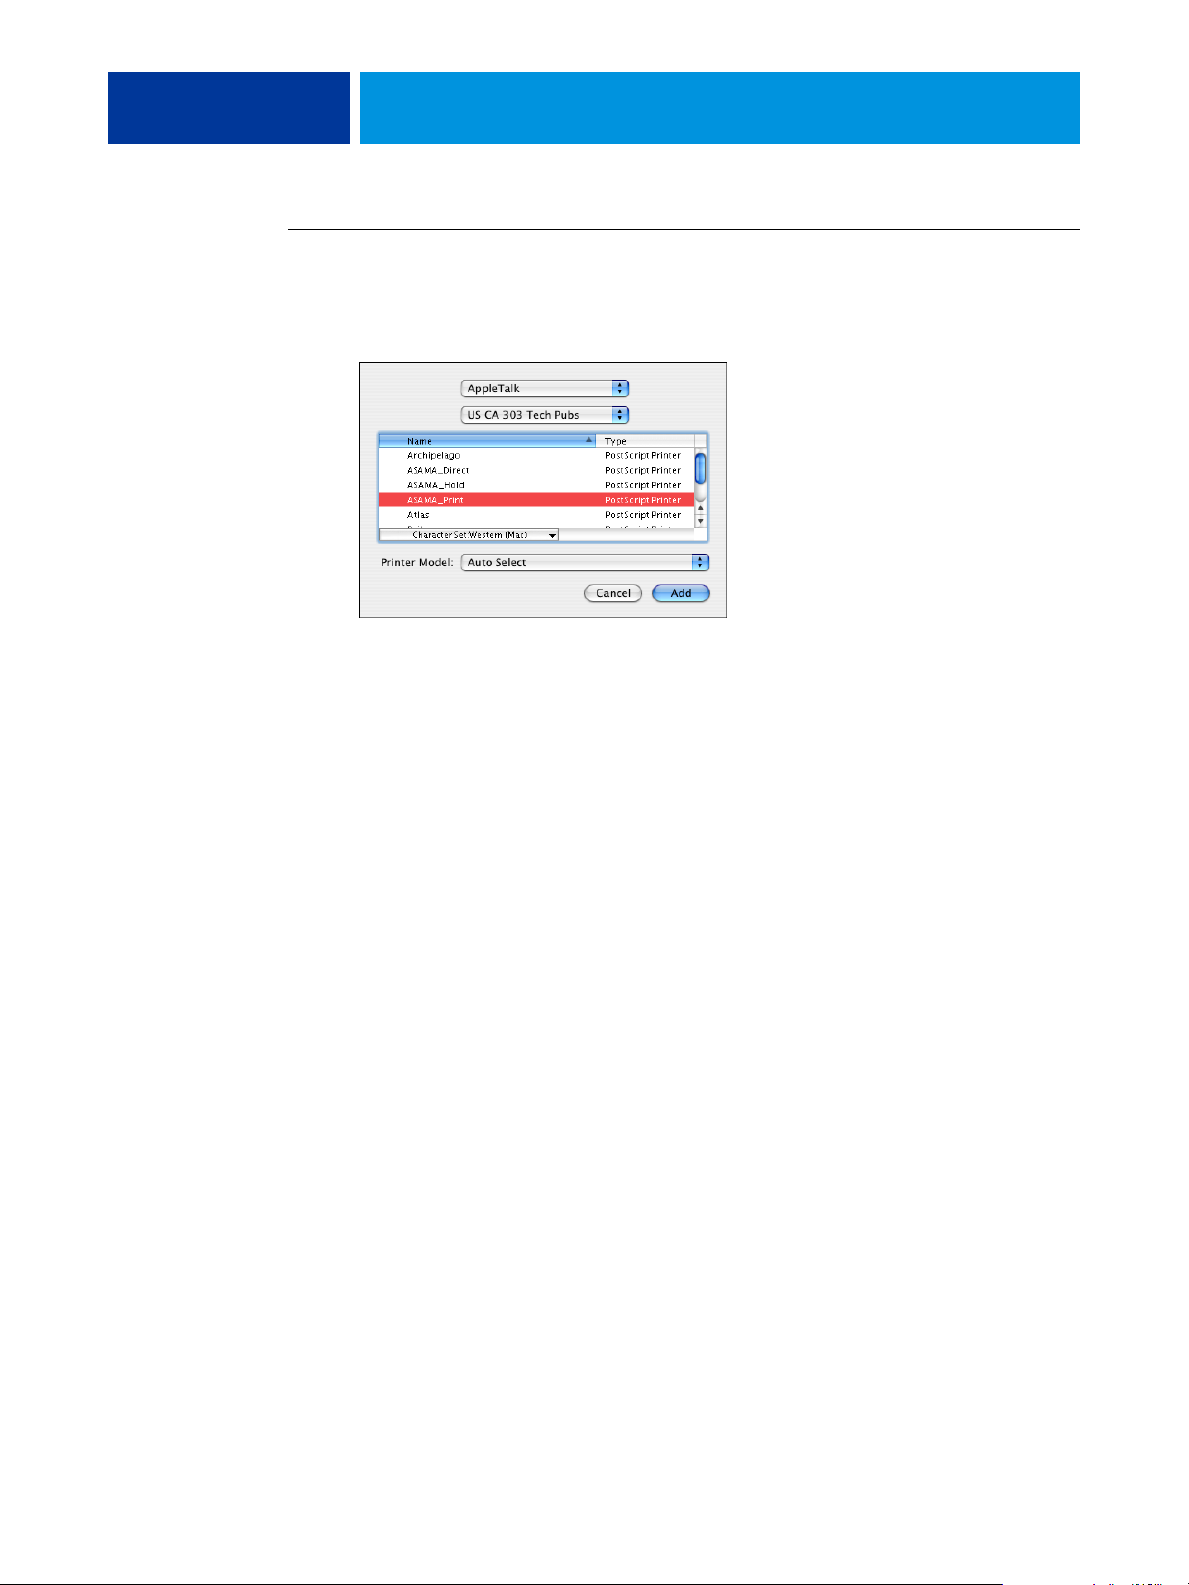
TO ADD A PRINTER WITH THE APPLETALK CONNECTION
1 Select AppleTalk from the list.
The AppleTalk pane appears.
2 Select the AppleTalk zone for the EX Print Server from the zone pop-up list.
The AppleTalk printers in the specified zone are listed. The virtual printers that are
configured at the EX Print Server are also listed.
NOTE: The names of the virtual printers appear as <printer name: virtual printer name> in the
Name list.
3 Select the EX Print Server name in the Name list.
4 Click Add.
The appropriate PPD file for the EX Print Server is automatically selected.
The EX Print Server name appears in the Printer List.
PRINTING FROM MAC OS X 25
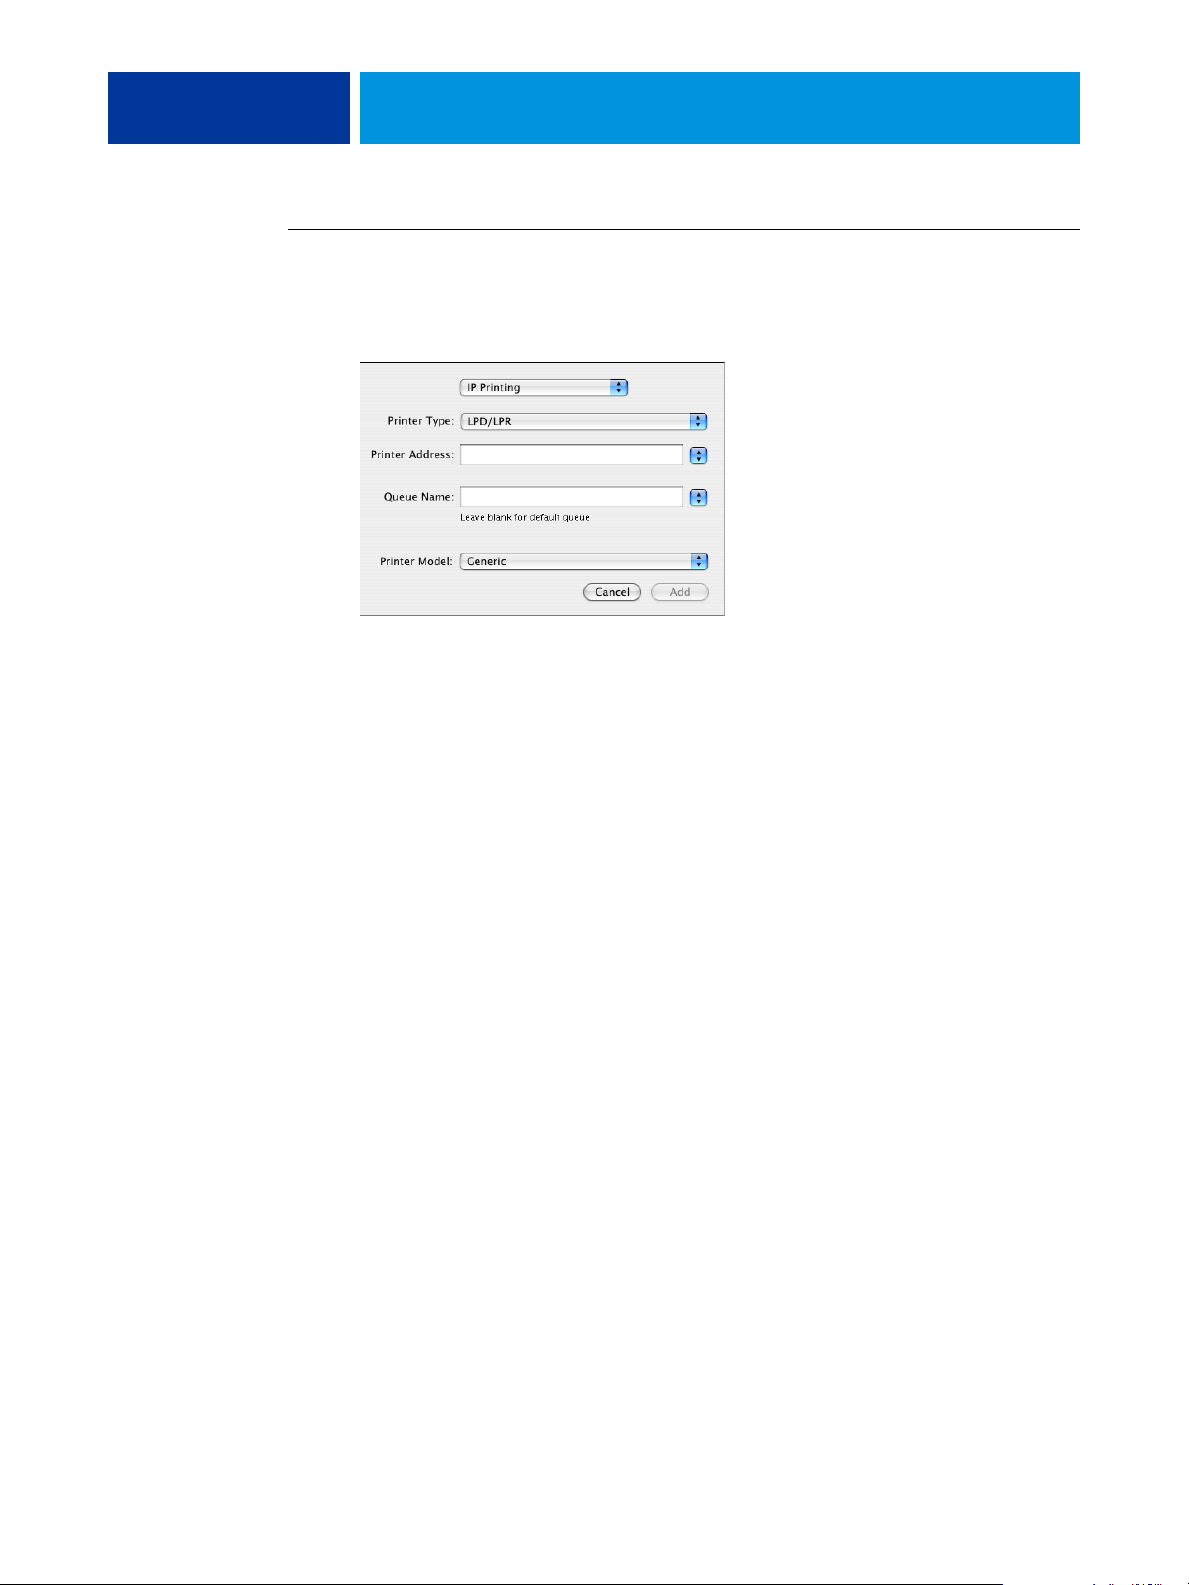
TO ADD A PRINTER WITH THE LPD/LPR CONNECTION
1 Select IP Printing from the list.
The IP Printing pane appears.
2 Select LPD/LPR from the Printer Type list.
3 Type the EX Print Server IP address in the Printer Address field.
4 Type the virtual printer name in the Queue Name field or leave it blank for the default
queue.
5 Select the appropriate model from the Printer Model list.
The Model Name pane appears in the dialog box.
6 Select the PPD file from the Model Name list.
7 Click Add.
The EX Print Server with its IP address appears in the Printer List.

PRINTING FROM MAC OS X 26
Adding a non-English printer on Mac OS X v10.5 and v10.6
When adding a non-English EX Print Server printer on Mac OS X v10.5 and 10.6, you must
navigate to Other to select the correct printer driver for your language.
TO ADD A NON-ENGLISH PRINTER
1 Open the Add Printer dialog box.
The list of available Bonjour printers is displayed.
2 Select the EX Print Server from the list.
3 From the Print Using menu, select Other.
4 On your computer, navigate to Library > Printers > PPDs > Contents > Resources, and open
the language folder that corresponds to the language you are using on your system.
5 Select the EX Print Server from the list.
6 Click Open, then click Add.
Configuring Installable Options
To use the print options for the press and EX Print Server appropriately, you must configure
the EX Print Server from your computer for the options that are installed on the press.
Configure the options manually.
For information about configuring installable options, see printer driver Help.
Using Desktop Printer (optional)
After adding the EX Print Server to the Printer List in Print & Fax or the Printer Setup
Utility, you can create and use the Desktop Printer feature.
For information about the Desktop Printer feature, see printer driver Help.

PRINTING FROM MAC OS X 27
Printing from Mac OS X computers
You can print to the EX Print Server just as you would print to any other printer from a
Mac OS X application. Select the EX Print Server as the current printer in the Printer List
and print the file from within the application. In addition to this method, you can download
files to the EX Print Server using Hot Folders or the Docs WebTool, and print documents
using Command WorkStation (see Utilities).
After you install the EX Print Server printer driver files using the OSX Installer and set up the
EX Print Server for printing, you can print directly from most Mac OS X applications. Using
the appropriate PPD file, you can control the EX Print Server printing features by specifying
print options from the Print dialog boxes. For more information about the EX Print Server
print options, see page 84.
To achieve optimal printing results from specific applications, see Color Printing, Fiery Color
Reference, and Command WorkStation Help.
For the location of each procedure, see the following table.
Procedure See
Selecting the EX Print Server in the Printer List page 28
Setting print options and printing from Mac OS X applications page 30
Defining and printing custom page sizes page 37
Viewing the press status page 37
PRINTING FROM MAC OS X 28
Selecting the EX Print Server in the Printer List
Before you print a job, you must select the EX Print Server from the Printer List. Use the
following procedure to select the EX Print Server as your default printer.
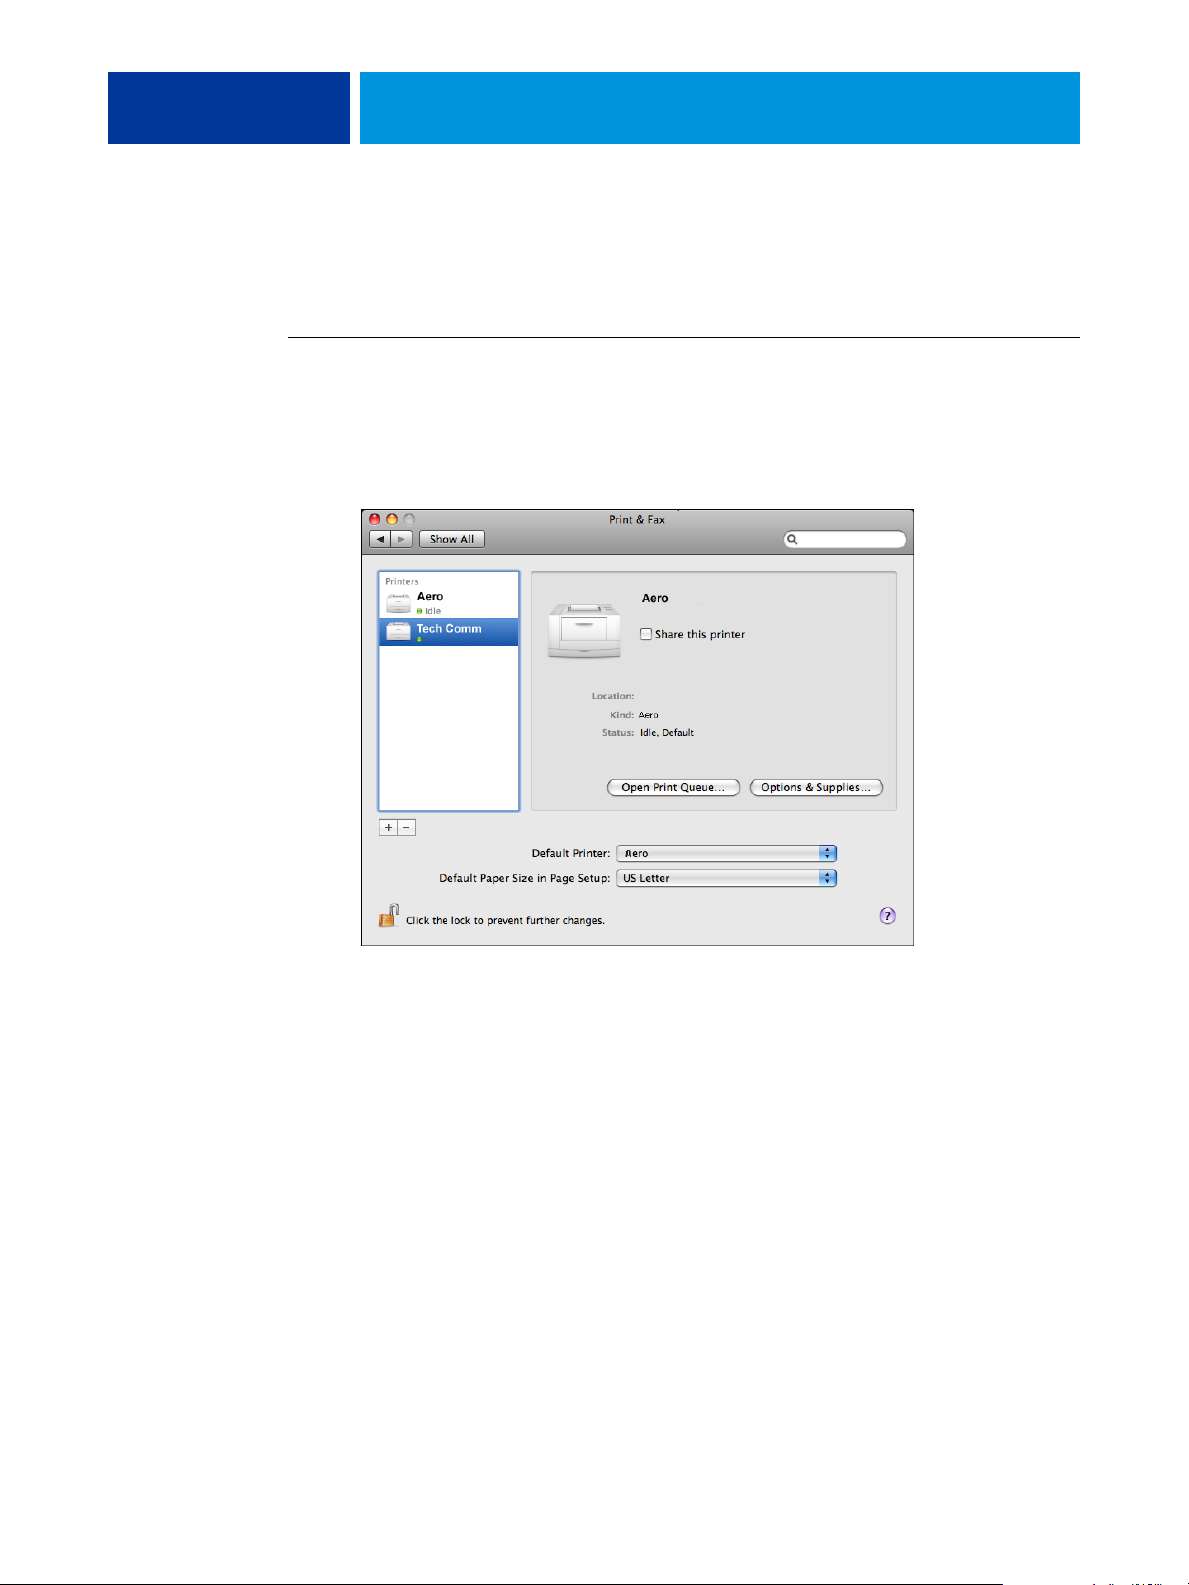
TO SELECT THE EX PRINT SERVER AS THE DEFAULT PRINTER WITH MAC OS X V10.5 OR MAC OS X V10.6
1 Make sure that the EX Print Server is connected to the network and turned on.
2 Choose System Preferences from the Apple menu, and then choose Print & Fax.
The Print & Fax dialog box appears.
The printers that are set up for printing are listed. The virtual printers that are configured at
the EX Print Server and set up for printing are also listed.
3 To make the EX Print Server the default printer, select it from the Default Printer menu.
4 Close the window.
PRINTING FROM MAC OS X 29
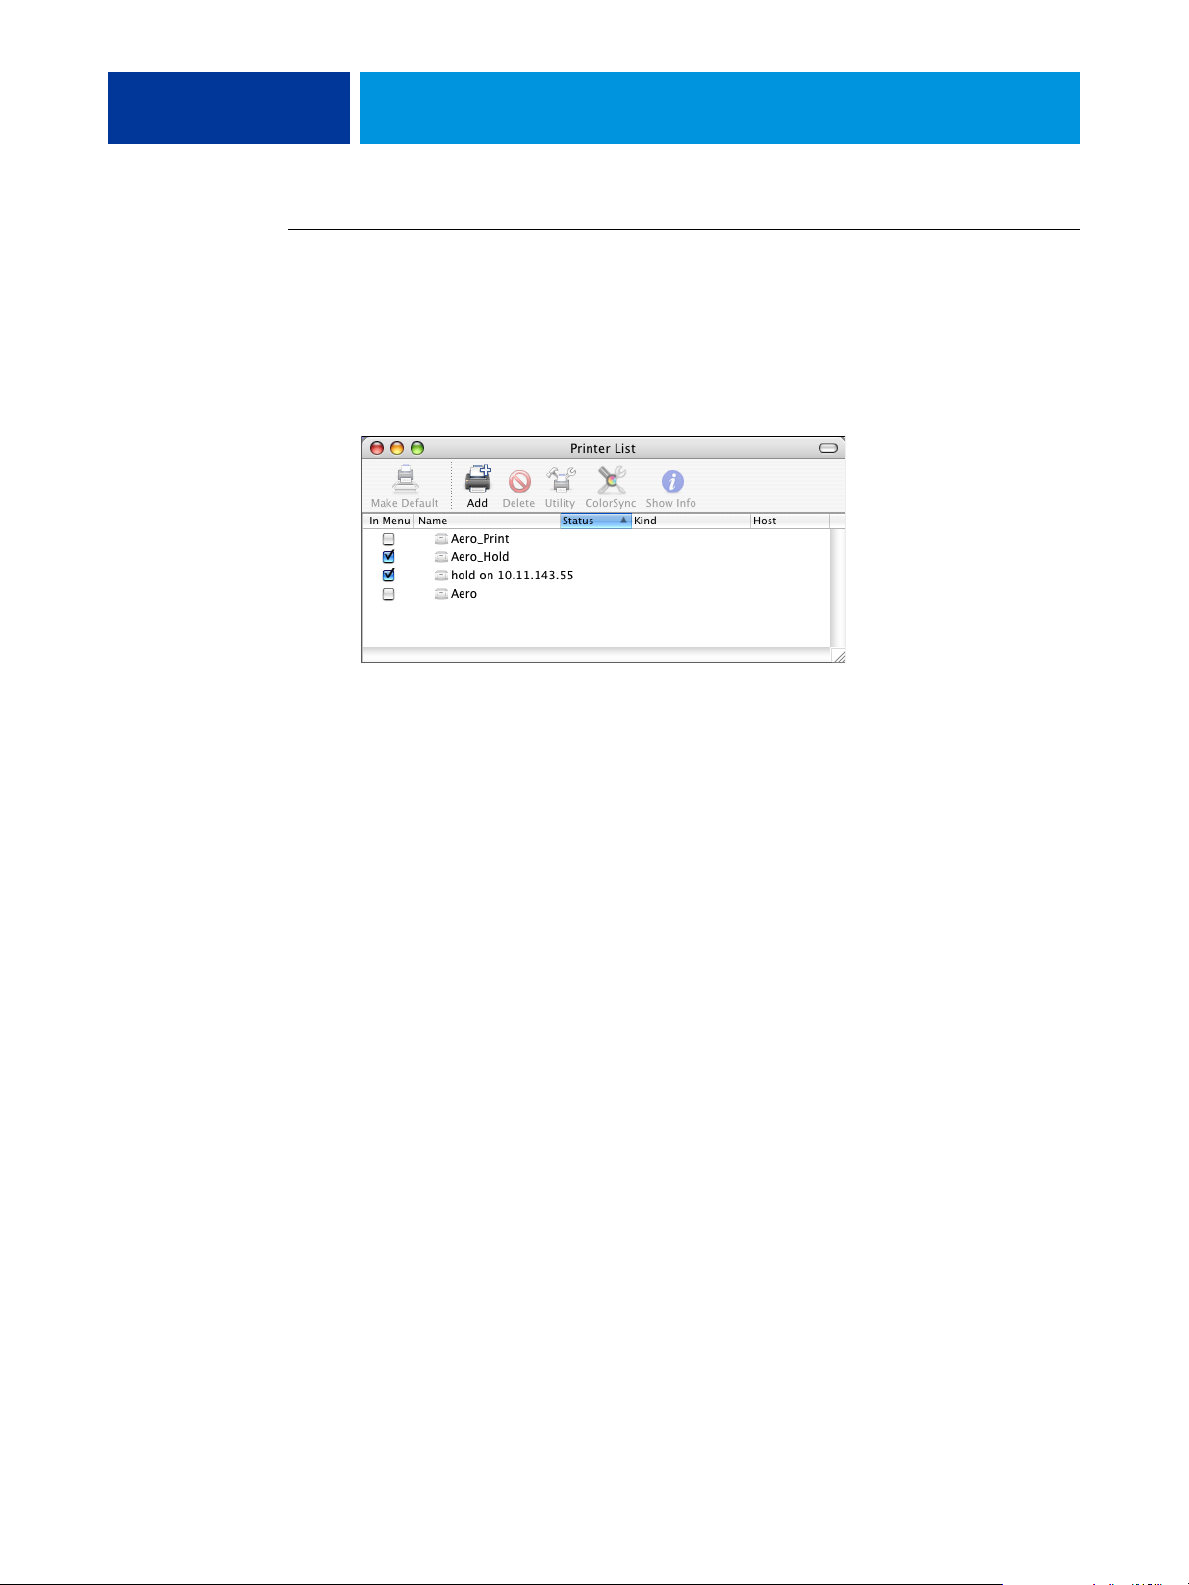
TO SELECT THE EX PRINT SERVER AS THE DEFAULT PRINTER WITH MAC OS X V10.4.X
1 Make sure that the EX Print Server is connected to the network and turned on.
2 In the Finder, choose Utilities from the Go menu.
3 Start Printer Setup Utility.
The Printer List dialog box appears.
The printers that are set up for printing are listed. The virtual printers that are configured at
the EX Print Server and set up for printing are also listed.
4 Select the EX Print Server in the Printer List to specify it as your current printer.
5 Click the Make Default icon.
The EX Print Server is now your default printer.
PRINTING FROM MAC OS X 30
Setting print options and printing from Mac OS X applications
In Mac OS X applications, print options are set from the Page Setup dialog box and the Print
dialog box. For information about specific print options, see Print Options.
NOTE: Some default print options are set by your administrator during Setup. For
information about the current server default settings, contact your administrator or the
operator.
NOTE: The following procedure uses Mac OS X v10.5 illustrations.
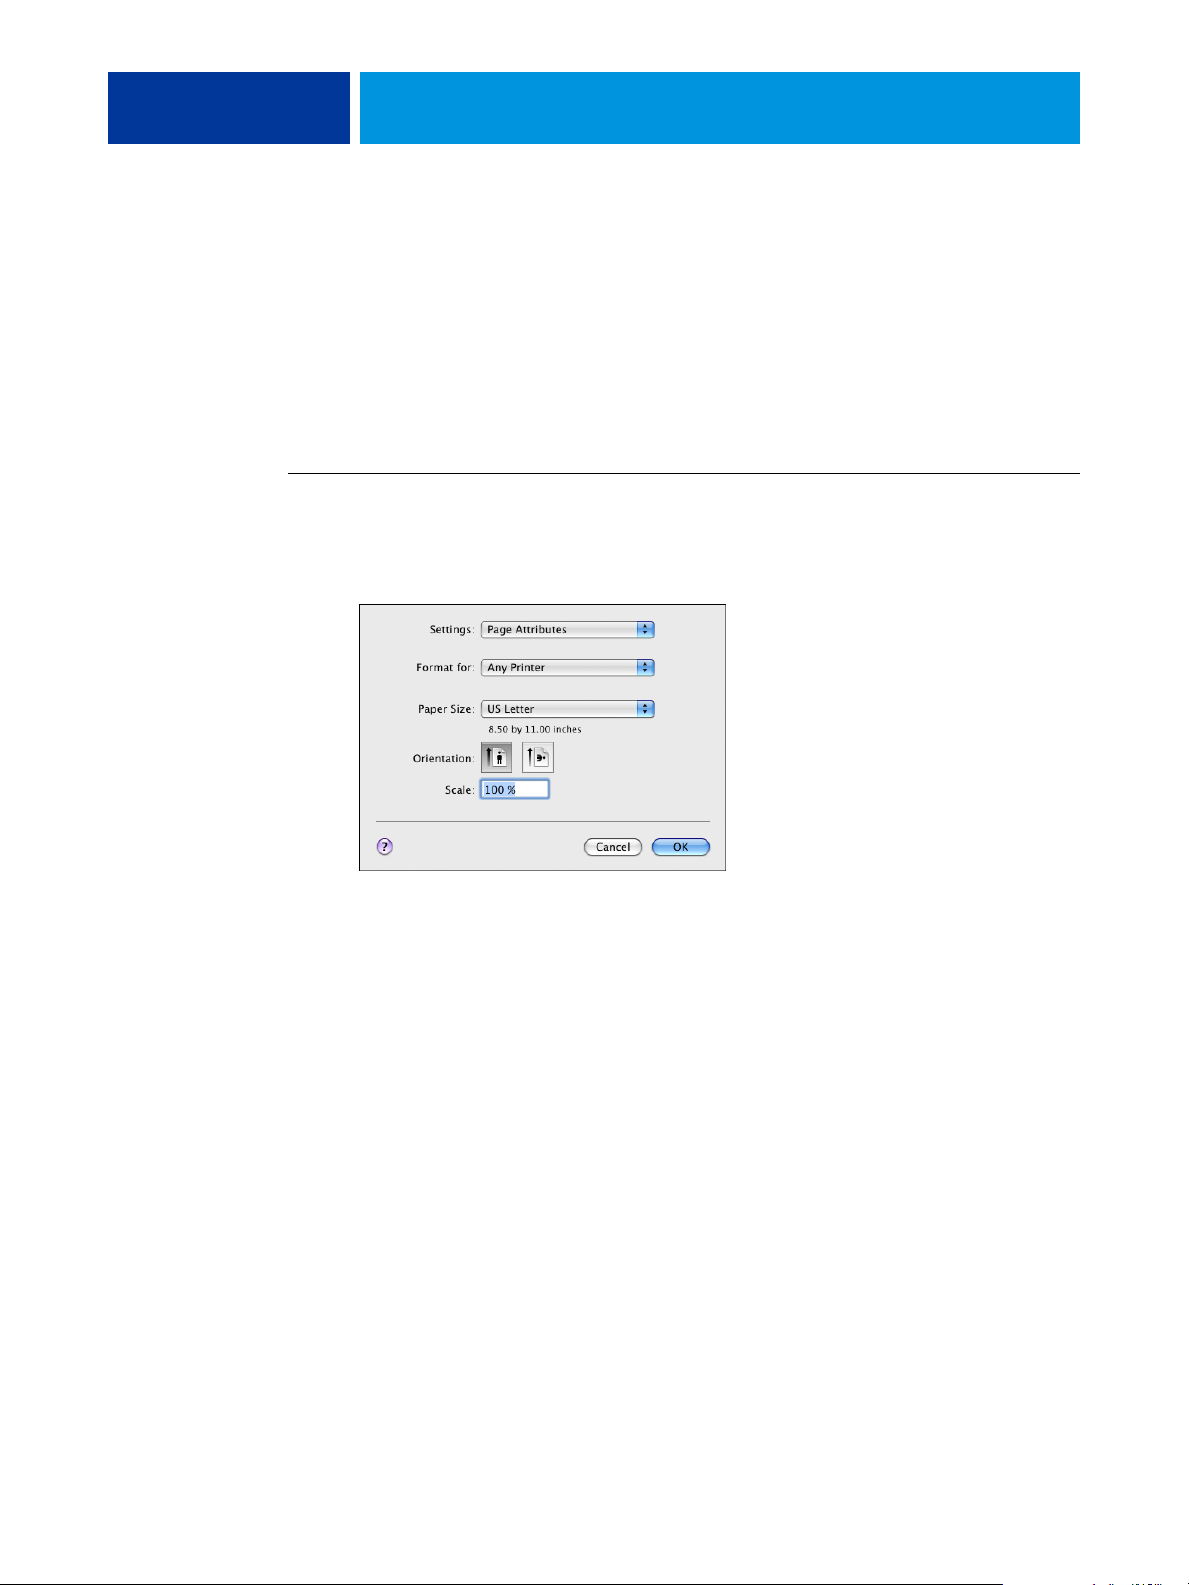
TO SET PRINT OPTIONS AND PRINT FROM MAC OS X
1 Open a file and choose Page Setup from the application’s File menu.
2 For Settings, choose Page Attributes. For Format for, choose the EX Print Server.
The Paper Size option in the Page Setup dialog box is the same as the Document Size print
option on the Fiery Features Media tab. Document Size is the page size defined in your
original application’s Print setup (or Page Setup) dialog box.
The Paper Size print option on the Fiery Features Media tab is the size of the actual sheet of
paper on which your job will print. The default value of the actual paper size is the paper size
set in the Page Setup dialog box.
3 Select the Page settings for your print job.
4 Click OK.
5 Choose Print from the application’s File menu.
6 Choose the EX Print Server as your printer.

1 Fiery Features
2 Customize button
3 Full Properties button
4Presets
5 Two-Way Communication
PRINTING FROM MAC OS X 31
7 Choose Fiery Features from the drop-down list.
4
1
2
5
3
NOTE: For information about Two-Way Communication, see page 37.
For information about using presets, see printer driver Help.
8 Click Customize to specify the options shown in the Quick Access window.
You can select a shortcut from the Available Shortcuts list and add it to the Current Shortcuts
list, as well as remove a shortcut from the Current Shortcuts list. Click OK to save your
changes.
For information about customizing the Quick Access view, see printer driver Help.

PRINTING FROM MAC OS X 32
9 Click Full Properties in the Quick Access pane.
The Job Info tab is displayed in the Printing Preferences dialog box.
10 Type your user name or domain\user name in the User Name field if User Authentication is
enabled on the EX Print Server under User Authentication.
11 Type your local password or domain password in the Password field if User Authentication is
enabled on the EX Print Server under User Authentication.
12 Type information in the Notes 1 and Notes 2 fields under Job Notes.
13 Type instructions to the operator about the job in the Instructions field.
These instructions can be displayed in Command WorkStation, but do not appear in the
Job Log. These instructions can be edited by the operator.
14 Type values for the other fields, as required.
For information about these fields, see page 84.

PRINTING FROM MAC OS X 33
15 Click the Color icon and specify the color profile options for the job.
In the Color Mode area, select a color mode for the job.
NOTE: To view the basic and expert color settings from the EX Print Server in this dialog box,
make sure that Two-Way Communication is enabled. For information about enabling
Two-Way Communication, see printer driver Help.

Two-Way Communication On
PRINTING FROM MAC OS X 34
16 To use basic color management features, such as the press color settings, click Basic Settings.
To revert to the EX Print Server default color settings, click Server Defaults.
To edit advanced color management features, such as RGB/Lab Rendering Intent,
click Expert Settings and proceed to step 17. Otherwise, proceed to step 19.

PRINTING FROM MAC OS X 35
17 To edit the advanced color management features, such as RGB/Lab Rendering Intent, click
Expert Settings.
The Expert Color Settings Advanced Edit dialog box appears.
The advanced edit controls are divided into three tabbed categories: Color Input,
Gray & Black Processing, and Output.
18 After you edit the expert settings, click OK.
To revert to the EX Print Server default color settings, click Server Defaults.
19 Specify the color settings for the print job and click OK.

PRINTING FROM MAC OS X 36
20 Choose other printer-specific options.
These print options are specific to the EX Print Server and the press. These options override
settings in EX Print Server Printer Setup but can be changed from Command WorkStation.
If you choose Printer’s default, the job prints according to the settings specified in Setup.
For more information about these options and overrides, see Print Options.
Some print options that are selectable from an application or are provided by the Mac OS are
similar to the print options that are specific to the EX Print Server and the press. In these
cases, use the print options specific to the EX Print Server and the press that appear in the
Fiery Features menu. The application may not set up the file properly for printing on the
EX Print Server, resulting in unexpected finishing, printing errors, or longer processing time.
When you print to your selected press, make sure to clear the Collated check box in the
Copies & Pages pane of the Mac OS X v10.4 or earlier printer driver or in the main pane of
the Mac OS X v10.5 or later printer driver.
If you select an invalid setting or combination of settings when printing a document, no error
message appears. For example, you may be able to select duplex printing on transparency
media. Invalid settings and combinations are ignored by the EX Print Server.
21 Click the VDP icon to specify variable data printing options.
For more information about VDP print options, see page 103.

PRINTING FROM MAC OS X 37
P
Land
22 Click the Stamping icon to specify a watermark for the print job.
For more information about watermarks, see printer driver Help.
23 Click the Printer icon to view press status.
For more information about monitoring press status, see printer driver Help.
24 Click the remaining print option icons to specify the appropriate settings for the print job
and click OK.
25 From your application, click Print to send your print job.
Defining and printing custom page sizes
With custom page sizes, you define the dimensions of a printed page. After you define a
custom page size, you can use it from within an application without redefining it each time
you print. When you create custom page sizes, specify Width dimensions to correspond with
the shorter side of your job and specify Height dimensions to correspond with the longer side
of your job. Set custom page sizes in this way, regardless of the orientation settings in the
application.
ortrait
Height
Width
NOTE: Custom page sizes are not supported with Imposition jobs.
Width
scape
Height
For information about defining and printing custom pages sizes, see printer driver Help.
Viewing the press status
If you enabled a TCP/IP network, you can retrieve press status and color settings from the
EX Print Server and display them in the printer driver using the Two-Way Communication
option. The press status includes the current paper and dry ink levels. You can set the color
settings on the EX Print Server using Command WorkStation. For more information about
color print options, see Color Printing or Command WorkStation Help.
For information about enabling Two-Way Communication, see printer driver Help.

PRINTING FROM WINDOWS 38
PRINTING FROM WINDOWS
To set up the EX Print Server as a press on a Windows computer, install the printer driver files
that correspond to your press and set up the EX Print Server for printing. Printer drivers
provide a way to communicate information about print jobs between your applications, the
EX Print Server, and the press.
For the location of each procedure, see the following table.
Procedure See
Installing Windows printer drivers page 38
Setting up the EX Print Server for printing page 52
Printing from Windows computers page 60
Installing Windows printer drivers
Installing printer drivers and printer description files is the first step in setting up the EX Print
Server as a PostScript printer.
You can install printer drivers as follows:
• From the EX Print Server through Point and Print using SMB printing
• From WebTools, using the Downloads tab to download the printer driver files before
installing the printer driver
NOTE: WebTools is available if the administrator has enabled Internet access to the EX Print
Server.
• From the EX Print Server by downloading the printer driver files over the network before
installing the printer driver
• From the User Software DVD
NOTE: Windows Vista and Windows 7 have a User Account Control (UAC) feature. You
must be the administrator or a user with administrator privileges to install printer drivers.
NOTE: If the EX Print Server printer driver is already installed, you must uninstall it before
you install a new driver (see “Uninstalling printer drivers” on page 51).

PRINTING FROM WINDOWS 39
For the location of each procedure, see the following table.
Procedure See
Installing printer drivers by Point and Print page 40
Downloading printer drivers using WebTools page 43
Downloading printer drivers from the EX Print Server page 44
Installing printer drivers from the User Software DVD page 45
Installing and connecting to a virtual printer page 48
Uninstalling printer drivers page 51

PRINTING FROM WINDOWS 40
Installing printer drivers by Point and Print
SMB printing (also known as Windows or WINS printing) allows you to install PostScript
printer drivers on your computer from the EX Print Server using Point and Print, and print
to a particular connection (Print queue, Hold queue, Direct connection, or Virtual Printer).
Each connection (print, hold, direct or virtual printer) requires a separate installation. Repeat
the procedure for each connection.
When you install the printer driver using Point and Print, you cannot configure installable
options manually. The installed options are displayed as the EX Print Server configuration in
the printer driver. For more information, see “Configuring installable options” on page 59.
BEFORE YOU BEGIN
Ask your administrator to do the following in Setup on the EX Print Server:
• Assign the EX Print Server a valid IP address.
Ask your administrator for the IP address or DNS name required in the following procedure.
• Configure the EX Print Server for SMB printing.
NOTE: SMB printing is referred to as Windows Printing in Setup and on the Configuration
page.
For more information, see Configuration and Setup or Configure Help.

PRINTING FROM WINDOWS 41
TO SET UP SMB PRINTING ON WINDOWS COMPUTERS
1 Windows 2000/XP/Server 2003: Right-click Network Neighborhood or My Network Places, and
select Find Computer or Search for Computers.
Windows Vista/Server 2008: Click Start, choose Control Panel, double-click Network and
Sharing Center, and then click the View computers and devices link.
Windows 7: Click Start, choose Control Panel, choose Network and Internet, choose Network
and Sharing Center, and then click the View network computers and devices link.
2 Windows 2000/XP/Server 2003: Type the name or IP address of the EX Print Server and click
Search Now or Search.
Windows Vista/Windows 7: Type the name of the EX Print Server in the Search field and click
Enter.
Windows Server 2008: Type the name or \\IP address of the EX Print Server in the Search
field and click Enter.
If you cannot locate the EX Print Server, contact your EX Print Server administrator.
3 Double-click the name of the EX Print Server to display enabled print connections.
NOTE: For a description of each print connection, see Configuration and Setup.
4 Double-click the connection that you want to set up (print, hold, direct, or virtual printer).
The files are installed on your computer.
NOTE: You may receive a message that you are about to connect to a printer on the EX Print
Server, which will automatically install a printer driver on your machine. Click Yes to
continue.
5 Windows 2000: Click Start, choose Settings, and then choose Printers.
Windows XP: Click Start and choose Printers and Faxes.
Windows Server 2003: Click Start, choose Control Panel, and then choose Printers and Faxes.
Windows Vista: Click Start, choose Control Panel, and then double-click Printers.
Windows Server 2008: Click Start, choose Control Panel, and under Classic View, double-click
Printers.
Windows 7: Click Start and choose Devices and Printers.
The printer is displayed in the Printers or Printers and Faxes window.
6 Right-click the EX Print Server icon and choose Properties.

PRINTING FROM WINDOWS 42
7 Click Print Test Page on the General tab.
If the Test Page prints successfully, you are ready to print from the computer.
8 Repeat the previous steps for the other connections that you want to set up.

PRINTING FROM WINDOWS 43
Downloading printer drivers using WebTools
WebTools allows you to download installers for printer drivers to your computer directly
from the EX Print Server.
Download the printer driver files from the EX Print Server using WebTools and then follow
the procedures on page 45 to install the printer driver. Before you download the printer driver
files, the administrator must set specific EX Print Server options in Setup. You must also
prepare each client computer to communicate with the EX Print Server over the Internet
or intranet.
For more information about Setup, see Configuration and Setup.
For more information about setting up and starting WebTools, see Utilities.
TO DOWNLOAD PRINTER DRIVER FILES WITH WEBTOOLS
1 Start your Internet or intranet browser and type the DNS name or IP address of the EX Print
Server.
2 Click the Downloads tab.
3 Click the link for the item that you want to install.
For Windows printer drivers, click the Printer Files link under the Windows heading.
4 If a dialog box prompts you to open the file or save it to disk, choose to save it
to disk.
5 Browse to the location where you want to save the PRNTDRVE.EXE file and click Save.
The file is downloaded from the EX Print Server. This compressed file is an archive that
contains multiple files.
6 Double-click the PRNTDRVE.EXE file to extract the files.
Depending on your operating system, you might be prompted to select a location to extract
the files to.
Follow the instructions for your operating system to install the printer driver. The procedures
are the same as for installing from the DVD, except that after you click Have Disk, you
browse to the location where you extracted the files, rather than to the DVD.
For instructions on installing the Windows printer driver, see “To install and complete the
print connection for Windows” on page 45.
For more information, see WebTools Downloads Help.

PRINTING FROM WINDOWS 44
Downloading printer drivers from the EX Print Server
You can download printer drivers files to your computer directly from the EX Print Server
over the network, and then install them following the procedures in “Installing printer drivers
from the User Software DVD” on page 45.
TO DOWNLOAD PRINTER DRIVER FILES FROM THE EX PRINT SERVER
1 Windows 2000/XP/Server 2003: Right-click Network Neighborhood or My Network Places,
and select Find Computer or Search for Computers.
Windows Vista/Server 2008: Click Start, choose Control Panel, double-click Network and
Sharing Center, and then click the View computers and devices link.
Windows 7: Click Start, choose Control Panel, choose Network and Internet, choose Network
and Sharing Center, and then click the View network computers and devices link.
2 Windows 2000/XP/Server 2003: Type the name or IP address of the EX Print Server and click
Search Now or Search.
Windows Vista/Windows 7: Type the name of the EX Print Server in the Search field and click
Enter.
Windows Server 2008: Type the name or \\IP address of the EX Print Server in the Search
field and click Enter.
If you cannot locate your EX Print Server, contact your administrator.
3 Double-click the name of the EX Print Server.
A folder called PC_User_SW is displayed along with the enabled print connections.
4 Double-click the PC_User_SW folder and browse to the English\Prntdrvr\Ps_drvr folder.
Follow the instructions for your operating system to install the printer driver. The procedures
are the same as for installing from the DVD, except that after you click Have Disk, you
browse to the Win_2K_XP_VISTA folder on your desktop, rather than to the DVD.

PRINTING FROM WINDOWS 45
Installing printer drivers from the User Software DVD
The following procedures describe installing the printer driver from the User Software DVD.
To install the printer driver on a Windows Server 2003/Server 2008 or Windows 7 computer,
select the same PPD (oemsetup.inf) file as for Windows 2000/XP/Vista, described in the
following procedure.
NOTE: The following procedures use Windows XP illustrations.
This procedure describes the installation of a local printer (Port 9100). You can modify the
printing protocol later, according to your network type.
TO INSTALL AND COMPLETE THE PRINT CONNECTION FOR WINDOWS
1 Windows 2000: Click Start, choose Settings, and then choose Printers.
Windows XP: Click Start and choose Printers and Faxes.
Windows Server 2003: Click Start, choose Control Panel, and then choose Printers and Faxes.
Windows Vista: Click Start, choose Control Panel, and then double-click Printers.
Windows Server 2008: Click Start, choose Control Panel, and under Classic View, double-click
Printers.
Windows 7: Click Start, choose Control Panel, choose Network and Internet, choose Network
and Sharing Center, and then click the View network computers and devices link.
2 Windows 2000/XP: Double-click the Add Printer icon and click Next.
Windows Server 2003: Double-click the Add a printer icon and click Next.
Windows Vista/Server 2008/Windows 7: Click Add a printer.
3 Windows 2000/XP/Server 2003: Specify printing using a Local printer, clear the
“Automatically detect and install my Plug and Play printer” option, and then click Next.
Windows Vista/Server 2008/Windows 7: Select Add a local printer.
4 Select Create a New Port, choose Standard TCP/IP Port from the Type of port menu, and then
click Next.
5 Windows 2000/XP/Server 2003: Click Next in the Welcome to the Add Standard TCP/IP
Printer Port Wizard dialog box.
The Add Standard TCP/IP Printer Port Wizard dialog box appears. Proceed to step 6.
Windows Vista/Server 2008/Windows 7: Select the Device Type, type the Hostname or IP
address of the EX Print Server, and then click Next. Proceed to step 9.
6 Type the printer name or IP address of the EX Print Server and click Next.
Windows 2000/Server 2003: Proceed to step 7.
Windows XP: Select the Device Type and click Next.
7 Windows 2000/XP/Server 2003: Make sure that Generic Network Card is selected as Standard
for Device Type and click Next.
PRINTING FROM WINDOWS 46
8 Windows 2000/XP/Server 2003: Click Finish to close the Add Standard TCP/IP Printer Port
Wizard dialog box.
NOTE: If the device is not found on the network, the device is displayed instead of the Finish
button. If a device is not found on the network, that could be for one of the following reasons:
• EX Print Server is not powered on
• Network is not connected
• EX Print Server is not configured properly
• IP address is not correct
If you encounter one of the situations mentioned, you can continue to set up the port by
configuring the port manually. See “To set up Standard TCP/IP Port (Raw or LPR) for
Windows” on page 53 and follow steps 11 to 14 before proceeding to step 9.
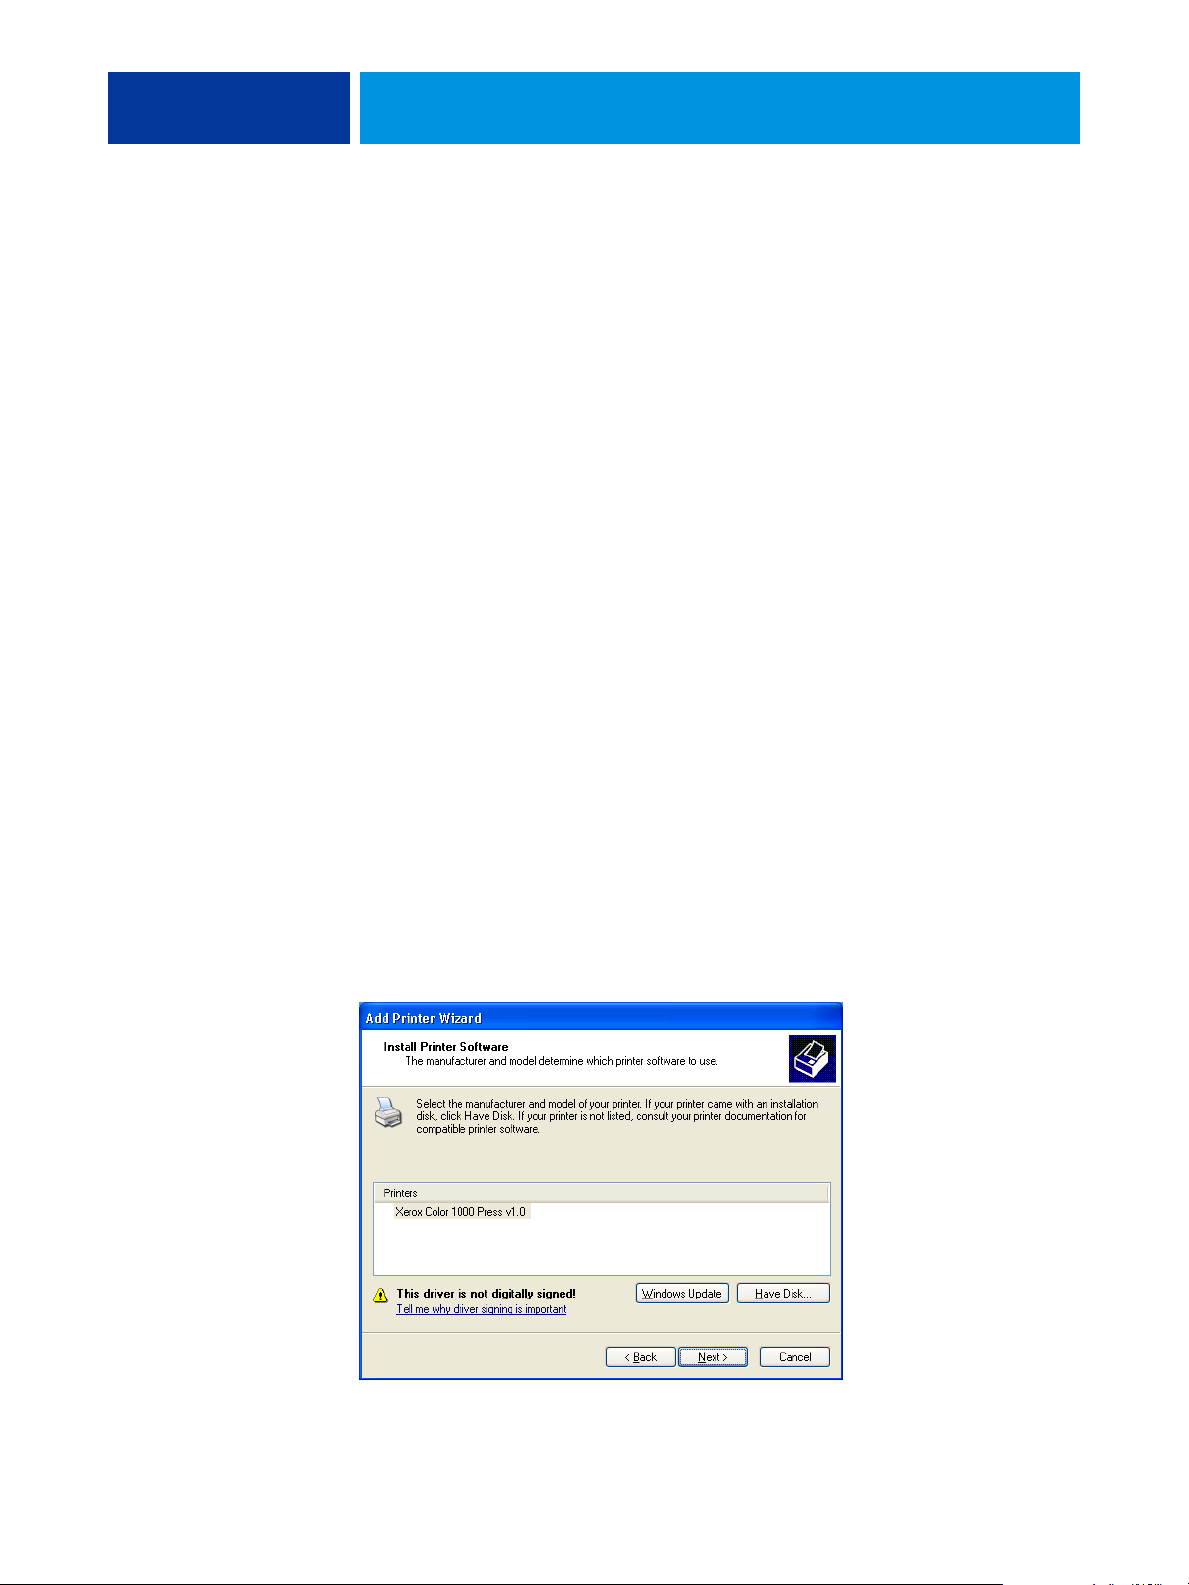
9 Click Have Disk in the dialog box displaying lists of manufacturers and printers.
The Install From Disk dialog box prompts you for the disk.
10 Insert the User Software DVD into the DVD drive, type the name of the DVD drive (for
example, D:\), and then click Browse. Browse to the
English\Prntdrvr\Ps_drvr\Win_2K_XP_VISTA folder.
If you are installing from the files you downloaded from the EX Print Server using the
Downloads tab in WebTools, browse to prntdrvr\Prntdrvr\Ps_drvr\Win_2K_XP_VISTA and click
Open.
11 Make sure that “oemsetup.inf” or “oemsetup” is selected and click Open.
The path is copied to the Install From Disk dialog box.
12 Verify that the path is correct and click OK.
13 In the Printers box, select the EX Print Server printer driver as your printer and click Next.

PRINTING FROM WINDOWS 47
14 Type a name for the EX Print Server in the Printer name field, indicate whether you want to
make it the default printer, and then click Next.
This name is used in the Printers window and the queues window.
15 Follow the on-screen instructions.
Do not share the printer and do not print a Test Page at this time. Continue with the printer
driver installation and at the last screen, click Finish.
The necessary files are installed on your hard disk. When installation is complete, the Printers
window appears with an icon for the newly installed printer.
Now you are ready to configure the installable options (see “Configuring installable options”
on page 59).
To set up a connection other than port 9100, proceed to “Setting up printing connections” on
page 52.
To use the printer driver, you must select the following options on the Advanced tab of the
printer driver after installation is complete:
• Spool print documents
• Start printing immediately
• Print spooled documents first

PRINTING FROM WINDOWS 48
Installing and connecting to a virtual printer
A virtual printer allows you to print to the EX Print Server using a predefined set of job
settings. You do not have to set print options manually. Before you can print to a virtual
printer, the administrator must create and configure the virtual printer using Command
WorkStation. After the virtual printer is set up, you can install the printer driver and printer
description files on your computer from the EX Print Server using Point and Print.
For more information about setting up virtual printers, see Command WorkStation Help.
When you install the printer driver using Point and Print, you cannot configure installable
options manually. Installable options are configured automatically. The installed options are
displayed in the printer driver when you select the Two-Way Communication option.

PRINTING FROM WINDOWS 49
TO SET UP A VIRTUAL PRINTER ON WINDOWS COMPUTERS USING POINT AND PRINT
1 Windows 2000/XP/Server 2003: Right-click Network Neighborhood or My Network Places and
select Find Computer or Search for Computers.
Windows Vista/Server 2008: Right-click Network and choose Open from the menu.
Windows 7: Click Start, choose Control Panel, choose Network and Internet, choose Network
and Sharing Center, and then click the View network computers and devices link.
2 Windows 2000/XP/Server 2003: Type the name or IP address of the EX Print Server and click
Search Now or Search.
Windows Vista/Windows 7: Type the name of the EX Print Server in the Search field and click
Enter.
Windows Server 2008: Type the name or \\IP address of the EX Print Server in the Search
field and click Enter.
If you cannot locate the EX Print Server, contact your network administrator.
3 Double-click the EX Print Server name to display enabled print connections.
Virtual printers are listed along with the Print queue, Hold queue, and Direct connection
(if those connections are enabled). Virtual printers usually have names that indicate the type
of job they are set up for.
4 Right-click the virtual printer that you want and choose Connect.
The files are installed on your computer.
5 Windows 2000: Click Start, choose Settings, and then choose Printers.
Windows XP: Click Start and choose Printers and Faxes.
Windows Server 2003: Click Start, choose Control Panel, and then choose Printers and Faxes.
Windows Vista: Click Start, choose Control Panel, and then double-click Printers.
Windows Server 2008: Click Start, choose Control Panel, and under Classic View, double-click
Printers.
Windows 7: Click Start and choose Devices and Printers.
The virtual printer is displayed in the Printers or Printers and Faxes window.
You can print to a virtual printer as you would print to the EX Print Server. Depending on
how the virtual printer is configured, you may not be able to set some print options.
You must enable Two-Way Communication to automatically update your printer driver to
reflect the options currently installed on the press.
NOTE: You must log on with Administrator privileges to add or change the installable options
after the Windows Vista printer driver is installed. For more information, see “Configuring
installable options for Windows Vista/Windows 7 printer driver” on page 59.

PRINTING FROM WINDOWS 50
TO ENABLE TWO-WAY COMMUNICATION
1 Windows 2000: Click Start, choose Settings, and then choose Printers.
Windows XP: Click Start and choose Printers and Faxes.
Windows Server 2003: Click Start, choose Control Panel, and then choose Printers and Faxes.
Windows Vista: Click Start, choose Control Panel, and then double-click Printers.
Windows Server 2008: Click Start, choose Control Panel, and under Classic View, double-click
Printers.
Windows 7: Click Start and choose Devices and Printers.
2 Windows 2000/XP/Server 2003/Server 2008/Vista: Right-click the EX Print Server icon and
choose Properties.
Windows 7: Right-click the EX Print Server icon and choose Printer properties.
3 Click the Installable Options tab.
4 Select Two-Way Communication.
5 Type the EX Print Server IP address or DNS name.
6 Select Update Fiery Driver When Opened to display the printer’s current default settings
when the printer driver is opened.
7 Click Update.
NOTE: To confirm that Two-Way Communication is enabled, click the About tab and check
that the EX Print Server name and other server information are displayed.
8 Click OK.

PRINTING FROM WINDOWS 51
Uninstalling printer drivers
All of the installation of user software on a Windows computer is performed through the
Fiery User Software Installer. The procedures in Utilities describe installing from the User
Software DVD.
The Printer Delete Utility is installed and used locally. You do not need to connect to the
EX Print Server before you use the software.
TO USE PRINTER DELETE UTILITY
1 Click Start, choose Programs or All Programs, and then choose Fiery.
2 Choose PrinterDeleteUtility.
The Printer Delete Utility dialog box appears. Any EX Print Server printer drivers found on
your computer are listed.
3 To delete a printer, select the check box next to the printer name and click Delete the
Selected Printers.
To delete all the installed printer drivers, select the Delete All Printer Drivers check box.
4 Click OK to delete the selected printer driver(s).
5 When you finish deleting printer drivers, click Exit and restart your computer.

PRINTING FROM WINDOWS 52
Setting up the EX Print Server for printing
To print from Windows computers, you or the administrator must perform the
following tasks to set up a connection other than port 9100:
• Set up network servers, if any.
• Set up the EX Print Server to accept print jobs from your computer.
• Configure a port on each Windows computer for the network type.
Setting up printing connections
The EX Print Server supports the following printing connections:
•SMB
• Standard TCP/IP (RAW or LPR)
• IPP or IPP over SSL
For the location of each procedure, see the following table.
Procedure See
Completing the SMB printing connection page 52
Completing Standard TCP/IP Port (Raw or LPR) printing connections page 53
Completing IPP connections page 56
Configuring installable options page 59
Completing the SMB printing connection
If your network does not have a Windows server, Windows computers can still print to the
EX Print Server. This method of printing is SMB printing (also known as Windows or WINS
printing). When users send print jobs, computers running Windows operate in a peer-to-peer
environment and communicate directly with the EX Print Server.
Enabling SMB printing allows the EX Print Server to be listed on the network, so that
Windows clients can print to a particular print connection (Print queue, Hold queue, Direct
connection or Virtual Printer) on the EX Print Server without using other networking
software. Windows printing runs via TCP/IP. You must configure TCP/IP on the EX Print
Server and on all computers that use SMB printing.
After you enable SMB printing on the EX Print Server, you can set up the Windows or SMB
connection and install the printer driver in one procedure. For more information, see
“Installing printer drivers by Point and Print” on page 40.

PRINTING FROM WINDOWS 53
Completing Standard TCP/IP Port (Raw or LPR) printing connections
After you install the PostScript and printer driver files, you can add or configure the Setup
for the Standard TCP/IP Port (Raw or LPR) connection as follows:
• Prepare the EX Print Server to accept print jobs using Standard TCP/IP Port (Raw or
LPR) protocols.
• Enable LPD or Port 9100 on the EX Print Server.
• Configure the computer for the TCP/IP connection.
For more information about Setup, see Configure Help.
Before you complete the following procedure, contact your system administrator for the
IP address assigned to the EX Print Server.
The TCP/IP protocol should be installed as a default on the Windows computer. For Port
9100, you can set up the connection and install the printer driver in one procedure.
NOTE: You can also set up the LPR Port connection by installing Print Services for UNIX,
which is supplied as an add-on Windows component. For more information, see the
documentation that accompanies Windows.
TO SET UP STANDARD TCP/IP PORT (RAW OR LPR) FOR WINDOWS
NOTE: The following procedures use Windows XP illustrations.
1 Windows 2000: Click Start, choose Settings, and then choose Printers.
Windows XP: Click Start and choose Printers and Faxes.
Windows Server 2003: Click Start, choose Control Panel, and then choose Printers and Faxes.
Windows Vista/Server 2008: Click Start, choose Control Panel, and then double-click Printers.
Windows 7: Click Start and choose Devices and Printers.
2 Windows 2000/XP/Server 2003/Server 2008/Vista: Right-click the EX Print Server icon and
choose Properties.
Windows 7: Right-click the EX Print Server icon and choose Printer properties.

PRINTING FROM WINDOWS 54
3 Click the Ports tab.
4 To add a new port, click Add Port.
To change the port settings, proceed to step 11.
5 Windows 2000/XP/Server2003: Select Standard TCP/IP Port from the list of Available port
types and click New Port Type.
Windows Vista/Server 2008: Double-click Standard TCP/IP Port from list.
Windows 7: Select Standard TCP/IP Port from the list of Available port types and click New
Port.
The Add Standard TCP/IP Printer Port Wizard dialog box appears.
6 Click Next.

PRINTING FROM WINDOWS 55
7 Type the EX Print Server IP address.
8 Click Next.
9 Make sure that Generic Network Card is selected as Standard for Device Type and click Next.
10 Click Finish to close the Add Standard TCP/IP Printer Port Wizard dialog box, and then click
Close in the Printer Ports dialog box.
To change the default setting, proceed to step 11.
If you do not want to change the default setting, the setting is now completed.
NOTE: Port 9100 was set as the default setting in the preceding procedure.
11 Click Configure Port on the Ports tab of the Properties dialog box.
The Configure Standard TCP/IP Port Monitor dialog box appears.

PRINTING FROM WINDOWS 56
12 To use LPR printing, select LPR in the Protocol area and LPR Byte Counting Enabled in the LPR
Settings area.
NOTE: You can also proceed without selecting LPR Byte Counting Enabled.
To use Port 9100 printing, select Raw in the Protocol area.
The port number 9100 automatically appears in the Raw Settings area. This is the default
port number. You can print to the printer connection selected for Port 9100 printing on the
EX Print Server.
To specify a specific port number, see the following step.
13 Type the name of the print connection.
For LPR, enter print or hold for Queue Name or published virtual printer name. The Direct
connection is not supported for LPR printing.
For Port 9100, type the following port numbers for each print connection in the Raw Settings
area:
EX Print Server default:
9100
direct: 9101
print: 9102
hold: 9103
OTE: Type the number exactly as shown.
N
14 Click OK to close the Configure Standard TCP/IP Port Monitor dialog box.
NOTE: The EX Print Server supports printing in the IPv6 environment on Windows
Server 2008, Windows 7, and Windows Vista.
NOTE: LPR printing in the IPv6 environment is supported on the Windows XP/Server 2003
computer from a command line, but other methods may work.
15 Click Apply in the EX Print Server Properties dialog box, and then click OK.
Completing IPP connections
With Internet Printing Protocol (IPP), print jobs are sent to the EX Print Server over
the Internet.
Before you begin, perform the following tasks:
• Make sure that the EX Print Server is configured for TCP/IP printing and IPP printing.
For more information, see Configure Help.
• Specify the printing destination on your computer.
NOTE: IPP over SSL connections is supported.

PRINTING FROM WINDOWS 57
TO SET UP IPP PRINTING WITH WINDOWS
1 Windows 2000: Click Start, choose Settings, and then choose Printers.
Windows XP: Click Start and choose Printers and Faxes.
Windows Server 2003: Click Start, choose Control Panel, and then choose Printers and Faxes.
Windows Vista: Click Start, choose Control Panel, and then double-click Printers.
Windows Server 2008: Click Start, choose Control Panel, and then double-click Printers under
Classic View.
Windows 7: Click Start, choose Control Panel, choose Network and Internet, choose Network
and Sharing Center, and then click the View network computers and devices link.
2 Windows 2000/XP: Double-click the Add Printer icon and click Next.
Windows Server 2003: Double-click the Add a printer icon and click Next.
Windows Vista/Server 2008/Windows 7: Click Add a printer.
3 Windows 2000/XP/Server 2003: Select Network printer and click Next.
Windows Vista: Select Add a network printer.
Windows Server 2008/Windows 7: Select Add a network, wireless, or Bluetooth printer.
4 Windows 2000/XP/Server 2003/Vista: Select Connect to a printer on the Internet or
your intranet.
Windows Server 2008/Windows 7: If the printer search takes a long time, click Stop, and
then click “The printer that I want isn’t listed.”
5 Windows 2000/XP/Server 2003/Vista: In the URL field, type the IP address or DNS name of
the EX Print Server, followed by “ipp/” and then the name of the connection (hold, direct,
print, or name of virtual printer).
For example, http://10.10.10.150/ipp/print or http://DNS name of the EX Print Server/ipp/
print
sends the job to the Print queue on the EX Print Server.
For IPP over SSL, type
https, instead of http.
NOTE: The ipp/print in the example is case sensitive.

PRINTING FROM WINDOWS 58
Windows Server 2008/Windows 7: Click Select a printer by name, and in the URL field, type
the IP address or DNS name of the EX Print Server, followed by the name of the connection
(print, hold, or direct).
NOTE: For example, http://10.10.10.150/ipp/print or http://DNS name of EX Print Server/
ipp/print
NOTE: The URL for the printer is not case-sensitive.
sends the job to the Print queue on the EX Print Server.
6 Windows 2000/XP/Server 2003/Vista: Click Next.
The Connect to Printer dialog box appears.
Windows Server 2008/Windows 7: Click Next.
7 Windows 2000/XP/Server 2003/Vista: Click OK.
The Add Printer Wizard dialog box appears.
Windows Server 2008/Windows 7: Click Install driver.
8 If you are installing the PostScript printer for the first time, follow the procedure “To install
and complete the print connection for Windows” on page 45, step 9.
9 Indicate whether you want to make the EX Print Server the default printer and click Next.
10 Click Finish.

PRINTING FROM WINDOWS 59
Configuring installable options
After you complete the printer driver installation, you must configure the EX Print Server for
the options installed on the press to allow the EX Print Server to take advantage of the press
options. Configure the options manually, or for TCP/IP network connections, use the
Two-Way Communication option to configure the options automatically.
For information about specifying installable options, see printer driver Help.
Configuring installable options for Windows Vista/Windows 7 printer driver
Windows Vista and Windows 7 have a User Account Control (UAC) feature. You must log
on with Administrator privileges to add or change the installable options after the printer
driver is installed.
TO CHANGE INSTALLABLE OPTIONS
1 Windows Vista: Open the Printers Control Panel.
Windows 7: Open the Devices and Printers Control Panel.
2 Windows Vista: Right-click the EX Print Server printer icon, choose Run as administrator, and
then choose Properties.
Windows 7: Right-click the EX Print Server printer icon, choose Run as administrator, and
then choose Printer properties.
The User Account Control dialog box opens.
3 Choose the User that has administrator privileges, type the password, and then click OK.
4 Windows Vista: Right-click the EX Print Server printer icon again and choose Properties.
Windows 7: Right-click the EX Print Server printer icon again and choose Printer properties.
5 Click the Installable Options tab and make your selections.
6 Click Apply, and then click OK.

PRINTING FROM WINDOWS 60
Printing from Windows computers
You can print to the EX Print Server just as you would print to any other printer from a
Windows application. You can print from a networked Windows computer or a computer
using Windows (WINS) printing.
The following table includes other methods to print to the EX Print Server and the location
in which to find more information.
For more information See
Downloading certain types of files to the EX Print Server using the
Docs WebTool
Printing documents using E-mail Services “E-mail Service” on
Printing documents using Hot Folders Utilities
Setting up the Windows environment for printing with Windows servers
connected to the EX Print Server
Utilities
page 71
Configuration and Setup
After you install the EX Print Server printer driver and configure the proper port, you can
print directly from most Windows applications. Set the print options for the job and choose
Print from your application.
To achieve optimal printing results from specific applications, see Color Printing, Fiery Color
Reference, and Command WorkStation Help.
NOTE: The following procedures use Windows XP illustrations, unless specified.
For the location of each procedure, see the following table.
Procedure See
Setting print options and printing from Windows applications page 61
Specifying default print options page 67
Customizing the Quick Access icon page 68
Defining and printing custom page sizes page 69
Viewing the press status page 69
Saving files to print to a remote location page 69

PRINTING FROM WINDOWS 61
Setting print options and printing from Windows applications
To print from Windows platforms, install the PostScript printer driver. For instructions, see
“Installing Windows printer drivers” on page 38. Be sure to configure the options on the
Advanced tab of the printer driver after installation is complete, as described on page 45.
If you print to a virtual printer, you may not be able to set some print options, depending on
how the virtual printer is configured.
The following procedures explain how to use the printer driver to specify print options for a
particular job and print it to the EX Print Server. You can also set default print settings using
the driver. For information about specific print options, see Print Options.
NOTE: The following procedures use Windows XP illustrations.
TO SET PRINT OPTIONS FOR A SPECIFIC WINDOWS PRINT JOB USING THE PRINTER DRIVER
1 Choose Print in your application.
2 Select the EX Print Server as your printer and click Properties.
1 Presets (Job Templates),
see Help
2 Print Option icons
3 Customize (Shortcuts),
see Help
4 Active area
5Job View
6 Printer Status
7Help
3 Click the Fiery Printing tab.
6
2
4
5
1
3
7
The Fiery Printing tab serves as the control center for all frequently used printing functions.
For information about using presets, see printer driver Help.
NOTE: For a list of print options, see page 84.

PRINTING FROM WINDOWS 62
4 Click the Job Info icon.
5 Type a user name and password in the User Authentication area.
The user name that you type in the User Authentication area can be your network
domain\user name or a local user name. Check with your system administrator about the
requirements for your system.
If you do not have a user name and password or you want to send jobs as a public user,
select the I’m a Guest option. The EX Print Server must be configured to allow guest
printing. Otherwise, clear the I'm a Guest option.
If you are not using a network user name and password, you can type your domain\user name
and password in the fields provided. Click Validate to validate the user name and password.
When the Use Windows Login option is selected, the LDAP domain user name and password
are used as an authenticated user name. This is available only if the user is logged on to the
Windows computer as a domain user.
6 Type information in the Notes 1 and 2 fields.
Type user and job identification information for managing purposes, or other information
that is required at your site.
The information that you type in this field can be viewed and edited by the operator in
Command WorkStation and also appears in the Job Log.
For more information about Command WorkStation, see Utilities and Command
WorkStation Help.

PRINTING FROM WINDOWS 63
7 Type instructions to the operator about the job in the Instructions field.
These instructions are displayed in Command WorkStation, but do not appear in the Job
Log. These instructions can be edited by the operator.
8 Type values for the other fields, as required.
For information about these fields, see page 84.
9 Click the Color icon and specify the color profile options for the job.
In the Color Mode area, select a color mode for the job.
NOTE: To display the basic and expert color settings from the EX Print Server in this dialog
box, make sure that Two-Way Communication is enabled. For information about enabling
Two-Way Communication, see printer driver Help.

Two-Way Communication On
PRINTING FROM WINDOWS 64
10 To use basic color management features, such as press color settings, click Basic Settings.
To revert to the EX Print Server default color settings, click Server Defaults.
To edit advanced color management features, such as RGB/Lab Rendering Intent, click
Expert Settings and proceed to step 11. Otherwise, proceed to step 13.

PRINTING FROM WINDOWS 65
11 To edit advanced color management features, such as RGB/Lab Rendering Intent, click Expert
Settings.
The Expert Color Settings Advanced Edit dialog box appears.
The advanced edit controls are divided into three tabbed categories: Color Input, Gray &
Black Processing, and Output.
12 After you edit the expert settings, click OK.
To revert to the EX Print Server default color settings, click Server Defaults.
13 Specify the color settings for the print job and click OK.

PRINTING FROM WINDOWS 66
14 Choose other printer-specific options.
15 Click the VDP icon to specify variable data printing options.
For more information about VDP print options, see “Variable Data Printing (VDP) options”
on page 103.
16 Click the Stamping icon to specify a watermark for the print job.
For more information about watermarks, see printer driver Help.
17 Click the Printer icon to view press status.
For more information about monitoring press status, see printer driver Help.
18 Click the remaining print option icons to specify the appropriate settings for the print job
and click OK.
The settings that you make for these print options override settings that the administrator
specified in EX Print Server Printer Setup, but can be overridden from Command
WorkStation. For information about these options and overrides, see page 83. For more
information about Command WorkStation, see Utilities and Command WorkStation Help.
Some print options are available only if a particular installable option has been configured.
For information about configuring installable options, see “Configuring installable options”
on page 59.
If you choose Printer’s default, the job prints according to the settings that the administrator
specified in Setup. For more information, see page 83.
NOTE: If you specify incompatible print settings, the Conflict dialog box provides instructions
to resolve the conflict.

PRINTING FROM WINDOWS 67
19 From your application, click OK to send your print job.
Make sure that the EX Print Server is selected as your current printer.
NOTE: Some print options that are selectable from an application are similar to print options
that are specific to the EX Print Server and the press. In these cases, use the print options
specific to the EX Print Server and the press. These options appear in the Fiery Printing tab.
The application may not set up the file properly for printing on the EX Print Server, resulting
in unexpected finishing, printing errors, or longer processing time.
Specifying default print options for print jobs
To set default print options, use the following procedure.
TO SET DEFAULT PRINT OPTIONS FOR WINDOWS PRINT JOBS USING THE POSTSCRIPT PRINTER DRIVER
1 Windows 2000: Click Start, choose Settings, and then choose Printers.
Windows XP: Click Start and choose Printers and Faxes.
Windows Server 2003: Click Start, choose Control Panel, and then choose Printers and Faxes.
Windows Vista/Server 2008: Click Start, choose Control Panel, and then double-click Printers.
Windows 7: Click Start and choose Devices and Printers.
2 Right-click the EX Print Server icon and choose Printing Preferences.
3 If the Fiery Printing tab is not displayed, click it.
4 Specify the default settings for your print job, as described on page 61.
5 Click OK to close the dialog box.

1 Quick Access icon
2 Customize (Shortcuts)
PRINTING FROM WINDOWS 68
Customizing the Quick Access icon
The Quick Access icon is on the Fiery Printing tab. You can customize it with the print
options you use frequently. This saves time because you do not have to open all of the other
print option icons if you only want to set the options in Quick Access. Quick Access initially
contains a default group of print options. You can remove these options and add others.
NOTE: When you place a print option in Quick Access, it still appears under its appropriate
print option icon. You can set the option from either location.
1
2
For more information about customizing the Quick Access icon, see printer driver Help.

PRINTING FROM WINDOWS 69
P
Land
Defining and printing custom page sizes
With custom page sizes, you define the dimensions of a printed page. After you define a
custom page size, you can use it from within an application without redefining it each time
you print. When you create custom page sizes, specify Width dimensions to correspond with
the shorter side of your job and specify Height dimensions to correspond with the longer side
of your job. Set custom page sizes in this way, regardless of the orientation settings in the
application.
ortrait
Height
Width
NOTE: Custom page sizes are not supported with Imposition jobs.
Width
scape
Height
For more information about defining and printing custom page sizes, see printer driver Help.
Viewing the press status
If you enabled a TCP/IP network, you can retrieve press status and color settings from the
EX Print Server and display them in the printer driver using the Two-Way Communication
option. If you have enabled Two-Way Communication for your press, you can monitor the
status of the press, including the levels of consumable materials, such as paper and dry ink.
For more information about enabling Two-Way Communication, see printer driver Help.
Saving files to print at a remote location
If you do not have an EX Print Server onsite and are preparing files to take to a service bureau
or other location, print the final files to the File port (as opposed to one of the local ports).
You can also print to the File port to create a file to download using the Docs WebTool. For
instructions on printing to the File port, see the documentation that accompanies Windows.

PRINTING METHODS
In addition to printing jobs from the EX Print Server printer driver, you can print jobs using
these methods:
•
•
•
•
•
•
PRINTING METHODS 70
Job Monitor displays information about the jobs sent to the EX Print Server and reprints
them.
E-mail Service submits jobs to the EX Print Server as e-mail attachments.
USB device prints files saved on a USB drive.
FTP printing prints to the EX Print Server using the FTP protocol.
Sample printing prints sample pages from a long job to ensure print quality.
Job Batching prints a collection of print jobs as a single job in the press job list and
accounting information.
•
Adobe PDF Print Engine (APPE) is an additional interpreter that allows native PDF
processing and rendering without the need for the EX Print Server to convert the job from
PDF to PostScript.
For the location of each procedure, see the following table.
Procedure See
Configuring and using Job Monitor page 71
E-mail Service page 71
Printing from a USB device page 75
FTP printing page 76
Sample printing page 77
Job Batching page 78
Adobe PDF Print Engine (APPE) page 79

PRINTING METHODS 71
Configuring and using Job Monitor
Use Job Monitor to monitor the status of EX Print Server and view information about the
print jobs sent to them.
NOTE: Job Monitor is not supported on Windows 2008, Windows XP/Server 2003/Vista,
Windows 7 64-bit version, or Mac OS X.
Configuring the connection
When you send your first print job to the EX Print Server, Job Monitor opens and establishes
a connection to the EX Print Server. If you installed and configured printer drivers for more
than one press, Job Monitor automatically establishes connections to all the EX Print Server
presses.
The Job Monitor icon ( ) appears on the desktop and in the Windows taskbar of
your computer.
Job Monitor is automatically installed when you choose the printer driver to install on your
computer. To use Job Monitor, you must enable it in the printer driver.
TO ENABLE JOB MONITOR
• Select the Monitor my Print Job check box on the Printer tab of the printer driver.
TO DISABLE JOB MONITOR
• Clear the Monitor my Print Job check box on the Printer tab of the printer driver.
Using Job Monitor
For information about using Job Monitor, see Job Monitor Help and printer driver Help.
E-mail Service
E-mail Service allows you to control the EX Print Server using your current e-mail
infrastructure, print to remote locations, and bypass firewalls. E-mail Service is not
application-specific. You can use any e-mail infrastructure.
NOTE: E-mail Service is not supported on Mac OS X.
The EX Print Server supports internal address books. Administrators can retrieve, add, delete,
and clear addresses from the address books by sending requests through e-mail. For more
information about address books, see Configuration and Setup.
To set up E-mail Service, see Configure Help.

PRINTING METHODS 72
Use E-mail Service in the following ways:
• Print a job from an e-mail application.
To print with an e-mail client, you send a file as an e-mail attachment. E-mail Service
extracts the file and sends it to the EX Print Server. The attachment can be in any format
the EX Print Server recognizes (PostScript, PDF, or TIFF).
NOTE: E-mail Service does not process files with .vbs, .exe, or .bat extensions.
• Manage jobs using an e-mail application.
You can manage your print jobs by submitting e-mail commands to the EX Print Server
using e-mail.
Printing using an e-mail client
You can submit print jobs to the EX Print Server in the form of an e-mail attachment using
your e-mail application. When you send an e-mail with an attachment, E-mail Service
extracts the file and sends it to the EX Print Server Print queue. The file format must be one
supported by the EX Print Server.
By default, anyone can print with an e-mail client, unless the Print address book has been set
up by the administrator. If the Print address book has been set up and your e-mail address is
not in it, you cannot send files to the EX Print Server via e-mail. For more information about
address books, see Configuration and Setup.
When User Authentication is enabled on the EX Print Server, the e-mail attachment must
have the appropriate user name and password when it is printed through e-mail printing. As
part of creating the e-mail attachment with the EX Print Server printer driver, type the
appropriate user name and password in the Job Info tab of the printer driver. The user name
and password must match those defined by the administrator in the Users and Groups section
of Configure. For information about Users and Groups, see Configure Help.
NOTE: The Direct connection is not supported by the e-mail client feature.
NOTE: The following illustrations depict the Microsoft Outlook e-mail application.

PRINTING METHODS 73
TO PRINT USING AN E-MAIL CLIENT
1 Open your e-mail application.
2 Type the EX Print Server e-mail address in the To: line.
3 Type text in the Subject line or leave the Subject line blank.
4 Attach the file that you want to print.
The attachment can be in any format the EX Print Server recognizes (PostScript, PDF,
or TIFF).
NOTE: If your attachment exceeds the file size limitation set by your e-mail system
administrator, the e-mail is not sent.
5 Optionally, you can type text in the body of the message. The text is printed with the file.
NOTE: HTML-formatted e-mail messages are not supported, and might not print as they
appear on the remote workstation. Send e-mail messages in plain text format.
6 Send the e-mail.
The file is sent to the EX Print Server and the job is printed. After the EX Print Server receives
the job, you are sent an e-mail notification that the print job was accepted. The e-mail
provides a job identification (ID). Use the job IDs to manage jobs with e-mail commands (see
“Managing print jobs with e-mail commands” on page 74). The e-mail notification indicates
any current error at the press.
After the job is printed, you are sent a second e-mail notification that indicates the job printed
successfully.

PRINTING METHODS 74
Managing print jobs with e-mail commands
You can manage your print jobs by submitting commands to the EX Print Server using
e-mail. You can cancel a job, check job status, and get help on a job. When you send a
command, the EX Print Server returns an e-mail response.
TO MANAGE PRINT JOBS WITH E-MAIL COMMANDS
1 In your e-mail application, type the EX Print Server e-mail address in the To: line.
2 Type one of the following commands in the Subject line:
To check the status of a job, type #JobStatus<job id> in the Subject line.
You receive a reply to your job status query. You can only get the status of the job if you sent
the job or are an administrator.
To cancel a job, type #CancelJob<job id> in the Subject line.
You receive a notification indicating that the job has been cancelled and did not print to the
EX Print Server. You can only cancel a job if you sent the job or are an administrator.
To get help, type #Help in the Subject line.
You receive an e-mail response that contains links that allow you to cancel jobs, check job
status, and search and manage address books. Click any of the links to perform a command.
3 Send the e-mail to the EX Print Server.

PRINTING METHODS 75
Printing from a USB device
You can print files on a USB device to the EX Print Server. To do so, save PS, PCL, EPS,
TIFF, and PDF files to the USB device and download them directly to the EX Print Server.
You can print files that originated on Mac OS X or Windows computers.
You can print files automatically from a USB device to one of the standard print queues on
the EX Print Server (Print, Hold, or Direct) or to published virtual printers (if supported).
Verify with your administrator that these connections are published in Setup. For more
information about virtual printers, see Command WorkStation Help.
Before you print files from a USB device, ask your administrator to configure the appropriate
options. For more information about configuring the appropriate options, see Configuration
and Setup or Configure Help.
Automatic printing
To print automatically to Print, Hold, or Direct queues, or to published virtual printers with
the Print All setting, set up folders on your USB device with the names print, hold, direct, and
the names of any published virtual printers. When you plug the USB device into a USB port
on the EX Print Server, the files in those folders are sent automatically to the corresponding
queues.
TO PRINT FILES FROM THE USB DEVICE
1 Configure the USB printing options in Setup.
2 Create folders at the top (root) level of the USB device named print, hold, direct, and virtual
printer.
3 Save the files (PS, EPS, PCL, TIFF, and PDF) from the user’s computer to the USB device.
Files copied to the print, hold, direct, or virtual printer folders are downloaded to the
corresponding print connection on the EX Print Server automatically when you connect the
USB device to the EX Print Server. Files copied to the root level of the USB device are
downloaded to the Print queue.
4 Remove the USB device from the computer and connect it to the USB connector on the
EX Print Server.
Make sure that the USB device is properly stopped before you disconnect it from the
computer.
For the location of the USB port, see Configuration and Setup.

FTP printing
PRINTING METHODS 76
If FTP Services are enabled on the EX Print Server, the EX Print Server is set up as an FTP
server. You can send jobs to the EX Print Server using FTP printing. For more information
about configuring FTP Services, see Configure Help.
You can use any FTP client software. Before you use FTP printing, the FTP client software
requires the following information (see your administrator):
• IP address or DNS name for the EX Print Server
• Directory or path to send the job to, such as the Print queue, Hold queue, or published
virtual printers (if supported)
NOTE: You cannot print to the Direct connection using FTP printing.
• User name and password (if required)
You can send PostScript (PS), Printer Control Language (PCL), Tagged Image File Format
(TIFF), and Portable Document Format (PDF) files to the EX Print Server. Encapsulated
PostScript (EPS) files are not supported for FTP printing.
TO PRINT FILES TO THE EX PRINT SERVER USING THE FTP PROTOCOL
1 Connect to the EX Print Server with your FTP client software.
Folders corresponding to the Print queue and Hold queue are displayed. Folders for any
published virtual printer are also displayed.
2 Navigate to the folder representing the print connection or published virtual printer.
3 Upload your job to the folder that you want.
After the job is printed, it is deleted from the EX Print Server.

PRINTING METHODS 77
Sample printing
The Sample Print feature allows you to print extra pages to an easily accessible output tray
during a long print job, to verify that the press is performing as expected.
For example, when a job is currently printing to a closed elevator (such as, 1000 pages to an
output tray that cannot be opened until the entire job is completed), you can use the sample
print function to print a separate page or finished output set to an open output tray to verify
the output. If the output is unsatisfactory, you can take corrective action.
Sample Print should only be used with presses that have multiple output trays, and is useful
when one of the output trays is closed and not easily accessed during printing.
The Sample Print default settings for the specified EX Print Server can be set up in WebTools
Configure. For more information, see Configure Help.
When the job is printing, you can initiate a sample print from Command WorkStation. For
more information about Sample Print, see Command WorkStation Help.
Using Sample Print
You can print an extra sheet or output set as follows:
• Once during the printing of a job
• Every N-sheets during the currently printing job
• Every N-sheets until cancelled (can span jobs)
When the job is printing, you can initiate a sample print. The default setup values are applied
and any existing sample print command in progress is overridden.
If Start Sample Print appears dimmed or unavailable, the EX Print Server is already
performing a sample print or it is not available for the specified EX Print Server.
TO INITIATE A SAMPLE PRINT
• While a job is printing, initiate a sample print from Server > Start Sample Print.
After sample print has been initiated, the EX Print Server performs the sample print based on
the options specified in Configure.
TO CANCEL A SAMPLE PRINT
• While a job is printing, cancel a sample print from Server > Stop Sample Print.
The EX Print Server cancels the previously requested sample print command.

Job Batching
Job Batching provides a way for the EX Print Server to send print jobs to the press to make
sure the job can print (if the print job is overly complex), or print faster by minimizing cycle
down times.
A batch job is a collection of jobs sent to the press as a single job. The batch job is shown as a
single job in the press job list and accounting information. The EX Print Server can continue
adding pages to an existing batch job, as long as the pages are processed and ready for
printing.
Job Batching functionality can be enabled or disabled by the administrator. For more
information about configuring Job Batching, see Configuration and Setup.
Cancelling batch jobs
When the EX Print Server cancels a job in a batch, either through an error or user
intervention, it cancels that job and resends the remainder of the jobs from that batch as a
new batch job in addition to any other queued batch jobs. This functionality maintains the
ability to print jobs in the desired order, including user-defined changes such as cancel, print
next, and rush print.
PRINTING METHODS 78
Using Command WorkStation Print Next and Rush Print commands with batch jobs
Print Next and Rush Print commands in Command WorkStation cannot be applied to batch
jobs. If you apply a Print Next command to a job that is not part of the batch job, the
EX Print Server stops adding jobs to the batch job and then prints the Print Next job after the
current batch job finishes printing. If you apply a Rush Print command to a job that is not
part of the batch job, the EX Print Server stops adding pages to the batch job at an
appropriate place in the job and then prints the Rush Print job after the current batch job
finishes printing. The EX Print Server sends the remaining pages of the interrupted job (as
necessary) and continues printing normally.
Accounting batch jobs
When the EX Print Server batches jobs together, it lists each original job while the press lists
only the resulting batched job. This can create a discontinuity between the EX Print Server
job list or job log, and the press job list or job log. The total media counts, however, remain
consistent between the EX Print Server and the press.

PRINTING METHODS 79
Adobe PDF Print Engine (APPE)
The EX Print Server provides features of the Adobe PDF Print Engine (APPE), which is an
additional interpreter that allows native PDF processing and rendering without the need for
the EX Print Server to convert the job from PDF to PostScript. No special printer driver is
required for printing APPE jobs, but the administrator must enable related settings in Setup.
If APPE is not enabled, PDF files are processed with the PostScript interpreter of the EX Print
Server. All PostScript files continue to be processed with the PostScript interpreter.
The APPE option is not available from the printer driver, but is included in Job Properties in
Command WorkStation. After the administrator has enabled APPE as the default in
Configure, you can enable or disable the APPE option in Job Properties on a per-job basis.
To enable Adobe PDF Print Engine (APPE) workflow in the EX Print Server, see
Configuration and Setup.
Printing with APPE workflow
You can print with the APPE workflow using one of the following methods:
• Command WorkStation
Import a job, or drag a job from your computer and drop it in the Job Center of
Command WorkStation.
For information about using Command WorkStation, see Command WorkStation Help.
•Hot Folders
Configure a hot folder for APPE.
For information about using Hot Folders, see Hot Folders Help.
USING APPE WORKFLOW IN COMMAND WORKSTATION
1 Double-click a PDF job in the Held or Printed list, or select the job and do one of the
following:
• Right-click to select Properties.
• Choose Job Center > Properties.
• Choose Properties from the Actions menu.
For information about printing multiple files, see “Printing multiple files with APPE” on
page 81.

1 Adobe PDF Print Engine
Preferred option
PRINTING METHODS 80
2 Select the Adobe PDF Print Engine Preferred check box.
1
3 Specify the print option settings, and then click Print.

1 Adobe PDF Print Engine
Preferred (Applies only to
PDF jobs) option
PRINTING METHODS 81
Printing multiple files with APPE
If you open Job Properties for files of different file types, the Adobe PDF Print Engine
Preferred option is displayed only if one of the selected files is a PDF. The print option name
is shown as Adobe PDF Print Engine Preferred (Applies only to PDF jobs) and the check box
indicates at least one of the PDF jobs selected has been processed through the APPE
workflow.
1
For a multiple file selection containing non-PDF files, the Adobe PDF Print Engine Preferred
option is not shown.
If a PDF file contains mixed page sizes when processed using APPE, the Paper Size option
reflects the size of the first page in the PDF. If you override the size in Job Properties, all the
pages in the PDF become the selected size.
TO ACCESS THE PROPERTIES OF MULTIPLE JOBS
1 Shift-click to select multiple, sequential jobs, or Ctrl-click to select multiple, non-sequential
jobs, and then click Properties.
The Job Properties dialog box appears. Menus for each available print option are displayed.
2 After the multiple jobs have opened, specifying a value in the Job Properties dialog box
applies it to all jobs.
The Summary tab allows a side-by-side comparison of the job properties for multiple jobs.

PRINT OPTIONS
About printer drivers and printer description files
PRINT OPTIONS 82
This chapter describes printer drivers and PPD (PostScript Printer Description) files,
EX Print Server print options, and where to set print options.
The EX Print Server receives files from computers on the network, processes (RIPs) the files,
and then sends them to the press. Windows and Mac OS computers communicate with the
EX Print Server by means of a printer driver and PPD files. The driver allows you to use
special features of the EX Print Server from the Print dialog box.
A printer driver manages printing communication between your application and the printer.
It interprets the instructions generated by the application, merges those instructions with
printer-specific options you set, and then translates all information into Adobe PostScript,
a language the printer understands. In other words, the printer driver writes a PostScript file
based on your original file and the options you set from the Print dialog box.
A printer driver also allows you to select print options for your press. To do this, the
printer driver must be matched with a PostScript Printer Description (PPD) file for your
EX Print Server. A PPD file contains information about the features and capabilities of a
particular device (for example, what paper sizes and media types are supported). The printer
driver reads the information in the PPD file and presents the information to you in the form
of options you select in the Print dialog box. The PPD file for the EX Print Server includes
information about the features of both the press and the EX Print Server. For information
about the specific print options for the EX Print Server, see the tables that begin on page 85.

PRINT OPTIONS 83
Setting print options
Print options give you access to the special features of your press and the EX Print Server. You
can specify print options in these areas:
•Setup
Some settings are specified during Setup by the administrator. For information about the
current default server settings, contact the administrator or the operator.
• Applications
With the printer drivers provided, you can specify job settings when you print a job.
For more information, see “Defining and printing custom page sizes” on page 37 and
“Defining and printing custom page sizes” on page 69.
• Color Setup
Set the default CMYK/Grayscale Source, CMYK/Grayscale Processing Method, RGB/Lab
Source, Separate RGB/Lab to CMYK Source, Output Profile, RGB/Lab Rendering Intent,
Spot Color Matching, Gray (CMYK), Gray (RGB), Black Text and Graphics, and Black
Overprint settings.
For information about using Color Setup, see Color Printing.
•Hot Folders
Assign a group of print options to a Hot Folder. When you specify print options for a
Hot Folder, the print options are assigned to all jobs sent through that Hot Folder.
These print options override any default options.
For information, see Hot Folders Help.
• Overrides in Command WorkStation
To change job settings from Command WorkStation, double-click a job to display the
Properties dialog box.
For more information, see Command WorkStation Help.
Print option override hierarchy
The override hierarchy is as follows:
• A user’s printer driver settings override the EX Print Server Setup settings.
• Settings assigned to Hot Folders override the user’s printer driver settings.
• Settings made from the job management tools (Command WorkStation Job Properties)
override the user’s printer driver settings.

PRINT OPTIONS 84
Print options and default settings
If you do not use the printer driver interface to configure a particular option, the EX Print
Server prints the job with the default setting. For options that the administer configures,
choosing Printer’s default results in the EX Print Server printing the job with the factory
default. For options that cannot be configured in Setup, the EX Print Server prints the job
with a preconfigured Printer’s default setting. When you select the printer driver for US, the
default Document Size is Letter or for International, the default Document Size is A4. For
more information, see the following tables.
To determine the current Setup defaults, print the Configuration page from Command
WorkStation. For information about how to print a Configuration page, see Configuration
and Setup.
The print option tables are organized according to the printer driver icons (tabs). Use the
following links for quick access:
Printer driver icon See
Quick Access (shortcuts) page 31 or page 68
Job Info page 85
Media page 87
Layout page 90
Color page 95
Image page 99
Finishing page 101
Variable Data Printing (VDP) page 103
Stamping/Watermark page 104

PRINT OPTIONS 85
Job Info options
Option Information
Copies
Print Range
Schedule Printing
User Authentication: User Name
User Authentication: Password
User Authentication: Use
Windows Login
User Authentication: I’m a Guest
The maximum number of copies is 9999.
Specify the page range or odd/even pages to print.
For VDP jobs, a range of Records can be selected for printing. For imposed VDP jobs, a range of
Records & Sheets can be printed.
For imposed jobs, a range of Sheet IDs can be selected for printing.
This option is only accessible from Command WorkStation.
Specify if you want to perform advance print scheduling based on date and time. If you select
On, select the date and time for the print job.
The job is printed based on the date and time set on the EX Print Server, not the client workstation.
If multiple jobs are selected and defined with the same date and time setting, job order is based on
alphabetic order of the file names.
If User Authentication is enabled on the EX Print Server, specify your User Name to print a job. Type
your user name or domain\user name for user authentication.
If User Authentication is enabled on the EX Print Server, specify your User Password to print a job.
Type your local password or domain password for user authentication.
If you are logged on to your Windows computer, select Use Windows Login for user authentication.
This option appears when you log on to your domain on your Windows computer.
For more information, see Configuration and Setup.
Select On to allow guest printing. Guest printing must be set to On at the EX Print Server.
Notes 1/Notes 2
Instructions
Print Queue Action
Control Bar
In Command WorkStation, the management of jobs is determined by how you log on to the EX Print
Server.
Specify information about the job. This field has a 31-character (alphanumeric and special characters)
limit.
Specify instructions for the operator about the job. This field has a 127-character (alphanumeric and
special characters) limit.
Select the job action associated with a published queue.
Select Print to send the file directly to printing.
Select Print and Hold to save the raster file after printing.
Select Process and Hold to RIP (process), but not print a job.
This option is invalid if your job is sent to the Direct connection.
Specify On to print a Control Bar (for print job identification) in the margin.
This option is available as part of the Fiery Graphic Arts Package, Premium Edition. For more
information, see Fiery Graphic Arts Package.
Printer’s default reflects the setting specified in Color Setup in Command WorkStation.

PRINT OPTIONS 86
Option Information
Progressives
Postflight
Specify On to enable the Progressives feature, a diagnostic tool used to show dry ink separations.
This feature uses the Progressives values specified in Color Setup in Command WorkStation.
This option is available as part of the Fiery Graphic Arts Package, Premium Edition. For more
information, see Fiery Graphic Arts Package.
NOTE: The Progressives and Postflight features cannot be used at the same time,
Specify whether or not you want to use the Postflight feature, a diagnostic tool that allows you to
analyze how data is processed by the EX Print Server.
This option is available as part of the Fiery Graphic Arts Package, Premium Edition. For more
information, see Fiery Graphic Arts Package.
NOTE: The Progressives and Postflight features cannot be used at the same time,

PRINT OPTIONS 87
Media options
Option Information
Paper Catalog
Media Weight
Media Type
Media Color
Preprinted Stock
Coating
Hole Punched
Paper Source
Tray Alignment
Click Select to access the Paper Catalog utility, which retrieves all paper information from the press.
For information about accessing Paper Catalog, see Utilities. For information about using Paper
Catalog, see Command WorkStation Help.
Access to Paper Catalog requires Two-Way Communication. For information about establishing
Two-Way Communication, see printer driver Help.
Select the weight for media used for your print job.
Choose the media type for your print job.
For information about media types and paper specifications, see the documentation that accompanies
the press.
Use this option to specify the media when printing on colored paper.
Specify Yes if you are using preprinted stock for your print job.
Specify a coating for your print job.
Specify the number of holes punched in the media used for your print job.
Specify the paper source that contains the paper to use for your print job.
For information about setting your choice of media in the Bypass, see the documentation that
accompanies your press.
Specify On to adjust the image on the page to achieve alignment on both sides of a page when printing
duplex.
For information about using Tray alignment, see Command WorkStation Help.

PRINT OPTIONS 88
Option Information
Document Size
Paper Size
Document Size is the page size defined in your application’s Print setup (or Page setup) dialog box.
In cases when printing one document page per sheet of paper, Document Size is usually the same as
Paper Size. However, it may differ when printing booklets or imposing multiple document pages on a
single sheet.
Document Size may also differ from Paper Size when you use the Scale or Scale to Fit options, in
which case the document page size is scaled at a given percent to fit a certain paper size.
Select from the list of available sizes in the Document size menu. (SEF stands for Short Edge Feed;
LEF stands for Long Edge Feed.)
The Document Size option is Read Only under the Media tab. This option can be changed by clicking
the Document Settings tab, which appears next to the Fiery Printing tab (Windows) or Print Setup.
When you select Print from the application, the Document Settings tab does not appear, so the option
cannot be changed.
NOTE: The default is Letter in the U.S. and A4 elsewhere.
For more information about Document size and Paper size, see page 123.
For information about Scale and Scale to fit, see page 123.
For information about printing custom page sizes, see page 37 and page 69.
Paper Size defines the size of the sheet of paper on which your job prints. It is the size of the physical
sheet of paper in the press tray. To assign Paper Size, do one of the following:
• Select the size from the available list. (SEF stands for Short Edge Feed; LEF stands for Long Edge
Feed.)
Slip Sheet
Slip Sheet Page Size
Slip Sheet Paper Source
Transparency Interleaving
• Click Custom to select a non-standard paper size.
• Select Same As Document Size to print one document page per sheet of paper.
The default size is Letter in the U.S. and A4 elsewhere. For more information, see page 115.
Specify whether to insert a slip sheet between copies or pages of multiple-copy jobs.
This option is effective only for non-sorted or collated jobs.
Specify the slip sheet page size by selecting from the list of available sizes. (SEF stands for Short Edge
Feed; LEF stands for Long Edge Feed.)
Specify the paper tray to use for the slip sheet.
To use Tray A1-1 and Tray A1-2, the 2 Tray HCF option must first be installed.
For information about installing optional trays, see page 26 or page 59.
Select On to print multiple transparency sheets separated by blank, plain paper pages.

PRINT OPTIONS 89
Option Information
Transparency Interleave Paper
Source
Mixed Media
Select a paper source tray for transparency interleaving.
To use Tray A1-1 and Tray A1-2, the 2 Tray HCF option must first be installed.
For information about installing optional trays, see page 26 or page 59.
Use Mixed Media to specify different media types, paper source, and chapter-based finishing for pages,
or ranges of pages, within a print job.
For more information, see page 119.
For information about using Mixed Media in Command WorkStation, see Utilities.

PRINT OPTIONS 90
Layout options
The Driver has three layout modes:
• Normal: use these options for printing standard documents, from 1 to 16 document pages
per sheet (page 90).
• Gangup: use these options for speed printing imposition modes (page 91). For additional
information, see page 118.
• Booklet: use these options for printing documents in booklet layout (page 92).
For additional information, see page 106.
Normal
Option Information
Mirror
Duplex
Rotate 180 (check box)
Scale
Scale to Fit
Print Border
Pages per Sheet
Page Order
Select On to print the mirror image of the job.
Select Off for single-sided printing.
Specify Top-Top or Top-Bottom for duplex (double-sided) printing by specifying the orientation of
printed images.
For more information, see page 116.
Specify On to rotate the pages of a job 180 degrees.
Specify an increase or decrease in the scale of your print job. When using the manual Scale option, you
cannot specify Scale to Fit.
For more information, see page 123.
Specify whether to scale your job to fit to a paper size. When using the Scale to Fit option, you cannot
use the manual Scale option.
For more information, see page 123.
Select On to print borders around each page in your print job.
Specify the number of document pages per sheet of paper for your print job.
NOTE: This option is invalid if your job is sent to the Direct connection.
Specify the layout direction when the Pages per sheet option is set to 2-up or greater.

PRINT OPTIONS 91
Gangup options
Option Information
Gangup
Gang-up type
Paper Size
Select On to specify options for speed printing imposition modes.
Select Step & repeat to speed print a job by printing two document pages on each sheet. When the
printed sheets are cut in half, the result is two complete sets of the same document.
Select Cut & stack to speed print a job by printing two document pages side by side. When the printed
sheets are cut in half and stacked together, the result is one complete set of the document (in faster
printing time).
For more information, see page 118.
Paper Size defines the size of the sheet of paper on which your job prints. It is the size of the physical
sheet of paper in the press tray. To assign Paper Size, do one of the following:
• Select the size from the available list. (SEF stands for Short Edge Feed; LEF stands for Long Edge
Feed.)
• Choose Select From Paper Catalog to access a dynamic database that stores the media attributes of
any paper available for printing from the EX Print Server.
• Select Custom Paper Size to select a non-standard paper size.
• Select Same as Document Size to print one document page per sheet of paper.
The default size is Letter in the U.S. and A4 elsewhere.
For information about Paper size and Document size, see page 123.
For information about printing custom page sizes, see page 37 and page 69.
For information about accessing Paper Catalog, see Utilities. For information about using Paper
Catalog, see Command WorkStation Help.
Shrink to fit
Increase gutter by
/-50.0–50.0 mm
0
(0.1 mm increments)
/-1.969–1.969 in
0
(.001 inch increments)
Duplex
Shrink to fit automatically scales down or reduces the document page size to fit the imageable area of
the selected paper size specified from the Paper size menu. Shrink to fit does not scale up or enlarge.
When Shrink to fit is set to Off, page contents print at 100%.
Increase gutter by controls the amount of space between adjacent pages on a sheet to adjust for
trimming or other finishing options.
Specify a positive value to increase the amount of blank space between adjacent pages.
Specify a negative value to decrease the amount of blank space between adjacent pages.
Select Off for single-sided printing.
Specify Top-Top for duplex (double-sided) printing to specify the orientation of printed images.
For more information, see page 116.

PRINT OPTIONS 92
Booklet options from the printer driver
This table references the Booklet Maker print options accessible from the printer driver. For
the Booklet Maker print options accessible from Command WorkStation Job Properties, see
“Booklet Maker in Job Properties” on page 108.
NOTE: You can use the Booklet Maker Wizard to specify your booklet options by clicking
Launch Wizard.
Option Information
Booklet
Booklet Type
Cover
Paper size: Paper Size for 2-up
Select On to specify options for printing documents in booklet layout. Click Launch Wizard to specify
how to arrange the pages of the job in special layouts for folding or cutting after printing.
Booklet Type is a combination of binding method, which determines how the signatures of the
booklet are folded and imposed, and binding edge, which determines the location of the spine of the
booklet.
For more information, see Booklet Maker Help.
The Cover option prepares a cover for your booklet. It is available for Saddle booklets only.
For more information, see Booklet Maker Help.
Paper Size for 2-up defines the size of the sheet of paper (unfolded) on which a booklet is printed.
To select a Paper size for a booklet, do one of the following:
• Select from the list of available sizes. (SEF stands for Short Edge Feed; LEF stands for Long Edge
Feed.)
• Choose Select From Paper Catalog to access a dynamic database that stores the media attributes of
any paper available for printing from the EX Print Server.
• Select Custom Paper Size to create a non-standard Paper size.
• Select Same as Document Size to print one document page per sheet of paper.
The default Paper Size is Letter in the U.S. and A4 elsewhere.
For information about Paper size and Document size in booklets, see page 115 and Booklet Maker
Help.
Paper size: Shrink to fit
Subset Size: Number of sheets in
a subset (Saddle)
For information about accessing Paper Catalog, see Utilities. For information about using Paper
Catalog, see Command WorkStation Help.
For information about printing custom page sizes, see page 37 and page 69.
Shrink to fit automatically scales down or reduces the document page size to fit the imageable area of
the selected paper size specified from the Paper size menu. Shrink to fit does not scale up or enlarge.
When Shrink to fit is set to Off, page content prints at 100%.
For more information, see Booklet Maker Help.
When Nested Saddle is selected, use this option to specify the number of sheets in each subset.
This option appears only when Nested Saddle is selected.

PRINT OPTIONS 93
Option Information
Page alignment:
Centering Adjustment
Page alignment:
Increase gutter by
/-50.0–50.0 mm
0
(0.1 mm increments)
/-1.969–1.969 in
0
(.005 inch increments)
Page alignment:
Compensate creep
Cover: Content input
Align pages positions page content in relation to the center of one-half the paper size or the spine, the
center of the sheet where the fold occurs.
At the center positions page content in the center of one-half the specified paper size.
At the spine aligns page content with the spine or center fold of your booklet.
For more information, see Booklet Maker Help.
Increase gutter by controls the amount of space between adjacent pages to adjust for binding or other
finishing options.
Specify a positive value to increase the amount of blank space between adjacent pages.
Specify a negative value to decrease the amount of blank space between adjacent pages.
For more information, see Booklet Maker Help.
Compensate creep for adjusts the position of the page content to counteract the shift that occurs when
sheets are folded to create Saddle and Nested Saddle booklets.
Select Plain when printing Saddle or Nested Saddle booklets with a large number of pages.
Select Thick when printing Saddle or Nested Saddle booklets on heavyweight paper.
For more information, see Booklet Maker Help.
Select Front & Back Separately to include cover content (individual pages in your document) as part of
your booklet print job.
Select Pre-Printed (use insert) to insert a pre-printed cover that will be added to the body pages from
an inserter tray.
For more information, see Booklet Maker Help.
Cover: Front Cover
When Front & Back Separately is selected, use the Front Cover option to define how the content of
the front cover is printed.
Select Print on outside to print only on the outside of the front cover (the inside of the front cover will
be blank).
Select Print on inside to print only on the inside of the front cover (the outside of the front cover will
be blank).
Select Print on both sides to print on both the inside and outside of the front cover.
Select Do not print if you do not want any content printed on the front cover.
When you add a cover, blank pages may be inserted depending on the allocation of pages to signatures.
For more information, see Booklet Maker Help.

PRINT OPTIONS 94
Option Information
Cover: Back Cover
Cover Media: Cover Media
Cover: Cover Source
When Front & Back Separately is selected, use the Back Cover option to define how the content of the
back cover is printed.
Select Print on outside to print only on the outside of the back cover (the inside of the back cover will
be blank).
Select Print on inside to print only on the inside of the back cover (the outside of the back cover will be
blank).
Select Print on both sides to print on both the inside and outside of the back cover.
Select Do not print if you do not want any content printed on the back cover.
When you add a cover, blank pages may be inserted depending on the allocation of pages to signatures
in the job. For more information, see Booklet Maker Help.
Cover Media (Saddle only) specifies the media for your booklet print job.
Choose Same as body to use the same media as the body pages of your job.
Choose Select from Paper Catalog to access the Paper Catalog utility. which retrieves all paper
information form the press.
NOTE: Cover Media is not an option for Mac OS.
For information about using Paper Catalog, see Utilities and Paper Catalog Help.
When Cover is selected, use the Cover Source option to select the tray that contains the Cover media
for your booklet. It is available for Saddle booklets only.

PRINT OPTIONS 95
Color options
.
Option Information
Color Mode
Auto Trapping
Composite overprint
Combine separations
Specify the color mode for the current print job.
Select CMYK for a full-color document.
Select Grayscale for a grayscale or black-and-white document.
Choose Basic Settings to specify color print options and settings.
Choose Expert Settings to edit other color print options and settings, including Black Overprint, Black
Text and Graphics, Gray (CMYK), and Gray (RGB).
For information about Expert Settings, see page 96.
Specify whether the job should automatically reduce white gaps for text and graphics.
Setting this option to On may result in graphics or text surrounded with borders.
For more information, see page 106.
Select On to overprint objects that are specified in the source PostScript or PDF file.
Design applications are typically set to knock out objects. To overprint, you must first change the
settings in the source application. When the Composite Overprint option is then set to On, the
overprinting commands specified in the source application take place, provided the output is
composite and consistent with the separations output.
For more information, see Color Printing.
When printing separations from supported desktop publishing applications:
Select On to combine separations on a single page.
Select Off to view separations as four individual black-and-white pages, each representing one color
plate.
For more information, see Color Printing.
Substitute Colors
2-Color print mapping
Select On to use the Substitute Color Values defined in the Spot-On module.
For more information, see Color Printing.
Specify if you want to replace spot colors with generic colors when you are creating a print job.
This option is available as part of the Fiery Graphic Arts Package, Premium Edition.
For more information, see Fiery Graphic Arts Package.

PRINT OPTIONS 96
Expert Settings options
To access the following options, click Expert Settings.
Expert Settings has three modes:
• Color Input: use these options for color printing (page 96).
• Gray & Black Processing: use these options for grayscale or black & white printing
(page 98).
• Output: specify the output profile to use for printing document (page 98).
Color Input
Option Information
CMYK/Grayscale Source
CMYK/Grayscale Processing
Method
Paper Simulation
RGB/Lab Source
Specify the simulation goal to be used for the current print job.
For more information, see Color Printing.
Specify the simulation method for CMYK print jobs.
Select Full (Source GCR) for a more complete and accurate simulation. Full (Source GCR) applies
colorimetric transformations that adjust hue as well as output density and produces output that
maintains the same amount of black as the source document.
Select Full (Output GCR) to apply the same simulation method as Full (Source GCR), except that the
output produced contains a black amount determined by the Output Profile.
Select Quick to use one-dimensional transfer curves to adjust density output of individual color
channels.
For more information, see Color Printing.
Specify to adjust the color according to the shade of the paper stock used as printable CMYK values in
the output color space.
This option is available as part of the Fiery Graphic Arts Package.
For more information, see Fiery Graphic Arts Package.
Specify a source color space definition for printing RGB images, objects, and text.
For more information, see Color Printing.

PRINT OPTIONS 97
Option Information
RGB/Lab Rendering Intent
Separate RGB/Lab to CMYK
Source
Spot Color Matching
Specify a default CRD (color rendering dictionary) for color conversion when printing RGB images,
objects, and text.
Select Presentation to print files with artwork, graphics and text. The result is similar to Photographic,
with well-rendered flesh tones and more saturated colors.
Select Photographic to print photographs, including scanned and digital camera images. The result is
less saturated than Presentation style.
Select Relative Colorimetric when color matching is important, but you also want to print white as
paper white. The white point transformation eliminates borders between blank spaces and white
objects.
Select Absolute Colorimetric when exact colors are required and visible borders are not distracting.
There is no white point transformation.
For more information, see Color Printing.
Select for RGB jobs when you want to simulate an output device other than the device to which you
are printing.
For more information, see Color Printing.
Select Off to print specified PANTONE colors in your job using the current CMYK/Grayscale Source
and CMYK/Grayscale Processing Method.
Select On to activate the PANTONE Lookup Table. The EX Print Server prints specified PANTONE
colors in your job by matching the CMYK print blend to the same color from the PANTONE library.
For more information, see Color Printing.
Use PDF/X Output Intent
Specify On to enable the PDF/X Output Intent feature to use the embedded output intent for PDF/X
compliant print jobs.
To use PDF/X Output Intent, you must set the RGB/Lab Source to None.
For information about the PDF/X Output Intent feature, see Color Printing.
This option is only accessible from Command WorkStation.

PRINT OPTIONS 98
Gray & Black Processing
Option Information
Gray (CMYK)
Gray (RGB)
Black Text and Graphics
Select these settings to print a CMYK job using black dry ink instead of process black.
This option renders the selected object types (Text/Graphics or Text/Graphics/Images) in grayscale
using black only, when C=M=Y=0 and K=n, where n is not zero. (Graphics refer to vector graphics;
Images refer to raster images.)
This option is designed to use black efficiently, by using only black dry ink (rather than four-color
process black).
For more information, see Color Printing.
Select these settings to print an RGB job using black dry ink instead of process black.
This option renders the selected object types (Text/Graphics or Text/Graphics/Images) in grayscale
using black only, when R=G=B. (Graphics refer to vector graphics; Images refer to raster images.)
This option is designed to use black efficiently, by using only black dry ink (rather than four-color
process black).
For more information, see Color Printing.
Select Normal to print black text and graphics as a four-color black using C, M, Y, and K dry ink, and
to use normal PostScript rendering.
Select Pure Black On to print black text and graphics as a one-color black, using black dry ink only.
Select Rich Black On to print black text and graphics as richer looking black, by layering a small
amount of Cyan dry ink underneath the black dry ink to make the black even darker.
This option is automatically set to Pure Black On if the Black Overprint option is enabled.
For more information, see Color Printing.
Black Overprint (for pure black)
Select Text to overprint black text.
Select Text/Graphics to overprint black text and graphics.
For more information, see Color Printing.
Output
Option Information
Default Output Profile
Specify the output profile to use for the current print job.
For information about output profiles, see Color Printing.

PRINT OPTIONS 99
Image options
For information about options specified in Setup, see Configuration and Setup.
Option Information
Image Smoothing
Brightness
Text/Graphics Enhancement
Image Quality
Text/Graphics Quality
Halftone Simulation
Select On to minimize grainy output when printing low-resolution images.
Specify the image brightness for the printed document.
Select 85% for a substantially lighter image, 115% for a substantially darker image, or use one
of the settings in between.
Specify if you want to sharpen the edges of text or vector graphics.
Specify the type of image quality for the job.
The Image Quality option affects the fineness of images in the job; there is a trade-off with
processing speed.
Specify the type of text and graphics quality for the print job.
The text/graphics quality affects the sharpness and fineness of text and graphics in the job, with a
trade-off in processing speed.
Select Normal for a good quality and faster processing speed.
Select Best for the sharpest possible text and graphic edges with slower processing speed.
Specify a halftone screening method for your print job.
Select Application Defined to use the screening set by the application.
Select Newsprint if you want a look similar to that of a newspaper.
Select User Defined 1-3 to use the screening set by the EX Print Server.
The User Defined Screen 1-3 settings reflect the setting specified in EX Print Server Setup.
For more information, see Fiery Graphic Arts Package.
Use maximum printer density
Image Halftone Mode
Graphics Halftone Mode
Text Halftone Mode
Text Sharpness Correction
This option is designed to create solid, saturated colors. It is typically used to print text and graphics,
not photographic images.
Select On to print 100% C, M, Y (or R, G, B) at the maximum density that the press is capable of
printing, regardless of calibration. C, M, Y (or R, G, B) values less than 100% still print at the
calibrated density value.
For best results, set the CMYK/Grayscale Source or RGB/Lab Source to None.
Specify the halftone screening method for images.
Specify the halftone screening method for graphics.
Specify the halftone screening method for text.
Specify On to correct the sharpness of the text and graphics edges.

PRINT OPTIONS 100
Option Information
Clear Dry Ink Mode
Image Enhance: Apply Image
Enhancement
Select Clear Dry Ink Mode to apply a layer of clear dry ink over the page(s) of the document according
to the selected mode:
Specify Apply to full page to apply a layer of clear dry ink to the full page regardless of any Clear spot
colors defined in the job.
Specify Apply to ‘Clear’ spot colors and selected objects to apply a layer of clear dry ink to ‘Clear’ spot
colors in the Clear Dry Ink group. Objects of the selected type are printed with ‘Clear’ spot color
applied.
Specify Do not print ‘Clear’ Spot Color to not apply Clear dry ink to the page. The spot colors in the
Clear Dry Ink group are ignored.
If the Clear Dry Ink Mode option is disabled, spot colors in the Clear Dry Ink group are not
recognized and are printed with an alternate spot color.
NOTE: To use Clear Dry Ink Mode, the Composite Overprint color option must be On.
For more information, see page 113.
Select Apply Image Enhancement to apply photo finishing enhancement to the specified page(s) or
sheets of the document.
The supported file formats are .pdf, .ps, .tiff, and .eps.
 Loading...