

Page 1

Version 6.3
May 2019
Xerox®
CentreWare®
Web Evaluation
Guide
Page 2

© 2019 Xerox Corporation. All rights reserved. Xerox®, Xerox and Design® and CentreWare® are
trademarks of Xerox Corporation in the United States and/or other countries.
Microsoft®, Windows®, Windows Vista®, Windows Server®, SQL Server®, Microsoft® .NET, Access®,
Excel®, and Internet Explorer® are either registered trademarks or trademarks of Microsoft Corporation in
the United States and/or other countries.
Hewlett-Packard® is a registered trademark or trademark of Hewlett-Packard Development Company, L.P.
in the United States and/or other countries.
Novell® is either a registered trademark or trademark of Novell, Inc. in the United States and/or other
countries.
BR#5354
Document Version: 6.3 (2019)
Page 3

Xerox CentreWare Web Evaluation Guide i
Contents
1. How to Use This Guide ............................................................................................................................................................................ 1-1
Intended Audience ................................................................................................................................................................................... 1-1
Nomenclature Used in This Guide ..................................................................................................................................................... 1-1
Guidelines for This Documentation .................................................................................................................................................. 1-2
CentreWare® Web Icons ....................................................................................................................................................................... 1-2
Acronyms Used in This Guide .............................................................................................................................................................. 1-2
Recommended Test Sequences .......................................................................................................................................................... 1-4
Reference Material .................................................................................................................................................................................... 1-4
CWW Software ...................................................................................................................................................................................... 1-4
Other Guides ........................................................................................................................................................................................... 1-4
Help System ............................................................................................................................................................................................ 1-4
Product Support Information ............................................................................................................................................................... 1-4
Internet Support ................................................................................................................................................................................... 1-4
Telephone Support .............................................................................................................................................................................. 1-4
Product Overview ....................................................................................................................................................................................... 1-5
System Requirements .............................................................................................................................................................................. 1-5
Recommended Hardware ................................................................................................................................................................ 1-5
Verifying Software Requirements ................................................................................................................................................ 1-7
Client Software Requirements ............................................................................................................................................................. 1-8
Browser Requirements ....................................................................................................................................................................... 1-8
Print Device Requirements .................................................................................................................................................................... 1-9
Network Printer Discovery/Monitoring Requirements ........................................................................................................ 1-9
2. Xerox® CentreWare Web Installation .......................................................................................................................................... 2-10
Suggested Prerequisites for This Evaluation .............................................................................................................................. 2-10
Expected Outcome of Installing CWW ......................................................................................................................................... 2-10
Installing CWW ........................................................................................................................................................................................ 2-10
Demonstrating the CWW Installation..................................................................................................................................... 2-13
Getting Started Wizard ........................................................................................................................................................................ 2-13
Getting Started: How Many Printers Discovery Wizard ................................................................................................... 2-14
Initial E-mail Notification Setup ................................................................................................................................................. 2-14
Proxy Server Setup ............................................................................................................................................................................ 2-15
Getting Started: Completed ......................................................................................................................................................... 2-17
Page 4

Xerox CentreWare Web Evaluation Guide ii
Installation Section Summary .......................................................................................................................................................... 2-17
3. CWW User Interface ............................................................................................................................................................................. 3-18
Prerequisites for This Section ............................................................................................................................................................ 3-18
The CWW Home Page .......................................................................................................................................................................... 3-18
Overview of the Printers Main Menu View .................................................................................................................................. 3-19
Navigation Menu (1): ...................................................................................................................................................................... 3-19
Printer Navigation Folder Window (2):.................................................................................................................................... 3-20
Group ID (3): ........................................................................................................................................................................................ 3-20
Printer Actions Window (4): .......................................................................................................................................................... 3-20
Group Actions (5): ............................................................................................................................................................................. 3-21
Show Comment/Database Results (6): ................................................................................................................................... 3-22
Table View and Table Preferences (7): ................................................................................................................................... 3-22
Find and In (8): ................................................................................................................................................................................... 3-23
Printer Table View (9): ..................................................................................................................................................................... 3-23
Paging Toolbar (10) ......................................................................................................................................................................... 3-24
Quick Device Discovery (11) ......................................................................................................................................................... 3-24
4. Device Discovery ..................................................................................................................................................................................... 4-25
Discovery Methods ................................................................................................................................................................................. 4-25
IP Addresses/DNS Names ............................................................................................................................................................. 4-25
IPv6 .......................................................................................................................................................................................................... 4-25
Import/Export Functions ................................................................................................................................................................ 4-25
Comments ............................................................................................................................................................................................ 4-26
Network Impact of Device Discovery ............................................................................................................................................ 4-26
Prerequisites for this Evaluation ................................................................................................................................................. 4-26
Quick Configuration ............................................................................................................................................................................... 4-27
Quick Configuration Evaluation: Intermediate ................................................................................................................... 4-27
Discovery Options ................................................................................................................................................................................... 4-28
Setting Up IP Based Discovery Methods ................................................................................................................................ 4-28
Discovery Exclusions......................................................................................................................................................................... 4-28
Delete Printers ..................................................................................................................................................................................... 4-29
SNMP v1/v2 .......................................................................................................................................................................................... 4-30
SNMP v3 ................................................................................................................................................................................................ 4-30
General Discovery Method Setup Notes & Considerations ........................................................................................... 4-31
IP Sweep Discovery........................................................................................................................................................................... 4-31
SNMP v3 Discovery ........................................................................................................................................................................... 4-31
Page 5

Xerox CentreWare Web Evaluation Guide iii
IP ARP Cache Discovery .................................................................................................................................................................. 4-31
IP Subnet Scan Discovery .............................................................................................................................................................. 4-31
Manual Discovery Using IP ARP Cache ................................................................................................................................... 4-32
Manual Discovery Using IP Subnet Scan ............................................................................................................................... 4-32
Manual Discovery Using IP Broadcast .................................................................................................................................... 4-32
Automatic discovery using IP Sweep ....................................................................................................................................... 4-32
Automatically Retrieving IP Addresses ................................................................................................................................... 4-33
IPX Printer Discovery Method ...................................................................................................................................................... 4-33
Configuring the Printer Re-Discovery Feature ..................................................................................................................... 4-34
Manually Clear All Printers Feature ........................................................................................................................................... 4-34
Printers Not Communicating Feature ...................................................................................................................................... 4-35
5. Generate a Status Report Using the Reports Function ......................................................................................................... 5-36
Graphical Reports .............................................................................................................................................................................. 5-36
Tabular Reports .................................................................................................................................................................................. 5-36
Standard Graphical Reports ............................................................................................................................................................... 5-37
Standard Tabular Reports ................................................................................................................................................................... 5-39
Named Reports ........................................................................................................................................................................................ 5-40
6. Custom Properties .................................................................................................................................................................................. 6-41
Enabling and Defining Custom Properties .................................................................................................................................. 6-41
Printer Sort Feature ................................................................................................................................................................................ 6-42
Enable Filter Feature.............................................................................................................................................................................. 6-42
Enforce Uniqueness Feature.............................................................................................................................................................. 6-42
Error/Warning Icon Settings .............................................................................................................................................................. 6-43
7. Printers Features ...................................................................................................................................................................................... 7-45
Printers Overview ..................................................................................................................................................................................... 7-45
How to Evaluate Printers Features .................................................................................................................................................. 7-45
Prerequisites for This Evaluation ...................................................................................................................................................... 7-45
New Printer Function ............................................................................................................................................................................. 7-45
Add New Non-Networked Printer Device ............................................................................................................................... 7-45
Add New Networked Printer Device ......................................................................................................................................... 7-46
Troubleshooting Function ................................................................................................................................................................... 7-46
Troubleshoot multiple printers .................................................................................................................................................... 7-47
Traps ............................................................................................................................................................................................................. 7-48
Modify Trap ......................................................................................................................................................................................... 7-48
Alert History ............................................................................................................................................................................................... 7-49
Page 6

Xerox CentreWare Web Evaluation Guide iv
Printer Status History ............................................................................................................................................................................. 7-49
Display Preferences Feature .............................................................................................................................................................. 7-50
Table Scrollbars Feature ...................................................................................................................................................................... 7-51
Find and In ................................................................................................................................................................................................. 7-51
To Use the Find and In Features ................................................................................................................................................ 7-51
Sort by Column Feature ....................................................................................................................................................................... 7-52
Automatic Filtering ................................................................................................................................................................................ 7-52
Edit Actions ................................................................................................................................................................................................ 7-53
How to use this feature .................................................................................................................................................................. 7-53
Edit Asset Properties ........................................................................................................................................................................ 7-53
Edit Printer Default Properties ..................................................................................................................................................... 7-54
Edit Protocol Properties .................................................................................................................................................................. 7-54
Edit Traps .............................................................................................................................................................................................. 7-55
Setting Edit Trap ................................................................................................................................................................................ 7-56
Edit Scan Services .............................................................................................................................................................................. 7-56
Edit Security Properties ................................................................................................................................................................... 7-57
Edit Job Accounting Properties ................................................................................................................................................... 7-58
Refresh Data ............................................................................................................................................................................................. 7-59
Printer Alerts .............................................................................................................................................................................................. 7-60
Reset Printer............................................................................................................................................................................................... 7-60
Alert History ............................................................................................................................................................................................... 7-60
Status History ............................................................................................................................................................................................ 7-61
Printers Section Summary ................................................................................................................................................................... 7-61
8. Utilizing Groups........................................................................................................................................................................................ 8-62
Overview of Groups ................................................................................................................................................................................ 8-62
Prerequisites for this Evaluation: ................................................................................................................................................ 8-62
How to Evaluate Printer Group Functions ................................................................................................................................... 8-62
Group Folder Navigation ..................................................................................................................................................................... 8-62
Error Printer Group ............................................................................................................................................................................ 8-63
Unconfigured Printer Group ......................................................................................................................................................... 8-63
All Group ................................................................................................................................................................................................ 8-63
Newly Discovered Group ................................................................................................................................................................ 8-63
Additional Printer Folder Functions ................................................................................................................................................ 8-63
Evaluating New Group Function ................................................................................................................................................ 8-64
User and Group access to Printer Groups .............................................................................................................................. 8-65
Custom Group Additional Actions .................................................................................................................................................. 8-65
Page 7

Xerox CentreWare Web Evaluation Guide v
Add to Group ....................................................................................................................................................................................... 8-66
Remove from Group ......................................................................................................................................................................... 8-66
Importing Groups .............................................................................................................................................................................. 8-66
Importing Devices into Groups ................................................................................................................................................... 8-66
Copy to Groups ................................................................................................................................................................................... 8-67
New Subgroup .................................................................................................................................................................................... 8-67
Reorder Group ..................................................................................................................................................................................... 8-68
Set Parent Group ............................................................................................................................................................................... 8-68
Delete Printers .......................................................................................................................................................................................... 8-69
Delete Group ............................................................................................................................................................................................. 8-69
Group Configuration ............................................................................................................................................................................. 8-70
Configure Group Identity .............................................................................................................................................................. 8-70
Group Status Retrieval .................................................................................................................................................................... 8-71
Group Membership Filter..................................................................................................................................................................... 8-71
Status Alerts ............................................................................................................................................................................................... 8-72
Prerequisite for the remainder of this test ............................................................................................................................ 8-73
Group Section Summary...................................................................................................................................................................... 8-74
9. Configuration Sets and Configuration Policies ......................................................................................................................... 9-75
Recommended Usage .......................................................................................................................................................................... 9-75
Creating Configuration Sets and Policies .................................................................................................................................... 9-76
Steps to Create a Configuration Set ........................................................................................................................................ 9-76
Delete and/or Copy a Saved Configuration Set ................................................................................................................. 9-77
Creating a Configuration Set from a Device ........................................................................................................................ 9-77
Configuring Devices Remotely .................................................................................................................................................... 9-77
Creating Configuration Policies .................................................................................................................................................. 9-78
Editing a Configuration Policy..................................................................................................................................................... 9-78
Additional Configuration Policy Actions ................................................................................................................................ 9-79
10. Exploring the Device Management Dashboard ..................................................................................................................... 10-80
Policy Drill Down .................................................................................................................................................................................... 10-81
Exporting the Dashboards ................................................................................................................................................................ 10-81
11. Working with Device Firmware Policy ......................................................................................................................................... 11-82
Overview .................................................................................................................................................................................................... 11-82
Adding / Deleting Files to the Software File Repository ..................................................................................................... 11-83
Creating a New Firmware Policy .................................................................................................................................................... 11-84
Manually Releasing an Upgrade ................................................................................................................................................... 11-86
Page 8

Xerox CentreWare Web Evaluation Guide vi
Deployment Tasks ................................................................................................................................................................................ 11-86
Editing a Firmware Policy .................................................................................................................................................................. 11-87
Miscellaneous Tips................................................................................................................................................................................ 11-87
12. Working with Device Passwords Policy ....................................................................................................................................... 12-88
Overview .................................................................................................................................................................................................... 12-88
Creating New Password Policies .................................................................................................................................................... 12-88
Enforcing Policies ............................................................................................................................................................................. 12-89
Editing Password Policies................................................................................................................................................................... 12-89
Viewing and Updating Passwords ................................................................................................................................................ 12-90
Applying A Password...................................................................................................................................................................... 12-90
Importing Passwords from CSV File ....................................................................................................................................... 12-90
13. Print Server Queues .............................................................................................................................................................................. 13-91
Printer Queue Administration ......................................................................................................................................................... 13-91
Prerequisites for this evaluation ............................................................................................................................................... 13-91
CentreWare® Web Configuration Utility ............................................................................................................................ 13-91
Local Queue Management ............................................................................................................................................................... 13-92
Prerequisite for this evaluation ................................................................................................................................................. 13-92
Creating a Print Queue ....................................................................................................................................................................... 13-92
Edit Queue Properties ......................................................................................................................................................................... 13-93
Evaluating the Edit Queue Properties .................................................................................................................................... 13-93
Installing Printers in Queues ............................................................................................................................................................ 13-94
Evaluate Installation of Multiple Printers ............................................................................................................................ 13-94
Evaluate Single Printer Install .................................................................................................................................................... 13-94
Alternate Method to Test the Install Multiple Printers .................................................................................................. 13-94
Adding Print Servers ............................................................................................................................................................................. 13-94
Prerequisites for this portion of the evaluation ................................................................................................................ 13-94
Add/Delete Directory .......................................................................................................................................................................... 13-95
Queue Section Summary ................................................................................................................................................................... 13-95
14. Generating Reports .............................................................................................................................................................................. 14-96
Primary Purpose of These Features .............................................................................................................................................. 14-96
Prerequisites for This Evaluation .................................................................................................................................................... 14-97
Overview of Reports Features ......................................................................................................................................................... 14-98
Standard Graphical Reports ....................................................................................................................................................... 14-98
Standard Tabular Reports ........................................................................................................................................................... 14-99
Named Reports ............................................................................................................................................................................. 14-100
Page 9

Xerox CentreWare Web Evaluation Guide vii
Evaluating Graphical Reports ....................................................................................................................................................... 14-100
Pie Chart ........................................................................................................................................................................................... 14-100
Line Chart ......................................................................................................................................................................................... 14-100
Clustered Column Chart ............................................................................................................................................................ 14-101
Stacked Column Chart ............................................................................................................................................................... 14-101
Evaluating the Standard Tabular Reports .............................................................................................................................. 14-101
Configure Report .......................................................................................................................................................................... 14-101
Named Reports ................................................................................................................................................................................... 14-103
Report Section Summary................................................................................................................................................................ 14-104
15. Functions Within Wizards .............................................................................................................................................................. 15-105
Wizards Overview ............................................................................................................................................................................... 15-105
Getting Started Wizard ................................................................................................................................................................... 15-105
Install Printers Wizard ...................................................................................................................................................................... 15-105
Troubleshoot Printers Wizard ....................................................................................................................................................... 15-105
Troubleshooting Wizard ............................................................................................................................................................ 15-106
Using the Upgrade Android Tablets Wizard ......................................................................................................................... 15-106
Adding an Android Tablet Upgrade File ........................................................................................................................... 15-106
Scheduling an Android Tablet Upgrade File ................................................................................................................... 15-107
Stopping or Restarting an Upgrade .................................................................................................................................... 15-108
Deleting an Upgrade .................................................................................................................................................................. 15-108
Clone Phaser Printers Wizard Overview ................................................................................................................................... 15-109
Prerequisites for this evaluation ............................................................................................................................................ 15-109
Clone Phaser Printers Wizard .................................................................................................................................................. 15-109
Using the Clone Printers Wizard ................................................................................................................................................. 15-110
Feature Installation .......................................................................................................................................................................... 15-110
Feature Installation Wizard ..................................................................................................................................................... 15-111
16. Administration Functions ............................................................................................................................................................... 16-112
Administration Menu Overview ................................................................................................................................................... 16-112
Discovery ................................................................................................................................................................................................ 16-113
Discovery Methods ...................................................................................................................................................................... 16-114
SNMP v1/v2 ..................................................................................................................................................................................... 16-115
SET and GET Community Names ......................................................................................................................................... 16-117
Configure E-mail and External Servers ..................................................................................................................................... 16-118
Setup Network Usage Configuration ....................................................................................................................................... 16-119
Setup Historical Data information ............................................................................................................................................. 16-122
Page 10

Xerox CentreWare Web Evaluation Guide viii
Setup for SMart eSolutions............................................................................................................................................................ 16-123
SMart eSolutions Actions ............................................................................................................................................................... 16-124
Restore SMart eSolutions Group – Status ......................................................................................................................... 16-124
Transaction Log Setup ............................................................................................................................................................... 16-124
Job Accounting.................................................................................................................................................................................... 16-126
Device Based Accounting Data Retrieval .......................................................................................................................... 16-126
Customers and Chargeback Codes ...................................................................................................................................... 16-126
Chargeback Codes ....................................................................................................................................................................... 16-127
Creating a New Chargeback Code ....................................................................................................................................... 16-127
Creating a New Customer (End User) ................................................................................................................................ 16-128
Deleting a Customer ................................................................................................................................................................... 16-129
Importing and Exporting Customers .................................................................................................................................. 16-129
E-mail Alerts on Failure to Retrieve Job Accounting Data ........................................................................................ 16-131
Advanced ............................................................................................................................................................................................... 16-131
Customize ........................................................................................................................................................................................ 16-131
Setup Custom Properties .......................................................................................................................................................... 16-132
Setup Useful References ........................................................................................................................................................... 16-133
Xerox® CentreWare® Web Updates ................................................................................................................................. 16-134
Setup Administrator Information ......................................................................................................................................... 16-134
Administration Setup Section Summary................................................................................................................................. 16-134
17. Configuring SMart eSolutions ...................................................................................................................................................... 17-136
SMart eSolutions Overview ............................................................................................................................................................ 17-136
Request for Registration ................................................................................................................................................................. 17-138
Table Preferences .............................................................................................................................................................................. 17-138
Printer Actions for SMart eSolutions Group ........................................................................................................................... 17-139
Add to Group ........................................................................................................................................................................................ 17-139
Remove from Group ......................................................................................................................................................................... 17-140
Copy to Group ..................................................................................................................................................................................... 17-140
Group Actions ...................................................................................................................................................................................... 17-141
Page 11

Xerox CentreWare Web Evaluation Guide 1-1
1. How to Use This Guide
This guide is designed to assist in evaluating the CentreWare® Web (CWW) software product for use in a
network operating environment. It uses a combination of high-level feature descriptions, representative
screen images, examples of feature usage and specific sequences to perform the evaluation.
Intended Audience
It is expected that this guide is used by a client evaluation team during installation of CWW. In order to get
the most from this guide, the readers should have an understanding of:
• The printer environment at the site where CWW is to be installed
• Network topology – routing configuration, addresses and subnets in the environment
• The Windows® operating system on which CWW is to be installed
• The basic functionality of SNMP-based monitoring of network devices
By reading the guide, the evaluator will become familiar with the features and capabilities of CentreWare
Web. Working through these sections, the evaluator is provided with a series of exercises that can be used
to evaluate CWW.
Nomenclature Used in This Guide
The following nomenclature is used when describing functions, examples or tests used in this guide.
• Page: Refers to the currently displayed Web-browser window for CentreWare® Web. Functions in
CentreWare® Web are grouped by one of the four main functional pages: Printers, Wizards, Reports, and
Administration.
• Tab: The Tab is the navigation device, displayed along the top of the page, and is the basic mechanism
for switching between functions.
• Pane: Many pages contain discrete windows associated with specific functions or actions. Some panes
contain icons, so you can minimize or expand the contents.
• Navigation pane: Each page of CentreWare® Web displays a navigation pane along the left side of the
page. In the Printers page, the navigation pane is displayed as a graphic with folder icons representing
nodes. The Printers page, also displays text to navigate to the Printers, Queues, or Configuration Sets
page. Text is used to navigate between sub-functions of the Wizards, Reports and Administration pages.
• Data entry field: Data entry fields allow the user to input variable data into CWW. Data entry fields are
rectangular in shape and identified as having a lighter background than the windows in which they are
displayed. A field name placed adjacent identifies data entry fields.
Depending upon the page function, user data can be entered via one of the following:
• Drop-down menu: A drop-down menu allows the selection from a list of fixed values.
• Selection box: A selection box is used to select or deselect specific records or values.
Page 12
Xerox CentreWare Web Evaluation Guide 1-2
• Radio buttons: radio buttons are used when only one of multiple selections can be made for a particular
function. radio buttons are small circular icons. Selecting one radio button typically deselects any
associated buttons.
• Action buttons: action buttons are active icons within a page that direct the browser to another function.
Mouse-overs on buttons typically display the function.
Guidelines for This Documentation
• Navigation guidelines: In some instances, the evaluator is directed to view pages or activate functions on
specific pages. The sequence Administration > Discovery Methods > Discover Now button directs the
evaluator to first select the Administration page, next select the Discovery Methods page and finally
activate the Discover Now button.
• Error information: If an error is encountered during user interaction (i.e. a mandatory field not filled in, an
error in the operation, a prerequisite not met, etc.) the red error icon appears next to the action or data
entry field and an error message is posted at the top of the page.
• Notes and other information:
Specific Notes or Cautions are indicated in text similar to this, following the text to which they apply.
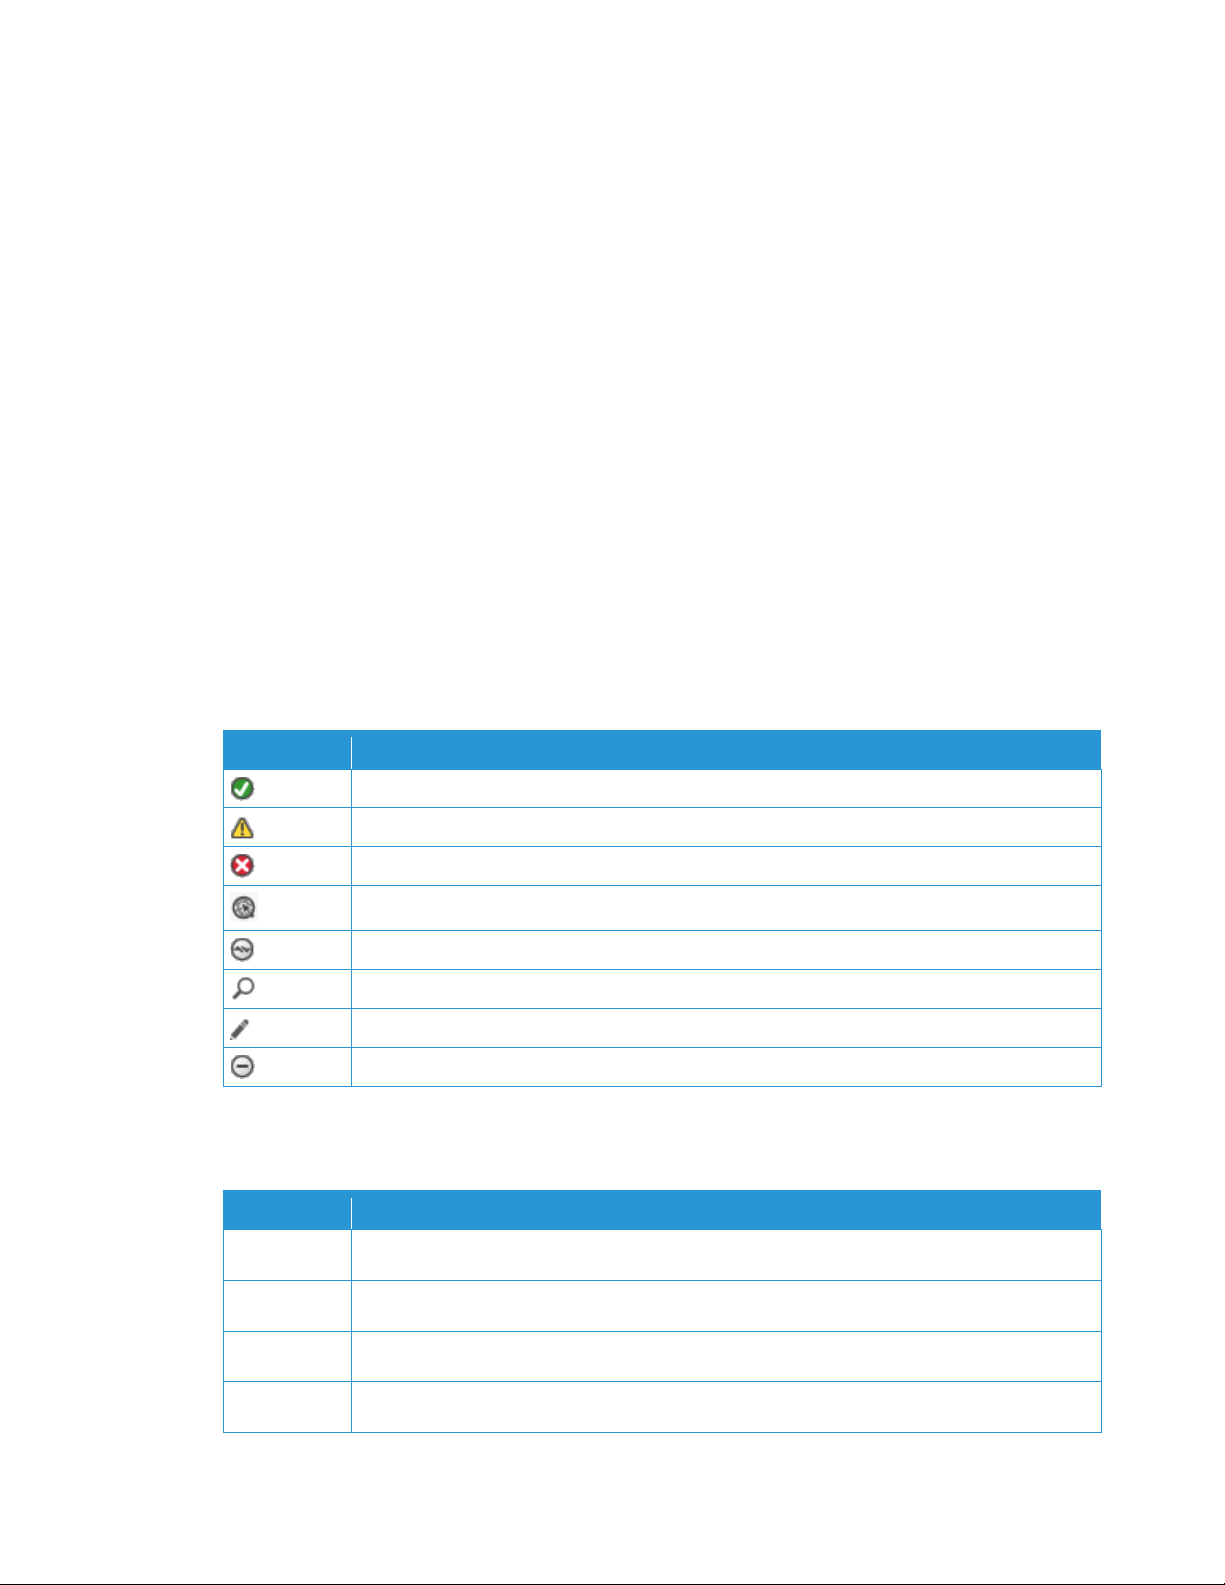
CentreWare® Web Icons
Icon
Definition
Printer status up-and-running or action successful
Warning button: non-critical device status or action produced a warning.
Error – Attention is required or action failed or status from device is indeterminate.
Open Printer Web page
No network connection
Display Selection, Device Details
Modify or Change Action
Unsupported: the device is noncompliant or action is not supported
Acronyms Used in This Guide
Acronym
Definition
AMR
Auto Meter Readings
ASR
Automatic Supplies Replenishment
CWW
Xerox CentreWare® Web print management software
CSV
Comma Separated Value
Page 13

Xerox CentreWare Web Evaluation Guide 1-3
Acronym
Definition
DNS
Domain Naming System
DocuPrint
A Xerox Printer Family
HTML
Hypertext Markup Language
ICMP
Internet Control Message Protocol
IE
Microsoft Internet Explorer®
IIS
Microsoft® Internet Information Services
IP
Internet Protocol
IPX
Internetwork Packet Exchange
LPR
Line Printer Remote
MB
Megabyte (2^10 kilobytes)
MFD’s
Multi-function devices
MHz
10^6 Hertz
MIB
Management Information Base
MTS
Microsoft® Transaction Server
NT
Microsoft Windows NT® 4.x OS
OIDs
Object Interface Definition
OS
Operating System – Microsoft Windows®
PDF
Portable Document Format
Phaser
A Xerox Printer Family
RFC
Request For Comments [Internet]
RPC
Remote Procedure Call
SMTP
Simple Mail Transfer Protocol
SNMP
Simple Network Management Protocol
TCP/IP
Transmission Control Protocol/Internet Protocol
Page 14

Xerox CentreWare Web Evaluation Guide 1-4
Acronym
Definition
XML
Extensible Markup Language
Recommended Test Sequences
This guide is organized so that some evaluations build on and use prior settings and test results. Xerox
recommends that the evaluation steps be followed in the order presented, but if a certain feature(s) is not
to be evaluated, please read the prerequisite paragraph in the follow-on sections before proceeding.
During installation, the user is presented with the option to initially discover print devices via the Getting
Started Wizard. Xerox recommends that the evaluator allow this wizard to run with Least Printers selected,
initially. This populates CWW with printers that exist on the local subnet and should provide sufficient
devices to perform the evaluation with minimal impact to the IT environment. The Discovery section, after
the evaluation sections on Printers, Queues, and Administrative Set-up, can be used to expand the printers
under management.
Reference Material
C W W S OF TW AR E
A copy of the CWW software is available for download at: http://www.xerox.com/centrewareweb or
http://www.xerox.com. Follow the path: Production Equipment > Software > System Management and
Administration > Xerox CentreWare® Web Device Management Software.
OT H ER G UI DE S
The CWW Evaluation Guide and Installation Guide are available in Portable Document Format (PDF)
format on the Web at http://www.xerox.com/centrewareweb.
HE L P SY ST EM
CWW has an online help system that contains information about the features and functions and how to
use the application. The link to the help is located on the upper right of the CWW Web pages.
Product Support Information
I N T ER NE T SU PP OR T
Xerox maintains an online help system for CWW at http://www.xerox.com by following the path: Production
Equipment > Software > System Management and Administration > Xerox CentreWare Web Device
Management Software > Support.
T E LE P HO NE S UP PO RT
For additional assistance, go to http://www.xerox.com and follow the path Contact Us > Support to obtain
the telephone number for support in a specific region.
Page 15

Xerox CentreWare Web Evaluation Guide 1-5
Product Overview
CWW is a real-time control and monitoring application that can discover, install and configure, manage,
monitor, and report on any type of SNMP-compliant printing device attached to an IP network, regardless
of manufacturer. Operation of CWW is through the Web browser. As such, no client software is required for
access to CWW, and any network connected PC capable of running Internet Explorer can be utilized.
The discovery of networked printers can be selected for specific subnets in an enterprise. CWW features a
built-in alert detection system, and through customization of alert severity levels, has the capability to send
an e-mail message to a specified recipient when user-defined conditions exist in the devices being
monitored. CWW provides clear and concise status of all networked printers, with the ability to group
printers in a way that best fits the network environment. Printer status conditions can be displayed and
configured to meet specific account needs.
With CWW, the administrator can:
• Discover and manage network connected printers
• Install and manage local and remote print queues
• Install Windows® printer drivers for single or multiple printers
• Monitor printers and print servers for status and alert conditions and notify users (via e-mail) when faults
occur
• Initiate troubleshooting tests on single or multiple printers and display the results
• Monitor and modify print device properties via Configuration Sets
• Upgrade printer firmware
• Gather and report on printer status and information
• Through its reporting capability, CWW can provide the following information:
– List of all printers found in the enterprise
– Report of printers that need attention
– Summary of print volume across an enterprise, summarized by printer and queue
System Requirements
RE C OM ME ND ED H AR DW AR E
The hardware recommendation listed below is what would be expected when installing CWW on new
equipment in a production server environment, but may not represent the minimum hardware needed. For
those requirements, consult the CWW Readme document provided in the CWW installer. It is available
during the installation process, by selecting the View Readme button, and is stored in Program
Files\Xerox\Xerox CentreWare® Web\Readme.txt.
Hardware Requirement
Recommendations
Processor
Intel® Pentium® 4 processor at 3GHz or Intel® Core™ 2 Duo. AMD
equivalent processors are supported as well.
Memory
2 GB of RAM
Server
Separate server with SQL® installed is recommended if:
• The number of groups configured for concurrent status polling is
greater than 20, and/or
• The number of alert profiles is greater than 20, and/or
Page 16

Xerox CentreWare Web Evaluation Guide 1-6
• Job data consumption is greater than 100,000/week
Note: If you install the application in the Azure Cloud on a
supported operating system, you may use Azure SQL database.
You may operate Xerox® CentreWare Web off-premise in the
Azure Cloud with Azure SQL
Available Disk Space
Minimum: 3GB
Recommended: 20GB on 7200 rpm hard drive if collecting
historical data on thousands of devices.
Examples: Below are our recommendations for hardware, operating systems, and SQL requirements.
For Installs < 5000 Devices:
• Xerox
®
CWW on Windows Server 2008R2 with off-box SQL*
– 2 CPU cores @2.9 GHz
– 4 GB RAM
– 40 GB free space (preferably on a non-system disk)
• Xerox® CWW on Windows Server 2008R2 with on-box SQL/SQL Express**
– 2 CPU cores @2.9 GHz
– 8 GB RAM
– 60 GB free space (preferably on a non-system disk)
• Xerox® CWW on Windows Server 2012R2 with off-box SQL*
– 2 CPU cores @2.9 GHz
– 12 GB RAM
– 40 GB free space (preferably on a non-system disk)
• Xerox® CWW on Windows Server 2012R2 with on-box SQL/SQL Express**
– 2 CPU cores @2.9 GHz
– 16 GB RAM
– 60 GB free space (preferably on a non-system disk)
* Use the newest version of SQL acceptable to the customer.
** On‐box SQL is only recommended for very small installations (< 200 devices)
For Installs > 5000 devices:
• Use an off-box SQL Server
• Increase memory by 50%
• Add 2 CPU cores
For Installs 10,000 devices:
• One terabyte disk space
• 16 GB RAM
• Quad Core 3.4 GHz processor
• SQL Enterprise on separate server
Page 17

Xerox CentreWare Web Evaluation Guide 1-7
If running on a virtual system, all resources need to be dedicated to Xerox® CWW.
Note: If you need to install Xerox® CWW on a rack-mounted server, you need a keyboard-video-mouse
terminal interface to the server.
V E R IF YI NG S OF TW AR E RE Q UI R EM EN TS
The following table describes the software requirements for the Xerox® CWW
Software Requirement
Recommendations
Operating Systems
Windows® 2008 x86 and x64 and R2x64
Windows® 10
Windows® Server® 2012 and 2012 R2
Windows® Server® 2016
Note: When installing on Windows Server® 2012, right-click the
installer and select Run as Administrator.
Note: Xerox® CWW does not support Windows® systems running
on a Novell® client, Macintosh®, or non-NTFS partitions.
Note: Xerox® CWW does not support installation on a domain
controller.
Web Server
Microsoft® Internet Information Services (IIS) 6.0 or above
Internet Protocol
Working Microsoft® TCP/IPv4 Stack
Browser
Microsoft® Internet Explorer® 10.0, 11.0
Microsoft® Edge
Access Components
Windows Data Access Components (WDAC)
Note: MDAC changed to WDAC with Windows® Vista and
Windows® Server 2008. WDAC is included as part of the
operating system and is not available separately for redistribution.
Serviceability for WDAC is subject to the life cycle of the operating
system.
Microsoft® .NET Framework
Microsoft® .NET 4.5.2
Note: The .NET Framework is not installed with CWW and needs to
be installed prior to running the installation for CWW.
Database Server
Minimum: For new installations of Xerox® CWW, a customer
provided Microsoft® SQL Server® is required. Current installations
may continue to use the Microsoft® SQL Server® Express database.
Recommended: Use SQL Server® 2008 R2/2012/2014/2016/2017
Standard/Enterprise if available in the customer’s IT environment.
Note: If using a remote SQL Server, both the remote client on
which SQL Server is installed and the Xerox® CWW Server client
Page 18

Xerox CentreWare Web Evaluation Guide 1-8
Software Requirement
Recommendations
require the Microsoft® Distributed Transaction Coordinator
(MSDTC) service to be enabled and configured in order to allow
remote client access. If the Windows® Firewall is running a firewall,
an exception needs to be created for the MSDTC service.
Note: When managing more than 5000 devices or using the
Xerox® Print Agent feature, we recommend that you install a
Standard/Enterprise version of SQL Server® on a separate server.
The requirements for the separate database server should match
the requirements for the Xerox® CWW server
Note: If using an Azure SQL Services installation, the following
components need to be installed and the server rebooted prior to
installing Xerox® CentreWare Web:
1. Windows Management Framework 5.1 (Windows Server 2016,
2012 R2 or 2012*) *not available for Server 2008 or Server 2008
R2.
2. Azure Powershell 6.7.0 or later can be downloaded here from
https://github.com/Azure/azure-powershell/ Both *x86 or x64
(default) should work. Installing PowerShell within the PowerShell
ISE does not meet the requirement to list the software in the
Windows Programs & Features list.
Other Components
Minimum: AJAX 2.0.
Client Software Requirements
BR O WS ER R EQ UI RE ME NT S
Although the CWW server can be used to directly browse the application, in some cases itis necessary for
personnel to access the application from a remote desktop. Optimal performance and security can be
achieved when using Internet Explorer® 10.0, or 11.0 and EDGE.
Warning
• Network Transmission Control Protocol/Internet Protocol (TCP/IP) must be loaded and operational.
• To use the IPX Network features of Xerox CentreWare® Web, an IPX protocol stack must be loaded and
operational on the CWW server
Note: Xerox recommends that any desktop environments be kept up to date with the latest critical patches
and service releases obtainable from Microsoft®.
Page 19

Xerox CentreWare Web Evaluation Guide 1-9
Print Device Requirements
N E T WO RK P RI NT ER D IS CO V ER Y /M ON IT OR IN G RE QU I RE ME NT S
For successful management by CWW, all SNMP-based printer devices should support the mandatory MIB
elements and groups as defined by the following standards:
Standard
Description
RFC 1157
SNMP Version 1
RFC 1213
MIB-II for TCP/IP-based Internet
RFC 1514/2790
Host Resources MIB v1/v2
RFC 1759
Printer MIB v1
RFC 3805
Printer MIB v2
RFC 3806
Printer Finishing MIB
Optional: RFC 2271-2275
SNMP v3 Architecture
Xerox recommends that any printer be kept up-to-date with the latest patches and firmware obtainable
from the manufacturer to ensure that the maximum amount of MIB object data can be exposed to the
application.
Page 20

Xerox CentreWare Web Evaluation Guide 2-10
2. Xerox® CentreWare Web Installation
The CWW installer provides a quick and easy way to install and configure the system for use in this
evaluation. The installer utilizes Microsoft® MSI functionality, and requires Microsoft® .NET framework
version 4.5.2 if not already installed on the target machine. In addition to installing CentreWare® Web, the
installer can also install the redistributable package for Microsoft SQL Server® 2008 Express.
Suggested Prerequisites for This Evaluation
Before starting the CWW installation process, make sure that the following are available:
• An appropriate Windows® operating system server is network enabled and configured to meet the
highest recommended configuration of the minimum hardware and software requirements listed here or
in the Readme.txt file.
• DNS Name or Internet Protocol (IP) address of the Simple Mail Transfer Protocol (SMTP) server, if e-mail
based Status Alerts are to be evaluated, and the username and password of the account used by CWW, if
required by the SMTP server in use at this site.
• Account name, domain name, and e-mail address of the CWW administrator (the evaluator).
• If you require a proxy server for your internet connection, you need:
– Proxy Server Address, Port Number
– If your proxy server requires a login, you also need:
– Authentication Type, User Name, Domain Name, and Password
• At least one networked printer for the evaluation. The device needs to be compliant to the SNMP RFCs.
• If the Smart eSolutions feature is to be completely functional, it is necessary to obtain a list of all the
printers/devices currently under a Xerox Service agreement. This information may be available from the
client’s billing department. Details on the Smart eSolutions feature are available at:
www.xerox.com/smartesolutions.
Expected Outcome of Installing CWW
Upon completing the installation process according to this guide, the evaluator will have successfully
installed CWW with a minimum amount of time spent. The installation process is expected to take less than
30 minutes to complete, given that all prerequisite information and systems are known and in place prior to
beginning.
Installing CWW
For the purpose of this evaluation, the typical or standard installation process is used. Refer to the CWW
Installation Guide to install the product using more advanced settings and options. This is available from
the Xerox Web site at: http://www.xerox.com/centrewareweb.
1. Obtain a copy of CWW and related documentation from the Xerox Web site and install it on the
evaluation server. Access the Xerox Web site at: http://www.xerox.com/centrewareweb. The installer
must have administrator level access to the server where CWW is being installed.
2. Download and run the CWW executable (EXE) file.
Page 21
Xerox CentreWare Web Evaluation Guide 2-11
3. Click Next when the CWW Setup window opens.
4. When the License Agreement window is displayed, review the license, and if acceptable, select Agree
and then click Next.
5. In the Choose Run As Account window, select either Create Local Account or Specify Existing Account
and then click Next.
6. If you selected Specify Existing Account in step 5, In the Specify Run As Account window, enter the
Domain or Workgroup, the User Name, and the Password and then click Next and move to step 8.
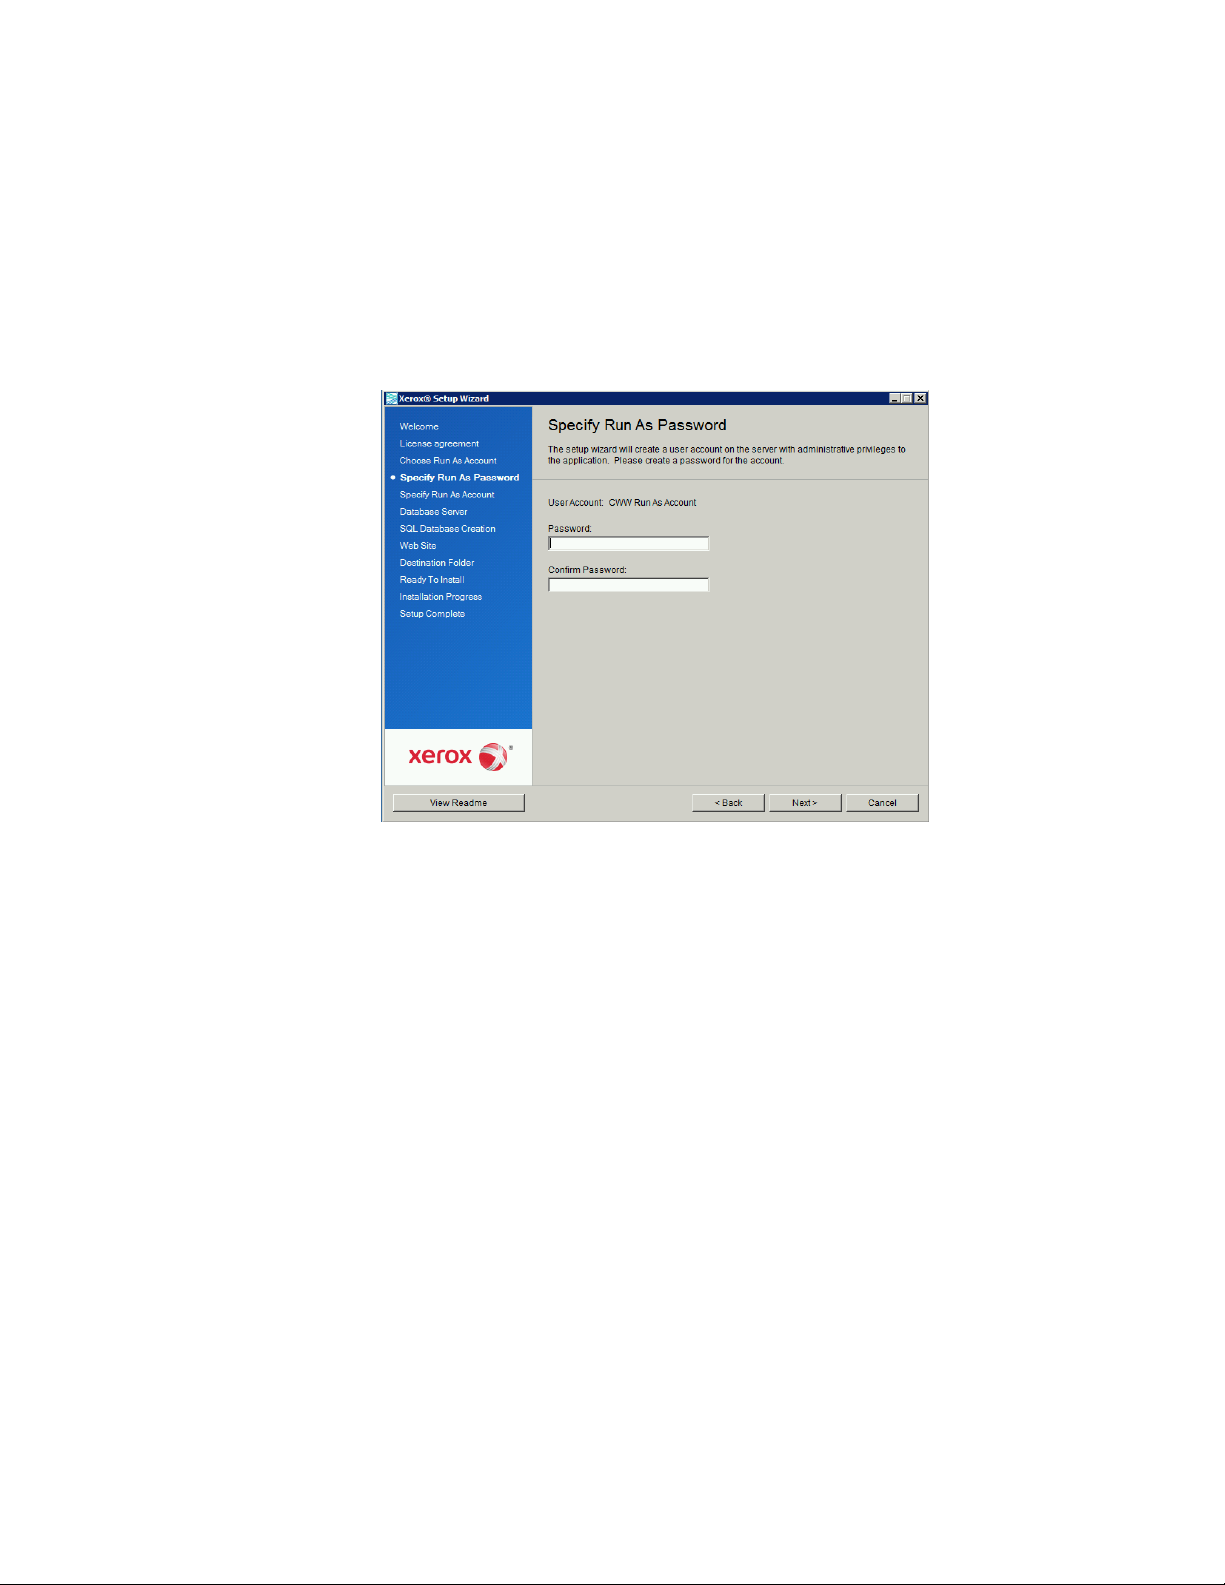
7. If you selected Create Local Account in step 5, In the Specify Run As Password window, enter the
password for the Default CWW User Account that is to be used on the CWW server. Click Next.
Note: All passwords must comply with the computer’s local security policy requirements (length, characters,
numbers, etc.). The CWW Configuration Utility can be used to set and reset passwords and the advanced
user account, after installation, if desired. That use is described later in this guide.
8. Specify a database server and then click Next.
9. If the installer detects a database instance from a previous installation, CWW allows the database to
be upgraded. Alternatively, a new database can be created, which will overwrite any existing database.
Either choose an existing database, or enter the name of the new database, and then click Next.
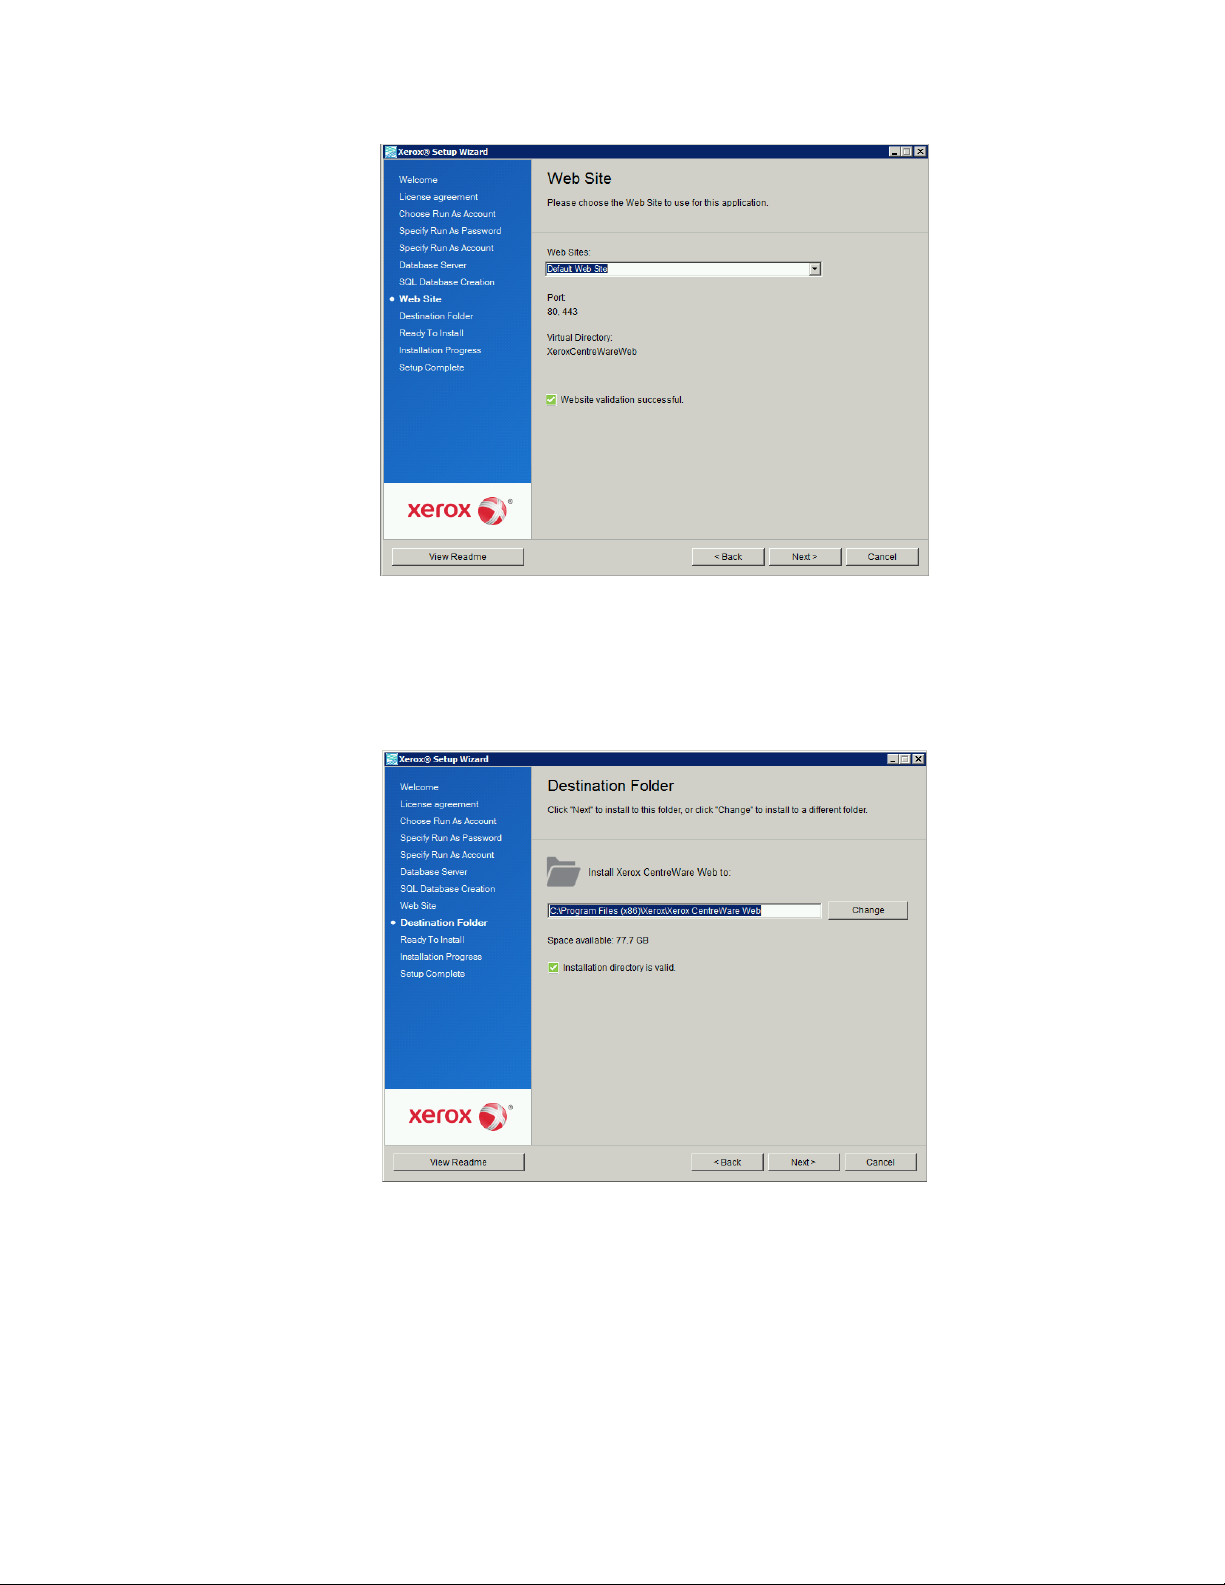
10. Select the Web site to use for this application. The Web site text field indicates the default Web site.
Click the Web Sites drop-down arrow to select another option, and then click Next.
Page 22
Xerox CentreWare Web Evaluation Guide 2-12
11. CWW displays the default destination folder in the Destination Folder window. Most installations can
use the default location (C:\Program Files\Xerox\CentreWareWeb\). Click Next to accept the default
location, or click the Change button to select another location for the application. Enter the desired
location and then click Next.
Note: The installer does not allow installation under Drive Root or a non-NTFS formatted partition.
12. In the Ready To Install window, click Install to begin the installation.
13. The Installation Progress screen opens, indicating the status of the installation.
Page 23

Xerox CentreWare Web Evaluation Guide 2-13
14. Once CWW is installed successfully, the Setup Complete window shows. Click Finish.
DE M ON ST RA TI NG T HE C WW I NS TA LL AT IO N
You can see if CWW was installed successfully by viewing the product features from a Web browser on the
server or from a remote machine. After you install the application, you can access it at http://<Server
Name>/XeroxCentreWareWeb/default.aspx , where <Server Name> is the local server.
Getting Started Wizard
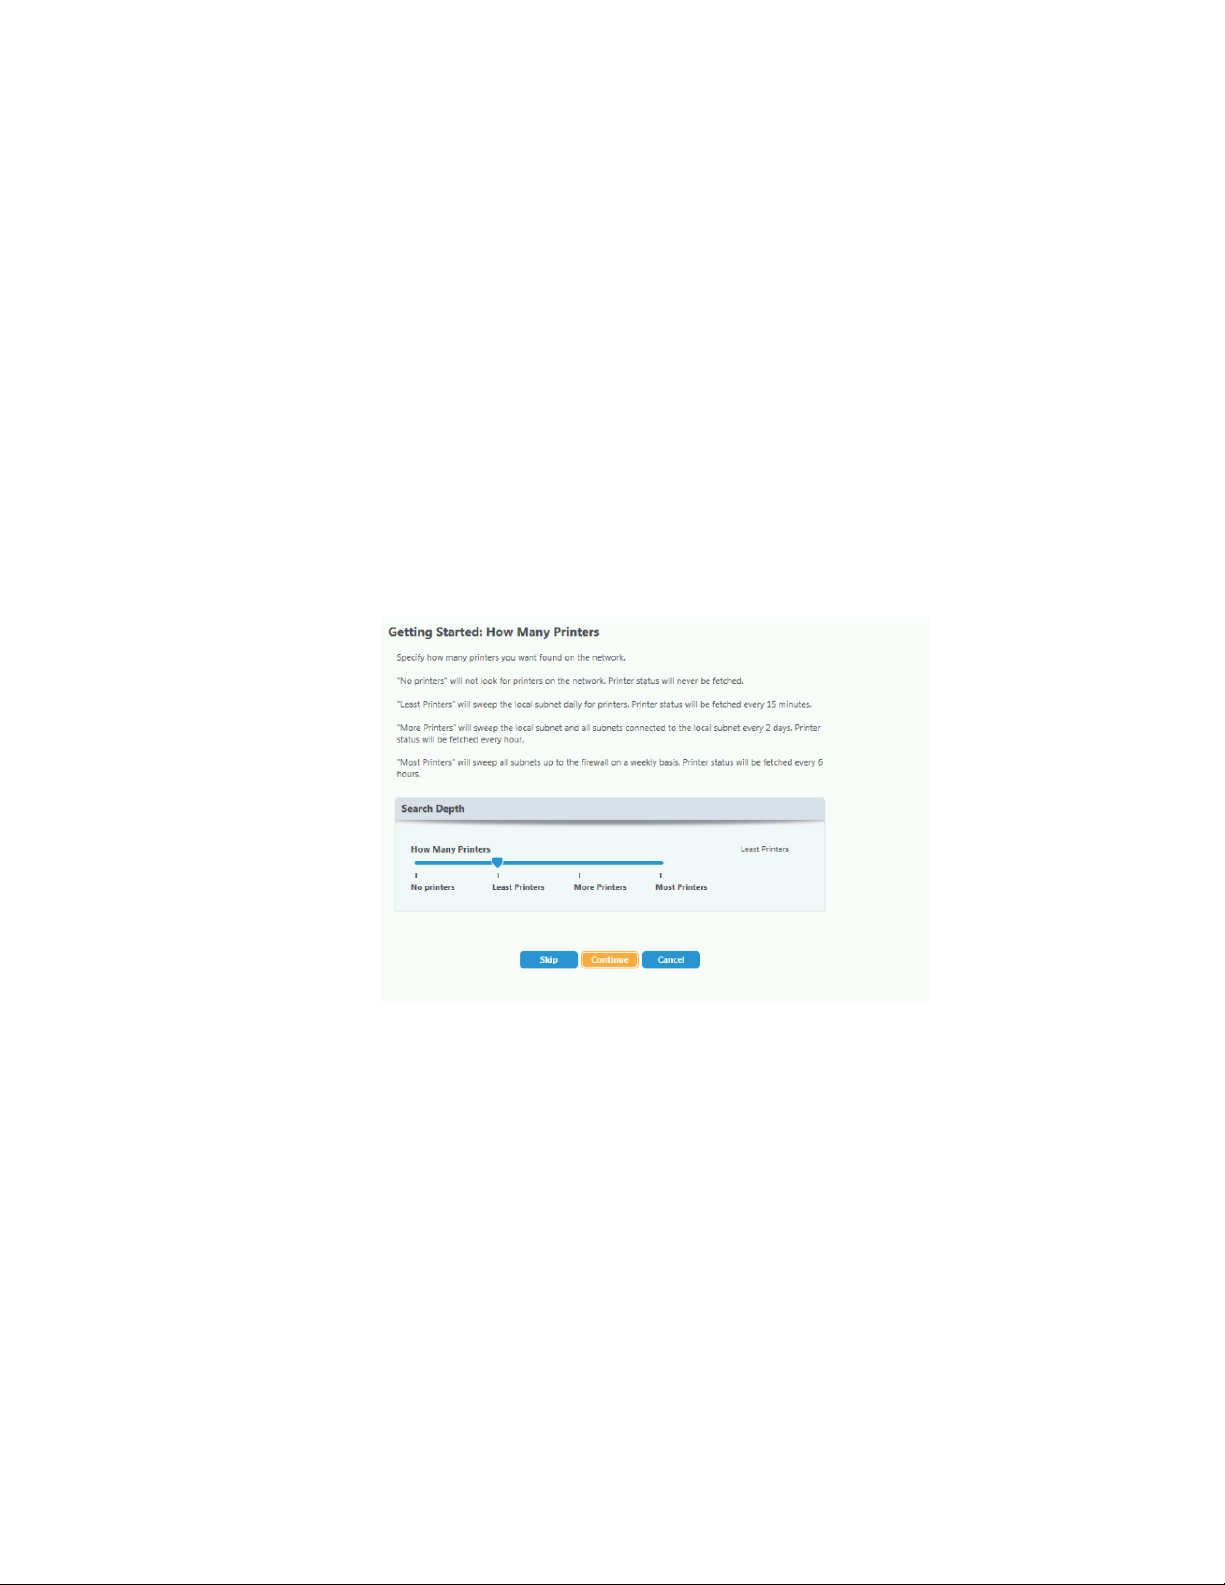
The Getting Started Wizard provides a quick way to specify how many printers to find on the network, how
often to gather information about them and defines the SMTP outgoing mail server and the proxy server.
Advanced configuration options are discussed later in the Administration Features section.
Read the information in this window and if desired, select the Hide this wizard on startup check box and
then click Continue.
Note: You may skip any step during the Getting Started Wizard and return to it at a later time by selecting
the Getting Start Wizard from the Wizards drop-down menu in CentreWare® Web.
Page 24
Xerox CentreWare Web Evaluation Guide 2-14
GE T TI NG S TA RT ED : HO W M AN Y P RI NT ER S DI SC OV E RY W IZ A RD
At this point in the procedure, you should configure CWW to perform an initial device discovery that is
loaded into the database and set the frequency of the status polling you want performed.
The search depth for printers ranges from:
• No printers: Discovery is not performed.
• Least Printers (default): Sweep the local subnet immediately and then daily, with status fetched every 10
minutes.
• More Printers: Sweep the local subnet and all subnets connected to local subnet immediately and then
every 2 days, with status fetched every 60 minutes.
• Most Printers: Sweep all subnets up to the firewall immediately, and then on a weekly basis, with status
fetched every 6 hours.
For the purpose of this evaluation, select the default Least Printers. The Least Printers option utilizes an IP
Easy Discovery method to discover printers on the network.
Move the slider to select the desired How Many Printers option (in this instance, Least Printers). After
selecting the desired search depth, click Continue.
I N I TI AL E -M AI L NO TI FI CA TI O N S ET UP
The next step in the Getting Started Wizard process allows the user to configure the appropriate SMTP email server network information that CWW uses for e-mail based Status Alert notifications. Once the
network address information has been entered, the administrator can test the connection between the mail
server and the CWW as well as send out a test e-mail alert message to a specified address. Among the
information needed to complete this step is the e-mail address that CWW should use as the from e-mail
address for email alerts.
Page 25
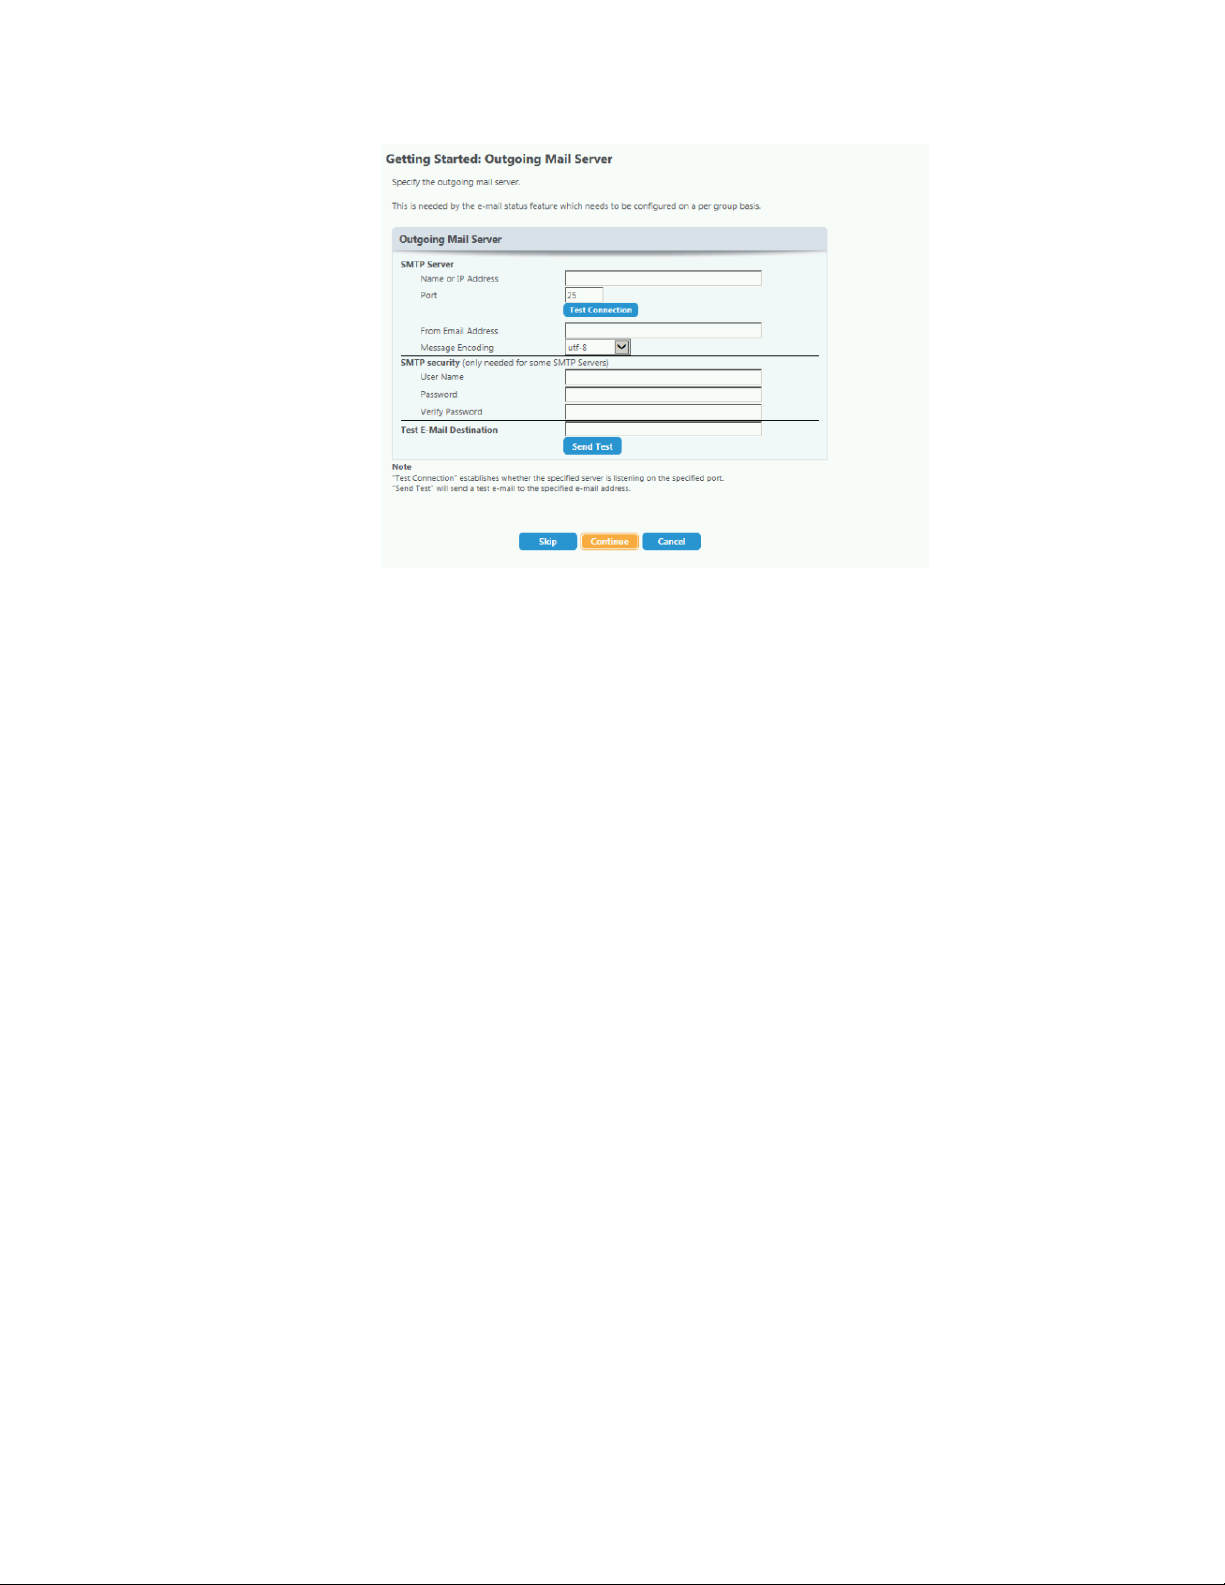
Xerox CentreWare Web Evaluation Guide 2-15
1. Enter either the DNS server name or the IP Address and the Port Number of the SMTP server and then
click Test Connection.
2. After successfully completing this test, complete the From E-mail Address field, and if required, the
SMTP security section.
3. In the Test E-mail Destination text field, enter a valid e-mail and then click Send Test.
4. The application sends an e-mail message confirming successful configuration of CWW to this address.
Click Continue to finish the e-mail configuration and continue on to configure the proxy server.
5. In the From text field, enter the CWW evaluator’s e-mail address. You can also set this up later with an
evaluation exercise located in the Administration section.
PR O XY S ER VE R SE TU P
Next, configure the appropriate proxy server settings that CWW uses during Automatic Drive Downloads
and during communications with the Xerox Communications server as part of SMart eSolutions. When you
first access this page, the CWW detects and displays the current proxy server setting of the CWW server’s
administrator account automatically. You can override these settings if necessary. CWW supports both
HTTP and HTTPS (secure) proxy servers.
Page 26
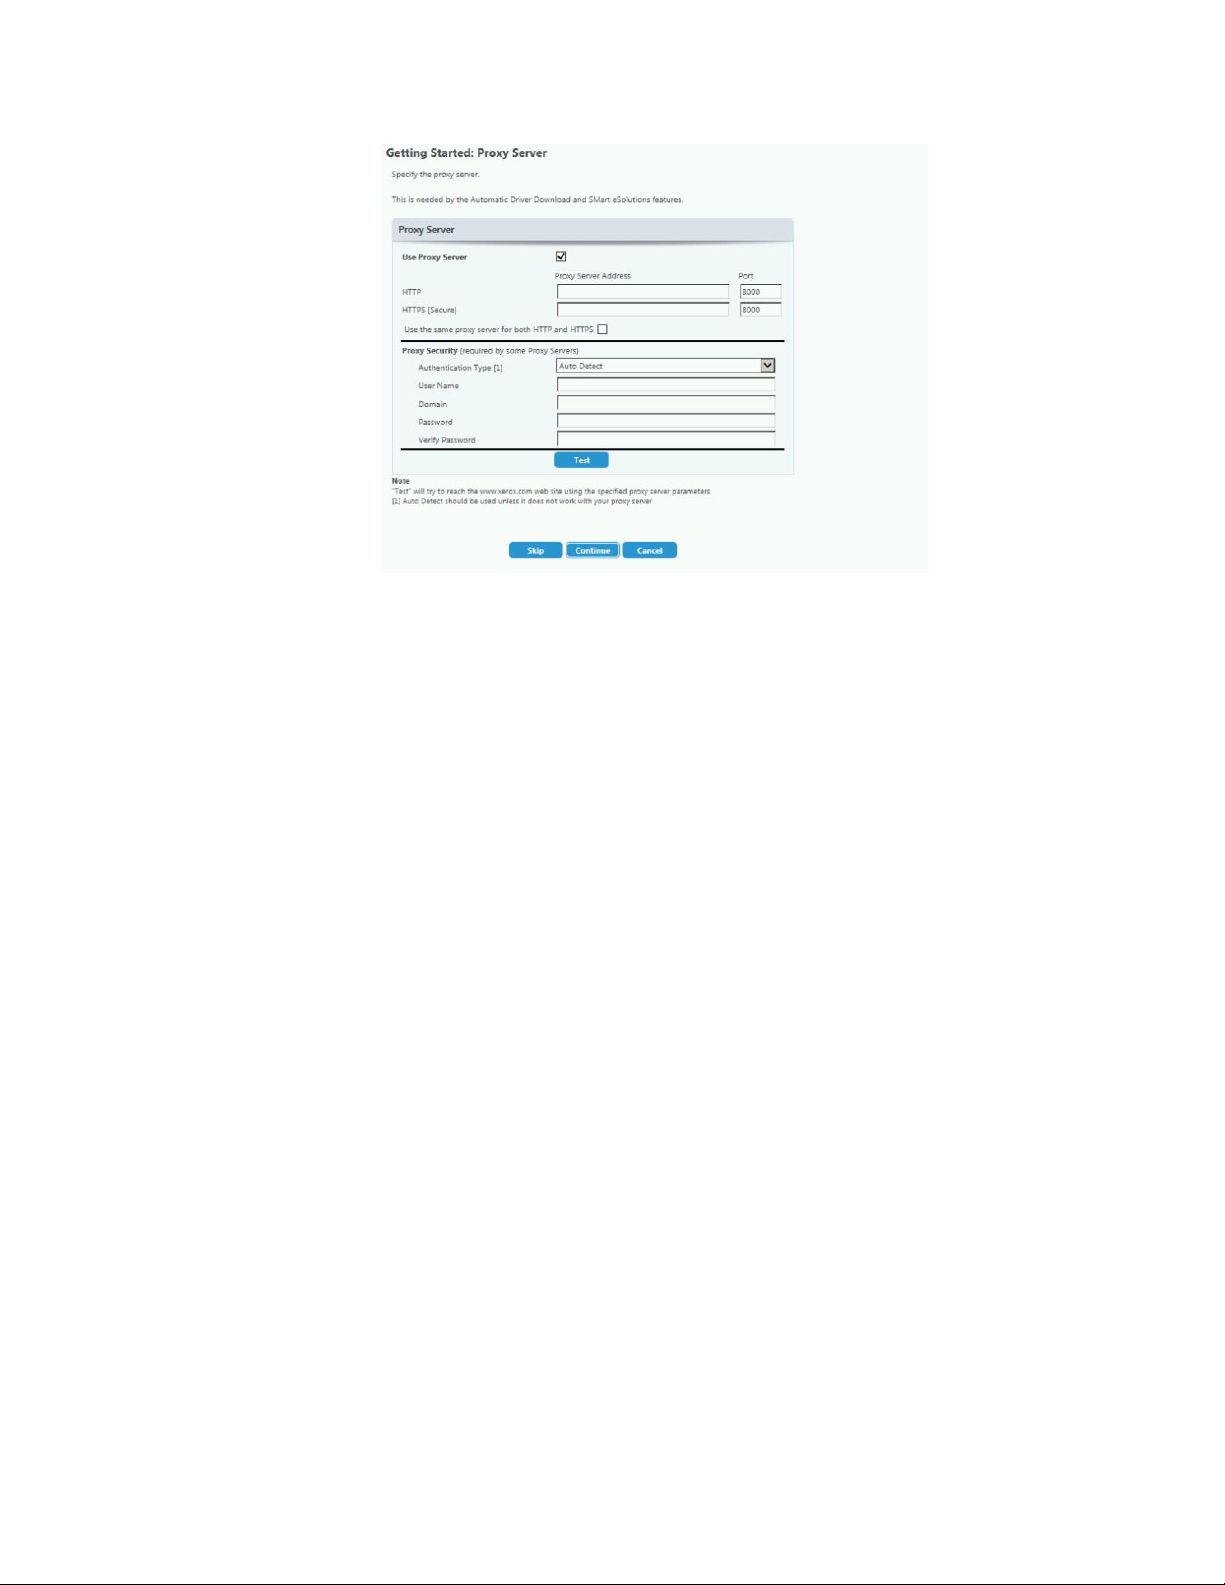
Xerox CentreWare Web Evaluation Guide 2-16
To configure an HTTP proxy server:
1. Enable the proxy server by selecting the Use Proxy Server check box.
2. Enter the proxy server address and the proxy server port number in the corresponding fields for HTTP.
3. If needed, enter the proxy server information.
4. Click Test to confirm the connection and then click Continue.
5. After you have specified the proxy server settings, click Continue. The Getting Started: Completed
window opens.
To configure a separate HTTPS proxy server:
1. Verify that the Use the Same Proxy Server for HTTP and HTTPS check box is selected.
2. Enter the proxy server address and proxy server number in the corresponding fields for HTTP.
3. If needed, enter the proxy server information.
4. Click Test to confirm the connection and then click Continue.
5. After you have specified the proxy server settings, click Continue. The Getting Started: Completed
window opens.
To configure both HTTP and HTTPS to use the same proxy server:
1. Select the Use the Same Proxy Server for HTTP and HTTPS check box.
2. Enter the proxy server address and the proxy server port number in the corresponding fields for HTTP.
3. CWW automatically configures the HTTPS proxy server with the same settings as the HTTP proxy
server.
4. If needed, enter the proxy server information.
5. Click Test to confirm the connection and then click Continue.
6. After you have specified the proxy server settings, click Continue. The Getting Started: Completed
window opens.
Page 27
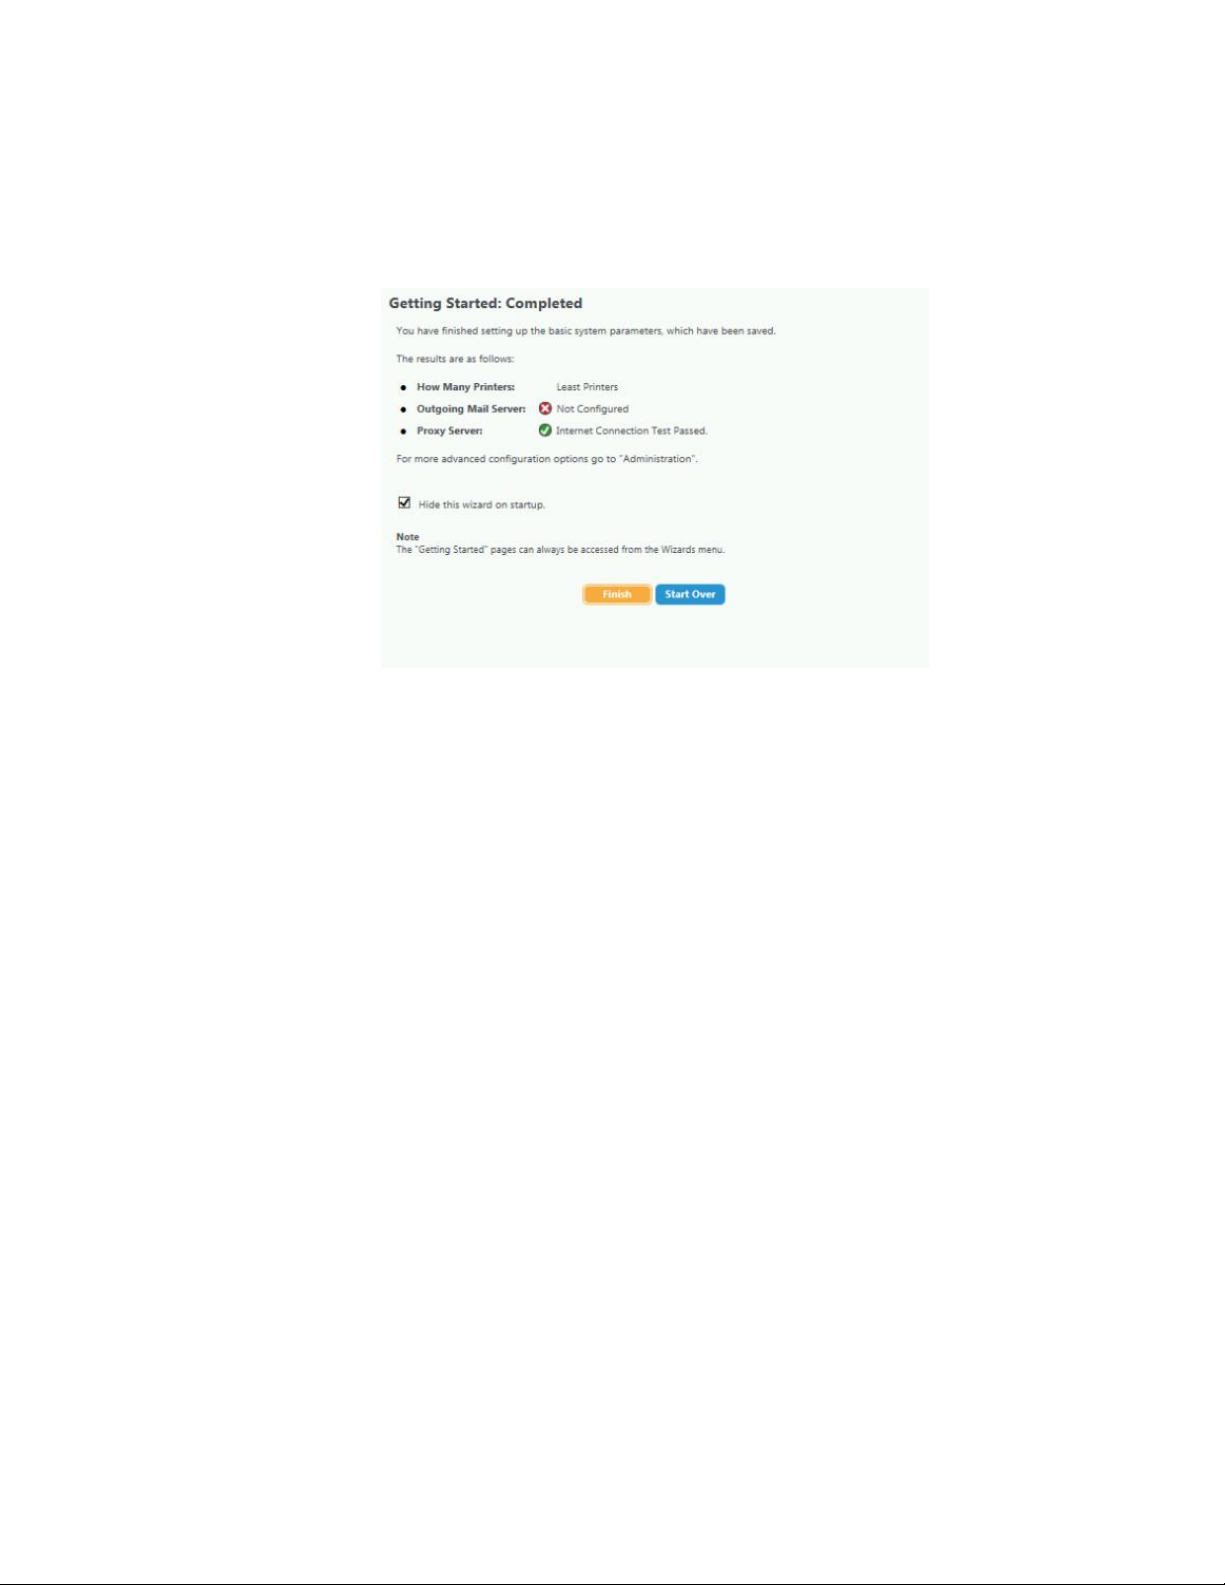
Xerox CentreWare Web Evaluation Guide 2-17
GE T TI NG S TA RT ED : CO MPL ET ED
This screen summarizes the three settings configured during the wizard and their status, if applicable. This
wizard launches each time an administrator starts up CWW. However, you can disable the wizard from
launching by selecting the Hide this wizard on startup radio button. Click Finish to return to the CWW home
page.
Installation Section Summary
After you complete the steps in this section, you should have an understanding of the following aspects of
the CWW installation process:
• Hardware and software prerequisites
• Required documentation and installation instructions
• Steps needed to install and configure the application in your environment
• How to demonstrate successful installation and begin using the system
Page 28
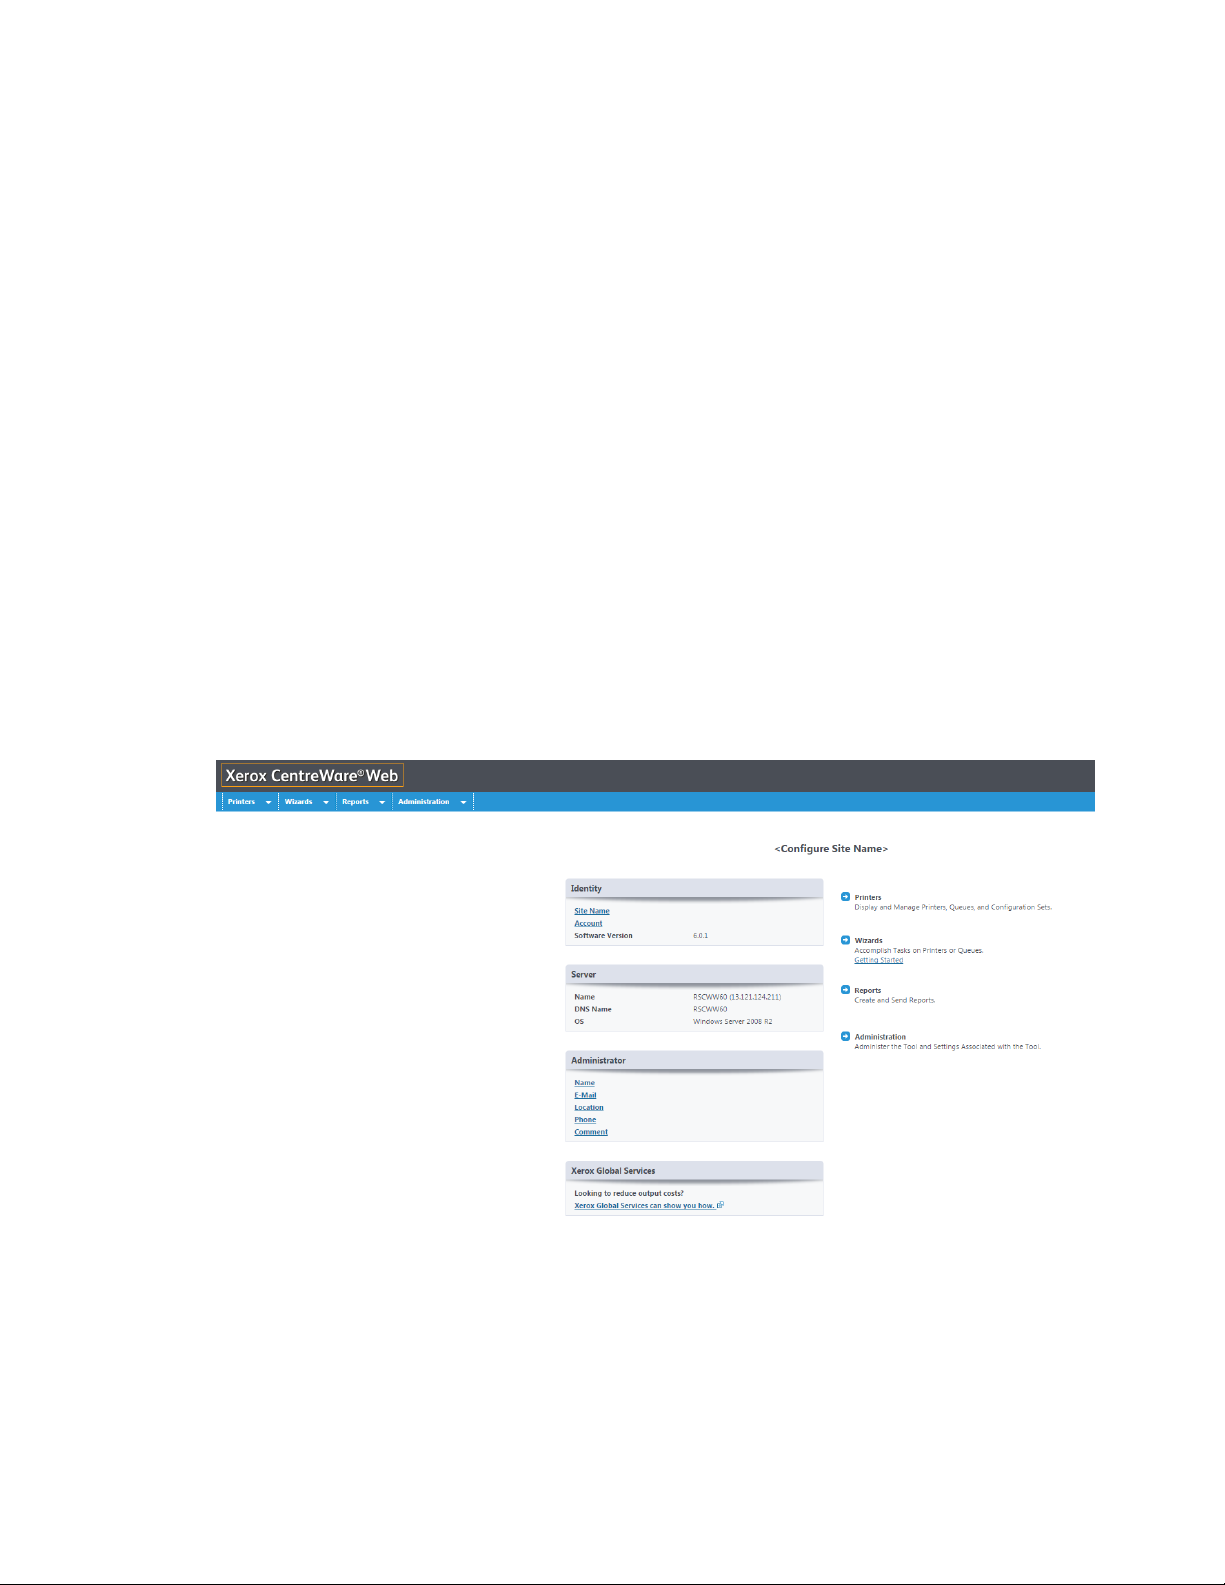
Xerox CentreWare Web Evaluation Guide 3-18
3. CWW User Interface
It is important to have a basic understanding of the User Interface (UI) and navigational features of CWW.
Prerequisites for This Section
Before you can begin your review of the UI, you must complete the following actions:
• Complete installation without errors
• Complete the Getting Started Wizard or complete printer discovery using another method
• Navigate to the CWW home page
The CWW Home Page
CWW displays this page when you access the CWW server through the Web browser or another machine.
Note that in this view, all four of the main pages (Printers, Wizards, Reports, and Administration) are
accessible via two paths. Navigate to any of those pages by clicking the respective tab at top of page or by
clicking the arrow icons to the right of the Identity and Server sections. Hovering over the tabs exposes the
sub-menus that are available for that tab.
1. To view the initial Getting Started discovery results, select Printers > All.
2. CWW displays the discovered printers in the Printers > All Group window.
a. If CWW does not display printers in the All Printers Table View window, make adjustments to the
discovery settings and rerun discovery. But first, check the following to confirm connectivity to a
device:
• From the Windows Operating System Start menu, select Start > Run and enter cmd:
Page 29
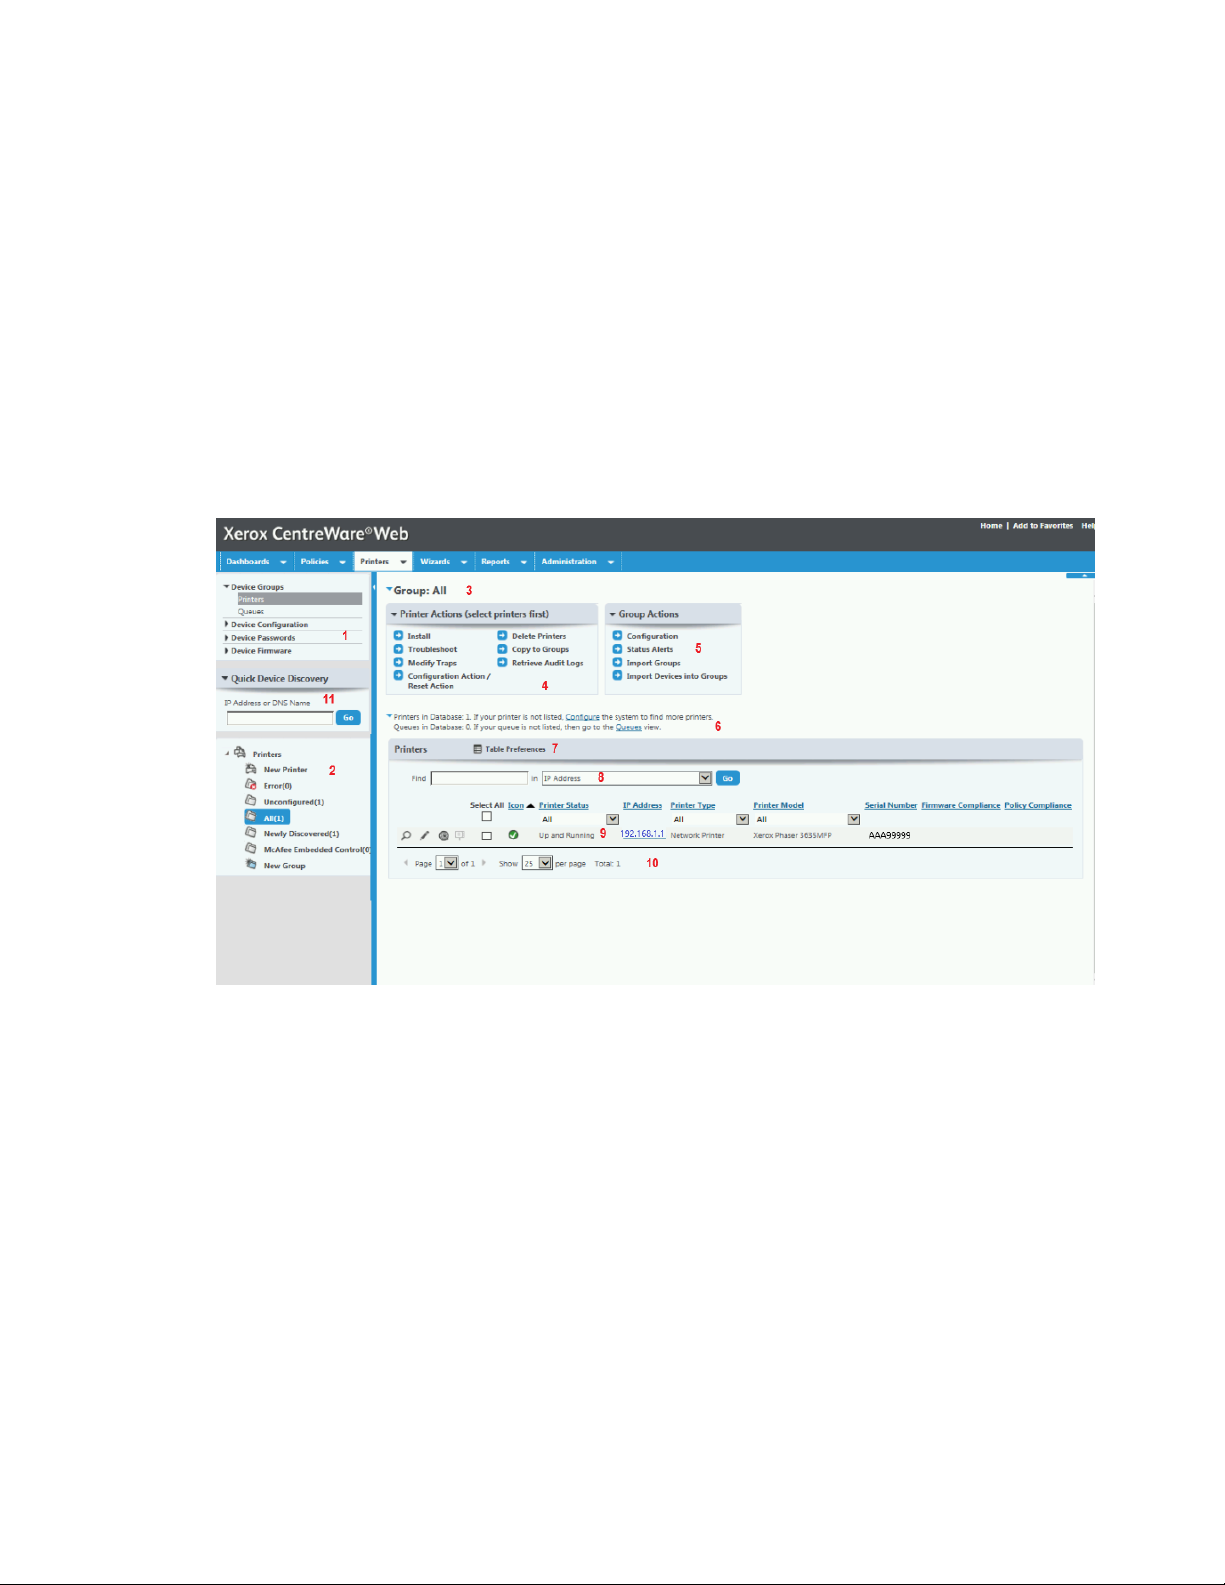
Xerox CentreWare Web Evaluation Guide 3-19
• In the Command window, enter ping and then enter a selected IP address to confirm network
connectivity.
• Go to Administration > Discovery > SNMP v1/v2 and confirm that the appropriate GET and SET
Community names are defined.
– Under SNMP, verify that Printer SNMP GET Community Names contains public in the Current
Names.
– Verify that Printer SNMP SET Community Names contains public and private in the Current
Names.
Overview of the Printers Main Menu View
This figure identifies the features of the Printers main menu by numbers 1-11. The subsequent paragraphs
use those numbers as a reference point when describing each feature.
N A V IG AT IO N ME NU ( 1) :
• Device Groups
– Printers: Clicking Printers displays all the currently discovered printers. The Printers view (as illustrated
above) provides access to printer properties and features such as Table Preferences, Actions, etc.
– Queues: Displays the managed printer servers and active directories found on the network.
• Device Configuration
– Configuration Sets: Displays the configuration templates that you can use to set up and enable
multiple printer configuration sets.
– Configuration Policies: Displays policies that you can use to schedule and run the configuration sets.
• Device Passwords
– Password Policies: Displays policies that you can use to monitor, remediate, and update administrator
passwords.
– Stored Device Passwords: Displays an interface to view and update device administrator passwords.
Page 30

Xerox CentreWare Web Evaluation Guide 3-20
• Device Firmware
– Firmware Version Policies: Displays the interface used to create monitoring and scheduling tasks for
firmware updates.
– Deployment Tasks: Displays the tasks that run for scheduled firmware policies.
– Software File Repository: Displays the interface used to store firmware files for device upgrades.
PR I NT ER N AV IG AT IO N FOL D ER W IN DO W (2 ):
In this window, you can add new printers, create new groups, and configure printers into groups. Groups
allow you to organize, manage, and configure network printers based on common attributes. For example,
you may want to put all the multi-function devices or all the devices in one location in one group.
When enabled through the Administration menu, the SMart eSolutions Group is part of this view.
Predefined Groups in Printer Folders Window:
The CWW application creates four system groups during installation. These groups are:
• New Printer: Allows you to manually add a printer to the list of available printers.
• Error Group: CWW can display printers in an error state in this group.
• Unconfigured Group: Printers that do not have a queue set up on the server. These are printers that are
functional and that CWW can find during discovery, but no there is no associated print queue.
• All Group: All of the printers discovered by CWW are included in the All group. Every printer is a member
of the All group whether or not they are members of any other groups or subgroups.
• Newly Discovered: Discovery automatically adds new printers and printers with changed IP addresses to
this group. After any management activities, you should remove the printers from this group. You can
copy selected printers to other groups and then remove them, or just remove the printers from this group.
• New Group: You can create any number of custom groups, set the identity for the group (fully editable),
and configure the Advanced > Communication settings and the Status and History Retrieval settings. You
can organize these custom groups as custom top level or can be set to be a child of a custom top level
group.
GR O UP I D (3 ):
The top of the window always indicates the group of printers. In this instance, we are viewing All Discovered
printers.
PR I NT ER A CT IO NS W IN DO W ( 4) :
The Printer Actions window gives you access to sub-menus that contain functionality to assist you in
managing printers on the network.
You must first select a printer from the Printers View by selecting the check box next to the printer listing.
You can collapse or expand the Printer Actions window by selecting the arrow to the left on the Printer
Actions title. When collapsed, the Printer Actions features are displayed as a pull-down menu. This behavior
applies to other cases where multiple selections within a feature grouping occur (For example Group
Actions).
Page 31

Xerox CentreWare Web Evaluation Guide 3-21
The following actions are possible:
• Install: Installs up to 25 printers on any print server queue managed by the application.
• Troubleshoot: Provides printer status, access to printer Web server, print test page to printer, or reset
printer.
• Modify Traps: Register and clear traps for this server in the device.
• Configuration Action/Reset Action: Provides the capability to apply configuration sets to one or more
devices, audit printers with established configuration sets, and to reset printers.
• Delete Printers: Remove printer from database completely.
• Copy to Groups: Copy selected printer(s) to user-created or system-default groups.
• Add to Group*: Enables you to choose printers from any group and add them to a custom group.
• Remove From Group*: Enables you to remove printers from a custom group.
• Retrieve Audit Logs: Attempts to get audit logs from selected device(s)
* These two functions are not displayed for the Error, Unconfigured, or All groups.
GR O UP A CT IO NS ( 5) :
The Group Actions box gives you access to sub-menus that contain features to help you manage system
and custom groups on the network. The following actions are possible:
• Configuration: View/define the name, owner, and attributes of this group. Additionally, set up the
dynamic group filter for this group of printers.
• Status Alerts: Define the conditions in a device that triggers an alert, what information to display about
the printer that is generating the alert, and where to send the e-mail notification.
• If one of the Custom Groups (user-defined) has been highlighted, the following Group Actions are
available.
– New Sub Group: Create a child group folder and place it under the highlighted group.
Page 32

Xerox CentreWare Web Evaluation Guide 3-22
– Reorder Group: Move this group up or down in the custom groups list.
– Set Parent Group: Reassign an existing group to a different parent group.
– Delete Group: Permanently remove this group from the database.
SH O W CO MM EN T/ DA TA BA SE R ES UL TS ( 6) :
The Show Comment displays the number of printers and queues that are currently in the database. There
are additional links to discover more printers as well as to add servers and active directories (additional
queues).
T A B LE V IE W AN D TA BL E PR E FE RE N CE S (7 ):
The Printer Table view is a column view of all the selected Table Preferences fields. Clicking the column
heading name sorts the information based upon that column heading. Choosing a filtering option from the
drop-down lists sorts the information displayed based upon that selection. When you select All, CWW
selects all the items in the list. You can view and update properties that provide information about a specific
printer using the Edit options or through the printer’s embedded Web server.
The Table Preferences icon links you to the configuration page where you can set up the Printer Table view.
You can also configure the refresh rate, paging toolbar, and scroll bars for the lists here.
Overview of Display Fields Sub-Window
• The Available Fields window lists printer status fields that are available for display in alphabetical order.
• The Included Fields window lists printer status fields currently being displayed for all groups.
Page 33

Xerox CentreWare Web Evaluation Guide 3-23
• Restore defaults sets the Included Fields for the Printers window to: Icon, Printer Status, IP Address,
Printer Model, and Serial Number.
• Additional arrow buttons allow you to move fields to and from the Available and Included fields and to
change the order in which those fields are displayed in the group’s Printer view.
F I ND AN D IN ( 8) :
The Find and In fields can help you filter the list of printers when you enter a combined set of variables. For
example, if your site contains HP and Xerox printers but you only want to view the Xerox, printers, you would
enter Xerox in the Find field and then filter the In field by manufacturer. CWW displays results for all
printers manufactured by Xerox.
PR I NT ER T AB LE V IE W (9 ) :
To access the detailed Printer Display, click the magnifying glass icon of a particular printer. To edit those,
click the pencil. The Printer display provides a powerful tool in managing the printer and gives you status
information, editing capabilities, trap information, troubleshooting, and management capabilities.
You can also access this page by clicking the IP Address link located in the Printers Table View.
Page 34

Xerox CentreWare Web Evaluation Guide 3-24
In addition to the actions described in the Printer Actions (4), the following capabilities are available from
the detailed Printer Properties page.
• Edit Properties: Allow you to modify printer settings.
• Printer Web page: Provides access to the embedded Web server for the printer.
• Reset Printer: Provides the ability to reboot a printer over the network.
• Refresh Data: To get up-to-the-minute status of the displayed printer, click Refresh Status. This action
requests current status information from the printer (instead of from the database).
The detailed Printer Display properties are briefly defined below:
Status: Allows you to view the current status of traps and alerts and the age of the status report.
Consumables: Displays print cartridge, paper tray, output bin, and finisher information
Information: Provides printer ID (type, manufacturer, Model, Firmware Level), serial numbers or asset
numbers, MAC Address, DNS Name, IP Address, Network ID, Location, and Discovery method used to find a
device. Outlines what the printer is capable of doing (i.e. is it an MFD, color device, analog fax, marking
technology, color capabilities) and basic hardware information.
Usage Statistics and Device Counters: Provides information from device usage counters such as page count,
number of 2-sided impressions, % of 2-sided impressions, scan to e-mail, etc.
PA G IN G TO OL BA R (1 0)
The paging toolbar displays the total number of pages of discovered printers and allows you to move to any
of the pages. You can configure this information to display at the top or bottom of the window in the Table
Preferences dialog box. You can also configure how many printers you want to display on each page (up to
500). The paging toolbar also includes the total number of printers in this group.
QU I CK D EV IC E DI SC OV ERY (1 1)
This pane allows you to quickly enter an address to discover and add to Xerox CentreWare Web.
Page 35

Xerox CentreWare Web Evaluation Guide 4-25
4. Device Discovery
Discovery Methods
CWW provides multiple IP and IPX-based discovery methods for identifying devices on a network.
Additionally, you can query the domain controller or Microsoft Active Directory® for known printers as part
of the discovery process. You can configure each method individually by selecting the New Discovery
Method from the Administration>Discovery>Discovery Methods Web page or by selecting and editing a
previously saved discovery instance. By configuring subnet and IP address information, you can tailor
discovery to find individual printers or specific groups of printers. You can also exclude certain subnets from
the discovery process on the Administration > Discovery > Discovery Exclusions page. You can also specify
the frequency, date, and time for scheduling automatic discovery.
I P AD DR ES SE S/ DN S NA ME S
CWW discovery operations support IP addresses and DNS Names, which you can intermix within a
discovery. You can also export and import lists of addresses into discovery and discovery exclusions
operations.
I P V 6
CWW supports the IPv6 communication protocol, providing the ability to manage devices in IPv6
environments. There are, however, some differences in the behavior of CWW with IPv6 vs. IPv4.
For IPv6, CWW can:
• Communicate with devices via IPv6
• Import a file of IPv6 addresses for discovery via IP Sweep
For IPv6, CWW cannot:
• Automatically discover devices on the network with only IPv6 addresses
• Support Queue management of IPv6 addressed devices
I M P OR T/ EX PO RT F UN CT IO NS
CWW provides the capability to import and export lists of device addresses for use in discovery and
discovery exclusions operations. The files are in comma-separated value (CSV) format. Three discovery
operations support Importing and Exporting device lists:
• IP Broadcast Sweep
• IP Sweep
• Discovery Exclusions
By clicking the Export button in any one of these pages, CWW generates a file with a listing of all devices
associated with that particular discovery or exclusion instance. You can easily edit these files by using any
software that can read CSV files such as Microsoft Excel®. You can also import these files by clicking Import
and navigating to the appropriate file location. This functionality makes it easy to enter, update, and
Page 36

Xerox CentreWare Web Evaluation Guide 4-26
maintain the discovery and exclusion lists. To create a file template, simply click Export and save the file.
The file header displays the required CSV format for each entry in the file: DNS Name, IP Address, Start IP
Address, End IP Address, Subnet Mask, Comment<CR> where <CR> = carriage return.
For entries where not all of the fields are utilized, a comma replaces the unused field. For example, if you
need to scan a range of IP addresses, CWW does not use the DNS and IP Address fields for individual
devices. The format would be: Start IP Address, End IP Address, Subnet Mask, Comment<CR>where<Start
Address> = beginning address in range and <End Address> = last address in range
C O M ME NT S
You can add comments to discoveries and discovery exclusions, including any useful information about the
purpose of the task. For example, a discovery exclusion might have a comment that a company owner uses
the excluded devices exclusively, so these devices are not managed.
Network Impact of Device Discovery
This evaluation guide provides information on how to set up and execute the various discovery methods
and notes any caveats associated with each method.
PR E RE QU IS IT ES F OR T HI S E VA LU A TI ON
Up until this point in the evaluation, the guide has only provided you with information about discovery to
the local subnet via the Getting Started Wizard and the Least Printers selection. The following evaluation
exercises show you how to perform printer discovery outside of the local subnet and across your intranet.
As you select the discovery methods that you want to permit in your network, consider which portions of the
intranet you want to monitor and the form of discovery. You can configure these subnets/addresses in the
Administration > Discovery > Discovery Methods page.
You should also give additional consideration to which portions of the network need to be excluded from
the discovery process, if any. You can exclude those subnets in the Administration>Discovery>Discovery
Exclusions page.
Lastly, if you have set the SNMP community name strings for the printers to anything other than the default
public or private name strings, apply these strings to the CWW Discovery methods on the
Administration>Discovery>SNMP v1/v2 page in order to discover printers.
Some of the evaluation exercises in this section instruct you to clear the database, so that you can confirm
that the discovery process is working. Deleting printers resets the database, so you can re-discover printer
the next time you run the discovery.
To clear the database:
1. Select Administration > Discovery > Delete Printers. The following window opens:
Page 37

Xerox CentreWare Web Evaluation Guide 4-27
2. Select the Clear All Devices radio button.
3. Click Clear Now.
Quick Configuration
Quick Configuration is a method for discovering network printers quickly. There are three configuration
modes that allow you to select how far and how often you want discovery to fetch printers from the
network and at what frequency you want it to gather the statuses.
The three configuration modes are:
• Simple: displays a screen similar to the Getting Started Wizard.
• Intermediate: allows you to apply closer control over discovery and status retrieval.
• Advanced: displays a screen similar to discovery methods.
The Intermediate mode is presented below. The Simple mode has been previously described in the Getting
Started Wizard section and the Advanced mode is described in the following paragraphs on Discover
Methods.
QU I CK C ON FI GU RA TI ON E VA L UA T IO N: I NT ER ME DI AT E
To evaluate Quick Configuration:
1. Clear all printers from the database as described in the Clear Database procedure.
2. Navigate to the Administration > Quick Configuration > Intermediate page.
3. Set the How Far slider to Further (1 hop).
4. Set the When to Look slider to Less Frequent (every 2 days.).
5. Set the How Often to Fetch Status slider to Often (10 minutes).
6. Click Save.
7. CWW automatically starts and runs the discovery. To see the progress of the discovery, navigate to the
Administration > Quick Configuration > Advanced mode and then click the Progress button, or navigate
to Administration > Discovery Methods and click the Progress button.
Page 38

Xerox CentreWare Web Evaluation Guide 4-28
Discovery Options
SE T TI NG U P IP B AS ED D IS C OV ER Y M ET HO DS
The Discovery Method Status Web page lists each of the currently configured discovery methods defined
for a CWW site. Click the Table Preferences icon to configure what information you want to display, such as
when the last status update took place and when the next discovery is scheduled. You can trigger any of the
listed discovery mechanisms immediately by selecting the appropriate discovery instance and clicking Run
Discovery Now. You can configure these options individually by selecting the corresponding Edit icon.
DI S CO VE RY E XC LU SI ON S
If you need to remove certain subnets on your intranet or specific IP addresses during discovery, you can
define these exclusions in the Discovery Exclusions Web page.
You can exclude a single IP address or DNS name, an address range, or a subnet by entering the
appropriate information in the IP Addresses section. You can also import a file of addresses or address
ranges can by using the Import function.
You can also add comments or any other pertinent information to any exclusion to help you identify why
these addresses are excluded from discovery.
When running automated remote device discovery over a REST Service, if you have multiple Xerox®
CentreWare Web servers, you must configure a discovery exclusions list.
Page 39

Xerox CentreWare Web Evaluation Guide 4-29
DE L ET E PRI N TE RS
The Delete Printers function removes unwanted printers from the database. This action clears the entire
database of printers. To remove unwanted devices from the database:
1. Choose Administration > Discovery > Delete Printers.
2. Select the Clear Devices action.
3. Click Clear Now.
Page 40

Xerox CentreWare Web Evaluation Guide 4-30
4. Click Confirm.
You can also clear printers that have not communicated in a predetermined length of time by selecting the
Devices not communicating for option, specifying the number of days, and then clicking the Clear Now
button.
SN M P V1 /V 2
The SNMP GET and SET Community Names option enables you to specify which SNMP community names
to use when retrieving information from printers and applying settings. If the printers on your intranet have
the SNMP access community name strings set to a community name other than public for getting SNMP
information and private for setting SNMP information, then CWW needs to have the name strings in order
to unlock the important MIB information stored within the devices. You can perform this task within the
SNMP v1/v2 Web pages within the discovery configuration section of CWW.
To change the SNMP v1/v2 community names:
1. Choose Administration > Discovery > SNMP v1/v2.
2. To add a community name, enter a new name, and then click Add.
3. To remove a community name, go to the Current Name section, select an item, and click Remove.
4. Make the settings changes and click Save to save the changes or click Cancel to exit the page without
making changes.
SN M P V3
In addition to SNMP v1/v2, CWW supports SNMP v3. You can configure the SNMP v3 username, context
name, authentication mode, and the SNMP v3 access keys and password via the Edit Properties page for a
device.
Page 41

Xerox CentreWare Web Evaluation Guide 4-31
GE N ER AL D IS CO VE RY M ET HOD S E TU P NO TE S & CO N SI DE RA T IO NS
The IP-based methods have many similar characteristics. The following notes apply to any of the IP-based
discovery methods.
• You can configure CWW to automatically schedule all discovery methods to occur at a predetermined
frequency defined in hours, days, weeks, or months. You can also specify when the first iteration of the
recurring schedule for a given discovery method occurs.
• You can specify Subnet Scan methods in terms of the number of hops that the scan is limited to (i.e.
restricting the scan to a specific number of hops or all subnets within the firewall).
• Depending on your network complexity, you may want to adjust the Subnet Timeout value in the
Advanced settings of this Discovery method. The recommended Timeout per Printer setting is five
seconds and the recommended Retries setting is 1 for this evaluation.
• Be sure to configure IP Exclude before using the All Subnets in the Firewall option to prevent IP Easy
Discovery from communicating with specific subnets within the firewall.
• You can block the ability to answer SNMP requests via routers or you can disable it on selected printers.
Although the setup of each of the discovery methods is similar, there are some nuances for certain methods
that you should note.
I P SW EE P DI SC OV ER Y
IP Sweep Discovery configuration allows you to add the Internet Printing Protocol (IPP) as a last resort
during device querying in the event that the device fails to respond to SNMP v1/v2 queries. By selecting this
option, the Discovery process may experience significant delay in completing the sweep operation, and
could introduce additional network traffic. You can access this option under the Advanced settings at the
bottom of the IP Sweep Discovery page.
SN M P V3 D IS CO VE RY
SNMP v3 discovery allows you to find more than one v3 printer at a time.
I P AR P CA CH E DI SC OV ER Y
IP ARP Cache Discovery only discovers networked printers.
I P SU BN ET S CA N DI SC OV E RY
CWW lists the subnets found during the last scan in the Subnets window.
Page 42

Xerox CentreWare Web Evaluation Guide 4-32
MA N UA L DI SC OV ER Y US IN G IP A RP C A C HE
Use this method if you do not know the network subnet topology.
1. Clear the database by selecting Administration > Discovery > Delete Printers.
2. Click Clear Now.
3. From Administration > Discovery > Discovery Methods, select New Discovery, and then select the IP ARP
Cache radio button.
4. Click Continue.
5. In the Identity text field, enter a name for this discovery.
6. In the Schedule text field, select the button for the frequency with which you would like this discovery
to run.
7. Enter the schedule rate, the next scheduled date, and the next scheduled time.
8. Select the Limit subnet scan to, and enter a value of 1 for the number of hops.
9. Click Save.
10. From Administration > Discovery > Discovery Methods, click the IP Subnet Scan > Discover Now button.
(Make a note of the time when this action was taken.)
11. Wait for the Discovery in Progress indicator to reach 100%.
12. View the results of the discovery on the printer page by displaying the All printers folder. The Discovery
Date field for all of the printers listed should have a time approximately equal to the time discovery
was initiated.
MA N UA L DI SC OV ER Y US IN G IP S UB NE T SC AN
Perform this step if you do not know the network subnet topology. This step discovers subnets for use in the
actions described below. No printers are discovered.
1. From Administration > Discovery > Discovery Methods, select IP Subnet Scan>Configure button.
2. Select Limit subnet scan to. Enter a value of 1 for the number of hops.
3. Click Save.
4. From Administration > Discovery > Discovery Methods, select the IP Subnet Scan>Discover Now button.
(Make a note of the time when this action was taken.)
5. Wait for the Discovery in Progress indicator to reach 100%.
6. Subnets discovered are available for use in subsequent printer discovery.
MA N UA L DI SC OV ER Y US IN G IP B RO AD CA ST
1. Clear the database by selecting Admin > Discovery > Delete Printers.
2. Click Clear Now.
3. Initiate a manual discovery by clicking the IP Broadcast button. From Administration > Discovery >
Discovery Methods, select IP Broadcast > Discover Now. (Make a note of the time when this action was
taken.)
4. Wait for the Discovery in Progress indicator to reach 100%.
5. View the results of the discovery on the printer page by displaying the All printers folder. The Discovery
Date field for all of the printers listed should have a time approximately equal to the time discovery
was initiated.
AU T OM AT IC D IS CO VE RY U SI N G I P SW EE P
1. Schedule a time for automatic discovery to begin.
Page 43

Xerox CentreWare Web Evaluation Guide 4-33
2. Select Administration > Discovery > IP Sweep and click Configure.
3. Select Enable Scheduled Discovery check box.
4. Set the Next Discovery Date and Next Discovery Time to take place 1 to 2 minutes from the current
time.
5. Click Save to apply the changes.
6. Once discovery starts, wait for the Discovery in Progress indicator to reach 100%.
7. View the results of the discovery on the printer page.
8. Select Printers > All Printers folder.
9. The Discovery Date field for all of the printers listed should have a time approximately equal to the
time discovery was initiated.
AU T OM AT IC AL LY R ET RI EV IN G IP A DD RE SS ES
CWW provides the ability to automatically retrieve a list of IP addresses for IP Sweep discoveries. This
functionality allows the user to maintain and modify a file of addresses for the discovery operation. The file
format is CSV and CWW provides the option to create a file template. To create a file template:
1. Create a new IP Sweep Discovery by selecting Administration>Discovery>Discovery Methods>New
Discovery>IP Sweep and click Continue.
2. In the Addressing Mode section, select the Automatically Retrieve IP Addresses radio button.
3. In the Automatically Retrieve IP Addresses section, click the Troubleshoot button to open the
troubleshooting window. In this window, click the Export button to create a file template.
4. Edit the file template by adding one or more IP addresses to the file and saving it.
To retrieve the IP address file:
1. Create a new IP Sweep Discovery, following steps 1 and 2 above.
2. In the Automatically Retrieve IP Addresses section, enter the file name/UNC path for the saved file.
3. Click Retrieve Now.
4. Click Save at the bottom of the window.
5. Navigate to the Discovery Methods window and select this newly-created IP Sweep Discovery.
6. Select Run Discovery Now and verify that the Discovery operation was successful.
I P X P RI NT ER D IS CO VE RY M ET HO D
Xerox CWW also allows you to discover printers using the Internet work Packet Exchange(IPX) protocol. This
networking protocol is used by Novell Netware® network operating systems.
Access to the IPX-based discovery methods are disabled (greyed-out) if the IPX networking protocols have
not been installed on the CWW server.
To discover printers using the IPX protocol, utilize the IPX Servers or IPX Addresses features of Xerox CWW.
Configuring the IPX Network Scan Discovery feature:
1. On the Administration>Discovery>Discovery Methods page, go to the Actions menu, and select New
Discovery.
2. Select the IPX Network Scan selection and click Continue.
3. If you need to schedule this discovery method, expand the Schedule section of this configuration page
and set accordingly. You can specify the method of scanning for servers and networks in terms of the
number of hops that the scan is limited to.
Page 44

Xerox CentreWare Web Evaluation Guide 4-34
4. CWW lists the servers and networks identified during the last IPX Network Scan within the Servers and
Networks Found section of the Last Scan window.
Configuring the IPX Server Discovery feature:
1. On the Admin>Discovery>Discovery Methods page, go to the Actions menu, and select New Discovery.
2. Select the IPX Server and click Continue.
3. If scheduling this Discovery method is needed, expand the Schedule section of this configuration page
and set accordingly.
4. Within the Server for Printer Discovery window, identify the specific server(s) to be used during
Discovery by:
a. Selecting the Specify NetWare Server radio button, and then entering one or more server addresses
to use for Discovery, or
b. Selecting the Choose NetWare Servers from IPX Network Scan radio button and then highlighting
specific servers from the IPX NetWare Servers list for Discovery. The last discovery from the IPX
Network Scan Discovery populates the list of servers contained within the IPX Network Servers
window.
Configuring the IPX Address Discovery feature:
1. On the Admin>Discovery>Discovery Methods page, go to the Actions menu, and select New Discovery.
2. Select IPX Addresses and click Continue.
3. If scheduling this discovery method is needed, expand the Schedule section of this configuration page
and set accordingly.
4. Within the IPX Addresses window, the evaluator can limit the discovery process to specific networks,
which in turn reduces discovery processing time and resource requirements via the following
specification options:
a. Selecting the Single Address radio button, and then populating the IPX Network and IPX Address
fields, or
b. Selecting the Specific Network radio button and then populating the IPX Network field, or
c. Selecting the Choose Network from IPX Network Scan radio button and then highlighting specific
servers from the IPX NetWare Servers list for Discovery. The last discovery obtained by the IPX
Network Scan feature populates the list of the networks contained within the Networks window.
5. Click Add to include the networks as specified above to the Current IPX Addresses list.
6. Save this Discovery method specification by clicking Save.
C O N FI GU RI NG T HE P RI NT ER RE -D I SC OV ER Y FE AT U RE
1. On the Discovery Methods page, go to the Actions menu, and select New Discovery.
2. In the Schedule section, select the Every radio button to turn on Printer Re-Discovery.
3. Use the Next Scheduled Date and Next Scheduled Time settings to specify when the evaluator wants
the Printer Re-Discovery to occur.
4. Save the evaluator changes by clicking Save, or exit without making changes by clicking Cancel.
MA N UA LL Y CL EA R AL L PRI NT ER S F EA TU RE
1. Click the Administration tab and click the Discovery button to display the Discovery.
2. In the Manually Clear Database window, select All Printers.
3. Clear the database by clicking Clear Databases Now.
4. View the results of the discovery on the printer page.
5. Select the All Printers folder.
6. The software displays the following message: There are no printers to display.
Page 45

Xerox CentreWare Web Evaluation Guide 4-35
PR I NT ER S NO T CO MM UN IC AT IN G FE AT UR E
Due to the nature of this feature, it may be necessary to conduct this portion of the test after CWW has
been running long enough to have a history of printers in the database that are more than one-day-old.
1. Re-run discovery to populate the CWW database.
2. Click the Administration tab and click the Discovery button to display the Discovery.
3. In the Manually Delete Printers window, select the Printers Not Communicating radio button, and set
the time equal to 1 day.
4. Select Clear All Devices to clear the database.
5. View the results of the discovery on the printer page.
6. Select the All Printers folder.
7. Any printers that have not communicated for more than one day are removed from the database.
Page 46

Xerox CentreWare Web Evaluation Guide 5-36
5. Generate a Status Report Using the Reports Function
Note: To evaluate these features, set up the SMTP mail server. If you did not set this up with the CWW
Getting Started Wizard, you can go to Administration > Network > E-mail & External Servers and set up the
server there.
CWW offers the capability to generate a wide variety of status reports on networked printers. Standard
Reports provides pre-defined graphical and tabular reports that meet the requirements of many network
administrators. The Standard Report types available are:
GR A PH IC AL R EP OR TS
• Color by Function Usage
• Color Usage
• Function Usage
• Image Sent Usage
• Large Impression Usage
• Faults by Manufacturer Device Count
• Manufacturer Device Count
• Print Model Device Count
• Printer Status Device Count
• Printer Type Device Count
• Summary Condition Device Count
T A B UL AR R EP OR TS
• Printer Asset
• Printer Status
• Usage Counter History
• Alert History
• Job Accounting
• User Summary
• Audit Check
• Fleet Security
• McAfee Embedded Control
• Supply
• Password Audit
Additionally, CWW provides the option to create custom named reports based on the standard reports for
your unique system administration needs.
Page 47

Xerox CentreWare Web Evaluation Guide 5-37
Standard Graphical Reports
You can select from four types of charts, using the Graphical Reports function, based on the type of data or
your preferences. The chart types include:
• Pie Chart – Displays the percentage of contribution of each parameter to the total on an area basis.
• Line Chart – Displays trends.
• Clustered Column Chart – Compares the values across time or device category.
• Stacked Column Chart – Compares the contribution of the values across time or device category.
You can display graphical reports immediately or send them via an e-mail message. You can access the
graph type and configuration settings through the Graph Options window. In the Graph Options window,
you can select either the Report Interval (time) or Device Category (devices, models, manufacturers, and
type) for the dependent variable. Note that CWW automatically configures the available chart types and
dependent variable options as a function of the chosen report.
Page 48

Xerox CentreWare Web Evaluation Guide 5-38
This example utilizes the Color Usage Report function. For reports to work properly, you must enable the
Historical Data function.
1. Select Administration > Network > Historical Data.
2. In the History Retrieval section, select the Every radio button and enter one in the text field. Click the
pull-down menu and select Days.
3. In the Next Scheduled Date text fields, enter the current date.
4. In the Next Scheduled Time text fields, enter a time that is approximately one to five minutes later
than the current time.
5. Click Save.
CWW polls the discovered devices for status based on the time you entered in the Next Scheduled Time
field, and save the data to the database. Once the database has been populated, you can now generate
reports.
1. Select Reports>Standard Graphical Reports>Color Usage Report.
Page 49

Xerox CentreWare Web Evaluation Guide 5-39
2. The default Group to report on is All. To verify this, go to the What To Report On window, and click the
Restore Defaults button.
3. In the Chart Type Graph Options, select Pie Chart.
4. Select the Display Values checkbox to add the corresponding values to the chart.
5. In the Time Span window, select All Data.
6. In the Report Actions window, select Display Report to display the report in a new window. This is useful
for checking the report configuration before sending the report.
7. In the Report Actions window, select Send Report to send the report via e-mail. (Note there must be at
least one e-mail recipient configured in the E-mail Recipients text field for this to function).
The Report Colors window allows you to configure the report in saturated or pastel colors or in black & white
patterns. This feature is particularly useful if you want to copy reports in black & white because some colors
reproduce in similar grey shades, generating a graph that is difficult to read.
Standard Tabular Reports
Standard Tabular Reports create tables of printer-related data for analysis. To evaluate this function:
1. Go to the page Count History Report Configuration page by selecting Reports>Standard
Reports>Usage Counter History Report.
2. In the What To Report On text field, click the Restore Defaults. The Included Groups displays the All
group.
3. In the Group By text field, select Printer Model in the 1st field pull-down box and No Summary in the
2nd field pull-down box.
4. In the Included Field text field, select Restore Defaults.
5. In the Time Span text field, select All Data.
6. In the E-Mail Recipients text field, enter a valid e-mail address and click Add. CWW now auto-populate
the Current Recipients text field with the e-mail address.
7. In the E-Mail Message Body text field, go to the Subject field and select the Automatic (Xerox
CentreWare® Web Report). Under Custom Note, select At Front Of Report Body and enter CWW Test
Report 1 in the text field.
8. In the Report Format text field, select All.
9. In the Schedule Period text field, select Never.
10. In the Language text field, select your preferred language.
11. Click Save to save your report format and return to the Reports main menu.
12. On the Reports page, select Usage Counter History Report.
13. In the Report Actions text field at the top of the page, select Send Report.
14. Wait a sufficient amount of time for the e-mail with the subject Xerox CentreWare® Web Usage
Counter History Report to arrive at the recipient’s inbox.
15. View each of the report attachments contained in the e-mail message and verify that there are three
reports: a CSV file, an HTML file, and an XML file. Also, verify that the poll date listed in the reports is
approximately the time entered in the Next Scheduled Time text field when you enabled the Historical
Data.
Page 50

Xerox CentreWare Web Evaluation Guide 5-40
Named Reports
With Named Reports, you can use the standard reports as templates or create custom reports. You also
determine the information that is most important to you and organize the reported data to meet your
needs. Named Reports are available in both the Graphical Report and Tabular Report formats.
To test Named Reports:
1. Select Reports>Named Reports. The Named Reports window opens:
2. From the Report Actions section, select New Named Report to open the New Named Report window.
3. In the Create New Report Based Upon window, go to the Category pull-down menu and select Tabular
or Graphical. For this exercise, select Tabular.
4. In the Create New Report Based Upon section, go to the Type pull-down menu, and select Status
Reports.
5. Select the desired report template type and click Continue. For this exercise, select Printer Status Report
(Standard).
6. The Configure Report window opens. In the General Properties section, go to the In the Name text field
and enter Custom Status Report. In the Comment text field, enter Test Report.
7. In the Included Fields window, click the left arrow to remove the Queue Name and Queue Status
entries.
8. In the New Recipients text field, enter a valid e-mail address and click Add.
9. In the E-Mail Message section, select the Custom radio button for the subject and enter Custom Status
Report Test in the text field.
10. For the Custom Note, select the None radio button.
11. In the Report Format section, go to the pull-down menu, and select All.
12. In the Schedule Period window, select the Once radio button.
13. In the Next Scheduled window, click the Calendar icon, and select today’s date from the Time pull-
down menu, select a time that is close to, but not earlier than, the current time. You can choose times in
increments of 15 minutes or more.
14. In the Language text field, select the desired language and then click Save.
15. At the specified time, CWW sends an e-mail message with three attachments, one in each reporting
format. Open these attachments and verify that CWW generated the reports properly.
Page 51

Xerox CentreWare Web Evaluation Guide 6-41
6. Custom Properties
The Custom Properties feature allows you to define your unique properties and assign them to printers. This
is another tool that you can use to manage devices in your specific environment, enabling you to sort and
filter information that is critical to you.
Enabling and Defining Custom Properties
In this example, we first define some custom properties and then assign them to printers.
To access the Custom Properties:
1. Select Administration>Advanced>Preferences & Properties.
2. Scroll down to the Define Custom Properties 1 section and select Enable.
3. In the Name text field, enter the property name. For this example, enter Team.
4. At the bottom of the page, click Save.
Now that you have defined a custom property, we can assign custom properties to individual printers. In
this example, we assume that printers are assigned to three specific work teams: the Red, Green, and Blue
teams. You can assign custom properties via the Printers>Edit Asset Properties page.
1. From the task bar, select the Printers>Printers>All. CWW displays the All group of printers.
2. Select a printer’s detail page by clicking the magnifying glass or its IP address.
3. In the Edit Actions text field, select Edit Asset Properties.
4. In the Custom Properties text field, enter Red for the team name.
5. Click Save. CWW returns to the printer detail page.
6. Click Back at the bottom of the page. CWW returns to the All printers page.
7. Choose a second printer and assign it a custom property of Red.
8. Choose a third printer and assign it a custom property of Green.
9. Choose a fourth printer and assign it a custom property of Blue.
Page 52

Xerox CentreWare Web Evaluation Guide 6-42
Printer Sort Feature
This feature allows you to sort printers based on the custom properties assigned to them.
1. Return to the printer display group by selecting Printers>All.
2. In the Printers Table, select Table Preferences. Use the arrow keys to move Add Team (Custom) field to
the Included Fields.
3. The four printers should have the phrases Red, Green, and Blue displayed in the Team field.
4. Test the Field sort capability by highlighting and selecting the Title column heading. CWW sorts the
group in ascending order based on the value in the Team field. Printers that do not have data in the
Custom Property 1 field are first in the list followed by the printers that have Blue, Green, and Red in
this field.
5. Click the Team field column heading again to sort the list in descending order.
Enable Filter Feature
Enable Filter allows CWW to display filter list selections on the Printers tab, so you can quickly filter printers
based on their custom properties
1. On the Administration page, select Custom Properties to turn on Enable Filter for Custom Property 1.
2. For Custom Property 1, select the Enable Filter check box.
3. Click Save at the bottom of the screen to apply the change.
4. Select the Test 1 folder to return to the Test 1 printer display.
5. The CWW Evaluation field should now have a drop-down menu under the Team heading with the
following selections:
a. All
b. Blue
c. Green
d. Red
6. In the CWW Evaluation section, select Red from the pull-down menu. CWW displays the two printers
with the phrase Red in the CWW Evaluation field.
7. CWW displays the two printers with the phrase Red in the CWW Evaluation field.
Enforce Uniqueness Feature
Enforce Uniqueness ensures that the custom field value is unique for every printer. To turn on Enforce
Uniqueness for Custom Property 1:
1. Choose Administration>Advanced>Preferences & Properties page, and select Custom Properties.
2. In the Define Custom Property 1 section, select the Enforce Uniqueness check box.
3. Click Save to apply these settings.
4. CWW shows the following error messages because two of the printers in the CWW database have the
value of red in the Custom Properties 1 text field and because you have enabled Filter and Enforce
Uniqueness.
Page 53

Xerox CentreWare Web Evaluation Guide 6-43
This procedure allows you to detect non-unique entries when entering data while the Enforce uniqueness
feature is on. You can eliminate the non-unique situation by removing red from the CWW Evaluation text
field in one of the conflicting printers in the All group.
1. Choose Administration>Advanced>Preferences & Properties, and select the Enable Filter check box for
Custom Property 1 (Team).
2. Select Printers>All to display the All group.
3. Select the IP address of one of the offending (Red) printers.
4. Select Edit Asset Properties to enable changing of the Custom Properties field.
5. From the Custom Properties text field, delete Red.
6. Click Save to apply this change.
7. Choose Administration>Advanced>Preferences & Properties, and select the Enforce Uniqueness check
box for Custom Property 1 (Team).
8. Select Administration>Custom Properties to display custom properties.
9. Click Save to apply these changes.
Now create a non-unique situation in the CWW Evaluation field.
1. Select Printers>All to display the All Printer group.
2. Select the IP address of a printer that has a blank Custom Properties (Team) field.
3. Select Edit Asset Properties to enable changing of the Custom Properties (Team) field.
4. In the CWW Evaluation text field, enter the phrase, red team (note the use of lowercase in this
example).
5. Click Save to apply this change.
6. The Edit Properties window displays the following warning:
Error/Warning Icon Settings
The Define Error/Warning Icon feature lets you specify severity levels for a number of printer alert
conditions. CWW detects a total of 21 alert conditions. For each of these alerts, you can specify whether
they are displayed as an error condition, as a warning, or as OK. You can configure these settings via the
dashboard on the Administration Preferences & Properties page.
To evaluate this feature, perform the following steps:
1. Select an evaluation printer that is in the All printer group and has a convenient location.
2. Using the evaluation printer, verify that it is a member of the All Printers group and ensure that it is in
an Up and Running status condition.
Page 54

Xerox CentreWare Web Evaluation Guide 6-44
3. Display the Error/Warning set-up page by selecting Administration>Advanced>Preferences &
Properties.
4. Verify that the Use Icons Originating From Device radio button is selected.
5. Place the evaluation printer in a Door Open condition.
6. Using CWW, display the test printer’s detailed status by clicking on its IP Address from within the All
Printers group.
7. Select the Refresh Status button to obtain the current status for the test printer.
8. Verify that CWW displays the device’s error condition and corresponding icon.
9. Close the door on the evaluation printer and verify that it is in an Up and Running Status condition.
10. Display the Error/Warning set-up page by selecting Administration>Advanced>Preferences &
Properties.
11. Select the Use Icons As Specified Below radio button.
12. Repeat the next sequence of steps first setting the Door Open status condition to Error then to Warning
and then to OK.
13. In the Define Error/Warning Icon table, select the Error radio button for Door Open.
14. Place the evaluation printer in a Door Open condition.
15. Using CWW, display the test printer’s detailed status by clicking its IP Address from within the All
Printers group.
16. Select the Refresh Status button to obtain the current status for the test printer.
17. Verify that the device’s error condition is Error and the red X icon is displayed.
18. Close the door on the evaluation printer and verify that it is in an Up and Running Status condition.
19. At the conclusion of this test, return the Icon Origin setting to Use Icons Originating From Device.
Page 55

Xerox CentreWare Web Evaluation Guide 7-45
7. Printers Features
Printers Overview
The Printers page displays information about printers on the network and allows you to create and manage
print queues and custom groups and assign printers to those groups. You can conduct troubleshooting tests
on single printers or groups of printers from these pages.
How to Evaluate Printers Features
This section focuses on the printer-related functions illustrated below.
You only see the SMart eSolutions Group in the Printers navigation tree after it is enabled. Reference the
Administration section for details on how to enable this feature. The SMart eSolutions feature is further
discussed in Administration Functions and Configuring SMart eSolutions.
Prerequisites for This Evaluation
In order to evaluate the Printers feature, you must have completed a discovery in CWW and obtained data
from one or more printers as a result. If there are no printers displayed in the All Printers group, return to the
procedure to re-run discovery in IP Sweep.
Many of the evaluations from this point forward require you to enable a trap-supported printer. The
majority of current Xerox® printers support SNMP traps.
To determine if a specific printer supports traps, either open the detailed printer page and view the printer
status related to traps, or configure the Printers>Table Preferences to display Traps Supported as a column
in the printers view.
New Printer Function
The New Printer function manually adds printers to the CWW database. Printers can be specified as either
Networked or Non-networked.
AD D N EW N ON -NET WO RK ED P RI NT ER D EV IC E
To evaluate this feature, perform the following.
1. Display the New Printer page by selecting the New Printer icon within the Printers navigation tree.
2. Select the Non-Networked Printing Device radio button.
3. Select Continue. The New Non-Networked Printing Device page is displayed.
Page 56

Xerox CentreWare Web Evaluation Guide 7-46
For non-networked printers, several data fields such as System Name, Location, Page Count and others can
be manually entered. Once entered, this data then becomes part of the CWW database.
In addition to being an efficient way to manage non-networked printers and copiers, it is possible to then
generate monthly billing meter reports using the Import and Export page counts function.
AD D N EW N ET WO RK ED P RI NT E R D EV IC E
To evaluate this feature, perform the following:
1. Display the New Printer page by selecting the New Printer icon within the Printers navigation tree.
2. Select the IP (or IPX) Networked Printer button, depending on the site topology.
If the IPX Networked Printer is grayed out, then the IPX protocol stack is not enabled on this server. This is
expected behavior if Novell IPX (not IP) is not in your print environment. If you know your environment IS
utilizing Novell IPX (not IP) you need to install the Novell IPX stack on the CWW server to allow IPX
functionality.
3. Enter the printer’s IP Address and Subnet Mask values in the corresponding data entry fields.
4. From SNMP Access, select SNMP v1/v2 (most printers) or SNMP v3. For SNMP v3, enter the SNMP
access, and authentication information for the printer. Enter a context name if required.
5. Select Continue.
6. At this point, the specified printer is accessed and added to the CWW’s database if it is a valid SNMP
compliant printing device.
7. Return to the All printer group by selecting the All printer icon within the Printers navigation tree.
8. Verify that the newly added printer is listed in the All printer group.
Troubleshooting Function
By selecting a printer and clicking on the Troubleshoot button, CWW performs a Printer Ping test and return
the test status. This is displayed in the Troubleshoot Device window. To evaluate this feature, perform the
following:
1. Display the All printers group by selecting All from the Printers navigation tree.
2. Choose one of the printers in the All Printers list by clicking on the selection box associated with that
printer. (For now, avoid selecting any printers whose status is Not Communicating.)
Page 57

Xerox CentreWare Web Evaluation Guide 7-47
3. Select the Troubleshoot button from within the Printer Actions window.
4. At this point, a Troubleshoot All section displayed followed by a Troubleshooting in Progress section.
5. The Troubleshooting Results in the Troubleshooting in Progress window displays the results of the
Printer Ping test along with printer information including System Name, IP Address, Description, Server
Name, Share name and Printer Status.
6. By selecting the Details/Test button from within the Troubleshooting Results window, three additional
troubleshooting features are provided.
7. Printer Web page opens up a separate browser window to display the printer’s embedded web server.
The Printer Web page function is also accessible from the printer’s Detailed Status window.
8. A test print can be generated on the printer by selecting the Print Direct Test button.
This test does not succeed if the printer does not support port 9100, 2000, or 2105 or LPR through port 515
(typically used for LPR).
9. Reset Printer reboots the printer.
T R O UB LE SH OO T MU LT IP LE PR I NT ER S
To evaluate the Troubleshoot feature for multiple Printers, perform the following:
1. Display the All printers group by selecting All from the Printers navigation tree.
2. Choose a number of printers to be tested by selecting the check boxes in the All printers group table
view window.
3. Activate the Troubleshoot feature by selecting the Troubleshoot button.
4. Wait a sufficient time for the tests to complete. Observe the Current Progress indicator.
5. When the tests complete, the results for each printer are displayed in the Troubleshoot Results window.
To perform more advanced tests, select the Details/Test button in the Troubleshoot Results window.
This links to the Troubleshoot Device feature as described in the Troubleshoot single printer above.
6. Selecting the Back button on the Troubleshoot Device window returns to the Troubleshooting Results
window. Proceed with tests on the rest of the printers.
Page 58

Xerox CentreWare Web Evaluation Guide 7-48
Traps
An SNMP Trap is an unsolicited alert notification that a significant event has occurred on a network device.
CWW provides trap configuration modifications such as registering for Traps, clearing Traps for the CWW
server, and clearing all Traps in the printer (for all registered servers). Within CWW, Traps are configurable
on an individual printer and a per-group basis. CWW also provides the ability to register for Traps for all
newly discovered printers, as an alternative to registering for Traps on an individual printer or per-group
basis, with one convenient step in the SNMP Trap Settings area of the CWW Administration section. This
feature is discussed in the SNMP section of the Administration portion of the document.
Not all printers support traps. Trap actions are ignored for printers that do not support traps.
MO D IF Y TR AP
The Modify Trap feature provides per-group configuration of the following features:
• Register for Traps: Registers the CWW application to receive Trap alerts from printers which support
Traps.
• Clear Traps for this Server: Clear the Traps registered with the local server upon which CWW has been
installed.
• Clear All Traps in Printer (for all server destinations): Clears all Traps that are displayed within CWW for
the associated printers, regardless of server.
Selecting this un-registers all the Traps which are displayed; not just those registered with the local server.
Modify Trap Feature
1. Display the All Printers group by selecting All from the Printers navigation tree. Use the Table
Preferences feature to display the Traps Supported column.
2. Choose one or more of the printers in the All Printers list by clicking on the selection box(s) associated
with that printer. Be sure to select a printer(s) that supports Traps.
3. To verify a printer supports traps a user can check the Table Preference column for Traps Supports =
YES.
4. Select a Printer and use the magnifying glass icon to view Printer Properties. If Traps are supported or
unsupported it appears on printer’s properties page.
5. Select the Modify Traps button from within the Printer Actions window. The Modify Traps page displays
the following three options:
a. Register for Traps
b. Clear Traps for this Server
c. Clear All Traps in Printer (for All Destinations)
6. In this case, select Register for Traps by clicking on the associated radio button and then click on the
Confirm button.
7. The display returns to the All Printers page. At this point, all of the printers selected in step #2 above
(which support Traps) now are registered to receive the Traps specified by the individual printer
manufacturer.
The process to evaluate Clear Traps for this Server and Clear All Traps in Printer is similar to the steps
described above. To view the behavior of CWW when a Trap is received, perform the following:
1. Force a printer with physical access, that is both trap supported and registered, into a fault condition.
For example, open a door or a paper tray on the printer. (In this case, select a printer displaying a green
Icon and a Printer Status of Up and Running).
Page 59

Xerox CentreWare Web Evaluation Guide 7-49
2. Upon returning to the computer, notice within a minute or two on the All Printers page that the printer
Icon has now changed from green to yellow or red and that the Printer Status has changed from Up
and Running to a Trap detected fault status.
Additional information on Evaluating Traps can be found in Edit Traps.
Alert History
Whenever CentreWare® Web reads the status on a device, all alert conditions are registered. The Alert
History feature saves and displays all alerts collected over a period of time. Retaining an Alert History allows
easy identification of problem devices.
To evaluate the Alert History feature, perform the following:
1. Display the All printers group by selecting All from the Printers navigation tree.
2. Display the Group Configuration page for the All group by selecting Configuration from the Group
Actions window.
3. Display the Configure Group Properties page by clicking the Properties Configure button.
4. In the Status Retrieval window, select the Every radio button and set the time period.
5. Select the Full Status radio button.
6. In the History Retrieval window select the Every radio button and set the time period.
7. Enter the Next Scheduled Date and Next Scheduled Time and check the Collect Alert History checkbox.
8. Click Save.
9. Return to the Printers > All page and display the detailed status for a printer by clicking on its IP
Address.
10. Force the printer to multiple fault conditions (Out of paper, Door open, etc) and select the Refresh
Status button.
11. Select Alert History.
12. Repeat the above two steps periodically.
13. The list of Alerts should show all alerts that occurred over the period; even if the alert conditions no
longer exist.
Printer Status History
Whenever CentreWare® Web reads the status on a device, in addition to alert conditions which
CentreWare® Web is sensitive to, the Status History retrieves detailed device status information generated
by the device’s internal sensing logic. Some of this is informational and may not directly impact CWW
alerting. Retaining a Status History in conjunction with the Alert History allows easy identification of
problem devices.
To evaluate the Status History feature, perform the following:
1. Display the All printers group by selecting All from the Printers navigation tree.
2. Display the Group Configuration page for the All group by selecting Configuration from the Group
Actions window.
3. Display the Configure Group Properties page by clicking the Properties Configure button.
4. In the Status Retrieval window, select the Every radio button and set the time period.
5. Select the Full Status radio button.
6. In the History Retrieval window select the Every radio button and set the time period.
Page 60

Xerox CentreWare Web Evaluation Guide 7-50
7. Enter the Next Scheduled Date and Next Scheduled Time and check the Collect Alert History checkbox.
8. Click Save.
9. Return to the Printers > All page and display the detailed status for a printer by clicking on its IP
Address.
10. Force the printer to multiple fault conditions (Out of paper, Door open, etc) and select the Refresh
Status button.
11. Select Status History.
12. Repeat the above two steps periodically.
A Status History for a typical printer is shown.
Display Preferences Feature
The Display Preferences feature allows users to customize the printer table to their particular needs and
preferences. You may select which fields are displayed and their order of appearance. To configure the
Printers table:
1. In the Printers page, select the All printer group.
2. Display the Preferences section by selecting the Table Preferences button at the top of the Printers
table view.
3. The Display Fields window and its two sub windows, Included Fields and Available Fields specifies which
fields are displayed for the selected group.
4. By highlighting a field in the Available Fields sub window and selecting the ► button, that field moves to
the Included Field.
5. To remove a field from the Included Fields sub window, highlight it and select the ◄ button.
6. To move all fields from one sub window to the other, select the ►►button or the ◄◄ button.
Page 61

Xerox CentreWare Web Evaluation Guide 7-51
7. To change the order in which the fields are displayed, highlight a field in the Included Fields sub
window and select either the Move Up or the Move Down button to change its position in the list.
8. To test this feature, move one or more fields into the Included Fields sub window, rearrange the order
and select Save.
9. Return to the All printers group to verify that the table fields and order are in accordance with the
settings.
10. To restore the display to the default settings, return to the Preferences page, select Restore Defaults
and then select Save.
Table Scrollbars Feature
The Table Scrollbars feature allows you to quickly scan through a table. To enable the Table Scrollbars
feature:
1. Select the Table Preferences button at the top of the Printers table view.
2. Check the Enable checkbox within the Table Scrollbars window.
3. In this case, leave the default Width and Height pixel settings at 600 and 400 respectively.
4. Select the Save button.
5. The display returns to the main display for All Printers, notice now that the table view contains scrolling
bars for enhanced viewing capabilities.
By changing the Preferences settings for one group, the same settings are applied to all groups with the
exception of the SMart eSolutions group, certain fields are always present on this group.
6. Select the Table Preferences button at the top of the Printers table view and select Restore Defaults in
the Table Scrollbars window.
7. Select the Save button.
The display returns to the main display for All Printers. The table returns to its default appearance without
scrollbars.
Find and In
The Find and In feature of the Printers table provides an easy method to access the data for any device.
This is particularly useful as the number of devices within a group is large. The In pull-down contains over
100 different fields to search on, making CWW’s Find/In feature extremely powerful.
T O US E TH E FI ND A ND I N F EA TU RE S
1. Display the All printers group by selecting All from the Printers navigation tree.
Page 62

Xerox CentreWare Web Evaluation Guide 7-52
2. Using the Find field, enter a string of characters that selects only a subset of the printers in the group.
Then select a logical table preference filter from the In pull-down. For example, if All contains both
Xerox and HP printers:
a. To view only the Xerox printers, type Xerox in the Find field.
b. Then select Manufacturer from the In pull-down.
c. Select Go.
3. Printers displayed contains any printers where the word Xerox was found in the Manufacturer fields.
4. Construct other searches (Using partial phrases or numbers) to further evaluate the Find feature.
5. To redisplay all printers, click the Reset View button.
Sort by Column Feature
The Sort by Column feature allows you to sort all of the printers based upon the parameter displayed in that
column. Sorts may be performed in ascending or descending order as desired.
To use this feature:
1. On the Printers page, select the All printer group.
2. Click the IP Address heading in the Printers window to sort the listed printers by IP Address.
3. Verify that the printers are listed in ascending order by IP Address.
4. Clicking the IP Address heading again sorts the printers in descending order by IP Address.
Note: Notice that a small Up arrow and Down arrow appears on alternate clicks indicating the order in
which the list has been sorted.
5. Verify that the printers are listed in descending order by IP Address.
6. In a similar fashion, any displayed column can be sorted.
7. To reset the sorting, click the Reset View button.
Automatic Filtering
Automatic Filtering lets you quickly identify printers meeting specific criteria using predefined
characteristics. Several of the column headings in the Printers table such as Printer Status, Printer Type and
Printer Model, etc. support automatic filtering. To use this feature:
1. In the Printers page, select the All printers group.
2. Notice the pull down menu beneath the Printer Status and Printer Type column headings in the Printers
window. These pull down menus contain a list of all printer status states and printer types identified for
the group listed.
3. From the Printer Type pull down menu, select one of the printer types.
4. Note that only those printers that match the selected printer type are displayed.
5. From the Printer Type pull down menu, select All.
6. Verify that all of the printers noted in step 1 are again displayed.
Page 63

Xerox CentreWare Web Evaluation Guide 7-53
Edit Actions
The Edit Actions box lets you quickly and easily edit and modify properties associated with a specific device.
These functions are accessed through the Detailed Properties page for a device. The properties that can be
edited include:
• Asset Properties
• Default Settings
• Protocol Properties
• Scan Services
• Security Properties
• Job Accounting Properties
HO W T O US E TH IS F EA TU R E
1. Select a device from any printer Group.
2. Select the desired Edit Properties action from the Edit Actions box.
Note: Selecting any specific Edit Properties Action displays the specific Properties tab, but you can then
select any properties available in the tabs provided for all other Edit Properties.
3. Go to each section of properties requiring an edit.
4. Make the change.
5. Select Save to set the edited configuration on the device or select Cancel to go back to the device
detailed properties page.
ED I T AS SE T PR OP ER TI ES
The Edit Asset Properties action displays the Asset Properties tab. The Asset Properties tab includes
properties for setting Printer Information, Extensible Interface Platform configuration, and Custom
Properties of the device.
Page 64

Xerox CentreWare Web Evaluation Guide 7-54
ED I T PR IN TE R DE FA UL T P RO PE RT I ES
The Edit Printer Default Properties action displays the Defaults Properties tab. The Defaults Properties tab
includes properties for setting Front panel/Console access, device time attributes, Feature Defaults,
Multinational, and Finishing Capabilities of the device.
ED I T PR OT OC OL P RO PE RT IE S
The Edit Protocol Properties action displays the Protocol Properties tab. The Protocol Properties tab includes
properties for setting up Networking, Name Resolution, and Print protocols as well as setup for E-Mail, Proxy,
and LDAP servers. SNMP Trap configuration is also configured on the Protocols properties tab.
Page 65

Xerox CentreWare Web Evaluation Guide 7-55
ED I T TR AP S
The Edit Trap feature in CWW sets Trap configuration on an individual printer basis, and views the
registered Traps specific to the selected printer. Via table format, the information presented is as follo ws:
• Network Protocol: IP, IPX
• Trap Destination: CWW server (or any other SNMP manager) for which trap is registered
• Port typically: 162
• Traps type: coldstart, warmstart, link up/down, authentication failure or all:Pass Everything
Additionally, the Edit Trap feature performs individual printer configuration of the following features:
• Register for Traps: Registers the CWW application to receive Trap alerts from the selected printer. The
printer must support Traps.
• Clear Traps for this Server: Clear the Traps registered with the local server upon which CWW has been
installed.
• Clear All Traps in Printer (for All Destinations): Clears all Traps that are displayed within CWW for the
associated printers.
Selecting this de-registers the CWW server from receiving all the Traps which are displayed not just those
registered with the local server.
• Clear Selected Traps: Clear specifically identified Traps.
Page 66

Xerox CentreWare Web Evaluation Guide 7-56
SE T TI NG E DI T TR AP
Display the All Printers group by selecting All from the Printers navigation tree. Use the Table Preferences
feature to display the Traps Supported column.
1. Select a printer by clicking on the selection box(s) associated with that printer. Be sure to select a
printer(s) that supports Traps.
2. Select the display icon to display the printer properties page.
3. On the printer properties page, select Edit Traps from within the Printer Actions window.
4. The Edit Traps page is displayed presenting the following four options:
a. Register for Traps
b. Clear Selected Traps
c. Clear Traps for this Server
d. Clear All Traps in Printer (for All Destinations)
5. In this case, select Clear Traps for this Server by clicking on the associated radio button and then click
the Confirm button.
Once the CWW application completes processing, notice that the Current Traps field in the Printer table is
updated to now show that the printer is no longer configured to receive Traps.
ED I T SC AN S ER VI CE S
The Edit Scan Services Properties action displays the Scan Services Properties tab. The Scan Services
Properties tab includes properties for setting up Multi-Function Device (MFD) Scanning features. This
includes setup of Scan to File, Server Fax, E-Mail, Internet Fax, Mailbox and Scan to Home scanning services.
Page 67

Xerox CentreWare Web Evaluation Guide 7-57
ED I T SE CU RI TY P RO PE RT IE S
The Edit Security Properties action displays the Security Properties tab. The Security Properties tab includes
properties for setting a device admin password, SNMP communication settings, quick Service disablement,
Access control, and Authentication Settings. You can also set Disk overwrite settings.
Page 68

Xerox CentreWare Web Evaluation Guide 7-58
Device Admin Password
Use this tab to change the device’s administrator password. Some devices only allow this to be done via
their front panel/console. In this case, CWW displays Not supported by the device in the Device Admin
Password box. When setting a new password, reuse of the previous ten passwords is not allowed.
SNMP Access
This tab in the Edit Security Properties tab enables you to change the community names with which CWW
communicates with a device or change a device’s GET, SET and TRAP community names. This function is
useful if printers are configured with community names that are different from the common GET = “Public”
and SET = “Private” condition. For CWW to communicate correctly with devices, it must be configured to
match their GET, SET and TRAP community names. This function also allows you to change a device’s
community names from their default values to increase network security.
1. Select a printer from the All group and click on its IP Address or Device Details icon.
2. In the Edit Actions window select Edit Security Properties.
3. Click on the SNMP tab.
4. Click the Use to Access Device Only radio button. This enables changing the community names that
CWW uses to communicate with the printer.
5. Click the SNMP v1/v2 radio button. Record the name displayed in Get Community Name textbox.
6. Enter a different name in the Get Community Name textbox. For example, if the current Get
Community Name = public, change it to “red”.
7. Click Save.
8. CWW now try and communicate with the device using the Set community name “red”. Since this does
not match the printer’s Set community name “public”, communication fails and the following message
is displayed:
9. Change the GET community name back to the name recorded earlier (in this example public) and click
Save. CWW can now again communicate with the printer.
ED I T JO B AC CO UN TI NG P R OP E RT IE S
The Edit Job Accounting Properties action displays the Job Accounting Properties tab. The Job Accounting
Properties tab includes properties for setting device Job Accounting and Job Validation Options.
Page 69

Xerox CentreWare Web Evaluation Guide 7-59
Refresh Data
Note: When first displayed, the Printer Alerts Window of the Detailed Printer section displays the faults
detected at the last status retrieval action. Depending on settings that exist in the Historical Data section of
the Administration page, alert conditions for any of the discovered printers may or may not be shown when
the detailed printer status is first.
To evaluate the Refresh Data feature, perform the following.
1. Display the All printers group by selecting All from the Printers navigation tree.
2. Display the detailed status for an individual printer by clicking on the IP Address for that printer.
3. In the Printer Alerts window, note any alert conditions that are listed.
4. At this point, the status shown in the Printer Alerts window may or may not match the overall status
icon displayed with the printer at the top of the page since a Printer Alerts data collection action has
not taken place.
Note: It is recommended that when displaying the detailed status for a printer that a Refresh Data action
be performed to obtain the current printer status information.
5. Select the Refresh Data button and note that the status shown in the Printer Alerts window matches
the overall status icon displayed with the printer at the top of the page.
6. Force the printer to a fault state (Out of paper, Door open, etc) and select the Refresh Data button.
7. Note that the new printer status now appears in the Printer Status window.
8. Return to the All printers display by selecting all groups in the folder navigation window and verify that
the new status is shown in the Printer Status column.
Page 70

Xerox CentreWare Web Evaluation Guide 7-60
Printer Alerts
The Printer Alert Status provides an “up to the minute” view of all alert conditions in the selected printer. To
evaluate the Printer Alerts, perform the following.
1. Display the All printers group by selecting All from the Printers navigation tree.
2. Display the detailed status for an individual printer by clicking on the IP Address for that printer.
3. In the Printer Alerts Details window, note any alert conditions that are listed.
4. At this point, the status shown in the Printer Status window may or may not match the overall status
icon displayed with the printer at the top of the page since a Printer Alerts data collection action has
not taken place.
5. Select the Refresh Data button and note that the status shown in the Printer Alerts Details window
matches the overall status icon displayed with the printer at the top of the page.
6. Force the printer to multiple fault conditions (Out of paper, Door open, etc) and select the Refresh Data
button.
7. Note that the new printer status lists multiple fault conditions in the Printer Status window.
Reset Printer
The Reset Printer feature reboots a printer over the network thereby providing a convenient way to quickly
respond to printer fault conditions which require a machine reboot. CWW can reset a single printer or
multiple printers with one action. The reset operation may be performed immediately or scheduled to occur
at a later time. This scheduling capability is particularly useful if a group of printers is to be rebooted as it
allows the operation to be scheduled during off-peak hours to minimize printing disruption.
To evaluate the Reset Printer feature, perform the following:
1. Display the All Printers group by selecting All from the Printers navigation tree.
2. Select one or more of the printers in the All Printers list by clicking on the IP address associated with
that printer to display the detailed Printer Properties page.
3. Select the Reset Printer button from within the Printer Actions window.
4. In the Schedule window, check the Apply/Check Now radio button.
5. Select Confirm.
To evaluate scheduling the Reset Printer feature, perform the following:
1. Perform steps 1 through 3 above.
2. In the Schedule window, check the Apply/Check Later radio button.
3. Enter a date and time for the reset operation. For the purposes of this evaluation, enter the current
date and a time that is between 1 and 5 minutes later than the current time.
4. Select Confirm.
Alert History
The Alert History feature saves and views all alerts collected over a period of time. Retaining an Alert History
allows easy identification of problem devices.
To evaluate the Alert History feature, perform the following:
1. Display the All printers group by selecting All from the Printers navigation tree.
Page 71

Xerox CentreWare Web Evaluation Guide 7-61
2. Display the Group Configuration page for the All group by selecting Configuration from the Group
Actions window
3. Display the Configure Group Properties page by clicking the Properties Configure button.
4. In the Status Retrieval window, select the Every radio button and set the time period.
5. In the History Retrieval window select the Every radio button and set the time period.
6. Display the detailed status for an individual printer by clicking the IP Address for that printer.
7. Force the printer to multiple fault conditions (Out of paper, Door open, etc) and select the Refresh
Status button.
8. Select Alert History.
9. Repeat the above two steps periodically.
10. The list of Alerts should show all alerts that occurred over the period, even if the alert conditions no
longer exist.
Status History
The Status History feature monitors the overall performance of printers over a specified period of time.
To evaluate the Status History feature, perform the following:
1. Display the All printers group by selecting All from the Printers navigation tree.
2. Display the Group Configuration page for the All group by selecting Configuration from the Group
Actions window.
3. Display the Configure Group Properties page by clicking the Properties Configure button.
4. In the Status Retrieval window, select the Every radio button
5. Display the detailed status for an individual printer by clicking on the IP Address for that printer.
6. Force the printer to multiple fault conditions (Out of paper, Door open, etc) and select the Refresh
Status button.
7. Select Status History.
8. Repeat the above two steps periodically.
Printers Section Summary
After completing the steps in this section the evaluator should have an understanding of the following
aspects of the CWW Printers capabilities.
• Gain sufficient understanding of CWW’s User Interface operability and be able to assess its ease of use
relative to competitive products.
• Sort a list of printers within a group in either ascending or descending order for a number of printer.
parameters.
• View only those printers from within a group of printers that match the filter criteria specified.
• Locate an individual printer or a group of printers in the CWW database based on search criteria
provided.
• Perform troubleshooting tasks for single or multiple printers.
• Display detailed information for a specific printer.
• View trap and alert information for an individual printer or group of printers.
• Schedule and perform printer resets for one or more printers.
• Add a non-networked printer’s information to the CWW database.
Page 72

Xerox CentreWare Web Evaluation Guide 8-62
8. Utilizing Groups
Overview of Groups
The main purpose of this section is to familiarize the evaluator with the Folder navigation feature and to
describe the various default groups that are created. When CWW is first installed, four default groups are
created. Printers that are discovered during the initial discovery action are placed in one or more of these
default folders depending on their status at the time of discovery.
The ability to set up custom groups lets the evaluator arrange printers in a way that best suits the
environment. Groups can be created to represent geographic relationships (All printers in Atlanta, Ga.);
functionally (mission critical printers that require quick response to problems); or any way that best suits the
needs.
PR E RE QU IS IT ES F OR T HI S E VA LU A TI ON :
It is necessary for CWW to have completed a Discovery operation and obtained data from one or more
printers. If there are no printers displayed in the All printers group, return to the Getting Started Wizard or
proceed to the Administration Section to run Discovery in IP Sweep mode.
How to Evaluate Printer Group Functions
This section discusses the Group related functions highlighted below.
Group Folder Navigation
CWW’s Printers page uses the standard Windows® Classic Folders view to show printer and print queue
groupings. Each Icon in the folder navigation window represents a Group of printers or Print Queues that
contain zero or more items. Folders (also known as Groups) can be selected for display by simply clicking on
the folder icon.
To navigate to various printer groups:
• Select in succession the Error, Unconfigured, All and Newly Discovered folder icons.
• Observe that in each case, a list of printers is displayed in the Printers table view window for each group.
Page 73

Xerox CentreWare Web Evaluation Guide 8-63
The following criteria are used to assign printers to a specific system folder.
ER R OR P RI NT ER G RO UP
Printers are placed in the Error group if it is detected that they have an Error fault condition at the time of
discovery. Refer to the section on Administration for more information on setting up definitions for the Error
fault conditions.
A printer is added to the Error group any time a status update is performed on that printer and it is
determined that a critical error condition exists in the printer. This can occur for subsequent discovery
actions, a Refresh Status action or a Status retrieval action.
A printer is removed from the Error group any time a status update is performed on that printer and it is
determined that no critical error condition exist in the printer. This can occur for subsequent discovery
actions, a Refresh Status action or a Status retrieval action.
UN C ON FI GU RE D PR IN TE R G R OU P
The Unconfigured group contains discovered printers that have not been installed (queue created) using
CWW.
A printer is added to the Unconfigured group any time a printer is discovered that is not associated with
any print queue. This can occur for subsequent discovery actions, a Refresh Status action or a Status
retrieval action. (Refer to Section 8 for details on adding printers to queues).
A printer is removed from the Unconfigured group when it is assigned to a print queue.
AL L G RO UP
Any printer discovered on the network is included in the All printers group.
A printer is added to the All group any time a status update is performed and a printer is discovered that
had not been included in the CWW’s database. This can occur for subsequent discovery actions, a Refresh
Status action or a Status retrieval action.
Printers can be manually added to the CWW database and the All group using the New Printer function.
Printers can be removed from the All group by using the Manually Clear Database function in the
Administration page of CWW. This is described in detail in Section 11.
Printers can also be removed from the All group by using the Delete Printers function described later in this
document.
N E W LY D IS CO VE RE D GR OU P
The Newly Discovered group contains only those printers detected during the latest Discovery process,
which did not previously exist within the CWW server’s database.
Printers are removed from the Newly Discovered group manually by using the Delete Printer feature
described later in this section.
Additional Printer Folder Functions
In addition to the above group folders, the Printers folder includes the following icons.
• New Group - create a new custom group.
Page 74

Xerox CentreWare Web Evaluation Guide 8-64
• New Printer- manually adds networked or non-networked devices to the CWW database. Refer to the
section on Printer Management for evaluations associated with adding new printers.
EV A LU AT IN G NE W GR OU P FUN C TI ON
The evaluator can create and set up a new printer group using the New Group feature. To evaluate this
capability, perform the following steps.
1. Select the New Group icon in the Folder navigation window within the Printers page. This action
displays the Configure Group Information: New Group page.
2. For the purpose of this evaluation, enter Test 1 in the Group Name data field within the Identity
window. Optionally fill in the remaining Group Identity data fields. Note that Group Name is the only
required information in this window.
Note: The Group Name is used to identify a new folder in the Printer navigation window. All remaining
Group Identity information is included in any reports generated using this group.
3. This is where the opportunity to configure groups to meet particular needs is provided. As an example,
the print administrator may need to set a critical printer group to a 5 minute (or less) status update rate
while less critical printer groups can be set to a lower rate. Keep in mind that the Status Retrieval rate
has an impact on network loading. Groups can be created as Top-level groups or subgroups of another
group. When completed, the Test 1 group becomes a Top-Level group.
Note: CWW does not allow the evaluator to create subgroups under the built-in groups. The New Group
option is used to create New Groups and Subgroups of these custom groups.
4. If the Advanced box is not open, click on the arrow to the left of “Advanced”. Three boxes open:
Communication Settings, Status Retrieval and History Retrieval.
5. The Communication Settings window lets the evaluator specify the timeout period for printer access
and how many retries are to be attempted if communication fails. You may select either the Use
System Default radio button or the Specify radio button and enter timeout and retry values. For this
example, select the Use System Default option.
6. The Status Retrieval window lets the evaluator specify when status updates are to be collected for
printers in this group. The options are System Default, Never and Every. By selecting Every, the
evaluator can set the status retrieval time for 1 to 999 minutes. When Every is selected, the Basic and
Full radio buttons are enabled. These are used to select the level of printer status that is retrieved. For
the purpose of this evaluation, leave the Status Retrieval selector button set to Use System Default.
7. The History Retrieval window lets the evaluator specify when history data is collected. The options are
Use System Default, Never and Every. Selecting the Every radio button enables the frequency to be
input in the text box. The value may range from 1 to 99. The unit is set via the pull-down box and can
be set to Hours, Days, Weeks or Months. The Next Scheduled Date and Next Scheduled Time can be
entered using their associated pull-down boxes. Finally, you can select via the checkboxes which
historical data to acquire: Usage Counter History, Alert History or both. For this example, select Never
and then select Save at the bottom of the window.
8. Verify that a new folder named Test 1 is added to the Folder navigation window.
9. A window entitled Group Configuration: Test 1 appears as shown here. Note that the Membership Filter
box contains the message: No expressions defined. This is configured later. Click the Back button.
Page 75

Xerox CentreWare Web Evaluation Guide 8-65
10. Select the new folder named Test 1. Note that it is presently empty. This changes later as additional
CWW features are evaluated.
US E R AN D GR OU P AC CE SS TO PR IN TE R GR OU PS
Users can only view the contents of the Printer Groups to which they have access. This feature does not
affect any users that are in the CWW Power Users or CWW Administrators groups.
To allow access to a specific Printer Group,
1. On the CWW Server, add the domain group of users requiring Printer Group access to the CWW Users
group.
2. On the Printer tab in CWW, select the Printer Group to which to assign access.
3. Under Group Actions, select Configuration and then select Configure.
4. Under the Advanced section, go to the User Access section.
5. Under Actions, select Add. A list of domain groups appears. The domain can be changed from the list of
domains to which the CWW Server has access. Changing the domain changes the list of domain
groups.
6. Select the domain groups to be granted access and select Add.
7. Select Save from the Group Configuration page.
8. When a user within the selected domain group(s) authenticates, they have access to view the printers
in this Printer Group.
Custom Group Additional Actions
As described earlier, the Printer and Group actions windows for a custom group (i.e. the Test 1 group just
created) contain additional selections over and above those presented in the four default groups created by
CWW. The Printer Actions window for the Test 1 group should include new actions Add to Group, Remove
from Group and the Group Actions Window includes new actions Delete Group, New Subgroup, and Reorder
Group.
Page 76

Xerox CentreWare Web Evaluation Guide 8-66
AD D T O GR OU P
The Copy to Group and Add to Group functions differ primarily in that the printer list displayed using Copy
to Group includes all of the printers in the source group whereas the Add to Group function lists only those
printers not already assigned to the target group.
To evaluate Add to Group, perform the following:
1. Display the Test 1 group by selecting it in the Printers Folder navigation window.
2. Select the Add to Group button in the Printer Actions window, observing on the Add to Group page that
only those printers not already assigned to the Test 1 group are being displayed.
3. Select one or more printers and select the Add button.
4. Redisplay the Test 1 group and verify that the specified printers have been added to the Test 1 group.
RE M OV E FR OM G RO UP
Remove from Group removes the selected printers from the group being displayed. The printers remain in
the CWW database and well as any groups to which those printers were assigned.
To evaluate Remove from Group, perform the following.
1. Display the Test 1 group by selecting the Test 1 group in the Printers Folder navigation window.
2. Select a printer in Test 1 by checking its checkbox.
3. Under Printer Actions select the Delete Printers button.
4. Redisplay the Test 1 group and verify that the printer has been removed from the group.
5. Display the All Printer group and verify that the printer is still a member of that group.
I M P OR TI NG G RO UP S
The Import Groups action lets you import csv file data to create groups and the hierarchy of groups. And
add Membership Filters to groups. Importing groups is supported for up to 6000 groups and subgroups. You
may have up to 20 sub-levels of subgroups. There are templates for Group and Membership that you can
export and use to build your import file.
Follow the steps below to import group and membership files.
1. Navigate to Devices>Printers.
2. Under Group Actions click Import Groups.
3. Follow the instructions to import a csv file to either:
a. Create the group hierarchy.
b. Add filters to existing desired groups.
4. Click Import.
5. A results screen tells you how many groups have been added, updated, and how many errors there are.
6. Click Back
7. Your new groups appear in the Printer group list in the left navigation.
I M P OR TI NG D EV IC ES I NT O G RO U PS
The Import Devices into Groups action lets you import csv file data to add device to groups. You can assign
new or existing (already discovered) devices to a group. With a new device, Xerox® CWW runs a discovery
for the provided IP address and assigns the device to the group. There is an Assign to Group template you
may export and use to build your import file
Follow the steps below to import devices into a group.
Page 77

Xerox CentreWare Web Evaluation Guide 8-67
1. Navigate to Device >Printers.
2. Under Group Actions click Import Devices to Groups.
3. Follow the instructions to import a csv file.
4. Click Import.
5. A results view shows you how many addresses were found and how many entries were assigned
successfully to existing groups.
6. Click Back.
C O P Y TO G RO UP S
Use the Copy to Group function to add printers to the custom groups that the evaluator creates. This
feature, along with Create New Group enables the evaluator to arrange printers in a way that best suits the
environment. After creating a custom group, printers can be added to that group by selecting printers from
another group or by using the Find function to locate printers to copy.
To evaluate this feature, perform the following.
1. Display the All group by selecting the All group in the Printers Folder navigation window.
2. Select one or more printers either by checking the individual check boxes or by checking the Select All
box.
3. After selecting one or more printers, select the Copy to Groups button within the Printer Actions
window.
4. At this point, the Copy to Group page is displayed. This page displays a selection list of all custom
groups (For example Test Group 1).
5. A listing of available groups is displayed in the Add New Printer to Selected Group window. Click on the
Test 1 group in the Available Groups box and then click on the ▼ down arrow. This group now appears
in the Selected Groups box.
6. Click the Finish button and the printers selected in the step 2 are copied to the specified custom group
(Test 1).
7. Verify that the newly added printers are now visible in the Test 1 group page.
8. CWW also provides the ability to create a new custom group from within the Copy to Groups feature
for enhanced convenience and usability. This feature allows the evaluator to easily create a new group
and copy a selection of printers to the newly created group all on one page.
Notice also that the Copy to Group page displays a Remove from Source window, depending on which
group was selected at the time the Copy to Group feature was selected. The Remove from Source option
may or may not be enabled based on the rules defining the group populations described in Group
Configuration (Section 6).
The behavior of the Remove from Source selector is as follows:
• If the Error group, the Un-configured group or the All group is being displayed when the Copy to Group
feature is selected, the Remove from Source option is disabled. This is because the user is not allowed to
override the rules for including printers in those groups.
• If the Newly Discovered group or any Custom Defined group is being displayed when the Copy to Group
feature is selected, the Remove from Source option is enabled. This is because the user is allowed to
manually specify printers to be included in these groups.
N E W S UB GR OU P
The New Subgroup feature enables the creation of groups that are subsets of a higher level group. To
evaluate the New Subgroup feature, perform the following:
Page 78

Xerox CentreWare Web Evaluation Guide 8-68
1. Display the Test 1 group by selecting the Test 1 group in the Printers Folder navigation window.
2. Select the New Subgroup button from the Group Actions window.
3. Enter Test 1.1 in the Group Name field.
4. Click the Save button.
5. In the Group Configuration window, click the Back button.
6. Verify that the new subgroup entitled Test 1.1 is now displayed in the Printer navigation window.
Notice that this new subgroup is displayed using the standard Windows® Classic Folders view.
RE O RD ER G RO UP
CWW provides the ability to quickly and conveniently organize the way in which custom printer groups
(folders) are displayed within the Printer navigation window.
To evaluate the Reorder Group feature, perform the following:
1. Create another New Subgroup of Test 1 by executing steps listed above. However, this time name the
group Test 1.2.
2. Click on the + sign to expand the subgroups. Verify that the New Subgroup entitled Test 1.2 is now
displayed in the Printer navigation window.
3. Notice that the Test 1.1 group is presented as the first subgroup folder for Test 1 group followed by the
Test 1.2 subgroup. Select either the Test 1.1 or Test 1.2 subgroup from the Printer navigation window.
4. Click on the Reorder Group button in the Group Actions box.
5. In the Reorder Peer Groups window: Highlight the Test 1.2 subgroup and select the up arrow ↑ to
reposition the Test 1.2 subgroup above the Test 1.1 subgroup.
6. Click on the Save button.
7. Notice that the Test 1.2 group is now presented as the first subgroup folder for the Test 1 group
followed by the Test 1.1 subgroup.
The capability to Reorder Groups exists only for peer groups residing at the same folder level referred to as
peer groups. Top-Level groups are peer groups to each other. Additionally, Subgroups are also peer groups
to each other. CWW does not provide the ability to Reorder the built-in groups.
SE T P AR EN T GR OU P
CWW’s Set Parent Group feature provides the capability to reassign a group to a different parent group,
even if it previously did not have a parent group. This can be useful in reassigning assets to different
organization, groups, etc. The group stays intact when it is reassigned to the new parent.
To evaluate the Set Parent Group function:
1. Select the group to be reassigned and click Set Parent Group.
2. In the Set Parent Group box, select the New Parent Group and click Save. The group is now shown in the
hierarchical view under its new parent group.
For example, let’s say that we want to move the group Phasers to be under the parent group Xerox B111.
Selecting the group Phasers in the Group Actions Box and clicking on Set Parent Group. Select Xerox B111
assigns the Phasers group to the Xerox B111 parent group.
Page 79

Xerox CentreWare Web Evaluation Guide 8-69
Delete Printers
Use the Delete Printers function to remove printers from the CWW database. This feature is provided as a
way to delete printers that are not intended to be included in the CWW database.
If the printer was included to the CWW database as a result of a specified discovery action, it may be
necessary to adjust the discovery parameters so that the unwanted printer is not subsequently rediscovered.
To evaluate this feature, perform the following.
1. Display the Test 1 group by selecting the Test 1 group in the Printers Folder navigation window.
2. Select one or more printers to be deleted using the check box next to those printers.
3. Select the Delete Printers button from within the Printer Actions window.
Observe that the Printer Actions window for the Test 1 group contains a Remove From Group button not
visible in the All printer group. The reason for this is that printers are allowed to be removed from Custom
Groups but not from the All printers group.
4. Select the Confirm button on the Delete Printers page to remove the selected printers from the CWW
database.
5. Verify that the selected printers were removed from the Test 1 group.
6. Return to the All Printers group and verify that the selected printers were removed from that group as
well.
At this point, the evaluator may want to re-run discovery to add the deleted printers to the CWW database.
Delete Group
The Delete Group function enables the removal of a custom group or subgroup. Note that deleting a group
that contains sub-groups results in the deletion of the sub-groups as well. To evaluate the Delete Group
function, do the following:
1. Display the Test 1 group by selecting the Test 1 group in the Printers Folder navigation window.
2. Select the Delete Group button from the Group Actions window.
Page 80

Xerox CentreWare Web Evaluation Guide 8-70
3. Select the Confirm button to delete the group.
4. The Test 1 group is deleted and the All group is displayed.
Group Configuration
All CWW printer groups can be customized to meet the specific organization’s needs by using the Configure
Group features. Additional group configuration settings are available for all default and Custom groups by
selecting the Configure button from within the Group Actions window of the currently selected group. This
includes the ability to specify group identification information, status retrieval rates and membership filters
for the selected group.
C O N FI GU RE G RO UP I DE NT IT Y
The evaluator can customize any group to make it easier to identify printers in the group. Groups can be
identified by geographical location, building location, level of service needs and other criteria. Descriptive
information for a group includes Group Name, Owner Name, Owner E-mail, Owner Phone, Location and a
Comment field.
To evaluate the Group Identity function, perform the following.
1. Display the All Printers group by selecting the All folder in the Printers Folder navigation window.
2. Select Configuration within the Group Actions window.
3. Select the Configure button in the Properties window.
4. For the purpose of this evaluation, fill in each of the data fields in the Identity window as follows:
a. Group Name: All (not editable)
Page 81

Xerox CentreWare Web Evaluation Guide 8-71
b. Owner: System Administrator
c. E-mail: SA@ MyCompany.com
d. Location: Home Office
e. Phone: 555-1212
f. Comment: Evaluating groups
Note: For predefined groups, the group name is set at time of installation and cannot be changed. For
Custom groups, the user specifies the group name when the group is created.
5. Select the Save button at the bottom of the Configure Group Information section. This returns to the
Configure Group: All page.
6. Verify that the information entered in the Group Identification data field is now displayed in the
Identity window.
7. Observe that the Owner and E-mail fields are displayed as hyperlinks.
GR O UP S TA TU S RE TR IE VA L
The Status Retrieval feature specifies how often status information is retrieved for the printers in any
default group as well as for any Custom groups that have been created. The status retrieval rates for each
group can be specified so that they best meet the needs of the support requirements of the site. For
example, status for high visibility or mission critical printers can be taken as frequently as once a minute.
Status rates for less critical printers can be set to lower rates.
To evaluate the Status Retrieval function, do the following.
1. Display the All Printers group by selecting the All folder in the Printers Folder navigation window.
2. Select the Configuration button from the Group Actions sub window.
3. Select the Configure button at the top of the Properties window.
4. Click on the arrow next to Advanced to open the Advanced settings.
5. Click on the arrow next to Status Retrieval to open the Status Retrieval window.
6. Select the radio button labeled Every from within the Status Retrieval window.
7. Enter 1 (minute) in the Minutes data field.
8. Select the Full Status radio button.
9. Select the Save button to apply these changes. This returns to the Configure Group section.
10. Verify that the Status Retrieval window shows a status retrieval rate of Every 1 minute(s).
11. Wait a few minutes and redisplay the All printer group.
12. View the Status Date column within the Printer window for the All printer group to verify that the
printers were pooled for status within the last minute.
Note: See the Evaluating Table Preferences section above to add the Status Date column to the Printer
window if it is not already present.
13. Return to the Configure Group Information page and reset the status retrieval rate back to Use System
Default.
Group Membership Filter
The CWW Membership Filter feature provides the ability to automatically populate custom printer groups
with specific printers, based upon a flexible configuration of printer device property variables, conditions
Page 82

Xerox CentreWare Web Evaluation Guide 8-72
and values. For example, the evaluator can automatically assign a printer to a particular group based upon
device properties such as Manufacturer = Xerox, where the device property variable is Manufacturer, the
condition is Equals, and the value is Xerox. Once the desired configuration is established, the CWW
application dynamically populates the specified groups based upon device status information obtained
during the group Status Retrieval process evaluated previously in this document.
To evaluate the Group Membership Filter and configure the Basic Dynamic Grouping feature, perform the
following:
1. If group Test 1 was previously deleted, create a New Group and label it Test 1. Otherwise, display the
Test 1 printers group by selecting the Test 1 folder in the Printers Folder navigation window.
2. Select the Configuration button from the Group Actions window.
3. Select the Configure button located at the top of the Membership Filter window.
Note: This window should be displaying a value of No expressions defined, indicating that the Membership
Filter does not contain any dynamic grouping specifications.
4. Select the New Expressions button located at the top of the Expressions table.
5. Highlight the Traps Enabled selection from within the Variable drop-down box.
6. In this case, notice that the Condition field is automatically set to Equals.
7. Highlight the Yes selection from within the Value drop-down box.
8. Select the Save button.
9. Notice the Expressions table is now populated with the Traps Enabled variable and the associated
condition and value.
10. Select the Back button.
11. The Group Configuration page for the Test 1 group is displayed which now contains the addition of the
Traps Enabled Membership Filter.
12. Display the Test 1 printers group by selecting the Test 1 folder in the Printers Folder navigation window.
13. Notice that any printer previously registered to receive Traps is now displayed in the Test 1 group.
Note: CWW enables Dynamic Grouping for custom groups only. Built-in groups contain pre-configured
dynamic grouping and group membership filters.
An added feature of the Group Membership capabilities is that CWW can also display the group names of
which a particular printer is a member. This feature not only specifies the group(s) that a printer is a
member of, but also identifies the nature of the membership. For example, CWW indicates whether the
printer was automatically, dynamically, or manually added to a particular group(s). Understanding this
information further enhances the ability to effectively organize and manage the printer groups.
To view a printer’s group membership:
1. Select a printer by clicking on its IP Address or Device Details icon.
2. Select Group from the toolbar. The printer’s Group Membership is displayed.
Status Alerts
CWW enables sending E-mail messages for only those printer alert conditions and printer queue-based
conditions that are considered important. In other words, filter out less important alert conditions (e.g. door
open, output tray full, etc.) and send E-mail messages only for the critical ones (e.g. Paper Jammed, Toner
Low, etc.). Additionally, CWW enables customization of the subject line of the resulting E-Mail message as
well as providing additional descriptive text in the body of the E-Mail message. CWW provides an expanded
Page 83

Xerox CentreWare Web Evaluation Guide 8-73
array of alerts that encompass a variety of conditions of concern to the system administrator. These
expanded alerts give greater insight into the printer status. For example, CWW can alert the system
administrator when a consumable such as an imaging drum or fuser is reaching its end of life. With this
information it is now possible to order replacement supplies in a timely manner to avoid out of service
conditions.
PR E RE QU IS IT E FO R TH E RE MA IN DE R OF T HI S TE S T
In order to conduct this test, it is required to have physical access to a networked printer on which the
evaluator can perform tests such as forcing a Door Open or Out of Paper conditions. This printer must also
be included among the All Printer group within the CWW database.
• Verify that the status of the test printer is Up and Running before conducting the Status Alerts test.
• On the Administration>Network page, select Enable Status Alerts and configure the Mail server if
required.
E-mail alerts feature
1. Display the All Printers group by selecting the All folder in the Printers Folder navigation window.
2. Select the E-mail Alerts button. This displays and sets up the E-mail Alerts for the All printers group.
3. If this is the first time, create a new E-mail Alert Profile. Select New. The New Printer E-mail Alert Profile
window is opened
4. In the Profile Identity window enter All Profile without the quotes in the Name fields.
5. Check the Enabled box.
This feature enables or disables individual profiles from generating Status alerts. This can be useful for
evaluating functional alerting without having to re-enter the profile information.
6. In the Device Alerts to Report window, select Door Open from within the Excluded Alerts sub window.
7. Select the → button to move Door Open to the Included Alerts sub window.
8. In the Data Fields window, select the → button to select all fields. This is the information about the
device included in the mail note sent to the recipient.
9. In the New Recipient field of the E-mail Recipients window, enter a valid SMTP E-mail address for the
evaluator.
10. In the E-Mail Alert Format window check the Custom radio button and enter the following text: Testing
EMail alert feature.
11. Select Add.
12. Select Save to save the new E-mail Alert Profile.
Multiple Status Alert Profiles can be associated with a group. Different individuals may be notified of
different alerts. Each Profile may specify different data to be sent to the recipient.
13. On the Configure Group: All page, select the Configure button.
14. On the Configure Group Information: All page, select the Every radio button and set the status retrieval
interval to 1 minute.
15. Select Save to apply the Status Retrieval settings.
16. Using the test machine, force a door open condition.
17. Wait at least one minute for a Status Retrieval action to occur.
18. Display the detailed status for the test printer by clicking on the printer’s IP address from within the All
Printers group display page.
Page 84

Xerox CentreWare Web Evaluation Guide 8-74
19. Verify that the Door Open status is identified in the Printer Status window. At this point, an E-mail is
generated and sent to the address specified in the Alert Recipients field of the All Profile sub window on
the Printer E-mail Alerts page.
20. Verify the delivery and accuracy of this E-mail message.
21. Upon completion of this test, set the status retrieval interval to a value that won’t stress the network.
Group Section Summary
After completing the steps in this section the evaluator should have an understanding of the following
aspects of the CWW Group capabilities:
• Become familiar with the Printers navigation window and understand the purpose and characteristics of
the Error, Unconfigured, All, Newly Discovered and New Group folders.
• Be able to create new printer groups and configure and arrange them to best match the environment.
• Within the Printer Table view for a group of printers, specify up to 20 printer parameters to be displayed
for the group.
• Assess the ease of performing printer group management tasks.
• Be able to configure groups to meet the organizational needs.
• Use group membership filters to create flexible groupings that support the management model.
• Be able to delete or change printer groups that are no longer needed.
• Be able to assign status retrieval rates for groups of printers that match the organizational needs.
• Determine additional ways to utilize CWW in the network environment
Page 85

Xerox CentreWare Web Evaluation Guide 9-75
9. Configuration Sets and Configuration Policies
Within any managed site, there is a need to be able to efficiently and effectively manage the settings
common to a particular class of machine. Configuration Sets applied using Configuration Policies provides
this capability, and can significantly aid in conformance stability, especially within a large fleet of devices
and/or where there is a high level of device Moves and Adds or Changes. Configuration Sets applied using
Configuration Policies provides a reusable template to both monitor and set various device configuration
parameters. Applying settings to these devices is a two-step process:
1. Configure a Configuration Set
2. Configure a Configuration Policy
CWW Configuration Sets provides the tool to record and maintain templates of device configuration
settings. These configuration settings include the following: Protocol, Network Scanning, Security, Printer
Defaults, Asset information, and Job Accounting settings. The settings in each group are displayed within
the User interface in a tabbed format. Additionally, there are settings that can be configured for non-Xerox
devices. These settings can be found on the Other tab. The Configuration Set templates can then be
scheduled to be applied to devices or to check Compliance using Configuration Policies.
CWW Configuration Policies provide a task-based mechanism to schedule and monitor the application of
Configuration Sets. Configuration Policies can have a set schedule, or they can run upon a device discovery.
Multiple Configuration Policies can be created to apply different configured Configuration Sets to devices
based upon existing groups in CWW or on a specified filtered list of devices.
Periodic application of Configuration Sets can identify devices that are not in compliance (Check Audit
Check detail action), and can also be used to reset the specific fields to conform to the site requirements
(Apply Configuration detail action). Configuration Sets can be created from a blank template or from an
already configured device to pre-populate a template. Configuration Sets can be applied to a single device,
or to a group of devices for both checking and setting configuration.
Warning: A Configuration Set can be created using a mix of device settings. Example: A Configuration Set
can include some Protocol, Security and Network Scanning settings together.
Some fields within a configuration set are appropriate only to a specific model, some are generic and can
be applied to any model, and some are appropriate for only a specific support or service function but
appropriate for many model types.
Automated remote discovery is available for configuration sets. A device can initiate contact to a Xerox®
CentreWare Web server through a REST Service. The Xerox® CentreWare Web responds by running
discovery on the calling device, which either adds the device to Xerox® CentreWare Web or updates
information for the existing device. During the discovery process, Xerox® CentreWare Web will write its
address to the managed by server field on the device.
Recommended Usage
• Know what is out there.
– Use Audit Check Configuration Set to confirm which settings need to change, and which should
remain. There may be specific printers that require settings that are different from standards;
individual requirements should be confirmed.
Page 86

Xerox CentreWare Web Evaluation Guide 9-76
• Test. Apply Configuration to one device while that printer status is visible.
– Confirm that the outcome of the new device settings is as expected. Different firmware levels in the
same product family may behave differently – multiple firmware levels on the devices in the same
family might suggest multiple tests.
• Apply Configuration to a known group of printers, and confirm status and setting.
Creating Configuration Sets and Policies
ST E PS T O CR EA TE A C ON FI GU R A TI ON S ET
1. Select Policies > Configuration > Configuration Sets > New Set or New Set Configuration Action.
2. Configure the Set Identity Information. Configuration Set Name is required to uniquely identify the
Configuration Set.
Page 87

Xerox CentreWare Web Evaluation Guide 9-77
3. Configure any Asset, Printer Default, Protocol, Network Scanning, Security, Job Accounting or Other
settings on each respective tab.
Note: The Other tab contains settings for non-Xerox Devices, and currently only supports HP default
settings. HP Protocol settings are configured along with Xerox Protocol Settings. All other HP settings that
are configurable are contained in the Other tab.
4. Select Save to save the Configuration Set.
DE L ET E AN D/ OR C OP Y A S A VE D CO NF IG UR AT IO N SE T
1. Select Policies > Configuration > Configuration Sets
2. Check each Configuration set you wish to Delete or Copy by selecting each Configuration Set in the list.
3. Select the Delete Sets or Copy Set Configuration Set Action.
C R E AT IN G A CO NF IG UR AT ION SE T FR OM A D EV IC E
A Configuration Set can also be created by selecting a device that has the settings you wish to propagate,
and copying the configuration to a new Configuration Set.
1. Select Device Groups > Printers:
2. Select the View icon of the desired printer from the printer list to propagate settings from.
3. Select the Save as New Configuration Set action for the device.
4. Select settings to include in new configuration set and press Continue.
5. Edit the New Configuration Set if necessary and select Save.
C O N FI GU RI NG D EV IC ES R EM OT EL Y
You can use configuration sets to configure a newly installed device remotely. Rather than have a carrier
perform the initial set up at delivery on site, the Xerox® CWW administrator can create and schedule a
configuration set and policy to perform this function.
Requirements:
• This is supported for devices initially set for Dynamic Host Configuration Protocol (DHCP) only.
Page 88

Xerox CentreWare Web Evaluation Guide 9-78
• The device must be connected to a working network that is reachable by Xerox® CWW.
• Available only for devices that support remote Install Wizard settings.
To use this feature, follow the steps below:
1. Create a configuration set that includes disabling the Install Wizard screen (Security/Disable Services
tabs)
2. Create a policy.
a. Add the configuration set that was created in Step 1.
b. Set the policy to run on newly discovered devices - or - select devices for which to apply the policy.
3. Run Discovery that includes the subnet for the new device (either through schedule or on demand).
C R E AT IN G CO NF IG UR AT IO N P O LI CI ES
Policies allow you to manage a fleet’s configuration--both firmware and configuration sets. There are
extensive configuration options that can be linked to individual or multiple groups. Configuration policies
offer a more intuitive way to update and audit device settings. When you create a policy and apply it to
groups, it is used as the basis for policy execution and reporting. Taken in conjunction with the Device
Health Dashboard, which is a graphical display of compliance successes and issues that you can drill down
into for details, configuration policies are a powerful tool for fleet management.
1. Go to Policies > Configuration > Configuration Policies and click New.
2. On the Identity tab click Enabled to turn on the policy. Enter a name and description. Click Next.
3. On the Actions tab complete the following fields as needed, and click Next.
a. Actions: Choose to Audit devices, Enforce the attributes in configuration set(s), or to reboot devices.
Once you select Reboot Devices Only, other fields are greyed out.
b. Configuration Profile
• Choose one or more configuration sets from the drop down.
c. In the Schedule section set the frequency and the next date and time.
• You can also choose whether to run immediately on devices which are newly discovered.
4. On the Assign Tab, complete the following fields as needed and click Next.
a. Devices to Apply: Choose the device groups and/or device expressions.
• For device groups. click in the multi-select box and choose a group or groups.
• If you choose device expressions, you may need to add a new row (e.g., IP address—enter the
values in the row for a new expression.)
b. Device Admin Password: Choose Auto to use the default password, or select Specified and enter the
Administrator user name and password.
5. On the Audit Notification tab, to enable e-mail notifications, turn on the Send E-Mail Notification
switch. It is off by default. Indicate who will receive emails about configuration policy status and what
the notification will contain. Click Save.
6. After a policy runs, go to Dashboards to view the compliance dashboards.
ED I TI NG A C ON FI GU RA TI O N PO L IC Y
Follow the steps below to edit a firmware policy. You cannot edit a policy that is running.
1. In the Configuration Policies screen, select a policy and click the Edit icon.
2. You may modify the settings on the Identity, Actions, Assign, and Audit Notification tabs, as needed.
Page 89

Xerox CentreWare Web Evaluation Guide 9-79
AD D IT IO NA L CO NF IG UR AT IO N PO LI CY A CT IO NS
• View Results / Progress: Allows you to view the current status and progress of a selected Configuration
Policy and the Results of a completed Policy.
• Stop: Stops a Configuration Policy that is currently running.
• Run: Starts the selected Configuration Policy.
• Delete: Deletes a selected Configuration Policy.
Page 90

Xerox CentreWare Web Evaluation Guide 10-80
10. Exploring the Device Management Dashboard
The Device Management Dashboard allows you to monitor devices and resolve issues to ensure that they
remain in the desired configuration state. Drill down features make it easy to see and understand the policy
compliance at each device level. The detailed views display specific errors relating to device policy
compliance.
In the left navigation choose which compliance information to display. You can click on the graphs to drill
down for greater detail.
In each of the policy charts or bars, click on a ring or bar to drill down for more information about the policy.
Click again to view a list of compliant or non-compliant devices. From this view you can enforce the policy.
• Compliance Summary: Shows overall compliance by policy in a doughnut chart. Each ring is a different
firmware, configuration set, or password policy. You can filter these views by one or more device groups.
This feature is only functional when a device group is associated with a policy, rather than individual
printers.
• Configuration Compliance: Shows compliance for the configuration policies you have set. The
dashboards present information in an overall view, by each policy, by model, and by trend.
• Password Compliance: Shows compliance for the password policies you have set. The dashboards present
information in an overall view, by each policy, by model, and by trend.
• Firmware Compliance: Shows compliance with firmware policies you have set. You must have a policy
type of ‘Monitor’ or ‘Monitor and Automatically Upgrade’ in order for the firmware policy to appear in the
dashboards.
• Security Monitoring: Proactively monitors devices discovered by Xerox® CentreWare Web that have
"McAfee Embedded Control" enabled and have been registered to communicate with Xerox®
CentreWare Web if any security breaches happen on a device.
– The McAfee Security Monitoring dashboard chart shows the security threats that occurred during the
last 30 days. The threat detected can be verified by clicking on chart to drill down. The detailed threat
message is then displayed from the device, and the user can audit the individual threat with an
appropriate audit determination.
– The McAfee Monitoring Trend chart shows a historical view of security events by month for the last 12
months.
Page 91

Xerox CentreWare Web Evaluation Guide 10-81
Policy Drill Down
When you want more information than the high-level dashboards present, click on a ring or bar for more
details. Click again to view a list of compliant or non-compliant devices. If you have the appropriate
permissions, you can enforce the policy from this view. Customer Report Users will not see the Enforce
button, and it will not display on the Security Monitoring drilldown view.
Below you can see the Compliance by Policy view, which is showing compliance by percent for firmware.
You can apply filters to display different views of the dashboard depending on the data you need. You can
see there are several policies out of compliance. Hover over the bar to see the full policy name and percent
of devices out of compliance. Click on the bar for a list of the devices and details about their level of
compliance. The list view shows you the model and reasons for non-compliance, as well as the other
pertinent information for remediation.
Exporting the Dashboards
Each of the dashboards can be exported and stored locally to support tracking and resolving compliance
issues. Follow the steps below to export a dashboard.
1. Click the Export icon above the dashboard.
2. In the Export to File pop-up window complete the following fields.
a. Row Grouping: Choose to group by policy or device.
b. Included Fields: Either use the defaults our custom set the fields you want to include in the export
c. Time Span: Set the range of days to include in your export. You can choose all data, a set number of
previous days, or a specific date range.
d. Format: In the drop-down select CSV or HTML
e. Language: Choose the language of your export to translate your fields names.
3. Click Download.
4. Save the file.
Page 92

Xerox CentreWare Web Evaluation Guide 11-82
11. Working with Device Firmware Policy
Overview
A firmware upgrade policy gives you the ability to manage and deploy firmware changes to an entire fleet
of printers in order to improve printer capabilities and functions. The Firmware Version Policies pages have a
streamlined look and additional functionality, such as scheduling retries for failed upgrades, and adding
options to restart only failed upgrades.
In addition to our standard method of updating firmware on your devices, we are also compatible with
Fleet Orchestrator; a hub and spoke model for firmware deployment to Xerox® Altalink® devices.
Firmware upgrades can:
• Supply corrective actions
• Enable new features
• Extend support capabilities for existing print devices
Xerox® CWW provides a simple procedure to:
• Organize printer firmware upgrade files
• Select a population of devices for upgrade
• Schedule the upgrade
• Report back on the success or failure for each device
• Schedule retries for failed upgrade and restart upgrades that have failed.
To navigate to this screen, go to Policies > Software > Firmware Policies.
Page 93

Xerox CentreWare Web Evaluation Guide 11-83
The Firmware Version Policies grid shows the policies that have been created and their status. Within the
grid you can edit policies. You also have the capability to create a new policy, delete it, or perform a release
upgrade. Within the grid you can also edit or copy an existing policy.
We support updating Xerox® printers, HP printers, and HP JetDirect cards, Lexmark, and Honeywell. The
manufacturers whose devices we support continues to expand.
Notes:
• The task list of printers to be upgraded is kept in the database so if there is a failure in the Xerox®
CentreWare Web server, the process restarts at the last stage of the upgrade task.
• An upgrade task in progress can be Stopped, Restarted or Deleted. A new upgrade task cannot be started
until the final device of the previous upgrade task has reached the verifying state.
• Typically, the device goes offline as it reboots to apply the upgrade file. It must be contacted again to
confirm the upgrade was successful.
Adding / Deleting Files to the Software File Repository
Use the Software File Repository to house the files you need to support upgrades. Generally, these files can
be downloaded from the device manufacturer’s site.
1. Click Software File Repository to view the Software File Repository grid.
2. If the appropriate upgrade file is not available, select Add File.
3. Select the Manufacturer from the drop-down list. A link to the manufacturer’s website displays.
4. Select either the Exact Model printer for which these files are appropriate from the drop-down menu, or
when a file may be appropriate for multiple members of a family, select Model Contains, and specify
the string to be matched.
Page 94

Xerox CentreWare Web Evaluation Guide 11-84
Note: For HP devices, only the Printer Model Contains option is available.
5. Click Browse next to Upgrade File. You can now upgrade the uncompressed file.
6. Highlight the file and select [Open] in the Choose File box.
7. By default, Qualify is set to Off for all upgrade files. When Qualify is off, the upgrade file may only be
sent to one device at a time. You may also change the Qualify setting from the Firmware File
Repository grid. Change Qualify to On, if you want to send the file to any number of devices
simultaneously.
8. If there is relevant documentation associated with this particular upgrade, select Attachment, and then
select the appropriate file. You should attach Word (.doc), text (.txt), PowerPoint (.ppt) or Adobe (.pdf)
files.
9. Enter a short explanation for why or when to use this file in the Description field.
10. Click Save to return.
Creating a New Firmware Policy
This section describes how to create a firmware policy. To create a firmware policy:
1. Select Policies > Software > Firmware Policies. The Firmware Version Policies screen displays.
2. Select New. The New Firmware Policy screen displays. Complete the Identity, Assign, and Schedule tabs.
3. On the Identity tab, complete the following fields as needed, then click Next.
a. Enable: Toggle to enable/disable the policy.
b. Policy Name: Enter a unique name.
c. Type: From the drop-down list choose the policy type. The policy type drives the rest of the
configuration within the policy. When you choose Monitor or Monitor and Automatically Upgrade,
these policies report on through the Device Health Dashboard, so that you can see how compliant
the fleet is to a given version of firmware.
• Monitor Only: Monitors the firmware upgrade for the desired version.
• Schedule Only: This allows you to upgrade the firmware to the desired version without any
monitoring. Note you cannot downgrade firmware remotely. This is most similar to earlier
version’s Upgrade Printer Wizard.
• Monitor and Automatically Upgrade: Monitors the firmware version and attempts to upgrade if
the version is not on the desired version. Note, you cannot downgrade firmware remotely.
d. Model Selection: Choose a printer model from the drop-down list or the Printer Model contains
option.
e. Use Fleet Orchestration Method: When you choose a printer model that supports the Fleet
Orchestration Method this option is enabled by default. The Fleet Orchestrator method configures
devices to pull the file at the scheduled runtime of the policy. The default topology for this
distribution is flat; in other words, all devices in the schedule will make a request to Xerox®
CentreWare Web, and Xerox® CentreWare Web will respond with the file.
Note: Currently, we only support Xerox® Altalink®devices.
f. Description: Enter a short explanation for why or when to use this file.
g. Monitor: For a Monitor task or a Monitor and Automatically Upgrade task, you need to set a version
for which to check. For Monitor and Automatically Upgrade only, you also have the option to
upgrade for multiple versions of firmware if you enable the version range, In this case, the policy
only upgrades when the firmware of the device is within a specific range of versions. If the major
version were upgradeable to 073 firmware only when the device is on 072, then the range would be
set to min 072 and max 072. Then, when the firmware is not on the desired version and it is within
Page 95

Xerox CentreWare Web Evaluation Guide 11-85
the version range, the system will trigger the upgrade at the scheduled time. You can then set up
multiple policies to cover the entire range of possible firmware versions, and the firmware will
upgrade each night when it isn't on the desired version.
h. Upgrade: Click Select to choose a single file for upgrade. In the Upgrade Files pop-up choose a file.
These files are typically downloaded from the device manufacturer site. If they are in compressed
file format (Zip, Rar, or other), uncompress them to a known file location. The list of upgrade files can
be modified through the File Repository.
Note: For the following devices, you must have the admin user name and password saved in Xerox®
CentreWare Web in order to upgrade them: PX4i, PX6i, I-Class, H-Class, M-Class, A-Class.
4. On the Assign tab you can select the printers to which the policy applies.
a. Group: From the drop-down list choose the groups to which you will apply the policy. If you toggle on
the option to Link the Policy to Selected Group(s) then the policy will automatically be applied to any
devices added to the group. The policy will also be disassociated from any printers that leave the
group.
b. Use Hub and Spoke Mode: Toggle to enable/disable the method of firmware policy upgrade. When
enabled, the system will assign a device on the subnet as hub and the remaining devices will be
spokes. This improves overall deployment speed to a fleet of devices, as it distributes the network
load across the network since devices can request the file from other devices, rather than all devices
requesting it from Xerox® CentreWare Web.
c. Assign Printers: Select the desired printers to be part of the policy (if the policy is not linked to a
group).
5. Click Next to continue.
6. On the Schedule tab you can schedule the time to monitor, monitor and upgrade, or schedule a
date/time to run an Upgrade Only. You can schedule when, and how often to poll the results from the
printer. You can set retry attempts for any devices that the version does not change after the polling
window.
a. Schedule: The options vary depending on the policy type.
• Schedule Upgrade Only: You can choose to Upgrade Now or Upgrade Later and set a start time.
• Monitor Policy Types: Set the Policy Check Start time.
• For Monitor and Automatically Upgrade policies, you have the option to Hold Auto Upgrade for
Manual Release. This means that you can perform a verification before the upgrade is set.
• The Advanced settings are available with Fleet Orchestrator and offer greater flexibility for when
the policies download and actually install. In addition to setting different download and install
times, you can set a delay interval so that devices do not all communicate with Xerox®
CentreWare Web at the same time when they call to request the file.
b. Checking the Upgrade Results: Polling allows us to determine if the upgrade is successful because we
can check if the firmware version changed.
• Poll every: Set time in minutes.
• Poll for a duration of: Set time in minutes.
c. Retry: For Scheduled Upgrades you can allow up to 5 retries. For Monitor policy types, only one retry
is allowed.
• Enabled: Toggle on and off.
• Number of Retries: Options depend on your policy type.
• Hours Between Retries: Choose how many hours between retries. For example, if a retry is
unsuccessful because a device is turned off, it might be better to wait before trying again, so that
the device has time to come back online.
• Retry Window Enabled: Enable to specify the times during which retries can run. For example, you
could set the retry window to exclude morning hours.
Page 96

Xerox CentreWare Web Evaluation Guide 11-86
• Retry Window Start Time: Enter start time for retry window.
• Retry Window End Time: Enter end time for retry window.
7. Click Save.
Firmware Upgrade Policies that are set as Monitor or Monitor and Automatically Upgrade are also reported
through the Device Dashboard, so that you can see how compliant the fleet is to a given version of
firmware.
Manually Releasing an Upgrade
If you have set the Hold Auto Upgrade for Manual Release option on the Schedule tab, you will need to
manually release the policy upgrade from Firmware Version Policies.
1. Select the policies that you want to release in the table. The Policy Status will be Hold for the policies
you want to release. You can select multiple policies.
2. Click Yes in the confirmation pop-up.
3. Click Release Upgrade.
When upgrading the printer firmware:
• Use meaningful names for software upgrade files uploaded to Xerox® CentreWare Web.
• Add release notes and clear descriptions to identify reasons for the upgrade.
• Use dynamic groups to organize printers that need to be upgraded.
• Ensure all faults are cleared from the target devices before applying the upgrade.
• Test the upgrade file on the target machine before applying it to the fleet.
• Apply software upgrade files after regular business hours to increase the probability of success.
• Rediscover newly-upgraded printers so Xerox® CWW can detect changes in FW/SW levels.
Deployment Tasks
Each Deployment task is associated with a single policy. When the policy is Monitor only or Monitor and
Upgrade Only, no Deployment Task is created. For any other case, there should always be one task for each
policy. Think of the deployment task being created or updated to enforce the policy. The table tracks the
results of the policy.
Page 97

Xerox CentreWare Web Evaluation Guide 11-87
To see a graphical representation of the deployment task, click the Chart icon in the table. The Task
Progress screen displays.
The feedback updates refreshes automatically while you are in this view. The Restart option allows you to
restart all printers (including those that passed) in the policy. This returns the status to pending and the
original firmware is removed. If you opt to Restart Failed devices only those devices with a status of
warning, failed, or aborted will restart.
Editing a Firmware Policy
Follow the steps below to edit a firmware policy. You cannot edit a policy that is running.
1. In the Firmware Version Policies screen, click the Edit icon for the policy you want to revise.
2. You may modify the settings on the Identity, Assign, and Schedule tabs, as needed.
3. In addition, in the Edit Details view, there is a History tab for the policy. This shows the last change that
took place. Click Task History to link to the results. In the Results table, click a row to see details from
that instance.
Miscellaneous Tips
• The task list of printers to be upgraded is kept in the database so if there is a failure in the Xerox® CWW
server, the process restarts at the last stage of the upgrade task.
• An upgrade task in progress can be Stopped, Restarted or Deleted. A new upgrade task cannot be started
until the final device of the previous upgrade task has reached the verifying state.
• Typically, the device goes offline as it reboots to apply the upgrade file. It must be re-contacted to
confirm the upgrade was successful.
Page 98

Xerox CentreWare Web Evaluation Guide 12-88
12. Working with Device Passwords Policy
Overview
Device Password Policies allows you to manage the password policies for multiple devices across an
account. This section is subdivided into:
• Password Policies
• Stored Device Passwords
Xerox® CentreWare Web can support password updates at scale (i.e., 1000 devices as part of
policy/configuration set). This feature includes the following capabilities:
• Ability to track previous passwords for each device in Xerox® CentreWare Web.
• Ability to track when a passwords was set in Xerox ® CentreWare Web.
• Ability to audit known device passwords.
• Option to retry last passwords and even the default admin password to find and update the incorrect
one stored in Xerox ® CentreWare Web.
• Ability to change passwords using the list of devices and show password to authentic users.
• Audit Report for verified passwords (admins only).
• Audit page for verified passwords (admins only).
• Ability to change passwords for single devices or a set of devices.
• Enable a unique password for each device.
• Ability to create unique password per device by using uniqueness pattern by prefixing Serial
Number/MAC Address.
• Create unique password per device by appending a sequence number or date stamp with the password.
The Password Policies grid shows the policies that have been created and their status. Within the grid you
can create, delete, enforce, and stop policies. You also have the capability to edit and view the status of the
policy in the dashboard.
Creating New Password Policies
Follow the steps below to create a new password policy for a group of devices.
Page 99

Xerox CentreWare Web Evaluation Guide 12-89
1. Go to Policies > Passwords>Password Policies.
2. On the Password Policies screen click New. The New Password Policy screen displays. Complete the
Identity, Actions, Assign, Audit Notification, and Results Options tabs.
3. On the Identity tab click Enable to turn on the policy. Enter a name and description. Click Next.
4. On the Actions tab complete the applicable fields and click Next. One or both of the sections must be
enabled.
a. Monitor and Remediate Password section
b. Update Password section
5. On the Assign tab you can select the printers to which the policy applies. Then click Next.
a. Group: From the drop-down list choose the groups to which you will apply the policy. If you toggle on
the option to Link the Policy to Selected Group(s) then the policy will automatically be applied to any
devices added to the group. The policy will also be disassociated from any printers that leave the
group.
b. Assign Printers: Select the desired printers to be part of the policy (if the policy is not linked to a
group).
6. On the Audit Notification tab indicate who will receive emails about password policy status and what
the notification will contain. Enable Send E-Mail Notification to turn the notifications on and open the
fields for updates; it is off by default. Click Next.
7. On the Result Options tab customize what data you want to include in the dashboards and the
notifications.
8. Click Save.
After a policy runs, go to Dashboards> Password Compliance to view the related compliance dashboards.
To delete a policy, select it from the grid and click Delete. Confirm your selection.
EN F OR CI NG P OL IC IE S
You have the option to manually enforce policies that have been created for an account.
1. In the grid, check the policy you want to enforce.
2. Click Enforce.
3. Click the View Results icon to see the progress and results of the enforcement
Editing Password Policies
Follow the steps below to edit a password policy. You cannot edit a policy that is running.
1. In the Password Policies screen, select a policy and click the Edit icon.
2. You may modify the settings on the Identity, Actions, Assign. Audit Notification, and Result Options
tabs, as needed.
In addition, in the Edit Details view, there is a History tab for the policy. This shows the last change that took
place.
Click Result to link to the results. In the Results table, click a row to see details from that instance.
Page 100

Xerox CentreWare Web Evaluation Guide 12-90
Viewing and Updating Passwords
In the Stored Device Password section, you can manage the passwords for devices. The grid displays all the
printers in the selected groups for password policies. By default, the password is hidden, but you can select
devices in the grid and click Show All Passwords to display the actual passwords in the Password column.
AP P LY IN G A PA SS WO RD
Note: Updating the password within the Stored Device Password only updates it in the database to match
what is currently on the device. It does not change the password on the device.
1. Go to Policies > Passwords> Stored Device Passwords.
2. In the Update Stored Device Admin Password field enter a new password. The password must be
between 4 and 63 characters.
3. In the Verify Password field re-enter the same password.
4. In the grid, select the printers to which you want to apply the new password.
5. Click Apply to Selected.
I M P OR TI NG P AS SW OR DS F RO M CS V FI LE
1. On the Stored devices page click the Import Passwords from CSV File link. This takes you to
Administration > Advanced > Import Device Passwords.
2. On the Import Device Passwords screen enter or browse for the correct XSV file and click Import.
3. If you do not have a CSV file of passwords, you can click Export Template. Complete the Admin User
Name, Password, Serial Number, and MAC Address fields and save the file.
4. Click Import.
 Loading...